
:max_bytes(150000):strip_icc():format(webp)/hexadecimal-code-security-key-krzysztof-zmij-e-plus-getty-images-57c76b825f9b5829f4bd185e.jpg)
10 Best Animation Makers for Kids to Have Fun
10 Best Animation Makers for Kids to Have Fun
10 Best Animation Makers for Kids to Have Fun

Shanoon Cox
Mar 27, 2024• Proven solutions
When you are trying to make funny cartoons, explainer videos, cartoon painting, or informative shorts to post online, 2D animation software can come in handy. With access to a 2D animation maker , you can create intricate and interesting animated cartoon types that will help you connect with your audience.
Whether you are teaching a group of kids, showing employees how to do their job, introducing a new product, or trying to elicit an emotional reaction from your audience, some free animation makers can be very useful.
If you are new to the world of 2D animation, you will be interested in our review of the top 8 2D animation software options that may prove useful to you.
- Part 1: Best 2D Animation Software
- Part 2: Best Open Source 2D Animation Software
- Part 3: FAQ about Animation Maker for Kids
You may also like: 11 Best Beginner/Waterproof/Vlogging Camera for Kids
If you are looking for an animation editor for kids, here we recommend using Filmora . The editing experience is fun and easy to use for kids. You can use it to make 3D animation or 2D animation by adding keyframes, so that the animation will be smooth and natural.
You just need to build a white plane to start making animation easily. Besides, color correction and audio mixer will raise your animation video to a new level. Download it to have a try (Free)!
 Download Mac Version ](https://tools.techidaily.com/wondershare/filmora/download/ )
Part1: Best 2D Animation Software
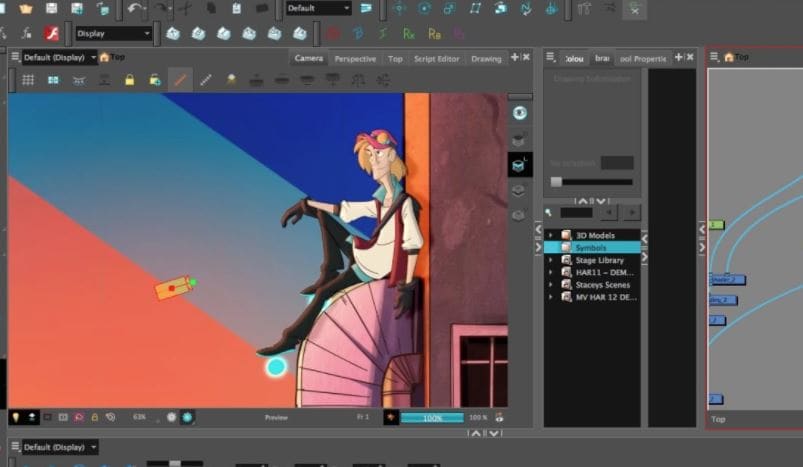
1. Toon Boom Harmony
Whether you are trying to create an art piece, showcase a story through 2D images, or craft a unique message for your audience, Toon Boom Harmony will help you immensely. The software has bitmap and vector tools for creating art, 3D imported models for hybrid productions, and the option to create multiplane scenes with Z-depth.
Features:
- Revolutionary vector and bitmap drawing technology - Brush Engine
- Advanced color palettes and paint options
- 2D and 3D integration
- Cut-out animation tools
- Traditional paperless animation.
Price: The first 21 days of using the product are free. After the 21 days are up, you will need to pay $109 per month.
2. CelAction2D
Want to create unique and complex 2D animations for your upcoming projects? CelAction2D is the type of product that is going to help you create wonderful animations. While getting a full license is a financial commitment, you are getting a product with all the features you could need.
You can create a palette using up to 16 million colors, and you will have a very easy time getting to grips with the way the software works. It is designed for beginners and intermediate users, but still has all the advanced features that a pro would want.
Features:
- Easy and fast to use
- Features ergonomic controls
- Easily handles complex projects with thousands of layers
- Works with all modern Windows machines - 32 and 64-bit Also work with Macs through Boot Camp
- Multiplane camera features.
Price: If you go with the Studio Edition, it costs $1,300 to obtain a single license to use it for a lifetime. Studio Edition is $1300 for one single license.

3. Moho (Anime Studio) Pro
Anime Studio Pro is a fantastic option for anyone who is looking to get into 2D animation creation. It is affordable and designed for Flash-style animations. While you cannot create frame-by-frame animations using this program, you will be able to create some fantastic videos nonetheless.
There is an Anime Studio Debut, which is targeted towards the beginner user. But if you want all the features of a high-end 2D animation software, you will want to go with the Pro version.
Features:
- Enhanced freehand drawing tools
- Beizer handles to make it easier for you to design your videos the way that you want
- Smart warp feature helps create custom meshes to bend and twist your animations
- Realistic motion blur
- Animation for multiple layers at the same time
Price: $399.99 for the full package.

4. Stop Motion Studio
Want to create fun, 2D animated videos? Hoping to impress your bosses with a 2D animated presentation to highlight a product’s features? Using Stop Motion Studio will help you achieve all that you want in the world of 2D animation.
You can capture content with ease, whether you change up the focus, exposure, or white balance. There is DSLR support so that you can use your high-end camera in conjunction with this software.
And with a unique, frame-by-frame editor, you will be able to get the result that you want for your 2D stop animation movie.
Features:
- Onionskin allows you to view previous frames through a transparent overlay, which helps you create your next frame
- Comes with Chroma key and audio recording to better narrate and add voice effects to your videos
- Easy one-click uploading to YouTube and Facebook
- DSLR camera support for creating perfect 1080p recordings
Price: $59.99 to download the software onto your PC.

Part2: Best Open Source 2D Animation Software
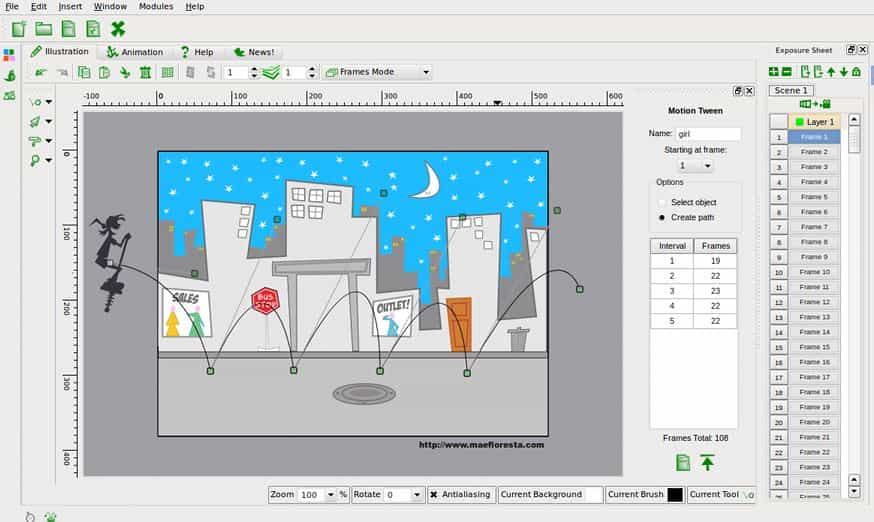
1. Synfig
Synfig Studio is an open-source 2D animation software that is the perfect place for beginners to learn about 2D animation. There are two versions available for download - stable and testing. The testing version has some experimental features if users want to try those ahead of their introduction into the stable release.
Features:
- Supports multiple layers of content
- The bone system allows for the creation of cutout animations from bitmap images
- Has sound support to allow for the addition and syncing of narration and/or music to the video
Price: Free

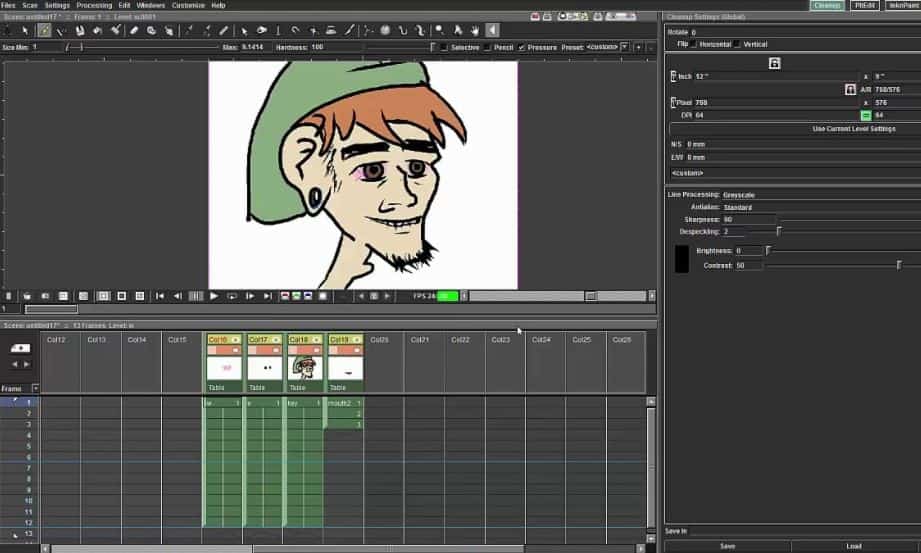
2. Opentoonz
Based on the Toonz software, Opentoonz is an open-source and free alternative that will help you create 2D animated content. Anyone can use the software, free of charge. And users can modify the source code to add specific features to the program.
Features:
- GTS scanning tool
- Ability to change picture styles
- Add distortion and light effects
- Compatible with black and white and colored scans
Price: Free
3. Tupi
The beauty of the Tupitube app is that you can use your Android or iOS tablet and smartphone to create 2D animated videos. There is no need to pay for expensive software if you just want to create some fun videos to show your friends.
Features:
- A downloadable app that works on smartphones and tablets
- Easy animation tutorials
- Intuitive interface that beginners can use with ease
Price: Free
4. Pencil 2D
Want an open-source and free 2D animation design software to help you create videos? Pencil2D animation is the type of program that can help beginners. You can get to grips with how 2D animation works, and you can create funny and interesting videos along the way.
Features:
- Minimalist design
- Raster and vector workflow switching
- Cross-platform compatibility
Price: Free

You may also like: Best Animation Makers Online >>
Part 3: FAQ about Animation Maker for Kids
1. How do you make animations for kids?
Despite popular belief, it isn’t too difficult to find animation makers for kids. There are even tools out there that will let kids create their animations if they are old enough.
Children nowadays can create and develop their characters – and even dream up storylines to put a motion. The School Run has lots of exciting ideas on how children can get into animation themselves.
For adults, however, a good animation maker for kids can help us submit high-end projects on a low-end pay scale, providing you use the correct software.
2. What is the best animation software for beginners?
Some best include Blender, Adobe Character Animator, and Filmora by Wondershare.
You can enter existing artwork or create new ones of your own in the virtual space, all of which can be done on a drag-and-drop basis.
3. What is the easiest animation software to use?
The easiest animation maker for kids that you can use as software for your own projects has to be Filmora. As well as having a ton of free features, it gives you everything you need to mask, edit, animate, and evolve all of your details. You can use it to create art if you haven’t already got something planned – or you can use it to input any file type that you like.
It has some wonderful animation-making features that let you go from high-end and professional (like logo making) to fun and playful (like animation making). Best out of all of the features is that it is easy enough for children to understand how to do it.
Conclusion
Creating a 2D animation video is a lot easier when you have the right software available to you. You already have a script and storyboard in mind, but now you can realize your vision in intricate and unique ways. Anyone of the products above will serve you well, but FimoraPro is the one you should consider. Just download it now to have a try!
Download Mac Version ](https://tools.techidaily.com/wondershare/filmora/download/ )
Shanoon Cox
Shanoon Cox is a writer and a lover of all things video.
Follow @Shanoon Cox
Shanoon Cox
Mar 27, 2024• Proven solutions
When you are trying to make funny cartoons, explainer videos, cartoon painting, or informative shorts to post online, 2D animation software can come in handy. With access to a 2D animation maker , you can create intricate and interesting animated cartoon types that will help you connect with your audience.
Whether you are teaching a group of kids, showing employees how to do their job, introducing a new product, or trying to elicit an emotional reaction from your audience, some free animation makers can be very useful.
If you are new to the world of 2D animation, you will be interested in our review of the top 8 2D animation software options that may prove useful to you.
- Part 1: Best 2D Animation Software
- Part 2: Best Open Source 2D Animation Software
- Part 3: FAQ about Animation Maker for Kids
You may also like: 11 Best Beginner/Waterproof/Vlogging Camera for Kids
If you are looking for an animation editor for kids, here we recommend using Filmora . The editing experience is fun and easy to use for kids. You can use it to make 3D animation or 2D animation by adding keyframes, so that the animation will be smooth and natural.
You just need to build a white plane to start making animation easily. Besides, color correction and audio mixer will raise your animation video to a new level. Download it to have a try (Free)!
Download Mac Version ](https://tools.techidaily.com/wondershare/filmora/download/ )
Part1: Best 2D Animation Software
1. Toon Boom Harmony
Whether you are trying to create an art piece, showcase a story through 2D images, or craft a unique message for your audience, Toon Boom Harmony will help you immensely. The software has bitmap and vector tools for creating art, 3D imported models for hybrid productions, and the option to create multiplane scenes with Z-depth.
Features:
- Revolutionary vector and bitmap drawing technology - Brush Engine
- Advanced color palettes and paint options
- 2D and 3D integration
- Cut-out animation tools
- Traditional paperless animation.
Price: The first 21 days of using the product are free. After the 21 days are up, you will need to pay $109 per month.
2. CelAction2D
Want to create unique and complex 2D animations for your upcoming projects? CelAction2D is the type of product that is going to help you create wonderful animations. While getting a full license is a financial commitment, you are getting a product with all the features you could need.
You can create a palette using up to 16 million colors, and you will have a very easy time getting to grips with the way the software works. It is designed for beginners and intermediate users, but still has all the advanced features that a pro would want.
Features:
- Easy and fast to use
- Features ergonomic controls
- Easily handles complex projects with thousands of layers
- Works with all modern Windows machines - 32 and 64-bit Also work with Macs through Boot Camp
- Multiplane camera features.
Price: If you go with the Studio Edition, it costs $1,300 to obtain a single license to use it for a lifetime. Studio Edition is $1300 for one single license.
3. Moho (Anime Studio) Pro
Anime Studio Pro is a fantastic option for anyone who is looking to get into 2D animation creation. It is affordable and designed for Flash-style animations. While you cannot create frame-by-frame animations using this program, you will be able to create some fantastic videos nonetheless.
There is an Anime Studio Debut, which is targeted towards the beginner user. But if you want all the features of a high-end 2D animation software, you will want to go with the Pro version.
Features:
- Enhanced freehand drawing tools
- Beizer handles to make it easier for you to design your videos the way that you want
- Smart warp feature helps create custom meshes to bend and twist your animations
- Realistic motion blur
- Animation for multiple layers at the same time
Price: $399.99 for the full package.
4. Stop Motion Studio
Want to create fun, 2D animated videos? Hoping to impress your bosses with a 2D animated presentation to highlight a product’s features? Using Stop Motion Studio will help you achieve all that you want in the world of 2D animation.
You can capture content with ease, whether you change up the focus, exposure, or white balance. There is DSLR support so that you can use your high-end camera in conjunction with this software.
And with a unique, frame-by-frame editor, you will be able to get the result that you want for your 2D stop animation movie.
Features:
- Onionskin allows you to view previous frames through a transparent overlay, which helps you create your next frame
- Comes with Chroma key and audio recording to better narrate and add voice effects to your videos
- Easy one-click uploading to YouTube and Facebook
- DSLR camera support for creating perfect 1080p recordings
Price: $59.99 to download the software onto your PC.
Part2: Best Open Source 2D Animation Software
1. Synfig
Synfig Studio is an open-source 2D animation software that is the perfect place for beginners to learn about 2D animation. There are two versions available for download - stable and testing. The testing version has some experimental features if users want to try those ahead of their introduction into the stable release.
Features:
- Supports multiple layers of content
- The bone system allows for the creation of cutout animations from bitmap images
- Has sound support to allow for the addition and syncing of narration and/or music to the video
Price: Free
2. Opentoonz
Based on the Toonz software, Opentoonz is an open-source and free alternative that will help you create 2D animated content. Anyone can use the software, free of charge. And users can modify the source code to add specific features to the program.
Features:
- GTS scanning tool
- Ability to change picture styles
- Add distortion and light effects
- Compatible with black and white and colored scans
Price: Free
3. Tupi
The beauty of the Tupitube app is that you can use your Android or iOS tablet and smartphone to create 2D animated videos. There is no need to pay for expensive software if you just want to create some fun videos to show your friends.
Features:
- A downloadable app that works on smartphones and tablets
- Easy animation tutorials
- Intuitive interface that beginners can use with ease
Price: Free
4. Pencil 2D
Want an open-source and free 2D animation design software to help you create videos? Pencil2D animation is the type of program that can help beginners. You can get to grips with how 2D animation works, and you can create funny and interesting videos along the way.
Features:
- Minimalist design
- Raster and vector workflow switching
- Cross-platform compatibility
Price: Free
You may also like: Best Animation Makers Online >>
Part 3: FAQ about Animation Maker for Kids
1. How do you make animations for kids?
Despite popular belief, it isn’t too difficult to find animation makers for kids. There are even tools out there that will let kids create their animations if they are old enough.
Children nowadays can create and develop their characters – and even dream up storylines to put a motion. The School Run has lots of exciting ideas on how children can get into animation themselves.
For adults, however, a good animation maker for kids can help us submit high-end projects on a low-end pay scale, providing you use the correct software.
2. What is the best animation software for beginners?
Some best include Blender, Adobe Character Animator, and Filmora by Wondershare.
You can enter existing artwork or create new ones of your own in the virtual space, all of which can be done on a drag-and-drop basis.
3. What is the easiest animation software to use?
The easiest animation maker for kids that you can use as software for your own projects has to be Filmora. As well as having a ton of free features, it gives you everything you need to mask, edit, animate, and evolve all of your details. You can use it to create art if you haven’t already got something planned – or you can use it to input any file type that you like.
It has some wonderful animation-making features that let you go from high-end and professional (like logo making) to fun and playful (like animation making). Best out of all of the features is that it is easy enough for children to understand how to do it.
Conclusion
Creating a 2D animation video is a lot easier when you have the right software available to you. You already have a script and storyboard in mind, but now you can realize your vision in intricate and unique ways. Anyone of the products above will serve you well, but FimoraPro is the one you should consider. Just download it now to have a try!
Download Mac Version ](https://tools.techidaily.com/wondershare/filmora/download/ )
Shanoon Cox
Shanoon Cox is a writer and a lover of all things video.
Follow @Shanoon Cox
Tips for Canva Animated Elements
Versatile Video Editor - Wondershare Filmora
An easy yet powerful editor
Numerous effects to choose from
Detailed tutorials provided by the official channel
Thanks to the progress of graphic design, users are no longer simply satisfied with everyday designs, no matter how complex the design itself. They want innovation, they want a fresh and mesmerizing new idea. This becomes increasingly harder to achieve and helps push the boundaries of what designers want.
This is where motion can come into play. Movement in graphic design has emerged as a recent design trend. This is where users benefit from valuable tips for Canva animated elements.
Without further ado, let’s dive into everything you need to know to design animated elements in Canva.
In this article
01 [What is Canva?](#Part 1)
02 [Animate An Element In Canva ](#Part 2)
03 [Make Elements Move In Canva](#Part 3)
04 [How About Making Animated Elements On Video](#Part 4)
Part 1 What is Canva?
Canva has become a buzzword in the designing and animation world. It’s a graphic design platform that allows users to create graphic designs for social media, for presentations, documents, cards for any memorable occasion. It was founded by Melanie Perkins, an Australian technology entrepreneur.
Canva has become a buzzword in the designing and animation world. It’s a graphic design platform that allows users to create graphic designs for social media, for presentations, documents, cards for any memorable occasion. It was founded by Melanie Perkins, an Australian technology entrepreneur.
It allows users to work individually or across teams. With real-time live changes made available, Canva is pushing the boundary of what is possible and making it more accessible. With the introduction of animated elements in Canva, the possibilities for design horizons have expanded significantly.
Part 2 Animate An Element In Canva
There are one of two ways to go about creating an animation. You can work off an existing template or create a custom template. If you’re wondering how to animate individual elements in Canva then this guide is for you.
The first step to animation is building your custom static design. For that you need to go to Canva and select “Create a Design” option. Once you do, select the type of content you’re attempting to create- from Instagram posts to a presentation or an A4 document.
Think of the text font you’re going to use.

Then you should look into adding elements that suit your text on the design.

You can upload photographs into your creation with the upload button. This also extends to uploading audio that you want to use on video clips.

Once you’re done with these steps, you should have a customized static design that you can use. Let’s now look at how to animate individual elements in Canva. These elements are the text, the image, audio, and video.
2.1 Image
To add an image to Canva, you need to upload it in the ‘Upload’ tab on Canva. Once you do, the image can then be selected for display on your presentation.
For images, you can also choose to frame them within the “elements” tab. There are two kinds of elements. One which allows photographs to be embedded in them and ones which don’t. You can choose any element as a frame for your embedded image.
The next thing is to choose the “Animate” button. This will open up different options for animation features. The animate button allows a preview of what each animation does in real-time.

The ones with the crown are premium features exclusive to Canva Pro, the paid subscription.
2.2 Text
Add in the text you want to see to the image. The text can be in any style that you choose. Canva offers a variety of fonts that you can use to customize the color, size, and duration of the display.

2.3 Video
If you’re ready to take your content creation skills to the next level, this section is for you. You have the option of adding videos to Canva as well. Just load the video you have on hand to the Canva “Uploads” section. Introduce the video clip to the design.
Another way to embed the video is by using an element and embedding your video within it.
With video, you also have options like cropping, adjusting the playback. With playback, you can choose “Autoplay Video” and “Loop Video.” These are basic options for how the video can be played. The crop function allows you to trim the video to any point in time.
On top of this, you can use the animate button, which can create options for how the video is introduced to the backdrop.

If you want to remove the animation, you need to go to the “Animate” button and select the ‘None’ option to delete the animation from the design.
You can opt to animate either just the elements or you can animate the slide on the whole with “Page Animations.”
Part 3 Make Elements Move In Canva
How To Arrange The Order Of An Animation?
The brilliant thing about Canva is that you can decide the order you want to create your animation. The component elements of a Canva backdrop are the text, audio, images, video. These form the basis for the animated elements in Canva.
You can work on whichever component feels more accessible to you. Canva also allows users to make videos for title sequences and end-cards for video sharing platforms.
How to Change The Duration Of Animated Graphic In Canva
Once you’ve added a video element to your presentation, you’ll notice that the timer disappears from the production. This is because the presentation only lasts the duration of the video.
If you go to the next slide of the presentation, you can often notice a timer available. It has a default duration of five seconds. If you click on the clock symbol, a menu with “Timing” will appear with a slider. You can adjust the timing from 0.1 seconds up to a maximum of 30 seconds.
Part 4 How About Making Animated Elements On Video
If you’ve decided Canva is not the tool for you, you can choose any video editing software to make your animation.
Wondershare Filmora is the tool that can help you level up your content creation. It allows users to increase precision and provides professional video editing options.
AI Portrait – The best feature of Wondershare Filmora for gameplay editing
The AI Portrait is a new add-on in Wondershare Filmora. It can easily remove video backgrounds without using a green screen or chroma key, allowing you to add borders, glitch effects, pixelated, noise, or segmentation video effects.

Conclusion
Now that you understand how to build an animation and the software required, you should differentiate between average and extraordinary editing tools.
Filmora and Canva are the best editing tools in this case. Like you can animate individual elements Canva, you can do the same in the other tool also. It may be used to produce animation videos by introducing keyframes, resulting in a seamless and realistic animation. Aside from that, using color correction and an audio processor can help take your animations to the next tier.
Download it today to make your videos better.
Thanks to the progress of graphic design, users are no longer simply satisfied with everyday designs, no matter how complex the design itself. They want innovation, they want a fresh and mesmerizing new idea. This becomes increasingly harder to achieve and helps push the boundaries of what designers want.
This is where motion can come into play. Movement in graphic design has emerged as a recent design trend. This is where users benefit from valuable tips for Canva animated elements.
Without further ado, let’s dive into everything you need to know to design animated elements in Canva.
In this article
01 [What is Canva?](#Part 1)
02 [Animate An Element In Canva ](#Part 2)
03 [Make Elements Move In Canva](#Part 3)
04 [How About Making Animated Elements On Video](#Part 4)
Part 1 What is Canva?
Canva has become a buzzword in the designing and animation world. It’s a graphic design platform that allows users to create graphic designs for social media, for presentations, documents, cards for any memorable occasion. It was founded by Melanie Perkins, an Australian technology entrepreneur.
Canva has become a buzzword in the designing and animation world. It’s a graphic design platform that allows users to create graphic designs for social media, for presentations, documents, cards for any memorable occasion. It was founded by Melanie Perkins, an Australian technology entrepreneur.
It allows users to work individually or across teams. With real-time live changes made available, Canva is pushing the boundary of what is possible and making it more accessible. With the introduction of animated elements in Canva, the possibilities for design horizons have expanded significantly.
Part 2 Animate An Element In Canva
There are one of two ways to go about creating an animation. You can work off an existing template or create a custom template. If you’re wondering how to animate individual elements in Canva then this guide is for you.
The first step to animation is building your custom static design. For that you need to go to Canva and select “Create a Design” option. Once you do, select the type of content you’re attempting to create- from Instagram posts to a presentation or an A4 document.
Think of the text font you’re going to use.
Then you should look into adding elements that suit your text on the design.
You can upload photographs into your creation with the upload button. This also extends to uploading audio that you want to use on video clips.
Once you’re done with these steps, you should have a customized static design that you can use. Let’s now look at how to animate individual elements in Canva. These elements are the text, the image, audio, and video.
2.1 Image
To add an image to Canva, you need to upload it in the ‘Upload’ tab on Canva. Once you do, the image can then be selected for display on your presentation.
For images, you can also choose to frame them within the “elements” tab. There are two kinds of elements. One which allows photographs to be embedded in them and ones which don’t. You can choose any element as a frame for your embedded image.
The next thing is to choose the “Animate” button. This will open up different options for animation features. The animate button allows a preview of what each animation does in real-time.
The ones with the crown are premium features exclusive to Canva Pro, the paid subscription.
2.2 Text
Add in the text you want to see to the image. The text can be in any style that you choose. Canva offers a variety of fonts that you can use to customize the color, size, and duration of the display.
2.3 Video
If you’re ready to take your content creation skills to the next level, this section is for you. You have the option of adding videos to Canva as well. Just load the video you have on hand to the Canva “Uploads” section. Introduce the video clip to the design.
Another way to embed the video is by using an element and embedding your video within it.
With video, you also have options like cropping, adjusting the playback. With playback, you can choose “Autoplay Video” and “Loop Video.” These are basic options for how the video can be played. The crop function allows you to trim the video to any point in time.
On top of this, you can use the animate button, which can create options for how the video is introduced to the backdrop.
If you want to remove the animation, you need to go to the “Animate” button and select the ‘None’ option to delete the animation from the design.
You can opt to animate either just the elements or you can animate the slide on the whole with “Page Animations.”
Part 3 Make Elements Move In Canva
How To Arrange The Order Of An Animation?
The brilliant thing about Canva is that you can decide the order you want to create your animation. The component elements of a Canva backdrop are the text, audio, images, video. These form the basis for the animated elements in Canva.
You can work on whichever component feels more accessible to you. Canva also allows users to make videos for title sequences and end-cards for video sharing platforms.
How to Change The Duration Of Animated Graphic In Canva
Once you’ve added a video element to your presentation, you’ll notice that the timer disappears from the production. This is because the presentation only lasts the duration of the video.
If you go to the next slide of the presentation, you can often notice a timer available. It has a default duration of five seconds. If you click on the clock symbol, a menu with “Timing” will appear with a slider. You can adjust the timing from 0.1 seconds up to a maximum of 30 seconds.
Part 4 How About Making Animated Elements On Video
If you’ve decided Canva is not the tool for you, you can choose any video editing software to make your animation.
Wondershare Filmora is the tool that can help you level up your content creation. It allows users to increase precision and provides professional video editing options.
AI Portrait – The best feature of Wondershare Filmora for gameplay editing
The AI Portrait is a new add-on in Wondershare Filmora. It can easily remove video backgrounds without using a green screen or chroma key, allowing you to add borders, glitch effects, pixelated, noise, or segmentation video effects.
Conclusion
Now that you understand how to build an animation and the software required, you should differentiate between average and extraordinary editing tools.
Filmora and Canva are the best editing tools in this case. Like you can animate individual elements Canva, you can do the same in the other tool also. It may be used to produce animation videos by introducing keyframes, resulting in a seamless and realistic animation. Aside from that, using color correction and an audio processor can help take your animations to the next tier.
Download it today to make your videos better.
Best 10 Photo Animator Templates
What’s the Best 10 Photo Animator Templates That Bring Your Images to Life?
An easy yet powerful editor
Numerous effects to choose from
Detailed tutorials provided by the official channel
Using free 3d motion graphics, we can animate the image and bring it back to life.
Using a 3d animation photo maker online we can animate any image using a template and bring it back to life. This must have gotten you excited? We are as excited as you are as we give you an overview of 3d photo animation online.
In this article
01 [What is 3D Image Animate?](#Part 1)
02 [What is 3D Photo Motion?](#Part 2)
03 [How to Create 3D Animations from a Single Still Image?](#Part 3)
Part 1 What is 3D Image Animate?
3D Image Animate is making a moving scene using just a simple image. It is quite a complicated process and requires high technical skills to achieve a moving animation out of a still image. For your convenience, here we list some of the examples that will make you understand what 3D Image Animate is.
01Resuscitate a Person or Object
This first 3D Image Animate example depicts turning a real-life still image of a person and making him move out of that still image. Sounds absurd, right? Well, just look at this example below.
02Pan View of Car
This next example shows a still image of a car is turned into a moving scene as if the camera person is shooting a pan view of a parked Car.
03Dispersing Elements
Here is another amazing 3D Photo Animate example for you. In this one, you’ll get to see an image that is stacked with several elements, fruits, and veggies (in this case), which get dispersed out of the canvas. Go ahead check it out.
Part 2 What is 3D Photo Motion?
3D photo motion is basically a contemporary technology that helps us to bring life into the pictures. In simple words, using 3D photo motion and animation tools we can make still images into moving ones. 3D animation photo maker online offers you several motion templates. You can apply any of the available motion templates to a still image and make it animated. 3D photo motion helps convert 2D images to life like moving 3D images. This can be useful when working with a project that deals with many still images. By using animation on still images, the project can become more attractive and hence has a higher chance of getting liked!
Part 3 How to Create 3D Animations from a Single Still Image?
01Simple steps to create 3d animations from a single still image
When it comes to animation, Adobe is recognized as one of the best tools. Animation with Adobe is one of the most convenient ways of animation. Here is how you can convert any 2D image to a 3D animated image using adobe. For those of you who are used to animating with adobe, it must be simple to follow the few steps listed below:
● Firstly, you need to convert the 2D layers of the still image to 3D postcards (planes that possess 3D properties). In case the layer you are starting with is a text layer, any transparency will be retained.
● Now to convert the object into 3D, wrap the 2D layer around any 3D object such as cube, cone, or sphere. Choose the shape that suits your layer.
● Next, you need to create a 3D mesh from greyscale information in a 2D image.
● Now you need to simulate a metalworking technique called “Repousse”. By doing so, you will be extruding a 2D object in a 3D space
● Next, you need to build a 3D volume from any multi-frame file like DICOM. Photoshop automatically converts the individual slices of the file into a 3D object that can be manipulated in 3D space from any angle. Furthermore, if you wish to optimize the display, you can also apply any 3D volume render effects.
02Best 10 Photo Animator Templates to Bring Your Images to Life
3D motion photo animator
The first tool on the list of 3d photo animators onlineis an excellent tool called 3D motion photo Animator. The tool helps to split landscape shots into numerous panels depending on the distance of the object from the camera. Furthermore, the plug-in also adds a soft parallax movement into the layers, giving the final image a beautiful 3D effect. The tool also has several editing options and a wide range of lens flare. The animator tool allows you to tweak the weather by using the weather effect options available in the tool.
3D photo animator
This 3d animation photo maker online takes the hype of the parallax effect in animation to a whole different level. The animator allows you to add parallax effects to any still image to make it appear 3 dimensional. Moreover, you can also add depth to the animated image to enhance the 3 dimensional effects and make it appear more realistic.
Live photo animation
Live photo animation is another seamless tool that offers free 3d motion graphics. The tool which is mainly meant for animation gives you the ability to mask the object and a keyframe from vivid natural movements. Once the subject and the background have been isolated and processed, they work independently from each other. This means that, due to independent operation, live photo animation becomes even more realistic since the subject can be animated without affecting the background. The tool also has cool zooming and 3D tracking effects.
Easy 3D face photo Animator
Most tools for 3d photo animation online fail to make the image look completely 3 dimensional. Even after the animation is performed, the people and the objects continue to look 2 dimensional. However easy 3D face photo Animator solves the problem. Using this tool, you can individually animate a face and make it 3 dimensional. It uses several panels to recreate the effect that’d be provided by a video recorder.
Live photo Animator
Looking for an animating tool to animate still images and transform them into stunning videos like action pictures? Live photo Animator is just the perfect tool for you then. The tool has a simple interface and helps generate realistic 3d action images. The plug-in works on the principle of duplicating action elements in an image. These action images include water, dust, fire, and other different kinds of moving objects in an image.
Photo Animator tool
The photo Animator tool kit is a great tool to generate animated 3D images. This quick time-saving tool is your go-to tool for photo effects and zooming. Moreover, the pack also consists of 50 preset animation templates that you can choose from. All you need to do is drag and drop the still images into the tool, and then you need to select the template that you’d like to apply to the image. The tool then processes the image and animates it to convert the still image into a 3d one.
Media animator
Think of smooth and seamless media transitions? Media animator is the perfect tool for you. This software offers a set of seamless and dynamically animated media transitions. The smooth transition effects make the images produced by this tool perfect for using the 3D animations in your official presentations and slideshows.
3D photo Animator
Have an attractive image that you wish to enhance by using animation? Here’s a simple software that can help you add a touch of flair to any simple image. The software has amazing 3d animation powers. When you zoom on the images produced by the software, the entire perspective changes, and the image looks entirely 3D.
Particular photo animation
The animating tool is the best for those who wish to finish animation quickly. The software has an amazing and stylish way of making slideshows. The tool has several templates that concentrate on the particular motion.
Key Takeaways from This Episode
● 3d animation is one of the most budding fields these days. It makes our photos life-like and brings back real life memories.
● Using 3D animation, still images are brought back to life and memories from years back are revived.
● We looked at a few of the best tools for animating an image and converting them to 3D. 3D images can also help make your project reports and presentations much more attractive and earn you the extra edge over your colleagues.
● We recommend you to try a few of these cool tools and get your hands dirty with animation today!
Top 10 Cartoon Canvas Painting Ideas for Total Beginners
10 Cartoon Canvas Painting Ideas for Total Beginners
An easy yet powerful editor
Numerous effects to choose from
Detailed tutorials provided by the official channel
Beginning your streak into cartoon canvas painting? Stay tuned to learn about the 10 most amazing ideas to design your best cartoon canvas art in no time!
In this article
01 [10 Cartoon Canvas Painting Ideas](#Part 1)
02 [How To Paint A Cartoon On Canvas](#Part 2)
Part 1 Cartoon Canvas Painting Ideas
Cartoon are an evergreen favourite for almost everyone around. After all, who would mind sparing a laugh on the adorable musings of the cutest cat and mouse duo in Tom and Jerry, or long for a dive into the fantasy of icy adventures with the Frozen fairy tale! While the huge caricature repository has the best of fun to offer, watching them peep at you from the canvas painting on your art wall is no less of a delight.
When starting to create your own cartoon canvas art, end your search of the most striking painting idea with the amazingly stunning choices in the following section:
01Tom and Jerry
These two are undoubtedly the pioneers of the entire cartoon story that has affordably existed till date. The naughty duo promises to lighten up your day with a mere gaze through the art wall in your room, in the same way as their show sets the mood in. Painting them on your room’s wall canvas will certainly add life to the place.
02Super Mario
Who can forget this adorable red plumber, who conveniently takes the credit for giving us the fondest childhood memories? Whether or not a regular console gamer, this adventure hero is an undisputed favorite of everyone around. So why not make him a member of your art collection through a cartoon canvas painting!
03Characters from the Frozen Land
The adorable cartoon characters from the icy landscapes of this winter fairy saga are possibly the best way to begin your exciting journey of cartoon canvas painting. While the magical storyline of the pixie quest has a diversity of the coolest and the most adorable characters to choose from, you are always free to pick your favorite one and start your design spree.
04Kung fu Panda
If you are a parallel admirer of martial arts and caricature heroes, this cartoon character would be an apt choice to satisfy your love for canvas painting. The adorably cute bear eyeing at you from the painting in his best warlike posture would certainly motivate you to work on keeping a check of your fitness levels!
05Sponge Bob
Living up to his name, this spongy creature has created a separate and strong fan base among viewers of all age groups beyond time. Choosing this character for your cartoon canvas art is surely going to spark up your day with the vibrancy of a real rainbow, even in between the sulkiest of moments, as they say, it’s time to brighten up your life with Bob!
06Homer Simpson
If you are convincingly fascinated by the lures of life overseas, this American toon character is all set to give you the perfect feel of the day to day American lifestyle. Try hands at painting a scene from the eventful life of the Simpson family that is ready to add a fun angle to the most boring chores, while giving you a parodical glimpse of the American society and culture.
07Characters from the Avenger Series
Avengers must be your absolute favorite if you have a love for battle and combat games. Bring your adventure feel back to life with creating a canvas painting art of your most admired avenger, or consider including all of them on a king size canvas if you are having a tough time picking the best from the best!
08Angry Birds
These furious creatures have been a global sensation since their entry into the world of gaming. While these star birds take you on a stunning adventure realism with an amazing graphic excellence, a caricature canvas art of these in your painting collection will certainly add the missing spunk to your graphic creativity.
09Members and Trainers of the Pokémon Species
From TV series to gaming adventures, the love for Pokémon has stood the tests of time in every dimension. When it comes to adding these characters to your canvas painting, you have a storehouse of choices from the cute Pikachu and the meticulous Ash to the nasty team Rocket and other amazing members of the Pokémon species.
10Donald Duck
If you are keen on adding a touch of nostalgia to your creative drawing, consider designing a masterpiece of cartoon canvas artwork portraying this bubbly ad quaky creature that has given you the best of childhood entertainment in the form of possibly the most reliable financial advisor and the cutest good luck charm of toon land.
Now that the graphic design technology has reached its par, you can explore your creativity to design these characters for various uses, such as, illustrative, animated, gag, editorial and political cartoons, or caricatures on comic panels and strips.
Part 2 How To Paint A Cartoon On Canvas
Now that you have come cross the exciting ideas of creating cartoon canvas art, this must be a sufficient motivation to experiment with creating a top class caricature canvas painting for yourself. Read through the following section to get an insight into the knowhow of painting a cartoon on canvas in the easiest possible way!
User’s Guide to Create a Cartoon Canvas Painting on Wondershare Filmora Video Editor
Before entering into the actual design task, you will require a download, installation and launch of the Wondershare Filmora application to any of your Windows or Mac supported devices. Visit the following link for a free download of the software program:

Wondershare Filmora - Best Video Editor for Mac/Windows
5,481,435 people have downloaded it.
Build unique custom animations without breaking a sweat.
Focus on creating epic stories and leave the details to Filmora’s auto features.
Start a creative adventure with drag & drop effects and endless possibilities.
Filmora simplifies advanced features to save you time and effort.
Filmora cuts out repetition so you can move on to your next creative breakthrough.
Painting a Young Character
Take the following steps to draw the caricature form of a young or middle aged character in Wondershare Filmora:
Step 1:
Launch Wondershare Filmora on your system and then start new project. Now import the video from your computer in the software interface.

Step 2:
Once you have added the video then simply drag and drop it in the timeline.

Step 3
Once you have added video to the timeline double click on the added video in timeline to open the video editing menu of Wondershare Filmora.

Step 4:
Now, click the “Animation” tab in the editing options at the left side of interface then you can select anyone from the available preset options.

Step 5:
Select any preset from the available list and then drag and drop it in the timeline to apply the preset on the video. After applying you can use the play button to preview the file. This is the way to create beautiful animation with the Wondershare Filmora. Just like this you can quickly create the best Cartoon canvas as well.

Step 5
After doing all necessary editing you just need to click the “Export” button and save it on your computer.

● Ending Thoughts →
● Cartoon canvas art has gained immense popularity in recent times having a reliable economic and creation advantage with the growth of animation design.
● There are a variety of cartoon painting ideas that you can choose to explore your graphic design creativity.
● When looking for the best solutions to work on creating caricature canvas art, Wondershare Filmora is your worthiest choice.
Beginning your streak into cartoon canvas painting? Stay tuned to learn about the 10 most amazing ideas to design your best cartoon canvas art in no time!
In this article
01 [10 Cartoon Canvas Painting Ideas](#Part 1)
02 [How To Paint A Cartoon On Canvas](#Part 2)
Part 1 Cartoon Canvas Painting Ideas
Cartoon are an evergreen favourite for almost everyone around. After all, who would mind sparing a laugh on the adorable musings of the cutest cat and mouse duo in Tom and Jerry, or long for a dive into the fantasy of icy adventures with the Frozen fairy tale! While the huge caricature repository has the best of fun to offer, watching them peep at you from the canvas painting on your art wall is no less of a delight.
When starting to create your own cartoon canvas art, end your search of the most striking painting idea with the amazingly stunning choices in the following section:
01Tom and Jerry
These two are undoubtedly the pioneers of the entire cartoon story that has affordably existed till date. The naughty duo promises to lighten up your day with a mere gaze through the art wall in your room, in the same way as their show sets the mood in. Painting them on your room’s wall canvas will certainly add life to the place.
02Super Mario
Who can forget this adorable red plumber, who conveniently takes the credit for giving us the fondest childhood memories? Whether or not a regular console gamer, this adventure hero is an undisputed favorite of everyone around. So why not make him a member of your art collection through a cartoon canvas painting!
03Characters from the Frozen Land
The adorable cartoon characters from the icy landscapes of this winter fairy saga are possibly the best way to begin your exciting journey of cartoon canvas painting. While the magical storyline of the pixie quest has a diversity of the coolest and the most adorable characters to choose from, you are always free to pick your favorite one and start your design spree.
04Kung fu Panda
If you are a parallel admirer of martial arts and caricature heroes, this cartoon character would be an apt choice to satisfy your love for canvas painting. The adorably cute bear eyeing at you from the painting in his best warlike posture would certainly motivate you to work on keeping a check of your fitness levels!
05Sponge Bob
Living up to his name, this spongy creature has created a separate and strong fan base among viewers of all age groups beyond time. Choosing this character for your cartoon canvas art is surely going to spark up your day with the vibrancy of a real rainbow, even in between the sulkiest of moments, as they say, it’s time to brighten up your life with Bob!
06Homer Simpson
If you are convincingly fascinated by the lures of life overseas, this American toon character is all set to give you the perfect feel of the day to day American lifestyle. Try hands at painting a scene from the eventful life of the Simpson family that is ready to add a fun angle to the most boring chores, while giving you a parodical glimpse of the American society and culture.
07Characters from the Avenger Series
Avengers must be your absolute favorite if you have a love for battle and combat games. Bring your adventure feel back to life with creating a canvas painting art of your most admired avenger, or consider including all of them on a king size canvas if you are having a tough time picking the best from the best!
08Angry Birds
These furious creatures have been a global sensation since their entry into the world of gaming. While these star birds take you on a stunning adventure realism with an amazing graphic excellence, a caricature canvas art of these in your painting collection will certainly add the missing spunk to your graphic creativity.
09Members and Trainers of the Pokémon Species
From TV series to gaming adventures, the love for Pokémon has stood the tests of time in every dimension. When it comes to adding these characters to your canvas painting, you have a storehouse of choices from the cute Pikachu and the meticulous Ash to the nasty team Rocket and other amazing members of the Pokémon species.
10Donald Duck
If you are keen on adding a touch of nostalgia to your creative drawing, consider designing a masterpiece of cartoon canvas artwork portraying this bubbly ad quaky creature that has given you the best of childhood entertainment in the form of possibly the most reliable financial advisor and the cutest good luck charm of toon land.
Now that the graphic design technology has reached its par, you can explore your creativity to design these characters for various uses, such as, illustrative, animated, gag, editorial and political cartoons, or caricatures on comic panels and strips.
Part 2 How To Paint A Cartoon On Canvas
Now that you have come cross the exciting ideas of creating cartoon canvas art, this must be a sufficient motivation to experiment with creating a top class caricature canvas painting for yourself. Read through the following section to get an insight into the knowhow of painting a cartoon on canvas in the easiest possible way!
User’s Guide to Create a Cartoon Canvas Painting on Wondershare Filmora Video Editor
Before entering into the actual design task, you will require a download, installation and launch of the Wondershare Filmora application to any of your Windows or Mac supported devices. Visit the following link for a free download of the software program:
Wondershare Filmora - Best Video Editor for Mac/Windows
5,481,435 people have downloaded it.
Build unique custom animations without breaking a sweat.
Focus on creating epic stories and leave the details to Filmora’s auto features.
Start a creative adventure with drag & drop effects and endless possibilities.
Filmora simplifies advanced features to save you time and effort.
Filmora cuts out repetition so you can move on to your next creative breakthrough.
Painting a Young Character
Take the following steps to draw the caricature form of a young or middle aged character in Wondershare Filmora:
Step 1:
Launch Wondershare Filmora on your system and then start new project. Now import the video from your computer in the software interface.
Step 2:
Once you have added the video then simply drag and drop it in the timeline.
Step 3
Once you have added video to the timeline double click on the added video in timeline to open the video editing menu of Wondershare Filmora.
Step 4:
Now, click the “Animation” tab in the editing options at the left side of interface then you can select anyone from the available preset options.
Step 5:
Select any preset from the available list and then drag and drop it in the timeline to apply the preset on the video. After applying you can use the play button to preview the file. This is the way to create beautiful animation with the Wondershare Filmora. Just like this you can quickly create the best Cartoon canvas as well.
Step 5
After doing all necessary editing you just need to click the “Export” button and save it on your computer.
● Ending Thoughts →
● Cartoon canvas art has gained immense popularity in recent times having a reliable economic and creation advantage with the growth of animation design.
● There are a variety of cartoon painting ideas that you can choose to explore your graphic design creativity.
● When looking for the best solutions to work on creating caricature canvas art, Wondershare Filmora is your worthiest choice.
Learn All About Lip-Syncing in Animation
Learn all about Lip-Syncing in Animation
An easy yet powerful editor
Numerous effects to choose from
Detailed tutorials provided by the official channel
Lip syncing is one of the important parts of animations that need to be done perfectly. As children we have all enjoyed the special way in which Donald Duck or Mickey Mouse used to talk in cartoons, this is all because of the perfect lip-syncing.

Lip-sync animation tutorial are available that can assist you with the task.
In this article
01 [What is lip-syncing and its importance in animations?](#Part 1)
02 [Key factors to consider while lip-syncing in animations.](#Part 2)
03 [Best software for lip-syncing animations.](#Part 3)
04 [Best all-in-one video editing software for creating impressive animations.](#Part 4)
Part 1 What is Lip-syncing and Its Importance in Animations
In the simplest terms, lip-syncing can be termed as the process and way in which the sound is synchronized to the characters in animation. It is lip-syncing which brings life to the characters and makes them look talking. The process of lip-syncing in animations includes the dialogues and the mouth charts. The dialogues are broken into the phonetic syllables and the frames required for these syllables are then accessed.
Animations are moving and talking images and liveliness come from the dialogues that they speak. So, to make these talks appear real, flawless lip-syncing is very important.
Part 2 Key Factors to Consider While Lip-syncing in Animations
To make the lip-syncing in your animation look perfect several factors need to be taken care of. Some of these important ones are enlisted below.
01 Perfect Match of the Keyframes
The keyframes for the shapes of the words phrase by phrase needs to be perfect to make it look right. The right lip sync will have the correct timings from the mouth open to the mouth close.
02 Adding Body Language
To make the characters in your animations look real and lively, adding gestures and body language will play a huge role. Moreover, lip-syncing along with facial expressions will add to the overall richness of the animations.
03 Watch Yourself or Record Sample Videos
To get the correct lip-syncing for your animations, you can first try and practice by using a mirror or recording some trial videos. In these videos, you can speak and observe the jaw motion.
04 Use Blending
The technique of blending can also be used where the focus is on the most important shape of the mouth rather than each syllable. These shapes can then be blended and used in different ways and combinations.
05 Emphasize Eyes
Eyes need special focus as they can be used for expressing several emotions. Especially during the close-up shots in animations, a person looks at the eyes before the rest of the face.
06 Use the Apt Voice
No matter how perfectly the lip-syncing is done, it will not look good if the voice does not match the characters in your animations. So, make sure to select the voice that matches the looks and the personality of your characters.
Part 3 Best Software for Lip-syncing Animations
Lip sync in animations has become an easier and hassle-free task thanks to the advanced technology and several software and programs available. These 2D and 3D animation-supported tools allow syncing the mouth of the animated character with the dialogues and audio tracks. A few widely used tools for the task are enlisted below.
01 Anime Studio
This is a Windows and Mac-based professional software that supports multiple advanced functions like bone-rigging, automatic image tracing, integrated lip-synching, motion tracking, 3D shape design, character wizard, and many more. Using the vector-based tools of the software, you can add drawings and images for creating customized characters. There is a built-in character wizard that can be used for quick drawing and rigging the characters from the starting. Anime Studio allows recording the sound clip and then these can be synced to the animated characters. Several pre-set props, scenes, videos, stock audio, and characters are also available to choose from.

02 DAZ Studio
This is free-to-use software that can create impressive animations using multiple advanced features. The simple interface and functioning of the software make it apt even for users who have no prior experience in animations. The lip-sync feature of the software can be used to add audio to the created animations. Additional functions include morphing, adjusting different camera angles, plug-ins with advanced capabilities, and more.

03 Crazy Talk
To create impressive animations and add lip-syncing this is one of the popularly used tools. Quick to download, the software allows adding images and pictures to the tool, and then the head, mouth, and eye movement can be added along with lip-synced audio for creating impressive animations. The built-in timeline of the software offers you complete control over the animations, audio, and other parameters. Detailed customization options are supported including the teeth in the mouth of the character. The software is available for Windows and Mac systems.

04 Toon Boom Studio
To help you create rich animations for movies, games, learning, social media sites and any other purpose this is an apt tool to use. The software has a basic version for beginners while an advanced version for professionals. You can import media files in an array of formats like AI, JPEG, TGA, GIF, and others to create animations of your choice. Audio files in WAV, AIFF, and MP3 formats can be added to the created animations and the lip-sync analyzer tool can be used for that perfect syncing. Additional features include zoom-in, zoom-out, skeleton effect, support to the 3D background, multiple formats for exporting files, and more.

05 Crazy Talk Animator
This 2D animation tool can be used for creating rich animations by adding motion and different effects to your images. You can also create landscapes and scenes to further enhance the overall clip. Lip-sync to the animations is supported by the tool and you can even create marks for facial expression and use them to morph. Several tutorials and web resources are available for a better understanding of the tool and its functioning.

Adobe is also a good tool for all types of animation requirements and you can also check the adobe animate lip sync tutorial for your lip-syncing task.
Key Takeaways from This Episode
● Lip-syncing is an important and inevitable part of animations. Lip-syncing brings richness and liveliness to the clips.
● An array of tools and software are available that can help you effortlessly lip-sync animations.
● or all types of video editing needs and for creating animations, Wondershare Filmora works as an excellent all-in-one software.
Lip syncing is one of the important parts of animations that need to be done perfectly. As children we have all enjoyed the special way in which Donald Duck or Mickey Mouse used to talk in cartoons, this is all because of the perfect lip-syncing.
Lip-sync animation tutorial are available that can assist you with the task.
In this article
01 [What is lip-syncing and its importance in animations?](#Part 1)
02 [Key factors to consider while lip-syncing in animations.](#Part 2)
03 [Best software for lip-syncing animations.](#Part 3)
04 [Best all-in-one video editing software for creating impressive animations.](#Part 4)
Part 1 What is Lip-syncing and Its Importance in Animations
In the simplest terms, lip-syncing can be termed as the process and way in which the sound is synchronized to the characters in animation. It is lip-syncing which brings life to the characters and makes them look talking. The process of lip-syncing in animations includes the dialogues and the mouth charts. The dialogues are broken into the phonetic syllables and the frames required for these syllables are then accessed.
Animations are moving and talking images and liveliness come from the dialogues that they speak. So, to make these talks appear real, flawless lip-syncing is very important.
Part 2 Key Factors to Consider While Lip-syncing in Animations
To make the lip-syncing in your animation look perfect several factors need to be taken care of. Some of these important ones are enlisted below.
01 Perfect Match of the Keyframes
The keyframes for the shapes of the words phrase by phrase needs to be perfect to make it look right. The right lip sync will have the correct timings from the mouth open to the mouth close.
02 Adding Body Language
To make the characters in your animations look real and lively, adding gestures and body language will play a huge role. Moreover, lip-syncing along with facial expressions will add to the overall richness of the animations.
03 Watch Yourself or Record Sample Videos
To get the correct lip-syncing for your animations, you can first try and practice by using a mirror or recording some trial videos. In these videos, you can speak and observe the jaw motion.
04 Use Blending
The technique of blending can also be used where the focus is on the most important shape of the mouth rather than each syllable. These shapes can then be blended and used in different ways and combinations.
05 Emphasize Eyes
Eyes need special focus as they can be used for expressing several emotions. Especially during the close-up shots in animations, a person looks at the eyes before the rest of the face.
06 Use the Apt Voice
No matter how perfectly the lip-syncing is done, it will not look good if the voice does not match the characters in your animations. So, make sure to select the voice that matches the looks and the personality of your characters.
Part 3 Best Software for Lip-syncing Animations
Lip sync in animations has become an easier and hassle-free task thanks to the advanced technology and several software and programs available. These 2D and 3D animation-supported tools allow syncing the mouth of the animated character with the dialogues and audio tracks. A few widely used tools for the task are enlisted below.
01 Anime Studio
This is a Windows and Mac-based professional software that supports multiple advanced functions like bone-rigging, automatic image tracing, integrated lip-synching, motion tracking, 3D shape design, character wizard, and many more. Using the vector-based tools of the software, you can add drawings and images for creating customized characters. There is a built-in character wizard that can be used for quick drawing and rigging the characters from the starting. Anime Studio allows recording the sound clip and then these can be synced to the animated characters. Several pre-set props, scenes, videos, stock audio, and characters are also available to choose from.
02 DAZ Studio
This is free-to-use software that can create impressive animations using multiple advanced features. The simple interface and functioning of the software make it apt even for users who have no prior experience in animations. The lip-sync feature of the software can be used to add audio to the created animations. Additional functions include morphing, adjusting different camera angles, plug-ins with advanced capabilities, and more.
03 Crazy Talk
To create impressive animations and add lip-syncing this is one of the popularly used tools. Quick to download, the software allows adding images and pictures to the tool, and then the head, mouth, and eye movement can be added along with lip-synced audio for creating impressive animations. The built-in timeline of the software offers you complete control over the animations, audio, and other parameters. Detailed customization options are supported including the teeth in the mouth of the character. The software is available for Windows and Mac systems.
04 Toon Boom Studio
To help you create rich animations for movies, games, learning, social media sites and any other purpose this is an apt tool to use. The software has a basic version for beginners while an advanced version for professionals. You can import media files in an array of formats like AI, JPEG, TGA, GIF, and others to create animations of your choice. Audio files in WAV, AIFF, and MP3 formats can be added to the created animations and the lip-sync analyzer tool can be used for that perfect syncing. Additional features include zoom-in, zoom-out, skeleton effect, support to the 3D background, multiple formats for exporting files, and more.
05 Crazy Talk Animator
This 2D animation tool can be used for creating rich animations by adding motion and different effects to your images. You can also create landscapes and scenes to further enhance the overall clip. Lip-sync to the animations is supported by the tool and you can even create marks for facial expression and use them to morph. Several tutorials and web resources are available for a better understanding of the tool and its functioning.
Adobe is also a good tool for all types of animation requirements and you can also check the adobe animate lip sync tutorial for your lip-syncing task.
Key Takeaways from This Episode
● Lip-syncing is an important and inevitable part of animations. Lip-syncing brings richness and liveliness to the clips.
● An array of tools and software are available that can help you effortlessly lip-sync animations.
● or all types of video editing needs and for creating animations, Wondershare Filmora works as an excellent all-in-one software.
10 Top Tools to Make Pic Collage for Windows
10 Best Tools to Make Pic Collage for Windows
An easy yet powerful editor
Numerous effects to choose from
Detailed tutorials provided by the official channel
Collages are a great way to assemble all your favorite pictures in one place. You can share these collages with your friends, relatives, and dear ones or can also use them for posting on social media sites and other online platforms. Though creating a collage may sound simple, a lot of considerations need to be taken for creating an interesting and eye-catchy collage, and for this, a help of a professional tool can be taken. In the following parts of the topic, you can learn about the best tools for photo collage Windows 10 and other OS.

In the following parts of the topic, you can learn about the best tools for photo collage Windows 10 and other OS.
In this article
01 [Top 10 Pic Collage for Windows Tools](#Part 1)
02 [The Best Tool to Get Stock Images for Creating Collages](#Part 2)
Part 1 Top 10 Pic Collage for Windows Tools
Checkout the best collage for Windows below.
01PhotoPad Photo Editing Software
This is a complete photo editing tool supporting an array of features including the creation of a photo collage. This software from NCH software can let you add the desired images manually and also support using the auto grid to add an unlimited number of pictures. The tool also lets you choose the collage orientation size and set the background as needed.
Pros:
● Create collage Windows manually or automatically.
● Allows adding a background color, image, or from the available background options.
● Spacing and corners between the images can be selected.
● The size of the tool is small.
Cons:
● Stickers and filters to individual images cannot be added.
● Cannot choose a custom collage size.

02PhotoScapeX
Available for download on Windows 10 and higher versions this is another widely used photo editing tool that can also let you create collages manually as well as automatically. Multiple frames are available that can be selected as desired and there are additional features like adding filters, and also edit them in multiple ways.
Pros:
● Allows creating collage manually and automatically.
● Multiple editing tools for customization like filters, crop, zoom, doodle, and more.
● Picture alignment can be done in 3 modes- vertical, horizontal, and tile.
● Option to change and customize image size, spacing, margin, and others.
Cons:
● Limited photos can be added.
● The size of the tool is large in comparison to other tools.

03Phototastic Collage
This is free to use Windows-based tool that can create impressive collages in no time. Multiple designs, frames, and other options are available to create a customized collage as needed.
Pros:
● Multiple customization options are available for creating the desired collage.
● User-friendly and simple interface.
● An array of templates is available.
Cons:
● The free version has limited features.
● Limitation to the number of images that can be added.
● Ads in the app.

04PicCollage
Unleash your creativity by creating an interesting collage using this excellent collage-making app. There are multiple templates and customization options supports.
Pros
● Create collage manually or automatically
● The earlier created collage can be edited.
● Allows creating a collage in 3 options- grid, template, freestyle.
Cons
● Watermark on the created collage.
● The image size cannot be customized.

05Collage Maker-Photo Grid and Montage
Using this free Windows tool, you can create an interesting photo collage or a free-styled montage as needed. A wide range of layouts and templates are available that can be further customized to get the desired collage.
Pros:
● Free Windows software.
● Come with multiple filters, layout, and editing tools.
● The user interface is easy.
● Preview option available.
Cons:
● Performance glitches due to bugs.
● Custom collage size cannot be set.
● Watermark on the collage.

06Fotor
If you are looking for a simple and basic collage-making tool, Fotor is the right choice. Collage in the grid, freestyle, and photo-stitch style can be created and basic customization features are supported.
Pros:
● Simple to use tool that is apt for beginners.
● Border can be changed from a solid color to a background.
Cons:
● Customization options are limited.
● Border and the image size cannot be changed.

07El Collagero
Just like its name, this is an interesting Windows-based tool for creating a collage of your choice. A wide range of options for customization is available that can let you edit the images, choose a template and then also edit the file.
Pros:
● A wide range of templates and designs for collages is available.
● Allows adding text, symbols, and other elements.
● Created collage can be shared on social media sites.
Cons:
● In comparison to other professional tools, the functions are limited.

08Atlantas Photo Collage Studio
This Windows-based tool will let you create collages of all types and for all occasions. You can choose from over 100 templates that best match your collage theme and image content.
Pros:
● More than 100 templates for collage designs are available.
● The size of the layout can be changed.
● Multiple editing and customization options are supported like zoom, opacity selection, and more.
Cons:
● Limitation of adding 45 images.
● For the advanced functions, need to subscribe to the paid version.

09PhotoJoiner
Using this Windows tool, pick up your favorite images and turn them into a beautiful collage with customized design and style.
Pros:
● A simple and basic tool for creating a collage.
● Created collage can be saved or shared to the social media site.
● Change the order of the images, margins, and other aspects.
Cons
● Collage templates are limited.
● Advanced features are missing.

1010. Blend Photo
To create a collage of images with a blending effect, this is the right tool to use. Available for download on the Windows system this tool lets you create collages telling interesting stories.
Pros:
● Simple and easy collage-making tool.
● Add blending effect to your collages.
● Over 50 custom shapes for image cropping are available along with the option for free-hand cropping.
● Multiple filters can be added.
Cons:
● Limited Editing and customization options.

Part 2 The Best Tool to Get Stock Images for Creating Collages
Several times, the captured and stored images may not fit in the collage theme you wish to create and, in such situations, you can use the stock images available online at several sites. One of the best tools where you can check out the images in different categories is Wondershare Filmora. This versatile software from Wondershare Filmora Video Editor is an advanced video editing tool that also has a huge collection of stock media including images.
Additionally, the split-screen feature of the software can be used for creating a video collage. Available for Windows and Mac systems, Wondershare Filmora will look after all your advanced video editing and customized requirements.
Wondershare Filmora - Best Video Editor for Mac/Windows
5,481,435 people have downloaded it.
Build unique custom animations without breaking a sweat.
Focus on creating epic stories and leave the details to Filmora’s auto features.
Start a creative adventure with drag & drop effects and endless possibilities.
Filmora simplifies advanced features to save you time and effort.
Filmora cuts out repetition so you can move on to your next creative breakthrough.
● Key Takeaways from This Episode →
● Collage-making tools help in creating an interesting and eye-catchy collage in a hassle-free manner.
●Several Windows-based tools are available for quick download.
●Wondershare Filmora is a great software to find a collection of stock images in different categories.
Collages are a great way to assemble all your favorite pictures in one place. You can share these collages with your friends, relatives, and dear ones or can also use them for posting on social media sites and other online platforms. Though creating a collage may sound simple, a lot of considerations need to be taken for creating an interesting and eye-catchy collage, and for this, a help of a professional tool can be taken. In the following parts of the topic, you can learn about the best tools for photo collage Windows 10 and other OS.
In the following parts of the topic, you can learn about the best tools for photo collage Windows 10 and other OS.
In this article
01 [Top 10 Pic Collage for Windows Tools](#Part 1)
02 [The Best Tool to Get Stock Images for Creating Collages](#Part 2)
Part 1 Top 10 Pic Collage for Windows Tools
Checkout the best collage for Windows below.
01PhotoPad Photo Editing Software
This is a complete photo editing tool supporting an array of features including the creation of a photo collage. This software from NCH software can let you add the desired images manually and also support using the auto grid to add an unlimited number of pictures. The tool also lets you choose the collage orientation size and set the background as needed.
Pros:
● Create collage Windows manually or automatically.
● Allows adding a background color, image, or from the available background options.
● Spacing and corners between the images can be selected.
● The size of the tool is small.
Cons:
● Stickers and filters to individual images cannot be added.
● Cannot choose a custom collage size.
02PhotoScapeX
Available for download on Windows 10 and higher versions this is another widely used photo editing tool that can also let you create collages manually as well as automatically. Multiple frames are available that can be selected as desired and there are additional features like adding filters, and also edit them in multiple ways.
Pros:
● Allows creating collage manually and automatically.
● Multiple editing tools for customization like filters, crop, zoom, doodle, and more.
● Picture alignment can be done in 3 modes- vertical, horizontal, and tile.
● Option to change and customize image size, spacing, margin, and others.
Cons:
● Limited photos can be added.
● The size of the tool is large in comparison to other tools.
03Phototastic Collage
This is free to use Windows-based tool that can create impressive collages in no time. Multiple designs, frames, and other options are available to create a customized collage as needed.
Pros:
● Multiple customization options are available for creating the desired collage.
● User-friendly and simple interface.
● An array of templates is available.
Cons:
● The free version has limited features.
● Limitation to the number of images that can be added.
● Ads in the app.
04PicCollage
Unleash your creativity by creating an interesting collage using this excellent collage-making app. There are multiple templates and customization options supports.
Pros
● Create collage manually or automatically
● The earlier created collage can be edited.
● Allows creating a collage in 3 options- grid, template, freestyle.
Cons
● Watermark on the created collage.
● The image size cannot be customized.
05Collage Maker-Photo Grid and Montage
Using this free Windows tool, you can create an interesting photo collage or a free-styled montage as needed. A wide range of layouts and templates are available that can be further customized to get the desired collage.
Pros:
● Free Windows software.
● Come with multiple filters, layout, and editing tools.
● The user interface is easy.
● Preview option available.
Cons:
● Performance glitches due to bugs.
● Custom collage size cannot be set.
● Watermark on the collage.
06Fotor
If you are looking for a simple and basic collage-making tool, Fotor is the right choice. Collage in the grid, freestyle, and photo-stitch style can be created and basic customization features are supported.
Pros:
● Simple to use tool that is apt for beginners.
● Border can be changed from a solid color to a background.
Cons:
● Customization options are limited.
● Border and the image size cannot be changed.
07El Collagero
Just like its name, this is an interesting Windows-based tool for creating a collage of your choice. A wide range of options for customization is available that can let you edit the images, choose a template and then also edit the file.
Pros:
● A wide range of templates and designs for collages is available.
● Allows adding text, symbols, and other elements.
● Created collage can be shared on social media sites.
Cons:
● In comparison to other professional tools, the functions are limited.
08Atlantas Photo Collage Studio
This Windows-based tool will let you create collages of all types and for all occasions. You can choose from over 100 templates that best match your collage theme and image content.
Pros:
● More than 100 templates for collage designs are available.
● The size of the layout can be changed.
● Multiple editing and customization options are supported like zoom, opacity selection, and more.
Cons:
● Limitation of adding 45 images.
● For the advanced functions, need to subscribe to the paid version.
09PhotoJoiner
Using this Windows tool, pick up your favorite images and turn them into a beautiful collage with customized design and style.
Pros:
● A simple and basic tool for creating a collage.
● Created collage can be saved or shared to the social media site.
● Change the order of the images, margins, and other aspects.
Cons
● Collage templates are limited.
● Advanced features are missing.
1010. Blend Photo
To create a collage of images with a blending effect, this is the right tool to use. Available for download on the Windows system this tool lets you create collages telling interesting stories.
Pros:
● Simple and easy collage-making tool.
● Add blending effect to your collages.
● Over 50 custom shapes for image cropping are available along with the option for free-hand cropping.
● Multiple filters can be added.
Cons:
● Limited Editing and customization options.
Part 2 The Best Tool to Get Stock Images for Creating Collages
Several times, the captured and stored images may not fit in the collage theme you wish to create and, in such situations, you can use the stock images available online at several sites. One of the best tools where you can check out the images in different categories is Wondershare Filmora. This versatile software from Wondershare Filmora Video Editor is an advanced video editing tool that also has a huge collection of stock media including images.
Additionally, the split-screen feature of the software can be used for creating a video collage. Available for Windows and Mac systems, Wondershare Filmora will look after all your advanced video editing and customized requirements.
Wondershare Filmora - Best Video Editor for Mac/Windows
5,481,435 people have downloaded it.
Build unique custom animations without breaking a sweat.
Focus on creating epic stories and leave the details to Filmora’s auto features.
Start a creative adventure with drag & drop effects and endless possibilities.
Filmora simplifies advanced features to save you time and effort.
Filmora cuts out repetition so you can move on to your next creative breakthrough.
● Key Takeaways from This Episode →
● Collage-making tools help in creating an interesting and eye-catchy collage in a hassle-free manner.
●Several Windows-based tools are available for quick download.
●Wondershare Filmora is a great software to find a collection of stock images in different categories.
Easy Cartoon Characters Drawing Tutorials for You Who Are Learning to Draw
Easy Cartoon Characters Drawing Tutorials for You Who Are Learning to Draw
An easy yet powerful editor
Numerous effects to choose from
Detailed tutorials provided by the official channel
Learning the art of cartoon characters drawing? We can help! Cartoon characters drawing is no rocket science, ABCD: Anybody Can Draw!

We are as excited as you as we bring to you a few of the best drawing tutorials!
In this article
01 [Double Your Results with Learning Cartoon Drawing Styles First](#Part 1)
02 [Best 6 Cartoon Characters Anyone Can Draw (with Free Video Tutorials)](#Part 2)
03 [Easy Cartoon Characters to Draw Step by Step](#Part 3)
Part 1 Double Your Results with Learning Cartoon Drawing Styles First
01 Cartoon Character Sketches
Sketching is one of the most popular art forms. Sketching can be done for real-life people or celebrities or we can also make sketches of imaginary characters and cartoons. Sketching is generally made of pencil and does not involve the usage of colors.

02 Cartoon Characters Drawing with Color
Cartoon characters can be made with color to make them more attractive. This is another popular form of art that cartoonists follow. You can explore several methods of coloring and try making your cartoon colorful.

03 Disney Cartoon Characters Drawing
Disney cartoon character drawing is probably one of the simplest. This is because they have a predefined size and are mostly symmetric. Disney cartoon characters generally use common geometric shapes such as circles, ovals, and squares. Hence making it a beginner-friendly choice!

Part 2 Best 6 Cartoon Characters Anyone Can Draw (with Free Video Tutorials)
01 Roger the alien
Roger the alien is one of the simplest cartoon characters to draw. This children’s classic cartoon character always intrigues children due to its bizarre shape. It fixes the image of an outer space characters in a child’s mind(If they exist).
What makes it easy to draw?
● The oval-shaped head is easy to draw since it is not very detailed.
● The character does not have any hair, hair is one of the more difficult parts to draw.
● The body features aren’t very prominent, hence making the character easy to draw.
Challenges you may encounter
● If you are a first-timer, then you may find it challenging to draw fingers and the toes.
● Getting the weird alien head shape might be a little difficult and may take you a few attempts.
● Making the two eyes exactly similar to each other may be challenging for a few of you.
02 Wakko Warner
What makes it easy to draw?
● The character generally has geometrical shapes and hence you can use shape tracers to draw a few parts.
● The appealing appearance of the character makes it interesting to draw.
● The eyes are not very difficult to recreate.
Challenges you may encounter
● The eyes are not very difficult to recreate.
● The shape of the mouth and the tongue that is sticking out is slightly complex.
● Perfecting the shape of the hair is a little challenging.
03 Cosmo
What makes it easy to draw?
● We recommend you to try this character out mainly because of its uniqueness.
● The eyes are not very complicated to draw.
● The body resembles a stick image and is hence simple to draw.
Challenges you may encounter
● The shape of the crown needs to be perfect, especially because of the tilt the crown has.
● The fingers are challenging to draw.
● The hair has a distinct shape, this shape needs to come out perfectly.
04 Courage the cowardly dog
What makes it easy to draw?
● Firstly, it’s one of the most favorite cartoons, hence it will ensure to keep you interested in the drawing.
● The hands and legs resemble stick figures and are simple to draw.
● The body structure is simple.
Challenges you may encounter
● Drawing a cartoon animal instead of a human being might be intriguing for beginners.
● The large eyes, which is one of the characteristic features needs to be perfect.
● The design of the ears is the trickiest part and could be difficult to draw.
05 Tom And Jerry
When we think of cartoons, the first few names that probably come to our mind are tom and jerry. This duo of a grumpy cat and a mysterious mouse has left an everlasting impact on the world of cartoons. The duo is famous throughout the world and is loved throughout age groups
Why do we recommend you to try your hands on this?
● This is a classic cartoon that almost everyone loves.
● There are several resources on the internet to help you draw the cartoon characters.
● The characters need not be perfect, even a close resemblance to them would be sufficient for the viewers to identify them due to their fame.
Challenges you may encounter
● You need to be careful with the proportion of sizes of tom and jerry.
● The structures of tom and jerry are not very simple to draw.
● Perfecting the grumpy expression on tom’s face and a frightened expression on jerry’s face is challenging.
05 Catdog
Catdog is another very interesting character. Who’d have imagined a cat and a dog morphed in a single body? Well, imagination has no end to it as they say! Catdog is a yellow cat and dog in a single body, it looks cute and at the same time intriguing.
Why do we recommend you try your hands on this?
● The cartoon character is mainly composed of geometrical shapes.
● The character is vividly colorful.
● The bright yellow color is super attractive and hence makes drawing catdog very fun.
Challenges you may encounter
● The character is illusional, you might have difficulty while deciding how to even look at it.
● The cat and dog faces are not very different from each other and have minute differences while drawing you need to be careful about having a distinct difference between the two faces.
Now that we’ve taken our baby steps towards understanding the art of drawing cartoons.
Key Takeaways from This Episode
● That’s a lot of knowledge for today, isn’t it? Today we’ve seen the basics of drawing cartoon characters.
● We also got our hands dirty by exploring a few easy cartoon characters that you could draw.
● Further, we saw the basic steps that you would need to take in order to draw the face of any cartoon character! All in all, we learned everything we needed to know to draw our first cartoon! What are you waiting for? Go try out drawing your first cartoon today!
Learning the art of cartoon characters drawing? We can help! Cartoon characters drawing is no rocket science, ABCD: Anybody Can Draw!
We are as excited as you as we bring to you a few of the best drawing tutorials!
In this article
01 [Double Your Results with Learning Cartoon Drawing Styles First](#Part 1)
02 [Best 6 Cartoon Characters Anyone Can Draw (with Free Video Tutorials)](#Part 2)
03 [Easy Cartoon Characters to Draw Step by Step](#Part 3)
Part 1 Double Your Results with Learning Cartoon Drawing Styles First
01 Cartoon Character Sketches
Sketching is one of the most popular art forms. Sketching can be done for real-life people or celebrities or we can also make sketches of imaginary characters and cartoons. Sketching is generally made of pencil and does not involve the usage of colors.
02 Cartoon Characters Drawing with Color
Cartoon characters can be made with color to make them more attractive. This is another popular form of art that cartoonists follow. You can explore several methods of coloring and try making your cartoon colorful.
03 Disney Cartoon Characters Drawing
Disney cartoon character drawing is probably one of the simplest. This is because they have a predefined size and are mostly symmetric. Disney cartoon characters generally use common geometric shapes such as circles, ovals, and squares. Hence making it a beginner-friendly choice!
Part 2 Best 6 Cartoon Characters Anyone Can Draw (with Free Video Tutorials)
01 Roger the alien
Roger the alien is one of the simplest cartoon characters to draw. This children’s classic cartoon character always intrigues children due to its bizarre shape. It fixes the image of an outer space characters in a child’s mind(If they exist).
What makes it easy to draw?
● The oval-shaped head is easy to draw since it is not very detailed.
● The character does not have any hair, hair is one of the more difficult parts to draw.
● The body features aren’t very prominent, hence making the character easy to draw.
Challenges you may encounter
● If you are a first-timer, then you may find it challenging to draw fingers and the toes.
● Getting the weird alien head shape might be a little difficult and may take you a few attempts.
● Making the two eyes exactly similar to each other may be challenging for a few of you.
02 Wakko Warner
What makes it easy to draw?
● The character generally has geometrical shapes and hence you can use shape tracers to draw a few parts.
● The appealing appearance of the character makes it interesting to draw.
● The eyes are not very difficult to recreate.
Challenges you may encounter
● The eyes are not very difficult to recreate.
● The shape of the mouth and the tongue that is sticking out is slightly complex.
● Perfecting the shape of the hair is a little challenging.
03 Cosmo
What makes it easy to draw?
● We recommend you to try this character out mainly because of its uniqueness.
● The eyes are not very complicated to draw.
● The body resembles a stick image and is hence simple to draw.
Challenges you may encounter
● The shape of the crown needs to be perfect, especially because of the tilt the crown has.
● The fingers are challenging to draw.
● The hair has a distinct shape, this shape needs to come out perfectly.
04 Courage the cowardly dog
What makes it easy to draw?
● Firstly, it’s one of the most favorite cartoons, hence it will ensure to keep you interested in the drawing.
● The hands and legs resemble stick figures and are simple to draw.
● The body structure is simple.
Challenges you may encounter
● Drawing a cartoon animal instead of a human being might be intriguing for beginners.
● The large eyes, which is one of the characteristic features needs to be perfect.
● The design of the ears is the trickiest part and could be difficult to draw.
05 Tom And Jerry
When we think of cartoons, the first few names that probably come to our mind are tom and jerry. This duo of a grumpy cat and a mysterious mouse has left an everlasting impact on the world of cartoons. The duo is famous throughout the world and is loved throughout age groups
Why do we recommend you to try your hands on this?
● This is a classic cartoon that almost everyone loves.
● There are several resources on the internet to help you draw the cartoon characters.
● The characters need not be perfect, even a close resemblance to them would be sufficient for the viewers to identify them due to their fame.
Challenges you may encounter
● You need to be careful with the proportion of sizes of tom and jerry.
● The structures of tom and jerry are not very simple to draw.
● Perfecting the grumpy expression on tom’s face and a frightened expression on jerry’s face is challenging.
05 Catdog
Catdog is another very interesting character. Who’d have imagined a cat and a dog morphed in a single body? Well, imagination has no end to it as they say! Catdog is a yellow cat and dog in a single body, it looks cute and at the same time intriguing.
Why do we recommend you try your hands on this?
● The cartoon character is mainly composed of geometrical shapes.
● The character is vividly colorful.
● The bright yellow color is super attractive and hence makes drawing catdog very fun.
Challenges you may encounter
● The character is illusional, you might have difficulty while deciding how to even look at it.
● The cat and dog faces are not very different from each other and have minute differences while drawing you need to be careful about having a distinct difference between the two faces.
Now that we’ve taken our baby steps towards understanding the art of drawing cartoons.
Key Takeaways from This Episode
● That’s a lot of knowledge for today, isn’t it? Today we’ve seen the basics of drawing cartoon characters.
● We also got our hands dirty by exploring a few easy cartoon characters that you could draw.
● Further, we saw the basic steps that you would need to take in order to draw the face of any cartoon character! All in all, we learned everything we needed to know to draw our first cartoon! What are you waiting for? Go try out drawing your first cartoon today!
Also read:
- In 2024, How to Create an Animated Sticky Navbar
- Updated 2024 Approved 10 Most Memorable Japanese Cat Cartoons
- Updated In 2024, How to Create an Animated Sticky Navbar
- New In 2024, Amazing Ways to Find Suitable Animated Graphic Maker
- New In 2024, Whiteboard Animation Services Top 15 Animation Companies to Pick
- New Top 10 3D Text Animation Templates
- New 2024 Approved Epic Formula to Animate Photos From These 10 Animate Pictures App
- In 2024, 10 Classical Animated Cartoon Types With Examples
- Updated 20 Free After Effects Logo Reveal Templates for 2024
- New 2024 Approved What Is Anime? Anime VS Manga VS Cartoon
- New 5 Different Animation Styles A Simple but Complete Guide for 2024
- Updated How to Create a Whiteboard Video Step by Step for 2024
- Updated How to Become a Motion Graphic Designer for 2024
- In 2024, The Only Guide Youll Ever Need to Learn About GIF Video Downloader
- How to Make Architecture Animation
- Updated How You Can Turn Yourself Into Anime Character Using Anime Filter for 2024
- In 2024, Top 10 Best Photo to Animation Converters
- Updated In 2024, 10 2D/3D Animation Tips & Tricks for You
- New The Coolest Anime Characters Ever| List of Top Favorites for 2024
- Updated How To Make Pinterest Slideshow in Simple Ways
- New In 2024, 10 Great Apps for Turning Funny Animated Images Into Comics
- New 10 Cartoon Characters That Should Top Your List
- How To Make Pinterest Slideshow in Simple Ways for 2024
- The Secret Sauce for Making GIF Instagram Story More Aesthetic
- New 2024 Approved Fuel Your Creativity with 10 Awesome Collection of 2D Animation Examples
- Are You Ready to Animate Game Character From Scratch, In 2024
- Best Websites to Download Animated GIFs for Free-Free GIF Download
- Best 10 Anime Websites to Watch Dubbed Anime Free
- How to Make Your GIF on WhatsApp in Simple Ways
- In 2024, Ways You Can Master to Make Claymation Videos
- 2024 Approved 10 Must Watch Netflix Cartoon Series
- New 2024 Approved How to Stop Animation From Looping in Unity
- New In 2024, Create Animated Video on Canva
- 2024 Approved 12 Animation Video Maker That Can Triple Your Conversion Rates
- Tutorials to Make Animated Images
- Top 15 Male Anime Characters By Voting
- New Best 12 Evil Cartoon Characters of All Time
- New 6 Unexpected Ways Gif Animation Maker Can Affect Your Marketing for 2024
- New 5 Different Animation Styles A Simple but Comprehensive Guide
- New 2024 Approved How to Turn Yourself Into a WhatsApp Cartoon
- Updated In 2024, Samples of Cartoon Character Face to Inspire You
- In 2024, What Is the Meaning of Motion Graphics
- New 2024 Approved Tips for Canva Animated Elements
- Updated Create Animated Social Media Posts in Canva
- Updated Christmas Is Coming! How to Find & Make Animated Christmas GIFs for 2024
- In 2024, 10 Cartoon Character Makers to Make Animated Characters
- Updated 2024 Approved 10 Realistic Cartoon Characters You Will Run Away From if You Met in R
- Updated In 2024, How to Make a Video a Live Photo
- Updated Learn 3D Logo Animation and Templates for 2024
- In 2024, Trouble with iPhone SE Swipe-Up? Try These 11 Solutions | Dr.fone
- Full Guide to Fix iToolab AnyGO Not Working On Samsung Galaxy XCover 6 Pro Tactical Edition | Dr.fone
- In 2024, Fake Android Location without Rooting For Your Itel A60 | Dr.fone
- How to Fix Android.Process.Media Has Stopped on Vivo Y17s | Dr.fone
- In 2024, Does Vivo Y78+ Have Find My Friends? | Dr.fone
- In 2024, Overview of the Best Samsung Galaxy S23 FE Screen Mirroring App | Dr.fone
- 6 Solutions to Unlock ZTE Phones If You Forgot Password, PIN, Pattern
- App Wont Open on Your Oppo Reno 11 5G? Here Are All Fixes | Dr.fone
- New Multiple Ways How To Remove iCloud Activation Lock From your iPhone 6s Plus
- In 2024, How To Remove iCloud From iPhone 14 Pro Smoothly
- In 2024, How to Transfer Apps from Oppo Find X7 Ultra to Another | Dr.fone
- In 2024, How to Transfer from Apple iPhone 13 Pro to iPhone 8/11/11 Pro | Dr.fone
- In 2024, 3 Ways for Android Pokemon Go Spoofing On Nokia C22 | Dr.fone
- Title: 10 Best Animation Makers for Kids to Have Fun
- Author: Elon
- Created at : 2024-05-19 03:04:22
- Updated at : 2024-05-20 03:04:22
- Link: https://animation-videos.techidaily.com/10-best-animation-makers-for-kids-to-have-fun/
- License: This work is licensed under CC BY-NC-SA 4.0.
