
:max_bytes(150000):strip_icc():format(webp)/istabletworthit-a75b20684e5241b8a64efc0733092fcd.jpg)
10 Best Photoshop Cartoon Effects For Creatives
10 Best Photoshop Cartoon Effects For Creatives
10 Photoshop Cartoon Effects For Creatives
An easy yet powerful editor
Numerous effects to choose from
Detailed tutorials provided by the official channel
Whether cartoon lover or not, photo cartoon effects is admired by everyone nowadays. People want to use Photoshop cartoon effects.
Using Photoshop applications lets, you know that editing and applying effects are often time-consuming. Adjusting the color, resizing the image, applying effects is lengthy, requires focus, and sometimes may be boring. Thus, we have some Photoshop cartoon effects that will save your time and provide you with desired results.
In this article
01 [11 Best Photoshop Cartoon Effects](#Part 1)
02 [How To Create A Photo To Cartoon Effect In A Photoshop](#Part 2)
Part 1 Best Photoshop Cartoon Effects
If you prefer to download the cartoon effect app or want to edit the photo online without editing, here’s is a list of some of the best Photoshop or Premiere Pro cartoon effects:
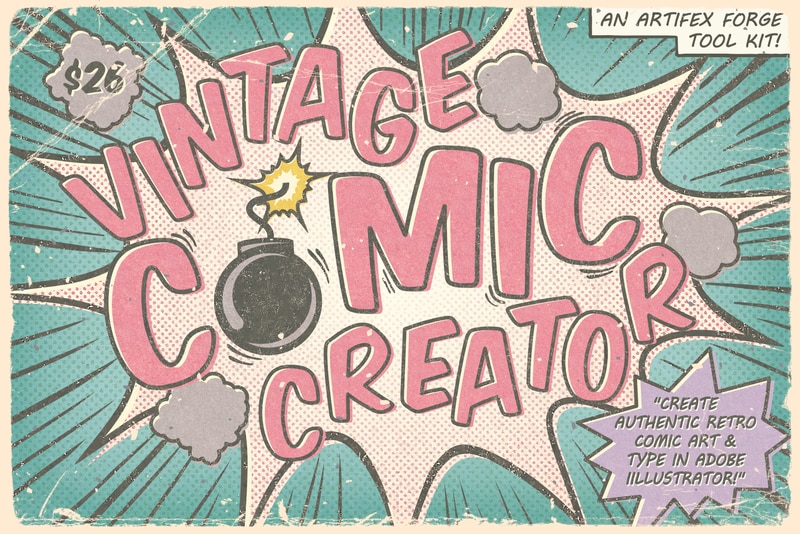
01Vintage Comic Creator
Vintage Comic Creator allows users to add After Effects in cartoon effects in photographs and texts. This can be the best choice if you want to add some shape effects, color, and change texture.
Along with cartoon edit text, an individual can also download overlays, pattern styles, and layer styles to make it comic book text. All the downloaded versions of templates are popular and editable as per the user’s requirement.
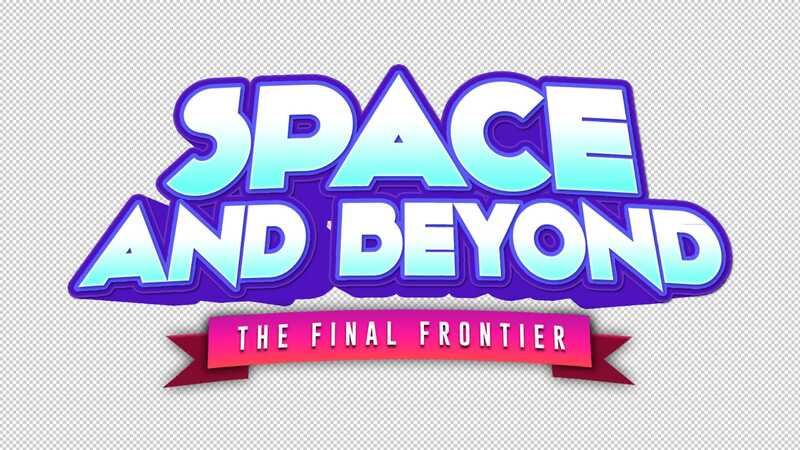
02Ultra Realistic 3D Space effect
Are you a space lover and looking for space inspires cartoon edits? Here’s a Solution. Ultra Realistic 3D Space cartoon effect allows the users to create editable fun cartoon text and Space themes.
Since it provides a variety of themes and ideas doesn’t limit the user when it comes to editing.
It provides you with a file with an example to make it easy to apply the cartoon effect online according to your wish.
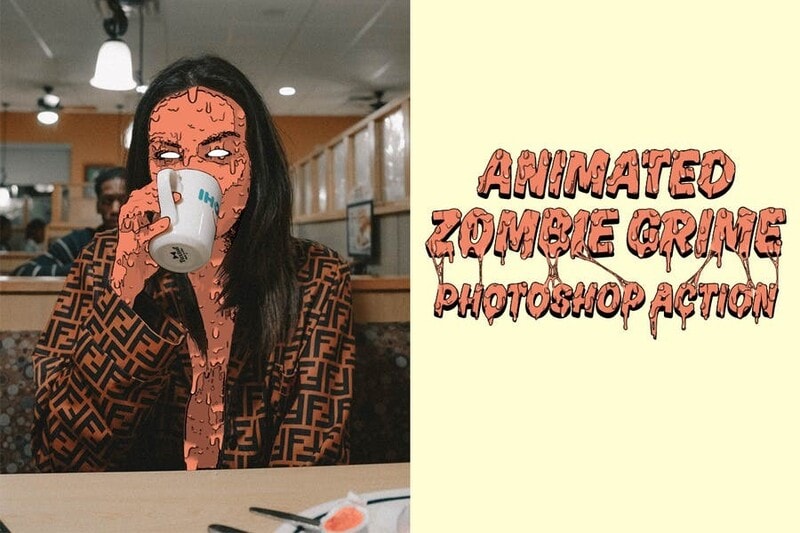
03Animated Zombie Grime Art Photoshop action
To the fans of all the zombie movies, here’s something you should try out!
Animated Zombie Grime Art provides features in which users can edit their photographs with zombie cartoon effects and experience how they will look like a zombie with zero effort. It also provides the option to create and save GIFs or videos. One can easily use them on their social media accounts.
04Cartoon art Photoshop action
A quick and easy online cartoon effect helps individuals edit their photographs into paintings or cartoon characters. With only a few simple actions, users can easily edit their pictures. It provides editing in paintings, cartoons, oil pastels, oil paintings, etc.
05Soft Photoshop cartoon effects
Soft Photoshop cartoon effects help the users edit the photos into cartoon effects and allow them to add smooth effects to them. With just one click, you can add different colors to your image can adjust the brightness, contrast, highlight, texture, etc. It includes layers and smart filters, thus providing various editing options.

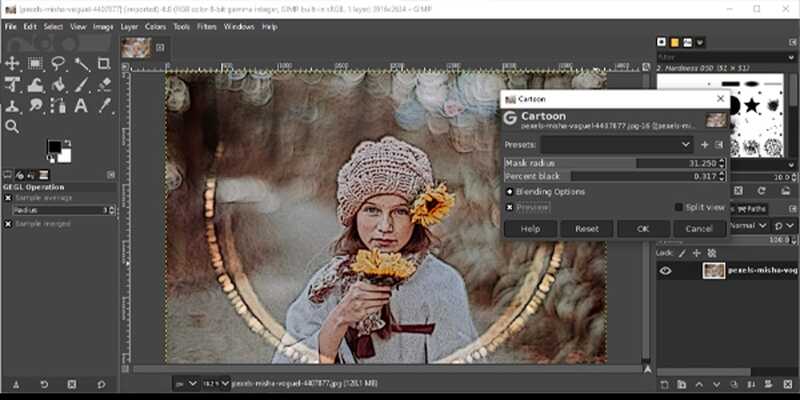
06Gimp cartoon effect
It is one of the fastest methods to edit your photographs into cartoon effects. Within a single click, you can cartoonify your pictures. With the help of the Gimp cartoon effect, the user can readjust brightness, contrast, light, etc. You can try soft burn, burn and overlay and can invert colors. It provides different filters with special effects that users can use free of cost.
07Pop art Photoshop action
Pop art Photoshop action easily converts any photograph into a retro cartoon photo effect. It transforms the picture into a cartoon customized painting within one click. Users can enjoy the features of adjusting colors and can change the background according to their wishes.

08Cell shader Photoshop action
If you want to convert photos into cartoon effects and at the same time want to apply cell shading, then here’s a magic photo cartoon effect. Cartooning your picture along with cell shading can be time-consuming sometimes. Cell shader Photoshop allows the user to shade the image with a single click. You can try it on any picture.
093D cartoon text effect
This cartoon effect app helped change the text or the style of the text by adding specific animations or filters. It includes different forms and types in which users can edit the text and make it look fantastic. This 3D animation you can use in your document in animation or simple editing.
10Filmora cartoon effects
With Wondershare Filmora Video Editor , users can take a new picture or add a photo from their phone’s gallery. Once the image is ready for editing, you should tap on the Apply Cartoon Effect button. It contains 12 different cartoon photo effect styles; thus, users can choose any style they want to insert in their picture. You can also add motion to images, videos, and unlimited editing features with the latest updates.
For Win 7 or later (64-bit)
For macOS 10.12 or later
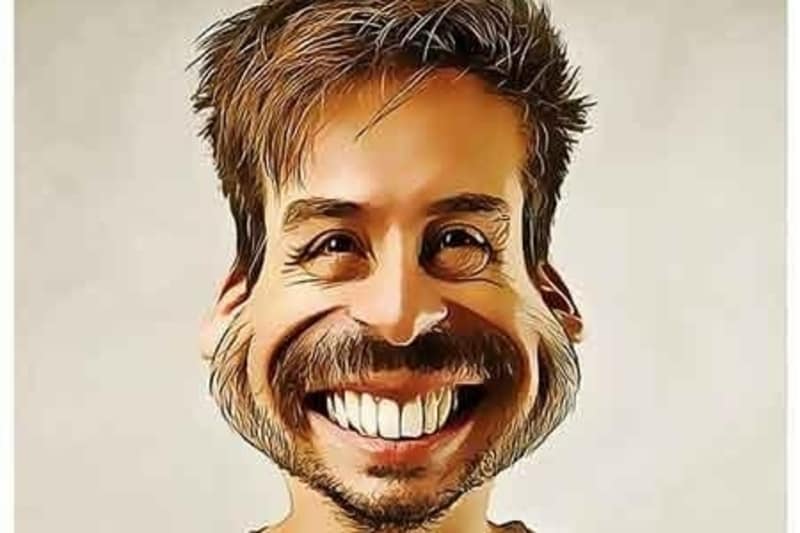
11 Caricature maker Photoshop action
You can turn your photographs into caricatures and make them look awesome. With the help of this After Effects, cartoon animation converts a simple picture into a fun carriage with just one click. You can adjust colors, size, and shape and add more features.
Part 2 How To Create A Photo To Cartoon Effect In A Photoshop
Below is a guide that will help you know more about Photoshop’s cartoon effect.
● Step 1: Select Image
Now, choose an image you want to cartoonize.
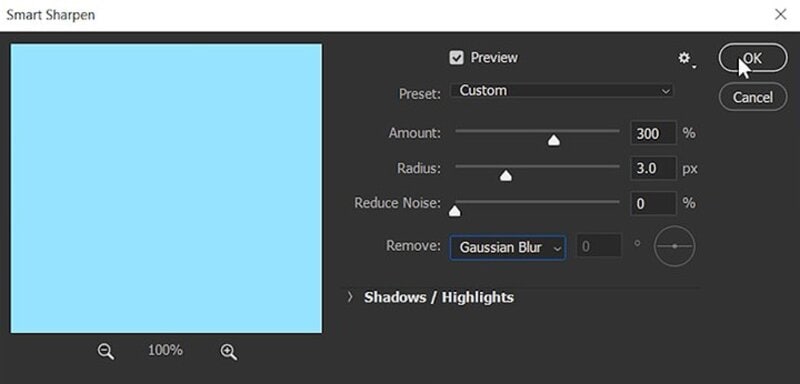
● Step 2: Apply Filter-Sharpen
Go to Filter to sharpen the image. Select the Gaussian Blur from the Remove drop-down list
Press OK.
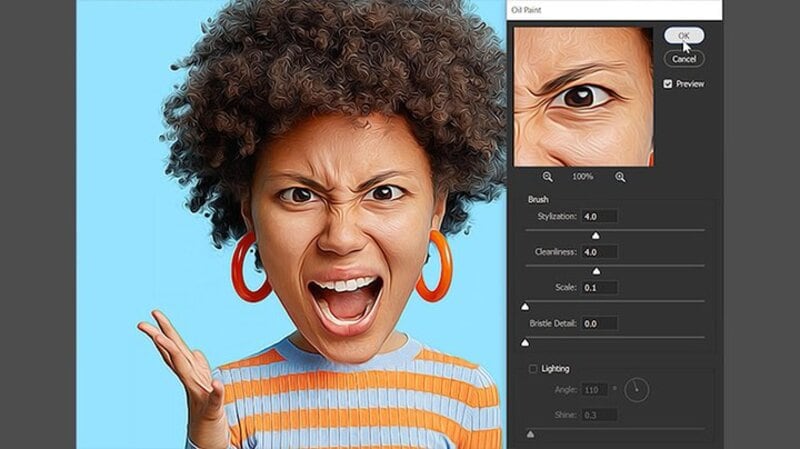
● Step 3: Apply Filter-Stylize
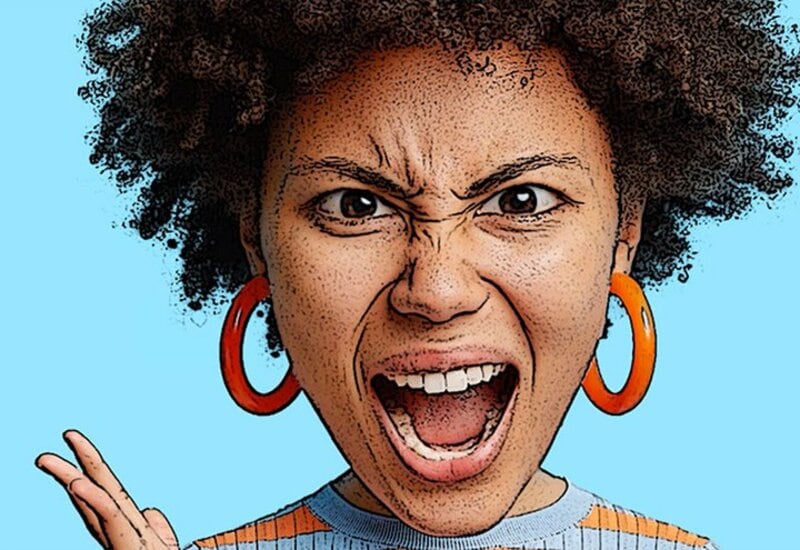
Go to Filter, then apply stylization and Oil paint.
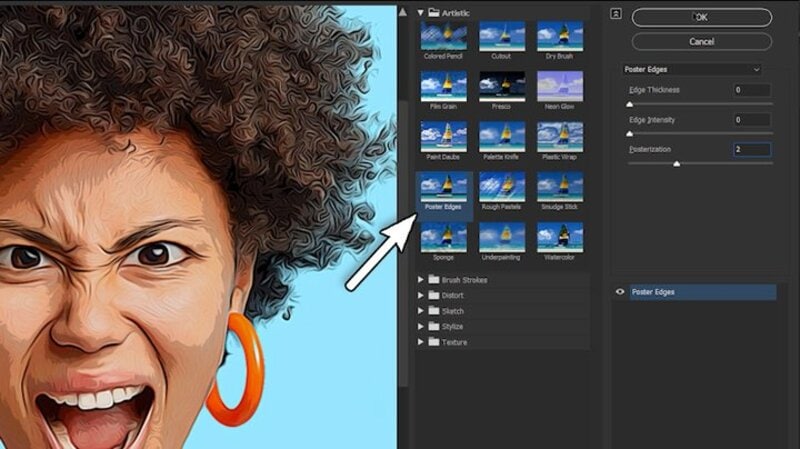
● Step 4: Choose Poster Edges
Choose from the list of effects on the filter gallery, click on Poster Edges and click OK.
● Step 5: Blur
It will start to resemble a cartoon, but there’s still more to do, so use the Filter > Blur Menu to add a Surface Blur. Set the Threshold to 15 pixels and the Radius to 12 pixels. This effect gives the skin a considerably smoother and cleaner appearance. Select OK.
● Step 6: Unsharp Mask
You can add some sharpness and increase particular highlights by going to Filter > Sharpen > Unsharp Mask.
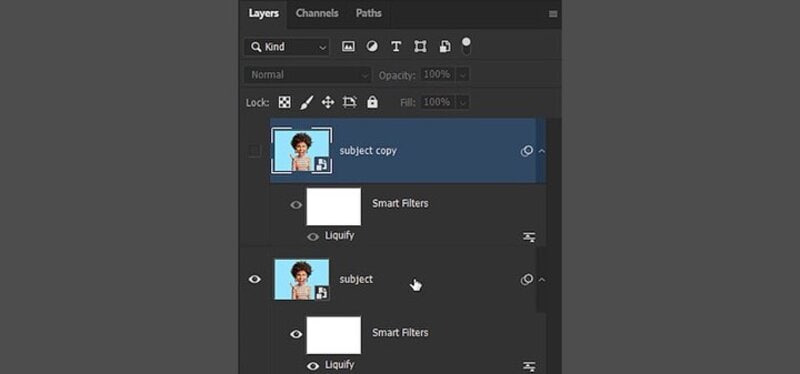
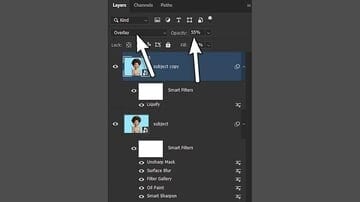
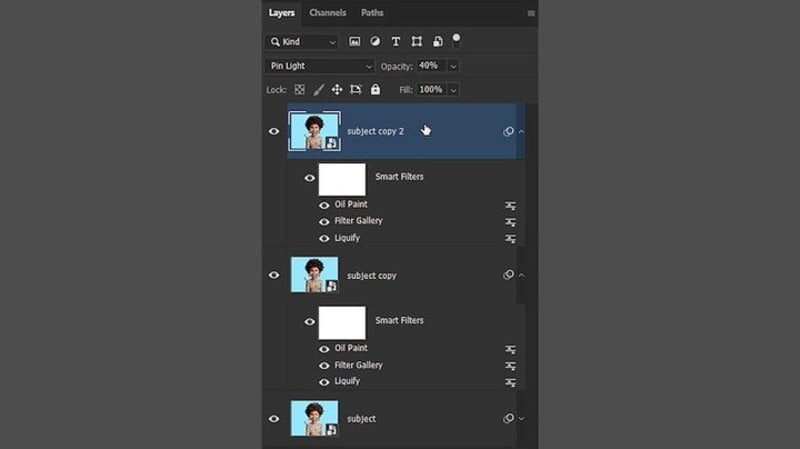
Unhide the second Smart Object layer and change its blending mode to Overlay. Then, reduce the layer’s Opacity to 55 percent.
Now, it will start to resemble a cartoon, but there’s still more to do, so use the Filter > Blur Menu to add a Surface Blur. Set the Threshold to 12 pixels and the Radius to 12 pixels.
● Step 7: Apply the Oil paint filter again
Return to Filter > Filter Gallery and select Poster Edges once more. These will draw attention to certain aspects of the portrait.
Choose the Oil Paint Filter from Filter > Stylize. Select OK.
● Step 8: Double-click on Filter Gallery
Click OK after double-clicking the Filter Gallery Smart Filter already on this layer.
Carry on with the same steps for the Oil Paint Filter.
Select OK.
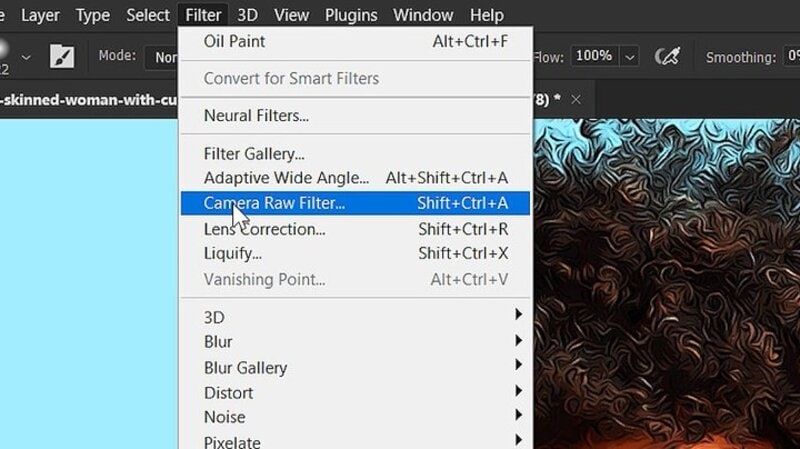
● Step 9: Choose the Raw filter option
Let’s take this photo cartoon effect to the next level with a simple method! To make a Stamp Visible Layer, choose the very top layer and press Control-Shift-Alt-E. When you wish to merge all the layers in a document onto a new layer, this shortcut comes in handy.
Lastly, convert the new layer to a Smart Object by right-clicking on it.
Select the Camera Raw Filter option from the Filter menu.
● Ending Thoughts →
● After visiting this article, I’m sure you have plenty of options for cartoon effects according to your choice. In this technological world, it’s hard to find the Photoshop cartoon effect of your desire, which helps save time.
● The above is one of the best After Effects cartoon animations you can use as a cartoon lover. Besides, you can also try out our recommended Filmora – the editor in vogue for its world-class editing features to help enhance your data.
Whether cartoon lover or not, photo cartoon effects is admired by everyone nowadays. People want to use Photoshop cartoon effects.
Using Photoshop applications lets, you know that editing and applying effects are often time-consuming. Adjusting the color, resizing the image, applying effects is lengthy, requires focus, and sometimes may be boring. Thus, we have some Photoshop cartoon effects that will save your time and provide you with desired results.
In this article
01 [11 Best Photoshop Cartoon Effects](#Part 1)
02 [How To Create A Photo To Cartoon Effect In A Photoshop](#Part 2)
Part 1 Best Photoshop Cartoon Effects
If you prefer to download the cartoon effect app or want to edit the photo online without editing, here’s is a list of some of the best Photoshop or Premiere Pro cartoon effects:
01Vintage Comic Creator
Vintage Comic Creator allows users to add After Effects in cartoon effects in photographs and texts. This can be the best choice if you want to add some shape effects, color, and change texture.
Along with cartoon edit text, an individual can also download overlays, pattern styles, and layer styles to make it comic book text. All the downloaded versions of templates are popular and editable as per the user’s requirement.
02Ultra Realistic 3D Space effect
Are you a space lover and looking for space inspires cartoon edits? Here’s a Solution. Ultra Realistic 3D Space cartoon effect allows the users to create editable fun cartoon text and Space themes.
Since it provides a variety of themes and ideas doesn’t limit the user when it comes to editing.
It provides you with a file with an example to make it easy to apply the cartoon effect online according to your wish.
03Animated Zombie Grime Art Photoshop action
To the fans of all the zombie movies, here’s something you should try out!
Animated Zombie Grime Art provides features in which users can edit their photographs with zombie cartoon effects and experience how they will look like a zombie with zero effort. It also provides the option to create and save GIFs or videos. One can easily use them on their social media accounts.
04Cartoon art Photoshop action
A quick and easy online cartoon effect helps individuals edit their photographs into paintings or cartoon characters. With only a few simple actions, users can easily edit their pictures. It provides editing in paintings, cartoons, oil pastels, oil paintings, etc.
05Soft Photoshop cartoon effects
Soft Photoshop cartoon effects help the users edit the photos into cartoon effects and allow them to add smooth effects to them. With just one click, you can add different colors to your image can adjust the brightness, contrast, highlight, texture, etc. It includes layers and smart filters, thus providing various editing options.
06Gimp cartoon effect
It is one of the fastest methods to edit your photographs into cartoon effects. Within a single click, you can cartoonify your pictures. With the help of the Gimp cartoon effect, the user can readjust brightness, contrast, light, etc. You can try soft burn, burn and overlay and can invert colors. It provides different filters with special effects that users can use free of cost.
07Pop art Photoshop action
Pop art Photoshop action easily converts any photograph into a retro cartoon photo effect. It transforms the picture into a cartoon customized painting within one click. Users can enjoy the features of adjusting colors and can change the background according to their wishes.
08Cell shader Photoshop action
If you want to convert photos into cartoon effects and at the same time want to apply cell shading, then here’s a magic photo cartoon effect. Cartooning your picture along with cell shading can be time-consuming sometimes. Cell shader Photoshop allows the user to shade the image with a single click. You can try it on any picture.
093D cartoon text effect
This cartoon effect app helped change the text or the style of the text by adding specific animations or filters. It includes different forms and types in which users can edit the text and make it look fantastic. This 3D animation you can use in your document in animation or simple editing.
10Filmora cartoon effects
With Wondershare Filmora Video Editor , users can take a new picture or add a photo from their phone’s gallery. Once the image is ready for editing, you should tap on the Apply Cartoon Effect button. It contains 12 different cartoon photo effect styles; thus, users can choose any style they want to insert in their picture. You can also add motion to images, videos, and unlimited editing features with the latest updates.
For Win 7 or later (64-bit)
For macOS 10.12 or later
11 Caricature maker Photoshop action
You can turn your photographs into caricatures and make them look awesome. With the help of this After Effects, cartoon animation converts a simple picture into a fun carriage with just one click. You can adjust colors, size, and shape and add more features.
Part 2 How To Create A Photo To Cartoon Effect In A Photoshop
Below is a guide that will help you know more about Photoshop’s cartoon effect.
● Step 1: Select Image
Now, choose an image you want to cartoonize.
● Step 2: Apply Filter-Sharpen
Go to Filter to sharpen the image. Select the Gaussian Blur from the Remove drop-down list
Press OK.
● Step 3: Apply Filter-Stylize
Go to Filter, then apply stylization and Oil paint.
● Step 4: Choose Poster Edges
Choose from the list of effects on the filter gallery, click on Poster Edges and click OK.
● Step 5: Blur
It will start to resemble a cartoon, but there’s still more to do, so use the Filter > Blur Menu to add a Surface Blur. Set the Threshold to 15 pixels and the Radius to 12 pixels. This effect gives the skin a considerably smoother and cleaner appearance. Select OK.
● Step 6: Unsharp Mask
You can add some sharpness and increase particular highlights by going to Filter > Sharpen > Unsharp Mask.
Unhide the second Smart Object layer and change its blending mode to Overlay. Then, reduce the layer’s Opacity to 55 percent.
Now, it will start to resemble a cartoon, but there’s still more to do, so use the Filter > Blur Menu to add a Surface Blur. Set the Threshold to 12 pixels and the Radius to 12 pixels.
● Step 7: Apply the Oil paint filter again
Return to Filter > Filter Gallery and select Poster Edges once more. These will draw attention to certain aspects of the portrait.
Choose the Oil Paint Filter from Filter > Stylize. Select OK.
● Step 8: Double-click on Filter Gallery
Click OK after double-clicking the Filter Gallery Smart Filter already on this layer.
Carry on with the same steps for the Oil Paint Filter.
Select OK.
● Step 9: Choose the Raw filter option
Let’s take this photo cartoon effect to the next level with a simple method! To make a Stamp Visible Layer, choose the very top layer and press Control-Shift-Alt-E. When you wish to merge all the layers in a document onto a new layer, this shortcut comes in handy.
Lastly, convert the new layer to a Smart Object by right-clicking on it.
Select the Camera Raw Filter option from the Filter menu.
● Ending Thoughts →
● After visiting this article, I’m sure you have plenty of options for cartoon effects according to your choice. In this technological world, it’s hard to find the Photoshop cartoon effect of your desire, which helps save time.
● The above is one of the best After Effects cartoon animations you can use as a cartoon lover. Besides, you can also try out our recommended Filmora – the editor in vogue for its world-class editing features to help enhance your data.
Have You Seen the Facebook Cartoon App Everyone’s Using Lately
Have You Seen the Facebook Cartoon App Everyone’s Using Lately
An easy yet powerful editor
Numerous effects to choose from
Detailed tutorials provided by the official channel
Facebook cartooning has lately gained momentum in the realm of social media entertainment. Level up your graphic skills with the most recent cartoon app for Facebook!
In this article
01 [How to Make a Facebook Avatar](#Part 1)
02 [Facebook: How to Do the Cartoon Filter Challenge](#Part 2)
Part 1 How to Make a Facebook Avatar
Cartooning and caricature drawing has earned an ultimate preference of graphic designers since times as old as the retro cartoon strips to the modern day digitally created caricaturized avatars, which have by now imbibed usage credibility within almost any and every sector, regardless of the central theme of pr productivity.
Owing to their highly expressive avatars and the inherent ability to transmit information via a characteristic fun element, these have become potential sources of information sharing and entertainment. When it comes to social media, these graphic masterpieces become more vibrant and exportable. Talking of the current trends, caricature avatars on the Facebook cartoon app have created a buzz among the users of the app.
This one is a recently launched feature of Facebook that allows you to cartoonize your real time image with a diversity of customization options. Diving into the creation pool, see through the following section to learn the knowhow of creating amazing caricature avatars using the Facebook app:
User’s Guide to Create a Facebook Avatar
Step 1: You Need the Facebook Application
As the first step, you will need to download and launch the Facebook app in your preferred Android, Windows or MacOs device.
Step 2: Setting Up the Utility
After a successful launch of the app in your device, navigate to the bottom right corner of Facebook’s welcome interface and tap the ‘Three Lines’ icon.

Step 3: Choosing Your Avatar
As you tap on the icon mentioned in Step 2, a drop down menu appears. Click on the ‘See More’ option in the menu and tap ‘Avatars’ in the list of options that follows.

Step 4: Do as Directed
Once you have selected the ‘Avatar’ feature, a number of prompts will appear sin series, asking you to make selections of your hair style, skin tone and related features for customization. In case you are not able to locate all the options, tap the bar at the top of each option and also below your progressing avatar.


Step 5: Adding Further Details
You can additionally explore your editing creativity by customizing the eye, nose and body shape, eyebrows and outfit of your avatar.


Step 6: Almost There!
When you are satisfied with the look of your avatar, navigate to upper right corner of the app screen and click on the ‘Checkmark’ to finalize your changes. Go for a comparison of the created avatar with your real time photo by clicking on the ‘Selfie’ button beneath your avatar.

Step 7: Share Your Work
The created avatars get automatically saved locally in your device; from you can share and export them to any media sharing platforms, like amplifying your chat comments or sending stickers in different apps with utmost convenience using the ‘Share’ button.


Part 2 Facebook: How to Do the Cartoon Filter Challenge
Now that you are accustomed to the fun and excitement of creating cartoonized avatars on the cartoon app on Facebook, it would be an absolute merry to try hands on taking up the trending Facebook Cartoon Filter Challenge, which is the current buzz on social media. Let us enter into the challenge with the quick and easy process discussed in the following section:
Steps to Take Up the Cartoon Filter Challenge
Step 1: Download the Required Application
Begin with downloading the Voila AI Artist Cartoon Photo application to your system by visiting the latter’s official website.
Step 2: Launch the Application
Post a successful installation, launch the app in your system and tap ‘3D Cartoon’ in the latter’s opening interface.
Step 3: Grant App Permissions
You will now be asked to grant certain access permissions by the app to use your device media. Grant the same by tapping the ‘Allow Access’ option, followed by clicking on ‘Select Photos’.
Step 4: Make Your Selection
Browse your device gallery to choose a desired photo for cartoonizing.
Step 5: View the Transformation
When you are done with selecting and uploading the photo, tap on the same to let the app transform your selection to a caricature image grid.
Step 6: Save Your Avatar
Once the conversion process is over, navigate to the ’Arrow’ in the right corner of the screen to save your caricature image in your device gallery.
Step 7: Ready to Export
Saving your work permits you to export and share your creation on Facebook.
Filmora Cartoon Creator
Creating cartoonized images is already an absolute fun, which gets further leveled up when you pick the Wondershare Filmora Video Editor Cartoon Creator to work on caricature avatars. This one is an excellent choice to adhere to the purpose of making and customizing cartoonized versions of real time photos. Launched by Wondershare, the Filmora app is known to not only create, but also texturise and beautify your cartoon avatars with its extensive effects library in almost no time.
For Win 7 or later (64-bit)
For macOS 10.12 or later
● Ending Thoughts →
● Facebook has recently introduced a new cartoon avatar feature that creates cartoonized versions of your real-time photos.
● You can take part in the Cartoon Filter Challenge on Facebook to create and share amazing cartoon images.
● You can alternatively depend on the Filmora Cartoon Creator app to create and customize cartoon avatars within a blink.
Facebook cartooning has lately gained momentum in the realm of social media entertainment. Level up your graphic skills with the most recent cartoon app for Facebook!
In this article
01 [How to Make a Facebook Avatar](#Part 1)
02 [Facebook: How to Do the Cartoon Filter Challenge](#Part 2)
Part 1 How to Make a Facebook Avatar
Cartooning and caricature drawing has earned an ultimate preference of graphic designers since times as old as the retro cartoon strips to the modern day digitally created caricaturized avatars, which have by now imbibed usage credibility within almost any and every sector, regardless of the central theme of pr productivity.
Owing to their highly expressive avatars and the inherent ability to transmit information via a characteristic fun element, these have become potential sources of information sharing and entertainment. When it comes to social media, these graphic masterpieces become more vibrant and exportable. Talking of the current trends, caricature avatars on the Facebook cartoon app have created a buzz among the users of the app.
This one is a recently launched feature of Facebook that allows you to cartoonize your real time image with a diversity of customization options. Diving into the creation pool, see through the following section to learn the knowhow of creating amazing caricature avatars using the Facebook app:
User’s Guide to Create a Facebook Avatar
Step 1: You Need the Facebook Application
As the first step, you will need to download and launch the Facebook app in your preferred Android, Windows or MacOs device.
Step 2: Setting Up the Utility
After a successful launch of the app in your device, navigate to the bottom right corner of Facebook’s welcome interface and tap the ‘Three Lines’ icon.
Step 3: Choosing Your Avatar
As you tap on the icon mentioned in Step 2, a drop down menu appears. Click on the ‘See More’ option in the menu and tap ‘Avatars’ in the list of options that follows.
Step 4: Do as Directed
Once you have selected the ‘Avatar’ feature, a number of prompts will appear sin series, asking you to make selections of your hair style, skin tone and related features for customization. In case you are not able to locate all the options, tap the bar at the top of each option and also below your progressing avatar.
Step 5: Adding Further Details
You can additionally explore your editing creativity by customizing the eye, nose and body shape, eyebrows and outfit of your avatar.
Step 6: Almost There!
When you are satisfied with the look of your avatar, navigate to upper right corner of the app screen and click on the ‘Checkmark’ to finalize your changes. Go for a comparison of the created avatar with your real time photo by clicking on the ‘Selfie’ button beneath your avatar.
Step 7: Share Your Work
The created avatars get automatically saved locally in your device; from you can share and export them to any media sharing platforms, like amplifying your chat comments or sending stickers in different apps with utmost convenience using the ‘Share’ button.
Part 2 Facebook: How to Do the Cartoon Filter Challenge
Now that you are accustomed to the fun and excitement of creating cartoonized avatars on the cartoon app on Facebook, it would be an absolute merry to try hands on taking up the trending Facebook Cartoon Filter Challenge, which is the current buzz on social media. Let us enter into the challenge with the quick and easy process discussed in the following section:
Steps to Take Up the Cartoon Filter Challenge
Step 1: Download the Required Application
Begin with downloading the Voila AI Artist Cartoon Photo application to your system by visiting the latter’s official website.
Step 2: Launch the Application
Post a successful installation, launch the app in your system and tap ‘3D Cartoon’ in the latter’s opening interface.
Step 3: Grant App Permissions
You will now be asked to grant certain access permissions by the app to use your device media. Grant the same by tapping the ‘Allow Access’ option, followed by clicking on ‘Select Photos’.
Step 4: Make Your Selection
Browse your device gallery to choose a desired photo for cartoonizing.
Step 5: View the Transformation
When you are done with selecting and uploading the photo, tap on the same to let the app transform your selection to a caricature image grid.
Step 6: Save Your Avatar
Once the conversion process is over, navigate to the ’Arrow’ in the right corner of the screen to save your caricature image in your device gallery.
Step 7: Ready to Export
Saving your work permits you to export and share your creation on Facebook.
Filmora Cartoon Creator
Creating cartoonized images is already an absolute fun, which gets further leveled up when you pick the Wondershare Filmora Video Editor Cartoon Creator to work on caricature avatars. This one is an excellent choice to adhere to the purpose of making and customizing cartoonized versions of real time photos. Launched by Wondershare, the Filmora app is known to not only create, but also texturise and beautify your cartoon avatars with its extensive effects library in almost no time.
For Win 7 or later (64-bit)
For macOS 10.12 or later
● Ending Thoughts →
● Facebook has recently introduced a new cartoon avatar feature that creates cartoonized versions of your real-time photos.
● You can take part in the Cartoon Filter Challenge on Facebook to create and share amazing cartoon images.
● You can alternatively depend on the Filmora Cartoon Creator app to create and customize cartoon avatars within a blink.
Top 4 Websites to Get Anime Footage for Free
Top 4 Websites to Get Anime Footage for Free

Shanoon Cox
Mar 27, 2024• Proven solutions
If you are an anime fan, then you may already know that recently the anime music videos and anime montages have been going viral across different social media platforms. People are creating their own montages and sharing them on platforms like TikTok and Facebook. You may be inspired to create your own anime footage after watching those videos.
If you are an anime lover and want to create your own anime music videos or TikTok montage then you can easily do it by using a video editor like Wondershare Filmora . All you need to do is, record your footage, select a clip from anime video, and connect your footage with anime clip. There is no really big deal to it; the most difficult part of it is how to find a website where you can download anime videos to use for making anime footage.
![]()
A cross-platform for making videos anywhere for all creators

Why your video editing isn’t good enough? How about some creative inspo?
- 100 Million+ Users
- 150+ Countries and Regions
- 4 Million+ Social Media Followers
- 5 Million+ Stock Media for Use
* Secure Download

Part 1 Top 4 Websites to Get Anime Footage for Free
If you are struggling to download anime videos and you want a solution to your problem, then you just landed on the right page. In this article, we will share the top four websites from where you can download anime footage for free and use them to create your montages. So, let’s discuss in detail those websites.
01 Anime-Raws
Because of technical reason, You need to register before you download raw anime from here now. If you don’t want to bother to do that, try out the latter choices. Anime Raws is a website that you can use to directly download raw anime videos. It is one of the top websites to download anime music videos and anime gifs. When you open the website through its link, you will see a lot of options in the top menu. You can click on the master list from the top navigation, and it will take you to a page where you will find a huge list of anime tv series.
You will see that there are thousands of raw anime series which you can easily download. All you have to do is to search for your favorite anime and click on it. It will take you to a cloud link where all episodes will be already uploaded. From there, you can easily download your desired episodes by doing just a few simple clicks.
02 Compsquad.carrd.co
Comp Squad is the second-best website that you can use to download anime clips. Comp Squad’s full name is Compilation Squad, and as the name suggests, this website contains compilations from various anime series. When you open the website from its URL, you will see two options on the homepage (Comp List and Tellynom).
If you want to download and get clips of a certain anime, then you have to click on the Comp List. It will take you to a page where you will see different anime series listed. You will see multiple compilations from a single anime, so things will become a lot easier for you. Just search the name of your desired anime, and you will see a google drive or mega link in front of the compilation. You can simply download your desired clips from those cloud links.
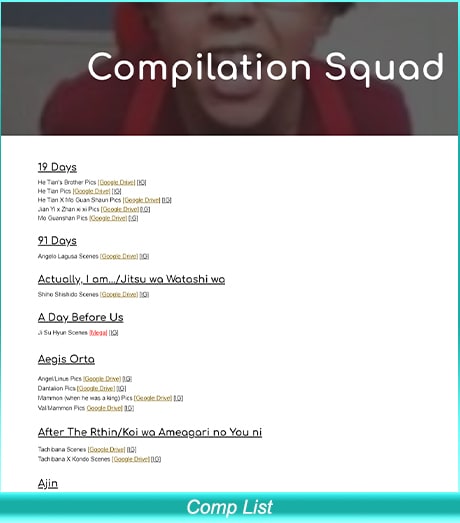
If you cannot find your desired anime in the list, you can click on the Tellynom button from the homepage, and it will take you to a new page where you can request your desired anime from the contributors.
03 Gogoanime.VC
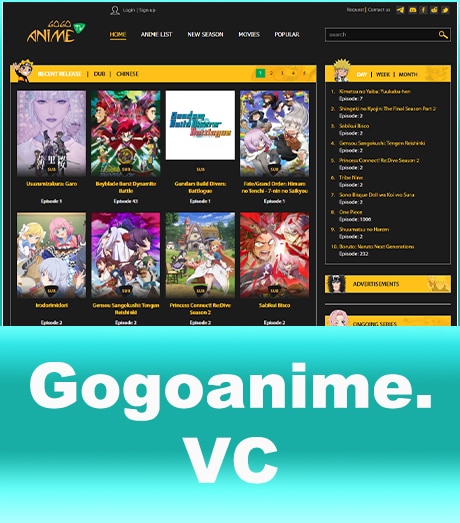
Gogo Anime is the third popular website from where you can easily download anime seasons and anime movies. To download your favorite anime seasons, just click on the anime list from the top navigation of the website, and it will take you to a page where you will find different anime sessions alphabetically sorted.

Search for your favorite anime in the list and click on it. It will take you to a page where you will find all episodes. Click on your desired episode, and you will see a download button. You can easily download your favorite episodes in just a few simple clicks.
04 Nyaa.si
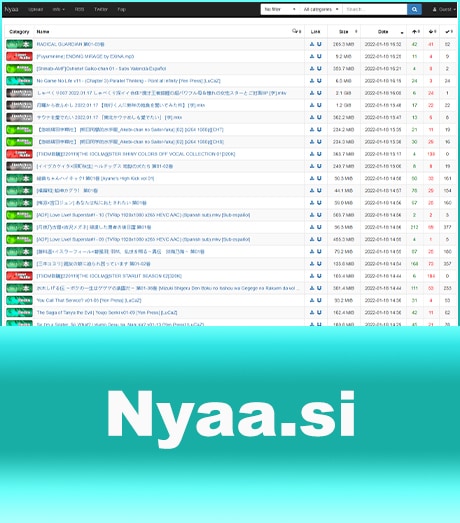
Nyaa is an easy-to-use site for downloading anime. Just open the website, and you will see the most recently listed anime in listicle form, as shown in the picture above. You will find a torrent download link and a magnetic link next to every anime name. It only requires a single click to download any video from this website. Moreover, you can also search for your desired anime in the search bar and download it easily.
Part 2 How to Use Filmora for Cutting the Desired Clip From a Full Video
The next step in making your anime montage is to cut the desired part of a few seconds from your anime video. We recommend you use Wondershare Filmora to edit videos for this purpose. You can easily use the built-in screen recorder of Filmora to get the desired part from a full video. You can do it in a few simple steps.
Run Filmora on your computer, and if it is not installed, then you can download and install it from their official website.
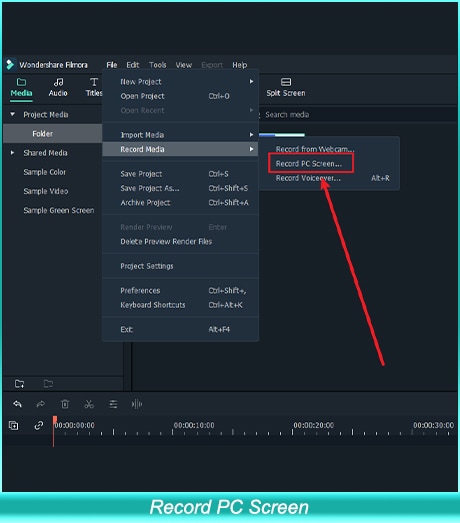
Now go to file, click on record media, and then click on the record PC screen.
A new window will open where you will see different recording options.
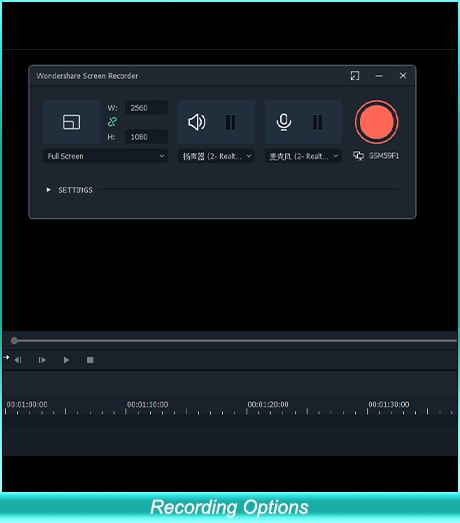
Now play the anime video using any media player on your computer and go to the desired part of the video that you want to record, and click on start recording.
When your desired scene has been recorded, you may stop the recording whenever you like.
Once you stop the recording, the file will be automatically imported to Filmora, and now you can use it for creating your anime montage.


Shanoon Cox
Shanoon Cox is a writer and a lover of all things video.
Follow @Shanoon Cox
Shanoon Cox
Mar 27, 2024• Proven solutions
If you are an anime fan, then you may already know that recently the anime music videos and anime montages have been going viral across different social media platforms. People are creating their own montages and sharing them on platforms like TikTok and Facebook. You may be inspired to create your own anime footage after watching those videos.
If you are an anime lover and want to create your own anime music videos or TikTok montage then you can easily do it by using a video editor like Wondershare Filmora . All you need to do is, record your footage, select a clip from anime video, and connect your footage with anime clip. There is no really big deal to it; the most difficult part of it is how to find a website where you can download anime videos to use for making anime footage.
![]()
A cross-platform for making videos anywhere for all creators
Why your video editing isn’t good enough? How about some creative inspo?
- 100 Million+ Users
- 150+ Countries and Regions
- 4 Million+ Social Media Followers
- 5 Million+ Stock Media for Use
* Secure Download
Part 1 Top 4 Websites to Get Anime Footage for Free
If you are struggling to download anime videos and you want a solution to your problem, then you just landed on the right page. In this article, we will share the top four websites from where you can download anime footage for free and use them to create your montages. So, let’s discuss in detail those websites.
01 Anime-Raws
Because of technical reason, You need to register before you download raw anime from here now. If you don’t want to bother to do that, try out the latter choices. Anime Raws is a website that you can use to directly download raw anime videos. It is one of the top websites to download anime music videos and anime gifs. When you open the website through its link, you will see a lot of options in the top menu. You can click on the master list from the top navigation, and it will take you to a page where you will find a huge list of anime tv series.
You will see that there are thousands of raw anime series which you can easily download. All you have to do is to search for your favorite anime and click on it. It will take you to a cloud link where all episodes will be already uploaded. From there, you can easily download your desired episodes by doing just a few simple clicks.
02 Compsquad.carrd.co
Comp Squad is the second-best website that you can use to download anime clips. Comp Squad’s full name is Compilation Squad, and as the name suggests, this website contains compilations from various anime series. When you open the website from its URL, you will see two options on the homepage (Comp List and Tellynom).
If you want to download and get clips of a certain anime, then you have to click on the Comp List. It will take you to a page where you will see different anime series listed. You will see multiple compilations from a single anime, so things will become a lot easier for you. Just search the name of your desired anime, and you will see a google drive or mega link in front of the compilation. You can simply download your desired clips from those cloud links.
If you cannot find your desired anime in the list, you can click on the Tellynom button from the homepage, and it will take you to a new page where you can request your desired anime from the contributors.
03 Gogoanime.VC
Gogo Anime is the third popular website from where you can easily download anime seasons and anime movies. To download your favorite anime seasons, just click on the anime list from the top navigation of the website, and it will take you to a page where you will find different anime sessions alphabetically sorted.
Search for your favorite anime in the list and click on it. It will take you to a page where you will find all episodes. Click on your desired episode, and you will see a download button. You can easily download your favorite episodes in just a few simple clicks.
04 Nyaa.si
Nyaa is an easy-to-use site for downloading anime. Just open the website, and you will see the most recently listed anime in listicle form, as shown in the picture above. You will find a torrent download link and a magnetic link next to every anime name. It only requires a single click to download any video from this website. Moreover, you can also search for your desired anime in the search bar and download it easily.
Part 2 How to Use Filmora for Cutting the Desired Clip From a Full Video
The next step in making your anime montage is to cut the desired part of a few seconds from your anime video. We recommend you use Wondershare Filmora to edit videos for this purpose. You can easily use the built-in screen recorder of Filmora to get the desired part from a full video. You can do it in a few simple steps.
Run Filmora on your computer, and if it is not installed, then you can download and install it from their official website.
Now go to file, click on record media, and then click on the record PC screen.
A new window will open where you will see different recording options.
Now play the anime video using any media player on your computer and go to the desired part of the video that you want to record, and click on start recording.
When your desired scene has been recorded, you may stop the recording whenever you like.
Once you stop the recording, the file will be automatically imported to Filmora, and now you can use it for creating your anime montage.
Shanoon Cox
Shanoon Cox is a writer and a lover of all things video.
Follow @Shanoon Cox
Easy Shortcut to Convert Videos to Gifs on iPhone
Simple Shortcut to Convert Videos to Gifs on iPhone
An easy yet powerful editor
Numerous effects to choose from
Detailed tutorials provided by the official channel
To create iPhone video to GIF there are several third-party apps available. You can even choose the online sites for the task, but the editing and other options will be limited. The GIFs on your iPhone can be created using videos as well as Live photos.

One of the best ways to create a GIF is using the Shortcuts app that comes pre-installed on devices running on iOS 13 and later versions of the OS. The app has shortcuts to accomplish several tasks on your iPhone including GIF creation. Learn about using Shortcuts and other tools for creating a GIF on iPhone.
In this article
01 [How to make GIF from Video on iPhone using Shortcut App](#Part 1)
02 [How to save Live Photos as GIF on iPhone](#Part 2)
03 [How to save Live Photos as GIF on iPhone](#Part 3)
04 [How to save videos as live photos on your iPhone?](#Part 4)
05 [Best tool for creating GIFs and video editing on your Windows and Mac- Wondershare Filmora](#Part 5)
Part 1 How to make GIF from Video on iPhone using Shortcut App
One of the easiest ways to convert video GIF iPhone is by using the Shortcuts app. If you have deleted the app, you can reinstall it from the app store. Once the app is installed, you would next need to allow the untrusted shortcuts and for this go to Settings > Shortcuts> toggle Add Untrusted Shortcuts to add the shortcuts created by the user. The further steps for converting video to GIF iPhone are as follows.
Step 1. On your iPhone, download the Video to GIF shortcut. You can download it using iCloud or RoutineHub. Find the shortcut and click on Get Shortcut will let you check the action of the shortcut.
Move down and click on the red Add Untrusted Shortcut button that will add the shortcut for the library.

Step 2. Go to the My Shortcuts tab and click on the Video to GIF section. If you are using it for the first time, you need to grant permission to use the videos and photos. Click on the OK button and continue.

Step 3. Next, browse and add the video from which you wish to create the GIF. Since GIF animations are short, it is always recommended to use short videos.
Step 4. Video processing will start and during this, the Video to GIF shortcut will be greyed out.

Step 5. Once done, the preview of the GIF will appear on the screen. Finally, you can save the GIF to your Photos app on iPhone or can also share it through email, AirDrop, iMessage, and other third-party services as needed.

Part 2 How to save Live Photos as GIF on iPhone
Live Photo is an interesting feature of the iPhone where an image is captured in an animated form for a couple of seconds. These Live Photos can be easily converted to GIFs using the steps below.
Step 1. On your iPhone Photo app, open the Live Photo that you want to save as GIF.
Step 2. Darg the selected photo upwards and will see multiple effects options along with other image details.
Step 3 To save the selected image as GIF, choose Loop or Bounce animation. Once done, share the image on mail and other services listed or save it to the device.

Part 3 How to save Live Photo as video on iPhone
You can also convert your live photos to videos and then use them for making GIFs and for other uses. The steps for iPhone live photo to video are as follows.
Step 1. On your iPhone, open the Photos app and choose the Live Photo that you want to convert.
Step 2. Next, click on the share button at the bottom of the screen and multiple options will be seen.
Step 3. Scroll down and choose Save as Video option and with this, the live photo will be saved as a Video.
Additionally, you can also convert the LivePhotos to videos using the shortcut app.

Part 4 How to save videos as live photos on your iPhone?
If you need to convert your videos to live photos on iPhone, there are several third-party tools available and one of the widely used is IntoLive. Using this app, videos, as well as GIFs, can be converted into live photos.
Steps on how to turn a video into a live photo iPhone
Step 1. Download, install and launch the IntoLive app from the app store.
Step 2. Next, browse and add the desired video.
Step 3. If needed, the added video can be customized using several supported features.
Step 4. Next, click on the Make option at the top-right corner and then choose the repeats you want for a Live Photo.
Step 5. Finally, click on the Live Photo and your Live Photo will be saved to the device.

Part 5 Best tool for creating GIFs and video editing on your Windows and Mac- Wondershare Filmora
Above we have listed several ways to create GIFs on your iPhone and also to convert videos to LivePhotos and vice-versa. Installing different tools for different tasks is a hassle and also a time-consuming task. So, if you are looking for an all-in-one tool that allows you to create GIFs, and professionally edit your media files, Wondershare Filmora Video Editor is the best tool to consider. Available for quick download on your Windows and Mac system, this feature-packed software has an intuitive and user-friendly interface.
Wondershare Filmora
Get started easily with Filmora’s powerful performance, intuitive interface, and countless effects!
Try It Free Try It Free Try It Free Learn More >

Media files in all key formats are supported by the tool and there are multiple options for editing and video creation like splitting, rotating, cutting, adding effects, sounds, text, and other elements. In a few simple steps, your customized GIF and other professional-looking media files will be ready.
Steps to create GIF using Wondershare Filmora
Step 1. Launch the installed software on your system and add the video or images from the system.
Step 2. The added media files next need to be dragged and dropped to the timeline at the bottom of the interface.
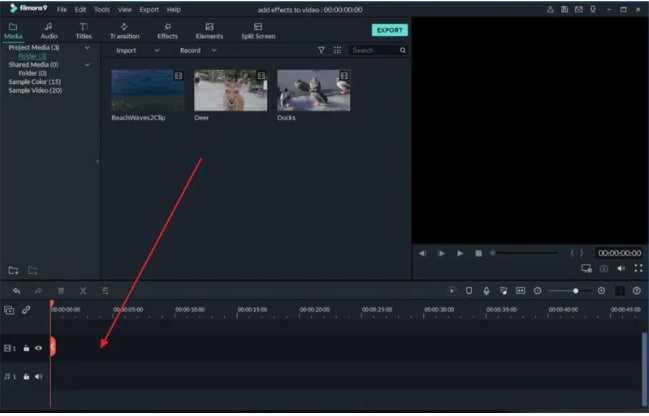
Step 3. After the files are moved, you can customize them using several editing tools like rotate, crop, cut, and more.
Step 4. Next, add text, effects, sound, and other elements as needed.

Step 5. Finally choose to export the file and then from the Local tab, select the GIF option. Choose a file name and location and then finally click on the EXPORT button.

● Key Takeaways from This Episode →
●There are several ways to turn video into GIF iPhone.
●Using shortcuts is one of the most straightforward methods for creating GIFs using videos.
●You can also convert videos to LivePhoto and vice versa on your iPhone using third-party apps.
●Wondershare Filmora is an excellent software to make GIFs and professionally edit media files.
To create iPhone video to GIF there are several third-party apps available. You can even choose the online sites for the task, but the editing and other options will be limited. The GIFs on your iPhone can be created using videos as well as Live photos.
One of the best ways to create a GIF is using the Shortcuts app that comes pre-installed on devices running on iOS 13 and later versions of the OS. The app has shortcuts to accomplish several tasks on your iPhone including GIF creation. Learn about using Shortcuts and other tools for creating a GIF on iPhone.
In this article
01 [How to make GIF from Video on iPhone using Shortcut App](#Part 1)
02 [How to save Live Photos as GIF on iPhone](#Part 2)
03 [How to save Live Photos as GIF on iPhone](#Part 3)
04 [How to save videos as live photos on your iPhone?](#Part 4)
05 [Best tool for creating GIFs and video editing on your Windows and Mac- Wondershare Filmora](#Part 5)
Part 1 How to make GIF from Video on iPhone using Shortcut App
One of the easiest ways to convert video GIF iPhone is by using the Shortcuts app. If you have deleted the app, you can reinstall it from the app store. Once the app is installed, you would next need to allow the untrusted shortcuts and for this go to Settings > Shortcuts> toggle Add Untrusted Shortcuts to add the shortcuts created by the user. The further steps for converting video to GIF iPhone are as follows.
Step 1. On your iPhone, download the Video to GIF shortcut. You can download it using iCloud or RoutineHub. Find the shortcut and click on Get Shortcut will let you check the action of the shortcut.
Move down and click on the red Add Untrusted Shortcut button that will add the shortcut for the library.
Step 2. Go to the My Shortcuts tab and click on the Video to GIF section. If you are using it for the first time, you need to grant permission to use the videos and photos. Click on the OK button and continue.
Step 3. Next, browse and add the video from which you wish to create the GIF. Since GIF animations are short, it is always recommended to use short videos.
Step 4. Video processing will start and during this, the Video to GIF shortcut will be greyed out.
Step 5. Once done, the preview of the GIF will appear on the screen. Finally, you can save the GIF to your Photos app on iPhone or can also share it through email, AirDrop, iMessage, and other third-party services as needed.
Part 2 How to save Live Photos as GIF on iPhone
Live Photo is an interesting feature of the iPhone where an image is captured in an animated form for a couple of seconds. These Live Photos can be easily converted to GIFs using the steps below.
Step 1. On your iPhone Photo app, open the Live Photo that you want to save as GIF.
Step 2. Darg the selected photo upwards and will see multiple effects options along with other image details.
Step 3 To save the selected image as GIF, choose Loop or Bounce animation. Once done, share the image on mail and other services listed or save it to the device.
Part 3 How to save Live Photo as video on iPhone
You can also convert your live photos to videos and then use them for making GIFs and for other uses. The steps for iPhone live photo to video are as follows.
Step 1. On your iPhone, open the Photos app and choose the Live Photo that you want to convert.
Step 2. Next, click on the share button at the bottom of the screen and multiple options will be seen.
Step 3. Scroll down and choose Save as Video option and with this, the live photo will be saved as a Video.
Additionally, you can also convert the LivePhotos to videos using the shortcut app.
Part 4 How to save videos as live photos on your iPhone?
If you need to convert your videos to live photos on iPhone, there are several third-party tools available and one of the widely used is IntoLive. Using this app, videos, as well as GIFs, can be converted into live photos.
Steps on how to turn a video into a live photo iPhone
Step 1. Download, install and launch the IntoLive app from the app store.
Step 2. Next, browse and add the desired video.
Step 3. If needed, the added video can be customized using several supported features.
Step 4. Next, click on the Make option at the top-right corner and then choose the repeats you want for a Live Photo.
Step 5. Finally, click on the Live Photo and your Live Photo will be saved to the device.
Part 5 Best tool for creating GIFs and video editing on your Windows and Mac- Wondershare Filmora
Above we have listed several ways to create GIFs on your iPhone and also to convert videos to LivePhotos and vice-versa. Installing different tools for different tasks is a hassle and also a time-consuming task. So, if you are looking for an all-in-one tool that allows you to create GIFs, and professionally edit your media files, Wondershare Filmora Video Editor is the best tool to consider. Available for quick download on your Windows and Mac system, this feature-packed software has an intuitive and user-friendly interface.
Wondershare Filmora
Get started easily with Filmora’s powerful performance, intuitive interface, and countless effects!
Try It Free Try It Free Try It Free Learn More >
Media files in all key formats are supported by the tool and there are multiple options for editing and video creation like splitting, rotating, cutting, adding effects, sounds, text, and other elements. In a few simple steps, your customized GIF and other professional-looking media files will be ready.
Steps to create GIF using Wondershare Filmora
Step 1. Launch the installed software on your system and add the video or images from the system.
Step 2. The added media files next need to be dragged and dropped to the timeline at the bottom of the interface.
Step 3. After the files are moved, you can customize them using several editing tools like rotate, crop, cut, and more.
Step 4. Next, add text, effects, sound, and other elements as needed.
Step 5. Finally choose to export the file and then from the Local tab, select the GIF option. Choose a file name and location and then finally click on the EXPORT button.
● Key Takeaways from This Episode →
●There are several ways to turn video into GIF iPhone.
●Using shortcuts is one of the most straightforward methods for creating GIFs using videos.
●You can also convert videos to LivePhoto and vice versa on your iPhone using third-party apps.
●Wondershare Filmora is an excellent software to make GIFs and professionally edit media files.
Best GIF Maker Software for Windows and Mac
Best GIF Maker Software for Windows and Mac
Shanoon Cox
Mar 27, 2024• Proven solutions
GIFs can delivery stories with effectiveness and added emotions. When we view that sequence of memories with animations then they add a different feeling to viewer’s heart. The best part is that these GIF creations use to be light weight files that mean they can be easily shared on other platforms. You can easily send them to popular social media sites or prefer to share them via Whatsapp and even using MMS. If you are working on a desktop and need a compatible GIF creator tool then here are few user friendly desktop application suggestions for you. You can easily pick any of these tools and start creating your own animated GIF to impress your friends around.
GIF Maker Software for Windows and Mac
The article below contains details about 10 most popular GIF makers where first five are compatible with Windows platform and rest are dedicated to Mac devices. Using these advanced software tools, you can easily create animated GIF from sequence of images or from videos that are downloaded from internet. It is also possible to adjust timing between frames or users can also customize frame rotation effects, loop animations, or apply overlays. These software tools can support almost all file types like TIF, TGA, PNG BMP, GIF and JPG etc. Some of these software tools are also able to process webcam results instantly and will save files in form of high quality GIFs. If you are ready to develop your own GIF image then read the reviews below and choose your tool to get best results.
A. Best GIF Maker For Windows
Best Recommendation
If you are not satisfied with the collection discussed above then professionals recommend Wondershare Filmora as most trustworthy tool for your GIF conversion needs. This software can work on Windows as well as Mac devices with full feature support.
If you want to make GIF easily, Filmora will also offer you an online solution for making a GIF. Filmora meme maker can help you make image, GIF and video memes directly without watermark. It is totally FREE and no sign up. You can change text size, color and position to create caption. You can also put text inside or outside in GIF. Try it now!
Download Mac Version ](https://tools.techidaily.com/wondershare/filmora/download/ )
Key Features:
- This interactive interface can process more than 150 file formats with ease
- It can easily convert any video file into GIF format.
- Wondershare Filmora can be used to adjust frame size, captions, resolution of images while adding classic animation effects and advanced filters to processes images.
1. Photoscape

Here is your personal GIF creator tool that possesses abilities of a multi-purpose photo editor. This tool comes with so many advanced capabilities like it can behave as a raw converter, screen capturer, editor, viewer or can also rename details. Photoscape is commonly used for GIF image creation where users can easily set timings between frames.
Pros:
- It is much easier to use with intuitive interface.
- Offers adjustable canvas size along with easy customization capabilities for photo alignment, background colour and transition effects.
Cons:
- It can create bug trouble if you want to process large size files.
2. Microsoft GIF Animator
This software is also available free of cost and it can generate animated GIF files instantly. Its drag and drop type media interface can assist users in easy processing of large number of files. Further, you can easily set time duration of frames, set transparency, re order images and make changes for looping effect.
Pros:
- Its drag and drop feature provides it higher ranking.
- One can easily customize all detailed like transparency, frame order, time duration etc.
Cons:
- Microsoft has now stopped designing this software.
3. SSuite GIF Animator

SSuite GIF animator can be used to develop high quality GIF images within very less time. It can easily process raw files in form of BMP, JPEG and JPG extension whereas frame interval can be manually reduced up to few milliseconds. Created GIFs can be further used for easy sharing on other social media websites.
Pros:
- Interactive and simple GUI.
- Takes lesser time for installation and small space in your device memory.
Cons:
- Supported limited file formats and has limited functions.
4. KickMyGraphics

KickMyGraphics is an easy to use GIF animator and allows users to work with a slider so that frames can be adjusted with desired timing sequence. It also assists in other professional level settings such as out quality, zoom and transparency etc. It is also possible to rotate any selected frame with 90 degree motion.
Pros:
- Offers 90 degree image rotation facility.
- Comes with professional level settings.
Cons:
- Complicated for beginners.
5. GiftedMotion

This open source and interactive GIF animation developer application is available for free on Window platforms. It can be used process set of images as well as videos with additional animation effects. Note that, your system must have Java preinstalled if you want to run GiftedMotion on it.
Pros:
- It does not demand installation and download file size is also very small.
- Offers preview facility.
Cons:
- Limited features with time consuming image loading process.
B. Best GIF maker For Mac
1. PicGIF - $19.99:
This paid software tool can be used to turn sequence of snapshots into high quality animated GIFs within few seconds. Users can also re-edit their changes in existing GIF files by adjusting its size, text formatting and speed etc. It is also possible to transfer variety of short videos into animated smooth GIFs. It allows users personalize graphics with so many special image effects and color settings.
2. GIPHY Capture – Free:
Giphy Capture is available for free for all Mac users and it offers wide range of powerful, intuitive yet simple to use feature set. There are so many incredible things that you can manage in this single platform while editing your GIF sequences. It can easily capture your screen while processing all images with adjustable size, captions and text values. Finally the created GIFs can be easily shared with friends on social media.
3. Image GIF:

This simple and easy to use application can do many miracles for you. You can simply drag and drop lots of image files to this platform and then process them on timeline with advanced feature set. The animation effects and file control capabilities are really interesting that allow easy modification over content. Image GIF is best solution for beginners as it possesses intuitive and user friendly interface.
Shanoon Cox
Shanoon Cox is a writer and a lover of all things video.
Follow @Shanoon Cox
Shanoon Cox
Mar 27, 2024• Proven solutions
GIFs can delivery stories with effectiveness and added emotions. When we view that sequence of memories with animations then they add a different feeling to viewer’s heart. The best part is that these GIF creations use to be light weight files that mean they can be easily shared on other platforms. You can easily send them to popular social media sites or prefer to share them via Whatsapp and even using MMS. If you are working on a desktop and need a compatible GIF creator tool then here are few user friendly desktop application suggestions for you. You can easily pick any of these tools and start creating your own animated GIF to impress your friends around.
GIF Maker Software for Windows and Mac
The article below contains details about 10 most popular GIF makers where first five are compatible with Windows platform and rest are dedicated to Mac devices. Using these advanced software tools, you can easily create animated GIF from sequence of images or from videos that are downloaded from internet. It is also possible to adjust timing between frames or users can also customize frame rotation effects, loop animations, or apply overlays. These software tools can support almost all file types like TIF, TGA, PNG BMP, GIF and JPG etc. Some of these software tools are also able to process webcam results instantly and will save files in form of high quality GIFs. If you are ready to develop your own GIF image then read the reviews below and choose your tool to get best results.
A. Best GIF Maker For Windows
Best Recommendation
If you are not satisfied with the collection discussed above then professionals recommend Wondershare Filmora as most trustworthy tool for your GIF conversion needs. This software can work on Windows as well as Mac devices with full feature support.
If you want to make GIF easily, Filmora will also offer you an online solution for making a GIF. Filmora meme maker can help you make image, GIF and video memes directly without watermark. It is totally FREE and no sign up. You can change text size, color and position to create caption. You can also put text inside or outside in GIF. Try it now!
Download Mac Version ](https://tools.techidaily.com/wondershare/filmora/download/ )
Key Features:
- This interactive interface can process more than 150 file formats with ease
- It can easily convert any video file into GIF format.
- Wondershare Filmora can be used to adjust frame size, captions, resolution of images while adding classic animation effects and advanced filters to processes images.
1. Photoscape
Here is your personal GIF creator tool that possesses abilities of a multi-purpose photo editor. This tool comes with so many advanced capabilities like it can behave as a raw converter, screen capturer, editor, viewer or can also rename details. Photoscape is commonly used for GIF image creation where users can easily set timings between frames.
Pros:
- It is much easier to use with intuitive interface.
- Offers adjustable canvas size along with easy customization capabilities for photo alignment, background colour and transition effects.
Cons:
- It can create bug trouble if you want to process large size files.
2. Microsoft GIF Animator
This software is also available free of cost and it can generate animated GIF files instantly. Its drag and drop type media interface can assist users in easy processing of large number of files. Further, you can easily set time duration of frames, set transparency, re order images and make changes for looping effect.
Pros:
- Its drag and drop feature provides it higher ranking.
- One can easily customize all detailed like transparency, frame order, time duration etc.
Cons:
- Microsoft has now stopped designing this software.
3. SSuite GIF Animator
SSuite GIF animator can be used to develop high quality GIF images within very less time. It can easily process raw files in form of BMP, JPEG and JPG extension whereas frame interval can be manually reduced up to few milliseconds. Created GIFs can be further used for easy sharing on other social media websites.
Pros:
- Interactive and simple GUI.
- Takes lesser time for installation and small space in your device memory.
Cons:
- Supported limited file formats and has limited functions.
4. KickMyGraphics
KickMyGraphics is an easy to use GIF animator and allows users to work with a slider so that frames can be adjusted with desired timing sequence. It also assists in other professional level settings such as out quality, zoom and transparency etc. It is also possible to rotate any selected frame with 90 degree motion.
Pros:
- Offers 90 degree image rotation facility.
- Comes with professional level settings.
Cons:
- Complicated for beginners.
5. GiftedMotion
This open source and interactive GIF animation developer application is available for free on Window platforms. It can be used process set of images as well as videos with additional animation effects. Note that, your system must have Java preinstalled if you want to run GiftedMotion on it.
Pros:
- It does not demand installation and download file size is also very small.
- Offers preview facility.
Cons:
- Limited features with time consuming image loading process.
B. Best GIF maker For Mac
1. PicGIF - $19.99:
This paid software tool can be used to turn sequence of snapshots into high quality animated GIFs within few seconds. Users can also re-edit their changes in existing GIF files by adjusting its size, text formatting and speed etc. It is also possible to transfer variety of short videos into animated smooth GIFs. It allows users personalize graphics with so many special image effects and color settings.
2. GIPHY Capture – Free:
Giphy Capture is available for free for all Mac users and it offers wide range of powerful, intuitive yet simple to use feature set. There are so many incredible things that you can manage in this single platform while editing your GIF sequences. It can easily capture your screen while processing all images with adjustable size, captions and text values. Finally the created GIFs can be easily shared with friends on social media.
3. Image GIF:
This simple and easy to use application can do many miracles for you. You can simply drag and drop lots of image files to this platform and then process them on timeline with advanced feature set. The animation effects and file control capabilities are really interesting that allow easy modification over content. Image GIF is best solution for beginners as it possesses intuitive and user friendly interface.
Shanoon Cox
Shanoon Cox is a writer and a lover of all things video.
Follow @Shanoon Cox
5 Must Try Ways to Add GIF in Text Message on Android
5 Must Try Ways to Add and Send GIF in Text Message on Android
An easy yet powerful editor
Numerous effects to choose from
Detailed tutorials provided by the official channel
A much easier and more extraordinary way of expressing yourself is texting with GIFs, and thus, GIFs for texting on Android are so famous now. GIFs, an abbreviation for Graphics Interchange Format, are brief animated images primarily used in a fun way to pass a message during texting and chatting. You do not necessarily have to say a word; a GIF does that for you!

Having GIFs is one thing; it is another to know how to use them effectively during conversations. Almost all operating system keyboards come with their style of sending GIFs to people. Also, you can download GIFs from the internet and go ahead to attach them directly to a text message. There are also third-party applications like GIPHY and GIF Keyboard to get GIFs for texting on Android. GIPHY is undoubtedly the best GIF app for Android texting. With Gboard, the built-in Google keyboard found in most Android devices; you can effortlessly search for GIFs for texting on Android.
In this article
01 [Can You Text a GIF?](#Part 1)
02 [Best 5 Ways to Add and Send GIFs in Text Message on Android](#Part 2)
Part 1 Can You Text a GIF?
The simple answer is yes! It is possible to message a GIF. GIFs for Android text messaging are becoming the new normal, and this is not surprising as they are easy to add to texts and make texting livelier.
To use a GIF for texting on Android, open any messaging app of your choice found on your Android device; it could be WhatsApp or the default message app installed on the Android device. The keyboard would most likely offer you a variety of GIF options. If not, click on the smiley icon at the bottom of the keyboard to reveal other GIFs grouped in categories. Simply clicking on any of your choices would select it, and all you must do is hit the send icon.
Google’s texting app, Google Messages, comes with sending GIFs. To use a GIF in text messages on Android, open the messaging app and start a fresh conversation or open an existing one, then select the square icon with GIF written in the middle. Select your preferred GIF, then click Send. You can also add a brief description or caption before sending the GIF across.
Apart from the built-in apps on Android devices that allow you to send GIFs, there are unique apps like GIPHY (compatible with Android and iOS devices) with an extensive array of GIFs that can fit into different contexts greetings, culture, animals, reactions, etc. You can also employ social media trackers that help you discover popular and trending GIFs. If the available GIFs do not express your intention, you can go ahead to perform a search to find other GIFs. That way, there’s no limitation to the messages you want to pass through GIFs for texting on Android devices.
Part 2 Best 5 Ways to Add and Send GIF in Text Message on Android
There are different ways of using GIFs for Android texting. Apart from using the GIFs available in the built-in keyboard of messaging apps, downloading, and installing an instant messaging app or GIF keyboard is one of the best and easiest ways to access many GIF libraries.
This section would suggest to you the best GIF apps for Android texting and other ways you can explore to send GIFs and make your texting less wordy, more visual, and more expressive:
01Attaching GIF to a text message
This method of using GIFs for Android texting is straightforward. All you need is a messaging app, then follow these steps:
Step 1: On your Android phone’s app list, open Messages, the app represented as a white speech bubble.

Step 2: At the bottom right corner of the app, tap the blue circular button with a white plus sign. This will open a page to select the receiver’s contact.

Step 3: Select the recipient’s number by tapping on it from the contact list or type the number or name of the person directly into the “To” field at the top of the screen.

Step 4: Tap the circular button with the plus sign in the middle on the left side of the message field. Depending on the app, it may be a paper clip icon.

Step 5: Tap the images icon to select an image from your phone media library.

Step 6: Click Gallery to select a previously downloaded GIF.

Step 7: Select the GIF you want to send. This would insert the GIF into a small preview image on the text message. The GIF would play in the preview window.

Step 8: Click the paper icon at the right corner of the text field to send the animated GIF image.

02Gboard
Gboard is a Google keyboard. This is another easy way of adding GIFs for Android text messaging. If you do not have Gboard, download it from Play Store and install it on your Android phone. Follow these to add GIFs to your text messages:
Step 1: Download, install and set up Gboard on your Android phone.

Step 2: Open your text messaging app to write a new text message. If you have previously sent a message to the recipient, click on the ongoing conversation or open a new chat and select the recipient’s contact.
Step 3: Tap the text message field to compose your text message. If your default keyboard is Gboard, then Gboard will be automatically opened.

Step 4: At the bottom of the keyboard, just to the left of the space bar, tap the smiley face icon.

Step 5: Click the GIF button located at the bottom row of the keyboard.

Step 6: Browse through the different categories tab below the GIF to select a GIF or enter a keyword to look for a GIF.

Step 7: Click on the GIF you want to add to the text message you’re typing automatically.

Step 8: Click the Send button, usually represented as a paper airplane icon at the bottom right of the messaging app.

03GIPHY
This is one of the most popular platforms that supports GIFs for texting on Android. It has the largest library of GIFs, making it a perfect search engine for them. GIPHY allows you to personalize your GIFs while finding the latest and trending GIFs. It also allows you to explore visual aspects, including sports highlights, TV shows, movies, etc. Installing this application gives you access to various GIFs that you can directly share with friends on social media or send them to messaging apps like WhatsApp, Facebook Messenger, etc. With GIPHY, you can save and share gifs while also using the animated stickers available on the app.

04SwiftKey Keyboard
This keyboard app comes with many features, including sending GIFs. This keyboard app lends your writing style and adapts to it, making it a highly productive app for typing. Its emoji keyboard allows you to effortlessly search and send fun stickers, emojis, and GIFs while texting. It also has a multilingual feature.

05GIF Keyboard
This keyboard makes it easy for you to directly and conveniently send GIFs from your keyboard. With a library of millions of GIFs, you need to type in a keyword to get the right GIF at any point in time. Send emojis, videos, and animated GIFs with just a single click using GIF Keyboard. You can browse for GIFs by category, save your favorites GIFs, and share them using different messaging apps.

● Key Takeaways from This Episode →
● How to use GIFs for Android texting.
●the Best GIF apps for Android texting.
● Different reliable ways of using GIFs to spice up your texting on Android devices.
●Using GIFs for Android text messaging is the way to go in this modern age. This is because people relate more to visual representations than mere write-ups. Now, you know that it is possible to text GIFs and send them is simple using the extensively discussed methods in this article.
A much easier and more extraordinary way of expressing yourself is texting with GIFs, and thus, GIFs for texting on Android are so famous now. GIFs, an abbreviation for Graphics Interchange Format, are brief animated images primarily used in a fun way to pass a message during texting and chatting. You do not necessarily have to say a word; a GIF does that for you!
Having GIFs is one thing; it is another to know how to use them effectively during conversations. Almost all operating system keyboards come with their style of sending GIFs to people. Also, you can download GIFs from the internet and go ahead to attach them directly to a text message. There are also third-party applications like GIPHY and GIF Keyboard to get GIFs for texting on Android. GIPHY is undoubtedly the best GIF app for Android texting. With Gboard, the built-in Google keyboard found in most Android devices; you can effortlessly search for GIFs for texting on Android.
In this article
01 [Can You Text a GIF?](#Part 1)
02 [Best 5 Ways to Add and Send GIFs in Text Message on Android](#Part 2)
Part 1 Can You Text a GIF?
The simple answer is yes! It is possible to message a GIF. GIFs for Android text messaging are becoming the new normal, and this is not surprising as they are easy to add to texts and make texting livelier.
To use a GIF for texting on Android, open any messaging app of your choice found on your Android device; it could be WhatsApp or the default message app installed on the Android device. The keyboard would most likely offer you a variety of GIF options. If not, click on the smiley icon at the bottom of the keyboard to reveal other GIFs grouped in categories. Simply clicking on any of your choices would select it, and all you must do is hit the send icon.
Google’s texting app, Google Messages, comes with sending GIFs. To use a GIF in text messages on Android, open the messaging app and start a fresh conversation or open an existing one, then select the square icon with GIF written in the middle. Select your preferred GIF, then click Send. You can also add a brief description or caption before sending the GIF across.
Apart from the built-in apps on Android devices that allow you to send GIFs, there are unique apps like GIPHY (compatible with Android and iOS devices) with an extensive array of GIFs that can fit into different contexts greetings, culture, animals, reactions, etc. You can also employ social media trackers that help you discover popular and trending GIFs. If the available GIFs do not express your intention, you can go ahead to perform a search to find other GIFs. That way, there’s no limitation to the messages you want to pass through GIFs for texting on Android devices.
Part 2 Best 5 Ways to Add and Send GIF in Text Message on Android
There are different ways of using GIFs for Android texting. Apart from using the GIFs available in the built-in keyboard of messaging apps, downloading, and installing an instant messaging app or GIF keyboard is one of the best and easiest ways to access many GIF libraries.
This section would suggest to you the best GIF apps for Android texting and other ways you can explore to send GIFs and make your texting less wordy, more visual, and more expressive:
01Attaching GIF to a text message
This method of using GIFs for Android texting is straightforward. All you need is a messaging app, then follow these steps:
Step 1: On your Android phone’s app list, open Messages, the app represented as a white speech bubble.
Step 2: At the bottom right corner of the app, tap the blue circular button with a white plus sign. This will open a page to select the receiver’s contact.
Step 3: Select the recipient’s number by tapping on it from the contact list or type the number or name of the person directly into the “To” field at the top of the screen.
Step 4: Tap the circular button with the plus sign in the middle on the left side of the message field. Depending on the app, it may be a paper clip icon.
Step 5: Tap the images icon to select an image from your phone media library.
Step 6: Click Gallery to select a previously downloaded GIF.
Step 7: Select the GIF you want to send. This would insert the GIF into a small preview image on the text message. The GIF would play in the preview window.
Step 8: Click the paper icon at the right corner of the text field to send the animated GIF image.
02Gboard
Gboard is a Google keyboard. This is another easy way of adding GIFs for Android text messaging. If you do not have Gboard, download it from Play Store and install it on your Android phone. Follow these to add GIFs to your text messages:
Step 1: Download, install and set up Gboard on your Android phone.
Step 2: Open your text messaging app to write a new text message. If you have previously sent a message to the recipient, click on the ongoing conversation or open a new chat and select the recipient’s contact.
Step 3: Tap the text message field to compose your text message. If your default keyboard is Gboard, then Gboard will be automatically opened.
Step 4: At the bottom of the keyboard, just to the left of the space bar, tap the smiley face icon.
Step 5: Click the GIF button located at the bottom row of the keyboard.
Step 6: Browse through the different categories tab below the GIF to select a GIF or enter a keyword to look for a GIF.
Step 7: Click on the GIF you want to add to the text message you’re typing automatically.
Step 8: Click the Send button, usually represented as a paper airplane icon at the bottom right of the messaging app.
03GIPHY
This is one of the most popular platforms that supports GIFs for texting on Android. It has the largest library of GIFs, making it a perfect search engine for them. GIPHY allows you to personalize your GIFs while finding the latest and trending GIFs. It also allows you to explore visual aspects, including sports highlights, TV shows, movies, etc. Installing this application gives you access to various GIFs that you can directly share with friends on social media or send them to messaging apps like WhatsApp, Facebook Messenger, etc. With GIPHY, you can save and share gifs while also using the animated stickers available on the app.
04SwiftKey Keyboard
This keyboard app comes with many features, including sending GIFs. This keyboard app lends your writing style and adapts to it, making it a highly productive app for typing. Its emoji keyboard allows you to effortlessly search and send fun stickers, emojis, and GIFs while texting. It also has a multilingual feature.
05GIF Keyboard
This keyboard makes it easy for you to directly and conveniently send GIFs from your keyboard. With a library of millions of GIFs, you need to type in a keyword to get the right GIF at any point in time. Send emojis, videos, and animated GIFs with just a single click using GIF Keyboard. You can browse for GIFs by category, save your favorites GIFs, and share them using different messaging apps.
● Key Takeaways from This Episode →
● How to use GIFs for Android texting.
●the Best GIF apps for Android texting.
● Different reliable ways of using GIFs to spice up your texting on Android devices.
●Using GIFs for Android text messaging is the way to go in this modern age. This is because people relate more to visual representations than mere write-ups. Now, you know that it is possible to text GIFs and send them is simple using the extensively discussed methods in this article.
How To Learn Cartoon Sketch Drawing— Pencil Sketch for Beginners
How To Learn Cartoon Sketch Drawing— Pencil Sketch for Beginners
An easy yet powerful editor
Numerous effects to choose from
Detailed tutorials provided by the official channel
If you are learning how to draw, particularly cartoon sketches drawing, you must start at a beginner’s level. No skill is difficult if you just put your mind to it. You can learn the basics of the beginning, what you must do, and a learning curve, but if you have passion for it or love what you are doing, you will give it time to practice.
It all boils down to practicing it. Knowing how to draw beautiful sketch cartoons drawing is not a complex thing to do if you start at the beginner’s level.
So, for all who are reading this article, we will show sketch drawings of cartoons, i.e., how to draw step by step in an understandable manner.
In this article
01 [Collection of 8 Hottest Cartoon Drawings](#Part 1)
02 [How to Draw Cartoon Step by Step Easy Pencil Drawing](#Part 2)
Part 1 Collection of 8 Hottest Cartoon Drawings
Here’s a collection of 8 hottest cartoon love drawing pencil sketches for you.
01Motlu Patlu
This is a sketch of the Motu Patlu cartoon drawing. The artist used some simple forms such as a pear shape while developing the body in making this sketch. The pear shape helps in developing the bodies of cartoon characters.

02Basketball Sketch Drawing
The cartoon basketball drawing is one of our top picks wherein the artist took his time to get every detail in the scene. The image alone tells the story.

03Tom and Jerry Sketch drawing
If you were a lover of the famous cartoon Tom and Jerry, you should know this. Here’s a sketch cartoon drawing of Tom and Jerry.

04Cat Sketch
Isn’t this beautiful sketch cartoon drawing of a cat just it? The way the artist details it and gets the perfect fit made it part of our collection.

05Cute Cartoon love sketch
We couldn’t have finished this list without adding this beautiful sketch cartoon drawing.

06Homer
This cartoon sketch drawing of Homer in the Simpsons is just it. Looking at the body build, you can easily trace the outline of the pear-shaped form.

07Cute Cartoon Drawing
This drawing cartoon sketch caught our attention, and we are sure you would love it. With the round head and pear-shaped belly, you will agree that you can start your learning journey with the steps listed in this article.

08Cartoon love drawing
This sketch cartoon drawing portrays the love between a girl and a boy. It is one attractive sketch that shows details of expressions on the faces.

Part 2 How to Draw Cartoon Step by Step Easy Pencil Drawing
An essential factor you must bear in mind is that you must not let go of your creativity when learning how to draw.
You have to be free with yourself and try to create cartoon sketch drawings of characters that you love.
The more it’s about something you love, the better you get at it.
Here’s a step-by-step process of an easy pencil drawing or sketch cartoon drawing.
● Step 1: Draw a circle
Draw a circle and a “noodle” shape, as shown in the illustration. The head is a circle, and the body is a pear form.
The lower half of the pear is fatter than the top. Take note of how the upper half slightly overlaps the head circle.

● Step 2: Draw a pair of eyes.
As shown in the image, add the perspective guidelines around the head. These recommendations will assist you in correctly positioning your rabbit’s eyes and nose.
Above the horizontal guideline, draw the eyes. Where the parameters cross is where the nose is put.

● Step 3: Draw the cheek and Wings
Make the cheekbones. As shown in the illustration, add the ears and arms. It’s OK if the ear shapes differ somewhat from those displayed.
Notice how the arm contour curve organically emerges from behind the shoulders when you sketch the arms. Make it this way if you can.

● Step 4: Draw the legs
Draw the legs and tail of the animal. The arm and leg curves may appear to be challenging. As a result, be gentle with your pencil. Don’t yank on the pencil too hard!
Your cartoon rabbit’s shape is now plainly evident.

● Step 5: Draw the mouth
Let’s focus on the face for a moment. Draw an iris ellipse and an inner line in the ear inside the eyes. Include the nose. Draw the mouth and the teeth.

● Step 6: Outline the contours
Because rabbits eat carrots, this one eats them in excess. Outline the carrot’s outlines. On the legs, draw the brows and the fingers.
As you may have observed, I messed up the teeth in the previous image. Therefore I deleted the thick black pencil lines that were superfluous.
Erase and Shade (Step 8)

● Step 7: Outline the Character
Now, outline the contours of the entire character with a softer pencil. You can pick up B4 or B6 (if you don’t have either, try HB). Please leave a little bright dot on the nose while darkening it.

● Step 8: Erase and Shade
Remove everything that isn’t required. See? That is how your bunny should seem.
I also advocate using a pencil-type eraser in addition to regular or kneaded erasers. Shade the entire rabbit’s body if you’re using a graphite pencil. The inside of the ear, the belly, the paws, and the tail can all be white or brighter.

●Bonus Software for Beautiful Sketch Cartoon Drawing:
Wondershare Filmora Video Editor is a superb video editing software developed by Wondershare. It is a simple entry-level version with preset video templates and effects. With the numerous powerful features in Filmora, we can add amazing effects to our cartoon sketches to make them look better.
For Win 7 or later (64-bit)
For macOS 10.12 or later
Here’s how to use Filmora for cartoon sketch drawing enhancements.
Chroma key (Green screen): This feature can change the background of your sketched cartoon drawing photo by adding special effects to make it look nice.
Color Match: Color match is a feature in Filmora used to apply color correction settings in a video. You can use this feature to enhance your sketches.
Mask and blend: Filmora mask and blend feature has resourceful modes and is easy to use. You can use them for your pencil sketched cartoon drawing.
● Ending Thoughts →
● Making beautiful sketch cartoon drawings is not rocket science. It is a result of consistent practice.
● In this article, we have given you key points and strategies you can use to start practicing cartoon sketch drawing. However, do begin from our idea, i.e., a circle for the head and a pear for developing the body.
● Thus, your journey to learning how to draw cartoons step by step quickly with a pencil is already a walkover.
If you are learning how to draw, particularly cartoon sketches drawing, you must start at a beginner’s level. No skill is difficult if you just put your mind to it. You can learn the basics of the beginning, what you must do, and a learning curve, but if you have passion for it or love what you are doing, you will give it time to practice.
It all boils down to practicing it. Knowing how to draw beautiful sketch cartoons drawing is not a complex thing to do if you start at the beginner’s level.
So, for all who are reading this article, we will show sketch drawings of cartoons, i.e., how to draw step by step in an understandable manner.
In this article
01 [Collection of 8 Hottest Cartoon Drawings](#Part 1)
02 [How to Draw Cartoon Step by Step Easy Pencil Drawing](#Part 2)
Part 1 Collection of 8 Hottest Cartoon Drawings
Here’s a collection of 8 hottest cartoon love drawing pencil sketches for you.
01Motlu Patlu
This is a sketch of the Motu Patlu cartoon drawing. The artist used some simple forms such as a pear shape while developing the body in making this sketch. The pear shape helps in developing the bodies of cartoon characters.
02Basketball Sketch Drawing
The cartoon basketball drawing is one of our top picks wherein the artist took his time to get every detail in the scene. The image alone tells the story.
03Tom and Jerry Sketch drawing
If you were a lover of the famous cartoon Tom and Jerry, you should know this. Here’s a sketch cartoon drawing of Tom and Jerry.
04Cat Sketch
Isn’t this beautiful sketch cartoon drawing of a cat just it? The way the artist details it and gets the perfect fit made it part of our collection.
05Cute Cartoon love sketch
We couldn’t have finished this list without adding this beautiful sketch cartoon drawing.
06Homer
This cartoon sketch drawing of Homer in the Simpsons is just it. Looking at the body build, you can easily trace the outline of the pear-shaped form.
07Cute Cartoon Drawing
This drawing cartoon sketch caught our attention, and we are sure you would love it. With the round head and pear-shaped belly, you will agree that you can start your learning journey with the steps listed in this article.
08Cartoon love drawing
This sketch cartoon drawing portrays the love between a girl and a boy. It is one attractive sketch that shows details of expressions on the faces.
Part 2 How to Draw Cartoon Step by Step Easy Pencil Drawing
An essential factor you must bear in mind is that you must not let go of your creativity when learning how to draw.
You have to be free with yourself and try to create cartoon sketch drawings of characters that you love.
The more it’s about something you love, the better you get at it.
Here’s a step-by-step process of an easy pencil drawing or sketch cartoon drawing.
● Step 1: Draw a circle
Draw a circle and a “noodle” shape, as shown in the illustration. The head is a circle, and the body is a pear form.
The lower half of the pear is fatter than the top. Take note of how the upper half slightly overlaps the head circle.
● Step 2: Draw a pair of eyes.
As shown in the image, add the perspective guidelines around the head. These recommendations will assist you in correctly positioning your rabbit’s eyes and nose.
Above the horizontal guideline, draw the eyes. Where the parameters cross is where the nose is put.
● Step 3: Draw the cheek and Wings
Make the cheekbones. As shown in the illustration, add the ears and arms. It’s OK if the ear shapes differ somewhat from those displayed.
Notice how the arm contour curve organically emerges from behind the shoulders when you sketch the arms. Make it this way if you can.
● Step 4: Draw the legs
Draw the legs and tail of the animal. The arm and leg curves may appear to be challenging. As a result, be gentle with your pencil. Don’t yank on the pencil too hard!
Your cartoon rabbit’s shape is now plainly evident.
● Step 5: Draw the mouth
Let’s focus on the face for a moment. Draw an iris ellipse and an inner line in the ear inside the eyes. Include the nose. Draw the mouth and the teeth.
● Step 6: Outline the contours
Because rabbits eat carrots, this one eats them in excess. Outline the carrot’s outlines. On the legs, draw the brows and the fingers.
As you may have observed, I messed up the teeth in the previous image. Therefore I deleted the thick black pencil lines that were superfluous.
Erase and Shade (Step 8)
● Step 7: Outline the Character
Now, outline the contours of the entire character with a softer pencil. You can pick up B4 or B6 (if you don’t have either, try HB). Please leave a little bright dot on the nose while darkening it.
● Step 8: Erase and Shade
Remove everything that isn’t required. See? That is how your bunny should seem.
I also advocate using a pencil-type eraser in addition to regular or kneaded erasers. Shade the entire rabbit’s body if you’re using a graphite pencil. The inside of the ear, the belly, the paws, and the tail can all be white or brighter.
●Bonus Software for Beautiful Sketch Cartoon Drawing:
Wondershare Filmora Video Editor is a superb video editing software developed by Wondershare. It is a simple entry-level version with preset video templates and effects. With the numerous powerful features in Filmora, we can add amazing effects to our cartoon sketches to make them look better.
For Win 7 or later (64-bit)
For macOS 10.12 or later
Here’s how to use Filmora for cartoon sketch drawing enhancements.
Chroma key (Green screen): This feature can change the background of your sketched cartoon drawing photo by adding special effects to make it look nice.
Color Match: Color match is a feature in Filmora used to apply color correction settings in a video. You can use this feature to enhance your sketches.
Mask and blend: Filmora mask and blend feature has resourceful modes and is easy to use. You can use them for your pencil sketched cartoon drawing.
● Ending Thoughts →
● Making beautiful sketch cartoon drawings is not rocket science. It is a result of consistent practice.
● In this article, we have given you key points and strategies you can use to start practicing cartoon sketch drawing. However, do begin from our idea, i.e., a circle for the head and a pear for developing the body.
● Thus, your journey to learning how to draw cartoons step by step quickly with a pencil is already a walkover.
Also read:
- New 15 Best Sites to Watch Cartoons Online Free And So Can You
- New How to Send and Add Snapchat GIFs 100 in Easy Way
- How to Make a Video a Live Photo for 2024
- New 2024 Approved Top 8 Tools Tell You How to Make Slideshows for Instagram
- New 2024 Approved Learn All About 3D Logo Animation and Templates
- New Ways to Make Sure You Get the Most up to Date Cartoon Character Design Tips for 2024
- How to Liven Up Your Animate Website on Scroll for 2024
- New 20 Free After Effects Logo Reveal Templates for 2024
- New How to Cartoonize Photo Photoshop in Easy Steps
- How I Animate Discord Profile Pictures (& You Can Too) for 2024
- New 10 Great Apps to Turn Funny Animated Images Into Comics for 2024
- New In 2024, Top 8 Anime Name & Title Generators Online-Get Cool Anime Names
- 2024 Approved What Is Still Motion Animation and How Does It Work?
- New Simple Guide to Create New and Exciting Blackboard Animation
- In 2024, 5 Websites with Animated Logos That Catch Your Eyes
- How to Create Animated Video on Canva, In 2024
- New In 2024, What Is Anime? Anime VS Manga VS Cartoon
- How to Convert Video to GIF Fast & Easy for 2024
- New 2024 Approved 10 Best Animation Makers for Kids to Have Fun
- Updated Types of Cartoon Styles You May Use for Your Next Marketing Project
- Updated How to Animate Image on Scroll
- Updated In 2024,
- How to Make GIF Stickers for WhatsApp 100 The Easy Way
- New 2024 Approved The 15 Most Efficient Photo to Cartoon Software for Android
- New 2024 Approved How to Convert Video to GIF Fast & Easy
- Updated Easy Cartoon Characters Drawing Tutorials for You Who Are Learning to Draw for 2024
- Updated 5 Photoshop Alternatives to Animate Logo
- New All About 3D Medical Animation And Its Uses
- In 2024, How to Make Architecture Animation
- Top Claymation Shows That Make Your Memories Unforgettable
- Updated 2024 Approved Pencil2D Animation Tutorial Overview
- New 2024 Approved 10 Trendy & Stylish Free Logo Animation Templates
- Updated Techniques on Making After Effects 2D Animation
- In 2024, Best 10 Animated DP for WhatsApp
- New 15 Types of Cartoon Drawing Styles with Examples for 2024
- Updated Before You Learn Facebook Slideshow 5 Things You Should Know for 2024
- New In 2024, The Top Free 12 GIF Meme Maker at a Glance
- New Can I Do Animated Logo Design Without Design Skills for 2024
- Updated Ways You Can Master to Make Claymation Videos for 2024
- New In 2024, Types of Cartoon Styles You May Use for Your Next Marketing Project
- Updated How to Convert Video to GIF Fast & Easy
- New How to Create Animated Video on Canva, In 2024
- New In 2024, What Wikipedia Wont Tell You About Character Rigging
- New 2024 Approved 12+ Stunning Instagram GIF Stickers and How to Make & Find
- In 2024, How Many Attempts To Unlock iPhone 8 Plus | Dr.fone
- How to Flash Dead Poco C55 Safely | Dr.fone
- Fixing Foneazy MockGo Not Working On HTC U23 Pro | Dr.fone
- In 2024, Latest way to get Shiny Meltan Box in Pokémon Go Mystery Box On Poco F5 5G | Dr.fone
- In 2024, How Do You Get Sun Stone Evolutions in Pokémon For Lava Yuva 2 Pro? | Dr.fone
- In 2024, How to Change/Fake Your Vivo T2 5G Location on Viber | Dr.fone
- 4 Methods to Turn off Life 360 On Motorola Moto G13 without Anyone Knowing | Dr.fone
- In 2024, How to Fix when Apple Account Locked From Apple iPhone 13 mini?
- 5 Hassle-Free Solutions to Fake Location on Find My Friends Of Sony Xperia 1 V | Dr.fone
- Apple ID Locked for Security Reasons On Apple iPhone 8 Plus? Find the Best Solution Here
- How To Change Xiaomi Redmi Note 12 Pro+ 5G Lock Screen Clock in Seconds
- Ultimate Guide from Lava Yuva 3 FRP Bypass
- In 2024, Forgotten The Voicemail Password Of Realme C55? Try These Fixes
- In 2024, Is GSM Flasher ADB Legit? Full Review To Bypass Your Nokia 130 MusicFRP Lock
- In 2024, How PGSharp Save You from Ban While Spoofing Pokemon Go On Honor X50? | Dr.fone
- How To Transfer Data From iPhone X To Other iPhone? | Dr.fone
- The way to get back lost call history from Reno 9A
- Title: 10 Best Photoshop Cartoon Effects For Creatives
- Author: Elon
- Created at : 2024-05-19 03:04:25
- Updated at : 2024-05-20 03:04:25
- Link: https://animation-videos.techidaily.com/10-best-photoshop-cartoon-effects-for-creatives/
- License: This work is licensed under CC BY-NC-SA 4.0.
