

12 Captivating Websites with Triggered Animate on Scroll Examples
12 Captivating Websites with Triggered Animate on Scroll Examples
12 Captivating Websites with Triggered Animate on Scroll Examples
An easy yet powerful editor
Numerous effects to choose from
Detailed tutorials provided by the official channel
It is impossible to imagine any website that doesn’t have any dynamic elements. It has almost become a compulsion to use dynamic elements in websites. Nowadays we look for websites that are more engaging and interactive.
This is where the popular Scroll-Triggered Animations in websites come in. Filmora Pro is one of the best website development companies that develops websites with a triggered animate scroll for customers all around the world. Filmora Pro wonderfully animate elements on scroll for the websites they develop.
In this article
01 [What Are Scroll-Triggered Animations?](#Part 1)
02 [Best 12 Websites With Triggered Animate On Scroll Examples](#Part 2)
Part 1 What Are Scroll-Triggered Animations?
Scroll-triggered animations are that strong trend that has been with us for many years. It is the most effective way to animate elements on scrolls like the graphics, texts, videos, and photos and bring all of them to life while you scroll down a website page. Scroll animations are used to grab the attention of the user and make a website more interesting and attractive.
Part 2 Best 12 Websites with triggered animate on scroll examples
Given below are the 12 best Websites with triggered animate on scroll examples.
01Joey Bada$ Political MC

The website of Joey Bada$ Political MC is considered to be one of the most exquisite examples of how scroll-triggered animations can be used effectively to say a story. This website is a collaboration between Shoes Up - The French magazine and American MC. This is a satirical website and resembles a political campaign. To build this website scroll-triggered animation was used all through. The scrolling is designed in such a way that it changes from horizontal to vertical. Each scroll delivers many interesting facts about Joey’s political beliefs.
02Vincent Saïsset

Vincent Saïsset, the first thing that you will see is a white background with a very big white letter V on it. The letter V symbolizes the artist’s initials. There is an arrow pointing downward that encourages you to start exploring the website. As you start to scroll you will see a wave of animated typefaces with a monochromatic interplay. The website is designed with horizontal and vertical scroll transitions. It also has a playful micro-interaction that is there between the letters and the cursor.
03Home Société

The website of Home Société amazingly depicts all the interior design work of the company. The design of this website is very simple but at the same rich with graphic elements, animations, and typography. The animated elements used are rhythmically intersecting and overlapping with each other. The images that are used in the background are changing constantly with eye-catching typefaces. The best part that it makes different from other websites is the horizontal scroll; this portrays a whole new dimension giving the users an experience of infinite scroll.
04Sally

This company is from NYC and they rent cars to Lyft, Via Juno, and Uber. The website of Sally might look minimal when it comes to color and designs or exquisite detailing. But what makes the website captivating is a car’s 3D model and seventy other animations which gives the look that the car is moving. It is the perfect example where you can animate elements on scroll one can move the model from one section to the other by moving the cursor or just scrolling. All the transitions used are synchronized eloquently and there is no hitch in the entire website.
05Yuto Takahashi

The website of Yuto Takahashi’s is that of a portfolio website. This website is another amazing example of scroll-triggered animations. The very first thing that one will notice is a rotating circle that is made with the words of the artist’s name. Then instructions will pop up and ask one to hold on to the mouse to access the artist’s works. The typefaces used are Serif that surrounds the photographs. With every new scroll, some sort of liquid animation can be viewed over the photographs. While if one clicks any of the featured works one can see scroll-triggered animations are used on every single work.
06Editorial New

The website of Editorial New is a collaboration between the Pangram Pangram Foundry and the Locomotive. The typeface of this website has a reflection of the designs of the ‘90s. The website starts with a newspaper look-alike section that keeps rotating as you scroll and stops until it covers the screen completely. You will then come across various typefaces showcasing their versatility. You will also find a magazine cover being created by using the beautiful font. While you click on the Randomize button you will see that the cover changes and shows font in various other sizes.
07Danilo De Marco

The website of Danilo De Marco’s is a collaboration with Studio K95. This website is developed with the view of promoting all these works. In this website, the scroll-triggered animations are used in some specific sections, yet they are prominent. The logo along with the font used is animated in an enchanting way. The vibrant green color used will not let you move away from the screen. The typography used is very dominant. And if you click on any of his featured work you will be directed to reach the page that is solely dedicated to that particular work. While scrolling the photographs it will seem as they are drifting further away.
08K24 Moscow

K24 Moscow is one of the most captivating websites built for a modern architectural project. The website recalls the spirit of Russian suprematism and avant-garde. Scroll-triggered animations are used to animate elements on scroll throughout the full presentation. With every new scroll, you will discover something new. The combination of white, black, and red color sections that move and overlap with changes in size make a distinct typeface. These combine to make it an exciting website while keeping the Russian avant-garde spirit.
09Green Chameleon

The website of Green Chameleon was created to showcase all of their cherished achievements and memories from 2018. On the website at the very beginning, you will be greeted with an introductory graphic and then you will begin exploring the site. You will have the feeling like you have entered into a time capsule. You will be able to see the works month by month. And when you click on any particular project the picture will get displayed right on the center of the screen. With it, you will find relevant information underneath. The background color keeps changing while navigating through a 3D space.
10Bewegen

The website of Bewegen is a showcase of animations, rich content, and interactions. Bewegen is a popular world-class system known for sharing bikes. The scroll-triggered animations along with the zoom shots give a detailed view of the popular Bewegen Pedelec bike. While one scroll down further one will get related information about the bike-sharing system and also get details on how to use it. There is also the option where anyone can create their sharing system just by choosing the city and the number of heads to be included in the project while choosing the color and other features of the bike.
11Wtower

The website of Wtower is built to an interactive virtual world that tells the story of the world’s largest water tower in past - Ural’s White Tower. This website is another amazing storytelling website where the scroll-triggered animation fits like puzzle pieces. The scrolling takes to a 3D space where you will be able to learn how the tower originated and what the current state is in present. You will find a progress bar at the bottom and this appears every time there is some useful element to be delivered. Also, you can check how much of the story you have listened to and how much is left.
12Parmigiani Fleurier

The website of Parmigiani Fleurier is a website for Swiss watchmakers. This website is also another amazing animate on scroll example. The layout of the website is elegant as well as demure. While one scroll one can explore the entire collection by using the rows used on both sides of the screen. After you find the model that attracts your eye, you can view the detailed information that shows in an asymmetrical pattern around the watch. You will also come to know about other details like the case, dial, strap, winding system, and other technical specifications. The animations used are very subtle and well-balanced.
Part 3 Advantages and Disadvantages of These 12 Websites
| Name of Website | Advantage | Disadvantage |
|---|---|---|
| Joey Bada$ Political MC | Scroll-triggered animation was used all through. The scrolling is designed in such a way that it changes from horizontal to vertical. | Resource intensive. |
| Vincent Saïsset | It has a playful micro-interaction that is there between the letters and the cursor. | Components use is intensive. |
| Home Société | The horizontal scroll portrays a whole new dimension giving the users an experience of infinite scroll. | Memory usage is high. |
| Sally | The captivating part is the car’s 3D model and seventy other animations which give the look that the car is moving. | Very resource intensive. |
| Yuto Takahashi | With every new scroll, some sort of liquid animation can be viewed over the photographs | Requires High Bandwidth. |
| Editorial New | While a click is made on the Randomize button it will be seen that the cover changes and shows font in various other sizes. | Needs good Internet. |
| Danilo De Marco | The typography used is very dominant. | Resource intensive. |
| K24 Moscow | The combination of white, black, and red color sections that move and overlap with changes in size make a distinct typeface. | Requires High Bandwidth. |
| Green Chameleon | One will have the feeling like one has entered into a time capsule. | The website is resource-intensive. |
| Bewegen | There is also the option where anyone can create their sharing system just by choosing the city and the number of heads to be included in the project while choosing the color and other features of the bike. | Components use is intensive. |
| Wtower | A progress bar at the bottom and appears every time there is some useful element to be delivered. | The website is resource-intensive. |
| Parmigiani Fleurier | One can explore the entire collection by using the rows used on both sides of the screen. | Very resource-intensive |
Key Takeaways from This Episode
● At the end of this article, you have understood what Scroll-triggered animations are all about.
● You also got the view as to why you need Scroll-triggered animations while you develop a website for yourself.
● The article also tells you about the 12 best captivating Scroll-triggered animation websites which will give you various ideas for your next website.
It is impossible to imagine any website that doesn’t have any dynamic elements. It has almost become a compulsion to use dynamic elements in websites. Nowadays we look for websites that are more engaging and interactive.
This is where the popular Scroll-Triggered Animations in websites come in. Filmora Pro is one of the best website development companies that develops websites with a triggered animate scroll for customers all around the world. Filmora Pro wonderfully animate elements on scroll for the websites they develop.
In this article
01 [What Are Scroll-Triggered Animations?](#Part 1)
02 [Best 12 Websites With Triggered Animate On Scroll Examples](#Part 2)
Part 1 What Are Scroll-Triggered Animations?
Scroll-triggered animations are that strong trend that has been with us for many years. It is the most effective way to animate elements on scrolls like the graphics, texts, videos, and photos and bring all of them to life while you scroll down a website page. Scroll animations are used to grab the attention of the user and make a website more interesting and attractive.
Part 2 Best 12 Websites with triggered animate on scroll examples
Given below are the 12 best Websites with triggered animate on scroll examples.
01Joey Bada$ Political MC
The website of Joey Bada$ Political MC is considered to be one of the most exquisite examples of how scroll-triggered animations can be used effectively to say a story. This website is a collaboration between Shoes Up - The French magazine and American MC. This is a satirical website and resembles a political campaign. To build this website scroll-triggered animation was used all through. The scrolling is designed in such a way that it changes from horizontal to vertical. Each scroll delivers many interesting facts about Joey’s political beliefs.
02Vincent Saïsset
Vincent Saïsset, the first thing that you will see is a white background with a very big white letter V on it. The letter V symbolizes the artist’s initials. There is an arrow pointing downward that encourages you to start exploring the website. As you start to scroll you will see a wave of animated typefaces with a monochromatic interplay. The website is designed with horizontal and vertical scroll transitions. It also has a playful micro-interaction that is there between the letters and the cursor.
03Home Société
The website of Home Société amazingly depicts all the interior design work of the company. The design of this website is very simple but at the same rich with graphic elements, animations, and typography. The animated elements used are rhythmically intersecting and overlapping with each other. The images that are used in the background are changing constantly with eye-catching typefaces. The best part that it makes different from other websites is the horizontal scroll; this portrays a whole new dimension giving the users an experience of infinite scroll.
04Sally
This company is from NYC and they rent cars to Lyft, Via Juno, and Uber. The website of Sally might look minimal when it comes to color and designs or exquisite detailing. But what makes the website captivating is a car’s 3D model and seventy other animations which gives the look that the car is moving. It is the perfect example where you can animate elements on scroll one can move the model from one section to the other by moving the cursor or just scrolling. All the transitions used are synchronized eloquently and there is no hitch in the entire website.
05Yuto Takahashi
The website of Yuto Takahashi’s is that of a portfolio website. This website is another amazing example of scroll-triggered animations. The very first thing that one will notice is a rotating circle that is made with the words of the artist’s name. Then instructions will pop up and ask one to hold on to the mouse to access the artist’s works. The typefaces used are Serif that surrounds the photographs. With every new scroll, some sort of liquid animation can be viewed over the photographs. While if one clicks any of the featured works one can see scroll-triggered animations are used on every single work.
06Editorial New
The website of Editorial New is a collaboration between the Pangram Pangram Foundry and the Locomotive. The typeface of this website has a reflection of the designs of the ‘90s. The website starts with a newspaper look-alike section that keeps rotating as you scroll and stops until it covers the screen completely. You will then come across various typefaces showcasing their versatility. You will also find a magazine cover being created by using the beautiful font. While you click on the Randomize button you will see that the cover changes and shows font in various other sizes.
07Danilo De Marco
The website of Danilo De Marco’s is a collaboration with Studio K95. This website is developed with the view of promoting all these works. In this website, the scroll-triggered animations are used in some specific sections, yet they are prominent. The logo along with the font used is animated in an enchanting way. The vibrant green color used will not let you move away from the screen. The typography used is very dominant. And if you click on any of his featured work you will be directed to reach the page that is solely dedicated to that particular work. While scrolling the photographs it will seem as they are drifting further away.
08K24 Moscow
K24 Moscow is one of the most captivating websites built for a modern architectural project. The website recalls the spirit of Russian suprematism and avant-garde. Scroll-triggered animations are used to animate elements on scroll throughout the full presentation. With every new scroll, you will discover something new. The combination of white, black, and red color sections that move and overlap with changes in size make a distinct typeface. These combine to make it an exciting website while keeping the Russian avant-garde spirit.
09Green Chameleon
The website of Green Chameleon was created to showcase all of their cherished achievements and memories from 2018. On the website at the very beginning, you will be greeted with an introductory graphic and then you will begin exploring the site. You will have the feeling like you have entered into a time capsule. You will be able to see the works month by month. And when you click on any particular project the picture will get displayed right on the center of the screen. With it, you will find relevant information underneath. The background color keeps changing while navigating through a 3D space.
10Bewegen
The website of Bewegen is a showcase of animations, rich content, and interactions. Bewegen is a popular world-class system known for sharing bikes. The scroll-triggered animations along with the zoom shots give a detailed view of the popular Bewegen Pedelec bike. While one scroll down further one will get related information about the bike-sharing system and also get details on how to use it. There is also the option where anyone can create their sharing system just by choosing the city and the number of heads to be included in the project while choosing the color and other features of the bike.
11Wtower
The website of Wtower is built to an interactive virtual world that tells the story of the world’s largest water tower in past - Ural’s White Tower. This website is another amazing storytelling website where the scroll-triggered animation fits like puzzle pieces. The scrolling takes to a 3D space where you will be able to learn how the tower originated and what the current state is in present. You will find a progress bar at the bottom and this appears every time there is some useful element to be delivered. Also, you can check how much of the story you have listened to and how much is left.
12Parmigiani Fleurier
The website of Parmigiani Fleurier is a website for Swiss watchmakers. This website is also another amazing animate on scroll example. The layout of the website is elegant as well as demure. While one scroll one can explore the entire collection by using the rows used on both sides of the screen. After you find the model that attracts your eye, you can view the detailed information that shows in an asymmetrical pattern around the watch. You will also come to know about other details like the case, dial, strap, winding system, and other technical specifications. The animations used are very subtle and well-balanced.
Part 3 Advantages and Disadvantages of These 12 Websites
| Name of Website | Advantage | Disadvantage |
|---|---|---|
| Joey Bada$ Political MC | Scroll-triggered animation was used all through. The scrolling is designed in such a way that it changes from horizontal to vertical. | Resource intensive. |
| Vincent Saïsset | It has a playful micro-interaction that is there between the letters and the cursor. | Components use is intensive. |
| Home Société | The horizontal scroll portrays a whole new dimension giving the users an experience of infinite scroll. | Memory usage is high. |
| Sally | The captivating part is the car’s 3D model and seventy other animations which give the look that the car is moving. | Very resource intensive. |
| Yuto Takahashi | With every new scroll, some sort of liquid animation can be viewed over the photographs | Requires High Bandwidth. |
| Editorial New | While a click is made on the Randomize button it will be seen that the cover changes and shows font in various other sizes. | Needs good Internet. |
| Danilo De Marco | The typography used is very dominant. | Resource intensive. |
| K24 Moscow | The combination of white, black, and red color sections that move and overlap with changes in size make a distinct typeface. | Requires High Bandwidth. |
| Green Chameleon | One will have the feeling like one has entered into a time capsule. | The website is resource-intensive. |
| Bewegen | There is also the option where anyone can create their sharing system just by choosing the city and the number of heads to be included in the project while choosing the color and other features of the bike. | Components use is intensive. |
| Wtower | A progress bar at the bottom and appears every time there is some useful element to be delivered. | The website is resource-intensive. |
| Parmigiani Fleurier | One can explore the entire collection by using the rows used on both sides of the screen. | Very resource-intensive |
Key Takeaways from This Episode
● At the end of this article, you have understood what Scroll-triggered animations are all about.
● You also got the view as to why you need Scroll-triggered animations while you develop a website for yourself.
● The article also tells you about the 12 best captivating Scroll-triggered animation websites which will give you various ideas for your next website.
Pencil2D Animation Tutorial Overview
Animation is one of the trendiest technologies. The basics of animation were formulated in the 2000s from the moving page trick. The first few animators learned that animation is nothing but continuous switching of frames from one to another. One animated still is switched to another and then another in a quick sequence such that it makes a sequential moving frame. Today, animation has come a long way from where it started and today it is used for several commercials, tutorials, and even educational lecture videos. Pencil2D animation is an amazing animation tool that can be used by even neophytes. Want to learn more about 2d pencil animation and its super cool features? Well, you’re at the perfect place. Today we’ll be telling you more about pencil 2d animation and giving you a small overview of its usage.
In this article
01 [What is Pencil2D and How to Install?](#Part 1)
02 [Overview of the Application Interface](#Part 2)
03 [How to Create Animations with Pencil2D?](#Part 3)
Part 1 What is Pencil2D and How to Install?
2d pencil animation is popular open-source animation software. The software is pretty cool for those who are newly starting off with animation. The open-source software is available on all major operating systems including Windows, Mac OS, and Unix. Using this amazing software, we can make amazing cartoon characters using traditional cartoon-making techniques such as tracing drawing, skinning. Using this software, you can save animations in the native animation formats or extract the animation to PNG, JPG, or other formats. Wish to explore more about pencil 2d animation software? Follow the steps listed below in order to download the pencil2d animation software.
● Firstly, you need to ensure that your device has ample space on it.
● Next, you need to head to the official website of pencil2d.
● Further, you need to select your operating system. You can find different versions of the software, namely windows 7/8/10, windows XP/ Vista, Mac OS, and Linux
● Once downloaded, you need to start the installation setup. Note that this may take a while to download.
● Once downloaded, you can start familiarizing yourself with the software.
Part 2 Overview of the Application Interface
1. The brush tool
The brush tool must have reminded you of paint software in windows. The brush tool is a popular and highly utilitarian basic tool in Pencil2D animation software. You can either access it via the user interface or quickly access it by using the B key on your keyboard. As the name suggests, the brush tool is literally just a brush that allows you to draw and paint any sort of drawings of different shades, colors, and thickness. If you wish to change the color, you can find a color palette on the left side of the interface.

2. The eraser tool
You’ve a brush tool; it’s almost common sense that there’d be an eraser. The eraser tool has an eraser as its icon. If you wish to use the eraser, click on the eraser tool or simply click the E button on your keyboard. Once you’ve selected the tool, you need to simply hover over the parts you wish to erase.

3. Bucket tool
The bucket tool is another useful tool that you can find in the left tool pane of pencil 2d animation. The tool icon looks like a bucket and it is used to fill an entire area with a particular color. You can choose the color you’d like to fill from the color pallet available on the left side. Alternatively, you can also access the bucket tool by pressing the “K” key on your keyboard.

4. Custom colors
A cool feature that you can find on pencil 2d animation software is the custom color one. You can merge and mix colors according to your choice and create your own color. To do so, you need to click on the small color box that you’ll find at the top right of your screen. By doing so, a huge color wheel will appear on your screen. Now you can either enter values of the R, G, and B if you wish to merge different colors and make a new one or select a particular color from the huge color wheel that appears in front of you. These colors vary in gradient, shade, and a lot of different factors.

5. The Undo button
The Undo button is a highly useful functionality for the lazy ones who do not wish to erase the mistake they made. By undoing, the previous step gets reverted and you can start over again. The traditional undo shortcut, Ctrl+Z does work in the pencil 2d animation. Alternatively, you can also use the undo feature via the user interface. You can do so by heading over to the edit option in the topmost bar. The first option in the drop-down menu would be undo.

Part 3 How to Create Animations with Pencil2D?
Creating animations in pencil 2d is slightly sophisticated and certainly needs minimal practice. Follow the steps listed below in order to learn how to animate through pencil 2d to make your first animation.
1. Ensure that you’ve turned on your bitmap on the first frame
Animation works through quick switching of frame which makes it appear as though the object is in motion. By turning on the bitmap, pencil 2d animation ensures that you’ve no blank frames at the start of your animation.

2. Draw your animated character
Since you’re trying to animate, you need to have an animated character or object. Hence, the first step to making your first animation is by drawing the object or character that you wish to animate. Try to make the character as realistic as possible. To start with, maybe you can try animating just a stick figure; this is because animating a complex character is rather difficult for beginners.

3.The three circular buttons
Once you’re satisfied with the character you draw, you need to spot the 3 circular buttons which are arranged in the “+”,”-“,”+” order. By pressing the first “+” button, you can add an empty slide. If you click on the “-“ button, it will delete the most recent slide and if you click on the next “+” button, it will duplicate the current slide.

4.Repeat until you get an animation
Now that you know how to deal with multiple frames, you can continue creating frames and making the animated characters move by tweaking with the drawing in every frame. For instance, if you wish to show that the animated character is running, in one of the frames the left leg should be forward and in the next one, the right leg should be forward. Keep repeating this process of tweaking with frames until you’ve your desired animated video.

Now that we’ve seen the process of animation via Pencil2D, you must have realized that it’s pretty orthodox and complicated. Moreover, you cannot carry out rigging and other newer animation techniques. Hence, we introduce you to Wondershare Filmora Video Editor , your all in one animation making platform. Here you can animate without any hassle. Wondershare Filmora makes your job easier with multiple animation features, you needn’t even draw your animated character. You can simply import a custom-made character and rig the character. Further, you need not deal with multiple frames and personally pay attention to each frame. All in all, Filmora makes your job simple and your animations much more seamless.
For Win 7 or later (64-bit)
For macOS 10.12 or later
Key Takeaways from This Episode
● Animation is actively being used for multiple purposes.
● Today we took a look at one of the orthodox yet popular animation tools, Pencil2D.
● The Pencil2D animation tool offers you multiple functionalities and allows you to make animations.
● Next, we also took a look at Wondershare Filmora Pro, your one-stop shop for all animation needs. You can find multiple animation features here and it’s all so simple.
● What are you waiting for? Your next animation is just one click away.
02 [Overview of the Application Interface](#Part 2)
03 [How to Create Animations with Pencil2D?](#Part 3)
Part 1 What is Pencil2D and How to Install?
2d pencil animation is popular open-source animation software. The software is pretty cool for those who are newly starting off with animation. The open-source software is available on all major operating systems including Windows, Mac OS, and Unix. Using this amazing software, we can make amazing cartoon characters using traditional cartoon-making techniques such as tracing drawing, skinning. Using this software, you can save animations in the native animation formats or extract the animation to PNG, JPG, or other formats. Wish to explore more about pencil 2d animation software? Follow the steps listed below in order to download the pencil2d animation software.
● Firstly, you need to ensure that your device has ample space on it.
● Next, you need to head to the official website of pencil2d.
● Further, you need to select your operating system. You can find different versions of the software, namely windows 7/8/10, windows XP/ Vista, Mac OS, and Linux
● Once downloaded, you need to start the installation setup. Note that this may take a while to download.
● Once downloaded, you can start familiarizing yourself with the software.
Part 2 Overview of the Application Interface
1. The brush tool
The brush tool must have reminded you of paint software in windows. The brush tool is a popular and highly utilitarian basic tool in Pencil2D animation software. You can either access it via the user interface or quickly access it by using the B key on your keyboard. As the name suggests, the brush tool is literally just a brush that allows you to draw and paint any sort of drawings of different shades, colors, and thickness. If you wish to change the color, you can find a color palette on the left side of the interface.
2. The eraser tool
You’ve a brush tool; it’s almost common sense that there’d be an eraser. The eraser tool has an eraser as its icon. If you wish to use the eraser, click on the eraser tool or simply click the E button on your keyboard. Once you’ve selected the tool, you need to simply hover over the parts you wish to erase.
3. Bucket tool
The bucket tool is another useful tool that you can find in the left tool pane of pencil 2d animation. The tool icon looks like a bucket and it is used to fill an entire area with a particular color. You can choose the color you’d like to fill from the color pallet available on the left side. Alternatively, you can also access the bucket tool by pressing the “K” key on your keyboard.
4. Custom colors
A cool feature that you can find on pencil 2d animation software is the custom color one. You can merge and mix colors according to your choice and create your own color. To do so, you need to click on the small color box that you’ll find at the top right of your screen. By doing so, a huge color wheel will appear on your screen. Now you can either enter values of the R, G, and B if you wish to merge different colors and make a new one or select a particular color from the huge color wheel that appears in front of you. These colors vary in gradient, shade, and a lot of different factors.
5. The Undo button
The Undo button is a highly useful functionality for the lazy ones who do not wish to erase the mistake they made. By undoing, the previous step gets reverted and you can start over again. The traditional undo shortcut, Ctrl+Z does work in the pencil 2d animation. Alternatively, you can also use the undo feature via the user interface. You can do so by heading over to the edit option in the topmost bar. The first option in the drop-down menu would be undo.
Part 3 How to Create Animations with Pencil2D?
Creating animations in pencil 2d is slightly sophisticated and certainly needs minimal practice. Follow the steps listed below in order to learn how to animate through pencil 2d to make your first animation.
1. Ensure that you’ve turned on your bitmap on the first frame
Animation works through quick switching of frame which makes it appear as though the object is in motion. By turning on the bitmap, pencil 2d animation ensures that you’ve no blank frames at the start of your animation.
2. Draw your animated character
Since you’re trying to animate, you need to have an animated character or object. Hence, the first step to making your first animation is by drawing the object or character that you wish to animate. Try to make the character as realistic as possible. To start with, maybe you can try animating just a stick figure; this is because animating a complex character is rather difficult for beginners.
3.The three circular buttons
Once you’re satisfied with the character you draw, you need to spot the 3 circular buttons which are arranged in the “+”,”-“,”+” order. By pressing the first “+” button, you can add an empty slide. If you click on the “-“ button, it will delete the most recent slide and if you click on the next “+” button, it will duplicate the current slide.
4.Repeat until you get an animation
Now that you know how to deal with multiple frames, you can continue creating frames and making the animated characters move by tweaking with the drawing in every frame. For instance, if you wish to show that the animated character is running, in one of the frames the left leg should be forward and in the next one, the right leg should be forward. Keep repeating this process of tweaking with frames until you’ve your desired animated video.
Now that we’ve seen the process of animation via Pencil2D, you must have realized that it’s pretty orthodox and complicated. Moreover, you cannot carry out rigging and other newer animation techniques. Hence, we introduce you to Wondershare Filmora Video Editor , your all in one animation making platform. Here you can animate without any hassle. Wondershare Filmora makes your job easier with multiple animation features, you needn’t even draw your animated character. You can simply import a custom-made character and rig the character. Further, you need not deal with multiple frames and personally pay attention to each frame. All in all, Filmora makes your job simple and your animations much more seamless.
For Win 7 or later (64-bit)
For macOS 10.12 or later
Key Takeaways from This Episode
● Animation is actively being used for multiple purposes.
● Today we took a look at one of the orthodox yet popular animation tools, Pencil2D.
● The Pencil2D animation tool offers you multiple functionalities and allows you to make animations.
● Next, we also took a look at Wondershare Filmora Pro, your one-stop shop for all animation needs. You can find multiple animation features here and it’s all so simple.
● What are you waiting for? Your next animation is just one click away.
8 Top Motion Graphics Online Tools for Your Inspiration
8 Best Motion Graphics Online Tools for Your Inspiration
An easy yet powerful editor
Numerous effects to choose from
Detailed tutorials provided by the official channel
Are you looking for the correct answers about what is motion graphics or how to create motion graphics? If yes, then you are at the right place.
Here we will discuss about few best motion graphics online websites and how to create motion graphics video.
In this article
01 [The Power of Motion Graphics](#Part 1)
02 [Motion Graphics Online Courses You Should Learn](#Part 2)
03 [How to Make Motion Graphics in 5 Steps Easily?](#Part 3)
04 [How to Make a Studio-quality Motion Graphics Video](#Part 4)
Part 1 The Power of Motion Graphics
Motion graphics is actually a term which is generally used to describe the mix up of the animation and the graphic designs. People usage the motion graphics in the emotions videos and market their products as well. Motion graphics with the video on the landing page of your website increases the conversion rate by 8as compared to the other methods. Motion graphic videos of your products can simply display the idea of your business within few seconds to the target audience. The biggest reason of using the motion graphics now a day is that motions graphics can quickly the critical or complex business things in few seconds with the fast, simple and compelling way.
Part 2 Motion Graphics Online Courses You Should Learn
If you are newbie to the motion graphics then there are thousands of courses available over the internet which can help you to learn what motion graphic is and how to create your own motion graphic videos of your product and services. Here we are going to list a few courses.
01Creative Coding: Making Visuals with JavaScript
This is the first course which is mainly designed to learn to make the beautiful visuals using the JavaScript. This course is designed by Bruno Imbrizi. In this course you can also explore the coding fundamentals very easily. You can learn the things you need to setup before the programming concepts such as loops, arrays, variables and functions.

02Psychedelic Animation with Photoshop and After Effects
This motion graphics online course is designed by the Klarens Malluta which helps you to understand the aspect of Photoshop to create the beautiful motion graphic videos. Here, you can easily learn about creating colorful psychedelic animation for your motion graphics. With this course you can easily turn the simple photos in the retro futuristic artwork and connect the emotions of the target audience.

03Introduction to Design and Modeling with Blender
This motion graphics video course is presented by the Luis Arizaga which defines the making of characters and the designs in your videos. This course mainly focuses on the blender software which helps you to create powerful animate videos using the render, light, model and the other objects. This course also tells you that how to use the camera lights and create the materials for your motion graphic videos.

04Express Animation for Social Media with After Effects
This course is provided by the Yimbo Escárrega over the internet. With the help of this course you can learn about making your motion graphic online projects quickly in the record time to save your time. While learning this course you can create the beautiful animations quickly and easily with the graphics as well as the video content.

05#Creation of Animated Short Films in for Social Media
The creation of animated short films in for the social media course is presented by the Buda.tv which mainly helps you to learn creating the animated short films for your projects. This helps you to learn the concept from the starting to the end so you can easily understand the basic concepts as well as up to the execution of your video. This course starts with the meeting with Martin and Dalmiro who are the founders of the Buda.TV. Slowly they will start teaching you short films and finally you will be able to export the project with the specification provided by the Martin and Dalmiro.

Part 3 How to Make Motion Graphics in 5 Steps Easily?
Creating motion graphic videos requires you to have lots of designing skills without using any software. In the software’s generally there are premade templates available for mostly all kinds of categories. You can use them and directly apply with your videos with just few changes. If you are still unsure about how to start then you can follow the below steps in this part.
01Things to Prepare before Starting
● First of all you need to start with a creative story. This will help your animator and writer to understand their job easily. Make sure to include all information in the story.
● Make sure to hire a good promotion team in the starting itself because it will help you to get the view of your videos as much as you want.
Now, if you ready then please follow the below steps.
02Steps of Making Motion Graphics
Step 1 Write your Script with a Story
If you want to create good motion graphics video then the story is the first requirement for your motion graphic video. Make sure to choose a short story which defines and clear the motive of video. Mostly stories will be from the seconds to 3 minutes.
Step 2 Prepare for Storyboard for Visualize the Content
Now, you need to prepare the story with the help of your team members of the production and design team. This is the step where the final product will take place. In this step if you have any confusion then you must discuss it with the team because this is very important part of your motion graphic video.
Step 3 Turn your Creative Storyboard in the Design:
At this stage you can now turn your storyboard idea in the design. Here you have to choose the graphic designs of your video, style and color combination for your video. The best thing is that you can choose simple design because it gives a great impact on the video you are creating for your brand.
Once you are ready with the sketches of the storyboard you can easily translate the storyboard in the design what you want. Make sure to keep the things perfect because at this stage every effort will be for the final design.
Step 4 Create the Final Motion Graphic Video Design:
This stage is where you will start animating your designs to make to actual motion graphic video. Here, you need to take care about lots of things such as the style of animation in video, timing, music and the sound effects.
Part 4 How to Make a Studio-quality Motion Graphics Video
Wondershare Filmora Video Editor
Wondershare Filmora is motion graphics maker software which enables you to create best and perfect motion graphics videos within few seconds with the help of premade templates offered in the software. This program comes with the beautiful interface which is very easy to understand for all users and everyone can videos without any effort even if you are newbie to the animation industry. The program comes with several unique features such as motion tracking, key framing, color matching, audio ducking, green screen, split screen, video effects, audio effects and many more other features.

Wondershare Filmora - Best Video Editor for Mac/Windows
5,481,435 people have downloaded it.
Build unique custom animations without breaking a sweat.
Focus on creating epic stories and leave the details to Filmora’s auto features.
Start a creative adventure with drag & drop effects and endless possibilities.
Filmora simplifies advanced features to save you time and effort.
Filmora cuts out repetition so you can move on to your next creative breakthrough.
● Key Takeaways from This Episode →
● Generally, creating motion graphics videos for your products or services requires lots of efforts when you are going to create them first time. It takes lots of time and research for making the motion graphic videos.
● If you want to save your time and create the award winning motion graphic videos then we would like you to try the Wondershare Filmora because it quickly create best and perfect videos for your product or services promotions.
Are you looking for the correct answers about what is motion graphics or how to create motion graphics? If yes, then you are at the right place.
Here we will discuss about few best motion graphics online websites and how to create motion graphics video.
In this article
01 [The Power of Motion Graphics](#Part 1)
02 [Motion Graphics Online Courses You Should Learn](#Part 2)
03 [How to Make Motion Graphics in 5 Steps Easily?](#Part 3)
04 [How to Make a Studio-quality Motion Graphics Video](#Part 4)
Part 1 The Power of Motion Graphics
Motion graphics is actually a term which is generally used to describe the mix up of the animation and the graphic designs. People usage the motion graphics in the emotions videos and market their products as well. Motion graphics with the video on the landing page of your website increases the conversion rate by 8as compared to the other methods. Motion graphic videos of your products can simply display the idea of your business within few seconds to the target audience. The biggest reason of using the motion graphics now a day is that motions graphics can quickly the critical or complex business things in few seconds with the fast, simple and compelling way.
Part 2 Motion Graphics Online Courses You Should Learn
If you are newbie to the motion graphics then there are thousands of courses available over the internet which can help you to learn what motion graphic is and how to create your own motion graphic videos of your product and services. Here we are going to list a few courses.
01Creative Coding: Making Visuals with JavaScript
This is the first course which is mainly designed to learn to make the beautiful visuals using the JavaScript. This course is designed by Bruno Imbrizi. In this course you can also explore the coding fundamentals very easily. You can learn the things you need to setup before the programming concepts such as loops, arrays, variables and functions.
02Psychedelic Animation with Photoshop and After Effects
This motion graphics online course is designed by the Klarens Malluta which helps you to understand the aspect of Photoshop to create the beautiful motion graphic videos. Here, you can easily learn about creating colorful psychedelic animation for your motion graphics. With this course you can easily turn the simple photos in the retro futuristic artwork and connect the emotions of the target audience.
03Introduction to Design and Modeling with Blender
This motion graphics video course is presented by the Luis Arizaga which defines the making of characters and the designs in your videos. This course mainly focuses on the blender software which helps you to create powerful animate videos using the render, light, model and the other objects. This course also tells you that how to use the camera lights and create the materials for your motion graphic videos.
04Express Animation for Social Media with After Effects
This course is provided by the Yimbo Escárrega over the internet. With the help of this course you can learn about making your motion graphic online projects quickly in the record time to save your time. While learning this course you can create the beautiful animations quickly and easily with the graphics as well as the video content.
05#Creation of Animated Short Films in for Social Media
The creation of animated short films in for the social media course is presented by the Buda.tv which mainly helps you to learn creating the animated short films for your projects. This helps you to learn the concept from the starting to the end so you can easily understand the basic concepts as well as up to the execution of your video. This course starts with the meeting with Martin and Dalmiro who are the founders of the Buda.TV. Slowly they will start teaching you short films and finally you will be able to export the project with the specification provided by the Martin and Dalmiro.
Part 3 How to Make Motion Graphics in 5 Steps Easily?
Creating motion graphic videos requires you to have lots of designing skills without using any software. In the software’s generally there are premade templates available for mostly all kinds of categories. You can use them and directly apply with your videos with just few changes. If you are still unsure about how to start then you can follow the below steps in this part.
01Things to Prepare before Starting
● First of all you need to start with a creative story. This will help your animator and writer to understand their job easily. Make sure to include all information in the story.
● Make sure to hire a good promotion team in the starting itself because it will help you to get the view of your videos as much as you want.
Now, if you ready then please follow the below steps.
02Steps of Making Motion Graphics
Step 1 Write your Script with a Story
If you want to create good motion graphics video then the story is the first requirement for your motion graphic video. Make sure to choose a short story which defines and clear the motive of video. Mostly stories will be from the seconds to 3 minutes.
Step 2 Prepare for Storyboard for Visualize the Content
Now, you need to prepare the story with the help of your team members of the production and design team. This is the step where the final product will take place. In this step if you have any confusion then you must discuss it with the team because this is very important part of your motion graphic video.
Step 3 Turn your Creative Storyboard in the Design:
At this stage you can now turn your storyboard idea in the design. Here you have to choose the graphic designs of your video, style and color combination for your video. The best thing is that you can choose simple design because it gives a great impact on the video you are creating for your brand.
Once you are ready with the sketches of the storyboard you can easily translate the storyboard in the design what you want. Make sure to keep the things perfect because at this stage every effort will be for the final design.
Step 4 Create the Final Motion Graphic Video Design:
This stage is where you will start animating your designs to make to actual motion graphic video. Here, you need to take care about lots of things such as the style of animation in video, timing, music and the sound effects.
Part 4 How to Make a Studio-quality Motion Graphics Video
Wondershare Filmora Video Editor
Wondershare Filmora is motion graphics maker software which enables you to create best and perfect motion graphics videos within few seconds with the help of premade templates offered in the software. This program comes with the beautiful interface which is very easy to understand for all users and everyone can videos without any effort even if you are newbie to the animation industry. The program comes with several unique features such as motion tracking, key framing, color matching, audio ducking, green screen, split screen, video effects, audio effects and many more other features.
Wondershare Filmora - Best Video Editor for Mac/Windows
5,481,435 people have downloaded it.
Build unique custom animations without breaking a sweat.
Focus on creating epic stories and leave the details to Filmora’s auto features.
Start a creative adventure with drag & drop effects and endless possibilities.
Filmora simplifies advanced features to save you time and effort.
Filmora cuts out repetition so you can move on to your next creative breakthrough.
● Key Takeaways from This Episode →
● Generally, creating motion graphics videos for your products or services requires lots of efforts when you are going to create them first time. It takes lots of time and research for making the motion graphic videos.
● If you want to save your time and create the award winning motion graphic videos then we would like you to try the Wondershare Filmora because it quickly create best and perfect videos for your product or services promotions.
The Only Guide You’ll Need to Learn About GIF Video Downloader
The Only Guide You’ll Ever Need to Learn About GIF Video Downloader
An easy yet powerful editor
Numerous effects to choose from
Detailed tutorials provided by the official channel
Want to escape the tiff of tedious video download processes? Stay tuned for best solutions
In this article
01 [Benefits of Using Video Downloader Online](#Part 1)
02 [How to Download Videos From Giphy?](#Part 2)
03 [How to Download Giphy Videos for Mobile/Computer?](#Part 3)
04 [Best 5 Tools for Converting Giphy to Mp4](#Part 4)
Part 1 Benefits of Using Video Downloader Online
Today’s information technology centered era has found a web solution for almost any and everything that can be possibly thought of. From informative articles to explanatory videos, you can find useful and need specific content in a diversity of ways. While reading does not sound a convenient cup of tea to most of us, videos are something more preferable.
When looking through descriptive solutions that could affordably serve your purpose, explanatory videos are the handiest choices owing to the ‘see and learn’ flexibility they provide viewers with. However, what attract more concern is, how to save these videos to your device. After all, you would never want to lose a useful video and most of us, of course have data pricing and usage limitations.
Online video downloader tools are certainly the most widely preferred and trusted solutions to the aforesaid concerns, and why not, they claim a range of choice benefits. Some of the obvious benefits of using these tools are listed below:
01Hassle Free Video Streaming
A seamless stream is something all of us would wish to be guaranteed of, before even thinking to watch a video. Whether looking through informative content or just as an entertainment choice, videos with frequent buffering intervals are always disapproving. One of the major reasons you should prefer an online video download is to escape the ‘and…that’s buffering again’ notch.
02Information Sharing
Living within a bunch of social media platforms and utilities, content sharing has become more of a habit than a requisite need. Any and everything ranging from useful to entertaining, unusual to funny; is shared across social media platforms every seconds.
Well, that’s absolutely fine, but what if you wish to share large video files through Instant Messaging tools and mails? Link sharing is not always convenient, owing to device version differences. To be on the safe side, it is quite better to download videos online and share them with your peers without having to worry about length and device compatibility.
03Cut Down on e-Learning Utilities
Imagine a scenario where you are into watching an explicitly useful video and the internet shuts down or you run out of data? This can be both annoying and critical at times. Why take the risk when you have dependable solutions? Just go for a quick video download using any of your preferred online tools and enjoy an uninterrupted streaming
04YouTube is not the End
Online video downloading tools provide you with the flexibility of surfing through a pool of content sites and support a range of video formats. Consequently, there is a visibly unlimited content access and download liberty that these tools assure you of. As a matter of fact, YouTube is definitely not the only video platform you are left with.
05Say ‘NO’ to Installation Procedures
Installing apps is something most of us tend to preferably avoid. While the running out of your device’s storage space is an evident concern, exposure to malware and spam content is an added risk to your smartphone or PC. Besides this, installation procedures may often be wary and time consuming. Taking the help of inbuilt download feature these online tools have is an affordable pick through.
06Convenient Usage
Not everyone around you is familiar with the know-how of technical utilities. Keeping that in mind, these online video download tools are developed to serve users within a range of technical backgrounds. Even if you don’t know anything about downloads, all you need to do is just copy a video link and paste it in the downloader’s URL bar and that’s actually it. You can see the video in your device gallery within a minimal time span.
Part 2 How to Download Videos From Giphy?
Giphy is a popular and preferred application you can choose to share video contents with social media communities across various platforms. The site has introduced a GIF Video downloader tool to facilitate quick and easy video downloads among its users. This tool allows you a high quality video download in mp4 format.
The tool is compatible with almost all common web browsers and confines the video download process to a single copy-paste step. You can even download live Giphy videos here, but you are required to wait for the video streaming to finish. To download videos to your heart’s content using this tool, here’s what you need to do:
Step 1: Copy a Video Link
Visit the official website of Giphy and type a matching keyword in the search box to look for a desired video. You can also refer to the site’s suggestion list that appears when you enter a particular keyword. When you have made your choice, just copy the video URL.
Step 2: Time to Paste
Paste the copied link in the Giphy search bar and click on ‘Download’ to receive a download link for your selected video. Click on the provided link to initiate the downloading process.
Part 3 How to Download Giphy Videos for Mobile/Computer?
Most of us have specific device preferences to get that perfect and comfortable video streaming experience. While some of us get glued to smartphones, others may find PCs more convenient. If device compatibility keeps you from watching your favorite videos, see through the following steps to download GIF videos on any of your preferred devices:
01Mobile Downloads
Downloading Giphy videos was never easier You just need to do the following to get your favorite one in your smartphone:
Step 1:
Visit the official Giphy website and search a video of your choice.
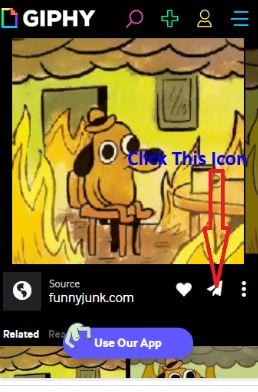
Step2:
Once found, copy the video URL and paste the same in the Giphy search bar.
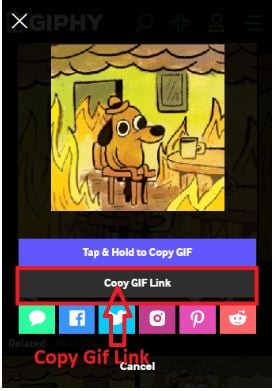
Step 3:
Click ‘Download’ and that’s it
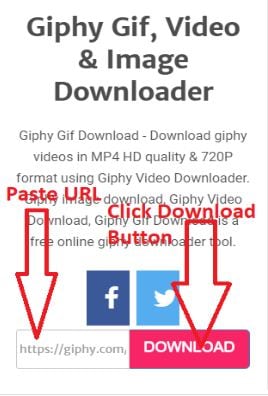
02PC Downloads
If you are among those who would rather prefer a wide screen video stream, you can choose download Giphy videos into your PC. After all, it’s nothing more than a few quick steps All you have to do is explained below:
Step 1: Video Selection
In your suitable browser, visit the official Giphy website. Select a video category from the top and select a video you wish to download.
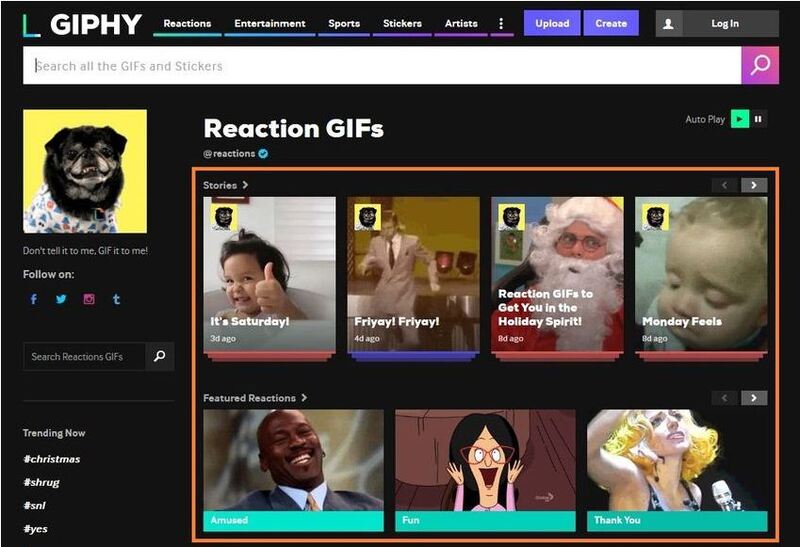
Step 2: Save Your Video
Right click on your previously selected video and choose ‘Save Image As’ fr4om the drop down menu. The ‘Save Image’ box opens up.
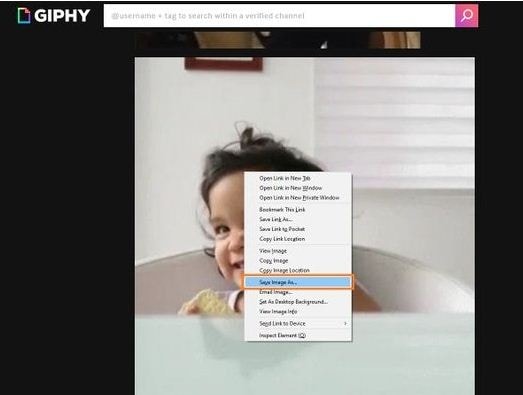
Step 3: Name Your Video
Using the ‘Save Image’ box, navigate to a suitable destination in your PC where you want to save your video. In the ‘File Name’ dialog box, give a name to the video file without changing the file extension. When you are done, click on ‘Save’. This will download and save your video in the selected target folder.
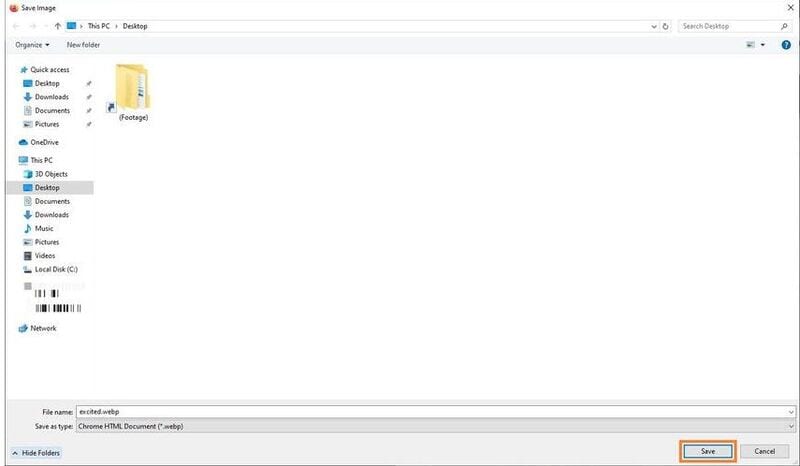
Part 4 Best 5 Tools for Converting Giphy to Mp4
While the short and specific GIFs on the Giphy website are quite interesting and impactful, you may sometimes encounter the need to go for a change of video format (for IM and mail sharing purposes). Having learnt about benefits of online video download, you would certainly want to browse through the best tools for converting Giphy videos to mp4.
Listed below are some of the most quick and convenient tools you can choose to convert Giphy video to mp4:
01** Wondershare Filmora Video Editor
This is exceptionally excellent video converter software that has the potential to cater to all your conversion needs in a single go. Loaded with exciting features and available to users for free, this tool supports and ensures a hassle free inter conversion of almost all known video file formats. This is a single package solution to all your video editing and conversion requirements.
Wondershare Filmora
Get started easily with Filmora’s powerful performance, intuitive interface, and countless effects  Try It Free Try It Free Learn More >

Key Features:
Some of the most prominent features of this software include the following:
● The most appealing feature about this tool is that you don’t require an internet facility to use it.
● Highly stable and crash protected software, even on heavy loading (around 10 files at a time).
● Has the most convenient interface, suitable for users with varieties of technical aptitude.
● Comes with an inbuilt audio library that allows you to add relatable music to your video, once you are done with the conversion process.
● You can enhance your downloaded video with a range of amazing effects and texts in the tool’s editor window.
02Online-Convert
This is quite a handy tool to convert Giphy videos to mp4. It comes with an inbuilt video editor that gives you the liberty to cut, crop, trim and rotate your videos to exclusively extract the ‘most perfect’ parts and even decorate them with amazing frames. This one is also a free video converter tool.
Key Features
Listed below are some of the most viable features of this conversion tool:
● You can directly export the mp4 files to Cloud utilities.
● This tool supports almost all video formats.
● Has preloaded fundamental video editing features
03Convert GIF to Mp4
This one is a free online Giphy to mp4 converter tool, having a bit tricky interface, but has amazing editing features. You can cut, crop and trim videos, add music and adjust frame rates and even add subtitles to your videos with this tool. It however does not support external media sharing of the converted mp4 files.
Key Features:
Major attractions of this online tool comprise the following:
● This tool is loaded with hundreds of sound and video editing utilities.
● It comes with SubRip Subtitle (SRT) files that you can use to add interesting subtitles and make your videos more impactful.
● You can directly export the downloaded videos to your Google and IOS Dropbox.
04GIF-2-Mp4
This conversion tool has possibly has the most convenient user interface. Like most online tools, this too offers you a free GIF to video conversion service. However, you will have to compromise on the editing flexibility and data limit while using this tool, as it lacks any editing features and converts files within 50 MB. You can only adjust the resolution and quality of the converted mp4 files.
Key Features:
You can still prefer this conversion tool on account of the following features:
● This tool is simple and is developed with a view to assure user cohesiveness.
● You don’t need to go through wary software settings or wait for long durations for the conversion process to finish.
● Using this tool, you can share video files through email.
05CloudConvert
This is another excellent online tool to convert Giphy videos to mp4. It enables a quick file conversion and you are granted the liberty to make adjustments in video quality, file size and resolution. The tool’s handy interface converts GIF video to mp4 files in a matter of several seconds. However, it has a limitation of allowing utmost 25 conversions in 24 hours.
Key Features:
Using this tool for video conversion gives you access to the following features:
● This is a quick and free converter tool.
● You are not forced to watch unnecessary advertisements on the tool’s site.
● You can go for a parallel conversion of multiple files.
● You can make changes in the default video and sound settings.
● Key Takeaways from This Episode →
● Online video downloader tools are an advantageous means of hassle free video streaming.
● User credibility has flooded the online market with a range of video converter tools.
● Filmora is among the most preferred, quick and convenient GIF to mp4 converters available online.
Want to escape the tiff of tedious video download processes? Stay tuned for best solutions
In this article
01 [Benefits of Using Video Downloader Online](#Part 1)
02 [How to Download Videos From Giphy?](#Part 2)
03 [How to Download Giphy Videos for Mobile/Computer?](#Part 3)
04 [Best 5 Tools for Converting Giphy to Mp4](#Part 4)
Part 1 Benefits of Using Video Downloader Online
Today’s information technology centered era has found a web solution for almost any and everything that can be possibly thought of. From informative articles to explanatory videos, you can find useful and need specific content in a diversity of ways. While reading does not sound a convenient cup of tea to most of us, videos are something more preferable.
When looking through descriptive solutions that could affordably serve your purpose, explanatory videos are the handiest choices owing to the ‘see and learn’ flexibility they provide viewers with. However, what attract more concern is, how to save these videos to your device. After all, you would never want to lose a useful video and most of us, of course have data pricing and usage limitations.
Online video downloader tools are certainly the most widely preferred and trusted solutions to the aforesaid concerns, and why not, they claim a range of choice benefits. Some of the obvious benefits of using these tools are listed below:
01Hassle Free Video Streaming
A seamless stream is something all of us would wish to be guaranteed of, before even thinking to watch a video. Whether looking through informative content or just as an entertainment choice, videos with frequent buffering intervals are always disapproving. One of the major reasons you should prefer an online video download is to escape the ‘and…that’s buffering again’ notch.
02Information Sharing
Living within a bunch of social media platforms and utilities, content sharing has become more of a habit than a requisite need. Any and everything ranging from useful to entertaining, unusual to funny; is shared across social media platforms every seconds.
Well, that’s absolutely fine, but what if you wish to share large video files through Instant Messaging tools and mails? Link sharing is not always convenient, owing to device version differences. To be on the safe side, it is quite better to download videos online and share them with your peers without having to worry about length and device compatibility.
03Cut Down on e-Learning Utilities
Imagine a scenario where you are into watching an explicitly useful video and the internet shuts down or you run out of data? This can be both annoying and critical at times. Why take the risk when you have dependable solutions? Just go for a quick video download using any of your preferred online tools and enjoy an uninterrupted streaming
04YouTube is not the End
Online video downloading tools provide you with the flexibility of surfing through a pool of content sites and support a range of video formats. Consequently, there is a visibly unlimited content access and download liberty that these tools assure you of. As a matter of fact, YouTube is definitely not the only video platform you are left with.
05Say ‘NO’ to Installation Procedures
Installing apps is something most of us tend to preferably avoid. While the running out of your device’s storage space is an evident concern, exposure to malware and spam content is an added risk to your smartphone or PC. Besides this, installation procedures may often be wary and time consuming. Taking the help of inbuilt download feature these online tools have is an affordable pick through.
06Convenient Usage
Not everyone around you is familiar with the know-how of technical utilities. Keeping that in mind, these online video download tools are developed to serve users within a range of technical backgrounds. Even if you don’t know anything about downloads, all you need to do is just copy a video link and paste it in the downloader’s URL bar and that’s actually it. You can see the video in your device gallery within a minimal time span.
Part 2 How to Download Videos From Giphy?
Giphy is a popular and preferred application you can choose to share video contents with social media communities across various platforms. The site has introduced a GIF Video downloader tool to facilitate quick and easy video downloads among its users. This tool allows you a high quality video download in mp4 format.
The tool is compatible with almost all common web browsers and confines the video download process to a single copy-paste step. You can even download live Giphy videos here, but you are required to wait for the video streaming to finish. To download videos to your heart’s content using this tool, here’s what you need to do:
Step 1: Copy a Video Link
Visit the official website of Giphy and type a matching keyword in the search box to look for a desired video. You can also refer to the site’s suggestion list that appears when you enter a particular keyword. When you have made your choice, just copy the video URL.
Step 2: Time to Paste
Paste the copied link in the Giphy search bar and click on ‘Download’ to receive a download link for your selected video. Click on the provided link to initiate the downloading process.
Part 3 How to Download Giphy Videos for Mobile/Computer?
Most of us have specific device preferences to get that perfect and comfortable video streaming experience. While some of us get glued to smartphones, others may find PCs more convenient. If device compatibility keeps you from watching your favorite videos, see through the following steps to download GIF videos on any of your preferred devices:
01Mobile Downloads
Downloading Giphy videos was never easier You just need to do the following to get your favorite one in your smartphone:
Step 1:
Visit the official Giphy website and search a video of your choice.
Step2:
Once found, copy the video URL and paste the same in the Giphy search bar.
Step 3:
Click ‘Download’ and that’s it
02PC Downloads
If you are among those who would rather prefer a wide screen video stream, you can choose download Giphy videos into your PC. After all, it’s nothing more than a few quick steps All you have to do is explained below:
Step 1: Video Selection
In your suitable browser, visit the official Giphy website. Select a video category from the top and select a video you wish to download.
Step 2: Save Your Video
Right click on your previously selected video and choose ‘Save Image As’ fr4om the drop down menu. The ‘Save Image’ box opens up.
Step 3: Name Your Video
Using the ‘Save Image’ box, navigate to a suitable destination in your PC where you want to save your video. In the ‘File Name’ dialog box, give a name to the video file without changing the file extension. When you are done, click on ‘Save’. This will download and save your video in the selected target folder.
Part 4 Best 5 Tools for Converting Giphy to Mp4
While the short and specific GIFs on the Giphy website are quite interesting and impactful, you may sometimes encounter the need to go for a change of video format (for IM and mail sharing purposes). Having learnt about benefits of online video download, you would certainly want to browse through the best tools for converting Giphy videos to mp4.
Listed below are some of the most quick and convenient tools you can choose to convert Giphy video to mp4:
01** Wondershare Filmora Video Editor
This is exceptionally excellent video converter software that has the potential to cater to all your conversion needs in a single go. Loaded with exciting features and available to users for free, this tool supports and ensures a hassle free inter conversion of almost all known video file formats. This is a single package solution to all your video editing and conversion requirements.
Wondershare Filmora
Get started easily with Filmora’s powerful performance, intuitive interface, and countless effects Try It Free Try It Free Learn More >
Key Features:
Some of the most prominent features of this software include the following:
● The most appealing feature about this tool is that you don’t require an internet facility to use it.
● Highly stable and crash protected software, even on heavy loading (around 10 files at a time).
● Has the most convenient interface, suitable for users with varieties of technical aptitude.
● Comes with an inbuilt audio library that allows you to add relatable music to your video, once you are done with the conversion process.
● You can enhance your downloaded video with a range of amazing effects and texts in the tool’s editor window.
02Online-Convert
This is quite a handy tool to convert Giphy videos to mp4. It comes with an inbuilt video editor that gives you the liberty to cut, crop, trim and rotate your videos to exclusively extract the ‘most perfect’ parts and even decorate them with amazing frames. This one is also a free video converter tool.
Key Features
Listed below are some of the most viable features of this conversion tool:
● You can directly export the mp4 files to Cloud utilities.
● This tool supports almost all video formats.
● Has preloaded fundamental video editing features
03Convert GIF to Mp4
This one is a free online Giphy to mp4 converter tool, having a bit tricky interface, but has amazing editing features. You can cut, crop and trim videos, add music and adjust frame rates and even add subtitles to your videos with this tool. It however does not support external media sharing of the converted mp4 files.
Key Features:
Major attractions of this online tool comprise the following:
● This tool is loaded with hundreds of sound and video editing utilities.
● It comes with SubRip Subtitle (SRT) files that you can use to add interesting subtitles and make your videos more impactful.
● You can directly export the downloaded videos to your Google and IOS Dropbox.
04GIF-2-Mp4
This conversion tool has possibly has the most convenient user interface. Like most online tools, this too offers you a free GIF to video conversion service. However, you will have to compromise on the editing flexibility and data limit while using this tool, as it lacks any editing features and converts files within 50 MB. You can only adjust the resolution and quality of the converted mp4 files.
Key Features:
You can still prefer this conversion tool on account of the following features:
● This tool is simple and is developed with a view to assure user cohesiveness.
● You don’t need to go through wary software settings or wait for long durations for the conversion process to finish.
● Using this tool, you can share video files through email.
05CloudConvert
This is another excellent online tool to convert Giphy videos to mp4. It enables a quick file conversion and you are granted the liberty to make adjustments in video quality, file size and resolution. The tool’s handy interface converts GIF video to mp4 files in a matter of several seconds. However, it has a limitation of allowing utmost 25 conversions in 24 hours.
Key Features:
Using this tool for video conversion gives you access to the following features:
● This is a quick and free converter tool.
● You are not forced to watch unnecessary advertisements on the tool’s site.
● You can go for a parallel conversion of multiple files.
● You can make changes in the default video and sound settings.
● Key Takeaways from This Episode →
● Online video downloader tools are an advantageous means of hassle free video streaming.
● User credibility has flooded the online market with a range of video converter tools.
● Filmora is among the most preferred, quick and convenient GIF to mp4 converters available online.
Easy Cartoon Characters Drawing Tutorials for You Beginners
Easy Cartoon Characters Drawing Tutorials for You Who Are Learning to Draw
An easy yet powerful editor
Numerous effects to choose from
Detailed tutorials provided by the official channel
Learning the art of cartoon characters drawing? We can help! Cartoon characters drawing is no rocket science, ABCD: Anybody Can Draw!

We are as excited as you as we bring to you a few of the best drawing tutorials!
In this article
01 [Double Your Results with Learning Cartoon Drawing Styles First](#Part 1)
02 [Best 6 Cartoon Characters Anyone Can Draw (with Free Video Tutorials)](#Part 2)
03 [Easy Cartoon Characters to Draw Step by Step](#Part 3)
Part 1 Double Your Results with Learning Cartoon Drawing Styles First
01 Cartoon Character Sketches
Sketching is one of the most popular art forms. Sketching can be done for real-life people or celebrities or we can also make sketches of imaginary characters and cartoons. Sketching is generally made of pencil and does not involve the usage of colors.

02 Cartoon Characters Drawing with Color
Cartoon characters can be made with color to make them more attractive. This is another popular form of art that cartoonists follow. You can explore several methods of coloring and try making your cartoon colorful.

03 Disney Cartoon Characters Drawing
Disney cartoon character drawing is probably one of the simplest. This is because they have a predefined size and are mostly symmetric. Disney cartoon characters generally use common geometric shapes such as circles, ovals, and squares. Hence making it a beginner-friendly choice!

Part 2 Best 6 Cartoon Characters Anyone Can Draw (with Free Video Tutorials)
01 Roger the alien
Roger the alien is one of the simplest cartoon characters to draw. This children’s classic cartoon character always intrigues children due to its bizarre shape. It fixes the image of an outer space characters in a child’s mind(If they exist).
What makes it easy to draw?
● The oval-shaped head is easy to draw since it is not very detailed.
● The character does not have any hair, hair is one of the more difficult parts to draw.
● The body features aren’t very prominent, hence making the character easy to draw.
Challenges you may encounter
● If you are a first-timer, then you may find it challenging to draw fingers and the toes.
● Getting the weird alien head shape might be a little difficult and may take you a few attempts.
● Making the two eyes exactly similar to each other may be challenging for a few of you.
02 Wakko Warner
What makes it easy to draw?
● The character generally has geometrical shapes and hence you can use shape tracers to draw a few parts.
● The appealing appearance of the character makes it interesting to draw.
● The eyes are not very difficult to recreate.
Challenges you may encounter
● The eyes are not very difficult to recreate.
● The shape of the mouth and the tongue that is sticking out is slightly complex.
● Perfecting the shape of the hair is a little challenging.
03 Cosmo
What makes it easy to draw?
● We recommend you to try this character out mainly because of its uniqueness.
● The eyes are not very complicated to draw.
● The body resembles a stick image and is hence simple to draw.
Challenges you may encounter
● The shape of the crown needs to be perfect, especially because of the tilt the crown has.
● The fingers are challenging to draw.
● The hair has a distinct shape, this shape needs to come out perfectly.
04 Courage the cowardly dog
What makes it easy to draw?
● Firstly, it’s one of the most favorite cartoons, hence it will ensure to keep you interested in the drawing.
● The hands and legs resemble stick figures and are simple to draw.
● The body structure is simple.
Challenges you may encounter
● Drawing a cartoon animal instead of a human being might be intriguing for beginners.
● The large eyes, which is one of the characteristic features needs to be perfect.
● The design of the ears is the trickiest part and could be difficult to draw.
05 Tom And Jerry
When we think of cartoons, the first few names that probably come to our mind are tom and jerry. This duo of a grumpy cat and a mysterious mouse has left an everlasting impact on the world of cartoons. The duo is famous throughout the world and is loved throughout age groups
Why do we recommend you to try your hands on this?
● This is a classic cartoon that almost everyone loves.
● There are several resources on the internet to help you draw the cartoon characters.
● The characters need not be perfect, even a close resemblance to them would be sufficient for the viewers to identify them due to their fame.
Challenges you may encounter
● You need to be careful with the proportion of sizes of tom and jerry.
● The structures of tom and jerry are not very simple to draw.
● Perfecting the grumpy expression on tom’s face and a frightened expression on jerry’s face is challenging.
05 Catdog
Catdog is another very interesting character. Who’d have imagined a cat and a dog morphed in a single body? Well, imagination has no end to it as they say! Catdog is a yellow cat and dog in a single body, it looks cute and at the same time intriguing.
Why do we recommend you try your hands on this?
● The cartoon character is mainly composed of geometrical shapes.
● The character is vividly colorful.
● The bright yellow color is super attractive and hence makes drawing catdog very fun.
Challenges you may encounter
● The character is illusional, you might have difficulty while deciding how to even look at it.
● The cat and dog faces are not very different from each other and have minute differences while drawing you need to be careful about having a distinct difference between the two faces.
Now that we’ve taken our baby steps towards understanding the art of drawing cartoons.
Key Takeaways from This Episode
● That’s a lot of knowledge for today, isn’t it? Today we’ve seen the basics of drawing cartoon characters.
● We also got our hands dirty by exploring a few easy cartoon characters that you could draw.
● Further, we saw the basic steps that you would need to take in order to draw the face of any cartoon character! All in all, we learned everything we needed to know to draw our first cartoon! What are you waiting for? Go try out drawing your first cartoon today Try It Free
Learning the art of cartoon characters drawing? We can help! Cartoon characters drawing is no rocket science, ABCD: Anybody Can Draw!
We are as excited as you as we bring to you a few of the best drawing tutorials!
In this article
01 [Double Your Results with Learning Cartoon Drawing Styles First](#Part 1)
02 [Best 6 Cartoon Characters Anyone Can Draw (with Free Video Tutorials)](#Part 2)
03 [Easy Cartoon Characters to Draw Step by Step](#Part 3)
Part 1 Double Your Results with Learning Cartoon Drawing Styles First
01 Cartoon Character Sketches
Sketching is one of the most popular art forms. Sketching can be done for real-life people or celebrities or we can also make sketches of imaginary characters and cartoons. Sketching is generally made of pencil and does not involve the usage of colors.
02 Cartoon Characters Drawing with Color
Cartoon characters can be made with color to make them more attractive. This is another popular form of art that cartoonists follow. You can explore several methods of coloring and try making your cartoon colorful.
03 Disney Cartoon Characters Drawing
Disney cartoon character drawing is probably one of the simplest. This is because they have a predefined size and are mostly symmetric. Disney cartoon characters generally use common geometric shapes such as circles, ovals, and squares. Hence making it a beginner-friendly choice!
Part 2 Best 6 Cartoon Characters Anyone Can Draw (with Free Video Tutorials)
01 Roger the alien
Roger the alien is one of the simplest cartoon characters to draw. This children’s classic cartoon character always intrigues children due to its bizarre shape. It fixes the image of an outer space characters in a child’s mind(If they exist).
What makes it easy to draw?
● The oval-shaped head is easy to draw since it is not very detailed.
● The character does not have any hair, hair is one of the more difficult parts to draw.
● The body features aren’t very prominent, hence making the character easy to draw.
Challenges you may encounter
● If you are a first-timer, then you may find it challenging to draw fingers and the toes.
● Getting the weird alien head shape might be a little difficult and may take you a few attempts.
● Making the two eyes exactly similar to each other may be challenging for a few of you.
02 Wakko Warner
What makes it easy to draw?
● The character generally has geometrical shapes and hence you can use shape tracers to draw a few parts.
● The appealing appearance of the character makes it interesting to draw.
● The eyes are not very difficult to recreate.
Challenges you may encounter
● The eyes are not very difficult to recreate.
● The shape of the mouth and the tongue that is sticking out is slightly complex.
● Perfecting the shape of the hair is a little challenging.
03 Cosmo
What makes it easy to draw?
● We recommend you to try this character out mainly because of its uniqueness.
● The eyes are not very complicated to draw.
● The body resembles a stick image and is hence simple to draw.
Challenges you may encounter
● The shape of the crown needs to be perfect, especially because of the tilt the crown has.
● The fingers are challenging to draw.
● The hair has a distinct shape, this shape needs to come out perfectly.
04 Courage the cowardly dog
What makes it easy to draw?
● Firstly, it’s one of the most favorite cartoons, hence it will ensure to keep you interested in the drawing.
● The hands and legs resemble stick figures and are simple to draw.
● The body structure is simple.
Challenges you may encounter
● Drawing a cartoon animal instead of a human being might be intriguing for beginners.
● The large eyes, which is one of the characteristic features needs to be perfect.
● The design of the ears is the trickiest part and could be difficult to draw.
05 Tom And Jerry
When we think of cartoons, the first few names that probably come to our mind are tom and jerry. This duo of a grumpy cat and a mysterious mouse has left an everlasting impact on the world of cartoons. The duo is famous throughout the world and is loved throughout age groups
Why do we recommend you to try your hands on this?
● This is a classic cartoon that almost everyone loves.
● There are several resources on the internet to help you draw the cartoon characters.
● The characters need not be perfect, even a close resemblance to them would be sufficient for the viewers to identify them due to their fame.
Challenges you may encounter
● You need to be careful with the proportion of sizes of tom and jerry.
● The structures of tom and jerry are not very simple to draw.
● Perfecting the grumpy expression on tom’s face and a frightened expression on jerry’s face is challenging.
05 Catdog
Catdog is another very interesting character. Who’d have imagined a cat and a dog morphed in a single body? Well, imagination has no end to it as they say! Catdog is a yellow cat and dog in a single body, it looks cute and at the same time intriguing.
Why do we recommend you try your hands on this?
● The cartoon character is mainly composed of geometrical shapes.
● The character is vividly colorful.
● The bright yellow color is super attractive and hence makes drawing catdog very fun.
Challenges you may encounter
● The character is illusional, you might have difficulty while deciding how to even look at it.
● The cat and dog faces are not very different from each other and have minute differences while drawing you need to be careful about having a distinct difference between the two faces.
Now that we’ve taken our baby steps towards understanding the art of drawing cartoons.
Key Takeaways from This Episode
● That’s a lot of knowledge for today, isn’t it? Today we’ve seen the basics of drawing cartoon characters.
● We also got our hands dirty by exploring a few easy cartoon characters that you could draw.
● Further, we saw the basic steps that you would need to take in order to draw the face of any cartoon character! All in all, we learned everything we needed to know to draw our first cartoon! What are you waiting for? Go try out drawing your first cartoon today!
Tutorial Guide to Animate Pictures in Canva
Versatile Video Editor - Wondershare Filmora
An easy yet powerful editor
Numerous effects to choose from
Detailed tutorials provided by the official channel
With the rapid rise of social media worldwide, animated posts (like GIFs) are becoming famous. They have become a replacement to other modes like JPEG and .Png
Famous designing tools like Canva introduced an animation feature in the light of its popularity. The feature allows you to step up your social media game and creates animated visuals in a blink! It is also efficient for both professional and amateur users.
Besides social media content, Canva is also useful to design birthday cards, event invites, inspirational quotes, and more! Let’s learn about how to animate pictures in Canva in detail.
In this article
01 What Canva Pictures Can Be Used For?
02 How to Animate Pictures in Canva?
03 Tips: Animate Pictures In Video
Part 1: What Canva Pictures Can Be Used For?
Be it for marketing campaigns or projects, Canva is the best tool for all designing work. It is a foolproof platform where you do not need prior designing experience. Canva is useful for

Social media/Instagram Posts: You can build your Instagram presence by creating posts through Canva. It has multiple templates and features to make alluring Instagram posts. It also has drag-and-drop free images to add customized designs to the template.
Facebook Covers: You can make Facebook covers on Canva by choosing a layout and adding other elements. You can include colors, fonts, and pictures on the cover. Canva has templates for all themes, moods, and styles!
Event Invites: Canva has hundreds of free layouts and libraries to create event invites. You can choose the appropriate template and incorporate party-oriented photos, icons, stickers, illustrations, and graphics. It also has a personalizing option to add personal pictures and artwork in the editor.
Inspirational Quotes: Canva allows you to curate inspirational quotes and dispense motivation in people. It has templates to modify the elements like font size, text size, borders, images, and more!
Collages: It helps create a collage where you can combine multiple pictures in one frame. Canva offers various grids with a capacity of 12 pictures and different sizes.
Part 2: How to Animate Pictures in Canva?
Canva helps you add instant animation in presentations, social media posts, and more. To know how to animate images in Canva, follow the below steps:

Step 1: Add Static Elements
Start by creating an image through static elements. To make the design attractive, you can add sample texts, illustrations, doodles, and other entities.
Try to stimulate your creativity and come up with a layout beforehand. If possible, sketch on paper and replicate the same.
Step 2: Animate Your Design
Take a final glance at the layout. Make sure it’s perfect. Once all the elements are placed as per your design, it’s time to animate them. For that:
- Click on the white background page
- Go to the “Toolbar” section
- Select the “Animate” button
Step 3: Select Page Animation Style
Canva offers six animation styles, where five are for free users, and one is for pro users. To access the five animation styles, follow these steps.
- Press the “Animate” Button
- Select “Page Animations”
- There you will find options like Block, Pan, Fade, Rise, and Tumble
- Select the style as per your design
Step 4: Preview and Download
After selecting a page animation style, it will preview the effect. If you find it good, move on to downloading the GIF. Here’s how to do so
- Go to the “Toolbar” option (present on your upper right hand)
- Choose GIF as the file type
- Check the page number and verify if it’s correct
- Press the “Done” button
Step 5: Final GIF
After clicking on the “Done” button, your GIF will be downloaded. You will be able to see a display for five seconds. If you want to edit the image after this, click on the time button (near the “Animate” button).
So, that was all about how to animate a photo in Canva.
Drawbacks of Canva
Despite efficient features and easy interface, there are certain areas where Canva lacks. This includes
- It does not have any local file storage.
- As too many people use Canva, your template may look the same as others.
- Some of its best features are not free to access.
- The mobile app version lacks certain elements and features.
Out of all these drawbacks, repetitions of templates are a big issue. That’s because everyone wants their posts to look unique and irreplaceable. However, common Canva templates may prevent that from happening.
Fortunately, there are ways to combat such issues. Let’s learn about them in the next section.
Tips: Animate Pictures In Video
You can also animate pictures in the video to make them more lively. For that, you can use Wondershare Filmora Pro Video Editor. It’s also efficient if you don’t know how to animate a picture in Canva:
Wondershare Filmora Video Editor
Filmora by Wondershare is a video editing software that helps you build custom animations easily. It has auto features to make epic stories and posts.
Wondershare Filmora
Get started easily with Filmora’s powerful performance, intuitive interface, and countless effects Try It Free Try It Free Learn More about Filmora>
Its drag and drop effect makes designing simple and quick. Due to its outstanding attributes, options, and styles, Filmora has 77+ million happy users!
It’s a power-packed integration of functionality, performance, and more! In fact, it resolves the repeated template issue of Canva. The software has top-notch functions and innovative filters that add authenticity to the designs.
Till now, you learned about how to animate a picture on Canva. Now, let’s comprehend the right way to use Filmora for animating and adding images in the video.
Before using, make sure to update the software to its latest version. Follow separate methods for both Windows and Mac.
For Win
Step 1: Adding Image to Video Track
With Filmora, adding images to video is a matter of seconds! Start by:
- Identify the position where you want to add the image and place the Playhead there.
- Right-click on the picture from the media library. Click on the “Insert” option. Your image will be added. Select the “Append” option, if you want to add an image at the video end.

Note: How to Remove Black Bars around the Image?
- Go to “Settings” from the File section.
- Click on the “Editing” tab and select “Photo Placement.”
- Choose from the “Crop to Fit” or “Pan To Zoom” option. The black bars will be removed.
To add the image in between the video clip, split them. Now, add the image between the split parts.
Step 2: Add Images as Overlays
To add images as overlays, drag the image to a video track above the main track. The main track consists of your video.
Track 1 (or the track with a video clip) is the base of your video. If you add anything else, it will be displayed above this track as video track 2, 3, and so on. Overall, you can add 100 video tracks.
Step 3: Edit Your Image
If you know how to animate an image in Canva, editing images on Filmora is even easier. You can try the following methods:
Animate Your Images
- To add animation presets to the image, click on the image twice.
- Go to the “Animation Tab” and look for an animation preset.
- Drag the presets to the image for its effect

Make Image Color Adjustments
- Double-click on the image
- Go to the “Color” tab and then the “Color” section
- Customize the temperature, saturation, brightness, etc., as per your need.
- Press Ok.
Change Image Duration
You can increase the image duration to more than the default timing of 5 seconds. For that:
- Click on the image and select the “Duration” option.
- Go to the “Duration Setting” panel.
- Add the new duration timing.

Adjust Position, Rotate/Flip, and Opacity
- You can resize the image position through the circles and squares at the image edges.
- To flip or rotate the image, double-click on the picture. From the “Image Panel,” go to “Transform” and then click on “Rotate.” You can choose either “Horizontal Flip” or “Vertical Flip” to flip the images.
- Double-click on the image and click on the “Composting” option to add opacity. You can choose the blending mode or adjust the “Opacity” accordingly.

For Mac
Filmora for Mac comes with a drag and drop feature to add transitions, animated titles, and effects. You can start a new project from scratch by clicking on “New Project”. The entire process is the same as that for Windows users.
To apply animation in the images, use the motion effects option. For that,
- Click on the Image
- Go to Motion Tab
- Select a motion effect
- Double-click to apply the effect

Conclusion
So that’s how to animate photos in Canva. Hopefully, our steps will help you revamp your posts like a pro! If not Canva, you can use its alternative Filmora. It’s equally prominent, user-friendly, and feature-rich.
Versatile Video Editor - Wondershare Filmora
An easy yet powerful editor
Numerous effects to choose from
Detailed tutorials provided by the official channel
With the rapid rise of social media worldwide, animated posts (like GIFs) are becoming famous. They have become a replacement to other modes like JPEG and .Png
Famous designing tools like Canva introduced an animation feature in the light of its popularity. The feature allows you to step up your social media game and creates animated visuals in a blink! It is also efficient for both professional and amateur users.
Besides social media content, Canva is also useful to design birthday cards, event invites, inspirational quotes, and more! Let’s learn about how to animate pictures in Canva in detail.
In this article
01 What Canva Pictures Can Be Used For?
02 How to Animate Pictures in Canva?
03 Tips: Animate Pictures In Video
Part 1: What Canva Pictures Can Be Used For?
Be it for marketing campaigns or projects, Canva is the best tool for all designing work. It is a foolproof platform where you do not need prior designing experience. Canva is useful for
Social media/Instagram Posts: You can build your Instagram presence by creating posts through Canva. It has multiple templates and features to make alluring Instagram posts. It also has drag-and-drop free images to add customized designs to the template.
Facebook Covers: You can make Facebook covers on Canva by choosing a layout and adding other elements. You can include colors, fonts, and pictures on the cover. Canva has templates for all themes, moods, and styles!
Event Invites: Canva has hundreds of free layouts and libraries to create event invites. You can choose the appropriate template and incorporate party-oriented photos, icons, stickers, illustrations, and graphics. It also has a personalizing option to add personal pictures and artwork in the editor.
Inspirational Quotes: Canva allows you to curate inspirational quotes and dispense motivation in people. It has templates to modify the elements like font size, text size, borders, images, and more!
Collages: It helps create a collage where you can combine multiple pictures in one frame. Canva offers various grids with a capacity of 12 pictures and different sizes.
Part 2: How to Animate Pictures in Canva?
Canva helps you add instant animation in presentations, social media posts, and more. To know how to animate images in Canva, follow the below steps:
Step 1: Add Static Elements
Start by creating an image through static elements. To make the design attractive, you can add sample texts, illustrations, doodles, and other entities.
Try to stimulate your creativity and come up with a layout beforehand. If possible, sketch on paper and replicate the same.
Step 2: Animate Your Design
Take a final glance at the layout. Make sure it’s perfect. Once all the elements are placed as per your design, it’s time to animate them. For that:
- Click on the white background page
- Go to the “Toolbar” section
- Select the “Animate” button
Step 3: Select Page Animation Style
Canva offers six animation styles, where five are for free users, and one is for pro users. To access the five animation styles, follow these steps.
- Press the “Animate” Button
- Select “Page Animations”
- There you will find options like Block, Pan, Fade, Rise, and Tumble
- Select the style as per your design
Step 4: Preview and Download
After selecting a page animation style, it will preview the effect. If you find it good, move on to downloading the GIF. Here’s how to do so
- Go to the “Toolbar” option (present on your upper right hand)
- Choose GIF as the file type
- Check the page number and verify if it’s correct
- Press the “Done” button
Step 5: Final GIF
After clicking on the “Done” button, your GIF will be downloaded. You will be able to see a display for five seconds. If you want to edit the image after this, click on the time button (near the “Animate” button).
So, that was all about how to animate a photo in Canva.
Drawbacks of Canva
Despite efficient features and easy interface, there are certain areas where Canva lacks. This includes
- It does not have any local file storage.
- As too many people use Canva, your template may look the same as others.
- Some of its best features are not free to access.
- The mobile app version lacks certain elements and features.
Out of all these drawbacks, repetitions of templates are a big issue. That’s because everyone wants their posts to look unique and irreplaceable. However, common Canva templates may prevent that from happening.
Fortunately, there are ways to combat such issues. Let’s learn about them in the next section.
Tips: Animate Pictures In Video
You can also animate pictures in the video to make them more lively. For that, you can use Wondershare Filmora Pro Video Editor. It’s also efficient if you don’t know how to animate a picture in Canva:
Wondershare Filmora Video Editor
Filmora by Wondershare is a video editing software that helps you build custom animations easily. It has auto features to make epic stories and posts.
Wondershare Filmora
Get started easily with Filmora’s powerful performance, intuitive interface, and countless effects Try It Free Try It Free Learn More about Filmora>
Its drag and drop effect makes designing simple and quick. Due to its outstanding attributes, options, and styles, Filmora has 77+ million happy users!
It’s a power-packed integration of functionality, performance, and more! In fact, it resolves the repeated template issue of Canva. The software has top-notch functions and innovative filters that add authenticity to the designs.
Till now, you learned about how to animate a picture on Canva. Now, let’s comprehend the right way to use Filmora for animating and adding images in the video.
Before using, make sure to update the software to its latest version. Follow separate methods for both Windows and Mac.
For Win
Step 1: Adding Image to Video Track
With Filmora, adding images to video is a matter of seconds! Start by:
- Identify the position where you want to add the image and place the Playhead there.
- Right-click on the picture from the media library. Click on the “Insert” option. Your image will be added. Select the “Append” option, if you want to add an image at the video end.
Note: How to Remove Black Bars around the Image?
- Go to “Settings” from the File section.
- Click on the “Editing” tab and select “Photo Placement.”
- Choose from the “Crop to Fit” or “Pan To Zoom” option. The black bars will be removed.
To add the image in between the video clip, split them. Now, add the image between the split parts.
Step 2: Add Images as Overlays
To add images as overlays, drag the image to a video track above the main track. The main track consists of your video.
Track 1 (or the track with a video clip) is the base of your video. If you add anything else, it will be displayed above this track as video track 2, 3, and so on. Overall, you can add 100 video tracks.
Step 3: Edit Your Image
If you know how to animate an image in Canva, editing images on Filmora is even easier. You can try the following methods:
Animate Your Images
- To add animation presets to the image, click on the image twice.
- Go to the “Animation Tab” and look for an animation preset.
- Drag the presets to the image for its effect
Make Image Color Adjustments
- Double-click on the image
- Go to the “Color” tab and then the “Color” section
- Customize the temperature, saturation, brightness, etc., as per your need.
- Press Ok.
Change Image Duration
You can increase the image duration to more than the default timing of 5 seconds. For that:
- Click on the image and select the “Duration” option.
- Go to the “Duration Setting” panel.
- Add the new duration timing.
Adjust Position, Rotate/Flip, and Opacity
- You can resize the image position through the circles and squares at the image edges.
- To flip or rotate the image, double-click on the picture. From the “Image Panel,” go to “Transform” and then click on “Rotate.” You can choose either “Horizontal Flip” or “Vertical Flip” to flip the images.
- Double-click on the image and click on the “Composting” option to add opacity. You can choose the blending mode or adjust the “Opacity” accordingly.
For Mac
Filmora for Mac comes with a drag and drop feature to add transitions, animated titles, and effects. You can start a new project from scratch by clicking on “New Project”. The entire process is the same as that for Windows users.
To apply animation in the images, use the motion effects option. For that,
- Click on the Image
- Go to Motion Tab
- Select a motion effect
- Double-click to apply the effect
Conclusion
So that’s how to animate photos in Canva. Hopefully, our steps will help you revamp your posts like a pro! If not Canva, you can use its alternative Filmora. It’s equally prominent, user-friendly, and feature-rich.
Versatile Video Editor - Wondershare Filmora
An easy yet powerful editor
Numerous effects to choose from
Detailed tutorials provided by the official channel
Also read:
- 10 Great MP4 to GIF Converters to Get Perfect-Made GIF for 2024
- Stunning Ideas About Creating Personalised WhatsApp GIF Sticker
- Top 10 Apps to Enhance Your Instagram Story Slideshow for 2024
- Updated 2024 Approved Nurturing Mind, Heart, and Soul on the Top 5 Anime Streaming Sanctuaries
- In 2024, How to Animate Picture Online Without Learning From Scratch
- Updated 2024 Approved Epic Formula to Animate Photos From These 10 Animate Pictures App
- New In 2024, DP Animation Maker Tutorial for Finding The Best Animated Profile Picture Maker
- In 2024, What Is Still Motion Animation and How Does It Work?
- Updated Best 15 2D Animation Software Free That Worth to Try for 2024
- Adobe Animate CC Everything You Need to Know for 2024
- How to Create Picsart Cartoon
- Updated Ways to Make Sure You Get the Most up to Date Cartoon Character Design Tips for 2024
- How to Create Photo Collage Frame for Free in Minutes?
- In 2024, Best 10 Anime Series of All Time | Watch Anime Online
- New 2024 Approved All About Types of Motion Graphics
- 2024 Approved How to Make a Video a Live Photo 2023
- New In 2024, Ways on How to Liven Up Your Animate Website on Scroll
- New 2024 Approved Ways to Master to Find 10 Best Free Animated Text Generator
- 2024 Approved Best GIF Croppers How to Crop an Animated GIF
- New Learn How to Create Adobe 3D Animation
- Updated In 2024, Great Ways to Make Claymation Videos
- New 2024 Approved Techniques on How to Make After Effects 2D Animation
- New Is It That Easy to Make My Own Animated Character for 2024
- New In 2024, Best 8 Tools Tell You How to Make Slideshows for Instagram
- Updated The Best 8 Places for High-Quality Royalty Free Gifs (Paid and Free)
- New 2024 Approved How to Make Your Own GIF on WhatsApp in Simple Ways
- 2024 Approved Best 15 Instant Classics Animated Cartoon Movies
- New 2024 Approved 10 Scary Anime Girls That Will Make You Creepy
- How to Fix the Soft Bricked Tecno Spark 10 Pro? | Dr.fone
- Still Using Pattern Locks with Nokia C12 Plus? Tips, Tricks and Helpful Advice
- How to Detect and Remove Spyware on Realme C33 2023? | Dr.fone
- 7 Ways to Unlock a Locked Oppo Reno 11 Pro 5G Phone
- Troubleshooting Error Connecting to the Apple ID Server On iPhone 6s
- Bypassing Google Account With vnROM Bypass For Vivo Y78t
- Recover your contacts after Xiaomi Redmi Note 13 Pro+ 5G has been deleted.
- Is GSM Flasher ADB Legit? Full Review To Bypass Your Lava Storm 5G Phone FRP Lock
- In 2024, The Most Useful Tips for Pokemon Go Ultra League On Oppo K11 5G | Dr.fone
- Fix Unfortunately Settings Has Stopped on Asus ROG Phone 7 Ultimate Quickly | Dr.fone
- Why Your WhatsApp Location is Not Updating and How to Fix On Vivo X Fold 2 | Dr.fone
- Title: 12 Captivating Websites with Triggered Animate on Scroll Examples
- Author: Elon
- Created at : 2024-06-30 12:27:45
- Updated at : 2024-07-01 12:27:45
- Link: https://animation-videos.techidaily.com/12-captivating-websites-with-triggered-animate-on-scroll-examples/
- License: This work is licensed under CC BY-NC-SA 4.0.
