
2024 Approved Best GIF Maker Software for Windows and Mac
Best GIF Maker Software for Windows and Mac
Best GIF Maker Software for Windows and Mac

Shanoon Cox
Mar 27, 2024• Proven solutions
GIFs can delivery stories with effectiveness and added emotions. When we view that sequence of memories with animations then they add a different feeling to viewer’s heart. The best part is that these GIF creations use to be light weight files that mean they can be easily shared on other platforms. You can easily send them to popular social media sites or prefer to share them via Whatsapp and even using MMS. If you are working on a desktop and need a compatible GIF creator tool then here are few user friendly desktop application suggestions for you. You can easily pick any of these tools and start creating your own animated GIF to impress your friends around.
GIF Maker Software for Windows and Mac
The article below contains details about 10 most popular GIF makers where first five are compatible with Windows platform and rest are dedicated to Mac devices. Using these advanced software tools, you can easily create animated GIF from sequence of images or from videos that are downloaded from internet. It is also possible to adjust timing between frames or users can also customize frame rotation effects, loop animations, or apply overlays. These software tools can support almost all file types like TIF, TGA, PNG BMP, GIF and JPG etc. Some of these software tools are also able to process webcam results instantly and will save files in form of high quality GIFs. If you are ready to develop your own GIF image then read the reviews below and choose your tool to get best results.
A. Best GIF Maker For Windows
Best Recommendation
If you are not satisfied with the collection discussed above then professionals recommend Wondershare Filmora as most trustworthy tool for your GIF conversion needs. This software can work on Windows as well as Mac devices with full feature support.
If you want to make GIF easily, Filmora will also offer you an online solution for making a GIF. Filmora meme maker can help you make image, GIF and video memes directly without watermark. It is totally FREE and no sign up. You can change text size, color and position to create caption. You can also put text inside or outside in GIF. Try it now!
 Download Mac Version ](https://tools.techidaily.com/wondershare/filmora/download/ )
Key Features:
- This interactive interface can process more than 150 file formats with ease
- It can easily convert any video file into GIF format.
- Wondershare Filmora can be used to adjust frame size, captions, resolution of images while adding classic animation effects and advanced filters to processes images.
1. Photoscape

Here is your personal GIF creator tool that possesses abilities of a multi-purpose photo editor. This tool comes with so many advanced capabilities like it can behave as a raw converter, screen capturer, editor, viewer or can also rename details. Photoscape is commonly used for GIF image creation where users can easily set timings between frames.
Pros:
- It is much easier to use with intuitive interface.
- Offers adjustable canvas size along with easy customization capabilities for photo alignment, background colour and transition effects.
Cons:
- It can create bug trouble if you want to process large size files.
2. Microsoft GIF Animator
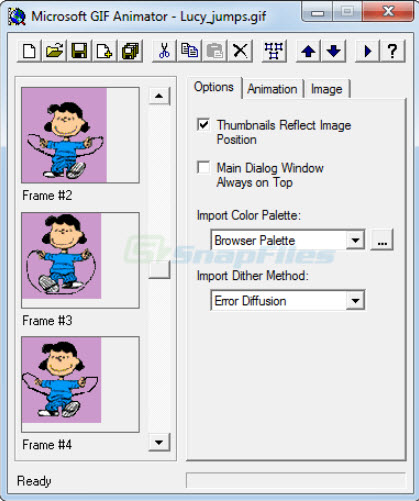
This software is also available free of cost and it can generate animated GIF files instantly. Its drag and drop type media interface can assist users in easy processing of large number of files. Further, you can easily set time duration of frames, set transparency, re order images and make changes for looping effect.
Pros:
- Its drag and drop feature provides it higher ranking.
- One can easily customize all detailed like transparency, frame order, time duration etc.
Cons:
- Microsoft has now stopped designing this software.
3. SSuite GIF Animator

SSuite GIF animator can be used to develop high quality GIF images within very less time. It can easily process raw files in form of BMP, JPEG and JPG extension whereas frame interval can be manually reduced up to few milliseconds. Created GIFs can be further used for easy sharing on other social media websites.
Pros:
- Interactive and simple GUI.
- Takes lesser time for installation and small space in your device memory.
Cons:
- Supported limited file formats and has limited functions.
4. KickMyGraphics

KickMyGraphics is an easy to use GIF animator and allows users to work with a slider so that frames can be adjusted with desired timing sequence. It also assists in other professional level settings such as out quality, zoom and transparency etc. It is also possible to rotate any selected frame with 90 degree motion.
Pros:
- Offers 90 degree image rotation facility.
- Comes with professional level settings.
Cons:
- Complicated for beginners.
5. GiftedMotion

This open source and interactive GIF animation developer application is available for free on Window platforms. It can be used process set of images as well as videos with additional animation effects. Note that, your system must have Java preinstalled if you want to run GiftedMotion on it.
Pros:
- It does not demand installation and download file size is also very small.
- Offers preview facility.
Cons:
- Limited features with time consuming image loading process.
B. Best GIF maker For Mac
1. PicGIF - $19.99:
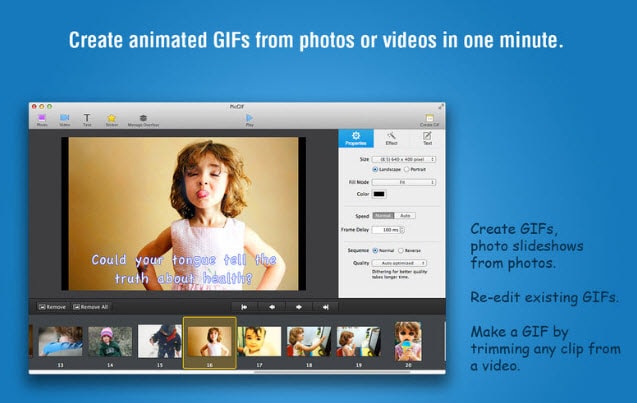
This paid software tool can be used to turn sequence of snapshots into high quality animated GIFs within few seconds. Users can also re-edit their changes in existing GIF files by adjusting its size, text formatting and speed etc. It is also possible to transfer variety of short videos into animated smooth GIFs. It allows users personalize graphics with so many special image effects and color settings.
2. GIPHY Capture – Free:
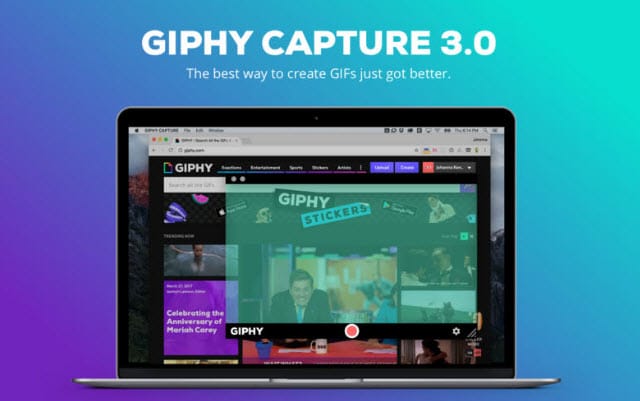
Giphy Capture is available for free for all Mac users and it offers wide range of powerful, intuitive yet simple to use feature set. There are so many incredible things that you can manage in this single platform while editing your GIF sequences. It can easily capture your screen while processing all images with adjustable size, captions and text values. Finally the created GIFs can be easily shared with friends on social media.
3. Image GIF:

This simple and easy to use application can do many miracles for you. You can simply drag and drop lots of image files to this platform and then process them on timeline with advanced feature set. The animation effects and file control capabilities are really interesting that allow easy modification over content. Image GIF is best solution for beginners as it possesses intuitive and user friendly interface.
Shanoon Cox
Shanoon Cox is a writer and a lover of all things video.
Follow @Shanoon Cox
Shanoon Cox
Mar 27, 2024• Proven solutions
GIFs can delivery stories with effectiveness and added emotions. When we view that sequence of memories with animations then they add a different feeling to viewer’s heart. The best part is that these GIF creations use to be light weight files that mean they can be easily shared on other platforms. You can easily send them to popular social media sites or prefer to share them via Whatsapp and even using MMS. If you are working on a desktop and need a compatible GIF creator tool then here are few user friendly desktop application suggestions for you. You can easily pick any of these tools and start creating your own animated GIF to impress your friends around.
GIF Maker Software for Windows and Mac
The article below contains details about 10 most popular GIF makers where first five are compatible with Windows platform and rest are dedicated to Mac devices. Using these advanced software tools, you can easily create animated GIF from sequence of images or from videos that are downloaded from internet. It is also possible to adjust timing between frames or users can also customize frame rotation effects, loop animations, or apply overlays. These software tools can support almost all file types like TIF, TGA, PNG BMP, GIF and JPG etc. Some of these software tools are also able to process webcam results instantly and will save files in form of high quality GIFs. If you are ready to develop your own GIF image then read the reviews below and choose your tool to get best results.
A. Best GIF Maker For Windows
Best Recommendation
If you are not satisfied with the collection discussed above then professionals recommend Wondershare Filmora as most trustworthy tool for your GIF conversion needs. This software can work on Windows as well as Mac devices with full feature support.
If you want to make GIF easily, Filmora will also offer you an online solution for making a GIF. Filmora meme maker can help you make image, GIF and video memes directly without watermark. It is totally FREE and no sign up. You can change text size, color and position to create caption. You can also put text inside or outside in GIF. Try it now!
Download Mac Version ](https://tools.techidaily.com/wondershare/filmora/download/ )
Key Features:
- This interactive interface can process more than 150 file formats with ease
- It can easily convert any video file into GIF format.
- Wondershare Filmora can be used to adjust frame size, captions, resolution of images while adding classic animation effects and advanced filters to processes images.
1. Photoscape
Here is your personal GIF creator tool that possesses abilities of a multi-purpose photo editor. This tool comes with so many advanced capabilities like it can behave as a raw converter, screen capturer, editor, viewer or can also rename details. Photoscape is commonly used for GIF image creation where users can easily set timings between frames.
Pros:
- It is much easier to use with intuitive interface.
- Offers adjustable canvas size along with easy customization capabilities for photo alignment, background colour and transition effects.
Cons:
- It can create bug trouble if you want to process large size files.
2. Microsoft GIF Animator
This software is also available free of cost and it can generate animated GIF files instantly. Its drag and drop type media interface can assist users in easy processing of large number of files. Further, you can easily set time duration of frames, set transparency, re order images and make changes for looping effect.
Pros:
- Its drag and drop feature provides it higher ranking.
- One can easily customize all detailed like transparency, frame order, time duration etc.
Cons:
- Microsoft has now stopped designing this software.
3. SSuite GIF Animator
SSuite GIF animator can be used to develop high quality GIF images within very less time. It can easily process raw files in form of BMP, JPEG and JPG extension whereas frame interval can be manually reduced up to few milliseconds. Created GIFs can be further used for easy sharing on other social media websites.
Pros:
- Interactive and simple GUI.
- Takes lesser time for installation and small space in your device memory.
Cons:
- Supported limited file formats and has limited functions.
4. KickMyGraphics
KickMyGraphics is an easy to use GIF animator and allows users to work with a slider so that frames can be adjusted with desired timing sequence. It also assists in other professional level settings such as out quality, zoom and transparency etc. It is also possible to rotate any selected frame with 90 degree motion.
Pros:
- Offers 90 degree image rotation facility.
- Comes with professional level settings.
Cons:
- Complicated for beginners.
5. GiftedMotion
This open source and interactive GIF animation developer application is available for free on Window platforms. It can be used process set of images as well as videos with additional animation effects. Note that, your system must have Java preinstalled if you want to run GiftedMotion on it.
Pros:
- It does not demand installation and download file size is also very small.
- Offers preview facility.
Cons:
- Limited features with time consuming image loading process.
B. Best GIF maker For Mac
1. PicGIF - $19.99:
This paid software tool can be used to turn sequence of snapshots into high quality animated GIFs within few seconds. Users can also re-edit their changes in existing GIF files by adjusting its size, text formatting and speed etc. It is also possible to transfer variety of short videos into animated smooth GIFs. It allows users personalize graphics with so many special image effects and color settings.
2. GIPHY Capture – Free:
Giphy Capture is available for free for all Mac users and it offers wide range of powerful, intuitive yet simple to use feature set. There are so many incredible things that you can manage in this single platform while editing your GIF sequences. It can easily capture your screen while processing all images with adjustable size, captions and text values. Finally the created GIFs can be easily shared with friends on social media.
3. Image GIF:
This simple and easy to use application can do many miracles for you. You can simply drag and drop lots of image files to this platform and then process them on timeline with advanced feature set. The animation effects and file control capabilities are really interesting that allow easy modification over content. Image GIF is best solution for beginners as it possesses intuitive and user friendly interface.
Shanoon Cox
Shanoon Cox is a writer and a lover of all things video.
Follow @Shanoon Cox
How to Get Started in Stop Motion Claymation
How to Get Started in Stop Motion Claymation
An easy yet powerful editor
Numerous effects to choose from
Detailed tutorials provided by the official channel
Stop Motion Claymation is not a new concept. It has been floating around the media industry since the 1950 and many creators have utilized it to tell their stories to the world. If you haven’t heard about claymations so far, you are not alone. Unfortunately, a wide range of the global population is unfamiliar with the concept of stop motion claymation.

But, if you are someone who wants to get into animation, but don’t have an expensive budget, claymations can be a great tool to share your story with the world and attract a global audience. In this guide, we are going to talk about claymations, some of the most popular claymation websites, and the best ways to get started with stop motion claymation. So, if you also want to explore your creative side and be unique with the approach, continue reading. By the end of this guide, you’ll be running out to buy clay and make some high-quality clay stop-motion animations.
In this article
01 [Ways to Make Stop Motion Videos with Clay Using Your Phone](#Part 1)
02 [How to Edit a Stop Motion Claymation Animation](#Part 2)
03 [Best 5 Clay for Stop Motion and Ways to Get Started](#Part 3)
Part 1 Ways to Make Stop Motion Videos with Clay Using Your Phone
So, now that you are familiar with the basic concept of clay stop animation, let’s understand how you can get started with claymation animations. Ideally, if you are an absolute beginner, you would want to start by understanding the dynamics of creating clay models first. Whether you are going to create a animation or a simple stop motion clip, the models will play a major role in the story and it would be important that these models look appealing.
When it comes to capturing the motion, you don’t need any expensive cameras. You can easily shoot the entire motion on your phone as well. Today, even the basic smartphones come with recording features and they are enough to capture the movement of your clay models. However, if you want to keep the production quality as high as possible, make sure to invest in a decent tripod. A tripod will ensure that your stop motion claymation doesn’t feel jerky at all.
After you have crafted the clay models and purchased the tripod, the next step would be to write down a script for the animation. Whether you are creating a short video or a 3-hour long movie, a script will ensure that you don’t miss out on any important scenes while recording the animation. There are multiple script writing software you can find online that’ll speed up the entire process. However, as a beginner, you can also pen down your script in a regular MS Word document. Lack of resources should never come between your creativity.
Once the script is final, the next phase would be to record the stop motion animation claymation. This is the stage where you have to be extra careful because you’ll practically be recording the storyline of your animation. Simply fire up the smartphone’s camera and start shooting each frame one-by-one. Keep in mind that shooting a stop motion animation is pretty time-consuming and it can even take up to 5-7 hours to get the job done. So, make sure to grab your cup of coffee and stay patient throughout the process.
Part 2 How to Edit a Stop Motion Claymation Animation
At this point, you would have several hundred photographs and a script in mind to make your stop motion claymation. So, the next part would be to turn these raw images into an animation. To do this, you can use different types of video editing applications. However, we recommend using Wondershare Wondershare Filmora Video Editor for the job.
It’s a full-scale cross-platform video editing tool that’s designed to help creators showcase their creativity by turning RAW images/clips into visually engaging videos. Filmora is targeted towards a wide variety of creators such as YouTubers, social media influencers, production artists, and even animators. For an animator, Filmora is nothing short of an oasis.
The tool comes with a built-in media library where you’ll find hundreds of ready-to-use animation templates. These templates could be integrated into your video with a single click. The best part is all these templates are fully customizable, which means you can modify them to meet the overall theme of your claymation.
Filmora boasts a timeline-based interface that makes the editing process a hassle-free task, especially when you have hundreds of images to edit. You can simply bring all the images to the timeline and merge them together to make a stunning animation within a few minutes. The tool also comes with a dedicated audio editing panel where you can add the voiceover or background tracks to bring life to your stop animation claymation. If you have edited any videos in the past, you may already know that the audio is the backbone for any video, even if you are editing a stop motion animation using clay.
Here’s a quick recap of all the features that make Wondershare Filmora an ideal video editing software for stop motion claymation animation.
● Timeline based user interface for more convenient editing
● Built-in media library to find graphic, animation, and audio templates
● Export videos directly to YouTube and other social media platforms
● Available for both Windows and macOS
So, if you are also ready with your clay models and smartphone’s camera, get started with the shooting process and use Filmora to turn the RAW images to a visually enticing stop motion claymation.
Part 3 Best 5 Clay for Stop Motion and Ways to Get Started
In case you are getting serious about stop motion claymations, you would also want to understand which clays are best for such animations. To be honest, you can find dozens of clays in the market. But, not every clay is worth using in a claymation. Here are 5 of the best clays for stop motion animations you can use in your projects.
01Puppet Putty
Puppet Putty is one of the most popular clay brands that’s specifically marketed towards claymation fanatics. As compared to other available options, the Puppet Putty is comparatively softer, which means you can easily mold it into different shapes using your hands only. While the Puppet Putty works great by itself, you can also combine it with other types of clay to make your clay models more appealing.
02Van Aken
Van Aken is another popular clay brand that’s ideal for claymation animations. It’s one of the inexpensive clays and that’s the reason why many claymation fanatics use it to create clay models for their projects. One of the best features of the Van Aken clay is that it’s available in different colors, which means you can get creative with your models by mixing different color combinations. Some animators also mix Van Aken with Pupper Putty to make the characters look more stunning under the perfect lighting conditions.
03Sargent Art
Sargent Art is a brand that primarily designs clays for sculpting. However, you can also use it to create clay models for your claymations. Sargent Art’s clay has the perfect blend of Wax and Oil, which makes it quite easier for the animator to sculpt different models.
04Sculpey
Sculpey is a clay brand that designs polymer-based clays that are relatively better than the traditional ceramic mud clays. This type of clay is made up of plastic and it’s comparatively more pliable than any regular clay. And, once you have your sculpture ready, you can simply place the cay model in an oven and make it rock solid within a few minutes.
05Plastilina
Finally, Plastilina is also a great option for stop motion claymation models. You can use Plastilina to design parts of the model that need to look as natural as possible. For example, you can use Plastilina to create parts such as teeth, eyes, and tongue so that your animation characters don’t contain any distortions.
● Key Takeaways from This Episode →
● Stop motion claymation animations are a great way to create stunning animations and share your creative stories with the world.
● To get started with claymations, you’ll need the right type of clay, an editing software like Wondershare Filmora Video Editor , and a storyline.
● There are different types of clays you can use to create clay models for your animations. To make your animations look more natural, you can also mix different types of clays together. This will also allow you to create personalized color combinations for your animation projects.
Stop Motion Claymation is not a new concept. It has been floating around the media industry since the 1950 and many creators have utilized it to tell their stories to the world. If you haven’t heard about claymations so far, you are not alone. Unfortunately, a wide range of the global population is unfamiliar with the concept of stop motion claymation.
But, if you are someone who wants to get into animation, but don’t have an expensive budget, claymations can be a great tool to share your story with the world and attract a global audience. In this guide, we are going to talk about claymations, some of the most popular claymation websites, and the best ways to get started with stop motion claymation. So, if you also want to explore your creative side and be unique with the approach, continue reading. By the end of this guide, you’ll be running out to buy clay and make some high-quality clay stop-motion animations.
In this article
01 [Ways to Make Stop Motion Videos with Clay Using Your Phone](#Part 1)
02 [How to Edit a Stop Motion Claymation Animation](#Part 2)
03 [Best 5 Clay for Stop Motion and Ways to Get Started](#Part 3)
Part 1 Ways to Make Stop Motion Videos with Clay Using Your Phone
So, now that you are familiar with the basic concept of clay stop animation, let’s understand how you can get started with claymation animations. Ideally, if you are an absolute beginner, you would want to start by understanding the dynamics of creating clay models first. Whether you are going to create a animation or a simple stop motion clip, the models will play a major role in the story and it would be important that these models look appealing.
When it comes to capturing the motion, you don’t need any expensive cameras. You can easily shoot the entire motion on your phone as well. Today, even the basic smartphones come with recording features and they are enough to capture the movement of your clay models. However, if you want to keep the production quality as high as possible, make sure to invest in a decent tripod. A tripod will ensure that your stop motion claymation doesn’t feel jerky at all.
After you have crafted the clay models and purchased the tripod, the next step would be to write down a script for the animation. Whether you are creating a short video or a 3-hour long movie, a script will ensure that you don’t miss out on any important scenes while recording the animation. There are multiple script writing software you can find online that’ll speed up the entire process. However, as a beginner, you can also pen down your script in a regular MS Word document. Lack of resources should never come between your creativity.
Once the script is final, the next phase would be to record the stop motion animation claymation. This is the stage where you have to be extra careful because you’ll practically be recording the storyline of your animation. Simply fire up the smartphone’s camera and start shooting each frame one-by-one. Keep in mind that shooting a stop motion animation is pretty time-consuming and it can even take up to 5-7 hours to get the job done. So, make sure to grab your cup of coffee and stay patient throughout the process.
Part 2 How to Edit a Stop Motion Claymation Animation
At this point, you would have several hundred photographs and a script in mind to make your stop motion claymation. So, the next part would be to turn these raw images into an animation. To do this, you can use different types of video editing applications. However, we recommend using Wondershare Wondershare Filmora Video Editor for the job.
It’s a full-scale cross-platform video editing tool that’s designed to help creators showcase their creativity by turning RAW images/clips into visually engaging videos. Filmora is targeted towards a wide variety of creators such as YouTubers, social media influencers, production artists, and even animators. For an animator, Filmora is nothing short of an oasis.
The tool comes with a built-in media library where you’ll find hundreds of ready-to-use animation templates. These templates could be integrated into your video with a single click. The best part is all these templates are fully customizable, which means you can modify them to meet the overall theme of your claymation.
Filmora boasts a timeline-based interface that makes the editing process a hassle-free task, especially when you have hundreds of images to edit. You can simply bring all the images to the timeline and merge them together to make a stunning animation within a few minutes. The tool also comes with a dedicated audio editing panel where you can add the voiceover or background tracks to bring life to your stop animation claymation. If you have edited any videos in the past, you may already know that the audio is the backbone for any video, even if you are editing a stop motion animation using clay.
Here’s a quick recap of all the features that make Wondershare Filmora an ideal video editing software for stop motion claymation animation.
● Timeline based user interface for more convenient editing
● Built-in media library to find graphic, animation, and audio templates
● Export videos directly to YouTube and other social media platforms
● Available for both Windows and macOS
So, if you are also ready with your clay models and smartphone’s camera, get started with the shooting process and use Filmora to turn the RAW images to a visually enticing stop motion claymation.
Part 3 Best 5 Clay for Stop Motion and Ways to Get Started
In case you are getting serious about stop motion claymations, you would also want to understand which clays are best for such animations. To be honest, you can find dozens of clays in the market. But, not every clay is worth using in a claymation. Here are 5 of the best clays for stop motion animations you can use in your projects.
01Puppet Putty
Puppet Putty is one of the most popular clay brands that’s specifically marketed towards claymation fanatics. As compared to other available options, the Puppet Putty is comparatively softer, which means you can easily mold it into different shapes using your hands only. While the Puppet Putty works great by itself, you can also combine it with other types of clay to make your clay models more appealing.
02Van Aken
Van Aken is another popular clay brand that’s ideal for claymation animations. It’s one of the inexpensive clays and that’s the reason why many claymation fanatics use it to create clay models for their projects. One of the best features of the Van Aken clay is that it’s available in different colors, which means you can get creative with your models by mixing different color combinations. Some animators also mix Van Aken with Pupper Putty to make the characters look more stunning under the perfect lighting conditions.
03Sargent Art
Sargent Art is a brand that primarily designs clays for sculpting. However, you can also use it to create clay models for your claymations. Sargent Art’s clay has the perfect blend of Wax and Oil, which makes it quite easier for the animator to sculpt different models.
04Sculpey
Sculpey is a clay brand that designs polymer-based clays that are relatively better than the traditional ceramic mud clays. This type of clay is made up of plastic and it’s comparatively more pliable than any regular clay. And, once you have your sculpture ready, you can simply place the cay model in an oven and make it rock solid within a few minutes.
05Plastilina
Finally, Plastilina is also a great option for stop motion claymation models. You can use Plastilina to design parts of the model that need to look as natural as possible. For example, you can use Plastilina to create parts such as teeth, eyes, and tongue so that your animation characters don’t contain any distortions.
● Key Takeaways from This Episode →
● Stop motion claymation animations are a great way to create stunning animations and share your creative stories with the world.
● To get started with claymations, you’ll need the right type of clay, an editing software like Wondershare Filmora Video Editor , and a storyline.
● There are different types of clays you can use to create clay models for your animations. To make your animations look more natural, you can also mix different types of clays together. This will also allow you to create personalized color combinations for your animation projects.
How to Make 3D Cartoon of Yourself
How to Make a 3D Cartoon of Yourself
An easy yet powerful editor
Numerous effects to choose from
Detailed tutorials provided by the official channel
From among the several trends that emerged on Social Media, making a 3D cartoon of yourself is probably the most popular.
Learning how to make 3D cartoons may just be in the height of demand in the near future.
In this article
01 [What is AI Artist? Plus how to cartoon yourself with it](#Part 1)
02 [How to Create a 3D Cartoon of Yourself for Meta](#Part 2)
03 [How to make 3D Cartoon From a Photo](#Part 3)
04 [Five 3D cartoon Disney-Fied yourself apps](#Part 4)
05 [More New Useful Tools to Upgrade Your Animation/Cartoon](#Part 5)
Part 1 What is AI Artist? Plus how to cartoon yourself with it
We all remember the Cartoon filter challenge on Facebook, right? Everyone was excited to transform themselves into a cartoon. The options of making personalized cartoon representations of yourself was pretty limited back then. With the Voila AI artist app you can choose at least 3 different cartoon variations of yourself.

The Voila AI artist app can be downloaded from the Apple App store and Android Play Store. You can use the app for free but for faster editing and an ad free experience, you will need to upgrade to the paid version. Other than just creating a cartoon of yourself, you can also create renaissance portraits and caricatures.
● Step 1: Download the Voila AI artist App for your device, and complete the installation process. Allow the app to access your Phone’s Camera rolling permission.
● Step 2: Select the style option you want to use. What we are using here is 3D cartoon (other options: 2D Cartoon, Caricature & and the rest). Touch the arrow and start.
● Step 3: Now, with your camera roll open, click a new one or choose from your gallery. You can also find a celebrities option where you can search for celebrities. This generates a four-grid choice. If you are using the free version, then be prepared to encounter one or two ads. After a few seconds, you can exit out and get back to your images.
● Step 4: You will receive a composite grid of four options; your original image, plus three cartoon representations (Royalty 3D, Baby 3D & Cartoon 3D). Here, you can select the option you like the most and start editing. Locate the up arrow button to immediately share on your preferred social media or simply save a copy in your device.
If the AI artist app has any paid and premium version, upon subscribing you will get ad free & watermark free animated representations.
Part 2 How to Create a 3D Cartoon of Yourself for Meta
Facebook only recently rebranded themselves as Meta. This has now started the rush to create a live virtual interaction space, and big companies like Microsoft and Nvidia are now competing with each other to bridge the gap.
Soon, activities like convening meetings, attending live events or even dating online would take place in virtual environments. So best be prepared for the future by creating a 3D avatar for yourself.
Your virtual avatar would be able to interact with the real world through a virtual platform by using VR headsets and other tech. Sensing your virtual presence would be almost the same as the real world for your peers and colleagues. You can attend a meeting without ever having to travel.
The process behind creating a 3D cartoon of yourself for Meta platforms starts by establishing a facial rig which is like a framework for the cartoon animations to sit on. These days, most apps come with automatic FACS facial rigging which is why certain Instagram filters like the Puppy nose filter was possible.
Presently, creating a complete 3D virtual model of yourself is a bit complicated to do on your own but soon this service will be automated in an app for you.
Part 3 How to make 3D Cartoon From a Photo
Photoshop is no doubt one of the most influential digital assets that allow you to do virtually anything with your photos. Of course, this includes turning your photos into 3D cartoon.
There are advanced techniques and tools you can use to retouch your image to achieve an animated like look for your portraits.
Of course, you can find multiple Photoshop hacks online but the following guide can give you an easy to follow idea of how to go about creating your own 3D cartoon out of an image.

Note; These steps are to be perceived as a simplified overview of your objectives when editing on Photoshop;
● To start out on turning your image into a 3D character, you need to learn how to create layers and then stack them on each other.
● You can then ‘liquify’ these layers to form a mould for your image.
● Apply skin softening techniques to take away the realistic features of the photo before working on turning it into a cartoon.
● Now you can start focus on applying the details to features like eyes, hair, nose and facial lines on your cartoon image.
● You can also change the colour of any individual features on your image. This method is applicable in making caricatures of your photo as well.
Part 4 Five 3D cartoon Disney-Fied yourself apps
Vibrant colours, gorgeous large eyes and shiny hair – pretty much sums up every Disney character you have ever seen. Now, everyone is obsessed with making their own Disney avatar and for good reason. You can use it as filter or upload it on your profile. Here are some of the most in-trend AI powered 3D Disneyfied apps you can use;
01Voila AI Artist

The Voila AI Artist app was released back in March of 2021 and has been the rage among Disneyfied apps. To clarify, the app has nothing to do with the Disney animation company but is perceived by users as the most successful app for disneyfication. Its on-board AI can create 3D and 2D renderings for your image along with hand drawn caricatures. You can download the app on App Store and Google Play.
02ToonMe

The next best app on our Disneyfied list is ToonMe. It also uses AI to turn photos into Disney Characters. The app keeps updating new cartoonish filters which you can use over your images. There are various other features which you can try as well like recreating your photos into classic vectors. The results are of extraordinary quality and can be uploaded on Instagram. You can download the app for free from Play store and App store.
03Snapchat

Snapchat has been around for some time now so you might already have it on your phone. Snapchat offers a vast range of filters and effects that of course includes Disneyfied filters and 3D cartoon images. You can look for them on the Snapchat search bar. New filters keep popping up every day which you can apply over your own images.
04Prisma

Prisma is a notoriously well know pop photo editor – which means it makes your photos ‘pop’. You can use it to edit photos on both Android and iPhone. It also comes with its own range of filters for turning your photos into cartoon images. There are hundreds of variations to choose from so you will definitely be spoilt for choices.
05Clip2Comic Cartoon

This app is only available on the App stores and is well known among iPhone users for turning photos into cartoons and caricatures. It is not exactly a Disneyfied app but it has a plethora of filters and a combination of editing tools to help personalize your 3D photos and comics. You can also directly upload these photos to your Social Media Accounts.
Key Takeaways from This Episode
● With the help of AI and other amazing features, you can use your everyday pictures to make a 3D cartoon of yourself.
● The Metaverse is her and soon we all will be interacting in a virtual space. So best learn how to rig your face with an animation filter.
● Apps like Voila AI artist, you can disneyfy your images quite easily. Explore dozens of such filters and effects with Disneyfied apps.
From among the several trends that emerged on Social Media, making a 3D cartoon of yourself is probably the most popular.
Learning how to make 3D cartoons may just be in the height of demand in the near future.
In this article
01 [What is AI Artist? Plus how to cartoon yourself with it](#Part 1)
02 [How to Create a 3D Cartoon of Yourself for Meta](#Part 2)
03 [How to make 3D Cartoon From a Photo](#Part 3)
04 [Five 3D cartoon Disney-Fied yourself apps](#Part 4)
05 [More New Useful Tools to Upgrade Your Animation/Cartoon](#Part 5)
Part 1 What is AI Artist? Plus how to cartoon yourself with it
We all remember the Cartoon filter challenge on Facebook, right? Everyone was excited to transform themselves into a cartoon. The options of making personalized cartoon representations of yourself was pretty limited back then. With the Voila AI artist app you can choose at least 3 different cartoon variations of yourself.
The Voila AI artist app can be downloaded from the Apple App store and Android Play Store. You can use the app for free but for faster editing and an ad free experience, you will need to upgrade to the paid version. Other than just creating a cartoon of yourself, you can also create renaissance portraits and caricatures.
● Step 1: Download the Voila AI artist App for your device, and complete the installation process. Allow the app to access your Phone’s Camera rolling permission.
● Step 2: Select the style option you want to use. What we are using here is 3D cartoon (other options: 2D Cartoon, Caricature & and the rest). Touch the arrow and start.
● Step 3: Now, with your camera roll open, click a new one or choose from your gallery. You can also find a celebrities option where you can search for celebrities. This generates a four-grid choice. If you are using the free version, then be prepared to encounter one or two ads. After a few seconds, you can exit out and get back to your images.
● Step 4: You will receive a composite grid of four options; your original image, plus three cartoon representations (Royalty 3D, Baby 3D & Cartoon 3D). Here, you can select the option you like the most and start editing. Locate the up arrow button to immediately share on your preferred social media or simply save a copy in your device.
If the AI artist app has any paid and premium version, upon subscribing you will get ad free & watermark free animated representations.
Part 2 How to Create a 3D Cartoon of Yourself for Meta
Facebook only recently rebranded themselves as Meta. This has now started the rush to create a live virtual interaction space, and big companies like Microsoft and Nvidia are now competing with each other to bridge the gap.
Soon, activities like convening meetings, attending live events or even dating online would take place in virtual environments. So best be prepared for the future by creating a 3D avatar for yourself.
Your virtual avatar would be able to interact with the real world through a virtual platform by using VR headsets and other tech. Sensing your virtual presence would be almost the same as the real world for your peers and colleagues. You can attend a meeting without ever having to travel.
The process behind creating a 3D cartoon of yourself for Meta platforms starts by establishing a facial rig which is like a framework for the cartoon animations to sit on. These days, most apps come with automatic FACS facial rigging which is why certain Instagram filters like the Puppy nose filter was possible.
Presently, creating a complete 3D virtual model of yourself is a bit complicated to do on your own but soon this service will be automated in an app for you.
Part 3 How to make 3D Cartoon From a Photo
Photoshop is no doubt one of the most influential digital assets that allow you to do virtually anything with your photos. Of course, this includes turning your photos into 3D cartoon.
There are advanced techniques and tools you can use to retouch your image to achieve an animated like look for your portraits.
Of course, you can find multiple Photoshop hacks online but the following guide can give you an easy to follow idea of how to go about creating your own 3D cartoon out of an image.
Note; These steps are to be perceived as a simplified overview of your objectives when editing on Photoshop;
● To start out on turning your image into a 3D character, you need to learn how to create layers and then stack them on each other.
● You can then ‘liquify’ these layers to form a mould for your image.
● Apply skin softening techniques to take away the realistic features of the photo before working on turning it into a cartoon.
● Now you can start focus on applying the details to features like eyes, hair, nose and facial lines on your cartoon image.
● You can also change the colour of any individual features on your image. This method is applicable in making caricatures of your photo as well.
Part 4 Five 3D cartoon Disney-Fied yourself apps
Vibrant colours, gorgeous large eyes and shiny hair – pretty much sums up every Disney character you have ever seen. Now, everyone is obsessed with making their own Disney avatar and for good reason. You can use it as filter or upload it on your profile. Here are some of the most in-trend AI powered 3D Disneyfied apps you can use;
01Voila AI Artist
The Voila AI Artist app was released back in March of 2021 and has been the rage among Disneyfied apps. To clarify, the app has nothing to do with the Disney animation company but is perceived by users as the most successful app for disneyfication. Its on-board AI can create 3D and 2D renderings for your image along with hand drawn caricatures. You can download the app on App Store and Google Play.
02ToonMe
The next best app on our Disneyfied list is ToonMe. It also uses AI to turn photos into Disney Characters. The app keeps updating new cartoonish filters which you can use over your images. There are various other features which you can try as well like recreating your photos into classic vectors. The results are of extraordinary quality and can be uploaded on Instagram. You can download the app for free from Play store and App store.
03Snapchat
Snapchat has been around for some time now so you might already have it on your phone. Snapchat offers a vast range of filters and effects that of course includes Disneyfied filters and 3D cartoon images. You can look for them on the Snapchat search bar. New filters keep popping up every day which you can apply over your own images.
04Prisma
Prisma is a notoriously well know pop photo editor – which means it makes your photos ‘pop’. You can use it to edit photos on both Android and iPhone. It also comes with its own range of filters for turning your photos into cartoon images. There are hundreds of variations to choose from so you will definitely be spoilt for choices.
05Clip2Comic Cartoon
This app is only available on the App stores and is well known among iPhone users for turning photos into cartoons and caricatures. It is not exactly a Disneyfied app but it has a plethora of filters and a combination of editing tools to help personalize your 3D photos and comics. You can also directly upload these photos to your Social Media Accounts.
Key Takeaways from This Episode
● With the help of AI and other amazing features, you can use your everyday pictures to make a 3D cartoon of yourself.
● The Metaverse is her and soon we all will be interacting in a virtual space. So best learn how to rig your face with an animation filter.
● Apps like Voila AI artist, you can disneyfy your images quite easily. Explore dozens of such filters and effects with Disneyfied apps.
Make Creative Animation Videos
Animation can explain whatever the mind of man can conceive – Walt Disney. Animation video is a craft in which images go through the process of conspiring, layout addition, and photographic chronology to create an illusion of action. In this article, let’s learn the importance of video animations and when and why to use this technique.
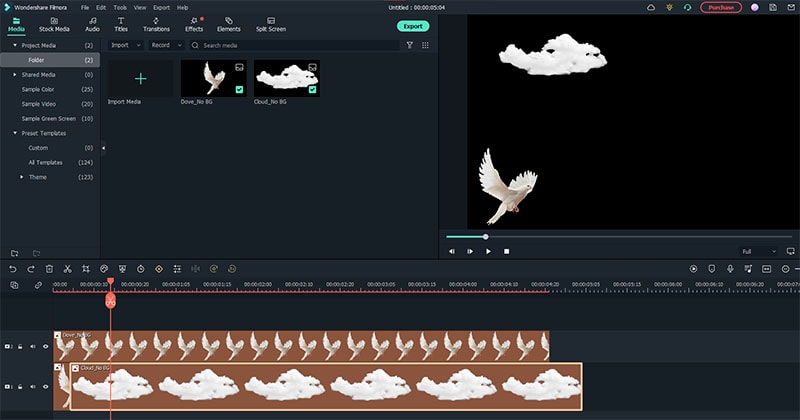
What are Video Animation and its importance?
Video as a marketing tool has become more popular but also more important. In this article, you can read more about why media marketing is getting more essential in comparison to text marketing. Therefore, an explainer video with Animation is an amazing way to show your target audience who you are, where you stand for, what you do and how you can solve the customer’s problem.
Video animation is an engaging technique that can help you comprehensively tell your story. Animated meaning can be better comprehended as a simulation of motion created by showing a series of pictures. Animated videos for a business catch the viewers and make for an enjoyable story-telling experience.
Often, animation videos are used to explain a concept or process. It’s straightforward to make these videos appealing and likable as you can primarily create them however you want. It can take longer to get the point across when people explain how to do something. Animations not only trigger emotions but spark conversations as well.
What are most common types of Animation?
The purpose of this article is to take you through the complexity of the different types of animation styles and methods. It also covers the track you should take (and what that path entails) to become an animator for each of the five types.
This guide is not about learning how to animate. But instead, it breaks down the five types of Animation available to you and what you’ll need to start animating: best software, schools, and courses.
Motion Graphics (Key framing): Motion graphics focus on making dynamic and exciting presentations of moving text logos and fundamental illustrations.
- Motion graphics can be 2D and 3D, and you’ll find them everywhere in news, sporting videos, the news, and other TV productions.
- Correct character animation is generally outside the scope of motion graphics, but many core animation principles also apply to motion graphics.
- Creating Motion Graphics depends on the plan used since video editing software often have different user interface or settings, but the idea is the same. Motion Graphics usually involves animating texts, pictures, or video clips using keyframing that is tweened to make a smooth motion between frames.
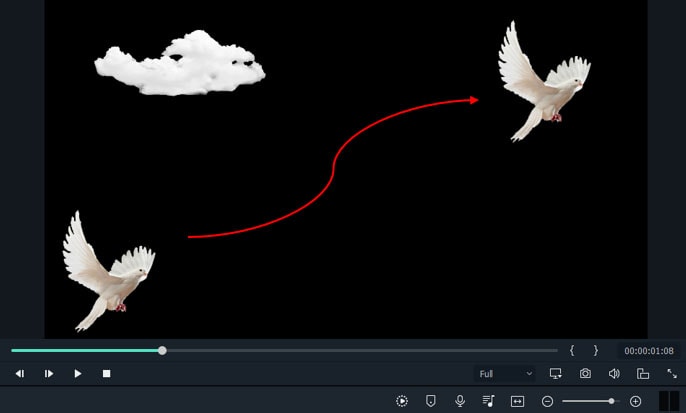
Traditional Animation: This is the classic type of Animation you’re probably most well known with. In the past, animators drew characters frame by frame, and then those pictures were moved onto transparent sheets for painting. That’s where the term animation comes from.
They started scanning drawings into the computer for digital coloring. The important thing is that hand-drawn animators still create their animation frame by frame using the same method and concept as in those old days of paper and cels.
How to Use Motion Graphics Animation in Filmora
Keyframes specify the start or end of a transition in a shot. A series of keyframes can give the semblance of the movement of an object. Keyframes include parameters such as Position, Scale, Opacity, and Rotation. These values can be changed and customized to make animations using keyframing.
Wondershare Filmora makes it really easy to use. Even learners or novices can use keyframe animation to create extraordinary videos. Plus, the keyframe templates are an added satisfaction. If you have limited time and need a quick fix, using Presets in the Animation tab is your best bet.
For this example, we’ll walk you through using Keyframes on the short video clip to make your Animation using Wondershare Filmora.
Free Download For Win 7 or later(64-bit)
Free Download For macOS 10.14 or later
Step1 Launch Wondershare Filmora from your system and select New Project.

Step2 Import your selected images. In this case I imported no background images to have a clear view on how key framing works.
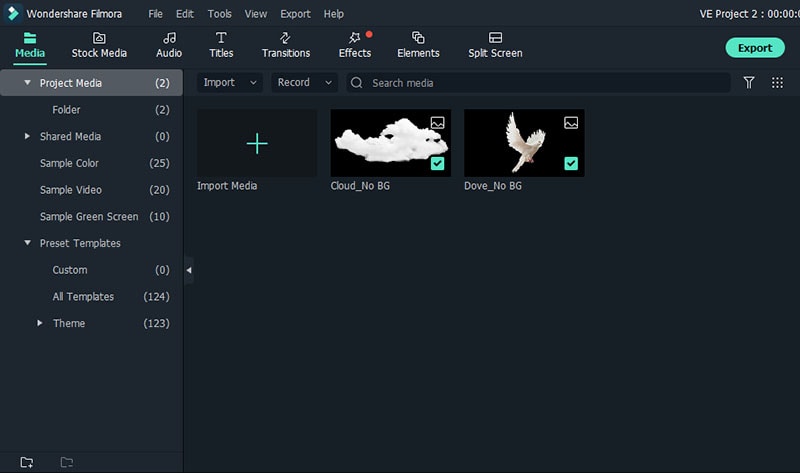
Step3 Drag or add the image on the Timeline Panel.
In this case I use a dove and a cloud to demo the Motion graphics animation
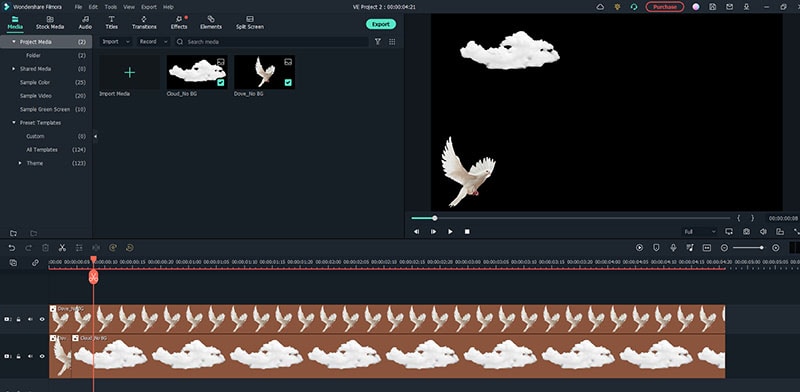
Step4 Double click the image then the Animation tab will display. Here, there are available presets, either the latest or the Legacy Animation, as indicated on the display that you can use.
There is also a tab if you want to customize your animations which requires premium account.
- Fade In
- Fade Out
- Pause
- Slide right
- Slide up
- Vortex In
- Vortex Out
- Zoom In
- Zoom Out
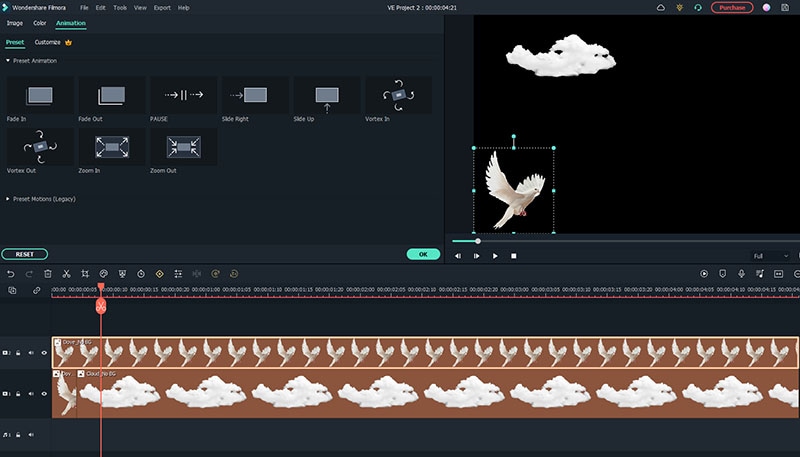
Step5 Select any animation you want by double-clicking the presets. In this case, I selected a slight right preset, and you will notice that the start arrow and end arrow indicator are displayed.
In the Timeline panel, you have an option to customize the start and end of the Preset. Just drag the arrow keys on either side to reach the keyframe you wish to change. Just simple.
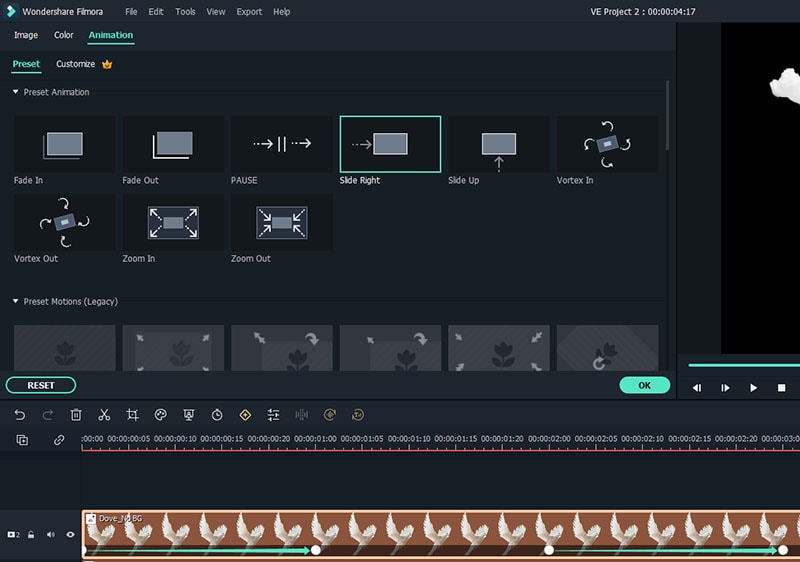
You can also do it on the cloud image that we’ve added.
Takeaway
Keyframing can bring steady images to life by introducing animations. With the super-easy keyframing tool in Filmora, you can now make invigorating videos. From easy to complex key framing. The customization property lets you unbind your creativity and take your editing to a professional level. Make your logo pop by adding keyframe animations. Better yet, you can also animate text.
No matter what industry you’re in, Animation can be relevant. Small start-ups to giant corporations use animation videos, too. Animation videos help to explain tricky processes or concepts, sell a product, or even to gain recognition for a product. Everyone resonates with Animation in some way or another. Almost everyone has watched cartoons or animations in their life, so these tend to grab attention more effectively.
We all love animation. From the animated cartoons we watched as kids to the latest and hottest animated music video, there’s something about seeing visuals come alive that captivates and inspires us. But video animation isn’t just for children, and it isn’t just for the entertainment value only.
Free Download For macOS 10.14 or later
Step1 Launch Wondershare Filmora from your system and select New Project.
Step2 Import your selected images. In this case I imported no background images to have a clear view on how key framing works.
Step3 Drag or add the image on the Timeline Panel.
In this case I use a dove and a cloud to demo the Motion graphics animation
Step4 Double click the image then the Animation tab will display. Here, there are available presets, either the latest or the Legacy Animation, as indicated on the display that you can use.
There is also a tab if you want to customize your animations which requires premium account.
- Fade In
- Fade Out
- Pause
- Slide right
- Slide up
- Vortex In
- Vortex Out
- Zoom In
- Zoom Out
Step5 Select any animation you want by double-clicking the presets. In this case, I selected a slight right preset, and you will notice that the start arrow and end arrow indicator are displayed.
In the Timeline panel, you have an option to customize the start and end of the Preset. Just drag the arrow keys on either side to reach the keyframe you wish to change. Just simple.
You can also do it on the cloud image that we’ve added.
Takeaway
Keyframing can bring steady images to life by introducing animations. With the super-easy keyframing tool in Filmora, you can now make invigorating videos. From easy to complex key framing. The customization property lets you unbind your creativity and take your editing to a professional level. Make your logo pop by adding keyframe animations. Better yet, you can also animate text.
No matter what industry you’re in, Animation can be relevant. Small start-ups to giant corporations use animation videos, too. Animation videos help to explain tricky processes or concepts, sell a product, or even to gain recognition for a product. Everyone resonates with Animation in some way or another. Almost everyone has watched cartoons or animations in their life, so these tend to grab attention more effectively.
We all love animation. From the animated cartoons we watched as kids to the latest and hottest animated music video, there’s something about seeing visuals come alive that captivates and inspires us. But video animation isn’t just for children, and it isn’t just for the entertainment value only.
10 Best Tools to Make Pic Collage for Windows
10 Best Tools to Make Pic Collage for Windows
An easy yet powerful editor
Numerous effects to choose from
Detailed tutorials provided by the official channel
Collages are a great way to assemble all your favorite pictures in one place. You can share these collages with your friends, relatives, and dear ones or can also use them for posting on social media sites and other online platforms. Though creating a collage may sound simple, a lot of considerations need to be taken for creating an interesting and eye-catchy collage, and for this, a help of a professional tool can be taken. In the following parts of the topic, you can learn about the best tools for photo collage Windows 10 and other OS.

In the following parts of the topic, you can learn about the best tools for photo collage Windows 10 and other OS.
In this article
01 [Top 10 Pic Collage for Windows Tools](#Part 1)
02 [The Best Tool to Get Stock Images for Creating Collages](#Part 2)
Part 1 Top 10 Pic Collage for Windows Tools
Checkout the best collage for Windows below.
01PhotoPad Photo Editing Software
This is a complete photo editing tool supporting an array of features including the creation of a photo collage. This software from NCH software can let you add the desired images manually and also support using the auto grid to add an unlimited number of pictures. The tool also lets you choose the collage orientation size and set the background as needed.
Pros:
● Create collage Windows manually or automatically.
● Allows adding a background color, image, or from the available background options.
● Spacing and corners between the images can be selected.
● The size of the tool is small.
Cons:
● Stickers and filters to individual images cannot be added.
● Cannot choose a custom collage size.

02PhotoScapeX
Available for download on Windows 10 and higher versions this is another widely used photo editing tool that can also let you create collages manually as well as automatically. Multiple frames are available that can be selected as desired and there are additional features like adding filters, and also edit them in multiple ways.
Pros:
● Allows creating collage manually and automatically.
● Multiple editing tools for customization like filters, crop, zoom, doodle, and more.
● Picture alignment can be done in 3 modes- vertical, horizontal, and tile.
● Option to change and customize image size, spacing, margin, and others.
Cons:
● Limited photos can be added.
● The size of the tool is large in comparison to other tools.

03Phototastic Collage
This is free to use Windows-based tool that can create impressive collages in no time. Multiple designs, frames, and other options are available to create a customized collage as needed.
Pros:
● Multiple customization options are available for creating the desired collage.
● User-friendly and simple interface.
● An array of templates is available.
Cons:
● The free version has limited features.
● Limitation to the number of images that can be added.
● Ads in the app.

04PicCollage
Unleash your creativity by creating an interesting collage using this excellent collage-making app. There are multiple templates and customization options supports.
Pros
● Create collage manually or automatically
● The earlier created collage can be edited.
● Allows creating a collage in 3 options- grid, template, freestyle.
Cons
● Watermark on the created collage.
● The image size cannot be customized.

05Collage Maker-Photo Grid and Montage
Using this free Windows tool, you can create an interesting photo collage or a free-styled montage as needed. A wide range of layouts and templates are available that can be further customized to get the desired collage.
Pros:
● Free Windows software.
● Come with multiple filters, layout, and editing tools.
● The user interface is easy.
● Preview option available.
Cons:
● Performance glitches due to bugs.
● Custom collage size cannot be set.
● Watermark on the collage.

06Fotor
If you are looking for a simple and basic collage-making tool, Fotor is the right choice. Collage in the grid, freestyle, and photo-stitch style can be created and basic customization features are supported.
Pros:
● Simple to use tool that is apt for beginners.
● Border can be changed from a solid color to a background.
Cons:
● Customization options are limited.
● Border and the image size cannot be changed.

07El Collagero
Just like its name, this is an interesting Windows-based tool for creating a collage of your choice. A wide range of options for customization is available that can let you edit the images, choose a template and then also edit the file.
Pros:
● A wide range of templates and designs for collages is available.
● Allows adding text, symbols, and other elements.
● Created collage can be shared on social media sites.
Cons:
● In comparison to other professional tools, the functions are limited.

08Atlantas Photo Collage Studio
This Windows-based tool will let you create collages of all types and for all occasions. You can choose from over 100 templates that best match your collage theme and image content.
Pros:
● More than 100 templates for collage designs are available.
● The size of the layout can be changed.
● Multiple editing and customization options are supported like zoom, opacity selection, and more.
Cons:
● Limitation of adding 45 images.
● For the advanced functions, need to subscribe to the paid version.

09PhotoJoiner
Using this Windows tool, pick up your favorite images and turn them into a beautiful collage with customized design and style.
Pros:
● A simple and basic tool for creating a collage.
● Created collage can be saved or shared to the social media site.
● Change the order of the images, margins, and other aspects.
Cons
● Collage templates are limited.
● Advanced features are missing.

1010. Blend Photo
To create a collage of images with a blending effect, this is the right tool to use. Available for download on the Windows system this tool lets you create collages telling interesting stories.
Pros:
● Simple and easy collage-making tool.
● Add blending effect to your collages.
● Over 50 custom shapes for image cropping are available along with the option for free-hand cropping.
● Multiple filters can be added.
Cons:
● Limited Editing and customization options.

Part 2 The Best Tool to Get Stock Images for Creating Collages
Several times, the captured and stored images may not fit in the collage theme you wish to create and, in such situations, you can use the stock images available online at several sites. One of the best tools where you can check out the images in different categories is Wondershare Filmora. This versatile software from Wondershare Filmora Video Editor is an advanced video editing tool that also has a huge collection of stock media including images.
Additionally, the split-screen feature of the software can be used for creating a video collage. Available for Windows and Mac systems, Wondershare Filmora will look after all your advanced video editing and customized requirements.

Wondershare Filmora - Best Video Editor for Mac/Windows
5,481,435 people have downloaded it.
Build unique custom animations without breaking a sweat.
Focus on creating epic stories and leave the details to Filmora’s auto features.
Start a creative adventure with drag & drop effects and endless possibilities.
Filmora simplifies advanced features to save you time and effort.
Filmora cuts out repetition so you can move on to your next creative breakthrough.
● Key Takeaways from This Episode →
● Collage-making tools help in creating an interesting and eye-catchy collage in a hassle-free manner.
●Several Windows-based tools are available for quick download.
●Wondershare Filmora is a great software to find a collection of stock images in different categories.
Collages are a great way to assemble all your favorite pictures in one place. You can share these collages with your friends, relatives, and dear ones or can also use them for posting on social media sites and other online platforms. Though creating a collage may sound simple, a lot of considerations need to be taken for creating an interesting and eye-catchy collage, and for this, a help of a professional tool can be taken. In the following parts of the topic, you can learn about the best tools for photo collage Windows 10 and other OS.
In the following parts of the topic, you can learn about the best tools for photo collage Windows 10 and other OS.
In this article
01 [Top 10 Pic Collage for Windows Tools](#Part 1)
02 [The Best Tool to Get Stock Images for Creating Collages](#Part 2)
Part 1 Top 10 Pic Collage for Windows Tools
Checkout the best collage for Windows below.
01PhotoPad Photo Editing Software
This is a complete photo editing tool supporting an array of features including the creation of a photo collage. This software from NCH software can let you add the desired images manually and also support using the auto grid to add an unlimited number of pictures. The tool also lets you choose the collage orientation size and set the background as needed.
Pros:
● Create collage Windows manually or automatically.
● Allows adding a background color, image, or from the available background options.
● Spacing and corners between the images can be selected.
● The size of the tool is small.
Cons:
● Stickers and filters to individual images cannot be added.
● Cannot choose a custom collage size.
02PhotoScapeX
Available for download on Windows 10 and higher versions this is another widely used photo editing tool that can also let you create collages manually as well as automatically. Multiple frames are available that can be selected as desired and there are additional features like adding filters, and also edit them in multiple ways.
Pros:
● Allows creating collage manually and automatically.
● Multiple editing tools for customization like filters, crop, zoom, doodle, and more.
● Picture alignment can be done in 3 modes- vertical, horizontal, and tile.
● Option to change and customize image size, spacing, margin, and others.
Cons:
● Limited photos can be added.
● The size of the tool is large in comparison to other tools.
03Phototastic Collage
This is free to use Windows-based tool that can create impressive collages in no time. Multiple designs, frames, and other options are available to create a customized collage as needed.
Pros:
● Multiple customization options are available for creating the desired collage.
● User-friendly and simple interface.
● An array of templates is available.
Cons:
● The free version has limited features.
● Limitation to the number of images that can be added.
● Ads in the app.
04PicCollage
Unleash your creativity by creating an interesting collage using this excellent collage-making app. There are multiple templates and customization options supports.
Pros
● Create collage manually or automatically
● The earlier created collage can be edited.
● Allows creating a collage in 3 options- grid, template, freestyle.
Cons
● Watermark on the created collage.
● The image size cannot be customized.
05Collage Maker-Photo Grid and Montage
Using this free Windows tool, you can create an interesting photo collage or a free-styled montage as needed. A wide range of layouts and templates are available that can be further customized to get the desired collage.
Pros:
● Free Windows software.
● Come with multiple filters, layout, and editing tools.
● The user interface is easy.
● Preview option available.
Cons:
● Performance glitches due to bugs.
● Custom collage size cannot be set.
● Watermark on the collage.
06Fotor
If you are looking for a simple and basic collage-making tool, Fotor is the right choice. Collage in the grid, freestyle, and photo-stitch style can be created and basic customization features are supported.
Pros:
● Simple to use tool that is apt for beginners.
● Border can be changed from a solid color to a background.
Cons:
● Customization options are limited.
● Border and the image size cannot be changed.
07El Collagero
Just like its name, this is an interesting Windows-based tool for creating a collage of your choice. A wide range of options for customization is available that can let you edit the images, choose a template and then also edit the file.
Pros:
● A wide range of templates and designs for collages is available.
● Allows adding text, symbols, and other elements.
● Created collage can be shared on social media sites.
Cons:
● In comparison to other professional tools, the functions are limited.
08Atlantas Photo Collage Studio
This Windows-based tool will let you create collages of all types and for all occasions. You can choose from over 100 templates that best match your collage theme and image content.
Pros:
● More than 100 templates for collage designs are available.
● The size of the layout can be changed.
● Multiple editing and customization options are supported like zoom, opacity selection, and more.
Cons:
● Limitation of adding 45 images.
● For the advanced functions, need to subscribe to the paid version.
09PhotoJoiner
Using this Windows tool, pick up your favorite images and turn them into a beautiful collage with customized design and style.
Pros:
● A simple and basic tool for creating a collage.
● Created collage can be saved or shared to the social media site.
● Change the order of the images, margins, and other aspects.
Cons
● Collage templates are limited.
● Advanced features are missing.
1010. Blend Photo
To create a collage of images with a blending effect, this is the right tool to use. Available for download on the Windows system this tool lets you create collages telling interesting stories.
Pros:
● Simple and easy collage-making tool.
● Add blending effect to your collages.
● Over 50 custom shapes for image cropping are available along with the option for free-hand cropping.
● Multiple filters can be added.
Cons:
● Limited Editing and customization options.
Part 2 The Best Tool to Get Stock Images for Creating Collages
Several times, the captured and stored images may not fit in the collage theme you wish to create and, in such situations, you can use the stock images available online at several sites. One of the best tools where you can check out the images in different categories is Wondershare Filmora. This versatile software from Wondershare Filmora Video Editor is an advanced video editing tool that also has a huge collection of stock media including images.
Additionally, the split-screen feature of the software can be used for creating a video collage. Available for Windows and Mac systems, Wondershare Filmora will look after all your advanced video editing and customized requirements.
Wondershare Filmora - Best Video Editor for Mac/Windows
5,481,435 people have downloaded it.
Build unique custom animations without breaking a sweat.
Focus on creating epic stories and leave the details to Filmora’s auto features.
Start a creative adventure with drag & drop effects and endless possibilities.
Filmora simplifies advanced features to save you time and effort.
Filmora cuts out repetition so you can move on to your next creative breakthrough.
● Key Takeaways from This Episode →
● Collage-making tools help in creating an interesting and eye-catchy collage in a hassle-free manner.
●Several Windows-based tools are available for quick download.
●Wondershare Filmora is a great software to find a collection of stock images in different categories.
5 Must Try Ways to Add and Send GIF in Text Message on Android
5 Must Try Ways to Add and Send GIF in Text Message on Android
An easy yet powerful editor
Numerous effects to choose from
Detailed tutorials provided by the official channel
A much easier and more extraordinary way of expressing yourself is texting with GIFs, and thus, GIFs for texting on Android are so famous now. GIFs, an abbreviation for Graphics Interchange Format, are brief animated images primarily used in a fun way to pass a message during texting and chatting. You do not necessarily have to say a word; a GIF does that for you!

Having GIFs is one thing; it is another to know how to use them effectively during conversations. Almost all operating system keyboards come with their style of sending GIFs to people. Also, you can download GIFs from the internet and go ahead to attach them directly to a text message. There are also third-party applications like GIPHY and GIF Keyboard to get GIFs for texting on Android. GIPHY is undoubtedly the best GIF app for Android texting. With Gboard, the built-in Google keyboard found in most Android devices; you can effortlessly search for GIFs for texting on Android.
In this article
01 [Can You Text a GIF?](#Part 1)
02 [Best 5 Ways to Add and Send GIFs in Text Message on Android](#Part 2)
Part 1 Can You Text a GIF?
The simple answer is yes! It is possible to message a GIF. GIFs for Android text messaging are becoming the new normal, and this is not surprising as they are easy to add to texts and make texting livelier.
To use a GIF for texting on Android, open any messaging app of your choice found on your Android device; it could be WhatsApp or the default message app installed on the Android device. The keyboard would most likely offer you a variety of GIF options. If not, click on the smiley icon at the bottom of the keyboard to reveal other GIFs grouped in categories. Simply clicking on any of your choices would select it, and all you must do is hit the send icon.
Google’s texting app, Google Messages, comes with sending GIFs. To use a GIF in text messages on Android, open the messaging app and start a fresh conversation or open an existing one, then select the square icon with GIF written in the middle. Select your preferred GIF, then click Send. You can also add a brief description or caption before sending the GIF across.
Apart from the built-in apps on Android devices that allow you to send GIFs, there are unique apps like GIPHY (compatible with Android and iOS devices) with an extensive array of GIFs that can fit into different contexts greetings, culture, animals, reactions, etc. You can also employ social media trackers that help you discover popular and trending GIFs. If the available GIFs do not express your intention, you can go ahead to perform a search to find other GIFs. That way, there’s no limitation to the messages you want to pass through GIFs for texting on Android devices.
Part 2 Best 5 Ways to Add and Send GIF in Text Message on Android
There are different ways of using GIFs for Android texting. Apart from using the GIFs available in the built-in keyboard of messaging apps, downloading, and installing an instant messaging app or GIF keyboard is one of the best and easiest ways to access many GIF libraries.
This section would suggest to you the best GIF apps for Android texting and other ways you can explore to send GIFs and make your texting less wordy, more visual, and more expressive:
01Attaching GIF to a text message
This method of using GIFs for Android texting is straightforward. All you need is a messaging app, then follow these steps:
Step 1: On your Android phone’s app list, open Messages, the app represented as a white speech bubble.

Step 2: At the bottom right corner of the app, tap the blue circular button with a white plus sign. This will open a page to select the receiver’s contact.

Step 3: Select the recipient’s number by tapping on it from the contact list or type the number or name of the person directly into the “To” field at the top of the screen.

Step 4: Tap the circular button with the plus sign in the middle on the left side of the message field. Depending on the app, it may be a paper clip icon.

Step 5: Tap the images icon to select an image from your phone media library.

Step 6: Click Gallery to select a previously downloaded GIF.

Step 7: Select the GIF you want to send. This would insert the GIF into a small preview image on the text message. The GIF would play in the preview window.

Step 8: Click the paper icon at the right corner of the text field to send the animated GIF image.

02Gboard
Gboard is a Google keyboard. This is another easy way of adding GIFs for Android text messaging. If you do not have Gboard, download it from Play Store and install it on your Android phone. Follow these to add GIFs to your text messages:
Step 1: Download, install and set up Gboard on your Android phone.

Step 2: Open your text messaging app to write a new text message. If you have previously sent a message to the recipient, click on the ongoing conversation or open a new chat and select the recipient’s contact.
Step 3: Tap the text message field to compose your text message. If your default keyboard is Gboard, then Gboard will be automatically opened.

Step 4: At the bottom of the keyboard, just to the left of the space bar, tap the smiley face icon.

Step 5: Click the GIF button located at the bottom row of the keyboard.

Step 6: Browse through the different categories tab below the GIF to select a GIF or enter a keyword to look for a GIF.

Step 7: Click on the GIF you want to add to the text message you’re typing automatically.

Step 8: Click the Send button, usually represented as a paper airplane icon at the bottom right of the messaging app.

03GIPHY
This is one of the most popular platforms that supports GIFs for texting on Android. It has the largest library of GIFs, making it a perfect search engine for them. GIPHY allows you to personalize your GIFs while finding the latest and trending GIFs. It also allows you to explore visual aspects, including sports highlights, TV shows, movies, etc. Installing this application gives you access to various GIFs that you can directly share with friends on social media or send them to messaging apps like WhatsApp, Facebook Messenger, etc. With GIPHY, you can save and share gifs while also using the animated stickers available on the app.

04SwiftKey Keyboard
This keyboard app comes with many features, including sending GIFs. This keyboard app lends your writing style and adapts to it, making it a highly productive app for typing. Its emoji keyboard allows you to effortlessly search and send fun stickers, emojis, and GIFs while texting. It also has a multilingual feature.

05GIF Keyboard
This keyboard makes it easy for you to directly and conveniently send GIFs from your keyboard. With a library of millions of GIFs, you need to type in a keyword to get the right GIF at any point in time. Send emojis, videos, and animated GIFs with just a single click using GIF Keyboard. You can browse for GIFs by category, save your favorites GIFs, and share them using different messaging apps.

● Key Takeaways from This Episode →
● How to use GIFs for Android texting.
●the Best GIF apps for Android texting.
● Different reliable ways of using GIFs to spice up your texting on Android devices.
●Using GIFs for Android text messaging is the way to go in this modern age. This is because people relate more to visual representations than mere write-ups. Now, you know that it is possible to text GIFs and send them is simple using the extensively discussed methods in this article.
A much easier and more extraordinary way of expressing yourself is texting with GIFs, and thus, GIFs for texting on Android are so famous now. GIFs, an abbreviation for Graphics Interchange Format, are brief animated images primarily used in a fun way to pass a message during texting and chatting. You do not necessarily have to say a word; a GIF does that for you!
Having GIFs is one thing; it is another to know how to use them effectively during conversations. Almost all operating system keyboards come with their style of sending GIFs to people. Also, you can download GIFs from the internet and go ahead to attach them directly to a text message. There are also third-party applications like GIPHY and GIF Keyboard to get GIFs for texting on Android. GIPHY is undoubtedly the best GIF app for Android texting. With Gboard, the built-in Google keyboard found in most Android devices; you can effortlessly search for GIFs for texting on Android.
In this article
01 [Can You Text a GIF?](#Part 1)
02 [Best 5 Ways to Add and Send GIFs in Text Message on Android](#Part 2)
Part 1 Can You Text a GIF?
The simple answer is yes! It is possible to message a GIF. GIFs for Android text messaging are becoming the new normal, and this is not surprising as they are easy to add to texts and make texting livelier.
To use a GIF for texting on Android, open any messaging app of your choice found on your Android device; it could be WhatsApp or the default message app installed on the Android device. The keyboard would most likely offer you a variety of GIF options. If not, click on the smiley icon at the bottom of the keyboard to reveal other GIFs grouped in categories. Simply clicking on any of your choices would select it, and all you must do is hit the send icon.
Google’s texting app, Google Messages, comes with sending GIFs. To use a GIF in text messages on Android, open the messaging app and start a fresh conversation or open an existing one, then select the square icon with GIF written in the middle. Select your preferred GIF, then click Send. You can also add a brief description or caption before sending the GIF across.
Apart from the built-in apps on Android devices that allow you to send GIFs, there are unique apps like GIPHY (compatible with Android and iOS devices) with an extensive array of GIFs that can fit into different contexts greetings, culture, animals, reactions, etc. You can also employ social media trackers that help you discover popular and trending GIFs. If the available GIFs do not express your intention, you can go ahead to perform a search to find other GIFs. That way, there’s no limitation to the messages you want to pass through GIFs for texting on Android devices.
Part 2 Best 5 Ways to Add and Send GIF in Text Message on Android
There are different ways of using GIFs for Android texting. Apart from using the GIFs available in the built-in keyboard of messaging apps, downloading, and installing an instant messaging app or GIF keyboard is one of the best and easiest ways to access many GIF libraries.
This section would suggest to you the best GIF apps for Android texting and other ways you can explore to send GIFs and make your texting less wordy, more visual, and more expressive:
01Attaching GIF to a text message
This method of using GIFs for Android texting is straightforward. All you need is a messaging app, then follow these steps:
Step 1: On your Android phone’s app list, open Messages, the app represented as a white speech bubble.
Step 2: At the bottom right corner of the app, tap the blue circular button with a white plus sign. This will open a page to select the receiver’s contact.
Step 3: Select the recipient’s number by tapping on it from the contact list or type the number or name of the person directly into the “To” field at the top of the screen.
Step 4: Tap the circular button with the plus sign in the middle on the left side of the message field. Depending on the app, it may be a paper clip icon.
Step 5: Tap the images icon to select an image from your phone media library.
Step 6: Click Gallery to select a previously downloaded GIF.
Step 7: Select the GIF you want to send. This would insert the GIF into a small preview image on the text message. The GIF would play in the preview window.
Step 8: Click the paper icon at the right corner of the text field to send the animated GIF image.
02Gboard
Gboard is a Google keyboard. This is another easy way of adding GIFs for Android text messaging. If you do not have Gboard, download it from Play Store and install it on your Android phone. Follow these to add GIFs to your text messages:
Step 1: Download, install and set up Gboard on your Android phone.
Step 2: Open your text messaging app to write a new text message. If you have previously sent a message to the recipient, click on the ongoing conversation or open a new chat and select the recipient’s contact.
Step 3: Tap the text message field to compose your text message. If your default keyboard is Gboard, then Gboard will be automatically opened.
Step 4: At the bottom of the keyboard, just to the left of the space bar, tap the smiley face icon.
Step 5: Click the GIF button located at the bottom row of the keyboard.
Step 6: Browse through the different categories tab below the GIF to select a GIF or enter a keyword to look for a GIF.
Step 7: Click on the GIF you want to add to the text message you’re typing automatically.
Step 8: Click the Send button, usually represented as a paper airplane icon at the bottom right of the messaging app.
03GIPHY
This is one of the most popular platforms that supports GIFs for texting on Android. It has the largest library of GIFs, making it a perfect search engine for them. GIPHY allows you to personalize your GIFs while finding the latest and trending GIFs. It also allows you to explore visual aspects, including sports highlights, TV shows, movies, etc. Installing this application gives you access to various GIFs that you can directly share with friends on social media or send them to messaging apps like WhatsApp, Facebook Messenger, etc. With GIPHY, you can save and share gifs while also using the animated stickers available on the app.
04SwiftKey Keyboard
This keyboard app comes with many features, including sending GIFs. This keyboard app lends your writing style and adapts to it, making it a highly productive app for typing. Its emoji keyboard allows you to effortlessly search and send fun stickers, emojis, and GIFs while texting. It also has a multilingual feature.
05GIF Keyboard
This keyboard makes it easy for you to directly and conveniently send GIFs from your keyboard. With a library of millions of GIFs, you need to type in a keyword to get the right GIF at any point in time. Send emojis, videos, and animated GIFs with just a single click using GIF Keyboard. You can browse for GIFs by category, save your favorites GIFs, and share them using different messaging apps.
● Key Takeaways from This Episode →
● How to use GIFs for Android texting.
●the Best GIF apps for Android texting.
● Different reliable ways of using GIFs to spice up your texting on Android devices.
●Using GIFs for Android text messaging is the way to go in this modern age. This is because people relate more to visual representations than mere write-ups. Now, you know that it is possible to text GIFs and send them is simple using the extensively discussed methods in this article.
10 Cartoon Photo Converters You Couldn’t Do Without
D:\【内容】文章录入资料\20220321 Cartoon\35. 10 Cartoon Photo Converters You Couldn’t Do Without
An easy yet powerful editor
Numerous effects to choose from
Detailed tutorials provided by the official channel
We all love to edit our images. Undoubtedly right now, the innovation in technology or day the editing tools available put us at a point where we can do more than editing the photograph. Well, here we are discussing convert picture to cartoon. Yes, you understand it right. This conversion can be done for various projects. We are not saying you to confine this ultimate option to your photos only. If you are a part of social media and create content, these tools will help you to get the best outcome in return.
Well, keep reading till the last as here we explore photo to cartoon online free, and some paid versions that you can try. Let’s get started!
In this article
01 [5 Online Picture to Cartoon Converters](#Part 1)
02 [5 Picture to Cartoon Converters on Your Phone](#Part 2)
03 [How to convert photo to cartoon with the help of FotoSketcher](#Part 3)
Part 1 Online Picture to Cartoon Converters
In this section, we are discussing the best online photo to cartoon converter that you can use and complete this tedious task within a few minutes. The best tools that you can consider include: -
01Befunky
Befunky, an online picture converter, offers a unique way of transforming your photographs into cartoon-like images. You can choose from a 50+ range of styles and adjust the size of the image before you start. The website lets you choose the style of cartoon you want, such as traditional or modern. You can also choose the size of your cartoon and even change the background color.

02Cartoonize
Cartoonize is an online tool that converts pictures into cartoon-style images. It is a free online service that allows users to convert any image into a cartoon-style image in seconds. It has been widely used by bloggers, teachers, and artists for the quick and easy creation of cartoons. This online tool can be used for many purposes, including Blogging, Teaching, Social Media Marketing, and other portals.

03PhotoCartoon
PhotoCartoon is an online image-to cartoon converter that converts photos into cartoons. This tool is helpful for people who want to create a cartoon from an image without having to draw it by hand. The website also provides users with the ability to add text, color, and other effects to the images they have converted into comics. It can be used for creating memes or advertisements as well as personal projects like comics and illustrations.

04Free Photo to cartoon
This online Free Photo to Cartoon Converter allows users to convert a photo into an animated cartoon. It is an easy-to-use tool that provides high-quality results in a short amount of time. It has been proven to be more effective than using traditional methods. The site also offers users the option of using different filters and uploading images from Facebook or Instagram for conversion. Within no time, a user will be able to get the outcome of their choice.

05Picsart
Picsart is a website that lets users draw pictures and make them into cartoons. It offers an easy interface to create personalized cartoons, which can be shared on social media. It has a free version for drawing and sharing custom images, as well as paid subscriptions for more features like making animated GIFs, drawing with your webcam, or using the site’s editor.

Part 2 5 Picture to Cartoon Converters on Your Phone
Well, above, we have discussed the tools that can be used through the website or, say, on the computer. But when you don’t have a computer, you can do it with the help of your phone as well. Now cartoon photo converter for phones is also available that one can try. These are as follows: -
01** Wondershare Filmora Video Editor
Filmora is an app for users to create videos, collages, and other types of images. It is a free app that comes with different features. It has been downloaded over 100 million times and has been used by numerous industries for completing the editing part. This acts as the best video to cartoon converter online free. It is available on iOS, Android, Windows 10, and Mac OS X.
For Win 7 or later (64-bit)
For macOS 10.12 or later
In general, it allows users to take pictures or videos from their phones and then convert them into a cartoon. The app also allows users to edit their images before converting them into cartoons as they want. The effects added in this tool are so awesome that any can love trying this out.
02Cartoon Photo Editor
This is a photo editor that allows users to turn photos into cartoon drawings. Users can choose from a range of styles and colors to create their own unique cartoons. The app offers different drawing styles, and accordingly, a user can choose one and do the editing easily. It also features abstract designs that lack realism but are still recognizable as cartoons. Users feel great using this app because of its interface and the features available.
03Art Camera – Cartoon, Pencil Sketch Art Effect Photo
Art Camera is a new photo app that allows taking photos that look like pencil drawings or sketches. It uses a sophisticated algorithm and the latest machine learning technology to transform your photos into cartoon-like images. This app is perfect for those who are looking for an artistic way of capturing memories, portraits, or even creating art from their own imagination. It is widely is available on iOS, Android, and Windows Phone devices.
04Tooncam – Cartoon, Pencil Sketch Pic
Tooncam is a free app that helps you to create cartoon images. You can use it on your phone or tablet. It is one of the best apps for creating cartoons on your phone with images with just one click. With this app, you can also share your cartoons with friends or family members and make them laugh out loud with funny pictures.
The app uses the camera of your device and its powerful photo editing tools to convert any photo into a cartoon image in just a few steps.
05Photo To Cartoon Yourself Edit
The app is a picture to cartoon converter on your phone that lets you transform a photo into a cartoon in just one tap. You can use this app to create an animated movie, comic strip, or comic book. The app works by converting the image into vector graphics and then adding colors and shading, and finally exporting it as an animated GIF. The app is available for iOS platforms.
Part 3 How to convert photo to cartoon
We are sure you might be thinking about how you can use these tools. Well, firstly, understand that every tool we have discussed above have the somewhere same interface, and you need to follow some steps to convert photo to cartoon. To help you more, here we are discussing the steps you need to follow while using FotoSketcher for the same purpose.
FotoSketcher is one of the best tools available free of cost for you. You can simply convert the photos into a cartoon and use them over different portals as per your need. There will be no need for you to engage in any complicated process to complete the editing task. The steps are also very simple to follow for this tool, and these are as follows: -
Step 1: firstly, get the FotoSketcher tool on your device.
Step 2: Wait until the installation of the tool gets completed. It is compatible with Windows and Mac both.
Step 3: Now, open the tool and upload the photo you wish to convert.
Step 4: Here, it asks you to select the type. You can either select cartoon 1 or Cartoon 2. These are the special effects being part of this software.
Step 5: Now, from the list of features, select the type of editing you wish to apply. There are multiple options available to choose from. You can choose any of them as per your preference.
Step 6: Blend the colors as needed for the edited photo. Along with it, there are some other parameters too need to look out for editing, and accordingly, you can set them.
Step 7: After setting up the changes, click on “Draw” to apply the changes. Wait until it applies the effects.
Step 8: The resulted image will appear, and you can download it in the required format from here.
● Ending Thoughts →
● Do convert photo to cartoon online in just simple steps without being part of any complicated process.
● Filmora is the best cartoon image converter online available, helping in converting the images as required.
● The photo to cartoon software is quite simple to use and does not require any particular technical knowledge.
We all love to edit our images. Undoubtedly right now, the innovation in technology or day the editing tools available put us at a point where we can do more than editing the photograph. Well, here we are discussing convert picture to cartoon. Yes, you understand it right. This conversion can be done for various projects. We are not saying you to confine this ultimate option to your photos only. If you are a part of social media and create content, these tools will help you to get the best outcome in return.
Well, keep reading till the last as here we explore photo to cartoon online free, and some paid versions that you can try. Let’s get started!
In this article
01 [5 Online Picture to Cartoon Converters](#Part 1)
02 [5 Picture to Cartoon Converters on Your Phone](#Part 2)
03 [How to convert photo to cartoon with the help of FotoSketcher](#Part 3)
Part 1 Online Picture to Cartoon Converters
In this section, we are discussing the best online photo to cartoon converter that you can use and complete this tedious task within a few minutes. The best tools that you can consider include: -
01Befunky
Befunky, an online picture converter, offers a unique way of transforming your photographs into cartoon-like images. You can choose from a 50+ range of styles and adjust the size of the image before you start. The website lets you choose the style of cartoon you want, such as traditional or modern. You can also choose the size of your cartoon and even change the background color.
02Cartoonize
Cartoonize is an online tool that converts pictures into cartoon-style images. It is a free online service that allows users to convert any image into a cartoon-style image in seconds. It has been widely used by bloggers, teachers, and artists for the quick and easy creation of cartoons. This online tool can be used for many purposes, including Blogging, Teaching, Social Media Marketing, and other portals.
03PhotoCartoon
PhotoCartoon is an online image-to cartoon converter that converts photos into cartoons. This tool is helpful for people who want to create a cartoon from an image without having to draw it by hand. The website also provides users with the ability to add text, color, and other effects to the images they have converted into comics. It can be used for creating memes or advertisements as well as personal projects like comics and illustrations.
04Free Photo to cartoon
This online Free Photo to Cartoon Converter allows users to convert a photo into an animated cartoon. It is an easy-to-use tool that provides high-quality results in a short amount of time. It has been proven to be more effective than using traditional methods. The site also offers users the option of using different filters and uploading images from Facebook or Instagram for conversion. Within no time, a user will be able to get the outcome of their choice.
05Picsart
Picsart is a website that lets users draw pictures and make them into cartoons. It offers an easy interface to create personalized cartoons, which can be shared on social media. It has a free version for drawing and sharing custom images, as well as paid subscriptions for more features like making animated GIFs, drawing with your webcam, or using the site’s editor.
Part 2 5 Picture to Cartoon Converters on Your Phone
Well, above, we have discussed the tools that can be used through the website or, say, on the computer. But when you don’t have a computer, you can do it with the help of your phone as well. Now cartoon photo converter for phones is also available that one can try. These are as follows: -
01** Wondershare Filmora Video Editor
Filmora is an app for users to create videos, collages, and other types of images. It is a free app that comes with different features. It has been downloaded over 100 million times and has been used by numerous industries for completing the editing part. This acts as the best video to cartoon converter online free. It is available on iOS, Android, Windows 10, and Mac OS X.
For Win 7 or later (64-bit)
For macOS 10.12 or later
In general, it allows users to take pictures or videos from their phones and then convert them into a cartoon. The app also allows users to edit their images before converting them into cartoons as they want. The effects added in this tool are so awesome that any can love trying this out.
02Cartoon Photo Editor
This is a photo editor that allows users to turn photos into cartoon drawings. Users can choose from a range of styles and colors to create their own unique cartoons. The app offers different drawing styles, and accordingly, a user can choose one and do the editing easily. It also features abstract designs that lack realism but are still recognizable as cartoons. Users feel great using this app because of its interface and the features available.
03Art Camera – Cartoon, Pencil Sketch Art Effect Photo
Art Camera is a new photo app that allows taking photos that look like pencil drawings or sketches. It uses a sophisticated algorithm and the latest machine learning technology to transform your photos into cartoon-like images. This app is perfect for those who are looking for an artistic way of capturing memories, portraits, or even creating art from their own imagination. It is widely is available on iOS, Android, and Windows Phone devices.
04Tooncam – Cartoon, Pencil Sketch Pic
Tooncam is a free app that helps you to create cartoon images. You can use it on your phone or tablet. It is one of the best apps for creating cartoons on your phone with images with just one click. With this app, you can also share your cartoons with friends or family members and make them laugh out loud with funny pictures.
The app uses the camera of your device and its powerful photo editing tools to convert any photo into a cartoon image in just a few steps.
05Photo To Cartoon Yourself Edit
The app is a picture to cartoon converter on your phone that lets you transform a photo into a cartoon in just one tap. You can use this app to create an animated movie, comic strip, or comic book. The app works by converting the image into vector graphics and then adding colors and shading, and finally exporting it as an animated GIF. The app is available for iOS platforms.
Part 3 How to convert photo to cartoon
We are sure you might be thinking about how you can use these tools. Well, firstly, understand that every tool we have discussed above have the somewhere same interface, and you need to follow some steps to convert photo to cartoon. To help you more, here we are discussing the steps you need to follow while using FotoSketcher for the same purpose.
FotoSketcher is one of the best tools available free of cost for you. You can simply convert the photos into a cartoon and use them over different portals as per your need. There will be no need for you to engage in any complicated process to complete the editing task. The steps are also very simple to follow for this tool, and these are as follows: -
Step 1: firstly, get the FotoSketcher tool on your device.
Step 2: Wait until the installation of the tool gets completed. It is compatible with Windows and Mac both.
Step 3: Now, open the tool and upload the photo you wish to convert.
Step 4: Here, it asks you to select the type. You can either select cartoon 1 or Cartoon 2. These are the special effects being part of this software.
Step 5: Now, from the list of features, select the type of editing you wish to apply. There are multiple options available to choose from. You can choose any of them as per your preference.
Step 6: Blend the colors as needed for the edited photo. Along with it, there are some other parameters too need to look out for editing, and accordingly, you can set them.
Step 7: After setting up the changes, click on “Draw” to apply the changes. Wait until it applies the effects.
Step 8: The resulted image will appear, and you can download it in the required format from here.
● Ending Thoughts →
● Do convert photo to cartoon online in just simple steps without being part of any complicated process.
● Filmora is the best cartoon image converter online available, helping in converting the images as required.
● The photo to cartoon software is quite simple to use and does not require any particular technical knowledge.
Also read:
- 15 Horror Animes That Will Trigger a Heart Attack for 2024
- Updated In 2024, Learn How to Do Funny Cartoon Drawings
- New In 2024, Best 10 Old Cartoons From Cartoon Network That You Miss
- 2024 Approved Pencil2D Animation Tutorial Overview
- New In 2024, 10 Classical Animated Cartoon Types With Examples
- FREE Best Anime Streaming Sites to Download Anime
- Is It That Easy to Make My Own Animated Character for 2024
- New How to Stop Animation From Looping in Unity for 2024
- Updated In 2024, How to Animate - Adobe Animate Tutorias
- Updated In 2024, Tutorials to Make Animated Images – Even if Youre Just Starting Out
- Updated 2024 Approved 15 Types of Cartoon Drawing Styles Examples
- New In 2024, 5 Must Try Ways to Add GIF in Text Message on Android
- In 2024, Learn Disney Cartoon Drawing to See More Disney Magic Moments
- Updated Whats Rigging Animation for 2024
- FREE Top 10 Best Convert Video Between GIF and Software High Quality, 2024
- New What This Post Can Teach You About Clay Animation for 2024
- Updated Simple Shortcut to Convert Videos to Gifs on iPhone
- Updated How to Make Animated Videos for Business Simple Guide
- New 2024 Approved 15 Animated Characters We All Had A Crush On
- New Nurturing Mind, Heart, and Soul on the Top 5 Anime Streaming Sanctuaries for 2024
- Top 3 Ways to Create Gif Images with Great 3D Gif Maker for 2024
- In 2024, The Only Guide Youll Need to Learn About GIF Video Downloader
- 2024 Approved 10 Must-Use MP4 to GIF Converters to Get Perfect-Made GIF
- New 2024 Approved 12 Captivating Websites with Triggered Animate on Scroll Examples
- Updated In 2024, Tips for Canva Animated Elements
- Top 4 Websites to Get Anime Footage for Free
- Have You Seen the Facebook Cartoon App Everyones Using Lately
- Updated Easy Shortcut to Convert Videos to Gifs on iPhone
- Updated Handy Tips From Adobe Animate Rigging Tutorial for All Learners
- 2024 Approved All About Types of Motion Graphics
- New How to Cartoonize Photo Photoshop in Simple Steps
- Before You Learn 3D Animation Some Things You Should Know
- Updated How to Make My Photo 3D Cartoon Online for 2024
- Updated The 10 Most Adorable Aesthetic Cartoon Characters
- Updated 2024 Approved How to Draw Cartoons Step by Step with This Guide
- New How to Create a YouTube Intro Animation Like a Pro
- 2024 Approved How to Make Animation Characters with the Best Character Creators
- Updated 12+ Stunning Instagram GIF Stickers for 2024
- Updated 18 Best Tools and Services to Create Animated Videos for Your Business for 2024
- New 2024 Approved How to Analyze an Editorial Cartoon
- In 2024, Animate Photo Online with These Awesome Tools
- New In 2024, Amazing Ideas About Creating Personalised WhatsApp GIF Sticker
- In 2024, Ultimate Guide on Motorola G54 5G FRP Bypass
- How to Unlock iPhone 8 with IMEI Code?
- How to Change Spotify Location After Moving to Another Country On Honor X9a | Dr.fone
- Fake Android Location without Rooting For Your Vivo Y36 | Dr.fone
- How To Remove the Two Factor Authentication On iPhone SE (2020)
- How to Show Wi-Fi Password on Poco X6
- In 2024, iPogo will be the new iSpoofer On Realme Narzo 60x 5G? | Dr.fone
- How to Transfer Photos from Motorola Edge 2023 to Laptop Without USB | Dr.fone
- What Does Enter PUK Code Mean And Why Did The Sim Get PUK Blocked On Gionee F3 Pro Device
- Complete Tutorial to Use GPS Joystick to Fake GPS Location On Infinix Note 30 | Dr.fone
- How to Fix Unfortunately, Contacts Has Stopped Error on Lenovo ThinkPhone | Dr.fone
- In 2024, How to Mirror Your Infinix Smart 8 HD Screen to PC with Chromecast | Dr.fone
- In 2024, How Many Attempts To Unlock Apple iPhone 11 Pro Max | Dr.fone
- How to Remove Forgotten PIN Of Your Xiaomi Redmi 13C
- 8 Solutions to Fix Find My Friends Location Not Available On Motorola Moto E13 | Dr.fone
- How To Restore Missing Music Files from Honor X7b
- In 2024, How to use Snapchat Location Spoofer to Protect Your Privacy On Samsung Galaxy A25 5G? | Dr.fone
- In 2024, 5 Easy Ways to Copy Contacts from Xiaomi Redmi Note 12R to iPhone 14 and 15 | Dr.fone
- In 2024, How to Come up With the Best Pokemon Team On Oppo A79 5G? | Dr.fone
- How does the stardust trade cost In pokemon go On Motorola Razr 40? | Dr.fone
- In 2024, Samsung Galaxy A54 5G ADB Format Tool for PC vs. Other Unlocking Tools Which One is the Best?
- In 2024, How to Make the Most of Your Apple iPhone XS Max Lock Screen with Notifications?
- Ways To Find Unlocking Codes For Oppo A1 5G Phones
- In 2024, Ultimate Guide from iPhone 13 iCloud Activation Lock Bypass
- Samsung Galaxy F04 ADB Format Tool for PC vs. Other Unlocking Tools Which One is the Best?
- Play Store Not Working On Google Pixel 8? 8 Solutions Inside | Dr.fone
- In 2024, How I Transferred Messages from Infinix Smart 8 Pro to iPhone 12/XS (Max) in Seconds | Dr.fone
- Easy Guide to ZTE Blade A73 5G FRP Bypass With Best Methods
- Android Unlock Code Sim Unlock Your Infinix GT 10 Pro Phone and Remove Locked Screen
- New What Is AI Voice for 2024
- 6 Things We Can Do To Save A Water Damaged iPhone 12 Pro | Stellar
- In 2024, Full Guide on Mirroring Your Xiaomi Redmi 12 5G to Your PC/Mac | Dr.fone
- Data Retrieval tool – restore lost data from Galaxy A15 5G
- In 2024, How to Unlock a Network Locked Oppo Reno 11F 5G Phone?
- How to Access Your iPhone XR When You Forget the Passcode?
- A Guide Tecno Pova 5 Wireless and Wired Screen Mirroring | Dr.fone
- Here are Some of the Best Pokemon Discord Servers to Join On Realme C33 2023 | Dr.fone
- 4 solution to get rid of pokemon fail to detect location On Realme GT 5 Pro | Dr.fone
- How to Cast Samsung Galaxy M34 5G Screen to PC Using WiFi | Dr.fone
- Title: 2024 Approved Best GIF Maker Software for Windows and Mac
- Author: Elon
- Created at : 2024-06-30 12:27:31
- Updated at : 2024-07-01 12:27:31
- Link: https://animation-videos.techidaily.com/2024-approved-best-gif-maker-software-for-windows-and-mac/
- License: This work is licensed under CC BY-NC-SA 4.0.
