
:max_bytes(150000):strip_icc():format(webp)/best-sports-movies-creed-michael-b-jordan-cbca95120e5243edb7eca00403eaa626.jpg)
2024 Approved How to Create Your Avatar Free
How to Create Your Avatar Free
How to Create Your Own Avatar Free
An easy yet powerful editor
Numerous effects to choose from
Detailed tutorials provided by the official channel
As a profile image, you can use your Facebook avatar. You can choose from a range of faces, hairstyles, and costumes for your avatar.
This article will help in creating your own avatar app and let you understand how to make your own my little pony avatar.
In this article
01 [Avatar Maker Tutorial | Create your Avatar for Free](#Part 1)
02 [5 Apps to Build Your Avatar](#Part 2)
Part 1 Avatar Maker Tutorial | Create your Avatar for Free
Adobe Creative Cloud Express is an online tool to make your own avatars for free. With Adobe, you can create a handcrafted avatar to match your personality for your social media profiles, YouTube videos, and so much more. Adobe lets you think out of the box, easy as choosing a template and sharing. Let us discuss the steps to create your own avatar for free using Adobe.
![]()
01Step 1: Start with Inspiration
You can never start from an empty canvas; there are several templates available you can choose any one of them by browsing with color, aesthetic, mood, and many other categories to have an idea of creating an avatar. Once you find a suitable graphic, you can click or tap on it starts editing as a document in the editor.
![]()
02Step 2: Remix
You can customize your avatar templates in a variety of ways. Change the font and copy. Substitute your photos for the imagery. Alternatively, you can use Creative Cloud Express to search through thousands of free pictures. Design your own by spending as little time as you wish.
![]()
03Step 3: Amplify Up the Flair
You can be as creative as you can by adding flair and personality to your projects with design assets. Add animated text and GIF to your project in one tap. They have cleared all the other technical issues to focus on your style and message.
![]()
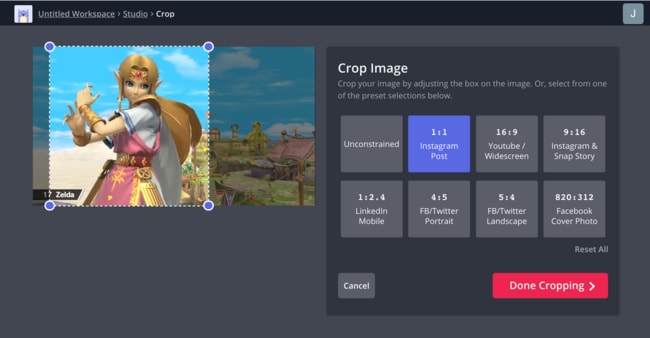
04Step 4: Resize
The days where you have to remember the dimension of the image are gone. Once you have selected the design, you can modify and resize using the Auto magical resize available feature. Duplicate the project, select “Hit Resize,” and choose the platform to adapt it, and our AI will take care of the rest. Enjoy sharing it on other media.
[Well, this feature is a premium feature, so if you wish to access it, you need to do a subscription.]
![]()
05Step 5: Save and Share
Once you have applied all your creativity to your project, click on the “Publish” button and share your creations. Creative Cloud saves your project in your profile so that you can revisit and edit your projects whenever required.
Explore these professional templates to make your own avatar-free. Browse for themes like logos, icons, personalized fonts, and other elements to create an authentic look.
![]()
Part 2 5 Apps to Build Your Avatars
Having your avatar as your profile picture is freaking excellent and fun. There are many apps to create your avatars; let’s discuss some of them.
01Boo App–3D Avatar Emoji
Boo creates 3D characters that look similar to you within minutes. There are plenty of outfit options that can be customized separately for your styles to match your daily fashion. With this app, make your own avatars for free.
Highlights
●It offers a ton of features like skin tones, hair colors, eye colors, and hairstyles
●It assists in making your own my little pony avatar to give a unique style.
●New items are updated regularly.
Limits
●Limited color options
●Background glitch
●Sometimes after clicking the color option, it gets changed.
Review/Ratings
It has a rating of about 4.4 and many good reviews from users.
02Faceq
This application provides multiple facial features and an extensive trendy wardrobe. Even the tiniest characteristics on the face, such as beauty marks, facial hair, and brows, are essential. Hair accessories to make you own my little pony avatar. It looks as beautiful as when you apply your creativity to the maximum level.
Highlights
●Inclusive of many tabs for obvious face form, hairdo, and attire.
●Add more life to your avatars like text bubbles, hand gestures, etc.
●Multiple facial features
Limits
●Limited makeup options
●More dressing options expected
●Some slogans may be inappropriate
Ratings/Review
It has a rating of 3.1
03 SuperMe
This application is mainly for girls, and it offers 1000+ facial expressions and more materials. You can create and share animated videos of your avatars with the world and chat with people to make new friends. You can use this application to create my animated avatar.
Highlights
●There are 100 animations facilities where you can randomly apply by a simple handshake.
●A straightforward procedure to use.
●Multiple Facial expressions.
Limits
●You need to buy coins. It would be good if available for free.
●Primarily for girls
●The limitation of this application is that the language is still in its original language (Chinese).
Ratings/Review
This app has a rating of about 4
04Zmoji
Zmoji, a personal emoji creator, enables chatting with multiple versions of yours, and thus this way, you can make your own my little pony avatar. There are many unique features introduced to create a more appropriate.
Highlights
●It has a simple interface.
●It allows you to build a vivid cartoon avatar that matches your style quickly.
●It has Emoji Keyboard, which will enable you to send emojis directly from your keyboard in iMessage and third-party apps.
Limits
●The app also requires a subscription for some activities, which is disappointing.
●The subscription cost is high.
Ratings/Reviews
This app has a review of about 4.6
05Wondershare Wondershare Filmora Video Editor
To create my animated avatar, you can choose Wondershare Wondershare Filmora Video Editor . It is something magical that allows you to do anything with your photo. Of course, including changing to an avatar or a cartoon character. In this journal, you will see many different ways to make your own avatar for free, but Wondershare Filmora Video Editor offers to be all. It contains many templates, font styles, animation effects, wardrobes, and what less. Wondershare Filmora Video Editor is easier to use; with a few steps, you can create an avatar representing you more accurately than any other software could do.
It just goes with creating layers, liquefying, smoothening and additional features. And simply, you can share it to any social media directly from the software. Wondershare Wondershare Filmora Video Editor is mainly used to create my animated avatar.
Highlights
●Simple and easy interface.
●User friendly
●Multitude of features
Limits
●Advanced version need a subscription
Reviews
4.4 as per user reviews
For Win 7 or later (64-bit)
For macOS 10.12 or later
● Key Takeaways from This Episode →
● Understanding Adobe Creative Cloud Express
● Five different Apps used in creating my animated avatar
● Compared to all other online tools and programs, Wondershare Wondershare Filmora Video Editor is superior.
As a profile image, you can use your Facebook avatar. You can choose from a range of faces, hairstyles, and costumes for your avatar.
This article will help in creating your own avatar app and let you understand how to make your own my little pony avatar.
In this article
01 [Avatar Maker Tutorial | Create your Avatar for Free](#Part 1)
02 [5 Apps to Build Your Avatar](#Part 2)
Part 1 Avatar Maker Tutorial | Create your Avatar for Free
Adobe Creative Cloud Express is an online tool to make your own avatars for free. With Adobe, you can create a handcrafted avatar to match your personality for your social media profiles, YouTube videos, and so much more. Adobe lets you think out of the box, easy as choosing a template and sharing. Let us discuss the steps to create your own avatar for free using Adobe.
![]()
01Step 1: Start with Inspiration
You can never start from an empty canvas; there are several templates available you can choose any one of them by browsing with color, aesthetic, mood, and many other categories to have an idea of creating an avatar. Once you find a suitable graphic, you can click or tap on it starts editing as a document in the editor.
![]()
02Step 2: Remix
You can customize your avatar templates in a variety of ways. Change the font and copy. Substitute your photos for the imagery. Alternatively, you can use Creative Cloud Express to search through thousands of free pictures. Design your own by spending as little time as you wish.
![]()
03Step 3: Amplify Up the Flair
You can be as creative as you can by adding flair and personality to your projects with design assets. Add animated text and GIF to your project in one tap. They have cleared all the other technical issues to focus on your style and message.
![]()
04Step 4: Resize
The days where you have to remember the dimension of the image are gone. Once you have selected the design, you can modify and resize using the Auto magical resize available feature. Duplicate the project, select “Hit Resize,” and choose the platform to adapt it, and our AI will take care of the rest. Enjoy sharing it on other media.
[Well, this feature is a premium feature, so if you wish to access it, you need to do a subscription.]
![]()
05Step 5: Save and Share
Once you have applied all your creativity to your project, click on the “Publish” button and share your creations. Creative Cloud saves your project in your profile so that you can revisit and edit your projects whenever required.
Explore these professional templates to make your own avatar-free. Browse for themes like logos, icons, personalized fonts, and other elements to create an authentic look.
![]()
Part 2 5 Apps to Build Your Avatars
Having your avatar as your profile picture is freaking excellent and fun. There are many apps to create your avatars; let’s discuss some of them.
01Boo App–3D Avatar Emoji
Boo creates 3D characters that look similar to you within minutes. There are plenty of outfit options that can be customized separately for your styles to match your daily fashion. With this app, make your own avatars for free.
Highlights
●It offers a ton of features like skin tones, hair colors, eye colors, and hairstyles
●It assists in making your own my little pony avatar to give a unique style.
●New items are updated regularly.
Limits
●Limited color options
●Background glitch
●Sometimes after clicking the color option, it gets changed.
Review/Ratings
It has a rating of about 4.4 and many good reviews from users.
02Faceq
This application provides multiple facial features and an extensive trendy wardrobe. Even the tiniest characteristics on the face, such as beauty marks, facial hair, and brows, are essential. Hair accessories to make you own my little pony avatar. It looks as beautiful as when you apply your creativity to the maximum level.
Highlights
●Inclusive of many tabs for obvious face form, hairdo, and attire.
●Add more life to your avatars like text bubbles, hand gestures, etc.
●Multiple facial features
Limits
●Limited makeup options
●More dressing options expected
●Some slogans may be inappropriate
Ratings/Review
It has a rating of 3.1
03 SuperMe
This application is mainly for girls, and it offers 1000+ facial expressions and more materials. You can create and share animated videos of your avatars with the world and chat with people to make new friends. You can use this application to create my animated avatar.
Highlights
●There are 100 animations facilities where you can randomly apply by a simple handshake.
●A straightforward procedure to use.
●Multiple Facial expressions.
Limits
●You need to buy coins. It would be good if available for free.
●Primarily for girls
●The limitation of this application is that the language is still in its original language (Chinese).
Ratings/Review
This app has a rating of about 4
04Zmoji
Zmoji, a personal emoji creator, enables chatting with multiple versions of yours, and thus this way, you can make your own my little pony avatar. There are many unique features introduced to create a more appropriate.
Highlights
●It has a simple interface.
●It allows you to build a vivid cartoon avatar that matches your style quickly.
●It has Emoji Keyboard, which will enable you to send emojis directly from your keyboard in iMessage and third-party apps.
Limits
●The app also requires a subscription for some activities, which is disappointing.
●The subscription cost is high.
Ratings/Reviews
This app has a review of about 4.6
05Wondershare Wondershare Filmora Video Editor
To create my animated avatar, you can choose Wondershare Wondershare Filmora Video Editor . It is something magical that allows you to do anything with your photo. Of course, including changing to an avatar or a cartoon character. In this journal, you will see many different ways to make your own avatar for free, but Wondershare Filmora Video Editor offers to be all. It contains many templates, font styles, animation effects, wardrobes, and what less. Wondershare Filmora Video Editor is easier to use; with a few steps, you can create an avatar representing you more accurately than any other software could do.
It just goes with creating layers, liquefying, smoothening and additional features. And simply, you can share it to any social media directly from the software. Wondershare Wondershare Filmora Video Editor is mainly used to create my animated avatar.
Highlights
●Simple and easy interface.
●User friendly
●Multitude of features
Limits
●Advanced version need a subscription
Reviews
4.4 as per user reviews
For Win 7 or later (64-bit)
For macOS 10.12 or later
● Key Takeaways from This Episode →
● Understanding Adobe Creative Cloud Express
● Five different Apps used in creating my animated avatar
● Compared to all other online tools and programs, Wondershare Wondershare Filmora Video Editor is superior.
How to Make GIF Instagram
How to Make GIF Instagram | Quick Tips
An easy yet powerful editor
Numerous effects to choose from
Detailed tutorials provided by the official channel
Creating gif for Instagram to make stories engaging in easy steps. Making Instagram stories by converting gif to video to attract more people.
In this article
01 [10 Best Instagram Gifs for Your Stories](#Part 1)
02 [How to Create a GIF for Instagram](#Part 2)
03 [How to Convert GIF to Video for Instagram](#Part 3)
Part 1 10 Best Instagram Gifs for Your Stories
All of you might know that GIF is also known as Graphics Interchange Format. It was created for the first time in the year 1987. With it you can decrease the size of photos and short animated images. With this kind of technology a gif instagram can also be made with the greatest ease. The GIF instagram story is a fun oriented task that all of you will appreciate in the long run. Here you can even add animated stickers and paste them to your story. With this way you can also make more stickers by changing their size in the long way. Instagram logo gif can also be made easily by following some keywords to get the desired gif over Instagram.
So, to make an Instagram story more happening some of the top gif galleries are:
01Bohemian
As the name suggests, the gif are Bohemian themed. Those who love to add some cute Bohemian things and pictures in gif style; they can type Bohemian on the search bar and choose the best one to make an Instagram story Bohemian themed. Colorful flowers, star, dream catcher, cute girl and days name are available in the said gif style.
02Chicayeye
Various gifs available at this keyword are warm colors themed. They make any Instagram story pleasing with simple yet beautiful color combinations. With matching color combinations of pictures and words, instagram stories can be made more interesting.
03Kindcomments

The name itself indicates, there will be a lot of quotes or sayings. Those who are fond of posting some beautiful and engaging quotes on social media accounts, they will definitely love to add gif from Kindcomments.
04Scarletpin

It is seen that food lovers always post their story when they have a lunch or dinner. Making people know what new they are having at a place through Instagram stories seems to be very interesting. So, for those SCARLETPIN has a wide collection of food gifs. It has bright and colorful pictures of food to make the stories more interesting.
05Gladdest
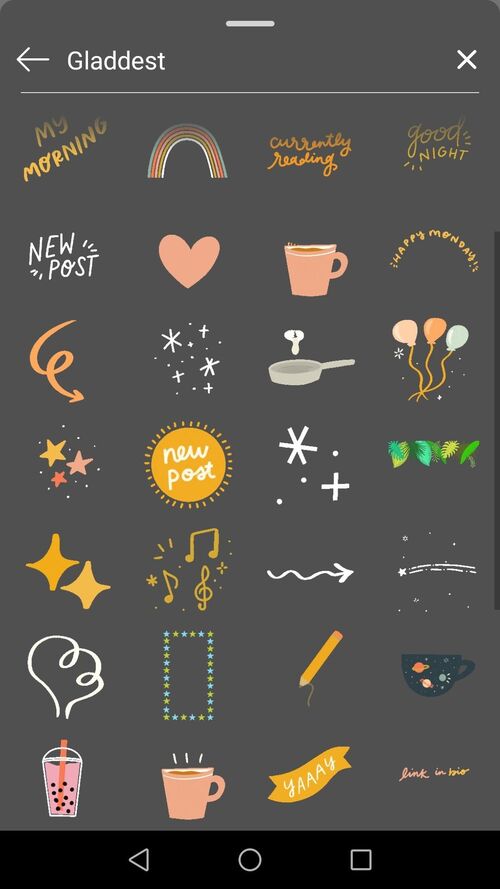
Adorable gif for insta can make any Instagram story look so sweet and engaging. So, when you need a soft tone gif with a lot of sayings, stars, flowers, a piece of cake and music, then type Gladdest at your search result and get some vintage styles gif that make your Instagram story adorable. This will make people to shower love and hearts at your story.
06Hanmade
A lot of gif in instagram that seems to be written with hands can be searched through “handmade”. It has some adorable pink and cute designs. Days and the months are written in some amazing style. An Instagram story can be made attractive by including some heart gif and sayings gif. Those who wish to add some cute stories on Christmas day, they can even get some cute wishes gif in it.
07Hygge
Season’s gif are most common gifs that are included in any Instagram story by the social media users. The most lovable season is the winters where the users have a lot of stuff to include in the story. Looking for winter’s gif for story? Then type Hygge at your search results. ???It will show various gif for a mood of coziness. One can find cozy mugs, stars, snowman, and seasonal stickers to make interesting story over Instagram.
08Vipapier
Some users look for a place where they can get most of the best instagram gifs for their Instagram stories. From sayings to cute pictures of hearts, flowers and stars all can be taken from Vipapier. The best thing is that it has muted color scheme and paint gif that can be applied anywhere in the background of the text. So, search Vipapier over the search results of Instagram and add one that fits in your space.
09LINE & LINES

This is a simple yet very good gif available to make text in the Instgaram look amazing and stylish. One can underline something or write something interesting in break up to give the text a new look. So, various lines can be seen at LINE & LINES to include the same in the Instagram stories.
10Square & Rectangle
Basic shapes are loved by every Instagram user who updates their stories every day. The reason is that they give a new and cool look to any picture. So, if you need basic shape, then ‘square’ or ‘rectangle’ are great way to make your new post look different and impress your followers. They are simple to create and can be added as background theme for the pictures of videos.
Part 2 How to Create a GIF for Instagram
Posting an Instagram GIF is easy using an application for both iPhone and Android. So, let’s see one by one how to make gifs for instagram and post the same on the Instagram stories. To begin with:
01How to Post an Instagram GIF Using App for iPhone
When you are in need to post Gifs to instagram story then you have to take some essential steps. These steps have been taken by GIPHY as well as from GIF stickers that you can add to your content at social media sites like Instagram.
● Install the Giphy app on your iPhone and open it.
● Look for the desired GIF which you want to include in your story on GIPHY.
● Click on the paper-airplane icon located under the GIF.
● Tap the Instagram button. A permission screen will open asking for giving permission for access to open Instagram.
● After giving permission, the selected GIF will open inside Instagram. Select Feed to post the selected GIF to your Instagram feed. This will be a new post over the Instagram.
● In case you need to edit of add filters, you can go with that by moving on to Next.
● Further tap next again to add caption and hash tags if required.
● After creation of GIF post is over, tap Share.
Here you will get more benefits like increasing and decreasing the size of images. Instagram story gif is an issue that is to be done for every kind of need and all the Instagram stories. By good fortune GIPHY has many tons of GIFs that can be selected for this kind of conditions. You just need a special kind of flair when you are making texts for your GIF interface. Even then you have to adopt gif instagram story aesthetic so that your task of doing any promotion on social media sites could become an easy one.
02How to Post an Instagram GIF Using App for Android
Gif can be posted easily using GIPHY Cam for Android. Here you can even open the app of instagram media with the help of an android. The simple steps are:
Save the GIF to the Download folder which you want to share to the Instagram.
Tap to the camera roll after opening GIPHY CAM.
Choose the GIF and move to the next button.
Let the GIF convert and then go to Instagram and share.
Part 3 How to Convert GIF to Video for Instagram
A gif can be converted into video by using various applications. Converting Gif by adding some filter, light effects and sound into video make it more attractive for Instagram stories. One can try Filmora to convert gif to video for instagram in just simple steps.
01**Wondershare Filmora Video Editor ** –A GIF resource

Wondershare Filmora - Best Video Editor for Mac/Windows
5,481,435 people have downloaded it.
Build unique custom animations without breaking a sweat.
Focus on creating epic stories and leave the details to Filmora’s auto features.
Start a creative adventure with drag & drop effects and endless possibilities.
Filmora simplifies advanced features to save you time and effort.
Filmora cuts out repetition so you can move on to your next creative breakthrough.
There are many applications and web tools that offer to convert beautiful gifs to videos and sharing the same over Instagram stories. Filmora V11 is one of the best video editor applications which assist the users to convert gif to video with minimal effort. It is a user-friendly tool that has media editing features. It allows the users to enhance their video with wide variety of sound, light effects, and beautiful gifs and share them to their Instagram stories.
For creating video or converting gifs to video, Filmora V11 can be used. It makes easy for the beginners to convert gift into videos in a few simple steps. Filmora V11 app is required to be installed on the system and media files can be imported there. The best thing is that it supports most of the video formats such as MP4, AVI, H261, FLV, MKV, 3GP, MOV, MPEG, VOB, RMVB, M4V, TS, M2TS, WMV, ASF and many more. To customize gifs and then converting it to video, the Filmora Meme maker can be used. Templates and captions are also found at the application.
02Steps to convert GIF to video for Instagram
● The first step is to download the application Filmora at your computer and open it. Choose the GIF file from the Filmora file.
● Do the necessary editing. This including adding some text, colors and effects to the gif.
● After adding all the effects and editing, tap to create a video from it. Export the same in MP4 format and save it over the mobile. The application will convert the gift into video and is ready for uploading.
● At last in the uploading process, open the Instagram application, select the video from the gallery.
● Captions or description can be added and then uploaded.
● Key Takeaways from This Episode →
● Instagram story gifs are concerned with mainstream creation for graphics interchange format. With these formats you can make the best and interesting story. So, to make gif, maximum use of GIPHY can be made to make your work look to be the best promotional one. Some of the best gifs can be searched by tapping keywords like Bohemian, Hanmade, LINE & LINES and Square & Rectangle
● Posting gif can be understood in just simple steps. If you desire to know how to create gifs for instagram, then you can explore various applications for both iPhone and Android. You may even search well on your GIF and then select the desired gif that can be added well to your instagram story.
● Instagram stories can be made more attractive by converting gif into videos. The same can be done with ease with some user friendly and high tech applications. Filmora can be the best software application for doing the magic over Instagram stories. It can be used to turn gif into videos or videos to gif. So, give your creativity a new height with some good application and impress your followers.
Creating gif for Instagram to make stories engaging in easy steps. Making Instagram stories by converting gif to video to attract more people.
In this article
01 [10 Best Instagram Gifs for Your Stories](#Part 1)
02 [How to Create a GIF for Instagram](#Part 2)
03 [How to Convert GIF to Video for Instagram](#Part 3)
Part 1 10 Best Instagram Gifs for Your Stories
All of you might know that GIF is also known as Graphics Interchange Format. It was created for the first time in the year 1987. With it you can decrease the size of photos and short animated images. With this kind of technology a gif instagram can also be made with the greatest ease. The GIF instagram story is a fun oriented task that all of you will appreciate in the long run. Here you can even add animated stickers and paste them to your story. With this way you can also make more stickers by changing their size in the long way. Instagram logo gif can also be made easily by following some keywords to get the desired gif over Instagram.
So, to make an Instagram story more happening some of the top gif galleries are:
01Bohemian
As the name suggests, the gif are Bohemian themed. Those who love to add some cute Bohemian things and pictures in gif style; they can type Bohemian on the search bar and choose the best one to make an Instagram story Bohemian themed. Colorful flowers, star, dream catcher, cute girl and days name are available in the said gif style.
02Chicayeye
Various gifs available at this keyword are warm colors themed. They make any Instagram story pleasing with simple yet beautiful color combinations. With matching color combinations of pictures and words, instagram stories can be made more interesting.
03Kindcomments
The name itself indicates, there will be a lot of quotes or sayings. Those who are fond of posting some beautiful and engaging quotes on social media accounts, they will definitely love to add gif from Kindcomments.
04Scarletpin
It is seen that food lovers always post their story when they have a lunch or dinner. Making people know what new they are having at a place through Instagram stories seems to be very interesting. So, for those SCARLETPIN has a wide collection of food gifs. It has bright and colorful pictures of food to make the stories more interesting.
05Gladdest
Adorable gif for insta can make any Instagram story look so sweet and engaging. So, when you need a soft tone gif with a lot of sayings, stars, flowers, a piece of cake and music, then type Gladdest at your search result and get some vintage styles gif that make your Instagram story adorable. This will make people to shower love and hearts at your story.
06Hanmade
A lot of gif in instagram that seems to be written with hands can be searched through “handmade”. It has some adorable pink and cute designs. Days and the months are written in some amazing style. An Instagram story can be made attractive by including some heart gif and sayings gif. Those who wish to add some cute stories on Christmas day, they can even get some cute wishes gif in it.
07Hygge
Season’s gif are most common gifs that are included in any Instagram story by the social media users. The most lovable season is the winters where the users have a lot of stuff to include in the story. Looking for winter’s gif for story? Then type Hygge at your search results. ???It will show various gif for a mood of coziness. One can find cozy mugs, stars, snowman, and seasonal stickers to make interesting story over Instagram.
08Vipapier
Some users look for a place where they can get most of the best instagram gifs for their Instagram stories. From sayings to cute pictures of hearts, flowers and stars all can be taken from Vipapier. The best thing is that it has muted color scheme and paint gif that can be applied anywhere in the background of the text. So, search Vipapier over the search results of Instagram and add one that fits in your space.
09LINE & LINES
This is a simple yet very good gif available to make text in the Instgaram look amazing and stylish. One can underline something or write something interesting in break up to give the text a new look. So, various lines can be seen at LINE & LINES to include the same in the Instagram stories.
10Square & Rectangle
Basic shapes are loved by every Instagram user who updates their stories every day. The reason is that they give a new and cool look to any picture. So, if you need basic shape, then ‘square’ or ‘rectangle’ are great way to make your new post look different and impress your followers. They are simple to create and can be added as background theme for the pictures of videos.
Part 2 How to Create a GIF for Instagram
Posting an Instagram GIF is easy using an application for both iPhone and Android. So, let’s see one by one how to make gifs for instagram and post the same on the Instagram stories. To begin with:
01How to Post an Instagram GIF Using App for iPhone
When you are in need to post Gifs to instagram story then you have to take some essential steps. These steps have been taken by GIPHY as well as from GIF stickers that you can add to your content at social media sites like Instagram.
● Install the Giphy app on your iPhone and open it.
● Look for the desired GIF which you want to include in your story on GIPHY.
● Click on the paper-airplane icon located under the GIF.
● Tap the Instagram button. A permission screen will open asking for giving permission for access to open Instagram.
● After giving permission, the selected GIF will open inside Instagram. Select Feed to post the selected GIF to your Instagram feed. This will be a new post over the Instagram.
● In case you need to edit of add filters, you can go with that by moving on to Next.
● Further tap next again to add caption and hash tags if required.
● After creation of GIF post is over, tap Share.
Here you will get more benefits like increasing and decreasing the size of images. Instagram story gif is an issue that is to be done for every kind of need and all the Instagram stories. By good fortune GIPHY has many tons of GIFs that can be selected for this kind of conditions. You just need a special kind of flair when you are making texts for your GIF interface. Even then you have to adopt gif instagram story aesthetic so that your task of doing any promotion on social media sites could become an easy one.
02How to Post an Instagram GIF Using App for Android
Gif can be posted easily using GIPHY Cam for Android. Here you can even open the app of instagram media with the help of an android. The simple steps are:
Save the GIF to the Download folder which you want to share to the Instagram.
Tap to the camera roll after opening GIPHY CAM.
Choose the GIF and move to the next button.
Let the GIF convert and then go to Instagram and share.
Part 3 How to Convert GIF to Video for Instagram
A gif can be converted into video by using various applications. Converting Gif by adding some filter, light effects and sound into video make it more attractive for Instagram stories. One can try Filmora to convert gif to video for instagram in just simple steps.
01**Wondershare Filmora Video Editor ** –A GIF resource
Wondershare Filmora - Best Video Editor for Mac/Windows
5,481,435 people have downloaded it.
Build unique custom animations without breaking a sweat.
Focus on creating epic stories and leave the details to Filmora’s auto features.
Start a creative adventure with drag & drop effects and endless possibilities.
Filmora simplifies advanced features to save you time and effort.
Filmora cuts out repetition so you can move on to your next creative breakthrough.
There are many applications and web tools that offer to convert beautiful gifs to videos and sharing the same over Instagram stories. Filmora V11 is one of the best video editor applications which assist the users to convert gif to video with minimal effort. It is a user-friendly tool that has media editing features. It allows the users to enhance their video with wide variety of sound, light effects, and beautiful gifs and share them to their Instagram stories.
For creating video or converting gifs to video, Filmora V11 can be used. It makes easy for the beginners to convert gift into videos in a few simple steps. Filmora V11 app is required to be installed on the system and media files can be imported there. The best thing is that it supports most of the video formats such as MP4, AVI, H261, FLV, MKV, 3GP, MOV, MPEG, VOB, RMVB, M4V, TS, M2TS, WMV, ASF and many more. To customize gifs and then converting it to video, the Filmora Meme maker can be used. Templates and captions are also found at the application.
02Steps to convert GIF to video for Instagram
● The first step is to download the application Filmora at your computer and open it. Choose the GIF file from the Filmora file.
● Do the necessary editing. This including adding some text, colors and effects to the gif.
● After adding all the effects and editing, tap to create a video from it. Export the same in MP4 format and save it over the mobile. The application will convert the gift into video and is ready for uploading.
● At last in the uploading process, open the Instagram application, select the video from the gallery.
● Captions or description can be added and then uploaded.
● Key Takeaways from This Episode →
● Instagram story gifs are concerned with mainstream creation for graphics interchange format. With these formats you can make the best and interesting story. So, to make gif, maximum use of GIPHY can be made to make your work look to be the best promotional one. Some of the best gifs can be searched by tapping keywords like Bohemian, Hanmade, LINE & LINES and Square & Rectangle
● Posting gif can be understood in just simple steps. If you desire to know how to create gifs for instagram, then you can explore various applications for both iPhone and Android. You may even search well on your GIF and then select the desired gif that can be added well to your instagram story.
● Instagram stories can be made more attractive by converting gif into videos. The same can be done with ease with some user friendly and high tech applications. Filmora can be the best software application for doing the magic over Instagram stories. It can be used to turn gif into videos or videos to gif. So, give your creativity a new height with some good application and impress your followers.
How I Animate Discord Profile Pictures
How I Animate Discord Profile Pictures (& You Can Too)
An easy yet powerful editor
Numerous effects to choose from
Detailed tutorials provided by the official channel
Some users are still unaware of the fact that they can change the discord profile photo. If you are looking forward to the same, then you are on the right page.
Here we will discuss the process helpful for animating Discord profile pictures in just a few simple steps. Let’s get started!
In this article
01 [Where Can I Get Animated Avatar for Discord?](#Part 1)
02 [How to Get an Animated Profile Picture on Discord](#Part 2)
03 [Some Other Useful Tips to Improve Your Image Animate](#Part 3)
Part 1 Where Can I Get an Animated Avatar for Discord?
In this section, we will discuss how you can animate a PFP and how to get an animated avatar for Discord.
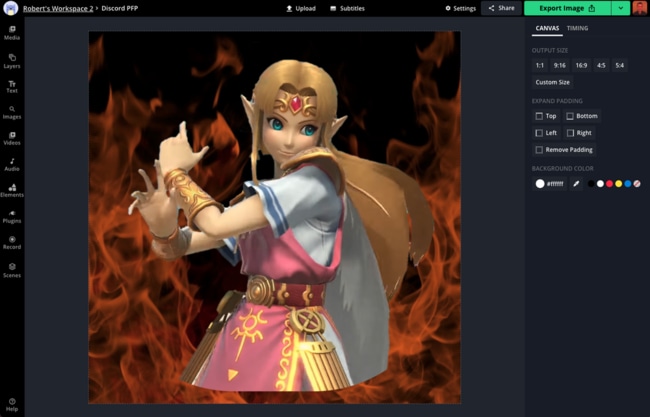
How Do You Animate a PFP?
The steps you need to follow to animate a PFP are:
Step 1: Firstly, you need to decide on what character you want to have as PFP. It can be a cartoon character, a painting, an illustration etc.
Step 2: Now, choose an online tool and begin to edit your image. When you upload the image, make sure to crop it to square. Please note that you need to make your image circle. So now, look for the rounded corner option and give the image the desired shape.
Step 3: It’s time to be creative with the image now. You can remove background, erase or add text and even add a background that suits your avatar. The customization depends all on your requirement. This is it. Now, you need to know how you can get an animated avatar on Discord.
Part 2 How to Get an Animated Profile Picture on Discord
If you are confused about how you will be able to get an animated profile picture on Discord, don’t worry at all. The steps are as follows:
Step 1: To get an animated discord profile picture, you will need to have Nitro. Otherwise the profile picture won’t save as animated. Also, if you use PC for this, things will be better. Now, open the desktop version of Discord.
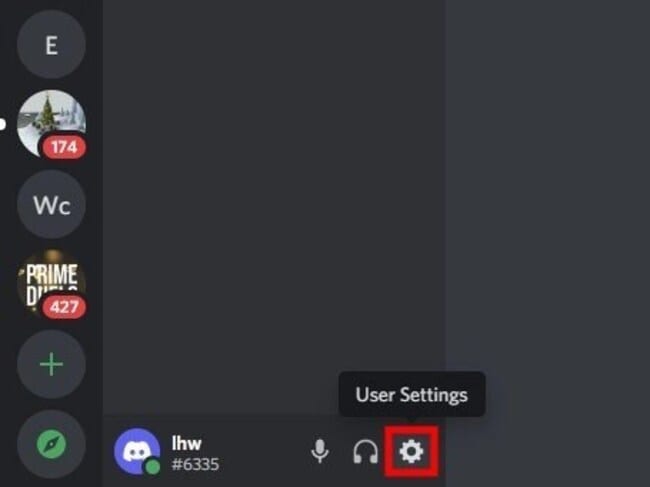
Step 2: Login to your account and go to User Settings by clicking the gear icon given next to your profile picture.
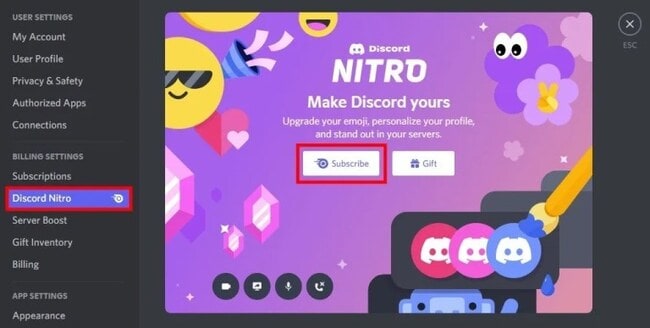
Step 3: In Settings, multiple options will be visible. You need to look for the “Discord Nitro” option. Clicking on this will lead you to Discord Nitro page.
Note: You need to click on “Subscribe” if you don’t have Discord Nitro.
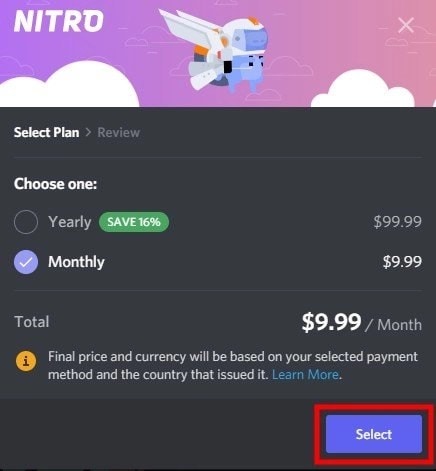
Step 4: Choose the plan once you subscribe. Hit on “Select” after choosing it.
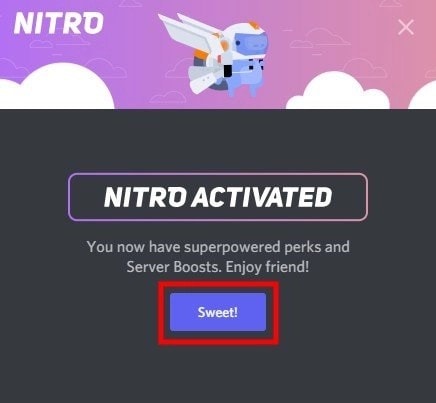
Step 5: Pay for it using the desired payment method. Enter your address and agree to the terms and conditions of Discord. After all the formalities are done, please click on “Sweet”. This will complete the subscription.
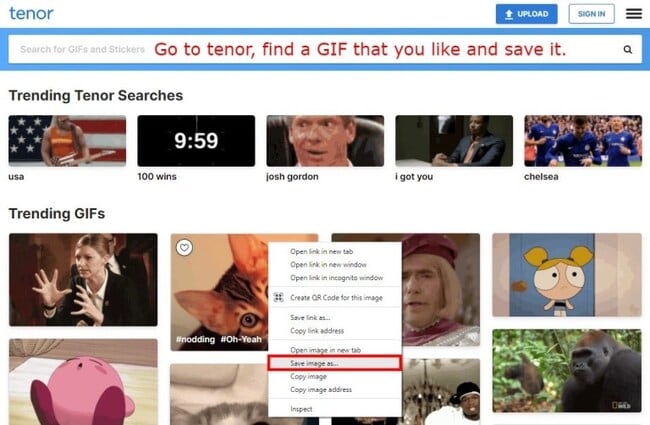
Step 6: Now, head to the GIF website like Tenor and choose the GIF that you like. Download it. You can right click on the GIF and click “Save Image as…” to get it.
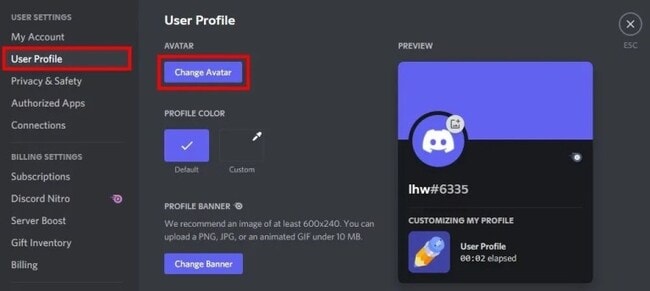
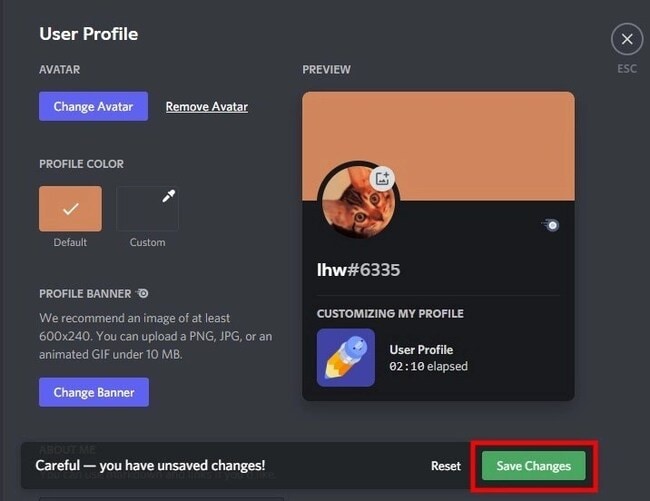
Step 7: After saving the GIF, go to the Settings of your Discord account. Hit on “User Profile” followed by “Change Avatar”.
Step 8: The dialog box will open where you need to find the GIF you just saved. After finding the GIF, click on “Open”.
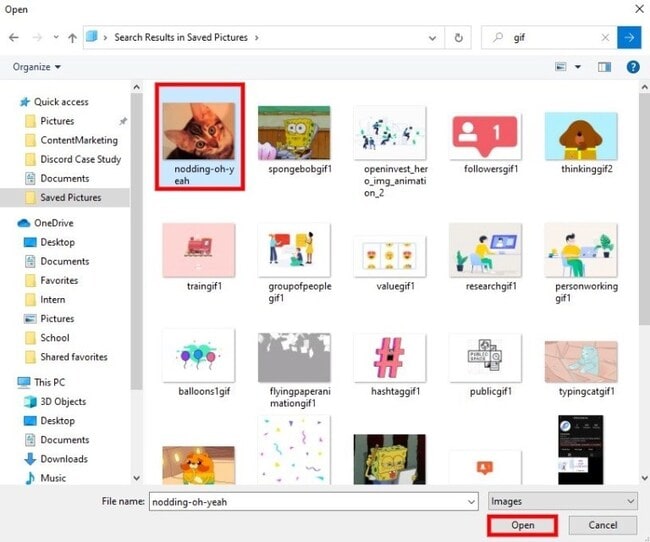
Note: You can take the animated avatar that you created yourself by using the steps in the previous part.
Step 9: Now, you will get to the Discord profile picture page. Here, you need to resize the GIF. Click on “Apply” when you are satisfied with the resizing or you can skip it too.
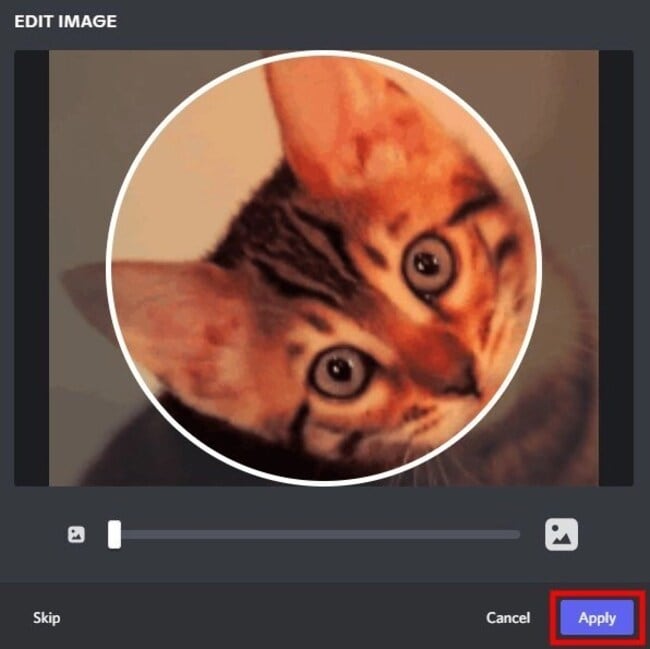
Step 10: Save the changes and you are good to go!
Part 3 Some Other Useful Tips to Improve Your Image Animate
If you’re wondering how to improve image animation, we’ve got some pointers for you. We all know that nitro is expensive and not everyone can get it for animating images. If you’re thinking the same thing, we’ve got the best tools for you right here.
Tools to consider for animating and improving the image:
01Adobe Spark
Adobe Spark is also among the best logo animation makers available and comes with the best features. It gives the final touch to the logo or video you have created. When you wish to animate your profile picture for Discord, the same can be done easily with it. The collection available on it is really very cool, and selecting from it can be an amazing experience. The templates are divided into categories along with the tabular ones so that you can choose them as per your requirements.
02Renderforest
Renderforest is also among the most loved software or applications loved by people around the world. It is helpful in creating logo animations too, for free. You can also choose from different templates available and customise them accordingly. Also, giving the animated effect to the logo is really very easy. If you wish to edit the logo, the same can be done easily. The major feature making it more appealing today is the transition effect, which is helpful in transforming a normal 2D logo into a 3D effect.

03Free Design logo
Free Design logo is an online application that always rules out the list. It features a 3D animation logo maker that is available for free. It has some logo samples and a catalogue available that are helpful for users to create excellent logos easily. Moreover, the templates available can be customised as per the need for stop. A user needs to download the application and, after it, they can have access to all the examples available for 3D logos.
04Tube arsenal
Tube Arsenal is also a famous application for users whenever they wish to animate a logo for their company. The interface appears to be similar to Renderforest, but the features are quite advanced. There is no technical knowledge required for using the same because it comes with an easy-to-use interface and templates that will be helpful in creating the logo of your choice.
Creative logo tips:
Some tips you can keep in mind while creating logo are as follows:
● Be specific to your brand. Be sure that you are not choosing a logo that may deviate customers from your brand perspective.
● Always choose colors in contrast because a single color logo does not seem to be appealing.
● Make sure to choose a template that is easy to understand. If the template seems to be difficult to understand, a user will not be able to get it.
● Create a logo with the minimum design because excessive design will make it tacky.
● Be sure not to add extra icons to the logo. This can be troublesome and make the logo unappealing.
● Go for white or a dark shade of background, because this will be helpful in making the text more visible.
Part 1 How to add an animated image/DP to WhatsApp?
Unfortunately, if you are looking forward to setting up an animated image on WhatsApp, it is not possible. The WhatsApp algorithm has been designed in such a manner that you can only use static images that is in JPG format. If the format is not the same, you can’t use it as the image over WhatsApp.
Key Takeaways from This Episode
● Nitro is helpful in setting up the animated image for discord.
● Filmora Pro is the best tool for editing images and animating them.
● WhatsApp doesn’t entertain setting up animated images over DP.
Some users are still unaware of the fact that they can change the discord profile photo. If you are looking forward to the same, then you are on the right page.
Here we will discuss the process helpful for animating Discord profile pictures in just a few simple steps. Let’s get started!
In this article
01 [Where Can I Get Animated Avatar for Discord?](#Part 1)
02 [How to Get an Animated Profile Picture on Discord](#Part 2)
03 [Some Other Useful Tips to Improve Your Image Animate](#Part 3)
Part 1 Where Can I Get an Animated Avatar for Discord?
In this section, we will discuss how you can animate a PFP and how to get an animated avatar for Discord.
How Do You Animate a PFP?
The steps you need to follow to animate a PFP are:
Step 1: Firstly, you need to decide on what character you want to have as PFP. It can be a cartoon character, a painting, an illustration etc.
Step 2: Now, choose an online tool and begin to edit your image. When you upload the image, make sure to crop it to square. Please note that you need to make your image circle. So now, look for the rounded corner option and give the image the desired shape.
Step 3: It’s time to be creative with the image now. You can remove background, erase or add text and even add a background that suits your avatar. The customization depends all on your requirement. This is it. Now, you need to know how you can get an animated avatar on Discord.
Part 2 How to Get an Animated Profile Picture on Discord
If you are confused about how you will be able to get an animated profile picture on Discord, don’t worry at all. The steps are as follows:
Step 1: To get an animated discord profile picture, you will need to have Nitro. Otherwise the profile picture won’t save as animated. Also, if you use PC for this, things will be better. Now, open the desktop version of Discord.
Step 2: Login to your account and go to User Settings by clicking the gear icon given next to your profile picture.
Step 3: In Settings, multiple options will be visible. You need to look for the “Discord Nitro” option. Clicking on this will lead you to Discord Nitro page.
Note: You need to click on “Subscribe” if you don’t have Discord Nitro.
Step 4: Choose the plan once you subscribe. Hit on “Select” after choosing it.
Step 5: Pay for it using the desired payment method. Enter your address and agree to the terms and conditions of Discord. After all the formalities are done, please click on “Sweet”. This will complete the subscription.
Step 6: Now, head to the GIF website like Tenor and choose the GIF that you like. Download it. You can right click on the GIF and click “Save Image as…” to get it.
Step 7: After saving the GIF, go to the Settings of your Discord account. Hit on “User Profile” followed by “Change Avatar”.
Step 8: The dialog box will open where you need to find the GIF you just saved. After finding the GIF, click on “Open”.
Note: You can take the animated avatar that you created yourself by using the steps in the previous part.
Step 9: Now, you will get to the Discord profile picture page. Here, you need to resize the GIF. Click on “Apply” when you are satisfied with the resizing or you can skip it too.
Step 10: Save the changes and you are good to go!
Part 3 Some Other Useful Tips to Improve Your Image Animate
If you’re wondering how to improve image animation, we’ve got some pointers for you. We all know that nitro is expensive and not everyone can get it for animating images. If you’re thinking the same thing, we’ve got the best tools for you right here.
Tools to consider for animating and improving the image:
01Adobe Spark
Adobe Spark is also among the best logo animation makers available and comes with the best features. It gives the final touch to the logo or video you have created. When you wish to animate your profile picture for Discord, the same can be done easily with it. The collection available on it is really very cool, and selecting from it can be an amazing experience. The templates are divided into categories along with the tabular ones so that you can choose them as per your requirements.
02Renderforest
Renderforest is also among the most loved software or applications loved by people around the world. It is helpful in creating logo animations too, for free. You can also choose from different templates available and customise them accordingly. Also, giving the animated effect to the logo is really very easy. If you wish to edit the logo, the same can be done easily. The major feature making it more appealing today is the transition effect, which is helpful in transforming a normal 2D logo into a 3D effect.
03Free Design logo
Free Design logo is an online application that always rules out the list. It features a 3D animation logo maker that is available for free. It has some logo samples and a catalogue available that are helpful for users to create excellent logos easily. Moreover, the templates available can be customised as per the need for stop. A user needs to download the application and, after it, they can have access to all the examples available for 3D logos.
04Tube arsenal
Tube Arsenal is also a famous application for users whenever they wish to animate a logo for their company. The interface appears to be similar to Renderforest, but the features are quite advanced. There is no technical knowledge required for using the same because it comes with an easy-to-use interface and templates that will be helpful in creating the logo of your choice.
Creative logo tips:
Some tips you can keep in mind while creating logo are as follows:
● Be specific to your brand. Be sure that you are not choosing a logo that may deviate customers from your brand perspective.
● Always choose colors in contrast because a single color logo does not seem to be appealing.
● Make sure to choose a template that is easy to understand. If the template seems to be difficult to understand, a user will not be able to get it.
● Create a logo with the minimum design because excessive design will make it tacky.
● Be sure not to add extra icons to the logo. This can be troublesome and make the logo unappealing.
● Go for white or a dark shade of background, because this will be helpful in making the text more visible.
Part 1 How to add an animated image/DP to WhatsApp?
Unfortunately, if you are looking forward to setting up an animated image on WhatsApp, it is not possible. The WhatsApp algorithm has been designed in such a manner that you can only use static images that is in JPG format. If the format is not the same, you can’t use it as the image over WhatsApp.
Key Takeaways from This Episode
● Nitro is helpful in setting up the animated image for discord.
● Filmora Pro is the best tool for editing images and animating them.
● WhatsApp doesn’t entertain setting up animated images over DP.
Best GIF Croppers: How to Crop an Animated GIF
Best GIF Croppers: How to Crop an Animated GIF

Shanoon Cox
Mar 27, 2024• Proven solutions
Cropping an animated gif is quite different from cropping still images. Fortunately, there are also some free and easy to use croppers that can help you realize it. Read on to find the best 5 GIF croppers, and the how-to steps are listed in detail.
Top 5 Best GIF Croppers
#1 Wondershare Filmora
Wondershare Filmora is an easy-to-use yet powerful video editing software that allows you to edit GIF files, like cropping, reversing, rotating, splitting, cutting, add text and overlays, etc.
How to crop gifs with Filmora
- Import gif file into the program
- Drag it into the timeline
- Right click on the gif clip, choose “Crop and Zoom”
- Drag the rectangle frame to crop the gif
- Hit the play button to preview the result. Hit OK when you get the image you want
- Click “Export”, choose “GIF” as the export format. You can change the resolution, frame rate and bit rate of the gif
- Export and save
 Download Mac Version ](https://tools.techidaily.com/wondershare/filmora/download/ )
Pros:
- It allows you to adjust the cropping domain accurately, and you can preview the result before export.
- An all in one editor that not only allows you to crop your GIF image, but also to convert gif to video (video to gif), add text and effects to a gif file , correct color for gif images, etc.
- Share to Facebook directly
Cons:
- It might be a little bit heavy if you just want to crop a GIF image.
#2 GIFS.COM
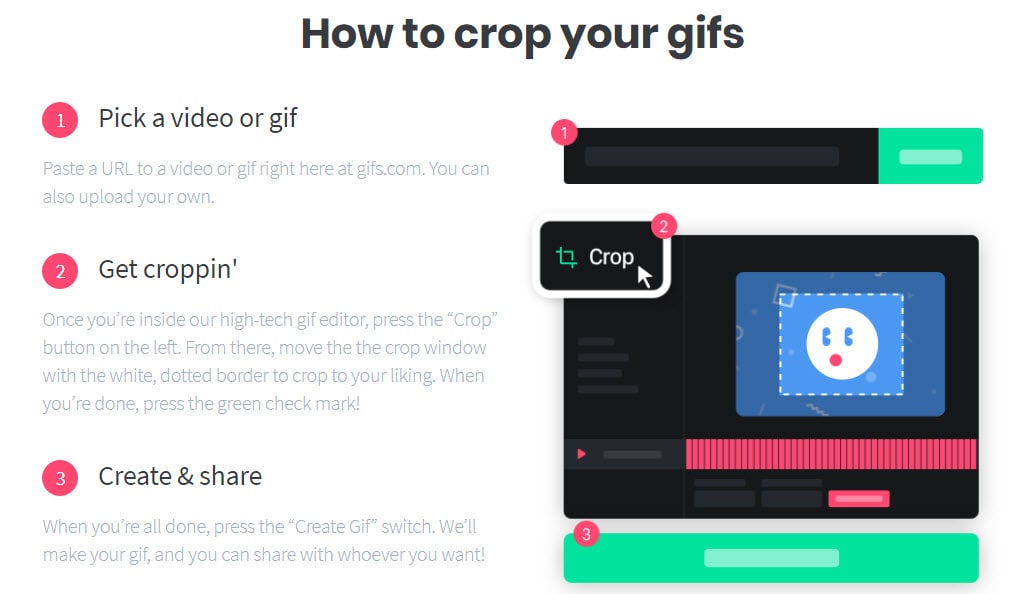
An online site designed for GIF editing, you can find lots of interesting gifs made by other users on this site.
How to crop gif with GIFS.COM
- Upload the gif file to the website, or paste the URL of the file
- Choose Crop
- Drag the highlighted area over the part you want to be in the final gif
- All the darker area will be removed
- Drag the left angle to resize
- Click Save, Create GIF
- Save or Share
Pros:
- Beautiful interface and easy to use
- Allow you to blur, flip the gif
- Allows you to post the GIF directly on Facebook, Twitter, Pinterest, etc
Cons:
- Some effects can’t be previewed
- You have to sign in to export the gif
#3 EZGIF.COM

Another simple online tool for cropping and slicing animated GIF, PNG and WebP.
How to crop gifs with EZGIF.COM
- Upload image from your computer or paste an URL, click Upload
- Choose the Crop tool, drag a rectangle over the image
- Set the image width, height and adjust the aspect ratio
- Hit “Crop it”
Pros:
- Allows you resize, rotate, adjust speed, and add text/overlays
- Can’t share on Twitter, Facebook directly
Cons:
- The final output result is not very accurate
#4 ILOVEIMAGE.COM
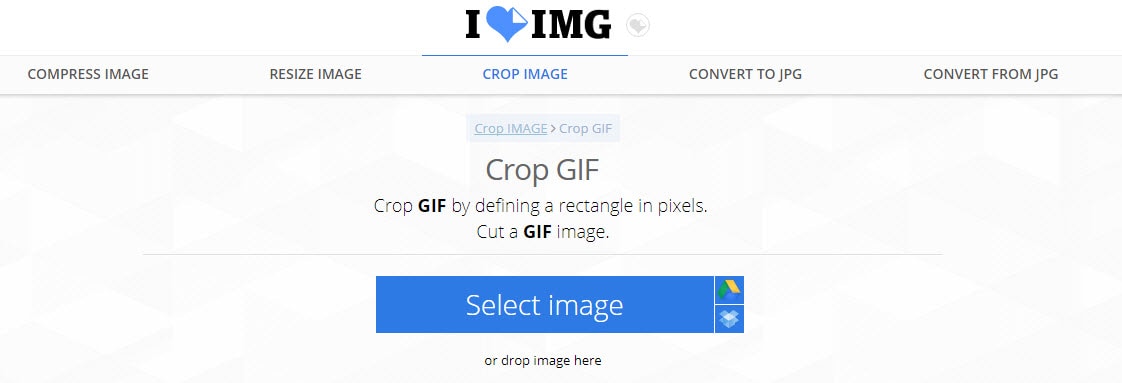
A very tiny online tool that can help you crop GIFs quickly and easily
How to crop gif with ILOVEIMG.COM
- Select a GIF file from desktop, Google Drive, and Dropbox
- Drag the rectangle to crop the image
- Hit “Crop image”
- The final result will be downloaded automatically, you can also copy the image link if you want to share it with others.
Pros:
- Very easy to use
- Light and rapid
Cons:
- Some editing options are missing
- Can’t preview the result before downloading
#5 GIFGIFS.COM
This is an online GIF editor that helps you crop and slice animated GIFs
How to use GIFGIFS.COM to crop gifs
- Select the part of the image that you want to crop
- Press the “Crop” button
- A second later, a preview window will appear under the original image. Click “Download the result” to export the cropped gif image.
Pros:
- No need to download a program, free
- You can also resize, optimize, reverse, rotate, add text, split the gifs
Cons:
- The final output result is not very accurate
- Progress can be slow due to internet connection
Frequently Asked Questions About Cropping GIFs
1. How To Crop A GIF?
Web and desktop-based GIF makers and video editing software products make cropping a GIF a routine action. However, the exact steps you will need to take in order to crop a GIF file, depend on the GIF maker or video editing software you choose.
In most cases, you will just have to click on the Crop option, specify the area of the image you want to remove and confirm that you want to create a GIF. It is essential to keep in mind that cropping a GIF can alter its aspect ratio.
2. How To Reduce A GIF’s Size?
Increasing or decreasing the size of a GIF takes only a few moments of your time. You need to go through a few easy steps to resize a GIF online, since you just have to upload a file to the platform of your choosing, specify by how much you want to reduce the GIF’s size and then wait for the task to be completed.
In addition, reducing the number of frames a GIF contains will impact the size of the file, as the size of a GIF file increases with each new frame, you add to a GIF.
3. How To Crop A GIF To A Circle?
Whether or not you can crop a GIF into a circle, depends on the cropping tools the app you are using offers. Some GIF makers allow you to choose the shape to which you are going to crop a GIF, while others don’t provide this option.
Using Filmora’s mask features is probably one of the easiest ways to crop a GIF to a circle, as you simply have to apply the mask to the footage and specify which parts of the GIF’s frames are going to be removed. What’s more, you can choose the shape of the mask in Filmora which enables you to crop GIFs into a variety of different shapes.
Conclusion
If you want to make a GIF online, Filmora meme maker is your ultimate solution. It helps you make images, GIFs and video memes directly without watermark. It is totally FREE to use and no signup. You can change text size, color and position to create caption when you are editing. You can also put text inside or outside in GIF.
Shanoon Cox
Shanoon Cox is a writer and a lover of all things video.
Follow @Shanoon Cox
Shanoon Cox
Mar 27, 2024• Proven solutions
Cropping an animated gif is quite different from cropping still images. Fortunately, there are also some free and easy to use croppers that can help you realize it. Read on to find the best 5 GIF croppers, and the how-to steps are listed in detail.
Top 5 Best GIF Croppers
#1 Wondershare Filmora
Wondershare Filmora is an easy-to-use yet powerful video editing software that allows you to edit GIF files, like cropping, reversing, rotating, splitting, cutting, add text and overlays, etc.
How to crop gifs with Filmora
- Import gif file into the program
- Drag it into the timeline
- Right click on the gif clip, choose “Crop and Zoom”
- Drag the rectangle frame to crop the gif
- Hit the play button to preview the result. Hit OK when you get the image you want
- Click “Export”, choose “GIF” as the export format. You can change the resolution, frame rate and bit rate of the gif
- Export and save
Download Mac Version ](https://tools.techidaily.com/wondershare/filmora/download/ )
Pros:
- It allows you to adjust the cropping domain accurately, and you can preview the result before export.
- An all in one editor that not only allows you to crop your GIF image, but also to convert gif to video (video to gif), add text and effects to a gif file , correct color for gif images, etc.
- Share to Facebook directly
Cons:
- It might be a little bit heavy if you just want to crop a GIF image.
#2 GIFS.COM
An online site designed for GIF editing, you can find lots of interesting gifs made by other users on this site.
How to crop gif with GIFS.COM
- Upload the gif file to the website, or paste the URL of the file
- Choose Crop
- Drag the highlighted area over the part you want to be in the final gif
- All the darker area will be removed
- Drag the left angle to resize
- Click Save, Create GIF
- Save or Share
Pros:
- Beautiful interface and easy to use
- Allow you to blur, flip the gif
- Allows you to post the GIF directly on Facebook, Twitter, Pinterest, etc
Cons:
- Some effects can’t be previewed
- You have to sign in to export the gif
#3 EZGIF.COM
Another simple online tool for cropping and slicing animated GIF, PNG and WebP.
How to crop gifs with EZGIF.COM
- Upload image from your computer or paste an URL, click Upload
- Choose the Crop tool, drag a rectangle over the image
- Set the image width, height and adjust the aspect ratio
- Hit “Crop it”
Pros:
- Allows you resize, rotate, adjust speed, and add text/overlays
- Can’t share on Twitter, Facebook directly
Cons:
- The final output result is not very accurate
#4 ILOVEIMAGE.COM
A very tiny online tool that can help you crop GIFs quickly and easily
How to crop gif with ILOVEIMG.COM
- Select a GIF file from desktop, Google Drive, and Dropbox
- Drag the rectangle to crop the image
- Hit “Crop image”
- The final result will be downloaded automatically, you can also copy the image link if you want to share it with others.
Pros:
- Very easy to use
- Light and rapid
Cons:
- Some editing options are missing
- Can’t preview the result before downloading
#5 GIFGIFS.COM
This is an online GIF editor that helps you crop and slice animated GIFs
How to use GIFGIFS.COM to crop gifs
- Select the part of the image that you want to crop
- Press the “Crop” button
- A second later, a preview window will appear under the original image. Click “Download the result” to export the cropped gif image.
Pros:
- No need to download a program, free
- You can also resize, optimize, reverse, rotate, add text, split the gifs
Cons:
- The final output result is not very accurate
- Progress can be slow due to internet connection
Frequently Asked Questions About Cropping GIFs
1. How To Crop A GIF?
Web and desktop-based GIF makers and video editing software products make cropping a GIF a routine action. However, the exact steps you will need to take in order to crop a GIF file, depend on the GIF maker or video editing software you choose.
In most cases, you will just have to click on the Crop option, specify the area of the image you want to remove and confirm that you want to create a GIF. It is essential to keep in mind that cropping a GIF can alter its aspect ratio.
2. How To Reduce A GIF’s Size?
Increasing or decreasing the size of a GIF takes only a few moments of your time. You need to go through a few easy steps to resize a GIF online, since you just have to upload a file to the platform of your choosing, specify by how much you want to reduce the GIF’s size and then wait for the task to be completed.
In addition, reducing the number of frames a GIF contains will impact the size of the file, as the size of a GIF file increases with each new frame, you add to a GIF.
3. How To Crop A GIF To A Circle?
Whether or not you can crop a GIF into a circle, depends on the cropping tools the app you are using offers. Some GIF makers allow you to choose the shape to which you are going to crop a GIF, while others don’t provide this option.
Using Filmora’s mask features is probably one of the easiest ways to crop a GIF to a circle, as you simply have to apply the mask to the footage and specify which parts of the GIF’s frames are going to be removed. What’s more, you can choose the shape of the mask in Filmora which enables you to crop GIFs into a variety of different shapes.
Conclusion
If you want to make a GIF online, Filmora meme maker is your ultimate solution. It helps you make images, GIFs and video memes directly without watermark. It is totally FREE to use and no signup. You can change text size, color and position to create caption when you are editing. You can also put text inside or outside in GIF.
Shanoon Cox
Shanoon Cox is a writer and a lover of all things video.
Follow @Shanoon Cox
Tutorial Guide to Animate Pictures in Canva
Versatile Video Editor - Wondershare Filmora
An easy yet powerful editor
Numerous effects to choose from
Detailed tutorials provided by the official channel
With the rapid rise of social media worldwide, animated posts (like GIFs) are becoming famous. They have become a replacement to other modes like JPEG and .Png
Famous designing tools like Canva introduced an animation feature in the light of its popularity. The feature allows you to step up your social media game and creates animated visuals in a blink! It is also efficient for both professional and amateur users.
Besides social media content, Canva is also useful to design birthday cards, event invites, inspirational quotes, and more! Let’s learn about how to animate pictures in Canva in detail.
In this article
01 What Canva Pictures Can Be Used For?
02 How to Animate Pictures in Canva?
03 Tips: Animate Pictures In Video
Part 1: What Canva Pictures Can Be Used For?
Be it for marketing campaigns or projects, Canva is the best tool for all designing work. It is a foolproof platform where you do not need prior designing experience. Canva is useful for

Social media/Instagram Posts: You can build your Instagram presence by creating posts through Canva. It has multiple templates and features to make alluring Instagram posts. It also has drag-and-drop free images to add customized designs to the template.
Facebook Covers: You can make Facebook covers on Canva by choosing a layout and adding other elements. You can include colors, fonts, and pictures on the cover. Canva has templates for all themes, moods, and styles!
Event Invites: Canva has hundreds of free layouts and libraries to create event invites. You can choose the appropriate template and incorporate party-oriented photos, icons, stickers, illustrations, and graphics. It also has a personalizing option to add personal pictures and artwork in the editor.
Inspirational Quotes: Canva allows you to curate inspirational quotes and dispense motivation in people. It has templates to modify the elements like font size, text size, borders, images, and more!
Collages: It helps create a collage where you can combine multiple pictures in one frame. Canva offers various grids with a capacity of 12 pictures and different sizes.
Part 2: How to Animate Pictures in Canva?
Canva helps you add instant animation in presentations, social media posts, and more. To know how to animate images in Canva, follow the below steps:

Step 1: Add Static Elements
Start by creating an image through static elements. To make the design attractive, you can add sample texts, illustrations, doodles, and other entities.
Try to stimulate your creativity and come up with a layout beforehand. If possible, sketch on paper and replicate the same.
Step 2: Animate Your Design
Take a final glance at the layout. Make sure it’s perfect. Once all the elements are placed as per your design, it’s time to animate them. For that:
- Click on the white background page
- Go to the “Toolbar” section
- Select the “Animate” button
Step 3: Select Page Animation Style
Canva offers six animation styles, where five are for free users, and one is for pro users. To access the five animation styles, follow these steps.
- Press the “Animate” Button
- Select “Page Animations”
- There you will find options like Block, Pan, Fade, Rise, and Tumble
- Select the style as per your design
Step 4: Preview and Download
After selecting a page animation style, it will preview the effect. If you find it good, move on to downloading the GIF. Here’s how to do so
- Go to the “Toolbar” option (present on your upper right hand)
- Choose GIF as the file type
- Check the page number and verify if it’s correct
- Press the “Done” button
Step 5: Final GIF
After clicking on the “Done” button, your GIF will be downloaded. You will be able to see a display for five seconds. If you want to edit the image after this, click on the time button (near the “Animate” button).
So, that was all about how to animate a photo in Canva.
Drawbacks of Canva
Despite efficient features and easy interface, there are certain areas where Canva lacks. This includes
- It does not have any local file storage.
- As too many people use Canva, your template may look the same as others.
- Some of its best features are not free to access.
- The mobile app version lacks certain elements and features.
Out of all these drawbacks, repetitions of templates are a big issue. That’s because everyone wants their posts to look unique and irreplaceable. However, common Canva templates may prevent that from happening.
Fortunately, there are ways to combat such issues. Let’s learn about them in the next section.
Tips: Animate Pictures In Video
You can also animate pictures in the video to make them more lively. For that, you can use Wondershare Filmora Pro Video Editor. It’s also efficient if you don’t know how to animate a picture in Canva:
Wondershare Filmora Video Editor
Filmora by Wondershare is a video editing software that helps you build custom animations easily. It has auto features to make epic stories and posts.
Wondershare Filmora
Get started easily with Filmora’s powerful performance, intuitive interface, and countless effects!
Try It Free Try It Free Try It Free Learn More about Filmora>

Its drag and drop effect makes designing simple and quick. Due to its outstanding attributes, options, and styles, Filmora has 77+ million happy users!
It’s a power-packed integration of functionality, performance, and more! In fact, it resolves the repeated template issue of Canva. The software has top-notch functions and innovative filters that add authenticity to the designs.
Till now, you learned about how to animate a picture on Canva. Now, let’s comprehend the right way to use Filmora for animating and adding images in the video.
Before using, make sure to update the software to its latest version. Follow separate methods for both Windows and Mac.
For Win
Step 1: Adding Image to Video Track
With Filmora, adding images to video is a matter of seconds! Start by:
- Identify the position where you want to add the image and place the Playhead there.
- Right-click on the picture from the media library. Click on the “Insert” option. Your image will be added. Select the “Append” option, if you want to add an image at the video end.

Note: How to Remove Black Bars around the Image?
- Go to “Settings” from the File section.
- Click on the “Editing” tab and select “Photo Placement.”
- Choose from the “Crop to Fit” or “Pan To Zoom” option. The black bars will be removed.
To add the image in between the video clip, split them. Now, add the image between the split parts.
Step 2: Add Images as Overlays
To add images as overlays, drag the image to a video track above the main track. The main track consists of your video.
Track 1 (or the track with a video clip) is the base of your video. If you add anything else, it will be displayed above this track as video track 2, 3, and so on. Overall, you can add 100 video tracks.
Step 3: Edit Your Image
If you know how to animate an image in Canva, editing images on Filmora is even easier. You can try the following methods:
Animate Your Images
- To add animation presets to the image, click on the image twice.
- Go to the “Animation Tab” and look for an animation preset.
- Drag the presets to the image for its effect

Make Image Color Adjustments
- Double-click on the image
- Go to the “Color” tab and then the “Color” section
- Customize the temperature, saturation, brightness, etc., as per your need.
- Press Ok.
Change Image Duration
You can increase the image duration to more than the default timing of 5 seconds. For that:
- Click on the image and select the “Duration” option.
- Go to the “Duration Setting” panel.
- Add the new duration timing.

Adjust Position, Rotate/Flip, and Opacity
- You can resize the image position through the circles and squares at the image edges.
- To flip or rotate the image, double-click on the picture. From the “Image Panel,” go to “Transform” and then click on “Rotate.” You can choose either “Horizontal Flip” or “Vertical Flip” to flip the images.
- Double-click on the image and click on the “Composting” option to add opacity. You can choose the blending mode or adjust the “Opacity” accordingly.

For Mac
Filmora for Mac comes with a drag and drop feature to add transitions, animated titles, and effects. You can start a new project from scratch by clicking on “New Project”. The entire process is the same as that for Windows users.
To apply animation in the images, use the motion effects option. For that,
- Click on the Image
- Go to Motion Tab
- Select a motion effect
- Double-click to apply the effect

Conclusion
So that’s how to animate photos in Canva. Hopefully, our steps will help you revamp your posts like a pro! If not Canva, you can use its alternative Filmora. It’s equally prominent, user-friendly, and feature-rich.
Versatile Video Editor - Wondershare Filmora
An easy yet powerful editor
Numerous effects to choose from
Detailed tutorials provided by the official channel
With the rapid rise of social media worldwide, animated posts (like GIFs) are becoming famous. They have become a replacement to other modes like JPEG and .Png
Famous designing tools like Canva introduced an animation feature in the light of its popularity. The feature allows you to step up your social media game and creates animated visuals in a blink! It is also efficient for both professional and amateur users.
Besides social media content, Canva is also useful to design birthday cards, event invites, inspirational quotes, and more! Let’s learn about how to animate pictures in Canva in detail.
In this article
01 What Canva Pictures Can Be Used For?
02 How to Animate Pictures in Canva?
03 Tips: Animate Pictures In Video
Part 1: What Canva Pictures Can Be Used For?
Be it for marketing campaigns or projects, Canva is the best tool for all designing work. It is a foolproof platform where you do not need prior designing experience. Canva is useful for
Social media/Instagram Posts: You can build your Instagram presence by creating posts through Canva. It has multiple templates and features to make alluring Instagram posts. It also has drag-and-drop free images to add customized designs to the template.
Facebook Covers: You can make Facebook covers on Canva by choosing a layout and adding other elements. You can include colors, fonts, and pictures on the cover. Canva has templates for all themes, moods, and styles!
Event Invites: Canva has hundreds of free layouts and libraries to create event invites. You can choose the appropriate template and incorporate party-oriented photos, icons, stickers, illustrations, and graphics. It also has a personalizing option to add personal pictures and artwork in the editor.
Inspirational Quotes: Canva allows you to curate inspirational quotes and dispense motivation in people. It has templates to modify the elements like font size, text size, borders, images, and more!
Collages: It helps create a collage where you can combine multiple pictures in one frame. Canva offers various grids with a capacity of 12 pictures and different sizes.
Part 2: How to Animate Pictures in Canva?
Canva helps you add instant animation in presentations, social media posts, and more. To know how to animate images in Canva, follow the below steps:
Step 1: Add Static Elements
Start by creating an image through static elements. To make the design attractive, you can add sample texts, illustrations, doodles, and other entities.
Try to stimulate your creativity and come up with a layout beforehand. If possible, sketch on paper and replicate the same.
Step 2: Animate Your Design
Take a final glance at the layout. Make sure it’s perfect. Once all the elements are placed as per your design, it’s time to animate them. For that:
- Click on the white background page
- Go to the “Toolbar” section
- Select the “Animate” button
Step 3: Select Page Animation Style
Canva offers six animation styles, where five are for free users, and one is for pro users. To access the five animation styles, follow these steps.
- Press the “Animate” Button
- Select “Page Animations”
- There you will find options like Block, Pan, Fade, Rise, and Tumble
- Select the style as per your design
Step 4: Preview and Download
After selecting a page animation style, it will preview the effect. If you find it good, move on to downloading the GIF. Here’s how to do so
- Go to the “Toolbar” option (present on your upper right hand)
- Choose GIF as the file type
- Check the page number and verify if it’s correct
- Press the “Done” button
Step 5: Final GIF
After clicking on the “Done” button, your GIF will be downloaded. You will be able to see a display for five seconds. If you want to edit the image after this, click on the time button (near the “Animate” button).
So, that was all about how to animate a photo in Canva.
Drawbacks of Canva
Despite efficient features and easy interface, there are certain areas where Canva lacks. This includes
- It does not have any local file storage.
- As too many people use Canva, your template may look the same as others.
- Some of its best features are not free to access.
- The mobile app version lacks certain elements and features.
Out of all these drawbacks, repetitions of templates are a big issue. That’s because everyone wants their posts to look unique and irreplaceable. However, common Canva templates may prevent that from happening.
Fortunately, there are ways to combat such issues. Let’s learn about them in the next section.
Tips: Animate Pictures In Video
You can also animate pictures in the video to make them more lively. For that, you can use Wondershare Filmora Pro Video Editor. It’s also efficient if you don’t know how to animate a picture in Canva:
Wondershare Filmora Video Editor
Filmora by Wondershare is a video editing software that helps you build custom animations easily. It has auto features to make epic stories and posts.
Wondershare Filmora
Get started easily with Filmora’s powerful performance, intuitive interface, and countless effects!
Try It Free Try It Free Try It Free Learn More about Filmora>
Its drag and drop effect makes designing simple and quick. Due to its outstanding attributes, options, and styles, Filmora has 77+ million happy users!
It’s a power-packed integration of functionality, performance, and more! In fact, it resolves the repeated template issue of Canva. The software has top-notch functions and innovative filters that add authenticity to the designs.
Till now, you learned about how to animate a picture on Canva. Now, let’s comprehend the right way to use Filmora for animating and adding images in the video.
Before using, make sure to update the software to its latest version. Follow separate methods for both Windows and Mac.
For Win
Step 1: Adding Image to Video Track
With Filmora, adding images to video is a matter of seconds! Start by:
- Identify the position where you want to add the image and place the Playhead there.
- Right-click on the picture from the media library. Click on the “Insert” option. Your image will be added. Select the “Append” option, if you want to add an image at the video end.
Note: How to Remove Black Bars around the Image?
- Go to “Settings” from the File section.
- Click on the “Editing” tab and select “Photo Placement.”
- Choose from the “Crop to Fit” or “Pan To Zoom” option. The black bars will be removed.
To add the image in between the video clip, split them. Now, add the image between the split parts.
Step 2: Add Images as Overlays
To add images as overlays, drag the image to a video track above the main track. The main track consists of your video.
Track 1 (or the track with a video clip) is the base of your video. If you add anything else, it will be displayed above this track as video track 2, 3, and so on. Overall, you can add 100 video tracks.
Step 3: Edit Your Image
If you know how to animate an image in Canva, editing images on Filmora is even easier. You can try the following methods:
Animate Your Images
- To add animation presets to the image, click on the image twice.
- Go to the “Animation Tab” and look for an animation preset.
- Drag the presets to the image for its effect
Make Image Color Adjustments
- Double-click on the image
- Go to the “Color” tab and then the “Color” section
- Customize the temperature, saturation, brightness, etc., as per your need.
- Press Ok.
Change Image Duration
You can increase the image duration to more than the default timing of 5 seconds. For that:
- Click on the image and select the “Duration” option.
- Go to the “Duration Setting” panel.
- Add the new duration timing.
Adjust Position, Rotate/Flip, and Opacity
- You can resize the image position through the circles and squares at the image edges.
- To flip or rotate the image, double-click on the picture. From the “Image Panel,” go to “Transform” and then click on “Rotate.” You can choose either “Horizontal Flip” or “Vertical Flip” to flip the images.
- Double-click on the image and click on the “Composting” option to add opacity. You can choose the blending mode or adjust the “Opacity” accordingly.
For Mac
Filmora for Mac comes with a drag and drop feature to add transitions, animated titles, and effects. You can start a new project from scratch by clicking on “New Project”. The entire process is the same as that for Windows users.
To apply animation in the images, use the motion effects option. For that,
- Click on the Image
- Go to Motion Tab
- Select a motion effect
- Double-click to apply the effect
Conclusion
So that’s how to animate photos in Canva. Hopefully, our steps will help you revamp your posts like a pro! If not Canva, you can use its alternative Filmora. It’s equally prominent, user-friendly, and feature-rich.
Versatile Video Editor - Wondershare Filmora
An easy yet powerful editor
Numerous effects to choose from
Detailed tutorials provided by the official channel
Techniques for Creating Animated Logo That Few People Know About
Some Techniques for Creating Animated Logo That Few People Know About
An easy yet powerful editor
Numerous effects to choose from
Detailed tutorials provided by the official channel
How you present your brand on the digital landscape has a huge impact on your company’s overall conversions.
![]()
This guide will walk you through different procedures for creating an animated logo using different solutions.
In this article
01 [Are There Wow Factors in Your Branding with Animation Effects?](#Part 1)
02 [How to Make an Animated Logo: a Step-by-step Guide](#Part 2)
03 [5 Steps to Animate Your Logo](#Part 3)
04 [What is the Best Software to Animate a Logo?](#Part 4)
05 [Want to Explore More Advanced Animation Skills?](#Part 5)
Part 1 Are There Wow Factors in Your Branding with Animation Effects?
As we mentioned in the earlier paragraph, an animated logo can do wonders for your digital presence. How? When you publish an animated logo on your website or any other social media profile, it’ll automatically help you garner the attention from website visitors. Creating an animated logo will also make it easier for the customers to remember your business days after they visited your website.
However, when you are creating an animated logo, it’ll be crucial to follow a few tips to achieve the best results. Here are a few factors that’ll help you create the best animated logo.
● Always start with a simple research to analyze the customer behavior
● Instead of starting with the final design, take your time and work on a few sketches at the beginning
● Understand where you are going to publish the logo and then, choose the right color-scheme accordingly
● When it comes to animated logos, overdoing the animations can also damage the overall visual appearance of your logo
Part 2 How to Make an Animated Logo: a Step-by-step Guide
So, now that we’ve explained the importance of animated logos, let’s start with the step-by-step process of creating an animated logo using different solutions. First, we’ll take a look at some of the premade logo templates that you can integrate and customize to speed up the entire process.
01Vortex Logo Reveal
If you want to use your animated logo in a dedicated video, Vortex logo reveal can be an ideal choice for the job. The template contains a 3-5 seconds animation that’ll reveal your actual logo in a suspenseful manner.
023D Logo Animation
This is a pre-made animated logo template in After Effects that you can integrate with a single tap. The template simply shatters the logo into pieces after the initial reveal to create a dramatic effect for the viewers.
03Gold Luxury Logo Reveal
If you’re worried that using 3D-effects might overdo the animations, you can use this simple gold luxury logo reveal template. As compared to the previous two templates, this one has a simple animation and will help you convey your message more effectively.
04Waving 3D Logo Reveal
This logo is a widely popular AE animated logo template that many users buy to make their logos more appealing. The template utilizes motion graphics and a clean animation to reveal the actual brand logo while keeping the viewers engaged throughout the process.
05Infinite Zoom Logo Reveal
Want to reveal your animated logo in a unique manner? This template has got you covered. The After Effects logo template will allow you to use different pictures to reveal the logo with the traditional zoom-out transition. You can use all the pictures that represent your brand to add the required business values to your logo.
06Space Animation
Space animation is another After Effects template that’s ideal for brands who want to reveal their brand logo in a visually appealing manner. Different stars in the cosmos will combine together to represent your logo and leave a great first impression on the viewers.
Part 3 5 Steps to Animate Your Logo
Now, let’s move towards the next phase of creating an animated logo, i.e., animating the logo itself. It doesn’t matter which software you use to get the job done, you can adhere to the following steps to achieve the best results and create a visually stunning animated logo.
01Prepare the Simple Logo
In every situation, you’ll first have to prepare the simple one-dimension logo that you’ve been using so far. To create this logo, you can use a wide variety of tools such as Adobe Photoshop or even a simple logo maker such as Canva. Keep in mind that you should implement all the customization on the design during this stage only.
02Import the Logo File
The next step towards creating the animated logo is to simply import your logo file into the tool that you want to use to do the job. For instance, if you are planning to use Adobe After Effects, simply click “File > Open” and select the logo file to load it into AE’s editing panel. Once the file is successfully imported, you can move towards the next step.
03Choose the Right Animation Template
Now, you can proceed towards choosing the right animation template for your animated logo. It doesn’t matter which software you’re using for creating an animated logo, you’ll find dozens of built-in templates that can be integrated into the design with one click. Choose any of these templates and move towards the next step.
04Apply the Keyframes
After you’ve successfully imported the file and chosen a dedicated animation template, the next step would be to apply the keyframes. In tools like After Effects, you’ll find a built-in slider that’ll allow you to adjust the keyframes to customize the animation.
05Make the Final Adjustments
Finally, make the final adjustments to the animation. For instance, you can customize the color scheme or color-grade the logo for better visual appearance. You can also add other objects on top of the design to enhance the overall quality of the logo.
Part 4 What is the Best Software to Animate a Logo?
Here are the top three software you can use to get started with your animated logo and complete the process.
01Pixteller
![]()
Pixteller is an online logo maker designed to allow users to animate their logos in an easy-to-use interface. Even if you are not an experienced designer, you’ll find it pretty easy to animate the logo using Pixteller. The tool has a plethora of built-in templates that’ll allow you to edit your logo without any hassle.
02Crello
![]()
Crello is another easy-to-use online tool you can use to animate your logos without any technical skills. Being a web-based software, you can use Crello anywhere you want. In every situation, it’ll allow you to design a visually appealing logo with high-quality animation.
03Adobe After Effects
![]()
Now, if you are an experienced designer and are familiar with the Adobe ecosystem, After Effects is the most reliable tool to get the job done. Even though AE has a pretty complicated user interface, it’ll allow you to design a stunning logo animation, especially if you are familiar with all its editing tools.
Key Takeaways from This Episode
● Creating an animated logo is one of the most reliable ways to boost your brand visibility and attract new customers
● While creating an animated logo, it’s crucial to follow a dedicated process to attain the best results
● To use animated logos in your promotional videos, you can use Filmora Pro and its built-in features to get the job done.
20 Free After Effects Logo Reveal Templates You Will Want to Know
20 Free After Effects Logo Reveal Templates You Will Want to Know
An easy yet powerful editor
Numerous effects to choose from
Detailed tutorials provided by the official channel
The free After Effects logo reveals templates is a creative and clean animation that is very easy to use and customizable in just a few clicks. This template allows you to change the color, edit the text, add your logo, and click on render and contains two different logo animations for you to choose from. It does not require any plugin, and you can use it for your following modern and professional logo animation.
![]()
By incorporating a logo animation into your video, you can make your brand memorable and choose a suitable template for your brand personality. So, get ready for all the free logo reveal templates in this article.
In this article
01 [20 Best Logo Reveal Templates for After Effects 2022](#Part 1)
02 [Learn How to Use After Effects Logo Reveal Templates](#Part 2)
Part 1 Best Logo Reveal Templates for After Effects 2022
You can use an animated logo reveal if you need to add spice to your marketing campaigns and branded videos. An animated logo reveal is explained as a Great way to capture your audience’s attention as they screw through their newsfeed and stand you out from the competition. This section of the article will give you After Effects logo reveal templates for free that you can choose from this 2022:
![]()
01[Fast Flip Logo Reveal Template](https://dsqqu7oxq6o1v.cloudfront.net/preview-215084-pWlBMUhYg4-high.mp4 target=)
Fast Flip logo reveal template free to download is perfect for those on a budget and uses stock photography which can be replaced with photos of a company or team to review and an elegant logo at the end. All that is required is to customize the color, replace the images, and add your logo.
02Logo Web Search
Logo Web Search is an easy-to-use, stylish and simple animation for a company website. It allows you to change colors quickly and free sound effects, and all you need to do is change the logo text and click on render.
03Search Logo Reveal
Search Logo Reveal After Effect template for free allows you to customize the text and easily drag and drop in your logo. It provides a unique way to review your logo by using an animated search bar with a sample question and bringing up your logo as the answer. It can be a great add on to websites with search options.
04Colors Logo Reveal
Colors Logo Reveal is a super clean and straightforward After Effects logo reveal template that is very easy to use for designers and creators. It contains two different logos animations that you can choose from and requires no plugin. Add your logo, change the color, edit the text, and click on render.
05Logo Reveal
Logo Reveal is perfect for small business companies and startups with an easy-to-use template that comes with detailed instruction on how to customize and render your logo reveal Project.
06Unlock Phone Logo Reveal
Unlock Phone Logo Reveal is one of the dynamic logo reveal After Effects templates for free with a modern design, smooth transition effects, and simple text animation that is super easy to use. All that is required is to edit the text, drag and drop in your media, and click on render. It comprises a cool intro or opener to presentations, slideshows, promotions, and event videos to impress your audience.
07Orbital Free HUD Logo Reveal
Orbital Free HUD Logo Reveal is perfect for any tech company, and it’s done up in futuristic style and includes the complete. AEP project file with background texture and elements.
08Corporate logo reveal
Corporate Logo Reveal template is a stylish and contemporary template that features a simple shape that is elegantly animated and combined with reviewing your logo. It has one logo placeholder, editable text layers, and an easy-to-use color controller. An excellent logo reveals the Premiere Pro template free to download for companies like stockbrokers.
09White Scroll Logo Reveals
White Scroll Logo Reveals perfect for a more classic logo opener and comes with three background versions and three different logo placement options.
10Shape Logo Reveal
Shape Logo Reveal is a stylish logo reveal template with colorful shape layers and lines that beautifully form a clean-looking logo reveal. It is a short intro for a business slideshow, promotions, events, TV shows, videos, commercials, corporate presentations, etc.
11Free Animated Logo Reveals
Free Animated Logo Reveals is packed with three different logos reveal, which a suitable for corporates and an excellent option for one who wants a modern and professional logo show.
12Clean Titles And Logo Reveal
Clean Titles and Logo Reveal offers stylish templates which an eye-catching design and contains two text placeholders and one logo placeholder. It is effortless to use and a short introduction to TV shows, commercials, slideshows, promotions, Facebook and YouTube videos, etc.
13Hi-Tech Logo Reveal 02
Hi-Tech Logo Reveal is a premium animated logo reveal that features a dark blue background joint with light blue HUD elements and a perfect logo reveal template for a company that wants to stand out online.
14Testimonials Logo Reveal
Testimonials logo Reveal is a stylish and clean project that is perfect for displaying the company’s testimonials and reviews. This After Effects logo reveal template for free features six title placeholders, one logo holder, and six photo placeholders, requiring no plugin.
15Elegant Logo Reveal
Elegant logo Reveals perfect for a feminine background. It features chrome logo pens with a silky dark background, enabling you to easily add your text, insert your logo, and change the colors.
16Logo Web Search II
Logo Web Search II is a stylish and straightforward animation mainly for company websites. It is elementary to use.
17Battle Logo Reveal
Blue Action Logo Reveal is for those looking for a minimalist logo opener and features a dynamic animation style, including an editable text layer and a logo placeholder. It also allows you to adjust the colors easily.
18Blue Action Logo Reveal
Blue Action Logo Reveal is majorly for those looking for a minimalist logo opener and features a dynamic animation style including an editable text layer and a logo placeholder. It also allows you to easily adjust the colors.
19Logo Introduction Template
Logo Introduction Template is a free logo reveal from Premiere Pro. It is perfect for the ones looking for a Tudor style logo reveal and allows you to easily customize the colors and insert your logo with a detailed help file.
20Minimal Logo Klick
Minimal Logo Klick comes in a sleek and modern design with playful animation. It encompasses a logo placeholder, an editable text layer, and an intelligent color controller. If you are searching for an unfussy and free logo reveal online, this one is for you.
Part 2 Learn How to Use After Effects Logo Reveal Templates
This section provides you with a basic tutorial on using the logo reveal After Effects template for free. However, this is a professional video editing software, but if video editing is new to you, you can try out Filmora, which is powerful, easy to use for new users. In Filmora, you will use the logo reveal template as a professional even if you are a beginner.
Below is how to use the After Effects logo reveals template:
01Open After Effects and Begin
Open your After Effect software and set up your Project ready. To begin face, create a composition using composition>New. You can also search the web resolution to 3x 2for this Project.
![]()
02Start Creating Logo
Next is to create a solid layer for your logo by using layers>new>solid, and select an appropriate color to match your composition.
![]()
Next is the creator logo by adding the pre-prepared logo artwork. Go to layer>new>text to create a text layer and adjust the text size and color to see.
![]()
03Add Animation to Logo
Manipulate your logo to create an animation and ensure that everything is right where you want it.
![]()
04Add Effects and Keyframe
Add Effect by going to Effect>Simulation>CC Particle World or click on Effects and Presets panel on the right to drag the CC Particle World effect onto your solid layer.
![]()
Set off your animation by adding a keyframe and controlling the animation of the particles effect through the birth rate setting, which is found by expanding the settings in the timeline panel for the solid layer.
![]()
05Import Vector Graphics and Finish
Finally, import your vector graphics into the After Effects by dragging and dropping the file into the Project panel, which brings up an import dialogue.
For Win 7 or later (64-bit)
For macOS 10.12 or later
That’s it! You successfully made use of the logo reveal maker.
● Key Takeaways from This Episode →
● The top 20 logo reveal Premiere Pro templates free to download.
● THow to make logo with After Effects – the logo reveal maker.
● TLastly, the logo reveal, free online tool, Filmora.
● TI hope I’ve gave you a few ideas on the After Effects logo reveal template for your Project and provided a breakdown of other software you can use for free logo reveal, such as Filmora. The article also lists the best logo reveal templates for after-effects that you can choose from this 202You can also use other software for your free logo reveal, but we all need to start somewhere.
Also read:
- 10 Best Animation Makers for Kids to Have Fun for 2024
- Updated Create Animated Video on Canva
- Updated In 2024, Top 10 Animated Photo Collage Apps You Should Know
- In 2024, 10 Amazing Whiteboard Animation Video Examples You Need to Bookmark
- Updated Create Animated Social Media Posts in Canva for 2024
- In 2024, Best Websites to Download Animated GIFs for Free
- Updated 2024 Approved 18 Best Tools and Services to Create Animated Videos for Business 2023
- New In 2024, No. 1 Maker to Animate Your Logo Online Free
- In 2024, Ideas That Will Help You Out in Learning How to Send WhatsApp Animated Gifs
- New Tips on How to Learn Graphics Animation
- Updated 2024 Approved Animate Pictures in Canva
- Updated The Ultimate Cheatsheet to 15 Adobe Animate Alternatives for 2024
- 2024 Approved Secret Shortcut to Adobe Animate Character Tutorial
- Updated What Is Still Motion Animation?
- 10 Great Moving Animation PowerPoint Techniques
- 5 Photoshop Alternatives to Animate Your Logo
- Top 12 Evil Cartoon Characters of All Time for 2024
- New In 2024, Top 10 Sketch Animation Video Makers
- New Tips for GIF to Animated PNG You Should Know
- New In-Depth Study of Cartoon Painting Starts From Learning to Draw It for 2024
- Updated In 2024, Techniques on Making After Effects 2D Animation
- New Before You Learn 3D Animation Some Things You Should Know for 2024
- 2024 Approved 15 Top Pics Collage Apps
- How to Animate - Adobe Animate Tutorias
- 2024 Approved How To Remove The Endless Loop From Animated GIF
- Updated 15 Animated Characters We All Had A Crush On for 2024
- New Apps to Animate Still Pictures
- Updated 2024 Approved 10 Creative Wallpaper Collage Ideas and Photos
- Updated Top Claymation Shows That Make Your Memories Unforgettable for 2024
- New In 2024, Ways to Create an Animated Sticky Navbar
- New In 2024, How to Create Picsart Cartoon
- New Handy Tip From Adobe Animate Rigging Tutorial for All Learners for 2024
- Best 10 Popular Cartoons You Forgot Existed
- Best 12 Illusion Gifs Top Picks for 2024
- Is It That Easy to Make My Animated Character
- Updated In 2024, Whats Rigging Animation and Why It Matters
- New 2024 Approved A Roster of 15 Best Disney Channel Cartoons
- New 10 Must Watch Netflix Cartoon Series For You for 2024
- New Thousands Already Found 15 Best Sites to Watch Cartoons Online Free And So Can You
- 10 Must Watch Netflix Cartoon Series
- Updated 2024 Approved Techniques on Making After Effects 2D Animation
- Updated Top 20+ Best Free GIF Makers Online to Quickly Edit GIF for 2024
- Updated Simple Guide to Create New and Exciting Blackboard Animation for 2024
- 2024 Approved What Wikipedia Wont Tell You Specifically About Character Rigging
- Updated Animate Pictures in Canva for 2024
- Updated In 2024, Best Canva 10 Animated Templates
- New In 2024, 10 Great MP4 to GIF Converters to Get Perfect-Made GIF
- What Is the Meaning of Motion Graphics for 2024
- New A Beginners Guide for Learning 3D Animation for 2024
- New Animate Photo Online with These Awesome Tools for 2024
- In 2024, 4 Ways to Transfer Music from Oppo Find X7 Ultra to iPhone | Dr.fone
- In 2024, 5 Techniques to Transfer Data from Itel S23 to iPhone 15/14/13/12 | Dr.fone
- In 2024, Where Is the Best Place to Catch Dratini On OnePlus 12R | Dr.fone
- How to retrieve erased messages from Huawei Nova Y71
- Complete Tutorial to Use GPS Joystick to Fake GPS Location On Nokia G310 | Dr.fone
- How to Unlock Samsung Galaxy F54 5G Phone with Broken Screen
- How To Simulate GPS Movement With Location Spoofer On Xiaomi 13 Ultra? | Dr.fone
- How to Unlock iCloud lock from your iPhone SE (2022) and iPad?
- How to retrieve lost files from Poco F5 5G?
- How to P55T Get Deleted Phone Number Back with Ease and Safety
- 4 solution to get rid of pokemon fail to detect location On Poco C55 | Dr.fone
- 3 Facts You Need to Know about Screen Mirroring Oppo Reno 10 Pro 5G | Dr.fone
- In 2024, Top 12 Prominent Nokia G22 Fingerprint Not Working Solutions
- In 2024, 3 Ways to Export Contacts from Apple iPhone SE (2020) to Excel CSV & vCard Easily | Dr.fone
- Undelete lost pictures from Nokia C12.
- In 2024, How to Transfer Contacts from Infinix Note 30 VIP to Other Android Devices Devices? | Dr.fone
- In 2024, Here are Different Ways to Find Pokemon Go Trainer Codes to Add to Your Account On Apple iPhone 13 mini | Dr.fone
- How To Repair Apple iPhone SE (2020) iOS System? | Dr.fone
- Title: 2024 Approved How to Create Your Avatar Free
- Author: Elon
- Created at : 2024-05-19 03:04:46
- Updated at : 2024-05-20 03:04:46
- Link: https://animation-videos.techidaily.com/2024-approved-how-to-create-your-avatar-free/
- License: This work is licensed under CC BY-NC-SA 4.0.
