
:max_bytes(150000):strip_icc():format(webp)/Sony-PS5-PlayStation-5-Gaming-Console-7-1434c073922c4bf59bca47a33013a6dd.jpg)
2024 Approved How to Make a GIF in Photoshop
How to Make a GIF in Photoshop
How to Make a GIF in Photoshop

Shanoon Cox
Mar 27, 2024• Proven solutions
We all love GIFs and their impressive style of delivering stories. They not only contain set of frames rather they wrap inside lots of emotions and thoughts of creators. You can easily find numbers of eye catching GIF collections over social media sites.
If you love these animated images then probably you might have initiated a search over internet about how to create GIFs. And search engine must have shown you a path to unlimited GIF creator tools . That’s common. But here we are going to talk about one professional recommendation for GIF creation. Yeah, it is Photoshop and it can instantly generate appealing animated Gifs for you.
Below you will be able to learn strategies to create GIF images with latest version of Photoshop:
How to make a GIF in Photoshop
Method 1: Make a GIF from Video in Photoshop
Step 1: Launch your software
Once you have downloaded your Photoshop software tool on your device then simply run it. Note that CS6 versions of Photoshop provide full support to animated files.
Step 2: Get your video clip imported
As your software timeline is available on screen, now you have to import your desired video file to this platform. Simple go to File option from top left corner of toolbar and then from drop down menu select import. Further select, video frames to layers. Choose your video file and soon all its frames will appear on screen. Photoshop also allows users to work on clipped versions of video files; in that case you can use slider to limit the frames at the time of uploading process.
Step 3: Adjust file Import Settings
You will be glad to know that Photoshop offers creative editing features where you can also make color balance adjustments. When you are done with the frame adjustments then go to File and now choose Save for Web from drop down menu.
It will immediately open one new window containing all advanced settings that can assist in better customization of your GIF image. As users need small file size for web uploading needs so you can adjust all these parameters below to get best results:
Colors: Colors are most important descriptive elements for any video so their selection must be done wisely. As more colors can ensure better view but for reducing file size at the same time you can prefer to drop this selection up to 128.
Dither: The dithering process is used to scatter so many colour rich pixels into image so that even a limited colour package can develop intermediate colours over it. If you pick higher number of colours then definitely the image will look finer but at the cost of higher file size.
Lossy: If you want to add some internal drop in the quality of image then this setting is useful. But try to keep it lower because higher range may destroy actual information from image whereas smaller value is good if you want to just reduce the file size.
Size: Users can prefer to change overall dimensions of their GIF that ultimately leads to huge impact on file size.
Step 4: Time to Save your GIF file
When you are done with the editing process and want to save the newly created GIF image then simply move to the File menu available on top left corner of software window and from drop down menu choose “Save for Web” option. It will further ask you to adjust the output file parameters ahead, make changes as per need of your project and finally get it saved to your device.
Check this video to know more:
Method 2: Make a GIF from Still Photos in Photoshop
It is also possible to develop animated GIF images from collection of still images in Photoshop. In this method, users simply need to maintain layers of each frame and then they are sequenced using timeline tool or Photoshop’s animation based editing. Here are few simple to follow steps to get best results:
1. Step 1
First of all, user is advised to bring all desired still images into a single folder in his computer. Then go to the software window, move to Files option and further choose Scripts. It will provide you an option for Load Files into Stack. Now hit browse button and choose your images from desktop folder that you further want to use for development of GIF image. Hit OK. It will immediately open a new composition on screen and all these stills will appear like individual layers of a new single image.
Users can reorder or rearrange these frames as per their desired GIF animation but note that the frame that you want to place at first position in your final GIF must appear at bottom layer and others must follow the same sequence upwards.
All these GIF layers can also be created individually by user using Photoshop tools. To do this, simply run your Photoshop and then use File > New option to start working with a new project. Hit Ok. It is time to unlock the background layer; you can do this by simply double clicking on the lock icon available on screen. Now in order to create a new layer over it, move to Layer option and press New button. You can design all your new layers with this process. As soon as all your images get created then arrange them in bottom to top order same as the previous method.
Note that, this process becomes effective only if you are working on the older version of software and it does not have “Load Files into Stack” feature. You can simply load all your desired stills on Photoshop platform and then drag them to new project window. The free transform tool of Photoshop can help you to resize all the added layers as per need. Use shortcut keys: Ctrl+T to make changes faster.
2. Step 2
Now as your entire GIF image layers have been arranged so next task is to start sequencing. If you are working on CS5 or lower version of Photoshop then you van move to animation window by using Window plus Animation option. On the other side, CS6 or CC users need to click over Window + Timeline option.
As soon as sequencing tool appears on your screen, you will find a small right facing arrow on upper right corner of your screen. Hit this arrow and then choose “Make Frames from Layer” option. The eye icon can be used to hide all unwanted layers. From bottom menu, you can choose looping sequence for your image.
3. Step 3
Finally your animated GIF image is ready and now you can export it to your computer. Hit File option and then Chose Save for Web from drop down menu. But note that for web uploading a file size less then 1MB is acceptable. You can alter it by changing, loss, dither, color and size settings. At last hit Save button and now you can upload your GIF.
Read More to Get : the ultimate guide on How to Convert GIF to Video on your laptop or phone.
Conclusion
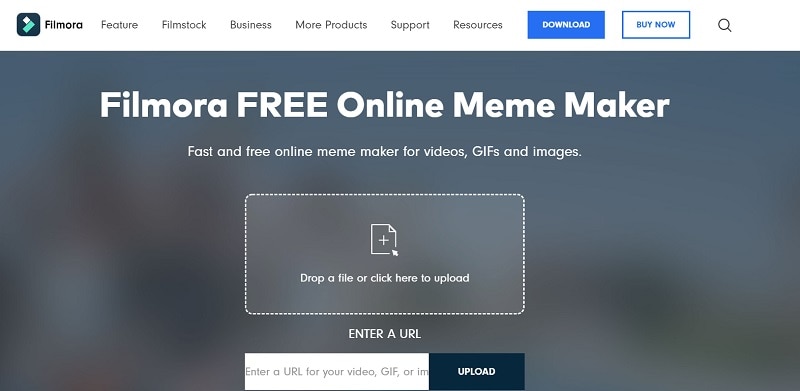
If you feel like Photoshop is difficult to learn, Filmora meme maker is your ultimate solution. It helps you make image, GIF and video memes directly without watermark. It is totally FREE to use and no sign up. You can change text size, color and position to create caption when you are editing. You can also put text inside or outside in GIF. Just with a few clicks, your GIF is done . Try it now!
Shanoon Cox
Shanoon Cox is a writer and a lover of all things video.
Follow @Shanoon Cox
Shanoon Cox
Mar 27, 2024• Proven solutions
We all love GIFs and their impressive style of delivering stories. They not only contain set of frames rather they wrap inside lots of emotions and thoughts of creators. You can easily find numbers of eye catching GIF collections over social media sites.
If you love these animated images then probably you might have initiated a search over internet about how to create GIFs. And search engine must have shown you a path to unlimited GIF creator tools . That’s common. But here we are going to talk about one professional recommendation for GIF creation. Yeah, it is Photoshop and it can instantly generate appealing animated Gifs for you.
Below you will be able to learn strategies to create GIF images with latest version of Photoshop:
How to make a GIF in Photoshop
Method 1: Make a GIF from Video in Photoshop
Step 1: Launch your software
Once you have downloaded your Photoshop software tool on your device then simply run it. Note that CS6 versions of Photoshop provide full support to animated files.
Step 2: Get your video clip imported
As your software timeline is available on screen, now you have to import your desired video file to this platform. Simple go to File option from top left corner of toolbar and then from drop down menu select import. Further select, video frames to layers. Choose your video file and soon all its frames will appear on screen. Photoshop also allows users to work on clipped versions of video files; in that case you can use slider to limit the frames at the time of uploading process.
Step 3: Adjust file Import Settings
You will be glad to know that Photoshop offers creative editing features where you can also make color balance adjustments. When you are done with the frame adjustments then go to File and now choose Save for Web from drop down menu.
It will immediately open one new window containing all advanced settings that can assist in better customization of your GIF image. As users need small file size for web uploading needs so you can adjust all these parameters below to get best results:
Colors: Colors are most important descriptive elements for any video so their selection must be done wisely. As more colors can ensure better view but for reducing file size at the same time you can prefer to drop this selection up to 128.
Dither: The dithering process is used to scatter so many colour rich pixels into image so that even a limited colour package can develop intermediate colours over it. If you pick higher number of colours then definitely the image will look finer but at the cost of higher file size.
Lossy: If you want to add some internal drop in the quality of image then this setting is useful. But try to keep it lower because higher range may destroy actual information from image whereas smaller value is good if you want to just reduce the file size.
Size: Users can prefer to change overall dimensions of their GIF that ultimately leads to huge impact on file size.
Step 4: Time to Save your GIF file
When you are done with the editing process and want to save the newly created GIF image then simply move to the File menu available on top left corner of software window and from drop down menu choose “Save for Web” option. It will further ask you to adjust the output file parameters ahead, make changes as per need of your project and finally get it saved to your device.
Check this video to know more:
Method 2: Make a GIF from Still Photos in Photoshop
It is also possible to develop animated GIF images from collection of still images in Photoshop. In this method, users simply need to maintain layers of each frame and then they are sequenced using timeline tool or Photoshop’s animation based editing. Here are few simple to follow steps to get best results:
1. Step 1
First of all, user is advised to bring all desired still images into a single folder in his computer. Then go to the software window, move to Files option and further choose Scripts. It will provide you an option for Load Files into Stack. Now hit browse button and choose your images from desktop folder that you further want to use for development of GIF image. Hit OK. It will immediately open a new composition on screen and all these stills will appear like individual layers of a new single image.
Users can reorder or rearrange these frames as per their desired GIF animation but note that the frame that you want to place at first position in your final GIF must appear at bottom layer and others must follow the same sequence upwards.
All these GIF layers can also be created individually by user using Photoshop tools. To do this, simply run your Photoshop and then use File > New option to start working with a new project. Hit Ok. It is time to unlock the background layer; you can do this by simply double clicking on the lock icon available on screen. Now in order to create a new layer over it, move to Layer option and press New button. You can design all your new layers with this process. As soon as all your images get created then arrange them in bottom to top order same as the previous method.
Note that, this process becomes effective only if you are working on the older version of software and it does not have “Load Files into Stack” feature. You can simply load all your desired stills on Photoshop platform and then drag them to new project window. The free transform tool of Photoshop can help you to resize all the added layers as per need. Use shortcut keys: Ctrl+T to make changes faster.
2. Step 2
Now as your entire GIF image layers have been arranged so next task is to start sequencing. If you are working on CS5 or lower version of Photoshop then you van move to animation window by using Window plus Animation option. On the other side, CS6 or CC users need to click over Window + Timeline option.
As soon as sequencing tool appears on your screen, you will find a small right facing arrow on upper right corner of your screen. Hit this arrow and then choose “Make Frames from Layer” option. The eye icon can be used to hide all unwanted layers. From bottom menu, you can choose looping sequence for your image.
3. Step 3
Finally your animated GIF image is ready and now you can export it to your computer. Hit File option and then Chose Save for Web from drop down menu. But note that for web uploading a file size less then 1MB is acceptable. You can alter it by changing, loss, dither, color and size settings. At last hit Save button and now you can upload your GIF.
Read More to Get : the ultimate guide on How to Convert GIF to Video on your laptop or phone.
Conclusion
If you feel like Photoshop is difficult to learn, Filmora meme maker is your ultimate solution. It helps you make image, GIF and video memes directly without watermark. It is totally FREE to use and no sign up. You can change text size, color and position to create caption when you are editing. You can also put text inside or outside in GIF. Just with a few clicks, your GIF is done . Try it now!
Shanoon Cox
Shanoon Cox is a writer and a lover of all things video.
Follow @Shanoon Cox
10 Realistic Cartoon Characters You Will Run Away From if You Met in R
10 Realistic Cartoon Characters You Would Run Away From if You Met in Real Life
An easy yet powerful editor
Numerous effects to choose from
Detailed tutorials provided by the official channel
Remember watching a cartoon reality show on the Cartoon Network? We all grew up watching cartoons. Cartoons are an unforgettable part of our childhood. But have you ever wondered what would your favorite cartoon characters look like in real life? Many cartoon characters like Popeye, Sponge Bob, Mickey Mouse, etc. look funny in their 2D images. Watching them do funny things and their funny expressions have always been fun.
But with the advancement in technology and the passage of time, we have some digital artists like Tatiana and Miguel Vasquez, who have recreated your famous cartoon characters into 3D. They have given them a realistic look that will scare you. These realistic cartoon faces will blow your mind.
In this article
01 [What’s a Realistic Cartoon?](#Part 1)
02 [10 Realistic Cartoon Characters You Would Run Away From If You Met In Real Life](#Part 2)
03 [How Do Cartoon Characters Reimagined As Realistic 3D Animation](#Part 3)
Part 1 What’s Realistic Cartoon?
Before moving towards the list of realistic cartoon characters, you must first know what a realistic cartoon is. As we all know, any animated drawing or illustration is a cartoon, it can either be non-realistic or semi-realistic. Earlier artists used to draw these cartoon characters on paper, but now technology has evolved.
With the introduction of different AI tools, many digital artists have recreated 3D versions of your favorite cartoon characters. These 3D versions of different cartoons are known as realistic cartoons. This can be done easily with help of AI technology and Digital Software.
Part 2 Realistic Cartoon Characters You Would Run Away From If You Met In Real Life
Have you ever thought how would your favorite cartoon character sponge bob looks like in real life? We will show you realistic versions of your favorite cartoon characters. Stay tuned for great fun waiting for you in this article!
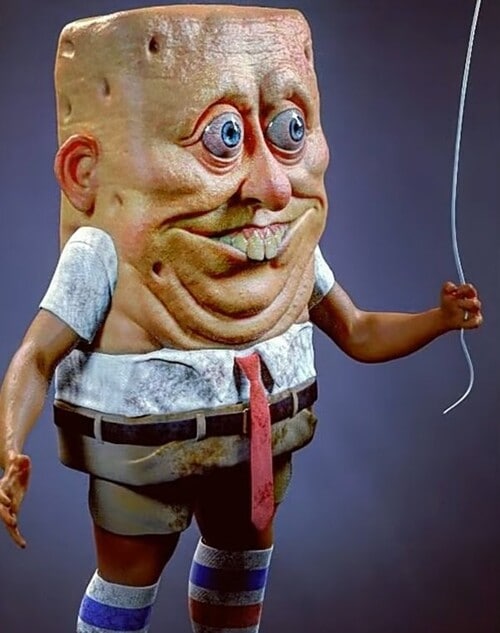
01Sponge Bob (Sponge Bob Square Pants)
Sponge Bob Square Pants is an animated series full of fun and comedy. This show currently runs on Nickelodeon. Sponge Bob is a yellow-colored sea sponge and the main protagonist of the show. He is a cook at a restaurant named Krusty Krab. He often goes on adventures with his best friend Patrick Star. He mainly focuses on and aims at getting a boat-driving license from Mr. Puff’s boating school.
Have a look at the 3D recreation of this funny creature.
02Sid the Sloth (Ice Age)
Ice Age is one of the most popular animated series that revolves around the lives of a mammoth, tiger, sloth, and a scrat. A scrat is a combination of a squirrel and a rat. This series became so popular among the children that it was even nominated for an Oscar award.
It has a character called Sid. He is an abandoned sloth. His mother left him for some good to happen with him during the migration. His character in the entire series exhibits a friendly and carefree nature. Sometimes, he also acts as dumb and naïve.
Look at the funny recreation of this dumb-witted character. Does this recreation scare you?

03Mr. Krabs (Sponge Bob Square Pants)
Sponge Bob Square Pants is one of the cartoons that have many different and funny-looking creatures. Mr. Krabs is one of those characters. He is a money-minded and miserly creature. He is the owner of the Krusty Krab fast food restaurant, where Sponge Bob works as a cook. He has a teenage daughter named Pearl and he can do anything to see her happy. He exhibits romantic feelings for Mrs. Puff.
Does this funny creature from the Sponge Bob series look funny in real life too?

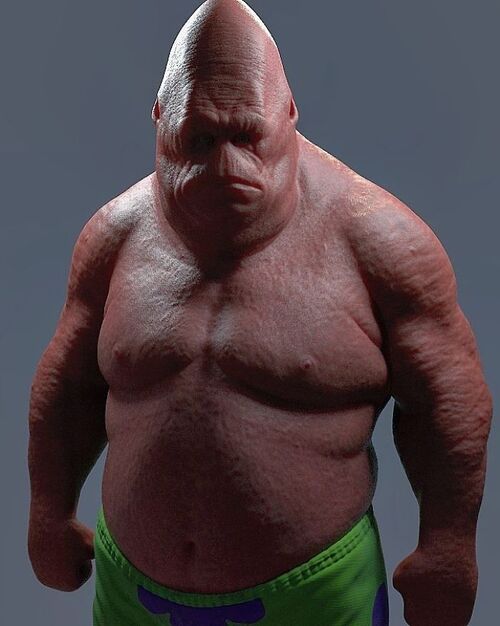
04Patrick Star (Sponge Bob Square Pants)
Patrick Star is again a character from the cartoon show Sponge Bob Square Pants. He is the best friend of the main protagonist Sponge Bob, who lives 2 houses away from Sponge Bob’s house. He is a lazy, fat, and stupid pink-colored starfish. His character makes the show funnier and more interesting for kids.
How would you react when you will see this funny creature from Sponge Bob in real life? His 3D recreation seems a bit scary like a monster in real life.
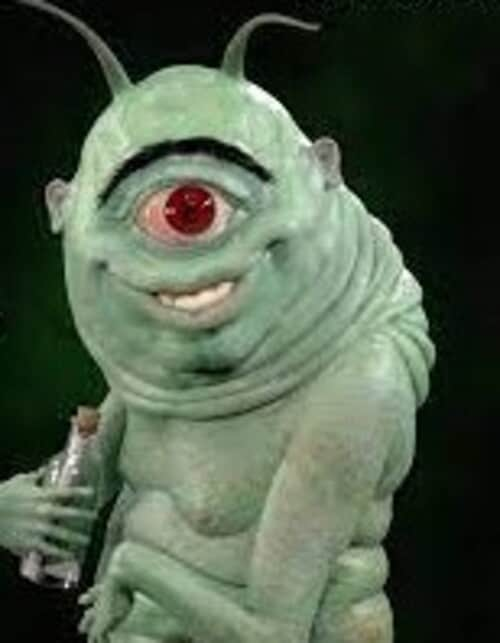
05Plankton (Sponge Bob Square Pants)
Plankton was once the best friend of Mr. Krabs but now they both share a rivalry bond. He is married to Karen and owns a fast food restaurant named Chum Bucket Restaurant in competition with Mr. Krabs’ Restaurant. He plays the antagonist character in the series. His restaurant doesn’t work as successfully as Krusty Krab Restaurant. In rivalry, he often comes up with different plans and tricks to outwit Mr. Krabs and steal the secret recipe of his famous Krabby Patty Burger, but never succeeds.
Have a look at the 3D recreation of this funny character from the series.
06Homer (The Simpsons)
The Simpsons is an animated series that revolves around the life of an American family. The Simpson family has five members named Homer, Marge, Bart, Lisa, and Maggie. Homer Simpson is the main character of this series. He lives in Springfield and is employed as a Safety Inspector at Springfield Nuclear Power Plant. He is married to Marge and is the father of three children – Bart, Lisa, and Maggie. The series depicts a strong bond of love and care for each other in the family.
Have a look at this realistic 3D recreation of Homer Simpson.

07Bugs Bunny (Looney Tunes)
Looney Tunes is entertaining people of all ages due to its great and funny characters. Bugs Bunny is one of our favorite characters from the animated cartoon show Looney Tunes. He is the main protagonist and the most popular character of the series. Kids love him the most because of his mischievous acts in the show. He looks too funny with a mouth filled with carrots and wearing funny costumes. This unique character has a great fan following all over the world.
The 3D recreation of this famous cartoon character is funny and scary at the same time.

08Sally (The Nightmare Before Christmas)
As the name suggests, The Nightmare Before Christmas is an American dark fantasy animated movie. This animated movie has received great financial success and appreciation for its wonderful characters and music.
Sally is a shy ragdoll created by a scientist Doctor Finkelstein. She secretly loves Jack – the main Protagonist of the movie. She tells him not to mix the preparation of Christmas with the Halloween party.
Look at her realistic 3D recreation by Tatiana, popularly known as TatiMoons.

09Stitch (Lilo and Stitch)
Lilo and Stitch is also an animated American movie. It is a science fiction and comedy movie that attracts the interest of people of all age groups. The story of this animated movie revolves around the two main characters named Lilo and Stitch. Lilo is a 7-year old orphan girl whose parents died in a car accident. She has a pet named Stitch.
The original name of Stitch is Experiment 626. He was illegally created by a scientist Jumba Jokiba through a genetic experiment. Lilo adopts him thinking that he is an innocent creature, she doesn’t know about his birth and origin.
Have a look at this realistic 3D recreation of Stitch’s character. Isn’t it scary?

10 Popeye (Popeye – The Sailor Man)
Popeye – The Sailor Man is another famous cartoon series. Popeye is the main protagonist of this series. He has a girlfriend named Olive Oyl. This series depicts the love triangle between Popeye, Olive, and Bluto. He is an uneducated sailor man who gets energy by eating spinach. He often comes up with non-realistic solutions to different problems and helps the police by investigating different cases. He has a versatile tobacco smoking pipe that sometimes acts as a whistle, and he even intakes the spinach through his pipe.
In the cartoon films, he looks funny, but this 3D recreation of his character is a bit scary.

Part 2 How Do Cartoon Characters Reimagined As Realistic 3D Animation
Nowadays, it has become easier to create and turn your imagination into a cartoon character with different online 3D animators. This makes storytelling easier and funny and it is a great way to engage children. Out of all the 3D animation tools, Filmora will assist you to create the best 3D version of your favorite cartoon character.
Filmora has various smart features that help you to turn any image into realistic 3D animation. You can create great animations using Wondershare Filmora Video Editor within a couple of hours. It offers you many different features that help in convenient customization.
● Ending Thoughts →
● Being a cartoon lover, we hope that you would have liked the 3D recreation of your favorite cartoons. Some of these 3D recreations are so scary that you would just run away from them in real life and some look like real monster cartoons.
● AI combined with digital software like Filmora makes it easier to create these 3D versions of famous cartoon characters.
● With Filmora, you don’t need to spend hours sketching cartoon characters on paper. You can easily create great and realistic animations digitally.
Remember watching a cartoon reality show on the Cartoon Network? We all grew up watching cartoons. Cartoons are an unforgettable part of our childhood. But have you ever wondered what would your favorite cartoon characters look like in real life? Many cartoon characters like Popeye, Sponge Bob, Mickey Mouse, etc. look funny in their 2D images. Watching them do funny things and their funny expressions have always been fun.
But with the advancement in technology and the passage of time, we have some digital artists like Tatiana and Miguel Vasquez, who have recreated your famous cartoon characters into 3D. They have given them a realistic look that will scare you. These realistic cartoon faces will blow your mind.
In this article
01 [What’s a Realistic Cartoon?](#Part 1)
02 [10 Realistic Cartoon Characters You Would Run Away From If You Met In Real Life](#Part 2)
03 [How Do Cartoon Characters Reimagined As Realistic 3D Animation](#Part 3)
Part 1 What’s Realistic Cartoon?
Before moving towards the list of realistic cartoon characters, you must first know what a realistic cartoon is. As we all know, any animated drawing or illustration is a cartoon, it can either be non-realistic or semi-realistic. Earlier artists used to draw these cartoon characters on paper, but now technology has evolved.
With the introduction of different AI tools, many digital artists have recreated 3D versions of your favorite cartoon characters. These 3D versions of different cartoons are known as realistic cartoons. This can be done easily with help of AI technology and Digital Software.
Part 2 Realistic Cartoon Characters You Would Run Away From If You Met In Real Life
Have you ever thought how would your favorite cartoon character sponge bob looks like in real life? We will show you realistic versions of your favorite cartoon characters. Stay tuned for great fun waiting for you in this article!
01Sponge Bob (Sponge Bob Square Pants)
Sponge Bob Square Pants is an animated series full of fun and comedy. This show currently runs on Nickelodeon. Sponge Bob is a yellow-colored sea sponge and the main protagonist of the show. He is a cook at a restaurant named Krusty Krab. He often goes on adventures with his best friend Patrick Star. He mainly focuses on and aims at getting a boat-driving license from Mr. Puff’s boating school.
Have a look at the 3D recreation of this funny creature.
02Sid the Sloth (Ice Age)
Ice Age is one of the most popular animated series that revolves around the lives of a mammoth, tiger, sloth, and a scrat. A scrat is a combination of a squirrel and a rat. This series became so popular among the children that it was even nominated for an Oscar award.
It has a character called Sid. He is an abandoned sloth. His mother left him for some good to happen with him during the migration. His character in the entire series exhibits a friendly and carefree nature. Sometimes, he also acts as dumb and naïve.
Look at the funny recreation of this dumb-witted character. Does this recreation scare you?
03Mr. Krabs (Sponge Bob Square Pants)
Sponge Bob Square Pants is one of the cartoons that have many different and funny-looking creatures. Mr. Krabs is one of those characters. He is a money-minded and miserly creature. He is the owner of the Krusty Krab fast food restaurant, where Sponge Bob works as a cook. He has a teenage daughter named Pearl and he can do anything to see her happy. He exhibits romantic feelings for Mrs. Puff.
Does this funny creature from the Sponge Bob series look funny in real life too?
04Patrick Star (Sponge Bob Square Pants)
Patrick Star is again a character from the cartoon show Sponge Bob Square Pants. He is the best friend of the main protagonist Sponge Bob, who lives 2 houses away from Sponge Bob’s house. He is a lazy, fat, and stupid pink-colored starfish. His character makes the show funnier and more interesting for kids.
How would you react when you will see this funny creature from Sponge Bob in real life? His 3D recreation seems a bit scary like a monster in real life.
05Plankton (Sponge Bob Square Pants)
Plankton was once the best friend of Mr. Krabs but now they both share a rivalry bond. He is married to Karen and owns a fast food restaurant named Chum Bucket Restaurant in competition with Mr. Krabs’ Restaurant. He plays the antagonist character in the series. His restaurant doesn’t work as successfully as Krusty Krab Restaurant. In rivalry, he often comes up with different plans and tricks to outwit Mr. Krabs and steal the secret recipe of his famous Krabby Patty Burger, but never succeeds.
Have a look at the 3D recreation of this funny character from the series.
06Homer (The Simpsons)
The Simpsons is an animated series that revolves around the life of an American family. The Simpson family has five members named Homer, Marge, Bart, Lisa, and Maggie. Homer Simpson is the main character of this series. He lives in Springfield and is employed as a Safety Inspector at Springfield Nuclear Power Plant. He is married to Marge and is the father of three children – Bart, Lisa, and Maggie. The series depicts a strong bond of love and care for each other in the family.
Have a look at this realistic 3D recreation of Homer Simpson.
07Bugs Bunny (Looney Tunes)
Looney Tunes is entertaining people of all ages due to its great and funny characters. Bugs Bunny is one of our favorite characters from the animated cartoon show Looney Tunes. He is the main protagonist and the most popular character of the series. Kids love him the most because of his mischievous acts in the show. He looks too funny with a mouth filled with carrots and wearing funny costumes. This unique character has a great fan following all over the world.
The 3D recreation of this famous cartoon character is funny and scary at the same time.
08Sally (The Nightmare Before Christmas)
As the name suggests, The Nightmare Before Christmas is an American dark fantasy animated movie. This animated movie has received great financial success and appreciation for its wonderful characters and music.
Sally is a shy ragdoll created by a scientist Doctor Finkelstein. She secretly loves Jack – the main Protagonist of the movie. She tells him not to mix the preparation of Christmas with the Halloween party.
Look at her realistic 3D recreation by Tatiana, popularly known as TatiMoons.
09Stitch (Lilo and Stitch)
Lilo and Stitch is also an animated American movie. It is a science fiction and comedy movie that attracts the interest of people of all age groups. The story of this animated movie revolves around the two main characters named Lilo and Stitch. Lilo is a 7-year old orphan girl whose parents died in a car accident. She has a pet named Stitch.
The original name of Stitch is Experiment 626. He was illegally created by a scientist Jumba Jokiba through a genetic experiment. Lilo adopts him thinking that he is an innocent creature, she doesn’t know about his birth and origin.
Have a look at this realistic 3D recreation of Stitch’s character. Isn’t it scary?
10 Popeye (Popeye – The Sailor Man)
Popeye – The Sailor Man is another famous cartoon series. Popeye is the main protagonist of this series. He has a girlfriend named Olive Oyl. This series depicts the love triangle between Popeye, Olive, and Bluto. He is an uneducated sailor man who gets energy by eating spinach. He often comes up with non-realistic solutions to different problems and helps the police by investigating different cases. He has a versatile tobacco smoking pipe that sometimes acts as a whistle, and he even intakes the spinach through his pipe.
In the cartoon films, he looks funny, but this 3D recreation of his character is a bit scary.
Part 2 How Do Cartoon Characters Reimagined As Realistic 3D Animation
Nowadays, it has become easier to create and turn your imagination into a cartoon character with different online 3D animators. This makes storytelling easier and funny and it is a great way to engage children. Out of all the 3D animation tools, Filmora will assist you to create the best 3D version of your favorite cartoon character.
Filmora has various smart features that help you to turn any image into realistic 3D animation. You can create great animations using Wondershare Filmora Video Editor within a couple of hours. It offers you many different features that help in convenient customization.
● Ending Thoughts →
● Being a cartoon lover, we hope that you would have liked the 3D recreation of your favorite cartoons. Some of these 3D recreations are so scary that you would just run away from them in real life and some look like real monster cartoons.
● AI combined with digital software like Filmora makes it easier to create these 3D versions of famous cartoon characters.
● With Filmora, you don’t need to spend hours sketching cartoon characters on paper. You can easily create great and realistic animations digitally.
Christmas Is Coming! How to Find & Make Animated Christmas GIFs?
Versatile Video Editor - Wondershare Filmora
An easy yet powerful editor
Numerous effects to choose from
Detailed tutorials provided by the official channel
Since Christmas is just around the corner, you must be looking for all kinds of GIFs and video greetings to wish your loved ones on this special occasion. Ideally, sending an animated Christmas GIF is one of the best ways to expect them during the festive season. If you are running short on time, then you can find a readily available Merry Christmas funny GIF or can come up with a customized Christmas wishes GIF as well. Here, I will let you know how to find and make free Christmas GIFs like a pro.

In this article
01 [5 Best Places to Find Animated Christmas GIFs for Free](#Part 1)
02 [How to Create your Animated Christmas GIFs (with Music): A DIY Guide](#Part 2)
03 [Pro Tip: Customize your GIFs on the Go with Filmora Meme Maker](#Part 3)
Part 1 5 Best Places to Find Animated Christmas GIFs for Free
While there are plenty of websites and apps, I would recommend exploring the following sources to find Merry Christmas animated GIFs for free.
1. Pinterest
Pinterest has to be one of the best sources to get free Christmas GIFs of all kinds. While some GIFs can readily be downloaded from Pinterest, you might be redirected to third-party websites at times. Also, before you use any GIF from Pinterest, make sure you check its copyright policy.
Mostly, you would find aesthetically pleasing Merry Christmas wishes GIFs on Pinterest about DIY activities, food, animations, and so on. The only issue is that the range of GIFs at Pinterest is pretty extensive, and there are no inbuilt categories or filters.
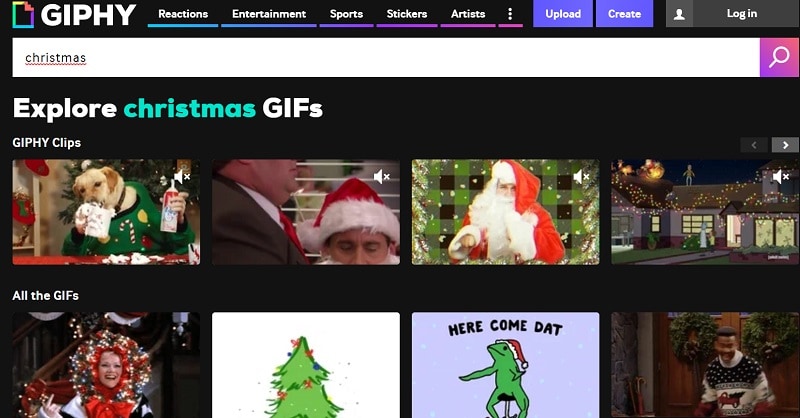
2. Giphy
If you are looking for funny Christmas GIFs, then Giphy would be one of the best places to explore. It has some of the most extensive GIFs collections of all styles, including Christmas wishes GIFs.
You can head to the website of Giphy or use its mobile application to find all sorts of animated Christmas GIFs as per your needs. There are tons of stickers, animated stories, and funny GIFs related to pop cultures that you would also find on Giphy.
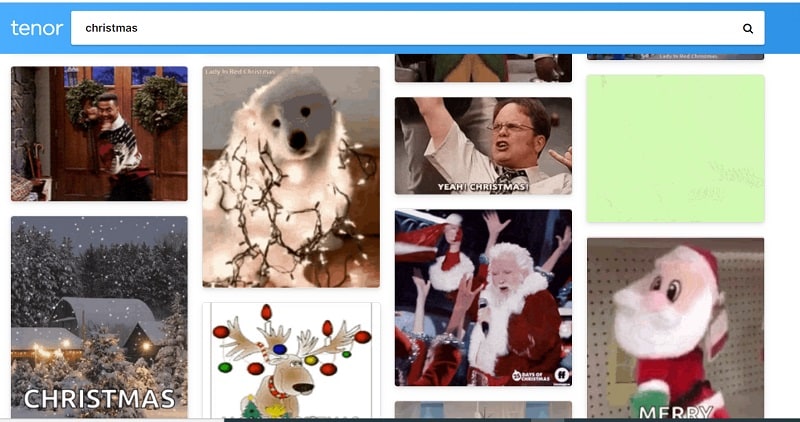
3. Tenor
Tenor is another clean and user-friendly website where you can find different types of funny Merry Christmas GIFs for free. You can look for stickers and GIFs by simply entering keywords of your choice on Tenor.
Once you load an animated Christmas GIF, you can save it offline or generate its shareable link. In this way, you can directly share the Merry Christmas wishes GIF to your loved ones on platforms like WhatsApp, Telegram, Messenger, and so on.
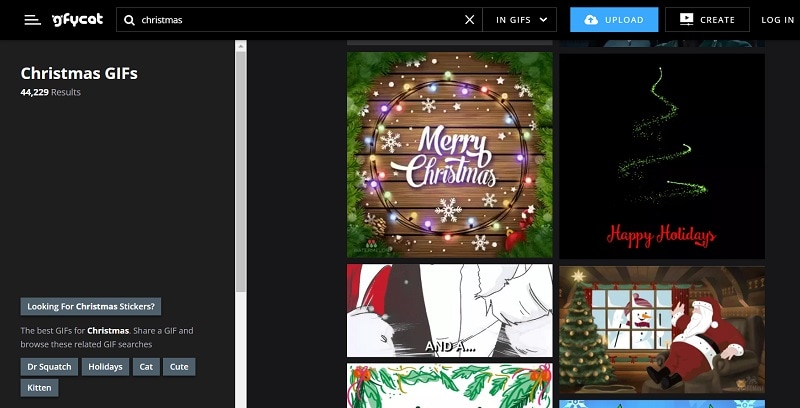
4. GyfCat
Having thousands of anime Christmas GIFs, GyfCat is another popular online source that you should check out. Most of the free Christmas GIFs here are animated or related to pop culture videos.
You can enter multiple keywords and hashtags on the search bar of GyfCat to find specific Christmas wishes GIFs. Most of the results here are ideal for funny Xmas GIFs that are bound to make your friends and family smile.
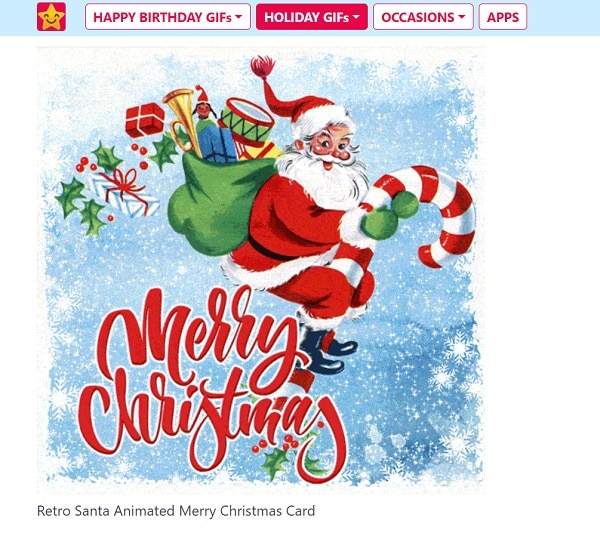
5. Funimada
From elves to Santa Claus and reindeers to fireworks, you can find funny Christmas GIFs of all kinds in Funimada. Unlike other places, Funimada has a curated list of animated Christmas GIFs that you can explore on its website.
Once you find a perfect anime Christmas GIF at Funimada, you can download it on your device or system and share it with others however you like.
Part 2 How to Create your Animated Christmas GIFs (with Music): A DIY Guide
Most of these readily available animated Christmas GIFs are quite generic and lack a customized appeal. Therefore, if you want to come up with some customized Christmas wishes GIFs, then consider using a dedicated editing tool like Wondershare Filmora.
Since it is a user-friendly video and media editing tool, you won’t encounter issues working on an animated Christmas GIF. You can explore and use the wide range of media assets of Filmora or import anything from your system. Besides that, tons of transitions, filters, captions, and other effects would let you come up with some customized Merry Christmas wishes GIFs via Filmora in the following way.
Step 1 Load the Media Files of your Choice on Filmora
You can start by installing Wondershare Filmora on your system and launch it whenever you want to work on any animated Christmas GIF. Afterward, you can drag and drop your media files to it or go to its Menu > File > Import Media to browse and load your files.
For Win 7 or later (64-bit)
For macOS 10.12 or later

Step2 Create your Animated Christmas GIFs with Filmora
Great! Once you have loaded your media files, you can drag and drop them to the timeline at the bottom to start editing them. If you want to clip out any unwanted parts from a video, then hover the mouse at the end. This will let you use its trimming tool to clip out any part of the file.

There are tons of other editing options that are available on Filmora. For instance, once you select a video, you can go to its properties to apply all sorts of transformations such as rotation, flipping, scaling, repositioning, and so on.

Many people would like to add captions to their animated Christmas GIFs to wish others personally. You can do the same by visiting the “Titles” section of Filmora and exploring different styles of caption effects. You can drag and drop any caption effect and add your text here to customize it.

To further improve the visual appeal of your Christmas wishes GIF, you can explore and apply tons of transitions, filters, overlays, and other effects that are available in Filmora.

If you want to add music to your Merry Christmas wishes GIF, you can add any soundtrack to your project. You can also go to the “Audio” section of Filmora, where you can browse several sound effects and drag and drop your media files. If you want, you can also record voiceovers for your videos using the native feature on Filmora.

Step 3 Export your Christmas Wishes GIFs from Filmora
Lastly, you can get a preview of your funny Merry Christmas GIF on Filmora and can click on the “Export” button to save it. Here, you can select a preferred format (like GIF or MP4) in which you want to keep your media file on your system. If you have included music in your project, consider exporting it as an MP4 file instead of a GIF.

Part 3 Pro Tip: Customize your GIFs on the Go with Filmora Meme Maker
If you already have a Merry Christmas GIF and want to customize it further, you can also check the online Filmora Meme Maker . You can go to its website and upload a video, GIF, or image of your choice. If you have found a funny Christmas GIF online, you can paste its exact URL. Later, you can add texts to your GIFs and export them to your system in a preferred format.
Wondershare Filmora
Get started easily with Filmora’s powerful performance, intuitive interface, and countless effects!
Try It Free Try It Free Try It Free Learn More >

AI Portrait – The best feature of Wondershare Filmora for gameplay editing
The AI Portrait is a new add-on in Wondershare Filmora. It can easily remove video backgrounds without using a green screen or chroma key, allowing you to add borders, glitch effects, pixelated, noise, or segmentation video effects.

Conclusion
So, what are you waiting for? Now when you know where to find animated Christmas GIFs, you can explore the above-listed websites on your own. Apart from using these readily available options, you can also create some customized, funny Merry Christmas GIFs. For that, you can take the assistance of Wondershare Filmora and make the most of its professional features to create, customize, and export your GIFs with music and tons of other effects. Feel free to explore Filmora and wish your loved ones a joyous Christmas in style!
Since Christmas is just around the corner, you must be looking for all kinds of GIFs and video greetings to wish your loved ones on this special occasion. Ideally, sending an animated Christmas GIF is one of the best ways to expect them during the festive season. If you are running short on time, then you can find a readily available Merry Christmas funny GIF or can come up with a customized Christmas wishes GIF as well. Here, I will let you know how to find and make free Christmas GIFs like a pro.
In this article
01 [5 Best Places to Find Animated Christmas GIFs for Free](#Part 1)
02 [How to Create your Animated Christmas GIFs (with Music): A DIY Guide](#Part 2)
03 [Pro Tip: Customize your GIFs on the Go with Filmora Meme Maker](#Part 3)
Part 1 5 Best Places to Find Animated Christmas GIFs for Free
While there are plenty of websites and apps, I would recommend exploring the following sources to find Merry Christmas animated GIFs for free.
1. Pinterest
Pinterest has to be one of the best sources to get free Christmas GIFs of all kinds. While some GIFs can readily be downloaded from Pinterest, you might be redirected to third-party websites at times. Also, before you use any GIF from Pinterest, make sure you check its copyright policy.
Mostly, you would find aesthetically pleasing Merry Christmas wishes GIFs on Pinterest about DIY activities, food, animations, and so on. The only issue is that the range of GIFs at Pinterest is pretty extensive, and there are no inbuilt categories or filters.
2. Giphy
If you are looking for funny Christmas GIFs, then Giphy would be one of the best places to explore. It has some of the most extensive GIFs collections of all styles, including Christmas wishes GIFs.
You can head to the website of Giphy or use its mobile application to find all sorts of animated Christmas GIFs as per your needs. There are tons of stickers, animated stories, and funny GIFs related to pop cultures that you would also find on Giphy.
3. Tenor
Tenor is another clean and user-friendly website where you can find different types of funny Merry Christmas GIFs for free. You can look for stickers and GIFs by simply entering keywords of your choice on Tenor.
Once you load an animated Christmas GIF, you can save it offline or generate its shareable link. In this way, you can directly share the Merry Christmas wishes GIF to your loved ones on platforms like WhatsApp, Telegram, Messenger, and so on.
4. GyfCat
Having thousands of anime Christmas GIFs, GyfCat is another popular online source that you should check out. Most of the free Christmas GIFs here are animated or related to pop culture videos.
You can enter multiple keywords and hashtags on the search bar of GyfCat to find specific Christmas wishes GIFs. Most of the results here are ideal for funny Xmas GIFs that are bound to make your friends and family smile.
5. Funimada
From elves to Santa Claus and reindeers to fireworks, you can find funny Christmas GIFs of all kinds in Funimada. Unlike other places, Funimada has a curated list of animated Christmas GIFs that you can explore on its website.
Once you find a perfect anime Christmas GIF at Funimada, you can download it on your device or system and share it with others however you like.
Part 2 How to Create your Animated Christmas GIFs (with Music): A DIY Guide
Most of these readily available animated Christmas GIFs are quite generic and lack a customized appeal. Therefore, if you want to come up with some customized Christmas wishes GIFs, then consider using a dedicated editing tool like Wondershare Filmora.
Since it is a user-friendly video and media editing tool, you won’t encounter issues working on an animated Christmas GIF. You can explore and use the wide range of media assets of Filmora or import anything from your system. Besides that, tons of transitions, filters, captions, and other effects would let you come up with some customized Merry Christmas wishes GIFs via Filmora in the following way.
Step 1 Load the Media Files of your Choice on Filmora
You can start by installing Wondershare Filmora on your system and launch it whenever you want to work on any animated Christmas GIF. Afterward, you can drag and drop your media files to it or go to its Menu > File > Import Media to browse and load your files.
For Win 7 or later (64-bit)
For macOS 10.12 or later
Step2 Create your Animated Christmas GIFs with Filmora
Great! Once you have loaded your media files, you can drag and drop them to the timeline at the bottom to start editing them. If you want to clip out any unwanted parts from a video, then hover the mouse at the end. This will let you use its trimming tool to clip out any part of the file.
There are tons of other editing options that are available on Filmora. For instance, once you select a video, you can go to its properties to apply all sorts of transformations such as rotation, flipping, scaling, repositioning, and so on.
Many people would like to add captions to their animated Christmas GIFs to wish others personally. You can do the same by visiting the “Titles” section of Filmora and exploring different styles of caption effects. You can drag and drop any caption effect and add your text here to customize it.
To further improve the visual appeal of your Christmas wishes GIF, you can explore and apply tons of transitions, filters, overlays, and other effects that are available in Filmora.
If you want to add music to your Merry Christmas wishes GIF, you can add any soundtrack to your project. You can also go to the “Audio” section of Filmora, where you can browse several sound effects and drag and drop your media files. If you want, you can also record voiceovers for your videos using the native feature on Filmora.
Step 3 Export your Christmas Wishes GIFs from Filmora
Lastly, you can get a preview of your funny Merry Christmas GIF on Filmora and can click on the “Export” button to save it. Here, you can select a preferred format (like GIF or MP4) in which you want to keep your media file on your system. If you have included music in your project, consider exporting it as an MP4 file instead of a GIF.
Part 3 Pro Tip: Customize your GIFs on the Go with Filmora Meme Maker
If you already have a Merry Christmas GIF and want to customize it further, you can also check the online Filmora Meme Maker . You can go to its website and upload a video, GIF, or image of your choice. If you have found a funny Christmas GIF online, you can paste its exact URL. Later, you can add texts to your GIFs and export them to your system in a preferred format.
Wondershare Filmora
Get started easily with Filmora’s powerful performance, intuitive interface, and countless effects!
Try It Free Try It Free Try It Free Learn More >
AI Portrait – The best feature of Wondershare Filmora for gameplay editing
The AI Portrait is a new add-on in Wondershare Filmora. It can easily remove video backgrounds without using a green screen or chroma key, allowing you to add borders, glitch effects, pixelated, noise, or segmentation video effects.
Conclusion
So, what are you waiting for? Now when you know where to find animated Christmas GIFs, you can explore the above-listed websites on your own. Apart from using these readily available options, you can also create some customized, funny Merry Christmas GIFs. For that, you can take the assistance of Wondershare Filmora and make the most of its professional features to create, customize, and export your GIFs with music and tons of other effects. Feel free to explore Filmora and wish your loved ones a joyous Christmas in style!
How to Make Slideshow in LinkedIn
How to Create Slideshow in LinkedIn
An easy yet powerful editor
Numerous effects to choose from
Detailed tutorials provided by the official channel
LinkedIn slideshows are interesting means of professional content presentations in an elusive and catchy style. Stay tuned to learn everything about LinkedIn slideshows!
In this article
01 [Why Should You Care LinkedIn Slideshow?](#Part 1)
02 [What Are the Specs & Dimensions of LinkedIn Slideshow?](#Part 2)
03 [Examples of LinkedIn Slideshow](#Part 3)
04 [How to Create Slideshow in LinkedIn?](#Part 4)
Part 1 Why Should You Care LinkedIn Slideshow?
Today’s IT revolutionized era has a technology infused solution to everything and employment is no exception. Defining the platform, LinkedIn is a professional social networking site that allows you to put forward your qualifications, education, skills, expertise and experience to address your job oriented concerns. The platform is a market leader in hiring professionals to a diversity of work profiles, while increasing the number of potential audiences.
The social media platform essentially works to keep the job realm informed about you with the most detailed aspects. This is why, creating a LinkedIn profile turns out to be a significant step in the professional world. Let us get into understanding some more beneficial aspects of a LinkedIn recognition in the following section:
01Establishing Professional Connections
Making yourself available on the professional front through a LinkedIn profile lets you know about the diversities of recruitment prerequisites, connect with professionals belonging to different domains, backgrounds and industries, while getting numerous opportunities to meet people who share a similar work perspective as yours.
02Being Informed About Job Postings
A LinkedIn profile caters most effectively to your concern of getting regular updates about employment opportunities in a diverse range of industrial and business corporations, companies and recruiting agencies. You can use the platform to create a professional account and follow the respective company pages that match with your qualifications and expertise, to get the latest updates of their job postings and vacancy announcements.
03Recruiter’s Search Visibility
Having a LinkedIn profile affordably means that you are entitled to a recognition in the recruiter’s search results on Google, thus giving a considerable boost to your chances of being viewed and hired. This is additionally beneficial for the recruiting agencies as well, who get the maximum fruit with the least effort.
04Globalization
Creating a comprehensive LinkedIn profile with the correct choice of keywords and exact content opens up employment opportunities beyond the cross country borders, thanks to the platform’s global reach and credibility. This in turn, causes your professional integrity to be presented in front of a large scale audience diversity.
05Personal Branding
Being active on LinkedIn lets you become a brand for yourself through its endorsement and recommendation features. Seeing your LinkedIn profile, your akin, coworkers and professionally senior acquaintances of the past can write a positive testimonial on your expertise, thus increasing your chances of being hired to a new job post.
06A Valuable Asset
You can conveniently regard a LinkedIn profile as your professional diary, where you can update your latest corporate or industrial achievements, awards, project undertakings and voluntary activities. This will facilitate your recruiter with the latest and exact information about your corporate capabilities, which would further aid the latter to consider on hiring you.
07Real and Trustworthy Platform
Creating a LinkedIn profile essentially requires furnishing real and authentic details of education, skills and professional backgrounds for getting relevant opportunities in their respective fields. Uploading false information and fake details will anyway result in beating around the bush, without any significant gain and hence, this practice is essentially avoided by LinkedIn users.
08Active Job Search
Instead of following the conventional passive job seeker pattern of sending resume and waiting for the HR response, LinkedIn allows you to be in regular touch with the recruiter of your chosen company for latest updates on the hiring process. If you are worried of getting the ‘desperate’ tag, rest assured as the platform will rather present you as a proactive professional.
Part 2 What Are the Specs & Dimensions of LinkedIn Slideshow?
Now that you are familiar with the credibility of a LinkedIn carousel post in the professional world, let us get into some more details of the utility with proceeding towards a discussion of the different specifications and dimensions of a LinkedIn slideshow and the professional aspects of the same in the following section:
● Take Care of the File Size
The credibility of LinkedIn carousel posts lies in the engaging presentation of your static and monotonous text to make them stand out of the crowded newsfeed. True that your creative skills are sufficient enough to design a graphic masterpiece, yet you should take care to remain within an affordable limit, lest you would end up with a large file that gets difficult to upload and process. Most reliably, a 100 MB file size would easily fit into the bill.
● Restrict Your Slide Count
When creating a slideshow LinkedIn presentation, it is normal to get a bit over the line while including the most exemplary and comprehensive details about your professional qualifications, skills and background. Relax, that’s nothing wrong! However, all you need to care about is limiting the slide count of your slideshow to a maximum of 300 pages. As a genuine approach, no one would bother going beyond that to read about you anyway!
● Use a Commendable File Format
You would ideally want the documents and media files in your slideshow to have the finest quality. LinkedIn allows you to create and share your graphic presentations in the PDF, DOCX, DOC, PPTX and PPT file formats. If you want the assurance of your slideshows having the highest resolution and appreciable output quality, it is recommended to save them in the PDF file format.
● Make a Careful Upload
When you are ready to upload your presentation, consider taking a close preview of its contents to make sure that you have not missed out on anything. This becomes all the more necessary, owing to the fact that, you are not allowed to edit your post in anyway after it gets uploaded on your LinkedIn profile.
● Bonus Tip
To include the latest and up-to-date information within your presentation, consider visiting the LinkedIn official webpage directly from your platform account.
Part 3 Examples of LinkedIn Slideshow
Creating a LinkedIn slide show can be both, exciting as well as advantageous on the professional front. After having an insight of the significance, dimensions and specifications, let us now move towards browsing through some of the most excellent examples of LinkedIn slideshow presentations in the following section:
● Share Numbers, Infographics and Statistics
The utility of the LinkedIn platform to share documents has been worked upon by Brian Wallace, an infographic agency owner, to present his professional excellence in front of the target audiences through useful statistics and examples. Opening his work profile, you would firstly get to see an infographic PDF export, which are later uploaded as document files on a LinkedIn post that speaks in favor of the statistics.
● Share Action Oriented Business Modules
Travis Lachner, the CEO of a renowned business enterprise, has worked upon the clever idea of designing appealing, call to action presentations to encourage the participation of his potential audiences in the business module through a graphical arrow desisgn, asking them to share their opinions via relatable comments.
● Stepwise Instructions and Design Frameworks
This LinkedIn feature is utilized by Demodesk to present a stepwise demonstration of its newly launched ‘One Feature Framework’ through a slideshow presentation. You can work with the facility to share documents comprising of market oriented case studies, business reports, frameworks, etc., from your company’s official webpage.
● Conference Presentations and Event Contents
LinkedIn slideshows are indeed the most expressive means of sharing conference essentials and event marketing. Such presentations have been perfectly put to use by Jens Hilgers, the eSports creator and entrepreneur, to help viewers and players in navigating through his game landscapes. You can also choose a simple task of creating a buzz of your upcoming event among your audience, like Garter did to inform about the CFO & Executive Conference.
● Content Promotion
You can use a LinkedIn slideshow post to effectively promote your content among a global audience like Matheos Simou, a graphic designer cum recruitment strategist, who utilized LinkedIn presentations to educate his target audience about the significance of graphic desisgn and product branding outsources through his slideshow post titled ‘Flipping Pointless Brand Identity’.
Part 4 How to Create Slideshow in LinkedIn?
Having talked enough about LinkedIn slideshows and their market credibility, let us now make an attempt to try hands at creating professionally useful LinkedIn presentations. The following section describes a detailed, stepwise tutorial to adhere to the aforesaid purpose within a quick time span and utmost ease:
● User’s Guide to Create a LinkedIn Slideshow
Step 1: Open Your LinkedIn Profile
Start with logging in to your LinkedIn profile in any preferred device.
Step 2: Create a Google Slide Deck
Launch Google Slides in your device and proceed to design a slide deck on the same.

Step 3: Add Content to the Inaugural Slide
Populate the first slide of your presentation with the opening content, like the titles and subtitles of slideshow creation objective, company name, profile and expertise, etc.

As far as designing the subsequent slides is concerned, it would be a smart idea to clone the first slide to maintain an overall homogeneity.

Step 4: Save Your Work
When you are done with creating the presentation, choose to save it on your profile in the PDF file format for ensuring a high output quality.

Step 5: Sharing Your Creation
Create a document post on your profile to share the slideshow presentation with fellow LinkedIn users.

Step 6: Describe Your Post
The last step is to supplement your post with a suitable description and a few catchy hashtags. When you are happy with your work, navigate to the bottom right of the profile screen and tap ‘Post’.

● Creating LinkedIn Slideshows with Wondershare Filmora
When looking for a convenient and easy to use slideshow creator to design your LinkedIn presentations, you can rely on the Wondershare Filmora Video Editor Slideshow Creator software program to make high end, professional quality slide shows in a commendable resolution, and supplement them with a diversity of cohesive graphic effects.
For Win 7 or later (64-bit)
For macOS 10.12 or later
● Ending Thoughts →
● LinkedIn slideshows are highly useful in creating a notable impact of your professional skills and capabilities in front of job recruiters.
● There are some essential aspects of LinkedIn slideshows, which you should consider while designing your presentation.
● Wondershare Filmora is certainly one among the best software solutions to create LinkedIn slideshows with high end professional excellence.
LinkedIn slideshows are interesting means of professional content presentations in an elusive and catchy style. Stay tuned to learn everything about LinkedIn slideshows!
In this article
01 [Why Should You Care LinkedIn Slideshow?](#Part 1)
02 [What Are the Specs & Dimensions of LinkedIn Slideshow?](#Part 2)
03 [Examples of LinkedIn Slideshow](#Part 3)
04 [How to Create Slideshow in LinkedIn?](#Part 4)
Part 1 Why Should You Care LinkedIn Slideshow?
Today’s IT revolutionized era has a technology infused solution to everything and employment is no exception. Defining the platform, LinkedIn is a professional social networking site that allows you to put forward your qualifications, education, skills, expertise and experience to address your job oriented concerns. The platform is a market leader in hiring professionals to a diversity of work profiles, while increasing the number of potential audiences.
The social media platform essentially works to keep the job realm informed about you with the most detailed aspects. This is why, creating a LinkedIn profile turns out to be a significant step in the professional world. Let us get into understanding some more beneficial aspects of a LinkedIn recognition in the following section:
01Establishing Professional Connections
Making yourself available on the professional front through a LinkedIn profile lets you know about the diversities of recruitment prerequisites, connect with professionals belonging to different domains, backgrounds and industries, while getting numerous opportunities to meet people who share a similar work perspective as yours.
02Being Informed About Job Postings
A LinkedIn profile caters most effectively to your concern of getting regular updates about employment opportunities in a diverse range of industrial and business corporations, companies and recruiting agencies. You can use the platform to create a professional account and follow the respective company pages that match with your qualifications and expertise, to get the latest updates of their job postings and vacancy announcements.
03Recruiter’s Search Visibility
Having a LinkedIn profile affordably means that you are entitled to a recognition in the recruiter’s search results on Google, thus giving a considerable boost to your chances of being viewed and hired. This is additionally beneficial for the recruiting agencies as well, who get the maximum fruit with the least effort.
04Globalization
Creating a comprehensive LinkedIn profile with the correct choice of keywords and exact content opens up employment opportunities beyond the cross country borders, thanks to the platform’s global reach and credibility. This in turn, causes your professional integrity to be presented in front of a large scale audience diversity.
05Personal Branding
Being active on LinkedIn lets you become a brand for yourself through its endorsement and recommendation features. Seeing your LinkedIn profile, your akin, coworkers and professionally senior acquaintances of the past can write a positive testimonial on your expertise, thus increasing your chances of being hired to a new job post.
06A Valuable Asset
You can conveniently regard a LinkedIn profile as your professional diary, where you can update your latest corporate or industrial achievements, awards, project undertakings and voluntary activities. This will facilitate your recruiter with the latest and exact information about your corporate capabilities, which would further aid the latter to consider on hiring you.
07Real and Trustworthy Platform
Creating a LinkedIn profile essentially requires furnishing real and authentic details of education, skills and professional backgrounds for getting relevant opportunities in their respective fields. Uploading false information and fake details will anyway result in beating around the bush, without any significant gain and hence, this practice is essentially avoided by LinkedIn users.
08Active Job Search
Instead of following the conventional passive job seeker pattern of sending resume and waiting for the HR response, LinkedIn allows you to be in regular touch with the recruiter of your chosen company for latest updates on the hiring process. If you are worried of getting the ‘desperate’ tag, rest assured as the platform will rather present you as a proactive professional.
Part 2 What Are the Specs & Dimensions of LinkedIn Slideshow?
Now that you are familiar with the credibility of a LinkedIn carousel post in the professional world, let us get into some more details of the utility with proceeding towards a discussion of the different specifications and dimensions of a LinkedIn slideshow and the professional aspects of the same in the following section:
● Take Care of the File Size
The credibility of LinkedIn carousel posts lies in the engaging presentation of your static and monotonous text to make them stand out of the crowded newsfeed. True that your creative skills are sufficient enough to design a graphic masterpiece, yet you should take care to remain within an affordable limit, lest you would end up with a large file that gets difficult to upload and process. Most reliably, a 100 MB file size would easily fit into the bill.
● Restrict Your Slide Count
When creating a slideshow LinkedIn presentation, it is normal to get a bit over the line while including the most exemplary and comprehensive details about your professional qualifications, skills and background. Relax, that’s nothing wrong! However, all you need to care about is limiting the slide count of your slideshow to a maximum of 300 pages. As a genuine approach, no one would bother going beyond that to read about you anyway!
● Use a Commendable File Format
You would ideally want the documents and media files in your slideshow to have the finest quality. LinkedIn allows you to create and share your graphic presentations in the PDF, DOCX, DOC, PPTX and PPT file formats. If you want the assurance of your slideshows having the highest resolution and appreciable output quality, it is recommended to save them in the PDF file format.
● Make a Careful Upload
When you are ready to upload your presentation, consider taking a close preview of its contents to make sure that you have not missed out on anything. This becomes all the more necessary, owing to the fact that, you are not allowed to edit your post in anyway after it gets uploaded on your LinkedIn profile.
● Bonus Tip
To include the latest and up-to-date information within your presentation, consider visiting the LinkedIn official webpage directly from your platform account.
Part 3 Examples of LinkedIn Slideshow
Creating a LinkedIn slide show can be both, exciting as well as advantageous on the professional front. After having an insight of the significance, dimensions and specifications, let us now move towards browsing through some of the most excellent examples of LinkedIn slideshow presentations in the following section:
● Share Numbers, Infographics and Statistics
The utility of the LinkedIn platform to share documents has been worked upon by Brian Wallace, an infographic agency owner, to present his professional excellence in front of the target audiences through useful statistics and examples. Opening his work profile, you would firstly get to see an infographic PDF export, which are later uploaded as document files on a LinkedIn post that speaks in favor of the statistics.
● Share Action Oriented Business Modules
Travis Lachner, the CEO of a renowned business enterprise, has worked upon the clever idea of designing appealing, call to action presentations to encourage the participation of his potential audiences in the business module through a graphical arrow desisgn, asking them to share their opinions via relatable comments.
● Stepwise Instructions and Design Frameworks
This LinkedIn feature is utilized by Demodesk to present a stepwise demonstration of its newly launched ‘One Feature Framework’ through a slideshow presentation. You can work with the facility to share documents comprising of market oriented case studies, business reports, frameworks, etc., from your company’s official webpage.
● Conference Presentations and Event Contents
LinkedIn slideshows are indeed the most expressive means of sharing conference essentials and event marketing. Such presentations have been perfectly put to use by Jens Hilgers, the eSports creator and entrepreneur, to help viewers and players in navigating through his game landscapes. You can also choose a simple task of creating a buzz of your upcoming event among your audience, like Garter did to inform about the CFO & Executive Conference.
● Content Promotion
You can use a LinkedIn slideshow post to effectively promote your content among a global audience like Matheos Simou, a graphic designer cum recruitment strategist, who utilized LinkedIn presentations to educate his target audience about the significance of graphic desisgn and product branding outsources through his slideshow post titled ‘Flipping Pointless Brand Identity’.
Part 4 How to Create Slideshow in LinkedIn?
Having talked enough about LinkedIn slideshows and their market credibility, let us now make an attempt to try hands at creating professionally useful LinkedIn presentations. The following section describes a detailed, stepwise tutorial to adhere to the aforesaid purpose within a quick time span and utmost ease:
● User’s Guide to Create a LinkedIn Slideshow
Step 1: Open Your LinkedIn Profile
Start with logging in to your LinkedIn profile in any preferred device.
Step 2: Create a Google Slide Deck
Launch Google Slides in your device and proceed to design a slide deck on the same.
Step 3: Add Content to the Inaugural Slide
Populate the first slide of your presentation with the opening content, like the titles and subtitles of slideshow creation objective, company name, profile and expertise, etc.
As far as designing the subsequent slides is concerned, it would be a smart idea to clone the first slide to maintain an overall homogeneity.
Step 4: Save Your Work
When you are done with creating the presentation, choose to save it on your profile in the PDF file format for ensuring a high output quality.
Step 5: Sharing Your Creation
Create a document post on your profile to share the slideshow presentation with fellow LinkedIn users.
Step 6: Describe Your Post
The last step is to supplement your post with a suitable description and a few catchy hashtags. When you are happy with your work, navigate to the bottom right of the profile screen and tap ‘Post’.
● Creating LinkedIn Slideshows with Wondershare Filmora
When looking for a convenient and easy to use slideshow creator to design your LinkedIn presentations, you can rely on the Wondershare Filmora Video Editor Slideshow Creator software program to make high end, professional quality slide shows in a commendable resolution, and supplement them with a diversity of cohesive graphic effects.
For Win 7 or later (64-bit)
For macOS 10.12 or later
● Ending Thoughts →
● LinkedIn slideshows are highly useful in creating a notable impact of your professional skills and capabilities in front of job recruiters.
● There are some essential aspects of LinkedIn slideshows, which you should consider while designing your presentation.
● Wondershare Filmora is certainly one among the best software solutions to create LinkedIn slideshows with high end professional excellence.
How To Learn Cartoon Sketch Drawing
How To Learn Cartoon Sketch Drawing— Pencil Sketch for Beginners
An easy yet powerful editor
Numerous effects to choose from
Detailed tutorials provided by the official channel
If you are learning how to draw, particularly cartoon sketches drawing, you must start at a beginner’s level. No skill is difficult if you just put your mind to it. You can learn the basics of the beginning, what you must do, and a learning curve, but if you have passion for it or love what you are doing, you will give it time to practice.
It all boils down to practicing it. Knowing how to draw beautiful sketch cartoons drawing is not a complex thing to do if you start at the beginner’s level.
So, for all who are reading this article, we will show sketch drawings of cartoons, i.e., how to draw step by step in an understandable manner.
In this article
01 [Collection of 8 Hottest Cartoon Drawings](#Part 1)
02 [How to Draw Cartoon Step by Step Easy Pencil Drawing](#Part 2)
Part 1 Collection of 8 Hottest Cartoon Drawings
Here’s a collection of 8 hottest cartoon love drawing pencil sketches for you.
01Motlu Patlu
This is a sketch of the Motu Patlu cartoon drawing. The artist used some simple forms such as a pear shape while developing the body in making this sketch. The pear shape helps in developing the bodies of cartoon characters.

02Basketball Sketch Drawing
The cartoon basketball drawing is one of our top picks wherein the artist took his time to get every detail in the scene. The image alone tells the story.

03Tom and Jerry Sketch drawing
If you were a lover of the famous cartoon Tom and Jerry, you should know this. Here’s a sketch cartoon drawing of Tom and Jerry.

04Cat Sketch
Isn’t this beautiful sketch cartoon drawing of a cat just it? The way the artist details it and gets the perfect fit made it part of our collection.

05Cute Cartoon love sketch
We couldn’t have finished this list without adding this beautiful sketch cartoon drawing.

06Homer
This cartoon sketch drawing of Homer in the Simpsons is just it. Looking at the body build, you can easily trace the outline of the pear-shaped form.

07Cute Cartoon Drawing
This drawing cartoon sketch caught our attention, and we are sure you would love it. With the round head and pear-shaped belly, you will agree that you can start your learning journey with the steps listed in this article.

08Cartoon love drawing
This sketch cartoon drawing portrays the love between a girl and a boy. It is one attractive sketch that shows details of expressions on the faces.

Part 2 How to Draw Cartoon Step by Step Easy Pencil Drawing
An essential factor you must bear in mind is that you must not let go of your creativity when learning how to draw.
You have to be free with yourself and try to create cartoon sketch drawings of characters that you love.
The more it’s about something you love, the better you get at it.
Here’s a step-by-step process of an easy pencil drawing or sketch cartoon drawing.
● Step 1: Draw a circle
Draw a circle and a “noodle” shape, as shown in the illustration. The head is a circle, and the body is a pear form.
The lower half of the pear is fatter than the top. Take note of how the upper half slightly overlaps the head circle.

● Step 2: Draw a pair of eyes.
As shown in the image, add the perspective guidelines around the head. These recommendations will assist you in correctly positioning your rabbit’s eyes and nose.
Above the horizontal guideline, draw the eyes. Where the parameters cross is where the nose is put.

● Step 3: Draw the cheek and Wings
Make the cheekbones. As shown in the illustration, add the ears and arms. It’s OK if the ear shapes differ somewhat from those displayed.
Notice how the arm contour curve organically emerges from behind the shoulders when you sketch the arms. Make it this way if you can.

● Step 4: Draw the legs
Draw the legs and tail of the animal. The arm and leg curves may appear to be challenging. As a result, be gentle with your pencil. Don’t yank on the pencil too hard!
Your cartoon rabbit’s shape is now plainly evident.

● Step 5: Draw the mouth
Let’s focus on the face for a moment. Draw an iris ellipse and an inner line in the ear inside the eyes. Include the nose. Draw the mouth and the teeth.

● Step 6: Outline the contours
Because rabbits eat carrots, this one eats them in excess. Outline the carrot’s outlines. On the legs, draw the brows and the fingers.
As you may have observed, I messed up the teeth in the previous image. Therefore I deleted the thick black pencil lines that were superfluous.
Erase and Shade (Step 8)

● Step 7: Outline the Character
Now, outline the contours of the entire character with a softer pencil. You can pick up B4 or B6 (if you don’t have either, try HB). Please leave a little bright dot on the nose while darkening it.

● Step 8: Erase and Shade
Remove everything that isn’t required. See? That is how your bunny should seem.
I also advocate using a pencil-type eraser in addition to regular or kneaded erasers. Shade the entire rabbit’s body if you’re using a graphite pencil. The inside of the ear, the belly, the paws, and the tail can all be white or brighter.

●Bonus Software for Beautiful Sketch Cartoon Drawing:
Wondershare Filmora Video Editor is a superb video editing software developed by Wondershare. It is a simple entry-level version with preset video templates and effects. With the numerous powerful features in Filmora, we can add amazing effects to our cartoon sketches to make them look better.
For Win 7 or later (64-bit)
For macOS 10.12 or later
Here’s how to use Filmora for cartoon sketch drawing enhancements.
Chroma key (Green screen): This feature can change the background of your sketched cartoon drawing photo by adding special effects to make it look nice.
Color Match: Color match is a feature in Filmora used to apply color correction settings in a video. You can use this feature to enhance your sketches.
Mask and blend: Filmora mask and blend feature has resourceful modes and is easy to use. You can use them for your pencil sketched cartoon drawing.
● Ending Thoughts →
● Making beautiful sketch cartoon drawings is not rocket science. It is a result of consistent practice.
● In this article, we have given you key points and strategies you can use to start practicing cartoon sketch drawing. However, do begin from our idea, i.e., a circle for the head and a pear for developing the body.
● Thus, your journey to learning how to draw cartoons step by step quickly with a pencil is already a walkover.
If you are learning how to draw, particularly cartoon sketches drawing, you must start at a beginner’s level. No skill is difficult if you just put your mind to it. You can learn the basics of the beginning, what you must do, and a learning curve, but if you have passion for it or love what you are doing, you will give it time to practice.
It all boils down to practicing it. Knowing how to draw beautiful sketch cartoons drawing is not a complex thing to do if you start at the beginner’s level.
So, for all who are reading this article, we will show sketch drawings of cartoons, i.e., how to draw step by step in an understandable manner.
In this article
01 [Collection of 8 Hottest Cartoon Drawings](#Part 1)
02 [How to Draw Cartoon Step by Step Easy Pencil Drawing](#Part 2)
Part 1 Collection of 8 Hottest Cartoon Drawings
Here’s a collection of 8 hottest cartoon love drawing pencil sketches for you.
01Motlu Patlu
This is a sketch of the Motu Patlu cartoon drawing. The artist used some simple forms such as a pear shape while developing the body in making this sketch. The pear shape helps in developing the bodies of cartoon characters.
02Basketball Sketch Drawing
The cartoon basketball drawing is one of our top picks wherein the artist took his time to get every detail in the scene. The image alone tells the story.
03Tom and Jerry Sketch drawing
If you were a lover of the famous cartoon Tom and Jerry, you should know this. Here’s a sketch cartoon drawing of Tom and Jerry.
04Cat Sketch
Isn’t this beautiful sketch cartoon drawing of a cat just it? The way the artist details it and gets the perfect fit made it part of our collection.
05Cute Cartoon love sketch
We couldn’t have finished this list without adding this beautiful sketch cartoon drawing.
06Homer
This cartoon sketch drawing of Homer in the Simpsons is just it. Looking at the body build, you can easily trace the outline of the pear-shaped form.
07Cute Cartoon Drawing
This drawing cartoon sketch caught our attention, and we are sure you would love it. With the round head and pear-shaped belly, you will agree that you can start your learning journey with the steps listed in this article.
08Cartoon love drawing
This sketch cartoon drawing portrays the love between a girl and a boy. It is one attractive sketch that shows details of expressions on the faces.
Part 2 How to Draw Cartoon Step by Step Easy Pencil Drawing
An essential factor you must bear in mind is that you must not let go of your creativity when learning how to draw.
You have to be free with yourself and try to create cartoon sketch drawings of characters that you love.
The more it’s about something you love, the better you get at it.
Here’s a step-by-step process of an easy pencil drawing or sketch cartoon drawing.
● Step 1: Draw a circle
Draw a circle and a “noodle” shape, as shown in the illustration. The head is a circle, and the body is a pear form.
The lower half of the pear is fatter than the top. Take note of how the upper half slightly overlaps the head circle.
● Step 2: Draw a pair of eyes.
As shown in the image, add the perspective guidelines around the head. These recommendations will assist you in correctly positioning your rabbit’s eyes and nose.
Above the horizontal guideline, draw the eyes. Where the parameters cross is where the nose is put.
● Step 3: Draw the cheek and Wings
Make the cheekbones. As shown in the illustration, add the ears and arms. It’s OK if the ear shapes differ somewhat from those displayed.
Notice how the arm contour curve organically emerges from behind the shoulders when you sketch the arms. Make it this way if you can.
● Step 4: Draw the legs
Draw the legs and tail of the animal. The arm and leg curves may appear to be challenging. As a result, be gentle with your pencil. Don’t yank on the pencil too hard!
Your cartoon rabbit’s shape is now plainly evident.
● Step 5: Draw the mouth
Let’s focus on the face for a moment. Draw an iris ellipse and an inner line in the ear inside the eyes. Include the nose. Draw the mouth and the teeth.
● Step 6: Outline the contours
Because rabbits eat carrots, this one eats them in excess. Outline the carrot’s outlines. On the legs, draw the brows and the fingers.
As you may have observed, I messed up the teeth in the previous image. Therefore I deleted the thick black pencil lines that were superfluous.
Erase and Shade (Step 8)
● Step 7: Outline the Character
Now, outline the contours of the entire character with a softer pencil. You can pick up B4 or B6 (if you don’t have either, try HB). Please leave a little bright dot on the nose while darkening it.
● Step 8: Erase and Shade
Remove everything that isn’t required. See? That is how your bunny should seem.
I also advocate using a pencil-type eraser in addition to regular or kneaded erasers. Shade the entire rabbit’s body if you’re using a graphite pencil. The inside of the ear, the belly, the paws, and the tail can all be white or brighter.
●Bonus Software for Beautiful Sketch Cartoon Drawing:
Wondershare Filmora Video Editor is a superb video editing software developed by Wondershare. It is a simple entry-level version with preset video templates and effects. With the numerous powerful features in Filmora, we can add amazing effects to our cartoon sketches to make them look better.
For Win 7 or later (64-bit)
For macOS 10.12 or later
Here’s how to use Filmora for cartoon sketch drawing enhancements.
Chroma key (Green screen): This feature can change the background of your sketched cartoon drawing photo by adding special effects to make it look nice.
Color Match: Color match is a feature in Filmora used to apply color correction settings in a video. You can use this feature to enhance your sketches.
Mask and blend: Filmora mask and blend feature has resourceful modes and is easy to use. You can use them for your pencil sketched cartoon drawing.
● Ending Thoughts →
● Making beautiful sketch cartoon drawings is not rocket science. It is a result of consistent practice.
● In this article, we have given you key points and strategies you can use to start practicing cartoon sketch drawing. However, do begin from our idea, i.e., a circle for the head and a pear for developing the body.
● Thus, your journey to learning how to draw cartoons step by step quickly with a pencil is already a walkover.
Before You Learn Facebook Slideshow: 5 Things You Should Know
Before You Learn Facebook Slideshow Things You Should Know [How-TOS]
An easy yet powerful editor
Numerous effects to choose from
Detailed tutorials provided by the official channel
If you are looking for interesting solutions to create the most amazing slideshow on Facebook, rest assured, you are at the right place to get every help!
In this article
01 [Where Did the Facebook Slideshow Tool Go?](#Part 1)
02 [How to Create a Slideshow on Facebook?](#Part 2)
03 [Top 5 Facebook Slideshow Alternatives](#Part 3)
Part 1 Where Did the Facebook Slideshow Tool Go?
While almost everyone around you must be fascinated about the stunning and appealing slideshows that the Facebook community used to offer its users with, it is evidently sad to realize that the utility has become a story of the past. The creators of the tool have by now, took multiple rounds on removing, retrieving and again removing the utility from the official Facebook website as well as the smartphone application.
It is however relaxing to know that the Facebook developer team has worked efficiently to produce alternatives to the application’s slideshow tool after the latter’s permanent disappearance from the user account pages and app profiles. You can now work with the Facebook Ads Manager or Facebook Creator Studio to sort out the concern of creating slideshow on Facebook.
Part 2 How to Create a Slideshow on Facebook?
Facebook slideshows are incredibly awesome trends of making a concise, expressive and to the point delivery of diverse content varieties. Piping up your information through and extensive assortment of sound, text and motion, these short snippets are no less than a seamless video streaming of the same information.
If you are about to launch a new product for your business enterprise, consider working with the utility to create an elusive Facebook slideshow ad for a quick demonstration of your brand among different social media communities, turning the fun of slideshow creation into a smart and responsive product promotion strategy, without having to bother your wallet for the same.
If you are concerned about the quality of the final output, it is not a cause of worry, since the Facebook slideshow creator tool promises you of an appreciable slideshow result, that takes a quick loading time, is comparable to a high resolution video and works well with all your favourite devices.
Having talked enough on the usage credibility, let us now proceed to adhere to the concern of creating a slideshow on Facebook with a diversity of media files in the following section:
01Facebook Slideshows from Videos
Step 1: Launch the Tool
Start with opening the Facebook app in your device to launch the ‘Facebook Ads Manager’ utility and tap ‘Create’ in the latter’s welcome interface.

Step 2: Select Your Video
Browse through your device’s gallery to choose a desired video for slideshow creation. When you have made your choice, set a 16:9 aspect ratio for the same to avoid square cropping.

Step 3: Upload Your Video
Proceed with uploading your video to the Facebook tool by clicking on the ‘Add Video’ button and watch it getting split into still images frames, from where you can view a seamless slideshow display of the same.

Step 4: Select Multiple Frames
you can now select a series of image frames and arrange them in the correct sequence of appearance by clicking on each one of them to be included within the creator timeline.
Step 5: Add Captions Your Stills
Tap on the small ‘Pencil’ icon within the images to customize them with suitable captions. You can further add style to these image names by making appropriate selections of font, position color of every frame caption. Once you have finished naming all the frames, click on ‘Save’ to apply your changes.
Step 6: Preview Your Creation
When you are satisfied with your work, consider watching a preview of the same to be assured of the perfect placement of everything. To do this, navigate to the ‘Preview Pane’ at the top right corner of the program interface, and tapping the ‘Preview’ button.
02Facebook Slideshows from Images
Step 1: Launch the Tool
To begin with, open the Facebook app in any of your preferred devices and proceed to launch the ‘Facebook Ads Manager’ tool, followed by clicking on the ‘Create Slideshow’ button at the bottom of the tool’s welcome screen.

Step 2: Upload Your Images
As you complete Step 1, a ‘Video Creation Kit’ will appear, where you will need to click within the ‘Create Slideshow’ checkbox, followed by tapping on the ‘Continue’ button at the bottom right corner of the window.

Step 3: Upload Your Images
Clicking on the ‘Continue’ button will take you to the ‘Settings Box’ where you need to tap on the ‘Add Photos’ option. An image selection box will now pop up, allowing you to select and upload a maximum of 10 images from your Facebook account, stock and page galleries or your device collections. Prefer keeping all the photos within the same aspect ratio to escape the extra task of cropping the images.
When you have finished making your selections, navigate to the bottom right corner of the window and hit the ‘Confirm’ button. This will make your selections shows up all together in the ‘Settings Box’, in the sequential order of their appearance in the slideshow. If you want to introduce some changes, delete and re-upload the images.

Step 4: Customize Your Images with Captions
To add suitable captions to the slideshow images, tap the ‘Pencil’ icon within them. You are also allowed to customize the stills with transitions, effects, etc., and make adjustments to the screen time of each image frame.

Part 3 Top 5 Facebook Slideshow Alternatives
Having heard about the disappointment from the exit of the Facebook slideshow creator tool, it becomes naturally important to seek through the affordable alternatives of the same to set straight the issue of how to do a slideshow on Facebook. Working towards the solutions, let us learn about the top 5 most preferred Facebook slideshow alternatives in the following section:
03PowerDirector
One of the most suitable candidates of Facebook slideshow alternatives, PowerDirector easily lands among the highly preferred tools for creating stunning slideshows. Compatible with the MacOs and Windows operating systems, the software lets you create high end, top quality slideshow presentations with a classic and professional outlook.
Talking of the creator program’s most appealing features, this one is an upgraded slideshow creator suite that is capable enough to address your most diverse design requirements, like those of high resolution video effects, Hollywood inspired movies and personal content sharing. The software package is loaded with tons of elusive video effects, themed templates and transition effects to facilitate a compelling creation.
Working with PowerDirector’s exclusive slideshow program, you get the liberty to escape the notch of storyboard and timeline editing and start the creation process in the launch window of the program itself. The extremely user cohesive interface of the software guides you through each creation step via streamlined plug-ins, making the design process quick and super easy even for newbies.

04SmartSHOW 3D
When thinking of how to make a slideshow on facebook, this one is another top rated Facebook slideshow alternatives, that comes with an extensive toolkit to create amazing presentations from video clips and images, while complementing them with a plethora of effects and transitions. Some of the key features of the program include multiple slide layering, animating selected layers and fine tune the transitions with keyframe adjustments.
You can additionally uplift the slides with image masks, shapes, 3D animated texts and other forms of graphic arts. An additively appealing feature of the slideshow creator program is the ability to mix descriptive images with your favorite music to develop stunning masterpieces of entertaining slideshows, which you can conveniently share and enjoy with family and friends on a diversity of social media platforms.
Using the tool, you can work with applying motion graphic effects to still photos without having to be an over the top tech savvy user. The editor library of the tool is loaded with some of the most awesome transition effects, like, wipes, 3D motions, gradients and fade-ins, along with the facility of adding titles, voice comments and captions to the slides of your presentation. The tool is however, exclusively a Windows compatible utility.

05PhotoStage Slideshow Software
Next in the list of alternatives to the Facebook slideshow maker tool is the aforesaid software program, that allows you to create professional quality slideshows with as many videos and images as you can possibly think of and supplement them with a variety of texts, music, voiceovers and effects. You can further work on customizing the slideshow images with making suitable adjustments in color, brightness and saturation parameters.
The software comes with a Quick Create utility, which you can use to instantly create high resolution slideshows and spark them up with zooms, pans and fades, while getting a preview of the same in real-time. You can even proceed to burn your creation into a disk, make an online upload, or simply save it to your device.
Talking of the cost constraints of this amazing slideshow creator tool, you get to work with the software for a commercial use, free of cost for a definite time period and with a restricted number of features. However, you can always consider on buying the paid version of the program to avail an access to the latter’s entire range of features and utilities. The tool works well with all Windows and Mac supported devices.

06Kizoa
Moving ahead in the list you have the Kizoa slideshow maker for Facebook, which is a dependable alternative to the conventional Facebook slideshow creator. Choosing this tool to design your slideshow presentation, you are entitled to the amazing feature of displaying your presentation on almost any screen, including smartphones, television, computers and tablets with getting to choose from 7 types of aspect ratios. The tool is designed to have a Windows and MacOs compatibility.
The application further lets you add the most specific parts of your images within the presentation slides with its smart cropping tool, while keeping an account of the file formats and screen space requirements of the images with utmost convenience. You are also allowed to choose from a storehouse of preset templates to add your desired photos and video clips in the slideshow and entice them with GIFs, effects and texts.
When you are done with the creation process, just attempt to download and save the slideshow in any preferred file format, such as, AVI, GIF, MP4, MOV, MPEG2, etc., or even burn it to a DVD. You are now free to share your slideshow on various online media sharing platforms. Using the free version of Kizoa, you are permitted to create slideshows with a duration of 60 seconds, which can be upgraded to a limitless length with a paid subscription.

07SlideLab
If you are a newbie to the field of creating slideshows, and wondering about how to create a slideshow on Facebook 2021, this one is affordably the most perfect tool you can rely on. Packed with an extensive range of effects, music, transitions and filters, SlideLab is the smartest software choice to create slideshow presentations for family entertainment and personal use.
The tool consists of an in built sharing utility that allows you to design and share slideshows on social media platforms, like YouTube, Facebook and Instagram with a single click. Working on your slideshow within the program, you can escape the cringe of cropping the images, as they are automatically adjusted to the square fit alignment of the app’s working window. You can quickly rearrange the placement of the images in the slideshow as per your preferences.
As far as the sharing credibility of the presentation is concerned, the software grants you the liberty to export your creation in PPTX and PDF file formats, and view them later in Keynote and PowerPoint.
The app shows a convenient workflow with Windows and MacOs devices and limits the image play duration to 3 seconds, along with a permitting a restricted number of transitions and effects in its free version, which you can access by availing a paid subscription of the program.

08Creating Facebook Slideshows With Wondershare Filmora
When browsing through feasible alternatives on how to make a facebook slideshow, the IT market is indeed flooded with a hoard of creation utilities. If you have just begun trying hands at slideshow creation, consider using the Wondershare Filmora Video Editor slideshow maker application for addressing your slideshow design concerns. The extensive, feature rich library of the app lets you create attractive presentation masterpieces with a wide range of special effects, transitions, texts, titles and music tracks.
For Win 7 or later (64-bit)
For macOS 10.12 or later
Working with the Filmora slideshow creator, you can trim, crop or cut the video clips and images of your presentation to give them the best look. The tool comes with a unique Filmora Template Mode to create business oriented Facebook slideshows, is compatible to any windows and Mac supported device and lets you easily make a slideshow on Facebook.
● Ending Thoughts →
● Creating Facebook slideshows can be useful in addressing a variety of personal and professional data sharing needs.
● Browsing through design alternatives, you will land across a pool of software choices to create stunning slideshows for Facebook.
● When deciding on the best Facebook slideshow creator tool, Wondershare Filmora can be your smartest pick.
If you are looking for interesting solutions to create the most amazing slideshow on Facebook, rest assured, you are at the right place to get every help!
In this article
01 [Where Did the Facebook Slideshow Tool Go?](#Part 1)
02 [How to Create a Slideshow on Facebook?](#Part 2)
03 [Top 5 Facebook Slideshow Alternatives](#Part 3)
Part 1 Where Did the Facebook Slideshow Tool Go?
While almost everyone around you must be fascinated about the stunning and appealing slideshows that the Facebook community used to offer its users with, it is evidently sad to realize that the utility has become a story of the past. The creators of the tool have by now, took multiple rounds on removing, retrieving and again removing the utility from the official Facebook website as well as the smartphone application.
It is however relaxing to know that the Facebook developer team has worked efficiently to produce alternatives to the application’s slideshow tool after the latter’s permanent disappearance from the user account pages and app profiles. You can now work with the Facebook Ads Manager or Facebook Creator Studio to sort out the concern of creating slideshow on Facebook.
Part 2 How to Create a Slideshow on Facebook?
Facebook slideshows are incredibly awesome trends of making a concise, expressive and to the point delivery of diverse content varieties. Piping up your information through and extensive assortment of sound, text and motion, these short snippets are no less than a seamless video streaming of the same information.
If you are about to launch a new product for your business enterprise, consider working with the utility to create an elusive Facebook slideshow ad for a quick demonstration of your brand among different social media communities, turning the fun of slideshow creation into a smart and responsive product promotion strategy, without having to bother your wallet for the same.
If you are concerned about the quality of the final output, it is not a cause of worry, since the Facebook slideshow creator tool promises you of an appreciable slideshow result, that takes a quick loading time, is comparable to a high resolution video and works well with all your favourite devices.
Having talked enough on the usage credibility, let us now proceed to adhere to the concern of creating a slideshow on Facebook with a diversity of media files in the following section:
01Facebook Slideshows from Videos
Step 1: Launch the Tool
Start with opening the Facebook app in your device to launch the ‘Facebook Ads Manager’ utility and tap ‘Create’ in the latter’s welcome interface.
Step 2: Select Your Video
Browse through your device’s gallery to choose a desired video for slideshow creation. When you have made your choice, set a 16:9 aspect ratio for the same to avoid square cropping.
Step 3: Upload Your Video
Proceed with uploading your video to the Facebook tool by clicking on the ‘Add Video’ button and watch it getting split into still images frames, from where you can view a seamless slideshow display of the same.
Step 4: Select Multiple Frames
you can now select a series of image frames and arrange them in the correct sequence of appearance by clicking on each one of them to be included within the creator timeline.
Step 5: Add Captions Your Stills
Tap on the small ‘Pencil’ icon within the images to customize them with suitable captions. You can further add style to these image names by making appropriate selections of font, position color of every frame caption. Once you have finished naming all the frames, click on ‘Save’ to apply your changes.
Step 6: Preview Your Creation
When you are satisfied with your work, consider watching a preview of the same to be assured of the perfect placement of everything. To do this, navigate to the ‘Preview Pane’ at the top right corner of the program interface, and tapping the ‘Preview’ button.
02Facebook Slideshows from Images
Step 1: Launch the Tool
To begin with, open the Facebook app in any of your preferred devices and proceed to launch the ‘Facebook Ads Manager’ tool, followed by clicking on the ‘Create Slideshow’ button at the bottom of the tool’s welcome screen.
Step 2: Upload Your Images
As you complete Step 1, a ‘Video Creation Kit’ will appear, where you will need to click within the ‘Create Slideshow’ checkbox, followed by tapping on the ‘Continue’ button at the bottom right corner of the window.
Step 3: Upload Your Images
Clicking on the ‘Continue’ button will take you to the ‘Settings Box’ where you need to tap on the ‘Add Photos’ option. An image selection box will now pop up, allowing you to select and upload a maximum of 10 images from your Facebook account, stock and page galleries or your device collections. Prefer keeping all the photos within the same aspect ratio to escape the extra task of cropping the images.
When you have finished making your selections, navigate to the bottom right corner of the window and hit the ‘Confirm’ button. This will make your selections shows up all together in the ‘Settings Box’, in the sequential order of their appearance in the slideshow. If you want to introduce some changes, delete and re-upload the images.
Step 4: Customize Your Images with Captions
To add suitable captions to the slideshow images, tap the ‘Pencil’ icon within them. You are also allowed to customize the stills with transitions, effects, etc., and make adjustments to the screen time of each image frame.
Part 3 Top 5 Facebook Slideshow Alternatives
Having heard about the disappointment from the exit of the Facebook slideshow creator tool, it becomes naturally important to seek through the affordable alternatives of the same to set straight the issue of how to do a slideshow on Facebook. Working towards the solutions, let us learn about the top 5 most preferred Facebook slideshow alternatives in the following section:
03PowerDirector
One of the most suitable candidates of Facebook slideshow alternatives, PowerDirector easily lands among the highly preferred tools for creating stunning slideshows. Compatible with the MacOs and Windows operating systems, the software lets you create high end, top quality slideshow presentations with a classic and professional outlook.
Talking of the creator program’s most appealing features, this one is an upgraded slideshow creator suite that is capable enough to address your most diverse design requirements, like those of high resolution video effects, Hollywood inspired movies and personal content sharing. The software package is loaded with tons of elusive video effects, themed templates and transition effects to facilitate a compelling creation.
Working with PowerDirector’s exclusive slideshow program, you get the liberty to escape the notch of storyboard and timeline editing and start the creation process in the launch window of the program itself. The extremely user cohesive interface of the software guides you through each creation step via streamlined plug-ins, making the design process quick and super easy even for newbies.
04SmartSHOW 3D
When thinking of how to make a slideshow on facebook, this one is another top rated Facebook slideshow alternatives, that comes with an extensive toolkit to create amazing presentations from video clips and images, while complementing them with a plethora of effects and transitions. Some of the key features of the program include multiple slide layering, animating selected layers and fine tune the transitions with keyframe adjustments.
You can additionally uplift the slides with image masks, shapes, 3D animated texts and other forms of graphic arts. An additively appealing feature of the slideshow creator program is the ability to mix descriptive images with your favorite music to develop stunning masterpieces of entertaining slideshows, which you can conveniently share and enjoy with family and friends on a diversity of social media platforms.
Using the tool, you can work with applying motion graphic effects to still photos without having to be an over the top tech savvy user. The editor library of the tool is loaded with some of the most awesome transition effects, like, wipes, 3D motions, gradients and fade-ins, along with the facility of adding titles, voice comments and captions to the slides of your presentation. The tool is however, exclusively a Windows compatible utility.
05PhotoStage Slideshow Software
Next in the list of alternatives to the Facebook slideshow maker tool is the aforesaid software program, that allows you to create professional quality slideshows with as many videos and images as you can possibly think of and supplement them with a variety of texts, music, voiceovers and effects. You can further work on customizing the slideshow images with making suitable adjustments in color, brightness and saturation parameters.
The software comes with a Quick Create utility, which you can use to instantly create high resolution slideshows and spark them up with zooms, pans and fades, while getting a preview of the same in real-time. You can even proceed to burn your creation into a disk, make an online upload, or simply save it to your device.
Talking of the cost constraints of this amazing slideshow creator tool, you get to work with the software for a commercial use, free of cost for a definite time period and with a restricted number of features. However, you can always consider on buying the paid version of the program to avail an access to the latter’s entire range of features and utilities. The tool works well with all Windows and Mac supported devices.
06Kizoa
Moving ahead in the list you have the Kizoa slideshow maker for Facebook, which is a dependable alternative to the conventional Facebook slideshow creator. Choosing this tool to design your slideshow presentation, you are entitled to the amazing feature of displaying your presentation on almost any screen, including smartphones, television, computers and tablets with getting to choose from 7 types of aspect ratios. The tool is designed to have a Windows and MacOs compatibility.
The application further lets you add the most specific parts of your images within the presentation slides with its smart cropping tool, while keeping an account of the file formats and screen space requirements of the images with utmost convenience. You are also allowed to choose from a storehouse of preset templates to add your desired photos and video clips in the slideshow and entice them with GIFs, effects and texts.
When you are done with the creation process, just attempt to download and save the slideshow in any preferred file format, such as, AVI, GIF, MP4, MOV, MPEG2, etc., or even burn it to a DVD. You are now free to share your slideshow on various online media sharing platforms. Using the free version of Kizoa, you are permitted to create slideshows with a duration of 60 seconds, which can be upgraded to a limitless length with a paid subscription.
07SlideLab
If you are a newbie to the field of creating slideshows, and wondering about how to create a slideshow on Facebook 2021, this one is affordably the most perfect tool you can rely on. Packed with an extensive range of effects, music, transitions and filters, SlideLab is the smartest software choice to create slideshow presentations for family entertainment and personal use.
The tool consists of an in built sharing utility that allows you to design and share slideshows on social media platforms, like YouTube, Facebook and Instagram with a single click. Working on your slideshow within the program, you can escape the cringe of cropping the images, as they are automatically adjusted to the square fit alignment of the app’s working window. You can quickly rearrange the placement of the images in the slideshow as per your preferences.
As far as the sharing credibility of the presentation is concerned, the software grants you the liberty to export your creation in PPTX and PDF file formats, and view them later in Keynote and PowerPoint.
The app shows a convenient workflow with Windows and MacOs devices and limits the image play duration to 3 seconds, along with a permitting a restricted number of transitions and effects in its free version, which you can access by availing a paid subscription of the program.
08Creating Facebook Slideshows With Wondershare Filmora
When browsing through feasible alternatives on how to make a facebook slideshow, the IT market is indeed flooded with a hoard of creation utilities. If you have just begun trying hands at slideshow creation, consider using the Wondershare Filmora Video Editor slideshow maker application for addressing your slideshow design concerns. The extensive, feature rich library of the app lets you create attractive presentation masterpieces with a wide range of special effects, transitions, texts, titles and music tracks.
For Win 7 or later (64-bit)
For macOS 10.12 or later
Working with the Filmora slideshow creator, you can trim, crop or cut the video clips and images of your presentation to give them the best look. The tool comes with a unique Filmora Template Mode to create business oriented Facebook slideshows, is compatible to any windows and Mac supported device and lets you easily make a slideshow on Facebook.
● Ending Thoughts →
● Creating Facebook slideshows can be useful in addressing a variety of personal and professional data sharing needs.
● Browsing through design alternatives, you will land across a pool of software choices to create stunning slideshows for Facebook.
● When deciding on the best Facebook slideshow creator tool, Wondershare Filmora can be your smartest pick.
Also read:
- Updated How to Create Benime Whiteboard Animation on Android
- New 2024 Approved The Top Free 12 GIF Meme Maker at a Glance
- Ways You Can Master to Find 10 Best Free Animated Text Generator for 2024
- Updated 2024 Approved How to Make an Animation With 7 Steps
- Simple Shortcut to Convert Videos to Gifs on iPhone
- New Best 15 2D Animation Software Free That Worth to Try for 2024
- Best Guide for Beginners on 2D Animation Making for 2024
- New 2024 Approved 18 Best Tools and Services to Create Animated Videos for Business 2023
- New Tips for Learning Graphics Animation for 2024
- New 2024 Approved Ways You Can Master to Make Claymation Videos
- New Top 10 Websites to Download Anime Subtitles for Free
- New In 2024, Before You Learn Facebook Slideshow 5 Things You Should Know How-TOS
- New 12 Best Stop Motion Studios Worth Recommending
- Updated Ways on How to Liven Up Your Animate Website on Scroll
- New Best Websites to Download Animated GIFs for Free-Free GIF Download
- How To Track IMEI Number Of Samsung Galaxy XCover 7 Through Google Earth?
- In 2024, Network Locked SIM Card Inserted On Your Vivo Y200 Phone? Unlock It Now
- In 2024, 4 Ways to Transfer Music from Xiaomi Civi 3 Disney 100th Anniversary Edition to iPhone | Dr.fone
- How to recover deleted photos from Android Gallery without backup on Tecno Spark 20C
- The Ultimate Guide to Learning All the Details About Voice Cloning
- Preparation to Beat Giovani in Pokemon Go For Samsung Galaxy A15 4G | Dr.fone
- Possible solutions to restore deleted contacts from Narzo N53.
- Two Ways to Track My Boyfriends Motorola Edge 40 Pro without Him Knowing | Dr.fone
- In 2024, Top 10 Fingerprint Lock Apps to Lock Your Xiaomi Phone
- In 2024, How To Unlock iPhone 6 Plus Without Passcode? 4 Easy Methods
- Forgot iPhone Passcode Again? Unlock iPhone SE Without Passcode Now
- In 2024, Ultimate Guide to Catch the Regional-Located Pokemon For Poco X5 | Dr.fone
- Title: 2024 Approved How to Make a GIF in Photoshop
- Author: Elon
- Created at : 2024-05-19 03:04:53
- Updated at : 2024-05-20 03:04:53
- Link: https://animation-videos.techidaily.com/2024-approved-how-to-make-a-gif-in-photoshop/
- License: This work is licensed under CC BY-NC-SA 4.0.
