
:max_bytes(150000):strip_icc():format(webp)/GettyImages-527847020-5b9edc17c9e77c0050ff9045.jpg)
A Beginners Guide to Tell You What 3D Animation Is for 2024
A Beginner’s Guide to Tell You What 3D Animation Is
A Beginner’s Guide to Explain What 3D Animation Is
An easy yet powerful editor
Numerous effects to choose from
Detailed tutorials provided by the official channel
With present-day technology, 3D animation has reached all spheres be it entertainment, advertising, architecture, education, and much more. With the increasing use of 3D animation, there is a rise in the tools and programs used for creating such animations.
So, to help you get all the details about 3D animation, 3D modelling and animation process, best tools, tips, and tricks, keep reading the following parts.
In this article
01 [What Does 3D Animation Mean?](#Part 1)
02 [What is the Process of 3D Animation?](#Part 2)
03 [Types of 3D Animations](#Part 3)
04 [Top 5 3D Animation Software](#Part 4)
05 [Top Animation Tips and Tricks](#Part 5)
Part 1 What does 3D animation mean?
In simplest terms, animation is a process of manipulating the images so that they appear to be moving, and when this manipulation is done in three-dimensional space, it is called 3D animation. The objects and the models used for 3D animation can be rotated or moved like the real ones. Some tools can be used to scan real-life objects which can be then used as blueprints for creating animation 3D models.
The characters and the objects in 3D animations have to be moved to make them as realistic as possible. No matter, how interesting or perfect character you may create, if it does not move in an even manner, the overall effect will be ruined. The latest techniques and tools these days are capable of creating lifelike scenes.

Part 2 What is the process of 3D Animation?
Creating a 3D animation is a complex process involving several phases. Below listed are the main 3 phases for creating an animation.
01Modeling
The main thing for any 3D animation is its objects, models, or characters and this phase involves creating these objects. Since the objects are based on 3D computer models, the process is termed 3D modeling. A model by a computer appears like a mesh of geometric shapes including curves, points, lines, and more. These shapes do not look anywhere like real objects and only after when the textures and colors are added to them, they appear like real things.
02Layout and animation
The next step is layout and animation where characters are placed in the scenes and the animation of their movements is done using 3D animation tools. Initially, keyframes are created which are the start and the end pose of any animation, and then later other details like the effects, lighting, camerawork, and more are added to get the desired animation that appears on the screen.
03Rendering
The final step in the 3D creation process is rendering where the created animation is finalized as well as exported. To make sure that the final animation plays seamlessly and looks absolutely perfect, it is essential to check all the minute details.
After the production of 3D animation is done, next comes the post-production which is the phase where effects, music, and voiceovers are added and combined to make the entire animation look complete.

Part 3 Types of 3D animations
Now when we know what is a 3D animation and its process, we also need to know that different types of 3D animations are there. Some of the key ones are as below.
● 3D videos and movies
● 3D Virtual Reality
● Interactive 3D
● Digital 3D
● Clay Motion also termed Stop motion animation
● Pixilation
● Cell-shaded animation
● Paint-on-glass
● Pinscreen
Part 4 Top 5 3D Animation software
When it comes to 3D animation tools, the choices can be overwhelming and the list of promises claimed by the tools can be large. He, you need to shortlist the tools that best match your requirements as well as your skill sets. Below we have narrowed down the top 5 software of the category.
01Autodesk Maya
This is a top-rated animation, modeling, simulation, and rendering tool. Using this versatile tool, complex characters and animated videos can be created with all the needed effects.
Key features:
● Versatile 3D animation tool with support to a wide range of features.
● Available for download on Windows, Mac, and Linux systems.
● Allows creating complex characters, adding realistic effects, custom graphics, and more.
● Arnold’s feature of the tool allows switching between CPU and GPU.
● Animation features like fast-playback, time editing, graph editing, ghost editing, multiple modeling options, and others are supported.

02Blender
This is free and open-source software that can be used for creating 3D animations, motion graphics, computer games, and more. Since the tool has been in use for a long time, several artists keep adding to the tool.
Key features
● Free and open-source animation tool.
● Support to multiple platforms including Windows, Mac, and Linux.
● OpenGL interface which makes the functioning smooth.
● Comprehensive and robust set of tools for creating versatile animations. Some of these include automatic skilling, unwrapping texturing, envelope, skeleton, B-spline interpolated bones, sound synchronization, and more.
● Support input from motion-capture tools.

03Houdini
Used by reputed VFX companies like Pixar, Sony, Disney, and others, this is an excellent software that can be used for creating 3D animations, games, and others. With multi-platform support, it is a paid tool that also comes with a free learning edition.
Key features
● Feature-packed animation tool used by industry pioneers.
● Use node-based workflow for creating animations.
● Create biped and quadruped 3D objects using rigging tools.
● Comes with multiple plans to choose from as per budget and requirements.
● Offers a high level of flexibility and creativity.

04Cinema 4D
This professional animation creation software is known for its features and stability. With the availability of multiple tutorials and guides, learning the tool and its functions is easy.
Key features of the software
● Known to be an excellent tool for motion graphics, illustrations, and visualizations.
● Easy learning curve owing to the availability of tutorials, guides, and training materials. Access to free membership of Cineversity which is a training site.
● Comes with a 14-day free trial version along with a free education version for the teachers and students.
● Functions of the software are tested by QA and Beta testers that offer high stability.
● Support features like automatic keyframing, tag and expressions, effectors, and more.

05**Wondershare Filmora Video Editor **
If you are looking for software that is simple and easy to use but supports all advanced features this is one of the best choices. Available for Windows and Mac the tool also works as an excellent video editing tool.
Key features
● This easy 3D animation tool Allows creating sharp and lively animations using features like keyframing, motion-tracking, and others.
● Allows to add the preset motions or even customize your own animations.
● The speed, as well as the duration of the animation, can be changed using the ease-in and ease-out options.
● Make your videos lively with features like warp, distorting, masking, lights & flares, text& titles, and more.
● High-quality presets are available with features like auto-correction, color wheels, scopes, and more.
● Audio features supported like automatic audio sync, audio compression, audio transitions, and noise correction.
For Win 7 or later (64-bit)
For macOS 10.12 or later
Part 5 Top Animation Tips And Tricks
Though 3D animation requires a lot of technical know-how of the process, there are several tips and tricks that can make your task quicker, easier, and smoother. We have gathered a few such tips below.
01Make realistic objects by observing real life
The more you will observe real-life the more you will be able to imitate it into your animations for giving life to your objects, models, and characters. Having some knowledge about real-life, gravity, and similar topics will help you work on your animations more interactively.
02Evolve with latest techniques and technology
The tools, programs, and technology are progressing every day and to make the best use of the same, you need to evolve with the technology. To use the features and functions of the software you need to keep learning and growing.
03Go with the basic first
While working with the animations, it is very easy to get carried away with the process and get into the trap of looking for details. This will eventually move you away from your main track and will lead to a waste of time and effort. Thus, it is always advisable to go with the basics first and then move towards the detailing.
04Learn about the human emotions
Facial expressions are an important element of any 3D animation that brings life to characters. A good animation will portray good and complex emotions and thus it is important to study these emotions in detail so that they can be incorporated into your objects, models, and characters.

● Key Takeaways from This Episode →
● Animations created in 3-dimensional space are termed 3D animations.
● 3D animations involve pre-production, post-production, and several steps.
● For the smooth creation of 3D animations, several tips and tricks can be considered.
● A wide range of tools for creating 3D animations are available and one of the best tools in the category is Wondershare Filmora Video Editor that is effective and easy to use.
With present-day technology, 3D animation has reached all spheres be it entertainment, advertising, architecture, education, and much more. With the increasing use of 3D animation, there is a rise in the tools and programs used for creating such animations.
So, to help you get all the details about 3D animation, 3D modelling and animation process, best tools, tips, and tricks, keep reading the following parts.
In this article
01 [What Does 3D Animation Mean?](#Part 1)
02 [What is the Process of 3D Animation?](#Part 2)
03 [Types of 3D Animations](#Part 3)
04 [Top 5 3D Animation Software](#Part 4)
05 [Top Animation Tips and Tricks](#Part 5)
Part 1 What does 3D animation mean?
In simplest terms, animation is a process of manipulating the images so that they appear to be moving, and when this manipulation is done in three-dimensional space, it is called 3D animation. The objects and the models used for 3D animation can be rotated or moved like the real ones. Some tools can be used to scan real-life objects which can be then used as blueprints for creating animation 3D models.
The characters and the objects in 3D animations have to be moved to make them as realistic as possible. No matter, how interesting or perfect character you may create, if it does not move in an even manner, the overall effect will be ruined. The latest techniques and tools these days are capable of creating lifelike scenes.
Part 2 What is the process of 3D Animation?
Creating a 3D animation is a complex process involving several phases. Below listed are the main 3 phases for creating an animation.
01Modeling
The main thing for any 3D animation is its objects, models, or characters and this phase involves creating these objects. Since the objects are based on 3D computer models, the process is termed 3D modeling. A model by a computer appears like a mesh of geometric shapes including curves, points, lines, and more. These shapes do not look anywhere like real objects and only after when the textures and colors are added to them, they appear like real things.
02Layout and animation
The next step is layout and animation where characters are placed in the scenes and the animation of their movements is done using 3D animation tools. Initially, keyframes are created which are the start and the end pose of any animation, and then later other details like the effects, lighting, camerawork, and more are added to get the desired animation that appears on the screen.
03Rendering
The final step in the 3D creation process is rendering where the created animation is finalized as well as exported. To make sure that the final animation plays seamlessly and looks absolutely perfect, it is essential to check all the minute details.
After the production of 3D animation is done, next comes the post-production which is the phase where effects, music, and voiceovers are added and combined to make the entire animation look complete.
Part 3 Types of 3D animations
Now when we know what is a 3D animation and its process, we also need to know that different types of 3D animations are there. Some of the key ones are as below.
● 3D videos and movies
● 3D Virtual Reality
● Interactive 3D
● Digital 3D
● Clay Motion also termed Stop motion animation
● Pixilation
● Cell-shaded animation
● Paint-on-glass
● Pinscreen
Part 4 Top 5 3D Animation software
When it comes to 3D animation tools, the choices can be overwhelming and the list of promises claimed by the tools can be large. He, you need to shortlist the tools that best match your requirements as well as your skill sets. Below we have narrowed down the top 5 software of the category.
01Autodesk Maya
This is a top-rated animation, modeling, simulation, and rendering tool. Using this versatile tool, complex characters and animated videos can be created with all the needed effects.
Key features:
● Versatile 3D animation tool with support to a wide range of features.
● Available for download on Windows, Mac, and Linux systems.
● Allows creating complex characters, adding realistic effects, custom graphics, and more.
● Arnold’s feature of the tool allows switching between CPU and GPU.
● Animation features like fast-playback, time editing, graph editing, ghost editing, multiple modeling options, and others are supported.
02Blender
This is free and open-source software that can be used for creating 3D animations, motion graphics, computer games, and more. Since the tool has been in use for a long time, several artists keep adding to the tool.
Key features
● Free and open-source animation tool.
● Support to multiple platforms including Windows, Mac, and Linux.
● OpenGL interface which makes the functioning smooth.
● Comprehensive and robust set of tools for creating versatile animations. Some of these include automatic skilling, unwrapping texturing, envelope, skeleton, B-spline interpolated bones, sound synchronization, and more.
● Support input from motion-capture tools.
03Houdini
Used by reputed VFX companies like Pixar, Sony, Disney, and others, this is an excellent software that can be used for creating 3D animations, games, and others. With multi-platform support, it is a paid tool that also comes with a free learning edition.
Key features
● Feature-packed animation tool used by industry pioneers.
● Use node-based workflow for creating animations.
● Create biped and quadruped 3D objects using rigging tools.
● Comes with multiple plans to choose from as per budget and requirements.
● Offers a high level of flexibility and creativity.
04Cinema 4D
This professional animation creation software is known for its features and stability. With the availability of multiple tutorials and guides, learning the tool and its functions is easy.
Key features of the software
● Known to be an excellent tool for motion graphics, illustrations, and visualizations.
● Easy learning curve owing to the availability of tutorials, guides, and training materials. Access to free membership of Cineversity which is a training site.
● Comes with a 14-day free trial version along with a free education version for the teachers and students.
● Functions of the software are tested by QA and Beta testers that offer high stability.
● Support features like automatic keyframing, tag and expressions, effectors, and more.
05**Wondershare Filmora Video Editor **
If you are looking for software that is simple and easy to use but supports all advanced features this is one of the best choices. Available for Windows and Mac the tool also works as an excellent video editing tool.
Key features
● This easy 3D animation tool Allows creating sharp and lively animations using features like keyframing, motion-tracking, and others.
● Allows to add the preset motions or even customize your own animations.
● The speed, as well as the duration of the animation, can be changed using the ease-in and ease-out options.
● Make your videos lively with features like warp, distorting, masking, lights & flares, text& titles, and more.
● High-quality presets are available with features like auto-correction, color wheels, scopes, and more.
● Audio features supported like automatic audio sync, audio compression, audio transitions, and noise correction.
For Win 7 or later (64-bit)
For macOS 10.12 or later
Part 5 Top Animation Tips And Tricks
Though 3D animation requires a lot of technical know-how of the process, there are several tips and tricks that can make your task quicker, easier, and smoother. We have gathered a few such tips below.
01Make realistic objects by observing real life
The more you will observe real-life the more you will be able to imitate it into your animations for giving life to your objects, models, and characters. Having some knowledge about real-life, gravity, and similar topics will help you work on your animations more interactively.
02Evolve with latest techniques and technology
The tools, programs, and technology are progressing every day and to make the best use of the same, you need to evolve with the technology. To use the features and functions of the software you need to keep learning and growing.
03Go with the basic first
While working with the animations, it is very easy to get carried away with the process and get into the trap of looking for details. This will eventually move you away from your main track and will lead to a waste of time and effort. Thus, it is always advisable to go with the basics first and then move towards the detailing.
04Learn about the human emotions
Facial expressions are an important element of any 3D animation that brings life to characters. A good animation will portray good and complex emotions and thus it is important to study these emotions in detail so that they can be incorporated into your objects, models, and characters.
● Key Takeaways from This Episode →
● Animations created in 3-dimensional space are termed 3D animations.
● 3D animations involve pre-production, post-production, and several steps.
● For the smooth creation of 3D animations, several tips and tricks can be considered.
● A wide range of tools for creating 3D animations are available and one of the best tools in the category is Wondershare Filmora Video Editor that is effective and easy to use.
How to Make a Photoshop Collage in EASY Steps
How to Make a Photoshop Collage in EASY Steps
An easy yet powerful editor
Numerous effects to choose from
Detailed tutorials provided by the official channel
Photographs are a way of capturing and stopping the time in a small frame. They hold millions of memories that we want to cherish forever in our lives. And sometimes, we want to make a cluster of all the happy memories by making a collage of the photos.

Also, what can be a better gift to someone than presenting them a collection of all the cherishable memories you have with them in photographs? And that can be made possible through various photoshop collage ideas.
In this article
01 [Does Photoshop Have Collage Templates?](#Part 1)
02 [How to Make Your Own Collage with Photoshop Templates](#Part 2)
03 [How to Custom a Photoshop Collage in 9 Simple Steps](#Part 3)
Part 1 Does Photoshop Have Collage Templates?
There is numerous photo collage template in photoshop, and you even access and use some of them for free. Additionally, you can also create your template in Photoshop and use them in making your collage. If you want to make your template in Photoshop, here is how.
Step 1: Make a new layer and fill it up with your choice of colour.
Step 2: Resize and duplicate the layer to create the pattern you want for your collage.
Step 3: Integrate a “Clipping Mask.”
Step 4: For every image, create new clipping masks.
Step 5: Your collage template is ready so, export it to use!
Part 2 How to Make Your Own Collage with Photoshop Templates
Now that we know that you can access numerous incredible photoshop templates for free, you might want to create a collage for yourself in Photoshop. So, this is how you can use the photoshop collage template to make your collage with Photoshop Templates.
First, you need to select the images you want to create a collage with. Then you will have to import them. You can either “select and import” them one at a time or even batch import all of them together. Then, you can readily choose the template you want to use, or you can also create one for yourself.
Then you can resize or edit the images in the way you want and place them in the desired order. After you are done arranging and creating the collage perfectly, save the file in JPEG format and then export it to access it whenever you want!
Part 3 How to Custom a Photoshop Collage in 9 Simple Steps
If you do not know the answer to the question: how to make a collage in photoshop, there is absolutely nothing to worry about. Because the answer to this question is simple and includes not more than nine steps.
So now, we will be discussing the nine simple steps that will help you make a custom photo collage in photoshop. Here is the list of steps that will help you in doing so.
● Step 1: Selecting your favorite photos
The first step to making a collage in photoshop is to select all the photos you would like your collage to have. Now, it will be best for you to choose your photos wisely. We understand that each photograph is equally sweet and cherishable. But, when you select the images for your collage in a thoughtful manner, the collage turns out much better than expected.
You can use different collage ideas for photoshop, such as following a particular storyline, where you collage the photos so that it recreates the memory or the moments in sequence. Another way to select your photos is by sticking to a particular theme, and it can be vintage or on one specific color or the like. It will help your collage turn out in the best and the most thoughtful way.
● Step 2: Opening the photos you have selected, in collage maker photoshop
Now that you have selected which images you would want your collage to have, the next step will require you to open those images in the collage maker Photoshop. For this, you will have to select the option “File”. There, you will find the option “Open”. Then you will open the images you have chosen in Photoshop.
Also, you can simply press the “ctrl” and the “O” keys on your keyboard and it will automatically help you open the images you have selected for the photo collage on photoshop.

Another way to open the pages you have selected for your collage is through the “Drag and Drop” function. It is more effortless to choose the images and open them in Photoshop. After you have opened the photos in Photoshop, it will open in a different tab and look like in the following picture.

● Step 3: Make a new file for your collage on photoshop
The third step requires you to make a new file for your photo collage in photoshop. For this, you need to select or click on the “File” option on Photoshop. Then, click on the “New” option. It will help you make a new file for your collage. You can also select the “ctrl” and “N” together.
As you click on the “New” option, you will be given options to choose from. Choose the one that matches your preference.
When you are working on photoshop to make a collage, the images will need a collage background because it is on this background that the photos will assemble. If you have made a collage before on photoshop, you can use the old collage photoshop template. Otherwise, you need to create a new document for the collage.

● Step 4: Add the selected images one-by-one
Adding the images can be done in many ways. One way to do so is by opening the photo and clicking on it. Another way of doing so is to use the “Marquee Tool” of Photoshop.

Another way of doing so is by pressing the “ctrl” and “A” keys on your keyboard together. You will find the matching ants border around the image when you do this.

Then, go to the “Edit” option and choose “Copy” there. Or, you can also select the “ctrl” and “C” keys on your keywords together. Then go to your new document and select the option of “Paste” from the “Edit” option, or you can also press the “ctrl” and “V” keys together to do so.
The photo will be added in its own layer on the new document.

● Step 5: Arrange the images
Now, arrange the images in the way you want. If you have chosen to tell a story through your collage creator in photoshop, then arrange the photos accordingly. You can do so with the help of the “Move” tool or simply tap V. You can also use the “Free Transform” tool to edit and transform the images in the way you want. You can resize, rotate and edit the photos in many other ways through the “Free Transform” tool.
Step 6: Integrate image space
To create a collage in photoshop in a better and more spaced-out manner, you need to add some spacing between the images you have in your collage. There are two ways to add spacing between the pictures; one way is by creating a thin, white border around each image.
And the second method is by accessing and using the “Layers” feature in Photoshop.

● Step 7: Merge all the Layers
This step is necessary when you have used the “Layer” feature to create the spacing among the images present in your collage. You will be able to do so from the “Layer” option. So, go to the “Layer” option and select the “Merge Invisible” option present there.

● Step 8: cropping the final picture
Before the final step, it is important that you crop the final picture. And to do so, you can opt for the “Crop tool”. You will be able to access it easily, or you can also simply tap C to use the “Crop tool.”

● Step 9: Save the final collage and export
After you have done all the necessary changes and are satisfied with the final collage, then, save the file. To do so, go to the “File” option and select the “Save as” option.

Then choose the file type to be “JPEG”. Type the name you would want the collage to be saved as. This completes the process of saving the file. Then choose the image quality you would want the collage to be exported in.

● Key Takeaways from This Episode →
● In this discussion, we have covered the following topics.
● We discussed whether Photoshop has collage templates.
● Then we proceeded with discussing how we can create a collage in photoshop using the templates in it.
● Lastly, we wrapped up our discussion with the nine-step tutorial about customizing a collage in Photoshop.
Photographs are a way of capturing and stopping the time in a small frame. They hold millions of memories that we want to cherish forever in our lives. And sometimes, we want to make a cluster of all the happy memories by making a collage of the photos.
Also, what can be a better gift to someone than presenting them a collection of all the cherishable memories you have with them in photographs? And that can be made possible through various photoshop collage ideas.
In this article
01 [Does Photoshop Have Collage Templates?](#Part 1)
02 [How to Make Your Own Collage with Photoshop Templates](#Part 2)
03 [How to Custom a Photoshop Collage in 9 Simple Steps](#Part 3)
Part 1 Does Photoshop Have Collage Templates?
There is numerous photo collage template in photoshop, and you even access and use some of them for free. Additionally, you can also create your template in Photoshop and use them in making your collage. If you want to make your template in Photoshop, here is how.
Step 1: Make a new layer and fill it up with your choice of colour.
Step 2: Resize and duplicate the layer to create the pattern you want for your collage.
Step 3: Integrate a “Clipping Mask.”
Step 4: For every image, create new clipping masks.
Step 5: Your collage template is ready so, export it to use!
Part 2 How to Make Your Own Collage with Photoshop Templates
Now that we know that you can access numerous incredible photoshop templates for free, you might want to create a collage for yourself in Photoshop. So, this is how you can use the photoshop collage template to make your collage with Photoshop Templates.
First, you need to select the images you want to create a collage with. Then you will have to import them. You can either “select and import” them one at a time or even batch import all of them together. Then, you can readily choose the template you want to use, or you can also create one for yourself.
Then you can resize or edit the images in the way you want and place them in the desired order. After you are done arranging and creating the collage perfectly, save the file in JPEG format and then export it to access it whenever you want!
Part 3 How to Custom a Photoshop Collage in 9 Simple Steps
If you do not know the answer to the question: how to make a collage in photoshop, there is absolutely nothing to worry about. Because the answer to this question is simple and includes not more than nine steps.
So now, we will be discussing the nine simple steps that will help you make a custom photo collage in photoshop. Here is the list of steps that will help you in doing so.
● Step 1: Selecting your favorite photos
The first step to making a collage in photoshop is to select all the photos you would like your collage to have. Now, it will be best for you to choose your photos wisely. We understand that each photograph is equally sweet and cherishable. But, when you select the images for your collage in a thoughtful manner, the collage turns out much better than expected.
You can use different collage ideas for photoshop, such as following a particular storyline, where you collage the photos so that it recreates the memory or the moments in sequence. Another way to select your photos is by sticking to a particular theme, and it can be vintage or on one specific color or the like. It will help your collage turn out in the best and the most thoughtful way.
● Step 2: Opening the photos you have selected, in collage maker photoshop
Now that you have selected which images you would want your collage to have, the next step will require you to open those images in the collage maker Photoshop. For this, you will have to select the option “File”. There, you will find the option “Open”. Then you will open the images you have chosen in Photoshop.
Also, you can simply press the “ctrl” and the “O” keys on your keyboard and it will automatically help you open the images you have selected for the photo collage on photoshop.
Another way to open the pages you have selected for your collage is through the “Drag and Drop” function. It is more effortless to choose the images and open them in Photoshop. After you have opened the photos in Photoshop, it will open in a different tab and look like in the following picture.
● Step 3: Make a new file for your collage on photoshop
The third step requires you to make a new file for your photo collage in photoshop. For this, you need to select or click on the “File” option on Photoshop. Then, click on the “New” option. It will help you make a new file for your collage. You can also select the “ctrl” and “N” together.
As you click on the “New” option, you will be given options to choose from. Choose the one that matches your preference.
When you are working on photoshop to make a collage, the images will need a collage background because it is on this background that the photos will assemble. If you have made a collage before on photoshop, you can use the old collage photoshop template. Otherwise, you need to create a new document for the collage.
● Step 4: Add the selected images one-by-one
Adding the images can be done in many ways. One way to do so is by opening the photo and clicking on it. Another way of doing so is to use the “Marquee Tool” of Photoshop.
Another way of doing so is by pressing the “ctrl” and “A” keys on your keyboard together. You will find the matching ants border around the image when you do this.
Then, go to the “Edit” option and choose “Copy” there. Or, you can also select the “ctrl” and “C” keys on your keywords together. Then go to your new document and select the option of “Paste” from the “Edit” option, or you can also press the “ctrl” and “V” keys together to do so.
The photo will be added in its own layer on the new document.
● Step 5: Arrange the images
Now, arrange the images in the way you want. If you have chosen to tell a story through your collage creator in photoshop, then arrange the photos accordingly. You can do so with the help of the “Move” tool or simply tap V. You can also use the “Free Transform” tool to edit and transform the images in the way you want. You can resize, rotate and edit the photos in many other ways through the “Free Transform” tool.
Step 6: Integrate image space
To create a collage in photoshop in a better and more spaced-out manner, you need to add some spacing between the images you have in your collage. There are two ways to add spacing between the pictures; one way is by creating a thin, white border around each image.
And the second method is by accessing and using the “Layers” feature in Photoshop.
● Step 7: Merge all the Layers
This step is necessary when you have used the “Layer” feature to create the spacing among the images present in your collage. You will be able to do so from the “Layer” option. So, go to the “Layer” option and select the “Merge Invisible” option present there.
● Step 8: cropping the final picture
Before the final step, it is important that you crop the final picture. And to do so, you can opt for the “Crop tool”. You will be able to access it easily, or you can also simply tap C to use the “Crop tool.”
● Step 9: Save the final collage and export
After you have done all the necessary changes and are satisfied with the final collage, then, save the file. To do so, go to the “File” option and select the “Save as” option.
Then choose the file type to be “JPEG”. Type the name you would want the collage to be saved as. This completes the process of saving the file. Then choose the image quality you would want the collage to be exported in.
● Key Takeaways from This Episode →
● In this discussion, we have covered the following topics.
● We discussed whether Photoshop has collage templates.
● Then we proceeded with discussing how we can create a collage in photoshop using the templates in it.
● Lastly, we wrapped up our discussion with the nine-step tutorial about customizing a collage in Photoshop.
5 Must Try Ways to Add GIF in Text Message on Android
5 Must Try Ways to Add and Send GIF in Text Message on Android
An easy yet powerful editor
Numerous effects to choose from
Detailed tutorials provided by the official channel
A much easier and more extraordinary way of expressing yourself is texting with GIFs, and thus, GIFs for texting on Android are so famous now. GIFs, an abbreviation for Graphics Interchange Format, are brief animated images primarily used in a fun way to pass a message during texting and chatting. You do not necessarily have to say a word; a GIF does that for you!

Having GIFs is one thing; it is another to know how to use them effectively during conversations. Almost all operating system keyboards come with their style of sending GIFs to people. Also, you can download GIFs from the internet and go ahead to attach them directly to a text message. There are also third-party applications like GIPHY and GIF Keyboard to get GIFs for texting on Android. GIPHY is undoubtedly the best GIF app for Android texting. With Gboard, the built-in Google keyboard found in most Android devices; you can effortlessly search for GIFs for texting on Android.
In this article
01 [Can You Text a GIF?](#Part 1)
02 [Best 5 Ways to Add and Send GIFs in Text Message on Android](#Part 2)
Part 1 Can You Text a GIF?
The simple answer is yes! It is possible to message a GIF. GIFs for Android text messaging are becoming the new normal, and this is not surprising as they are easy to add to texts and make texting livelier.
To use a GIF for texting on Android, open any messaging app of your choice found on your Android device; it could be WhatsApp or the default message app installed on the Android device. The keyboard would most likely offer you a variety of GIF options. If not, click on the smiley icon at the bottom of the keyboard to reveal other GIFs grouped in categories. Simply clicking on any of your choices would select it, and all you must do is hit the send icon.
Google’s texting app, Google Messages, comes with sending GIFs. To use a GIF in text messages on Android, open the messaging app and start a fresh conversation or open an existing one, then select the square icon with GIF written in the middle. Select your preferred GIF, then click Send. You can also add a brief description or caption before sending the GIF across.
Apart from the built-in apps on Android devices that allow you to send GIFs, there are unique apps like GIPHY (compatible with Android and iOS devices) with an extensive array of GIFs that can fit into different contexts greetings, culture, animals, reactions, etc. You can also employ social media trackers that help you discover popular and trending GIFs. If the available GIFs do not express your intention, you can go ahead to perform a search to find other GIFs. That way, there’s no limitation to the messages you want to pass through GIFs for texting on Android devices.
Part 2 Best 5 Ways to Add and Send GIF in Text Message on Android
There are different ways of using GIFs for Android texting. Apart from using the GIFs available in the built-in keyboard of messaging apps, downloading, and installing an instant messaging app or GIF keyboard is one of the best and easiest ways to access many GIF libraries.
This section would suggest to you the best GIF apps for Android texting and other ways you can explore to send GIFs and make your texting less wordy, more visual, and more expressive:
01Attaching GIF to a text message
This method of using GIFs for Android texting is straightforward. All you need is a messaging app, then follow these steps:
Step 1: On your Android phone’s app list, open Messages, the app represented as a white speech bubble.

Step 2: At the bottom right corner of the app, tap the blue circular button with a white plus sign. This will open a page to select the receiver’s contact.

Step 3: Select the recipient’s number by tapping on it from the contact list or type the number or name of the person directly into the “To” field at the top of the screen.

Step 4: Tap the circular button with the plus sign in the middle on the left side of the message field. Depending on the app, it may be a paper clip icon.

Step 5: Tap the images icon to select an image from your phone media library.

Step 6: Click Gallery to select a previously downloaded GIF.

Step 7: Select the GIF you want to send. This would insert the GIF into a small preview image on the text message. The GIF would play in the preview window.

Step 8: Click the paper icon at the right corner of the text field to send the animated GIF image.

02Gboard
Gboard is a Google keyboard. This is another easy way of adding GIFs for Android text messaging. If you do not have Gboard, download it from Play Store and install it on your Android phone. Follow these to add GIFs to your text messages:
Step 1: Download, install and set up Gboard on your Android phone.

Step 2: Open your text messaging app to write a new text message. If you have previously sent a message to the recipient, click on the ongoing conversation or open a new chat and select the recipient’s contact.
Step 3: Tap the text message field to compose your text message. If your default keyboard is Gboard, then Gboard will be automatically opened.

Step 4: At the bottom of the keyboard, just to the left of the space bar, tap the smiley face icon.

Step 5: Click the GIF button located at the bottom row of the keyboard.

Step 6: Browse through the different categories tab below the GIF to select a GIF or enter a keyword to look for a GIF.

Step 7: Click on the GIF you want to add to the text message you’re typing automatically.

Step 8: Click the Send button, usually represented as a paper airplane icon at the bottom right of the messaging app.

03GIPHY
This is one of the most popular platforms that supports GIFs for texting on Android. It has the largest library of GIFs, making it a perfect search engine for them. GIPHY allows you to personalize your GIFs while finding the latest and trending GIFs. It also allows you to explore visual aspects, including sports highlights, TV shows, movies, etc. Installing this application gives you access to various GIFs that you can directly share with friends on social media or send them to messaging apps like WhatsApp, Facebook Messenger, etc. With GIPHY, you can save and share gifs while also using the animated stickers available on the app.

04SwiftKey Keyboard
This keyboard app comes with many features, including sending GIFs. This keyboard app lends your writing style and adapts to it, making it a highly productive app for typing. Its emoji keyboard allows you to effortlessly search and send fun stickers, emojis, and GIFs while texting. It also has a multilingual feature.

05GIF Keyboard
This keyboard makes it easy for you to directly and conveniently send GIFs from your keyboard. With a library of millions of GIFs, you need to type in a keyword to get the right GIF at any point in time. Send emojis, videos, and animated GIFs with just a single click using GIF Keyboard. You can browse for GIFs by category, save your favorites GIFs, and share them using different messaging apps.

● Key Takeaways from This Episode →
● How to use GIFs for Android texting.
●the Best GIF apps for Android texting.
● Different reliable ways of using GIFs to spice up your texting on Android devices.
●Using GIFs for Android text messaging is the way to go in this modern age. This is because people relate more to visual representations than mere write-ups. Now, you know that it is possible to text GIFs and send them is simple using the extensively discussed methods in this article.
A much easier and more extraordinary way of expressing yourself is texting with GIFs, and thus, GIFs for texting on Android are so famous now. GIFs, an abbreviation for Graphics Interchange Format, are brief animated images primarily used in a fun way to pass a message during texting and chatting. You do not necessarily have to say a word; a GIF does that for you!
Having GIFs is one thing; it is another to know how to use them effectively during conversations. Almost all operating system keyboards come with their style of sending GIFs to people. Also, you can download GIFs from the internet and go ahead to attach them directly to a text message. There are also third-party applications like GIPHY and GIF Keyboard to get GIFs for texting on Android. GIPHY is undoubtedly the best GIF app for Android texting. With Gboard, the built-in Google keyboard found in most Android devices; you can effortlessly search for GIFs for texting on Android.
In this article
01 [Can You Text a GIF?](#Part 1)
02 [Best 5 Ways to Add and Send GIFs in Text Message on Android](#Part 2)
Part 1 Can You Text a GIF?
The simple answer is yes! It is possible to message a GIF. GIFs for Android text messaging are becoming the new normal, and this is not surprising as they are easy to add to texts and make texting livelier.
To use a GIF for texting on Android, open any messaging app of your choice found on your Android device; it could be WhatsApp or the default message app installed on the Android device. The keyboard would most likely offer you a variety of GIF options. If not, click on the smiley icon at the bottom of the keyboard to reveal other GIFs grouped in categories. Simply clicking on any of your choices would select it, and all you must do is hit the send icon.
Google’s texting app, Google Messages, comes with sending GIFs. To use a GIF in text messages on Android, open the messaging app and start a fresh conversation or open an existing one, then select the square icon with GIF written in the middle. Select your preferred GIF, then click Send. You can also add a brief description or caption before sending the GIF across.
Apart from the built-in apps on Android devices that allow you to send GIFs, there are unique apps like GIPHY (compatible with Android and iOS devices) with an extensive array of GIFs that can fit into different contexts greetings, culture, animals, reactions, etc. You can also employ social media trackers that help you discover popular and trending GIFs. If the available GIFs do not express your intention, you can go ahead to perform a search to find other GIFs. That way, there’s no limitation to the messages you want to pass through GIFs for texting on Android devices.
Part 2 Best 5 Ways to Add and Send GIF in Text Message on Android
There are different ways of using GIFs for Android texting. Apart from using the GIFs available in the built-in keyboard of messaging apps, downloading, and installing an instant messaging app or GIF keyboard is one of the best and easiest ways to access many GIF libraries.
This section would suggest to you the best GIF apps for Android texting and other ways you can explore to send GIFs and make your texting less wordy, more visual, and more expressive:
01Attaching GIF to a text message
This method of using GIFs for Android texting is straightforward. All you need is a messaging app, then follow these steps:
Step 1: On your Android phone’s app list, open Messages, the app represented as a white speech bubble.
Step 2: At the bottom right corner of the app, tap the blue circular button with a white plus sign. This will open a page to select the receiver’s contact.
Step 3: Select the recipient’s number by tapping on it from the contact list or type the number or name of the person directly into the “To” field at the top of the screen.
Step 4: Tap the circular button with the plus sign in the middle on the left side of the message field. Depending on the app, it may be a paper clip icon.
Step 5: Tap the images icon to select an image from your phone media library.
Step 6: Click Gallery to select a previously downloaded GIF.
Step 7: Select the GIF you want to send. This would insert the GIF into a small preview image on the text message. The GIF would play in the preview window.
Step 8: Click the paper icon at the right corner of the text field to send the animated GIF image.
02Gboard
Gboard is a Google keyboard. This is another easy way of adding GIFs for Android text messaging. If you do not have Gboard, download it from Play Store and install it on your Android phone. Follow these to add GIFs to your text messages:
Step 1: Download, install and set up Gboard on your Android phone.
Step 2: Open your text messaging app to write a new text message. If you have previously sent a message to the recipient, click on the ongoing conversation or open a new chat and select the recipient’s contact.
Step 3: Tap the text message field to compose your text message. If your default keyboard is Gboard, then Gboard will be automatically opened.
Step 4: At the bottom of the keyboard, just to the left of the space bar, tap the smiley face icon.
Step 5: Click the GIF button located at the bottom row of the keyboard.
Step 6: Browse through the different categories tab below the GIF to select a GIF or enter a keyword to look for a GIF.
Step 7: Click on the GIF you want to add to the text message you’re typing automatically.
Step 8: Click the Send button, usually represented as a paper airplane icon at the bottom right of the messaging app.
03GIPHY
This is one of the most popular platforms that supports GIFs for texting on Android. It has the largest library of GIFs, making it a perfect search engine for them. GIPHY allows you to personalize your GIFs while finding the latest and trending GIFs. It also allows you to explore visual aspects, including sports highlights, TV shows, movies, etc. Installing this application gives you access to various GIFs that you can directly share with friends on social media or send them to messaging apps like WhatsApp, Facebook Messenger, etc. With GIPHY, you can save and share gifs while also using the animated stickers available on the app.
04SwiftKey Keyboard
This keyboard app comes with many features, including sending GIFs. This keyboard app lends your writing style and adapts to it, making it a highly productive app for typing. Its emoji keyboard allows you to effortlessly search and send fun stickers, emojis, and GIFs while texting. It also has a multilingual feature.
05GIF Keyboard
This keyboard makes it easy for you to directly and conveniently send GIFs from your keyboard. With a library of millions of GIFs, you need to type in a keyword to get the right GIF at any point in time. Send emojis, videos, and animated GIFs with just a single click using GIF Keyboard. You can browse for GIFs by category, save your favorites GIFs, and share them using different messaging apps.
● Key Takeaways from This Episode →
● How to use GIFs for Android texting.
●the Best GIF apps for Android texting.
● Different reliable ways of using GIFs to spice up your texting on Android devices.
●Using GIFs for Android text messaging is the way to go in this modern age. This is because people relate more to visual representations than mere write-ups. Now, you know that it is possible to text GIFs and send them is simple using the extensively discussed methods in this article.
Dead Simple Guide to Create New and Exciting Blackboard Animation
Dead Simple Guide to Create New and Exciting Blackboard Animation
An easy yet powerful editor
Numerous effects to choose from
Detailed tutorials provided by the official channel
Yes, it is definitely possible In fact, it couldn’t be easier. A lot of the ‘whiteboard animation’ generators also work as blackboard animation generators.
In this guide, we hope to shed some light on the subject so that everyone can have an easier time approaching the matter of creating a blackboard project on their own.
In this article
01 [Is Blackboard Animation Outdated?](#Part 1)
02 [How to Combine Modern Needs with Blackboard Animation?](#Part 2)
03 [How to Create a Blackboard Animation in ONE DAY?](#Part 3)
Part 1 Is Blackboard Animation Outdated?
Blackboard animation some may say is as outdated as the concept of ‘blackboards’ themselves. After all, nowadays, whiteboards are the standard for presenting information in a school setting — with many preferring the ease of using dry-erase markers over the more unwieldy chalk.
However, unlike the inconveniences of using an actual chalkboard, chalkboard animation is not so different from whiteboard animation In fact, it’s just given a different look. One that may be exactly what you’re looking for — especially if you’re looking to get in touch with the older generation (who would no doubt be more familiar with the concept.)

Part 2 How to Combine Modern Needs with Blackboard Animation?
But alright, so how do you make it so that your blackboard animation is just as suited for the modern generation as it is for the older generation?? Well, that’s easy really. You’ll need images Or, rather, you’ll need visuals outside of just the plain text that is usually associated with chalkboard animation.
With the right kind of visuals to go along with your informational text, you can boost the effectiveness of your chalkboard animation video and make it more palatable. Perfectly in line with the modern needs of the era.

Part 3 How to Create a Blackboard Animation in ONE DAY?
Alright, so onto actually talking about how you can go about creating a chalkboard animation video Take note, this is going to be an ‘overview’ kind of tutorial. We’ve also decided to choose a more ‘custom’ method, rather than using one of the premium blackboard animation generators (which usually require you to pay a steep price in order to gain access to a media library.)
01Step 1. Pick Your Software
The first step in creating chalkboard animation is to pick the software that you want to use This can be something more ‘animation-specific’, like After Effects. Or something more ‘video-editing-specific’ like Filmora.
Again, because this is meant to be more of a ‘general’ tutorial, we won’t be showing you exactly how to use whatever editing software you decide to use in order to create your blackboard animation videos. But, as a general kind of advice, it would be best that you pick a video editor like Wondershare Filmora Video Editor that offers a Timeline feature that will allow you to quickly put together a project

02Step 2. Create a Storyboard
Next, to make the actual blackboard animation creation process go smoother, it’s important that you create a storyboard that will outline the video that you want to create
The more detailed this storyboard is, the better Although, of course, you don’t necessarily have to draw every single frame of your chalkboard animation beforehand. Just sketch out the general idea. It will help make sure that you won’t have to rush about making all sorts of corrections in the future

03Step 3. Draw Characters
For this step, we say ‘characters’ and use the word ‘draw.’ But really, this is a very open kind of step where we encourage you to put together all media that you will need to make your project into a reality This is where the storyboard really helps. After all, with that, you have an idea of exactly what kind of characters, settings, music, audio, etc. you’ll need for each scene (if not each frame)
If you’re not the ‘drawing’ type, by the way, there are both FREE and premium media libraries that you can take advantage of to use for your project It might be difficult to find matching art styles at first. But, if you’re really particular about that, then you can always find a freelance digital artist to design with a specific style in mind

04Step 4. Put Together Project
Last of all, of course, is the process of putting everything together. Do you have your software? Great Launch it and create a new project Do you have your storyboard? That’s also great Now you have an idea where each character and setting will go
In the image below, we’re only showing the start of a potential project. We’ve only added one image to the timeline But, as you can see, with the use of Filmora, even this one image can be turned into a video

● Key Takeaways from This Episode →
● Blackboards are naturally associated with learning This makes blackboard animation videos a great method of sharing information with an audience. Whether you’re doing it to promote your services/goods or just genuinely looking to impart knowledge to another
● Some may think that blackboards are outdated — for the mere fact that blackboards themselves are considered outdated when compared to whiteboards — but that doesn’t make them any less effective at getting a message across so long as you include the right kind of visuals
● In our brief ‘overview’ tutorial, we expand on the subject of blackboard animation some more. Be warned, it’s not the kind of project you should go into if you’re not prepared for the work Longer projects, especially, will require quite a bit of elbow grease to get done.
● Still, there’s something satisfying about a well-done chalkboard animation video that will not only be a joy to create but also, hopefully, catch the attention of your audience as well.
Yes, it is definitely possible In fact, it couldn’t be easier. A lot of the ‘whiteboard animation’ generators also work as blackboard animation generators.
In this guide, we hope to shed some light on the subject so that everyone can have an easier time approaching the matter of creating a blackboard project on their own.
In this article
01 [Is Blackboard Animation Outdated?](#Part 1)
02 [How to Combine Modern Needs with Blackboard Animation?](#Part 2)
03 [How to Create a Blackboard Animation in ONE DAY?](#Part 3)
Part 1 Is Blackboard Animation Outdated?
Blackboard animation some may say is as outdated as the concept of ‘blackboards’ themselves. After all, nowadays, whiteboards are the standard for presenting information in a school setting — with many preferring the ease of using dry-erase markers over the more unwieldy chalk.
However, unlike the inconveniences of using an actual chalkboard, chalkboard animation is not so different from whiteboard animation In fact, it’s just given a different look. One that may be exactly what you’re looking for — especially if you’re looking to get in touch with the older generation (who would no doubt be more familiar with the concept.)
Part 2 How to Combine Modern Needs with Blackboard Animation?
But alright, so how do you make it so that your blackboard animation is just as suited for the modern generation as it is for the older generation?? Well, that’s easy really. You’ll need images Or, rather, you’ll need visuals outside of just the plain text that is usually associated with chalkboard animation.
With the right kind of visuals to go along with your informational text, you can boost the effectiveness of your chalkboard animation video and make it more palatable. Perfectly in line with the modern needs of the era.
Part 3 How to Create a Blackboard Animation in ONE DAY?
Alright, so onto actually talking about how you can go about creating a chalkboard animation video Take note, this is going to be an ‘overview’ kind of tutorial. We’ve also decided to choose a more ‘custom’ method, rather than using one of the premium blackboard animation generators (which usually require you to pay a steep price in order to gain access to a media library.)
01Step 1. Pick Your Software
The first step in creating chalkboard animation is to pick the software that you want to use This can be something more ‘animation-specific’, like After Effects. Or something more ‘video-editing-specific’ like Filmora.
Again, because this is meant to be more of a ‘general’ tutorial, we won’t be showing you exactly how to use whatever editing software you decide to use in order to create your blackboard animation videos. But, as a general kind of advice, it would be best that you pick a video editor like Wondershare Filmora Video Editor that offers a Timeline feature that will allow you to quickly put together a project
02Step 2. Create a Storyboard
Next, to make the actual blackboard animation creation process go smoother, it’s important that you create a storyboard that will outline the video that you want to create
The more detailed this storyboard is, the better Although, of course, you don’t necessarily have to draw every single frame of your chalkboard animation beforehand. Just sketch out the general idea. It will help make sure that you won’t have to rush about making all sorts of corrections in the future
03Step 3. Draw Characters
For this step, we say ‘characters’ and use the word ‘draw.’ But really, this is a very open kind of step where we encourage you to put together all media that you will need to make your project into a reality This is where the storyboard really helps. After all, with that, you have an idea of exactly what kind of characters, settings, music, audio, etc. you’ll need for each scene (if not each frame)
If you’re not the ‘drawing’ type, by the way, there are both FREE and premium media libraries that you can take advantage of to use for your project It might be difficult to find matching art styles at first. But, if you’re really particular about that, then you can always find a freelance digital artist to design with a specific style in mind
04Step 4. Put Together Project
Last of all, of course, is the process of putting everything together. Do you have your software? Great Launch it and create a new project Do you have your storyboard? That’s also great Now you have an idea where each character and setting will go
In the image below, we’re only showing the start of a potential project. We’ve only added one image to the timeline But, as you can see, with the use of Filmora, even this one image can be turned into a video
● Key Takeaways from This Episode →
● Blackboards are naturally associated with learning This makes blackboard animation videos a great method of sharing information with an audience. Whether you’re doing it to promote your services/goods or just genuinely looking to impart knowledge to another
● Some may think that blackboards are outdated — for the mere fact that blackboards themselves are considered outdated when compared to whiteboards — but that doesn’t make them any less effective at getting a message across so long as you include the right kind of visuals
● In our brief ‘overview’ tutorial, we expand on the subject of blackboard animation some more. Be warned, it’s not the kind of project you should go into if you’re not prepared for the work Longer projects, especially, will require quite a bit of elbow grease to get done.
● Still, there’s something satisfying about a well-done chalkboard animation video that will not only be a joy to create but also, hopefully, catch the attention of your audience as well.
Learn Disney Cartoon Drawing to See More Disney Magic Moments
Learn Disney Cartoon Drawing to See More Disney Magic Moments
An easy yet powerful editor
Numerous effects to choose from
Detailed tutorials provided by the official channel
How to Draw a Disney Caricature

Disney-Inspired Ipad Drawing Class for Beginners
In this article
01 [How to Draw a Disney Caricature](#Part 1)
02 [Disney-Inspired Ipad Drawing Class for Beginners](#Part 2)
Part 1 How to Draw a Disney Caricature
Below is the step-by-step guide to making a Disney cartoon drawing with colors from the comfort of your home:
01How to Draw Mickey

Unarguably, Mickey Mouse is one of the most famous anime characters globally. This character was created in 1928 and is a famous Disney cartoon drawing by animators. Here are straightforward steps to help you draw a Mickey Mouse:
Step 1: Sketch the general but carefully observed features of Mickey Mouse, including the position of ears, body shape (reverse C shape), body proportions including eyes, limbs, and arms, length of arms, button on his pants, and angle on the hands.
Step 2: Take your pencil and paper, and using gentle and weak strokes, make a simple sketch of the head, neck, belly, and limbs.

Step 3: Draw contours of the mouth, ears, and nose.

Step 4: Specify the face features like a smiling opened mouth, tip of the nose, and eyes.

Step 5: Draw the hands carefully, observing the length of both arms and their proportion to the size of the character’s head.

Step 6: Sketch the outline contours of the shoes, the legs, and the pants.

Step 7: Sketch the final outline contour of the body, then erase excess lines where necessary. Add the two buttons on Mickey mouse pants.

Step 8: Draw his nose’s tail, tongue, and ellipse.

Step 9: First, use a 2B or 4B or any soft black color pencil to color the black parts.

Step 10: Depending on your preference, you can color with water, acrylic paints, or pastels.

02How to Draw Captain America
Follow these simple steps to make a Disney cartoon drawing of Captain America:
Step 1: Draw the head and chest
Draw the outlines of his masked face using smooth lines. Draw a curved line across his face to divide his face from his mask. Draw a large letter A and add tiny wings beside it on his forehead. Draw his mouth, eyes, and nose. Use curved lines to indicate his shoulder and chest, then draw a star on his chest.

Step 2: Draw his arm and waist
Draw a curved line on the shoulder to represent the bicep, then draw his gloved arm curled to form a fist. Draw curved lines beneath the chest to represent his muscular weight, then draw the pouches on his belt and use more curved lines to draw his waist.

Step 3: Draw his legs
Here, we shall portray Captain America in action. Use curved lines to show his extended right leg with boots. The left leg should appear more petite.

Step 4: Draw his shield
Against his right arm, carefully draw a flattened circular shape. You can achieve this by drawing concentric circles with a large star in the middle. Draw his arm poking out from behind his shield.

Step 5: Include the final details
Add some vertical lines across his waist and some details on his boots.

Step 6: Colour Captain America
Using colors of the American flag, color your drawing with red, white, and blue colors.

03How to Draw Stitch
Stitch is a bulletproof and fireproof alien from the Lilo and Stitch animations. Here’s how you can draw Stitch:
Step 1: Draw a circle that would form Stitch’s head

Step 2: Using a long curved line, draw an irregular peanut shape beneath the head to represent its body.

Step 3: To form its light underbelly, enclose a small shape parallel to the outline of Stitch’s body using a long curved line. On the chest region, draw a series of small “V” shapes to indicate the presence of fur.

Step 4: Draw Stitch’s arm using curved lines for the upper arm and another pair for the lower arm. Draw his bent hands and fingers using short lines. At the tip of its fingers, draw small pointed triangles to represent its claws.

Step 5: Erase the guidelines from Stitch’s arm

Step 6: Draw Stitch’s outstretched arm using a pair of curved lines and small “C” shaped lines to represent the fingers. Use short lines to connect the fingers. Draw small “V” shapes at the tip of the fingers for the triangular claws.

Step 7: Use a pair of curved lines to sketch each leg, then enclose the toes using C-shaped lines

Step 8: Sketch the ears using long curved lines to indicate the base and folds. Sketch the fur on top of Stitch’s head using a series of curved lines.

Step 9: Draw a big circle for the nose and use curved lines to indicate the nostrils. For the eyes, draw irregular rounded shapes, one within the other. Sketch too long curved lines to show the mouth and small blonde triangles for the teeth. Above the eyes and nose, draw curved lines.

Step 10: Use different shades of blue to colour Stitch.

Part 2 Disney-Inspired Ipad Drawing Class for Beginner
Here is a list of classes for beginners interested in drawing Disney characters.
01Dive into the world of Animation with a Disney-Inspired Ipad Drawing Course

This Disney-inspired lesson focuses on real-life scenarios that are beautiful and adorable. Create your everyday settings by sketching backgrounds and outfitting figures.
It will assist you in developing a straightforward approach to drawing cartoon characters through experimentation and time. Follow along and sketch characters, then make your new character.
02Drawing Faces: A Beginner‘s Guide

Ira Marcks, a graphic novelist, will teach you everything you need to know about drawing faces. Are you completely new when it comes to drawing? No worries; follow along with Ira’s bite-sized lectures, and you’ll be ready to delve into a class project by the end of the course.
Do you prefer to set your speed and work at it? If yes, then extend your learning beyond the classroom, download Ira’s Drawing Faces Book.
03Disney Inspired Drawings: Faces and Expressions

Learners will look at sketching a cartoon image of themselves or people they know while exploring the specific traits of Disney-style characters in this one-time live drawing lesson.
Learners will collaborate with the teacher while working on their art projects. This is a technique class, so the focus will be on the process and working towards a finished goal. Nevertheless, a piece may get completed outside of class.
This program is for students who have a basic understanding of drawing and proportion, are open to artistic growth, and are comfortable appearing on camera and sharing their work in a small group setting. All to help each other, and the classroom environment will support all students.
04Free Art Lessons By The Parks’ Imagineers
This lesson will teach how to create your theme park, design virtual landscapes, and even sketch unique costumes!
You’ll also learn how to draw characters from Frozen 2 like Anna and Elsa and classics like Mickey Mouse, Daisy Duck, Pluto, and others.
Your class experience can be enjoyable when using an easy-to-use tool like Wondershare Filmora.
Wondershare Filmora Video Editor is a robust and easy-to-use video editor for users of all skill levels, from beginner to advanced. Its advanced tools, adjustable keyframing, smoothing effects, and motion blur will considerably assist you in creating a high-quality animation video. Furthermore, the auto color correction and audio mixing will elevate your 2D animation film to new heights. Filmora is the best solution if you want more productivity, control, and customization options for your Disney cartoon drawings and animation.
For Win 7 or later (64-bit)
For macOS 10.12 or later
● Ending Thoughts →
● How to make a Disney cartoon drawing
● A step-by-step guide to drawing your favorite Disney cartoon drawing with colors
● How to use Filmora to create animations
● Different Disney-inspired beginner classes for iPad users.
How to Draw a Disney Caricature
Disney-Inspired Ipad Drawing Class for Beginners
In this article
01 [How to Draw a Disney Caricature](#Part 1)
02 [Disney-Inspired Ipad Drawing Class for Beginners](#Part 2)
Part 1 How to Draw a Disney Caricature
Below is the step-by-step guide to making a Disney cartoon drawing with colors from the comfort of your home:
01How to Draw Mickey
Unarguably, Mickey Mouse is one of the most famous anime characters globally. This character was created in 1928 and is a famous Disney cartoon drawing by animators. Here are straightforward steps to help you draw a Mickey Mouse:
Step 1: Sketch the general but carefully observed features of Mickey Mouse, including the position of ears, body shape (reverse C shape), body proportions including eyes, limbs, and arms, length of arms, button on his pants, and angle on the hands.
Step 2: Take your pencil and paper, and using gentle and weak strokes, make a simple sketch of the head, neck, belly, and limbs.
Step 3: Draw contours of the mouth, ears, and nose.
Step 4: Specify the face features like a smiling opened mouth, tip of the nose, and eyes.
Step 5: Draw the hands carefully, observing the length of both arms and their proportion to the size of the character’s head.
Step 6: Sketch the outline contours of the shoes, the legs, and the pants.
Step 7: Sketch the final outline contour of the body, then erase excess lines where necessary. Add the two buttons on Mickey mouse pants.
Step 8: Draw his nose’s tail, tongue, and ellipse.
Step 9: First, use a 2B or 4B or any soft black color pencil to color the black parts.
Step 10: Depending on your preference, you can color with water, acrylic paints, or pastels.
02How to Draw Captain America
Follow these simple steps to make a Disney cartoon drawing of Captain America:
Step 1: Draw the head and chest
Draw the outlines of his masked face using smooth lines. Draw a curved line across his face to divide his face from his mask. Draw a large letter A and add tiny wings beside it on his forehead. Draw his mouth, eyes, and nose. Use curved lines to indicate his shoulder and chest, then draw a star on his chest.
Step 2: Draw his arm and waist
Draw a curved line on the shoulder to represent the bicep, then draw his gloved arm curled to form a fist. Draw curved lines beneath the chest to represent his muscular weight, then draw the pouches on his belt and use more curved lines to draw his waist.
Step 3: Draw his legs
Here, we shall portray Captain America in action. Use curved lines to show his extended right leg with boots. The left leg should appear more petite.
Step 4: Draw his shield
Against his right arm, carefully draw a flattened circular shape. You can achieve this by drawing concentric circles with a large star in the middle. Draw his arm poking out from behind his shield.
Step 5: Include the final details
Add some vertical lines across his waist and some details on his boots.
Step 6: Colour Captain America
Using colors of the American flag, color your drawing with red, white, and blue colors.
03How to Draw Stitch
Stitch is a bulletproof and fireproof alien from the Lilo and Stitch animations. Here’s how you can draw Stitch:
Step 1: Draw a circle that would form Stitch’s head
Step 2: Using a long curved line, draw an irregular peanut shape beneath the head to represent its body.
Step 3: To form its light underbelly, enclose a small shape parallel to the outline of Stitch’s body using a long curved line. On the chest region, draw a series of small “V” shapes to indicate the presence of fur.
Step 4: Draw Stitch’s arm using curved lines for the upper arm and another pair for the lower arm. Draw his bent hands and fingers using short lines. At the tip of its fingers, draw small pointed triangles to represent its claws.
Step 5: Erase the guidelines from Stitch’s arm
Step 6: Draw Stitch’s outstretched arm using a pair of curved lines and small “C” shaped lines to represent the fingers. Use short lines to connect the fingers. Draw small “V” shapes at the tip of the fingers for the triangular claws.
Step 7: Use a pair of curved lines to sketch each leg, then enclose the toes using C-shaped lines
Step 8: Sketch the ears using long curved lines to indicate the base and folds. Sketch the fur on top of Stitch’s head using a series of curved lines.
Step 9: Draw a big circle for the nose and use curved lines to indicate the nostrils. For the eyes, draw irregular rounded shapes, one within the other. Sketch too long curved lines to show the mouth and small blonde triangles for the teeth. Above the eyes and nose, draw curved lines.
Step 10: Use different shades of blue to colour Stitch.
Part 2 Disney-Inspired Ipad Drawing Class for Beginner
Here is a list of classes for beginners interested in drawing Disney characters.
01Dive into the world of Animation with a Disney-Inspired Ipad Drawing Course
This Disney-inspired lesson focuses on real-life scenarios that are beautiful and adorable. Create your everyday settings by sketching backgrounds and outfitting figures.
It will assist you in developing a straightforward approach to drawing cartoon characters through experimentation and time. Follow along and sketch characters, then make your new character.
02Drawing Faces: A Beginner‘s Guide
Ira Marcks, a graphic novelist, will teach you everything you need to know about drawing faces. Are you completely new when it comes to drawing? No worries; follow along with Ira’s bite-sized lectures, and you’ll be ready to delve into a class project by the end of the course.
Do you prefer to set your speed and work at it? If yes, then extend your learning beyond the classroom, download Ira’s Drawing Faces Book.
03Disney Inspired Drawings: Faces and Expressions
Learners will look at sketching a cartoon image of themselves or people they know while exploring the specific traits of Disney-style characters in this one-time live drawing lesson.
Learners will collaborate with the teacher while working on their art projects. This is a technique class, so the focus will be on the process and working towards a finished goal. Nevertheless, a piece may get completed outside of class.
This program is for students who have a basic understanding of drawing and proportion, are open to artistic growth, and are comfortable appearing on camera and sharing their work in a small group setting. All to help each other, and the classroom environment will support all students.
04Free Art Lessons By The Parks’ Imagineers
This lesson will teach how to create your theme park, design virtual landscapes, and even sketch unique costumes!
You’ll also learn how to draw characters from Frozen 2 like Anna and Elsa and classics like Mickey Mouse, Daisy Duck, Pluto, and others.
Your class experience can be enjoyable when using an easy-to-use tool like Wondershare Filmora.
Wondershare Filmora Video Editor is a robust and easy-to-use video editor for users of all skill levels, from beginner to advanced. Its advanced tools, adjustable keyframing, smoothing effects, and motion blur will considerably assist you in creating a high-quality animation video. Furthermore, the auto color correction and audio mixing will elevate your 2D animation film to new heights. Filmora is the best solution if you want more productivity, control, and customization options for your Disney cartoon drawings and animation.
For Win 7 or later (64-bit)
For macOS 10.12 or later
● Ending Thoughts →
● How to make a Disney cartoon drawing
● A step-by-step guide to drawing your favorite Disney cartoon drawing with colors
● How to use Filmora to create animations
● Different Disney-inspired beginner classes for iPad users.
[Top 10] Best Photo to Animation Converters That Give You an Advantage
[Top 10] Best Photo to Animation Converters That Give You an Advantage
An easy yet powerful editor
Numerous effects to choose from
Detailed tutorials provided by the official channel
We do have a couple of recommendations to give. There’s a wide variety of tools out there that will allow you to make animated pictures. With some actually allowing you to add animation (or motion) to your photographs while others bring a pop-up of life to your pictures with artistic filters and effects.
Have a look at our list of the top ten best photos to animation converter tools below to see if one of them catches your eye.
Alright, let’s get straight to our list of the best photo to animation converter tools available. As mentioned, we’ve picked quite the variety — including both software and online photo animator tools so that you can find one that best suits the kind of projects that you’re working on.
For your convenience, we’ve included the pros and cons of each converter as well as the most common scenarios each application can be used.
01Filmora
Rating and Reviews: [Techradar: 4.5/5]
Wondershare Filmora Video Editor , while, first and foremost, is an advanced video editor, is the first photo animation maker on this list of ours. This software is highly-rated online and it comes with a bunch of presets, filters, and effects, that you can use in order to animate your photographs. Its more advanced video editing functions would no doubt prove to be useful in the future as well, allowing you to increase the complexity of your projects and achieve more and more things.
● With Filmora, you have access to a built-in library of Effects and Elements that you can use in order to make animated pictures.
● The advanced video editing functions can also be used to create more complex motion animations that you are unlikely to see in other alternatives.
URL: https://filmora.wondershare.com/
| PROS | CONS |
|---|---|
| ● Access to built-in effects and elements library.● Advanced editing functions.● A FREE trial is available to try out its many features. | ● As a downloadable software, Filmora will require downloading and installing.● Some of its features and functions are locked in the FREE version as well.● Payment is either subscription-based or one-time for a perpetual license. |
For Win 7 or later (64-bit)
For macOS 10.12 or later
02PicMonkey
Rating and Reviews: [G2: 4.4/5]
When it comes to online photo animator tools, PicMonkey is definitely one of the first that people recommend. It’s premium software, so you’ll have to pay to use all of its functions — with the cheapest plan worth $72 annually or $7.99 monthly. The best part about it is, undoubtedly, the fact that it was developed by Shutterstock, which is highly regarded in the photography industry. So, you can surely rely on stable support.
● Photo Animation maker with lots of built-in animation effects and templates that allow users to easily make animated pictures.
URL: https://www.picmonkey.com/design/photo-animation-maker
| PROS | CONS |
|---|---|
| ● A FREE trial is available to test out its functions.● Developed by a reliable company.● Packed with lots of built-in animated effects and presets. | ● Packed with lots of built-in animated effects and presets.● No software version for use without the internet.● Does not come equipped with advanced custom animation tools. |

03Adobe Creative Cloud Express
Rating and Reviews: [Creative Bloq: 4/5]
The Adobe Creative Cloud Express is both an online photo animator and an application that you can download and install on your phone. As is expected from any Adobe product, it’s quite premium in make and is better suited for more serious photo animations — especially as you’ll need to pay in order to be able to use it to its fullest extent.
● Comes with a veritable library of templates, effects, and filters for advanced photo editing and photo animation.
URL: https://www.adobe.com/express/create/social-media-graphic
| PROS | CONS |
|---|---|
| ● Advanced photo editing tool.● Available both online and as an app.● Reliable and trustworthy adobe product. | ● The FREE trial is limited.● The FREE trial is limited.● Advanced photo editing is not suitable for beginners. |

04ColorCinch
Rating and Reviews: [Crozdesk: 4/5]
ColorCinch, or Cartoonize, as it is also called, is another popular online photo animator that you might have heard about already. This one features quite a few presets that you can use to quickly change the look of your photographs.
● Photo editing functions for breathing new life into existing photographs.
● Presets, templates, filters, and effects are available for easy and efficient photo editing.
URL: https://www.cartoonize.net/
| PROS | CONS |
|---|---|
| ● Beginner-friendly UI.● Comes with lots of filters and effects built-in.● Cartoonizer effect for simple photo animation onlinep. | ● Paid tool Limited FREE trial.● Subscription-based packages.● Limited customer animation functions. |

05Photo Cartoon
Rating and Reviews: N/A
Photo Cartoon is an online photo animator that specifically alters your photos and ‘cartoon-izes’ it (with several effects to choose from as to the specific style that you want). This single-use, while definitely not the most advanced on this list of ours, offers the user an easy way to change the look of their photographs.
● Transform photos into cartoons, paintings, drawings, and caricatures.
URL: https://photocartoon.net/
| PROS | CONS |
|---|---|
| ● Quick and easy to use● Online software, good for all devices● The finished photo animation can be downloaded and shared. | ● Very basic functions.● Limited effects/filters to choose from. ● Not highly rated online. |
06BeFunky
Rating and Reviews: [G2: 4.2/5]
With BeFunky, we go back to somewhat more advanced online photo animator tools. This one works quite simply as well though. Similar to the previous tool we introduced, BeFunky is meant primarily for quickly and easily adding filters and effects to photographs to change its style to look more like a cartoon or animation.
● Create a cartoon version of your images easily and quickly.
URL: https://www.befunky.com/features/photo-to-cartoon/
| PROS | CONS |
|---|---|
| ● Easy-to-use and beginner-friendly● Easy-to-use and beginner-friendly.● Available online and thus compatible with most devices. | ● Limited photo editing scope.● Sign-up is required for long-term use.● No advanced custom animation functions. |

077. ASPOSE
Rating and Reviews: N/A
Although not very well-known, ASPOSE is an easy way of animating pictures online. All you really have to do is upload your file (in the way that is suggested) and you’re good to go. You’ll be given a choice in what kind of animations you want to put on your photograph thereafter. And, when the conversion is complete, it’ll be FREE to download and share.
● Easily make animated pictures online by uploading photographs to be animated.
URL: https://products.aspose.app/imaging/animation-maker
| PROS | CONS |
|---|---|
| ● FREE photo to animation converter● Easy-to-use and efficient.● Motion animations available. | ● Internet is required for use.● Not the most advanced filters/effects/animations are available.● No custom animation function. |

08TheCartoonist.me
Rating and Reviews: N/A
We’re approaching more and more obscure territory the further we go along this list, with many of the tools, including this next one, called ‘The Cartoonist.me’, not having been rated by the usual tech websites. But, that doesn’t mean that the tool itself is any less useful. This one, in particular, is akin to the other cartoon-izers that we introduced earlier — in that it changes the look of photographs into one similar to what is used in animations.
● Picture animator online that allows you to turn your pictures into cartoon versions of their former self.
URL: https://thecartoonist.me/
| PROS | CONS |
|---|---|
| ● FREE photo animation maker.● Basic cartoon effects available.● Upload and Download | ● No advanced photo editing.● No advanced photo editing.● Not highly rated. |

09Snapstouch
Rating and Reviews: N/A
Snapstouch is another obscure, but no less useful, photo editing tool that adds a touch animation to your photographs. This online tool offers sketch, painting, pencil sketch, outline, cartoon, and many other filters that you can apply to your photographs to directly change their look.
● Change the look of your photographs with an easily applied filter.
URL: http://www.snapstouch.com/
| PROS | CONS |
|---|---|
| ● Easy-to-use (upload then download)● FREE to use online tool.● Several effects to choose from. | ● A limited selection of filter effects.● Old and dated UI.● Not highly rated. |

10AnyMaking
Rating and Reviews: N/A
AnyMaking is a basic online photo editor that comes with a variety of photo effects that you can apply to your photographs to change their looks. Much like the previous tools, AnyMaking offers ‘animation’ style filters that can turn your photographs into something that looks like they came from one of your favorite animated films.
● Turn your photographs completely anew with fun photo effects.
| PROS | CONS |
|---|---|
| ● FREE-to-use photo effects tool.● Cartoonizer effect for animating photographs.● Easy-to-use (upload then download) | ● Limited photo effects.● No custom photo animation functions.● Not highly rated. |

● Key Takeaways from This Episode →
● Photo to Animation is quite a broad subject and, fittingly, that means that the tools that allow for it are varied indeed.
● Some photo to animation converters will allow you to completely change the look of your photograph with a single application of a filter. While others are more involved (and thus, more flexible) and require more careful customization.
● We’ve included both types (and all the types between) in our list of photo to animation converters. Hopefully, you’ll find one that can help you make the animated pictures that you want to make.
We do have a couple of recommendations to give. There’s a wide variety of tools out there that will allow you to make animated pictures. With some actually allowing you to add animation (or motion) to your photographs while others bring a pop-up of life to your pictures with artistic filters and effects.
Have a look at our list of the top ten best photos to animation converter tools below to see if one of them catches your eye.
Alright, let’s get straight to our list of the best photo to animation converter tools available. As mentioned, we’ve picked quite the variety — including both software and online photo animator tools so that you can find one that best suits the kind of projects that you’re working on.
For your convenience, we’ve included the pros and cons of each converter as well as the most common scenarios each application can be used.
01Filmora
Rating and Reviews: [Techradar: 4.5/5]
Wondershare Filmora Video Editor , while, first and foremost, is an advanced video editor, is the first photo animation maker on this list of ours. This software is highly-rated online and it comes with a bunch of presets, filters, and effects, that you can use in order to animate your photographs. Its more advanced video editing functions would no doubt prove to be useful in the future as well, allowing you to increase the complexity of your projects and achieve more and more things.
● With Filmora, you have access to a built-in library of Effects and Elements that you can use in order to make animated pictures.
● The advanced video editing functions can also be used to create more complex motion animations that you are unlikely to see in other alternatives.
URL: https://filmora.wondershare.com/
| PROS | CONS |
|---|---|
| ● Access to built-in effects and elements library.● Advanced editing functions.● A FREE trial is available to try out its many features. | ● As a downloadable software, Filmora will require downloading and installing.● Some of its features and functions are locked in the FREE version as well.● Payment is either subscription-based or one-time for a perpetual license. |
For Win 7 or later (64-bit)
For macOS 10.12 or later
02PicMonkey
Rating and Reviews: [G2: 4.4/5]
When it comes to online photo animator tools, PicMonkey is definitely one of the first that people recommend. It’s premium software, so you’ll have to pay to use all of its functions — with the cheapest plan worth $72 annually or $7.99 monthly. The best part about it is, undoubtedly, the fact that it was developed by Shutterstock, which is highly regarded in the photography industry. So, you can surely rely on stable support.
● Photo Animation maker with lots of built-in animation effects and templates that allow users to easily make animated pictures.
URL: https://www.picmonkey.com/design/photo-animation-maker
| PROS | CONS |
|---|---|
| ● A FREE trial is available to test out its functions.● Developed by a reliable company.● Packed with lots of built-in animated effects and presets. | ● Packed with lots of built-in animated effects and presets.● No software version for use without the internet.● Does not come equipped with advanced custom animation tools. |
03Adobe Creative Cloud Express
Rating and Reviews: [Creative Bloq: 4/5]
The Adobe Creative Cloud Express is both an online photo animator and an application that you can download and install on your phone. As is expected from any Adobe product, it’s quite premium in make and is better suited for more serious photo animations — especially as you’ll need to pay in order to be able to use it to its fullest extent.
● Comes with a veritable library of templates, effects, and filters for advanced photo editing and photo animation.
URL: https://www.adobe.com/express/create/social-media-graphic
| PROS | CONS |
|---|---|
| ● Advanced photo editing tool.● Available both online and as an app.● Reliable and trustworthy adobe product. | ● The FREE trial is limited.● The FREE trial is limited.● Advanced photo editing is not suitable for beginners. |
04ColorCinch
Rating and Reviews: [Crozdesk: 4/5]
ColorCinch, or Cartoonize, as it is also called, is another popular online photo animator that you might have heard about already. This one features quite a few presets that you can use to quickly change the look of your photographs.
● Photo editing functions for breathing new life into existing photographs.
● Presets, templates, filters, and effects are available for easy and efficient photo editing.
URL: https://www.cartoonize.net/
| PROS | CONS |
|---|---|
| ● Beginner-friendly UI.● Comes with lots of filters and effects built-in.● Cartoonizer effect for simple photo animation onlinep. | ● Paid tool Limited FREE trial.● Subscription-based packages.● Limited customer animation functions. |
05Photo Cartoon
Rating and Reviews: N/A
Photo Cartoon is an online photo animator that specifically alters your photos and ‘cartoon-izes’ it (with several effects to choose from as to the specific style that you want). This single-use, while definitely not the most advanced on this list of ours, offers the user an easy way to change the look of their photographs.
● Transform photos into cartoons, paintings, drawings, and caricatures.
URL: https://photocartoon.net/
| PROS | CONS |
|---|---|
| ● Quick and easy to use● Online software, good for all devices● The finished photo animation can be downloaded and shared. | ● Very basic functions.● Limited effects/filters to choose from. ● Not highly rated online. |
06BeFunky
Rating and Reviews: [G2: 4.2/5]
With BeFunky, we go back to somewhat more advanced online photo animator tools. This one works quite simply as well though. Similar to the previous tool we introduced, BeFunky is meant primarily for quickly and easily adding filters and effects to photographs to change its style to look more like a cartoon or animation.
● Create a cartoon version of your images easily and quickly.
URL: https://www.befunky.com/features/photo-to-cartoon/
| PROS | CONS |
|---|---|
| ● Easy-to-use and beginner-friendly● Easy-to-use and beginner-friendly.● Available online and thus compatible with most devices. | ● Limited photo editing scope.● Sign-up is required for long-term use.● No advanced custom animation functions. |
077. ASPOSE
Rating and Reviews: N/A
Although not very well-known, ASPOSE is an easy way of animating pictures online. All you really have to do is upload your file (in the way that is suggested) and you’re good to go. You’ll be given a choice in what kind of animations you want to put on your photograph thereafter. And, when the conversion is complete, it’ll be FREE to download and share.
● Easily make animated pictures online by uploading photographs to be animated.
URL: https://products.aspose.app/imaging/animation-maker
| PROS | CONS |
|---|---|
| ● FREE photo to animation converter● Easy-to-use and efficient.● Motion animations available. | ● Internet is required for use.● Not the most advanced filters/effects/animations are available.● No custom animation function. |
08TheCartoonist.me
Rating and Reviews: N/A
We’re approaching more and more obscure territory the further we go along this list, with many of the tools, including this next one, called ‘The Cartoonist.me’, not having been rated by the usual tech websites. But, that doesn’t mean that the tool itself is any less useful. This one, in particular, is akin to the other cartoon-izers that we introduced earlier — in that it changes the look of photographs into one similar to what is used in animations.
● Picture animator online that allows you to turn your pictures into cartoon versions of their former self.
URL: https://thecartoonist.me/
| PROS | CONS |
|---|---|
| ● FREE photo animation maker.● Basic cartoon effects available.● Upload and Download | ● No advanced photo editing.● No advanced photo editing.● Not highly rated. |
09Snapstouch
Rating and Reviews: N/A
Snapstouch is another obscure, but no less useful, photo editing tool that adds a touch animation to your photographs. This online tool offers sketch, painting, pencil sketch, outline, cartoon, and many other filters that you can apply to your photographs to directly change their look.
● Change the look of your photographs with an easily applied filter.
URL: http://www.snapstouch.com/
| PROS | CONS |
|---|---|
| ● Easy-to-use (upload then download)● FREE to use online tool.● Several effects to choose from. | ● A limited selection of filter effects.● Old and dated UI.● Not highly rated. |
10AnyMaking
Rating and Reviews: N/A
AnyMaking is a basic online photo editor that comes with a variety of photo effects that you can apply to your photographs to change their looks. Much like the previous tools, AnyMaking offers ‘animation’ style filters that can turn your photographs into something that looks like they came from one of your favorite animated films.
● Turn your photographs completely anew with fun photo effects.
| PROS | CONS |
|---|---|
| ● FREE-to-use photo effects tool.● Cartoonizer effect for animating photographs.● Easy-to-use (upload then download) | ● Limited photo effects.● No custom photo animation functions.● Not highly rated. |
● Key Takeaways from This Episode →
● Photo to Animation is quite a broad subject and, fittingly, that means that the tools that allow for it are varied indeed.
● Some photo to animation converters will allow you to completely change the look of your photograph with a single application of a filter. While others are more involved (and thus, more flexible) and require more careful customization.
● We’ve included both types (and all the types between) in our list of photo to animation converters. Hopefully, you’ll find one that can help you make the animated pictures that you want to make.
4 Things You Need to Know About Pinterest GIF
4 Things You Should Know About Pinterest GIF
An easy yet powerful editor
Numerous effects to choose from
Detailed tutorials provided by the official channel
Emojis formerly reigned supreme, but GIFs and memes have since supplanted them. When you add a GIF to a conversation, it becomes more exciting. GIFs are considerably better at communicating our feelings, and they deserve credit for that. Pinterest, like other social networking sites and chat apps, enables GIFs. Pinterest is a photo-sharing website where you can find home decor ideas, recipes, fashion inspiration, DIY projects, and more.
Compared to a static image, adding a GIF to Pinterest conveys more information. You can make GIFs for your DIY projects or use them to display all sides of a cushion, which would typically require many images. But what if you like a GIF you found on Pinterest? What’s the best way to get it? That is what we will demonstrate here. This article will show how to download Pinterest GIFs to your computer and mobile device.
In this article
01 [Are There Gifs on Pinterest?](#Part 1)
02 [How to Get Pinterest GIF Downloader](#Part 2)
03 [How to Get an Animated GIF on Pinterest](#Part 3)
Part 1 Are There Gifs on Pinterest?
You can submit GIF and animated GIF images from your computer or the Internet to Pinterest. Because the pictures on your board aren’t animated, you might conclude that animated GIFs don’t work on Pinterest. When you click on the photos and open them on their respective Web pages, they become animated. Because images posted from websites do not save on Pinterest’s servers, they are not animated. You can’t do anything if Pinterest doesn’t animate a GIF.
Part 2 How to Get Pinterest GIF Downloader
Compared to a static image, adding a GIF to Pinterest conveys more information. You can make GIFs for your DIY projects or use them to display all sides of a cushion, which would typically require many images.
But what if you’re a Pinterest fan of a GIF? What’s the best way to get it? That is what we will demonstrate here. We’ll show you how to complete a Pinterest GIF video download to your computer and mobile device in this session.
Let’s get started.
01How to Download Pinterest Videos Using Mobile?
Here are simple steps to follow to achieve this:
Make use of the native download button
Step 1: Select GIF to download
Go to the selected GIF and click it.
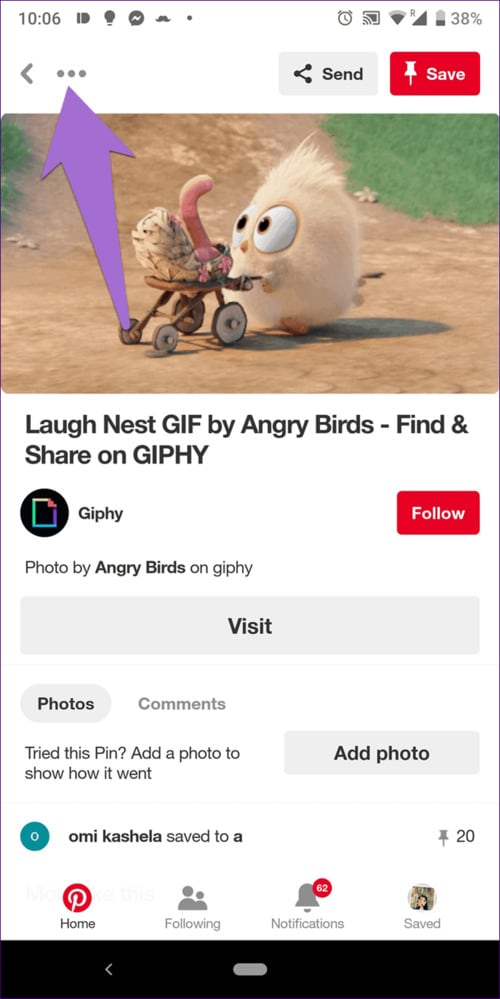
Step 2: Download Image
Click the three-dot icon at the top from the menu and select Download image.

Step 3: Notification
After the image gets saved, you will receive a notification at the bottom. The freshly downloaded GIF will appear in your gallery or camera roll when you open it.
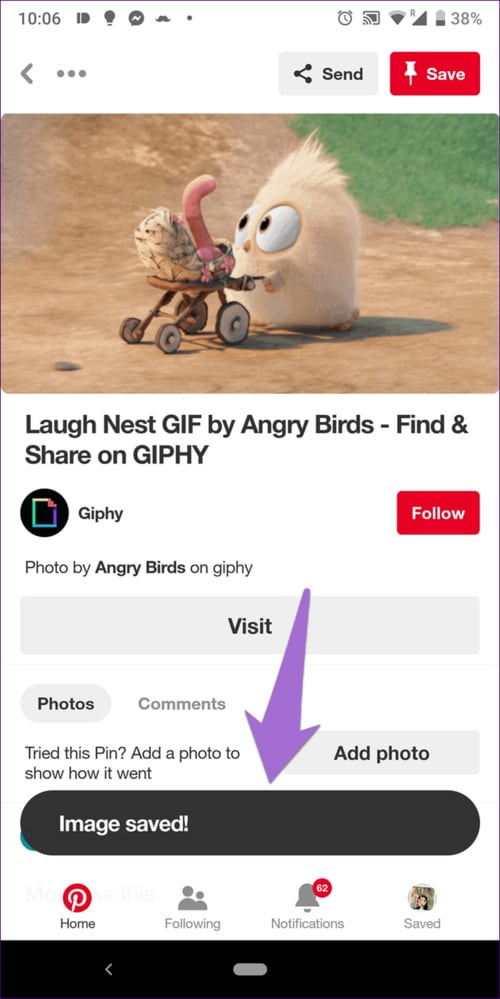
02How to Download Pinterest Videos by Computer?
Follow these simple step guides to achieve this:
Step 1: Open selected GIF
On your computer, open the GIF you want to use.
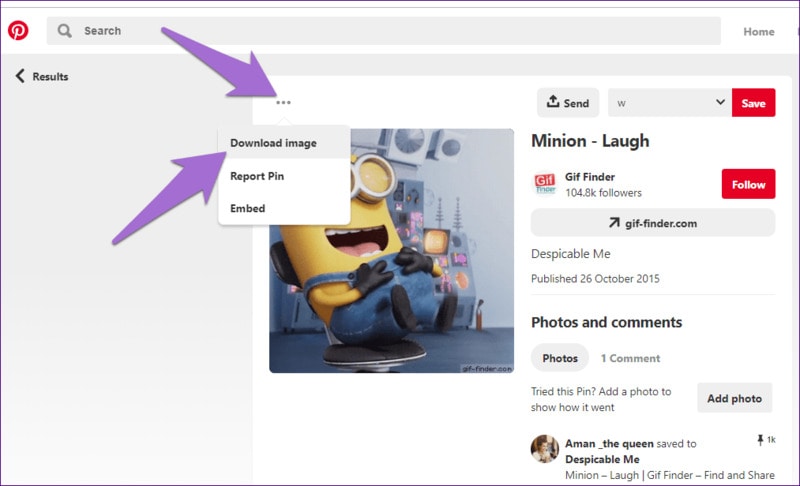
Step 2: Select Download
Select Download image from the menu by clicking on the three-dot icon above the GIF.
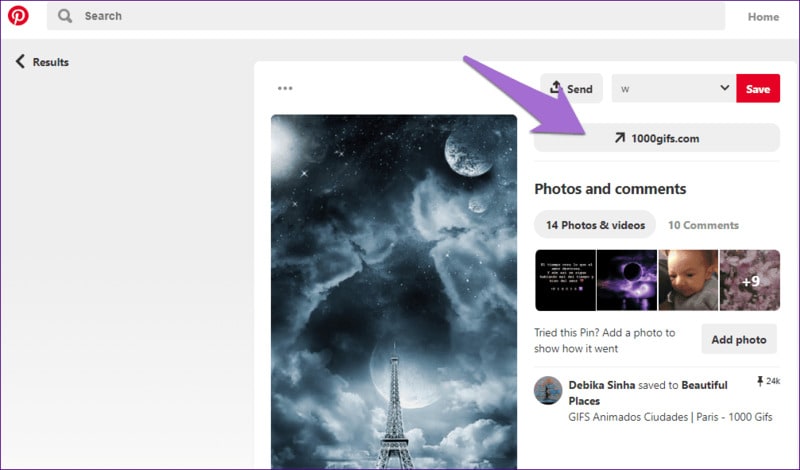
Step 3: Alternative
If the download option isn’t available for any reason, you’ll have to rely on the company’s
website. To do so, click on the GIF’s link.
You’ll reach the GIF’s host site. Right-click on the GIF and choose to Save image as… from the menu that appears. Ensure that the extension is . GIF. In some circumstances, you will have the opportunity to download the video.
Part 3 How to Get an Animated GIF on Pinterest
Save a picture from the Web to your hard drive before pinning it; GIFs pinned from Web pages are not animated. Open the Web page with the image you want to pin, then right-click the image and opt “Save as” to save it to a folder on your computer. You can save pictures off the Web in all major Web browsers, including Google Chrome, Mozilla Firefox, and Internet Explorer. Log in to Pinterest select “Upload a Pin” from the “+” menu. Select the animated GIF from your hard drive by clicking the “Choose Image” button. Click “Pin It” after selecting the board you wish to pin the image.
How to Upload a GIF to Pinterest
Now that you know how to download Pinterest GIFs, you may want to consider posting GIFs to Pinterest as well. Unfortunately, you cannot upload GIFs from mobile apps. To upload a GIF to your Pinterest account, you’ll need to utilize a computer.
If you have a GIF file on your computer, follow these instructions to add it.
Step 1: Log in to your Pinterest account
Log in to your Pinterest account, then go to the bottom of the page to the add icon. From the menu, choose to Create a Pin.
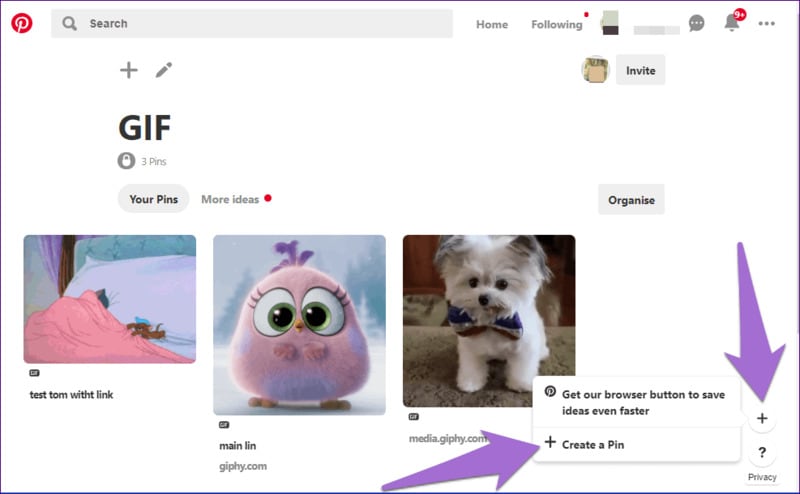
Step 2: Upload GIF
Drag and drop the GIF or upload it onto the pin creation screen from your computer.
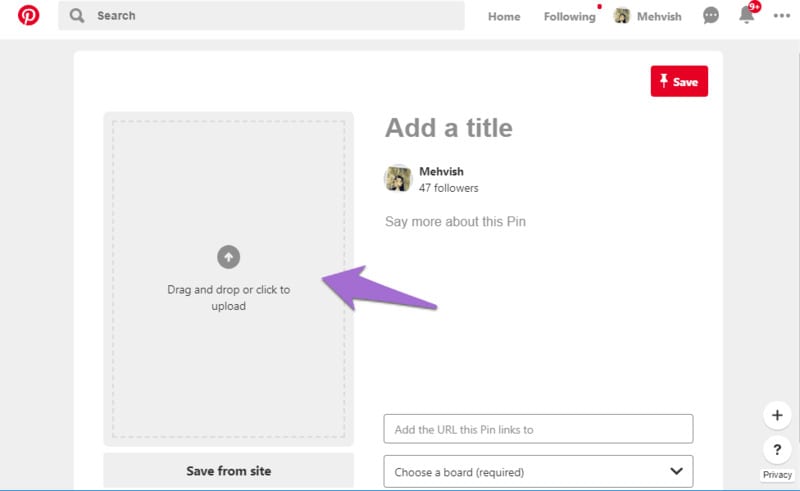
Step 3: Save GIF
When the GIF appears on the next screen, describe it and select a board for the pin. Finally, press the Save button.
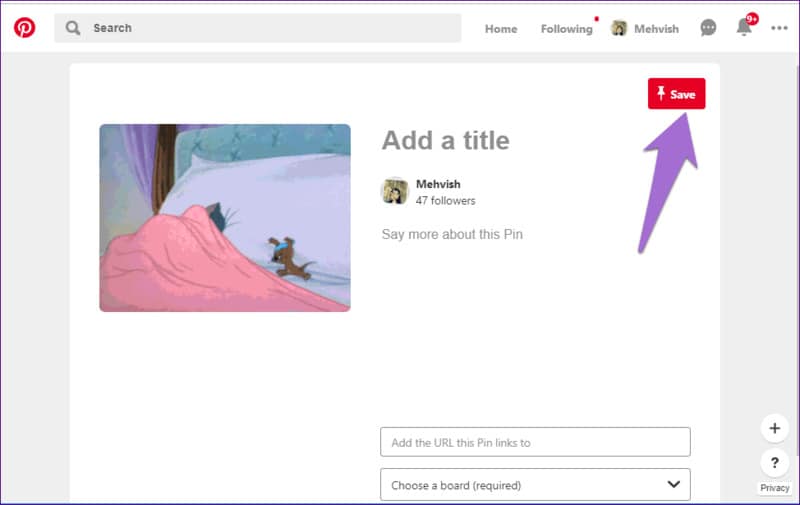
To save a file with the.GIF extension, you’ll need to use a GIF Pinterest downloader software or an application usable both online and offline. Wondershare Filmora is the most popular programs for this work because of the following benefits: it is elementary to use, and anyone can handle who isn’t technically inclined.
Wondershare Filmora Video Editor can convert Pinterest video to GIF from various video formats, including.wmv,.mp4,.mkv,.evo,.dat,.wav,.mpeg, and.avi, so you don’t have to worry about compatibility.
Wondershare Filmora
Get started easily with Filmora’s powerful performance, intuitive interface, and countless effects!
Try It Free Try It Free Try It Free Learn More >

The most important thing to know about Filmora video editing software is that it allows users to edit GIF files is one of the preferable programs for this task due to its advantages. It is elementary to use and is operational by any nontechnical person.
● Key Takeaways from This Episode →
● Now have learned how to easily download GIFs from Pinterest using Pinterest GIF downloader. By sincerely following the simple tips listed above, you can easily download video on GIF from Pinterest using any device on your mobile phone or your PC.
● However, Wondershare Filmora is one app that can meet all your needs to create a unique Pinterest GIF. And to top is all it is easy to use for none professionals
Emojis formerly reigned supreme, but GIFs and memes have since supplanted them. When you add a GIF to a conversation, it becomes more exciting. GIFs are considerably better at communicating our feelings, and they deserve credit for that. Pinterest, like other social networking sites and chat apps, enables GIFs. Pinterest is a photo-sharing website where you can find home decor ideas, recipes, fashion inspiration, DIY projects, and more.
Compared to a static image, adding a GIF to Pinterest conveys more information. You can make GIFs for your DIY projects or use them to display all sides of a cushion, which would typically require many images. But what if you like a GIF you found on Pinterest? What’s the best way to get it? That is what we will demonstrate here. This article will show how to download Pinterest GIFs to your computer and mobile device.
In this article
01 [Are There Gifs on Pinterest?](#Part 1)
02 [How to Get Pinterest GIF Downloader](#Part 2)
03 [How to Get an Animated GIF on Pinterest](#Part 3)
Part 1 Are There Gifs on Pinterest?
You can submit GIF and animated GIF images from your computer or the Internet to Pinterest. Because the pictures on your board aren’t animated, you might conclude that animated GIFs don’t work on Pinterest. When you click on the photos and open them on their respective Web pages, they become animated. Because images posted from websites do not save on Pinterest’s servers, they are not animated. You can’t do anything if Pinterest doesn’t animate a GIF.
Part 2 How to Get Pinterest GIF Downloader
Compared to a static image, adding a GIF to Pinterest conveys more information. You can make GIFs for your DIY projects or use them to display all sides of a cushion, which would typically require many images.
But what if you’re a Pinterest fan of a GIF? What’s the best way to get it? That is what we will demonstrate here. We’ll show you how to complete a Pinterest GIF video download to your computer and mobile device in this session.
Let’s get started.
01How to Download Pinterest Videos Using Mobile?
Here are simple steps to follow to achieve this:
Make use of the native download button
Step 1: Select GIF to download
Go to the selected GIF and click it.
Step 2: Download Image
Click the three-dot icon at the top from the menu and select Download image.
Step 3: Notification
After the image gets saved, you will receive a notification at the bottom. The freshly downloaded GIF will appear in your gallery or camera roll when you open it.
02How to Download Pinterest Videos by Computer?
Follow these simple step guides to achieve this:
Step 1: Open selected GIF
On your computer, open the GIF you want to use.
Step 2: Select Download
Select Download image from the menu by clicking on the three-dot icon above the GIF.
Step 3: Alternative
If the download option isn’t available for any reason, you’ll have to rely on the company’s
website. To do so, click on the GIF’s link.
You’ll reach the GIF’s host site. Right-click on the GIF and choose to Save image as… from the menu that appears. Ensure that the extension is . GIF. In some circumstances, you will have the opportunity to download the video.
Part 3 How to Get an Animated GIF on Pinterest
Save a picture from the Web to your hard drive before pinning it; GIFs pinned from Web pages are not animated. Open the Web page with the image you want to pin, then right-click the image and opt “Save as” to save it to a folder on your computer. You can save pictures off the Web in all major Web browsers, including Google Chrome, Mozilla Firefox, and Internet Explorer. Log in to Pinterest select “Upload a Pin” from the “+” menu. Select the animated GIF from your hard drive by clicking the “Choose Image” button. Click “Pin It” after selecting the board you wish to pin the image.
How to Upload a GIF to Pinterest
Now that you know how to download Pinterest GIFs, you may want to consider posting GIFs to Pinterest as well. Unfortunately, you cannot upload GIFs from mobile apps. To upload a GIF to your Pinterest account, you’ll need to utilize a computer.
If you have a GIF file on your computer, follow these instructions to add it.
Step 1: Log in to your Pinterest account
Log in to your Pinterest account, then go to the bottom of the page to the add icon. From the menu, choose to Create a Pin.
Step 2: Upload GIF
Drag and drop the GIF or upload it onto the pin creation screen from your computer.
Step 3: Save GIF
When the GIF appears on the next screen, describe it and select a board for the pin. Finally, press the Save button.
To save a file with the.GIF extension, you’ll need to use a GIF Pinterest downloader software or an application usable both online and offline. Wondershare Filmora is the most popular programs for this work because of the following benefits: it is elementary to use, and anyone can handle who isn’t technically inclined.
Wondershare Filmora Video Editor can convert Pinterest video to GIF from various video formats, including.wmv,.mp4,.mkv,.evo,.dat,.wav,.mpeg, and.avi, so you don’t have to worry about compatibility.
Wondershare Filmora
Get started easily with Filmora’s powerful performance, intuitive interface, and countless effects!
Try It Free Try It Free Try It Free Learn More >
The most important thing to know about Filmora video editing software is that it allows users to edit GIF files is one of the preferable programs for this task due to its advantages. It is elementary to use and is operational by any nontechnical person.
● Key Takeaways from This Episode →
● Now have learned how to easily download GIFs from Pinterest using Pinterest GIF downloader. By sincerely following the simple tips listed above, you can easily download video on GIF from Pinterest using any device on your mobile phone or your PC.
● However, Wondershare Filmora is one app that can meet all your needs to create a unique Pinterest GIF. And to top is all it is easy to use for none professionals
Also read:
- Updated Useful Tips for Canva Animated Elements for 2024
- In 2024, How to Make GIF Stickers for WhatsApp 100 The Simple Way
- New How to Make an Animation With 7 Steps
- Updated 2024 Approved 10 Must Watch Netflix Cartoon Series
- Updated How I Animate Discord Profile Pictures (& You Can Too) for 2024
- Updated 20 Best Anime Movies You Cannot Miss 2024 List
- Top Practices on Online 3D Avatar Creator
- Best 10 Video to GIF Converters Top Picks for 2024
- How to Send and Add Snapchat GIFs 100 in Easy Way
- New In 2024, How to Draw A Skeleton Cartoon – A Step by Step Guide
- New How to Turn Yourself Into a WhatsApp Cartoon
- Updated In 2024, Best 15 Female Anime Characters-Who Is Your Favorite?
- Updated How to Create A GIF with Sound for 2024
- New 20 Free After Effects Logo Reveal Templates You Will Want to Know for 2024
- New In 2024, How to Make Your GIF on WhatsApp in Simple Ways
- New How to Draw Skeleton Cartoon – A Step by Step Guide
- Updated 2024 Approved How to Make a Video a Live Photo 2023
- Updated Types of Cartoon Styles You May Use for Your Next Marketing Project
- In 2024, How to Analyze an Editorial Cartoon
- Updated How to Create Benime Whiteboard Animation in Android
- New Best 10 Anime Websites to Watch Dubbed Anime Free
- Updated Simple Shortcut to Convert Videos to Gifs on iPhone for 2024
- 2024 Approved 5 Best Adobe Animate Courses & Classes | Beginners Complete Tutorial
- Top Claymation Shows That Make Your Memories Unforgettable for 2024
- Ways to Create an Adobe Collage for 2024
- How-To Guide Make Animation Characters with the Best Animated Character Creators
- New 2024 Approved Tutorials to Make Animated Images
- Updated Tutorial on Making Unity 2D Animation for 2024
- Updated Top 12 Video to GIF Converters High Quality to Check Out
- Secret Source to Make a Great Stop Motion Puppet for 2024
- In 2024, Best 15 Anime Fonts-Find Your Favorite One
- The Only Guide to Make 2D Rigging Clear to You
- Best 10 Apps to Enhance Your Instagram Story Slideshow for 2024
- New Tips for GIF to Animated PNG You Should Know for 2024
- Whats Music Video GIF & How to Add Music to GIF Files for 2024
- 2024 Approved FREE Best Anime Streaming Sites to Download Anime
- Updated The 15 Best Apps to Turn Photos Into Cartoons and Sketches
- Updated How to Make a GIF in Photoshop for 2024
- Updated In 2024, How to Draw A Skeleton Cartoon – A Step by Step Guide
- 2024 Approved How to Create Picsart Cartoon
- New Best 8 Tools Tell You How to Make Slideshows for Instagram for 2024
- New 2024 Approved Tips for GIF to Animated PNG
- Updated 15 Forgotten Cartoon Characters of All Time for 2024
- Updated 2024 Approved How to Make GIF Instagram | Quick Tips
- 3 Solutions to Find Your Xiaomi 14 Ultra Current Location of a Mobile Number | Dr.fone
- In 2024, Catch or Beat Sleeping Snorlax on Pokemon Go For Vivo Y100i | Dr.fone
- Best Xiaomi Civi 3 Pattern Lock Removal Tools Remove Android Pattern Lock Without Losing Data
- How to Unlock Apple iPhone XR Passcode without Computer?
- Tips And Tricks To Tell if Your Apple iPhone 13 Is Unlocked
- About OnePlus Ace 2 Pro FRP Bypass
- Solutions to restore deleted files from Y200e 5G
- How To Transfer WhatsApp From iPhone 14 to other iPhone 11 Pro devices? | Dr.fone
- Detailed guide of ispoofer for pogo installation On Realme 12 5G | Dr.fone
- Possible ways to recover deleted files from Honor 100 Pro
- How to recover old music from your Oppo Reno 8T 5G
- How to Intercept Text Messages on Vivo Y100i Power 5G | Dr.fone
- In 2024, Change Location on Yik Yak For your OnePlus Ace 2 to Enjoy More Fun | Dr.fone
- FRP Hijacker by Hagard Download and Bypass your Huawei P60 FRP Locks
- How to Fix Error 495 While Download/Updating Android Apps On Oppo A79 5G | Dr.fone
- In 2024, What Pokémon Evolve with A Dawn Stone For Oppo Reno 10 5G? | Dr.fone
- Where Is the Best Place to Catch Dratini On Vivo V29 | Dr.fone
- 3 Ways to Change Location on Facebook Marketplace for Realme V30T | Dr.fone
- How to Perform Hard Reset on Itel P55? | Dr.fone
- Infinix Note 30 support - Forgotten screen lock.
- In 2024, How to Fake Snapchat Location on Samsung Galaxy M14 4G | Dr.fone
- In 2024, Process of Screen Sharing Realme Narzo N55 to PC- Detailed Steps | Dr.fone
- In 2024, Detailed Guide on Removing Apple iPhone 14 Pro Max Activation Lock without Previous Owner?
- Everything You Need to Know about Lock Screen Settings on your Tecno Pop 8
- In 2024, Unlock Apple iPhone 13 Pro Max With Forgotten Passcode Different Methods You Can Try | Dr.fone
- In 2024, 3 Ways to Change Location on Facebook Marketplace for Vivo Y36 | Dr.fone
- Solved Warning Camera Failed on Itel A05s | Dr.fone
- In 2024, Hassle-Free Ways to Remove FRP Lock on Huawei Nova Y71 Phones with/without a PC
- Top 10 AirPlay Apps in Oppo Find N3 for Streaming | Dr.fone
- In 2024, Complete Tutorial to Use GPS Joystick to Fake GPS Location On Vivo Y100i Power 5G | Dr.fone
- Title: A Beginners Guide to Tell You What 3D Animation Is for 2024
- Author: Elon
- Created at : 2024-05-19 03:04:32
- Updated at : 2024-05-20 03:04:32
- Link: https://animation-videos.techidaily.com/a-beginners-guide-to-tell-you-what-3d-animation-is-for-2024/
- License: This work is licensed under CC BY-NC-SA 4.0.
