
:max_bytes(150000):strip_icc():format(webp)/001_the-16-best-shows-to-watch-on-discovery-plus-right-now-5116795-b17411d87cfd4bd690fda5be50ea188c.jpg)
Best 15 2D Animation Software Free That Worth to Try for 2024
Best 15 2D Animation Software Free That Worth to Try
Top 15 2D Animation Software Free That Worth to Try
An easy yet powerful editor
Numerous effects to choose from
Detailed tutorials provided by the official channel
When you are trying to create a funny cartoon, explainer videos, or other short informative content to post online, 2D animation software is a breeze to use.
With access to the best 2D animation software, you can create compelling and intricate stories that will help you sync with the audience.
01Wondershare Filmora
Price: Free, $99.99 (Perpetual); $59.99 (1-Year)
Pros
Numerous preset options
Both for beginners and professionals
Quick video trim/edits
Cons
Straightforward user interface
Lacks various shortcuts
May need high system requirements
What are users saying?
“I am solving the problem of getting an easy-to-use, all-in-one video editor. In addition, the editor gives you the ability to command over your audio files, whereas other editors just give you the basic audio editing capabilities. Lastly, the fully editable text effects and the vast numbers too.”
Key Features
Unlimited Video Tracks.
Audio Noise Reduction.
Automatic Audio Sync.
Motion Graphics animation support.
Auto color correction.
Available for Mac and Windows.
For Win 7 or later (64-bit)
For macOS 10.12 or later
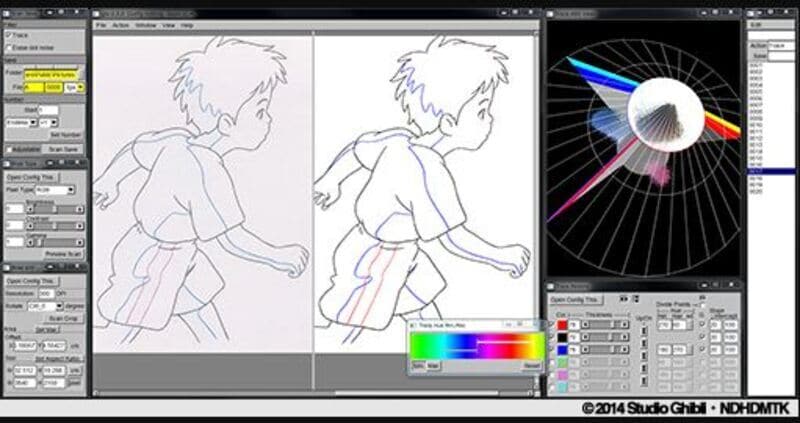
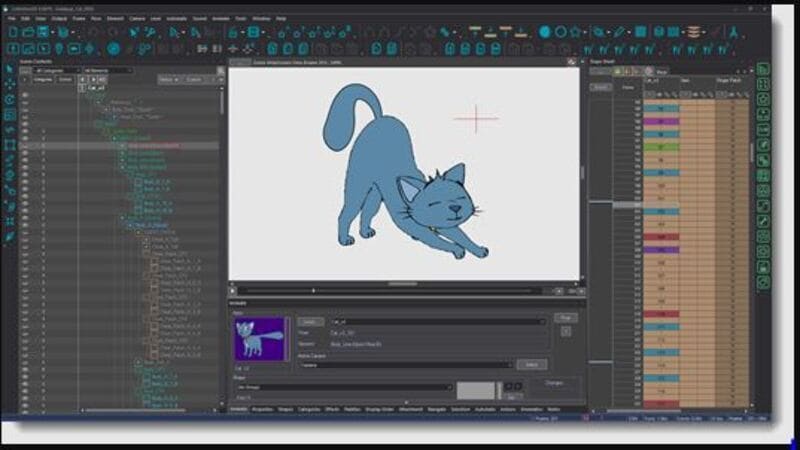
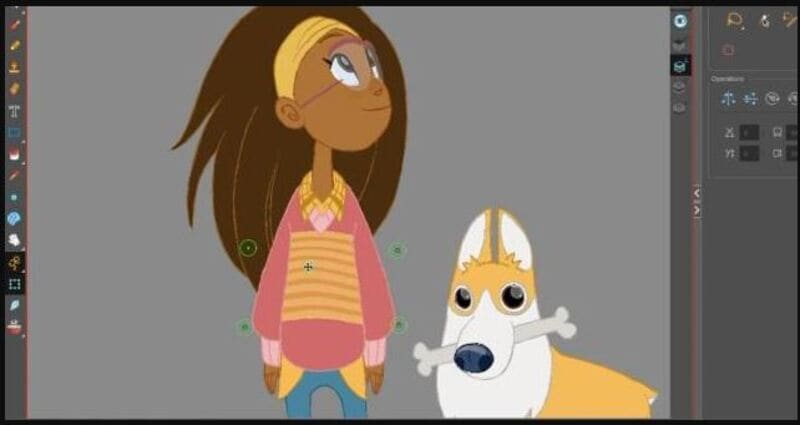
02Opentoonz
Price: Free
Pros
Accessible plugin to automatically create animation effects
Unique Xsheets & Timelines features
Audio/Soundtrack Implementer
Cons
Somewhat Limited drawing capabilities
Intricate setup
A bit outdated UI design
What are users saying?
“Not a very self-explanatory 2D animation software. I had to look up some help, but it worked out in the end (youtube tutorials).”
Key Features
GTS scanning tool
Easy to modify picture styles
Add light and distortion effects
Works with black and white and colored scans
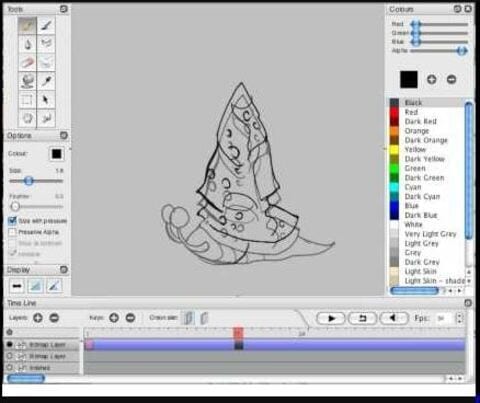
03Pencil 2D
Price: Free
Pros
Easy to use
Open sources
Supports multiple languages
Cons
It doesn’t support shape tools
Only for beginners
It doesn’t support 3D animation
What are users saying?
“The main thing against Pencil2d is the lack of complicated tools. Some tools are not there to bring better color effects, curves, drawing tools, etc. But honestly, this is not a big problem, the intention to be the most robust in the world but to be a tool that provides you a great introduction to animation with vector drawing.”
Key Features
Simplistic design to let you make animation easily
Raster and vector workflow switching
Cross-platform compatibility to free download
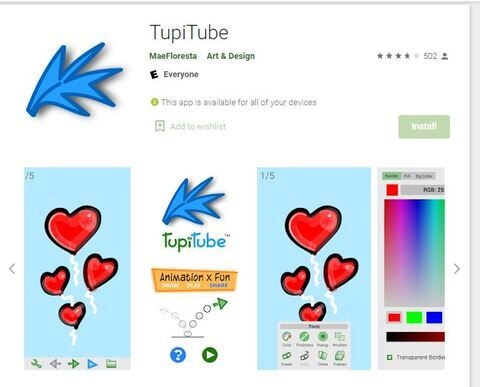
04Maefloresta/TupiTube
Price: Free
Pros
Great for beginners
Effective tools management
Friendly price plan
Cons
Differences in color correction
Certain confusing tools
Unable to erase unwanted frames
What are users saying?
“Honestly, I love the app, but I wish there were an eraser, but other than that, it is great for everything from experimental clips to my YT videos that will be coming out in a few months.”
Key Features
A free downloadable app that assists on tablets and smartphones
Simple software with tutorials
Interactive user interface that beginners can use with ease
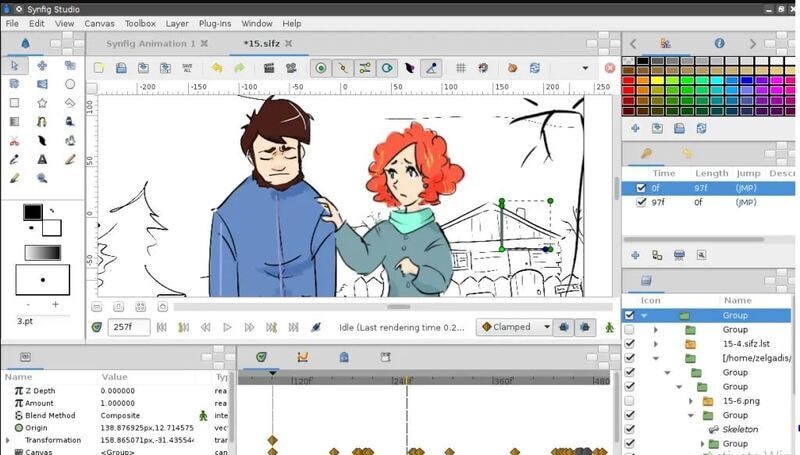
05Synfig
Price: Free
Pros
Offers 50+ layers
Easy to use layout
Lots of technical tools and functions
Cons
Difficult layout
Hard learning curve
Only a few tutorials available
What are users saying?
“It is cumbersome. You will look for tutorials to understand it, even if you have the best 2D animation software Background. - Though, it’s not famous so you may not wander for information about it as easily. - You do need high PC requirements to operate it, it is heavy. - You have to Constantly save because there are a few operations that make it crash.”
Key Features
Compatible with multiple content layers
The bone system assists for the cutout animations creation from bitmap images
Consistent with sound support to allow for the addition and syncing of narration and music to the video
06CelAction 2D
Price: $1300 Studio Edition (Single License Use)
Pros
Fast to use
Low system requirements
Add-ons available
Cons
Less dynamic
Less in demand
Time-Consuming to learn
What are users saying?
**”**I found the software pretty responsive and may not be good for beginners. Being a beginner, I need easy-to-use free download 2D animation software with low learning, and it didn’t fit my needs entirely.”
Key Features
Quick and straightforward to use professionally
Features ergonomic controls
Simply manages complicated projects with different layers
Compatible with all modern Windows machines - 32 and 64-bit Also runs with Macs through Boot Camp
The multiplane camera helps you have more excellent controls
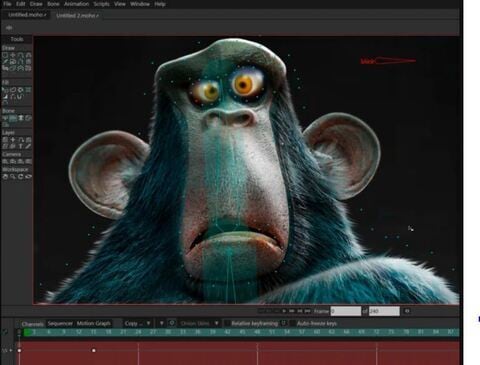
07Moho (Anime Studio) Pro
Price: $399 (Full Pack)
Pros
Regular updates available
Advanced features
Also good for beginners
Cons
Doesn’t automatically sync
Some functions are highly advanced
Lacks flexibility
What are users saying?
“I am freelance, and Moho12 has allowed me to give more character to animated characters that I can use for some clients. The compatibility that I get with Adobe Illustrator and the speed of the render makes it one of my central tools when it comes to working with character animations.”
Key Features
Improved freehand drawing tools
Beizer manages to make it simpler for you to design your videos
Brilliant warp feature assists in creating custom meshes to twist and bend your animations
Realistic motion blur
Best 2D Animation software for different layers at the same time
08FlipBook
Price: $19.99 (FlipBook Lite); $49.99 (FlipBook Studio); $149.99 (FlipBook Pro); $199.99 (FlipBook Pro HD)
Pros
Simple to draw
Easy to import from a scanner
Quick uploads
Cons
No free version
Challenging to make subtle changes
May not be user-friendly features
What are users saying?
“FlipBook does not contain a steep learning curve, and even first-time animators will be able to produce creative projects.”
Key Features
Modifications will be active while you draw the animation, so FlipBook is pretty quick
Easy to use the shift key to make speed painting
Ten animation layers for adding extra touches
Simple to use a scanner to import images

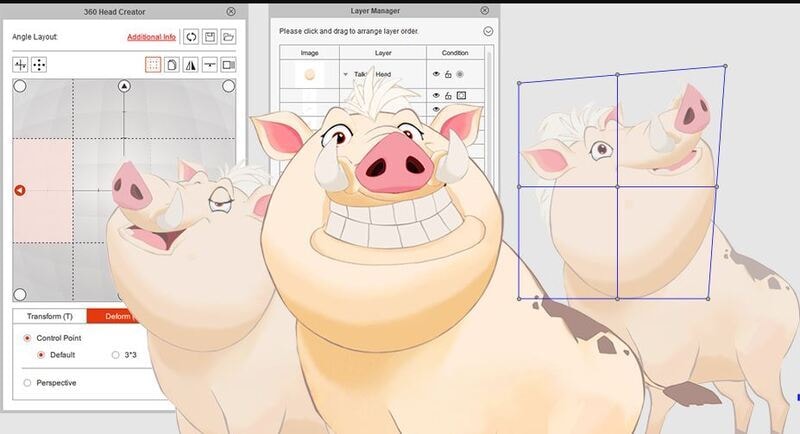
09Reallusion CrazyTalk Animator
Price: $199 (Pipeline); $99 (Pro)
Pros
Large library of appealing templates
Both for beginners and professionals
Easy to control characters
Cons
No drawing tools
A bit high learning curve
Hard to sync voice
What are users saying?
“This is a 2D animation maker online that makes sense. CTA makes sense in everything it does. One will find the tools exactly where they are supposed to be, and things work exactly the way one expects them to work.”
Key Features
Assists real-time facial expression with precise modification
Black magic to transform the image into a moving cartoon
You can make 2D visual effects for professionals
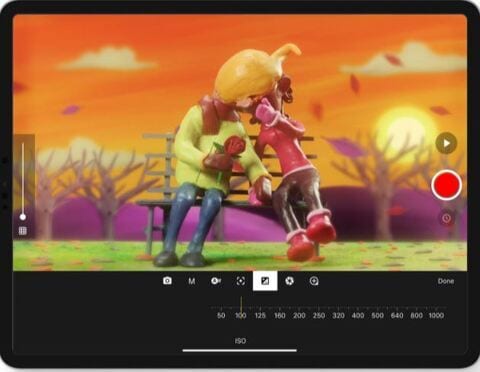
10Stop Motion Studio
Price: $59.99
Pros
Inbuilt sound editor
Easy to schedule
Not free
Cons
Certain hoops
No bone ringing tools or template designs
Only for 2D stop motion, 2D animation online
What are users saying?
“So I am in high school, Considering an animation class. Currently, we use this to make a claymation. I have noticed a few complexities with it. The camera does not aim well, which is a big hassle. It also Consists of a glitch where sometimes, if you hit the undo frame, it will delete all your other projects. When that happened to me, I was not happy. Now, this last part may just be nitpicking, but when I saw the official company’s animation, I saw their fingers in it, and the animation was not smooth.”
Key Features
Onionskin helps you to view previous frames via a transparent overlay
Audio recording and Chroma key and audio recording to better narrate and add voice effects
Simple
one-click upload to Facebook and YouTube
DSLR camera assistance for creating perfect 1080p recordings
11Harmony
Price: $25.50/month (Harmony Essentials); $64.50/month (Harmony Advanced); $117.50/month (Harmony Premium)
Pros
Lots of animation and drawing tools
Offers various color controls
Flexible 2D animation
Cons
Complicated to learn
High system requirements
Not free
What are users saying?
“I have created really powerful 2D animations with Harmony; it offers almost every tool to be precise and creative in the artworks and the advanced tools for paperless animations, which they helped me a lot.”
Key Features
Smooth lines
Stabilizer
It offers 3, 4, and 5-point guides for curved perspectives.
It helps create cut-out animation.
Easy integration with software available in the production pipeline.
It offers 2D or 3D integration.
12Krita
Price: Free
Pros
Completely free
Easy to use
High compatibility
Cons
No dedicated support
Use only on desktop
Outdated UI
What are users saying?
“Krita helps me with my advertising videos as well as logos and other image editing use cases. I mainly use it to make thumbnails for my youtube channel and featured images for the articles on my website. I also use it to make some quick logos for my youtube channel and website.“
Key Features
This online 2D animation maker software allows you to add a stabilizer to the brush to smooth it.
Personalized brush with nine different brush engines.
Create comic panels with built-in vector drawing tools.
Create seamless patterns and textures by making image reference on the x and y-axis.
Import brush packs and texture from other artists.
You can flatten, combine, or order layers to organize your artwork.

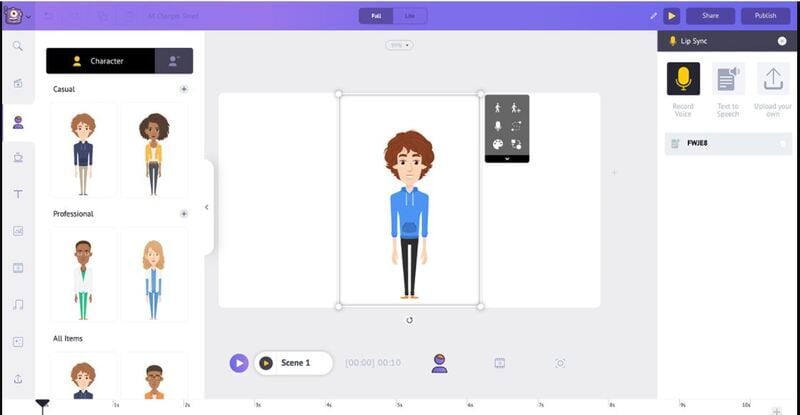
13Animaker
Price: $10/mo (Basic); $19/mo (Starter); $49/mo (Pro); Custom Pricing (Enterprise)
Pros
Helpful app
Able to make beautiful videos
Tons of features
Cons
May not work on specific systems
Chunky UI
Time-Consuming
What are users saying?
“Firstly, it displays that you are limited to the materials that you can use. If you want it, you can go for its paid version, which I think is ideal for a company but still hard. Secondly, I am trying to execute a project for my science class, and so far, I’ve had three days to work on it.”
Key Features
Create animated videos in 6 unique video styles like 2D, handcraft, infographics, whiteboard, 2.5 D, and typography.
Beginners can create videos and use them as both animation and animated presentations.
Best free download 2D animation software has 200 sound effects to choose from.
It offers 100 background music tracks.
It helps you to record direct voice recordings.
Animaker allows the team to collaborate.
Export video in full HD quality.
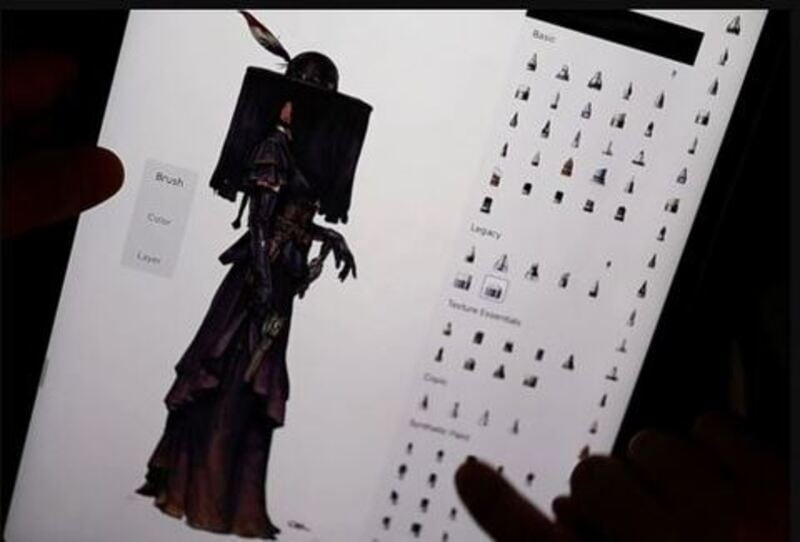
14SketchBook
Price: Free
Pros
Many options of pencils, brushes etc.
Various color options
Ideal for quick inspirations
Cons
It may be hard to enlarge projects
Lack of usability in some features
Some functions are confusing
What are users saying?
“Sketchbook has helped us in mobility. Since it is also available for tablets like iPad, it can be used to create quick artworks and concept arts and be used as a notebook to take notes. The different features also come in real handy, and the artwork created can be used to display professionally with a good amount of details.”
Key Features
It helps you draw basic shapes like circles, triangles, rectangles, etc.
Adjust the rules as per your desire.
Fill color into your artwork.
Also, import or export the layer as PSD.
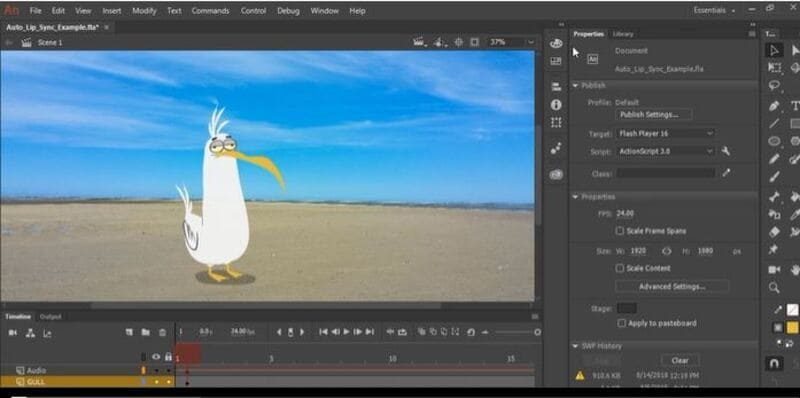
15Animate CC
Price: $20.99/mo
Pros
Helpful user interface
Various essential modules
Extremely smooth
Cons
High battery utilization
Steep learning curve
Lack some tools for handling sound
What are users saying?
“We use Animate to make educational videos, but we also use some of the drawing tools to create vector-based illustrations, and we can export them out from Animate to use them in printed products.“
Key Features
Create new poses for vector images or figures.
It helps you to arrange your layers in a parent-child hierarchy.
● Automatically matches mouth poses to voice inflections.
● Easy to export 360 VR animations.
● Create ads directly with Animate.
● Export images with the correct resolution by bypassing the image optimization and using image settings.
● Key Takeaways from This Episode →
● Using 2D animation software is simpler when you have the right software. You already have a storyboard and a script in mind, but now you can realize your vision in unique and intricate ways.
● So, if you want to make 3D animation, various 3D animation software options are also for you. If any of the products above will serve you well, you could use Filmora, which comes first in the series of 2D animation software.
When you are trying to create a funny cartoon, explainer videos, or other short informative content to post online, 2D animation software is a breeze to use.
With access to the best 2D animation software, you can create compelling and intricate stories that will help you sync with the audience.
01Wondershare Filmora
Price: Free, $99.99 (Perpetual); $59.99 (1-Year)
Pros
Numerous preset options
Both for beginners and professionals
Quick video trim/edits
Cons
Straightforward user interface
Lacks various shortcuts
May need high system requirements
What are users saying?
“I am solving the problem of getting an easy-to-use, all-in-one video editor. In addition, the editor gives you the ability to command over your audio files, whereas other editors just give you the basic audio editing capabilities. Lastly, the fully editable text effects and the vast numbers too.”
Key Features
Unlimited Video Tracks.
Audio Noise Reduction.
Automatic Audio Sync.
Motion Graphics animation support.
Auto color correction.
Available for Mac and Windows.
For Win 7 or later (64-bit)
For macOS 10.12 or later
02Opentoonz
Price: Free
Pros
Accessible plugin to automatically create animation effects
Unique Xsheets & Timelines features
Audio/Soundtrack Implementer
Cons
Somewhat Limited drawing capabilities
Intricate setup
A bit outdated UI design
What are users saying?
“Not a very self-explanatory 2D animation software. I had to look up some help, but it worked out in the end (youtube tutorials).”
Key Features
GTS scanning tool
Easy to modify picture styles
Add light and distortion effects
Works with black and white and colored scans
03Pencil 2D
Price: Free
Pros
Easy to use
Open sources
Supports multiple languages
Cons
It doesn’t support shape tools
Only for beginners
It doesn’t support 3D animation
What are users saying?
“The main thing against Pencil2d is the lack of complicated tools. Some tools are not there to bring better color effects, curves, drawing tools, etc. But honestly, this is not a big problem, the intention to be the most robust in the world but to be a tool that provides you a great introduction to animation with vector drawing.”
Key Features
Simplistic design to let you make animation easily
Raster and vector workflow switching
Cross-platform compatibility to free download
04Maefloresta/TupiTube
Price: Free
Pros
Great for beginners
Effective tools management
Friendly price plan
Cons
Differences in color correction
Certain confusing tools
Unable to erase unwanted frames
What are users saying?
“Honestly, I love the app, but I wish there were an eraser, but other than that, it is great for everything from experimental clips to my YT videos that will be coming out in a few months.”
Key Features
A free downloadable app that assists on tablets and smartphones
Simple software with tutorials
Interactive user interface that beginners can use with ease
05Synfig
Price: Free
Pros
Offers 50+ layers
Easy to use layout
Lots of technical tools and functions
Cons
Difficult layout
Hard learning curve
Only a few tutorials available
What are users saying?
“It is cumbersome. You will look for tutorials to understand it, even if you have the best 2D animation software Background. - Though, it’s not famous so you may not wander for information about it as easily. - You do need high PC requirements to operate it, it is heavy. - You have to Constantly save because there are a few operations that make it crash.”
Key Features
Compatible with multiple content layers
The bone system assists for the cutout animations creation from bitmap images
Consistent with sound support to allow for the addition and syncing of narration and music to the video
06CelAction 2D
Price: $1300 Studio Edition (Single License Use)
Pros
Fast to use
Low system requirements
Add-ons available
Cons
Less dynamic
Less in demand
Time-Consuming to learn
What are users saying?
**”**I found the software pretty responsive and may not be good for beginners. Being a beginner, I need easy-to-use free download 2D animation software with low learning, and it didn’t fit my needs entirely.”
Key Features
Quick and straightforward to use professionally
Features ergonomic controls
Simply manages complicated projects with different layers
Compatible with all modern Windows machines - 32 and 64-bit Also runs with Macs through Boot Camp
The multiplane camera helps you have more excellent controls
07Moho (Anime Studio) Pro
Price: $399 (Full Pack)
Pros
Regular updates available
Advanced features
Also good for beginners
Cons
Doesn’t automatically sync
Some functions are highly advanced
Lacks flexibility
What are users saying?
“I am freelance, and Moho12 has allowed me to give more character to animated characters that I can use for some clients. The compatibility that I get with Adobe Illustrator and the speed of the render makes it one of my central tools when it comes to working with character animations.”
Key Features
Improved freehand drawing tools
Beizer manages to make it simpler for you to design your videos
Brilliant warp feature assists in creating custom meshes to twist and bend your animations
Realistic motion blur
Best 2D Animation software for different layers at the same time
08FlipBook
Price: $19.99 (FlipBook Lite); $49.99 (FlipBook Studio); $149.99 (FlipBook Pro); $199.99 (FlipBook Pro HD)
Pros
Simple to draw
Easy to import from a scanner
Quick uploads
Cons
No free version
Challenging to make subtle changes
May not be user-friendly features
What are users saying?
“FlipBook does not contain a steep learning curve, and even first-time animators will be able to produce creative projects.”
Key Features
Modifications will be active while you draw the animation, so FlipBook is pretty quick
Easy to use the shift key to make speed painting
Ten animation layers for adding extra touches
Simple to use a scanner to import images
09Reallusion CrazyTalk Animator
Price: $199 (Pipeline); $99 (Pro)
Pros
Large library of appealing templates
Both for beginners and professionals
Easy to control characters
Cons
No drawing tools
A bit high learning curve
Hard to sync voice
What are users saying?
“This is a 2D animation maker online that makes sense. CTA makes sense in everything it does. One will find the tools exactly where they are supposed to be, and things work exactly the way one expects them to work.”
Key Features
Assists real-time facial expression with precise modification
Black magic to transform the image into a moving cartoon
You can make 2D visual effects for professionals
10Stop Motion Studio
Price: $59.99
Pros
Inbuilt sound editor
Easy to schedule
Not free
Cons
Certain hoops
No bone ringing tools or template designs
Only for 2D stop motion, 2D animation online
What are users saying?
“So I am in high school, Considering an animation class. Currently, we use this to make a claymation. I have noticed a few complexities with it. The camera does not aim well, which is a big hassle. It also Consists of a glitch where sometimes, if you hit the undo frame, it will delete all your other projects. When that happened to me, I was not happy. Now, this last part may just be nitpicking, but when I saw the official company’s animation, I saw their fingers in it, and the animation was not smooth.”
Key Features
Onionskin helps you to view previous frames via a transparent overlay
Audio recording and Chroma key and audio recording to better narrate and add voice effects
Simple
one-click upload to Facebook and YouTube
DSLR camera assistance for creating perfect 1080p recordings
11Harmony
Price: $25.50/month (Harmony Essentials); $64.50/month (Harmony Advanced); $117.50/month (Harmony Premium)
Pros
Lots of animation and drawing tools
Offers various color controls
Flexible 2D animation
Cons
Complicated to learn
High system requirements
Not free
What are users saying?
“I have created really powerful 2D animations with Harmony; it offers almost every tool to be precise and creative in the artworks and the advanced tools for paperless animations, which they helped me a lot.”
Key Features
Smooth lines
Stabilizer
It offers 3, 4, and 5-point guides for curved perspectives.
It helps create cut-out animation.
Easy integration with software available in the production pipeline.
It offers 2D or 3D integration.
12Krita
Price: Free
Pros
Completely free
Easy to use
High compatibility
Cons
No dedicated support
Use only on desktop
Outdated UI
What are users saying?
“Krita helps me with my advertising videos as well as logos and other image editing use cases. I mainly use it to make thumbnails for my youtube channel and featured images for the articles on my website. I also use it to make some quick logos for my youtube channel and website.“
Key Features
This online 2D animation maker software allows you to add a stabilizer to the brush to smooth it.
Personalized brush with nine different brush engines.
Create comic panels with built-in vector drawing tools.
Create seamless patterns and textures by making image reference on the x and y-axis.
Import brush packs and texture from other artists.
You can flatten, combine, or order layers to organize your artwork.
13Animaker
Price: $10/mo (Basic); $19/mo (Starter); $49/mo (Pro); Custom Pricing (Enterprise)
Pros
Helpful app
Able to make beautiful videos
Tons of features
Cons
May not work on specific systems
Chunky UI
Time-Consuming
What are users saying?
“Firstly, it displays that you are limited to the materials that you can use. If you want it, you can go for its paid version, which I think is ideal for a company but still hard. Secondly, I am trying to execute a project for my science class, and so far, I’ve had three days to work on it.”
Key Features
Create animated videos in 6 unique video styles like 2D, handcraft, infographics, whiteboard, 2.5 D, and typography.
Beginners can create videos and use them as both animation and animated presentations.
Best free download 2D animation software has 200 sound effects to choose from.
It offers 100 background music tracks.
It helps you to record direct voice recordings.
Animaker allows the team to collaborate.
Export video in full HD quality.
14SketchBook
Price: Free
Pros
Many options of pencils, brushes etc.
Various color options
Ideal for quick inspirations
Cons
It may be hard to enlarge projects
Lack of usability in some features
Some functions are confusing
What are users saying?
“Sketchbook has helped us in mobility. Since it is also available for tablets like iPad, it can be used to create quick artworks and concept arts and be used as a notebook to take notes. The different features also come in real handy, and the artwork created can be used to display professionally with a good amount of details.”
Key Features
It helps you draw basic shapes like circles, triangles, rectangles, etc.
Adjust the rules as per your desire.
Fill color into your artwork.
Also, import or export the layer as PSD.
15Animate CC
Price: $20.99/mo
Pros
Helpful user interface
Various essential modules
Extremely smooth
Cons
High battery utilization
Steep learning curve
Lack some tools for handling sound
What are users saying?
“We use Animate to make educational videos, but we also use some of the drawing tools to create vector-based illustrations, and we can export them out from Animate to use them in printed products.“
Key Features
Create new poses for vector images or figures.
It helps you to arrange your layers in a parent-child hierarchy.
● Automatically matches mouth poses to voice inflections.
● Easy to export 360 VR animations.
● Create ads directly with Animate.
● Export images with the correct resolution by bypassing the image optimization and using image settings.
● Key Takeaways from This Episode →
● Using 2D animation software is simpler when you have the right software. You already have a storyboard and a script in mind, but now you can realize your vision in unique and intricate ways.
● So, if you want to make 3D animation, various 3D animation software options are also for you. If any of the products above will serve you well, you could use Filmora, which comes first in the series of 2D animation software.
Before You Learn 3D Animation: Things You Should Know
Before You Learn 3D Animation: Some Things You Should Know
An easy yet powerful editor
Numerous effects to choose from
Detailed tutorials provided by the official channel
Before you delve into the profession of creating 3d cartoon filters, you need to understand or decide if creating animated characters is something you would like to do. It’s not going to be smooth as you will get frustrated at some point, you will get confused, and it will be challenging, but in the end, it is rewarding because it is an expression of your mind coming to life. You are the one to breathe life into your characters who represent your imaginations. You will also have to infuse a great deal of your creativity to create beautiful and exciting characters for others to enjoy. Meanwhile, let’s first understand what 3d animations mean.
Becoming a 3d animator is not a feat you can achieve in a short time. It is not days, weeks, months, or even years. Like any other profession, a professional 3d animator must have put in a great deal of work, mixed with a lot of passion and love for what he is doing. To become successful as a 3d animator, you must love what you are doing or be ready to put in the work.
This article will expose what you should learn to create beautiful 3d animation cartoons, including what to expect as a 3d animator.
In this article
01 [What are 3d animation and the process of 3d animation?](#Part 1)
02 [Differences between 2d animation and 3d animation](#Part 2)
03 [A roaster of 8 best 3d animation software.](#Part 3)
04 [Top 3 3d animation making mistakes to avoid](#Part 4)
Part 1 What Is 3D Animation And The Process of 3D Animation?
animation is a term that describes the art of creating 3-dimensional images and placing them in a digital environment. It is a process that uses motion to bring objects, characters, etc., to life.
It is also known as computer-generated imagery, and it is currently the most common animation type for feature films.
Various software and programs are designed specifically for 3d animations and allow the animators to bring the objects to life.
The process of 3d animation happens in three(3) stages;
● Modeling
● Layout and animation
● Rendering
Modeling in 3d animation involves generating the objects or characters either by using a modeling tool or using a real thing. The real object is scanned directly into the computer, where other processes follow. You have total control over your character and how you want them to appear by modeling. You decide the weight, specifications, feel, etc. However, scanning objects save a lot of time. You must add texture before modeling your character or reviewing it before moving to the following layout and animation.
Layout and animation stage: A layout is determined when the generated objects move to this stage. It involves creating a set/scene where the objects can position. Layout first happens before animation does. After adding the objects and characters, they get animated using animation variables. After this, you use motion capture or keyframing to give life to the models in the scenes.
Rendering: Rendering is using software or programs. It is not something to do using just your computer. These tools can generate the scenes into the finished image according to the client’s requirements or set goals.
Creating cartoon background images or any other form of animations is a process that requires a lot of planning and work, which sums up a lot of time. To learn 3d animation, you must be ready to give in ample time as it is a profession that requires some time to handle.
The process listed above also shows the creativity requirement required to succeed in the 3d animation industry. To think that you must create the scenes, which is the layout stage, means you have to be creative in your imagination. If you then decide to model your character from scratch using modeling tools. That also requires another job of thinking and extracting a lot of your creative juices.
Part 2 What is the difference between 2d animation and 3d animation?
Anyone can decide to learn animation with no plan in mind or understanding of what the profession involves. animation is different from 2d animation, and if you want to learn animation, you need to understand the distinction between these two.
animation can have a lot of creative possibilities, whereas 3d animation has a lot of natural abilities. The visual style of both types of animation is explicitly different.
3d animation is a more intensive technical process than the various stages mentioned earlier. It would most likely involve different specialists to handle them to get a more professional output. However, 2d animation consists of drawing the characters frame by frame.
animated cartoons are in The Simpsons, Pinocchio, the Lion king, etc.

animations are like the ones Dreamworks, Pixar, produce. They include the avengers, the bad guys, etc.


Part 3 A Roaster Of 8 Best 3D Animation Software

Several 3D animation software exists in the market, both free and paid. If you are a animation creator or love animation for fun, you can use the free software to make your videos, cartoon photos, 3d cartoon faces, etc.
With many animation software available in the market, you can only fully trust a few.
Here’s a roaster of 8 best 3D animation software you could use to create the cartoon monsters you’ve always been curious about;
● Filmora
● Blender
● Maya
● Wings 3d
● Adobe Animate
● Cinema 4d
● K-3D
● Milcamo
Filmora Video animation tool: This is a highly recommended 3D animation tool with many features and pros. It has a wide range of keyframes, about six of which make your cartoon background images smooth and natural.
| Software | Features | OS | Pro |
|---|---|---|---|
| Wondershare Filmora Video Editor | It has an auto-color correction It has smooth keyframes | Windows, Mac | You can apply light flare effects You can apply an audio mixer |
| Blender | It has textured brushes and masking for 3d painting. It has add-ons and customised tools with high python scripting. | Windows, Linux, Mac computers | It has Virtual reality rendering, Strong camera restoration. It had both manual and automatic tracking. |
| Maya | Free trial of 30 days. Can create complex technical effects | Windows, Max | Good Control and perfect accuracy. Can collect motion capture data. |
| Wings 3d | Auto UV mapping system It has support for light and material effects. | Windows, Linux, and Mac OS | Advanced 3d and 2d modeling tools. It is free to use |
| Adobe animate | Virtual camera functionality gives a realistic view. Adoptive animation effects, zooming, panning etc. | Windows, Mac | Effective audio syncing technology. Customizable font, styling etc. |
| Cinema 4d | Concepts develop without time modeling Large library of preset scenes. | Windows, Mac | Customised with a huge asset range It is a faster tool than Maya Dissect complete scene and is faster than Maya. |
| K-3D | It has property adjustment capabilities with handy strong features. I5 is made up of basic tools for animation, curves, patches. | Mac OS X, Linux, FreeBSD, windows platforms | It is very flexible for either complex or basic workflows. It has a wide selection of plugins. |
| Mixamo | Streamlined user experience It has a faster search function that is accurate | Windows, Mac | It has fast character and animation browsing. Download multiple animations at a go |
For Win 7 or later (64-bit)
For macOS 10.12 or later
Part 4 Top Three (3) 3d Animation Making Mistakes To Avoid

As we initially mentioned, 3d animation requires an intensive technical process. It is a skill that you need to hone over the years by paying attention to detail, being highly creative, and daring to succeed.
Here are 3 mistakes you must avoid during the animation process;
● Forgetting the ‘why’ factor
● Over-animating a scene
● Not giving your viewers time to take it in
Forgetting the why: In a animation cartoon, every move, walking step, and smile is essential. Every character represented in your cartoon background is there for a specific reason.
You would be making a mistake that will affect the result if you lose focus on this reason. Your viewers won’t find your cartoon believable if the moves and acting don’t add up.
Your characters don’t just move because they want to move. Something must have spurred the motion or reaction. It could be for what happened to them, what they heard, or saw another character did in the scene. Do not neglect the why of the act.
While animating, focus on why and keep revisiting until all your characters and objects are knitted closely together.
Over-animating a scene: This is another mistake animators should avoid. If you animate your characters, everything may be a mess if you animate the background and foreground. Simplicity is how to get this thing, keep it simple and focused.
Do not have much going on in each scene but only where you need the attention of your viewers. Animators that do this end up confusing their viewers with no direction.
You can use camera effects such as depth of field to make your audience focus on the point you are trying to make in the particular scene.
Not giving your viewers time to take it in: This is another 3d animation making a mistake you should be careful of. Not giving your viewers time to process the happenings on the scene before the next.
This can be avoided by timing and measuring cuts such that any animation at the start of a new scene is timed to enable the viewers to take it in. You can ask for third-party criticism on your work to find out how your animation is received and see pointers to mistakes such as this. The third party could be your colleague or friend.
Note: You can easily avoid any error or mistake or modify your 3D animation with the help of the Wondershare Filmora video editor. That will provide a solid base for featuring 3D animation.
● Ending Thoughts →
● 3D animation refers to using motion to breathe life into inanimate objects, and they can create animated videos and animation cartoons.
● 3D animation is highly technical, unlike 2d animation
● You can avoid the above 3d mistakes if you remain objective and open, and ready to accept constructive criticism.
● Becoming an animator is a fun thing to do, and it allows you to be free to express your creativity while entertaining other people entirely.
● Before you start learning 3d animation and create cartoon photos, ensure that you have read through all that we have explained here to have good information about what you are going into.
Before you delve into the profession of creating 3d cartoon filters, you need to understand or decide if creating animated characters is something you would like to do. It’s not going to be smooth as you will get frustrated at some point, you will get confused, and it will be challenging, but in the end, it is rewarding because it is an expression of your mind coming to life. You are the one to breathe life into your characters who represent your imaginations. You will also have to infuse a great deal of your creativity to create beautiful and exciting characters for others to enjoy. Meanwhile, let’s first understand what 3d animations mean.
Becoming a 3d animator is not a feat you can achieve in a short time. It is not days, weeks, months, or even years. Like any other profession, a professional 3d animator must have put in a great deal of work, mixed with a lot of passion and love for what he is doing. To become successful as a 3d animator, you must love what you are doing or be ready to put in the work.
This article will expose what you should learn to create beautiful 3d animation cartoons, including what to expect as a 3d animator.
In this article
01 [What are 3d animation and the process of 3d animation?](#Part 1)
02 [Differences between 2d animation and 3d animation](#Part 2)
03 [A roaster of 8 best 3d animation software.](#Part 3)
04 [Top 3 3d animation making mistakes to avoid](#Part 4)
Part 1 What Is 3D Animation And The Process of 3D Animation?
animation is a term that describes the art of creating 3-dimensional images and placing them in a digital environment. It is a process that uses motion to bring objects, characters, etc., to life.
It is also known as computer-generated imagery, and it is currently the most common animation type for feature films.
Various software and programs are designed specifically for 3d animations and allow the animators to bring the objects to life.
The process of 3d animation happens in three(3) stages;
● Modeling
● Layout and animation
● Rendering
Modeling in 3d animation involves generating the objects or characters either by using a modeling tool or using a real thing. The real object is scanned directly into the computer, where other processes follow. You have total control over your character and how you want them to appear by modeling. You decide the weight, specifications, feel, etc. However, scanning objects save a lot of time. You must add texture before modeling your character or reviewing it before moving to the following layout and animation.
Layout and animation stage: A layout is determined when the generated objects move to this stage. It involves creating a set/scene where the objects can position. Layout first happens before animation does. After adding the objects and characters, they get animated using animation variables. After this, you use motion capture or keyframing to give life to the models in the scenes.
Rendering: Rendering is using software or programs. It is not something to do using just your computer. These tools can generate the scenes into the finished image according to the client’s requirements or set goals.
Creating cartoon background images or any other form of animations is a process that requires a lot of planning and work, which sums up a lot of time. To learn 3d animation, you must be ready to give in ample time as it is a profession that requires some time to handle.
The process listed above also shows the creativity requirement required to succeed in the 3d animation industry. To think that you must create the scenes, which is the layout stage, means you have to be creative in your imagination. If you then decide to model your character from scratch using modeling tools. That also requires another job of thinking and extracting a lot of your creative juices.
Part 2 What is the difference between 2d animation and 3d animation?
Anyone can decide to learn animation with no plan in mind or understanding of what the profession involves. animation is different from 2d animation, and if you want to learn animation, you need to understand the distinction between these two.
animation can have a lot of creative possibilities, whereas 3d animation has a lot of natural abilities. The visual style of both types of animation is explicitly different.
3d animation is a more intensive technical process than the various stages mentioned earlier. It would most likely involve different specialists to handle them to get a more professional output. However, 2d animation consists of drawing the characters frame by frame.
animated cartoons are in The Simpsons, Pinocchio, the Lion king, etc.
animations are like the ones Dreamworks, Pixar, produce. They include the avengers, the bad guys, etc.
Part 3 A Roaster Of 8 Best 3D Animation Software
Several 3D animation software exists in the market, both free and paid. If you are a animation creator or love animation for fun, you can use the free software to make your videos, cartoon photos, 3d cartoon faces, etc.
With many animation software available in the market, you can only fully trust a few.
Here’s a roaster of 8 best 3D animation software you could use to create the cartoon monsters you’ve always been curious about;
● Filmora
● Blender
● Maya
● Wings 3d
● Adobe Animate
● Cinema 4d
● K-3D
● Milcamo
Filmora Video animation tool: This is a highly recommended 3D animation tool with many features and pros. It has a wide range of keyframes, about six of which make your cartoon background images smooth and natural.
| Software | Features | OS | Pro |
|---|---|---|---|
| Wondershare Filmora Video Editor | It has an auto-color correction It has smooth keyframes | Windows, Mac | You can apply light flare effects You can apply an audio mixer |
| Blender | It has textured brushes and masking for 3d painting. It has add-ons and customised tools with high python scripting. | Windows, Linux, Mac computers | It has Virtual reality rendering, Strong camera restoration. It had both manual and automatic tracking. |
| Maya | Free trial of 30 days. Can create complex technical effects | Windows, Max | Good Control and perfect accuracy. Can collect motion capture data. |
| Wings 3d | Auto UV mapping system It has support for light and material effects. | Windows, Linux, and Mac OS | Advanced 3d and 2d modeling tools. It is free to use |
| Adobe animate | Virtual camera functionality gives a realistic view. Adoptive animation effects, zooming, panning etc. | Windows, Mac | Effective audio syncing technology. Customizable font, styling etc. |
| Cinema 4d | Concepts develop without time modeling Large library of preset scenes. | Windows, Mac | Customised with a huge asset range It is a faster tool than Maya Dissect complete scene and is faster than Maya. |
| K-3D | It has property adjustment capabilities with handy strong features. I5 is made up of basic tools for animation, curves, patches. | Mac OS X, Linux, FreeBSD, windows platforms | It is very flexible for either complex or basic workflows. It has a wide selection of plugins. |
| Mixamo | Streamlined user experience It has a faster search function that is accurate | Windows, Mac | It has fast character and animation browsing. Download multiple animations at a go |
For Win 7 or later (64-bit)
For macOS 10.12 or later
Part 4 Top Three (3) 3d Animation Making Mistakes To Avoid
As we initially mentioned, 3d animation requires an intensive technical process. It is a skill that you need to hone over the years by paying attention to detail, being highly creative, and daring to succeed.
Here are 3 mistakes you must avoid during the animation process;
● Forgetting the ‘why’ factor
● Over-animating a scene
● Not giving your viewers time to take it in
Forgetting the why: In a animation cartoon, every move, walking step, and smile is essential. Every character represented in your cartoon background is there for a specific reason.
You would be making a mistake that will affect the result if you lose focus on this reason. Your viewers won’t find your cartoon believable if the moves and acting don’t add up.
Your characters don’t just move because they want to move. Something must have spurred the motion or reaction. It could be for what happened to them, what they heard, or saw another character did in the scene. Do not neglect the why of the act.
While animating, focus on why and keep revisiting until all your characters and objects are knitted closely together.
Over-animating a scene: This is another mistake animators should avoid. If you animate your characters, everything may be a mess if you animate the background and foreground. Simplicity is how to get this thing, keep it simple and focused.
Do not have much going on in each scene but only where you need the attention of your viewers. Animators that do this end up confusing their viewers with no direction.
You can use camera effects such as depth of field to make your audience focus on the point you are trying to make in the particular scene.
Not giving your viewers time to take it in: This is another 3d animation making a mistake you should be careful of. Not giving your viewers time to process the happenings on the scene before the next.
This can be avoided by timing and measuring cuts such that any animation at the start of a new scene is timed to enable the viewers to take it in. You can ask for third-party criticism on your work to find out how your animation is received and see pointers to mistakes such as this. The third party could be your colleague or friend.
Note: You can easily avoid any error or mistake or modify your 3D animation with the help of the Wondershare Filmora video editor. That will provide a solid base for featuring 3D animation.
● Ending Thoughts →
● 3D animation refers to using motion to breathe life into inanimate objects, and they can create animated videos and animation cartoons.
● 3D animation is highly technical, unlike 2d animation
● You can avoid the above 3d mistakes if you remain objective and open, and ready to accept constructive criticism.
● Becoming an animator is a fun thing to do, and it allows you to be free to express your creativity while entertaining other people entirely.
● Before you start learning 3d animation and create cartoon photos, ensure that you have read through all that we have explained here to have good information about what you are going into.
How To Create Pinterest Slideshow in Simple Ways
How to Make Pinterest Slideshow in Simple Ways
An easy yet powerful editor
Numerous effects to choose from
Detailed tutorials provided by the official channel
Slideshows are a collection of images arranged together that an audience can quickly swipe through to view the content. Pinterest is known for its one-pin to one post feature. You cannot post more than one image or video in a pin.
Thus, business people could start sharing all of the images or products, services, or articles mostly because it can be stressful to do that. But with the Pinterest slideshow, you can now upload all the images you want to at once in one pin. Moreso, even have people view the pins simultaneously just by swiping through.
In this article
01 [How to display Pinterest’s latest pins in a slideshow? ](#Part 1)
02 [How to upload multiple photos to Pinterest?](#Part 2)
03 [How to display Pinterest’s latest pins in a slideshow? ](#Part 3)
Part 1 How to Display Pinterest Latest Pins in A Slideshow
Using Pinterest’s latest pins in a slideshow is another way to display the latest pins from any Pinterest user or blogger’s blog. Each image is linked to its pin page on Pinterest instead of the board or profile page if you use the Pinterest profile or board widget.
To install this widget, you need the user or board’s RSS feed URL, then use it as the input for a blogger slide show gadget.
Here are the tricky steps to follow for the Pinterest slide show;
Step 1: Constructing Pinterest RSS feed URL
The Pinterest RSS feed URL of a user is different from aboard.
● It would be the user’s profile URL + feed/RSS for a user. To get your Profile URL, click on your username in the top right corner of your screen, and you will see a URL in your web browser’s URL. That is your profile URL.
● For the board URL, you will get that after clicking on the board from the homepage. The URL would appear on your browser’s URL bar.

Step 2: Reformatting the feed for the slideshow gadget:
The RSS feed from step one is not very compatible with the blogger slideshow gadget. It accepts RSS feed in Media RSS format, but you can convert with Yahoo pipe. Simply plug in your feed URL in the Yahoo pipe URL.
You have to replace the value of the feed URL with the feed URL you got in step one and the pin count with the number of pins displayed on the slide show.
With this, you have successfully converted your feed URL to the media version of the Pinterest feed.
Step 3: Add the slideshow widget
Take the following step to add the slideshow widget.
Go to Dashboard > Layout and click on ‘Add A Gadget.’
Now Add, A Gadget window, scroll down and select Slideshow.

Under Source, select Other.

Put in the converted Pinterest RSS feed URL from step 2 into the Feed URL text box.
Click Save and view your blog.
Part 2 How to Upload Multiple Photos to Pinterest
If you want to display multiple photos of your product or share your brand story with pictures, then this is a feature you will grab. Pinterest allows you to display various products at a time. But first, you must also have a business account to do this.
When you upload multiple photos on Pinterest, they are known as carousel pins. This feature is a great advertising tool and will help you during the Pinterest slideshow.
This is because people would see your carousel on their home feed just like any other pin you have posted. They may also tap on the carousel and swipe through the different photos on the carousel. When the pinner saves it, they have kept the entire image.
Here is a step-by-step method to upload multiple photos to Pinterest.
Step 1: Log into your Pinterest
First, log into your Pinterest business account to access the feature. If you do not have a business account, it is elementary to do so. There is no need for you to enter any billing information if you are wondering about that. It is a straightforward process. Just open your account, click on the drop-down menu near your profile picture, see ‘convert to business,’ then upgrade your account, and you are good to go.
You should also ensure that the photos you want to upload are on your computer. If you have originally planned to use it to explain an article visually, then make sure the particular image that represents that article is correctly saved on your computer. The images should be 1:1 or 2:3 in ratio, and the format either ‘png’ or ‘jpeg.’
Add your pictures and upload. If you want to reorder your pin, you can replace or remove images within the carousel.

Step 2: Add Title
Add a title, description, and website of the carousel pin. Your title will be a snippet of what the blog post or article will be about or the recipe’s title. Your description should be the same as your Pinterest text, and you can also choose to let it appear only on your first image on your carousel pin.
Step 3: Select a Board
The last step is to select a board relevant to your carousel pin. Thus, you have your carousel pin and images. However, you cannot view this immediately as in a standard pin or video pin. But you can go back to your board to view your pin when it is ready.
Part 3 How to Make Pinterest Slideshow In 5 Simple Ways
Slideshows are a beautiful way to enhance your Pinterest account and generate more leads on your Profile. If you’ve been wondering if and how you can make slideshows on Pinterest, here’s a guaranteed step you can follow. But then Pinterest slideshows are instead referred to as a showcase.
However, to access this feature, you must first own a business account on Pinterest.
Here are five (5) simple ways you can make Slideshow on Pinterest:
Step 1: Go to your Pinterest Profile
Click settings next to your profile photo in the top right corner.

Step 2: Select Profile
When the Settings window appears, select Profile.

Step 3: Click Edit
Next to Featured Boards, click Edit.

Step 4: Select Boards
After clicking Edit for your Featured Boards, you’ll reach a screen where you may edit the boards you want to highlight. Select which boards you’d like to feature by clicking on each drop-down menu.
Opening a new Pinterest page is a good idea. Scroll down to Boards with the most Pin impressions under Analytics>Profile. These are the boards that I highlighted.

Step 5: Save
When you’ve decided which boards to include in your Featured, click Save.
● Bonus – Wondershare Filmora
With this feature, you can also tweak your Pinterest slides and make them look professional and befitting to your audience using Wondershare Filmora Video Editor .
For Win 7 or later (64-bit)
For macOS 10.12 or later
Wondershare Filmora is an online video editing software with several unique features, including split-screen, freeze-frame, loop images, and videos to help you create top-notch visual content for your brand. With features like the Chroma key, you can easily create special effects in your Pinterest slideshow background.
You can also use color match and video effects to enhance the quality of the slide.
● Ending Thoughts →
● Making a Pinterest slideshow can be confusing if you do not have the correct information. But if you do, it’ll be a great way to spice up your social media content and create more leads for your business.
● Pinterest is a social media platform that keeps growing and adding more features by the day. It is also increasing the number of users per day. Try out the simple steps stated on how to make a slideshow on Pinterest. Finally, by incorporating Filmora in your levelling up plans, you will be able to bring your brand in front of your target customer and present it nicely.
Slideshows are a collection of images arranged together that an audience can quickly swipe through to view the content. Pinterest is known for its one-pin to one post feature. You cannot post more than one image or video in a pin.
Thus, business people could start sharing all of the images or products, services, or articles mostly because it can be stressful to do that. But with the Pinterest slideshow, you can now upload all the images you want to at once in one pin. Moreso, even have people view the pins simultaneously just by swiping through.
In this article
01 [How to display Pinterest’s latest pins in a slideshow? ](#Part 1)
02 [How to upload multiple photos to Pinterest?](#Part 2)
03 [How to display Pinterest’s latest pins in a slideshow? ](#Part 3)
Part 1 How to Display Pinterest Latest Pins in A Slideshow
Using Pinterest’s latest pins in a slideshow is another way to display the latest pins from any Pinterest user or blogger’s blog. Each image is linked to its pin page on Pinterest instead of the board or profile page if you use the Pinterest profile or board widget.
To install this widget, you need the user or board’s RSS feed URL, then use it as the input for a blogger slide show gadget.
Here are the tricky steps to follow for the Pinterest slide show;
Step 1: Constructing Pinterest RSS feed URL
The Pinterest RSS feed URL of a user is different from aboard.
● It would be the user’s profile URL + feed/RSS for a user. To get your Profile URL, click on your username in the top right corner of your screen, and you will see a URL in your web browser’s URL. That is your profile URL.
● For the board URL, you will get that after clicking on the board from the homepage. The URL would appear on your browser’s URL bar.
Step 2: Reformatting the feed for the slideshow gadget:
The RSS feed from step one is not very compatible with the blogger slideshow gadget. It accepts RSS feed in Media RSS format, but you can convert with Yahoo pipe. Simply plug in your feed URL in the Yahoo pipe URL.
You have to replace the value of the feed URL with the feed URL you got in step one and the pin count with the number of pins displayed on the slide show.
With this, you have successfully converted your feed URL to the media version of the Pinterest feed.
Step 3: Add the slideshow widget
Take the following step to add the slideshow widget.
Go to Dashboard > Layout and click on ‘Add A Gadget.’
Now Add, A Gadget window, scroll down and select Slideshow.
Under Source, select Other.
Put in the converted Pinterest RSS feed URL from step 2 into the Feed URL text box.
Click Save and view your blog.
Part 2 How to Upload Multiple Photos to Pinterest
If you want to display multiple photos of your product or share your brand story with pictures, then this is a feature you will grab. Pinterest allows you to display various products at a time. But first, you must also have a business account to do this.
When you upload multiple photos on Pinterest, they are known as carousel pins. This feature is a great advertising tool and will help you during the Pinterest slideshow.
This is because people would see your carousel on their home feed just like any other pin you have posted. They may also tap on the carousel and swipe through the different photos on the carousel. When the pinner saves it, they have kept the entire image.
Here is a step-by-step method to upload multiple photos to Pinterest.
Step 1: Log into your Pinterest
First, log into your Pinterest business account to access the feature. If you do not have a business account, it is elementary to do so. There is no need for you to enter any billing information if you are wondering about that. It is a straightforward process. Just open your account, click on the drop-down menu near your profile picture, see ‘convert to business,’ then upgrade your account, and you are good to go.
You should also ensure that the photos you want to upload are on your computer. If you have originally planned to use it to explain an article visually, then make sure the particular image that represents that article is correctly saved on your computer. The images should be 1:1 or 2:3 in ratio, and the format either ‘png’ or ‘jpeg.’
Add your pictures and upload. If you want to reorder your pin, you can replace or remove images within the carousel.
Step 2: Add Title
Add a title, description, and website of the carousel pin. Your title will be a snippet of what the blog post or article will be about or the recipe’s title. Your description should be the same as your Pinterest text, and you can also choose to let it appear only on your first image on your carousel pin.
Step 3: Select a Board
The last step is to select a board relevant to your carousel pin. Thus, you have your carousel pin and images. However, you cannot view this immediately as in a standard pin or video pin. But you can go back to your board to view your pin when it is ready.
Part 3 How to Make Pinterest Slideshow In 5 Simple Ways
Slideshows are a beautiful way to enhance your Pinterest account and generate more leads on your Profile. If you’ve been wondering if and how you can make slideshows on Pinterest, here’s a guaranteed step you can follow. But then Pinterest slideshows are instead referred to as a showcase.
However, to access this feature, you must first own a business account on Pinterest.
Here are five (5) simple ways you can make Slideshow on Pinterest:
Step 1: Go to your Pinterest Profile
Click settings next to your profile photo in the top right corner.
Step 2: Select Profile
When the Settings window appears, select Profile.
Step 3: Click Edit
Next to Featured Boards, click Edit.
Step 4: Select Boards
After clicking Edit for your Featured Boards, you’ll reach a screen where you may edit the boards you want to highlight. Select which boards you’d like to feature by clicking on each drop-down menu.
Opening a new Pinterest page is a good idea. Scroll down to Boards with the most Pin impressions under Analytics>Profile. These are the boards that I highlighted.
Step 5: Save
When you’ve decided which boards to include in your Featured, click Save.
● Bonus – Wondershare Filmora
With this feature, you can also tweak your Pinterest slides and make them look professional and befitting to your audience using Wondershare Filmora Video Editor .
For Win 7 or later (64-bit)
For macOS 10.12 or later
Wondershare Filmora is an online video editing software with several unique features, including split-screen, freeze-frame, loop images, and videos to help you create top-notch visual content for your brand. With features like the Chroma key, you can easily create special effects in your Pinterest slideshow background.
You can also use color match and video effects to enhance the quality of the slide.
● Ending Thoughts →
● Making a Pinterest slideshow can be confusing if you do not have the correct information. But if you do, it’ll be a great way to spice up your social media content and create more leads for your business.
● Pinterest is a social media platform that keeps growing and adding more features by the day. It is also increasing the number of users per day. Try out the simple steps stated on how to make a slideshow on Pinterest. Finally, by incorporating Filmora in your levelling up plans, you will be able to bring your brand in front of your target customer and present it nicely.
Animate Your Photo Online with These Awesome Tools
Animate Your Photo Online with These Awesome Tools
An easy yet powerful editor
Numerous effects to choose from
Detailed tutorials provided by the official channel
Animating your family photos online will not only make you nostalgic but will also make you relive that moment. Adding on to this, animating your photos can also make your boring ppt interesting.
This article helps you understand how to animate your pictures online for free and the different features you can use.
In this article
01 [How Can I Turn My Photo into a Cartoon Online?](#Part 1)
02 [Some Other Tools/Plugins to Help You Improve Photo Animate](#Part 2)
Part 1 Part 1: How Can I Turn My Photo into a Cartoon Online?
Animation gives life to your lifeless photos, makes them more interesting, and attracts an audience. You can add more fun to your normal photos by turning your photos into a cartoon. One of the simplest ways is by turning your photo into a cartoon by using online tools. In this section of the article, we will explore more on some online tools which will help you to turn your photos into a cartoon online.
01Befunky
An online cartoonizer that processes your photo online at a very good speed and gives you a cartoon version of the photo in seconds.
A single click on your cartoonizer and you’ll go from photo to cartoon in seconds. Go to the photo editor and click on the artsy section. You will have five classic cartoonizer effects and you will be one click away from your beautiful results.
Pros
Can upload several photos simultaneously.
Very simple interface that supports drag and drop feature.
It is possible to download photos from the stream.
Cons
Many functions are not free.
Too much advertising.
Price $4.95/month
Rating 4.1/5
“Great collage maker and photo editing tools.” - Fayak. A
02Painnt- Art & Cartoon Filters
Painnt is one of the best cartoons yourself apps on the market with more than a thousand filters and effects. It is also a creative community which not only helps you animate your photo online but also helps you discover the artwork of your taste or meet like-minded people.
Pros
Regularly updates its software to support more features.
Customize cartoon filter settings with various parameters.
Cons
Bugs might cause trouble to your system even if you have a purchases version.
Price Free/ in-app purchases will not cost more than $9.99
Rating 4.5/ 5
“Great app lots of fun don’t put no money into the custom style.” - SB
03Prisma Photo Editor
A few years ago, Prisma is one of the most popular applications to animate your photo online. Though its popularity has reduced it still has some cool features.
Pros
Has a good number of filters and you will have a lot of options.
Every image you try will be automatically saved to your camera roll.
Create unique-looking features.
Cons
Create unique-looking features.
Users have no control over how the app reads every image and gives output.
Price Users have no control over how the app reads every image and gives output.
Rating 4.6/5
“I am seriously addicted to this app. I use it to change my 360 pics into mind blowing Virtual Reality 3D photosphere.” -Leighton Scharf
04Cartoon Sketch Camera Pro
Sketch, Cartoon, Halftone, Swirl, Pixellate, Emboss, Crosshatch, or Dots effects can be used to cartoon a photo in this app. but there are only a limited amount of cartoon effects which makes the cartoon sketch camera pro, not one of the best options to animate your photo online free.
Pros
It includes 8 different filters and effects.
You can save a photo to your cartoon library.
Cons
Supported by only Mac products.
Limited filters and effects
Issues wid bugs
Annoying ads
Price Free/In-app purchases.
Rating 3.6/5
“Get ready to watch a lot of application ads”
05Cartoon Photo Editor
The cartoon photo editor app helps you create animated pictures online for free. All effects can be previewed in real-time, which helps you to see your results before capturing a picture or recording a video.
Pros
Supports autofocus when shooting a video, picture.
Can also use cartoon effects on previously captured pictures.
Cons
Ads can be bothersome.
Price Free/ In-app purchases.
Rating 4.4 /5
“Not the most well-developed app.” - Nunya
06Photo Lab
Pros
Has an immense number of filters.
Can easily share pictures on social media.
Easy interface
Cons
It’s an internet-based app, so limited features when using offline.
Price Free/ PRO subscription- $4.99/month
Rating 4.6/5
“I love so many aspects of this app.” - creativeme
07Toon Me
Special AI developed algorithm in Toon me app instantly gives you, your cartoon picture. Just take a picture and upload it and get ready to meet your cartoon self. Toon me is one of the easiest ways to animate your photo online.
Pros
Easy to use.
Cool filters which are unique from normal toon apps.
No adds.
Cons
Good filters are only available after paid subscriptions.
Some add ons are and filters are strange.
The App doesn’t let you cartoon any photo. it has to have a face on it.
Price The App doesn’t let you cartoon any photo. it has to have a face on it.
Rating 4.5/5
“Great app. I’m thinking of actually paying for it to try some of the other cool filters,” - Angel
08MomentCam Cartoons and stickers
This app offers a wide range of filters and stickers. besides this, MomentCam is a community that awards prizes to its most creative members. You can accessorize your cartoon with hairbands, sunglasses, pick hairstyles or beards.
Pros
Great cartoon effects.
Easy to use.
Cons
Bugs to be fixed.
May witness errors while connected to a network.
New updates are causing issues.
Price Free/ Subscription $4.99/month
Rating 4.5 / 5
“Disappointed in the new update. Interface is confusing to use.” - Kristie
Part 2 Some Other Tools/Plugins to Help You Improve Photo Animate
012D Photography Online
An animation is a vital tool for any digital artist. Leaving your images to normal static pictures can sometimes bore your audience. Your 2d photography can be animated easily online. To animate your photos online you have several online tools like -
Open Toonz It is a powerful tool that is also open-source software.
Piskel Piskel is an online tool for creating animated sprites and pixel art. It’s easy to use and requires no sign-up.
Asperite Is another online tool that can animate your 2d photography online. You can purchase the software for $19.99.
023D Photography Online
3D This- 3Dthis is a unique animation platform that supports 3D animation with the help of amazing in-app tools. It can create 3D models of people’s faces to morph animations. You can convert any picture to a 3D image. Being free software it helps you to learn and explore and create 3D animated pictures online for free.
03Animated Photo Frame Online Editor
Animated photo frames and effects will instantly turn any photo into an awesome greeting card. You can now creatively make your greeting cards for any occasion by using these animations which will convert into gif form.
04Animate Face from Photo Online
This particular type of animation has created a huge trend on social media. Animating faces online you can see how a person in the photograph smiles, moves their head around, etc. People often use it to relive their nostalgic moments of their ancestor’s pictures. My heritage blog is one of the websites which makes still faces move. With the help of My heritage blog, you can animate any of the faces in your photos to see them move, blink, and smile. My heritage easily helps you to animate your family photos online.
Now that we have seen various kinds of animation tools and pros and cons, let us look into one such amazing tool that can animate your photo online easily and very professionally.
Key Takeaways from This Episode
● In this article we have seen how animating a picture can make a static picture into an interesting art piece.
● We have also explored various tools that can make a cartoon and animate your photo online. We have also explored each tool’s pros and cons, their pricing, reviews, and ratings. We have also seen various other tools which help you improve your photo animate. We have also seen. With the advancement of technology, we learned that old pictures of our ancestors can be bought into motion.
● In the later part of the article, we also learned about a specific software called Filmora Pro that has awesome features. In addition to this, Filmora Pro gives a very professional result.
The Secret Sauce for Making GIF Instagram Story More Aesthetic
The Secret Sauce for Making GIF Instagram Story More Aesthetic
An easy yet powerful editor
Numerous effects to choose from
Detailed tutorials provided by the official channel
Adding own gift stickers to an Instagram story is in trend. An Instagram story can be made more creative with an Instagram gif story. Make a powerful impact with a gif on an Instagram story.
In this article
01 [How to Post Gifs to Instagram Story](#Part 1)
02 [8 Cute Instagram Stickers to Make Your Stories Aesthetic](#Part 2)
03 [How to Create Custom Gifs for Instagram Stories](#Part 3)
Part 1 How to Post Gifs to Instagram Story
Instagram stories are one of the best mediums to get connected to people at large. To be in trends and grab maximum people’s attention, it is very necessary to be updated with the new elements of Instagram stories. Gif Instagram story is a new way to increase the followers and be in trends. Adding these gifs in Instagram stories will improve your business by creating more engaging content for business promotion. Let’s see how this can be done?
● Go to the Instagram app installed on your phone. While adding a sticker to a picture of videos in Instagram stories, a GIF option will appear.
● When you tap it, you can find several attractive gifs in the library powered by GIPHY.
● Tap add sticker button that appears on the top of the Instagram stories. Tap the ‘GIF’ icon; the library of trending gifs will appear.
● Look for the gif you need to add to your story. You also have a search option to find your favorite or trending gif.
● After selecting the desired gif, you can add it to your photo or video after resizing it as you desired.
● After finishing, tap on the ‘Your story’ icon.
So, this way, it is easy to create gif story instagram with just a few simple steps.
Part 2 Cute Instagram Stickers to Make Your Stories Aesthetic
Cute Instagram stickers are the best way to lift the creativity of your Instagram stories. Adding stickers are an amazing idea to add design to Instagram stories. Stickers make stories more creative and interesting. Some of the amazing stickers to beautify Instagram stories are:
01BOHO
Boho stickers are good when you search for new stickers. They add fun to the story and give an amazing look for any lifestyle picture over an Instagram story. Boho white is also one type of sticker where are of them are white. Applying white boho to the picture background highlights the space and looks good. One has so many options from cute stars, hearts, lines, and flowers.
02FOOPKLO
For those who want words and saying gif on instagram story, there are some cute pink stickers available. These can be searched as FOOPKLO. Pink flowers, clusters, sayings, hearts, and some more cute stickers are there which can make Instagram stories lovelier.
03HALEYIVERS
For those who are active Instagram users and update their stories every day, the old stickers may not entertain them. So, for those, there are HALEYIVERS stickers. Good morning, days, sunshine, coffee, stars, and hearts add a great style to the Instagram stories. So, next time you need some punch over Instagram stories add some HALEYIVERS stickers.
04OHLALALITA
Instagram story gif is one of the great ways to even express your thoughts and moods in a summarized way. So, for those who wish to add a short story on Instagram, OHLALALITA has the best stickers. Loaded with so many cute words such as Tank you, Made with love, chill, glow, bye-bye, Wow, and many more, it makes any story in just simple words.
05SCARLETPIN
Instagram story gifs are a gift to those who are food lovers. Now with some new additions of gifs from GIPHY, they can post their food stories over their Instagram stories. The range of stickers that can help them is SCARLETPIN. These consist of some bright and colorful stickers of food. Red strawberries, tea, leaves, and oranges are great stuff to include in the morning Instagram stories.
06CURSIVE
Gif for Instagram story is also available in attractive writings. CURSIVE is the most attractive form of writing stories. Popular and cute sayings can be checked on CURSIVE and can be included in the stories. They can be searched and remembered easily. Cursive phrases can be added to the Instagram stories that look visually appealing to the viewers.
07EMOJIS
Emojis are the most lovable stickers available and can be part of any Instagram story. Typing on emojis can be done easily and they can be searched on the search bar. Perfect emojis gifs can be applied to an Instagram story that suits the situation. It can be moved or resized as per the requirement. These emojis gifs add a fun element to the Instagram stories.
08PAINT & BRUSH
Instagram gif story can be made creative with paint and brush. Earlier the users can add text with plain background only. But, paint and brush have enhanced it. Now users can add paint behind the text to make it more engaging. They are simple yet very attractive when added to the stories.
Part 3 How to Create Custom Gifs for Instagram Stories
Funny and expressive Instagram stories of your own always win the hearts of followers. Custom-made gif for Instagram is a great tool for business owners as it brings volume to their business by increasing leads. Custom-made gifs over Instagram stories are eye-catching and thus people get interested in the business. This helps in creating a good brand image for the business.
So, some of the ways to create fascinating custom Gifs Instagram stories for self and business are:
01Pin Instagram stories
Visiting a place and letting people know where you are through Instagram stories is always loved by all. Now, this can be done attractively by using the Pin feature. One can pin on the pictures and videos over the Instagram stories to a particular place. This is the most interesting element to make an Instagram story catchy. It can be done easily by tapping and holding it till it shows a pin at the little bar. This was one can pin gif at the desired location. This gif can pop up at a certain location only. It can be applied to videos one has made of a certain location by moving the gif to a place where one desires.
02Using Gif to give life to any image
To make gif Instagram story aesthetic, adding some moves with sparkles will be the right option. An Instagram user can give life to a picture by including animated elements. Gif adds a fun and surprising element to any Instagram story. When movement in any picture is added through gif, it catches the attention of the viewers and they follow it. A business can make its content engaging with gifs and can achieve its goal.
03Gifs Instagram story to catch viewer’s attention
Gif can be used effectively to create attractive Instagram stories. These gifs are good for the business to highlight their important elements. Gifs like the link in bio, sound on, and swipe up are created for a call to action from the viewers. Adding arrows and signals through gif in the Instagram stories direct the people to spend some minutes on the stories and find something new.
04Highlighting text with gif effects
A customized Instagram story can be made by highlighting text through adding gifs. Sparkle, stars, and highlights gifs can be searched easily and can be applied to any Instagram story. By adding a gif, the text looks stunning and grabs the attention of the viewers. GIPHY has several text-based gifs which can take an ordinary text over the story at a great level. It can be searched by mentioning related keywords.
05Adding gifs to customize selfies
Selfies to Instagram stories are very common. But they can be made even better with some amazing gifs from GIPHY. One can add sunglasses, hats, jewelry, and other fun props to the selfies. Filters can be added by creating their own story through a gif.
06Filmora V11 – A GIF resource
Wondershare Filmora Video Editor (The Filmora Meme maker) : Some many apps and websites offer beautiful gifs to beautify Instagram stories. One of the places where Instagram users can find a wide collection of attractive gifs is Filmora V11. It is a user-friendly tool that has media editing features. It can be used to add sound, light effects, and beautiful gifs to Instagram stories.

Wondershare Filmora - Best Video Editor for Mac/Windows
5,481,435 people have downloaded it.
Build unique custom animations without breaking a sweat.
Focus on creating epic stories and leave the details to Filmora’s auto features.
Start a creative adventure with drag & drop effects and endless possibilities.
Filmora simplifies advanced features to save you time and effort.
Filmora cuts out repetition so you can move on to your next creative breakthrough.
For creating gifs, Filmora V11 can be used and it can be made in a few simple steps. Filmora V11 app is required to be installed on the system and media files can be imported there. Files can be dragged for creating gifs. Filters, stickers, and other effects can be added. They can be further customized as per the requirement of the users. After adding background effects, music, and sound, the gif can be previewed also. The media can be saved as GIFs and can be easily exported also. To customize gifs, the Filmora Meme maker can be used. Captions can be added to GIFs and can be customized by using templates available at Filmora.
So, next time you need to know how to add your own gif to Instagram story, go to Filmora V11. This is one of the great platforms to create some amazing custom gifs to add to Instagram stories. If you want to surprise your viewers with some interesting gifs, try Filmora V11.
● Key Takeaways from This Episode →
● Instagram stories are the most effective way to mark a great impression on the viewers. It is also one of the effective tools to lift any business. Best results can be obtained when attractive and interesting gifs are added to Instagram stories.
● Instagram stories gifs are becoming trendy and there are so many cute and amazing gif stickers available to create Instagram stories. Some of the widely used gifs and stickers are Boho, FOOPKLO, HALEYIVERS, OHLALALITA, and EMOJIS. Instagram users can explore these cute and funny stickers and add them to beautify their Instagram stories.
● Customized gif has spiced up the Instagram stories and amazed the people. This feature helps a business to influence people towards their work and attract more people. The content becomes more engaging and interesting through a customized gif.
Adding own gift stickers to an Instagram story is in trend. An Instagram story can be made more creative with an Instagram gif story. Make a powerful impact with a gif on an Instagram story.
In this article
01 [How to Post Gifs to Instagram Story](#Part 1)
02 [8 Cute Instagram Stickers to Make Your Stories Aesthetic](#Part 2)
03 [How to Create Custom Gifs for Instagram Stories](#Part 3)
Part 1 How to Post Gifs to Instagram Story
Instagram stories are one of the best mediums to get connected to people at large. To be in trends and grab maximum people’s attention, it is very necessary to be updated with the new elements of Instagram stories. Gif Instagram story is a new way to increase the followers and be in trends. Adding these gifs in Instagram stories will improve your business by creating more engaging content for business promotion. Let’s see how this can be done?
● Go to the Instagram app installed on your phone. While adding a sticker to a picture of videos in Instagram stories, a GIF option will appear.
● When you tap it, you can find several attractive gifs in the library powered by GIPHY.
● Tap add sticker button that appears on the top of the Instagram stories. Tap the ‘GIF’ icon; the library of trending gifs will appear.
● Look for the gif you need to add to your story. You also have a search option to find your favorite or trending gif.
● After selecting the desired gif, you can add it to your photo or video after resizing it as you desired.
● After finishing, tap on the ‘Your story’ icon.
So, this way, it is easy to create gif story instagram with just a few simple steps.
Part 2 Cute Instagram Stickers to Make Your Stories Aesthetic
Cute Instagram stickers are the best way to lift the creativity of your Instagram stories. Adding stickers are an amazing idea to add design to Instagram stories. Stickers make stories more creative and interesting. Some of the amazing stickers to beautify Instagram stories are:
01BOHO
Boho stickers are good when you search for new stickers. They add fun to the story and give an amazing look for any lifestyle picture over an Instagram story. Boho white is also one type of sticker where are of them are white. Applying white boho to the picture background highlights the space and looks good. One has so many options from cute stars, hearts, lines, and flowers.
02FOOPKLO
For those who want words and saying gif on instagram story, there are some cute pink stickers available. These can be searched as FOOPKLO. Pink flowers, clusters, sayings, hearts, and some more cute stickers are there which can make Instagram stories lovelier.
03HALEYIVERS
For those who are active Instagram users and update their stories every day, the old stickers may not entertain them. So, for those, there are HALEYIVERS stickers. Good morning, days, sunshine, coffee, stars, and hearts add a great style to the Instagram stories. So, next time you need some punch over Instagram stories add some HALEYIVERS stickers.
04OHLALALITA
Instagram story gif is one of the great ways to even express your thoughts and moods in a summarized way. So, for those who wish to add a short story on Instagram, OHLALALITA has the best stickers. Loaded with so many cute words such as Tank you, Made with love, chill, glow, bye-bye, Wow, and many more, it makes any story in just simple words.
05SCARLETPIN
Instagram story gifs are a gift to those who are food lovers. Now with some new additions of gifs from GIPHY, they can post their food stories over their Instagram stories. The range of stickers that can help them is SCARLETPIN. These consist of some bright and colorful stickers of food. Red strawberries, tea, leaves, and oranges are great stuff to include in the morning Instagram stories.
06CURSIVE
Gif for Instagram story is also available in attractive writings. CURSIVE is the most attractive form of writing stories. Popular and cute sayings can be checked on CURSIVE and can be included in the stories. They can be searched and remembered easily. Cursive phrases can be added to the Instagram stories that look visually appealing to the viewers.
07EMOJIS
Emojis are the most lovable stickers available and can be part of any Instagram story. Typing on emojis can be done easily and they can be searched on the search bar. Perfect emojis gifs can be applied to an Instagram story that suits the situation. It can be moved or resized as per the requirement. These emojis gifs add a fun element to the Instagram stories.
08PAINT & BRUSH
Instagram gif story can be made creative with paint and brush. Earlier the users can add text with plain background only. But, paint and brush have enhanced it. Now users can add paint behind the text to make it more engaging. They are simple yet very attractive when added to the stories.
Part 3 How to Create Custom Gifs for Instagram Stories
Funny and expressive Instagram stories of your own always win the hearts of followers. Custom-made gif for Instagram is a great tool for business owners as it brings volume to their business by increasing leads. Custom-made gifs over Instagram stories are eye-catching and thus people get interested in the business. This helps in creating a good brand image for the business.
So, some of the ways to create fascinating custom Gifs Instagram stories for self and business are:
01Pin Instagram stories
Visiting a place and letting people know where you are through Instagram stories is always loved by all. Now, this can be done attractively by using the Pin feature. One can pin on the pictures and videos over the Instagram stories to a particular place. This is the most interesting element to make an Instagram story catchy. It can be done easily by tapping and holding it till it shows a pin at the little bar. This was one can pin gif at the desired location. This gif can pop up at a certain location only. It can be applied to videos one has made of a certain location by moving the gif to a place where one desires.
02Using Gif to give life to any image
To make gif Instagram story aesthetic, adding some moves with sparkles will be the right option. An Instagram user can give life to a picture by including animated elements. Gif adds a fun and surprising element to any Instagram story. When movement in any picture is added through gif, it catches the attention of the viewers and they follow it. A business can make its content engaging with gifs and can achieve its goal.
03Gifs Instagram story to catch viewer’s attention
Gif can be used effectively to create attractive Instagram stories. These gifs are good for the business to highlight their important elements. Gifs like the link in bio, sound on, and swipe up are created for a call to action from the viewers. Adding arrows and signals through gif in the Instagram stories direct the people to spend some minutes on the stories and find something new.
04Highlighting text with gif effects
A customized Instagram story can be made by highlighting text through adding gifs. Sparkle, stars, and highlights gifs can be searched easily and can be applied to any Instagram story. By adding a gif, the text looks stunning and grabs the attention of the viewers. GIPHY has several text-based gifs which can take an ordinary text over the story at a great level. It can be searched by mentioning related keywords.
05Adding gifs to customize selfies
Selfies to Instagram stories are very common. But they can be made even better with some amazing gifs from GIPHY. One can add sunglasses, hats, jewelry, and other fun props to the selfies. Filters can be added by creating their own story through a gif.
06Filmora V11 – A GIF resource
Wondershare Filmora Video Editor (The Filmora Meme maker) : Some many apps and websites offer beautiful gifs to beautify Instagram stories. One of the places where Instagram users can find a wide collection of attractive gifs is Filmora V11. It is a user-friendly tool that has media editing features. It can be used to add sound, light effects, and beautiful gifs to Instagram stories.
Wondershare Filmora - Best Video Editor for Mac/Windows
5,481,435 people have downloaded it.
Build unique custom animations without breaking a sweat.
Focus on creating epic stories and leave the details to Filmora’s auto features.
Start a creative adventure with drag & drop effects and endless possibilities.
Filmora simplifies advanced features to save you time and effort.
Filmora cuts out repetition so you can move on to your next creative breakthrough.
For creating gifs, Filmora V11 can be used and it can be made in a few simple steps. Filmora V11 app is required to be installed on the system and media files can be imported there. Files can be dragged for creating gifs. Filters, stickers, and other effects can be added. They can be further customized as per the requirement of the users. After adding background effects, music, and sound, the gif can be previewed also. The media can be saved as GIFs and can be easily exported also. To customize gifs, the Filmora Meme maker can be used. Captions can be added to GIFs and can be customized by using templates available at Filmora.
So, next time you need to know how to add your own gif to Instagram story, go to Filmora V11. This is one of the great platforms to create some amazing custom gifs to add to Instagram stories. If you want to surprise your viewers with some interesting gifs, try Filmora V11.
● Key Takeaways from This Episode →
● Instagram stories are the most effective way to mark a great impression on the viewers. It is also one of the effective tools to lift any business. Best results can be obtained when attractive and interesting gifs are added to Instagram stories.
● Instagram stories gifs are becoming trendy and there are so many cute and amazing gif stickers available to create Instagram stories. Some of the widely used gifs and stickers are Boho, FOOPKLO, HALEYIVERS, OHLALALITA, and EMOJIS. Instagram users can explore these cute and funny stickers and add them to beautify their Instagram stories.
● Customized gif has spiced up the Instagram stories and amazed the people. This feature helps a business to influence people towards their work and attract more people. The content becomes more engaging and interesting through a customized gif.
Complete Guide to Send Gif WhatsApp on Android
Step-by-step Guide to Send Gif WhatsApp on Android
An easy yet powerful editor
Numerous effects to choose from
Detailed tutorials provided by the official channel
While chatting with your friends and dear ones on WhatsApp, you can not only send videos and images but also some GIFs. The GIF files will convey your mood and feelings using short animations.
On your Android device, these files can be either selected from the collection available at WhatsApp or can be imported from Giphy. Additionally, you can also create your own customized WhatsApp GIFs Android using images or videos.
In this article
01 [How to send WhatsApp GIF on Android](#Part 1)
02 [How to create a custom GIF on WhatsApp Android](#Part 2)
03 [Create professional-looking GIF using Wondershare Filmora](#Part 3)
Part 1 How to send WhatsApp GIF on Android
To send GIFs to your contacts in WhatsApp it is important to ensure that you have the latest version of the messaging app installed on your phone. There is an integrated library of GIFs on your Android phone from where you can search like tom and jerry gif stickers for WhatsApp, peach and Goma gif for WhatsApp, and more.
Step 1.Launch WhatsApp on your Android device and open any conversation to which you wish to send a GIF.
Step 2.Click on the Emoji icon at the bottom left corner of the chat window.
Step 3.At the bottom middle of the screen, click on the GIF button and the list of options available at the integrated library will appear on the screen. You can even search for the desired GIF by entering the keyword at the search icon.
Step 4.Next, tap on the selected GIF to preview it. You can also add a message using Add a caption… button
Step 5.Finally, click on the green Send button (white paper plane icon) at the bottom-right corner. The GIF will be sent to your conversation.
Part 2 How to create a custom GIF on WhatsApp Android
WhatsApp allows you to create a customized GIF using images and videos on your Android phone. The steps for the same are as follows
Step 1.Open the WhatsApp chat to whom you wish to send the customized GIF.
Step 2.At the bottom of the screen, click the camera icon. Either choose to record a desired video or import from the phone gallery to create a GIF.
Step 3.Once the video is added, trim it using the slider at the top. (To create a GIF, the video cannot be more than 5 seconds). You can even add a text message using Add a caption. option at the bottom of the screen.
Step 4.Next, click on the GIF button under the slider and then click on the send button at the bottom-right corner.
GIF created using the video will be sent to your contact.
Part 3 Create professional-looking GIF using Wondershare Filmora Video Editor
Though WhatsApp allows creating GIFs using videos and images, the options for customizations are not there. So, to facilitate you creating professional-looking GIFs in no time, we suggest using Wondershare Filmora. Images and videos can be added to this versatile Windows and Mac-based tool for creating artistic animations. There are multiple options for customizing the file like adding elements, sound, text, and more.
Wondershare Filmora
Get started easily with Filmora’s powerful performance, intuitive interface, and countless effects!
Try It Free Try It Free Try It Free Learn More >

You can also speed up, slow down, rotate, crop, and perform other editing tasks. The software allows adding media files in all widely used formats like MO4, MOV, MKV, and more. The software has a user-friendly interface that makes it apt for users even without any prior experience in creating animations.
Steps to create a customized GIF WhstaApp Android using Wondershare Filmora
Step 1.Download, install and open the Wondershare Filmora software on your system. Browse and import the videos and images from your system from which you wish to create a GIF.
Step 2.After the files are added, drag and drop them to the timeline of the software at the bottom.
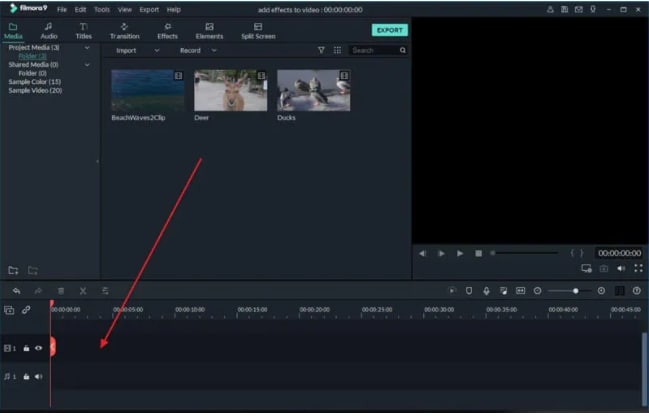
Step 3.Next comes the editing. Using multiple editing functions of the software you can rotate, crop, speed up, slow down, and perform a wide range of tasks as needed.
Step 4.You can even add the text messages to your animations and also choose the font and other parameters of the text.

Step 5.Once all the selections and editing are done, choose GIF at the Local tab to save your created media file as GIF. Finally, click on the EXPORT button to start processing and saving the file as GIF.
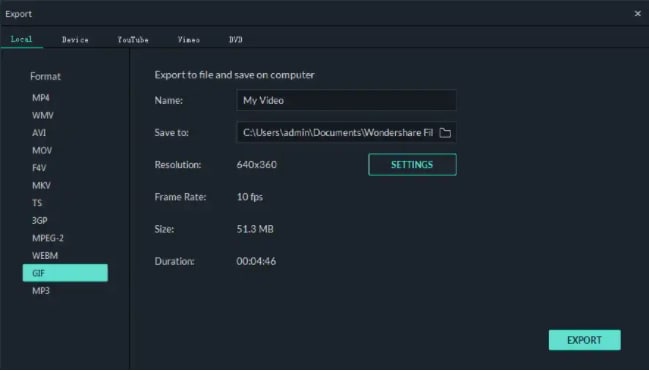
The created GIF can now be used for WhatsApp chat, social media sites, and other online sites.
● Key Takeaways from This Episode →
●GIF animations can be added to WhatsApp chats on your Android phone using an integrated library or GIPHY.
●WhatsApp also allows creating GIFs using videos and images on your device or by recording one.
●To create a professional and appealing GIF, Wondershare Filmora is the best tool. The software can also be used for several other video editing tasks.
While chatting with your friends and dear ones on WhatsApp, you can not only send videos and images but also some GIFs. The GIF files will convey your mood and feelings using short animations.
On your Android device, these files can be either selected from the collection available at WhatsApp or can be imported from Giphy. Additionally, you can also create your own customized WhatsApp GIFs Android using images or videos.
In this article
01 [How to send WhatsApp GIF on Android](#Part 1)
02 [How to create a custom GIF on WhatsApp Android](#Part 2)
03 [Create professional-looking GIF using Wondershare Filmora](#Part 3)
Part 1 How to send WhatsApp GIF on Android
To send GIFs to your contacts in WhatsApp it is important to ensure that you have the latest version of the messaging app installed on your phone. There is an integrated library of GIFs on your Android phone from where you can search like tom and jerry gif stickers for WhatsApp, peach and Goma gif for WhatsApp, and more.
Step 1.Launch WhatsApp on your Android device and open any conversation to which you wish to send a GIF.
Step 2.Click on the Emoji icon at the bottom left corner of the chat window.
Step 3.At the bottom middle of the screen, click on the GIF button and the list of options available at the integrated library will appear on the screen. You can even search for the desired GIF by entering the keyword at the search icon.
Step 4.Next, tap on the selected GIF to preview it. You can also add a message using Add a caption… button
Step 5.Finally, click on the green Send button (white paper plane icon) at the bottom-right corner. The GIF will be sent to your conversation.
Part 2 How to create a custom GIF on WhatsApp Android
WhatsApp allows you to create a customized GIF using images and videos on your Android phone. The steps for the same are as follows
Step 1.Open the WhatsApp chat to whom you wish to send the customized GIF.
Step 2.At the bottom of the screen, click the camera icon. Either choose to record a desired video or import from the phone gallery to create a GIF.
Step 3.Once the video is added, trim it using the slider at the top. (To create a GIF, the video cannot be more than 5 seconds). You can even add a text message using Add a caption. option at the bottom of the screen.
Step 4.Next, click on the GIF button under the slider and then click on the send button at the bottom-right corner.
GIF created using the video will be sent to your contact.
Part 3 Create professional-looking GIF using Wondershare Filmora Video Editor
Though WhatsApp allows creating GIFs using videos and images, the options for customizations are not there. So, to facilitate you creating professional-looking GIFs in no time, we suggest using Wondershare Filmora. Images and videos can be added to this versatile Windows and Mac-based tool for creating artistic animations. There are multiple options for customizing the file like adding elements, sound, text, and more.
Wondershare Filmora
Get started easily with Filmora’s powerful performance, intuitive interface, and countless effects!
Try It Free Try It Free Try It Free Learn More >
You can also speed up, slow down, rotate, crop, and perform other editing tasks. The software allows adding media files in all widely used formats like MO4, MOV, MKV, and more. The software has a user-friendly interface that makes it apt for users even without any prior experience in creating animations.
Steps to create a customized GIF WhstaApp Android using Wondershare Filmora
Step 1.Download, install and open the Wondershare Filmora software on your system. Browse and import the videos and images from your system from which you wish to create a GIF.
Step 2.After the files are added, drag and drop them to the timeline of the software at the bottom.
Step 3.Next comes the editing. Using multiple editing functions of the software you can rotate, crop, speed up, slow down, and perform a wide range of tasks as needed.
Step 4.You can even add the text messages to your animations and also choose the font and other parameters of the text.
Step 5.Once all the selections and editing are done, choose GIF at the Local tab to save your created media file as GIF. Finally, click on the EXPORT button to start processing and saving the file as GIF.
The created GIF can now be used for WhatsApp chat, social media sites, and other online sites.
● Key Takeaways from This Episode →
●GIF animations can be added to WhatsApp chats on your Android phone using an integrated library or GIPHY.
●WhatsApp also allows creating GIFs using videos and images on your device or by recording one.
●To create a professional and appealing GIF, Wondershare Filmora is the best tool. The software can also be used for several other video editing tasks.
How to Make Whiteboard Animation Videos
Whiteboard animation simply refers to the process of story telling using pictures and drawn resources on a whiteboard or a plane white surface. Its simply the creation of conventional story telling procedure where text, images, diagrams, figures, etc are drawn onto a white surface.
Whiteboard animation video usually work with audio, visual and most times a combination of both audio and visual to sell a particular information to the audience. Another name it has gotten over time which you may come across while surfing the internet is doodle videos.

In creating this type of videos, script writes are usually employed because of the dynamics involved in creating them. The major users of whiteboard animation video are business owners and people in the education fields. Other people make use of it but these two groups are the major users.
Whiteboard animation is important because it helps viewers remember the contents of what they watched better than looking at an image that contains a lot of information that may not always be organized.
Over time, whiteboard videos have become a more compelling and innovative method of dissemination information. They work so well because it’s a more relatable and fun way of making videos. It goes outside the conventional video making techniques and employs the animation standards which is fun to watch, engaging and still maintains the ability to effective pass the required information to the viewers.
Also, it uses a unique style to mix text, animations, and colors to drive the point home. Viewers are usually glued to their screen while watching it. The usual white background equally makes the information being displayed to effective contrast with each other. However, there is a recent movement from the usual white background to any color of choice while still maintaining the contrasting quality of the videos.
Finally, people tend to remember events or information if they are told as stories. This is one of the major objectives of whiteboard animation videos. They use graphics and animations to tell stories, sell products and services while maintaining the fun in it.
Whiteboard animation video usually takes time to create. Its not always as easy as it may seem. It takes dedication and patience before you perfect the video. if you’re new to this, its ok to not have that perfect video immediately. What matters is your will to grow and get better.
Below is an example of a whiteboard animation video created using Animaker. We’ll still look at the various software applications used for creating whiteboard animation videos.
How to Create Your Video
Step1 The first step to creating your whiteboard animation video is to know your topic of choice. Determining your choice topic is based on the purpose of the video. You have to know the reason why the video is being created in the first place to enable you decide the contents, the outlook, the font style and size and the colors to use.
Step2 The next step after you’ve getting your topic is execution of the idea. This involves having a script which usually involves the step-by-step procedure you are to follow to achieve your goal. Writing the script is arguable the most difficult process. However, once you get it right, all the other processes become relatively easy to execute. You might need to employ a professional script writer depending on your budget for the project.
Step3 After that, the next thing is to deicide whether or not to use your own voice or computer voice. This is also called a voice over. Most software provides a text to speech voice over option which usually comes with various alternatives. There is also another option of using your own voice to finish the project.
Step4 Add text, graphics and animation. This step is usually easier when you are working with the script already provided. You include the text, animations, figures, etc. sometimes you might need to import additional resources to complete this task. However, not all software provides for this.
Step5 Organize your work. In organizing your work, you must ensure that you voice over matches properly with what is on display. Check your spellings, grammar, composition and other ‘little’ details that may give your work a bad look.
Step6 Save your work and export. Once your done with your work, you have to save it on your local disk. This also means downloading the work from the website or software onto a local disk. You can now share the video on any social media of your choice. The most popular place to share it is on YouTube which is the most widely used video watching application.
Top 3 Whiteboard Animation Software
When considering which software is best for whiteboard animation creation needs, the most important factor to have at the back of your mind is flexibility and cost. Some software are really flexible to use but cost more than many people can afford. Others are cheap to purchase but do not have all the necessary resources needed to make a great video.
We’ll be looking at various software that combines cost effectiveness and flexibility. Note however that this list is not exhaustive of the software that combines these two features but are worthy of mention for the purpose of this article.
Filmora
At the top of our list is Filmora . This does not make them the best. However, they are relatively easy to use and have a combination of the two features mentioned above. Finally on our list is Filmora. This software offers much more than just whiteboard animation. It’s your go-to software for your video creation and video editing needs. One of the best parts of this software is that it supports 2D and 3D animation.

Free Download For Win 7 or later(64-bit)
Free Download For macOS 10.14 or later
Animaker
It has a lot of free resources which are made available to users after creating and account with them and verifying your email. However, like most other software, the juicy parts of it are locked and can be unlocked with a monthly or yearly subscription. They are 3 packages; Basic which cost $10 per month and $120 per year, starter package which cost $19 per month and $228 per year and the pro package which costs $49 per month and $588 per year.

This software is at the top of our list because the free resources it provides is adequate to make a decent whiteboard animation. Note that it comes with their watermark which cannot be removed without a paid subscription.
Doodly
Doodly is one of the most popular software applications for creating whiteboard videos. Its popularity comes from the fact that no prior skills is needed to use the software other than basic computer and internet usage. A lot of processes are already automated for users. If you’re a user that is concerned about quick responses from their customer care/support, doodly covers you. They have a record time response to issues from their users. Visit https://www.doodly.com/pricing/ to view their pricing.

Conclusion
If you’re wondering why you should chose whiteboard animation over the conventional video creating technique, then you should probably try it out. Animation easily captures the interest of viewers and the slide-by-slide transitioning equally makes it better. You can always try out other software applications to know the one that fits you best.
How to Create Your Video
Step1 The first step to creating your whiteboard animation video is to know your topic of choice. Determining your choice topic is based on the purpose of the video. You have to know the reason why the video is being created in the first place to enable you decide the contents, the outlook, the font style and size and the colors to use.
Step2 The next step after you’ve getting your topic is execution of the idea. This involves having a script which usually involves the step-by-step procedure you are to follow to achieve your goal. Writing the script is arguable the most difficult process. However, once you get it right, all the other processes become relatively easy to execute. You might need to employ a professional script writer depending on your budget for the project.
Step3 After that, the next thing is to deicide whether or not to use your own voice or computer voice. This is also called a voice over. Most software provides a text to speech voice over option which usually comes with various alternatives. There is also another option of using your own voice to finish the project.
Step4 Add text, graphics and animation. This step is usually easier when you are working with the script already provided. You include the text, animations, figures, etc. sometimes you might need to import additional resources to complete this task. However, not all software provides for this.
Step5 Organize your work. In organizing your work, you must ensure that you voice over matches properly with what is on display. Check your spellings, grammar, composition and other ‘little’ details that may give your work a bad look.
Step6 Save your work and export. Once your done with your work, you have to save it on your local disk. This also means downloading the work from the website or software onto a local disk. You can now share the video on any social media of your choice. The most popular place to share it is on YouTube which is the most widely used video watching application.
Top 3 Whiteboard Animation Software
When considering which software is best for whiteboard animation creation needs, the most important factor to have at the back of your mind is flexibility and cost. Some software are really flexible to use but cost more than many people can afford. Others are cheap to purchase but do not have all the necessary resources needed to make a great video.
We’ll be looking at various software that combines cost effectiveness and flexibility. Note however that this list is not exhaustive of the software that combines these two features but are worthy of mention for the purpose of this article.
Filmora
At the top of our list is Filmora . This does not make them the best. However, they are relatively easy to use and have a combination of the two features mentioned above. Finally on our list is Filmora. This software offers much more than just whiteboard animation. It’s your go-to software for your video creation and video editing needs. One of the best parts of this software is that it supports 2D and 3D animation.
Free Download For Win 7 or later(64-bit)
Free Download For macOS 10.14 or later
Animaker
It has a lot of free resources which are made available to users after creating and account with them and verifying your email. However, like most other software, the juicy parts of it are locked and can be unlocked with a monthly or yearly subscription. They are 3 packages; Basic which cost $10 per month and $120 per year, starter package which cost $19 per month and $228 per year and the pro package which costs $49 per month and $588 per year.
This software is at the top of our list because the free resources it provides is adequate to make a decent whiteboard animation. Note that it comes with their watermark which cannot be removed without a paid subscription.
Doodly
Doodly is one of the most popular software applications for creating whiteboard videos. Its popularity comes from the fact that no prior skills is needed to use the software other than basic computer and internet usage. A lot of processes are already automated for users. If you’re a user that is concerned about quick responses from their customer care/support, doodly covers you. They have a record time response to issues from their users. Visit https://www.doodly.com/pricing/ to view their pricing.
Conclusion
If you’re wondering why you should chose whiteboard animation over the conventional video creating technique, then you should probably try it out. Animation easily captures the interest of viewers and the slide-by-slide transitioning equally makes it better. You can always try out other software applications to know the one that fits you best.
Also read:
- 10 Scary Anime Girls That Will Make You Creepy for 2024
- New In 2024, Best Websites to Download Animated GIFs for Free-Free GIF Download
- New Convert Animated GIF From Video for 2024
- New Ways to Create an Adobe Collage for 2024
- New 2024 Approved Best GIF Maker Software for Windows and Mac
- New 2024 Approved 5 Photoshop Alternatives to Animate Logo
- 2024 Approved Handy Tips From Adobe Animate Rigging Tutorial for All Learners
- Updated 2024 Approved 12 Animation Video Maker That Can Triple Your Conversion Rates
- In 2024, 8 Free GIF Animators to Make Your Own GIF
- How to Cartoonize Photo Photoshop in Easy Steps for 2024
- Updated In 2024, Beginners Guide for Learning 3D Animation
- Updated Learn How to Create Adobe 3D Animation for 2024
- New 5 Best Adobe Animate Courses & Classes
- New 2024 Approved FREE Best Anime Streaming Sites to Download Anime
- Updated Learn All About Lip-Syncing in Animation for 2024
- New 12+ Stunning Instagram GIF Stickers and How to Make & Find for 2024
- Updated 2024 Approved Tutorials to Make Animated Images – Even if Youre Just Starting Out
- New Ways to Create Animated Clipart in PowerPoint
- New 2024 Approved 10 Top Tools to Make Pic Collage for Windows
- Handy Tip From Adobe Animate Rigging Tutorial for All Learners
- Updated In 2024, Learn Pencil2D Animation Tutorial Overview
- Updated How to Combine Two/More GIFs Into One GIF Mergers Offered for 2024
- Updated Best 15 Classics Animated Cartoon Movies
- New 2024 Approved Top 10 Sketch Animation Video Makers
- The Coolest Anime Characters Ever| List of Top Favorites
- Updated In 2024, Types of Cartoon Styles You May Use for The Next Marketing Project
- Updated What Is the Meaning of Motion Graphics for 2024
- Updated 15 Forgotten Cartoon Characters of All Time You Used to Love for 2024
- In 2024, Best Claymation Shows That Make Your Memories Unforgettable
- Popular Female & Male Disney Cartoon Characters To Empower You
- New Before You Learn 3D Animation Things You Should Know
- Whats Your No. 1 Maker to Animate Your Logo Online Free
- All About Types of Motion Graphics
- Updated Best 15 Female Anime Characters-Who Is Your Favorite, In 2024
- Updated Best 12 2D Animation Studios All Should Check Out
- Updated 2024 Approved How to Make My Photo 3D Cartoon Online
- Updated Is It That Easy to Make My Own Animated Character?
- New 2024 Approved Learn How to Make Your Characters Interactive in Unity Animation Rigging
- In 2024, The Most Efficient Techniques for You to Make 3D Animation Character
- Updated 10 of the Best Disney Animated Shows (Sorted by Popularity Ascending)
- Top 8 Anime Name & Title Generators Online-Get Cool Anime Names for 2024
- 10 Cartoon Photo Converters for 2024
- In 2024, Ultimate Guide to Catch the Regional-Located Pokemon For Vivo Y100 | Dr.fone
- In 2024, Hassle-Free Ways to Remove FRP Lock on Asus ROG Phone 7 Ultimatewith/without a PC
- Change Location on Yik Yak For your Huawei Nova Y71 to Enjoy More Fun | Dr.fone
- New Amazon Live for Beginners Features, Pro Tips & Future Trends
- In 2024, Solutions to Spy on Vivo Y100i Power 5G with and without jailbreak | Dr.fone
- In 2024, How to Change Your Location on Apple iPhone SE (2020) | Dr.fone
- In 2024, List of Pokémon Go Joysticks On Realme 12 Pro+ 5G | Dr.fone
- How to recover old messages from your Infinix Hot 30 5G
- Universal Unlock Pattern for Xiaomi 13T
- 7 Ways to Unlock a Locked Vivo Y27s Phone
- What To Do if Your Samsung Galaxy XCover 7 Auto Does Not Work | Dr.fone
- Fake Android Location without Rooting For Your Itel P55 5G | Dr.fone
- Why is iPogo not working On Tecno Pova 6 Pro 5G? Fixed | Dr.fone
- 3 Ways to Export Contacts from Apple iPhone XS Max to Excel CSV & vCard Easily | Dr.fone
- Recover lost data from ZTE Axon 40 Lite
- Unlock iPhone 14 Pro screen lock without password
- Updated In 2024, The Power of YouTube Live Selling Unlock Your Sales Potential
- Find N3 Flip Music Recovery - Recover Deleted Music from Find N3 Flip
- In 2024, How to Turn Off Find My Apple iPhone 8 Plus when Phone is Broken?
- 5 Solutions For Meizu Unlock Without Password
- In 2024, How and Where to Find a Shiny Stone Pokémon For Tecno Phantom V Fold? | Dr.fone
- In 2024, How to Detect and Remove Spyware on Vivo S17? | Dr.fone
- How To Transfer WhatsApp From iPhone 14 Plus to other iPhone 15 Pro Max devices? | Dr.fone
- In 2024, Best Pokemons for PVP Matches in Pokemon Go For Apple iPhone 14 | Dr.fone
- How to Use Pokémon Emerald Master Ball Cheat On Vivo Y78+ (T1) Edition | Dr.fone
- Title: Best 15 2D Animation Software Free That Worth to Try for 2024
- Author: Elon
- Created at : 2024-05-19 03:04:31
- Updated at : 2024-05-20 03:04:31
- Link: https://animation-videos.techidaily.com/best-15-2d-animation-software-free-that-worth-to-try-for-2024/
- License: This work is licensed under CC BY-NC-SA 4.0.
