
:max_bytes(150000):strip_icc():format(webp)/podcasts-safeforkids-5b2f3dd4eb97de0036d9f87b.jpg)
How to Create A GIF with Sound?
How to Create A GIF with Sound?
How to Create A GIF with Sound?

Shanoon Cox
Mar 27, 2024• Proven solutions
GIFs are simple animations without any sound. However, modern GIFs have the ability to carry audio and are more preferred. The technology is absolutely new, and you can even add music to GIF files. Today, we will explore the best tools to create GIFs with sound. You can also join the trend and share GIFs with audio bites with your friends and family.
Part 1: How to Create a GIF with Sound on Imgur?
Imgur is a popular image sharing platform . It’s also one of the oldest services, starting its journey way back in 2009.
You can upload images on Imgur and embed them on your websites or blogs. The service is really popular, thanks to forums like Reddit. People love to share images on Imgur, which is fast and convenient.
Now, you can also upload and watch GIFs on Imgur. The platform even introduced a new GIF format to make GIFs more smooth and reliable. Additionally, Imgur even lets you upload GIFs with sound through its iOS app.
You can watch the GIFs with audio from your computer and tablets. Soon, you will be able to access the feature from the Imgur Android app. The new GIFs are really catching on, and people love the sound bites that come along. GIFs with sound are more fun to watch, and you can also easily convey your message.
Here is how you can create and upload GIFs with sound on Imgur.
- Download and run the latest version of the Imgur iOS app from here: https://apps.apple.com/us/app/imgur-funny-meme-gif-maker/id639881495
- Now press the camera button and choose a video from your device. You can add only video files with sound for making a GIF with sound.
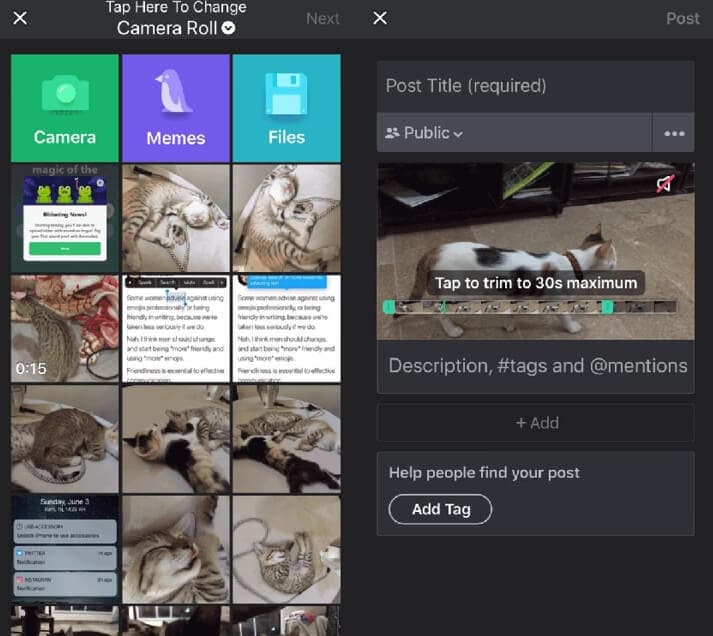
Note: Your GIF with audio cannot be more than 30-seconds long. Use the app the trim your video down to 30-seconds. If you want, you can even trim your video below 30-seconds.
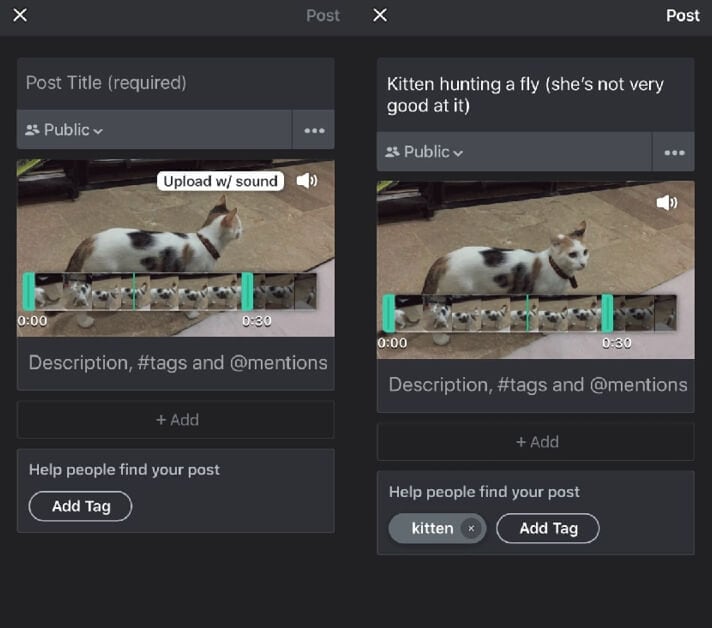
- Now, press the speaker icon on the video to unmute the sound. You can next upload the video with sound and watch it as a GIF.
Part 2: How to Create GIF with sound on Gfycat?
Gfycat is one of the largest GIF sharing sites. You can find thousands of GIFs shared by users from all across the world. The GIFs are neatly sorted into categories so that you can find your favorite ones easily.
Gfycat was the pioneer in video to GIF conversion . It first offered the service in 2013 that took the internet by storm. Since then, Gfycat has been the choice of millions of people for sharing memes and short videos.
Gfycat now enables you to share GIFs with sound. You can upload any video and convert it to a GIF without sacrificing the sound. However, you can only upload only up to a minute of GIF that contains sound.
Follow the steps below to create your GIF with sound-
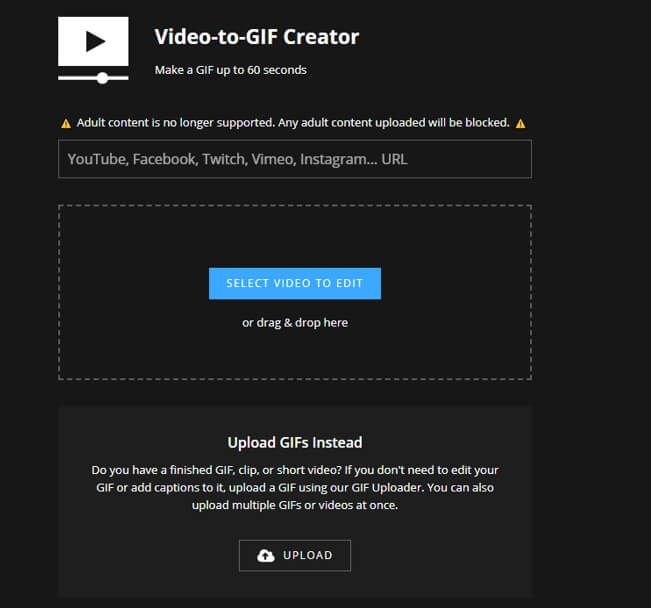
- Launch the Gfycat website and choose the video you want to convert. You can add files from your device or use URLs of video sites. Be sure to choose small file sizes for the best results.
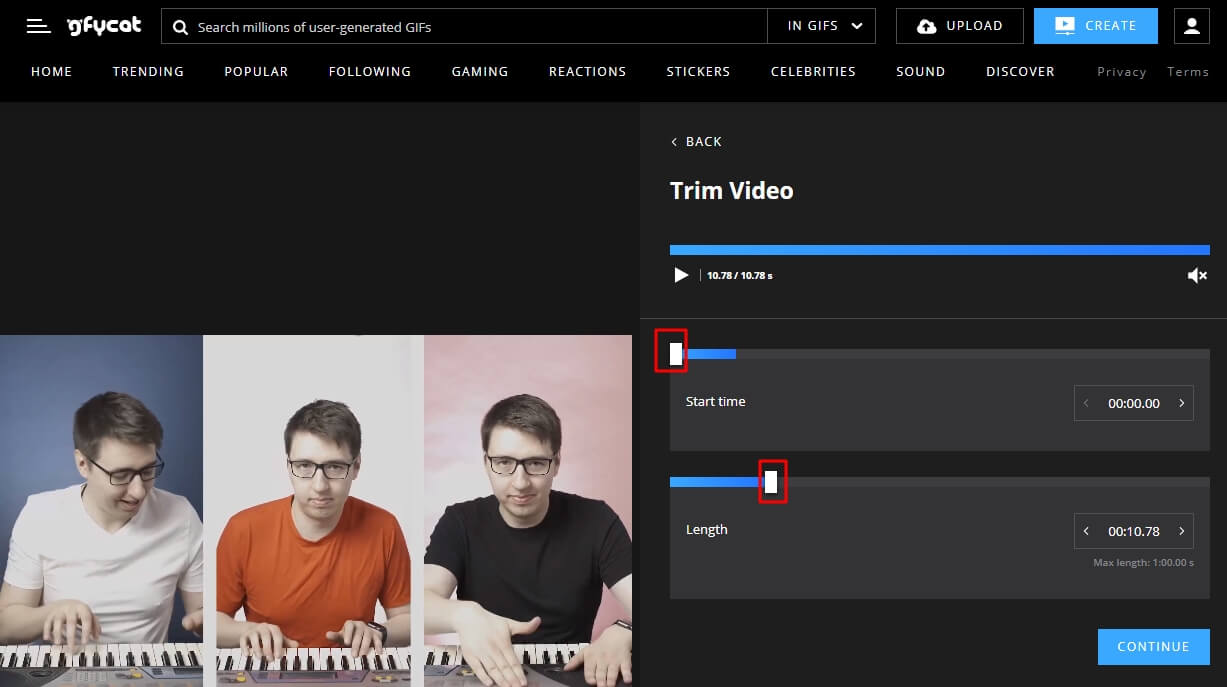
- You can now trim your video down to your desired length. Remember that adding sound will make the file size big. So, it pays to keep your GIFs short to 60 seconds. Use the sliders to select the portion of the video you want to convert and then click Continue.
- Besides sound, Gfycat also lets you add texts and captions to your GIFs. You can move the slider to the proper time and then click ADD A CAPTION to add a new text box. If you don’t need to add text, click Continue and jump to the next step.
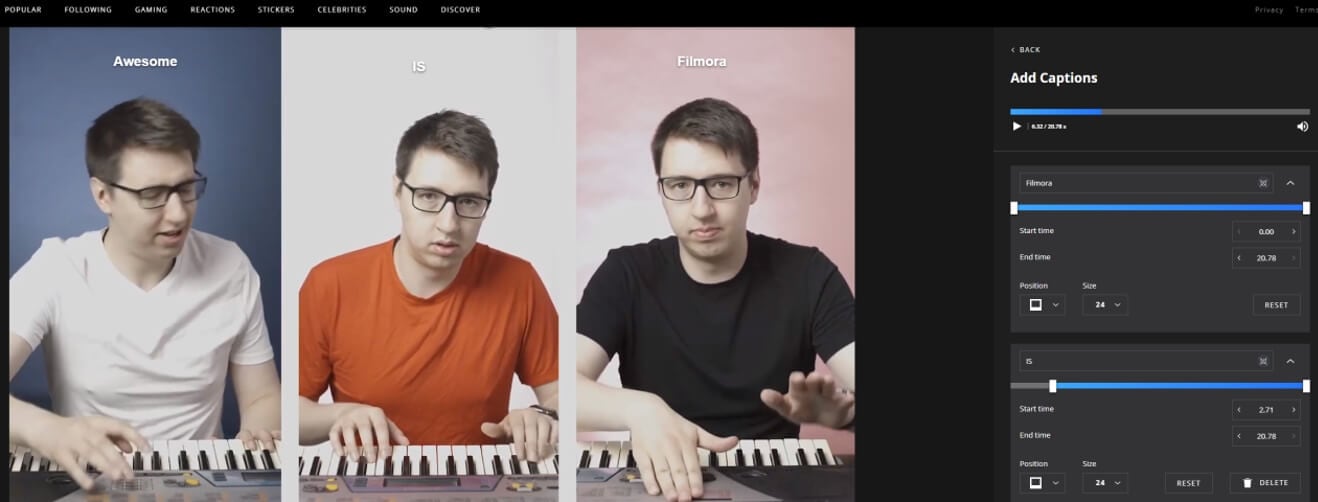
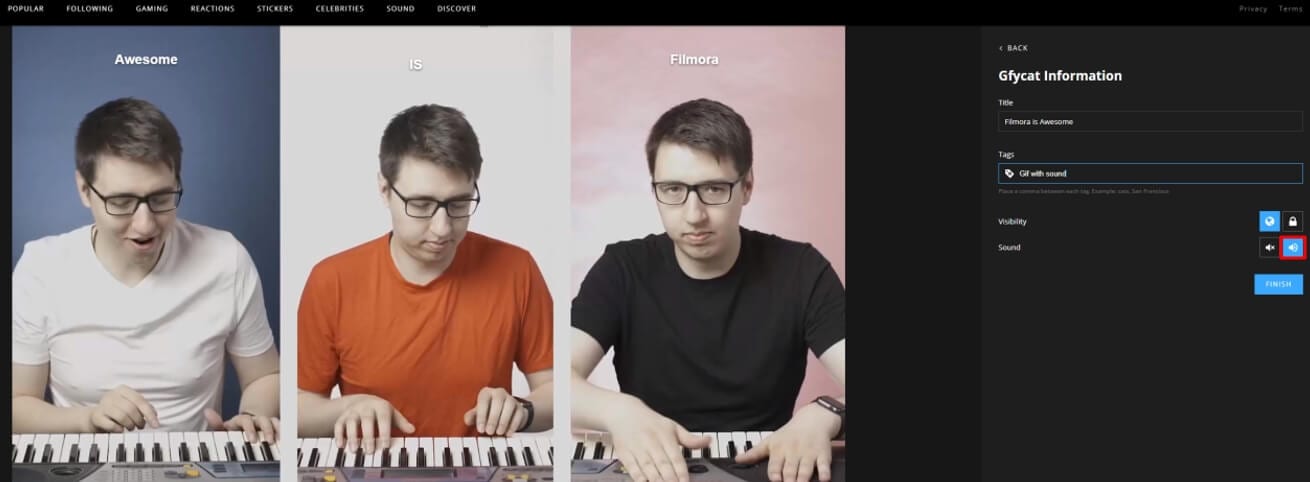
- Now comes the time to add titles and tags to your GIFs. To create and share the GIF with sound, remember to enable the Speaker icon. After you’re done, just click the FINISH button to upload your GIF with sound on Gfycat.
Part 3: How to Add Music And Sound Effect To GIFs With Filmora?
Filmora is a cutting-edge video and GIF editing software. Adding sound to GIFs is really easy and can be done in a few steps. You have several perks like-
1. Vast Audio Library
The Audio library brings you a royalty-free music and sound effect library. You can use a plethora of audio files, sound effects, and music for your GIFs without spending a cent. Besides, the Filmstock effect store provides more sound effects and music to try.
2. Optimum Sync
Filmora features advanced beat detection to detect the hits in the audio and generate markers, you can sync your audio with GIFs perfectly with the help of markers. You don’t have to worry about your GIFs appearing out of sync with your audio.
3. Provide Voiceover
You can use your voiceover for your GIFs to make them awesome. Just hook up your microphone and record your voice for ultimate enjoyment.
How to Add Sound to GIFs in Filmora Video Editor?
- The first step to adding music and sound effect to your GIF is to import them to your timeline.
- Then you can choose to add music and sound effect from the in-built audio library, or record your own voice.
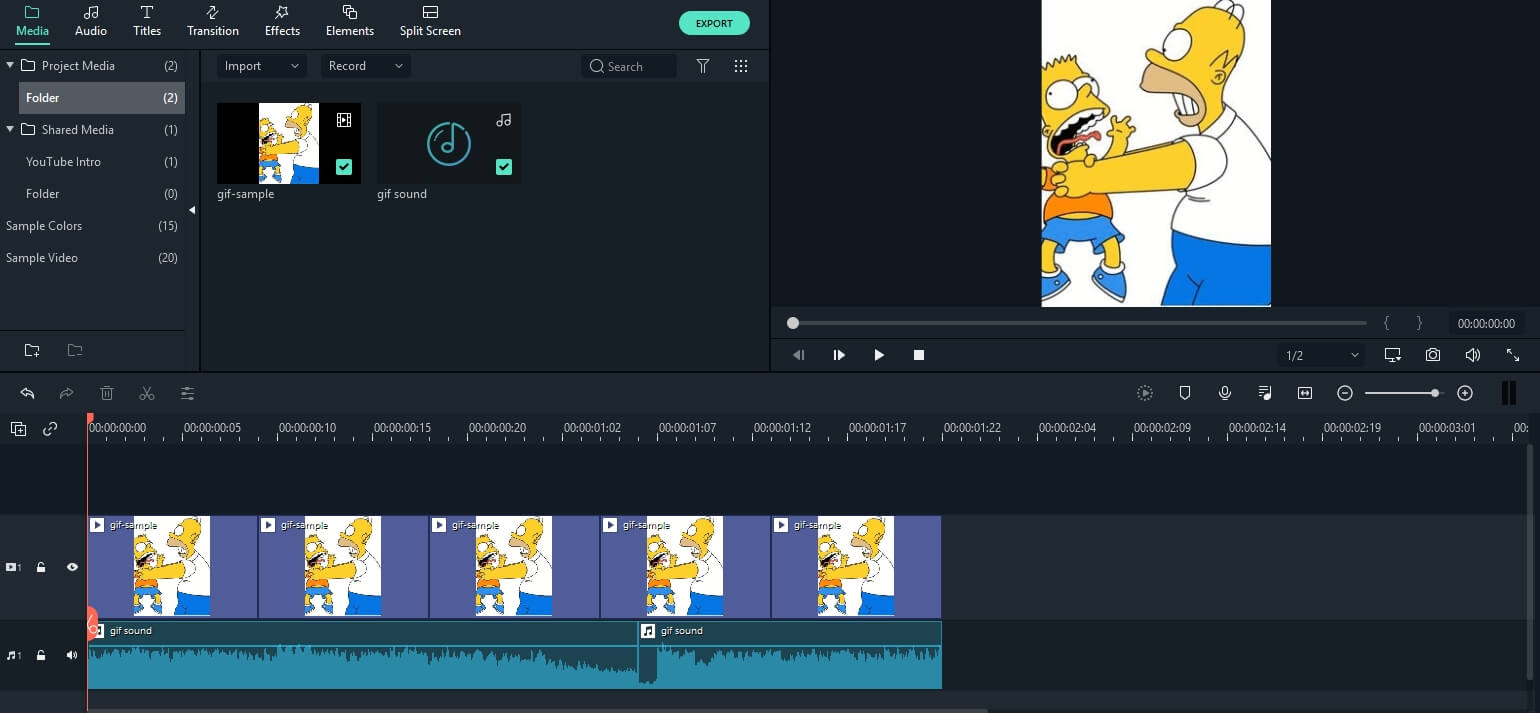
When you’re done, just export your gif file as a video in mp4 or other proper formats. You can also configure the resolution and bits for better results.
FIlmora is very user-friendly, and you don’t need to face any learning curve. You can quickly start adding audio and create GIFs with sound in minutes!
FAQ About Sound GIF
Where can I see GIFs with sound?
Presently, only a few platforms allow you to play GIFs with sounds. For that, you have to first embed an audio file in your image or use a video.
Some platforms like Giphy, Imgur, Gfycat, or Tenor let you watch GIFs with sound. You can also give YouTube a try and find GIFs with audio. Else, you can watch them on your mobiles or tablets.
Creating a GIF with sound is simple, quick and easy with Filmora. Have you tried it out yet?


Shanoon Cox
Shanoon Cox is a writer and a lover of all things video.
Follow @Shanoon Cox
Shanoon Cox
Mar 27, 2024• Proven solutions
GIFs are simple animations without any sound. However, modern GIFs have the ability to carry audio and are more preferred. The technology is absolutely new, and you can even add music to GIF files. Today, we will explore the best tools to create GIFs with sound. You can also join the trend and share GIFs with audio bites with your friends and family.
Part 1: How to Create a GIF with Sound on Imgur?
Imgur is a popular image sharing platform . It’s also one of the oldest services, starting its journey way back in 2009.
You can upload images on Imgur and embed them on your websites or blogs. The service is really popular, thanks to forums like Reddit. People love to share images on Imgur, which is fast and convenient.
Now, you can also upload and watch GIFs on Imgur. The platform even introduced a new GIF format to make GIFs more smooth and reliable. Additionally, Imgur even lets you upload GIFs with sound through its iOS app.
You can watch the GIFs with audio from your computer and tablets. Soon, you will be able to access the feature from the Imgur Android app. The new GIFs are really catching on, and people love the sound bites that come along. GIFs with sound are more fun to watch, and you can also easily convey your message.
Here is how you can create and upload GIFs with sound on Imgur.
- Download and run the latest version of the Imgur iOS app from here: https://apps.apple.com/us/app/imgur-funny-meme-gif-maker/id639881495
- Now press the camera button and choose a video from your device. You can add only video files with sound for making a GIF with sound.
Note: Your GIF with audio cannot be more than 30-seconds long. Use the app the trim your video down to 30-seconds. If you want, you can even trim your video below 30-seconds.
- Now, press the speaker icon on the video to unmute the sound. You can next upload the video with sound and watch it as a GIF.
Part 2: How to Create GIF with sound on Gfycat?
Gfycat is one of the largest GIF sharing sites. You can find thousands of GIFs shared by users from all across the world. The GIFs are neatly sorted into categories so that you can find your favorite ones easily.
Gfycat was the pioneer in video to GIF conversion . It first offered the service in 2013 that took the internet by storm. Since then, Gfycat has been the choice of millions of people for sharing memes and short videos.
Gfycat now enables you to share GIFs with sound. You can upload any video and convert it to a GIF without sacrificing the sound. However, you can only upload only up to a minute of GIF that contains sound.
Follow the steps below to create your GIF with sound-
- Launch the Gfycat website and choose the video you want to convert. You can add files from your device or use URLs of video sites. Be sure to choose small file sizes for the best results.
- You can now trim your video down to your desired length. Remember that adding sound will make the file size big. So, it pays to keep your GIFs short to 60 seconds. Use the sliders to select the portion of the video you want to convert and then click Continue.
- Besides sound, Gfycat also lets you add texts and captions to your GIFs. You can move the slider to the proper time and then click ADD A CAPTION to add a new text box. If you don’t need to add text, click Continue and jump to the next step.
- Now comes the time to add titles and tags to your GIFs. To create and share the GIF with sound, remember to enable the Speaker icon. After you’re done, just click the FINISH button to upload your GIF with sound on Gfycat.
Part 3: How to Add Music And Sound Effect To GIFs With Filmora?
Filmora is a cutting-edge video and GIF editing software. Adding sound to GIFs is really easy and can be done in a few steps. You have several perks like-
1. Vast Audio Library
The Audio library brings you a royalty-free music and sound effect library. You can use a plethora of audio files, sound effects, and music for your GIFs without spending a cent. Besides, the Filmstock effect store provides more sound effects and music to try.
2. Optimum Sync
Filmora features advanced beat detection to detect the hits in the audio and generate markers, you can sync your audio with GIFs perfectly with the help of markers. You don’t have to worry about your GIFs appearing out of sync with your audio.
3. Provide Voiceover
You can use your voiceover for your GIFs to make them awesome. Just hook up your microphone and record your voice for ultimate enjoyment.
How to Add Sound to GIFs in Filmora Video Editor?
- The first step to adding music and sound effect to your GIF is to import them to your timeline.
- Then you can choose to add music and sound effect from the in-built audio library, or record your own voice.
When you’re done, just export your gif file as a video in mp4 or other proper formats. You can also configure the resolution and bits for better results.
FIlmora is very user-friendly, and you don’t need to face any learning curve. You can quickly start adding audio and create GIFs with sound in minutes!
FAQ About Sound GIF
Where can I see GIFs with sound?
Presently, only a few platforms allow you to play GIFs with sounds. For that, you have to first embed an audio file in your image or use a video.
Some platforms like Giphy, Imgur, Gfycat, or Tenor let you watch GIFs with sound. You can also give YouTube a try and find GIFs with audio. Else, you can watch them on your mobiles or tablets.
Creating a GIF with sound is simple, quick and easy with Filmora. Have you tried it out yet?
Shanoon Cox
Shanoon Cox is a writer and a lover of all things video.
Follow @Shanoon Cox
Finding Some Different Ways to Animated Cartoon of Yourself
How to Find Some Different Ways to Animated Cartoon of Yourself
An easy yet powerful editor
Numerous effects to choose from
Detailed tutorials provided by the official channel
Illustrations and transforming pictures into cartoon characters have become famous these days. Are you keen to make one but unable to find the right apps that animate your pictures to do so?
This article will help you find the perfect match for you. You can make an animated cartoon of yourself.
In this article
01 [8 Ways to Get Creative With Your Photos into Cartoon Online Or With Apps](#Part 1)
02 [How to Make Animated Cartoon of Yourself in PowerPoint](#Part 2)
03 [Best 5 Apps to Cartoon Yourself on iPhone, iPad, and Android](#Part 3)
Part 1 8 Ways to Get Creative With Your Photos into Cartoon Online Or With Apps
01ToonCamera
Pros:
● ToonCamera is famous for its tremendous and in-time customer support.
● It has got a variety of high-quality filters for your pictures.
● The best part is that it allows you to apply filters in existing photos or videos and real-time.
Cons:
● ToonCamera comes only with the basic set of tools. You will get multiple filters but not various tools.
● It works only on iOS 8.1 or the later versions.
● The app will charge $1.99.

Hot comments from netizens:
ToonCamera allows you to crop and resize your photos. You can add any filter from its huge filter collection and give your picture an animated effect or Edit.
02Cartoon Camera Free
Pros:
● Cartoon Camera Free is an application that is very easy to use.
● The interface of this app is intuitive.
● You will have high-resolution export as output using a cartoon camera free for editing.
Cons:
● The shortcoming of this app is that it asks you to update frequently.
● The settings in the application are entirely automatic and already set.
● You cannot try your creativity or make changes in the editing according to your choice. It has only two effects.

Hot comments from netizens:
Cartoon Camera Free allows you to apply cartoon and pencil sketch effects to your photos. It is a tremendous animate your pictures app. Not only that, this app will enable you to view the impact in real-time.
03Clip2Comic & Caricature Maker
Pros:
● Clip2Comic & Caricature Maker has 1080p at export.
● This application can transform your pictures into posters, cartoons, and sketch art.
● The best of the app is that it allows you to reset image settings
Cons:
● It works only on iOS platforms.
● The app will leave back their watermark on your pictures. You need to get the paid version to remove the watermark.
● It is an expensive app compared to other editing apps.

Hot Comments from netizens:
People love this editing app. There are eight different comics, sketches, and cartoon characters. The app comes with a caricature and deformation tool and multiple image editing and enhancing tools.
04Cartoon Yourself Video Effects
Pros:
● The editing in this app allows you to keep realistic emotions in your videos and photos.
● The interface is very intuitive.
● The app imitates perfect emotions and has a wide variety for you.
Cons:
● Cartoon Yourself Video Effects may lag sometimes
● The effects may not work at times.
● You may require in-app purchases.

Hot Comments from netizens:
This app gives you access to a brand spectrum of emotions giving the perfect realistic touch to your video. You can share animated videos and gifs with your friends from this app.
05Cartoon Sketch Camera Pro
Pros:
● Cartoon Sketch Camera Pro has a sleek user interface.
● It has got eight cartoon effects and filters for your photos.
● It supports iOS13.
Cons:
● There are no image editors’ options.
● You may face image reporting issues.
● The app will cost you $1.99 to get rid of ads and distances.

Hot Comments from netizens:
Cartoon Sketch Camera Pro Cartoon has effects likePixellate, Sketch, Halftone, Dots, Crosshatch Swirl, and Emboss. You can pally these effects on your photos to get the desired output.
06Photo to Cartoon yourself Edit
Pros:
● You can directly click photos using the app that you want to edit.
● This app allows you to share the cartooned image via email.
● There are a lot of effects and textures available.
Cons:
● You may need in-app purchases to access all effects.
● You will not be able to stretch images to get more photo details.
● You cannot share files from here on social media.

Hot Comments from netizens:
Photo to Cartoon yourself Edit is an app that makes your picture look animated and transforms them into funny and beautiful cartoons in seconds. You can adjust the image in all formats and make the color look more vivid.
07Artist – Video and Photo Editor with Art Filters
Pros:
● Artist allows you to use cartoon filter with just a single click
● This app has multiple filters for every emotion.
● You can create square videos in low quality too.
Cons
● For video edits, the app supports only 30-sec duration.
● You may require in-app purchases to access some features.
● The app may lag at times.

Hot Comments from netizens:
Artist is a straightforward and helpful app. It has multiple features and effects for creating animated pictures. It offers video editing options that look fun. You can turn your selfie into cartoon characters using artisto in just one click.
08Moment Cartoon Caricature Cam
Pros:
● Moment Cartoon Caricature Cam holds an exciting selfie contest for users.
● The app has multiple collections of stickers.
● There are a variety of photo-enhancing tools.
Cons:
● The app is relatively slow at loading
● It includes a lot of ads.
● There are sometimes photo uploading issues.

Hot Comments from netizens:
Using Moment Cartoon Caricature Cam you can edit and enhance your photos. You can create a cartoon version of your selfies and participate in selfie contests.
Part 2 How to Make Animated Cartoon of Yourself in PowerPoint
To turn yourself into an animated character in PowerPoint, it is best to have an image with transparent or white background for best results. You can then use the picture effects, and other tools present in PowerPoint as mentioned to get your output.
● If the target picture has a background, your first step is to isolate it from its background. Remove the background or make it white.
● Now you need to sharpen the picture by 50%. This is available in the picture corrections effect.
● Next, copy the image and paste it back as a picture.
● Repeat these steps four times to make the lines in the image stand out sharply.
● In the end, add the color effect of Black and White at 20%.
● You will get quite a fairly detailed output.
Part 3 Best 5 Apps to Cartoon Yourself on iPhone, iPad, and Android
Five apps to cartoon yourself on iOS and Android platforms.
01Cartoon Yourself
Pros:
● It is a verybasic and simple to use photo to cartoon app for everyone.
● One does not require any editing skills to use this app.
● It contains nice and beautiful cartoons effects
Cons:
● The number of free filters and effects is minimal.
● You may require in-app purchases to access some features.
● It does not allow to click photos or record videos.
Hot Comments from netizens:
Cartoon Yourself is a great app to effortlessly turn your photos into animated versions. You have to add pictures from your gallery and then start editing. You will find a lot of editing tools in this app.
02Paint- art and cartoon filters
Pros:
● It has more than a thousand filters and effects
● Customized cartoon filters are set with various parameters
● It is also an artwork community
Cons:
● Even if you use the paid version, there might be bugs on thedesktop version.
● It needs almost regular updates.
● You may require in-app purchases to access some features.
Hot Comments from netizens:
Paint is an excellent app with thousands of filters and effects to choose from. It allows you to experiment with your creativity and create animated pictures.
03MomentCam cartoons and stickers
Pros:
● Here, you can create your cartoon effects
● It has a very active art community to share photos and win prizes.
● It has an easy user interface
Cons:
● There might be errors in loading if you connect with wifi.
● You may require in-app purchases to access some features
● Ads are very annoying.
Hot comments from netizens:
This app offers you a wide range of filters and emoticons. You can easily edit your photos and convert them into cartoon versions.
04Cart
Pros:
● It is a user-friendly app.
● It has got an intuitive interface
● The effects present here are very interesting
Cons:
● The app contains a lot of ads
● The app may freeze sometimes
● It includes an ad.
Hot comments from netizens:
Camaro offers you a wide range of effects like pencil, sketch, carton, watermarks, etc. You can customize the parameters of each filter.
05Sketch Me! Sketch and Cartoon
Pros:
● You can save the image directly from here
● It has opacity adjustments and distinct edges
● There are multiple video effects, including cartoons
Cons:
● There are issues with image importing
● It costs $1.99 in the app store
● May lag at times
Hot comments from netizens:
Sketch Me! Sketch and Cartoon is a great app that allows you to edit images, manage settings, adjust sharpness, opacity, and create the best-animated version of your photo.
Key Takeaways from This Episode
● Creating cartoon versions of your photos is very simple.
● You need not be a skilled editor for that.
● You can work out your creativity seamlessly by accessing these apps, tools, and software.
● Take help from the aforementioned apps and get the desired results. Happy animating!
Illustrations and transforming pictures into cartoon characters have become famous these days. Are you keen to make one but unable to find the right apps that animate your pictures to do so?
This article will help you find the perfect match for you. You can make an animated cartoon of yourself.
In this article
01 [8 Ways to Get Creative With Your Photos into Cartoon Online Or With Apps](#Part 1)
02 [How to Make Animated Cartoon of Yourself in PowerPoint](#Part 2)
03 [Best 5 Apps to Cartoon Yourself on iPhone, iPad, and Android](#Part 3)
Part 1 8 Ways to Get Creative With Your Photos into Cartoon Online Or With Apps
01ToonCamera
Pros:
● ToonCamera is famous for its tremendous and in-time customer support.
● It has got a variety of high-quality filters for your pictures.
● The best part is that it allows you to apply filters in existing photos or videos and real-time.
Cons:
● ToonCamera comes only with the basic set of tools. You will get multiple filters but not various tools.
● It works only on iOS 8.1 or the later versions.
● The app will charge $1.99.
Hot comments from netizens:
ToonCamera allows you to crop and resize your photos. You can add any filter from its huge filter collection and give your picture an animated effect or Edit.
02Cartoon Camera Free
Pros:
● Cartoon Camera Free is an application that is very easy to use.
● The interface of this app is intuitive.
● You will have high-resolution export as output using a cartoon camera free for editing.
Cons:
● The shortcoming of this app is that it asks you to update frequently.
● The settings in the application are entirely automatic and already set.
● You cannot try your creativity or make changes in the editing according to your choice. It has only two effects.
Hot comments from netizens:
Cartoon Camera Free allows you to apply cartoon and pencil sketch effects to your photos. It is a tremendous animate your pictures app. Not only that, this app will enable you to view the impact in real-time.
03Clip2Comic & Caricature Maker
Pros:
● Clip2Comic & Caricature Maker has 1080p at export.
● This application can transform your pictures into posters, cartoons, and sketch art.
● The best of the app is that it allows you to reset image settings
Cons:
● It works only on iOS platforms.
● The app will leave back their watermark on your pictures. You need to get the paid version to remove the watermark.
● It is an expensive app compared to other editing apps.
Hot Comments from netizens:
People love this editing app. There are eight different comics, sketches, and cartoon characters. The app comes with a caricature and deformation tool and multiple image editing and enhancing tools.
04Cartoon Yourself Video Effects
Pros:
● The editing in this app allows you to keep realistic emotions in your videos and photos.
● The interface is very intuitive.
● The app imitates perfect emotions and has a wide variety for you.
Cons:
● Cartoon Yourself Video Effects may lag sometimes
● The effects may not work at times.
● You may require in-app purchases.
Hot Comments from netizens:
This app gives you access to a brand spectrum of emotions giving the perfect realistic touch to your video. You can share animated videos and gifs with your friends from this app.
05Cartoon Sketch Camera Pro
Pros:
● Cartoon Sketch Camera Pro has a sleek user interface.
● It has got eight cartoon effects and filters for your photos.
● It supports iOS13.
Cons:
● There are no image editors’ options.
● You may face image reporting issues.
● The app will cost you $1.99 to get rid of ads and distances.
Hot Comments from netizens:
Cartoon Sketch Camera Pro Cartoon has effects likePixellate, Sketch, Halftone, Dots, Crosshatch Swirl, and Emboss. You can pally these effects on your photos to get the desired output.
06Photo to Cartoon yourself Edit
Pros:
● You can directly click photos using the app that you want to edit.
● This app allows you to share the cartooned image via email.
● There are a lot of effects and textures available.
Cons:
● You may need in-app purchases to access all effects.
● You will not be able to stretch images to get more photo details.
● You cannot share files from here on social media.
Hot Comments from netizens:
Photo to Cartoon yourself Edit is an app that makes your picture look animated and transforms them into funny and beautiful cartoons in seconds. You can adjust the image in all formats and make the color look more vivid.
07Artist – Video and Photo Editor with Art Filters
Pros:
● Artist allows you to use cartoon filter with just a single click
● This app has multiple filters for every emotion.
● You can create square videos in low quality too.
Cons
● For video edits, the app supports only 30-sec duration.
● You may require in-app purchases to access some features.
● The app may lag at times.
Hot Comments from netizens:
Artist is a straightforward and helpful app. It has multiple features and effects for creating animated pictures. It offers video editing options that look fun. You can turn your selfie into cartoon characters using artisto in just one click.
08Moment Cartoon Caricature Cam
Pros:
● Moment Cartoon Caricature Cam holds an exciting selfie contest for users.
● The app has multiple collections of stickers.
● There are a variety of photo-enhancing tools.
Cons:
● The app is relatively slow at loading
● It includes a lot of ads.
● There are sometimes photo uploading issues.
Hot Comments from netizens:
Using Moment Cartoon Caricature Cam you can edit and enhance your photos. You can create a cartoon version of your selfies and participate in selfie contests.
Part 2 How to Make Animated Cartoon of Yourself in PowerPoint
To turn yourself into an animated character in PowerPoint, it is best to have an image with transparent or white background for best results. You can then use the picture effects, and other tools present in PowerPoint as mentioned to get your output.
● If the target picture has a background, your first step is to isolate it from its background. Remove the background or make it white.
● Now you need to sharpen the picture by 50%. This is available in the picture corrections effect.
● Next, copy the image and paste it back as a picture.
● Repeat these steps four times to make the lines in the image stand out sharply.
● In the end, add the color effect of Black and White at 20%.
● You will get quite a fairly detailed output.
Part 3 Best 5 Apps to Cartoon Yourself on iPhone, iPad, and Android
Five apps to cartoon yourself on iOS and Android platforms.
01Cartoon Yourself
Pros:
● It is a verybasic and simple to use photo to cartoon app for everyone.
● One does not require any editing skills to use this app.
● It contains nice and beautiful cartoons effects
Cons:
● The number of free filters and effects is minimal.
● You may require in-app purchases to access some features.
● It does not allow to click photos or record videos.
Hot Comments from netizens:
Cartoon Yourself is a great app to effortlessly turn your photos into animated versions. You have to add pictures from your gallery and then start editing. You will find a lot of editing tools in this app.
02Paint- art and cartoon filters
Pros:
● It has more than a thousand filters and effects
● Customized cartoon filters are set with various parameters
● It is also an artwork community
Cons:
● Even if you use the paid version, there might be bugs on thedesktop version.
● It needs almost regular updates.
● You may require in-app purchases to access some features.
Hot Comments from netizens:
Paint is an excellent app with thousands of filters and effects to choose from. It allows you to experiment with your creativity and create animated pictures.
03MomentCam cartoons and stickers
Pros:
● Here, you can create your cartoon effects
● It has a very active art community to share photos and win prizes.
● It has an easy user interface
Cons:
● There might be errors in loading if you connect with wifi.
● You may require in-app purchases to access some features
● Ads are very annoying.
Hot comments from netizens:
This app offers you a wide range of filters and emoticons. You can easily edit your photos and convert them into cartoon versions.
04Cart
Pros:
● It is a user-friendly app.
● It has got an intuitive interface
● The effects present here are very interesting
Cons:
● The app contains a lot of ads
● The app may freeze sometimes
● It includes an ad.
Hot comments from netizens:
Camaro offers you a wide range of effects like pencil, sketch, carton, watermarks, etc. You can customize the parameters of each filter.
05Sketch Me! Sketch and Cartoon
Pros:
● You can save the image directly from here
● It has opacity adjustments and distinct edges
● There are multiple video effects, including cartoons
Cons:
● There are issues with image importing
● It costs $1.99 in the app store
● May lag at times
Hot comments from netizens:
Sketch Me! Sketch and Cartoon is a great app that allows you to edit images, manage settings, adjust sharpness, opacity, and create the best-animated version of your photo.
Key Takeaways from This Episode
● Creating cartoon versions of your photos is very simple.
● You need not be a skilled editor for that.
● You can work out your creativity seamlessly by accessing these apps, tools, and software.
● Take help from the aforementioned apps and get the desired results. Happy animating!
What’s the Best 10 Photo Animator Templates That Bring Your Images to Life?
What’s the Best 10 Photo Animator Templates That Bring Your Images to Life?
An easy yet powerful editor
Numerous effects to choose from
Detailed tutorials provided by the official channel
Using free 3d motion graphics, we can animate the image and bring it back to life.
Using a 3d animation photo maker online we can animate any image using a template and bring it back to life. This must have gotten you excited? We are as excited as you are as we give you an overview of 3d photo animation online.
In this article
01 [What is 3D Image Animate?](#Part 1)
02 [What is 3D Photo Motion?](#Part 2)
03 [How to Create 3D Animations from a Single Still Image?](#Part 3)
Part 1 What is 3D Image Animate?
3D Image Animate is making a moving scene using just a simple image. It is quite a complicated process and requires high technical skills to achieve a moving animation out of a still image. For your convenience, here we list some of the examples that will make you understand what 3D Image Animate is.
01Resuscitate a Person or Object
This first 3D Image Animate example depicts turning a real-life still image of a person and making him move out of that still image. Sounds absurd, right? Well, just look at this example below.
02Pan View of Car
This next example shows a still image of a car is turned into a moving scene as if the camera person is shooting a pan view of a parked Car.
03Dispersing Elements
Here is another amazing 3D Photo Animate example for you. In this one, you’ll get to see an image that is stacked with several elements, fruits, and veggies (in this case), which get dispersed out of the canvas. Go ahead check it out.
Part 2 What is 3D Photo Motion?
3D photo motion is basically a contemporary technology that helps us to bring life into the pictures. In simple words, using 3D photo motion and animation tools we can make still images into moving ones. 3D animation photo maker online offers you several motion templates. You can apply any of the available motion templates to a still image and make it animated. 3D photo motion helps convert 2D images to life like moving 3D images. This can be useful when working with a project that deals with many still images. By using animation on still images, the project can become more attractive and hence has a higher chance of getting liked!
Part 3 How to Create 3D Animations from a Single Still Image?
01Simple steps to create 3d animations from a single still image
When it comes to animation, Adobe is recognized as one of the best tools. Animation with Adobe is one of the most convenient ways of animation. Here is how you can convert any 2D image to a 3D animated image using adobe. For those of you who are used to animating with adobe, it must be simple to follow the few steps listed below:
● Firstly, you need to convert the 2D layers of the still image to 3D postcards (planes that possess 3D properties). In case the layer you are starting with is a text layer, any transparency will be retained.
● Now to convert the object into 3D, wrap the 2D layer around any 3D object such as cube, cone, or sphere. Choose the shape that suits your layer.
● Next, you need to create a 3D mesh from greyscale information in a 2D image.
● Now you need to simulate a metalworking technique called “Repousse”. By doing so, you will be extruding a 2D object in a 3D space
● Next, you need to build a 3D volume from any multi-frame file like DICOM. Photoshop automatically converts the individual slices of the file into a 3D object that can be manipulated in 3D space from any angle. Furthermore, if you wish to optimize the display, you can also apply any 3D volume render effects.
02Best 10 Photo Animator Templates to Bring Your Images to Life
3D motion photo animator
The first tool on the list of 3d photo animators onlineis an excellent tool called 3D motion photo Animator. The tool helps to split landscape shots into numerous panels depending on the distance of the object from the camera. Furthermore, the plug-in also adds a soft parallax movement into the layers, giving the final image a beautiful 3D effect. The tool also has several editing options and a wide range of lens flare. The animator tool allows you to tweak the weather by using the weather effect options available in the tool.
3D photo animator
This 3d animation photo maker online takes the hype of the parallax effect in animation to a whole different level. The animator allows you to add parallax effects to any still image to make it appear 3 dimensional. Moreover, you can also add depth to the animated image to enhance the 3 dimensional effects and make it appear more realistic.
Live photo animation
Live photo animation is another seamless tool that offers free 3d motion graphics. The tool which is mainly meant for animation gives you the ability to mask the object and a keyframe from vivid natural movements. Once the subject and the background have been isolated and processed, they work independently from each other. This means that, due to independent operation, live photo animation becomes even more realistic since the subject can be animated without affecting the background. The tool also has cool zooming and 3D tracking effects.
Easy 3D face photo Animator
Most tools for 3d photo animation online fail to make the image look completely 3 dimensional. Even after the animation is performed, the people and the objects continue to look 2 dimensional. However easy 3D face photo Animator solves the problem. Using this tool, you can individually animate a face and make it 3 dimensional. It uses several panels to recreate the effect that’d be provided by a video recorder.
Live photo Animator
Looking for an animating tool to animate still images and transform them into stunning videos like action pictures? Live photo Animator is just the perfect tool for you then. The tool has a simple interface and helps generate realistic 3d action images. The plug-in works on the principle of duplicating action elements in an image. These action images include water, dust, fire, and other different kinds of moving objects in an image.
Photo Animator tool
The photo Animator tool kit is a great tool to generate animated 3D images. This quick time-saving tool is your go-to tool for photo effects and zooming. Moreover, the pack also consists of 50 preset animation templates that you can choose from. All you need to do is drag and drop the still images into the tool, and then you need to select the template that you’d like to apply to the image. The tool then processes the image and animates it to convert the still image into a 3d one.
Media animator
Think of smooth and seamless media transitions? Media animator is the perfect tool for you. This software offers a set of seamless and dynamically animated media transitions. The smooth transition effects make the images produced by this tool perfect for using the 3D animations in your official presentations and slideshows.
3D photo Animator
Have an attractive image that you wish to enhance by using animation? Here’s a simple software that can help you add a touch of flair to any simple image. The software has amazing 3d animation powers. When you zoom on the images produced by the software, the entire perspective changes, and the image looks entirely 3D.
Particular photo animation
The animating tool is the best for those who wish to finish animation quickly. The software has an amazing and stylish way of making slideshows. The tool has several templates that concentrate on the particular motion.
Key Takeaways from This Episode
● 3d animation is one of the most budding fields these days. It makes our photos life-like and brings back real life memories.
● Using 3D animation, still images are brought back to life and memories from years back are revived.
● We looked at a few of the best tools for animating an image and converting them to 3D. 3D images can also help make your project reports and presentations much more attractive and earn you the extra edge over your colleagues.
● We recommend you to try a few of these cool tools and get your hands dirty with animation today!
Secret Shortcut to Adobe Animate Character Tutorial
How-to Guide: Secret Shortcut to Adobe Animate Character Tutorial
An easy yet powerful editor
Numerous effects to choose from
Detailed tutorials provided by the official channel
Whether you are a beginner or an experienced graphics designer, you can use Adobe Character Animator to animate 2D characters easily. But, if you are an absolute beginner, it might take a few weeks to get familiar with the software’s features/workflow.

Irrespective of your experience with the tool, this Adobe animate character tutorial will help you get started and edit visually appealing animated shorts.
In this article
01 [How Do I Animate a Character in Adobe Animation?](#Part 1)
02 [Is Adobe Character Animator Easy to Use?](#Part 2)
03 [How to Rig a Simple Character | Adobe Animate Tutorial](#Part 3)
04 [One-Stop Solution to Edit High-Quality Videos in Every Situation](#Part 4)
Part 1 How Do I Animate a Character in Adobe Animation?
1. Start With a Script
If you want to create an animation that engages the customers, you must always start your journey with a script. Like a short movie, even an animated sketch requires a script. It’ll set the tone for the entire animation and help you start sailing in the right direction.

If you have a full production team, the writers will take care of scriptwriting and you’ll just have to suggest a few changes in between. But, if you are working on your own, you’ll have to handle the script writing all-by-yourself. In any case, however, make sure to start by crafting a beautiful script with an amazing storyline.
2. Record the Voiceover
The next step in our Adobe Animate character tutorial is recording the voiceover for the video. Unless you are planning to create a GIF animation, you would need a dedicated voiceover for your animated video to make it more appealing.

Now, before you even begin with animating the character, recording the audio will help you clear out one task from the list. To record the voiceover, you can try different types of audio recording software and equipment.
3. Start Creating the Character
At this point in our Adobe animate character tutorial, we are ready to design the actual character itself. To do this, launch Adobe Character Animator on your system. On its home screen, you’ll see a tab containing different types of characters (along with their dedicated Photoshop and Illustrator versions). Click on any of these characters and it’ll automatically open in the editing panel of Adobe character animator.

Now, you can start with animating the character. In the top-left corner, you’ll see two different options, i.e., “
If you double-tap the “Scene” tab the character will open up in a real-time environment where it’ll react to your movement and speech. Make sure that the webcam stays turned on throughout the process. Then, simply press the “Record” button and start recording the entire scene for your animation.
Part 2 Is Adobe Character Animator Easy to Use?
That’s how you can animate a character in Adobe character animator and create visually stunning animations. However, many beginners want to know if it’s easy to use Adobe character animator. The answer is Yes! With Character Animator, Adobe has developed a relatively easy-to-use interface that anyone can use easily.
Part 3 How to Rig a Simple Character | Adobe Animate Tutorial
Now, if you aspire to become a skilled graphic designer, here are a few tutorials that’ll help you get started with Adobe Character Animator and explore all its features.
1. Getting Started With Adobe Character Animator
This 15 minutes Adobe animate character tutorial by Okay Samurai is the best thing you’ll find on the Internet, especially if you are a complete beginner and want to learn different elements of the software.
2. Creating Illustrator Puppet
Adobe Character Animator lets users create both Illustrator and Photoshop puppets. If you want to become an expert in the former, this hour-long YouTube video is the best tutorial for you.
3. Getting Started With Advanced Rigging
This is another useful Adobe Animate character tutorial that’s exclusively designed to help editors understand the basics of creating a character such as “Surr”. For people who don’t know, it’s a free character in the Illustrator puppet library that you can directly import into your project.
4. Animation Workflow in Adobe Character Animator
If you are looking for an all-in-one tutorial to understand the entire workflow of working with the software, this tutorial by Okay Samurai is the best place to get started.
5. Adding an Illustrator Puppet on Live Footage
In this tutorial, you’ll understand how you can create an Illustrator puppet and add it to real-life footage, even when there’s camera movement.
6. Using the Walk Behavior in Adobe Character Animator
This tutorial will be the perfect knowledge hub. In this tutorial, you’ll learn about the basics of using the walk behavior in Adobe Character Animator and how to apply it to different characters to make it walk across the scene.
7. Creating and Implementing Replays
Replays are one of the most powerful (and one of the latest) features of Adobe Character Animator. With Replays, you can record a gesture/movement and apply a trigger to use it anytime you want throughout the animation. This tutorial will help you understand how to implement the replays in the software and use them to craft the perfect storyline.
8. Cartoon Workflow in Character Animator
Thanks to this amazing 1 hour 40 minutes long Adobe animate character tutorial, you’ll be able to get familiar with the complete workflow of pairing the software with other tools and compiling a cartoon animation at the end using Adobe After Effects.
9. Running an Animated Livestream
If you are a YouTuber or have your own Instagram brand, this will be a pretty exciting way to engage with your audience. Simply use the livestream feature, create a stunning 2D character, and interact with your audience in a more interactive manner.
10. Working With Adobe Fresco and Character Animator
This is also a useful Adobe character animate tutorial by David Werner that’ll help you understand how to use both Adobe Fresco and Character Animator together. After this tutorial, you’ll be able to import your Fresco drawings into Character Animator and customize them to create visually engaging animations.
Key Takeaways from This Episode
● Adobe Character Animator is among the most powerful animation tools you can use in 2021 to create stunning animations
● You should always start designing an animation in Character Animator by writing dedicated scripts.
● You can also pair Adobe Character Animator with other Adobe editing tools such as Illustrator, Photoshop, and Adobe Fresco
Whether you are a beginner or an experienced graphics designer, you can use Adobe Character Animator to animate 2D characters easily. But, if you are an absolute beginner, it might take a few weeks to get familiar with the software’s features/workflow.
Irrespective of your experience with the tool, this Adobe animate character tutorial will help you get started and edit visually appealing animated shorts.
In this article
01 [How Do I Animate a Character in Adobe Animation?](#Part 1)
02 [Is Adobe Character Animator Easy to Use?](#Part 2)
03 [How to Rig a Simple Character | Adobe Animate Tutorial](#Part 3)
04 [One-Stop Solution to Edit High-Quality Videos in Every Situation](#Part 4)
Part 1 How Do I Animate a Character in Adobe Animation?
1. Start With a Script
If you want to create an animation that engages the customers, you must always start your journey with a script. Like a short movie, even an animated sketch requires a script. It’ll set the tone for the entire animation and help you start sailing in the right direction.
If you have a full production team, the writers will take care of scriptwriting and you’ll just have to suggest a few changes in between. But, if you are working on your own, you’ll have to handle the script writing all-by-yourself. In any case, however, make sure to start by crafting a beautiful script with an amazing storyline.
2. Record the Voiceover
The next step in our Adobe Animate character tutorial is recording the voiceover for the video. Unless you are planning to create a GIF animation, you would need a dedicated voiceover for your animated video to make it more appealing.
Now, before you even begin with animating the character, recording the audio will help you clear out one task from the list. To record the voiceover, you can try different types of audio recording software and equipment.
3. Start Creating the Character
At this point in our Adobe animate character tutorial, we are ready to design the actual character itself. To do this, launch Adobe Character Animator on your system. On its home screen, you’ll see a tab containing different types of characters (along with their dedicated Photoshop and Illustrator versions). Click on any of these characters and it’ll automatically open in the editing panel of Adobe character animator.
Now, you can start with animating the character. In the top-left corner, you’ll see two different options, i.e., “
If you double-tap the “Scene” tab the character will open up in a real-time environment where it’ll react to your movement and speech. Make sure that the webcam stays turned on throughout the process. Then, simply press the “Record” button and start recording the entire scene for your animation.
Part 2 Is Adobe Character Animator Easy to Use?
That’s how you can animate a character in Adobe character animator and create visually stunning animations. However, many beginners want to know if it’s easy to use Adobe character animator. The answer is Yes! With Character Animator, Adobe has developed a relatively easy-to-use interface that anyone can use easily.
Part 3 How to Rig a Simple Character | Adobe Animate Tutorial
Now, if you aspire to become a skilled graphic designer, here are a few tutorials that’ll help you get started with Adobe Character Animator and explore all its features.
1. Getting Started With Adobe Character Animator
This 15 minutes Adobe animate character tutorial by Okay Samurai is the best thing you’ll find on the Internet, especially if you are a complete beginner and want to learn different elements of the software.
2. Creating Illustrator Puppet
Adobe Character Animator lets users create both Illustrator and Photoshop puppets. If you want to become an expert in the former, this hour-long YouTube video is the best tutorial for you.
3. Getting Started With Advanced Rigging
This is another useful Adobe Animate character tutorial that’s exclusively designed to help editors understand the basics of creating a character such as “Surr”. For people who don’t know, it’s a free character in the Illustrator puppet library that you can directly import into your project.
4. Animation Workflow in Adobe Character Animator
If you are looking for an all-in-one tutorial to understand the entire workflow of working with the software, this tutorial by Okay Samurai is the best place to get started.
5. Adding an Illustrator Puppet on Live Footage
In this tutorial, you’ll understand how you can create an Illustrator puppet and add it to real-life footage, even when there’s camera movement.
6. Using the Walk Behavior in Adobe Character Animator
This tutorial will be the perfect knowledge hub. In this tutorial, you’ll learn about the basics of using the walk behavior in Adobe Character Animator and how to apply it to different characters to make it walk across the scene.
7. Creating and Implementing Replays
Replays are one of the most powerful (and one of the latest) features of Adobe Character Animator. With Replays, you can record a gesture/movement and apply a trigger to use it anytime you want throughout the animation. This tutorial will help you understand how to implement the replays in the software and use them to craft the perfect storyline.
8. Cartoon Workflow in Character Animator
Thanks to this amazing 1 hour 40 minutes long Adobe animate character tutorial, you’ll be able to get familiar with the complete workflow of pairing the software with other tools and compiling a cartoon animation at the end using Adobe After Effects.
9. Running an Animated Livestream
If you are a YouTuber or have your own Instagram brand, this will be a pretty exciting way to engage with your audience. Simply use the livestream feature, create a stunning 2D character, and interact with your audience in a more interactive manner.
10. Working With Adobe Fresco and Character Animator
This is also a useful Adobe character animate tutorial by David Werner that’ll help you understand how to use both Adobe Fresco and Character Animator together. After this tutorial, you’ll be able to import your Fresco drawings into Character Animator and customize them to create visually engaging animations.
Key Takeaways from This Episode
● Adobe Character Animator is among the most powerful animation tools you can use in 2021 to create stunning animations
● You should always start designing an animation in Character Animator by writing dedicated scripts.
● You can also pair Adobe Character Animator with other Adobe editing tools such as Illustrator, Photoshop, and Adobe Fresco
FREE Top 10 Best Convert Video Between GIF and Software [High Quality, 2024]
FREE Top 10 Best Convert Video Between GIF and Software [High Quality, 2024]
Shanoon Cox
Mar 27, 2024• Proven solutions
GIF images are gaining popularity among users as they are able to convey a great amount of information. So when you are not able to accommodate heavy videos in your projects but want to deliver more accurate visual information, then GIF are useful solutions.
Converting a video clip to GIF is the easiest way to make GIFs. If you still feel the GIF file is too large, cutting GIF is also a great option.
After 28 hours of research and comparison, we rounded up the top 10 software to convert video between GIFs to help you make GIFs with ease. They are gif video makers that can be used online, on Windows and Mac.
10 Best Software for Converting Video to GIF
1. Wondershare Filmora
Using an interactive platform of Wondershare Filmora, you can easily develop a classic GIF image as an output. All popular video file formats like MKV, WMV, AVI and MP4, etc. are OK. The best part is that Filmora never poses any restriction about file size during conversion hence users can process HD videos to get GIF images.
It’s a very impressive editing tool with a wide set of attractive features that can make your image highly customized. Feel free to choose advanced elements, animations, text, overlays, etc for the development of original GIFs.
Besides, Filmora allows you to extract still images from video with the same resolution. You can then combine and edit the extracted PNG images to make an interesting GIF.

Click Snapshot icon to extract image from video in Filmora
Moreover, if you want to make a GIF online, the Filmora meme maker is your ultimate solution. It helps you make images, GIFs and video memes directly without watermark. You can change text size, color, and position to create a caption when you are editing. You can also put text inside or outside in GIF.
It is totally FREE to use and no signup. Try it now!
Check this video to learn how to convert video to GIF step by step.
Download Mac Version ](https://tools.techidaily.com/wondershare/filmora/download/ )
2. Any GIF Animator
The simple and powerful design of Any GIF converter app can immediately turn your favorite videos into interactive GIFs. It supports a wide range of file formats like WEBM, ASF, MPG, FLV, and AVI, etc. The best part is that this tool also allows users to get their media files imported from optical storage devices like DVD etc or even webcam recorded screens can also be processed. It is possible to specify frame rate start and end time markers with ease and for customization, users can access advanced text overlays, loops, and resolution effects.
Features:
- Intuitive easy to use interface lets you access it without even checking any user manual. It is simple and completely hassle-free.
- You may perfect your GIF animation with the help of an animation wizard. It is an easy and quick way of customizing and adding effects to your GIF animation.
- You get a built-in image editor that includes a comprehensive set of tools for editing.
- There are several graphics formats that you may use to convert video to gif on Any GIF Animator. It includes PNG, JPEG, TIFF, BMP, GIF, ICO, PSD, PCX, RLE, PIC, DIB, AVI, PCD, WMF, and several others.
3. Free Video to GIF Converter
This lightweight and user-friendly application can easily fulfill your video to GIF conversion needs with its straightforward conversion process. Users simply need to upload their video file to the software timeline and then update settings for its start time, end time, resolution, frame rate, and size etc. Once all details are specified then simply hit the convert button and within a few seconds, your GIF will be with you. Users can also preview their files at the time of the conversion process so that desired changes can be updated on time.
Features:
- A very simple tool that can be easily used by anyone.
- It allows you to convert long video to gif.
- The interface has just steps, extract, and create a video to gifs.
- The file types supported are AVI, GIF, mp4, MPEG, and WAV.
- You can change the height and width of the individual frame.
- You can select the playback speed.
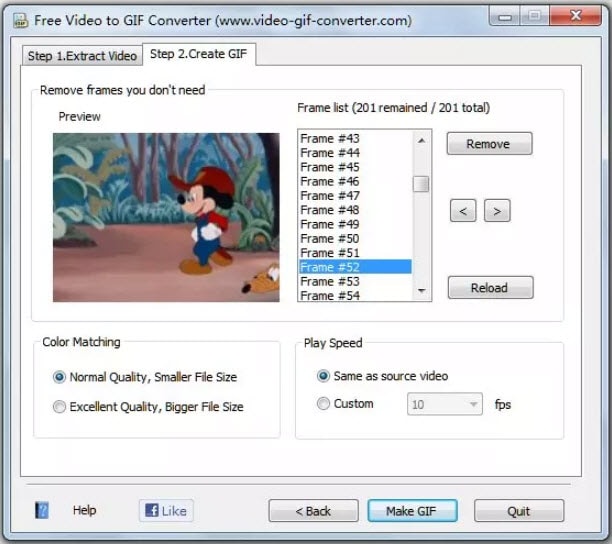
4. Cute Video to GIF Converter
This tool is designed to assist users with fast and efficient GIF conversion processes using various animation effects. It allows users to share collections of GIFS over other networks so that audience can avail the best content with ease update. Users can also extract moments from their favorite TV shows and then develop eye-catching GIFs with small file size and lesser loading times.
Features:
- It has an intuitive GUI consisting of a single-window that shows every segment of the app in one frame with making it fussy.
- Supports several video file types along with several audio file types as well. The video file types include MP4, AVI, MPEG, RMVB, WMV, VOB, SWF, and M2TS and the audio track formats are MP3, AC3, and WMA.
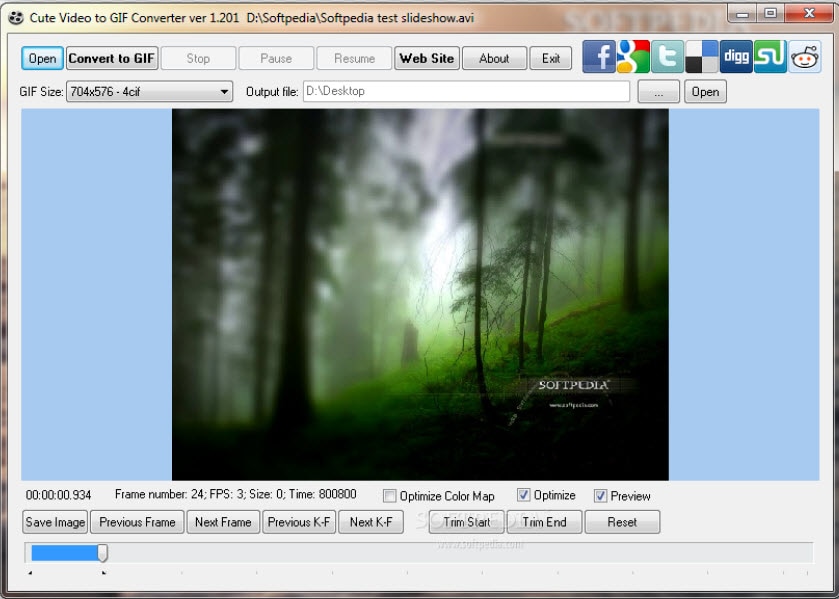
5. KickMyGraphics
Here is a lightweight yet powerful GIF converter program that can record, create or edit GIF images to produce high quality customized results. Users can easily update various animated clips to this platform with popular file formats like PNG, BMP, JPG, regular GIF and animated GIF etc. Its advanced editor allows easy customization with rotate, trim, stretch, loopback, scale and many more options. Users can easily adjust settings for the output file format, size and quality.
Features:
- It is a small, in-built freeware program to convert video to gif.
- You can import several video MPG, AVI, MP4, ASF, and other video types as well. You can import manifold animated Gif, Jpg, Bmp and Png files.
- Direct recording of animated GIF images.
- Allows various editing options like the loop, stretch, pan, reverse, and much more.

6. Movie to GIF
Converting video clips to GIF becomes very simple with Movie to GIF converter tool because its user-friendly interface and fast editing tools make everything possible with ease. It allows users to define color depth, frame rate, speed and size of videos manually and once all settings are done them GIFs can be created within seconds. This tool supports almost all popular media file formats for GIF processing like VOB, MOV, WMV, MP4, AVI etc.
Features:
- Very simple video to GIF converter.
- User-friendly interface.
- Play video clips in GIF files.
- Set more frames per second so the output GIF appears as the original video.
- The breadth and height of the GIF are adjustable.

7. Instagriffer
Using Instagriffer, users can collect memorable stills from the screen within seconds and then process them interactively to develop GIFs. No matter whether you want to grab moments from your favorite YouTube video, lovable Vine start or something interesting from Netflix, Instagriffer can assist you to import any of your desired moment for designing GIFs. This instant professional image editor tool possesses a wide range of loops, filters and text abilities. It is available free of cost and you need not worry about viruses, spyware or annoying ads on this platform.
Features:
- You can capture the best GIF-worthy moments instantly from your screen.
- Add text, filters, loops, and more.
- Convert video to gif completely free of charge.
- Easy addition of highly customizable text and custom logos
- With Instagriffer there will be no watermarks to your gif
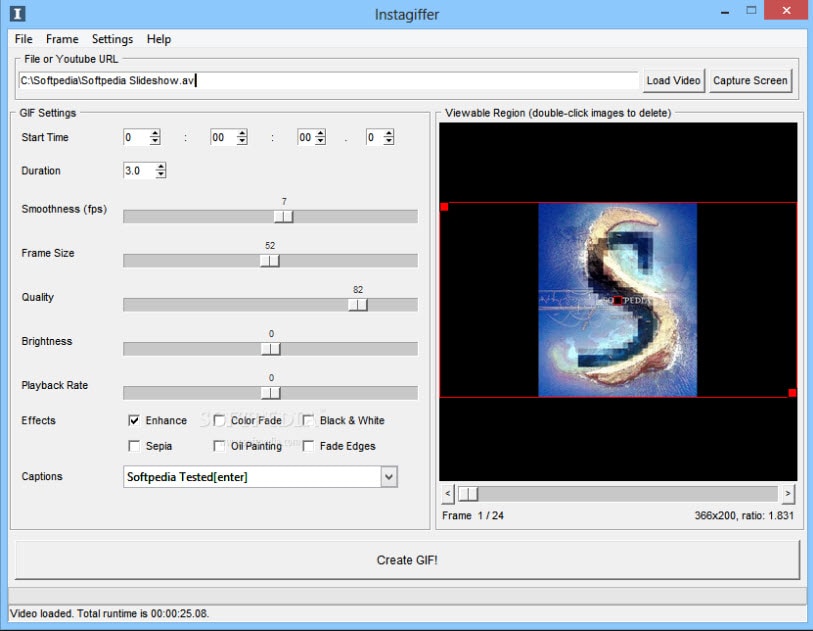
8. Ezgif
There are two useful options for GIF conversions on Ezgif, the first one is to upload an already existing video file to a software timeline for generating GIF as an output. The second option is to paste the video URL on a specified field in software and then process this video link. It can convert large-sized videos into GIFs within very less time. Never forget to use impressive editing tools of Ezgif to get outstanding and professional-looking GIF outputs.
Features:
- Convert transparent video (with alpha channel) to transparent GIF.
- Use resize the crop tool to crop out only part of the video or change your gif’s dimension.
- Select frame rates as per your requirement.
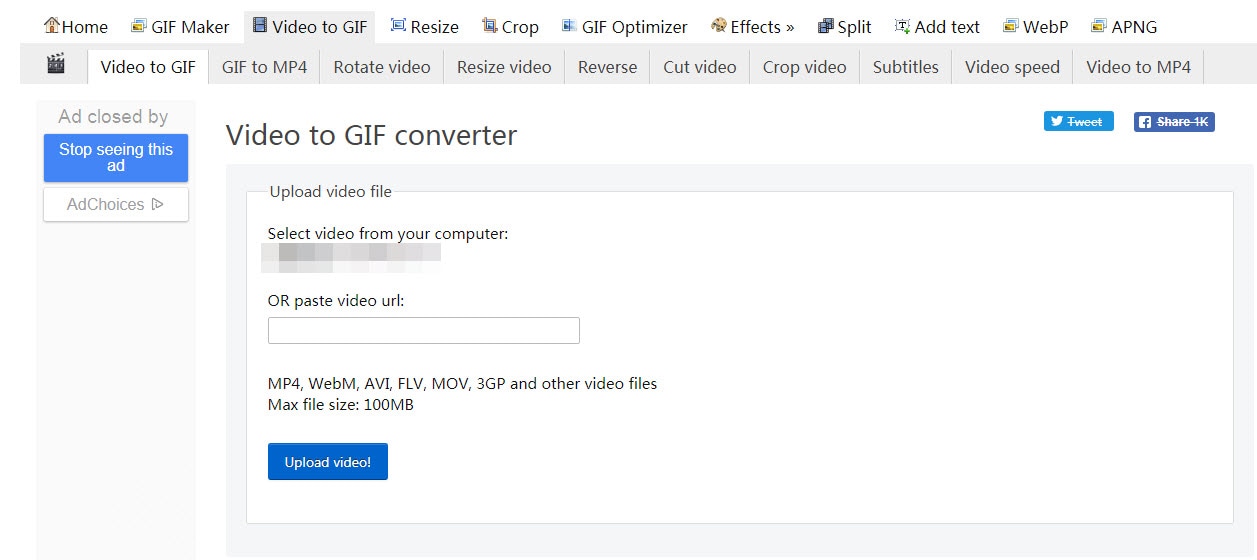
9. Giphy
Giphy is well known as the biggest GIF supportive platform that is being accessed by millions of users every day. This tool is designed to assists in easy conversions and fast sharing needs for developed GIF images. Users need to copy their desired video URL into a specified field on the software window and then hit the create button. It also follows drag and drop tools for getting videos internally from folders inside the computer. Users can also add sound clips for their GIFs and make it more eye-catching with additional tags and descriptions.
Features:
- Extremely easy and fast gif creation
- Create animated gifs from YouTube videos and images
- Convert video to GIF completely free

10. Zazmar
If you need a tool that can process heavy media files faster to develop light-weighted GIFS then Zamar is the best option for you. It supports more than 1200 media file formats so that users can process any of their desired video or image with ease and their interactive platform makes every editing task much easier with user-friendly editing tools.
Features:
- Fast and easy video to gif conversion.
- Easy drag and drop option for uploading multiple files.
- A high-speed download of the converted files.
Conclusion
Here, I am sure you’ve known which one is the best video to GIF converter software for your needs.
Comparison Table of the Best Video to GIF Converters
Note: You can click the product name to get into the detailed info of each video to GIF converters listed above.
| Program Name | Supported format | System available |
|---|---|---|
| Wondershare Filmora | AVI, DV, DIF, NUT, NSV, FLV, MKV, MP4, M4V, PSP, 3GP, MOV, MPG, MPEG, VOB, DAT, EVO, TS, TP, TRP, M2TS, WMV, ASF, DVR-MS | Win & Mac |
| Any GIF Animator | MP4, MOV, AVI, and more | Win |
| Free Video to GIF Converter | MKV, MP4, MOV, WMV, AVI, FLV, and MOB | Win |
| Cute Video to GIF Converter | AVI, MPG, FLV, MP4, 3GP, VOB, WMV | win |
| KickMyGraphics | AVI, MPG, WMV, MP4, ASF | win |
| Movie to GIF | AVI, MPG, WMV, MP4, MKV, MOV, VOB etc. | win |
| Instagriffer | mkv, flv, avi, mp4 | Win & Mac |
| Ezgif | MP4/AVI/WEBM/FLV/MOV and other video files | Online |
| Giphy | MP4/AVI/WEBM/FLV/MOV and other video files | Online |
| Zamzar | MP4 | Online |
However, Filmora is one of the best powerful software that can help you create GIFs with straightforward UI interface, and easy-to-use GIF tools. If you want to know the specific steps, please check the video below.
Download Mac Version ](https://tools.techidaily.com/wondershare/filmora/download/ )
Frequently Asked Questions About Converting Video to GIFs
1. How To Crop A GIF To A Circle?
Whether or not you can crop a GIF into a circle, depends on the cropping tools the app you are using offers. Some GIF makers allow you to choose the shape to which you are going to crop a GIF, while others don’t provide this option.
Using Filmora’s mask features is probably one of the easiest ways to crop a GIF to a circle, as you simply have to apply the mask to the footage and specify which parts of the GIF’s frames are going to be removed. What’s more, you can choose the shape of the mask in Filmora which enables you to crop GIFs into a variety of different shapes.
2. How To Turn A Video Into A GIF?
All you need to do in order to turn a video into a GIF is to change the file’s format. Most videos are saved as MP4, AVI, or MOV files, and nearly all video editors and GIF makers allow you to convert a video file into a GIF.
So, you simply have to choose GIF as the format in which you want to export a video file you imported into a video editing software or an online GIF maker and wait for the rendering process to be completed.
Shanoon Cox
Shanoon Cox is a writer and a lover of all things video.
Follow @Shanoon Cox
Shanoon Cox
Mar 27, 2024• Proven solutions
GIF images are gaining popularity among users as they are able to convey a great amount of information. So when you are not able to accommodate heavy videos in your projects but want to deliver more accurate visual information, then GIF are useful solutions.
Converting a video clip to GIF is the easiest way to make GIFs. If you still feel the GIF file is too large, cutting GIF is also a great option.
After 28 hours of research and comparison, we rounded up the top 10 software to convert video between GIFs to help you make GIFs with ease. They are gif video makers that can be used online, on Windows and Mac.
10 Best Software for Converting Video to GIF
1. Wondershare Filmora
Using an interactive platform of Wondershare Filmora, you can easily develop a classic GIF image as an output. All popular video file formats like MKV, WMV, AVI and MP4, etc. are OK. The best part is that Filmora never poses any restriction about file size during conversion hence users can process HD videos to get GIF images.
It’s a very impressive editing tool with a wide set of attractive features that can make your image highly customized. Feel free to choose advanced elements, animations, text, overlays, etc for the development of original GIFs.
Besides, Filmora allows you to extract still images from video with the same resolution. You can then combine and edit the extracted PNG images to make an interesting GIF.
Click Snapshot icon to extract image from video in Filmora
Moreover, if you want to make a GIF online, the Filmora meme maker is your ultimate solution. It helps you make images, GIFs and video memes directly without watermark. You can change text size, color, and position to create a caption when you are editing. You can also put text inside or outside in GIF.
It is totally FREE to use and no signup. Try it now!
Check this video to learn how to convert video to GIF step by step.
Download Mac Version ](https://tools.techidaily.com/wondershare/filmora/download/ )
2. Any GIF Animator
The simple and powerful design of Any GIF converter app can immediately turn your favorite videos into interactive GIFs. It supports a wide range of file formats like WEBM, ASF, MPG, FLV, and AVI, etc. The best part is that this tool also allows users to get their media files imported from optical storage devices like DVD etc or even webcam recorded screens can also be processed. It is possible to specify frame rate start and end time markers with ease and for customization, users can access advanced text overlays, loops, and resolution effects.
Features:
- Intuitive easy to use interface lets you access it without even checking any user manual. It is simple and completely hassle-free.
- You may perfect your GIF animation with the help of an animation wizard. It is an easy and quick way of customizing and adding effects to your GIF animation.
- You get a built-in image editor that includes a comprehensive set of tools for editing.
- There are several graphics formats that you may use to convert video to gif on Any GIF Animator. It includes PNG, JPEG, TIFF, BMP, GIF, ICO, PSD, PCX, RLE, PIC, DIB, AVI, PCD, WMF, and several others.
3. Free Video to GIF Converter
This lightweight and user-friendly application can easily fulfill your video to GIF conversion needs with its straightforward conversion process. Users simply need to upload their video file to the software timeline and then update settings for its start time, end time, resolution, frame rate, and size etc. Once all details are specified then simply hit the convert button and within a few seconds, your GIF will be with you. Users can also preview their files at the time of the conversion process so that desired changes can be updated on time.
Features:
- A very simple tool that can be easily used by anyone.
- It allows you to convert long video to gif.
- The interface has just steps, extract, and create a video to gifs.
- The file types supported are AVI, GIF, mp4, MPEG, and WAV.
- You can change the height and width of the individual frame.
- You can select the playback speed.
4. Cute Video to GIF Converter
This tool is designed to assist users with fast and efficient GIF conversion processes using various animation effects. It allows users to share collections of GIFS over other networks so that audience can avail the best content with ease update. Users can also extract moments from their favorite TV shows and then develop eye-catching GIFs with small file size and lesser loading times.
Features:
- It has an intuitive GUI consisting of a single-window that shows every segment of the app in one frame with making it fussy.
- Supports several video file types along with several audio file types as well. The video file types include MP4, AVI, MPEG, RMVB, WMV, VOB, SWF, and M2TS and the audio track formats are MP3, AC3, and WMA.
5. KickMyGraphics
Here is a lightweight yet powerful GIF converter program that can record, create or edit GIF images to produce high quality customized results. Users can easily update various animated clips to this platform with popular file formats like PNG, BMP, JPG, regular GIF and animated GIF etc. Its advanced editor allows easy customization with rotate, trim, stretch, loopback, scale and many more options. Users can easily adjust settings for the output file format, size and quality.
Features:
- It is a small, in-built freeware program to convert video to gif.
- You can import several video MPG, AVI, MP4, ASF, and other video types as well. You can import manifold animated Gif, Jpg, Bmp and Png files.
- Direct recording of animated GIF images.
- Allows various editing options like the loop, stretch, pan, reverse, and much more.
6. Movie to GIF
Converting video clips to GIF becomes very simple with Movie to GIF converter tool because its user-friendly interface and fast editing tools make everything possible with ease. It allows users to define color depth, frame rate, speed and size of videos manually and once all settings are done them GIFs can be created within seconds. This tool supports almost all popular media file formats for GIF processing like VOB, MOV, WMV, MP4, AVI etc.
Features:
- Very simple video to GIF converter.
- User-friendly interface.
- Play video clips in GIF files.
- Set more frames per second so the output GIF appears as the original video.
- The breadth and height of the GIF are adjustable.
7. Instagriffer
Using Instagriffer, users can collect memorable stills from the screen within seconds and then process them interactively to develop GIFs. No matter whether you want to grab moments from your favorite YouTube video, lovable Vine start or something interesting from Netflix, Instagriffer can assist you to import any of your desired moment for designing GIFs. This instant professional image editor tool possesses a wide range of loops, filters and text abilities. It is available free of cost and you need not worry about viruses, spyware or annoying ads on this platform.
Features:
- You can capture the best GIF-worthy moments instantly from your screen.
- Add text, filters, loops, and more.
- Convert video to gif completely free of charge.
- Easy addition of highly customizable text and custom logos
- With Instagriffer there will be no watermarks to your gif
8. Ezgif
There are two useful options for GIF conversions on Ezgif, the first one is to upload an already existing video file to a software timeline for generating GIF as an output. The second option is to paste the video URL on a specified field in software and then process this video link. It can convert large-sized videos into GIFs within very less time. Never forget to use impressive editing tools of Ezgif to get outstanding and professional-looking GIF outputs.
Features:
- Convert transparent video (with alpha channel) to transparent GIF.
- Use resize the crop tool to crop out only part of the video or change your gif’s dimension.
- Select frame rates as per your requirement.
9. Giphy
Giphy is well known as the biggest GIF supportive platform that is being accessed by millions of users every day. This tool is designed to assists in easy conversions and fast sharing needs for developed GIF images. Users need to copy their desired video URL into a specified field on the software window and then hit the create button. It also follows drag and drop tools for getting videos internally from folders inside the computer. Users can also add sound clips for their GIFs and make it more eye-catching with additional tags and descriptions.
Features:
- Extremely easy and fast gif creation
- Create animated gifs from YouTube videos and images
- Convert video to GIF completely free
10. Zazmar
If you need a tool that can process heavy media files faster to develop light-weighted GIFS then Zamar is the best option for you. It supports more than 1200 media file formats so that users can process any of their desired video or image with ease and their interactive platform makes every editing task much easier with user-friendly editing tools.
Features:
- Fast and easy video to gif conversion.
- Easy drag and drop option for uploading multiple files.
- A high-speed download of the converted files.
Conclusion
Here, I am sure you’ve known which one is the best video to GIF converter software for your needs.
Comparison Table of the Best Video to GIF Converters
Note: You can click the product name to get into the detailed info of each video to GIF converters listed above.
| Program Name | Supported format | System available |
|---|---|---|
| Wondershare Filmora | AVI, DV, DIF, NUT, NSV, FLV, MKV, MP4, M4V, PSP, 3GP, MOV, MPG, MPEG, VOB, DAT, EVO, TS, TP, TRP, M2TS, WMV, ASF, DVR-MS | Win & Mac |
| Any GIF Animator | MP4, MOV, AVI, and more | Win |
| Free Video to GIF Converter | MKV, MP4, MOV, WMV, AVI, FLV, and MOB | Win |
| Cute Video to GIF Converter | AVI, MPG, FLV, MP4, 3GP, VOB, WMV | win |
| KickMyGraphics | AVI, MPG, WMV, MP4, ASF | win |
| Movie to GIF | AVI, MPG, WMV, MP4, MKV, MOV, VOB etc. | win |
| Instagriffer | mkv, flv, avi, mp4 | Win & Mac |
| Ezgif | MP4/AVI/WEBM/FLV/MOV and other video files | Online |
| Giphy | MP4/AVI/WEBM/FLV/MOV and other video files | Online |
| Zamzar | MP4 | Online |
However, Filmora is one of the best powerful software that can help you create GIFs with straightforward UI interface, and easy-to-use GIF tools. If you want to know the specific steps, please check the video below.
Download Mac Version ](https://tools.techidaily.com/wondershare/filmora/download/ )
Frequently Asked Questions About Converting Video to GIFs
1. How To Crop A GIF To A Circle?
Whether or not you can crop a GIF into a circle, depends on the cropping tools the app you are using offers. Some GIF makers allow you to choose the shape to which you are going to crop a GIF, while others don’t provide this option.
Using Filmora’s mask features is probably one of the easiest ways to crop a GIF to a circle, as you simply have to apply the mask to the footage and specify which parts of the GIF’s frames are going to be removed. What’s more, you can choose the shape of the mask in Filmora which enables you to crop GIFs into a variety of different shapes.
2. How To Turn A Video Into A GIF?
All you need to do in order to turn a video into a GIF is to change the file’s format. Most videos are saved as MP4, AVI, or MOV files, and nearly all video editors and GIF makers allow you to convert a video file into a GIF.
So, you simply have to choose GIF as the format in which you want to export a video file you imported into a video editing software or an online GIF maker and wait for the rendering process to be completed.
Shanoon Cox
Shanoon Cox is a writer and a lover of all things video.
Follow @Shanoon Cox
Best 15 Anime Fonts-Find Your Favorite One
Best 15 Anime Fonts-Find Your Favorite One
Shanoon Cox
Mar 27, 2024• Proven solutions
Anime is basically a fancy name for Japanese cartoons and is a trending genre for a long time. The popularity of these anime series has led fans to create characteristic font styles based on the logo or title of these series. A font such as this is commonly regarded as an anime font.
Since the anime font has a very distinct typeface and usually represents a theme, it is now widely used in video making, titles, posters, and also in games. The anime font can depict fun or thrill depending on which one you choose.
In this article, we have listed the best anime fonts of all time.
- Best 15 Anime Fonts You Can Choose
- Bonus Tip-Add Subtitle to an Anime Movie with Wondershare Filmora
Best 15 Anime Fonts You Can Choose
As anime is a trendy genre and you are likely to find a huge variety of anime font online. However, some of these fonts, based on the best-selling anime series, are sought after more than others. Therefore, we have rounded the ultimate anime font list for your ease.
1. Naruto Font
As we all know the popular Japanese Manga series Naruto, this anime font is based on the logo of that series. It is a very simple brush stroke anime font but is designed very artistically. This free anime font is perfect for adding elegant yet animated fonts to various kinds of videos or content.
2. Anime Ace Font
Anime Ace is a free anime font that is part of Blambot’s Dialogue Collection by Nate Piekos. It is a cartoonish font that is perfect for use in comic books. This is designed to be used as the font for the character’s speech bubbles. Using this anime font can give a very comic-esque vibe to your creations, making them very attractive.
3. Death Note Font
The famous thrilling action series Death Note has a very characteristic font used. This has come to be known as the Death Note Font. As its origin is from a thriller series, this anime font is best for complementing horror and scary themes. An anime font like this one has a hair-rising and dramatic appeal to it.
4. Evangelion Font
Another famed television series released back in the 90s, Neon Genesis Evangelion, has been trending, and so is the anime font used in its titles. This bold and tightly packed anime font is very conventional and artistic. It can be used to complement some serious themes with a stylish anime font like this one. This anime font also gives a dramatic outlook and hence can be used for engaging titles.
5. Sailor Moon Font
Sailor Moon is a best-selling Manga series, and its distinctive fonts are also quite loved. There are total 3 fonts used in this series. The unique feature of these fonts is that they are all very stylish with a visually attractive appeal. This particular anime font is thus best suited for brand titles, posters, shopping bags, etc. As a free anime font, you can use it for various purposes, including utilizing it for making beautiful invitation cards.
6. Haikyuu Font
This anime font from the sports-based Manga series resembles Japanese calligraphy. It has a dramatic vibe that is well-suited for short titles for serious shows and content. You can also use this free anime font to give your content a striking introduction. Plus, this anime font is available as Regular as well Shadowed. So, you can choose the style that best fits the theme of your content.
7. Danganronpa font
A captivating anime font is featured in the Japanese video game, Danganronpa. This anime font has gained popularity as it is stylishly distinct with a thriller vibe linked to it. Since it is a free anime font and is easily available, it can help you craft very engaging and stunning content. It will serve to give your content a unique touch as this anime font has a very characteristic style.
8. My Hero Academia Font
My Hero Academia is a highly acclaimed superhero Manga series, and its font has also been used extensively. It presents a very attractive anime font that can be utilized in banners and posters since it has a very clean and simple typeface. This anime font is also well-suited for use in logos.
9. Pet Fonts
As the name suggests, this anime font is based on different animals. Cats, dogs, bunnies, and many other animals are used creatively as fonts. Using this cute and creative anime font gives a very crafty and artful effect to the content it is utilized in. So, Pets font is great to create a light-hearted and cartoonish outlook.
10. Otaku Rant Anime Font Family
The Otaku Rant Anime Font Family consists of 3 types i.e., Regular, Italic, and Bold. All these comic fonts are very simple yet elegant. This anime font family can be perfectly used for designing posters and covers, owing to its stylish appeal. Thus, it is a great anime font for making interesting content that wows the viewers.

11. Squealer Anime Font
The Squealer Anime Font is very artistic. It has a gothic calligraphic appeal to it. This unique and riveting anime font can be employed in designing posters to impress the audience. As this free anime font is very stylish, it can also be used commercially in crafting cards or posters.

12. Porky’s Font Comic Font
As the name suggests, this anime font is based on the 1980’s Classic movie ‘Porky.’ It presents a very fancy and artistic style. Therefore, it is widely used for blogs or fashion magazines, giving an attractive outlook. It is a fusion of ancient and conventional typography. This free anime font can help you give a beautiful look to your content.

13. Anime Inept
Anime Inept gives the look of a handwritten font, which makes the text more personalized. Since this anime font gives a distinct look, it makes any text stand out of the ordinary. Given the simplicity of this font, it is an excellent choice for comic texts or titles.
14. Pokemon Anime Font
We all know the world-famous Pokemon that has been a popular game and animated series. Its even catchier anime font has also been extensively used for various purposes. Since the Pokemon anime font has a clear and fun typeface, it is perfect for creating attractive stickers, advertisements, and similar titles.
15. Saiyan Sans Anime Font
Dragon Ball Z or Saiyan Sans is a fan-favorite anime series. This anime font is based on the fancy logo used in the Dragon Ball Z title. It is a very catchy and curvy anime font that adds a stylish appeal to the text. Owing to its fancy style, it is also suitable for use as overlay text on an image.
Bonus Tip-Add Subtitle to an Anime Movie with Wondershare Filmora
Wondershare Filmora is a very intuitive and easy-to-use video editor. It has powerful one-click tools to enable users to craft professional-grade videos effortlessly. In Filmora, you will find a wide array of catchy text templates that can be customized and animated to add further effects.
Here is a guide to add anime font to your videos using Filmora.
1. Download and install Filmora on your PC. To import your anime video, go to File and select Import Media Files or drag and drop it to Filmora.
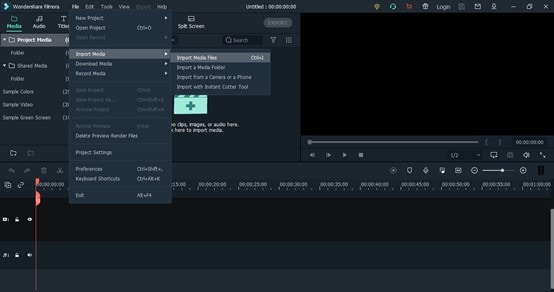
2. After importing, drag and drop the video to the timeline.
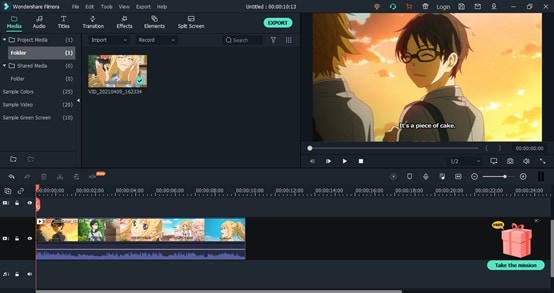
3. In the Titles tab, you can find a variety of text templates from different categories like Openers, Subtitles, Titles, etc. Double-click a title to it to the timeline. Drag and adjust the duration of the text. Double-click on the title in the timeline to customize it.
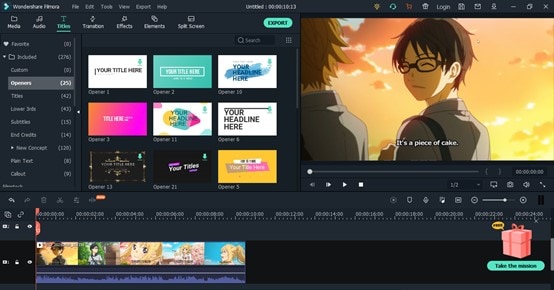
4. Here you can adjust the size, position, font, and other aspects of the text. Use the scale to change the size of the text.
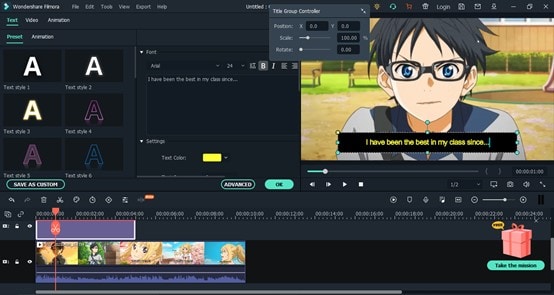
5. In the Animation tab, you can also add a special effect to the text, making it catchy and dynamic. Just double-click the animation to add it.
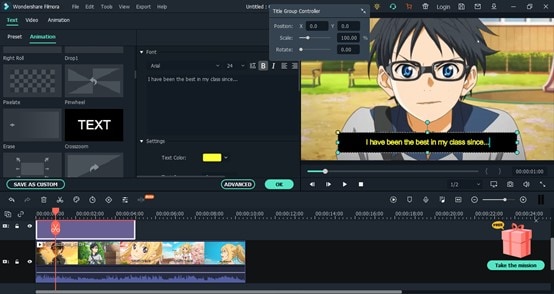
6. Click on Export. Select the resolution and export it to your device or share it to social media.

Conclusion
Now, you have the best 15 anime font list to help you craft exciting videos. Whether you wish to create a stylish fashion video with an elegant anime font, or a short horror clip with anime font from Death Note, you will find a free anime font for every theme here.
Since fonts play a significant role in any content, they must be chosen with care. So, give our list a read and find out which anime font complements your video the best. Don’t forget to try and add anime font subtitles to your video using the Filmora video editor.
Good luck!
Shanoon Cox
Shanoon Cox is a writer and a lover of all things video.
Follow @Shanoon Cox
Shanoon Cox
Mar 27, 2024• Proven solutions
Anime is basically a fancy name for Japanese cartoons and is a trending genre for a long time. The popularity of these anime series has led fans to create characteristic font styles based on the logo or title of these series. A font such as this is commonly regarded as an anime font.
Since the anime font has a very distinct typeface and usually represents a theme, it is now widely used in video making, titles, posters, and also in games. The anime font can depict fun or thrill depending on which one you choose.
In this article, we have listed the best anime fonts of all time.
- Best 15 Anime Fonts You Can Choose
- Bonus Tip-Add Subtitle to an Anime Movie with Wondershare Filmora
Best 15 Anime Fonts You Can Choose
As anime is a trendy genre and you are likely to find a huge variety of anime font online. However, some of these fonts, based on the best-selling anime series, are sought after more than others. Therefore, we have rounded the ultimate anime font list for your ease.
1. Naruto Font
As we all know the popular Japanese Manga series Naruto, this anime font is based on the logo of that series. It is a very simple brush stroke anime font but is designed very artistically. This free anime font is perfect for adding elegant yet animated fonts to various kinds of videos or content.
2. Anime Ace Font
Anime Ace is a free anime font that is part of Blambot’s Dialogue Collection by Nate Piekos. It is a cartoonish font that is perfect for use in comic books. This is designed to be used as the font for the character’s speech bubbles. Using this anime font can give a very comic-esque vibe to your creations, making them very attractive.
3. Death Note Font
The famous thrilling action series Death Note has a very characteristic font used. This has come to be known as the Death Note Font. As its origin is from a thriller series, this anime font is best for complementing horror and scary themes. An anime font like this one has a hair-rising and dramatic appeal to it.
4. Evangelion Font
Another famed television series released back in the 90s, Neon Genesis Evangelion, has been trending, and so is the anime font used in its titles. This bold and tightly packed anime font is very conventional and artistic. It can be used to complement some serious themes with a stylish anime font like this one. This anime font also gives a dramatic outlook and hence can be used for engaging titles.
5. Sailor Moon Font
Sailor Moon is a best-selling Manga series, and its distinctive fonts are also quite loved. There are total 3 fonts used in this series. The unique feature of these fonts is that they are all very stylish with a visually attractive appeal. This particular anime font is thus best suited for brand titles, posters, shopping bags, etc. As a free anime font, you can use it for various purposes, including utilizing it for making beautiful invitation cards.
6. Haikyuu Font
This anime font from the sports-based Manga series resembles Japanese calligraphy. It has a dramatic vibe that is well-suited for short titles for serious shows and content. You can also use this free anime font to give your content a striking introduction. Plus, this anime font is available as Regular as well Shadowed. So, you can choose the style that best fits the theme of your content.
7. Danganronpa font
A captivating anime font is featured in the Japanese video game, Danganronpa. This anime font has gained popularity as it is stylishly distinct with a thriller vibe linked to it. Since it is a free anime font and is easily available, it can help you craft very engaging and stunning content. It will serve to give your content a unique touch as this anime font has a very characteristic style.
8. My Hero Academia Font
My Hero Academia is a highly acclaimed superhero Manga series, and its font has also been used extensively. It presents a very attractive anime font that can be utilized in banners and posters since it has a very clean and simple typeface. This anime font is also well-suited for use in logos.
9. Pet Fonts
As the name suggests, this anime font is based on different animals. Cats, dogs, bunnies, and many other animals are used creatively as fonts. Using this cute and creative anime font gives a very crafty and artful effect to the content it is utilized in. So, Pets font is great to create a light-hearted and cartoonish outlook.
10. Otaku Rant Anime Font Family
The Otaku Rant Anime Font Family consists of 3 types i.e., Regular, Italic, and Bold. All these comic fonts are very simple yet elegant. This anime font family can be perfectly used for designing posters and covers, owing to its stylish appeal. Thus, it is a great anime font for making interesting content that wows the viewers.
11. Squealer Anime Font
The Squealer Anime Font is very artistic. It has a gothic calligraphic appeal to it. This unique and riveting anime font can be employed in designing posters to impress the audience. As this free anime font is very stylish, it can also be used commercially in crafting cards or posters.
12. Porky’s Font Comic Font
As the name suggests, this anime font is based on the 1980’s Classic movie ‘Porky.’ It presents a very fancy and artistic style. Therefore, it is widely used for blogs or fashion magazines, giving an attractive outlook. It is a fusion of ancient and conventional typography. This free anime font can help you give a beautiful look to your content.
13. Anime Inept
Anime Inept gives the look of a handwritten font, which makes the text more personalized. Since this anime font gives a distinct look, it makes any text stand out of the ordinary. Given the simplicity of this font, it is an excellent choice for comic texts or titles.
14. Pokemon Anime Font
We all know the world-famous Pokemon that has been a popular game and animated series. Its even catchier anime font has also been extensively used for various purposes. Since the Pokemon anime font has a clear and fun typeface, it is perfect for creating attractive stickers, advertisements, and similar titles.
15. Saiyan Sans Anime Font
Dragon Ball Z or Saiyan Sans is a fan-favorite anime series. This anime font is based on the fancy logo used in the Dragon Ball Z title. It is a very catchy and curvy anime font that adds a stylish appeal to the text. Owing to its fancy style, it is also suitable for use as overlay text on an image.
Bonus Tip-Add Subtitle to an Anime Movie with Wondershare Filmora
Wondershare Filmora is a very intuitive and easy-to-use video editor. It has powerful one-click tools to enable users to craft professional-grade videos effortlessly. In Filmora, you will find a wide array of catchy text templates that can be customized and animated to add further effects.
Here is a guide to add anime font to your videos using Filmora.
1. Download and install Filmora on your PC. To import your anime video, go to File and select Import Media Files or drag and drop it to Filmora.
2. After importing, drag and drop the video to the timeline.
3. In the Titles tab, you can find a variety of text templates from different categories like Openers, Subtitles, Titles, etc. Double-click a title to it to the timeline. Drag and adjust the duration of the text. Double-click on the title in the timeline to customize it.
4. Here you can adjust the size, position, font, and other aspects of the text. Use the scale to change the size of the text.
5. In the Animation tab, you can also add a special effect to the text, making it catchy and dynamic. Just double-click the animation to add it.
6. Click on Export. Select the resolution and export it to your device or share it to social media.
Conclusion
Now, you have the best 15 anime font list to help you craft exciting videos. Whether you wish to create a stylish fashion video with an elegant anime font, or a short horror clip with anime font from Death Note, you will find a free anime font for every theme here.
Since fonts play a significant role in any content, they must be chosen with care. So, give our list a read and find out which anime font complements your video the best. Don’t forget to try and add anime font subtitles to your video using the Filmora video editor.
Good luck!
Shanoon Cox
Shanoon Cox is a writer and a lover of all things video.
Follow @Shanoon Cox
Learn About Lip-Syncing in Animation
Learn all about Lip-Syncing in Animation
An easy yet powerful editor
Numerous effects to choose from
Detailed tutorials provided by the official channel
Lip syncing is one of the important parts of animations that need to be done perfectly. As children we have all enjoyed the special way in which Donald Duck or Mickey Mouse used to talk in cartoons, this is all because of the perfect lip-syncing.

Lip-sync animation tutorial are available that can assist you with the task.
In this article
01 [What is lip-syncing and its importance in animations?](#Part 1)
02 [Key factors to consider while lip-syncing in animations.](#Part 2)
03 [Best software for lip-syncing animations.](#Part 3)
04 [Best all-in-one video editing software for creating impressive animations.](#Part 4)
Part 1 What is Lip-syncing and Its Importance in Animations
In the simplest terms, lip-syncing can be termed as the process and way in which the sound is synchronized to the characters in animation. It is lip-syncing which brings life to the characters and makes them look talking. The process of lip-syncing in animations includes the dialogues and the mouth charts. The dialogues are broken into the phonetic syllables and the frames required for these syllables are then accessed.
Animations are moving and talking images and liveliness come from the dialogues that they speak. So, to make these talks appear real, flawless lip-syncing is very important.
Part 2 Key Factors to Consider While Lip-syncing in Animations
To make the lip-syncing in your animation look perfect several factors need to be taken care of. Some of these important ones are enlisted below.
01 Perfect Match of the Keyframes
The keyframes for the shapes of the words phrase by phrase needs to be perfect to make it look right. The right lip sync will have the correct timings from the mouth open to the mouth close.
02 Adding Body Language
To make the characters in your animations look real and lively, adding gestures and body language will play a huge role. Moreover, lip-syncing along with facial expressions will add to the overall richness of the animations.
03 Watch Yourself or Record Sample Videos
To get the correct lip-syncing for your animations, you can first try and practice by using a mirror or recording some trial videos. In these videos, you can speak and observe the jaw motion.
04 Use Blending
The technique of blending can also be used where the focus is on the most important shape of the mouth rather than each syllable. These shapes can then be blended and used in different ways and combinations.
05 Emphasize Eyes
Eyes need special focus as they can be used for expressing several emotions. Especially during the close-up shots in animations, a person looks at the eyes before the rest of the face.
06 Use the Apt Voice
No matter how perfectly the lip-syncing is done, it will not look good if the voice does not match the characters in your animations. So, make sure to select the voice that matches the looks and the personality of your characters.
Part 3 Best Software for Lip-syncing Animations
Lip sync in animations has become an easier and hassle-free task thanks to the advanced technology and several software and programs available. These 2D and 3D animation-supported tools allow syncing the mouth of the animated character with the dialogues and audio tracks. A few widely used tools for the task are enlisted below.
01 Anime Studio
This is a Windows and Mac-based professional software that supports multiple advanced functions like bone-rigging, automatic image tracing, integrated lip-synching, motion tracking, 3D shape design, character wizard, and many more. Using the vector-based tools of the software, you can add drawings and images for creating customized characters. There is a built-in character wizard that can be used for quick drawing and rigging the characters from the starting. Anime Studio allows recording the sound clip and then these can be synced to the animated characters. Several pre-set props, scenes, videos, stock audio, and characters are also available to choose from.

02 DAZ Studio
This is free-to-use software that can create impressive animations using multiple advanced features. The simple interface and functioning of the software make it apt even for users who have no prior experience in animations. The lip-sync feature of the software can be used to add audio to the created animations. Additional functions include morphing, adjusting different camera angles, plug-ins with advanced capabilities, and more.

03 Crazy Talk
To create impressive animations and add lip-syncing this is one of the popularly used tools. Quick to download, the software allows adding images and pictures to the tool, and then the head, mouth, and eye movement can be added along with lip-synced audio for creating impressive animations. The built-in timeline of the software offers you complete control over the animations, audio, and other parameters. Detailed customization options are supported including the teeth in the mouth of the character. The software is available for Windows and Mac systems.

04 Toon Boom Studio
To help you create rich animations for movies, games, learning, social media sites and any other purpose this is an apt tool to use. The software has a basic version for beginners while an advanced version for professionals. You can import media files in an array of formats like AI, JPEG, TGA, GIF, and others to create animations of your choice. Audio files in WAV, AIFF, and MP3 formats can be added to the created animations and the lip-sync analyzer tool can be used for that perfect syncing. Additional features include zoom-in, zoom-out, skeleton effect, support to the 3D background, multiple formats for exporting files, and more.

05 Crazy Talk Animator
This 2D animation tool can be used for creating rich animations by adding motion and different effects to your images. You can also create landscapes and scenes to further enhance the overall clip. Lip-sync to the animations is supported by the tool and you can even create marks for facial expression and use them to morph. Several tutorials and web resources are available for a better understanding of the tool and its functioning.

Adobe is also a good tool for all types of animation requirements and you can also check the adobe animate lip sync tutorial for your lip-syncing task.
Key Takeaways from This Episode
● Lip-syncing is an important and inevitable part of animations. Lip-syncing brings richness and liveliness to the clips.
● An array of tools and software are available that can help you effortlessly lip-sync animations.
● or all types of video editing needs and for creating animations, Wondershare Filmora works as an excellent all-in-one software.
Lip syncing is one of the important parts of animations that need to be done perfectly. As children we have all enjoyed the special way in which Donald Duck or Mickey Mouse used to talk in cartoons, this is all because of the perfect lip-syncing.
Lip-sync animation tutorial are available that can assist you with the task.
In this article
01 [What is lip-syncing and its importance in animations?](#Part 1)
02 [Key factors to consider while lip-syncing in animations.](#Part 2)
03 [Best software for lip-syncing animations.](#Part 3)
04 [Best all-in-one video editing software for creating impressive animations.](#Part 4)
Part 1 What is Lip-syncing and Its Importance in Animations
In the simplest terms, lip-syncing can be termed as the process and way in which the sound is synchronized to the characters in animation. It is lip-syncing which brings life to the characters and makes them look talking. The process of lip-syncing in animations includes the dialogues and the mouth charts. The dialogues are broken into the phonetic syllables and the frames required for these syllables are then accessed.
Animations are moving and talking images and liveliness come from the dialogues that they speak. So, to make these talks appear real, flawless lip-syncing is very important.
Part 2 Key Factors to Consider While Lip-syncing in Animations
To make the lip-syncing in your animation look perfect several factors need to be taken care of. Some of these important ones are enlisted below.
01 Perfect Match of the Keyframes
The keyframes for the shapes of the words phrase by phrase needs to be perfect to make it look right. The right lip sync will have the correct timings from the mouth open to the mouth close.
02 Adding Body Language
To make the characters in your animations look real and lively, adding gestures and body language will play a huge role. Moreover, lip-syncing along with facial expressions will add to the overall richness of the animations.
03 Watch Yourself or Record Sample Videos
To get the correct lip-syncing for your animations, you can first try and practice by using a mirror or recording some trial videos. In these videos, you can speak and observe the jaw motion.
04 Use Blending
The technique of blending can also be used where the focus is on the most important shape of the mouth rather than each syllable. These shapes can then be blended and used in different ways and combinations.
05 Emphasize Eyes
Eyes need special focus as they can be used for expressing several emotions. Especially during the close-up shots in animations, a person looks at the eyes before the rest of the face.
06 Use the Apt Voice
No matter how perfectly the lip-syncing is done, it will not look good if the voice does not match the characters in your animations. So, make sure to select the voice that matches the looks and the personality of your characters.
Part 3 Best Software for Lip-syncing Animations
Lip sync in animations has become an easier and hassle-free task thanks to the advanced technology and several software and programs available. These 2D and 3D animation-supported tools allow syncing the mouth of the animated character with the dialogues and audio tracks. A few widely used tools for the task are enlisted below.
01 Anime Studio
This is a Windows and Mac-based professional software that supports multiple advanced functions like bone-rigging, automatic image tracing, integrated lip-synching, motion tracking, 3D shape design, character wizard, and many more. Using the vector-based tools of the software, you can add drawings and images for creating customized characters. There is a built-in character wizard that can be used for quick drawing and rigging the characters from the starting. Anime Studio allows recording the sound clip and then these can be synced to the animated characters. Several pre-set props, scenes, videos, stock audio, and characters are also available to choose from.
02 DAZ Studio
This is free-to-use software that can create impressive animations using multiple advanced features. The simple interface and functioning of the software make it apt even for users who have no prior experience in animations. The lip-sync feature of the software can be used to add audio to the created animations. Additional functions include morphing, adjusting different camera angles, plug-ins with advanced capabilities, and more.
03 Crazy Talk
To create impressive animations and add lip-syncing this is one of the popularly used tools. Quick to download, the software allows adding images and pictures to the tool, and then the head, mouth, and eye movement can be added along with lip-synced audio for creating impressive animations. The built-in timeline of the software offers you complete control over the animations, audio, and other parameters. Detailed customization options are supported including the teeth in the mouth of the character. The software is available for Windows and Mac systems.
04 Toon Boom Studio
To help you create rich animations for movies, games, learning, social media sites and any other purpose this is an apt tool to use. The software has a basic version for beginners while an advanced version for professionals. You can import media files in an array of formats like AI, JPEG, TGA, GIF, and others to create animations of your choice. Audio files in WAV, AIFF, and MP3 formats can be added to the created animations and the lip-sync analyzer tool can be used for that perfect syncing. Additional features include zoom-in, zoom-out, skeleton effect, support to the 3D background, multiple formats for exporting files, and more.
05 Crazy Talk Animator
This 2D animation tool can be used for creating rich animations by adding motion and different effects to your images. You can also create landscapes and scenes to further enhance the overall clip. Lip-sync to the animations is supported by the tool and you can even create marks for facial expression and use them to morph. Several tutorials and web resources are available for a better understanding of the tool and its functioning.
Adobe is also a good tool for all types of animation requirements and you can also check the adobe animate lip sync tutorial for your lip-syncing task.
Key Takeaways from This Episode
● Lip-syncing is an important and inevitable part of animations. Lip-syncing brings richness and liveliness to the clips.
● An array of tools and software are available that can help you effortlessly lip-sync animations.
● or all types of video editing needs and for creating animations, Wondershare Filmora works as an excellent all-in-one software.
Also read:
- Creative Ways to Create iPhone Text GIF
- Updated 2024 Approved Top 20+ Best Free GIF Makers Online to Quickly Edit GIF
- 10 Best Romance Anime Movies You Need to Watch
- 2024 Approved Best 10 Anime Websites to Watch Dubbed Anime Free
- New In 2024, 10 2D/3D Animation Tips & Tricks to Bring New Ideas to You
- 2024 Approved The Most Efficient Techniques to Make 3D Animation Character
- Updated Convert Animated GIF From Video
- 2024 Approved How to Create Your Own Avatar Free
- Updated In 2024, Obtain and Create Animated GIF Icons
- In 2024, Great Guide for Beginners on 2D Animation Making
- New How To Make Pinterest Slideshow in Simple Ways for 2024
- Amazing Ideas About Creating Personalised WhatsApp GIF Sticker
- 2024 Approved Fuel Your Creativity with 10 Awesome Collection of 2D Animation Examples
- Updated 2024 Approved Best 10 Animoji Apps You Can Use to Edit Animoji
- Updated How to Find & Make Animated Christmas GIFs for 2024
- Updated How to Make an Animated Travel Map Video, In 2024
- Updated 2024 Approved Best GIF Resizers to Reduce GIF Size
- New Before You Learn 3D Animation Things You Should Know
- In 2024, Want to Make a Meme GIF?
- Updated 2024 Approved The Only Guide Youll Ever Need to Learn That Make 2D Rigging Clear to You
- What Wikipedia Wont Tell You Specifically About Character Rigging
- 2024 Approved Great Ways to Make Claymation Videos
- New In 2024, Top 10 3D Text Animation Templates
- Learn What Are Differences Between 2D And 3D Animation
- New 2024 Approved Animate Pictures in Canva
- New Is It That Easy to Make My Own Animated Character for 2024
- How do i sign a Word 2016 free
- Protecting Your Privacy How To Remove Apple ID From iPhone 12
- How to Perform Hard Reset on Honor X50? | Dr.fone
- How Can We Bypass Oppo F23 5G FRP?
- How To Remove Screen Lock PIN On Infinix Hot 30i Like A Pro 5 Easy Ways
- How to Get and Use Pokemon Go Promo Codes On Motorola Moto G34 5G | Dr.fone
- Recover Apple iPhone SE (2020) Data From iOS iTunes Backup | Dr.fone
- Two Ways to Track My Boyfriends Samsung Galaxy M14 4G without Him Knowing | Dr.fone
- In 2024, Top 5 OnePlus Ace 2V Bypass FRP Tools for PC That Actually Work
- Samsung Galaxy XCover 7 won't play MOV videos, how to fix ?
- How To Pause Life360 Location Sharing For Oppo A58 4G | Dr.fone
- In 2024, 2 Ways to Transfer Text Messages from Vivo S17e to iPhone 15/14/13/12/11/X/8/ | Dr.fone
- Unlock Your Infinix Note 30s Potential The Top 20 Lock Screen Apps You Need to Try
- In 2024, How to Reset a Locked Infinix Zero 5G 2023 Turbo Phone
- Ultimate guide to get the meltan box pokemon go For Vivo V29 | Dr.fone
- How to Soft Reset Nubia Red Magic 9 Pro+ phone? | Dr.fone
- Simple and Effective Ways to Change Your Country on YouTube App Of your Samsung Galaxy M34 5G | Dr.fone
- Apple ID Locked or Disabled From iPhone 6? 7 Mehtods You Cant-Miss
- In 2024, How to Watch Hulu Outside US On Nokia C32 | Dr.fone
- Title: How to Create A GIF with Sound?
- Author: Elon
- Created at : 2024-05-19 03:04:23
- Updated at : 2024-05-20 03:04:23
- Link: https://animation-videos.techidaily.com/how-to-create-a-gif-with-sound/
- License: This work is licensed under CC BY-NC-SA 4.0.
