
:max_bytes(150000):strip_icc():format(webp)/social-media-text-588a94263df78caebc620f05.jpg)
In 2024, 10 Classical Animated Cartoon Types With Examples
Top 10 Classical Animated Cartoon Types With Examples
10 Classical Animated Cartoon Types With Examples
An easy yet powerful editor
Numerous effects to choose from
Detailed tutorials provided by the official channel
In today’s time, animation has advanced way more and we can name more than one series, starting from “BoJack Horseman” to “The Flintstones” which can be simply termed as a funny cartoon.

In this article, we will look at the 10 best classical animated cartoon types along with relevant examples to help you understand.
In this article
01 [The Best Animated Series of All Time](#Part 1)
02 [Anyway We Can Create Animation Ourselves?](#Part 2)
Part 1 The Best Animated Series of All Time
Here are 10 classical animated cartoon types with an example for each of them. A lot of us have our earliest TV memories tied to an animated series or the nostalgia of one of the very popular 90s cartoons. In this list, you might as well find one of those funny cartoons or even one of your very favorite Disney cartoons.
01 Doug (1991-1994)
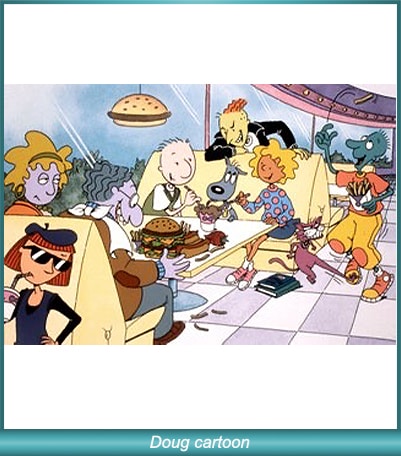
For people who were more into Nickelodeon than Disney/ABC, Doug was one of the most popular 90s cartoons. The funny cartoon show was rated to be one of the most relatable goobers on children’s TV. Along with that, the funny cartoon was known for the ingenuity and creative character names like Doug Funnie, Patti Mayonnaise, Skeeter, Porkchop, Tippi Dink, Roger Klotz, and Mosquito Valentine.
02 Popeye The Sailor (1960-1963)
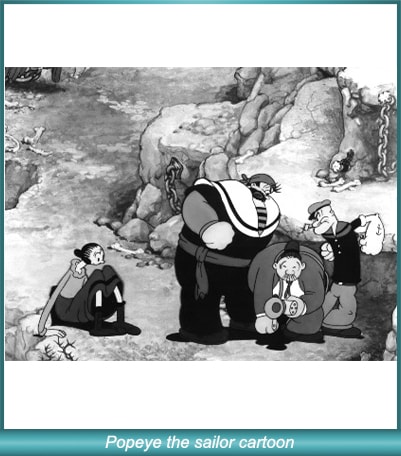
“Popeye” initially started out as a comic strip in newspapers, but after the theatrical short features started airing on TV during the 1950s, soon 220 cartoons were created in just two years, making it one of the most popular television shows of all time. It had rudimentary animation and focused on the popularity of the character “Popeye the Sailor” which is still a very well-known character.
03 Pokemon (1997-Present)
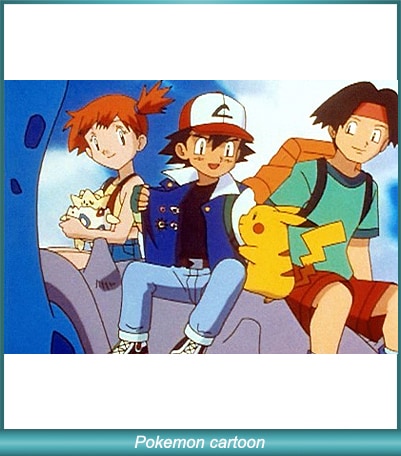
It’s that good and it keeps going on. Pokemon was initially a series of games for the Nintendo Gameboy and from there it grew to be immensely popular where children across the globe simply loved the cute cartoon characters in the show. The Japanese pocket monsters became an integral part of life when the animated television series started airing.
04 Dexter’s Laboratory (1996-2003)
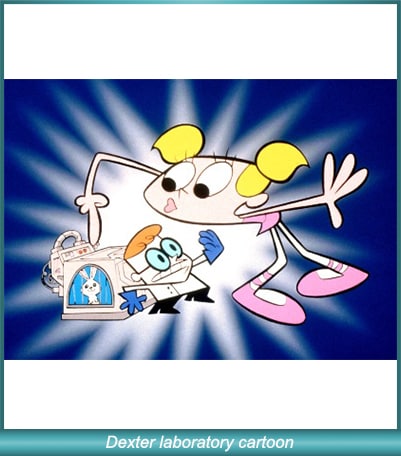
In 1996 Cartoon Network audiences were introduced to a show named Dexter’s Laboratory with Dexter as the primary character of the cartoon show. The boy genius had a massive hidden laboratory under his house. Every episode would feature Dexter planning an exciting experiment which was a favorite of kids. The series is one of the highest-rated series on the Cartoon Network and it also received a Primetime Emmy Award in 1996.
05 Alvin and the Chipmunks (1983-1990)
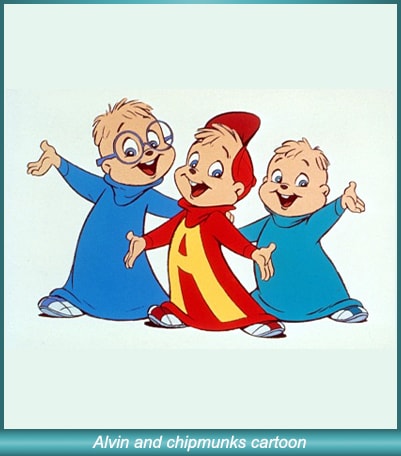
Alvin and the Chipmunks have been known since the 1960s. Although the show “Alvin and the Chipmunks’’ became popular on NBC in 1983. It featured three main characters: Alvin, Simon, and the loveable Theodore who got into all kinds of hijinks. The series had a large following, especially after the Chip-ettes, female versions of the Chipmunks, were introduced.
06 Scooby Doo, Where Are You! (1969-1970)

Barely any other two-season title has ever become as popular as “Scooby Doo, Where Are You!” The animation franchise is existent even today. The main attraction of this very funny cartoon was the cowardly Great Dane with a speech impediment. The dog solved crimes with teen friends and perfectly captured the imaginations of children as well as teenagers with subtle horror elements and some really hilarious catchphrases.
07 The Flintstones (1960-1966)

The Flintstones is inspired by “The Honeymooners’’ and was also the first animated series released in primetime. It was also the most successful one of its kind until “The Simpsons” was released 30 years later. The popularity of the series was because of its satirical take on modern suburban culture through the use of absurd, anachronistic elements in a Stone Age setting.
08 The Simpsons (1987-1990)

The Simpsons are simply one of the most popular and revolutionary 90s cartoons. It became a cultural juggernaut during its time and has been rated highly by viewers of all ages. The series emphasizes animation which has increased its appeal to modern viewers.
09 Sealab 2021 (2000-2005)
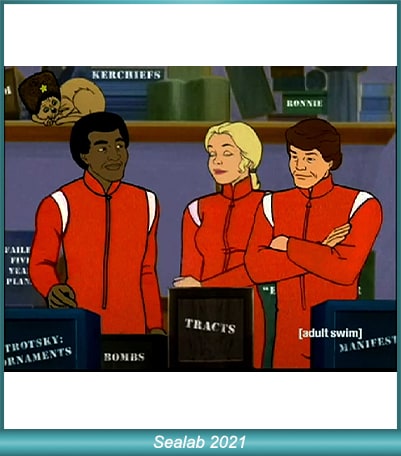
Sealab 2021 is one of Adult Swim’s initial launches of cartoons. It follows a forgotten ’70s adventure cartoon that turns the environmentally-friendly adventure into a blend of workplace resentments and absurd humor.
10 Teen Titans Go (2013- Present)
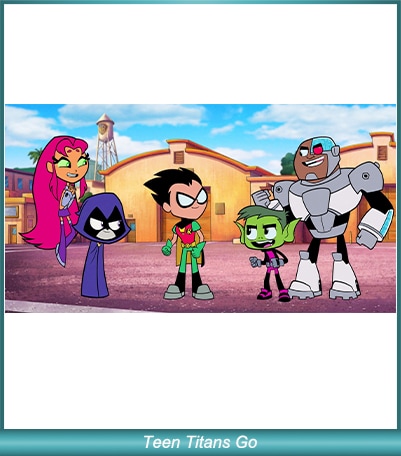
This is one of the modern and fast-paced animated series with jokes infused in every quarter of a minute. The funny cartoon animation is popular for its pop-culture references, sly hits at the DC universe, and a well-presented set of self-deprecating jokes.
Part 2 Anyway We Can Create Animation Ourselves?
There can be a number of reasons why you may need to create an animation. With modern technology, it is very easy and possible to quickly and effectively create animations suited for your purposes. Before you go on to creating animations, you need to know about the 5 key kinds of animation popular in modern times. They are:
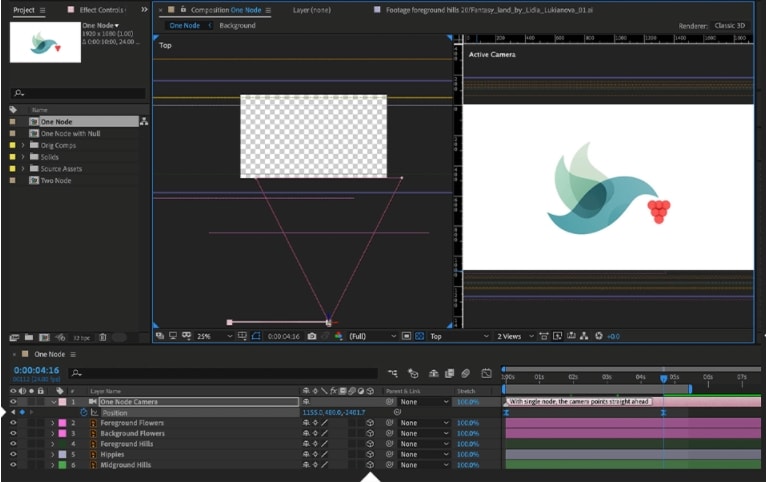
3D computer animation
Traditional animation
Stop motion
2D Vector-based animation
Motion graphics
No matter which one you are going to create, what you need is an efficient and versatile tool like the Wondershare Filmora . This tool is an advanced and highly functional tool that is used and recommended by professionals all across the globe. The tool enables you to create all kinds of animations with increased ease. The video editing tool comes with a vast range of professional tools that can help you create the perfect video for storytelling.
With Filmora you can create animations just as you imagine. With a range of customization options, you can actually, “breathe life into your clips.” Amongst the key features of the tools, the mentionable ones are:
Motion tracking
A vast range of animation options
Ease in and ease out features
Pan and zoom
A range of text styles and editing options to adjust lights and flares warps and distorts, etc.
Filmora is the perfect tool to bring your imagination to life and express your cinematic flair. The vast range of tools and easy usability help you make the most of your venture and create the perfect animations for your purposes, seamlessly and really quickly.
Key Takeaways from This Episode
● Animation is a vast and versatile field. With the advancement of computer technology and the transformation of the animation industry, we have moved far ahead with our approaches than where we were with the 90s cartoons.
● This article has brought forward the various animation styles that have been a part of the animation industry.
● From the old funny cartoons to the latest dramatic animated web series, you have read about it all to help you better understand the distinctions and the evolution of animation over time.
● Along with BoJack Horseman or just one of the popular Disney cartoons, you have also read about how to create your own animations all by yourself. Filmora Pro is the perfect tool for making animations for a variety of purposes, including marketing videos.
● We hope all of that information will help you make the most of your animation venture!
In today’s time, animation has advanced way more and we can name more than one series, starting from “BoJack Horseman” to “The Flintstones” which can be simply termed as a funny cartoon.
In this article, we will look at the 10 best classical animated cartoon types along with relevant examples to help you understand.
In this article
01 [The Best Animated Series of All Time](#Part 1)
02 [Anyway We Can Create Animation Ourselves?](#Part 2)
Part 1 The Best Animated Series of All Time
Here are 10 classical animated cartoon types with an example for each of them. A lot of us have our earliest TV memories tied to an animated series or the nostalgia of one of the very popular 90s cartoons. In this list, you might as well find one of those funny cartoons or even one of your very favorite Disney cartoons.
01 Doug (1991-1994)
For people who were more into Nickelodeon than Disney/ABC, Doug was one of the most popular 90s cartoons. The funny cartoon show was rated to be one of the most relatable goobers on children’s TV. Along with that, the funny cartoon was known for the ingenuity and creative character names like Doug Funnie, Patti Mayonnaise, Skeeter, Porkchop, Tippi Dink, Roger Klotz, and Mosquito Valentine.
02 Popeye The Sailor (1960-1963)
“Popeye” initially started out as a comic strip in newspapers, but after the theatrical short features started airing on TV during the 1950s, soon 220 cartoons were created in just two years, making it one of the most popular television shows of all time. It had rudimentary animation and focused on the popularity of the character “Popeye the Sailor” which is still a very well-known character.
03 Pokemon (1997-Present)
It’s that good and it keeps going on. Pokemon was initially a series of games for the Nintendo Gameboy and from there it grew to be immensely popular where children across the globe simply loved the cute cartoon characters in the show. The Japanese pocket monsters became an integral part of life when the animated television series started airing.
04 Dexter’s Laboratory (1996-2003)
In 1996 Cartoon Network audiences were introduced to a show named Dexter’s Laboratory with Dexter as the primary character of the cartoon show. The boy genius had a massive hidden laboratory under his house. Every episode would feature Dexter planning an exciting experiment which was a favorite of kids. The series is one of the highest-rated series on the Cartoon Network and it also received a Primetime Emmy Award in 1996.
05 Alvin and the Chipmunks (1983-1990)
Alvin and the Chipmunks have been known since the 1960s. Although the show “Alvin and the Chipmunks’’ became popular on NBC in 1983. It featured three main characters: Alvin, Simon, and the loveable Theodore who got into all kinds of hijinks. The series had a large following, especially after the Chip-ettes, female versions of the Chipmunks, were introduced.
06 Scooby Doo, Where Are You! (1969-1970)
Barely any other two-season title has ever become as popular as “Scooby Doo, Where Are You!” The animation franchise is existent even today. The main attraction of this very funny cartoon was the cowardly Great Dane with a speech impediment. The dog solved crimes with teen friends and perfectly captured the imaginations of children as well as teenagers with subtle horror elements and some really hilarious catchphrases.
07 The Flintstones (1960-1966)
The Flintstones is inspired by “The Honeymooners’’ and was also the first animated series released in primetime. It was also the most successful one of its kind until “The Simpsons” was released 30 years later. The popularity of the series was because of its satirical take on modern suburban culture through the use of absurd, anachronistic elements in a Stone Age setting.
08 The Simpsons (1987-1990)
The Simpsons are simply one of the most popular and revolutionary 90s cartoons. It became a cultural juggernaut during its time and has been rated highly by viewers of all ages. The series emphasizes animation which has increased its appeal to modern viewers.
09 Sealab 2021 (2000-2005)
Sealab 2021 is one of Adult Swim’s initial launches of cartoons. It follows a forgotten ’70s adventure cartoon that turns the environmentally-friendly adventure into a blend of workplace resentments and absurd humor.
10 Teen Titans Go (2013- Present)
This is one of the modern and fast-paced animated series with jokes infused in every quarter of a minute. The funny cartoon animation is popular for its pop-culture references, sly hits at the DC universe, and a well-presented set of self-deprecating jokes.
Part 2 Anyway We Can Create Animation Ourselves?
There can be a number of reasons why you may need to create an animation. With modern technology, it is very easy and possible to quickly and effectively create animations suited for your purposes. Before you go on to creating animations, you need to know about the 5 key kinds of animation popular in modern times. They are:
3D computer animation
Traditional animation
Stop motion
2D Vector-based animation
Motion graphics
No matter which one you are going to create, what you need is an efficient and versatile tool like the Wondershare Filmora . This tool is an advanced and highly functional tool that is used and recommended by professionals all across the globe. The tool enables you to create all kinds of animations with increased ease. The video editing tool comes with a vast range of professional tools that can help you create the perfect video for storytelling.
With Filmora you can create animations just as you imagine. With a range of customization options, you can actually, “breathe life into your clips.” Amongst the key features of the tools, the mentionable ones are:
Motion tracking
A vast range of animation options
Ease in and ease out features
Pan and zoom
A range of text styles and editing options to adjust lights and flares warps and distorts, etc.
Filmora is the perfect tool to bring your imagination to life and express your cinematic flair. The vast range of tools and easy usability help you make the most of your venture and create the perfect animations for your purposes, seamlessly and really quickly.
Key Takeaways from This Episode
● Animation is a vast and versatile field. With the advancement of computer technology and the transformation of the animation industry, we have moved far ahead with our approaches than where we were with the 90s cartoons.
● This article has brought forward the various animation styles that have been a part of the animation industry.
● From the old funny cartoons to the latest dramatic animated web series, you have read about it all to help you better understand the distinctions and the evolution of animation over time.
● Along with BoJack Horseman or just one of the popular Disney cartoons, you have also read about how to create your own animations all by yourself. Filmora Pro is the perfect tool for making animations for a variety of purposes, including marketing videos.
● We hope all of that information will help you make the most of your animation venture!
Animated Business Logos and Tools to Create
Know All About Animated Business Logos and the Best Tools to Create One
An easy yet powerful editor
Numerous effects to choose from
Detailed tutorials provided by the official channel
Just like people, brands and businesses also have their own identities.
If you too want to reap the benefits of an animated business logo, creating an impressive one is important and to get the task done, there are several software and other tools available.
In this article
01 [About animated business logos and how they can help in the growth of the business?](#Part 1)
02 [Tips for making an effective animated business logo](#Part 2)
03 [Types of animated business logo makers](#Part 3)
04 [The best tool to create an animated business logo effortlessly- Wondershare Filmora](#Part 4)
Part 1 About Animated Business Logos and How They Can Help in the Growth of the Business?
An animated logo is a logo that has rich motion graphics. These logos are catchy and get the instant attention of the viewers. A well-created animated business logo not only gives a professional look but also helps in creating awareness about the brand, supports the story of the brand, and enhances visual appearance.
There are several ways in which an animated business logo can be used for the growth of the business. Summarized below are some of the major ones.
01Use animated logos at the start or the end of the videos
An animated logo creates a lasting impression and thus including then in the marketing videos at the starting or the end helps in the business growth. These logos can be added to the videos that are created for internal communication as well as for the public.
02Using animated logos for e-commerce
If your business is related to products, then adding animated logos to the product movies will make them look interesting.
03Use animated logos for YouTube videos
If you are using YouTube videos for your business promotion, ensure to add the animated logos for branding as it makes the videos look different from the other regular ones and thus creates an interest among the viewers.
04Using animated logos for YouTube ads
Using these motion graphic logos as short YouTube ads will work as an effective way for promoting the business and for their growth as well.
05Use animated logos for the films on your website
If you are making videos for your business websites as introduction videos or explainer videos, using animated logos adds a professional and dynamic touch.
06Using animated logos for social media sites
The number of users on social media sites is increasing every day and thus promoting your business on these sites helps you reach a wider audience. So, if you too are planning a video campaign on Facebook, Twitter, Instagram, and other sites use animated logos in the newsfeed.

Part 2 Tips for making an effective an animated business logo
The below-listed tips can help you create an impressive and interesting animated logo for your business.
● Create short animated logos: Animated logos should be short and convey the meaning and purpose of your business and brand. A long video can be boring and the target audience can lose interest and thus they have to be short, immersive, and impactful.
● Create an impression: Create an animated logo that can create a positive impression. Your animated logo needs to match the style of your business and get the interest of the viewers.
● Use the correct animation style: Several animation styles can be used for creating your business logo like 2D, 3D, traditional, and more. Different designs leave a different impact among the viewers and create a different understanding of the brand. Thus, while using the animation style, choose the one that matches your business style.
Part 3 Types of animated business logo makers
If you are looking for created animated logos, there is no dearth of tools. The majority of the editing and animated software can help you get the task done. There is several online and desktop software available using which you can either add your own logo and make an animated version of it or can design an animation from the scratch.
The choice of the tool selection depends on your budget and the features required. Some of the popularly used tools that can be considered are as below.
Popularly Used Tools →
● Renderforest
● Adobe Spark
● Logo Maker Plus
● Animaker
● Viddyoze
Popularly Used Tools →
● Offeo
● Canva
● Design Free Logo
● Tube Arsenal
● MotionDen
Part 4 The best tool to create an animated business logo effortlessly- Wondershare Filmora
To create animated logos effortlessly and use the best features Wondershare Filmora is an excellent choice. This desktop software can be quickly downloaded and installed on your Windows and Mac after which it can be used for multitasking like editing, creating animations, logos, and much more. The interface is simple and user-friendly which makes the program popular among all user types.
Wondershare Filmora
Power Up Your Story with Filmora. Professional video editing is made easy.
Key features of the software:
● Allows creating different types of animations including animated business logos.
● Allows creating 2D and 3D animated logos.
● Allows creating logos using keyframing for better customization.
● Multiple effects can be added like titles, tiles, warp, masking, distort, lights, flares, and more.
● To further enhance the overall looks of your animation the software offers better control over the colors and other parameters through tools like color wheels, auto-correction, scopes, and more.
● Audio controls are also offered through features like audio compression, audio noise correction, audio sync, transitions, and more.
● Compatible with all the latest Windows and Mac.
Key Takeaways from This Episode
● Animated business logos are an important aspect of any business promotion and marketing strategy.
● An impressive animated logo can help a business grow in several ways and several factors should be considered while creating an animated logo.
● Different types of desktop and online tools for animated business logos are present.
● Wondershare Filmora works as the best animation logo that can create impressive animated logos in no time.


Just like people, brands and businesses also have their own identities.
If you too want to reap the benefits of an animated business logo, creating an impressive one is important and to get the task done, there are several software and other tools available.
In this article
01 [About animated business logos and how they can help in the growth of the business?](#Part 1)
02 [Tips for making an effective animated business logo](#Part 2)
03 [Types of animated business logo makers](#Part 3)
04 [The best tool to create an animated business logo effortlessly- Wondershare Filmora](#Part 4)
Part 1 About Animated Business Logos and How They Can Help in the Growth of the Business?
An animated logo is a logo that has rich motion graphics. These logos are catchy and get the instant attention of the viewers. A well-created animated business logo not only gives a professional look but also helps in creating awareness about the brand, supports the story of the brand, and enhances visual appearance.
There are several ways in which an animated business logo can be used for the growth of the business. Summarized below are some of the major ones.
01Use animated logos at the start or the end of the videos
An animated logo creates a lasting impression and thus including then in the marketing videos at the starting or the end helps in the business growth. These logos can be added to the videos that are created for internal communication as well as for the public.
02Using animated logos for e-commerce
If your business is related to products, then adding animated logos to the product movies will make them look interesting.
03Use animated logos for YouTube videos
If you are using YouTube videos for your business promotion, ensure to add the animated logos for branding as it makes the videos look different from the other regular ones and thus creates an interest among the viewers.
04Using animated logos for YouTube ads
Using these motion graphic logos as short YouTube ads will work as an effective way for promoting the business and for their growth as well.
05Use animated logos for the films on your website
If you are making videos for your business websites as introduction videos or explainer videos, using animated logos adds a professional and dynamic touch.
06Using animated logos for social media sites
The number of users on social media sites is increasing every day and thus promoting your business on these sites helps you reach a wider audience. So, if you too are planning a video campaign on Facebook, Twitter, Instagram, and other sites use animated logos in the newsfeed.
Part 2 Tips for making an effective an animated business logo
The below-listed tips can help you create an impressive and interesting animated logo for your business.
● Create short animated logos: Animated logos should be short and convey the meaning and purpose of your business and brand. A long video can be boring and the target audience can lose interest and thus they have to be short, immersive, and impactful.
● Create an impression: Create an animated logo that can create a positive impression. Your animated logo needs to match the style of your business and get the interest of the viewers.
● Use the correct animation style: Several animation styles can be used for creating your business logo like 2D, 3D, traditional, and more. Different designs leave a different impact among the viewers and create a different understanding of the brand. Thus, while using the animation style, choose the one that matches your business style.
Part 3 Types of animated business logo makers
If you are looking for created animated logos, there is no dearth of tools. The majority of the editing and animated software can help you get the task done. There is several online and desktop software available using which you can either add your own logo and make an animated version of it or can design an animation from the scratch.
The choice of the tool selection depends on your budget and the features required. Some of the popularly used tools that can be considered are as below.
Popularly Used Tools →
● Renderforest
● Adobe Spark
● Logo Maker Plus
● Animaker
● Viddyoze
Popularly Used Tools →
● Offeo
● Canva
● Design Free Logo
● Tube Arsenal
● MotionDen
Part 4 The best tool to create an animated business logo effortlessly- Wondershare Filmora
To create animated logos effortlessly and use the best features Wondershare Filmora is an excellent choice. This desktop software can be quickly downloaded and installed on your Windows and Mac after which it can be used for multitasking like editing, creating animations, logos, and much more. The interface is simple and user-friendly which makes the program popular among all user types.
Wondershare Filmora
Power Up Your Story with Filmora. Professional video editing is made easy.
Key features of the software:
● Allows creating different types of animations including animated business logos.
● Allows creating 2D and 3D animated logos.
● Allows creating logos using keyframing for better customization.
● Multiple effects can be added like titles, tiles, warp, masking, distort, lights, flares, and more.
● To further enhance the overall looks of your animation the software offers better control over the colors and other parameters through tools like color wheels, auto-correction, scopes, and more.
● Audio controls are also offered through features like audio compression, audio noise correction, audio sync, transitions, and more.
● Compatible with all the latest Windows and Mac.
Key Takeaways from This Episode
● Animated business logos are an important aspect of any business promotion and marketing strategy.
● An impressive animated logo can help a business grow in several ways and several factors should be considered while creating an animated logo.
● Different types of desktop and online tools for animated business logos are present.
● Wondershare Filmora works as the best animation logo that can create impressive animated logos in no time.
Top 10 Cartoon Canvas Painting Ideas for Total Beginners
10 Cartoon Canvas Painting Ideas for Total Beginners
An easy yet powerful editor
Numerous effects to choose from
Detailed tutorials provided by the official channel
Beginning your streak into cartoon canvas painting? Stay tuned to learn about the 10 most amazing ideas to design your best cartoon canvas art in no time!
In this article
01 [10 Cartoon Canvas Painting Ideas](#Part 1)
02 [How To Paint A Cartoon On Canvas](#Part 2)
Part 1 Cartoon Canvas Painting Ideas
Cartoon are an evergreen favourite for almost everyone around. After all, who would mind sparing a laugh on the adorable musings of the cutest cat and mouse duo in Tom and Jerry, or long for a dive into the fantasy of icy adventures with the Frozen fairy tale! While the huge caricature repository has the best of fun to offer, watching them peep at you from the canvas painting on your art wall is no less of a delight.
When starting to create your own cartoon canvas art, end your search of the most striking painting idea with the amazingly stunning choices in the following section:
01Tom and Jerry
These two are undoubtedly the pioneers of the entire cartoon story that has affordably existed till date. The naughty duo promises to lighten up your day with a mere gaze through the art wall in your room, in the same way as their show sets the mood in. Painting them on your room’s wall canvas will certainly add life to the place.
02Super Mario
Who can forget this adorable red plumber, who conveniently takes the credit for giving us the fondest childhood memories? Whether or not a regular console gamer, this adventure hero is an undisputed favorite of everyone around. So why not make him a member of your art collection through a cartoon canvas painting!
03Characters from the Frozen Land
The adorable cartoon characters from the icy landscapes of this winter fairy saga are possibly the best way to begin your exciting journey of cartoon canvas painting. While the magical storyline of the pixie quest has a diversity of the coolest and the most adorable characters to choose from, you are always free to pick your favorite one and start your design spree.
04Kung fu Panda
If you are a parallel admirer of martial arts and caricature heroes, this cartoon character would be an apt choice to satisfy your love for canvas painting. The adorably cute bear eyeing at you from the painting in his best warlike posture would certainly motivate you to work on keeping a check of your fitness levels!
05Sponge Bob
Living up to his name, this spongy creature has created a separate and strong fan base among viewers of all age groups beyond time. Choosing this character for your cartoon canvas art is surely going to spark up your day with the vibrancy of a real rainbow, even in between the sulkiest of moments, as they say, it’s time to brighten up your life with Bob!
06Homer Simpson
If you are convincingly fascinated by the lures of life overseas, this American toon character is all set to give you the perfect feel of the day to day American lifestyle. Try hands at painting a scene from the eventful life of the Simpson family that is ready to add a fun angle to the most boring chores, while giving you a parodical glimpse of the American society and culture.
07Characters from the Avenger Series
Avengers must be your absolute favorite if you have a love for battle and combat games. Bring your adventure feel back to life with creating a canvas painting art of your most admired avenger, or consider including all of them on a king size canvas if you are having a tough time picking the best from the best!
08Angry Birds
These furious creatures have been a global sensation since their entry into the world of gaming. While these star birds take you on a stunning adventure realism with an amazing graphic excellence, a caricature canvas art of these in your painting collection will certainly add the missing spunk to your graphic creativity.
09Members and Trainers of the Pokémon Species
From TV series to gaming adventures, the love for Pokémon has stood the tests of time in every dimension. When it comes to adding these characters to your canvas painting, you have a storehouse of choices from the cute Pikachu and the meticulous Ash to the nasty team Rocket and other amazing members of the Pokémon species.
10Donald Duck
If you are keen on adding a touch of nostalgia to your creative drawing, consider designing a masterpiece of cartoon canvas artwork portraying this bubbly ad quaky creature that has given you the best of childhood entertainment in the form of possibly the most reliable financial advisor and the cutest good luck charm of toon land.
Now that the graphic design technology has reached its par, you can explore your creativity to design these characters for various uses, such as, illustrative, animated, gag, editorial and political cartoons, or caricatures on comic panels and strips.
Part 2 How To Paint A Cartoon On Canvas
Now that you have come cross the exciting ideas of creating cartoon canvas art, this must be a sufficient motivation to experiment with creating a top class caricature canvas painting for yourself. Read through the following section to get an insight into the knowhow of painting a cartoon on canvas in the easiest possible way!
User’s Guide to Create a Cartoon Canvas Painting on Wondershare Filmora Video Editor
Before entering into the actual design task, you will require a download, installation and launch of the Wondershare Filmora application to any of your Windows or Mac supported devices. Visit the following link for a free download of the software program:

Wondershare Filmora - Best Video Editor for Mac/Windows
5,481,435 people have downloaded it.
Build unique custom animations without breaking a sweat.
Focus on creating epic stories and leave the details to Filmora’s auto features.
Start a creative adventure with drag & drop effects and endless possibilities.
Filmora simplifies advanced features to save you time and effort.
Filmora cuts out repetition so you can move on to your next creative breakthrough.
Painting a Young Character
Take the following steps to draw the caricature form of a young or middle aged character in Wondershare Filmora:
Step 1:
Launch Wondershare Filmora on your system and then start new project. Now import the video from your computer in the software interface.

Step 2:
Once you have added the video then simply drag and drop it in the timeline.

Step 3
Once you have added video to the timeline double click on the added video in timeline to open the video editing menu of Wondershare Filmora.

Step 4:
Now, click the “Animation” tab in the editing options at the left side of interface then you can select anyone from the available preset options.

Step 5:
Select any preset from the available list and then drag and drop it in the timeline to apply the preset on the video. After applying you can use the play button to preview the file. This is the way to create beautiful animation with the Wondershare Filmora. Just like this you can quickly create the best Cartoon canvas as well.

Step 5
After doing all necessary editing you just need to click the “Export” button and save it on your computer.

● Ending Thoughts →
● Cartoon canvas art has gained immense popularity in recent times having a reliable economic and creation advantage with the growth of animation design.
● There are a variety of cartoon painting ideas that you can choose to explore your graphic design creativity.
● When looking for the best solutions to work on creating caricature canvas art, Wondershare Filmora is your worthiest choice.
Beginning your streak into cartoon canvas painting? Stay tuned to learn about the 10 most amazing ideas to design your best cartoon canvas art in no time!
In this article
01 [10 Cartoon Canvas Painting Ideas](#Part 1)
02 [How To Paint A Cartoon On Canvas](#Part 2)
Part 1 Cartoon Canvas Painting Ideas
Cartoon are an evergreen favourite for almost everyone around. After all, who would mind sparing a laugh on the adorable musings of the cutest cat and mouse duo in Tom and Jerry, or long for a dive into the fantasy of icy adventures with the Frozen fairy tale! While the huge caricature repository has the best of fun to offer, watching them peep at you from the canvas painting on your art wall is no less of a delight.
When starting to create your own cartoon canvas art, end your search of the most striking painting idea with the amazingly stunning choices in the following section:
01Tom and Jerry
These two are undoubtedly the pioneers of the entire cartoon story that has affordably existed till date. The naughty duo promises to lighten up your day with a mere gaze through the art wall in your room, in the same way as their show sets the mood in. Painting them on your room’s wall canvas will certainly add life to the place.
02Super Mario
Who can forget this adorable red plumber, who conveniently takes the credit for giving us the fondest childhood memories? Whether or not a regular console gamer, this adventure hero is an undisputed favorite of everyone around. So why not make him a member of your art collection through a cartoon canvas painting!
03Characters from the Frozen Land
The adorable cartoon characters from the icy landscapes of this winter fairy saga are possibly the best way to begin your exciting journey of cartoon canvas painting. While the magical storyline of the pixie quest has a diversity of the coolest and the most adorable characters to choose from, you are always free to pick your favorite one and start your design spree.
04Kung fu Panda
If you are a parallel admirer of martial arts and caricature heroes, this cartoon character would be an apt choice to satisfy your love for canvas painting. The adorably cute bear eyeing at you from the painting in his best warlike posture would certainly motivate you to work on keeping a check of your fitness levels!
05Sponge Bob
Living up to his name, this spongy creature has created a separate and strong fan base among viewers of all age groups beyond time. Choosing this character for your cartoon canvas art is surely going to spark up your day with the vibrancy of a real rainbow, even in between the sulkiest of moments, as they say, it’s time to brighten up your life with Bob!
06Homer Simpson
If you are convincingly fascinated by the lures of life overseas, this American toon character is all set to give you the perfect feel of the day to day American lifestyle. Try hands at painting a scene from the eventful life of the Simpson family that is ready to add a fun angle to the most boring chores, while giving you a parodical glimpse of the American society and culture.
07Characters from the Avenger Series
Avengers must be your absolute favorite if you have a love for battle and combat games. Bring your adventure feel back to life with creating a canvas painting art of your most admired avenger, or consider including all of them on a king size canvas if you are having a tough time picking the best from the best!
08Angry Birds
These furious creatures have been a global sensation since their entry into the world of gaming. While these star birds take you on a stunning adventure realism with an amazing graphic excellence, a caricature canvas art of these in your painting collection will certainly add the missing spunk to your graphic creativity.
09Members and Trainers of the Pokémon Species
From TV series to gaming adventures, the love for Pokémon has stood the tests of time in every dimension. When it comes to adding these characters to your canvas painting, you have a storehouse of choices from the cute Pikachu and the meticulous Ash to the nasty team Rocket and other amazing members of the Pokémon species.
10Donald Duck
If you are keen on adding a touch of nostalgia to your creative drawing, consider designing a masterpiece of cartoon canvas artwork portraying this bubbly ad quaky creature that has given you the best of childhood entertainment in the form of possibly the most reliable financial advisor and the cutest good luck charm of toon land.
Now that the graphic design technology has reached its par, you can explore your creativity to design these characters for various uses, such as, illustrative, animated, gag, editorial and political cartoons, or caricatures on comic panels and strips.
Part 2 How To Paint A Cartoon On Canvas
Now that you have come cross the exciting ideas of creating cartoon canvas art, this must be a sufficient motivation to experiment with creating a top class caricature canvas painting for yourself. Read through the following section to get an insight into the knowhow of painting a cartoon on canvas in the easiest possible way!
User’s Guide to Create a Cartoon Canvas Painting on Wondershare Filmora Video Editor
Before entering into the actual design task, you will require a download, installation and launch of the Wondershare Filmora application to any of your Windows or Mac supported devices. Visit the following link for a free download of the software program:
Wondershare Filmora - Best Video Editor for Mac/Windows
5,481,435 people have downloaded it.
Build unique custom animations without breaking a sweat.
Focus on creating epic stories and leave the details to Filmora’s auto features.
Start a creative adventure with drag & drop effects and endless possibilities.
Filmora simplifies advanced features to save you time and effort.
Filmora cuts out repetition so you can move on to your next creative breakthrough.
Painting a Young Character
Take the following steps to draw the caricature form of a young or middle aged character in Wondershare Filmora:
Step 1:
Launch Wondershare Filmora on your system and then start new project. Now import the video from your computer in the software interface.
Step 2:
Once you have added the video then simply drag and drop it in the timeline.
Step 3
Once you have added video to the timeline double click on the added video in timeline to open the video editing menu of Wondershare Filmora.
Step 4:
Now, click the “Animation” tab in the editing options at the left side of interface then you can select anyone from the available preset options.
Step 5:
Select any preset from the available list and then drag and drop it in the timeline to apply the preset on the video. After applying you can use the play button to preview the file. This is the way to create beautiful animation with the Wondershare Filmora. Just like this you can quickly create the best Cartoon canvas as well.
Step 5
After doing all necessary editing you just need to click the “Export” button and save it on your computer.
● Ending Thoughts →
● Cartoon canvas art has gained immense popularity in recent times having a reliable economic and creation advantage with the growth of animation design.
● There are a variety of cartoon painting ideas that you can choose to explore your graphic design creativity.
● When looking for the best solutions to work on creating caricature canvas art, Wondershare Filmora is your worthiest choice.
Nurturing Mind, Heart, and Soul on the Top 5 Anime Streaming Sanctuaries
FREE Best Anime Streaming Sites to Download Anime

Benjamin Arango
Mar 27, 2024• Proven solutions


Anime (also known as Japanese-style animation) is a global subgenre of TV content. With billions of viewers around the globe, the Anime industry is one of the mainstream genres getting a lot of attention. It has boomed in popularity with the rise in online streaming services. People are discovering the amazing blend of art, animation, storytelling, and music. You can find the best free anime websites to watch anime online .
But why we’re here is that only a few of these streaming sites allow their users to download anime easily and watch cartoon online in HD . That said there are numerous free and paid providers out of which only a handful works properly and lets the users enjoy their favorite anime. So, let us discover the best anime streaming sites – free and paid as well as those with the feature to download anime and watch anime offline. In this article, you will learn:
- Part 1: Best Anime Streaming Sites to Download Anime[Free]
- Part 2: Best Anime Streaming Sites to Download Anime[Paid]
- Part 3: Record an Anime with Wondershare Filmora
Part 1 Best Anime Streaming Sites to Download Anime[Free]
Free Anime Streaming Sites to Download Anime at A Glance:
01 Animeland
Animeland is a free online English dubbed anime streaming site that doesn’t require you to register to watch or even download anime from the site. It is one of the most famous free anime sites offering 1080p high-definition video streaming. The site has reportedly around 1.10 million monthly viewers with famous anime series English dubbed like Naruto, Bleach, Attack on Titan, etc.

Image Source: Animeland
You can download from the site just by going on the site and searching for your desired dubbed anime movie or series. Play the episode you want to download and then on the playback window, you will see a download button right at the top of the player box, click it, and your episode will start downloading automatically.
02 Kissanime.ru
The Kissanime site is popular for dubbed anime streaming with the latest content. The site offers high-definition video quality arranged category-wise with easy access and searching features. The user interface is quite neat with high-performance servers for buffer-free streaming i.e. RapidVideo, Streamango, etc., and featured thumbnail images.
Image Source: Kissanime.ru
The website has made it very easy for users to download their desired anime seasons. To download from kissanime.ru, please search for your desired anime series and play the episode that you want to download. Shortly you’ll be taken to the screenplay page, here just scroll down a bit and you’ll find a clickable link to download the very episode that is being played in the browser window.
03 Chia-Anime
Chia-Anime is another free tier anime streaming site with a mobile-friendly UI sorted category-wise and including old and new dubbed anime series. The categorization makes navigation pretty smooth on the site and you’ll be able to find your desired anime content easily. The Chia anime has a wide range of the latest anime series like the popular “One Piece”, “High school of Death”, etc.

Image Source: Chia-Anime
The site supports ultra-high-definition video streaming with its sleek and colorful design. To download an anime episode from Chia-anime.tv, you can head onto the site and search for the anime series you want to download. Then play the intended episode once you’re on the streaming webpage you’ll see a download link just down below the video player, click on it and your download should start.
04 GoGoAnime.io
GoGoAnime is also a free anime streaming site with seven different streaming servers to choose from that make the streaming quite fast and reliable. The collection of anime movies and shows on the site is pretty satisfactory and also has a dedicated chat room where you can interact with other anime lovers and make friends.
Image Source: GoGoAnime.io
You can download the full episode of your desired anime from GoGoAnime only from the default server named VIDSTREAMING. To download play the episode and on the streaming webpage you’ll see a download icon just above the player window press it and the episode will directly start downloading.
05 9anime
9Anime also offers a free online anime streaming library. With a wide variety of fascinating anime catalogs to choose from. The site has diverse anime genres such as Yaoi, Parody, Dementia, action, etc. The servers are fast and offer HD quality content on the go. On 9anime you won’t need to sign up before enjoying your treasured anime series even for accessing the free anime resources.
Image Source: 9anime5
You can download any anime episode from the site. To do so you need to play the episode you want to download and then select the Mp4upload server in the server list then a download button will appear down the player window.
Part 2 Best Anime Streaming Sites to Download [Paid]
Paid Anime Streaming Sites to Download Anime at a Glance:
| Site | Pricing | Download | Supported OS |
|---|---|---|---|
| Funimation | $7.99 monthly | FunimationNow app | Android/IOS |
| Crunchyroll | $9.99 monthly | VRV app | Android/IOS |
| Hulu | $5.99 monthly | Hulu app | Windows 10/Android/IOS |
| Netflix | $8.99 monthly | Netflix app | Windows/Mac/Android/IOS |
| Amazon Prime Video | $12.99 monthly | Amazon Prime Video app | Android/IOS |
01 Funimation
In the anime industry, Funimation has its history with big anime series like Dragon Ball Z and other exclusives that you won’t find anywhere else. If you’re searching for titles that no other streaming site may have, you most probably will find the leading seasonal titles on Funimation.
Image Source: Funimation
Please kindly note that the anime download from Funimation is only available for mobile users on both Android and iOS. You need to install the FunimationNow app on your phone, then search for the anime you like, and download the anime episodes to watch anime offline through your library.
02 Crunchyroll
Crunchyroll is one of the top anime streaming sites – legally. You can have a free account to keep track of your watch history. But to enjoy the wonderful selection of shows from subgenres like seinen, shojo, to shonen you’ll have to buy a premium membership. There’s a Crunchyroll app for iOS and Android as well to let its users stream anime on the go.
Image Source: Crunchyroll
But you can download anime via the Crunchyroll app. Instead, you’ll have to connect it to your VRV streaming service pack and you can download your anime on the VRV app for offline viewing. Crunchyroll premium clients already have a VRV premium account.
03 Hulu
Hulu is a Walt Disney-owned subscription video-on-demand service. It’s one of the anime streaming sites offering different genres of anime in HD quality. It has an excellent variety of anime shows with its on-demand library growing each day with anime TV shows and series. Even before Netflix was imagining diving into the anime world Hulu had collected a valuable collection of anime titles that’s been growing ever since.
Image Source: Hulu Stream
Hulu also has different subscription plans so if you have the right plan you can enjoy watching anime offline. The anime can be downloaded on mobile devices only and you can find the Downloadable items in the app and if your chosen anime is downloadable you can just click the download button on the details page and there you go.
04 Netflix
The streaming giant Netflix has pushed hard in on Japanese anime. In the past two to three years the company has enormously increased its anime database buying rights to several popular titles on the internet such as Neon Genesis Evangelion, Baki, and Death Note. While also investing and producing some Netflix original anime series and movie titles as well.
Image Source: Netflix Download
Netflix comes with multiple subscription plans and allows you to download and enjoy anime offline on its mobile Netflix app. To watch anime offline, you have to search for your desired anime series and open it in the app just look around for a download icon on the description page of the specific series, and pressing it will download the title for you.
05 Amazon Prime Video
Amazon Prime Video is an online streaming service offering a large library of original as well as popular anime movies and series. Subscribers to Amazon Prime have the facility to download content even in 4K Ultra video quality. Though the site has a comparatively low reputation in its anime catalog, it has developed a decent mix of classics, brand-new, hidden gem series, and movies.
Image Source: Amazon Prime Video
A subscribed user can download anime on the mobile application of the Amazon Prime Video for both Android and IOS. To download anime, you can look out for your favorite content, and in the description of that series or movie you’ll see a download button, press it. Now you’ll be able to watch anime offline anywhere without an active internet connection.
Part 3 Record an Anime with Wondershare Filmora
There are lots of paid and subscription-based anime sites that limited people have access to and you want to share the latest episode with your friends, want to make a video for YouTube, or compose an anime reviews video with markers and voiceover to show off your editing skills but first, you’ll need to record anime. Whichever might be the case persuading you to record anime on your computer, you don’t need to worry as I’ll be taking you through each step needed to record anime. Remember to connect with other video creators in the Wondershare Video Community .
Wondershare Filmora is a proficient tool for video content creators and makes it easy and simple to record anime and create professional-looking videos on Mac and Windows. There are three kinds of screen recording types you can choose from, including full-screen, target window, and custom selection. You can record from the computer audio system or microphone audio, determine the quality you want as output, the frame rate, set hotkeys to start, and stop the recording from the settings window. Now we will dive into recording our anime video to produce a review of the Tower of God anime series.
The steps for you to record anime are (the steps are the same on Windows):
- Download Filmora and install it on your computer system either Mac or Windows as the efficient tool supports both platforms.
- Open Filmora, click on the “New Project” option, go to the Record drop-down menu, and choose the “Record PC Screen” option.
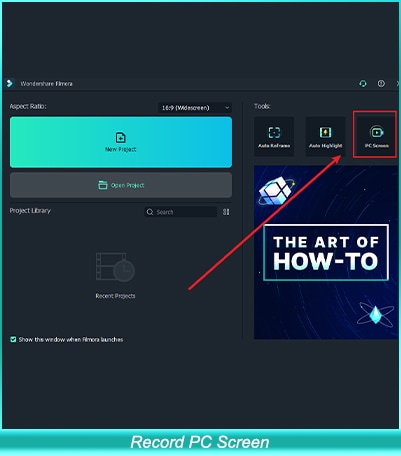
- Now head over to the anime you want to record and play it.
- You will be prompted with Wondershare Filmora Scrn recorder options i.e. in case you want Full-Screen recording, audio, and microphone options. Once you press the record (red) button Filmora will start the recording.
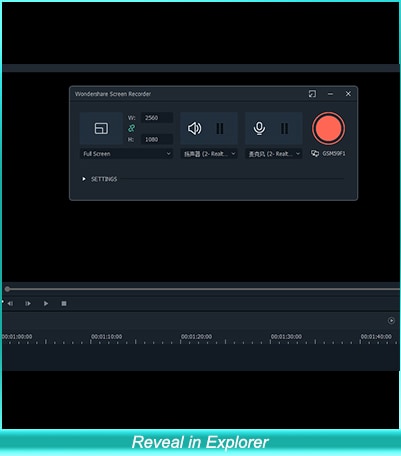
- You can confirm if the software is recording your screen or not by looking at the top menu bar, a red recording button will be displayed during the whole screen recording.
- To pause or stop the anime recording press the red button on the top menu bar.
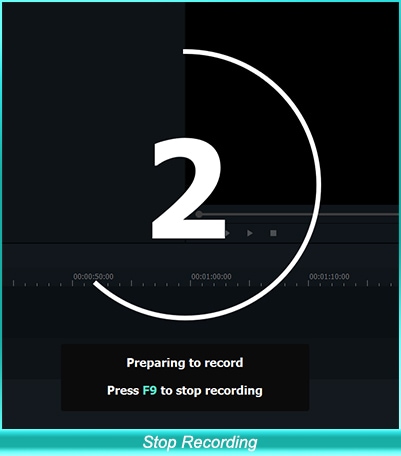
- Press the Stop button to finish recording the anime. You’ll be taken back to the Filmora editor window where you can tweak around with the recorded anime.
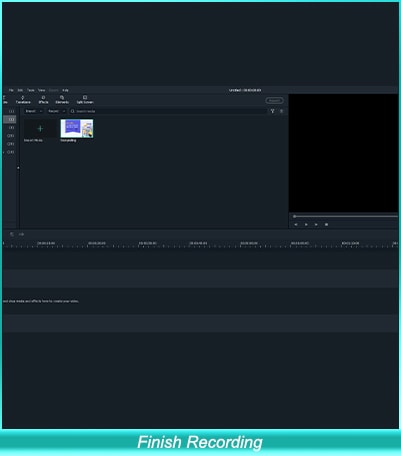
- You can locate the recorded file by right-clicking the recorded file in the media library and selecting the “Reveal in Explorer” option.

- You can drag and drop the recorded file to the timeline if you want to edit it. Filmora can easily cut, trim, rotate, layer multiple video effects, and much more. That’s up to you how deep you want to dig into the features of this amazing video editing toolkit.
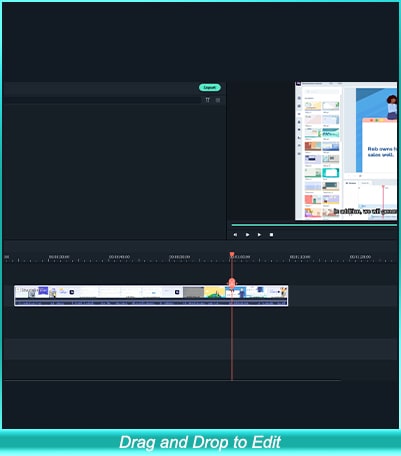
Tips:
You can also set a timer to record the anime i.e. for 20 minutes and then the screen recording will automatically stop and save the file onto the location you’ve specified in the “Save To” location bar.
Seeing all this, aren’t you interested in Filmora? Give it a go.
● Conclusion for Downloading Anime →
With the popularity of the once-niche area of animation continuously blossoming and becoming more mainstream. These free and paid sites are propping up to grab more users’ attention with unique features. Japanese anime has the power to impress anyone with its vivid imagination and colorful storytelling techniques. We’ve covered top free and paid sites that allow you to download anime content and stream on the go without worrying about an active internet connection. Also, to extend your anime interest, you can put life into the world of anime and find some apps to turn photos into cartoons and sketches !
Benjamin Arango
Benjamin Arango is a writer and a lover of all things video.
Follow @Benjamin Arango
Benjamin Arango
Mar 27, 2024• Proven solutions
Anime (also known as Japanese-style animation) is a global subgenre of TV content. With billions of viewers around the globe, the Anime industry is one of the mainstream genres getting a lot of attention. It has boomed in popularity with the rise in online streaming services. People are discovering the amazing blend of art, animation, storytelling, and music. You can find the best free anime websites to watch anime online .
But why we’re here is that only a few of these streaming sites allow their users to download anime easily and watch cartoon online in HD . That said there are numerous free and paid providers out of which only a handful works properly and lets the users enjoy their favorite anime. So, let us discover the best anime streaming sites – free and paid as well as those with the feature to download anime and watch anime offline. In this article, you will learn:
- Part 1: Best Anime Streaming Sites to Download Anime[Free]
- Part 2: Best Anime Streaming Sites to Download Anime[Paid]
- Part 3: Record an Anime with Wondershare Filmora
Part 1 Best Anime Streaming Sites to Download Anime[Free]
Free Anime Streaming Sites to Download Anime at A Glance:
01 Animeland
Animeland is a free online English dubbed anime streaming site that doesn’t require you to register to watch or even download anime from the site. It is one of the most famous free anime sites offering 1080p high-definition video streaming. The site has reportedly around 1.10 million monthly viewers with famous anime series English dubbed like Naruto, Bleach, Attack on Titan, etc.
Image Source: Animeland
You can download from the site just by going on the site and searching for your desired dubbed anime movie or series. Play the episode you want to download and then on the playback window, you will see a download button right at the top of the player box, click it, and your episode will start downloading automatically.
02 Kissanime.ru
The Kissanime site is popular for dubbed anime streaming with the latest content. The site offers high-definition video quality arranged category-wise with easy access and searching features. The user interface is quite neat with high-performance servers for buffer-free streaming i.e. RapidVideo, Streamango, etc., and featured thumbnail images.
Image Source: Kissanime.ru
The website has made it very easy for users to download their desired anime seasons. To download from kissanime.ru, please search for your desired anime series and play the episode that you want to download. Shortly you’ll be taken to the screenplay page, here just scroll down a bit and you’ll find a clickable link to download the very episode that is being played in the browser window.
03 Chia-Anime
Chia-Anime is another free tier anime streaming site with a mobile-friendly UI sorted category-wise and including old and new dubbed anime series. The categorization makes navigation pretty smooth on the site and you’ll be able to find your desired anime content easily. The Chia anime has a wide range of the latest anime series like the popular “One Piece”, “High school of Death”, etc.
Image Source: Chia-Anime
The site supports ultra-high-definition video streaming with its sleek and colorful design. To download an anime episode from Chia-anime.tv, you can head onto the site and search for the anime series you want to download. Then play the intended episode once you’re on the streaming webpage you’ll see a download link just down below the video player, click on it and your download should start.
04 GoGoAnime.io
GoGoAnime is also a free anime streaming site with seven different streaming servers to choose from that make the streaming quite fast and reliable. The collection of anime movies and shows on the site is pretty satisfactory and also has a dedicated chat room where you can interact with other anime lovers and make friends.
Image Source: GoGoAnime.io
You can download the full episode of your desired anime from GoGoAnime only from the default server named VIDSTREAMING. To download play the episode and on the streaming webpage you’ll see a download icon just above the player window press it and the episode will directly start downloading.
05 9anime
9Anime also offers a free online anime streaming library. With a wide variety of fascinating anime catalogs to choose from. The site has diverse anime genres such as Yaoi, Parody, Dementia, action, etc. The servers are fast and offer HD quality content on the go. On 9anime you won’t need to sign up before enjoying your treasured anime series even for accessing the free anime resources.
Image Source: 9anime5
You can download any anime episode from the site. To do so you need to play the episode you want to download and then select the Mp4upload server in the server list then a download button will appear down the player window.
Part 2 Best Anime Streaming Sites to Download [Paid]
Paid Anime Streaming Sites to Download Anime at a Glance:
| Site | Pricing | Download | Supported OS |
|---|---|---|---|
| Funimation | $7.99 monthly | FunimationNow app | Android/IOS |
| Crunchyroll | $9.99 monthly | VRV app | Android/IOS |
| Hulu | $5.99 monthly | Hulu app | Windows 10/Android/IOS |
| Netflix | $8.99 monthly | Netflix app | Windows/Mac/Android/IOS |
| Amazon Prime Video | $12.99 monthly | Amazon Prime Video app | Android/IOS |
01 Funimation
In the anime industry, Funimation has its history with big anime series like Dragon Ball Z and other exclusives that you won’t find anywhere else. If you’re searching for titles that no other streaming site may have, you most probably will find the leading seasonal titles on Funimation.
Image Source: Funimation
Please kindly note that the anime download from Funimation is only available for mobile users on both Android and iOS. You need to install the FunimationNow app on your phone, then search for the anime you like, and download the anime episodes to watch anime offline through your library.
02 Crunchyroll
Crunchyroll is one of the top anime streaming sites – legally. You can have a free account to keep track of your watch history. But to enjoy the wonderful selection of shows from subgenres like seinen, shojo, to shonen you’ll have to buy a premium membership. There’s a Crunchyroll app for iOS and Android as well to let its users stream anime on the go.
Image Source: Crunchyroll
But you can download anime via the Crunchyroll app. Instead, you’ll have to connect it to your VRV streaming service pack and you can download your anime on the VRV app for offline viewing. Crunchyroll premium clients already have a VRV premium account.
03 Hulu
Hulu is a Walt Disney-owned subscription video-on-demand service. It’s one of the anime streaming sites offering different genres of anime in HD quality. It has an excellent variety of anime shows with its on-demand library growing each day with anime TV shows and series. Even before Netflix was imagining diving into the anime world Hulu had collected a valuable collection of anime titles that’s been growing ever since.
Image Source: Hulu Stream
Hulu also has different subscription plans so if you have the right plan you can enjoy watching anime offline. The anime can be downloaded on mobile devices only and you can find the Downloadable items in the app and if your chosen anime is downloadable you can just click the download button on the details page and there you go.
04 Netflix
The streaming giant Netflix has pushed hard in on Japanese anime. In the past two to three years the company has enormously increased its anime database buying rights to several popular titles on the internet such as Neon Genesis Evangelion, Baki, and Death Note. While also investing and producing some Netflix original anime series and movie titles as well.
Image Source: Netflix Download
Netflix comes with multiple subscription plans and allows you to download and enjoy anime offline on its mobile Netflix app. To watch anime offline, you have to search for your desired anime series and open it in the app just look around for a download icon on the description page of the specific series, and pressing it will download the title for you.
05 Amazon Prime Video
Amazon Prime Video is an online streaming service offering a large library of original as well as popular anime movies and series. Subscribers to Amazon Prime have the facility to download content even in 4K Ultra video quality. Though the site has a comparatively low reputation in its anime catalog, it has developed a decent mix of classics, brand-new, hidden gem series, and movies.
Image Source: Amazon Prime Video
A subscribed user can download anime on the mobile application of the Amazon Prime Video for both Android and IOS. To download anime, you can look out for your favorite content, and in the description of that series or movie you’ll see a download button, press it. Now you’ll be able to watch anime offline anywhere without an active internet connection.
Part 3 Record an Anime with Wondershare Filmora
There are lots of paid and subscription-based anime sites that limited people have access to and you want to share the latest episode with your friends, want to make a video for YouTube, or compose an anime reviews video with markers and voiceover to show off your editing skills but first, you’ll need to record anime. Whichever might be the case persuading you to record anime on your computer, you don’t need to worry as I’ll be taking you through each step needed to record anime. Remember to connect with other video creators in the Wondershare Video Community .
Wondershare Filmora is a proficient tool for video content creators and makes it easy and simple to record anime and create professional-looking videos on Mac and Windows. There are three kinds of screen recording types you can choose from, including full-screen, target window, and custom selection. You can record from the computer audio system or microphone audio, determine the quality you want as output, the frame rate, set hotkeys to start, and stop the recording from the settings window. Now we will dive into recording our anime video to produce a review of the Tower of God anime series.
The steps for you to record anime are (the steps are the same on Windows):
- Download Filmora and install it on your computer system either Mac or Windows as the efficient tool supports both platforms.
- Open Filmora, click on the “New Project” option, go to the Record drop-down menu, and choose the “Record PC Screen” option.
- Now head over to the anime you want to record and play it.
- You will be prompted with Wondershare Filmora Scrn recorder options i.e. in case you want Full-Screen recording, audio, and microphone options. Once you press the record (red) button Filmora will start the recording.
- You can confirm if the software is recording your screen or not by looking at the top menu bar, a red recording button will be displayed during the whole screen recording.
- To pause or stop the anime recording press the red button on the top menu bar.
- Press the Stop button to finish recording the anime. You’ll be taken back to the Filmora editor window where you can tweak around with the recorded anime.
- You can locate the recorded file by right-clicking the recorded file in the media library and selecting the “Reveal in Explorer” option.
- You can drag and drop the recorded file to the timeline if you want to edit it. Filmora can easily cut, trim, rotate, layer multiple video effects, and much more. That’s up to you how deep you want to dig into the features of this amazing video editing toolkit.
Tips:
You can also set a timer to record the anime i.e. for 20 minutes and then the screen recording will automatically stop and save the file onto the location you’ve specified in the “Save To” location bar.
Seeing all this, aren’t you interested in Filmora? Give it a go.
● Conclusion for Downloading Anime →
With the popularity of the once-niche area of animation continuously blossoming and becoming more mainstream. These free and paid sites are propping up to grab more users’ attention with unique features. Japanese anime has the power to impress anyone with its vivid imagination and colorful storytelling techniques. We’ve covered top free and paid sites that allow you to download anime content and stream on the go without worrying about an active internet connection. Also, to extend your anime interest, you can put life into the world of anime and find some apps to turn photos into cartoons and sketches !
Benjamin Arango
Benjamin Arango is a writer and a lover of all things video.
Follow @Benjamin Arango
10 Top Tools to Make Pic Collage for Windows
10 Best Tools to Make Pic Collage for Windows
An easy yet powerful editor
Numerous effects to choose from
Detailed tutorials provided by the official channel
Collages are a great way to assemble all your favorite pictures in one place. You can share these collages with your friends, relatives, and dear ones or can also use them for posting on social media sites and other online platforms. Though creating a collage may sound simple, a lot of considerations need to be taken for creating an interesting and eye-catchy collage, and for this, a help of a professional tool can be taken. In the following parts of the topic, you can learn about the best tools for photo collage Windows 10 and other OS.

In the following parts of the topic, you can learn about the best tools for photo collage Windows 10 and other OS.
In this article
01 [Top 10 Pic Collage for Windows Tools](#Part 1)
02 [The Best Tool to Get Stock Images for Creating Collages](#Part 2)
Part 1 Top 10 Pic Collage for Windows Tools
Checkout the best collage for Windows below.
01PhotoPad Photo Editing Software
This is a complete photo editing tool supporting an array of features including the creation of a photo collage. This software from NCH software can let you add the desired images manually and also support using the auto grid to add an unlimited number of pictures. The tool also lets you choose the collage orientation size and set the background as needed.
Pros:
● Create collage Windows manually or automatically.
● Allows adding a background color, image, or from the available background options.
● Spacing and corners between the images can be selected.
● The size of the tool is small.
Cons:
● Stickers and filters to individual images cannot be added.
● Cannot choose a custom collage size.

02PhotoScapeX
Available for download on Windows 10 and higher versions this is another widely used photo editing tool that can also let you create collages manually as well as automatically. Multiple frames are available that can be selected as desired and there are additional features like adding filters, and also edit them in multiple ways.
Pros:
● Allows creating collage manually and automatically.
● Multiple editing tools for customization like filters, crop, zoom, doodle, and more.
● Picture alignment can be done in 3 modes- vertical, horizontal, and tile.
● Option to change and customize image size, spacing, margin, and others.
Cons:
● Limited photos can be added.
● The size of the tool is large in comparison to other tools.

03Phototastic Collage
This is free to use Windows-based tool that can create impressive collages in no time. Multiple designs, frames, and other options are available to create a customized collage as needed.
Pros:
● Multiple customization options are available for creating the desired collage.
● User-friendly and simple interface.
● An array of templates is available.
Cons:
● The free version has limited features.
● Limitation to the number of images that can be added.
● Ads in the app.

04PicCollage
Unleash your creativity by creating an interesting collage using this excellent collage-making app. There are multiple templates and customization options supports.
Pros
● Create collage manually or automatically
● The earlier created collage can be edited.
● Allows creating a collage in 3 options- grid, template, freestyle.
Cons
● Watermark on the created collage.
● The image size cannot be customized.

05Collage Maker-Photo Grid and Montage
Using this free Windows tool, you can create an interesting photo collage or a free-styled montage as needed. A wide range of layouts and templates are available that can be further customized to get the desired collage.
Pros:
● Free Windows software.
● Come with multiple filters, layout, and editing tools.
● The user interface is easy.
● Preview option available.
Cons:
● Performance glitches due to bugs.
● Custom collage size cannot be set.
● Watermark on the collage.

06Fotor
If you are looking for a simple and basic collage-making tool, Fotor is the right choice. Collage in the grid, freestyle, and photo-stitch style can be created and basic customization features are supported.
Pros:
● Simple to use tool that is apt for beginners.
● Border can be changed from a solid color to a background.
Cons:
● Customization options are limited.
● Border and the image size cannot be changed.

07El Collagero
Just like its name, this is an interesting Windows-based tool for creating a collage of your choice. A wide range of options for customization is available that can let you edit the images, choose a template and then also edit the file.
Pros:
● A wide range of templates and designs for collages is available.
● Allows adding text, symbols, and other elements.
● Created collage can be shared on social media sites.
Cons:
● In comparison to other professional tools, the functions are limited.

08Atlantas Photo Collage Studio
This Windows-based tool will let you create collages of all types and for all occasions. You can choose from over 100 templates that best match your collage theme and image content.
Pros:
● More than 100 templates for collage designs are available.
● The size of the layout can be changed.
● Multiple editing and customization options are supported like zoom, opacity selection, and more.
Cons:
● Limitation of adding 45 images.
● For the advanced functions, need to subscribe to the paid version.

09PhotoJoiner
Using this Windows tool, pick up your favorite images and turn them into a beautiful collage with customized design and style.
Pros:
● A simple and basic tool for creating a collage.
● Created collage can be saved or shared to the social media site.
● Change the order of the images, margins, and other aspects.
Cons
● Collage templates are limited.
● Advanced features are missing.

1010. Blend Photo
To create a collage of images with a blending effect, this is the right tool to use. Available for download on the Windows system this tool lets you create collages telling interesting stories.
Pros:
● Simple and easy collage-making tool.
● Add blending effect to your collages.
● Over 50 custom shapes for image cropping are available along with the option for free-hand cropping.
● Multiple filters can be added.
Cons:
● Limited Editing and customization options.

Part 2 The Best Tool to Get Stock Images for Creating Collages
Several times, the captured and stored images may not fit in the collage theme you wish to create and, in such situations, you can use the stock images available online at several sites. One of the best tools where you can check out the images in different categories is Wondershare Filmora. This versatile software from Wondershare Filmora Video Editor is an advanced video editing tool that also has a huge collection of stock media including images.
Additionally, the split-screen feature of the software can be used for creating a video collage. Available for Windows and Mac systems, Wondershare Filmora will look after all your advanced video editing and customized requirements.
Wondershare Filmora - Best Video Editor for Mac/Windows
5,481,435 people have downloaded it.
Build unique custom animations without breaking a sweat.
Focus on creating epic stories and leave the details to Filmora’s auto features.
Start a creative adventure with drag & drop effects and endless possibilities.
Filmora simplifies advanced features to save you time and effort.
Filmora cuts out repetition so you can move on to your next creative breakthrough.
● Key Takeaways from This Episode →
● Collage-making tools help in creating an interesting and eye-catchy collage in a hassle-free manner.
●Several Windows-based tools are available for quick download.
●Wondershare Filmora is a great software to find a collection of stock images in different categories.
Collages are a great way to assemble all your favorite pictures in one place. You can share these collages with your friends, relatives, and dear ones or can also use them for posting on social media sites and other online platforms. Though creating a collage may sound simple, a lot of considerations need to be taken for creating an interesting and eye-catchy collage, and for this, a help of a professional tool can be taken. In the following parts of the topic, you can learn about the best tools for photo collage Windows 10 and other OS.
In the following parts of the topic, you can learn about the best tools for photo collage Windows 10 and other OS.
In this article
01 [Top 10 Pic Collage for Windows Tools](#Part 1)
02 [The Best Tool to Get Stock Images for Creating Collages](#Part 2)
Part 1 Top 10 Pic Collage for Windows Tools
Checkout the best collage for Windows below.
01PhotoPad Photo Editing Software
This is a complete photo editing tool supporting an array of features including the creation of a photo collage. This software from NCH software can let you add the desired images manually and also support using the auto grid to add an unlimited number of pictures. The tool also lets you choose the collage orientation size and set the background as needed.
Pros:
● Create collage Windows manually or automatically.
● Allows adding a background color, image, or from the available background options.
● Spacing and corners between the images can be selected.
● The size of the tool is small.
Cons:
● Stickers and filters to individual images cannot be added.
● Cannot choose a custom collage size.
02PhotoScapeX
Available for download on Windows 10 and higher versions this is another widely used photo editing tool that can also let you create collages manually as well as automatically. Multiple frames are available that can be selected as desired and there are additional features like adding filters, and also edit them in multiple ways.
Pros:
● Allows creating collage manually and automatically.
● Multiple editing tools for customization like filters, crop, zoom, doodle, and more.
● Picture alignment can be done in 3 modes- vertical, horizontal, and tile.
● Option to change and customize image size, spacing, margin, and others.
Cons:
● Limited photos can be added.
● The size of the tool is large in comparison to other tools.
03Phototastic Collage
This is free to use Windows-based tool that can create impressive collages in no time. Multiple designs, frames, and other options are available to create a customized collage as needed.
Pros:
● Multiple customization options are available for creating the desired collage.
● User-friendly and simple interface.
● An array of templates is available.
Cons:
● The free version has limited features.
● Limitation to the number of images that can be added.
● Ads in the app.
04PicCollage
Unleash your creativity by creating an interesting collage using this excellent collage-making app. There are multiple templates and customization options supports.
Pros
● Create collage manually or automatically
● The earlier created collage can be edited.
● Allows creating a collage in 3 options- grid, template, freestyle.
Cons
● Watermark on the created collage.
● The image size cannot be customized.
05Collage Maker-Photo Grid and Montage
Using this free Windows tool, you can create an interesting photo collage or a free-styled montage as needed. A wide range of layouts and templates are available that can be further customized to get the desired collage.
Pros:
● Free Windows software.
● Come with multiple filters, layout, and editing tools.
● The user interface is easy.
● Preview option available.
Cons:
● Performance glitches due to bugs.
● Custom collage size cannot be set.
● Watermark on the collage.
06Fotor
If you are looking for a simple and basic collage-making tool, Fotor is the right choice. Collage in the grid, freestyle, and photo-stitch style can be created and basic customization features are supported.
Pros:
● Simple to use tool that is apt for beginners.
● Border can be changed from a solid color to a background.
Cons:
● Customization options are limited.
● Border and the image size cannot be changed.
07El Collagero
Just like its name, this is an interesting Windows-based tool for creating a collage of your choice. A wide range of options for customization is available that can let you edit the images, choose a template and then also edit the file.
Pros:
● A wide range of templates and designs for collages is available.
● Allows adding text, symbols, and other elements.
● Created collage can be shared on social media sites.
Cons:
● In comparison to other professional tools, the functions are limited.
08Atlantas Photo Collage Studio
This Windows-based tool will let you create collages of all types and for all occasions. You can choose from over 100 templates that best match your collage theme and image content.
Pros:
● More than 100 templates for collage designs are available.
● The size of the layout can be changed.
● Multiple editing and customization options are supported like zoom, opacity selection, and more.
Cons:
● Limitation of adding 45 images.
● For the advanced functions, need to subscribe to the paid version.
09PhotoJoiner
Using this Windows tool, pick up your favorite images and turn them into a beautiful collage with customized design and style.
Pros:
● A simple and basic tool for creating a collage.
● Created collage can be saved or shared to the social media site.
● Change the order of the images, margins, and other aspects.
Cons
● Collage templates are limited.
● Advanced features are missing.
1010. Blend Photo
To create a collage of images with a blending effect, this is the right tool to use. Available for download on the Windows system this tool lets you create collages telling interesting stories.
Pros:
● Simple and easy collage-making tool.
● Add blending effect to your collages.
● Over 50 custom shapes for image cropping are available along with the option for free-hand cropping.
● Multiple filters can be added.
Cons:
● Limited Editing and customization options.
Part 2 The Best Tool to Get Stock Images for Creating Collages
Several times, the captured and stored images may not fit in the collage theme you wish to create and, in such situations, you can use the stock images available online at several sites. One of the best tools where you can check out the images in different categories is Wondershare Filmora. This versatile software from Wondershare Filmora Video Editor is an advanced video editing tool that also has a huge collection of stock media including images.
Additionally, the split-screen feature of the software can be used for creating a video collage. Available for Windows and Mac systems, Wondershare Filmora will look after all your advanced video editing and customized requirements.
Wondershare Filmora - Best Video Editor for Mac/Windows
5,481,435 people have downloaded it.
Build unique custom animations without breaking a sweat.
Focus on creating epic stories and leave the details to Filmora’s auto features.
Start a creative adventure with drag & drop effects and endless possibilities.
Filmora simplifies advanced features to save you time and effort.
Filmora cuts out repetition so you can move on to your next creative breakthrough.
● Key Takeaways from This Episode →
● Collage-making tools help in creating an interesting and eye-catchy collage in a hassle-free manner.
●Several Windows-based tools are available for quick download.
●Wondershare Filmora is a great software to find a collection of stock images in different categories.
Creative Ways to Make iPhone Text GIF
Creative Ways to Make iPhone Text GIF
An easy yet powerful editor
Numerous effects to choose from
Detailed tutorials provided by the official channel
GIFs add fun and humor to interactions via text messages. GIFs allow you to convey ideas, emotions, and thoughts in much more precise ways than an emoji would. iPhones operating on iOS 10 or later versions have an in-built GIF keyboard, making it super easy to add GIFs. iPhone text GIFs are readily accessible from GIF keyboards. Still, if you do not have one, you can resort to third-party applications like GIPHY and GIF keyboard for more prominent access to GIF libraries.

Let’s now delve into the different ways of adding GIFs in text messages on iPhone and directly sending them using the Messages app.
In this article
01 [How to Text a GIF: For iOS and Android](#Part 1)
02 [How to Text a GIF on an iPhone Using a Third-Party App](#Part 2)
03 [How to Send GIFs on iPhone](#Part 3)
Part 1 How to Text a GIF: For iOS and Android Users
iPhone text GIFs make texting more fun. Hence, we dedicated this part to teaching you how to use iPhone text GIFs to revitalize and better express yourself while texting.
On iPhone, there are two different ways to send iPhone text GIFs – employing the default keyboard or through the help of third-party apps. You can use the iOS default keyboard to search for GIFs in iMessage on iPhones directly. This applies to all iPhones running on iOS 10 and later versions. If your iPhone belongs to this category, follow the simple steps to add GIFs in text messages on iPhone:
01Sending GIFs using the iPhone Default Keyboard
Here’s how you can send iPhone text GIFs using the iOS default keyboard:
Step 1: On your iPhone, click on the iMessage app to open it.

Step 2: Click on the contact you want to send the GIF to from the list. If you have not previously sent a message to the contact, at the top right corner, click the Write icon represented as a square with a pencil, then enter the name of the contact you want to send the GIF to.

Step 3: Click the Images icon from the menu bar below the new message field. The image icon represents a white magnifying glass in the middle of a pink-colored circle.

Step 4: This pops up a GIF keyboard with the prompt, “Find images.” Browse through the library of GIFs to see recently used or popular GIFs. If you’re looking for a specific GIF, type in a search keyword into the Find images search bar to discover the results of GIFs that best match your request. For example, you may type “Compliments of the season” or “Grumpy,” depending on what you want.

Step 5: Scroll through the different GIFs on your screen to find the one that best fits your message. Click on it to automatically add it to your message in the text field. Peradventure you selected the wrong GIF, hit the small “x” icon at the top right corner of the GIF to delete it.

Step 6: Click the Send icon, represented as a blue arrow icon, to send your GIF.

You can add comments to a GIF just before sending it on the iMessage app. Type a message under the GIF before clicking “Send” to get the comment delivered together with the GIF.
From these simple steps, you can tell that sending a GIF from an iOS default keyboard is straightforward.
02Sending GIFs from an Android Device
Adding a GIF while using an Android phone is pretty much straightforward. Using the Gboard keyboard, follow the steps below to add a GIF on Android:
Step 1: Open the Message app and at the bottom of the screen, click the text bubble icon to enter the name of the person you’re texting in the contact field > Click Start.

Step 2: Click the smiley icon on the keyboard > Swipe to browse through GIFs and stickers or enter a search text to find your desired GIF.

Step 3: Select the GIF you want by clicking on it > Hit Send.
Part 2 How to Text a GIF on an iPhone Using a Third-Party App
Sending a GIF from an iPhone is also possible using third-party applications such as GIF Keyboard and GIPHY. These applications are built to add character to text messaging using animated objects called GIFs. Adding a GIF to your texts usually brings in some humor and life. You must have downloaded them from App Store and installed them on your iPhone to use these applications.
You can also visit third-party websites to send GIFs from there. For example, GIPHY supports searching and sending GIFs via iMessage.
Here are the steps to follow to search and send GIFs on iPhone text messages on iMessage using third-party tools:
Step 1: Search for your desired GIF on GIPHY or other GIF websites.

Step 2: Click on the GIF to open it.

Step 3: Long press on the GIF, and from the pop-up options, click Open.

Step 4: Launch Messages, click the Write icon and enter the person’s contact details you want to text.

Step 5: Click on the text box to bring up your iOS keyboard.

Step 6: Click on the text box again to add the paste option.

Step 7: When the GIF appears, click Paste.

Step 8: A preview of the GIF would appear on the text box. Hit Send when you’re ready to send the GIF.

If you use a GIF website other than GIPHY, the sent GIF may appear as a link rather than an image. If you’re okay with that, make sure the address of the shared animated image you end with the file extension, “.gif” if not, iMessage would not be able to load it.
Part 3 How to Send GIFs on iPhone
To save your file with .GIF extension, you need an application or software accessible online and offline. Indeed, many GIF creators are available in the market, both free and paid versions. However, Wondershare Filmora Video Editor is one of the preferable programs for video conversion to GIF. The software is intuitive and does not require any tech knowledge to use it. With this software, you can customize or create your GIFs while adding creative animation effects and texts to them. Filmora supports GIF creation from a variety of video formats including .mpeg, .dat, .mkv, .wmv, .mp4, .avi, and .evo.
Wondershare Filmora
Get started easily with Filmora’s powerful performance, intuitive interface, and countless effects!
Try It Free Try It Free Try It Free Learn More >

With Filmora, you can create and edit your GIFs with its in-built tools like rotation, color correction, cropping, speed alterations, merging, and lots more. What is more, you can also make a GIF online using Filmora online meme maker. This platform allows you to make videos, GIFs, and image memes without a watermark. You need no sign-up, and it is free to use. Create captions for your GIF while changing your text size, position, and color. Your text can be directly placed outside or inside the GIF and rotated to give it an artistic feel. When you finish creating, your GIF is ready to be used across all devices, including your iPhone.
If you’re unsure about how to use Wondershare Filmora for creating your GIF, below is a YouTube clip to guide you through the process for iPhone text GIFs.
● Key Takeaways from This Episode →
● How to create a GIF on an iPhone text and Android device.
● How to text a GIF using third-party tools like GIPHY and GIF Keyboard.
● The use of Wondershare Filmora to create GIFs with animated texts and outstanding edits.
●If you have stayed with us till this point, you’d have learned how to use your iOS default keyboard to send iPhone text GIFs effortlessly. You have also known how to send GIFs using the Gboard keyboard on your Android devices. Finally, you were introduced to Wondershare Filmora, a professional video editing software that allows you to create stunning GIFs in text messages for iPhone online and offline.
GIFs add fun and humor to interactions via text messages. GIFs allow you to convey ideas, emotions, and thoughts in much more precise ways than an emoji would. iPhones operating on iOS 10 or later versions have an in-built GIF keyboard, making it super easy to add GIFs. iPhone text GIFs are readily accessible from GIF keyboards. Still, if you do not have one, you can resort to third-party applications like GIPHY and GIF keyboard for more prominent access to GIF libraries.
Let’s now delve into the different ways of adding GIFs in text messages on iPhone and directly sending them using the Messages app.
In this article
01 [How to Text a GIF: For iOS and Android](#Part 1)
02 [How to Text a GIF on an iPhone Using a Third-Party App](#Part 2)
03 [How to Send GIFs on iPhone](#Part 3)
Part 1 How to Text a GIF: For iOS and Android Users
iPhone text GIFs make texting more fun. Hence, we dedicated this part to teaching you how to use iPhone text GIFs to revitalize and better express yourself while texting.
On iPhone, there are two different ways to send iPhone text GIFs – employing the default keyboard or through the help of third-party apps. You can use the iOS default keyboard to search for GIFs in iMessage on iPhones directly. This applies to all iPhones running on iOS 10 and later versions. If your iPhone belongs to this category, follow the simple steps to add GIFs in text messages on iPhone:
01Sending GIFs using the iPhone Default Keyboard
Here’s how you can send iPhone text GIFs using the iOS default keyboard:
Step 1: On your iPhone, click on the iMessage app to open it.
Step 2: Click on the contact you want to send the GIF to from the list. If you have not previously sent a message to the contact, at the top right corner, click the Write icon represented as a square with a pencil, then enter the name of the contact you want to send the GIF to.
Step 3: Click the Images icon from the menu bar below the new message field. The image icon represents a white magnifying glass in the middle of a pink-colored circle.
Step 4: This pops up a GIF keyboard with the prompt, “Find images.” Browse through the library of GIFs to see recently used or popular GIFs. If you’re looking for a specific GIF, type in a search keyword into the Find images search bar to discover the results of GIFs that best match your request. For example, you may type “Compliments of the season” or “Grumpy,” depending on what you want.
Step 5: Scroll through the different GIFs on your screen to find the one that best fits your message. Click on it to automatically add it to your message in the text field. Peradventure you selected the wrong GIF, hit the small “x” icon at the top right corner of the GIF to delete it.
Step 6: Click the Send icon, represented as a blue arrow icon, to send your GIF.
You can add comments to a GIF just before sending it on the iMessage app. Type a message under the GIF before clicking “Send” to get the comment delivered together with the GIF.
From these simple steps, you can tell that sending a GIF from an iOS default keyboard is straightforward.
02Sending GIFs from an Android Device
Adding a GIF while using an Android phone is pretty much straightforward. Using the Gboard keyboard, follow the steps below to add a GIF on Android:
Step 1: Open the Message app and at the bottom of the screen, click the text bubble icon to enter the name of the person you’re texting in the contact field > Click Start.
Step 2: Click the smiley icon on the keyboard > Swipe to browse through GIFs and stickers or enter a search text to find your desired GIF.
Step 3: Select the GIF you want by clicking on it > Hit Send.
Part 2 How to Text a GIF on an iPhone Using a Third-Party App
Sending a GIF from an iPhone is also possible using third-party applications such as GIF Keyboard and GIPHY. These applications are built to add character to text messaging using animated objects called GIFs. Adding a GIF to your texts usually brings in some humor and life. You must have downloaded them from App Store and installed them on your iPhone to use these applications.
You can also visit third-party websites to send GIFs from there. For example, GIPHY supports searching and sending GIFs via iMessage.
Here are the steps to follow to search and send GIFs on iPhone text messages on iMessage using third-party tools:
Step 1: Search for your desired GIF on GIPHY or other GIF websites.
Step 2: Click on the GIF to open it.
Step 3: Long press on the GIF, and from the pop-up options, click Open.
Step 4: Launch Messages, click the Write icon and enter the person’s contact details you want to text.
Step 5: Click on the text box to bring up your iOS keyboard.
Step 6: Click on the text box again to add the paste option.
Step 7: When the GIF appears, click Paste.
Step 8: A preview of the GIF would appear on the text box. Hit Send when you’re ready to send the GIF.
If you use a GIF website other than GIPHY, the sent GIF may appear as a link rather than an image. If you’re okay with that, make sure the address of the shared animated image you end with the file extension, “.gif” if not, iMessage would not be able to load it.
Part 3 How to Send GIFs on iPhone
To save your file with .GIF extension, you need an application or software accessible online and offline. Indeed, many GIF creators are available in the market, both free and paid versions. However, Wondershare Filmora Video Editor is one of the preferable programs for video conversion to GIF. The software is intuitive and does not require any tech knowledge to use it. With this software, you can customize or create your GIFs while adding creative animation effects and texts to them. Filmora supports GIF creation from a variety of video formats including .mpeg, .dat, .mkv, .wmv, .mp4, .avi, and .evo.
Wondershare Filmora
Get started easily with Filmora’s powerful performance, intuitive interface, and countless effects!
Try It Free Try It Free Try It Free Learn More >
With Filmora, you can create and edit your GIFs with its in-built tools like rotation, color correction, cropping, speed alterations, merging, and lots more. What is more, you can also make a GIF online using Filmora online meme maker. This platform allows you to make videos, GIFs, and image memes without a watermark. You need no sign-up, and it is free to use. Create captions for your GIF while changing your text size, position, and color. Your text can be directly placed outside or inside the GIF and rotated to give it an artistic feel. When you finish creating, your GIF is ready to be used across all devices, including your iPhone.
If you’re unsure about how to use Wondershare Filmora for creating your GIF, below is a YouTube clip to guide you through the process for iPhone text GIFs.
● Key Takeaways from This Episode →
● How to create a GIF on an iPhone text and Android device.
● How to text a GIF using third-party tools like GIPHY and GIF Keyboard.
● The use of Wondershare Filmora to create GIFs with animated texts and outstanding edits.
●If you have stayed with us till this point, you’d have learned how to use your iOS default keyboard to send iPhone text GIFs effortlessly. You have also known how to send GIFs using the Gboard keyboard on your Android devices. Finally, you were introduced to Wondershare Filmora, a professional video editing software that allows you to create stunning GIFs in text messages for iPhone online and offline.
12 Animated Slideshow PowerPoint Templates
Animated Slideshow Powerpoint Templates and Tool to Make Them
An easy yet powerful editor
Numerous effects to choose from
Detailed tutorials provided by the official channel
If you are passionate about uplifting your graphic design skills with stunning animated slideshow creation, read here about the best PowerPoint templates!
In this article
01 [12 Cool Animated Slideshow PowerPoint Templates](#Part 1)
02 [5 Tools to Make Stunning Animated Slideshow PowerPoint](#Part 2)
Part 1 12 Cool Animated Slideshow PowerPoint Templates
Slideshows are an already appealing media of content presentation, which when supplemented with animated backgrounds, are bound to captivate attention. Considering the underlying reason, it should be noted that animated slideshows offer a more vivid and lively presentation of information, as compared to their static counterparts. Animated slideshows have the additional advantage of presenting the content in the exact and accurate tone that suits the grasping capability of the audience.
Talking of feasible solutions for creating high end animated slide show presentations, the software market has a diverse range of alternatives to choose from. However, Microsoft PowerPoint is a graphic presentation tool that almost everyone is familiar with. Limiting our discussion to the same, there are a diversity of animated slideshow PowerPoint templates, like that of Evanto Elements and GraphicRiver to design professionally outstanding animated slideshows.
If you are keen on trying hands at adding that extra spunk your ordinarily boring static presentations, spare time to read the following section of this article, which incorporates the features, utilities and merits of the top 12 design templates in GraphicRiver for creating animated slideshows in PowerPoint with utmost ease and within a quick time span:
01Parallax Ultimate PowerPoint Animated Template
Choosing this animated presentation template to design your slideshow projects will supplement tour creations with the most amazing parallax effect, including an additional list of tempting and trendy editing features, like, limitless color choices, high definition video resolution, master slide presentations, modern, elegant, fully animated, company oriented slides, with object animations and parallax transitions, 16:9 wide screen aspect ratio, handmade infographics and much more.

02Splash Animated PPT
This one is an excellent animated template to create elegant animated slideshow presentations that will make your design creativity stand out of the crowd. Working with the template entitles you of a matchless, professional quality slideshow animation PowerPoint project on account some exclusive features, like those of high definition screen resolution and widescreen image aspect ratio, light and dark presentation backgrounds etc.
Mentioning some additional credibility of using the template for creating animated slideshows, you get to access as many as 500 selected slides, vector line and social media icons, uniquely styled image masks, calendars and vector maps.
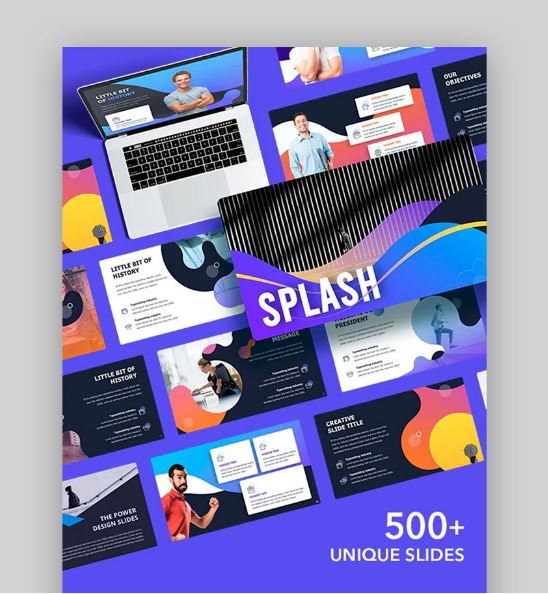
03Social Media Animated PowerPoint Templates
If your working constraints require an extensive use of social media information, consider using tis interactive PowerPoint template for designing social media compatible, premium quality, professional slideshows with animated graphics. Working with the template, you will get a complementary access to a pool of exciting slideshow features.
Talking of the specific utilities of the animated slideshow maker template, you can choose from over 50 slide layouts, light and dark backgrounds themes, enjoy a seamless, drag and drop workflow and easily edit grouped elements, along with modifying infographic elements in Excel sheets.
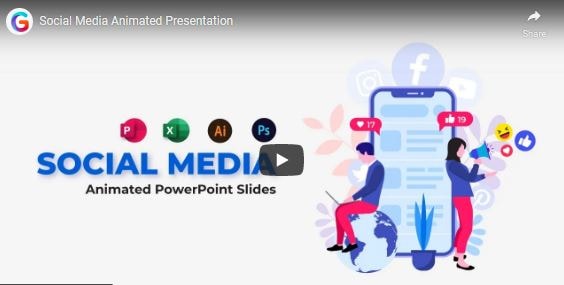
04Animated Slides Bundle for PowerPoint Presentation
This one is an interactive GraphicRiver PowerPoint animation slideshow maker template, which you can work with for a delivery of high end and illustrative animated slideshow presentations. The template facilitates its users with a diversity of graphic customization features, like that of visual transitions, custom reveals and objectified motions to your presentation slides, points and images.
The template promises you of a stunning, high quality and compelling slideshow output with an elegant presentation outlook. The template has a variety of inbuilt slide layouts, is easy to use and comes to you absolutely free of cost.
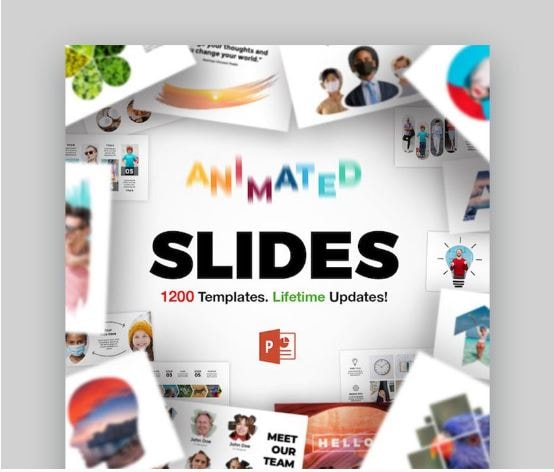
05Proposal PowerPoint Animated
If you are about to deliver a dynamic business presentation, consider working with this graphic tool to create your animoto slideshow in PowerPoint. Proposal PowerPoint Animated is an interactive animation template, designed exclusively for adhering to the concern of business centered content delivery.
You can create captivating motion stories with the conveniently editable slides and high end animated graphics of this PowerPoint template, thus ensuring a high pitched information conveyance to your target audience.
06DIY Animated PPT Promo Kit
Looking for the most feasible PowerPoint animated slideshow templates for slideshow creation generally refers to a time consuming web search. If you are a creativity freak and want to escape the aforesaid hustle, try hands at working with the DIY Animated PPT Promo Kit to create a customized animated slideshow template of your own.
Talking about the utilities, this interactive slideshow presentation kit is packed with a lot of professional features that are sufficient to give a hype to your normal quality slideshows and allows you to work with over 100 entirely customizable slides in 2 variable color schemes.
07Pitch Deck Animated Bundle
Using a pitch deck strategy is a common way of attracting fund credibility for your business for an appreciable revenue growth, which is often put to the additional use of addressing potential workers of the company on the latter’s crucial success factors. When working towards either of the purposes, using the aforesaid software bundle is a smart choice to showcase the exact content concerning your overall business concept to the target audience.
This one is preferably the best pitch deck template you could ever get. Though there is an appealing set of market choices, it is always an impressive decision to select the cream from the curd for ensuring high end results.
08Massive X Presentation Template for PowerPoint
When having a desire to access the credibility of slideshow templates though user reviews, this animated PowerPoint template is sure winner. Packed with an extensive library of over 960 exceptional slides in dark and light background themes, along with 20 preset color schemes, this graphic template is an absolute favorite of creative designers across the globe.
Choosing the template for catering to your animation centered slideshow creation needs opens a diversity of audio-visual customization features with an entirely free access and an easy to use working interface.

09Imperial Multipurpose PowerPoint Template
Living up to its name, this one is a multi-functional, free animated slideshow template that allows you to choose the perfect color scheme for your brand from more than 100 shade varieties, thus ensuring a high end transition flexibility. Prefer using this template to add a visual highlight to your slideshow presentations with a diversity of icons and customized animations.
If you have invested enough time looking for the best PowerPoint animation slideshow creator utility, end your search with the Imperial Multipurpose template that is available to you without asking for a penny from your pocket and welcomes you with the most interactive working environment.

10Minimal PowerPoint
The aforesaid slideshow template for creating animated presentations is a fundamental and clean graphic creation utility that comes with a wide range of more than 500 different sides and convenient to use drag and drop placeholders for seamless content inclusion. Additional features of the template consist of inbuilt calendars, charts, graphs and customized illustration components, suitable for a diverse set of industries.
This one is an interactive style PowerPoint animoto slideshow maker template that works best to infuse data and animation graphics together. You can use this graphic design tool without a second thought for delivering quality content with a cohesive slideshow presentation, of course without having to worry about any cost constraints.
11PowerPoint Animated Pro Pack- With Animated Slides
Using this animation slideshow template for your business presentations facilitates you with a series of interactive graphic modules within professionally compatible slides. You can use this high end template package to supplement your presentations with high quality animated motion diagrams.
Other appealing features of the package include a huge set of conveniently editable slides, with an extensive variety of PowerPoint compatible motion transitions, animations and many more surplus features to add the right amount of spark to your professional animated slideshow presentations.
12Wow Slides for PowerPoint
If you are yet to reach to the perfect animated slideshow creator solution, consider sparing a thought about this wonderful PowerPoint template to cater to your animation design concerns. Available to you with a decent set of over 24 inbuilt color themes, this one is a perfect choice for working on webinar slides, business presentations and pitch decks.
Apart from elegantly beautiful collection of animations, you will find this slideshow template package to be a storehouse of elusive and explanatory charts, graphs, maps and icon packs, which you can use to add relevant statistical content to your presentations or give an enhanced and organized look to your slideshow project.
Part 2 5 Tools to Make Stunning Animated Slideshow PowerPoint
Having discussed about the most amazing animation slideshow templates for PowerPoint, let us now extend our talk to learn about some of the most preferred graphic tools to create high end and professionally expressive and stunning animation centered slideshow presentations in PowerPoint, considering the fact that such presentations are an important part of the ongoing business trends, which you should be aware of.
The following section presents a detailed discussion on the features, best application utilities, market reviews and usage guidelines of the top 5 animated slideshow creator tools:
01**Wondershare Filmora Video Editor **
For Win 7 or later (64-bit)
For macOS 10.12 or later
This one is possibly the best and an all in one software package that promises to address almost all of your graphic editing needs in the most affordable manner. Talking of the specific utility of creating animated slideshow presentations, Wondershare Filmora is dedicated towards delivering high end motion graphic slideshows of matchless professional excellence.
The tool is best in making audio infused, animated photo slideshows that are apt for comprehensive graphic proposals for top rated business projects. About the software’s pricing requirements, you can avail a free usage of the tool for free in its trial version for 7 days, following which, working with the tool will demand paid monthly and annual subscriptions of $9.99 and $19.99 respectively.
Pros
● Working with the tool, you are entitled to use a plethora of audio-visual effects and filters to enhance your presentations.
● The tool’s feature rich library has everything to design animated slideshows with high resolution output quality.
● The tool is known to support almost all popular audio, video and image file formats.
Cons
● The tool has a limited variety of fine-tuned utilities for effect tweaking.
● The features of chapter authoring and DVD menu are absent.
● Working with the tool, you may encounter occasional software crashes.
User’s Guide to Create Animated Slideshows in Wondershare Filmora
Having understood the basic functionalities and exceptional features of Filmora’s Animated Slideshow creator tool, let us see through the following section to get familiar to the knowhow of using the same for designing animation top rated slideshow presentations in a stepwise procedure:
Step 1: Download and Install the Software
Before getting though with the creation process, initiate a download of the slideshow creator program from the latter’s official website to any of your preferred Windows or iOS compatible devices.
Step 2: Add Your Images and Videos
Creating a slideshow presentation may require a set of multiple image and video files to the program’s graphic creator timeline. It is recommended to add your selections of the aforesaid files to a single folder before launching the software in your system.
Once you have finished making your selections, launch the program to reach its welcome interface, were you need to navigate and click on the ‘Media’ tab in the top toolbar. From the task options that appear, click on ‘Import a Media’. Next, you will be asked to browse through your device locations and choose the folder that contains your previously selected files to be used in the presentation you are about to create.
When you have found the required folder, tap on ‘OK’ to import the same to the new slideshow project in the Filmora timeline. All your selected files will be visible here after a successful import.
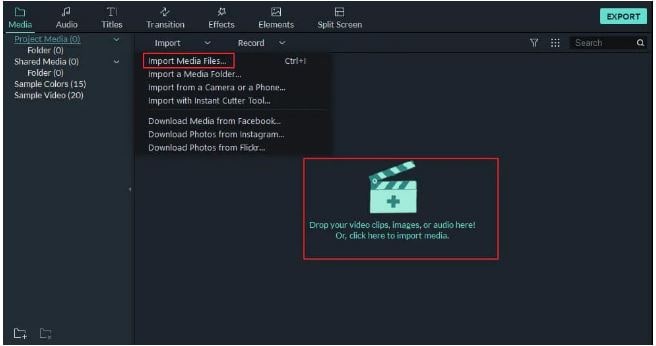
Step 3: Timeline Positioning of Media Files
Before working on the task of positioning the imported media files on the app’s timeline, navigate to the ‘File’ menu and choose the ‘Preferences’ option. As soon as the respective window pops up, reach to the ‘Editing’ tab at the top and select ‘Photo Placement’ from the drop down menu that follows.
In case your selected images do not have a matching aspect ratio with the program’s preset values, choose the ‘Crop to Fit’ option for removing the additional black bars from the selected images. For the requirement of adding camera pan and zoom movements to your images, select the ‘Pan & Zoom’ option in the ‘Preferences’ settings.
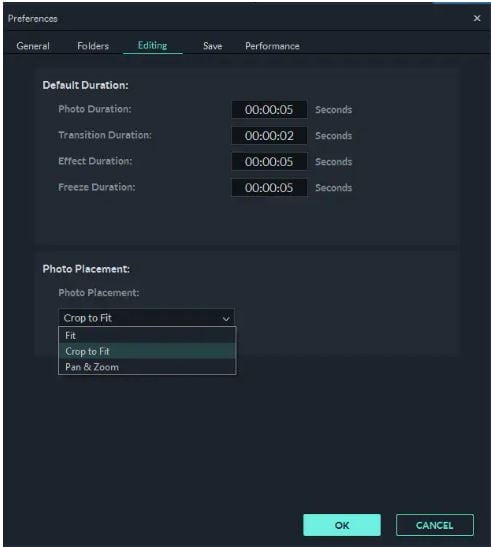
You can proceed to change the preset play durations of images, effects and transitions in the ‘Editing’ window itself. As an alternative you can adhere to the same task in the program’s timeline by dragging any one end of the media files in an outward or inward direction. The ‘Crop to Fit’ option may not give an affordable size in some cases where the images are set in a vertical 9:16 aspect ratio. Choose the ‘Fit’ option to set this issue straight.
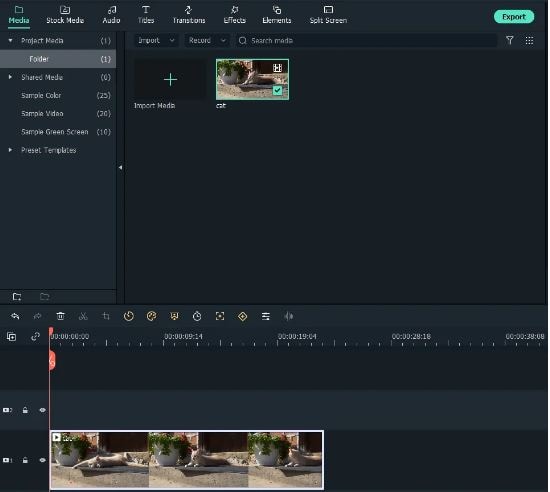
When you have finished making all the aforesaid adjustments, navigate to the Media panel again for adding the selected image files to the software’s timeline. Proceed with selecting a file and dragging and dropping the same at the desired position within the timeline. Continue repeating the process till all the images have been placed at their respective locations, and in the exact order of appearance in the slideshow. This should be followed by adjusting the image play durations using any one of the previously described methods.
Step 4: Escape Hard Cuts With Image Transitions
Hard cuts among different slides of a presentation break the flow of the slideshow. To escape this cringe, consider using a smooth transition effect within the slides of your project. To do this, navigate to the ‘Transitions’ tab in the top toolbar of Filmora’s project window and select a desired one from over 100 choices of customizable transitions.
You can now drop these transitions in the timeline at the exact intersection point of two image files. Avoid using the same transition for every hard cut to escape monotony. You can instead choose different transitions for each slide while observing its appearance in the clip.
After you are done with applying transitions to each slide, double click on a particular transition to open its ‘Transition Setting Window’ either for presetting the transition play duration or to choose a desired transition mode. You can also prefer a direct customization of the transition duration in the project timeline through a right or left dragging of any of its ends.
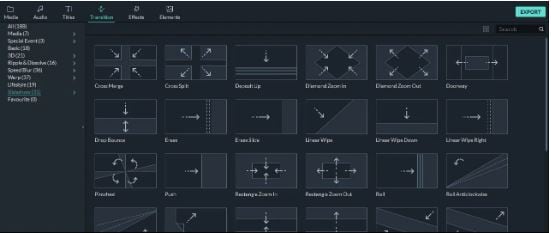
Step 5: Uplift Your Slideshow Colors With Overlays and Filters
Navigate to the top toolbar and hit the ‘Effects’ tab to choose from a diversity of visual effects that can be added to the slideshow images to supplement them with an increased vibrancy through color desaturation. These effects in the program’s library are categorized into classes of Overlays and Filters, with further subcategories of Sepia Tone, Light Leaks and Lomography and many more.
To apply these effects, just select and add them into a timeline track above the clip you wish to add the overlay or filter to. When you have applied the effects, observe the overall clip appearance in the ‘Preview Panel’. Double click on a particular effect to fine-tune the latter’s settings.
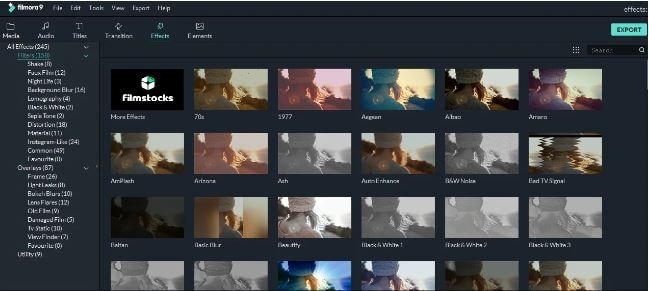
Step 6: Supplement Your Slides With Motion Graphic Elements
While motion graphics will undoubtedly enhance your animated slideshows, adding them to your presentation is purely optional, since most professional projects do not need a motion graphic element to escalate their presentation outlook. If, however, you choose to work on making these a part of your animated slideshow, Filmora lets you do that in its ‘Elements’ tab.
There is a plethora of motion graphic templates that you can select and add to the project timeline for a quick and vibrant upgrade of your presentation slides, but, at the same time, it becomes important to take care of the visual outlook and the underlying reason of creating the slideshow before you decide on adding these elements to your project.
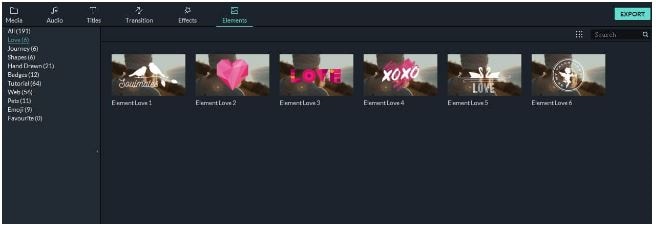
Step 7: Create Voiceovers and Record Soundtracks for Your Slideshow
Narration is a smart way to captivate the target audience within your slideshow, whether though a self-delivery or a recorded voiceover. If you decide on the second option, you can conveniently use the Filmora Slideshow Creator program to add voiceovers and soundtracks to your presentation.
To adhere to the purpose, navigate to the top toolbar and click on the ‘Media’ tab. From the options that appear, tap on the ‘Record’ menu that drops down, followed by selecting the ‘Record Voiceover’ option. As soon as the ‘Record Audio’ prompt pops up, select your desired microphone to be used in the recording process and click on the ‘Record’ button.
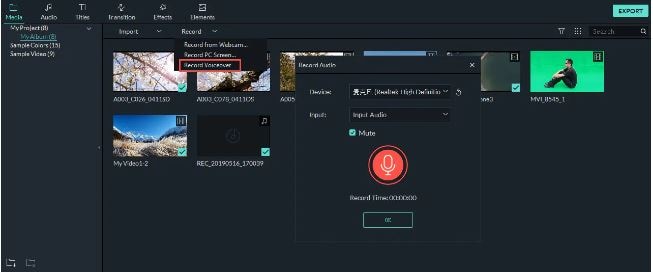
The recording that you have just created will appear in the ‘Media’ tab beside your all other imported audio-visual and image files, and you can add the same to any desired file with utmost ease. The Filmora library further allows you with a free access to its huge inventory of sound and audio effects. To apply these effects to your project, navigate to the ‘Audio’ tab and browse through impressive music categories, like, Young & Bright, Rock, Electronic, etc., to select the best matching audio for your slideshow.
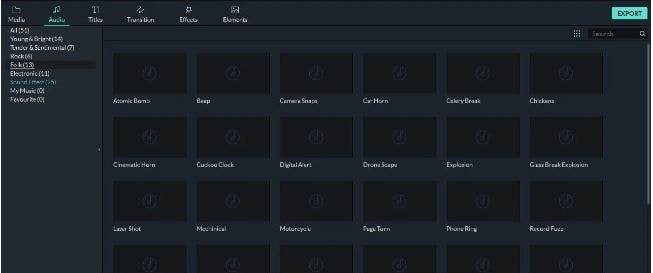
When you have made your selections, add all of them to the slideshow’s audio track in the project timeline and make suitable adjustments to their play durations.
Step 8: Export Your Creation
When your satisfied with your efforts till here, you have indeed created a wonderful animated slideshow presentation that should be exported to relevant platforms. Navigate to the ‘Export’ tab at the top right corner of the project timeline and click on the same. As soon as the utility window appears, choose a preferred file format, set a desired output resolution and fame rate for your presentation, followed by making a direct export of the same to your Vimeo or YouTube accounts.
The slideshow rendering time on different platforms may vary in cohesion with the specific presentation lengths, with larger file requiring a considerably longer time to get rendered than the smaller ones. It is advisable to limit the output file size within 500 MB for a quick rendering process.
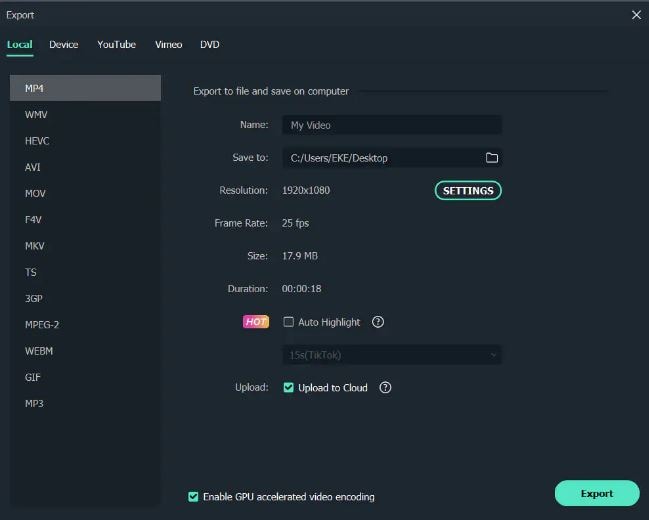
02Canva
This one is an online animation slideshow creation tool that could certainly be your best choice to design high end professional presentations. Facilitating you with over 100 different slide design layouts, the tool additionally grants you the liberty to add your own images to the presentation being created, or even select suitable alternatives from Canva’s extensive image stack that has over 1 million apposite images to choose from.
You can make the best use of Canva to create promotional presentations to add extra emphasis on the brand of your company and product brand, which a compatible to a diverse variety of professional platforms for information sharing.
As far as the cost constraints of the tool are concerned, you get to access a free version of the tool for working on slideshow presentations for individual or small business units, while the graphics design needs of large scale professional corporations are suitably addressed by the utility’s Canva for Work version, which is equipped with high end team coordinated features with a 30-day free trial, along with monthly and annual subscription of $ 12.95 and $ 119.4 respectively.
Pros
● The tool allows you to add elusive texts, filters, fonts and images to the animated slides of your business presentation.
● Working with the tool, you can drag and drop an extensive variety of elements within your slideshow.
● Canva further allows you to create, upload and save the logo of your brand.
Cons
● The tool’s customer support is not quite welcoming.
● You need to add your phone number within the tool’s customer support interface for getting the required help.
● The tool’s working interface is somewhat confusing.
User’s Guide to Create Animated Slideshows in Canva
Let us see browse through the detailed, step by step process to quickly create amazing animated slideshow presentations using the Canva graphic design tool in the following section:
Step 1: Download and Install Canva
Visit the official site of the tool for a free download of the Canva slideshow creator software in any suitable iOS or Windows compatible desktops, laptops and PC systems.
Step 2: Choose Your Task
Undertake a launch of the downloaded program to reach the latter’s welcome page. Here, you need to navigate to the search bar at the top and type a keyword to select your task. For creating slideshow presentations, enter ‘Slideshow’ in the search tab.
In the drop down menu that follows, a list of the closest matching alternatives of your keyword will appear. Select ‘Slideshow Videos’ from the same.
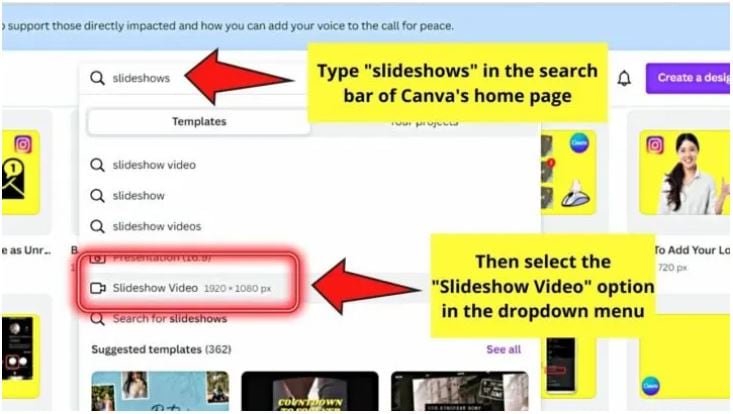
Step 3: Select a Template
The completion of Step 2 will take you to the program’s template library, where you can either work with creating a presentation of your own by clicking on the ‘Create a Blank Sideshow Video’ option, or choose any one from the finest collection of in built slideshow templates from the Canva library.
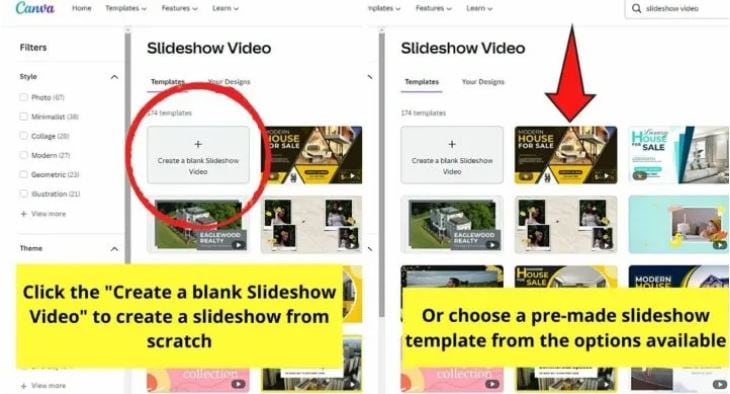
Step 4: Customize Your Template
After selecting the template, you will reach Canva’s slideshow editor page. Here you can customize your slideshow as per your preferences. To begin with, replace the preset images in the template with your selected ones.
You can either choose a set of images from the program’s inbuilt photo gallery or select the same from your device. Navigate to the ‘Tools Panel’ in the left and click on ‘Photos’ to work with the first method, or tap ‘Uploads’ in that very panel to apply the second.
When you have made your choice, click on ‘Upload Media’ to bring your selections to the tool’s editor timeline. This should be followed by dragging and dropping the images at appropriate places within the template.

Step 5: Crop the Images
Double click on any image and drag it sideways to crop the same within your preferred aspect ratio. When you are happy with the changes, click on ‘Done’ to apply them. You can additionally, customize the images with a variety of available effects at this stage.
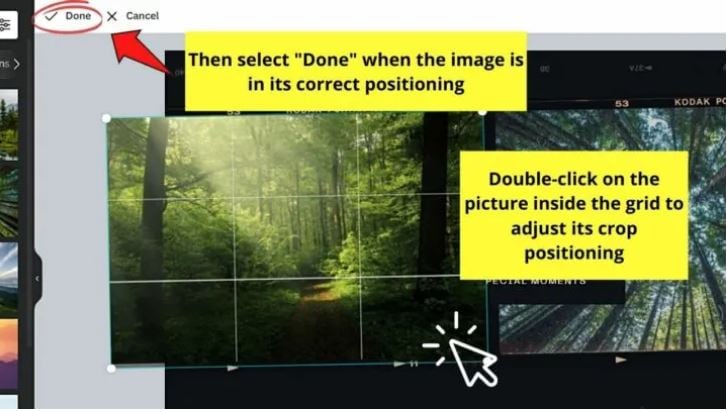
To proceed with the aforesaid process, choose the image you want to customize and select ‘Edit Image’ from the dropdown that appears. You will be directed to the ‘Edit Image Gallery’, where you can select the effect you want to complement your image with.
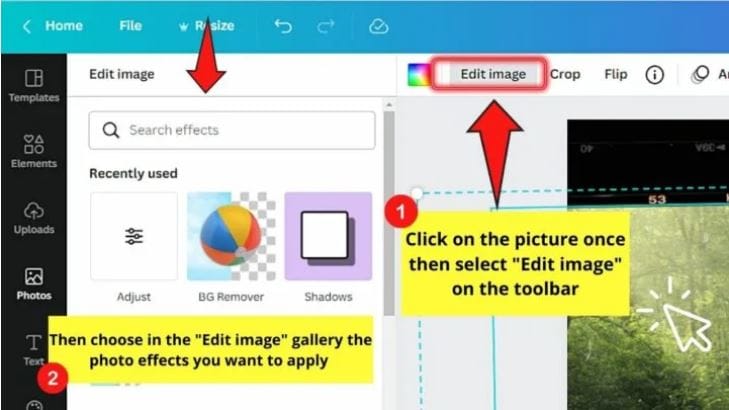
Step 6: Add Other Design Elements
Tap on ‘Elements’ in the ‘Tools Panel’ at the left to select a suitable component from a range of stickers, icons, illustrations and charts to add to your slideshow according to its creation theme.
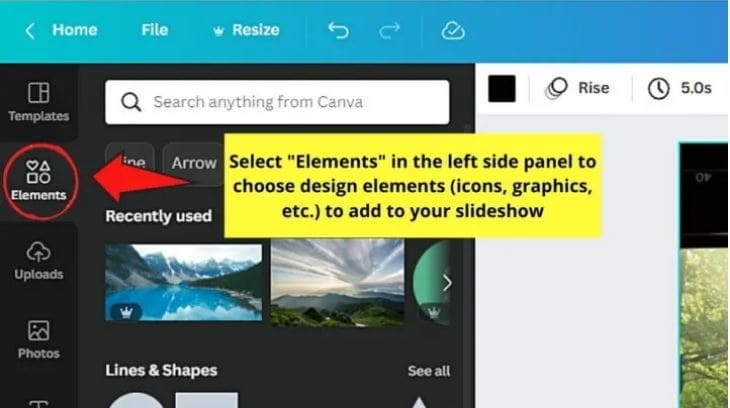
Step 7: Customize the Text
The template has some pre-written text, which you can change by double clicking inside the text boxes to highlight the already written text and edit the same as per your requirement. Press ‘T’ on your system’s keyboard for adding extra text boxes. You can also visit the ‘Editor Toolbar’ work with a variety of text formatting options, like, font size, style and color.
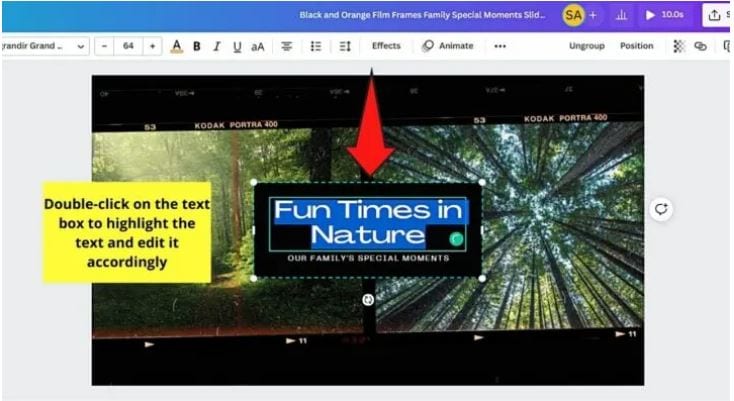
Step 8: Include Suitable Animations
To supplement your slideshow with stunning animations, select the image, element or text you wish to animate, followed by pressing the ‘Animate’ button. You will reach the ‘Animations Gallery’ for a selection of the desired text or page animation you want to add.
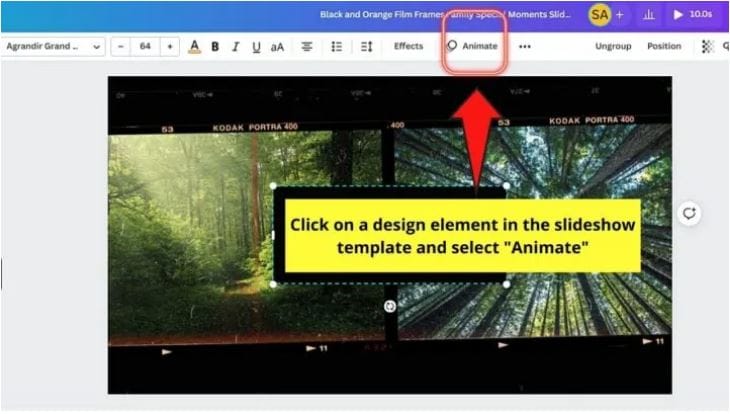
Once you have finalized your choice, click outside the gallery to apply your selected animation.
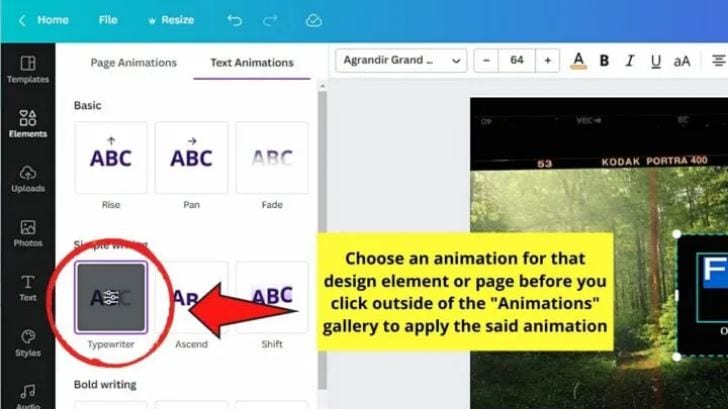
Step 9: Add the Perfect Sound
To uplift your presentation with an appealing music, navigate to the ‘Tools Panel’ at the left of the editor window and tap on ‘Audio’. A gallery of music clips will get displayed. Choose the one that best suits the theme of your animated presentation.
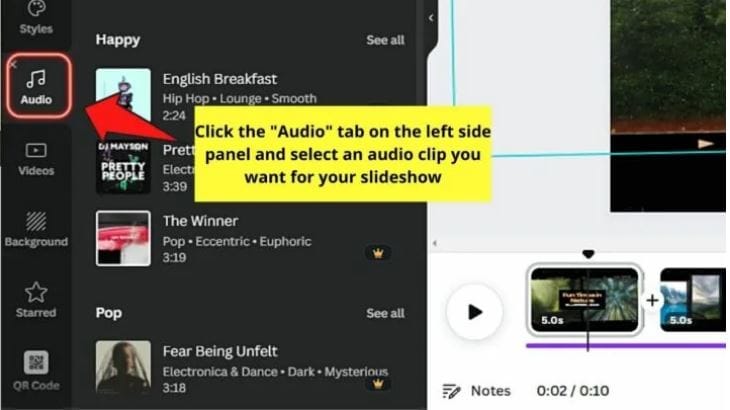
Step 10: Preview Your Creation
When you are done with creating the presentation, watch how it looks by navigating to the ‘Menu Bar’ at the top and clicking on the ‘Play’ button. When you have finished, click on ‘Close’ to reach the editor window.

Step 11: Set the Play Duration
To adjust the play duration of any slide, select it and navigate to the toolbar at the top left corner.
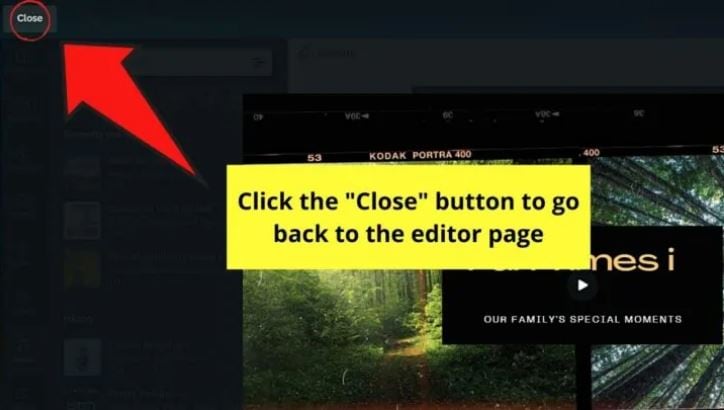
Click on ‘Edit Timing’ in the same and make suitable adjustments either by encoding the required number of seconds or dragging the duration slider.
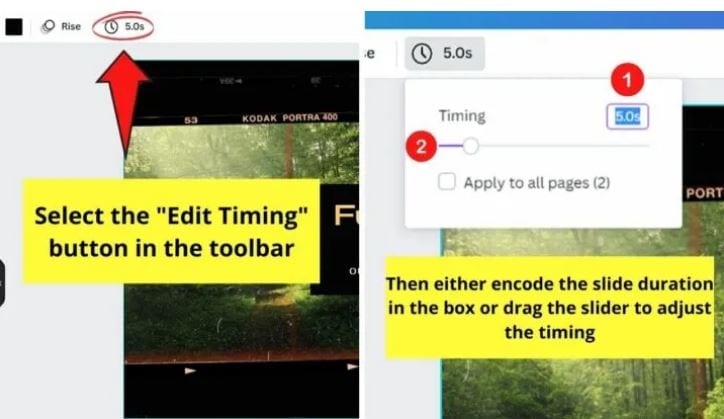
Step 12: Time to Download and Share!
Prefer previewing the slides one again to take a final look at your presentation. If you are happy with your work, navigate to and tap ‘Download’, followed by selecting the file type to save your creation locally to your device.
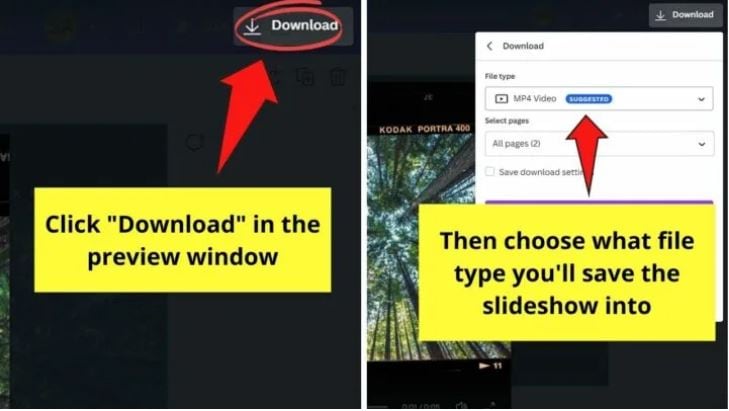
It is recommended to choose the ‘MP4 Video’ file format for saving audio enabled presentations. In case you want the background music to be included, either choose the ‘GIF’ format or download the slideshow as a PowerPoint presentation.
For a direct share of the animated slideshow, navigate to the ‘Menu Bar’ at the top and click on ‘Share’, followed by ‘All Options’ and lastly, tap ‘Present’.
03Keynote
This one is affordably the most convenient presentation tools if you are a user of iOS devices, and is a world class utility to create animated slideshow presentations. You can work with this tool to add an extra element of practicality to the otherwise customary business oriented animation slideshows with a diversity of effects, filters and transitions. The software is an ultimate best in adhering to real-time and remote event collaboration concerns of employees.
Concerning the pricing requirements, you can work with this slideshow creator tool for free if your usage concerns are restricted to a personal need. In an otherwise case, you can prefer buying the latter for a monthly investment of $ 99 and $ 299, respectively for business and enterprise based concerns.
Pros
● The Keynote program allows you a real-time, remote and revised access to the slideshow presentation.
● The program’s creator library is a storehouse of the most elegant and expressive slideshow templates and themes.
● The application greets you with a responsive and non-messy interface, with a decluttered toolbar.
Cons
● The program offers you a limited number of options to export your creations.
● You cannot work with the application on a Windows compatible device.
● If you are a regular PowerPoint user, working with the tool will require you a comprehensive learning of the usage pattern.
User’s Guide to Create Animated Slideshows in Keynote
Moving ahead with the discussion, let us understand the process of creating an animated slideshow presentation in Keynote though a step by step guide in the following section:
Step 1: Download the Keynote Slideshow Creator Tool
Start with initiating a free download of the tool from the official Apple website through your login credentials and proceed to install the same in your iOS device.
Step 2: Select a Presentation Theme
To start working on your slideshow presentation, you will require to choose a suitable theme. To do this, open the tool by clicking on its icon in the Launchpad, Applications folder or the Dock. The ‘Theme Chooser’ window pops up. In case this doesn’t happen, navigate to the bottom left corner of the screen and tap ‘New Document’.
In the ‘Theme Chooser’, you can either see through different categories or tap ‘All Themes’ to select the one you like. When you have found your preferred theme, open it by double clicking on the same.
You may either use the preset slide layout of the selected theme or use a different one by navigating to and clicking on ‘Format’ tab at the right side of the screen. You can now add your specific content in the presentation through adding new slides, text and images.
Click on the ‘+’ symbol in the theme toolbar to add a new slide followed by choosing its layout, double click inside the placeholder text to edit the same or drag and drop an image from your device gallery or the internet to replace the preset one in the template.
Step 3: Supplement Your Presentation With Objects
Proceed to add different slideshow objects in your creation by navigating to the ‘Object Toolbar’ at the top and selecting tables, charts, shapes, text boxes, comments, etc., that you wish to add in your presentation.
You can further make changes in the color, shadow and border of the object to improvise its appearance, or prefer applying a preset object style to enhance the overall object look to bring it in line with the slideshow theme. To do this, select the object and you will see its formatting options in the sidebar at the right. Click on the ‘Format Toolbar’ if the sidebar does not appear.
You can additionally, add layers to the slide objects, change their size or nest them within a shape or text box and link objects to switch to a new slide, open a related web page or email message.
Step 4: Add Audio-Visual Elements
Try adding suitable media elements to your creation by dragging a video or music file from your system either to a media placeholder or just anywhere within the slide. You can alternatively tap on the ‘Media’ icon in the top toolbar and choose ‘Music’ or ‘Movies’ from the dropdown that appears, followed by dragging the file with the previously explained method.
To add a soundtrack to the presentation, click on the ‘Soundtrack’ icon in the toolbar at the top, followed by clicking on the ‘Audio’ tab in the sidebar that appears. Next, tap the ‘+’ icon to select specific songs or playlists you want to add in the soundtrack.
Step 5: Add Stunning Animations
Start with selecting a slide to add the animation effect in the ‘Slide Navigator’. The ‘Animate’ sidebar appears, where you need to select the ‘Add an Effect’ option. Scroll down to view and choose a desired transition.
You can see a preview of the selected transition being played, with the slide navigator displaying a blue mark at the right corner of the slide to indicate the addition of a transition.
To change a previously selected transition, navigate to the sidebar at the top and tap ‘Change’ to select a new one. You can further, use the sidebar options to set the direction and transition play duration.
Step 6: Playing Your Slideshow
When satisfied with your effort, you can prefer playing the presentation, either in full screen or in a single window. If you choose to play in full screen, navigate to the ‘Play’ menu, click on the same and select ‘Full Screen’, followed by choosing the desired slide from where you wish the presentation to start in the slide navigator.
If you want to play the slideshow in a window, select a preferred slide in the slide navigator, go to the ‘Play’ menu at the top, click on the ‘Play’ tab, followed by choosing the ‘In Window’ option. The presentation will now start with the selected slide being played in one window and the presenter in the other.
In either of the above slideshow playing modes, press ‘Esc’ from your system’s keyboard to end the presentation playing process.
Step 7: Collaborating With Others
Working with the Keynote Slideshow Creator, you can collaborate with others to invite people to view and edit your presentation. To give a presentation access, you can either share a web link for a public access, or invite certain people having registered Apple credentials to view your creation. You can even give editing permissions to selected viewers or allow them to invite other people to collaborate.
04Powtoon
This one is a useful tool to create interactive business presentations for brand promotion and company recognition. Talking about the specific features of the tool, you can work with the utility to design an attractive logo for your company, import data and charts to your presentation, make adjustments in the color schemes of the slideshow, initiate infographic building and organize your slideshow into several sections.
The tool works best towards educating potential customers and clients about your company’s mainstream work profile and business. Sticking to the terms of utility pricing, you can begin with taking a free demo of the tool to access its credibility in cohesion with your specific needs. Following this, you can avail a monthly paid subscription of Powtoon, which has a price range of $ 19 to $ 59, according to the type and extent of features you choose to avail.
Pros
● You can add the details of your brand in the most expressive and appealing manner with the tool’s manifold design features.
● You can work with hundreds of preset slide designs to quickly create professionally sound animated slideshows.
● The tool is excellent in catering to your diverse slideshow design needs, when working for a large scale organizational setup.
Cons
● The tool is not a smart choice for individual or small scale business setups.
● The extensive variety of features results in a bit confusing and messy working interface.
● You can add a limited number of users to the monthly subscription plan of the tool.
User’s Guide to Create Animated Slideshows in Powtoon
For a better insight on how to create animated slideshows in Powtoon, let us go through the stepwise tutorial of the process in the following section:
Step 1: Launch the Online Tool
Visit the Powtoon official website to open the slideshow designer tool in any of your favorite internet browsers.
Powtoon Official Site Link: https://www.powtoon.com/index/
Step 2: Script Your Presentation
Start with creating a preset content for every slide of your presentation, based on the reason behind creating the slideshow, type and style of content presentation and so on.
Step 2: Add a Cohesive Background Music
You can complement your presentation with the perfect background music from the Powtoon library, from the web or even create your own voiceover recording through any preferred online text-to-voice recorder tool to voice the contents of your presentation. When you are done, upload your recording to the Powtoon editor to proceed with adding visual content to the presentation.
Step 3: Divide Your Presentation Slides
You can now add images, text and animations to your project in line with your presentation script. Choose suitable images from your device or from the web, add short, impactful texts and stunning animations from the Powtoon’s library to level up the appearance of your slideshow.
Step 4: Include Design Elements
Try adding additional elements like, graphics, background themes, animation styles, props, color schemes and other relevant characteristics to the slides.
Step 5: Time Your Presentation
In the last step, use the Powtoon timeline to set the sequence and time of appearance of different elements in each of your presentation slides. You can also hear the voiceover in the slideshow background to ensure the synchronization between the audio play and visual content appearance within the presentation.
05Visme
This one is a top grade cloud based professional tool for creating animated slideshow presentations with an affordably high visual credibility. Equipped with a drag and drop design workflow, the tool works effectively towards delivering intuitive and engaging animated slideshows for effective communication of business ideas and top rated brand promotion strategies.
The best usage of the tool lies in the creation of business presentations that are aimed at ensuring company oriented image collection and brand consistency. Talking of the tool’s pricing constraints, a single user subscription of the utility would cost you $ 20 on a monthly basis, which increases to $ 60 per month for a 3-user package.
It is a smart choice to take a free live demonstration of the tool to get a comprehensive understanding of the latter’s working technology.
Pros
● Extensive variety of colors, images and logos to complement your business presentations with elusive design elements.
● Promotes a viable consistency among multiple employee presentations
● The tool comes with an in built analytic system that keeps a track of the viewers of your slideshow presentations.
Cons
● The tool lacks some essential elements of slideshow design.
● The design features are mostly generic and do not cater to intense creation needs.
● The tool lacks a free trial facility.
User’s Guide to Create Animated Slideshows in Visme
In the following section is presented a stepwise procedure to create stunning animated slideshows in Visme with high end professional excellence and in the quickest time span:
Step 1: Download and Install the Program
Navigate to the official website of the Visme Slideshow Creator program to download and install the same in any of your preferred MacOs or Windows supported devices.
Visme Official Download Link: https://visme.co/blog/
Step 2: Start a New Project
You will need to create a Visme account to start working on the slideshow creation process. When you have created one, navigate to and click the ‘Create New Visme’ option in the tool’s opening screen to open a new project and assign a suitable name to it.
Step 3: Choose a Template
in the new project window that appears, click on ‘Presentations’ option at the top to see a library of slideshow templates being displayed. You can either, select a template from the library to edit or start an entirely new creation of your own.
Step 4: Make Color Schemes and Background Selections
To proceed with the selection of slide backgrounds and color schemes, you can either choose an exact color by entering its RGB code in the ‘Edit Colors’ option, or choose one from Google web pages using the ‘Chrome Eye Dropper’ tool.
Step 5: Add Shapes and Icons
You can supplement your slideshow with suitable design elements, like icons and shapes. All you need to do is navigate to the ‘Tools Panel’ in the left, click on the ‘All Shapes’ symbol and type a related keyword in the search bar to get a list of matching shapes to choose from.
Step 6: Insert and Format Text
You can now proceed with adding suitable text, titles and subtitles to the presentation slides. Again, visit the ‘Tools Panel’, tap the ‘T’ icon and click on ‘Add a Title’. A text box will be created within the slide, where you can add the required text. You can also format the same from the ‘Format Toolbar’ that gets displayed above the inserted text box.
Step 7: Add Photographic Slides
To include image slides, start with inserting a new slide in the presentation, flowed by once again navigating to the ‘Tools Panel’ in the left and clicking on the ‘Background’ icon. Choose a suitable color scheme and again, click on the ‘Images’ symbol in the ‘Tools Panel’. Here you can select any suitable image from the library that gets displayed.
Step 8: Link Your Slides
Link the sequential slides of your presentation with any suitable indicator, such as an arrow, so that clicking on the same takes the viewer to the successive slide. You can alternatively create ‘Hotspots’ to link the slides together.
Step 9: Publish and Share Your Presentation
When the final result makes you happy, navigate to the ‘Publish’ tab just above your slide window to open the presentation publishing interface. Here, you can choose from the options of a direct share, a site or blog embed or a local download of the presentation to your device.
● Ending Thoughts →
● Animated slideshow presentations land among the most trending ways to ensure a precise and engaging content delivery.
● The software market is packed with a diverse range of impressive slideshow creator tools with the most amazing features.
● When making your choice of the perfect animated slideshow designer tools, the Wondershare Filmora Slideshow Creator program is indeed a smart pick.
If you are passionate about uplifting your graphic design skills with stunning animated slideshow creation, read here about the best PowerPoint templates!
In this article
01 [12 Cool Animated Slideshow PowerPoint Templates](#Part 1)
02 [5 Tools to Make Stunning Animated Slideshow PowerPoint](#Part 2)
Part 1 12 Cool Animated Slideshow PowerPoint Templates
Slideshows are an already appealing media of content presentation, which when supplemented with animated backgrounds, are bound to captivate attention. Considering the underlying reason, it should be noted that animated slideshows offer a more vivid and lively presentation of information, as compared to their static counterparts. Animated slideshows have the additional advantage of presenting the content in the exact and accurate tone that suits the grasping capability of the audience.
Talking of feasible solutions for creating high end animated slide show presentations, the software market has a diverse range of alternatives to choose from. However, Microsoft PowerPoint is a graphic presentation tool that almost everyone is familiar with. Limiting our discussion to the same, there are a diversity of animated slideshow PowerPoint templates, like that of Evanto Elements and GraphicRiver to design professionally outstanding animated slideshows.
If you are keen on trying hands at adding that extra spunk your ordinarily boring static presentations, spare time to read the following section of this article, which incorporates the features, utilities and merits of the top 12 design templates in GraphicRiver for creating animated slideshows in PowerPoint with utmost ease and within a quick time span:
01Parallax Ultimate PowerPoint Animated Template
Choosing this animated presentation template to design your slideshow projects will supplement tour creations with the most amazing parallax effect, including an additional list of tempting and trendy editing features, like, limitless color choices, high definition video resolution, master slide presentations, modern, elegant, fully animated, company oriented slides, with object animations and parallax transitions, 16:9 wide screen aspect ratio, handmade infographics and much more.
02Splash Animated PPT
This one is an excellent animated template to create elegant animated slideshow presentations that will make your design creativity stand out of the crowd. Working with the template entitles you of a matchless, professional quality slideshow animation PowerPoint project on account some exclusive features, like those of high definition screen resolution and widescreen image aspect ratio, light and dark presentation backgrounds etc.
Mentioning some additional credibility of using the template for creating animated slideshows, you get to access as many as 500 selected slides, vector line and social media icons, uniquely styled image masks, calendars and vector maps.
03Social Media Animated PowerPoint Templates
If your working constraints require an extensive use of social media information, consider using tis interactive PowerPoint template for designing social media compatible, premium quality, professional slideshows with animated graphics. Working with the template, you will get a complementary access to a pool of exciting slideshow features.
Talking of the specific utilities of the animated slideshow maker template, you can choose from over 50 slide layouts, light and dark backgrounds themes, enjoy a seamless, drag and drop workflow and easily edit grouped elements, along with modifying infographic elements in Excel sheets.
04Animated Slides Bundle for PowerPoint Presentation
This one is an interactive GraphicRiver PowerPoint animation slideshow maker template, which you can work with for a delivery of high end and illustrative animated slideshow presentations. The template facilitates its users with a diversity of graphic customization features, like that of visual transitions, custom reveals and objectified motions to your presentation slides, points and images.
The template promises you of a stunning, high quality and compelling slideshow output with an elegant presentation outlook. The template has a variety of inbuilt slide layouts, is easy to use and comes to you absolutely free of cost.
05Proposal PowerPoint Animated
If you are about to deliver a dynamic business presentation, consider working with this graphic tool to create your animoto slideshow in PowerPoint. Proposal PowerPoint Animated is an interactive animation template, designed exclusively for adhering to the concern of business centered content delivery.
You can create captivating motion stories with the conveniently editable slides and high end animated graphics of this PowerPoint template, thus ensuring a high pitched information conveyance to your target audience.
06DIY Animated PPT Promo Kit
Looking for the most feasible PowerPoint animated slideshow templates for slideshow creation generally refers to a time consuming web search. If you are a creativity freak and want to escape the aforesaid hustle, try hands at working with the DIY Animated PPT Promo Kit to create a customized animated slideshow template of your own.
Talking about the utilities, this interactive slideshow presentation kit is packed with a lot of professional features that are sufficient to give a hype to your normal quality slideshows and allows you to work with over 100 entirely customizable slides in 2 variable color schemes.
07Pitch Deck Animated Bundle
Using a pitch deck strategy is a common way of attracting fund credibility for your business for an appreciable revenue growth, which is often put to the additional use of addressing potential workers of the company on the latter’s crucial success factors. When working towards either of the purposes, using the aforesaid software bundle is a smart choice to showcase the exact content concerning your overall business concept to the target audience.
This one is preferably the best pitch deck template you could ever get. Though there is an appealing set of market choices, it is always an impressive decision to select the cream from the curd for ensuring high end results.
08Massive X Presentation Template for PowerPoint
When having a desire to access the credibility of slideshow templates though user reviews, this animated PowerPoint template is sure winner. Packed with an extensive library of over 960 exceptional slides in dark and light background themes, along with 20 preset color schemes, this graphic template is an absolute favorite of creative designers across the globe.
Choosing the template for catering to your animation centered slideshow creation needs opens a diversity of audio-visual customization features with an entirely free access and an easy to use working interface.
09Imperial Multipurpose PowerPoint Template
Living up to its name, this one is a multi-functional, free animated slideshow template that allows you to choose the perfect color scheme for your brand from more than 100 shade varieties, thus ensuring a high end transition flexibility. Prefer using this template to add a visual highlight to your slideshow presentations with a diversity of icons and customized animations.
If you have invested enough time looking for the best PowerPoint animation slideshow creator utility, end your search with the Imperial Multipurpose template that is available to you without asking for a penny from your pocket and welcomes you with the most interactive working environment.
10Minimal PowerPoint
The aforesaid slideshow template for creating animated presentations is a fundamental and clean graphic creation utility that comes with a wide range of more than 500 different sides and convenient to use drag and drop placeholders for seamless content inclusion. Additional features of the template consist of inbuilt calendars, charts, graphs and customized illustration components, suitable for a diverse set of industries.
This one is an interactive style PowerPoint animoto slideshow maker template that works best to infuse data and animation graphics together. You can use this graphic design tool without a second thought for delivering quality content with a cohesive slideshow presentation, of course without having to worry about any cost constraints.
11PowerPoint Animated Pro Pack- With Animated Slides
Using this animation slideshow template for your business presentations facilitates you with a series of interactive graphic modules within professionally compatible slides. You can use this high end template package to supplement your presentations with high quality animated motion diagrams.
Other appealing features of the package include a huge set of conveniently editable slides, with an extensive variety of PowerPoint compatible motion transitions, animations and many more surplus features to add the right amount of spark to your professional animated slideshow presentations.
12Wow Slides for PowerPoint
If you are yet to reach to the perfect animated slideshow creator solution, consider sparing a thought about this wonderful PowerPoint template to cater to your animation design concerns. Available to you with a decent set of over 24 inbuilt color themes, this one is a perfect choice for working on webinar slides, business presentations and pitch decks.
Apart from elegantly beautiful collection of animations, you will find this slideshow template package to be a storehouse of elusive and explanatory charts, graphs, maps and icon packs, which you can use to add relevant statistical content to your presentations or give an enhanced and organized look to your slideshow project.
Part 2 5 Tools to Make Stunning Animated Slideshow PowerPoint
Having discussed about the most amazing animation slideshow templates for PowerPoint, let us now extend our talk to learn about some of the most preferred graphic tools to create high end and professionally expressive and stunning animation centered slideshow presentations in PowerPoint, considering the fact that such presentations are an important part of the ongoing business trends, which you should be aware of.
The following section presents a detailed discussion on the features, best application utilities, market reviews and usage guidelines of the top 5 animated slideshow creator tools:
01**Wondershare Filmora Video Editor **
For Win 7 or later (64-bit)
For macOS 10.12 or later
This one is possibly the best and an all in one software package that promises to address almost all of your graphic editing needs in the most affordable manner. Talking of the specific utility of creating animated slideshow presentations, Wondershare Filmora is dedicated towards delivering high end motion graphic slideshows of matchless professional excellence.
The tool is best in making audio infused, animated photo slideshows that are apt for comprehensive graphic proposals for top rated business projects. About the software’s pricing requirements, you can avail a free usage of the tool for free in its trial version for 7 days, following which, working with the tool will demand paid monthly and annual subscriptions of $9.99 and $19.99 respectively.
Pros
● Working with the tool, you are entitled to use a plethora of audio-visual effects and filters to enhance your presentations.
● The tool’s feature rich library has everything to design animated slideshows with high resolution output quality.
● The tool is known to support almost all popular audio, video and image file formats.
Cons
● The tool has a limited variety of fine-tuned utilities for effect tweaking.
● The features of chapter authoring and DVD menu are absent.
● Working with the tool, you may encounter occasional software crashes.
User’s Guide to Create Animated Slideshows in Wondershare Filmora
Having understood the basic functionalities and exceptional features of Filmora’s Animated Slideshow creator tool, let us see through the following section to get familiar to the knowhow of using the same for designing animation top rated slideshow presentations in a stepwise procedure:
Step 1: Download and Install the Software
Before getting though with the creation process, initiate a download of the slideshow creator program from the latter’s official website to any of your preferred Windows or iOS compatible devices.
Step 2: Add Your Images and Videos
Creating a slideshow presentation may require a set of multiple image and video files to the program’s graphic creator timeline. It is recommended to add your selections of the aforesaid files to a single folder before launching the software in your system.
Once you have finished making your selections, launch the program to reach its welcome interface, were you need to navigate and click on the ‘Media’ tab in the top toolbar. From the task options that appear, click on ‘Import a Media’. Next, you will be asked to browse through your device locations and choose the folder that contains your previously selected files to be used in the presentation you are about to create.
When you have found the required folder, tap on ‘OK’ to import the same to the new slideshow project in the Filmora timeline. All your selected files will be visible here after a successful import.
Step 3: Timeline Positioning of Media Files
Before working on the task of positioning the imported media files on the app’s timeline, navigate to the ‘File’ menu and choose the ‘Preferences’ option. As soon as the respective window pops up, reach to the ‘Editing’ tab at the top and select ‘Photo Placement’ from the drop down menu that follows.
In case your selected images do not have a matching aspect ratio with the program’s preset values, choose the ‘Crop to Fit’ option for removing the additional black bars from the selected images. For the requirement of adding camera pan and zoom movements to your images, select the ‘Pan & Zoom’ option in the ‘Preferences’ settings.
You can proceed to change the preset play durations of images, effects and transitions in the ‘Editing’ window itself. As an alternative you can adhere to the same task in the program’s timeline by dragging any one end of the media files in an outward or inward direction. The ‘Crop to Fit’ option may not give an affordable size in some cases where the images are set in a vertical 9:16 aspect ratio. Choose the ‘Fit’ option to set this issue straight.
When you have finished making all the aforesaid adjustments, navigate to the Media panel again for adding the selected image files to the software’s timeline. Proceed with selecting a file and dragging and dropping the same at the desired position within the timeline. Continue repeating the process till all the images have been placed at their respective locations, and in the exact order of appearance in the slideshow. This should be followed by adjusting the image play durations using any one of the previously described methods.
Step 4: Escape Hard Cuts With Image Transitions
Hard cuts among different slides of a presentation break the flow of the slideshow. To escape this cringe, consider using a smooth transition effect within the slides of your project. To do this, navigate to the ‘Transitions’ tab in the top toolbar of Filmora’s project window and select a desired one from over 100 choices of customizable transitions.
You can now drop these transitions in the timeline at the exact intersection point of two image files. Avoid using the same transition for every hard cut to escape monotony. You can instead choose different transitions for each slide while observing its appearance in the clip.
After you are done with applying transitions to each slide, double click on a particular transition to open its ‘Transition Setting Window’ either for presetting the transition play duration or to choose a desired transition mode. You can also prefer a direct customization of the transition duration in the project timeline through a right or left dragging of any of its ends.
Step 5: Uplift Your Slideshow Colors With Overlays and Filters
Navigate to the top toolbar and hit the ‘Effects’ tab to choose from a diversity of visual effects that can be added to the slideshow images to supplement them with an increased vibrancy through color desaturation. These effects in the program’s library are categorized into classes of Overlays and Filters, with further subcategories of Sepia Tone, Light Leaks and Lomography and many more.
To apply these effects, just select and add them into a timeline track above the clip you wish to add the overlay or filter to. When you have applied the effects, observe the overall clip appearance in the ‘Preview Panel’. Double click on a particular effect to fine-tune the latter’s settings.
Step 6: Supplement Your Slides With Motion Graphic Elements
While motion graphics will undoubtedly enhance your animated slideshows, adding them to your presentation is purely optional, since most professional projects do not need a motion graphic element to escalate their presentation outlook. If, however, you choose to work on making these a part of your animated slideshow, Filmora lets you do that in its ‘Elements’ tab.
There is a plethora of motion graphic templates that you can select and add to the project timeline for a quick and vibrant upgrade of your presentation slides, but, at the same time, it becomes important to take care of the visual outlook and the underlying reason of creating the slideshow before you decide on adding these elements to your project.
Step 7: Create Voiceovers and Record Soundtracks for Your Slideshow
Narration is a smart way to captivate the target audience within your slideshow, whether though a self-delivery or a recorded voiceover. If you decide on the second option, you can conveniently use the Filmora Slideshow Creator program to add voiceovers and soundtracks to your presentation.
To adhere to the purpose, navigate to the top toolbar and click on the ‘Media’ tab. From the options that appear, tap on the ‘Record’ menu that drops down, followed by selecting the ‘Record Voiceover’ option. As soon as the ‘Record Audio’ prompt pops up, select your desired microphone to be used in the recording process and click on the ‘Record’ button.
The recording that you have just created will appear in the ‘Media’ tab beside your all other imported audio-visual and image files, and you can add the same to any desired file with utmost ease. The Filmora library further allows you with a free access to its huge inventory of sound and audio effects. To apply these effects to your project, navigate to the ‘Audio’ tab and browse through impressive music categories, like, Young & Bright, Rock, Electronic, etc., to select the best matching audio for your slideshow.
When you have made your selections, add all of them to the slideshow’s audio track in the project timeline and make suitable adjustments to their play durations.
Step 8: Export Your Creation
When your satisfied with your efforts till here, you have indeed created a wonderful animated slideshow presentation that should be exported to relevant platforms. Navigate to the ‘Export’ tab at the top right corner of the project timeline and click on the same. As soon as the utility window appears, choose a preferred file format, set a desired output resolution and fame rate for your presentation, followed by making a direct export of the same to your Vimeo or YouTube accounts.
The slideshow rendering time on different platforms may vary in cohesion with the specific presentation lengths, with larger file requiring a considerably longer time to get rendered than the smaller ones. It is advisable to limit the output file size within 500 MB for a quick rendering process.
02Canva
This one is an online animation slideshow creation tool that could certainly be your best choice to design high end professional presentations. Facilitating you with over 100 different slide design layouts, the tool additionally grants you the liberty to add your own images to the presentation being created, or even select suitable alternatives from Canva’s extensive image stack that has over 1 million apposite images to choose from.
You can make the best use of Canva to create promotional presentations to add extra emphasis on the brand of your company and product brand, which a compatible to a diverse variety of professional platforms for information sharing.
As far as the cost constraints of the tool are concerned, you get to access a free version of the tool for working on slideshow presentations for individual or small business units, while the graphics design needs of large scale professional corporations are suitably addressed by the utility’s Canva for Work version, which is equipped with high end team coordinated features with a 30-day free trial, along with monthly and annual subscription of $ 12.95 and $ 119.4 respectively.
Pros
● The tool allows you to add elusive texts, filters, fonts and images to the animated slides of your business presentation.
● Working with the tool, you can drag and drop an extensive variety of elements within your slideshow.
● Canva further allows you to create, upload and save the logo of your brand.
Cons
● The tool’s customer support is not quite welcoming.
● You need to add your phone number within the tool’s customer support interface for getting the required help.
● The tool’s working interface is somewhat confusing.
User’s Guide to Create Animated Slideshows in Canva
Let us see browse through the detailed, step by step process to quickly create amazing animated slideshow presentations using the Canva graphic design tool in the following section:
Step 1: Download and Install Canva
Visit the official site of the tool for a free download of the Canva slideshow creator software in any suitable iOS or Windows compatible desktops, laptops and PC systems.
Step 2: Choose Your Task
Undertake a launch of the downloaded program to reach the latter’s welcome page. Here, you need to navigate to the search bar at the top and type a keyword to select your task. For creating slideshow presentations, enter ‘Slideshow’ in the search tab.
In the drop down menu that follows, a list of the closest matching alternatives of your keyword will appear. Select ‘Slideshow Videos’ from the same.
Step 3: Select a Template
The completion of Step 2 will take you to the program’s template library, where you can either work with creating a presentation of your own by clicking on the ‘Create a Blank Sideshow Video’ option, or choose any one from the finest collection of in built slideshow templates from the Canva library.
Step 4: Customize Your Template
After selecting the template, you will reach Canva’s slideshow editor page. Here you can customize your slideshow as per your preferences. To begin with, replace the preset images in the template with your selected ones.
You can either choose a set of images from the program’s inbuilt photo gallery or select the same from your device. Navigate to the ‘Tools Panel’ in the left and click on ‘Photos’ to work with the first method, or tap ‘Uploads’ in that very panel to apply the second.
When you have made your choice, click on ‘Upload Media’ to bring your selections to the tool’s editor timeline. This should be followed by dragging and dropping the images at appropriate places within the template.
Step 5: Crop the Images
Double click on any image and drag it sideways to crop the same within your preferred aspect ratio. When you are happy with the changes, click on ‘Done’ to apply them. You can additionally, customize the images with a variety of available effects at this stage.
To proceed with the aforesaid process, choose the image you want to customize and select ‘Edit Image’ from the dropdown that appears. You will be directed to the ‘Edit Image Gallery’, where you can select the effect you want to complement your image with.
Step 6: Add Other Design Elements
Tap on ‘Elements’ in the ‘Tools Panel’ at the left to select a suitable component from a range of stickers, icons, illustrations and charts to add to your slideshow according to its creation theme.
Step 7: Customize the Text
The template has some pre-written text, which you can change by double clicking inside the text boxes to highlight the already written text and edit the same as per your requirement. Press ‘T’ on your system’s keyboard for adding extra text boxes. You can also visit the ‘Editor Toolbar’ work with a variety of text formatting options, like, font size, style and color.
Step 8: Include Suitable Animations
To supplement your slideshow with stunning animations, select the image, element or text you wish to animate, followed by pressing the ‘Animate’ button. You will reach the ‘Animations Gallery’ for a selection of the desired text or page animation you want to add.
Once you have finalized your choice, click outside the gallery to apply your selected animation.
Step 9: Add the Perfect Sound
To uplift your presentation with an appealing music, navigate to the ‘Tools Panel’ at the left of the editor window and tap on ‘Audio’. A gallery of music clips will get displayed. Choose the one that best suits the theme of your animated presentation.
Step 10: Preview Your Creation
When you are done with creating the presentation, watch how it looks by navigating to the ‘Menu Bar’ at the top and clicking on the ‘Play’ button. When you have finished, click on ‘Close’ to reach the editor window.
Step 11: Set the Play Duration
To adjust the play duration of any slide, select it and navigate to the toolbar at the top left corner.
Click on ‘Edit Timing’ in the same and make suitable adjustments either by encoding the required number of seconds or dragging the duration slider.
Step 12: Time to Download and Share!
Prefer previewing the slides one again to take a final look at your presentation. If you are happy with your work, navigate to and tap ‘Download’, followed by selecting the file type to save your creation locally to your device.
It is recommended to choose the ‘MP4 Video’ file format for saving audio enabled presentations. In case you want the background music to be included, either choose the ‘GIF’ format or download the slideshow as a PowerPoint presentation.
For a direct share of the animated slideshow, navigate to the ‘Menu Bar’ at the top and click on ‘Share’, followed by ‘All Options’ and lastly, tap ‘Present’.
03Keynote
This one is affordably the most convenient presentation tools if you are a user of iOS devices, and is a world class utility to create animated slideshow presentations. You can work with this tool to add an extra element of practicality to the otherwise customary business oriented animation slideshows with a diversity of effects, filters and transitions. The software is an ultimate best in adhering to real-time and remote event collaboration concerns of employees.
Concerning the pricing requirements, you can work with this slideshow creator tool for free if your usage concerns are restricted to a personal need. In an otherwise case, you can prefer buying the latter for a monthly investment of $ 99 and $ 299, respectively for business and enterprise based concerns.
Pros
● The Keynote program allows you a real-time, remote and revised access to the slideshow presentation.
● The program’s creator library is a storehouse of the most elegant and expressive slideshow templates and themes.
● The application greets you with a responsive and non-messy interface, with a decluttered toolbar.
Cons
● The program offers you a limited number of options to export your creations.
● You cannot work with the application on a Windows compatible device.
● If you are a regular PowerPoint user, working with the tool will require you a comprehensive learning of the usage pattern.
User’s Guide to Create Animated Slideshows in Keynote
Moving ahead with the discussion, let us understand the process of creating an animated slideshow presentation in Keynote though a step by step guide in the following section:
Step 1: Download the Keynote Slideshow Creator Tool
Start with initiating a free download of the tool from the official Apple website through your login credentials and proceed to install the same in your iOS device.
Step 2: Select a Presentation Theme
To start working on your slideshow presentation, you will require to choose a suitable theme. To do this, open the tool by clicking on its icon in the Launchpad, Applications folder or the Dock. The ‘Theme Chooser’ window pops up. In case this doesn’t happen, navigate to the bottom left corner of the screen and tap ‘New Document’.
In the ‘Theme Chooser’, you can either see through different categories or tap ‘All Themes’ to select the one you like. When you have found your preferred theme, open it by double clicking on the same.
You may either use the preset slide layout of the selected theme or use a different one by navigating to and clicking on ‘Format’ tab at the right side of the screen. You can now add your specific content in the presentation through adding new slides, text and images.
Click on the ‘+’ symbol in the theme toolbar to add a new slide followed by choosing its layout, double click inside the placeholder text to edit the same or drag and drop an image from your device gallery or the internet to replace the preset one in the template.
Step 3: Supplement Your Presentation With Objects
Proceed to add different slideshow objects in your creation by navigating to the ‘Object Toolbar’ at the top and selecting tables, charts, shapes, text boxes, comments, etc., that you wish to add in your presentation.
You can further make changes in the color, shadow and border of the object to improvise its appearance, or prefer applying a preset object style to enhance the overall object look to bring it in line with the slideshow theme. To do this, select the object and you will see its formatting options in the sidebar at the right. Click on the ‘Format Toolbar’ if the sidebar does not appear.
You can additionally, add layers to the slide objects, change their size or nest them within a shape or text box and link objects to switch to a new slide, open a related web page or email message.
Step 4: Add Audio-Visual Elements
Try adding suitable media elements to your creation by dragging a video or music file from your system either to a media placeholder or just anywhere within the slide. You can alternatively tap on the ‘Media’ icon in the top toolbar and choose ‘Music’ or ‘Movies’ from the dropdown that appears, followed by dragging the file with the previously explained method.
To add a soundtrack to the presentation, click on the ‘Soundtrack’ icon in the toolbar at the top, followed by clicking on the ‘Audio’ tab in the sidebar that appears. Next, tap the ‘+’ icon to select specific songs or playlists you want to add in the soundtrack.
Step 5: Add Stunning Animations
Start with selecting a slide to add the animation effect in the ‘Slide Navigator’. The ‘Animate’ sidebar appears, where you need to select the ‘Add an Effect’ option. Scroll down to view and choose a desired transition.
You can see a preview of the selected transition being played, with the slide navigator displaying a blue mark at the right corner of the slide to indicate the addition of a transition.
To change a previously selected transition, navigate to the sidebar at the top and tap ‘Change’ to select a new one. You can further, use the sidebar options to set the direction and transition play duration.
Step 6: Playing Your Slideshow
When satisfied with your effort, you can prefer playing the presentation, either in full screen or in a single window. If you choose to play in full screen, navigate to the ‘Play’ menu, click on the same and select ‘Full Screen’, followed by choosing the desired slide from where you wish the presentation to start in the slide navigator.
If you want to play the slideshow in a window, select a preferred slide in the slide navigator, go to the ‘Play’ menu at the top, click on the ‘Play’ tab, followed by choosing the ‘In Window’ option. The presentation will now start with the selected slide being played in one window and the presenter in the other.
In either of the above slideshow playing modes, press ‘Esc’ from your system’s keyboard to end the presentation playing process.
Step 7: Collaborating With Others
Working with the Keynote Slideshow Creator, you can collaborate with others to invite people to view and edit your presentation. To give a presentation access, you can either share a web link for a public access, or invite certain people having registered Apple credentials to view your creation. You can even give editing permissions to selected viewers or allow them to invite other people to collaborate.
04Powtoon
This one is a useful tool to create interactive business presentations for brand promotion and company recognition. Talking about the specific features of the tool, you can work with the utility to design an attractive logo for your company, import data and charts to your presentation, make adjustments in the color schemes of the slideshow, initiate infographic building and organize your slideshow into several sections.
The tool works best towards educating potential customers and clients about your company’s mainstream work profile and business. Sticking to the terms of utility pricing, you can begin with taking a free demo of the tool to access its credibility in cohesion with your specific needs. Following this, you can avail a monthly paid subscription of Powtoon, which has a price range of $ 19 to $ 59, according to the type and extent of features you choose to avail.
Pros
● You can add the details of your brand in the most expressive and appealing manner with the tool’s manifold design features.
● You can work with hundreds of preset slide designs to quickly create professionally sound animated slideshows.
● The tool is excellent in catering to your diverse slideshow design needs, when working for a large scale organizational setup.
Cons
● The tool is not a smart choice for individual or small scale business setups.
● The extensive variety of features results in a bit confusing and messy working interface.
● You can add a limited number of users to the monthly subscription plan of the tool.
User’s Guide to Create Animated Slideshows in Powtoon
For a better insight on how to create animated slideshows in Powtoon, let us go through the stepwise tutorial of the process in the following section:
Step 1: Launch the Online Tool
Visit the Powtoon official website to open the slideshow designer tool in any of your favorite internet browsers.
Powtoon Official Site Link: https://www.powtoon.com/index/
Step 2: Script Your Presentation
Start with creating a preset content for every slide of your presentation, based on the reason behind creating the slideshow, type and style of content presentation and so on.
Step 2: Add a Cohesive Background Music
You can complement your presentation with the perfect background music from the Powtoon library, from the web or even create your own voiceover recording through any preferred online text-to-voice recorder tool to voice the contents of your presentation. When you are done, upload your recording to the Powtoon editor to proceed with adding visual content to the presentation.
Step 3: Divide Your Presentation Slides
You can now add images, text and animations to your project in line with your presentation script. Choose suitable images from your device or from the web, add short, impactful texts and stunning animations from the Powtoon’s library to level up the appearance of your slideshow.
Step 4: Include Design Elements
Try adding additional elements like, graphics, background themes, animation styles, props, color schemes and other relevant characteristics to the slides.
Step 5: Time Your Presentation
In the last step, use the Powtoon timeline to set the sequence and time of appearance of different elements in each of your presentation slides. You can also hear the voiceover in the slideshow background to ensure the synchronization between the audio play and visual content appearance within the presentation.
05Visme
This one is a top grade cloud based professional tool for creating animated slideshow presentations with an affordably high visual credibility. Equipped with a drag and drop design workflow, the tool works effectively towards delivering intuitive and engaging animated slideshows for effective communication of business ideas and top rated brand promotion strategies.
The best usage of the tool lies in the creation of business presentations that are aimed at ensuring company oriented image collection and brand consistency. Talking of the tool’s pricing constraints, a single user subscription of the utility would cost you $ 20 on a monthly basis, which increases to $ 60 per month for a 3-user package.
It is a smart choice to take a free live demonstration of the tool to get a comprehensive understanding of the latter’s working technology.
Pros
● Extensive variety of colors, images and logos to complement your business presentations with elusive design elements.
● Promotes a viable consistency among multiple employee presentations
● The tool comes with an in built analytic system that keeps a track of the viewers of your slideshow presentations.
Cons
● The tool lacks some essential elements of slideshow design.
● The design features are mostly generic and do not cater to intense creation needs.
● The tool lacks a free trial facility.
User’s Guide to Create Animated Slideshows in Visme
In the following section is presented a stepwise procedure to create stunning animated slideshows in Visme with high end professional excellence and in the quickest time span:
Step 1: Download and Install the Program
Navigate to the official website of the Visme Slideshow Creator program to download and install the same in any of your preferred MacOs or Windows supported devices.
Visme Official Download Link: https://visme.co/blog/
Step 2: Start a New Project
You will need to create a Visme account to start working on the slideshow creation process. When you have created one, navigate to and click the ‘Create New Visme’ option in the tool’s opening screen to open a new project and assign a suitable name to it.
Step 3: Choose a Template
in the new project window that appears, click on ‘Presentations’ option at the top to see a library of slideshow templates being displayed. You can either, select a template from the library to edit or start an entirely new creation of your own.
Step 4: Make Color Schemes and Background Selections
To proceed with the selection of slide backgrounds and color schemes, you can either choose an exact color by entering its RGB code in the ‘Edit Colors’ option, or choose one from Google web pages using the ‘Chrome Eye Dropper’ tool.
Step 5: Add Shapes and Icons
You can supplement your slideshow with suitable design elements, like icons and shapes. All you need to do is navigate to the ‘Tools Panel’ in the left, click on the ‘All Shapes’ symbol and type a related keyword in the search bar to get a list of matching shapes to choose from.
Step 6: Insert and Format Text
You can now proceed with adding suitable text, titles and subtitles to the presentation slides. Again, visit the ‘Tools Panel’, tap the ‘T’ icon and click on ‘Add a Title’. A text box will be created within the slide, where you can add the required text. You can also format the same from the ‘Format Toolbar’ that gets displayed above the inserted text box.
Step 7: Add Photographic Slides
To include image slides, start with inserting a new slide in the presentation, flowed by once again navigating to the ‘Tools Panel’ in the left and clicking on the ‘Background’ icon. Choose a suitable color scheme and again, click on the ‘Images’ symbol in the ‘Tools Panel’. Here you can select any suitable image from the library that gets displayed.
Step 8: Link Your Slides
Link the sequential slides of your presentation with any suitable indicator, such as an arrow, so that clicking on the same takes the viewer to the successive slide. You can alternatively create ‘Hotspots’ to link the slides together.
Step 9: Publish and Share Your Presentation
When the final result makes you happy, navigate to the ‘Publish’ tab just above your slide window to open the presentation publishing interface. Here, you can choose from the options of a direct share, a site or blog embed or a local download of the presentation to your device.
● Ending Thoughts →
● Animated slideshow presentations land among the most trending ways to ensure a precise and engaging content delivery.
● The software market is packed with a diverse range of impressive slideshow creator tools with the most amazing features.
● When making your choice of the perfect animated slideshow designer tools, the Wondershare Filmora Slideshow Creator program is indeed a smart pick.
Also read:
- In 2024, Have You Seen the Facebook Cartoon App Everyones Using Recently
- New Looking for Love Animated GIFs? Here Are 5 Free Sources For You for 2024
- Updated In 2024, 4 Things You Should Know About Pinterest GIF
- In 2024, Best Practices on Online 3D Avatar Creator
- New 2024 Approved Want to Make a Meme GIF? Heres How to Do
- New 2024 Approved Adobe Animate Text Effects Skills That You Need to Know
- New 2024 Approved How To Learn Cartoon Sketch Drawing— Pencil Sketch for Beginners
- In 2024, 10 Caricature Makers to Turn Your Photo to Caricature Effects
- Updated 15 Best Stop Motion Animation Kits to Fuel Creativity
- Updated Best 8 Tools Tell You How to Make Slideshows for Instagram
- Updated 10 Best Romance Anime Movies You Need to Watch
- New In 2024, 10 of the Best Disney Animated Shows (Sorted by Popularity Ascending)
- New 15 Animated Characters We All Had A Crush On
- In 2024, 10 Realistic Cartoon Characters You Will Run Away From if You Met in R
- New 2024 Approved 15 Best Stop Motion Animation Kits to Fuel Creativity
- In 2024, How to Make Animated Videos for Business Simple Guide
- Updated In 2024, Learn How to Draw Cartoons Step by Step with This Guide
- 2024 Approved 10 Best Convert Video Between GIF Software High Quality
- 5 Must Try Ways to Add GIF in Text Message on Android
- New 2024 Approved Adobe Animate Riggings PROPER Tutorial for You
- Updated In 2024, 10 Amazing Wallpaper Collage Ideas and Photos
- Updated 5 Techniques You Never Heard of for Converting MP4 to GIF in Photoshop
- New 2024 Approved How to Liven Up Your Animate Website on Scroll
- New 12 Animated Slideshow PowerPoint Templates and Tools to Make Them for 2024
- Updated Secret Shortcut to Adobe Animate Character Tutorial
- 2024 Approved How to Make a Video a Live Photo 2023
- New 2024 Approved What Is Motion Graphics
- Updated 2024 Approved Amazing Techniques of Motion Graphics in Premiere Pro
- Updated 6 Unexpected Ways Gif Animation Maker Can Affect Your Marketing
- In 2024, How to Hide/Fake Snapchat Location on Your Apple iPhone 11 | Dr.fone
- In 2024, 11 Best Location Changers for Apple iPhone 12 | Dr.fone
- In 2024, Forgot Pattern Lock? Heres How You Can Unlock Realme V30 Pattern Lock Screen
- Complete guide for recovering photos files on Samsung Galaxy A15 4G.
- CatchEmAll Celebrate National Pokémon Day with Virtual Location On Poco M6 Pro 4G | Dr.fone
- In 2024, How Can I Screen Mirroring Apple iPhone 13 Pro to TV/Laptop? | Dr.fone
- Data Retrieval tool – restore lost data from Galaxy S24+
- Repair Video Tool - Repair all your damaged video files of Realme 11X 5G on Windows
- What are Location Permissions Life360 On Tecno Pova 5 Pro? | Dr.fone
- In 2024, 5 Most Effective Methods to Unlock iPhone XS Max in Lost Mode
- How to Transfer Data from Realme Narzo 60x 5G to Samsung Phone | Dr.fone
- Downloading SamFw FRP Tool 3.0 for Honor X7b
- In 2024, Unlock Your Device iCloud DNS Bypass Explained and Tested, Plus Easy Alternatives From Apple iPhone 13 mini
- Does 14 support AVCHD video?
- How to Watch Hulu Outside US On Nubia Z50 Ultra | Dr.fone
- In 2024, 11 Best Location Changers for Samsung Galaxy A25 5G | Dr.fone
- Here are Some Pro Tips for Pokemon Go PvP Battles On Apple iPhone SE (2020) | Dr.fone
- Complete Review & Guide to Techeligible FRP Bypass and More For Samsung Galaxy A15 4G
- Best Ways on How to Unlock/Bypass/Swipe/Remove Xiaomi Redmi Note 12 4G Fingerprint Lock
- A Comprehensive Guide to iPhone SE (2020) Blacklist Removal Tips and Tools
- Bypassing Google Account With vnROM Bypass For Vivo S17 Pro
- Title: In 2024, 10 Classical Animated Cartoon Types With Examples
- Author: Elon
- Created at : 2024-05-19 03:04:28
- Updated at : 2024-05-20 03:04:28
- Link: https://animation-videos.techidaily.com/in-2024-10-classical-animated-cartoon-types-with-examples/
- License: This work is licensed under CC BY-NC-SA 4.0.
