
:max_bytes(150000):strip_icc():format(webp)/Race-982fb219114a48fb96b9c5a2c6f93847.jpg)
In 2024, 12 Animated Slideshow PowerPoint Templates and Tools to Make Them
12 Animated Slideshow PowerPoint Templates and Tools to Make Them
Animated Slideshow Powerpoint Templates and Tool to Make Them
An easy yet powerful editor
Numerous effects to choose from
Detailed tutorials provided by the official channel
If you are passionate about uplifting your graphic design skills with stunning animated slideshow creation, read here about the best PowerPoint templates!
In this article
01 [12 Cool Animated Slideshow PowerPoint Templates](#Part 1)
02 [5 Tools to Make Stunning Animated Slideshow PowerPoint](#Part 2)
Part 1 12 Cool Animated Slideshow PowerPoint Templates
Slideshows are an already appealing media of content presentation, which when supplemented with animated backgrounds, are bound to captivate attention. Considering the underlying reason, it should be noted that animated slideshows offer a more vivid and lively presentation of information, as compared to their static counterparts. Animated slideshows have the additional advantage of presenting the content in the exact and accurate tone that suits the grasping capability of the audience.
Talking of feasible solutions for creating high end animated slide show presentations, the software market has a diverse range of alternatives to choose from. However, Microsoft PowerPoint is a graphic presentation tool that almost everyone is familiar with. Limiting our discussion to the same, there are a diversity of animated slideshow PowerPoint templates, like that of Evanto Elements and GraphicRiver to design professionally outstanding animated slideshows.
If you are keen on trying hands at adding that extra spunk your ordinarily boring static presentations, spare time to read the following section of this article, which incorporates the features, utilities and merits of the top 12 design templates in GraphicRiver for creating animated slideshows in PowerPoint with utmost ease and within a quick time span:
01Parallax Ultimate PowerPoint Animated Template
Choosing this animated presentation template to design your slideshow projects will supplement tour creations with the most amazing parallax effect, including an additional list of tempting and trendy editing features, like, limitless color choices, high definition video resolution, master slide presentations, modern, elegant, fully animated, company oriented slides, with object animations and parallax transitions, 16:9 wide screen aspect ratio, handmade infographics and much more.

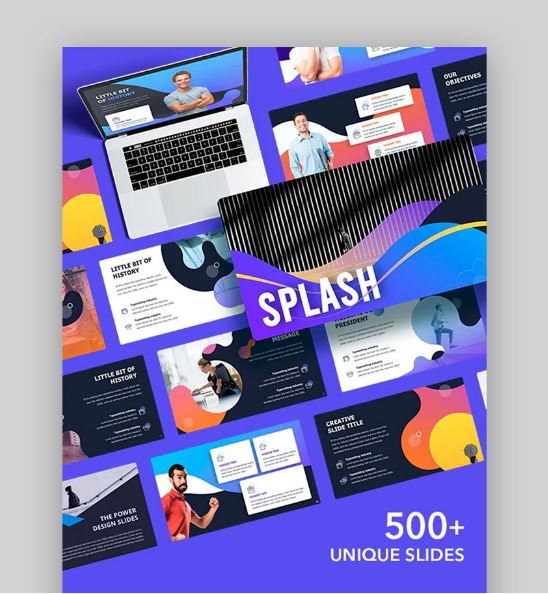
02Splash Animated PPT
This one is an excellent animated template to create elegant animated slideshow presentations that will make your design creativity stand out of the crowd. Working with the template entitles you of a matchless, professional quality slideshow animation PowerPoint project on account some exclusive features, like those of high definition screen resolution and widescreen image aspect ratio, light and dark presentation backgrounds etc.
Mentioning some additional credibility of using the template for creating animated slideshows, you get to access as many as 500 selected slides, vector line and social media icons, uniquely styled image masks, calendars and vector maps.
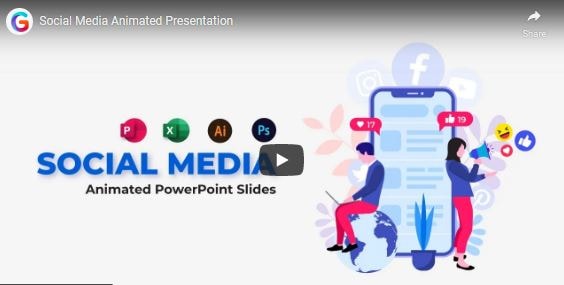
03Social Media Animated PowerPoint Templates
If your working constraints require an extensive use of social media information, consider using tis interactive PowerPoint template for designing social media compatible, premium quality, professional slideshows with animated graphics. Working with the template, you will get a complementary access to a pool of exciting slideshow features.
Talking of the specific utilities of the animated slideshow maker template, you can choose from over 50 slide layouts, light and dark backgrounds themes, enjoy a seamless, drag and drop workflow and easily edit grouped elements, along with modifying infographic elements in Excel sheets.
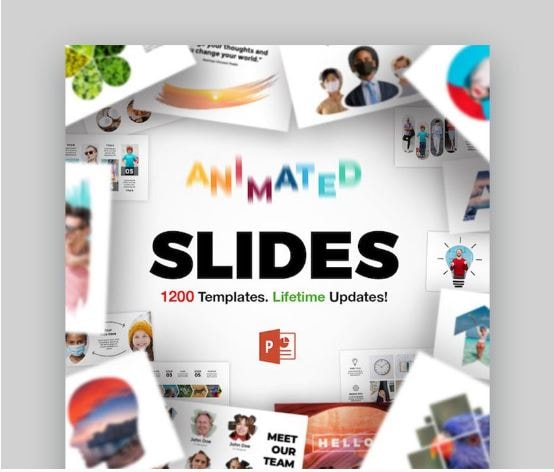
04Animated Slides Bundle for PowerPoint Presentation
This one is an interactive GraphicRiver PowerPoint animation slideshow maker template, which you can work with for a delivery of high end and illustrative animated slideshow presentations. The template facilitates its users with a diversity of graphic customization features, like that of visual transitions, custom reveals and objectified motions to your presentation slides, points and images.
The template promises you of a stunning, high quality and compelling slideshow output with an elegant presentation outlook. The template has a variety of inbuilt slide layouts, is easy to use and comes to you absolutely free of cost.
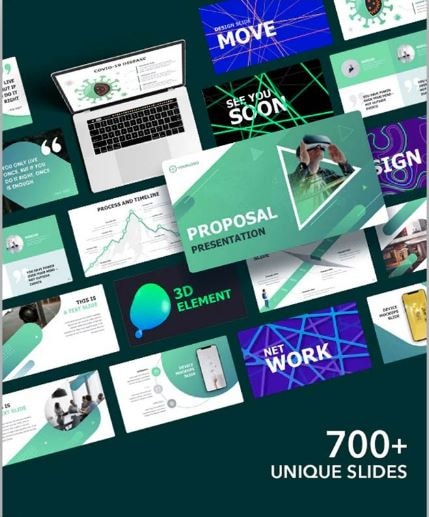
05Proposal PowerPoint Animated
If you are about to deliver a dynamic business presentation, consider working with this graphic tool to create your animoto slideshow in PowerPoint. Proposal PowerPoint Animated is an interactive animation template, designed exclusively for adhering to the concern of business centered content delivery.
You can create captivating motion stories with the conveniently editable slides and high end animated graphics of this PowerPoint template, thus ensuring a high pitched information conveyance to your target audience.
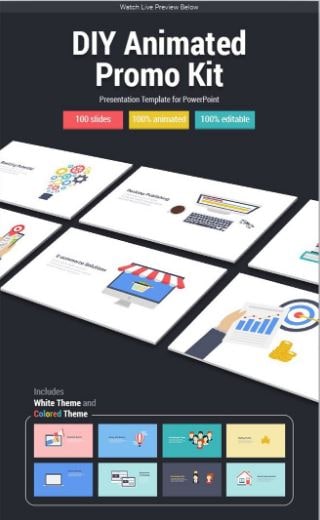
06DIY Animated PPT Promo Kit
Looking for the most feasible PowerPoint animated slideshow templates for slideshow creation generally refers to a time consuming web search. If you are a creativity freak and want to escape the aforesaid hustle, try hands at working with the DIY Animated PPT Promo Kit to create a customized animated slideshow template of your own.
Talking about the utilities, this interactive slideshow presentation kit is packed with a lot of professional features that are sufficient to give a hype to your normal quality slideshows and allows you to work with over 100 entirely customizable slides in 2 variable color schemes.
07Pitch Deck Animated Bundle
Using a pitch deck strategy is a common way of attracting fund credibility for your business for an appreciable revenue growth, which is often put to the additional use of addressing potential workers of the company on the latter’s crucial success factors. When working towards either of the purposes, using the aforesaid software bundle is a smart choice to showcase the exact content concerning your overall business concept to the target audience.
This one is preferably the best pitch deck template you could ever get. Though there is an appealing set of market choices, it is always an impressive decision to select the cream from the curd for ensuring high end results.
08Massive X Presentation Template for PowerPoint
When having a desire to access the credibility of slideshow templates though user reviews, this animated PowerPoint template is sure winner. Packed with an extensive library of over 960 exceptional slides in dark and light background themes, along with 20 preset color schemes, this graphic template is an absolute favorite of creative designers across the globe.
Choosing the template for catering to your animation centered slideshow creation needs opens a diversity of audio-visual customization features with an entirely free access and an easy to use working interface.

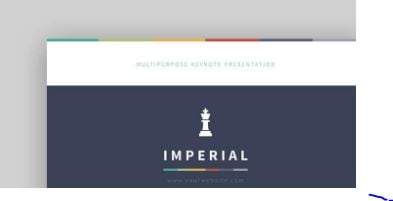
09Imperial Multipurpose PowerPoint Template
Living up to its name, this one is a multi-functional, free animated slideshow template that allows you to choose the perfect color scheme for your brand from more than 100 shade varieties, thus ensuring a high end transition flexibility. Prefer using this template to add a visual highlight to your slideshow presentations with a diversity of icons and customized animations.
If you have invested enough time looking for the best PowerPoint animation slideshow creator utility, end your search with the Imperial Multipurpose template that is available to you without asking for a penny from your pocket and welcomes you with the most interactive working environment.
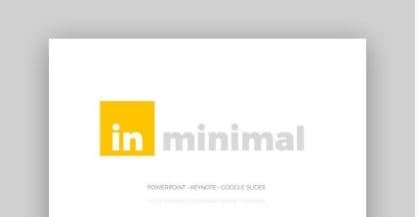
10Minimal PowerPoint
The aforesaid slideshow template for creating animated presentations is a fundamental and clean graphic creation utility that comes with a wide range of more than 500 different sides and convenient to use drag and drop placeholders for seamless content inclusion. Additional features of the template consist of inbuilt calendars, charts, graphs and customized illustration components, suitable for a diverse set of industries.
This one is an interactive style PowerPoint animoto slideshow maker template that works best to infuse data and animation graphics together. You can use this graphic design tool without a second thought for delivering quality content with a cohesive slideshow presentation, of course without having to worry about any cost constraints.
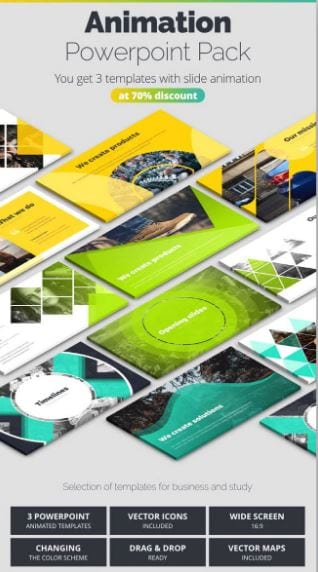
11PowerPoint Animated Pro Pack- With Animated Slides
Using this animation slideshow template for your business presentations facilitates you with a series of interactive graphic modules within professionally compatible slides. You can use this high end template package to supplement your presentations with high quality animated motion diagrams.
Other appealing features of the package include a huge set of conveniently editable slides, with an extensive variety of PowerPoint compatible motion transitions, animations and many more surplus features to add the right amount of spark to your professional animated slideshow presentations.
12Wow Slides for PowerPoint
If you are yet to reach to the perfect animated slideshow creator solution, consider sparing a thought about this wonderful PowerPoint template to cater to your animation design concerns. Available to you with a decent set of over 24 inbuilt color themes, this one is a perfect choice for working on webinar slides, business presentations and pitch decks.
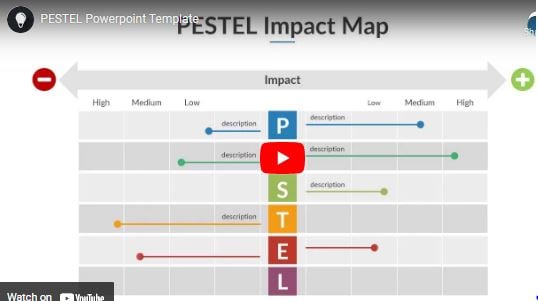
Apart from elegantly beautiful collection of animations, you will find this slideshow template package to be a storehouse of elusive and explanatory charts, graphs, maps and icon packs, which you can use to add relevant statistical content to your presentations or give an enhanced and organized look to your slideshow project.
Part 2 5 Tools to Make Stunning Animated Slideshow PowerPoint
Having discussed about the most amazing animation slideshow templates for PowerPoint, let us now extend our talk to learn about some of the most preferred graphic tools to create high end and professionally expressive and stunning animation centered slideshow presentations in PowerPoint, considering the fact that such presentations are an important part of the ongoing business trends, which you should be aware of.
The following section presents a detailed discussion on the features, best application utilities, market reviews and usage guidelines of the top 5 animated slideshow creator tools:
01**Wondershare Filmora Video Editor **
For Win 7 or later (64-bit)
For macOS 10.12 or later
This one is possibly the best and an all in one software package that promises to address almost all of your graphic editing needs in the most affordable manner. Talking of the specific utility of creating animated slideshow presentations, Wondershare Filmora is dedicated towards delivering high end motion graphic slideshows of matchless professional excellence.
The tool is best in making audio infused, animated photo slideshows that are apt for comprehensive graphic proposals for top rated business projects. About the software’s pricing requirements, you can avail a free usage of the tool for free in its trial version for 7 days, following which, working with the tool will demand paid monthly and annual subscriptions of $9.99 and $19.99 respectively.
Pros
● Working with the tool, you are entitled to use a plethora of audio-visual effects and filters to enhance your presentations.
● The tool’s feature rich library has everything to design animated slideshows with high resolution output quality.
● The tool is known to support almost all popular audio, video and image file formats.
Cons
● The tool has a limited variety of fine-tuned utilities for effect tweaking.
● The features of chapter authoring and DVD menu are absent.
● Working with the tool, you may encounter occasional software crashes.
User’s Guide to Create Animated Slideshows in Wondershare Filmora
Having understood the basic functionalities and exceptional features of Filmora’s Animated Slideshow creator tool, let us see through the following section to get familiar to the knowhow of using the same for designing animation top rated slideshow presentations in a stepwise procedure:
Step 1: Download and Install the Software
Before getting though with the creation process, initiate a download of the slideshow creator program from the latter’s official website to any of your preferred Windows or iOS compatible devices.
Step 2: Add Your Images and Videos
Creating a slideshow presentation may require a set of multiple image and video files to the program’s graphic creator timeline. It is recommended to add your selections of the aforesaid files to a single folder before launching the software in your system.
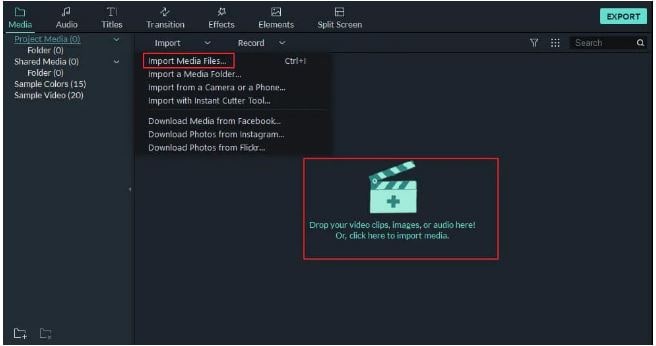
Once you have finished making your selections, launch the program to reach its welcome interface, were you need to navigate and click on the ‘Media’ tab in the top toolbar. From the task options that appear, click on ‘Import a Media’. Next, you will be asked to browse through your device locations and choose the folder that contains your previously selected files to be used in the presentation you are about to create.
When you have found the required folder, tap on ‘OK’ to import the same to the new slideshow project in the Filmora timeline. All your selected files will be visible here after a successful import.
Step 3: Timeline Positioning of Media Files
Before working on the task of positioning the imported media files on the app’s timeline, navigate to the ‘File’ menu and choose the ‘Preferences’ option. As soon as the respective window pops up, reach to the ‘Editing’ tab at the top and select ‘Photo Placement’ from the drop down menu that follows.
In case your selected images do not have a matching aspect ratio with the program’s preset values, choose the ‘Crop to Fit’ option for removing the additional black bars from the selected images. For the requirement of adding camera pan and zoom movements to your images, select the ‘Pan & Zoom’ option in the ‘Preferences’ settings.
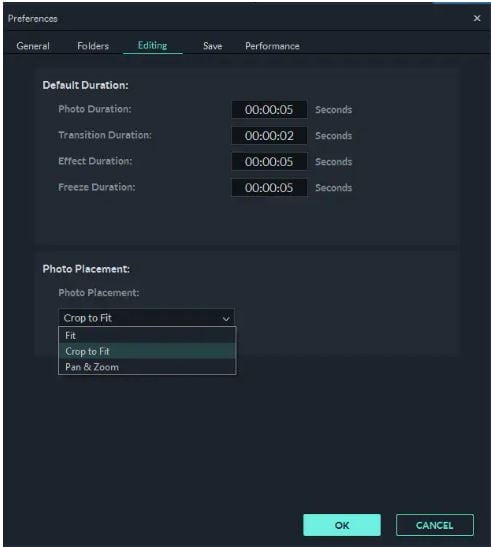
You can proceed to change the preset play durations of images, effects and transitions in the ‘Editing’ window itself. As an alternative you can adhere to the same task in the program’s timeline by dragging any one end of the media files in an outward or inward direction. The ‘Crop to Fit’ option may not give an affordable size in some cases where the images are set in a vertical 9:16 aspect ratio. Choose the ‘Fit’ option to set this issue straight.
When you have finished making all the aforesaid adjustments, navigate to the Media panel again for adding the selected image files to the software’s timeline. Proceed with selecting a file and dragging and dropping the same at the desired position within the timeline. Continue repeating the process till all the images have been placed at their respective locations, and in the exact order of appearance in the slideshow. This should be followed by adjusting the image play durations using any one of the previously described methods.
Step 4: Escape Hard Cuts With Image Transitions
Hard cuts among different slides of a presentation break the flow of the slideshow. To escape this cringe, consider using a smooth transition effect within the slides of your project. To do this, navigate to the ‘Transitions’ tab in the top toolbar of Filmora’s project window and select a desired one from over 100 choices of customizable transitions.
You can now drop these transitions in the timeline at the exact intersection point of two image files. Avoid using the same transition for every hard cut to escape monotony. You can instead choose different transitions for each slide while observing its appearance in the clip.
After you are done with applying transitions to each slide, double click on a particular transition to open its ‘Transition Setting Window’ either for presetting the transition play duration or to choose a desired transition mode. You can also prefer a direct customization of the transition duration in the project timeline through a right or left dragging of any of its ends.
Step 5: Uplift Your Slideshow Colors With Overlays and Filters
Navigate to the top toolbar and hit the ‘Effects’ tab to choose from a diversity of visual effects that can be added to the slideshow images to supplement them with an increased vibrancy through color desaturation. These effects in the program’s library are categorized into classes of Overlays and Filters, with further subcategories of Sepia Tone, Light Leaks and Lomography and many more.
To apply these effects, just select and add them into a timeline track above the clip you wish to add the overlay or filter to. When you have applied the effects, observe the overall clip appearance in the ‘Preview Panel’. Double click on a particular effect to fine-tune the latter’s settings.
Step 6: Supplement Your Slides With Motion Graphic Elements
While motion graphics will undoubtedly enhance your animated slideshows, adding them to your presentation is purely optional, since most professional projects do not need a motion graphic element to escalate their presentation outlook. If, however, you choose to work on making these a part of your animated slideshow, Filmora lets you do that in its ‘Elements’ tab.
There is a plethora of motion graphic templates that you can select and add to the project timeline for a quick and vibrant upgrade of your presentation slides, but, at the same time, it becomes important to take care of the visual outlook and the underlying reason of creating the slideshow before you decide on adding these elements to your project.
Step 7: Create Voiceovers and Record Soundtracks for Your Slideshow
Narration is a smart way to captivate the target audience within your slideshow, whether though a self-delivery or a recorded voiceover. If you decide on the second option, you can conveniently use the Filmora Slideshow Creator program to add voiceovers and soundtracks to your presentation.
To adhere to the purpose, navigate to the top toolbar and click on the ‘Media’ tab. From the options that appear, tap on the ‘Record’ menu that drops down, followed by selecting the ‘Record Voiceover’ option. As soon as the ‘Record Audio’ prompt pops up, select your desired microphone to be used in the recording process and click on the ‘Record’ button.
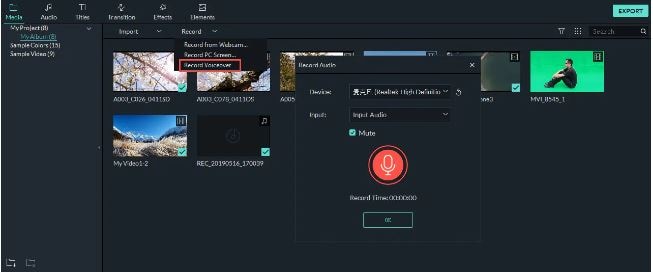
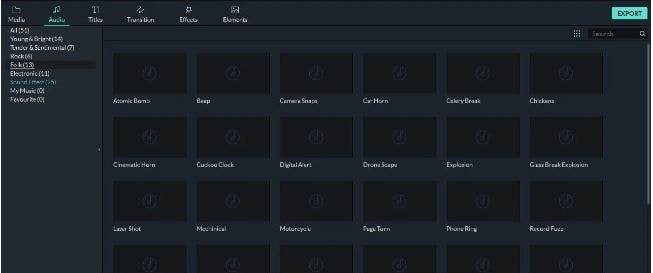
The recording that you have just created will appear in the ‘Media’ tab beside your all other imported audio-visual and image files, and you can add the same to any desired file with utmost ease. The Filmora library further allows you with a free access to its huge inventory of sound and audio effects. To apply these effects to your project, navigate to the ‘Audio’ tab and browse through impressive music categories, like, Young & Bright, Rock, Electronic, etc., to select the best matching audio for your slideshow.
When you have made your selections, add all of them to the slideshow’s audio track in the project timeline and make suitable adjustments to their play durations.
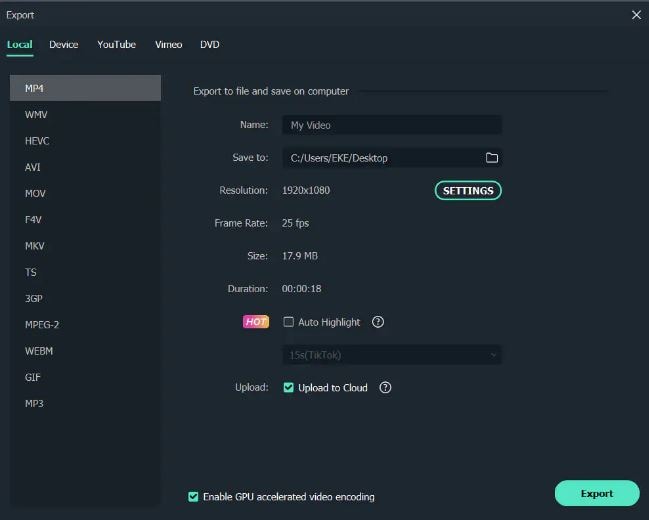
Step 8: Export Your Creation
When your satisfied with your efforts till here, you have indeed created a wonderful animated slideshow presentation that should be exported to relevant platforms. Navigate to the ‘Export’ tab at the top right corner of the project timeline and click on the same. As soon as the utility window appears, choose a preferred file format, set a desired output resolution and fame rate for your presentation, followed by making a direct export of the same to your Vimeo or YouTube accounts.
The slideshow rendering time on different platforms may vary in cohesion with the specific presentation lengths, with larger file requiring a considerably longer time to get rendered than the smaller ones. It is advisable to limit the output file size within 500 MB for a quick rendering process.
02Canva
This one is an online animation slideshow creation tool that could certainly be your best choice to design high end professional presentations. Facilitating you with over 100 different slide design layouts, the tool additionally grants you the liberty to add your own images to the presentation being created, or even select suitable alternatives from Canva’s extensive image stack that has over 1 million apposite images to choose from.
You can make the best use of Canva to create promotional presentations to add extra emphasis on the brand of your company and product brand, which a compatible to a diverse variety of professional platforms for information sharing.
As far as the cost constraints of the tool are concerned, you get to access a free version of the tool for working on slideshow presentations for individual or small business units, while the graphics design needs of large scale professional corporations are suitably addressed by the utility’s Canva for Work version, which is equipped with high end team coordinated features with a 30-day free trial, along with monthly and annual subscription of $ 12.95 and $ 119.4 respectively.
Pros
● The tool allows you to add elusive texts, filters, fonts and images to the animated slides of your business presentation.
● Working with the tool, you can drag and drop an extensive variety of elements within your slideshow.
● Canva further allows you to create, upload and save the logo of your brand.
Cons
● The tool’s customer support is not quite welcoming.
● You need to add your phone number within the tool’s customer support interface for getting the required help.
● The tool’s working interface is somewhat confusing.
User’s Guide to Create Animated Slideshows in Canva
Let us see browse through the detailed, step by step process to quickly create amazing animated slideshow presentations using the Canva graphic design tool in the following section:
Step 1: Download and Install Canva
Visit the official site of the tool for a free download of the Canva slideshow creator software in any suitable iOS or Windows compatible desktops, laptops and PC systems.
Step 2: Choose Your Task
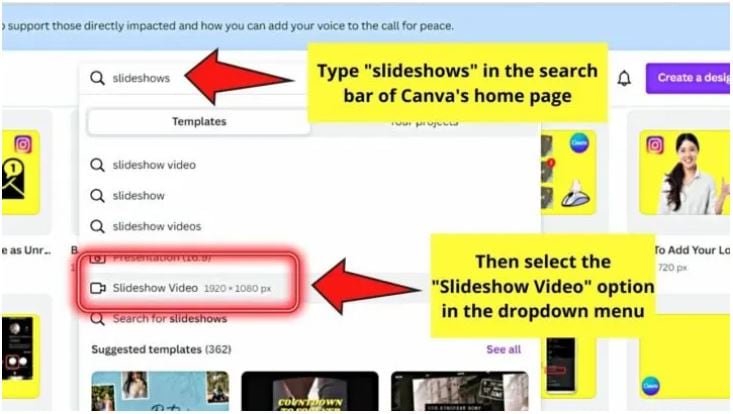
Undertake a launch of the downloaded program to reach the latter’s welcome page. Here, you need to navigate to the search bar at the top and type a keyword to select your task. For creating slideshow presentations, enter ‘Slideshow’ in the search tab.
In the drop down menu that follows, a list of the closest matching alternatives of your keyword will appear. Select ‘Slideshow Videos’ from the same.
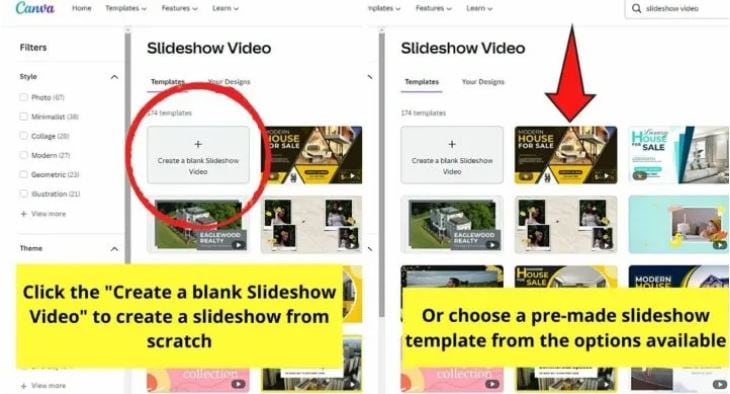
Step 3: Select a Template
The completion of Step 2 will take you to the program’s template library, where you can either work with creating a presentation of your own by clicking on the ‘Create a Blank Sideshow Video’ option, or choose any one from the finest collection of in built slideshow templates from the Canva library.
Step 4: Customize Your Template
After selecting the template, you will reach Canva’s slideshow editor page. Here you can customize your slideshow as per your preferences. To begin with, replace the preset images in the template with your selected ones.
You can either choose a set of images from the program’s inbuilt photo gallery or select the same from your device. Navigate to the ‘Tools Panel’ in the left and click on ‘Photos’ to work with the first method, or tap ‘Uploads’ in that very panel to apply the second.
When you have made your choice, click on ‘Upload Media’ to bring your selections to the tool’s editor timeline. This should be followed by dragging and dropping the images at appropriate places within the template.

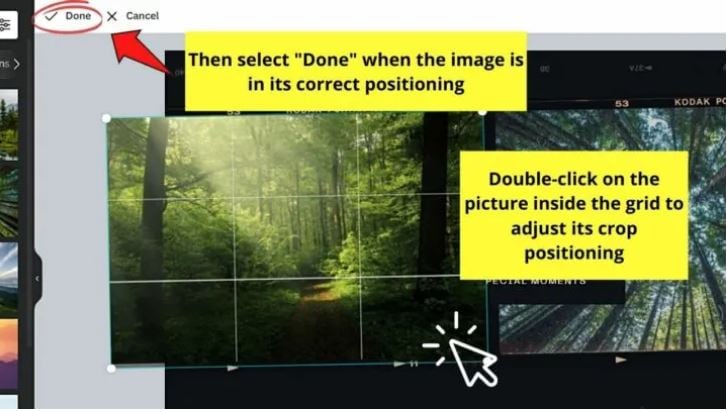
Step 5: Crop the Images
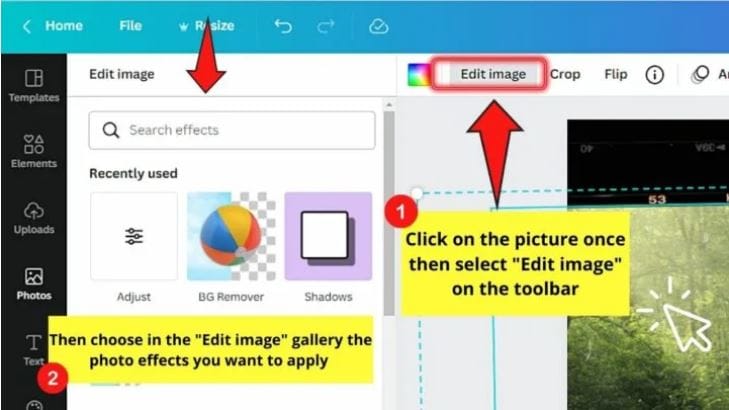
Double click on any image and drag it sideways to crop the same within your preferred aspect ratio. When you are happy with the changes, click on ‘Done’ to apply them. You can additionally, customize the images with a variety of available effects at this stage.
To proceed with the aforesaid process, choose the image you want to customize and select ‘Edit Image’ from the dropdown that appears. You will be directed to the ‘Edit Image Gallery’, where you can select the effect you want to complement your image with.
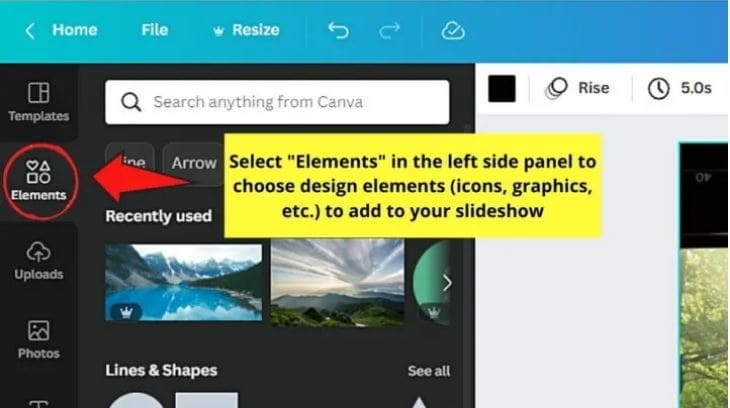
Step 6: Add Other Design Elements
Tap on ‘Elements’ in the ‘Tools Panel’ at the left to select a suitable component from a range of stickers, icons, illustrations and charts to add to your slideshow according to its creation theme.
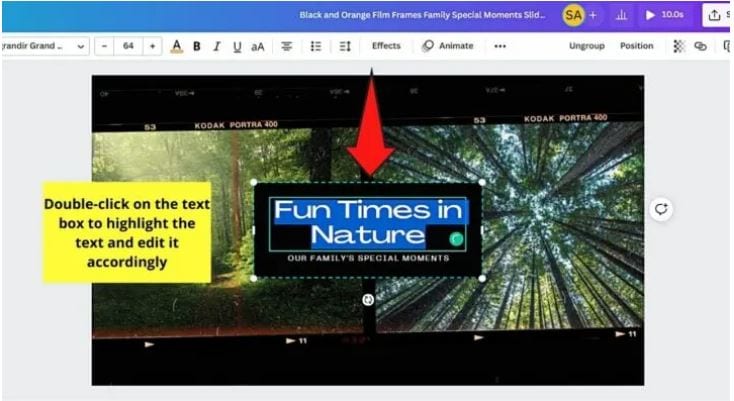
Step 7: Customize the Text
The template has some pre-written text, which you can change by double clicking inside the text boxes to highlight the already written text and edit the same as per your requirement. Press ‘T’ on your system’s keyboard for adding extra text boxes. You can also visit the ‘Editor Toolbar’ work with a variety of text formatting options, like, font size, style and color.
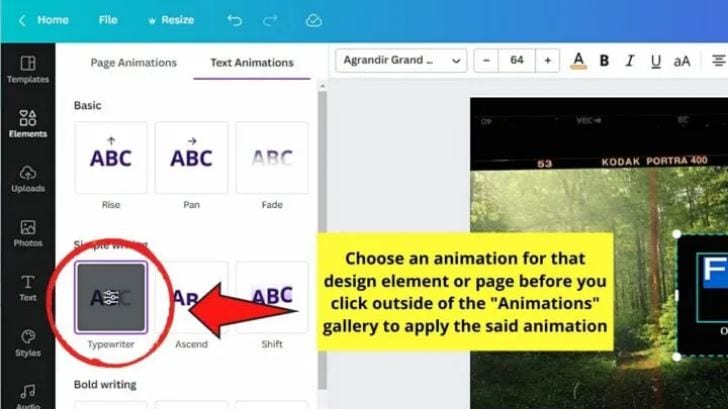
Step 8: Include Suitable Animations
To supplement your slideshow with stunning animations, select the image, element or text you wish to animate, followed by pressing the ‘Animate’ button. You will reach the ‘Animations Gallery’ for a selection of the desired text or page animation you want to add.
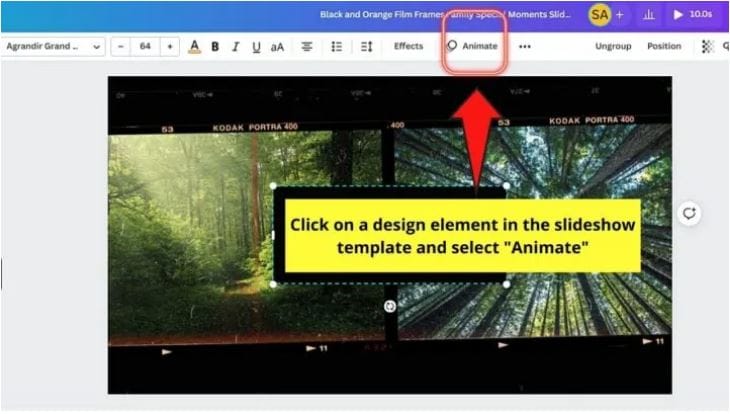
Once you have finalized your choice, click outside the gallery to apply your selected animation.
Step 9: Add the Perfect Sound
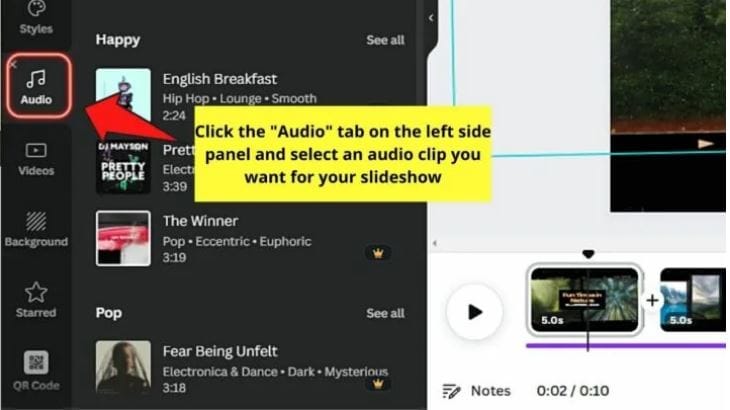
To uplift your presentation with an appealing music, navigate to the ‘Tools Panel’ at the left of the editor window and tap on ‘Audio’. A gallery of music clips will get displayed. Choose the one that best suits the theme of your animated presentation.
Step 10: Preview Your Creation
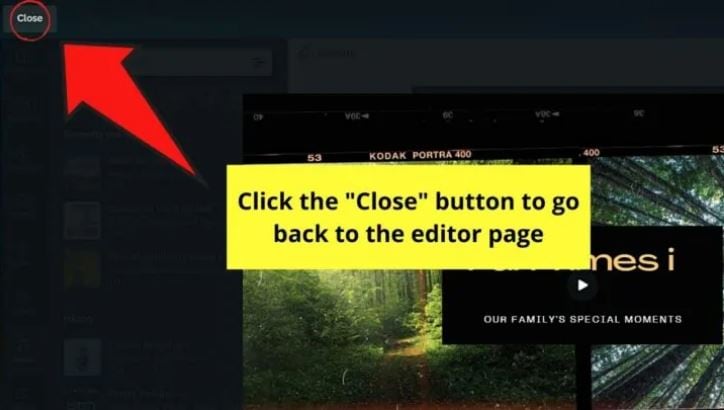
When you are done with creating the presentation, watch how it looks by navigating to the ‘Menu Bar’ at the top and clicking on the ‘Play’ button. When you have finished, click on ‘Close’ to reach the editor window.

Step 11: Set the Play Duration
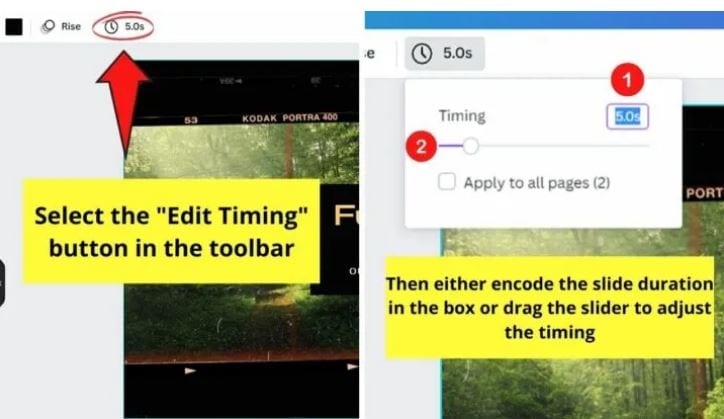
To adjust the play duration of any slide, select it and navigate to the toolbar at the top left corner.
Click on ‘Edit Timing’ in the same and make suitable adjustments either by encoding the required number of seconds or dragging the duration slider.
Step 12: Time to Download and Share!
Prefer previewing the slides one again to take a final look at your presentation. If you are happy with your work, navigate to and tap ‘Download’, followed by selecting the file type to save your creation locally to your device.
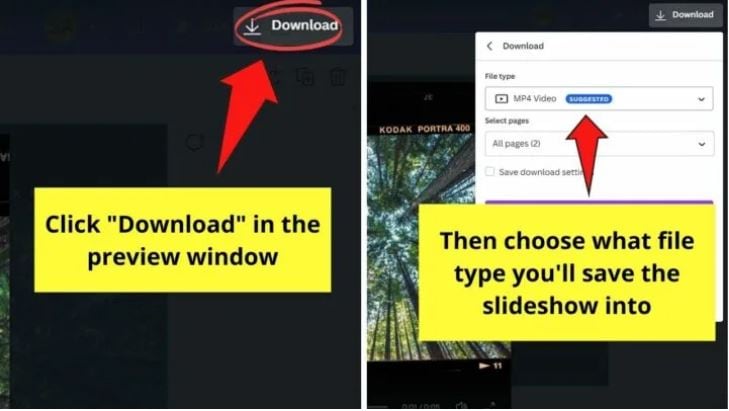
It is recommended to choose the ‘MP4 Video’ file format for saving audio enabled presentations. In case you want the background music to be included, either choose the ‘GIF’ format or download the slideshow as a PowerPoint presentation.
For a direct share of the animated slideshow, navigate to the ‘Menu Bar’ at the top and click on ‘Share’, followed by ‘All Options’ and lastly, tap ‘Present’.
03Keynote
This one is affordably the most convenient presentation tools if you are a user of iOS devices, and is a world class utility to create animated slideshow presentations. You can work with this tool to add an extra element of practicality to the otherwise customary business oriented animation slideshows with a diversity of effects, filters and transitions. The software is an ultimate best in adhering to real-time and remote event collaboration concerns of employees.
Concerning the pricing requirements, you can work with this slideshow creator tool for free if your usage concerns are restricted to a personal need. In an otherwise case, you can prefer buying the latter for a monthly investment of $ 99 and $ 299, respectively for business and enterprise based concerns.
Pros
● The Keynote program allows you a real-time, remote and revised access to the slideshow presentation.
● The program’s creator library is a storehouse of the most elegant and expressive slideshow templates and themes.
● The application greets you with a responsive and non-messy interface, with a decluttered toolbar.
Cons
● The program offers you a limited number of options to export your creations.
● You cannot work with the application on a Windows compatible device.
● If you are a regular PowerPoint user, working with the tool will require you a comprehensive learning of the usage pattern.
User’s Guide to Create Animated Slideshows in Keynote
Moving ahead with the discussion, let us understand the process of creating an animated slideshow presentation in Keynote though a step by step guide in the following section:
Step 1: Download the Keynote Slideshow Creator Tool
Start with initiating a free download of the tool from the official Apple website through your login credentials and proceed to install the same in your iOS device.
Step 2: Select a Presentation Theme
To start working on your slideshow presentation, you will require to choose a suitable theme. To do this, open the tool by clicking on its icon in the Launchpad, Applications folder or the Dock. The ‘Theme Chooser’ window pops up. In case this doesn’t happen, navigate to the bottom left corner of the screen and tap ‘New Document’.
In the ‘Theme Chooser’, you can either see through different categories or tap ‘All Themes’ to select the one you like. When you have found your preferred theme, open it by double clicking on the same.
You may either use the preset slide layout of the selected theme or use a different one by navigating to and clicking on ‘Format’ tab at the right side of the screen. You can now add your specific content in the presentation through adding new slides, text and images.
Click on the ‘+’ symbol in the theme toolbar to add a new slide followed by choosing its layout, double click inside the placeholder text to edit the same or drag and drop an image from your device gallery or the internet to replace the preset one in the template.
Step 3: Supplement Your Presentation With Objects
Proceed to add different slideshow objects in your creation by navigating to the ‘Object Toolbar’ at the top and selecting tables, charts, shapes, text boxes, comments, etc., that you wish to add in your presentation.
You can further make changes in the color, shadow and border of the object to improvise its appearance, or prefer applying a preset object style to enhance the overall object look to bring it in line with the slideshow theme. To do this, select the object and you will see its formatting options in the sidebar at the right. Click on the ‘Format Toolbar’ if the sidebar does not appear.
You can additionally, add layers to the slide objects, change their size or nest them within a shape or text box and link objects to switch to a new slide, open a related web page or email message.
Step 4: Add Audio-Visual Elements
Try adding suitable media elements to your creation by dragging a video or music file from your system either to a media placeholder or just anywhere within the slide. You can alternatively tap on the ‘Media’ icon in the top toolbar and choose ‘Music’ or ‘Movies’ from the dropdown that appears, followed by dragging the file with the previously explained method.
To add a soundtrack to the presentation, click on the ‘Soundtrack’ icon in the toolbar at the top, followed by clicking on the ‘Audio’ tab in the sidebar that appears. Next, tap the ‘+’ icon to select specific songs or playlists you want to add in the soundtrack.
Step 5: Add Stunning Animations
Start with selecting a slide to add the animation effect in the ‘Slide Navigator’. The ‘Animate’ sidebar appears, where you need to select the ‘Add an Effect’ option. Scroll down to view and choose a desired transition.
You can see a preview of the selected transition being played, with the slide navigator displaying a blue mark at the right corner of the slide to indicate the addition of a transition.
To change a previously selected transition, navigate to the sidebar at the top and tap ‘Change’ to select a new one. You can further, use the sidebar options to set the direction and transition play duration.
Step 6: Playing Your Slideshow
When satisfied with your effort, you can prefer playing the presentation, either in full screen or in a single window. If you choose to play in full screen, navigate to the ‘Play’ menu, click on the same and select ‘Full Screen’, followed by choosing the desired slide from where you wish the presentation to start in the slide navigator.
If you want to play the slideshow in a window, select a preferred slide in the slide navigator, go to the ‘Play’ menu at the top, click on the ‘Play’ tab, followed by choosing the ‘In Window’ option. The presentation will now start with the selected slide being played in one window and the presenter in the other.
In either of the above slideshow playing modes, press ‘Esc’ from your system’s keyboard to end the presentation playing process.
Step 7: Collaborating With Others
Working with the Keynote Slideshow Creator, you can collaborate with others to invite people to view and edit your presentation. To give a presentation access, you can either share a web link for a public access, or invite certain people having registered Apple credentials to view your creation. You can even give editing permissions to selected viewers or allow them to invite other people to collaborate.
04Powtoon
This one is a useful tool to create interactive business presentations for brand promotion and company recognition. Talking about the specific features of the tool, you can work with the utility to design an attractive logo for your company, import data and charts to your presentation, make adjustments in the color schemes of the slideshow, initiate infographic building and organize your slideshow into several sections.
The tool works best towards educating potential customers and clients about your company’s mainstream work profile and business. Sticking to the terms of utility pricing, you can begin with taking a free demo of the tool to access its credibility in cohesion with your specific needs. Following this, you can avail a monthly paid subscription of Powtoon, which has a price range of $ 19 to $ 59, according to the type and extent of features you choose to avail.
Pros
● You can add the details of your brand in the most expressive and appealing manner with the tool’s manifold design features.
● You can work with hundreds of preset slide designs to quickly create professionally sound animated slideshows.
● The tool is excellent in catering to your diverse slideshow design needs, when working for a large scale organizational setup.
Cons
● The tool is not a smart choice for individual or small scale business setups.
● The extensive variety of features results in a bit confusing and messy working interface.
● You can add a limited number of users to the monthly subscription plan of the tool.
User’s Guide to Create Animated Slideshows in Powtoon
For a better insight on how to create animated slideshows in Powtoon, let us go through the stepwise tutorial of the process in the following section:
Step 1: Launch the Online Tool
Visit the Powtoon official website to open the slideshow designer tool in any of your favorite internet browsers.
Powtoon Official Site Link: https://www.powtoon.com/index/
Step 2: Script Your Presentation
Start with creating a preset content for every slide of your presentation, based on the reason behind creating the slideshow, type and style of content presentation and so on.
Step 2: Add a Cohesive Background Music
You can complement your presentation with the perfect background music from the Powtoon library, from the web or even create your own voiceover recording through any preferred online text-to-voice recorder tool to voice the contents of your presentation. When you are done, upload your recording to the Powtoon editor to proceed with adding visual content to the presentation.
Step 3: Divide Your Presentation Slides
You can now add images, text and animations to your project in line with your presentation script. Choose suitable images from your device or from the web, add short, impactful texts and stunning animations from the Powtoon’s library to level up the appearance of your slideshow.
Step 4: Include Design Elements
Try adding additional elements like, graphics, background themes, animation styles, props, color schemes and other relevant characteristics to the slides.
Step 5: Time Your Presentation
In the last step, use the Powtoon timeline to set the sequence and time of appearance of different elements in each of your presentation slides. You can also hear the voiceover in the slideshow background to ensure the synchronization between the audio play and visual content appearance within the presentation.
05Visme
This one is a top grade cloud based professional tool for creating animated slideshow presentations with an affordably high visual credibility. Equipped with a drag and drop design workflow, the tool works effectively towards delivering intuitive and engaging animated slideshows for effective communication of business ideas and top rated brand promotion strategies.
The best usage of the tool lies in the creation of business presentations that are aimed at ensuring company oriented image collection and brand consistency. Talking of the tool’s pricing constraints, a single user subscription of the utility would cost you $ 20 on a monthly basis, which increases to $ 60 per month for a 3-user package.
It is a smart choice to take a free live demonstration of the tool to get a comprehensive understanding of the latter’s working technology.
Pros
● Extensive variety of colors, images and logos to complement your business presentations with elusive design elements.
● Promotes a viable consistency among multiple employee presentations
● The tool comes with an in built analytic system that keeps a track of the viewers of your slideshow presentations.
Cons
● The tool lacks some essential elements of slideshow design.
● The design features are mostly generic and do not cater to intense creation needs.
● The tool lacks a free trial facility.
User’s Guide to Create Animated Slideshows in Visme
In the following section is presented a stepwise procedure to create stunning animated slideshows in Visme with high end professional excellence and in the quickest time span:
Step 1: Download and Install the Program
Navigate to the official website of the Visme Slideshow Creator program to download and install the same in any of your preferred MacOs or Windows supported devices.
Visme Official Download Link: https://visme.co/blog/
Step 2: Start a New Project
You will need to create a Visme account to start working on the slideshow creation process. When you have created one, navigate to and click the ‘Create New Visme’ option in the tool’s opening screen to open a new project and assign a suitable name to it.
Step 3: Choose a Template
in the new project window that appears, click on ‘Presentations’ option at the top to see a library of slideshow templates being displayed. You can either, select a template from the library to edit or start an entirely new creation of your own.
Step 4: Make Color Schemes and Background Selections
To proceed with the selection of slide backgrounds and color schemes, you can either choose an exact color by entering its RGB code in the ‘Edit Colors’ option, or choose one from Google web pages using the ‘Chrome Eye Dropper’ tool.
Step 5: Add Shapes and Icons
You can supplement your slideshow with suitable design elements, like icons and shapes. All you need to do is navigate to the ‘Tools Panel’ in the left, click on the ‘All Shapes’ symbol and type a related keyword in the search bar to get a list of matching shapes to choose from.
Step 6: Insert and Format Text
You can now proceed with adding suitable text, titles and subtitles to the presentation slides. Again, visit the ‘Tools Panel’, tap the ‘T’ icon and click on ‘Add a Title’. A text box will be created within the slide, where you can add the required text. You can also format the same from the ‘Format Toolbar’ that gets displayed above the inserted text box.
Step 7: Add Photographic Slides
To include image slides, start with inserting a new slide in the presentation, flowed by once again navigating to the ‘Tools Panel’ in the left and clicking on the ‘Background’ icon. Choose a suitable color scheme and again, click on the ‘Images’ symbol in the ‘Tools Panel’. Here you can select any suitable image from the library that gets displayed.
Step 8: Link Your Slides
Link the sequential slides of your presentation with any suitable indicator, such as an arrow, so that clicking on the same takes the viewer to the successive slide. You can alternatively create ‘Hotspots’ to link the slides together.
Step 9: Publish and Share Your Presentation
When the final result makes you happy, navigate to the ‘Publish’ tab just above your slide window to open the presentation publishing interface. Here, you can choose from the options of a direct share, a site or blog embed or a local download of the presentation to your device.
● Ending Thoughts →
● Animated slideshow presentations land among the most trending ways to ensure a precise and engaging content delivery.
● The software market is packed with a diverse range of impressive slideshow creator tools with the most amazing features.
● When making your choice of the perfect animated slideshow designer tools, the Wondershare Filmora Slideshow Creator program is indeed a smart pick.
If you are passionate about uplifting your graphic design skills with stunning animated slideshow creation, read here about the best PowerPoint templates!
In this article
01 [12 Cool Animated Slideshow PowerPoint Templates](#Part 1)
02 [5 Tools to Make Stunning Animated Slideshow PowerPoint](#Part 2)
Part 1 12 Cool Animated Slideshow PowerPoint Templates
Slideshows are an already appealing media of content presentation, which when supplemented with animated backgrounds, are bound to captivate attention. Considering the underlying reason, it should be noted that animated slideshows offer a more vivid and lively presentation of information, as compared to their static counterparts. Animated slideshows have the additional advantage of presenting the content in the exact and accurate tone that suits the grasping capability of the audience.
Talking of feasible solutions for creating high end animated slide show presentations, the software market has a diverse range of alternatives to choose from. However, Microsoft PowerPoint is a graphic presentation tool that almost everyone is familiar with. Limiting our discussion to the same, there are a diversity of animated slideshow PowerPoint templates, like that of Evanto Elements and GraphicRiver to design professionally outstanding animated slideshows.
If you are keen on trying hands at adding that extra spunk your ordinarily boring static presentations, spare time to read the following section of this article, which incorporates the features, utilities and merits of the top 12 design templates in GraphicRiver for creating animated slideshows in PowerPoint with utmost ease and within a quick time span:
01Parallax Ultimate PowerPoint Animated Template
Choosing this animated presentation template to design your slideshow projects will supplement tour creations with the most amazing parallax effect, including an additional list of tempting and trendy editing features, like, limitless color choices, high definition video resolution, master slide presentations, modern, elegant, fully animated, company oriented slides, with object animations and parallax transitions, 16:9 wide screen aspect ratio, handmade infographics and much more.
02Splash Animated PPT
This one is an excellent animated template to create elegant animated slideshow presentations that will make your design creativity stand out of the crowd. Working with the template entitles you of a matchless, professional quality slideshow animation PowerPoint project on account some exclusive features, like those of high definition screen resolution and widescreen image aspect ratio, light and dark presentation backgrounds etc.
Mentioning some additional credibility of using the template for creating animated slideshows, you get to access as many as 500 selected slides, vector line and social media icons, uniquely styled image masks, calendars and vector maps.
03Social Media Animated PowerPoint Templates
If your working constraints require an extensive use of social media information, consider using tis interactive PowerPoint template for designing social media compatible, premium quality, professional slideshows with animated graphics. Working with the template, you will get a complementary access to a pool of exciting slideshow features.
Talking of the specific utilities of the animated slideshow maker template, you can choose from over 50 slide layouts, light and dark backgrounds themes, enjoy a seamless, drag and drop workflow and easily edit grouped elements, along with modifying infographic elements in Excel sheets.
04Animated Slides Bundle for PowerPoint Presentation
This one is an interactive GraphicRiver PowerPoint animation slideshow maker template, which you can work with for a delivery of high end and illustrative animated slideshow presentations. The template facilitates its users with a diversity of graphic customization features, like that of visual transitions, custom reveals and objectified motions to your presentation slides, points and images.
The template promises you of a stunning, high quality and compelling slideshow output with an elegant presentation outlook. The template has a variety of inbuilt slide layouts, is easy to use and comes to you absolutely free of cost.
05Proposal PowerPoint Animated
If you are about to deliver a dynamic business presentation, consider working with this graphic tool to create your animoto slideshow in PowerPoint. Proposal PowerPoint Animated is an interactive animation template, designed exclusively for adhering to the concern of business centered content delivery.
You can create captivating motion stories with the conveniently editable slides and high end animated graphics of this PowerPoint template, thus ensuring a high pitched information conveyance to your target audience.
06DIY Animated PPT Promo Kit
Looking for the most feasible PowerPoint animated slideshow templates for slideshow creation generally refers to a time consuming web search. If you are a creativity freak and want to escape the aforesaid hustle, try hands at working with the DIY Animated PPT Promo Kit to create a customized animated slideshow template of your own.
Talking about the utilities, this interactive slideshow presentation kit is packed with a lot of professional features that are sufficient to give a hype to your normal quality slideshows and allows you to work with over 100 entirely customizable slides in 2 variable color schemes.
07Pitch Deck Animated Bundle
Using a pitch deck strategy is a common way of attracting fund credibility for your business for an appreciable revenue growth, which is often put to the additional use of addressing potential workers of the company on the latter’s crucial success factors. When working towards either of the purposes, using the aforesaid software bundle is a smart choice to showcase the exact content concerning your overall business concept to the target audience.
This one is preferably the best pitch deck template you could ever get. Though there is an appealing set of market choices, it is always an impressive decision to select the cream from the curd for ensuring high end results.
08Massive X Presentation Template for PowerPoint
When having a desire to access the credibility of slideshow templates though user reviews, this animated PowerPoint template is sure winner. Packed with an extensive library of over 960 exceptional slides in dark and light background themes, along with 20 preset color schemes, this graphic template is an absolute favorite of creative designers across the globe.
Choosing the template for catering to your animation centered slideshow creation needs opens a diversity of audio-visual customization features with an entirely free access and an easy to use working interface.
09Imperial Multipurpose PowerPoint Template
Living up to its name, this one is a multi-functional, free animated slideshow template that allows you to choose the perfect color scheme for your brand from more than 100 shade varieties, thus ensuring a high end transition flexibility. Prefer using this template to add a visual highlight to your slideshow presentations with a diversity of icons and customized animations.
If you have invested enough time looking for the best PowerPoint animation slideshow creator utility, end your search with the Imperial Multipurpose template that is available to you without asking for a penny from your pocket and welcomes you with the most interactive working environment.
10Minimal PowerPoint
The aforesaid slideshow template for creating animated presentations is a fundamental and clean graphic creation utility that comes with a wide range of more than 500 different sides and convenient to use drag and drop placeholders for seamless content inclusion. Additional features of the template consist of inbuilt calendars, charts, graphs and customized illustration components, suitable for a diverse set of industries.
This one is an interactive style PowerPoint animoto slideshow maker template that works best to infuse data and animation graphics together. You can use this graphic design tool without a second thought for delivering quality content with a cohesive slideshow presentation, of course without having to worry about any cost constraints.
11PowerPoint Animated Pro Pack- With Animated Slides
Using this animation slideshow template for your business presentations facilitates you with a series of interactive graphic modules within professionally compatible slides. You can use this high end template package to supplement your presentations with high quality animated motion diagrams.
Other appealing features of the package include a huge set of conveniently editable slides, with an extensive variety of PowerPoint compatible motion transitions, animations and many more surplus features to add the right amount of spark to your professional animated slideshow presentations.
12Wow Slides for PowerPoint
If you are yet to reach to the perfect animated slideshow creator solution, consider sparing a thought about this wonderful PowerPoint template to cater to your animation design concerns. Available to you with a decent set of over 24 inbuilt color themes, this one is a perfect choice for working on webinar slides, business presentations and pitch decks.
Apart from elegantly beautiful collection of animations, you will find this slideshow template package to be a storehouse of elusive and explanatory charts, graphs, maps and icon packs, which you can use to add relevant statistical content to your presentations or give an enhanced and organized look to your slideshow project.
Part 2 5 Tools to Make Stunning Animated Slideshow PowerPoint
Having discussed about the most amazing animation slideshow templates for PowerPoint, let us now extend our talk to learn about some of the most preferred graphic tools to create high end and professionally expressive and stunning animation centered slideshow presentations in PowerPoint, considering the fact that such presentations are an important part of the ongoing business trends, which you should be aware of.
The following section presents a detailed discussion on the features, best application utilities, market reviews and usage guidelines of the top 5 animated slideshow creator tools:
01**Wondershare Filmora Video Editor **
For Win 7 or later (64-bit)
For macOS 10.12 or later
This one is possibly the best and an all in one software package that promises to address almost all of your graphic editing needs in the most affordable manner. Talking of the specific utility of creating animated slideshow presentations, Wondershare Filmora is dedicated towards delivering high end motion graphic slideshows of matchless professional excellence.
The tool is best in making audio infused, animated photo slideshows that are apt for comprehensive graphic proposals for top rated business projects. About the software’s pricing requirements, you can avail a free usage of the tool for free in its trial version for 7 days, following which, working with the tool will demand paid monthly and annual subscriptions of $9.99 and $19.99 respectively.
Pros
● Working with the tool, you are entitled to use a plethora of audio-visual effects and filters to enhance your presentations.
● The tool’s feature rich library has everything to design animated slideshows with high resolution output quality.
● The tool is known to support almost all popular audio, video and image file formats.
Cons
● The tool has a limited variety of fine-tuned utilities for effect tweaking.
● The features of chapter authoring and DVD menu are absent.
● Working with the tool, you may encounter occasional software crashes.
User’s Guide to Create Animated Slideshows in Wondershare Filmora
Having understood the basic functionalities and exceptional features of Filmora’s Animated Slideshow creator tool, let us see through the following section to get familiar to the knowhow of using the same for designing animation top rated slideshow presentations in a stepwise procedure:
Step 1: Download and Install the Software
Before getting though with the creation process, initiate a download of the slideshow creator program from the latter’s official website to any of your preferred Windows or iOS compatible devices.
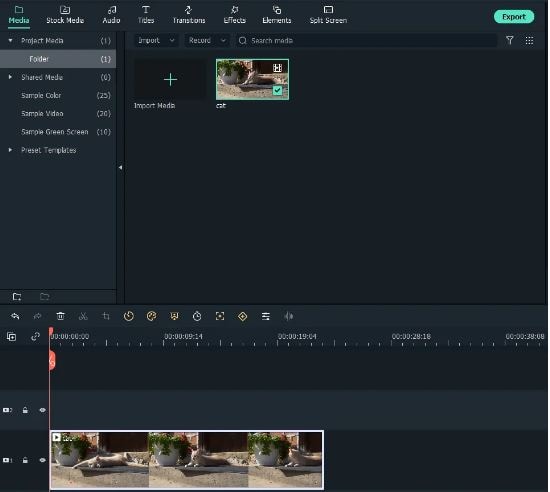
Step 2: Add Your Images and Videos
Creating a slideshow presentation may require a set of multiple image and video files to the program’s graphic creator timeline. It is recommended to add your selections of the aforesaid files to a single folder before launching the software in your system.
Once you have finished making your selections, launch the program to reach its welcome interface, were you need to navigate and click on the ‘Media’ tab in the top toolbar. From the task options that appear, click on ‘Import a Media’. Next, you will be asked to browse through your device locations and choose the folder that contains your previously selected files to be used in the presentation you are about to create.
When you have found the required folder, tap on ‘OK’ to import the same to the new slideshow project in the Filmora timeline. All your selected files will be visible here after a successful import.
Step 3: Timeline Positioning of Media Files
Before working on the task of positioning the imported media files on the app’s timeline, navigate to the ‘File’ menu and choose the ‘Preferences’ option. As soon as the respective window pops up, reach to the ‘Editing’ tab at the top and select ‘Photo Placement’ from the drop down menu that follows.
In case your selected images do not have a matching aspect ratio with the program’s preset values, choose the ‘Crop to Fit’ option for removing the additional black bars from the selected images. For the requirement of adding camera pan and zoom movements to your images, select the ‘Pan & Zoom’ option in the ‘Preferences’ settings.
You can proceed to change the preset play durations of images, effects and transitions in the ‘Editing’ window itself. As an alternative you can adhere to the same task in the program’s timeline by dragging any one end of the media files in an outward or inward direction. The ‘Crop to Fit’ option may not give an affordable size in some cases where the images are set in a vertical 9:16 aspect ratio. Choose the ‘Fit’ option to set this issue straight.
When you have finished making all the aforesaid adjustments, navigate to the Media panel again for adding the selected image files to the software’s timeline. Proceed with selecting a file and dragging and dropping the same at the desired position within the timeline. Continue repeating the process till all the images have been placed at their respective locations, and in the exact order of appearance in the slideshow. This should be followed by adjusting the image play durations using any one of the previously described methods.
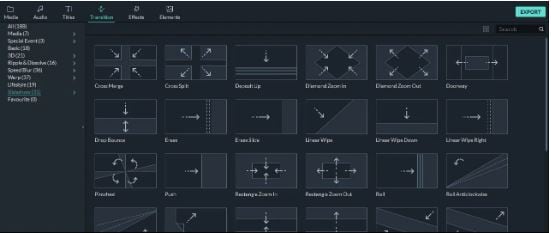
Step 4: Escape Hard Cuts With Image Transitions
Hard cuts among different slides of a presentation break the flow of the slideshow. To escape this cringe, consider using a smooth transition effect within the slides of your project. To do this, navigate to the ‘Transitions’ tab in the top toolbar of Filmora’s project window and select a desired one from over 100 choices of customizable transitions.
You can now drop these transitions in the timeline at the exact intersection point of two image files. Avoid using the same transition for every hard cut to escape monotony. You can instead choose different transitions for each slide while observing its appearance in the clip.
After you are done with applying transitions to each slide, double click on a particular transition to open its ‘Transition Setting Window’ either for presetting the transition play duration or to choose a desired transition mode. You can also prefer a direct customization of the transition duration in the project timeline through a right or left dragging of any of its ends.
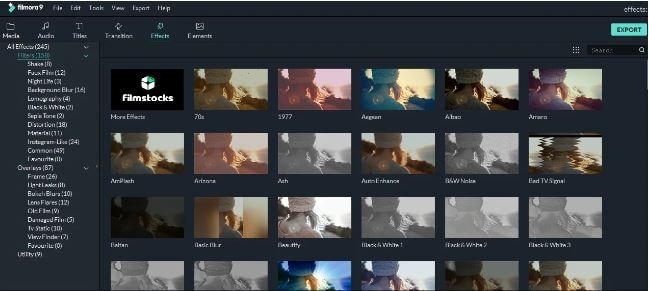
Step 5: Uplift Your Slideshow Colors With Overlays and Filters
Navigate to the top toolbar and hit the ‘Effects’ tab to choose from a diversity of visual effects that can be added to the slideshow images to supplement them with an increased vibrancy through color desaturation. These effects in the program’s library are categorized into classes of Overlays and Filters, with further subcategories of Sepia Tone, Light Leaks and Lomography and many more.
To apply these effects, just select and add them into a timeline track above the clip you wish to add the overlay or filter to. When you have applied the effects, observe the overall clip appearance in the ‘Preview Panel’. Double click on a particular effect to fine-tune the latter’s settings.
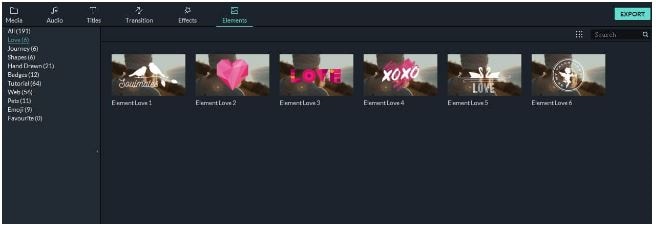
Step 6: Supplement Your Slides With Motion Graphic Elements
While motion graphics will undoubtedly enhance your animated slideshows, adding them to your presentation is purely optional, since most professional projects do not need a motion graphic element to escalate their presentation outlook. If, however, you choose to work on making these a part of your animated slideshow, Filmora lets you do that in its ‘Elements’ tab.
There is a plethora of motion graphic templates that you can select and add to the project timeline for a quick and vibrant upgrade of your presentation slides, but, at the same time, it becomes important to take care of the visual outlook and the underlying reason of creating the slideshow before you decide on adding these elements to your project.
Step 7: Create Voiceovers and Record Soundtracks for Your Slideshow
Narration is a smart way to captivate the target audience within your slideshow, whether though a self-delivery or a recorded voiceover. If you decide on the second option, you can conveniently use the Filmora Slideshow Creator program to add voiceovers and soundtracks to your presentation.
To adhere to the purpose, navigate to the top toolbar and click on the ‘Media’ tab. From the options that appear, tap on the ‘Record’ menu that drops down, followed by selecting the ‘Record Voiceover’ option. As soon as the ‘Record Audio’ prompt pops up, select your desired microphone to be used in the recording process and click on the ‘Record’ button.
The recording that you have just created will appear in the ‘Media’ tab beside your all other imported audio-visual and image files, and you can add the same to any desired file with utmost ease. The Filmora library further allows you with a free access to its huge inventory of sound and audio effects. To apply these effects to your project, navigate to the ‘Audio’ tab and browse through impressive music categories, like, Young & Bright, Rock, Electronic, etc., to select the best matching audio for your slideshow.
When you have made your selections, add all of them to the slideshow’s audio track in the project timeline and make suitable adjustments to their play durations.
Step 8: Export Your Creation
When your satisfied with your efforts till here, you have indeed created a wonderful animated slideshow presentation that should be exported to relevant platforms. Navigate to the ‘Export’ tab at the top right corner of the project timeline and click on the same. As soon as the utility window appears, choose a preferred file format, set a desired output resolution and fame rate for your presentation, followed by making a direct export of the same to your Vimeo or YouTube accounts.
The slideshow rendering time on different platforms may vary in cohesion with the specific presentation lengths, with larger file requiring a considerably longer time to get rendered than the smaller ones. It is advisable to limit the output file size within 500 MB for a quick rendering process.
02Canva
This one is an online animation slideshow creation tool that could certainly be your best choice to design high end professional presentations. Facilitating you with over 100 different slide design layouts, the tool additionally grants you the liberty to add your own images to the presentation being created, or even select suitable alternatives from Canva’s extensive image stack that has over 1 million apposite images to choose from.
You can make the best use of Canva to create promotional presentations to add extra emphasis on the brand of your company and product brand, which a compatible to a diverse variety of professional platforms for information sharing.
As far as the cost constraints of the tool are concerned, you get to access a free version of the tool for working on slideshow presentations for individual or small business units, while the graphics design needs of large scale professional corporations are suitably addressed by the utility’s Canva for Work version, which is equipped with high end team coordinated features with a 30-day free trial, along with monthly and annual subscription of $ 12.95 and $ 119.4 respectively.
Pros
● The tool allows you to add elusive texts, filters, fonts and images to the animated slides of your business presentation.
● Working with the tool, you can drag and drop an extensive variety of elements within your slideshow.
● Canva further allows you to create, upload and save the logo of your brand.
Cons
● The tool’s customer support is not quite welcoming.
● You need to add your phone number within the tool’s customer support interface for getting the required help.
● The tool’s working interface is somewhat confusing.
User’s Guide to Create Animated Slideshows in Canva
Let us see browse through the detailed, step by step process to quickly create amazing animated slideshow presentations using the Canva graphic design tool in the following section:
Step 1: Download and Install Canva
Visit the official site of the tool for a free download of the Canva slideshow creator software in any suitable iOS or Windows compatible desktops, laptops and PC systems.
Step 2: Choose Your Task
Undertake a launch of the downloaded program to reach the latter’s welcome page. Here, you need to navigate to the search bar at the top and type a keyword to select your task. For creating slideshow presentations, enter ‘Slideshow’ in the search tab.
In the drop down menu that follows, a list of the closest matching alternatives of your keyword will appear. Select ‘Slideshow Videos’ from the same.
Step 3: Select a Template
The completion of Step 2 will take you to the program’s template library, where you can either work with creating a presentation of your own by clicking on the ‘Create a Blank Sideshow Video’ option, or choose any one from the finest collection of in built slideshow templates from the Canva library.
Step 4: Customize Your Template
After selecting the template, you will reach Canva’s slideshow editor page. Here you can customize your slideshow as per your preferences. To begin with, replace the preset images in the template with your selected ones.
You can either choose a set of images from the program’s inbuilt photo gallery or select the same from your device. Navigate to the ‘Tools Panel’ in the left and click on ‘Photos’ to work with the first method, or tap ‘Uploads’ in that very panel to apply the second.
When you have made your choice, click on ‘Upload Media’ to bring your selections to the tool’s editor timeline. This should be followed by dragging and dropping the images at appropriate places within the template.
Step 5: Crop the Images
Double click on any image and drag it sideways to crop the same within your preferred aspect ratio. When you are happy with the changes, click on ‘Done’ to apply them. You can additionally, customize the images with a variety of available effects at this stage.
To proceed with the aforesaid process, choose the image you want to customize and select ‘Edit Image’ from the dropdown that appears. You will be directed to the ‘Edit Image Gallery’, where you can select the effect you want to complement your image with.
Step 6: Add Other Design Elements
Tap on ‘Elements’ in the ‘Tools Panel’ at the left to select a suitable component from a range of stickers, icons, illustrations and charts to add to your slideshow according to its creation theme.
Step 7: Customize the Text
The template has some pre-written text, which you can change by double clicking inside the text boxes to highlight the already written text and edit the same as per your requirement. Press ‘T’ on your system’s keyboard for adding extra text boxes. You can also visit the ‘Editor Toolbar’ work with a variety of text formatting options, like, font size, style and color.
Step 8: Include Suitable Animations
To supplement your slideshow with stunning animations, select the image, element or text you wish to animate, followed by pressing the ‘Animate’ button. You will reach the ‘Animations Gallery’ for a selection of the desired text or page animation you want to add.
Once you have finalized your choice, click outside the gallery to apply your selected animation.
Step 9: Add the Perfect Sound
To uplift your presentation with an appealing music, navigate to the ‘Tools Panel’ at the left of the editor window and tap on ‘Audio’. A gallery of music clips will get displayed. Choose the one that best suits the theme of your animated presentation.
Step 10: Preview Your Creation
When you are done with creating the presentation, watch how it looks by navigating to the ‘Menu Bar’ at the top and clicking on the ‘Play’ button. When you have finished, click on ‘Close’ to reach the editor window.
Step 11: Set the Play Duration
To adjust the play duration of any slide, select it and navigate to the toolbar at the top left corner.
Click on ‘Edit Timing’ in the same and make suitable adjustments either by encoding the required number of seconds or dragging the duration slider.
Step 12: Time to Download and Share!
Prefer previewing the slides one again to take a final look at your presentation. If you are happy with your work, navigate to and tap ‘Download’, followed by selecting the file type to save your creation locally to your device.
It is recommended to choose the ‘MP4 Video’ file format for saving audio enabled presentations. In case you want the background music to be included, either choose the ‘GIF’ format or download the slideshow as a PowerPoint presentation.
For a direct share of the animated slideshow, navigate to the ‘Menu Bar’ at the top and click on ‘Share’, followed by ‘All Options’ and lastly, tap ‘Present’.
03Keynote
This one is affordably the most convenient presentation tools if you are a user of iOS devices, and is a world class utility to create animated slideshow presentations. You can work with this tool to add an extra element of practicality to the otherwise customary business oriented animation slideshows with a diversity of effects, filters and transitions. The software is an ultimate best in adhering to real-time and remote event collaboration concerns of employees.
Concerning the pricing requirements, you can work with this slideshow creator tool for free if your usage concerns are restricted to a personal need. In an otherwise case, you can prefer buying the latter for a monthly investment of $ 99 and $ 299, respectively for business and enterprise based concerns.
Pros
● The Keynote program allows you a real-time, remote and revised access to the slideshow presentation.
● The program’s creator library is a storehouse of the most elegant and expressive slideshow templates and themes.
● The application greets you with a responsive and non-messy interface, with a decluttered toolbar.
Cons
● The program offers you a limited number of options to export your creations.
● You cannot work with the application on a Windows compatible device.
● If you are a regular PowerPoint user, working with the tool will require you a comprehensive learning of the usage pattern.
User’s Guide to Create Animated Slideshows in Keynote
Moving ahead with the discussion, let us understand the process of creating an animated slideshow presentation in Keynote though a step by step guide in the following section:
Step 1: Download the Keynote Slideshow Creator Tool
Start with initiating a free download of the tool from the official Apple website through your login credentials and proceed to install the same in your iOS device.
Step 2: Select a Presentation Theme
To start working on your slideshow presentation, you will require to choose a suitable theme. To do this, open the tool by clicking on its icon in the Launchpad, Applications folder or the Dock. The ‘Theme Chooser’ window pops up. In case this doesn’t happen, navigate to the bottom left corner of the screen and tap ‘New Document’.
In the ‘Theme Chooser’, you can either see through different categories or tap ‘All Themes’ to select the one you like. When you have found your preferred theme, open it by double clicking on the same.
You may either use the preset slide layout of the selected theme or use a different one by navigating to and clicking on ‘Format’ tab at the right side of the screen. You can now add your specific content in the presentation through adding new slides, text and images.
Click on the ‘+’ symbol in the theme toolbar to add a new slide followed by choosing its layout, double click inside the placeholder text to edit the same or drag and drop an image from your device gallery or the internet to replace the preset one in the template.
Step 3: Supplement Your Presentation With Objects
Proceed to add different slideshow objects in your creation by navigating to the ‘Object Toolbar’ at the top and selecting tables, charts, shapes, text boxes, comments, etc., that you wish to add in your presentation.
You can further make changes in the color, shadow and border of the object to improvise its appearance, or prefer applying a preset object style to enhance the overall object look to bring it in line with the slideshow theme. To do this, select the object and you will see its formatting options in the sidebar at the right. Click on the ‘Format Toolbar’ if the sidebar does not appear.
You can additionally, add layers to the slide objects, change their size or nest them within a shape or text box and link objects to switch to a new slide, open a related web page or email message.
Step 4: Add Audio-Visual Elements
Try adding suitable media elements to your creation by dragging a video or music file from your system either to a media placeholder or just anywhere within the slide. You can alternatively tap on the ‘Media’ icon in the top toolbar and choose ‘Music’ or ‘Movies’ from the dropdown that appears, followed by dragging the file with the previously explained method.
To add a soundtrack to the presentation, click on the ‘Soundtrack’ icon in the toolbar at the top, followed by clicking on the ‘Audio’ tab in the sidebar that appears. Next, tap the ‘+’ icon to select specific songs or playlists you want to add in the soundtrack.
Step 5: Add Stunning Animations
Start with selecting a slide to add the animation effect in the ‘Slide Navigator’. The ‘Animate’ sidebar appears, where you need to select the ‘Add an Effect’ option. Scroll down to view and choose a desired transition.
You can see a preview of the selected transition being played, with the slide navigator displaying a blue mark at the right corner of the slide to indicate the addition of a transition.
To change a previously selected transition, navigate to the sidebar at the top and tap ‘Change’ to select a new one. You can further, use the sidebar options to set the direction and transition play duration.
Step 6: Playing Your Slideshow
When satisfied with your effort, you can prefer playing the presentation, either in full screen or in a single window. If you choose to play in full screen, navigate to the ‘Play’ menu, click on the same and select ‘Full Screen’, followed by choosing the desired slide from where you wish the presentation to start in the slide navigator.
If you want to play the slideshow in a window, select a preferred slide in the slide navigator, go to the ‘Play’ menu at the top, click on the ‘Play’ tab, followed by choosing the ‘In Window’ option. The presentation will now start with the selected slide being played in one window and the presenter in the other.
In either of the above slideshow playing modes, press ‘Esc’ from your system’s keyboard to end the presentation playing process.
Step 7: Collaborating With Others
Working with the Keynote Slideshow Creator, you can collaborate with others to invite people to view and edit your presentation. To give a presentation access, you can either share a web link for a public access, or invite certain people having registered Apple credentials to view your creation. You can even give editing permissions to selected viewers or allow them to invite other people to collaborate.
04Powtoon
This one is a useful tool to create interactive business presentations for brand promotion and company recognition. Talking about the specific features of the tool, you can work with the utility to design an attractive logo for your company, import data and charts to your presentation, make adjustments in the color schemes of the slideshow, initiate infographic building and organize your slideshow into several sections.
The tool works best towards educating potential customers and clients about your company’s mainstream work profile and business. Sticking to the terms of utility pricing, you can begin with taking a free demo of the tool to access its credibility in cohesion with your specific needs. Following this, you can avail a monthly paid subscription of Powtoon, which has a price range of $ 19 to $ 59, according to the type and extent of features you choose to avail.
Pros
● You can add the details of your brand in the most expressive and appealing manner with the tool’s manifold design features.
● You can work with hundreds of preset slide designs to quickly create professionally sound animated slideshows.
● The tool is excellent in catering to your diverse slideshow design needs, when working for a large scale organizational setup.
Cons
● The tool is not a smart choice for individual or small scale business setups.
● The extensive variety of features results in a bit confusing and messy working interface.
● You can add a limited number of users to the monthly subscription plan of the tool.
User’s Guide to Create Animated Slideshows in Powtoon
For a better insight on how to create animated slideshows in Powtoon, let us go through the stepwise tutorial of the process in the following section:
Step 1: Launch the Online Tool
Visit the Powtoon official website to open the slideshow designer tool in any of your favorite internet browsers.
Powtoon Official Site Link: https://www.powtoon.com/index/
Step 2: Script Your Presentation
Start with creating a preset content for every slide of your presentation, based on the reason behind creating the slideshow, type and style of content presentation and so on.
Step 2: Add a Cohesive Background Music
You can complement your presentation with the perfect background music from the Powtoon library, from the web or even create your own voiceover recording through any preferred online text-to-voice recorder tool to voice the contents of your presentation. When you are done, upload your recording to the Powtoon editor to proceed with adding visual content to the presentation.
Step 3: Divide Your Presentation Slides
You can now add images, text and animations to your project in line with your presentation script. Choose suitable images from your device or from the web, add short, impactful texts and stunning animations from the Powtoon’s library to level up the appearance of your slideshow.
Step 4: Include Design Elements
Try adding additional elements like, graphics, background themes, animation styles, props, color schemes and other relevant characteristics to the slides.
Step 5: Time Your Presentation
In the last step, use the Powtoon timeline to set the sequence and time of appearance of different elements in each of your presentation slides. You can also hear the voiceover in the slideshow background to ensure the synchronization between the audio play and visual content appearance within the presentation.
05Visme
This one is a top grade cloud based professional tool for creating animated slideshow presentations with an affordably high visual credibility. Equipped with a drag and drop design workflow, the tool works effectively towards delivering intuitive and engaging animated slideshows for effective communication of business ideas and top rated brand promotion strategies.
The best usage of the tool lies in the creation of business presentations that are aimed at ensuring company oriented image collection and brand consistency. Talking of the tool’s pricing constraints, a single user subscription of the utility would cost you $ 20 on a monthly basis, which increases to $ 60 per month for a 3-user package.
It is a smart choice to take a free live demonstration of the tool to get a comprehensive understanding of the latter’s working technology.
Pros
● Extensive variety of colors, images and logos to complement your business presentations with elusive design elements.
● Promotes a viable consistency among multiple employee presentations
● The tool comes with an in built analytic system that keeps a track of the viewers of your slideshow presentations.
Cons
● The tool lacks some essential elements of slideshow design.
● The design features are mostly generic and do not cater to intense creation needs.
● The tool lacks a free trial facility.
User’s Guide to Create Animated Slideshows in Visme
In the following section is presented a stepwise procedure to create stunning animated slideshows in Visme with high end professional excellence and in the quickest time span:
Step 1: Download and Install the Program
Navigate to the official website of the Visme Slideshow Creator program to download and install the same in any of your preferred MacOs or Windows supported devices.
Visme Official Download Link: https://visme.co/blog/
Step 2: Start a New Project
You will need to create a Visme account to start working on the slideshow creation process. When you have created one, navigate to and click the ‘Create New Visme’ option in the tool’s opening screen to open a new project and assign a suitable name to it.
Step 3: Choose a Template
in the new project window that appears, click on ‘Presentations’ option at the top to see a library of slideshow templates being displayed. You can either, select a template from the library to edit or start an entirely new creation of your own.
Step 4: Make Color Schemes and Background Selections
To proceed with the selection of slide backgrounds and color schemes, you can either choose an exact color by entering its RGB code in the ‘Edit Colors’ option, or choose one from Google web pages using the ‘Chrome Eye Dropper’ tool.
Step 5: Add Shapes and Icons
You can supplement your slideshow with suitable design elements, like icons and shapes. All you need to do is navigate to the ‘Tools Panel’ in the left, click on the ‘All Shapes’ symbol and type a related keyword in the search bar to get a list of matching shapes to choose from.
Step 6: Insert and Format Text
You can now proceed with adding suitable text, titles and subtitles to the presentation slides. Again, visit the ‘Tools Panel’, tap the ‘T’ icon and click on ‘Add a Title’. A text box will be created within the slide, where you can add the required text. You can also format the same from the ‘Format Toolbar’ that gets displayed above the inserted text box.
Step 7: Add Photographic Slides
To include image slides, start with inserting a new slide in the presentation, flowed by once again navigating to the ‘Tools Panel’ in the left and clicking on the ‘Background’ icon. Choose a suitable color scheme and again, click on the ‘Images’ symbol in the ‘Tools Panel’. Here you can select any suitable image from the library that gets displayed.
Step 8: Link Your Slides
Link the sequential slides of your presentation with any suitable indicator, such as an arrow, so that clicking on the same takes the viewer to the successive slide. You can alternatively create ‘Hotspots’ to link the slides together.
Step 9: Publish and Share Your Presentation
When the final result makes you happy, navigate to the ‘Publish’ tab just above your slide window to open the presentation publishing interface. Here, you can choose from the options of a direct share, a site or blog embed or a local download of the presentation to your device.
● Ending Thoughts →
● Animated slideshow presentations land among the most trending ways to ensure a precise and engaging content delivery.
● The software market is packed with a diverse range of impressive slideshow creator tools with the most amazing features.
● When making your choice of the perfect animated slideshow designer tools, the Wondershare Filmora Slideshow Creator program is indeed a smart pick.
If you are passionate about uplifting your graphic design skills with stunning animated slideshow creation, read here about the best PowerPoint templates!
In this article
01 [12 Cool Animated Slideshow PowerPoint Templates](#Part 1)
02 [5 Tools to Make Stunning Animated Slideshow PowerPoint](#Part 2)
Part 1 12 Cool Animated Slideshow PowerPoint Templates
Slideshows are an already appealing media of content presentation, which when supplemented with animated backgrounds, are bound to captivate attention. Considering the underlying reason, it should be noted that animated slideshows offer a more vivid and lively presentation of information, as compared to their static counterparts. Animated slideshows have the additional advantage of presenting the content in the exact and accurate tone that suits the grasping capability of the audience.
Talking of feasible solutions for creating high end animated slide show presentations, the software market has a diverse range of alternatives to choose from. However, Microsoft PowerPoint is a graphic presentation tool that almost everyone is familiar with. Limiting our discussion to the same, there are a diversity of animated slideshow PowerPoint templates, like that of Evanto Elements and GraphicRiver to design professionally outstanding animated slideshows.
If you are keen on trying hands at adding that extra spunk your ordinarily boring static presentations, spare time to read the following section of this article, which incorporates the features, utilities and merits of the top 12 design templates in GraphicRiver for creating animated slideshows in PowerPoint with utmost ease and within a quick time span:
01Parallax Ultimate PowerPoint Animated Template
Choosing this animated presentation template to design your slideshow projects will supplement tour creations with the most amazing parallax effect, including an additional list of tempting and trendy editing features, like, limitless color choices, high definition video resolution, master slide presentations, modern, elegant, fully animated, company oriented slides, with object animations and parallax transitions, 16:9 wide screen aspect ratio, handmade infographics and much more.
02Splash Animated PPT
This one is an excellent animated template to create elegant animated slideshow presentations that will make your design creativity stand out of the crowd. Working with the template entitles you of a matchless, professional quality slideshow animation PowerPoint project on account some exclusive features, like those of high definition screen resolution and widescreen image aspect ratio, light and dark presentation backgrounds etc.
Mentioning some additional credibility of using the template for creating animated slideshows, you get to access as many as 500 selected slides, vector line and social media icons, uniquely styled image masks, calendars and vector maps.
03Social Media Animated PowerPoint Templates
If your working constraints require an extensive use of social media information, consider using tis interactive PowerPoint template for designing social media compatible, premium quality, professional slideshows with animated graphics. Working with the template, you will get a complementary access to a pool of exciting slideshow features.
Talking of the specific utilities of the animated slideshow maker template, you can choose from over 50 slide layouts, light and dark backgrounds themes, enjoy a seamless, drag and drop workflow and easily edit grouped elements, along with modifying infographic elements in Excel sheets.
04Animated Slides Bundle for PowerPoint Presentation
This one is an interactive GraphicRiver PowerPoint animation slideshow maker template, which you can work with for a delivery of high end and illustrative animated slideshow presentations. The template facilitates its users with a diversity of graphic customization features, like that of visual transitions, custom reveals and objectified motions to your presentation slides, points and images.
The template promises you of a stunning, high quality and compelling slideshow output with an elegant presentation outlook. The template has a variety of inbuilt slide layouts, is easy to use and comes to you absolutely free of cost.
05Proposal PowerPoint Animated
If you are about to deliver a dynamic business presentation, consider working with this graphic tool to create your animoto slideshow in PowerPoint. Proposal PowerPoint Animated is an interactive animation template, designed exclusively for adhering to the concern of business centered content delivery.
You can create captivating motion stories with the conveniently editable slides and high end animated graphics of this PowerPoint template, thus ensuring a high pitched information conveyance to your target audience.
06DIY Animated PPT Promo Kit
Looking for the most feasible PowerPoint animated slideshow templates for slideshow creation generally refers to a time consuming web search. If you are a creativity freak and want to escape the aforesaid hustle, try hands at working with the DIY Animated PPT Promo Kit to create a customized animated slideshow template of your own.
Talking about the utilities, this interactive slideshow presentation kit is packed with a lot of professional features that are sufficient to give a hype to your normal quality slideshows and allows you to work with over 100 entirely customizable slides in 2 variable color schemes.
07Pitch Deck Animated Bundle
Using a pitch deck strategy is a common way of attracting fund credibility for your business for an appreciable revenue growth, which is often put to the additional use of addressing potential workers of the company on the latter’s crucial success factors. When working towards either of the purposes, using the aforesaid software bundle is a smart choice to showcase the exact content concerning your overall business concept to the target audience.
This one is preferably the best pitch deck template you could ever get. Though there is an appealing set of market choices, it is always an impressive decision to select the cream from the curd for ensuring high end results.
08Massive X Presentation Template for PowerPoint
When having a desire to access the credibility of slideshow templates though user reviews, this animated PowerPoint template is sure winner. Packed with an extensive library of over 960 exceptional slides in dark and light background themes, along with 20 preset color schemes, this graphic template is an absolute favorite of creative designers across the globe.
Choosing the template for catering to your animation centered slideshow creation needs opens a diversity of audio-visual customization features with an entirely free access and an easy to use working interface.
09Imperial Multipurpose PowerPoint Template
Living up to its name, this one is a multi-functional, free animated slideshow template that allows you to choose the perfect color scheme for your brand from more than 100 shade varieties, thus ensuring a high end transition flexibility. Prefer using this template to add a visual highlight to your slideshow presentations with a diversity of icons and customized animations.
If you have invested enough time looking for the best PowerPoint animation slideshow creator utility, end your search with the Imperial Multipurpose template that is available to you without asking for a penny from your pocket and welcomes you with the most interactive working environment.
10Minimal PowerPoint
The aforesaid slideshow template for creating animated presentations is a fundamental and clean graphic creation utility that comes with a wide range of more than 500 different sides and convenient to use drag and drop placeholders for seamless content inclusion. Additional features of the template consist of inbuilt calendars, charts, graphs and customized illustration components, suitable for a diverse set of industries.
This one is an interactive style PowerPoint animoto slideshow maker template that works best to infuse data and animation graphics together. You can use this graphic design tool without a second thought for delivering quality content with a cohesive slideshow presentation, of course without having to worry about any cost constraints.
11PowerPoint Animated Pro Pack- With Animated Slides
Using this animation slideshow template for your business presentations facilitates you with a series of interactive graphic modules within professionally compatible slides. You can use this high end template package to supplement your presentations with high quality animated motion diagrams.
Other appealing features of the package include a huge set of conveniently editable slides, with an extensive variety of PowerPoint compatible motion transitions, animations and many more surplus features to add the right amount of spark to your professional animated slideshow presentations.
12Wow Slides for PowerPoint
If you are yet to reach to the perfect animated slideshow creator solution, consider sparing a thought about this wonderful PowerPoint template to cater to your animation design concerns. Available to you with a decent set of over 24 inbuilt color themes, this one is a perfect choice for working on webinar slides, business presentations and pitch decks.
Apart from elegantly beautiful collection of animations, you will find this slideshow template package to be a storehouse of elusive and explanatory charts, graphs, maps and icon packs, which you can use to add relevant statistical content to your presentations or give an enhanced and organized look to your slideshow project.
Part 2 5 Tools to Make Stunning Animated Slideshow PowerPoint
Having discussed about the most amazing animation slideshow templates for PowerPoint, let us now extend our talk to learn about some of the most preferred graphic tools to create high end and professionally expressive and stunning animation centered slideshow presentations in PowerPoint, considering the fact that such presentations are an important part of the ongoing business trends, which you should be aware of.
The following section presents a detailed discussion on the features, best application utilities, market reviews and usage guidelines of the top 5 animated slideshow creator tools:
01**Wondershare Filmora Video Editor **
For Win 7 or later (64-bit)
For macOS 10.12 or later
This one is possibly the best and an all in one software package that promises to address almost all of your graphic editing needs in the most affordable manner. Talking of the specific utility of creating animated slideshow presentations, Wondershare Filmora is dedicated towards delivering high end motion graphic slideshows of matchless professional excellence.
The tool is best in making audio infused, animated photo slideshows that are apt for comprehensive graphic proposals for top rated business projects. About the software’s pricing requirements, you can avail a free usage of the tool for free in its trial version for 7 days, following which, working with the tool will demand paid monthly and annual subscriptions of $9.99 and $19.99 respectively.
Pros
● Working with the tool, you are entitled to use a plethora of audio-visual effects and filters to enhance your presentations.
● The tool’s feature rich library has everything to design animated slideshows with high resolution output quality.
● The tool is known to support almost all popular audio, video and image file formats.
Cons
● The tool has a limited variety of fine-tuned utilities for effect tweaking.
● The features of chapter authoring and DVD menu are absent.
● Working with the tool, you may encounter occasional software crashes.
User’s Guide to Create Animated Slideshows in Wondershare Filmora
Having understood the basic functionalities and exceptional features of Filmora’s Animated Slideshow creator tool, let us see through the following section to get familiar to the knowhow of using the same for designing animation top rated slideshow presentations in a stepwise procedure:
Step 1: Download and Install the Software
Before getting though with the creation process, initiate a download of the slideshow creator program from the latter’s official website to any of your preferred Windows or iOS compatible devices.
Step 2: Add Your Images and Videos
Creating a slideshow presentation may require a set of multiple image and video files to the program’s graphic creator timeline. It is recommended to add your selections of the aforesaid files to a single folder before launching the software in your system.
Once you have finished making your selections, launch the program to reach its welcome interface, were you need to navigate and click on the ‘Media’ tab in the top toolbar. From the task options that appear, click on ‘Import a Media’. Next, you will be asked to browse through your device locations and choose the folder that contains your previously selected files to be used in the presentation you are about to create.
When you have found the required folder, tap on ‘OK’ to import the same to the new slideshow project in the Filmora timeline. All your selected files will be visible here after a successful import.
Step 3: Timeline Positioning of Media Files
Before working on the task of positioning the imported media files on the app’s timeline, navigate to the ‘File’ menu and choose the ‘Preferences’ option. As soon as the respective window pops up, reach to the ‘Editing’ tab at the top and select ‘Photo Placement’ from the drop down menu that follows.
In case your selected images do not have a matching aspect ratio with the program’s preset values, choose the ‘Crop to Fit’ option for removing the additional black bars from the selected images. For the requirement of adding camera pan and zoom movements to your images, select the ‘Pan & Zoom’ option in the ‘Preferences’ settings.
You can proceed to change the preset play durations of images, effects and transitions in the ‘Editing’ window itself. As an alternative you can adhere to the same task in the program’s timeline by dragging any one end of the media files in an outward or inward direction. The ‘Crop to Fit’ option may not give an affordable size in some cases where the images are set in a vertical 9:16 aspect ratio. Choose the ‘Fit’ option to set this issue straight.
When you have finished making all the aforesaid adjustments, navigate to the Media panel again for adding the selected image files to the software’s timeline. Proceed with selecting a file and dragging and dropping the same at the desired position within the timeline. Continue repeating the process till all the images have been placed at their respective locations, and in the exact order of appearance in the slideshow. This should be followed by adjusting the image play durations using any one of the previously described methods.
Step 4: Escape Hard Cuts With Image Transitions
Hard cuts among different slides of a presentation break the flow of the slideshow. To escape this cringe, consider using a smooth transition effect within the slides of your project. To do this, navigate to the ‘Transitions’ tab in the top toolbar of Filmora’s project window and select a desired one from over 100 choices of customizable transitions.
You can now drop these transitions in the timeline at the exact intersection point of two image files. Avoid using the same transition for every hard cut to escape monotony. You can instead choose different transitions for each slide while observing its appearance in the clip.
After you are done with applying transitions to each slide, double click on a particular transition to open its ‘Transition Setting Window’ either for presetting the transition play duration or to choose a desired transition mode. You can also prefer a direct customization of the transition duration in the project timeline through a right or left dragging of any of its ends.
Step 5: Uplift Your Slideshow Colors With Overlays and Filters
Navigate to the top toolbar and hit the ‘Effects’ tab to choose from a diversity of visual effects that can be added to the slideshow images to supplement them with an increased vibrancy through color desaturation. These effects in the program’s library are categorized into classes of Overlays and Filters, with further subcategories of Sepia Tone, Light Leaks and Lomography and many more.
To apply these effects, just select and add them into a timeline track above the clip you wish to add the overlay or filter to. When you have applied the effects, observe the overall clip appearance in the ‘Preview Panel’. Double click on a particular effect to fine-tune the latter’s settings.
Step 6: Supplement Your Slides With Motion Graphic Elements
While motion graphics will undoubtedly enhance your animated slideshows, adding them to your presentation is purely optional, since most professional projects do not need a motion graphic element to escalate their presentation outlook. If, however, you choose to work on making these a part of your animated slideshow, Filmora lets you do that in its ‘Elements’ tab.
There is a plethora of motion graphic templates that you can select and add to the project timeline for a quick and vibrant upgrade of your presentation slides, but, at the same time, it becomes important to take care of the visual outlook and the underlying reason of creating the slideshow before you decide on adding these elements to your project.
Step 7: Create Voiceovers and Record Soundtracks for Your Slideshow
Narration is a smart way to captivate the target audience within your slideshow, whether though a self-delivery or a recorded voiceover. If you decide on the second option, you can conveniently use the Filmora Slideshow Creator program to add voiceovers and soundtracks to your presentation.
To adhere to the purpose, navigate to the top toolbar and click on the ‘Media’ tab. From the options that appear, tap on the ‘Record’ menu that drops down, followed by selecting the ‘Record Voiceover’ option. As soon as the ‘Record Audio’ prompt pops up, select your desired microphone to be used in the recording process and click on the ‘Record’ button.
The recording that you have just created will appear in the ‘Media’ tab beside your all other imported audio-visual and image files, and you can add the same to any desired file with utmost ease. The Filmora library further allows you with a free access to its huge inventory of sound and audio effects. To apply these effects to your project, navigate to the ‘Audio’ tab and browse through impressive music categories, like, Young & Bright, Rock, Electronic, etc., to select the best matching audio for your slideshow.
When you have made your selections, add all of them to the slideshow’s audio track in the project timeline and make suitable adjustments to their play durations.
Step 8: Export Your Creation
When your satisfied with your efforts till here, you have indeed created a wonderful animated slideshow presentation that should be exported to relevant platforms. Navigate to the ‘Export’ tab at the top right corner of the project timeline and click on the same. As soon as the utility window appears, choose a preferred file format, set a desired output resolution and fame rate for your presentation, followed by making a direct export of the same to your Vimeo or YouTube accounts.
The slideshow rendering time on different platforms may vary in cohesion with the specific presentation lengths, with larger file requiring a considerably longer time to get rendered than the smaller ones. It is advisable to limit the output file size within 500 MB for a quick rendering process.
02Canva
This one is an online animation slideshow creation tool that could certainly be your best choice to design high end professional presentations. Facilitating you with over 100 different slide design layouts, the tool additionally grants you the liberty to add your own images to the presentation being created, or even select suitable alternatives from Canva’s extensive image stack that has over 1 million apposite images to choose from.
You can make the best use of Canva to create promotional presentations to add extra emphasis on the brand of your company and product brand, which a compatible to a diverse variety of professional platforms for information sharing.
As far as the cost constraints of the tool are concerned, you get to access a free version of the tool for working on slideshow presentations for individual or small business units, while the graphics design needs of large scale professional corporations are suitably addressed by the utility’s Canva for Work version, which is equipped with high end team coordinated features with a 30-day free trial, along with monthly and annual subscription of $ 12.95 and $ 119.4 respectively.
Pros
● The tool allows you to add elusive texts, filters, fonts and images to the animated slides of your business presentation.
● Working with the tool, you can drag and drop an extensive variety of elements within your slideshow.
● Canva further allows you to create, upload and save the logo of your brand.
Cons
● The tool’s customer support is not quite welcoming.
● You need to add your phone number within the tool’s customer support interface for getting the required help.
● The tool’s working interface is somewhat confusing.
User’s Guide to Create Animated Slideshows in Canva
Let us see browse through the detailed, step by step process to quickly create amazing animated slideshow presentations using the Canva graphic design tool in the following section:
Step 1: Download and Install Canva
Visit the official site of the tool for a free download of the Canva slideshow creator software in any suitable iOS or Windows compatible desktops, laptops and PC systems.
Step 2: Choose Your Task
Undertake a launch of the downloaded program to reach the latter’s welcome page. Here, you need to navigate to the search bar at the top and type a keyword to select your task. For creating slideshow presentations, enter ‘Slideshow’ in the search tab.
In the drop down menu that follows, a list of the closest matching alternatives of your keyword will appear. Select ‘Slideshow Videos’ from the same.
Step 3: Select a Template
The completion of Step 2 will take you to the program’s template library, where you can either work with creating a presentation of your own by clicking on the ‘Create a Blank Sideshow Video’ option, or choose any one from the finest collection of in built slideshow templates from the Canva library.
Step 4: Customize Your Template
After selecting the template, you will reach Canva’s slideshow editor page. Here you can customize your slideshow as per your preferences. To begin with, replace the preset images in the template with your selected ones.
You can either choose a set of images from the program’s inbuilt photo gallery or select the same from your device. Navigate to the ‘Tools Panel’ in the left and click on ‘Photos’ to work with the first method, or tap ‘Uploads’ in that very panel to apply the second.
When you have made your choice, click on ‘Upload Media’ to bring your selections to the tool’s editor timeline. This should be followed by dragging and dropping the images at appropriate places within the template.
Step 5: Crop the Images
Double click on any image and drag it sideways to crop the same within your preferred aspect ratio. When you are happy with the changes, click on ‘Done’ to apply them. You can additionally, customize the images with a variety of available effects at this stage.
To proceed with the aforesaid process, choose the image you want to customize and select ‘Edit Image’ from the dropdown that appears. You will be directed to the ‘Edit Image Gallery’, where you can select the effect you want to complement your image with.
Step 6: Add Other Design Elements
Tap on ‘Elements’ in the ‘Tools Panel’ at the left to select a suitable component from a range of stickers, icons, illustrations and charts to add to your slideshow according to its creation theme.
Step 7: Customize the Text
The template has some pre-written text, which you can change by double clicking inside the text boxes to highlight the already written text and edit the same as per your requirement. Press ‘T’ on your system’s keyboard for adding extra text boxes. You can also visit the ‘Editor Toolbar’ work with a variety of text formatting options, like, font size, style and color.
Step 8: Include Suitable Animations
To supplement your slideshow with stunning animations, select the image, element or text you wish to animate, followed by pressing the ‘Animate’ button. You will reach the ‘Animations Gallery’ for a selection of the desired text or page animation you want to add.
Once you have finalized your choice, click outside the gallery to apply your selected animation.
Step 9: Add the Perfect Sound
To uplift your presentation with an appealing music, navigate to the ‘Tools Panel’ at the left of the editor window and tap on ‘Audio’. A gallery of music clips will get displayed. Choose the one that best suits the theme of your animated presentation.
Step 10: Preview Your Creation
When you are done with creating the presentation, watch how it looks by navigating to the ‘Menu Bar’ at the top and clicking on the ‘Play’ button. When you have finished, click on ‘Close’ to reach the editor window.
Step 11: Set the Play Duration
To adjust the play duration of any slide, select it and navigate to the toolbar at the top left corner.
Click on ‘Edit Timing’ in the same and make suitable adjustments either by encoding the required number of seconds or dragging the duration slider.
Step 12: Time to Download and Share!
Prefer previewing the slides one again to take a final look at your presentation. If you are happy with your work, navigate to and tap ‘Download’, followed by selecting the file type to save your creation locally to your device.
It is recommended to choose the ‘MP4 Video’ file format for saving audio enabled presentations. In case you want the background music to be included, either choose the ‘GIF’ format or download the slideshow as a PowerPoint presentation.
For a direct share of the animated slideshow, navigate to the ‘Menu Bar’ at the top and click on ‘Share’, followed by ‘All Options’ and lastly, tap ‘Present’.
03Keynote
This one is affordably the most convenient presentation tools if you are a user of iOS devices, and is a world class utility to create animated slideshow presentations. You can work with this tool to add an extra element of practicality to the otherwise customary business oriented animation slideshows with a diversity of effects, filters and transitions. The software is an ultimate best in adhering to real-time and remote event collaboration concerns of employees.
Concerning the pricing requirements, you can work with this slideshow creator tool for free if your usage concerns are restricted to a personal need. In an otherwise case, you can prefer buying the latter for a monthly investment of $ 99 and $ 299, respectively for business and enterprise based concerns.
Pros
● The Keynote program allows you a real-time, remote and revised access to the slideshow presentation.
● The program’s creator library is a storehouse of the most elegant and expressive slideshow templates and themes.
● The application greets you with a responsive and non-messy interface, with a decluttered toolbar.
Cons
● The program offers you a limited number of options to export your creations.
● You cannot work with the application on a Windows compatible device.
● If you are a regular PowerPoint user, working with the tool will require you a comprehensive learning of the usage pattern.
User’s Guide to Create Animated Slideshows in Keynote
Moving ahead with the discussion, let us understand the process of creating an animated slideshow presentation in Keynote though a step by step guide in the following section:
Step 1: Download the Keynote Slideshow Creator Tool
Start with initiating a free download of the tool from the official Apple website through your login credentials and proceed to install the same in your iOS device.
Step 2: Select a Presentation Theme
To start working on your slideshow presentation, you will require to choose a suitable theme. To do this, open the tool by clicking on its icon in the Launchpad, Applications folder or the Dock. The ‘Theme Chooser’ window pops up. In case this doesn’t happen, navigate to the bottom left corner of the screen and tap ‘New Document’.
In the ‘Theme Chooser’, you can either see through different categories or tap ‘All Themes’ to select the one you like. When you have found your preferred theme, open it by double clicking on the same.
You may either use the preset slide layout of the selected theme or use a different one by navigating to and clicking on ‘Format’ tab at the right side of the screen. You can now add your specific content in the presentation through adding new slides, text and images.
Click on the ‘+’ symbol in the theme toolbar to add a new slide followed by choosing its layout, double click inside the placeholder text to edit the same or drag and drop an image from your device gallery or the internet to replace the preset one in the template.
Step 3: Supplement Your Presentation With Objects
Proceed to add different slideshow objects in your creation by navigating to the ‘Object Toolbar’ at the top and selecting tables, charts, shapes, text boxes, comments, etc., that you wish to add in your presentation.
You can further make changes in the color, shadow and border of the object to improvise its appearance, or prefer applying a preset object style to enhance the overall object look to bring it in line with the slideshow theme. To do this, select the object and you will see its formatting options in the sidebar at the right. Click on the ‘Format Toolbar’ if the sidebar does not appear.
You can additionally, add layers to the slide objects, change their size or nest them within a shape or text box and link objects to switch to a new slide, open a related web page or email message.
Step 4: Add Audio-Visual Elements
Try adding suitable media elements to your creation by dragging a video or music file from your system either to a media placeholder or just anywhere within the slide. You can alternatively tap on the ‘Media’ icon in the top toolbar and choose ‘Music’ or ‘Movies’ from the dropdown that appears, followed by dragging the file with the previously explained method.
To add a soundtrack to the presentation, click on the ‘Soundtrack’ icon in the toolbar at the top, followed by clicking on the ‘Audio’ tab in the sidebar that appears. Next, tap the ‘+’ icon to select specific songs or playlists you want to add in the soundtrack.
Step 5: Add Stunning Animations
Start with selecting a slide to add the animation effect in the ‘Slide Navigator’. The ‘Animate’ sidebar appears, where you need to select the ‘Add an Effect’ option. Scroll down to view and choose a desired transition.
You can see a preview of the selected transition being played, with the slide navigator displaying a blue mark at the right corner of the slide to indicate the addition of a transition.
To change a previously selected transition, navigate to the sidebar at the top and tap ‘Change’ to select a new one. You can further, use the sidebar options to set the direction and transition play duration.
Step 6: Playing Your Slideshow
When satisfied with your effort, you can prefer playing the presentation, either in full screen or in a single window. If you choose to play in full screen, navigate to the ‘Play’ menu, click on the same and select ‘Full Screen’, followed by choosing the desired slide from where you wish the presentation to start in the slide navigator.
If you want to play the slideshow in a window, select a preferred slide in the slide navigator, go to the ‘Play’ menu at the top, click on the ‘Play’ tab, followed by choosing the ‘In Window’ option. The presentation will now start with the selected slide being played in one window and the presenter in the other.
In either of the above slideshow playing modes, press ‘Esc’ from your system’s keyboard to end the presentation playing process.
Step 7: Collaborating With Others
Working with the Keynote Slideshow Creator, you can collaborate with others to invite people to view and edit your presentation. To give a presentation access, you can either share a web link for a public access, or invite certain people having registered Apple credentials to view your creation. You can even give editing permissions to selected viewers or allow them to invite other people to collaborate.
04Powtoon
This one is a useful tool to create interactive business presentations for brand promotion and company recognition. Talking about the specific features of the tool, you can work with the utility to design an attractive logo for your company, import data and charts to your presentation, make adjustments in the color schemes of the slideshow, initiate infographic building and organize your slideshow into several sections.
The tool works best towards educating potential customers and clients about your company’s mainstream work profile and business. Sticking to the terms of utility pricing, you can begin with taking a free demo of the tool to access its credibility in cohesion with your specific needs. Following this, you can avail a monthly paid subscription of Powtoon, which has a price range of $ 19 to $ 59, according to the type and extent of features you choose to avail.
Pros
● You can add the details of your brand in the most expressive and appealing manner with the tool’s manifold design features.
● You can work with hundreds of preset slide designs to quickly create professionally sound animated slideshows.
● The tool is excellent in catering to your diverse slideshow design needs, when working for a large scale organizational setup.
Cons
● The tool is not a smart choice for individual or small scale business setups.
● The extensive variety of features results in a bit confusing and messy working interface.
● You can add a limited number of users to the monthly subscription plan of the tool.
User’s Guide to Create Animated Slideshows in Powtoon
For a better insight on how to create animated slideshows in Powtoon, let us go through the stepwise tutorial of the process in the following section:
Step 1: Launch the Online Tool
Visit the Powtoon official website to open the slideshow designer tool in any of your favorite internet browsers.
Powtoon Official Site Link: https://www.powtoon.com/index/
Step 2: Script Your Presentation
Start with creating a preset content for every slide of your presentation, based on the reason behind creating the slideshow, type and style of content presentation and so on.
Step 2: Add a Cohesive Background Music
You can complement your presentation with the perfect background music from the Powtoon library, from the web or even create your own voiceover recording through any preferred online text-to-voice recorder tool to voice the contents of your presentation. When you are done, upload your recording to the Powtoon editor to proceed with adding visual content to the presentation.
Step 3: Divide Your Presentation Slides
You can now add images, text and animations to your project in line with your presentation script. Choose suitable images from your device or from the web, add short, impactful texts and stunning animations from the Powtoon’s library to level up the appearance of your slideshow.
Step 4: Include Design Elements
Try adding additional elements like, graphics, background themes, animation styles, props, color schemes and other relevant characteristics to the slides.
Step 5: Time Your Presentation
In the last step, use the Powtoon timeline to set the sequence and time of appearance of different elements in each of your presentation slides. You can also hear the voiceover in the slideshow background to ensure the synchronization between the audio play and visual content appearance within the presentation.
05Visme
This one is a top grade cloud based professional tool for creating animated slideshow presentations with an affordably high visual credibility. Equipped with a drag and drop design workflow, the tool works effectively towards delivering intuitive and engaging animated slideshows for effective communication of business ideas and top rated brand promotion strategies.
The best usage of the tool lies in the creation of business presentations that are aimed at ensuring company oriented image collection and brand consistency. Talking of the tool’s pricing constraints, a single user subscription of the utility would cost you $ 20 on a monthly basis, which increases to $ 60 per month for a 3-user package.
It is a smart choice to take a free live demonstration of the tool to get a comprehensive understanding of the latter’s working technology.
Pros
● Extensive variety of colors, images and logos to complement your business presentations with elusive design elements.
● Promotes a viable consistency among multiple employee presentations
● The tool comes with an in built analytic system that keeps a track of the viewers of your slideshow presentations.
Cons
● The tool lacks some essential elements of slideshow design.
● The design features are mostly generic and do not cater to intense creation needs.
● The tool lacks a free trial facility.
User’s Guide to Create Animated Slideshows in Visme
In the following section is presented a stepwise procedure to create stunning animated slideshows in Visme with high end professional excellence and in the quickest time span:
Step 1: Download and Install the Program
Navigate to the official website of the Visme Slideshow Creator program to download and install the same in any of your preferred MacOs or Windows supported devices.
Visme Official Download Link: https://visme.co/blog/
Step 2: Start a New Project
You will need to create a Visme account to start working on the slideshow creation process. When you have created one, navigate to and click the ‘Create New Visme’ option in the tool’s opening screen to open a new project and assign a suitable name to it.
Step 3: Choose a Template
in the new project window that appears, click on ‘Presentations’ option at the top to see a library of slideshow templates being displayed. You can either, select a template from the library to edit or start an entirely new creation of your own.
Step 4: Make Color Schemes and Background Selections
To proceed with the selection of slide backgrounds and color schemes, you can either choose an exact color by entering its RGB code in the ‘Edit Colors’ option, or choose one from Google web pages using the ‘Chrome Eye Dropper’ tool.
Step 5: Add Shapes and Icons
You can supplement your slideshow with suitable design elements, like icons and shapes. All you need to do is navigate to the ‘Tools Panel’ in the left, click on the ‘All Shapes’ symbol and type a related keyword in the search bar to get a list of matching shapes to choose from.
Step 6: Insert and Format Text
You can now proceed with adding suitable text, titles and subtitles to the presentation slides. Again, visit the ‘Tools Panel’, tap the ‘T’ icon and click on ‘Add a Title’. A text box will be created within the slide, where you can add the required text. You can also format the same from the ‘Format Toolbar’ that gets displayed above the inserted text box.
Step 7: Add Photographic Slides
To include image slides, start with inserting a new slide in the presentation, flowed by once again navigating to the ‘Tools Panel’ in the left and clicking on the ‘Background’ icon. Choose a suitable color scheme and again, click on the ‘Images’ symbol in the ‘Tools Panel’. Here you can select any suitable image from the library that gets displayed.
Step 8: Link Your Slides
Link the sequential slides of your presentation with any suitable indicator, such as an arrow, so that clicking on the same takes the viewer to the successive slide. You can alternatively create ‘Hotspots’ to link the slides together.
Step 9: Publish and Share Your Presentation
When the final result makes you happy, navigate to the ‘Publish’ tab just above your slide window to open the presentation publishing interface. Here, you can choose from the options of a direct share, a site or blog embed or a local download of the presentation to your device.
● Ending Thoughts →
● Animated slideshow presentations land among the most trending ways to ensure a precise and engaging content delivery.
● The software market is packed with a diverse range of impressive slideshow creator tools with the most amazing features.
● When making your choice of the perfect animated slideshow designer tools, the Wondershare Filmora Slideshow Creator program is indeed a smart pick.
Make Well Done Animated GIF
Versatile Video Editor - Wondershare Filmora
An easy yet powerful editor
Numerous effects to choose from
Detailed tutorials provided by the official channel
GIF refers to Graphics Interchange Format, and you can generally discover this animated graphic image on web pages. You will see them like a twirling icon or a banner or just a few letters that go huge like magic. Note that well done animated GIF file mentions as a GIF89a, and this single file is helpful to contain various images inside a particular folder.
Moreover, these well-done animated GIF files are excellent for social media platforms, ad banners, and web pages.
They also want to add many funny words, bringing in interesting front outcomes at all times. Of course, it all boils down to the experience you wish to gain, but GIFs are always great to share online, and they bring in tons of fantastic fun moments that you can enjoy with your family.
Today, we will explore the ideal tool to create well done animated GIF along with a well-framed animated GIF tutorial. So, let’s join the trend and share the same with your friends and family.
In this article
01 [Make well done animated GIF with Filmora](#Part 1)
02 [Samples for Well Done Animated GIF](#Part 2)
Part 1 Make well done animated GIF with Filmora
You may easily find multiples of GIF files over different social media channels. These day’s people are using them mainly to entertain the audience on their channels or pages. They are also active in use for active conversations in other replies or comments.
Lots of people use GIFs to convey unique reactions on the internet on various channels. They are also valuable for illustrations, and one of the most prominent implications is in the business world for marketing requirements. It allows explaining your business products with increased user engagement and entertainment. The artistic world of GIFs can quickly boost your customers online.
It is possible to create well-done animated GIFs from still images or even from moving videos. This task is pretty straightforward than anyone can perform. To execute this task with much simplicity, we would like to recommend Wondershare Filmora for you.
Wondershare Filmora
Get started easily with Filmora’s powerful performance, intuitive interface, and countless effects!
Try It Free Try It Free Try It Free Learn More >

Using Filmora, you can quickly transform small videos into GIFs or combine several stills into GIFs. The more exciting thing is that Filmora also allows easy GIF customization as users can add different elements, overlays, text, etc., to their GIFs using the Filmora platform.
With Filmora, no matter what video formats you get, including FLV, MKV, WMV, MP4, etc. You can also introduce various advanced elements, animations, overlays, text to customize your GIFs.
Yet, if you are looking for an animated GIF tutorial, Filmora makes it all convenient for you. It assists you in creating an image, video memes, and GIFs directly without a watermark. It is FREE to use and has no signup.
You can change text size, position, and color to create a caption during the editing process. Then, just with a few clicks, your GIF is done. Try it now!
How to make GIFs with Wondershare Filmora
Here are a few simple steps to accomplish this task:
Step 1 Upload video or an image
Primarily, you have to import some editable video files or a collection of photos to the timeline of Wondershare Filmora.
Step 2 Drag to timeline
You can drag their imported media in Step 1 and drop it on the Filmora timeline.

Step 3 Edit media files
There are tons of editing options with pretty cool Filmora features. Users can easily choose among options like speed up, slow down, combine, rotate, crop, split, etc., to create a compelling video as per the content available.
Step 4 Add text effect to GIF files
It is the right time to update text-based information GIFs. Few text messages always appear good in GIFs. Or, you can add other elements here like sound, etc.

Step 5 Save and export
Once you have finished all the steps, save your file with a GIF extension and get ready to upload it on various social media platforms.

Part 2 Samples for Well Done Animated GIF
They say that an image is worth looking at a thousand words, so you must consider an animated GIF even more regarding this statement. In the current scenario, email marketers are revamping the boundaries of email design by including well-done animated GIFs to showcase their services and products in action.
Here is a collection of 5 beautiful samples of well-done animated GIFs in email marketing that proved to be very creative, engaging, and colorful.
1. ShoeMint
This cute GIF syncs pretty well with the ShoeMint’s email marketing template’s title – “C’mon, Get Happy!.” You can smile when you see the colorful socks swaying in a carefree manner.
2. Mr. Porter
This is an animated fireplace in the email marketing newsletter of Mr. Porter. It gives a pretty cozy and warm feel and atmosphere to the entire image, which is what they’re looking for or wandering for with the casual clothes the man is wearing.
3. American Apparel
American Apparel sells “power washed” T-shirts to make them “super soft.”
This critical merit would not attract many users if it weren’t for simulating the animated GIF of the T-shirts getting washed in an imaginary washing machine.
4. Looper
One of the major motion pictures was Looper, that introduced us to the world’s first “official” GIF movie poster when the film premiered. The clock GIF inside the first O is exclusively creative, and the incredible animated dust effect suggests that both characters are fading away due to the events in the movie.
5. West Elm
West Elm offers modern furniture and various home decorations. In this email newsletter, they are presenting a selection of lamps, and what better way to showcase them than a GIF of them turning on at the same time.
Thus, these were the top five samples of our animated GIF tutorial you can take cue from right away.
Versatile Video Editor - Wondershare Filmora
An easy yet powerful editor
Numerous effects to choose from
Detailed tutorials provided by the official channel
Conclusion
While the lots of GIF makers available might prove to be good at times, they won’t be able to provide the value you want all the time. That’s what makes Wondershare Filmora an ideal pick to use for finishing well done animated GIF and one that will undoubtedly deliver on its promise. Creating a well-done animated GIF is simple, easy, and quick with Filmora. Have you tried it out yet?
GIF refers to Graphics Interchange Format, and you can generally discover this animated graphic image on web pages. You will see them like a twirling icon or a banner or just a few letters that go huge like magic. Note that well done animated GIF file mentions as a GIF89a, and this single file is helpful to contain various images inside a particular folder.
Moreover, these well-done animated GIF files are excellent for social media platforms, ad banners, and web pages.
They also want to add many funny words, bringing in interesting front outcomes at all times. Of course, it all boils down to the experience you wish to gain, but GIFs are always great to share online, and they bring in tons of fantastic fun moments that you can enjoy with your family.
Today, we will explore the ideal tool to create well done animated GIF along with a well-framed animated GIF tutorial. So, let’s join the trend and share the same with your friends and family.
In this article
01 [Make well done animated GIF with Filmora](#Part 1)
02 [Samples for Well Done Animated GIF](#Part 2)
Part 1 Make well done animated GIF with Filmora
You may easily find multiples of GIF files over different social media channels. These day’s people are using them mainly to entertain the audience on their channels or pages. They are also active in use for active conversations in other replies or comments.
Lots of people use GIFs to convey unique reactions on the internet on various channels. They are also valuable for illustrations, and one of the most prominent implications is in the business world for marketing requirements. It allows explaining your business products with increased user engagement and entertainment. The artistic world of GIFs can quickly boost your customers online.
It is possible to create well-done animated GIFs from still images or even from moving videos. This task is pretty straightforward than anyone can perform. To execute this task with much simplicity, we would like to recommend Wondershare Filmora for you.
Wondershare Filmora
Get started easily with Filmora’s powerful performance, intuitive interface, and countless effects!
Try It Free Try It Free Try It Free Learn More >
Using Filmora, you can quickly transform small videos into GIFs or combine several stills into GIFs. The more exciting thing is that Filmora also allows easy GIF customization as users can add different elements, overlays, text, etc., to their GIFs using the Filmora platform.
With Filmora, no matter what video formats you get, including FLV, MKV, WMV, MP4, etc. You can also introduce various advanced elements, animations, overlays, text to customize your GIFs.
Yet, if you are looking for an animated GIF tutorial, Filmora makes it all convenient for you. It assists you in creating an image, video memes, and GIFs directly without a watermark. It is FREE to use and has no signup.
You can change text size, position, and color to create a caption during the editing process. Then, just with a few clicks, your GIF is done. Try it now!
How to make GIFs with Wondershare Filmora
Here are a few simple steps to accomplish this task:
Step 1 Upload video or an image
Primarily, you have to import some editable video files or a collection of photos to the timeline of Wondershare Filmora.
Step 2 Drag to timeline
You can drag their imported media in Step 1 and drop it on the Filmora timeline.
Step 3 Edit media files
There are tons of editing options with pretty cool Filmora features. Users can easily choose among options like speed up, slow down, combine, rotate, crop, split, etc., to create a compelling video as per the content available.
Step 4 Add text effect to GIF files
It is the right time to update text-based information GIFs. Few text messages always appear good in GIFs. Or, you can add other elements here like sound, etc.
Step 5 Save and export
Once you have finished all the steps, save your file with a GIF extension and get ready to upload it on various social media platforms.
Part 2 Samples for Well Done Animated GIF
They say that an image is worth looking at a thousand words, so you must consider an animated GIF even more regarding this statement. In the current scenario, email marketers are revamping the boundaries of email design by including well-done animated GIFs to showcase their services and products in action.
Here is a collection of 5 beautiful samples of well-done animated GIFs in email marketing that proved to be very creative, engaging, and colorful.
1. ShoeMint
This cute GIF syncs pretty well with the ShoeMint’s email marketing template’s title – “C’mon, Get Happy!.” You can smile when you see the colorful socks swaying in a carefree manner.
2. Mr. Porter
This is an animated fireplace in the email marketing newsletter of Mr. Porter. It gives a pretty cozy and warm feel and atmosphere to the entire image, which is what they’re looking for or wandering for with the casual clothes the man is wearing.
3. American Apparel
American Apparel sells “power washed” T-shirts to make them “super soft.”
This critical merit would not attract many users if it weren’t for simulating the animated GIF of the T-shirts getting washed in an imaginary washing machine.
4. Looper
One of the major motion pictures was Looper, that introduced us to the world’s first “official” GIF movie poster when the film premiered. The clock GIF inside the first O is exclusively creative, and the incredible animated dust effect suggests that both characters are fading away due to the events in the movie.
5. West Elm
West Elm offers modern furniture and various home decorations. In this email newsletter, they are presenting a selection of lamps, and what better way to showcase them than a GIF of them turning on at the same time.
Thus, these were the top five samples of our animated GIF tutorial you can take cue from right away.
Versatile Video Editor - Wondershare Filmora
An easy yet powerful editor
Numerous effects to choose from
Detailed tutorials provided by the official channel
Conclusion
While the lots of GIF makers available might prove to be good at times, they won’t be able to provide the value you want all the time. That’s what makes Wondershare Filmora an ideal pick to use for finishing well done animated GIF and one that will undoubtedly deliver on its promise. Creating a well-done animated GIF is simple, easy, and quick with Filmora. Have you tried it out yet?
What Wikipedia Won’t Tell You About Character Rigging
What Wikipedia Won’t Tell You Specifically About Character Rigging
An easy yet powerful editor
Numerous effects to choose from
Detailed tutorials provided by the official channel
The function of character rigging can easily be compared to that of bones, muscles and joints. They act as skeletons to virtual animations. You can also imagine them as strings used on dolls. These digitalized bones function inter-connectedly in a 3D animation.
In this article
01 [Intro to Character Rigging](#Part 1)
02 [8 Tips for Character Rigging](#Part 2)
03 [10 Best Character Rigging Services to Buy Online](#Part 3)
04 [How to Make 3d Character Rig? Are There Any Plugins or Easy](#Part 4)
Part 1 Intro to Character Rigging
As you already know by now that the process of rigging a character can be quite a tedious task. It involves a lot of creative thinking, precision and a keen eye to notice all the small details.
Once you have a model character to work on, riggers set off to creating a skeleton to match the character. These skele-animations can be used to move the entire model as if tugging on strings (not literally).
The movement of the chain of skeletons or rigs is interdependent. Which means if you pull on any one bone, it moves all the other bones in the same sequence. Similar to how bones move within the human body.
Riggers use programs and tools to create a series of bone like structures that can deformed and animated freely according to the preference of the animators.
Movements like positioning, curving and rotation can be recorded and then played back in the animation.
This requires the rigger to constantly coordinate between modelers, animators till the end of the project. This entire process can take weeks or even months.
Amazingly enough, its 20and there are online tools and tutorials you can use to easily learn complex animations like they make in large scale movies and games.
Part 2 8 Tips for Character Rigging
01The Right Rig for the Job
Rigging is a skill all animators gets good at overtime. The more you practice the more familiar you are with the tools you are using. It will also help you understand that not all rigs are meant for the same set of movements.
You need to be able to discern what rig is it that you need and discard what you don’t. If the rig is being used in a game, then the focus will be more on the experience while for movies its attention.
02Deformers for Facial Rigging
Constructing a realistic facial rig can be quite a task but is indeed satisfying once finished. Human facial features require a great degree of flexibility which is why using a variety of deformers for different parts of the face. They are better suited for creating joints over the face and can be done more quickly.
03IK and FK
Though you can use one without the other, it is best to use both of them in an animation. You can’t work without both arms can you? Applying both Inverse and Forward Kinematics in your rig design can help it make more stylistic.
04Learn Python and Maya API: Learn Python and Maya API
If you wish to take your rigging skills to the next level then learning Maya API and Python are great millstones. This way, you can create high quality and sophisticated rigs with high intense flexibility on Maya. Also, Python allows you to write new scripts for PlugIns.
05Delegate to an Animator
After rigging for several hours it is easy to feel like you are only seeing from one perspective. Get in touch with an animator earlier on in the project can help you get feedback to stay consistent in the rigging process.
06Learn Web Technologies: Learn Web Technologies
To be a good animator or rigging specialist involves a lot of learning. Animation technology is constantly changing therefore it is highly recommended to stay up to date with the latest web technologies. Learning HTML, Java Script and CSS is becoming vital to being a part of the gaming world.
07Use Scalable Tools
Not all the characters or objects you rig are going to be of the same size. Selecting the right rigging software is crucial for you to be able to scale your animations. You won’t need to use everything, just the tools that serve your purpose.
08Use a Clean Interface
If you have ever heard of the phrase ‘clean workplace – cleaner work’ then you should know how an untidy interface can affect your workflow. This won’t necessarily change the results but can surely better your experience.
Part 3 Best Character Rigging Services to Buy Online
Don’t feel confused about where to begin. The first step to get into rigging is to master a software, any software, here are of the best ones you can choose from;
01Maya
Offers the best animation features on the market.

02Blender
Vast variety of tools for sculpting, rigging or VFX.

03Modo
Has a more simplified approach towards modelling and rigging.

043ds Max
Leverages high flexibility and ease of use to riggers.
05Sculptris
Excellentfor beginners who need a gateway software to start art.

06ZBrush
Lets you work on your sculpting skills with digital clay.

07Cheetah 3D
Developed by Macintosh to be an easy to learn modelling software.

08Rhinoceros 3D
Harbours a mathematical approach to modelling and modular design.

09Fusion 360
Offers a wide range of simulation tools.

10Cinema 4D
Recognized by professionals for well-equipped arsenal of digital rendering.

Part 4 How to Make Character Rig? Are There Any Plugins or Easy
How to Make Character Rig? Are There Any Plugins or Easy
When we imagine animation, most of the time we are baffled by the end product? But what really goes on behind the mesmerizing colors and whimsical characters.
The basic is of course building rigs to support the entire movement of the character and confine it to actual physical laws that makes it almost a mimic of reality. The entire process of rigging rather simplifies the path to achieve that goal.
In Cinema, character rigging has multiple layers that goes into creating the entire skeleton animation. Setting up a character rig can take anywhere between a few hours or a few days. It probably takes mainstream movies ten times that time.
Let us break down the process of making a rig so that it is simpler to understand.
The process;
Weight Painting: An integral part of the entire rigging process. Although, weight painting can be rendered automatically by the software that you are using, but that can end up making the animation look less realistic. You can instead fine tune the weight of each bone in the rig. You can also copy similar looking bones and apply them to different mesh and repurpose them to function differently.
Placing Bones: After designing a bone structure of character, you can copy the same and use it for similar characters. This is why in games and animation, you notice characters with similar features and traits.
Inverse Kinematics: Not all bones are meant to move in a forward direction. This is why inverses Kinematics are applied to certain bones like the legs, shoulders or even a dragon’s tail. Setting up the IK of your rig would keep specific bones pointed in the right direction so as to make the animation look more natural.
Applying Constraints: The physical realm is built with restrictions. There are things you can do or can’t do according to the natural order of things so as to make your character movement more naturalistic.
Simulation Skeletons: Now comes the part where the magic happens. After fully completing a skeletal animation you can now simulate the motion over the mesh and record the result of the simulation through a series of frames.
Create an animated movie: You can play back the simulation in an animation software such as Blender and then create your own animated movie with Filmora with its easy drag and drop interface. Movies are a collage of frames, so you need to animate according to the fps you want for your video.
Facial Rigs: Facial expressions are more complex than whole body movements. It requires the attention dedicated to a project of its own. Here is where you can play with deforming shapes together to replicate facial muscle movement.
● Key Takeaways from This Episode →
● Rigging has become science in its own right but that does not mean you can’t be artistic with it.
● What you should remember that creating skeletal animation is all about movement and applying physical restrictions to it.
● Start simple and practice until you master the most complex features of any of the top rigging software services raging in the market.
The function of character rigging can easily be compared to that of bones, muscles and joints. They act as skeletons to virtual animations. You can also imagine them as strings used on dolls. These digitalized bones function inter-connectedly in a 3D animation.
In this article
01 [Intro to Character Rigging](#Part 1)
02 [8 Tips for Character Rigging](#Part 2)
03 [10 Best Character Rigging Services to Buy Online](#Part 3)
04 [How to Make 3d Character Rig? Are There Any Plugins or Easy](#Part 4)
Part 1 Intro to Character Rigging
As you already know by now that the process of rigging a character can be quite a tedious task. It involves a lot of creative thinking, precision and a keen eye to notice all the small details.
Once you have a model character to work on, riggers set off to creating a skeleton to match the character. These skele-animations can be used to move the entire model as if tugging on strings (not literally).
The movement of the chain of skeletons or rigs is interdependent. Which means if you pull on any one bone, it moves all the other bones in the same sequence. Similar to how bones move within the human body.
Riggers use programs and tools to create a series of bone like structures that can deformed and animated freely according to the preference of the animators.
Movements like positioning, curving and rotation can be recorded and then played back in the animation.
This requires the rigger to constantly coordinate between modelers, animators till the end of the project. This entire process can take weeks or even months.
Amazingly enough, its 20and there are online tools and tutorials you can use to easily learn complex animations like they make in large scale movies and games.
Part 2 8 Tips for Character Rigging
01The Right Rig for the Job
Rigging is a skill all animators gets good at overtime. The more you practice the more familiar you are with the tools you are using. It will also help you understand that not all rigs are meant for the same set of movements.
You need to be able to discern what rig is it that you need and discard what you don’t. If the rig is being used in a game, then the focus will be more on the experience while for movies its attention.
02Deformers for Facial Rigging
Constructing a realistic facial rig can be quite a task but is indeed satisfying once finished. Human facial features require a great degree of flexibility which is why using a variety of deformers for different parts of the face. They are better suited for creating joints over the face and can be done more quickly.
03IK and FK
Though you can use one without the other, it is best to use both of them in an animation. You can’t work without both arms can you? Applying both Inverse and Forward Kinematics in your rig design can help it make more stylistic.
04Learn Python and Maya API: Learn Python and Maya API
If you wish to take your rigging skills to the next level then learning Maya API and Python are great millstones. This way, you can create high quality and sophisticated rigs with high intense flexibility on Maya. Also, Python allows you to write new scripts for PlugIns.
05Delegate to an Animator
After rigging for several hours it is easy to feel like you are only seeing from one perspective. Get in touch with an animator earlier on in the project can help you get feedback to stay consistent in the rigging process.
06Learn Web Technologies: Learn Web Technologies
To be a good animator or rigging specialist involves a lot of learning. Animation technology is constantly changing therefore it is highly recommended to stay up to date with the latest web technologies. Learning HTML, Java Script and CSS is becoming vital to being a part of the gaming world.
07Use Scalable Tools
Not all the characters or objects you rig are going to be of the same size. Selecting the right rigging software is crucial for you to be able to scale your animations. You won’t need to use everything, just the tools that serve your purpose.
08Use a Clean Interface
If you have ever heard of the phrase ‘clean workplace – cleaner work’ then you should know how an untidy interface can affect your workflow. This won’t necessarily change the results but can surely better your experience.
Part 3 Best Character Rigging Services to Buy Online
Don’t feel confused about where to begin. The first step to get into rigging is to master a software, any software, here are of the best ones you can choose from;
01Maya
Offers the best animation features on the market.
02Blender
Vast variety of tools for sculpting, rigging or VFX.
03Modo
Has a more simplified approach towards modelling and rigging.
043ds Max
Leverages high flexibility and ease of use to riggers.
05Sculptris
Excellentfor beginners who need a gateway software to start art.
06ZBrush
Lets you work on your sculpting skills with digital clay.
07Cheetah 3D
Developed by Macintosh to be an easy to learn modelling software.
08Rhinoceros 3D
Harbours a mathematical approach to modelling and modular design.
09Fusion 360
Offers a wide range of simulation tools.
10Cinema 4D
Recognized by professionals for well-equipped arsenal of digital rendering.
Part 4 How to Make Character Rig? Are There Any Plugins or Easy
How to Make Character Rig? Are There Any Plugins or Easy
When we imagine animation, most of the time we are baffled by the end product? But what really goes on behind the mesmerizing colors and whimsical characters.
The basic is of course building rigs to support the entire movement of the character and confine it to actual physical laws that makes it almost a mimic of reality. The entire process of rigging rather simplifies the path to achieve that goal.
In Cinema, character rigging has multiple layers that goes into creating the entire skeleton animation. Setting up a character rig can take anywhere between a few hours or a few days. It probably takes mainstream movies ten times that time.
Let us break down the process of making a rig so that it is simpler to understand.
The process;
Weight Painting: An integral part of the entire rigging process. Although, weight painting can be rendered automatically by the software that you are using, but that can end up making the animation look less realistic. You can instead fine tune the weight of each bone in the rig. You can also copy similar looking bones and apply them to different mesh and repurpose them to function differently.
Placing Bones: After designing a bone structure of character, you can copy the same and use it for similar characters. This is why in games and animation, you notice characters with similar features and traits.
Inverse Kinematics: Not all bones are meant to move in a forward direction. This is why inverses Kinematics are applied to certain bones like the legs, shoulders or even a dragon’s tail. Setting up the IK of your rig would keep specific bones pointed in the right direction so as to make the animation look more natural.
Applying Constraints: The physical realm is built with restrictions. There are things you can do or can’t do according to the natural order of things so as to make your character movement more naturalistic.
Simulation Skeletons: Now comes the part where the magic happens. After fully completing a skeletal animation you can now simulate the motion over the mesh and record the result of the simulation through a series of frames.
Create an animated movie: You can play back the simulation in an animation software such as Blender and then create your own animated movie with Filmora with its easy drag and drop interface. Movies are a collage of frames, so you need to animate according to the fps you want for your video.
Facial Rigs: Facial expressions are more complex than whole body movements. It requires the attention dedicated to a project of its own. Here is where you can play with deforming shapes together to replicate facial muscle movement.
● Key Takeaways from This Episode →
● Rigging has become science in its own right but that does not mean you can’t be artistic with it.
● What you should remember that creating skeletal animation is all about movement and applying physical restrictions to it.
● Start simple and practice until you master the most complex features of any of the top rigging software services raging in the market.
How to Create Slideshow in LinkedIn
How to Create Slideshow in LinkedIn
An easy yet powerful editor
Numerous effects to choose from
Detailed tutorials provided by the official channel
LinkedIn slideshows are interesting means of professional content presentations in an elusive and catchy style. Stay tuned to learn everything about LinkedIn slideshows!
In this article
01 [Why Should You Care LinkedIn Slideshow?](#Part 1)
02 [What Are the Specs & Dimensions of LinkedIn Slideshow?](#Part 2)
03 [Examples of LinkedIn Slideshow](#Part 3)
04 [How to Create Slideshow in LinkedIn?](#Part 4)
Part 1 Why Should You Care LinkedIn Slideshow?
Today’s IT revolutionized era has a technology infused solution to everything and employment is no exception. Defining the platform, LinkedIn is a professional social networking site that allows you to put forward your qualifications, education, skills, expertise and experience to address your job oriented concerns. The platform is a market leader in hiring professionals to a diversity of work profiles, while increasing the number of potential audiences.
The social media platform essentially works to keep the job realm informed about you with the most detailed aspects. This is why, creating a LinkedIn profile turns out to be a significant step in the professional world. Let us get into understanding some more beneficial aspects of a LinkedIn recognition in the following section:
01Establishing Professional Connections
Making yourself available on the professional front through a LinkedIn profile lets you know about the diversities of recruitment prerequisites, connect with professionals belonging to different domains, backgrounds and industries, while getting numerous opportunities to meet people who share a similar work perspective as yours.
02Being Informed About Job Postings
A LinkedIn profile caters most effectively to your concern of getting regular updates about employment opportunities in a diverse range of industrial and business corporations, companies and recruiting agencies. You can use the platform to create a professional account and follow the respective company pages that match with your qualifications and expertise, to get the latest updates of their job postings and vacancy announcements.
03Recruiter’s Search Visibility
Having a LinkedIn profile affordably means that you are entitled to a recognition in the recruiter’s search results on Google, thus giving a considerable boost to your chances of being viewed and hired. This is additionally beneficial for the recruiting agencies as well, who get the maximum fruit with the least effort.
04Globalization
Creating a comprehensive LinkedIn profile with the correct choice of keywords and exact content opens up employment opportunities beyond the cross country borders, thanks to the platform’s global reach and credibility. This in turn, causes your professional integrity to be presented in front of a large scale audience diversity.
05Personal Branding
Being active on LinkedIn lets you become a brand for yourself through its endorsement and recommendation features. Seeing your LinkedIn profile, your akin, coworkers and professionally senior acquaintances of the past can write a positive testimonial on your expertise, thus increasing your chances of being hired to a new job post.
06A Valuable Asset
You can conveniently regard a LinkedIn profile as your professional diary, where you can update your latest corporate or industrial achievements, awards, project undertakings and voluntary activities. This will facilitate your recruiter with the latest and exact information about your corporate capabilities, which would further aid the latter to consider on hiring you.
07Real and Trustworthy Platform
Creating a LinkedIn profile essentially requires furnishing real and authentic details of education, skills and professional backgrounds for getting relevant opportunities in their respective fields. Uploading false information and fake details will anyway result in beating around the bush, without any significant gain and hence, this practice is essentially avoided by LinkedIn users.
08Active Job Search
Instead of following the conventional passive job seeker pattern of sending resume and waiting for the HR response, LinkedIn allows you to be in regular touch with the recruiter of your chosen company for latest updates on the hiring process. If you are worried of getting the ‘desperate’ tag, rest assured as the platform will rather present you as a proactive professional.
Part 2 What Are the Specs & Dimensions of LinkedIn Slideshow?
Now that you are familiar with the credibility of a LinkedIn carousel post in the professional world, let us get into some more details of the utility with proceeding towards a discussion of the different specifications and dimensions of a LinkedIn slideshow and the professional aspects of the same in the following section:
● Take Care of the File Size
The credibility of LinkedIn carousel posts lies in the engaging presentation of your static and monotonous text to make them stand out of the crowded newsfeed. True that your creative skills are sufficient enough to design a graphic masterpiece, yet you should take care to remain within an affordable limit, lest you would end up with a large file that gets difficult to upload and process. Most reliably, a 100 MB file size would easily fit into the bill.
● Restrict Your Slide Count
When creating a slideshow LinkedIn presentation, it is normal to get a bit over the line while including the most exemplary and comprehensive details about your professional qualifications, skills and background. Relax, that’s nothing wrong! However, all you need to care about is limiting the slide count of your slideshow to a maximum of 300 pages. As a genuine approach, no one would bother going beyond that to read about you anyway!
● Use a Commendable File Format
You would ideally want the documents and media files in your slideshow to have the finest quality. LinkedIn allows you to create and share your graphic presentations in the PDF, DOCX, DOC, PPTX and PPT file formats. If you want the assurance of your slideshows having the highest resolution and appreciable output quality, it is recommended to save them in the PDF file format.
● Make a Careful Upload
When you are ready to upload your presentation, consider taking a close preview of its contents to make sure that you have not missed out on anything. This becomes all the more necessary, owing to the fact that, you are not allowed to edit your post in anyway after it gets uploaded on your LinkedIn profile.
● Bonus Tip
To include the latest and up-to-date information within your presentation, consider visiting the LinkedIn official webpage directly from your platform account.
Part 3 Examples of LinkedIn Slideshow
Creating a LinkedIn slide show can be both, exciting as well as advantageous on the professional front. After having an insight of the significance, dimensions and specifications, let us now move towards browsing through some of the most excellent examples of LinkedIn slideshow presentations in the following section:
● Share Numbers, Infographics and Statistics
The utility of the LinkedIn platform to share documents has been worked upon by Brian Wallace, an infographic agency owner, to present his professional excellence in front of the target audiences through useful statistics and examples. Opening his work profile, you would firstly get to see an infographic PDF export, which are later uploaded as document files on a LinkedIn post that speaks in favor of the statistics.
● Share Action Oriented Business Modules
Travis Lachner, the CEO of a renowned business enterprise, has worked upon the clever idea of designing appealing, call to action presentations to encourage the participation of his potential audiences in the business module through a graphical arrow desisgn, asking them to share their opinions via relatable comments.
● Stepwise Instructions and Design Frameworks
This LinkedIn feature is utilized by Demodesk to present a stepwise demonstration of its newly launched ‘One Feature Framework’ through a slideshow presentation. You can work with the facility to share documents comprising of market oriented case studies, business reports, frameworks, etc., from your company’s official webpage.
● Conference Presentations and Event Contents
LinkedIn slideshows are indeed the most expressive means of sharing conference essentials and event marketing. Such presentations have been perfectly put to use by Jens Hilgers, the eSports creator and entrepreneur, to help viewers and players in navigating through his game landscapes. You can also choose a simple task of creating a buzz of your upcoming event among your audience, like Garter did to inform about the CFO & Executive Conference.
● Content Promotion
You can use a LinkedIn slideshow post to effectively promote your content among a global audience like Matheos Simou, a graphic designer cum recruitment strategist, who utilized LinkedIn presentations to educate his target audience about the significance of graphic desisgn and product branding outsources through his slideshow post titled ‘Flipping Pointless Brand Identity’.
Part 4 How to Create Slideshow in LinkedIn?
Having talked enough about LinkedIn slideshows and their market credibility, let us now make an attempt to try hands at creating professionally useful LinkedIn presentations. The following section describes a detailed, stepwise tutorial to adhere to the aforesaid purpose within a quick time span and utmost ease:
● User’s Guide to Create a LinkedIn Slideshow
Step 1: Open Your LinkedIn Profile
Start with logging in to your LinkedIn profile in any preferred device.
Step 2: Create a Google Slide Deck
Launch Google Slides in your device and proceed to design a slide deck on the same.

Step 3: Add Content to the Inaugural Slide
Populate the first slide of your presentation with the opening content, like the titles and subtitles of slideshow creation objective, company name, profile and expertise, etc.

As far as designing the subsequent slides is concerned, it would be a smart idea to clone the first slide to maintain an overall homogeneity.

Step 4: Save Your Work
When you are done with creating the presentation, choose to save it on your profile in the PDF file format for ensuring a high output quality.

Step 5: Sharing Your Creation
Create a document post on your profile to share the slideshow presentation with fellow LinkedIn users.

Step 6: Describe Your Post
The last step is to supplement your post with a suitable description and a few catchy hashtags. When you are happy with your work, navigate to the bottom right of the profile screen and tap ‘Post’.

● Creating LinkedIn Slideshows with Wondershare Filmora
When looking for a convenient and easy to use slideshow creator to design your LinkedIn presentations, you can rely on the Wondershare Filmora Video Editor Slideshow Creator software program to make high end, professional quality slide shows in a commendable resolution, and supplement them with a diversity of cohesive graphic effects.
For Win 7 or later (64-bit)
For macOS 10.12 or later
● Ending Thoughts →
● LinkedIn slideshows are highly useful in creating a notable impact of your professional skills and capabilities in front of job recruiters.
● There are some essential aspects of LinkedIn slideshows, which you should consider while designing your presentation.
● Wondershare Filmora is certainly one among the best software solutions to create LinkedIn slideshows with high end professional excellence.
LinkedIn slideshows are interesting means of professional content presentations in an elusive and catchy style. Stay tuned to learn everything about LinkedIn slideshows!
In this article
01 [Why Should You Care LinkedIn Slideshow?](#Part 1)
02 [What Are the Specs & Dimensions of LinkedIn Slideshow?](#Part 2)
03 [Examples of LinkedIn Slideshow](#Part 3)
04 [How to Create Slideshow in LinkedIn?](#Part 4)
Part 1 Why Should You Care LinkedIn Slideshow?
Today’s IT revolutionized era has a technology infused solution to everything and employment is no exception. Defining the platform, LinkedIn is a professional social networking site that allows you to put forward your qualifications, education, skills, expertise and experience to address your job oriented concerns. The platform is a market leader in hiring professionals to a diversity of work profiles, while increasing the number of potential audiences.
The social media platform essentially works to keep the job realm informed about you with the most detailed aspects. This is why, creating a LinkedIn profile turns out to be a significant step in the professional world. Let us get into understanding some more beneficial aspects of a LinkedIn recognition in the following section:
01Establishing Professional Connections
Making yourself available on the professional front through a LinkedIn profile lets you know about the diversities of recruitment prerequisites, connect with professionals belonging to different domains, backgrounds and industries, while getting numerous opportunities to meet people who share a similar work perspective as yours.
02Being Informed About Job Postings
A LinkedIn profile caters most effectively to your concern of getting regular updates about employment opportunities in a diverse range of industrial and business corporations, companies and recruiting agencies. You can use the platform to create a professional account and follow the respective company pages that match with your qualifications and expertise, to get the latest updates of their job postings and vacancy announcements.
03Recruiter’s Search Visibility
Having a LinkedIn profile affordably means that you are entitled to a recognition in the recruiter’s search results on Google, thus giving a considerable boost to your chances of being viewed and hired. This is additionally beneficial for the recruiting agencies as well, who get the maximum fruit with the least effort.
04Globalization
Creating a comprehensive LinkedIn profile with the correct choice of keywords and exact content opens up employment opportunities beyond the cross country borders, thanks to the platform’s global reach and credibility. This in turn, causes your professional integrity to be presented in front of a large scale audience diversity.
05Personal Branding
Being active on LinkedIn lets you become a brand for yourself through its endorsement and recommendation features. Seeing your LinkedIn profile, your akin, coworkers and professionally senior acquaintances of the past can write a positive testimonial on your expertise, thus increasing your chances of being hired to a new job post.
06A Valuable Asset
You can conveniently regard a LinkedIn profile as your professional diary, where you can update your latest corporate or industrial achievements, awards, project undertakings and voluntary activities. This will facilitate your recruiter with the latest and exact information about your corporate capabilities, which would further aid the latter to consider on hiring you.
07Real and Trustworthy Platform
Creating a LinkedIn profile essentially requires furnishing real and authentic details of education, skills and professional backgrounds for getting relevant opportunities in their respective fields. Uploading false information and fake details will anyway result in beating around the bush, without any significant gain and hence, this practice is essentially avoided by LinkedIn users.
08Active Job Search
Instead of following the conventional passive job seeker pattern of sending resume and waiting for the HR response, LinkedIn allows you to be in regular touch with the recruiter of your chosen company for latest updates on the hiring process. If you are worried of getting the ‘desperate’ tag, rest assured as the platform will rather present you as a proactive professional.
Part 2 What Are the Specs & Dimensions of LinkedIn Slideshow?
Now that you are familiar with the credibility of a LinkedIn carousel post in the professional world, let us get into some more details of the utility with proceeding towards a discussion of the different specifications and dimensions of a LinkedIn slideshow and the professional aspects of the same in the following section:
● Take Care of the File Size
The credibility of LinkedIn carousel posts lies in the engaging presentation of your static and monotonous text to make them stand out of the crowded newsfeed. True that your creative skills are sufficient enough to design a graphic masterpiece, yet you should take care to remain within an affordable limit, lest you would end up with a large file that gets difficult to upload and process. Most reliably, a 100 MB file size would easily fit into the bill.
● Restrict Your Slide Count
When creating a slideshow LinkedIn presentation, it is normal to get a bit over the line while including the most exemplary and comprehensive details about your professional qualifications, skills and background. Relax, that’s nothing wrong! However, all you need to care about is limiting the slide count of your slideshow to a maximum of 300 pages. As a genuine approach, no one would bother going beyond that to read about you anyway!
● Use a Commendable File Format
You would ideally want the documents and media files in your slideshow to have the finest quality. LinkedIn allows you to create and share your graphic presentations in the PDF, DOCX, DOC, PPTX and PPT file formats. If you want the assurance of your slideshows having the highest resolution and appreciable output quality, it is recommended to save them in the PDF file format.
● Make a Careful Upload
When you are ready to upload your presentation, consider taking a close preview of its contents to make sure that you have not missed out on anything. This becomes all the more necessary, owing to the fact that, you are not allowed to edit your post in anyway after it gets uploaded on your LinkedIn profile.
● Bonus Tip
To include the latest and up-to-date information within your presentation, consider visiting the LinkedIn official webpage directly from your platform account.
Part 3 Examples of LinkedIn Slideshow
Creating a LinkedIn slide show can be both, exciting as well as advantageous on the professional front. After having an insight of the significance, dimensions and specifications, let us now move towards browsing through some of the most excellent examples of LinkedIn slideshow presentations in the following section:
● Share Numbers, Infographics and Statistics
The utility of the LinkedIn platform to share documents has been worked upon by Brian Wallace, an infographic agency owner, to present his professional excellence in front of the target audiences through useful statistics and examples. Opening his work profile, you would firstly get to see an infographic PDF export, which are later uploaded as document files on a LinkedIn post that speaks in favor of the statistics.
● Share Action Oriented Business Modules
Travis Lachner, the CEO of a renowned business enterprise, has worked upon the clever idea of designing appealing, call to action presentations to encourage the participation of his potential audiences in the business module through a graphical arrow desisgn, asking them to share their opinions via relatable comments.
● Stepwise Instructions and Design Frameworks
This LinkedIn feature is utilized by Demodesk to present a stepwise demonstration of its newly launched ‘One Feature Framework’ through a slideshow presentation. You can work with the facility to share documents comprising of market oriented case studies, business reports, frameworks, etc., from your company’s official webpage.
● Conference Presentations and Event Contents
LinkedIn slideshows are indeed the most expressive means of sharing conference essentials and event marketing. Such presentations have been perfectly put to use by Jens Hilgers, the eSports creator and entrepreneur, to help viewers and players in navigating through his game landscapes. You can also choose a simple task of creating a buzz of your upcoming event among your audience, like Garter did to inform about the CFO & Executive Conference.
● Content Promotion
You can use a LinkedIn slideshow post to effectively promote your content among a global audience like Matheos Simou, a graphic designer cum recruitment strategist, who utilized LinkedIn presentations to educate his target audience about the significance of graphic desisgn and product branding outsources through his slideshow post titled ‘Flipping Pointless Brand Identity’.
Part 4 How to Create Slideshow in LinkedIn?
Having talked enough about LinkedIn slideshows and their market credibility, let us now make an attempt to try hands at creating professionally useful LinkedIn presentations. The following section describes a detailed, stepwise tutorial to adhere to the aforesaid purpose within a quick time span and utmost ease:
● User’s Guide to Create a LinkedIn Slideshow
Step 1: Open Your LinkedIn Profile
Start with logging in to your LinkedIn profile in any preferred device.
Step 2: Create a Google Slide Deck
Launch Google Slides in your device and proceed to design a slide deck on the same.
Step 3: Add Content to the Inaugural Slide
Populate the first slide of your presentation with the opening content, like the titles and subtitles of slideshow creation objective, company name, profile and expertise, etc.
As far as designing the subsequent slides is concerned, it would be a smart idea to clone the first slide to maintain an overall homogeneity.
Step 4: Save Your Work
When you are done with creating the presentation, choose to save it on your profile in the PDF file format for ensuring a high output quality.
Step 5: Sharing Your Creation
Create a document post on your profile to share the slideshow presentation with fellow LinkedIn users.
Step 6: Describe Your Post
The last step is to supplement your post with a suitable description and a few catchy hashtags. When you are happy with your work, navigate to the bottom right of the profile screen and tap ‘Post’.
● Creating LinkedIn Slideshows with Wondershare Filmora
When looking for a convenient and easy to use slideshow creator to design your LinkedIn presentations, you can rely on the Wondershare Filmora Video Editor Slideshow Creator software program to make high end, professional quality slide shows in a commendable resolution, and supplement them with a diversity of cohesive graphic effects.
For Win 7 or later (64-bit)
For macOS 10.12 or later
● Ending Thoughts →
● LinkedIn slideshows are highly useful in creating a notable impact of your professional skills and capabilities in front of job recruiters.
● There are some essential aspects of LinkedIn slideshows, which you should consider while designing your presentation.
● Wondershare Filmora is certainly one among the best software solutions to create LinkedIn slideshows with high end professional excellence.
All About 3D Medical Animation
All About 3D Medical Animation And Its Uses
An easy yet powerful editor
Numerous effects to choose from
Detailed tutorials provided by the official channel
You can see the use of 3D animation in all spheres of life including the medical field. More and more professionals in the field of the healthcare industry are now using 3D animations for several different tasks like education, communication, marketing, and more.

So, if you too are keen to learn about 3D medical animation videos, their uses, popular companies, and other details, you are reading on the right page.
In this article
01 [What is 3D Medical Animation?](#Part 1)
02 [Uses of 3D Medical Animations](#Part 2)
03 [Benefits of Using 3D Medical Animations](#Part 3)
04 [Top 3D Animation Companies](#Part 4)
05 [The Best Tool to Edit Your 3D Medical Animated Video – Wondershare Filmora](#Part 4)
Part 1 What is 3D Medical Animation?
A 3D medical animation can be termed as an animation that is used for different tasks in the healthcare and medical industry. These animations are used for several different tasks like explaining and detailing the concepts to the patients, compelling the investors, training professionals, marketing devices and drugs, and more. Depending on the target audience, the animations can be created by taking the help of specialized industries or using animated software.
Part 2 Uses Of 3D Medical Animations
3D animations have proved to be useful in the healthcare and medical industry in several ways. Below we have gathered some of the key benefits of the same.
01Using As A Mode Of Communication With Patients
Communication with the patients is one of the major uses of 3D animation in the healthcare field. Using animations, the communication with the patients can be enhanced in several ways. Explaining complex medical conditions and procedures to patients is difficult and here the animations help to a great extent. Going through animation will make a patient well prepared to see the doctor and learn about his/her medical condition or procedure to be performed. Patients do not have medical knowledge and these animations help them to know their condition, scenario, and procedure in a simple way that they can understand.
02Training Of Medical Professionals
Medical professionals need to keep themselves updated with the latest trends and practices and for this, they need to undergo training from time to time. 3D animations for the topics to be studied help them in better understanding the concepts and the procedures. Moreover, animations also help in e-learning.
03Educating New Professionals
For the new students using 3D animations is a great way to teach complex medical topics which otherwise explaining them orally or visually are not that effective. Animations can be used to educate about different topics like the anatomy of a human body, medical procedures, drug mechanisms, use of devices, and more.
04Used As A Marketing Tool
Since the presentation of medical information is difficult, marketing in the healthcare industry is quite a challenge. Moreover, the investors do not possess any medical know-how and the task of marketing becomes even more difficult. Thus, using 3D medical animations can be helpful here to explain the products, devices, and other things. Marketing of medicines to patients can also be done using animated mascots and characters.
05Marketing To Medical Professional
While marketing products and devices to medical professionals is not difficult in terms of knowledge or know-how as they are from the medical background. But with multiple marketing teams approaching them, time is a limitation and thus presentation needs to be short yet informative which can be achieved through the use of animations. Moreover, these animations can be sent to professionals through emails or by sharing a website link.

Part 3 Benefits Of Using 3D Medical Animations
Above we have discussed several fields and uses of 3D medical animations. Several factors make these animations useful.
●Helps in offering an in-depth and detailed explanation of complex subjects.
●Offers broad scope of explanation and especially subjects that cannot be explained easily through images or orally.
●Visual presentations offer better recall of the topic and details.
●Engagement through animations is enhanced and better.
●3D medical animations look professional and thus appear to be more reliable.
●Animations can be created to cater to a wider audience and people for different subjects.
Part 4 Top 3D Animation Companies
Creating 3D medical animation is not like creating any other 3D animation as it not only requires technical know-how but also in-depth knowledge of the medical field. Thus, for creating 3D medical animations, take help from the companies that specialize in this field to create 3D medical animation videos. Below we have shortlisted some of the popular 3D medical animation company.
●DG Medical Animations
●The SGNY Group
●Fusion Medical Animation
●TMBA Inc
●Pixeldust Studios
●Indigo Productions
●Nanobot Medical Animation Studio
●MultiVision Digital
●ICom Creative
●INVIVO
●JLab Animation
These companies offer different 3D medical animation services and depending on your requirements, you can choose the best suitable one.

Part 5 The Best Tool To Edit Your 3d Medical Animated Video – Wondershare Wondershare Filmora Video Editor
Even if you have got a 3D medical animation video created by a professional company, several times, the need may arise to edit and customize it. In such situations, you would need a professional tool that can help in editing the video without affecting the quality and other details. Wondershare Wondershare Filmora Video Editor is one such excellent software that can be used for the task. This Windows and Mac-based tool comes with a feature-packed built-in editor that can let you edit the files quickly and in a hassle-free manner. Additionally, you can also create decent animations using multiple features of the software.
The interface is simple and user-friendly that making the task of video creation and editing simple.
Key features of the software
● Allows creating dynamic and lively videos using over 100 layers of media.
● Allows complete editing and customization of the video using the editor.
● Animations using keyframing and other features can be created.
● Enhance audio using features like background noise reduction, keyframe audio editing, audio equalizer, and more.
● Support to features likes stabilization, fisheye correction, speed controlling, advanced color correction, 3D LUTs, and more.
● Support to Windows and Mac.
For Win 7 or later (64-bit)
For macOS 10.12 or later
● Key Takeaways from This Episode →
● The use of 3D medical animation in the healthcare and medical industry has increased manifold.
● The 3D medical animations are used for communication with patients, training, marketing, educations, and other uses.
● Several professional and specialized industries can help you create 3D medical animations.
● To edit the created videos and create other decent ones, Wondershare Wondershare Filmora Video Editor works as a great option.
You can see the use of 3D animation in all spheres of life including the medical field. More and more professionals in the field of the healthcare industry are now using 3D animations for several different tasks like education, communication, marketing, and more.
So, if you too are keen to learn about 3D medical animation videos, their uses, popular companies, and other details, you are reading on the right page.
In this article
01 [What is 3D Medical Animation?](#Part 1)
02 [Uses of 3D Medical Animations](#Part 2)
03 [Benefits of Using 3D Medical Animations](#Part 3)
04 [Top 3D Animation Companies](#Part 4)
05 [The Best Tool to Edit Your 3D Medical Animated Video – Wondershare Filmora](#Part 4)
Part 1 What is 3D Medical Animation?
A 3D medical animation can be termed as an animation that is used for different tasks in the healthcare and medical industry. These animations are used for several different tasks like explaining and detailing the concepts to the patients, compelling the investors, training professionals, marketing devices and drugs, and more. Depending on the target audience, the animations can be created by taking the help of specialized industries or using animated software.
Part 2 Uses Of 3D Medical Animations
3D animations have proved to be useful in the healthcare and medical industry in several ways. Below we have gathered some of the key benefits of the same.
01Using As A Mode Of Communication With Patients
Communication with the patients is one of the major uses of 3D animation in the healthcare field. Using animations, the communication with the patients can be enhanced in several ways. Explaining complex medical conditions and procedures to patients is difficult and here the animations help to a great extent. Going through animation will make a patient well prepared to see the doctor and learn about his/her medical condition or procedure to be performed. Patients do not have medical knowledge and these animations help them to know their condition, scenario, and procedure in a simple way that they can understand.
02Training Of Medical Professionals
Medical professionals need to keep themselves updated with the latest trends and practices and for this, they need to undergo training from time to time. 3D animations for the topics to be studied help them in better understanding the concepts and the procedures. Moreover, animations also help in e-learning.
03Educating New Professionals
For the new students using 3D animations is a great way to teach complex medical topics which otherwise explaining them orally or visually are not that effective. Animations can be used to educate about different topics like the anatomy of a human body, medical procedures, drug mechanisms, use of devices, and more.
04Used As A Marketing Tool
Since the presentation of medical information is difficult, marketing in the healthcare industry is quite a challenge. Moreover, the investors do not possess any medical know-how and the task of marketing becomes even more difficult. Thus, using 3D medical animations can be helpful here to explain the products, devices, and other things. Marketing of medicines to patients can also be done using animated mascots and characters.
05Marketing To Medical Professional
While marketing products and devices to medical professionals is not difficult in terms of knowledge or know-how as they are from the medical background. But with multiple marketing teams approaching them, time is a limitation and thus presentation needs to be short yet informative which can be achieved through the use of animations. Moreover, these animations can be sent to professionals through emails or by sharing a website link.
Part 3 Benefits Of Using 3D Medical Animations
Above we have discussed several fields and uses of 3D medical animations. Several factors make these animations useful.
●Helps in offering an in-depth and detailed explanation of complex subjects.
●Offers broad scope of explanation and especially subjects that cannot be explained easily through images or orally.
●Visual presentations offer better recall of the topic and details.
●Engagement through animations is enhanced and better.
●3D medical animations look professional and thus appear to be more reliable.
●Animations can be created to cater to a wider audience and people for different subjects.
Part 4 Top 3D Animation Companies
Creating 3D medical animation is not like creating any other 3D animation as it not only requires technical know-how but also in-depth knowledge of the medical field. Thus, for creating 3D medical animations, take help from the companies that specialize in this field to create 3D medical animation videos. Below we have shortlisted some of the popular 3D medical animation company.
●DG Medical Animations
●The SGNY Group
●Fusion Medical Animation
●TMBA Inc
●Pixeldust Studios
●Indigo Productions
●Nanobot Medical Animation Studio
●MultiVision Digital
●ICom Creative
●INVIVO
●JLab Animation
These companies offer different 3D medical animation services and depending on your requirements, you can choose the best suitable one.
Part 5 The Best Tool To Edit Your 3d Medical Animated Video – Wondershare Wondershare Filmora Video Editor
Even if you have got a 3D medical animation video created by a professional company, several times, the need may arise to edit and customize it. In such situations, you would need a professional tool that can help in editing the video without affecting the quality and other details. Wondershare Wondershare Filmora Video Editor is one such excellent software that can be used for the task. This Windows and Mac-based tool comes with a feature-packed built-in editor that can let you edit the files quickly and in a hassle-free manner. Additionally, you can also create decent animations using multiple features of the software.
The interface is simple and user-friendly that making the task of video creation and editing simple.
Key features of the software
● Allows creating dynamic and lively videos using over 100 layers of media.
● Allows complete editing and customization of the video using the editor.
● Animations using keyframing and other features can be created.
● Enhance audio using features like background noise reduction, keyframe audio editing, audio equalizer, and more.
● Support to features likes stabilization, fisheye correction, speed controlling, advanced color correction, 3D LUTs, and more.
● Support to Windows and Mac.
For Win 7 or later (64-bit)
For macOS 10.12 or later
● Key Takeaways from This Episode →
● The use of 3D medical animation in the healthcare and medical industry has increased manifold.
● The 3D medical animations are used for communication with patients, training, marketing, educations, and other uses.
● Several professional and specialized industries can help you create 3D medical animations.
● To edit the created videos and create other decent ones, Wondershare Wondershare Filmora Video Editor works as a great option.
Best Claymation Shows That Make Your Memories Unforgettable
Best Claymation Shows That Make Your Memories Unforgettable
An easy yet powerful editor
Numerous effects to choose from
Detailed tutorials provided by the official channel
There are plenty of things that the 90s have given us. And when we revisit them now, it gives us an inimitable feeling of nostalgia which we would like to store forever with us. And one of the things that can bring back tons of cherished memories from the 90s is the claymation tv shows.
The claymation shows were called the clay animation shows. The reason for such a name was because the characters in the shows were made from malleable or deformable materials, especially out of clay. They have been one of the most revolutionary and entertaining components of that time.
These shows were one of the forms among the numerous forms of stop-motion animations. We will cover what these shows were about, their cast, and where you can watch them today. And in the following discussion, we will be discussing the ten best 90s claymation shows to bring back wonderful nostalgic memories.

Here is the list of the top claymation tv shows and all the information, including the sites and apps you can watch even today!
01Plasmo
Plasmo was an Australian science fiction TV series about a two and a half-year-old space orphan. The show first premiered in 199starring Abbe Holmes, Phillip Houghton and Pia Morley. You can watch this show on YouTube.

02Plonsters
The Plonsters was a show that premiered in 19which showed the characters Plif, Plops and Plummy, babble and morph, and their wonderful adventures. The show starred Ralph Thiekötter, and you can watch this show on Netflix and Tubi.
04Rex the Runt
Rex the Runt was a comedy show that premiered in 199The show was about the adventures of intrepid Rex and his plasticine companions. It starred about nine celebrities. Steve Box, Elisabeth Hadley, Andrew Jeffers, and Kevin Wrench were among them. You can watch this show even today on Amazon Prime.

05Mio Mao
Mia Mao first premiered in 197starring Derek Griffiths as cast. The show was about two plasticine kittens, Mia and Mao, exploring and finding different objects and animals who hide in their garden. You can watch this show on Amazon Prime.
06Celebrity Death
The Celebrity Deathmatch featured numerous celebrities who were shown as clay-animated characters. Their characters would have quite an intense fight in a boxing ring, and the match would be pretty different from the ordinary boxing matches.
Most of the boxing matches ended with the death of the celebrities, which was the reason for the show to get its name “Celebrity Deathmatch”. It was one of the most favourite and popular 9claymation shows on MTV, an absolute treat and entertainment to watch.
The show premiered on January 2199and it continued to air till the year 2007., with its final episode on March 3200Its cast included a series of celebrities, including Maurice Schlafer, Lean Maxwell, Mills Lane, David Wills, Steve Austin, Masasa Moyo and several other celebrities.
You can readily watch this show today on Amazon Instant Video, iTunes, Paramount+ or Amazon Prime Video.
07The Gumby Show
The Gumby Show was yet another popular tv show of the 9that premiered first on March 1195It featured a green-titular character, a humanoid that was a creation and the model of Art Clokey.
This character has been the reason behind two tv series, another feature-length movie and several other media. The ones to star in this tv show are Dal McKennon and Dick Beals. The show is about Gumby experiencing different adventures through various times and environments in history. The show also features his constant companion, a titular, red coloured talking pony named Pokey.
You can watch the show on Netflix and Amazon Prime.
08Pat & Mat
Pat & Mat was an entertaining and fun-to-watch television show of the 90s. The show first premiered in 19and starred David Nykl and Peter Alton, who played the role of Pat and Mat, respectively.
The show was about two neighbours, Pat and Mat, who faced self-created problems. And then, they solved these problems through any possible and impossible remedy.
You can watch this show now on Zee5 and Mx Player for free.
09Pingu
Pingu was a television show about a clumsy yet sweet penguin who lived with his family in the polar ice cap of Antarctica. Pingu, along with his seal friend Robby and sister, Punga, go on different adventures.
This show first premiered on May 2198with Carlo Bonomi, David Sant and Marcello Magni starring in it. You can watch the episodes of this unforgettable and entertaining tv show on ITV Hub and Amazon Prime.
10The Red and the Blue
The Red and the Blue was an Italian television series for children that first premiered in 197The show was about two antagonist clay shape-shifting characters who detected against an undifferentiated background, white.
The cast of this tv show included Carlo Bonomi, and you can see this show today on YouTube.
11The PJs
The PJs was a popular and loved tv show that premiered on 10th January 199About twenty celebrities were starring in this show, and naming a few among them were Eddie Murphy, Ja’Net DuBois, Loretta Devine, Shawn Michael Howard, Snoop Dog and many more.
The show was about Thurgood Stubbs, the superintendent of Lawrence Hilton-Jacobs housing project and lived with his wife, Muriel. This comedy show satirically featured the difficulties one faces in a big-city housing project, which the protagonist Thurgood Stubbs and his friends faced.
You can watch this show on Peacock Tv.
● Bonus:
Now, without video editing, these fantastic shows of the 9could not have been created. But To your surprise, you too can create such incredible videos effortlessly. And that can be possible through an efficient and effective video editing tool.
You can find innumerable video editing tools available in this present world, but you must choose the best. So, let us introduce you to the best video editing tool, with which you can showcase all your editing skills and creativity-Wondershare Filmora Video Editor !
We call this tool the best video editing tool because its numerous features make it the most proficient video editing tool. Let us now look into its numerous effective features below.
● Professional editing tools
Filmora is the video editing tool that incorporates all the professional editing features to make your videos of the best and the professional quality. The elements envelop every aspect of the finest quality video editing works, which brings out the best of skills and creativity in you.
● Easy to use
Although Filmora has every professional editing tool, you will face no difficulty figuring out how the tools work. Even if you are a beginner, you can effortlessly use this editing tool to not only initiate your video editing journey but also enrich your skills.
● Free trial
You need not buy the proceed features on your first try. You can readily avail of the free trial of Filmora and its paid features. And as you try and find the features pleasing, you can proceed to purchase the aid features.
● Personalize and edit your videos
You can avail of the various features such as rotating, cropping, trimming and splitting the videos to edit. Also, there are other features where you can change the speed of the videos. Therefore, the features you get in these tools are of the most proficient quality.
● Over 8effects
The Filmora editing tool offers you more than 8editing effects that will never make you feel lacking any features and effects you need. And this helps you in making the best videos most effortlessly.
● Get the tool on any devices
Filmora believes that editing skills should be made discoverable anywhere and everywhere. Thus, you can download or use this tool on any device that you use. So, you need not have any specific device to avail of this incredible video editing tool, and you can make and edit videos on any device you want.
● Key Takeaways from This Episode →
● These are the best ten claymation tv shows and series that you can watch even today to bring back all the memories and revisit your early days of the 90s. So, to wrap up our discussion, we would conclude by retracing the aspects and factors that we covered in our discussion. We had enveloped the following topics effectively.
● We discussed the claymation picture through a little interdiction.
● Then, we discussed the ten best claymation TV shows popular in the 90s. We discussed their stories, their casts, their premieres and also the sites and apps where you can watch them even today.
● Lastly, we introduced you to the best editing tool, Filmora, that will help you edit any video of your choice and explore your video editing skills with the finest professional features and infinite effects.
There are plenty of things that the 90s have given us. And when we revisit them now, it gives us an inimitable feeling of nostalgia which we would like to store forever with us. And one of the things that can bring back tons of cherished memories from the 90s is the claymation tv shows.
The claymation shows were called the clay animation shows. The reason for such a name was because the characters in the shows were made from malleable or deformable materials, especially out of clay. They have been one of the most revolutionary and entertaining components of that time.
These shows were one of the forms among the numerous forms of stop-motion animations. We will cover what these shows were about, their cast, and where you can watch them today. And in the following discussion, we will be discussing the ten best 90s claymation shows to bring back wonderful nostalgic memories.
Here is the list of the top claymation tv shows and all the information, including the sites and apps you can watch even today!
01Plasmo
Plasmo was an Australian science fiction TV series about a two and a half-year-old space orphan. The show first premiered in 199starring Abbe Holmes, Phillip Houghton and Pia Morley. You can watch this show on YouTube.
02Plonsters
The Plonsters was a show that premiered in 19which showed the characters Plif, Plops and Plummy, babble and morph, and their wonderful adventures. The show starred Ralph Thiekötter, and you can watch this show on Netflix and Tubi.
04Rex the Runt
Rex the Runt was a comedy show that premiered in 199The show was about the adventures of intrepid Rex and his plasticine companions. It starred about nine celebrities. Steve Box, Elisabeth Hadley, Andrew Jeffers, and Kevin Wrench were among them. You can watch this show even today on Amazon Prime.
05Mio Mao
Mia Mao first premiered in 197starring Derek Griffiths as cast. The show was about two plasticine kittens, Mia and Mao, exploring and finding different objects and animals who hide in their garden. You can watch this show on Amazon Prime.
06Celebrity Death
The Celebrity Deathmatch featured numerous celebrities who were shown as clay-animated characters. Their characters would have quite an intense fight in a boxing ring, and the match would be pretty different from the ordinary boxing matches.
Most of the boxing matches ended with the death of the celebrities, which was the reason for the show to get its name “Celebrity Deathmatch”. It was one of the most favourite and popular 9claymation shows on MTV, an absolute treat and entertainment to watch.
The show premiered on January 2199and it continued to air till the year 2007., with its final episode on March 3200Its cast included a series of celebrities, including Maurice Schlafer, Lean Maxwell, Mills Lane, David Wills, Steve Austin, Masasa Moyo and several other celebrities.
You can readily watch this show today on Amazon Instant Video, iTunes, Paramount+ or Amazon Prime Video.
07The Gumby Show
The Gumby Show was yet another popular tv show of the 9that premiered first on March 1195It featured a green-titular character, a humanoid that was a creation and the model of Art Clokey.
This character has been the reason behind two tv series, another feature-length movie and several other media. The ones to star in this tv show are Dal McKennon and Dick Beals. The show is about Gumby experiencing different adventures through various times and environments in history. The show also features his constant companion, a titular, red coloured talking pony named Pokey.
You can watch the show on Netflix and Amazon Prime.
08Pat & Mat
Pat & Mat was an entertaining and fun-to-watch television show of the 90s. The show first premiered in 19and starred David Nykl and Peter Alton, who played the role of Pat and Mat, respectively.
The show was about two neighbours, Pat and Mat, who faced self-created problems. And then, they solved these problems through any possible and impossible remedy.
You can watch this show now on Zee5 and Mx Player for free.
09Pingu
Pingu was a television show about a clumsy yet sweet penguin who lived with his family in the polar ice cap of Antarctica. Pingu, along with his seal friend Robby and sister, Punga, go on different adventures.
This show first premiered on May 2198with Carlo Bonomi, David Sant and Marcello Magni starring in it. You can watch the episodes of this unforgettable and entertaining tv show on ITV Hub and Amazon Prime.
10The Red and the Blue
The Red and the Blue was an Italian television series for children that first premiered in 197The show was about two antagonist clay shape-shifting characters who detected against an undifferentiated background, white.
The cast of this tv show included Carlo Bonomi, and you can see this show today on YouTube.
11The PJs
The PJs was a popular and loved tv show that premiered on 10th January 199About twenty celebrities were starring in this show, and naming a few among them were Eddie Murphy, Ja’Net DuBois, Loretta Devine, Shawn Michael Howard, Snoop Dog and many more.
The show was about Thurgood Stubbs, the superintendent of Lawrence Hilton-Jacobs housing project and lived with his wife, Muriel. This comedy show satirically featured the difficulties one faces in a big-city housing project, which the protagonist Thurgood Stubbs and his friends faced.
You can watch this show on Peacock Tv.
● Bonus:
Now, without video editing, these fantastic shows of the 9could not have been created. But To your surprise, you too can create such incredible videos effortlessly. And that can be possible through an efficient and effective video editing tool.
You can find innumerable video editing tools available in this present world, but you must choose the best. So, let us introduce you to the best video editing tool, with which you can showcase all your editing skills and creativity-Wondershare Filmora Video Editor !
We call this tool the best video editing tool because its numerous features make it the most proficient video editing tool. Let us now look into its numerous effective features below.
● Professional editing tools
Filmora is the video editing tool that incorporates all the professional editing features to make your videos of the best and the professional quality. The elements envelop every aspect of the finest quality video editing works, which brings out the best of skills and creativity in you.
● Easy to use
Although Filmora has every professional editing tool, you will face no difficulty figuring out how the tools work. Even if you are a beginner, you can effortlessly use this editing tool to not only initiate your video editing journey but also enrich your skills.
● Free trial
You need not buy the proceed features on your first try. You can readily avail of the free trial of Filmora and its paid features. And as you try and find the features pleasing, you can proceed to purchase the aid features.
● Personalize and edit your videos
You can avail of the various features such as rotating, cropping, trimming and splitting the videos to edit. Also, there are other features where you can change the speed of the videos. Therefore, the features you get in these tools are of the most proficient quality.
● Over 8effects
The Filmora editing tool offers you more than 8editing effects that will never make you feel lacking any features and effects you need. And this helps you in making the best videos most effortlessly.
● Get the tool on any devices
Filmora believes that editing skills should be made discoverable anywhere and everywhere. Thus, you can download or use this tool on any device that you use. So, you need not have any specific device to avail of this incredible video editing tool, and you can make and edit videos on any device you want.
● Key Takeaways from This Episode →
● These are the best ten claymation tv shows and series that you can watch even today to bring back all the memories and revisit your early days of the 90s. So, to wrap up our discussion, we would conclude by retracing the aspects and factors that we covered in our discussion. We had enveloped the following topics effectively.
● We discussed the claymation picture through a little interdiction.
● Then, we discussed the ten best claymation TV shows popular in the 90s. We discussed their stories, their casts, their premieres and also the sites and apps where you can watch them even today.
● Lastly, we introduced you to the best editing tool, Filmora, that will help you edit any video of your choice and explore your video editing skills with the finest professional features and infinite effects.
10 Options for Your Need on Animation Makers
10 Options for Your Need on Animation Makers
An easy yet powerful editor
Numerous effects to choose from
Detailed tutorials provided by the official channel
Avatar is the graphic illusion of the user or user’s character to represent them. It has managed to invade different social media networks and applications with more reach than any other way of communication.
Through this article, you will know about online avatar creators, free avatar makers from a photo, get guidance to choose from different YouTube avatar makers, and how you can discord animated avatar makers out of the multitude of online options.
In this article
01 [Why Use Avatars Online?](#Part 1)
02 [How to Make an Avatar?](#Part 2)
03 [Need Avatar Animation? Check the 10 Options to Go With](#Part 3)
Part 1 Why Use Avatars Online?
Online Avatars maker is the best way to create avatars. It can be an excellent way to protect your identity to reduce the risk of theft, especially for children from online social media handles. It helps in creating a single identity across different platforms. Online avatars can be uploaded for a long time and need not be updated regularly. You can keep them for an extended period without worrying about getting updated.
The online avatars are easy to use and can be created quickly. Primarily they support all the formats which you can choose while saving. Some online animated avatar creators support sharing to social media platforms directly from the website, such as YouTube avatar maker or vTuber avatar maker free.
Part 1 How to Make an Avatar?
There are multiple websites, software, and applications to create avatars. So here, you will learn about such avatar makers online for free.
016 Best Avatar Makers for 2022
❶ Avatar Maker
Avatar Maker is an online tool to free avatar creators within seconds. You have all the required options right on the screen without searching for the features. You can download it at a pixel rate of 200 X 200 and 400 X 400, the standard dimensions of profile pictures in social media, and images in Vector format apart from standard PNG format. Options to upload directly Gravatar, which support all Gravatar accessing third–party websites.
![]()
❷ Avachara
Avachara, let us dive into the serious business of animated avatar creators. It has the next level of customization features. There are hundreds of clothes in the wardrobe, and you can customize your Avatar with attributes like a guitar, caps, and the area behind the neck. You can save it in formats like PNG and JPEG. In contrast, PNG has dimensions of 200 X 400, whereas JPEG has more dimensions of 480 X 480.
![]()
❸ Mega Anime Avatar Creator
This is a terrific option to create animated avatars with tools by Doll Divine. The main disadvantage of this creator is it does not have a download or save option. Users can screenshot the resulting image and crop it to use. There are roughly 34 backdrops to pick from in this fantastic collection of backgrounds to blend with the surrounding environment. You can customize your avatar with facial tattoos, moles, scars, and facial shrink.
![]()
❹ Picassohead
Picassohead is a creative online avatar creator tool to create artistic and creative expression. Create digital color painting as your online Avatar. You can drag and drop your nose, lips, and hair to create an avatar in the black canvass. One disadvantage is you cannot share it directly on social media or download it but can send it through email, and you can take a screenshot of a final avatar. Besides, you can try a painting touch to the Avatar.
![]()
❺ Charat
This Charat app is a cute avatar maker app to create chubby characters originating from Japan. It has easy and intrusive for the avatoon app. It has pre-made build templates in which you can customize your Avatar and share it directly on social media websites. A variety of hairdos and costumes are available.
![]()
❻ South Park Avatar Creator
South Park Avatar Creator contains tools directly from South Park Studio itself, one of the best-animated avatar creators. It has all the characteristics of South Avatar Studio that can become an avatar of your customization. It has five different skin tones for other continents. Avatar can be stored under the My avatar section, but login is required.
![]()
02How to Create Your Own Animated Avatar on Facebook
The success of avatar-creating websites is wide in social media, and now it is Facebook’s turn to create an animated avatar. The aim is to compete with Bitmoji and Snapchat to create personalized stickers and use them in chats. It is available on Android and iOS. And here, we show how to create an avatar using Facebook as an Online avatar creator.
Step 1: Where to Find
After signup/login, makes sure you have updated the app to the latest version to create avatars in Google Play Store. Enter to any Facebook post as comments. On the keypad, you’ll see a smiling face icon that will lead you to a gallery of emojis, stickers, and GIFs.
![]()
Step 2: Creating Avatar
In there, you will see a new “Pink Icon” in which you can add features like hair, skin tone, eye, nose, mouth, and other character traits and even accessories. Once you have done all the customization, click on “Done.” Now that you can comment on any post using stickers.
![]()
This way, you can create your animated Avatar on Facebook following the steps mentioned above.
03How to Make Animated Avatar of Yourself?
This will be helpful for cute avatar makers. There are multiple apps available to create your Avatar. You need to download the app simply. You can see many templates in the application and various filters and features, including GIFs. The app will give you animation and artistic effects as you wish. Primarily all apps will come with subscriptions for advanced and unique features. You can pay and get the subscription or use the available features.
Photo Lab App, Toon Me, Photo Cartoon, Sketch Me, BeFuncky, crypko free avatar maker, cat avatar maker, furry avatar maker, and LunaPic are some of the applications that help to create an avatar.
![]()
Part 3 Need Avatar Animation? Let’s check 10 such Options to Go With
You can go with an online avatar maker from your PC that will provide you with a hassle-free avatar-making experience. So, dive into following incredible animated avatar makers online with complete information.
01Adobe Animate
This is a vector and 2D avatar animation maker software accessible through web and mobile apps. For users to build interactive content, vector graphics, and add more effects. It also has in-built templates such as color and tone effects which you can customize to your wish. It allows you to create content with simple drag and drop features. This software is free to use. However, the personal version costs $20.99 per month.
![]()
02Maya
Maya is an award-winning 3D computer graphics and avatar animation creator software, currently owned by Autodesk, more useful for 3D applications like Video games, Tv series, motion pictures, and special effects. It is used in films like “Lord of Rings,” “Spiderman,” “Star Wars,” and “Ice Age.” It supports most operating systems, including Windows, Linux, and Mac. Some unique features are the Clip matching feature, enhanced viewpoint, deep adaptive liquid simulations, DX11 shader rendering engine, lip-syncing technology, Arnold integration, and paint effect feature.
![]()
03Renderforest
This is an online avatar animation creator, logo, and website maker. This is excellent software for designers and business owners who aren’t looking for advanced 3D modeling. People who do not want to hire animaters separately but can do it themselves with simple online avatar maker tutorials can choose Renderforest. Over 50,000 artwork files to choose from. 100+ animated video templates to choose from for your slideshows, introduction, logo reveals, and animated infographics.
![]()
04Pencil2D
This tool is helpful for creative 2D hand-drawn animations. Pencil2D is an open-source and free avatar maker, the cheapest tool on the market. It is also a user-friendly avatar making ideal software for beginners who want to hand-draw character designs. Supporting OS are Windows, Mac, Linux, etc.
![]()
05Animaker
Animaker is a 2D animation software and video editor with in-built video and infographics to create animated avatars, including essential animation work, education tutorials, and classroom teaching. It has cloud-based animation as well video-making facility. Animaker uses HTML and Adobe Flash.
![]()
06OpenToonz
This is an open-source software tool any developer can edit, modify and create an animated avatar. Opentoonz’s main aim is to link academic research and to animate research ideas. Suitable for a high level of customizability, ideal for small and medium businesses and creating education tutorials. It supports many platforms like Windows, Mac, and Linux.
![]()
07Synfig
Synfig is the newest animation tool on the market. It is a free avatar maker, animation software, creates 2D animation, character animation, and vector graphic solutions. Beneficial in creating marketing initiatives, publicity campaigns, and televisions. It has two versions with different attributes: the stable version and the development version.
![]()
08KeyShot
KeyShot is used to produce high-quality 2D and 3D animations. There is no requirement to place another graphic card on your PC. Supports 30+ file types for rendering 3D animation. And has remarkable attributes like interactive labeling, texture mapping, and physical lighting.
![]()
09K – 3D
K – 3D software is an incredible 3D avatar animation creator and modeling software. Above all, it is easy to use and easy to learn with support to both Mac and Windows. It also does 2D animation, however not a free software tool.
![]()
10Wondershare Wondershare Filmora Video Editor
It is the best avatar animation maker. With Wondershare Filmora Video Editor , you can make smooth animation easily and quickly. It has a customizable worktable and value graph to adjust the keyframe. To edit videos professionally, we recommend you use Wondershare Wondershare Filmora Video Editor . If you want more control over the movement of animation, character keyframes and value adjust graphs are most helpful.
For Win 7 or later (64-bit)
For macOS 10.12 or later
● Key Takeaways from This Episode →
● Learned about why we need to use online avatar makers.
● Learned how to create an avatar using applications and websites.
● 10 different software for professional avatar animation makers.
● Now that you have learned various animated avatar maker websites, applications, and software methods. We prefer you to use Wondershare Filmora Video Editor software which is professional and easy to use. Animating is very important in the present world to reach customers worldwide. It is an act of bringing life to your Avatar or a cartoon character.
Also read:
- Uncensored Top 10 + Free Streaming Sites for 2024
- Updated 10 2D/3D Animation Tips & Tricks to Bring New Ideas to You
- Updated Techniques on How to Make After Effects 2D Animation
- Updated Epic Formula to Animate Photos From These 10 Animate Pictures App for 2024
- 2024 Approved Top Tips for Effortless Unity 3D Animation
- Updated Top 10 Best Batman Anime Movies 2024 Updated
- New Little Known Techniques of Motion Graphics in Premiere Pro for 2024
- Best Claymation Shows That Make Your Memories Unforgettable for 2024
- Updated Top 10 Banned Anime Around the World and Why
- Updated 10 Amazing Cartoon Music Examples You Need to Bookmark
- New In 2024, How to Create Animated Video on Canva?
- New 2024 Approved Is It That Easy to Make My Own Animated Character?
- New Top 3 Ways to Create Gif with Great 3D Gif Maker for 2024
- New In 2024, 8 Best Motion Graphics Online Tools for Your Inspiration
- Tutorial Guide to Animate Pictures in Canva
- Updated 12 Aesthetic GIF Instagram for Marketers and Creatives for 2024
- Updated In 2024, Incredible Ways to Find Suitable Animated Graphic Maker
- Tips for GIF to Animated PNG
- New In 2024, 10 Realistic Cartoon Characters You Would Run Away From if You Met in Real Life
- New In 2024, How to Make Your GIF on WhatsApp in Simple Ways
- In 2024, Top 10 Apps to Enhance Your Instagram Story Slideshow
- New In 2024, Tips to Create Animated Social Media Posts in Canva
- How to unlock a disable iPhone 7 Plus using macOS finder
- In 2024, Top 5 Tracking Apps to Track Apple iPhone 12 Pro Max without Them Knowing | Dr.fone
- How to Digitally Sign .dotm file online free - (Tutorial)
- Top 15 Augmented Reality Games Like Pokémon GO To Play On Vivo Y27 4G | Dr.fone
- Easily Unlock Your Infinix Note 30 VIP Device SIM
- In 2024, How Can We Bypass Oppo Reno 10 Pro 5G FRP?
- Top 5 Car Locator Apps for Vivo Y27s | Dr.fone
- Here are Some of the Best Pokemon Discord Servers to Join On Apple iPhone SE | Dr.fone
- Best 10 Mock Location Apps Worth Trying On Itel A05s | Dr.fone
- How to Mirror Samsung Galaxy S23 to Mac? | Dr.fone
- In 2024, How to use Pokemon Go Joystick on Honor X7b? | Dr.fone
- In 2024, How to Transfer Data from Honor X50 GT to BlackBerry | Dr.fone
- How to Restore iPhone 11 Pro Max from Backup when iTunes Backup is Corrupt or not compatible | Stellar
- In 2024, Why is iPogo not working On Honor 90? Fixed | Dr.fone
- Title: In 2024, 12 Animated Slideshow PowerPoint Templates and Tools to Make Them
- Author: Elon
- Created at : 2024-05-19 03:04:30
- Updated at : 2024-05-20 03:04:30
- Link: https://animation-videos.techidaily.com/in-2024-12-animated-slideshow-powerpoint-templates-and-tools-to-make-them/
- License: This work is licensed under CC BY-NC-SA 4.0.
