

In 2024, 5 Websites with Animated Logos That Catch Your Eyes
5 Websites with Animated Logos That Catch Your Eyes
5 Websites with Animated Logos That Can Catch Your Eyes
An easy yet powerful editor
Numerous effects to choose from
Detailed tutorials provided by the official channel
Animated logos could be difficult to make for someone who has no experience with animation. That is why we are here to tell you how you can make an attractive animated logo.
Learn more about websites with animated logos through this article.
In this article
01 [Why You Should Use Logo Animation](#Part 1)
02 [5 Awesome Ways to Use Logo Animation](#Part 2)
03 [6 of the Best Animated Logos](#Part 3)
04 [8 Websites with Premium Animated Logo Templates](#Part 4)
Part 1 Why You Should Use Logo Animation
Those who make it big are known to brave the storm. The ones who follow the crowd just turn out to be ordinary. However, those who innovate, rise to a higher level. Here is why you should go for a website with animated logo!
01They grab viewers attraction
The human mind chooses to believe in the supremacy of what appeals to them visually. It is highly important to grab the user’s attention in order to make a mark. Animated logos help your website to visually appeal to the viewer and grab his/her attention. Potential customers will tend to remember the logo of your website and this would directly impact the conversion rates of your website.

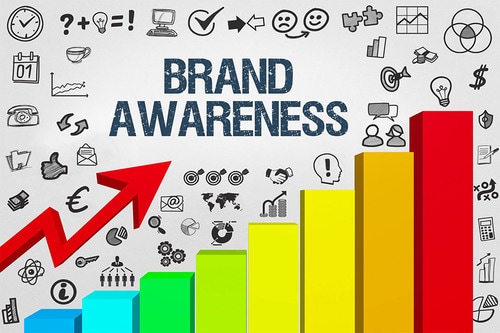
02Increase in brand awareness
Brand awareness is key to a website’s success. As we saw earlier, people often tend to remember brands by their logo and not name. An attractive animated logo will help you create a strong brand awareness among potential customers and help your brand gain popularity.
03Animated logos can convey more
A brand logo is supposed to be the identity of a brand. The logo should be capable enough of explaining your website’s understanding about the field. For instance, if your company is in the cyber security domain, the logo should be good enough to justify your company’s expertise. Animated logos help you establish trust by conveying more through the medium of a logo.
Part 2 4 Awesome Ways to Use Logo Animation
01They can serve as introductions to marketing videos
Video marketing is one of the most commonly used marketing techniques. Research suggested that about 99 percent of brands use video marketing in order to enhance their brand image. Starting of your video with an animated logo will not just look catchy but also make the video all the more professional.
02They can make great outros
Just like animated videos can serve as amazing introductory bits of the video, they can also be the perfect outros to videos. If you haven’t added your animated logo in the introduction of the video then they can be added at the end. This will lead to your viewers remembering your brand for a longer time.
03Look very attractive at trade shows
Trade shows are opportunities where websites and company owners can interact with investors and potential customers face to face. It’s an excellent opportunity to make your mark on the big stage. Logos of companies may be projected on the big screen in such events. At such events when you have just a few seconds to make a mark, you need your logo to grab the viewer’s attention. Hence, animated logos could be very useful.
04They could be a great addition to your company’s email signature
Emails are regarded as the 3rd largest information sources in the B2B industry. It is one of the largest means of communication and marketing. Email signatures have been around for years; however the traditional email signatures have now gone out of fashion. Contemporary email signatures include animated logos to leave a bigger impact on the receiver. Using animated logos, you can add grace to your email signatures and escape the ordinary.
Part 3 6 of the Best Animated Logos
01Mastercard
Mastercard is one of the first companies to use animated logos. The logo is simply fantastic due to the meaning it conveys without any complex animation. The animated logo involves the traditional venn diagram logo of mastercard morphing into several objects. These objects include everything from food to groceries to luxurious products. It basically includes the various kinds of commodities people buy using mastercards.
02Burger king
Another popular brand that uses animated logos is the american fast food giant, burger king. The logo is not highly flashy like we see in mastercard. However, the animated logo does obviously look more attention seeking than the conventional static logo. The logo shows the stacking of the different elements of the logo one by one over each other. This resembles the process of making a burger.
03Fedex
Another logo that would classify as a flashy animated logo is the fedex logo. Initially, fedex had experimented with several logos before sticking to the arrow logo which continues even today. The animated logo involves an arrow making the letter “Fedex” with its trajectory and then finally settling in between letters X and E. The logistics giant delivers couriers from one corner of the world to another, and the arrow symbolizes exactly that!
04Flickr
Flickr is a popular stock image and video hosting platform. Anyone can use the stock images and videos in their content. The logo starts with a blue and pink dot initially. These dots later expand in a whirlpool like motion. The logo starts off with the static logo before it expands. The idea is to show that the online stock image portal goes beyond limits and has every picture and video you’d need
05Bundle
Bundle is a popular app that offers its users rewards upon shopping from selected stores. These stores have an alliance with bundle and upon shopping from them, users seek reward points on the bundle app. The animated logo starts of with a pink screen which later converges to become a large “B” wrapped with a gifting ribbon. Although, the logo is pretty simple it does an amazing job at explaining the brand’s MSP and attracts customers.
06Google
The logo of google has evolved over the years. Google is almost synonymous to attractive logos and it comes up with attractive new logos every now and then. One of the newest logos, an animated one, is by far one of the most attractive animated logos. It aims to depict the numerous things users can search using “Google voice search”.
Part 4 5 Websites with Premium Animated Logo Templates
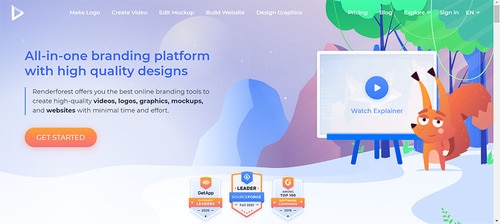
01RenderForest
There are several applications you can use for animating your next logo for your website. RenderForest is one such software that lets you explore multiple animated logo templates. The tool has an array of templates you can choose from. Each of the templates is unique in its own way and has its own charm. Additionally, the software also has a functionality using which you can animate your static logo using templates.
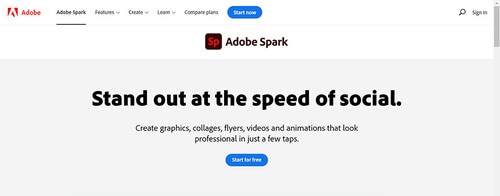
Developed and managed by Adobe, the editing application is a popular one. The software allows you to use several pre-made templates while animating. The animations that you can find on adobe spark are
02Adobe Spark
Adobe spark seamless and designed perfectly. Using adobe spark, you can give your animated logo a touch of class and perfection. Although the software is paid, it is worth every penny due to the numerous animation templates and video editing tools available.
03Design free logo
Another amazing tool for animation, design free logo is a complete animation tool that offers several animation templates. Additionally, the free software also lets users animate in 3 dimensions. The software is best suited for novice animators who have limited experience with animation. The software is very simple to use unlike its sophisticated counterparts.
04Logo maker plus
If you are looking for an android application that helps you create seamless animated logos, well logo maker plus is just the perfect application for you. The app has more than a 100 templates for animating your logo, hence making it the perfect app for those who want to perform basic animation. Additionally, the app also has multiple visual effects which would enable you to make catchy logos
05Animaker
The final software on this list of amazing softwares is animaker. The software works well to animate logos, presentations, and marketing videos. The software has more than 50 effects. Moreover, using this software you can add filters, effects and sound effects. The software also lets users upload the videos to facebook and youtube directly!
Final Thoughts
● Today, we took a look at a few of the best animated logos which you could idealize.
● Nowadays, even big brands are adopting animated logos.
● They help establish a brand image and take your brand to a higher level.
● We also saw a few softwares that could help you make an animated logo. Wish to make an animated logo? Head to any one of the websites and make your website with animated logos Try It Free
Animated logos could be difficult to make for someone who has no experience with animation. That is why we are here to tell you how you can make an attractive animated logo.
Learn more about websites with animated logos through this article.
In this article
01 [Why You Should Use Logo Animation](#Part 1)
02 [5 Awesome Ways to Use Logo Animation](#Part 2)
03 [6 of the Best Animated Logos](#Part 3)
04 [8 Websites with Premium Animated Logo Templates](#Part 4)
Part 1 Why You Should Use Logo Animation
Those who make it big are known to brave the storm. The ones who follow the crowd just turn out to be ordinary. However, those who innovate, rise to a higher level. Here is why you should go for a website with animated logo!
01They grab viewers attraction
The human mind chooses to believe in the supremacy of what appeals to them visually. It is highly important to grab the user’s attention in order to make a mark. Animated logos help your website to visually appeal to the viewer and grab his/her attention. Potential customers will tend to remember the logo of your website and this would directly impact the conversion rates of your website.
02Increase in brand awareness
Brand awareness is key to a website’s success. As we saw earlier, people often tend to remember brands by their logo and not name. An attractive animated logo will help you create a strong brand awareness among potential customers and help your brand gain popularity.
03Animated logos can convey more
A brand logo is supposed to be the identity of a brand. The logo should be capable enough of explaining your website’s understanding about the field. For instance, if your company is in the cyber security domain, the logo should be good enough to justify your company’s expertise. Animated logos help you establish trust by conveying more through the medium of a logo.
Part 2 4 Awesome Ways to Use Logo Animation
01They can serve as introductions to marketing videos
Video marketing is one of the most commonly used marketing techniques. Research suggested that about 99 percent of brands use video marketing in order to enhance their brand image. Starting of your video with an animated logo will not just look catchy but also make the video all the more professional.
02They can make great outros
Just like animated videos can serve as amazing introductory bits of the video, they can also be the perfect outros to videos. If you haven’t added your animated logo in the introduction of the video then they can be added at the end. This will lead to your viewers remembering your brand for a longer time.
03Look very attractive at trade shows
Trade shows are opportunities where websites and company owners can interact with investors and potential customers face to face. It’s an excellent opportunity to make your mark on the big stage. Logos of companies may be projected on the big screen in such events. At such events when you have just a few seconds to make a mark, you need your logo to grab the viewer’s attention. Hence, animated logos could be very useful.
04They could be a great addition to your company’s email signature
Emails are regarded as the 3rd largest information sources in the B2B industry. It is one of the largest means of communication and marketing. Email signatures have been around for years; however the traditional email signatures have now gone out of fashion. Contemporary email signatures include animated logos to leave a bigger impact on the receiver. Using animated logos, you can add grace to your email signatures and escape the ordinary.
Part 3 6 of the Best Animated Logos
01Mastercard
Mastercard is one of the first companies to use animated logos. The logo is simply fantastic due to the meaning it conveys without any complex animation. The animated logo involves the traditional venn diagram logo of mastercard morphing into several objects. These objects include everything from food to groceries to luxurious products. It basically includes the various kinds of commodities people buy using mastercards.
02Burger king
Another popular brand that uses animated logos is the american fast food giant, burger king. The logo is not highly flashy like we see in mastercard. However, the animated logo does obviously look more attention seeking than the conventional static logo. The logo shows the stacking of the different elements of the logo one by one over each other. This resembles the process of making a burger.
03Fedex
Another logo that would classify as a flashy animated logo is the fedex logo. Initially, fedex had experimented with several logos before sticking to the arrow logo which continues even today. The animated logo involves an arrow making the letter “Fedex” with its trajectory and then finally settling in between letters X and E. The logistics giant delivers couriers from one corner of the world to another, and the arrow symbolizes exactly that!
04Flickr
Flickr is a popular stock image and video hosting platform. Anyone can use the stock images and videos in their content. The logo starts with a blue and pink dot initially. These dots later expand in a whirlpool like motion. The logo starts off with the static logo before it expands. The idea is to show that the online stock image portal goes beyond limits and has every picture and video you’d need
05Bundle
Bundle is a popular app that offers its users rewards upon shopping from selected stores. These stores have an alliance with bundle and upon shopping from them, users seek reward points on the bundle app. The animated logo starts of with a pink screen which later converges to become a large “B” wrapped with a gifting ribbon. Although, the logo is pretty simple it does an amazing job at explaining the brand’s MSP and attracts customers.
06Google
The logo of google has evolved over the years. Google is almost synonymous to attractive logos and it comes up with attractive new logos every now and then. One of the newest logos, an animated one, is by far one of the most attractive animated logos. It aims to depict the numerous things users can search using “Google voice search”.
Part 4 5 Websites with Premium Animated Logo Templates
01RenderForest
There are several applications you can use for animating your next logo for your website. RenderForest is one such software that lets you explore multiple animated logo templates. The tool has an array of templates you can choose from. Each of the templates is unique in its own way and has its own charm. Additionally, the software also has a functionality using which you can animate your static logo using templates.
Developed and managed by Adobe, the editing application is a popular one. The software allows you to use several pre-made templates while animating. The animations that you can find on adobe spark are
02Adobe Spark
Adobe spark seamless and designed perfectly. Using adobe spark, you can give your animated logo a touch of class and perfection. Although the software is paid, it is worth every penny due to the numerous animation templates and video editing tools available.
03Design free logo
Another amazing tool for animation, design free logo is a complete animation tool that offers several animation templates. Additionally, the free software also lets users animate in 3 dimensions. The software is best suited for novice animators who have limited experience with animation. The software is very simple to use unlike its sophisticated counterparts.
04Logo maker plus
If you are looking for an android application that helps you create seamless animated logos, well logo maker plus is just the perfect application for you. The app has more than a 100 templates for animating your logo, hence making it the perfect app for those who want to perform basic animation. Additionally, the app also has multiple visual effects which would enable you to make catchy logos
05Animaker
The final software on this list of amazing softwares is animaker. The software works well to animate logos, presentations, and marketing videos. The software has more than 50 effects. Moreover, using this software you can add filters, effects and sound effects. The software also lets users upload the videos to facebook and youtube directly!
Final Thoughts
● Today, we took a look at a few of the best animated logos which you could idealize.
● Nowadays, even big brands are adopting animated logos.
● They help establish a brand image and take your brand to a higher level.
● We also saw a few softwares that could help you make an animated logo. Wish to make an animated logo? Head to any one of the websites and make your website with animated logos!
How to Create a Whiteboard Animation Video
Whiteboard animation simply refers to the process of story telling using pictures and drawn resources on a whiteboard or a plane white surface. Its simply the creation of conventional story telling procedure where text, images, diagrams, figures, etc are drawn onto a white surface.
Whiteboard animation video usually work with audio, visual and most times a combination of both audio and visual to sell a particular information to the audience. Another name it has gotten over time which you may come across while surfing the internet is doodle videos.

In creating this type of videos, script writes are usually employed because of the dynamics involved in creating them. The major users of whiteboard animation video are business owners and people in the education fields. Other people make use of it but these two groups are the major users.
Whiteboard animation is important because it helps viewers remember the contents of what they watched better than looking at an image that contains a lot of information that may not always be organized.
Over time, whiteboard videos have become a more compelling and innovative method of dissemination information. They work so well because it’s a more relatable and fun way of making videos. It goes outside the conventional video making techniques and employs the animation standards which is fun to watch, engaging and still maintains the ability to effective pass the required information to the viewers.
Also, it uses a unique style to mix text, animations, and colors to drive the point home. Viewers are usually glued to their screen while watching it. The usual white background equally makes the information being displayed to effective contrast with each other. However, there is a recent movement from the usual white background to any color of choice while still maintaining the contrasting quality of the videos.
Finally, people tend to remember events or information if they are told as stories. This is one of the major objectives of whiteboard animation videos. They use graphics and animations to tell stories, sell products and services while maintaining the fun in it.
Whiteboard animation video usually takes time to create. Its not always as easy as it may seem. It takes dedication and patience before you perfect the video. if you’re new to this, its ok to not have that perfect video immediately. What matters is your will to grow and get better.
Below is an example of a whiteboard animation video created using Animaker. We’ll still look at the various software applications used for creating whiteboard animation videos.
How to Create Your Video
Step1 The first step to creating your whiteboard animation video is to know your topic of choice. Determining your choice topic is based on the purpose of the video. You have to know the reason why the video is being created in the first place to enable you decide the contents, the outlook, the font style and size and the colors to use.
Step2 The next step after you’ve getting your topic is execution of the idea. This involves having a script which usually involves the step-by-step procedure you are to follow to achieve your goal. Writing the script is arguable the most difficult process. However, once you get it right, all the other processes become relatively easy to execute. You might need to employ a professional script writer depending on your budget for the project.
Step3 After that, the next thing is to deicide whether or not to use your own voice or computer voice. This is also called a voice over. Most software provides a text to speech voice over option which usually comes with various alternatives. There is also another option of using your own voice to finish the project.
Step4 Add text, graphics and animation. This step is usually easier when you are working with the script already provided. You include the text, animations, figures, etc. sometimes you might need to import additional resources to complete this task. However, not all software provides for this.
Step5 Organize your work. In organizing your work, you must ensure that you voice over matches properly with what is on display. Check your spellings, grammar, composition and other ‘little’ details that may give your work a bad look.
Step6 Save your work and export. Once your done with your work, you have to save it on your local disk. This also means downloading the work from the website or software onto a local disk. You can now share the video on any social media of your choice. The most popular place to share it is on YouTube which is the most widely used video watching application.
Top 3 Whiteboard Animation Software
When considering which software is best for whiteboard animation creation needs, the most important factor to have at the back of your mind is flexibility and cost. Some software are really flexible to use but cost more than many people can afford. Others are cheap to purchase but do not have all the necessary resources needed to make a great video.
We’ll be looking at various software that combines cost effectiveness and flexibility. Note however that this list is not exhaustive of the software that combines these two features but are worthy of mention for the purpose of this article.
Filmora
At the top of our list is Filmora . This does not make them the best. However, they are relatively easy to use and have a combination of the two features mentioned above. Finally on our list is Filmora. This software offers much more than just whiteboard animation. It’s your go-to software for your video creation and video editing needs. One of the best parts of this software is that it supports 2D and 3D animation.

Free Download For Win 7 or later(64-bit)
Free Download For macOS 10.14 or later
Animaker
It has a lot of free resources which are made available to users after creating and account with them and verifying your email. However, like most other software, the juicy parts of it are locked and can be unlocked with a monthly or yearly subscription. They are 3 packages; Basic which cost $10 per month and $120 per year, starter package which cost $19 per month and $228 per year and the pro package which costs $49 per month and $588 per year.

This software is at the top of our list because the free resources it provides is adequate to make a decent whiteboard animation. Note that it comes with their watermark which cannot be removed without a paid subscription.
Doodly
Doodly is one of the most popular software applications for creating whiteboard videos. Its popularity comes from the fact that no prior skills is needed to use the software other than basic computer and internet usage. A lot of processes are already automated for users. If you’re a user that is concerned about quick responses from their customer care/support, doodly covers you. They have a record time response to issues from their users. Visit https://www.doodly.com/pricing/ to view their pricing.

Conclusion
If you’re wondering why you should chose whiteboard animation over the conventional video creating technique, then you should probably try it out. Animation easily captures the interest of viewers and the slide-by-slide transitioning equally makes it better. You can always try out other software applications to know the one that fits you best.
How to Create Your Video
Step1 The first step to creating your whiteboard animation video is to know your topic of choice. Determining your choice topic is based on the purpose of the video. You have to know the reason why the video is being created in the first place to enable you decide the contents, the outlook, the font style and size and the colors to use.
Step2 The next step after you’ve getting your topic is execution of the idea. This involves having a script which usually involves the step-by-step procedure you are to follow to achieve your goal. Writing the script is arguable the most difficult process. However, once you get it right, all the other processes become relatively easy to execute. You might need to employ a professional script writer depending on your budget for the project.
Step3 After that, the next thing is to deicide whether or not to use your own voice or computer voice. This is also called a voice over. Most software provides a text to speech voice over option which usually comes with various alternatives. There is also another option of using your own voice to finish the project.
Step4 Add text, graphics and animation. This step is usually easier when you are working with the script already provided. You include the text, animations, figures, etc. sometimes you might need to import additional resources to complete this task. However, not all software provides for this.
Step5 Organize your work. In organizing your work, you must ensure that you voice over matches properly with what is on display. Check your spellings, grammar, composition and other ‘little’ details that may give your work a bad look.
Step6 Save your work and export. Once your done with your work, you have to save it on your local disk. This also means downloading the work from the website or software onto a local disk. You can now share the video on any social media of your choice. The most popular place to share it is on YouTube which is the most widely used video watching application.
Top 3 Whiteboard Animation Software
When considering which software is best for whiteboard animation creation needs, the most important factor to have at the back of your mind is flexibility and cost. Some software are really flexible to use but cost more than many people can afford. Others are cheap to purchase but do not have all the necessary resources needed to make a great video.
We’ll be looking at various software that combines cost effectiveness and flexibility. Note however that this list is not exhaustive of the software that combines these two features but are worthy of mention for the purpose of this article.
Filmora
At the top of our list is Filmora . This does not make them the best. However, they are relatively easy to use and have a combination of the two features mentioned above. Finally on our list is Filmora. This software offers much more than just whiteboard animation. It’s your go-to software for your video creation and video editing needs. One of the best parts of this software is that it supports 2D and 3D animation.
Free Download For Win 7 or later(64-bit)
Free Download For macOS 10.14 or later
Animaker
It has a lot of free resources which are made available to users after creating and account with them and verifying your email. However, like most other software, the juicy parts of it are locked and can be unlocked with a monthly or yearly subscription. They are 3 packages; Basic which cost $10 per month and $120 per year, starter package which cost $19 per month and $228 per year and the pro package which costs $49 per month and $588 per year.
This software is at the top of our list because the free resources it provides is adequate to make a decent whiteboard animation. Note that it comes with their watermark which cannot be removed without a paid subscription.
Doodly
Doodly is one of the most popular software applications for creating whiteboard videos. Its popularity comes from the fact that no prior skills is needed to use the software other than basic computer and internet usage. A lot of processes are already automated for users. If you’re a user that is concerned about quick responses from their customer care/support, doodly covers you. They have a record time response to issues from their users. Visit https://www.doodly.com/pricing/ to view their pricing.
Conclusion
If you’re wondering why you should chose whiteboard animation over the conventional video creating technique, then you should probably try it out. Animation easily captures the interest of viewers and the slide-by-slide transitioning equally makes it better. You can always try out other software applications to know the one that fits you best.
Most Effective Tactics to Set WhatsApp Status
Most Effective Tactics to Set WhatsApp Status
An easy yet powerful editor
Numerous effects to choose from
Detailed tutorials provided by the official channel
People generally use images to be uploaded as their WhatsApp status and unknown to many, videos as well as GIFs can also be added as status.
This status remains on your profile for 24 hours and can be viewed only by people who are on your contact list. So, if you too looking for ways to add WhatsApp status GIF, keep reading.
In this article
01 [How to set an animated GIF as WhatsApp status from the phone gallery?](#Part 1)
02 [How to set an animated GIF as WhatsApp status using an app?](#Part 2)
03 [Setting WhatsApp GIF status using device internal camera](#Part 3)
04 [How to create an interesting GIF in a hassle-free manner using Wondershare Filmora](#Part 4)
Part 1 How to set an animated GIF as WhatsApp status from the phone gallery?
If the GIF that you wish to use as the WhatsApp status is present on your phone, you can add it directly from the phone gallery. The steps to get this task done are enlisted below.
Step 1. Launch WhatsApp on your phone and then click on the Status tab.
Step 2. Tap on the My status tab to add a new status. The camera app on the phone will open and you need to launch the phone gallery now.
Step 3. Choose the desired GIF from the gallery, click on it and then tap on the Send button to set it as your status.
The selected GIF will be set as your WhatsApp status.
Part 2 How to set an animated GIF as WhatsApp status using an app?
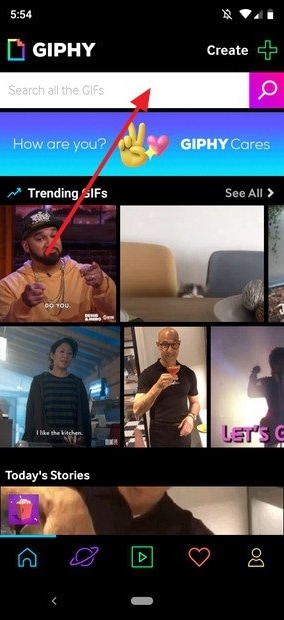
Another way to add an animated GIF WhatsApp status is by using an app and for this, we recommend Giphy as the best tool. The steps to use the app for setting an animated status are as follows.
Step 1. Download, install and open the Giphy app on your phone.
Step 2. The main interface of the app will show multiple GIF options. You can also search your choice of animation based on categories or by using the search box.
Step 3. Next, click on the desired GIF to open it and see it in a larger frame.
Step 4. Under the selected GIF, click on the icon resembling a paper plane, and sharing options will appear.
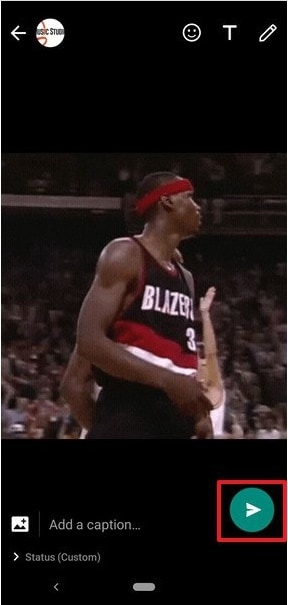
Step 5. Choose the WhatsApp icon from the options available and then at the next menu, click on the My status option.
Step 6. Next, tap on the green arrow at the bottom-right corner to set GIF as WhatsApp status.
Part 3 Setting WhatsApp GIF status using device internal camera
Another way to add an animated GIF as WhatsApp status is using the internal camera of the device. The steps for the same are as follows.
Step 1. On your phone, launch WhatsApp and at the Status tab, click on the My Status option.
Step 2. The camera of the phone will get activated and now to start the video recording, you need to tap and hold the button that is used for taking the images.
Step 3. Record the video for which you wish to make an animation (video cannot be longer than 5 seconds).
Step 4. After the recording is done, you can adjust the duration using the slider and then choose to play the recorded video as GIF. Click on the Send button to share the video as WhatsApp Status.

Part 4 How to create an interesting GIF in a hassle-free manner using ** Wondershare Filmora Video Editor
If you wish to set your WhatsApp status as interesting GIF videos, you would need to download such animations online. Another way is to get customized GIF files and this professional tool will be required. If you too want to create your own customized animation in a hassle-free manner, we suggest using Wondershare Filmora. Not only WhatsApp status, but you can also use software for creating GIF animations for web pages, social media sites, ad banners, and other uses.
Wondershare Filmora
Get started easily with Filmora’s powerful performance, intuitive interface, and countless effects Try It Free Try It Free Learn More >

Using Wondershare Filmora, artistic animations can be quickly created using an image as well as videos. The process is simple and does not require any advanced technical know-how. To create the desired GIF video, there are multiple options for customizations available like adding text, overlays, elements, and more.
Key features of the software
● Create GIF animations using videos and still images.
● Support all key video and image formats like FLV, MKV, MP4, and more.
● Allows customizing the animations by adding text, overlays, elements, and others.
● Quick and hassle-free tool for creating an interesting GIF.
● Windows and Mac support.
Steps to create GIF for WhatsApp status using Wondershare Filmora
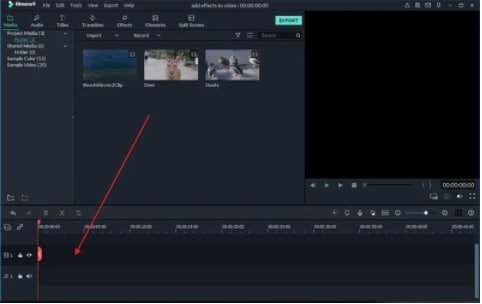
Step 1. Launch Wondershare Filmora and add video or images from which you wish to create an animated GIF.
Step 2. Drag and drop the added media file to the timeline of the software.
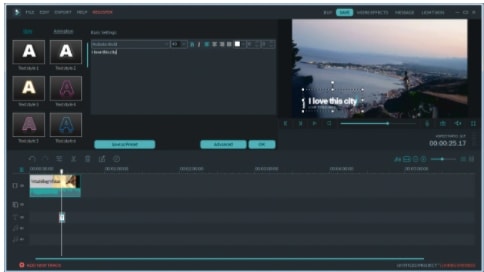
Step 3. Next, edit and customize the added files using features like combine, crop, split, speed-up, slow, and more.
Step 4. You can also add text or elements like sound and others to the added files.
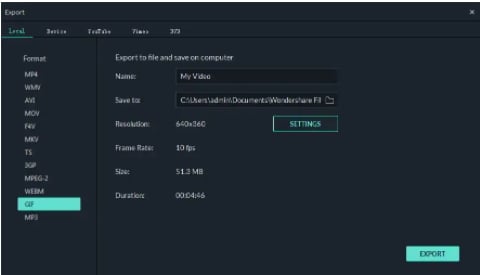
Step 5. Next, when all settings are done, choose GIF at the Local tab to save the media file as GIF. Choose the desired file name and the system location to save the file. Finally, click on the Export button.
The created GIF animation will save to your selected folder and can be used as WhatsApp status, on social media sites, or for any other use as needed.
● Key Takeaways from This Episode →
●GIF animations can now be used as WhatsApp status.
●There are multiple ways to set GIF animations as WhatsApp status.
People generally use images to be uploaded as their WhatsApp status and unknown to many, videos as well as GIFs can also be added as status.
This status remains on your profile for 24 hours and can be viewed only by people who are on your contact list. So, if you too looking for ways to add WhatsApp status GIF, keep reading.
In this article
01 [How to set an animated GIF as WhatsApp status from the phone gallery?](#Part 1)
02 [How to set an animated GIF as WhatsApp status using an app?](#Part 2)
03 [Setting WhatsApp GIF status using device internal camera](#Part 3)
04 [How to create an interesting GIF in a hassle-free manner using Wondershare Filmora](#Part 4)
Part 1 How to set an animated GIF as WhatsApp status from the phone gallery?
If the GIF that you wish to use as the WhatsApp status is present on your phone, you can add it directly from the phone gallery. The steps to get this task done are enlisted below.
Step 1. Launch WhatsApp on your phone and then click on the Status tab.
Step 2. Tap on the My status tab to add a new status. The camera app on the phone will open and you need to launch the phone gallery now.
Step 3. Choose the desired GIF from the gallery, click on it and then tap on the Send button to set it as your status.
The selected GIF will be set as your WhatsApp status.
Part 2 How to set an animated GIF as WhatsApp status using an app?
Another way to add an animated GIF WhatsApp status is by using an app and for this, we recommend Giphy as the best tool. The steps to use the app for setting an animated status are as follows.
Step 1. Download, install and open the Giphy app on your phone.
Step 2. The main interface of the app will show multiple GIF options. You can also search your choice of animation based on categories or by using the search box.
Step 3. Next, click on the desired GIF to open it and see it in a larger frame.
Step 4. Under the selected GIF, click on the icon resembling a paper plane, and sharing options will appear.
Step 5. Choose the WhatsApp icon from the options available and then at the next menu, click on the My status option.
Step 6. Next, tap on the green arrow at the bottom-right corner to set GIF as WhatsApp status.
Part 3 Setting WhatsApp GIF status using device internal camera
Another way to add an animated GIF as WhatsApp status is using the internal camera of the device. The steps for the same are as follows.
Step 1. On your phone, launch WhatsApp and at the Status tab, click on the My Status option.
Step 2. The camera of the phone will get activated and now to start the video recording, you need to tap and hold the button that is used for taking the images.
Step 3. Record the video for which you wish to make an animation (video cannot be longer than 5 seconds).
Step 4. After the recording is done, you can adjust the duration using the slider and then choose to play the recorded video as GIF. Click on the Send button to share the video as WhatsApp Status.
Part 4 How to create an interesting GIF in a hassle-free manner using ** Wondershare Filmora Video Editor
If you wish to set your WhatsApp status as interesting GIF videos, you would need to download such animations online. Another way is to get customized GIF files and this professional tool will be required. If you too want to create your own customized animation in a hassle-free manner, we suggest using Wondershare Filmora. Not only WhatsApp status, but you can also use software for creating GIF animations for web pages, social media sites, ad banners, and other uses.
Wondershare Filmora
Get started easily with Filmora’s powerful performance, intuitive interface, and countless effects Try It Free Try It Free Learn More >
Using Wondershare Filmora, artistic animations can be quickly created using an image as well as videos. The process is simple and does not require any advanced technical know-how. To create the desired GIF video, there are multiple options for customizations available like adding text, overlays, elements, and more.
Key features of the software
● Create GIF animations using videos and still images.
● Support all key video and image formats like FLV, MKV, MP4, and more.
● Allows customizing the animations by adding text, overlays, elements, and others.
● Quick and hassle-free tool for creating an interesting GIF.
● Windows and Mac support.
Steps to create GIF for WhatsApp status using Wondershare Filmora
Step 1. Launch Wondershare Filmora and add video or images from which you wish to create an animated GIF.
Step 2. Drag and drop the added media file to the timeline of the software.
Step 3. Next, edit and customize the added files using features like combine, crop, split, speed-up, slow, and more.
Step 4. You can also add text or elements like sound and others to the added files.
Step 5. Next, when all settings are done, choose GIF at the Local tab to save the media file as GIF. Choose the desired file name and the system location to save the file. Finally, click on the Export button.
The created GIF animation will save to your selected folder and can be used as WhatsApp status, on social media sites, or for any other use as needed.
● Key Takeaways from This Episode →
●GIF animations can now be used as WhatsApp status.
●There are multiple ways to set GIF animations as WhatsApp status.
Tips for GIF to Animated PNG
Versatile Video Editor - Wondershare Filmora
An easy yet powerful editor
Numerous effects to choose from
Detailed tutorials provided by the official channel
The advent of many instant chats had led to the demand for GIFs and animated PNGs. Users access these files to express their emotions amidst the chat environment. There are unique ways to convert GIFs to animated PNGs precisely. In the digital space, there are surplus applications are available to perform this conversion process without compromising with the quality factors.
In this article, a detailed discussion on the GIFs and the animated PNGs are available for better understanding. It is the process of working with images and implementing some actions with the pictures that makes it appear interesting. Most GIFs and animated PNGs are used for fun and it helps to excite your friends amidst serious chats. It serves as the source of conveying thoughts with fun-filled visuals. Before choosing between the GIFs and APNGs, analyze which file format offers you surplus advantages for optimal handling. Here, in the below discussion you will study the features of this file format and the precise methods to switch between these two files efficiently.
In this article
01 [What is GIF & What is animated PNG](#Part 1)
02 [GIF vs animated PNG, which is better?](#Part 2)
03 [Can PNG be animated like GIF?](#Part 3)
04 [How to Convert GIF to animated PNG?](#Part 4)
Part 1 What is GIF & What is animated PNG
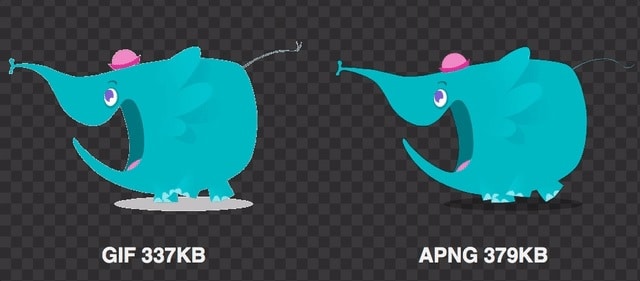
The GIFs are animated images and the picture moves in a sequence in a cycle. The movement repeats without stopping. This type of picture is popular on the webpages and the built-in templates are available in the digital space for quick downloads. The single-frame GIFs take more time to download and displays exciting moves that trigger laughter with audiences. GIF takes the abbreviation of Graphics Interchange Format. It came into existence in the year 1980s and is widely used globally. GIFs are animated images in a basic format. It adopts the safe LZW algorithm that tracks the colors optimally.
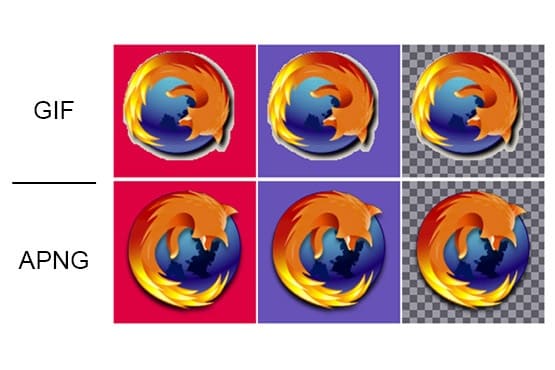
The superior form of the motion picture is animated PNGs. It stands for Portable Network Graphics. This format supports indexed color, grayscale, and true color images. Additionally, the animated PNGs has advantages like alpha channels, cross-platform gamma corrections and two-dimensional interlacing. APNG came into existence in the year 1995 and is compatible with a few web browsers.
Part 2 GIF vs animated PNG, which is better?
When compared to GIFs and APNG, APNG seems to be technically strong with a wide range of supporting features. The quality of the file of APNG is good as it displays 24-bit images and 8- bit transparency. The APNG images can be compressed to the smallest value thereby encouraging the ease of transfer between devices. APNG has access to many color combinations whereas GIFs can use up to 256 colors. The new web browser versions are compatible with APNGs and the older browsers play the GIFs precisely. To view the APNG files in the older browsers you require external plugins or extensions. The higher quality APNGs are mostly used by professionals when compared to GIFs. The portability in moving the animated images is simple with APNGs. The GIF files have a poor compression rate and it is difficult to transfer at the digital space.
Part 3 Can PNG be animated like GIF?
You can animate the PNG files like GIF using reliable tools in the online space. There are unique programs to establish this process. It works on every detail on the PNG files and adds transition effects to the images to implement the movements. If you take closer looks at the digital space, you will acquire sophisticated programs to add transitions to the static pictures. While animating the PNG files, you must include frames, durations, and transition effects to the PNG images to include the animations. Based on the settings, the animated PNG file functions. Every move of the images is assigned by the attributes set by the users with the help of powerful applications in the digital space. You can also find online tools to assist in this operation. The static PNG files get desired moves by animating like GIF files. The APNG has superior quality when compared to GIF files. As discussed above many professionals opt for APNG files than GIFs.

Part 4 How to Convert GIF to animated PNG?
In this section, you will learn how to convert GIF to animated PNG using online tools. Use the recommended online platform to carry out the quality conversions to acquire desired outcomes.
1. EZGIF
It is an exclusive online space that brings quality animations to GIF files acquiring the properties of APNG. By converting the GIFs to APNG, you can enhance various features like easy storage, best compression, quality elements in the file. When you step into this website, you can perform a wide range of conversion processes between animated and static image files. Choose the right tabs on the menu to trigger the desired changes to the uploaded files.
Choose GIF to APNG tab at the top menu to begin this conversion process. The GIF files will receive all the good functionalities of APNG after this conversion process. You can download the animated PNGs to any platform after a successful conversion.
Follow the below steps to proceed with GIF to animated PNGs using the EZGIF online tool.
Step 1
Go to the website and upload the GIF file by tapping the ‘Choose File’ button. The maximum file size is 50MB that ensures a flawless upload process. Here, you can either choose a file from a local drive or paste the URL from an online source into this webpage flawlessly. Then, click the Upload button to trigger this GIF to the APNG conversion process.
Step 2
Format the output and click the convert button to download the animated PNG files.
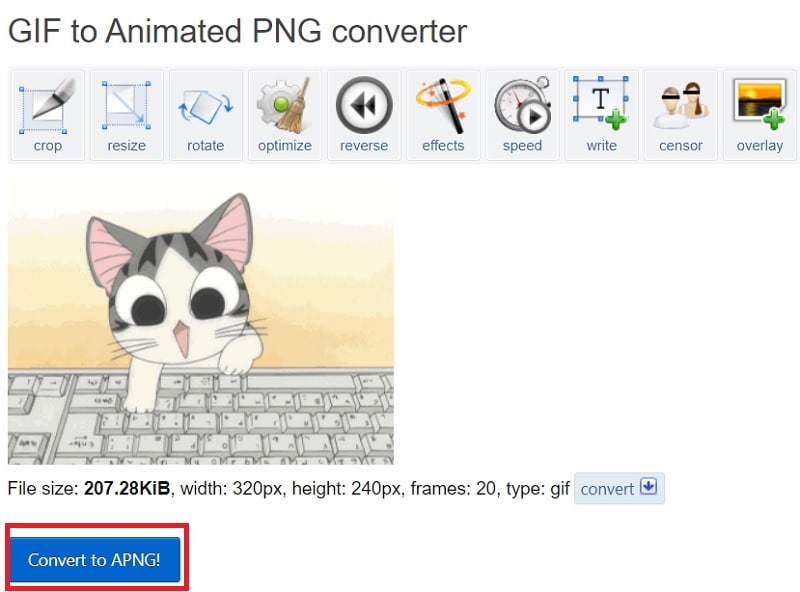
It is a simple and yet effective one that helps to convert the GIFs to animated PNGs in no time. You can also use the edit tools to make changes to the GIF files before the conversion process. The converted files are available for downloads at your local system drive. Access them when required and upload them to the desired platform to make fun with your friends and family members.
2. Free convert
In this section, you will be learning how to use the Free convert webpage to carry out the GIF to the animated PNG conversion process. It is a user-friendly interface where the controls are explicit to make the perfect click appropriately. This website provides a secure platform to carry out the conversion process optimally. The uploaded files are deleted automatically after 2 hours. You can expect a quality conversion process to take place on this website.
The stepwise process to convert GIF to animated PNG using the Freeconvert website.
Step 1
Upload the Gif files by tapping the ‘Choose GIF files’ button. This platform supports GIF file sizes up to 1GB.

Step 2
Hit the Convert to APNG button to trigger the conversion process and download the APNG file to desired storage space precisely.

Surf the above steps to carry out a precise conversion process between GIF and animated PNG. After this format conversion process, you can enjoy all the benefits of APNG overcoming the constraints with the GIF files.
These are the two efficient ways of converting the GIF files to APNG format using online web pages. You can choose any one of the websites to carry out the desired APNG conversion process optimally.
Wondershare Filmora
Get started easily with Filmora’s powerful performance, intuitive interface, and countless effects Try It Free Try It Free Learn More >
AI Portrait – The best feature of Wondershare Filmora for gameplay editing
The AI Portrait is a new add-on in Wondershare Filmora. It can easily remove video backgrounds without using a green screen or chroma key, allowing you to add borders, glitch effects, pixelated, noise, or segmentation video effects.

Conclusion
Thus, this article had given valuable insights on the conversion of GIF to animated PNG files. The enlightening discussion about the GIFs and APNGs assists you to choose the best one from these two options. You must be clear about the differences between these formats and select the ones that meet your needs appropriately. Connect with the above-discussed web pages to carry out the conversion effortlessly with a few clicks. Stay connected with this article to discover the new horizons of animated clippings that excite you during online communications.
The advent of many instant chats had led to the demand for GIFs and animated PNGs. Users access these files to express their emotions amidst the chat environment. There are unique ways to convert GIFs to animated PNGs precisely. In the digital space, there are surplus applications are available to perform this conversion process without compromising with the quality factors.
In this article, a detailed discussion on the GIFs and the animated PNGs are available for better understanding. It is the process of working with images and implementing some actions with the pictures that makes it appear interesting. Most GIFs and animated PNGs are used for fun and it helps to excite your friends amidst serious chats. It serves as the source of conveying thoughts with fun-filled visuals. Before choosing between the GIFs and APNGs, analyze which file format offers you surplus advantages for optimal handling. Here, in the below discussion you will study the features of this file format and the precise methods to switch between these two files efficiently.
In this article
01 [What is GIF & What is animated PNG](#Part 1)
02 [GIF vs animated PNG, which is better?](#Part 2)
03 [Can PNG be animated like GIF?](#Part 3)
04 [How to Convert GIF to animated PNG?](#Part 4)
Part 1 What is GIF & What is animated PNG
The GIFs are animated images and the picture moves in a sequence in a cycle. The movement repeats without stopping. This type of picture is popular on the webpages and the built-in templates are available in the digital space for quick downloads. The single-frame GIFs take more time to download and displays exciting moves that trigger laughter with audiences. GIF takes the abbreviation of Graphics Interchange Format. It came into existence in the year 1980s and is widely used globally. GIFs are animated images in a basic format. It adopts the safe LZW algorithm that tracks the colors optimally.
The superior form of the motion picture is animated PNGs. It stands for Portable Network Graphics. This format supports indexed color, grayscale, and true color images. Additionally, the animated PNGs has advantages like alpha channels, cross-platform gamma corrections and two-dimensional interlacing. APNG came into existence in the year 1995 and is compatible with a few web browsers.
Part 2 GIF vs animated PNG, which is better?
When compared to GIFs and APNG, APNG seems to be technically strong with a wide range of supporting features. The quality of the file of APNG is good as it displays 24-bit images and 8- bit transparency. The APNG images can be compressed to the smallest value thereby encouraging the ease of transfer between devices. APNG has access to many color combinations whereas GIFs can use up to 256 colors. The new web browser versions are compatible with APNGs and the older browsers play the GIFs precisely. To view the APNG files in the older browsers you require external plugins or extensions. The higher quality APNGs are mostly used by professionals when compared to GIFs. The portability in moving the animated images is simple with APNGs. The GIF files have a poor compression rate and it is difficult to transfer at the digital space.
Part 3 Can PNG be animated like GIF?
You can animate the PNG files like GIF using reliable tools in the online space. There are unique programs to establish this process. It works on every detail on the PNG files and adds transition effects to the images to implement the movements. If you take closer looks at the digital space, you will acquire sophisticated programs to add transitions to the static pictures. While animating the PNG files, you must include frames, durations, and transition effects to the PNG images to include the animations. Based on the settings, the animated PNG file functions. Every move of the images is assigned by the attributes set by the users with the help of powerful applications in the digital space. You can also find online tools to assist in this operation. The static PNG files get desired moves by animating like GIF files. The APNG has superior quality when compared to GIF files. As discussed above many professionals opt for APNG files than GIFs.
Part 4 How to Convert GIF to animated PNG?
In this section, you will learn how to convert GIF to animated PNG using online tools. Use the recommended online platform to carry out the quality conversions to acquire desired outcomes.
1. EZGIF
It is an exclusive online space that brings quality animations to GIF files acquiring the properties of APNG. By converting the GIFs to APNG, you can enhance various features like easy storage, best compression, quality elements in the file. When you step into this website, you can perform a wide range of conversion processes between animated and static image files. Choose the right tabs on the menu to trigger the desired changes to the uploaded files.
Choose GIF to APNG tab at the top menu to begin this conversion process. The GIF files will receive all the good functionalities of APNG after this conversion process. You can download the animated PNGs to any platform after a successful conversion.
Follow the below steps to proceed with GIF to animated PNGs using the EZGIF online tool.
Step 1
Go to the website and upload the GIF file by tapping the ‘Choose File’ button. The maximum file size is 50MB that ensures a flawless upload process. Here, you can either choose a file from a local drive or paste the URL from an online source into this webpage flawlessly. Then, click the Upload button to trigger this GIF to the APNG conversion process.
Step 2
Format the output and click the convert button to download the animated PNG files.
It is a simple and yet effective one that helps to convert the GIFs to animated PNGs in no time. You can also use the edit tools to make changes to the GIF files before the conversion process. The converted files are available for downloads at your local system drive. Access them when required and upload them to the desired platform to make fun with your friends and family members.
2. Free convert
In this section, you will be learning how to use the Free convert webpage to carry out the GIF to the animated PNG conversion process. It is a user-friendly interface where the controls are explicit to make the perfect click appropriately. This website provides a secure platform to carry out the conversion process optimally. The uploaded files are deleted automatically after 2 hours. You can expect a quality conversion process to take place on this website.
The stepwise process to convert GIF to animated PNG using the Freeconvert website.
Step 1
Upload the Gif files by tapping the ‘Choose GIF files’ button. This platform supports GIF file sizes up to 1GB.
Step 2
Hit the Convert to APNG button to trigger the conversion process and download the APNG file to desired storage space precisely.
Surf the above steps to carry out a precise conversion process between GIF and animated PNG. After this format conversion process, you can enjoy all the benefits of APNG overcoming the constraints with the GIF files.
These are the two efficient ways of converting the GIF files to APNG format using online web pages. You can choose any one of the websites to carry out the desired APNG conversion process optimally.
Wondershare Filmora
Get started easily with Filmora’s powerful performance, intuitive interface, and countless effects Try It Free Try It Free Learn More >
AI Portrait – The best feature of Wondershare Filmora for gameplay editing
The AI Portrait is a new add-on in Wondershare Filmora. It can easily remove video backgrounds without using a green screen or chroma key, allowing you to add borders, glitch effects, pixelated, noise, or segmentation video effects.
Conclusion
Thus, this article had given valuable insights on the conversion of GIF to animated PNG files. The enlightening discussion about the GIFs and APNGs assists you to choose the best one from these two options. You must be clear about the differences between these formats and select the ones that meet your needs appropriately. Connect with the above-discussed web pages to carry out the conversion effortlessly with a few clicks. Stay connected with this article to discover the new horizons of animated clippings that excite you during online communications.
In-Depth Study of Cartoon Painting Starts From Learning to Draw It
In-depth Study of Cartoon Painting Starts from Learning to Draw It
An easy yet powerful editor
Numerous effects to choose from
Detailed tutorials provided by the official channel
Cartoon painting is slowly becoming popular due to its many benefits, especially easy cartoon canvas painting. For instance, it is pretty eye-grabbing, especially if your audience is children.

Thanks to the animation aspect, it has become relatively cheap to do advertisements with cartoons instead of real people.
In this article
01 [What Are Good Cartoons to Draw?](#Part 1)
02 [How Do You Draw a Cartoon Character for Beginners?](#Part 2)
03 [Is There Anything else You Can Do to Draw Cartoons More Quickly?](#Part 3)
Part 1 What Are Good Cartoons to Draw?
As far as good cartoons are concerned, expect about 5 popular types. These cartoons to draw include:
01 Illustrative Cartoons
They are the most suitable cartoons to draw when portraying particular ideas directly and simply.
The cartoons are primarily used in advertisements, teaching aids, and explaining stories. They also have text that explains them further.
It explains why they are common in school books, making them perfect for explaining content or subject.

02 Animated Cartoons
It is important to note that these cartoons are drawn using computers despite looking as if they are hand-drawn. One thing that makes them stand out is that they seem to be in action and movement.
As much as that’s how they seem from the viewer’s perspective, that’s far from the truth. They are just drawn in series, and since the first one will differ from the second one, there is that illusion of movement created.

03 Comic Strips or Panels
In most cases, these are regular features characterized by established or known characters and usually displayed in newspapers.
Just like the animated cartoons, they are showcased in series to tell or illustrate a story. The series of panels have words said by the various characters.
The words are usually in balloons, and a single comic strip may cover a single or double page of a newspaper.

04 Gag Cartoons
As the name gag suggests, these cartoons revolve around jokes. These single-paneled cartoons often make fun of human beings.
Through overstatements, humor resonates from what is drawn. They can either serve as entertainment or point out, if not make fun of, people, especially their mistakes and faults. Besides the cartoon, expect a caption that’s often a single sentence.

05 Editorial or Political Cartoons
These cartoons are also made for the newspapers. Expect them to be a single drawing on an editorial page. It sheds more light on a particular newspaper’s editorial comment.
As much as some have captions, that’s not always the case. Just like the gag cartoons, they ridicule people, but the editorial ones focus on celebrities.

Part 2 How Do You Draw a Cartoon Character for Beginners?
Even cartoon painting experts were once beginners. So, feel encouraged because you stand a chance also to become an expert in the long run. All you need to do is take the first step. Fortunately, we are here to hold your hand as you do so. So. Without further ado, let’s get started.
01 Cartoon Painting of a Young Character
These are the steps you need to follow when doing so:
Step 1Start with the face
The face is significant, especially when it comes to cartoon painting. It has complex as well as simple parts. For example, the face itself is pretty basic since you will need to begin with a circle.
After that, draw a horizontal and vertical line and ensure that they intersect in the middle.

Step 2Draw the eyes by drawing
Draw the eyes by drawing an oval and ensuring that the top side is slightly tilting to the side.
Do the same thing on the other side since the norm is a pair of eyes. The gap between the two should also be sensible.

Step 3Draw eyebrows
On the upper side of the eye, ensure that the lines are slightly thick. The eyebrows also need to be placed above the eyes, slightly above the thick line representing the eyelashes.

Step 4Draw jaw
After that, start shaping the jaw. Keep in mind that it plays a huge role in determining whether the character will look thin or fat. Additionally, how you draw the jaw determines whether the character will be old or young and how old or young the person will look.

Step 5Draw nose
Design the nose and ensure that you don’t put many details. The good thing about the nose is that a tip is enough to serve the purpose. Another common approach when drawing the nose is doing so as if you are viewing it from the side.

Step 6Draw mouth
Next, draw the mouth and consider the age of your character as you do so. If it is a child, despite the gender, stick to simplicity. You should also avoid drawing the lips. Preferably, go for the good, expressive trace since it never disappoints.

Step 7Draw ears
Proceed to the ears and in relation to whether the character is facing the camera or not. If your character is looking at the camera, you should see the front side view. Therefore, it won’t make sense to display the internal cavities in this case.

Step 8Draw haircut
Proceed to the ears and in relation to whether the character is facing the camera or not. If your character is looking at the camera, you should see the front side view. Therefore, it won’t make sense to display the internal cavities in this case.
As scary as it may look, you need not be an expert to make the haircut look perfect. Additionally, there is no constant way of drawing the haircut, and you are at liberty to practice as much creativity as possible.
Nevertheless, please don’t take it lightly since it can be quite descriptive. For instance, the hair is used to tell the personality of a character. Practice makes perfect, and you better keep doing it until you get it right. Ensure that what you draw shows the age and character of the cartoons to draw as perfectly as possible.
So far, our focus has been on a young character. However, that’s not always the case explaining why we will look at a cartoon painting of an old character.

02 Cartoon Paintings of an Old Character
If you want your character to look old, this is the way to go:
Step 1Old character draw a face
The face is no different from that of a young character. Start with the eyes and add their pupils, eyebrows and don’t forget to add wrinkles.
Since the character is old compared to the previous one, ensure that the eyebrows are thick. They should occupy more space of the forehead.

Step 2Old character make the chin
Make the chin longer too.

Step 3Old character draw the nose
Ensure that the nose design looks wider and larger since the character is old. To achieve that, make the nose look close to the eyes

Step 4Old character exaggerates mustache
Skip the mouth bit and instead go for a big, exaggerated mustache. That’s one common characteristic of an old character, especially male.

Step 5Draw hair
When it comes to hair, bald and side hair will play the trick perfectly. The nose is no different from that of a young character.

03 Cartoon Painting of a Female Character
So far, our focus has been on a male character. So, what do you do if you want to create a female one instead? These are some of the steps to follow as you do so.
The procedure is not that different. However, consider that women’s facial structures are more delicate than those of their male counterparts. Some of the things that stand out include long hair, a small nose, a thin chin, thin eyebrows, and large, expressive eyelashes. Large pupils will also do, especially if you are good at drawing.

Key Takeaways from This Episode
● There are five major types of cartoons to draw, animation, editorial, gag, illustrative and comic strips.
● Cartoon painting is not that hard, especially if you have a guide on how to go about it.
● If that turns out to be difficult, you can always go for the Filmora pro.
Cartoon painting is slowly becoming popular due to its many benefits, especially easy cartoon canvas painting. For instance, it is pretty eye-grabbing, especially if your audience is children.
Thanks to the animation aspect, it has become relatively cheap to do advertisements with cartoons instead of real people.
In this article
01 [What Are Good Cartoons to Draw?](#Part 1)
02 [How Do You Draw a Cartoon Character for Beginners?](#Part 2)
03 [Is There Anything else You Can Do to Draw Cartoons More Quickly?](#Part 3)
Part 1 What Are Good Cartoons to Draw?
As far as good cartoons are concerned, expect about 5 popular types. These cartoons to draw include:
01 Illustrative Cartoons
They are the most suitable cartoons to draw when portraying particular ideas directly and simply.
The cartoons are primarily used in advertisements, teaching aids, and explaining stories. They also have text that explains them further.
It explains why they are common in school books, making them perfect for explaining content or subject.
02 Animated Cartoons
It is important to note that these cartoons are drawn using computers despite looking as if they are hand-drawn. One thing that makes them stand out is that they seem to be in action and movement.
As much as that’s how they seem from the viewer’s perspective, that’s far from the truth. They are just drawn in series, and since the first one will differ from the second one, there is that illusion of movement created.
03 Comic Strips or Panels
In most cases, these are regular features characterized by established or known characters and usually displayed in newspapers.
Just like the animated cartoons, they are showcased in series to tell or illustrate a story. The series of panels have words said by the various characters.
The words are usually in balloons, and a single comic strip may cover a single or double page of a newspaper.
04 Gag Cartoons
As the name gag suggests, these cartoons revolve around jokes. These single-paneled cartoons often make fun of human beings.
Through overstatements, humor resonates from what is drawn. They can either serve as entertainment or point out, if not make fun of, people, especially their mistakes and faults. Besides the cartoon, expect a caption that’s often a single sentence.
05 Editorial or Political Cartoons
These cartoons are also made for the newspapers. Expect them to be a single drawing on an editorial page. It sheds more light on a particular newspaper’s editorial comment.
As much as some have captions, that’s not always the case. Just like the gag cartoons, they ridicule people, but the editorial ones focus on celebrities.
Part 2 How Do You Draw a Cartoon Character for Beginners?
Even cartoon painting experts were once beginners. So, feel encouraged because you stand a chance also to become an expert in the long run. All you need to do is take the first step. Fortunately, we are here to hold your hand as you do so. So. Without further ado, let’s get started.
01 Cartoon Painting of a Young Character
These are the steps you need to follow when doing so:
Step 1Start with the face
The face is significant, especially when it comes to cartoon painting. It has complex as well as simple parts. For example, the face itself is pretty basic since you will need to begin with a circle.
After that, draw a horizontal and vertical line and ensure that they intersect in the middle.
Step 2Draw the eyes by drawing
Draw the eyes by drawing an oval and ensuring that the top side is slightly tilting to the side.
Do the same thing on the other side since the norm is a pair of eyes. The gap between the two should also be sensible.
Step 3Draw eyebrows
On the upper side of the eye, ensure that the lines are slightly thick. The eyebrows also need to be placed above the eyes, slightly above the thick line representing the eyelashes.
Step 4Draw jaw
After that, start shaping the jaw. Keep in mind that it plays a huge role in determining whether the character will look thin or fat. Additionally, how you draw the jaw determines whether the character will be old or young and how old or young the person will look.
Step 5Draw nose
Design the nose and ensure that you don’t put many details. The good thing about the nose is that a tip is enough to serve the purpose. Another common approach when drawing the nose is doing so as if you are viewing it from the side.
Step 6Draw mouth
Next, draw the mouth and consider the age of your character as you do so. If it is a child, despite the gender, stick to simplicity. You should also avoid drawing the lips. Preferably, go for the good, expressive trace since it never disappoints.
Step 7Draw ears
Proceed to the ears and in relation to whether the character is facing the camera or not. If your character is looking at the camera, you should see the front side view. Therefore, it won’t make sense to display the internal cavities in this case.
Step 8Draw haircut
Proceed to the ears and in relation to whether the character is facing the camera or not. If your character is looking at the camera, you should see the front side view. Therefore, it won’t make sense to display the internal cavities in this case.
As scary as it may look, you need not be an expert to make the haircut look perfect. Additionally, there is no constant way of drawing the haircut, and you are at liberty to practice as much creativity as possible.
Nevertheless, please don’t take it lightly since it can be quite descriptive. For instance, the hair is used to tell the personality of a character. Practice makes perfect, and you better keep doing it until you get it right. Ensure that what you draw shows the age and character of the cartoons to draw as perfectly as possible.
So far, our focus has been on a young character. However, that’s not always the case explaining why we will look at a cartoon painting of an old character.
02 Cartoon Paintings of an Old Character
If you want your character to look old, this is the way to go:
Step 1Old character draw a face
The face is no different from that of a young character. Start with the eyes and add their pupils, eyebrows and don’t forget to add wrinkles.
Since the character is old compared to the previous one, ensure that the eyebrows are thick. They should occupy more space of the forehead.
Step 2Old character make the chin
Make the chin longer too.
Step 3Old character draw the nose
Ensure that the nose design looks wider and larger since the character is old. To achieve that, make the nose look close to the eyes
Step 4Old character exaggerates mustache
Skip the mouth bit and instead go for a big, exaggerated mustache. That’s one common characteristic of an old character, especially male.
Step 5Draw hair
When it comes to hair, bald and side hair will play the trick perfectly. The nose is no different from that of a young character.
03 Cartoon Painting of a Female Character
So far, our focus has been on a male character. So, what do you do if you want to create a female one instead? These are some of the steps to follow as you do so.
The procedure is not that different. However, consider that women’s facial structures are more delicate than those of their male counterparts. Some of the things that stand out include long hair, a small nose, a thin chin, thin eyebrows, and large, expressive eyelashes. Large pupils will also do, especially if you are good at drawing.
Key Takeaways from This Episode
● There are five major types of cartoons to draw, animation, editorial, gag, illustrative and comic strips.
● Cartoon painting is not that hard, especially if you have a guide on how to go about it.
● If that turns out to be difficult, you can always go for the Filmora pro.
Apps to Animate Still Pictures Which Could Make Your Pictures Become Internet Sensation
Apps to Animate Still Pictures Which Could Make Your Pictures Become Internet Sensation
An easy yet powerful editor
Numerous effects to choose from
Detailed tutorials provided by the official channel
Now, it is a question of what to do with all those still photos lying in your phone. You can be pretty certain that you won’t be retiring from clicking images anytime soon. A tip to help make posting images more interesting would be using apps to animate your photos.
You can also find an app that animates your face specifically, which is great for instagram content and has a greater chance of getting reactions or comments. So without further to do let’s get animating.
In this article
01 [Review of General Methods: Can You Animate Still Pictures?](#Part 1)
02 [10 Best apps to animate still photos on Android & iOS](#Part 2)
03 [Additional Extension: 5 Apps to Animate Old Photos](#Part 3)
Part 1 Review of General Methods: Can You Animate Still Pictures?
It’s pretty obvious that you can! These days you can do whatever you want online so animating still pictures should be a piece of cake if you know-how.
A video is basically an entire collage of moving pictures. So if you can cut out pictures from a video why not turn still pictures into animations.
There are a number of ways you can use to animate still images →
● Videos are multiple pictures that move at a frame rate. Make short copies of a video by cutting out the essential moments and playing them in a loop.
● Add and play video animation elements over a picture. With the right software, this task is as easy as copy-pasting over another image.
● Apply an animated 3D image with a transparent background over another image. Remember, the bigger the element the closer it is. So size is directly translated as distance.
● You can use multiple filters and effects on an image with an animated portrait app. Find out what app you can use further on in this article.
● Turn an image into a GIF. No matter its small size and cartoonish style, GIF animation has a very wide appeal as online content.
Part 2 10 Best apps to animate still photos on Android & iOS
01GIPHY
Giphy is the largest internet catalog for GIF files, clips & stickers. No matter if it is a scene from a movie or an animation you have watched somewhere, using this application you can easily find, save & share or simply create something new.
Price: Free
Pros
● Quickly turns still photos into an animation.
● Easily share your work through all social media channels.
Cons
● Search tags are varied; you may need to search using unlikely words to get desired results.
Applicable System: Android
02GIPHY
One of the best ways to turn your photos & videos into GIFs is using ImgPlay. It has a clearer interface making it easy to use. Imgplay comes with paid- premium and non-paid version making it suitable for personal & professional application.
Price: Pro $4.99.
Pros
● It is not packed with unnecessary features.
Cons
● ImgPlay slaps a watermark on all its non-premium versions.
Applicable System: Android & iOS.
03Loopsie
The best Part is that Loopsie provides spectacular cinematographic effects to your animated stills. Stabilization algorithm efficiently removes shaking effects & blurs.
Price: Free.
Pros
● User friendly UI
● Easy to share on social media platforms.
Cons
● Paid version is a bit pricey.
Applicable System: Only on iOS.
04StoryZ
Looking for ways to create animated visuals form still images? This is where your quest ends. An advanced editing platform that offers overlays, movement & color filters. Banner Ads & watermarks can be removed by paying a small subscription fee.
Price: Free version available. Premium costs INR 789 a year.
Pros
● Double exposure effect combines video overlay & static imagery.
Cons
● Contains Ad & watermark.
Applicable System: Android.
05Animate Me
Animate Me offers you a package of postcards & greeting snapshots that you can animate according to your need. The paid subscription will get you updated sounds & effects every now & then.
Price: Free.
Pros
● Easy to use & beginners friendly.
Cons
● Editing features & tools are limited.
Applicable System: Windows**.**
06Movepic
Create animated stills, GIFs, live-wallpapers all with Movepic. It allows you to animate simply anything by drawing a path. You can also adjust the speed of animation manually.
Price: Free.
Pros
● Animate in a light motion.
● Easy to use.
Cons
● Free version leaves a watermark on images.
Applicable System: Android & iOS.
07Pixaloop
Pixaloop is a fun app packed with significant animation & editing features. 100% free to use software delivers live animated images in a few clicks. User friendly interface edits images using powerful & precise animation tools.
Price- Free.
Pros
● Offers all the necessary features & core tools.
● Provides accuracy & flexibility to the users.
Cons
● The animation process is a bit time consuming.
Applicable System: Android & iOS.
08Zoetropic
Zoetropic has a combination of 3D tools and Camera FX to animate your images. User friendly interface allows you to mask the still areas if you wish to keep it still.
Price: $199 (Pro)
Pros
● Easily customize motion areas.
● Apply overlays & audios.
Cons
● App price is higher than similar available apps.
Applicable System: Android & iOS.
9Motionleap
It is one of the most top reviewed apps on Playstore related to animating still photos. It has several features like programming directional cues, freeze portions of your photo or even apply filters.
Price: Free version. Pro version; $3.50/month, $18/year and $55 lifetime.
Pros
● Its free version does not apply watermark.
● Intuitive Interface.
Cons
● Best features are locked in Pro version.
Applicable System: Android & iOS.
Part 3 Additional Extension: 5 Apps to Animate Old Photos
It can be unanimously agreed upon that people have been storing photos for decades as a means of preserving memories. We don’t get much opportunity to meet familiar faces too often so why not just try and animate still images of relatives. Now we already know how we can start animating images on apps but restoring original images maybe a tad more complicated than that. This time a bit of the animation is dependent on the physical state of the picture so be sure it’s in mint condition.
These photos can be restored or manipulated digitally with the help of smart AI. We have listed down some of the apps to animate old photos and reconstruct faces;
01Photos Revive
You can add colour to old worn out photos and make them look more realistic in terms of tonal colorization using artificial intelligence. The app also asks you recollect any details of the photo that you might remember in terms of the image.
Applicable OS: iOS only.

02Remini
After going through several improvements and upgrades, you can use the app Remini to confidently restore low resolution images that are either pixelated, blurred or damaged into High Definition images. This app has already been used by users to process a hundred million photos.
Applicable OS: Android 1.7.2 or higher, & iOS 9.3 or higher.

03Colorize
Another app that uses AI to add colorization to your old images. It is a popular animate your family photo app which has amazing other tools and filters to try out.
Applicable OS: Android and iOS.

04Deep Nostalgia
Using this app which has been innovated by the geology platform MyHeritage uses ai to add gestures to still images to evoke nostalgia in the users.
Applicable OS: Online.

04Google Photoscan
Google scanner is a futuristic app for restoring photos of the past. The app uses a smart scanning technology that provides several scans of the same photo automatically.
Applicable OS: Android or iOS.

Key Takeaways from This Episode
● Animating photos are a new way of reimagining still images into moving live content. There are many methods and approaches you can choose to animate your images.
● Some of them being video animations, transparent background elements, Filters and effects and of course GIFs.
● There are dozens of apps with built in smart artificial intelligence to help restore old photos or make short animations out of them. Some of them are applicable for desktops while others available both on Android and iOS.
Now, it is a question of what to do with all those still photos lying in your phone. You can be pretty certain that you won’t be retiring from clicking images anytime soon. A tip to help make posting images more interesting would be using apps to animate your photos.
You can also find an app that animates your face specifically, which is great for instagram content and has a greater chance of getting reactions or comments. So without further to do let’s get animating.
In this article
01 [Review of General Methods: Can You Animate Still Pictures?](#Part 1)
02 [10 Best apps to animate still photos on Android & iOS](#Part 2)
03 [Additional Extension: 5 Apps to Animate Old Photos](#Part 3)
Part 1 Review of General Methods: Can You Animate Still Pictures?
It’s pretty obvious that you can! These days you can do whatever you want online so animating still pictures should be a piece of cake if you know-how.
A video is basically an entire collage of moving pictures. So if you can cut out pictures from a video why not turn still pictures into animations.
There are a number of ways you can use to animate still images →
● Videos are multiple pictures that move at a frame rate. Make short copies of a video by cutting out the essential moments and playing them in a loop.
● Add and play video animation elements over a picture. With the right software, this task is as easy as copy-pasting over another image.
● Apply an animated 3D image with a transparent background over another image. Remember, the bigger the element the closer it is. So size is directly translated as distance.
● You can use multiple filters and effects on an image with an animated portrait app. Find out what app you can use further on in this article.
● Turn an image into a GIF. No matter its small size and cartoonish style, GIF animation has a very wide appeal as online content.
Part 2 10 Best apps to animate still photos on Android & iOS
01GIPHY
Giphy is the largest internet catalog for GIF files, clips & stickers. No matter if it is a scene from a movie or an animation you have watched somewhere, using this application you can easily find, save & share or simply create something new.
Price: Free
Pros
● Quickly turns still photos into an animation.
● Easily share your work through all social media channels.
Cons
● Search tags are varied; you may need to search using unlikely words to get desired results.
Applicable System: Android
02GIPHY
One of the best ways to turn your photos & videos into GIFs is using ImgPlay. It has a clearer interface making it easy to use. Imgplay comes with paid- premium and non-paid version making it suitable for personal & professional application.
Price: Pro $4.99.
Pros
● It is not packed with unnecessary features.
Cons
● ImgPlay slaps a watermark on all its non-premium versions.
Applicable System: Android & iOS.
03Loopsie
The best Part is that Loopsie provides spectacular cinematographic effects to your animated stills. Stabilization algorithm efficiently removes shaking effects & blurs.
Price: Free.
Pros
● User friendly UI
● Easy to share on social media platforms.
Cons
● Paid version is a bit pricey.
Applicable System: Only on iOS.
04StoryZ
Looking for ways to create animated visuals form still images? This is where your quest ends. An advanced editing platform that offers overlays, movement & color filters. Banner Ads & watermarks can be removed by paying a small subscription fee.
Price: Free version available. Premium costs INR 789 a year.
Pros
● Double exposure effect combines video overlay & static imagery.
Cons
● Contains Ad & watermark.
Applicable System: Android.
05Animate Me
Animate Me offers you a package of postcards & greeting snapshots that you can animate according to your need. The paid subscription will get you updated sounds & effects every now & then.
Price: Free.
Pros
● Easy to use & beginners friendly.
Cons
● Editing features & tools are limited.
Applicable System: Windows**.**
06Movepic
Create animated stills, GIFs, live-wallpapers all with Movepic. It allows you to animate simply anything by drawing a path. You can also adjust the speed of animation manually.
Price: Free.
Pros
● Animate in a light motion.
● Easy to use.
Cons
● Free version leaves a watermark on images.
Applicable System: Android & iOS.
07Pixaloop
Pixaloop is a fun app packed with significant animation & editing features. 100% free to use software delivers live animated images in a few clicks. User friendly interface edits images using powerful & precise animation tools.
Price- Free.
Pros
● Offers all the necessary features & core tools.
● Provides accuracy & flexibility to the users.
Cons
● The animation process is a bit time consuming.
Applicable System: Android & iOS.
08Zoetropic
Zoetropic has a combination of 3D tools and Camera FX to animate your images. User friendly interface allows you to mask the still areas if you wish to keep it still.
Price: $199 (Pro)
Pros
● Easily customize motion areas.
● Apply overlays & audios.
Cons
● App price is higher than similar available apps.
Applicable System: Android & iOS.
9Motionleap
It is one of the most top reviewed apps on Playstore related to animating still photos. It has several features like programming directional cues, freeze portions of your photo or even apply filters.
Price: Free version. Pro version; $3.50/month, $18/year and $55 lifetime.
Pros
● Its free version does not apply watermark.
● Intuitive Interface.
Cons
● Best features are locked in Pro version.
Applicable System: Android & iOS.
Part 3 Additional Extension: 5 Apps to Animate Old Photos
It can be unanimously agreed upon that people have been storing photos for decades as a means of preserving memories. We don’t get much opportunity to meet familiar faces too often so why not just try and animate still images of relatives. Now we already know how we can start animating images on apps but restoring original images maybe a tad more complicated than that. This time a bit of the animation is dependent on the physical state of the picture so be sure it’s in mint condition.
These photos can be restored or manipulated digitally with the help of smart AI. We have listed down some of the apps to animate old photos and reconstruct faces;
01Photos Revive
You can add colour to old worn out photos and make them look more realistic in terms of tonal colorization using artificial intelligence. The app also asks you recollect any details of the photo that you might remember in terms of the image.
Applicable OS: iOS only.
02Remini
After going through several improvements and upgrades, you can use the app Remini to confidently restore low resolution images that are either pixelated, blurred or damaged into High Definition images. This app has already been used by users to process a hundred million photos.
Applicable OS: Android 1.7.2 or higher, & iOS 9.3 or higher.
03Colorize
Another app that uses AI to add colorization to your old images. It is a popular animate your family photo app which has amazing other tools and filters to try out.
Applicable OS: Android and iOS.
04Deep Nostalgia
Using this app which has been innovated by the geology platform MyHeritage uses ai to add gestures to still images to evoke nostalgia in the users.
Applicable OS: Online.
04Google Photoscan
Google scanner is a futuristic app for restoring photos of the past. The app uses a smart scanning technology that provides several scans of the same photo automatically.
Applicable OS: Android or iOS.
Key Takeaways from This Episode
● Animating photos are a new way of reimagining still images into moving live content. There are many methods and approaches you can choose to animate your images.
● Some of them being video animations, transparent background elements, Filters and effects and of course GIFs.
● There are dozens of apps with built in smart artificial intelligence to help restore old photos or make short animations out of them. Some of them are applicable for desktops while others available both on Android and iOS.
Learn How to Draw Cartoons Step by Step with This Guide
Learn How to Draw Cartoons Step by Step with This Guide
An easy yet powerful editor
Numerous effects to choose from
Detailed tutorials provided by the official channel
Cartoon character drawing is usually a vital aspect of any child’s life who loves to watch cartoon series and can sometimes be someone’s favorite thing in the world.

A cartoon character is a series of single drawings that tell a joke or story. Although cartoons are mostly drawn, they can sometimes be animated. Kids like comics which makes them an essential part of every child’s life. Cartoons are not only used for entertainment purposes but also help kids and young children learn more about the world around them. For example, children learn about love, loss, friendship, and other essential life issues about life by watching cartoons.
However, cartoons are not only limited to children but are also for adults. In addition, cartoons created for an adult audience go deeper into real-life problems and explore darker themes. They aim to create content that matches the maturity and age of the audience. Watching cartoons is fun. But what if you could make them? This article will provide you with a guide on producing cool cartoon drawings that will match different audiences, both older and younger.
In this article
01 [How to Draw Cartoon Characters Step by Step](#Part 1)
02 [Cartoon Easy Drawing with Colour Step by Step](#Part 2)
03 [Cartoon Easy Sketch Drawing Step by Step](#Part 3)
Part 1 How to Draw Cartoon Characters Step by Step
Note that in the world we live in, Professionals were once students, and experts were once beginners. This means that everyone has a starting point, and they all have one thing in common: “learning.” Whether you are aspiring to become an English teacher, an astrophysicist, an artist, or a physician’s assistant, you must first learn the ins and outs of the field.
Those aspiring to become animators and cartoonists must first learn the basics of cartoon character drawing and practice some easy, simple cartoon drawing before cranking out the Mickey-Mouses of the entertainment world. However, we will cover the basic principles of easy cartoon drawing for beginners step by step to get your learning process started. Here is how to draw a Micky-Mouse perfectly:

Step 1:
● Use a pencil to begin your drawing.
● First, create a circle for the head and a curved line on the left side.
● Draw a horizontal line at the center.
Step 2: Next, draw an oval shape for the mouth and a “U” shape added to the bottom, and then you can add another parallel “U” shape and connect it with the oval.
Step 3: Draw the eye using two upside-down “U” shapes, and then you add his large ear on the right and a small one at the top of the head.
Step 4: You can draw a bean shape and another smaller one inside for the body.
Step 5: Add oval shapes for his feet to draw his legs and draw his tail on the right side just above the leg.
Step 6: Draw two elongated shapes for his arms, a small oval for the hand and a basic shape of his fingers.
Step 7: Draw the cheese and add a few small circles inside.
Step 8: Also include the facial features by drawing the inside of the nose, eyebrows, eyes, and whiskers.
Step 9:
● Draw his fingers and hair between his ears.
● Trace your pencil lines with a sharpie.
● Erase the pencil afterward.
Step 10: Finally, you can color your drawing and upload it to your website.
Part 1 Cartoon Easy Drawing with Colour Step by Step
Applying color to a drawing is very important to beautify your drawing and make it look stunning and attractive. Here is how to cartoon easy drawing a flower using a colored pencil:
Step 1: Using a color photocopy of a reference photo, crop and rearrange elements of the poppy composition. With light pressure and HB pencil, draw a composition onto a four-ply, 100% cotton museum board frequently found among framing supplies.
Step 2: With very light pressure, apply the first colored pencil layer and add more emphasis where the values will be deeper. While doing this, note that the pencil application will still appear granular, and the texture of the museum board is still visible.

Step 3: Create the veins in the leaves and the fuzzy texture of the stem and pod, and also, as the individual strands of stamens, put down a sheet of translucent drafting paper. Use heavy tracing paper with a very sharp 7H graphite pencil and apply heavy pressure in drawing the lines for stamens, fuzz, and veins on the drafting paper and impress them into the surface of the museum board. Then, with a contrasting layer of darker color, these features dramatically show up on the stem, leaves, center of the flower, pod, and center of the flower. Then add deeper values of rose in the shadowed areas of the flower petals.

Step 4: To make them appear less granular and intensify the colors, start by blending with a clear, alcohol-based blending marker. The solvent, wax, or vegetable oil then dissolves the binder in the colored pencil layer and fluidly releases the pigment. This will also help to “fill in” the dots of the tooth of the paper and make the color appear denser.

Step 5: Continue to intensify the color by using a non-pigmented blending pencil over a previous layer and repeat a layer or two of color, much like a “color sandwich.” Repeat this “ burnishing “ process for subsequent layerings of color, like a double-decker or triple-decker sandwich.
Also, make sure the rich, dark negative space is carried out the same way, layering colors and burnishing, then repeating the colors for deep, rich saturation.
Render the deep, smeary flecks of pollen by heavily applying “freckles” of burgundy, then slightly smudge them with the tip of a blending marker. Lastly, scratch a few of the tiny wisps of fuzz on the pod and stem carefully into the board via a sharp X-acto knife for a striking contrast of light against the deep background.

Part 2 Cartoon Easy Sketch Drawing Step by Step
This is the initial stage of the drawing process. It requires you to create an outline of the concept you want to draw before adding color. However, it is also referred to as a technique in shading. For example, if you’re going to sketch a cherry fruit, there are a few things to note here.
Try not to look at the cherry as a whole but look at its shapes and name them. This way, you are looking at the parts to the whole and not the entire piece.

Step 1: Draw two overlapping circles and draw two curved lines from each of the circles.
Step 2: Make a small rectangle at the top to join the two stems and draw a second set of curved lines.
Step 3: Draw thick lines inside the rectangle for the bumps and darken the lines and use your finger to smudge them a bit for the shaded effect.
Step 4: Draw a curved line from the stem on the right to the circle’s edge to create the bump.
Step 5: Holding your pencil at an angle, make light strokes going across the front of both cherries. Take note of the places where there is no light. This is where the light source is hitting the cherry the most.
Step 6: To darken, a shade over those places again, keep layering the shading technique until you get the effect you see on the cherries.
Step 7: Use the same technique to shade under the cherries, but use your finger to smudge it to smoother the shadow.
●Bonus:
You can add color, effect, or animate to your cartoon character drawing by using Wondershare Filmora Video Editor , the best editor on the internet. Filmora is a free software program with the same creating abilities and imaging editing similar to Adobe Illustrator. It is open software that runs on various programs, such as Windows, Mac, and Linux. Please get to know more about this exclusive tool from Wondershare on their official website.
For Win 7 or later (64-bit)
For macOS 10.12 or later
● Ending Thoughts →
● A step-by-step guide on drawing easy cartoons for painting and how to sketch your drawing correctly.
● Cartoon character drawings in easy and quick steps.
● Easy cartoon drawing for beginners.
● Lastly, to add color to your drawing, use Filmora software.
● So, use the tips and tricks to make your presentation’s best cartoon characters come alive and be a pro with Filmora.
Cartoon character drawing is usually a vital aspect of any child’s life who loves to watch cartoon series and can sometimes be someone’s favorite thing in the world.
A cartoon character is a series of single drawings that tell a joke or story. Although cartoons are mostly drawn, they can sometimes be animated. Kids like comics which makes them an essential part of every child’s life. Cartoons are not only used for entertainment purposes but also help kids and young children learn more about the world around them. For example, children learn about love, loss, friendship, and other essential life issues about life by watching cartoons.
However, cartoons are not only limited to children but are also for adults. In addition, cartoons created for an adult audience go deeper into real-life problems and explore darker themes. They aim to create content that matches the maturity and age of the audience. Watching cartoons is fun. But what if you could make them? This article will provide you with a guide on producing cool cartoon drawings that will match different audiences, both older and younger.
In this article
01 [How to Draw Cartoon Characters Step by Step](#Part 1)
02 [Cartoon Easy Drawing with Colour Step by Step](#Part 2)
03 [Cartoon Easy Sketch Drawing Step by Step](#Part 3)
Part 1 How to Draw Cartoon Characters Step by Step
Note that in the world we live in, Professionals were once students, and experts were once beginners. This means that everyone has a starting point, and they all have one thing in common: “learning.” Whether you are aspiring to become an English teacher, an astrophysicist, an artist, or a physician’s assistant, you must first learn the ins and outs of the field.
Those aspiring to become animators and cartoonists must first learn the basics of cartoon character drawing and practice some easy, simple cartoon drawing before cranking out the Mickey-Mouses of the entertainment world. However, we will cover the basic principles of easy cartoon drawing for beginners step by step to get your learning process started. Here is how to draw a Micky-Mouse perfectly:
Step 1:
● Use a pencil to begin your drawing.
● First, create a circle for the head and a curved line on the left side.
● Draw a horizontal line at the center.
Step 2: Next, draw an oval shape for the mouth and a “U” shape added to the bottom, and then you can add another parallel “U” shape and connect it with the oval.
Step 3: Draw the eye using two upside-down “U” shapes, and then you add his large ear on the right and a small one at the top of the head.
Step 4: You can draw a bean shape and another smaller one inside for the body.
Step 5: Add oval shapes for his feet to draw his legs and draw his tail on the right side just above the leg.
Step 6: Draw two elongated shapes for his arms, a small oval for the hand and a basic shape of his fingers.
Step 7: Draw the cheese and add a few small circles inside.
Step 8: Also include the facial features by drawing the inside of the nose, eyebrows, eyes, and whiskers.
Step 9:
● Draw his fingers and hair between his ears.
● Trace your pencil lines with a sharpie.
● Erase the pencil afterward.
Step 10: Finally, you can color your drawing and upload it to your website.
Part 1 Cartoon Easy Drawing with Colour Step by Step
Applying color to a drawing is very important to beautify your drawing and make it look stunning and attractive. Here is how to cartoon easy drawing a flower using a colored pencil:
Step 1: Using a color photocopy of a reference photo, crop and rearrange elements of the poppy composition. With light pressure and HB pencil, draw a composition onto a four-ply, 100% cotton museum board frequently found among framing supplies.
Step 2: With very light pressure, apply the first colored pencil layer and add more emphasis where the values will be deeper. While doing this, note that the pencil application will still appear granular, and the texture of the museum board is still visible.
Step 3: Create the veins in the leaves and the fuzzy texture of the stem and pod, and also, as the individual strands of stamens, put down a sheet of translucent drafting paper. Use heavy tracing paper with a very sharp 7H graphite pencil and apply heavy pressure in drawing the lines for stamens, fuzz, and veins on the drafting paper and impress them into the surface of the museum board. Then, with a contrasting layer of darker color, these features dramatically show up on the stem, leaves, center of the flower, pod, and center of the flower. Then add deeper values of rose in the shadowed areas of the flower petals.
Step 4: To make them appear less granular and intensify the colors, start by blending with a clear, alcohol-based blending marker. The solvent, wax, or vegetable oil then dissolves the binder in the colored pencil layer and fluidly releases the pigment. This will also help to “fill in” the dots of the tooth of the paper and make the color appear denser.
Step 5: Continue to intensify the color by using a non-pigmented blending pencil over a previous layer and repeat a layer or two of color, much like a “color sandwich.” Repeat this “ burnishing “ process for subsequent layerings of color, like a double-decker or triple-decker sandwich.
Also, make sure the rich, dark negative space is carried out the same way, layering colors and burnishing, then repeating the colors for deep, rich saturation.
Render the deep, smeary flecks of pollen by heavily applying “freckles” of burgundy, then slightly smudge them with the tip of a blending marker. Lastly, scratch a few of the tiny wisps of fuzz on the pod and stem carefully into the board via a sharp X-acto knife for a striking contrast of light against the deep background.
Part 2 Cartoon Easy Sketch Drawing Step by Step
This is the initial stage of the drawing process. It requires you to create an outline of the concept you want to draw before adding color. However, it is also referred to as a technique in shading. For example, if you’re going to sketch a cherry fruit, there are a few things to note here.
Try not to look at the cherry as a whole but look at its shapes and name them. This way, you are looking at the parts to the whole and not the entire piece.
Step 1: Draw two overlapping circles and draw two curved lines from each of the circles.
Step 2: Make a small rectangle at the top to join the two stems and draw a second set of curved lines.
Step 3: Draw thick lines inside the rectangle for the bumps and darken the lines and use your finger to smudge them a bit for the shaded effect.
Step 4: Draw a curved line from the stem on the right to the circle’s edge to create the bump.
Step 5: Holding your pencil at an angle, make light strokes going across the front of both cherries. Take note of the places where there is no light. This is where the light source is hitting the cherry the most.
Step 6: To darken, a shade over those places again, keep layering the shading technique until you get the effect you see on the cherries.
Step 7: Use the same technique to shade under the cherries, but use your finger to smudge it to smoother the shadow.
●Bonus:
You can add color, effect, or animate to your cartoon character drawing by using Wondershare Filmora Video Editor , the best editor on the internet. Filmora is a free software program with the same creating abilities and imaging editing similar to Adobe Illustrator. It is open software that runs on various programs, such as Windows, Mac, and Linux. Please get to know more about this exclusive tool from Wondershare on their official website.
For Win 7 or later (64-bit)
For macOS 10.12 or later
● Ending Thoughts →
● A step-by-step guide on drawing easy cartoons for painting and how to sketch your drawing correctly.
● Cartoon character drawings in easy and quick steps.
● Easy cartoon drawing for beginners.
● Lastly, to add color to your drawing, use Filmora software.
● So, use the tips and tricks to make your presentation’s best cartoon characters come alive and be a pro with Filmora.
Also read:
- Updated 2024 Approved Fuel Your Creativity with 10 Awesome Collection of 2D Animation Examples
- Updated Best Claymation Shows That Make Your Memories Unforgettable
- Updated Learn How to Make Architecture Animation for 2024
- Updated In 2024, Top 10 Animated Photo Collage Apps You Should Know
- New In 2024, 10 Classical Animated Cartoon Types With Examples
- New In 2024, How to Make Slideshow in LinkedIn
- New 12 Animation Video Maker That Can Triple Your Conversion Rates for 2024
- New 2024 Approved 10 Must Watch Netflix Cartoon Series For You
- New 2024 Approved Best 12 Illusion Gifs Top Picks
- In 2024, Top 10 Banned Anime Around the World and Why
- Updated 2024 Approved 12 Dubbed Anime Websites to Watch for Free
- 2024 Approved Learn What Are Differences Between 2D And 3D Animation
- Updated In 2024, Best Websites to Download Animated GIFs for Free-Free GIF Download
- Updated 10 2D/3D Animation Tips & Tricks to Bring New Ideas to You for 2024
- Updated 10 Great Apps for Turning Funny Animated Images Into Comics
- Updated 2024 Approved 15 Top Collage Makers to Create Aesthetic Collages
- Updated Top 10 Banned Anime Around the World and Why
- Updated 2024 Approved Pencil2D Animation Tutorial Overview
- New How to Cartoonize Photo Photoshop in Easy Steps
- Updated OBS Animated Lower Thirds Alternatives for 2024
- 2024 Approved Best 15 Anime Fonts-Find Your Favorite One
- Updated In 2024, How To Create Pinterest Slideshow in Simple Ways
- New 2024 Approved Learn How to Make Your Characters Interactive in Unity Animation Rigging
- 2024 Approved 4 Things You Need to Know About Pinterest GIF
- How to Create a YouTube Intro Animation Like a Pro for 2024
- New Animated Collage Maker Tips
- The Coolest Anime Characters Ever| List of Top Favorites
- Updated In 2024, Top 15 Greatest Claymation Movies of All Time
- New 5 Recommended Websites for Text GIF Maker
- New 5 Free Animated Gif Sources You Must Check for 2024
- New What Is the Best Collage Photo Grid Maker - Experts Choice for 2024
- 2024 Approved How to Convert Animated GIF From Video
- Updated 5 Best Adobe Animate Courses & Classes
- 2024 Approved In-Depth Study of Cartoon Painting Starts
- Updated Stunning Ideas About Creating Personalised WhatsApp GIF Sticker for 2024
- Updated Pencil2D Animation Tutorial Overview for 2024
- New The Secret Sauce for Making GIF Instagram Story More Aesthetic
- In 2024, How and Where to Find a Shiny Stone Pokémon For Apple iPhone 11? | Dr.fone
- In 2024, The Ultimate Guide to Get the Rare Candy on Pokemon Go Fire Red On Samsung Galaxy A34 5G | Dr.fone
- In 2024, How I Transferred Messages from Vivo V30 Lite 5G to iPhone 12/XS (Max) in Seconds | Dr.fone
- A Guide Oppo Reno 11F 5G Wireless and Wired Screen Mirroring | Dr.fone
- How To Fix OEM Unlock Missing on Xiaomi Redmi Note 12 Pro 4G?
- How To Change Your SIM PIN Code on Your Xiaomi 13T Pro Phone
- Easy Ways to Manage Your Nubia Red Magic 8S Pro+ Location Settings | Dr.fone
- In 2024, Set Your Preferred Job Location on LinkedIn App of your Honor X7b | Dr.fone
- The Ultimate Guide to Nokia C32 Pattern Lock Screen Everything You Need to Know
- Complete guide for recovering photos files on Edge 40 Neo.
- How to Watch Hulu Outside US On Infinix Hot 40i | Dr.fone
- Delete Gmail Account With/Without Password On Poco C51
- Ultimate Guide to Free PPTP VPN For Beginners On Oppo Reno 10 5G | Dr.fone
- A Complete Guide To OEM Unlocking on Tecno Pova 5
- In 2024, Bypass iCloud Activation Lock with IMEI Code From your iPhone 11 Pro
- How to Perform Hard Reset on Infinix Smart 7 HD? | Dr.fone
- Unlock Your Disabled Apple iPhone 12 Without iTunes in 5 Ways | Dr.fone
- Remove the Lock Screen Fingerprint Of Your Infinix Hot 30 5G
- How to fix iCloud lock from your iPhone SE (2020) and iPad
- In 2024, 8 Best Apps for Screen Mirroring Gionee F3 Pro PC | Dr.fone
- In 2024, How To Change Samsung Galaxy A34 5G Lock Screen Password?
- In 2024, Unlock Your Infinix Phone with Ease The 3 Best Lock Screen Removal Tools
- In 2024, Will Pokémon Go Ban the Account if You Use PGSharp On Apple iPhone SE | Dr.fone
- How to Repair Broken video files of Nokia ?
- New In 2024, Never Miss a Moment With Free World Cup Live Streaming
- In 2024, Easy Tutorial for Activating iCloud from iPhone 14 Safe and Legal
- In 2024, Forgot iPhone Passcode Again? Unlock Apple iPhone XS Without Passcode Now
- AI Avatar | Wondershare Virbo Online
- Top 15 Apps To Hack WiFi Password On Nokia C12
- In 2024, How To Remove Flashlight From iPhone 7 Lock Screen
- Title: In 2024, 5 Websites with Animated Logos That Catch Your Eyes
- Author: Elon
- Created at : 2024-06-23 02:10:19
- Updated at : 2024-06-24 02:10:19
- Link: https://animation-videos.techidaily.com/in-2024-5-websites-with-animated-logos-that-catch-your-eyes/
- License: This work is licensed under CC BY-NC-SA 4.0.
