
:max_bytes(150000):strip_icc():format(webp)/GettyImages-642981042-5a903651a18d9e0037d31742.jpg)
In 2024, Easy Cartoon Characters Drawing Tutorials for You Beginners
Easy Cartoon Characters Drawing Tutorials for You Beginners
Easy Cartoon Characters Drawing Tutorials for You Who Are Learning to Draw
An easy yet powerful editor
Numerous effects to choose from
Detailed tutorials provided by the official channel
Learning the art of cartoon characters drawing? We can help! Cartoon characters drawing is no rocket science, ABCD: Anybody Can Draw!

We are as excited as you as we bring to you a few of the best drawing tutorials!
In this article
01 [Double Your Results with Learning Cartoon Drawing Styles First](#Part 1)
02 [Best 6 Cartoon Characters Anyone Can Draw (with Free Video Tutorials)](#Part 2)
03 [Easy Cartoon Characters to Draw Step by Step](#Part 3)
Part 1 Double Your Results with Learning Cartoon Drawing Styles First
01 Cartoon Character Sketches
Sketching is one of the most popular art forms. Sketching can be done for real-life people or celebrities or we can also make sketches of imaginary characters and cartoons. Sketching is generally made of pencil and does not involve the usage of colors.

02 Cartoon Characters Drawing with Color
Cartoon characters can be made with color to make them more attractive. This is another popular form of art that cartoonists follow. You can explore several methods of coloring and try making your cartoon colorful.

03 Disney Cartoon Characters Drawing
Disney cartoon character drawing is probably one of the simplest. This is because they have a predefined size and are mostly symmetric. Disney cartoon characters generally use common geometric shapes such as circles, ovals, and squares. Hence making it a beginner-friendly choice!

Part 2 Best 6 Cartoon Characters Anyone Can Draw (with Free Video Tutorials)
01 Roger the alien
Roger the alien is one of the simplest cartoon characters to draw. This children’s classic cartoon character always intrigues children due to its bizarre shape. It fixes the image of an outer space characters in a child’s mind(If they exist).
What makes it easy to draw?
● The oval-shaped head is easy to draw since it is not very detailed.
● The character does not have any hair, hair is one of the more difficult parts to draw.
● The body features aren’t very prominent, hence making the character easy to draw.
Challenges you may encounter
● If you are a first-timer, then you may find it challenging to draw fingers and the toes.
● Getting the weird alien head shape might be a little difficult and may take you a few attempts.
● Making the two eyes exactly similar to each other may be challenging for a few of you.
02 Wakko Warner
What makes it easy to draw?
● The character generally has geometrical shapes and hence you can use shape tracers to draw a few parts.
● The appealing appearance of the character makes it interesting to draw.
● The eyes are not very difficult to recreate.
Challenges you may encounter
● The eyes are not very difficult to recreate.
● The shape of the mouth and the tongue that is sticking out is slightly complex.
● Perfecting the shape of the hair is a little challenging.
03 Cosmo
What makes it easy to draw?
● We recommend you to try this character out mainly because of its uniqueness.
● The eyes are not very complicated to draw.
● The body resembles a stick image and is hence simple to draw.
Challenges you may encounter
● The shape of the crown needs to be perfect, especially because of the tilt the crown has.
● The fingers are challenging to draw.
● The hair has a distinct shape, this shape needs to come out perfectly.
04 Courage the cowardly dog
What makes it easy to draw?
● Firstly, it’s one of the most favorite cartoons, hence it will ensure to keep you interested in the drawing.
● The hands and legs resemble stick figures and are simple to draw.
● The body structure is simple.
Challenges you may encounter
● Drawing a cartoon animal instead of a human being might be intriguing for beginners.
● The large eyes, which is one of the characteristic features needs to be perfect.
● The design of the ears is the trickiest part and could be difficult to draw.
05 Tom And Jerry
When we think of cartoons, the first few names that probably come to our mind are tom and jerry. This duo of a grumpy cat and a mysterious mouse has left an everlasting impact on the world of cartoons. The duo is famous throughout the world and is loved throughout age groups
Why do we recommend you to try your hands on this?
● This is a classic cartoon that almost everyone loves.
● There are several resources on the internet to help you draw the cartoon characters.
● The characters need not be perfect, even a close resemblance to them would be sufficient for the viewers to identify them due to their fame.
Challenges you may encounter
● You need to be careful with the proportion of sizes of tom and jerry.
● The structures of tom and jerry are not very simple to draw.
● Perfecting the grumpy expression on tom’s face and a frightened expression on jerry’s face is challenging.
05 Catdog
Catdog is another very interesting character. Who’d have imagined a cat and a dog morphed in a single body? Well, imagination has no end to it as they say! Catdog is a yellow cat and dog in a single body, it looks cute and at the same time intriguing.
Why do we recommend you try your hands on this?
● The cartoon character is mainly composed of geometrical shapes.
● The character is vividly colorful.
● The bright yellow color is super attractive and hence makes drawing catdog very fun.
Challenges you may encounter
● The character is illusional, you might have difficulty while deciding how to even look at it.
● The cat and dog faces are not very different from each other and have minute differences while drawing you need to be careful about having a distinct difference between the two faces.
Now that we’ve taken our baby steps towards understanding the art of drawing cartoons.
Key Takeaways from This Episode
● That’s a lot of knowledge for today, isn’t it? Today we’ve seen the basics of drawing cartoon characters.
● We also got our hands dirty by exploring a few easy cartoon characters that you could draw.
● Further, we saw the basic steps that you would need to take in order to draw the face of any cartoon character! All in all, we learned everything we needed to know to draw our first cartoon! What are you waiting for? Go try out drawing your first cartoon today!
Learning the art of cartoon characters drawing? We can help! Cartoon characters drawing is no rocket science, ABCD: Anybody Can Draw!
We are as excited as you as we bring to you a few of the best drawing tutorials!
In this article
01 [Double Your Results with Learning Cartoon Drawing Styles First](#Part 1)
02 [Best 6 Cartoon Characters Anyone Can Draw (with Free Video Tutorials)](#Part 2)
03 [Easy Cartoon Characters to Draw Step by Step](#Part 3)
Part 1 Double Your Results with Learning Cartoon Drawing Styles First
01 Cartoon Character Sketches
Sketching is one of the most popular art forms. Sketching can be done for real-life people or celebrities or we can also make sketches of imaginary characters and cartoons. Sketching is generally made of pencil and does not involve the usage of colors.
02 Cartoon Characters Drawing with Color
Cartoon characters can be made with color to make them more attractive. This is another popular form of art that cartoonists follow. You can explore several methods of coloring and try making your cartoon colorful.
03 Disney Cartoon Characters Drawing
Disney cartoon character drawing is probably one of the simplest. This is because they have a predefined size and are mostly symmetric. Disney cartoon characters generally use common geometric shapes such as circles, ovals, and squares. Hence making it a beginner-friendly choice!
Part 2 Best 6 Cartoon Characters Anyone Can Draw (with Free Video Tutorials)
01 Roger the alien
Roger the alien is one of the simplest cartoon characters to draw. This children’s classic cartoon character always intrigues children due to its bizarre shape. It fixes the image of an outer space characters in a child’s mind(If they exist).
What makes it easy to draw?
● The oval-shaped head is easy to draw since it is not very detailed.
● The character does not have any hair, hair is one of the more difficult parts to draw.
● The body features aren’t very prominent, hence making the character easy to draw.
Challenges you may encounter
● If you are a first-timer, then you may find it challenging to draw fingers and the toes.
● Getting the weird alien head shape might be a little difficult and may take you a few attempts.
● Making the two eyes exactly similar to each other may be challenging for a few of you.
02 Wakko Warner
What makes it easy to draw?
● The character generally has geometrical shapes and hence you can use shape tracers to draw a few parts.
● The appealing appearance of the character makes it interesting to draw.
● The eyes are not very difficult to recreate.
Challenges you may encounter
● The eyes are not very difficult to recreate.
● The shape of the mouth and the tongue that is sticking out is slightly complex.
● Perfecting the shape of the hair is a little challenging.
03 Cosmo
What makes it easy to draw?
● We recommend you to try this character out mainly because of its uniqueness.
● The eyes are not very complicated to draw.
● The body resembles a stick image and is hence simple to draw.
Challenges you may encounter
● The shape of the crown needs to be perfect, especially because of the tilt the crown has.
● The fingers are challenging to draw.
● The hair has a distinct shape, this shape needs to come out perfectly.
04 Courage the cowardly dog
What makes it easy to draw?
● Firstly, it’s one of the most favorite cartoons, hence it will ensure to keep you interested in the drawing.
● The hands and legs resemble stick figures and are simple to draw.
● The body structure is simple.
Challenges you may encounter
● Drawing a cartoon animal instead of a human being might be intriguing for beginners.
● The large eyes, which is one of the characteristic features needs to be perfect.
● The design of the ears is the trickiest part and could be difficult to draw.
05 Tom And Jerry
When we think of cartoons, the first few names that probably come to our mind are tom and jerry. This duo of a grumpy cat and a mysterious mouse has left an everlasting impact on the world of cartoons. The duo is famous throughout the world and is loved throughout age groups
Why do we recommend you to try your hands on this?
● This is a classic cartoon that almost everyone loves.
● There are several resources on the internet to help you draw the cartoon characters.
● The characters need not be perfect, even a close resemblance to them would be sufficient for the viewers to identify them due to their fame.
Challenges you may encounter
● You need to be careful with the proportion of sizes of tom and jerry.
● The structures of tom and jerry are not very simple to draw.
● Perfecting the grumpy expression on tom’s face and a frightened expression on jerry’s face is challenging.
05 Catdog
Catdog is another very interesting character. Who’d have imagined a cat and a dog morphed in a single body? Well, imagination has no end to it as they say! Catdog is a yellow cat and dog in a single body, it looks cute and at the same time intriguing.
Why do we recommend you try your hands on this?
● The cartoon character is mainly composed of geometrical shapes.
● The character is vividly colorful.
● The bright yellow color is super attractive and hence makes drawing catdog very fun.
Challenges you may encounter
● The character is illusional, you might have difficulty while deciding how to even look at it.
● The cat and dog faces are not very different from each other and have minute differences while drawing you need to be careful about having a distinct difference between the two faces.
Now that we’ve taken our baby steps towards understanding the art of drawing cartoons.
Key Takeaways from This Episode
● That’s a lot of knowledge for today, isn’t it? Today we’ve seen the basics of drawing cartoon characters.
● We also got our hands dirty by exploring a few easy cartoon characters that you could draw.
● Further, we saw the basic steps that you would need to take in order to draw the face of any cartoon character! All in all, we learned everything we needed to know to draw our first cartoon! What are you waiting for? Go try out drawing your first cartoon today!
Pencil2D Animation Tutorial Overview
Animation is one of the trendiest technologies. The basics of animation were formulated in the 2000s from the moving page trick. The first few animators learned that animation is nothing but continuous switching of frames from one to another. One animated still is switched to another and then another in a quick sequence such that it makes a sequential moving frame. Today, animation has come a long way from where it started and today it is used for several commercials, tutorials, and even educational lecture videos. Pencil2D animation is an amazing animation tool that can be used by even neophytes. Want to learn more about 2d pencil animation and its super cool features? Well, you’re at the perfect place. Today we’ll be telling you more about pencil 2d animation and giving you a small overview of its usage.
In this article
01 [What is Pencil2D and How to Install?](#Part 1)
02 [Overview of the Application Interface](#Part 2)
03 [How to Create Animations with Pencil2D?](#Part 3)
Part 1 What is Pencil2D and How to Install?
2d pencil animation is popular open-source animation software. The software is pretty cool for those who are newly starting off with animation. The open-source software is available on all major operating systems including Windows, Mac OS, and Unix. Using this amazing software, we can make amazing cartoon characters using traditional cartoon-making techniques such as tracing drawing, skinning. Using this software, you can save animations in the native animation formats or extract the animation to PNG, JPG, or other formats. Wish to explore more about pencil 2d animation software? Follow the steps listed below in order to download the pencil2d animation software.
● Firstly, you need to ensure that your device has ample space on it.
● Next, you need to head to the official website of pencil2d.
● Further, you need to select your operating system. You can find different versions of the software, namely windows 7/8/10, windows XP/ Vista, Mac OS, and Linux
● Once downloaded, you need to start the installation setup. Note that this may take a while to download.
● Once downloaded, you can start familiarizing yourself with the software.
Part 2 Overview of the Application Interface
1. The brush tool
The brush tool must have reminded you of paint software in windows. The brush tool is a popular and highly utilitarian basic tool in Pencil2D animation software. You can either access it via the user interface or quickly access it by using the B key on your keyboard. As the name suggests, the brush tool is literally just a brush that allows you to draw and paint any sort of drawings of different shades, colors, and thickness. If you wish to change the color, you can find a color palette on the left side of the interface.

2. The eraser tool
You’ve a brush tool; it’s almost common sense that there’d be an eraser. The eraser tool has an eraser as its icon. If you wish to use the eraser, click on the eraser tool or simply click the E button on your keyboard. Once you’ve selected the tool, you need to simply hover over the parts you wish to erase.

3. Bucket tool
The bucket tool is another useful tool that you can find in the left tool pane of pencil 2d animation. The tool icon looks like a bucket and it is used to fill an entire area with a particular color. You can choose the color you’d like to fill from the color pallet available on the left side. Alternatively, you can also access the bucket tool by pressing the “K” key on your keyboard.

4. Custom colors
A cool feature that you can find on pencil 2d animation software is the custom color one. You can merge and mix colors according to your choice and create your own color. To do so, you need to click on the small color box that you’ll find at the top right of your screen. By doing so, a huge color wheel will appear on your screen. Now you can either enter values of the R, G, and B if you wish to merge different colors and make a new one or select a particular color from the huge color wheel that appears in front of you. These colors vary in gradient, shade, and a lot of different factors.

5. The Undo button
The Undo button is a highly useful functionality for the lazy ones who do not wish to erase the mistake they made. By undoing, the previous step gets reverted and you can start over again. The traditional undo shortcut, Ctrl+Z does work in the pencil 2d animation. Alternatively, you can also use the undo feature via the user interface. You can do so by heading over to the edit option in the topmost bar. The first option in the drop-down menu would be undo.

Part 3 How to Create Animations with Pencil2D?
Creating animations in pencil 2d is slightly sophisticated and certainly needs minimal practice. Follow the steps listed below in order to learn how to animate through pencil 2d to make your first animation.
1. Ensure that you’ve turned on your bitmap on the first frame
Animation works through quick switching of frame which makes it appear as though the object is in motion. By turning on the bitmap, pencil 2d animation ensures that you’ve no blank frames at the start of your animation.

2. Draw your animated character
Since you’re trying to animate, you need to have an animated character or object. Hence, the first step to making your first animation is by drawing the object or character that you wish to animate. Try to make the character as realistic as possible. To start with, maybe you can try animating just a stick figure; this is because animating a complex character is rather difficult for beginners.

3.The three circular buttons
Once you’re satisfied with the character you draw, you need to spot the 3 circular buttons which are arranged in the “+”,”-“,”+” order. By pressing the first “+” button, you can add an empty slide. If you click on the “-“ button, it will delete the most recent slide and if you click on the next “+” button, it will duplicate the current slide.

4.Repeat until you get an animation
Now that you know how to deal with multiple frames, you can continue creating frames and making the animated characters move by tweaking with the drawing in every frame. For instance, if you wish to show that the animated character is running, in one of the frames the left leg should be forward and in the next one, the right leg should be forward. Keep repeating this process of tweaking with frames until you’ve your desired animated video.

Now that we’ve seen the process of animation via Pencil2D, you must have realized that it’s pretty orthodox and complicated. Moreover, you cannot carry out rigging and other newer animation techniques. Hence, we introduce you to Wondershare Filmora Video Editor , your all in one animation making platform. Here you can animate without any hassle. Wondershare Filmora makes your job easier with multiple animation features, you needn’t even draw your animated character. You can simply import a custom-made character and rig the character. Further, you need not deal with multiple frames and personally pay attention to each frame. All in all, Filmora makes your job simple and your animations much more seamless.
For Win 7 or later (64-bit)
For macOS 10.12 or later
Key Takeaways from This Episode
● Animation is actively being used for multiple purposes.
● Today we took a look at one of the orthodox yet popular animation tools, Pencil2D.
● The Pencil2D animation tool offers you multiple functionalities and allows you to make animations.
● Next, we also took a look at Wondershare Filmora Pro, your one-stop shop for all animation needs. You can find multiple animation features here and it’s all so simple.
● What are you waiting for? Your next animation is just one click away.
02 [Overview of the Application Interface](#Part 2)
03 [How to Create Animations with Pencil2D?](#Part 3)
Part 1 What is Pencil2D and How to Install?
2d pencil animation is popular open-source animation software. The software is pretty cool for those who are newly starting off with animation. The open-source software is available on all major operating systems including Windows, Mac OS, and Unix. Using this amazing software, we can make amazing cartoon characters using traditional cartoon-making techniques such as tracing drawing, skinning. Using this software, you can save animations in the native animation formats or extract the animation to PNG, JPG, or other formats. Wish to explore more about pencil 2d animation software? Follow the steps listed below in order to download the pencil2d animation software.
● Firstly, you need to ensure that your device has ample space on it.
● Next, you need to head to the official website of pencil2d.
● Further, you need to select your operating system. You can find different versions of the software, namely windows 7/8/10, windows XP/ Vista, Mac OS, and Linux
● Once downloaded, you need to start the installation setup. Note that this may take a while to download.
● Once downloaded, you can start familiarizing yourself with the software.
Part 2 Overview of the Application Interface
1. The brush tool
The brush tool must have reminded you of paint software in windows. The brush tool is a popular and highly utilitarian basic tool in Pencil2D animation software. You can either access it via the user interface or quickly access it by using the B key on your keyboard. As the name suggests, the brush tool is literally just a brush that allows you to draw and paint any sort of drawings of different shades, colors, and thickness. If you wish to change the color, you can find a color palette on the left side of the interface.
2. The eraser tool
You’ve a brush tool; it’s almost common sense that there’d be an eraser. The eraser tool has an eraser as its icon. If you wish to use the eraser, click on the eraser tool or simply click the E button on your keyboard. Once you’ve selected the tool, you need to simply hover over the parts you wish to erase.
3. Bucket tool
The bucket tool is another useful tool that you can find in the left tool pane of pencil 2d animation. The tool icon looks like a bucket and it is used to fill an entire area with a particular color. You can choose the color you’d like to fill from the color pallet available on the left side. Alternatively, you can also access the bucket tool by pressing the “K” key on your keyboard.
4. Custom colors
A cool feature that you can find on pencil 2d animation software is the custom color one. You can merge and mix colors according to your choice and create your own color. To do so, you need to click on the small color box that you’ll find at the top right of your screen. By doing so, a huge color wheel will appear on your screen. Now you can either enter values of the R, G, and B if you wish to merge different colors and make a new one or select a particular color from the huge color wheel that appears in front of you. These colors vary in gradient, shade, and a lot of different factors.
5. The Undo button
The Undo button is a highly useful functionality for the lazy ones who do not wish to erase the mistake they made. By undoing, the previous step gets reverted and you can start over again. The traditional undo shortcut, Ctrl+Z does work in the pencil 2d animation. Alternatively, you can also use the undo feature via the user interface. You can do so by heading over to the edit option in the topmost bar. The first option in the drop-down menu would be undo.
Part 3 How to Create Animations with Pencil2D?
Creating animations in pencil 2d is slightly sophisticated and certainly needs minimal practice. Follow the steps listed below in order to learn how to animate through pencil 2d to make your first animation.
1. Ensure that you’ve turned on your bitmap on the first frame
Animation works through quick switching of frame which makes it appear as though the object is in motion. By turning on the bitmap, pencil 2d animation ensures that you’ve no blank frames at the start of your animation.
2. Draw your animated character
Since you’re trying to animate, you need to have an animated character or object. Hence, the first step to making your first animation is by drawing the object or character that you wish to animate. Try to make the character as realistic as possible. To start with, maybe you can try animating just a stick figure; this is because animating a complex character is rather difficult for beginners.
3.The three circular buttons
Once you’re satisfied with the character you draw, you need to spot the 3 circular buttons which are arranged in the “+”,”-“,”+” order. By pressing the first “+” button, you can add an empty slide. If you click on the “-“ button, it will delete the most recent slide and if you click on the next “+” button, it will duplicate the current slide.
4.Repeat until you get an animation
Now that you know how to deal with multiple frames, you can continue creating frames and making the animated characters move by tweaking with the drawing in every frame. For instance, if you wish to show that the animated character is running, in one of the frames the left leg should be forward and in the next one, the right leg should be forward. Keep repeating this process of tweaking with frames until you’ve your desired animated video.
Now that we’ve seen the process of animation via Pencil2D, you must have realized that it’s pretty orthodox and complicated. Moreover, you cannot carry out rigging and other newer animation techniques. Hence, we introduce you to Wondershare Filmora Video Editor , your all in one animation making platform. Here you can animate without any hassle. Wondershare Filmora makes your job easier with multiple animation features, you needn’t even draw your animated character. You can simply import a custom-made character and rig the character. Further, you need not deal with multiple frames and personally pay attention to each frame. All in all, Filmora makes your job simple and your animations much more seamless.
For Win 7 or later (64-bit)
For macOS 10.12 or later
Key Takeaways from This Episode
● Animation is actively being used for multiple purposes.
● Today we took a look at one of the orthodox yet popular animation tools, Pencil2D.
● The Pencil2D animation tool offers you multiple functionalities and allows you to make animations.
● Next, we also took a look at Wondershare Filmora Pro, your one-stop shop for all animation needs. You can find multiple animation features here and it’s all so simple.
● What are you waiting for? Your next animation is just one click away.
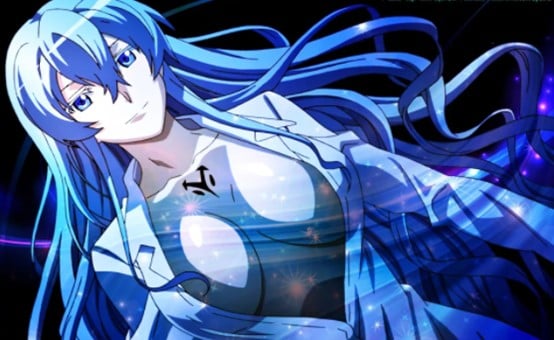
Best 15 Female Anime Characters-Who Is Your Favorite?
Best 15 Female Anime Characters-Who Is Your Favorite?

Shanoon Cox
Mar 27, 2024• Proven solutions
With some powerful themes and ideas of loyalty, honor, and sacrifice, anime culture is not ending anytime soon. And being an anime fan, we are glad.
Since the early 1900’s, cool male and female anime characters have been inspiring fans worldwide; you will find plenty of anime girl characters who are ferocious, smartass, or simply princesses with blue, red, or blonde hair and personalities so engaging and influencing. This article includes tons of strong anime ladies you can look up to, from incredibly intellectual Motoko Kusanagi to an agile warrior Saber. We will talk about their intriguing stories, abilities, and powers that steal our hearts away.
Best 15 Female Anime Characters of All Time
Here we have the best 15 female anime characters found on TV and in films which are always one thing – popular. However, note that all these girl characters have earned their place in our list in no particular order. Let’s check them out!
- 1. Erza Scarlet- Fairy Tail
- 2. Kushina Uzumaki-Naruto
- 3. Asuna- Sword Art Online
- 4. Saber- Fate/Stay Night
- 5. Rias Gremory- High School DxD
- 6. Karma Akabane – Assassination Classroom
- 7. Mikasa Ackerman-Attack on Titan
- 8. Motoko Kusanagi-Ghost in the Shell
- 9. Touka Kirishima-Tokyo Ghoul
- 10. Tsukuyo-Gintama
- 11. Lucy Heartfilia- Fairy Tail
- 12. Yui Komori- Diabolik Lovers
- 13. Revy-Black Lagoon
- 14. Shoko Nishimiya- A Silent Voice
- 15.Esdeath- Akame ga Kill!
1. Erza Scarlet- Fairy Tail
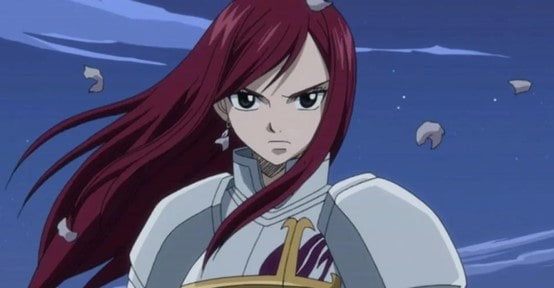
Tall, beautiful, and a bit scary, Erza Scarlet is an S-class mage of the Fairy Tail Guild. As one of the leading female protagonists in Team Natsu, Erza feels great pride and shows dedication to the guild. She’s often seen in her custom-made armored suit, a blue skirt, and black boots with a blue Fairy Tail stamp on her upper left arm. But, changing her attire at any given time is never a problem for her, thanks to her Requip magic powers.
Anime fans love Erza for her strict yet clumsy personality. Her fighting and leadership skills in the war against Phantom Lord Guild have had fans in admiration.
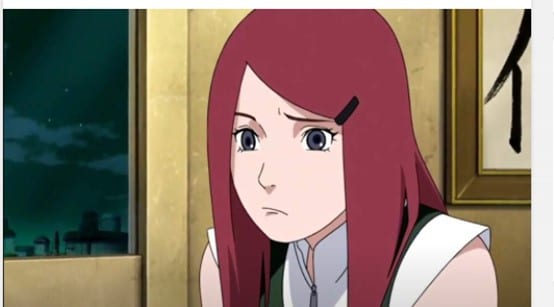
2. Kushina Uzumaki-Naruto
We love the nickname “Red hot-blooded Habanero,” Kushina earned when she attacked a bunch of kids who teased and laughed at her. Born inUzushiogakure Uzumaki clan, Kushina was a beautiful woman in her early 20s with a slender figure. She is the wife of Minato Namikaze and the mother of Naruto Uzumaki in the top-rated Naruto series. Despite a short temper and violent outbursts, Kushina possesses a soft and caring side most people love her for.
3. Asuna- Sword Art Online
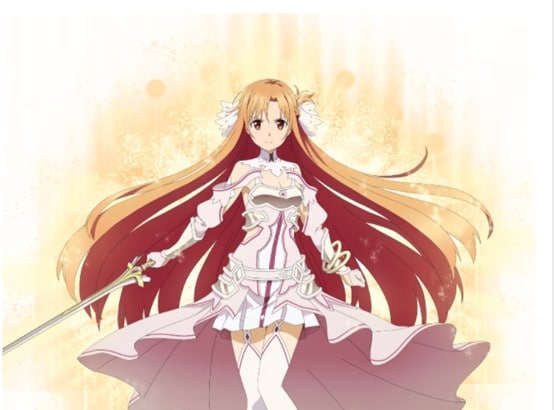
Asuna Yuuki is one of the popular anime girl characters of our favorite Sword Art Online novel, manga, anime franchise. She is the deuteragonist and former Vice-commander of the Knights of the Blood Oath in Sword Art Online. Early on, Asuna was shown to be a strong fighter who did not care about dying until she met Kirito. However, Asuna is a bit overly serious, and as the SAO series progresses, she is shown nothing but the wife of Kirito.
4. Saber- Fate/Stay Night
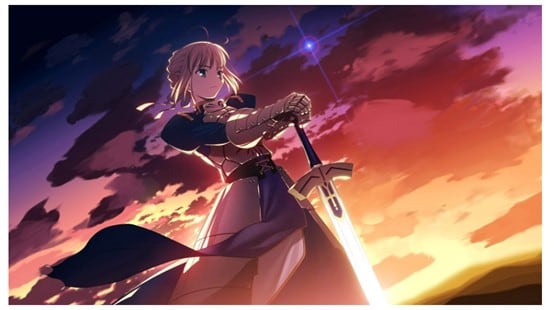
Fate/Stay Night’s Saber is the saber class servant of Kiritsugu Emiya in the Fourth Holy Grail War and Shirou Emiya in the Fifth Holy Grail War.. Serving her master with loyalty and devotion, Saber is a courageous and strong-willed female anime character. Fans around the world acknowledge her as a supremely skilled warrior with a kind heart, caring about the ones she loves. Her stats
5. Rias Gremory- High School DxD
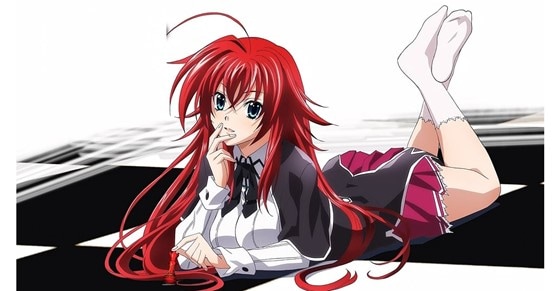
School’s number one beauty, the red-haired Rias Gremory, deserves a spot on our list. She is the only daughter of Zeoticus Venelana Gremory and the next head of the Gremory clan. We love when she is called the Crimson-haired Ruin Princess. While she has charming features, she is very kind and compassionate even to her servants – something which makes her a fan favorite,
6. Nobara Kugisaki- Jujutsu Kaisen
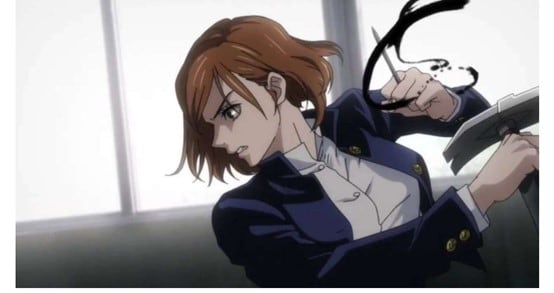
Out of the many unique anime characters in Jujutsu Kaisen, Nobara Kugosaki is a tough girl most anime fans are drawn to. She is one of the Jujutsu manga’s three primary protagonists who moved to Tokyo. Nobara isn’t your typical strong lady; she is confident and outspoken about her appearance and herself as a person.
As a rebellious fighter, she has shown superhuman pain tolerance while fighting foes even larger than herself. Nobara fans love her proficiency with various curse-infused weaponry, such as the hammer and nail, straw dolls, and the rubber mallet.
7. Mikasa Ackerman-Attack on Titan

As the favorite of many anime fans, Mikasa Ackerman had to make it to our list of the best anime girl characters. The lead female of Attack on Titan, Mikasa, is portrayed as one of the strongest characters, both physically and mentally.
Once a cheerful, outgoing, and innocent child living with her parents, Mikasa grows up to be quite stoic and dangerous at times. Despite the trauma of witnessing the carnage during the Survey Corps and her biological parent’s brutal murder, Mikasa Ackerman retains humanity in her kind heart. But with a reserved, emotionally withdrawn personality who rarely speaks or losses her cool. Her character in the Attack on Titan series causes us to question our endurance.
8. Motoko Kusanagi-Ghost in the Shell
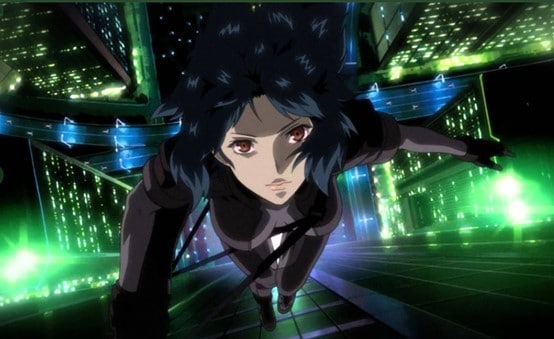
Who doesn’t know this quick-witted girl from the very popular Ghost in the shell manga-anime franchise, with a characteristic cyborg body? Motoko Kusanagi is employed as an officer for Public Security Section 9, a Japanese National Public Safety Commission division. After the airplane accident in her childhood, Motoko was comatose until her consciousness was put into a prosthetic body. Since then, she has been an excellent hacker with incredible intelligence and combat skills respected among her colleagues. Motoko connects with the audience on a greater level, for she is strong, cool, intellectual, and artificial at the same time.
9. Touka Kirishima-Tokyo Ghoul
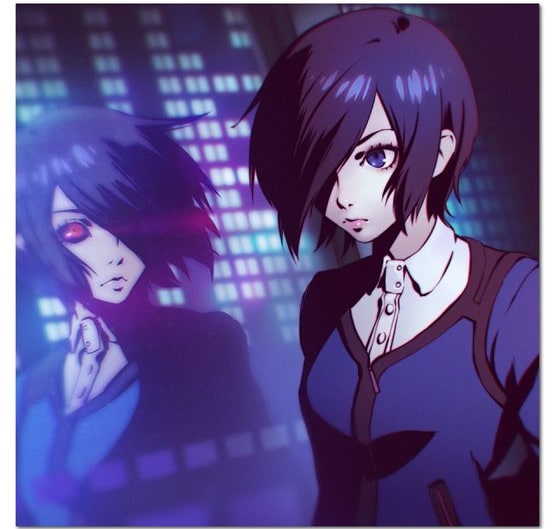
Here comes a ferocious ghoul; one of the most talked-about female protagonists from the Tokyo Ghoul series is Touka Kirishima, aka Rabbit. While she tries not to resort to violence most of the time, sometimes she hunts with a Rabbit mask on, hence the alias.
In the past, she was a waitress at the famous coffee shop in Anteiku. With the progression of the series, Touka becomes the manager two years after the Owl Suppression Operation. And as humans and ghouls come to peace, she marries Ken Kaneki and gives birth to their first daughter Ichika Kaneki. Being a rugged, know-it-all kind of girl but with a touch of kindness, people adore Touka Kirishima.
10. Tsukuyo-Gintama
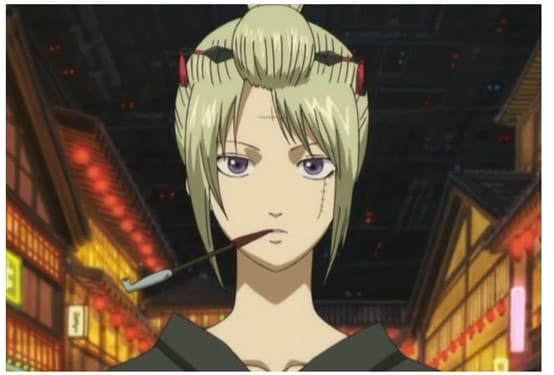
Tsukuyo from Gintama anime and manga is a fan-favorite, often known as “Courtesan of Death.” She is a blondie with a scar over her forehead that tells the tales of her loyalty to her master when he asked her to reject her identity as a woman. Orphaned as a child, Tsukuyo was raised and trained by a ruthless and deadly assassin, Jiraia. And so, she grows to be a competent, highly skilled ninja currently serving as a leader of an all-female law enforcement squad—no wonder all feminist anime fans look up to her interesting personality and powerful character.
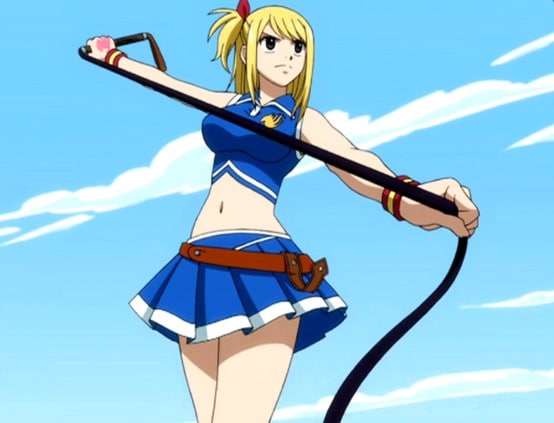
11. Lucy Heartfilia- Fairy Tail
Lucy Heartfilia, an iconic anime girl from the Fairy Tail manga series, has the best character growth from the first episode to the last. When we first see her, she is a happy, innocent little girl who grows up to be a divine spirit mage and mother to seven children.
There are so many likable qualities about Lucy – she is fair and beautiful, responsible, with impressive magic skills, and a desire to become a world-famous author. Lucy Heartfilia leaves her home after her mother’s death with an ambition for independence, something admired by the fandom.
12. Yui Komori- Diabolik Lovers
Yui is living with Cordelia’s heart in her. When Cordelia was dying, she asked Richter to cut out and implant her heart into another human body, so he did it in the abandoned kid Yui. Later, she was adopted by a priest and vampire hunter, Seiji, and is forced to live with six vampire brothers.
When it comes to lovely vampire anime ladies, it’s not a surprise that Diabolik Lover’s Yui Komori is everyone’s favorite. Her wavy platinum blonde hair and glistering sherbet pink color eyes have caught the attention of the viewers. Not to mention the pretty pink flower hair clip on the left side of her hair adds to her beauty. But there’s more than just beauty about Yui Komori – she is still-willed and brave, with an optimistic personality. She is seen to keep a cool head about threats and not mind any mean comments from the other vampires.
13. Revy-Black Lagoon

No, we did not forget the heroine, Revy, or as you may call her Rebecca Lee from the Black Lagoon anime series. Everything about Revy is ferocious. In her mid to late twenties, Revy is a Chinese-American tan-skinned woman with a wild temperament. In the old days, she is shown as a thief and murderer who shot an unknown man as her first murder. You can’t really relate to this complex female anime character until you dive deeper into her intriguing story and understand the verbal and physical trauma she has faced over the years. Though she is a little rude, sarcastic, and troubled, her forgetful and humorous side touches our hearts once in a while.
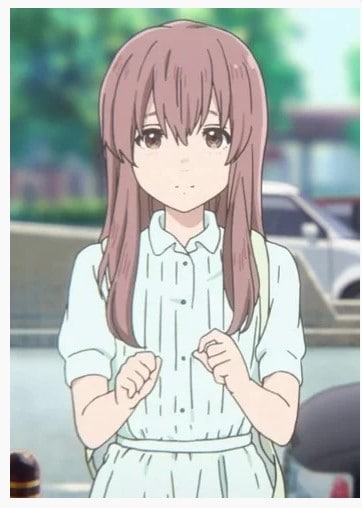
14. Shoko Nishimiya- A Silent Voice
This entry has had a long-lasting impression on most anime fans because of her sweet and forgiving nature, who fakes smiles even when it’s hard to. Her character is one of a kind being clinically deaf but still the leading protagonist of the A Silent Voice series. Unfortunately, she has always been an easy target for bullies, especially her classmate Shoya, who later becomes her friend due to her forgiving nature. Despite the bullies, the pain, Shoko Nishimiya is a strong girl who cares about her family and friends but cries in silence when she is hurt.
15. Esdeath- Akame ga Kill
Without a doubt, Esdeath is the best dark character in the history of the darkest anime series or films. If you are an action lover like us, Esdeath’s spectacular fight skills will wow you. As a high-ranking general of the Empire, her attire consists of a General’s apparel with long sleeves, a blue scarf around the neck, and high-heeled boots. Soon, the Prime Minister appoints her as the leader of the Jaegers since she is stronger (emotionally and physically) than most characters. Now a manipulative and sadistic woman, Esdeath did not always lack empathy. Sadly, it was her father’s death in her own arms that hardened her heart to a point she humiliated and tortured anyone she finds weaker than her.
What Makes a Female Anime Character Stand out?
A bunch of unique and exciting anime characters is released every year. While some of these turn out lovable gems, others prove long-forgotten failures. But what is it about an anime character that makes it stand out?
Everything shapes the perfect leading anime character, from their personalities to their clothes and styling to the character development. Memorable anime girl characters are rare, well-written protagonists with profound nature, exciting stories, and emotions that relate to anime fans.
So, which female anime character is your favorite?
Shanoon Cox
Shanoon Cox is a writer and a lover of all things video.
Follow @Shanoon Cox
Shanoon Cox
Mar 27, 2024• Proven solutions
With some powerful themes and ideas of loyalty, honor, and sacrifice, anime culture is not ending anytime soon. And being an anime fan, we are glad.
Since the early 1900’s, cool male and female anime characters have been inspiring fans worldwide; you will find plenty of anime girl characters who are ferocious, smartass, or simply princesses with blue, red, or blonde hair and personalities so engaging and influencing. This article includes tons of strong anime ladies you can look up to, from incredibly intellectual Motoko Kusanagi to an agile warrior Saber. We will talk about their intriguing stories, abilities, and powers that steal our hearts away.
Best 15 Female Anime Characters of All Time
Here we have the best 15 female anime characters found on TV and in films which are always one thing – popular. However, note that all these girl characters have earned their place in our list in no particular order. Let’s check them out!
- 1. Erza Scarlet- Fairy Tail
- 2. Kushina Uzumaki-Naruto
- 3. Asuna- Sword Art Online
- 4. Saber- Fate/Stay Night
- 5. Rias Gremory- High School DxD
- 6. Karma Akabane – Assassination Classroom
- 7. Mikasa Ackerman-Attack on Titan
- 8. Motoko Kusanagi-Ghost in the Shell
- 9. Touka Kirishima-Tokyo Ghoul
- 10. Tsukuyo-Gintama
- 11. Lucy Heartfilia- Fairy Tail
- 12. Yui Komori- Diabolik Lovers
- 13. Revy-Black Lagoon
- 14. Shoko Nishimiya- A Silent Voice
- 15.Esdeath- Akame ga Kill!
1. Erza Scarlet- Fairy Tail
Tall, beautiful, and a bit scary, Erza Scarlet is an S-class mage of the Fairy Tail Guild. As one of the leading female protagonists in Team Natsu, Erza feels great pride and shows dedication to the guild. She’s often seen in her custom-made armored suit, a blue skirt, and black boots with a blue Fairy Tail stamp on her upper left arm. But, changing her attire at any given time is never a problem for her, thanks to her Requip magic powers.
Anime fans love Erza for her strict yet clumsy personality. Her fighting and leadership skills in the war against Phantom Lord Guild have had fans in admiration.
2. Kushina Uzumaki-Naruto
We love the nickname “Red hot-blooded Habanero,” Kushina earned when she attacked a bunch of kids who teased and laughed at her. Born inUzushiogakure Uzumaki clan, Kushina was a beautiful woman in her early 20s with a slender figure. She is the wife of Minato Namikaze and the mother of Naruto Uzumaki in the top-rated Naruto series. Despite a short temper and violent outbursts, Kushina possesses a soft and caring side most people love her for.
3. Asuna- Sword Art Online
Asuna Yuuki is one of the popular anime girl characters of our favorite Sword Art Online novel, manga, anime franchise. She is the deuteragonist and former Vice-commander of the Knights of the Blood Oath in Sword Art Online. Early on, Asuna was shown to be a strong fighter who did not care about dying until she met Kirito. However, Asuna is a bit overly serious, and as the SAO series progresses, she is shown nothing but the wife of Kirito.
4. Saber- Fate/Stay Night
Fate/Stay Night’s Saber is the saber class servant of Kiritsugu Emiya in the Fourth Holy Grail War and Shirou Emiya in the Fifth Holy Grail War.. Serving her master with loyalty and devotion, Saber is a courageous and strong-willed female anime character. Fans around the world acknowledge her as a supremely skilled warrior with a kind heart, caring about the ones she loves. Her stats
5. Rias Gremory- High School DxD
School’s number one beauty, the red-haired Rias Gremory, deserves a spot on our list. She is the only daughter of Zeoticus Venelana Gremory and the next head of the Gremory clan. We love when she is called the Crimson-haired Ruin Princess. While she has charming features, she is very kind and compassionate even to her servants – something which makes her a fan favorite,
6. Nobara Kugisaki- Jujutsu Kaisen
Out of the many unique anime characters in Jujutsu Kaisen, Nobara Kugosaki is a tough girl most anime fans are drawn to. She is one of the Jujutsu manga’s three primary protagonists who moved to Tokyo. Nobara isn’t your typical strong lady; she is confident and outspoken about her appearance and herself as a person.
As a rebellious fighter, she has shown superhuman pain tolerance while fighting foes even larger than herself. Nobara fans love her proficiency with various curse-infused weaponry, such as the hammer and nail, straw dolls, and the rubber mallet.
7. Mikasa Ackerman-Attack on Titan
As the favorite of many anime fans, Mikasa Ackerman had to make it to our list of the best anime girl characters. The lead female of Attack on Titan, Mikasa, is portrayed as one of the strongest characters, both physically and mentally.
Once a cheerful, outgoing, and innocent child living with her parents, Mikasa grows up to be quite stoic and dangerous at times. Despite the trauma of witnessing the carnage during the Survey Corps and her biological parent’s brutal murder, Mikasa Ackerman retains humanity in her kind heart. But with a reserved, emotionally withdrawn personality who rarely speaks or losses her cool. Her character in the Attack on Titan series causes us to question our endurance.
8. Motoko Kusanagi-Ghost in the Shell
Who doesn’t know this quick-witted girl from the very popular Ghost in the shell manga-anime franchise, with a characteristic cyborg body? Motoko Kusanagi is employed as an officer for Public Security Section 9, a Japanese National Public Safety Commission division. After the airplane accident in her childhood, Motoko was comatose until her consciousness was put into a prosthetic body. Since then, she has been an excellent hacker with incredible intelligence and combat skills respected among her colleagues. Motoko connects with the audience on a greater level, for she is strong, cool, intellectual, and artificial at the same time.
9. Touka Kirishima-Tokyo Ghoul
Here comes a ferocious ghoul; one of the most talked-about female protagonists from the Tokyo Ghoul series is Touka Kirishima, aka Rabbit. While she tries not to resort to violence most of the time, sometimes she hunts with a Rabbit mask on, hence the alias.
In the past, she was a waitress at the famous coffee shop in Anteiku. With the progression of the series, Touka becomes the manager two years after the Owl Suppression Operation. And as humans and ghouls come to peace, she marries Ken Kaneki and gives birth to their first daughter Ichika Kaneki. Being a rugged, know-it-all kind of girl but with a touch of kindness, people adore Touka Kirishima.
10. Tsukuyo-Gintama
Tsukuyo from Gintama anime and manga is a fan-favorite, often known as “Courtesan of Death.” She is a blondie with a scar over her forehead that tells the tales of her loyalty to her master when he asked her to reject her identity as a woman. Orphaned as a child, Tsukuyo was raised and trained by a ruthless and deadly assassin, Jiraia. And so, she grows to be a competent, highly skilled ninja currently serving as a leader of an all-female law enforcement squad—no wonder all feminist anime fans look up to her interesting personality and powerful character.
11. Lucy Heartfilia- Fairy Tail
Lucy Heartfilia, an iconic anime girl from the Fairy Tail manga series, has the best character growth from the first episode to the last. When we first see her, she is a happy, innocent little girl who grows up to be a divine spirit mage and mother to seven children.
There are so many likable qualities about Lucy – she is fair and beautiful, responsible, with impressive magic skills, and a desire to become a world-famous author. Lucy Heartfilia leaves her home after her mother’s death with an ambition for independence, something admired by the fandom.
12. Yui Komori- Diabolik Lovers
Yui is living with Cordelia’s heart in her. When Cordelia was dying, she asked Richter to cut out and implant her heart into another human body, so he did it in the abandoned kid Yui. Later, she was adopted by a priest and vampire hunter, Seiji, and is forced to live with six vampire brothers.
When it comes to lovely vampire anime ladies, it’s not a surprise that Diabolik Lover’s Yui Komori is everyone’s favorite. Her wavy platinum blonde hair and glistering sherbet pink color eyes have caught the attention of the viewers. Not to mention the pretty pink flower hair clip on the left side of her hair adds to her beauty. But there’s more than just beauty about Yui Komori – she is still-willed and brave, with an optimistic personality. She is seen to keep a cool head about threats and not mind any mean comments from the other vampires.
13. Revy-Black Lagoon
No, we did not forget the heroine, Revy, or as you may call her Rebecca Lee from the Black Lagoon anime series. Everything about Revy is ferocious. In her mid to late twenties, Revy is a Chinese-American tan-skinned woman with a wild temperament. In the old days, she is shown as a thief and murderer who shot an unknown man as her first murder. You can’t really relate to this complex female anime character until you dive deeper into her intriguing story and understand the verbal and physical trauma she has faced over the years. Though she is a little rude, sarcastic, and troubled, her forgetful and humorous side touches our hearts once in a while.
14. Shoko Nishimiya- A Silent Voice
This entry has had a long-lasting impression on most anime fans because of her sweet and forgiving nature, who fakes smiles even when it’s hard to. Her character is one of a kind being clinically deaf but still the leading protagonist of the A Silent Voice series. Unfortunately, she has always been an easy target for bullies, especially her classmate Shoya, who later becomes her friend due to her forgiving nature. Despite the bullies, the pain, Shoko Nishimiya is a strong girl who cares about her family and friends but cries in silence when she is hurt.
15. Esdeath- Akame ga Kill
Without a doubt, Esdeath is the best dark character in the history of the darkest anime series or films. If you are an action lover like us, Esdeath’s spectacular fight skills will wow you. As a high-ranking general of the Empire, her attire consists of a General’s apparel with long sleeves, a blue scarf around the neck, and high-heeled boots. Soon, the Prime Minister appoints her as the leader of the Jaegers since she is stronger (emotionally and physically) than most characters. Now a manipulative and sadistic woman, Esdeath did not always lack empathy. Sadly, it was her father’s death in her own arms that hardened her heart to a point she humiliated and tortured anyone she finds weaker than her.
What Makes a Female Anime Character Stand out?
A bunch of unique and exciting anime characters is released every year. While some of these turn out lovable gems, others prove long-forgotten failures. But what is it about an anime character that makes it stand out?
Everything shapes the perfect leading anime character, from their personalities to their clothes and styling to the character development. Memorable anime girl characters are rare, well-written protagonists with profound nature, exciting stories, and emotions that relate to anime fans.
So, which female anime character is your favorite?
Shanoon Cox
Shanoon Cox is a writer and a lover of all things video.
Follow @Shanoon Cox
What Are Differences Between 2D And 3D Animation
What Are Differences Between 2D And 3D Animation
An easy yet powerful editor
Numerous effects to choose from
Detailed tutorials provided by the official channel
Creating an animation requires multiple processes and tasks to get that final result that we enjoy on the screen. Irrespective of the type of animations like stop-motion, sketch, computer, and others, all of them majorly falls under two main categories- 2D animation and 3D animation. The popular cartoons like Mickey Mouse, Tom & Jerry, and others that became an integral part of all childhood were 2D animations and with technological advancement and 3D animation in use, they are more like aged-veterans.
Toy Story was the first 3D animation movie and after that, there is no stopping. Though 3D animations are more interesting and engaging, they are fields where 2D animations work better. This article will help you to learn in detail about 2D 3D animation, their differences, uses, and other aspects.
In this article
01 [Definition of 2D Animation 3D Animation?](#Part 1)
02 [Key Differences Between 2D Animations and 3D Animations](#Part 2)
03 [Selecting Between 2D Animation and 3D Animation?](#Part 3)
04 [Merging 2D Animation and 3D Animation](#Part 4)
Part 1 Part Definition Of 2D And 3D Animation
012D Animation
The traditional method of animation is termed 2D animation and it has been in use for a long time. A 2D animated video has multiple images in different positions which when moved quickly one after the other simulates a movement. The flipping of the images creates an illusion of movement. Earlier 2D animations were created using hands but now there is advanced computer software that can create these animations in just a few simple clicks. The term 2D means 2 dimensional which means that an image for the animation can be moved in two-dimensional space that is X-axis and Y-axis.
023D Animation
In simplest terms, a 3D animation is an animation that is created in three-dimensional space which makes the characters and objects appear realistic and lively. Thus, a 3D animation has height, width as well as depth. These animations are more complex and the process of creating them is totally different from that of 2D animations. Though 3D animations are used in different industries and platforms these days, majorly they can be found for creating movies, games, and cartoons.
Part 2 Part Key Differences Between 2d Animations and 3d Animations
The major difference between a 2D animation and 3D animation lies in the final appearance. While a 2D animation appears like a flat animation which can be an image or a photograph at a fast movement while a 3D animation looks like real objects that can be seen from all angles and have their front, back, top, as well as the bottom.
The table below will differentiate both these animations on various parameters.
| Features/Type of Animation | 2D Animation | 3D Animation |
|---|---|---|
| Full-Form | Two-dimensional | Three-dimensional |
| Meaning | These animations with 2-dimensional objects appear to be moving when the images are moved at a fast speed. | The objects and characters in these animations look more realistic as their appear in 3-dimensional space. |
| Supported Aspects and axis | Length and height (X-axis and Y-axis) | Length, height, and width (X-axis, Y-axis and Z-axis) |
| Appearance | Appear as flat | Appear lively and realistic |
| Basic elements | It’s all about frames | The animation is all about movements |
| Axis | Images appear at X-axis, and Y axis | Objects appear at X-axis, Y-axis, and Z-axis. |
| Use and target audience | Used for social media sites, demos, animated whiteboard videos, and similar others. | Used for movies, cartoons, video games. |
| Use of software | Hand-drawn images or computer-generated images can be used. | Complex software is needed. |
| Cost | Cheaper than 3D animations | Expensive |
| Examples | Snow White, The Jungle Book, Mickey Mouse, Tom & Jerry, and more. | The Toy Story, Transformers, Incredibles, and more. |
Part 3 Selecting Between 2D Animation and 3D Animation?
Confused between 2D animation and 3D animation? Several factors can be considered to select between the two types of animations. Major ones are enlisted below.
● Target audience: For general explanation and use, 2D animations are a good choice as they are interesting, engaging, and also pocket-friendly. If the target audience is professional people that need in-depth and important information about something, 3D animations are a better choice.
● Availability of software: There are different software used for different types of animations. The availability of the software can also be a deciding factor for selecting between a 2D animation or 3D animation.
● Budget: This is another important factor to be considered. Since 3D animation requires more complex tools and procedures, creating them is expensive. So, depending on how much you are willing to spend, you can choose between the two.
Part 4 Part Merging 2D Animation and 3D Animation
Why choose one, when both can be used? Yes, to get the best of both worlds, 2D animations can be used along with 3D animations depending on the type of the project. Both the styles can be adjusted as per the requirements and for this, good professional software is needed.
We here suggest Wondershare Filmora Video Editor as the best tool as it not only comes equipped with all the latest features but the entire process is also quick and hassle-free. Majorly working as an excellent video editing software, the program supports multiple functions supporting animated videos. Using this Windows and Mac-based tool yon create dynamic animated videos and also edit them and customize them to suit your requirements.
For Win 7 or later (64-bit)
For macOS 10.12 or later
Key features of the software
● Create interesting and engaging animated and other videos using more than 100 media layers, composting tools, and dynamic effects.
● Apply motion elements, filters, and transitions for dynamic videos.
● Audio functions like background noise removal, audio equalizer, keyframe audio editing, and others are supported.
● Fast import, export, and rendering.
● Option to preview the files in high resolution.
● Features like fisheye correction, speed control, stabilization, advanced color correction, 3D LUTs, and others are supported.
● Additional supported functions include import from social media sites, portrait support, camera shake, audio-mixing, screen recording, auto-crop, and others.
● Windows and Mac support.
● Key Takeaways from This Episode →
● 2D and 3D animation are the two major types of animations created for different uses.
● A 2D animation appears in two-dimensional space while a 3D animation appears in a three-dimensional space and looks livelier and more realistic.
● Both 2D and 3D animations can be merged using professional software like Wondershare Filmora Video Editor that supports a wide range of other functions as well.
Best 10 3D Text Animation Templates
Top 10 3D Text Animation Templates
An easy yet powerful editor
Numerous effects to choose from
Detailed tutorials provided by the official channel
“Where is everyone getting their 3D Text Animation templates?”
To answer this request, we’ve compiled a guide that not only teaches you how to create things like 3D Spinning Text (After Effects) but also gives you an idea of where you can find the kind of resources (i.e., 3D Text Animation templates and presets) that you need to get a head start on your projects.
In this article
01 [Top 10 3D Text Animation Templates ](#Part 1)
02 [How Do I Make 3D Text in After Effects?](#Part 2)
03 [The Best 10 Amazing 3D Text Animation Templates](#Part 3)
04 [Secrets to Learning More Animation Tactics](#Part 4)
Part 1 What’s 3D Text Animation?
Before anything else, let’s talk about text animation. Specifically, 3D Text Animation. The text that you’re reading now, is 2D Text. It’s static, and it lacks depth. It’s just letters on a screen. Meanwhile, 3D Text is usually built for motion, and thus, it has volume and depth — it’s almost tangible. Here’s what that looks like:

As you can see, even without actually moving, in the text shown in the image above, the potential for motion is there — it looks alive.
Now, you’ll see 3D text like this often in movies or promotions. Usually in the form of extravagant title cards or 3D text logo animation. They’re eye-catching, and because they’re 3D, you can play with them as much as you want to really add drama to your creations.
Part 2 How Do I Make 3D Text in After Effects?
As promised, this next section will teach you how to create 3D Text Animation in Adobe After Effects, which is a VFX and motion graphics software used by many animators to bring life to their text. You’ll notice that the following tutorial is really more about introducing the tools that you can use in order to create 3D Text Animation:
01Step 1. Add Your Text
The first thing that you have to do, of course, is to add your text! To do this, go to the ‘Tools’ panel, select the Type tool, and then select the ‘Composition’ panel. The composition is where you type your text!
With After Effects, you also have the following options:
● Change Text Font
● Adjust Text Size
● Adjust Text Color
● Shift Justification (Left, Middle, right)
And so on! Once you’re done with your text composition, it will be generated by After Effects into a layer that you can adjust as needed in the next steps.

01Step 2. Use Animation Presets
With your text now in a layer that you can add animations to… you’ve practically done a third of the job! Or even more than that if you decide to use the animation presets that are provided by After Effects.
These can be found by selecting ‘Browse Presets…’ on the ‘Animation’ tab (shown in the image below.) All you need to apply them is to drag and drop them onto your text layer.
Note: The first keyframe of this built-in text animation will be applied at the location of the Current Time Indicator (CTI), so make sure that you’ve adjusted that accordingly.

01Step 3. Per-Character Animation
If you’d like to personalize your text animation, After Effects does also give you the option to animate per character (or, per letter, in this case.)
This will give you more control over how you decided to animate your text. Of course, it does mean that it is slightly more complicated as well.
● To animate text per layer, select ‘animate’ on that layer and choose a parameter to start working on animations for.
● You’ll be able to previous (or scrub) through your animations in order to see if they are doing what you need them to do.
● You can also remove applied parameters in order to re-work your animation.

01Step 4. Add Graphic Elements to Text
If you really want to make your 3D Animation Text pop, Adobe After Effects also offers the tools needed to add Graphic Elements to your composition — which can be found at the top-most toolbar!

Part 3 The Best 10 Amazing 3D Text Animation Templates
Now, as promised, we’re also going to be introducing a couple of 3D text animation templates that you can try out for your own projects! Each template will have a link that you can go to in order to see what it looks like, as well as an explanation on how you can use it for your projects in the future!
01Real 3D Light Bulb Kit
The first Text Animation Template on our list is the “Logo Light Bulb” 3D Animation from Envato Elements. This one literally glows people! Making it perfect for a quirky, and yet still very impressive Title Card or Logo. Its design is very realistic, and you can also control how it flickers! For example, turning the bulbs on certain characters first, or turning them all off at once in the end.
023D Text Reveal
This next 3D Animation template is also from Envato Market. And, just like the first, it makes for quite the dramatic Title Card or Logo. With this template, your Text can literally zoom in to view while looking its best and sparkiest in High-Chrome.
033D Metallic Text Animation
Our next pick, the 3D Metallic text animation is another great one for those who are looking for something flashy — something that gives off the impression of being impressive right from the gate. Compared to the previous text animation template, this one has a more rugged kind of appearance. Perfect for those looking to promote something more fun rather than professional.
043D Text Box Animation Pack
The next one is a little less ‘impressive’ — in the sense that it isn’t as in your face as the other 3D animation templates that we’ve introduced thus far. And that’s exactly why the 3D Text Box Animation Pack deserves to be on this list! Its 3D spinning text (after effects) elements are very usable — in that it can work for a variety of individuals and styles. It has a more professional look as well. Making it perfect for corporations.
053D Text & Logo Boxes
This next one, the 3D Text & Logo Boxes pack is particularly perfect for 3D logos. The pack gives you several options for box size as well as text parameters. So, you can design your animated 3D Logo however you want and use it for future projects to give them even more dimension than before.
06The Light Bulb Kit
Our next pick, which is the ‘Light Bulb Kit’ also from Envato, is very similar to the first item on our list — in that it features text lit up by lightbulbs. However, it lends an extra bit of photo-realism to it. Less sparkle and more grain — which may exactly be what you want for your new title card or logo.
073D Text Templates
The 3D Text Templates is a very bright and pop-y template that is perfect for creating eye-catching promotions and advertisements. It’s very simple to use, which, again, maybe exactly what you want. Literally, the template will ask you to choose your own text and change the colors to suit that of your own brand, then you’re done!
083D Text Shapes Logo Reveal
The ‘3D Text Shapes Logo Reveal’ template is a pack of 3D text animations that you can use in order to add a little spin to your logo reveals (quite literally, in some cases!) It has a lot of personality to it, and a certain tech-y or science-y feel that would make it perfect for anyone looking for something more technical.
09Bold Titles
The ‘Bold Titles’ template is very loud and proud. But it has a bit of a retro-vibe to it as well. Making it stand out from some of the more minimalistic modern text animation styles that you see these days.
1010. Wave 3D Logo & Text
Looking for something simple and professional? Then the ‘Wave 3D Logo & Text’ template may just be the one for you. We put it last on this list, but it’s actually quite a strong contender. One that just about anyone (for just about any type of project they’re working on), should be able to get some use out of.
Key Takeaways from This Episode
● 3D Text Animation is the practice of bringing text to life! It gives dimension, depth, and, even, movement into what are usually very static properties!
● You see a lot of 3D Text Animation in big pictures these days. And you can start creating your own with the use of Adobe After Effects — a VFX and Motion Graphics Software that a lot of professionals use for their own text animation.
● Of course, if you don’t have the kind of time to create your own 3D Text Animations from scratch, you can always use templates instead! There are hundreds (if not thousands) of them available out there. It should be simple enough to find one that fits the kind of vibe you’re looking for.
● SECRET TIP! If you’re looking for an all-in-one kind of solution, you might want to consider Filmora Pro. It’s a video editor, first and foremost, but that’s not all it is — you can be using it today to start creating your own 3D Text Animations!
“Where is everyone getting their 3D Text Animation templates?”
To answer this request, we’ve compiled a guide that not only teaches you how to create things like 3D Spinning Text (After Effects) but also gives you an idea of where you can find the kind of resources (i.e., 3D Text Animation templates and presets) that you need to get a head start on your projects.
In this article
01 [Top 10 3D Text Animation Templates ](#Part 1)
02 [How Do I Make 3D Text in After Effects?](#Part 2)
03 [The Best 10 Amazing 3D Text Animation Templates](#Part 3)
04 [Secrets to Learning More Animation Tactics](#Part 4)
Part 1 What’s 3D Text Animation?
Before anything else, let’s talk about text animation. Specifically, 3D Text Animation. The text that you’re reading now, is 2D Text. It’s static, and it lacks depth. It’s just letters on a screen. Meanwhile, 3D Text is usually built for motion, and thus, it has volume and depth — it’s almost tangible. Here’s what that looks like:
As you can see, even without actually moving, in the text shown in the image above, the potential for motion is there — it looks alive.
Now, you’ll see 3D text like this often in movies or promotions. Usually in the form of extravagant title cards or 3D text logo animation. They’re eye-catching, and because they’re 3D, you can play with them as much as you want to really add drama to your creations.
Part 2 How Do I Make 3D Text in After Effects?
As promised, this next section will teach you how to create 3D Text Animation in Adobe After Effects, which is a VFX and motion graphics software used by many animators to bring life to their text. You’ll notice that the following tutorial is really more about introducing the tools that you can use in order to create 3D Text Animation:
01Step 1. Add Your Text
The first thing that you have to do, of course, is to add your text! To do this, go to the ‘Tools’ panel, select the Type tool, and then select the ‘Composition’ panel. The composition is where you type your text!
With After Effects, you also have the following options:
● Change Text Font
● Adjust Text Size
● Adjust Text Color
● Shift Justification (Left, Middle, right)
And so on! Once you’re done with your text composition, it will be generated by After Effects into a layer that you can adjust as needed in the next steps.
01Step 2. Use Animation Presets
With your text now in a layer that you can add animations to… you’ve practically done a third of the job! Or even more than that if you decide to use the animation presets that are provided by After Effects.
These can be found by selecting ‘Browse Presets…’ on the ‘Animation’ tab (shown in the image below.) All you need to apply them is to drag and drop them onto your text layer.
Note: The first keyframe of this built-in text animation will be applied at the location of the Current Time Indicator (CTI), so make sure that you’ve adjusted that accordingly.
01Step 3. Per-Character Animation
If you’d like to personalize your text animation, After Effects does also give you the option to animate per character (or, per letter, in this case.)
This will give you more control over how you decided to animate your text. Of course, it does mean that it is slightly more complicated as well.
● To animate text per layer, select ‘animate’ on that layer and choose a parameter to start working on animations for.
● You’ll be able to previous (or scrub) through your animations in order to see if they are doing what you need them to do.
● You can also remove applied parameters in order to re-work your animation.
01Step 4. Add Graphic Elements to Text
If you really want to make your 3D Animation Text pop, Adobe After Effects also offers the tools needed to add Graphic Elements to your composition — which can be found at the top-most toolbar!
Part 3 The Best 10 Amazing 3D Text Animation Templates
Now, as promised, we’re also going to be introducing a couple of 3D text animation templates that you can try out for your own projects! Each template will have a link that you can go to in order to see what it looks like, as well as an explanation on how you can use it for your projects in the future!
01Real 3D Light Bulb Kit
The first Text Animation Template on our list is the “Logo Light Bulb” 3D Animation from Envato Elements. This one literally glows people! Making it perfect for a quirky, and yet still very impressive Title Card or Logo. Its design is very realistic, and you can also control how it flickers! For example, turning the bulbs on certain characters first, or turning them all off at once in the end.
023D Text Reveal
This next 3D Animation template is also from Envato Market. And, just like the first, it makes for quite the dramatic Title Card or Logo. With this template, your Text can literally zoom in to view while looking its best and sparkiest in High-Chrome.
033D Metallic Text Animation
Our next pick, the 3D Metallic text animation is another great one for those who are looking for something flashy — something that gives off the impression of being impressive right from the gate. Compared to the previous text animation template, this one has a more rugged kind of appearance. Perfect for those looking to promote something more fun rather than professional.
043D Text Box Animation Pack
The next one is a little less ‘impressive’ — in the sense that it isn’t as in your face as the other 3D animation templates that we’ve introduced thus far. And that’s exactly why the 3D Text Box Animation Pack deserves to be on this list! Its 3D spinning text (after effects) elements are very usable — in that it can work for a variety of individuals and styles. It has a more professional look as well. Making it perfect for corporations.
053D Text & Logo Boxes
This next one, the 3D Text & Logo Boxes pack is particularly perfect for 3D logos. The pack gives you several options for box size as well as text parameters. So, you can design your animated 3D Logo however you want and use it for future projects to give them even more dimension than before.
06The Light Bulb Kit
Our next pick, which is the ‘Light Bulb Kit’ also from Envato, is very similar to the first item on our list — in that it features text lit up by lightbulbs. However, it lends an extra bit of photo-realism to it. Less sparkle and more grain — which may exactly be what you want for your new title card or logo.
073D Text Templates
The 3D Text Templates is a very bright and pop-y template that is perfect for creating eye-catching promotions and advertisements. It’s very simple to use, which, again, maybe exactly what you want. Literally, the template will ask you to choose your own text and change the colors to suit that of your own brand, then you’re done!
083D Text Shapes Logo Reveal
The ‘3D Text Shapes Logo Reveal’ template is a pack of 3D text animations that you can use in order to add a little spin to your logo reveals (quite literally, in some cases!) It has a lot of personality to it, and a certain tech-y or science-y feel that would make it perfect for anyone looking for something more technical.
09Bold Titles
The ‘Bold Titles’ template is very loud and proud. But it has a bit of a retro-vibe to it as well. Making it stand out from some of the more minimalistic modern text animation styles that you see these days.
1010. Wave 3D Logo & Text
Looking for something simple and professional? Then the ‘Wave 3D Logo & Text’ template may just be the one for you. We put it last on this list, but it’s actually quite a strong contender. One that just about anyone (for just about any type of project they’re working on), should be able to get some use out of.
Key Takeaways from This Episode
● 3D Text Animation is the practice of bringing text to life! It gives dimension, depth, and, even, movement into what are usually very static properties!
● You see a lot of 3D Text Animation in big pictures these days. And you can start creating your own with the use of Adobe After Effects — a VFX and Motion Graphics Software that a lot of professionals use for their own text animation.
● Of course, if you don’t have the kind of time to create your own 3D Text Animations from scratch, you can always use templates instead! There are hundreds (if not thousands) of them available out there. It should be simple enough to find one that fits the kind of vibe you’re looking for.
● SECRET TIP! If you’re looking for an all-in-one kind of solution, you might want to consider Filmora Pro. It’s a video editor, first and foremost, but that’s not all it is — you can be using it today to start creating your own 3D Text Animations!
Top 10 Video to GIF Converters: Top Picks
Best 10 Video to GIF Converters: Top Picks
An easy yet powerful editor
Numerous effects to choose from
Detailed tutorials provided by the official channel
Having trouble converting your videos to GIF? Browse the top 10 converters to sort this out!
In this article
01 [Why GIFs are Widely Used and Popular?](#Part 1)
02 [Top 10 Ways to Turn Video into GIF](#Part 2)
Part 1 Why GIFs are Widely Used and Popular?
If you take a poll on the watch preference of GIF versus videos, most of votes you get would be in favor of watching GIFs. There are obvious reasons to the fact that anyone would prefer watching a GIF over a video, irrespective of its length. Some major ones that make it quite annoying to watch videos include the following:
● To begin with, you need to turn the video on and off, depending on your choice of watching a video or surfing through stories and feeds, failing which you get to hear additional sounds through your feed from the already running video. You further need to stop the music or go for a volume control in case you are not interested to watch the video.
● Most of the videos you run turn up to be irrelevant or uninteresting through the middle, but you don’t have a choice to make bit adjustments. If however possible, the method is not quite convenient. You may need to visit a different site in case you run a video that is not integrated with webpage of your searched content, wait for the portal’s interface to load or watch an advertisement.
● GIFs, on the other hand, do not require pausing or turning off, and run automatically. You also don’t need to mute any sounds. These ensure to-the-point message delivery and don’t divert your attention from the primary content you visit the webpage for.
Owing to the above, most of us are now much interested to convert videos to GIFs for an exact, impactful and to the point content creation and sharing. See through the next sections of this article to learn about the best video to GIF conversion tools and software.
Part 1 Top 10 Ways to Turn Video into GIF
Considering the credibility of GIFs, you may often require to convert your long videos into short and content specific GIFs. Given below are the 10 best methods to cater to the need of video to GIF conversion:
01Filmora
Wondershare Filmora Video Editor is one among the most popular and easy methods to convert videos to GIFs. It is compatible with almost all common video formats and is loaded with a plethora of exciting effects and editing tools. Take the following steps to create GIFs from videos using this application:
Wondershare Filmora
Get started easily with Filmora’s powerful performance, intuitive interface, and countless effects!
Try It Free Try It Free Try It Free Learn More >


Step 1: Import Your Video
Launch Filmora and import your desired video in the app’s welcome window. To do this, click on ‘New Project’ followed by ‘Import’ option from the drop down menu to add your video to the Filmora.

Step 2: Timeline Dragging
Add your video to the app’s timeline using the ‘Drag and Drop’ method. You can also extract video frames by taking screenshots and merge these images into your GIF from the media library.

Step 3: Explore Your Editing Skills
You can now edit the imported video in the timeline using a range of interesting effects. Crop, trim, split or make speed adjustments to give your video a catchy look.

Step 4: Include Messages
Try adding texts and supplementary elements to deliver impactful messages through your creation.

Step 5: It’s Time to Share!
Click ‘Export’ to save your GIF to your device. You are now ready to post your work in your social communities to get the most deserved attention of your peers!

02YouTube to GIF
This one is a simple and user-friendly video to GIF converter. You can convert videos to GIFs from your PC or other online platforms with this converter. The converter allows you to play with a variety of editing effects to make your creation more interesting. All you need to do is the following:
● In the video URL bar, type ‘gif’ after ‘www.’ and you will be redirected to converter’s working window. Set the GIF time interval or apply specific effects using the tools from the panel in the left of the working window.


● To set the video time frame, highlight it in the video timeline. Set the desired interval using the ‘Start Time’ and ‘End Time’ options.

● To add a new visual effect, select it from the menu. Below the video timeline, a row of parameters will get displayed. Set the effect parameters to make desired changes.
● Click ‘Create GIF’. In the ‘Settings’ menu, you can rename and add tags to your creation and even make it private.

● That’s it! You can download your GIF now. You may get a converter purchase offer for enabling advanced features. While most users prefer sticking to the free version, it is up to you whether to decline or accept the purchase offer.
● The ‘Download’ feature is exclusive to registered users. However, if you don’t prefer creating an account, just open the GIF download link in a separate tab’s ‘Direct Link’ row. Alternatively, you can replace ‘gif’ with ‘conv’ in the video URL bar and choose ‘Convert to GIF’. However, this process may take some extra minutes.

03Giphy GIF Maker
This is an editing tool that you can use to convert video to GIF online. This one is a reliable converter tool with a user-cohesive interface. It is a simple video editor that is available to you for free. All you need to do is mentioned below:
Step 1: Load your Video
Go to the official app website and paste your desired video link in the search bar. Your video gets uploaded to the app’s editor screen. Specify the time frame and check out your GIF’s preview.

Step 2: Let’s Go Editing!
Select ‘Continue to Decorate’ to edit your GIF with texts, effects, frames and filters. You can even go for a straight upload if your video doesn’t require customization.

Step 3: Time to Share!
Select ‘Continue to Upload’ and add required tags. Tap ‘Upload to Giphy’ to make a social media post or add it to the app’s website through a specific share code.
04Wondershare TunesGo
This is an effective video to GIF creator tool, loaded with extensive features. You can use this application to convert videos, live photos and multiple snaps into interesting GIFs. TunesGo gives you the freedom to edit your work in your own style with a variety of effects. Here’s what you need to do:

Step 1: Launch TunesGo
Download, install and launch the app into your PC. You may be asked for a device connection setup, but you can skip that in case GIF creation is your only requirement.

Step 2: Upload your Video
In the app’s welcome screen, navigate to ‘Toolbox’ at the top. From the drop down interface, choose ‘GIF Maker’. In the new window that pops-up next, click on ‘Add’ to upload the desired video to the app from your PC.

Step 3: Let’s Create!
Set the required time frame for your GIF in the app’s timeline and tap the ‘Create GIF’ button to start the conversion process. On completion, your work gets automatically saved in the ‘Pictures’ folder in your PC. You can also customize your target location.

05Vimeo
Vimeo is also a quick, 3-stepvideo to GIF converter. However, you need to have a Vimeo account to take up the conversion process. This is an easy and hassle free GIF creator, that adheres to your creation needs within minutes. Here’s what you need to do:
Step 1: Upload Your Video
Log in to your Vimeo account. In the opening window, select ’Upload’ from the toolbar at the top. ‘Drag and Drop’ or click ‘Choose Files’ to upload the desired video from your device.

Step 2: Create Your GIF
After you are done uploading the video, select ‘Create a GIF’ from the sidebar at the left. You will be directed to the GIF Editor window. Select a loop section from the video and set a time frame of maximum 6 seconds in the video timeline. Now click ‘Create GIF’.


Step 3: Export Your Creation
Your GIF is ready to download and share. You can also embed your GIF by generating embed codes for specific platforms.
06 Adobe Photoshop
This one is one f the most popular editing applications you can use to make GIF out of video. It’s simple and user-friendly interface does not require you to possess a Photoshop mastery for the conversion purpose. Here’s what you need to follow:
Step 1: Search Your Video
Find a video of your choice from a desired platform. In case you want a YouTube video, add ‘ss’ prior to the video’s service name in YouTube’s URL bar.
STEP 2: Edit Your Video
Use any preferable video splitters and editors to crop, trim and add interesting effects to your video and set a maximum time frame of 3 seconds.
Step 3: Create GIF
Open your edited video in Adobe Photoshop and tap ‘File Import-Video frames into layers’.

Step 4: Adjust Settings
Make required setting adjustments and click on ‘File-Save for Web’. Try adjusting image resolution and color range if your file size exceeds 10 MB.

Step 5: Save Your Work
In the ’Files’ tab at the top, select ‘Save’ and choose the ‘.gif’ extension in the ‘File Type’ dialog box to save your creation to your PC.
07Convertio
This converter provides a simple, 3-step process to create GIF from video. Either use it as a browser extension or download it from Google Chrome Webstore. Take the following steps to convert videos to GIF online.
● Upload your desired video to the service timeline. You can either choose files directly or ‘Drag and Drop’ them from your device.
● Select ‘Convert’ to make GIF from your uploaded video.
● Tap ‘Download’ to save your creation.

You can use this service to make different format conversions. However, this converter does not allow you to edit or add effects your GIF.
08MakeAGif
You can use this tool as a GIF video maker online to create, exchange and share GIFs on different platforms. Additionally, you also get the flexibility to use already saved images in your device to add them to your GIF. The app’s basic version allows you to create GIFs without watermarks. To add watermarks, you will need an account on the app. To convert videos to GIFs using this tool, you should take the following steps:
Step 1: Upload Your Video
In the app’s welcome screen, click on ‘Video to GIF’ and upload a desired video in the editor timeline. Add effects and make speed and time frame adjustments. When satisfied, tap ‘Continue to Publishing’.

Step 2: Add Names and Tags
In the publishing window, give a suitable name and add required tags to your edited video to make it easily identifiable. When you are done, click on ‘Create a GIF’ from the bottom right.

Step 3: Ready to Share!
You can now share your created GIF across social media platforms.

09Adobe Premiere
Similar to Adobe Photoshop, Adobe Premiere too is quite a preferred application for creating GIFs from videos. This is a simple, quick and free application that converts your videos to GIFs in a span of few minutes. Here’s what you need to do to go about the process:

Step 1: Edit your Video
Add a video of your choice in the Adobe Premiere timeline and play with your editing creativity to add desired effects and filters to it. Make sure to set requisite time frames to your edit.

Step 2: Prepare an Export
Click into the app’s video timeline, and prepare a file export using the following path:
File> Export> Media

Step 3: Settings Adjustments
In the Media Export window, navigate to the ‘Format’ tab. From the drop down menu, choose ‘Animated GIF’. Here, you can add your gif file, select its target destination and adjust the required settings.

Step 4: Export Your Work
Click ‘Export’ to share your creation on social media or click on ‘Queue’ to send your GIF to a specific media encoder.

1010. Movavi Video Converter
This is one of the latest video converter software you can rely on to make GIF from video files. This software allows you to create top quality animated GIFs and is compatible with a variety of video formats. Using this converter, you can create amazing GIFs in 5 quick steps: here’s what you need to follow:
Step 1: Download and Install the Software
To begin, download the converter software from its official site and adhere to the user instructions to install the same in your system.
Step 2: Upload Your Video
In the software’s opening window, click on ‘Add Media’ followed by ‘Add Video’ and select a desired video from your system to upload on the Movavi video timeline.

Step 3: Trim Your Video
Select ‘Edit’ from the right of your video file. In the editing window, specify the initial cut of the video by displacing the marker to the desired point. Click on ‘Scissors’ to add multiple cut points to your video. You can even drag the cut points around the editor timeline. Choose the unvented sections and click ‘Trash Can’. When the result satisfies you, click ‘Done’.

Step 4: Choose a Conversion Format
Navigate to the ‘Images’ tab and select ‘GIF’ and set an adequate size for the GIF. Here, you can adjust quality, frame size and rate and resize method using the ‘Cogwheel’ tool.

Step 5: Let’s Get Converting!
Tap ‘Convert’ and wait for the conversion to finish. You will be automatically directed to the folder where your converted files get saved.

● Key Takeaways from This Episode →
● GIFs are short, to the point and convenient to access, providing exact and impactful message delivery.
● The software market is flooded with a variety of editing tools to convert your dull videos to catchy GIFs.
● Filmora is a quick and smart editing tool that envisages your GIF creating experience with a range of exciting features.
Having trouble converting your videos to GIF? Browse the top 10 converters to sort this out!
In this article
01 [Why GIFs are Widely Used and Popular?](#Part 1)
02 [Top 10 Ways to Turn Video into GIF](#Part 2)
Part 1 Why GIFs are Widely Used and Popular?
If you take a poll on the watch preference of GIF versus videos, most of votes you get would be in favor of watching GIFs. There are obvious reasons to the fact that anyone would prefer watching a GIF over a video, irrespective of its length. Some major ones that make it quite annoying to watch videos include the following:
● To begin with, you need to turn the video on and off, depending on your choice of watching a video or surfing through stories and feeds, failing which you get to hear additional sounds through your feed from the already running video. You further need to stop the music or go for a volume control in case you are not interested to watch the video.
● Most of the videos you run turn up to be irrelevant or uninteresting through the middle, but you don’t have a choice to make bit adjustments. If however possible, the method is not quite convenient. You may need to visit a different site in case you run a video that is not integrated with webpage of your searched content, wait for the portal’s interface to load or watch an advertisement.
● GIFs, on the other hand, do not require pausing or turning off, and run automatically. You also don’t need to mute any sounds. These ensure to-the-point message delivery and don’t divert your attention from the primary content you visit the webpage for.
Owing to the above, most of us are now much interested to convert videos to GIFs for an exact, impactful and to the point content creation and sharing. See through the next sections of this article to learn about the best video to GIF conversion tools and software.
Part 1 Top 10 Ways to Turn Video into GIF
Considering the credibility of GIFs, you may often require to convert your long videos into short and content specific GIFs. Given below are the 10 best methods to cater to the need of video to GIF conversion:
01Filmora
Wondershare Filmora Video Editor is one among the most popular and easy methods to convert videos to GIFs. It is compatible with almost all common video formats and is loaded with a plethora of exciting effects and editing tools. Take the following steps to create GIFs from videos using this application:
Wondershare Filmora
Get started easily with Filmora’s powerful performance, intuitive interface, and countless effects!
Try It Free Try It Free Try It Free Learn More >
Step 1: Import Your Video
Launch Filmora and import your desired video in the app’s welcome window. To do this, click on ‘New Project’ followed by ‘Import’ option from the drop down menu to add your video to the Filmora.
Step 2: Timeline Dragging
Add your video to the app’s timeline using the ‘Drag and Drop’ method. You can also extract video frames by taking screenshots and merge these images into your GIF from the media library.
Step 3: Explore Your Editing Skills
You can now edit the imported video in the timeline using a range of interesting effects. Crop, trim, split or make speed adjustments to give your video a catchy look.
Step 4: Include Messages
Try adding texts and supplementary elements to deliver impactful messages through your creation.
Step 5: It’s Time to Share!
Click ‘Export’ to save your GIF to your device. You are now ready to post your work in your social communities to get the most deserved attention of your peers!
02YouTube to GIF
This one is a simple and user-friendly video to GIF converter. You can convert videos to GIFs from your PC or other online platforms with this converter. The converter allows you to play with a variety of editing effects to make your creation more interesting. All you need to do is the following:
● In the video URL bar, type ‘gif’ after ‘www.’ and you will be redirected to converter’s working window. Set the GIF time interval or apply specific effects using the tools from the panel in the left of the working window.
● To set the video time frame, highlight it in the video timeline. Set the desired interval using the ‘Start Time’ and ‘End Time’ options.
● To add a new visual effect, select it from the menu. Below the video timeline, a row of parameters will get displayed. Set the effect parameters to make desired changes.
● Click ‘Create GIF’. In the ‘Settings’ menu, you can rename and add tags to your creation and even make it private.
● That’s it! You can download your GIF now. You may get a converter purchase offer for enabling advanced features. While most users prefer sticking to the free version, it is up to you whether to decline or accept the purchase offer.
● The ‘Download’ feature is exclusive to registered users. However, if you don’t prefer creating an account, just open the GIF download link in a separate tab’s ‘Direct Link’ row. Alternatively, you can replace ‘gif’ with ‘conv’ in the video URL bar and choose ‘Convert to GIF’. However, this process may take some extra minutes.
03Giphy GIF Maker
This is an editing tool that you can use to convert video to GIF online. This one is a reliable converter tool with a user-cohesive interface. It is a simple video editor that is available to you for free. All you need to do is mentioned below:
Step 1: Load your Video
Go to the official app website and paste your desired video link in the search bar. Your video gets uploaded to the app’s editor screen. Specify the time frame and check out your GIF’s preview.
Step 2: Let’s Go Editing!
Select ‘Continue to Decorate’ to edit your GIF with texts, effects, frames and filters. You can even go for a straight upload if your video doesn’t require customization.
Step 3: Time to Share!
Select ‘Continue to Upload’ and add required tags. Tap ‘Upload to Giphy’ to make a social media post or add it to the app’s website through a specific share code.
04Wondershare TunesGo
This is an effective video to GIF creator tool, loaded with extensive features. You can use this application to convert videos, live photos and multiple snaps into interesting GIFs. TunesGo gives you the freedom to edit your work in your own style with a variety of effects. Here’s what you need to do:
Step 1: Launch TunesGo
Download, install and launch the app into your PC. You may be asked for a device connection setup, but you can skip that in case GIF creation is your only requirement.
Step 2: Upload your Video
In the app’s welcome screen, navigate to ‘Toolbox’ at the top. From the drop down interface, choose ‘GIF Maker’. In the new window that pops-up next, click on ‘Add’ to upload the desired video to the app from your PC.
Step 3: Let’s Create!
Set the required time frame for your GIF in the app’s timeline and tap the ‘Create GIF’ button to start the conversion process. On completion, your work gets automatically saved in the ‘Pictures’ folder in your PC. You can also customize your target location.
05Vimeo
Vimeo is also a quick, 3-stepvideo to GIF converter. However, you need to have a Vimeo account to take up the conversion process. This is an easy and hassle free GIF creator, that adheres to your creation needs within minutes. Here’s what you need to do:
Step 1: Upload Your Video
Log in to your Vimeo account. In the opening window, select ’Upload’ from the toolbar at the top. ‘Drag and Drop’ or click ‘Choose Files’ to upload the desired video from your device.
Step 2: Create Your GIF
After you are done uploading the video, select ‘Create a GIF’ from the sidebar at the left. You will be directed to the GIF Editor window. Select a loop section from the video and set a time frame of maximum 6 seconds in the video timeline. Now click ‘Create GIF’.
Step 3: Export Your Creation
Your GIF is ready to download and share. You can also embed your GIF by generating embed codes for specific platforms.
06 Adobe Photoshop
This one is one f the most popular editing applications you can use to make GIF out of video. It’s simple and user-friendly interface does not require you to possess a Photoshop mastery for the conversion purpose. Here’s what you need to follow:
Step 1: Search Your Video
Find a video of your choice from a desired platform. In case you want a YouTube video, add ‘ss’ prior to the video’s service name in YouTube’s URL bar.
STEP 2: Edit Your Video
Use any preferable video splitters and editors to crop, trim and add interesting effects to your video and set a maximum time frame of 3 seconds.
Step 3: Create GIF
Open your edited video in Adobe Photoshop and tap ‘File Import-Video frames into layers’.
Step 4: Adjust Settings
Make required setting adjustments and click on ‘File-Save for Web’. Try adjusting image resolution and color range if your file size exceeds 10 MB.
Step 5: Save Your Work
In the ’Files’ tab at the top, select ‘Save’ and choose the ‘.gif’ extension in the ‘File Type’ dialog box to save your creation to your PC.
07Convertio
This converter provides a simple, 3-step process to create GIF from video. Either use it as a browser extension or download it from Google Chrome Webstore. Take the following steps to convert videos to GIF online.
● Upload your desired video to the service timeline. You can either choose files directly or ‘Drag and Drop’ them from your device.
● Select ‘Convert’ to make GIF from your uploaded video.
● Tap ‘Download’ to save your creation.
You can use this service to make different format conversions. However, this converter does not allow you to edit or add effects your GIF.
08MakeAGif
You can use this tool as a GIF video maker online to create, exchange and share GIFs on different platforms. Additionally, you also get the flexibility to use already saved images in your device to add them to your GIF. The app’s basic version allows you to create GIFs without watermarks. To add watermarks, you will need an account on the app. To convert videos to GIFs using this tool, you should take the following steps:
Step 1: Upload Your Video
In the app’s welcome screen, click on ‘Video to GIF’ and upload a desired video in the editor timeline. Add effects and make speed and time frame adjustments. When satisfied, tap ‘Continue to Publishing’.
Step 2: Add Names and Tags
In the publishing window, give a suitable name and add required tags to your edited video to make it easily identifiable. When you are done, click on ‘Create a GIF’ from the bottom right.
Step 3: Ready to Share!
You can now share your created GIF across social media platforms.
09Adobe Premiere
Similar to Adobe Photoshop, Adobe Premiere too is quite a preferred application for creating GIFs from videos. This is a simple, quick and free application that converts your videos to GIFs in a span of few minutes. Here’s what you need to do to go about the process:
Step 1: Edit your Video
Add a video of your choice in the Adobe Premiere timeline and play with your editing creativity to add desired effects and filters to it. Make sure to set requisite time frames to your edit.
Step 2: Prepare an Export
Click into the app’s video timeline, and prepare a file export using the following path:
File> Export> Media
Step 3: Settings Adjustments
In the Media Export window, navigate to the ‘Format’ tab. From the drop down menu, choose ‘Animated GIF’. Here, you can add your gif file, select its target destination and adjust the required settings.
Step 4: Export Your Work
Click ‘Export’ to share your creation on social media or click on ‘Queue’ to send your GIF to a specific media encoder.
1010. Movavi Video Converter
This is one of the latest video converter software you can rely on to make GIF from video files. This software allows you to create top quality animated GIFs and is compatible with a variety of video formats. Using this converter, you can create amazing GIFs in 5 quick steps: here’s what you need to follow:
Step 1: Download and Install the Software
To begin, download the converter software from its official site and adhere to the user instructions to install the same in your system.
Step 2: Upload Your Video
In the software’s opening window, click on ‘Add Media’ followed by ‘Add Video’ and select a desired video from your system to upload on the Movavi video timeline.
Step 3: Trim Your Video
Select ‘Edit’ from the right of your video file. In the editing window, specify the initial cut of the video by displacing the marker to the desired point. Click on ‘Scissors’ to add multiple cut points to your video. You can even drag the cut points around the editor timeline. Choose the unvented sections and click ‘Trash Can’. When the result satisfies you, click ‘Done’.
Step 4: Choose a Conversion Format
Navigate to the ‘Images’ tab and select ‘GIF’ and set an adequate size for the GIF. Here, you can adjust quality, frame size and rate and resize method using the ‘Cogwheel’ tool.
Step 5: Let’s Get Converting!
Tap ‘Convert’ and wait for the conversion to finish. You will be automatically directed to the folder where your converted files get saved.
● Key Takeaways from This Episode →
● GIFs are short, to the point and convenient to access, providing exact and impactful message delivery.
● The software market is flooded with a variety of editing tools to convert your dull videos to catchy GIFs.
● Filmora is a quick and smart editing tool that envisages your GIF creating experience with a range of exciting features.
10 Great Apps to Turn Funny Animated Images Into Comics
10 Great Apps for Turning Funny Animated Images into Comics
An easy yet powerful editor
Numerous effects to choose from
Detailed tutorials provided by the official channel
There are several apps available that can let you create interesting funny animated images, cartoons, and comics by adding speech bubbles, animations, and other effects.
In this article
01 [Top apps to turn pictures into cartoons](#Part 1)
02 [Best Alternative to Cartoon Apps- Wondershare Filmorapro](#Part 2)
03 [Key Takeaways](#Part 3)
Part 1 Top apps to turn pictures into cartoons
To add some fun elements to your regular images and make them even more interesting you can convert them into cartoons and comics. The task of conversion can seem to be difficult and tricky but with the availability of several apps and programs, you can achieve the desired results in just a few clicks.
With multiple options available, you are bound to get confused while selecting an app. Helping you with the same, we have shortlisted the top 10 apps in the category as below.
01 Prisma Photo Editor
Available for download on Android and iOS devices this is an excellent photo editing app that comes with over 300 art filters and animations. You can quickly convert your images into funny and interesting cartoons using the app in no time. Additionally, several image parameters like sharpness, exposure, brightness, and others can also be adjusted as needed.
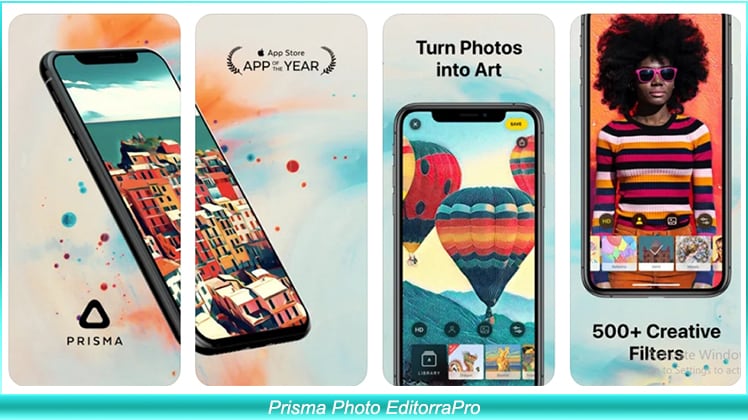
02 Photo Lab Picture Editor
This is free to use app on the Google Play Store with the IAP option. With a 4.6 high rating, the app is simple to use and offers more than 900 funny and stylish effects that can be added to your images. You can choose from photo montages, animations, filters, and other effects that match your requirements. You can even add photo frames to make your image look impressive. Create professional-looking cartoons in no time using this wonderful app.
03 MomentCam Cartoons & Stickers
This free app on Google Play Store with a 4 rating is just perfect for creating interesting cartoons and emoticons using images. The process is simple and quick where you just need to add the image and create its personalized avatar. Interesting background can also be added to further enhance the cartoon. The app also gives you the option to share the created cartoon on social media sites.

04 ToonMe
Create cartoons using your selfies and other images on your phone in just a few clicks using this high-rated app on Google Play Store. The AI of the app allows the creation of interesting full-body cartoons as well as vector portrait templates. Multiple layouts and designs are also available to choose from. The interface is simple and the app is also available for download Apple Play Store.

05 Pixlr- Free Photo Editor
This is a widely used image editing app that is simple and free to use. A wide range of image editing features and filters are available with the app including cartoon filters that will let you unleash your creativity and design impressive cartoons and other images. Also available for iOS devices the app also facilitates sharing the created images over social media and emails. Additional features include auto-fix, double exposure, adjusting image tone, and others.
06 Painnt- Pro Art Filters
This feature-packed app on Google Store lets you create professional-looking art pieces from the images using filters and animations. With more than 1000 filters in several categories including cartoons, classical, abstract, and others you can have a creation of your choice. App uses AI and also has an option for preview and fine-tuning. You can even share your creations with the app community and over social networking sites.
07 Clip2Comic & Caricature Maker
This is among the best app for iPhone users that allows creating funny and interesting cartoons, caricatures, and other artwork using images. Several other editing tools and filters are also available that support customizing high-quality and high-resolution images. Additionally, the app also supports editing the videos and converting them into animated clippings. The deformation filter further makes your creation look funny and interesting.
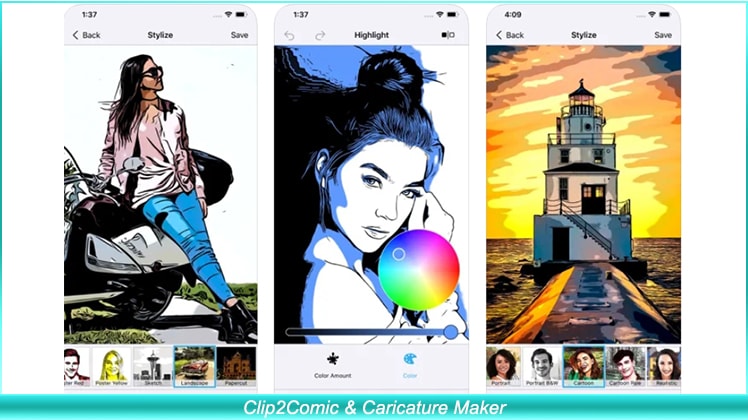
08 Deep Art Effects
This free app for Android and iOS devices comes with more than 100 effects and filters of different types including cartoon-based. Using the AI of the app, you can create impressive artwork in HD resolution. The app supports fast image processing and also supports sharing the artwork with the community. A paid premium version of the app is also available that has no ads, watermark, allows creating own filters, and has additional features.
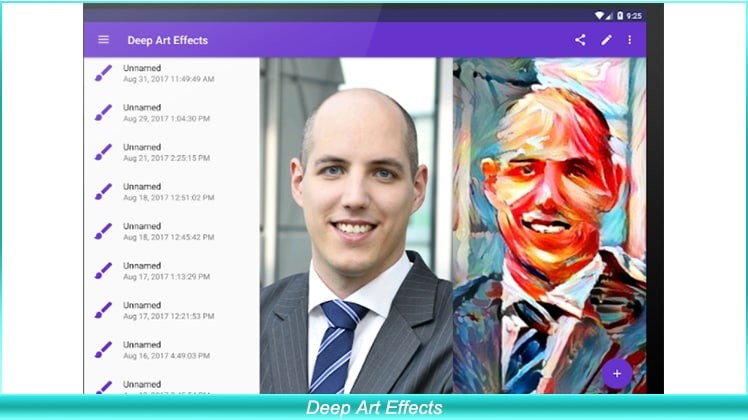
09 Cartoon Photo Editor
This free app for iOS devices will let you turn your images into cartoons like a pro. The app comes with more than 15 cartoon filters to choose from and you can even choose the art style as a retro cartoon, Minecraft, and others. The images from the device can be added to the app or you can even capture one using the camera. The created cartoons can also be shared over social media sites using the app. The pro-paid version offers additional features and functions.
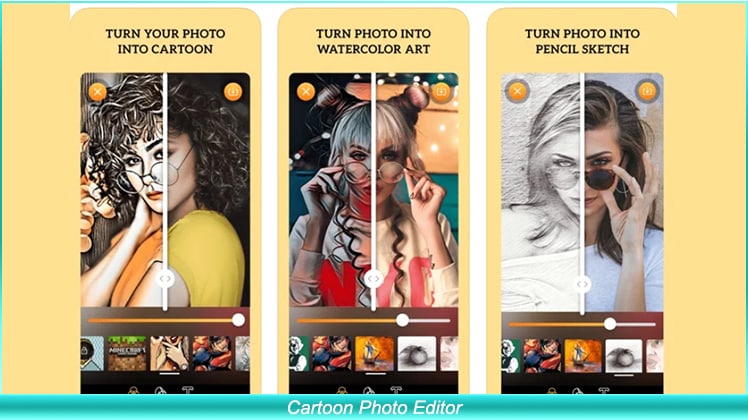
10 Comica- Comics and cartoon maker
As the name suggests, this is a comics and cartoon creating an app on Google Play Store. This lightweight app is free to use and comes with legit-looking effects and allows adding speech balloons. You can even create your memes using the app and take your creativity to a new level.

Key Takeaways from This Episode
● Check out the images on your smartphone or system that can be used for creating interesting cartoons.
● Analyze multiple apps and programs that can let you add cartoon and comic effects to your selected images.
● Finalize the tool that offers the best features, is simple to use, and can quickly convert your images to funny animated images and cartoons with added functionalities.
There are several apps available that can let you create interesting funny animated images, cartoons, and comics by adding speech bubbles, animations, and other effects.
In this article
01 [Top apps to turn pictures into cartoons](#Part 1)
02 [Best Alternative to Cartoon Apps- Wondershare Filmorapro](#Part 2)
03 [Key Takeaways](#Part 3)
Part 1 Top apps to turn pictures into cartoons
To add some fun elements to your regular images and make them even more interesting you can convert them into cartoons and comics. The task of conversion can seem to be difficult and tricky but with the availability of several apps and programs, you can achieve the desired results in just a few clicks.
With multiple options available, you are bound to get confused while selecting an app. Helping you with the same, we have shortlisted the top 10 apps in the category as below.
01 Prisma Photo Editor
Available for download on Android and iOS devices this is an excellent photo editing app that comes with over 300 art filters and animations. You can quickly convert your images into funny and interesting cartoons using the app in no time. Additionally, several image parameters like sharpness, exposure, brightness, and others can also be adjusted as needed.
02 Photo Lab Picture Editor
This is free to use app on the Google Play Store with the IAP option. With a 4.6 high rating, the app is simple to use and offers more than 900 funny and stylish effects that can be added to your images. You can choose from photo montages, animations, filters, and other effects that match your requirements. You can even add photo frames to make your image look impressive. Create professional-looking cartoons in no time using this wonderful app.
03 MomentCam Cartoons & Stickers
This free app on Google Play Store with a 4 rating is just perfect for creating interesting cartoons and emoticons using images. The process is simple and quick where you just need to add the image and create its personalized avatar. Interesting background can also be added to further enhance the cartoon. The app also gives you the option to share the created cartoon on social media sites.
04 ToonMe
Create cartoons using your selfies and other images on your phone in just a few clicks using this high-rated app on Google Play Store. The AI of the app allows the creation of interesting full-body cartoons as well as vector portrait templates. Multiple layouts and designs are also available to choose from. The interface is simple and the app is also available for download Apple Play Store.
05 Pixlr- Free Photo Editor
This is a widely used image editing app that is simple and free to use. A wide range of image editing features and filters are available with the app including cartoon filters that will let you unleash your creativity and design impressive cartoons and other images. Also available for iOS devices the app also facilitates sharing the created images over social media and emails. Additional features include auto-fix, double exposure, adjusting image tone, and others.
06 Painnt- Pro Art Filters
This feature-packed app on Google Store lets you create professional-looking art pieces from the images using filters and animations. With more than 1000 filters in several categories including cartoons, classical, abstract, and others you can have a creation of your choice. App uses AI and also has an option for preview and fine-tuning. You can even share your creations with the app community and over social networking sites.
07 Clip2Comic & Caricature Maker
This is among the best app for iPhone users that allows creating funny and interesting cartoons, caricatures, and other artwork using images. Several other editing tools and filters are also available that support customizing high-quality and high-resolution images. Additionally, the app also supports editing the videos and converting them into animated clippings. The deformation filter further makes your creation look funny and interesting.
08 Deep Art Effects
This free app for Android and iOS devices comes with more than 100 effects and filters of different types including cartoon-based. Using the AI of the app, you can create impressive artwork in HD resolution. The app supports fast image processing and also supports sharing the artwork with the community. A paid premium version of the app is also available that has no ads, watermark, allows creating own filters, and has additional features.
09 Cartoon Photo Editor
This free app for iOS devices will let you turn your images into cartoons like a pro. The app comes with more than 15 cartoon filters to choose from and you can even choose the art style as a retro cartoon, Minecraft, and others. The images from the device can be added to the app or you can even capture one using the camera. The created cartoons can also be shared over social media sites using the app. The pro-paid version offers additional features and functions.
10 Comica- Comics and cartoon maker
As the name suggests, this is a comics and cartoon creating an app on Google Play Store. This lightweight app is free to use and comes with legit-looking effects and allows adding speech balloons. You can even create your memes using the app and take your creativity to a new level.
Key Takeaways from This Episode
● Check out the images on your smartphone or system that can be used for creating interesting cartoons.
● Analyze multiple apps and programs that can let you add cartoon and comic effects to your selected images.
● Finalize the tool that offers the best features, is simple to use, and can quickly convert your images to funny animated images and cartoons with added functionalities.
Also read:
- In 2024, How to Make Animated Videos for Business Simple Guide
- New Best 10 Old Cartoons From Cartoon Network That You Miss
- New 2024 Approved Is It That Easy to Make My Own Animated Character?
- Updated 2024 Approved Convert Animated GIF From Video
- Make Creative Animation Videos
- New In 2024, The Secret Sauce for Making GIF Instagram Story More Aesthetic
- In 2024, How to Make a 3D Cartoon of Yourself
- 2024 Approved 5 Must Try Ways to Add GIF in Text Message on Android
- New 2024 Approved All About 3D Medical Animation And Its Uses
- New In 2024, 12 Dubbed Anime Websites to Watch for Free
- Animate Photo Online with These Awesome Tools
- Make Well Done Animated GIF for 2024
- Tips for GIF to Animated PNG You Should Know for 2024
- New 10 Cartoon Characters That Should Top Your List
- Updated 10 Caricature Makers to Turn Photo to Caricature Effects for 2024
- New Secret Shortcut to Adobe Animate Character Tutorial for 2024
- In 2024, How to Make an Animation With 7 Steps
- Learn Disney Cartoon Drawing to See Disney Magic Moments
- Updated In 2024, Whats Music Video GIF & How to Add Music to Your GIF Files
- 12 Animated Slideshow PowerPoint Templates
- 10 Best Animation Makers for Kids to Have Fun for 2024
- New 2024 Approved 8 Free GIF Animators to Make Your Own GIF
- Updated Adobe Auto Rigger Is AWESOME
- Updated Top 10 Apps to Enhance Your Instagram Story Slideshow
- New 18 Best Tools and Services to Create Animated Videos for Your Business
- Updated 2024 Approved Tips for Learning Graphics Animation
- Updated In 2024, How I Animate Discord Profile Pictures (& You Can Too)
- In 2024, How to Draw A Skeleton Cartoon – A Step by Step Guide
- 5 Techniques You Never Heard of for Converting MP4 to GIF in Photoshop for 2024
- Ways to Get the Most up to Date Cartoon Character Design Tips for 2024
- Updated In 2024, Tips for GIF to Animated PNG
- Updated What Are Differences Between 2D And 3D Animation for 2024
- Updated In 2024, Fuel Creativity with 10 Awesome Collection of 2D Animation Examples
- New 2024 Approved 10 Trendy & Stylish Free Logo Animation Templates
- 10 Amazing Wallpaper Collage Ideas and Photos
- What Is Still Motion Animation for 2024
- The Ultimate Cheatsheet to 15 Adobe Animate Alternatives
- In 2024, How to Make My Photo 3D Cartoon Online
- New In 2024, Incredible Ways to Find Suitable Animated Graphic Maker
- New Top 10 Best Photo to Animation Converters That Give You an Advantage
- How to Send and Add Snapchat GIFs 100 The Easy Way
- The Best Android Unlock Software For Nokia 105 Classic Device Top 5 Picks to Remove Android Locks
- In 2024, How To Change Country on App Store for Apple iPhone 8 With 7 Methods | Dr.fone
- In 2024, Forgotten The Voicemail Password Of Nokia C12 Plus? Try These Fixes
- In 2024, Top 10 AirPlay Apps in Infinix Note 30 5G for Streaming | Dr.fone
- Repair damaged, unplayable video files of Huawei Nova Y71 on Windows
- Easy steps to recover deleted call history from OnePlus
- In 2024, How Can You Transfer Files From Infinix Note 30 VIP Racing Edition To iPhone 15/14/13? | Dr.fone
- In 2024, Top 15 Augmented Reality Games Like Pokémon GO To Play On Lava Blaze Curve 5G | Dr.fone
- How to Reset a Lava Yuva 2 Pro Phone That Is Locked | Dr.fone
- In 2024, How to Change GPS Location on Vivo S17e Easily & Safely | Dr.fone
- Read This Guide to Find a Reliable Alternative to Fake GPS On OnePlus Ace 2V | Dr.fone
- Full Guide to Catch 100 IV Pokémon Using a Map On Samsung Galaxy M34 | Dr.fone
- How to recover deleted photos on OnePlus Nord 3 5G
- How to Fake GPS on Android without Mock Location For your Samsung Galaxy F15 5G | Dr.fone
- 2 Ways to Transfer Text Messages from Realme Narzo 60x 5G to iPhone 15/14/13/12/11/X/8/ | Dr.fone
- Recover your photos after Tecno Pop 8 has been deleted.
- Itel Tutorial - Bypass Lock Screen,Security Password Pin,Fingerprint,Pattern
- Disabled Apple iPhone 11 How to Unlock a Disabled Apple iPhone 11? | Dr.fone
- In 2024, Top-Notch Solutions for Disabled Apple ID From iPhone 6 Making It Possible
- How to play AVCHD MTS files on Samsung Galaxy S24 Ultra?
- How Oppo Find N3 Flip Mirror Screen to PC? | Dr.fone
- Title: In 2024, Easy Cartoon Characters Drawing Tutorials for You Beginners
- Author: Elon
- Created at : 2024-05-19 03:04:44
- Updated at : 2024-05-20 03:04:44
- Link: https://animation-videos.techidaily.com/in-2024-easy-cartoon-characters-drawing-tutorials-for-you-beginners/
- License: This work is licensed under CC BY-NC-SA 4.0.
