
:max_bytes(150000):strip_icc():format(webp)/watch-free-movies-online-1356647-32f79b8cc3ed484ca1f9f898f503e416.png)
In 2024, How to Stop Animation From Looping in Unity
How to Stop Animation From Looping in Unity
How to Stop Animation from Looping in Unity
An easy yet powerful editor
Numerous effects to choose from
Detailed tutorials provided by the official channel
Unity is an IDE interface all designed exclusively for game developers. However, you can do much more with Unity than game development. But, our main concern here is something else than this subject. You’re looking for easy tutorials on Unity stop animation!

And luckily, we’ve got you covered as we’ve briefly explained how to perform Unity stop animation from looping and the steps to make a smooth animation.
In this article
01 [What is Unity Used for?](#Part 1)
02 [How to Stop Animation Playing in Loop in Unity?](#Part 2)
03 [How to Smooth an Animation in Unity?](#Part 3)
Part 1 What is Unity Used for?
Unity is a software tool friendly to all the game developers out there. This tool is used by the large community of game developers to power and create their game development projects. And, the software is more of a professional means and not a simple pared-down ‘game builder .’Unity also offers one of the most significant inbuilt features like rendering, physics, and collision detection. Thus, one of the powerful aspects of Unity is that game developers need not go out of the box and create everything from scratch. Instead, they are available with the physics engine required to develop games quickly. Another robust feature of Unity is that it includes an excellent ‘Asset Store’ where developers can upload their creations and showcase them to the whole community. So, that’s Unity and its uses in a broader scope!
Before we take you through the next section, it’s important to mention that Unity is also known as cross-platform IDE, where IDE stands for ‘integrated development environment.’ So, it can be called more of an interface with access to all the tools and resources required to develop games.
Apart from the game development, Unity is known for other excellent usage purposes as:
● Simulations
● Animation
● Architectural Visualization
● Previsualization for Film
● Interactive Experiences
Among these features only, we’ll describe Unity stop animation from looping in detail.
Part 2 How to Stop Animation Playing in Loop in Unity?
As we said, we’ll describe to you the most accessible definition of how to stop Animation in Unity. Thus, there are simple steps that we’d like to define firsthand before explaining the whole procedure with an image-centric step-by-step guide.
So, those simple steps to stop motion animation in After Effects in the loop also go like below:
Step 1 Go to the Project tab and select Animation.
Step 2 Open the Inspector tab.
Step 3 Uncheck the checkbox Loop Time, and you’re good to go!
We’ll describe the same, i.e., Unity stop animation from looping through the step guide below.
In this guide, we’ll explain right from applying the Animation so that you’d understand better. So, let’s begin without any further ado!
01Step 1 Delete animation folder
We have already created an animation folder in the folder named as own Animation, so click that folder, click the animation folder, and then another folder along with as shown below. Hold the Shift key and click another folder. Then, right-click the Delete tab as depicted below.
Similarly, you can also delete the Animation if you wish.

02Step 2 Create an animation for the subject
Now, you may have different subjects. We’re creating Animation on Mobile Joystick for reference, as shown below.

Now, hit the Create tab on the Unity panel below. Then, proceed to save your Animation in the folder you’ve already created for the same.

03Step 3 Give positions to the animation
Firstly, hit the red-icon button used for recording, as shown below.

Give the position on the left side after you click the button. And, then, clicking almost near to 3you can give the position to the right-hand side as shown below.

Now, the animation has been set. You can see the animation from left to right if you click the Play button. So, here, you can see the results of infinite loop animation, which won’t stop.

You can follow two ways to stop this Animation in Unity from looping, and we’ll describe both methods below.
04Step 4 Stop animation Unity Way 1
Go to the animation folder where you’ve created the animation and click the New Animation icon as shown below.

Now, you have to uncheck the Loop Time tab on the top-right corner of the Unity panel.

05Step 5 Stop animation Unity Way 2
Alternatively, you can click the Animator tab on the top of the Unity panel and double-tap the New Animation button. Then, it will also delete or uncheck the loop time, as shown below.

These were all the steps to stop animation Unity.
Part 3 How to Smooth an Animation in Unity?
After done with Unity stop animation, it’s time to smooth your Unity animation. Again, we will describe it simply if you’re used to the Unity platform and then with a step guide with respective screenshots.
So, stay tuned until the end to reveal the easy steps of smoothing an animation in Unity.
Select the Dopesheet at the bottom of the animation window. Then, you need to switch to the ‘Curves’ view once you create your Animation in the Dopesheet. These animation curves help you accelerate and decelerate animations so that the movement and other things can stop and start smoothly.
So, let’s begin with the step guide tutorial on the same as follows:
For reference, take an example of a metronome object imported from Blender to Unity. Here, we’ve grouped all the pendulum objects under one rotation so that when we move the pendulum, it pivots to the correct point, as shown below.

01Add the animator
So, the first step begins with adding the Animator component to the parent object. You can do this by clicking the Add Component tab on the Unity panel’s left side, searching for Animator, and clicking the Animator.
You will also need a controller to control the animations. Go to your animation folder, right-click, and select Create> Animator Controller tab.

Let’s call or give it a name metronome animator as shown below.
Then, you need to drag this into your animator component. Again, you need to go to your animations folder, right-click, select Create> Animations tab.
Now, give this a name pendulum full swing.
02Open the animator tab
Now, open the animator tab, drag this pendulum swing animation to that panel, and double-tap the yellow-colored New Animation button.

03Create an animation
With the game object selected, the animated metronome pendulum, in this case, we’d like to animate the X component of the rotation. So, you need to click Add Property> Transform> Rotation tab and click the + sign on its right, as shown below.
Now, click the plus sign automatically to set two keyframes, one at the beginning and one at the end. Now, click on end select all, and then delete for now.

04Add keyframes to rotate the pendulum
With the first set of keyframes and the pendulum all way to the right, go halfway and change the rotation to the left on the left panel of Unity. Then, add another keyframe.

05Slow down the animation
As you can observe, the Animation of this pendulum is in a straight line and feels unnatural to the eyes. Thus, we’re required to smooth this Animation now! For this purpose, go to the Curves; you can see the pink properties of rotation as going from one side to another.

Now, you need to adjust these pink curves. Start by adding a key to one of its sides, as shown below. After that, it is all on you how slow or fasts you want these values to be.
Here, you’re all done smoothing the animation in Unity after learning the stop-animation Unity tutorial.
You can even stop motion animation on Photoshop with the above tutorial.
06Bonus Tip:
We want to introduce an excellent video editor software called Filmora Video Editor . It is from the house of Wondershare, a well-known software company worldwide.

Wondershare Filmora - Best Video Editor for Mac/Windows
5,481,435 people have downloaded it.
Build unique custom animations without breaking a sweat.
Focus on creating epic stories and leave the details to Filmora’s auto features.
Start a creative adventure with drag & drop effects and endless possibilities.
Filmora simplifies advanced features to save you time and effort.
Filmora cuts out repetition so you can move on to your next creative breakthrough.
With Filmora, you can easily add Animation and edit your videos to make them look world-class. The latest version and new updates are eye-candy and quick fix for beginner video editors.
So, please pay a visit to the Filmora website and check out its Mac and Windows version for free today.
● Key Takeaways from This Episode →
● Learning the concept and usage of Unity
● A tutorial on how to stop animation in Unity from looping
● A tutorial on how to smooth animation in Unity
● Introduction to Filmora, the top-most video editor software for beginners.
Unity is an IDE interface all designed exclusively for game developers. However, you can do much more with Unity than game development. But, our main concern here is something else than this subject. You’re looking for easy tutorials on Unity stop animation!
And luckily, we’ve got you covered as we’ve briefly explained how to perform Unity stop animation from looping and the steps to make a smooth animation.
In this article
01 [What is Unity Used for?](#Part 1)
02 [How to Stop Animation Playing in Loop in Unity?](#Part 2)
03 [How to Smooth an Animation in Unity?](#Part 3)
Part 1 What is Unity Used for?
Unity is a software tool friendly to all the game developers out there. This tool is used by the large community of game developers to power and create their game development projects. And, the software is more of a professional means and not a simple pared-down ‘game builder .’Unity also offers one of the most significant inbuilt features like rendering, physics, and collision detection. Thus, one of the powerful aspects of Unity is that game developers need not go out of the box and create everything from scratch. Instead, they are available with the physics engine required to develop games quickly. Another robust feature of Unity is that it includes an excellent ‘Asset Store’ where developers can upload their creations and showcase them to the whole community. So, that’s Unity and its uses in a broader scope!
Before we take you through the next section, it’s important to mention that Unity is also known as cross-platform IDE, where IDE stands for ‘integrated development environment.’ So, it can be called more of an interface with access to all the tools and resources required to develop games.
Apart from the game development, Unity is known for other excellent usage purposes as:
● Simulations
● Animation
● Architectural Visualization
● Previsualization for Film
● Interactive Experiences
Among these features only, we’ll describe Unity stop animation from looping in detail.
Part 2 How to Stop Animation Playing in Loop in Unity?
As we said, we’ll describe to you the most accessible definition of how to stop Animation in Unity. Thus, there are simple steps that we’d like to define firsthand before explaining the whole procedure with an image-centric step-by-step guide.
So, those simple steps to stop motion animation in After Effects in the loop also go like below:
Step 1 Go to the Project tab and select Animation.
Step 2 Open the Inspector tab.
Step 3 Uncheck the checkbox Loop Time, and you’re good to go!
We’ll describe the same, i.e., Unity stop animation from looping through the step guide below.
In this guide, we’ll explain right from applying the Animation so that you’d understand better. So, let’s begin without any further ado!
01Step 1 Delete animation folder
We have already created an animation folder in the folder named as own Animation, so click that folder, click the animation folder, and then another folder along with as shown below. Hold the Shift key and click another folder. Then, right-click the Delete tab as depicted below.
Similarly, you can also delete the Animation if you wish.
02Step 2 Create an animation for the subject
Now, you may have different subjects. We’re creating Animation on Mobile Joystick for reference, as shown below.
Now, hit the Create tab on the Unity panel below. Then, proceed to save your Animation in the folder you’ve already created for the same.
03Step 3 Give positions to the animation
Firstly, hit the red-icon button used for recording, as shown below.
Give the position on the left side after you click the button. And, then, clicking almost near to 3you can give the position to the right-hand side as shown below.
Now, the animation has been set. You can see the animation from left to right if you click the Play button. So, here, you can see the results of infinite loop animation, which won’t stop.
You can follow two ways to stop this Animation in Unity from looping, and we’ll describe both methods below.
04Step 4 Stop animation Unity Way 1
Go to the animation folder where you’ve created the animation and click the New Animation icon as shown below.
Now, you have to uncheck the Loop Time tab on the top-right corner of the Unity panel.
05Step 5 Stop animation Unity Way 2
Alternatively, you can click the Animator tab on the top of the Unity panel and double-tap the New Animation button. Then, it will also delete or uncheck the loop time, as shown below.
These were all the steps to stop animation Unity.
Part 3 How to Smooth an Animation in Unity?
After done with Unity stop animation, it’s time to smooth your Unity animation. Again, we will describe it simply if you’re used to the Unity platform and then with a step guide with respective screenshots.
So, stay tuned until the end to reveal the easy steps of smoothing an animation in Unity.
Select the Dopesheet at the bottom of the animation window. Then, you need to switch to the ‘Curves’ view once you create your Animation in the Dopesheet. These animation curves help you accelerate and decelerate animations so that the movement and other things can stop and start smoothly.
So, let’s begin with the step guide tutorial on the same as follows:
For reference, take an example of a metronome object imported from Blender to Unity. Here, we’ve grouped all the pendulum objects under one rotation so that when we move the pendulum, it pivots to the correct point, as shown below.
01Add the animator
So, the first step begins with adding the Animator component to the parent object. You can do this by clicking the Add Component tab on the Unity panel’s left side, searching for Animator, and clicking the Animator.
You will also need a controller to control the animations. Go to your animation folder, right-click, and select Create> Animator Controller tab.
Let’s call or give it a name metronome animator as shown below.
Then, you need to drag this into your animator component. Again, you need to go to your animations folder, right-click, select Create> Animations tab.
Now, give this a name pendulum full swing.
02Open the animator tab
Now, open the animator tab, drag this pendulum swing animation to that panel, and double-tap the yellow-colored New Animation button.
03Create an animation
With the game object selected, the animated metronome pendulum, in this case, we’d like to animate the X component of the rotation. So, you need to click Add Property> Transform> Rotation tab and click the + sign on its right, as shown below.
Now, click the plus sign automatically to set two keyframes, one at the beginning and one at the end. Now, click on end select all, and then delete for now.
04Add keyframes to rotate the pendulum
With the first set of keyframes and the pendulum all way to the right, go halfway and change the rotation to the left on the left panel of Unity. Then, add another keyframe.
05Slow down the animation
As you can observe, the Animation of this pendulum is in a straight line and feels unnatural to the eyes. Thus, we’re required to smooth this Animation now! For this purpose, go to the Curves; you can see the pink properties of rotation as going from one side to another.
Now, you need to adjust these pink curves. Start by adding a key to one of its sides, as shown below. After that, it is all on you how slow or fasts you want these values to be.
Here, you’re all done smoothing the animation in Unity after learning the stop-animation Unity tutorial.
You can even stop motion animation on Photoshop with the above tutorial.
06Bonus Tip:
We want to introduce an excellent video editor software called Filmora Video Editor . It is from the house of Wondershare, a well-known software company worldwide.
Wondershare Filmora - Best Video Editor for Mac/Windows
5,481,435 people have downloaded it.
Build unique custom animations without breaking a sweat.
Focus on creating epic stories and leave the details to Filmora’s auto features.
Start a creative adventure with drag & drop effects and endless possibilities.
Filmora simplifies advanced features to save you time and effort.
Filmora cuts out repetition so you can move on to your next creative breakthrough.
With Filmora, you can easily add Animation and edit your videos to make them look world-class. The latest version and new updates are eye-candy and quick fix for beginner video editors.
So, please pay a visit to the Filmora website and check out its Mac and Windows version for free today.
● Key Takeaways from This Episode →
● Learning the concept and usage of Unity
● A tutorial on how to stop animation in Unity from looping
● A tutorial on how to smooth animation in Unity
● Introduction to Filmora, the top-most video editor software for beginners.
Popular Female & Male Disney Cartoon Characters To Empower You
Popular Female & Male Disney Cartoon Characters To Empower You
An easy yet powerful editor
Numerous effects to choose from
Detailed tutorials provided by the official channel
Making your Disney cartoons is easy with various applications. Learn about cute Disney princess cartoon characters. See new look of old Disney characters.
Cartoon characters are not only favorite to the small age group kids or toddlers, but they are loved by the elders also. We all have grown up watching our favorite cartoon characters like Cinderella, Jasmine-Aladdin, tom-jerry and snow white. These cartoon characters have been like a friend to the kids at their growing ages. Most of the Disney channel cartoon characters are known for their courage, strength, intelligence and many other attributes. These characters help the kids to learn so many things along with fun.
In this article
01 [Top Pick for the Cutest Female Disney Characters](#Part 1)
02 [The 5 Hottest Disney Animated Men](#Part 2)
03 [Is It Possible to Use Disney Cartoon Material in Filmora?](#Part 3)
Part 1 Top Pick for the Cutest Female Disney Characters
No doubt HD techniques and animations have brought some new and amazing cartoon characters that can make anyone fall in love with them. But the craziness of kids for old cartoon characters has not changed yet. You or your kid may not be familiar with all characters of cartoon world, so here is a compilation of some of the best and well-known cartoon characters in both male and female characters. Let**’**s see first female disney cartoon characters:
01Elsa-Frozen
Voice actor: Idina Menzel
Film’s Year of Release: 2013
Imdb Ratings: 6.8/10
Character Story Description: Elsa is one of the beautiful and strongest characters of Disney. The specialty of this cute character is that she can freeze anything and make ice. Not only pretty but she is also good at heart. The only thing which makes her different is that she cannot control her power, so she needs to be away from people. Her sister helps her to get back to normal state.
02Jasmine – Aladdin
Voice actor: Mena Massoud
Film’s Year of Release: 2019
Imdb Ratings: 6.9/10
Character Story Description: If Aladdin is favorite character of boys, Jasmine is adored by girls. Although from a royal family, she loves to do silly things that make her happy. Small girls love to dress up like Jasmine and act like her. She is no doubt a beautiful female Disney cartoon character.
033. Belle – The Beauty and the Beast
Voice actor: Emma Watson
Film’s Year of Release: 2017
Imdb Ratings: 7.1/10
Character Story Description: Belle is a sweet gild and fond of books. Being a simple and kind hearted does not make her weak and it**’**s not like she cannot protect herself. In the movie Gaston tries to be flirty with her, but she remained strong and kept him away from the home number of times. She always sees the good nature of a person than the appearance of a person.
04Snow White – Snow White and the Seven Dwarves
Voice actor: Adriana Caselotti
Film’s Year of Release: 1938
Imdb Ratings: 7.6/10
Character Story Description: Snow white is the first princess cartoon character from Disney that appears on the big screen. As her name suggest she is as beautiful like snow. But she has a bad step mother who hates her and tries to mess all the things related to snow white. The story is about how snow white gets a way to be free from her step mother and live happily ever.
05Helen Parr – The Incredibles
Voice actor: Holly Hunter
Film’s Year of Release: 2004
Imdb Ratings: 8.1/10
Character Story Description: Helen Parr in the movie has super power to be elastic as she wants. She can change her body shape to anything as she desires. She is having a special and powerful suit that she wears while fighting with the other supers. She is also known as Mrs. Incredible. Eventually her suit gets damages but she gets it back and once again becomes a super power**.**
Part 2 The 5 Hottest Disney Animated Men
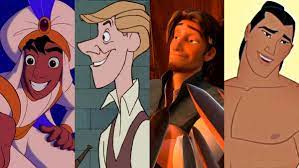
Male Disney cartoon characters have varieties like some of them are king, while some are the super heroes and some are cute to be loved. With the changing trend of the cartoon world, kids are more inclined to super heroes and marvel heroes. But we have some of the top old Disney cartoon characters along with some new ones. Here is the list.
01Simba- The Lion King
Voice actor: Mathew Broderick
Film’s Year of Release: 1994
Imdb Ratings: 1/10
Character Story Description: Simba was the main character of the movie, which left the kingdom of his father thinking that he is the reason for his father death. The misconception of his father death was created by a bad character in the story called Uncle Scar. However, Nala, a popular cartoon character inside the movie encouraged Simba to return back and conquer the kingdom.
02Prince Eric- The Little Mermaid
Voice actor: Christopher Daniel Barnes
Film’s Year of Release: 1989
Imdb Ratings: 6/10
Character Story Description: Prince Eric is one of the sweetest cartoon characters of Disney. The movie narrates a story of mermaid who wishes to live her life with human and falls in love with Prince Eric. Eric is handsome and charming guy. He is unaware about the mysteries of sea world. His life chances when he was saved by mermaid Ariel in a storm. It**’**s all about how they fall in love with each other.
03Aladdin- Aladdin
Voice actor: Scott Weinger
Film’s Year of Release: 1992
Imdb Ratings: 8/10
Character Story Description: Aladdin is probably one of the cute disney cartoon characters. His charming smile makes him more attractive. The way he handles the adverse situations makes him a great hero. He inspires the people from his deeds. He has a magical lamp called genie that fulfill his wishes. He tries to impress the princess Jasmine and at last marries her.
04Hercules
Voice actor: Tate Donovan
Film’s Year of Release: 1997
Imdb Ratings: 3/10
Character Story Description: Hercules is a cartoon character with good physical structure. The way he reaches Mount Olympus is inspirational for the kids. Hercules is son of God, but he was taken away by Hades and was living a life of half god and half man. He is a strong man and fights with evil creatures in the earth.
05Tarzan-Tarzan
Voice actor: Tony Goldwyn
Film’s Year of Release: 1999
Imdb Ratings: 3/10
Character Story Description: The character of Tarzan is more like a Jungle man. He is an orphan, spend his childhood in jungle. His life turned when he moved away from jungle. He struggled to live a normal life. The story of this cartoon character is inspiring and motivates others. This character is so memorable and lovable.
Part 3 Is It Possible to Use Disney Cartoon Material in Wondershare Filmora Video Editor ?
For Win 7 or later (64-bit)
For macOS 10.12 or later
Now the kids of present time not only enjoy watching the cartoon characters but they love to draw them also. One can easily learn Disney cartoon characters to draw in simple and easy steps. There are number of applications which can be used to learn drawing your favorite Disney Cartoons. One of them is Filmora. Let**’**s know about it.
Introduction & Description: Filmora is amazing software used for making pictures, videos, animated pictures and video editing. It is a good application and software for those who love creativity. This software is very helpful in film making and performing necessary editing works. One can not only create pictures and videos but can also add special effects in them. The application can be easily downloaded and can be run on phones as well as personal computers. Trail version of the application can help the beginners to know more about the application and how useful it is.
Filmora can also be used for Disney cartoon characters drawing. There are various ways one can learn to draw Disney or other cartoon characters. Some of them are Cartoon Character Sketches, Drawing cartoons with colors and Disney cartoon characters drawing. Among all Disney cartoon drawing are the simplest and easy to learn as it uses only geometric shapes. Those who are beginners, they can start drawing Walt Disney cartoon characters from this application.
● Ending Thoughts →
● Cartoon characters are the most fascinating part of any person. They grow and get inspire with those cartoon characters. Although there are many cartoon characters, but disney cartoon characters names are always on the top of people favorite list. They are loved by everyone.
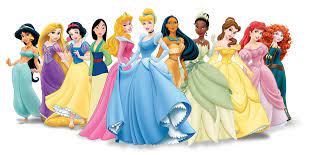
● The Disney cartoon characters are categorized into male and female characters. Disney princess cartoon characters and superheroes are some of the best one from Disney house. Some of female Disney cartoon characters are Elsa from Frozen, Jasmine from Aladin, Belle from The Beauty and the Beast and Helen Parr from The Incredibles. The best male animated cartoons Simba from the Lion King, Tarzan from the movie Tarzan and Aladdin.
● Filmora can be the best platform to learn and draw cartoons. The Disney cartoon characters can be used as a material for creating some amazing pictures and videos. One can easily download the application and learn to draw cartoon characters with free Video Tutorials.
Making your Disney cartoons is easy with various applications. Learn about cute Disney princess cartoon characters. See new look of old Disney characters.
Cartoon characters are not only favorite to the small age group kids or toddlers, but they are loved by the elders also. We all have grown up watching our favorite cartoon characters like Cinderella, Jasmine-Aladdin, tom-jerry and snow white. These cartoon characters have been like a friend to the kids at their growing ages. Most of the Disney channel cartoon characters are known for their courage, strength, intelligence and many other attributes. These characters help the kids to learn so many things along with fun.
In this article
01 [Top Pick for the Cutest Female Disney Characters](#Part 1)
02 [The 5 Hottest Disney Animated Men](#Part 2)
03 [Is It Possible to Use Disney Cartoon Material in Filmora?](#Part 3)
Part 1 Top Pick for the Cutest Female Disney Characters
No doubt HD techniques and animations have brought some new and amazing cartoon characters that can make anyone fall in love with them. But the craziness of kids for old cartoon characters has not changed yet. You or your kid may not be familiar with all characters of cartoon world, so here is a compilation of some of the best and well-known cartoon characters in both male and female characters. Let**’**s see first female disney cartoon characters:
01Elsa-Frozen
Voice actor: Idina Menzel
Film’s Year of Release: 2013
Imdb Ratings: 6.8/10
Character Story Description: Elsa is one of the beautiful and strongest characters of Disney. The specialty of this cute character is that she can freeze anything and make ice. Not only pretty but she is also good at heart. The only thing which makes her different is that she cannot control her power, so she needs to be away from people. Her sister helps her to get back to normal state.
02Jasmine – Aladdin
Voice actor: Mena Massoud
Film’s Year of Release: 2019
Imdb Ratings: 6.9/10
Character Story Description: If Aladdin is favorite character of boys, Jasmine is adored by girls. Although from a royal family, she loves to do silly things that make her happy. Small girls love to dress up like Jasmine and act like her. She is no doubt a beautiful female Disney cartoon character.
033. Belle – The Beauty and the Beast
Voice actor: Emma Watson
Film’s Year of Release: 2017
Imdb Ratings: 7.1/10
Character Story Description: Belle is a sweet gild and fond of books. Being a simple and kind hearted does not make her weak and it**’**s not like she cannot protect herself. In the movie Gaston tries to be flirty with her, but she remained strong and kept him away from the home number of times. She always sees the good nature of a person than the appearance of a person.
04Snow White – Snow White and the Seven Dwarves
Voice actor: Adriana Caselotti
Film’s Year of Release: 1938
Imdb Ratings: 7.6/10
Character Story Description: Snow white is the first princess cartoon character from Disney that appears on the big screen. As her name suggest she is as beautiful like snow. But she has a bad step mother who hates her and tries to mess all the things related to snow white. The story is about how snow white gets a way to be free from her step mother and live happily ever.
05Helen Parr – The Incredibles
Voice actor: Holly Hunter
Film’s Year of Release: 2004
Imdb Ratings: 8.1/10
Character Story Description: Helen Parr in the movie has super power to be elastic as she wants. She can change her body shape to anything as she desires. She is having a special and powerful suit that she wears while fighting with the other supers. She is also known as Mrs. Incredible. Eventually her suit gets damages but she gets it back and once again becomes a super power**.**
Part 2 The 5 Hottest Disney Animated Men
Male Disney cartoon characters have varieties like some of them are king, while some are the super heroes and some are cute to be loved. With the changing trend of the cartoon world, kids are more inclined to super heroes and marvel heroes. But we have some of the top old Disney cartoon characters along with some new ones. Here is the list.
01Simba- The Lion King
Voice actor: Mathew Broderick
Film’s Year of Release: 1994
Imdb Ratings: 1/10
Character Story Description: Simba was the main character of the movie, which left the kingdom of his father thinking that he is the reason for his father death. The misconception of his father death was created by a bad character in the story called Uncle Scar. However, Nala, a popular cartoon character inside the movie encouraged Simba to return back and conquer the kingdom.
02Prince Eric- The Little Mermaid
Voice actor: Christopher Daniel Barnes
Film’s Year of Release: 1989
Imdb Ratings: 6/10
Character Story Description: Prince Eric is one of the sweetest cartoon characters of Disney. The movie narrates a story of mermaid who wishes to live her life with human and falls in love with Prince Eric. Eric is handsome and charming guy. He is unaware about the mysteries of sea world. His life chances when he was saved by mermaid Ariel in a storm. It**’**s all about how they fall in love with each other.
03Aladdin- Aladdin
Voice actor: Scott Weinger
Film’s Year of Release: 1992
Imdb Ratings: 8/10
Character Story Description: Aladdin is probably one of the cute disney cartoon characters. His charming smile makes him more attractive. The way he handles the adverse situations makes him a great hero. He inspires the people from his deeds. He has a magical lamp called genie that fulfill his wishes. He tries to impress the princess Jasmine and at last marries her.
04Hercules
Voice actor: Tate Donovan
Film’s Year of Release: 1997
Imdb Ratings: 3/10
Character Story Description: Hercules is a cartoon character with good physical structure. The way he reaches Mount Olympus is inspirational for the kids. Hercules is son of God, but he was taken away by Hades and was living a life of half god and half man. He is a strong man and fights with evil creatures in the earth.
05Tarzan-Tarzan
Voice actor: Tony Goldwyn
Film’s Year of Release: 1999
Imdb Ratings: 3/10
Character Story Description: The character of Tarzan is more like a Jungle man. He is an orphan, spend his childhood in jungle. His life turned when he moved away from jungle. He struggled to live a normal life. The story of this cartoon character is inspiring and motivates others. This character is so memorable and lovable.
Part 3 Is It Possible to Use Disney Cartoon Material in Wondershare Filmora Video Editor ?
For Win 7 or later (64-bit)
For macOS 10.12 or later
Now the kids of present time not only enjoy watching the cartoon characters but they love to draw them also. One can easily learn Disney cartoon characters to draw in simple and easy steps. There are number of applications which can be used to learn drawing your favorite Disney Cartoons. One of them is Filmora. Let**’**s know about it.
Introduction & Description: Filmora is amazing software used for making pictures, videos, animated pictures and video editing. It is a good application and software for those who love creativity. This software is very helpful in film making and performing necessary editing works. One can not only create pictures and videos but can also add special effects in them. The application can be easily downloaded and can be run on phones as well as personal computers. Trail version of the application can help the beginners to know more about the application and how useful it is.
Filmora can also be used for Disney cartoon characters drawing. There are various ways one can learn to draw Disney or other cartoon characters. Some of them are Cartoon Character Sketches, Drawing cartoons with colors and Disney cartoon characters drawing. Among all Disney cartoon drawing are the simplest and easy to learn as it uses only geometric shapes. Those who are beginners, they can start drawing Walt Disney cartoon characters from this application.
● Ending Thoughts →
● Cartoon characters are the most fascinating part of any person. They grow and get inspire with those cartoon characters. Although there are many cartoon characters, but disney cartoon characters names are always on the top of people favorite list. They are loved by everyone.
● The Disney cartoon characters are categorized into male and female characters. Disney princess cartoon characters and superheroes are some of the best one from Disney house. Some of female Disney cartoon characters are Elsa from Frozen, Jasmine from Aladin, Belle from The Beauty and the Beast and Helen Parr from The Incredibles. The best male animated cartoons Simba from the Lion King, Tarzan from the movie Tarzan and Aladdin.
● Filmora can be the best platform to learn and draw cartoons. The Disney cartoon characters can be used as a material for creating some amazing pictures and videos. One can easily download the application and learn to draw cartoon characters with free Video Tutorials.
12 Aesthetic GIF Instagram for Marketers and Creatives
12 Aesthetic GIF Instagram for Marketers and Creatives
An easy yet powerful editor
Numerous effects to choose from
Detailed tutorials provided by the official channel
Cute-Instagram story-stickers or in simple words GIFs are becoming one of the most handy ways to decorate your Instagram-stories with beautiful & distinctive ways – even in the case of not being an artist or having artistic mind. However, there are various Instagram GIFs present on the app which is quite difficult to weed by using the wacky & tacky ones to find-out, but don’t worry we will make the structure of your Instagram truly aesthetic.
Who doesn’t want to be attractive with their Instagram-Stories? Let’s find out the means of having aesthetic gif Instagram.
In this article
01 [What Are Aesthetic GIF Instagram?](#Part 1)
02 [How to Search to Find and Use Cute Gifs on Instagram](#Part 2)
03 [10 Stunning Instagram Story Gifs for Bloggers + Creatives](#Part 3)
Part 1 What Are Aesthetic GIF Instagram?
Making use of GIFs on the Instagram app is just a magnificent way to clutch your viewer’s interest as well as spotlight sure factors in the dedicated stories. Aesthetic GIF can let you discover new ways to put GIFs to the Instagram Stories of yours that’s for sure your followers are going to love.
In case you have been searching for some methods to apply the content material that is greater attention-grabbing, engaging, and creative, then making use of Instagram-Stories GIF’s would possibly be one of the most brilliant answers.
Initially, this year, the Instagram teamed-up with the GIPHY to construct a beautiful library of fantastic GIF’s on the Instagram Stories. It is now the time for you be fun loving, expressive and attractive through the use of GIF stickers for any of your pictures or videos in desired story.GIFs are additionally the exquisite device for an organizations to create flawlessly branded Instagram-Stories with assured satisfaction for all of your followers.
Are you ready to begin? Next you will learn about how to look after the cutest GIF’s on the Instagram for your stories.
Part 2 How to Search to Find and Use Cute Gifs on Instagram
You understand what’s truly hard? Well, being in the 2nd when actually you are spending the first-rate time with the cherished ones. You comprehend, what makes it even-harder? At the time of doing something adorable with your loved ones, &you’re making an attempt to just publish an equally adorable Instagram-story whilst nonetheless staying in attractive moment. So what typically happens?
You both probably:
● Save the content-material and strive to bear in mind to submit later or
● You throw some lovely GIFs, with a tag & then name it with a day, that is exactly we all think about.
However, it definitely can be so tough to discover an accurate GIF. Don’t trust us? Just search “fitness” the subsequent time, by doing so, you’re just making an attempt to put-up your ‘workout-of-day’ story. Tons of exceptional selections there are possibly, thankfully, we did one of the most challenging task for you. Tirelessly scoured & determined the fantastic GIFs is Instagram has for you to offer. Let’s begin what and how to search in order to perfectly locate lovable GIFs at the Instagram.
If you are not a regular user of Instagram, then here is one of the most brilliant way to speed up the process of applying stepwise solutions for finding or adding some creative gif Instagram aestheticfor your stories.
● First step is to head towards the Instagram profile & after that click on the profile picture to begin growing a latest style of story.
● Next thing for you to do is just click on the + (plus) sign available at the top-left corner. (In case you have already posted something in your story)
● On the third step, upload your recently selected picture or a video for that particular story.
● Hit the ‘square smiley-face’ icon.
● At last click on the “GIF”.
Voila, you are ready to discover the true essence of GIF aesthetic.
Now, is the time for you to find out an answer to your question of “How to search Cute Instagram-story GIFs’? As there are tons of GIFs are available at the Instagram app to use.
Part 3 Stunning Instagram Story Gifs for Bloggers + Creatives
If you are a blogger or a creative person who just want to get number of followers to your blog for finding right kind of product or service that you are delivering through your posts, then it is a better idea for you to consider adding stunning designed Instagram Story GIFs in your posts.GIF-section can be quite overwhelming & similarly a hard thing to sift as there are numerous options available for you to use and finding the aesthetic GIF Instagram story-stickers is a hard nut to crack.
Here is the compiled list of 10 stunning and the most lovable Instagram Story GIFsfor the artists or bloggers to search while considering aesthetic Instagram stickers.
01The Uncommon Place
Name any instantaneous place where you can easily publish your desired Instagram story & that too with “good times” by the use of relevant GIF? Yes, right from the dedicated polaroid of constellations to some adorable little leaves, ‘The Uncommon Place’ is where you can easily get higher acceptance of attractiveness through GIFs to make it looks better for all your upcoming posts, stories etc. it is very close to the heart and has many cheerful GIFs in the heat colors.
02Vipapier

We may also no-longer all be in a position to completely agree whether or not it is pronounced as “GIF” or “Jiff,” however one thing we all can genuinely agree that this pack of GIFs is absolutely adorable! Right from the scripts to colors, we could not assist any single one, however just “enjoy!” The Vipapier Instagram story-stickers are bit muted & comes with antique feels.
03Lidiaontheroad
With some truly inspirational as well as motivational pack of stickers the Lidiaontheroad has something warm, minimal and neutral in its tones.
04Ohlalalita
It is a cute pack of Instagram story-GIFs by which you can easily and in a pretty much confident manner for any kind of picture or video as per your preferences at the time of uploading.
05Queenbemonyei
Image Name: 12-aesthetic-gif-instagram-for-marketers-and-creatives7
As the name suggests, it makes use of attractive-rich jewel-tones in your Instagram stickers/GIFs with the true blend of beautiful stickers available for the African- American persons.
06Ilustralle
For you to clearly enjoy the true essence of romantic-novel or smoothening dream of frolicking inside the field of flowers, Ilustralle is the one you need today. The stickers here are whimsical & fashionable to give us major hat-inspiration!
07Inspiredbythis
You understand you be aware of we are absolutely going to start this off through a non-public plug. Attending one of the wonderful-occasions or even simply having the stimulation of way of something, the ‘Inspiredbythis’ is magnificent GIF set.
08Gladdest
For you to add cuteness and bubbly appearance in your picture/Posts, this GIF set is for you. Whether it is about a “Good Morning” GIF for your loved one with a cup of tea! Or a mix of balloons for your upcoming birthday-dinner, the Gladdest have it all. This is meant for giving absolutely anything as well as everything. It also brings cheerful-vibes with the warm-toned Instagram-stickers.
09Malenaflores
Whether you are a baking master, a thinker, a reader, or a blogger who is finding cute collection of GIFs on the Instagram, then with a fast searching of “Malenaflores” you can achieve this. Malenaflores absolutely brings softness and feminism to your stories with great varieties of stickers.
10 Chicayeye
In case you like the GIF pictures with warm-color options, then it has all the things to provide really amazing performance.
Filmora App to Apply Varieties in your Instagram Posts
If you desire to obtain greater varieties of services in your Instagram story then by being a little expert about the posts, the added software that can be helpful for applying amazing aspects of powerful features and at the same time being an identical among the followers in a friendlier way, the Filmora app is the brilliant solution you need today.It is one of the most brilliant video-editor and picture editor for all you to create interesting, fun loving and attractiveness in your posts for Instagram in an extraordinary manner. It is a handy way to make the most of it in an interesting way with fun loving features.
Features that you can enjoy the most with Wondershare Filmora Video Editor :
● Capability to beautifully construct the custom-animations
● Different varieties of Effects-pack to make the most out of it for your Instagram stories
● Attractive filters as well as GIFs pack to allow you focused around cute Stickers with right kind of suggestions.
● Additionally flawless features to crop, cut, trim, cut-up & mix the operations in a few-clicks.
● For the visualization, different effects, stickers, GIFs and smileys to be an outstanding creator
● You can also save your creations to your device
● Animations for your videos
● Options to share the same to many websites like Facebook, YouTube, and Instagram story quickly.
Instead of just making use of common, unrealistic and unattractive celebration tags, stickers that can depart a messy-watermark as soon as after the process of developing your story and then spreading it among your friends, you can easily utilise different characteristic of Instagram stickers or GIFs to apply visual appearance to your posts through many different types of Nama GIF Instagram yang aesthetic as per your preference and the types of moments to capture in your photo. Doing this can excellently put the option of being attractive among your followers through your posts. You can use this feature through your android or iPhone device with higher quality.
It is the time for you to try out the latest GIF-ideas for your Instagram-stories, and never forget to apply all of these in your stories for the desired posts and feel trending among your followers.
● Key Takeaways from This Episode →
● Instagram GIFcan be an interesting way to grab the attention of millions without any worries.
● Aesthetic story Instagram is the trend that has been following among the users for their posts to look fantastic.
● Through an Instagram, there are varieties of ways to club together many things in a single picture. Just use the same for adding better solutions to your stories.
Cute-Instagram story-stickers or in simple words GIFs are becoming one of the most handy ways to decorate your Instagram-stories with beautiful & distinctive ways – even in the case of not being an artist or having artistic mind. However, there are various Instagram GIFs present on the app which is quite difficult to weed by using the wacky & tacky ones to find-out, but don’t worry we will make the structure of your Instagram truly aesthetic.
Who doesn’t want to be attractive with their Instagram-Stories? Let’s find out the means of having aesthetic gif Instagram.
In this article
01 [What Are Aesthetic GIF Instagram?](#Part 1)
02 [How to Search to Find and Use Cute Gifs on Instagram](#Part 2)
03 [10 Stunning Instagram Story Gifs for Bloggers + Creatives](#Part 3)
Part 1 What Are Aesthetic GIF Instagram?
Making use of GIFs on the Instagram app is just a magnificent way to clutch your viewer’s interest as well as spotlight sure factors in the dedicated stories. Aesthetic GIF can let you discover new ways to put GIFs to the Instagram Stories of yours that’s for sure your followers are going to love.
In case you have been searching for some methods to apply the content material that is greater attention-grabbing, engaging, and creative, then making use of Instagram-Stories GIF’s would possibly be one of the most brilliant answers.
Initially, this year, the Instagram teamed-up with the GIPHY to construct a beautiful library of fantastic GIF’s on the Instagram Stories. It is now the time for you be fun loving, expressive and attractive through the use of GIF stickers for any of your pictures or videos in desired story.GIFs are additionally the exquisite device for an organizations to create flawlessly branded Instagram-Stories with assured satisfaction for all of your followers.
Are you ready to begin? Next you will learn about how to look after the cutest GIF’s on the Instagram for your stories.
Part 2 How to Search to Find and Use Cute Gifs on Instagram
You understand what’s truly hard? Well, being in the 2nd when actually you are spending the first-rate time with the cherished ones. You comprehend, what makes it even-harder? At the time of doing something adorable with your loved ones, &you’re making an attempt to just publish an equally adorable Instagram-story whilst nonetheless staying in attractive moment. So what typically happens?
You both probably:
● Save the content-material and strive to bear in mind to submit later or
● You throw some lovely GIFs, with a tag & then name it with a day, that is exactly we all think about.
However, it definitely can be so tough to discover an accurate GIF. Don’t trust us? Just search “fitness” the subsequent time, by doing so, you’re just making an attempt to put-up your ‘workout-of-day’ story. Tons of exceptional selections there are possibly, thankfully, we did one of the most challenging task for you. Tirelessly scoured & determined the fantastic GIFs is Instagram has for you to offer. Let’s begin what and how to search in order to perfectly locate lovable GIFs at the Instagram.
If you are not a regular user of Instagram, then here is one of the most brilliant way to speed up the process of applying stepwise solutions for finding or adding some creative gif Instagram aestheticfor your stories.
● First step is to head towards the Instagram profile & after that click on the profile picture to begin growing a latest style of story.
● Next thing for you to do is just click on the + (plus) sign available at the top-left corner. (In case you have already posted something in your story)
● On the third step, upload your recently selected picture or a video for that particular story.
● Hit the ‘square smiley-face’ icon.
● At last click on the “GIF”.
Voila, you are ready to discover the true essence of GIF aesthetic.
Now, is the time for you to find out an answer to your question of “How to search Cute Instagram-story GIFs’? As there are tons of GIFs are available at the Instagram app to use.
Part 3 Stunning Instagram Story Gifs for Bloggers + Creatives
If you are a blogger or a creative person who just want to get number of followers to your blog for finding right kind of product or service that you are delivering through your posts, then it is a better idea for you to consider adding stunning designed Instagram Story GIFs in your posts.GIF-section can be quite overwhelming & similarly a hard thing to sift as there are numerous options available for you to use and finding the aesthetic GIF Instagram story-stickers is a hard nut to crack.
Here is the compiled list of 10 stunning and the most lovable Instagram Story GIFsfor the artists or bloggers to search while considering aesthetic Instagram stickers.
01The Uncommon Place
Name any instantaneous place where you can easily publish your desired Instagram story & that too with “good times” by the use of relevant GIF? Yes, right from the dedicated polaroid of constellations to some adorable little leaves, ‘The Uncommon Place’ is where you can easily get higher acceptance of attractiveness through GIFs to make it looks better for all your upcoming posts, stories etc. it is very close to the heart and has many cheerful GIFs in the heat colors.
02Vipapier
We may also no-longer all be in a position to completely agree whether or not it is pronounced as “GIF” or “Jiff,” however one thing we all can genuinely agree that this pack of GIFs is absolutely adorable! Right from the scripts to colors, we could not assist any single one, however just “enjoy!” The Vipapier Instagram story-stickers are bit muted & comes with antique feels.
03Lidiaontheroad
With some truly inspirational as well as motivational pack of stickers the Lidiaontheroad has something warm, minimal and neutral in its tones.
04Ohlalalita
It is a cute pack of Instagram story-GIFs by which you can easily and in a pretty much confident manner for any kind of picture or video as per your preferences at the time of uploading.
05Queenbemonyei
Image Name: 12-aesthetic-gif-instagram-for-marketers-and-creatives7
As the name suggests, it makes use of attractive-rich jewel-tones in your Instagram stickers/GIFs with the true blend of beautiful stickers available for the African- American persons.
06Ilustralle
For you to clearly enjoy the true essence of romantic-novel or smoothening dream of frolicking inside the field of flowers, Ilustralle is the one you need today. The stickers here are whimsical & fashionable to give us major hat-inspiration!
07Inspiredbythis
You understand you be aware of we are absolutely going to start this off through a non-public plug. Attending one of the wonderful-occasions or even simply having the stimulation of way of something, the ‘Inspiredbythis’ is magnificent GIF set.
08Gladdest
For you to add cuteness and bubbly appearance in your picture/Posts, this GIF set is for you. Whether it is about a “Good Morning” GIF for your loved one with a cup of tea! Or a mix of balloons for your upcoming birthday-dinner, the Gladdest have it all. This is meant for giving absolutely anything as well as everything. It also brings cheerful-vibes with the warm-toned Instagram-stickers.
09Malenaflores
Whether you are a baking master, a thinker, a reader, or a blogger who is finding cute collection of GIFs on the Instagram, then with a fast searching of “Malenaflores” you can achieve this. Malenaflores absolutely brings softness and feminism to your stories with great varieties of stickers.
10 Chicayeye
In case you like the GIF pictures with warm-color options, then it has all the things to provide really amazing performance.
Filmora App to Apply Varieties in your Instagram Posts
If you desire to obtain greater varieties of services in your Instagram story then by being a little expert about the posts, the added software that can be helpful for applying amazing aspects of powerful features and at the same time being an identical among the followers in a friendlier way, the Filmora app is the brilliant solution you need today.It is one of the most brilliant video-editor and picture editor for all you to create interesting, fun loving and attractiveness in your posts for Instagram in an extraordinary manner. It is a handy way to make the most of it in an interesting way with fun loving features.
Features that you can enjoy the most with Wondershare Filmora Video Editor :
● Capability to beautifully construct the custom-animations
● Different varieties of Effects-pack to make the most out of it for your Instagram stories
● Attractive filters as well as GIFs pack to allow you focused around cute Stickers with right kind of suggestions.
● Additionally flawless features to crop, cut, trim, cut-up & mix the operations in a few-clicks.
● For the visualization, different effects, stickers, GIFs and smileys to be an outstanding creator
● You can also save your creations to your device
● Animations for your videos
● Options to share the same to many websites like Facebook, YouTube, and Instagram story quickly.
Instead of just making use of common, unrealistic and unattractive celebration tags, stickers that can depart a messy-watermark as soon as after the process of developing your story and then spreading it among your friends, you can easily utilise different characteristic of Instagram stickers or GIFs to apply visual appearance to your posts through many different types of Nama GIF Instagram yang aesthetic as per your preference and the types of moments to capture in your photo. Doing this can excellently put the option of being attractive among your followers through your posts. You can use this feature through your android or iPhone device with higher quality.
It is the time for you to try out the latest GIF-ideas for your Instagram-stories, and never forget to apply all of these in your stories for the desired posts and feel trending among your followers.
● Key Takeaways from This Episode →
● Instagram GIFcan be an interesting way to grab the attention of millions without any worries.
● Aesthetic story Instagram is the trend that has been following among the users for their posts to look fantastic.
● Through an Instagram, there are varieties of ways to club together many things in a single picture. Just use the same for adding better solutions to your stories.
Animated Business Logos and Tools to Create
Know All About Animated Business Logos and the Best Tools to Create One
An easy yet powerful editor
Numerous effects to choose from
Detailed tutorials provided by the official channel
Just like people, brands and businesses also have their own identities.
If you too want to reap the benefits of an animated business logo, creating an impressive one is important and to get the task done, there are several software and other tools available.
In this article
01 [About animated business logos and how they can help in the growth of the business?](#Part 1)
02 [Tips for making an effective animated business logo](#Part 2)
03 [Types of animated business logo makers](#Part 3)
04 [The best tool to create an animated business logo effortlessly- Wondershare Filmora](#Part 4)
Part 1 About Animated Business Logos and How They Can Help in the Growth of the Business?
An animated logo is a logo that has rich motion graphics. These logos are catchy and get the instant attention of the viewers. A well-created animated business logo not only gives a professional look but also helps in creating awareness about the brand, supports the story of the brand, and enhances visual appearance.
There are several ways in which an animated business logo can be used for the growth of the business. Summarized below are some of the major ones.
01Use animated logos at the start or the end of the videos
An animated logo creates a lasting impression and thus including then in the marketing videos at the starting or the end helps in the business growth. These logos can be added to the videos that are created for internal communication as well as for the public.
02Using animated logos for e-commerce
If your business is related to products, then adding animated logos to the product movies will make them look interesting.
03Use animated logos for YouTube videos
If you are using YouTube videos for your business promotion, ensure to add the animated logos for branding as it makes the videos look different from the other regular ones and thus creates an interest among the viewers.
04Using animated logos for YouTube ads
Using these motion graphic logos as short YouTube ads will work as an effective way for promoting the business and for their growth as well.
05Use animated logos for the films on your website
If you are making videos for your business websites as introduction videos or explainer videos, using animated logos adds a professional and dynamic touch.
06Using animated logos for social media sites
The number of users on social media sites is increasing every day and thus promoting your business on these sites helps you reach a wider audience. So, if you too are planning a video campaign on Facebook, Twitter, Instagram, and other sites use animated logos in the newsfeed.
Part 2 Tips for making an effective an animated business logo
The below-listed tips can help you create an impressive and interesting animated logo for your business.
● Create short animated logos: Animated logos should be short and convey the meaning and purpose of your business and brand. A long video can be boring and the target audience can lose interest and thus they have to be short, immersive, and impactful.
● Create an impression: Create an animated logo that can create a positive impression. Your animated logo needs to match the style of your business and get the interest of the viewers.
● Use the correct animation style: Several animation styles can be used for creating your business logo like 2D, 3D, traditional, and more. Different designs leave a different impact among the viewers and create a different understanding of the brand. Thus, while using the animation style, choose the one that matches your business style.
Part 3 Types of animated business logo makers
If you are looking for created animated logos, there is no dearth of tools. The majority of the editing and animated software can help you get the task done. There is several online and desktop software available using which you can either add your own logo and make an animated version of it or can design an animation from the scratch.
The choice of the tool selection depends on your budget and the features required. Some of the popularly used tools that can be considered are as below.
Popularly Used Tools →
● Renderforest
● Adobe Spark
● Logo Maker Plus
● Animaker
● Viddyoze
Popularly Used Tools →
● Offeo
● Canva
● Design Free Logo
● Tube Arsenal
● MotionDen
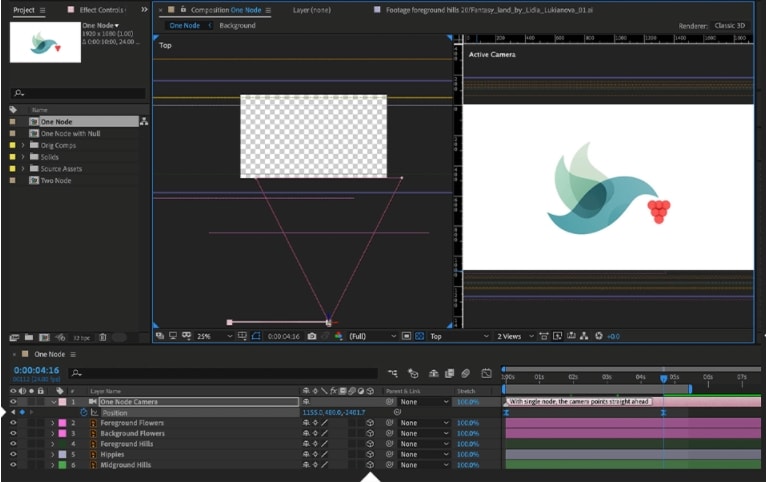
Part 4 The best tool to create an animated business logo effortlessly- Wondershare Filmora
To create animated logos effortlessly and use the best features Wondershare Filmora is an excellent choice. This desktop software can be quickly downloaded and installed on your Windows and Mac after which it can be used for multitasking like editing, creating animations, logos, and much more. The interface is simple and user-friendly which makes the program popular among all user types.
Wondershare Filmora
Power Up Your Story with Filmora. Professional video editing is made easy.
Key features of the software:
● Allows creating different types of animations including animated business logos.
● Allows creating 2D and 3D animated logos.
● Allows creating logos using keyframing for better customization.
● Multiple effects can be added like titles, tiles, warp, masking, distort, lights, flares, and more.
● To further enhance the overall looks of your animation the software offers better control over the colors and other parameters through tools like color wheels, auto-correction, scopes, and more.
● Audio controls are also offered through features like audio compression, audio noise correction, audio sync, transitions, and more.
● Compatible with all the latest Windows and Mac.
Key Takeaways from This Episode
● Animated business logos are an important aspect of any business promotion and marketing strategy.
● An impressive animated logo can help a business grow in several ways and several factors should be considered while creating an animated logo.
● Different types of desktop and online tools for animated business logos are present.
● Wondershare Filmora works as the best animation logo that can create impressive animated logos in no time.


Just like people, brands and businesses also have their own identities.
If you too want to reap the benefits of an animated business logo, creating an impressive one is important and to get the task done, there are several software and other tools available.
In this article
01 [About animated business logos and how they can help in the growth of the business?](#Part 1)
02 [Tips for making an effective animated business logo](#Part 2)
03 [Types of animated business logo makers](#Part 3)
04 [The best tool to create an animated business logo effortlessly- Wondershare Filmora](#Part 4)
Part 1 About Animated Business Logos and How They Can Help in the Growth of the Business?
An animated logo is a logo that has rich motion graphics. These logos are catchy and get the instant attention of the viewers. A well-created animated business logo not only gives a professional look but also helps in creating awareness about the brand, supports the story of the brand, and enhances visual appearance.
There are several ways in which an animated business logo can be used for the growth of the business. Summarized below are some of the major ones.
01Use animated logos at the start or the end of the videos
An animated logo creates a lasting impression and thus including then in the marketing videos at the starting or the end helps in the business growth. These logos can be added to the videos that are created for internal communication as well as for the public.
02Using animated logos for e-commerce
If your business is related to products, then adding animated logos to the product movies will make them look interesting.
03Use animated logos for YouTube videos
If you are using YouTube videos for your business promotion, ensure to add the animated logos for branding as it makes the videos look different from the other regular ones and thus creates an interest among the viewers.
04Using animated logos for YouTube ads
Using these motion graphic logos as short YouTube ads will work as an effective way for promoting the business and for their growth as well.
05Use animated logos for the films on your website
If you are making videos for your business websites as introduction videos or explainer videos, using animated logos adds a professional and dynamic touch.
06Using animated logos for social media sites
The number of users on social media sites is increasing every day and thus promoting your business on these sites helps you reach a wider audience. So, if you too are planning a video campaign on Facebook, Twitter, Instagram, and other sites use animated logos in the newsfeed.
Part 2 Tips for making an effective an animated business logo
The below-listed tips can help you create an impressive and interesting animated logo for your business.
● Create short animated logos: Animated logos should be short and convey the meaning and purpose of your business and brand. A long video can be boring and the target audience can lose interest and thus they have to be short, immersive, and impactful.
● Create an impression: Create an animated logo that can create a positive impression. Your animated logo needs to match the style of your business and get the interest of the viewers.
● Use the correct animation style: Several animation styles can be used for creating your business logo like 2D, 3D, traditional, and more. Different designs leave a different impact among the viewers and create a different understanding of the brand. Thus, while using the animation style, choose the one that matches your business style.
Part 3 Types of animated business logo makers
If you are looking for created animated logos, there is no dearth of tools. The majority of the editing and animated software can help you get the task done. There is several online and desktop software available using which you can either add your own logo and make an animated version of it or can design an animation from the scratch.
The choice of the tool selection depends on your budget and the features required. Some of the popularly used tools that can be considered are as below.
Popularly Used Tools →
● Renderforest
● Adobe Spark
● Logo Maker Plus
● Animaker
● Viddyoze
Popularly Used Tools →
● Offeo
● Canva
● Design Free Logo
● Tube Arsenal
● MotionDen
Part 4 The best tool to create an animated business logo effortlessly- Wondershare Filmora
To create animated logos effortlessly and use the best features Wondershare Filmora is an excellent choice. This desktop software can be quickly downloaded and installed on your Windows and Mac after which it can be used for multitasking like editing, creating animations, logos, and much more. The interface is simple and user-friendly which makes the program popular among all user types.
Wondershare Filmora
Power Up Your Story with Filmora. Professional video editing is made easy.
Key features of the software:
● Allows creating different types of animations including animated business logos.
● Allows creating 2D and 3D animated logos.
● Allows creating logos using keyframing for better customization.
● Multiple effects can be added like titles, tiles, warp, masking, distort, lights, flares, and more.
● To further enhance the overall looks of your animation the software offers better control over the colors and other parameters through tools like color wheels, auto-correction, scopes, and more.
● Audio controls are also offered through features like audio compression, audio noise correction, audio sync, transitions, and more.
● Compatible with all the latest Windows and Mac.
Key Takeaways from This Episode
● Animated business logos are an important aspect of any business promotion and marketing strategy.
● An impressive animated logo can help a business grow in several ways and several factors should be considered while creating an animated logo.
● Different types of desktop and online tools for animated business logos are present.
● Wondershare Filmora works as the best animation logo that can create impressive animated logos in no time.
How to Make a Video a Live Photo 2023
How to Make a Video a Live Photo [2022]
An easy yet powerful editor
Numerous effects to choose from
Detailed tutorials provided by the official channel
Looking forward to turn your videos into live photos? Stay tuned to know how!
In this article
01 [How to Save Live Photos as a Video on iPhone/Ipad/Ipod](#Part 1)
02 [How to Turn a Video Into a Live Photo on iOS/Android](#Part 2)
Part 1 How to Save Live Photos as a Video on iPhone/Ipad/Ipod
Live photos are an amazing utility that allow you to save images as short moving snaps. Creating live photos is among the latest spunk of trendsetter stories, whether shared on social media platforms or created and saved just for fun, these definitely sound and look exciting, but that’s just one among the many things you can experiment on live photos.
Creating live photos takes you to a world of exciting features where you can explore your creativity in a number of ways, one of the easiest being turning live photos to videos. This comes handy when you need to share your live photos on platforms that do not have the compatibility to run live photos. If you are an iPhone user and wish to try your hands on experimenting with live photos, see through the following section of this article to learn how to turn live photo into video:
01Save as Video
Step 1: Launch the Photos App
In your iPhone, launch the ‘Photos’ app and navigate to ‘Albums’. All your live photos are present in the ‘Live Photos’ album.
Step 2: Format Selection
In latest versions (iOS 13v and above), you get a direct ‘Save as Video’ option in the ‘Photos’ application. Just click on that, and your live photo will be instantly saved in your iPhone gallery as a video. Here’s how you can use this feature:
● In the ‘Photos’ application, go to the ‘Live Photos’ album to select and open a desired live photo that you wish to convert to a video.
● Click on the ‘Share’ icon.

● Select ‘Save as Video’ from the drop down menu that displays sharing options.

Your created video will be saved in the ‘Photos’ application, next to the live photo you chose to turn into a video.
02iOS Shortcuts
This is a quicker way to save your live photos as videos in your iPhone. To use this feature, you first need to save the ‘Convert LivePhotos to Video’ shortcut in the ‘Shortcuts App’ gallery of your iPhone. You can do this by opening in your iOS internet browser.
Before using the above link, make sure to enable the ‘Allow Untrusted Shortcuts’ feature in your iPhone settings. You can do this as explained below:
● Reach to the ‘Settings’ application of your iPhone.
● Tap on ‘Shortcuts’ from the app’s welcome screen.
● Enable ‘Allow Untrusted Shortcuts’ with a toggle.

Having done that, here’s what you need to follow:
● Open the ‘Shortcuts’ application in your iOS device and tap the ‘Convert LivePhotos to Video’ shortcut.

● The ‘Live Photos’ album of your device opens up. Make a desired selection.

Your converted video gets automatically saved in the ‘Camera Roll’ folder of the ‘Photos’ application. Open the ‘Recents’ album to view your creation.
Part 2 How to Turn a Video Into a Live Photo on iOS/Android
Converting live photos to videos is fine, but going the other way round is all the more exciting and fun! You can even use these converted live photos as live screen wallpapers for your iOS and Android devices. If you are motivated to take up the excitement, look through the following methods to turn video into live photo:
01iOS Devices
Being an iOS user, you can choose among the following tools to convert video to live photo in your iPad, iPod or iPhone:
● Wondershare Filmora
Wondershare Filmora Video Editor is currently leading the software market among converter utilities that cater to various media conversion needs. This one is a free, smart, quick and convenient conversion tool that assures you of a hassle free video to live photo conversion in just a few clicks. What’s more interesting is, you don’t need to limit yourself with sticking to some particular video format, as Filmora conveniently supports almost all common ones.
Wondershare Filmora
Get started easily with Filmora’s powerful performance, intuitive interface, and countless effects!
Try It Free Try It Free Try It Free Learn More >

● IntoLive
This one is a third party application that allows you to convert videos into live photos, quickly and conveniently. This tool works well with devices having iOS 12.0 and later versions. All you have to do is follow the steps mentioned below:
Step 1:
Download the ‘IntoLive’ application from the Apple App Store.

Step 2:
Launch the same on your iOS device and grant the permission to access its ‘Photos’ Album.

Step 3:
In the ‘Videos’ section, choose the desired video that you wish to turn into a live photo.

Step 4:
An editor window will open up. Here, you can edit (cut, crop, trim, etc.) and add desired effects or filters to your selected video. Click on ‘Make’ at the top right when you finish the editing process.

Step 5:
If you have the paid version of the app, you can take up multiple repeats of your live photo; else you can use the free version with no repeats.

Step 6:
Once you are satisfied with the result, click on ‘Save Live Photo’. This will save your created live photo in your device’s gallery.

02VideoToLive
This is a free converter you can choose to turn video into live photo. This is a quite popular tool among iPhone users worldwide and is suitable for iOS versions 11.2 and later. You also have the liberty to share your created live photos on social media with this converter. Take the following steps to begin the conversion process:

Step 1:
Download the application from the Apple App Store and launch it on your iOS device.
Step 2:
Choose a video from your device gallery to convert it into a live photo.
Step 3:
In the video editor screen, crop the video to the preferred section that has to be converted into live photo. You can add video frames to your edited clip from the upper section of the editor screen.
Step 4:
Click on ‘Convert’ at the top right corner to initiate the conversion process.
03Android Devices
Live photos are undoubtedly known to add spark to your cherished moments, but the notch that puts these off with Android devices is that you can enjoy live photos on these devices only as live wallpapers.
Being an iPhone exclusive utility, Android devices lack the flexibility to capture live images. However, you can see them move on being set as live screen wallpapers. A handy alternative to this is converting a turn video into live photo and use it as live wallpaper. Here’s how you can take up the conversion process:
● TurnLive- Live Wallpaper
This one is a convenient, third party tool that lets you turn video into live photo in just a few quick steps. You can either use this application for free, or upgrade to the paid version to enjoy its premium features. To make amazing live photos from videos using this tool, you need to take up the steps given below:

Step 1: App Installation
To begin, visit the Google Playstore in your Android device and download the TurnLive- Live Wallpaper application. Next, you need install and launch the app in your device and accept its terms of service.
Step 2: Select a Video
Once you are done, click on the ‘Live Photo’ icon in the bottom of the app’s opening screen to reach the video selection page. Here, you need to choose ‘Video to Live Wallpaper’ option and grant the required app permissions to access your device’s camera and gallery. Select a desired video from the ones saved in your device and click ‘Done’ at the top right.
Step 3: Edit Your Video
You will now get directed to the app’s editor window, where you need to trim the selected video within a time frame of 1-5 seconds. To do this, select a cover frame within the clip and click ‘Next’. You can now use the video slider at the bottom to trim the clip. Adding suitable video effects and filters is also possible with this tool.
Step 4: It’s Almost Done!
When you finish editing, click ‘Next’ and choose the number of repeats for the created live photo. Wait for the conversion to finish and click on ‘My Wallpapers’ to view your creation.
Step 5: Download Your Live Photo!
Click ‘Download’ and tap ‘Clear’ in the app’s prompt message to remove your device’s current screen wallpaper. Next, allow the app to access your system settings. Once this finishes, tap ‘Clear’ again to download your creation. You will now get directed to a black screen tagged ‘DayTime LWP’. Click on ‘Set Wallpaper’ in this screen to make your live photo, the current wallpaper of your Android device.
● Video Live Wallpaper
This is another free app that you can use to your videos into amazing live photos in just 4 quick steps. All you need to do is explained in the following steps:
Step 1: download the Application
Download the Video Live Wallpaper application in your Android device from Google Playstore and proceed for its installation and launch.

Step 2: Select Your Video
In the app’s opening screen, click ‘Choose Video’ and grant app permissions to access your device’s media. Browse your video gallery to select a desired video that you wish to convert into a live photo.

Step 3: Edit Your Video
You will now get directed to the app’s editor screen. Here, you can explore your editing creativity to edit the selected video. Once you are happy, click the picture icon at the top right corner.

Step 4: Your Live Wallpaper is Ready!
To set the created live photo as your device screen wallpaper, select ‘Set as Wallpaper’ at the bottom right.

● Key Takeaways from This Episode →
● From cherishing moments to sharing them on social media, live photos can do it all.
● Being an iPhone exclusive utility, you need to create these from videos to enjoy them on other platforms and devices.
● Filmora is the best video to live photo converters, available as an easy, quick and convenient conversion tool.
Looking forward to turn your videos into live photos? Stay tuned to know how!
In this article
01 [How to Save Live Photos as a Video on iPhone/Ipad/Ipod](#Part 1)
02 [How to Turn a Video Into a Live Photo on iOS/Android](#Part 2)
Part 1 How to Save Live Photos as a Video on iPhone/Ipad/Ipod
Live photos are an amazing utility that allow you to save images as short moving snaps. Creating live photos is among the latest spunk of trendsetter stories, whether shared on social media platforms or created and saved just for fun, these definitely sound and look exciting, but that’s just one among the many things you can experiment on live photos.
Creating live photos takes you to a world of exciting features where you can explore your creativity in a number of ways, one of the easiest being turning live photos to videos. This comes handy when you need to share your live photos on platforms that do not have the compatibility to run live photos. If you are an iPhone user and wish to try your hands on experimenting with live photos, see through the following section of this article to learn how to turn live photo into video:
01Save as Video
Step 1: Launch the Photos App
In your iPhone, launch the ‘Photos’ app and navigate to ‘Albums’. All your live photos are present in the ‘Live Photos’ album.
Step 2: Format Selection
In latest versions (iOS 13v and above), you get a direct ‘Save as Video’ option in the ‘Photos’ application. Just click on that, and your live photo will be instantly saved in your iPhone gallery as a video. Here’s how you can use this feature:
● In the ‘Photos’ application, go to the ‘Live Photos’ album to select and open a desired live photo that you wish to convert to a video.
● Click on the ‘Share’ icon.
● Select ‘Save as Video’ from the drop down menu that displays sharing options.
Your created video will be saved in the ‘Photos’ application, next to the live photo you chose to turn into a video.
02iOS Shortcuts
This is a quicker way to save your live photos as videos in your iPhone. To use this feature, you first need to save the ‘Convert LivePhotos to Video’ shortcut in the ‘Shortcuts App’ gallery of your iPhone. You can do this by opening in your iOS internet browser.
Before using the above link, make sure to enable the ‘Allow Untrusted Shortcuts’ feature in your iPhone settings. You can do this as explained below:
● Reach to the ‘Settings’ application of your iPhone.
● Tap on ‘Shortcuts’ from the app’s welcome screen.
● Enable ‘Allow Untrusted Shortcuts’ with a toggle.
Having done that, here’s what you need to follow:
● Open the ‘Shortcuts’ application in your iOS device and tap the ‘Convert LivePhotos to Video’ shortcut.
● The ‘Live Photos’ album of your device opens up. Make a desired selection.
Your converted video gets automatically saved in the ‘Camera Roll’ folder of the ‘Photos’ application. Open the ‘Recents’ album to view your creation.
Part 2 How to Turn a Video Into a Live Photo on iOS/Android
Converting live photos to videos is fine, but going the other way round is all the more exciting and fun! You can even use these converted live photos as live screen wallpapers for your iOS and Android devices. If you are motivated to take up the excitement, look through the following methods to turn video into live photo:
01iOS Devices
Being an iOS user, you can choose among the following tools to convert video to live photo in your iPad, iPod or iPhone:
● Wondershare Filmora
Wondershare Filmora Video Editor is currently leading the software market among converter utilities that cater to various media conversion needs. This one is a free, smart, quick and convenient conversion tool that assures you of a hassle free video to live photo conversion in just a few clicks. What’s more interesting is, you don’t need to limit yourself with sticking to some particular video format, as Filmora conveniently supports almost all common ones.
Wondershare Filmora
Get started easily with Filmora’s powerful performance, intuitive interface, and countless effects!
Try It Free Try It Free Try It Free Learn More >
● IntoLive
This one is a third party application that allows you to convert videos into live photos, quickly and conveniently. This tool works well with devices having iOS 12.0 and later versions. All you have to do is follow the steps mentioned below:
Step 1:
Download the ‘IntoLive’ application from the Apple App Store.
Step 2:
Launch the same on your iOS device and grant the permission to access its ‘Photos’ Album.
Step 3:
In the ‘Videos’ section, choose the desired video that you wish to turn into a live photo.
Step 4:
An editor window will open up. Here, you can edit (cut, crop, trim, etc.) and add desired effects or filters to your selected video. Click on ‘Make’ at the top right when you finish the editing process.
Step 5:
If you have the paid version of the app, you can take up multiple repeats of your live photo; else you can use the free version with no repeats.
Step 6:
Once you are satisfied with the result, click on ‘Save Live Photo’. This will save your created live photo in your device’s gallery.
02VideoToLive
This is a free converter you can choose to turn video into live photo. This is a quite popular tool among iPhone users worldwide and is suitable for iOS versions 11.2 and later. You also have the liberty to share your created live photos on social media with this converter. Take the following steps to begin the conversion process:
Step 1:
Download the application from the Apple App Store and launch it on your iOS device.
Step 2:
Choose a video from your device gallery to convert it into a live photo.
Step 3:
In the video editor screen, crop the video to the preferred section that has to be converted into live photo. You can add video frames to your edited clip from the upper section of the editor screen.
Step 4:
Click on ‘Convert’ at the top right corner to initiate the conversion process.
03Android Devices
Live photos are undoubtedly known to add spark to your cherished moments, but the notch that puts these off with Android devices is that you can enjoy live photos on these devices only as live wallpapers.
Being an iPhone exclusive utility, Android devices lack the flexibility to capture live images. However, you can see them move on being set as live screen wallpapers. A handy alternative to this is converting a turn video into live photo and use it as live wallpaper. Here’s how you can take up the conversion process:
● TurnLive- Live Wallpaper
This one is a convenient, third party tool that lets you turn video into live photo in just a few quick steps. You can either use this application for free, or upgrade to the paid version to enjoy its premium features. To make amazing live photos from videos using this tool, you need to take up the steps given below:
Step 1: App Installation
To begin, visit the Google Playstore in your Android device and download the TurnLive- Live Wallpaper application. Next, you need install and launch the app in your device and accept its terms of service.
Step 2: Select a Video
Once you are done, click on the ‘Live Photo’ icon in the bottom of the app’s opening screen to reach the video selection page. Here, you need to choose ‘Video to Live Wallpaper’ option and grant the required app permissions to access your device’s camera and gallery. Select a desired video from the ones saved in your device and click ‘Done’ at the top right.
Step 3: Edit Your Video
You will now get directed to the app’s editor window, where you need to trim the selected video within a time frame of 1-5 seconds. To do this, select a cover frame within the clip and click ‘Next’. You can now use the video slider at the bottom to trim the clip. Adding suitable video effects and filters is also possible with this tool.
Step 4: It’s Almost Done!
When you finish editing, click ‘Next’ and choose the number of repeats for the created live photo. Wait for the conversion to finish and click on ‘My Wallpapers’ to view your creation.
Step 5: Download Your Live Photo!
Click ‘Download’ and tap ‘Clear’ in the app’s prompt message to remove your device’s current screen wallpaper. Next, allow the app to access your system settings. Once this finishes, tap ‘Clear’ again to download your creation. You will now get directed to a black screen tagged ‘DayTime LWP’. Click on ‘Set Wallpaper’ in this screen to make your live photo, the current wallpaper of your Android device.
● Video Live Wallpaper
This is another free app that you can use to your videos into amazing live photos in just 4 quick steps. All you need to do is explained in the following steps:
Step 1: download the Application
Download the Video Live Wallpaper application in your Android device from Google Playstore and proceed for its installation and launch.
Step 2: Select Your Video
In the app’s opening screen, click ‘Choose Video’ and grant app permissions to access your device’s media. Browse your video gallery to select a desired video that you wish to convert into a live photo.
Step 3: Edit Your Video
You will now get directed to the app’s editor screen. Here, you can explore your editing creativity to edit the selected video. Once you are happy, click the picture icon at the top right corner.
Step 4: Your Live Wallpaper is Ready!
To set the created live photo as your device screen wallpaper, select ‘Set as Wallpaper’ at the bottom right.
● Key Takeaways from This Episode →
● From cherishing moments to sharing them on social media, live photos can do it all.
● Being an iPhone exclusive utility, you need to create these from videos to enjoy them on other platforms and devices.
● Filmora is the best video to live photo converters, available as an easy, quick and convenient conversion tool.
How to Make Your Characters Interactive in Unity Animation Rigging
Learn How to Make Your Characters Interactive in Unity Animation Rigging
An easy yet powerful editor
Numerous effects to choose from
Detailed tutorials provided by the official channel
Animation is one such aspect that is formed from the integration of several varied factors and processes. One of the most vital ones is the process of rigging. Thus, we will be discussing Unity character rigging as Unity is one of the most efficient platforms for animation.
Additionally, we will introduce you to one of the best tools you can use to edit videos and nurture the creative skills you carry in yourself. So, without any further delay, let us start our discussion.
In this article
01 [What is Unity Rigging?](#Part 1)
02 [Is It Better to Rig in Unity or Blender?](#Part 2)
03 [How To Use Animation Rigging In Unity](#Part 3)
Part 1 What is Unity Rigging?
To understand what Unity rigging is, we must start our discussion first by discussing rigging in animation. In animation, rigging is the process in which your animation characters are separated into two parts. One is the mesh-like structure of the characters. And the other is the skeletal structure given to the characters.
You integrate bones and joints and join them accordingly in the characters present in your animation. It is similar to the presence of the human skeletal system. Moreover, just like the skeletal system in humans helps in the movements of the different parts of the body, the bone and joint structure through rigging also enables the characters in animation to move.
Therefore, we can say that rigging is the process by which you can enable your characters’ in animation to move and show different facial expressions, etc. So, it is obvious that without the process of rigging, the animation is impossible, which makes rigging one of the most crucial aspects of animation.
Now that we know what rigging in animation is, we will be discussing what is animation rigging in Unity. Unity technologies have developed a cross-platform gaming engine called ‘Unity’. And this platform also offers the ones interested in animation to learn animation rigging.
The Unity platform offers robust and effective tools for animation rigging. And these tools assist the animators to create real-time rigs in Unity. Most commonly, the set of tools in Unity for rigging is used on the characters. But, if one likes, they can also use the tools on ani Game Object that includes animations and skeletons.
Therefore, when you utilise the platform of Unity or the toolsets of Unity to perform rigging in animation, it can be referred to as unity rigging. It is one of the most powerful and renowned platforms for animation, creating the finest and most professional animation creations.

Part 2 Is It Better to Rig in Unity or Blender?
Another platform that can ideally assist you in animation is Blender. A common question arises as to whether one should choose blender rigging over Unity or vice versa. We have laid down the following table to compare the different features of Blender with that of Unity.
| | Unity | Blender | |
| ——————- | ————————————————————————————————————————- | ————————————————————————————————————————————— |
| About | It is a game engine that enables you in creating human-machine interfaces, AR simulations, customize splash screens, etc. | It is a computer graphics software that is open source and is mainly used for creating 3D models. |
| Types Supported | Supports 3D | |
| Best Purpose | Ideal for film, architecture, automotive, transportation, and other industries | Ideal for animation and design that assists in VFX, simulation, organizations of all sizes with rendering, modeling, and video editing. |
There are many features that Blender lacks, but Unity includes. The features included in Unity but are absent in Blender are as follows.
● Drawing
● Games
● In-Game Analytics
● Multi-player Gaming Network
● Player Management
● Virtual Reality
● IT Asset Management
● Prototype Creation
Therefore, it is preferred to opt for Unity rigging than Blender rigging, as Blender lacks a considerable number of features.
Part 3 How To Use Animation Rigging In Unity
Now, we will be introducing you to the different steps that will help you in unity rig animation. The following list includes the steps in the sequence that, when you deploy, will help you rig in the platform of Unity.
Step 1Installation
The first step is to install the “animation rigging package” of Unity. You will get the animation rigging package in the “Package Manager”. You will be able to avail of this animation package in Unity 2019.1 and above.
This package offers you a library that consists of rig constraints. And this library of rig constraints enables you to create procedural motion during the runtime. And the general term used for this is called “runtime rigging”.
The “Asset’s Animator Root” consist of the “Rig Builder Component”, which is the source where the rigs are accumulated. The rigs here are the constraints put together in groups. With these steps you will be able to create Unity humanoid rig that will make your animation creations look the finest, most realistic and most professional.

Step 2Rig Builder set-up
After installing the unity animation rigging package, the next step is to set up the rig builder. You will have to use the “Animator component” in this step. Using the “Animator component”, integrate the “Rig Builder component” with the “GameObject”. Generally, in the hierarchy of rig, it is the topmost “Transform”.
Then, you will have to make a new child GameObject. To which, you will have to integrate the “Rig component”. After this step, you need to access the “Animator root”, where you will find the “Rig Builder component”. In the “Rig Builder component”, you need to assign the “Rig to the Rig Layers” list.
It will complete the task of creating the most basic rig. The further steps will help you install the required behaviours in the character or characters.

Step 3Bone Rendering
Whether it is unity rigging or 3D, bone rendering is the most crucial step to enable your animation characters to gain movement. The “Unity Editor” will help you interact and work with the character’s skeleton in the “Scene view.”
You can add “Transform” lists and then display them in various visual styles with the help of the “Bone Renderer: component. It enables you to integrate numerous “Bone Renderer” components, each of them having its unique style of display. As a result, gameplay debugging, rig setup, keyframing, and other artist workflows are facilitated.

Step 4Adding Rig Effectors
This step enables one to add Gizmos to Transforms, facilitating selection and visualisation. The “Effector” are invisible during “Game View”, and this step enhances the quality of the character animation.

Step 5Managing the Rig Constraints
Your characters gain “runtime animation” through the rig constraints, and thus, these are the building blocks facilitating assembling the rigs. The rigs are combined in multiple and varied ways to obtain the desired motions and movements in the characters.

Step 6Working with the Two Bone IK Constraint
The first step here is to rest your character to the “Bind Pose.” you can do so by opting for the “Menu Bar” and selecting the “Animation Rigging” option. You will find the “Bind Pose” option there, and you will have to click on it.

Then add a child GameObject below “Character Rig”. Then add a new child GameObject below “Right Arm IK”. Integrate two new child GameObjects beneath the “Right Arm Ik” by naming the first and the second one “RH IK Target” and “RH IK Hint”, respectively.

Integrate the “Rig Builder Component” with the “Animator root GameObject”. Then proceed with selecting the “CharecterRig GameObject” and integrating a “Rig Component”. Select “Two Bone IK Contrainst” to the “Right Arm IK.”

Then, incorporate a “Box Effector” to the RH IK Target. Integrate a “Ball Effector” to the “RH IK Hint”.

Then select the “RH IK Hint” and “Right Elbow”. Select “Animation Rigging>align Transform”. Move away from the “Ball Effector”. Select the “Right Arm IK GameObject” and integrate the required bones. Integrate the Character Rig GameObkect with Rig Layer list by selecting the option of “Ninja”. Then press “Play” and see your creation come to life.

Now, you might as well want to showcase your creativity in editing and video making. For that, we have the best tool for you- FILMORA. This is the finest video editing tool with the most proficient features included in the following list.
● Over 8effects for editing videos
● Keyboard shortcut, audio ducking colour, colour match
● You can also change the speed of the videos
● Every professional-level video editing tool that you need is included in Wondershare Filmora Video Editor
The features are innumerable and so can not be possibly listed differently. So, you can readily try out this tool yourself, and if you do not want to purchase in the first instance, you can easily avail of its free trial. Although, we can guarantee that after using its free trial, you would definitely want to use every avail feature of the tool!

For Win 7 or later (64-bit)
For macOS 10.12 or later
● Key Takeaways from This Episode →
● A short introduction to the process of rigging, with which we proceeded on describing and understanding what unity rigging is. We also stated how important it is in the sphere of animation.
● Next, we compared rigging in Blender and Unity. After comparing the different factors, we decided that it is optimum to choose Unity for character rigging because of the lack of features in Blender.
● Lastly, we introduced you to the best video editing tool that will equally assist you in nurturing your creativity, video editing, and animation skills.
Animation is one such aspect that is formed from the integration of several varied factors and processes. One of the most vital ones is the process of rigging. Thus, we will be discussing Unity character rigging as Unity is one of the most efficient platforms for animation.
Additionally, we will introduce you to one of the best tools you can use to edit videos and nurture the creative skills you carry in yourself. So, without any further delay, let us start our discussion.
In this article
01 [What is Unity Rigging?](#Part 1)
02 [Is It Better to Rig in Unity or Blender?](#Part 2)
03 [How To Use Animation Rigging In Unity](#Part 3)
Part 1 What is Unity Rigging?
To understand what Unity rigging is, we must start our discussion first by discussing rigging in animation. In animation, rigging is the process in which your animation characters are separated into two parts. One is the mesh-like structure of the characters. And the other is the skeletal structure given to the characters.
You integrate bones and joints and join them accordingly in the characters present in your animation. It is similar to the presence of the human skeletal system. Moreover, just like the skeletal system in humans helps in the movements of the different parts of the body, the bone and joint structure through rigging also enables the characters in animation to move.
Therefore, we can say that rigging is the process by which you can enable your characters’ in animation to move and show different facial expressions, etc. So, it is obvious that without the process of rigging, the animation is impossible, which makes rigging one of the most crucial aspects of animation.
Now that we know what rigging in animation is, we will be discussing what is animation rigging in Unity. Unity technologies have developed a cross-platform gaming engine called ‘Unity’. And this platform also offers the ones interested in animation to learn animation rigging.
The Unity platform offers robust and effective tools for animation rigging. And these tools assist the animators to create real-time rigs in Unity. Most commonly, the set of tools in Unity for rigging is used on the characters. But, if one likes, they can also use the tools on ani Game Object that includes animations and skeletons.
Therefore, when you utilise the platform of Unity or the toolsets of Unity to perform rigging in animation, it can be referred to as unity rigging. It is one of the most powerful and renowned platforms for animation, creating the finest and most professional animation creations.
Part 2 Is It Better to Rig in Unity or Blender?
Another platform that can ideally assist you in animation is Blender. A common question arises as to whether one should choose blender rigging over Unity or vice versa. We have laid down the following table to compare the different features of Blender with that of Unity.
| | Unity | Blender | |
| ——————- | ————————————————————————————————————————- | ————————————————————————————————————————————— |
| About | It is a game engine that enables you in creating human-machine interfaces, AR simulations, customize splash screens, etc. | It is a computer graphics software that is open source and is mainly used for creating 3D models. |
| Types Supported | Supports 3D | |
| Best Purpose | Ideal for film, architecture, automotive, transportation, and other industries | Ideal for animation and design that assists in VFX, simulation, organizations of all sizes with rendering, modeling, and video editing. |
There are many features that Blender lacks, but Unity includes. The features included in Unity but are absent in Blender are as follows.
● Drawing
● Games
● In-Game Analytics
● Multi-player Gaming Network
● Player Management
● Virtual Reality
● IT Asset Management
● Prototype Creation
Therefore, it is preferred to opt for Unity rigging than Blender rigging, as Blender lacks a considerable number of features.
Part 3 How To Use Animation Rigging In Unity
Now, we will be introducing you to the different steps that will help you in unity rig animation. The following list includes the steps in the sequence that, when you deploy, will help you rig in the platform of Unity.
Step 1Installation
The first step is to install the “animation rigging package” of Unity. You will get the animation rigging package in the “Package Manager”. You will be able to avail of this animation package in Unity 2019.1 and above.
This package offers you a library that consists of rig constraints. And this library of rig constraints enables you to create procedural motion during the runtime. And the general term used for this is called “runtime rigging”.
The “Asset’s Animator Root” consist of the “Rig Builder Component”, which is the source where the rigs are accumulated. The rigs here are the constraints put together in groups. With these steps you will be able to create Unity humanoid rig that will make your animation creations look the finest, most realistic and most professional.
Step 2Rig Builder set-up
After installing the unity animation rigging package, the next step is to set up the rig builder. You will have to use the “Animator component” in this step. Using the “Animator component”, integrate the “Rig Builder component” with the “GameObject”. Generally, in the hierarchy of rig, it is the topmost “Transform”.
Then, you will have to make a new child GameObject. To which, you will have to integrate the “Rig component”. After this step, you need to access the “Animator root”, where you will find the “Rig Builder component”. In the “Rig Builder component”, you need to assign the “Rig to the Rig Layers” list.
It will complete the task of creating the most basic rig. The further steps will help you install the required behaviours in the character or characters.
Step 3Bone Rendering
Whether it is unity rigging or 3D, bone rendering is the most crucial step to enable your animation characters to gain movement. The “Unity Editor” will help you interact and work with the character’s skeleton in the “Scene view.”
You can add “Transform” lists and then display them in various visual styles with the help of the “Bone Renderer: component. It enables you to integrate numerous “Bone Renderer” components, each of them having its unique style of display. As a result, gameplay debugging, rig setup, keyframing, and other artist workflows are facilitated.
Step 4Adding Rig Effectors
This step enables one to add Gizmos to Transforms, facilitating selection and visualisation. The “Effector” are invisible during “Game View”, and this step enhances the quality of the character animation.
Step 5Managing the Rig Constraints
Your characters gain “runtime animation” through the rig constraints, and thus, these are the building blocks facilitating assembling the rigs. The rigs are combined in multiple and varied ways to obtain the desired motions and movements in the characters.
Step 6Working with the Two Bone IK Constraint
The first step here is to rest your character to the “Bind Pose.” you can do so by opting for the “Menu Bar” and selecting the “Animation Rigging” option. You will find the “Bind Pose” option there, and you will have to click on it.
Then add a child GameObject below “Character Rig”. Then add a new child GameObject below “Right Arm IK”. Integrate two new child GameObjects beneath the “Right Arm Ik” by naming the first and the second one “RH IK Target” and “RH IK Hint”, respectively.
Integrate the “Rig Builder Component” with the “Animator root GameObject”. Then proceed with selecting the “CharecterRig GameObject” and integrating a “Rig Component”. Select “Two Bone IK Contrainst” to the “Right Arm IK.”
Then, incorporate a “Box Effector” to the RH IK Target. Integrate a “Ball Effector” to the “RH IK Hint”.
Then select the “RH IK Hint” and “Right Elbow”. Select “Animation Rigging>align Transform”. Move away from the “Ball Effector”. Select the “Right Arm IK GameObject” and integrate the required bones. Integrate the Character Rig GameObkect with Rig Layer list by selecting the option of “Ninja”. Then press “Play” and see your creation come to life.
Now, you might as well want to showcase your creativity in editing and video making. For that, we have the best tool for you- FILMORA. This is the finest video editing tool with the most proficient features included in the following list.
● Over 8effects for editing videos
● Keyboard shortcut, audio ducking colour, colour match
● You can also change the speed of the videos
● Every professional-level video editing tool that you need is included in Wondershare Filmora Video Editor
The features are innumerable and so can not be possibly listed differently. So, you can readily try out this tool yourself, and if you do not want to purchase in the first instance, you can easily avail of its free trial. Although, we can guarantee that after using its free trial, you would definitely want to use every avail feature of the tool!
For Win 7 or later (64-bit)
For macOS 10.12 or later
● Key Takeaways from This Episode →
● A short introduction to the process of rigging, with which we proceeded on describing and understanding what unity rigging is. We also stated how important it is in the sphere of animation.
● Next, we compared rigging in Blender and Unity. After comparing the different factors, we decided that it is optimum to choose Unity for character rigging because of the lack of features in Blender.
● Lastly, we introduced you to the best video editing tool that will equally assist you in nurturing your creativity, video editing, and animation skills.
Create Animated Social Media Posts in Canva
Versatile Video Editor - Wondershare Filmora
An easy yet powerful editor
Numerous effects to choose from
Detailed tutorials provided by the official channel
Eye-catching social media posts are an excellent, attention-grabbing way to make your ideal clients stop scrolling. Today, we’ll describe how to create animated social media posts through Canva posts entirely free and without any design experience required on Canva.
Level up your next social media campaign by adding beautifully designed graphics! You can choose from our library of professionally designed Canva layouts for Facebook, Pinterest, Twitter, Instagram, and more.
Without any further ado, let’s get into the process as follows!
In this article
01 [Which social media animated posts can be created on Canva?](#Part 1)
02 [What Canva can help with animated social media posts?](#Part 2)
03 [Steps to create animated social media pictures in Canva](#Part 3)
04 [Steps to create animated social media videos in Canva](#Part 4)
Part 1 Which social media animated posts can be created on Canva?
With the latest Canva Pro feature, you can go for Canva Animator!
Yes, you can easily create animated social media posts via Canva, like Facebook stories or animated Instagram stories. And, you can also create ads for any other social media platform using its Custom Design feature.
It consists of ready-made templates for Facebook, Twitter, Instagram, and more.
To explore the entire animated social media templates, visit the Canva official website, log in, and type in the vibrant social media to see different options below.

All of the templates that will come upon Canva are fully customizable as per your requirements. If you prefer, you can also select a blank animated story template, which is probably the first among these options.
Part 2 What Canva can help with animated social media posts?
As already discussed, Canva consists of thousands of templates to choose from among the category of animated social media posts. Moreover, there are lots of free as well as paid templates.
Another thing that Canva can help you with these templates is complete customization. You can easily customize the entire template ranging from its colors selection to images to elements etc. And, you can even remove aspects if you don’t like anything among the template designs.
Understand the pros of Canva to get our point better as follows:
Canva provides a range of features due to which has gained popularity among millions of people. The benefits of using Canva are −
1. Free Design Platform
Canva is free to use platform for everyone. You can use it for creating attention-grabbing designs for marketing campaigns, social media, or projects.
There are certain features in Canva that are useful for professionals. You can get Canva Pro to access those features with a premium library of stock photos, shapes, fonts, and templates.
You can also go for in-app purchases if you are not looking to purchase the Pro version.
2. No skills or experience required
To use Canva, you don’t need any prior experience as a graphic designer. You can swap between images and fonts to create a professional design with many layouts and tools available.
3. Ease of use with multiple templates and fonts
Canva has a library of different backgrounds, images, templates, fonts, stickers to ensure that you get outstanding outcomes. You can create an engaging design in just a few clicks with these tools. The only thing you need is creativity.

4. Endless options
Canva has every digital design option covered, from Pinterest and Facebook posts to Resume, e−book

5. User−friendly interface
The Canva’s layout is pretty simple to use.
On the design page of Canva, there are the grids for templates, photos, stickers, and background on the left-hand side. Above the design are the color palettes, font tabs, and other formatting tools. You can use these tools with the drag and drop editor in your design in a few clicks.

6. Create a team
You can make your Canva team so that they can have access to the designs. You can determine the kind of access your team members or employees have through the shareable links to make edits.

Part 3 Steps to create animated social media pictures in Canva
Unleash your creativity by animating your design pages, elements, and text.
Make or open an existing design.
- Hit to choose the page, element, or text box that you wish to animate.
- Once you hit the Animate tab above the editor on the toolbar, you will see the displayed options on the side panel.
- Please hover your mouse over it to preview an option. Then, you’ll see your design animate.
- Click on it to apply.
- For pages: To control the animation timing, click to select the page, and then click on the stopwatch icon above the editor.
- Download your design in GIF or video format.
You can also directly share them on social media or schedule them for later.
Part 4 Steps to create animated social media videos in Canva
1. Select your template
Sign in to Canva, then choose and make your social media story template. There are two vastly different ways to explore this: You can either select “Create a design” at the top or go for a particular template to get the ideal dimensions.
2. Animate your video
Here’s where the fun begins! Now that you are ready to start editing your selected template, you can add animated and unique elements to your story in three various ways.
- Add a video
You’re ready to add in your video once you’ve chosen your template! Upload or select any video you might want to use and drag it into a placeholder on your story chosen template. If needed, adjust the size and positioning until it fits.
- Animated design elements
Another option to animate your social media posts videos is through the Elements feature in Canva by choosing the “Stickers” tab.
You can either enter your requirement in the search bar or scroll through Canva’s huge graphics and enter “animated {insert the word you’re searching for, i.e., lines, arrows}. Then, you can drag and drop them right into your design.
There are specific search terms for your reference: Animated Sparkle, Animated Arrow, Animated Word, and Animated Line.
- Use the Animate button.
There’s an “Animate” button you’ll see at the top when you’re in your design. Hit on the page you wish to animate, and the Animate tab will pop up on the top left.
Use these three features to create an animated video individually or all together – they’ll be sure to up-level your stories in a fun and unique way.
3. Preview and Download
You can preview your animated stories once you finish the action by hitting the “Play” tab at the top of your screen.
There you have your Canva animated social media creation!
For quick reference, be sure to download my Animated Canva Elements document, all my favorite animated elements. Head to the video to grab them!
As you know how to create an animation and the steps needed, you must also be aware of one of the best editing software available.
Here we recommend using Filmora. You can use it to create compelling animation videos than the animated social media on Canva posts so that the animation will come out smooth and natural by adding keyframes. You are just required to frame a white plane to begin creating animation. Despite this, its audio mixer and color correction editing elements will increase your animation video to a new level. Download it to have a try (Free)!
Wondershare Filmora
Get started easily with Filmora’s powerful performance, intuitive interface, and countless effects!
Try It Free Try It Free Try It Free Learn More >
AI Portrait – The best feature of Wondershare Filmora for gameplay editing
The AI Portrait is a new add-on in Wondershare Filmora. It can easily remove video backgrounds without using a green screen or chroma key, allowing you to add borders, glitch effects, pixelated, noise, or segmentation video effects.

Conclusion
And that, my friends, is how you can create your unique animated graphics quickly and easily. So, now it’s your turn! With our above tutorial, you can now permit yourself to make and craft your first and exclusive Canva animated GIFs for social media!
Besides, do not forget to try out the Wondershare FilmorPro for any video editing that you may need for your animated social media videos via Canva.
I can’t wait to hear all about it. See you next time.
Eye-catching social media posts are an excellent, attention-grabbing way to make your ideal clients stop scrolling. Today, we’ll describe how to create animated social media posts through Canva posts entirely free and without any design experience required on Canva.
Level up your next social media campaign by adding beautifully designed graphics! You can choose from our library of professionally designed Canva layouts for Facebook, Pinterest, Twitter, Instagram, and more.
Without any further ado, let’s get into the process as follows!
In this article
01 [Which social media animated posts can be created on Canva?](#Part 1)
02 [What Canva can help with animated social media posts?](#Part 2)
03 [Steps to create animated social media pictures in Canva](#Part 3)
04 [Steps to create animated social media videos in Canva](#Part 4)
Part 1 Which social media animated posts can be created on Canva?
With the latest Canva Pro feature, you can go for Canva Animator!
Yes, you can easily create animated social media posts via Canva, like Facebook stories or animated Instagram stories. And, you can also create ads for any other social media platform using its Custom Design feature.
It consists of ready-made templates for Facebook, Twitter, Instagram, and more.
To explore the entire animated social media templates, visit the Canva official website, log in, and type in the vibrant social media to see different options below.
All of the templates that will come upon Canva are fully customizable as per your requirements. If you prefer, you can also select a blank animated story template, which is probably the first among these options.
Part 2 What Canva can help with animated social media posts?
As already discussed, Canva consists of thousands of templates to choose from among the category of animated social media posts. Moreover, there are lots of free as well as paid templates.
Another thing that Canva can help you with these templates is complete customization. You can easily customize the entire template ranging from its colors selection to images to elements etc. And, you can even remove aspects if you don’t like anything among the template designs.
Understand the pros of Canva to get our point better as follows:
Canva provides a range of features due to which has gained popularity among millions of people. The benefits of using Canva are −
1. Free Design Platform
Canva is free to use platform for everyone. You can use it for creating attention-grabbing designs for marketing campaigns, social media, or projects.
There are certain features in Canva that are useful for professionals. You can get Canva Pro to access those features with a premium library of stock photos, shapes, fonts, and templates.
You can also go for in-app purchases if you are not looking to purchase the Pro version.
2. No skills or experience required
To use Canva, you don’t need any prior experience as a graphic designer. You can swap between images and fonts to create a professional design with many layouts and tools available.
3. Ease of use with multiple templates and fonts
Canva has a library of different backgrounds, images, templates, fonts, stickers to ensure that you get outstanding outcomes. You can create an engaging design in just a few clicks with these tools. The only thing you need is creativity.
4. Endless options
Canva has every digital design option covered, from Pinterest and Facebook posts to Resume, e−book
5. User−friendly interface
The Canva’s layout is pretty simple to use.
On the design page of Canva, there are the grids for templates, photos, stickers, and background on the left-hand side. Above the design are the color palettes, font tabs, and other formatting tools. You can use these tools with the drag and drop editor in your design in a few clicks.
6. Create a team
You can make your Canva team so that they can have access to the designs. You can determine the kind of access your team members or employees have through the shareable links to make edits.
Part 3 Steps to create animated social media pictures in Canva
Unleash your creativity by animating your design pages, elements, and text.
Make or open an existing design.
- Hit to choose the page, element, or text box that you wish to animate.
- Once you hit the Animate tab above the editor on the toolbar, you will see the displayed options on the side panel.
- Please hover your mouse over it to preview an option. Then, you’ll see your design animate.
- Click on it to apply.
- For pages: To control the animation timing, click to select the page, and then click on the stopwatch icon above the editor.
- Download your design in GIF or video format.
You can also directly share them on social media or schedule them for later.
Part 4 Steps to create animated social media videos in Canva
1. Select your template
Sign in to Canva, then choose and make your social media story template. There are two vastly different ways to explore this: You can either select “Create a design” at the top or go for a particular template to get the ideal dimensions.
2. Animate your video
Here’s where the fun begins! Now that you are ready to start editing your selected template, you can add animated and unique elements to your story in three various ways.
- Add a video
You’re ready to add in your video once you’ve chosen your template! Upload or select any video you might want to use and drag it into a placeholder on your story chosen template. If needed, adjust the size and positioning until it fits.
- Animated design elements
Another option to animate your social media posts videos is through the Elements feature in Canva by choosing the “Stickers” tab.
You can either enter your requirement in the search bar or scroll through Canva’s huge graphics and enter “animated {insert the word you’re searching for, i.e., lines, arrows}. Then, you can drag and drop them right into your design.
There are specific search terms for your reference: Animated Sparkle, Animated Arrow, Animated Word, and Animated Line.
- Use the Animate button.
There’s an “Animate” button you’ll see at the top when you’re in your design. Hit on the page you wish to animate, and the Animate tab will pop up on the top left.
Use these three features to create an animated video individually or all together – they’ll be sure to up-level your stories in a fun and unique way.
3. Preview and Download
You can preview your animated stories once you finish the action by hitting the “Play” tab at the top of your screen.
There you have your Canva animated social media creation!
For quick reference, be sure to download my Animated Canva Elements document, all my favorite animated elements. Head to the video to grab them!
As you know how to create an animation and the steps needed, you must also be aware of one of the best editing software available.
Here we recommend using Filmora. You can use it to create compelling animation videos than the animated social media on Canva posts so that the animation will come out smooth and natural by adding keyframes. You are just required to frame a white plane to begin creating animation. Despite this, its audio mixer and color correction editing elements will increase your animation video to a new level. Download it to have a try (Free)!
Wondershare Filmora
Get started easily with Filmora’s powerful performance, intuitive interface, and countless effects!
Try It Free Try It Free Try It Free Learn More >
AI Portrait – The best feature of Wondershare Filmora for gameplay editing
The AI Portrait is a new add-on in Wondershare Filmora. It can easily remove video backgrounds without using a green screen or chroma key, allowing you to add borders, glitch effects, pixelated, noise, or segmentation video effects.
Conclusion
And that, my friends, is how you can create your unique animated graphics quickly and easily. So, now it’s your turn! With our above tutorial, you can now permit yourself to make and craft your first and exclusive Canva animated GIFs for social media!
Besides, do not forget to try out the Wondershare FilmorPro for any video editing that you may need for your animated social media videos via Canva.
I can’t wait to hear all about it. See you next time.
Also read:
- Updated 2024 Approved 12 Captivating Websites with Triggered Animate on Scroll Examples
- 2024 Approved 10 Popular Cartoon Characters That You Wont Want to Miss
- OBS Animated Lower Thirds Alternatives
- Updated Best GIF Croppers How to Crop an Animated GIF
- Updated Top 3 Ways to Create Gif with Great 3D Gif Maker
- New 2024 Approved Why These 10 Top Text Motion Templates Are Worth Your Attention
- Make Creative Animation Videos
- Updated 2024 Approved Top 10 Animated DP for WhatsApp
- Updated 12+ Stunning Instagram GIF Stickers for 2024
- New Tips That Show Anybody How to Get Awesome Background for Slideshow in PowerPoint for 2024
- Updated In 2024, Is It That Easy to Make My Animated Character
- Updated In 2024, The 15 Most Efficient Photo to Cartoon Software for Android
- 2024 Approved Tutorials to Make Animated Images – Even if Youre Just Starting Out
- Updated Easy Shortcut to Convert Videos to Gifs on iPhone
- Updated How I Animate Discord Profile Pictures (& You Can Too) for 2024
- New 2024 Approved What Wikipedia Cant Tell You About the 10 Batman Cartoons
- New What This Post Can Teach You About Clay Animation for 2024
- 10 Great Moving Animation PowerPoint Techniques for 2024
- Updated In 2024, Is It That Easy to Make My Own Animated Character?
- Best 12 Evil Cartoon Characters of All Time
- New Whats Music Video GIF & How to Add Music to GIF Files for 2024
- Updated 2024 Approved Apps to Animate Still Pictures Which Could Make Your Pictures Become Internet Sensation
- 2024 Approved Tutorials to Make Animated Images
- In 2024, Creative Ways to Create iPhone Text GIF
- 10 Cartoon Photo Converters for 2024
- Updated How to Create Animated Video on Canva for 2024
- Updated In 2024, What Is the Meaning of Motion Graphics
- Updated In 2024, Are You Head Over Heels With 3D Animation Design?
- Updated 2024 Approved Best 15 Instant Classics Animated Cartoon Movies
- New 2024 Approved 10 Best Animation Makers for Kids to Have Fun
- Top 10 Online Animated Logo Makers Everyone Should Know for 2024
- The Only Guide Youll Need to Learn About GIF Video Downloader for 2024
- Updated Top 10 Websites to Download Anime Subtitles for Free for 2024
- Updated In 2024, 10 Great MP4 to GIF Converters to Get Perfect-Made GIF
- New Some Must-Know Useful Lego Animation Ideas for You for 2024
- Top 12 Illusion Gifs Top Picks for 2024
- New Formula to Animate Photos From 10 Animate Pictures App for 2024
- New 2024 Approved 10 Options for Your Need on Animation Makers
- New The Best 10 Sketch Animation Video Makers
- How To Animate Graphics in Canva for 2024
- In 2024, Animated Collage Maker Tips
- Updated In 2024, 10 Amazing Cartoon Music Examples You Need to Bookmark
- In 2024, The 15 Most Efficient Photo to Cartoon Apps for Android
- 12 Dubbed Anime Websites to Watch for Free
- 2024 Approved The Secret Sauce for Making GIF Instagram Story More Aesthetic
- New The 15 Best Apps to Turn Photos Into Cartoons and Sketches
- In 2024, Best Practices on Online 3D Avatar Creator
- 3 Best Tools to Hard Reset Xiaomi Redmi 13C | Dr.fone
- How to restore wiped videos on Huawei Nova Y91
- In 2024, How to Unlock Your Apple iPhone 15 Pro Max Passcode 4 Easy Methods (With or Without iTunes) | Dr.fone
- In 2024, AddROM Bypass An Android Tool to Unlock FRP Lock Screen For your Vivo V27e
- In 2024, Two Ways to Track My Boyfriends Gionee F3 Pro without Him Knowing | Dr.fone
- How To Transfer Data From Apple iPhone 13 Pro Max To Other iPhone 14 Pro devices? | Dr.fone
- Unlock Samsung Galaxy S23 Tactical Edition Phone Password Without Factory Reset Full Guide Here
- Updated In 2024, Top 10 Solutions for Movie Subtitle Translation Making Things Perfect
- How to Track a Lost Vivo Y56 5G for Free? | Dr.fone
- How to Fake Snapchat Location without Jailbreak On Motorola Moto G14 | Dr.fone
- How to Cast Realme 11 Pro+ Screen to PC Using WiFi | Dr.fone
- How to Remove and Reset Face ID on Apple iPhone 13 Pro | Dr.fone
- Repair damaged, unplayable video files of Samsung on Mac
- Failed to play MP4 movies with Razr 40
- In 2024, Here Are Some Reliable Ways to Get Pokemon Go Friend Codes For Tecno Spark 10C | Dr.fone
- In 2024, AddROM Bypass An Android Tool to Unlock FRP Lock Screen For your Samsung Galaxy Z Flip 5
- In 2024, Reset iTunes Backup Password Of Apple iPhone 13 Prevention & Solution
- A Guide Infinix Note 30 VIP Racing Edition Wireless and Wired Screen Mirroring | Dr.fone
- Title: In 2024, How to Stop Animation From Looping in Unity
- Author: Elon
- Created at : 2024-05-19 03:04:54
- Updated at : 2024-05-20 03:04:54
- Link: https://animation-videos.techidaily.com/in-2024-how-to-stop-animation-from-looping-in-unity/
- License: This work is licensed under CC BY-NC-SA 4.0.
