
:max_bytes(150000):strip_icc():format(webp)/GettyImages-1094009490-2694d308001d46049e0755f4dd7fdf4c.jpg)
In 2024, Top 3 Ways to Create Gif Images with Great 3D Gif Maker
Top 3 Ways to Create Gif with Great 3D Gif Maker
Top 3 Ways to Create Gif Images with Great 3D Gif Maker
An easy yet powerful editor
Numerous effects to choose from
Detailed tutorials provided by the official channel
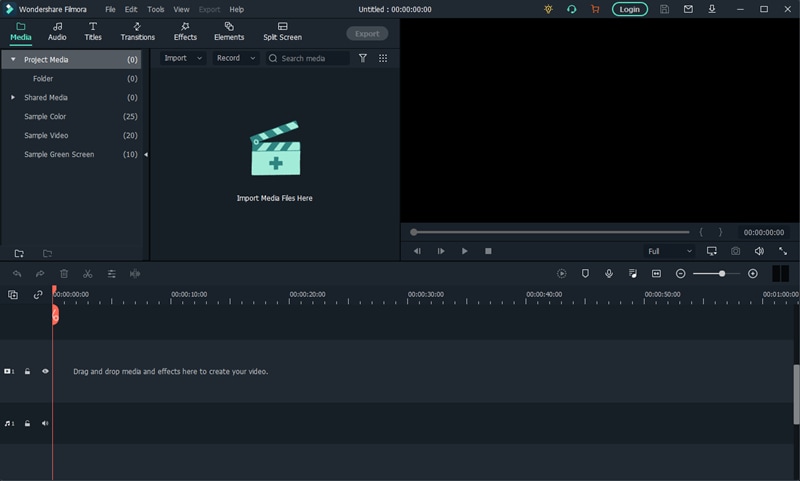
If what you’re searching for is a 3D GIF Maker, then we’ve got your back. Below, we’ve not only listed the three best ways to create 3D animated GIFs, but we’ve also included a brief tutorial that you can reference when creating your very own GIF images.
In this article
01 [Best 3 Ways to Create 3D Animated GIFs](#Part 1)
02 [Create 3D animated GIFs online with Filmora](#Part 2)
Part 1 Best 3 Ways to Create 3D Animated GIFs
First off, as promised, we have a brief list of some 3D GIF Maker tools that you can try. We’ve made sure to pick a unique set of 3D GIF Maker tools and 3D GIF Generator tools in order to give you a variety to choose from. It won’t be the most comprehensive list, but it should help you on your way to understanding how these 3D GIF makers usually work and how you can use them in order to create GIF images that you can share with your friends, family, and colleagues.
01 Wondershare Filmora Video Editor
The first 3D GIF Maker on our list is Filmora. It’s probably not the first one that you’d naturally think of as a 3D GIF Maker, seeing as it was developed to be more than that. But, it doesn’t discount the fact that it can be used in order to create and edit your own GIFs.
Wondershare Filmora is available for both Windows and Mac users. It allows you to create a GIF with images or video easily and even gives you the tools needed to edit and perfect it before you export it for use (a process that we’ll be showing off in more detail in the tutorial section below if you’re interested in learning more.)
For Win 7 or later (64-bit)
For macOS 10.12 or later
022. Adobe Photoshop
Adobe Photoshop, much like Filmora, is probably not, first and foremost, considered a mere 3D GIF Maker. However, it doesn’t erase its 3D GIF Creator functions. This tool, if used correctly, can make just about anything you want.
The process of using it, of course, is a little fussier than other alternatives (you’ll probably want to look up a more detailed explanation on the subject), but the fussiness does also mean that you can control every detail of your project and get it to look exactly how you want it to look.
03EaseUS Video Editor
Similar to Filmora, EaseUS Video Editor is an advanced video editing tool that you can use as a 3D GIF Creator quite easily. It comes built-in with templates, filters, design elements, transition effects, music, and so much more — allowing you to freely design your GIF images so that they can be ready for publishing right off the bat.
The beauty of it, of course, is that, much like with all the other options that we introduced today, you can use the program for more than just 3D GIF creation after the fact — opening yourself up for different and more complex projects in the future (be they image, audio, or video-related.)
Part 2 Create 3D Animated Gifs Online With Wondershare Filmora Video Editor
Now, as promised, we’ve also included a tutorial that you can follow along with to create your own 3D Animated GIFs with the tool, Wondershare Filmora Video Editor . With this tool, we’ll be showing you the basic way to do it (by using a premade video that you can edit and then convert into GIF format). But, feel free to explore the tool and use it as you wish (i.e., as a 3D spinning GIF creator, 3D rotating text GIF maker, 3D cube GIF maker, and so on.)
01Step 1: Launch Filmora Video Editor
First things first, launch the 3D GIF maker that you intend to use. In our case, that is Filmora (a screenshot has been provided below for your edification and reference. We’ll be using Filmora as our example.)
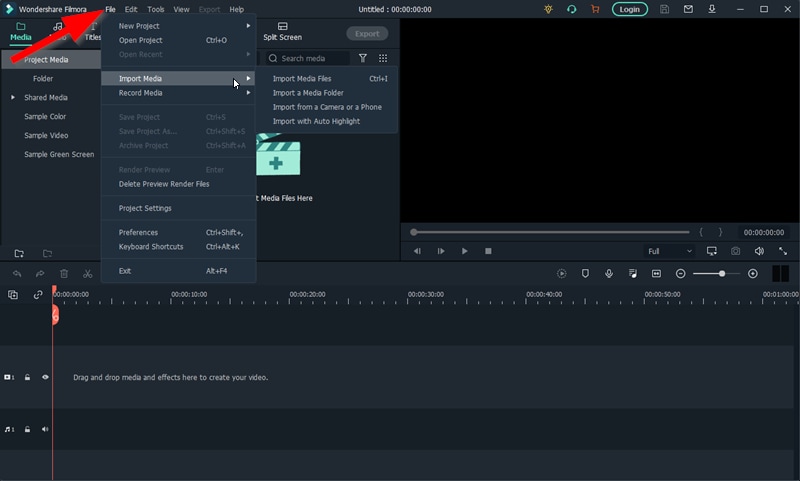
02Step 2: Upload File(s)
Next, upload the file or files that you want to turn into a GIF.
As mentioned in the introduction, we’ll be using a pre-made video, but you can use whatever you wish (i.e., images). In order to upload, we clicked the File tab (pointed out in the image below) and selected Import Media > Import Media File. However, you can also drag and drop your file(s) on the designated area of the UI..
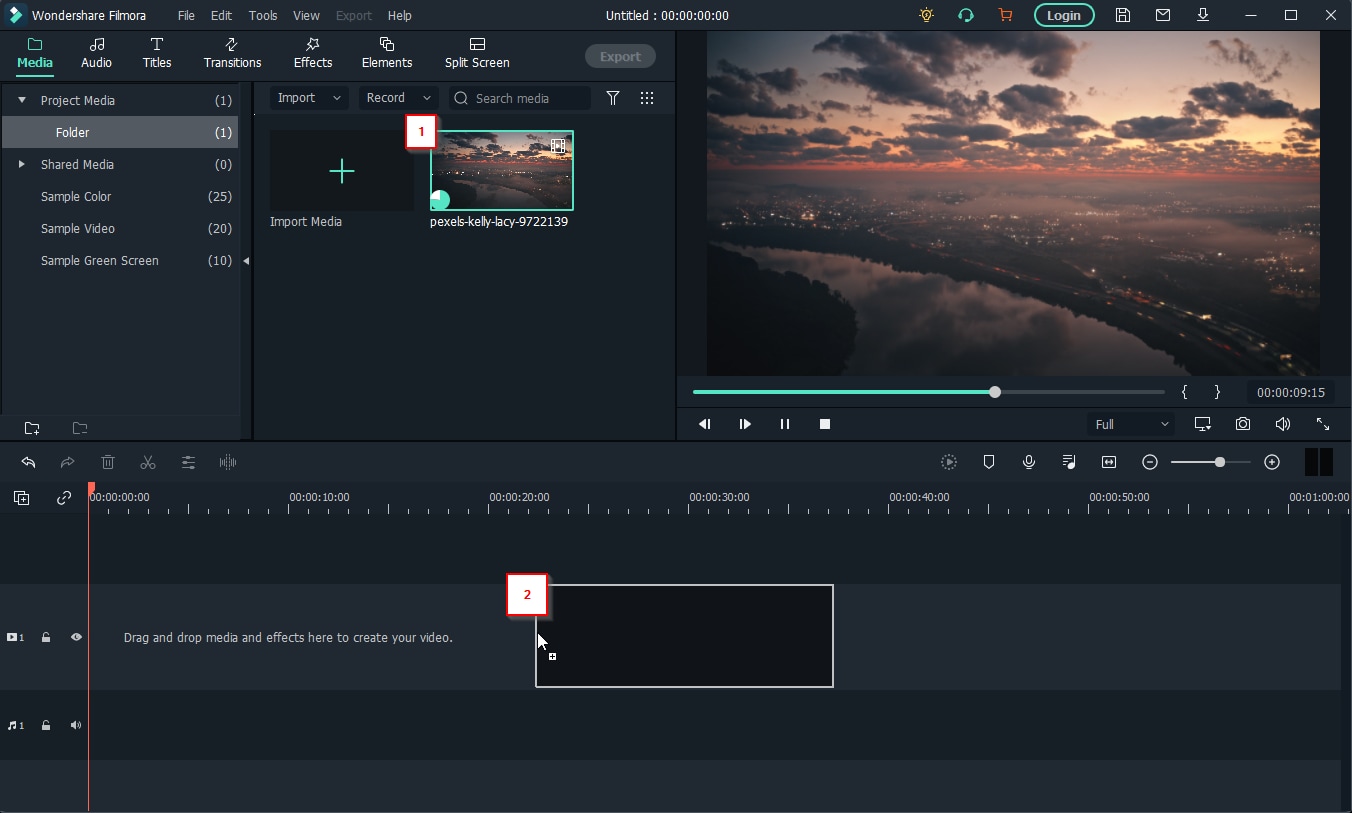
03Step 3: Drag Uploaded Media to Timeline
To create a GIF withFilmora , you’ll need to first create a video. Don’t worry, this is simple. Just drag and drop the media that you want to use onto the timeline.
Note: Any uploaded media will be in the media folder (marked [1] in the image below). Drag media from there onto the timeline (marked [2] in the image below) in order to create a video.
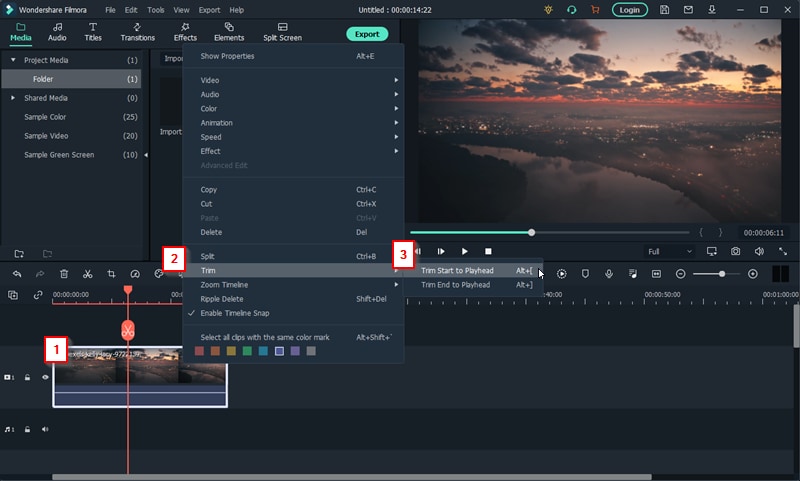
04Step 4: (Optional) Edit Video
If you want, take this opportunity to work on your video some more before converting it into a GIF. Filmora is set up to help you with this. Providing all the following features:
●Trim or Cut features to trim down the video.
●Add Text or audio to video.
●Use templates, filters, or other elements to design videos.
●Add transitions for better video flow.
And then some. In our case, we used the ‘Trim’ feature to cut down our video for a cleaner look.
05Step 5: Create Video > GIF
Once you’re done editing your video, you can now convert it to a GIF.
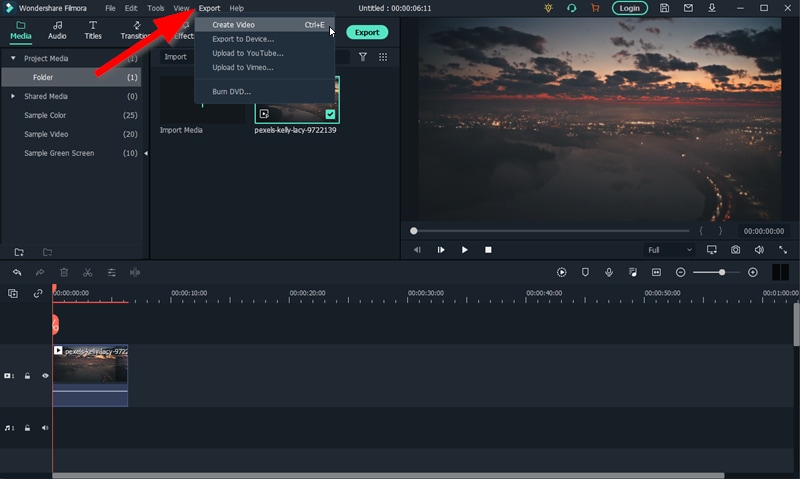
This is easy enough to do. Just click the ‘Export’ tab and select the ‘Create Video’ option. That will allow you to choose to convert your finished video into a GIF file that you can share with your friends.
● Key Takeaways from This Episode →
● GIFs are a great way of sharing fun moments with friends and family. And, these days, it’s easier than ever to create them.
● There are 3D GIF Makers available everywhere online. Each one is a little different, of course. But capable of allowing you to create GIFs with images and videos that you can eventually share.
● One such example is the 3D GIF Maker, Filmora. It was the first one that we introduced on our list of the best 3D GIf Makers.
● We also included a tutorial on how you can use Filmora as a 3D GIF Generator for your reference. You can try out the program today if you like. Wondershare offers a FREE trial that you can use in order to explore the many functions of the software before you commit to buying out the perpetual license or signing up for one of their subscription packages.
If what you’re searching for is a 3D GIF Maker, then we’ve got your back. Below, we’ve not only listed the three best ways to create 3D animated GIFs, but we’ve also included a brief tutorial that you can reference when creating your very own GIF images.
In this article
01 [Best 3 Ways to Create 3D Animated GIFs](#Part 1)
02 [Create 3D animated GIFs online with Filmora](#Part 2)
Part 1 Best 3 Ways to Create 3D Animated GIFs
First off, as promised, we have a brief list of some 3D GIF Maker tools that you can try. We’ve made sure to pick a unique set of 3D GIF Maker tools and 3D GIF Generator tools in order to give you a variety to choose from. It won’t be the most comprehensive list, but it should help you on your way to understanding how these 3D GIF makers usually work and how you can use them in order to create GIF images that you can share with your friends, family, and colleagues.
01 Wondershare Filmora Video Editor
The first 3D GIF Maker on our list is Filmora. It’s probably not the first one that you’d naturally think of as a 3D GIF Maker, seeing as it was developed to be more than that. But, it doesn’t discount the fact that it can be used in order to create and edit your own GIFs.
Wondershare Filmora is available for both Windows and Mac users. It allows you to create a GIF with images or video easily and even gives you the tools needed to edit and perfect it before you export it for use (a process that we’ll be showing off in more detail in the tutorial section below if you’re interested in learning more.)
For Win 7 or later (64-bit)
For macOS 10.12 or later
022. Adobe Photoshop
Adobe Photoshop, much like Filmora, is probably not, first and foremost, considered a mere 3D GIF Maker. However, it doesn’t erase its 3D GIF Creator functions. This tool, if used correctly, can make just about anything you want.
The process of using it, of course, is a little fussier than other alternatives (you’ll probably want to look up a more detailed explanation on the subject), but the fussiness does also mean that you can control every detail of your project and get it to look exactly how you want it to look.
03EaseUS Video Editor
Similar to Filmora, EaseUS Video Editor is an advanced video editing tool that you can use as a 3D GIF Creator quite easily. It comes built-in with templates, filters, design elements, transition effects, music, and so much more — allowing you to freely design your GIF images so that they can be ready for publishing right off the bat.
The beauty of it, of course, is that, much like with all the other options that we introduced today, you can use the program for more than just 3D GIF creation after the fact — opening yourself up for different and more complex projects in the future (be they image, audio, or video-related.)
Part 2 Create 3D Animated Gifs Online With Wondershare Filmora Video Editor
Now, as promised, we’ve also included a tutorial that you can follow along with to create your own 3D Animated GIFs with the tool, Wondershare Filmora Video Editor . With this tool, we’ll be showing you the basic way to do it (by using a premade video that you can edit and then convert into GIF format). But, feel free to explore the tool and use it as you wish (i.e., as a 3D spinning GIF creator, 3D rotating text GIF maker, 3D cube GIF maker, and so on.)
01Step 1: Launch Filmora Video Editor
First things first, launch the 3D GIF maker that you intend to use. In our case, that is Filmora (a screenshot has been provided below for your edification and reference. We’ll be using Filmora as our example.)
02Step 2: Upload File(s)
Next, upload the file or files that you want to turn into a GIF.
As mentioned in the introduction, we’ll be using a pre-made video, but you can use whatever you wish (i.e., images). In order to upload, we clicked the File tab (pointed out in the image below) and selected Import Media > Import Media File. However, you can also drag and drop your file(s) on the designated area of the UI..
03Step 3: Drag Uploaded Media to Timeline
To create a GIF withFilmora , you’ll need to first create a video. Don’t worry, this is simple. Just drag and drop the media that you want to use onto the timeline.
Note: Any uploaded media will be in the media folder (marked [1] in the image below). Drag media from there onto the timeline (marked [2] in the image below) in order to create a video.
04Step 4: (Optional) Edit Video
If you want, take this opportunity to work on your video some more before converting it into a GIF. Filmora is set up to help you with this. Providing all the following features:
●Trim or Cut features to trim down the video.
●Add Text or audio to video.
●Use templates, filters, or other elements to design videos.
●Add transitions for better video flow.
And then some. In our case, we used the ‘Trim’ feature to cut down our video for a cleaner look.
05Step 5: Create Video > GIF
Once you’re done editing your video, you can now convert it to a GIF.
This is easy enough to do. Just click the ‘Export’ tab and select the ‘Create Video’ option. That will allow you to choose to convert your finished video into a GIF file that you can share with your friends.
● Key Takeaways from This Episode →
● GIFs are a great way of sharing fun moments with friends and family. And, these days, it’s easier than ever to create them.
● There are 3D GIF Makers available everywhere online. Each one is a little different, of course. But capable of allowing you to create GIFs with images and videos that you can eventually share.
● One such example is the 3D GIF Maker, Filmora. It was the first one that we introduced on our list of the best 3D GIf Makers.
● We also included a tutorial on how you can use Filmora as a 3D GIF Generator for your reference. You can try out the program today if you like. Wondershare offers a FREE trial that you can use in order to explore the many functions of the software before you commit to buying out the perpetual license or signing up for one of their subscription packages.
4 Smart Solutions to Create or Find Good Morning/Night GIFs
Versatile Video Editor - Wondershare Filmora
An easy yet powerful editor
Numerous effects to choose from
Detailed tutorials provided by the official channel
Do you want to wish your friends and family some heartful greetings every morning or night? Like you, many other people also look for good morning and night GIF images to meet their requirements. Since there can be limited sources for animated GIFs, you might find getting some new and unique images hard. That’s why I will let you know how to come up with some good night/morning animated GIFs in this post and share some reliable resources to download them.

In this article
01 [Create Good Morning/Night GIF Images with Adobe Photoshop](#Part 1)
02 [Create Stunning Good Morning or Night GIFs with Filmora](#Part 2)
03 [Create Animated Good Morning/Night GIFs with Canva](#Part 3)
04 [Find Readily Available Good Morning/Night GIFs](#Part 4)
Part 1 Create Good Morning/Night GIF Images with Adobe Photoshop
If you are familiar with Adobe Photoshop or are willing to learn it, you can also use its assistance to create good morning/night GIF images. Even though the application is mostly used to edit images, it can also help you develop all kinds of funny good morning/night GIFs.
To do that, you need to work on different layers in Photoshop and then merge them as a single frame to provide a more animated appeal. Here are some basic steps that you can follow to come up with anime good night or morning GIFs.
Step 1 Launch Photoshop and Load Media Assets
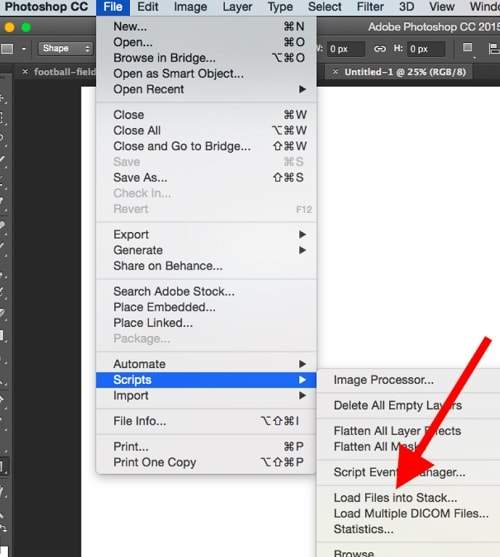
You can start by launching Adobe Photoshop on your system and visiting its File > Scripts section to load your media files.
Step 2 Start working on Animated GIFs in Photoshop
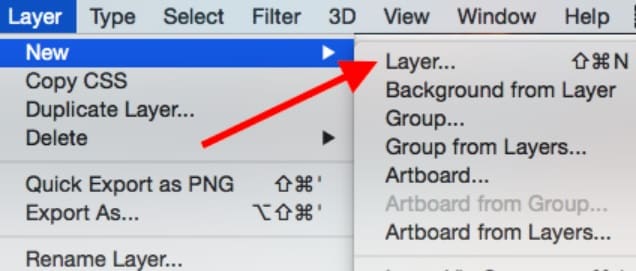
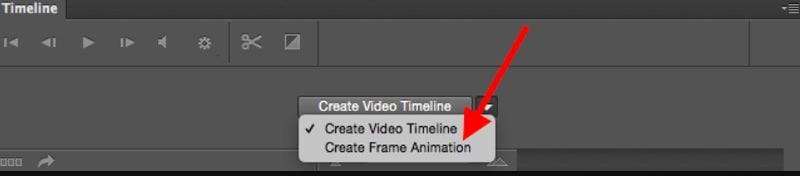
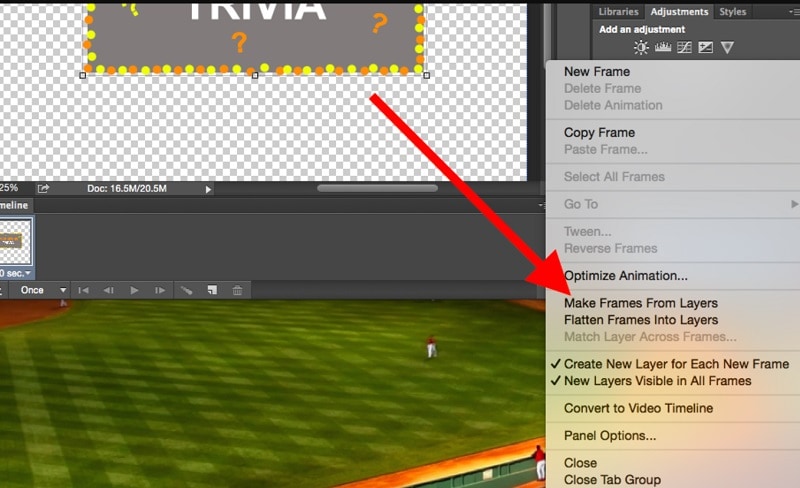
Now, to come up with a funny good morning/night GIF, you can go to its Menu > Layer and choose to create a new layer.
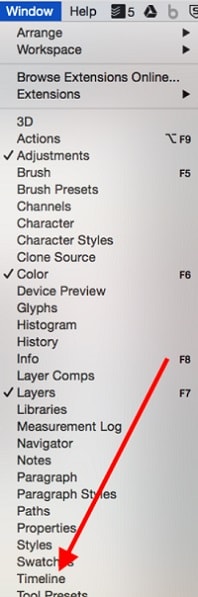
Since it is recommended to have a timeline for your media, you can go to its Window > Timeline to get a timeline view at the bottom.
Afterward, you can go to the timeline at the bottom panel and choose work on frame animations to create any good morning/night animation.
You can now duplicate your files or adjust them on the timeline to develop an animated GIF. Afterward, you can go to its properties to create a new layer for your frames and then merge them.
Step 3 Make Final Adjustments to your Animated GIFs
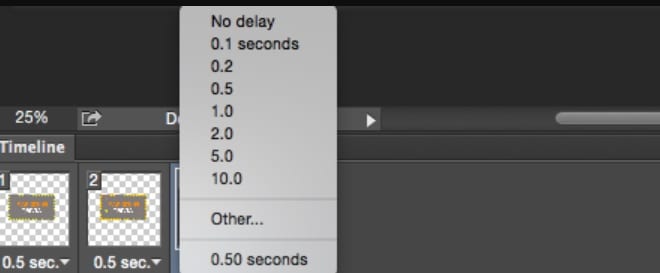
As you would have different good morning/night GIF funny animations, you can right-click on the timeline and set up their respective durations.
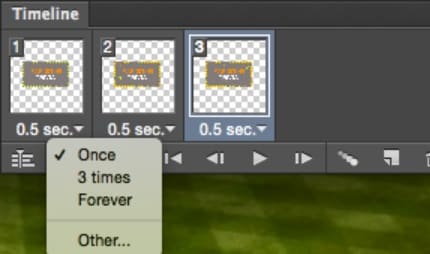
Besides that, you can also right-click any frame and select how many times it would be repeated.
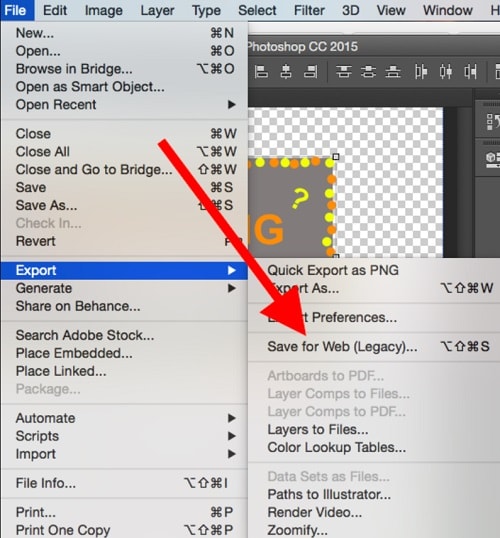
Step 4 Export the Media file as a GIF from Photoshop
After making all the edits, you can go to its File > Export feature and save your good night/morning GIF images in a compatible format (to be published on the web).
Part 2 Create Stunning Good Morning or Night GIFs with Filmora
Since Photoshop can be quite complicated to learn, you can consider using Wondershare Filmora to create videos and GIFs of all sorts. It is a multitrack timeline editing application that offers a wide range of editing options that are super easy to use. Apart from that, you will also get access to a wide range of media assets and effects that you can readily use to create good morning/night animated GIFs.
Wondershare Filmora
Get started easily with Filmora’s powerful performance, intuitive interface, and countless effects!
Try It Free Try It Free Try It Free Learn More >

Step 1 Launch Filmora and Load your Files to Create GIFs
You can start by launching Wondershare Filmora on your system and just drag and drop your media files to its interface. Besides that, you can also go to its File > Import menu to browse and load your media files (like morning or night images).

Step 2 Come up with Engaging GIFs using Filmora
Afterward, you can drop these media assets to the timeline at the bottom in a preferred format and start editing them. For instance, you can hover the cursor at the side to use the trimmer tool to clip any unwanted part from the video clip.

You can also select any media file and go to its properties to perform all kinds of actions on the selected media file like scaling, repositioning, flipping, rotating, and so on.

Many people would like to write quotes and messages on their good night/morning GIF images. In this case, you can go to the “Titles” section of Filmora to add different caption effects to your videos.

Besides that, you can also explore a wide range of transitions, stickers, overlays, filters, and numerous other visual effects that you can readily add to your animated good morning/night GIFs.

Step 3 Save your good morning or night GIFs on Filmora
After working on your anime good night/morning GIF, you can click on the “Export” button from the top and choose to save the media file in a GIF format on your system.

Part 3 Create Animated Good Morning/Night GIFs with Canva
Canva is one of the most user-friendly online solutions that you can use to come up with graphics of different styles. From social media posts to posters and video clips to logos, Canva can help you develop all types of customized designs. A while back, it has added a dedicated option to create and edit animations that would let you come up with some stunning good morning/night GIF images.
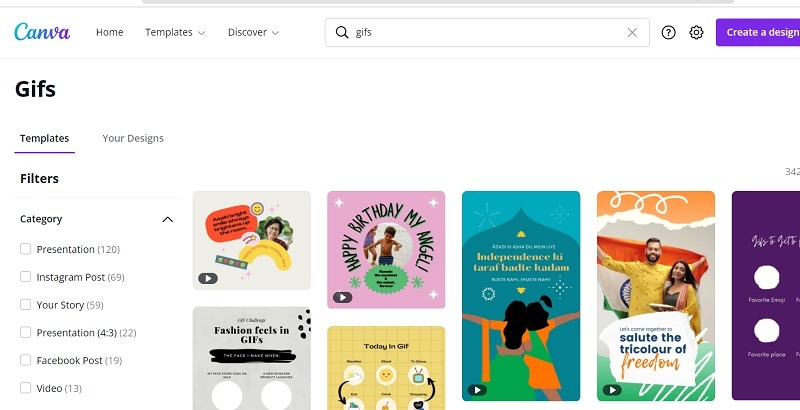
Step 1 Select a Project Type or Template of Canva
At first, you can go to the official website of Canva and choose to work on a template of your choice. Here, you can look for GIFs readily available on Canva or work on an empty canvas.
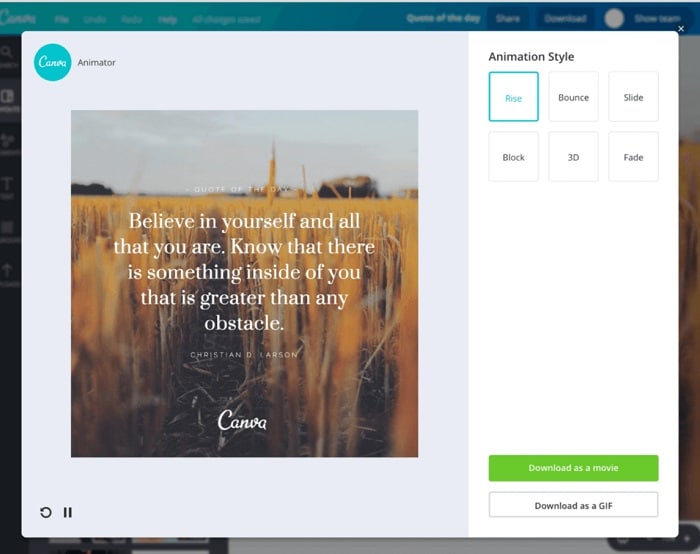
Step 2 Customize your Good Morning/Night GIF on Canva
From the sidebar, you can drag and drop various elements, captions, borders, and other objects to develop an animated good morning/night GIF. Several other features in Canva would let you customize and edit your GIFs easily.
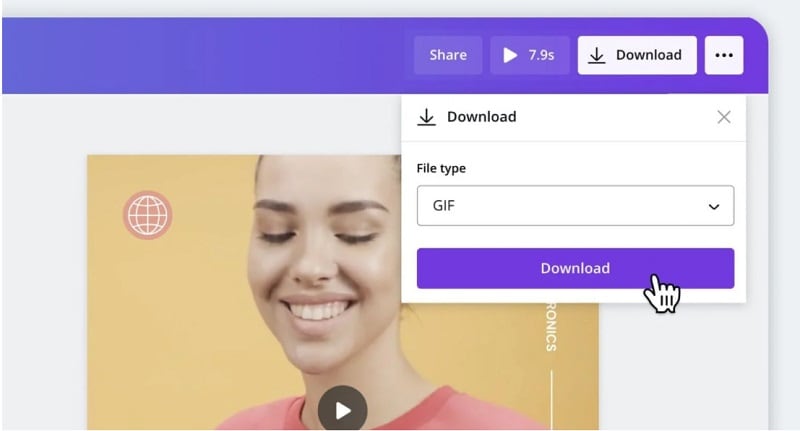
Step 3 Export your Designs as GIFs from Canva
That’s it! After working on all the features of your good night/morning funny GIFs, you can click on the “Export” button from the top and save your GIF on your system’s local storage from Canva.
Part 4 Find Readily Available Good Morning/Night GIFs
If you are running short on time and can’t come up with any good morning/night animated GIF, then you can pick them from the following resources:
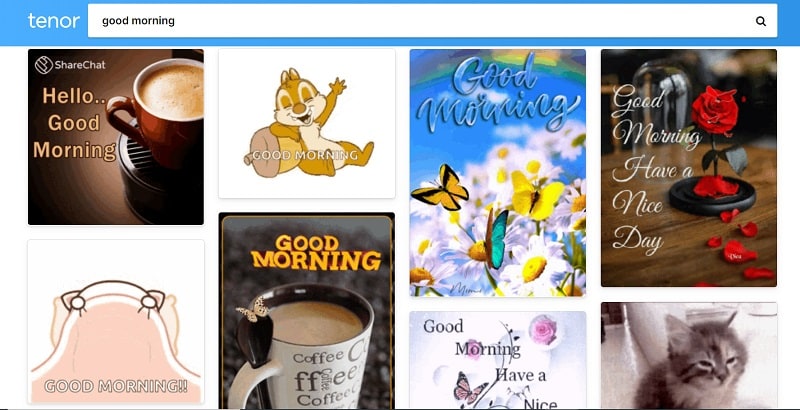
1. Tenor
Tenor is certainly one of the most prominent websites to find GIFs and stickers of all kinds. Therefore, you can head to its official website and look for good morning/night animations by entering relevant keywords on the search bar. Later, you can download the GIF or directly share its link with others.
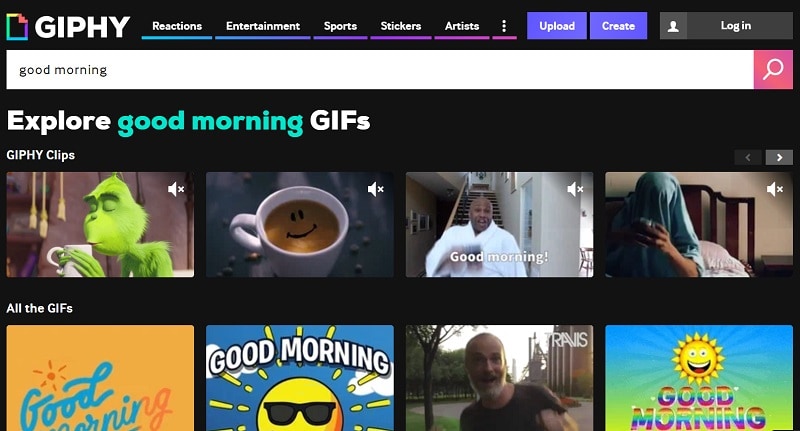
2. Giphy
Like Tenor, Giphy is another popular source where you can find hundreds of good night/morning funny GIFs. The website is quite easy to navigate and will let you see all kinds of GIFs by entering appropriate keywords. Later, you can directly copy the URL of the GIF and share it with others on platforms like WhatsApp and Instagram.
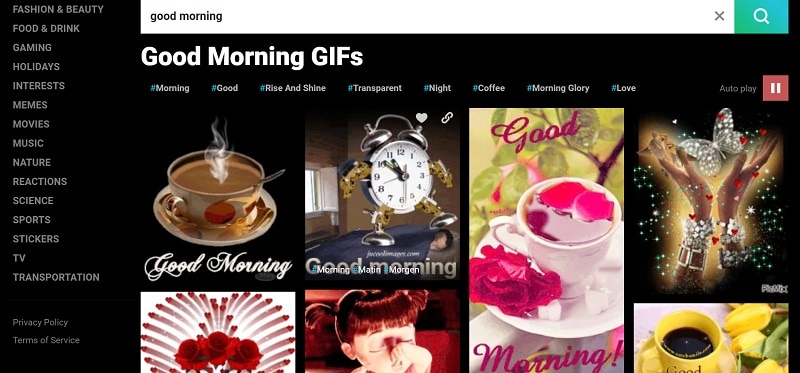
3. Gifer
Lastly, you can also explore Gifer to find an extensive collection of inspiring or funny good night/morning GIFs. The website has already listed GIFs in different categories that you can explore to save time or can enter keywords on the search bar to find appropriate content.
Wondershare Filmora
Get started easily with Filmora’s powerful performance, intuitive interface, and countless effects!
Try It Free Try It Free Try It Free Learn More >
AI Portrait – The best feature of Wondershare Filmora for gameplay editing
The AI Portrait is a new add-on in Wondershare Filmora. It can easily remove video backgrounds without using a green screen or chroma key, allowing you to add borders, glitch effects, pixelated, noise, or segmentation video effects.

Conclusion
After reading this guide, I’m sure that you can easily pick or create all kinds of good night/morning GIFs. While Photoshop can make animated good morning/night GIFs, it is certainly not that user-friendly. That’s why I would recommend using a reliable and friendly application like Wondershare Filmora to meet your requirements. The media-editing tool has an extensive range of assets and offers tons of high-end features to come up with all sorts of inspiring, romantic, or funny good morning/night GIFs.
Do you want to wish your friends and family some heartful greetings every morning or night? Like you, many other people also look for good morning and night GIF images to meet their requirements. Since there can be limited sources for animated GIFs, you might find getting some new and unique images hard. That’s why I will let you know how to come up with some good night/morning animated GIFs in this post and share some reliable resources to download them.
In this article
01 [Create Good Morning/Night GIF Images with Adobe Photoshop](#Part 1)
02 [Create Stunning Good Morning or Night GIFs with Filmora](#Part 2)
03 [Create Animated Good Morning/Night GIFs with Canva](#Part 3)
04 [Find Readily Available Good Morning/Night GIFs](#Part 4)
Part 1 Create Good Morning/Night GIF Images with Adobe Photoshop
If you are familiar with Adobe Photoshop or are willing to learn it, you can also use its assistance to create good morning/night GIF images. Even though the application is mostly used to edit images, it can also help you develop all kinds of funny good morning/night GIFs.
To do that, you need to work on different layers in Photoshop and then merge them as a single frame to provide a more animated appeal. Here are some basic steps that you can follow to come up with anime good night or morning GIFs.
Step 1 Launch Photoshop and Load Media Assets
You can start by launching Adobe Photoshop on your system and visiting its File > Scripts section to load your media files.
Step 2 Start working on Animated GIFs in Photoshop
Now, to come up with a funny good morning/night GIF, you can go to its Menu > Layer and choose to create a new layer.
Since it is recommended to have a timeline for your media, you can go to its Window > Timeline to get a timeline view at the bottom.
Afterward, you can go to the timeline at the bottom panel and choose work on frame animations to create any good morning/night animation.
You can now duplicate your files or adjust them on the timeline to develop an animated GIF. Afterward, you can go to its properties to create a new layer for your frames and then merge them.
Step 3 Make Final Adjustments to your Animated GIFs
As you would have different good morning/night GIF funny animations, you can right-click on the timeline and set up their respective durations.
Besides that, you can also right-click any frame and select how many times it would be repeated.
Step 4 Export the Media file as a GIF from Photoshop
After making all the edits, you can go to its File > Export feature and save your good night/morning GIF images in a compatible format (to be published on the web).
Part 2 Create Stunning Good Morning or Night GIFs with Filmora
Since Photoshop can be quite complicated to learn, you can consider using Wondershare Filmora to create videos and GIFs of all sorts. It is a multitrack timeline editing application that offers a wide range of editing options that are super easy to use. Apart from that, you will also get access to a wide range of media assets and effects that you can readily use to create good morning/night animated GIFs.
Wondershare Filmora
Get started easily with Filmora’s powerful performance, intuitive interface, and countless effects!
Try It Free Try It Free Try It Free Learn More >
Step 1 Launch Filmora and Load your Files to Create GIFs
You can start by launching Wondershare Filmora on your system and just drag and drop your media files to its interface. Besides that, you can also go to its File > Import menu to browse and load your media files (like morning or night images).
Step 2 Come up with Engaging GIFs using Filmora
Afterward, you can drop these media assets to the timeline at the bottom in a preferred format and start editing them. For instance, you can hover the cursor at the side to use the trimmer tool to clip any unwanted part from the video clip.
You can also select any media file and go to its properties to perform all kinds of actions on the selected media file like scaling, repositioning, flipping, rotating, and so on.
Many people would like to write quotes and messages on their good night/morning GIF images. In this case, you can go to the “Titles” section of Filmora to add different caption effects to your videos.
Besides that, you can also explore a wide range of transitions, stickers, overlays, filters, and numerous other visual effects that you can readily add to your animated good morning/night GIFs.
Step 3 Save your good morning or night GIFs on Filmora
After working on your anime good night/morning GIF, you can click on the “Export” button from the top and choose to save the media file in a GIF format on your system.
Part 3 Create Animated Good Morning/Night GIFs with Canva
Canva is one of the most user-friendly online solutions that you can use to come up with graphics of different styles. From social media posts to posters and video clips to logos, Canva can help you develop all types of customized designs. A while back, it has added a dedicated option to create and edit animations that would let you come up with some stunning good morning/night GIF images.
Step 1 Select a Project Type or Template of Canva
At first, you can go to the official website of Canva and choose to work on a template of your choice. Here, you can look for GIFs readily available on Canva or work on an empty canvas.
Step 2 Customize your Good Morning/Night GIF on Canva
From the sidebar, you can drag and drop various elements, captions, borders, and other objects to develop an animated good morning/night GIF. Several other features in Canva would let you customize and edit your GIFs easily.
Step 3 Export your Designs as GIFs from Canva
That’s it! After working on all the features of your good night/morning funny GIFs, you can click on the “Export” button from the top and save your GIF on your system’s local storage from Canva.
Part 4 Find Readily Available Good Morning/Night GIFs
If you are running short on time and can’t come up with any good morning/night animated GIF, then you can pick them from the following resources:
1. Tenor
Tenor is certainly one of the most prominent websites to find GIFs and stickers of all kinds. Therefore, you can head to its official website and look for good morning/night animations by entering relevant keywords on the search bar. Later, you can download the GIF or directly share its link with others.
2. Giphy
Like Tenor, Giphy is another popular source where you can find hundreds of good night/morning funny GIFs. The website is quite easy to navigate and will let you see all kinds of GIFs by entering appropriate keywords. Later, you can directly copy the URL of the GIF and share it with others on platforms like WhatsApp and Instagram.
3. Gifer
Lastly, you can also explore Gifer to find an extensive collection of inspiring or funny good night/morning GIFs. The website has already listed GIFs in different categories that you can explore to save time or can enter keywords on the search bar to find appropriate content.
Wondershare Filmora
Get started easily with Filmora’s powerful performance, intuitive interface, and countless effects!
Try It Free Try It Free Try It Free Learn More >
AI Portrait – The best feature of Wondershare Filmora for gameplay editing
The AI Portrait is a new add-on in Wondershare Filmora. It can easily remove video backgrounds without using a green screen or chroma key, allowing you to add borders, glitch effects, pixelated, noise, or segmentation video effects.
Conclusion
After reading this guide, I’m sure that you can easily pick or create all kinds of good night/morning GIFs. While Photoshop can make animated good morning/night GIFs, it is certainly not that user-friendly. That’s why I would recommend using a reliable and friendly application like Wondershare Filmora to meet your requirements. The media-editing tool has an extensive range of assets and offers tons of high-end features to come up with all sorts of inspiring, romantic, or funny good morning/night GIFs.
Little Known Techniques of Motion Graphics in Premiere Pro
Little Known Techniques of Motion Graphics in Premiere Pro
An easy yet powerful editor
Numerous effects to choose from
Detailed tutorials provided by the official channel
Video editing has recently gained momentum in content design, and with Motion Graphics Premiere Pro editing templates, it has all the fun in the house.
In this article
01 [5 Editing Motion Graphics Techniques in Adobe Premiere Pro](#Part 1)
02 [10 Free Motion Graphics Templates for Premiere Pro](#Part 2)
03 [How to Use Motion Graphics Templates in Premiere Pro](#Part 3)
Part 1 5 Editing Motion Graphics Techniques in Adobe Premiere Pro
A variety of editing techniques of motion graphics for Premiere Pro are ready to give a classy touch to your videos. Let’s brush up through the best you can have.
01Cropping Clips
Cropping your videos allows you to fit them into your required size frames. To remove any unwanted portions of your edits, crop them in adobe Premiere Pro with your desired aspect ratio to give that ‘just perfect’ look to your edits.
Start from importing and adding your footage to your project panel, followed by creating a fresh composition. Now, choose ‘Crop’ from the Effects panel to add it to your clip, either by double-clicking or dragging and dropping.
02Trimming Clips
If you want to adjust the ‘In and Out’ play back sequence of your edited clips, you can go for trimming them. You can trim your clips in the Source and Program monitors, or even in the Premiere Pro timeline. You can choose from the standard cut, jump cut, B-roll cut etc, to suit your editing needs and styles.
All you need to do is open the clip, mark the In and Out points, adjust their sequence with previous or next edits in your cue and that’s it. You can also use keyboard shortcuts for this purpose. However, you need to preset these shortcuts before you begin editing your clips.
03Adding Text
You can try adding simple and formatted texts to enhance your video outlook. This comes handy when you are aiming to deliver specific messages to your audience. You can add normal write-ups, callout quotations and customize your text in a number of exciting styles. Just go to the Type tool, format your text in the Text Box and you’re done!
04Audio Level Adjustment
Want to add spark to your clips with a synchronized audio visual effect? After you finish trimming and cropping, consider opting for an in-line audio adjustment. This will definitely enhance your video and take your craft to the next level.
All you need to do is select an audio clip, click on ‘Audio Gain’ in the drop down menu, set desired Decibel count in the Audio Gain Box and select ‘OK’.
05Exporting Videos
Once you are done with your video craft, you should certainly look forward to making it available for social exposure. To do this, select appropriate sequence constraints in the Export window, choose the export platform, format and Codec, make fine tuning and bit rate adjustments and finish export either in Premiere Pro or Media Encoder. You may also save these settings for your next exports.
Part 2 Free Motion Graphics Templates for Premiere Pro
Let’s have a look into your best choices of free motion graphic templates for Premiere Pro:
0114 Premiere Pro Lumetri Looks
Want to enhance your video creativity with that amazing Hollywood feel? You can undoubtedly opt for the Premiere Lumetri Looks template that gives you the liberty to provide a Hollywood oriented color scheme to your videos, just like those incredible color patterns one would see in Dr. Strangelove, The Martian and many more famous Hollywood flicks.

0215 Animated Lower Thirds
This template comes handy when you need to add lower thirds to your videos, either to introduce different content varieties or to objectify your video components. You can use this template with ease in your personal as well as commercial videos to give them that explicit professional touch.

03Horror Trailer Titles
If horror videos turn you on, use this template in video creations to customize them with that intense and scary feel! This template helps you add scary title slates that are just enough to add a terrifying quotient to your videos. From personal to professional, this template can add intensity to any video type.
04Instagram Stories Premiere Pro Template
This template is a definite catch for those Instagram lovers who constantly experiment to post engaging stories on the platform. If you want your IG stories to grab the talk, go for this animation template to customize photos and text so that they get the buzz among your followers.

05Dust Overlays
Comprising of studio-like effects, this template allows you to enhance your films with high quality dynamic animation in appealing texture variations. Use this template to create videos with those attractive misty backgrounds with cohesive variations in lighting with adjustable power effects.
06Travel Stories Premiere Pro Template
If you are into travel blogging and trying to add spunk to your stories and videos, this template is there to help you out with its catchy text animations and flowy transitions. Available in an upgraded configuration, this template is everything you need to make your travel blogs hover the trending charts.

07Digital Slideshow
Go for this template to add spark to your graphic presentations. Designed primarily for professional usage, it is equally effective in personal projects also. Developed by Evanto Elements, the company offers unlimited access on subscription.

08Free Quotes Premiere Pro Template
If you want to add animated quotes to your video creations, this template is a must try for you. Providing 6 quoting options and a ‘click to change’ text and color interface with convenient customizability keeps it among the top choices for hastle free motion editing.

09Cinematic Title Style Library
If you are bored with those conventional Premiere Pro titles but don’t want to invest time in creating styles of your own, you can use the modernized title styles from this library to enhance your creations with that intense cinematic feel. You can use them comfortably for personal and commercial purposes.

10Space Background Elements
This set of background templates is designed to provide realistic settings to video creators who work on science fiction and space oriented themes. Loaded with different real-time effects, this template provides the ultimate feel of a space travel in 4K.

Part 2 Alternatives to Premiere Pro: Filmora
If not Premiere Pro, you can go for Filmora as a dependable alternative. It’s an exquisite set of amazing and top-notch tools for creating g and editing videos. Wondershare introduced Filmora as an effective, easy-to-use editing software that’s equally caters to the editing pace of beginners as well as experts. You can use Filmora with Windows and macOS.
Packed with a range of appealing customization choices, Filmora comes to you in four principal versions:
● Wondershare Filmora Video Editor
Suitable for beginners, this is the basic and the simplest version having inbuilt editing templates. It’s desktop compatible software.
For Win 7 or later (64-bit)
For macOS 10.12 or later
● Filmora
Android and iOS compatibility in this version of Filmora brought video editing from PCs and laptops into smartphones.

● FilmoraScrn
This version allows you to record your editing screen if you’re a working on Windows.

Part 4 How to Use Motion Graphics Templates in Premiere Pro
After getting familiar with Premiere Pro editing and templates, let’s get into using these adobe premiere motion graphics templates for an exemplary video creating experience. Take up the following steps to get started.
● Go to Premiere Pro Essential Graphics Panel
In the Premiere Pro startup page, select ‘Window’ from the toolbar and select ‘Essential Graphics’ from the drop down menu.
● Add Motion Graphics Templates to Library
Click the ‘Import’ button present at the bottom in the right side of the Essential Graphics Panel. Go to and choose your downloaded motion graphics template file and select ‘Open’. Your file is added to the Essential Graphics Library.
● Drag-Drop the MOGRT to Timeline
‘Drag’ your motion graphics template from the library and ‘Drop’ it on your Timeline.
● Customize Your Template
Go to the ‘Edit’ option in the Essential Graphics Panel to look for customization choices available for your selected motion graphics adobe template.
● Key Takeaways from This Episode →
● Adobe Premiere Pro is an amazing video creation and editing tool that ensures to give a professional class to your edits. Be it personal creativity or professional expertise, this software is all set to give you a wholesome editing experience you will never forget.
● Loaded with an extensive variety of editing templates, available for free and on subscription, adobe premiere pro is a one stop access to all your editing concerns. Its customizable effects will certainly make your creations stand out in the league.
● Video editing is a high in demand craft of excellence. With advancements in software developments, the creative market offers you a pool of over the top editing software that is ready to give that classy spunk to your videos. So just your own from the pool and go on a spree of creating trend setting videos that never miss out on grabbing the attention of everyone around!
Video editing has recently gained momentum in content design, and with Motion Graphics Premiere Pro editing templates, it has all the fun in the house.
In this article
01 [5 Editing Motion Graphics Techniques in Adobe Premiere Pro](#Part 1)
02 [10 Free Motion Graphics Templates for Premiere Pro](#Part 2)
03 [How to Use Motion Graphics Templates in Premiere Pro](#Part 3)
Part 1 5 Editing Motion Graphics Techniques in Adobe Premiere Pro
A variety of editing techniques of motion graphics for Premiere Pro are ready to give a classy touch to your videos. Let’s brush up through the best you can have.
01Cropping Clips
Cropping your videos allows you to fit them into your required size frames. To remove any unwanted portions of your edits, crop them in adobe Premiere Pro with your desired aspect ratio to give that ‘just perfect’ look to your edits.
Start from importing and adding your footage to your project panel, followed by creating a fresh composition. Now, choose ‘Crop’ from the Effects panel to add it to your clip, either by double-clicking or dragging and dropping.
02Trimming Clips
If you want to adjust the ‘In and Out’ play back sequence of your edited clips, you can go for trimming them. You can trim your clips in the Source and Program monitors, or even in the Premiere Pro timeline. You can choose from the standard cut, jump cut, B-roll cut etc, to suit your editing needs and styles.
All you need to do is open the clip, mark the In and Out points, adjust their sequence with previous or next edits in your cue and that’s it. You can also use keyboard shortcuts for this purpose. However, you need to preset these shortcuts before you begin editing your clips.
03Adding Text
You can try adding simple and formatted texts to enhance your video outlook. This comes handy when you are aiming to deliver specific messages to your audience. You can add normal write-ups, callout quotations and customize your text in a number of exciting styles. Just go to the Type tool, format your text in the Text Box and you’re done!
04Audio Level Adjustment
Want to add spark to your clips with a synchronized audio visual effect? After you finish trimming and cropping, consider opting for an in-line audio adjustment. This will definitely enhance your video and take your craft to the next level.
All you need to do is select an audio clip, click on ‘Audio Gain’ in the drop down menu, set desired Decibel count in the Audio Gain Box and select ‘OK’.
05Exporting Videos
Once you are done with your video craft, you should certainly look forward to making it available for social exposure. To do this, select appropriate sequence constraints in the Export window, choose the export platform, format and Codec, make fine tuning and bit rate adjustments and finish export either in Premiere Pro or Media Encoder. You may also save these settings for your next exports.
Part 2 Free Motion Graphics Templates for Premiere Pro
Let’s have a look into your best choices of free motion graphic templates for Premiere Pro:
0114 Premiere Pro Lumetri Looks
Want to enhance your video creativity with that amazing Hollywood feel? You can undoubtedly opt for the Premiere Lumetri Looks template that gives you the liberty to provide a Hollywood oriented color scheme to your videos, just like those incredible color patterns one would see in Dr. Strangelove, The Martian and many more famous Hollywood flicks.
0215 Animated Lower Thirds
This template comes handy when you need to add lower thirds to your videos, either to introduce different content varieties or to objectify your video components. You can use this template with ease in your personal as well as commercial videos to give them that explicit professional touch.
03Horror Trailer Titles
If horror videos turn you on, use this template in video creations to customize them with that intense and scary feel! This template helps you add scary title slates that are just enough to add a terrifying quotient to your videos. From personal to professional, this template can add intensity to any video type.
04Instagram Stories Premiere Pro Template
This template is a definite catch for those Instagram lovers who constantly experiment to post engaging stories on the platform. If you want your IG stories to grab the talk, go for this animation template to customize photos and text so that they get the buzz among your followers.
05Dust Overlays
Comprising of studio-like effects, this template allows you to enhance your films with high quality dynamic animation in appealing texture variations. Use this template to create videos with those attractive misty backgrounds with cohesive variations in lighting with adjustable power effects.
06Travel Stories Premiere Pro Template
If you are into travel blogging and trying to add spunk to your stories and videos, this template is there to help you out with its catchy text animations and flowy transitions. Available in an upgraded configuration, this template is everything you need to make your travel blogs hover the trending charts.
07Digital Slideshow
Go for this template to add spark to your graphic presentations. Designed primarily for professional usage, it is equally effective in personal projects also. Developed by Evanto Elements, the company offers unlimited access on subscription.
08Free Quotes Premiere Pro Template
If you want to add animated quotes to your video creations, this template is a must try for you. Providing 6 quoting options and a ‘click to change’ text and color interface with convenient customizability keeps it among the top choices for hastle free motion editing.
09Cinematic Title Style Library
If you are bored with those conventional Premiere Pro titles but don’t want to invest time in creating styles of your own, you can use the modernized title styles from this library to enhance your creations with that intense cinematic feel. You can use them comfortably for personal and commercial purposes.
10Space Background Elements
This set of background templates is designed to provide realistic settings to video creators who work on science fiction and space oriented themes. Loaded with different real-time effects, this template provides the ultimate feel of a space travel in 4K.
Part 2 Alternatives to Premiere Pro: Filmora
If not Premiere Pro, you can go for Filmora as a dependable alternative. It’s an exquisite set of amazing and top-notch tools for creating g and editing videos. Wondershare introduced Filmora as an effective, easy-to-use editing software that’s equally caters to the editing pace of beginners as well as experts. You can use Filmora with Windows and macOS.
Packed with a range of appealing customization choices, Filmora comes to you in four principal versions:
● Wondershare Filmora Video Editor
Suitable for beginners, this is the basic and the simplest version having inbuilt editing templates. It’s desktop compatible software.
For Win 7 or later (64-bit)
For macOS 10.12 or later
● Filmora
Android and iOS compatibility in this version of Filmora brought video editing from PCs and laptops into smartphones.
● FilmoraScrn
This version allows you to record your editing screen if you’re a working on Windows.
Part 4 How to Use Motion Graphics Templates in Premiere Pro
After getting familiar with Premiere Pro editing and templates, let’s get into using these adobe premiere motion graphics templates for an exemplary video creating experience. Take up the following steps to get started.
● Go to Premiere Pro Essential Graphics Panel
In the Premiere Pro startup page, select ‘Window’ from the toolbar and select ‘Essential Graphics’ from the drop down menu.
● Add Motion Graphics Templates to Library
Click the ‘Import’ button present at the bottom in the right side of the Essential Graphics Panel. Go to and choose your downloaded motion graphics template file and select ‘Open’. Your file is added to the Essential Graphics Library.
● Drag-Drop the MOGRT to Timeline
‘Drag’ your motion graphics template from the library and ‘Drop’ it on your Timeline.
● Customize Your Template
Go to the ‘Edit’ option in the Essential Graphics Panel to look for customization choices available for your selected motion graphics adobe template.
● Key Takeaways from This Episode →
● Adobe Premiere Pro is an amazing video creation and editing tool that ensures to give a professional class to your edits. Be it personal creativity or professional expertise, this software is all set to give you a wholesome editing experience you will never forget.
● Loaded with an extensive variety of editing templates, available for free and on subscription, adobe premiere pro is a one stop access to all your editing concerns. Its customizable effects will certainly make your creations stand out in the league.
● Video editing is a high in demand craft of excellence. With advancements in software developments, the creative market offers you a pool of over the top editing software that is ready to give that classy spunk to your videos. So just your own from the pool and go on a spree of creating trend setting videos that never miss out on grabbing the attention of everyone around!
12+ Stunning Instagram GIF Stickers and How to Make & Find
12+ Stunning Instagram GIF Stickers and How to Make & Find
An easy yet powerful editor
Numerous effects to choose from
Detailed tutorials provided by the official channel
Creating gif stickers for Instagram is an easy step. Know how to make Instagram gif stickers. Find Instagram gif stickers.
In this article
01 [What’s Top 12 Amazing Instagram GIF Stickers](#Part 1)
02 [Where to Find Instagram GIF Stickers](#Part 2)
03 [How to Make Instagram GIF Stickers](#Part 3)
Part 1 What’s Top 12 Amazing Instagram GIF Stickers
Instagram stories have become routine for every social media lover. Their day is never complete without a new and interesting story that their viewers love to watch and cannot wait for a new one. There are always some new updates on Instagram and to be in trend, it is a must to include some quirky and engaging content in the stories. The introduction of GIF to Instagram has made it easy for users to add some unique elements and content to their Instagram stories. GIF on Instagram has been powered by GIPHY. Several gifs have been uploaded and they can be searched easily on the search bar over Instagram. Instagram gif stickers are used by Instagram users to express their feelings and influence people. There are various gifs for different moods and occasions. So these gif stickers become a must-have element in Instagram stories.
So, let’s see some of the top 12 Amazing Instagram GIF Stickers that can make your Instagram story more engaging and interesting.
01THE UNCOMMON PLACE

The uncommon place is having a perfect set of gifs that are based on seasons. These gifs are best for nature lovers who wish to add some of them to their Instagram stories. This gif is created by a well-known designer and Illustrator from California called Katie Theirjung. This gif has spider web, candy for Halloween, flowers, stars, and some sayings. It has some cheerful gifs in warm colors. The uncommon place gif over morning Instagram stories can be pleasing and yet engaging.
02QUEENBEMONYEI
Girls, who are always active in handling their Instagram stories, love to search for Queenbemonyei. It has beautiful and the best Instagram gif stickers for girls to express their style and mood. It has a beautiful rich jewel tone and stickers of African-American women.
03OURSECOND
Instagram users who love the outdoors and update stuff on Instagram stories related to their outings, OURSECOND is the best kind of gif to make their Instagram stories more happening and interesting. Tress, campfire essential, tent, and natural stickers are available here. It can be searched easily by typing OURSEC and all the OURSECOND gifs will appear for applying.
04SCRIPTBYNORA
Sayings and cute words with Instagram stories are just amazing things to share. If you are fond of writing something catchy on your Instagram stories, SCRIPTBYNORA is the great place to get some great writing gifs. It includes days and seasons names like Sunday, Friday, summer night, playtime, saves the date, and many more gifs.
05NEUTRAL

Some cute colorful gifs can be obtained by searching NEUTRAL on Instagram. It is a great collection of some assorted cute stickers such as stars, hearts, decorative lights, sunshine, and many others. These gifs are a great way to beautify any Instagram stories.
06PAINT & BRUSH
Paint and Brush Instagram gif sticker is good for the artists who keep on presenting something new to their viewers. They can be applied to the backgrounds of text and make them more attractive. Cute paint and brush stickers draw the attention of the viewers when they read the Instagram stories.
07GLADDEST
This Gif is created by Mac Ford, an illustrator in Vancouver. For those who want some sparkles and cute fonts, gladdest gifs are the best option. An amazing collection of party stuff, stars, music, heart, and some cute words in gladdest can make Instagram stories unique and stylish. New posts can be added on Instagram stories with cute gifs of gladdest. It can be searched easily by typing gladdest and all the gifs will pop up.
08AISFORAI

One of the most attractive Instagram sticker gif is Aisforai. This is very popular on GIPHY and has more than 20.5B GIF views. This is a special one as it relates to love and children. It shows that ‘love is all around them, even when their loved ones are not with them. To add them to Instagram stories, search Aisforai and get them for your stories.
09LAURENBLAIR
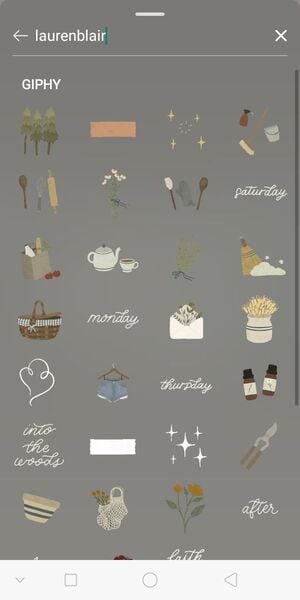
Laurenblair Gifs are perfect for posting outdoor and homely Instagram stories. It has an amazing collection of days and months. Gif of cottages and stuff that is good to post at the weekends and afternoon can be found here. Several stickers can pop up when one searches for Laurenblair at the Instagram account.
10 ODSANYU
For those who love adventure, Odsanyu have several gifs perfect for adventurous Instagram stories. It contains hearts, smiley faces, and adventure time characters. Selling prints and illusions stickers of Odsanyu make the Instagram stories aesthetic.
1111. FLOWERINGWORDS
Flashing cursive words with some cute gifts can be used in creating attractive Instagram stories from floweringwords. These gifs are good when an Instagram user desires to make an engaging story during winters and celebrations. Hearts, cute sayings, and stars are included in it. They can be searched by typing Floweringwords are the search bar.
1212. PASTEL
The Instagram users who love simple, being, and white colors inside their Instagram stories, Pastel has all for them. Some of the cute gifs like animals, hearts, and birthdays are there to make Instagram stories more creative.
So, these are some of the top Instagram stickers which can make any Instagram story look cool and awesome.
Part 2 Where to Find Instagram GIF Stickers
Gif sticker Instagram has given a new level to the Instagram stories. The stickers have added more fun and interesting elements to every story posted over Instagram. It connects with the audience and helps a business to generate leads. But, there are several Instagram Gifs available, and finding the suitable one is very difficult. So, if you are wondering where to find Instagram gif stickers list. Here are some options where one can get their favorite Instagram stickers to bring life to the Instagram stories.
● Vipapier: It has vintage touch gifs and stickers. Flowers and cute words are available. Those who love vintage gifs to be included in their Instagram stories can search over Vipapier.
● Lidiaontheroad: Those who are looking for some motivational and inspirational gifs, it be searched on Lidiaontheroad.
● Ohlalalita: Cute Instagram stories can be made with Ohlalalita gifs. It can be searched by typing it on the search bar. It can make any picture or video attractive.
● Illustragabs: Funny and cheerful gifs can be searched at Illustragabs. For those who wish to make their Instagram stories funny and visually attractive, this is a great option.
● All things Lilly Anne: Instagram users who love creativity and add color combos to their Instagram stories can get it on all things Lilly Anne.
● Mikylacreates: Those who are looking for daisy and candy hearts to include in the Instagram stories; they can get the same at Mikylacreates.
● Greendotori: Short stories can be made interesting with some cute pictures of coffee, hearts, and stars. One can get it at Greendotori.
● Dindaps: Feminine lovers may get some amazing modern gifs at Dindaps. A lot of stickers will pop up when searching Dindaps at the search bar.
Apart from these, there are many other places where some trending gifs can be searched. Animated, sparkling, stylish, and attractive gifs can be used by taking them from great sources powered by GIPHY.
Part 3 How to Make Instagram GIF Stickers
Making Instagram stories filled with wonderful stickers and gif brings more followers and views. So, Instagram GIF stickers can be made in just a few simple steps. Let’s see it:
Apply for Giphy’s brand account: After uploading at least five GIFs, one can process having an account at GIPHY. The requirements can be read out and after approval, one can begin making gifs and uploading them.
Creating gif sticker through Filmora:
Wondershare Filmora Video Editor is a well-known professional video editing program. Bestowed with great features and being user-friendly, this is the best application for gif making. This is a good place where video editing, adding transition effects, captions can be done.
Filmora is easy-to-use digital creativity software that has taken advanced digital technology to take video, sound, and text to the next level with magical effects, interesting stickers, and filters. It has various simplified tools to make content engaging.
Following steps shall be followed to create a Gif over Filmora:
● Download the application Filmora and install it on your PC. Locate and select the media file from the PC and open it to import the Gif on the application.
● Click on +icon appearing at the thumbnail center. Click MATCH TO MEDIA for adding the file to the timeline.
● Move to the project setting and choose the aspect ratio from the drop-down list.
● Click on export from the media library, select the MP4 format. Perform other required adjustments and click on exports to convert gifs to Instagram videos. Open the Instagram app and upload the gif video to your profile.
● The other method of uploading and sharing gifs is through the GIPHY app. Any video which requires modification, the Filmora app can be used to trim it.
So, if you are looking for how to create gif stickers for Instagram, explore Filmora and create some amazing gifs from videos or videos from Gif. You can do it in simple steps with Filmora.
● Key Takeaways from This Episode →
● Instagram stories can be made more impactful with some effects, sparkles, good sayings, colorful stickers, and some cute pictures. All this is possible by adding some amazing gifs. Gifs are a great way to complement any text posted over Instagram stories. Some aesthetic Gifs can be found at the uncommon place, queenbemonyei,oursecond, scriptbynora, neutral, and many more.
● There are several gifs available for Instagram stories, but finding the best source is a must to create some engaging and customized stories. Based on the expressions and mood, there are many gifs that can guide the viewers. So, they can be accessed at Vipapier, Lidiaontheroad, Ohlalalita, Illustragabs, All things Lilly Anne, Mikylacreates, and many more sections.
● Attractive Gif can be created by following some simple steps. One of the great applications that can make your gif and stickers amazing for Instagram stories is Filmora.
Creating gif stickers for Instagram is an easy step. Know how to make Instagram gif stickers. Find Instagram gif stickers.
In this article
01 [What’s Top 12 Amazing Instagram GIF Stickers](#Part 1)
02 [Where to Find Instagram GIF Stickers](#Part 2)
03 [How to Make Instagram GIF Stickers](#Part 3)
Part 1 What’s Top 12 Amazing Instagram GIF Stickers
Instagram stories have become routine for every social media lover. Their day is never complete without a new and interesting story that their viewers love to watch and cannot wait for a new one. There are always some new updates on Instagram and to be in trend, it is a must to include some quirky and engaging content in the stories. The introduction of GIF to Instagram has made it easy for users to add some unique elements and content to their Instagram stories. GIF on Instagram has been powered by GIPHY. Several gifs have been uploaded and they can be searched easily on the search bar over Instagram. Instagram gif stickers are used by Instagram users to express their feelings and influence people. There are various gifs for different moods and occasions. So these gif stickers become a must-have element in Instagram stories.
So, let’s see some of the top 12 Amazing Instagram GIF Stickers that can make your Instagram story more engaging and interesting.
01THE UNCOMMON PLACE
The uncommon place is having a perfect set of gifs that are based on seasons. These gifs are best for nature lovers who wish to add some of them to their Instagram stories. This gif is created by a well-known designer and Illustrator from California called Katie Theirjung. This gif has spider web, candy for Halloween, flowers, stars, and some sayings. It has some cheerful gifs in warm colors. The uncommon place gif over morning Instagram stories can be pleasing and yet engaging.
02QUEENBEMONYEI
Girls, who are always active in handling their Instagram stories, love to search for Queenbemonyei. It has beautiful and the best Instagram gif stickers for girls to express their style and mood. It has a beautiful rich jewel tone and stickers of African-American women.
03OURSECOND
Instagram users who love the outdoors and update stuff on Instagram stories related to their outings, OURSECOND is the best kind of gif to make their Instagram stories more happening and interesting. Tress, campfire essential, tent, and natural stickers are available here. It can be searched easily by typing OURSEC and all the OURSECOND gifs will appear for applying.
04SCRIPTBYNORA
Sayings and cute words with Instagram stories are just amazing things to share. If you are fond of writing something catchy on your Instagram stories, SCRIPTBYNORA is the great place to get some great writing gifs. It includes days and seasons names like Sunday, Friday, summer night, playtime, saves the date, and many more gifs.
05NEUTRAL
Some cute colorful gifs can be obtained by searching NEUTRAL on Instagram. It is a great collection of some assorted cute stickers such as stars, hearts, decorative lights, sunshine, and many others. These gifs are a great way to beautify any Instagram stories.
06PAINT & BRUSH
Paint and Brush Instagram gif sticker is good for the artists who keep on presenting something new to their viewers. They can be applied to the backgrounds of text and make them more attractive. Cute paint and brush stickers draw the attention of the viewers when they read the Instagram stories.
07GLADDEST
This Gif is created by Mac Ford, an illustrator in Vancouver. For those who want some sparkles and cute fonts, gladdest gifs are the best option. An amazing collection of party stuff, stars, music, heart, and some cute words in gladdest can make Instagram stories unique and stylish. New posts can be added on Instagram stories with cute gifs of gladdest. It can be searched easily by typing gladdest and all the gifs will pop up.
08AISFORAI
One of the most attractive Instagram sticker gif is Aisforai. This is very popular on GIPHY and has more than 20.5B GIF views. This is a special one as it relates to love and children. It shows that ‘love is all around them, even when their loved ones are not with them. To add them to Instagram stories, search Aisforai and get them for your stories.
09LAURENBLAIR
Laurenblair Gifs are perfect for posting outdoor and homely Instagram stories. It has an amazing collection of days and months. Gif of cottages and stuff that is good to post at the weekends and afternoon can be found here. Several stickers can pop up when one searches for Laurenblair at the Instagram account.
10 ODSANYU
For those who love adventure, Odsanyu have several gifs perfect for adventurous Instagram stories. It contains hearts, smiley faces, and adventure time characters. Selling prints and illusions stickers of Odsanyu make the Instagram stories aesthetic.
1111. FLOWERINGWORDS
Flashing cursive words with some cute gifts can be used in creating attractive Instagram stories from floweringwords. These gifs are good when an Instagram user desires to make an engaging story during winters and celebrations. Hearts, cute sayings, and stars are included in it. They can be searched by typing Floweringwords are the search bar.
1212. PASTEL
The Instagram users who love simple, being, and white colors inside their Instagram stories, Pastel has all for them. Some of the cute gifs like animals, hearts, and birthdays are there to make Instagram stories more creative.
So, these are some of the top Instagram stickers which can make any Instagram story look cool and awesome.
Part 2 Where to Find Instagram GIF Stickers
Gif sticker Instagram has given a new level to the Instagram stories. The stickers have added more fun and interesting elements to every story posted over Instagram. It connects with the audience and helps a business to generate leads. But, there are several Instagram Gifs available, and finding the suitable one is very difficult. So, if you are wondering where to find Instagram gif stickers list. Here are some options where one can get their favorite Instagram stickers to bring life to the Instagram stories.
● Vipapier: It has vintage touch gifs and stickers. Flowers and cute words are available. Those who love vintage gifs to be included in their Instagram stories can search over Vipapier.
● Lidiaontheroad: Those who are looking for some motivational and inspirational gifs, it be searched on Lidiaontheroad.
● Ohlalalita: Cute Instagram stories can be made with Ohlalalita gifs. It can be searched by typing it on the search bar. It can make any picture or video attractive.
● Illustragabs: Funny and cheerful gifs can be searched at Illustragabs. For those who wish to make their Instagram stories funny and visually attractive, this is a great option.
● All things Lilly Anne: Instagram users who love creativity and add color combos to their Instagram stories can get it on all things Lilly Anne.
● Mikylacreates: Those who are looking for daisy and candy hearts to include in the Instagram stories; they can get the same at Mikylacreates.
● Greendotori: Short stories can be made interesting with some cute pictures of coffee, hearts, and stars. One can get it at Greendotori.
● Dindaps: Feminine lovers may get some amazing modern gifs at Dindaps. A lot of stickers will pop up when searching Dindaps at the search bar.
Apart from these, there are many other places where some trending gifs can be searched. Animated, sparkling, stylish, and attractive gifs can be used by taking them from great sources powered by GIPHY.
Part 3 How to Make Instagram GIF Stickers
Making Instagram stories filled with wonderful stickers and gif brings more followers and views. So, Instagram GIF stickers can be made in just a few simple steps. Let’s see it:
Apply for Giphy’s brand account: After uploading at least five GIFs, one can process having an account at GIPHY. The requirements can be read out and after approval, one can begin making gifs and uploading them.
Creating gif sticker through Filmora:
Wondershare Filmora Video Editor is a well-known professional video editing program. Bestowed with great features and being user-friendly, this is the best application for gif making. This is a good place where video editing, adding transition effects, captions can be done.
Filmora is easy-to-use digital creativity software that has taken advanced digital technology to take video, sound, and text to the next level with magical effects, interesting stickers, and filters. It has various simplified tools to make content engaging.
Following steps shall be followed to create a Gif over Filmora:
● Download the application Filmora and install it on your PC. Locate and select the media file from the PC and open it to import the Gif on the application.
● Click on +icon appearing at the thumbnail center. Click MATCH TO MEDIA for adding the file to the timeline.
● Move to the project setting and choose the aspect ratio from the drop-down list.
● Click on export from the media library, select the MP4 format. Perform other required adjustments and click on exports to convert gifs to Instagram videos. Open the Instagram app and upload the gif video to your profile.
● The other method of uploading and sharing gifs is through the GIPHY app. Any video which requires modification, the Filmora app can be used to trim it.
So, if you are looking for how to create gif stickers for Instagram, explore Filmora and create some amazing gifs from videos or videos from Gif. You can do it in simple steps with Filmora.
● Key Takeaways from This Episode →
● Instagram stories can be made more impactful with some effects, sparkles, good sayings, colorful stickers, and some cute pictures. All this is possible by adding some amazing gifs. Gifs are a great way to complement any text posted over Instagram stories. Some aesthetic Gifs can be found at the uncommon place, queenbemonyei,oursecond, scriptbynora, neutral, and many more.
● There are several gifs available for Instagram stories, but finding the best source is a must to create some engaging and customized stories. Based on the expressions and mood, there are many gifs that can guide the viewers. So, they can be accessed at Vipapier, Lidiaontheroad, Ohlalalita, Illustragabs, All things Lilly Anne, Mikylacreates, and many more sections.
● Attractive Gif can be created by following some simple steps. One of the great applications that can make your gif and stickers amazing for Instagram stories is Filmora.
How to Make a Photoshop Collage in EASY Steps
How to Make a Photoshop Collage in EASY Steps
An easy yet powerful editor
Numerous effects to choose from
Detailed tutorials provided by the official channel
Photographs are a way of capturing and stopping the time in a small frame. They hold millions of memories that we want to cherish forever in our lives. And sometimes, we want to make a cluster of all the happy memories by making a collage of the photos.

Also, what can be a better gift to someone than presenting them a collection of all the cherishable memories you have with them in photographs? And that can be made possible through various photoshop collage ideas.
In this article
01 [Does Photoshop Have Collage Templates?](#Part 1)
02 [How to Make Your Own Collage with Photoshop Templates](#Part 2)
03 [How to Custom a Photoshop Collage in 9 Simple Steps](#Part 3)
Part 1 Does Photoshop Have Collage Templates?
There is numerous photo collage template in photoshop, and you even access and use some of them for free. Additionally, you can also create your template in Photoshop and use them in making your collage. If you want to make your template in Photoshop, here is how.
Step 1: Make a new layer and fill it up with your choice of colour.
Step 2: Resize and duplicate the layer to create the pattern you want for your collage.
Step 3: Integrate a “Clipping Mask.”
Step 4: For every image, create new clipping masks.
Step 5: Your collage template is ready so, export it to use!
Part 2 How to Make Your Own Collage with Photoshop Templates
Now that we know that you can access numerous incredible photoshop templates for free, you might want to create a collage for yourself in Photoshop. So, this is how you can use the photoshop collage template to make your collage with Photoshop Templates.
First, you need to select the images you want to create a collage with. Then you will have to import them. You can either “select and import” them one at a time or even batch import all of them together. Then, you can readily choose the template you want to use, or you can also create one for yourself.
Then you can resize or edit the images in the way you want and place them in the desired order. After you are done arranging and creating the collage perfectly, save the file in JPEG format and then export it to access it whenever you want!
Part 3 How to Custom a Photoshop Collage in 9 Simple Steps
If you do not know the answer to the question: how to make a collage in photoshop, there is absolutely nothing to worry about. Because the answer to this question is simple and includes not more than nine steps.
So now, we will be discussing the nine simple steps that will help you make a custom photo collage in photoshop. Here is the list of steps that will help you in doing so.
● Step 1: Selecting your favorite photos
The first step to making a collage in photoshop is to select all the photos you would like your collage to have. Now, it will be best for you to choose your photos wisely. We understand that each photograph is equally sweet and cherishable. But, when you select the images for your collage in a thoughtful manner, the collage turns out much better than expected.
You can use different collage ideas for photoshop, such as following a particular storyline, where you collage the photos so that it recreates the memory or the moments in sequence. Another way to select your photos is by sticking to a particular theme, and it can be vintage or on one specific color or the like. It will help your collage turn out in the best and the most thoughtful way.
● Step 2: Opening the photos you have selected, in collage maker photoshop
Now that you have selected which images you would want your collage to have, the next step will require you to open those images in the collage maker Photoshop. For this, you will have to select the option “File”. There, you will find the option “Open”. Then you will open the images you have chosen in Photoshop.
Also, you can simply press the “ctrl” and the “O” keys on your keyboard and it will automatically help you open the images you have selected for the photo collage on photoshop.

Another way to open the pages you have selected for your collage is through the “Drag and Drop” function. It is more effortless to choose the images and open them in Photoshop. After you have opened the photos in Photoshop, it will open in a different tab and look like in the following picture.

● Step 3: Make a new file for your collage on photoshop
The third step requires you to make a new file for your photo collage in photoshop. For this, you need to select or click on the “File” option on Photoshop. Then, click on the “New” option. It will help you make a new file for your collage. You can also select the “ctrl” and “N” together.
As you click on the “New” option, you will be given options to choose from. Choose the one that matches your preference.
When you are working on photoshop to make a collage, the images will need a collage background because it is on this background that the photos will assemble. If you have made a collage before on photoshop, you can use the old collage photoshop template. Otherwise, you need to create a new document for the collage.

● Step 4: Add the selected images one-by-one
Adding the images can be done in many ways. One way to do so is by opening the photo and clicking on it. Another way of doing so is to use the “Marquee Tool” of Photoshop.

Another way of doing so is by pressing the “ctrl” and “A” keys on your keyboard together. You will find the matching ants border around the image when you do this.

Then, go to the “Edit” option and choose “Copy” there. Or, you can also select the “ctrl” and “C” keys on your keywords together. Then go to your new document and select the option of “Paste” from the “Edit” option, or you can also press the “ctrl” and “V” keys together to do so.
The photo will be added in its own layer on the new document.

● Step 5: Arrange the images
Now, arrange the images in the way you want. If you have chosen to tell a story through your collage creator in photoshop, then arrange the photos accordingly. You can do so with the help of the “Move” tool or simply tap V. You can also use the “Free Transform” tool to edit and transform the images in the way you want. You can resize, rotate and edit the photos in many other ways through the “Free Transform” tool.
Step 6: Integrate image space
To create a collage in photoshop in a better and more spaced-out manner, you need to add some spacing between the images you have in your collage. There are two ways to add spacing between the pictures; one way is by creating a thin, white border around each image.
And the second method is by accessing and using the “Layers” feature in Photoshop.

● Step 7: Merge all the Layers
This step is necessary when you have used the “Layer” feature to create the spacing among the images present in your collage. You will be able to do so from the “Layer” option. So, go to the “Layer” option and select the “Merge Invisible” option present there.

● Step 8: cropping the final picture
Before the final step, it is important that you crop the final picture. And to do so, you can opt for the “Crop tool”. You will be able to access it easily, or you can also simply tap C to use the “Crop tool.”

● Step 9: Save the final collage and export
After you have done all the necessary changes and are satisfied with the final collage, then, save the file. To do so, go to the “File” option and select the “Save as” option.

Then choose the file type to be “JPEG”. Type the name you would want the collage to be saved as. This completes the process of saving the file. Then choose the image quality you would want the collage to be exported in.

● Key Takeaways from This Episode →
● In this discussion, we have covered the following topics.
● We discussed whether Photoshop has collage templates.
● Then we proceeded with discussing how we can create a collage in photoshop using the templates in it.
● Lastly, we wrapped up our discussion with the nine-step tutorial about customizing a collage in Photoshop.
Photographs are a way of capturing and stopping the time in a small frame. They hold millions of memories that we want to cherish forever in our lives. And sometimes, we want to make a cluster of all the happy memories by making a collage of the photos.
Also, what can be a better gift to someone than presenting them a collection of all the cherishable memories you have with them in photographs? And that can be made possible through various photoshop collage ideas.
In this article
01 [Does Photoshop Have Collage Templates?](#Part 1)
02 [How to Make Your Own Collage with Photoshop Templates](#Part 2)
03 [How to Custom a Photoshop Collage in 9 Simple Steps](#Part 3)
Part 1 Does Photoshop Have Collage Templates?
There is numerous photo collage template in photoshop, and you even access and use some of them for free. Additionally, you can also create your template in Photoshop and use them in making your collage. If you want to make your template in Photoshop, here is how.
Step 1: Make a new layer and fill it up with your choice of colour.
Step 2: Resize and duplicate the layer to create the pattern you want for your collage.
Step 3: Integrate a “Clipping Mask.”
Step 4: For every image, create new clipping masks.
Step 5: Your collage template is ready so, export it to use!
Part 2 How to Make Your Own Collage with Photoshop Templates
Now that we know that you can access numerous incredible photoshop templates for free, you might want to create a collage for yourself in Photoshop. So, this is how you can use the photoshop collage template to make your collage with Photoshop Templates.
First, you need to select the images you want to create a collage with. Then you will have to import them. You can either “select and import” them one at a time or even batch import all of them together. Then, you can readily choose the template you want to use, or you can also create one for yourself.
Then you can resize or edit the images in the way you want and place them in the desired order. After you are done arranging and creating the collage perfectly, save the file in JPEG format and then export it to access it whenever you want!
Part 3 How to Custom a Photoshop Collage in 9 Simple Steps
If you do not know the answer to the question: how to make a collage in photoshop, there is absolutely nothing to worry about. Because the answer to this question is simple and includes not more than nine steps.
So now, we will be discussing the nine simple steps that will help you make a custom photo collage in photoshop. Here is the list of steps that will help you in doing so.
● Step 1: Selecting your favorite photos
The first step to making a collage in photoshop is to select all the photos you would like your collage to have. Now, it will be best for you to choose your photos wisely. We understand that each photograph is equally sweet and cherishable. But, when you select the images for your collage in a thoughtful manner, the collage turns out much better than expected.
You can use different collage ideas for photoshop, such as following a particular storyline, where you collage the photos so that it recreates the memory or the moments in sequence. Another way to select your photos is by sticking to a particular theme, and it can be vintage or on one specific color or the like. It will help your collage turn out in the best and the most thoughtful way.
● Step 2: Opening the photos you have selected, in collage maker photoshop
Now that you have selected which images you would want your collage to have, the next step will require you to open those images in the collage maker Photoshop. For this, you will have to select the option “File”. There, you will find the option “Open”. Then you will open the images you have chosen in Photoshop.
Also, you can simply press the “ctrl” and the “O” keys on your keyboard and it will automatically help you open the images you have selected for the photo collage on photoshop.
Another way to open the pages you have selected for your collage is through the “Drag and Drop” function. It is more effortless to choose the images and open them in Photoshop. After you have opened the photos in Photoshop, it will open in a different tab and look like in the following picture.
● Step 3: Make a new file for your collage on photoshop
The third step requires you to make a new file for your photo collage in photoshop. For this, you need to select or click on the “File” option on Photoshop. Then, click on the “New” option. It will help you make a new file for your collage. You can also select the “ctrl” and “N” together.
As you click on the “New” option, you will be given options to choose from. Choose the one that matches your preference.
When you are working on photoshop to make a collage, the images will need a collage background because it is on this background that the photos will assemble. If you have made a collage before on photoshop, you can use the old collage photoshop template. Otherwise, you need to create a new document for the collage.
● Step 4: Add the selected images one-by-one
Adding the images can be done in many ways. One way to do so is by opening the photo and clicking on it. Another way of doing so is to use the “Marquee Tool” of Photoshop.
Another way of doing so is by pressing the “ctrl” and “A” keys on your keyboard together. You will find the matching ants border around the image when you do this.
Then, go to the “Edit” option and choose “Copy” there. Or, you can also select the “ctrl” and “C” keys on your keywords together. Then go to your new document and select the option of “Paste” from the “Edit” option, or you can also press the “ctrl” and “V” keys together to do so.
The photo will be added in its own layer on the new document.
● Step 5: Arrange the images
Now, arrange the images in the way you want. If you have chosen to tell a story through your collage creator in photoshop, then arrange the photos accordingly. You can do so with the help of the “Move” tool or simply tap V. You can also use the “Free Transform” tool to edit and transform the images in the way you want. You can resize, rotate and edit the photos in many other ways through the “Free Transform” tool.
Step 6: Integrate image space
To create a collage in photoshop in a better and more spaced-out manner, you need to add some spacing between the images you have in your collage. There are two ways to add spacing between the pictures; one way is by creating a thin, white border around each image.
And the second method is by accessing and using the “Layers” feature in Photoshop.
● Step 7: Merge all the Layers
This step is necessary when you have used the “Layer” feature to create the spacing among the images present in your collage. You will be able to do so from the “Layer” option. So, go to the “Layer” option and select the “Merge Invisible” option present there.
● Step 8: cropping the final picture
Before the final step, it is important that you crop the final picture. And to do so, you can opt for the “Crop tool”. You will be able to access it easily, or you can also simply tap C to use the “Crop tool.”
● Step 9: Save the final collage and export
After you have done all the necessary changes and are satisfied with the final collage, then, save the file. To do so, go to the “File” option and select the “Save as” option.
Then choose the file type to be “JPEG”. Type the name you would want the collage to be saved as. This completes the process of saving the file. Then choose the image quality you would want the collage to be exported in.
● Key Takeaways from This Episode →
● In this discussion, we have covered the following topics.
● We discussed whether Photoshop has collage templates.
● Then we proceeded with discussing how we can create a collage in photoshop using the templates in it.
● Lastly, we wrapped up our discussion with the nine-step tutorial about customizing a collage in Photoshop.
DP Animation Maker Tutorial for Finding The Best Animated Profile Picture Maker
DP Animation Maker Tutorial for Finding The Best Animated Profile Picture Maker
An easy yet powerful editor
Numerous effects to choose from
Detailed tutorials provided by the official channel
Social media is getting more and more competitive, and it’s crucial to make a good first impression. Animated profile pictures grab the user’s attention and give the added boost that helps you become different in a good way.
This article will show you the ten top animated profile picture makers using which you can create awesome profile pictures with ease.
In this article
01 [What does “PFP” mean?](#Part 1)
02 [The 10 Best Animated Profile Picture Makers for Making awesome profile pictures](#Part 2)
03 [What Happens if You Make Animated Video Instead of Pictures?](#Part 3)
Part 1 What does “PFP” mean?
PFP stands for “Picture For Profile” or, more commonly, “Profile Picture.” It is the first thing people see when they visit your profile on a social networking website. The profile owners typically upload their own images on Facebook, Twitter, Instagram, WhatsApp, and others at different times during the year or when anything significant happens.
Adding a photo gives your followers a chance to put a face to the name and an idea of what you look like. This allows them to better relate to you and creates a strong foundation for conversations and any other type of interactions.
Part 2 The 10 Best Animated Profile Picture Makers for Making awesome profile pictures
Animated profile pictures add fun and steal the show when you add them to your social accounts. What’s more, it can be much easier to create a WhatsApp animated profile picture when you’re using the right tool. Here in this post, we present you with the ten best animated profile picture makers for your reference and use.
01Canva
Canva lets you make an animated profile picture as simple as “drag and drop” without any creativity. Canva’s unique WYSIWYG animation technique makes it very straightforward to create your own avatar - making awesome animated gifs has never been simpler.
The UI is simple enough that even the smallest of details are well thought out. The captions are editable, so you easily customize the words appearing in each awesome gif.
Canva, one of the best animated profile picture makers, is a great alternative for those who prefer to work and create using the browser and without downloading and installing any software. You can also access Canva directly from any mobile device or tablet, making it convenient for you to share creative greetings and social media posts with your friends and loved ones.

●Pros:
● A near-unlimited number of stunning pre-built templates for a wide range of usage
● Beautiful and easy-to-use application interface
● The tool gets frequent bug fixes and updates with the latest features and even more templates
Cons:
● The free plan comes with a pretty meager cloud storage capacity
● No vector design is possible
● Lack of the ability to connect more than one Facebook login for those who handle personal and business pages separately
02Placeit
Are you looking for an easy way to make a simple but effective WhatsApp animated profile picture? Go to Placeit.net, and be creative with its wide range of customizable attractive pre-built templates.
Templates are hand-drawn and professionally designed. With thousands of animated templates, you can create a profile picture in a jiffy. Placeit lets you post fun and exciting photos that attract attention and grow your fanbase in no time.
Make your profile picture come to life with this one-of-a-kind animated profile picture maker! Using its proprietary image editor, you will be able to spread smiles, laughter, surprise, and much more right in seconds.

Pros:
● The overall UI is fairly streamlined – making an animated profile picture should take more than just a few clicks
● From color schemes to changing text fonts – everything is customizable
● Templates are ultra-high-quality
Cons:
● A bit expensive monthly plan
● Pay-per-item cost is definitely not affordable
● No option to add your own custom font
03PicMonkey
PicMonkey is a powerful yet simple online photo editor that lets you showcase your creativity and brand through animated profile pictures, cover photos, advertisements of all kinds, and more. In addition to its easy-to-learn features, PicMonkey offers endless possibilities for amateurs and professionals alike!
To be a meaningful part of the social media world, creating your own profile picture is not only fun but also a smart way to show your individuality. And with PicMonkey’s image editor, crafting the perfect profile picture doesn’t have to be complicated. With over 15 million users, PicMonkey is a leading photo editing software that has been helping individuals create drool-worthy designs in minutes.

Pros:
● The interface is user-friendly, and the tool offers an easy-to-learn feature set
● With a plethora of customizable in-built templates, you can generate some fresh animated profile pictures every time you try the app
● The developer keeps the tool updated with new resources and features always
Cons:
● You cannot work on more than one template simultaneously
● Lacks a proper and detailed user guide with useful tips
● Without paying for the Pro version, you can’t access some super-handy basic features
04Powerpuff Yourself
Are you looking for an easy way to make your own avatar? Powerpuff Yourself is a user-friendly tool that produces realistic anime avatars based on your photos. The features that you can expect are –
● Anime avatars, each with six different skin tones.
● Female or male avatars,
● Unique background based on your answers to the questions, and
● About 70 different hairstyles.
Make your very own anime avatar with this cute animated profile picture generator by simply selecting mouth, eyes, glasses, hair, and dress for your preferred character. After choosing the scene for the background, answer some questions about yourself and press the button to create your avatar!

Pros:
● Choose from a variety of combinations of face, eyes, hairstyles, clothes, and accessories
● Share your fresh customized avatar with just a single click
● Available in all major languages
Cons:
● No option to upload your own custom design
● The generated avatar can’t be white-labeled as the end result gets saved with the CN logo
● While the background can be animated, you are not allowed to animate the main character
05Pixlr
Change the way you see yourself on social networks With Pixlr. It is a free online profile picture maker, tablet, and mobile photo editor with all the amazing editing features one can expect only from professional tools like Photoshop. Ever wonder how your photos would look in black-and-white or what that flower in your hand looks like as a cartoon? Go to pixlr.com, log in with Facebook to create your free account, and you will be surprised by what you can do with its host of powerful self-edit features.
Complete your online persona with the help of Pixlr, now available on browser, Android, and iOS! Use the Pixlr app to take a picture and then, with a few taps or mouse clicks, enhance and decorate it. Add funny text, use special effects filters, crop and rotate, remove red-eye - it’s all there in one app! Make an impact with your profile picture and be recognized as an expert in your field.

Pros:
● Offers a simple yet powerful browser-based graphics editing experience
● A great collection of multipurpose templates designed to keep the modern social platforms in mind
● Plenty of super useful features are available in the free version
Cons:
● Some annoying glitches in the middle of editing while shifting from one tab to another
● A fair number of options work slowly due to bugs that need to be ironed out
● The doodle tool offers no “brush” feature
06Animate Me
Animate Me is a new application for iPhone that assists you with creating animated images. It has an easy-to-use interface to make animations with photos so that you can design your own animated image in a jiffy without any hassle.
The tool has two modes to create images. One of the modes is Edit mode, where you can edit your work immediately after you finish drawing. And another is Camera mode, which allows you to make a hand-drawn animation out of videos already shot. This dp animation maker tutorial can be easy for you to understand.
Touch, draw and share your animation - with Animate Me, there is no longer any need for professional graphics tools. Create animation from your photos, GIF files, or live camera action with just a touch, and share it with family and friends by email, message or post it to your Facebook wall.

Pros:
● Straightforward user interface
● Add images from your device or Facebook album or choose one from the app’s pre-built collection
● Add exciting cool features and cute sounds to your images
Cons:
● The free version of the tool has a limited number of options
● Frequent updates come with new bugs
● Some users complained of “bad words” even in the kid’s voice
07Picstun
Do you want to make awesome animated videos with your photos easily? Picstun is the best photo animator app in the Android market which can add powerful video effects to a picture free and instantaneously. It produces beautiful cartoon effects for your photos and video, allowing you to tell animated video stories in gorgeous styles instead of sharing static pictures.
You can learn this simple yet professional photo animator easily. Users of PicStun are able to create an animated video with a variety of over 3,000 pictures in various topics and animation effects.
The best thing about this application is that you can use your gallery images, too, on which the animation will be superimposed. There are many other nifty features in this next-generation picture animation maker tool. For instance, adding text, effects, music, and more right onto your pictures is possible directly from the application interface.

Pros:
● A wide range of animation effects are available
● Allows you to preview the result before you finally save it and share the same with the world
● One-click social network sharing
Cons:
● The application often crashes when trying to import multiple images into it
● A limited number of effects beg for an update with fresh animation possibilities
● Lacks proper instructions for the new users
08Loopsie
Loopsie allows you to create picture animation using your own photos. Add emojis, text, drawings, and speech bubbles to your photos in a matter of seconds to create amazing GIF images that can be used for messages or for sharing.
Are you tired of boring photos? This animated profile picture maker lets you animate your images! Just add one of the characters to your photo and give them an animated life. Loopsie supports video creation too! Add video clips and photos, pick a theme for your video, and Loopsie will do the work for you. Now, you can also hashtag on Facebook or Twitter to show off your design like the pros!

Pros:
● An easy-to-use interface offers a short learning curve
● The resolutions of end-results are readily social media compatible
● Can share on all major social networking sites directly within the app
Cons:
● While it allows the user to import their own videos, they get ranked randomly inside the app
● A new user can find it a little difficult to use the software without enough instruction set
● Recent updates added too many gimmicky filters without actually improving the experience much
09PFPmaker
PFPmaker is the original animated profile picture maker that allows adding eye-catching animations to your profile images on major social platforms like Instagram, Facebook, Twitter, and more. With PFPMaker, creating personalized animated gifs of yourself is a piece of cake. Simply decide what you want in your animation, upload some images (or take from the in-built collection inside the app), and PFPMaker will make it happen.
Increase your brand awareness, get more likes and shares, and drive more traffic to your website - all by making custom animated profile pictures using PFPmaker. Now you can create a professional identity in a matter of seconds and acquire new followers, fans, or customers!

Pros:
● Generates strikingly gorgeous animated profile images in seconds
● Its AI-powered background removal tool works awesomely well
● Loads of customization option makes this a cool nifty tool
Cons:
● No native Android or iOS app is available; everything is browser-based
● Competitors offer more animation possibilities
● While users can request a specific feature, it gets implemented rarely
10Animated GIF Maker
Animated GIF Maker is an online tool to create animated gif pictures from the user’s photos and images. The tool can convert image files up to 6MB in size, with a maximum of 5 frames. However, files greater than 3MB in size will not be displayed on the result page
Make a photo animation! Upload your own images, and Animated Gif Maker will merge them into a cool animated GIF. You can use this tool to create an animated profile picture for your social page or just have fun making short videos with your friends’ photos. Adjust the file format, resize the image and add text to your new animated picture – whatever way you want to customize the result is possible by this little tool!

Pros:
● Allows a user to upload more than one file at the same time
● Images can be converted into multiple formats easily
● Cropping and resizing the uploaded pictures is a breeze
Cons:
● File upload size restricted to 6 MB
● No native smartphone app
● The browser-based interface offers limited functionalities
Key Takeaways from This Episode
● Keeping your Facebook, Twitter, and other social profile photos fresh is vital if you want to make a good impression.
● Or perhaps you just want to have an image that is up to date and relevant. But have you ever tried to use an animated profile picture maker?
● If not, this is the right time you choose from one of our preferred tools from this article and surprise your friends with your new whatsapp animated profile picture today.
Social media is getting more and more competitive, and it’s crucial to make a good first impression. Animated profile pictures grab the user’s attention and give the added boost that helps you become different in a good way.
This article will show you the ten top animated profile picture makers using which you can create awesome profile pictures with ease.
In this article
01 [What does “PFP” mean?](#Part 1)
02 [The 10 Best Animated Profile Picture Makers for Making awesome profile pictures](#Part 2)
03 [What Happens if You Make Animated Video Instead of Pictures?](#Part 3)
Part 1 What does “PFP” mean?
PFP stands for “Picture For Profile” or, more commonly, “Profile Picture.” It is the first thing people see when they visit your profile on a social networking website. The profile owners typically upload their own images on Facebook, Twitter, Instagram, WhatsApp, and others at different times during the year or when anything significant happens.
Adding a photo gives your followers a chance to put a face to the name and an idea of what you look like. This allows them to better relate to you and creates a strong foundation for conversations and any other type of interactions.
Part 2 The 10 Best Animated Profile Picture Makers for Making awesome profile pictures
Animated profile pictures add fun and steal the show when you add them to your social accounts. What’s more, it can be much easier to create a WhatsApp animated profile picture when you’re using the right tool. Here in this post, we present you with the ten best animated profile picture makers for your reference and use.
01Canva
Canva lets you make an animated profile picture as simple as “drag and drop” without any creativity. Canva’s unique WYSIWYG animation technique makes it very straightforward to create your own avatar - making awesome animated gifs has never been simpler.
The UI is simple enough that even the smallest of details are well thought out. The captions are editable, so you easily customize the words appearing in each awesome gif.
Canva, one of the best animated profile picture makers, is a great alternative for those who prefer to work and create using the browser and without downloading and installing any software. You can also access Canva directly from any mobile device or tablet, making it convenient for you to share creative greetings and social media posts with your friends and loved ones.
●Pros:
● A near-unlimited number of stunning pre-built templates for a wide range of usage
● Beautiful and easy-to-use application interface
● The tool gets frequent bug fixes and updates with the latest features and even more templates
Cons:
● The free plan comes with a pretty meager cloud storage capacity
● No vector design is possible
● Lack of the ability to connect more than one Facebook login for those who handle personal and business pages separately
02Placeit
Are you looking for an easy way to make a simple but effective WhatsApp animated profile picture? Go to Placeit.net, and be creative with its wide range of customizable attractive pre-built templates.
Templates are hand-drawn and professionally designed. With thousands of animated templates, you can create a profile picture in a jiffy. Placeit lets you post fun and exciting photos that attract attention and grow your fanbase in no time.
Make your profile picture come to life with this one-of-a-kind animated profile picture maker! Using its proprietary image editor, you will be able to spread smiles, laughter, surprise, and much more right in seconds.
Pros:
● The overall UI is fairly streamlined – making an animated profile picture should take more than just a few clicks
● From color schemes to changing text fonts – everything is customizable
● Templates are ultra-high-quality
Cons:
● A bit expensive monthly plan
● Pay-per-item cost is definitely not affordable
● No option to add your own custom font
03PicMonkey
PicMonkey is a powerful yet simple online photo editor that lets you showcase your creativity and brand through animated profile pictures, cover photos, advertisements of all kinds, and more. In addition to its easy-to-learn features, PicMonkey offers endless possibilities for amateurs and professionals alike!
To be a meaningful part of the social media world, creating your own profile picture is not only fun but also a smart way to show your individuality. And with PicMonkey’s image editor, crafting the perfect profile picture doesn’t have to be complicated. With over 15 million users, PicMonkey is a leading photo editing software that has been helping individuals create drool-worthy designs in minutes.
Pros:
● The interface is user-friendly, and the tool offers an easy-to-learn feature set
● With a plethora of customizable in-built templates, you can generate some fresh animated profile pictures every time you try the app
● The developer keeps the tool updated with new resources and features always
Cons:
● You cannot work on more than one template simultaneously
● Lacks a proper and detailed user guide with useful tips
● Without paying for the Pro version, you can’t access some super-handy basic features
04Powerpuff Yourself
Are you looking for an easy way to make your own avatar? Powerpuff Yourself is a user-friendly tool that produces realistic anime avatars based on your photos. The features that you can expect are –
● Anime avatars, each with six different skin tones.
● Female or male avatars,
● Unique background based on your answers to the questions, and
● About 70 different hairstyles.
Make your very own anime avatar with this cute animated profile picture generator by simply selecting mouth, eyes, glasses, hair, and dress for your preferred character. After choosing the scene for the background, answer some questions about yourself and press the button to create your avatar!
Pros:
● Choose from a variety of combinations of face, eyes, hairstyles, clothes, and accessories
● Share your fresh customized avatar with just a single click
● Available in all major languages
Cons:
● No option to upload your own custom design
● The generated avatar can’t be white-labeled as the end result gets saved with the CN logo
● While the background can be animated, you are not allowed to animate the main character
05Pixlr
Change the way you see yourself on social networks With Pixlr. It is a free online profile picture maker, tablet, and mobile photo editor with all the amazing editing features one can expect only from professional tools like Photoshop. Ever wonder how your photos would look in black-and-white or what that flower in your hand looks like as a cartoon? Go to pixlr.com, log in with Facebook to create your free account, and you will be surprised by what you can do with its host of powerful self-edit features.
Complete your online persona with the help of Pixlr, now available on browser, Android, and iOS! Use the Pixlr app to take a picture and then, with a few taps or mouse clicks, enhance and decorate it. Add funny text, use special effects filters, crop and rotate, remove red-eye - it’s all there in one app! Make an impact with your profile picture and be recognized as an expert in your field.
Pros:
● Offers a simple yet powerful browser-based graphics editing experience
● A great collection of multipurpose templates designed to keep the modern social platforms in mind
● Plenty of super useful features are available in the free version
Cons:
● Some annoying glitches in the middle of editing while shifting from one tab to another
● A fair number of options work slowly due to bugs that need to be ironed out
● The doodle tool offers no “brush” feature
06Animate Me
Animate Me is a new application for iPhone that assists you with creating animated images. It has an easy-to-use interface to make animations with photos so that you can design your own animated image in a jiffy without any hassle.
The tool has two modes to create images. One of the modes is Edit mode, where you can edit your work immediately after you finish drawing. And another is Camera mode, which allows you to make a hand-drawn animation out of videos already shot. This dp animation maker tutorial can be easy for you to understand.
Touch, draw and share your animation - with Animate Me, there is no longer any need for professional graphics tools. Create animation from your photos, GIF files, or live camera action with just a touch, and share it with family and friends by email, message or post it to your Facebook wall.
Pros:
● Straightforward user interface
● Add images from your device or Facebook album or choose one from the app’s pre-built collection
● Add exciting cool features and cute sounds to your images
Cons:
● The free version of the tool has a limited number of options
● Frequent updates come with new bugs
● Some users complained of “bad words” even in the kid’s voice
07Picstun
Do you want to make awesome animated videos with your photos easily? Picstun is the best photo animator app in the Android market which can add powerful video effects to a picture free and instantaneously. It produces beautiful cartoon effects for your photos and video, allowing you to tell animated video stories in gorgeous styles instead of sharing static pictures.
You can learn this simple yet professional photo animator easily. Users of PicStun are able to create an animated video with a variety of over 3,000 pictures in various topics and animation effects.
The best thing about this application is that you can use your gallery images, too, on which the animation will be superimposed. There are many other nifty features in this next-generation picture animation maker tool. For instance, adding text, effects, music, and more right onto your pictures is possible directly from the application interface.
Pros:
● A wide range of animation effects are available
● Allows you to preview the result before you finally save it and share the same with the world
● One-click social network sharing
Cons:
● The application often crashes when trying to import multiple images into it
● A limited number of effects beg for an update with fresh animation possibilities
● Lacks proper instructions for the new users
08Loopsie
Loopsie allows you to create picture animation using your own photos. Add emojis, text, drawings, and speech bubbles to your photos in a matter of seconds to create amazing GIF images that can be used for messages or for sharing.
Are you tired of boring photos? This animated profile picture maker lets you animate your images! Just add one of the characters to your photo and give them an animated life. Loopsie supports video creation too! Add video clips and photos, pick a theme for your video, and Loopsie will do the work for you. Now, you can also hashtag on Facebook or Twitter to show off your design like the pros!
Pros:
● An easy-to-use interface offers a short learning curve
● The resolutions of end-results are readily social media compatible
● Can share on all major social networking sites directly within the app
Cons:
● While it allows the user to import their own videos, they get ranked randomly inside the app
● A new user can find it a little difficult to use the software without enough instruction set
● Recent updates added too many gimmicky filters without actually improving the experience much
09PFPmaker
PFPmaker is the original animated profile picture maker that allows adding eye-catching animations to your profile images on major social platforms like Instagram, Facebook, Twitter, and more. With PFPMaker, creating personalized animated gifs of yourself is a piece of cake. Simply decide what you want in your animation, upload some images (or take from the in-built collection inside the app), and PFPMaker will make it happen.
Increase your brand awareness, get more likes and shares, and drive more traffic to your website - all by making custom animated profile pictures using PFPmaker. Now you can create a professional identity in a matter of seconds and acquire new followers, fans, or customers!
Pros:
● Generates strikingly gorgeous animated profile images in seconds
● Its AI-powered background removal tool works awesomely well
● Loads of customization option makes this a cool nifty tool
Cons:
● No native Android or iOS app is available; everything is browser-based
● Competitors offer more animation possibilities
● While users can request a specific feature, it gets implemented rarely
10Animated GIF Maker
Animated GIF Maker is an online tool to create animated gif pictures from the user’s photos and images. The tool can convert image files up to 6MB in size, with a maximum of 5 frames. However, files greater than 3MB in size will not be displayed on the result page
Make a photo animation! Upload your own images, and Animated Gif Maker will merge them into a cool animated GIF. You can use this tool to create an animated profile picture for your social page or just have fun making short videos with your friends’ photos. Adjust the file format, resize the image and add text to your new animated picture – whatever way you want to customize the result is possible by this little tool!
Pros:
● Allows a user to upload more than one file at the same time
● Images can be converted into multiple formats easily
● Cropping and resizing the uploaded pictures is a breeze
Cons:
● File upload size restricted to 6 MB
● No native smartphone app
● The browser-based interface offers limited functionalities
Key Takeaways from This Episode
● Keeping your Facebook, Twitter, and other social profile photos fresh is vital if you want to make a good impression.
● Or perhaps you just want to have an image that is up to date and relevant. But have you ever tried to use an animated profile picture maker?
● If not, this is the right time you choose from one of our preferred tools from this article and surprise your friends with your new whatsapp animated profile picture today.
5 Foolproof Amazing Anime Text to Speech Tips
5 Foolproof Amazing Anime Text to Speech Tips for Makers
An easy yet powerful editor
Numerous effects to choose from
Detailed tutorials provided by the official channel
Our topic for today’s article is on that exact same subject. Or, rather, more specifically, anime text-to-speech.
For those who want more than the usual robotic text-to-speech AI that you see in more professional software. Learn more about all this below, we’ve prepared an entire guide for you!
In this article
01 [What is the Most Realistic Sounding Text to Speech & How to Do It?](#Part 1)
02 [How to Make Your Own Text to Speech Videos for Youtube](#Part 2)
03 [How to Get More Voices for Text to Speech?](#Part 3)
04 [Top 5 Tips on Anime Text to Speech](#Part 4)
Part 1 What is the Most Realistic Sounding Text to Speech & How to Do It?
To start off, we’ve included this little second on need-to-know information regarding text-to-speech. Starting with:
01How did text to speech get popular?
Perhaps unsurprisingly, the text-to-speech function was developed to increase accessibility for those who have trouble reading on screen-text. Either as a result of visual impairment, are blindness. However, with its emergence came popular programs like Audible, which introduced even those without accessibility problems to its convenience for multi-tasking purposes.
02How to get the most realistic sounding text to speech?
There are several ways you can increase the natural sound of your text-to-speech:
● You can choose a tone that suits your taste.
● You can choose a voice gender that you are more comfortable with.
● And you can increase the speed of the text to reduce the awkward, and unnatural pauses that occur after each word.
In the end, though, the best way to get realistic speech is to find a tool that offers high-quality audio options. Which is what we’ll be introducing in the latter sections:
Part 2 How to Make Your Own Text to Speech Videos for YouTube
If you want to create your own anime text-to-speech for your YouTube videos (which is popular with a lot of YouTubers these days), the process is about the same no matter what text-to-speech option you end up choosing in the end. For our examples below, we will be using Natural Readers though, which is a FREE tool, making it a good choice for those who are just looking to try it out.
Step 1: Compose Your Text
The first step is to compose your text! You might prefer to do this on Google Docs or Word, but a lot of text-to-speech tools do offer you a way of composing your text along with them (like the online tool Natural Readers):

Step 2: Choose Voice / Reader
Next, it’s time to choose the reader that you want your text to be read by!
Usually, there are options for different types of accents and languages offered. So, if you want your text to speech to match that of your desired anime characters, you should play around with these options to get the right one.

Step 3: Choose Reading Speed!
Next, it’s time to choose your desired reading speed!
Most readers start off at 1X speed on average, but we personally recommend going for at least 1.25X - 1.5X for an instantly more natural-sounding text-to-speech anime characters.

Step 4: Choose Output Format
And finally, to finish us off, it’s time to choose what output format you want your text-to-speech audio to be! To keep this simple for uploading to YouTube, we recommend sticking with MP3, which most editors accept.

Part 3 How to Get More Voices for Text to Speech?
If you think that the available cartoon characters text-to-speech voices you have are not quite doing it for your project, then you can always explore alternative, third-party options! There are many of these available. Although, you’ll have to check with your text-to-speech reader or maker to make sure that it allows for such a feat:
01Method 1: Windows Text-to-Speech Voices
If you’re looking to change your computer’s text-to-speech voice, then the place to look for this is on ‘Control Panel > Speech’. There, not only can you choose from a variety of different voice options, but you can also change voice speed and voice pitch (how high or low the pitch is), which is a great way of getting a very specific kind of tone for your anime text-to-speech creations.

02Method 2: Third-Party Voices (Screaming Bee)
Next is the third-party resource, Screaming Bee , which offers a good variety of text-to-speech voices that you can try out as well! Using this method will, of course, require downloading and applying these voices for your chosen text-to-speech reader. For example, if you want to use the Windows reader, go to the Control Panel > Speech page for the option to apply it there.

03Method 3: Third-Party Voices (Cepstral Voices)
Another resource that you can check out is Cepstral Voices . Just like Screaming Bee, it offers a range of text-to-speech voices that you can try out to see which one suits your taste most. This includes text-to-speech cartoon characters and text-to-speech anime characters voices!

Part 4 Top 5 Tips on Anime Text to Speech
Now, onto some more anime text-to-speech options that you can try in order to make your text-to-speech script sound exactly like your favorite cartoon or anime characters! For this list, we’ve not only included a description of each reader but also why you might want to try it out:
01Flixier
Flixier is the first anime text-to-speech maker on this list! It is not a free solution. You can try it out for FREE, but if you want to use it for its full capacity, then you’ll need to pay for one of their subscription packages, which start at $10 per month (for access to longer audios, unlimited projects, and more advanced export options.)
● Flixier comes with many different voice options.
● It is an online tool, so no download or installation is required.
● It comes with advanced team functionalities.

02Woord
Woord is our next pick because it works very efficiently at turning text into speech. All you need to do is plug in your text and it will convert it immediately! Much like Flixier, however, it is a freemium tool. So, while you can try it out for free, if you truly want to use it for creating professional projects, you’ll need to unlock one of its subscription packages (which start at $25 per month!)
● Instant text-to-speech maker.
● An online tool, no need for download or installation.
● Lots of natural-sounding voices to choose from.

03Speechelo
Speechelo is a bit different from the two text-to-speech makers on this list. However, that may just mean that it is a more preferable option for some. More specifically, it’s really more of a ‘voice-over-maker’. It does still use AI in order to create human-like voiceovers, with several different options to voice and language. The difference then lies in the fact that it is a one-time payment software that normally costs around $100. In this way, you can avoid long-term ongoing subscription plans. But it is a heavier commitment from the get-go.
● High-quality AI voices for creating realistic voice-overs.
● One-time payment only! No Subscription fees are needed.
● Works in several different languages.

04Cartoon Animator 4
Cartoon Animator 4 is a good option if you’re really looking for that anime or character style for your audio. It works just like your average text-to-speech maker, generally, although it does also offer a couple of more advanced features for those who are looking into animation.
● Free-to-use text-to-speech anime character
● Adjustable volume, pitch, and speed voice parameters.
● A wide variety of voice options to choose from.

05TTS Reader
TTSReader, much like Cartoon Animator 4, is a FREE online tool that you can use in order to create quick and easy text-to-speech audio for your cartoon/anime characters. It doesn’t have as many advanced features as some of the other tools out there, but it can get the job done if all you’re looking for is something easy to use.
● Available to use online for FREE.
● Variety of different voice options.
● Adjustable speed for voice.

Key Takeaways from This Episode
● If you’re looking to increase conversions with better-sounding voiceovers for your video content, then it’s important that you’re aware of all the different options out there!
● Most of these text-to-speech tools work in the same way, but you’ll notice that some of them offer more advanced tools than others.
● In the end, you’ll have to find one that works with your budget and learn how to play around with its settings to make sure that you are getting the most out of your text-to-speech maker.
Our topic for today’s article is on that exact same subject. Or, rather, more specifically, anime text-to-speech.
For those who want more than the usual robotic text-to-speech AI that you see in more professional software. Learn more about all this below, we’ve prepared an entire guide for you!
In this article
01 [What is the Most Realistic Sounding Text to Speech & How to Do It?](#Part 1)
02 [How to Make Your Own Text to Speech Videos for Youtube](#Part 2)
03 [How to Get More Voices for Text to Speech?](#Part 3)
04 [Top 5 Tips on Anime Text to Speech](#Part 4)
Part 1 What is the Most Realistic Sounding Text to Speech & How to Do It?
To start off, we’ve included this little second on need-to-know information regarding text-to-speech. Starting with:
01How did text to speech get popular?
Perhaps unsurprisingly, the text-to-speech function was developed to increase accessibility for those who have trouble reading on screen-text. Either as a result of visual impairment, are blindness. However, with its emergence came popular programs like Audible, which introduced even those without accessibility problems to its convenience for multi-tasking purposes.
02How to get the most realistic sounding text to speech?
There are several ways you can increase the natural sound of your text-to-speech:
● You can choose a tone that suits your taste.
● You can choose a voice gender that you are more comfortable with.
● And you can increase the speed of the text to reduce the awkward, and unnatural pauses that occur after each word.
In the end, though, the best way to get realistic speech is to find a tool that offers high-quality audio options. Which is what we’ll be introducing in the latter sections:
Part 2 How to Make Your Own Text to Speech Videos for YouTube
If you want to create your own anime text-to-speech for your YouTube videos (which is popular with a lot of YouTubers these days), the process is about the same no matter what text-to-speech option you end up choosing in the end. For our examples below, we will be using Natural Readers though, which is a FREE tool, making it a good choice for those who are just looking to try it out.
Step 1: Compose Your Text
The first step is to compose your text! You might prefer to do this on Google Docs or Word, but a lot of text-to-speech tools do offer you a way of composing your text along with them (like the online tool Natural Readers):
Step 2: Choose Voice / Reader
Next, it’s time to choose the reader that you want your text to be read by!
Usually, there are options for different types of accents and languages offered. So, if you want your text to speech to match that of your desired anime characters, you should play around with these options to get the right one.
Step 3: Choose Reading Speed!
Next, it’s time to choose your desired reading speed!
Most readers start off at 1X speed on average, but we personally recommend going for at least 1.25X - 1.5X for an instantly more natural-sounding text-to-speech anime characters.
Step 4: Choose Output Format
And finally, to finish us off, it’s time to choose what output format you want your text-to-speech audio to be! To keep this simple for uploading to YouTube, we recommend sticking with MP3, which most editors accept.
Part 3 How to Get More Voices for Text to Speech?
If you think that the available cartoon characters text-to-speech voices you have are not quite doing it for your project, then you can always explore alternative, third-party options! There are many of these available. Although, you’ll have to check with your text-to-speech reader or maker to make sure that it allows for such a feat:
01Method 1: Windows Text-to-Speech Voices
If you’re looking to change your computer’s text-to-speech voice, then the place to look for this is on ‘Control Panel > Speech’. There, not only can you choose from a variety of different voice options, but you can also change voice speed and voice pitch (how high or low the pitch is), which is a great way of getting a very specific kind of tone for your anime text-to-speech creations.
02Method 2: Third-Party Voices (Screaming Bee)
Next is the third-party resource, Screaming Bee , which offers a good variety of text-to-speech voices that you can try out as well! Using this method will, of course, require downloading and applying these voices for your chosen text-to-speech reader. For example, if you want to use the Windows reader, go to the Control Panel > Speech page for the option to apply it there.
03Method 3: Third-Party Voices (Cepstral Voices)
Another resource that you can check out is Cepstral Voices . Just like Screaming Bee, it offers a range of text-to-speech voices that you can try out to see which one suits your taste most. This includes text-to-speech cartoon characters and text-to-speech anime characters voices!
Part 4 Top 5 Tips on Anime Text to Speech
Now, onto some more anime text-to-speech options that you can try in order to make your text-to-speech script sound exactly like your favorite cartoon or anime characters! For this list, we’ve not only included a description of each reader but also why you might want to try it out:
01Flixier
Flixier is the first anime text-to-speech maker on this list! It is not a free solution. You can try it out for FREE, but if you want to use it for its full capacity, then you’ll need to pay for one of their subscription packages, which start at $10 per month (for access to longer audios, unlimited projects, and more advanced export options.)
● Flixier comes with many different voice options.
● It is an online tool, so no download or installation is required.
● It comes with advanced team functionalities.
02Woord
Woord is our next pick because it works very efficiently at turning text into speech. All you need to do is plug in your text and it will convert it immediately! Much like Flixier, however, it is a freemium tool. So, while you can try it out for free, if you truly want to use it for creating professional projects, you’ll need to unlock one of its subscription packages (which start at $25 per month!)
● Instant text-to-speech maker.
● An online tool, no need for download or installation.
● Lots of natural-sounding voices to choose from.
03Speechelo
Speechelo is a bit different from the two text-to-speech makers on this list. However, that may just mean that it is a more preferable option for some. More specifically, it’s really more of a ‘voice-over-maker’. It does still use AI in order to create human-like voiceovers, with several different options to voice and language. The difference then lies in the fact that it is a one-time payment software that normally costs around $100. In this way, you can avoid long-term ongoing subscription plans. But it is a heavier commitment from the get-go.
● High-quality AI voices for creating realistic voice-overs.
● One-time payment only! No Subscription fees are needed.
● Works in several different languages.
04Cartoon Animator 4
Cartoon Animator 4 is a good option if you’re really looking for that anime or character style for your audio. It works just like your average text-to-speech maker, generally, although it does also offer a couple of more advanced features for those who are looking into animation.
● Free-to-use text-to-speech anime character
● Adjustable volume, pitch, and speed voice parameters.
● A wide variety of voice options to choose from.
05TTS Reader
TTSReader, much like Cartoon Animator 4, is a FREE online tool that you can use in order to create quick and easy text-to-speech audio for your cartoon/anime characters. It doesn’t have as many advanced features as some of the other tools out there, but it can get the job done if all you’re looking for is something easy to use.
● Available to use online for FREE.
● Variety of different voice options.
● Adjustable speed for voice.
Key Takeaways from This Episode
● If you’re looking to increase conversions with better-sounding voiceovers for your video content, then it’s important that you’re aware of all the different options out there!
● Most of these text-to-speech tools work in the same way, but you’ll notice that some of them offer more advanced tools than others.
● In the end, you’ll have to find one that works with your budget and learn how to play around with its settings to make sure that you are getting the most out of your text-to-speech maker.
Also read:
- Updated 2024 Approved How to Draw Cartoons Step by Step with This Guide
- Updated In 2024, How To Create Pinterest Slideshow in Simple Ways
- New Top 4 Websites to Get Anime Footage for Free
- Updated 8 Blender 3D Animation Tutorials for Beginners
- New Complete Guide to Send Gif WhatsApp on Android for 2024
- Updated How to Make Slideshow in LinkedIn
- New 10 Creative Wallpaper Collage Ideas and Photos for 2024
- 2024 Approved You Can Turn a TikTok Into a GIF Now. Heres How
- Updated Uncensored Top 10 + Free Streaming Sites
- New In 2024, Samples of Cartoon Character Face
- Updated In 2024, Samples of Cartoon Character Face
- In 2024, Top 10 Sketch Animation Video Makers
- 26 Cool Anime Girl Names and Their Meanings for 2024
- Ways You Can Master to Find 10 Best Free Animated Text Generator for 2024
- Updated Learn How to Make Your Characters Interactive in Unity Animation Rigging
- Updated Animate Your Photo Online with These Awesome Tools
- Ready to Animate Game Character From Scratch for 2024
- Undelete lost messages from Samsung Galaxy A25 5G
- Which Pokémon can Evolve with a Moon Stone For Realme GT Neo 5? | Dr.fone
- In 2024, Can I use iTools gpx file to catch the rare Pokemon On Nokia G42 5G | Dr.fone
- In 2024, Fixing Foneazy MockGo Not Working On Huawei Nova Y91 | Dr.fone
- Sim Unlock Vivo Y27 5G Phones without Code 2 Ways to Remove Android Sim Lock
- In 2024, Is pgsharp legal when you are playing pokemon On OnePlus 12? | Dr.fone
- How to Change Your Apple iPhone 6 Plus Location on life360 Without Anyone Knowing? | Dr.fone
- In 2024, Hassle-Free Ways to Remove FRP Lock on Xiaomi Redmi 12 Phones with/without a PC
- Troubleshooting Guide How to Fix an Unresponsive Asus ROG Phone 7 Ultimate Screen | Dr.fone
- Best Anti Tracker Software For Realme GT 5 Pro | Dr.fone
- Recover Excel 2007 Files from Virus-Infected Pen Drives for Free | Stellar
- A Perfect Guide To Remove or Disable Google Smart Lock On Xiaomi Redmi 13C 5G
- Undelete lost music from Redmi Note 13 5G
- Cellular Network Not Available for Voice Calls On Itel P55+ | Dr.fone
- In 2024, 4 Ways to Transfer Music from Samsung Galaxy F34 5G to iPhone | Dr.fone
- Does Nova Y71 has native MKV support?
- Title: In 2024, Top 3 Ways to Create Gif Images with Great 3D Gif Maker
- Author: Elon
- Created at : 2024-05-19 03:05:06
- Updated at : 2024-05-20 03:05:06
- Link: https://animation-videos.techidaily.com/in-2024-top-3-ways-to-create-gif-images-with-great-3d-gif-maker/
- License: This work is licensed under CC BY-NC-SA 4.0.
