

Interesting Fundamentals and Ultimate Guide to Animated Characters Drawings for 2024
Interesting Fundamentals and Ultimate Guide to Animated Characters Drawings
Interesting Fundamentals and Ultimate Guide to Animated Characters Drawings
An easy yet powerful editor
Numerous effects to choose from
Detailed tutorials provided by the official channel
Cartoon character have stamped their faces in our hearts from childhood. A cartoon artist represents a cartoon or a natural person’s unique features with simple shapes accurately to recognize the person with the drawing and does not require a lot of patience to do this. The goal of the cartoon is to attract, and the child should get attracted when they see a cartoon image as well as adults. Though the sparkle may appear a little dull, it remains unaltered.
Let us grab a chance to recreate our cartoon characters with easy tutorials about animated characters to draw. In addition to that, you will learn about basic drawing exercises to lead into cool animated characters to draw through this guide in a step-by-step manner.
In this article
01 [What Do I Need to Start Learning Animated Characters Drawings?](#Part 1)
02 [6 Cartoon Characters that Anyone Can Draw (Provided with Free Video Tutorials)](#Part 2)
03 [4 Best Drawing Exercises for Creating Cartoon Characters](#Part 3)
Part 1 What Do I Need to Start Learning Animated Characters Drawings?
There are many software’s available, and anyone can create an animated character drawing, but still, the art of creating a perfect character needs a master. You don’t have to be a Disney-grade animator to make it; start with simple minor characters. Animation is the art of bringing a 3D illustrated cartoon into life. It is created by projecting a sequence of images one after the other immediately. Let us discuss the essential things you need to note before animating characters.
●Timeline is the most important for animation. Depending on the software, you have various options to change the duration and add effects.
●Animation is generally preferable in 24 frames per second, which means the total number of people in the frame for one second.
●There are two types of working they are one’s and two’s. 2D Animation is usually done in two’s, whereas 3D Animation is in one’s.
●In hand-drawn animations, keyframes are more critical to maintain. The keyframe is the position for the cartoon as per animator has decided.
●Breakdowns combine one or two keyframes, which decide the motion in between the keys.
●In-betweens are all the frames that come between to smooth the motion—automatically generated by the computer to move from key to key.
●Composting is creating or joining two or more images to create a single cartoon frame.
Part 2 6 Cartoon Characters that Anyone can Draw (With free Video Tutorials)
We will discuss animated characters to draw in hand. There are many cartoon characters, but we will look into six cartoon character drawings with their tutorial videos.
01 Smurfette
Smurfette stands out as the lone female Smurf in the entire bunch of blue critters around the village area. One of the rare designs with long hair and a dress is hers. Her design is a lot of fun to sketch.
So, in general, it’s best to work through the lesson as is, then turn it into Brainy, Papa, Joker, or even Smurf.
01Angelica Pickles
Angelica Pickles is one of the most challenging characters to depict from The Rugrats. But her design is so intricate that getting it proper will give you a true sense of accomplishment. Her pigtails, like her leggings, might be challenging to master, so keep practicing.
03Yogi Bear
Yogi Bear is a cartoon character on the sweeter side of the comic animal variety. Yogi Bear is a beloved character from Jellystone Park. As long as you get his tie and collar just right, this guy is a breeze to draw.
04Magilla Gorilla
Magilla Gorilla is another bizarre creature from Hanna-catalog. Barbera’s Because he comes with a bow tie, a little cap, and suspenders, this design is a little more complicated. Not to mention his enormous clown shoes. These small details can be a pain to draw, but Magilla is a very charming gorilla.
05Top Cat
Even further back in time, in the 1960s, there was the ever-popular Top Cat. He’s wearing a cap and a button-down vest, and he’s making some reasonably fancy dances. Give Top Cat a shot if you like The Flintstones’ basic Hanna-Barbera art style.
<
06Helga. G. Pataki
Helga is another character with some wacky hair. There’s a lot that’s bizarre about her. And half the fun of drawing her is figuring out how to do it. Just keep an eye on her head since getting it correct, especially with her rectangle hairdo, can be a little odd.
These are some of the cool animated characters to draw.
Part 3 4 Best Drawing Exercise for Creating Cartoon Characters
You’ll learn how to create cartoon characters individually, including their faces, hair, and facial expressions.
01How to Draw Cartoon Characters
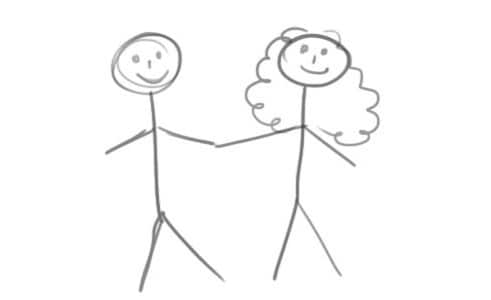
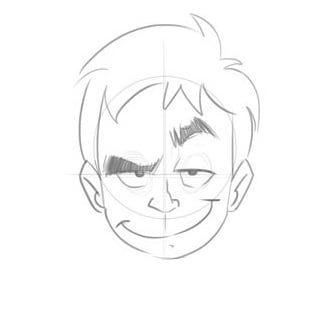
We’ll go through the fundamentals of human perception before getting into cartoon face drawing. Humans have a unique ability to synthesize the details that make up a structure or object in highly complicated ways into fundamental and simple ones. We can express everything with a few curves and geometric forms in this way. In cartoon face, we need to identify the character just by looking like looking at the below picture a girl and a boy.
02Here, you will learn How to Draw a Cartoon Face
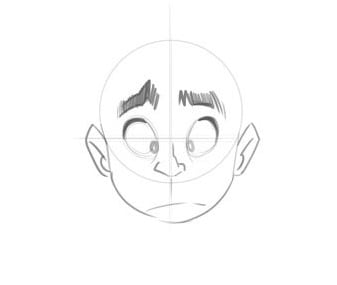
Let us begin with a sketch of a cartoon face. A circle is a basic cartoon shape. All you need is a circle. As seen in the image below, draw a vertical and horizontal line intersecting at the center.
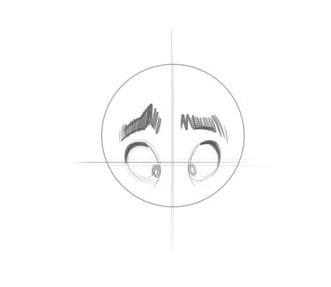
Let us have a look at how to make cartoon eyeballs. Draw an oval shape with a slight lean to the side at the top for the eyes. Repeat on the other side.
Slightly thicken the characteristic to represent our character eyelashes at the top of the circle, place the brows above the eyelashes to create a shocking appearance, draw both pupils to the center in the same direction.
When creating a nose from the front, it’s typical to leave off many details. Even if you merely sketch its tip, it will likely provide a convincing impact. Drawing only one side of the nose is also quite frequent. Children’s mouths are extremely simple in cartoon style, regardless of gender.
The ears are viewed from the front; therefore, the internal holes are not visible. The circle has already established the shape of our head.
03Let’s learn about How to Draw a Cartoon Hair
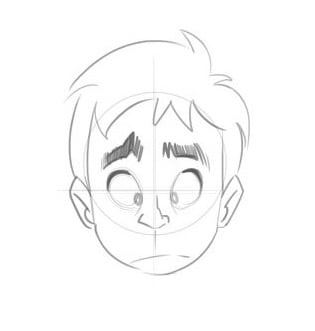
Keep in mind that our characters’ hair is essential for identifying their personalities, and it can also indicate their age. So, all we need is an effortless and playful haircut to bring our boy to life. Because there is no particular method for drawing hair, you’ll have to experiment until you find the perfect look. Look for photo references on the internet! Take a look at a magazine shoot or a Google search.
03How to Draw Characters with different Facial Expressions
By simply following the instructions below, you’ll notice that you can completely transform his expression: Lowering one brow and raising the other, eyelashes are used to cut the eyes in half, putting a smile on the face one side is higher.
To stay under the eyelashes, move the eye pupils up. That’s all there is to it! With just a few tweaks, we achieved the desired result. The circular form of the eyes, hair, ears, nose, chin and the circular shape of the ears are all the same! It’s that simple!
While working in cartooning or video making, Wondershare Wondershare Filmora Video Editor comes out with pros in mind, which can effortlessly convert conventional films into cartoon videos. If you want greater control over your cartoon video, you may also use keyframing to create it. You can fine-tune the parameters in Effects to achieve the best results. You can even change the Animation color after it has been created. It also allows you to use different text themes to showcase your videos.
We propose Wondershare Filmora Video Editor , in this case, to create animation videos by adding keyframes, resulting in a smooth and natural animation. To get started with Animation, all you need is a white plane. Aside from that, color correction and an audio mixer will take your animation video to the next level.
For Win 7 or later (64-bit)
For macOS 10.12 or later
● Key Takeaways from This Episode →
● Learn what are the key elements to make animation videos using software
● Tutorial on how to draw a cartoon character accurately
● In comparison, Wondershare Wondershare Filmora Video Editor is superior in making animation videos.
Cartoon character have stamped their faces in our hearts from childhood. A cartoon artist represents a cartoon or a natural person’s unique features with simple shapes accurately to recognize the person with the drawing and does not require a lot of patience to do this. The goal of the cartoon is to attract, and the child should get attracted when they see a cartoon image as well as adults. Though the sparkle may appear a little dull, it remains unaltered.
Let us grab a chance to recreate our cartoon characters with easy tutorials about animated characters to draw. In addition to that, you will learn about basic drawing exercises to lead into cool animated characters to draw through this guide in a step-by-step manner.
In this article
01 [What Do I Need to Start Learning Animated Characters Drawings?](#Part 1)
02 [6 Cartoon Characters that Anyone Can Draw (Provided with Free Video Tutorials)](#Part 2)
03 [4 Best Drawing Exercises for Creating Cartoon Characters](#Part 3)
Part 1 What Do I Need to Start Learning Animated Characters Drawings?
There are many software’s available, and anyone can create an animated character drawing, but still, the art of creating a perfect character needs a master. You don’t have to be a Disney-grade animator to make it; start with simple minor characters. Animation is the art of bringing a 3D illustrated cartoon into life. It is created by projecting a sequence of images one after the other immediately. Let us discuss the essential things you need to note before animating characters.
●Timeline is the most important for animation. Depending on the software, you have various options to change the duration and add effects.
●Animation is generally preferable in 24 frames per second, which means the total number of people in the frame for one second.
●There are two types of working they are one’s and two’s. 2D Animation is usually done in two’s, whereas 3D Animation is in one’s.
●In hand-drawn animations, keyframes are more critical to maintain. The keyframe is the position for the cartoon as per animator has decided.
●Breakdowns combine one or two keyframes, which decide the motion in between the keys.
●In-betweens are all the frames that come between to smooth the motion—automatically generated by the computer to move from key to key.
●Composting is creating or joining two or more images to create a single cartoon frame.
Part 2 6 Cartoon Characters that Anyone can Draw (With free Video Tutorials)
We will discuss animated characters to draw in hand. There are many cartoon characters, but we will look into six cartoon character drawings with their tutorial videos.
01 Smurfette
Smurfette stands out as the lone female Smurf in the entire bunch of blue critters around the village area. One of the rare designs with long hair and a dress is hers. Her design is a lot of fun to sketch.
So, in general, it’s best to work through the lesson as is, then turn it into Brainy, Papa, Joker, or even Smurf.
01Angelica Pickles
Angelica Pickles is one of the most challenging characters to depict from The Rugrats. But her design is so intricate that getting it proper will give you a true sense of accomplishment. Her pigtails, like her leggings, might be challenging to master, so keep practicing.
03Yogi Bear
Yogi Bear is a cartoon character on the sweeter side of the comic animal variety. Yogi Bear is a beloved character from Jellystone Park. As long as you get his tie and collar just right, this guy is a breeze to draw.
04Magilla Gorilla
Magilla Gorilla is another bizarre creature from Hanna-catalog. Barbera’s Because he comes with a bow tie, a little cap, and suspenders, this design is a little more complicated. Not to mention his enormous clown shoes. These small details can be a pain to draw, but Magilla is a very charming gorilla.
05Top Cat
Even further back in time, in the 1960s, there was the ever-popular Top Cat. He’s wearing a cap and a button-down vest, and he’s making some reasonably fancy dances. Give Top Cat a shot if you like The Flintstones’ basic Hanna-Barbera art style.
<
06Helga. G. Pataki
Helga is another character with some wacky hair. There’s a lot that’s bizarre about her. And half the fun of drawing her is figuring out how to do it. Just keep an eye on her head since getting it correct, especially with her rectangle hairdo, can be a little odd.
These are some of the cool animated characters to draw.
Part 3 4 Best Drawing Exercise for Creating Cartoon Characters
You’ll learn how to create cartoon characters individually, including their faces, hair, and facial expressions.
01How to Draw Cartoon Characters
We’ll go through the fundamentals of human perception before getting into cartoon face drawing. Humans have a unique ability to synthesize the details that make up a structure or object in highly complicated ways into fundamental and simple ones. We can express everything with a few curves and geometric forms in this way. In cartoon face, we need to identify the character just by looking like looking at the below picture a girl and a boy.
02Here, you will learn How to Draw a Cartoon Face
Let us begin with a sketch of a cartoon face. A circle is a basic cartoon shape. All you need is a circle. As seen in the image below, draw a vertical and horizontal line intersecting at the center.
Let us have a look at how to make cartoon eyeballs. Draw an oval shape with a slight lean to the side at the top for the eyes. Repeat on the other side.
Slightly thicken the characteristic to represent our character eyelashes at the top of the circle, place the brows above the eyelashes to create a shocking appearance, draw both pupils to the center in the same direction.
When creating a nose from the front, it’s typical to leave off many details. Even if you merely sketch its tip, it will likely provide a convincing impact. Drawing only one side of the nose is also quite frequent. Children’s mouths are extremely simple in cartoon style, regardless of gender.
The ears are viewed from the front; therefore, the internal holes are not visible. The circle has already established the shape of our head.
03Let’s learn about How to Draw a Cartoon Hair
Keep in mind that our characters’ hair is essential for identifying their personalities, and it can also indicate their age. So, all we need is an effortless and playful haircut to bring our boy to life. Because there is no particular method for drawing hair, you’ll have to experiment until you find the perfect look. Look for photo references on the internet! Take a look at a magazine shoot or a Google search.
03How to Draw Characters with different Facial Expressions
By simply following the instructions below, you’ll notice that you can completely transform his expression: Lowering one brow and raising the other, eyelashes are used to cut the eyes in half, putting a smile on the face one side is higher.
To stay under the eyelashes, move the eye pupils up. That’s all there is to it! With just a few tweaks, we achieved the desired result. The circular form of the eyes, hair, ears, nose, chin and the circular shape of the ears are all the same! It’s that simple!
While working in cartooning or video making, Wondershare Wondershare Filmora Video Editor comes out with pros in mind, which can effortlessly convert conventional films into cartoon videos. If you want greater control over your cartoon video, you may also use keyframing to create it. You can fine-tune the parameters in Effects to achieve the best results. You can even change the Animation color after it has been created. It also allows you to use different text themes to showcase your videos.
We propose Wondershare Filmora Video Editor , in this case, to create animation videos by adding keyframes, resulting in a smooth and natural animation. To get started with Animation, all you need is a white plane. Aside from that, color correction and an audio mixer will take your animation video to the next level.
For Win 7 or later (64-bit)
For macOS 10.12 or later
● Key Takeaways from This Episode →
● Learn what are the key elements to make animation videos using software
● Tutorial on how to draw a cartoon character accurately
● In comparison, Wondershare Wondershare Filmora Video Editor is superior in making animation videos.
How To Make Pinterest Slideshow in Simple Ways
How to Make Pinterest Slideshow in Simple Ways
An easy yet powerful editor
Numerous effects to choose from
Detailed tutorials provided by the official channel
Slideshows are a collection of images arranged together that an audience can quickly swipe through to view the content. Pinterest is known for its one-pin to one post feature. You cannot post more than one image or video in a pin.
Thus, business people could start sharing all of the images or products, services, or articles mostly because it can be stressful to do that. But with the Pinterest slideshow, you can now upload all the images you want to at once in one pin. Moreso, even have people view the pins simultaneously just by swiping through.
In this article
01 [How to display Pinterest’s latest pins in a slideshow?](#Part 1)
02 [How to upload multiple photos to Pinterest?](#Part 2)
03 [How to display Pinterest’s latest pins in a slideshow?](#Part 3)
Part 1 How to Display Pinterest Latest Pins in A Slideshow
Using Pinterest’s latest pins in a slideshow is another way to display the latest pins from any Pinterest user or blogger’s blog. Each image is linked to its pin page on Pinterest instead of the board or profile page if you use the Pinterest profile or board widget.
To install this widget, you need the user or board’s RSS feed URL, then use it as the input for a blogger slide show gadget.
Here are the tricky steps to follow for the Pinterest slide show;
Step 1: Constructing Pinterest RSS feed URL
The Pinterest RSS feed URL of a user is different from aboard.
● It would be the user’s profile URL + feed/RSS for a user. To get your Profile URL, click on your username in the top right corner of your screen, and you will see a URL in your web browser’s URL. That is your profile URL.
● For the board URL, you will get that after clicking on the board from the homepage. The URL would appear on your browser’s URL bar.

Step 2: Reformatting the feed for the slideshow gadget:
The RSS feed from step one is not very compatible with the blogger slideshow gadget. It accepts RSS feed in Media RSS format, but you can convert with Yahoo pipe. Simply plug in your feed URL in the Yahoo pipe URL.
You have to replace the value of the feed URL with the feed URL you got in step one and the pin count with the number of pins displayed on the slide show.
With this, you have successfully converted your feed URL to the media version of the Pinterest feed.
Step 3: Add the slideshow widget
Take the following step to add the slideshow widget.
Go to Dashboard > Layout and click on ‘Add A Gadget.’
Now Add, A Gadget window, scroll down and select Slideshow.

Under Source, select Other.

Put in the converted Pinterest RSS feed URL from step 2 into the Feed URL text box.
Click Save and view your blog.
Part 2 How to Upload Multiple Photos to Pinterest
If you want to display multiple photos of your product or share your brand story with pictures, then this is a feature you will grab. Pinterest allows you to display various products at a time. But first, you must also have a business account to do this.
When you upload multiple photos on Pinterest, they are known as carousel pins. This feature is a great advertising tool and will help you during the Pinterest slideshow.
This is because people would see your carousel on their home feed just like any other pin you have posted. They may also tap on the carousel and swipe through the different photos on the carousel. When the pinner saves it, they have kept the entire image.
Here is a step-by-step method to upload multiple photos to Pinterest.
Step 1: Log into your Pinterest
First, log into your Pinterest business account to access the feature. If you do not have a business account, it is elementary to do so. There is no need for you to enter any billing information if you are wondering about that. It is a straightforward process. Just open your account, click on the drop-down menu near your profile picture, see ‘convert to business,’ then upgrade your account, and you are good to go.
You should also ensure that the photos you want to upload are on your computer. If you have originally planned to use it to explain an article visually, then make sure the particular image that represents that article is correctly saved on your computer. The images should be 1:1 or 2:3 in ratio, and the format either ‘png’ or ‘jpeg.’
Add your pictures and upload. If you want to reorder your pin, you can replace or remove images within the carousel.

Step 2: Add Title
Add a title, description, and website of the carousel pin. Your title will be a snippet of what the blog post or article will be about or the recipe’s title. Your description should be the same as your Pinterest text, and you can also choose to let it appear only on your first image on your carousel pin.
Step 3: Select a Board
The last step is to select a board relevant to your carousel pin. Thus, you have your carousel pin and images. However, you cannot view this immediately as in a standard pin or video pin. But you can go back to your board to view your pin when it is ready.
Part 3 How to Make Pinterest Slideshow In 5 Simple Ways
Slideshows are a beautiful way to enhance your Pinterest account and generate more leads on your Profile. If you’ve been wondering if and how you can make slideshows on Pinterest, here’s a guaranteed step you can follow. But then Pinterest slideshows are instead referred to as a showcase.
However, to access this feature, you must first own a business account on Pinterest.
Here are five (5) simple ways you can make Slideshow on Pinterest:
Step 1: Go to your Pinterest Profile
Click settings next to your profile photo in the top right corner.

Step 2: Select Profile
When the Settings window appears, select Profile.

Step 3: Click Edit
Next to Featured Boards, click Edit.

Step 4: Select Boards
After clicking Edit for your Featured Boards, you’ll reach a screen where you may edit the boards you want to highlight. Select which boards you’d like to feature by clicking on each drop-down menu.
Opening a new Pinterest page is a good idea. Scroll down to Boards with the most Pin impressions under Analytics>Profile. These are the boards that I highlighted.

Step 5: Save
When you’ve decided which boards to include in your Featured, click Save.
● Bonus – Wondershare Filmora
With this feature, you can also tweak your Pinterest slides and make them look professional and befitting to your audience using Wondershare Filmora Video Editor .
For Win 7 or later (64-bit)
For macOS 10.12 or later
Wondershare Filmora is an online video editing software with several unique features, including split-screen, freeze-frame, loop images, and videos to help you create top-notch visual content for your brand. With features like the Chroma key, you can easily create special effects in your Pinterest slideshow background.
You can also use color match and video effects to enhance the quality of the slide.
● Ending Thoughts →
● Making a Pinterest slideshow can be confusing if you do not have the correct information. But if you do, it’ll be a great way to spice up your social media content and create more leads for your business.
● Pinterest is a social media platform that keeps growing and adding more features by the day. It is also increasing the number of users per day. Try out the simple steps stated on how to make a slideshow on Pinterest. Finally, by incorporating Filmora in your levelling up plans, you will be able to bring your brand in front of your target customer and present it nicely.
Slideshows are a collection of images arranged together that an audience can quickly swipe through to view the content. Pinterest is known for its one-pin to one post feature. You cannot post more than one image or video in a pin.
Thus, business people could start sharing all of the images or products, services, or articles mostly because it can be stressful to do that. But with the Pinterest slideshow, you can now upload all the images you want to at once in one pin. Moreso, even have people view the pins simultaneously just by swiping through.
In this article
01 [How to display Pinterest’s latest pins in a slideshow?](#Part 1)
02 [How to upload multiple photos to Pinterest?](#Part 2)
03 [How to display Pinterest’s latest pins in a slideshow?](#Part 3)
Part 1 How to Display Pinterest Latest Pins in A Slideshow
Using Pinterest’s latest pins in a slideshow is another way to display the latest pins from any Pinterest user or blogger’s blog. Each image is linked to its pin page on Pinterest instead of the board or profile page if you use the Pinterest profile or board widget.
To install this widget, you need the user or board’s RSS feed URL, then use it as the input for a blogger slide show gadget.
Here are the tricky steps to follow for the Pinterest slide show;
Step 1: Constructing Pinterest RSS feed URL
The Pinterest RSS feed URL of a user is different from aboard.
● It would be the user’s profile URL + feed/RSS for a user. To get your Profile URL, click on your username in the top right corner of your screen, and you will see a URL in your web browser’s URL. That is your profile URL.
● For the board URL, you will get that after clicking on the board from the homepage. The URL would appear on your browser’s URL bar.
Step 2: Reformatting the feed for the slideshow gadget:
The RSS feed from step one is not very compatible with the blogger slideshow gadget. It accepts RSS feed in Media RSS format, but you can convert with Yahoo pipe. Simply plug in your feed URL in the Yahoo pipe URL.
You have to replace the value of the feed URL with the feed URL you got in step one and the pin count with the number of pins displayed on the slide show.
With this, you have successfully converted your feed URL to the media version of the Pinterest feed.
Step 3: Add the slideshow widget
Take the following step to add the slideshow widget.
Go to Dashboard > Layout and click on ‘Add A Gadget.’
Now Add, A Gadget window, scroll down and select Slideshow.
Under Source, select Other.
Put in the converted Pinterest RSS feed URL from step 2 into the Feed URL text box.
Click Save and view your blog.
Part 2 How to Upload Multiple Photos to Pinterest
If you want to display multiple photos of your product or share your brand story with pictures, then this is a feature you will grab. Pinterest allows you to display various products at a time. But first, you must also have a business account to do this.
When you upload multiple photos on Pinterest, they are known as carousel pins. This feature is a great advertising tool and will help you during the Pinterest slideshow.
This is because people would see your carousel on their home feed just like any other pin you have posted. They may also tap on the carousel and swipe through the different photos on the carousel. When the pinner saves it, they have kept the entire image.
Here is a step-by-step method to upload multiple photos to Pinterest.
Step 1: Log into your Pinterest
First, log into your Pinterest business account to access the feature. If you do not have a business account, it is elementary to do so. There is no need for you to enter any billing information if you are wondering about that. It is a straightforward process. Just open your account, click on the drop-down menu near your profile picture, see ‘convert to business,’ then upgrade your account, and you are good to go.
You should also ensure that the photos you want to upload are on your computer. If you have originally planned to use it to explain an article visually, then make sure the particular image that represents that article is correctly saved on your computer. The images should be 1:1 or 2:3 in ratio, and the format either ‘png’ or ‘jpeg.’
Add your pictures and upload. If you want to reorder your pin, you can replace or remove images within the carousel.
Step 2: Add Title
Add a title, description, and website of the carousel pin. Your title will be a snippet of what the blog post or article will be about or the recipe’s title. Your description should be the same as your Pinterest text, and you can also choose to let it appear only on your first image on your carousel pin.
Step 3: Select a Board
The last step is to select a board relevant to your carousel pin. Thus, you have your carousel pin and images. However, you cannot view this immediately as in a standard pin or video pin. But you can go back to your board to view your pin when it is ready.
Part 3 How to Make Pinterest Slideshow In 5 Simple Ways
Slideshows are a beautiful way to enhance your Pinterest account and generate more leads on your Profile. If you’ve been wondering if and how you can make slideshows on Pinterest, here’s a guaranteed step you can follow. But then Pinterest slideshows are instead referred to as a showcase.
However, to access this feature, you must first own a business account on Pinterest.
Here are five (5) simple ways you can make Slideshow on Pinterest:
Step 1: Go to your Pinterest Profile
Click settings next to your profile photo in the top right corner.
Step 2: Select Profile
When the Settings window appears, select Profile.
Step 3: Click Edit
Next to Featured Boards, click Edit.
Step 4: Select Boards
After clicking Edit for your Featured Boards, you’ll reach a screen where you may edit the boards you want to highlight. Select which boards you’d like to feature by clicking on each drop-down menu.
Opening a new Pinterest page is a good idea. Scroll down to Boards with the most Pin impressions under Analytics>Profile. These are the boards that I highlighted.
Step 5: Save
When you’ve decided which boards to include in your Featured, click Save.
● Bonus – Wondershare Filmora
With this feature, you can also tweak your Pinterest slides and make them look professional and befitting to your audience using Wondershare Filmora Video Editor .
For Win 7 or later (64-bit)
For macOS 10.12 or later
Wondershare Filmora is an online video editing software with several unique features, including split-screen, freeze-frame, loop images, and videos to help you create top-notch visual content for your brand. With features like the Chroma key, you can easily create special effects in your Pinterest slideshow background.
You can also use color match and video effects to enhance the quality of the slide.
● Ending Thoughts →
● Making a Pinterest slideshow can be confusing if you do not have the correct information. But if you do, it’ll be a great way to spice up your social media content and create more leads for your business.
● Pinterest is a social media platform that keeps growing and adding more features by the day. It is also increasing the number of users per day. Try out the simple steps stated on how to make a slideshow on Pinterest. Finally, by incorporating Filmora in your levelling up plans, you will be able to bring your brand in front of your target customer and present it nicely.
Uncensored Top 10 + Free Streaming Sites
Top 10 Banned Anime Around the World and Why

Shanoon Cox
Mar 27, 2024• Proven solutions
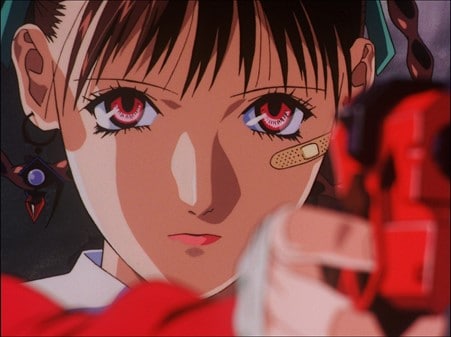
There is hardly a genre that anime hasn’t conquered. While anime is super entertaining and fun to watch, it can get quite crazy and questionable. Yes, anime is animated but the content is mature. From violence to incest and other controversial issues, anime can be offensive sometimes. Due to this, some countries have banned anime shows for its viewers – especially for younger audiences.
Want to find out what anime shows they are and why they are banned? Well, you are in the right spot. Today, we will talk about the top 10 banned anime shows and why they are banned. So, let’s find out!
![]()
A cross-platform for making videos anywhere for all creators

Why your video editing isn’t good enough? How about some creative inspo?
- 100 Million+ Users
- 150+ Countries and Regions
- 4 Million+ Social Media Followers
- 5 Million+ Stock Media for Use
* Secure Download

Part 1: Top 10 Banned Anime List
Here is a list of the 10 banned animes you should know about and why they are banned:
1. Shoujo Tsubaki (Banned Everywhere)
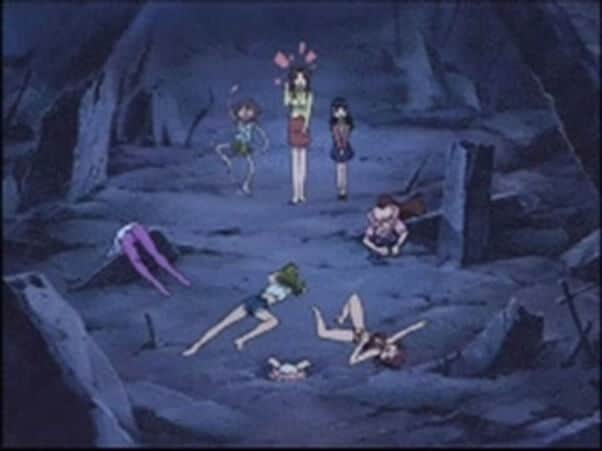
It has a very dark, depressing, and intense storyline and it is considered one of the most controversial anime movies ever. This is a 1992 anime film about a young girl whose mother dies. The girl meets a man who tells her he will help her if she ever needs anything. So, after her mother’s death, she goes to find the man and ends up at a circus where she gets abused and raped. Thus, Shoujo Tsubaki is about child sexual abuse with unbearable gore scenes. The horrific and disturbing visuals of this anime have left many viewers traumatized – so much so that the tapes of this film were also destroyed. Therefore, Shoujo Tsubaki is banned almost everywhere, including Japan itself.
2. Osomatsu-San (Banned in Japan)
Osomatsu-San is banned in Japan due to copyright issues. The series’ first episode had parodies of famous anime shows including Attack on Titan, Naruto, Sailor Moon, Dragon Ball Z, and more. Thus, due to copyright, the show’s first episode was removed from airing. It is still not available on mainstream anime websites. You can find the DVD version of the show, but even those do not have the first episode.

3. Excel Saga (Banned in Japan)
Excel Saga is based on a popular manga of the same name. It is about a secret ideological organization whose purpose is world domination. The entire Excel Saga is available to watch except for its last episode, called “Going Too Far” – very fitting indeed. It is even banned in its home country, Japan. The reason why this episode got banned is that it’s too long, violent, pornographic, and offensive. Fun fact: The Director of the show, Shinichi Watanabe, purposely got the last episode banned to make it daring and unforgettable. The last episode of Excel Saga is only available on DVD.

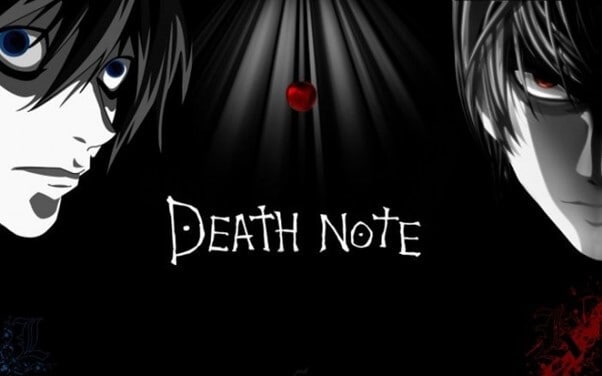
4. Death Note (Banned in China)
Death note is one of the most famous anime shows ever and while it’s gruesome, bloody and horrific, it is easily available on mainstream platforms, including Netflix. However, there is still a country that did not appreciate the dark premise of this show. Death Note is banned in China due to its theme. The show is about death, justice, murder and violence so it is considered as a corrupting influence on kids.
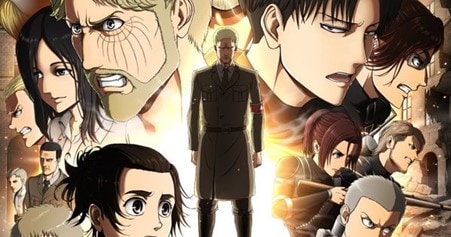
5. Attack on Titan (Banned in China)
Another cult-favorite anime on the lists is Attack on Titan. Due to its bloody, disgusting and disturbing visuals, it has been banned in China. While millions of viewers love this anime, China thinks this show portrays a lot of excessive violence which is very unhealthy for the younger audience. With that being said, if you are 18 and above, do not miss out on Attack on Titan. It is truly one of the best anime out there!
6. High School DxD (Banned in New Zealand)
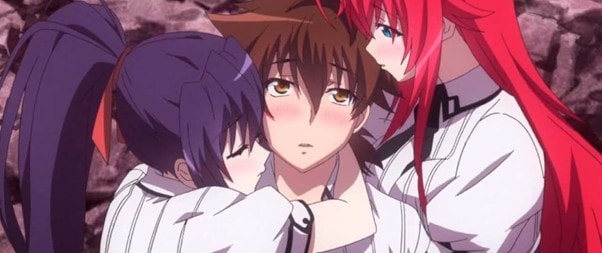
With very high viewer ratings, it’s a bit of shock to see this show on the list. High School DxD follows the story of Issei Hyodo, a perverted high school kid who is killed on his very first date. But he gets reincarnated by Rias Gremory as a demon. Now, how come a show about angles and demons gets banned? Well, the premise of the show focuses on corrupt high school kids with a perverted mindset. This show is very sexual and shows a lot of nudity in certain scenes. This is why New Zealand has banned High School DxD for its sexual, harem themes based around high school kids.
7. Puni Puny Poemy (Banned in New Zealand)
Puni Puny Poemy sounds super cute and childish but don’t let the name fool you. Puni Puny Poemy is a spin-off inspired by Excel Saga – no wonder is it banned. This anime has a lot of sexual content surrounding very young characters. The nudity, explicit sexual scenes and harem inspired content is what makes this show so questionable. Thus, it is banned in New Zealand for being overly vulgar and sexual for young viewers. The show does not have a high viewership such as popular titles like Death Note or Attack on Titan, so many countries ignored it.
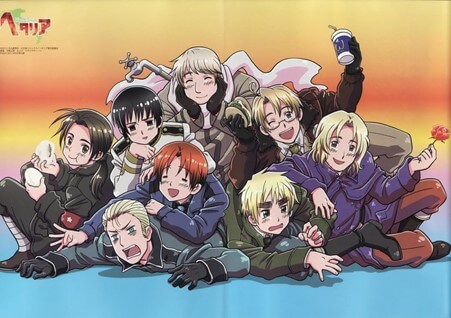
8. Hetalia: Axis Powers (Banned in South Korea)
Every character in this show represents a country and the role they played in World War II. Even though it is a comedy anime, it offended a few countries. South Korea actually banned the show on the grounds of “offensive stereotypes” and was called a “national crime” by the country. Hetalia: Axis Powers continued to air, the character and all the references to South Korea were completely removed due to backlash. The censored version of this anime is still available in some parts of the country.
9. Pokémon (Banned in Saudi Arabia)
Pokemon banned? Pokemon is perhaps THE most famous and innocent anime ever. It’s kid friendly and super clean. So, why is a show about Satoshi and his pocket monster banned? The religious authorities of Saudi Arabia declared that Pokemon promotes gambling and Jewish sentiments. Since then, there have been many conspiracy theories revolving around the show claiming it to be a Zionist conspiracy. Thus, it is banned in Saudi Arabia. Crazy right?
10. Kite (Banned in Norway)
Kite follows the story of a girl who uses bullets to kill people and make them explode. Now, you must be thinking that the violent nature of the show got it banned in Norway. Nope! not the case. Kite is banned in Norway due to a very graphic sexual assault scene on a minor. Norway has very strict laws against child pornography, thus the entire anime got banned. Similarly, the United States also censored and removed certain parts of the movie but it is not banned there.
Part 2: Where to Watch Anime Online for Free
If you live in any of the countries mentioned in the list above and want to watch the anime banned by your country, we have got you covered. Here are top 5 websites where you can watch anime online for free:
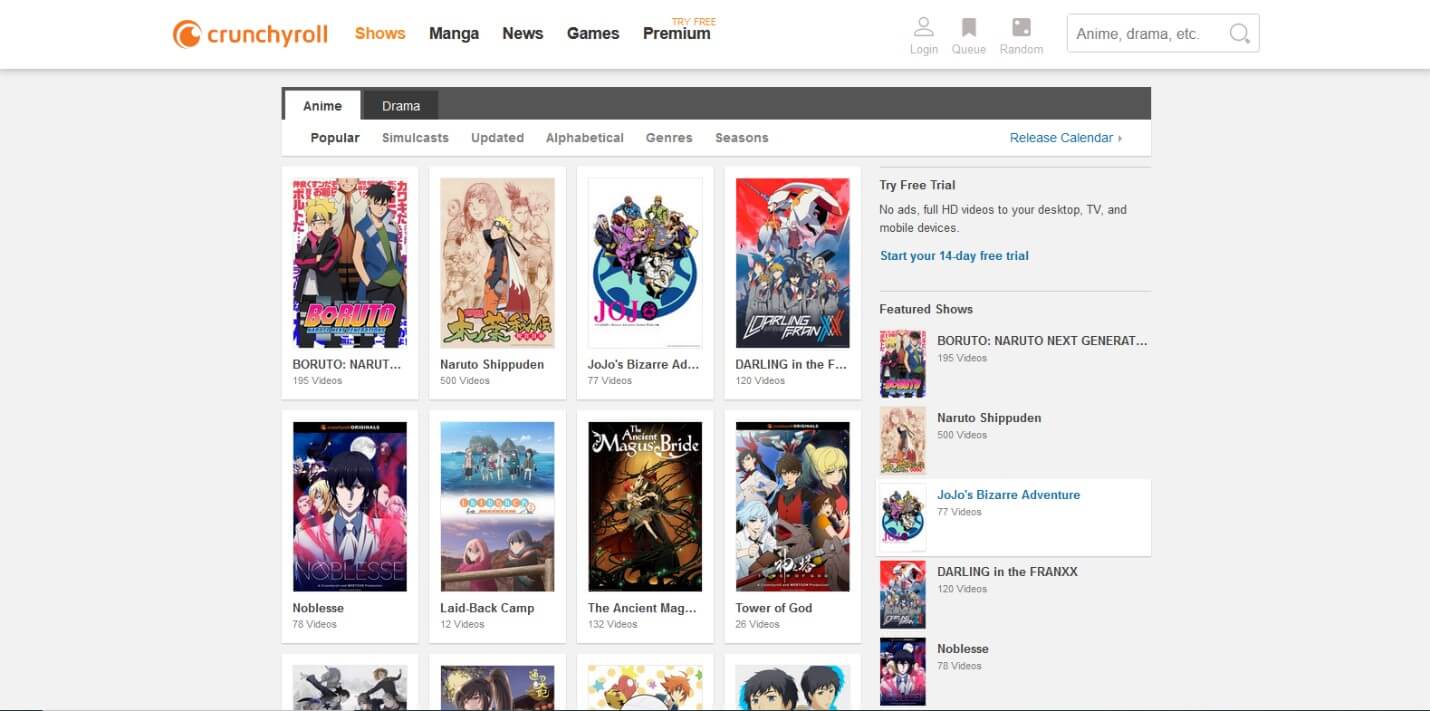
1. Crunchyroll
Crunchyroll has a wide range of anime shows and movies. This streaming service is available in different countries including the USA, UK, Canada, Australia and some Asian countries. From old anime shows to all the latest ones, you will find everything here. It allows you to watch and share anime on social media. It is also available in different languages with subtitles and dubbing. Crunchyroll also offers a premium version for an ad-free experience. The premium version also has a popular manga.
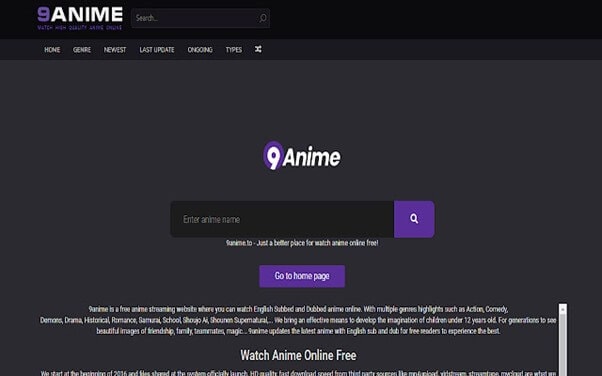
2. 9anime
9anime is a dedicated website for anime. It allows you to watch different types of animated content. From action, drama, and thriller to comedy, you can watch any anime show here. This website gives you access to all the popular anime shows, movies, and OVA (Original Video Animation). It is available across multiple countries including Canada, United States, United Kingdom, Australia, Netherlands, and some Asian countries. If it is not available in your country of origin, you can also access this website on a VPN.
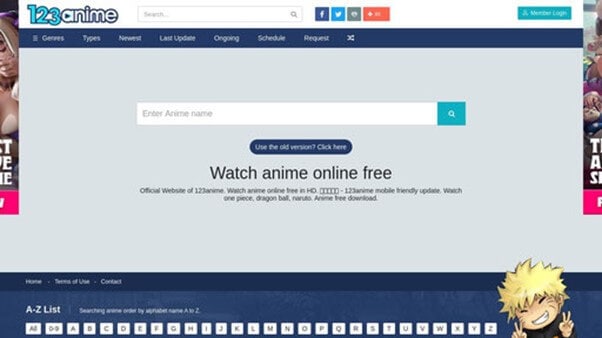
3. 123anime
This is a great alternative to 9anime. This website is a free platform to watch anime online for free in HD quality. It is also mobile-friendly and loads video without buffering. You can watch all the famous anime shows and movies on 123anime such as Pokemon, One Piece, Death Note, Dragon Ball Z, Naruto, and more. It also allows you to download anime for free.
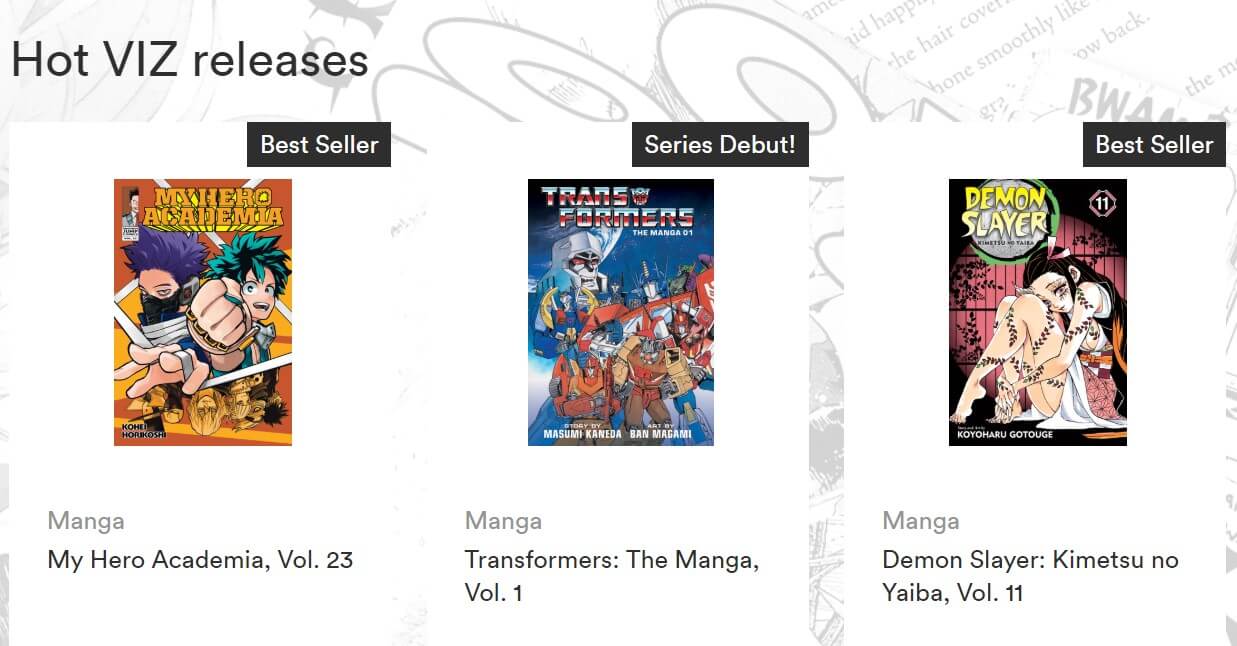
4. VIZ
VIZ is one of the most popular choices for manga and anime. From publishing, to animation and to entertainment licensing, VIZ handles it all. It offers all popular manga as well as all the latest anime series. From classic cult favorites to latest hits, VIZ has the best collection of anime shows and movies. You can save your favorite show on the website and create your own library to binge watch anime shows. All the shows also come with English subtitles.
5. Animelab
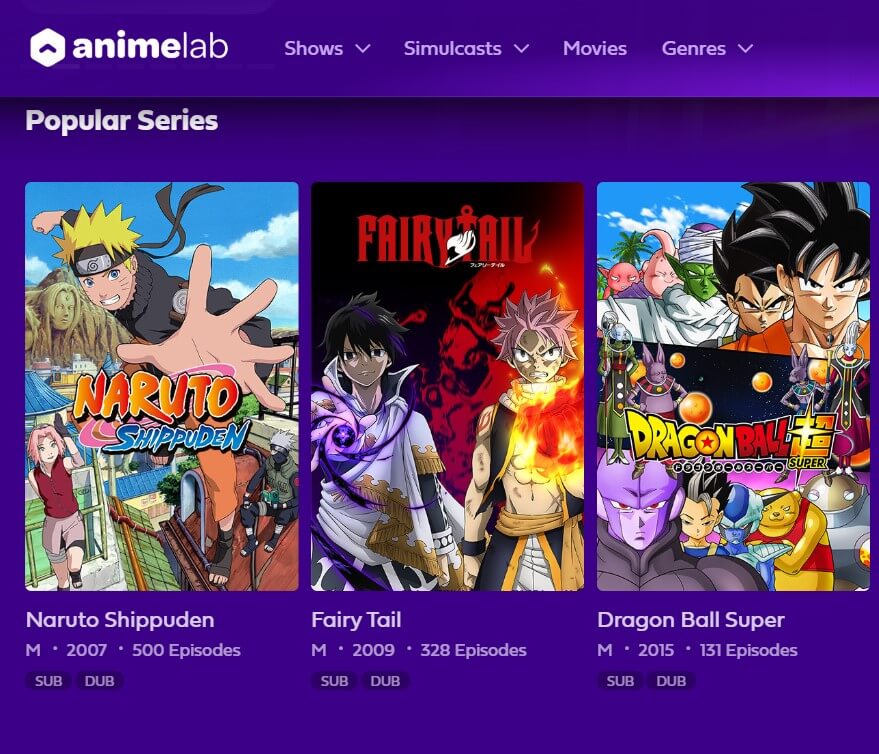
AnimeLab is a website that offers a huge collection of all the popular anime. Plus, all the videos here are dubbed and subtitled. It also allows you to watch all the latest shows and releases as soon as they are aired. From action, thriller, adventure and horror to drama and comedy, you can watch all types of anime here. It is also compatible with all android and iPhone devices. AnimeLab is available in only two countries currently i.e., New Zealand and Australia. You can use VPN to watch in any other country.
While anime has entertained fans over the years, there are some anime shows that are very disturbing and offensive. They can toy with the psychology of the viewer and are often too inappropriate to handle. Such anime can be violent, sexual or gruesome. This is why some anime are banned in certain countries due to local laws, censorship, and copyright issues. In this article, we listed down top 10 banned anime shows and why they are banned. If you want to watch anime, especially banned anime, do check out the websites mentioned above. You will find all the anime shows you are looking for!
Shanoon Cox
Shanoon Cox is a writer and a lover of all things video.
Follow @Shanoon Cox
Shanoon Cox
Mar 27, 2024• Proven solutions
There is hardly a genre that anime hasn’t conquered. While anime is super entertaining and fun to watch, it can get quite crazy and questionable. Yes, anime is animated but the content is mature. From violence to incest and other controversial issues, anime can be offensive sometimes. Due to this, some countries have banned anime shows for its viewers – especially for younger audiences.
Want to find out what anime shows they are and why they are banned? Well, you are in the right spot. Today, we will talk about the top 10 banned anime shows and why they are banned. So, let’s find out!
![]()
A cross-platform for making videos anywhere for all creators
Why your video editing isn’t good enough? How about some creative inspo?
- 100 Million+ Users
- 150+ Countries and Regions
- 4 Million+ Social Media Followers
- 5 Million+ Stock Media for Use
* Secure Download
Part 1: Top 10 Banned Anime List
Here is a list of the 10 banned animes you should know about and why they are banned:
1. Shoujo Tsubaki (Banned Everywhere)
It has a very dark, depressing, and intense storyline and it is considered one of the most controversial anime movies ever. This is a 1992 anime film about a young girl whose mother dies. The girl meets a man who tells her he will help her if she ever needs anything. So, after her mother’s death, she goes to find the man and ends up at a circus where she gets abused and raped. Thus, Shoujo Tsubaki is about child sexual abuse with unbearable gore scenes. The horrific and disturbing visuals of this anime have left many viewers traumatized – so much so that the tapes of this film were also destroyed. Therefore, Shoujo Tsubaki is banned almost everywhere, including Japan itself.
2. Osomatsu-San (Banned in Japan)
Osomatsu-San is banned in Japan due to copyright issues. The series’ first episode had parodies of famous anime shows including Attack on Titan, Naruto, Sailor Moon, Dragon Ball Z, and more. Thus, due to copyright, the show’s first episode was removed from airing. It is still not available on mainstream anime websites. You can find the DVD version of the show, but even those do not have the first episode.
3. Excel Saga (Banned in Japan)
Excel Saga is based on a popular manga of the same name. It is about a secret ideological organization whose purpose is world domination. The entire Excel Saga is available to watch except for its last episode, called “Going Too Far” – very fitting indeed. It is even banned in its home country, Japan. The reason why this episode got banned is that it’s too long, violent, pornographic, and offensive. Fun fact: The Director of the show, Shinichi Watanabe, purposely got the last episode banned to make it daring and unforgettable. The last episode of Excel Saga is only available on DVD.
4. Death Note (Banned in China)
Death note is one of the most famous anime shows ever and while it’s gruesome, bloody and horrific, it is easily available on mainstream platforms, including Netflix. However, there is still a country that did not appreciate the dark premise of this show. Death Note is banned in China due to its theme. The show is about death, justice, murder and violence so it is considered as a corrupting influence on kids.
5. Attack on Titan (Banned in China)
Another cult-favorite anime on the lists is Attack on Titan. Due to its bloody, disgusting and disturbing visuals, it has been banned in China. While millions of viewers love this anime, China thinks this show portrays a lot of excessive violence which is very unhealthy for the younger audience. With that being said, if you are 18 and above, do not miss out on Attack on Titan. It is truly one of the best anime out there!
6. High School DxD (Banned in New Zealand)
With very high viewer ratings, it’s a bit of shock to see this show on the list. High School DxD follows the story of Issei Hyodo, a perverted high school kid who is killed on his very first date. But he gets reincarnated by Rias Gremory as a demon. Now, how come a show about angles and demons gets banned? Well, the premise of the show focuses on corrupt high school kids with a perverted mindset. This show is very sexual and shows a lot of nudity in certain scenes. This is why New Zealand has banned High School DxD for its sexual, harem themes based around high school kids.
7. Puni Puny Poemy (Banned in New Zealand)
Puni Puny Poemy sounds super cute and childish but don’t let the name fool you. Puni Puny Poemy is a spin-off inspired by Excel Saga – no wonder is it banned. This anime has a lot of sexual content surrounding very young characters. The nudity, explicit sexual scenes and harem inspired content is what makes this show so questionable. Thus, it is banned in New Zealand for being overly vulgar and sexual for young viewers. The show does not have a high viewership such as popular titles like Death Note or Attack on Titan, so many countries ignored it.
8. Hetalia: Axis Powers (Banned in South Korea)
Every character in this show represents a country and the role they played in World War II. Even though it is a comedy anime, it offended a few countries. South Korea actually banned the show on the grounds of “offensive stereotypes” and was called a “national crime” by the country. Hetalia: Axis Powers continued to air, the character and all the references to South Korea were completely removed due to backlash. The censored version of this anime is still available in some parts of the country.
9. Pokémon (Banned in Saudi Arabia)
Pokemon banned? Pokemon is perhaps THE most famous and innocent anime ever. It’s kid friendly and super clean. So, why is a show about Satoshi and his pocket monster banned? The religious authorities of Saudi Arabia declared that Pokemon promotes gambling and Jewish sentiments. Since then, there have been many conspiracy theories revolving around the show claiming it to be a Zionist conspiracy. Thus, it is banned in Saudi Arabia. Crazy right?
10. Kite (Banned in Norway)
Kite follows the story of a girl who uses bullets to kill people and make them explode. Now, you must be thinking that the violent nature of the show got it banned in Norway. Nope! not the case. Kite is banned in Norway due to a very graphic sexual assault scene on a minor. Norway has very strict laws against child pornography, thus the entire anime got banned. Similarly, the United States also censored and removed certain parts of the movie but it is not banned there.
Part 2: Where to Watch Anime Online for Free
If you live in any of the countries mentioned in the list above and want to watch the anime banned by your country, we have got you covered. Here are top 5 websites where you can watch anime online for free:
1. Crunchyroll
Crunchyroll has a wide range of anime shows and movies. This streaming service is available in different countries including the USA, UK, Canada, Australia and some Asian countries. From old anime shows to all the latest ones, you will find everything here. It allows you to watch and share anime on social media. It is also available in different languages with subtitles and dubbing. Crunchyroll also offers a premium version for an ad-free experience. The premium version also has a popular manga.
2. 9anime
9anime is a dedicated website for anime. It allows you to watch different types of animated content. From action, drama, and thriller to comedy, you can watch any anime show here. This website gives you access to all the popular anime shows, movies, and OVA (Original Video Animation). It is available across multiple countries including Canada, United States, United Kingdom, Australia, Netherlands, and some Asian countries. If it is not available in your country of origin, you can also access this website on a VPN.
3. 123anime
This is a great alternative to 9anime. This website is a free platform to watch anime online for free in HD quality. It is also mobile-friendly and loads video without buffering. You can watch all the famous anime shows and movies on 123anime such as Pokemon, One Piece, Death Note, Dragon Ball Z, Naruto, and more. It also allows you to download anime for free.
4. VIZ
VIZ is one of the most popular choices for manga and anime. From publishing, to animation and to entertainment licensing, VIZ handles it all. It offers all popular manga as well as all the latest anime series. From classic cult favorites to latest hits, VIZ has the best collection of anime shows and movies. You can save your favorite show on the website and create your own library to binge watch anime shows. All the shows also come with English subtitles.
5. Animelab
AnimeLab is a website that offers a huge collection of all the popular anime. Plus, all the videos here are dubbed and subtitled. It also allows you to watch all the latest shows and releases as soon as they are aired. From action, thriller, adventure and horror to drama and comedy, you can watch all types of anime here. It is also compatible with all android and iPhone devices. AnimeLab is available in only two countries currently i.e., New Zealand and Australia. You can use VPN to watch in any other country.
While anime has entertained fans over the years, there are some anime shows that are very disturbing and offensive. They can toy with the psychology of the viewer and are often too inappropriate to handle. Such anime can be violent, sexual or gruesome. This is why some anime are banned in certain countries due to local laws, censorship, and copyright issues. In this article, we listed down top 10 banned anime shows and why they are banned. If you want to watch anime, especially banned anime, do check out the websites mentioned above. You will find all the anime shows you are looking for!
Shanoon Cox
Shanoon Cox is a writer and a lover of all things video.
Follow @Shanoon Cox
Animate Graphics in Canva
Versatile Video Editor - Wondershare Filmora
An easy yet powerful editor
Numerous effects to choose from
Detailed tutorials provided by the official channel
Canva is a graphic design platform that allows users to create stunning designs for social media posts, presentations, assignments, recipe cards, birthday videos.
With the introduction of Canva’s animation feature, a whole new world of possibilities are open to the public. Also, with pre-designed templates from professional designers, content creation has never been easier than Canva.
Animations themselves have the option of being individually customized element by element. Canva animated graphics makes it easy to unleash your creative potential.
This article will explore how to animate graphics in Canva that can suit every occasion.
In this article
01 [Animate Your Graphic In Canva](#Part 1)
02 [Make A Moving Graphic In Canva](#Part 2)
03 [Pricing for Canva You Should Know](#Part 3)
Part 1 Animate Your Graphic In Canva
People can create animations in Canva in one of two ways. You can select an animation from one of the pre-existing animated templates. This is a time-saving option as it lets you customize ready-made templates to suit your needs
With the pre-set animation templates, you have the option to choose from among
● Invitations
● A4 Documents
● Instagram Post
● Facebook Post
● YouTube Thumbnails
● Presentation
● Flyer/Poster
● Instagram Logo
● Infographic
These options generate the ability to be presented in both portrait and landscape mode. The multitude of options makes it an ideal medium for you to create your animation. The animation options at Canva also come with the opportunity to animate an existing image.

You can choose to animate an existing design. With a few minor edits, you can have a polished and sophisticated post that’s bound to draw viewer attention and earn you kudos.
If this is the case, then you benefit from saving time and the expertise of a professional design team through Canva.
The second option is creating an animation by yourself. Creating your own animation offers you greater flexibility in executing your vision for the design. Without further ado, let’s look at how we can help this happen in the how to make a moving graphic in the Canva section.
Part 2 Make A Moving Graphic In Canva
Making a moving graphic in Canva is easy. Canva offers an “Animation” button that allows users to animate each element in the content. There are four areas that the graphic can touch upon for content. These areas are text, image, audio, and video.
Here’s how you can animate individual elements in Canva.
2.1 How to animate text in Canva?
With text, Canva offers three options. You can choose to create either a title text, a sub-heading text, or regular text for use. Play with different styles and fonts to find one that suits your design. You can also add details like stickers or illustrations to customize the design.
You are now ready to animate once you’re happy with the design. Text animations will help your text jump out from the background. Then choose the “Animate” option in the sidebar after clicking on the selected text.

Allow your font to move around your design with motion. Thanks to “animate,” you can choose between subtle, smooth movement and jagged and sudden motion. You can even mix and match animations for each word.
In Wondershare Filmora, a premier video editing software, the texts are available according to use. For instance, opening and ending credit texts as a template. With options for choosing subtitles, lower 3rds, and call-out templates.
Additionally, users can also save a particular setting as a “preset’. Which makes it easy to reuse the settings in future projects. You can also adjust the duration of the individual text display. It also has an animation option that allows animation of the text according to given presets.
2.2 How do you animate a picture in Canva?
Users have the ability to choose to animate just the image or animate other elements of the picture. They can also make use of options to edit the image using background remover. This allows seamless integration into the presentation.

Users can simply upload their photos. Choose a stock image or upload an image through your photo gallery to use in your design. You can also choose to use “frames,” which are available under the “Elements” tab in Canva.
Make your photo come alive by animating it. Choose from a variety of innovative animation possibilities by selecting the Animation tool. The duration of the animation can be changed using the stopwatch animation icon. It uses a slider to help in setting the duration of each animation. You can also adjust this manually.
2.3 How do you add music to animation in Canva?
Users can find a section dedicated to “Uploads,” allowing creators to use their audio content. The users can use a soundtrack from one of Canva’s audio libraries. This gives users control over their animation’s impact.
One difference between Canva and Wondershare Filmora is that Canva users can only use one audio per presentation. Filmora allows users to overlay multiple soundtracks to their timeline.
Users can also make use of the Audio Effects feature to create audio for “Echo,” “large room,” “small room,” “lobby,” and “phone.” The preview function can help users experience it live before applying the effect.
Filmora Pro’s Auto-Normalization of audio allows intelligent audio analysis and volume adjustment.
2.4 How do you animate video in Canva?
Canva offers presentations that are similar to the explainer-style videos on Youtube. With more modifications, you can convert the presentation to a video format. You can edit individual elements in the presentation to reflect the project details and outcomes.
You can also introduce transition effects to make the presentation a smooth video. Incorporating the three other elements will be a breeze to make a video with animation.

Another noteworthy thing in Canva is that users can upload their videos or use videos provided in the video library. You can also embed videos within a frame from the “Elements” section in Canva. You can trim the video input on the slide for time. It can be presented as a “loop” video.
Filmora offers all the essential video editing tools in addition to AI-powered features called Auto-Highlight and Auro-Reframe. Auto Highlight is a feature that extracts the highlights from a video clip autonomously.
This will save you time while cutting your movie. It also makes it easier to extract the best moments from the video.
Auto Reframe recognizes as well as crops the focal point of your footage, constantly retaining it in the frame. Your film’s primary action or object will never be out of focus within that technique.
Part 3 Pricing for Canva You Should Know
Canva can be used among a multitude of users and companies. The range of access is from a single person use to teams of fifty. It also allows for a custom selection of a number of people.
Canva can be used as free graphic design software. It does display all available options with a few possibilities marked off for Canva Pro users only.
Canva Pro allows up to 5 users per team. A subscription to Canva Pro costs US $119.99 per annum or US $12.99 per month. Pro users have access to unlimited content and newly released tools.
The only difference between Canva Pro and Canva Enterprise is that Canva Pro is for smaller teams. Canva Enterprise allows collaboration between larger teams and franchises.
Canva also offers free Canva Pro subscriptions to non-profit organizations. Students and teachers are offered a special discount for those in educational programs.
Wondershare Filmora
Get started easily with Filmora’s powerful performance, intuitive interface, and countless effects Try It Free Try It Free Learn More >

AI Portrait – The best feature of Wondershare Filmora for gameplay editing
The AI Portrait is a new add-on in Wondershare Filmora. It can easily remove video backgrounds without using a green screen or chroma key, allowing you to add borders, glitch effects, pixelated, noise, or segmentation video effects.

Final Words
We’ve covered how to animate graphics in Canva. You can animate individual elements in Canva or automate it on the whole. Canva’s animate button is an automatic tool that revolutionizes the way traditional animation works.
Wondershare’s Filmora is the video editing tool that is easy to use and offer various animation options.
Canva is a graphic design platform that allows users to create stunning designs for social media posts, presentations, assignments, recipe cards, birthday videos.
With the introduction of Canva’s animation feature, a whole new world of possibilities are open to the public. Also, with pre-designed templates from professional designers, content creation has never been easier than Canva.
Animations themselves have the option of being individually customized element by element. Canva animated graphics makes it easy to unleash your creative potential.
This article will explore how to animate graphics in Canva that can suit every occasion.
In this article
01 [Animate Your Graphic In Canva](#Part 1)
02 [Make A Moving Graphic In Canva](#Part 2)
03 [Pricing for Canva You Should Know](#Part 3)
Part 1 Animate Your Graphic In Canva
People can create animations in Canva in one of two ways. You can select an animation from one of the pre-existing animated templates. This is a time-saving option as it lets you customize ready-made templates to suit your needs
With the pre-set animation templates, you have the option to choose from among
● Invitations
● A4 Documents
● Instagram Post
● Facebook Post
● YouTube Thumbnails
● Presentation
● Flyer/Poster
● Instagram Logo
● Infographic
These options generate the ability to be presented in both portrait and landscape mode. The multitude of options makes it an ideal medium for you to create your animation. The animation options at Canva also come with the opportunity to animate an existing image.
You can choose to animate an existing design. With a few minor edits, you can have a polished and sophisticated post that’s bound to draw viewer attention and earn you kudos.
If this is the case, then you benefit from saving time and the expertise of a professional design team through Canva.
The second option is creating an animation by yourself. Creating your own animation offers you greater flexibility in executing your vision for the design. Without further ado, let’s look at how we can help this happen in the how to make a moving graphic in the Canva section.
Part 2 Make A Moving Graphic In Canva
Making a moving graphic in Canva is easy. Canva offers an “Animation” button that allows users to animate each element in the content. There are four areas that the graphic can touch upon for content. These areas are text, image, audio, and video.
Here’s how you can animate individual elements in Canva.
2.1 How to animate text in Canva?
With text, Canva offers three options. You can choose to create either a title text, a sub-heading text, or regular text for use. Play with different styles and fonts to find one that suits your design. You can also add details like stickers or illustrations to customize the design.
You are now ready to animate once you’re happy with the design. Text animations will help your text jump out from the background. Then choose the “Animate” option in the sidebar after clicking on the selected text.
Allow your font to move around your design with motion. Thanks to “animate,” you can choose between subtle, smooth movement and jagged and sudden motion. You can even mix and match animations for each word.
In Wondershare Filmora, a premier video editing software, the texts are available according to use. For instance, opening and ending credit texts as a template. With options for choosing subtitles, lower 3rds, and call-out templates.
Additionally, users can also save a particular setting as a “preset’. Which makes it easy to reuse the settings in future projects. You can also adjust the duration of the individual text display. It also has an animation option that allows animation of the text according to given presets.
2.2 How do you animate a picture in Canva?
Users have the ability to choose to animate just the image or animate other elements of the picture. They can also make use of options to edit the image using background remover. This allows seamless integration into the presentation.
Users can simply upload their photos. Choose a stock image or upload an image through your photo gallery to use in your design. You can also choose to use “frames,” which are available under the “Elements” tab in Canva.
Make your photo come alive by animating it. Choose from a variety of innovative animation possibilities by selecting the Animation tool. The duration of the animation can be changed using the stopwatch animation icon. It uses a slider to help in setting the duration of each animation. You can also adjust this manually.
2.3 How do you add music to animation in Canva?
Users can find a section dedicated to “Uploads,” allowing creators to use their audio content. The users can use a soundtrack from one of Canva’s audio libraries. This gives users control over their animation’s impact.
One difference between Canva and Wondershare Filmora is that Canva users can only use one audio per presentation. Filmora allows users to overlay multiple soundtracks to their timeline.
Users can also make use of the Audio Effects feature to create audio for “Echo,” “large room,” “small room,” “lobby,” and “phone.” The preview function can help users experience it live before applying the effect.
Filmora Pro’s Auto-Normalization of audio allows intelligent audio analysis and volume adjustment.
2.4 How do you animate video in Canva?
Canva offers presentations that are similar to the explainer-style videos on Youtube. With more modifications, you can convert the presentation to a video format. You can edit individual elements in the presentation to reflect the project details and outcomes.
You can also introduce transition effects to make the presentation a smooth video. Incorporating the three other elements will be a breeze to make a video with animation.
Another noteworthy thing in Canva is that users can upload their videos or use videos provided in the video library. You can also embed videos within a frame from the “Elements” section in Canva. You can trim the video input on the slide for time. It can be presented as a “loop” video.
Filmora offers all the essential video editing tools in addition to AI-powered features called Auto-Highlight and Auro-Reframe. Auto Highlight is a feature that extracts the highlights from a video clip autonomously.
This will save you time while cutting your movie. It also makes it easier to extract the best moments from the video.
Auto Reframe recognizes as well as crops the focal point of your footage, constantly retaining it in the frame. Your film’s primary action or object will never be out of focus within that technique.
Part 3 Pricing for Canva You Should Know
Canva can be used among a multitude of users and companies. The range of access is from a single person use to teams of fifty. It also allows for a custom selection of a number of people.
Canva can be used as free graphic design software. It does display all available options with a few possibilities marked off for Canva Pro users only.
Canva Pro allows up to 5 users per team. A subscription to Canva Pro costs US $119.99 per annum or US $12.99 per month. Pro users have access to unlimited content and newly released tools.
The only difference between Canva Pro and Canva Enterprise is that Canva Pro is for smaller teams. Canva Enterprise allows collaboration between larger teams and franchises.
Canva also offers free Canva Pro subscriptions to non-profit organizations. Students and teachers are offered a special discount for those in educational programs.
Wondershare Filmora
Get started easily with Filmora’s powerful performance, intuitive interface, and countless effects Try It Free Try It Free Learn More >
AI Portrait – The best feature of Wondershare Filmora for gameplay editing
The AI Portrait is a new add-on in Wondershare Filmora. It can easily remove video backgrounds without using a green screen or chroma key, allowing you to add borders, glitch effects, pixelated, noise, or segmentation video effects.
Final Words
We’ve covered how to animate graphics in Canva. You can animate individual elements in Canva or automate it on the whole. Canva’s animate button is an automatic tool that revolutionizes the way traditional animation works.
Wondershare’s Filmora is the video editing tool that is easy to use and offer various animation options.
Most Popular Tips on Learning Animate Rigging
Most Popular Tips on Learning Animate Rigging
An easy yet powerful editor
Numerous effects to choose from
Detailed tutorials provided by the official channel
This was a question one of my friends asked me recently on the subject of animate rigging
To help them out (as well as other animation rigging beginners) I decided to compile some of the most popular tips on the subject in this article!
In this article
01 [The Only Guide You’ll Ever Need to Know About Rigging in Animation](#Part 1)
02 [How Do You Animate Rigging?](#Part 2)
Part 1 The Only Guide You’ll Ever Need to Know About Rigging in Animation
Before anything else, we’ve prepared a bit of an OVERVIEW on rigging in animation. This will cover most of the basic, need-to-know stuff to nudge you in the right direction and help the tips we’ve prepared to settle in more easily.
01What is Rigging in Animation
Rigging in animation is a technique used by animators to—quite literally—‘rig’ up a statistic digital character to act or move.
Even more simply, it’s a way of bringing literal life to your character models by introducing them to motion. The ‘rig’ in this case, is usually made as a sort of one-size-fits-all kind of tool, which you can use in order to create pre-made skeletal animations that replicate motions like walking, running, jumping, etc., and apply onto static characters. You can use animation software, like Maya in order to get this done!

02An Introduction to 2D Animation Rigging
2D animation is a more back-breaking kind of process. It’s what you see in a lot of older animations — where every frame needs to be drawn in order to allow for the illusion of motion in characters. This is how classics, like Mickey Mouse, are usually produced!
03An Introduction to 3D Animation Rigging
3D animation, as you can probably guess, is a more modern animation style. You see it in a lot of big blockbuster animated movies these days! Even Disney has since moved onto this style, whereas they were staunch supporters of 2D animation in previous decades. Now, a lot of their major productions, including titles such as “Tangled”, “Frozen”, and “Moana” are 3D animated.
In any case, this is more like what we described earlier — where skeletal ‘rigs’ are applied to static 3D character models to make them move.
04Key 3D Rigging Terms to Get You Moving
Finally, to make sure that you’re headed in the right direction, here’s a list of some of the more important 3D rigging terms that you’ll need to know:
Joints|Bones: This is pretty straightforward, but the Joints or the Bones, in this case, refers to the pieces of the skeletal rig that is used to create movement.
Driven Keys: Driven keys are there to help rigging artists make the movement appear more natural faster. It consists of two parts, the driver (which controls the animation) and the driven (the parts controlled by the driver).
Blend Shapes: This is an animation tool that riggers used mainly for facial animation (like lip-syncing). Basically, it allows them to blend or morph an existing shape to give it motion.
Inverse Kinematics: This is a method of animation that separates a part from the whole. Like how an animator can create motion in the wrist, for example, as a separate entity from the arm.
Forward Kinematics: Opposite of the previous style, this one is a method that follows a hierarchical progression.
Control Curves: This is a way of manipulating multiple joins in a rig in order to create one flowing movement.
Constraint: A way of limiting the positioning of a model or a joint.
Deformers: A way of enhancing rigs to produce a more organic model.
Skinning: This is the process of adding the 3D mesh to the joints.
Weight Planning: This is the process of planning how the weight of an object will affect its 3D mesh and the movement of its joints.
Facial Rigging: This is the process of setting up facial animation, similar to how you set up skeletal animation, but far more complex.
Part 2 How Do You Animate Rigging?
Now, onto actually talking about how you can start animate rigging. This section will guide you through the process in a way that should hopefully help you while in the process of learning about animation in general.
01How to Rig a Simple Character
This has been broken down into four distinct stages to make things as simple as possible! It won’t be discussing the tools you use, as there are plenty of tools you can use for animation, just the general process:
Step 1: Design Your Character

Before you even think about animation, you should start with designing your character (or characters.) This will give you a good basis on what kind of animation rigging you’ll need to work on for that character.
For example, for a humanoid character, a general skeletal rigging might be okay. However, for a creature or monster, their joints might be in different areas or they might even have additional joints regular human rigs don’t have!
So, start with a foundation that you can work from to make things easier on yourself.
Step 2: Start With Rigging Points!

When you have your character design ready, it’s time to start rigging joints! It’s best to start with the joints and leave the more finicky parts later. Basically, it’s always easier to start with the parts that can create big movements first!
Working on things layer by layer should help make things easier for you as well.
Step 3: Connect The Layers!
It’s time to put everything together to create smooth movement! Depending on what tool you’re using, this is usually just as easy as dragging things into place.
Step 4: Timing Your Animation

With the rig in place, the next thing you have to worry about is frame timing. Timing is important for ensuring that there is no break in character motions
02Beginners Tutorial on Shape Rigging
This one is a little more complicated, and should be improved more by trial and error, but here are a couple of tips that you can follow along with while exploring blend shapes in animation:
Master your sculpting tools first and foremost! The more familiar you are with the shapes that your tools can create, the better!
Symmetrical modeling is one way of making the process go a lot faster! Take advantage of this option to highlight components that you need to be affected in the same way and at the same time.
If symmetrical modeling is not working for you, independent modeling is a great way of making things appear more organic.

03How Auto Rig Mapping Works
Auto-rigging is the use of pre-made rigs in order to simplify the process. The tool automatically maps the areas where the characters and the rig are given the same symbol names and snaps them together to create joints for a motion to be applied.
04How Visual Rig Mapping Works
Visual mapping is a lot more complicated the auto-rig mapping, so it’s not something you want to jump into immediately. However, it is a must for animation riggers that work with unique character models. The process usually goes as follows:
Manually make connections starting with the joints.
Applying the skeleton to the rig to complete bones and connections.
Motion can then be added to the timeline.

05Finalizing Your Animated Rig
To finish us off, let’s talk about how you go about publishing your finished product! Of course, even after you have your complex rig completed, there are still other matters to think about in terms of making sure that the video is of quality!
Key Takeaways from This Episode
● Start off on the right footing by learning the basics of animation! These days, there are more options than ever, with the modern 3D animation rigging style now just as popular as the more classic 2D animation style.
● The best way to learn animation rigging is to practice! Structured guides can help you get to the point of almost mastery, but it’s not until you start playing with the tools of your craft that you can truly learn how to create beautiful animations!
● Some of the more complex functions of rigging require a lot of patience, so make sure that you always go into your projects with a level-head. And, just to be sure, invest in tools that will help rather than hinder your progress! There are many advanced software out there that can help you improve more easily.
This was a question one of my friends asked me recently on the subject of animate rigging
To help them out (as well as other animation rigging beginners) I decided to compile some of the most popular tips on the subject in this article!
In this article
01 [The Only Guide You’ll Ever Need to Know About Rigging in Animation](#Part 1)
02 [How Do You Animate Rigging?](#Part 2)
Part 1 The Only Guide You’ll Ever Need to Know About Rigging in Animation
Before anything else, we’ve prepared a bit of an OVERVIEW on rigging in animation. This will cover most of the basic, need-to-know stuff to nudge you in the right direction and help the tips we’ve prepared to settle in more easily.
01What is Rigging in Animation
Rigging in animation is a technique used by animators to—quite literally—‘rig’ up a statistic digital character to act or move.
Even more simply, it’s a way of bringing literal life to your character models by introducing them to motion. The ‘rig’ in this case, is usually made as a sort of one-size-fits-all kind of tool, which you can use in order to create pre-made skeletal animations that replicate motions like walking, running, jumping, etc., and apply onto static characters. You can use animation software, like Maya in order to get this done!
02An Introduction to 2D Animation Rigging
2D animation is a more back-breaking kind of process. It’s what you see in a lot of older animations — where every frame needs to be drawn in order to allow for the illusion of motion in characters. This is how classics, like Mickey Mouse, are usually produced!
03An Introduction to 3D Animation Rigging
3D animation, as you can probably guess, is a more modern animation style. You see it in a lot of big blockbuster animated movies these days! Even Disney has since moved onto this style, whereas they were staunch supporters of 2D animation in previous decades. Now, a lot of their major productions, including titles such as “Tangled”, “Frozen”, and “Moana” are 3D animated.
In any case, this is more like what we described earlier — where skeletal ‘rigs’ are applied to static 3D character models to make them move.
04Key 3D Rigging Terms to Get You Moving
Finally, to make sure that you’re headed in the right direction, here’s a list of some of the more important 3D rigging terms that you’ll need to know:
Joints|Bones: This is pretty straightforward, but the Joints or the Bones, in this case, refers to the pieces of the skeletal rig that is used to create movement.
Driven Keys: Driven keys are there to help rigging artists make the movement appear more natural faster. It consists of two parts, the driver (which controls the animation) and the driven (the parts controlled by the driver).
Blend Shapes: This is an animation tool that riggers used mainly for facial animation (like lip-syncing). Basically, it allows them to blend or morph an existing shape to give it motion.
Inverse Kinematics: This is a method of animation that separates a part from the whole. Like how an animator can create motion in the wrist, for example, as a separate entity from the arm.
Forward Kinematics: Opposite of the previous style, this one is a method that follows a hierarchical progression.
Control Curves: This is a way of manipulating multiple joins in a rig in order to create one flowing movement.
Constraint: A way of limiting the positioning of a model or a joint.
Deformers: A way of enhancing rigs to produce a more organic model.
Skinning: This is the process of adding the 3D mesh to the joints.
Weight Planning: This is the process of planning how the weight of an object will affect its 3D mesh and the movement of its joints.
Facial Rigging: This is the process of setting up facial animation, similar to how you set up skeletal animation, but far more complex.
Part 2 How Do You Animate Rigging?
Now, onto actually talking about how you can start animate rigging. This section will guide you through the process in a way that should hopefully help you while in the process of learning about animation in general.
01How to Rig a Simple Character
This has been broken down into four distinct stages to make things as simple as possible! It won’t be discussing the tools you use, as there are plenty of tools you can use for animation, just the general process:
Step 1: Design Your Character
Before you even think about animation, you should start with designing your character (or characters.) This will give you a good basis on what kind of animation rigging you’ll need to work on for that character.
For example, for a humanoid character, a general skeletal rigging might be okay. However, for a creature or monster, their joints might be in different areas or they might even have additional joints regular human rigs don’t have!
So, start with a foundation that you can work from to make things easier on yourself.
Step 2: Start With Rigging Points!
When you have your character design ready, it’s time to start rigging joints! It’s best to start with the joints and leave the more finicky parts later. Basically, it’s always easier to start with the parts that can create big movements first!
Working on things layer by layer should help make things easier for you as well.
Step 3: Connect The Layers!
It’s time to put everything together to create smooth movement! Depending on what tool you’re using, this is usually just as easy as dragging things into place.
Step 4: Timing Your Animation
With the rig in place, the next thing you have to worry about is frame timing. Timing is important for ensuring that there is no break in character motions
02Beginners Tutorial on Shape Rigging
This one is a little more complicated, and should be improved more by trial and error, but here are a couple of tips that you can follow along with while exploring blend shapes in animation:
Master your sculpting tools first and foremost! The more familiar you are with the shapes that your tools can create, the better!
Symmetrical modeling is one way of making the process go a lot faster! Take advantage of this option to highlight components that you need to be affected in the same way and at the same time.
If symmetrical modeling is not working for you, independent modeling is a great way of making things appear more organic.
03How Auto Rig Mapping Works
Auto-rigging is the use of pre-made rigs in order to simplify the process. The tool automatically maps the areas where the characters and the rig are given the same symbol names and snaps them together to create joints for a motion to be applied.
04How Visual Rig Mapping Works
Visual mapping is a lot more complicated the auto-rig mapping, so it’s not something you want to jump into immediately. However, it is a must for animation riggers that work with unique character models. The process usually goes as follows:
Manually make connections starting with the joints.
Applying the skeleton to the rig to complete bones and connections.
Motion can then be added to the timeline.
05Finalizing Your Animated Rig
To finish us off, let’s talk about how you go about publishing your finished product! Of course, even after you have your complex rig completed, there are still other matters to think about in terms of making sure that the video is of quality!
Key Takeaways from This Episode
● Start off on the right footing by learning the basics of animation! These days, there are more options than ever, with the modern 3D animation rigging style now just as popular as the more classic 2D animation style.
● The best way to learn animation rigging is to practice! Structured guides can help you get to the point of almost mastery, but it’s not until you start playing with the tools of your craft that you can truly learn how to create beautiful animations!
● Some of the more complex functions of rigging require a lot of patience, so make sure that you always go into your projects with a level-head. And, just to be sure, invest in tools that will help rather than hinder your progress! There are many advanced software out there that can help you improve more easily.
Tips on How to Learn Graphics Animation
Tips for Learning Graphics Animation
An easy yet powerful editor
Numerous effects to choose from
Detailed tutorials provided by the official channel
In the recent few years, videos have become the primary tool for marketers to attract their target customers. Unlike banners and pamphlets, videos are relatively more engaging and make it easier for marketers to establish a connection with the viewers. Now, each brand has different preferences when it comes to choosing the right video marketing strategy.
While some brands opt for conventional video advertisements, others get a bit creative and introduce graphics animation to their videos to make them more captivating. Of course, if you want to maximize the user’s attention and retain more customers, you would prefer the latter. Animated videos are more engaging and also sets the brand apart from the rest of the crowd.
In this article
01 [Why Study Graphic Design and Animation?](#Part 1)
02 [What’s the Difference Between Motion Graphics and Animation?](#Part 2)
03 [5 Graphic Design Techniques for Motion Graphics](#Part 3)
04 [How to Create Animated Graphics That Stand Out](#Part 4)
Part 1 Why Study Graphic Design and Animation?
So, why should you care about graphic design and animation? The answer is pretty simple - because these two concepts can help you step up your brand’s marketing game and attract maximum leads. By incorporating graphics and animations into your videos, you’ll be able to make them highly engaging.
However, user engagement isn’t the only reason why graphics and animations should be a part of your marketing strategy. They can also be used to simplify complex topics and explain them in an interactive manner. Let’s say you want to explain the overall working of a particular product. Instead of creating a boring tutorial, you can design explainer white paper animations to explain each step in detail and help viewers understand the overall dynamics of the product more conveniently.
Similarly, the applications of animated videos are endless. From product promotion to everyday marketing, they can help businesses in different scenarios and maximize the results.
Part 2 What’s the Difference Between Motion Graphics and Animation?
Now, whenever we talk about graphic animation videos, people often get confused between motion graphics and simple animations. While both these terms are in correlation, there are certain factors that separate motion graphics from animations. In layman terms, all motion graphics are animations, but not all animations are motion graphics. To give you a better clarity, we have explained both motion graphics and animations in detail.
01Motion Graphics
Motion Graphics are one of the sub-categories of animations that are primarily created to add motion to still images. The flashing logos you see on different websites are the perfect example of motion graphics. The primary objective of motion graphics is to make designs more appealing. A traditional website logo may not grab the visitor’s attention, but if it has a slight movement, it’ll most likely draw the eyeballs, even if someone is visiting the website for the first time. In general, designers apply motion graphics to objects and texts to enhance their visual appearance.
Moreover, motion graphics can also make it easier to educate people on a certain topic. For instance, a still image may not clarify the overall USPs of your brand. However, by designing a dedicated motion graphics, you’ll be able to explain everything and connect with the potential customers more effectively. Some designers also use motion graphics to simply uplift the overall visual appearance of their designs.
Whatever the reason, using motion graphics in 20can make you reach your marketing objectives more conveniently.
02Animations
Animation, on the other hand, is a general broader Umbrella term that’s used to define a wide variety of visual representations. As we mentioned earlier, motion graphics are also a part of graphics animations. However, animations aren’t just limited to moving text/objects. According to the official definition, an animation can be explained as a video in which motion is introduced to make static objects move in the landscape.
The general idea of an animation is to convey a storyline in an interactive manner while keeping the customers engaged. Animations are usually divided into two categories, i.e., animations and animations. White paper animations are a great example of animations as the entire movement is in a two-dimensional landscape. In animations, on the other hand, the movement is not restricted to two dimensions only. Cartoons and animated series are the perfect example of animations as the objects are allowed to move in a three dimensional landscape.
Part 3 5 Graphic Design Techniques for Motion Graphics
So, now that you know how motion graphics differ from the regular animations, let’s understand the tactics to design motion graphics as a beginner. Of course, if you are planning to step into the world of animated videos, you are less likely to start with graphic animation videos. A better starting point would be something as simple as a motion graphics animation. Here are 5 tactics that’ll guide you the right way while creating a motion graphics animation for the first time.
01Start With a Template
Now, when it comes to designing a motion graphics animation, you can either start on a blank canvas or choose one of the ready-to-use templates to speed up the entire designing process. As an absolute beginner, it would be better to choose the latter as it’ll require less designing from your part.
Working on a blank canvas is quite a challenging task, especially when you don’t have years of experience as a designer. But, with a ready made template, you can start with the editing process right away. There are a plethora of editing platforms like Canva, PicArt, and Visme where you’ll find motion graphics templates. These templates are fully customizable, which means you can manipulate their design to meet your specific brand requirements.
02Be Subtle With Personal Branding
Now, even if you are choosing a built-in template, it would be crucial to customize its color scheme so that it matches the overall theme of your brand. Let’s say you are using red and white colors on your website. So, while designing the motion graphics, make sure to change its existing color scheme with red and white so that it can go with your website in a hassle-free manner.
In addition to the color scheme, you can also use other visual elements that represent your brand in the digital landscape. However, do not overdo the personal branding as it may also backfire and affect the quality of your motion graphics animation.
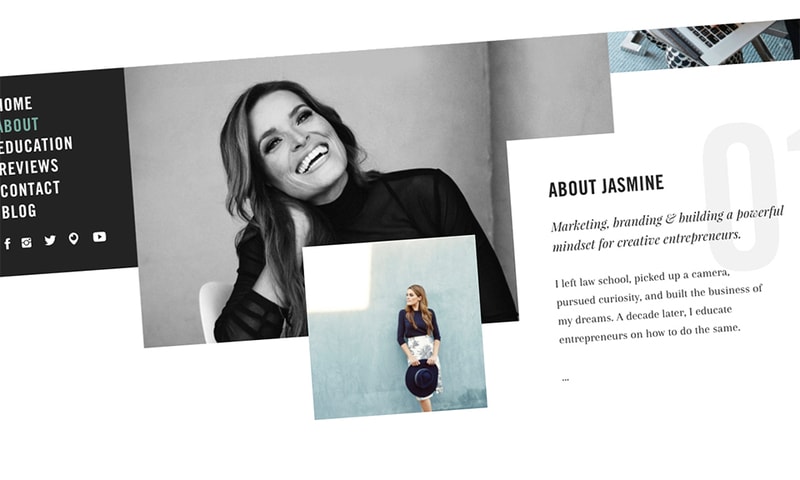
03Do Not Add Unnecessary Elements
It’s also worth noting that any unnecessary element in your motion graphics design will only make it cluttered and damage the overall user experience. Before you publish the motion graphics on any online portal, make sure to analyze it from users’ point-of-view. In case you find any invaluable elements, go ahead and remove them from the design.
04Design Multiple Variations
It’s not necessary that the first motion graphic you design will be worth publishing on your website. That’s why it’s always necessary to design multiple variations so that you can upload the most appealing design on your website. Some designers also A/B test their motion graphics design to choose the best design among all the variations. In any case, having multiple variations will only help you maintain the high market standards.
05Use GIF Format
Finally, once your motion graphics animation is ready, go ahead and save it in GIF format. With GIF format, you’ll be able to upload the picture across all platforms and ensure that the object movement inside the motion graphics doesn’t get affected at all.
Part 5 How to Create Animated Graphics That Stand out
At this point, you already know that designing a graphics animation requires a professional editing tool. While there are different options to choose from, we recommend using Wondershare Wondershare Filmora Video Editor . It’s a professional video editing tool that comes with a built-in media library where you’ll find hundreds of ready-to-use animation templates.
These templates are one-click away from being integrated into your videos, which means you’ll be able to design graphic animation videos in no time. The tool offers a timeline based editing panel that speeds up the entire editing process and makes your workflow much smoother. All the animation templates in Filmora are completely customizable. So, as an editor, you’ll be able to edit the template and customize it to match the overall storyline of your video.
Filmora is an ideal editing software for editors who want to add motion graphics and animations directly to their videos. Instead of switching to a different editing tool, Filmora will allow you to integrate the animations directly to your video and enjoy an uninterrupted workflow.
Some of the key features that make Filmora the perfect editing tool for motion graphics animation include:
● Built-in media library containing several animation templates
● Advanced editing features such as keyframing and motion graphics design
● Timeline-based user interface for quick editing
● Cross-platform compatibility
\
● Key Takeaways from This Episode →
● Graphic animations and motion graphics have become the new go-to tool for marketers to promote their product/services
● A simple motion graphics can help you maximize the retention rate of your marketing campaigns due to their higher customer engagement
● If you want to add graphics animation to videos, install Wondershare Wondershare Filmora Video Editor on your system. With its ready-to-use animation templates, you’ll be able to create high-quality and visually stunning graphic animations in no time
In the recent few years, videos have become the primary tool for marketers to attract their target customers. Unlike banners and pamphlets, videos are relatively more engaging and make it easier for marketers to establish a connection with the viewers. Now, each brand has different preferences when it comes to choosing the right video marketing strategy.
While some brands opt for conventional video advertisements, others get a bit creative and introduce graphics animation to their videos to make them more captivating. Of course, if you want to maximize the user’s attention and retain more customers, you would prefer the latter. Animated videos are more engaging and also sets the brand apart from the rest of the crowd.
In this article
01 [Why Study Graphic Design and Animation?](#Part 1)
02 [What’s the Difference Between Motion Graphics and Animation?](#Part 2)
03 [5 Graphic Design Techniques for Motion Graphics](#Part 3)
04 [How to Create Animated Graphics That Stand Out](#Part 4)
Part 1 Why Study Graphic Design and Animation?
So, why should you care about graphic design and animation? The answer is pretty simple - because these two concepts can help you step up your brand’s marketing game and attract maximum leads. By incorporating graphics and animations into your videos, you’ll be able to make them highly engaging.
However, user engagement isn’t the only reason why graphics and animations should be a part of your marketing strategy. They can also be used to simplify complex topics and explain them in an interactive manner. Let’s say you want to explain the overall working of a particular product. Instead of creating a boring tutorial, you can design explainer white paper animations to explain each step in detail and help viewers understand the overall dynamics of the product more conveniently.
Similarly, the applications of animated videos are endless. From product promotion to everyday marketing, they can help businesses in different scenarios and maximize the results.
Part 2 What’s the Difference Between Motion Graphics and Animation?
Now, whenever we talk about graphic animation videos, people often get confused between motion graphics and simple animations. While both these terms are in correlation, there are certain factors that separate motion graphics from animations. In layman terms, all motion graphics are animations, but not all animations are motion graphics. To give you a better clarity, we have explained both motion graphics and animations in detail.
01Motion Graphics
Motion Graphics are one of the sub-categories of animations that are primarily created to add motion to still images. The flashing logos you see on different websites are the perfect example of motion graphics. The primary objective of motion graphics is to make designs more appealing. A traditional website logo may not grab the visitor’s attention, but if it has a slight movement, it’ll most likely draw the eyeballs, even if someone is visiting the website for the first time. In general, designers apply motion graphics to objects and texts to enhance their visual appearance.
Moreover, motion graphics can also make it easier to educate people on a certain topic. For instance, a still image may not clarify the overall USPs of your brand. However, by designing a dedicated motion graphics, you’ll be able to explain everything and connect with the potential customers more effectively. Some designers also use motion graphics to simply uplift the overall visual appearance of their designs.
Whatever the reason, using motion graphics in 20can make you reach your marketing objectives more conveniently.
02Animations
Animation, on the other hand, is a general broader Umbrella term that’s used to define a wide variety of visual representations. As we mentioned earlier, motion graphics are also a part of graphics animations. However, animations aren’t just limited to moving text/objects. According to the official definition, an animation can be explained as a video in which motion is introduced to make static objects move in the landscape.
The general idea of an animation is to convey a storyline in an interactive manner while keeping the customers engaged. Animations are usually divided into two categories, i.e., animations and animations. White paper animations are a great example of animations as the entire movement is in a two-dimensional landscape. In animations, on the other hand, the movement is not restricted to two dimensions only. Cartoons and animated series are the perfect example of animations as the objects are allowed to move in a three dimensional landscape.
Part 3 5 Graphic Design Techniques for Motion Graphics
So, now that you know how motion graphics differ from the regular animations, let’s understand the tactics to design motion graphics as a beginner. Of course, if you are planning to step into the world of animated videos, you are less likely to start with graphic animation videos. A better starting point would be something as simple as a motion graphics animation. Here are 5 tactics that’ll guide you the right way while creating a motion graphics animation for the first time.
01Start With a Template
Now, when it comes to designing a motion graphics animation, you can either start on a blank canvas or choose one of the ready-to-use templates to speed up the entire designing process. As an absolute beginner, it would be better to choose the latter as it’ll require less designing from your part.
Working on a blank canvas is quite a challenging task, especially when you don’t have years of experience as a designer. But, with a ready made template, you can start with the editing process right away. There are a plethora of editing platforms like Canva, PicArt, and Visme where you’ll find motion graphics templates. These templates are fully customizable, which means you can manipulate their design to meet your specific brand requirements.
02Be Subtle With Personal Branding
Now, even if you are choosing a built-in template, it would be crucial to customize its color scheme so that it matches the overall theme of your brand. Let’s say you are using red and white colors on your website. So, while designing the motion graphics, make sure to change its existing color scheme with red and white so that it can go with your website in a hassle-free manner.
In addition to the color scheme, you can also use other visual elements that represent your brand in the digital landscape. However, do not overdo the personal branding as it may also backfire and affect the quality of your motion graphics animation.
03Do Not Add Unnecessary Elements
It’s also worth noting that any unnecessary element in your motion graphics design will only make it cluttered and damage the overall user experience. Before you publish the motion graphics on any online portal, make sure to analyze it from users’ point-of-view. In case you find any invaluable elements, go ahead and remove them from the design.
04Design Multiple Variations
It’s not necessary that the first motion graphic you design will be worth publishing on your website. That’s why it’s always necessary to design multiple variations so that you can upload the most appealing design on your website. Some designers also A/B test their motion graphics design to choose the best design among all the variations. In any case, having multiple variations will only help you maintain the high market standards.
05Use GIF Format
Finally, once your motion graphics animation is ready, go ahead and save it in GIF format. With GIF format, you’ll be able to upload the picture across all platforms and ensure that the object movement inside the motion graphics doesn’t get affected at all.
Part 5 How to Create Animated Graphics That Stand out
At this point, you already know that designing a graphics animation requires a professional editing tool. While there are different options to choose from, we recommend using Wondershare Wondershare Filmora Video Editor . It’s a professional video editing tool that comes with a built-in media library where you’ll find hundreds of ready-to-use animation templates.
These templates are one-click away from being integrated into your videos, which means you’ll be able to design graphic animation videos in no time. The tool offers a timeline based editing panel that speeds up the entire editing process and makes your workflow much smoother. All the animation templates in Filmora are completely customizable. So, as an editor, you’ll be able to edit the template and customize it to match the overall storyline of your video.
Filmora is an ideal editing software for editors who want to add motion graphics and animations directly to their videos. Instead of switching to a different editing tool, Filmora will allow you to integrate the animations directly to your video and enjoy an uninterrupted workflow.
Some of the key features that make Filmora the perfect editing tool for motion graphics animation include:
● Built-in media library containing several animation templates
● Advanced editing features such as keyframing and motion graphics design
● Timeline-based user interface for quick editing
● Cross-platform compatibility
\
● Key Takeaways from This Episode →
● Graphic animations and motion graphics have become the new go-to tool for marketers to promote their product/services
● A simple motion graphics can help you maximize the retention rate of your marketing campaigns due to their higher customer engagement
● If you want to add graphics animation to videos, install Wondershare Wondershare Filmora Video Editor on your system. With its ready-to-use animation templates, you’ll be able to create high-quality and visually stunning graphic animations in no time
Also read:
- Updated How to Analyze an Editorial Cartoon Easily for 2024
- Updated How to Make Well Done Animated GIF By Yourself?
- New In 2024, 10 2D/3D Animation Tips & Tricks for You
- Updated 2024 Approved How to Draw A Skeleton Cartoon – A Step by Step Guide
- 2024 Approved Best GIF Maker Software for Windows and Mac
- Updated In 2024, Tutorials to Make Animated Images – Even if Youre Just Starting Out
- 2024 Approved Beginners Guide for Learning 3D Animation
- New Tips for GIF to Animated PNG
- New Best 10 Anime Series of All Time | Watch Anime Online
- New That Will Make Aesthetic Cartoon Drawing More Understandable
- New In 2024, The Most Efficient Techniques to Make 3D Animation Character
- How to Make 3D Cartoon of Yourself for 2024
- New 2024 Approved Handy Tip From Adobe Animate Rigging Tutorial for All Learners
- Something About Types of Motion Graphics for 2024
- Secret Shortcut to Adobe Animate Character Tutorial
- Updated Tips on How to Get Awesome Background for Slideshow in PowerPoint for 2024
- 2024 Approved How to Create Photo Collage Frame for Free in Minutes?
- New 15 Iconic Cartoon Characters of All Time for 2024
- New 2024 Approved 15 Top Video to GIF App on iPhone and Android
- New 20 Best Anime Movies You Cannot Miss 2024 Update
- Updated 10 Realistic Cartoon Characters You Will Run Away From if You Met in R for 2024
- Updated In 2024, Techniques for Creating Animated Logo That Few People Know About
- Secrets to Make 2D Game Animation
- New 2024 Approved How To Learn Cartoon Sketch Drawing— Pencil Sketch for Beginners
- Updated 5 Photoshop Alternatives to Animate Your Logo for 2024
- New Ways to Create Animated Clipart in PowerPoint for 2024
- Updated Epic Formula to Animate Photos From These 10 Animate Pictures App
- New How You Can Turn Yourself Into Anime Character Using Anime Filter for 2024
- Updated 2024 Approved 12 Animation Video Maker That Can Triple Your Conversion Rates
- New Learn Simple Blender Rigging in Only 2 Minutes
- Updated How to Make My Photo 3D Cartoon Online for 2024
- Updated How to Make GIF Instagram | Quick Tips
- 2024 Approved Best 15 Female Anime Characters-Who Is Your Favorite?
- New In 2024, The Best 8 Places for High-Quality Royalty Free Gifs
- New 2024 Approved Best 15 Anime Fonts-Find Your Favorite One
- New The Secret Sauce for Making GIF Instagram Story More Aesthetic
- New 2024 Approved How to Create Your Own Avatar Free
- 5 Photoshop Alternatives to Animate Your Logo
- In 2024, What Is the Best Collage Photo Grid Maker - Experts Choice
- How to Make Photo Motion Effect Online for 2024
- Updated How to Find & Make Animated Christmas GIFs for 2024
- 2024 Approved 6 Unexpected Ways Gif Animation Maker Can Affect Your Marketing
- Updated What Is Still Motion Animation, In 2024
- New In 2024, How to Find Some Different Ways to Animated Cartoon of Yourself
- Complete guide for recovering call logs on OnePlus Nord CE 3 Lite 5G
- In 2024, How To Remove or Bypass Knox Enrollment Service On Vivo Y77t
- Bypass/Reset Honor X50 Phone Screen Passcode/Pattern/Pin
- In 2024, Top 7 Skype Hacker to Hack Any Skype Account On your Asus ROG Phone 8 | Dr.fone
- How to Reset a Vivo X90S Phone that is Locked?
- Possible solutions to restore deleted call logs from Honor 90 Pro
- How To Activate and Use Life360 Ghost Mode On Oppo Reno 8T | Dr.fone
- How to sign .uot file document electronically
- In 2024, iCloud Separation How To Disconnect Apple iPhone 14 Plus and iPad
- Lock Your Realme C53 Phone in Style The Top 5 Gesture Lock Screen Apps
- Prevent Cross-Site Tracking on Samsung Galaxy F54 5G and Browser | Dr.fone
- How to Unlock Apple ID From your Apple iPhone 11 Pro without Security Questions?
- How to Downgrade iPhone 12 Pro Max to the Previous iOS/iPadOS Version? | Dr.fone
- Title: Interesting Fundamentals and Ultimate Guide to Animated Characters Drawings for 2024
- Author: Elon
- Created at : 2024-06-23 02:09:55
- Updated at : 2024-06-24 02:09:55
- Link: https://animation-videos.techidaily.com/interesting-fundamentals-and-ultimate-guide-to-animated-characters-drawings-for-2024/
- License: This work is licensed under CC BY-NC-SA 4.0.
