
:max_bytes(150000):strip_icc():format(webp)/samsung-soundbar-dolby-atmos-569f1fdd925e46ab8b3e1f51d95e1e6c.jpg)
New 15 Top Collage Makers to Create Aesthetic Collages
15 Top Collage Makers to Create Aesthetic Collages
15 Best Collage Makers to Create Aesthetic Collages
An easy yet powerful editor
Numerous effects to choose from
Detailed tutorials provided by the official channel
It is rightly said that a picture is worth a thousand words and what if there are multiple pictures? It becomes a story!! Creating collages have been popular among people for a long and with high-end cameras, mobile phones, and excellent tools the task has become even easier and quicker.
So, if you too are willing to create an aesthetic collage for yourself or loved ones, there is no dearth of collage-making tools. So, to prevent you from the hassles of selecting one such tool, we have shortlisted the popular ones.
In this article
01 [Need for a collage-making tool?](#Part 1)
02 [Top 15 collage makers to create aesthetic collages](#Part 2)
03 [Best software to create video collages and edit videos professionally – Wondershare Filmora](#Part 3)
Part 1 Need for a collage-making tool?
Though aesthetic collage wallpaper making may sound simple, it is an artwork to create an impressive-looking collage. Adjusting the images in the right format, cropping their sizes, setting a background, setting colors, adding text are some of the many factors that go into the making of a visually appealing collage. So now, all these considerations can be taken care of by a good collage-making tool. All you need to do is pick up your choice of images, select a template and let the tool do its work.
In no time, a collage of your choice will be ready.
Part 2 Top 15 collage makers to create aesthetic collages
There is a wide range of online, desktop, and app-based collage-making tools available that can be selected based on your requirements. Check out the most popular ones as below.
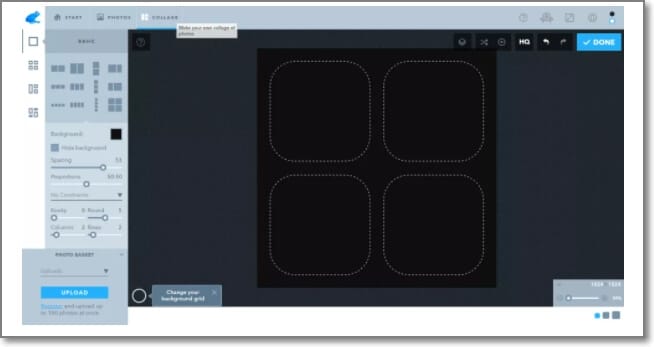
01Free Collage Maker Online
This is a free-to-use online tool that can be used for creating impressive aesthetic wallpaper collage quickly. The tool gives you the option to either choose your own layout or use one of the readymade templates. Multiple editing options are supported like adjust9ing exposure, contrast, shadows, white balance, and more. You can even turn, rotate, and distort the images. Using this online tool, you can even add the text and also customize it. A wide range of formats is supported by a tool like RAW, JPEG, PSD, PNG, and others.
022. Canva
This is a widely used online tool that supports multiple functions including image collage creation and image editing. The tool allows adding images in all popular formats for creating a collage using several templates. The position of the photos, font of the text, shades, and other parameters can be adjusted as required. The tool also has a huge collection of images in different categories that can also be used for making aesthetic photo collage. Created collages can be saved in JPEG, PDF, and PNG format.
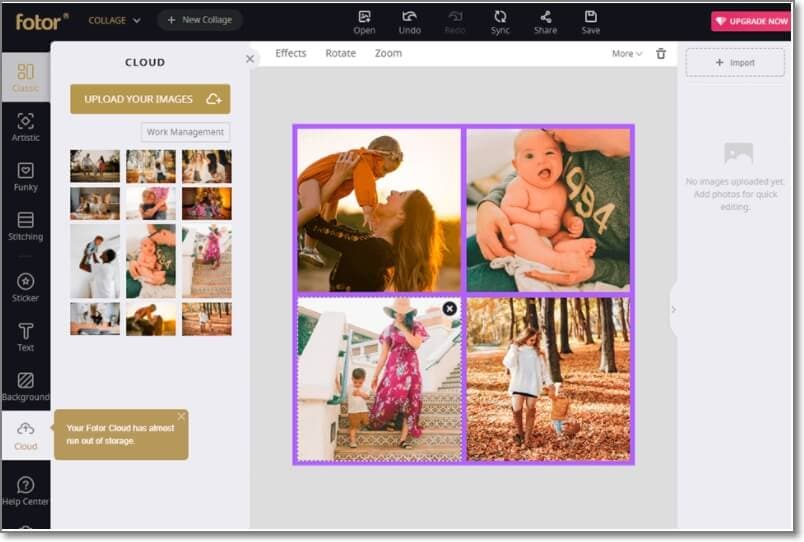
03Fotor
Creating high-quality trendy photo collages is easy and quick using this online tool that supports all popular image formats. There are several grids and template options available for you to create the desired collage. Stickers and text can be added to the created collage to add some fun elements. Several adjustments can be made like frame width, rounded corners, background color, aspect ratio, adding filters, effects, and more. With multiple features, the interface becomes quite confusing.
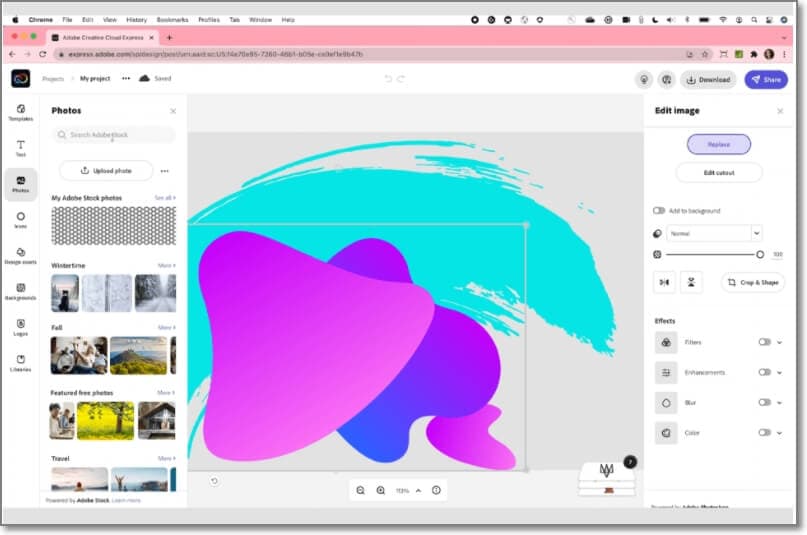
04Adobe Creative Cloud Express
Adobe is one of the most widely used tools when it comes to images and videos and creating a picture collage is one of the supported features. Using the online version of this tool, collages can be created quickly and only a free sign-up is needed. In addition to your images, you can even choose from the wide collection of royalty-free pictures. Theme-based templates are available to match your requirements and for customization, all basic editing features are supported. You can even add texts, filters, and effects to your collages.
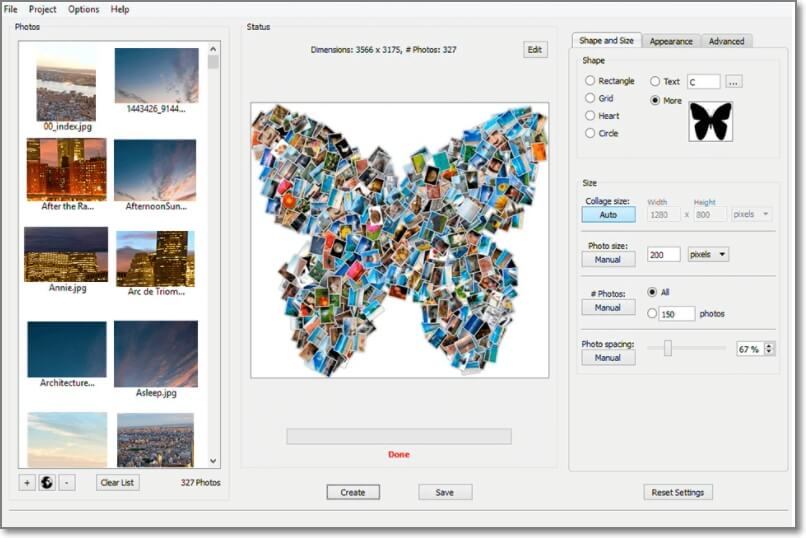
05Shape Collage
This automatic collage maker lets you create the desired collage in just a few simple steps. The interface is simple and all the basic editing functions for customization are supported. You can change the background, frame, the distance between the images, and several other factors. The tool is available to be used as desktop software, an online program, and also as an app that can be downloaded on a phone.
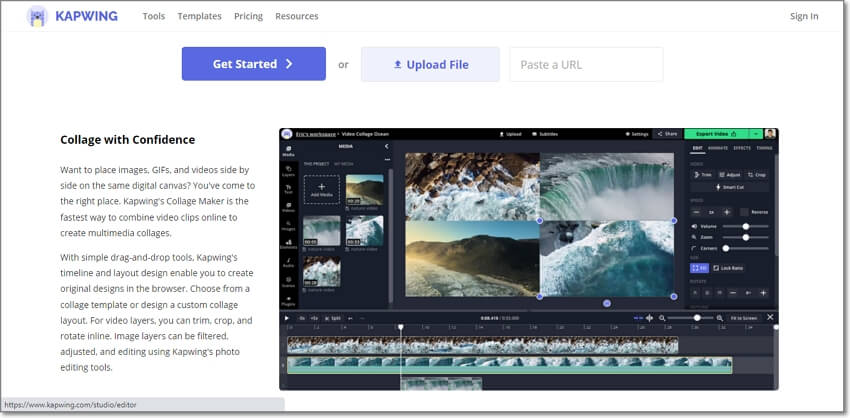
06Kapwing Collage Maker
Using this free online tool, collages can be made using images, videos, GIFs, as well as music files. The tool allows you to choose either a blank canvas or choose from multiple templates available at the site. The drag and drop features are supported and there are multiple editing options as well. The free version has a watermark on the created collages which can be removed after creating a free account. The created collage can be saved to the system or its URL can be obtained.
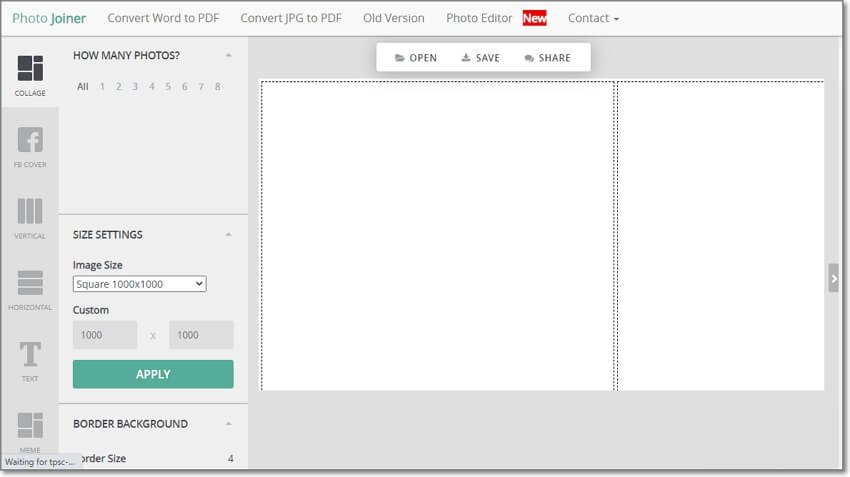
07Photo Joiner
As the name suggests, this is a photo joining tool that works from your browser and allows creating a picture collage. The interface is user-friendly and the work process is smooth where you just need to add the images, choose the layout, add text, and make required settings to create your choice of a template. The tool allows changing the image size, as well as the background. Using the tool, you can also create an FB cover in a simple step.
08Ribbet
This is a widely used photo editing tool that performs an array of additional features as well including collage making. The tool is available in a free as well as a premium paid version. The interface is smart and comes packed in with all basic collage-making functions. Decent templates are available to choose from with the option to adjust the size, edit exposure, lighting, and other parameters.
09BeFunky
Creating aesthetic, funky, and all types of different collages is quick and easy using this online tool. A variety of customizable layout options are available at the site to match your requirements. The images can be enhanced by changing the background color, pattern, adding fonts, effects, filters, and more. The free version of the tool supports basic functions while for more advanced options you need to purchase the premium plan. The tool is also available as an app for Android and iOS devices.
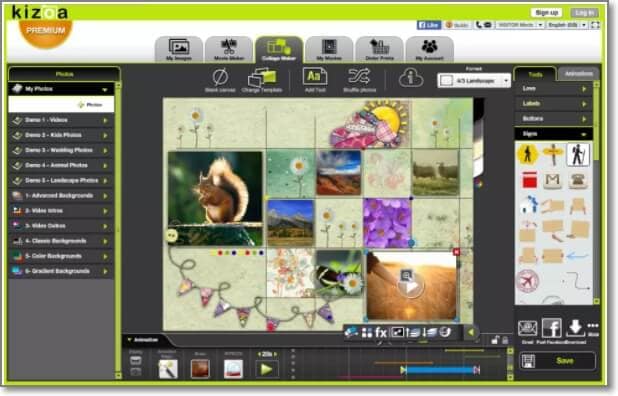
10Kizoa
This is a free online slideshow maker that allows creating a slideshow in different aspect ratios which is suitable for all types of platforms and screen sizes. An array of static and animated templates is available and you can even add multiple effects, text, and other elements to customize the collage as desired. There is also a paid version of the tool with added features and functions.
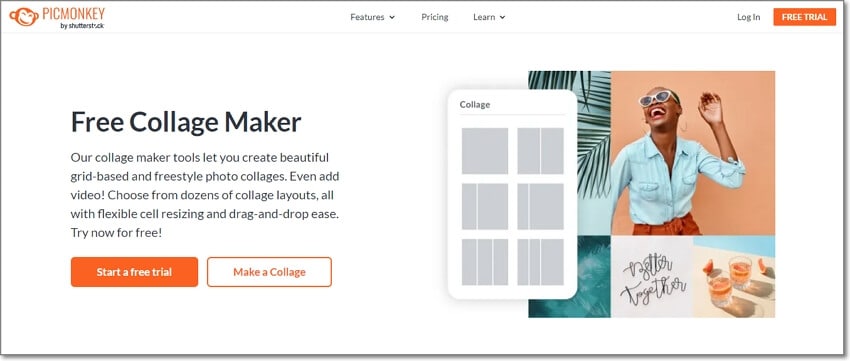
11PicMonkey
This is another popular name when it comes to collage-making tools. The tool allows creating freestyle as well as grid-based collages and in addition to the images, you can even add videos. Hundreds of collage layouts are available that can be further customized as needed. The function of auto-cell resizing adjusts all the images to the grids perfectly. Apart from your media files, you can even choose from the free stock of images and videos available at the site.
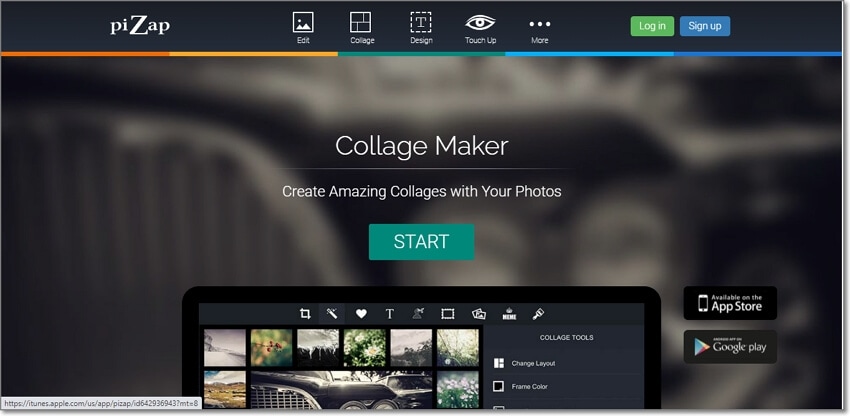
12piZap
Just like its interesting name, this online tool allows you to create interesting collages. The interface is intuitive and there are multiple templates to choose from. Further, the templates can be customized using an editing tool, adding filters, texts, effects, and other elements. The Facebook banner template is one of the interesting and useful features. For ad-free experience and additional functions, the pro-paid version can be selected.
13FotoJet
Using this browser-based tool you can create collages, posters, photo cards, YouTube banners, fun images, Facebook covers, and others. The templates in different categories are available to match your themes and create interesting collages. You can even choose to create a classic collage to keep it simple. Upgrading the tool to the paid version offers additional resources and features.

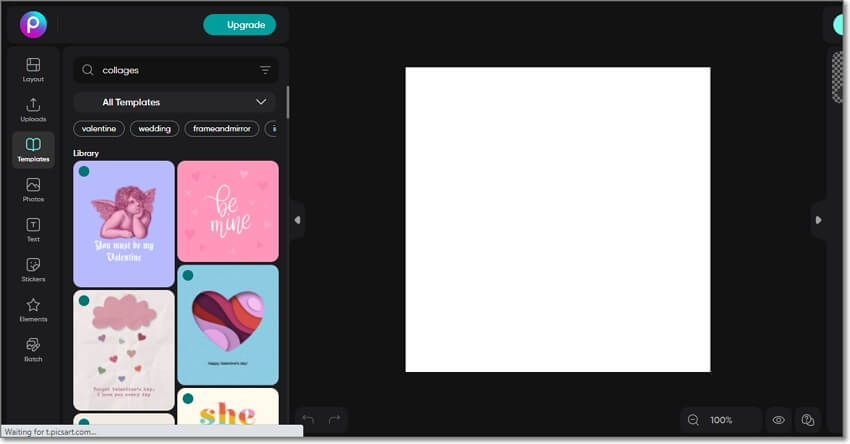
14Picsart Collage Maker
This is another simple to use free online collage-making tool that can create aesthetic and other types of collages. The interface of the tool is clean which makes the working smooth and quick and the images can be added from your system as well as from your social media accounts. Multiple effects, filters, clip-art, and other elements can be added to make the collage look impressive.
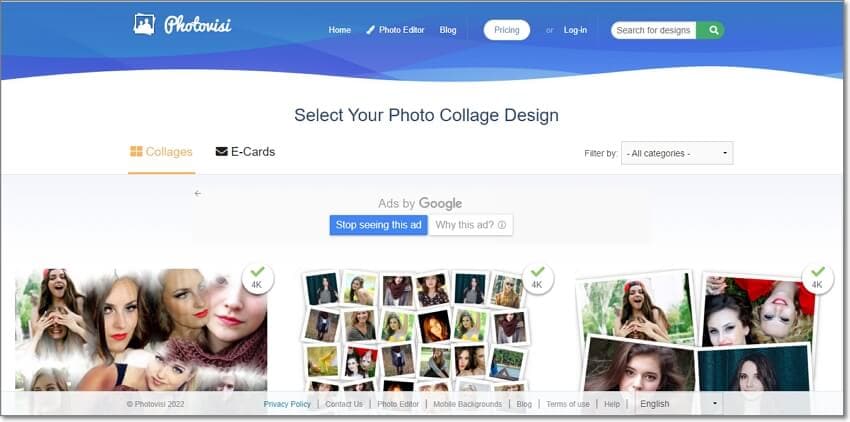
15Photovisi
Using this free online collage-making tool, you will have access to templates in different categories like abstract, magic, love, nature, and many categories more. You can even create Facebook covers, E-cards, and YouTube channel banners using the program. An array of built-in effects is available to customize the file and the tool also offers collaboration options. The created collage can be saved locally or can also be shared through an email.
Part 3 Best software to create video collages and edit videos professionally – Wondershare Filmora
Above we have listed the best tools for creating image collages and a few of them also has a feature to add videos. If you are want to create a video collage and looking for a tool that can edit your videos professionally, Wondershare Filmora is the best tool to consider. The animated split screen effect of the software allows you to view your videos on a split-screen thus making it look like a collage.
For all types of video editing requirements, this is an excellent tool available for download on Windows and Mac systems.
For Win 7 or later (64-bit)
For macOS 10.12 or later
● Key Takeaways from This Episode →
● To create aesthetics and other types of collages, a wide range of collage-maker tools are available.
● Choose from desktop tools, online programs, or apps as needed.
● To edit videos and create decent video collages, Wondershare Filmora is an excellent tool.
It is rightly said that a picture is worth a thousand words and what if there are multiple pictures? It becomes a story!! Creating collages have been popular among people for a long and with high-end cameras, mobile phones, and excellent tools the task has become even easier and quicker.
So, if you too are willing to create an aesthetic collage for yourself or loved ones, there is no dearth of collage-making tools. So, to prevent you from the hassles of selecting one such tool, we have shortlisted the popular ones.
In this article
01 [Need for a collage-making tool?](#Part 1)
02 [Top 15 collage makers to create aesthetic collages](#Part 2)
03 [Best software to create video collages and edit videos professionally – Wondershare Filmora](#Part 3)
Part 1 Need for a collage-making tool?
Though aesthetic collage wallpaper making may sound simple, it is an artwork to create an impressive-looking collage. Adjusting the images in the right format, cropping their sizes, setting a background, setting colors, adding text are some of the many factors that go into the making of a visually appealing collage. So now, all these considerations can be taken care of by a good collage-making tool. All you need to do is pick up your choice of images, select a template and let the tool do its work.
In no time, a collage of your choice will be ready.
Part 2 Top 15 collage makers to create aesthetic collages
There is a wide range of online, desktop, and app-based collage-making tools available that can be selected based on your requirements. Check out the most popular ones as below.
01Free Collage Maker Online
This is a free-to-use online tool that can be used for creating impressive aesthetic wallpaper collage quickly. The tool gives you the option to either choose your own layout or use one of the readymade templates. Multiple editing options are supported like adjust9ing exposure, contrast, shadows, white balance, and more. You can even turn, rotate, and distort the images. Using this online tool, you can even add the text and also customize it. A wide range of formats is supported by a tool like RAW, JPEG, PSD, PNG, and others.
022. Canva
This is a widely used online tool that supports multiple functions including image collage creation and image editing. The tool allows adding images in all popular formats for creating a collage using several templates. The position of the photos, font of the text, shades, and other parameters can be adjusted as required. The tool also has a huge collection of images in different categories that can also be used for making aesthetic photo collage. Created collages can be saved in JPEG, PDF, and PNG format.
03Fotor
Creating high-quality trendy photo collages is easy and quick using this online tool that supports all popular image formats. There are several grids and template options available for you to create the desired collage. Stickers and text can be added to the created collage to add some fun elements. Several adjustments can be made like frame width, rounded corners, background color, aspect ratio, adding filters, effects, and more. With multiple features, the interface becomes quite confusing.
04Adobe Creative Cloud Express
Adobe is one of the most widely used tools when it comes to images and videos and creating a picture collage is one of the supported features. Using the online version of this tool, collages can be created quickly and only a free sign-up is needed. In addition to your images, you can even choose from the wide collection of royalty-free pictures. Theme-based templates are available to match your requirements and for customization, all basic editing features are supported. You can even add texts, filters, and effects to your collages.
05Shape Collage
This automatic collage maker lets you create the desired collage in just a few simple steps. The interface is simple and all the basic editing functions for customization are supported. You can change the background, frame, the distance between the images, and several other factors. The tool is available to be used as desktop software, an online program, and also as an app that can be downloaded on a phone.
06Kapwing Collage Maker
Using this free online tool, collages can be made using images, videos, GIFs, as well as music files. The tool allows you to choose either a blank canvas or choose from multiple templates available at the site. The drag and drop features are supported and there are multiple editing options as well. The free version has a watermark on the created collages which can be removed after creating a free account. The created collage can be saved to the system or its URL can be obtained.
07Photo Joiner
As the name suggests, this is a photo joining tool that works from your browser and allows creating a picture collage. The interface is user-friendly and the work process is smooth where you just need to add the images, choose the layout, add text, and make required settings to create your choice of a template. The tool allows changing the image size, as well as the background. Using the tool, you can also create an FB cover in a simple step.
08Ribbet
This is a widely used photo editing tool that performs an array of additional features as well including collage making. The tool is available in a free as well as a premium paid version. The interface is smart and comes packed in with all basic collage-making functions. Decent templates are available to choose from with the option to adjust the size, edit exposure, lighting, and other parameters.
09BeFunky
Creating aesthetic, funky, and all types of different collages is quick and easy using this online tool. A variety of customizable layout options are available at the site to match your requirements. The images can be enhanced by changing the background color, pattern, adding fonts, effects, filters, and more. The free version of the tool supports basic functions while for more advanced options you need to purchase the premium plan. The tool is also available as an app for Android and iOS devices.
10Kizoa
This is a free online slideshow maker that allows creating a slideshow in different aspect ratios which is suitable for all types of platforms and screen sizes. An array of static and animated templates is available and you can even add multiple effects, text, and other elements to customize the collage as desired. There is also a paid version of the tool with added features and functions.
11PicMonkey
This is another popular name when it comes to collage-making tools. The tool allows creating freestyle as well as grid-based collages and in addition to the images, you can even add videos. Hundreds of collage layouts are available that can be further customized as needed. The function of auto-cell resizing adjusts all the images to the grids perfectly. Apart from your media files, you can even choose from the free stock of images and videos available at the site.
12piZap
Just like its interesting name, this online tool allows you to create interesting collages. The interface is intuitive and there are multiple templates to choose from. Further, the templates can be customized using an editing tool, adding filters, texts, effects, and other elements. The Facebook banner template is one of the interesting and useful features. For ad-free experience and additional functions, the pro-paid version can be selected.
13FotoJet
Using this browser-based tool you can create collages, posters, photo cards, YouTube banners, fun images, Facebook covers, and others. The templates in different categories are available to match your themes and create interesting collages. You can even choose to create a classic collage to keep it simple. Upgrading the tool to the paid version offers additional resources and features.
14Picsart Collage Maker
This is another simple to use free online collage-making tool that can create aesthetic and other types of collages. The interface of the tool is clean which makes the working smooth and quick and the images can be added from your system as well as from your social media accounts. Multiple effects, filters, clip-art, and other elements can be added to make the collage look impressive.
15Photovisi
Using this free online collage-making tool, you will have access to templates in different categories like abstract, magic, love, nature, and many categories more. You can even create Facebook covers, E-cards, and YouTube channel banners using the program. An array of built-in effects is available to customize the file and the tool also offers collaboration options. The created collage can be saved locally or can also be shared through an email.
Part 3 Best software to create video collages and edit videos professionally – Wondershare Filmora
Above we have listed the best tools for creating image collages and a few of them also has a feature to add videos. If you are want to create a video collage and looking for a tool that can edit your videos professionally, Wondershare Filmora is the best tool to consider. The animated split screen effect of the software allows you to view your videos on a split-screen thus making it look like a collage.
For all types of video editing requirements, this is an excellent tool available for download on Windows and Mac systems.
For Win 7 or later (64-bit)
For macOS 10.12 or later
● Key Takeaways from This Episode →
● To create aesthetics and other types of collages, a wide range of collage-maker tools are available.
● Choose from desktop tools, online programs, or apps as needed.
● To edit videos and create decent video collages, Wondershare Filmora is an excellent tool.
How I Animate Discord Profile Pictures (& You Can Too)
How I Animate Discord Profile Pictures (& You Can Too)
An easy yet powerful editor
Numerous effects to choose from
Detailed tutorials provided by the official channel
Some users are still unaware of the fact that they can change the discord profile photo. If you are looking forward to the same, then you are on the right page.
Here we will discuss the process helpful for animating Discord profile pictures in just a few simple steps. Let’s get started!
In this article
01 [Where Can I Get Animated Avatar for Discord?](#Part 1)
02 [How to Get an Animated Profile Picture on Discord](#Part 2)
03 [Some Other Useful Tips to Improve Your Image Animate](#Part 3)
Part 1 Where Can I Get an Animated Avatar for Discord?
In this section, we will discuss how you can animate a PFP and how to get an animated avatar for Discord.
How Do You Animate a PFP?
The steps you need to follow to animate a PFP are:
Step 1: Firstly, you need to decide on what character you want to have as PFP. It can be a cartoon character, a painting, an illustration etc.
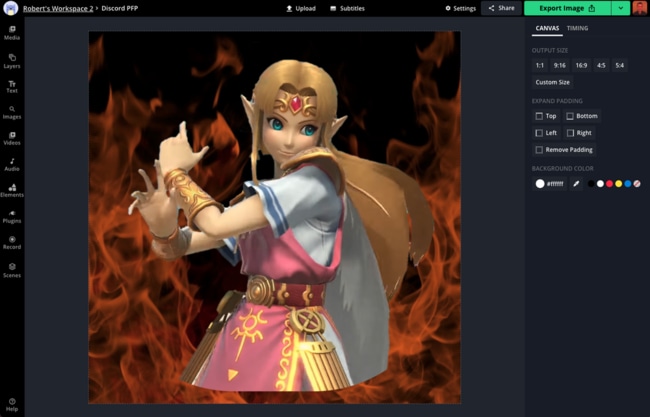
Step 2: Now, choose an online tool and begin to edit your image. When you upload the image, make sure to crop it to square. Please note that you need to make your image circle. So now, look for the rounded corner option and give the image the desired shape.
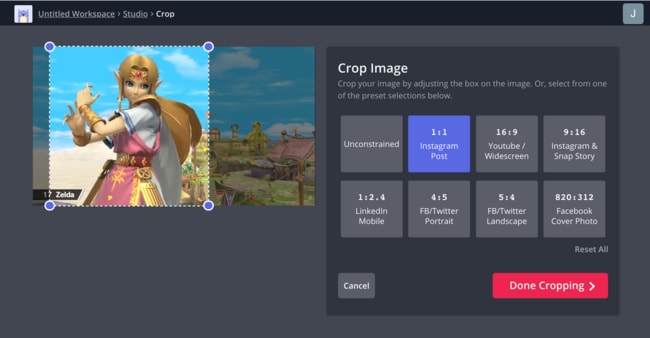
Step 3: It’s time to be creative with the image now. You can remove background, erase or add text and even add a background that suits your avatar. The customization depends all on your requirement. This is it. Now, you need to know how you can get an animated avatar on Discord.
Part 2 How to Get an Animated Profile Picture on Discord
If you are confused about how you will be able to get an animated profile picture on Discord, don’t worry at all. The steps are as follows:
Step 1: To get an animated discord profile picture, you will need to have Nitro. Otherwise the profile picture won’t save as animated. Also, if you use PC for this, things will be better. Now, open the desktop version of Discord.
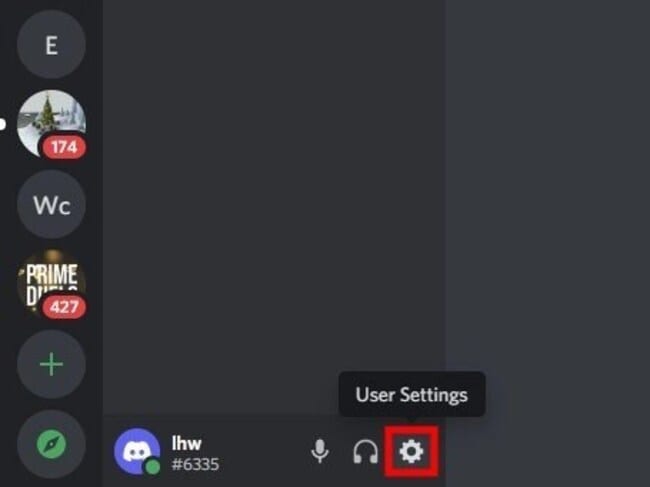
Step 2: Login to your account and go to User Settings by clicking the gear icon given next to your profile picture.
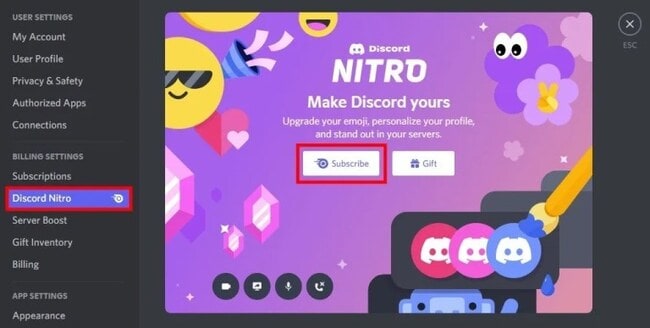
Step 3: In Settings, multiple options will be visible. You need to look for the “Discord Nitro” option. Clicking on this will lead you to Discord Nitro page.
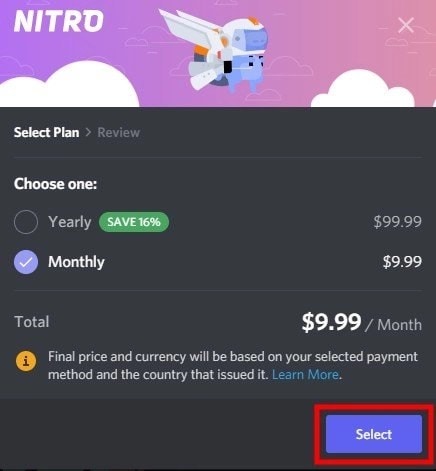
Note: You need to click on “Subscribe” if you don’t have Discord Nitro.
Step 4: Choose the plan once you subscribe. Hit on “Select” after choosing it.
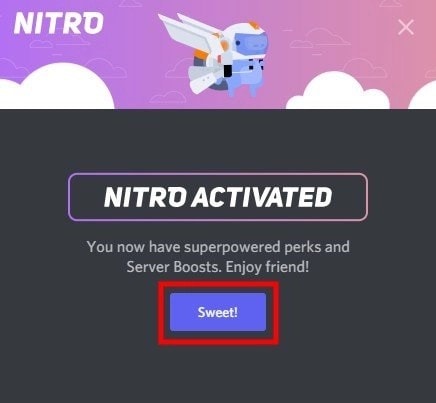
Step 5: Pay for it using the desired payment method. Enter your address and agree to the terms and conditions of Discord. After all the formalities are done, please click on “Sweet”. This will complete the subscription.
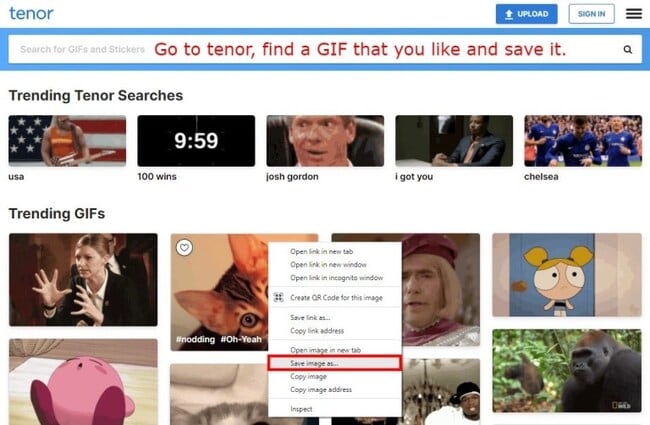
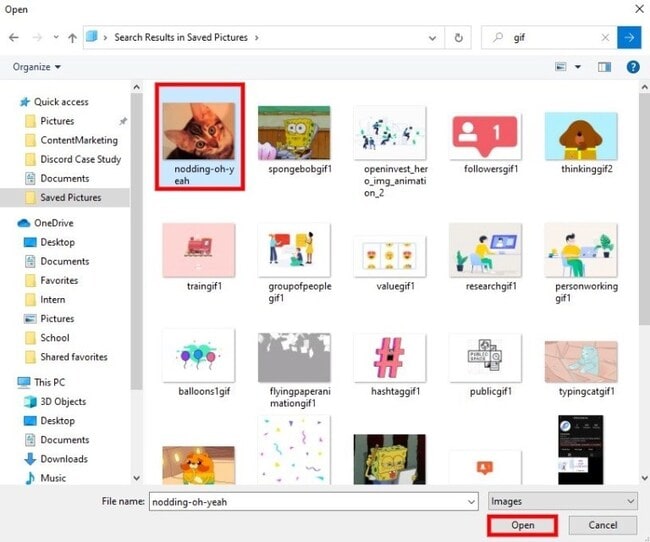
Step 6: Now, head to the GIF website like Tenor and choose the GIF that you like. Download it. You can right click on the GIF and click “Save Image as…” to get it.
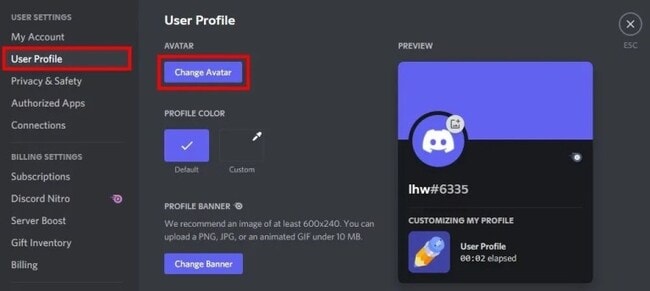
Step 7: After saving the GIF, go to the Settings of your Discord account. Hit on “User Profile” followed by “Change Avatar”.
Step 8: The dialog box will open where you need to find the GIF you just saved. After finding the GIF, click on “Open”.
Note: You can take the animated avatar that you created yourself by using the steps in the previous part.
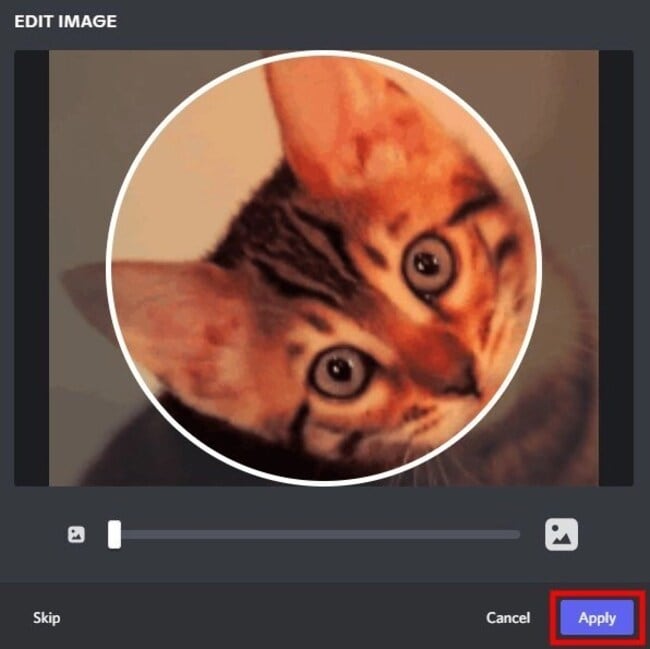
Step 9: Now, you will get to the Discord profile picture page. Here, you need to resize the GIF. Click on “Apply” when you are satisfied with the resizing or you can skip it too.
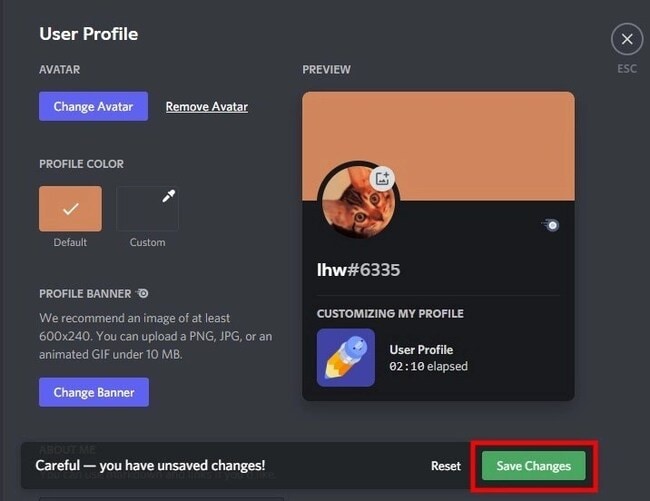
Step 10: Save the changes and you are good to go!
Part 3 Some Other Useful Tips to Improve Your Image Animate
If you’re wondering how to improve image animation, we’ve got some pointers for you. We all know that nitro is expensive and not everyone can get it for animating images. If you’re thinking the same thing, we’ve got the best tools for you right here.
Tools to consider for animating and improving the image:
01Adobe Spark
Adobe Spark is also among the best logo animation makers available and comes with the best features. It gives the final touch to the logo or video you have created. When you wish to animate your profile picture for Discord, the same can be done easily with it. The collection available on it is really very cool, and selecting from it can be an amazing experience. The templates are divided into categories along with the tabular ones so that you can choose them as per your requirements.
02Renderforest
Renderforest is also among the most loved software or applications loved by people around the world. It is helpful in creating logo animations too, for free. You can also choose from different templates available and customise them accordingly. Also, giving the animated effect to the logo is really very easy. If you wish to edit the logo, the same can be done easily. The major feature making it more appealing today is the transition effect, which is helpful in transforming a normal 2D logo into a 3D effect.

03Free Design logo
Free Design logo is an online application that always rules out the list. It features a 3D animation logo maker that is available for free. It has some logo samples and a catalogue available that are helpful for users to create excellent logos easily. Moreover, the templates available can be customised as per the need for stop. A user needs to download the application and, after it, they can have access to all the examples available for 3D logos.
04Tube arsenal
Tube Arsenal is also a famous application for users whenever they wish to animate a logo for their company. The interface appears to be similar to Renderforest, but the features are quite advanced. There is no technical knowledge required for using the same because it comes with an easy-to-use interface and templates that will be helpful in creating the logo of your choice.
Creative logo tips:
Some tips you can keep in mind while creating logo are as follows:
● Be specific to your brand. Be sure that you are not choosing a logo that may deviate customers from your brand perspective.
● Always choose colors in contrast because a single color logo does not seem to be appealing.
● Make sure to choose a template that is easy to understand. If the template seems to be difficult to understand, a user will not be able to get it.
● Create a logo with the minimum design because excessive design will make it tacky.
● Be sure not to add extra icons to the logo. This can be troublesome and make the logo unappealing.
● Go for white or a dark shade of background, because this will be helpful in making the text more visible.
Part 1 How to add an animated image/DP to WhatsApp?
Unfortunately, if you are looking forward to setting up an animated image on WhatsApp, it is not possible. The WhatsApp algorithm has been designed in such a manner that you can only use static images that is in JPG format. If the format is not the same, you can’t use it as the image over WhatsApp.
Key Takeaways from This Episode
● Nitro is helpful in setting up the animated image for discord.
● Filmora Pro is the best tool for editing images and animating them.
● WhatsApp doesn’t entertain setting up animated images over DP.
Some users are still unaware of the fact that they can change the discord profile photo. If you are looking forward to the same, then you are on the right page.
Here we will discuss the process helpful for animating Discord profile pictures in just a few simple steps. Let’s get started!
In this article
01 [Where Can I Get Animated Avatar for Discord?](#Part 1)
02 [How to Get an Animated Profile Picture on Discord](#Part 2)
03 [Some Other Useful Tips to Improve Your Image Animate](#Part 3)
Part 1 Where Can I Get an Animated Avatar for Discord?
In this section, we will discuss how you can animate a PFP and how to get an animated avatar for Discord.
How Do You Animate a PFP?
The steps you need to follow to animate a PFP are:
Step 1: Firstly, you need to decide on what character you want to have as PFP. It can be a cartoon character, a painting, an illustration etc.
Step 2: Now, choose an online tool and begin to edit your image. When you upload the image, make sure to crop it to square. Please note that you need to make your image circle. So now, look for the rounded corner option and give the image the desired shape.
Step 3: It’s time to be creative with the image now. You can remove background, erase or add text and even add a background that suits your avatar. The customization depends all on your requirement. This is it. Now, you need to know how you can get an animated avatar on Discord.
Part 2 How to Get an Animated Profile Picture on Discord
If you are confused about how you will be able to get an animated profile picture on Discord, don’t worry at all. The steps are as follows:
Step 1: To get an animated discord profile picture, you will need to have Nitro. Otherwise the profile picture won’t save as animated. Also, if you use PC for this, things will be better. Now, open the desktop version of Discord.
Step 2: Login to your account and go to User Settings by clicking the gear icon given next to your profile picture.
Step 3: In Settings, multiple options will be visible. You need to look for the “Discord Nitro” option. Clicking on this will lead you to Discord Nitro page.
Note: You need to click on “Subscribe” if you don’t have Discord Nitro.
Step 4: Choose the plan once you subscribe. Hit on “Select” after choosing it.
Step 5: Pay for it using the desired payment method. Enter your address and agree to the terms and conditions of Discord. After all the formalities are done, please click on “Sweet”. This will complete the subscription.
Step 6: Now, head to the GIF website like Tenor and choose the GIF that you like. Download it. You can right click on the GIF and click “Save Image as…” to get it.
Step 7: After saving the GIF, go to the Settings of your Discord account. Hit on “User Profile” followed by “Change Avatar”.
Step 8: The dialog box will open where you need to find the GIF you just saved. After finding the GIF, click on “Open”.
Note: You can take the animated avatar that you created yourself by using the steps in the previous part.
Step 9: Now, you will get to the Discord profile picture page. Here, you need to resize the GIF. Click on “Apply” when you are satisfied with the resizing or you can skip it too.
Step 10: Save the changes and you are good to go!
Part 3 Some Other Useful Tips to Improve Your Image Animate
If you’re wondering how to improve image animation, we’ve got some pointers for you. We all know that nitro is expensive and not everyone can get it for animating images. If you’re thinking the same thing, we’ve got the best tools for you right here.
Tools to consider for animating and improving the image:
01Adobe Spark
Adobe Spark is also among the best logo animation makers available and comes with the best features. It gives the final touch to the logo or video you have created. When you wish to animate your profile picture for Discord, the same can be done easily with it. The collection available on it is really very cool, and selecting from it can be an amazing experience. The templates are divided into categories along with the tabular ones so that you can choose them as per your requirements.
02Renderforest
Renderforest is also among the most loved software or applications loved by people around the world. It is helpful in creating logo animations too, for free. You can also choose from different templates available and customise them accordingly. Also, giving the animated effect to the logo is really very easy. If you wish to edit the logo, the same can be done easily. The major feature making it more appealing today is the transition effect, which is helpful in transforming a normal 2D logo into a 3D effect.
03Free Design logo
Free Design logo is an online application that always rules out the list. It features a 3D animation logo maker that is available for free. It has some logo samples and a catalogue available that are helpful for users to create excellent logos easily. Moreover, the templates available can be customised as per the need for stop. A user needs to download the application and, after it, they can have access to all the examples available for 3D logos.
04Tube arsenal
Tube Arsenal is also a famous application for users whenever they wish to animate a logo for their company. The interface appears to be similar to Renderforest, but the features are quite advanced. There is no technical knowledge required for using the same because it comes with an easy-to-use interface and templates that will be helpful in creating the logo of your choice.
Creative logo tips:
Some tips you can keep in mind while creating logo are as follows:
● Be specific to your brand. Be sure that you are not choosing a logo that may deviate customers from your brand perspective.
● Always choose colors in contrast because a single color logo does not seem to be appealing.
● Make sure to choose a template that is easy to understand. If the template seems to be difficult to understand, a user will not be able to get it.
● Create a logo with the minimum design because excessive design will make it tacky.
● Be sure not to add extra icons to the logo. This can be troublesome and make the logo unappealing.
● Go for white or a dark shade of background, because this will be helpful in making the text more visible.
Part 1 How to add an animated image/DP to WhatsApp?
Unfortunately, if you are looking forward to setting up an animated image on WhatsApp, it is not possible. The WhatsApp algorithm has been designed in such a manner that you can only use static images that is in JPG format. If the format is not the same, you can’t use it as the image over WhatsApp.
Key Takeaways from This Episode
● Nitro is helpful in setting up the animated image for discord.
● Filmora Pro is the best tool for editing images and animating them.
● WhatsApp doesn’t entertain setting up animated images over DP.
You Can Turn a TikTok Into a GIF Now. Here’s How
You Can Turn a TikTok Into a GIF Now. Here’s How
An easy yet powerful editor
Numerous effects to choose from
Detailed tutorials provided by the official channel
Want to add sharing flexibility to TikTok videos? Convert them into GIFs!
In this article
01 [What is GIF TikTok?](#Part 1)
02 [How to Make a GIF From a TikTok Video](#Part 2)
Part 1 What Is TikTok GIF?
In today’s IT enhanced lifestyle, having a profound reach on social media is the new name of popularity. Everyone out there is profusely keen on creating and sharing a plethora of content varieties; memes, videos, animations and what not, across social communities. However, TikTok videos lag behind in this race; often lack the ‘Share’ flexibility.
To match up, there are solutions to convert TikTok video into GIFs. A TikTok GIF is a short, impactful and to the point clip that’s here to share fun and exciting content in the most interesting ways. If you have a bunch of TikTok videos to share with your peers, but missing out on an effective sharing solution, you can conveniently look forward to convert those videos into catchy and interesting GIFs that will definitely hold the attention of your viewers.
Feel motivated? See through the rest of this article to know some quick and easy TikTok to GIF conversion tools and software!
Part 2 How to Make a GIF From a TikTok Video
When looking through solutions to create GIF TikTok videos, you will find a pool of methods and tools available on the internet. All you need to do is select the best one for yourself and get started with converting TikTok Videos into GIFs. Given below are some of the best solutions adhering to the aforesaid concern:
01Filmora
Wondershare Filmora Video Editor is one of the best application software to create a TikTok GIF. This is a simple and smart converter application that caters to your concern in just a few minutes. What’s best is that this app is absolutely free to use and is compatible with your PC, smartphone and a variety of other devices. Here’s how you can use Filmora to convert your TikTok videos into GIFs:

Step 1: Import Your Video
Start with importing a desired TikTok video file to the Filmora timeline. You can also ‘Drag and Drop’ the video file to the editor timeline. Using this application, you have the flexibility to import your clip in almost any video format.

Step 2: Edit Your Clip
Suited to your content preferences, you can edit and enhance your clips with a variety of effects, like, cut, trim, rotate, split, etc., and make appropriate speed adjustments. You can even include text messages to make your GIF more impactful.

Wondershare Filmora
Get started easily with Filmora’s powerful performance, intuitive interface, and countless effects!
Try It Free Try It Free Try It Free Learn More >

Step 3: Let’s Save and Share!
When you are happy, save your work using the .gif file extension. That’s it! You are ready to share your creation with your social media peers.

02TikTok’s Inbuilt GIF Converter
TikTok allows you to directly convert its videos into GIFs. You can use the TikTok application in your smartphone to take up the conversion process. All you need to do is follow the steps given below:
Step 1: Select Your TikTok Video
To get started, open the TikTok application in your smartphone and select the video you want to convert into GIF.
Step 2: Share the Video
Click the ‘Share’ icon at the right of the video screen.

Step 3: Format Selection
Scroll down to the bottom of the screen and choose the ‘Share as GIF’ option. This will automatically convert your TikTok video into GIF in a few seconds.

Step 4: Save and Export
Click on the ‘Save Image’ option to save the GIF in your phone’s gallery. You can also export your creation to different social media platforms.
03Wondershare UniConverter
This one is a handy toolbox loaded with a variety of features that allow you to play with your video creativity. Using this tool, you can quickly create GIF for TikTok and also fix the size and duration of the same. This software supports almost all video formats and comes with an inbuilt editor that you can use to add effects and make your GIFs all the more interesting. This is compatible with your Windows or MacOS PC.
Take the following steps to create GIFs from TikTok videos using this software:

Step 1: Download and Launch the Application
Download the Wondershare UniConverter application to your PC from the software’s official website.
Step 2: Open GIF Maker
In the app’s welcome screen, navigate to the ‘Toolbox’ tab and select ‘GIF Maker’ from the panel that gets displayed.
Step 3: Upload Your TikTok Video
In the next pop-up window, select ‘Video to GIF’ and click on the (+) icon in the centre. You can also click on ‘Add Files’ in the top left and choose a saved TikTok video from your PC to upload.

Step 4: Trim Your Video
Trim the uploaded video to the desired portion from where you wish to create the GIF and set adequate time frames for the same. You can even drag the video thumbnail slider to trim the video.

Step 5: Let’s Get Creating!
Set the final size and frame rate from the ‘Output Size’ and ‘Frame Rate’ tabs respectively. To save your creation, browse and choose the desired system folder by clicking on the ‘Save to:’ tab. Lastly, select ‘Create GIF’ to start the conversion process.

04Kapwing GIF Maker
There may be instances where you cannot save or share TikTok videos. To cut the rush in such cases, you can use Kapwing’s GIF Maker to convert videos from TikTok to GIF online. This one is a free video editing tool that works with almost all internet enabled smartphones and supports almost all common video formats. Here’s what you need to do for making GIFs from TikTok videos using this tool:
Step 1: Copy a Video Link
Search your desired TikTok video and click on the ‘Share’ icon. In the drop down menu, select ‘Copy Link’ to save the video link in your device memory. Once this happens, you will get a confirmation message that says, ‘Copied’.

Step 2: Open GIF Maker
Open the GIF Maker tool in your browser and paste the saved TikTok video link in the editor’s URL bar. This will automatically redirect you to the Kapwing Studio, where you have the liberty to trim, crop or split your video clip to the desired time frame. It is better to set a play span of 3-5 seconds.
You can trim the clip by dragging its ends or introduce cuts at specific points using the split button above the editor timeline. To make volume adjustments, select the video layer and click on ‘Edit Video’ and move the adjuster circle to the left or right to decrease, increase and mute the video volume.


Step 3: Download and Share Your Creation
To save your work, tap ‘Export Video’ at the top and select ‘Export as GIF’ from the drop down menu. Wait for the conversion process to finish and click ‘Download’. This will save the GIF to your device.
You will find a watermark at the corner of your clip. Click ‘Sign In to Remove the Watermark’ to remove it. A workspace for the present and later projects will be created, where you can save you work for a couple of days with Kapwing’s free version. To export your work to social media, click ‘Share’. You can even host your creation on websites. Just copy the video link and select ‘Embed’.

05TT Downloader
This one is another online tool you can use to create GIFs from TikTok videos. This is a quick converter tool that transforms TikTok videos to GIFs in 5 easy steps within minutes. It is a browser tool and does not require a software download. All you need to do is explained in the following steps:

Step 1:
Visit the official site of the tool.
Step 2:
Select ‘TikTok to GIF’ to get redirected to the TikTok to GIF Converter home page.
Step 3:
Copy and paste the desired TikTok video link in the converter’s URL bar. To proceed further, click on ‘Get Video’.

Step 4:
Trim your clip within a time frame of 1-10 seconds.
Step 5:
Click ‘Done’ to initiate the conversion process. Once it finishes, you can download the converted GIF to your device.
06MiniTool MovieMaker
You can prefer this tool to convert TikTok videos in your PC into GIFs. This tool gives you the liberty to trim, cut, reverse and rotate GIFs and even add text and filters to them. Here’s how you can use this tool to transform TikTok videos into interesting GIFs:
Step 1:
Download and install this GIF maker tool in your PC. Launch the same when you are done with the installation process.
Step 2:
In the converter window, import and add your desired TikTok clip into the converter timeline.

Step 3:
You are now free to edit and add text to your video.
Step 4:
Once you finish, tap ‘Export’ and choose your output format as GIF.
Step 5:
Hit ‘Export’ to let the conversion process begin.
● Key Takeaways from This Episode →
● TikTok videos often lack the save and share features, which is an obvious necessity of today’s social outlook.
● Varieties of online tools and software are available for converting TikTok videos to GIFs to increase the sharing flexibility.
● Filmora is a quick and intelligent choice to take up the conversion process within a catch of few clicks.
Want to add sharing flexibility to TikTok videos? Convert them into GIFs!
In this article
01 [What is GIF TikTok?](#Part 1)
02 [How to Make a GIF From a TikTok Video](#Part 2)
Part 1 What Is TikTok GIF?
In today’s IT enhanced lifestyle, having a profound reach on social media is the new name of popularity. Everyone out there is profusely keen on creating and sharing a plethora of content varieties; memes, videos, animations and what not, across social communities. However, TikTok videos lag behind in this race; often lack the ‘Share’ flexibility.
To match up, there are solutions to convert TikTok video into GIFs. A TikTok GIF is a short, impactful and to the point clip that’s here to share fun and exciting content in the most interesting ways. If you have a bunch of TikTok videos to share with your peers, but missing out on an effective sharing solution, you can conveniently look forward to convert those videos into catchy and interesting GIFs that will definitely hold the attention of your viewers.
Feel motivated? See through the rest of this article to know some quick and easy TikTok to GIF conversion tools and software!
Part 2 How to Make a GIF From a TikTok Video
When looking through solutions to create GIF TikTok videos, you will find a pool of methods and tools available on the internet. All you need to do is select the best one for yourself and get started with converting TikTok Videos into GIFs. Given below are some of the best solutions adhering to the aforesaid concern:
01Filmora
Wondershare Filmora Video Editor is one of the best application software to create a TikTok GIF. This is a simple and smart converter application that caters to your concern in just a few minutes. What’s best is that this app is absolutely free to use and is compatible with your PC, smartphone and a variety of other devices. Here’s how you can use Filmora to convert your TikTok videos into GIFs:
Step 1: Import Your Video
Start with importing a desired TikTok video file to the Filmora timeline. You can also ‘Drag and Drop’ the video file to the editor timeline. Using this application, you have the flexibility to import your clip in almost any video format.
Step 2: Edit Your Clip
Suited to your content preferences, you can edit and enhance your clips with a variety of effects, like, cut, trim, rotate, split, etc., and make appropriate speed adjustments. You can even include text messages to make your GIF more impactful.
Wondershare Filmora
Get started easily with Filmora’s powerful performance, intuitive interface, and countless effects!
Try It Free Try It Free Try It Free Learn More >
Step 3: Let’s Save and Share!
When you are happy, save your work using the .gif file extension. That’s it! You are ready to share your creation with your social media peers.
02TikTok’s Inbuilt GIF Converter
TikTok allows you to directly convert its videos into GIFs. You can use the TikTok application in your smartphone to take up the conversion process. All you need to do is follow the steps given below:
Step 1: Select Your TikTok Video
To get started, open the TikTok application in your smartphone and select the video you want to convert into GIF.
Step 2: Share the Video
Click the ‘Share’ icon at the right of the video screen.
Step 3: Format Selection
Scroll down to the bottom of the screen and choose the ‘Share as GIF’ option. This will automatically convert your TikTok video into GIF in a few seconds.
Step 4: Save and Export
Click on the ‘Save Image’ option to save the GIF in your phone’s gallery. You can also export your creation to different social media platforms.
03Wondershare UniConverter
This one is a handy toolbox loaded with a variety of features that allow you to play with your video creativity. Using this tool, you can quickly create GIF for TikTok and also fix the size and duration of the same. This software supports almost all video formats and comes with an inbuilt editor that you can use to add effects and make your GIFs all the more interesting. This is compatible with your Windows or MacOS PC.
Take the following steps to create GIFs from TikTok videos using this software:
Step 1: Download and Launch the Application
Download the Wondershare UniConverter application to your PC from the software’s official website.
Step 2: Open GIF Maker
In the app’s welcome screen, navigate to the ‘Toolbox’ tab and select ‘GIF Maker’ from the panel that gets displayed.
Step 3: Upload Your TikTok Video
In the next pop-up window, select ‘Video to GIF’ and click on the (+) icon in the centre. You can also click on ‘Add Files’ in the top left and choose a saved TikTok video from your PC to upload.
Step 4: Trim Your Video
Trim the uploaded video to the desired portion from where you wish to create the GIF and set adequate time frames for the same. You can even drag the video thumbnail slider to trim the video.
Step 5: Let’s Get Creating!
Set the final size and frame rate from the ‘Output Size’ and ‘Frame Rate’ tabs respectively. To save your creation, browse and choose the desired system folder by clicking on the ‘Save to:’ tab. Lastly, select ‘Create GIF’ to start the conversion process.
04Kapwing GIF Maker
There may be instances where you cannot save or share TikTok videos. To cut the rush in such cases, you can use Kapwing’s GIF Maker to convert videos from TikTok to GIF online. This one is a free video editing tool that works with almost all internet enabled smartphones and supports almost all common video formats. Here’s what you need to do for making GIFs from TikTok videos using this tool:
Step 1: Copy a Video Link
Search your desired TikTok video and click on the ‘Share’ icon. In the drop down menu, select ‘Copy Link’ to save the video link in your device memory. Once this happens, you will get a confirmation message that says, ‘Copied’.
Step 2: Open GIF Maker
Open the GIF Maker tool in your browser and paste the saved TikTok video link in the editor’s URL bar. This will automatically redirect you to the Kapwing Studio, where you have the liberty to trim, crop or split your video clip to the desired time frame. It is better to set a play span of 3-5 seconds.
You can trim the clip by dragging its ends or introduce cuts at specific points using the split button above the editor timeline. To make volume adjustments, select the video layer and click on ‘Edit Video’ and move the adjuster circle to the left or right to decrease, increase and mute the video volume.
Step 3: Download and Share Your Creation
To save your work, tap ‘Export Video’ at the top and select ‘Export as GIF’ from the drop down menu. Wait for the conversion process to finish and click ‘Download’. This will save the GIF to your device.
You will find a watermark at the corner of your clip. Click ‘Sign In to Remove the Watermark’ to remove it. A workspace for the present and later projects will be created, where you can save you work for a couple of days with Kapwing’s free version. To export your work to social media, click ‘Share’. You can even host your creation on websites. Just copy the video link and select ‘Embed’.
05TT Downloader
This one is another online tool you can use to create GIFs from TikTok videos. This is a quick converter tool that transforms TikTok videos to GIFs in 5 easy steps within minutes. It is a browser tool and does not require a software download. All you need to do is explained in the following steps:
Step 1:
Visit the official site of the tool.
Step 2:
Select ‘TikTok to GIF’ to get redirected to the TikTok to GIF Converter home page.
Step 3:
Copy and paste the desired TikTok video link in the converter’s URL bar. To proceed further, click on ‘Get Video’.
Step 4:
Trim your clip within a time frame of 1-10 seconds.
Step 5:
Click ‘Done’ to initiate the conversion process. Once it finishes, you can download the converted GIF to your device.
06MiniTool MovieMaker
You can prefer this tool to convert TikTok videos in your PC into GIFs. This tool gives you the liberty to trim, cut, reverse and rotate GIFs and even add text and filters to them. Here’s how you can use this tool to transform TikTok videos into interesting GIFs:
Step 1:
Download and install this GIF maker tool in your PC. Launch the same when you are done with the installation process.
Step 2:
In the converter window, import and add your desired TikTok clip into the converter timeline.
Step 3:
You are now free to edit and add text to your video.
Step 4:
Once you finish, tap ‘Export’ and choose your output format as GIF.
Step 5:
Hit ‘Export’ to let the conversion process begin.
● Key Takeaways from This Episode →
● TikTok videos often lack the save and share features, which is an obvious necessity of today’s social outlook.
● Varieties of online tools and software are available for converting TikTok videos to GIFs to increase the sharing flexibility.
● Filmora is a quick and intelligent choice to take up the conversion process within a catch of few clicks.
8 Best Motion Graphics Online Tools for Your Inspiration
8 Best Motion Graphics Online Tools for Your Inspiration
An easy yet powerful editor
Numerous effects to choose from
Detailed tutorials provided by the official channel
Are you looking for the correct answers about what is motion graphics or how to create motion graphics? If yes, then you are at the right place.
Here we will discuss about few best motion graphics online websites and how to create motion graphics video.
In this article
01 [The Power of Motion Graphics](#Part 1)
02 [Motion Graphics Online Courses You Should Learn](#Part 2)
03 [How to Make Motion Graphics in 5 Steps Easily?](#Part 3)
04 [How to Make a Studio-quality Motion Graphics Video](#Part 4)
Part 1 The Power of Motion Graphics
Motion graphics is actually a term which is generally used to describe the mix up of the animation and the graphic designs. People usage the motion graphics in the emotions videos and market their products as well. Motion graphics with the video on the landing page of your website increases the conversion rate by 8as compared to the other methods. Motion graphic videos of your products can simply display the idea of your business within few seconds to the target audience. The biggest reason of using the motion graphics now a day is that motions graphics can quickly the critical or complex business things in few seconds with the fast, simple and compelling way.
Part 2 Motion Graphics Online Courses You Should Learn
If you are newbie to the motion graphics then there are thousands of courses available over the internet which can help you to learn what motion graphic is and how to create your own motion graphic videos of your product and services. Here we are going to list a few courses.
01Creative Coding: Making Visuals with JavaScript
This is the first course which is mainly designed to learn to make the beautiful visuals using the JavaScript. This course is designed by Bruno Imbrizi. In this course you can also explore the coding fundamentals very easily. You can learn the things you need to setup before the programming concepts such as loops, arrays, variables and functions.

02Psychedelic Animation with Photoshop and After Effects
This motion graphics online course is designed by the Klarens Malluta which helps you to understand the aspect of Photoshop to create the beautiful motion graphic videos. Here, you can easily learn about creating colorful psychedelic animation for your motion graphics. With this course you can easily turn the simple photos in the retro futuristic artwork and connect the emotions of the target audience.

03Introduction to Design and Modeling with Blender
This motion graphics video course is presented by the Luis Arizaga which defines the making of characters and the designs in your videos. This course mainly focuses on the blender software which helps you to create powerful animate videos using the render, light, model and the other objects. This course also tells you that how to use the camera lights and create the materials for your motion graphic videos.

04Express Animation for Social Media with After Effects
This course is provided by the Yimbo Escárrega over the internet. With the help of this course you can learn about making your motion graphic online projects quickly in the record time to save your time. While learning this course you can create the beautiful animations quickly and easily with the graphics as well as the video content.

05#Creation of Animated Short Films in for Social Media
The creation of animated short films in for the social media course is presented by the Buda.tv which mainly helps you to learn creating the animated short films for your projects. This helps you to learn the concept from the starting to the end so you can easily understand the basic concepts as well as up to the execution of your video. This course starts with the meeting with Martin and Dalmiro who are the founders of the Buda.TV. Slowly they will start teaching you short films and finally you will be able to export the project with the specification provided by the Martin and Dalmiro.

Part 3 How to Make Motion Graphics in 5 Steps Easily?
Creating motion graphic videos requires you to have lots of designing skills without using any software. In the software’s generally there are premade templates available for mostly all kinds of categories. You can use them and directly apply with your videos with just few changes. If you are still unsure about how to start then you can follow the below steps in this part.
01Things to Prepare before Starting
● First of all you need to start with a creative story. This will help your animator and writer to understand their job easily. Make sure to include all information in the story.
● Make sure to hire a good promotion team in the starting itself because it will help you to get the view of your videos as much as you want.
Now, if you ready then please follow the below steps.
02Steps of Making Motion Graphics
Step 1 Write your Script with a Story
If you want to create good motion graphics video then the story is the first requirement for your motion graphic video. Make sure to choose a short story which defines and clear the motive of video. Mostly stories will be from the seconds to 3 minutes.
Step 2 Prepare for Storyboard for Visualize the Content
Now, you need to prepare the story with the help of your team members of the production and design team. This is the step where the final product will take place. In this step if you have any confusion then you must discuss it with the team because this is very important part of your motion graphic video.
Step 3 Turn your Creative Storyboard in the Design:
At this stage you can now turn your storyboard idea in the design. Here you have to choose the graphic designs of your video, style and color combination for your video. The best thing is that you can choose simple design because it gives a great impact on the video you are creating for your brand.
Once you are ready with the sketches of the storyboard you can easily translate the storyboard in the design what you want. Make sure to keep the things perfect because at this stage every effort will be for the final design.
Step 4 Create the Final Motion Graphic Video Design:
This stage is where you will start animating your designs to make to actual motion graphic video. Here, you need to take care about lots of things such as the style of animation in video, timing, music and the sound effects.
Part 4 How to Make a Studio-quality Motion Graphics Video
Wondershare Filmora Video Editor
Wondershare Filmora is motion graphics maker software which enables you to create best and perfect motion graphics videos within few seconds with the help of premade templates offered in the software. This program comes with the beautiful interface which is very easy to understand for all users and everyone can videos without any effort even if you are newbie to the animation industry. The program comes with several unique features such as motion tracking, key framing, color matching, audio ducking, green screen, split screen, video effects, audio effects and many more other features.

Wondershare Filmora - Best Video Editor for Mac/Windows
5,481,435 people have downloaded it.
Build unique custom animations without breaking a sweat.
Focus on creating epic stories and leave the details to Filmora’s auto features.
Start a creative adventure with drag & drop effects and endless possibilities.
Filmora simplifies advanced features to save you time and effort.
Filmora cuts out repetition so you can move on to your next creative breakthrough.
● Key Takeaways from This Episode →
● Generally, creating motion graphics videos for your products or services requires lots of efforts when you are going to create them first time. It takes lots of time and research for making the motion graphic videos.
● If you want to save your time and create the award winning motion graphic videos then we would like you to try the Wondershare Filmora because it quickly create best and perfect videos for your product or services promotions.
Are you looking for the correct answers about what is motion graphics or how to create motion graphics? If yes, then you are at the right place.
Here we will discuss about few best motion graphics online websites and how to create motion graphics video.
In this article
01 [The Power of Motion Graphics](#Part 1)
02 [Motion Graphics Online Courses You Should Learn](#Part 2)
03 [How to Make Motion Graphics in 5 Steps Easily?](#Part 3)
04 [How to Make a Studio-quality Motion Graphics Video](#Part 4)
Part 1 The Power of Motion Graphics
Motion graphics is actually a term which is generally used to describe the mix up of the animation and the graphic designs. People usage the motion graphics in the emotions videos and market their products as well. Motion graphics with the video on the landing page of your website increases the conversion rate by 8as compared to the other methods. Motion graphic videos of your products can simply display the idea of your business within few seconds to the target audience. The biggest reason of using the motion graphics now a day is that motions graphics can quickly the critical or complex business things in few seconds with the fast, simple and compelling way.
Part 2 Motion Graphics Online Courses You Should Learn
If you are newbie to the motion graphics then there are thousands of courses available over the internet which can help you to learn what motion graphic is and how to create your own motion graphic videos of your product and services. Here we are going to list a few courses.
01Creative Coding: Making Visuals with JavaScript
This is the first course which is mainly designed to learn to make the beautiful visuals using the JavaScript. This course is designed by Bruno Imbrizi. In this course you can also explore the coding fundamentals very easily. You can learn the things you need to setup before the programming concepts such as loops, arrays, variables and functions.
02Psychedelic Animation with Photoshop and After Effects
This motion graphics online course is designed by the Klarens Malluta which helps you to understand the aspect of Photoshop to create the beautiful motion graphic videos. Here, you can easily learn about creating colorful psychedelic animation for your motion graphics. With this course you can easily turn the simple photos in the retro futuristic artwork and connect the emotions of the target audience.
03Introduction to Design and Modeling with Blender
This motion graphics video course is presented by the Luis Arizaga which defines the making of characters and the designs in your videos. This course mainly focuses on the blender software which helps you to create powerful animate videos using the render, light, model and the other objects. This course also tells you that how to use the camera lights and create the materials for your motion graphic videos.
04Express Animation for Social Media with After Effects
This course is provided by the Yimbo Escárrega over the internet. With the help of this course you can learn about making your motion graphic online projects quickly in the record time to save your time. While learning this course you can create the beautiful animations quickly and easily with the graphics as well as the video content.
05#Creation of Animated Short Films in for Social Media
The creation of animated short films in for the social media course is presented by the Buda.tv which mainly helps you to learn creating the animated short films for your projects. This helps you to learn the concept from the starting to the end so you can easily understand the basic concepts as well as up to the execution of your video. This course starts with the meeting with Martin and Dalmiro who are the founders of the Buda.TV. Slowly they will start teaching you short films and finally you will be able to export the project with the specification provided by the Martin and Dalmiro.
Part 3 How to Make Motion Graphics in 5 Steps Easily?
Creating motion graphic videos requires you to have lots of designing skills without using any software. In the software’s generally there are premade templates available for mostly all kinds of categories. You can use them and directly apply with your videos with just few changes. If you are still unsure about how to start then you can follow the below steps in this part.
01Things to Prepare before Starting
● First of all you need to start with a creative story. This will help your animator and writer to understand their job easily. Make sure to include all information in the story.
● Make sure to hire a good promotion team in the starting itself because it will help you to get the view of your videos as much as you want.
Now, if you ready then please follow the below steps.
02Steps of Making Motion Graphics
Step 1 Write your Script with a Story
If you want to create good motion graphics video then the story is the first requirement for your motion graphic video. Make sure to choose a short story which defines and clear the motive of video. Mostly stories will be from the seconds to 3 minutes.
Step 2 Prepare for Storyboard for Visualize the Content
Now, you need to prepare the story with the help of your team members of the production and design team. This is the step where the final product will take place. In this step if you have any confusion then you must discuss it with the team because this is very important part of your motion graphic video.
Step 3 Turn your Creative Storyboard in the Design:
At this stage you can now turn your storyboard idea in the design. Here you have to choose the graphic designs of your video, style and color combination for your video. The best thing is that you can choose simple design because it gives a great impact on the video you are creating for your brand.
Once you are ready with the sketches of the storyboard you can easily translate the storyboard in the design what you want. Make sure to keep the things perfect because at this stage every effort will be for the final design.
Step 4 Create the Final Motion Graphic Video Design:
This stage is where you will start animating your designs to make to actual motion graphic video. Here, you need to take care about lots of things such as the style of animation in video, timing, music and the sound effects.
Part 4 How to Make a Studio-quality Motion Graphics Video
Wondershare Filmora Video Editor
Wondershare Filmora is motion graphics maker software which enables you to create best and perfect motion graphics videos within few seconds with the help of premade templates offered in the software. This program comes with the beautiful interface which is very easy to understand for all users and everyone can videos without any effort even if you are newbie to the animation industry. The program comes with several unique features such as motion tracking, key framing, color matching, audio ducking, green screen, split screen, video effects, audio effects and many more other features.
Wondershare Filmora - Best Video Editor for Mac/Windows
5,481,435 people have downloaded it.
Build unique custom animations without breaking a sweat.
Focus on creating epic stories and leave the details to Filmora’s auto features.
Start a creative adventure with drag & drop effects and endless possibilities.
Filmora simplifies advanced features to save you time and effort.
Filmora cuts out repetition so you can move on to your next creative breakthrough.
● Key Takeaways from This Episode →
● Generally, creating motion graphics videos for your products or services requires lots of efforts when you are going to create them first time. It takes lots of time and research for making the motion graphic videos.
● If you want to save your time and create the award winning motion graphic videos then we would like you to try the Wondershare Filmora because it quickly create best and perfect videos for your product or services promotions.
8 Blender 3D Animation Tutorials for Beginners
8 Blender 3D Animation Tutorials for Beginners
An easy yet powerful editor
Numerous effects to choose from
Detailed tutorials provided by the official channel
Blender animation software is one of the open-source software chosen to create animations. It is easy to create animations, videos or graphics, etc. If you want to be an animation 3D artist, make creative universes, and meet each of the different characters moving around in your heart.
You will learn the step-by-step procedure to create animations and add other edits to the animation. And also a few tips to develop better Blender 3D animation effects.
In this article
01 [Is Blender best for animation?](#Part 1)
02 [How to Create 3D Animated Characters with Blender in 15 Minutes.](#Part 2)
03 [Become a Pro from Beginners in 8 Tutorials](#Part 3)
Part 1 Is Blender best for animation?
The answer to if the Blender is suitable for animation is yes. Blender animation is the best for making animations and bringing any living to animator. This software is mostly for professional works whose limitations will be learning the process, not any technical defects. Let’s talk about why Blender 3D animation software is the best and more helpful.
Character animation is an essential tool for animation, and Blender has developed this tool with no way less to other software.
There are many animation effects other than animating characters. Blender 3D for free has all the necessary tools to do all types of rigs and animations without any difficulty.
Blender is one software that has 2D animation inbuilt in it, like drawing and creating 2D animation.
Blender’s animation tools are making motion graphics possible by advancing the features than it was four years ago.
Nowadays, many people are using Blender to do professional works, including freelancers, small studios, and even game developers.
Part 2 How to Create 3D Animated Characters with Blender in 15 Minutes.
This is a series for people who want to learn how to create 3D blender animation characters from keeping a reference image. Blender’s ringing tools will be more helpful for this process.
01Step 1: Importing
Initially, import a Blender 3D animation character into the Blender to animate. Many free and paid characters are available in Vincent, and Rain v2.0 is present in Blender Cloud; above all, these characters are for free.
Steps to import the character either from Vincent or Rain v2.0
Download the character file from the cloud to any destination folder on the computer. Open the Blender and place the cursor on the origin point on the screen. Later select import present in the File menu and choose the file format. And now, allow the Python script to run for the selected character folder.

02Step 2: Add Keyframes
There will be a diamond-shaped icon below to choose the keyframe you want to add to the timeline, which you may also delete.
Adding a keyframe is simple. Open the timeline window in the animation editor. Press the alphabet ‘G’ on the keyboard, move the bone and place it. Then hit Shift+I and choose the channel LocRot and insert the keyframe. Likewise, you can adjust the keyframe by dragging, making it fast or slow to the requirements.
Moving the keyframe to 20 makes it faster, and moving to 40, slower.
03Step 3: Get Reference Materials
It will be challenging to add movements to the characters, so plenty of videos can get the moves right. There are various reference images and videos available on the Internet. You can either add the selected reference materials to the second screen or add them to the 3D space. Let’s discuss how to add it.
Hit Shift + A to add the reference material. Later select “Image” and then choose the “Background.” Scale the reference image onto the 3D space after it loads.
Afterward, you can leave it to the animation of the reference article, or you can further edit or amplify the movements.
04Step 4: Fine–Tuning and Sound
This step will add smooth movements by combining two keyframes for a more professional look. We have to use the Dope sheet to do complete this process. Let’s see how to add it.
Initially, split the window horizontally. Later switch over the dope sheet below the animation tab, where you can see keyframes of all axis. Now you can drag and edit to slow or amplify the speed.
There is a Graphic editor, which is more advanced to make the movements more accurately and directly to edit the curves.
Sound effects make any video or animation better. You can add and import the sound files. You can also create your sound and insert it into the Blender. Let’s discuss adding sound and making it sync to the character.
Download the audio file, hit shift + A to open Add menu, and choose the “Sound.” Now select the sound that you wish to add.
Drag the sound to keep it to the specific sections alone. Also, you can switch between “No Sync” to “AV Sync” in the playback to give the best synchronization to the characters. The volume and pitch can be adjusted using the sidebar.
05Step 5: Rendering
Before rendering, make sure you keep the FPS is same as that chosen during the keyframes to avoid unnecessary renders. After setting the frame correctly, causing the animation is easy.
Initially, click on “scene” and choose the file extension, file formats, and file colors (BW, RGB, or RGBA). Select the encoding container as “WebM” and video Codec as “WEBM/VP9. After adding the sound, set the audio codec to “Vorbis.” Choose output quality and speed.
After all the rendering, select Render from the top bar and select “Render Animation” in Blender Animation.
Awesome! We have successfully blended a character using Blender 3D animation software. With more practice and knowledge about more tools, one can easily use the Blender 3D mouse.
Part 3 Become a Pro from Beginners in 8 Tutorials.
01Fix 1: Complete Beginners Guide to Blender 2.8
This YouTube tutorial focuses on Blender version 2.8. The tutorial features the redesigned user interface and tools like 3D viewpoint and UV editor, which has new interactive tools. And about different 3D shapes and simple edits like adding colors and “G drag,” etc.
02Fix 2: Blender 2.9 for Absolute Beginners
This YouTube tutorial on Blender 3D animation software version 2.9 has the new advancement about denoiser interactivity in the 3D viewpoint. The YouTuber explains EEVEE, cycles, workbench, movements, rotate, and scale objects.
03Fix 3: Blender Day -1 Absolute Basics - Introduction Series for Beginners
This YouTube tutorial says about the introduction to the Blender 3D for free for beginners. He explains simple movements like rotating and scaling, shapes, and colors to the objects. He also says about the pivot plot and how to create a basic primitive using blender.
04Fix 4: Zoync TV’s Blender Beginners Series
The Blender Beginners video by ZoyncTV is on Blender 2.6. Indeed, even as hotkeys and terms change, the hidden ideas will forever be pertinent. Every video in this 11-section is somewhere between 10 and 20 minutes, split into five separate subjects: displaying, modifiers, materials, surfaces, and animations. It’s a beginner-level course.
05Fix 5: The Blender Survival Guide
The Blender Survival Guide series by Creative COW is outdated but the best video for somebody who has never utilized Blender. Each video in this 13-section series is somewhere in the range of 15 and 45 minutes in length, which means you’ll get 350 intense minutes of preparing. It is a survival reference that shows just the outright necessities.
06Fix 6: KatBit’s Blender Tutorial
The KatsBits site is home to lots of tutorials, video games. Its Blender animation tutorials are fantastic when you want a beginning stage for various 3D models. There are 45 Blender tutorials. Tutorials take you through the most common way of making a 3D level for Quake and tell you the best way to make a basic model.
07Fix 7: Daniel Krafft’s 100 Blender 2.8 Tips
While this is another Blender 2.8 tutorial, Daniel’s tips are overall for any Blender work process. He teaches simple stuff like vertex and edges and some technical parts in the Blender 3D animation software.
08Fix 8: Blender 3D: Noob to Pro
This last tutorial is a “wiki book” called Blender 3D: Noob to Pro that consists of important Blender animation tips and experiences. Start with an outline of 3D ideas and a top-to-bottom introduction to Blender.
Regarding Blender 3D mouse software, we would like to recommend one more tool to you the most. Yes, it is none other than Wondershare Filmora, a perfect alternative to Blender 3D animation software wherein you can get excellent 3D animation effects, 3D texts and animate it. There are some simple steps and various options to work in Filmora for creating 3D animated effects.
● Composition
● Creating our 3D text
● Creating the 3D look
● Basics of 3D animation
● Animating the text in 3D
There are countless YouTube tutorial videos for working with Wondershare Filmora Video Editor ‘s latest version.
Key Takeaways from This Episode
● We learned about Blender 3D animation software.
● How can you create characters using Blender animation?
● 8 Tutorials to move you from a beginner to a Pro.
Blender animation software is one of the open-source software chosen to create animations. It is easy to create animations, videos or graphics, etc. If you want to be an animation 3D artist, make creative universes, and meet each of the different characters moving around in your heart.
You will learn the step-by-step procedure to create animations and add other edits to the animation. And also a few tips to develop better Blender 3D animation effects.
In this article
01 [Is Blender best for animation?](#Part 1)
02 [How to Create 3D Animated Characters with Blender in 15 Minutes.](#Part 2)
03 [Become a Pro from Beginners in 8 Tutorials](#Part 3)
Part 1 Is Blender best for animation?
The answer to if the Blender is suitable for animation is yes. Blender animation is the best for making animations and bringing any living to animator. This software is mostly for professional works whose limitations will be learning the process, not any technical defects. Let’s talk about why Blender 3D animation software is the best and more helpful.
Character animation is an essential tool for animation, and Blender has developed this tool with no way less to other software.
There are many animation effects other than animating characters. Blender 3D for free has all the necessary tools to do all types of rigs and animations without any difficulty.
Blender is one software that has 2D animation inbuilt in it, like drawing and creating 2D animation.
Blender’s animation tools are making motion graphics possible by advancing the features than it was four years ago.
Nowadays, many people are using Blender to do professional works, including freelancers, small studios, and even game developers.
Part 2 How to Create 3D Animated Characters with Blender in 15 Minutes.
This is a series for people who want to learn how to create 3D blender animation characters from keeping a reference image. Blender’s ringing tools will be more helpful for this process.
01Step 1: Importing
Initially, import a Blender 3D animation character into the Blender to animate. Many free and paid characters are available in Vincent, and Rain v2.0 is present in Blender Cloud; above all, these characters are for free.
Steps to import the character either from Vincent or Rain v2.0
Download the character file from the cloud to any destination folder on the computer. Open the Blender and place the cursor on the origin point on the screen. Later select import present in the File menu and choose the file format. And now, allow the Python script to run for the selected character folder.
02Step 2: Add Keyframes
There will be a diamond-shaped icon below to choose the keyframe you want to add to the timeline, which you may also delete.
Adding a keyframe is simple. Open the timeline window in the animation editor. Press the alphabet ‘G’ on the keyboard, move the bone and place it. Then hit Shift+I and choose the channel LocRot and insert the keyframe. Likewise, you can adjust the keyframe by dragging, making it fast or slow to the requirements.
Moving the keyframe to 20 makes it faster, and moving to 40, slower.
03Step 3: Get Reference Materials
It will be challenging to add movements to the characters, so plenty of videos can get the moves right. There are various reference images and videos available on the Internet. You can either add the selected reference materials to the second screen or add them to the 3D space. Let’s discuss how to add it.
Hit Shift + A to add the reference material. Later select “Image” and then choose the “Background.” Scale the reference image onto the 3D space after it loads.
Afterward, you can leave it to the animation of the reference article, or you can further edit or amplify the movements.
04Step 4: Fine–Tuning and Sound
This step will add smooth movements by combining two keyframes for a more professional look. We have to use the Dope sheet to do complete this process. Let’s see how to add it.
Initially, split the window horizontally. Later switch over the dope sheet below the animation tab, where you can see keyframes of all axis. Now you can drag and edit to slow or amplify the speed.
There is a Graphic editor, which is more advanced to make the movements more accurately and directly to edit the curves.
Sound effects make any video or animation better. You can add and import the sound files. You can also create your sound and insert it into the Blender. Let’s discuss adding sound and making it sync to the character.
Download the audio file, hit shift + A to open Add menu, and choose the “Sound.” Now select the sound that you wish to add.
Drag the sound to keep it to the specific sections alone. Also, you can switch between “No Sync” to “AV Sync” in the playback to give the best synchronization to the characters. The volume and pitch can be adjusted using the sidebar.
05Step 5: Rendering
Before rendering, make sure you keep the FPS is same as that chosen during the keyframes to avoid unnecessary renders. After setting the frame correctly, causing the animation is easy.
Initially, click on “scene” and choose the file extension, file formats, and file colors (BW, RGB, or RGBA). Select the encoding container as “WebM” and video Codec as “WEBM/VP9. After adding the sound, set the audio codec to “Vorbis.” Choose output quality and speed.
After all the rendering, select Render from the top bar and select “Render Animation” in Blender Animation.
Awesome! We have successfully blended a character using Blender 3D animation software. With more practice and knowledge about more tools, one can easily use the Blender 3D mouse.
Part 3 Become a Pro from Beginners in 8 Tutorials.
01Fix 1: Complete Beginners Guide to Blender 2.8
This YouTube tutorial focuses on Blender version 2.8. The tutorial features the redesigned user interface and tools like 3D viewpoint and UV editor, which has new interactive tools. And about different 3D shapes and simple edits like adding colors and “G drag,” etc.
02Fix 2: Blender 2.9 for Absolute Beginners
This YouTube tutorial on Blender 3D animation software version 2.9 has the new advancement about denoiser interactivity in the 3D viewpoint. The YouTuber explains EEVEE, cycles, workbench, movements, rotate, and scale objects.
03Fix 3: Blender Day -1 Absolute Basics - Introduction Series for Beginners
This YouTube tutorial says about the introduction to the Blender 3D for free for beginners. He explains simple movements like rotating and scaling, shapes, and colors to the objects. He also says about the pivot plot and how to create a basic primitive using blender.
04Fix 4: Zoync TV’s Blender Beginners Series
The Blender Beginners video by ZoyncTV is on Blender 2.6. Indeed, even as hotkeys and terms change, the hidden ideas will forever be pertinent. Every video in this 11-section is somewhere between 10 and 20 minutes, split into five separate subjects: displaying, modifiers, materials, surfaces, and animations. It’s a beginner-level course.
05Fix 5: The Blender Survival Guide
The Blender Survival Guide series by Creative COW is outdated but the best video for somebody who has never utilized Blender. Each video in this 13-section series is somewhere in the range of 15 and 45 minutes in length, which means you’ll get 350 intense minutes of preparing. It is a survival reference that shows just the outright necessities.
06Fix 6: KatBit’s Blender Tutorial
The KatsBits site is home to lots of tutorials, video games. Its Blender animation tutorials are fantastic when you want a beginning stage for various 3D models. There are 45 Blender tutorials. Tutorials take you through the most common way of making a 3D level for Quake and tell you the best way to make a basic model.
07Fix 7: Daniel Krafft’s 100 Blender 2.8 Tips
While this is another Blender 2.8 tutorial, Daniel’s tips are overall for any Blender work process. He teaches simple stuff like vertex and edges and some technical parts in the Blender 3D animation software.
08Fix 8: Blender 3D: Noob to Pro
This last tutorial is a “wiki book” called Blender 3D: Noob to Pro that consists of important Blender animation tips and experiences. Start with an outline of 3D ideas and a top-to-bottom introduction to Blender.
Regarding Blender 3D mouse software, we would like to recommend one more tool to you the most. Yes, it is none other than Wondershare Filmora, a perfect alternative to Blender 3D animation software wherein you can get excellent 3D animation effects, 3D texts and animate it. There are some simple steps and various options to work in Filmora for creating 3D animated effects.
● Composition
● Creating our 3D text
● Creating the 3D look
● Basics of 3D animation
● Animating the text in 3D
There are countless YouTube tutorial videos for working with Wondershare Filmora Video Editor ‘s latest version.
Key Takeaways from This Episode
● We learned about Blender 3D animation software.
● How can you create characters using Blender animation?
● 8 Tutorials to move you from a beginner to a Pro.
Fuel Creativity with 10 Awesome Collection of 2D Animation Examples
Fuel your Creativity with 10 Awesome Collection of 2D Animation Examples
An easy yet powerful editor
Numerous effects to choose from
Detailed tutorials provided by the official channel
It is pretty evident that organizations are prompt integrating videos into their campaigns on marketing and numerous other touch points.
If you’re not much sure about whether to go with 3D or 2D, always commence with viewing example videos to acquire some inspiration and knowledge or have a talk with 2D cartoon animation video production agencies which could suggest an apt fit.
As it’s always engaging, cost-effective, and fun, animated explainer best 2D animation video will educate and entertain the entire audience at the same time. It is just not only the insight about the services, products, or brand which associate your organization with your customers.
It is the attitude and personality of the brand as well that individual will forward to others after eyeing your video. If you wish to know about what an effectual video peeps like, here’re 10 majestic examples.
01Travel Portland
Why it’s Awesome: This gritty animation beautifully blends real-world objects and hand-drawn style.
Travel Portland - You Can, In Portland from HouseSpecial on Vimeo .
This video made for Travel Portland is quite a decent example of a video which combines distinctive animation disciplines through to singular vision. The video that was clearly created with After Effects, classic animation principles, hand-drawn animation, and showcases stop motion.
02Down the Rabbit Hole
Why It’s Awesome : An alluring case study in experimental design and shape organization.
Down The Rabbit Hole 2016 from Agent Pekka on Vimeo .
Without careful organization and pre-planning, the timeline of the animator could get considerably messy. This video showcases an extravagant example of a multidisciplinary approach and shape layer keyframing to best 2D animation design. In this video, you’ll get keyframing all of the elements.
03Veterans Day
Why it’s Awesome : It is a fascinating model to liquid gritty-style animated video.
SyFy / NBCUniversal - Veterans Day from STATE on Vimeo .
This video made for Syfy and NBC is a superb example of the liquid animation amalgamated with gritty design. Likely this video utilized a 2D rendering simulator technique such as ‘toon shading’ in the Cinema 4D.
04Min Stora Dag
Why it’s Awesome **:**This video wonderfully exhibits stretch and squash assorted with motivated actions.
Min Stora Dag from Brikk on Vimeo .
There’re twelve fundamental principles of animation which you must always follow to make your animations work more interesting. The following video is truly an appreciable instance of a piece that incorporates several of those twelve basic principles to make something remarkably fun.
05Paper
Why it’s Awesome : This video proficiently blends digital and physical elements to craft a splendid 2D design.
Probably you utilized to create most of your work on the computer. Even so, you may find it amusing to experiment with integrating real-world pieces into the next animation project of yours. It may perhaps take a little more pre-production than you are used to, however, the results could be astonishing. This incredible clip from PES is an exquisite blend of expert compositing and paper cutouts.
06CMYK
Why it’s Awesome **:**CMYK presents us that even nominal movement could add up lots of personality to 2D characters.
The objective of any character animator is just to unveil what your character is considering. Animators acquire this in distinct ways, but one vital thing to keep in mind is that you do not have to invest hundreds of hours on a single project so as to produce characters with emotions. This striking animation proves that you could give life to stiff characters with nothing but the most minuscule of movement.
07Tako Faito
Why it’s Awesome **:**This video is literally a fun blend of vectorized 3D elements and Japanese style animation.
Tako Faito! from Giant Ant on Vimeo .
The aim of most animators is to give a hand-drawn look to a project. Regardless, obtaining a good hand-drawn look without the physical drawing of your characters on the computer is quite challenging. This modish video from Giant Ant exhibits how you could simulate hand-drawn video with the ‘easy-to-make’ 3D elements.
08ZOHO
Why It’s Awesome : It reduces troubles significantly, and you face with multi-channel selling.
ZOHO Inventory is online-based inventory management software that aids you to manage offline and online orders and maintain track of the stock levels across multitudinous channels. Zoho Inventory incorporates eBay, Amazon, Etsy, and Shopify, so your sales, contacts, and items orders in these channels are automatically imported. This 2D animation video showcases how you could optimize inventory and purchases levels and obtain critical insights with ZOHO inventory about your businesses at any moment.
09TraQtion
Why it’s Awesome : Working in the cloud, your suppliers and you could ingress the system anywhere, anytime, so you’re in the loop always.
TraQtion is a cloud-based software that helps manufacturers and retailers with the site, product, and supplier compliance management. It aids in tracking the compliance and quality from macro to minutiae, predicting problems, and then taking rectifying measures, wherever you’re. TraQtion produced this animated 2D video to disclose how seamless compliance and quality can be. It’s a sprucely done video overall.
10George Clinical
Why it’s Awesome : George Clinical exhibits its all complete offerings with this 2D video.
In Asia, George Clinical is one of the prime Clinical Research Organizations, imparting top-quality clinical trial research facilities from beginning to finish, reinforced by innovation and science. George Clinical caters an extensive range of clinical trial services to biotech, medical device, and pharmaceutical consumers for all the trial phases, post-marketing trials, registration. This 2D animation video delivers a comprehensive overview of George Clinical and its services.
Verdict
The best upshot of a 2D animated video isn’t to increase the traffic but an endorsement of any brand. Free 2D animation video must cater to the personality and attitude of the brand to a wide range of target audiences. Hence, whenever that onlooker requires something accordant, they will consider your brand and its services.
Irrespective of the matter if you are going to use B2C or B2B marketing, live2D animation video is the platform that connects your audience with you. After the connection is completely built, you will be one step up ahead for sure, holding back on another side to generate sales and escalate ROI. Undeniably, animated videos do the conversion.
The affluent video is one with a catchy hook, a stimulating message and marks your brand to the target audience. Therefore, do not be afraid at all to be distinct from others.
In this respect the name of Wondershare Filmora Video Editor needs mentioning as it is one such video editing software that provides you with countless features and benefits. It becomes easy to create animated videos like a professional when you install Filmora.
Wondershare Filmora
Get started easily with Filmora’s powerful performance, intuitive interface, and countless effects!
Try It Free Try It Free Try It Free Learn More >
Key Takeaways from This Episode
● Work with an organization that can fully understand your requirement on video production easily
● Find a combine multiple videos or reference video elements from the different sources
● Build an invincible creative brief
● With the aforementioned live2D animation instances, it is pretty evident that organizations are prompt integrating videos into their campaigns on marketing and numerous other touch-points.
● If you’re planning to develop these videos, a steady commencement is to develop a briefing of what could be the style and tone for your videos. We recommend you to be unique and different whilst you produce your messaging via the videos.
● Agencies make custom videos typically based on your given brief. At a fixed price with an accomplished video production services plan, their design team skillfully works right from development concept to animation and art design. Having produced 1200+ explainers for the businesses, their creative professional team could help you come up with the upright fit.
How to Create Benime Whiteboard Animation on Android
How to Create Benime Whiteboard Animation in Android
An easy yet powerful editor
Numerous effects to choose from
Detailed tutorials provided by the official channel
Millions of people on social media would want to post the working system, information, and business policies on a topic. For this reason, such people need an easy way to make a good quality influential video in a short time. Although many applications can help you create animated videos.
In this article, we will be talking about whiteboard animation and, more specifically, about Benime whiteboard animation mod APK.
In this article
01 [What’s Benime Used for?](#Part 1)
02 [How to Create Benime Whiteboard Animation in Android](#Part 2)
Part 1 What’s Benime Used for?
Benime is the first doodle video creation application on Android devices that allows users to create professional and realistic doodle videos within minutes. It can add music and voice-over to audio, create presentations and marketing videos, and create a whiteboard animation using built-in assets.
One of the practical uses of Benime whiteboard animation is that it makes it very easy for anybody to create a professional whiteboard animation without any experience or knowledge in animation. With this application, you can use the built-in templates or decide to start from scratch using your drawings or images, then record yourself talking over the top of your work. It is one of the most active Android applications to explain ideas through a captivating animated video that can eventually increase your followers quickly.
It is used not just to explain information in an impersonal codon way but also to connect with your audience. By allowing your audience to show concern about what you are trying to showcase and evoking empathy.
It helps you get the audience to pay attention to the content you are creating by providing you with personalized graphics, colors, and images.
Benime is a great application that can help create an animated video using built-in assets. The application is flexible, user-friendly, and accessible via Benime whiteboard animation APK download. To download the Android application and make your desired video, you can also visit the Google play store to proceed with downloading the application as it contains advertisements and offers in-app purchases.
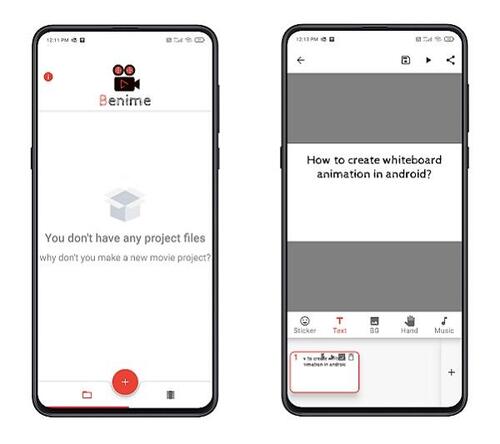
So, in short, we can say that Benime is valuable for,
● Whiteboard animation creation
● Inbuilt assets for video making
● Editing video with either voice, music, text, color
● Motion Slide animation
● Board background
● Supports online rendering of videos
● Instant preview functioning
● Sharing video in MP4 format
Part 2 How to Create Benime Whiteboard Animation in Android
We will also be giving you tips on all you need to know about creating a whiteboard animation:
● Write a script, whether it is a short script or a regular video. The whiteboard animation video might not succeed with exciting information and images and no coherent story. Since it is not a set of bullet points, storyboards, or blog stories, having a proper script is everything you need.
● Next is to start your storyboard to help you organize your thoughts much better. By creating a storyboard, you have a good idea of how the final product will look like and the transition of the story.
● Create memorable photos that will excite your audience. Perhaps if you are a creative person, this part will be much easier as all you need is to create a unique and fun image that will help pass the information that she wants to get across.
● Animates the created images and finds clearance between your script and the photos.
● Record the audio, which is the final step to ensure a perfectly synchronized audio and content.
Benime Whiteboard Animation application offers tons of features that can be used to enhance whiteboard animation creation. More so, here is a step-by-guide on how to use the Benime application more effectively and efficiently in creating a whiteboard animation:
01Software Download
First, download and install the Benime application on your phone and then open it.
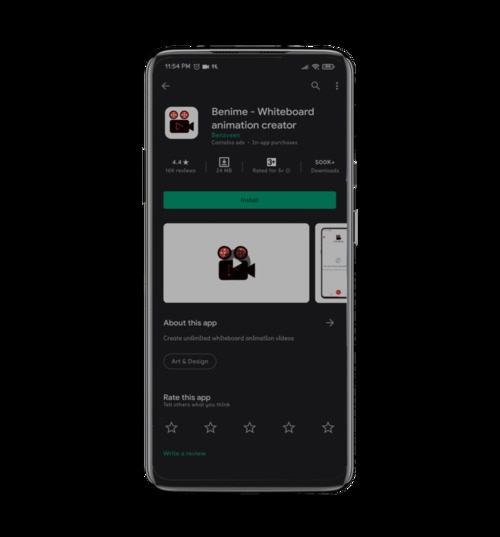
02Create New Video
Click on the + sign to make a new video. Enter the video title, choose the desired video quality, and click Create a Movie.
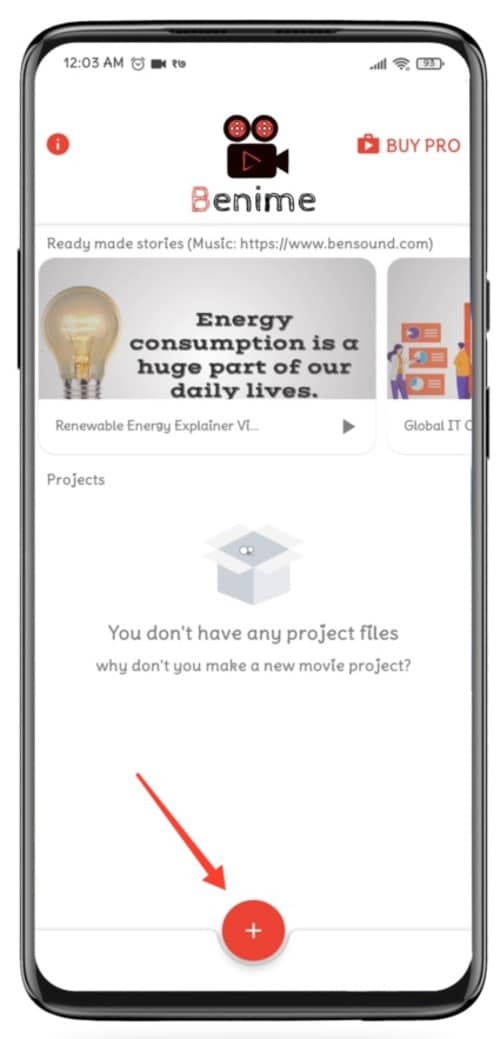
03Enter Text
A blank slide will be visible, where you will make changes, tap the Text option to enter the text.
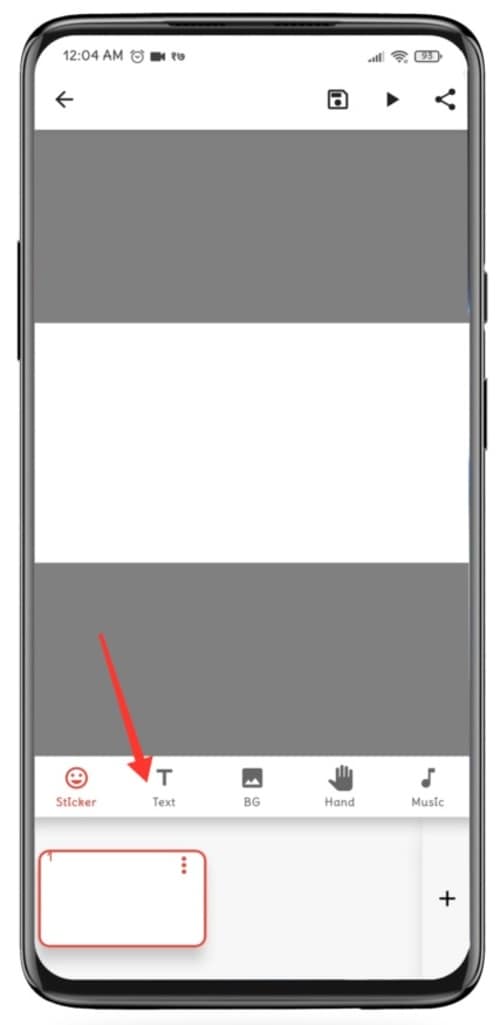
04Edit Text
After entering your desired text, click on the Insert option. The text size can be changeable by swiping to the left or right on the size line. More so, you can edit the color of the text by clicking on the color option. You can also change and use the application by clicking on the hand option. Background color change can go with the BG option.
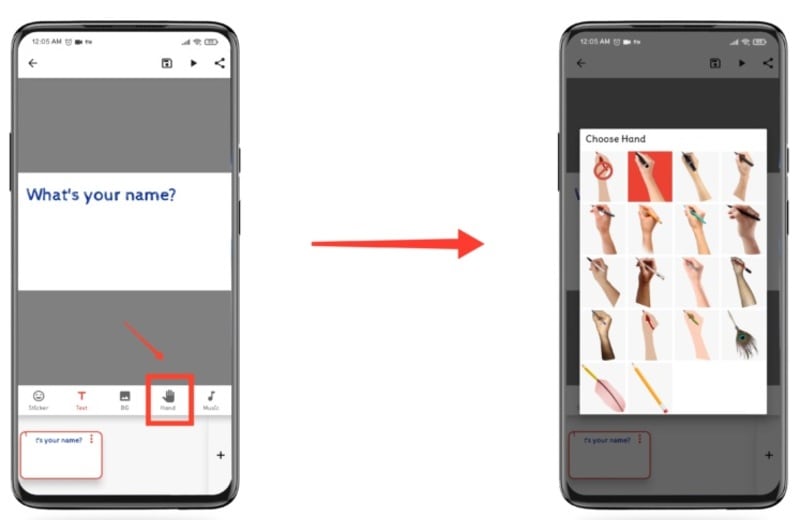
If you want to insert some characters, drawings, pictures, etc. Click on the sticker option at the bottom left and then slide to the right at the top to choose the icon or image that you want to insert.
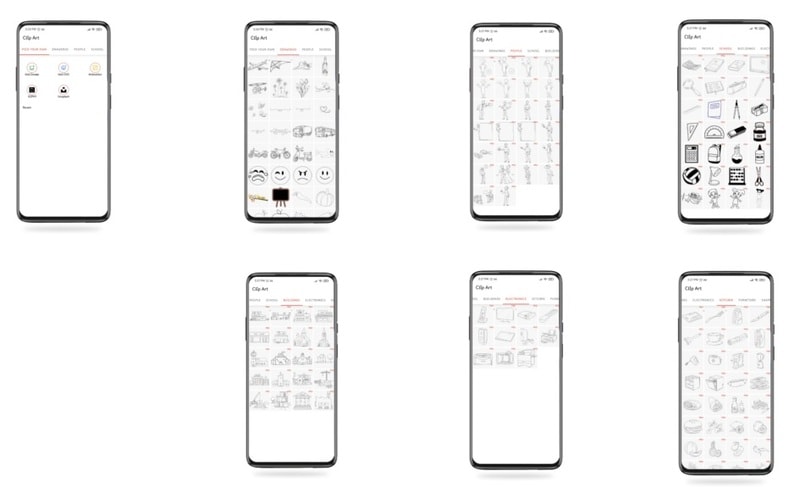
05Add Audio
After you are ok with the text and image, you can now add your voice over or music by clicking on any of the two options: voice over and music track.
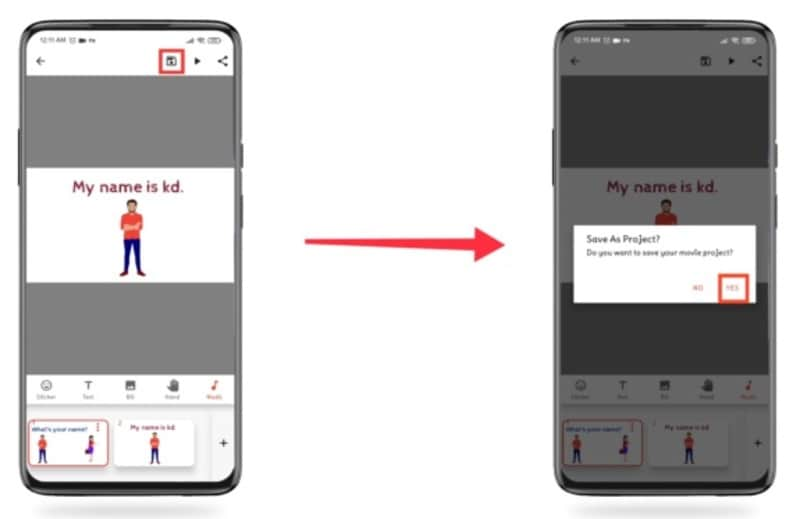
05Create and Share your Video
Lastly, click on the Save icon and then click on Yes. Then insert the name of the video and click on Make movie. Instantly the video will enter the rendering mode, and after this process, you will get the option of playing and sharing the film. Select the one you wish.
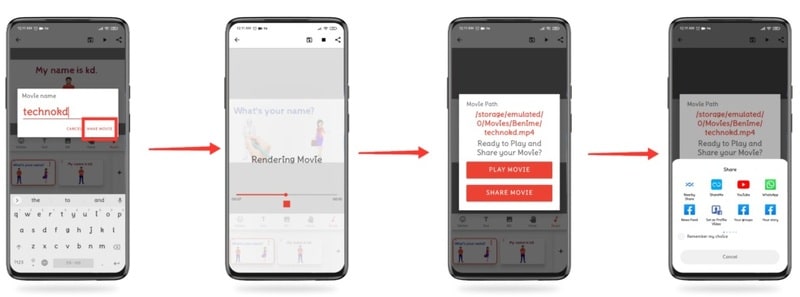
Benime Whiteboard animation can also be on PC via varieties of software. However, the Filmora software has proven to be one of the best because of its features. While working or creating a storyboard, the most aptly used software is Filmora. That will make it easy to create whiteboard animation with lots and lots of editing options in terms of transparency, 2D/animation, smooth keyframing, and a lot more.
Part 3 PC Tools Useful For Whiteboard Animation
01Renderforest Whiteboard Animation
Renderforest whiteboard animation: This is a free whiteboard animation tool that creates exciting and unique animation stories, a cloud-based program that does not need a powerful machine. It weeds hundreds of ready-made scenes to enhance your whiteboard animation stories
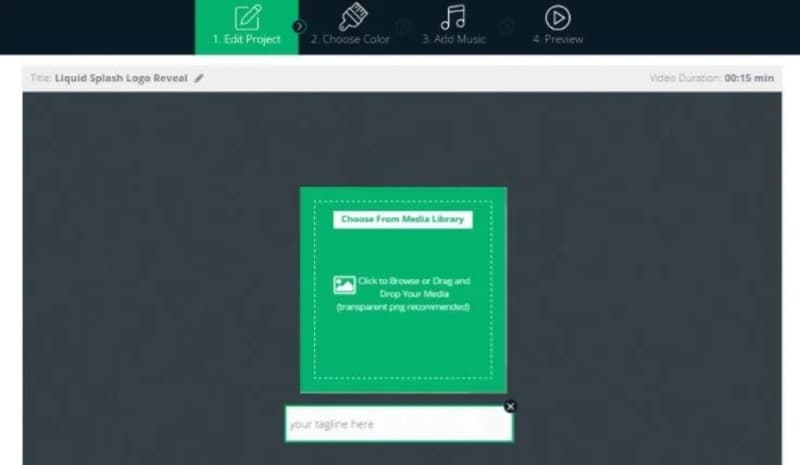
02Powtoon Whiteboard Animation
This can make a whiteboard animation very quickly for free, with an object to touch up video and free royalty music to make your whiteboard animation perfect.
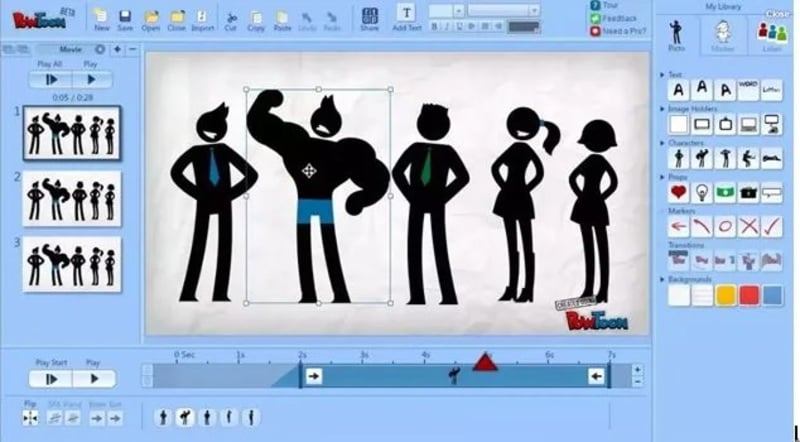
03Fiverr Whiteboard Animation
If looking for different whiteboard and animation explainers, Fiverr whiteboard animation will be the right choice. That will assist you in how to keep or engage your audience with proper explanation.
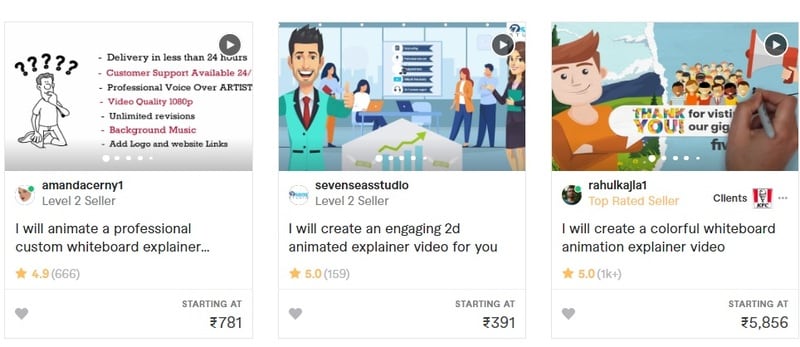
04Whiteboard Animation Videoscribe
Being in the education domain is a noble cause, and you can enhance the delivery of quality education through Whiteboard Animation Videoscribe. That will give you the freedom to modify your content with animation drawing. However, it is a subscription-based service.
05Vyond Whiteboard Animation
Vyond whiteboard animation provides you with in-house whiteboard animated video production solutions for educational, professional, or training purposes.
06Animaker Whiteboard Animation
This is another free whiteboard animation software used to make videos quickly with various functions. It includes a free-to-use option and a full video length that is enough. It supports a few props, characters, infographic icons, animated maps, charts, etc.
07Rawshorts Whiteboard Animation
This simple, easy-to-use whiteboard animation comes with an explainer video with a drag-and-drop interface. You can either start from nothing or choose between the animated whiteboard templates. Rendering and sharing the animated video in this software is super easy and comes with a Facebook, YouTube, and other social media platform integration. Anyone can use whether you are a beginner or professional, creating videos to show your client, training videos, and marketing videos that help demonstrate a strategy.
08Videojeeves Whiteboard Animation
This software has many whiteboard animation options, whether you are open to sharing something with your friends or creating a whiteboard animation for work. It helps to make your job easier and faster.
09Truscribe Whiteboard Animation
This premier software offers customers a dedicated plan when they are whiteboard animation videos can be created. With this software, the process can start when customers request a quote on their website, giving them more reliable information about the pricing and strategy.
● Key Takeaways from This Episode →
● Basic functionality of Benime Whiteboard Animation software.
● How to create whiteboard animation with Benime.
● Whiteboard animation on PC with Filmora and some other relevant software.
Millions of people on social media would want to post the working system, information, and business policies on a topic. For this reason, such people need an easy way to make a good quality influential video in a short time. Although many applications can help you create animated videos.
In this article, we will be talking about whiteboard animation and, more specifically, about Benime whiteboard animation mod APK.
In this article
01 [What’s Benime Used for?](#Part 1)
02 [How to Create Benime Whiteboard Animation in Android](#Part 2)
Part 1 What’s Benime Used for?
Benime is the first doodle video creation application on Android devices that allows users to create professional and realistic doodle videos within minutes. It can add music and voice-over to audio, create presentations and marketing videos, and create a whiteboard animation using built-in assets.
One of the practical uses of Benime whiteboard animation is that it makes it very easy for anybody to create a professional whiteboard animation without any experience or knowledge in animation. With this application, you can use the built-in templates or decide to start from scratch using your drawings or images, then record yourself talking over the top of your work. It is one of the most active Android applications to explain ideas through a captivating animated video that can eventually increase your followers quickly.
It is used not just to explain information in an impersonal codon way but also to connect with your audience. By allowing your audience to show concern about what you are trying to showcase and evoking empathy.
It helps you get the audience to pay attention to the content you are creating by providing you with personalized graphics, colors, and images.
Benime is a great application that can help create an animated video using built-in assets. The application is flexible, user-friendly, and accessible via Benime whiteboard animation APK download. To download the Android application and make your desired video, you can also visit the Google play store to proceed with downloading the application as it contains advertisements and offers in-app purchases.
So, in short, we can say that Benime is valuable for,
● Whiteboard animation creation
● Inbuilt assets for video making
● Editing video with either voice, music, text, color
● Motion Slide animation
● Board background
● Supports online rendering of videos
● Instant preview functioning
● Sharing video in MP4 format
Part 2 How to Create Benime Whiteboard Animation in Android
We will also be giving you tips on all you need to know about creating a whiteboard animation:
● Write a script, whether it is a short script or a regular video. The whiteboard animation video might not succeed with exciting information and images and no coherent story. Since it is not a set of bullet points, storyboards, or blog stories, having a proper script is everything you need.
● Next is to start your storyboard to help you organize your thoughts much better. By creating a storyboard, you have a good idea of how the final product will look like and the transition of the story.
● Create memorable photos that will excite your audience. Perhaps if you are a creative person, this part will be much easier as all you need is to create a unique and fun image that will help pass the information that she wants to get across.
● Animates the created images and finds clearance between your script and the photos.
● Record the audio, which is the final step to ensure a perfectly synchronized audio and content.
Benime Whiteboard Animation application offers tons of features that can be used to enhance whiteboard animation creation. More so, here is a step-by-guide on how to use the Benime application more effectively and efficiently in creating a whiteboard animation:
01Software Download
First, download and install the Benime application on your phone and then open it.
02Create New Video
Click on the + sign to make a new video. Enter the video title, choose the desired video quality, and click Create a Movie.
03Enter Text
A blank slide will be visible, where you will make changes, tap the Text option to enter the text.
04Edit Text
After entering your desired text, click on the Insert option. The text size can be changeable by swiping to the left or right on the size line. More so, you can edit the color of the text by clicking on the color option. You can also change and use the application by clicking on the hand option. Background color change can go with the BG option.
If you want to insert some characters, drawings, pictures, etc. Click on the sticker option at the bottom left and then slide to the right at the top to choose the icon or image that you want to insert.
05Add Audio
After you are ok with the text and image, you can now add your voice over or music by clicking on any of the two options: voice over and music track.
05Create and Share your Video
Lastly, click on the Save icon and then click on Yes. Then insert the name of the video and click on Make movie. Instantly the video will enter the rendering mode, and after this process, you will get the option of playing and sharing the film. Select the one you wish.
Benime Whiteboard animation can also be on PC via varieties of software. However, the Filmora software has proven to be one of the best because of its features. While working or creating a storyboard, the most aptly used software is Filmora. That will make it easy to create whiteboard animation with lots and lots of editing options in terms of transparency, 2D/animation, smooth keyframing, and a lot more.
Part 3 PC Tools Useful For Whiteboard Animation
01Renderforest Whiteboard Animation
Renderforest whiteboard animation: This is a free whiteboard animation tool that creates exciting and unique animation stories, a cloud-based program that does not need a powerful machine. It weeds hundreds of ready-made scenes to enhance your whiteboard animation stories
02Powtoon Whiteboard Animation
This can make a whiteboard animation very quickly for free, with an object to touch up video and free royalty music to make your whiteboard animation perfect.
03Fiverr Whiteboard Animation
If looking for different whiteboard and animation explainers, Fiverr whiteboard animation will be the right choice. That will assist you in how to keep or engage your audience with proper explanation.
04Whiteboard Animation Videoscribe
Being in the education domain is a noble cause, and you can enhance the delivery of quality education through Whiteboard Animation Videoscribe. That will give you the freedom to modify your content with animation drawing. However, it is a subscription-based service.
05Vyond Whiteboard Animation
Vyond whiteboard animation provides you with in-house whiteboard animated video production solutions for educational, professional, or training purposes.
06Animaker Whiteboard Animation
This is another free whiteboard animation software used to make videos quickly with various functions. It includes a free-to-use option and a full video length that is enough. It supports a few props, characters, infographic icons, animated maps, charts, etc.
07Rawshorts Whiteboard Animation
This simple, easy-to-use whiteboard animation comes with an explainer video with a drag-and-drop interface. You can either start from nothing or choose between the animated whiteboard templates. Rendering and sharing the animated video in this software is super easy and comes with a Facebook, YouTube, and other social media platform integration. Anyone can use whether you are a beginner or professional, creating videos to show your client, training videos, and marketing videos that help demonstrate a strategy.
08Videojeeves Whiteboard Animation
This software has many whiteboard animation options, whether you are open to sharing something with your friends or creating a whiteboard animation for work. It helps to make your job easier and faster.
09Truscribe Whiteboard Animation
This premier software offers customers a dedicated plan when they are whiteboard animation videos can be created. With this software, the process can start when customers request a quote on their website, giving them more reliable information about the pricing and strategy.
● Key Takeaways from This Episode →
● Basic functionality of Benime Whiteboard Animation software.
● How to create whiteboard animation with Benime.
● Whiteboard animation on PC with Filmora and some other relevant software.
Also read:
- New In 2024, Amazing Techniques of Motion Graphics in Premiere Pro
- 2024 Approved Best Websites to Download Animated GIFs for Free
- Updated In 2024, How to Create Benime Whiteboard Animation in Android
- Updated The Most Efficient Techniques to Make 3D Animation Character
- 2024 Approved Create Animated Social Media Posts in Canva
- In 2024, How to Make a Video a Live Photo 2023
- New In 2024, Learn 3D Logo Animation and Templates
- New Top 7 Animated GIF Text Makers
- 2024 Approved 6 Proven Ways to Dub Anime for Anime Voice Actor
- New In-Depth Study of Cartoon Painting Starts
- New In 2024, What Wikipedia Cant Tell You About the 10 Best Batman Cartoons
- Updated 2024 Approved Tutorial on Making Unity 2D Animation
- New Tips to Create Animated Social Media Posts in Canva
- Updated 4 Things You Should Know About Pinterest GIF for 2024
- New In 2024, 10 Caricature Makers to Turn Your Photo to Caricature Effects
- 2024 Approved Ready to Animate Game Character From Scratch?
- Something About Types of Motion Graphics
- Updated Top 10 Online Animated Logo Makers Everyone Should Know for 2024
- New Convert Animated GIF From Video
- The Only Guide to Make 2D Rigging Clear to You
- Updated 2024 Approved Best 10 Anime Websites to Watch Dubbed Anime Free
- 10 Cartoon Photo Converters You Couldnt Do Without for 2024
- In 2024, 10 Cartoon Character Makers to Make Animated Characters
- Updated Best GIF Resizers to Reduce GIF Size
- New Best GIF Maker Software for Windows and Mac for 2024
- Updated The Top 20 Motion Graphics Companies & Studios for 2024
- Updated FREE Best Anime Streaming Sites to Download Anime
- Updated Techniques for Creating Animated Logo That Few People Know About
- New In 2024, How to Make Animation Characters with the Best Character Creators
- Updated 2024 Approved What Is Still Motion Animation?
- How-To Guide Make Animation Characters with the Best Animated Character Creators for 2024
- In 2024, Top 10 Online Animated Logo Makers Everyone Should Know
- Updated In 2024, Can I Do Animated Logo Design Without Design Skills?
- New 2024 Approved Animate Photo Online with These Awesome Tools
- In 2024, Are You Head Over Heels With 3D Animation Design?
- In 2024, Guide on How to Create GIF in WhatsApp iPhone
- In 2024, 5 Websites with Animated Logos That Catch Your Eyes
- New In 2024, The 15 Most Efficient Photo to Cartoon Apps for Android
- Updated 2024 Approved What Is the Meaning of Motion Graphics
- What Is A GIF for 2024
- Updated Tips for Canva Animated Elements for 2024
- Updated 2024 Approved 10 Cartoon Character Makers to Make Animated Characters
- In 2024, 20 Free After Effects Logo Reveal Templates You Will Want to Know
- Updated How to Make an Animated Travel Map Video?
- New 2024 Approved 8 Blender 3D Animation Tutorials for Beginners
- 2024 Approved Top 10 Free Online Animated Logo Makers Everyone Should Know
- New 2024 Approved Top 15 2D Animation Software Free That Worth to Try
- How to Reset iPhone 15 Pro Max to Factory Settings? | Dr.fone
- In 2024, 6 Proven Ways to Unlock Xiaomi Redmi Note 12T Pro Phone When You Forget the Password
- Downloading SamFw FRP Tool 3.0 for Nokia G42 5G
- In 2024, Top 10 Fingerprint Lock Apps to Lock Your Infinix Smart 8 Plus Phone
- In 2024, 5 Easy Ways to Copy Contacts from Tecno Phantom V Fold to iPhone 14 and 15 | Dr.fone
- In 2024, Downloading SamFw FRP Tool 3.0 for Oppo A59 5G
- In 2024, Here Are Some Reliable Ways to Get Pokemon Go Friend Codes For Vivo V27e | Dr.fone
- How to Unlock Apple iPhone 7 with a Mask On
- In 2024, How to Remove an AirTag from Your Apple ID Account On Apple iPhone SE?
- Lenovo ThinkPhone support - Turn Off Screen Lock.
- In 2024, Ultimate guide to get the meltan box pokemon go For Sony Xperia 1 V | Dr.fone
- Google Play Services Wont Update? 12 Fixes are Here on Samsung Galaxy F04 | Dr.fone
- Title: New 15 Top Collage Makers to Create Aesthetic Collages
- Author: Elon
- Created at : 2024-05-19 03:04:35
- Updated at : 2024-05-20 03:04:35
- Link: https://animation-videos.techidaily.com/new-15-top-collage-makers-to-create-aesthetic-collages/
- License: This work is licensed under CC BY-NC-SA 4.0.
