
:max_bytes(150000):strip_icc():format(webp)/should-you-buy-an-apple-tv-5248431-f35331ef36b749b9895a2c1e3705cf22.jpg)
New 20 Free After Effects Logo Reveal Templates You Will Want to Know for 2024
20 Free After Effects Logo Reveal Templates You Will Want to Know
20 Free After Effects Logo Reveal Templates You Will Want to Know
An easy yet powerful editor
Numerous effects to choose from
Detailed tutorials provided by the official channel
The free After Effects logo reveals templates is a creative and clean animation that is very easy to use and customizable in just a few clicks. This template allows you to change the color, edit the text, add your logo, and click on render and contains two different logo animations for you to choose from. It does not require any plugin, and you can use it for your following modern and professional logo animation.
![]()
By incorporating a logo animation into your video, you can make your brand memorable and choose a suitable template for your brand personality. So, get ready for all the free logo reveal templates in this article.
In this article
01 [20 Best Logo Reveal Templates for After Effects 2022](#Part 1)
02 [Learn How to Use After Effects Logo Reveal Templates](#Part 2)
Part 1 Best Logo Reveal Templates for After Effects 2022
You can use an animated logo reveal if you need to add spice to your marketing campaigns and branded videos. An animated logo reveal is explained as a Great way to capture your audience’s attention as they screw through their newsfeed and stand you out from the competition. This section of the article will give you After Effects logo reveal templates for free that you can choose from this 2022:
![]()
01[Fast Flip Logo Reveal Template](https://dsqqu7oxq6o1v.cloudfront.net/preview-215084-pWlBMUhYg4-high.mp4 target=)
Fast Flip logo reveal template free to download is perfect for those on a budget and uses stock photography which can be replaced with photos of a company or team to review and an elegant logo at the end. All that is required is to customize the color, replace the images, and add your logo.
02Logo Web Search
Logo Web Search is an easy-to-use, stylish and simple animation for a company website. It allows you to change colors quickly and free sound effects, and all you need to do is change the logo text and click on render.
03Search Logo Reveal
Search Logo Reveal After Effect template for free allows you to customize the text and easily drag and drop in your logo. It provides a unique way to review your logo by using an animated search bar with a sample question and bringing up your logo as the answer. It can be a great add on to websites with search options.
04Colors Logo Reveal
Colors Logo Reveal is a super clean and straightforward After Effects logo reveal template that is very easy to use for designers and creators. It contains two different logos animations that you can choose from and requires no plugin. Add your logo, change the color, edit the text, and click on render.
05Logo Reveal
Logo Reveal is perfect for small business companies and startups with an easy-to-use template that comes with detailed instruction on how to customize and render your logo reveal Project.
06Unlock Phone Logo Reveal
Unlock Phone Logo Reveal is one of the dynamic logo reveal After Effects templates for free with a modern design, smooth transition effects, and simple text animation that is super easy to use. All that is required is to edit the text, drag and drop in your media, and click on render. It comprises a cool intro or opener to presentations, slideshows, promotions, and event videos to impress your audience.
07Orbital Free HUD Logo Reveal
Orbital Free HUD Logo Reveal is perfect for any tech company, and it’s done up in futuristic style and includes the complete. AEP project file with background texture and elements.
08Corporate logo reveal
Corporate Logo Reveal template is a stylish and contemporary template that features a simple shape that is elegantly animated and combined with reviewing your logo. It has one logo placeholder, editable text layers, and an easy-to-use color controller. An excellent logo reveals the Premiere Pro template free to download for companies like stockbrokers.
09White Scroll Logo Reveals
White Scroll Logo Reveals perfect for a more classic logo opener and comes with three background versions and three different logo placement options.
10Shape Logo Reveal
Shape Logo Reveal is a stylish logo reveal template with colorful shape layers and lines that beautifully form a clean-looking logo reveal. It is a short intro for a business slideshow, promotions, events, TV shows, videos, commercials, corporate presentations, etc.
11Free Animated Logo Reveals
Free Animated Logo Reveals is packed with three different logos reveal, which a suitable for corporates and an excellent option for one who wants a modern and professional logo show.
12Clean Titles And Logo Reveal
Clean Titles and Logo Reveal offers stylish templates which an eye-catching design and contains two text placeholders and one logo placeholder. It is effortless to use and a short introduction to TV shows, commercials, slideshows, promotions, Facebook and YouTube videos, etc.
13Hi-Tech Logo Reveal 02
Hi-Tech Logo Reveal is a premium animated logo reveal that features a dark blue background joint with light blue HUD elements and a perfect logo reveal template for a company that wants to stand out online.
14Testimonials Logo Reveal
Testimonials logo Reveal is a stylish and clean project that is perfect for displaying the company’s testimonials and reviews. This After Effects logo reveal template for free features six title placeholders, one logo holder, and six photo placeholders, requiring no plugin.
15Elegant Logo Reveal
Elegant logo Reveals perfect for a feminine background. It features chrome logo pens with a silky dark background, enabling you to easily add your text, insert your logo, and change the colors.
16Logo Web Search II
Logo Web Search II is a stylish and straightforward animation mainly for company websites. It is elementary to use.
17Battle Logo Reveal
Blue Action Logo Reveal is for those looking for a minimalist logo opener and features a dynamic animation style, including an editable text layer and a logo placeholder. It also allows you to adjust the colors easily.
18Blue Action Logo Reveal
Blue Action Logo Reveal is majorly for those looking for a minimalist logo opener and features a dynamic animation style including an editable text layer and a logo placeholder. It also allows you to easily adjust the colors.
19Logo Introduction Template
Logo Introduction Template is a free logo reveal from Premiere Pro. It is perfect for the ones looking for a Tudor style logo reveal and allows you to easily customize the colors and insert your logo with a detailed help file.
20Minimal Logo Klick
Minimal Logo Klick comes in a sleek and modern design with playful animation. It encompasses a logo placeholder, an editable text layer, and an intelligent color controller. If you are searching for an unfussy and free logo reveal online, this one is for you.
Part 2 Learn How to Use After Effects Logo Reveal Templates
This section provides you with a basic tutorial on using the logo reveal After Effects template for free. However, this is a professional video editing software, but if video editing is new to you, you can try out Filmora, which is powerful, easy to use for new users. In Filmora, you will use the logo reveal template as a professional even if you are a beginner.
Below is how to use the After Effects logo reveals template:
01Open After Effects and Begin
Open your After Effect software and set up your Project ready. To begin face, create a composition using composition>New. You can also search the web resolution to 3x 2for this Project.
![]()
02Start Creating Logo
Next is to create a solid layer for your logo by using layers>new>solid, and select an appropriate color to match your composition.
![]()
Next is the creator logo by adding the pre-prepared logo artwork. Go to layer>new>text to create a text layer and adjust the text size and color to see.
![]()
03Add Animation to Logo
Manipulate your logo to create an animation and ensure that everything is right where you want it.
![]()
04Add Effects and Keyframe
Add Effect by going to Effect>Simulation>CC Particle World or click on Effects and Presets panel on the right to drag the CC Particle World effect onto your solid layer.
![]()
Set off your animation by adding a keyframe and controlling the animation of the particles effect through the birth rate setting, which is found by expanding the settings in the timeline panel for the solid layer.
![]()
05Import Vector Graphics and Finish
Finally, import your vector graphics into the After Effects by dragging and dropping the file into the Project panel, which brings up an import dialogue.
For Win 7 or later (64-bit)
For macOS 10.12 or later
That’s it! You successfully made use of the logo reveal maker.
● Key Takeaways from This Episode →
● The top 20 logo reveal Premiere Pro templates free to download.
● THow to make logo with After Effects – the logo reveal maker.
● TLastly, the logo reveal, free online tool, Filmora.
● TI hope I’ve gave you a few ideas on the After Effects logo reveal template for your Project and provided a breakdown of other software you can use for free logo reveal, such as Filmora. The article also lists the best logo reveal templates for after-effects that you can choose from this 202You can also use other software for your free logo reveal, but we all need to start somewhere.
Easy Cartoon Characters Drawing Tutorials for You Who Are Learning to Draw
Easy Cartoon Characters Drawing Tutorials for You Who Are Learning to Draw
An easy yet powerful editor
Numerous effects to choose from
Detailed tutorials provided by the official channel
Learning the art of cartoon characters drawing? We can help! Cartoon characters drawing is no rocket science, ABCD: Anybody Can Draw!

We are as excited as you as we bring to you a few of the best drawing tutorials!
In this article
01 [Double Your Results with Learning Cartoon Drawing Styles First](#Part 1)
02 [Best 6 Cartoon Characters Anyone Can Draw (with Free Video Tutorials)](#Part 2)
03 [Easy Cartoon Characters to Draw Step by Step](#Part 3)
Part 1 Double Your Results with Learning Cartoon Drawing Styles First
01 Cartoon Character Sketches
Sketching is one of the most popular art forms. Sketching can be done for real-life people or celebrities or we can also make sketches of imaginary characters and cartoons. Sketching is generally made of pencil and does not involve the usage of colors.

02 Cartoon Characters Drawing with Color
Cartoon characters can be made with color to make them more attractive. This is another popular form of art that cartoonists follow. You can explore several methods of coloring and try making your cartoon colorful.

03 Disney Cartoon Characters Drawing
Disney cartoon character drawing is probably one of the simplest. This is because they have a predefined size and are mostly symmetric. Disney cartoon characters generally use common geometric shapes such as circles, ovals, and squares. Hence making it a beginner-friendly choice!

Part 2 Best 6 Cartoon Characters Anyone Can Draw (with Free Video Tutorials)
01 Roger the alien
Roger the alien is one of the simplest cartoon characters to draw. This children’s classic cartoon character always intrigues children due to its bizarre shape. It fixes the image of an outer space characters in a child’s mind(If they exist).
What makes it easy to draw?
● The oval-shaped head is easy to draw since it is not very detailed.
● The character does not have any hair, hair is one of the more difficult parts to draw.
● The body features aren’t very prominent, hence making the character easy to draw.
Challenges you may encounter
● If you are a first-timer, then you may find it challenging to draw fingers and the toes.
● Getting the weird alien head shape might be a little difficult and may take you a few attempts.
● Making the two eyes exactly similar to each other may be challenging for a few of you.
02 Wakko Warner
What makes it easy to draw?
● The character generally has geometrical shapes and hence you can use shape tracers to draw a few parts.
● The appealing appearance of the character makes it interesting to draw.
● The eyes are not very difficult to recreate.
Challenges you may encounter
● The eyes are not very difficult to recreate.
● The shape of the mouth and the tongue that is sticking out is slightly complex.
● Perfecting the shape of the hair is a little challenging.
03 Cosmo
What makes it easy to draw?
● We recommend you to try this character out mainly because of its uniqueness.
● The eyes are not very complicated to draw.
● The body resembles a stick image and is hence simple to draw.
Challenges you may encounter
● The shape of the crown needs to be perfect, especially because of the tilt the crown has.
● The fingers are challenging to draw.
● The hair has a distinct shape, this shape needs to come out perfectly.
04 Courage the cowardly dog
What makes it easy to draw?
● Firstly, it’s one of the most favorite cartoons, hence it will ensure to keep you interested in the drawing.
● The hands and legs resemble stick figures and are simple to draw.
● The body structure is simple.
Challenges you may encounter
● Drawing a cartoon animal instead of a human being might be intriguing for beginners.
● The large eyes, which is one of the characteristic features needs to be perfect.
● The design of the ears is the trickiest part and could be difficult to draw.
05 Tom And Jerry
When we think of cartoons, the first few names that probably come to our mind are tom and jerry. This duo of a grumpy cat and a mysterious mouse has left an everlasting impact on the world of cartoons. The duo is famous throughout the world and is loved throughout age groups
Why do we recommend you to try your hands on this?
● This is a classic cartoon that almost everyone loves.
● There are several resources on the internet to help you draw the cartoon characters.
● The characters need not be perfect, even a close resemblance to them would be sufficient for the viewers to identify them due to their fame.
Challenges you may encounter
● You need to be careful with the proportion of sizes of tom and jerry.
● The structures of tom and jerry are not very simple to draw.
● Perfecting the grumpy expression on tom’s face and a frightened expression on jerry’s face is challenging.
05 Catdog
Catdog is another very interesting character. Who’d have imagined a cat and a dog morphed in a single body? Well, imagination has no end to it as they say! Catdog is a yellow cat and dog in a single body, it looks cute and at the same time intriguing.
Why do we recommend you try your hands on this?
● The cartoon character is mainly composed of geometrical shapes.
● The character is vividly colorful.
● The bright yellow color is super attractive and hence makes drawing catdog very fun.
Challenges you may encounter
● The character is illusional, you might have difficulty while deciding how to even look at it.
● The cat and dog faces are not very different from each other and have minute differences while drawing you need to be careful about having a distinct difference between the two faces.
Now that we’ve taken our baby steps towards understanding the art of drawing cartoons.
Key Takeaways from This Episode
● That’s a lot of knowledge for today, isn’t it? Today we’ve seen the basics of drawing cartoon characters.
● We also got our hands dirty by exploring a few easy cartoon characters that you could draw.
● Further, we saw the basic steps that you would need to take in order to draw the face of any cartoon character! All in all, we learned everything we needed to know to draw our first cartoon! What are you waiting for? Go try out drawing your first cartoon today!
Learning the art of cartoon characters drawing? We can help! Cartoon characters drawing is no rocket science, ABCD: Anybody Can Draw!
We are as excited as you as we bring to you a few of the best drawing tutorials!
In this article
01 [Double Your Results with Learning Cartoon Drawing Styles First](#Part 1)
02 [Best 6 Cartoon Characters Anyone Can Draw (with Free Video Tutorials)](#Part 2)
03 [Easy Cartoon Characters to Draw Step by Step](#Part 3)
Part 1 Double Your Results with Learning Cartoon Drawing Styles First
01 Cartoon Character Sketches
Sketching is one of the most popular art forms. Sketching can be done for real-life people or celebrities or we can also make sketches of imaginary characters and cartoons. Sketching is generally made of pencil and does not involve the usage of colors.
02 Cartoon Characters Drawing with Color
Cartoon characters can be made with color to make them more attractive. This is another popular form of art that cartoonists follow. You can explore several methods of coloring and try making your cartoon colorful.
03 Disney Cartoon Characters Drawing
Disney cartoon character drawing is probably one of the simplest. This is because they have a predefined size and are mostly symmetric. Disney cartoon characters generally use common geometric shapes such as circles, ovals, and squares. Hence making it a beginner-friendly choice!
Part 2 Best 6 Cartoon Characters Anyone Can Draw (with Free Video Tutorials)
01 Roger the alien
Roger the alien is one of the simplest cartoon characters to draw. This children’s classic cartoon character always intrigues children due to its bizarre shape. It fixes the image of an outer space characters in a child’s mind(If they exist).
What makes it easy to draw?
● The oval-shaped head is easy to draw since it is not very detailed.
● The character does not have any hair, hair is one of the more difficult parts to draw.
● The body features aren’t very prominent, hence making the character easy to draw.
Challenges you may encounter
● If you are a first-timer, then you may find it challenging to draw fingers and the toes.
● Getting the weird alien head shape might be a little difficult and may take you a few attempts.
● Making the two eyes exactly similar to each other may be challenging for a few of you.
02 Wakko Warner
What makes it easy to draw?
● The character generally has geometrical shapes and hence you can use shape tracers to draw a few parts.
● The appealing appearance of the character makes it interesting to draw.
● The eyes are not very difficult to recreate.
Challenges you may encounter
● The eyes are not very difficult to recreate.
● The shape of the mouth and the tongue that is sticking out is slightly complex.
● Perfecting the shape of the hair is a little challenging.
03 Cosmo
What makes it easy to draw?
● We recommend you to try this character out mainly because of its uniqueness.
● The eyes are not very complicated to draw.
● The body resembles a stick image and is hence simple to draw.
Challenges you may encounter
● The shape of the crown needs to be perfect, especially because of the tilt the crown has.
● The fingers are challenging to draw.
● The hair has a distinct shape, this shape needs to come out perfectly.
04 Courage the cowardly dog
What makes it easy to draw?
● Firstly, it’s one of the most favorite cartoons, hence it will ensure to keep you interested in the drawing.
● The hands and legs resemble stick figures and are simple to draw.
● The body structure is simple.
Challenges you may encounter
● Drawing a cartoon animal instead of a human being might be intriguing for beginners.
● The large eyes, which is one of the characteristic features needs to be perfect.
● The design of the ears is the trickiest part and could be difficult to draw.
05 Tom And Jerry
When we think of cartoons, the first few names that probably come to our mind are tom and jerry. This duo of a grumpy cat and a mysterious mouse has left an everlasting impact on the world of cartoons. The duo is famous throughout the world and is loved throughout age groups
Why do we recommend you to try your hands on this?
● This is a classic cartoon that almost everyone loves.
● There are several resources on the internet to help you draw the cartoon characters.
● The characters need not be perfect, even a close resemblance to them would be sufficient for the viewers to identify them due to their fame.
Challenges you may encounter
● You need to be careful with the proportion of sizes of tom and jerry.
● The structures of tom and jerry are not very simple to draw.
● Perfecting the grumpy expression on tom’s face and a frightened expression on jerry’s face is challenging.
05 Catdog
Catdog is another very interesting character. Who’d have imagined a cat and a dog morphed in a single body? Well, imagination has no end to it as they say! Catdog is a yellow cat and dog in a single body, it looks cute and at the same time intriguing.
Why do we recommend you try your hands on this?
● The cartoon character is mainly composed of geometrical shapes.
● The character is vividly colorful.
● The bright yellow color is super attractive and hence makes drawing catdog very fun.
Challenges you may encounter
● The character is illusional, you might have difficulty while deciding how to even look at it.
● The cat and dog faces are not very different from each other and have minute differences while drawing you need to be careful about having a distinct difference between the two faces.
Now that we’ve taken our baby steps towards understanding the art of drawing cartoons.
Key Takeaways from This Episode
● That’s a lot of knowledge for today, isn’t it? Today we’ve seen the basics of drawing cartoon characters.
● We also got our hands dirty by exploring a few easy cartoon characters that you could draw.
● Further, we saw the basic steps that you would need to take in order to draw the face of any cartoon character! All in all, we learned everything we needed to know to draw our first cartoon! What are you waiting for? Go try out drawing your first cartoon today!
How You Can Turn Yourself Into Anime Character Using Anime Filter
How You Can Turn Yourself into Anime Character Using Anime Filter
An easy yet powerful editor
Numerous effects to choose from
Detailed tutorials provided by the official channel
Everyone is looking for the Anime Filter that allows you to turn yourself into an animated character. All in an effort to join in on the TikTok trend that’s been awakening the inner anime enthusiast in everyone.

In this post, we’ll be sharing with you all that we know about this elusive anime filter (along with some bonuses along the way)
In this article
01 [Let’s Figure out What’s Anime Filter First](#Part 1)
02 [More Tutorials on Anime Filter That You Should Not Miss](#Part 2)
Part 1 Let’s Figure out What’s Anime Filter First
01What is the Anime Filter on TikTok?
Okay, first off What even is this anime filter everyone is talking about and how can you use it to turn yourself into an animated character? We’ve attached a helpful YouTube Video below from @Kapwing who has a more comprehensive explanation for you.
But, as for the basics? It works just like most filters in that it can be used in both video and picture mode (allowing you to also make your own animated profile picture if you’d like). All you have to do is turn it on, and it’ll turn you into the most fitting anime character of your style immediately
02How to Get the TikTok Anime Filter?
Now to finally get down to business How exactly can you get the anime filter for your TikTok? Well, here’s the trick Despite having earned its popularity on TikTok, the Anime Style filter actually comes from Snapchat So, if you do want to animate yourself like you’ve seen all the other popular TikTok-ers do, you’ll need to record the video (or take the picture) on the Snapchat App first and then upload it to TikTok.
03A step-by-step breakdown of this process has been provided below (pictures included)
Step 1Download the Snapchat App
Alright, to start off with, you’ll need to download the Snapchat app on your smartphone (it’s available for both Android and iOS devices)

Step 2Open Snapchat App on your mobile device
Once you have the Snapchat app downloaded and installed on your device, open it

Step 3Search for the Anime Style Filter on Snapchat
Once you have the Snapchat app open, click on the search bar at the top of the interface, type ‘anime style’, and search
You might find that there are multiple versions of the filter (like as is shown in the image below), but the one that you need to select is the one titled Anime Style and created by Snapchat (it should appear first, as it does in the example)

Step 4Turn Yourself into an Animated Character
Finally You should be moved to the video recorder or the profile picture taker, where you can see yourself animated once and for all

Step 5Upload your anime filter-ed video to TikTok
Now, in order to get your Anime-fied self on TikTok, all you need to do is upload your video creation (either on your mobile device or your computer) We’ve provided a URL for you below that will take you directly to the TikTok upload page.

Part 2 More Tutorials on Anime Filter That You Should Not Miss
The Anime Style filter that we introduced in the previous section isn’t the only ‘animated’ filter available, of course It’s the one that caught the attention of a lot of people, thanks, in large part, to the participation of a couple of some of the bigger TikTok-ers on the platform. However, you can always expand your selection a bit by checking out some of the other interesting anime filters in the market:
0112 Anime Filters to Turn Yourself into an Anime Character
Anime Filter #1: Anime Style Realistic

In order to fix some of the more glaring issues with the regular Anime Style filter, Snapchat created a second filter, called Anime Style Realistic This one has a distinctively less anime style when it comes to looks. But it does allow for more skin colors, better hair integration, and accessories
Pros
FREE Snapchat lens that you can use at any time.
Works with most skin tones.
Better hair/accessory integration.
Cons
The style is more realistic than anime.
It is not available anywhere else; you’ll need to be on Snapchat to use it.
Not great at capturing motion.
This is a fun filter to use for those looking to spice up their timeline with something a little different (OR for those having a bad day and would like the almost-anonymity the filter can provide).
Anime Filter #2: Cartoon Style

Next, we have another Snapchat original lens called Cartoon Style This filter is more reminiscent of the older animated cartoon styles (think Pocahontas, Lilo & Stitch, etc.), but it doesn’t make it any less fun
Pros
FREE Snapchat lens.
Works with all skin tones.
Works with accessories.
Cons
More of a cartoon animated style than anime.
Not available anywhere else, you can only use it with Snapchat.
Not great at capturing motion.
Again, just like the Anime Filter, this is good for slapping on just to have fun or to sneakily erase a couple of blemishes
Anime Filter #3: Anime Filter

Now, although we mentioned that TikTok doesn’t have any anime-style filters, the Chinese version of it (surprisingly) does You can see it being used in the image above, rendering the user into an animated (albeit not classically Japanese animated) character.
Pros
Free Chinese TikTok filter.
Great at capturing motion.
Chinese animated drawing style.
Cons
Only available for the foreign version of the TikTok app.
Not the best with skin tones.
It doesn’t use the classic Japanese-animation style.
This has seen a popularity boost recently, with many TikTok users using it to show a ‘before’ and ‘after’ (like the image shown above), of their dance being animated.
Filter URL: https://www.douyin.com/
Anime Filter #4: Anime Eyes

This next filter is the first unofficial anime filter on this list. It was created by one of the users of Snapchat and can be found there if you want to use it This one doesn’t animate the whole face of the user, but it does apply a sticker of various ‘anime eyes’ that you can use as a semi-animated profile picture maker (free)
Pros
FREE Snapchat filter
Anime-eyes sticker to cover the eyes
Useful as an animated profile picture maker
Cons
Only available on the Snapchat app
Does not capture motion
Does not animate the entire face
This really is best used for profile pictures only You’ve probably seen it around as such, although some users also find it useful for hiding tired eyes
Anime Filter #5: Wondershare Filmora

If you’re looking to step up your game ‘editing-wise’ and give your pictures and videos an even more anime feel, then you can also consider the anime filters that the video editing tool, Wondershare Filmora Video Editor , offers. (You can also skip the pre-made filters altogether and create your own animated video with stickers and other effects.)
Pros
Variety of anime filters for videos
Comes with advanced video editing tools
Creates high-quality videos
Cons
Premium Software
No face animation
This particular option is for those looking for something a step above what everyone else is doing. All while allowing a more flexible experience
For Win 7 or later (64-bit)
For macOS 10.12 or later
Anime Filter #6: MHA Anime Filter (Instagram)

Continuing on from our trend of ‘out-there’ options, there’s also the MHA filter from Instagram This one has been especially popular with the anime fanbase as it offers plenty of opportunities for hilarious, pointed responses
Pros
FREE with Instagram
Anime-themed sticker
Trending on TikTok
Cons
Not a face animator filter
Not a profile picture animator
Limited anime options
It’s definitely not what you might have initially been looking for. But its popularity on TikTok is undeniable
Anime Filter #7: Anime Filter

Our second recommended anime-themed filter is the basic Anime Filter on Instagram This one flicks through dozens of some of the most popular animes to find out which one suits you best And, just like the previous, is currently trending on Tiktok
Pros
FREE with Instagram
Anime-themed sticker filter
Trending on TikTok
Cons
Sticker, not face animator
Available only on Instagram
Limited options
Anime Filter #8: Cartoon

This next animation filter pick of ours brings us back to Snapchat It’s called the Cartoon lens. And, just like our initial picks, it will change your pictures to that of a cartoon This one is closer to the cartoon-style popular around the 2000s (think Frozen & Tangled)
Pros
Available on Snapchat
Animated profile picture maker (free)
Works for various skin types
Cons
Not the best at motion capturing
Only available on Snapchat
Doesn’t use classic Japanese style
It’s not quite the anime filter that you’re probably looking for, but it does still work if all you want is a way of cartoon-ifying yourself to spice up your timeline It’ll clear up any blemishes too
Anime Filter #9: Comics Style

Again, we’re moving towards a different kind of animation style with this next filter from Snapchat, but the Comics Style filter does have its own promises of fun as well Especially for those who are long-time fans of American comics (or, even, your average modern-day Avengers fan)
Pros
FREE on Snapchat
Video face animator
Works with a variety of skin tones
Cons
Awkward with some face shapes
Does not work with all face accessories
Available only on Snapchat
Anime Filter #10: Cartoon 3D Style

Now, this might get confusing, but for our last picks, we actually have a set of filters all called Cartoon 3D Style But trust us They’re all different This first version is one you would probably relate more to the DreamWorks motion picture, Ratatouille
Pros
FREE profile picture animator on Snapchat
Compatible with a variety of face shapes
Compatible with a variety of skin tones
Cons
Set features (i.e., pointed nose)
Non-anime drawing style
Not compatible with some facial accessories
Anime Filter #11: Cartoon 3D Style

For our next Cartoon 3D Style lens from Snapchat, we have a face animator that can help you turn into something very close to another dreamwork’s motion picture (think the Despicable me or the Minions)
Pros
Cartoon style animator that is FREE to use
Great for motion capturing
Compatible with a variety of skin colors
Cons
Available only on Snapchat
Not compatible with certain face accessories
Limited face warping effect
Anime Filter #12: Cartoon 3D Style

And finally, for the last of our recommended anime filters, we have the Cartoon 3D Style lens from Snapchat that makes you look like your favorite Disney character (In this case, the obvious inspiration comes from Disney’s Frozen or Tangled)
Pros
Disney face animator that is FREE on Snapchat
Compatible with all skin tones
Trending on TikTok
Cons
It can only be used on Snapchat
Not great at capturing motion
02Steps to Download the Anime Filter App and Turn Yourself into an Anime Character
Now, if those filters weren’t enough for you, we’ve also included this next tutorial on how you can find apps on your mobile device that will allow you to get the same effect without having to use Snapchat, TikTok, or Instagram
Step 1Go to the App Store
The first step, of course, is to go to the app store on your mobile device.

Step 2Search for Anime Filter App
Next, search ‘Anime Filter’ on your phone’s app store.

Step 3Select Anime Filter App
There are multiple types of anime filter apps available in the market. Pick the one that you think will work best for you.

Step 4Install Anime Filter App
Finally, once you’ve found the anime filter app for you, install it.

Step 5Open Anime Filter App
The app that we used for our example, Anime Camera, offers several different animation styles However, this app does come with a subscription fee, so keep that in mind.

03Anime Filter Has a Sadly Unsurprising Problem
You might have noticed this while we were introducing all the different types of anime-style filters available, but the popular Anime Filter has its shortcomings. Which includes:
PROBLEM 1: Dark Skin Tones
The anime filter’s inability to capture darker skin tones accurately is one of the biggest issues users have with the filter.
PROBLEM 2: Hair Style
Hairstyle options are also very limited. And, as for black hairstyles? Well, the options are pretty much non-existent.
PROBLEM 3: Face Accessories
Do you wear glasses? How about piercings? Well, this won’t translate for you either, unfortunately
Key Takeaways from This Episode
● The Anime Filter is a hot, trending topic in platforms like Tiktok, Instagram, and Snapchat It’s also a fun way of engaging with the anime community
● There are other, similar face-animation filters available (The Cartoon 3D Styles, especially, were quite popular for a time)
● Unsurprisingly, the anime filter does have its problems… And it left a big chunk of the TikTok community pretty flabbergasted — and disappointed. But that didn’t stop them from joining in the fun to provide some empowering commentary
Everyone is looking for the Anime Filter that allows you to turn yourself into an animated character. All in an effort to join in on the TikTok trend that’s been awakening the inner anime enthusiast in everyone.
In this post, we’ll be sharing with you all that we know about this elusive anime filter (along with some bonuses along the way)
In this article
01 [Let’s Figure out What’s Anime Filter First](#Part 1)
02 [More Tutorials on Anime Filter That You Should Not Miss](#Part 2)
Part 1 Let’s Figure out What’s Anime Filter First
01What is the Anime Filter on TikTok?
Okay, first off What even is this anime filter everyone is talking about and how can you use it to turn yourself into an animated character? We’ve attached a helpful YouTube Video below from @Kapwing who has a more comprehensive explanation for you.
But, as for the basics? It works just like most filters in that it can be used in both video and picture mode (allowing you to also make your own animated profile picture if you’d like). All you have to do is turn it on, and it’ll turn you into the most fitting anime character of your style immediately
02How to Get the TikTok Anime Filter?
Now to finally get down to business How exactly can you get the anime filter for your TikTok? Well, here’s the trick Despite having earned its popularity on TikTok, the Anime Style filter actually comes from Snapchat So, if you do want to animate yourself like you’ve seen all the other popular TikTok-ers do, you’ll need to record the video (or take the picture) on the Snapchat App first and then upload it to TikTok.
03A step-by-step breakdown of this process has been provided below (pictures included)
Step 1Download the Snapchat App
Alright, to start off with, you’ll need to download the Snapchat app on your smartphone (it’s available for both Android and iOS devices)
Step 2Open Snapchat App on your mobile device
Once you have the Snapchat app downloaded and installed on your device, open it
Step 3Search for the Anime Style Filter on Snapchat
Once you have the Snapchat app open, click on the search bar at the top of the interface, type ‘anime style’, and search
You might find that there are multiple versions of the filter (like as is shown in the image below), but the one that you need to select is the one titled Anime Style and created by Snapchat (it should appear first, as it does in the example)
Step 4Turn Yourself into an Animated Character
Finally You should be moved to the video recorder or the profile picture taker, where you can see yourself animated once and for all
Step 5Upload your anime filter-ed video to TikTok
Now, in order to get your Anime-fied self on TikTok, all you need to do is upload your video creation (either on your mobile device or your computer) We’ve provided a URL for you below that will take you directly to the TikTok upload page.
Part 2 More Tutorials on Anime Filter That You Should Not Miss
The Anime Style filter that we introduced in the previous section isn’t the only ‘animated’ filter available, of course It’s the one that caught the attention of a lot of people, thanks, in large part, to the participation of a couple of some of the bigger TikTok-ers on the platform. However, you can always expand your selection a bit by checking out some of the other interesting anime filters in the market:
0112 Anime Filters to Turn Yourself into an Anime Character
Anime Filter #1: Anime Style Realistic
In order to fix some of the more glaring issues with the regular Anime Style filter, Snapchat created a second filter, called Anime Style Realistic This one has a distinctively less anime style when it comes to looks. But it does allow for more skin colors, better hair integration, and accessories
Pros
FREE Snapchat lens that you can use at any time.
Works with most skin tones.
Better hair/accessory integration.
Cons
The style is more realistic than anime.
It is not available anywhere else; you’ll need to be on Snapchat to use it.
Not great at capturing motion.
This is a fun filter to use for those looking to spice up their timeline with something a little different (OR for those having a bad day and would like the almost-anonymity the filter can provide).
Anime Filter #2: Cartoon Style
Next, we have another Snapchat original lens called Cartoon Style This filter is more reminiscent of the older animated cartoon styles (think Pocahontas, Lilo & Stitch, etc.), but it doesn’t make it any less fun
Pros
FREE Snapchat lens.
Works with all skin tones.
Works with accessories.
Cons
More of a cartoon animated style than anime.
Not available anywhere else, you can only use it with Snapchat.
Not great at capturing motion.
Again, just like the Anime Filter, this is good for slapping on just to have fun or to sneakily erase a couple of blemishes
Anime Filter #3: Anime Filter
Now, although we mentioned that TikTok doesn’t have any anime-style filters, the Chinese version of it (surprisingly) does You can see it being used in the image above, rendering the user into an animated (albeit not classically Japanese animated) character.
Pros
Free Chinese TikTok filter.
Great at capturing motion.
Chinese animated drawing style.
Cons
Only available for the foreign version of the TikTok app.
Not the best with skin tones.
It doesn’t use the classic Japanese-animation style.
This has seen a popularity boost recently, with many TikTok users using it to show a ‘before’ and ‘after’ (like the image shown above), of their dance being animated.
Filter URL: https://www.douyin.com/
Anime Filter #4: Anime Eyes
This next filter is the first unofficial anime filter on this list. It was created by one of the users of Snapchat and can be found there if you want to use it This one doesn’t animate the whole face of the user, but it does apply a sticker of various ‘anime eyes’ that you can use as a semi-animated profile picture maker (free)
Pros
FREE Snapchat filter
Anime-eyes sticker to cover the eyes
Useful as an animated profile picture maker
Cons
Only available on the Snapchat app
Does not capture motion
Does not animate the entire face
This really is best used for profile pictures only You’ve probably seen it around as such, although some users also find it useful for hiding tired eyes
Anime Filter #5: Wondershare Filmora
If you’re looking to step up your game ‘editing-wise’ and give your pictures and videos an even more anime feel, then you can also consider the anime filters that the video editing tool, Wondershare Filmora Video Editor , offers. (You can also skip the pre-made filters altogether and create your own animated video with stickers and other effects.)
Pros
Variety of anime filters for videos
Comes with advanced video editing tools
Creates high-quality videos
Cons
Premium Software
No face animation
This particular option is for those looking for something a step above what everyone else is doing. All while allowing a more flexible experience
For Win 7 or later (64-bit)
For macOS 10.12 or later
Anime Filter #6: MHA Anime Filter (Instagram)
Continuing on from our trend of ‘out-there’ options, there’s also the MHA filter from Instagram This one has been especially popular with the anime fanbase as it offers plenty of opportunities for hilarious, pointed responses
Pros
FREE with Instagram
Anime-themed sticker
Trending on TikTok
Cons
Not a face animator filter
Not a profile picture animator
Limited anime options
It’s definitely not what you might have initially been looking for. But its popularity on TikTok is undeniable
Anime Filter #7: Anime Filter
Our second recommended anime-themed filter is the basic Anime Filter on Instagram This one flicks through dozens of some of the most popular animes to find out which one suits you best And, just like the previous, is currently trending on Tiktok
Pros
FREE with Instagram
Anime-themed sticker filter
Trending on TikTok
Cons
Sticker, not face animator
Available only on Instagram
Limited options
Anime Filter #8: Cartoon
This next animation filter pick of ours brings us back to Snapchat It’s called the Cartoon lens. And, just like our initial picks, it will change your pictures to that of a cartoon This one is closer to the cartoon-style popular around the 2000s (think Frozen & Tangled)
Pros
Available on Snapchat
Animated profile picture maker (free)
Works for various skin types
Cons
Not the best at motion capturing
Only available on Snapchat
Doesn’t use classic Japanese style
It’s not quite the anime filter that you’re probably looking for, but it does still work if all you want is a way of cartoon-ifying yourself to spice up your timeline It’ll clear up any blemishes too
Anime Filter #9: Comics Style
Again, we’re moving towards a different kind of animation style with this next filter from Snapchat, but the Comics Style filter does have its own promises of fun as well Especially for those who are long-time fans of American comics (or, even, your average modern-day Avengers fan)
Pros
FREE on Snapchat
Video face animator
Works with a variety of skin tones
Cons
Awkward with some face shapes
Does not work with all face accessories
Available only on Snapchat
Anime Filter #10: Cartoon 3D Style
Now, this might get confusing, but for our last picks, we actually have a set of filters all called Cartoon 3D Style But trust us They’re all different This first version is one you would probably relate more to the DreamWorks motion picture, Ratatouille
Pros
FREE profile picture animator on Snapchat
Compatible with a variety of face shapes
Compatible with a variety of skin tones
Cons
Set features (i.e., pointed nose)
Non-anime drawing style
Not compatible with some facial accessories
Anime Filter #11: Cartoon 3D Style
For our next Cartoon 3D Style lens from Snapchat, we have a face animator that can help you turn into something very close to another dreamwork’s motion picture (think the Despicable me or the Minions)
Pros
Cartoon style animator that is FREE to use
Great for motion capturing
Compatible with a variety of skin colors
Cons
Available only on Snapchat
Not compatible with certain face accessories
Limited face warping effect
Anime Filter #12: Cartoon 3D Style
And finally, for the last of our recommended anime filters, we have the Cartoon 3D Style lens from Snapchat that makes you look like your favorite Disney character (In this case, the obvious inspiration comes from Disney’s Frozen or Tangled)
Pros
Disney face animator that is FREE on Snapchat
Compatible with all skin tones
Trending on TikTok
Cons
It can only be used on Snapchat
Not great at capturing motion
02Steps to Download the Anime Filter App and Turn Yourself into an Anime Character
Now, if those filters weren’t enough for you, we’ve also included this next tutorial on how you can find apps on your mobile device that will allow you to get the same effect without having to use Snapchat, TikTok, or Instagram
Step 1Go to the App Store
The first step, of course, is to go to the app store on your mobile device.
Step 2Search for Anime Filter App
Next, search ‘Anime Filter’ on your phone’s app store.
Step 3Select Anime Filter App
There are multiple types of anime filter apps available in the market. Pick the one that you think will work best for you.
Step 4Install Anime Filter App
Finally, once you’ve found the anime filter app for you, install it.
Step 5Open Anime Filter App
The app that we used for our example, Anime Camera, offers several different animation styles However, this app does come with a subscription fee, so keep that in mind.
03Anime Filter Has a Sadly Unsurprising Problem
You might have noticed this while we were introducing all the different types of anime-style filters available, but the popular Anime Filter has its shortcomings. Which includes:
PROBLEM 1: Dark Skin Tones
The anime filter’s inability to capture darker skin tones accurately is one of the biggest issues users have with the filter.
PROBLEM 2: Hair Style
Hairstyle options are also very limited. And, as for black hairstyles? Well, the options are pretty much non-existent.
PROBLEM 3: Face Accessories
Do you wear glasses? How about piercings? Well, this won’t translate for you either, unfortunately
Key Takeaways from This Episode
● The Anime Filter is a hot, trending topic in platforms like Tiktok, Instagram, and Snapchat It’s also a fun way of engaging with the anime community
● There are other, similar face-animation filters available (The Cartoon 3D Styles, especially, were quite popular for a time)
● Unsurprisingly, the anime filter does have its problems… And it left a big chunk of the TikTok community pretty flabbergasted — and disappointed. But that didn’t stop them from joining in the fun to provide some empowering commentary
5 Best Adobe Animate Courses & Classes
5 Best Adobe Animate Courses & Classes | Beginners Complete Tutorial
An easy yet powerful editor
Numerous effects to choose from
Detailed tutorials provided by official channel
Professional animation is hence one of the fields that has a bright future. Willing to learn more about animation?

Don’t worry! We’ve got you covered, follow this article and find out more about the best 5 Adobe animate courses.
In this article
01 [What is Adobe Animate CC?](#Part 1)
02 [Top 8 FULL ADOBE ANIMATE COURSES | Beginners Complete Tutorial](#Part 2)
03 [How to Quickly Learn the Skills of Adobe Animate Course](#Part 3)
Part 1 What is Adobe Animate CC?
1. Who should take Adobe Animate course?
Learning is never bound. Anyone willing to learn can put in effort and time. As long as you wish to learn, and have an interest in it you can take it up. Those of you who wish to make a career in animation are highly recommended to take up this course. The Adobe animate course can help you kickstart your career as a professional animator.
2. Are there prerequisites to Adobe Animate course?
Animation is one such field that does not require a lot of prerequisites. In fact, even a beginner who has absolutely no idea about animation can take up the adobe animate course.
Part 2 Top 5 FULL ADOBE ANIMATE COURSES | Beginners Complete Tutorial
1. Adobe animate CC 2018- HTML5 Banner Ads
Adobe animate CC 2018- HTML5 Banner Ads is one of the most comprehensive courses on adobe animate. It teaches you several relevant skills associated with animation and marketing (one of the primary applications of animation).

Skills you will learn:
● Basics of HTML5 banner ads using adobe animate
● Understanding the importance of Adobe animate CC in web advertisements
● Through this course, you’d become an expert at publishing ad networks
● The course will help you explore tools and techniques related to banner advertising
Udemy: Udemy Duration: About 5 hours
Pros
The course is beginner-friendly; it helps you advance your career in animation from scratch.
The course covers even complex concepts.
You receive a course completion certificate
Cons
The course is paid and you need to pay a nominal fee in order to access the lecture videos.
The course is monotonous i.e. there is no live teaching.
2. 2D animation for beginners with adobe animate, Walt Wonderwolk
If you’re looking for a well-designed course that covers almost all the necessary concepts, then this course is just the right one for you. Through this course, you can learn all about Adobe animate. All the primary concepts are explained in detail in this course.

Skills you will learn:
● All the primary concepts of computer-generated animations using Adobe animate.
● You will learn important concepts such as eases, symbols, vector drawings, tweens, and key frames.
● You will also learn how to add sound to your animation
● You will gain hands-on knowledge about drawing, composition, and animation of characters.
Udemy: skillshare
Pros
The course is great for beginners to start learning about Adobe animate
The course covers fundamental concepts of animation
Cons
You need a skillshare membership in order to access the lecture videos.
You need to pay in order to get a skillshare membership
You do not get a course completion certificate
3. Rigging and animating in Adobe animate
Looking for a quick crash course about Adobe animate? Well, this course is perfect for you. As the name suggests, in this course you shall learn all about rigging and animating 2d characters.

Skills you will learn:
● rigging and animating adobe animate
● Through this course, you will know how to efficiently animate any character
● Discover the utilization of vectors and images for rigging
● You will get a clear understanding of important concepts such as layer parenting, motion tweening, and symbols.
Udemy: Udemy Duration: around 4 hours
Pros
You will learn the major concepts of animation.
You will learn about rigging in detail, one of the core concepts of animation.
The course is available on Udemy, one of the most accessible platforms.
Cons
The course is not free, you need to pay a nominal amount to access the course.
It is not a renowned course.
The course is not Beginner friendly, it needs you to have some understanding of animation.
4. Learning Adobe Animate CC: Animation, LinkedIn learning
LinkedIn’s new platform, LinkedIn learning has several professional courses. Learning Adobe animate CC is one of the courses available on LinkedIn learning. It teaches you all about digital transformations. By the end of this course, you will be able to create a handy bit of animation.

Skills you will learn:
● Fundamentals of digital animation on Adobe animate CC
● Understanding and implementation of concepts such as keyframes, symbols, tweening, and drawing tools.
● Understand about the creation of natural effects and shape tweens.
● Adding music and sound effects to your animation.
Udemy: LinkedIn learning Duration: Around 3 hours
Pros
The course duration is considerably shorter.
All the primary concepts of animation are given importance in this course.
You get additional quizzes and study material along with the lecture videos
Cons
You need to have an active LinkedIn learning membership.
You need to pay for the LinkedIn learning membership.
The course is fast-paced, you need to grasp the concepts quickly.
5. Animate a walk cycle frame by frame in Adobe animate
This hands-on course is perfect for those who prefer experimenting as they watch the lecture videos. The course teaches you how to animate 2D and 3D characters smoothly. As you near the end of this course, you will have a clear understanding of how animation works and how to animate a hand-drawn character from scratch.

Skills you will learn:
● You will learn how to animate a hand-drawn character from scratch.
● You shall learn how to set up a working canvas and design a character.
● You will learn about the essential features of designing such as color fills, overlapping actions, shadows, and cleanup strokes.
Udemy: skillshare
Pros
The course focuses on the design aspect of animated characters.
The course gives you a hands-on experience with animation tools.
The course helps you learn how to create creative hand drawn characters.
Cons
You need an active skillshare membership to access the lecture videos
Skillshare membership is a paid one.
There are courses from more popular counterparts such as Udemy.
Part 3 How to Quickly Learn the Skills of Adobe Animate Course
Now that you’ve decided to get your hands dirty by dwelling into animation, you must give Wondershare Filmora Pro a try. What’s Wondershare Filmora ?
It’s essentially a one-stop shop for all your video editing needs. From video editing to rigging Wwondershare Filmora Pro has got it all. Using this platform, even a beginner can create exquisite animated videos.
The platform offers you several tools that are easy to use.
Even a neophyte could easily create beautiful animations by using Wondershare Filmora Pro. Using Wondershare Filmora Pro, you can not only animate characters but also define their motion, add sound effects, and edit videos. Filmora Pro offers you animation tools that are easier to operate and resultantly help you make amazing animated videos.
Wondershare Filmora
Get started easily with Filmora’s powerful performance, intuitive interface, and countless effects!
Try It Free Try It Free Try It Free Learn More >

Key Takeaways from This Episode
● As we see, today we’ve taken a look at a few of the best Adobe animate courses.
● Each of the courses can help you learn the basics of animation.
● Animation is indeed one of the budding fields, and with these fruitful courses, you can learn all about animation and possibly begin your journey as a freelancer or a professional in animation.
● Through these courses, you can create animated advertisement videos with ease. Wondershare Filmora Pro however can make your job easier by offering you amazing tools for generating animated videos!<
● Well, on this note we shall take leave! Wishing you good luck on your journey as an animator!
Professional animation is hence one of the fields that has a bright future. Willing to learn more about animation?
Don’t worry! We’ve got you covered, follow this article and find out more about the best 5 Adobe animate courses.
In this article
01 [What is Adobe Animate CC?](#Part 1)
02 [Top 8 FULL ADOBE ANIMATE COURSES | Beginners Complete Tutorial](#Part 2)
03 [How to Quickly Learn the Skills of Adobe Animate Course](#Part 3)
Part 1 What is Adobe Animate CC?
1. Who should take Adobe Animate course?
Learning is never bound. Anyone willing to learn can put in effort and time. As long as you wish to learn, and have an interest in it you can take it up. Those of you who wish to make a career in animation are highly recommended to take up this course. The Adobe animate course can help you kickstart your career as a professional animator.
2. Are there prerequisites to Adobe Animate course?
Animation is one such field that does not require a lot of prerequisites. In fact, even a beginner who has absolutely no idea about animation can take up the adobe animate course.
Part 2 Top 5 FULL ADOBE ANIMATE COURSES | Beginners Complete Tutorial
1. Adobe animate CC 2018- HTML5 Banner Ads
Adobe animate CC 2018- HTML5 Banner Ads is one of the most comprehensive courses on adobe animate. It teaches you several relevant skills associated with animation and marketing (one of the primary applications of animation).
Skills you will learn:
● Basics of HTML5 banner ads using adobe animate
● Understanding the importance of Adobe animate CC in web advertisements
● Through this course, you’d become an expert at publishing ad networks
● The course will help you explore tools and techniques related to banner advertising
Udemy: Udemy Duration: About 5 hours
Pros
The course is beginner-friendly; it helps you advance your career in animation from scratch.
The course covers even complex concepts.
You receive a course completion certificate
Cons
The course is paid and you need to pay a nominal fee in order to access the lecture videos.
The course is monotonous i.e. there is no live teaching.
2. 2D animation for beginners with adobe animate, Walt Wonderwolk
If you’re looking for a well-designed course that covers almost all the necessary concepts, then this course is just the right one for you. Through this course, you can learn all about Adobe animate. All the primary concepts are explained in detail in this course.
Skills you will learn:
● All the primary concepts of computer-generated animations using Adobe animate.
● You will learn important concepts such as eases, symbols, vector drawings, tweens, and key frames.
● You will also learn how to add sound to your animation
● You will gain hands-on knowledge about drawing, composition, and animation of characters.
Udemy: skillshare
Pros
The course is great for beginners to start learning about Adobe animate
The course covers fundamental concepts of animation
Cons
You need a skillshare membership in order to access the lecture videos.
You need to pay in order to get a skillshare membership
You do not get a course completion certificate
3. Rigging and animating in Adobe animate
Looking for a quick crash course about Adobe animate? Well, this course is perfect for you. As the name suggests, in this course you shall learn all about rigging and animating 2d characters.
Skills you will learn:
● rigging and animating adobe animate
● Through this course, you will know how to efficiently animate any character
● Discover the utilization of vectors and images for rigging
● You will get a clear understanding of important concepts such as layer parenting, motion tweening, and symbols.
Udemy: Udemy Duration: around 4 hours
Pros
You will learn the major concepts of animation.
You will learn about rigging in detail, one of the core concepts of animation.
The course is available on Udemy, one of the most accessible platforms.
Cons
The course is not free, you need to pay a nominal amount to access the course.
It is not a renowned course.
The course is not Beginner friendly, it needs you to have some understanding of animation.
4. Learning Adobe Animate CC: Animation, LinkedIn learning
LinkedIn’s new platform, LinkedIn learning has several professional courses. Learning Adobe animate CC is one of the courses available on LinkedIn learning. It teaches you all about digital transformations. By the end of this course, you will be able to create a handy bit of animation.
Skills you will learn:
● Fundamentals of digital animation on Adobe animate CC
● Understanding and implementation of concepts such as keyframes, symbols, tweening, and drawing tools.
● Understand about the creation of natural effects and shape tweens.
● Adding music and sound effects to your animation.
Udemy: LinkedIn learning Duration: Around 3 hours
Pros
The course duration is considerably shorter.
All the primary concepts of animation are given importance in this course.
You get additional quizzes and study material along with the lecture videos
Cons
You need to have an active LinkedIn learning membership.
You need to pay for the LinkedIn learning membership.
The course is fast-paced, you need to grasp the concepts quickly.
5. Animate a walk cycle frame by frame in Adobe animate
This hands-on course is perfect for those who prefer experimenting as they watch the lecture videos. The course teaches you how to animate 2D and 3D characters smoothly. As you near the end of this course, you will have a clear understanding of how animation works and how to animate a hand-drawn character from scratch.
Skills you will learn:
● You will learn how to animate a hand-drawn character from scratch.
● You shall learn how to set up a working canvas and design a character.
● You will learn about the essential features of designing such as color fills, overlapping actions, shadows, and cleanup strokes.
Udemy: skillshare
Pros
The course focuses on the design aspect of animated characters.
The course gives you a hands-on experience with animation tools.
The course helps you learn how to create creative hand drawn characters.
Cons
You need an active skillshare membership to access the lecture videos
Skillshare membership is a paid one.
There are courses from more popular counterparts such as Udemy.
Part 3 How to Quickly Learn the Skills of Adobe Animate Course
Now that you’ve decided to get your hands dirty by dwelling into animation, you must give Wondershare Filmora Pro a try. What’s Wondershare Filmora ?
It’s essentially a one-stop shop for all your video editing needs. From video editing to rigging Wwondershare Filmora Pro has got it all. Using this platform, even a beginner can create exquisite animated videos.
The platform offers you several tools that are easy to use.
Even a neophyte could easily create beautiful animations by using Wondershare Filmora Pro. Using Wondershare Filmora Pro, you can not only animate characters but also define their motion, add sound effects, and edit videos. Filmora Pro offers you animation tools that are easier to operate and resultantly help you make amazing animated videos.
Wondershare Filmora
Get started easily with Filmora’s powerful performance, intuitive interface, and countless effects!
Try It Free Try It Free Try It Free Learn More >
Key Takeaways from This Episode
● As we see, today we’ve taken a look at a few of the best Adobe animate courses.
● Each of the courses can help you learn the basics of animation.
● Animation is indeed one of the budding fields, and with these fruitful courses, you can learn all about animation and possibly begin your journey as a freelancer or a professional in animation.
● Through these courses, you can create animated advertisement videos with ease. Wondershare Filmora Pro however can make your job easier by offering you amazing tools for generating animated videos!<
● Well, on this note we shall take leave! Wishing you good luck on your journey as an animator!
5 Must Try Ways to Add GIF in Text Message on Android
5 Must Try Ways to Add and Send GIF in Text Message on Android
An easy yet powerful editor
Numerous effects to choose from
Detailed tutorials provided by the official channel
A much easier and more extraordinary way of expressing yourself is texting with GIFs, and thus, GIFs for texting on Android are so famous now. GIFs, an abbreviation for Graphics Interchange Format, are brief animated images primarily used in a fun way to pass a message during texting and chatting. You do not necessarily have to say a word; a GIF does that for you!

Having GIFs is one thing; it is another to know how to use them effectively during conversations. Almost all operating system keyboards come with their style of sending GIFs to people. Also, you can download GIFs from the internet and go ahead to attach them directly to a text message. There are also third-party applications like GIPHY and GIF Keyboard to get GIFs for texting on Android. GIPHY is undoubtedly the best GIF app for Android texting. With Gboard, the built-in Google keyboard found in most Android devices; you can effortlessly search for GIFs for texting on Android.
In this article
01 [Can You Text a GIF?](#Part 1)
02 [Best 5 Ways to Add and Send GIFs in Text Message on Android](#Part 2)
Part 1 Can You Text a GIF?
The simple answer is yes! It is possible to message a GIF. GIFs for Android text messaging are becoming the new normal, and this is not surprising as they are easy to add to texts and make texting livelier.
To use a GIF for texting on Android, open any messaging app of your choice found on your Android device; it could be WhatsApp or the default message app installed on the Android device. The keyboard would most likely offer you a variety of GIF options. If not, click on the smiley icon at the bottom of the keyboard to reveal other GIFs grouped in categories. Simply clicking on any of your choices would select it, and all you must do is hit the send icon.
Google’s texting app, Google Messages, comes with sending GIFs. To use a GIF in text messages on Android, open the messaging app and start a fresh conversation or open an existing one, then select the square icon with GIF written in the middle. Select your preferred GIF, then click Send. You can also add a brief description or caption before sending the GIF across.
Apart from the built-in apps on Android devices that allow you to send GIFs, there are unique apps like GIPHY (compatible with Android and iOS devices) with an extensive array of GIFs that can fit into different contexts greetings, culture, animals, reactions, etc. You can also employ social media trackers that help you discover popular and trending GIFs. If the available GIFs do not express your intention, you can go ahead to perform a search to find other GIFs. That way, there’s no limitation to the messages you want to pass through GIFs for texting on Android devices.
Part 2 Best 5 Ways to Add and Send GIF in Text Message on Android
There are different ways of using GIFs for Android texting. Apart from using the GIFs available in the built-in keyboard of messaging apps, downloading, and installing an instant messaging app or GIF keyboard is one of the best and easiest ways to access many GIF libraries.
This section would suggest to you the best GIF apps for Android texting and other ways you can explore to send GIFs and make your texting less wordy, more visual, and more expressive:
01Attaching GIF to a text message
This method of using GIFs for Android texting is straightforward. All you need is a messaging app, then follow these steps:
Step 1: On your Android phone’s app list, open Messages, the app represented as a white speech bubble.

Step 2: At the bottom right corner of the app, tap the blue circular button with a white plus sign. This will open a page to select the receiver’s contact.

Step 3: Select the recipient’s number by tapping on it from the contact list or type the number or name of the person directly into the “To” field at the top of the screen.

Step 4: Tap the circular button with the plus sign in the middle on the left side of the message field. Depending on the app, it may be a paper clip icon.

Step 5: Tap the images icon to select an image from your phone media library.

Step 6: Click Gallery to select a previously downloaded GIF.

Step 7: Select the GIF you want to send. This would insert the GIF into a small preview image on the text message. The GIF would play in the preview window.

Step 8: Click the paper icon at the right corner of the text field to send the animated GIF image.

02Gboard
Gboard is a Google keyboard. This is another easy way of adding GIFs for Android text messaging. If you do not have Gboard, download it from Play Store and install it on your Android phone. Follow these to add GIFs to your text messages:
Step 1: Download, install and set up Gboard on your Android phone.

Step 2: Open your text messaging app to write a new text message. If you have previously sent a message to the recipient, click on the ongoing conversation or open a new chat and select the recipient’s contact.
Step 3: Tap the text message field to compose your text message. If your default keyboard is Gboard, then Gboard will be automatically opened.

Step 4: At the bottom of the keyboard, just to the left of the space bar, tap the smiley face icon.

Step 5: Click the GIF button located at the bottom row of the keyboard.

Step 6: Browse through the different categories tab below the GIF to select a GIF or enter a keyword to look for a GIF.

Step 7: Click on the GIF you want to add to the text message you’re typing automatically.

Step 8: Click the Send button, usually represented as a paper airplane icon at the bottom right of the messaging app.

03GIPHY
This is one of the most popular platforms that supports GIFs for texting on Android. It has the largest library of GIFs, making it a perfect search engine for them. GIPHY allows you to personalize your GIFs while finding the latest and trending GIFs. It also allows you to explore visual aspects, including sports highlights, TV shows, movies, etc. Installing this application gives you access to various GIFs that you can directly share with friends on social media or send them to messaging apps like WhatsApp, Facebook Messenger, etc. With GIPHY, you can save and share gifs while also using the animated stickers available on the app.

04SwiftKey Keyboard
This keyboard app comes with many features, including sending GIFs. This keyboard app lends your writing style and adapts to it, making it a highly productive app for typing. Its emoji keyboard allows you to effortlessly search and send fun stickers, emojis, and GIFs while texting. It also has a multilingual feature.

05GIF Keyboard
This keyboard makes it easy for you to directly and conveniently send GIFs from your keyboard. With a library of millions of GIFs, you need to type in a keyword to get the right GIF at any point in time. Send emojis, videos, and animated GIFs with just a single click using GIF Keyboard. You can browse for GIFs by category, save your favorites GIFs, and share them using different messaging apps.

● Key Takeaways from This Episode →
● How to use GIFs for Android texting.
●the Best GIF apps for Android texting.
● Different reliable ways of using GIFs to spice up your texting on Android devices.
●Using GIFs for Android text messaging is the way to go in this modern age. This is because people relate more to visual representations than mere write-ups. Now, you know that it is possible to text GIFs and send them is simple using the extensively discussed methods in this article.
A much easier and more extraordinary way of expressing yourself is texting with GIFs, and thus, GIFs for texting on Android are so famous now. GIFs, an abbreviation for Graphics Interchange Format, are brief animated images primarily used in a fun way to pass a message during texting and chatting. You do not necessarily have to say a word; a GIF does that for you!
Having GIFs is one thing; it is another to know how to use them effectively during conversations. Almost all operating system keyboards come with their style of sending GIFs to people. Also, you can download GIFs from the internet and go ahead to attach them directly to a text message. There are also third-party applications like GIPHY and GIF Keyboard to get GIFs for texting on Android. GIPHY is undoubtedly the best GIF app for Android texting. With Gboard, the built-in Google keyboard found in most Android devices; you can effortlessly search for GIFs for texting on Android.
In this article
01 [Can You Text a GIF?](#Part 1)
02 [Best 5 Ways to Add and Send GIFs in Text Message on Android](#Part 2)
Part 1 Can You Text a GIF?
The simple answer is yes! It is possible to message a GIF. GIFs for Android text messaging are becoming the new normal, and this is not surprising as they are easy to add to texts and make texting livelier.
To use a GIF for texting on Android, open any messaging app of your choice found on your Android device; it could be WhatsApp or the default message app installed on the Android device. The keyboard would most likely offer you a variety of GIF options. If not, click on the smiley icon at the bottom of the keyboard to reveal other GIFs grouped in categories. Simply clicking on any of your choices would select it, and all you must do is hit the send icon.
Google’s texting app, Google Messages, comes with sending GIFs. To use a GIF in text messages on Android, open the messaging app and start a fresh conversation or open an existing one, then select the square icon with GIF written in the middle. Select your preferred GIF, then click Send. You can also add a brief description or caption before sending the GIF across.
Apart from the built-in apps on Android devices that allow you to send GIFs, there are unique apps like GIPHY (compatible with Android and iOS devices) with an extensive array of GIFs that can fit into different contexts greetings, culture, animals, reactions, etc. You can also employ social media trackers that help you discover popular and trending GIFs. If the available GIFs do not express your intention, you can go ahead to perform a search to find other GIFs. That way, there’s no limitation to the messages you want to pass through GIFs for texting on Android devices.
Part 2 Best 5 Ways to Add and Send GIF in Text Message on Android
There are different ways of using GIFs for Android texting. Apart from using the GIFs available in the built-in keyboard of messaging apps, downloading, and installing an instant messaging app or GIF keyboard is one of the best and easiest ways to access many GIF libraries.
This section would suggest to you the best GIF apps for Android texting and other ways you can explore to send GIFs and make your texting less wordy, more visual, and more expressive:
01Attaching GIF to a text message
This method of using GIFs for Android texting is straightforward. All you need is a messaging app, then follow these steps:
Step 1: On your Android phone’s app list, open Messages, the app represented as a white speech bubble.
Step 2: At the bottom right corner of the app, tap the blue circular button with a white plus sign. This will open a page to select the receiver’s contact.
Step 3: Select the recipient’s number by tapping on it from the contact list or type the number or name of the person directly into the “To” field at the top of the screen.
Step 4: Tap the circular button with the plus sign in the middle on the left side of the message field. Depending on the app, it may be a paper clip icon.
Step 5: Tap the images icon to select an image from your phone media library.
Step 6: Click Gallery to select a previously downloaded GIF.
Step 7: Select the GIF you want to send. This would insert the GIF into a small preview image on the text message. The GIF would play in the preview window.
Step 8: Click the paper icon at the right corner of the text field to send the animated GIF image.
02Gboard
Gboard is a Google keyboard. This is another easy way of adding GIFs for Android text messaging. If you do not have Gboard, download it from Play Store and install it on your Android phone. Follow these to add GIFs to your text messages:
Step 1: Download, install and set up Gboard on your Android phone.
Step 2: Open your text messaging app to write a new text message. If you have previously sent a message to the recipient, click on the ongoing conversation or open a new chat and select the recipient’s contact.
Step 3: Tap the text message field to compose your text message. If your default keyboard is Gboard, then Gboard will be automatically opened.
Step 4: At the bottom of the keyboard, just to the left of the space bar, tap the smiley face icon.
Step 5: Click the GIF button located at the bottom row of the keyboard.
Step 6: Browse through the different categories tab below the GIF to select a GIF or enter a keyword to look for a GIF.
Step 7: Click on the GIF you want to add to the text message you’re typing automatically.
Step 8: Click the Send button, usually represented as a paper airplane icon at the bottom right of the messaging app.
03GIPHY
This is one of the most popular platforms that supports GIFs for texting on Android. It has the largest library of GIFs, making it a perfect search engine for them. GIPHY allows you to personalize your GIFs while finding the latest and trending GIFs. It also allows you to explore visual aspects, including sports highlights, TV shows, movies, etc. Installing this application gives you access to various GIFs that you can directly share with friends on social media or send them to messaging apps like WhatsApp, Facebook Messenger, etc. With GIPHY, you can save and share gifs while also using the animated stickers available on the app.
04SwiftKey Keyboard
This keyboard app comes with many features, including sending GIFs. This keyboard app lends your writing style and adapts to it, making it a highly productive app for typing. Its emoji keyboard allows you to effortlessly search and send fun stickers, emojis, and GIFs while texting. It also has a multilingual feature.
05GIF Keyboard
This keyboard makes it easy for you to directly and conveniently send GIFs from your keyboard. With a library of millions of GIFs, you need to type in a keyword to get the right GIF at any point in time. Send emojis, videos, and animated GIFs with just a single click using GIF Keyboard. You can browse for GIFs by category, save your favorites GIFs, and share them using different messaging apps.
● Key Takeaways from This Episode →
● How to use GIFs for Android texting.
●the Best GIF apps for Android texting.
● Different reliable ways of using GIFs to spice up your texting on Android devices.
●Using GIFs for Android text messaging is the way to go in this modern age. This is because people relate more to visual representations than mere write-ups. Now, you know that it is possible to text GIFs and send them is simple using the extensively discussed methods in this article.
Secrets to Make 2D Game Animation
Secrets to Make 2D Game Animation
An easy yet powerful editor
Numerous effects to choose from
Detailed tutorials provided by the official channel
In this dominated era by 2D game animation, when even the latest versions of Super Mario Bros and Street Fighter. are created of polygonized characters, quality sprite-based 2D games are rare.
In this article
01 [2D Game Animation Courses and Tutorials](#Part 1)
02 [5 Best Game Animation Services to Buy Online](#Part 2)
03 [Best 5 Game Animation Tools for Development As of 2022](#Part 3)
04 [3 Tips for Making Great Animations for 2D Games](#Part 4)
05 [How to Make 2D Animation for Games](#Part 5)
Part 1 2D Game Animation Courses and Tutorials
01Animating a 2D Character within Live-Action Video in Photoshop and Premiere
This tutorial greatly defines the process of creating traditional 2D animation in Photoshop implacable over live-action video. We’ll discuss the live-action planning shots with animation in mind, continuity of video editing, and making references for video animation. You will also know how to create the critical poses via rough animation to finish the entire movement and make final line images.
02Beginning 2D Animation: The Absolute Beginner’s Entry with Jeff Mumm
This course lays a solid foundation for absolute beginners entering the exciting world of 2D game animation. Here, we describe the detailed steps to create unique and great-looking animations.
You will also learn ‘easing,’ one of the twelve animation principles, and ultimately plan an animated sequence.
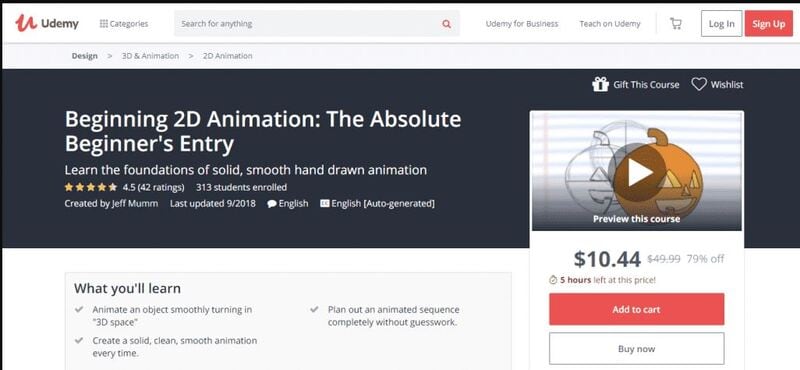
032D Animation in Moho from Basic to Advanced
This course focuses on applying the principles of animation to create an organic walk cycle for the character. This tutorial or course will also teach you how to rig and prepare your animated characters and do 2D game animation.
You will also learn how to trace characters in Moho and use different drawing tools.
Also, you will learn how to create an organic walk cycle by applying advanced animation principles.

042D Animation 101 Courses
This is one of the free online and the ultimate 2D game character design and animation courses that offer free online certificates. Autumn Leave Films has ten years of experience in the film industry and a great collection of short films – nearly 30 2D Animation 101 Courses.
2D Animation 101 provides eight courses, plus free and proprietary 2D game character animation software. In addition, their “Free Step-by-Step Plan” is specifically compelling to beginners in the 2D Animation arena.
It includes daily 10-minute lessons, online 2D game character animation tutorials, suggestions, and tips on using the required software.
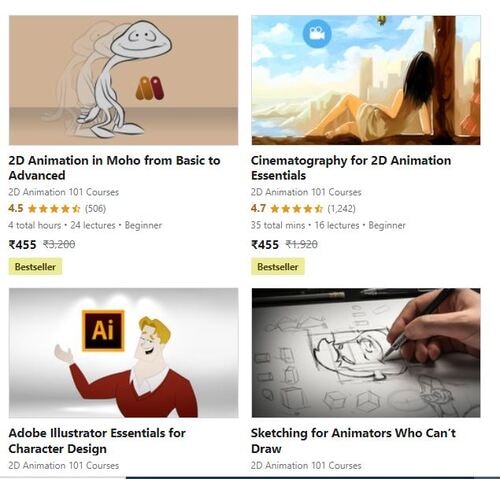
05Skillshare -2D Animation for Beginners with Adobe Animate
This is one of the free online 2D animation courses that offer free online animation courses with certificates. You can learn 2D animation online by following Walt’s course. This course is designed for beginners and demonstrates how to create animated characters by providing students with an understanding of the fundamental principles and vivid examples. This tutorial covers various topics, including vector art basics in Animate, nested animations, adding audio to animations, and more.
This short course or tutorial is ideal for animation for personal rather than professional reasons.

Part 2 5 Best Game Animation Services to Buy Online
Rather than using and learning the best 2D animation software for game development, we’d like to describe a list of the top 5 freelancing platforms to rely upon for the best game animation services.
01Upwork
02Freelancer
03Fiverr
04Guru
05PeoplePerHour
Part 3 Best 5 Game Animation Tools for Development As of 2022
01Adobe Animate
It is a program from Adobe’s Creative Cloud. It offers the ability to make many varieties of animated features, games, or other Flash multimedia. The program was called Adobe Flash Professional for more than ten years; that name was retired in 2015.
The main features of Animate are as follows:
● Integration with your Adobe cloud library of assets
● Easy cross-platform use with other Adobe products
● Creates animated movies, cartoons, or clips
● Creates Flash games or interactive Flash utilities
02Moho
It’s a comprehensive and best 2D game animation software where your animations are basically on the level of some of your favorite creations. It’s projected toward animators looking to hone their craft.
You could create some fantastic stuff if you’re up to the task (and the price). Moreover, they’re constantly adding updates.
03Plastic Animation Paper
Plastic Animation Paper is another best 2D game character animation software that deals heavily with the concept of pencil drawing.
The program is designed for the most straightforward use and involves clear resolution. You can do whatever you wish with your drawings and elevate yourself to the next level.
04Stop Motion Studio
‘Want to create movies like Wallace and those groovy Lego shorts on YouTube? Stop Motion Studio allows you to create terrific stop action movies with a bucket of specialized features.’
05Animaker
Learning how to make 2D animation for games with Animaker is also good to set up a storyboard and animate the characters or props in that scene. It’s used by companies like Verizon, Google, Pepsi, etc.
It’s appropriate for ad placement on websites and simplistic for beginners. They make it easy and super-fast to get lost for hours animating.
Part 4 3 Tips for Making Great Animations for 2D Games
Now that you have some initial idea of 2D game animation let’s jump to the top 3 tips that will help you create the best and unique 2D game character animation designs with ease.
It will be beneficial while knowing how to make 2D animation for games.
01Focus on the story and start with simple movements
You need to focus on the storyline so that outcome will come accordingly. Focus on every detail while sketching, and don’t miss out on simple movements. Take paper and pencil and start drawing simple exercises like the movement of a bouncing ball etc.
02Use keyframes properly
You need to carefully use keyframes’ start and endpoints to have robust storytelling and movements. To adequately describe the first and last, you need to consider effectively using the keyframes.
03Enliven your characters
You need to give life to your characters so that audience can best relate to the story. Also, pay good attention to facial expressions, sound, tickling movements, etc.
Although these may look like the most straightforward tips ever, these are the most practical 2D game animation strategies that can do wonders if used effectively.
Part 5 How to Make 2D Animation for Games
Making 2D game character animation isn’t a straightforward process and thus needs detailed knowledge that we will describe below.
Let’s use Unity as the best 2D animation software for games without further ado!
Essential awareness of the Unity Editor (how to navigate and open tabs) is required to work with the Unity Animation window.
01Step 1: Start the Animation tab
Choose the Adventurer character and launch the Animation tab.
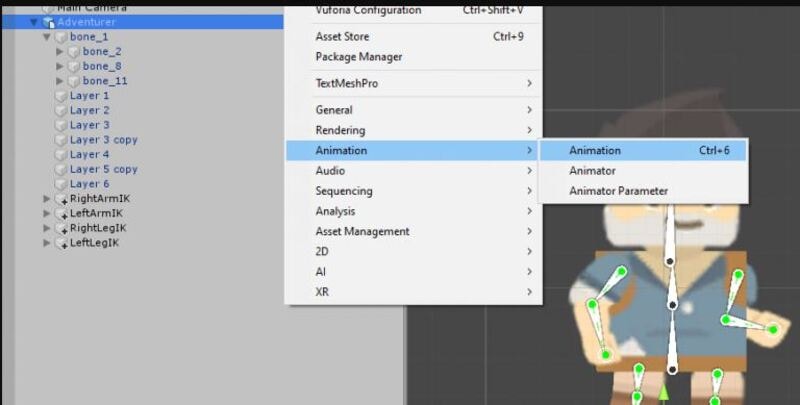
Dock this next to your project tab and console tab. Head towards the project tab and name with the Adventurer folder. Make a new folder known as “Animation.”
With the Animation tab, create a new animation known as “Idle” placed in our Animation folder.
It also creates an Animator Controller in that same folder.
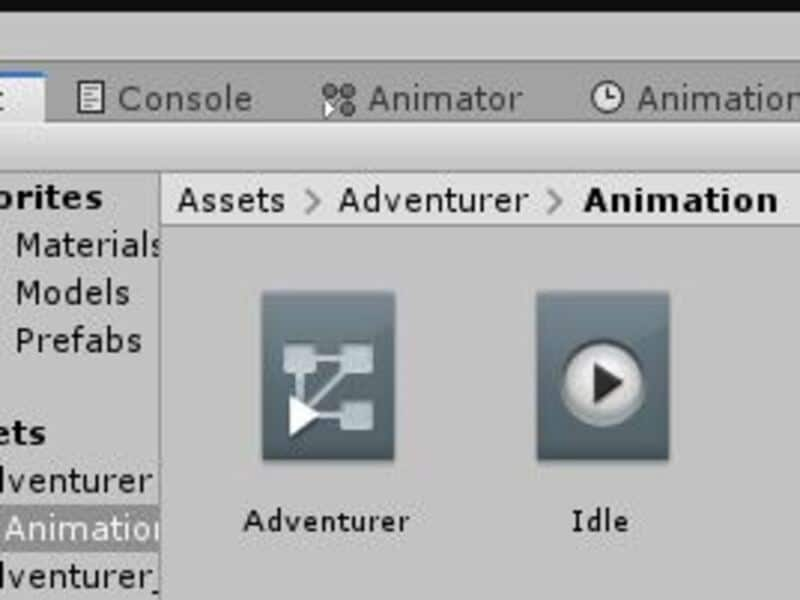
Now, let’s start animating this character!
02Step 2: Proceed with the Idle Animation
IKs contribute a lot to the efficiency and speed of animating when it comes to idle animation. We must animate a subtle movement very similar to a breathing motion. Tap the red record button and move the character to this position:
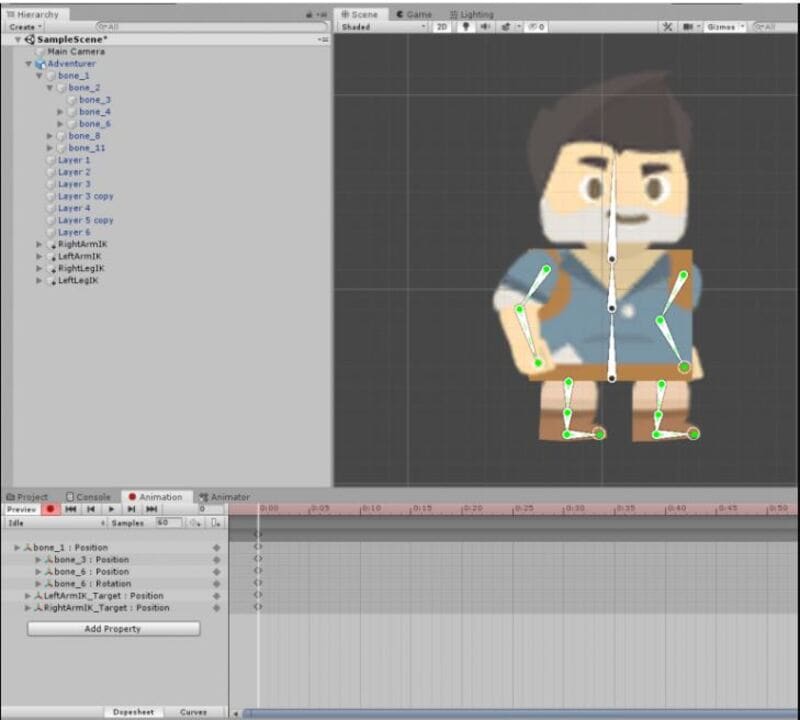
Now go about fifty frames ahead and barely move the top torso bone straight down.
Drag the arm IKs to the side to contain less bend in them and display a sort of “swinging” motion. Here is the pose that I chose:
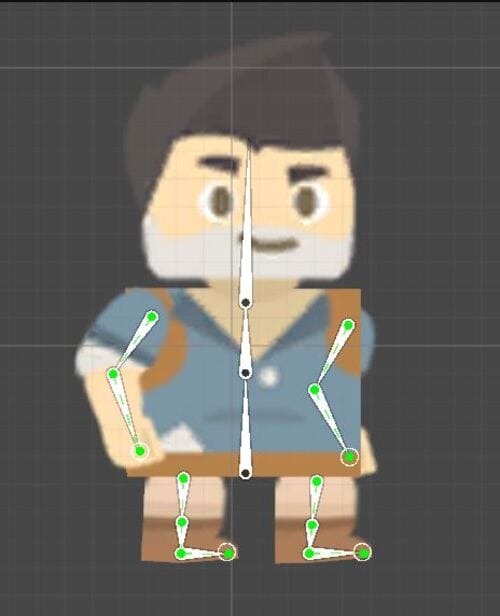
A subtle tweak is there. It makes the idle animation look strange if we create large movements. Then, choose the first group of keyframes and tap the Ctrl-C (Command-C on a Mac).
Then, paste these frame-centric keyframes on number 1:50.
So, the nice looping animation is over now! It looks genuine, but we need to add some head motion to improve the illusion.
Just rotate the head back ever so slightly. But, as you can see, it makes a huge difference. Alright! Congratulations! We now have an idle animation!
03Step 3: Start walk animation
Create a new animation clip called ‘Walk.”
This animation is a bit more technical. Here, we need to know a few essential things about walk locomotion. The walk animation’s primary function is that the character is always touching the ground. Therefore, we should never have a pose where our character is airborne. Also, I use the word “pose” intentionally. When we animate in 2D, an action comprises certain key poses. In the scenario of the walk animation, we have one posture like this:
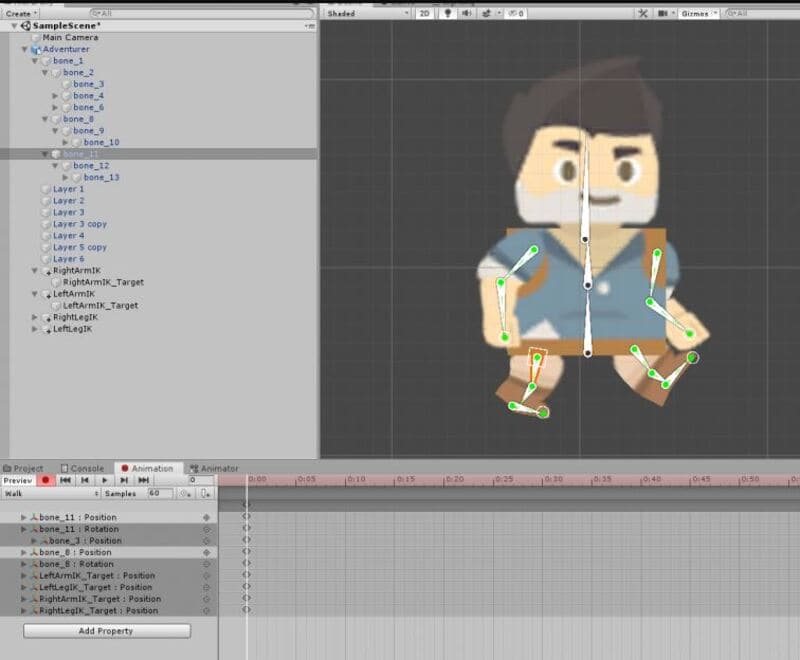
Here we have the right foot (relative to the character) touching the ground as you wander.
Then, about six frames ahead, we have a “passing pose.”
It contains a slight movement downwards. It further adds a realistic bobbing motion.
We must animate the character moving forward by moving the entire character game object. Don’t move the surface by any other means except by dragging the character as the whole object.
Then, the “dynamic pose” with the left foot touching the ground this time.
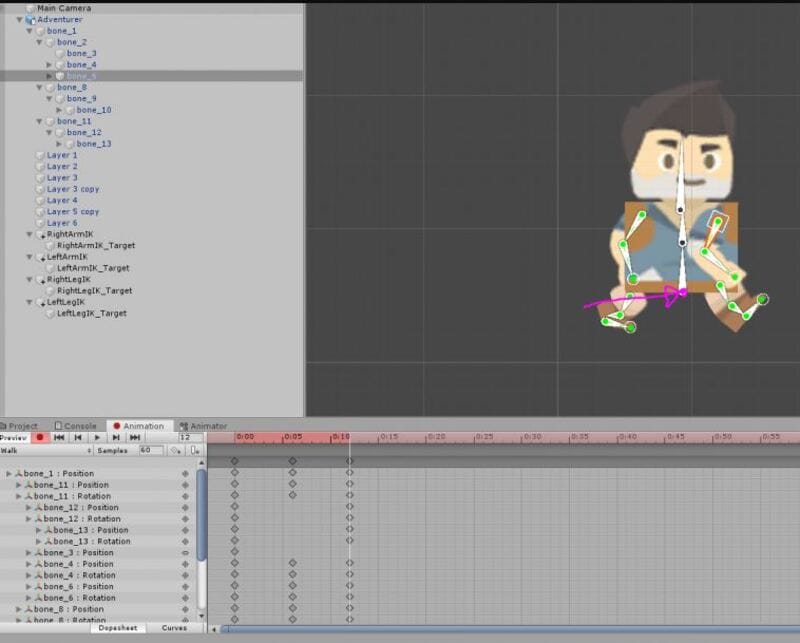
This happens at frame twelve, and we are still forwarding the character.
Now, we just require a final passing pose.
And then we recreate the same pose!
Now, copy the first keyframe and paste it. Reposition the character on the X-axis to match the forward motion. Now, go back to your animation and tweak any limbs bending in the wrong direction.
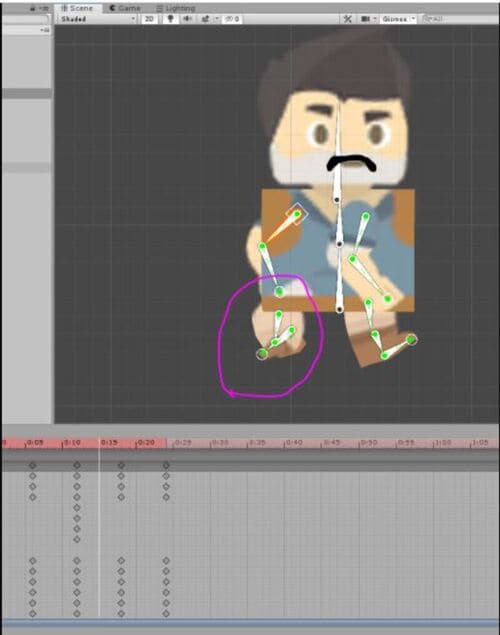
We are done!
04Step 4: Run animation
For the Run animation, create one pose with the airborne character. The distance covered is also more significant than the walk animation. Besides, the run animation has a similar general structure, but we add one extra pose to improve the illusion ultimately.
Create a new animation folder or clip called “Run.”
Tap the record tab and move the limbs to this pose:
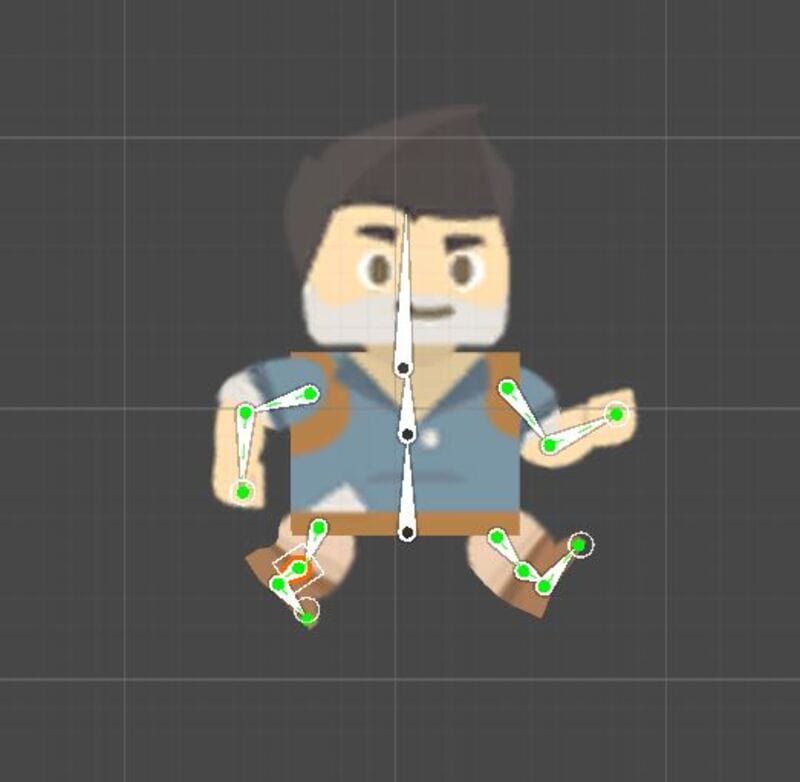
The armature, we found, was very fiddly, so be patient while trying to create this pose. This first dynamic pose means that we need to have the whole character move slightly up on the y-axis. Then, after forwarding the six frames, we drag the character in different positions and down while limbs reposition to make the first passing pose.
Go through these two keyframes to check if you have an experimental animation. Reposition the feet to avoid foot sliding.
Then, the second dynamic pose happens six frames forward:
Now, we have another passing posture at frame number 18:
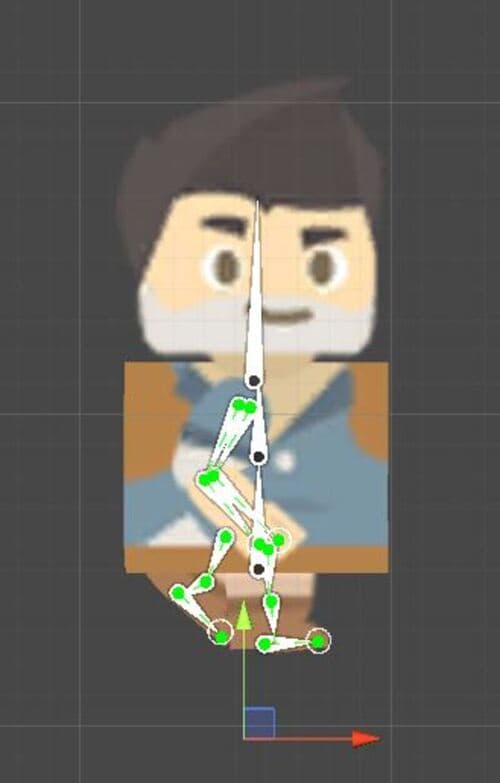
And conclusively, we have our final dynamic pose and make it look like the first pose. An excellent place to begin is to copy the first frame and paste it at the end. Drag the character forward on the X-axis into the ideal place. Now move the limbs into roughly the exact position as the beginning pose.
05Step 5: Go back to animation and check
Now, you can go back through the animation and consider checking two things. Firstly, correct any unnaturally bent limbs.
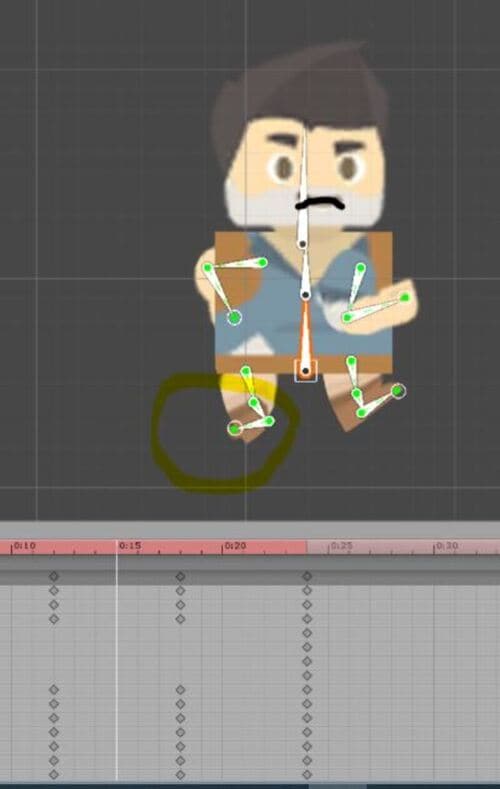
06Step 6: Create a contact pose
Secondly, we are required to add a unique pose to this run cycle called a “Contact Pose,” where we can visibly see the character make contact with the ground. This pose occurs a few frames after the dynamic pose and a few before the passing pose. It is simply the forward leg making early contact with the ground.

We need one of these before every passing pose. Also, while we’re here, let’s add a little more toe movement after passing each passing pose to make it look like the character got pushed off the ground.
So, this is the procedure to use the best 2D animation software for game development via Unity, and you can similarly continue to make jump animations, root motion, and more.
This tutorial mainly focused on animating a 2D character and dove deeper into the actual structure of an animation. Knowing these things will allow you to animate 2D characters and 3D characters as the principles are the same for each medium.
Easiest Solution for 2D Game Character Animation
Animating 2D games with Filmora Pro is a perfect choice. You get to try out its excellent 2D and 3D animation functions that are highly affordable and simple to use for both Android and iOS devices. You can consider using keyframe animations and letting them look realistic.
You can also get your fingers on a vast range of video editing tools with Wondershare Filmora Video Editor , such as color correction and grading, motion tracking, keying, simulations, and more. It allows you to make incredible animated videos and cinematic reels.
How to animate games with Wondershare Filmora
More advancement means more and kinds of games are fading out to obscurity. You can now animate 2D games underrated and add a bit of your touch to them via software like Filmora Pro and others like it.
For example, Filmora Pro features a dozen different transition effects like Centre Wipe, Evaporate, or Linear Wipe.
For Win 7 or later (64-bit)
For macOS 10.12 or later
You can also apply 3D rendering techniques to your games’ light and shadow effects.
● Key Takeaways from This Episode →
● A guide to the ultimate 2d game character design & animation course
● A guide to 5 best game animation services
● Learning five best 2D game character animation tools
● Tips for making excellent 2D game animations
● A step by ultimate step guide to making 2D game animation character in Unity
● Exploring the easiest solution for 2D game animation
In this dominated era by 2D game animation, when even the latest versions of Super Mario Bros and Street Fighter. are created of polygonized characters, quality sprite-based 2D games are rare.
In this article
01 [2D Game Animation Courses and Tutorials](#Part 1)
02 [5 Best Game Animation Services to Buy Online](#Part 2)
03 [Best 5 Game Animation Tools for Development As of 2022](#Part 3)
04 [3 Tips for Making Great Animations for 2D Games](#Part 4)
05 [How to Make 2D Animation for Games](#Part 5)
Part 1 2D Game Animation Courses and Tutorials
01Animating a 2D Character within Live-Action Video in Photoshop and Premiere
This tutorial greatly defines the process of creating traditional 2D animation in Photoshop implacable over live-action video. We’ll discuss the live-action planning shots with animation in mind, continuity of video editing, and making references for video animation. You will also know how to create the critical poses via rough animation to finish the entire movement and make final line images.
02Beginning 2D Animation: The Absolute Beginner’s Entry with Jeff Mumm
This course lays a solid foundation for absolute beginners entering the exciting world of 2D game animation. Here, we describe the detailed steps to create unique and great-looking animations.
You will also learn ‘easing,’ one of the twelve animation principles, and ultimately plan an animated sequence.
032D Animation in Moho from Basic to Advanced
This course focuses on applying the principles of animation to create an organic walk cycle for the character. This tutorial or course will also teach you how to rig and prepare your animated characters and do 2D game animation.
You will also learn how to trace characters in Moho and use different drawing tools.
Also, you will learn how to create an organic walk cycle by applying advanced animation principles.
042D Animation 101 Courses
This is one of the free online and the ultimate 2D game character design and animation courses that offer free online certificates. Autumn Leave Films has ten years of experience in the film industry and a great collection of short films – nearly 30 2D Animation 101 Courses.
2D Animation 101 provides eight courses, plus free and proprietary 2D game character animation software. In addition, their “Free Step-by-Step Plan” is specifically compelling to beginners in the 2D Animation arena.
It includes daily 10-minute lessons, online 2D game character animation tutorials, suggestions, and tips on using the required software.
05Skillshare -2D Animation for Beginners with Adobe Animate
This is one of the free online 2D animation courses that offer free online animation courses with certificates. You can learn 2D animation online by following Walt’s course. This course is designed for beginners and demonstrates how to create animated characters by providing students with an understanding of the fundamental principles and vivid examples. This tutorial covers various topics, including vector art basics in Animate, nested animations, adding audio to animations, and more.
This short course or tutorial is ideal for animation for personal rather than professional reasons.
Part 2 5 Best Game Animation Services to Buy Online
Rather than using and learning the best 2D animation software for game development, we’d like to describe a list of the top 5 freelancing platforms to rely upon for the best game animation services.
01Upwork
02Freelancer
03Fiverr
04Guru
05PeoplePerHour
Part 3 Best 5 Game Animation Tools for Development As of 2022
01Adobe Animate
It is a program from Adobe’s Creative Cloud. It offers the ability to make many varieties of animated features, games, or other Flash multimedia. The program was called Adobe Flash Professional for more than ten years; that name was retired in 2015.
The main features of Animate are as follows:
● Integration with your Adobe cloud library of assets
● Easy cross-platform use with other Adobe products
● Creates animated movies, cartoons, or clips
● Creates Flash games or interactive Flash utilities
02Moho
It’s a comprehensive and best 2D game animation software where your animations are basically on the level of some of your favorite creations. It’s projected toward animators looking to hone their craft.
You could create some fantastic stuff if you’re up to the task (and the price). Moreover, they’re constantly adding updates.
03Plastic Animation Paper
Plastic Animation Paper is another best 2D game character animation software that deals heavily with the concept of pencil drawing.
The program is designed for the most straightforward use and involves clear resolution. You can do whatever you wish with your drawings and elevate yourself to the next level.
04Stop Motion Studio
‘Want to create movies like Wallace and those groovy Lego shorts on YouTube? Stop Motion Studio allows you to create terrific stop action movies with a bucket of specialized features.’
05Animaker
Learning how to make 2D animation for games with Animaker is also good to set up a storyboard and animate the characters or props in that scene. It’s used by companies like Verizon, Google, Pepsi, etc.
It’s appropriate for ad placement on websites and simplistic for beginners. They make it easy and super-fast to get lost for hours animating.
Part 4 3 Tips for Making Great Animations for 2D Games
Now that you have some initial idea of 2D game animation let’s jump to the top 3 tips that will help you create the best and unique 2D game character animation designs with ease.
It will be beneficial while knowing how to make 2D animation for games.
01Focus on the story and start with simple movements
You need to focus on the storyline so that outcome will come accordingly. Focus on every detail while sketching, and don’t miss out on simple movements. Take paper and pencil and start drawing simple exercises like the movement of a bouncing ball etc.
02Use keyframes properly
You need to carefully use keyframes’ start and endpoints to have robust storytelling and movements. To adequately describe the first and last, you need to consider effectively using the keyframes.
03Enliven your characters
You need to give life to your characters so that audience can best relate to the story. Also, pay good attention to facial expressions, sound, tickling movements, etc.
Although these may look like the most straightforward tips ever, these are the most practical 2D game animation strategies that can do wonders if used effectively.
Part 5 How to Make 2D Animation for Games
Making 2D game character animation isn’t a straightforward process and thus needs detailed knowledge that we will describe below.
Let’s use Unity as the best 2D animation software for games without further ado!
Essential awareness of the Unity Editor (how to navigate and open tabs) is required to work with the Unity Animation window.
01Step 1: Start the Animation tab
Choose the Adventurer character and launch the Animation tab.
Dock this next to your project tab and console tab. Head towards the project tab and name with the Adventurer folder. Make a new folder known as “Animation.”
With the Animation tab, create a new animation known as “Idle” placed in our Animation folder.
It also creates an Animator Controller in that same folder.
Now, let’s start animating this character!
02Step 2: Proceed with the Idle Animation
IKs contribute a lot to the efficiency and speed of animating when it comes to idle animation. We must animate a subtle movement very similar to a breathing motion. Tap the red record button and move the character to this position:
Now go about fifty frames ahead and barely move the top torso bone straight down.
Drag the arm IKs to the side to contain less bend in them and display a sort of “swinging” motion. Here is the pose that I chose:
A subtle tweak is there. It makes the idle animation look strange if we create large movements. Then, choose the first group of keyframes and tap the Ctrl-C (Command-C on a Mac).
Then, paste these frame-centric keyframes on number 1:50.
So, the nice looping animation is over now! It looks genuine, but we need to add some head motion to improve the illusion.
Just rotate the head back ever so slightly. But, as you can see, it makes a huge difference. Alright! Congratulations! We now have an idle animation!
03Step 3: Start walk animation
Create a new animation clip called ‘Walk.”
This animation is a bit more technical. Here, we need to know a few essential things about walk locomotion. The walk animation’s primary function is that the character is always touching the ground. Therefore, we should never have a pose where our character is airborne. Also, I use the word “pose” intentionally. When we animate in 2D, an action comprises certain key poses. In the scenario of the walk animation, we have one posture like this:
Here we have the right foot (relative to the character) touching the ground as you wander.
Then, about six frames ahead, we have a “passing pose.”
It contains a slight movement downwards. It further adds a realistic bobbing motion.
We must animate the character moving forward by moving the entire character game object. Don’t move the surface by any other means except by dragging the character as the whole object.
Then, the “dynamic pose” with the left foot touching the ground this time.
This happens at frame twelve, and we are still forwarding the character.
Now, we just require a final passing pose.
And then we recreate the same pose!
Now, copy the first keyframe and paste it. Reposition the character on the X-axis to match the forward motion. Now, go back to your animation and tweak any limbs bending in the wrong direction.
We are done!
04Step 4: Run animation
For the Run animation, create one pose with the airborne character. The distance covered is also more significant than the walk animation. Besides, the run animation has a similar general structure, but we add one extra pose to improve the illusion ultimately.
Create a new animation folder or clip called “Run.”
Tap the record tab and move the limbs to this pose:
The armature, we found, was very fiddly, so be patient while trying to create this pose. This first dynamic pose means that we need to have the whole character move slightly up on the y-axis. Then, after forwarding the six frames, we drag the character in different positions and down while limbs reposition to make the first passing pose.
Go through these two keyframes to check if you have an experimental animation. Reposition the feet to avoid foot sliding.
Then, the second dynamic pose happens six frames forward:
Now, we have another passing posture at frame number 18:
And conclusively, we have our final dynamic pose and make it look like the first pose. An excellent place to begin is to copy the first frame and paste it at the end. Drag the character forward on the X-axis into the ideal place. Now move the limbs into roughly the exact position as the beginning pose.
05Step 5: Go back to animation and check
Now, you can go back through the animation and consider checking two things. Firstly, correct any unnaturally bent limbs.
06Step 6: Create a contact pose
Secondly, we are required to add a unique pose to this run cycle called a “Contact Pose,” where we can visibly see the character make contact with the ground. This pose occurs a few frames after the dynamic pose and a few before the passing pose. It is simply the forward leg making early contact with the ground.
We need one of these before every passing pose. Also, while we’re here, let’s add a little more toe movement after passing each passing pose to make it look like the character got pushed off the ground.
So, this is the procedure to use the best 2D animation software for game development via Unity, and you can similarly continue to make jump animations, root motion, and more.
This tutorial mainly focused on animating a 2D character and dove deeper into the actual structure of an animation. Knowing these things will allow you to animate 2D characters and 3D characters as the principles are the same for each medium.
Easiest Solution for 2D Game Character Animation
Animating 2D games with Filmora Pro is a perfect choice. You get to try out its excellent 2D and 3D animation functions that are highly affordable and simple to use for both Android and iOS devices. You can consider using keyframe animations and letting them look realistic.
You can also get your fingers on a vast range of video editing tools with Wondershare Filmora Video Editor , such as color correction and grading, motion tracking, keying, simulations, and more. It allows you to make incredible animated videos and cinematic reels.
How to animate games with Wondershare Filmora
More advancement means more and kinds of games are fading out to obscurity. You can now animate 2D games underrated and add a bit of your touch to them via software like Filmora Pro and others like it.
For example, Filmora Pro features a dozen different transition effects like Centre Wipe, Evaporate, or Linear Wipe.
For Win 7 or later (64-bit)
For macOS 10.12 or later
You can also apply 3D rendering techniques to your games’ light and shadow effects.
● Key Takeaways from This Episode →
● A guide to the ultimate 2d game character design & animation course
● A guide to 5 best game animation services
● Learning five best 2D game character animation tools
● Tips for making excellent 2D game animations
● A step by ultimate step guide to making 2D game animation character in Unity
● Exploring the easiest solution for 2D game animation
Epic Formula to Animate Photos From These 10 Animate Pictures App
Epic Formula to Animate Photos from These 10 Animate Pictures App
An easy yet powerful editor
Numerous effects to choose from
Detailed tutorials provided by the official channel
With the availability of modern technology, still photos can be seamlessly transformed into live animated photos. Adding motion and movement along with filter effects to still photos is pretty easy with an animated pictures app.
For Win 7 or later (64-bit)
For macOS 10.12 or later
In this article, we have listed 10 of the best animated picture apps available in 2021. You will find all essential details and features of these 10 apps which will help you choose the best option when choosing an app for animating a picture. Let us take a look at these 10 apps!
In this article
01 [10 Animate Pictures Apps](#Part 1)
02 [The contrast of These 10 Animate Pictures Apps](#Part 2)
Part 1 10 Animate Pictures Apps
01 MotionLeap

MotionLeap
● Price
Free, with premium version available.
● OS
Android and iOS
● Key features
You can freeze parts of an image.
Variety of filters can be applied.
Although MotionLeap is free to use there’s a Pro and subscription version with a greater variety of features in it. The best part about this animated pictures app is that it does not put any watermark over the final image.
The app can animate still photos and convert them into short, loop videos. This is done by the programming of the directional cues into the image which is executed by dragging actions of the thumb across your mobile screen.
Although, on MotionLeap, without the pro version, the photo will be saved in video format.
02 GIPHY

GIPHY
● Price
Free
● OS
Android and iOS
● Key features
Simple, easy to use UI
A variety of built-in animation tools
Sticker maker on iOS (for iPhone X and later models)
We might already be acquainted with GIPHY as the most popular search engine for GIFs. Although, what’s unknown is that GIPHY has a mobile app both for Android and iOS which can be used to create GIFs and animate photos.
The app’s key advantage is its highly intuitive and very easy to use interface that makes it really easy to animate photos with the GIPHY app. Above all, it is completely free to use and along with animating pictures, you can also add captions to your animated photos or even capture short videos.
03 Movepic

Movepic
● Price
Free, with premium version available.
● OS
Android and iOS
● Key features
Easy to use.
A range of built in overlays and filters.
Movepic is another excellent app for animating pictures. As an animated pictures app, it is quite similar to MotionLeap owing to the fact that it animates still photos.
A downside of the Movepic free version is that it puts a watermark on the image and you cannot remove it without upgrading to the premium version or VIP account. The app saves the final images as a movie file and not as a GIF.
04 ImgPlay

ImgPlay
● Price
Free, with premium version available.
● OS
Android and iOS
● Key features
Easy to use.
Lay out still photographs side-by-side and use burst photos or videos.
ImgPlay is another very popular and effective animated pictures app. The app makes use of a range of ready-to-use animated photos for the web.
ImgPlay also comes with a range of advanced and easy-to-understand controls. This app, in spite of all its perks, puts a watermark on the image—which, once again, cannot be removed unless you buy the premium version of the app.
05 StoryZ

StoryZ
● Price
Free, with premium version available.
● OS
Android and iOS
● Key features
Programmed movement paths, overlays and color filters.
Saves images automatically as GIFs.
StoryZ is one of the best apps on this list and anyone who has used the app would agree with that. The app can seamlessly animate still photos.
A great thing about this app is that StoryZ enables users to remove the watermark from the image by simply watching a quick ad before saving the file.
06 VIMAGE 3D

VIMAGE 3D
● Price
Free, with premium version available.
● OS
Android and iOS
● Key features
AI enabled.
A range of filters and special effects.
Add sounds to your animated images and videos.
This one is an award winning app for animating pictures and the app won a Google Play award in 2018. The app is simply exceptional in terms of user experience as well as features.
Like most of these apps, you do need to pay to remove the watermark, get access to the full effects library, and the ability to export your images in up to 2560p resolution.
07 Photo Bender

Photo Bender
● Price
Free
● OS
Android
● Key features
A variety of editing tools and features including brushes.
Enables users to export images as MP4s, GIFs, JPEGs, and PNGs.
Photo Bender is an animated pictures app that is specific to the Android platform. The app is popular for its convenience of use and it enables users to digitally warp images and animate photos.
There are a variety of things that can be done to an image with the help of this app. From colouring an image, to bending it, stretching it, and a lot more, you can do it all. You also get a range of brushes to use on the image.
08 Zoetropic

Zoetropic
● Price
Free, with premium version available.
● OS
Android and iOS
● Key features
The app is really fast and efficient.
Simple UI.
Zoetropic helps you animate images in minutes,even if you are using the app for the first time. The app does not come with a lot of features but its simplicity, effectiveness and ease of use makes it a great option for animated pictures app.
09 Lumyer

Lumyer
● Price
Free, with premium version available.
● OS
Android and iOS
● Key features
Seasonal and occasional animation effects.
Easy to use.
This app is another great platform to edit pictures and animate them. It enables you to add a variety of effects to pictures and easily animate them.
From subtle weather effects to sparkle, seasonal animations and a lot more, the app offers a lot of options.
Part 2: The contrast of These 10 Animate Pictures Apps
| Name of The Animated Picture App | Advantages | Disadvantages |
|---|---|---|
| MotionLeap | No watermark+Variety of filters; | File saved in video format without pro version |
| GIPHY | Free to use+Simple UI | Not suitable for advanced editing |
| Movepic | Built-in overlays and filters | Saves final image as video file without pro version Watermark |
| ImgPlay | Easy to use and understand+Ready to go animated photos for the web | Watermark on image |
| StoryZ | Remove watermark by watching an ad+Variety of animation techniques | Boring interface |
| VIMAGE 3D | Neat UI+Endless features+AI enabled | Need to buy premium version to access majority of features |
| Photo Bender | A range of tasks can be executed | Not a very attractive UI |
| Zoetropic | Simple, effective and easy to use | Limited effects on free version |
| Lumyer | Fast and easy to use+Lot of features | Can be expensive due to several in-app purchases |
| Filmora | Easy to Use+fordable+ons of features+Seamless UI+rofessional video editing tools | Not available on mobile |
Key Takeaways from This Episode
● That brings us to the end of the article. Anyone looking for an animated pictures app to animate their images have found 10 of the best apps available in the market right now.
● With the list of these 10 apps, anyone can find the most suitable platform for their own purposes of animating an image.
● Last but not the least, if it comes to an all inclusive platform for video editing and animating pictures, Filmora Pro is definitely the winner on this list! So check out your options and make the best choice!
With the availability of modern technology, still photos can be seamlessly transformed into live animated photos. Adding motion and movement along with filter effects to still photos is pretty easy with an animated pictures app.
For Win 7 or later (64-bit)
For macOS 10.12 or later
In this article, we have listed 10 of the best animated picture apps available in 2021. You will find all essential details and features of these 10 apps which will help you choose the best option when choosing an app for animating a picture. Let us take a look at these 10 apps!
In this article
01 [10 Animate Pictures Apps](#Part 1)
02 [The contrast of These 10 Animate Pictures Apps](#Part 2)
Part 1 10 Animate Pictures Apps
01 MotionLeap
MotionLeap
● Price
Free, with premium version available.
● OS
Android and iOS
● Key features
You can freeze parts of an image.
Variety of filters can be applied.
Although MotionLeap is free to use there’s a Pro and subscription version with a greater variety of features in it. The best part about this animated pictures app is that it does not put any watermark over the final image.
The app can animate still photos and convert them into short, loop videos. This is done by the programming of the directional cues into the image which is executed by dragging actions of the thumb across your mobile screen.
Although, on MotionLeap, without the pro version, the photo will be saved in video format.
02 GIPHY
GIPHY
● Price
Free
● OS
Android and iOS
● Key features
Simple, easy to use UI
A variety of built-in animation tools
Sticker maker on iOS (for iPhone X and later models)
We might already be acquainted with GIPHY as the most popular search engine for GIFs. Although, what’s unknown is that GIPHY has a mobile app both for Android and iOS which can be used to create GIFs and animate photos.
The app’s key advantage is its highly intuitive and very easy to use interface that makes it really easy to animate photos with the GIPHY app. Above all, it is completely free to use and along with animating pictures, you can also add captions to your animated photos or even capture short videos.
03 Movepic
Movepic
● Price
Free, with premium version available.
● OS
Android and iOS
● Key features
Easy to use.
A range of built in overlays and filters.
Movepic is another excellent app for animating pictures. As an animated pictures app, it is quite similar to MotionLeap owing to the fact that it animates still photos.
A downside of the Movepic free version is that it puts a watermark on the image and you cannot remove it without upgrading to the premium version or VIP account. The app saves the final images as a movie file and not as a GIF.
04 ImgPlay
ImgPlay
● Price
Free, with premium version available.
● OS
Android and iOS
● Key features
Easy to use.
Lay out still photographs side-by-side and use burst photos or videos.
ImgPlay is another very popular and effective animated pictures app. The app makes use of a range of ready-to-use animated photos for the web.
ImgPlay also comes with a range of advanced and easy-to-understand controls. This app, in spite of all its perks, puts a watermark on the image—which, once again, cannot be removed unless you buy the premium version of the app.
05 StoryZ
StoryZ
● Price
Free, with premium version available.
● OS
Android and iOS
● Key features
Programmed movement paths, overlays and color filters.
Saves images automatically as GIFs.
StoryZ is one of the best apps on this list and anyone who has used the app would agree with that. The app can seamlessly animate still photos.
A great thing about this app is that StoryZ enables users to remove the watermark from the image by simply watching a quick ad before saving the file.
06 VIMAGE 3D
VIMAGE 3D
● Price
Free, with premium version available.
● OS
Android and iOS
● Key features
AI enabled.
A range of filters and special effects.
Add sounds to your animated images and videos.
This one is an award winning app for animating pictures and the app won a Google Play award in 2018. The app is simply exceptional in terms of user experience as well as features.
Like most of these apps, you do need to pay to remove the watermark, get access to the full effects library, and the ability to export your images in up to 2560p resolution.
07 Photo Bender
Photo Bender
● Price
Free
● OS
Android
● Key features
A variety of editing tools and features including brushes.
Enables users to export images as MP4s, GIFs, JPEGs, and PNGs.
Photo Bender is an animated pictures app that is specific to the Android platform. The app is popular for its convenience of use and it enables users to digitally warp images and animate photos.
There are a variety of things that can be done to an image with the help of this app. From colouring an image, to bending it, stretching it, and a lot more, you can do it all. You also get a range of brushes to use on the image.
08 Zoetropic
Zoetropic
● Price
Free, with premium version available.
● OS
Android and iOS
● Key features
The app is really fast and efficient.
Simple UI.
Zoetropic helps you animate images in minutes,even if you are using the app for the first time. The app does not come with a lot of features but its simplicity, effectiveness and ease of use makes it a great option for animated pictures app.
09 Lumyer
Lumyer
● Price
Free, with premium version available.
● OS
Android and iOS
● Key features
Seasonal and occasional animation effects.
Easy to use.
This app is another great platform to edit pictures and animate them. It enables you to add a variety of effects to pictures and easily animate them.
From subtle weather effects to sparkle, seasonal animations and a lot more, the app offers a lot of options.
Part 2: The contrast of These 10 Animate Pictures Apps
| Name of The Animated Picture App | Advantages | Disadvantages |
|---|---|---|
| MotionLeap | No watermark+Variety of filters; | File saved in video format without pro version |
| GIPHY | Free to use+Simple UI | Not suitable for advanced editing |
| Movepic | Built-in overlays and filters | Saves final image as video file without pro version Watermark |
| ImgPlay | Easy to use and understand+Ready to go animated photos for the web | Watermark on image |
| StoryZ | Remove watermark by watching an ad+Variety of animation techniques | Boring interface |
| VIMAGE 3D | Neat UI+Endless features+AI enabled | Need to buy premium version to access majority of features |
| Photo Bender | A range of tasks can be executed | Not a very attractive UI |
| Zoetropic | Simple, effective and easy to use | Limited effects on free version |
| Lumyer | Fast and easy to use+Lot of features | Can be expensive due to several in-app purchases |
| Filmora | Easy to Use+fordable+ons of features+Seamless UI+rofessional video editing tools | Not available on mobile |
Key Takeaways from This Episode
● That brings us to the end of the article. Anyone looking for an animated pictures app to animate their images have found 10 of the best apps available in the market right now.
● With the list of these 10 apps, anyone can find the most suitable platform for their own purposes of animating an image.
● Last but not the least, if it comes to an all inclusive platform for video editing and animating pictures, Filmora Pro is definitely the winner on this list! So check out your options and make the best choice!
Also read:
- New 12 Dubbed Anime Websites to Watch for Free
- In 2024, Adobe Animate Riggings PROPER Tutorial for You
- 2024 Approved Uncensored Top 10 + Free Streaming Sites
- Updated 2024 Approved Whats Music Video GIF & How to Add Music to GIF Files
- Updated Best 12 Video to GIF Converters High Quality to Check Out for 2024
- 2024 Approved Top 12 Video to GIF Converters High Quality to Check Out
- New 2024 Approved 8 Best Motion Graphics Online Tools for Your Inspiration
- Updated In 2024, Learn Easy Blender Rigging in Only 2 Minutes
- Updated What Make Aesthetic Cartoon Drawing More Understandable for 2024
- New Fuel Creativity with 10 Awesome Collection of 2D Animation Examples for 2024
- Updated In 2024, The 10 Most Adorable Aesthetic Cartoon Characters of All Time
- New Samples of Cartoon Character Face to Inspire You
- In 2024, The Best 20 Motion Graphics Companies & Studios
- Updated 2024 Approved 5 Must Try Ways to Add and Send GIF in Text Message on Android
- Updated 2024 Approved 5 Websites with Animated Logos That Catch Your Eyes
- Updated 10 Cartoon Photo Converters You Couldnt Do Without for 2024
- A Complete Guide To OEM Unlocking on Honor Magic 5 Lite
- Updated In 2024, Coqui Voice Cloning The Ultimate Solution to Streamline Audio Content
- Xiaomi Redmi 12 5G Not Receiving Texts? 10 Hassle-Free Solutions Here | Dr.fone
- A Step-by-Step Guide on Using ADB and Fastboot to Remove FRP Lock on your Xiaomi Redmi Note 12 Pro 4G
- Top 4 Ways for Apple iPhone 6s to Mac Mirroring | Dr.fone
- In 2024, Tips and Tricks for Apple ID Locked Issue From iPhone 6s Plus
- 8 Ultimate Fixes for Google Play Your Vivo Y77t Isnt Compatible | Dr.fone
- In 2024, How to Unlock iCloud lock from your Apple iPhone 7 Plus and iPad?
- In 2024, Top 5 Xiaomi Civi 3 Bypass FRP Tools for PC That Actually Work
- Fix Xiaomi Redmi Note 12R Android System Webview Crash 2024 Issue | Dr.fone
- In 2024, How to Screen Mirror your Apple iPhone 12 Pro Max Display? | Dr.fone
- Full Guide How To Fix Connection Is Not Private on Honor Magic 6 Lite | Dr.fone
- In 2024, How To Unlock Xiaomi Redmi Note 12R Phone Without Password?
- Title: New 20 Free After Effects Logo Reveal Templates You Will Want to Know for 2024
- Author: Elon
- Created at : 2024-05-19 03:05:12
- Updated at : 2024-05-20 03:05:12
- Link: https://animation-videos.techidaily.com/new-20-free-after-effects-logo-reveal-templates-you-will-want-to-know-for-2024/
- License: This work is licensed under CC BY-NC-SA 4.0.
