
:max_bytes(150000):strip_icc():format(webp)/man-attaching-action-camera-to-chest-664655587-5c8c2559c9e77c0001ac184b.jpg)
New 2024 Approved <Https //images.wondershare.com/filmora/article-images/filmora9-website>
https://images.wondershare.com/filmora/article-images/filmora9-website
2D Character Animation: Everything You Should Know About It
An easy yet powerful editor
Numerous effects to choose from
Detailed tutorials provided by the official channel
2D character animation is one of the significant kinds of animation popularly used for creating animated movies, marketing videos, cartoons, advertisements, educational content, corporate presentations, video games, etc.
With the popularity of video content, more and more businesses tend to use animation for promotion, as they magnify conversion rates by 20%. Some companies hire 2D character animation services; others try to make them online with software help.
In this article
01 [What is 2D Character Animation and What Does 2D Animation Do?](#Part 1)
02 [2D Character Animation Tips and Tricks](#Part 2)
03 [An Ultimate Guide to Create 2D Character Animation Online](#Part 3)
04 [5 Great 2D Character Animation Templates](#Part 4)
Part 1 What is 2D Character Animation and What Does 2D Animation Do?
2D animation is identified by having its characters and objects created in a 2D space. It means that they only have height and width to specify.
However, 2D animation is considered a traditional style, known from the 1800s. Initially, it was designed by merging the frames in which one drawing was followed by another and making them different; every second consists of 24 frames.
We all remember the classic Disney animations. Snow White and the Seven Dwarfs, The Little Mermaid, Bambi, etc. They are some of the highly famous 2D animation styles.
With the advancement of computer technologies, this process also got digitized through various 2D character animation software.
In this guide, we’ll talk about everything relatable to 2D character animation, and let’s proceed with the expert tips and tricks to create inspirational style within animation character 2D.
Part 2 2D Character Animation Tips and Tricks
01Look for a real-time reference
Using a real-world reference for 2D character animation can help you effectively animate faces. For example, when studios collaborate with voice-over artists, they often record their facial movements. It further helps 2D animators to ensure their expressions get captured convincingly.
If it seems impossible, you can consider using your face, so you have something to refer back to. You could also use a mirror and utter the words your character will speak. It will display the correct animated expressions.
02Observe real life
You need to use observation a lot more. One of the primary aspects of 2D character animation is bringing life to animate objections. Therefore, you must carefully consider how emotion can get portrayed and select each movement accordingly.
Take time watching how people in real-life environments talk and interact with each other, how they express emotions, how they move, etc. Please don’t spend much time doing this, as it is valuable to research.
03Simplicity is the key
2D character animation is never complex compared with 3D. Think carefully before creating a scene too complicated. You must not include too much information, which is hard to digest, and you may even find yourself compromising the scene’s realism. Try not to heavy the stage with too many pose changes or other elements, and keep it genuine.
04Draw animation again and again
Drawing animation consumes a lot of time. You can’t complete it within one day, so you better know deep down that one task only can be done after you have revamped it various times. For 2D character animation, you may need to draw objects on paper several times.
You can’t master the skill of animation character 2D quickly. Luckily, all pains will be relieved someday.
05Feedback is important
Feedback is an essential element of artistic development. It’s wise to actively seek out feedback from familiar figures who can help you enhance. Naturally, we may see work we have invested a great deal of time and effort indifferently to someone not so involved in the creative process. Feedback can equate to a valuable learning opportunity that will assist you produce the results hit the spot much more appropriately.
Part 3 An Ultimate Guide to Create 2D Character Animation Online
Let’s now look at making an illustrated 2D character animation move on a screen.
While there are nearly numerous options for 2D character animation tools and software, this tutorial will animate a character in Adobe After Effects.
Steps to create 2D character animation After Effects
01Step 1: Download and Install Duik
You need to install the Duik animation plugin for Adobe After Effects to simplify the whole process. You can animate and rig characters’ entire limbs with Duik using just the placement of their feet and hands.
While this isn’t an essential step, it can be valuable for beginners, as you’ll see in this tutorial. Luckily, Duik is available for free from Rainbox Laboratory.
02Step 2: Design Your Character
You need a moving character before you’re able to start animating. You can create this character in Adobe Illustrator and import it into After Effects.
Try creating a straightforward character with an aim on the character’s limbs.
In the example mentioned below, you can see that the body is a very rudimentary shape—a circle—with long legs that make it simple to consider the animation process.

Check the character’s joints. Making a round joint between the lower and upper parts of the legs, for instance, will help the character move more smoothly.

03Step 3: Make and Import Your Character Artwork
Now, you’ll need to make a few final adjustments before moving your character artwork. Break your character out into layers firstly. Every section of the character that will move independently needs a separate layer.
So, layers include his circular body, face, and the leg’s segments (i.e., lower leg, upper leg, and foot).

To import your character artwork, go to File, click the Import tab, and choose your character file. Ensure that you need to import it as a composition to ensure it includes the layers you just created.
04Step 4: Establish Initial Character Rigging
Now, the 2D character animation is almost over by the initial rigging.
Firstly, lower the opacity of all your layers to above 50% to see the critical joints within the character.
Next, you must ensure that the joints hinge in the ideal direction. It’s simple to do with the anchor point tool. For each character’s layer, place the anchor point at the center of gravity for each layer of the 2D character animation.
The anchor point would probably go between the eyes for the layer of the face (i.e., the nose, eyes, and mouth). For each legs’ section, hold the anchor point where the leg will hinge (e.g., the anchor point would be at the highest point for the leg’s upper portion, where it meets the body).

Then, use the parent tool to join the limbs’ sections. For instance, the parent of the foot would be the lower leg, and the upper portion is the parent of the lower leg.
It makes sure that the leg moves together as one unit with multiple hinge points.
Finally, use the Duik toolbar to create character controllers. Controllers control the rotation and position of critical elements within your character. For the ankles of the 2D character animation, you would select the controller that encompasses both the rotation and position.
05Step 5: Create Your Rig
Use the Duik toolbar to create a rig. Select each layer from the extremities inward from each limb, lasting with your controllers.
You would select the ankle for a leg, followed by the upper portion, the lower leg, and conclusively, the controller at the ankle. Then, select auto-rig within the Rigging area of the Duik toolbar.
The entire leg will move when you move that ankle controller. If your character contains them, repeat the process for the other leg, along with other limbs.
Before proceeding, test the limbs to make sure they hinge and move correctly. You need to adjust the opacity of the character back to 100% once you are satisfied with the movements.

06Step 6: Start Animating Your Character
You can begin animating after completing a rig. First, create keyframes—the ending and beginning points of the character’s movement. The character’s legs are at their most magnified are thus the endpoints for a walk cycle. Make sure that the beginning and ending of keyframes are identical to get an ideal loop.
Start adding in-between frames from there, like when one leg crosses over the other in the middle of a walking stride.
Moreover, you can add ‘easing” to the animation via 2D character animation After Effects’ Easy Ease tab, located under the Animation button, and Keyframe Assistant.
It will smoothen the transition between the keyframes. You will have a primary walking sequence at this instance.

Now, you can make further refinements to add detail and secondary movement, like a bobbing motion of the head. You can also modify elements like the keyframe velocity, further smoothing out the animation.
As you practice, you’ll get a better feel for your animation preferences and develop more advanced realistic 2D animation character design capabilities.
Part 4 5 Great 2D Character Animation Templates
1 – FrameStory Character Animation Toolkit
2 – Explainer Video Character Animation ToolKit
3 – 2D Character Animation After Effects Template
4 – Character Animation ToolKit
5 – Rigged Character Animation Mockup Template
Given above is a list of the best 2D character animation templates worth considering. Yet, if you are tired of using After Effects Templates, why not select Wondershare Filmora Template Mode?
It is a brand-new mode recently launched by Filmora to ramp up your story. It is a simplistic way to use compared with After Effects.
****Wondershare Filmora Video Editor Template Mode**
For Win 7 or later (64-bit)
For macOS 10.12 or later
Filmora Template Mode is a bold breakthrough that helps you create incredible videos in a minute. Forget about dragging n dropping the video clips into a timeline; Filmora template Mode provides you a new way of generating videos automatically by using various stylish video templates.
Steps to create a stunning animated video in 3 levels
01Step 1: Choose a template
Pick up a video template that best suits your needs.

02Step 2: Import Media
Import at least three video clips or images and let AI assist you in ramping the production process without hassle.

03Step 3: Export Project
Export media among multiple social media platforms.

● Key Takeaways from This Episode →
● Understanding 2D character animation tips and tricks
● A step by step guide to creating 2D character animation online
● Five best 2D character animation templates
● The best alternative of using the Template mode directly within the Wondershare Filmora
2D character animation is one of the significant kinds of animation popularly used for creating animated movies, marketing videos, cartoons, advertisements, educational content, corporate presentations, video games, etc.
With the popularity of video content, more and more businesses tend to use animation for promotion, as they magnify conversion rates by 20%. Some companies hire 2D character animation services; others try to make them online with software help.
In this article
01 [What is 2D Character Animation and What Does 2D Animation Do?](#Part 1)
02 [2D Character Animation Tips and Tricks](#Part 2)
03 [An Ultimate Guide to Create 2D Character Animation Online](#Part 3)
04 [5 Great 2D Character Animation Templates](#Part 4)
Part 1 What is 2D Character Animation and What Does 2D Animation Do?
2D animation is identified by having its characters and objects created in a 2D space. It means that they only have height and width to specify.
However, 2D animation is considered a traditional style, known from the 1800s. Initially, it was designed by merging the frames in which one drawing was followed by another and making them different; every second consists of 24 frames.
We all remember the classic Disney animations. Snow White and the Seven Dwarfs, The Little Mermaid, Bambi, etc. They are some of the highly famous 2D animation styles.
With the advancement of computer technologies, this process also got digitized through various 2D character animation software.
In this guide, we’ll talk about everything relatable to 2D character animation, and let’s proceed with the expert tips and tricks to create inspirational style within animation character 2D.
Part 2 2D Character Animation Tips and Tricks
01Look for a real-time reference
Using a real-world reference for 2D character animation can help you effectively animate faces. For example, when studios collaborate with voice-over artists, they often record their facial movements. It further helps 2D animators to ensure their expressions get captured convincingly.
If it seems impossible, you can consider using your face, so you have something to refer back to. You could also use a mirror and utter the words your character will speak. It will display the correct animated expressions.
02Observe real life
You need to use observation a lot more. One of the primary aspects of 2D character animation is bringing life to animate objections. Therefore, you must carefully consider how emotion can get portrayed and select each movement accordingly.
Take time watching how people in real-life environments talk and interact with each other, how they express emotions, how they move, etc. Please don’t spend much time doing this, as it is valuable to research.
03Simplicity is the key
2D character animation is never complex compared with 3D. Think carefully before creating a scene too complicated. You must not include too much information, which is hard to digest, and you may even find yourself compromising the scene’s realism. Try not to heavy the stage with too many pose changes or other elements, and keep it genuine.
04Draw animation again and again
Drawing animation consumes a lot of time. You can’t complete it within one day, so you better know deep down that one task only can be done after you have revamped it various times. For 2D character animation, you may need to draw objects on paper several times.
You can’t master the skill of animation character 2D quickly. Luckily, all pains will be relieved someday.
05Feedback is important
Feedback is an essential element of artistic development. It’s wise to actively seek out feedback from familiar figures who can help you enhance. Naturally, we may see work we have invested a great deal of time and effort indifferently to someone not so involved in the creative process. Feedback can equate to a valuable learning opportunity that will assist you produce the results hit the spot much more appropriately.
Part 3 An Ultimate Guide to Create 2D Character Animation Online
Let’s now look at making an illustrated 2D character animation move on a screen.
While there are nearly numerous options for 2D character animation tools and software, this tutorial will animate a character in Adobe After Effects.
Steps to create 2D character animation After Effects
01Step 1: Download and Install Duik
You need to install the Duik animation plugin for Adobe After Effects to simplify the whole process. You can animate and rig characters’ entire limbs with Duik using just the placement of their feet and hands.
While this isn’t an essential step, it can be valuable for beginners, as you’ll see in this tutorial. Luckily, Duik is available for free from Rainbox Laboratory.
02Step 2: Design Your Character
You need a moving character before you’re able to start animating. You can create this character in Adobe Illustrator and import it into After Effects.
Try creating a straightforward character with an aim on the character’s limbs.
In the example mentioned below, you can see that the body is a very rudimentary shape—a circle—with long legs that make it simple to consider the animation process.
Check the character’s joints. Making a round joint between the lower and upper parts of the legs, for instance, will help the character move more smoothly.
03Step 3: Make and Import Your Character Artwork
Now, you’ll need to make a few final adjustments before moving your character artwork. Break your character out into layers firstly. Every section of the character that will move independently needs a separate layer.
So, layers include his circular body, face, and the leg’s segments (i.e., lower leg, upper leg, and foot).
To import your character artwork, go to File, click the Import tab, and choose your character file. Ensure that you need to import it as a composition to ensure it includes the layers you just created.
04Step 4: Establish Initial Character Rigging
Now, the 2D character animation is almost over by the initial rigging.
Firstly, lower the opacity of all your layers to above 50% to see the critical joints within the character.
Next, you must ensure that the joints hinge in the ideal direction. It’s simple to do with the anchor point tool. For each character’s layer, place the anchor point at the center of gravity for each layer of the 2D character animation.
The anchor point would probably go between the eyes for the layer of the face (i.e., the nose, eyes, and mouth). For each legs’ section, hold the anchor point where the leg will hinge (e.g., the anchor point would be at the highest point for the leg’s upper portion, where it meets the body).
Then, use the parent tool to join the limbs’ sections. For instance, the parent of the foot would be the lower leg, and the upper portion is the parent of the lower leg.
It makes sure that the leg moves together as one unit with multiple hinge points.
Finally, use the Duik toolbar to create character controllers. Controllers control the rotation and position of critical elements within your character. For the ankles of the 2D character animation, you would select the controller that encompasses both the rotation and position.
05Step 5: Create Your Rig
Use the Duik toolbar to create a rig. Select each layer from the extremities inward from each limb, lasting with your controllers.
You would select the ankle for a leg, followed by the upper portion, the lower leg, and conclusively, the controller at the ankle. Then, select auto-rig within the Rigging area of the Duik toolbar.
The entire leg will move when you move that ankle controller. If your character contains them, repeat the process for the other leg, along with other limbs.
Before proceeding, test the limbs to make sure they hinge and move correctly. You need to adjust the opacity of the character back to 100% once you are satisfied with the movements.
06Step 6: Start Animating Your Character
You can begin animating after completing a rig. First, create keyframes—the ending and beginning points of the character’s movement. The character’s legs are at their most magnified are thus the endpoints for a walk cycle. Make sure that the beginning and ending of keyframes are identical to get an ideal loop.
Start adding in-between frames from there, like when one leg crosses over the other in the middle of a walking stride.
Moreover, you can add ‘easing” to the animation via 2D character animation After Effects’ Easy Ease tab, located under the Animation button, and Keyframe Assistant.
It will smoothen the transition between the keyframes. You will have a primary walking sequence at this instance.
Now, you can make further refinements to add detail and secondary movement, like a bobbing motion of the head. You can also modify elements like the keyframe velocity, further smoothing out the animation.
As you practice, you’ll get a better feel for your animation preferences and develop more advanced realistic 2D animation character design capabilities.
Part 4 5 Great 2D Character Animation Templates
1 – FrameStory Character Animation Toolkit
2 – Explainer Video Character Animation ToolKit
3 – 2D Character Animation After Effects Template
4 – Character Animation ToolKit
5 – Rigged Character Animation Mockup Template
Given above is a list of the best 2D character animation templates worth considering. Yet, if you are tired of using After Effects Templates, why not select Wondershare Filmora Template Mode?
It is a brand-new mode recently launched by Filmora to ramp up your story. It is a simplistic way to use compared with After Effects.
****Wondershare Filmora Video Editor Template Mode**
For Win 7 or later (64-bit)
For macOS 10.12 or later
Filmora Template Mode is a bold breakthrough that helps you create incredible videos in a minute. Forget about dragging n dropping the video clips into a timeline; Filmora template Mode provides you a new way of generating videos automatically by using various stylish video templates.
Steps to create a stunning animated video in 3 levels
01Step 1: Choose a template
Pick up a video template that best suits your needs.
02Step 2: Import Media
Import at least three video clips or images and let AI assist you in ramping the production process without hassle.
03Step 3: Export Project
Export media among multiple social media platforms.
● Key Takeaways from This Episode →
● Understanding 2D character animation tips and tricks
● A step by step guide to creating 2D character animation online
● Five best 2D character animation templates
● The best alternative of using the Template mode directly within the Wondershare Filmora
Convert Animated GIF From Video
Versatile Video Editor - Wondershare Filmora
An easy yet powerful editor
Numerous effects to choose from
Detailed tutorials provided by the official channel
The animated GIFs excite the viewers and convey a message. The instant chats include these animated GIFs to add fun to your conversation. Few web designers place animated GIFs on their web pages to attract their target customers wisely. You can convert animated GIFs from video using a reliable application available in the digital space. The animated GIFs impress the viewers and add flavor to the content. Mostly used replacing the emojis because the emojis are static images, whereas the animated GIFs showcase an action that triggers more meaning to the viewers. There are options to extract a specific clipping from videos and use them as animated GIFs. Here, you will be learning about GIFs and the best ways to edit them with sophisticated tools.

In this article
01 [What is GIF?](#Part 1)
02 [Why do People like to use GIFs?](#Part 2)
03 [Convert Animated GIF from Video](#Part 3)
04 [Tip: Easily edit your GIF for free](#Part 4)
Part 1 What is GIF?
The GIF is a Graphical Interchange Format and represents the file format in the bitmap. When compared to other image formats, GIF has unique specifications that are appreciable. The GIF has a lossless compression feature and you can transfer them to any space effortlessly. It includes 256 colors and is widely used for creating buttons and banners on the webpages. It came into practice in the year1987 and occupied the computer space commercially. GIFs are preferred to create small animations and are adopted by social media users. After the advent of PNG, the usage of GIF gradually decreased by website users. Later, the animated GIFs conquered the digital space as they replace most websites’ videos. It serves as one of the best message conveyers and is quite interesting for social media users. Gradually the younger generations were highly attracted to these animated GIFs to express their thoughts in an image format.
Part 2 Why do People like to use GIFs?
People prefer GIFs when compared to videos because animated GIFs convey a strong message quickly than videos. Social media users feel comfortable using GIFs and consider it the best way to express their emotions. Apart from the chat interface, you can find the animated GIFs occupying the website’s landing page, blog posts, and emails. The designers opt for animated GIFs instead of short videos because of their effective results. Many webpage visitors skim the content, and the animated GIFs quickly reveal what you convey. The audience understands the essential data you are emphasizing on the websites swiftly with the help of the animated GIFs.
When you include videos on your websites, the users skip the videos without making any clicks due to lack of time. The animated GIFs overcame this issue, the GIFs started to play as soon as the page loads, and the audience took a quick look at it, receiving the data you are trying to narrate through these animated GIFs. Many web page users prefer animated GIFs because they take less time to load and consume data. Both the viewers and webpage designers use GIFs instead of videos to convey their message in a visual format.
Part 3 Convert Animated GIF from Video
Giphy is the best online program that creates animated GIFs from video. It is an exclusively online program that focuses on an efficient way to create animated GIFs from videos. There are many online tools available to make your GIFs. The Giphy is an impressive application with loads of in-built features to entertain audiences. While creating a GIF, ensure it has a good loading capability to obtain efficient results. You can follow the below steps to convert GIFs from videos using the Giphy app.
Step 1
Visit the official website of Giphy and upload the videos to convert a GIF by tapping the Convert button. You can also upload the video file by pasting the URL from YouTube or Vimeo.

Step 2
Now, use the Giphy tool to trim the video and spot out the section that requires converting it as GIFs.
Trim the videos and locate the section that requires the creation of animated GIFs.

Step 3
Customize the trimmed video section using stickers, filters, and texts. After personalizing the trimmed video, tap Upload to Giphy to store the edited animated GIFs in its library.
You can access the animated GIFs from the storage library in your account.

Follow the above guidelines to create animated GIFs from videos using the Giphy online tool. Surf the steps carefully to ensure successful completion of the animated GIFs creation from video.
Part 4 Tip: Easily edit your GIF for free
Further, you can refine the GIFs using a professional editor like Filmora. The Filmora from Wondershare is an awesome tool that gives you a wow feel while editing the media files. It is an exclusive program that edits the media files effectively to obtain the desired outcomes. You can work as a pro editor without any technical skills. The simple interface of this application triggers you to use the built-in elements professionally. Tap the relevant controls to include the desired effects on the uploaded GIF images. The timeline has a user-friendly interface and there are no complexities even while handling larger image or video files.
The key features of the Filmora application
● Customize the videos based on your needs. You can crop, add text, resize the dimensions precisely.
● You can add special effects to the videos using the in-built filters
● It has a simple interface and assists you in working like a pro.
● The trimmer tool aids in creating animated GIFs from your videos
● Easy to import and export the edited files to desired storage space by a single click action.
Apart from the above functionalities, you can discover enlightening uses of Filmora by installing it on your device. The controls are explicit and you can access them without any hesitation. The simple interface aids the newbie users to master this app in no time due to its comfortable working timeline.
The stepwise procedure to create animated GIFs from the imported videos using the Filmora application.
Step 1 Install the application
Visit the official website of Filmora, download the tool concerning your system OS, and install it by following the instruction wizard. Import the desired video into the timeline by tapping the Import Media Files option.

Step 2 Add texts to the video
Based on your requirements, you can trim the video using the edit tool and insert desired texts by tapping the Title menu.

Step 3 Export the edited file
Finally, click the Export button to save the edited file on any desired storage space. During the export operation, you can perform various changes to your media files. There are options to modify the file format, resolution, and storage path. Tap the respective menus to choose the desired platform that requires the storage operation. Directly post the animated GIFs on your YouTube or Vimeo based on your needs.

The above steps will aid you in creating animated GIFs from videos and using this application efficiently to bring the desired impact on it.
Wondershare Filmora
Get started easily with Filmora’s powerful performance, intuitive interface, and countless effects!
Try It Free Try It Free Try It Free Learn More >

AI Portrait – The best feature of Wondershare Filmora for gameplay editing
The AI Portrait is a new add-on in Wondershare Filmora. It can easily remove video backgrounds without using a green screen or chroma key, allowing you to add borders, glitch effects, pixelated, noise, or segmentation video effects.

Conclusion
Thus, this article had given enough insights into creating an animated GIF from videos. You can either use an online tool or opt for Filmora to edit the videos and convert them to impressive animated GIFs. The Filmora helps you to edit the media files professionally, and its simple interface assists in handling even the complex files efficiently. Connect with this article to explore the video edit process using a reliable program like Filmora. Stay tuned to create animated GIFs that conveys explicit messages to the audience.
The animated GIFs excite the viewers and convey a message. The instant chats include these animated GIFs to add fun to your conversation. Few web designers place animated GIFs on their web pages to attract their target customers wisely. You can convert animated GIFs from video using a reliable application available in the digital space. The animated GIFs impress the viewers and add flavor to the content. Mostly used replacing the emojis because the emojis are static images, whereas the animated GIFs showcase an action that triggers more meaning to the viewers. There are options to extract a specific clipping from videos and use them as animated GIFs. Here, you will be learning about GIFs and the best ways to edit them with sophisticated tools.
In this article
01 [What is GIF?](#Part 1)
02 [Why do People like to use GIFs?](#Part 2)
03 [Convert Animated GIF from Video](#Part 3)
04 [Tip: Easily edit your GIF for free](#Part 4)
Part 1 What is GIF?
The GIF is a Graphical Interchange Format and represents the file format in the bitmap. When compared to other image formats, GIF has unique specifications that are appreciable. The GIF has a lossless compression feature and you can transfer them to any space effortlessly. It includes 256 colors and is widely used for creating buttons and banners on the webpages. It came into practice in the year1987 and occupied the computer space commercially. GIFs are preferred to create small animations and are adopted by social media users. After the advent of PNG, the usage of GIF gradually decreased by website users. Later, the animated GIFs conquered the digital space as they replace most websites’ videos. It serves as one of the best message conveyers and is quite interesting for social media users. Gradually the younger generations were highly attracted to these animated GIFs to express their thoughts in an image format.
Part 2 Why do People like to use GIFs?
People prefer GIFs when compared to videos because animated GIFs convey a strong message quickly than videos. Social media users feel comfortable using GIFs and consider it the best way to express their emotions. Apart from the chat interface, you can find the animated GIFs occupying the website’s landing page, blog posts, and emails. The designers opt for animated GIFs instead of short videos because of their effective results. Many webpage visitors skim the content, and the animated GIFs quickly reveal what you convey. The audience understands the essential data you are emphasizing on the websites swiftly with the help of the animated GIFs.
When you include videos on your websites, the users skip the videos without making any clicks due to lack of time. The animated GIFs overcame this issue, the GIFs started to play as soon as the page loads, and the audience took a quick look at it, receiving the data you are trying to narrate through these animated GIFs. Many web page users prefer animated GIFs because they take less time to load and consume data. Both the viewers and webpage designers use GIFs instead of videos to convey their message in a visual format.
Part 3 Convert Animated GIF from Video
Giphy is the best online program that creates animated GIFs from video. It is an exclusively online program that focuses on an efficient way to create animated GIFs from videos. There are many online tools available to make your GIFs. The Giphy is an impressive application with loads of in-built features to entertain audiences. While creating a GIF, ensure it has a good loading capability to obtain efficient results. You can follow the below steps to convert GIFs from videos using the Giphy app.
Step 1
Visit the official website of Giphy and upload the videos to convert a GIF by tapping the Convert button. You can also upload the video file by pasting the URL from YouTube or Vimeo.
Step 2
Now, use the Giphy tool to trim the video and spot out the section that requires converting it as GIFs.
Trim the videos and locate the section that requires the creation of animated GIFs.
Step 3
Customize the trimmed video section using stickers, filters, and texts. After personalizing the trimmed video, tap Upload to Giphy to store the edited animated GIFs in its library.
You can access the animated GIFs from the storage library in your account.
Follow the above guidelines to create animated GIFs from videos using the Giphy online tool. Surf the steps carefully to ensure successful completion of the animated GIFs creation from video.
Part 4 Tip: Easily edit your GIF for free
Further, you can refine the GIFs using a professional editor like Filmora. The Filmora from Wondershare is an awesome tool that gives you a wow feel while editing the media files. It is an exclusive program that edits the media files effectively to obtain the desired outcomes. You can work as a pro editor without any technical skills. The simple interface of this application triggers you to use the built-in elements professionally. Tap the relevant controls to include the desired effects on the uploaded GIF images. The timeline has a user-friendly interface and there are no complexities even while handling larger image or video files.
The key features of the Filmora application
● Customize the videos based on your needs. You can crop, add text, resize the dimensions precisely.
● You can add special effects to the videos using the in-built filters
● It has a simple interface and assists you in working like a pro.
● The trimmer tool aids in creating animated GIFs from your videos
● Easy to import and export the edited files to desired storage space by a single click action.
Apart from the above functionalities, you can discover enlightening uses of Filmora by installing it on your device. The controls are explicit and you can access them without any hesitation. The simple interface aids the newbie users to master this app in no time due to its comfortable working timeline.
The stepwise procedure to create animated GIFs from the imported videos using the Filmora application.
Step 1 Install the application
Visit the official website of Filmora, download the tool concerning your system OS, and install it by following the instruction wizard. Import the desired video into the timeline by tapping the Import Media Files option.
Step 2 Add texts to the video
Based on your requirements, you can trim the video using the edit tool and insert desired texts by tapping the Title menu.
Step 3 Export the edited file
Finally, click the Export button to save the edited file on any desired storage space. During the export operation, you can perform various changes to your media files. There are options to modify the file format, resolution, and storage path. Tap the respective menus to choose the desired platform that requires the storage operation. Directly post the animated GIFs on your YouTube or Vimeo based on your needs.
The above steps will aid you in creating animated GIFs from videos and using this application efficiently to bring the desired impact on it.
Wondershare Filmora
Get started easily with Filmora’s powerful performance, intuitive interface, and countless effects!
Try It Free Try It Free Try It Free Learn More >
AI Portrait – The best feature of Wondershare Filmora for gameplay editing
The AI Portrait is a new add-on in Wondershare Filmora. It can easily remove video backgrounds without using a green screen or chroma key, allowing you to add borders, glitch effects, pixelated, noise, or segmentation video effects.
Conclusion
Thus, this article had given enough insights into creating an animated GIF from videos. You can either use an online tool or opt for Filmora to edit the videos and convert them to impressive animated GIFs. The Filmora helps you to edit the media files professionally, and its simple interface assists in handling even the complex files efficiently. Connect with this article to explore the video edit process using a reliable program like Filmora. Stay tuned to create animated GIFs that conveys explicit messages to the audience.
How You Can Turn Yourself Into Anime Character Using Anime Filter
How You Can Turn Yourself into Anime Character Using Anime Filter
An easy yet powerful editor
Numerous effects to choose from
Detailed tutorials provided by the official channel
Everyone is looking for the Anime Filter that allows you to turn yourself into an animated character. All in an effort to join in on the TikTok trend that’s been awakening the inner anime enthusiast in everyone.

In this post, we’ll be sharing with you all that we know about this elusive anime filter (along with some bonuses along the way)
In this article
01 [Let’s Figure out What’s Anime Filter First](#Part 1)
02 [More Tutorials on Anime Filter That You Should Not Miss](#Part 2)
Part 1 Let’s Figure out What’s Anime Filter First
01What is the Anime Filter on TikTok?
Okay, first off What even is this anime filter everyone is talking about and how can you use it to turn yourself into an animated character? We’ve attached a helpful YouTube Video below from @Kapwing who has a more comprehensive explanation for you.
But, as for the basics? It works just like most filters in that it can be used in both video and picture mode (allowing you to also make your own animated profile picture if you’d like). All you have to do is turn it on, and it’ll turn you into the most fitting anime character of your style immediately
02How to Get the TikTok Anime Filter?
Now to finally get down to business How exactly can you get the anime filter for your TikTok? Well, here’s the trick Despite having earned its popularity on TikTok, the Anime Style filter actually comes from Snapchat So, if you do want to animate yourself like you’ve seen all the other popular TikTok-ers do, you’ll need to record the video (or take the picture) on the Snapchat App first and then upload it to TikTok.
03A step-by-step breakdown of this process has been provided below (pictures included)
Step 1Download the Snapchat App
Alright, to start off with, you’ll need to download the Snapchat app on your smartphone (it’s available for both Android and iOS devices)

Step 2Open Snapchat App on your mobile device
Once you have the Snapchat app downloaded and installed on your device, open it

Step 3Search for the Anime Style Filter on Snapchat
Once you have the Snapchat app open, click on the search bar at the top of the interface, type ‘anime style’, and search
You might find that there are multiple versions of the filter (like as is shown in the image below), but the one that you need to select is the one titled Anime Style and created by Snapchat (it should appear first, as it does in the example)

Step 4Turn Yourself into an Animated Character
Finally You should be moved to the video recorder or the profile picture taker, where you can see yourself animated once and for all

Step 5Upload your anime filter-ed video to TikTok
Now, in order to get your Anime-fied self on TikTok, all you need to do is upload your video creation (either on your mobile device or your computer) We’ve provided a URL for you below that will take you directly to the TikTok upload page.

Part 2 More Tutorials on Anime Filter That You Should Not Miss
The Anime Style filter that we introduced in the previous section isn’t the only ‘animated’ filter available, of course It’s the one that caught the attention of a lot of people, thanks, in large part, to the participation of a couple of some of the bigger TikTok-ers on the platform. However, you can always expand your selection a bit by checking out some of the other interesting anime filters in the market:
0112 Anime Filters to Turn Yourself into an Anime Character
Anime Filter #1: Anime Style Realistic

In order to fix some of the more glaring issues with the regular Anime Style filter, Snapchat created a second filter, called Anime Style Realistic This one has a distinctively less anime style when it comes to looks. But it does allow for more skin colors, better hair integration, and accessories
Pros
FREE Snapchat lens that you can use at any time.
Works with most skin tones.
Better hair/accessory integration.
Cons
The style is more realistic than anime.
It is not available anywhere else; you’ll need to be on Snapchat to use it.
Not great at capturing motion.
This is a fun filter to use for those looking to spice up their timeline with something a little different (OR for those having a bad day and would like the almost-anonymity the filter can provide).
Anime Filter #2: Cartoon Style

Next, we have another Snapchat original lens called Cartoon Style This filter is more reminiscent of the older animated cartoon styles (think Pocahontas, Lilo & Stitch, etc.), but it doesn’t make it any less fun
Pros
FREE Snapchat lens.
Works with all skin tones.
Works with accessories.
Cons
More of a cartoon animated style than anime.
Not available anywhere else, you can only use it with Snapchat.
Not great at capturing motion.
Again, just like the Anime Filter, this is good for slapping on just to have fun or to sneakily erase a couple of blemishes
Anime Filter #3: Anime Filter

Now, although we mentioned that TikTok doesn’t have any anime-style filters, the Chinese version of it (surprisingly) does You can see it being used in the image above, rendering the user into an animated (albeit not classically Japanese animated) character.
Pros
Free Chinese TikTok filter.
Great at capturing motion.
Chinese animated drawing style.
Cons
Only available for the foreign version of the TikTok app.
Not the best with skin tones.
It doesn’t use the classic Japanese-animation style.
This has seen a popularity boost recently, with many TikTok users using it to show a ‘before’ and ‘after’ (like the image shown above), of their dance being animated.
Filter URL: https://www.douyin.com/
Anime Filter #4: Anime Eyes

This next filter is the first unofficial anime filter on this list. It was created by one of the users of Snapchat and can be found there if you want to use it This one doesn’t animate the whole face of the user, but it does apply a sticker of various ‘anime eyes’ that you can use as a semi-animated profile picture maker (free)
Pros
FREE Snapchat filter
Anime-eyes sticker to cover the eyes
Useful as an animated profile picture maker
Cons
Only available on the Snapchat app
Does not capture motion
Does not animate the entire face
This really is best used for profile pictures only You’ve probably seen it around as such, although some users also find it useful for hiding tired eyes
Anime Filter #5: Wondershare Filmora

If you’re looking to step up your game ‘editing-wise’ and give your pictures and videos an even more anime feel, then you can also consider the anime filters that the video editing tool, Wondershare Filmora Video Editor , offers. (You can also skip the pre-made filters altogether and create your own animated video with stickers and other effects.)
Pros
Variety of anime filters for videos
Comes with advanced video editing tools
Creates high-quality videos
Cons
Premium Software
No face animation
This particular option is for those looking for something a step above what everyone else is doing. All while allowing a more flexible experience
For Win 7 or later (64-bit)
For macOS 10.12 or later
Anime Filter #6: MHA Anime Filter (Instagram)

Continuing on from our trend of ‘out-there’ options, there’s also the MHA filter from Instagram This one has been especially popular with the anime fanbase as it offers plenty of opportunities for hilarious, pointed responses
Pros
FREE with Instagram
Anime-themed sticker
Trending on TikTok
Cons
Not a face animator filter
Not a profile picture animator
Limited anime options
It’s definitely not what you might have initially been looking for. But its popularity on TikTok is undeniable
Anime Filter #7: Anime Filter

Our second recommended anime-themed filter is the basic Anime Filter on Instagram This one flicks through dozens of some of the most popular animes to find out which one suits you best And, just like the previous, is currently trending on Tiktok
Pros
FREE with Instagram
Anime-themed sticker filter
Trending on TikTok
Cons
Sticker, not face animator
Available only on Instagram
Limited options
Anime Filter #8: Cartoon

This next animation filter pick of ours brings us back to Snapchat It’s called the Cartoon lens. And, just like our initial picks, it will change your pictures to that of a cartoon This one is closer to the cartoon-style popular around the 2000s (think Frozen & Tangled)
Pros
Available on Snapchat
Animated profile picture maker (free)
Works for various skin types
Cons
Not the best at motion capturing
Only available on Snapchat
Doesn’t use classic Japanese style
It’s not quite the anime filter that you’re probably looking for, but it does still work if all you want is a way of cartoon-ifying yourself to spice up your timeline It’ll clear up any blemishes too
Anime Filter #9: Comics Style

Again, we’re moving towards a different kind of animation style with this next filter from Snapchat, but the Comics Style filter does have its own promises of fun as well Especially for those who are long-time fans of American comics (or, even, your average modern-day Avengers fan)
Pros
FREE on Snapchat
Video face animator
Works with a variety of skin tones
Cons
Awkward with some face shapes
Does not work with all face accessories
Available only on Snapchat
Anime Filter #10: Cartoon 3D Style

Now, this might get confusing, but for our last picks, we actually have a set of filters all called Cartoon 3D Style But trust us They’re all different This first version is one you would probably relate more to the DreamWorks motion picture, Ratatouille
Pros
FREE profile picture animator on Snapchat
Compatible with a variety of face shapes
Compatible with a variety of skin tones
Cons
Set features (i.e., pointed nose)
Non-anime drawing style
Not compatible with some facial accessories
Anime Filter #11: Cartoon 3D Style

For our next Cartoon 3D Style lens from Snapchat, we have a face animator that can help you turn into something very close to another dreamwork’s motion picture (think the Despicable me or the Minions)
Pros
Cartoon style animator that is FREE to use
Great for motion capturing
Compatible with a variety of skin colors
Cons
Available only on Snapchat
Not compatible with certain face accessories
Limited face warping effect
Anime Filter #12: Cartoon 3D Style

And finally, for the last of our recommended anime filters, we have the Cartoon 3D Style lens from Snapchat that makes you look like your favorite Disney character (In this case, the obvious inspiration comes from Disney’s Frozen or Tangled)
Pros
Disney face animator that is FREE on Snapchat
Compatible with all skin tones
Trending on TikTok
Cons
It can only be used on Snapchat
Not great at capturing motion
02Steps to Download the Anime Filter App and Turn Yourself into an Anime Character
Now, if those filters weren’t enough for you, we’ve also included this next tutorial on how you can find apps on your mobile device that will allow you to get the same effect without having to use Snapchat, TikTok, or Instagram
Step 1Go to the App Store
The first step, of course, is to go to the app store on your mobile device.

Step 2Search for Anime Filter App
Next, search ‘Anime Filter’ on your phone’s app store.

Step 3Select Anime Filter App
There are multiple types of anime filter apps available in the market. Pick the one that you think will work best for you.

Step 4Install Anime Filter App
Finally, once you’ve found the anime filter app for you, install it.

Step 5Open Anime Filter App
The app that we used for our example, Anime Camera, offers several different animation styles However, this app does come with a subscription fee, so keep that in mind.

03Anime Filter Has a Sadly Unsurprising Problem
You might have noticed this while we were introducing all the different types of anime-style filters available, but the popular Anime Filter has its shortcomings. Which includes:
PROBLEM 1: Dark Skin Tones
The anime filter’s inability to capture darker skin tones accurately is one of the biggest issues users have with the filter.
PROBLEM 2: Hair Style
Hairstyle options are also very limited. And, as for black hairstyles? Well, the options are pretty much non-existent.
PROBLEM 3: Face Accessories
Do you wear glasses? How about piercings? Well, this won’t translate for you either, unfortunately
Key Takeaways from This Episode
● The Anime Filter is a hot, trending topic in platforms like Tiktok, Instagram, and Snapchat It’s also a fun way of engaging with the anime community
● There are other, similar face-animation filters available (The Cartoon 3D Styles, especially, were quite popular for a time)
● Unsurprisingly, the anime filter does have its problems… And it left a big chunk of the TikTok community pretty flabbergasted — and disappointed. But that didn’t stop them from joining in the fun to provide some empowering commentary
Everyone is looking for the Anime Filter that allows you to turn yourself into an animated character. All in an effort to join in on the TikTok trend that’s been awakening the inner anime enthusiast in everyone.
In this post, we’ll be sharing with you all that we know about this elusive anime filter (along with some bonuses along the way)
In this article
01 [Let’s Figure out What’s Anime Filter First](#Part 1)
02 [More Tutorials on Anime Filter That You Should Not Miss](#Part 2)
Part 1 Let’s Figure out What’s Anime Filter First
01What is the Anime Filter on TikTok?
Okay, first off What even is this anime filter everyone is talking about and how can you use it to turn yourself into an animated character? We’ve attached a helpful YouTube Video below from @Kapwing who has a more comprehensive explanation for you.
But, as for the basics? It works just like most filters in that it can be used in both video and picture mode (allowing you to also make your own animated profile picture if you’d like). All you have to do is turn it on, and it’ll turn you into the most fitting anime character of your style immediately
02How to Get the TikTok Anime Filter?
Now to finally get down to business How exactly can you get the anime filter for your TikTok? Well, here’s the trick Despite having earned its popularity on TikTok, the Anime Style filter actually comes from Snapchat So, if you do want to animate yourself like you’ve seen all the other popular TikTok-ers do, you’ll need to record the video (or take the picture) on the Snapchat App first and then upload it to TikTok.
03A step-by-step breakdown of this process has been provided below (pictures included)
Step 1Download the Snapchat App
Alright, to start off with, you’ll need to download the Snapchat app on your smartphone (it’s available for both Android and iOS devices)
Step 2Open Snapchat App on your mobile device
Once you have the Snapchat app downloaded and installed on your device, open it
Step 3Search for the Anime Style Filter on Snapchat
Once you have the Snapchat app open, click on the search bar at the top of the interface, type ‘anime style’, and search
You might find that there are multiple versions of the filter (like as is shown in the image below), but the one that you need to select is the one titled Anime Style and created by Snapchat (it should appear first, as it does in the example)
Step 4Turn Yourself into an Animated Character
Finally You should be moved to the video recorder or the profile picture taker, where you can see yourself animated once and for all
Step 5Upload your anime filter-ed video to TikTok
Now, in order to get your Anime-fied self on TikTok, all you need to do is upload your video creation (either on your mobile device or your computer) We’ve provided a URL for you below that will take you directly to the TikTok upload page.
Part 2 More Tutorials on Anime Filter That You Should Not Miss
The Anime Style filter that we introduced in the previous section isn’t the only ‘animated’ filter available, of course It’s the one that caught the attention of a lot of people, thanks, in large part, to the participation of a couple of some of the bigger TikTok-ers on the platform. However, you can always expand your selection a bit by checking out some of the other interesting anime filters in the market:
0112 Anime Filters to Turn Yourself into an Anime Character
Anime Filter #1: Anime Style Realistic
In order to fix some of the more glaring issues with the regular Anime Style filter, Snapchat created a second filter, called Anime Style Realistic This one has a distinctively less anime style when it comes to looks. But it does allow for more skin colors, better hair integration, and accessories
Pros
FREE Snapchat lens that you can use at any time.
Works with most skin tones.
Better hair/accessory integration.
Cons
The style is more realistic than anime.
It is not available anywhere else; you’ll need to be on Snapchat to use it.
Not great at capturing motion.
This is a fun filter to use for those looking to spice up their timeline with something a little different (OR for those having a bad day and would like the almost-anonymity the filter can provide).
Anime Filter #2: Cartoon Style
Next, we have another Snapchat original lens called Cartoon Style This filter is more reminiscent of the older animated cartoon styles (think Pocahontas, Lilo & Stitch, etc.), but it doesn’t make it any less fun
Pros
FREE Snapchat lens.
Works with all skin tones.
Works with accessories.
Cons
More of a cartoon animated style than anime.
Not available anywhere else, you can only use it with Snapchat.
Not great at capturing motion.
Again, just like the Anime Filter, this is good for slapping on just to have fun or to sneakily erase a couple of blemishes
Anime Filter #3: Anime Filter
Now, although we mentioned that TikTok doesn’t have any anime-style filters, the Chinese version of it (surprisingly) does You can see it being used in the image above, rendering the user into an animated (albeit not classically Japanese animated) character.
Pros
Free Chinese TikTok filter.
Great at capturing motion.
Chinese animated drawing style.
Cons
Only available for the foreign version of the TikTok app.
Not the best with skin tones.
It doesn’t use the classic Japanese-animation style.
This has seen a popularity boost recently, with many TikTok users using it to show a ‘before’ and ‘after’ (like the image shown above), of their dance being animated.
Filter URL: https://www.douyin.com/
Anime Filter #4: Anime Eyes
This next filter is the first unofficial anime filter on this list. It was created by one of the users of Snapchat and can be found there if you want to use it This one doesn’t animate the whole face of the user, but it does apply a sticker of various ‘anime eyes’ that you can use as a semi-animated profile picture maker (free)
Pros
FREE Snapchat filter
Anime-eyes sticker to cover the eyes
Useful as an animated profile picture maker
Cons
Only available on the Snapchat app
Does not capture motion
Does not animate the entire face
This really is best used for profile pictures only You’ve probably seen it around as such, although some users also find it useful for hiding tired eyes
Anime Filter #5: Wondershare Filmora
If you’re looking to step up your game ‘editing-wise’ and give your pictures and videos an even more anime feel, then you can also consider the anime filters that the video editing tool, Wondershare Filmora Video Editor , offers. (You can also skip the pre-made filters altogether and create your own animated video with stickers and other effects.)
Pros
Variety of anime filters for videos
Comes with advanced video editing tools
Creates high-quality videos
Cons
Premium Software
No face animation
This particular option is for those looking for something a step above what everyone else is doing. All while allowing a more flexible experience
For Win 7 or later (64-bit)
For macOS 10.12 or later
Anime Filter #6: MHA Anime Filter (Instagram)
Continuing on from our trend of ‘out-there’ options, there’s also the MHA filter from Instagram This one has been especially popular with the anime fanbase as it offers plenty of opportunities for hilarious, pointed responses
Pros
FREE with Instagram
Anime-themed sticker
Trending on TikTok
Cons
Not a face animator filter
Not a profile picture animator
Limited anime options
It’s definitely not what you might have initially been looking for. But its popularity on TikTok is undeniable
Anime Filter #7: Anime Filter
Our second recommended anime-themed filter is the basic Anime Filter on Instagram This one flicks through dozens of some of the most popular animes to find out which one suits you best And, just like the previous, is currently trending on Tiktok
Pros
FREE with Instagram
Anime-themed sticker filter
Trending on TikTok
Cons
Sticker, not face animator
Available only on Instagram
Limited options
Anime Filter #8: Cartoon
This next animation filter pick of ours brings us back to Snapchat It’s called the Cartoon lens. And, just like our initial picks, it will change your pictures to that of a cartoon This one is closer to the cartoon-style popular around the 2000s (think Frozen & Tangled)
Pros
Available on Snapchat
Animated profile picture maker (free)
Works for various skin types
Cons
Not the best at motion capturing
Only available on Snapchat
Doesn’t use classic Japanese style
It’s not quite the anime filter that you’re probably looking for, but it does still work if all you want is a way of cartoon-ifying yourself to spice up your timeline It’ll clear up any blemishes too
Anime Filter #9: Comics Style
Again, we’re moving towards a different kind of animation style with this next filter from Snapchat, but the Comics Style filter does have its own promises of fun as well Especially for those who are long-time fans of American comics (or, even, your average modern-day Avengers fan)
Pros
FREE on Snapchat
Video face animator
Works with a variety of skin tones
Cons
Awkward with some face shapes
Does not work with all face accessories
Available only on Snapchat
Anime Filter #10: Cartoon 3D Style
Now, this might get confusing, but for our last picks, we actually have a set of filters all called Cartoon 3D Style But trust us They’re all different This first version is one you would probably relate more to the DreamWorks motion picture, Ratatouille
Pros
FREE profile picture animator on Snapchat
Compatible with a variety of face shapes
Compatible with a variety of skin tones
Cons
Set features (i.e., pointed nose)
Non-anime drawing style
Not compatible with some facial accessories
Anime Filter #11: Cartoon 3D Style
For our next Cartoon 3D Style lens from Snapchat, we have a face animator that can help you turn into something very close to another dreamwork’s motion picture (think the Despicable me or the Minions)
Pros
Cartoon style animator that is FREE to use
Great for motion capturing
Compatible with a variety of skin colors
Cons
Available only on Snapchat
Not compatible with certain face accessories
Limited face warping effect
Anime Filter #12: Cartoon 3D Style
And finally, for the last of our recommended anime filters, we have the Cartoon 3D Style lens from Snapchat that makes you look like your favorite Disney character (In this case, the obvious inspiration comes from Disney’s Frozen or Tangled)
Pros
Disney face animator that is FREE on Snapchat
Compatible with all skin tones
Trending on TikTok
Cons
It can only be used on Snapchat
Not great at capturing motion
02Steps to Download the Anime Filter App and Turn Yourself into an Anime Character
Now, if those filters weren’t enough for you, we’ve also included this next tutorial on how you can find apps on your mobile device that will allow you to get the same effect without having to use Snapchat, TikTok, or Instagram
Step 1Go to the App Store
The first step, of course, is to go to the app store on your mobile device.
Step 2Search for Anime Filter App
Next, search ‘Anime Filter’ on your phone’s app store.
Step 3Select Anime Filter App
There are multiple types of anime filter apps available in the market. Pick the one that you think will work best for you.
Step 4Install Anime Filter App
Finally, once you’ve found the anime filter app for you, install it.
Step 5Open Anime Filter App
The app that we used for our example, Anime Camera, offers several different animation styles However, this app does come with a subscription fee, so keep that in mind.
03Anime Filter Has a Sadly Unsurprising Problem
You might have noticed this while we were introducing all the different types of anime-style filters available, but the popular Anime Filter has its shortcomings. Which includes:
PROBLEM 1: Dark Skin Tones
The anime filter’s inability to capture darker skin tones accurately is one of the biggest issues users have with the filter.
PROBLEM 2: Hair Style
Hairstyle options are also very limited. And, as for black hairstyles? Well, the options are pretty much non-existent.
PROBLEM 3: Face Accessories
Do you wear glasses? How about piercings? Well, this won’t translate for you either, unfortunately
Key Takeaways from This Episode
● The Anime Filter is a hot, trending topic in platforms like Tiktok, Instagram, and Snapchat It’s also a fun way of engaging with the anime community
● There are other, similar face-animation filters available (The Cartoon 3D Styles, especially, were quite popular for a time)
● Unsurprisingly, the anime filter does have its problems… And it left a big chunk of the TikTok community pretty flabbergasted — and disappointed. But that didn’t stop them from joining in the fun to provide some empowering commentary
How to Find Some Different Ways to Animated Cartoon of Yourself
How to Find Some Different Ways to Animated Cartoon of Yourself
An easy yet powerful editor
Numerous effects to choose from
Detailed tutorials provided by the official channel
Illustrations and transforming pictures into cartoon characters have become famous these days. Are you keen to make one but unable to find the right apps that animate your pictures to do so?
This article will help you find the perfect match for you. You can make an animated cartoon of yourself.
In this article
01 [8 Ways to Get Creative With Your Photos into Cartoon Online Or With Apps](#Part 1)
02 [How to Make Animated Cartoon of Yourself in PowerPoint](#Part 2)
03 [Best 5 Apps to Cartoon Yourself on iPhone, iPad, and Android](#Part 3)
Part 1 8 Ways to Get Creative With Your Photos into Cartoon Online Or With Apps
01ToonCamera
Pros:
● ToonCamera is famous for its tremendous and in-time customer support.
● It has got a variety of high-quality filters for your pictures.
● The best part is that it allows you to apply filters in existing photos or videos and real-time.
Cons:
● ToonCamera comes only with the basic set of tools. You will get multiple filters but not various tools.
● It works only on iOS 8.1 or the later versions.
● The app will charge $1.99.

Hot comments from netizens:
ToonCamera allows you to crop and resize your photos. You can add any filter from its huge filter collection and give your picture an animated effect or Edit.
02Cartoon Camera Free
Pros:
● Cartoon Camera Free is an application that is very easy to use.
● The interface of this app is intuitive.
● You will have high-resolution export as output using a cartoon camera free for editing.
Cons:
● The shortcoming of this app is that it asks you to update frequently.
● The settings in the application are entirely automatic and already set.
● You cannot try your creativity or make changes in the editing according to your choice. It has only two effects.

Hot comments from netizens:
Cartoon Camera Free allows you to apply cartoon and pencil sketch effects to your photos. It is a tremendous animate your pictures app. Not only that, this app will enable you to view the impact in real-time.
03Clip2Comic & Caricature Maker
Pros:
● Clip2Comic & Caricature Maker has 1080p at export.
● This application can transform your pictures into posters, cartoons, and sketch art.
● The best of the app is that it allows you to reset image settings
Cons:
● It works only on iOS platforms.
● The app will leave back their watermark on your pictures. You need to get the paid version to remove the watermark.
● It is an expensive app compared to other editing apps.

Hot Comments from netizens:
People love this editing app. There are eight different comics, sketches, and cartoon characters. The app comes with a caricature and deformation tool and multiple image editing and enhancing tools.
04Cartoon Yourself Video Effects
Pros:
● The editing in this app allows you to keep realistic emotions in your videos and photos.
● The interface is very intuitive.
● The app imitates perfect emotions and has a wide variety for you.
Cons:
● Cartoon Yourself Video Effects may lag sometimes
● The effects may not work at times.
● You may require in-app purchases.

Hot Comments from netizens:
This app gives you access to a brand spectrum of emotions giving the perfect realistic touch to your video. You can share animated videos and gifs with your friends from this app.
05Cartoon Sketch Camera Pro
Pros:
● Cartoon Sketch Camera Pro has a sleek user interface.
● It has got eight cartoon effects and filters for your photos.
● It supports iOS13.
Cons:
● There are no image editors’ options.
● You may face image reporting issues.
● The app will cost you $1.99 to get rid of ads and distances.

Hot Comments from netizens:
Cartoon Sketch Camera Pro Cartoon has effects likePixellate, Sketch, Halftone, Dots, Crosshatch Swirl, and Emboss. You can pally these effects on your photos to get the desired output.
06Photo to Cartoon yourself Edit
Pros:
● You can directly click photos using the app that you want to edit.
● This app allows you to share the cartooned image via email.
● There are a lot of effects and textures available.
Cons:
● You may need in-app purchases to access all effects.
● You will not be able to stretch images to get more photo details.
● You cannot share files from here on social media.

Hot Comments from netizens:
Photo to Cartoon yourself Edit is an app that makes your picture look animated and transforms them into funny and beautiful cartoons in seconds. You can adjust the image in all formats and make the color look more vivid.
07Artist – Video and Photo Editor with Art Filters
Pros:
● Artist allows you to use cartoon filter with just a single click
● This app has multiple filters for every emotion.
● You can create square videos in low quality too.
Cons
● For video edits, the app supports only 30-sec duration.
● You may require in-app purchases to access some features.
● The app may lag at times.

Hot Comments from netizens:
Artist is a straightforward and helpful app. It has multiple features and effects for creating animated pictures. It offers video editing options that look fun. You can turn your selfie into cartoon characters using artisto in just one click.
08Moment Cartoon Caricature Cam
Pros:
● Moment Cartoon Caricature Cam holds an exciting selfie contest for users.
● The app has multiple collections of stickers.
● There are a variety of photo-enhancing tools.
Cons:
● The app is relatively slow at loading
● It includes a lot of ads.
● There are sometimes photo uploading issues.

Hot Comments from netizens:
Using Moment Cartoon Caricature Cam you can edit and enhance your photos. You can create a cartoon version of your selfies and participate in selfie contests.
Part 2 How to Make Animated Cartoon of Yourself in PowerPoint
To turn yourself into an animated character in PowerPoint, it is best to have an image with transparent or white background for best results. You can then use the picture effects, and other tools present in PowerPoint as mentioned to get your output.
● If the target picture has a background, your first step is to isolate it from its background. Remove the background or make it white.
● Now you need to sharpen the picture by 50%. This is available in the picture corrections effect.
● Next, copy the image and paste it back as a picture.
● Repeat these steps four times to make the lines in the image stand out sharply.
● In the end, add the color effect of Black and White at 20%.
● You will get quite a fairly detailed output.
Part 3 Best 5 Apps to Cartoon Yourself on iPhone, iPad, and Android
Five apps to cartoon yourself on iOS and Android platforms.
01Cartoon Yourself
Pros:
● It is a verybasic and simple to use photo to cartoon app for everyone.
● One does not require any editing skills to use this app.
● It contains nice and beautiful cartoons effects
Cons:
● The number of free filters and effects is minimal.
● You may require in-app purchases to access some features.
● It does not allow to click photos or record videos.
Hot Comments from netizens:
Cartoon Yourself is a great app to effortlessly turn your photos into animated versions. You have to add pictures from your gallery and then start editing. You will find a lot of editing tools in this app.
02Paint- art and cartoon filters
Pros:
● It has more than a thousand filters and effects
● Customized cartoon filters are set with various parameters
● It is also an artwork community
Cons:
● Even if you use the paid version, there might be bugs on thedesktop version.
● It needs almost regular updates.
● You may require in-app purchases to access some features.
Hot Comments from netizens:
Paint is an excellent app with thousands of filters and effects to choose from. It allows you to experiment with your creativity and create animated pictures.
03MomentCam cartoons and stickers
Pros:
● Here, you can create your cartoon effects
● It has a very active art community to share photos and win prizes.
● It has an easy user interface
Cons:
● There might be errors in loading if you connect with wifi.
● You may require in-app purchases to access some features
● Ads are very annoying.
Hot comments from netizens:
This app offers you a wide range of filters and emoticons. You can easily edit your photos and convert them into cartoon versions.
04Cart
Pros:
● It is a user-friendly app.
● It has got an intuitive interface
● The effects present here are very interesting
Cons:
● The app contains a lot of ads
● The app may freeze sometimes
● It includes an ad.
Hot comments from netizens:
Camaro offers you a wide range of effects like pencil, sketch, carton, watermarks, etc. You can customize the parameters of each filter.
05Sketch Me! Sketch and Cartoon
Pros:
● You can save the image directly from here
● It has opacity adjustments and distinct edges
● There are multiple video effects, including cartoons
Cons:
● There are issues with image importing
● It costs $1.99 in the app store
● May lag at times
Hot comments from netizens:
Sketch Me! Sketch and Cartoon is a great app that allows you to edit images, manage settings, adjust sharpness, opacity, and create the best-animated version of your photo.
Key Takeaways from This Episode
● Creating cartoon versions of your photos is very simple.
● You need not be a skilled editor for that.
● You can work out your creativity seamlessly by accessing these apps, tools, and software.
● Take help from the aforementioned apps and get the desired results. Happy animating!
Illustrations and transforming pictures into cartoon characters have become famous these days. Are you keen to make one but unable to find the right apps that animate your pictures to do so?
This article will help you find the perfect match for you. You can make an animated cartoon of yourself.
In this article
01 [8 Ways to Get Creative With Your Photos into Cartoon Online Or With Apps](#Part 1)
02 [How to Make Animated Cartoon of Yourself in PowerPoint](#Part 2)
03 [Best 5 Apps to Cartoon Yourself on iPhone, iPad, and Android](#Part 3)
Part 1 8 Ways to Get Creative With Your Photos into Cartoon Online Or With Apps
01ToonCamera
Pros:
● ToonCamera is famous for its tremendous and in-time customer support.
● It has got a variety of high-quality filters for your pictures.
● The best part is that it allows you to apply filters in existing photos or videos and real-time.
Cons:
● ToonCamera comes only with the basic set of tools. You will get multiple filters but not various tools.
● It works only on iOS 8.1 or the later versions.
● The app will charge $1.99.
Hot comments from netizens:
ToonCamera allows you to crop and resize your photos. You can add any filter from its huge filter collection and give your picture an animated effect or Edit.
02Cartoon Camera Free
Pros:
● Cartoon Camera Free is an application that is very easy to use.
● The interface of this app is intuitive.
● You will have high-resolution export as output using a cartoon camera free for editing.
Cons:
● The shortcoming of this app is that it asks you to update frequently.
● The settings in the application are entirely automatic and already set.
● You cannot try your creativity or make changes in the editing according to your choice. It has only two effects.
Hot comments from netizens:
Cartoon Camera Free allows you to apply cartoon and pencil sketch effects to your photos. It is a tremendous animate your pictures app. Not only that, this app will enable you to view the impact in real-time.
03Clip2Comic & Caricature Maker
Pros:
● Clip2Comic & Caricature Maker has 1080p at export.
● This application can transform your pictures into posters, cartoons, and sketch art.
● The best of the app is that it allows you to reset image settings
Cons:
● It works only on iOS platforms.
● The app will leave back their watermark on your pictures. You need to get the paid version to remove the watermark.
● It is an expensive app compared to other editing apps.
Hot Comments from netizens:
People love this editing app. There are eight different comics, sketches, and cartoon characters. The app comes with a caricature and deformation tool and multiple image editing and enhancing tools.
04Cartoon Yourself Video Effects
Pros:
● The editing in this app allows you to keep realistic emotions in your videos and photos.
● The interface is very intuitive.
● The app imitates perfect emotions and has a wide variety for you.
Cons:
● Cartoon Yourself Video Effects may lag sometimes
● The effects may not work at times.
● You may require in-app purchases.
Hot Comments from netizens:
This app gives you access to a brand spectrum of emotions giving the perfect realistic touch to your video. You can share animated videos and gifs with your friends from this app.
05Cartoon Sketch Camera Pro
Pros:
● Cartoon Sketch Camera Pro has a sleek user interface.
● It has got eight cartoon effects and filters for your photos.
● It supports iOS13.
Cons:
● There are no image editors’ options.
● You may face image reporting issues.
● The app will cost you $1.99 to get rid of ads and distances.
Hot Comments from netizens:
Cartoon Sketch Camera Pro Cartoon has effects likePixellate, Sketch, Halftone, Dots, Crosshatch Swirl, and Emboss. You can pally these effects on your photos to get the desired output.
06Photo to Cartoon yourself Edit
Pros:
● You can directly click photos using the app that you want to edit.
● This app allows you to share the cartooned image via email.
● There are a lot of effects and textures available.
Cons:
● You may need in-app purchases to access all effects.
● You will not be able to stretch images to get more photo details.
● You cannot share files from here on social media.
Hot Comments from netizens:
Photo to Cartoon yourself Edit is an app that makes your picture look animated and transforms them into funny and beautiful cartoons in seconds. You can adjust the image in all formats and make the color look more vivid.
07Artist – Video and Photo Editor with Art Filters
Pros:
● Artist allows you to use cartoon filter with just a single click
● This app has multiple filters for every emotion.
● You can create square videos in low quality too.
Cons
● For video edits, the app supports only 30-sec duration.
● You may require in-app purchases to access some features.
● The app may lag at times.
Hot Comments from netizens:
Artist is a straightforward and helpful app. It has multiple features and effects for creating animated pictures. It offers video editing options that look fun. You can turn your selfie into cartoon characters using artisto in just one click.
08Moment Cartoon Caricature Cam
Pros:
● Moment Cartoon Caricature Cam holds an exciting selfie contest for users.
● The app has multiple collections of stickers.
● There are a variety of photo-enhancing tools.
Cons:
● The app is relatively slow at loading
● It includes a lot of ads.
● There are sometimes photo uploading issues.
Hot Comments from netizens:
Using Moment Cartoon Caricature Cam you can edit and enhance your photos. You can create a cartoon version of your selfies and participate in selfie contests.
Part 2 How to Make Animated Cartoon of Yourself in PowerPoint
To turn yourself into an animated character in PowerPoint, it is best to have an image with transparent or white background for best results. You can then use the picture effects, and other tools present in PowerPoint as mentioned to get your output.
● If the target picture has a background, your first step is to isolate it from its background. Remove the background or make it white.
● Now you need to sharpen the picture by 50%. This is available in the picture corrections effect.
● Next, copy the image and paste it back as a picture.
● Repeat these steps four times to make the lines in the image stand out sharply.
● In the end, add the color effect of Black and White at 20%.
● You will get quite a fairly detailed output.
Part 3 Best 5 Apps to Cartoon Yourself on iPhone, iPad, and Android
Five apps to cartoon yourself on iOS and Android platforms.
01Cartoon Yourself
Pros:
● It is a verybasic and simple to use photo to cartoon app for everyone.
● One does not require any editing skills to use this app.
● It contains nice and beautiful cartoons effects
Cons:
● The number of free filters and effects is minimal.
● You may require in-app purchases to access some features.
● It does not allow to click photos or record videos.
Hot Comments from netizens:
Cartoon Yourself is a great app to effortlessly turn your photos into animated versions. You have to add pictures from your gallery and then start editing. You will find a lot of editing tools in this app.
02Paint- art and cartoon filters
Pros:
● It has more than a thousand filters and effects
● Customized cartoon filters are set with various parameters
● It is also an artwork community
Cons:
● Even if you use the paid version, there might be bugs on thedesktop version.
● It needs almost regular updates.
● You may require in-app purchases to access some features.
Hot Comments from netizens:
Paint is an excellent app with thousands of filters and effects to choose from. It allows you to experiment with your creativity and create animated pictures.
03MomentCam cartoons and stickers
Pros:
● Here, you can create your cartoon effects
● It has a very active art community to share photos and win prizes.
● It has an easy user interface
Cons:
● There might be errors in loading if you connect with wifi.
● You may require in-app purchases to access some features
● Ads are very annoying.
Hot comments from netizens:
This app offers you a wide range of filters and emoticons. You can easily edit your photos and convert them into cartoon versions.
04Cart
Pros:
● It is a user-friendly app.
● It has got an intuitive interface
● The effects present here are very interesting
Cons:
● The app contains a lot of ads
● The app may freeze sometimes
● It includes an ad.
Hot comments from netizens:
Camaro offers you a wide range of effects like pencil, sketch, carton, watermarks, etc. You can customize the parameters of each filter.
05Sketch Me! Sketch and Cartoon
Pros:
● You can save the image directly from here
● It has opacity adjustments and distinct edges
● There are multiple video effects, including cartoons
Cons:
● There are issues with image importing
● It costs $1.99 in the app store
● May lag at times
Hot comments from netizens:
Sketch Me! Sketch and Cartoon is a great app that allows you to edit images, manage settings, adjust sharpness, opacity, and create the best-animated version of your photo.
Key Takeaways from This Episode
● Creating cartoon versions of your photos is very simple.
● You need not be a skilled editor for that.
● You can work out your creativity seamlessly by accessing these apps, tools, and software.
● Take help from the aforementioned apps and get the desired results. Happy animating!
10 Cartoon Character Makers to Create Animated Characters
10 Cartoon Character Makers to Create Animated Characters
An easy yet powerful editor
Numerous effects to choose from
Detailed tutorials provided by the official channel
Learning cartoon making is easy through various application or makers online. Draw cartoon characters sketch in easy steps.

With the changing marketing and business trends, people and business owners are adopting different patterns in the pictures to make them visually good and attractive. Videos and pictures with animated characters look so amazing and gain maximum customers views. This ultimately helps the business owners to generate more leads for their business.
Not only business, but the presence of animated characters is also seen in the stories and status of the people over social media accounts. People impress others through making their own cartoon characters and animated pictures or characters. Earlier it has very tough to create cartoon character, but with so many online makers today, one can easily draw and create cartoon characters. There are various platforms that use software to turn a picture into a cartoon character or even animated picture. There are easy and interesting ways to create cartoon characters. If you love to see and are interested in drawing cartoon characters, then you can make it through various platforms. Let’s see some easy way to create own cartoon character.
In this article
01 [5 Easy Ways to Create Your Own Cartoon Character [For Non-illustrators] ](#Part 1)
02 [5 Create Cartoon Characters to Create Animated Characters for PRO](#Part 2)
03 [How to Create a Cartoon Character: A General Guide](#Part 3)
Part 1 5 Easy Ways to Create Your Own Cartoon Character [For Non-illustrators]
01Through Online Avatar Builders
Avatar building is an extraordinary way of presenting yourself. The best thing with avatar builders is that there is no need to download any application. You can easily do it in your device through online websites. They are the easiest and economical way of creating cartoon. You can add fun elements with these Avatar builders. Some of the websites that offer avatar building tools are:
Cartoonize: You can instantly make cartoon or avatar characters through Cartoonize. It can be used for face customization and adding colors. Face features like eyes, nose, hair style and expressions can be perfectly drawn with this tool. You can learn more by going to their official website.
The process is simple. You can upload your picture, go to cartoonize option at the top of the menu, do the necessary edits and features. Save it and your avatar cartoon is ready.
The other avatar building platforms are charatoon and Face your Manga. For Face your Manga, Adobe Flash Player is required. The gallery can be explored with some famous avatar of popular personalities.
02Character builders
The other way to create your own cartoon character is through character builders. The difference of this cartoon making is that one can create a complete cartoon with complete features. Like from head to toe. GraphicMama Character Maker Packs is one that offers kit to make customized cartoons.
03Tools for converting pictures into cartoons
A perfect cartoon can be made when it resemble truly as you are. The best method for doing that is using software to turn a picture into a cartoon. Filters, facial expressions and styles can be added through this way. Adobe Character Animator is a tool that can be used to convert a picture, catch the facial expression and voice.
You can learn to create cartoon character from photo by following the video
The other two ways are related to taking help of others in making the cartoon characters. Some of them are:
04Outsourcing designers or illustrators
When the perfection level is not achieved through own creation, the other option is to get it done through designers or illustrators. There are freelancers and studio who offer such services. They create cartoon as per the requirement of the customers.
05Modification in Stock cartoon characters
Those who are not having any experience of making cartoons, they can use the stocks cartoon characters and can change them with the use of software.
Part 2 5 Create Cartoon Characters to Create Animated Characters for PRO
A professional cartoon maker need some advance tools and features to give a unique and perfect look to his cartoon drawn. So, for them some applications or cartoon character maker is good. Let’s see some of the makers that are specifically designed for professionals:
01Animaker
This has various themes to make your cartoon look great. It brings life to a character. The steps involve in making a cartoon character is as under:
● As required, select the animated template.
● You can add customized features as such as backgrounds, pictures and animated text.
● Music can also be added and can be selected from the library.
● After the character is ready, you can share or download the video.
02Adobe
This is the most widely platform or maker for creating high quality contents, cartoon avatar and games. Sketch and drawing tool are there in the maker that gives real experience to the cartoon. The platform facilitates exploring the file to WebGL, SVG and Adobe AIR.
You can view how it works and the process in the video-
03Reallusion
Text and voice has given a new definition to the cartoon world. If you desire to add some interesting elements in cartoon through text and voices, then Reallusion is a good option for you. It has 3D head creation tool which can be used to make animated cartoons for mails and e-cards.
You can view how it works and the process in the video-
04Renderforest
This cartoon maker has some great collection of professionally designed templates, to make cartoon making process easy and perfect. Templates for kids, education, character adventure, healthcare and iconic animation are some of the collections one can find in this maker.
The process of cartoon creation is easy with following steps:
● Choose the most excellent cartoon templates or start from zero through sketch,
● You can edit the already available stories. Even animated characters can be used.
● Add some customized features like voice or music, style or colors.
● This is how you can create exclusive vibrant cartoons.
Video can be watched at-
05Biteable
Biteable has several templates like leadership skill tips, travel agent explainer and many more. The video clips, music, animated templates of this maker create engaging cartoon characters.
The process to develop a cartoon video through Biteable is as under:
● Open the maker Biteable
● As per your requirement, pick the one cartoon template
● Log in the account
● You can add many effects like backing music, clips and text.
● As made in the website, you can share on social media and emails.
Part 3 How to Create a Cartoon Character: A General Guide
A professional cartoon expert becomes an expert after a continuous practice. It’s not easy to learn making cartoons. Therefore to be an expert one need to learn the basics and other important principles for cartoon making. A general guide for the same is as under:
● Begin with basic steps
Learn the basic shapes like making ovals, circles and other shapes. This will help you to be perfection in making the basic outline of the cartoon. This will improve you skill and you can explore more possibilities with the basic outlines.
● Shape improvement
This is an advance stage of basic step. This step will help you to define the shape of the cartoon character you are going to draw. It gives structure and design to a character.
● Including details
This stage is more about designing a character. Pose, expression, attires, props are selected in this step. The personality of a character is made better. It makes the character more interesting and engaging.
● Shadow of cartoon character
Before giving a final touch to the character, it is necessary to check the shadow of the picture drawn. It will show whether you are on right path or not.
● Final touch
The last step is adding all details in the character. It may be straight teeth, big smile, messy hairs or anything. Lines can be made fine and clean. You can add colors of your choice.
The other platform or cartoon maker that can be checked out is Filmora.
Wondershare Filmora Video Editor is software used for making, editing and adding effects to pictures or videos. It is easy to use application loaded with many advanced tools and features to make picture and video editing simple. Those who are looking for a robust application for capturing some precious moments through picture and videos, then Filmora is a perfect application.
Filmora can be used to draw and insert cartoon characters in any video. Animation, text and music can be added effectively with Filmora. A beginner can easily learn to create cartoon character online.
Wondershare Filmora
Get started easily with Filmora’s powerful performance, intuitive interface, and countless effects!
Try It Free Try It Free Try It Free Learn More >
● Ending Thoughts →
● Cartoon characters making is not an easy task. But now there are cartoon character maker free which has made easy to learn cartoon making. The various tools used are Avatar maker, cartoon making, turning picture into cartoon and through experts support.
● The different professional cartoon character maker online are Animaker, Reallusion, Biteable and Adobe. Through these cartoon makers making cartoon characters are easy with advanced features.
● Filmora is one of the popular picture and video making and editing software which can also be used for making amazing cartoon characters.
Learning cartoon making is easy through various application or makers online. Draw cartoon characters sketch in easy steps.
With the changing marketing and business trends, people and business owners are adopting different patterns in the pictures to make them visually good and attractive. Videos and pictures with animated characters look so amazing and gain maximum customers views. This ultimately helps the business owners to generate more leads for their business.
Not only business, but the presence of animated characters is also seen in the stories and status of the people over social media accounts. People impress others through making their own cartoon characters and animated pictures or characters. Earlier it has very tough to create cartoon character, but with so many online makers today, one can easily draw and create cartoon characters. There are various platforms that use software to turn a picture into a cartoon character or even animated picture. There are easy and interesting ways to create cartoon characters. If you love to see and are interested in drawing cartoon characters, then you can make it through various platforms. Let’s see some easy way to create own cartoon character.
In this article
01 [5 Easy Ways to Create Your Own Cartoon Character [For Non-illustrators] ](#Part 1)
02 [5 Create Cartoon Characters to Create Animated Characters for PRO](#Part 2)
03 [How to Create a Cartoon Character: A General Guide](#Part 3)
Part 1 5 Easy Ways to Create Your Own Cartoon Character [For Non-illustrators]
01Through Online Avatar Builders
Avatar building is an extraordinary way of presenting yourself. The best thing with avatar builders is that there is no need to download any application. You can easily do it in your device through online websites. They are the easiest and economical way of creating cartoon. You can add fun elements with these Avatar builders. Some of the websites that offer avatar building tools are:
Cartoonize: You can instantly make cartoon or avatar characters through Cartoonize. It can be used for face customization and adding colors. Face features like eyes, nose, hair style and expressions can be perfectly drawn with this tool. You can learn more by going to their official website.
The process is simple. You can upload your picture, go to cartoonize option at the top of the menu, do the necessary edits and features. Save it and your avatar cartoon is ready.
The other avatar building platforms are charatoon and Face your Manga. For Face your Manga, Adobe Flash Player is required. The gallery can be explored with some famous avatar of popular personalities.
02Character builders
The other way to create your own cartoon character is through character builders. The difference of this cartoon making is that one can create a complete cartoon with complete features. Like from head to toe. GraphicMama Character Maker Packs is one that offers kit to make customized cartoons.
03Tools for converting pictures into cartoons
A perfect cartoon can be made when it resemble truly as you are. The best method for doing that is using software to turn a picture into a cartoon. Filters, facial expressions and styles can be added through this way. Adobe Character Animator is a tool that can be used to convert a picture, catch the facial expression and voice.
You can learn to create cartoon character from photo by following the video
The other two ways are related to taking help of others in making the cartoon characters. Some of them are:
04Outsourcing designers or illustrators
When the perfection level is not achieved through own creation, the other option is to get it done through designers or illustrators. There are freelancers and studio who offer such services. They create cartoon as per the requirement of the customers.
05Modification in Stock cartoon characters
Those who are not having any experience of making cartoons, they can use the stocks cartoon characters and can change them with the use of software.
Part 2 5 Create Cartoon Characters to Create Animated Characters for PRO
A professional cartoon maker need some advance tools and features to give a unique and perfect look to his cartoon drawn. So, for them some applications or cartoon character maker is good. Let’s see some of the makers that are specifically designed for professionals:
01Animaker
This has various themes to make your cartoon look great. It brings life to a character. The steps involve in making a cartoon character is as under:
● As required, select the animated template.
● You can add customized features as such as backgrounds, pictures and animated text.
● Music can also be added and can be selected from the library.
● After the character is ready, you can share or download the video.
02Adobe
This is the most widely platform or maker for creating high quality contents, cartoon avatar and games. Sketch and drawing tool are there in the maker that gives real experience to the cartoon. The platform facilitates exploring the file to WebGL, SVG and Adobe AIR.
You can view how it works and the process in the video-
03Reallusion
Text and voice has given a new definition to the cartoon world. If you desire to add some interesting elements in cartoon through text and voices, then Reallusion is a good option for you. It has 3D head creation tool which can be used to make animated cartoons for mails and e-cards.
You can view how it works and the process in the video-
04Renderforest
This cartoon maker has some great collection of professionally designed templates, to make cartoon making process easy and perfect. Templates for kids, education, character adventure, healthcare and iconic animation are some of the collections one can find in this maker.
The process of cartoon creation is easy with following steps:
● Choose the most excellent cartoon templates or start from zero through sketch,
● You can edit the already available stories. Even animated characters can be used.
● Add some customized features like voice or music, style or colors.
● This is how you can create exclusive vibrant cartoons.
Video can be watched at-
05Biteable
Biteable has several templates like leadership skill tips, travel agent explainer and many more. The video clips, music, animated templates of this maker create engaging cartoon characters.
The process to develop a cartoon video through Biteable is as under:
● Open the maker Biteable
● As per your requirement, pick the one cartoon template
● Log in the account
● You can add many effects like backing music, clips and text.
● As made in the website, you can share on social media and emails.
Part 3 How to Create a Cartoon Character: A General Guide
A professional cartoon expert becomes an expert after a continuous practice. It’s not easy to learn making cartoons. Therefore to be an expert one need to learn the basics and other important principles for cartoon making. A general guide for the same is as under:
● Begin with basic steps
Learn the basic shapes like making ovals, circles and other shapes. This will help you to be perfection in making the basic outline of the cartoon. This will improve you skill and you can explore more possibilities with the basic outlines.
● Shape improvement
This is an advance stage of basic step. This step will help you to define the shape of the cartoon character you are going to draw. It gives structure and design to a character.
● Including details
This stage is more about designing a character. Pose, expression, attires, props are selected in this step. The personality of a character is made better. It makes the character more interesting and engaging.
● Shadow of cartoon character
Before giving a final touch to the character, it is necessary to check the shadow of the picture drawn. It will show whether you are on right path or not.
● Final touch
The last step is adding all details in the character. It may be straight teeth, big smile, messy hairs or anything. Lines can be made fine and clean. You can add colors of your choice.
The other platform or cartoon maker that can be checked out is Filmora.
Wondershare Filmora Video Editor is software used for making, editing and adding effects to pictures or videos. It is easy to use application loaded with many advanced tools and features to make picture and video editing simple. Those who are looking for a robust application for capturing some precious moments through picture and videos, then Filmora is a perfect application.
Filmora can be used to draw and insert cartoon characters in any video. Animation, text and music can be added effectively with Filmora. A beginner can easily learn to create cartoon character online.
Wondershare Filmora
Get started easily with Filmora’s powerful performance, intuitive interface, and countless effects!
Try It Free Try It Free Try It Free Learn More >
● Ending Thoughts →
● Cartoon characters making is not an easy task. But now there are cartoon character maker free which has made easy to learn cartoon making. The various tools used are Avatar maker, cartoon making, turning picture into cartoon and through experts support.
● The different professional cartoon character maker online are Animaker, Reallusion, Biteable and Adobe. Through these cartoon makers making cartoon characters are easy with advanced features.
● Filmora is one of the popular picture and video making and editing software which can also be used for making amazing cartoon characters.
Top 3 Ways to Create Gif Images with Great 3D Gif Maker
Top 3 Ways to Create Gif Images with Great 3D Gif Maker
An easy yet powerful editor
Numerous effects to choose from
Detailed tutorials provided by the official channel
If what you’re searching for is a 3D GIF Maker, then we’ve got your back. Below, we’ve not only listed the three best ways to create 3D animated GIFs, but we’ve also included a brief tutorial that you can reference when creating your very own GIF images.
In this article
01 [Best 3 Ways to Create 3D Animated GIFs](#Part 1)
02 [Create 3D animated GIFs online with Filmora](#Part 2)
Part 1 Best 3 Ways to Create 3D Animated GIFs
First off, as promised, we have a brief list of some 3D GIF Maker tools that you can try. We’ve made sure to pick a unique set of 3D GIF Maker tools and 3D GIF Generator tools in order to give you a variety to choose from. It won’t be the most comprehensive list, but it should help you on your way to understanding how these 3D GIF makers usually work and how you can use them in order to create GIF images that you can share with your friends, family, and colleagues.
01 Wondershare Filmora Video Editor
The first 3D GIF Maker on our list is Filmora. It’s probably not the first one that you’d naturally think of as a 3D GIF Maker, seeing as it was developed to be more than that. But, it doesn’t discount the fact that it can be used in order to create and edit your own GIFs.
Wondershare Filmora is available for both Windows and Mac users. It allows you to create a GIF with images or video easily and even gives you the tools needed to edit and perfect it before you export it for use (a process that we’ll be showing off in more detail in the tutorial section below if you’re interested in learning more.)
For Win 7 or later (64-bit)
For macOS 10.12 or later
022. Adobe Photoshop
Adobe Photoshop, much like Filmora, is probably not, first and foremost, considered a mere 3D GIF Maker. However, it doesn’t erase its 3D GIF Creator functions. This tool, if used correctly, can make just about anything you want.
The process of using it, of course, is a little fussier than other alternatives (you’ll probably want to look up a more detailed explanation on the subject), but the fussiness does also mean that you can control every detail of your project and get it to look exactly how you want it to look.
03EaseUS Video Editor
Similar to Filmora, EaseUS Video Editor is an advanced video editing tool that you can use as a 3D GIF Creator quite easily. It comes built-in with templates, filters, design elements, transition effects, music, and so much more — allowing you to freely design your GIF images so that they can be ready for publishing right off the bat.
The beauty of it, of course, is that, much like with all the other options that we introduced today, you can use the program for more than just 3D GIF creation after the fact — opening yourself up for different and more complex projects in the future (be they image, audio, or video-related.)
Part 2 Create 3D Animated Gifs Online With Wondershare Filmora Video Editor
Now, as promised, we’ve also included a tutorial that you can follow along with to create your own 3D Animated GIFs with the tool, Wondershare Filmora Video Editor . With this tool, we’ll be showing you the basic way to do it (by using a premade video that you can edit and then convert into GIF format). But, feel free to explore the tool and use it as you wish (i.e., as a 3D spinning GIF creator, 3D rotating text GIF maker, 3D cube GIF maker, and so on.)
01Step 1: Launch Filmora Video Editor
First things first, launch the 3D GIF maker that you intend to use. In our case, that is Filmora (a screenshot has been provided below for your edification and reference. We’ll be using Filmora as our example.)
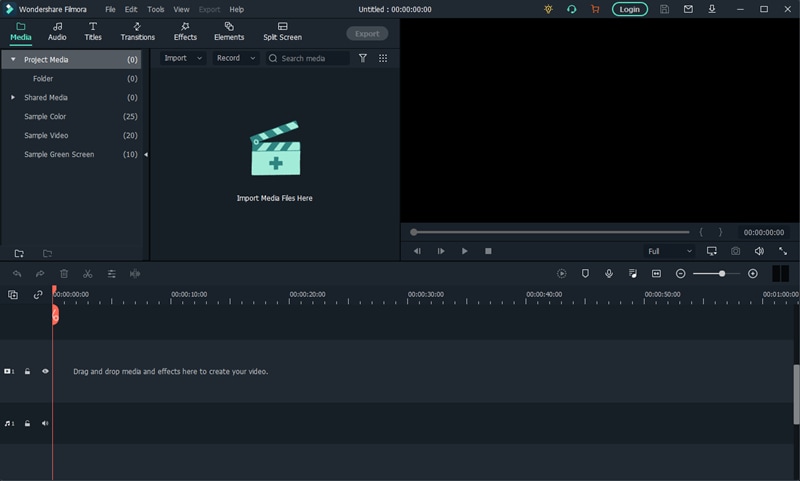
02Step 2: Upload File(s)
Next, upload the file or files that you want to turn into a GIF.
As mentioned in the introduction, we’ll be using a pre-made video, but you can use whatever you wish (i.e., images). In order to upload, we clicked the File tab (pointed out in the image below) and selected Import Media > Import Media File. However, you can also drag and drop your file(s) on the designated area of the UI..
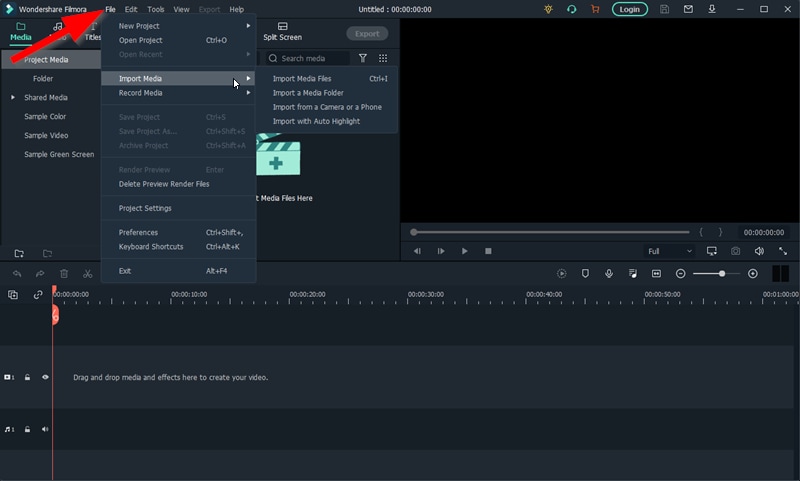
03Step 3: Drag Uploaded Media to Timeline
To create a GIF withFilmora , you’ll need to first create a video. Don’t worry, this is simple. Just drag and drop the media that you want to use onto the timeline.
Note: Any uploaded media will be in the media folder (marked [1] in the image below). Drag media from there onto the timeline (marked [2] in the image below) in order to create a video.
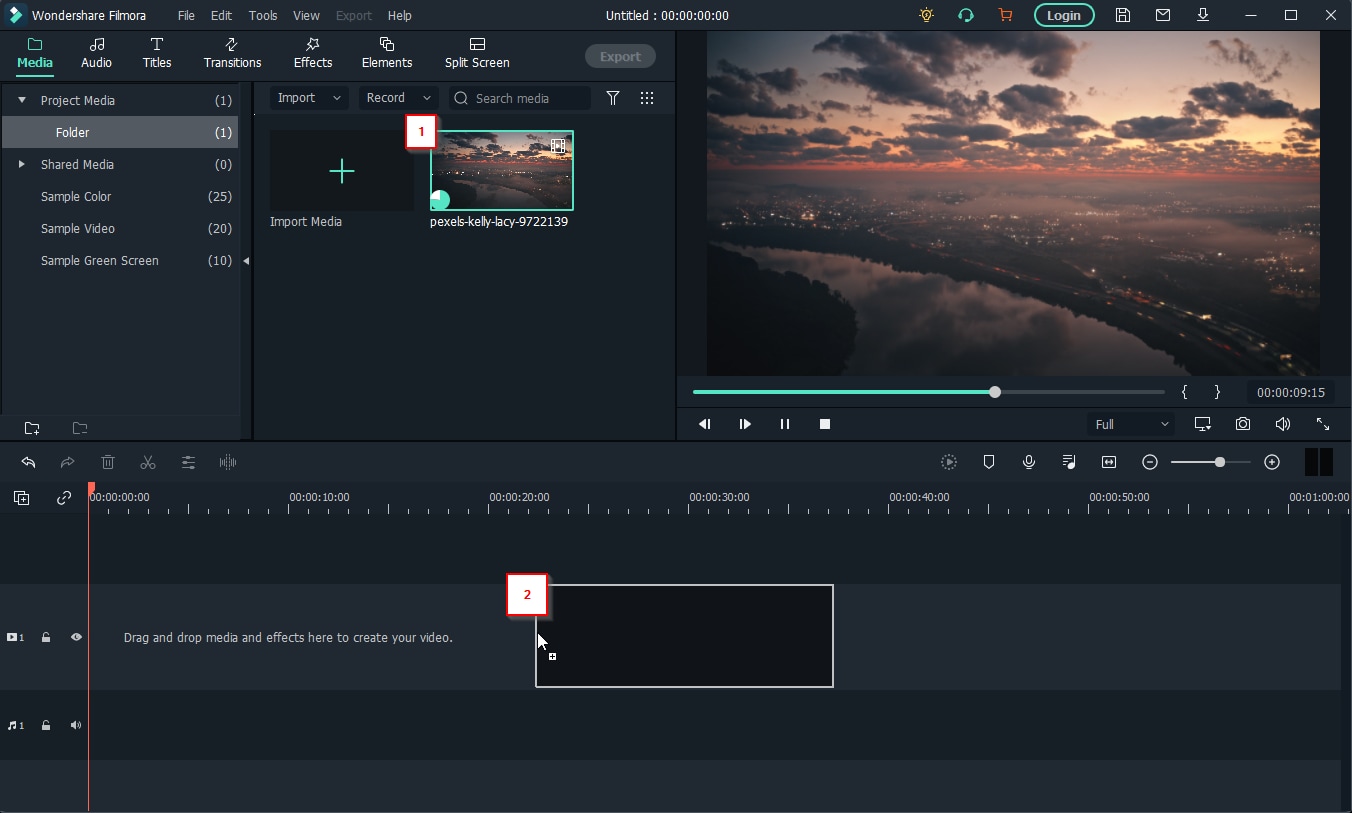
04Step 4: (Optional) Edit Video
If you want, take this opportunity to work on your video some more before converting it into a GIF. Filmora is set up to help you with this. Providing all the following features:
●Trim or Cut features to trim down the video.
●Add Text or audio to video.
●Use templates, filters, or other elements to design videos.
●Add transitions for better video flow.
And then some. In our case, we used the ‘Trim’ feature to cut down our video for a cleaner look.
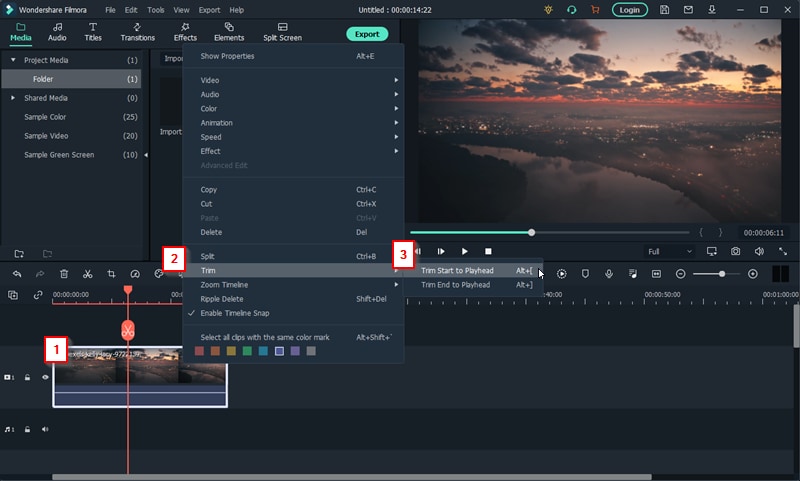
05Step 5: Create Video > GIF
Once you’re done editing your video, you can now convert it to a GIF.
This is easy enough to do. Just click the ‘Export’ tab and select the ‘Create Video’ option. That will allow you to choose to convert your finished video into a GIF file that you can share with your friends.
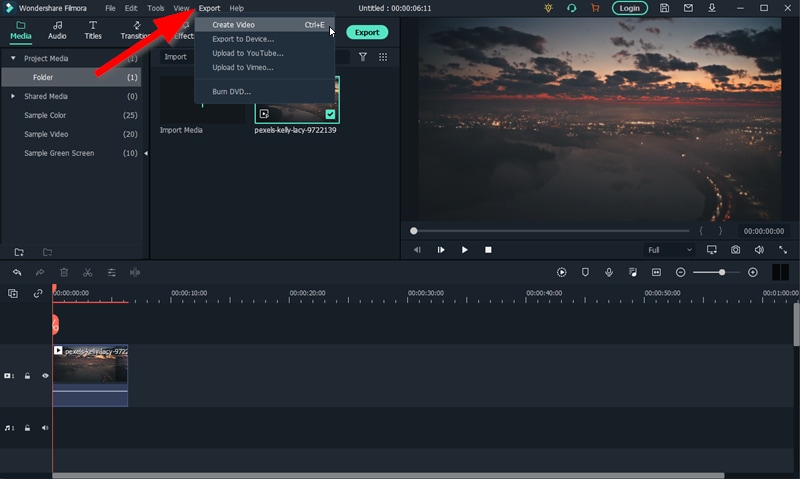
● Key Takeaways from This Episode →
● GIFs are a great way of sharing fun moments with friends and family. And, these days, it’s easier than ever to create them.
● There are 3D GIF Makers available everywhere online. Each one is a little different, of course. But capable of allowing you to create GIFs with images and videos that you can eventually share.
● One such example is the 3D GIF Maker, Filmora. It was the first one that we introduced on our list of the best 3D GIf Makers.
● We also included a tutorial on how you can use Filmora as a 3D GIF Generator for your reference. You can try out the program today if you like. Wondershare offers a FREE trial that you can use in order to explore the many functions of the software before you commit to buying out the perpetual license or signing up for one of their subscription packages.
If what you’re searching for is a 3D GIF Maker, then we’ve got your back. Below, we’ve not only listed the three best ways to create 3D animated GIFs, but we’ve also included a brief tutorial that you can reference when creating your very own GIF images.
In this article
01 [Best 3 Ways to Create 3D Animated GIFs](#Part 1)
02 [Create 3D animated GIFs online with Filmora](#Part 2)
Part 1 Best 3 Ways to Create 3D Animated GIFs
First off, as promised, we have a brief list of some 3D GIF Maker tools that you can try. We’ve made sure to pick a unique set of 3D GIF Maker tools and 3D GIF Generator tools in order to give you a variety to choose from. It won’t be the most comprehensive list, but it should help you on your way to understanding how these 3D GIF makers usually work and how you can use them in order to create GIF images that you can share with your friends, family, and colleagues.
01 Wondershare Filmora Video Editor
The first 3D GIF Maker on our list is Filmora. It’s probably not the first one that you’d naturally think of as a 3D GIF Maker, seeing as it was developed to be more than that. But, it doesn’t discount the fact that it can be used in order to create and edit your own GIFs.
Wondershare Filmora is available for both Windows and Mac users. It allows you to create a GIF with images or video easily and even gives you the tools needed to edit and perfect it before you export it for use (a process that we’ll be showing off in more detail in the tutorial section below if you’re interested in learning more.)
For Win 7 or later (64-bit)
For macOS 10.12 or later
022. Adobe Photoshop
Adobe Photoshop, much like Filmora, is probably not, first and foremost, considered a mere 3D GIF Maker. However, it doesn’t erase its 3D GIF Creator functions. This tool, if used correctly, can make just about anything you want.
The process of using it, of course, is a little fussier than other alternatives (you’ll probably want to look up a more detailed explanation on the subject), but the fussiness does also mean that you can control every detail of your project and get it to look exactly how you want it to look.
03EaseUS Video Editor
Similar to Filmora, EaseUS Video Editor is an advanced video editing tool that you can use as a 3D GIF Creator quite easily. It comes built-in with templates, filters, design elements, transition effects, music, and so much more — allowing you to freely design your GIF images so that they can be ready for publishing right off the bat.
The beauty of it, of course, is that, much like with all the other options that we introduced today, you can use the program for more than just 3D GIF creation after the fact — opening yourself up for different and more complex projects in the future (be they image, audio, or video-related.)
Part 2 Create 3D Animated Gifs Online With Wondershare Filmora Video Editor
Now, as promised, we’ve also included a tutorial that you can follow along with to create your own 3D Animated GIFs with the tool, Wondershare Filmora Video Editor . With this tool, we’ll be showing you the basic way to do it (by using a premade video that you can edit and then convert into GIF format). But, feel free to explore the tool and use it as you wish (i.e., as a 3D spinning GIF creator, 3D rotating text GIF maker, 3D cube GIF maker, and so on.)
01Step 1: Launch Filmora Video Editor
First things first, launch the 3D GIF maker that you intend to use. In our case, that is Filmora (a screenshot has been provided below for your edification and reference. We’ll be using Filmora as our example.)
02Step 2: Upload File(s)
Next, upload the file or files that you want to turn into a GIF.
As mentioned in the introduction, we’ll be using a pre-made video, but you can use whatever you wish (i.e., images). In order to upload, we clicked the File tab (pointed out in the image below) and selected Import Media > Import Media File. However, you can also drag and drop your file(s) on the designated area of the UI..
03Step 3: Drag Uploaded Media to Timeline
To create a GIF withFilmora , you’ll need to first create a video. Don’t worry, this is simple. Just drag and drop the media that you want to use onto the timeline.
Note: Any uploaded media will be in the media folder (marked [1] in the image below). Drag media from there onto the timeline (marked [2] in the image below) in order to create a video.
04Step 4: (Optional) Edit Video
If you want, take this opportunity to work on your video some more before converting it into a GIF. Filmora is set up to help you with this. Providing all the following features:
●Trim or Cut features to trim down the video.
●Add Text or audio to video.
●Use templates, filters, or other elements to design videos.
●Add transitions for better video flow.
And then some. In our case, we used the ‘Trim’ feature to cut down our video for a cleaner look.
05Step 5: Create Video > GIF
Once you’re done editing your video, you can now convert it to a GIF.
This is easy enough to do. Just click the ‘Export’ tab and select the ‘Create Video’ option. That will allow you to choose to convert your finished video into a GIF file that you can share with your friends.
● Key Takeaways from This Episode →
● GIFs are a great way of sharing fun moments with friends and family. And, these days, it’s easier than ever to create them.
● There are 3D GIF Makers available everywhere online. Each one is a little different, of course. But capable of allowing you to create GIFs with images and videos that you can eventually share.
● One such example is the 3D GIF Maker, Filmora. It was the first one that we introduced on our list of the best 3D GIf Makers.
● We also included a tutorial on how you can use Filmora as a 3D GIF Generator for your reference. You can try out the program today if you like. Wondershare offers a FREE trial that you can use in order to explore the many functions of the software before you commit to buying out the perpetual license or signing up for one of their subscription packages.
How to Create a Whiteboard Video Step by Step [2023 Updated]
How to Create a Whiteboard Video Step by Step

Shanoon Cox
Mar 27, 2024• Proven solutions
Drawings will always have a special place in storytelling. Whether you are demonstrating a new concept to a child, highlighting the features of a product to your bosses, or showcasing the intricacies of a marketing campaign, drawings make it easier for the audience to understand what is being said.
That is why it is so important to learn how to create whiteboard animation. When you learn how to create a whiteboard video with animate pictures app , you are in a unique position when it comes to selling your story, and convincing others of what you already know.
- Part1: What is Whiteboard Animation Video?
- Part2: How to Create Whiteboard Animation Videos?
- Part3: Useful Tips for Creating Whiteboard Animation
Part 1:What is Whiteboard Animation Video?
To understand the whiteboard animation video, we must go back to the beginning. Think about how professors illustrate different topics and equations using a whiteboard. They will write down the important words or formulas and then expand on that information through their lecture.
Whiteboard animation is taking those words, phrases and images to another level. Whiteboard animation is a series of events or videos that are created using 2D animation software . These videos can be showcased in any type of setting. You can upload them onto a social media site, show them as part of a presentation, or add them to a crowdfunding or product funding page.
When someone watches a whiteboard animation video, they see the series of images and graphics in sequential order, and there is usually a narration accompanying those images. These videos can be short, anywhere from 30 to 90 seconds. The idea is to deliver information in a clear, coherent and concise way.
To create whiteboard animation, the goal is to take complex concepts and information, and make it easy to understand. Now we can go into some detail about how to create a whiteboard video.
Part 2:How to Create Whiteboard Animation Videos?
Step 1: Write a Script
Much like a normal video or a short skit, there must be a script if a whiteboard animation video is to succeed. Having interesting images and information is great, but they are nothing without a coherent story.
It is not a blog post, storyboard or a set of bullet points. What you need is a proper script, which says everything in regards to the video. Why? Because then you will know precisely what images should be added in certain sections, what the narrator must say, and what transitions are necessary.

Step 2: Start with the Storyboard
Now you have a script. You have a clear idea of how you want your video to come across. It is time to start creating the storyboard. With a storyboard, you will be able to organize your thoughts much better. You can see how each frame comes onto the screen, and how one shot ties into the other.
When you create your storyboard, you will have a good idea about how your final product will look. If there are some transitions you are not happy with, this is the moment where you can make changes.

Step 3: Create Images
If you are a creative person, you will find this part very easy. It is all about creating fun and unique images that will help convey the information that you want to get across. Try to create memorable images that will excite your audience. The simpler, more distinctive and interesting you can make those images, the better your end result.

Step 4: Animate Those Images
Now you have your images, and it is time to find some coherence between those images and your script. You will have to time the animation for your images as you do not want things lingering on the screen for too long, or being seen for a brief second. It may be a good idea for you to speak out the narration as you are animating the images and timing their animation. It will help you with the timing.

Step 5: Record and Sync the Audio
The final step involves getting your audio. Every animated video must have narration as it helps to explain what is happening in the images that people are seeing. Record your audio, and ensure it is perfectly in sync with your content.

Part 3:Useful Tips for Creating Whiteboard Animation
Evoke Empathy
The goal of a whiteboard animation video is not just to explain information in a cold and impersonal way. You are hoping to make a connection with your audience. You want them to care about what you are showcasing. By evoking empathy, you will create the connection that you desire.
By adding emotional references, such as funny, lighthearted, cute or emotional moments, you will find your videos are getting a much better reception from the audience. People can relate to content better when it makes them feel things - especially if those feelings are positive.
Personalize the Images
Showing interesting images is a good start. But if you can personalize these images with graphics and color, your storyboard will look even better. Remember that your goal is to get people to stand up and take notice of the content that you are creating.
Conclusion
Now that we have gone over the entire process of creating a whiteboard animation video, we hope that you are ready to get started on your project. And if you are wondering how you will edit your video, we recommend Filmora . You can use it to make animation video by adding keyframes, so the animation will be smooth and natural. You just need to build a white plane to easily start making animation. Besides, color correction and audio mixer will raise up your explainer video to a new level. Download it to have a try (Free)!
Shanoon Cox
Shanoon Cox is a writer and a lover of all things video.
Follow @Shanoon Cox
Shanoon Cox
Mar 27, 2024• Proven solutions
Drawings will always have a special place in storytelling. Whether you are demonstrating a new concept to a child, highlighting the features of a product to your bosses, or showcasing the intricacies of a marketing campaign, drawings make it easier for the audience to understand what is being said.
That is why it is so important to learn how to create whiteboard animation. When you learn how to create a whiteboard video with animate pictures app , you are in a unique position when it comes to selling your story, and convincing others of what you already know.
- Part1: What is Whiteboard Animation Video?
- Part2: How to Create Whiteboard Animation Videos?
- Part3: Useful Tips for Creating Whiteboard Animation
Part 1:What is Whiteboard Animation Video?
To understand the whiteboard animation video, we must go back to the beginning. Think about how professors illustrate different topics and equations using a whiteboard. They will write down the important words or formulas and then expand on that information through their lecture.
Whiteboard animation is taking those words, phrases and images to another level. Whiteboard animation is a series of events or videos that are created using 2D animation software . These videos can be showcased in any type of setting. You can upload them onto a social media site, show them as part of a presentation, or add them to a crowdfunding or product funding page.
When someone watches a whiteboard animation video, they see the series of images and graphics in sequential order, and there is usually a narration accompanying those images. These videos can be short, anywhere from 30 to 90 seconds. The idea is to deliver information in a clear, coherent and concise way.
To create whiteboard animation, the goal is to take complex concepts and information, and make it easy to understand. Now we can go into some detail about how to create a whiteboard video.
Part 2:How to Create Whiteboard Animation Videos?
Step 1: Write a Script
Much like a normal video or a short skit, there must be a script if a whiteboard animation video is to succeed. Having interesting images and information is great, but they are nothing without a coherent story.
It is not a blog post, storyboard or a set of bullet points. What you need is a proper script, which says everything in regards to the video. Why? Because then you will know precisely what images should be added in certain sections, what the narrator must say, and what transitions are necessary.
Step 2: Start with the Storyboard
Now you have a script. You have a clear idea of how you want your video to come across. It is time to start creating the storyboard. With a storyboard, you will be able to organize your thoughts much better. You can see how each frame comes onto the screen, and how one shot ties into the other.
When you create your storyboard, you will have a good idea about how your final product will look. If there are some transitions you are not happy with, this is the moment where you can make changes.
Step 3: Create Images
If you are a creative person, you will find this part very easy. It is all about creating fun and unique images that will help convey the information that you want to get across. Try to create memorable images that will excite your audience. The simpler, more distinctive and interesting you can make those images, the better your end result.
Step 4: Animate Those Images
Now you have your images, and it is time to find some coherence between those images and your script. You will have to time the animation for your images as you do not want things lingering on the screen for too long, or being seen for a brief second. It may be a good idea for you to speak out the narration as you are animating the images and timing their animation. It will help you with the timing.
Step 5: Record and Sync the Audio
The final step involves getting your audio. Every animated video must have narration as it helps to explain what is happening in the images that people are seeing. Record your audio, and ensure it is perfectly in sync with your content.
Part 3:Useful Tips for Creating Whiteboard Animation
Evoke Empathy
The goal of a whiteboard animation video is not just to explain information in a cold and impersonal way. You are hoping to make a connection with your audience. You want them to care about what you are showcasing. By evoking empathy, you will create the connection that you desire.
By adding emotional references, such as funny, lighthearted, cute or emotional moments, you will find your videos are getting a much better reception from the audience. People can relate to content better when it makes them feel things - especially if those feelings are positive.
Personalize the Images
Showing interesting images is a good start. But if you can personalize these images with graphics and color, your storyboard will look even better. Remember that your goal is to get people to stand up and take notice of the content that you are creating.
Conclusion
Now that we have gone over the entire process of creating a whiteboard animation video, we hope that you are ready to get started on your project. And if you are wondering how you will edit your video, we recommend Filmora . You can use it to make animation video by adding keyframes, so the animation will be smooth and natural. You just need to build a white plane to easily start making animation. Besides, color correction and audio mixer will raise up your explainer video to a new level. Download it to have a try (Free)!
Shanoon Cox
Shanoon Cox is a writer and a lover of all things video.
Follow @Shanoon Cox
Also read:
- New How to Find & Make Animated Christmas GIFs for 2024
- In 2024, How to Create Your Own Avatar Free
- New Is It That Easy to Make My Own Animated Character?
- How To Make Pinterest Slideshow in Simple Ways
- Ways You Can Master to Find 10 Best Free Animated Text Generator
- Updated Animate Photo Online with These Awesome Tools for 2024
- Complete Guide to Send Gif WhatsApp on Android
- Updated In 2024, How to Create Slideshow in LinkedIn
- In 2024, What Wikipedia Cant Tell You About the 10 Batman Cartoons
- New In 2024, The 15 Best Apps to Turn Photos Into Cartoons and Sketches
- New Ways to Get the Most up to Date Cartoon Character Design Tips
- Updated How to Become a Motion Graphic Designer
- 12 Top Stop Motion Studios Worth Recommending for 2024
- In 2024, Top 10 Video to GIF Converters Top Picks
- New 2024 Approved Tips for GIF to Animated PNG You Should Know
- Updated 5 Free Animated Gif Sources You Must Check
- New OBS Animated Alternatives for 2024
- New What Wikipedia Wont Tell You About Character Rigging
- New How to Make Photo Motion Effect Online, In 2024
- Ideas That Will Help You Out in Learning How to Send WhatsApp Animated Gifs
- New How to Cartoonize Photo Photoshop in Easy Steps for 2024
- New Animate Your Photo Online with These Awesome Tools for 2024
- 2024 Approved Interesting Fundamentals and Ultimate Guide to Animated Characters Drawings
- In 2024, 10 Must-Use MP4 to GIF Converters to Get Perfect-Made GIF
- Updated In 2024, 10 of the Best Disney Animated Shows
- In 2024, Finding Some Different Ways to Animated Cartoon of Yourself
- New Best 15 Greatest Claymation Movies of All Time
- How To Deal With the Motorola Defy 2 Screen Black But Still Works? | Dr.fone
- In 2024, Does Airplane Mode Turn off GPS Location On Apple iPhone 11 Pro Max? | Dr.fone
- How to Transfer Data from Xiaomi Redmi Note 12R to Samsung Phone | Dr.fone
- Full Solutions to Fix Error Code 920 In Google Play on Samsung Galaxy A54 5G | Dr.fone
- In 2024, How Do I Stop Someone From Tracking My Vivo V29? | Dr.fone
- In 2024, Three Ways to Sim Unlock Motorola Moto G Stylus 5G (2023)
- How to Stop My Spouse from Spying on My Samsung Galaxy S21 FE 5G (2023) | Dr.fone
- How to Stop Life360 from Tracking You On Infinix Note 30 VIP? | Dr.fone
- How To Unlock a Xiaomi Redmi K70 Pro Easily?
- How To Repair iOS System Issues of iPhone 14 Plus? | Dr.fone
- 2 Ways to Monitor Vivo V30 Pro Activity | Dr.fone
- What Does Enter PUK Code Mean And Why Did The Sim Get PUK Blocked On Lava Device
- Can Life360 Track Or See Text Messages? What Can You Do with Life360 On Meizu 21 Pro? | Dr.fone
- How to Stop Google Chrome from Tracking Your Location On Asus ROG Phone 8? | Dr.fone
- 9 Quick Fixes to Unfortunately TouchWiz has stopped Of Vivo Y100t | Dr.fone
- How to Fix Error 495 While Download/Updating Android Apps On Infinix Smart 8 Pro | Dr.fone
- Prevent Cross-Site Tracking on Honor V Purse and Browser | Dr.fone
- How To Reset the Security Questions of Your Apple ID On Your Apple iPhone 6s
- How to Change Location on TikTok to See More Content On your Nokia G22 | Dr.fone
- Why Your Lava Yuva 2 Screen Might be Unresponsive and How to Fix It | Dr.fone
- In 2024, Top 5 TikTok Voice Generators You Should Try
- Title: New 2024 Approved <Https //images.wondershare.com/filmora/article-images/filmora9-website>
- Author: Elon
- Created at : 2024-05-19 03:05:13
- Updated at : 2024-05-20 03:05:13
- Link: https://animation-videos.techidaily.com/new-2024-approved-(https-imageswondersharecomfilmoraarticle-imagesfilmora9-website)/
- License: This work is licensed under CC BY-NC-SA 4.0.
