
:max_bytes(150000):strip_icc():format(webp)/duetinslides-fd2c11f1a91a4d7388cc25f2f4719cca.jpg)
New 2024 Approved 10 Amazing Cartoon Music Examples You Need to Bookmark
10 Amazing Cartoon Music Examples You Need to Bookmark
10 Amazing Cartoon Music Examples You Need to Bookmark in 2022
An easy yet powerful editor
Numerous effects to choose from
Detailed tutorials provided by the official channel
If cartoon music turns you on, this is preferably the right place for you! Stay tuned to learn about the top 10 exciting alternatives of cartoon audios!
In this article
01 [Top 10 Cartoon Music](#Part 1)
02 [How to Add Cartoon Music in Video Editing Clips](#Part 2)
Part 1 Top 10 Cartoon Music
Talking of the fascinating and exciting world of cartoons, the subject is an evergreen source of entertainment for almost all age groups; after all, the essence of enjoying something cannot be limited within age boundaries. Diving into some specific details, the fundamental reason behind the extreme popularity of cartoon films and television series is, without any doubt, the stunning graphics and catchy background music.
Speaking of the sound credibility in particular, the following section presents a discussion on some of the choicest audio alternatives from cartoon media creations. If you have enjoyed the bliss of streaming those century old classic opera songs, you can easily relate to the entries in the upcoming list:
01Tales from the Vienna Woods
This was a masterpiece in the world of cartoon music, originally heard in the caricature series, A Corny Concerto in 1943, directed by Bob Clampett under the globally known Disney production house. The composition is essentially a repetition of Fantasia, which was released in 1940.
Talking about the exact music placement within the storyline, the inaugural audio segment, with a special emphasis on the ‘’wythm of woodwinds’’, when Porky Pig, the hero of the storyline, along with his obedient dog, traverses in search of Bugs.
Concerning on the popularity of the music, the latter has received positive music reviews from almost all the leading media critic platforms.
02The Blue Danube
Again an inclusion of the 1943 release, A corny Concerto, this was predominantly a comic version of the original track. It was used to complement the second stage of the storyline, where, a mother swan is seen humming the music to her little ones, giving the classic melody, the feel of a birdsong cover. As the audio swings in, the toddler Daffy Duck is seen paddling over an unwanted honking, while his mother is worried until everything ends up to be fine.
On the take of preference credibility, the music was quite well appreciated by the globally known media critics.
03Dance of the Comedians
This music piece originally belongs to the music album, The Bartered Bride, and was first used in Zoom and Bored in 1957, to uplift the combating theme of the cartoon series. While aptly supplementing the quest of Wile E. Coyote, the protagonist of the story, against Road Runner, his nasty opponent, the climax of the music turns out to be the most loved operas of Czech origin.
About the fan base of the audio snippet, the composition claimed welcoming responses from a worldwide audience.
04Minute Waltz in D-Flat
This one was an explicitly stunning piece of background audio, which was added to the Hyde and Hare cartoon series of 1955, to complement the latter’s storyline with the best suited sound effects.
Entering into the storyline, you will find Bugs, the cutest of rabbits, tends to locate a piano in Dr. Jekyll’s yard, and the latter being the most sophisticated lagomorph ever; begins to explore his musical skills on the instrument. Things however, take an unwanted turn when Mr. Hyde, the antagonist barges in with an attempt of destroying everything.
While the music piece came to be known as the favorite pick of Waltz lovers, the latter received considerable applaud from other media critics as well.
05Morning, Noon and Night in Vienna
This audio background was an exclusive media add-on to Baton Bunny, the 1959 released musical cartoon movies series, which was a further episode of Bugs’ journey that features this adorable, broad toothed rabbit, taking on a conducting task in the land of Vienna.
It is interesting to note that von Suppe, the developer of this music piece, also happened to work on a conducting profile, although on a comic note, the latter did not receive any appreciation for running behind odd smelling flies amid his performance!
Talking of the audience credibility, this one was a musical masterpiece, which received a large scale appreciation from listeners across the globe for featuring the most funny cartoon music ever!
06The Barber of Seville Overture
Like its aforesaid counterparts, this one was also an appreciated piece of audio, first heard in The Rabbit of Seville cartoon series, released in 1950. The musical luxury aims to compliment the combat Bugs, the adorable rabbit, against Elmer Fudd, the antagonist of the storyline, after the latter chases Bugs to a local stage. The music piece is a classic opera composition by Rossini that fails to miss out on a single beat or encounter a tempo breakdown.
The composition was fortunate enough to gain a positive critical acclaim from global audience as well as renowned critics of the artwork.
07Beethoven’s 7th
This music piece is an addition to the list of classic opera melodies by Beethoven. Talking of the inaugural release, the operatic audio was first heard in A Ham in a Role, the 1949 cartoon series. The storyline of the show talks of a speech fluent dog, longing for recognition in theatres commemorating the Shakespearean era, who is forced to lay back with his plans, thanks to the nasty pranks of the Goofy Gophers.
One of the antagonists attiring up like our poor dog, takes the credit of the efforts made by the latter and manages to get cast for a thrilling ghost scene in the Shakespearean tragedy of Hamlet.
Talking of the appreciation catered by the melody, the snippet was a somewhat strange composition, which made the critics, think of Beethoven being in a drunk state while creating the same.
08Traumerei Dreaming
This one is a short 38 seconds snippet on a tender theme, which runs to supplement the assumption of Bugs, the protagonist bunny as dead by Oalfish Canine, the latter’s newest opponent. The cult line of the music piece was gloomy enough to get a removal from the censor board, leading to a considerable edit of the audio before its theatrical showcase. The final audio was, however, still too heavy on the modernized audience to undertake.
As is evident, critics of the audio regard it to be a bit hefty, though the sound is somewhat appealing to opera lovers.
09Largo al Factotum
This high end opera was a rehearsal favorite of Giovanni Jones, the famous opera singer in The Long-Haired Hare, a well-known cartoon classic released in 1949. The star is supported in his streak by our adorable Bugs, who strums out loud on his banjo at a little distance.
All seemed well until Jones, in an annoyed state barges into break the poor rabbit’s instruments, while stretching him upwards through his long and pointed ears. The incident eventually transforms into war by the adorable bunny, who had been enraged by the time.
The music piece is catchy and captivating, considering the fact that it is a popular opera classic sung by a music star in the series.
10Johannes Brahms’ Hungarian Dances
This musical masterpiece was a part of the set of 21 Hungarian Dance compositions to supplement the country’s folk music. First heard in the cartoon series released under the name of Pigs in a Polka in 1943, the melody is essentially a miscellany of the aforesaid 21 music pieces, highlighting the catchiest elements from each.
Considering the fact that the musical delight is an assortment of some of the already best compositions, this excellent audio snippet was bound to receive a welcoming critical acclaim, and was greatly enjoyed by different sets of audiences across the world.
Part 2 How to Add Cartoon Music in Video Editing Clips
Having a significant insight of the stunning varieties of cartoon music, you can try hands at creating a masterpiece of your own by adding appealing caricature music to your video footage and clips. If you are concerned about the take away of the process, rest assured and see through the following section to understand the stepwise method to complement your video with appropriate cartoon music.
Before entering into the music adding process, let us have a formal acquaintance with Filmora, that is, the video editing software being used to cater to the aforesaid concern.
Wondershare Filmora Video Editor

Wondershare Filmora - Best Video Editor for Mac/Windows
5,481,435 people have downloaded it.
Build unique custom animations without breaking a sweat.
Focus on creating epic stories and leave the details to Filmora’s auto features.
Start a creative adventure with drag & drop effects and endless possibilities.
Filmora simplifies advanced features to save you time and effort.
Filmora cuts out repetition so you can move on to your next creative breakthrough.
To begin with, this one is the most reliable audio visual editing program, which you can use to add that extra spunk and a classic professional touch to your normal video footage. The software grants you complete liberty to explore your graphic editing skills and create visual masterpieces by choosing the perfect effects and filters from the latter’s extensive media library.
The program interface is the sweetest of all, making you cling to the editing fun in videos on a roll. Apart from this, the software is quick and smart, allowing you to create beautiful and stunning audio visual artworks within a few seconds.
User’s Guide to Add Cartoon Music to Video Clips in Filmora
Step 1: Download and Install Filmora
From the program’s official website, undertake a free download of Filmora into your MacOs or Windows supported PC or desktop.
Step 2: Import Your Video
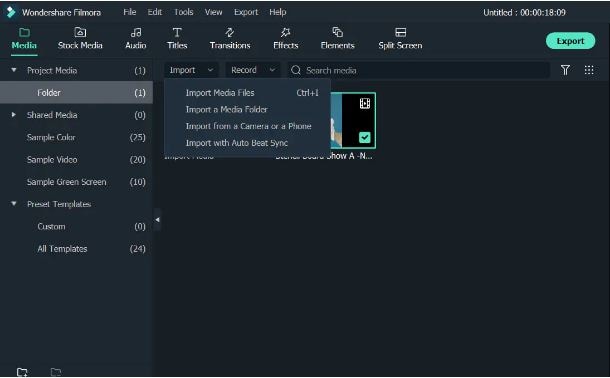
After a successful installation of the Filmora Video Editor program in your system, proceed to launch the same in your device, followed by click on ‘Import’ in the app’s opening interface. This will allow you to select and upload any desired videos from your device to the program’s media album.
As an alternative, you can always prefer the ‘Drag and Drop’ method to upload selected video files. Your uploaded footage will be shown in the media panel at the left of the main editor window. Additional to video clips, you can also add still captures to complement them with appropriate audio.
Step 3: Adding a Suitable Cartoon Music
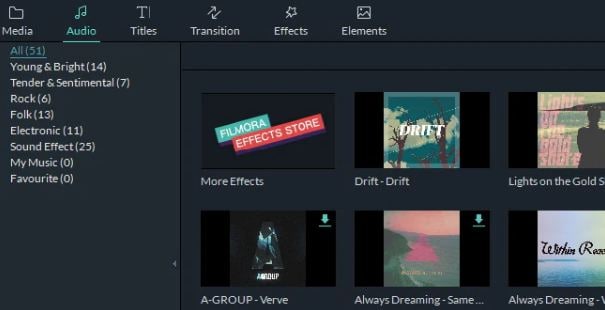
Start with dragging the uploaded video files, one at a time, from Filmora’s media album to its timeline tracks. Take caution of the serial and non-redundant arrangement of the footage files in cohesion with the desired play sequence.
Next, proceed with adding the desired cartoon background music track above the already created video track, by using the conventional ‘Drag and Drop’ method. Check for any trimming requirements for adjusting the audio track length and position to be in concord with the video play time. While making position adjustments, you can simultaneously examine your changes in the editor’s ‘Preview Window’ and fine tune the same in real time.
Step 4: Editing the Cartoon Music
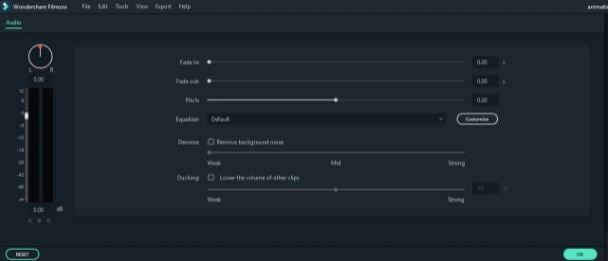
To edit your music, open the audio editing panel by double clicking the music file in the editor’s audio track. The feature allows you to enhance your cartoon music track by adding a variety of sound effects, like, fade in, fade out, volume adjustment, pitch tuning and setting up the Audio Equalizer.
You can also try hands on making a slow motion or fast forward version of the footage by varying the audio speed, while applying the ‘Reverse Speed’ effect for a reverse playback of the audio.
Step 5: Export Your Creation
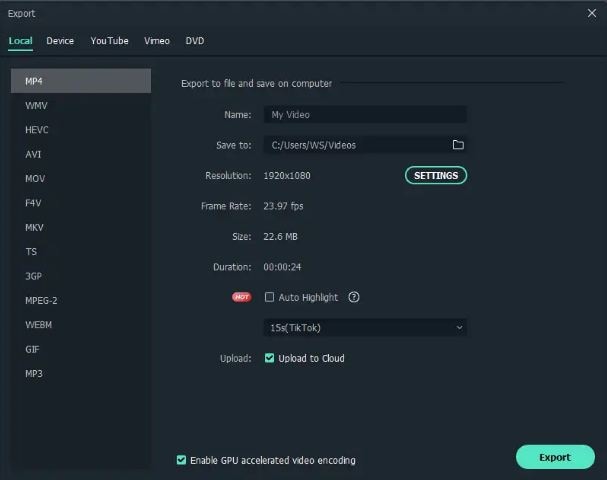
When you are happy with your work, navigate to and click on the ‘Export’ tab at the bottom right corner of the program’s editor timeline. Save the edited cartoon music video to your device in any preferred file format in the pop-up window that appears next.
You can additionally create videos for iOS devices as well as upload your creations to various media sharing platforms, while also conveniently burning the same to a DVD for a television watch. For looping the cartoon music, just drag the audio clip to the exact length of the video footage.
● Ending Thoughts →
● The extreme craze of cartoon music has achieved an evergreen essence over decades of release.
● Among the plethora of music varieties, some specific tracks have maintained a separate fan base.
● When experimenting on creating your own video edits with cartoon music, the Filmora Video Editor is the best tool you can pick.
If cartoon music turns you on, this is preferably the right place for you! Stay tuned to learn about the top 10 exciting alternatives of cartoon audios!
In this article
01 [Top 10 Cartoon Music](#Part 1)
02 [How to Add Cartoon Music in Video Editing Clips](#Part 2)
Part 1 Top 10 Cartoon Music
Talking of the fascinating and exciting world of cartoons, the subject is an evergreen source of entertainment for almost all age groups; after all, the essence of enjoying something cannot be limited within age boundaries. Diving into some specific details, the fundamental reason behind the extreme popularity of cartoon films and television series is, without any doubt, the stunning graphics and catchy background music.
Speaking of the sound credibility in particular, the following section presents a discussion on some of the choicest audio alternatives from cartoon media creations. If you have enjoyed the bliss of streaming those century old classic opera songs, you can easily relate to the entries in the upcoming list:
01Tales from the Vienna Woods
This was a masterpiece in the world of cartoon music, originally heard in the caricature series, A Corny Concerto in 1943, directed by Bob Clampett under the globally known Disney production house. The composition is essentially a repetition of Fantasia, which was released in 1940.
Talking about the exact music placement within the storyline, the inaugural audio segment, with a special emphasis on the ‘’wythm of woodwinds’’, when Porky Pig, the hero of the storyline, along with his obedient dog, traverses in search of Bugs.
Concerning on the popularity of the music, the latter has received positive music reviews from almost all the leading media critic platforms.
02The Blue Danube
Again an inclusion of the 1943 release, A corny Concerto, this was predominantly a comic version of the original track. It was used to complement the second stage of the storyline, where, a mother swan is seen humming the music to her little ones, giving the classic melody, the feel of a birdsong cover. As the audio swings in, the toddler Daffy Duck is seen paddling over an unwanted honking, while his mother is worried until everything ends up to be fine.
On the take of preference credibility, the music was quite well appreciated by the globally known media critics.
03Dance of the Comedians
This music piece originally belongs to the music album, The Bartered Bride, and was first used in Zoom and Bored in 1957, to uplift the combating theme of the cartoon series. While aptly supplementing the quest of Wile E. Coyote, the protagonist of the story, against Road Runner, his nasty opponent, the climax of the music turns out to be the most loved operas of Czech origin.
About the fan base of the audio snippet, the composition claimed welcoming responses from a worldwide audience.
04Minute Waltz in D-Flat
This one was an explicitly stunning piece of background audio, which was added to the Hyde and Hare cartoon series of 1955, to complement the latter’s storyline with the best suited sound effects.
Entering into the storyline, you will find Bugs, the cutest of rabbits, tends to locate a piano in Dr. Jekyll’s yard, and the latter being the most sophisticated lagomorph ever; begins to explore his musical skills on the instrument. Things however, take an unwanted turn when Mr. Hyde, the antagonist barges in with an attempt of destroying everything.
While the music piece came to be known as the favorite pick of Waltz lovers, the latter received considerable applaud from other media critics as well.
05Morning, Noon and Night in Vienna
This audio background was an exclusive media add-on to Baton Bunny, the 1959 released musical cartoon movies series, which was a further episode of Bugs’ journey that features this adorable, broad toothed rabbit, taking on a conducting task in the land of Vienna.
It is interesting to note that von Suppe, the developer of this music piece, also happened to work on a conducting profile, although on a comic note, the latter did not receive any appreciation for running behind odd smelling flies amid his performance!
Talking of the audience credibility, this one was a musical masterpiece, which received a large scale appreciation from listeners across the globe for featuring the most funny cartoon music ever!
06The Barber of Seville Overture
Like its aforesaid counterparts, this one was also an appreciated piece of audio, first heard in The Rabbit of Seville cartoon series, released in 1950. The musical luxury aims to compliment the combat Bugs, the adorable rabbit, against Elmer Fudd, the antagonist of the storyline, after the latter chases Bugs to a local stage. The music piece is a classic opera composition by Rossini that fails to miss out on a single beat or encounter a tempo breakdown.
The composition was fortunate enough to gain a positive critical acclaim from global audience as well as renowned critics of the artwork.
07Beethoven’s 7th
This music piece is an addition to the list of classic opera melodies by Beethoven. Talking of the inaugural release, the operatic audio was first heard in A Ham in a Role, the 1949 cartoon series. The storyline of the show talks of a speech fluent dog, longing for recognition in theatres commemorating the Shakespearean era, who is forced to lay back with his plans, thanks to the nasty pranks of the Goofy Gophers.
One of the antagonists attiring up like our poor dog, takes the credit of the efforts made by the latter and manages to get cast for a thrilling ghost scene in the Shakespearean tragedy of Hamlet.
Talking of the appreciation catered by the melody, the snippet was a somewhat strange composition, which made the critics, think of Beethoven being in a drunk state while creating the same.
08Traumerei Dreaming
This one is a short 38 seconds snippet on a tender theme, which runs to supplement the assumption of Bugs, the protagonist bunny as dead by Oalfish Canine, the latter’s newest opponent. The cult line of the music piece was gloomy enough to get a removal from the censor board, leading to a considerable edit of the audio before its theatrical showcase. The final audio was, however, still too heavy on the modernized audience to undertake.
As is evident, critics of the audio regard it to be a bit hefty, though the sound is somewhat appealing to opera lovers.
09Largo al Factotum
This high end opera was a rehearsal favorite of Giovanni Jones, the famous opera singer in The Long-Haired Hare, a well-known cartoon classic released in 1949. The star is supported in his streak by our adorable Bugs, who strums out loud on his banjo at a little distance.
All seemed well until Jones, in an annoyed state barges into break the poor rabbit’s instruments, while stretching him upwards through his long and pointed ears. The incident eventually transforms into war by the adorable bunny, who had been enraged by the time.
The music piece is catchy and captivating, considering the fact that it is a popular opera classic sung by a music star in the series.
10Johannes Brahms’ Hungarian Dances
This musical masterpiece was a part of the set of 21 Hungarian Dance compositions to supplement the country’s folk music. First heard in the cartoon series released under the name of Pigs in a Polka in 1943, the melody is essentially a miscellany of the aforesaid 21 music pieces, highlighting the catchiest elements from each.
Considering the fact that the musical delight is an assortment of some of the already best compositions, this excellent audio snippet was bound to receive a welcoming critical acclaim, and was greatly enjoyed by different sets of audiences across the world.
Part 2 How to Add Cartoon Music in Video Editing Clips
Having a significant insight of the stunning varieties of cartoon music, you can try hands at creating a masterpiece of your own by adding appealing caricature music to your video footage and clips. If you are concerned about the take away of the process, rest assured and see through the following section to understand the stepwise method to complement your video with appropriate cartoon music.
Before entering into the music adding process, let us have a formal acquaintance with Filmora, that is, the video editing software being used to cater to the aforesaid concern.
Wondershare Filmora Video Editor
Wondershare Filmora - Best Video Editor for Mac/Windows
5,481,435 people have downloaded it.
Build unique custom animations without breaking a sweat.
Focus on creating epic stories and leave the details to Filmora’s auto features.
Start a creative adventure with drag & drop effects and endless possibilities.
Filmora simplifies advanced features to save you time and effort.
Filmora cuts out repetition so you can move on to your next creative breakthrough.
To begin with, this one is the most reliable audio visual editing program, which you can use to add that extra spunk and a classic professional touch to your normal video footage. The software grants you complete liberty to explore your graphic editing skills and create visual masterpieces by choosing the perfect effects and filters from the latter’s extensive media library.
The program interface is the sweetest of all, making you cling to the editing fun in videos on a roll. Apart from this, the software is quick and smart, allowing you to create beautiful and stunning audio visual artworks within a few seconds.
User’s Guide to Add Cartoon Music to Video Clips in Filmora
Step 1: Download and Install Filmora
From the program’s official website, undertake a free download of Filmora into your MacOs or Windows supported PC or desktop.
Step 2: Import Your Video
After a successful installation of the Filmora Video Editor program in your system, proceed to launch the same in your device, followed by click on ‘Import’ in the app’s opening interface. This will allow you to select and upload any desired videos from your device to the program’s media album.
As an alternative, you can always prefer the ‘Drag and Drop’ method to upload selected video files. Your uploaded footage will be shown in the media panel at the left of the main editor window. Additional to video clips, you can also add still captures to complement them with appropriate audio.
Step 3: Adding a Suitable Cartoon Music
Start with dragging the uploaded video files, one at a time, from Filmora’s media album to its timeline tracks. Take caution of the serial and non-redundant arrangement of the footage files in cohesion with the desired play sequence.
Next, proceed with adding the desired cartoon background music track above the already created video track, by using the conventional ‘Drag and Drop’ method. Check for any trimming requirements for adjusting the audio track length and position to be in concord with the video play time. While making position adjustments, you can simultaneously examine your changes in the editor’s ‘Preview Window’ and fine tune the same in real time.
Step 4: Editing the Cartoon Music
To edit your music, open the audio editing panel by double clicking the music file in the editor’s audio track. The feature allows you to enhance your cartoon music track by adding a variety of sound effects, like, fade in, fade out, volume adjustment, pitch tuning and setting up the Audio Equalizer.
You can also try hands on making a slow motion or fast forward version of the footage by varying the audio speed, while applying the ‘Reverse Speed’ effect for a reverse playback of the audio.
Step 5: Export Your Creation
When you are happy with your work, navigate to and click on the ‘Export’ tab at the bottom right corner of the program’s editor timeline. Save the edited cartoon music video to your device in any preferred file format in the pop-up window that appears next.
You can additionally create videos for iOS devices as well as upload your creations to various media sharing platforms, while also conveniently burning the same to a DVD for a television watch. For looping the cartoon music, just drag the audio clip to the exact length of the video footage.
● Ending Thoughts →
● The extreme craze of cartoon music has achieved an evergreen essence over decades of release.
● Among the plethora of music varieties, some specific tracks have maintained a separate fan base.
● When experimenting on creating your own video edits with cartoon music, the Filmora Video Editor is the best tool you can pick.
Useful Tips for Canva Animated Elements
Versatile Video Editor - Wondershare Filmora
An easy yet powerful editor
Numerous effects to choose from
Detailed tutorials provided by the official channel
Thanks to the progress of graphic design, users are no longer simply satisfied with everyday designs, no matter how complex the design itself. They want innovation, they want a fresh and mesmerizing new idea. This becomes increasingly harder to achieve and helps push the boundaries of what designers want.
This is where motion can come into play. Movement in graphic design has emerged as a recent design trend. This is where users benefit from valuable tips for Canva animated elements.
Without further ado, let’s dive into everything you need to know to design animated elements in Canva.
In this article
01 [What is Canva?](#Part 1)
02 [Animate An Element In Canva ](#Part 2)
03 [Make Elements Move In Canva](#Part 3)
04 [How About Making Animated Elements On Video](#Part 4)
Part 1 What is Canva?
Canva has become a buzzword in the designing and animation world. It’s a graphic design platform that allows users to create graphic designs for social media, for presentations, documents, cards for any memorable occasion. It was founded by Melanie Perkins, an Australian technology entrepreneur.
Canva has become a buzzword in the designing and animation world. It’s a graphic design platform that allows users to create graphic designs for social media, for presentations, documents, cards for any memorable occasion. It was founded by Melanie Perkins, an Australian technology entrepreneur.
It allows users to work individually or across teams. With real-time live changes made available, Canva is pushing the boundary of what is possible and making it more accessible. With the introduction of animated elements in Canva, the possibilities for design horizons have expanded significantly.
Part 2 Animate An Element In Canva
There are one of two ways to go about creating an animation. You can work off an existing template or create a custom template. If you’re wondering how to animate individual elements in Canva then this guide is for you.
The first step to animation is building your custom static design. For that you need to go to Canva and select “Create a Design” option. Once you do, select the type of content you’re attempting to create- from Instagram posts to a presentation or an A4 document.
Think of the text font you’re going to use.

Then you should look into adding elements that suit your text on the design.

You can upload photographs into your creation with the upload button. This also extends to uploading audio that you want to use on video clips.

Once you’re done with these steps, you should have a customized static design that you can use. Let’s now look at how to animate individual elements in Canva. These elements are the text, the image, audio, and video.
2.1 Image
To add an image to Canva, you need to upload it in the ‘Upload’ tab on Canva. Once you do, the image can then be selected for display on your presentation.
For images, you can also choose to frame them within the “elements” tab. There are two kinds of elements. One which allows photographs to be embedded in them and ones which don’t. You can choose any element as a frame for your embedded image.
The next thing is to choose the “Animate” button. This will open up different options for animation features. The animate button allows a preview of what each animation does in real-time.

The ones with the crown are premium features exclusive to Canva Pro, the paid subscription.
2.2 Text
Add in the text you want to see to the image. The text can be in any style that you choose. Canva offers a variety of fonts that you can use to customize the color, size, and duration of the display.

2.3 Video
If you’re ready to take your content creation skills to the next level, this section is for you. You have the option of adding videos to Canva as well. Just load the video you have on hand to the Canva “Uploads” section. Introduce the video clip to the design.
Another way to embed the video is by using an element and embedding your video within it.
With video, you also have options like cropping, adjusting the playback. With playback, you can choose “Autoplay Video” and “Loop Video.” These are basic options for how the video can be played. The crop function allows you to trim the video to any point in time.
On top of this, you can use the animate button, which can create options for how the video is introduced to the backdrop.

If you want to remove the animation, you need to go to the “Animate” button and select the ‘None’ option to delete the animation from the design.
You can opt to animate either just the elements or you can animate the slide on the whole with “Page Animations.”
Part 3 Make Elements Move In Canva
How To Arrange The Order Of An Animation?
The brilliant thing about Canva is that you can decide the order you want to create your animation. The component elements of a Canva backdrop are the text, audio, images, video. These form the basis for the animated elements in Canva.
You can work on whichever component feels more accessible to you. Canva also allows users to make videos for title sequences and end-cards for video sharing platforms.
How to Change The Duration Of Animated Graphic In Canva
Once you’ve added a video element to your presentation, you’ll notice that the timer disappears from the production. This is because the presentation only lasts the duration of the video.
If you go to the next slide of the presentation, you can often notice a timer available. It has a default duration of five seconds. If you click on the clock symbol, a menu with “Timing” will appear with a slider. You can adjust the timing from 0.1 seconds up to a maximum of 30 seconds.
Part 4 How About Making Animated Elements On Video
If you’ve decided Canva is not the tool for you, you can choose any video editing software to make your animation.
Wondershare Filmora is the tool that can help you level up your content creation. It allows users to increase precision and provides professional video editing options.
AI Portrait – The best feature of Wondershare Filmora for gameplay editing
The AI Portrait is a new add-on in Wondershare Filmora. It can easily remove video backgrounds without using a green screen or chroma key, allowing you to add borders, glitch effects, pixelated, noise, or segmentation video effects.

Conclusion
Now that you understand how to build an animation and the software required, you should differentiate between average and extraordinary editing tools.
Filmora and Canva are the best editing tools in this case. Like you can animate individual elements Canva, you can do the same in the other tool also. It may be used to produce animation videos by introducing keyframes, resulting in a seamless and realistic animation. Aside from that, using color correction and an audio processor can help take your animations to the next tier.
Download it today to make your videos better.
Thanks to the progress of graphic design, users are no longer simply satisfied with everyday designs, no matter how complex the design itself. They want innovation, they want a fresh and mesmerizing new idea. This becomes increasingly harder to achieve and helps push the boundaries of what designers want.
This is where motion can come into play. Movement in graphic design has emerged as a recent design trend. This is where users benefit from valuable tips for Canva animated elements.
Without further ado, let’s dive into everything you need to know to design animated elements in Canva.
In this article
01 [What is Canva?](#Part 1)
02 [Animate An Element In Canva ](#Part 2)
03 [Make Elements Move In Canva](#Part 3)
04 [How About Making Animated Elements On Video](#Part 4)
Part 1 What is Canva?
Canva has become a buzzword in the designing and animation world. It’s a graphic design platform that allows users to create graphic designs for social media, for presentations, documents, cards for any memorable occasion. It was founded by Melanie Perkins, an Australian technology entrepreneur.
Canva has become a buzzword in the designing and animation world. It’s a graphic design platform that allows users to create graphic designs for social media, for presentations, documents, cards for any memorable occasion. It was founded by Melanie Perkins, an Australian technology entrepreneur.
It allows users to work individually or across teams. With real-time live changes made available, Canva is pushing the boundary of what is possible and making it more accessible. With the introduction of animated elements in Canva, the possibilities for design horizons have expanded significantly.
Part 2 Animate An Element In Canva
There are one of two ways to go about creating an animation. You can work off an existing template or create a custom template. If you’re wondering how to animate individual elements in Canva then this guide is for you.
The first step to animation is building your custom static design. For that you need to go to Canva and select “Create a Design” option. Once you do, select the type of content you’re attempting to create- from Instagram posts to a presentation or an A4 document.
Think of the text font you’re going to use.
Then you should look into adding elements that suit your text on the design.
You can upload photographs into your creation with the upload button. This also extends to uploading audio that you want to use on video clips.
Once you’re done with these steps, you should have a customized static design that you can use. Let’s now look at how to animate individual elements in Canva. These elements are the text, the image, audio, and video.
2.1 Image
To add an image to Canva, you need to upload it in the ‘Upload’ tab on Canva. Once you do, the image can then be selected for display on your presentation.
For images, you can also choose to frame them within the “elements” tab. There are two kinds of elements. One which allows photographs to be embedded in them and ones which don’t. You can choose any element as a frame for your embedded image.
The next thing is to choose the “Animate” button. This will open up different options for animation features. The animate button allows a preview of what each animation does in real-time.
The ones with the crown are premium features exclusive to Canva Pro, the paid subscription.
2.2 Text
Add in the text you want to see to the image. The text can be in any style that you choose. Canva offers a variety of fonts that you can use to customize the color, size, and duration of the display.
2.3 Video
If you’re ready to take your content creation skills to the next level, this section is for you. You have the option of adding videos to Canva as well. Just load the video you have on hand to the Canva “Uploads” section. Introduce the video clip to the design.
Another way to embed the video is by using an element and embedding your video within it.
With video, you also have options like cropping, adjusting the playback. With playback, you can choose “Autoplay Video” and “Loop Video.” These are basic options for how the video can be played. The crop function allows you to trim the video to any point in time.
On top of this, you can use the animate button, which can create options for how the video is introduced to the backdrop.
If you want to remove the animation, you need to go to the “Animate” button and select the ‘None’ option to delete the animation from the design.
You can opt to animate either just the elements or you can animate the slide on the whole with “Page Animations.”
Part 3 Make Elements Move In Canva
How To Arrange The Order Of An Animation?
The brilliant thing about Canva is that you can decide the order you want to create your animation. The component elements of a Canva backdrop are the text, audio, images, video. These form the basis for the animated elements in Canva.
You can work on whichever component feels more accessible to you. Canva also allows users to make videos for title sequences and end-cards for video sharing platforms.
How to Change The Duration Of Animated Graphic In Canva
Once you’ve added a video element to your presentation, you’ll notice that the timer disappears from the production. This is because the presentation only lasts the duration of the video.
If you go to the next slide of the presentation, you can often notice a timer available. It has a default duration of five seconds. If you click on the clock symbol, a menu with “Timing” will appear with a slider. You can adjust the timing from 0.1 seconds up to a maximum of 30 seconds.
Part 4 How About Making Animated Elements On Video
If you’ve decided Canva is not the tool for you, you can choose any video editing software to make your animation.
Wondershare Filmora is the tool that can help you level up your content creation. It allows users to increase precision and provides professional video editing options.
AI Portrait – The best feature of Wondershare Filmora for gameplay editing
The AI Portrait is a new add-on in Wondershare Filmora. It can easily remove video backgrounds without using a green screen or chroma key, allowing you to add borders, glitch effects, pixelated, noise, or segmentation video effects.
Conclusion
Now that you understand how to build an animation and the software required, you should differentiate between average and extraordinary editing tools.
Filmora and Canva are the best editing tools in this case. Like you can animate individual elements Canva, you can do the same in the other tool also. It may be used to produce animation videos by introducing keyframes, resulting in a seamless and realistic animation. Aside from that, using color correction and an audio processor can help take your animations to the next tier.
Download it today to make your videos better.
15 Forgotten Cartoon Characters of All Time You Used to Love
15 Forgotten Cartoon Characters of All Time You Used to Love
An easy yet powerful editor
Numerous effects to choose from
Detailed tutorials provided by the official channel
Whether you are from your 70’s, 80’s or 90’s, thanks to video streaming services like Amazon, Netflix, YouTube and various others, you are now getting a golden chance to watch your favourite cartoons at your comfort.
Watching Cartoons were always one of the favourite activities that everything loves to experience without any age restriction. For different centuries cartoon industry has been treated as the perfect medium for the entertainment. With lots of cartoons flooding your TV sets from the last few decades everybody have seen different varieties of characters that have won the hearts of millions.
In this article
01 [Five 70s cartoon characters](#Part 1)
02 [Five 80s cartoon characters](#Part 2)
03 [Five 90s cartoon characters](#Part 3)
Part 1 Six 70s cartoon characters
All the cartoon characters mentioned below were very popular during the 70s &are still having good marks in our hearts today. 70s were known for interesting cartoon series.
01Bagpuss
Premiered: 1974
Actors: Oliver Postgate
YouTube video
Summary
Saggy cloth-cat from this show was featured in around 13 episodes. At that time ‘stop-motion’ technique for animation was utilized by the creators for this television series.
02Fat Albert
Name of the character: Fat Albert
Name of Show: Fat Albert and Cosby Kids
Premiered: 1974
Actors: Weird Harold, Rudy, Mush-mouth, Dumb Donald, Bucky, Bill & of course-Fat Albert.
YouTube video
Summary: Still childhood experiences of Bill-Cosby have had amazing influence on making of this amazing TV series.
03Fred Flintstones
Name of the character: Fred Flintstones
Name of Show: Flintstones
Premiered: 1960-1966
Actors: John Goodman.
YouTube video
YouTube video
Summary
Flintstones returned to TV-screens with characters as well as cultural-references thrown into stone- age narrative that ultimately captivated the audience right before time of ‘The Simpsons’. This show set the premise at the time of stone-age but carefully and delicately crafted plot characteristic of modern day. The Flintstones fascinated audience with casual manner of how the characters faced-life, thus making lasting connection with audience who were craving for celluloid freshness. Fred Flintstone was one of the most amazing 70s cartoon characters.
04The Herbs
Name of the character: The Herbs
**Name of Show:**The Herbs!
Premiered: 1968
Actors:Gordon Rollings .
YouTube video
Summary
Multiple different characters were featured in this 3D animated series with a leading role by same character name. Other important characters were ‘Parsley the Lion’, Sir-Basil, Tarragon-the-Dragon, Lady Rosemary, Sage the Owl, Dill the Dog, Bay Leaf & Signor Solidago.
05Godzooky
Name of the character: Godzooky
**Name of Show:**Godzilla.
Premiered: 1978
Actors: Jeff David as Captain Carl Majors
YouTube video
Summary
Created by Hanna-Barbera-Productions this television series Godzooky.Don-Messick gave his voice for this amazing character. After some popularity of 60s cartoon characters, this was the only one that was extremely famous for his villain attitude.
06Casper
Name of the character: Casper
Name of Show: ‘Casper and the Angels’
Premiered: 1979-1980
Actors: Casper: Julie McWhirter, Nerdley: Hall Smith
YouTube video
Summary
Magic of 70s cartoon cartoons still prevails and Casper is the most amazing example. The ‘Casper’ character was a ghost that was presented in television series as a friendly person. It was like a ghost-child who always tries to befriend the people rather than scaring them off.
Part 2 Five 80s cartoon characters
01Jem
Name of the character: Jem
Name of Show: ‘Jem’
Premiered: 1985
Actors: Britta Phillips as Jerrica Benton
YouTube video
Summary
“Showtime synergy!” beginning with this attractive storylines, this was slightly more adult as compared to the average 80s cartoon characters. This was pretty cool cartoon and sometimes inspires El to easily come-up with her own style of fun alter-ego that Jem could use in order to escape stresses of being world’s savior.
02Penny
Name of the character: Penny
Name of Show: ‘’Inspector Gadget’
Premiered: 1983
Actors: Mona Marshall, Holly Berger
YouTube video
Summary
Penny in this series was the brain behind her uncle’s all crazy escapades. El makes use of her brain in order to provide help for Hopper fling enemies whenever his brawn was not enough to get things done. Both characters tasked with the outsmarting similar power of enemies Dr. Claw in the Inspector Gadget and runs M.A.D. a criminal organization and other ones were Evil Russians beneath mall in the Stranger Things. It was always good to watch this fancy, amazing character from 90s, 80s female cartoon characters.
03Garfield
Name of the character: Garfield
Name of Show: ‘Garfield and Friends’
Premiered: 1988-1995
Actors: Bill Murray as Garfield
YouTube video:
Summary
Followed by Lazy cat Garfield, this show contains excitable dog-Odie, imaginative pig-Orson, & their animal-friends with lots of small-scale adventures around their hometown like playing pranks, throwing birthday-parties, and watching movies together. Garfield was a lazy-cat that only desire to lie around the habits of watching-TV & eating Lasagna, however his friends as well as his owner-Jon always drags him into fun loving adventures of their own.
04Michaelangelo
Name of the character: MichaelLangelo
Name of Show: ‘Teenage Mutant Ninja Turtles’
Premiered: 1987-1996
Actors: Noel Fisher, Greg Cipes, Robbie Rist
YouTube video:
Summary
Michelangelo or nicknamed Mike/Mikey, is the fictional superhero & a leading character from the four main characters of favorite 80’s show Teenage Mutant Ninja Turtles. Michaelangelo, Raphael, Donatello and Leonardo are popular mutant-turtles all have grown-up as youngsters with their mentor Splinter at underground. They fight villains like Foot Clan, Shredder, &intelligent brain inside the jar named Krang. Because of so many fun-villains inside this series were presented, that show was so much popular and beloved by everyone. This TV-series aired for around 10 seasons.
05Firestar
Name of the character: FireStar
Name of Show: Spider-Man & his Amazing Friends
Premiered: 1981
Actors: Kathy Garver, Laura Bailey
YouTube video
Summary
Firestar got the ability to battle wide range of super-villains together with the Spider-Man & Iceman in this animated show Spider-Man & His Amazing Friends. She had never ever appeared in the comic book form earlier Spider-Man & his Amazing-Friends hit but you might see her in modern, live-action Marvel Cinematic-Universe very soon.
Use Wondershare Filmora Video Editor for Cartoon animations, Styles and Editing
cartoon主题视频
For Win 7 or later (64-bit)
For macOS 10.12 or later
Still thinking about your favorite cartoon characters from 80’s or 90’s? Then Filmora can help you to create nostalgic moments again with your hand crafts. You can make video animations, sketch and draw an art of your loved ones from the list of extremely popular cartoon characters. FIlmora is the best choice drawing some amazing cartoons in just few steps.
Even you can Cartoonize any of your video with your favorite animations of cartoons through cartoon effects.
It is the best Smartphone and PC platform based software to make cartoons.
Later on you can share your creations with other platforms over the web.
Even if you want to customize or edit any cartoon, you can do this with its powerful editing features.
Part 3 Five 90s cartoon characters
Most of us are from ‘90s but at the same time, during our children, we didn’t had a lot of options rather than just watch whatever put on the television. At that time cartoons were super-cool with popular music & contains originality. One of the most interesting things was the presence of sense-of-commonality among the people especially children. Cartoons materialized during ‘90s still continue to charm us and cartoon characters were the most among all. Let dig deep-down into our memory lane today & check out the amazing cartoon characters from Golden Period of animation.
01Dexter
Name of the character: Dexter
Name of Show: Dexter’s Laboratory
Premiered: 1995-2003
Actors: Dexter: Christine Cavanaugh, Dee-Dee: Kat Cressida
YouTube video:
Summary
Dexter was the original & the ultimate genius during 90s. Dexter’s intelligence as well as knack for the new inventions made him not only popular but also the smartest one’s among the cartoon characters from 90s cartoon network characters. He was credited with creation of plethora of extraordinary devices & known for someone who keeps on experimenting with various ideas on his mindful head. Dexter shares cute love-hate relationship with an annoying sister of his own Dee-Dee.
02Buster Bunny
Name of the character: Buster Bunny
Name of Show: Tiny Toon Adventures
Premiered: 1995-2003
Actors: Charlie Adler and John Kassir
YouTube video:
Summary
In the list of cartoon network characters 90swe name we have is Buster bunny. Somewhat similar to ‘Looney Tunes’ cartoon-series, the Tiny Toon Adventures’s USP was Buster Bunny and does the same so adventurously. With its young & enthusiastic personality of male rabbit was the commander of all sorts for Tiny Toons. He was capable of dealing with his own-set of issues together with other complicated School curriculum.
03Mojo Jojo
Name of the character: Mojo Jojo!
Name of Show: The Powerpuff Girls
Premiered: 1998-2005
Actors: Cathy Cavadini, Tom Kenny, Tara Strong, EG Daily.
YouTube video:
Summary
The Powerpuff-Girls was one of the most amazing and the most recognizable cartoons characters of all times. Mojo Jojo character also featured in this popular animated-television series with its evil mysteries and actions. This character was at prime time during 90’s and Mojo jojo always threatens Powerpuff Girls with his skills and expertise in gadgets, strategies etc. but somehow powerpuff-girls always managed to beat Mojo-Jojo.
04Courage
Name of the character: Courage
Name of Show: Courage The Cowardly Dog
Premiered: 1996
Actors: Marty Grabstein
YouTube video
Courage character may be easily scared &often found nervous, but he was someone who cares for his owner Muriel & Eustace and would go to any level to protect them. It was the most encouraging and commendable projections of canine on-screen. He was loyal & loving with his emotions to be selfless by risking his life for his owners. Before the arrival of2000 cartoon characters, this was favorite entertainment package for all age group.
05Johnny Bravo
Name of the character: Johnny Bravo
Name of Show: Johnny Bravo
Premiered: 1997–2004
Actors: Jeff Bennett, Brenda Vaccaro& Mae Whitman
YouTube video:
Summary
Who don’t know about ‘Johnny Bravo’? This was one of the most famous and extremely popular character of cartoon network 90s cartoon characters. During 90s this gain so much popularity and showcased with a bang. The animated character Johnny bravo was all famous and was the leading figure. The iconic and comic character Johnny was the central attraction of this television series. He was confident and good-looking as humanly as possible. You often see him wearing sunglasses with black shirt & blue jeans. He was somewhere a positive-individual with no bad-qualities whatsoever that makes him goofy &truly a blue narcissist. No matter how tough were the circumstances, if Johnny cares for or likes a girl, he can go beyond the ordinary level to assure that that particular girl like him at the end.
● Ending Thoughts →
● Different characters from all eras 70’s, 80’s and 90’s were true examples of perfect personality for the children.
● You can cherish all the moments by living again you period as a kid with all those characters
● No matter what the situation or circumstances demands cartoon characters always the best to ensure great level of entertainment without any age restrictions.
What Is the Best Collage Photo Grid Maker - Experts Choice
What is the Best Collage Photo Grid Maker - Experts Choice
An easy yet powerful editor
Numerous effects to choose from
Detailed tutorials provided by the official channel
Whether it is an Instagram collage grid, other social media sites, an online platform, a greeting card, or even a wall of your room, collages are everywhere. It is a great way to assemble multiple pictures into a single frame. Depending on your purpose, theme, and other factors, there are several different styles of collages that can be created like photo grid, shaped collage, polaroid collage, and more. One of the most classic and traditional styles is a photo grid collage. Taking the help of a dedicated collage-making app or a tool can help you create an amazing and eye-catchy collage in no time. Keep reading to learn more about collage photo grid and the best tools to create them.

In this article
01 [What is a photo grid?](#Part 1)
02 [Need for using special tools and apps to create a photo grid collage](#Part 2)
03 [Top 5 tools to create photo grid](#Part 3)
04 [Use stock images to enhance your photo grid](#Part 4)
Part 1 What is a photo grid?
When a special grid frame having a specific number of rows and columns is used for arranging photos, the created collage is known as a photo grid collage. These multiple added images will make them look like a single picture in a frame. A photo grid is one of the most classic styles of creating a collage that is also the most widely used one. You can never go wrong with a collage while arranging the pictures in a photo grid.
Part 2 Need for using special tools and apps to create a photo grid collage
Though creating a photo grid may look like a simple process which it is also, there are a lot of elements that go into creating an impressive and attractive collage. Adding the images of the correct size and orientation, adjusting the borders, customizing the frames, adding filters, adding text, are some of the many factors that help in creating a wonderful collage, and for this good collage-making tool or an app is required.
These special photo grid collage maker tools have built-in templates, designs, and support other features that help you create an interesting photo grid of your choice. Moreover, some of these programs also come with high-quality stock images that can be used in the grid to further enhance their overall looks.
Part 3 Top 5 tools to create photo grid
We have selected the top 5 grid collage maker tools that can be used to create a customized photo grid.
01Fotor
This is one of the best tools available for creating a photo grid using one of the several templates available. It is the Classic Collage style of this app that will let you create a customized grid where you can add the desired number of images and then edit the background, borders, and other elements. You can even add text, stickers, effects, and other interesting filters. Fotor is a free online tool that can be used from your browser and you just need to free sign-up using your Google, Facebook, or Apple account.

02FotoJet
This is another free-to-use browser-based tool that can be used for creating a photo grid. The interface of the tool is simple and there are multiple grid options to choose from depending on the number of images to be added. The spacing between the grids as well as the roundness of the margins can also be adjusted as desired. The tool also gives you the option to choose the added image file resolution. Text, clipart, and background to the collage can also be added and there is also a library of images that can be used. The created collage can be saved or can also be shared directly to Twitter, Pinterest, and Tumblr.

03Adobe Spark
This is one of the top collages making tools that can be used to design the desired collage in different styles including photo grid. Unlike other Adobe tools, the collage-making program is simple and quick to use and does not require advanced technical know-how. You simply need to create a free account for Adobe Creative Cloud and the collage-making features can be easily used. There are pre-set designs and templates available to match your theme and requirements. You can further make customization to other collage elements as needed.

04Photo Collage
This free-to-use online tool requires no software download or installation and allows creating a grid quickly and easily. The interface of the tool is user-friendly where you just need to browse and add the images or can simply drag and drop them as well. You can choose from multiple template options available and can also add text, effects, and stickers to the collage. Multiple image editing options are also supported like zoom, flip, transparency, and more.

05Canva
Free and simple to use, this is one of the most widely used collage-making tools that is available as a browser-based program as well as Android and iOS app. Several photo-grid templates in different styles are available at the site that lets you create the desired collage in no time. You can customize the selected templates by adding filters, texts, effects, and more elements available. A paid version of the tool with advanced features is also available.

Part 4 Use stock images to enhance your photo grid
Adding high-quality and interesting images to your photo grid will level up its overall look and make it eye-catchy. If you are running short of such interesting and bright images, no need to worry as several sites have a good collection of images that can be used. One such program that we recommend here to check the stock images is Wondershare Filmora. Though Filmora is an advanced Windows and Mac-based video editing software, there are multiple additional features supported one of them is a collection of images in an array of categories.
Depending on the theme of your photo grid, you can select the desired images and other media from Wondershare Filmora Video Editor . Additionally, the split-screen feature of the software will let you add and play multiple videos in a single frame that makes it look like a video collage.
Wondershare Filmora - Best Video Editor for Mac/Windows
5,481,435 people have downloaded it.
Build unique custom animations without breaking a sweat.
Focus on creating epic stories and leave the details to Filmora’s auto features.
Start a creative adventure with drag & drop effects and endless possibilities.
Filmora simplifies advanced features to save you time and effort.
Filmora cuts out repetition so you can move on to your next creative breakthrough.
● Key Takeaways from This Episode →
● A photo grid is a classic and traditional style of creating a collage.
● There are several online tools, software, and mobile apps available for creating interesting photo grids.
● Wondershare Filmora is a great site to get stock of images in different categories and for all types of video editing requirements.
Whether it is an Instagram collage grid, other social media sites, an online platform, a greeting card, or even a wall of your room, collages are everywhere. It is a great way to assemble multiple pictures into a single frame. Depending on your purpose, theme, and other factors, there are several different styles of collages that can be created like photo grid, shaped collage, polaroid collage, and more. One of the most classic and traditional styles is a photo grid collage. Taking the help of a dedicated collage-making app or a tool can help you create an amazing and eye-catchy collage in no time. Keep reading to learn more about collage photo grid and the best tools to create them.
In this article
01 [What is a photo grid?](#Part 1)
02 [Need for using special tools and apps to create a photo grid collage](#Part 2)
03 [Top 5 tools to create photo grid](#Part 3)
04 [Use stock images to enhance your photo grid](#Part 4)
Part 1 What is a photo grid?
When a special grid frame having a specific number of rows and columns is used for arranging photos, the created collage is known as a photo grid collage. These multiple added images will make them look like a single picture in a frame. A photo grid is one of the most classic styles of creating a collage that is also the most widely used one. You can never go wrong with a collage while arranging the pictures in a photo grid.
Part 2 Need for using special tools and apps to create a photo grid collage
Though creating a photo grid may look like a simple process which it is also, there are a lot of elements that go into creating an impressive and attractive collage. Adding the images of the correct size and orientation, adjusting the borders, customizing the frames, adding filters, adding text, are some of the many factors that help in creating a wonderful collage, and for this good collage-making tool or an app is required.
These special photo grid collage maker tools have built-in templates, designs, and support other features that help you create an interesting photo grid of your choice. Moreover, some of these programs also come with high-quality stock images that can be used in the grid to further enhance their overall looks.
Part 3 Top 5 tools to create photo grid
We have selected the top 5 grid collage maker tools that can be used to create a customized photo grid.
01Fotor
This is one of the best tools available for creating a photo grid using one of the several templates available. It is the Classic Collage style of this app that will let you create a customized grid where you can add the desired number of images and then edit the background, borders, and other elements. You can even add text, stickers, effects, and other interesting filters. Fotor is a free online tool that can be used from your browser and you just need to free sign-up using your Google, Facebook, or Apple account.
02FotoJet
This is another free-to-use browser-based tool that can be used for creating a photo grid. The interface of the tool is simple and there are multiple grid options to choose from depending on the number of images to be added. The spacing between the grids as well as the roundness of the margins can also be adjusted as desired. The tool also gives you the option to choose the added image file resolution. Text, clipart, and background to the collage can also be added and there is also a library of images that can be used. The created collage can be saved or can also be shared directly to Twitter, Pinterest, and Tumblr.
03Adobe Spark
This is one of the top collages making tools that can be used to design the desired collage in different styles including photo grid. Unlike other Adobe tools, the collage-making program is simple and quick to use and does not require advanced technical know-how. You simply need to create a free account for Adobe Creative Cloud and the collage-making features can be easily used. There are pre-set designs and templates available to match your theme and requirements. You can further make customization to other collage elements as needed.
04Photo Collage
This free-to-use online tool requires no software download or installation and allows creating a grid quickly and easily. The interface of the tool is user-friendly where you just need to browse and add the images or can simply drag and drop them as well. You can choose from multiple template options available and can also add text, effects, and stickers to the collage. Multiple image editing options are also supported like zoom, flip, transparency, and more.
05Canva
Free and simple to use, this is one of the most widely used collage-making tools that is available as a browser-based program as well as Android and iOS app. Several photo-grid templates in different styles are available at the site that lets you create the desired collage in no time. You can customize the selected templates by adding filters, texts, effects, and more elements available. A paid version of the tool with advanced features is also available.
Part 4 Use stock images to enhance your photo grid
Adding high-quality and interesting images to your photo grid will level up its overall look and make it eye-catchy. If you are running short of such interesting and bright images, no need to worry as several sites have a good collection of images that can be used. One such program that we recommend here to check the stock images is Wondershare Filmora. Though Filmora is an advanced Windows and Mac-based video editing software, there are multiple additional features supported one of them is a collection of images in an array of categories.
Depending on the theme of your photo grid, you can select the desired images and other media from Wondershare Filmora Video Editor . Additionally, the split-screen feature of the software will let you add and play multiple videos in a single frame that makes it look like a video collage.
Wondershare Filmora - Best Video Editor for Mac/Windows
5,481,435 people have downloaded it.
Build unique custom animations without breaking a sweat.
Focus on creating epic stories and leave the details to Filmora’s auto features.
Start a creative adventure with drag & drop effects and endless possibilities.
Filmora simplifies advanced features to save you time and effort.
Filmora cuts out repetition so you can move on to your next creative breakthrough.
● Key Takeaways from This Episode →
● A photo grid is a classic and traditional style of creating a collage.
● There are several online tools, software, and mobile apps available for creating interesting photo grids.
● Wondershare Filmora is a great site to get stock of images in different categories and for all types of video editing requirements.
How To Create Pinterest Slideshow in Simple Ways
How to Make Pinterest Slideshow in Simple Ways
An easy yet powerful editor
Numerous effects to choose from
Detailed tutorials provided by the official channel
Slideshows are a collection of images arranged together that an audience can quickly swipe through to view the content. Pinterest is known for its one-pin to one post feature. You cannot post more than one image or video in a pin.
Thus, business people could start sharing all of the images or products, services, or articles mostly because it can be stressful to do that. But with the Pinterest slideshow, you can now upload all the images you want to at once in one pin. Moreso, even have people view the pins simultaneously just by swiping through.
In this article
01 [How to display Pinterest’s latest pins in a slideshow? ](#Part 1)
02 [How to upload multiple photos to Pinterest?](#Part 2)
03 [How to display Pinterest’s latest pins in a slideshow? ](#Part 3)
Part 1 How to Display Pinterest Latest Pins in A Slideshow
Using Pinterest’s latest pins in a slideshow is another way to display the latest pins from any Pinterest user or blogger’s blog. Each image is linked to its pin page on Pinterest instead of the board or profile page if you use the Pinterest profile or board widget.
To install this widget, you need the user or board’s RSS feed URL, then use it as the input for a blogger slide show gadget.
Here are the tricky steps to follow for the Pinterest slide show;
Step 1: Constructing Pinterest RSS feed URL
The Pinterest RSS feed URL of a user is different from aboard.
● It would be the user’s profile URL + feed/RSS for a user. To get your Profile URL, click on your username in the top right corner of your screen, and you will see a URL in your web browser’s URL. That is your profile URL.
● For the board URL, you will get that after clicking on the board from the homepage. The URL would appear on your browser’s URL bar.

Step 2: Reformatting the feed for the slideshow gadget:
The RSS feed from step one is not very compatible with the blogger slideshow gadget. It accepts RSS feed in Media RSS format, but you can convert with Yahoo pipe. Simply plug in your feed URL in the Yahoo pipe URL.
You have to replace the value of the feed URL with the feed URL you got in step one and the pin count with the number of pins displayed on the slide show.
With this, you have successfully converted your feed URL to the media version of the Pinterest feed.
Step 3: Add the slideshow widget
Take the following step to add the slideshow widget.
Go to Dashboard > Layout and click on ‘Add A Gadget.’
Now Add, A Gadget window, scroll down and select Slideshow.

Under Source, select Other.

Put in the converted Pinterest RSS feed URL from step 2 into the Feed URL text box.
Click Save and view your blog.
Part 2 How to Upload Multiple Photos to Pinterest
If you want to display multiple photos of your product or share your brand story with pictures, then this is a feature you will grab. Pinterest allows you to display various products at a time. But first, you must also have a business account to do this.
When you upload multiple photos on Pinterest, they are known as carousel pins. This feature is a great advertising tool and will help you during the Pinterest slideshow.
This is because people would see your carousel on their home feed just like any other pin you have posted. They may also tap on the carousel and swipe through the different photos on the carousel. When the pinner saves it, they have kept the entire image.
Here is a step-by-step method to upload multiple photos to Pinterest.
Step 1: Log into your Pinterest
First, log into your Pinterest business account to access the feature. If you do not have a business account, it is elementary to do so. There is no need for you to enter any billing information if you are wondering about that. It is a straightforward process. Just open your account, click on the drop-down menu near your profile picture, see ‘convert to business,’ then upgrade your account, and you are good to go.
You should also ensure that the photos you want to upload are on your computer. If you have originally planned to use it to explain an article visually, then make sure the particular image that represents that article is correctly saved on your computer. The images should be 1:1 or 2:3 in ratio, and the format either ‘png’ or ‘jpeg.’
Add your pictures and upload. If you want to reorder your pin, you can replace or remove images within the carousel.

Step 2: Add Title
Add a title, description, and website of the carousel pin. Your title will be a snippet of what the blog post or article will be about or the recipe’s title. Your description should be the same as your Pinterest text, and you can also choose to let it appear only on your first image on your carousel pin.
Step 3: Select a Board
The last step is to select a board relevant to your carousel pin. Thus, you have your carousel pin and images. However, you cannot view this immediately as in a standard pin or video pin. But you can go back to your board to view your pin when it is ready.
Part 3 How to Make Pinterest Slideshow In 5 Simple Ways
Slideshows are a beautiful way to enhance your Pinterest account and generate more leads on your Profile. If you’ve been wondering if and how you can make slideshows on Pinterest, here’s a guaranteed step you can follow. But then Pinterest slideshows are instead referred to as a showcase.
However, to access this feature, you must first own a business account on Pinterest.
Here are five (5) simple ways you can make Slideshow on Pinterest:
Step 1: Go to your Pinterest Profile
Click settings next to your profile photo in the top right corner.

Step 2: Select Profile
When the Settings window appears, select Profile.

Step 3: Click Edit
Next to Featured Boards, click Edit.

Step 4: Select Boards
After clicking Edit for your Featured Boards, you’ll reach a screen where you may edit the boards you want to highlight. Select which boards you’d like to feature by clicking on each drop-down menu.
Opening a new Pinterest page is a good idea. Scroll down to Boards with the most Pin impressions under Analytics>Profile. These are the boards that I highlighted.

Step 5: Save
When you’ve decided which boards to include in your Featured, click Save.
● Bonus – Wondershare Filmora
With this feature, you can also tweak your Pinterest slides and make them look professional and befitting to your audience using Wondershare Filmora Video Editor .
For Win 7 or later (64-bit)
For macOS 10.12 or later
Wondershare Filmora is an online video editing software with several unique features, including split-screen, freeze-frame, loop images, and videos to help you create top-notch visual content for your brand. With features like the Chroma key, you can easily create special effects in your Pinterest slideshow background.
You can also use color match and video effects to enhance the quality of the slide.
● Ending Thoughts →
● Making a Pinterest slideshow can be confusing if you do not have the correct information. But if you do, it’ll be a great way to spice up your social media content and create more leads for your business.
● Pinterest is a social media platform that keeps growing and adding more features by the day. It is also increasing the number of users per day. Try out the simple steps stated on how to make a slideshow on Pinterest. Finally, by incorporating Filmora in your levelling up plans, you will be able to bring your brand in front of your target customer and present it nicely.
Slideshows are a collection of images arranged together that an audience can quickly swipe through to view the content. Pinterest is known for its one-pin to one post feature. You cannot post more than one image or video in a pin.
Thus, business people could start sharing all of the images or products, services, or articles mostly because it can be stressful to do that. But with the Pinterest slideshow, you can now upload all the images you want to at once in one pin. Moreso, even have people view the pins simultaneously just by swiping through.
In this article
01 [How to display Pinterest’s latest pins in a slideshow? ](#Part 1)
02 [How to upload multiple photos to Pinterest?](#Part 2)
03 [How to display Pinterest’s latest pins in a slideshow? ](#Part 3)
Part 1 How to Display Pinterest Latest Pins in A Slideshow
Using Pinterest’s latest pins in a slideshow is another way to display the latest pins from any Pinterest user or blogger’s blog. Each image is linked to its pin page on Pinterest instead of the board or profile page if you use the Pinterest profile or board widget.
To install this widget, you need the user or board’s RSS feed URL, then use it as the input for a blogger slide show gadget.
Here are the tricky steps to follow for the Pinterest slide show;
Step 1: Constructing Pinterest RSS feed URL
The Pinterest RSS feed URL of a user is different from aboard.
● It would be the user’s profile URL + feed/RSS for a user. To get your Profile URL, click on your username in the top right corner of your screen, and you will see a URL in your web browser’s URL. That is your profile URL.
● For the board URL, you will get that after clicking on the board from the homepage. The URL would appear on your browser’s URL bar.
Step 2: Reformatting the feed for the slideshow gadget:
The RSS feed from step one is not very compatible with the blogger slideshow gadget. It accepts RSS feed in Media RSS format, but you can convert with Yahoo pipe. Simply plug in your feed URL in the Yahoo pipe URL.
You have to replace the value of the feed URL with the feed URL you got in step one and the pin count with the number of pins displayed on the slide show.
With this, you have successfully converted your feed URL to the media version of the Pinterest feed.
Step 3: Add the slideshow widget
Take the following step to add the slideshow widget.
Go to Dashboard > Layout and click on ‘Add A Gadget.’
Now Add, A Gadget window, scroll down and select Slideshow.
Under Source, select Other.
Put in the converted Pinterest RSS feed URL from step 2 into the Feed URL text box.
Click Save and view your blog.
Part 2 How to Upload Multiple Photos to Pinterest
If you want to display multiple photos of your product or share your brand story with pictures, then this is a feature you will grab. Pinterest allows you to display various products at a time. But first, you must also have a business account to do this.
When you upload multiple photos on Pinterest, they are known as carousel pins. This feature is a great advertising tool and will help you during the Pinterest slideshow.
This is because people would see your carousel on their home feed just like any other pin you have posted. They may also tap on the carousel and swipe through the different photos on the carousel. When the pinner saves it, they have kept the entire image.
Here is a step-by-step method to upload multiple photos to Pinterest.
Step 1: Log into your Pinterest
First, log into your Pinterest business account to access the feature. If you do not have a business account, it is elementary to do so. There is no need for you to enter any billing information if you are wondering about that. It is a straightforward process. Just open your account, click on the drop-down menu near your profile picture, see ‘convert to business,’ then upgrade your account, and you are good to go.
You should also ensure that the photos you want to upload are on your computer. If you have originally planned to use it to explain an article visually, then make sure the particular image that represents that article is correctly saved on your computer. The images should be 1:1 or 2:3 in ratio, and the format either ‘png’ or ‘jpeg.’
Add your pictures and upload. If you want to reorder your pin, you can replace or remove images within the carousel.
Step 2: Add Title
Add a title, description, and website of the carousel pin. Your title will be a snippet of what the blog post or article will be about or the recipe’s title. Your description should be the same as your Pinterest text, and you can also choose to let it appear only on your first image on your carousel pin.
Step 3: Select a Board
The last step is to select a board relevant to your carousel pin. Thus, you have your carousel pin and images. However, you cannot view this immediately as in a standard pin or video pin. But you can go back to your board to view your pin when it is ready.
Part 3 How to Make Pinterest Slideshow In 5 Simple Ways
Slideshows are a beautiful way to enhance your Pinterest account and generate more leads on your Profile. If you’ve been wondering if and how you can make slideshows on Pinterest, here’s a guaranteed step you can follow. But then Pinterest slideshows are instead referred to as a showcase.
However, to access this feature, you must first own a business account on Pinterest.
Here are five (5) simple ways you can make Slideshow on Pinterest:
Step 1: Go to your Pinterest Profile
Click settings next to your profile photo in the top right corner.
Step 2: Select Profile
When the Settings window appears, select Profile.
Step 3: Click Edit
Next to Featured Boards, click Edit.
Step 4: Select Boards
After clicking Edit for your Featured Boards, you’ll reach a screen where you may edit the boards you want to highlight. Select which boards you’d like to feature by clicking on each drop-down menu.
Opening a new Pinterest page is a good idea. Scroll down to Boards with the most Pin impressions under Analytics>Profile. These are the boards that I highlighted.
Step 5: Save
When you’ve decided which boards to include in your Featured, click Save.
● Bonus – Wondershare Filmora
With this feature, you can also tweak your Pinterest slides and make them look professional and befitting to your audience using Wondershare Filmora Video Editor .
For Win 7 or later (64-bit)
For macOS 10.12 or later
Wondershare Filmora is an online video editing software with several unique features, including split-screen, freeze-frame, loop images, and videos to help you create top-notch visual content for your brand. With features like the Chroma key, you can easily create special effects in your Pinterest slideshow background.
You can also use color match and video effects to enhance the quality of the slide.
● Ending Thoughts →
● Making a Pinterest slideshow can be confusing if you do not have the correct information. But if you do, it’ll be a great way to spice up your social media content and create more leads for your business.
● Pinterest is a social media platform that keeps growing and adding more features by the day. It is also increasing the number of users per day. Try out the simple steps stated on how to make a slideshow on Pinterest. Finally, by incorporating Filmora in your levelling up plans, you will be able to bring your brand in front of your target customer and present it nicely.
What Is the Meaning of Motion Graphics
What is Motion Graphics
An easy yet powerful editor
Numerous effects to choose from
Detailed tutorials provided by the official channel
Are you new to motion graphics and looking to learn everything about animated motion then you are at the right webpage. In this article, we will cover everything about motion graphic videos.
In this article
01 [What is Motion Graphics? (Motion Graphics Definition)](#Part 1)
02 [5 Motion Graphics Animation Trends You Need to Know About](#Part 2)
03 [History of Motion Graphics](#Part 3)
04 [Uses of Motion Graphics Today (motion Graphics Examples)](#Part 4)
05 [ Motion Graphics Vs. Animation: What’s the Difference?](#Part 5)
05 [How to Make Motion Graphics?](#Part 5)
Part 1 What is Motion Graphics?
Motion graphics is known as videos with the mix-up of the text, effect, stickers, and many other types of components. It’s known as an animated graphic design as well. Motion graphics are a great way to communicate with the target audience with the help of video, text, and emotions in the videos. The motion graphics videos with the music, effects, and text can give a great message to the audience.
Part 2 5 Motion Graphics Animation Trends You Need to Know About
01Mix up the and 3D
Mixing up the and animations in the videos is still getting momentum. People love the way the motion graphic designer explains the video using the mixing of and 3D. This trend is also used in the hundreds of costly advertisements.
02Trend of Broken Text in Videos
The broken text trend is also used in thousands of videos and it helps designers to show the poetic meaning of the client video they are making. People take it positively and understand the video with just the broken text at the right place.
03Adding VFX in the Videos
02Trend of Broken Text in Videos
VFX trend is catching people a lot now a day. The complex visual effects in the videos get the attention of the audience very quickly. While browsing videos over the internet you can also observe the VFX effects in the case of the firestorm, explosions, etc in the videos.
04Animated Logos of Companies
Animated logos are in huge demand even by the biggest companies around the globe. Animated logos are also used in the motion graphic videos while showing the company products or in the marketing videos. The animated logos capture the attention of people very quickly.
05Thin Lines in the Videos
In animated motion graphics videos lines also plays a very important role as they can easily help viewers to understand the shape, directions, and many more other things. Designers are now drawing the thin lines in their videos.
Part 3 History of Motion Graphics
Previously, before the presence of motion graphics in the world of technology the graphics worked just the images in the un-moving and flat formats.
Motion graphics first came into the scene when Oskar Fischinger and Norman McLaren were doing some experimental work. Later in 195some designers introduced motion graphics to the public in a bigger way. The designers later used in a few films that time and these films are still a great example of the motion graphics used at that time. Motion graphics in these films presented information such as the product company, actors, film directors, movie title, and many other things about the films in a very creative way.
Playing with the words or graphic elements was never seen by the people before the motion graphics. Later it’s started used in mostly all films and ad videos.
Now a day in the few years the advancement of animation software’s and the improvements in designs allowed people to learn more about motion graphics and try to produce new and eye-catching graphics.
Part 4 Uses of Motion Graphics Today
Now a day due to the new technology every day the presence of the screen in multiple devices has extended the usage of motion graphics. Motion graphics are generally used in every device that has a screen such as opening the TV, introducing the information with the bumpers, and many other things. Below are a few examples where motion graphics are mainly used:
01Branding
Branding is the biggest channel and branding owners were looking for something different to refresh their brand and make it different from the other SKY channels. The Nerdo Creative Studio used motion graphics in their channel video and created a beautiful video with typography and text effects. This video makes it different from the other channels which generally people don’t see every day on television.

02Sharing Product Information Or Promotion Video
The main usage of motion graphics is promoting the products using the product videos created with the help of beautiful motion graphic backgrounds and texts. This helps brands to promote their products in front of customers in a clear way and get more sales. In the product videos, the animated motion graphics can help you a lot in creating entertaining, fun, and engaging eye-catching product videos.

03Telling a Story to the Audience
Storytelling about a brand or anything is a very complicated task because your story must be to the point and understandable by the viewers. In this case, motion graphics help a lot. For example, you can view the above video on the URL with clear images, text, icons, and great background music. This is a great concept and you can even use it for making ads for your products or for making short films.

04Explaining A Concept To Your Students Or In The Company Meetings
Motion graphics are a great way to make the explainer videos for your products or the new concepts to your students in the school or college. Motion graphic videos can more clearly explain the concepts to the audience instead of using a presentation. The YouTube video link above shows how beautifully the designer has explained the concept of blockchain in the video.

05Creating Awareness About Something
The above video is about empowering women and girls where motion graphics are used. This awareness video doesn’t have any fancy design or great colors but still, it clears its message to the people.

Part 5 Motion Graphics vs. Animation: What’s the Difference?
Motion graphics are generally represented with moving images, text, and other objects and these graphics can easily display information with the help of moving objects such as the moving website logo, blurring text, bars in graphs, etc. Simply we can say the motion graphics can display the letters and shapes in the motion of the user’s choice. Sometimes things are very hard to explain with the still images whereas with the help of a few seconds of motion graphics you can clear everything perfectly.
If we talk about animation then this is a term under which motion graphics falls. Animation is used for more than 1years. So, we can say motion graphics are a part of animation itself. Any technique in the world which helps users to move static images or objects is known as animation. It can be Claymation, anime, cartoons, or motion graphics.
Mainly the content separates the motion graphics from the other types of animations because, in the motion graphic text, objects are associated with the other graphic designs.
Part 6 How to Make Motion Graphics?
Wondershare Filmora Video Editor
Wondershare Filmora is desktop software that allows you to quickly make beautiful motion graphic videos without doing any effort. This motion graphics video maker program is available for windows as well as the Mac operating system computers. Wondershare Filmora is capable of making the best videos very easily even you can apply motion tracking in the videos with this software. It allows you to edit the videos from scratch and create the end-level best videos. It offers you several features such as video effects, split screen, green screen, and color grading and controlling the speed of your videos. Finally, this is a complete solution for all your video editing and motion graphic problems.
For Win 7 or later (64-bit)
For macOS 10.12 or later
● Key Takeaways from This Episode →
● This is the information about what motion graphics is and how to create the best motion graphics video on your computer with the help of Wondershare Filmora.
● There are hundreds of other motion graphics video maker software and apps available over the internet but not any app can design the best videos as compared to the Wondershare Filmora.
● The best part is that it is very easy to use and you can quickly make motion graphics videos even if you are a newbie.
Are you new to motion graphics and looking to learn everything about animated motion then you are at the right webpage. In this article, we will cover everything about motion graphic videos.
In this article
01 [What is Motion Graphics? (Motion Graphics Definition)](#Part 1)
02 [5 Motion Graphics Animation Trends You Need to Know About](#Part 2)
03 [History of Motion Graphics](#Part 3)
04 [Uses of Motion Graphics Today (motion Graphics Examples)](#Part 4)
05 [ Motion Graphics Vs. Animation: What’s the Difference?](#Part 5)
05 [How to Make Motion Graphics?](#Part 5)
Part 1 What is Motion Graphics?
Motion graphics is known as videos with the mix-up of the text, effect, stickers, and many other types of components. It’s known as an animated graphic design as well. Motion graphics are a great way to communicate with the target audience with the help of video, text, and emotions in the videos. The motion graphics videos with the music, effects, and text can give a great message to the audience.
Part 2 5 Motion Graphics Animation Trends You Need to Know About
01Mix up the and 3D
Mixing up the and animations in the videos is still getting momentum. People love the way the motion graphic designer explains the video using the mixing of and 3D. This trend is also used in the hundreds of costly advertisements.
02Trend of Broken Text in Videos
The broken text trend is also used in thousands of videos and it helps designers to show the poetic meaning of the client video they are making. People take it positively and understand the video with just the broken text at the right place.
03Adding VFX in the Videos
02Trend of Broken Text in Videos
VFX trend is catching people a lot now a day. The complex visual effects in the videos get the attention of the audience very quickly. While browsing videos over the internet you can also observe the VFX effects in the case of the firestorm, explosions, etc in the videos.
04Animated Logos of Companies
Animated logos are in huge demand even by the biggest companies around the globe. Animated logos are also used in the motion graphic videos while showing the company products or in the marketing videos. The animated logos capture the attention of people very quickly.
05Thin Lines in the Videos
In animated motion graphics videos lines also plays a very important role as they can easily help viewers to understand the shape, directions, and many more other things. Designers are now drawing the thin lines in their videos.
Part 3 History of Motion Graphics
Previously, before the presence of motion graphics in the world of technology the graphics worked just the images in the un-moving and flat formats.
Motion graphics first came into the scene when Oskar Fischinger and Norman McLaren were doing some experimental work. Later in 195some designers introduced motion graphics to the public in a bigger way. The designers later used in a few films that time and these films are still a great example of the motion graphics used at that time. Motion graphics in these films presented information such as the product company, actors, film directors, movie title, and many other things about the films in a very creative way.
Playing with the words or graphic elements was never seen by the people before the motion graphics. Later it’s started used in mostly all films and ad videos.
Now a day in the few years the advancement of animation software’s and the improvements in designs allowed people to learn more about motion graphics and try to produce new and eye-catching graphics.
Part 4 Uses of Motion Graphics Today
Now a day due to the new technology every day the presence of the screen in multiple devices has extended the usage of motion graphics. Motion graphics are generally used in every device that has a screen such as opening the TV, introducing the information with the bumpers, and many other things. Below are a few examples where motion graphics are mainly used:
01Branding
Branding is the biggest channel and branding owners were looking for something different to refresh their brand and make it different from the other SKY channels. The Nerdo Creative Studio used motion graphics in their channel video and created a beautiful video with typography and text effects. This video makes it different from the other channels which generally people don’t see every day on television.
02Sharing Product Information Or Promotion Video
The main usage of motion graphics is promoting the products using the product videos created with the help of beautiful motion graphic backgrounds and texts. This helps brands to promote their products in front of customers in a clear way and get more sales. In the product videos, the animated motion graphics can help you a lot in creating entertaining, fun, and engaging eye-catching product videos.
03Telling a Story to the Audience
Storytelling about a brand or anything is a very complicated task because your story must be to the point and understandable by the viewers. In this case, motion graphics help a lot. For example, you can view the above video on the URL with clear images, text, icons, and great background music. This is a great concept and you can even use it for making ads for your products or for making short films.
04Explaining A Concept To Your Students Or In The Company Meetings
Motion graphics are a great way to make the explainer videos for your products or the new concepts to your students in the school or college. Motion graphic videos can more clearly explain the concepts to the audience instead of using a presentation. The YouTube video link above shows how beautifully the designer has explained the concept of blockchain in the video.
05Creating Awareness About Something
The above video is about empowering women and girls where motion graphics are used. This awareness video doesn’t have any fancy design or great colors but still, it clears its message to the people.
Part 5 Motion Graphics vs. Animation: What’s the Difference?
Motion graphics are generally represented with moving images, text, and other objects and these graphics can easily display information with the help of moving objects such as the moving website logo, blurring text, bars in graphs, etc. Simply we can say the motion graphics can display the letters and shapes in the motion of the user’s choice. Sometimes things are very hard to explain with the still images whereas with the help of a few seconds of motion graphics you can clear everything perfectly.
If we talk about animation then this is a term under which motion graphics falls. Animation is used for more than 1years. So, we can say motion graphics are a part of animation itself. Any technique in the world which helps users to move static images or objects is known as animation. It can be Claymation, anime, cartoons, or motion graphics.
Mainly the content separates the motion graphics from the other types of animations because, in the motion graphic text, objects are associated with the other graphic designs.
Part 6 How to Make Motion Graphics?
Wondershare Filmora Video Editor
Wondershare Filmora is desktop software that allows you to quickly make beautiful motion graphic videos without doing any effort. This motion graphics video maker program is available for windows as well as the Mac operating system computers. Wondershare Filmora is capable of making the best videos very easily even you can apply motion tracking in the videos with this software. It allows you to edit the videos from scratch and create the end-level best videos. It offers you several features such as video effects, split screen, green screen, and color grading and controlling the speed of your videos. Finally, this is a complete solution for all your video editing and motion graphic problems.
For Win 7 or later (64-bit)
For macOS 10.12 or later
● Key Takeaways from This Episode →
● This is the information about what motion graphics is and how to create the best motion graphics video on your computer with the help of Wondershare Filmora.
● There are hundreds of other motion graphics video maker software and apps available over the internet but not any app can design the best videos as compared to the Wondershare Filmora.
● The best part is that it is very easy to use and you can quickly make motion graphics videos even if you are a newbie.
Ways to Stop Animation From Looping in Unity
How to Stop Animation from Looping in Unity
An easy yet powerful editor
Numerous effects to choose from
Detailed tutorials provided by the official channel
Unity is an IDE interface all designed exclusively for game developers. However, you can do much more with Unity than game development. But, our main concern here is something else than this subject. You’re looking for easy tutorials on Unity stop animation!

And luckily, we’ve got you covered as we’ve briefly explained how to perform Unity stop animation from looping and the steps to make a smooth animation.
In this article
01 [What is Unity Used for?](#Part 1)
02 [How to Stop Animation Playing in Loop in Unity?](#Part 2)
03 [How to Smooth an Animation in Unity?](#Part 3)
Part 1 What is Unity Used for?
Unity is a software tool friendly to all the game developers out there. This tool is used by the large community of game developers to power and create their game development projects. And, the software is more of a professional means and not a simple pared-down ‘game builder .’Unity also offers one of the most significant inbuilt features like rendering, physics, and collision detection. Thus, one of the powerful aspects of Unity is that game developers need not go out of the box and create everything from scratch. Instead, they are available with the physics engine required to develop games quickly. Another robust feature of Unity is that it includes an excellent ‘Asset Store’ where developers can upload their creations and showcase them to the whole community. So, that’s Unity and its uses in a broader scope!
Before we take you through the next section, it’s important to mention that Unity is also known as cross-platform IDE, where IDE stands for ‘integrated development environment.’ So, it can be called more of an interface with access to all the tools and resources required to develop games.
Apart from the game development, Unity is known for other excellent usage purposes as:
● Simulations
● Animation
● Architectural Visualization
● Previsualization for Film
● Interactive Experiences
Among these features only, we’ll describe Unity stop animation from looping in detail.
Part 2 How to Stop Animation Playing in Loop in Unity?
As we said, we’ll describe to you the most accessible definition of how to stop Animation in Unity. Thus, there are simple steps that we’d like to define firsthand before explaining the whole procedure with an image-centric step-by-step guide.
So, those simple steps to stop motion animation in After Effects in the loop also go like below:
Step 1 Go to the Project tab and select Animation.
Step 2 Open the Inspector tab.
Step 3 Uncheck the checkbox Loop Time, and you’re good to go!
We’ll describe the same, i.e., Unity stop animation from looping through the step guide below.
In this guide, we’ll explain right from applying the Animation so that you’d understand better. So, let’s begin without any further ado!
01Step 1 Delete animation folder
We have already created an animation folder in the folder named as own Animation, so click that folder, click the animation folder, and then another folder along with as shown below. Hold the Shift key and click another folder. Then, right-click the Delete tab as depicted below.
Similarly, you can also delete the Animation if you wish.

02Step 2 Create an animation for the subject
Now, you may have different subjects. We’re creating Animation on Mobile Joystick for reference, as shown below.

Now, hit the Create tab on the Unity panel below. Then, proceed to save your Animation in the folder you’ve already created for the same.

03Step 3 Give positions to the animation
Firstly, hit the red-icon button used for recording, as shown below.

Give the position on the left side after you click the button. And, then, clicking almost near to 3you can give the position to the right-hand side as shown below.

Now, the animation has been set. You can see the animation from left to right if you click the Play button. So, here, you can see the results of infinite loop animation, which won’t stop.

You can follow two ways to stop this Animation in Unity from looping, and we’ll describe both methods below.
04Step 4 Stop animation Unity Way 1
Go to the animation folder where you’ve created the animation and click the New Animation icon as shown below.

Now, you have to uncheck the Loop Time tab on the top-right corner of the Unity panel.

05Step 5 Stop animation Unity Way 2
Alternatively, you can click the Animator tab on the top of the Unity panel and double-tap the New Animation button. Then, it will also delete or uncheck the loop time, as shown below.

These were all the steps to stop animation Unity.
Part 3 How to Smooth an Animation in Unity?
After done with Unity stop animation, it’s time to smooth your Unity animation. Again, we will describe it simply if you’re used to the Unity platform and then with a step guide with respective screenshots.
So, stay tuned until the end to reveal the easy steps of smoothing an animation in Unity.
Select the Dopesheet at the bottom of the animation window. Then, you need to switch to the ‘Curves’ view once you create your Animation in the Dopesheet. These animation curves help you accelerate and decelerate animations so that the movement and other things can stop and start smoothly.
So, let’s begin with the step guide tutorial on the same as follows:
For reference, take an example of a metronome object imported from Blender to Unity. Here, we’ve grouped all the pendulum objects under one rotation so that when we move the pendulum, it pivots to the correct point, as shown below.

01Add the animator
So, the first step begins with adding the Animator component to the parent object. You can do this by clicking the Add Component tab on the Unity panel’s left side, searching for Animator, and clicking the Animator.
You will also need a controller to control the animations. Go to your animation folder, right-click, and select Create> Animator Controller tab.

Let’s call or give it a name metronome animator as shown below.
Then, you need to drag this into your animator component. Again, you need to go to your animations folder, right-click, select Create> Animations tab.
Now, give this a name pendulum full swing.
02Open the animator tab
Now, open the animator tab, drag this pendulum swing animation to that panel, and double-tap the yellow-colored New Animation button.

03Create an animation
With the game object selected, the animated metronome pendulum, in this case, we’d like to animate the X component of the rotation. So, you need to click Add Property> Transform> Rotation tab and click the + sign on its right, as shown below.
Now, click the plus sign automatically to set two keyframes, one at the beginning and one at the end. Now, click on end select all, and then delete for now.

04Add keyframes to rotate the pendulum
With the first set of keyframes and the pendulum all way to the right, go halfway and change the rotation to the left on the left panel of Unity. Then, add another keyframe.

05Slow down the animation
As you can observe, the Animation of this pendulum is in a straight line and feels unnatural to the eyes. Thus, we’re required to smooth this Animation now! For this purpose, go to the Curves; you can see the pink properties of rotation as going from one side to another.

Now, you need to adjust these pink curves. Start by adding a key to one of its sides, as shown below. After that, it is all on you how slow or fasts you want these values to be.
Here, you’re all done smoothing the animation in Unity after learning the stop-animation Unity tutorial.
You can even stop motion animation on Photoshop with the above tutorial.
06Bonus Tip:
We want to introduce an excellent video editor software called Filmora Video Editor . It is from the house of Wondershare, a well-known software company worldwide.
Wondershare Filmora - Best Video Editor for Mac/Windows
5,481,435 people have downloaded it.
Build unique custom animations without breaking a sweat.
Focus on creating epic stories and leave the details to Filmora’s auto features.
Start a creative adventure with drag & drop effects and endless possibilities.
Filmora simplifies advanced features to save you time and effort.
Filmora cuts out repetition so you can move on to your next creative breakthrough.
With Filmora, you can easily add Animation and edit your videos to make them look world-class. The latest version and new updates are eye-candy and quick fix for beginner video editors.
So, please pay a visit to the Filmora website and check out its Mac and Windows version for free today.
● Key Takeaways from This Episode →
● Learning the concept and usage of Unity
● A tutorial on how to stop animation in Unity from looping
● A tutorial on how to smooth animation in Unity
● Introduction to Filmora, the top-most video editor software for beginners.
Unity is an IDE interface all designed exclusively for game developers. However, you can do much more with Unity than game development. But, our main concern here is something else than this subject. You’re looking for easy tutorials on Unity stop animation!
And luckily, we’ve got you covered as we’ve briefly explained how to perform Unity stop animation from looping and the steps to make a smooth animation.
In this article
01 [What is Unity Used for?](#Part 1)
02 [How to Stop Animation Playing in Loop in Unity?](#Part 2)
03 [How to Smooth an Animation in Unity?](#Part 3)
Part 1 What is Unity Used for?
Unity is a software tool friendly to all the game developers out there. This tool is used by the large community of game developers to power and create their game development projects. And, the software is more of a professional means and not a simple pared-down ‘game builder .’Unity also offers one of the most significant inbuilt features like rendering, physics, and collision detection. Thus, one of the powerful aspects of Unity is that game developers need not go out of the box and create everything from scratch. Instead, they are available with the physics engine required to develop games quickly. Another robust feature of Unity is that it includes an excellent ‘Asset Store’ where developers can upload their creations and showcase them to the whole community. So, that’s Unity and its uses in a broader scope!
Before we take you through the next section, it’s important to mention that Unity is also known as cross-platform IDE, where IDE stands for ‘integrated development environment.’ So, it can be called more of an interface with access to all the tools and resources required to develop games.
Apart from the game development, Unity is known for other excellent usage purposes as:
● Simulations
● Animation
● Architectural Visualization
● Previsualization for Film
● Interactive Experiences
Among these features only, we’ll describe Unity stop animation from looping in detail.
Part 2 How to Stop Animation Playing in Loop in Unity?
As we said, we’ll describe to you the most accessible definition of how to stop Animation in Unity. Thus, there are simple steps that we’d like to define firsthand before explaining the whole procedure with an image-centric step-by-step guide.
So, those simple steps to stop motion animation in After Effects in the loop also go like below:
Step 1 Go to the Project tab and select Animation.
Step 2 Open the Inspector tab.
Step 3 Uncheck the checkbox Loop Time, and you’re good to go!
We’ll describe the same, i.e., Unity stop animation from looping through the step guide below.
In this guide, we’ll explain right from applying the Animation so that you’d understand better. So, let’s begin without any further ado!
01Step 1 Delete animation folder
We have already created an animation folder in the folder named as own Animation, so click that folder, click the animation folder, and then another folder along with as shown below. Hold the Shift key and click another folder. Then, right-click the Delete tab as depicted below.
Similarly, you can also delete the Animation if you wish.
02Step 2 Create an animation for the subject
Now, you may have different subjects. We’re creating Animation on Mobile Joystick for reference, as shown below.
Now, hit the Create tab on the Unity panel below. Then, proceed to save your Animation in the folder you’ve already created for the same.
03Step 3 Give positions to the animation
Firstly, hit the red-icon button used for recording, as shown below.
Give the position on the left side after you click the button. And, then, clicking almost near to 3you can give the position to the right-hand side as shown below.
Now, the animation has been set. You can see the animation from left to right if you click the Play button. So, here, you can see the results of infinite loop animation, which won’t stop.
You can follow two ways to stop this Animation in Unity from looping, and we’ll describe both methods below.
04Step 4 Stop animation Unity Way 1
Go to the animation folder where you’ve created the animation and click the New Animation icon as shown below.
Now, you have to uncheck the Loop Time tab on the top-right corner of the Unity panel.
05Step 5 Stop animation Unity Way 2
Alternatively, you can click the Animator tab on the top of the Unity panel and double-tap the New Animation button. Then, it will also delete or uncheck the loop time, as shown below.
These were all the steps to stop animation Unity.
Part 3 How to Smooth an Animation in Unity?
After done with Unity stop animation, it’s time to smooth your Unity animation. Again, we will describe it simply if you’re used to the Unity platform and then with a step guide with respective screenshots.
So, stay tuned until the end to reveal the easy steps of smoothing an animation in Unity.
Select the Dopesheet at the bottom of the animation window. Then, you need to switch to the ‘Curves’ view once you create your Animation in the Dopesheet. These animation curves help you accelerate and decelerate animations so that the movement and other things can stop and start smoothly.
So, let’s begin with the step guide tutorial on the same as follows:
For reference, take an example of a metronome object imported from Blender to Unity. Here, we’ve grouped all the pendulum objects under one rotation so that when we move the pendulum, it pivots to the correct point, as shown below.
01Add the animator
So, the first step begins with adding the Animator component to the parent object. You can do this by clicking the Add Component tab on the Unity panel’s left side, searching for Animator, and clicking the Animator.
You will also need a controller to control the animations. Go to your animation folder, right-click, and select Create> Animator Controller tab.
Let’s call or give it a name metronome animator as shown below.
Then, you need to drag this into your animator component. Again, you need to go to your animations folder, right-click, select Create> Animations tab.
Now, give this a name pendulum full swing.
02Open the animator tab
Now, open the animator tab, drag this pendulum swing animation to that panel, and double-tap the yellow-colored New Animation button.
03Create an animation
With the game object selected, the animated metronome pendulum, in this case, we’d like to animate the X component of the rotation. So, you need to click Add Property> Transform> Rotation tab and click the + sign on its right, as shown below.
Now, click the plus sign automatically to set two keyframes, one at the beginning and one at the end. Now, click on end select all, and then delete for now.
04Add keyframes to rotate the pendulum
With the first set of keyframes and the pendulum all way to the right, go halfway and change the rotation to the left on the left panel of Unity. Then, add another keyframe.
05Slow down the animation
As you can observe, the Animation of this pendulum is in a straight line and feels unnatural to the eyes. Thus, we’re required to smooth this Animation now! For this purpose, go to the Curves; you can see the pink properties of rotation as going from one side to another.
Now, you need to adjust these pink curves. Start by adding a key to one of its sides, as shown below. After that, it is all on you how slow or fasts you want these values to be.
Here, you’re all done smoothing the animation in Unity after learning the stop-animation Unity tutorial.
You can even stop motion animation on Photoshop with the above tutorial.
06Bonus Tip:
We want to introduce an excellent video editor software called Filmora Video Editor . It is from the house of Wondershare, a well-known software company worldwide.
Wondershare Filmora - Best Video Editor for Mac/Windows
5,481,435 people have downloaded it.
Build unique custom animations without breaking a sweat.
Focus on creating epic stories and leave the details to Filmora’s auto features.
Start a creative adventure with drag & drop effects and endless possibilities.
Filmora simplifies advanced features to save you time and effort.
Filmora cuts out repetition so you can move on to your next creative breakthrough.
With Filmora, you can easily add Animation and edit your videos to make them look world-class. The latest version and new updates are eye-candy and quick fix for beginner video editors.
So, please pay a visit to the Filmora website and check out its Mac and Windows version for free today.
● Key Takeaways from This Episode →
● Learning the concept and usage of Unity
● A tutorial on how to stop animation in Unity from looping
● A tutorial on how to smooth animation in Unity
● Introduction to Filmora, the top-most video editor software for beginners.
Also read:
- Updated The Secret Sauce for Making GIF Instagram Story More Stunning
- Updated In 2024, Top 10 Best Photo to Animation Converters
- New 2024 Approved Pencil2D Animation Tutorial Overview
- 5 Different Animation Styles A Simple but Comprehensive Guide for 2024
- New Best 10 Anime Websites to Watch Dubbed Anime Free
- Updated In 2024, Before You Learn Facebook Slideshow 5 Things You Should Know
- New In 2024, 18 Best Tools and Services to Create Animated Videos for Your Business
- 2024 Approved 5 Websites with Animated Logos That Can Catch Your Eyes
- Updated 10 Trendy Free Logo Animation Templates for 2024
- Updated In 2024, 12 Best Stop Motion Studios Worth Recommending
- In 2024, How to Combine Two/More GIFs Into One GIF Mergers Offered
- Updated In 2024, 10 Classical Animated Cartoon Types With Examples
- How to Make a GIF in Photoshop for 2024
- In 2024, Guide on Creating GIF in WhatsApp iPhone
- New In 2024, Nurturing the Spirit Through the Top 10 Intellectual Anime Websites
- Updated 2024 Approved What Is the Best Collage Photo Grid Maker - Experts Choice
- Updated How to Make Whiteboard Animation Videos for 2024
- 10 Photoshop Cartoon Effects For Creatives for 2024
- Updated 2024 Approved Best 15 Horror Animes That Will Trigger a Heart Attack
- New In 2024, Best GIF to Video Converters
- 15 Iconic Cartoon Characters of All Time for 2024
- Updated In 2024, A Beginners Guide for Learning 3D Animation
- Updated 8 Best Motion Graphics Online Tools for Your Inspiration
- Updated Create Animated Social Media Posts in Canva for 2024
- In 2024, 10 Options for Your Need on Animation Makers
- Updated The Complete Guide to Whiteboard Animation
- Updated 2024 Approved 20 Free After Effects Logo Reveal Templates You Will Want to Know
- New In 2024, Samples of Cartoon Character Face
- New 2024 Approved Useful Tips for Canva Animated Elements
- New 15 Top Video to GIF App on iPhone and Android for 2024
- Learn How to Make Your Characters Interactive in Unity Animation Rigging
- Updated In 2024, How To Learn Cartoon Sketch Drawing
- How to Transfer Text Messages from Vivo Y27 4G to New Phone | Dr.fone
- In 2024, 5 Ways to Move Contacts From Xiaomi Redmi K70 Pro to iPhone (13/14/15) | Dr.fone
- In 2024, Top 12 Prominent Motorola Moto G24 Fingerprint Not Working Solutions
- In 2024, The 10 Best Tools to Bypass iCloud Activation Lock From iPhone 15 Pro Max You Should Try Out
- How to Remove an AirTag from Your Apple ID Account On Apple iPhone 14 Plus?
- In 2024, How Can I Catch the Regional Pokémon without Traveling On Asus ROG Phone 7 | Dr.fone
- How to Fake Snapchat Location without Jailbreak On Apple iPhone 14 Pro Max | Dr.fone
- Full Guide to Catch 100 IV Pokémon Using a Map On Samsung Galaxy M14 5G | Dr.fone
- In 2024, 3 Solutions to Find Your Apple iPhone 13 Current Location of a Mobile Number | Dr.fone
- In 2024, How To Bypass the Required Apple Store Verification For Apple iPhone 12 Pro
- How to Unlock iPhone 8 Plus With an Apple Watch & What to Do if It Doesnt Work | Dr.fone
- In 2024, iPhone Transfer Transfer Contact from Apple iPhone 15 Pro to iPhone without iCloud | Dr.fone
- How to Fix Tecno Camon 20 Find My Friends No Location Found? | Dr.fone
- Is pgsharp legal when you are playing pokemon On Samsung Galaxy S21 FE 5G (2023)? | Dr.fone
- How to Fix Unfortunately, Contacts Has Stopped Error on ZTE Nubia Z60 Ultra | Dr.fone
- In 2024, How Can I Catch the Regional Pokémon without Traveling On Oppo Reno 9A | Dr.fone
- How To Fix Apple iPhone 12 Unavailable Issue With Ease | Dr.fone
- How Can We Bypass OnePlus Nord N30 5G FRP?
- How To Deal With the OnePlus Nord CE 3 Lite 5G Screen Black But Still Works? | Dr.fone
- Updated What Is an AI Video Maker for 2024
- In 2024, 7 Ways to Unlock a Locked Oppo Reno 11 5G Phone
- Title: New 2024 Approved 10 Amazing Cartoon Music Examples You Need to Bookmark
- Author: Elon
- Created at : 2024-05-19 03:05:28
- Updated at : 2024-05-20 03:05:28
- Link: https://animation-videos.techidaily.com/new-2024-approved-10-amazing-cartoon-music-examples-you-need-to-bookmark/
- License: This work is licensed under CC BY-NC-SA 4.0.
