

New 2024 Approved How to Make Creative Animation Videos
How to Make Creative Animation Videos
Animation can explain whatever the mind of man can conceive – Walt Disney. Animation video is a craft in which images go through the process of conspiring, layout addition, and photographic chronology to create an illusion of action. In this article, let’s learn the importance of video animations and when and why to use this technique.
What are Video Animation and its importance?
Video as a marketing tool has become more popular but also more important. In this article, you can read more about why media marketing is getting more essential in comparison to text marketing. Therefore, an explainer video with Animation is an amazing way to show your target audience who you are, where you stand for, what you do and how you can solve the customer’s problem.
Video animation is an engaging technique that can help you comprehensively tell your story. Animated meaning can be better comprehended as a simulation of motion created by showing a series of pictures. Animated videos for a business catch the viewers and make for an enjoyable story-telling experience.
Often, animation videos are used to explain a concept or process. It’s straightforward to make these videos appealing and likable as you can primarily create them however you want. It can take longer to get the point across when people explain how to do something. Animations not only trigger emotions but spark conversations as well.
What are most common types of Animation?
The purpose of this article is to take you through the complexity of the different types of animation styles and methods. It also covers the track you should take (and what that path entails) to become an animator for each of the five types.
This guide is not about learning how to animate. But instead, it breaks down the five types of Animation available to you and what you’ll need to start animating: best software, schools, and courses.
Motion Graphics (Key framing): Motion graphics focus on making dynamic and exciting presentations of moving text logos and fundamental illustrations.
- Motion graphics can be 2D and 3D, and you’ll find them everywhere in news, sporting videos, the news, and other TV productions.
- Correct character animation is generally outside the scope of motion graphics, but many core animation principles also apply to motion graphics.
- Creating Motion Graphics depends on the plan used since video editing software often have different user interface or settings, but the idea is the same. Motion Graphics usually involves animating texts, pictures, or video clips using keyframing that is tweened to make a smooth motion between frames.
Traditional Animation: This is the classic type of Animation you’re probably most well known with. In the past, animators drew characters frame by frame, and then those pictures were moved onto transparent sheets for painting. That’s where the term animation comes from.
They started scanning drawings into the computer for digital coloring. The important thing is that hand-drawn animators still create their animation frame by frame using the same method and concept as in those old days of paper and cels.
How to Use Motion Graphics Animation in Filmora
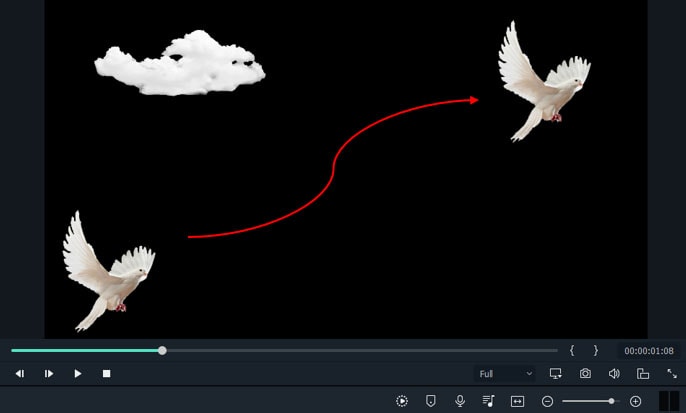
Keyframes specify the start or end of a transition in a shot. A series of keyframes can give the semblance of the movement of an object. Keyframes include parameters such as Position, Scale, Opacity, and Rotation. These values can be changed and customized to make animations using keyframing.
Wondershare Filmora makes it really easy to use. Even learners or novices can use keyframe animation to create extraordinary videos. Plus, the keyframe templates are an added satisfaction. If you have limited time and need a quick fix, using Presets in the Animation tab is your best bet.
For this example, we’ll walk you through using Keyframes on the short video clip to make your Animation using Wondershare Filmora.
Free Download For Win 7 or later(64-bit)
Free Download For macOS 10.14 or later
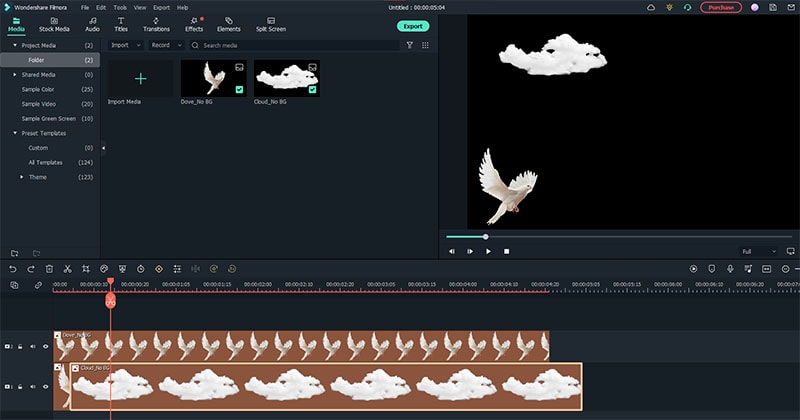
Step1 Launch Wondershare Filmora from your system and select New Project.

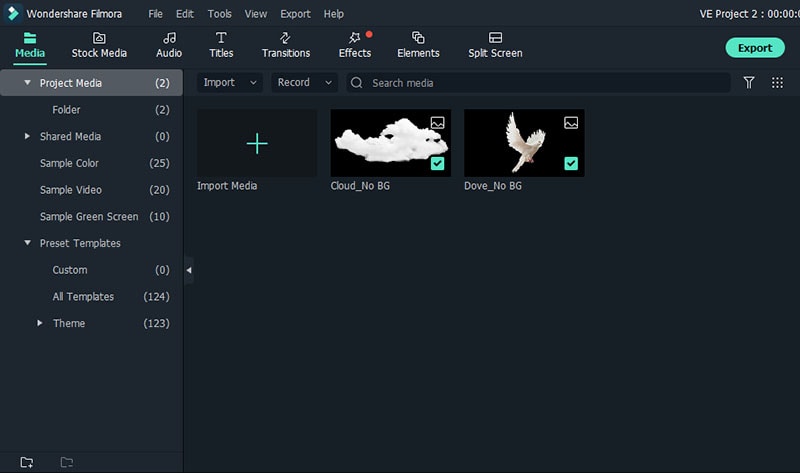
Step2 Import your selected images. In this case I imported no background images to have a clear view on how key framing works.
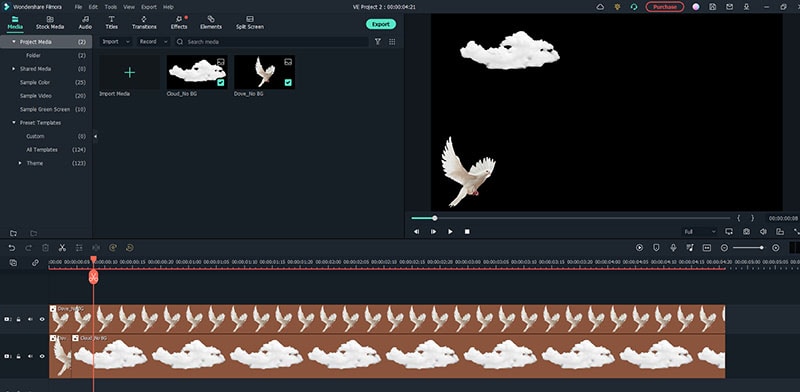
Step3 Drag or add the image on the Timeline Panel.
In this case I use a dove and a cloud to demo the Motion graphics animation
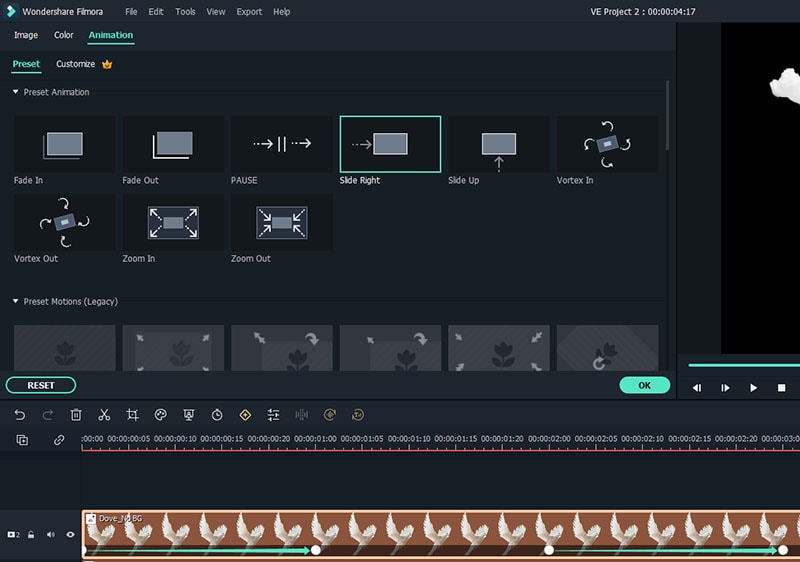
Step4 Double click the image then the Animation tab will display. Here, there are available presets, either the latest or the Legacy Animation, as indicated on the display that you can use.
There is also a tab if you want to customize your animations which requires premium account.
- Fade In
- Fade Out
- Pause
- Slide right
- Slide up
- Vortex In
- Vortex Out
- Zoom In
- Zoom Out
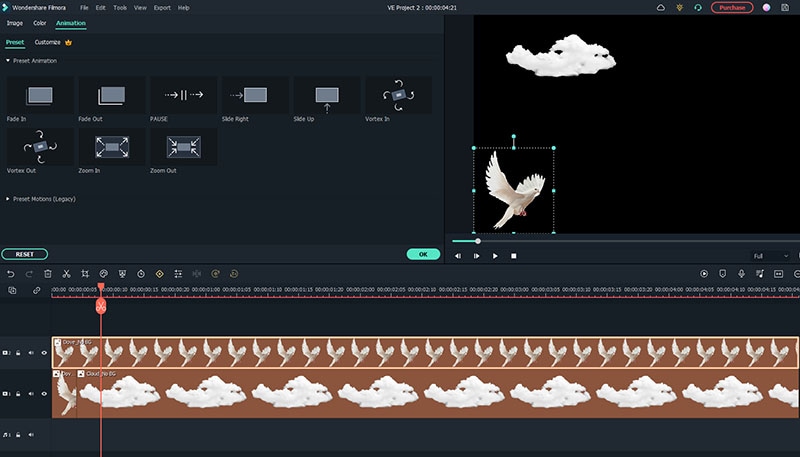
Step5 Select any animation you want by double-clicking the presets. In this case, I selected a slight right preset, and you will notice that the start arrow and end arrow indicator are displayed.
In the Timeline panel, you have an option to customize the start and end of the Preset. Just drag the arrow keys on either side to reach the keyframe you wish to change. Just simple.
You can also do it on the cloud image that we’ve added.
Takeaway
Keyframing can bring steady images to life by introducing animations. With the super-easy keyframing tool in Filmora, you can now make invigorating videos. From easy to complex key framing. The customization property lets you unbind your creativity and take your editing to a professional level. Make your logo pop by adding keyframe animations. Better yet, you can also animate text.
No matter what industry you’re in, Animation can be relevant. Small start-ups to giant corporations use animation videos, too. Animation videos help to explain tricky processes or concepts, sell a product, or even to gain recognition for a product. Everyone resonates with Animation in some way or another. Almost everyone has watched cartoons or animations in their life, so these tend to grab attention more effectively.
We all love animation. From the animated cartoons we watched as kids to the latest and hottest animated music video, there’s something about seeing visuals come alive that captivates and inspires us. But video animation isn’t just for children, and it isn’t just for the entertainment value only.
Free Download For macOS 10.14 or later
Step1 Launch Wondershare Filmora from your system and select New Project.
Step2 Import your selected images. In this case I imported no background images to have a clear view on how key framing works.
Step3 Drag or add the image on the Timeline Panel.
In this case I use a dove and a cloud to demo the Motion graphics animation
Step4 Double click the image then the Animation tab will display. Here, there are available presets, either the latest or the Legacy Animation, as indicated on the display that you can use.
There is also a tab if you want to customize your animations which requires premium account.
- Fade In
- Fade Out
- Pause
- Slide right
- Slide up
- Vortex In
- Vortex Out
- Zoom In
- Zoom Out
Step5 Select any animation you want by double-clicking the presets. In this case, I selected a slight right preset, and you will notice that the start arrow and end arrow indicator are displayed.
In the Timeline panel, you have an option to customize the start and end of the Preset. Just drag the arrow keys on either side to reach the keyframe you wish to change. Just simple.
You can also do it on the cloud image that we’ve added.
Takeaway
Keyframing can bring steady images to life by introducing animations. With the super-easy keyframing tool in Filmora, you can now make invigorating videos. From easy to complex key framing. The customization property lets you unbind your creativity and take your editing to a professional level. Make your logo pop by adding keyframe animations. Better yet, you can also animate text.
No matter what industry you’re in, Animation can be relevant. Small start-ups to giant corporations use animation videos, too. Animation videos help to explain tricky processes or concepts, sell a product, or even to gain recognition for a product. Everyone resonates with Animation in some way or another. Almost everyone has watched cartoons or animations in their life, so these tend to grab attention more effectively.
We all love animation. From the animated cartoons we watched as kids to the latest and hottest animated music video, there’s something about seeing visuals come alive that captivates and inspires us. But video animation isn’t just for children, and it isn’t just for the entertainment value only.
Best 10 Animated Templates in Canva
Versatile Video Editor - Wondershare Filmora
An easy yet powerful editor
Numerous effects to choose from
Detailed tutorials provided by the official channel
Canva is one of the premier graphic design platforms available to users. They can create Instagram posts, make YouTube thumbnails, infographics, invitations, business cards, and more.
The platform is beginner-friendly and extremely customizable, ideal for everyday use. More brands and companies use data visualized through graphic design, creating greater understanding and impact on users.
With Canva animated templates, you can show more with less work. This has wide-ranging effects from diversifying education to elaborating business reports and lucrative marketing opportunities.
In the article below, take a look at ten of the best Canva animated templates.
In this article
01 [Can You Animate in Canva?](#Part 1)
02 [Where Can I Find Animated Elements In Canva?](#Part 2)
03 [How Do I Get More Animations in Canva?](#Part 3)
Part 1 Can You Animate in Canva?
Animation is an evergreen storytelling style as it’s versatile enough to be used in various types of content. Animations can last from a few seconds to a few minutes. According to HubSpot, A video-based email increases click rates by 300%.
1. Customization
Canva can be used to create customized animation. This can be done by creating an image and animating each element. Users can choose to create a textured background and edit images uploaded to Canva.
Users can also overlay audio to enhance the quality of the animation. The text can be refined to suit the style of the animation.
2. Automation
Canva has also launched a comprehensive suite of features under the “Animation” button. This automates the process and allows static images to be converted to animations. The animations range from simple motion to complex creations.
3. Movement
With the animation button, users can choose the type of animation they would like to use. The choices range from subtle animations like ‘Fade’, ‘Drift’ to bursts of motion like ‘Tumble’ and ‘Block’ and everything in-between.
4. Overview
Canva helps create high-quality animations at affordable prices. Creating an animation has never been easier with ready-made design templates by experienced designers.
Let’s look at how to animate the various elements of an image and the various animated templates in Canva.
Part 2 Where Can I Find Animated Elements In Canva?
With Canva’s many layouts and features to choose from, it might be difficult to figure out where to start. So, let’s start with the basics.
You have four basic facets to consider when choosing to animate. They are text, audio, image, and video. Every animation is crafted from varied combinations of these four basic steps.
One other consideration is the style of presentation you’d like to choose. Is it in portrait mode or landscape mode?
Do you want a previously crafted presentation ready to go? If so, Canva offers two options.
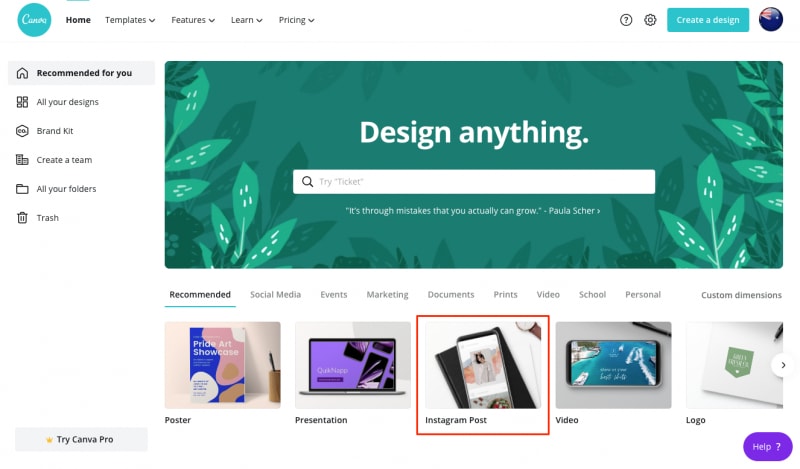
Step1 Select the “Create a Design” option on Canva
This allows users to create content in any format ranging from Instagram videos and reels, YouTube thumbnails and Facebook covers, logos, and more.
Step2 You can edit images and add the necessary text to your content. Bolster your content with video clips and audio to create the primary image you want
Edit the content to your preferences.
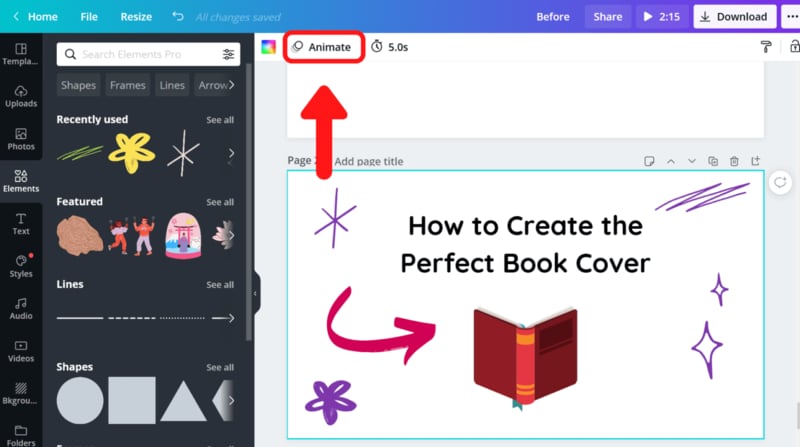
Step3 You are now ready to animate the construct
Select the animate button and look for “Page Animations” to animate the entire presentation. You can choose to animate any element on the page. You can also add borders or other design elements and animate them.
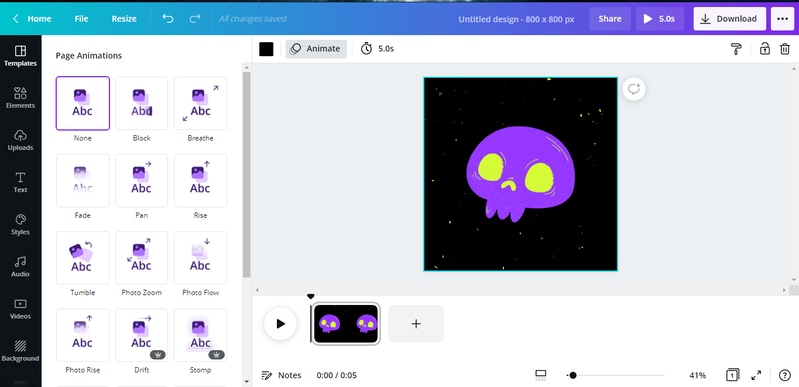
Step4 Here, you can choose from any myriad options for animation styles
You can also adjust the length of each animation with the stopwatch icon next to the animate button.
You can change the length of your video if you have one. You can also modify the audio clip to suit each animation.

Step5 Once you’ve animated the features according to your preference, you can now save the file in pdf, jpg, png or gif, or mp4 formats
Please note that all these options are for Canva Pro. Canva with the free subscription may allow limited format downloads. This is why you should consider tools like Wondershare Filmore for video animation.
Wondershare Filmora Pro for Video Animation
With Wondershare Filmora Pro, animation has never been easier. With its innovative keyframe technology, it makes animations easy to use. Animations can be easily created and, with the help of Filmora’s automation tool, fine-tuned for a professional finish.
Filmora provides a pioneering opportunity to create a visual masterpiece with a beginner’s experience with a simple functional drag and drop. With motion tracking, the ability to create split-screen, green screen, and blending capabilities, the Filmora Pro experience is unparalleled.
Part 3 How Do I Get More Animations in Canva?
Canva has filters allowing users to sort presentations by style, like “Animated,” “Minimalist,” “Corporate” and more. Canva has a series of ready-made animated templates available for use. Let’s explore a few of them.
It also allows sorting by themes like “Pink” or “Business” or “Background” depending on your needs. Users can also choose to sort out presentations according to the presentation’s color scheme.
Pink and Violet Simple Hot Neon Gradients Creative Presentation
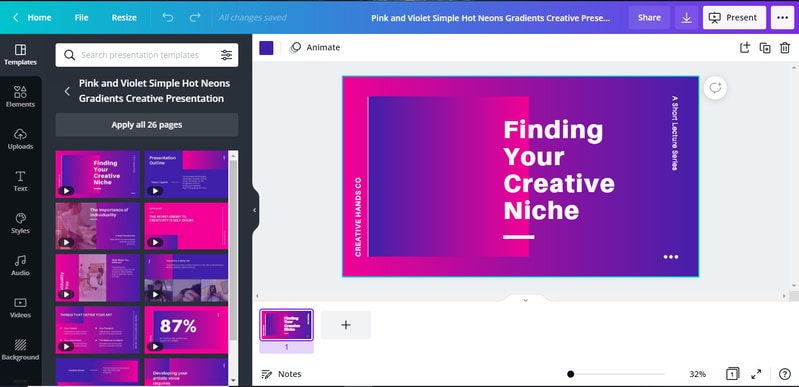
With a gradient background that’s a popular website trend, this presentation boasts twenty-six slides with a signature animation you can tweak to suit your needs.
Blue Timeline Cycle Presentation
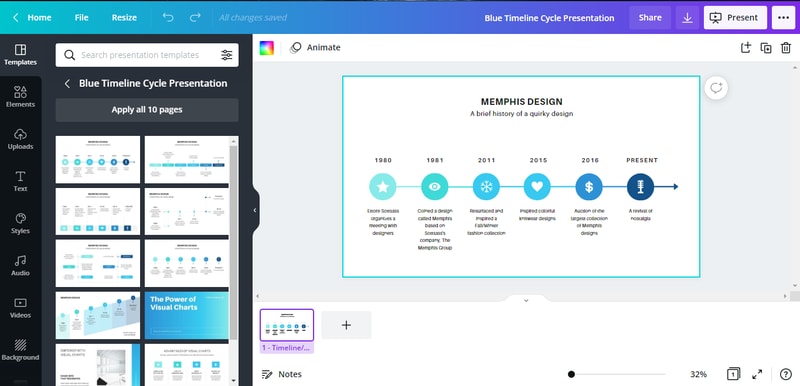
This presentation is useful for compact information with a clean and modern outlook. With ten power-packed slides, this animated template allows researchers and businesses to use data visualization to convey ideas.
Blue and White Illustrated Medical Healthcare in the 21st Century Education Presentation
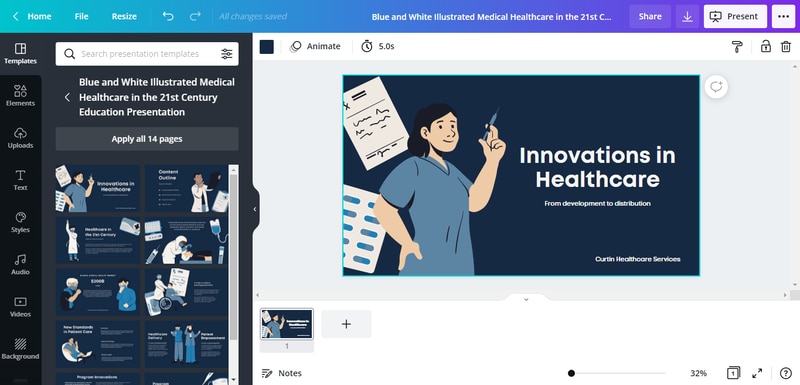
With fourteen slides, this animation perfectly creates a visual treat for viewers. You can also convey vital information in bite-sized morsels. You can illustrate your point with lively animation designs while captivating your audience.
Neon Cyber Monday Sale Animated Video Facebook Ad Post
A fresh offering from Canva is this neon Facebook Ad Post with a captivating starry background and neon text elements.
You can customize this video to edit the text, the color palette, the duration of the video, and more.
Yellow Happy Wildlife Conservation Day Animated Video
For a child-friendly video with animation, head on over to this presentation. This animation allows children to marvel at the motion and pay rapt attention when listening to essential issues with soothing attention-grabbing colors.
Green and Orange Business Hip Tech Weekly Team Updates Presentation
As the perfect complement of colors, this presentation is suited for everything from a YouTube thumbnail to a business meeting. With nineteen slides, the variations of animations found are endless.
Brown Cute Start Healthy Lifestyle Explainer Video Animation
These cute animations make it straightforward to craft an explainer video around fitness. You can also use this for an Instagram post or story reel.
With seven slides, you can craft a compelling explainer video that keeps your viewers glued to the screen.
Sweet Fruit Candy Animated Group Project Presentation
This presentation is perfect for group presentations. It’s an ideal template to break down large amounts of information in a versatile and easily created presentation.
With over thirteen slides, it’s a perfect slide set to breathe new life into your homework.
Pink and Cream Minimalist Food Animated Presentation

For a simple personalized food-related presentation, this slide set has you covered. With gorgeous visuals and space to write recipes, the history.
This presentation, with fourteen slides, remains a favorite among culinary enthusiasts.
Marketing Agency Animated Facebook Cover
Motion is identified as a compelling website design trend for 2022. Colorful, animated art in vibrant color themes can win more visitors to your page and attention in a saturated market.
Use this theme to illustrate a gorgeous campaign ad for your social media feed.
Wondershare Filmora
Get started easily with Filmora’s powerful performance, intuitive interface, and countless effects Try It Free Try It Free Learn More >

AI Portrait – The best feature of Wondershare Filmora for gameplay editing
The AI Portrait is a new add-on in Wondershare Filmora. It can easily remove video backgrounds without using a green screen or chroma key, allowing you to add borders, glitch effects, pixelated, noise, or segmentation video effects.

Final Words
Canva is a great tool for animated videos and you can use animated Canva templates to create a unique animation in images. It is a great tool and can be used easily to create any length of animated video. But if you are looking for an advanced and easy-to-use video animation tool, then give a try to Wondershare Filmora.
Canva is one of the premier graphic design platforms available to users. They can create Instagram posts, make YouTube thumbnails, infographics, invitations, business cards, and more.
The platform is beginner-friendly and extremely customizable, ideal for everyday use. More brands and companies use data visualized through graphic design, creating greater understanding and impact on users.
With Canva animated templates, you can show more with less work. This has wide-ranging effects from diversifying education to elaborating business reports and lucrative marketing opportunities.
In the article below, take a look at ten of the best Canva animated templates.
In this article
01 [Can You Animate in Canva?](#Part 1)
02 [Where Can I Find Animated Elements In Canva?](#Part 2)
03 [How Do I Get More Animations in Canva?](#Part 3)
Part 1 Can You Animate in Canva?
Animation is an evergreen storytelling style as it’s versatile enough to be used in various types of content. Animations can last from a few seconds to a few minutes. According to HubSpot, A video-based email increases click rates by 300%.
1. Customization
Canva can be used to create customized animation. This can be done by creating an image and animating each element. Users can choose to create a textured background and edit images uploaded to Canva.
Users can also overlay audio to enhance the quality of the animation. The text can be refined to suit the style of the animation.
2. Automation
Canva has also launched a comprehensive suite of features under the “Animation” button. This automates the process and allows static images to be converted to animations. The animations range from simple motion to complex creations.
3. Movement
With the animation button, users can choose the type of animation they would like to use. The choices range from subtle animations like ‘Fade’, ‘Drift’ to bursts of motion like ‘Tumble’ and ‘Block’ and everything in-between.
4. Overview
Canva helps create high-quality animations at affordable prices. Creating an animation has never been easier with ready-made design templates by experienced designers.
Let’s look at how to animate the various elements of an image and the various animated templates in Canva.
Part 2 Where Can I Find Animated Elements In Canva?
With Canva’s many layouts and features to choose from, it might be difficult to figure out where to start. So, let’s start with the basics.
You have four basic facets to consider when choosing to animate. They are text, audio, image, and video. Every animation is crafted from varied combinations of these four basic steps.
One other consideration is the style of presentation you’d like to choose. Is it in portrait mode or landscape mode?
Do you want a previously crafted presentation ready to go? If so, Canva offers two options.
Step1 Select the “Create a Design” option on Canva
This allows users to create content in any format ranging from Instagram videos and reels, YouTube thumbnails and Facebook covers, logos, and more.
Step2 You can edit images and add the necessary text to your content. Bolster your content with video clips and audio to create the primary image you want
Edit the content to your preferences.
Step3 You are now ready to animate the construct
Select the animate button and look for “Page Animations” to animate the entire presentation. You can choose to animate any element on the page. You can also add borders or other design elements and animate them.
Step4 Here, you can choose from any myriad options for animation styles
You can also adjust the length of each animation with the stopwatch icon next to the animate button.
You can change the length of your video if you have one. You can also modify the audio clip to suit each animation.
Step5 Once you’ve animated the features according to your preference, you can now save the file in pdf, jpg, png or gif, or mp4 formats
Please note that all these options are for Canva Pro. Canva with the free subscription may allow limited format downloads. This is why you should consider tools like Wondershare Filmore for video animation.
Wondershare Filmora Pro for Video Animation
With Wondershare Filmora Pro, animation has never been easier. With its innovative keyframe technology, it makes animations easy to use. Animations can be easily created and, with the help of Filmora’s automation tool, fine-tuned for a professional finish.
Filmora provides a pioneering opportunity to create a visual masterpiece with a beginner’s experience with a simple functional drag and drop. With motion tracking, the ability to create split-screen, green screen, and blending capabilities, the Filmora Pro experience is unparalleled.
Part 3 How Do I Get More Animations in Canva?
Canva has filters allowing users to sort presentations by style, like “Animated,” “Minimalist,” “Corporate” and more. Canva has a series of ready-made animated templates available for use. Let’s explore a few of them.
It also allows sorting by themes like “Pink” or “Business” or “Background” depending on your needs. Users can also choose to sort out presentations according to the presentation’s color scheme.
Pink and Violet Simple Hot Neon Gradients Creative Presentation
With a gradient background that’s a popular website trend, this presentation boasts twenty-six slides with a signature animation you can tweak to suit your needs.
Blue Timeline Cycle Presentation
This presentation is useful for compact information with a clean and modern outlook. With ten power-packed slides, this animated template allows researchers and businesses to use data visualization to convey ideas.
Blue and White Illustrated Medical Healthcare in the 21st Century Education Presentation
With fourteen slides, this animation perfectly creates a visual treat for viewers. You can also convey vital information in bite-sized morsels. You can illustrate your point with lively animation designs while captivating your audience.
Neon Cyber Monday Sale Animated Video Facebook Ad Post
A fresh offering from Canva is this neon Facebook Ad Post with a captivating starry background and neon text elements.
You can customize this video to edit the text, the color palette, the duration of the video, and more.
Yellow Happy Wildlife Conservation Day Animated Video
For a child-friendly video with animation, head on over to this presentation. This animation allows children to marvel at the motion and pay rapt attention when listening to essential issues with soothing attention-grabbing colors.
Green and Orange Business Hip Tech Weekly Team Updates Presentation
As the perfect complement of colors, this presentation is suited for everything from a YouTube thumbnail to a business meeting. With nineteen slides, the variations of animations found are endless.
Brown Cute Start Healthy Lifestyle Explainer Video Animation
These cute animations make it straightforward to craft an explainer video around fitness. You can also use this for an Instagram post or story reel.
With seven slides, you can craft a compelling explainer video that keeps your viewers glued to the screen.
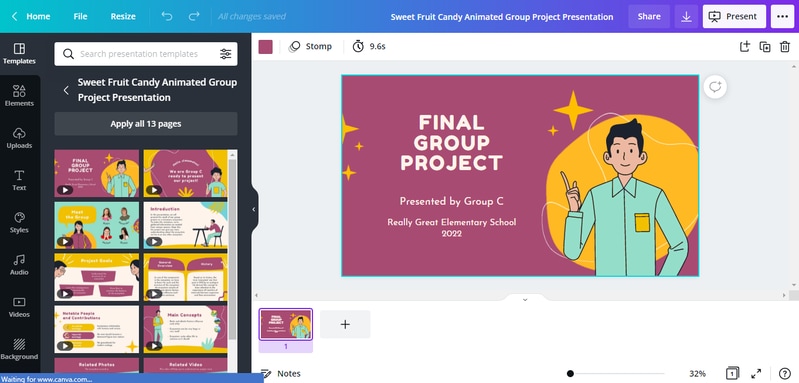
Sweet Fruit Candy Animated Group Project Presentation
This presentation is perfect for group presentations. It’s an ideal template to break down large amounts of information in a versatile and easily created presentation.
With over thirteen slides, it’s a perfect slide set to breathe new life into your homework.
Pink and Cream Minimalist Food Animated Presentation
For a simple personalized food-related presentation, this slide set has you covered. With gorgeous visuals and space to write recipes, the history.
This presentation, with fourteen slides, remains a favorite among culinary enthusiasts.
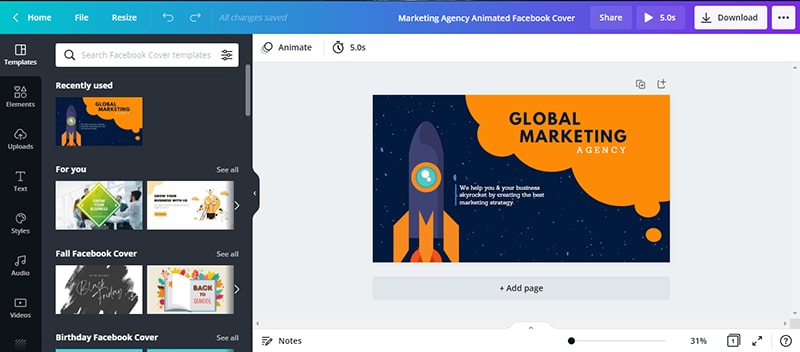
Marketing Agency Animated Facebook Cover
Motion is identified as a compelling website design trend for 2022. Colorful, animated art in vibrant color themes can win more visitors to your page and attention in a saturated market.
Use this theme to illustrate a gorgeous campaign ad for your social media feed.
Wondershare Filmora
Get started easily with Filmora’s powerful performance, intuitive interface, and countless effects Try It Free Try It Free Learn More >
AI Portrait – The best feature of Wondershare Filmora for gameplay editing
The AI Portrait is a new add-on in Wondershare Filmora. It can easily remove video backgrounds without using a green screen or chroma key, allowing you to add borders, glitch effects, pixelated, noise, or segmentation video effects.
Final Words
Canva is a great tool for animated videos and you can use animated Canva templates to create a unique animation in images. It is a great tool and can be used easily to create any length of animated video. But if you are looking for an advanced and easy-to-use video animation tool, then give a try to Wondershare Filmora.
Canva is one of the premier graphic design platforms available to users. They can create Instagram posts, make YouTube thumbnails, infographics, invitations, business cards, and more.
The platform is beginner-friendly and extremely customizable, ideal for everyday use. More brands and companies use data visualized through graphic design, creating greater understanding and impact on users.
With Canva animated templates, you can show more with less work. This has wide-ranging effects from diversifying education to elaborating business reports and lucrative marketing opportunities.
In the article below, take a look at ten of the best Canva animated templates.
In this article
01 [Can You Animate in Canva?](#Part 1)
02 [Where Can I Find Animated Elements In Canva?](#Part 2)
03 [How Do I Get More Animations in Canva?](#Part 3)
Part 1 Can You Animate in Canva?
Animation is an evergreen storytelling style as it’s versatile enough to be used in various types of content. Animations can last from a few seconds to a few minutes. According to HubSpot, A video-based email increases click rates by 300%.
1. Customization
Canva can be used to create customized animation. This can be done by creating an image and animating each element. Users can choose to create a textured background and edit images uploaded to Canva.
Users can also overlay audio to enhance the quality of the animation. The text can be refined to suit the style of the animation.
2. Automation
Canva has also launched a comprehensive suite of features under the “Animation” button. This automates the process and allows static images to be converted to animations. The animations range from simple motion to complex creations.
3. Movement
With the animation button, users can choose the type of animation they would like to use. The choices range from subtle animations like ‘Fade’, ‘Drift’ to bursts of motion like ‘Tumble’ and ‘Block’ and everything in-between.
4. Overview
Canva helps create high-quality animations at affordable prices. Creating an animation has never been easier with ready-made design templates by experienced designers.
Let’s look at how to animate the various elements of an image and the various animated templates in Canva.
Part 2 Where Can I Find Animated Elements In Canva?
With Canva’s many layouts and features to choose from, it might be difficult to figure out where to start. So, let’s start with the basics.
You have four basic facets to consider when choosing to animate. They are text, audio, image, and video. Every animation is crafted from varied combinations of these four basic steps.
One other consideration is the style of presentation you’d like to choose. Is it in portrait mode or landscape mode?
Do you want a previously crafted presentation ready to go? If so, Canva offers two options.
Step1 Select the “Create a Design” option on Canva
This allows users to create content in any format ranging from Instagram videos and reels, YouTube thumbnails and Facebook covers, logos, and more.
Step2 You can edit images and add the necessary text to your content. Bolster your content with video clips and audio to create the primary image you want
Edit the content to your preferences.
Step3 You are now ready to animate the construct
Select the animate button and look for “Page Animations” to animate the entire presentation. You can choose to animate any element on the page. You can also add borders or other design elements and animate them.
Step4 Here, you can choose from any myriad options for animation styles
You can also adjust the length of each animation with the stopwatch icon next to the animate button.
You can change the length of your video if you have one. You can also modify the audio clip to suit each animation.
Step5 Once you’ve animated the features according to your preference, you can now save the file in pdf, jpg, png or gif, or mp4 formats
Please note that all these options are for Canva Pro. Canva with the free subscription may allow limited format downloads. This is why you should consider tools like Wondershare Filmore for video animation.
Wondershare Filmora Pro for Video Animation
With Wondershare Filmora Pro, animation has never been easier. With its innovative keyframe technology, it makes animations easy to use. Animations can be easily created and, with the help of Filmora’s automation tool, fine-tuned for a professional finish.
Filmora provides a pioneering opportunity to create a visual masterpiece with a beginner’s experience with a simple functional drag and drop. With motion tracking, the ability to create split-screen, green screen, and blending capabilities, the Filmora Pro experience is unparalleled.
Part 3 How Do I Get More Animations in Canva?
Canva has filters allowing users to sort presentations by style, like “Animated,” “Minimalist,” “Corporate” and more. Canva has a series of ready-made animated templates available for use. Let’s explore a few of them.
It also allows sorting by themes like “Pink” or “Business” or “Background” depending on your needs. Users can also choose to sort out presentations according to the presentation’s color scheme.
Pink and Violet Simple Hot Neon Gradients Creative Presentation
With a gradient background that’s a popular website trend, this presentation boasts twenty-six slides with a signature animation you can tweak to suit your needs.
Blue Timeline Cycle Presentation
This presentation is useful for compact information with a clean and modern outlook. With ten power-packed slides, this animated template allows researchers and businesses to use data visualization to convey ideas.
Blue and White Illustrated Medical Healthcare in the 21st Century Education Presentation
With fourteen slides, this animation perfectly creates a visual treat for viewers. You can also convey vital information in bite-sized morsels. You can illustrate your point with lively animation designs while captivating your audience.
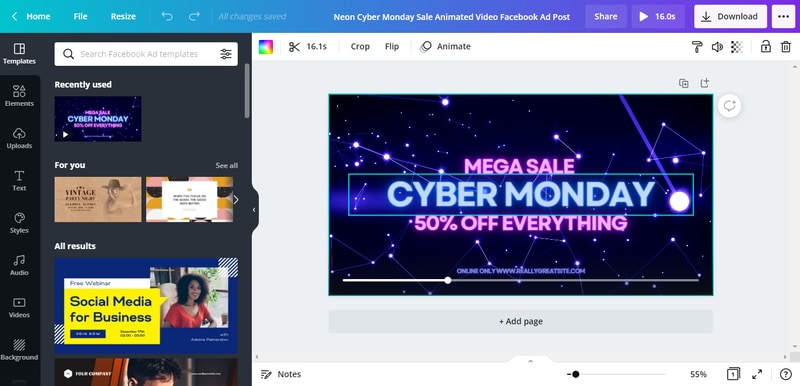
Neon Cyber Monday Sale Animated Video Facebook Ad Post
A fresh offering from Canva is this neon Facebook Ad Post with a captivating starry background and neon text elements.
You can customize this video to edit the text, the color palette, the duration of the video, and more.
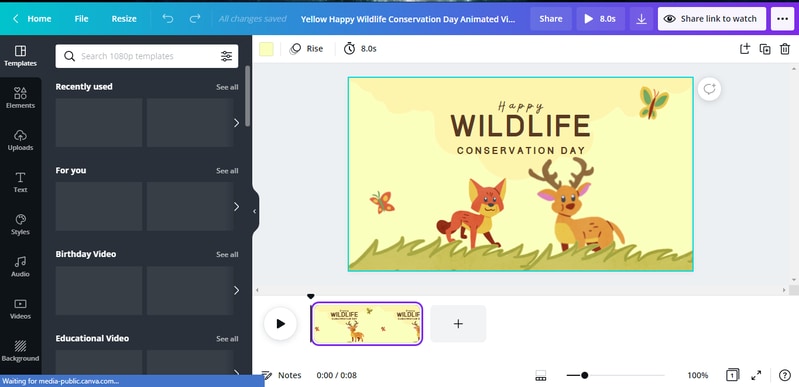
Yellow Happy Wildlife Conservation Day Animated Video
For a child-friendly video with animation, head on over to this presentation. This animation allows children to marvel at the motion and pay rapt attention when listening to essential issues with soothing attention-grabbing colors.
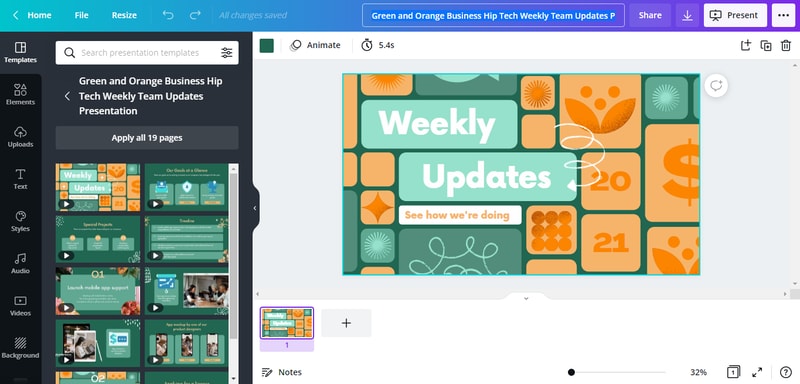
Green and Orange Business Hip Tech Weekly Team Updates Presentation
As the perfect complement of colors, this presentation is suited for everything from a YouTube thumbnail to a business meeting. With nineteen slides, the variations of animations found are endless.
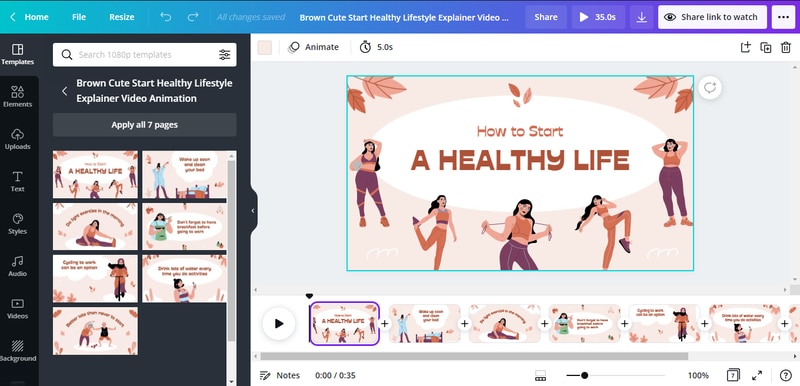
Brown Cute Start Healthy Lifestyle Explainer Video Animation
These cute animations make it straightforward to craft an explainer video around fitness. You can also use this for an Instagram post or story reel.
With seven slides, you can craft a compelling explainer video that keeps your viewers glued to the screen.
Sweet Fruit Candy Animated Group Project Presentation
This presentation is perfect for group presentations. It’s an ideal template to break down large amounts of information in a versatile and easily created presentation.
With over thirteen slides, it’s a perfect slide set to breathe new life into your homework.
Pink and Cream Minimalist Food Animated Presentation
For a simple personalized food-related presentation, this slide set has you covered. With gorgeous visuals and space to write recipes, the history.
This presentation, with fourteen slides, remains a favorite among culinary enthusiasts.
Marketing Agency Animated Facebook Cover
Motion is identified as a compelling website design trend for 2022. Colorful, animated art in vibrant color themes can win more visitors to your page and attention in a saturated market.
Use this theme to illustrate a gorgeous campaign ad for your social media feed.
Wondershare Filmora
Get started easily with Filmora’s powerful performance, intuitive interface, and countless effects Try It Free Try It Free Learn More >
AI Portrait – The best feature of Wondershare Filmora for gameplay editing
The AI Portrait is a new add-on in Wondershare Filmora. It can easily remove video backgrounds without using a green screen or chroma key, allowing you to add borders, glitch effects, pixelated, noise, or segmentation video effects.
Final Words
Canva is a great tool for animated videos and you can use animated Canva templates to create a unique animation in images. It is a great tool and can be used easily to create any length of animated video. But if you are looking for an advanced and easy-to-use video animation tool, then give a try to Wondershare Filmora.
Canva is one of the premier graphic design platforms available to users. They can create Instagram posts, make YouTube thumbnails, infographics, invitations, business cards, and more.
The platform is beginner-friendly and extremely customizable, ideal for everyday use. More brands and companies use data visualized through graphic design, creating greater understanding and impact on users.
With Canva animated templates, you can show more with less work. This has wide-ranging effects from diversifying education to elaborating business reports and lucrative marketing opportunities.
In the article below, take a look at ten of the best Canva animated templates.
In this article
01 [Can You Animate in Canva?](#Part 1)
02 [Where Can I Find Animated Elements In Canva?](#Part 2)
03 [How Do I Get More Animations in Canva?](#Part 3)
Part 1 Can You Animate in Canva?
Animation is an evergreen storytelling style as it’s versatile enough to be used in various types of content. Animations can last from a few seconds to a few minutes. According to HubSpot, A video-based email increases click rates by 300%.
1. Customization
Canva can be used to create customized animation. This can be done by creating an image and animating each element. Users can choose to create a textured background and edit images uploaded to Canva.
Users can also overlay audio to enhance the quality of the animation. The text can be refined to suit the style of the animation.
2. Automation
Canva has also launched a comprehensive suite of features under the “Animation” button. This automates the process and allows static images to be converted to animations. The animations range from simple motion to complex creations.
3. Movement
With the animation button, users can choose the type of animation they would like to use. The choices range from subtle animations like ‘Fade’, ‘Drift’ to bursts of motion like ‘Tumble’ and ‘Block’ and everything in-between.
4. Overview
Canva helps create high-quality animations at affordable prices. Creating an animation has never been easier with ready-made design templates by experienced designers.
Let’s look at how to animate the various elements of an image and the various animated templates in Canva.
Part 2 Where Can I Find Animated Elements In Canva?
With Canva’s many layouts and features to choose from, it might be difficult to figure out where to start. So, let’s start with the basics.
You have four basic facets to consider when choosing to animate. They are text, audio, image, and video. Every animation is crafted from varied combinations of these four basic steps.
One other consideration is the style of presentation you’d like to choose. Is it in portrait mode or landscape mode?
Do you want a previously crafted presentation ready to go? If so, Canva offers two options.
Step1 Select the “Create a Design” option on Canva
This allows users to create content in any format ranging from Instagram videos and reels, YouTube thumbnails and Facebook covers, logos, and more.
Step2 You can edit images and add the necessary text to your content. Bolster your content with video clips and audio to create the primary image you want
Edit the content to your preferences.
Step3 You are now ready to animate the construct
Select the animate button and look for “Page Animations” to animate the entire presentation. You can choose to animate any element on the page. You can also add borders or other design elements and animate them.
Step4 Here, you can choose from any myriad options for animation styles
You can also adjust the length of each animation with the stopwatch icon next to the animate button.
You can change the length of your video if you have one. You can also modify the audio clip to suit each animation.
Step5 Once you’ve animated the features according to your preference, you can now save the file in pdf, jpg, png or gif, or mp4 formats
Please note that all these options are for Canva Pro. Canva with the free subscription may allow limited format downloads. This is why you should consider tools like Wondershare Filmore for video animation.
Wondershare Filmora Pro for Video Animation
With Wondershare Filmora Pro, animation has never been easier. With its innovative keyframe technology, it makes animations easy to use. Animations can be easily created and, with the help of Filmora’s automation tool, fine-tuned for a professional finish.
Filmora provides a pioneering opportunity to create a visual masterpiece with a beginner’s experience with a simple functional drag and drop. With motion tracking, the ability to create split-screen, green screen, and blending capabilities, the Filmora Pro experience is unparalleled.
Part 3 How Do I Get More Animations in Canva?
Canva has filters allowing users to sort presentations by style, like “Animated,” “Minimalist,” “Corporate” and more. Canva has a series of ready-made animated templates available for use. Let’s explore a few of them.
It also allows sorting by themes like “Pink” or “Business” or “Background” depending on your needs. Users can also choose to sort out presentations according to the presentation’s color scheme.
Pink and Violet Simple Hot Neon Gradients Creative Presentation
With a gradient background that’s a popular website trend, this presentation boasts twenty-six slides with a signature animation you can tweak to suit your needs.
Blue Timeline Cycle Presentation
This presentation is useful for compact information with a clean and modern outlook. With ten power-packed slides, this animated template allows researchers and businesses to use data visualization to convey ideas.
Blue and White Illustrated Medical Healthcare in the 21st Century Education Presentation
With fourteen slides, this animation perfectly creates a visual treat for viewers. You can also convey vital information in bite-sized morsels. You can illustrate your point with lively animation designs while captivating your audience.
Neon Cyber Monday Sale Animated Video Facebook Ad Post
A fresh offering from Canva is this neon Facebook Ad Post with a captivating starry background and neon text elements.
You can customize this video to edit the text, the color palette, the duration of the video, and more.
Yellow Happy Wildlife Conservation Day Animated Video
For a child-friendly video with animation, head on over to this presentation. This animation allows children to marvel at the motion and pay rapt attention when listening to essential issues with soothing attention-grabbing colors.
Green and Orange Business Hip Tech Weekly Team Updates Presentation
As the perfect complement of colors, this presentation is suited for everything from a YouTube thumbnail to a business meeting. With nineteen slides, the variations of animations found are endless.
Brown Cute Start Healthy Lifestyle Explainer Video Animation
These cute animations make it straightforward to craft an explainer video around fitness. You can also use this for an Instagram post or story reel.
With seven slides, you can craft a compelling explainer video that keeps your viewers glued to the screen.
Sweet Fruit Candy Animated Group Project Presentation
This presentation is perfect for group presentations. It’s an ideal template to break down large amounts of information in a versatile and easily created presentation.
With over thirteen slides, it’s a perfect slide set to breathe new life into your homework.
Pink and Cream Minimalist Food Animated Presentation
For a simple personalized food-related presentation, this slide set has you covered. With gorgeous visuals and space to write recipes, the history.
This presentation, with fourteen slides, remains a favorite among culinary enthusiasts.
Marketing Agency Animated Facebook Cover
Motion is identified as a compelling website design trend for 2022. Colorful, animated art in vibrant color themes can win more visitors to your page and attention in a saturated market.
Use this theme to illustrate a gorgeous campaign ad for your social media feed.
Wondershare Filmora
Get started easily with Filmora’s powerful performance, intuitive interface, and countless effects Try It Free Try It Free Learn More >
AI Portrait – The best feature of Wondershare Filmora for gameplay editing
The AI Portrait is a new add-on in Wondershare Filmora. It can easily remove video backgrounds without using a green screen or chroma key, allowing you to add borders, glitch effects, pixelated, noise, or segmentation video effects.
Final Words
Canva is a great tool for animated videos and you can use animated Canva templates to create a unique animation in images. It is a great tool and can be used easily to create any length of animated video. But if you are looking for an advanced and easy-to-use video animation tool, then give a try to Wondershare Filmora.
Learn What Are Differences Between 2D And 3D Animation
What Are Differences Between 2D And 3D Animation
An easy yet powerful editor
Numerous effects to choose from
Detailed tutorials provided by the official channel
Creating an animation requires multiple processes and tasks to get that final result that we enjoy on the screen. Irrespective of the type of animations like stop-motion, sketch, computer, and others, all of them majorly falls under two main categories- 2D animation and 3D animation. The popular cartoons like Mickey Mouse, Tom & Jerry, and others that became an integral part of all childhood were 2D animations and with technological advancement and 3D animation in use, they are more like aged-veterans.
Toy Story was the first 3D animation movie and after that, there is no stopping. Though 3D animations are more interesting and engaging, they are fields where 2D animations work better. This article will help you to learn in detail about 2D 3D animation, their differences, uses, and other aspects.
In this article
01 [Definition of 2D Animation 3D Animation?](#Part 1)
02 [Key Differences Between 2D Animations and 3D Animations](#Part 2)
03 [Selecting Between 2D Animation and 3D Animation?](#Part 3)
04 [Merging 2D Animation and 3D Animation](#Part 4)
Part 1 Part Definition Of 2D And 3D Animation
012D Animation
The traditional method of animation is termed 2D animation and it has been in use for a long time. A 2D animated video has multiple images in different positions which when moved quickly one after the other simulates a movement. The flipping of the images creates an illusion of movement. Earlier 2D animations were created using hands but now there is advanced computer software that can create these animations in just a few simple clicks. The term 2D means 2 dimensional which means that an image for the animation can be moved in two-dimensional space that is X-axis and Y-axis.
023D Animation
In simplest terms, a 3D animation is an animation that is created in three-dimensional space which makes the characters and objects appear realistic and lively. Thus, a 3D animation has height, width as well as depth. These animations are more complex and the process of creating them is totally different from that of 2D animations. Though 3D animations are used in different industries and platforms these days, majorly they can be found for creating movies, games, and cartoons.
Part 2 Part Key Differences Between 2d Animations and 3d Animations
The major difference between a 2D animation and 3D animation lies in the final appearance. While a 2D animation appears like a flat animation which can be an image or a photograph at a fast movement while a 3D animation looks like real objects that can be seen from all angles and have their front, back, top, as well as the bottom.
The table below will differentiate both these animations on various parameters.
| Features/Type of Animation | 2D Animation | 3D Animation |
|---|---|---|
| Full-Form | Two-dimensional | Three-dimensional |
| Meaning | These animations with 2-dimensional objects appear to be moving when the images are moved at a fast speed. | The objects and characters in these animations look more realistic as their appear in 3-dimensional space. |
| Supported Aspects and axis | Length and height (X-axis and Y-axis) | Length, height, and width (X-axis, Y-axis and Z-axis) |
| Appearance | Appear as flat | Appear lively and realistic |
| Basic elements | It’s all about frames | The animation is all about movements |
| Axis | Images appear at X-axis, and Y axis | Objects appear at X-axis, Y-axis, and Z-axis. |
| Use and target audience | Used for social media sites, demos, animated whiteboard videos, and similar others. | Used for movies, cartoons, video games. |
| Use of software | Hand-drawn images or computer-generated images can be used. | Complex software is needed. |
| Cost | Cheaper than 3D animations | Expensive |
| Examples | Snow White, The Jungle Book, Mickey Mouse, Tom & Jerry, and more. | The Toy Story, Transformers, Incredibles, and more. |
Part 3 Selecting Between 2D Animation and 3D Animation?
Confused between 2D animation and 3D animation? Several factors can be considered to select between the two types of animations. Major ones are enlisted below.
● Target audience: For general explanation and use, 2D animations are a good choice as they are interesting, engaging, and also pocket-friendly. If the target audience is professional people that need in-depth and important information about something, 3D animations are a better choice.
● Availability of software: There are different software used for different types of animations. The availability of the software can also be a deciding factor for selecting between a 2D animation or 3D animation.
● Budget: This is another important factor to be considered. Since 3D animation requires more complex tools and procedures, creating them is expensive. So, depending on how much you are willing to spend, you can choose between the two.
Part 4 Part Merging 2D Animation and 3D Animation
Why choose one, when both can be used? Yes, to get the best of both worlds, 2D animations can be used along with 3D animations depending on the type of the project. Both the styles can be adjusted as per the requirements and for this, good professional software is needed.
We here suggest Wondershare Filmora Video Editor as the best tool as it not only comes equipped with all the latest features but the entire process is also quick and hassle-free. Majorly working as an excellent video editing software, the program supports multiple functions supporting animated videos. Using this Windows and Mac-based tool yon create dynamic animated videos and also edit them and customize them to suit your requirements.
For Win 7 or later (64-bit)
For macOS 10.12 or later
Key features of the software
● Create interesting and engaging animated and other videos using more than 100 media layers, composting tools, and dynamic effects.
● Apply motion elements, filters, and transitions for dynamic videos.
● Audio functions like background noise removal, audio equalizer, keyframe audio editing, and others are supported.
● Fast import, export, and rendering.
● Option to preview the files in high resolution.
● Features like fisheye correction, speed control, stabilization, advanced color correction, 3D LUTs, and others are supported.
● Additional supported functions include import from social media sites, portrait support, camera shake, audio-mixing, screen recording, auto-crop, and others.
● Windows and Mac support.
● Key Takeaways from This Episode →
● 2D and 3D animation are the two major types of animations created for different uses.
● A 2D animation appears in two-dimensional space while a 3D animation appears in a three-dimensional space and looks livelier and more realistic.
● Both 2D and 3D animations can be merged using professional software like Wondershare Filmora Video Editor that supports a wide range of other functions as well.
10 Top Tools to Make Pic Collage for Windows
10 Best Tools to Make Pic Collage for Windows
An easy yet powerful editor
Numerous effects to choose from
Detailed tutorials provided by the official channel
Collages are a great way to assemble all your favorite pictures in one place. You can share these collages with your friends, relatives, and dear ones or can also use them for posting on social media sites and other online platforms. Though creating a collage may sound simple, a lot of considerations need to be taken for creating an interesting and eye-catchy collage, and for this, a help of a professional tool can be taken. In the following parts of the topic, you can learn about the best tools for photo collage Windows 10 and other OS.

In the following parts of the topic, you can learn about the best tools for photo collage Windows 10 and other OS.
In this article
01 [Top 10 Pic Collage for Windows Tools](#Part 1)
02 [The Best Tool to Get Stock Images for Creating Collages](#Part 2)
Part 1 Top 10 Pic Collage for Windows Tools
Checkout the best collage for Windows below.
01PhotoPad Photo Editing Software
This is a complete photo editing tool supporting an array of features including the creation of a photo collage. This software from NCH software can let you add the desired images manually and also support using the auto grid to add an unlimited number of pictures. The tool also lets you choose the collage orientation size and set the background as needed.
Pros:
● Create collage Windows manually or automatically.
● Allows adding a background color, image, or from the available background options.
● Spacing and corners between the images can be selected.
● The size of the tool is small.
Cons:
● Stickers and filters to individual images cannot be added.
● Cannot choose a custom collage size.

02PhotoScapeX
Available for download on Windows 10 and higher versions this is another widely used photo editing tool that can also let you create collages manually as well as automatically. Multiple frames are available that can be selected as desired and there are additional features like adding filters, and also edit them in multiple ways.
Pros:
● Allows creating collage manually and automatically.
● Multiple editing tools for customization like filters, crop, zoom, doodle, and more.
● Picture alignment can be done in 3 modes- vertical, horizontal, and tile.
● Option to change and customize image size, spacing, margin, and others.
Cons:
● Limited photos can be added.
● The size of the tool is large in comparison to other tools.

03Phototastic Collage
This is free to use Windows-based tool that can create impressive collages in no time. Multiple designs, frames, and other options are available to create a customized collage as needed.
Pros:
● Multiple customization options are available for creating the desired collage.
● User-friendly and simple interface.
● An array of templates is available.
Cons:
● The free version has limited features.
● Limitation to the number of images that can be added.
● Ads in the app.

04PicCollage
Unleash your creativity by creating an interesting collage using this excellent collage-making app. There are multiple templates and customization options supports.
Pros
● Create collage manually or automatically
● The earlier created collage can be edited.
● Allows creating a collage in 3 options- grid, template, freestyle.
Cons
● Watermark on the created collage.
● The image size cannot be customized.

05Collage Maker-Photo Grid and Montage
Using this free Windows tool, you can create an interesting photo collage or a free-styled montage as needed. A wide range of layouts and templates are available that can be further customized to get the desired collage.
Pros:
● Free Windows software.
● Come with multiple filters, layout, and editing tools.
● The user interface is easy.
● Preview option available.
Cons:
● Performance glitches due to bugs.
● Custom collage size cannot be set.
● Watermark on the collage.

06Fotor
If you are looking for a simple and basic collage-making tool, Fotor is the right choice. Collage in the grid, freestyle, and photo-stitch style can be created and basic customization features are supported.
Pros:
● Simple to use tool that is apt for beginners.
● Border can be changed from a solid color to a background.
Cons:
● Customization options are limited.
● Border and the image size cannot be changed.

07El Collagero
Just like its name, this is an interesting Windows-based tool for creating a collage of your choice. A wide range of options for customization is available that can let you edit the images, choose a template and then also edit the file.
Pros:
● A wide range of templates and designs for collages is available.
● Allows adding text, symbols, and other elements.
● Created collage can be shared on social media sites.
Cons:
● In comparison to other professional tools, the functions are limited.

08Atlantas Photo Collage Studio
This Windows-based tool will let you create collages of all types and for all occasions. You can choose from over 100 templates that best match your collage theme and image content.
Pros:
● More than 100 templates for collage designs are available.
● The size of the layout can be changed.
● Multiple editing and customization options are supported like zoom, opacity selection, and more.
Cons:
● Limitation of adding 45 images.
● For the advanced functions, need to subscribe to the paid version.

09PhotoJoiner
Using this Windows tool, pick up your favorite images and turn them into a beautiful collage with customized design and style.
Pros:
● A simple and basic tool for creating a collage.
● Created collage can be saved or shared to the social media site.
● Change the order of the images, margins, and other aspects.
Cons
● Collage templates are limited.
● Advanced features are missing.

1010. Blend Photo
To create a collage of images with a blending effect, this is the right tool to use. Available for download on the Windows system this tool lets you create collages telling interesting stories.
Pros:
● Simple and easy collage-making tool.
● Add blending effect to your collages.
● Over 50 custom shapes for image cropping are available along with the option for free-hand cropping.
● Multiple filters can be added.
Cons:
● Limited Editing and customization options.

Part 2 The Best Tool to Get Stock Images for Creating Collages
Several times, the captured and stored images may not fit in the collage theme you wish to create and, in such situations, you can use the stock images available online at several sites. One of the best tools where you can check out the images in different categories is Wondershare Filmora. This versatile software from Wondershare Filmora Video Editor is an advanced video editing tool that also has a huge collection of stock media including images.
Additionally, the split-screen feature of the software can be used for creating a video collage. Available for Windows and Mac systems, Wondershare Filmora will look after all your advanced video editing and customized requirements.

Wondershare Filmora - Best Video Editor for Mac/Windows
5,481,435 people have downloaded it.
Build unique custom animations without breaking a sweat.
Focus on creating epic stories and leave the details to Filmora’s auto features.
Start a creative adventure with drag & drop effects and endless possibilities.
Filmora simplifies advanced features to save you time and effort.
Filmora cuts out repetition so you can move on to your next creative breakthrough.
● Key Takeaways from This Episode →
● Collage-making tools help in creating an interesting and eye-catchy collage in a hassle-free manner.
●Several Windows-based tools are available for quick download.
●Wondershare Filmora is a great software to find a collection of stock images in different categories.
Collages are a great way to assemble all your favorite pictures in one place. You can share these collages with your friends, relatives, and dear ones or can also use them for posting on social media sites and other online platforms. Though creating a collage may sound simple, a lot of considerations need to be taken for creating an interesting and eye-catchy collage, and for this, a help of a professional tool can be taken. In the following parts of the topic, you can learn about the best tools for photo collage Windows 10 and other OS.
In the following parts of the topic, you can learn about the best tools for photo collage Windows 10 and other OS.
In this article
01 [Top 10 Pic Collage for Windows Tools](#Part 1)
02 [The Best Tool to Get Stock Images for Creating Collages](#Part 2)
Part 1 Top 10 Pic Collage for Windows Tools
Checkout the best collage for Windows below.
01PhotoPad Photo Editing Software
This is a complete photo editing tool supporting an array of features including the creation of a photo collage. This software from NCH software can let you add the desired images manually and also support using the auto grid to add an unlimited number of pictures. The tool also lets you choose the collage orientation size and set the background as needed.
Pros:
● Create collage Windows manually or automatically.
● Allows adding a background color, image, or from the available background options.
● Spacing and corners between the images can be selected.
● The size of the tool is small.
Cons:
● Stickers and filters to individual images cannot be added.
● Cannot choose a custom collage size.
02PhotoScapeX
Available for download on Windows 10 and higher versions this is another widely used photo editing tool that can also let you create collages manually as well as automatically. Multiple frames are available that can be selected as desired and there are additional features like adding filters, and also edit them in multiple ways.
Pros:
● Allows creating collage manually and automatically.
● Multiple editing tools for customization like filters, crop, zoom, doodle, and more.
● Picture alignment can be done in 3 modes- vertical, horizontal, and tile.
● Option to change and customize image size, spacing, margin, and others.
Cons:
● Limited photos can be added.
● The size of the tool is large in comparison to other tools.
03Phototastic Collage
This is free to use Windows-based tool that can create impressive collages in no time. Multiple designs, frames, and other options are available to create a customized collage as needed.
Pros:
● Multiple customization options are available for creating the desired collage.
● User-friendly and simple interface.
● An array of templates is available.
Cons:
● The free version has limited features.
● Limitation to the number of images that can be added.
● Ads in the app.
04PicCollage
Unleash your creativity by creating an interesting collage using this excellent collage-making app. There are multiple templates and customization options supports.
Pros
● Create collage manually or automatically
● The earlier created collage can be edited.
● Allows creating a collage in 3 options- grid, template, freestyle.
Cons
● Watermark on the created collage.
● The image size cannot be customized.
05Collage Maker-Photo Grid and Montage
Using this free Windows tool, you can create an interesting photo collage or a free-styled montage as needed. A wide range of layouts and templates are available that can be further customized to get the desired collage.
Pros:
● Free Windows software.
● Come with multiple filters, layout, and editing tools.
● The user interface is easy.
● Preview option available.
Cons:
● Performance glitches due to bugs.
● Custom collage size cannot be set.
● Watermark on the collage.
06Fotor
If you are looking for a simple and basic collage-making tool, Fotor is the right choice. Collage in the grid, freestyle, and photo-stitch style can be created and basic customization features are supported.
Pros:
● Simple to use tool that is apt for beginners.
● Border can be changed from a solid color to a background.
Cons:
● Customization options are limited.
● Border and the image size cannot be changed.
07El Collagero
Just like its name, this is an interesting Windows-based tool for creating a collage of your choice. A wide range of options for customization is available that can let you edit the images, choose a template and then also edit the file.
Pros:
● A wide range of templates and designs for collages is available.
● Allows adding text, symbols, and other elements.
● Created collage can be shared on social media sites.
Cons:
● In comparison to other professional tools, the functions are limited.
08Atlantas Photo Collage Studio
This Windows-based tool will let you create collages of all types and for all occasions. You can choose from over 100 templates that best match your collage theme and image content.
Pros:
● More than 100 templates for collage designs are available.
● The size of the layout can be changed.
● Multiple editing and customization options are supported like zoom, opacity selection, and more.
Cons:
● Limitation of adding 45 images.
● For the advanced functions, need to subscribe to the paid version.
09PhotoJoiner
Using this Windows tool, pick up your favorite images and turn them into a beautiful collage with customized design and style.
Pros:
● A simple and basic tool for creating a collage.
● Created collage can be saved or shared to the social media site.
● Change the order of the images, margins, and other aspects.
Cons
● Collage templates are limited.
● Advanced features are missing.
1010. Blend Photo
To create a collage of images with a blending effect, this is the right tool to use. Available for download on the Windows system this tool lets you create collages telling interesting stories.
Pros:
● Simple and easy collage-making tool.
● Add blending effect to your collages.
● Over 50 custom shapes for image cropping are available along with the option for free-hand cropping.
● Multiple filters can be added.
Cons:
● Limited Editing and customization options.
Part 2 The Best Tool to Get Stock Images for Creating Collages
Several times, the captured and stored images may not fit in the collage theme you wish to create and, in such situations, you can use the stock images available online at several sites. One of the best tools where you can check out the images in different categories is Wondershare Filmora. This versatile software from Wondershare Filmora Video Editor is an advanced video editing tool that also has a huge collection of stock media including images.
Additionally, the split-screen feature of the software can be used for creating a video collage. Available for Windows and Mac systems, Wondershare Filmora will look after all your advanced video editing and customized requirements.
Wondershare Filmora - Best Video Editor for Mac/Windows
5,481,435 people have downloaded it.
Build unique custom animations without breaking a sweat.
Focus on creating epic stories and leave the details to Filmora’s auto features.
Start a creative adventure with drag & drop effects and endless possibilities.
Filmora simplifies advanced features to save you time and effort.
Filmora cuts out repetition so you can move on to your next creative breakthrough.
● Key Takeaways from This Episode →
● Collage-making tools help in creating an interesting and eye-catchy collage in a hassle-free manner.
●Several Windows-based tools are available for quick download.
●Wondershare Filmora is a great software to find a collection of stock images in different categories.
How To Create Pinterest Slideshow in Simple Ways
How to Make Pinterest Slideshow in Simple Ways
An easy yet powerful editor
Numerous effects to choose from
Detailed tutorials provided by the official channel
Slideshows are a collection of images arranged together that an audience can quickly swipe through to view the content. Pinterest is known for its one-pin to one post feature. You cannot post more than one image or video in a pin.
Thus, business people could start sharing all of the images or products, services, or articles mostly because it can be stressful to do that. But with the Pinterest slideshow, you can now upload all the images you want to at once in one pin. Moreso, even have people view the pins simultaneously just by swiping through.
In this article
01 [How to display Pinterest’s latest pins in a slideshow?](#Part 1)
02 [How to upload multiple photos to Pinterest?](#Part 2)
03 [How to display Pinterest’s latest pins in a slideshow?](#Part 3)
Part 1 How to Display Pinterest Latest Pins in A Slideshow
Using Pinterest’s latest pins in a slideshow is another way to display the latest pins from any Pinterest user or blogger’s blog. Each image is linked to its pin page on Pinterest instead of the board or profile page if you use the Pinterest profile or board widget.
To install this widget, you need the user or board’s RSS feed URL, then use it as the input for a blogger slide show gadget.
Here are the tricky steps to follow for the Pinterest slide show;
Step 1: Constructing Pinterest RSS feed URL
The Pinterest RSS feed URL of a user is different from aboard.
● It would be the user’s profile URL + feed/RSS for a user. To get your Profile URL, click on your username in the top right corner of your screen, and you will see a URL in your web browser’s URL. That is your profile URL.
● For the board URL, you will get that after clicking on the board from the homepage. The URL would appear on your browser’s URL bar.

Step 2: Reformatting the feed for the slideshow gadget:
The RSS feed from step one is not very compatible with the blogger slideshow gadget. It accepts RSS feed in Media RSS format, but you can convert with Yahoo pipe. Simply plug in your feed URL in the Yahoo pipe URL.
You have to replace the value of the feed URL with the feed URL you got in step one and the pin count with the number of pins displayed on the slide show.
With this, you have successfully converted your feed URL to the media version of the Pinterest feed.
Step 3: Add the slideshow widget
Take the following step to add the slideshow widget.
Go to Dashboard > Layout and click on ‘Add A Gadget.’
Now Add, A Gadget window, scroll down and select Slideshow.

Under Source, select Other.

Put in the converted Pinterest RSS feed URL from step 2 into the Feed URL text box.
Click Save and view your blog.
Part 2 How to Upload Multiple Photos to Pinterest
If you want to display multiple photos of your product or share your brand story with pictures, then this is a feature you will grab. Pinterest allows you to display various products at a time. But first, you must also have a business account to do this.
When you upload multiple photos on Pinterest, they are known as carousel pins. This feature is a great advertising tool and will help you during the Pinterest slideshow.
This is because people would see your carousel on their home feed just like any other pin you have posted. They may also tap on the carousel and swipe through the different photos on the carousel. When the pinner saves it, they have kept the entire image.
Here is a step-by-step method to upload multiple photos to Pinterest.
Step 1: Log into your Pinterest
First, log into your Pinterest business account to access the feature. If you do not have a business account, it is elementary to do so. There is no need for you to enter any billing information if you are wondering about that. It is a straightforward process. Just open your account, click on the drop-down menu near your profile picture, see ‘convert to business,’ then upgrade your account, and you are good to go.
You should also ensure that the photos you want to upload are on your computer. If you have originally planned to use it to explain an article visually, then make sure the particular image that represents that article is correctly saved on your computer. The images should be 1:1 or 2:3 in ratio, and the format either ‘png’ or ‘jpeg.’
Add your pictures and upload. If you want to reorder your pin, you can replace or remove images within the carousel.

Step 2: Add Title
Add a title, description, and website of the carousel pin. Your title will be a snippet of what the blog post or article will be about or the recipe’s title. Your description should be the same as your Pinterest text, and you can also choose to let it appear only on your first image on your carousel pin.
Step 3: Select a Board
The last step is to select a board relevant to your carousel pin. Thus, you have your carousel pin and images. However, you cannot view this immediately as in a standard pin or video pin. But you can go back to your board to view your pin when it is ready.
Part 3 How to Make Pinterest Slideshow In 5 Simple Ways
Slideshows are a beautiful way to enhance your Pinterest account and generate more leads on your Profile. If you’ve been wondering if and how you can make slideshows on Pinterest, here’s a guaranteed step you can follow. But then Pinterest slideshows are instead referred to as a showcase.
However, to access this feature, you must first own a business account on Pinterest.
Here are five (5) simple ways you can make Slideshow on Pinterest:
Step 1: Go to your Pinterest Profile
Click settings next to your profile photo in the top right corner.

Step 2: Select Profile
When the Settings window appears, select Profile.

Step 3: Click Edit
Next to Featured Boards, click Edit.

Step 4: Select Boards
After clicking Edit for your Featured Boards, you’ll reach a screen where you may edit the boards you want to highlight. Select which boards you’d like to feature by clicking on each drop-down menu.
Opening a new Pinterest page is a good idea. Scroll down to Boards with the most Pin impressions under Analytics>Profile. These are the boards that I highlighted.

Step 5: Save
When you’ve decided which boards to include in your Featured, click Save.
● Bonus – Wondershare Filmora
With this feature, you can also tweak your Pinterest slides and make them look professional and befitting to your audience using Wondershare Filmora Video Editor .
For Win 7 or later (64-bit)
For macOS 10.12 or later
Wondershare Filmora is an online video editing software with several unique features, including split-screen, freeze-frame, loop images, and videos to help you create top-notch visual content for your brand. With features like the Chroma key, you can easily create special effects in your Pinterest slideshow background.
You can also use color match and video effects to enhance the quality of the slide.
● Ending Thoughts →
● Making a Pinterest slideshow can be confusing if you do not have the correct information. But if you do, it’ll be a great way to spice up your social media content and create more leads for your business.
● Pinterest is a social media platform that keeps growing and adding more features by the day. It is also increasing the number of users per day. Try out the simple steps stated on how to make a slideshow on Pinterest. Finally, by incorporating Filmora in your levelling up plans, you will be able to bring your brand in front of your target customer and present it nicely.
Slideshows are a collection of images arranged together that an audience can quickly swipe through to view the content. Pinterest is known for its one-pin to one post feature. You cannot post more than one image or video in a pin.
Thus, business people could start sharing all of the images or products, services, or articles mostly because it can be stressful to do that. But with the Pinterest slideshow, you can now upload all the images you want to at once in one pin. Moreso, even have people view the pins simultaneously just by swiping through.
In this article
01 [How to display Pinterest’s latest pins in a slideshow?](#Part 1)
02 [How to upload multiple photos to Pinterest?](#Part 2)
03 [How to display Pinterest’s latest pins in a slideshow?](#Part 3)
Part 1 How to Display Pinterest Latest Pins in A Slideshow
Using Pinterest’s latest pins in a slideshow is another way to display the latest pins from any Pinterest user or blogger’s blog. Each image is linked to its pin page on Pinterest instead of the board or profile page if you use the Pinterest profile or board widget.
To install this widget, you need the user or board’s RSS feed URL, then use it as the input for a blogger slide show gadget.
Here are the tricky steps to follow for the Pinterest slide show;
Step 1: Constructing Pinterest RSS feed URL
The Pinterest RSS feed URL of a user is different from aboard.
● It would be the user’s profile URL + feed/RSS for a user. To get your Profile URL, click on your username in the top right corner of your screen, and you will see a URL in your web browser’s URL. That is your profile URL.
● For the board URL, you will get that after clicking on the board from the homepage. The URL would appear on your browser’s URL bar.
Step 2: Reformatting the feed for the slideshow gadget:
The RSS feed from step one is not very compatible with the blogger slideshow gadget. It accepts RSS feed in Media RSS format, but you can convert with Yahoo pipe. Simply plug in your feed URL in the Yahoo pipe URL.
You have to replace the value of the feed URL with the feed URL you got in step one and the pin count with the number of pins displayed on the slide show.
With this, you have successfully converted your feed URL to the media version of the Pinterest feed.
Step 3: Add the slideshow widget
Take the following step to add the slideshow widget.
Go to Dashboard > Layout and click on ‘Add A Gadget.’
Now Add, A Gadget window, scroll down and select Slideshow.
Under Source, select Other.
Put in the converted Pinterest RSS feed URL from step 2 into the Feed URL text box.
Click Save and view your blog.
Part 2 How to Upload Multiple Photos to Pinterest
If you want to display multiple photos of your product or share your brand story with pictures, then this is a feature you will grab. Pinterest allows you to display various products at a time. But first, you must also have a business account to do this.
When you upload multiple photos on Pinterest, they are known as carousel pins. This feature is a great advertising tool and will help you during the Pinterest slideshow.
This is because people would see your carousel on their home feed just like any other pin you have posted. They may also tap on the carousel and swipe through the different photos on the carousel. When the pinner saves it, they have kept the entire image.
Here is a step-by-step method to upload multiple photos to Pinterest.
Step 1: Log into your Pinterest
First, log into your Pinterest business account to access the feature. If you do not have a business account, it is elementary to do so. There is no need for you to enter any billing information if you are wondering about that. It is a straightforward process. Just open your account, click on the drop-down menu near your profile picture, see ‘convert to business,’ then upgrade your account, and you are good to go.
You should also ensure that the photos you want to upload are on your computer. If you have originally planned to use it to explain an article visually, then make sure the particular image that represents that article is correctly saved on your computer. The images should be 1:1 or 2:3 in ratio, and the format either ‘png’ or ‘jpeg.’
Add your pictures and upload. If you want to reorder your pin, you can replace or remove images within the carousel.
Step 2: Add Title
Add a title, description, and website of the carousel pin. Your title will be a snippet of what the blog post or article will be about or the recipe’s title. Your description should be the same as your Pinterest text, and you can also choose to let it appear only on your first image on your carousel pin.
Step 3: Select a Board
The last step is to select a board relevant to your carousel pin. Thus, you have your carousel pin and images. However, you cannot view this immediately as in a standard pin or video pin. But you can go back to your board to view your pin when it is ready.
Part 3 How to Make Pinterest Slideshow In 5 Simple Ways
Slideshows are a beautiful way to enhance your Pinterest account and generate more leads on your Profile. If you’ve been wondering if and how you can make slideshows on Pinterest, here’s a guaranteed step you can follow. But then Pinterest slideshows are instead referred to as a showcase.
However, to access this feature, you must first own a business account on Pinterest.
Here are five (5) simple ways you can make Slideshow on Pinterest:
Step 1: Go to your Pinterest Profile
Click settings next to your profile photo in the top right corner.
Step 2: Select Profile
When the Settings window appears, select Profile.
Step 3: Click Edit
Next to Featured Boards, click Edit.
Step 4: Select Boards
After clicking Edit for your Featured Boards, you’ll reach a screen where you may edit the boards you want to highlight. Select which boards you’d like to feature by clicking on each drop-down menu.
Opening a new Pinterest page is a good idea. Scroll down to Boards with the most Pin impressions under Analytics>Profile. These are the boards that I highlighted.
Step 5: Save
When you’ve decided which boards to include in your Featured, click Save.
● Bonus – Wondershare Filmora
With this feature, you can also tweak your Pinterest slides and make them look professional and befitting to your audience using Wondershare Filmora Video Editor .
For Win 7 or later (64-bit)
For macOS 10.12 or later
Wondershare Filmora is an online video editing software with several unique features, including split-screen, freeze-frame, loop images, and videos to help you create top-notch visual content for your brand. With features like the Chroma key, you can easily create special effects in your Pinterest slideshow background.
You can also use color match and video effects to enhance the quality of the slide.
● Ending Thoughts →
● Making a Pinterest slideshow can be confusing if you do not have the correct information. But if you do, it’ll be a great way to spice up your social media content and create more leads for your business.
● Pinterest is a social media platform that keeps growing and adding more features by the day. It is also increasing the number of users per day. Try out the simple steps stated on how to make a slideshow on Pinterest. Finally, by incorporating Filmora in your levelling up plans, you will be able to bring your brand in front of your target customer and present it nicely.
That Will Make Aesthetic Cartoon Drawing More Understandable
That Will Make Aesthetic Cartoon Drawing More Understandable
An easy yet powerful editor
Numerous effects to choose from
Detailed tutorials provided by the official channel
When you are trying to make an aesthetic drawings cartoon, the primary thing to focus on is the composition. Composition is the combination, arrangement, and organization of objects within the borders of drawing space. To have a great aesthetic cartoon drawing, you must focus on bringing the eyes of the viewer toward your center of interest within an aesthetically-pleasing composition. When we create illustrations, we are often concerned with putting in a lot of details that will overload the image and lose the meaning that we originally wanted it to convey.

We engage our audience and viewer more by composing a perfect aesthetic drawing. In addition, many rules define a good composition drawing, but these rules are mainly guidelines. Also pay attention to your personal preferences and instincts. In this guide, we’ll teach you how to make an excellent aesthetic cartoon painting more understandable.
In this article
01 [Canvas Aesthetic Painting Ideas](#Part 1)
02 [Blender Aesthetic Painting Ideas](#Part 2)
03 [How to Create Super-Detailed Aesthetic Cartoon Painting](#Part 3)
Part 1 Canvas Aesthetic Painting Ideas
There are times you do not need to be a famous painter or an art professional to create beautiful wall art. Canvas painting is an all-in-one application for all skill levels, from beginners to experts. It also provides you with different painting ideas ranging from beach scenes to abstract designs to create pieces that look stunning and professional.
We have compiled a list of canvas aesthetic painting ideas to help you begin your journey as an aesthetic cartoon painter. Look through the images to determine which ones match the style of painting you wish to add to your drawing and get inspiration to create your designs.
01Disney Canvas Art
These are aesthetic cartoon painting ideas relating to 2020 Disney Canvas Art. You can get ideas from this to begin your journey into the world of painting.

02Hippie Painting Canva Art
If you are also looking for other aesthetic cartoon painting ideas to choose from, you can select from this 2020 Cute Canvas Paintings “Hippie Painting” Canvas Art.

03Spongebob Painting
These painting ideas are a part of the Canvas Aesthetic Cartoon Painting ideas of 2020 called Spongebob Painting Disney Canvas Art.

04Babs Bunny Pa Et Mini Lerret
These are a painting about “Babs Bunny Pa Et Mini Lerret.” A 2020 Mini Canvas Art Hippie Painting Canvas idea that you can choose from

Part 2 Blender Aesthetic Painting Ideas
Blender is an accessible and open-source 3D creation suite that supports the entirety of the 3D pipeline modeling, rigging, animation, simulation, compositing rendering, motion tracking, video editing, and 2D animation pipeline. It is a fact that this is one of the best open-source software you can choose from to make your aesthetic cartoon drawing.
It is entirely free software, and various artists can use it to start digging in and playing with it. Here are some of the blender aesthetic cartoon painting ideas you can choose from:
01Princess Ira and Amina
This is a fictional aesthetic drawing cartoon of an African princess having gold gifted powers with her face painting inspired by Nigerian traditional face decorations. However, her crown is adorned with crosses, crystals, and chains which incorporate several elements from different cultural designs available from all over the world to portray unity.

02Survival Knife Weekly Drills 045
This was a design painting inspired based on BUCK KNIVES in pain texturing and focuses on making a practical game-ready asset.

03Radiance
This is a blender aesthetic cartoon painting idea of a graduation project made for the Concept Art specialized cursus at New3dge School.

04 The character looks dev
This blender cartoon painting’s inspiration came from Edward, the short film’s main character. It is a work in progress but a lovely painting that can inspire you.
Part 3 How to Create Super-Detailed Aesthetic Cartoon Painting
To create a super detailed aesthetic cartoon drawing, you do not need to be a trained artist, nor do you need a fancy cartoon picture maker. All you need to create a cartoon painting photo is a simple and Free picture from a cartoon editor to help you carry out the task more effectively.
However, you can also convert your cartoon paint into creative animation using Wondershare Filmora Video Editor . Filmora is a powerful all-in-one tool for editing that you can use to that can be used for free to animate your cartoon with its tons of effects, filters, and keyframing features that can help you carry this out effectively.
For Win 7 or later (64-bit)
For macOS 10.12 or later
Here is how to create a super detailed aesthetic cartoon painting:

Step 1: Open the Picsart editor on your desktop browser and click on the new project
Step 2: Next is to click on Upload to select the photo that you want to cartoon paint from the computer library of your hard drive
Step 2: Click on the toolbar, select the effect feature from the dropdown above your photo, and click on Magic to view all available one-click cartoon filters. However, almost all of the Magic effects on this editor will help you achieve an aesthetic cartoon photo effect.
Step 4: Click on Adjust and Blend above your photo workspace on the editor. This will help you manually adjust the effects (color burn, fade, saturation, brightness, etc.).
Step 5: Preview your result and once you are happy with the new cartoon photo painting, click on the Share button and download it from the top right corner of the editor to save it on your device.
● Ending Thoughts →
● This article explained creating and gave inspiration and ideas for the aesthetic cartoon painting you can choose from to make yours. In addition, the report also recommends Filmora as an influential editor if you intend to create an animation from your cartoon painting due to its tons of features.
● So, now you can start building your aesthetic drawings and cartoons Try It Free
When you are trying to make an aesthetic drawings cartoon, the primary thing to focus on is the composition. Composition is the combination, arrangement, and organization of objects within the borders of drawing space. To have a great aesthetic cartoon drawing, you must focus on bringing the eyes of the viewer toward your center of interest within an aesthetically-pleasing composition. When we create illustrations, we are often concerned with putting in a lot of details that will overload the image and lose the meaning that we originally wanted it to convey.
We engage our audience and viewer more by composing a perfect aesthetic drawing. In addition, many rules define a good composition drawing, but these rules are mainly guidelines. Also pay attention to your personal preferences and instincts. In this guide, we’ll teach you how to make an excellent aesthetic cartoon painting more understandable.
In this article
01 [Canvas Aesthetic Painting Ideas](#Part 1)
02 [Blender Aesthetic Painting Ideas](#Part 2)
03 [How to Create Super-Detailed Aesthetic Cartoon Painting](#Part 3)
Part 1 Canvas Aesthetic Painting Ideas
There are times you do not need to be a famous painter or an art professional to create beautiful wall art. Canvas painting is an all-in-one application for all skill levels, from beginners to experts. It also provides you with different painting ideas ranging from beach scenes to abstract designs to create pieces that look stunning and professional.
We have compiled a list of canvas aesthetic painting ideas to help you begin your journey as an aesthetic cartoon painter. Look through the images to determine which ones match the style of painting you wish to add to your drawing and get inspiration to create your designs.
01Disney Canvas Art
These are aesthetic cartoon painting ideas relating to 2020 Disney Canvas Art. You can get ideas from this to begin your journey into the world of painting.
02Hippie Painting Canva Art
If you are also looking for other aesthetic cartoon painting ideas to choose from, you can select from this 2020 Cute Canvas Paintings “Hippie Painting” Canvas Art.
03Spongebob Painting
These painting ideas are a part of the Canvas Aesthetic Cartoon Painting ideas of 2020 called Spongebob Painting Disney Canvas Art.
04Babs Bunny Pa Et Mini Lerret
These are a painting about “Babs Bunny Pa Et Mini Lerret.” A 2020 Mini Canvas Art Hippie Painting Canvas idea that you can choose from
Part 2 Blender Aesthetic Painting Ideas
Blender is an accessible and open-source 3D creation suite that supports the entirety of the 3D pipeline modeling, rigging, animation, simulation, compositing rendering, motion tracking, video editing, and 2D animation pipeline. It is a fact that this is one of the best open-source software you can choose from to make your aesthetic cartoon drawing.
It is entirely free software, and various artists can use it to start digging in and playing with it. Here are some of the blender aesthetic cartoon painting ideas you can choose from:
01Princess Ira and Amina
This is a fictional aesthetic drawing cartoon of an African princess having gold gifted powers with her face painting inspired by Nigerian traditional face decorations. However, her crown is adorned with crosses, crystals, and chains which incorporate several elements from different cultural designs available from all over the world to portray unity.
02Survival Knife Weekly Drills 045
This was a design painting inspired based on BUCK KNIVES in pain texturing and focuses on making a practical game-ready asset.
03Radiance
This is a blender aesthetic cartoon painting idea of a graduation project made for the Concept Art specialized cursus at New3dge School.
04 The character looks dev
This blender cartoon painting’s inspiration came from Edward, the short film’s main character. It is a work in progress but a lovely painting that can inspire you.
Part 3 How to Create Super-Detailed Aesthetic Cartoon Painting
To create a super detailed aesthetic cartoon drawing, you do not need to be a trained artist, nor do you need a fancy cartoon picture maker. All you need to create a cartoon painting photo is a simple and Free picture from a cartoon editor to help you carry out the task more effectively.
However, you can also convert your cartoon paint into creative animation using Wondershare Filmora Video Editor . Filmora is a powerful all-in-one tool for editing that you can use to that can be used for free to animate your cartoon with its tons of effects, filters, and keyframing features that can help you carry this out effectively.
For Win 7 or later (64-bit)
For macOS 10.12 or later
Here is how to create a super detailed aesthetic cartoon painting:
Step 1: Open the Picsart editor on your desktop browser and click on the new project
Step 2: Next is to click on Upload to select the photo that you want to cartoon paint from the computer library of your hard drive
Step 2: Click on the toolbar, select the effect feature from the dropdown above your photo, and click on Magic to view all available one-click cartoon filters. However, almost all of the Magic effects on this editor will help you achieve an aesthetic cartoon photo effect.
Step 4: Click on Adjust and Blend above your photo workspace on the editor. This will help you manually adjust the effects (color burn, fade, saturation, brightness, etc.).
Step 5: Preview your result and once you are happy with the new cartoon photo painting, click on the Share button and download it from the top right corner of the editor to save it on your device.
● Ending Thoughts →
● This article explained creating and gave inspiration and ideas for the aesthetic cartoon painting you can choose from to make yours. In addition, the report also recommends Filmora as an influential editor if you intend to create an animation from your cartoon painting due to its tons of features.
● So, now you can start building your aesthetic drawings and cartoons!
Also read:
- In 2024, Top 10 Cartoon Canvas Painting Ideas for Total Beginners
- Updated 2024 Approved How to Find 3D Animation Studio Meeting All Your Inspiring Needs
- Updated Best 12 Video to GIF Converters High Quality to Check Out for 2024
- 2024 Approved Top 12 2D Animation Studios All Should Check Out
- Updated 10 Cartoon Character Makers to Make Animated Characters
- Updated 2024 Approved Christmas Is Coming! How to Find & Make Animated Christmas GIFs?
- Updated How to Learn Cartoon Characters Sketch Quickly
- Updated Ways on How to Get Started in Stop Motion Claymation
- Updated Popular Female & Male Disney Cartoon Characters for 2024
- Updated 10 Best Convert Video Between GIF Software High Quality for 2024
- New Top 10 Websites to Download Anime Subtitles for Free for 2024
- Are You Head Over Heels With 3D Animation Design, In 2024
- New In 2024, 10 Must Watch Netflix Cartoon Series
- New In 2024, Tips for GIF to Animated PNG You Should Know
- Updated In 2024, Samples of Cartoon Character Face
- Updated How to Cartoonize Photo Photoshop in Simple Steps for 2024
- New In 2024, 5 Websites with Animated Logos That Catch Your Eyes
- New In 2024, Best GIF to Video Converters
- Top 10 Old Cartoons From Cartoon Network That You Miss
- Updated 2024 Approved The Best 8 Places for High-Quality Royalty Free Gifs
- Updated In 2024, Secret Shortcut to Adobe Animate Character Tutorial
- Updated 5 Different Animation Styles A Simple but Comprehensive Guide for 2024
- Updated What Make Aesthetic Cartoon Drawing More Understandable for 2024
- Updated 2024 Approved Adobe Rigger Is AWESOME
- 2024 Approved What Is the Meaning of Motion Graphics
- New 2D Character Animation Everything You Should Know About It
- How to Make a Photoshop Collage in Simple Steps for 2024
- Updated Top 10 Free Online Animated Logo Makers Everyone Should Know for 2024
- 5 Recommended Websites for Text GIF Maker for 2024
- Updated Learn How to Make Your Characters Interactive in Unity Animation Rigging
- Updated In 2024, The Most Efficient Techniques for You to Make 3D Animation Character
- Updated 12 Aesthetic GIF Instagram for Marketers and Creatives
- New 12 Best Stop Motion Studios Worth Recommending for 2024
- New In 2024, The Secret Sauce for Making GIF Instagram Story More Aesthetic
- No. 1 Maker to Animate Your Logo Online Free
- Updated In 2024, How to Turn Yourself Into WhatsApp Cartoon
- In 2024, 10 Amazing Wallpaper Collage Ideas and Photos
- Top 20+ Best Free GIF Makers Online to Quickly Edit GIF for 2024
- FREE Top 21 Best Anime Websites to Watch Anime Online for 2024
- 2024 Approved What Is Still Motion Animation and How Does It Work?
- Updated 2024 Approved Best Canva 10 Animated Templates
- New Learn Disney Cartoon Drawing to See Disney Magic Moments for 2024
- New What Is the Meaning of Motion Graphics
- 10 Cartoon Photo Converters You Couldnt Do Without
- Updated A Roster of 15 Top Disney Channel Cartoons
- 12 Dubbed Anime Websites to Watch for Free for 2024
- New 2024 Approved The 15 Most Efficient Photo to Cartoon Software for Android
- Updated 2024 Approved Some Must-Know Useful Lego Animation Ideas
- Updated Ways on How to Get Started in Stop Motion Claymation for 2024
- New The Secret Sauce for Making GIF Instagram Story More Stunning for 2024
- Hassle-Free Ways to Remove FRP Lock from Motorola Edge 40 Neo Phones with/without a PC
- How to Watch Hulu Outside US On Tecno Camon 30 Pro 5G | Dr.fone
- Full Guide on Mirroring Your Nubia Z50 Ultra to Your PC/Mac | Dr.fone
- Complete guide for recovering call logs on Vivo Y27s
- How to Bypass FRP from Oppo Find N3?
- In 2024, How to Transfer Contacts from Xiaomi Redmi A2+ to Outlook | Dr.fone
- How to Screen Mirroring Poco F5 5G to PC? | Dr.fone
- How to rescue lost call logs from Honor 90
- Double Location Dongle All to Know About Apple iPhone 15/iPad GPS Spoofing | Dr.fone
- In 2024, AddROM Bypass An Android Tool to Unlock FRP Lock Screen For your Meizu
- 3 Solutions to Find Your Apple iPhone 7 Plus Current Location of a Mobile Number | Dr.fone
- What to Do if Google Play Services Keeps Stopping on Nokia C32 | Dr.fone
- What You Want To Know About Two-Factor Authentication for iCloud From your Apple iPhone 12 Pro
- In 2024, Full Guide on Mirroring Your Realme 12 Pro+ 5G to Your PC/Mac | Dr.fone
- 3 Ways for Android Pokemon Go Spoofing On Motorola G54 5G | Dr.fone
- In 2024, How to Reset a Infinix Hot 30i Phone that is Locked?
- How To Use Allshare Cast To Turn On Screen Mirroring On Vivo S18 Pro | Dr.fone
- How to Resolve Realme 10T 5G Screen Not Working | Dr.fone
- In 2024, How to Transfer Contacts from Honor Magic V2 to iPhone XS/11 | Dr.fone
- How to Transfer Data from Tecno Spark 10 4G to Samsung Phone | Dr.fone
- How to Unlock iPhone SE without Passcode or Face ID
- Forgotten The Voicemail Password Of Oppo F25 Pro 5G? Try These Fixes
- Reset iTunes Backup Password Of Apple iPhone 6 Plus Prevention & Solution
- In 2024, Simple and Effective Ways to Change Your Country on YouTube App Of your Motorola Moto G13 | Dr.fone
- In 2024, Why Your WhatsApp Live Location is Not Updating and How to Fix on your Samsung Galaxy S21 FE 5G (2023) | Dr.fone
- In 2024, Hassle-Free Ways to Remove FRP Lock from Vivo V27 Phones with/without a PC
- In 2024, The Ultimate Guide to Unlocking Apple Watch Or iPhone 12 Pro Max from iCloud
- In 2024, How to Unlock a Network Locked Itel P40 Phone?
- In 2024, Hacks to do pokemon go trainer battles For Apple iPhone 11 Pro Max | Dr.fone
- Full Solutions to Fix Error Code 920 In Google Play on OnePlus 12 | Dr.fone
- 5 Ways to Reset Honor Magic5 Ultimate Without Volume Buttons | Dr.fone
- How to Repair a Damaged video file of Xiaomi 14 Pro using Video Repair Utility on Mac?
- Possible solutions to restore deleted pictures from Honor .
- How Do I Stop Someone From Tracking My Vivo X90S? | Dr.fone
- Top 10 Telegram Spy Tools On Samsung Galaxy F34 5G for Parents | Dr.fone
- How to Unlock Apple iPhone 15 Pro Passcode Screen?
- In 2024, Forgot Locked Apple iPhone 8 Password? Learn the Best Methods To Unlock
- In 2024, Which Pokémon can Evolve with a Moon Stone For OnePlus 11 5G? | Dr.fone
- How to Exit Android Factory Mode On Infinix Hot 30i? | Dr.fone
- How To Leave a Life360 Group On Poco X5 Pro Without Anyone Knowing? | Dr.fone
- In 2024, Set Your Preferred Job Location on LinkedIn App of your Realme C55 | Dr.fone
- Undelete lost messages from Nokia C210
- Full Guide to Unlock Your Itel A60s
- In 2024, Things You Should Know When Unlocking Total Wireless Of iPhone 7 | Dr.fone
- Easily Unlock Your Infinix Hot 40 Device SIM
- Title: New 2024 Approved How to Make Creative Animation Videos
- Author: Elon
- Created at : 2024-06-23 02:09:23
- Updated at : 2024-06-24 02:09:23
- Link: https://animation-videos.techidaily.com/new-2024-approved-how-to-make-creative-animation-videos/
- License: This work is licensed under CC BY-NC-SA 4.0.
