
:max_bytes(150000):strip_icc():format(webp)/GettyImages-642981042-5a903651a18d9e0037d31742.jpg)
New Best 12 2D Animation Studios All Should Check Out
Best 12 2D Animation Studios All Should Check Out
Top 12 2D Animation Studios All Should Check Out
An easy yet powerful editor
Numerous effects to choose from
Detailed tutorials provided by the official channel
Now, when it comes to video marketing, the majority of businesses prefer choosing 2D animations. The reason being 2D animations have a lower production cost and they still offer complete liberty over creativity. However, it’s worth noting that editing a visually engaging 2D animation requires expertise.
That’s why it’s always an ideal solution to hire a dedicated 2D animation company. Such organizations have experienced video editors who specialize in 2D video editing and can craft the perfect 2D animation for your brand. In this article, we are going to walk you through a list of the top 12 2D animation studios you can hire to launch an enticing marketing video for your business.
In this article
01 [What is a 2D Animation Video and How Much Does a 2D Animation Video Cost?](#Part 1)
02 [How Much Time Does It Take to Create a 2D Animation Video?](#Part 2)
03 [What Are the Best Company for Creating 2D Animation Video?](#Part 3)
Part 1 What is a 2D Animation Video and How Much Does a 2D Animation Video Cost?
First things first; what is a 2D animation and why is it necessary to hire a 2D animation company? In layman’s terms, a 2D animation is a video where the movements are represented in two-dimensional space. The subjects in the video can either move forward or backward, but they can’t be allowed to move in a third dimension (depth).
Now, even though there are tools you can use to edit a 2D animation on your own, the process is time-consuming and requires certain expertise. And, since the primary objective of creating a 2D animation video is to engage potential customers, it’s always necessary to be super creative with the editing approach. This is the reason why the majority of brands hire professional 2D animation studios for the job.
The cost to create a 2D animation video can range anywhere between $1,000 to $10,000. It all depends on the length of the video, the production company you hire, and the quality you are looking for. But, it’s also worth noting that high pricing does not always mean superior quality as well. You’ll have to be extra cautious while picking through the best 2D animation studios.
Part 2 How Much Time Does It Take to Create a 2D Animation Video?
Due to their immense popularity in the marketing world, many business owners and marketers want to know how much time it takes to create a 2D animation video. Well, the answer is - it depends. If you have hired a team of professional editors or a dedicated 2D animation company, you’ll get your animated video within a week. However, if you try to follow the DIY approach and don’t know where to get started, it can even take up to 3-4 weeks for the video to complete.
Part 3 What Are the Best Company for Creating 2D Animation Video?
Now that you know the cost and time it takes to create a 2D animation video, let’s dive into the list of the most popular 2D animation studios you can hire for the next project. We have listed these companies on the basis of their customer reviews and pricing so that you can make the right decision easily.
01Explain Ninja
Minimum Project Size: $5,000
Team Size: 100-300
Location: Poland
Ratings: 4.5/5
Explain Ninja is a popular Poland-based 2D animation company that offers a wide variety of video production services to global clients. The company has already worked with big brands like Google, Bolt, and MyTaxi and is more than ready to create a 2D animation video for you as well.
The team can create different types of marketing videos including whitepaper animations, explainer videos, conventional 2D animations, etc. Basically, if you have the desired budget and are looking for a professional video production company, Explain Ninja is the right answer.
02**Wondershare Filmora Video Editor **
Minimum Project Size: $100 (Depends on the type of video you want to edit)
Team Size: The tool is an ideal choice for DIY editing
Ratings: 5/5
Technically not a 2D animation studio, Wondershare Filmora is a full-scale video editing tool designed to help editors create stunning videos. The tool offers a plethora of features that make it the best choice for people who want to create 2D animations on their own.
Filmroa has a built-in media library where you can find an array of 2D animation templates, video graphics, and transitions that could be integrated into a video within a few seconds. Not to mention, its timeline-based interface will make it a hassle-free job to create high-quality 2D animations that engage the viewers and help you promote your product more effectively.
For Win 7 or later (64-bit)
For macOS 10.12 or later
03Sparkhouse
Minimum Project Size: $10,000
Team Size: 10-50
Location: California
Ratings: 4/5
SparkHouse is another popular 2D animation studio that primarily specializes in corporate and commercial projects. The company is based in California, USA, and has worked with top brands like YouTube and Forever 2Sparkhouse offers a wide variety of video production services including 2D animations, explainer videos, and regular white paper animations.
Unique storytelling and custom transitions are two of the major USPs of Sparkhouse. The only downside of Sparkhouse is its expensive price tag. Due to its extensive popularity, Sparkhouse charges a hefty amount for its projects, which means it’s only ideal for large enterprises with a solid marketing budget.
04Studio Pigeon
Minimum Project Size: $5,000
Team Size: 50-500
Location: Poland
Ratings: 5/5
Studio Pigeon is also a popular Poland-based 2D animation company that provides full-scale video production services to a global clientele. Studio Pigeon’s portfolio includes some of the industry leaders including Microsoft, Ikea, and FOX Networks.
While Studio Pigeon specializes in all types of video production services, 2D explainer videos are their strong point. So, if you are looking to create a stunning explainer video for a newly launched product or service, you can get in touch with Studio Pigeon and let expert designers create a stunning video for you.
05BluBlu Studios
Minimum Project Size: $5,000
Team Size: 50-250
Location: Poland and USA
Ratings: 4.5/5
BluBlu Studios is one of the best 2D animation studios having two different branches in Poland and Chicago, USA. The company is well-renowned for its remarkable work across the industry. Since its inception in 2013, BluBlu Studios has worked with both small-scale businesses and fortune 500s. During this period, the company has also worked with many big brands including The New York Times, IKEA, and Twitter.
Basically, if you want to get a high-quality 2D animation for your product/services, BluBlu Studios is worth the consideration. Even if you own a startup or a small business, BluBlue Studios will allow you to get a stunning 2D animated video without burning a hole in your wallet.
06Epipheo
Minimum Project Size: $12,000
Team Size: 10-100
Location: Los Angeles
Ratings: 5/5
With Google considering it as their official marketing partner, Epipheo is undoubtedly one of the most reliable 2D animation studios you can hire to create a high-quality 2D animation for your marketing campaigns.
In addition to end-to-end video production services, Epipheo also offers other digital services including UI/UX design and marketing assistance. In short, Epiheo can handle the entire online marketing campaign for your brand. However, since the company has Google on its portfolio, the production charges are going to be comparatively higher than other available options.
07Snowy Peak
Minimum Project Size: $3,000
Team Size: 10 Employees
Location: Colorado, USA
Ratings: 3.5/5
Snowy Peak is a Colorado-based video production company that offers full-scale production services to help brands elevate their online presence and attract more customers.
As compared to other available options, Snowy Peak’s services are relatively affordable - so even if you have a limited marketing budget, you can hire them to get your 2D animation video. In addition to end-to-end video production services, Snowy Peak also specializes in direction assistance so that you can launch the most stunning marketing video for your brand.
08Animation Explainers
Minimum Project Size: $2,000
Team Size: 10 Employees
Location: Dublin, Ireland
Ratings: 4.5/5
Animation Explainers is a small-scale video production company that primarily works with startups and small-scale businesses. Based out of Dublin, Ireland, Animation Explainers is working with a vision to help businesses gain better online exposure through high-quality video production. Animation Explainers is an ideal video production studio for brands who want to launch a 2D animation video at a lower production cost.
09Darvideo Animation Studio
Minimum Project Size: $1,000+
Team Size: 50 Employees
Location: UKRAINE
Ratings: 4/5
Darvideo Animation Studio is one of the most affordable video production studios that offer an array of video production services such as explainer videos, 2D animations, 3D animated videos, and explainer videos.
The services start at as low as $1,000, which means you can launch a high-quality animation video without going over budget. Apart from 2D animation videos, Darvideo Animation Studio can also help you launch short-form videos to engage potential buyers across different platforms. Ideally, the company is a suitable choice for small-scale businesses and startups that have a limited marketing budget for 2D animated videos.
10The DVI Group
Minimum Project Size: $10,000+
Team Size: 50 Employees
Location: Atlanta
Ratings: 4.5/5
The DVI Group is a widely popular 2D animation company that has worked with different brands and helped them gain massive exposure in the digital landscape. The DVI team specializes in both 2D as well as 3D animation, which means brands can target different types of customers through dedicated videos. You can also hire the company to get short-form videos to engage customers across different social media platforms.
111Kasra Design
Minimum Project Size: $5,000+
Team Size: 50 Employees
Location: Malaysia
Ratings: 4.5/5
If you are looking for an experienced 2D animation studio, Kasra Design is the right answer. This Malaysia-based 2D animation company has delivered more than 600 2D and 3D animations to different organizations. Their services are relatively affordable, which means you can hire them even with a limited marketing budget.
121Demo Duck
Minimum Project Size: $2,000
Team Size: 100 Employees
Location: Chicago, United States
Rating: 4/5
Last, but certainly not least, Demo Duck is an ideal 2D animation company for businesses who want to step up their marketing game through creativity. The team has highly talented video editors who have years of experience working with a variety of brands from different parts of the world. Even though the company specializes in 2D animation videos, you can also hire them to get explainer videos, 3D animations, and conventional marketing videos.
Key Takeaways from This Episode
● 2D animations are one of the great ways to engage potential customers and drive better brand exposure
● The cost to create a 2D animation varies for each brand and mainly depends on the 2D animation company you hire
● There are dozens of 2D animation studios you can hire to launch a custom 2D animation or use a professional tool like Wondershare Pro to create a dedicated 2D animated video by yourself.
Ways to Create an Animated Sticky Navbar
How to Create an Animated Sticky Navbar
An easy yet powerful editor
Numerous effects to choose from
Detailed tutorials provided by the official channel
While there are different ways to enhance the overall user experience of a website, using an animated sticky navbar is the most ideal solution to get the job done.
In this article, we’ll walk you through some of the top benefits of animated sticky navbars and why you should incorporate them in your website’s design. So, without any further ado, let’s get started.
In this article
01 [What is an Animated Sticky Navbar?](#Part 1)
02 [What Are the Benefits of An Animated Sticky Navbar?](#Part 2)
03 [8 Fixed Sticky Navbars That’ll Grab Your Attention](#Part 3)
04 [Want To Create More Professional and Amazing Animations?](#Part 4)
Part 1 What is an Animated Sticky Navbar?
To put it in simple words, an animated sticky navbar is a dedicated header that stays fixed on the website, irrespective of the web page you’re accessing. Ideally, designers use a sticky navbar to allow website visitors to visit any web page within 2-3 clicks.
The animated navbar also incorporates a few animations that uplift the overall visual appearance of the website. It doesn’t matter if you are planning to design an e-commerce store or a simple service-based website, the animated navbar will allow you to make your website more user-friendly for the end-users.
Part 2 What Are the Benefits of An Animated Sticky Navbar?
Now, there are endless benefits of using an animated sticky navbar on your website. However, these are a few factors that make animated sticky navbars the most useful on-page element of a website.
01Quick Navigation
As we mentioned earlier, easy navigation is one of the key features of a sticky navbar. You can place links to all the other web pages within the navbar in the form of drop-down menus and ensure that users can visit any webpage within a single click. This will enhance the overall user experience and you’ll be able to encourage one-time visitors to spend more time on your website. Using the navbar will also improve your search engine rankings because the search engine crawler will be able to crawl all the web pages easily.
02Aesthetically Pleasing
The way your website looks has a huge impact on whether you’re going to retain the website visitors or not. An animated sticky navbar will make your website look aesthetically pleasing and captivate the visitors more effectively. You can add different animations and visual elements to the navbar and make them match your website’s overall color scheme.
03Better User Experience
Another reason why you would want to place an animated sticky navbar on your website is that it’ll uplift the overall user experience for the website visitors. From finding easy navigation to all the web pages to ensuring that all the web pages offer the same browsing experience, a navbar will make your website engaging and it’ll become easier to captivate the users.
Part 3 8 Fixed Sticky Navbars That’ll Grab Your Attention
So, now that you are familiar with the benefits of animated sticky navbars, here are the top examples that explain the best ways to use navigation bars on a website.
01Search Engine Journal
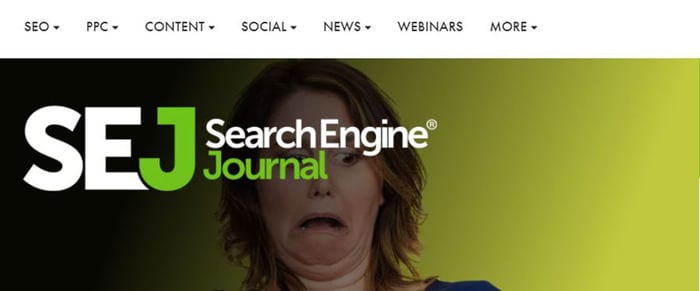
Search Engine Journal is an online knowledge hub where users can find every bit of information about digital marketing. The website publishes regular guides on SEO, PPC, Social Media Marketing, etc to help people get detailed insight into the benefits of digital marketing.
Since there are thousands of articles on the website, it could easily get chaotic for users to find the guide they are looking for. But, with an easy-to-navigate animated sticky navbar, Search Engine Journal has divided all the articles into their respective categories using simple drop-down menus
02AirBnB

Airbnb is one of the most popular platforms to find vacation homes in a different city/country to enjoy your holiday in complete comfort. One of the major reasons behind AirBnB’s immense success is its high-quality and easy-to-use website.
As you continue to scroll down the website, the sticky navbar stays fixed at the top with a dedicated search bar and a “Become a Host” Call-to-Action button. This way it doesn’t matter if a user is looking for a place to rent or simply wants to become a host, they’ll be able to get the job done within a few clicks.
03Graz Secrets
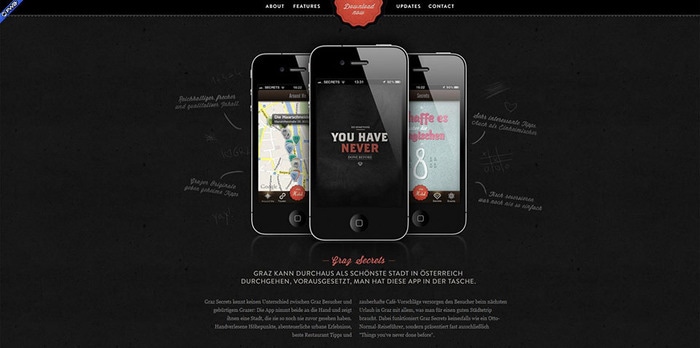
Graz Secrets is the perfect example of how you can use a sticky bar in the simplest manner and still grab users’ attention easily. The website uses a black-colored simple navigation bar with a “Download Now” button at the center. The button continues to illuminate due to the background animation even if you scroll to the end of the web page. The overall black design of the navbar adds more visual factors to the website and engages the visitors more effectively.
04Adobe
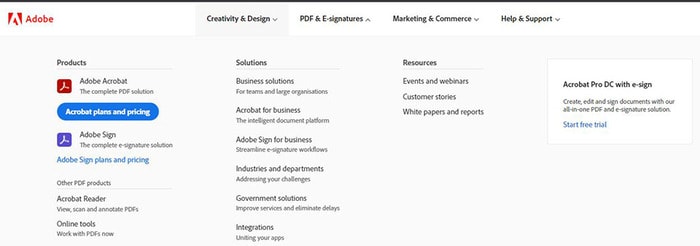
Adobe’s navigation bar is also a great example of how to use sticky navbars to uplift the overall user experience for website visitors. Even though the website doesn’t stay at its place when you scroll down, it immediately comes back as soon as you scroll up once.
Moreover, the navbar has links to all the Adobe products, which means users can visit any product page they want right away. It’s also worth understanding that Adobe has added a dedicated “Sign-in” button in the navigation bar to allow visitors to sign in to the Adobe cloud account straightaway.
05Daniel Filler
Daniel Filler’s website uses the navigation bar in the simplest way possible - yet manages to draw the viewers’ attention without any hassle. The designers have placed a pretty small navigation bar with links to all the important web pages.
The smaller size of the navigation bar doesn’t make the website look cluttered and still manages to do its job easily. In addition to this, the designers have also placed a dedicated logo and the “Up” button to allow users to directly go to the top of the web page with one click.
06Mind Inventory
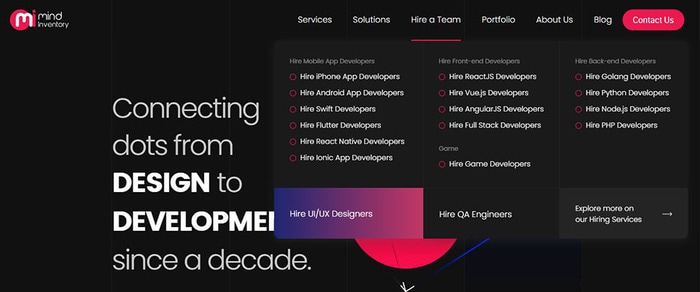
Mind Inventory is an Indian software development company working towards designing high-quality websites and mobile applications. Their website is a perfect example of how one should use navigation bars in a website to improve the overall design scheme. In addition to placing links to all the important web pages, Mind Inventory has also introduced dedicated animations to make the drop-down menu appearance more pleasing.
07FHOKE
FHOKE’s navigation bar is one of the most aesthetically pleasing animated navbars that you can replicate on your website to maximize its performance. A white-colored navbar automatically turns gray as soon as you scroll down to maintain the contrast of the entire web page.
There are dedicated links to other web pages as well. However, you won’t find any drop-down menus. In case your website also has limited web pages, you can also replicate this animated sticky navbar to make it more appealing.
08H&M
Last but certainly not least, H&M is a clothing brand that’s popular across the globe. At first, H&M’s official website may look pretty basic, but its navigation bar is backed by a great marketing strategy. The bar contains all the product page categories that’ll direct you to any product page within a single click.
Key Takeaways from This Episode
● Animated sticky navbars are one of the most useful on-page elements that could help you grab user’s attention easily
● There are different ways to use animated navbars and it mainly depends on your website requirements.
● Like your website, you can also uplift the quality of your videos by adding animations and high-quality transitions
While there are different ways to enhance the overall user experience of a website, using an animated sticky navbar is the most ideal solution to get the job done.
In this article, we’ll walk you through some of the top benefits of animated sticky navbars and why you should incorporate them in your website’s design. So, without any further ado, let’s get started.
In this article
01 [What is an Animated Sticky Navbar?](#Part 1)
02 [What Are the Benefits of An Animated Sticky Navbar?](#Part 2)
03 [8 Fixed Sticky Navbars That’ll Grab Your Attention](#Part 3)
04 [Want To Create More Professional and Amazing Animations?](#Part 4)
Part 1 What is an Animated Sticky Navbar?
To put it in simple words, an animated sticky navbar is a dedicated header that stays fixed on the website, irrespective of the web page you’re accessing. Ideally, designers use a sticky navbar to allow website visitors to visit any web page within 2-3 clicks.
The animated navbar also incorporates a few animations that uplift the overall visual appearance of the website. It doesn’t matter if you are planning to design an e-commerce store or a simple service-based website, the animated navbar will allow you to make your website more user-friendly for the end-users.
Part 2 What Are the Benefits of An Animated Sticky Navbar?
Now, there are endless benefits of using an animated sticky navbar on your website. However, these are a few factors that make animated sticky navbars the most useful on-page element of a website.
01Quick Navigation
As we mentioned earlier, easy navigation is one of the key features of a sticky navbar. You can place links to all the other web pages within the navbar in the form of drop-down menus and ensure that users can visit any webpage within a single click. This will enhance the overall user experience and you’ll be able to encourage one-time visitors to spend more time on your website. Using the navbar will also improve your search engine rankings because the search engine crawler will be able to crawl all the web pages easily.
02Aesthetically Pleasing
The way your website looks has a huge impact on whether you’re going to retain the website visitors or not. An animated sticky navbar will make your website look aesthetically pleasing and captivate the visitors more effectively. You can add different animations and visual elements to the navbar and make them match your website’s overall color scheme.
03Better User Experience
Another reason why you would want to place an animated sticky navbar on your website is that it’ll uplift the overall user experience for the website visitors. From finding easy navigation to all the web pages to ensuring that all the web pages offer the same browsing experience, a navbar will make your website engaging and it’ll become easier to captivate the users.
Part 3 8 Fixed Sticky Navbars That’ll Grab Your Attention
So, now that you are familiar with the benefits of animated sticky navbars, here are the top examples that explain the best ways to use navigation bars on a website.
01Search Engine Journal
Search Engine Journal is an online knowledge hub where users can find every bit of information about digital marketing. The website publishes regular guides on SEO, PPC, Social Media Marketing, etc to help people get detailed insight into the benefits of digital marketing.
Since there are thousands of articles on the website, it could easily get chaotic for users to find the guide they are looking for. But, with an easy-to-navigate animated sticky navbar, Search Engine Journal has divided all the articles into their respective categories using simple drop-down menus
02AirBnB
Airbnb is one of the most popular platforms to find vacation homes in a different city/country to enjoy your holiday in complete comfort. One of the major reasons behind AirBnB’s immense success is its high-quality and easy-to-use website.
As you continue to scroll down the website, the sticky navbar stays fixed at the top with a dedicated search bar and a “Become a Host” Call-to-Action button. This way it doesn’t matter if a user is looking for a place to rent or simply wants to become a host, they’ll be able to get the job done within a few clicks.
03Graz Secrets
Graz Secrets is the perfect example of how you can use a sticky bar in the simplest manner and still grab users’ attention easily. The website uses a black-colored simple navigation bar with a “Download Now” button at the center. The button continues to illuminate due to the background animation even if you scroll to the end of the web page. The overall black design of the navbar adds more visual factors to the website and engages the visitors more effectively.
04Adobe
Adobe’s navigation bar is also a great example of how to use sticky navbars to uplift the overall user experience for website visitors. Even though the website doesn’t stay at its place when you scroll down, it immediately comes back as soon as you scroll up once.
Moreover, the navbar has links to all the Adobe products, which means users can visit any product page they want right away. It’s also worth understanding that Adobe has added a dedicated “Sign-in” button in the navigation bar to allow visitors to sign in to the Adobe cloud account straightaway.
05Daniel Filler
Daniel Filler’s website uses the navigation bar in the simplest way possible - yet manages to draw the viewers’ attention without any hassle. The designers have placed a pretty small navigation bar with links to all the important web pages.
The smaller size of the navigation bar doesn’t make the website look cluttered and still manages to do its job easily. In addition to this, the designers have also placed a dedicated logo and the “Up” button to allow users to directly go to the top of the web page with one click.
06Mind Inventory
Mind Inventory is an Indian software development company working towards designing high-quality websites and mobile applications. Their website is a perfect example of how one should use navigation bars in a website to improve the overall design scheme. In addition to placing links to all the important web pages, Mind Inventory has also introduced dedicated animations to make the drop-down menu appearance more pleasing.
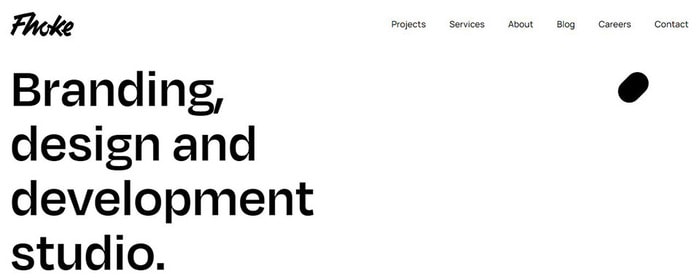
07FHOKE
FHOKE’s navigation bar is one of the most aesthetically pleasing animated navbars that you can replicate on your website to maximize its performance. A white-colored navbar automatically turns gray as soon as you scroll down to maintain the contrast of the entire web page.
There are dedicated links to other web pages as well. However, you won’t find any drop-down menus. In case your website also has limited web pages, you can also replicate this animated sticky navbar to make it more appealing.
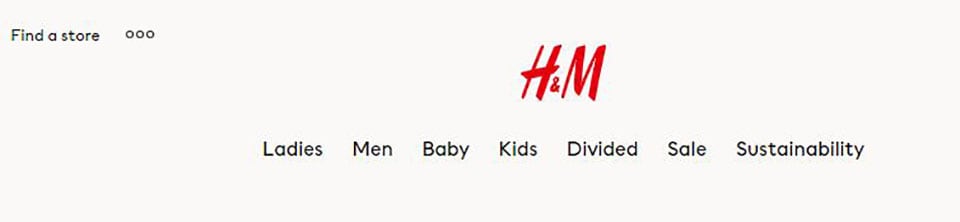
08H&M
Last but certainly not least, H&M is a clothing brand that’s popular across the globe. At first, H&M’s official website may look pretty basic, but its navigation bar is backed by a great marketing strategy. The bar contains all the product page categories that’ll direct you to any product page within a single click.
Key Takeaways from This Episode
● Animated sticky navbars are one of the most useful on-page elements that could help you grab user’s attention easily
● There are different ways to use animated navbars and it mainly depends on your website requirements.
● Like your website, you can also uplift the quality of your videos by adding animations and high-quality transitions
While there are different ways to enhance the overall user experience of a website, using an animated sticky navbar is the most ideal solution to get the job done.
In this article, we’ll walk you through some of the top benefits of animated sticky navbars and why you should incorporate them in your website’s design. So, without any further ado, let’s get started.
In this article
01 [What is an Animated Sticky Navbar?](#Part 1)
02 [What Are the Benefits of An Animated Sticky Navbar?](#Part 2)
03 [8 Fixed Sticky Navbars That’ll Grab Your Attention](#Part 3)
04 [Want To Create More Professional and Amazing Animations?](#Part 4)
Part 1 What is an Animated Sticky Navbar?
To put it in simple words, an animated sticky navbar is a dedicated header that stays fixed on the website, irrespective of the web page you’re accessing. Ideally, designers use a sticky navbar to allow website visitors to visit any web page within 2-3 clicks.
The animated navbar also incorporates a few animations that uplift the overall visual appearance of the website. It doesn’t matter if you are planning to design an e-commerce store or a simple service-based website, the animated navbar will allow you to make your website more user-friendly for the end-users.
Part 2 What Are the Benefits of An Animated Sticky Navbar?
Now, there are endless benefits of using an animated sticky navbar on your website. However, these are a few factors that make animated sticky navbars the most useful on-page element of a website.
01Quick Navigation
As we mentioned earlier, easy navigation is one of the key features of a sticky navbar. You can place links to all the other web pages within the navbar in the form of drop-down menus and ensure that users can visit any webpage within a single click. This will enhance the overall user experience and you’ll be able to encourage one-time visitors to spend more time on your website. Using the navbar will also improve your search engine rankings because the search engine crawler will be able to crawl all the web pages easily.
02Aesthetically Pleasing
The way your website looks has a huge impact on whether you’re going to retain the website visitors or not. An animated sticky navbar will make your website look aesthetically pleasing and captivate the visitors more effectively. You can add different animations and visual elements to the navbar and make them match your website’s overall color scheme.
03Better User Experience
Another reason why you would want to place an animated sticky navbar on your website is that it’ll uplift the overall user experience for the website visitors. From finding easy navigation to all the web pages to ensuring that all the web pages offer the same browsing experience, a navbar will make your website engaging and it’ll become easier to captivate the users.
Part 3 8 Fixed Sticky Navbars That’ll Grab Your Attention
So, now that you are familiar with the benefits of animated sticky navbars, here are the top examples that explain the best ways to use navigation bars on a website.
01Search Engine Journal
Search Engine Journal is an online knowledge hub where users can find every bit of information about digital marketing. The website publishes regular guides on SEO, PPC, Social Media Marketing, etc to help people get detailed insight into the benefits of digital marketing.
Since there are thousands of articles on the website, it could easily get chaotic for users to find the guide they are looking for. But, with an easy-to-navigate animated sticky navbar, Search Engine Journal has divided all the articles into their respective categories using simple drop-down menus
02AirBnB
Airbnb is one of the most popular platforms to find vacation homes in a different city/country to enjoy your holiday in complete comfort. One of the major reasons behind AirBnB’s immense success is its high-quality and easy-to-use website.
As you continue to scroll down the website, the sticky navbar stays fixed at the top with a dedicated search bar and a “Become a Host” Call-to-Action button. This way it doesn’t matter if a user is looking for a place to rent or simply wants to become a host, they’ll be able to get the job done within a few clicks.
03Graz Secrets
Graz Secrets is the perfect example of how you can use a sticky bar in the simplest manner and still grab users’ attention easily. The website uses a black-colored simple navigation bar with a “Download Now” button at the center. The button continues to illuminate due to the background animation even if you scroll to the end of the web page. The overall black design of the navbar adds more visual factors to the website and engages the visitors more effectively.
04Adobe
Adobe’s navigation bar is also a great example of how to use sticky navbars to uplift the overall user experience for website visitors. Even though the website doesn’t stay at its place when you scroll down, it immediately comes back as soon as you scroll up once.
Moreover, the navbar has links to all the Adobe products, which means users can visit any product page they want right away. It’s also worth understanding that Adobe has added a dedicated “Sign-in” button in the navigation bar to allow visitors to sign in to the Adobe cloud account straightaway.
05Daniel Filler
Daniel Filler’s website uses the navigation bar in the simplest way possible - yet manages to draw the viewers’ attention without any hassle. The designers have placed a pretty small navigation bar with links to all the important web pages.
The smaller size of the navigation bar doesn’t make the website look cluttered and still manages to do its job easily. In addition to this, the designers have also placed a dedicated logo and the “Up” button to allow users to directly go to the top of the web page with one click.
06Mind Inventory
Mind Inventory is an Indian software development company working towards designing high-quality websites and mobile applications. Their website is a perfect example of how one should use navigation bars in a website to improve the overall design scheme. In addition to placing links to all the important web pages, Mind Inventory has also introduced dedicated animations to make the drop-down menu appearance more pleasing.
07FHOKE
FHOKE’s navigation bar is one of the most aesthetically pleasing animated navbars that you can replicate on your website to maximize its performance. A white-colored navbar automatically turns gray as soon as you scroll down to maintain the contrast of the entire web page.
There are dedicated links to other web pages as well. However, you won’t find any drop-down menus. In case your website also has limited web pages, you can also replicate this animated sticky navbar to make it more appealing.
08H&M
Last but certainly not least, H&M is a clothing brand that’s popular across the globe. At first, H&M’s official website may look pretty basic, but its navigation bar is backed by a great marketing strategy. The bar contains all the product page categories that’ll direct you to any product page within a single click.
Key Takeaways from This Episode
● Animated sticky navbars are one of the most useful on-page elements that could help you grab user’s attention easily
● There are different ways to use animated navbars and it mainly depends on your website requirements.
● Like your website, you can also uplift the quality of your videos by adding animations and high-quality transitions
OBS Animated Alternatives
OBS Animated Lower Thirds Alternatives
An easy yet powerful editor
Numerous effects to choose from
Detailed tutorials provided by the official channel
It’s worth noting that people commonly use built-in OBS animated lower thirds for the job, but you can also use other editing tools to create custom animations and import them in your OBS Livestream.
This guide will walk you through everything you need to know about OBS animated lower thirds and their best alternatives you can use in 2022 and beyond.
In this article
01 [What are Lower Thirds in Animation?](#Part 1)
02 [How To Set Up An Animated Lower Third In OBS Studio](#Part 2)
03 [8 AMAZING OBS Animated Lower Thirds Alternatives](#Part 3)
Part 1 What is Lower Thirds in Animation?
To put it in simple words, a lower third is simply a graphic overlay that appears on top of the actual footage. As the name implies, the contents of the lower third usually occur at the lower end of the screen, but streamers can also configure the OBS settings to change their position within the screen. Ideally, lower third animations are utilized to give a context of the overall video.
Let’s say you are life streaming your GTA V gameplay on YouTube. So, to help first-time viewers get the overall context, you can add GTA-related elements in the lower third animation and maximize viewer acquisition. In addition to this, you can also use OBS animated lower-thirds to display exclusive offers and discounts throughout the live stream.
Part 2 How To Set Up An Animated Lower Third In OBS Studio
So, now that you know the major benefits of using animated lower thirds in OBS studio, let’s understand how to set them up to make your live streams more engaging. It’s worth noting that OBS works around the concept of layers that you can manage individually to run your live streams. So, to add an animated lower third in OBS studio, all you have to do is add a dedicated layer and place it right above the video layer.
When it comes to setting up the lower-third, you’ll first need to create the graphics you want to display on top of the live streams. You can use Photoshop to design a custom lower-third animation if you are a professional designer. But, if you have just stepped into the world of live streams and don’t have any prior experience with Photoshop, you can also purchase one of the ready-to-use lower-third packages and import them directly to OBS.
Either way, it would be crucial to ensure that your OBS animated lower-third graphics do not interfere with the actual video. Why? Because this will make the video look more cluttered, and you’ll end up losing potential viewers.
Here’s a YouTube video that’ll walk you through the step-by-step procedure of creating lower-third animations in OBS Studio.
Part 3 8 AMAZING OBS Animated Lower Thirds Alternatives
While OBS is a great tool to add lower-third animations to your live streams, it has its fair share of drawbacks. For instance, OBS has a pretty complicated interface, which means if you are an absolute beginner, you may not easily set up your live streams. Not to mention, OBS is heavy software - so if you don’t have a high-configuration system, you won’t be able to run the tool at all.
So, what’s your next best option? Fortunately, there are several OBS alternatives that you can use to set up OBS animated lower-third graphics and enhance the overall quality of your live streams. To make your job easier, we have cherry-picked 8 of the most reliable OBS alternatives that you can use to add lower-third animations to a Livestream video.
01Wirecast

Like OBS, Wirecast is a popular video streaming platform that many content creators use to live stream on their social media handles. It also offers a layer-based architecture, which means users can add multiple layers separately and manage them through an easy-to-navigate panel.
One of the key reasons Wirecast is an ideal choice to add animated lower-third graphics to your live streams is its built-in collections. The tool already has several ready-to-integrate lower-third animations that one could import into their project without any hassle.
Pros:
● Built-in lower-third graphic templates
● Easy-to-use Interface
● Switch between multiple camera angles with one click
Cons:
● Unlike OBS Studio, Wirecast isn’t available for free
Why Do We Recommend Wirecast?
Wirecast is a fully functional video streaming platform where you can easily manage all your live streams. Wirecast offers far better functionality than OBS Studio despite having a relatively easy-to-use UI.
02vMix

vMix is a feature-rich video production software that offers everything one would need to create stunning videos. However, it also has a dedicated live stream manager to manage your live streams, switch between multiple camera angles, and add overlay animations to keep the viewers engaged. Unlike OBS Studio, vMix doesn’t have a layering system, which means you can overlay multiple channels easily.
As far as OBS animated lower-thirds are concerned, there are different ways you can add these animations to your live streams. You can either import dedicated PSD files, embed HTML codes, or choose one of the ready-to-use lower-third templates to do the job. In either case, vMix will help you add stunning lower-third animations within a few minutes.
Pros:
● Full-scale video production software
● Built-in support for audio mixing
● Add and Manage Multiple Camera Inputs
Cons:
● If you want to relish all the benefits of vMix, you would have to purchase its pro version, which costs $1200. As compared to other available options, vMix is significantly expensive.
Why Do We Recommend vMix?
vMix is ideal for users who want to upgrade from OBS and can spend $1200 on a live stream manager. It’ll provide everything you need to live stream across different social media platforms.
03Restream Studio

Restream Studio is a browser-based live stream tool that offers an easy-to-navigate panel to manage your live streams. Restream is ideal for beginners who don’t want to spend a hefty amount on their live streaming software. With restream, you can upload your brand logos, graphic overlays, and text details and save them in the “Favorites” tab for future use.
This way, whenever you are live streaming, you can directly choose one of these overlays and switch between them easily. The tool also has a dedicated “Hide/Show” button that’ll allow you to change the display status of the lower-third animations.
Pros:
● Cross-platform Compatibility
● Ideal for Beginners and Novice YouTubers
● Save Multiple Graphic Overlays for Future Use
Cons:
● You won’t get any advanced functionality like Wirecast or OBS Studio
Why Do We Recommend Restream Studio?
Restream Studio is the perfect solution for users who don’t want to get overwhelmed with the complex features of OBS Studio. With its browser-friendly UI, you’ll be able to run Restream Studio across different platforms and add OBS animated lower-third graphics to your live streams easily.
04Lightstream

Lightstream is another free live stream manager that offers many features to execute hassle-free live streams across different platforms, including YouTube, Facebook, and Twitch. Even though the tool doesn’t provide advanced features like OBS Studio or Wirecast, it has everything you require to stream live on your social media handles. One of the key features of Lightstream is that you can add multiple scenes/overlays and switch between them with a single click.
Pros:
● Being open-source, Lightstream is available for free
● Lightstream is a cloud-based tool, which means it offers cross-platform compatibility
● Easy to set up, even if you are a beginner
Cons:
● Lacks advanced editing features
Why Do We Recommend Lightstream?
Lightstream is the most reliable live stream manager for users looking for a simple and cross-platform tool to manage live streams and add overlays.
05Adobe Photoshop

Before you act surprised, let us clarify that Adobe Photoshop isn’t an alternative to OBS Studio. However, you can use it to create customized overlays and lower-third graphics to add a personal touch to your live streams. Suppose you are already familiar with Photoshop and have been using it for a few years. In that case, it’ll allow you to design personalized text overlays, graphics, animations, and logos for your live streams.
And, once you have successfully designed the lower-third overlays, you can use any of the live stream managers to add them to your live streams.
Pros:
● Design custom overlays for your social media live streams
● Offers advanced editing options to customize logos and lower-third graphics
Cons:
● Photoshop has a steep learning curve, and if you are not an experienced designer, you won’t be able to design custom overlays
Why Do We Recommend Adobe Photoshop?
Adobe Photoshop is a reliable choice for creators who find the built-in media libraries of a live stream manager limited. With Photoshop, you’ll be able to design custom overlays for your live streams.
06ShareX

ShareX is also an open-source screen recorder and lives stream manager that offers all the OBS features you’ll need to manage your live streams and add multiple lower-third overlays. The only downside of ShareX is that it has a complicated user interface. Even if you have used OBS in the past, you’ll find ShareX’s user interface relatively complex. So, you should only sign up for ShareX if you are comfortable with complex user interfaces.
Pros:
● Upload and save pictures, videos, logos for lower-third overlays
● Record your entire screen or a specific window
● Assign hotkeys to switch between multiple windows during the Livestream
Cons:
● The user interface isn’t as friendly as other available options
Why Do We Recommend ShareX?
ShareX is an ideal OBS animated lower-third alternative for users who need a free-of-cost solution to manage their live streams.
07Canva

Again, Canva doesn’t support live stream management at all. However, like Adobe Photoshop, you can use Canva to create stunning lower-third overlays for your Livestream sessions. The major benefit of using Canva is that it has thousands of pre-made templates that you can import to your design with one click. All these templates are fully customizable - so you’ll be able to design custom lower-third overlays for your live streams.
Pros:
● Comparatively less complicated than Adobe Photoshop
● Canva is affordable
● Being a web-based designing tool, you can access Canva on any device
Cons:
● The premium version of Canva is relatively expensive than its competitors.
Why Do We Recommend Canva?
Canva is a one-stop solution for content creators looking for an additional designing tool to create custom OBS animated lower thirds for their live streams.
Key Takeaways from This Episode
● OBS animated lower-thirds are one of the most effective ways to share the context of a live stream with your viewers
● With OBS Studio, you have the liberty to import custom animated lower-third animations and overlays and add them to the live stream through its layered architecture
● Apart from OBS Studio, there are several other tools (such as Wondershare Filmora Pro) to add animated lower-thirds to live streams.
It’s worth noting that people commonly use built-in OBS animated lower thirds for the job, but you can also use other editing tools to create custom animations and import them in your OBS Livestream.
This guide will walk you through everything you need to know about OBS animated lower thirds and their best alternatives you can use in 2022 and beyond.
In this article
01 [What are Lower Thirds in Animation?](#Part 1)
02 [How To Set Up An Animated Lower Third In OBS Studio](#Part 2)
03 [8 AMAZING OBS Animated Lower Thirds Alternatives](#Part 3)
Part 1 What is Lower Thirds in Animation?
To put it in simple words, a lower third is simply a graphic overlay that appears on top of the actual footage. As the name implies, the contents of the lower third usually occur at the lower end of the screen, but streamers can also configure the OBS settings to change their position within the screen. Ideally, lower third animations are utilized to give a context of the overall video.
Let’s say you are life streaming your GTA V gameplay on YouTube. So, to help first-time viewers get the overall context, you can add GTA-related elements in the lower third animation and maximize viewer acquisition. In addition to this, you can also use OBS animated lower-thirds to display exclusive offers and discounts throughout the live stream.
Part 2 How To Set Up An Animated Lower Third In OBS Studio
So, now that you know the major benefits of using animated lower thirds in OBS studio, let’s understand how to set them up to make your live streams more engaging. It’s worth noting that OBS works around the concept of layers that you can manage individually to run your live streams. So, to add an animated lower third in OBS studio, all you have to do is add a dedicated layer and place it right above the video layer.
When it comes to setting up the lower-third, you’ll first need to create the graphics you want to display on top of the live streams. You can use Photoshop to design a custom lower-third animation if you are a professional designer. But, if you have just stepped into the world of live streams and don’t have any prior experience with Photoshop, you can also purchase one of the ready-to-use lower-third packages and import them directly to OBS.
Either way, it would be crucial to ensure that your OBS animated lower-third graphics do not interfere with the actual video. Why? Because this will make the video look more cluttered, and you’ll end up losing potential viewers.
Here’s a YouTube video that’ll walk you through the step-by-step procedure of creating lower-third animations in OBS Studio.
Part 3 8 AMAZING OBS Animated Lower Thirds Alternatives
While OBS is a great tool to add lower-third animations to your live streams, it has its fair share of drawbacks. For instance, OBS has a pretty complicated interface, which means if you are an absolute beginner, you may not easily set up your live streams. Not to mention, OBS is heavy software - so if you don’t have a high-configuration system, you won’t be able to run the tool at all.
So, what’s your next best option? Fortunately, there are several OBS alternatives that you can use to set up OBS animated lower-third graphics and enhance the overall quality of your live streams. To make your job easier, we have cherry-picked 8 of the most reliable OBS alternatives that you can use to add lower-third animations to a Livestream video.
01Wirecast
Like OBS, Wirecast is a popular video streaming platform that many content creators use to live stream on their social media handles. It also offers a layer-based architecture, which means users can add multiple layers separately and manage them through an easy-to-navigate panel.
One of the key reasons Wirecast is an ideal choice to add animated lower-third graphics to your live streams is its built-in collections. The tool already has several ready-to-integrate lower-third animations that one could import into their project without any hassle.
Pros:
● Built-in lower-third graphic templates
● Easy-to-use Interface
● Switch between multiple camera angles with one click
Cons:
● Unlike OBS Studio, Wirecast isn’t available for free
Why Do We Recommend Wirecast?
Wirecast is a fully functional video streaming platform where you can easily manage all your live streams. Wirecast offers far better functionality than OBS Studio despite having a relatively easy-to-use UI.
02vMix
vMix is a feature-rich video production software that offers everything one would need to create stunning videos. However, it also has a dedicated live stream manager to manage your live streams, switch between multiple camera angles, and add overlay animations to keep the viewers engaged. Unlike OBS Studio, vMix doesn’t have a layering system, which means you can overlay multiple channels easily.
As far as OBS animated lower-thirds are concerned, there are different ways you can add these animations to your live streams. You can either import dedicated PSD files, embed HTML codes, or choose one of the ready-to-use lower-third templates to do the job. In either case, vMix will help you add stunning lower-third animations within a few minutes.
Pros:
● Full-scale video production software
● Built-in support for audio mixing
● Add and Manage Multiple Camera Inputs
Cons:
● If you want to relish all the benefits of vMix, you would have to purchase its pro version, which costs $1200. As compared to other available options, vMix is significantly expensive.
Why Do We Recommend vMix?
vMix is ideal for users who want to upgrade from OBS and can spend $1200 on a live stream manager. It’ll provide everything you need to live stream across different social media platforms.
03Restream Studio
Restream Studio is a browser-based live stream tool that offers an easy-to-navigate panel to manage your live streams. Restream is ideal for beginners who don’t want to spend a hefty amount on their live streaming software. With restream, you can upload your brand logos, graphic overlays, and text details and save them in the “Favorites” tab for future use.
This way, whenever you are live streaming, you can directly choose one of these overlays and switch between them easily. The tool also has a dedicated “Hide/Show” button that’ll allow you to change the display status of the lower-third animations.
Pros:
● Cross-platform Compatibility
● Ideal for Beginners and Novice YouTubers
● Save Multiple Graphic Overlays for Future Use
Cons:
● You won’t get any advanced functionality like Wirecast or OBS Studio
Why Do We Recommend Restream Studio?
Restream Studio is the perfect solution for users who don’t want to get overwhelmed with the complex features of OBS Studio. With its browser-friendly UI, you’ll be able to run Restream Studio across different platforms and add OBS animated lower-third graphics to your live streams easily.
04Lightstream
Lightstream is another free live stream manager that offers many features to execute hassle-free live streams across different platforms, including YouTube, Facebook, and Twitch. Even though the tool doesn’t provide advanced features like OBS Studio or Wirecast, it has everything you require to stream live on your social media handles. One of the key features of Lightstream is that you can add multiple scenes/overlays and switch between them with a single click.
Pros:
● Being open-source, Lightstream is available for free
● Lightstream is a cloud-based tool, which means it offers cross-platform compatibility
● Easy to set up, even if you are a beginner
Cons:
● Lacks advanced editing features
Why Do We Recommend Lightstream?
Lightstream is the most reliable live stream manager for users looking for a simple and cross-platform tool to manage live streams and add overlays.
05Adobe Photoshop
Before you act surprised, let us clarify that Adobe Photoshop isn’t an alternative to OBS Studio. However, you can use it to create customized overlays and lower-third graphics to add a personal touch to your live streams. Suppose you are already familiar with Photoshop and have been using it for a few years. In that case, it’ll allow you to design personalized text overlays, graphics, animations, and logos for your live streams.
And, once you have successfully designed the lower-third overlays, you can use any of the live stream managers to add them to your live streams.
Pros:
● Design custom overlays for your social media live streams
● Offers advanced editing options to customize logos and lower-third graphics
Cons:
● Photoshop has a steep learning curve, and if you are not an experienced designer, you won’t be able to design custom overlays
Why Do We Recommend Adobe Photoshop?
Adobe Photoshop is a reliable choice for creators who find the built-in media libraries of a live stream manager limited. With Photoshop, you’ll be able to design custom overlays for your live streams.
06ShareX
ShareX is also an open-source screen recorder and lives stream manager that offers all the OBS features you’ll need to manage your live streams and add multiple lower-third overlays. The only downside of ShareX is that it has a complicated user interface. Even if you have used OBS in the past, you’ll find ShareX’s user interface relatively complex. So, you should only sign up for ShareX if you are comfortable with complex user interfaces.
Pros:
● Upload and save pictures, videos, logos for lower-third overlays
● Record your entire screen or a specific window
● Assign hotkeys to switch between multiple windows during the Livestream
Cons:
● The user interface isn’t as friendly as other available options
Why Do We Recommend ShareX?
ShareX is an ideal OBS animated lower-third alternative for users who need a free-of-cost solution to manage their live streams.
07Canva
Again, Canva doesn’t support live stream management at all. However, like Adobe Photoshop, you can use Canva to create stunning lower-third overlays for your Livestream sessions. The major benefit of using Canva is that it has thousands of pre-made templates that you can import to your design with one click. All these templates are fully customizable - so you’ll be able to design custom lower-third overlays for your live streams.
Pros:
● Comparatively less complicated than Adobe Photoshop
● Canva is affordable
● Being a web-based designing tool, you can access Canva on any device
Cons:
● The premium version of Canva is relatively expensive than its competitors.
Why Do We Recommend Canva?
Canva is a one-stop solution for content creators looking for an additional designing tool to create custom OBS animated lower thirds for their live streams.
Key Takeaways from This Episode
● OBS animated lower-thirds are one of the most effective ways to share the context of a live stream with your viewers
● With OBS Studio, you have the liberty to import custom animated lower-third animations and overlays and add them to the live stream through its layered architecture
● Apart from OBS Studio, there are several other tools (such as Wondershare Filmora Pro) to add animated lower-thirds to live streams.
How to Create Animated Video on Canva?
Canva is a simple way—without any graphic design experience—to make professional graphics for social media, newsletters, presentations, business cards, gift certificates, brochures, and more. Flexible design templates offer the ideal layout for your target destination, letting you aim over the design, not the file formatting or the size.
So, can you make an animated video on Canva?
Yes, because Canva lives on the cloud, you can access your graphics from anywhere you can get online while using Canva on the cloud. Learn how you can play, get up, and run with Canva in this short, fun tutorial guide. We’ll discuss adding and editing images, using inbuilt design templates, and working with typography to build your next project with Canva.
In the subsequent sections, we shall learn more about Canva animated videos and how to create one easily on your PC.
In this article
01 [Create an animated video with a Canva template](#Part 1)
02 [Create Canva animated video with your video](#Part 2)
Part 1 Create an animated video with a Canva template
In this section, we’ll explore how to make animated video on Canva, which applies to both the free and pro account of Canva. However, the steps given below got created from Canva’s free account. We suppose that you’ve already created an account on Canva and logged into the platform. So, further steps will proceed as follows:
Go to the Video tab given in the top front panel of Canva and choose any template of your desire. Let’s say we’ve selected the very first template, 1920 × 1080 pixels. There are lots of options provided by Canva from where you can choose your favorites. You can also create a template with a custom size.

After you enter the editing panel, you have the choice of different templates on the left-hand panel. You can search for a template of your choice among them and can create other pages, as shown below. To preview the templates, you can click the Play button with mentioned time duration on the top right corner of the editing screen.

Now, it’s time to add creativity and explore more editing elements within the Canva. You can modify the entire template given and add something of your own.

Now, you can explore various editing Elements given on the left-hand panel, as shown below. There are multiple options available here as well.

You can add some text within the Canva template, and you can search from the left-hand panel. Given above are various options by which you can bold, italicize, and underline the text.

Now, let’s add some music to the video. So, go to the Audio tab and select any one of the options among them. There are different choices for you to explore here as well.

After you’re done, you can hit the Preview Play button on the top and see your project, as shown below.
It’s all done, and you can proceed with the next section.
Part 2 Create Canva animated video with your video
We’ll discuss how to create an animated video by uploading our video in Canva without using any template in this section. After logging in to the Canva account credentials, select the Video tab and choose the different templates offered.
We’ve selected a blank template for the purpose as follows.

Now, you need to head directly towards the Uploads tab and upload your video created over here.

By now, you have most probably got over with uploading your media. Click the uploaded video, and it will automatically enter within the editing panel of Canva, as shown below.

You’re all done now, and it’s all finished! Even though template usage is quite simple, it’s pretty straightforward when you don’t use any ready-made template. However, you can still beautify this simple video with different elements like text, music, etc.
Animation style videos influence people of all ages to whatever generation, or the kind you belong to will be one of them for sure.
Animated ones provoke diverse impacts instead of ordinary videos on the audience utilizing illustration, kinesthetic, etc. But the fact is, due to technological advancements and overexposure to social media sites, we have forgotten its significance.
Want to know some other most accessible software tools that can bring out the artist in you? Here is an alternative that is all you need.
Are you surprised to find that you can go with various animation styles to boost your business or bring out your talents? But are you confused about how to revamp your story and effectively film it? Why should you worry when the best animation maker and Canva’s alternative Wondershare Filmora is here exclusively for you to create fantastic animation videos that could stand out of the box?
Conclusion
Do you aspire to paint with bright colors to videos or want to become an animator? Then, choose animation styles that you most enjoy, find attractive today, start working on them, or create Canva animated videos as the tutorial indicates above. Lastly, don’t forget to give Filmora a chance to upscale your creation and give your animation style a life!
02 [Create Canva animated video with your video](#Part 2)
Part 1 Create an animated video with a Canva template
In this section, we’ll explore how to make animated video on Canva, which applies to both the free and pro account of Canva. However, the steps given below got created from Canva’s free account. We suppose that you’ve already created an account on Canva and logged into the platform. So, further steps will proceed as follows:
Go to the Video tab given in the top front panel of Canva and choose any template of your desire. Let’s say we’ve selected the very first template, 1920 × 1080 pixels. There are lots of options provided by Canva from where you can choose your favorites. You can also create a template with a custom size.
After you enter the editing panel, you have the choice of different templates on the left-hand panel. You can search for a template of your choice among them and can create other pages, as shown below. To preview the templates, you can click the Play button with mentioned time duration on the top right corner of the editing screen.
Now, it’s time to add creativity and explore more editing elements within the Canva. You can modify the entire template given and add something of your own.
Now, you can explore various editing Elements given on the left-hand panel, as shown below. There are multiple options available here as well.
You can add some text within the Canva template, and you can search from the left-hand panel. Given above are various options by which you can bold, italicize, and underline the text.
Now, let’s add some music to the video. So, go to the Audio tab and select any one of the options among them. There are different choices for you to explore here as well.
After you’re done, you can hit the Preview Play button on the top and see your project, as shown below.
It’s all done, and you can proceed with the next section.
Part 2 Create Canva animated video with your video
We’ll discuss how to create an animated video by uploading our video in Canva without using any template in this section. After logging in to the Canva account credentials, select the Video tab and choose the different templates offered.
We’ve selected a blank template for the purpose as follows.
Now, you need to head directly towards the Uploads tab and upload your video created over here.
By now, you have most probably got over with uploading your media. Click the uploaded video, and it will automatically enter within the editing panel of Canva, as shown below.
You’re all done now, and it’s all finished! Even though template usage is quite simple, it’s pretty straightforward when you don’t use any ready-made template. However, you can still beautify this simple video with different elements like text, music, etc.
Animation style videos influence people of all ages to whatever generation, or the kind you belong to will be one of them for sure.
Animated ones provoke diverse impacts instead of ordinary videos on the audience utilizing illustration, kinesthetic, etc. But the fact is, due to technological advancements and overexposure to social media sites, we have forgotten its significance.
Want to know some other most accessible software tools that can bring out the artist in you? Here is an alternative that is all you need.
Are you surprised to find that you can go with various animation styles to boost your business or bring out your talents? But are you confused about how to revamp your story and effectively film it? Why should you worry when the best animation maker and Canva’s alternative Wondershare Filmora is here exclusively for you to create fantastic animation videos that could stand out of the box?
Conclusion
Do you aspire to paint with bright colors to videos or want to become an animator? Then, choose animation styles that you most enjoy, find attractive today, start working on them, or create Canva animated videos as the tutorial indicates above. Lastly, don’t forget to give Filmora a chance to upscale your creation and give your animation style a life!
The Only Guide to Make 2D Rigging Clear to You
The Only Guide You’ll Ever Need to Learn That Make 2D Rigging Clear to You
An easy yet powerful editor
Numerous effects to choose from
Detailed tutorials provided by the official channel
If you’re looking to get a head start in 2D Rigging or 2D Animation in general, then this guide should get you to where you need to go.
We’ll be introducing 2D Rigging in a comprehensive way — perfect for beginners who aren’t familiar with the subject and want something more solid as their foundation.
In this article
01 [All You Need to Know About 2D Rigging](#Part 1)
02 [What is the Difference and Connection Between 2D and 3D](#Part 2)
03 [What Are the Best 2D Rigging Animation Tools?](#Part 3)
Part 1 All You Need to Know About Rigging
For this first part, we’re going to talk about Rigging in a general way. Think of it as an introduction to the subject. One that should, hopefully, set you off on the right foot. It should also help clarify things that you might need to know as we delve into deeper and more advanced subjects in the next sections of this article.
01What is the Meaning of Rigging in Animation?
Alright, so what does rigging 2D characters actually do? What meaning, or effect, does it have? These questions can be quickly answered with this: Rigging (whether it’s or 3D) is the practice of attaching ‘bones’ to a character model. Bones that, in the future, you can use to create motion.
If you’re an artist, then you’re probably familiar with the concept of creating an initial sketch that you put the final drawing on top of — done with the sole purpose of creating a structure that will allow you to move forward more easily in your art.
That’s exactly what you do when Rigging. You’re building a structure that will allow you to easily create animated characters that you can move at will in the future.
02Why Use Animation?
Alright, so what’s the difference between creating a Face Rig and a Face Rig? Is there any? To answer this, the simple answer is, yes. There is quite the difference.
A lot of animators prefer to practice Animation over Animation because it is more traditional and requires less complicated software (not that it doesn’t come with complications of its own.) Specifically, animation requires quite a lengthy character creation and rigging process.
You should consider the subject more based on what project you’re working on. Things that you might want to keep in mind include your project timeline, project budget, character rig usability in the future, length of the project, and so on.
(There’s also a more in-depth breakdown of this in of this guide.)
03What is Animation Rigging Software?
Now, for the last section of this Rigging overview, let’s talk about Rigging Animation Software. You should be able to guess what it’s meant for, but how you can use it is a little different, especially with the many different varieties of Rigging Animation Software available.
We’ll be introducing some in the third part of this guide — so you can learn more about the differences there. For now, all you need to know is that it usually comes with advanced rigging and character deformer tools that you can use to easily (and efficiently) animate your characters.
Part 2 What is the Difference and Connection Between and 3D
As promised, this next section will be devoted to clarifying the differences and similarities between Animation and Animation. As we mentioned previously, most animators prefer Animation. But, more often than not, they switch between both forms in order to create something suitable for their current project.
01How and Animations Are Created
First, let’s talk about the process involved. In the end, this can be described simply as: it starts off the same, but then becomes significantly more and more dissimilar the further you go along. More specifically, whether you’re working on a or Animation, you usually start with working through your vision for the project.
That means exploring ideas and creating hand-illustrated storyboards (which will serve as the foundation for the project as a whole). Then, the next steps involve media gathering (i.e., character creation, sound clips, voice-overs, sound effects, etc.) So that everything would be ready for the project.
This is when the difference starts. Animation involves hand-drawing characters in different poses and angles (with the standard being frames for a second) and can be completed with basic rigging (i.e., face rig for moving mouths or eyes). It’s normal in Animation as well for characters to remain static for several frames. While, with 3D, it is the exact opposite — the characters must be in constant motion so as to remain realistic (which can be done with extensive rigging.)
02Time Investments for Creating and Animations
Next, let’s talk about time investments. This can be a bit tricky to differentiate. Animations, as mentioned, are generally easier to create because it requires less rigging (but more drawings for certain scenes and angles makes it take more time). Meanwhile, Animation usually involves a front-heavy timeline — since you’re looking at intensive character creation and rigging. Once all this is set up though? The rest of the process is much faster than Animation.
You’ll also have to consider the work that you have to put in after your animations have been created. For example, the work you’ll need to put into finalizing your project with a video editor like Wondershare Filmora Video Editor (which would work great with animations especially, as it will allow you to actively add into the timeline as you go.)
For Win 7 or later (64-bit)
For macOS 10.12 or later
Part 3 What Are the Best Rigging Animation Tools?
For this final section of the guide, we’re finally moving on to our introduction to Rigging Animation Software. As mentioned, we’ve picked quite the variety to make sure that you have a good idea of how each will work. (A sample video has also been attached to make sure that you know what kind of projects can be created with these Rigging tools. Take the opportunity to explore those, too. If only for further edification.)
01Reallusion – Cartoon Animator 4
The first of the Rigging Animation Software on this list is Reallusion’s Cartoon Animator 4 (previously known as CrazyTalk Animator). This software was originally developed in order to allow everyone (from beginners to professionals) to create advanced animations with very little effort. To that end, it comes with a lot of motion templates and Auto Rig functions (i.e., audio lip-syncing) that the user can use to seriously cut down on the work required.
02Harmony ToonBoom
Harmony ToonBoom is well-known in the Rigging Animation Software industry. It’s the software that is used by many professionals. According to the Toon Boom Harmony website, this software was even used to create popular television shows like Rick and Morty, Bob’s Burgers, The Simpsons, and Futurama. It’s considerably more difficult to use for beginners, but it comes with many advanced functions that allow its users to create truly complex and beautiful Animations.
03Synfig Studio
The best thing about Synfig Studio (right from the onset), is that it is FREE. There are two versions of this tool — one that is ‘stable’ and the other in ‘development.’ The developmental version offers more advanced functions, of course, but for most beginners, the ‘stable’ version would serve just as well.
04Adobe Animate
Adobe Animate is software that belongs in Adobe’s long line of professional-level products. It’s a part of the classic ‘Adobe Suite.’ As a professional software, however, keep in mind that it might be more difficult to get used to at first (there’s a steep, learning curve right off the bat). But, if used correctly, it can be used to create quite impressive and eye-catching interactive animations (i.e., game content or website elements.)
05Animaker
Animaker is quite popular for beginners. It offers templates, so you can start off with an easy project if that’s what you’d like. But it also offers a lot of custom-creation tools that can be used for creating complex and professional Animations — although perhaps not at the level as the ones you might see from other alternatives (this software is most suitable for simple animations.)
06Moho Pro
Moho Pro (previously known as Anime Studio Pro) is a popular Animation program that fans of anime really love. This is one of the best software to use if you’re more interested in traditional animation (which involves a lot of free-hand drawing). Although, despite that fact, it has many advanced rigging functions as well (so you can create a mix of traditional and modern animation if you wish.)
07Pencil 2D
Pencil 2D, much like Synfig Studio, is FREE, cross-platform software. It’s quite old, but it’s matured over the years to include more and more functions (you might already be personally aware of it, in fact. It had its time to shine in the early 2010s.) The important thing to remember though is the fact that this is definitely more of a ‘traditional animation’ software. It does offer some basic rigging, but it’s best used by those who would prefer to practice the art of frame-by-frame animation.
08OpenToonz
OpenToonz is another free Rigging Animation Software (although it should be noted that there is a premium version, called Toonz, that is quite well known.) The best part about it is that it is a combination of software. One that you can use both for traditional animation and Animation. It’s also pretty easy to use, making it a good option for those just starting out.
● Key Takeaways from This Episode →
● 2D Rigging is the practice of creating ‘structure’ or ‘bones’ from which you can move characters or models. In these are usually ‘pins’ placed in bendable areas (i.e., the elbow, for bending the arm.)
● There are many differences between Animation and Animation. What you end up choosing should be decided by your project.
● Remember though, that Animations usually take longer to create even though Animations require more complex riggings.
● If you’re serious about getting into Rigging, make sure to consider the Rigging Animation Software that you choose to use very carefully. Each one has its own pros and cons.
Top 10 Best Batman Anime Movies [2024 Updated]
The 10 Best Batman Anime Movies- 2024 Updated

Shanoon Cox
Mar 27, 2024• Proven solutions
Batman is one of the most popular and long-lasting characters in DC animated movies. There can always be an argument on Marvel and DC movies. Although, DC remains the king regards to animated movies. DC animated movies are better coordinated with live-action scenes. Each story features different aspects of Gotham city and its issues.
Batman or “Bruce Wayne” is an orphan billionaire living a carefree life. Yet, he leads the gods and exceptional ones like they do not matter much. The technology and the will Batman demonstrates are peculiar. No wonder Batman animated movies are one of the bestselling of all time. I could even say, in the early 90s, Batman was the most favorite hero of DC animated movies.
10 Best Batman Anime Movies-2024 List
- 1. The Dark Knight Returns
- 2. Batman: Mask of the Phantasm
- 3. Batman: Subzero
- 4. Batman Beyond: Return of the Joker
- 5. Batman Ninja
- 6. Batman: Under the Red Hood
- 7. Batman year one
- 8. Batman: Gotham Knight
- 9. The Batman vs. Dracula
- 10. Batman: Mystery of the Batwoman
1. The Dark Knight Returns
The top of the list is Dark Knight Returns anime. What makes this animated Batman so exceptional are his rules and consciousness. Batman goes beyond his limits to save his beloved city. But on top of all, Batman avoids making a public appearance. The movie is entertaining and less dark scenes, mostly targeting the younger generation.
However, when Gotham becomes the prey of mafias, gang wars, and Joker, Batman comes out of retirement or what looked like a retirement. Although Batman was criticized by the public and even hunted by authorities, he still came back, making him the “Dark Knight.” However, in the end, it seems that Bruce Wayne dies, but still, the true fate of Batman is unknown.
2. Batman: Mask of the Phantasm
This animated movie is more or less about the journey of the orphan Bruce Wayne to Batman. It demonstrates his childhood life and how he plans to become a masked vigilante. Unable to make sense of the tragedy, Bruce tries to stop robberies and thefts. Thus, trying to control his anger but couldn’t make much impact. This dark, grim, and thrilling anime is one of the finest anime movies.
In the meantime, he becomes deeply attached to Andrea Beaumont, who could somewhat console him. However, she leaves Bruce all broken. Bruce mysteriously leaves his beloved home city in a quest to find the true purpose of his life and comebacks as a symbol of hope for his beloved city.
3. Batman: Subzero
Mr. Freeze, who is the ex-enemy of Batman, finds himself in a devastating position. A tragic accident puts his wife in a life-and-death situation. Being heartbroken, Mr. Freeze comes back to Gotham city only to find out that Barbara Gordan can only save his wife.
He kidnaps Barbara and on-bards her on the plan to save his wife. In the meantime, Batman and Robbin learn the whereabouts of Barbara. Batman rescues Barbara while pledging Mr. Freeze to save his dying wife. This demonstrates the perfect example of how high Batman holds justice and rules.
4. Batman Beyond: Return of the Joker
Joker is the most despised enemy of all. He knows Batman too well and even has some instincts about his identity. On top of that, Joker isn’t much afraid of Batman. Batman is so much fed-up by Joker doesn’t even want to believe that he is alive. Even after the Joker interrupts the live press conference.
Batman investigates and tries to join pieces to understand how it is possible? Meanwhile, the Joker equips himself with high-tech weapons and armed satellites. Joker devises a plan to kill Bruce and puts it into motion. Joker and Batman make one of the best duos of animated movies.
5. Batman Ninja
This animated movie demonstrates the courage of Batman. Even after being defeated multiple times, he still doesn’t back down from saving his beloved Gotham. Fortunately, In the end, he succeeds.
The movie’s plot is twisted with time travel through Grodd’s Quake Engine time, which sends Batman to feudal Japan. This animated Batman laearns ninja techniques to defeat his deadliest enemies. In Batman Ninja’s animated movie, Batman and bat-clan had to face multiple enemies all at once, making their positions vulnerable.
6. Batman: Under the Red Hood
Batman has pledged himself to his rules that he follows them with all his heart, even if it costs him his dear friend. Being confused about the identity of the red hood, Batman visits Joker in Arkham Asylum, who denies any involvement.
Red hood tries to kill Black Mask and damages his drug business. Joker promises Red hood for his freedom to the Black Mask. However, Joker tricks the Black Mask and destroys all the drug lords along with Black Mask. In all of this, Batman confronts Ra’s al Gul to know more about the Red Hood and who is underneath it.
7. Batman year one
A lot of comic and anime fans started loving the batman character after this particular anime. Based on the first year of Bruce Wayne’s life as a batman, the serial shows his trouble with the police and public. The first episode starts with Jim Gordan and Batman walking down a street with all the crimes and robberies in the city.
Also, the plot revolves around Jim Gordan’s life and how he is trying so hard to make a difference in the police department. As police were involved in doing deals with monsters like Falcone and Fish Mooney.
As a lot of fans might already know, Jim and Batman were always friends from the beginning. Coming back from the training, Bruce still has to decide something that will scare his enemies. So, he comes up with the bat sign. The character of the Cat woman is also introduced in it, and it was amazing how dark and toned they made her. Not to forget, this dc animated movie is scripted by Frank Miller David Mazzucchelli, so it is connected to the Dark Knight rises.
8. Batman: Gotham Knight
No, this is not Dark Knight; it is the sixth sequel of the batman anime series. An underrated DC animated movie. This anime itself is consisting of six chapters. The animation is very stylish and a little bit distracting. Like, Batman was a fat, healthy man. However, this shows him weirdly slim and fit. The first chapter is the most interesting with full of action and thrilling.
Chapters 2 and 3 are full of the mysterious part of Batman’s life. The entire island feels full of psychotic maniacs. Lucious Fox and Bruce Wayne are working together in this part, testing the new bat gear. The 4th and 5th sequel is all about how detective Gordan is convinced to believe Batman, yet cannot trust him. The 6th part contains the most positively animated scenes when Batman saves Jim Gordan’s life. Each sequel gives off the unique character and abilities of batman.
9. The Batman vs. Dracula
There is no age limit for batman animated movies. Even, adults enjoy super amuzing dance and stunts of joker in this anime. All he do is dancing around barefoot, laughing maniacally, and annoying batman with his tricks. Batman faces a strange supernatural villain in this anime. The storyline starts in Arkham Asylum, from where the Joker escapes. As soon as Batman gets a signal about it, he goes hunting for the Joker. The details in the Joker’s dressing and outfit are beyond amazing. Although, the show has some flaws, as the penguin meets Joker a little too early. In search of finding some hidden treasure, the penguin wakes up Dracula.

10. Batman: Mystery of the Batwoman
The Batwoman scene starts when she tries to stop a truck full of drugs and robbers with her excellent skills, and Batman arrives at the location. In this Batman animated movie, the penguin owns a toy factory. The animated batwoman has some extraordinary, unrealistic skills which successfully gain batman attention. The story lies in the secrecy of Batwoman and other corrupted Dons of Gotham city.
Bonus Tip-Record Batman Animated Movie and Share
In the older days, all the movies came on a CD or DVD. Luckily, now you can record and watch all the dc animated movies or batman anime movies and watch them later too or share with your friends. Wondershare Filmora is extraordinary software that allows you to screen record and edit videos.


You can download it for windows 7, 8, 10 also for iOS. Surely, it is an ideal replacement for windows movie maker. The features and tools are handy, anyone with simple computer-operating skills can learn it. Wondershare Filmora supports all kinds of audio, video, and photo formats. Either share your screen recorded videos directly on any social media platform or save them on your PC, Wondershare Filmora has made It super easy. Plus, you can burn a disk, make ISO files, download HD videos. Managing and accessing videos, along with editing is hassle-free. The interface is intuitive and user-friendly. Some of the top features are listed below.
Features:
- Record your PC screen
- Edit and trim videos
- Add effects to your video.
- Merge the saved videos.
- Noise removal feature.
- Music library.
- Thousands of filters.
Conclusion
No wonder, DC has made super exciting anime and characters like Wonder Woman and Superman but Batman remains the all-time favorite of millions of Dc fans. The action, detail, and thrill of animated movies are super thrilling.
The quality of animation and video varies significantly as some of these Batman animated movies were released in the early 90s. You can watch all the above-listed batman animated movies and record with wonder share Filmora.
Shanoon Cox
Shanoon Cox is a writer and a lover of all things video.
Follow @Shanoon Cox
Shanoon Cox
Mar 27, 2024• Proven solutions
Batman is one of the most popular and long-lasting characters in DC animated movies. There can always be an argument on Marvel and DC movies. Although, DC remains the king regards to animated movies. DC animated movies are better coordinated with live-action scenes. Each story features different aspects of Gotham city and its issues.
Batman or “Bruce Wayne” is an orphan billionaire living a carefree life. Yet, he leads the gods and exceptional ones like they do not matter much. The technology and the will Batman demonstrates are peculiar. No wonder Batman animated movies are one of the bestselling of all time. I could even say, in the early 90s, Batman was the most favorite hero of DC animated movies.
10 Best Batman Anime Movies-2024 List
- 1. The Dark Knight Returns
- 2. Batman: Mask of the Phantasm
- 3. Batman: Subzero
- 4. Batman Beyond: Return of the Joker
- 5. Batman Ninja
- 6. Batman: Under the Red Hood
- 7. Batman year one
- 8. Batman: Gotham Knight
- 9. The Batman vs. Dracula
- 10. Batman: Mystery of the Batwoman
1. The Dark Knight Returns
The top of the list is Dark Knight Returns anime. What makes this animated Batman so exceptional are his rules and consciousness. Batman goes beyond his limits to save his beloved city. But on top of all, Batman avoids making a public appearance. The movie is entertaining and less dark scenes, mostly targeting the younger generation.
However, when Gotham becomes the prey of mafias, gang wars, and Joker, Batman comes out of retirement or what looked like a retirement. Although Batman was criticized by the public and even hunted by authorities, he still came back, making him the “Dark Knight.” However, in the end, it seems that Bruce Wayne dies, but still, the true fate of Batman is unknown.
2. Batman: Mask of the Phantasm
This animated movie is more or less about the journey of the orphan Bruce Wayne to Batman. It demonstrates his childhood life and how he plans to become a masked vigilante. Unable to make sense of the tragedy, Bruce tries to stop robberies and thefts. Thus, trying to control his anger but couldn’t make much impact. This dark, grim, and thrilling anime is one of the finest anime movies.
In the meantime, he becomes deeply attached to Andrea Beaumont, who could somewhat console him. However, she leaves Bruce all broken. Bruce mysteriously leaves his beloved home city in a quest to find the true purpose of his life and comebacks as a symbol of hope for his beloved city.
3. Batman: Subzero
Mr. Freeze, who is the ex-enemy of Batman, finds himself in a devastating position. A tragic accident puts his wife in a life-and-death situation. Being heartbroken, Mr. Freeze comes back to Gotham city only to find out that Barbara Gordan can only save his wife.
He kidnaps Barbara and on-bards her on the plan to save his wife. In the meantime, Batman and Robbin learn the whereabouts of Barbara. Batman rescues Barbara while pledging Mr. Freeze to save his dying wife. This demonstrates the perfect example of how high Batman holds justice and rules.
4. Batman Beyond: Return of the Joker
Joker is the most despised enemy of all. He knows Batman too well and even has some instincts about his identity. On top of that, Joker isn’t much afraid of Batman. Batman is so much fed-up by Joker doesn’t even want to believe that he is alive. Even after the Joker interrupts the live press conference.
Batman investigates and tries to join pieces to understand how it is possible? Meanwhile, the Joker equips himself with high-tech weapons and armed satellites. Joker devises a plan to kill Bruce and puts it into motion. Joker and Batman make one of the best duos of animated movies.
5. Batman Ninja
This animated movie demonstrates the courage of Batman. Even after being defeated multiple times, he still doesn’t back down from saving his beloved Gotham. Fortunately, In the end, he succeeds.
The movie’s plot is twisted with time travel through Grodd’s Quake Engine time, which sends Batman to feudal Japan. This animated Batman laearns ninja techniques to defeat his deadliest enemies. In Batman Ninja’s animated movie, Batman and bat-clan had to face multiple enemies all at once, making their positions vulnerable.
6. Batman: Under the Red Hood
Batman has pledged himself to his rules that he follows them with all his heart, even if it costs him his dear friend. Being confused about the identity of the red hood, Batman visits Joker in Arkham Asylum, who denies any involvement.
Red hood tries to kill Black Mask and damages his drug business. Joker promises Red hood for his freedom to the Black Mask. However, Joker tricks the Black Mask and destroys all the drug lords along with Black Mask. In all of this, Batman confronts Ra’s al Gul to know more about the Red Hood and who is underneath it.
7. Batman year one
A lot of comic and anime fans started loving the batman character after this particular anime. Based on the first year of Bruce Wayne’s life as a batman, the serial shows his trouble with the police and public. The first episode starts with Jim Gordan and Batman walking down a street with all the crimes and robberies in the city.
Also, the plot revolves around Jim Gordan’s life and how he is trying so hard to make a difference in the police department. As police were involved in doing deals with monsters like Falcone and Fish Mooney.
As a lot of fans might already know, Jim and Batman were always friends from the beginning. Coming back from the training, Bruce still has to decide something that will scare his enemies. So, he comes up with the bat sign. The character of the Cat woman is also introduced in it, and it was amazing how dark and toned they made her. Not to forget, this dc animated movie is scripted by Frank Miller David Mazzucchelli, so it is connected to the Dark Knight rises.
8. Batman: Gotham Knight
No, this is not Dark Knight; it is the sixth sequel of the batman anime series. An underrated DC animated movie. This anime itself is consisting of six chapters. The animation is very stylish and a little bit distracting. Like, Batman was a fat, healthy man. However, this shows him weirdly slim and fit. The first chapter is the most interesting with full of action and thrilling.
Chapters 2 and 3 are full of the mysterious part of Batman’s life. The entire island feels full of psychotic maniacs. Lucious Fox and Bruce Wayne are working together in this part, testing the new bat gear. The 4th and 5th sequel is all about how detective Gordan is convinced to believe Batman, yet cannot trust him. The 6th part contains the most positively animated scenes when Batman saves Jim Gordan’s life. Each sequel gives off the unique character and abilities of batman.
9. The Batman vs. Dracula
There is no age limit for batman animated movies. Even, adults enjoy super amuzing dance and stunts of joker in this anime. All he do is dancing around barefoot, laughing maniacally, and annoying batman with his tricks. Batman faces a strange supernatural villain in this anime. The storyline starts in Arkham Asylum, from where the Joker escapes. As soon as Batman gets a signal about it, he goes hunting for the Joker. The details in the Joker’s dressing and outfit are beyond amazing. Although, the show has some flaws, as the penguin meets Joker a little too early. In search of finding some hidden treasure, the penguin wakes up Dracula.
10. Batman: Mystery of the Batwoman
The Batwoman scene starts when she tries to stop a truck full of drugs and robbers with her excellent skills, and Batman arrives at the location. In this Batman animated movie, the penguin owns a toy factory. The animated batwoman has some extraordinary, unrealistic skills which successfully gain batman attention. The story lies in the secrecy of Batwoman and other corrupted Dons of Gotham city.
Bonus Tip-Record Batman Animated Movie and Share
In the older days, all the movies came on a CD or DVD. Luckily, now you can record and watch all the dc animated movies or batman anime movies and watch them later too or share with your friends. Wondershare Filmora is extraordinary software that allows you to screen record and edit videos.
You can download it for windows 7, 8, 10 also for iOS. Surely, it is an ideal replacement for windows movie maker. The features and tools are handy, anyone with simple computer-operating skills can learn it. Wondershare Filmora supports all kinds of audio, video, and photo formats. Either share your screen recorded videos directly on any social media platform or save them on your PC, Wondershare Filmora has made It super easy. Plus, you can burn a disk, make ISO files, download HD videos. Managing and accessing videos, along with editing is hassle-free. The interface is intuitive and user-friendly. Some of the top features are listed below.
Features:
- Record your PC screen
- Edit and trim videos
- Add effects to your video.
- Merge the saved videos.
- Noise removal feature.
- Music library.
- Thousands of filters.
Conclusion
No wonder, DC has made super exciting anime and characters like Wonder Woman and Superman but Batman remains the all-time favorite of millions of Dc fans. The action, detail, and thrill of animated movies are super thrilling.
The quality of animation and video varies significantly as some of these Batman animated movies were released in the early 90s. You can watch all the above-listed batman animated movies and record with wonder share Filmora.
Shanoon Cox
Shanoon Cox is a writer and a lover of all things video.
Follow @Shanoon Cox
How to Make a GIF in Photoshop
How to Make a GIF in Photoshop
Shanoon Cox
Mar 27, 2024• Proven solutions
We all love GIFs and their impressive style of delivering stories. They not only contain set of frames rather they wrap inside lots of emotions and thoughts of creators. You can easily find numbers of eye catching GIF collections over social media sites.
If you love these animated images then probably you might have initiated a search over internet about how to create GIFs. And search engine must have shown you a path to unlimited GIF creator tools . That’s common. But here we are going to talk about one professional recommendation for GIF creation. Yeah, it is Photoshop and it can instantly generate appealing animated Gifs for you.
Below you will be able to learn strategies to create GIF images with latest version of Photoshop:
How to make a GIF in Photoshop
Method 1: Make a GIF from Video in Photoshop
Step 1: Launch your software
Once you have downloaded your Photoshop software tool on your device then simply run it. Note that CS6 versions of Photoshop provide full support to animated files.
Step 2: Get your video clip imported
As your software timeline is available on screen, now you have to import your desired video file to this platform. Simple go to File option from top left corner of toolbar and then from drop down menu select import. Further select, video frames to layers. Choose your video file and soon all its frames will appear on screen. Photoshop also allows users to work on clipped versions of video files; in that case you can use slider to limit the frames at the time of uploading process.
Step 3: Adjust file Import Settings
You will be glad to know that Photoshop offers creative editing features where you can also make color balance adjustments. When you are done with the frame adjustments then go to File and now choose Save for Web from drop down menu.
It will immediately open one new window containing all advanced settings that can assist in better customization of your GIF image. As users need small file size for web uploading needs so you can adjust all these parameters below to get best results:
Colors: Colors are most important descriptive elements for any video so their selection must be done wisely. As more colors can ensure better view but for reducing file size at the same time you can prefer to drop this selection up to 128.
Dither: The dithering process is used to scatter so many colour rich pixels into image so that even a limited colour package can develop intermediate colours over it. If you pick higher number of colours then definitely the image will look finer but at the cost of higher file size.
Lossy: If you want to add some internal drop in the quality of image then this setting is useful. But try to keep it lower because higher range may destroy actual information from image whereas smaller value is good if you want to just reduce the file size.
Size: Users can prefer to change overall dimensions of their GIF that ultimately leads to huge impact on file size.
Step 4: Time to Save your GIF file
When you are done with the editing process and want to save the newly created GIF image then simply move to the File menu available on top left corner of software window and from drop down menu choose “Save for Web” option. It will further ask you to adjust the output file parameters ahead, make changes as per need of your project and finally get it saved to your device.
Check this video to know more:
Method 2: Make a GIF from Still Photos in Photoshop
It is also possible to develop animated GIF images from collection of still images in Photoshop. In this method, users simply need to maintain layers of each frame and then they are sequenced using timeline tool or Photoshop’s animation based editing. Here are few simple to follow steps to get best results:
1. Step 1
First of all, user is advised to bring all desired still images into a single folder in his computer. Then go to the software window, move to Files option and further choose Scripts. It will provide you an option for Load Files into Stack. Now hit browse button and choose your images from desktop folder that you further want to use for development of GIF image. Hit OK. It will immediately open a new composition on screen and all these stills will appear like individual layers of a new single image.
Users can reorder or rearrange these frames as per their desired GIF animation but note that the frame that you want to place at first position in your final GIF must appear at bottom layer and others must follow the same sequence upwards.
All these GIF layers can also be created individually by user using Photoshop tools. To do this, simply run your Photoshop and then use File > New option to start working with a new project. Hit Ok. It is time to unlock the background layer; you can do this by simply double clicking on the lock icon available on screen. Now in order to create a new layer over it, move to Layer option and press New button. You can design all your new layers with this process. As soon as all your images get created then arrange them in bottom to top order same as the previous method.
Note that, this process becomes effective only if you are working on the older version of software and it does not have “Load Files into Stack” feature. You can simply load all your desired stills on Photoshop platform and then drag them to new project window. The free transform tool of Photoshop can help you to resize all the added layers as per need. Use shortcut keys: Ctrl+T to make changes faster.
2. Step 2
Now as your entire GIF image layers have been arranged so next task is to start sequencing. If you are working on CS5 or lower version of Photoshop then you van move to animation window by using Window plus Animation option. On the other side, CS6 or CC users need to click over Window + Timeline option.
As soon as sequencing tool appears on your screen, you will find a small right facing arrow on upper right corner of your screen. Hit this arrow and then choose “Make Frames from Layer” option. The eye icon can be used to hide all unwanted layers. From bottom menu, you can choose looping sequence for your image.
3. Step 3
Finally your animated GIF image is ready and now you can export it to your computer. Hit File option and then Chose Save for Web from drop down menu. But note that for web uploading a file size less then 1MB is acceptable. You can alter it by changing, loss, dither, color and size settings. At last hit Save button and now you can upload your GIF.
Read More to Get : the ultimate guide on How to Convert GIF to Video on your laptop or phone.
Conclusion
If you feel like Photoshop is difficult to learn, Filmora meme maker is your ultimate solution. It helps you make image, GIF and video memes directly without watermark. It is totally FREE to use and no sign up. You can change text size, color and position to create caption when you are editing. You can also put text inside or outside in GIF. Just with a few clicks, your GIF is done . Try it now!
Shanoon Cox
Shanoon Cox is a writer and a lover of all things video.
Follow @Shanoon Cox
Shanoon Cox
Mar 27, 2024• Proven solutions
We all love GIFs and their impressive style of delivering stories. They not only contain set of frames rather they wrap inside lots of emotions and thoughts of creators. You can easily find numbers of eye catching GIF collections over social media sites.
If you love these animated images then probably you might have initiated a search over internet about how to create GIFs. And search engine must have shown you a path to unlimited GIF creator tools . That’s common. But here we are going to talk about one professional recommendation for GIF creation. Yeah, it is Photoshop and it can instantly generate appealing animated Gifs for you.
Below you will be able to learn strategies to create GIF images with latest version of Photoshop:
How to make a GIF in Photoshop
Method 1: Make a GIF from Video in Photoshop
Step 1: Launch your software
Once you have downloaded your Photoshop software tool on your device then simply run it. Note that CS6 versions of Photoshop provide full support to animated files.
Step 2: Get your video clip imported
As your software timeline is available on screen, now you have to import your desired video file to this platform. Simple go to File option from top left corner of toolbar and then from drop down menu select import. Further select, video frames to layers. Choose your video file and soon all its frames will appear on screen. Photoshop also allows users to work on clipped versions of video files; in that case you can use slider to limit the frames at the time of uploading process.
Step 3: Adjust file Import Settings
You will be glad to know that Photoshop offers creative editing features where you can also make color balance adjustments. When you are done with the frame adjustments then go to File and now choose Save for Web from drop down menu.
It will immediately open one new window containing all advanced settings that can assist in better customization of your GIF image. As users need small file size for web uploading needs so you can adjust all these parameters below to get best results:
Colors: Colors are most important descriptive elements for any video so their selection must be done wisely. As more colors can ensure better view but for reducing file size at the same time you can prefer to drop this selection up to 128.
Dither: The dithering process is used to scatter so many colour rich pixels into image so that even a limited colour package can develop intermediate colours over it. If you pick higher number of colours then definitely the image will look finer but at the cost of higher file size.
Lossy: If you want to add some internal drop in the quality of image then this setting is useful. But try to keep it lower because higher range may destroy actual information from image whereas smaller value is good if you want to just reduce the file size.
Size: Users can prefer to change overall dimensions of their GIF that ultimately leads to huge impact on file size.
Step 4: Time to Save your GIF file
When you are done with the editing process and want to save the newly created GIF image then simply move to the File menu available on top left corner of software window and from drop down menu choose “Save for Web” option. It will further ask you to adjust the output file parameters ahead, make changes as per need of your project and finally get it saved to your device.
Check this video to know more:
Method 2: Make a GIF from Still Photos in Photoshop
It is also possible to develop animated GIF images from collection of still images in Photoshop. In this method, users simply need to maintain layers of each frame and then they are sequenced using timeline tool or Photoshop’s animation based editing. Here are few simple to follow steps to get best results:
1. Step 1
First of all, user is advised to bring all desired still images into a single folder in his computer. Then go to the software window, move to Files option and further choose Scripts. It will provide you an option for Load Files into Stack. Now hit browse button and choose your images from desktop folder that you further want to use for development of GIF image. Hit OK. It will immediately open a new composition on screen and all these stills will appear like individual layers of a new single image.
Users can reorder or rearrange these frames as per their desired GIF animation but note that the frame that you want to place at first position in your final GIF must appear at bottom layer and others must follow the same sequence upwards.
All these GIF layers can also be created individually by user using Photoshop tools. To do this, simply run your Photoshop and then use File > New option to start working with a new project. Hit Ok. It is time to unlock the background layer; you can do this by simply double clicking on the lock icon available on screen. Now in order to create a new layer over it, move to Layer option and press New button. You can design all your new layers with this process. As soon as all your images get created then arrange them in bottom to top order same as the previous method.
Note that, this process becomes effective only if you are working on the older version of software and it does not have “Load Files into Stack” feature. You can simply load all your desired stills on Photoshop platform and then drag them to new project window. The free transform tool of Photoshop can help you to resize all the added layers as per need. Use shortcut keys: Ctrl+T to make changes faster.
2. Step 2
Now as your entire GIF image layers have been arranged so next task is to start sequencing. If you are working on CS5 or lower version of Photoshop then you van move to animation window by using Window plus Animation option. On the other side, CS6 or CC users need to click over Window + Timeline option.
As soon as sequencing tool appears on your screen, you will find a small right facing arrow on upper right corner of your screen. Hit this arrow and then choose “Make Frames from Layer” option. The eye icon can be used to hide all unwanted layers. From bottom menu, you can choose looping sequence for your image.
3. Step 3
Finally your animated GIF image is ready and now you can export it to your computer. Hit File option and then Chose Save for Web from drop down menu. But note that for web uploading a file size less then 1MB is acceptable. You can alter it by changing, loss, dither, color and size settings. At last hit Save button and now you can upload your GIF.
Read More to Get : the ultimate guide on How to Convert GIF to Video on your laptop or phone.
Conclusion
If you feel like Photoshop is difficult to learn, Filmora meme maker is your ultimate solution. It helps you make image, GIF and video memes directly without watermark. It is totally FREE to use and no sign up. You can change text size, color and position to create caption when you are editing. You can also put text inside or outside in GIF. Just with a few clicks, your GIF is done . Try it now!
Shanoon Cox
Shanoon Cox is a writer and a lover of all things video.
Follow @Shanoon Cox
Also read:
- 2024 Approved Fuel Creativity with 10 Awesome Collection of 2D Animation Examples
- How to Liven Up Your Animate Website on Scroll
- New 2024 Approved Simple Shortcut to Convert Videos to Gifs on iPhone
- New 2024 Approved How to Create a YouTube Intro Animation Like a Pro
- Updated Some Techniques for Creating Animated Logo That Few People Know About for 2024
- Updated In 2024, 15 Best Stop Motion Animation Kits to Fuel Creativity
- New Learn Easy Blender Rigging in Only 2 Minutes
- New In 2024, 10 Most Memorable Japanese Cat Cartoons
- Updated Tips to Create Animated Social Media Posts in Canva for 2024
- New 2024 Approved Animate Graphics in Canva
- In 2024, Before You Learn 3D Animation Some Things You Should Know
- New 2024 Approved 10 Amazing Cartoon Music Examples You Need to Bookmark
- In 2024, Cartoon Fundamentals How to Learn Cartoon Characters Sketch Quickly
- New Adobe Rigger Is AWESOME for 2024
- Everything You Need to Know About Becoming a Motion Graphic Designer
- 18 Best Tools and Services to Create Animated Videos for Your Business for 2024
- In 2024, Best Websites to Download Animated GIFs for Free-Free GIF Download
- Animate Your Photo Online with These Awesome Tools for 2024
- 10 Realistic Cartoon Characters You Would Run Away From if You Met in Real Life
- 2024 Approved 10 Realistic Cartoon Characters You Would Run Away From if You Met in Real Life
- New What Is Still Motion Animation, In 2024
- New In 2024, Animated Business Logos and Tools to Create
- New Have You Seen the Facebook Cartoon App Everyones Using Recently for 2024
- Updated Best 15 Greatest Claymation Movies of All Time for 2024
- Updated Top Claymation Shows That Make Your Memories Unforgettable for 2024
- New 4 Smart Solutions to Create or Find Good Morning/Night GIFs
- Updated What Is the Meaning of Motion Graphics for 2024
- Updated Creative Ways to Make iPhone Text GIF for 2024
- Updated In 2024, How to Make an Animated Travel Map Video?
- Updated What Make Aesthetic Cartoon Drawing More Understandable
- New 2024 Approved How to Make My Photo 3D Cartoon Online
- New In 2024, Before You Learn Facebook Slideshow 5 Things You Should Know
- New 2024 Approved 5 Foolproof Amazing Anime Text to Speech Tips
- Updated 2024 Approved Animate Graphics in Canva
- New 2024 Approved Learn How to Make Architecture Animation
- New 2024 Approved Can I Still Do Animated Logo Design Without Design Skills?
- New Why These 10 Top Text Motion Templates Are Worth Your Attention
- Can I Still Do Animated Logo Design Without Design Skills?
- New 10 Great MP4 to GIF Converters to Get Perfect-Made GIF for 2024
- Updated 2024 Approved All About 3D Medical Animation And Its Uses
- Top 10 Cartoon Canvas Painting Ideas for Total Beginners
- Updated 10 Great Moving Animation PowerPoint Techniques for 2024
- Updated 2024 Approved Best 10 Animated DP for WhatsApp
- Updated In 2024, How to Learn Cartoon Characters Sketch Quickly
- New Whiteboard Animation Services Top 15 Animation Companies to Pick for 2024
- In 2024, How to Make GIF Stickers for WhatsApp 100 The Easy Way
- Updated In 2024, Learn Simple Blender Rigging in Only 2 Minutes
- Complete Tutorial to Use VPNa to Fake GPS Location On Honor X50i+ | Dr.fone
- Forgot Pattern Lock? Heres How You Can Unlock Samsung Galaxy M54 5G Pattern Lock Screen
- How PGSharp Save You from Ban While Spoofing Pokemon Go On Meizu 21? | Dr.fone
- Disabled iPhone 14 How to Unlock a Disabled iPhone 14? | Dr.fone
- How To Activate and Use Life360 Ghost Mode On OnePlus 11 5G | Dr.fone
- Easy steps to recover deleted data from Honor Magic 6 Pro
- In 2024, 5 Ways To Teach You To Transfer Files from OnePlus Nord N30 SE to Other Android Devices Easily | Dr.fone
- How to Change Netflix Location to Get More Country Version On Honor 70 Lite 5G | Dr.fone
- Prank Your Friends! Easy Ways to Fake and Share Google Maps Location On Honor X50 | Dr.fone
- In 2024, Edit and Send Fake Location on Telegram For your HTC U23 in 3 Ways | Dr.fone
- Best Vivo V27e Pattern Lock Removal Tools Remove Android Pattern Lock Without Losing Data
- Reliable User Guide to Fix Huawei P60 Running Slow and Freezing | Dr.fone
- In 2024, A Complete Guide To OEM Unlocking on Realme C67 4G
- In 2024, Where Is the Best Place to Catch Dratini On Tecno Pop 7 Pro | Dr.fone
- Things You Dont Know About Asus ROG Phone 7 Reset Code | Dr.fone
- How to sign Excel 2003 files online
- Spoofing Life360 How to Do it on Realme 11 Pro? | Dr.fone
- Top 5 Car Locator Apps for Samsung Galaxy Z Flip 5 | Dr.fone
- In 2024, What Does Enter PUK Code Mean And Why Did The Sim Get PUK Blocked On Oppo A1x 5G Device
- Can I Bypass a Forgotten Phone Password Of Vivo?
- What To Do When Oppo A2 Has Black Screen of Death? | Dr.fone
- 15 Best Strongest Pokémon To Use in Pokémon GO PvP Leagues For Realme V30T | Dr.fone
- 3 Effective Ways to Bypass Activation Lock from Apple iPhone 13 Pro
- In 2024, 10 Fake GPS Location Apps on Android Of your Oppo Reno 10 Pro+ 5G | Dr.fone
- In 2024, 6 Ways To Transfer Contacts From Itel P55 to iPhone | Dr.fone
- Title: New Best 12 2D Animation Studios All Should Check Out
- Author: Elon
- Created at : 2024-05-19 03:04:31
- Updated at : 2024-05-20 03:04:31
- Link: https://animation-videos.techidaily.com/new-best-12-2d-animation-studios-all-should-check-out/
- License: This work is licensed under CC BY-NC-SA 4.0.
