

New Best 12 Evil Cartoon Characters of All Time for 2024
Best 12 Evil Cartoon Characters of All Time
Top 12 Evil Cartoon Characters of All Time
An easy yet powerful editor
Numerous effects to choose from
Detailed tutorials provided by the official channel
The time when Incredible 2 hits thetheatres, family of Super-starshad to face off against the new villain ‘The Screen Slaver’, he was a villain who make use of hypnotism to get the people do what he want to. Perhaps, only the time will tell us if any upcoming bad-guy will be brutal enough to gets added in the list of great cartoon animated villains throughout the history.Your favourite cartoon superhero would not be a super hero without a villain to battle. So, it’s the villain who set the stage or fire and plot in a motion.Many cartoon evil cartoon characters from the past shown us their presence with genuinely memorable moments and crimes that were both exciting & exhilarating to watch on the screen.
Presenting you the list of fifteen most incredible villains of all time when it comes to cartoon characters.
01Cruella De Vil, From 101 Dalmatians
Name of the cartoon character: Cruella De Vil
Your next villain on the list alone includes the words like Devil, Cruel, Evil, but you don’t need to spell each one of them in order to prove how wicked and cruel this female character is. A person don’t need to be a pet lover to know about the obsession of scalping puppies for the fur in terms of sick & twisted, however for the evil cartoon character ‘Cruella De Vil’, it is not just the horrible hobby but also a whole way of life. Aside from having penchant for the puppy murders, she loves to sit in home alone. Cartoon Cruella devilis the central antagonist of the animated series one hundred and one Dalmatians. Her death’s head-face, schizoid black &white head of hairsas well as her cheekbones which looks similar to a holding position of double-pointed arrows inside her mouth are enough to kill you. Her satanic, go-for-broke craving to grab those spotted puppies are always ready to bring Goosebumps. Cruella Deville cartooncharacter is one of the scariest and fantastic characters of that era.
02Hades, Disney’s Hercules
Name of the cartoon character: Hades
James Woods’ anachronistic Hollywood style “sweetie baby” patter and fast-talking, probably is not that far-off exactly from what you would like to hear in real life for TinselTown. In one of the episode of spin-off TV series by Disney: Hercules featured Jafar’s ghost in Strangers on the Train-style of plot to switch the enemies, Aladdin for the Hercules. Hades cannot believe in his guest’s melodramatic-histrionics & then indulges in few more wisecracks at the Jafar’s expense.
03Tasmanian Devil
Name of the cartoon character: Taz
Tasmanian devil or Tazharbours a very special craving for the rabbits and talking about its cruel acts, he always love to crave for his favourite food ‘Bunny the rabbit’. He is a strong murderous-beast with jaws as brutal as a steel trap. With his ravenous appetite he is capable of eating tigers, buffaloes, lions, elephants, donkeys, giraffes, rhinoceroses,octopuses, moose and of course Rabbits. In the animated character “Ducking the Devil”, a warning is show which describe TASMANIAN DEVIL as the most powerful, evil-tempered, vicious brute who is hungry for food every single time. He comes among the list of Tassie devil cartoonfor his killing abilities.
04Gru, Despicable Me
Name of the cartoon character: Gru
Gru is the central character of the movie franchise ‘Despicable Me’ and he is both villain & hero at once. He never seems to put any of his loved ones in danger physically but his villainy comes more in terms of mega-pranks. Thanks to his latent cuddliness and goofball horde of Minions won’s the heart of millions.
05Jafar From Aladdin
Name of the cartoon character: Jafar
Jafar always managed to put himself one step away from other townspeople who are searching for Aladdin . He is Sultan’s evil advisor, and having lots of negative qualities that goes beyond his questionable facial-hair. In the entire episodes of Disney’s classic Aladdin, Jafar always attempts to overthrow sultan, and forces Princess Jasmine to marry him and even plans to kill Aladdin.
06Ren Hoek, The Ren and Stimpy Show
Name of the cartoon character: Ren Hoek
He is the evil cartoon character who tortures & kills animals, but why? Well, there is no reason behind it, he just love to murder poor animals & one of the episodes of ‘The Ren and Stimpy Show’ he nearly whacks somebody’s eyeballs out. With his psychotic characteristics he is still among the list of dangerously wicked villains of all time. He is theEvil dog cartoonfor all the puppies.
07Scar, The Lion King
Name of the cartoon character: Scar
He is the central most antagonist of the Disney’s 1994 most anticipated and most interesting animated feature movie, The Lion King. He is the 2ndson of Uru & Ahadi, who were in past, the King and the Queen of this Pride Lands. He is also a younger brother of Mufasa,&uncle of Simba.
He is yet another glib feline from the Disney’s villain and ready to show his evilness with famous song “Be Prepared”. With Jeremy Irons’ outstanding delivery & sarcastic personality is all you need to watch as Scar always imagines himself asa fuehrer in another famous song ‘Triumph of the Will-style’.
Scar look at the things with his sinister approach and even one step further by convincing his nephew Simba for his father’s death after murdering her younger brother to gain access to the throw of king.
With his gang of hyenas, he take over his new-kingdom & ruled the same with his wicked leadership skills which is as horrible as Scar’s morals. He is always ready to show you his sinful supervillain approach who destroys everything in and around you.
08Sher-Khan, The Jungle book
Name of the cartoon character: Sher-Khan
With George Sanders’s sophisticated, urbane voice the role of Sher-khan was one of the most brilliant performances anevil cat cartoon can ever have. It was the kind of performance that can’t be replicated. SherKhan’s above-it-all voice delivery is just an incredible as well as an interesting alternative to voiceless predator who usually threatening hero in this Disney film.
09Mojo Jojo, Powerpuff Girls
Name of the cartoon character: Mojo Jojo
He was the one with tough cookie, a booming voice &different diabolical schemes as compared to what he knew in terms of what next to do. The bad monkey of animated cartoon characters always in a hurry to ruin the lives of Powerpuff Girls for different occasions, & eventually succeeded in doing so in various episodes of ‘Powerpuff Girls’. A successful villain is always memorable, but one who is hyper-intelligent sometimes wins few more brownie points.
10The Joker, From Batman Animated Series
Name of the cartoon character: The Joker
He is the most anticipated TV villain that you can’t forget to add in the list, he is the villain of the villains. The Joker from the Batman animated series and comic books is the most iconic villains of all times. Every single iteration of this ‘Clown Prince of Crime’delivers a new reason to love him. You can’t end the list of evil cartoon characters from 90’s without including MR. J. He has an intent of turning the ‘Gotham City ’ into his petrifying playground. It takes immense pleasure to watch him in each & every single moment while torturing with his killing performance to others. He love to create chaos at each place where he goes.
11Maleficent, Sleeping Beauty
Name of the cartoon character: Maleficent
With her icy elegant looks and great entrance with a blaze of eldritch flame makes her a supreme contender of the most evil cartoon face. She has an impeccable fashion-sense also with spiky black &purple robes and not to forget her headpiece shaped-like set of elegantly curved-horns.
She is the self-described “mistress’ of all devils.With being a nasty babe, she is sarcastically evil with her taunts and tortures of shooting lightning-bolts at her own cartoonish-minions. She is the bad-ass and always manages to sneak-peak a naughty word into the Disney toon at the time of turning into one of the coolest-looking cartoon-dragons ever.
12The Evil Queen, Snow White
Name of the cartoon character: The Evil Queen
The evil queen’s performance in Snow white is way more than even the 21st century’s standards and she is still the scariest devil cartoon character. There is always a pair of ‘excellent’ shots in the Snow white movie that never fails to impress anyone. The elegant evil queen downs the area that will transform the queen into the withered hag with both foreground &background elements framing the queen, suddenly slides intothe opposite directions & at the end dissolve into the blur when the room starts to spin around her-this is something powerful multiplane-effect. She always manages to tell you about her evil acts with breath-taking moments of visually appealing storytelling.
The Final Words
● When we mix up golden ages of animation & villainy, we will get amazing galleries of animated baddies, this list also have those baddies with mix of emotions & love for them.
● The Devils described demonstrating us about the level of creativity.
● You can refurbish your classic moments with those characters from this list with successfully greatest villains.
Also keep this suggestion of learning about the ways to simply turn yourself into one of your favourite Evil anime character through the use of filters and little understanding of anime.
Relive your classic moments of evil anime characters with FilmoraVideo Editor App
Remembering your coolest Anime Characters? Wondershare Filmora Video Editor can let you achieve this by turning yourself into evil character in just few steps.
For Win 7 or later (64-bit)
For macOS 10.12 or later
Also, you can apply:
● Record your anime
● Enhancement to your video contents through multiple effects
● Make use of sound effects to give yourself an devil look and feel.
● Customize the anime or cartoon videos
● Apply different styles of video effects
You Can Turn a TikTok Into a GIF Now. Here’s How
You Can Turn a TikTok Into a GIF Now. Here’s How
An easy yet powerful editor
Numerous effects to choose from
Detailed tutorials provided by the official channel
Want to add sharing flexibility to TikTok videos? Convert them into GIFs!
In this article
01 [What is GIF TikTok?](#Part 1)
02 [How to Make a GIF From a TikTok Video](#Part 2)
Part 1 What Is TikTok GIF?
In today’s IT enhanced lifestyle, having a profound reach on social media is the new name of popularity. Everyone out there is profusely keen on creating and sharing a plethora of content varieties; memes, videos, animations and what not, across social communities. However, TikTok videos lag behind in this race; often lack the ‘Share’ flexibility.
To match up, there are solutions to convert TikTok video into GIFs. A TikTok GIF is a short, impactful and to the point clip that’s here to share fun and exciting content in the most interesting ways. If you have a bunch of TikTok videos to share with your peers, but missing out on an effective sharing solution, you can conveniently look forward to convert those videos into catchy and interesting GIFs that will definitely hold the attention of your viewers.
Feel motivated? See through the rest of this article to know some quick and easy TikTok to GIF conversion tools and software!
Part 2 How to Make a GIF From a TikTok Video
When looking through solutions to create GIF TikTok videos, you will find a pool of methods and tools available on the internet. All you need to do is select the best one for yourself and get started with converting TikTok Videos into GIFs. Given below are some of the best solutions adhering to the aforesaid concern:
01Filmora
Wondershare Filmora Video Editor is one of the best application software to create a TikTok GIF. This is a simple and smart converter application that caters to your concern in just a few minutes. What’s best is that this app is absolutely free to use and is compatible with your PC, smartphone and a variety of other devices. Here’s how you can use Filmora to convert your TikTok videos into GIFs:

Step 1: Import Your Video
Start with importing a desired TikTok video file to the Filmora timeline. You can also ‘Drag and Drop’ the video file to the editor timeline. Using this application, you have the flexibility to import your clip in almost any video format.

Step 2: Edit Your Clip
Suited to your content preferences, you can edit and enhance your clips with a variety of effects, like, cut, trim, rotate, split, etc., and make appropriate speed adjustments. You can even include text messages to make your GIF more impactful.

Wondershare Filmora
Get started easily with Filmora’s powerful performance, intuitive interface, and countless effects!
Try It Free Try It Free Try It Free Learn More >

Step 3: Let’s Save and Share!
When you are happy, save your work using the .gif file extension. That’s it! You are ready to share your creation with your social media peers.

02TikTok’s Inbuilt GIF Converter
TikTok allows you to directly convert its videos into GIFs. You can use the TikTok application in your smartphone to take up the conversion process. All you need to do is follow the steps given below:
Step 1: Select Your TikTok Video
To get started, open the TikTok application in your smartphone and select the video you want to convert into GIF.
Step 2: Share the Video
Click the ‘Share’ icon at the right of the video screen.

Step 3: Format Selection
Scroll down to the bottom of the screen and choose the ‘Share as GIF’ option. This will automatically convert your TikTok video into GIF in a few seconds.

Step 4: Save and Export
Click on the ‘Save Image’ option to save the GIF in your phone’s gallery. You can also export your creation to different social media platforms.
03Wondershare UniConverter
This one is a handy toolbox loaded with a variety of features that allow you to play with your video creativity. Using this tool, you can quickly create GIF for TikTok and also fix the size and duration of the same. This software supports almost all video formats and comes with an inbuilt editor that you can use to add effects and make your GIFs all the more interesting. This is compatible with your Windows or MacOS PC.
Take the following steps to create GIFs from TikTok videos using this software:

Step 1: Download and Launch the Application
Download the Wondershare UniConverter application to your PC from the software’s official website.
Step 2: Open GIF Maker
In the app’s welcome screen, navigate to the ‘Toolbox’ tab and select ‘GIF Maker’ from the panel that gets displayed.
Step 3: Upload Your TikTok Video
In the next pop-up window, select ‘Video to GIF’ and click on the (+) icon in the centre. You can also click on ‘Add Files’ in the top left and choose a saved TikTok video from your PC to upload.

Step 4: Trim Your Video
Trim the uploaded video to the desired portion from where you wish to create the GIF and set adequate time frames for the same. You can even drag the video thumbnail slider to trim the video.

Step 5: Let’s Get Creating!
Set the final size and frame rate from the ‘Output Size’ and ‘Frame Rate’ tabs respectively. To save your creation, browse and choose the desired system folder by clicking on the ‘Save to:’ tab. Lastly, select ‘Create GIF’ to start the conversion process.

04Kapwing GIF Maker
There may be instances where you cannot save or share TikTok videos. To cut the rush in such cases, you can use Kapwing’s GIF Maker to convert videos from TikTok to GIF online. This one is a free video editing tool that works with almost all internet enabled smartphones and supports almost all common video formats. Here’s what you need to do for making GIFs from TikTok videos using this tool:
Step 1: Copy a Video Link
Search your desired TikTok video and click on the ‘Share’ icon. In the drop down menu, select ‘Copy Link’ to save the video link in your device memory. Once this happens, you will get a confirmation message that says, ‘Copied’.

Step 2: Open GIF Maker
Open the GIF Maker tool in your browser and paste the saved TikTok video link in the editor’s URL bar. This will automatically redirect you to the Kapwing Studio, where you have the liberty to trim, crop or split your video clip to the desired time frame. It is better to set a play span of 3-5 seconds.
You can trim the clip by dragging its ends or introduce cuts at specific points using the split button above the editor timeline. To make volume adjustments, select the video layer and click on ‘Edit Video’ and move the adjuster circle to the left or right to decrease, increase and mute the video volume.


Step 3: Download and Share Your Creation
To save your work, tap ‘Export Video’ at the top and select ‘Export as GIF’ from the drop down menu. Wait for the conversion process to finish and click ‘Download’. This will save the GIF to your device.
You will find a watermark at the corner of your clip. Click ‘Sign In to Remove the Watermark’ to remove it. A workspace for the present and later projects will be created, where you can save you work for a couple of days with Kapwing’s free version. To export your work to social media, click ‘Share’. You can even host your creation on websites. Just copy the video link and select ‘Embed’.

05TT Downloader
This one is another online tool you can use to create GIFs from TikTok videos. This is a quick converter tool that transforms TikTok videos to GIFs in 5 easy steps within minutes. It is a browser tool and does not require a software download. All you need to do is explained in the following steps:

Step 1:
Visit the official site of the tool.
Step 2:
Select ‘TikTok to GIF’ to get redirected to the TikTok to GIF Converter home page.
Step 3:
Copy and paste the desired TikTok video link in the converter’s URL bar. To proceed further, click on ‘Get Video’.

Step 4:
Trim your clip within a time frame of 1-10 seconds.
Step 5:
Click ‘Done’ to initiate the conversion process. Once it finishes, you can download the converted GIF to your device.
06MiniTool MovieMaker
You can prefer this tool to convert TikTok videos in your PC into GIFs. This tool gives you the liberty to trim, cut, reverse and rotate GIFs and even add text and filters to them. Here’s how you can use this tool to transform TikTok videos into interesting GIFs:
Step 1:
Download and install this GIF maker tool in your PC. Launch the same when you are done with the installation process.
Step 2:
In the converter window, import and add your desired TikTok clip into the converter timeline.

Step 3:
You are now free to edit and add text to your video.
Step 4:
Once you finish, tap ‘Export’ and choose your output format as GIF.
Step 5:
Hit ‘Export’ to let the conversion process begin.
● Key Takeaways from This Episode →
● TikTok videos often lack the save and share features, which is an obvious necessity of today’s social outlook.
● Varieties of online tools and software are available for converting TikTok videos to GIFs to increase the sharing flexibility.
● Filmora is a quick and intelligent choice to take up the conversion process within a catch of few clicks.
Want to add sharing flexibility to TikTok videos? Convert them into GIFs!
In this article
01 [What is GIF TikTok?](#Part 1)
02 [How to Make a GIF From a TikTok Video](#Part 2)
Part 1 What Is TikTok GIF?
In today’s IT enhanced lifestyle, having a profound reach on social media is the new name of popularity. Everyone out there is profusely keen on creating and sharing a plethora of content varieties; memes, videos, animations and what not, across social communities. However, TikTok videos lag behind in this race; often lack the ‘Share’ flexibility.
To match up, there are solutions to convert TikTok video into GIFs. A TikTok GIF is a short, impactful and to the point clip that’s here to share fun and exciting content in the most interesting ways. If you have a bunch of TikTok videos to share with your peers, but missing out on an effective sharing solution, you can conveniently look forward to convert those videos into catchy and interesting GIFs that will definitely hold the attention of your viewers.
Feel motivated? See through the rest of this article to know some quick and easy TikTok to GIF conversion tools and software!
Part 2 How to Make a GIF From a TikTok Video
When looking through solutions to create GIF TikTok videos, you will find a pool of methods and tools available on the internet. All you need to do is select the best one for yourself and get started with converting TikTok Videos into GIFs. Given below are some of the best solutions adhering to the aforesaid concern:
01Filmora
Wondershare Filmora Video Editor is one of the best application software to create a TikTok GIF. This is a simple and smart converter application that caters to your concern in just a few minutes. What’s best is that this app is absolutely free to use and is compatible with your PC, smartphone and a variety of other devices. Here’s how you can use Filmora to convert your TikTok videos into GIFs:
Step 1: Import Your Video
Start with importing a desired TikTok video file to the Filmora timeline. You can also ‘Drag and Drop’ the video file to the editor timeline. Using this application, you have the flexibility to import your clip in almost any video format.
Step 2: Edit Your Clip
Suited to your content preferences, you can edit and enhance your clips with a variety of effects, like, cut, trim, rotate, split, etc., and make appropriate speed adjustments. You can even include text messages to make your GIF more impactful.
Wondershare Filmora
Get started easily with Filmora’s powerful performance, intuitive interface, and countless effects!
Try It Free Try It Free Try It Free Learn More >
Step 3: Let’s Save and Share!
When you are happy, save your work using the .gif file extension. That’s it! You are ready to share your creation with your social media peers.
02TikTok’s Inbuilt GIF Converter
TikTok allows you to directly convert its videos into GIFs. You can use the TikTok application in your smartphone to take up the conversion process. All you need to do is follow the steps given below:
Step 1: Select Your TikTok Video
To get started, open the TikTok application in your smartphone and select the video you want to convert into GIF.
Step 2: Share the Video
Click the ‘Share’ icon at the right of the video screen.
Step 3: Format Selection
Scroll down to the bottom of the screen and choose the ‘Share as GIF’ option. This will automatically convert your TikTok video into GIF in a few seconds.
Step 4: Save and Export
Click on the ‘Save Image’ option to save the GIF in your phone’s gallery. You can also export your creation to different social media platforms.
03Wondershare UniConverter
This one is a handy toolbox loaded with a variety of features that allow you to play with your video creativity. Using this tool, you can quickly create GIF for TikTok and also fix the size and duration of the same. This software supports almost all video formats and comes with an inbuilt editor that you can use to add effects and make your GIFs all the more interesting. This is compatible with your Windows or MacOS PC.
Take the following steps to create GIFs from TikTok videos using this software:
Step 1: Download and Launch the Application
Download the Wondershare UniConverter application to your PC from the software’s official website.
Step 2: Open GIF Maker
In the app’s welcome screen, navigate to the ‘Toolbox’ tab and select ‘GIF Maker’ from the panel that gets displayed.
Step 3: Upload Your TikTok Video
In the next pop-up window, select ‘Video to GIF’ and click on the (+) icon in the centre. You can also click on ‘Add Files’ in the top left and choose a saved TikTok video from your PC to upload.
Step 4: Trim Your Video
Trim the uploaded video to the desired portion from where you wish to create the GIF and set adequate time frames for the same. You can even drag the video thumbnail slider to trim the video.
Step 5: Let’s Get Creating!
Set the final size and frame rate from the ‘Output Size’ and ‘Frame Rate’ tabs respectively. To save your creation, browse and choose the desired system folder by clicking on the ‘Save to:’ tab. Lastly, select ‘Create GIF’ to start the conversion process.
04Kapwing GIF Maker
There may be instances where you cannot save or share TikTok videos. To cut the rush in such cases, you can use Kapwing’s GIF Maker to convert videos from TikTok to GIF online. This one is a free video editing tool that works with almost all internet enabled smartphones and supports almost all common video formats. Here’s what you need to do for making GIFs from TikTok videos using this tool:
Step 1: Copy a Video Link
Search your desired TikTok video and click on the ‘Share’ icon. In the drop down menu, select ‘Copy Link’ to save the video link in your device memory. Once this happens, you will get a confirmation message that says, ‘Copied’.
Step 2: Open GIF Maker
Open the GIF Maker tool in your browser and paste the saved TikTok video link in the editor’s URL bar. This will automatically redirect you to the Kapwing Studio, where you have the liberty to trim, crop or split your video clip to the desired time frame. It is better to set a play span of 3-5 seconds.
You can trim the clip by dragging its ends or introduce cuts at specific points using the split button above the editor timeline. To make volume adjustments, select the video layer and click on ‘Edit Video’ and move the adjuster circle to the left or right to decrease, increase and mute the video volume.
Step 3: Download and Share Your Creation
To save your work, tap ‘Export Video’ at the top and select ‘Export as GIF’ from the drop down menu. Wait for the conversion process to finish and click ‘Download’. This will save the GIF to your device.
You will find a watermark at the corner of your clip. Click ‘Sign In to Remove the Watermark’ to remove it. A workspace for the present and later projects will be created, where you can save you work for a couple of days with Kapwing’s free version. To export your work to social media, click ‘Share’. You can even host your creation on websites. Just copy the video link and select ‘Embed’.
05TT Downloader
This one is another online tool you can use to create GIFs from TikTok videos. This is a quick converter tool that transforms TikTok videos to GIFs in 5 easy steps within minutes. It is a browser tool and does not require a software download. All you need to do is explained in the following steps:
Step 1:
Visit the official site of the tool.
Step 2:
Select ‘TikTok to GIF’ to get redirected to the TikTok to GIF Converter home page.
Step 3:
Copy and paste the desired TikTok video link in the converter’s URL bar. To proceed further, click on ‘Get Video’.
Step 4:
Trim your clip within a time frame of 1-10 seconds.
Step 5:
Click ‘Done’ to initiate the conversion process. Once it finishes, you can download the converted GIF to your device.
06MiniTool MovieMaker
You can prefer this tool to convert TikTok videos in your PC into GIFs. This tool gives you the liberty to trim, cut, reverse and rotate GIFs and even add text and filters to them. Here’s how you can use this tool to transform TikTok videos into interesting GIFs:
Step 1:
Download and install this GIF maker tool in your PC. Launch the same when you are done with the installation process.
Step 2:
In the converter window, import and add your desired TikTok clip into the converter timeline.
Step 3:
You are now free to edit and add text to your video.
Step 4:
Once you finish, tap ‘Export’ and choose your output format as GIF.
Step 5:
Hit ‘Export’ to let the conversion process begin.
● Key Takeaways from This Episode →
● TikTok videos often lack the save and share features, which is an obvious necessity of today’s social outlook.
● Varieties of online tools and software are available for converting TikTok videos to GIFs to increase the sharing flexibility.
● Filmora is a quick and intelligent choice to take up the conversion process within a catch of few clicks.
Simple Guide to Create New and Exciting Blackboard Animation
Dead Simple Guide to Create New and Exciting Blackboard Animation
An easy yet powerful editor
Numerous effects to choose from
Detailed tutorials provided by the official channel
Yes, it is definitely possible In fact, it couldn’t be easier. A lot of the ‘whiteboard animation’ generators also work as blackboard animation generators.
In this guide, we hope to shed some light on the subject so that everyone can have an easier time approaching the matter of creating a blackboard project on their own.
In this article
01 [Is Blackboard Animation Outdated?](#Part 1)
02 [How to Combine Modern Needs with Blackboard Animation?](#Part 2)
03 [How to Create a Blackboard Animation in ONE DAY?](#Part 3)
Part 1 Is Blackboard Animation Outdated?
Blackboard animation some may say is as outdated as the concept of ‘blackboards’ themselves. After all, nowadays, whiteboards are the standard for presenting information in a school setting — with many preferring the ease of using dry-erase markers over the more unwieldy chalk.
However, unlike the inconveniences of using an actual chalkboard, chalkboard animation is not so different from whiteboard animation In fact, it’s just given a different look. One that may be exactly what you’re looking for — especially if you’re looking to get in touch with the older generation (who would no doubt be more familiar with the concept.)

Part 2 How to Combine Modern Needs with Blackboard Animation?
But alright, so how do you make it so that your blackboard animation is just as suited for the modern generation as it is for the older generation?? Well, that’s easy really. You’ll need images Or, rather, you’ll need visuals outside of just the plain text that is usually associated with chalkboard animation.
With the right kind of visuals to go along with your informational text, you can boost the effectiveness of your chalkboard animation video and make it more palatable. Perfectly in line with the modern needs of the era.

Part 3 How to Create a Blackboard Animation in ONE DAY?
Alright, so onto actually talking about how you can go about creating a chalkboard animation video Take note, this is going to be an ‘overview’ kind of tutorial. We’ve also decided to choose a more ‘custom’ method, rather than using one of the premium blackboard animation generators (which usually require you to pay a steep price in order to gain access to a media library.)
01Step 1. Pick Your Software
The first step in creating chalkboard animation is to pick the software that you want to use This can be something more ‘animation-specific’, like After Effects. Or something more ‘video-editing-specific’ like Filmora.
Again, because this is meant to be more of a ‘general’ tutorial, we won’t be showing you exactly how to use whatever editing software you decide to use in order to create your blackboard animation videos. But, as a general kind of advice, it would be best that you pick a video editor like Wondershare Filmora Video Editor that offers a Timeline feature that will allow you to quickly put together a project

02Step 2. Create a Storyboard
Next, to make the actual blackboard animation creation process go smoother, it’s important that you create a storyboard that will outline the video that you want to create
The more detailed this storyboard is, the better Although, of course, you don’t necessarily have to draw every single frame of your chalkboard animation beforehand. Just sketch out the general idea. It will help make sure that you won’t have to rush about making all sorts of corrections in the future

03Step 3. Draw Characters
For this step, we say ‘characters’ and use the word ‘draw.’ But really, this is a very open kind of step where we encourage you to put together all media that you will need to make your project into a reality This is where the storyboard really helps. After all, with that, you have an idea of exactly what kind of characters, settings, music, audio, etc. you’ll need for each scene (if not each frame)
If you’re not the ‘drawing’ type, by the way, there are both FREE and premium media libraries that you can take advantage of to use for your project It might be difficult to find matching art styles at first. But, if you’re really particular about that, then you can always find a freelance digital artist to design with a specific style in mind

04Step 4. Put Together Project
Last of all, of course, is the process of putting everything together. Do you have your software? Great Launch it and create a new project Do you have your storyboard? That’s also great Now you have an idea where each character and setting will go
In the image below, we’re only showing the start of a potential project. We’ve only added one image to the timeline But, as you can see, with the use of Filmora, even this one image can be turned into a video

● Key Takeaways from This Episode →
● Blackboards are naturally associated with learning This makes blackboard animation videos a great method of sharing information with an audience. Whether you’re doing it to promote your services/goods or just genuinely looking to impart knowledge to another
● Some may think that blackboards are outdated — for the mere fact that blackboards themselves are considered outdated when compared to whiteboards — but that doesn’t make them any less effective at getting a message across so long as you include the right kind of visuals
● In our brief ‘overview’ tutorial, we expand on the subject of blackboard animation some more. Be warned, it’s not the kind of project you should go into if you’re not prepared for the work Longer projects, especially, will require quite a bit of elbow grease to get done.
● Still, there’s something satisfying about a well-done chalkboard animation video that will not only be a joy to create but also, hopefully, catch the attention of your audience as well.
Yes, it is definitely possible In fact, it couldn’t be easier. A lot of the ‘whiteboard animation’ generators also work as blackboard animation generators.
In this guide, we hope to shed some light on the subject so that everyone can have an easier time approaching the matter of creating a blackboard project on their own.
In this article
01 [Is Blackboard Animation Outdated?](#Part 1)
02 [How to Combine Modern Needs with Blackboard Animation?](#Part 2)
03 [How to Create a Blackboard Animation in ONE DAY?](#Part 3)
Part 1 Is Blackboard Animation Outdated?
Blackboard animation some may say is as outdated as the concept of ‘blackboards’ themselves. After all, nowadays, whiteboards are the standard for presenting information in a school setting — with many preferring the ease of using dry-erase markers over the more unwieldy chalk.
However, unlike the inconveniences of using an actual chalkboard, chalkboard animation is not so different from whiteboard animation In fact, it’s just given a different look. One that may be exactly what you’re looking for — especially if you’re looking to get in touch with the older generation (who would no doubt be more familiar with the concept.)
Part 2 How to Combine Modern Needs with Blackboard Animation?
But alright, so how do you make it so that your blackboard animation is just as suited for the modern generation as it is for the older generation?? Well, that’s easy really. You’ll need images Or, rather, you’ll need visuals outside of just the plain text that is usually associated with chalkboard animation.
With the right kind of visuals to go along with your informational text, you can boost the effectiveness of your chalkboard animation video and make it more palatable. Perfectly in line with the modern needs of the era.
Part 3 How to Create a Blackboard Animation in ONE DAY?
Alright, so onto actually talking about how you can go about creating a chalkboard animation video Take note, this is going to be an ‘overview’ kind of tutorial. We’ve also decided to choose a more ‘custom’ method, rather than using one of the premium blackboard animation generators (which usually require you to pay a steep price in order to gain access to a media library.)
01Step 1. Pick Your Software
The first step in creating chalkboard animation is to pick the software that you want to use This can be something more ‘animation-specific’, like After Effects. Or something more ‘video-editing-specific’ like Filmora.
Again, because this is meant to be more of a ‘general’ tutorial, we won’t be showing you exactly how to use whatever editing software you decide to use in order to create your blackboard animation videos. But, as a general kind of advice, it would be best that you pick a video editor like Wondershare Filmora Video Editor that offers a Timeline feature that will allow you to quickly put together a project
02Step 2. Create a Storyboard
Next, to make the actual blackboard animation creation process go smoother, it’s important that you create a storyboard that will outline the video that you want to create
The more detailed this storyboard is, the better Although, of course, you don’t necessarily have to draw every single frame of your chalkboard animation beforehand. Just sketch out the general idea. It will help make sure that you won’t have to rush about making all sorts of corrections in the future
03Step 3. Draw Characters
For this step, we say ‘characters’ and use the word ‘draw.’ But really, this is a very open kind of step where we encourage you to put together all media that you will need to make your project into a reality This is where the storyboard really helps. After all, with that, you have an idea of exactly what kind of characters, settings, music, audio, etc. you’ll need for each scene (if not each frame)
If you’re not the ‘drawing’ type, by the way, there are both FREE and premium media libraries that you can take advantage of to use for your project It might be difficult to find matching art styles at first. But, if you’re really particular about that, then you can always find a freelance digital artist to design with a specific style in mind
04Step 4. Put Together Project
Last of all, of course, is the process of putting everything together. Do you have your software? Great Launch it and create a new project Do you have your storyboard? That’s also great Now you have an idea where each character and setting will go
In the image below, we’re only showing the start of a potential project. We’ve only added one image to the timeline But, as you can see, with the use of Filmora, even this one image can be turned into a video
● Key Takeaways from This Episode →
● Blackboards are naturally associated with learning This makes blackboard animation videos a great method of sharing information with an audience. Whether you’re doing it to promote your services/goods or just genuinely looking to impart knowledge to another
● Some may think that blackboards are outdated — for the mere fact that blackboards themselves are considered outdated when compared to whiteboards — but that doesn’t make them any less effective at getting a message across so long as you include the right kind of visuals
● In our brief ‘overview’ tutorial, we expand on the subject of blackboard animation some more. Be warned, it’s not the kind of project you should go into if you’re not prepared for the work Longer projects, especially, will require quite a bit of elbow grease to get done.
● Still, there’s something satisfying about a well-done chalkboard animation video that will not only be a joy to create but also, hopefully, catch the attention of your audience as well.
4 Smart Solutions to Create or Find Good Morning/Night GIFs
Versatile Video Editor - Wondershare Filmora
An easy yet powerful editor
Numerous effects to choose from
Detailed tutorials provided by the official channel
Do you want to wish your friends and family some heartful greetings every morning or night? Like you, many other people also look for good morning and night GIF images to meet their requirements. Since there can be limited sources for animated GIFs, you might find getting some new and unique images hard. That’s why I will let you know how to come up with some good night/morning animated GIFs in this post and share some reliable resources to download them.
In this article
01 [Create Good Morning/Night GIF Images with Adobe Photoshop](#Part 1)
02 [Create Stunning Good Morning or Night GIFs with Filmora](#Part 2)
03 [Create Animated Good Morning/Night GIFs with Canva](#Part 3)
04 [Find Readily Available Good Morning/Night GIFs](#Part 4)
Part 1 Create Good Morning/Night GIF Images with Adobe Photoshop
If you are familiar with Adobe Photoshop or are willing to learn it, you can also use its assistance to create good morning/night GIF images. Even though the application is mostly used to edit images, it can also help you develop all kinds of funny good morning/night GIFs.
To do that, you need to work on different layers in Photoshop and then merge them as a single frame to provide a more animated appeal. Here are some basic steps that you can follow to come up with anime good night or morning GIFs.
Step 1 Launch Photoshop and Load Media Assets
You can start by launching Adobe Photoshop on your system and visiting its File > Scripts section to load your media files.
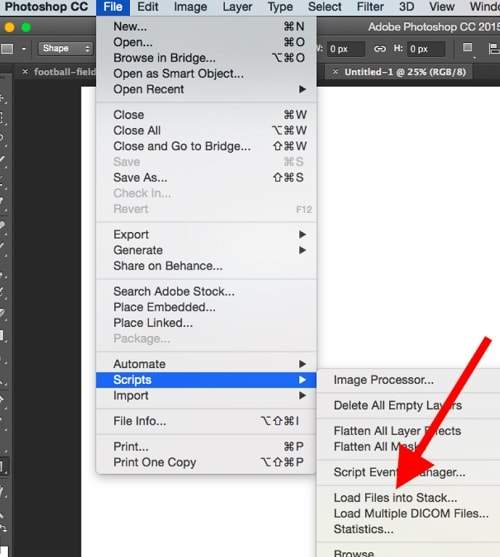
Step 2 Start working on Animated GIFs in Photoshop
Now, to come up with a funny good morning/night GIF, you can go to its Menu > Layer and choose to create a new layer.
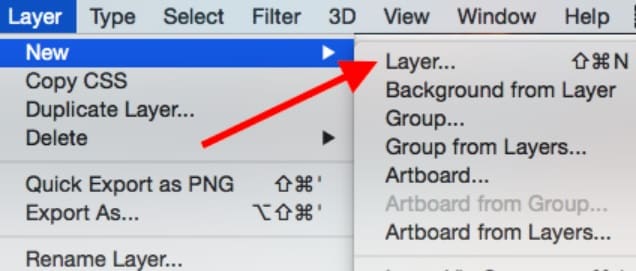
Since it is recommended to have a timeline for your media, you can go to its Window > Timeline to get a timeline view at the bottom.
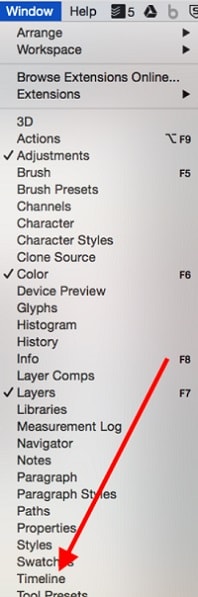
Afterward, you can go to the timeline at the bottom panel and choose work on frame animations to create any good morning/night animation.
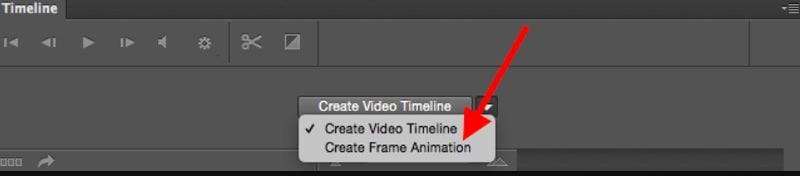
You can now duplicate your files or adjust them on the timeline to develop an animated GIF. Afterward, you can go to its properties to create a new layer for your frames and then merge them.
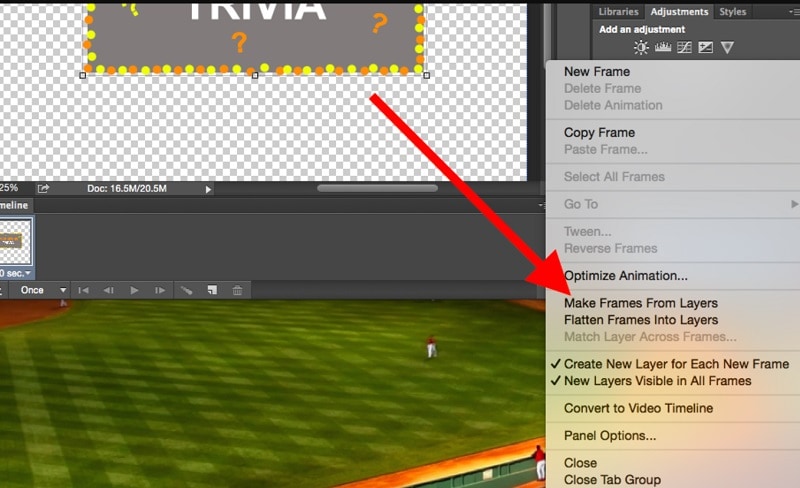
Step 3 Make Final Adjustments to your Animated GIFs
As you would have different good morning/night GIF funny animations, you can right-click on the timeline and set up their respective durations.
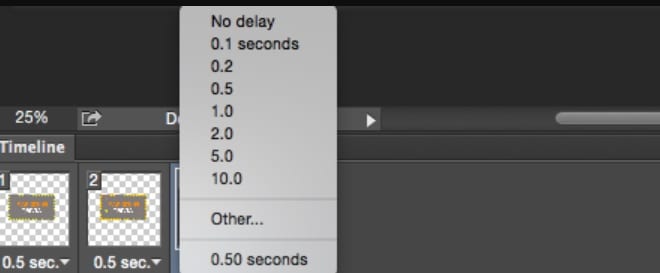
Besides that, you can also right-click any frame and select how many times it would be repeated.
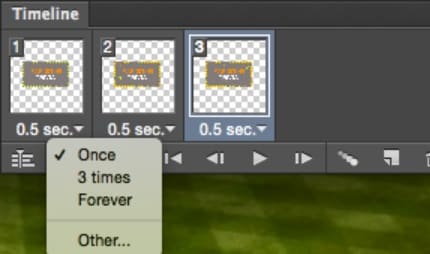
Step 4 Export the Media file as a GIF from Photoshop
After making all the edits, you can go to its File > Export feature and save your good night/morning GIF images in a compatible format (to be published on the web).
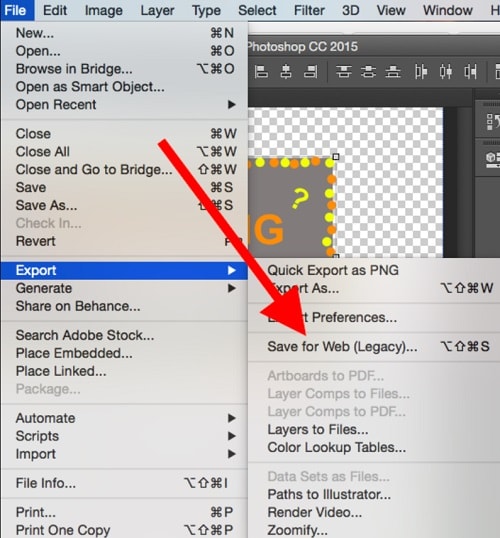
Part 2 Create Stunning Good Morning or Night GIFs with Filmora
Since Photoshop can be quite complicated to learn, you can consider using Wondershare Filmora to create videos and GIFs of all sorts. It is a multitrack timeline editing application that offers a wide range of editing options that are super easy to use. Apart from that, you will also get access to a wide range of media assets and effects that you can readily use to create good morning/night animated GIFs.
Wondershare Filmora
Get started easily with Filmora’s powerful performance, intuitive interface, and countless effects!
Try It Free Try It Free Try It Free Learn More >
Step 1 Launch Filmora and Load your Files to Create GIFs
You can start by launching Wondershare Filmora on your system and just drag and drop your media files to its interface. Besides that, you can also go to its File > Import menu to browse and load your media files (like morning or night images).

Step 2 Come up with Engaging GIFs using Filmora
Afterward, you can drop these media assets to the timeline at the bottom in a preferred format and start editing them. For instance, you can hover the cursor at the side to use the trimmer tool to clip any unwanted part from the video clip.

You can also select any media file and go to its properties to perform all kinds of actions on the selected media file like scaling, repositioning, flipping, rotating, and so on.

Many people would like to write quotes and messages on their good night/morning GIF images. In this case, you can go to the “Titles” section of Filmora to add different caption effects to your videos.

Besides that, you can also explore a wide range of transitions, stickers, overlays, filters, and numerous other visual effects that you can readily add to your animated good morning/night GIFs.

Step 3 Save your good morning or night GIFs on Filmora
After working on your anime good night/morning GIF, you can click on the “Export” button from the top and choose to save the media file in a GIF format on your system.

Part 3 Create Animated Good Morning/Night GIFs with Canva
Canva is one of the most user-friendly online solutions that you can use to come up with graphics of different styles. From social media posts to posters and video clips to logos, Canva can help you develop all types of customized designs. A while back, it has added a dedicated option to create and edit animations that would let you come up with some stunning good morning/night GIF images.
Step 1 Select a Project Type or Template of Canva
At first, you can go to the official website of Canva and choose to work on a template of your choice. Here, you can look for GIFs readily available on Canva or work on an empty canvas.
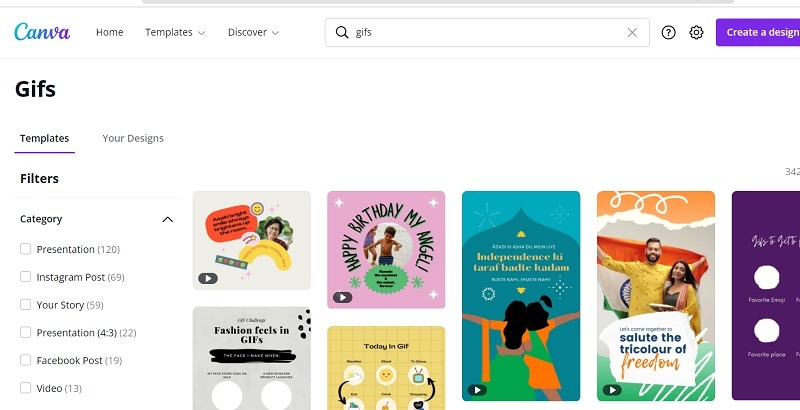
Step 2 Customize your Good Morning/Night GIF on Canva
From the sidebar, you can drag and drop various elements, captions, borders, and other objects to develop an animated good morning/night GIF. Several other features in Canva would let you customize and edit your GIFs easily.
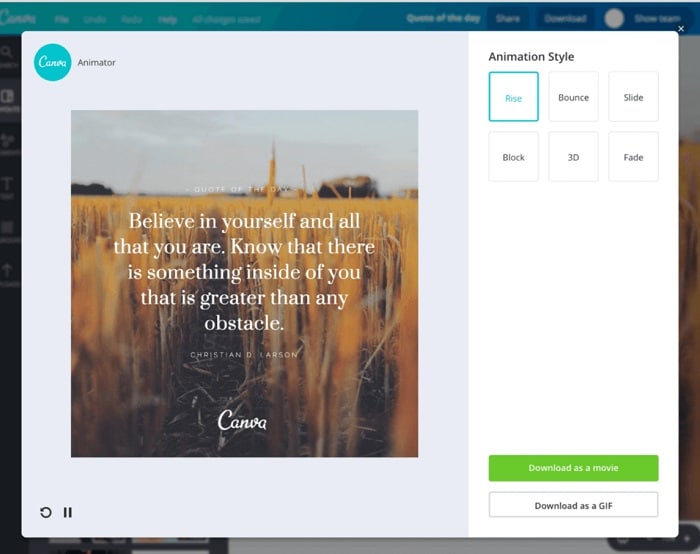
Step 3 Export your Designs as GIFs from Canva
That’s it! After working on all the features of your good night/morning funny GIFs, you can click on the “Export” button from the top and save your GIF on your system’s local storage from Canva.
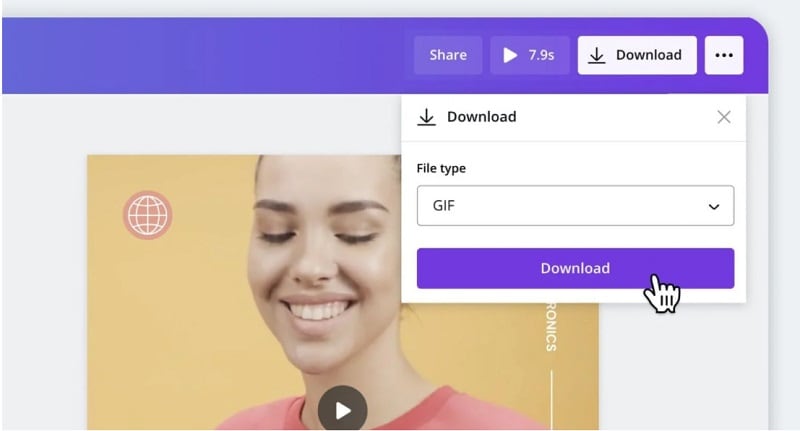
Part 4 Find Readily Available Good Morning/Night GIFs
If you are running short on time and can’t come up with any good morning/night animated GIF, then you can pick them from the following resources:
1. Tenor
Tenor is certainly one of the most prominent websites to find GIFs and stickers of all kinds. Therefore, you can head to its official website and look for good morning/night animations by entering relevant keywords on the search bar. Later, you can download the GIF or directly share its link with others.
2. Giphy
Like Tenor, Giphy is another popular source where you can find hundreds of good night/morning funny GIFs. The website is quite easy to navigate and will let you see all kinds of GIFs by entering appropriate keywords. Later, you can directly copy the URL of the GIF and share it with others on platforms like WhatsApp and Instagram.
3. Gifer
Lastly, you can also explore Gifer to find an extensive collection of inspiring or funny good night/morning GIFs. The website has already listed GIFs in different categories that you can explore to save time or can enter keywords on the search bar to find appropriate content.
Wondershare Filmora
Get started easily with Filmora’s powerful performance, intuitive interface, and countless effects!
Try It Free Try It Free Try It Free Learn More >
AI Portrait – The best feature of Wondershare Filmora for gameplay editing
The AI Portrait is a new add-on in Wondershare Filmora. It can easily remove video backgrounds without using a green screen or chroma key, allowing you to add borders, glitch effects, pixelated, noise, or segmentation video effects.

Conclusion
After reading this guide, I’m sure that you can easily pick or create all kinds of good night/morning GIFs. While Photoshop can make animated good morning/night GIFs, it is certainly not that user-friendly. That’s why I would recommend using a reliable and friendly application like Wondershare Filmora to meet your requirements. The media-editing tool has an extensive range of assets and offers tons of high-end features to come up with all sorts of inspiring, romantic, or funny good morning/night GIFs.
Do you want to wish your friends and family some heartful greetings every morning or night? Like you, many other people also look for good morning and night GIF images to meet their requirements. Since there can be limited sources for animated GIFs, you might find getting some new and unique images hard. That’s why I will let you know how to come up with some good night/morning animated GIFs in this post and share some reliable resources to download them.
In this article
01 [Create Good Morning/Night GIF Images with Adobe Photoshop](#Part 1)
02 [Create Stunning Good Morning or Night GIFs with Filmora](#Part 2)
03 [Create Animated Good Morning/Night GIFs with Canva](#Part 3)
04 [Find Readily Available Good Morning/Night GIFs](#Part 4)
Part 1 Create Good Morning/Night GIF Images with Adobe Photoshop
If you are familiar with Adobe Photoshop or are willing to learn it, you can also use its assistance to create good morning/night GIF images. Even though the application is mostly used to edit images, it can also help you develop all kinds of funny good morning/night GIFs.
To do that, you need to work on different layers in Photoshop and then merge them as a single frame to provide a more animated appeal. Here are some basic steps that you can follow to come up with anime good night or morning GIFs.
Step 1 Launch Photoshop and Load Media Assets
You can start by launching Adobe Photoshop on your system and visiting its File > Scripts section to load your media files.
Step 2 Start working on Animated GIFs in Photoshop
Now, to come up with a funny good morning/night GIF, you can go to its Menu > Layer and choose to create a new layer.
Since it is recommended to have a timeline for your media, you can go to its Window > Timeline to get a timeline view at the bottom.
Afterward, you can go to the timeline at the bottom panel and choose work on frame animations to create any good morning/night animation.
You can now duplicate your files or adjust them on the timeline to develop an animated GIF. Afterward, you can go to its properties to create a new layer for your frames and then merge them.
Step 3 Make Final Adjustments to your Animated GIFs
As you would have different good morning/night GIF funny animations, you can right-click on the timeline and set up their respective durations.
Besides that, you can also right-click any frame and select how many times it would be repeated.
Step 4 Export the Media file as a GIF from Photoshop
After making all the edits, you can go to its File > Export feature and save your good night/morning GIF images in a compatible format (to be published on the web).
Part 2 Create Stunning Good Morning or Night GIFs with Filmora
Since Photoshop can be quite complicated to learn, you can consider using Wondershare Filmora to create videos and GIFs of all sorts. It is a multitrack timeline editing application that offers a wide range of editing options that are super easy to use. Apart from that, you will also get access to a wide range of media assets and effects that you can readily use to create good morning/night animated GIFs.
Wondershare Filmora
Get started easily with Filmora’s powerful performance, intuitive interface, and countless effects!
Try It Free Try It Free Try It Free Learn More >
Step 1 Launch Filmora and Load your Files to Create GIFs
You can start by launching Wondershare Filmora on your system and just drag and drop your media files to its interface. Besides that, you can also go to its File > Import menu to browse and load your media files (like morning or night images).
Step 2 Come up with Engaging GIFs using Filmora
Afterward, you can drop these media assets to the timeline at the bottom in a preferred format and start editing them. For instance, you can hover the cursor at the side to use the trimmer tool to clip any unwanted part from the video clip.
You can also select any media file and go to its properties to perform all kinds of actions on the selected media file like scaling, repositioning, flipping, rotating, and so on.
Many people would like to write quotes and messages on their good night/morning GIF images. In this case, you can go to the “Titles” section of Filmora to add different caption effects to your videos.
Besides that, you can also explore a wide range of transitions, stickers, overlays, filters, and numerous other visual effects that you can readily add to your animated good morning/night GIFs.
Step 3 Save your good morning or night GIFs on Filmora
After working on your anime good night/morning GIF, you can click on the “Export” button from the top and choose to save the media file in a GIF format on your system.
Part 3 Create Animated Good Morning/Night GIFs with Canva
Canva is one of the most user-friendly online solutions that you can use to come up with graphics of different styles. From social media posts to posters and video clips to logos, Canva can help you develop all types of customized designs. A while back, it has added a dedicated option to create and edit animations that would let you come up with some stunning good morning/night GIF images.
Step 1 Select a Project Type or Template of Canva
At first, you can go to the official website of Canva and choose to work on a template of your choice. Here, you can look for GIFs readily available on Canva or work on an empty canvas.
Step 2 Customize your Good Morning/Night GIF on Canva
From the sidebar, you can drag and drop various elements, captions, borders, and other objects to develop an animated good morning/night GIF. Several other features in Canva would let you customize and edit your GIFs easily.
Step 3 Export your Designs as GIFs from Canva
That’s it! After working on all the features of your good night/morning funny GIFs, you can click on the “Export” button from the top and save your GIF on your system’s local storage from Canva.
Part 4 Find Readily Available Good Morning/Night GIFs
If you are running short on time and can’t come up with any good morning/night animated GIF, then you can pick them from the following resources:
1. Tenor
Tenor is certainly one of the most prominent websites to find GIFs and stickers of all kinds. Therefore, you can head to its official website and look for good morning/night animations by entering relevant keywords on the search bar. Later, you can download the GIF or directly share its link with others.
2. Giphy
Like Tenor, Giphy is another popular source where you can find hundreds of good night/morning funny GIFs. The website is quite easy to navigate and will let you see all kinds of GIFs by entering appropriate keywords. Later, you can directly copy the URL of the GIF and share it with others on platforms like WhatsApp and Instagram.
3. Gifer
Lastly, you can also explore Gifer to find an extensive collection of inspiring or funny good night/morning GIFs. The website has already listed GIFs in different categories that you can explore to save time or can enter keywords on the search bar to find appropriate content.
Wondershare Filmora
Get started easily with Filmora’s powerful performance, intuitive interface, and countless effects!
Try It Free Try It Free Try It Free Learn More >
AI Portrait – The best feature of Wondershare Filmora for gameplay editing
The AI Portrait is a new add-on in Wondershare Filmora. It can easily remove video backgrounds without using a green screen or chroma key, allowing you to add borders, glitch effects, pixelated, noise, or segmentation video effects.
Conclusion
After reading this guide, I’m sure that you can easily pick or create all kinds of good night/morning GIFs. While Photoshop can make animated good morning/night GIFs, it is certainly not that user-friendly. That’s why I would recommend using a reliable and friendly application like Wondershare Filmora to meet your requirements. The media-editing tool has an extensive range of assets and offers tons of high-end features to come up with all sorts of inspiring, romantic, or funny good morning/night GIFs.
10 Great Moving Animation PowerPoint Techniques
10 Awesome Moving Animation PowerPoint Techniques
An easy yet powerful editor
Numerous effects to choose from
Detailed tutorials provided by the official channel
PowerPoints can be quite dull without anything to spice it up. So, this question is more than 100% warranted. Fortunately, we were able to pull together a tutorial on creating moving animation PowerPoint presentations.
Complete with some templates that you can start off with (if you’d prefer to make it as simple as possible for yourself.)
In this article
01 [6 Animated Powerpoint Templates with Interactive Features](#Part 1)
02 [How to Create a Moving Animation in Powerpoint](#Part 2)
03 [10 Moving Animation Powerpoint Techniques](#Part 3)
Part 1 6 Animated PowerPoint Templates with Interactive Features
The default people tend to-go-to when it comes to presentations are videos. As they tend to be more engaging on their own. For that, you’ll see people gravitating towards software like Filmora, which can create beautiful, eye-catching presentations that you can easily and quickly share. Not just to an immediate audience, but also on social media and the like.
However, of course, sometimes a personal touch is important in a presentation — important to have a ‘voice’ attached to the image on the screen. But just because this is the case, doesn’t mean that you shouldn’t go all out on your presentation. Hence, why moving animation PowerPoint templates are such a big deal:
01 Company Presentation PowerPoint Template
For the first of the Moving Animation PowerPoint templates that we have to introduce, we chose the ‘Company Presentation PowerPoint Template.’ As you can perhaps guess from the name, it’s a very professional template. It comes with a total of 500 sample slides that you can choose from (50 of which are unique), and it’s set up with professional animations that can spice up your presentation without making it look gaudy or over-the-top.

02 Move Animated PowerPoint Template
Next is the modern, minimalistic template called “Move Animated.” This one is a lot more versatile, with every single one of the 144 unique slides available suitably animated. The best part of it is definitely the easy way in which it can be used. With the modern, minimalistic style, it’s easy enough to remove the presets and replace them with suitable company or product images to promote your content, idea, or project.

03 40 Animated Conceptual Slides for PowerPoint
Again, we have another modern and minimalistic kind of PowerPoint template with ‘40 Animated Conceptual Slides for PowerPoint.’ It comes with 40 modern slides, all of which come fully animated are easy enough to customize with your own branding or content.

04 UNIGRAPH - Animated & Creative Template (PPTX)
For a bit more fun, our next template is “UNIGRAPH.” This still definitely fits the description ‘minimalistic’ but the pop of color and effects that it brings to the table gives it a different kind of vibe from all the others. No less professional, but certainly more fun. Of course, most importantly, perhaps, is the fact that each slide is smoothly animated.

05 Graph & Charts PowerPoint Presentation
For this next one, we introduce a template set called “Graphs & Charts” for those who may want to present their products, projects, ideas, etc. in the shape of graphs and charts. It’s perfect for professionals, certainly. Especially with its clean look, brightened only by occasional pops of color that can be seen from the graphs and charts that it comes with.

06 Laststyle - PowerPoint Template
This next PowerPoint template is most suited for businesses looking to promote their products. The creator of the template has provided five different colored versions of the template, each with 30 unique slides that were carefully sectioned with suitable animations.

Part 2 How to Create a Moving Animation in PowerPoint
Now we come to the point of the article where we speak directly to those who may want to experiment more by personally creating a moving animation PowerPoint. For this example, we’ll be teaching you how to create a path animation PowerPoint with the available tools that the software offers under ‘Animation.’ Stick around if you want to learn more.
01Step 1. Open Project.
First things first, of course. Start a new project. When you’ve started, move on to the Animation tab (which we’ve pointed out in the image below.)

02Step 2. Add Animation.
Then, make sure to select the object or model that you want to animate (in this case, we’ve inserted a 2D model of a businessman), and then click the ‘Add Animation’ button (shown in the image below.)

03Step 3. Choose Animation.
Under ‘Add Animation’ you’ll find several different options for animations that you can choose from. Of course, since our goal is to create a PowerPoint Motion Path Animation, we have selected one of the ‘Motion Path’ options.

04Step 4. Choose Motion Path Animation
In order to make motion animation in PowerPoint, you must select one of the offered ‘Motion Paths’ (i.e., Bounce, Line, Arcs, etc.) and then use the motion path tool that appears to control the direction you wish to make your character move.
In this example, we chose the ‘Lines’ motion path (1) and then used the line tool to create a path for our businessman model. To walk from the right side of the screen towards the left.

05Step 5. Adjust Animation.
With path animation PowerPoint complete, you can adjust as needed with the tools provided. For example, you can have the character start moving as soon as the slide opens, or wait until a minute has passed, you can extend the animation by changing duration, etc.

Part 3 10 Moving Animation PowerPoint Techniques
For this last step, we break down some important PowerPoint 3D Animation need-to-knows. Including the specifics provided by each of the options made available to you and why it’s important to explore every single one to create better and more professional-looking presentations.
01Transitions
When it comes to PowerPoint presentations, most people are no doubt the most familiar with ‘Transitions’ when talking in terms of adding animation into a presentation. This one decides whether you want to shift from one slide to another smoothly, or if you want the previous slide to break into splinters, or rotate into the next slide, and so on and so forth. It’s an ‘in-between’ animation that signals where one ends and the other begins.

02Animations
Now, for the ‘Animations’ tab, we focus on animations that occur in the slide (not in-between like transitions). This can include a wide array of things. Whether it be characters moving (like shown in the tutorial we provided), text boxes appearing and disappearing in short order, images bouncing into view in dramatic fashion, and so on and so forth. There’s lots of potential here.

03Animation - Start
We mentioned this previously in the tutorial, but PowerPoint (which does not offer the more advanced 3D customization options), does still give you the freedom to choose how you want certain animations to work.
In the case of the ‘Animations-Start’ option, the goal is to decide when an animation starts playing. Do you want it to start after a click? Or maybe you want it to start up immediately? Whatever the case may be, this function will let you choose the specifics.

044. Animation - Duration
Next, we decide how long you want the animation to last. For example, if you chose to add a PowerPoint 3D rotation animation into a character, how long do you want it to spin before it settles into place? Perhaps only a second? Perhaps more? Whatever you chose, this is the option that will let you finalize that.

05Animation - Delay
This one is self-explanatory as well. But suffice to say, the ‘Delay’ option is for deciding how much an animation is delayed before starting. For example, if you chose to start it ‘On Click’ you can increase the delay to keep it from playing immediately on click.

06Break Up Presentation into Sections
A lot of PowerPoint templates, you’ll find, are naturally broken into sections. This is because it is easier to consume it in that way. It’s also a good signal to your audience as to what point of the presentation you are on. Are you in the beginning? The middle? Near the end? Etc. In this case, the best option for showing it is transitions that separate the sections from one another.

07Add Animation - Entrance
As promised earlier, we’ll be going through each type of animation is available under the ‘Add Animation’ option. The first is “Entrance” animations. This one is pretty easy to guess. It makes up a variety of animations that serve as its entrance animation. Here are some examples:
● Appear: To have objects appear without any other effect.
● Fade: To have objects fade into view.
● Bounce: To have objects bounce into view.
● Swivel: To have objects swivel into view.

08Add Animation - Emphasis
This next animation style is to give emphasis to an already-present object. For example, at a click, you can have a text box ‘Pulse’ and become the center of attention. You can change ‘Object Color’ to make it stand out. And so on.

099. Add Animation - Exit
Opposite of the ‘Entrance’ animations are the ‘Exit’ animations. You’ll notice that the style of animations is the same here. The only difference is that the animations occur to exit the project out of the presentation. For example, an image exiting to reveal text. Or text flying out to be replaced with more text, etc.

10Add Animation - Motion Path
We’ve already mentioned the PowerPoint Motion Path animation style previously, but just to reiterate some things, this is the most customizable animation feature on PowerPoint. One that allows you to move objects across the slide in whatever way you wish. In our example, we created a motion path animation that took the character from the center of the screen to the left of the screen.

● Key Takeaways from This Episode →
● While videos are the most popular way to share information, there are some presentations that require a heavier guiding hand.
● In these situations, a PowerPoint presentation, carefully animated, can serve in place of an edited video.
● There are templates available that you can take advantage of if you’d prefer to start with something to work from. We introduced some in this article that we think were particularly notable.
● But, of course, more careful personalization is sometimes necessary. In that case, we hope that you find our tutorial and our list of PowerPoint techniques helpful.
PowerPoints can be quite dull without anything to spice it up. So, this question is more than 100% warranted. Fortunately, we were able to pull together a tutorial on creating moving animation PowerPoint presentations.
Complete with some templates that you can start off with (if you’d prefer to make it as simple as possible for yourself.)
In this article
01 [6 Animated Powerpoint Templates with Interactive Features](#Part 1)
02 [How to Create a Moving Animation in Powerpoint](#Part 2)
03 [10 Moving Animation Powerpoint Techniques](#Part 3)
Part 1 6 Animated PowerPoint Templates with Interactive Features
The default people tend to-go-to when it comes to presentations are videos. As they tend to be more engaging on their own. For that, you’ll see people gravitating towards software like Filmora, which can create beautiful, eye-catching presentations that you can easily and quickly share. Not just to an immediate audience, but also on social media and the like.
However, of course, sometimes a personal touch is important in a presentation — important to have a ‘voice’ attached to the image on the screen. But just because this is the case, doesn’t mean that you shouldn’t go all out on your presentation. Hence, why moving animation PowerPoint templates are such a big deal:
01 Company Presentation PowerPoint Template
For the first of the Moving Animation PowerPoint templates that we have to introduce, we chose the ‘Company Presentation PowerPoint Template.’ As you can perhaps guess from the name, it’s a very professional template. It comes with a total of 500 sample slides that you can choose from (50 of which are unique), and it’s set up with professional animations that can spice up your presentation without making it look gaudy or over-the-top.
02 Move Animated PowerPoint Template
Next is the modern, minimalistic template called “Move Animated.” This one is a lot more versatile, with every single one of the 144 unique slides available suitably animated. The best part of it is definitely the easy way in which it can be used. With the modern, minimalistic style, it’s easy enough to remove the presets and replace them with suitable company or product images to promote your content, idea, or project.
03 40 Animated Conceptual Slides for PowerPoint
Again, we have another modern and minimalistic kind of PowerPoint template with ‘40 Animated Conceptual Slides for PowerPoint.’ It comes with 40 modern slides, all of which come fully animated are easy enough to customize with your own branding or content.
04 UNIGRAPH - Animated & Creative Template (PPTX)
For a bit more fun, our next template is “UNIGRAPH.” This still definitely fits the description ‘minimalistic’ but the pop of color and effects that it brings to the table gives it a different kind of vibe from all the others. No less professional, but certainly more fun. Of course, most importantly, perhaps, is the fact that each slide is smoothly animated.
05 Graph & Charts PowerPoint Presentation
For this next one, we introduce a template set called “Graphs & Charts” for those who may want to present their products, projects, ideas, etc. in the shape of graphs and charts. It’s perfect for professionals, certainly. Especially with its clean look, brightened only by occasional pops of color that can be seen from the graphs and charts that it comes with.
06 Laststyle - PowerPoint Template
This next PowerPoint template is most suited for businesses looking to promote their products. The creator of the template has provided five different colored versions of the template, each with 30 unique slides that were carefully sectioned with suitable animations.
Part 2 How to Create a Moving Animation in PowerPoint
Now we come to the point of the article where we speak directly to those who may want to experiment more by personally creating a moving animation PowerPoint. For this example, we’ll be teaching you how to create a path animation PowerPoint with the available tools that the software offers under ‘Animation.’ Stick around if you want to learn more.
01Step 1. Open Project.
First things first, of course. Start a new project. When you’ve started, move on to the Animation tab (which we’ve pointed out in the image below.)
02Step 2. Add Animation.
Then, make sure to select the object or model that you want to animate (in this case, we’ve inserted a 2D model of a businessman), and then click the ‘Add Animation’ button (shown in the image below.)
03Step 3. Choose Animation.
Under ‘Add Animation’ you’ll find several different options for animations that you can choose from. Of course, since our goal is to create a PowerPoint Motion Path Animation, we have selected one of the ‘Motion Path’ options.
04Step 4. Choose Motion Path Animation
In order to make motion animation in PowerPoint, you must select one of the offered ‘Motion Paths’ (i.e., Bounce, Line, Arcs, etc.) and then use the motion path tool that appears to control the direction you wish to make your character move.
In this example, we chose the ‘Lines’ motion path (1) and then used the line tool to create a path for our businessman model. To walk from the right side of the screen towards the left.
05Step 5. Adjust Animation.
With path animation PowerPoint complete, you can adjust as needed with the tools provided. For example, you can have the character start moving as soon as the slide opens, or wait until a minute has passed, you can extend the animation by changing duration, etc.
Part 3 10 Moving Animation PowerPoint Techniques
For this last step, we break down some important PowerPoint 3D Animation need-to-knows. Including the specifics provided by each of the options made available to you and why it’s important to explore every single one to create better and more professional-looking presentations.
01Transitions
When it comes to PowerPoint presentations, most people are no doubt the most familiar with ‘Transitions’ when talking in terms of adding animation into a presentation. This one decides whether you want to shift from one slide to another smoothly, or if you want the previous slide to break into splinters, or rotate into the next slide, and so on and so forth. It’s an ‘in-between’ animation that signals where one ends and the other begins.
02Animations
Now, for the ‘Animations’ tab, we focus on animations that occur in the slide (not in-between like transitions). This can include a wide array of things. Whether it be characters moving (like shown in the tutorial we provided), text boxes appearing and disappearing in short order, images bouncing into view in dramatic fashion, and so on and so forth. There’s lots of potential here.
03Animation - Start
We mentioned this previously in the tutorial, but PowerPoint (which does not offer the more advanced 3D customization options), does still give you the freedom to choose how you want certain animations to work.
In the case of the ‘Animations-Start’ option, the goal is to decide when an animation starts playing. Do you want it to start after a click? Or maybe you want it to start up immediately? Whatever the case may be, this function will let you choose the specifics.
044. Animation - Duration
Next, we decide how long you want the animation to last. For example, if you chose to add a PowerPoint 3D rotation animation into a character, how long do you want it to spin before it settles into place? Perhaps only a second? Perhaps more? Whatever you chose, this is the option that will let you finalize that.
05Animation - Delay
This one is self-explanatory as well. But suffice to say, the ‘Delay’ option is for deciding how much an animation is delayed before starting. For example, if you chose to start it ‘On Click’ you can increase the delay to keep it from playing immediately on click.
06Break Up Presentation into Sections
A lot of PowerPoint templates, you’ll find, are naturally broken into sections. This is because it is easier to consume it in that way. It’s also a good signal to your audience as to what point of the presentation you are on. Are you in the beginning? The middle? Near the end? Etc. In this case, the best option for showing it is transitions that separate the sections from one another.
07Add Animation - Entrance
As promised earlier, we’ll be going through each type of animation is available under the ‘Add Animation’ option. The first is “Entrance” animations. This one is pretty easy to guess. It makes up a variety of animations that serve as its entrance animation. Here are some examples:
● Appear: To have objects appear without any other effect.
● Fade: To have objects fade into view.
● Bounce: To have objects bounce into view.
● Swivel: To have objects swivel into view.
08Add Animation - Emphasis
This next animation style is to give emphasis to an already-present object. For example, at a click, you can have a text box ‘Pulse’ and become the center of attention. You can change ‘Object Color’ to make it stand out. And so on.
099. Add Animation - Exit
Opposite of the ‘Entrance’ animations are the ‘Exit’ animations. You’ll notice that the style of animations is the same here. The only difference is that the animations occur to exit the project out of the presentation. For example, an image exiting to reveal text. Or text flying out to be replaced with more text, etc.
10Add Animation - Motion Path
We’ve already mentioned the PowerPoint Motion Path animation style previously, but just to reiterate some things, this is the most customizable animation feature on PowerPoint. One that allows you to move objects across the slide in whatever way you wish. In our example, we created a motion path animation that took the character from the center of the screen to the left of the screen.
● Key Takeaways from This Episode →
● While videos are the most popular way to share information, there are some presentations that require a heavier guiding hand.
● In these situations, a PowerPoint presentation, carefully animated, can serve in place of an edited video.
● There are templates available that you can take advantage of if you’d prefer to start with something to work from. We introduced some in this article that we think were particularly notable.
● But, of course, more careful personalization is sometimes necessary. In that case, we hope that you find our tutorial and our list of PowerPoint techniques helpful.
How to Create Your Avatar Free
How to Create Your Own Avatar Free
An easy yet powerful editor
Numerous effects to choose from
Detailed tutorials provided by the official channel
As a profile image, you can use your Facebook avatar. You can choose from a range of faces, hairstyles, and costumes for your avatar.
This article will help in creating your own avatar app and let you understand how to make your own my little pony avatar.
In this article
01 [Avatar Maker Tutorial | Create your Avatar for Free](#Part 1)
02 [5 Apps to Build Your Avatar](#Part 2)
Part 1 Avatar Maker Tutorial | Create your Avatar for Free
Adobe Creative Cloud Express is an online tool to make your own avatars for free. With Adobe, you can create a handcrafted avatar to match your personality for your social media profiles, YouTube videos, and so much more. Adobe lets you think out of the box, easy as choosing a template and sharing. Let us discuss the steps to create your own avatar for free using Adobe.
![]()
01Step 1: Start with Inspiration
You can never start from an empty canvas; there are several templates available you can choose any one of them by browsing with color, aesthetic, mood, and many other categories to have an idea of creating an avatar. Once you find a suitable graphic, you can click or tap on it starts editing as a document in the editor.
![]()
02Step 2: Remix
You can customize your avatar templates in a variety of ways. Change the font and copy. Substitute your photos for the imagery. Alternatively, you can use Creative Cloud Express to search through thousands of free pictures. Design your own by spending as little time as you wish.
![]()
03Step 3: Amplify Up the Flair
You can be as creative as you can by adding flair and personality to your projects with design assets. Add animated text and GIF to your project in one tap. They have cleared all the other technical issues to focus on your style and message.
![]()
04Step 4: Resize
The days where you have to remember the dimension of the image are gone. Once you have selected the design, you can modify and resize using the Auto magical resize available feature. Duplicate the project, select “Hit Resize,” and choose the platform to adapt it, and our AI will take care of the rest. Enjoy sharing it on other media.
[Well, this feature is a premium feature, so if you wish to access it, you need to do a subscription.]
![]()
05Step 5: Save and Share
Once you have applied all your creativity to your project, click on the “Publish” button and share your creations. Creative Cloud saves your project in your profile so that you can revisit and edit your projects whenever required.
Explore these professional templates to make your own avatar-free. Browse for themes like logos, icons, personalized fonts, and other elements to create an authentic look.
![]()
Part 2 5 Apps to Build Your Avatars
Having your avatar as your profile picture is freaking excellent and fun. There are many apps to create your avatars; let’s discuss some of them.
01Boo App–3D Avatar Emoji
Boo creates 3D characters that look similar to you within minutes. There are plenty of outfit options that can be customized separately for your styles to match your daily fashion. With this app, make your own avatars for free.
Highlights
●It offers a ton of features like skin tones, hair colors, eye colors, and hairstyles
●It assists in making your own my little pony avatar to give a unique style.
●New items are updated regularly.
Limits
●Limited color options
●Background glitch
●Sometimes after clicking the color option, it gets changed.
Review/Ratings
It has a rating of about 4.4 and many good reviews from users.
02Faceq
This application provides multiple facial features and an extensive trendy wardrobe. Even the tiniest characteristics on the face, such as beauty marks, facial hair, and brows, are essential. Hair accessories to make you own my little pony avatar. It looks as beautiful as when you apply your creativity to the maximum level.
Highlights
●Inclusive of many tabs for obvious face form, hairdo, and attire.
●Add more life to your avatars like text bubbles, hand gestures, etc.
●Multiple facial features
Limits
●Limited makeup options
●More dressing options expected
●Some slogans may be inappropriate
Ratings/Review
It has a rating of 3.1
03 SuperMe
This application is mainly for girls, and it offers 1000+ facial expressions and more materials. You can create and share animated videos of your avatars with the world and chat with people to make new friends. You can use this application to create my animated avatar.
Highlights
●There are 100 animations facilities where you can randomly apply by a simple handshake.
●A straightforward procedure to use.
●Multiple Facial expressions.
Limits
●You need to buy coins. It would be good if available for free.
●Primarily for girls
●The limitation of this application is that the language is still in its original language (Chinese).
Ratings/Review
This app has a rating of about 4
04Zmoji
Zmoji, a personal emoji creator, enables chatting with multiple versions of yours, and thus this way, you can make your own my little pony avatar. There are many unique features introduced to create a more appropriate.
Highlights
●It has a simple interface.
●It allows you to build a vivid cartoon avatar that matches your style quickly.
●It has Emoji Keyboard, which will enable you to send emojis directly from your keyboard in iMessage and third-party apps.
Limits
●The app also requires a subscription for some activities, which is disappointing.
●The subscription cost is high.
Ratings/Reviews
This app has a review of about 4.6
05Wondershare ** Wondershare Filmora Video Editor
To create my animated avatar, you can choose Wondershare Wondershare Filmora Video Editor . It is something magical that allows you to do anything with your photo. Of course, including changing to an avatar or a cartoon character. In this journal, you will see many different ways to make your own avatar for free, but Wondershare Filmora Video Editor offers to be all. It contains many templates, font styles, animation effects, wardrobes, and what less. Wondershare Filmora Video Editor is easier to use; with a few steps, you can create an avatar representing you more accurately than any other software could do.
It just goes with creating layers, liquefying, smoothening and additional features. And simply, you can share it to any social media directly from the software. Wondershare Wondershare Filmora Video Editor is mainly used to create my animated avatar.
Highlights
●Simple and easy interface.
●User friendly
●Multitude of features
Limits
●Advanced version need a subscription
Reviews
4.4 as per user reviews
For Win 7 or later (64-bit)
For macOS 10.12 or later
● Key Takeaways from This Episode →
● Understanding Adobe Creative Cloud Express
● Five different Apps used in creating my animated avatar
● Compared to all other online tools and programs, Wondershare Wondershare Filmora Video Editor is superior.
Most Effective Tactics to Set WhatsApp Status
Most Effective Tactics to Set WhatsApp Status
An easy yet powerful editor
Numerous effects to choose from
Detailed tutorials provided by the official channel
People generally use images to be uploaded as their WhatsApp status and unknown to many, videos as well as GIFs can also be added as status.
This status remains on your profile for 24 hours and can be viewed only by people who are on your contact list. So, if you too looking for ways to add WhatsApp status GIF, keep reading.
In this article
01 [How to set an animated GIF as WhatsApp status from the phone gallery?](#Part 1)
02 [How to set an animated GIF as WhatsApp status using an app?](#Part 2)
03 [Setting WhatsApp GIF status using device internal camera](#Part 3)
04 [How to create an interesting GIF in a hassle-free manner using Wondershare Filmora](#Part 4)
Part 1 How to set an animated GIF as WhatsApp status from the phone gallery?
If the GIF that you wish to use as the WhatsApp status is present on your phone, you can add it directly from the phone gallery. The steps to get this task done are enlisted below.
Step 1. Launch WhatsApp on your phone and then click on the Status tab.
Step 2. Tap on the My status tab to add a new status. The camera app on the phone will open and you need to launch the phone gallery now.
Step 3. Choose the desired GIF from the gallery, click on it and then tap on the Send button to set it as your status.
The selected GIF will be set as your WhatsApp status.
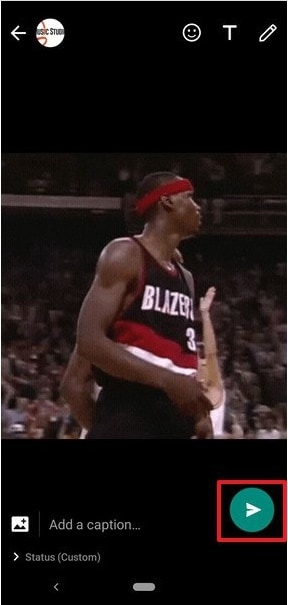
Part 2 How to set an animated GIF as WhatsApp status using an app?
Another way to add an animated GIF WhatsApp status is by using an app and for this, we recommend Giphy as the best tool. The steps to use the app for setting an animated status are as follows.
Step 1. Download, install and open the Giphy app on your phone.
Step 2. The main interface of the app will show multiple GIF options. You can also search your choice of animation based on categories or by using the search box.
Step 3. Next, click on the desired GIF to open it and see it in a larger frame.
Step 4. Under the selected GIF, click on the icon resembling a paper plane, and sharing options will appear.
Step 5. Choose the WhatsApp icon from the options available and then at the next menu, click on the My status option.
Step 6. Next, tap on the green arrow at the bottom-right corner to set GIF as WhatsApp status.
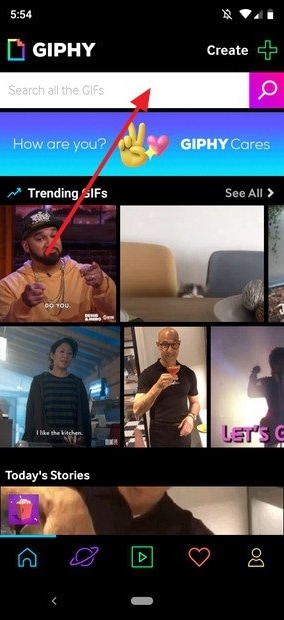
Part 3 Setting WhatsApp GIF status using device internal camera
Another way to add an animated GIF as WhatsApp status is using the internal camera of the device. The steps for the same are as follows.
Step 1. On your phone, launch WhatsApp and at the Status tab, click on the My Status option.
Step 2. The camera of the phone will get activated and now to start the video recording, you need to tap and hold the button that is used for taking the images.
Step 3. Record the video for which you wish to make an animation (video cannot be longer than 5 seconds).
Step 4. After the recording is done, you can adjust the duration using the slider and then choose to play the recorded video as GIF. Click on the Send button to share the video as WhatsApp Status.

Part 4 How to create an interesting GIF in a hassle-free manner using ** Wondershare Filmora Video Editor
If you wish to set your WhatsApp status as interesting GIF videos, you would need to download such animations online. Another way is to get customized GIF files and this professional tool will be required. If you too want to create your own customized animation in a hassle-free manner, we suggest using Wondershare Filmora. Not only WhatsApp status, but you can also use software for creating GIF animations for web pages, social media sites, ad banners, and other uses.
Wondershare Filmora
Get started easily with Filmora’s powerful performance, intuitive interface, and countless effects!
Try It Free Try It Free Try It Free Learn More >
Using Wondershare Filmora, artistic animations can be quickly created using an image as well as videos. The process is simple and does not require any advanced technical know-how. To create the desired GIF video, there are multiple options for customizations available like adding text, overlays, elements, and more.
Key features of the software
● Create GIF animations using videos and still images.
● Support all key video and image formats like FLV, MKV, MP4, and more.
● Allows customizing the animations by adding text, overlays, elements, and others.
● Quick and hassle-free tool for creating an interesting GIF.
● Windows and Mac support.
Steps to create GIF for WhatsApp status using Wondershare Filmora
Step 1. Launch Wondershare Filmora and add video or images from which you wish to create an animated GIF.
Step 2. Drag and drop the added media file to the timeline of the software.
Step 3. Next, edit and customize the added files using features like combine, crop, split, speed-up, slow, and more.
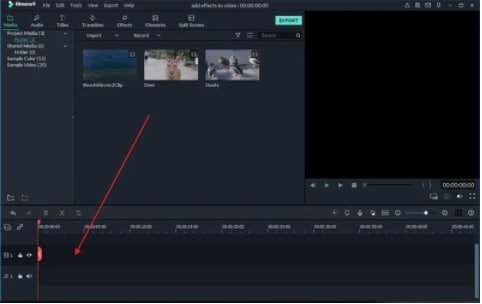
Step 4. You can also add text or elements like sound and others to the added files.
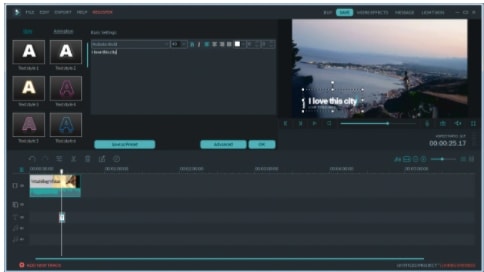
Step 5. Next, when all settings are done, choose GIF at the Local tab to save the media file as GIF. Choose the desired file name and the system location to save the file. Finally, click on the Export button.
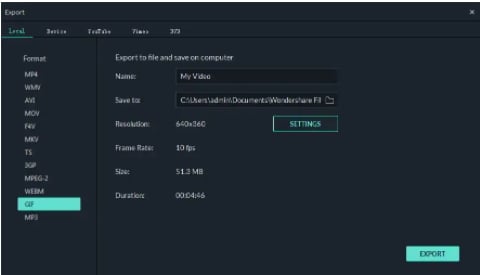
The created GIF animation will save to your selected folder and can be used as WhatsApp status, on social media sites, or for any other use as needed.
● Key Takeaways from This Episode →
●GIF animations can now be used as WhatsApp status.
●There are multiple ways to set GIF animations as WhatsApp status.
People generally use images to be uploaded as their WhatsApp status and unknown to many, videos as well as GIFs can also be added as status.
This status remains on your profile for 24 hours and can be viewed only by people who are on your contact list. So, if you too looking for ways to add WhatsApp status GIF, keep reading.
In this article
01 [How to set an animated GIF as WhatsApp status from the phone gallery?](#Part 1)
02 [How to set an animated GIF as WhatsApp status using an app?](#Part 2)
03 [Setting WhatsApp GIF status using device internal camera](#Part 3)
04 [How to create an interesting GIF in a hassle-free manner using Wondershare Filmora](#Part 4)
Part 1 How to set an animated GIF as WhatsApp status from the phone gallery?
If the GIF that you wish to use as the WhatsApp status is present on your phone, you can add it directly from the phone gallery. The steps to get this task done are enlisted below.
Step 1. Launch WhatsApp on your phone and then click on the Status tab.
Step 2. Tap on the My status tab to add a new status. The camera app on the phone will open and you need to launch the phone gallery now.
Step 3. Choose the desired GIF from the gallery, click on it and then tap on the Send button to set it as your status.
The selected GIF will be set as your WhatsApp status.
Part 2 How to set an animated GIF as WhatsApp status using an app?
Another way to add an animated GIF WhatsApp status is by using an app and for this, we recommend Giphy as the best tool. The steps to use the app for setting an animated status are as follows.
Step 1. Download, install and open the Giphy app on your phone.
Step 2. The main interface of the app will show multiple GIF options. You can also search your choice of animation based on categories or by using the search box.
Step 3. Next, click on the desired GIF to open it and see it in a larger frame.
Step 4. Under the selected GIF, click on the icon resembling a paper plane, and sharing options will appear.
Step 5. Choose the WhatsApp icon from the options available and then at the next menu, click on the My status option.
Step 6. Next, tap on the green arrow at the bottom-right corner to set GIF as WhatsApp status.
Part 3 Setting WhatsApp GIF status using device internal camera
Another way to add an animated GIF as WhatsApp status is using the internal camera of the device. The steps for the same are as follows.
Step 1. On your phone, launch WhatsApp and at the Status tab, click on the My Status option.
Step 2. The camera of the phone will get activated and now to start the video recording, you need to tap and hold the button that is used for taking the images.
Step 3. Record the video for which you wish to make an animation (video cannot be longer than 5 seconds).
Step 4. After the recording is done, you can adjust the duration using the slider and then choose to play the recorded video as GIF. Click on the Send button to share the video as WhatsApp Status.
Part 4 How to create an interesting GIF in a hassle-free manner using ** Wondershare Filmora Video Editor
If you wish to set your WhatsApp status as interesting GIF videos, you would need to download such animations online. Another way is to get customized GIF files and this professional tool will be required. If you too want to create your own customized animation in a hassle-free manner, we suggest using Wondershare Filmora. Not only WhatsApp status, but you can also use software for creating GIF animations for web pages, social media sites, ad banners, and other uses.
Wondershare Filmora
Get started easily with Filmora’s powerful performance, intuitive interface, and countless effects!
Try It Free Try It Free Try It Free Learn More >
Using Wondershare Filmora, artistic animations can be quickly created using an image as well as videos. The process is simple and does not require any advanced technical know-how. To create the desired GIF video, there are multiple options for customizations available like adding text, overlays, elements, and more.
Key features of the software
● Create GIF animations using videos and still images.
● Support all key video and image formats like FLV, MKV, MP4, and more.
● Allows customizing the animations by adding text, overlays, elements, and others.
● Quick and hassle-free tool for creating an interesting GIF.
● Windows and Mac support.
Steps to create GIF for WhatsApp status using Wondershare Filmora
Step 1. Launch Wondershare Filmora and add video or images from which you wish to create an animated GIF.
Step 2. Drag and drop the added media file to the timeline of the software.
Step 3. Next, edit and customize the added files using features like combine, crop, split, speed-up, slow, and more.
Step 4. You can also add text or elements like sound and others to the added files.
Step 5. Next, when all settings are done, choose GIF at the Local tab to save the media file as GIF. Choose the desired file name and the system location to save the file. Finally, click on the Export button.
The created GIF animation will save to your selected folder and can be used as WhatsApp status, on social media sites, or for any other use as needed.
● Key Takeaways from This Episode →
●GIF animations can now be used as WhatsApp status.
●There are multiple ways to set GIF animations as WhatsApp status.
Also read:
- In 2024, 10 Cartoon Character Makers to Make Animated Characters
- 10 2D/3D Animation Tips & Tricks to Bring New Ideas to You
- New Learn Disney Cartoon Drawing to See More Disney Magic Moments
- New In 2024, Adobe Animate Text Effects Skills You Need to Know
- New Beginner Tutorial on Making Unity 2D Animation for 2024
- Updated How to Draw Cartoons Step by Step with This Guide
- Updated In 2024, Stunning Ideas About Creating Personalised WhatsApp GIF Sticker
- New 2024 Approved Best 10 3D Text Animation Templates
- New 2024 Approved How to Create Animated Video on Canva?
- New Ways You Can Master to Make Claymation Videos for 2024
- New Secret Shortcut to Adobe Animate Character Tutorial for 2024
- Want to Make a Meme GIF? Heres How to Do for 2024
- New In 2024, Learn How to Create Adobe 3D Animation
- New Best GIF to Video Converters for 2024
- 15 Iconic Cartoon Characters of All Time for 2024
- Before You Learn Facebook Slideshow 5 Things You Should Know
- New In 2024, Most Effective Ways to Set WhatsApp Status
- New In 2024, A Beginners Guide to Tell You What 3D Animation Is
- Easy Shortcut to Convert Videos to Gifs on iPhone
- Updated In 2024, 10 Best Photoshop Cartoon Effects For Creatives
- In 2024, How to Bypass FRP on Xiaomi Redmi A2+?
- Three Ways to Sim Unlock Oppo A18
- How can I get more stardust in pokemon go On Vivo Y27 5G? | Dr.fone
- Updated The Ultimate Guide on How to Promoting Music Videos on YouTube for 2024
- How to Unlock Vivo Y17s Phone Password Without Factory Reset?
- Reliable User Guide to Fix Meizu 21 Running Slow and Freezing | Dr.fone
- How to Unlock a Network Locked Infinix Note 30 VIP Phone?
- In 2024, Top 10 Password Cracking Tools For Oppo F25 Pro 5G
- In 2024, How to Unlock Vivo V30 Pro Pattern Lock if Forgotten? 6 Ways
- How Can I Use a Fake GPS Without Mock Location On Samsung Galaxy XCover 7? | Dr.fone
- How to Track Vivo Y27 4G Location by Number | Dr.fone
- How to Mirror Nokia C02 to Mac? | Dr.fone
- In 2024, iPogo will be the new iSpoofer On Oppo A78 5G? | Dr.fone
- Fixing Foneazy MockGo Not Working On Tecno Camon 20 | Dr.fone
- Title: New Best 12 Evil Cartoon Characters of All Time for 2024
- Author: Elon
- Created at : 2024-06-30 12:27:38
- Updated at : 2024-07-01 12:27:38
- Link: https://animation-videos.techidaily.com/new-best-12-evil-cartoon-characters-of-all-time-for-2024/
- License: This work is licensed under CC BY-NC-SA 4.0.
