
:max_bytes(150000):strip_icc():format(webp)/GettyImages-1437209125-b47ae60035f248e2b01b781f50f919c1.jpg)
New Best GIF Maker Software for Windows and Mac for 2024
Best GIF Maker Software for Windows and Mac
Best GIF Maker Software for Windows and Mac

Shanoon Cox
Mar 27, 2024• Proven solutions
GIFs can delivery stories with effectiveness and added emotions. When we view that sequence of memories with animations then they add a different feeling to viewer’s heart. The best part is that these GIF creations use to be light weight files that mean they can be easily shared on other platforms. You can easily send them to popular social media sites or prefer to share them via Whatsapp and even using MMS. If you are working on a desktop and need a compatible GIF creator tool then here are few user friendly desktop application suggestions for you. You can easily pick any of these tools and start creating your own animated GIF to impress your friends around.
GIF Maker Software for Windows and Mac
The article below contains details about 10 most popular GIF makers where first five are compatible with Windows platform and rest are dedicated to Mac devices. Using these advanced software tools, you can easily create animated GIF from sequence of images or from videos that are downloaded from internet. It is also possible to adjust timing between frames or users can also customize frame rotation effects, loop animations, or apply overlays. These software tools can support almost all file types like TIF, TGA, PNG BMP, GIF and JPG etc. Some of these software tools are also able to process webcam results instantly and will save files in form of high quality GIFs. If you are ready to develop your own GIF image then read the reviews below and choose your tool to get best results.
A. Best GIF Maker For Windows
Best Recommendation
If you are not satisfied with the collection discussed above then professionals recommend Wondershare Filmora as most trustworthy tool for your GIF conversion needs. This software can work on Windows as well as Mac devices with full feature support.
If you want to make GIF easily, Filmora will also offer you an online solution for making a GIF. Filmora meme maker can help you make image, GIF and video memes directly without watermark. It is totally FREE and no sign up. You can change text size, color and position to create caption. You can also put text inside or outside in GIF. Try it now!
 Download Mac Version ](https://tools.techidaily.com/wondershare/filmora/download/ )
Key Features:
- This interactive interface can process more than 150 file formats with ease
- It can easily convert any video file into GIF format.
- Wondershare Filmora can be used to adjust frame size, captions, resolution of images while adding classic animation effects and advanced filters to processes images.
1. Photoscape

Here is your personal GIF creator tool that possesses abilities of a multi-purpose photo editor. This tool comes with so many advanced capabilities like it can behave as a raw converter, screen capturer, editor, viewer or can also rename details. Photoscape is commonly used for GIF image creation where users can easily set timings between frames.
Pros:
- It is much easier to use with intuitive interface.
- Offers adjustable canvas size along with easy customization capabilities for photo alignment, background colour and transition effects.
Cons:
- It can create bug trouble if you want to process large size files.
2. Microsoft GIF Animator
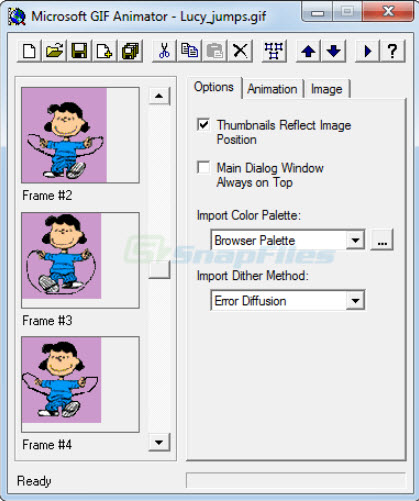
This software is also available free of cost and it can generate animated GIF files instantly. Its drag and drop type media interface can assist users in easy processing of large number of files. Further, you can easily set time duration of frames, set transparency, re order images and make changes for looping effect.
Pros:
- Its drag and drop feature provides it higher ranking.
- One can easily customize all detailed like transparency, frame order, time duration etc.
Cons:
- Microsoft has now stopped designing this software.
3. SSuite GIF Animator

SSuite GIF animator can be used to develop high quality GIF images within very less time. It can easily process raw files in form of BMP, JPEG and JPG extension whereas frame interval can be manually reduced up to few milliseconds. Created GIFs can be further used for easy sharing on other social media websites.
Pros:
- Interactive and simple GUI.
- Takes lesser time for installation and small space in your device memory.
Cons:
- Supported limited file formats and has limited functions.
4. KickMyGraphics

KickMyGraphics is an easy to use GIF animator and allows users to work with a slider so that frames can be adjusted with desired timing sequence. It also assists in other professional level settings such as out quality, zoom and transparency etc. It is also possible to rotate any selected frame with 90 degree motion.
Pros:
- Offers 90 degree image rotation facility.
- Comes with professional level settings.
Cons:
- Complicated for beginners.
5. GiftedMotion

This open source and interactive GIF animation developer application is available for free on Window platforms. It can be used process set of images as well as videos with additional animation effects. Note that, your system must have Java preinstalled if you want to run GiftedMotion on it.
Pros:
- It does not demand installation and download file size is also very small.
- Offers preview facility.
Cons:
- Limited features with time consuming image loading process.
B. Best GIF maker For Mac
1. PicGIF - $19.99:
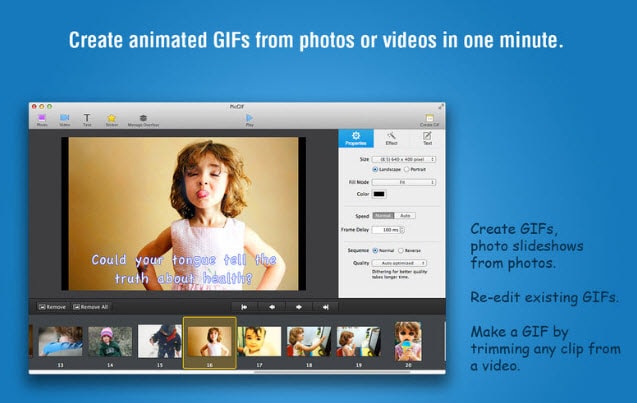
This paid software tool can be used to turn sequence of snapshots into high quality animated GIFs within few seconds. Users can also re-edit their changes in existing GIF files by adjusting its size, text formatting and speed etc. It is also possible to transfer variety of short videos into animated smooth GIFs. It allows users personalize graphics with so many special image effects and color settings.
2. GIPHY Capture – Free:
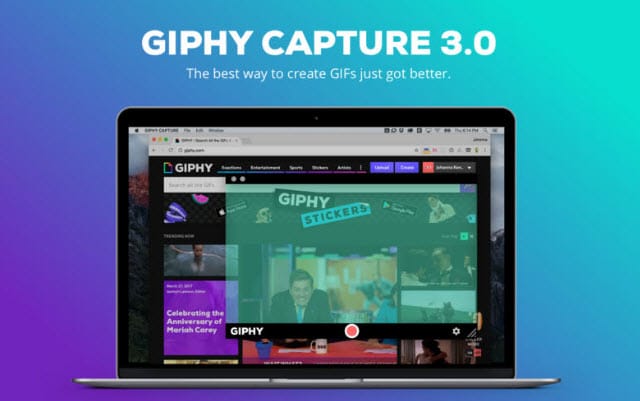
Giphy Capture is available for free for all Mac users and it offers wide range of powerful, intuitive yet simple to use feature set. There are so many incredible things that you can manage in this single platform while editing your GIF sequences. It can easily capture your screen while processing all images with adjustable size, captions and text values. Finally the created GIFs can be easily shared with friends on social media.
3. Image GIF:

This simple and easy to use application can do many miracles for you. You can simply drag and drop lots of image files to this platform and then process them on timeline with advanced feature set. The animation effects and file control capabilities are really interesting that allow easy modification over content. Image GIF is best solution for beginners as it possesses intuitive and user friendly interface.
Shanoon Cox
Shanoon Cox is a writer and a lover of all things video.
Follow @Shanoon Cox
Shanoon Cox
Mar 27, 2024• Proven solutions
GIFs can delivery stories with effectiveness and added emotions. When we view that sequence of memories with animations then they add a different feeling to viewer’s heart. The best part is that these GIF creations use to be light weight files that mean they can be easily shared on other platforms. You can easily send them to popular social media sites or prefer to share them via Whatsapp and even using MMS. If you are working on a desktop and need a compatible GIF creator tool then here are few user friendly desktop application suggestions for you. You can easily pick any of these tools and start creating your own animated GIF to impress your friends around.
GIF Maker Software for Windows and Mac
The article below contains details about 10 most popular GIF makers where first five are compatible with Windows platform and rest are dedicated to Mac devices. Using these advanced software tools, you can easily create animated GIF from sequence of images or from videos that are downloaded from internet. It is also possible to adjust timing between frames or users can also customize frame rotation effects, loop animations, or apply overlays. These software tools can support almost all file types like TIF, TGA, PNG BMP, GIF and JPG etc. Some of these software tools are also able to process webcam results instantly and will save files in form of high quality GIFs. If you are ready to develop your own GIF image then read the reviews below and choose your tool to get best results.
A. Best GIF Maker For Windows
Best Recommendation
If you are not satisfied with the collection discussed above then professionals recommend Wondershare Filmora as most trustworthy tool for your GIF conversion needs. This software can work on Windows as well as Mac devices with full feature support.
If you want to make GIF easily, Filmora will also offer you an online solution for making a GIF. Filmora meme maker can help you make image, GIF and video memes directly without watermark. It is totally FREE and no sign up. You can change text size, color and position to create caption. You can also put text inside or outside in GIF. Try it now!
Download Mac Version ](https://tools.techidaily.com/wondershare/filmora/download/ )
Key Features:
- This interactive interface can process more than 150 file formats with ease
- It can easily convert any video file into GIF format.
- Wondershare Filmora can be used to adjust frame size, captions, resolution of images while adding classic animation effects and advanced filters to processes images.
1. Photoscape
Here is your personal GIF creator tool that possesses abilities of a multi-purpose photo editor. This tool comes with so many advanced capabilities like it can behave as a raw converter, screen capturer, editor, viewer or can also rename details. Photoscape is commonly used for GIF image creation where users can easily set timings between frames.
Pros:
- It is much easier to use with intuitive interface.
- Offers adjustable canvas size along with easy customization capabilities for photo alignment, background colour and transition effects.
Cons:
- It can create bug trouble if you want to process large size files.
2. Microsoft GIF Animator
This software is also available free of cost and it can generate animated GIF files instantly. Its drag and drop type media interface can assist users in easy processing of large number of files. Further, you can easily set time duration of frames, set transparency, re order images and make changes for looping effect.
Pros:
- Its drag and drop feature provides it higher ranking.
- One can easily customize all detailed like transparency, frame order, time duration etc.
Cons:
- Microsoft has now stopped designing this software.
3. SSuite GIF Animator
SSuite GIF animator can be used to develop high quality GIF images within very less time. It can easily process raw files in form of BMP, JPEG and JPG extension whereas frame interval can be manually reduced up to few milliseconds. Created GIFs can be further used for easy sharing on other social media websites.
Pros:
- Interactive and simple GUI.
- Takes lesser time for installation and small space in your device memory.
Cons:
- Supported limited file formats and has limited functions.
4. KickMyGraphics
KickMyGraphics is an easy to use GIF animator and allows users to work with a slider so that frames can be adjusted with desired timing sequence. It also assists in other professional level settings such as out quality, zoom and transparency etc. It is also possible to rotate any selected frame with 90 degree motion.
Pros:
- Offers 90 degree image rotation facility.
- Comes with professional level settings.
Cons:
- Complicated for beginners.
5. GiftedMotion
This open source and interactive GIF animation developer application is available for free on Window platforms. It can be used process set of images as well as videos with additional animation effects. Note that, your system must have Java preinstalled if you want to run GiftedMotion on it.
Pros:
- It does not demand installation and download file size is also very small.
- Offers preview facility.
Cons:
- Limited features with time consuming image loading process.
B. Best GIF maker For Mac
1. PicGIF - $19.99:
This paid software tool can be used to turn sequence of snapshots into high quality animated GIFs within few seconds. Users can also re-edit their changes in existing GIF files by adjusting its size, text formatting and speed etc. It is also possible to transfer variety of short videos into animated smooth GIFs. It allows users personalize graphics with so many special image effects and color settings.
2. GIPHY Capture – Free:
Giphy Capture is available for free for all Mac users and it offers wide range of powerful, intuitive yet simple to use feature set. There are so many incredible things that you can manage in this single platform while editing your GIF sequences. It can easily capture your screen while processing all images with adjustable size, captions and text values. Finally the created GIFs can be easily shared with friends on social media.
3. Image GIF:
This simple and easy to use application can do many miracles for you. You can simply drag and drop lots of image files to this platform and then process them on timeline with advanced feature set. The animation effects and file control capabilities are really interesting that allow easy modification over content. Image GIF is best solution for beginners as it possesses intuitive and user friendly interface.
Shanoon Cox
Shanoon Cox is a writer and a lover of all things video.
Follow @Shanoon Cox
Adobe Animate Rigging’s Tutorial for You
Adobe Animate Rigging’s PROPER Tutorial for You
An easy yet powerful editor
Numerous effects to choose from
Detailed tutorials provided by the official channel
Character rigging involves some easy steps. And the best way for it is Adobe animate rigging. We have laid down the following discussion to help you learn the easiest method of character rigging. And along with it, we will also help you understand both 2D and 3D character designing most effortlessly.
Lastly, and most importantly, it is vital to opt for the simplest yet feature-loaded tool for any animation work. Thus, we will also mention the best tool for animation and video editing. So, without any further wait, let us start our discussion.
In this article
01 [How to Rig a Simple Character | Adobe Animate Tutorial](#Part 1)
02 [Step by Step to Help You Understand 2D/3D Character Design](#Part 2)
Part 1 How to Rig a Simple Character | Adobe Animate Tutorial
Character rigging in Adobe is effortless and straightforward. There are a few steps for rigging in adobe animate, and we will be discussing and explaining the different steps that will help you learn rigging characters for your animation works.
The following are the steps to help you create a rig in Adobe animate.
Step 1: The first step involves selecting the shape for rigging. Otherwise, you can also use bitmap on stage for it.
**Step 2:**Look for the “Asset warp tool” present in the tool panel. This tool will help you in the process of rigging.

Step 3: Create the first joint using the “Asset warp tool” by clicking on the image or the bitmap with the tool. You will see that a triangular mesh-like structure has been formed on your image or bitmap. And the part where you clicked on the image or the bitmap with the “Asset warp tool” forms the first joint.

Step 4: The next step involves making more joints on the image and instilling bones between the joints. For that, go to the “Warp Options” and choose the “Tools” tab. There you will see the option of “Create bones”. Ensure to enable the “Create bones” option; otherwise, you will not create bones between the different joints.

Step 5: Complete the rig formation by joining all the joints correctly with each other with the help of the bones.

The above steps would help you create the rig for the image or bitmap you want to animate. And now, the following steps will help you learn the steps for modifying the rig as well as tweening.
The first process for it is deformation. So, the following are the steps that help you perform the process of deformation in animation.
Step 6: You need to deform the mesh, and you can do so by holding and dragging the joint with the help of the “Asset warp tool”.

**Step 7:**You can also rotate a bone by clicking and dragging the bone you want to rotate when you drag a joint, the size of the joint changes, which is not the case when you drag a bone. Its size remains constant.

Now, we will help you learn to work with the different keyframes. The keyframes enable the image or the bitmap to acquire different poses, vital for animation. The “Edit Multiple Frames” mode helps you work with different keyframes.
You can readily create new keyframes and deform the image through joints or bones. Each keyframe retains its own set, and you can integrate different transforms after setting one pose for the image in the keyframe.

Part 2 Step by Step to Help You Understand 2D/Character Design
Animation is immensely enjoyable and takes the best of our creativity. And as we know, there are two major and most renowned types of it. One is the 2-dimensional animation, which we know as the animation. And the other one is 3-dimensional, better known as animation.
Now, there are different aspects that are essential for anyone aspiring to animate, whether in or 3D, to know. One of the aspects is designing characters for animation. And we have ideally put forth a discussion about the different factors you need to know about character designing in and animation.
01Animate Character Design
There are some steps involved in the designing a character for animation. And those steps are pretty diverse. So, we have enlisted all the required steps and factors to help you learn and understand character designing for animation. The list is as follows.
02Understanding your audience
To create the best character design, it is essential that you understand your target audience. If your target audience includes the kids and the children, your character design will primarily be based on cartoons.
Ensure which genre of animation does your audience prefer? If it is funny or mythological or any other genre, you design your characters accordingly.

03Understand the type of characters or animation you are going to create
There are different types of animation or characters in animation. Different types serve different purposes and genres. So, let us know about the different types of animations, and this will help you understand which one would suit your requirements.
● Pop-style Characters
The characters you see in the comics and superhero animation movies are pop-style characters. They are highly expressive, become the centre of attraction and always are dominant on the screen. They tend to deliver an energy that reaches the audience impeccably.

● Iconic design
These characters are less fancy but highly expressive. They usually have a block face yet connect to an audience of all types. They are generally best for the corporate videos and those with some messages to be delivered.

● Editorial Style Characters
These characters are highly elegant and bold. These are characters that we see in different publications. They consist of great style, realisticity and cleanliness. They are mainly used to express the quality of presence.

● Sketch and experiment
Now that you know about the different character types, it will help you understand which one would match the genre of animation you prefer to work on. So, start sketching your imagination in a draft.
Decide on the different poses your character might have. Track them down in a draft. It helps you become organised and put down your plan and creativity collectively.
Trial and error are one of the best ways to achieve perfection. So, it is crucial to sketch and then take feedback. If they do not appear praiseworthy, continue sketching and then get feedback again.
● Animate and execute
Lastly, it would be best to execute all your drafts and imaginations. Try using the animation tools that suit your skill capacity and genre of animation the best.
04Animate Character Design
There are five simple steps that will help you animate a character design in 3D. The steps are as follows.
● Contrivance the ideas
Try to include such characters that include several layers. It helps in better animation and also makes your creativity sphere widen.

● Designing the character
Your main character has a large to play. So, use all the necessary tools, starting from photoshop to all the other significant factors, to make your character attain all the features necessary for standing out. It also ensures that you can readily apply all the animation techniques and give your creativity shape.

● Modelling the environment
Adding props to the background is an option. You may choose not to include any props as well. You can add the required props and accessories to your main characters. It includes clothes, scars and the like.

● Animation
It is the main step. Use the best tool for animation and instill all the necessary animation processes. Use the different layers in your main character. Set up the primary constraints and animate the background and the props. Ensure proper light settings and set the handheld camera movements as well.

● Playblast settings
Here you choose the appropriate size of your animation video. It is also an important step, which completes your animation of the character in animation.

Now that we know about the different essential aspects of and animation and character design knowing which tool can help us in the most effortless yet best quality video editing. So, as promised before, we will now discuss the best video editing tool, Wondershare Filmora Video Editor !
Here are the best features of Filmora that can ideally help you in video editing.
● Professional quality video editing tools include video stabilization, noise removal, colour tuning, audio mixer, advanced text editor, editing support, scene detection, and an audio equalizer.
● Although it is ideal for professional use, the tool is simple and effortless ot use. You face no difficulties in understating the features of the tool.
● There are over 8effects available that you can use in your videos.
● You can download it for free!
● You can readily opt for its free trial that enables you to be sure of what you are using before buying it!

For Win 7 or later (64-bit)
For macOS 10.12 or later
● Key Takeaways from This Episode →
● A piece of general information about character rigging in animation and how it is beneficial.
● A simple tutorial for character designing in and animation
● The features of the best video editing tool- Filmora.
Character rigging involves some easy steps. And the best way for it is Adobe animate rigging. We have laid down the following discussion to help you learn the easiest method of character rigging. And along with it, we will also help you understand both 2D and 3D character designing most effortlessly.
Lastly, and most importantly, it is vital to opt for the simplest yet feature-loaded tool for any animation work. Thus, we will also mention the best tool for animation and video editing. So, without any further wait, let us start our discussion.
In this article
01 [How to Rig a Simple Character | Adobe Animate Tutorial](#Part 1)
02 [Step by Step to Help You Understand 2D/3D Character Design](#Part 2)
Part 1 How to Rig a Simple Character | Adobe Animate Tutorial
Character rigging in Adobe is effortless and straightforward. There are a few steps for rigging in adobe animate, and we will be discussing and explaining the different steps that will help you learn rigging characters for your animation works.
The following are the steps to help you create a rig in Adobe animate.
Step 1: The first step involves selecting the shape for rigging. Otherwise, you can also use bitmap on stage for it.
**Step 2:**Look for the “Asset warp tool” present in the tool panel. This tool will help you in the process of rigging.
Step 3: Create the first joint using the “Asset warp tool” by clicking on the image or the bitmap with the tool. You will see that a triangular mesh-like structure has been formed on your image or bitmap. And the part where you clicked on the image or the bitmap with the “Asset warp tool” forms the first joint.
Step 4: The next step involves making more joints on the image and instilling bones between the joints. For that, go to the “Warp Options” and choose the “Tools” tab. There you will see the option of “Create bones”. Ensure to enable the “Create bones” option; otherwise, you will not create bones between the different joints.
Step 5: Complete the rig formation by joining all the joints correctly with each other with the help of the bones.
The above steps would help you create the rig for the image or bitmap you want to animate. And now, the following steps will help you learn the steps for modifying the rig as well as tweening.
The first process for it is deformation. So, the following are the steps that help you perform the process of deformation in animation.
Step 6: You need to deform the mesh, and you can do so by holding and dragging the joint with the help of the “Asset warp tool”.
**Step 7:**You can also rotate a bone by clicking and dragging the bone you want to rotate when you drag a joint, the size of the joint changes, which is not the case when you drag a bone. Its size remains constant.
Now, we will help you learn to work with the different keyframes. The keyframes enable the image or the bitmap to acquire different poses, vital for animation. The “Edit Multiple Frames” mode helps you work with different keyframes.
You can readily create new keyframes and deform the image through joints or bones. Each keyframe retains its own set, and you can integrate different transforms after setting one pose for the image in the keyframe.
Part 2 Step by Step to Help You Understand 2D/Character Design
Animation is immensely enjoyable and takes the best of our creativity. And as we know, there are two major and most renowned types of it. One is the 2-dimensional animation, which we know as the animation. And the other one is 3-dimensional, better known as animation.
Now, there are different aspects that are essential for anyone aspiring to animate, whether in or 3D, to know. One of the aspects is designing characters for animation. And we have ideally put forth a discussion about the different factors you need to know about character designing in and animation.
01Animate Character Design
There are some steps involved in the designing a character for animation. And those steps are pretty diverse. So, we have enlisted all the required steps and factors to help you learn and understand character designing for animation. The list is as follows.
02Understanding your audience
To create the best character design, it is essential that you understand your target audience. If your target audience includes the kids and the children, your character design will primarily be based on cartoons.
Ensure which genre of animation does your audience prefer? If it is funny or mythological or any other genre, you design your characters accordingly.
03Understand the type of characters or animation you are going to create
There are different types of animation or characters in animation. Different types serve different purposes and genres. So, let us know about the different types of animations, and this will help you understand which one would suit your requirements.
● Pop-style Characters
The characters you see in the comics and superhero animation movies are pop-style characters. They are highly expressive, become the centre of attraction and always are dominant on the screen. They tend to deliver an energy that reaches the audience impeccably.
● Iconic design
These characters are less fancy but highly expressive. They usually have a block face yet connect to an audience of all types. They are generally best for the corporate videos and those with some messages to be delivered.
● Editorial Style Characters
These characters are highly elegant and bold. These are characters that we see in different publications. They consist of great style, realisticity and cleanliness. They are mainly used to express the quality of presence.
● Sketch and experiment
Now that you know about the different character types, it will help you understand which one would match the genre of animation you prefer to work on. So, start sketching your imagination in a draft.
Decide on the different poses your character might have. Track them down in a draft. It helps you become organised and put down your plan and creativity collectively.
Trial and error are one of the best ways to achieve perfection. So, it is crucial to sketch and then take feedback. If they do not appear praiseworthy, continue sketching and then get feedback again.
● Animate and execute
Lastly, it would be best to execute all your drafts and imaginations. Try using the animation tools that suit your skill capacity and genre of animation the best.
04Animate Character Design
There are five simple steps that will help you animate a character design in 3D. The steps are as follows.
● Contrivance the ideas
Try to include such characters that include several layers. It helps in better animation and also makes your creativity sphere widen.
● Designing the character
Your main character has a large to play. So, use all the necessary tools, starting from photoshop to all the other significant factors, to make your character attain all the features necessary for standing out. It also ensures that you can readily apply all the animation techniques and give your creativity shape.
● Modelling the environment
Adding props to the background is an option. You may choose not to include any props as well. You can add the required props and accessories to your main characters. It includes clothes, scars and the like.
● Animation
It is the main step. Use the best tool for animation and instill all the necessary animation processes. Use the different layers in your main character. Set up the primary constraints and animate the background and the props. Ensure proper light settings and set the handheld camera movements as well.
● Playblast settings
Here you choose the appropriate size of your animation video. It is also an important step, which completes your animation of the character in animation.
Now that we know about the different essential aspects of and animation and character design knowing which tool can help us in the most effortless yet best quality video editing. So, as promised before, we will now discuss the best video editing tool, Wondershare Filmora Video Editor !
Here are the best features of Filmora that can ideally help you in video editing.
● Professional quality video editing tools include video stabilization, noise removal, colour tuning, audio mixer, advanced text editor, editing support, scene detection, and an audio equalizer.
● Although it is ideal for professional use, the tool is simple and effortless ot use. You face no difficulties in understating the features of the tool.
● There are over 8effects available that you can use in your videos.
● You can download it for free!
● You can readily opt for its free trial that enables you to be sure of what you are using before buying it!
For Win 7 or later (64-bit)
For macOS 10.12 or later
● Key Takeaways from This Episode →
● A piece of general information about character rigging in animation and how it is beneficial.
● A simple tutorial for character designing in and animation
● The features of the best video editing tool- Filmora.
How to Turn Yourself Into WhatsApp Cartoon
How to Turn Yourself Into a WhatsApp Cartoon
An easy yet powerful editor
Numerous effects to choose from
Detailed tutorials provided by the official channel
Let me ask you a question - how much fun would it be if you could create your own animated stickers and send them to your friends and family members on Whatsapp? I mean, it would make the entire conversation more fun and also add a personal element to the entire chat. Right? Well, to tell you the truth, it is possible to create Whatsapp cartoons and stickers, and the best part is you don’t need any technical expertise to get the job done.
Of course, for a long time, Whatsapp didn’t allow its users to use third-party animated stickers within the messenger. But, recently the messaging platform introduced a custom “stickers pack” feature that now allows people to upload their own stickers and create a dedicated sticker app.
You can also rely on several third-party sticker designer applications to get the job done. So, if you have been looking for a way to use your own face as an animated sticker in Whatsapp, continue reading. In this guide, we’ll walk you through different ways to create and upload a custom cartoon sticker in Whatsapp and make your Whatsapp chats more fun.
In this article
01 [How to Create Your Own Custom Animated Whatsapp Stickers](#Part 1)
02 [How to Create Custom Animated Whatsapp Stickers on Android and iPhone](#Part 2)
Part 1 How to Create Your Own Custom Animated Whatsapp Stickers
Now, before we go any further, I would like to point out that Whatsapp doesn’t allow users to directly create a custom cartoon sticker. There’s no AR feature that’ll turn your face into a cartoon character. So, to use a cartoon Whatsapp profile picture, you’ll have to rely on a third-party tool to get the job done. Based on which platform you use to access Whatsapp, you can choose a wide variety of Whatsapp animated sticker creators and use them to design custom cartoon stickers to make traditional Whatsapp conversations more fun.
One of the easiest ways to create custom stickers for Whatsapp is to use Wondershare Wondershare Filmora Video Editor . Filmora is a full-scale video editing software that’s specifically designed to help editors unleash their creativity and create stunning movies for different platforms.
For Win 7 or later (64-bit)
For macOS 10.12 or later
Filmora is among the most popular video editing tools that many creators use to edit high-quality YouTube vlogs and other types of videos for other platforms. However, Wondershare Filmora is not just a video editing tool. You can also use it to create custom cartoon animations and export them in the desired format within a few seconds. Filmora has a timeline-based interface that makes it relatively easier for editors to streamline the entire editing process while ensuring that none of the shots go missing.

Filmora also has a built-in media store - known as FilmStocks - where you can find hundreds of video effects, animations, animated characters, etc. FilmStocks also offers access to copyright-free music, allowing creators to use high-quality music in their videos without worrying about unexpected copyright strikes.
So, if you are looking for an all-in-one tool to create Whatsapp cartoon stickers, install Wondershare Filmora on your computer and start turning your face into an animated sticker.
Part 1 How to Create Custom Animated Whatsapp Stickers on Android and iPhone
One of the tools that can help you do the job is “Toon Me”. As the name implies, Toon Me is an online platform that’s designed to help users turn their faces into respective cartoon stickers. It’s designed by the developers at Photo Labs - an online platform that makes photo editing a hassle-free task. Since the tool is designed by expert developers, you can expect to get the best results in the end. And, the best part is creating custom cartoon characters using Toon Me is a relatively easy process.

All you have to do is download Toon Me on your phone and use the camera to create a Whatsapp cartoon sticker for yourself. The app is available on both Google Play Store and Apple’s App Store. It means regardless of the smartphone you’re using, Toon Me will allow you to design a Whatsapp cartoon sticker without any hassle.
Like Toon Me, there are dozens of other applications you can install on your smartphone to create personalized animated stickers. One such example is Sticker Maker. Sticker Maker is an Android application that’ll allow you to capture your face and turn it into an animated sticker. It’s compatible across different Android versions and runs smoothly on all Android models. So, if you own an Android device, here’s the step-by-step process to use Sticker Maker to turn your face into an animated sticker.
Step 1 - Start by installing Sticker Maker on your smartphone and launch the application to get started.
Step 2 - On its home screen, click the “Create a New Sticker Pack” option.
Step 3 - Give the sticker pack a name and then, press enter to proceed further.
Step 4 - At this point, you can either select one of the existing pictures from your Gallery or open the camera to click a fresh selfie. Either way, upload the picture and let the app convert it into a corresponding sticker.
Step 5 - You can upload 8-10 pictures at once and create the entire sticker pack instantly. And, once you have successfully created the sticker pack, simply click the “Add to Whatsapp” button.

That’s it; the selected sticker pack will get added to your Whatsapp’s sticker collection and you’ll be able to use them right away. That’s how quick and easy it is to create custom Whatsapp cartoons using different tools on your smartphone.
● Ending Thoughts →
● Using personalized Whatsapp cartoon stickers is a great way to make Whatsapp conversations fun.
● Wondershare Filmora is a feature-packed video editing software that’s designed to help creators create stunning videos and Whatsapp stickers. Its timeline-based interface and built-in media store will allow you to create stunning Whatsapp stickers without any hassle
● You can also download dedicated sticker maker applications on your iPhone or Android devices and use them directly to create visually appealing animated stickers for Whatsapp.
Let me ask you a question - how much fun would it be if you could create your own animated stickers and send them to your friends and family members on Whatsapp? I mean, it would make the entire conversation more fun and also add a personal element to the entire chat. Right? Well, to tell you the truth, it is possible to create Whatsapp cartoons and stickers, and the best part is you don’t need any technical expertise to get the job done.
Of course, for a long time, Whatsapp didn’t allow its users to use third-party animated stickers within the messenger. But, recently the messaging platform introduced a custom “stickers pack” feature that now allows people to upload their own stickers and create a dedicated sticker app.
You can also rely on several third-party sticker designer applications to get the job done. So, if you have been looking for a way to use your own face as an animated sticker in Whatsapp, continue reading. In this guide, we’ll walk you through different ways to create and upload a custom cartoon sticker in Whatsapp and make your Whatsapp chats more fun.
In this article
01 [How to Create Your Own Custom Animated Whatsapp Stickers](#Part 1)
02 [How to Create Custom Animated Whatsapp Stickers on Android and iPhone](#Part 2)
Part 1 How to Create Your Own Custom Animated Whatsapp Stickers
Now, before we go any further, I would like to point out that Whatsapp doesn’t allow users to directly create a custom cartoon sticker. There’s no AR feature that’ll turn your face into a cartoon character. So, to use a cartoon Whatsapp profile picture, you’ll have to rely on a third-party tool to get the job done. Based on which platform you use to access Whatsapp, you can choose a wide variety of Whatsapp animated sticker creators and use them to design custom cartoon stickers to make traditional Whatsapp conversations more fun.
One of the easiest ways to create custom stickers for Whatsapp is to use Wondershare Wondershare Filmora Video Editor . Filmora is a full-scale video editing software that’s specifically designed to help editors unleash their creativity and create stunning movies for different platforms.
For Win 7 or later (64-bit)
For macOS 10.12 or later
Filmora is among the most popular video editing tools that many creators use to edit high-quality YouTube vlogs and other types of videos for other platforms. However, Wondershare Filmora is not just a video editing tool. You can also use it to create custom cartoon animations and export them in the desired format within a few seconds. Filmora has a timeline-based interface that makes it relatively easier for editors to streamline the entire editing process while ensuring that none of the shots go missing.
Filmora also has a built-in media store - known as FilmStocks - where you can find hundreds of video effects, animations, animated characters, etc. FilmStocks also offers access to copyright-free music, allowing creators to use high-quality music in their videos without worrying about unexpected copyright strikes.
So, if you are looking for an all-in-one tool to create Whatsapp cartoon stickers, install Wondershare Filmora on your computer and start turning your face into an animated sticker.
Part 1 How to Create Custom Animated Whatsapp Stickers on Android and iPhone
One of the tools that can help you do the job is “Toon Me”. As the name implies, Toon Me is an online platform that’s designed to help users turn their faces into respective cartoon stickers. It’s designed by the developers at Photo Labs - an online platform that makes photo editing a hassle-free task. Since the tool is designed by expert developers, you can expect to get the best results in the end. And, the best part is creating custom cartoon characters using Toon Me is a relatively easy process.
All you have to do is download Toon Me on your phone and use the camera to create a Whatsapp cartoon sticker for yourself. The app is available on both Google Play Store and Apple’s App Store. It means regardless of the smartphone you’re using, Toon Me will allow you to design a Whatsapp cartoon sticker without any hassle.
Like Toon Me, there are dozens of other applications you can install on your smartphone to create personalized animated stickers. One such example is Sticker Maker. Sticker Maker is an Android application that’ll allow you to capture your face and turn it into an animated sticker. It’s compatible across different Android versions and runs smoothly on all Android models. So, if you own an Android device, here’s the step-by-step process to use Sticker Maker to turn your face into an animated sticker.
Step 1 - Start by installing Sticker Maker on your smartphone and launch the application to get started.
Step 2 - On its home screen, click the “Create a New Sticker Pack” option.
Step 3 - Give the sticker pack a name and then, press enter to proceed further.
Step 4 - At this point, you can either select one of the existing pictures from your Gallery or open the camera to click a fresh selfie. Either way, upload the picture and let the app convert it into a corresponding sticker.
Step 5 - You can upload 8-10 pictures at once and create the entire sticker pack instantly. And, once you have successfully created the sticker pack, simply click the “Add to Whatsapp” button.
That’s it; the selected sticker pack will get added to your Whatsapp’s sticker collection and you’ll be able to use them right away. That’s how quick and easy it is to create custom Whatsapp cartoons using different tools on your smartphone.
● Ending Thoughts →
● Using personalized Whatsapp cartoon stickers is a great way to make Whatsapp conversations fun.
● Wondershare Filmora is a feature-packed video editing software that’s designed to help creators create stunning videos and Whatsapp stickers. Its timeline-based interface and built-in media store will allow you to create stunning Whatsapp stickers without any hassle
● You can also download dedicated sticker maker applications on your iPhone or Android devices and use them directly to create visually appealing animated stickers for Whatsapp.
8 Blender 3D Animation Tutorials for Beginners
8 Blender 3D Animation Tutorials for Beginners
An easy yet powerful editor
Numerous effects to choose from
Detailed tutorials provided by the official channel
Blender animation software is one of the open-source software chosen to create animations. It is easy to create animations, videos or graphics, etc. If you want to be an animation 3D artist, make creative universes, and meet each of the different characters moving around in your heart.
You will learn the step-by-step procedure to create animations and add other edits to the animation. And also a few tips to develop better Blender 3D animation effects.
In this article
01 [Is Blender best for animation?](#Part 1)
02 [How to Create 3D Animated Characters with Blender in 15 Minutes.](#Part 2)
03 [Become a Pro from Beginners in 8 Tutorials](#Part 3)
Part 1 Is Blender best for animation?
The answer to if the Blender is suitable for animation is yes. Blender animation is the best for making animations and bringing any living to animator. This software is mostly for professional works whose limitations will be learning the process, not any technical defects. Let’s talk about why Blender 3D animation software is the best and more helpful.
Character animation is an essential tool for animation, and Blender has developed this tool with no way less to other software.
There are many animation effects other than animating characters. Blender 3D for free has all the necessary tools to do all types of rigs and animations without any difficulty.
Blender is one software that has 2D animation inbuilt in it, like drawing and creating 2D animation.
Blender’s animation tools are making motion graphics possible by advancing the features than it was four years ago.
Nowadays, many people are using Blender to do professional works, including freelancers, small studios, and even game developers.
Part 2 How to Create 3D Animated Characters with Blender in 15 Minutes.
This is a series for people who want to learn how to create 3D blender animation characters from keeping a reference image. Blender’s ringing tools will be more helpful for this process.
01Step 1: Importing
Initially, import a Blender 3D animation character into the Blender to animate. Many free and paid characters are available in Vincent, and Rain v2.0 is present in Blender Cloud; above all, these characters are for free.
Steps to import the character either from Vincent or Rain v2.0
Download the character file from the cloud to any destination folder on the computer. Open the Blender and place the cursor on the origin point on the screen. Later select import present in the File menu and choose the file format. And now, allow the Python script to run for the selected character folder.

02Step 2: Add Keyframes
There will be a diamond-shaped icon below to choose the keyframe you want to add to the timeline, which you may also delete.
Adding a keyframe is simple. Open the timeline window in the animation editor. Press the alphabet ‘G’ on the keyboard, move the bone and place it. Then hit Shift+I and choose the channel LocRot and insert the keyframe. Likewise, you can adjust the keyframe by dragging, making it fast or slow to the requirements.
Moving the keyframe to 20 makes it faster, and moving to 40, slower.
03Step 3: Get Reference Materials
It will be challenging to add movements to the characters, so plenty of videos can get the moves right. There are various reference images and videos available on the Internet. You can either add the selected reference materials to the second screen or add them to the 3D space. Let’s discuss how to add it.
Hit Shift + A to add the reference material. Later select “Image” and then choose the “Background.” Scale the reference image onto the 3D space after it loads.
Afterward, you can leave it to the animation of the reference article, or you can further edit or amplify the movements.
04Step 4: Fine–Tuning and Sound
This step will add smooth movements by combining two keyframes for a more professional look. We have to use the Dope sheet to do complete this process. Let’s see how to add it.
Initially, split the window horizontally. Later switch over the dope sheet below the animation tab, where you can see keyframes of all axis. Now you can drag and edit to slow or amplify the speed.
There is a Graphic editor, which is more advanced to make the movements more accurately and directly to edit the curves.
Sound effects make any video or animation better. You can add and import the sound files. You can also create your sound and insert it into the Blender. Let’s discuss adding sound and making it sync to the character.
Download the audio file, hit shift + A to open Add menu, and choose the “Sound.” Now select the sound that you wish to add.
Drag the sound to keep it to the specific sections alone. Also, you can switch between “No Sync” to “AV Sync” in the playback to give the best synchronization to the characters. The volume and pitch can be adjusted using the sidebar.
05Step 5: Rendering
Before rendering, make sure you keep the FPS is same as that chosen during the keyframes to avoid unnecessary renders. After setting the frame correctly, causing the animation is easy.
Initially, click on “scene” and choose the file extension, file formats, and file colors (BW, RGB, or RGBA). Select the encoding container as “WebM” and video Codec as “WEBM/VP9. After adding the sound, set the audio codec to “Vorbis.” Choose output quality and speed.
After all the rendering, select Render from the top bar and select “Render Animation” in Blender Animation.
Awesome! We have successfully blended a character using Blender 3D animation software. With more practice and knowledge about more tools, one can easily use the Blender 3D mouse.
Part 3 Become a Pro from Beginners in 8 Tutorials.
01Fix 1: Complete Beginners Guide to Blender 2.8
This YouTube tutorial focuses on Blender version 2.8. The tutorial features the redesigned user interface and tools like 3D viewpoint and UV editor, which has new interactive tools. And about different 3D shapes and simple edits like adding colors and “G drag,” etc.
02Fix 2: Blender 2.9 for Absolute Beginners
This YouTube tutorial on Blender 3D animation software version 2.9 has the new advancement about denoiser interactivity in the 3D viewpoint. The YouTuber explains EEVEE, cycles, workbench, movements, rotate, and scale objects.
03Fix 3: Blender Day -1 Absolute Basics - Introduction Series for Beginners
This YouTube tutorial says about the introduction to the Blender 3D for free for beginners. He explains simple movements like rotating and scaling, shapes, and colors to the objects. He also says about the pivot plot and how to create a basic primitive using blender.
04Fix 4: Zoync TV’s Blender Beginners Series
The Blender Beginners video by ZoyncTV is on Blender 2.6. Indeed, even as hotkeys and terms change, the hidden ideas will forever be pertinent. Every video in this 11-section is somewhere between 10 and 20 minutes, split into five separate subjects: displaying, modifiers, materials, surfaces, and animations. It’s a beginner-level course.
05Fix 5: The Blender Survival Guide
The Blender Survival Guide series by Creative COW is outdated but the best video for somebody who has never utilized Blender. Each video in this 13-section series is somewhere in the range of 15 and 45 minutes in length, which means you’ll get 350 intense minutes of preparing. It is a survival reference that shows just the outright necessities.
06Fix 6: KatBit’s Blender Tutorial
The KatsBits site is home to lots of tutorials, video games. Its Blender animation tutorials are fantastic when you want a beginning stage for various 3D models. There are 45 Blender tutorials. Tutorials take you through the most common way of making a 3D level for Quake and tell you the best way to make a basic model.
07Fix 7: Daniel Krafft’s 100 Blender 2.8 Tips
While this is another Blender 2.8 tutorial, Daniel’s tips are overall for any Blender work process. He teaches simple stuff like vertex and edges and some technical parts in the Blender 3D animation software.
08Fix 8: Blender 3D: Noob to Pro
This last tutorial is a “wiki book” called Blender 3D: Noob to Pro that consists of important Blender animation tips and experiences. Start with an outline of 3D ideas and a top-to-bottom introduction to Blender.
Regarding Blender 3D mouse software, we would like to recommend one more tool to you the most. Yes, it is none other than Wondershare Filmora, a perfect alternative to Blender 3D animation software wherein you can get excellent 3D animation effects, 3D texts and animate it. There are some simple steps and various options to work in Filmora for creating 3D animated effects.
● Composition
● Creating our 3D text
● Creating the 3D look
● Basics of 3D animation
● Animating the text in 3D
There are countless YouTube tutorial videos for working with Wondershare Filmora Video Editor ‘s latest version.
Key Takeaways from This Episode
● We learned about Blender 3D animation software.
● How can you create characters using Blender animation?
● 8 Tutorials to move you from a beginner to a Pro.
Blender animation software is one of the open-source software chosen to create animations. It is easy to create animations, videos or graphics, etc. If you want to be an animation 3D artist, make creative universes, and meet each of the different characters moving around in your heart.
You will learn the step-by-step procedure to create animations and add other edits to the animation. And also a few tips to develop better Blender 3D animation effects.
In this article
01 [Is Blender best for animation?](#Part 1)
02 [How to Create 3D Animated Characters with Blender in 15 Minutes.](#Part 2)
03 [Become a Pro from Beginners in 8 Tutorials](#Part 3)
Part 1 Is Blender best for animation?
The answer to if the Blender is suitable for animation is yes. Blender animation is the best for making animations and bringing any living to animator. This software is mostly for professional works whose limitations will be learning the process, not any technical defects. Let’s talk about why Blender 3D animation software is the best and more helpful.
Character animation is an essential tool for animation, and Blender has developed this tool with no way less to other software.
There are many animation effects other than animating characters. Blender 3D for free has all the necessary tools to do all types of rigs and animations without any difficulty.
Blender is one software that has 2D animation inbuilt in it, like drawing and creating 2D animation.
Blender’s animation tools are making motion graphics possible by advancing the features than it was four years ago.
Nowadays, many people are using Blender to do professional works, including freelancers, small studios, and even game developers.
Part 2 How to Create 3D Animated Characters with Blender in 15 Minutes.
This is a series for people who want to learn how to create 3D blender animation characters from keeping a reference image. Blender’s ringing tools will be more helpful for this process.
01Step 1: Importing
Initially, import a Blender 3D animation character into the Blender to animate. Many free and paid characters are available in Vincent, and Rain v2.0 is present in Blender Cloud; above all, these characters are for free.
Steps to import the character either from Vincent or Rain v2.0
Download the character file from the cloud to any destination folder on the computer. Open the Blender and place the cursor on the origin point on the screen. Later select import present in the File menu and choose the file format. And now, allow the Python script to run for the selected character folder.
02Step 2: Add Keyframes
There will be a diamond-shaped icon below to choose the keyframe you want to add to the timeline, which you may also delete.
Adding a keyframe is simple. Open the timeline window in the animation editor. Press the alphabet ‘G’ on the keyboard, move the bone and place it. Then hit Shift+I and choose the channel LocRot and insert the keyframe. Likewise, you can adjust the keyframe by dragging, making it fast or slow to the requirements.
Moving the keyframe to 20 makes it faster, and moving to 40, slower.
03Step 3: Get Reference Materials
It will be challenging to add movements to the characters, so plenty of videos can get the moves right. There are various reference images and videos available on the Internet. You can either add the selected reference materials to the second screen or add them to the 3D space. Let’s discuss how to add it.
Hit Shift + A to add the reference material. Later select “Image” and then choose the “Background.” Scale the reference image onto the 3D space after it loads.
Afterward, you can leave it to the animation of the reference article, or you can further edit or amplify the movements.
04Step 4: Fine–Tuning and Sound
This step will add smooth movements by combining two keyframes for a more professional look. We have to use the Dope sheet to do complete this process. Let’s see how to add it.
Initially, split the window horizontally. Later switch over the dope sheet below the animation tab, where you can see keyframes of all axis. Now you can drag and edit to slow or amplify the speed.
There is a Graphic editor, which is more advanced to make the movements more accurately and directly to edit the curves.
Sound effects make any video or animation better. You can add and import the sound files. You can also create your sound and insert it into the Blender. Let’s discuss adding sound and making it sync to the character.
Download the audio file, hit shift + A to open Add menu, and choose the “Sound.” Now select the sound that you wish to add.
Drag the sound to keep it to the specific sections alone. Also, you can switch between “No Sync” to “AV Sync” in the playback to give the best synchronization to the characters. The volume and pitch can be adjusted using the sidebar.
05Step 5: Rendering
Before rendering, make sure you keep the FPS is same as that chosen during the keyframes to avoid unnecessary renders. After setting the frame correctly, causing the animation is easy.
Initially, click on “scene” and choose the file extension, file formats, and file colors (BW, RGB, or RGBA). Select the encoding container as “WebM” and video Codec as “WEBM/VP9. After adding the sound, set the audio codec to “Vorbis.” Choose output quality and speed.
After all the rendering, select Render from the top bar and select “Render Animation” in Blender Animation.
Awesome! We have successfully blended a character using Blender 3D animation software. With more practice and knowledge about more tools, one can easily use the Blender 3D mouse.
Part 3 Become a Pro from Beginners in 8 Tutorials.
01Fix 1: Complete Beginners Guide to Blender 2.8
This YouTube tutorial focuses on Blender version 2.8. The tutorial features the redesigned user interface and tools like 3D viewpoint and UV editor, which has new interactive tools. And about different 3D shapes and simple edits like adding colors and “G drag,” etc.
02Fix 2: Blender 2.9 for Absolute Beginners
This YouTube tutorial on Blender 3D animation software version 2.9 has the new advancement about denoiser interactivity in the 3D viewpoint. The YouTuber explains EEVEE, cycles, workbench, movements, rotate, and scale objects.
03Fix 3: Blender Day -1 Absolute Basics - Introduction Series for Beginners
This YouTube tutorial says about the introduction to the Blender 3D for free for beginners. He explains simple movements like rotating and scaling, shapes, and colors to the objects. He also says about the pivot plot and how to create a basic primitive using blender.
04Fix 4: Zoync TV’s Blender Beginners Series
The Blender Beginners video by ZoyncTV is on Blender 2.6. Indeed, even as hotkeys and terms change, the hidden ideas will forever be pertinent. Every video in this 11-section is somewhere between 10 and 20 minutes, split into five separate subjects: displaying, modifiers, materials, surfaces, and animations. It’s a beginner-level course.
05Fix 5: The Blender Survival Guide
The Blender Survival Guide series by Creative COW is outdated but the best video for somebody who has never utilized Blender. Each video in this 13-section series is somewhere in the range of 15 and 45 minutes in length, which means you’ll get 350 intense minutes of preparing. It is a survival reference that shows just the outright necessities.
06Fix 6: KatBit’s Blender Tutorial
The KatsBits site is home to lots of tutorials, video games. Its Blender animation tutorials are fantastic when you want a beginning stage for various 3D models. There are 45 Blender tutorials. Tutorials take you through the most common way of making a 3D level for Quake and tell you the best way to make a basic model.
07Fix 7: Daniel Krafft’s 100 Blender 2.8 Tips
While this is another Blender 2.8 tutorial, Daniel’s tips are overall for any Blender work process. He teaches simple stuff like vertex and edges and some technical parts in the Blender 3D animation software.
08Fix 8: Blender 3D: Noob to Pro
This last tutorial is a “wiki book” called Blender 3D: Noob to Pro that consists of important Blender animation tips and experiences. Start with an outline of 3D ideas and a top-to-bottom introduction to Blender.
Regarding Blender 3D mouse software, we would like to recommend one more tool to you the most. Yes, it is none other than Wondershare Filmora, a perfect alternative to Blender 3D animation software wherein you can get excellent 3D animation effects, 3D texts and animate it. There are some simple steps and various options to work in Filmora for creating 3D animated effects.
● Composition
● Creating our 3D text
● Creating the 3D look
● Basics of 3D animation
● Animating the text in 3D
There are countless YouTube tutorial videos for working with Wondershare Filmora Video Editor ‘s latest version.
Key Takeaways from This Episode
● We learned about Blender 3D animation software.
● How can you create characters using Blender animation?
● 8 Tutorials to move you from a beginner to a Pro.
What Is Motion Graphics
What is Motion Graphics
An easy yet powerful editor
Numerous effects to choose from
Detailed tutorials provided by the official channel
Are you new to motion graphics and looking to learn everything about animated motion then you are at the right webpage. In this article, we will cover everything about motion graphic videos.
In this article
01 [What is Motion Graphics? (Motion Graphics Definition)](#Part 1)
02 [5 Motion Graphics Animation Trends You Need to Know About](#Part 2)
03 [History of Motion Graphics](#Part 3)
04 [Uses of Motion Graphics Today (motion Graphics Examples)](#Part 4)
05 [ Motion Graphics Vs. Animation: What’s the Difference?](#Part 5)
05 [How to Make Motion Graphics?](#Part 5)
Part 1 What is Motion Graphics?
Motion graphics is known as videos with the mix-up of the text, effect, stickers, and many other types of components. It’s known as an animated graphic design as well. Motion graphics are a great way to communicate with the target audience with the help of video, text, and emotions in the videos. The motion graphics videos with the music, effects, and text can give a great message to the audience.
Part 2 5 Motion Graphics Animation Trends You Need to Know About
01Mix up the and 3D
Mixing up the and animations in the videos is still getting momentum. People love the way the motion graphic designer explains the video using the mixing of and 3D. This trend is also used in the hundreds of costly advertisements.
02Trend of Broken Text in Videos
The broken text trend is also used in thousands of videos and it helps designers to show the poetic meaning of the client video they are making. People take it positively and understand the video with just the broken text at the right place.
03Adding VFX in the Videos
02Trend of Broken Text in Videos
VFX trend is catching people a lot now a day. The complex visual effects in the videos get the attention of the audience very quickly. While browsing videos over the internet you can also observe the VFX effects in the case of the firestorm, explosions, etc in the videos.
04Animated Logos of Companies
Animated logos are in huge demand even by the biggest companies around the globe. Animated logos are also used in the motion graphic videos while showing the company products or in the marketing videos. The animated logos capture the attention of people very quickly.
05Thin Lines in the Videos
In animated motion graphics videos lines also plays a very important role as they can easily help viewers to understand the shape, directions, and many more other things. Designers are now drawing the thin lines in their videos.
Part 3 History of Motion Graphics
Previously, before the presence of motion graphics in the world of technology the graphics worked just the images in the un-moving and flat formats.
Motion graphics first came into the scene when Oskar Fischinger and Norman McLaren were doing some experimental work. Later in 195some designers introduced motion graphics to the public in a bigger way. The designers later used in a few films that time and these films are still a great example of the motion graphics used at that time. Motion graphics in these films presented information such as the product company, actors, film directors, movie title, and many other things about the films in a very creative way.
Playing with the words or graphic elements was never seen by the people before the motion graphics. Later it’s started used in mostly all films and ad videos.
Now a day in the few years the advancement of animation software’s and the improvements in designs allowed people to learn more about motion graphics and try to produce new and eye-catching graphics.
Part 4 Uses of Motion Graphics Today
Now a day due to the new technology every day the presence of the screen in multiple devices has extended the usage of motion graphics. Motion graphics are generally used in every device that has a screen such as opening the TV, introducing the information with the bumpers, and many other things. Below are a few examples where motion graphics are mainly used:
01Branding
Branding is the biggest channel and branding owners were looking for something different to refresh their brand and make it different from the other SKY channels. The Nerdo Creative Studio used motion graphics in their channel video and created a beautiful video with typography and text effects. This video makes it different from the other channels which generally people don’t see every day on television.

02Sharing Product Information Or Promotion Video
The main usage of motion graphics is promoting the products using the product videos created with the help of beautiful motion graphic backgrounds and texts. This helps brands to promote their products in front of customers in a clear way and get more sales. In the product videos, the animated motion graphics can help you a lot in creating entertaining, fun, and engaging eye-catching product videos.

03Telling a Story to the Audience
Storytelling about a brand or anything is a very complicated task because your story must be to the point and understandable by the viewers. In this case, motion graphics help a lot. For example, you can view the above video on the URL with clear images, text, icons, and great background music. This is a great concept and you can even use it for making ads for your products or for making short films.

04Explaining A Concept To Your Students Or In The Company Meetings
Motion graphics are a great way to make the explainer videos for your products or the new concepts to your students in the school or college. Motion graphic videos can more clearly explain the concepts to the audience instead of using a presentation. The YouTube video link above shows how beautifully the designer has explained the concept of blockchain in the video.

05Creating Awareness About Something
The above video is about empowering women and girls where motion graphics are used. This awareness video doesn’t have any fancy design or great colors but still, it clears its message to the people.

Part 5 Motion Graphics vs. Animation: What’s the Difference?
Motion graphics are generally represented with moving images, text, and other objects and these graphics can easily display information with the help of moving objects such as the moving website logo, blurring text, bars in graphs, etc. Simply we can say the motion graphics can display the letters and shapes in the motion of the user’s choice. Sometimes things are very hard to explain with the still images whereas with the help of a few seconds of motion graphics you can clear everything perfectly.
If we talk about animation then this is a term under which motion graphics falls. Animation is used for more than 1years. So, we can say motion graphics are a part of animation itself. Any technique in the world which helps users to move static images or objects is known as animation. It can be Claymation, anime, cartoons, or motion graphics.
Mainly the content separates the motion graphics from the other types of animations because, in the motion graphic text, objects are associated with the other graphic designs.
Part 6 How to Make Motion Graphics?
Wondershare Filmora Video Editor
Wondershare Filmora is desktop software that allows you to quickly make beautiful motion graphic videos without doing any effort. This motion graphics video maker program is available for windows as well as the Mac operating system computers. Wondershare Filmora is capable of making the best videos very easily even you can apply motion tracking in the videos with this software. It allows you to edit the videos from scratch and create the end-level best videos. It offers you several features such as video effects, split screen, green screen, and color grading and controlling the speed of your videos. Finally, this is a complete solution for all your video editing and motion graphic problems.
For Win 7 or later (64-bit)
For macOS 10.12 or later
● Key Takeaways from This Episode →
● This is the information about what motion graphics is and how to create the best motion graphics video on your computer with the help of Wondershare Filmora.
● There are hundreds of other motion graphics video maker software and apps available over the internet but not any app can design the best videos as compared to the Wondershare Filmora.
● The best part is that it is very easy to use and you can quickly make motion graphics videos even if you are a newbie.
Are you new to motion graphics and looking to learn everything about animated motion then you are at the right webpage. In this article, we will cover everything about motion graphic videos.
In this article
01 [What is Motion Graphics? (Motion Graphics Definition)](#Part 1)
02 [5 Motion Graphics Animation Trends You Need to Know About](#Part 2)
03 [History of Motion Graphics](#Part 3)
04 [Uses of Motion Graphics Today (motion Graphics Examples)](#Part 4)
05 [ Motion Graphics Vs. Animation: What’s the Difference?](#Part 5)
05 [How to Make Motion Graphics?](#Part 5)
Part 1 What is Motion Graphics?
Motion graphics is known as videos with the mix-up of the text, effect, stickers, and many other types of components. It’s known as an animated graphic design as well. Motion graphics are a great way to communicate with the target audience with the help of video, text, and emotions in the videos. The motion graphics videos with the music, effects, and text can give a great message to the audience.
Part 2 5 Motion Graphics Animation Trends You Need to Know About
01Mix up the and 3D
Mixing up the and animations in the videos is still getting momentum. People love the way the motion graphic designer explains the video using the mixing of and 3D. This trend is also used in the hundreds of costly advertisements.
02Trend of Broken Text in Videos
The broken text trend is also used in thousands of videos and it helps designers to show the poetic meaning of the client video they are making. People take it positively and understand the video with just the broken text at the right place.
03Adding VFX in the Videos
02Trend of Broken Text in Videos
VFX trend is catching people a lot now a day. The complex visual effects in the videos get the attention of the audience very quickly. While browsing videos over the internet you can also observe the VFX effects in the case of the firestorm, explosions, etc in the videos.
04Animated Logos of Companies
Animated logos are in huge demand even by the biggest companies around the globe. Animated logos are also used in the motion graphic videos while showing the company products or in the marketing videos. The animated logos capture the attention of people very quickly.
05Thin Lines in the Videos
In animated motion graphics videos lines also plays a very important role as they can easily help viewers to understand the shape, directions, and many more other things. Designers are now drawing the thin lines in their videos.
Part 3 History of Motion Graphics
Previously, before the presence of motion graphics in the world of technology the graphics worked just the images in the un-moving and flat formats.
Motion graphics first came into the scene when Oskar Fischinger and Norman McLaren were doing some experimental work. Later in 195some designers introduced motion graphics to the public in a bigger way. The designers later used in a few films that time and these films are still a great example of the motion graphics used at that time. Motion graphics in these films presented information such as the product company, actors, film directors, movie title, and many other things about the films in a very creative way.
Playing with the words or graphic elements was never seen by the people before the motion graphics. Later it’s started used in mostly all films and ad videos.
Now a day in the few years the advancement of animation software’s and the improvements in designs allowed people to learn more about motion graphics and try to produce new and eye-catching graphics.
Part 4 Uses of Motion Graphics Today
Now a day due to the new technology every day the presence of the screen in multiple devices has extended the usage of motion graphics. Motion graphics are generally used in every device that has a screen such as opening the TV, introducing the information with the bumpers, and many other things. Below are a few examples where motion graphics are mainly used:
01Branding
Branding is the biggest channel and branding owners were looking for something different to refresh their brand and make it different from the other SKY channels. The Nerdo Creative Studio used motion graphics in their channel video and created a beautiful video with typography and text effects. This video makes it different from the other channels which generally people don’t see every day on television.
02Sharing Product Information Or Promotion Video
The main usage of motion graphics is promoting the products using the product videos created with the help of beautiful motion graphic backgrounds and texts. This helps brands to promote their products in front of customers in a clear way and get more sales. In the product videos, the animated motion graphics can help you a lot in creating entertaining, fun, and engaging eye-catching product videos.
03Telling a Story to the Audience
Storytelling about a brand or anything is a very complicated task because your story must be to the point and understandable by the viewers. In this case, motion graphics help a lot. For example, you can view the above video on the URL with clear images, text, icons, and great background music. This is a great concept and you can even use it for making ads for your products or for making short films.
04Explaining A Concept To Your Students Or In The Company Meetings
Motion graphics are a great way to make the explainer videos for your products or the new concepts to your students in the school or college. Motion graphic videos can more clearly explain the concepts to the audience instead of using a presentation. The YouTube video link above shows how beautifully the designer has explained the concept of blockchain in the video.
05Creating Awareness About Something
The above video is about empowering women and girls where motion graphics are used. This awareness video doesn’t have any fancy design or great colors but still, it clears its message to the people.
Part 5 Motion Graphics vs. Animation: What’s the Difference?
Motion graphics are generally represented with moving images, text, and other objects and these graphics can easily display information with the help of moving objects such as the moving website logo, blurring text, bars in graphs, etc. Simply we can say the motion graphics can display the letters and shapes in the motion of the user’s choice. Sometimes things are very hard to explain with the still images whereas with the help of a few seconds of motion graphics you can clear everything perfectly.
If we talk about animation then this is a term under which motion graphics falls. Animation is used for more than 1years. So, we can say motion graphics are a part of animation itself. Any technique in the world which helps users to move static images or objects is known as animation. It can be Claymation, anime, cartoons, or motion graphics.
Mainly the content separates the motion graphics from the other types of animations because, in the motion graphic text, objects are associated with the other graphic designs.
Part 6 How to Make Motion Graphics?
Wondershare Filmora Video Editor
Wondershare Filmora is desktop software that allows you to quickly make beautiful motion graphic videos without doing any effort. This motion graphics video maker program is available for windows as well as the Mac operating system computers. Wondershare Filmora is capable of making the best videos very easily even you can apply motion tracking in the videos with this software. It allows you to edit the videos from scratch and create the end-level best videos. It offers you several features such as video effects, split screen, green screen, and color grading and controlling the speed of your videos. Finally, this is a complete solution for all your video editing and motion graphic problems.
For Win 7 or later (64-bit)
For macOS 10.12 or later
● Key Takeaways from This Episode →
● This is the information about what motion graphics is and how to create the best motion graphics video on your computer with the help of Wondershare Filmora.
● There are hundreds of other motion graphics video maker software and apps available over the internet but not any app can design the best videos as compared to the Wondershare Filmora.
● The best part is that it is very easy to use and you can quickly make motion graphics videos even if you are a newbie.
Top 10 Websites to Download Anime Subtitles for Free
Top 10 Websites to Download Anime Subtitles for Free
Shanoon Cox
Mar 27, 2024• Proven solutions
Subtitles are sometimes a distraction, but one cannot deny the fact that English anime subtitles are best for understanding a video properly in a different language. To watch your favorite Anime series, you would need to download anime subtitles. The idea behind anime subtitles is to not bind an anime series in a different language. In this article, you will learn about a few websites to download English as well as Japanese anime subtitles for free. When a dubbed version of your favorite anime series is not available you would simply need to put subtitles at work. Let’s dive into the article and find some exciting websites to download anime subtitles. You are going to learn:
- Part 1: Top10 Websites to Download Anime Subtitles
- Part 2: The Best Video Editor to Add Subtitles to an Anime
You may also like:
- Best Free Anime Streaming Sites to Download Anime
- Best Anime Series of All Time
- Top 4 Websites to Get Anime Footage for Free
Part 1: Top 10 Websites to Download Anime Subtitles
Here is a list of some amazing websites that have all the anime subtitles you can download at the moment. The best part about this guide is that it provides you with not only the anime English subtitles but also the entire anime series that you can download and watch.
- 1. OpenSubtitles
- 2. Kitsunekho
- 3. Subscene
- 4. SubDb
- 5. Addic7ed
- 6. Subtitles.hr
- 7. iSubtitles
- 8. Animetosho
- 9. CD Japan
- 10. AniSubs
1. OpenSubtitles
OpenSubtitles is one of the topmost subtitle websites where you can find all the latest as well old subtitles in multi-languages. The site is very normal in terms of the interface and looks like an old school website however the archives are huge. You can easily download anime subtitles from this website by clicking on the anime or series name and then click on the download option. It might ask you simple questions or to fill the captcha as a standard security check but that will be smooth.
The site is good, but sometimes the ads might annoy you a bit if you don’t like to surf a webpage with ads. And you need to become their VIP member to get rid of the annoying ads.
2. Kitsunekho
This is one of the best websites to download anime subtitles in different languages for free. The simple and easy interface lets you select from multiple options and series online. You can click on the series name and download the subtitle file in just a click. One can download subtitles in English, Japanese, Chinese and Korean language without going much deeper into finding the language options. All the subtitles are aggregated according to genre and language.
The interface of this website is super smooth, and there are no ads to annoy you.
3. Subscene
If you are looking for movies and anime at the same time so Subscene is a great website to download subtitles. One can easily download anime subtitles by searching their favorite series on the search bar and clicking on it to get the download options. Language is no bar on this website as almost all the languages are covered. The best part is that when you click on a series name your screen will get flooded with a lot of random subtitles in different languages.

Apart from some ads, the website is awesome.
4. SubDb
Subb is an open-source and free website with a huge database of subtitles. Being an open-source website, it’s a peer-to-peer network on which both the uploads and downloads are made by the user. This website has subtitles in different languages like English, Espanol, Italiano, Polski, and many more. You can only download the subtitles if you know how to run an API on your system.
The website is good but there is no search bar and a newbie with no tech knowledge cannot look for any file on this website.
5. Addic7ed
As the name suggests, you might get addicted to this site because of the multiple collections it has to download subtitles. You can download the subtitles on this website by clicking on the series name and there would be different subtitle files in many languages to download. There are many languages supported such as Japanese, English, Arabic, and many more to download subtitles.
The website has some good collections but the lack of search bar and too many irrelevant ads might irritate you.
6. Subtitles. hr
If you are looking for videos, software, and subtitles simultaneously, then Subtitles. hr is a great website where you can download subtitles in different languages. The concept of this website is also useful to the user where people upload the content and consume it. One can easily download the subtitles by clicking on the download button given on the website.
The website is good however the language icons are very small to recognize and it becomes difficult for a person to detect what exactly they are downloading.
7. iSubtitles
iSubtitles is a free website to download subtitles of your favorite anime series and movies. The website looks simple and has a search bar to put queries and get the result. Subtitles here are available in different languages from Arabic to Parsi and English to Japanese. Subtitle files are very easy to download as you only need to click on the anime series name and all the formats and languages available will be provided to you.
The website is good however there are a lot of ads to disturb you.
8. Animetosho
Animetosho is an old-school kind of website but the information here to vast to share. The website has a huge library of anime series, and you can download the entire anime series with all the subtitles on torrent/magnet. You can download the file and all the subtitle files are included in the same file.
There is a lot of information but it might look spammy to new users who are new to the internet industry.
9. CD Japan
This is a multi-niche website that covers content niches such as Music, Lifestyle, Anime, Apparel, and much more. The content on this website is more than huge and if you want to download anime subtitles then you might have to use the search bar or look for the anime tab on the menu. There is a lot of anime series in multiple languages available on this website.
Most of the anime series available here are paid and you need to purchase them to watch.
10. AniSubs
This website is only dedicated to download anime subtitles and you can find a lot of subtitle files here absolutely free. You can simply click on the anime series name and click on the download button to directly open the file into Google Drive or download it as a file on your computer. This site has subtitles in multiple languages depending upon the type and genre of anime series.

The website is good however a lot of ads might confuse you to differentiate between ads and content.
Part 2: The Best Video Editor to Add Subtitles to an Anime Video
Filmora is a great tool with endless effects and different ways to express creativity. Loaded with a lot of filters, overlays, transitions, video stabilization, and a lot of other features to create an amazing video. In terms of Anime, there is a lot of wonderful animation tool that you can use to add transitions and subtitles to your anime video. And Filmora has timeline-based video editing that allows you to drag and drop everything on the timeline and export the file to your computer or directly upload it to your YouTube Channel.
Step by step guide to add subtitles with Wondershare Filmora:
Step 1: Download and install Wondershare Filmora on your computer. Filmora is compatible with both Windows and macOS. To learn more about Filmora, you can visit Wondershare Video Community . If you don’t have time to read the text, just watch the below videos.

Step 2: To start with the editing and adding subtitles, import your anime video file by clicking on Import to upload media files. Then drop and drag it to the timeline.
Step 3: Now, go to the Titles tab and select the template that you want to use on your video for subtitles. You can easily drag and drop your favorite template and start editing the text that you want to publish on your video. There are several text editing templates that you can use here.
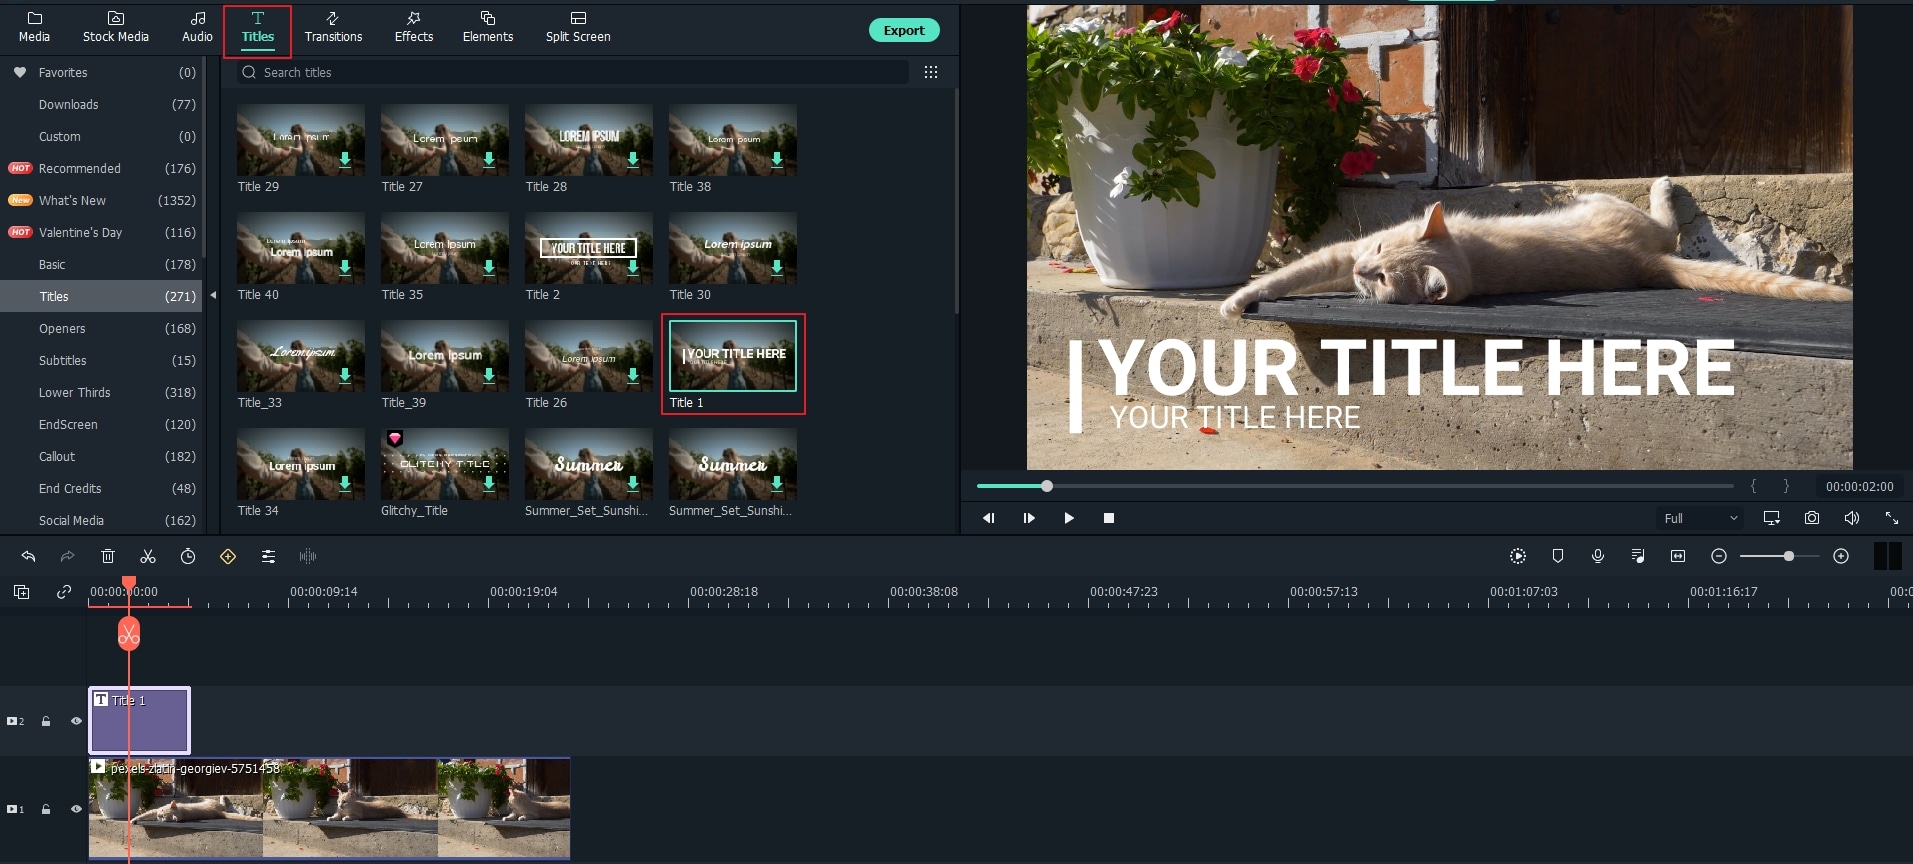
Step 4: If you want to add your own texts then double click on the Text on the timeline and input your text with colors, fonts, style, and animations.
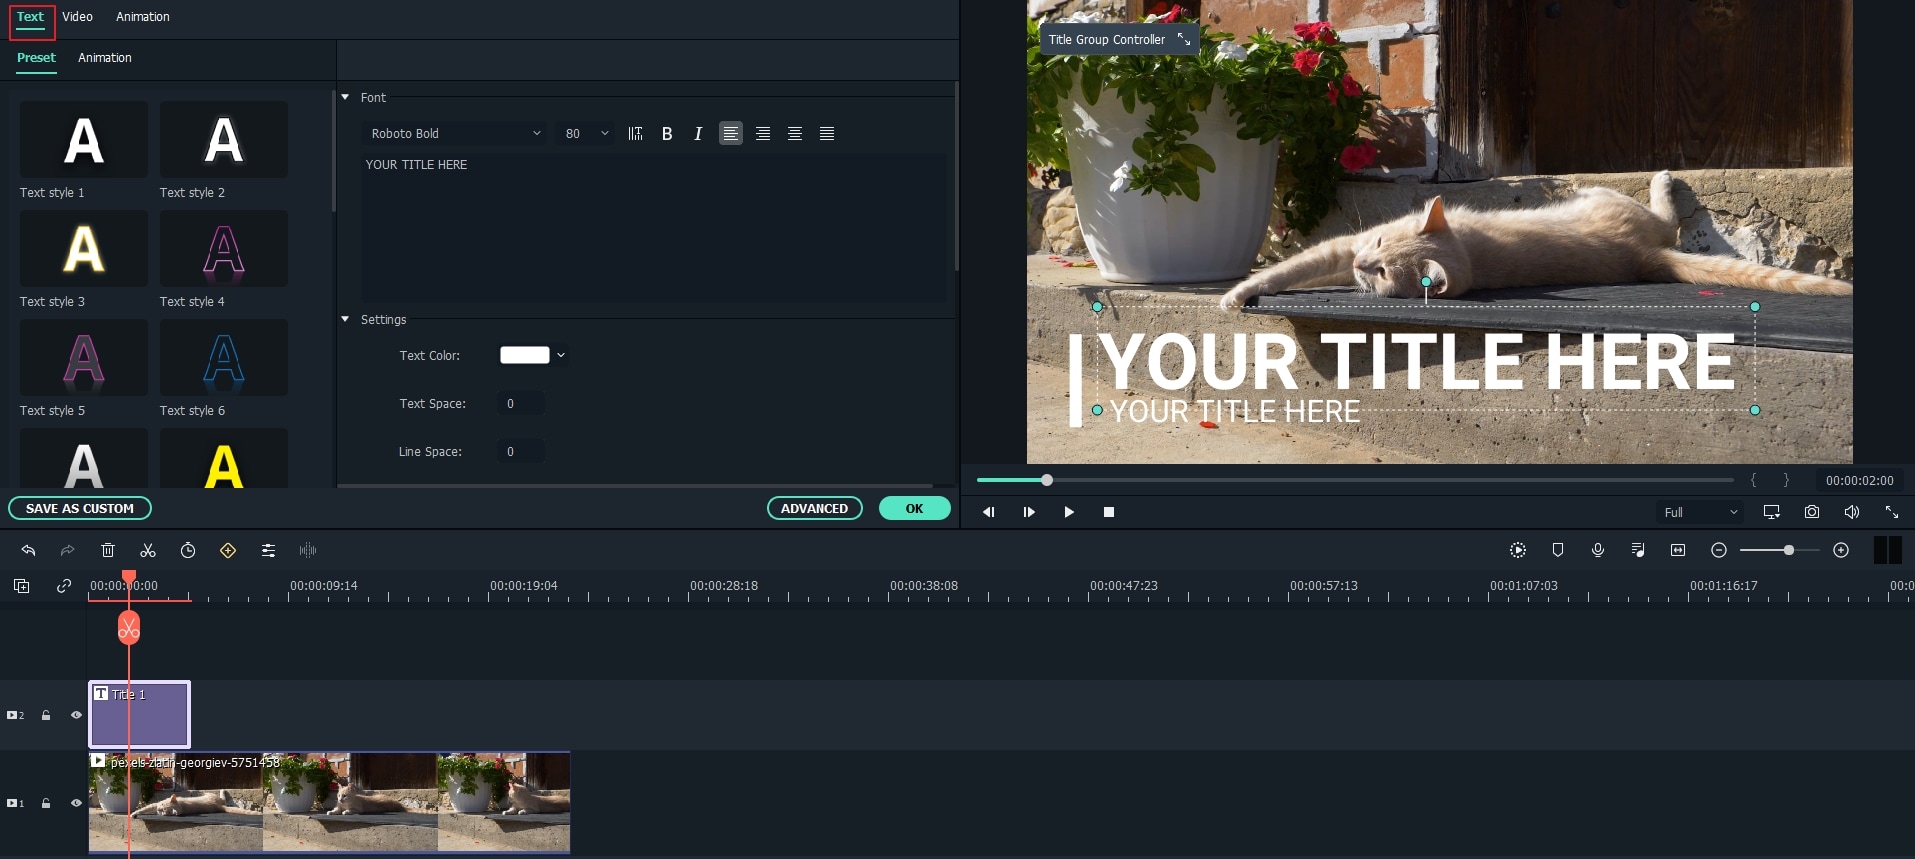
Step 5: To get more advanced results, you can use the Advanced button the timeline to enter the advanced editing tab, and here you can add animation, shadow, shapes, and borders to your text.
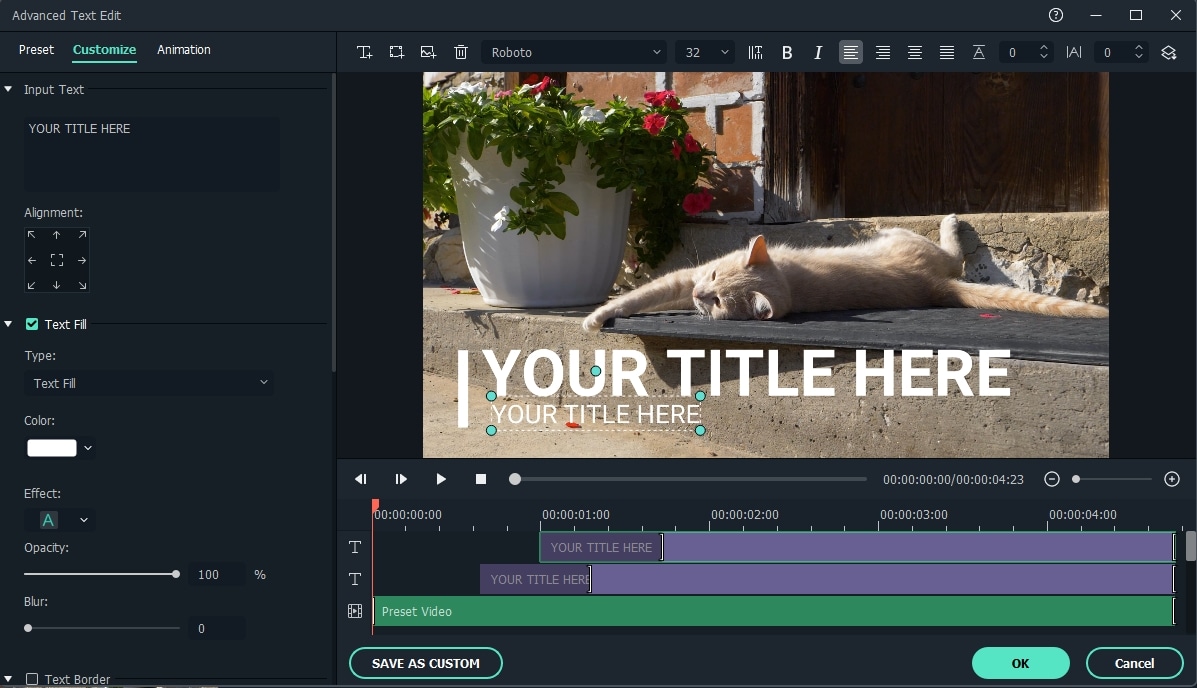
Step 6: Finally, when you are done, you can simply export the final version of your video clip in different available formats or you can directly upload your video to the YouTube channel.
So, using these simple steps you can create your texts and subtitles on the anime video clip.
Conclusion
Downloading anime subtitles is not an easy task but after reading this article you are in a position to use different websites to download anime subtitles. Anime subtitles are a must-have to understand the story if the anime is not in your native language. Also, if you are an anime enthusiast and want to edit an anime video in your style Wondershare Filmora is the best choice where you can use your skills and creativity to give a new shape to the anime video. All the creatives and features are available on Filmora that are powerful and capable of making any changes to an anime. Just drop a comment about the site you liked for subtitles and share this article with your friends who are anime lovers like you.
Shanoon Cox
Shanoon Cox is a writer and a lover of all things video.
Follow @Shanoon Cox
Shanoon Cox
Mar 27, 2024• Proven solutions
Subtitles are sometimes a distraction, but one cannot deny the fact that English anime subtitles are best for understanding a video properly in a different language. To watch your favorite Anime series, you would need to download anime subtitles. The idea behind anime subtitles is to not bind an anime series in a different language. In this article, you will learn about a few websites to download English as well as Japanese anime subtitles for free. When a dubbed version of your favorite anime series is not available you would simply need to put subtitles at work. Let’s dive into the article and find some exciting websites to download anime subtitles. You are going to learn:
- Part 1: Top10 Websites to Download Anime Subtitles
- Part 2: The Best Video Editor to Add Subtitles to an Anime
You may also like:
- Best Free Anime Streaming Sites to Download Anime
- Best Anime Series of All Time
- Top 4 Websites to Get Anime Footage for Free
Part 1: Top 10 Websites to Download Anime Subtitles
Here is a list of some amazing websites that have all the anime subtitles you can download at the moment. The best part about this guide is that it provides you with not only the anime English subtitles but also the entire anime series that you can download and watch.
- 1. OpenSubtitles
- 2. Kitsunekho
- 3. Subscene
- 4. SubDb
- 5. Addic7ed
- 6. Subtitles.hr
- 7. iSubtitles
- 8. Animetosho
- 9. CD Japan
- 10. AniSubs
1. OpenSubtitles
OpenSubtitles is one of the topmost subtitle websites where you can find all the latest as well old subtitles in multi-languages. The site is very normal in terms of the interface and looks like an old school website however the archives are huge. You can easily download anime subtitles from this website by clicking on the anime or series name and then click on the download option. It might ask you simple questions or to fill the captcha as a standard security check but that will be smooth.
The site is good, but sometimes the ads might annoy you a bit if you don’t like to surf a webpage with ads. And you need to become their VIP member to get rid of the annoying ads.
2. Kitsunekho
This is one of the best websites to download anime subtitles in different languages for free. The simple and easy interface lets you select from multiple options and series online. You can click on the series name and download the subtitle file in just a click. One can download subtitles in English, Japanese, Chinese and Korean language without going much deeper into finding the language options. All the subtitles are aggregated according to genre and language.
The interface of this website is super smooth, and there are no ads to annoy you.
3. Subscene
If you are looking for movies and anime at the same time so Subscene is a great website to download subtitles. One can easily download anime subtitles by searching their favorite series on the search bar and clicking on it to get the download options. Language is no bar on this website as almost all the languages are covered. The best part is that when you click on a series name your screen will get flooded with a lot of random subtitles in different languages.
Apart from some ads, the website is awesome.
4. SubDb
Subb is an open-source and free website with a huge database of subtitles. Being an open-source website, it’s a peer-to-peer network on which both the uploads and downloads are made by the user. This website has subtitles in different languages like English, Espanol, Italiano, Polski, and many more. You can only download the subtitles if you know how to run an API on your system.
The website is good but there is no search bar and a newbie with no tech knowledge cannot look for any file on this website.
5. Addic7ed
As the name suggests, you might get addicted to this site because of the multiple collections it has to download subtitles. You can download the subtitles on this website by clicking on the series name and there would be different subtitle files in many languages to download. There are many languages supported such as Japanese, English, Arabic, and many more to download subtitles.
The website has some good collections but the lack of search bar and too many irrelevant ads might irritate you.
6. Subtitles. hr
If you are looking for videos, software, and subtitles simultaneously, then Subtitles. hr is a great website where you can download subtitles in different languages. The concept of this website is also useful to the user where people upload the content and consume it. One can easily download the subtitles by clicking on the download button given on the website.
The website is good however the language icons are very small to recognize and it becomes difficult for a person to detect what exactly they are downloading.
7. iSubtitles
iSubtitles is a free website to download subtitles of your favorite anime series and movies. The website looks simple and has a search bar to put queries and get the result. Subtitles here are available in different languages from Arabic to Parsi and English to Japanese. Subtitle files are very easy to download as you only need to click on the anime series name and all the formats and languages available will be provided to you.
The website is good however there are a lot of ads to disturb you.
8. Animetosho
Animetosho is an old-school kind of website but the information here to vast to share. The website has a huge library of anime series, and you can download the entire anime series with all the subtitles on torrent/magnet. You can download the file and all the subtitle files are included in the same file.
There is a lot of information but it might look spammy to new users who are new to the internet industry.
9. CD Japan
This is a multi-niche website that covers content niches such as Music, Lifestyle, Anime, Apparel, and much more. The content on this website is more than huge and if you want to download anime subtitles then you might have to use the search bar or look for the anime tab on the menu. There is a lot of anime series in multiple languages available on this website.
Most of the anime series available here are paid and you need to purchase them to watch.
10. AniSubs
This website is only dedicated to download anime subtitles and you can find a lot of subtitle files here absolutely free. You can simply click on the anime series name and click on the download button to directly open the file into Google Drive or download it as a file on your computer. This site has subtitles in multiple languages depending upon the type and genre of anime series.
The website is good however a lot of ads might confuse you to differentiate between ads and content.
Part 2: The Best Video Editor to Add Subtitles to an Anime Video
Filmora is a great tool with endless effects and different ways to express creativity. Loaded with a lot of filters, overlays, transitions, video stabilization, and a lot of other features to create an amazing video. In terms of Anime, there is a lot of wonderful animation tool that you can use to add transitions and subtitles to your anime video. And Filmora has timeline-based video editing that allows you to drag and drop everything on the timeline and export the file to your computer or directly upload it to your YouTube Channel.
Step by step guide to add subtitles with Wondershare Filmora:
Step 1: Download and install Wondershare Filmora on your computer. Filmora is compatible with both Windows and macOS. To learn more about Filmora, you can visit Wondershare Video Community . If you don’t have time to read the text, just watch the below videos.
Step 2: To start with the editing and adding subtitles, import your anime video file by clicking on Import to upload media files. Then drop and drag it to the timeline.
Step 3: Now, go to the Titles tab and select the template that you want to use on your video for subtitles. You can easily drag and drop your favorite template and start editing the text that you want to publish on your video. There are several text editing templates that you can use here.
Step 4: If you want to add your own texts then double click on the Text on the timeline and input your text with colors, fonts, style, and animations.
Step 5: To get more advanced results, you can use the Advanced button the timeline to enter the advanced editing tab, and here you can add animation, shadow, shapes, and borders to your text.
Step 6: Finally, when you are done, you can simply export the final version of your video clip in different available formats or you can directly upload your video to the YouTube channel.
So, using these simple steps you can create your texts and subtitles on the anime video clip.
Conclusion
Downloading anime subtitles is not an easy task but after reading this article you are in a position to use different websites to download anime subtitles. Anime subtitles are a must-have to understand the story if the anime is not in your native language. Also, if you are an anime enthusiast and want to edit an anime video in your style Wondershare Filmora is the best choice where you can use your skills and creativity to give a new shape to the anime video. All the creatives and features are available on Filmora that are powerful and capable of making any changes to an anime. Just drop a comment about the site you liked for subtitles and share this article with your friends who are anime lovers like you.
Shanoon Cox
Shanoon Cox is a writer and a lover of all things video.
Follow @Shanoon Cox
Types of Cartoon Styles You May Use for The Next Marketing Project
Types of Cartoon Styles You May Use for Your Next Marketing Project
An easy yet powerful editor
Numerous effects to choose from
Detailed tutorials provided by the official channel
The whole concept of animation originated mainly from Japan. The cartoons that are shown on TV have different cartoon art styles. These cartoon art styles have their history of origin. These numerous cartoon styles play a significant role in the whole animation industry. If you find which cartoon illustration styles to use for your next project, this is the perfect place for your answer.
You can use any cartoon art style in your upcoming marketing project and make it a success. This article focuses on different cartoon art styles and how you can develop your anime cartoon style. You can use these methods to draw cartoon styles of yourself.
In this article
01 [10 Types of Cartoon Styles With Examples](#Part 1)
02 [Drawing Myself in 5 Different Cartoon Styles](#Part 2)
03 [How You Can Develop a Cartoon Style for Animation](#Part 3)
Part 1 Types of Cartoon Styles With Examples
There are numerous kinds of cartoon styles. Different animators use different cartoon styles. You can even develop your anime cartoon style. The different types of Animation are:
012D Animation
animations are trendy cartoon styles. This style of animation needs no introduction. This type of anime cartoon style was produced by Walt Disney. The most exciting features of the images were that they had only two dimensions: height and width.
Even though several people suggested that 2D art styles cartoon were invented during the early twentieth century. Back then, it was not much popular; Walt Disney made these cartoon styles famous. Example:

02Traditional Animation
As the name suggests, traditional Animation is an old cartoon art style. These cartoon styles were first seen in the year 1877. Emil Reynaud discovered a new tool for demonstrating objects that are moving. In this type of Animation, all the images are drawn manually on paper with a pencil. This method of making cartoon styles is time-consuming. However, later computer applications and programs were developed, making this task much easier and more efficient. Example:

03Animation
animation cartoon styles came into existence with graphics and visual software development. The first 3D dimensional image was created in the year 1972. However, an attempt to make 3D Animation was made in 1961. Nowadays, 3D Animation is a widely used animation style. It is used in the entertainment industry and medical imaging to adequately explain the body and organisms. Example:

04Flipbook Animation
In flipbook animation, each frame is drawn on each notebook page. After drawing all the frames is complete, turn the pages quickly. When the pages are turned quickly, it seems to be a moving video because of the different frames drawn on each page. Example:

05Clay Animation
This animation method turns out to be very funny after it is completed. This method of Animation is quite tricky. In this animation method, the characters are made out of clay at first, and then the movements are recorded in a camera. These movements are then made smooth and compiled like a video with different scenes using the software. The main audience for this kind of Animation is children. Example:

06Typography Animation
Typography animation is also called kinetic typography. This style of Animation is text animation. This method was originated in the year 1899. Back then, this Animation was not much popular. This style of typography animation gained popularity after 60 years it first originated. Typography animation is considered a good method for e-learning while training employees. Example:

07Stop-Motion Animation
Stop-Motion animation is an age-old animation technique. The attempt to use this type of Animation was made 150 years ago. The specialty of this type of Animation is that the animator takes pictures of different frames by moving the objects in different positions and clicking the picture of each frame. These pictures are compiled to create a continuous video. This method of Animation is straightforward to go. Example:

08Sand Animation
Sand Animation was invented in the year 1969. This type of Animation involves sand and a luminous surface on which the Animation is done. This method is used in cartoon anime styles or different shows. In this type of Animation, the sand is used to create 2D images. This type of Animation is used for storytelling in reality shows. Example:

09Motion Graphics
Motion design was invented in the year 1960. It is one of the most popular cartoon art styles used nowadays. This type of Animation creates promotional videos, game screensavers, commercial advertising videos, etc. It is one of the universal animation techniques used globally for various purposes. Example:

10Mechanical Animation
Mechanical Animation is mainly used in producing technical equipment. The most fantastic thing about this animation method is that you can make changes to a product that has not yet been developed. This kind of Animation is used with 3D Animation to show the working of machines in and out. It is done together with 3D Animation to clearly visualize the machine.

Part 2 Drawing Myself in 5 Different Cartoon Styles
You can draw yourself using these 5 different cartoon styles:
01You can use 3D filters on Snapchat to draw a Pixar-like picture of yourself
The steps are:
Step 1: Install and run the “Snapchat” app on your phone.
Step2: Open the app and turn on the camera.
Step 3: There is a smiling face symbol on the right side of the camera button, tap on that.
Step 4: Click on the explore menu and select the “Cartoon 3D Style” option.
Step 5: Capture your video
Step 6: Then your cartoon character-like video is ready.
02You can also use Instagram to create a Disney-like character of yourself
The steps are:
Step 1: Open your Instagram account.
Step 2: Click on the ‘+’ icon. Select the “Story” option.
Step 3: Different effects appear on the screen.
Step 4: Scroll the effects and find an icon of a magnifying glass.
Step 5: Click on that icon and type cartoon on the search bar.
Step 6: After your search is finished, different cartoon filters will appear on your screen.
Step 7: Tap on any one of the effects. The effect opens.
Step 8: Tap on the bookmark icon to save the cartoon effect.
Step 9: Now you can go back to the effects options to use the cartoon effect.
Your Disney-like cartoon picture is ready!
03You can use Google meet
Step 1: When you open the Google meet app, there are filters to use while on a call.
Step 2: Choose one of the filters that have a cartoon effect.
Step 3: When you join any meeting, you will appear like a cartoon character from TV.
04You can use B612
Step 1: Install and open the app on your phone.
Step 2: After you open the app, a circle button appears at the bottom of your screen in the middle.
Step 3: Tap on the circle.
Step 4: Numerous filters will appear.
Step 5: Choose one cartoon-like filter from the options of effect in the menu.
Step 6: After selecting one effect, make a video of yourself using an effect.
Step 7: Your cartoon video is ready on your screen.
05You can use Wondershare Filmora Video Editor
For Win 7 or later (64-bit)
For macOS 10.12 or later
Step 1: Capture a video of yourself using your phone’s camera.
Step 2: Install and open the Filmora app on your phone.
Step 3: After you open the app, you will be given the option to choose a video.
Step 4: Choose the video of yourself.
Step 5: After choosing your video, there is an option “click edit” tap on that.
Step 6: A menu appears; select the “effects” option from the menu.
Step 7: Different effects will appear on your screen.
Step 8: Select the cartoon effect you want to use in your video.
Step 9: After you have selected the effect, it will take some time to process.
Step 10: Your cartoon-like video is ready.
How You Can Develop a Cartoon Style for Animation
Anyone can develop new cartoon styles by following these simple procedures or habits. The procedures are:
● You can take references from real-life objects.
Most of the Animation we see here has been taken from real-life references, be it a cat, car, house, etc. So, to develop the cartoon styles, you can take references from real-life objects. You can also search for a particular characteristic in things you won’t use as your reference. If you want to draw a cat, you can use a living cat as your reference.
● You can copy and try to make Animation like your favorite animator.
If you use this method, this will help you improve your skill. No animation is 100% real, no matter what kind of Animation it is or who is creating it. However, you cannot keep on making animations like your favorite animator because you will not be able to find your anime art styles and skills.
● You can create an animated character of your own.
After taking your reference from real-life objects and knowing about the animation styles and the basic principles of Animation, you can create your animated character. If you create your character, keeping all the skills and techniques in mind, you can develop outstanding animation styles.
● To develop your cartoon style, you need to practice drawing regularly.
To get s grasp this whole process of Animation, you need to draw and practice different cartoon art styles. You can draw anything you like, or you don’t like on paper or on a drawing tablet. You can also color sketchbooks to improve your skills in Animation.
You can use Filmora to make cartoon videos and, at the same time, make cartoon videos of normally captured videos. These cartoon videos can be compiled into one video. You can use this video to edit different types of videos. Filmora has a user-friendly interface that can help you create your cartoon video effortlessly.
● Ending Thoughts →
● I hope you have understood the different types of anime cartoon styles by now.
● These methods can help you make the best for your next marketing project.
● These methods are easy, efficient, and efficient. All the aforementioned methods were discovered in the late nineteenth and early twentieth century.
● With the advancement of technology, the process has become more accessible. However, you can use any cartoon-style art.
The whole concept of animation originated mainly from Japan. The cartoons that are shown on TV have different cartoon art styles. These cartoon art styles have their history of origin. These numerous cartoon styles play a significant role in the whole animation industry. If you find which cartoon illustration styles to use for your next project, this is the perfect place for your answer.
You can use any cartoon art style in your upcoming marketing project and make it a success. This article focuses on different cartoon art styles and how you can develop your anime cartoon style. You can use these methods to draw cartoon styles of yourself.
In this article
01 [10 Types of Cartoon Styles With Examples](#Part 1)
02 [Drawing Myself in 5 Different Cartoon Styles](#Part 2)
03 [How You Can Develop a Cartoon Style for Animation](#Part 3)
Part 1 Types of Cartoon Styles With Examples
There are numerous kinds of cartoon styles. Different animators use different cartoon styles. You can even develop your anime cartoon style. The different types of Animation are:
012D Animation
animations are trendy cartoon styles. This style of animation needs no introduction. This type of anime cartoon style was produced by Walt Disney. The most exciting features of the images were that they had only two dimensions: height and width.
Even though several people suggested that 2D art styles cartoon were invented during the early twentieth century. Back then, it was not much popular; Walt Disney made these cartoon styles famous. Example:
02Traditional Animation
As the name suggests, traditional Animation is an old cartoon art style. These cartoon styles were first seen in the year 1877. Emil Reynaud discovered a new tool for demonstrating objects that are moving. In this type of Animation, all the images are drawn manually on paper with a pencil. This method of making cartoon styles is time-consuming. However, later computer applications and programs were developed, making this task much easier and more efficient. Example:
03Animation
animation cartoon styles came into existence with graphics and visual software development. The first 3D dimensional image was created in the year 1972. However, an attempt to make 3D Animation was made in 1961. Nowadays, 3D Animation is a widely used animation style. It is used in the entertainment industry and medical imaging to adequately explain the body and organisms. Example:
04Flipbook Animation
In flipbook animation, each frame is drawn on each notebook page. After drawing all the frames is complete, turn the pages quickly. When the pages are turned quickly, it seems to be a moving video because of the different frames drawn on each page. Example:
05Clay Animation
This animation method turns out to be very funny after it is completed. This method of Animation is quite tricky. In this animation method, the characters are made out of clay at first, and then the movements are recorded in a camera. These movements are then made smooth and compiled like a video with different scenes using the software. The main audience for this kind of Animation is children. Example:
06Typography Animation
Typography animation is also called kinetic typography. This style of Animation is text animation. This method was originated in the year 1899. Back then, this Animation was not much popular. This style of typography animation gained popularity after 60 years it first originated. Typography animation is considered a good method for e-learning while training employees. Example:
07Stop-Motion Animation
Stop-Motion animation is an age-old animation technique. The attempt to use this type of Animation was made 150 years ago. The specialty of this type of Animation is that the animator takes pictures of different frames by moving the objects in different positions and clicking the picture of each frame. These pictures are compiled to create a continuous video. This method of Animation is straightforward to go. Example:
08Sand Animation
Sand Animation was invented in the year 1969. This type of Animation involves sand and a luminous surface on which the Animation is done. This method is used in cartoon anime styles or different shows. In this type of Animation, the sand is used to create 2D images. This type of Animation is used for storytelling in reality shows. Example:
09Motion Graphics
Motion design was invented in the year 1960. It is one of the most popular cartoon art styles used nowadays. This type of Animation creates promotional videos, game screensavers, commercial advertising videos, etc. It is one of the universal animation techniques used globally for various purposes. Example:
10Mechanical Animation
Mechanical Animation is mainly used in producing technical equipment. The most fantastic thing about this animation method is that you can make changes to a product that has not yet been developed. This kind of Animation is used with 3D Animation to show the working of machines in and out. It is done together with 3D Animation to clearly visualize the machine.
Part 2 Drawing Myself in 5 Different Cartoon Styles
You can draw yourself using these 5 different cartoon styles:
01You can use 3D filters on Snapchat to draw a Pixar-like picture of yourself
The steps are:
Step 1: Install and run the “Snapchat” app on your phone.
Step2: Open the app and turn on the camera.
Step 3: There is a smiling face symbol on the right side of the camera button, tap on that.
Step 4: Click on the explore menu and select the “Cartoon 3D Style” option.
Step 5: Capture your video
Step 6: Then your cartoon character-like video is ready.
02You can also use Instagram to create a Disney-like character of yourself
The steps are:
Step 1: Open your Instagram account.
Step 2: Click on the ‘+’ icon. Select the “Story” option.
Step 3: Different effects appear on the screen.
Step 4: Scroll the effects and find an icon of a magnifying glass.
Step 5: Click on that icon and type cartoon on the search bar.
Step 6: After your search is finished, different cartoon filters will appear on your screen.
Step 7: Tap on any one of the effects. The effect opens.
Step 8: Tap on the bookmark icon to save the cartoon effect.
Step 9: Now you can go back to the effects options to use the cartoon effect.
Your Disney-like cartoon picture is ready!
03You can use Google meet
Step 1: When you open the Google meet app, there are filters to use while on a call.
Step 2: Choose one of the filters that have a cartoon effect.
Step 3: When you join any meeting, you will appear like a cartoon character from TV.
04You can use B612
Step 1: Install and open the app on your phone.
Step 2: After you open the app, a circle button appears at the bottom of your screen in the middle.
Step 3: Tap on the circle.
Step 4: Numerous filters will appear.
Step 5: Choose one cartoon-like filter from the options of effect in the menu.
Step 6: After selecting one effect, make a video of yourself using an effect.
Step 7: Your cartoon video is ready on your screen.
05You can use Wondershare Filmora Video Editor
For Win 7 or later (64-bit)
For macOS 10.12 or later
Step 1: Capture a video of yourself using your phone’s camera.
Step 2: Install and open the Filmora app on your phone.
Step 3: After you open the app, you will be given the option to choose a video.
Step 4: Choose the video of yourself.
Step 5: After choosing your video, there is an option “click edit” tap on that.
Step 6: A menu appears; select the “effects” option from the menu.
Step 7: Different effects will appear on your screen.
Step 8: Select the cartoon effect you want to use in your video.
Step 9: After you have selected the effect, it will take some time to process.
Step 10: Your cartoon-like video is ready.
How You Can Develop a Cartoon Style for Animation
Anyone can develop new cartoon styles by following these simple procedures or habits. The procedures are:
● You can take references from real-life objects.
Most of the Animation we see here has been taken from real-life references, be it a cat, car, house, etc. So, to develop the cartoon styles, you can take references from real-life objects. You can also search for a particular characteristic in things you won’t use as your reference. If you want to draw a cat, you can use a living cat as your reference.
● You can copy and try to make Animation like your favorite animator.
If you use this method, this will help you improve your skill. No animation is 100% real, no matter what kind of Animation it is or who is creating it. However, you cannot keep on making animations like your favorite animator because you will not be able to find your anime art styles and skills.
● You can create an animated character of your own.
After taking your reference from real-life objects and knowing about the animation styles and the basic principles of Animation, you can create your animated character. If you create your character, keeping all the skills and techniques in mind, you can develop outstanding animation styles.
● To develop your cartoon style, you need to practice drawing regularly.
To get s grasp this whole process of Animation, you need to draw and practice different cartoon art styles. You can draw anything you like, or you don’t like on paper or on a drawing tablet. You can also color sketchbooks to improve your skills in Animation.
You can use Filmora to make cartoon videos and, at the same time, make cartoon videos of normally captured videos. These cartoon videos can be compiled into one video. You can use this video to edit different types of videos. Filmora has a user-friendly interface that can help you create your cartoon video effortlessly.
● Ending Thoughts →
● I hope you have understood the different types of anime cartoon styles by now.
● These methods can help you make the best for your next marketing project.
● These methods are easy, efficient, and efficient. All the aforementioned methods were discovered in the late nineteenth and early twentieth century.
● With the advancement of technology, the process has become more accessible. However, you can use any cartoon-style art.
Also read:
- New Popular Tips on Learning Animate Rigging
- 2024 Approved DP Animation Maker Tutorial for Finding The Best Animated Profile Picture Maker
- How to Draw Skeleton Cartoon – A Step by Step Guide for 2024
- 2024 Approved How to Get Started in Stop Motion Claymation
- Updated Best 15 Anime Shows That Are Great to Binge Watch for 2024
- New Techniques for Creating Animated Logo That Few People Know About for 2024
- Updated 18 Best Tools and Services to Create Animated Videos for Business 2023
- New 2024 Approved Learn All About Lip-Syncing in Animation
- 10 Best Animation Makers for Kids to Have Fun
- New Learn Simple Blender Rigging in Only 2 Minutes for 2024
- 2024 Approved Formula to Animate Photos From 10 Animate Pictures App
- New 2024 Approved Christmas Is Coming! How to Find & Make Animated Christmas GIFs?
- New Top 10 Animated Photo Collage Apps You Should Know
- New In 2024, What Wikipedia Wont Tell You About Character Rigging
- New Top Claymation Shows That Make Your Memories Unforgettable for 2024
- Updated 5 Free Animated Gif Sources You Must Check for 2024
- Updated How to Create a Whiteboard Animation Video
- Updated How to Create a Whiteboard Video Step by Step 2023 Updated for 2024
- New The Most Efficient Techniques to Make 3D Animation Character
- How to Create an Animated Sticky Navbar for 2024
- New In 2024, How to Send and Add Snapchat GIFs 100 The Easy Way
- 2024 Approved Learn 3D Logo Animation and Templates
- Updated Popular Female & Male Disney Cartoon Characters
- New 2024 Approved How to Send and Add Snapchat GIFs 100 The Easy Way
- 10 Awesome Moving Animation PowerPoint Techniques for 2024
- Updated 2024 Approved 26 Cool Anime Girl Names and Their Meanings
- Top Claymation Shows That Make Your Memories Unforgettable
- Updated 2024 Approved How to Draw A Skeleton Cartoon – A Step by Step Guide
- You Can Turn a TikTok Into a GIF Now. Heres How
- In 2024, 10 Best Free GIF Apps for iPhone and iPad
- Top 10 Apps to Enhance Your Instagram Story Slideshow for 2024
- Updated In 2024, Techniques on How to Make After Effects 2D Animation
- In 2024, Forgotten The Voicemail Password Of Infinix Hot 40i? Try These Fixes
- In 2024, Complete Tutorial to Use GPS Joystick to Fake GPS Location On Poco X6 Pro | Dr.fone
- 9 Solutions to Fix Samsung Galaxy XCover 6 Pro Tactical Edition System Crash Issue | Dr.fone
- Top Apps and Online Tools To Track Nokia C22 Phone With/Without IMEI Number
- In 2024, 4 Ways to Unlock Apple iPhone 15 Plus to Use USB Accessories Without Passcode | Dr.fone
- 11 Ways to Fix it When My Infinix Hot 30 5G Wont Charge | Dr.fone
- In 2024, The Best iSpoofer Alternative to Try On Vivo X Flip | Dr.fone
- A Detailed Guide on Faking Your Location in Mozilla Firefox On Realme 12 5G | Dr.fone
- Here are Some Pro Tips for Pokemon Go PvP Battles On Honor 90 Lite | Dr.fone
- Where Is the Best Place to Catch Dratini On Xiaomi Civi 3 | Dr.fone
- In 2024, How to Mirror Apple iPhone 13 mini to PC via USB? | Dr.fone
- How to Fix when Apple Account Locked From Apple iPhone 8?
- 7 Fixes for Unfortunately, Phone Has Stopped on Samsung Galaxy Z Flip 5 | Dr.fone
- Undelete lost photos from Honor Play 7T.
- 11 Best Location Changers for Samsung Galaxy M34 | Dr.fone
- How to Use Google Assistant on Your Lock Screen Of Vivo S18 Phone
- In 2024, Easy Guide How To Bypass Vivo X Fold 2 FRP Android 10/11/12/13
- In 2024, Unlock Your Vivo X100 Phone with Ease The 3 Best Lock Screen Removal Tools
- In 2024, Top IMEI Unlokers for Your Lenovo Phone
- Title: New Best GIF Maker Software for Windows and Mac for 2024
- Author: Elon
- Created at : 2024-05-19 03:05:34
- Updated at : 2024-05-20 03:05:34
- Link: https://animation-videos.techidaily.com/new-best-gif-maker-software-for-windows-and-mac-for-2024/
- License: This work is licensed under CC BY-NC-SA 4.0.
