
:max_bytes(150000):strip_icc():format(webp)/GettyImages-140173628BetsieVanDerMeer-5927117e5f9b5859509a476c.jpg)
New Create Animated Video on Canva
Create Animated Video on Canva
Canva is a simple way—without any graphic design experience—to make professional graphics for social media, newsletters, presentations, business cards, gift certificates, brochures, and more. Flexible design templates offer the ideal layout for your target destination, letting you aim over the design, not the file formatting or the size.
So, can you make an animated video on Canva?
Yes, because Canva lives on the cloud, you can access your graphics from anywhere you can get online while using Canva on the cloud. Learn how you can play, get up, and run with Canva in this short, fun tutorial guide. We’ll discuss adding and editing images, using inbuilt design templates, and working with typography to build your next project with Canva.
In the subsequent sections, we shall learn more about Canva animated videos and how to create one easily on your PC.
In this article
01 [Create an animated video with a Canva template](#Part 1)
02 [Create Canva animated video with your video](#Part 2)
Part 1 Create an animated video with a Canva template
In this section, we’ll explore how to make animated video on Canva, which applies to both the free and pro account of Canva. However, the steps given below got created from Canva’s free account. We suppose that you’ve already created an account on Canva and logged into the platform. So, further steps will proceed as follows:
Go to the Video tab given in the top front panel of Canva and choose any template of your desire. Let’s say we’ve selected the very first template, 1920 × 1080 pixels. There are lots of options provided by Canva from where you can choose your favorites. You can also create a template with a custom size.

After you enter the editing panel, you have the choice of different templates on the left-hand panel. You can search for a template of your choice among them and can create other pages, as shown below. To preview the templates, you can click the Play button with mentioned time duration on the top right corner of the editing screen.

Now, it’s time to add creativity and explore more editing elements within the Canva. You can modify the entire template given and add something of your own.

Now, you can explore various editing Elements given on the left-hand panel, as shown below. There are multiple options available here as well.

You can add some text within the Canva template, and you can search from the left-hand panel. Given above are various options by which you can bold, italicize, and underline the text.

Now, let’s add some music to the video. So, go to the Audio tab and select any one of the options among them. There are different choices for you to explore here as well.

After you’re done, you can hit the Preview Play button on the top and see your project, as shown below.
It’s all done, and you can proceed with the next section.
Part 2 Create Canva animated video with your video
We’ll discuss how to create an animated video by uploading our video in Canva without using any template in this section. After logging in to the Canva account credentials, select the Video tab and choose the different templates offered.
We’ve selected a blank template for the purpose as follows.

Now, you need to head directly towards the Uploads tab and upload your video created over here.

By now, you have most probably got over with uploading your media. Click the uploaded video, and it will automatically enter within the editing panel of Canva, as shown below.

You’re all done now, and it’s all finished! Even though template usage is quite simple, it’s pretty straightforward when you don’t use any ready-made template. However, you can still beautify this simple video with different elements like text, music, etc.
Animation style videos influence people of all ages to whatever generation, or the kind you belong to will be one of them for sure.
Animated ones provoke diverse impacts instead of ordinary videos on the audience utilizing illustration, kinesthetic, etc. But the fact is, due to technological advancements and overexposure to social media sites, we have forgotten its significance.
Want to know some other most accessible software tools that can bring out the artist in you? Here is an alternative that is all you need.
Are you surprised to find that you can go with various animation styles to boost your business or bring out your talents? But are you confused about how to revamp your story and effectively film it? Why should you worry when the best animation maker and Canva’s alternative Wondershare Filmora is here exclusively for you to create fantastic animation videos that could stand out of the box?
Conclusion
Do you aspire to paint with bright colors to videos or want to become an animator? Then, choose animation styles that you most enjoy, find attractive today, start working on them, or create Canva animated videos as the tutorial indicates above. Lastly, don’t forget to give Filmora a chance to upscale your creation and give your animation style a life!
02 [Create Canva animated video with your video](#Part 2)
Part 1 Create an animated video with a Canva template
In this section, we’ll explore how to make animated video on Canva, which applies to both the free and pro account of Canva. However, the steps given below got created from Canva’s free account. We suppose that you’ve already created an account on Canva and logged into the platform. So, further steps will proceed as follows:
Go to the Video tab given in the top front panel of Canva and choose any template of your desire. Let’s say we’ve selected the very first template, 1920 × 1080 pixels. There are lots of options provided by Canva from where you can choose your favorites. You can also create a template with a custom size.
After you enter the editing panel, you have the choice of different templates on the left-hand panel. You can search for a template of your choice among them and can create other pages, as shown below. To preview the templates, you can click the Play button with mentioned time duration on the top right corner of the editing screen.
Now, it’s time to add creativity and explore more editing elements within the Canva. You can modify the entire template given and add something of your own.
Now, you can explore various editing Elements given on the left-hand panel, as shown below. There are multiple options available here as well.
You can add some text within the Canva template, and you can search from the left-hand panel. Given above are various options by which you can bold, italicize, and underline the text.
Now, let’s add some music to the video. So, go to the Audio tab and select any one of the options among them. There are different choices for you to explore here as well.
After you’re done, you can hit the Preview Play button on the top and see your project, as shown below.
It’s all done, and you can proceed with the next section.
Part 2 Create Canva animated video with your video
We’ll discuss how to create an animated video by uploading our video in Canva without using any template in this section. After logging in to the Canva account credentials, select the Video tab and choose the different templates offered.
We’ve selected a blank template for the purpose as follows.
Now, you need to head directly towards the Uploads tab and upload your video created over here.
By now, you have most probably got over with uploading your media. Click the uploaded video, and it will automatically enter within the editing panel of Canva, as shown below.
You’re all done now, and it’s all finished! Even though template usage is quite simple, it’s pretty straightforward when you don’t use any ready-made template. However, you can still beautify this simple video with different elements like text, music, etc.
Animation style videos influence people of all ages to whatever generation, or the kind you belong to will be one of them for sure.
Animated ones provoke diverse impacts instead of ordinary videos on the audience utilizing illustration, kinesthetic, etc. But the fact is, due to technological advancements and overexposure to social media sites, we have forgotten its significance.
Want to know some other most accessible software tools that can bring out the artist in you? Here is an alternative that is all you need.
Are you surprised to find that you can go with various animation styles to boost your business or bring out your talents? But are you confused about how to revamp your story and effectively film it? Why should you worry when the best animation maker and Canva’s alternative Wondershare Filmora is here exclusively for you to create fantastic animation videos that could stand out of the box?
Conclusion
Do you aspire to paint with bright colors to videos or want to become an animator? Then, choose animation styles that you most enjoy, find attractive today, start working on them, or create Canva animated videos as the tutorial indicates above. Lastly, don’t forget to give Filmora a chance to upscale your creation and give your animation style a life!
OBS Animated Lower Thirds Alternatives
OBS Animated Lower Thirds Alternatives
An easy yet powerful editor
Numerous effects to choose from
Detailed tutorials provided by the official channel
It’s worth noting that people commonly use built-in OBS animated lower thirds for the job, but you can also use other editing tools to create custom animations and import them in your OBS Livestream.
This guide will walk you through everything you need to know about OBS animated lower thirds and their best alternatives you can use in 2022 and beyond.
In this article
01 [What are Lower Thirds in Animation?](#Part 1)
02 [How To Set Up An Animated Lower Third In OBS Studio](#Part 2)
03 [8 AMAZING OBS Animated Lower Thirds Alternatives](#Part 3)
Part 1 What is Lower Thirds in Animation?
To put it in simple words, a lower third is simply a graphic overlay that appears on top of the actual footage. As the name implies, the contents of the lower third usually occur at the lower end of the screen, but streamers can also configure the OBS settings to change their position within the screen. Ideally, lower third animations are utilized to give a context of the overall video.
Let’s say you are life streaming your GTA V gameplay on YouTube. So, to help first-time viewers get the overall context, you can add GTA-related elements in the lower third animation and maximize viewer acquisition. In addition to this, you can also use OBS animated lower-thirds to display exclusive offers and discounts throughout the live stream.
Part 2 How To Set Up An Animated Lower Third In OBS Studio
So, now that you know the major benefits of using animated lower thirds in OBS studio, let’s understand how to set them up to make your live streams more engaging. It’s worth noting that OBS works around the concept of layers that you can manage individually to run your live streams. So, to add an animated lower third in OBS studio, all you have to do is add a dedicated layer and place it right above the video layer.
When it comes to setting up the lower-third, you’ll first need to create the graphics you want to display on top of the live streams. You can use Photoshop to design a custom lower-third animation if you are a professional designer. But, if you have just stepped into the world of live streams and don’t have any prior experience with Photoshop, you can also purchase one of the ready-to-use lower-third packages and import them directly to OBS.
Either way, it would be crucial to ensure that your OBS animated lower-third graphics do not interfere with the actual video. Why? Because this will make the video look more cluttered, and you’ll end up losing potential viewers.
Here’s a YouTube video that’ll walk you through the step-by-step procedure of creating lower-third animations in OBS Studio.
Part 3 8 AMAZING OBS Animated Lower Thirds Alternatives
While OBS is a great tool to add lower-third animations to your live streams, it has its fair share of drawbacks. For instance, OBS has a pretty complicated interface, which means if you are an absolute beginner, you may not easily set up your live streams. Not to mention, OBS is heavy software - so if you don’t have a high-configuration system, you won’t be able to run the tool at all.
So, what’s your next best option? Fortunately, there are several OBS alternatives that you can use to set up OBS animated lower-third graphics and enhance the overall quality of your live streams. To make your job easier, we have cherry-picked 8 of the most reliable OBS alternatives that you can use to add lower-third animations to a Livestream video.
01Wirecast

Like OBS, Wirecast is a popular video streaming platform that many content creators use to live stream on their social media handles. It also offers a layer-based architecture, which means users can add multiple layers separately and manage them through an easy-to-navigate panel.
One of the key reasons Wirecast is an ideal choice to add animated lower-third graphics to your live streams is its built-in collections. The tool already has several ready-to-integrate lower-third animations that one could import into their project without any hassle.
Pros:
● Built-in lower-third graphic templates
● Easy-to-use Interface
● Switch between multiple camera angles with one click
Cons:
● Unlike OBS Studio, Wirecast isn’t available for free
Why Do We Recommend Wirecast?
Wirecast is a fully functional video streaming platform where you can easily manage all your live streams. Wirecast offers far better functionality than OBS Studio despite having a relatively easy-to-use UI.
02vMix

vMix is a feature-rich video production software that offers everything one would need to create stunning videos. However, it also has a dedicated live stream manager to manage your live streams, switch between multiple camera angles, and add overlay animations to keep the viewers engaged. Unlike OBS Studio, vMix doesn’t have a layering system, which means you can overlay multiple channels easily.
As far as OBS animated lower-thirds are concerned, there are different ways you can add these animations to your live streams. You can either import dedicated PSD files, embed HTML codes, or choose one of the ready-to-use lower-third templates to do the job. In either case, vMix will help you add stunning lower-third animations within a few minutes.
Pros:
● Full-scale video production software
● Built-in support for audio mixing
● Add and Manage Multiple Camera Inputs
Cons:
● If you want to relish all the benefits of vMix, you would have to purchase its pro version, which costs $1200. As compared to other available options, vMix is significantly expensive.
Why Do We Recommend vMix?
vMix is ideal for users who want to upgrade from OBS and can spend $1200 on a live stream manager. It’ll provide everything you need to live stream across different social media platforms.
03Restream Studio

Restream Studio is a browser-based live stream tool that offers an easy-to-navigate panel to manage your live streams. Restream is ideal for beginners who don’t want to spend a hefty amount on their live streaming software. With restream, you can upload your brand logos, graphic overlays, and text details and save them in the “Favorites” tab for future use.
This way, whenever you are live streaming, you can directly choose one of these overlays and switch between them easily. The tool also has a dedicated “Hide/Show” button that’ll allow you to change the display status of the lower-third animations.
Pros:
● Cross-platform Compatibility
● Ideal for Beginners and Novice YouTubers
● Save Multiple Graphic Overlays for Future Use
Cons:
● You won’t get any advanced functionality like Wirecast or OBS Studio
Why Do We Recommend Restream Studio?
Restream Studio is the perfect solution for users who don’t want to get overwhelmed with the complex features of OBS Studio. With its browser-friendly UI, you’ll be able to run Restream Studio across different platforms and add OBS animated lower-third graphics to your live streams easily.
04Lightstream

Lightstream is another free live stream manager that offers many features to execute hassle-free live streams across different platforms, including YouTube, Facebook, and Twitch. Even though the tool doesn’t provide advanced features like OBS Studio or Wirecast, it has everything you require to stream live on your social media handles. One of the key features of Lightstream is that you can add multiple scenes/overlays and switch between them with a single click.
Pros:
● Being open-source, Lightstream is available for free
● Lightstream is a cloud-based tool, which means it offers cross-platform compatibility
● Easy to set up, even if you are a beginner
Cons:
● Lacks advanced editing features
Why Do We Recommend Lightstream?
Lightstream is the most reliable live stream manager for users looking for a simple and cross-platform tool to manage live streams and add overlays.
05Adobe Photoshop

Before you act surprised, let us clarify that Adobe Photoshop isn’t an alternative to OBS Studio. However, you can use it to create customized overlays and lower-third graphics to add a personal touch to your live streams. Suppose you are already familiar with Photoshop and have been using it for a few years. In that case, it’ll allow you to design personalized text overlays, graphics, animations, and logos for your live streams.
And, once you have successfully designed the lower-third overlays, you can use any of the live stream managers to add them to your live streams.
Pros:
● Design custom overlays for your social media live streams
● Offers advanced editing options to customize logos and lower-third graphics
Cons:
● Photoshop has a steep learning curve, and if you are not an experienced designer, you won’t be able to design custom overlays
Why Do We Recommend Adobe Photoshop?
Adobe Photoshop is a reliable choice for creators who find the built-in media libraries of a live stream manager limited. With Photoshop, you’ll be able to design custom overlays for your live streams.
06ShareX

ShareX is also an open-source screen recorder and lives stream manager that offers all the OBS features you’ll need to manage your live streams and add multiple lower-third overlays. The only downside of ShareX is that it has a complicated user interface. Even if you have used OBS in the past, you’ll find ShareX’s user interface relatively complex. So, you should only sign up for ShareX if you are comfortable with complex user interfaces.
Pros:
● Upload and save pictures, videos, logos for lower-third overlays
● Record your entire screen or a specific window
● Assign hotkeys to switch between multiple windows during the Livestream
Cons:
● The user interface isn’t as friendly as other available options
Why Do We Recommend ShareX?
ShareX is an ideal OBS animated lower-third alternative for users who need a free-of-cost solution to manage their live streams.
07Canva

Again, Canva doesn’t support live stream management at all. However, like Adobe Photoshop, you can use Canva to create stunning lower-third overlays for your Livestream sessions. The major benefit of using Canva is that it has thousands of pre-made templates that you can import to your design with one click. All these templates are fully customizable - so you’ll be able to design custom lower-third overlays for your live streams.
Pros:
● Comparatively less complicated than Adobe Photoshop
● Canva is affordable
● Being a web-based designing tool, you can access Canva on any device
Cons:
● The premium version of Canva is relatively expensive than its competitors.
Why Do We Recommend Canva?
Canva is a one-stop solution for content creators looking for an additional designing tool to create custom OBS animated lower thirds for their live streams.
Key Takeaways from This Episode
● OBS animated lower-thirds are one of the most effective ways to share the context of a live stream with your viewers
● With OBS Studio, you have the liberty to import custom animated lower-third animations and overlays and add them to the live stream through its layered architecture
● Apart from OBS Studio, there are several other tools (such as Wondershare Filmora Pro) to add animated lower-thirds to live streams.
It’s worth noting that people commonly use built-in OBS animated lower thirds for the job, but you can also use other editing tools to create custom animations and import them in your OBS Livestream.
This guide will walk you through everything you need to know about OBS animated lower thirds and their best alternatives you can use in 2022 and beyond.
In this article
01 [What are Lower Thirds in Animation?](#Part 1)
02 [How To Set Up An Animated Lower Third In OBS Studio](#Part 2)
03 [8 AMAZING OBS Animated Lower Thirds Alternatives](#Part 3)
Part 1 What is Lower Thirds in Animation?
To put it in simple words, a lower third is simply a graphic overlay that appears on top of the actual footage. As the name implies, the contents of the lower third usually occur at the lower end of the screen, but streamers can also configure the OBS settings to change their position within the screen. Ideally, lower third animations are utilized to give a context of the overall video.
Let’s say you are life streaming your GTA V gameplay on YouTube. So, to help first-time viewers get the overall context, you can add GTA-related elements in the lower third animation and maximize viewer acquisition. In addition to this, you can also use OBS animated lower-thirds to display exclusive offers and discounts throughout the live stream.
Part 2 How To Set Up An Animated Lower Third In OBS Studio
So, now that you know the major benefits of using animated lower thirds in OBS studio, let’s understand how to set them up to make your live streams more engaging. It’s worth noting that OBS works around the concept of layers that you can manage individually to run your live streams. So, to add an animated lower third in OBS studio, all you have to do is add a dedicated layer and place it right above the video layer.
When it comes to setting up the lower-third, you’ll first need to create the graphics you want to display on top of the live streams. You can use Photoshop to design a custom lower-third animation if you are a professional designer. But, if you have just stepped into the world of live streams and don’t have any prior experience with Photoshop, you can also purchase one of the ready-to-use lower-third packages and import them directly to OBS.
Either way, it would be crucial to ensure that your OBS animated lower-third graphics do not interfere with the actual video. Why? Because this will make the video look more cluttered, and you’ll end up losing potential viewers.
Here’s a YouTube video that’ll walk you through the step-by-step procedure of creating lower-third animations in OBS Studio.
Part 3 8 AMAZING OBS Animated Lower Thirds Alternatives
While OBS is a great tool to add lower-third animations to your live streams, it has its fair share of drawbacks. For instance, OBS has a pretty complicated interface, which means if you are an absolute beginner, you may not easily set up your live streams. Not to mention, OBS is heavy software - so if you don’t have a high-configuration system, you won’t be able to run the tool at all.
So, what’s your next best option? Fortunately, there are several OBS alternatives that you can use to set up OBS animated lower-third graphics and enhance the overall quality of your live streams. To make your job easier, we have cherry-picked 8 of the most reliable OBS alternatives that you can use to add lower-third animations to a Livestream video.
01Wirecast
Like OBS, Wirecast is a popular video streaming platform that many content creators use to live stream on their social media handles. It also offers a layer-based architecture, which means users can add multiple layers separately and manage them through an easy-to-navigate panel.
One of the key reasons Wirecast is an ideal choice to add animated lower-third graphics to your live streams is its built-in collections. The tool already has several ready-to-integrate lower-third animations that one could import into their project without any hassle.
Pros:
● Built-in lower-third graphic templates
● Easy-to-use Interface
● Switch between multiple camera angles with one click
Cons:
● Unlike OBS Studio, Wirecast isn’t available for free
Why Do We Recommend Wirecast?
Wirecast is a fully functional video streaming platform where you can easily manage all your live streams. Wirecast offers far better functionality than OBS Studio despite having a relatively easy-to-use UI.
02vMix
vMix is a feature-rich video production software that offers everything one would need to create stunning videos. However, it also has a dedicated live stream manager to manage your live streams, switch between multiple camera angles, and add overlay animations to keep the viewers engaged. Unlike OBS Studio, vMix doesn’t have a layering system, which means you can overlay multiple channels easily.
As far as OBS animated lower-thirds are concerned, there are different ways you can add these animations to your live streams. You can either import dedicated PSD files, embed HTML codes, or choose one of the ready-to-use lower-third templates to do the job. In either case, vMix will help you add stunning lower-third animations within a few minutes.
Pros:
● Full-scale video production software
● Built-in support for audio mixing
● Add and Manage Multiple Camera Inputs
Cons:
● If you want to relish all the benefits of vMix, you would have to purchase its pro version, which costs $1200. As compared to other available options, vMix is significantly expensive.
Why Do We Recommend vMix?
vMix is ideal for users who want to upgrade from OBS and can spend $1200 on a live stream manager. It’ll provide everything you need to live stream across different social media platforms.
03Restream Studio
Restream Studio is a browser-based live stream tool that offers an easy-to-navigate panel to manage your live streams. Restream is ideal for beginners who don’t want to spend a hefty amount on their live streaming software. With restream, you can upload your brand logos, graphic overlays, and text details and save them in the “Favorites” tab for future use.
This way, whenever you are live streaming, you can directly choose one of these overlays and switch between them easily. The tool also has a dedicated “Hide/Show” button that’ll allow you to change the display status of the lower-third animations.
Pros:
● Cross-platform Compatibility
● Ideal for Beginners and Novice YouTubers
● Save Multiple Graphic Overlays for Future Use
Cons:
● You won’t get any advanced functionality like Wirecast or OBS Studio
Why Do We Recommend Restream Studio?
Restream Studio is the perfect solution for users who don’t want to get overwhelmed with the complex features of OBS Studio. With its browser-friendly UI, you’ll be able to run Restream Studio across different platforms and add OBS animated lower-third graphics to your live streams easily.
04Lightstream
Lightstream is another free live stream manager that offers many features to execute hassle-free live streams across different platforms, including YouTube, Facebook, and Twitch. Even though the tool doesn’t provide advanced features like OBS Studio or Wirecast, it has everything you require to stream live on your social media handles. One of the key features of Lightstream is that you can add multiple scenes/overlays and switch between them with a single click.
Pros:
● Being open-source, Lightstream is available for free
● Lightstream is a cloud-based tool, which means it offers cross-platform compatibility
● Easy to set up, even if you are a beginner
Cons:
● Lacks advanced editing features
Why Do We Recommend Lightstream?
Lightstream is the most reliable live stream manager for users looking for a simple and cross-platform tool to manage live streams and add overlays.
05Adobe Photoshop
Before you act surprised, let us clarify that Adobe Photoshop isn’t an alternative to OBS Studio. However, you can use it to create customized overlays and lower-third graphics to add a personal touch to your live streams. Suppose you are already familiar with Photoshop and have been using it for a few years. In that case, it’ll allow you to design personalized text overlays, graphics, animations, and logos for your live streams.
And, once you have successfully designed the lower-third overlays, you can use any of the live stream managers to add them to your live streams.
Pros:
● Design custom overlays for your social media live streams
● Offers advanced editing options to customize logos and lower-third graphics
Cons:
● Photoshop has a steep learning curve, and if you are not an experienced designer, you won’t be able to design custom overlays
Why Do We Recommend Adobe Photoshop?
Adobe Photoshop is a reliable choice for creators who find the built-in media libraries of a live stream manager limited. With Photoshop, you’ll be able to design custom overlays for your live streams.
06ShareX
ShareX is also an open-source screen recorder and lives stream manager that offers all the OBS features you’ll need to manage your live streams and add multiple lower-third overlays. The only downside of ShareX is that it has a complicated user interface. Even if you have used OBS in the past, you’ll find ShareX’s user interface relatively complex. So, you should only sign up for ShareX if you are comfortable with complex user interfaces.
Pros:
● Upload and save pictures, videos, logos for lower-third overlays
● Record your entire screen or a specific window
● Assign hotkeys to switch between multiple windows during the Livestream
Cons:
● The user interface isn’t as friendly as other available options
Why Do We Recommend ShareX?
ShareX is an ideal OBS animated lower-third alternative for users who need a free-of-cost solution to manage their live streams.
07Canva
Again, Canva doesn’t support live stream management at all. However, like Adobe Photoshop, you can use Canva to create stunning lower-third overlays for your Livestream sessions. The major benefit of using Canva is that it has thousands of pre-made templates that you can import to your design with one click. All these templates are fully customizable - so you’ll be able to design custom lower-third overlays for your live streams.
Pros:
● Comparatively less complicated than Adobe Photoshop
● Canva is affordable
● Being a web-based designing tool, you can access Canva on any device
Cons:
● The premium version of Canva is relatively expensive than its competitors.
Why Do We Recommend Canva?
Canva is a one-stop solution for content creators looking for an additional designing tool to create custom OBS animated lower thirds for their live streams.
Key Takeaways from This Episode
● OBS animated lower-thirds are one of the most effective ways to share the context of a live stream with your viewers
● With OBS Studio, you have the liberty to import custom animated lower-third animations and overlays and add them to the live stream through its layered architecture
● Apart from OBS Studio, there are several other tools (such as Wondershare Filmora Pro) to add animated lower-thirds to live streams.
Samples of Cartoon Character Face to Inspire You
Samples of Cartoon Character Face to Inspire You
An easy yet powerful editor
Numerous effects to choose from
Detailed tutorials provided by the official channel
Being able to draw facial features is an essential skill for any animator. Whether you are a beginner at drawing faces or an experienced cartoon artist that has been drawing for years, this is a skill that can gradually improve with time. With the implementation and use of simple shapes, creating various facial features and cartoon styles can be done quickly.
The methods of creating funny face cartoon characters are suitable for everyone, even if they do not have a single day of illustrating experience. These methods presented in this article are easily accessible to provide you with different results depending on your budget and your desired outcome.
The act of drawing cartoon faces can be effortless, and in this article, we will give you some fundamental samples of how you can draw cartoon faces of your own.
In this article
01 [Learn to Understand the Core of Cartoon Style](#Part 1)
02 [Top 12 Cartoon Face Examples](#Part 2)
03 [How to Draw a Cartoon Face - For Beginners](#Part 3)
04 [How to Easily Turn Yourself into a Cartoon](#Part 4)
Part 1 Learn to Understand the Core of Cartoon Style
First, you need to simplify the different parts of the cartoon character face to pick up on very subtle facial expressions and features. For example, the eyes’ shape and size will help determine if the person is feeling sad, excited, happy, excited, or sad. In addition, the amount of lift under a person’s eyebrows can help determine whether a person is mad or not.
These facial expressions are crucial to how a person communicates. It has got to the point that we can read someone’s face without truly understanding which parts of the face convey that emotion. However, these days we get exposed to everyday adaptations of facial expressions, especially with the invention of Instagram, Snapchat, and cartoon face filters.
Consequently, cartoons are a combination of different shapes that are being put together and are not difficult if the focus is on each shape individually and the process breaks down step by step.
Cartoons are a mixture of different shapes put together. It’s not difficult if you focus on each shape individually and break down the process step by step.
Finally, understanding these unconscious and subtle differences in facial expressions is crucial when planning out an animated character. Afterward, when understood, you can simplify the features to be recognizable by your audience.
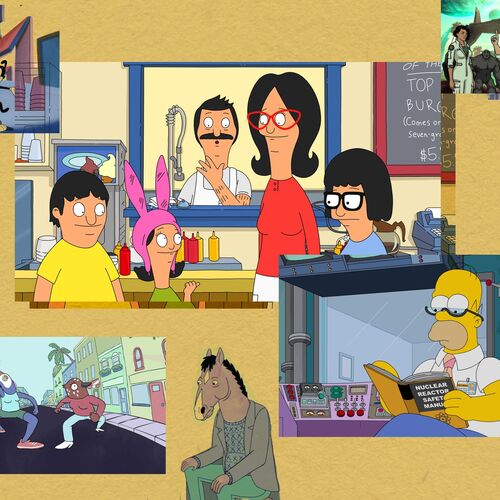
Part 2 Top 12 Cartoon Face Examples
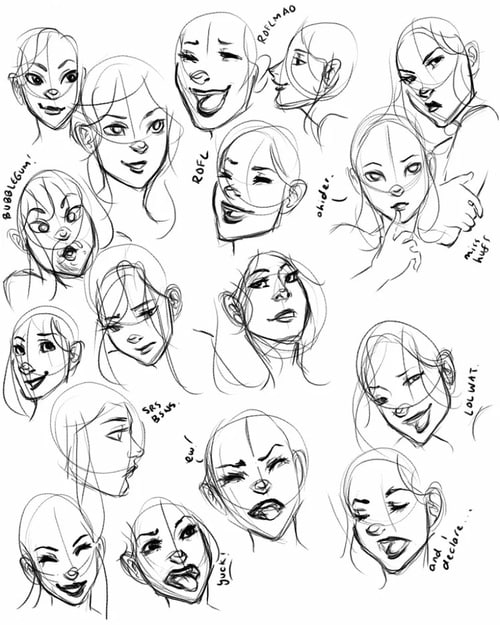
Cartoon character faces are gaining immense importance in design art due to their universality. Cartoon faces can represent people in several situations and add a comic or satirical twist to dull topics by highlighting their importance. However, drawing cartoon faces require a lot of skill and differentiation, and graphic designers, while working on basic and universal templates, always try and introduce unique elements.
Here are the top 10 examples of cartoon character faces you can choose from when you want to make your designs:
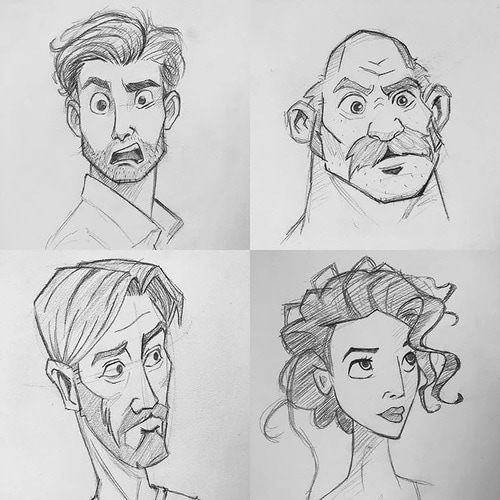
01Men and Women
This sketch features different facial expressions made by older men and women.
02Stretch and Squash
This photo shows the difference between squashing and stretching the face and provides references for extreme squash and extreme stretch.

03Dramatic Expressions
The expressions drawn here are super fun and dramatic. However, it is a great way to have fun and practice how to draw facial expressions simultaneously.
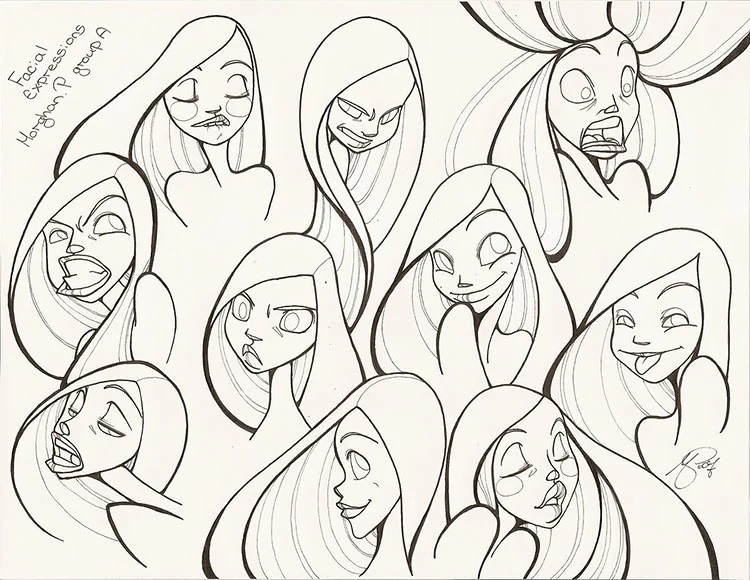
04Quick Expressive Sketches
With this, you can practice how to draw different facial expressions by doing quick sketches like this one. Perhaps you do not need to pay attention to perfection.
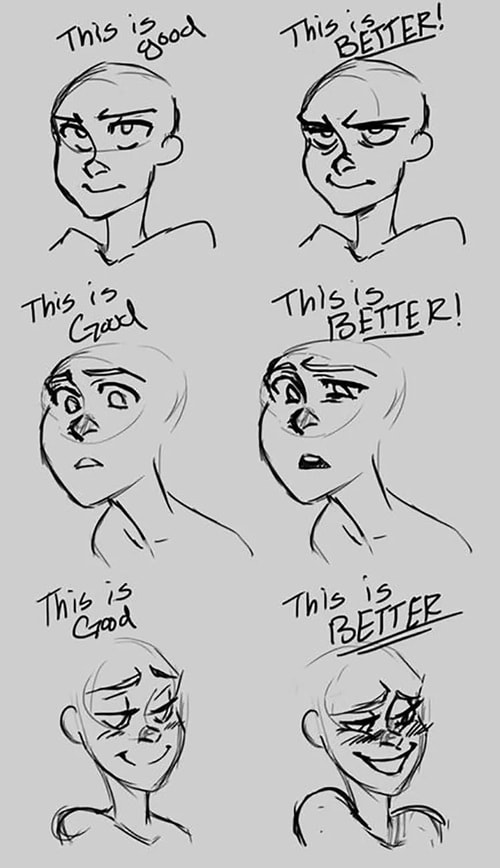
05This Is Good This Is Better
With this facial expression, you can see a good look and an even better expression. It shows the difference that subtle changes can make to your facial expressions**.**
06Male and Female Expressions
This includes both male and female expressions to express the facial reaction of both genders, like some funny cartoon characters face.
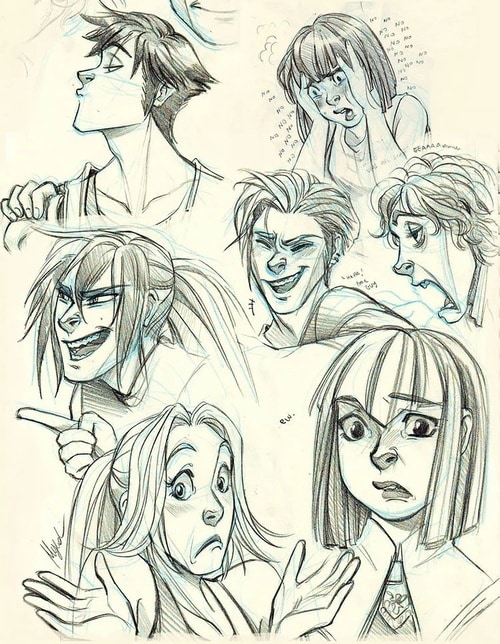
07Quick Sketches
This type of facial expression will help you get better at drawing cartoons, and you can use do some quick sketches every day.

08Jay Leno’s facial expression
Here, it is being exaggerated on a few of his most prominent facial features, including his chin. It is kind of a fat face cartoon character.

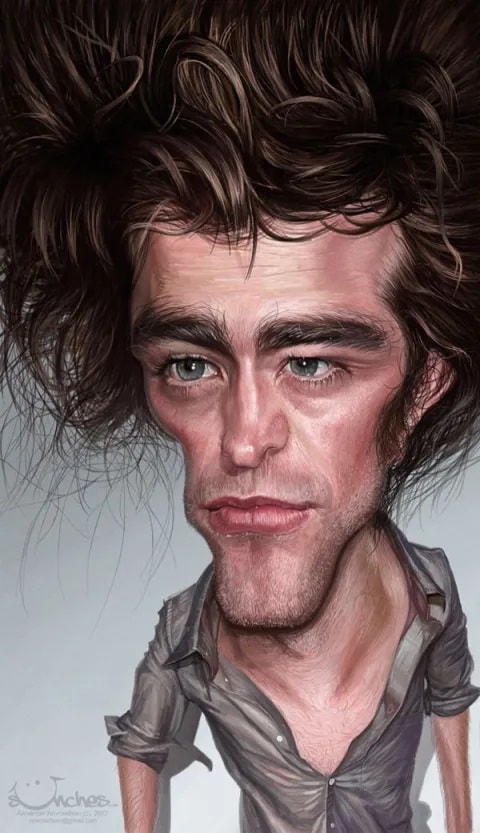
09Robert Pattinson Facials
In this photo, his head shape was distorted to show the thinness of his face, and his big hair also accentuates this prominent feature further.
10A,I,U,O,AE,M Facials
With this, you can practice how to draw your facial expression by pronouncing a, i, u, o, ae, m.

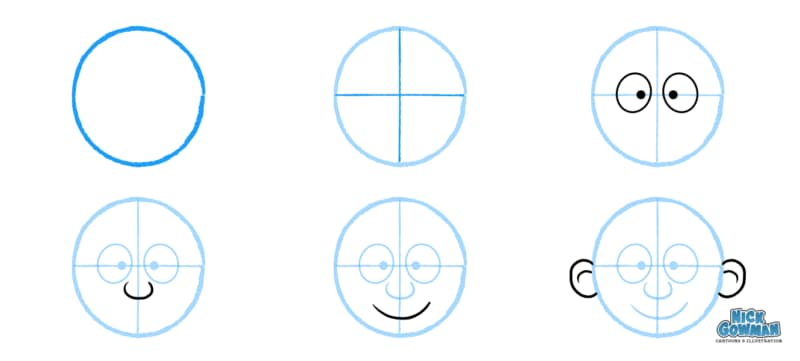
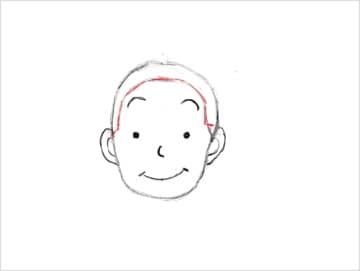
Part 3 How to Draw a Cartoon Face - For Beginners
Here, we have written down 7-step to follow on how to draw a cartoon character face as a beginner effectively.
● Step 1: Plan and Prepare
This is the first step is to plan out exactly what this character will convery through its expression while drawing a cartoon character.
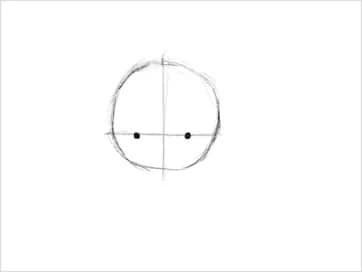
● Step 2: Drawing A Cartoon Head
Next is time to start sketching out the shape of the head based on the plan you have made. Whatsoever shape you decide to use for your character, start with a circle to serve as the basic shape for the head.
● Step 3: Drawing Cartoon Eyes
Now, you need to draw the eye of the character, which is a crucial step because the eye is the essential part of their expression. To get the character’s eyes in the right place, you should carefully sketch the horizontal or vertical dimension lines.
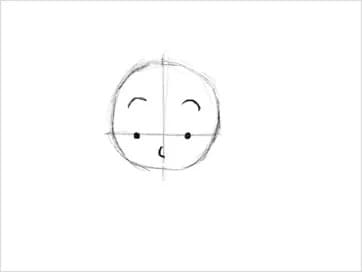
● Step 4: Drawing A Cartoon Nose
The simpler the nose is, the better it looks in a cartoon. Ensure to keep a proper ratio between the mouth, eyes, and nose so that it does not look too crowded together.
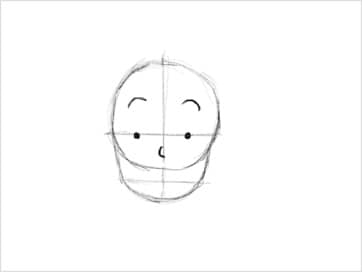
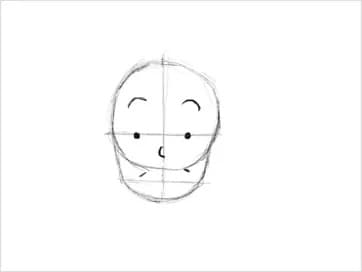
● Step 5: Shaping the Face
In shaping the face, one needs to be mindful of the character, which will help to determine how to shape the jawline and head. For example, for a girl, the face should be narrower and have the chin come to a bit of a point at the end, whereas, for a boy, it requires that the face is a bit bolder and focuses more on the definition of the jawline.
● Step 6: Drawing A Cartoon Mouth
The mouth is another essential part of the cartoon character’s expression and a key indicator of how the character is feeling. It portrays whether you want the character to smile, frown, yell, be nervous, or be neutral.
● Step 7: Drawing Cartoon Hair
Next, you need to draw the cartoon hair, and, in some cases, the cartoon hair is a significant part of their appearance as it is a way to convey your character’s personality, appearance, style, or gender.
● Step 8: Coloring
Another part requires you to paint your character to improve the texture and make it beautiful.
Part 4 How to Easily Turn Yourself into a Cartoon
Are you looking to turn yourself into a cartoon? This is very necessary as it provides you with a great way to integrate diverse characters into your brand’s marketing while simultaneously keeping your content personalized.
However, after converting a picture to a cartoon character face, you can decide to animate it, and the best tool is Wondershare Filmora Video Editor . Animation is a great way to advertise your business, especially during times like these. it is a clever way for leaders, CEOs, and managers to connect with their remote workers and boost engagement, company culture, and ultimately work morale. Filmora is also a great tool to create creative and powerful animation with tons of follow-come effect that enables you to carry it out effectively and efficiently. In this section, we will guide you on how to turn yourself into a cartoon easily:
Step 1: Visit Powtoon.com and sign up for a free account, then click on the “build your character” option from the dropdown menu.
Step 2: Next is to select the cartoon gender you want.
Step 3: Finally, you can customize your character’s facial features such as skin, hair, color, clothes, and animated gestures.

Step 4: Once you are satisfied with the result, you can save it on your device or share it on social media
For Win 7 or later (64-bit)
For macOS 10.12 or later
● Ending Thoughts →
● Thus, we saw how to easily cartoon your character’s face via some samples to help you out. With the method listed above, you can easily use it to create a square-faced cartoon character or draw a fat face cartoon character.
● This article also explained how to cartoon yourself. However, to cartoon your video or create a cartoon animated video, we recommend that you use Filmora, its keyframing feature to help you carry this out effectively.
Being able to draw facial features is an essential skill for any animator. Whether you are a beginner at drawing faces or an experienced cartoon artist that has been drawing for years, this is a skill that can gradually improve with time. With the implementation and use of simple shapes, creating various facial features and cartoon styles can be done quickly.
The methods of creating funny face cartoon characters are suitable for everyone, even if they do not have a single day of illustrating experience. These methods presented in this article are easily accessible to provide you with different results depending on your budget and your desired outcome.
The act of drawing cartoon faces can be effortless, and in this article, we will give you some fundamental samples of how you can draw cartoon faces of your own.
In this article
01 [Learn to Understand the Core of Cartoon Style](#Part 1)
02 [Top 12 Cartoon Face Examples](#Part 2)
03 [How to Draw a Cartoon Face - For Beginners](#Part 3)
04 [How to Easily Turn Yourself into a Cartoon](#Part 4)
Part 1 Learn to Understand the Core of Cartoon Style
First, you need to simplify the different parts of the cartoon character face to pick up on very subtle facial expressions and features. For example, the eyes’ shape and size will help determine if the person is feeling sad, excited, happy, excited, or sad. In addition, the amount of lift under a person’s eyebrows can help determine whether a person is mad or not.
These facial expressions are crucial to how a person communicates. It has got to the point that we can read someone’s face without truly understanding which parts of the face convey that emotion. However, these days we get exposed to everyday adaptations of facial expressions, especially with the invention of Instagram, Snapchat, and cartoon face filters.
Consequently, cartoons are a combination of different shapes that are being put together and are not difficult if the focus is on each shape individually and the process breaks down step by step.
Cartoons are a mixture of different shapes put together. It’s not difficult if you focus on each shape individually and break down the process step by step.
Finally, understanding these unconscious and subtle differences in facial expressions is crucial when planning out an animated character. Afterward, when understood, you can simplify the features to be recognizable by your audience.
Part 2 Top 12 Cartoon Face Examples
Cartoon character faces are gaining immense importance in design art due to their universality. Cartoon faces can represent people in several situations and add a comic or satirical twist to dull topics by highlighting their importance. However, drawing cartoon faces require a lot of skill and differentiation, and graphic designers, while working on basic and universal templates, always try and introduce unique elements.
Here are the top 10 examples of cartoon character faces you can choose from when you want to make your designs:
01Men and Women
This sketch features different facial expressions made by older men and women.
02Stretch and Squash
This photo shows the difference between squashing and stretching the face and provides references for extreme squash and extreme stretch.
03Dramatic Expressions
The expressions drawn here are super fun and dramatic. However, it is a great way to have fun and practice how to draw facial expressions simultaneously.
04Quick Expressive Sketches
With this, you can practice how to draw different facial expressions by doing quick sketches like this one. Perhaps you do not need to pay attention to perfection.
05This Is Good This Is Better
With this facial expression, you can see a good look and an even better expression. It shows the difference that subtle changes can make to your facial expressions**.**
06Male and Female Expressions
This includes both male and female expressions to express the facial reaction of both genders, like some funny cartoon characters face.
07Quick Sketches
This type of facial expression will help you get better at drawing cartoons, and you can use do some quick sketches every day.
08Jay Leno’s facial expression
Here, it is being exaggerated on a few of his most prominent facial features, including his chin. It is kind of a fat face cartoon character.
09Robert Pattinson Facials
In this photo, his head shape was distorted to show the thinness of his face, and his big hair also accentuates this prominent feature further.
10A,I,U,O,AE,M Facials
With this, you can practice how to draw your facial expression by pronouncing a, i, u, o, ae, m.
Part 3 How to Draw a Cartoon Face - For Beginners
Here, we have written down 7-step to follow on how to draw a cartoon character face as a beginner effectively.
● Step 1: Plan and Prepare
This is the first step is to plan out exactly what this character will convery through its expression while drawing a cartoon character.
● Step 2: Drawing A Cartoon Head
Next is time to start sketching out the shape of the head based on the plan you have made. Whatsoever shape you decide to use for your character, start with a circle to serve as the basic shape for the head.
● Step 3: Drawing Cartoon Eyes
Now, you need to draw the eye of the character, which is a crucial step because the eye is the essential part of their expression. To get the character’s eyes in the right place, you should carefully sketch the horizontal or vertical dimension lines.
● Step 4: Drawing A Cartoon Nose
The simpler the nose is, the better it looks in a cartoon. Ensure to keep a proper ratio between the mouth, eyes, and nose so that it does not look too crowded together.
● Step 5: Shaping the Face
In shaping the face, one needs to be mindful of the character, which will help to determine how to shape the jawline and head. For example, for a girl, the face should be narrower and have the chin come to a bit of a point at the end, whereas, for a boy, it requires that the face is a bit bolder and focuses more on the definition of the jawline.
● Step 6: Drawing A Cartoon Mouth
The mouth is another essential part of the cartoon character’s expression and a key indicator of how the character is feeling. It portrays whether you want the character to smile, frown, yell, be nervous, or be neutral.
● Step 7: Drawing Cartoon Hair
Next, you need to draw the cartoon hair, and, in some cases, the cartoon hair is a significant part of their appearance as it is a way to convey your character’s personality, appearance, style, or gender.
● Step 8: Coloring
Another part requires you to paint your character to improve the texture and make it beautiful.
Part 4 How to Easily Turn Yourself into a Cartoon
Are you looking to turn yourself into a cartoon? This is very necessary as it provides you with a great way to integrate diverse characters into your brand’s marketing while simultaneously keeping your content personalized.
However, after converting a picture to a cartoon character face, you can decide to animate it, and the best tool is Wondershare Filmora Video Editor . Animation is a great way to advertise your business, especially during times like these. it is a clever way for leaders, CEOs, and managers to connect with their remote workers and boost engagement, company culture, and ultimately work morale. Filmora is also a great tool to create creative and powerful animation with tons of follow-come effect that enables you to carry it out effectively and efficiently. In this section, we will guide you on how to turn yourself into a cartoon easily:
Step 1: Visit Powtoon.com and sign up for a free account, then click on the “build your character” option from the dropdown menu.
Step 2: Next is to select the cartoon gender you want.
Step 3: Finally, you can customize your character’s facial features such as skin, hair, color, clothes, and animated gestures.
Step 4: Once you are satisfied with the result, you can save it on your device or share it on social media
For Win 7 or later (64-bit)
For macOS 10.12 or later
● Ending Thoughts →
● Thus, we saw how to easily cartoon your character’s face via some samples to help you out. With the method listed above, you can easily use it to create a square-faced cartoon character or draw a fat face cartoon character.
● This article also explained how to cartoon yourself. However, to cartoon your video or create a cartoon animated video, we recommend that you use Filmora, its keyframing feature to help you carry this out effectively.
FREE Top 21 Best Anime Websites to Watch Anime Online
FREE Top 21 Best Anime Websites to Watch Anime Online

Shanoon Cox
Mar 27, 2024• Proven solutions


You all have heard about Fullmetal Alchemist, right? Anime has proven to be a productive means of spending time for kids below the age of twelve, and as a means of escape for the older generations as they promote themes like friendship, good relationships, family time, community order, and teamwork. Due to the skyrocketing popularity of anime series, countless free anime websites are now available for streaming. Have you spent a long time trying to find an anime website to watch anime for free but returned disappointed? Here in this article, we will show you the top anime websites where you can watch your favorite anime online and for free.
- Part 1: 21 Free Anime Websites to Watch Anime Online
- Part 2: Dub an Anime Series with Wondershare Filmora
- Part 3: FAQs About Watching Anime Online
You may also like:
- 10 Free Websites to Watch Cartoon Online in HD
- Top 10 Banned Anime Around the World and Why
- 15 Apps to Cartoon Yourself with Ease [iPhone & Android]
Part 1 21 Free Anime Websites to Watch Anime Online
Gone are the days when you spent hours searching for a website to watch your favorite anime. Now you can watch anime online from the following anime sites.
Here is the list(they are listed in no particular order):
01 Crunchyroll
Crunchyroll is a free anime website featuring some of the top animes such as Naruto, Attack on Titan, Yuri on Ice, etc. It has a simple interface and hosts a massive collection of Asian dramas, anime, and even manga. A premium version of Crunchyroll is also available, in which ads will be eliminated, and some extra features will be added. Some of the best anime series to watch on Crunchyroll for free are Naruto, Attack on Titan, Yuri on Ice, and My Hero Academia, etc.
Pros:
- Any anime series can be searched according to categories such as genre, seasons, or popularity
- Simple and attractive interface
- The standard version is free
- One-stop-shop for anime lovers
Cons:
- The ads are annoying
- Subscription required for the premium version
Countries or regions available: 180+ Countries
![]()
A cross-platform for making videos anywhere for all creators

Why your video editing isn’t good enough? How about some creative inspo?
- 100 Million+ Users
- 150+ Countries and Regions
- 4 Million+ Social Media Followers
- 5 Million+ Stock Media for Use
* Secure Download

02 Kissanime.ru
Kissanime is one of the biggest anime websites in the world with anime series in all categories like drama, Sci-Fi, horror, action, comedy, sports, and much more. On Kissanime you can watch any anime online for free or download and watch it later when you don’t have an active internet connection. And Kissanime offers free anime at all qualities from 240p to 1080p. It also has embedded English audio and subtitles for better understanding. Creating an account in Kissanime is not mandatory to watch the anime you like, but an account will help you to manage your favorite episodes and videos.

Pros:
- Subbed/dubbed versions available
- Offline viewing
- Choose the view quality as you want
- Advanced filter search
- Load videos super-fast
Cons:
- Not accessible on all devices
- Ads
Countries or regions available: Worldwide
03 Funimation
Owned by Sony, Funimation is a great anime website that is famous for releasing dubbed foreign content like anime, tv shows, etc. If you are not a fan of watching foreign anime with English subtitles and insist on English audio, then Funimation is the first place you look for it. It also releases applications for PS wherein you will be able to watch thousands of anime episodes. One drawback of the free version of Funimation is that you will have to put up with ads while watching your favorite anime.
Pros:
- Subbed/Dubbed versions
- On-going anime series also available
- Stream on two screens with the premium version
Cons:
- You will have to put up with ads while watching your favorite anime
- Dubbed version not free
Countries or regions available: The USA, United Kingdom, Ireland, Canada, Australia, and New Zealand (soon to be Mexico & Brazil)
04 9anime
9anime is one of the unique anime websites in which most of the content can be streamed in high-quality 1080p. It is a huge platform for anime series as well as movies that offer the best quality content only, which makes it the fan’s favorite. You will be able to access both subbed and dubbed versions of any anime on this website without registering or paying. Some of the anime that are listed as most-watched on 9anime are Death Note, Naruto, Dragon Ball, and Psycho.

Pros:
- Free subbed/dubbed versions
- No registration needed
- Support HD quality
- Upcoming anime series schedule displayed
Cons:
- Video-player cuts off intros
- Anime series cannot be downloaded
Countries or regions available: Worldwide
05 AnimeDao
AnimeDao is one of the best anime websites that have the top scores when it comes to video quality, ease of use, loading speeds, availability of content, and reliability. And it is preferred by anime lovers all over the world as it offers a smooth streaming experience and consumes low bandwidth. The quality of the video to be played can be adjusted between 340p to 1080p on AnimeDao, depending on your connection speed. AinmeDao also offers the dubbed the English subbed and dubbed versions of all the old and latest anime series and movies.
Pros:
- Simple interface. Light and dark themes are also available
- Low-bandwidth consumption
- Quality adjustment ( 340p-1080p)
- Bookmark videos
Cons:
- No downloading
- Ads
Countries or regions available: The USA
06 Chia-Anime
Chia anime is one of the popular anime websites that allows you to watch the most recent and all-time favorite anime easily. The website offers an enjoyable experience of anime watching as well as browsing for new anime. You will be able to watch popular anime like Hero Academia, One-piece, Dragon ball, Kokora, etc. as soon as it airs in Japan one Chia-Anime. Chia-Anime also has a special feature that keeps you updated with the latest and hottest anime of that time. The navigation through Chia-Anime is also very easy, with an amazing interface that allows you to search the anime based on different categories.
Pros:
- Easy categories for advanced search
- Faster video loading
- Download for offline viewing
- Free dubbed versions
Cons:
- Pop-up ads
Countries or regions available: Worldwide
07 AnimeLab
AnimeLab is a free anime website famous for its fast availability of the latest episodes aired in Japan. That is, it will be available on the website after 1 hour of broadcast. It makes it incredibly easy to search the desired anime with its neat categories like recently added, popular shows, genre, etc. There is a premium version for Animelab, which can be opted if you want to get rid of ads and prefer English audio over subtitles.
Pros:
- Subbed/dubbed versions provided
- Fast updates
- Compatible on multiple devices such as Android, iPhone, etc
Cons:
- Dubbed version only for premium users
- Ads in the free version
Countries or regions available: New Zealand and Australia
08 Anime-planet
Anime-planet is another popular free anime website to offer its users a collection of more than 45000 episodes. It immerses you in the world of comedy, horror, adventure, etc., for free. The users can access all kinds of manga and anime databases, reviews on different anime by fans, and recommendations. If you don’t know which anime to start, a ride through the Anime-planet platform will solve your problem. And the interface of the Anime-planet is very cool and is designed to provide a comfortable video watching experience on all devices like tablets, mobile phones, iOS devices, desktops, UHD TVs, etc.
Pros:
- Manga library available
- Fewer pop-up ads
- The meta description for videos
- Anime lovers community
- Compatible with multiple devices such as tablets, smartphones, iOS devices
Cons:
- Registration needed
- No specific categories in the anime genre, type, etc.
Countries or regions available: Worldwide
09 VIZ
VIZ is an American publisher and distributor of manga. It is the largest publisher of comic books and graphic novels in the whole of the United States. VIZ has been one of the entertainment companies that has been bringing the finest anime and manga to English-speaking people for 30 years. It is available on the google store to download for free and can be downloaded on any devices that run on android 2.2 or higher versions. You can even download the app on your smartphone for unlimited anime streaming. If you are a die-hard anime fan, you can even share your anime art in the community or post articles and reviews. Anime trailers and reviews will help you choose the anime worth watching.
Pros:
- Mobile-friendly
- Huge collection of manga
- Subbed/dubbed versions provided
Cons:
- Slow loading
Countries or regions available: Worldwide
10 AnimeHeaven
AnimeHeaven is one of the most liked anime sites with a good reputation for streaming online anime movies and series. It offers a collection of both old and the latest series and movies on a single platform for free. The videos on this platform are mostly 780p or 1080p. And it allows you to search for anime depending on genres like drama, action, comedy, mystery, thriller, and many more. All the anime movies of the AnimeHeaven features a dubbed and subbed version, which can be opted for if you desire.

Pros:
- Select the video quality for playback automatically
- Fewer ads
- Easy-to-access categories
Cons:
- Classic anime not available
- Delayed upload of the latest episodes
Countries or regions available: Worldwide
11 Animefreak. tv
With over a million users worldwide, this anime website has got all the features to attract anime and manga lovers. It is a free anime website that offers a vast collection of subbed/dubbed anime with a relatively straightforward interface.
Pros:
- User-friendly and attractive interface
- Regularly updated
- Manga series available
Cons:
- Lots of ads
Countries or regions available: Worldwide
12 MyAnimeList.net
MyAnimeList, a.k.a MAL, claims to have the largest anime and manga database. It is an anime social networking website. You can read reviews from other people before starting a new anime series. Also, you can find people of the same interests as you and form a fan club. As the name suggests, you can create lists of anime series that you will watch. MAL also hosts contests to challenge users into completing their lists before others.
Pros:
- Post or read reviews
- Create clubs with people of similar interests
- Start a discussion on favorite anime topics
- Write recommendations or blogs
Cons:
- Monthly/yearly subscription and logging in required for an ad-free version
Countries or regions available: Canada, USA, UK, and several other English-speaking countries
13 Contv.com
Contv is a unique multiplatform that streams movies, tv-series, anime, and even comics. From horror to romance, Contv has it all. It’s a one-stop-shop. With an attractive interface, it has numerous categories of genres. You can even watch your favorite anime or live tv available 24/7.
Pros:
- Comics and graphic novels
- Updated anime library
- Uncut content available
- Kids collection available
Cons:
- The free version has limited content
Countries or regions available: The USA
14 Asian Crush
If you’re a die-hard fan of Asian movies and dramas, this is for you. From Chinese martial arts to Japanese anime, it streams all in one place. It also has a blog that offers the latest news updates of the Asian industry.
Pros:
- Chinese series, anime, k-dramas
- Available on all devices, i.e., Apple, Android, Amazon Fire
- Filter search by genre, region, or theme
- Categorized into movies or collections such as award-winning films, bad romance, etc
Cons:
- Lots of ads
Countries or regions available: North America
15 NicoNico
NicoNico is set apart from other anime websites owing to its video comment feature. The texts/comments are time-synced to appear in the video at the playback time you commented. This gives a shared viewing experience. Anyone can upload or share videos.
Pros:
- Video commenting and tagging
- Create My list folders
- Anime illustrations, manga, and e-books are also available
- High-quality videos
Cons:
- Too many ads in the free version
Countries or regions available: The USA, Japan, Taiwan(China)
16 Soul Anime
With more than 4000 anime series available for free streaming, Soul Anime is one of the largest anime websites. Watch anime online in high quality only on Soul Anime. Anime episodes are updated instantly within an hour of release.
Pros:
- Subbed/dubbed versions available
- Advanced search (anime arranged alphabetically/genre-wise)
- Anime downloads allowed
- Unlimited free streaming
Cons:
- Ad pop-ups
Countries or regions available: Worldwide
17 AnimeTake.tv
A comprehensive collection of online anime series and movies. Easy to access with anime categorized as genre, popular, and movies. This anime site is as hassle-free as it comes.
Pros:
- Metadata with every anime title
- The next button enables switching to the next anime without going back
- Latest updates notifications
- Alphabetical categorization for easy anime search
Cons:
- Too many annoying ads
Countries or regions available: Worldwide
18 AniPlus Asia
AniPlus Asia is an online platform exclusively for anime lovers. AniPlus offers a free one-month trial, after which you need to sign up as a member. You can even like, share, or comment on the videos.
Pros:
- Anime merchandise store
- Build or join anime lovers community
- Available on multiple platforms, i.e., pc, mobile, tablet
- Members get priority access to giveaways and anime-related events and games.
Cons:
- Pop up ads
- Membership required after one-month trial ends
Countries or regions available: Singapore, Malaysia, Indonesia, Thailand, and the Philippines
19 Tubi.tv
It’s a free TV and anime website. You can stream movies, tv shows as well as anime in high quality. It offers a library of the oldest to the latest series. You can sync your devices to start watching where you left off on one device.
Pros:
- 100% free. No subscription needed
- Bookmark the movies/series to watch later
- Available for access on multiple devices, including Apple TV
- Ad-free streaming
Cons:
- No anime categories for search
- Ads at every 15-minute interval
Countries or regions available: The USA, Australia, Canada
20 MidNight.Pulp
The virtual house of everything strange and scary in the world of movies and anime. Suppose you’re into the dark and weird genre, MidNight.Pulp has got you covered from cult Sci-fi to horror, and much more. You can watch anime online, and that is too free of cost unless you want to subscribe to the premium ad-free version starting from $5/month.

Pros:
- Massive collection of rare and hard to find series
- Filter search by year
- A weekly update of episodes
Cons:
- Log in after every exit
- Limited content in the free version
- Ads
Countries or regions available: Worldwide
21 Watchanimelist
It’s a new active online anime and manga community and database. Watchanimelist provides a comprehensive platform that offers a vast collection of anime episodes, manage/comics, and novels, all available for free.

Pros:
- 100% free. No subscription needed
- A community for like-minded fans
- Diverse manga/comics and novels
- Optimized for all devices
Cons:
- Pop-up ads
- Strange upload
Countries or regions available: Worldwide
Part 2 Dub an Anime Series with Filmora
Anime was initially created by the Japanese in their native language but as its viewership expanded globally, so did the need for it to be available in the universal language, i.e., English. Dubbing the original films or clips into another language is a complex process that demands skill. Nonetheless, worry not because editing apps like Wondershare Filmora video editor are here to save the day with their easy and advanced editing tools.
How cool would it be to replace the original audio of an anime with your own voice? Exciting, right? You are in luck because the latest voiceover recording feature by Filmora is now available and ready to create your amazing and creatively dubbed videos in just a few easy steps.
Step 1 Install Wondershare Filmora on your PC and complete the setup.

Step 2 Then, launch the application, tap the ‘import’ button under the menu, select ‘Import Media Files’ and load the particular anime video to the media library.
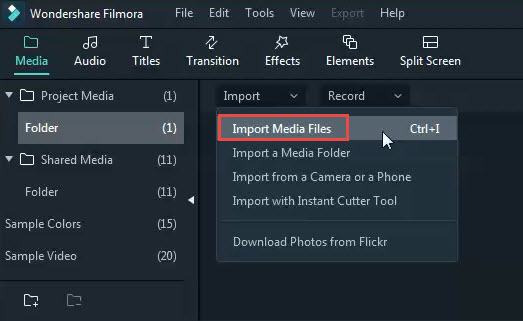
Step 3 Next, drag and drop the anime video onto the timeline. To add your own voiceover, you need to remove the original anime dubbing in the anime video first.
Step 4 Right-click on the video, tap ‘Detach Audio’, and then delete the background audio from the track.
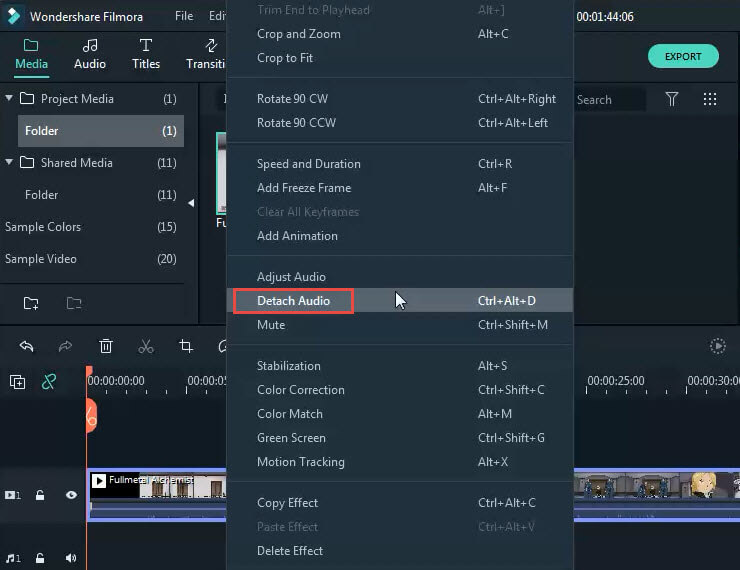
Step 5 Then hit the ‘Record Voiceover’ button on the toolbar, connect a professional external microphone to record your customized narration.
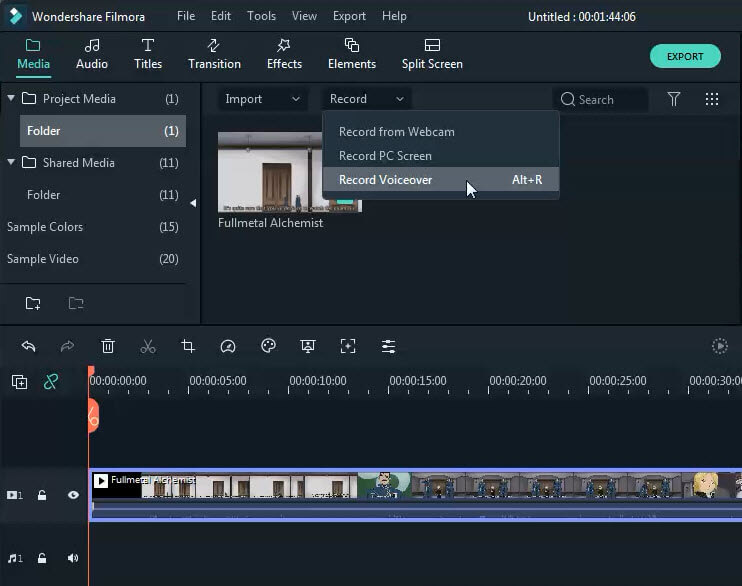
Step 6 After the Record dialogue appears, tap the Red circle, wait for 3 seconds, and then start talking.

Step 7 Upon completion, the recorded audio will automatically on the timeline as well as in the Album.
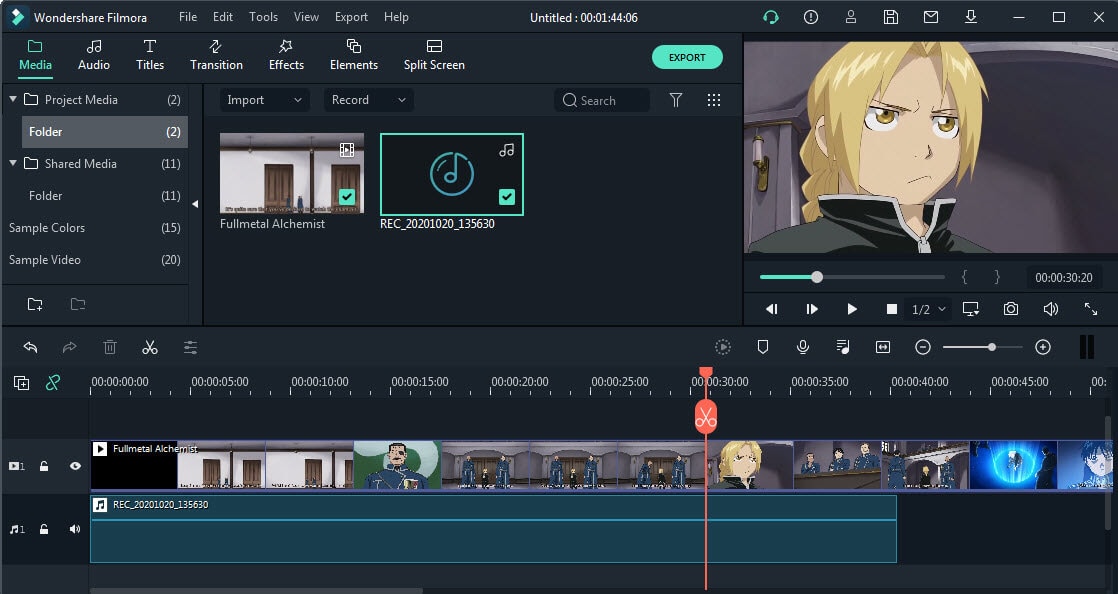
You can double-click the audio track on the timeline to enhance it by adjusting the speed, duration, or pitch of the voiceover, or add fade in or fade out to better sync your voiceover to the anime.
Step 8 Now, preview your creation, choose the file format of your choice, and hit ‘Export’ to export the whole project to your computer or local devices. Or you can also upload it to YouTube or Vimeo directly.
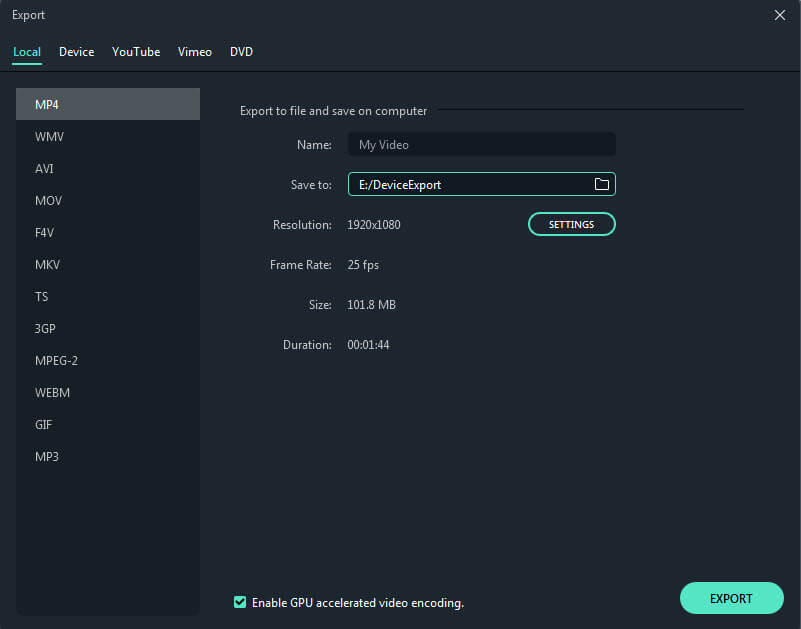
Congratulations! You have successfully learned the easy-to-follow steps to a fully customized anime with your personalized voiceover. Additional audio editing features are a plus point while using Wondershare Filmora to enhance your anime. So, are you ready to start making your dubbed animes? Download Filmora now and test your creativity.
Visit Wondershare Video Community to watch more creative videos.
Part 3 FAQs About Watching Anime Online
Here we summarized some FAQs you may be interested in when watching an anime online.
1. What is anime?
In Japan, anime refers to any animated cartoon, whereas outside Japan, it refers to cartoon videos made specifically in Japan. Anime is basically a hand or computer-drawn animated series. Owing to their gripping storylines, these series, as well as movies, have their separate fan base. Anime is set apart from other animations by characteristic doe-like eyes, spiky hairstyles, vibrant colors, and appealing visuals. Unlike other animations, anime majorly focuses on artistic cinematic effects such as panning and zooming to give realistic effects.
2. What’s the difference between Anime and Manga?
● Relation–Anime, derived from animation, implies an animated video. It is a cartoonish film or show produced in Japan. Manga, although also produced in Japan, refers to still images arranged in a book. Much like a comic book created in English-speaking countries.
● Content–Most, but not all of the anime, originate from or are based on graphic novels, i.e., manga. Manga is usually based on real-life or fictional stories. They are written and illustrated in a way to takes the reader into a fantasy world.
● Style–Anime is a collection of wild ideas and cinematographic techniques fused to form a visually attractive movie or series. Whereas, manga results from an imaginative mind combined with gripping and suspenseful storytelling ability displayed in the form of a publication.
3. What are common devices used for watching anime online?
TV was the most common device for watching Anime. Anime episodes aired on TVs on a weekly & monthly basis. After which they were made available on VHS, later LaserDisc, and eventually DVD. But nowadays, you can find OVAs (Original video animation) released in home video formats without prior showings on television or in theatres. With the rise of Anime streaming watching services and downloading websites, smartphones are now the most widely used devices for watching Anime. Other common devices include smart TVs, consoles, tablets, and even PCs.
4. What are the common features of top anime websites?
● A large collection of anime series in different categories, such as drama, action, comedy, mystery, thriller, and many more.
● Both subbed and dubbed versions available and advanced filter search by genre, region, or theme, etc.
● Faster updates on the anime library.
● Free anime streaming and downloads are allowed.
To Sum Up
Unlike in the real world, good always take down the evil in an anime, which is why watching them helps to restore the optimism in people and help them relax. Watching anime online is an experience which no one can describe, whether you are a kid or an adult. All people enjoy watching anime as it takes you to a very different world of happiness and relaxation. The above listed are some free anime websites where you can watch anime online. We also summarized all of their pros and cons for you, and you can also dub your favorite anime or record animation movies with Wondershare Filmora to share with your friends. Do let us know what you think about our suggestions and your experience by leaving comments below.
Shanoon Cox
Shanoon Cox is a writer and a lover of all things video.
Follow @Shanoon Cox
Shanoon Cox
Mar 27, 2024• Proven solutions
You all have heard about Fullmetal Alchemist, right? Anime has proven to be a productive means of spending time for kids below the age of twelve, and as a means of escape for the older generations as they promote themes like friendship, good relationships, family time, community order, and teamwork. Due to the skyrocketing popularity of anime series, countless free anime websites are now available for streaming. Have you spent a long time trying to find an anime website to watch anime for free but returned disappointed? Here in this article, we will show you the top anime websites where you can watch your favorite anime online and for free.
- Part 1: 21 Free Anime Websites to Watch Anime Online
- Part 2: Dub an Anime Series with Wondershare Filmora
- Part 3: FAQs About Watching Anime Online
You may also like:
- 10 Free Websites to Watch Cartoon Online in HD
- Top 10 Banned Anime Around the World and Why
- 15 Apps to Cartoon Yourself with Ease [iPhone & Android]
Part 1 21 Free Anime Websites to Watch Anime Online
Gone are the days when you spent hours searching for a website to watch your favorite anime. Now you can watch anime online from the following anime sites.
Here is the list(they are listed in no particular order):
01 Crunchyroll
Crunchyroll is a free anime website featuring some of the top animes such as Naruto, Attack on Titan, Yuri on Ice, etc. It has a simple interface and hosts a massive collection of Asian dramas, anime, and even manga. A premium version of Crunchyroll is also available, in which ads will be eliminated, and some extra features will be added. Some of the best anime series to watch on Crunchyroll for free are Naruto, Attack on Titan, Yuri on Ice, and My Hero Academia, etc.
Pros:
- Any anime series can be searched according to categories such as genre, seasons, or popularity
- Simple and attractive interface
- The standard version is free
- One-stop-shop for anime lovers
Cons:
- The ads are annoying
- Subscription required for the premium version
Countries or regions available: 180+ Countries
![]()
A cross-platform for making videos anywhere for all creators
Why your video editing isn’t good enough? How about some creative inspo?
- 100 Million+ Users
- 150+ Countries and Regions
- 4 Million+ Social Media Followers
- 5 Million+ Stock Media for Use
* Secure Download
02 Kissanime.ru
Kissanime is one of the biggest anime websites in the world with anime series in all categories like drama, Sci-Fi, horror, action, comedy, sports, and much more. On Kissanime you can watch any anime online for free or download and watch it later when you don’t have an active internet connection. And Kissanime offers free anime at all qualities from 240p to 1080p. It also has embedded English audio and subtitles for better understanding. Creating an account in Kissanime is not mandatory to watch the anime you like, but an account will help you to manage your favorite episodes and videos.
Pros:
- Subbed/dubbed versions available
- Offline viewing
- Choose the view quality as you want
- Advanced filter search
- Load videos super-fast
Cons:
- Not accessible on all devices
- Ads
Countries or regions available: Worldwide
03 Funimation
Owned by Sony, Funimation is a great anime website that is famous for releasing dubbed foreign content like anime, tv shows, etc. If you are not a fan of watching foreign anime with English subtitles and insist on English audio, then Funimation is the first place you look for it. It also releases applications for PS wherein you will be able to watch thousands of anime episodes. One drawback of the free version of Funimation is that you will have to put up with ads while watching your favorite anime.
Pros:
- Subbed/Dubbed versions
- On-going anime series also available
- Stream on two screens with the premium version
Cons:
- You will have to put up with ads while watching your favorite anime
- Dubbed version not free
Countries or regions available: The USA, United Kingdom, Ireland, Canada, Australia, and New Zealand (soon to be Mexico & Brazil)
04 9anime
9anime is one of the unique anime websites in which most of the content can be streamed in high-quality 1080p. It is a huge platform for anime series as well as movies that offer the best quality content only, which makes it the fan’s favorite. You will be able to access both subbed and dubbed versions of any anime on this website without registering or paying. Some of the anime that are listed as most-watched on 9anime are Death Note, Naruto, Dragon Ball, and Psycho.
Pros:
- Free subbed/dubbed versions
- No registration needed
- Support HD quality
- Upcoming anime series schedule displayed
Cons:
- Video-player cuts off intros
- Anime series cannot be downloaded
Countries or regions available: Worldwide
05 AnimeDao
AnimeDao is one of the best anime websites that have the top scores when it comes to video quality, ease of use, loading speeds, availability of content, and reliability. And it is preferred by anime lovers all over the world as it offers a smooth streaming experience and consumes low bandwidth. The quality of the video to be played can be adjusted between 340p to 1080p on AnimeDao, depending on your connection speed. AinmeDao also offers the dubbed the English subbed and dubbed versions of all the old and latest anime series and movies.
Pros:
- Simple interface. Light and dark themes are also available
- Low-bandwidth consumption
- Quality adjustment ( 340p-1080p)
- Bookmark videos
Cons:
- No downloading
- Ads
Countries or regions available: The USA
06 Chia-Anime
Chia anime is one of the popular anime websites that allows you to watch the most recent and all-time favorite anime easily. The website offers an enjoyable experience of anime watching as well as browsing for new anime. You will be able to watch popular anime like Hero Academia, One-piece, Dragon ball, Kokora, etc. as soon as it airs in Japan one Chia-Anime. Chia-Anime also has a special feature that keeps you updated with the latest and hottest anime of that time. The navigation through Chia-Anime is also very easy, with an amazing interface that allows you to search the anime based on different categories.
Pros:
- Easy categories for advanced search
- Faster video loading
- Download for offline viewing
- Free dubbed versions
Cons:
- Pop-up ads
Countries or regions available: Worldwide
07 AnimeLab
AnimeLab is a free anime website famous for its fast availability of the latest episodes aired in Japan. That is, it will be available on the website after 1 hour of broadcast. It makes it incredibly easy to search the desired anime with its neat categories like recently added, popular shows, genre, etc. There is a premium version for Animelab, which can be opted if you want to get rid of ads and prefer English audio over subtitles.
Pros:
- Subbed/dubbed versions provided
- Fast updates
- Compatible on multiple devices such as Android, iPhone, etc
Cons:
- Dubbed version only for premium users
- Ads in the free version
Countries or regions available: New Zealand and Australia
08 Anime-planet
Anime-planet is another popular free anime website to offer its users a collection of more than 45000 episodes. It immerses you in the world of comedy, horror, adventure, etc., for free. The users can access all kinds of manga and anime databases, reviews on different anime by fans, and recommendations. If you don’t know which anime to start, a ride through the Anime-planet platform will solve your problem. And the interface of the Anime-planet is very cool and is designed to provide a comfortable video watching experience on all devices like tablets, mobile phones, iOS devices, desktops, UHD TVs, etc.
Pros:
- Manga library available
- Fewer pop-up ads
- The meta description for videos
- Anime lovers community
- Compatible with multiple devices such as tablets, smartphones, iOS devices
Cons:
- Registration needed
- No specific categories in the anime genre, type, etc.
Countries or regions available: Worldwide
09 VIZ
VIZ is an American publisher and distributor of manga. It is the largest publisher of comic books and graphic novels in the whole of the United States. VIZ has been one of the entertainment companies that has been bringing the finest anime and manga to English-speaking people for 30 years. It is available on the google store to download for free and can be downloaded on any devices that run on android 2.2 or higher versions. You can even download the app on your smartphone for unlimited anime streaming. If you are a die-hard anime fan, you can even share your anime art in the community or post articles and reviews. Anime trailers and reviews will help you choose the anime worth watching.
Pros:
- Mobile-friendly
- Huge collection of manga
- Subbed/dubbed versions provided
Cons:
- Slow loading
Countries or regions available: Worldwide
10 AnimeHeaven
AnimeHeaven is one of the most liked anime sites with a good reputation for streaming online anime movies and series. It offers a collection of both old and the latest series and movies on a single platform for free. The videos on this platform are mostly 780p or 1080p. And it allows you to search for anime depending on genres like drama, action, comedy, mystery, thriller, and many more. All the anime movies of the AnimeHeaven features a dubbed and subbed version, which can be opted for if you desire.
Pros:
- Select the video quality for playback automatically
- Fewer ads
- Easy-to-access categories
Cons:
- Classic anime not available
- Delayed upload of the latest episodes
Countries or regions available: Worldwide
11 Animefreak. tv
With over a million users worldwide, this anime website has got all the features to attract anime and manga lovers. It is a free anime website that offers a vast collection of subbed/dubbed anime with a relatively straightforward interface.
Pros:
- User-friendly and attractive interface
- Regularly updated
- Manga series available
Cons:
- Lots of ads
Countries or regions available: Worldwide
12 MyAnimeList.net
MyAnimeList, a.k.a MAL, claims to have the largest anime and manga database. It is an anime social networking website. You can read reviews from other people before starting a new anime series. Also, you can find people of the same interests as you and form a fan club. As the name suggests, you can create lists of anime series that you will watch. MAL also hosts contests to challenge users into completing their lists before others.
Pros:
- Post or read reviews
- Create clubs with people of similar interests
- Start a discussion on favorite anime topics
- Write recommendations or blogs
Cons:
- Monthly/yearly subscription and logging in required for an ad-free version
Countries or regions available: Canada, USA, UK, and several other English-speaking countries
13 Contv.com
Contv is a unique multiplatform that streams movies, tv-series, anime, and even comics. From horror to romance, Contv has it all. It’s a one-stop-shop. With an attractive interface, it has numerous categories of genres. You can even watch your favorite anime or live tv available 24/7.
Pros:
- Comics and graphic novels
- Updated anime library
- Uncut content available
- Kids collection available
Cons:
- The free version has limited content
Countries or regions available: The USA
14 Asian Crush
If you’re a die-hard fan of Asian movies and dramas, this is for you. From Chinese martial arts to Japanese anime, it streams all in one place. It also has a blog that offers the latest news updates of the Asian industry.
Pros:
- Chinese series, anime, k-dramas
- Available on all devices, i.e., Apple, Android, Amazon Fire
- Filter search by genre, region, or theme
- Categorized into movies or collections such as award-winning films, bad romance, etc
Cons:
- Lots of ads
Countries or regions available: North America
15 NicoNico
NicoNico is set apart from other anime websites owing to its video comment feature. The texts/comments are time-synced to appear in the video at the playback time you commented. This gives a shared viewing experience. Anyone can upload or share videos.
Pros:
- Video commenting and tagging
- Create My list folders
- Anime illustrations, manga, and e-books are also available
- High-quality videos
Cons:
- Too many ads in the free version
Countries or regions available: The USA, Japan, Taiwan(China)
16 Soul Anime
With more than 4000 anime series available for free streaming, Soul Anime is one of the largest anime websites. Watch anime online in high quality only on Soul Anime. Anime episodes are updated instantly within an hour of release.
Pros:
- Subbed/dubbed versions available
- Advanced search (anime arranged alphabetically/genre-wise)
- Anime downloads allowed
- Unlimited free streaming
Cons:
- Ad pop-ups
Countries or regions available: Worldwide
17 AnimeTake.tv
A comprehensive collection of online anime series and movies. Easy to access with anime categorized as genre, popular, and movies. This anime site is as hassle-free as it comes.
Pros:
- Metadata with every anime title
- The next button enables switching to the next anime without going back
- Latest updates notifications
- Alphabetical categorization for easy anime search
Cons:
- Too many annoying ads
Countries or regions available: Worldwide
18 AniPlus Asia
AniPlus Asia is an online platform exclusively for anime lovers. AniPlus offers a free one-month trial, after which you need to sign up as a member. You can even like, share, or comment on the videos.
Pros:
- Anime merchandise store
- Build or join anime lovers community
- Available on multiple platforms, i.e., pc, mobile, tablet
- Members get priority access to giveaways and anime-related events and games.
Cons:
- Pop up ads
- Membership required after one-month trial ends
Countries or regions available: Singapore, Malaysia, Indonesia, Thailand, and the Philippines
19 Tubi.tv
It’s a free TV and anime website. You can stream movies, tv shows as well as anime in high quality. It offers a library of the oldest to the latest series. You can sync your devices to start watching where you left off on one device.
Pros:
- 100% free. No subscription needed
- Bookmark the movies/series to watch later
- Available for access on multiple devices, including Apple TV
- Ad-free streaming
Cons:
- No anime categories for search
- Ads at every 15-minute interval
Countries or regions available: The USA, Australia, Canada
20 MidNight.Pulp
The virtual house of everything strange and scary in the world of movies and anime. Suppose you’re into the dark and weird genre, MidNight.Pulp has got you covered from cult Sci-fi to horror, and much more. You can watch anime online, and that is too free of cost unless you want to subscribe to the premium ad-free version starting from $5/month.
Pros:
- Massive collection of rare and hard to find series
- Filter search by year
- A weekly update of episodes
Cons:
- Log in after every exit
- Limited content in the free version
- Ads
Countries or regions available: Worldwide
21 Watchanimelist
It’s a new active online anime and manga community and database. Watchanimelist provides a comprehensive platform that offers a vast collection of anime episodes, manage/comics, and novels, all available for free.
Pros:
- 100% free. No subscription needed
- A community for like-minded fans
- Diverse manga/comics and novels
- Optimized for all devices
Cons:
- Pop-up ads
- Strange upload
Countries or regions available: Worldwide
Part 2 Dub an Anime Series with Filmora
Anime was initially created by the Japanese in their native language but as its viewership expanded globally, so did the need for it to be available in the universal language, i.e., English. Dubbing the original films or clips into another language is a complex process that demands skill. Nonetheless, worry not because editing apps like Wondershare Filmora video editor are here to save the day with their easy and advanced editing tools.
How cool would it be to replace the original audio of an anime with your own voice? Exciting, right? You are in luck because the latest voiceover recording feature by Filmora is now available and ready to create your amazing and creatively dubbed videos in just a few easy steps.
Step 1 Install Wondershare Filmora on your PC and complete the setup.
Step 2 Then, launch the application, tap the ‘import’ button under the menu, select ‘Import Media Files’ and load the particular anime video to the media library.
Step 3 Next, drag and drop the anime video onto the timeline. To add your own voiceover, you need to remove the original anime dubbing in the anime video first.
Step 4 Right-click on the video, tap ‘Detach Audio’, and then delete the background audio from the track.
Step 5 Then hit the ‘Record Voiceover’ button on the toolbar, connect a professional external microphone to record your customized narration.
Step 6 After the Record dialogue appears, tap the Red circle, wait for 3 seconds, and then start talking.
Step 7 Upon completion, the recorded audio will automatically on the timeline as well as in the Album.
You can double-click the audio track on the timeline to enhance it by adjusting the speed, duration, or pitch of the voiceover, or add fade in or fade out to better sync your voiceover to the anime.
Step 8 Now, preview your creation, choose the file format of your choice, and hit ‘Export’ to export the whole project to your computer or local devices. Or you can also upload it to YouTube or Vimeo directly.
Congratulations! You have successfully learned the easy-to-follow steps to a fully customized anime with your personalized voiceover. Additional audio editing features are a plus point while using Wondershare Filmora to enhance your anime. So, are you ready to start making your dubbed animes? Download Filmora now and test your creativity.
Visit Wondershare Video Community to watch more creative videos.
Part 3 FAQs About Watching Anime Online
Here we summarized some FAQs you may be interested in when watching an anime online.
1. What is anime?
In Japan, anime refers to any animated cartoon, whereas outside Japan, it refers to cartoon videos made specifically in Japan. Anime is basically a hand or computer-drawn animated series. Owing to their gripping storylines, these series, as well as movies, have their separate fan base. Anime is set apart from other animations by characteristic doe-like eyes, spiky hairstyles, vibrant colors, and appealing visuals. Unlike other animations, anime majorly focuses on artistic cinematic effects such as panning and zooming to give realistic effects.
2. What’s the difference between Anime and Manga?
● Relation–Anime, derived from animation, implies an animated video. It is a cartoonish film or show produced in Japan. Manga, although also produced in Japan, refers to still images arranged in a book. Much like a comic book created in English-speaking countries.
● Content–Most, but not all of the anime, originate from or are based on graphic novels, i.e., manga. Manga is usually based on real-life or fictional stories. They are written and illustrated in a way to takes the reader into a fantasy world.
● Style–Anime is a collection of wild ideas and cinematographic techniques fused to form a visually attractive movie or series. Whereas, manga results from an imaginative mind combined with gripping and suspenseful storytelling ability displayed in the form of a publication.
3. What are common devices used for watching anime online?
TV was the most common device for watching Anime. Anime episodes aired on TVs on a weekly & monthly basis. After which they were made available on VHS, later LaserDisc, and eventually DVD. But nowadays, you can find OVAs (Original video animation) released in home video formats without prior showings on television or in theatres. With the rise of Anime streaming watching services and downloading websites, smartphones are now the most widely used devices for watching Anime. Other common devices include smart TVs, consoles, tablets, and even PCs.
4. What are the common features of top anime websites?
● A large collection of anime series in different categories, such as drama, action, comedy, mystery, thriller, and many more.
● Both subbed and dubbed versions available and advanced filter search by genre, region, or theme, etc.
● Faster updates on the anime library.
● Free anime streaming and downloads are allowed.
To Sum Up
Unlike in the real world, good always take down the evil in an anime, which is why watching them helps to restore the optimism in people and help them relax. Watching anime online is an experience which no one can describe, whether you are a kid or an adult. All people enjoy watching anime as it takes you to a very different world of happiness and relaxation. The above listed are some free anime websites where you can watch anime online. We also summarized all of their pros and cons for you, and you can also dub your favorite anime or record animation movies with Wondershare Filmora to share with your friends. Do let us know what you think about our suggestions and your experience by leaving comments below.
Shanoon Cox
Shanoon Cox is a writer and a lover of all things video.
Follow @Shanoon Cox
10 Best Tools to Make Pic Collage for Windows
10 Best Tools to Make Pic Collage for Windows
An easy yet powerful editor
Numerous effects to choose from
Detailed tutorials provided by the official channel
Collages are a great way to assemble all your favorite pictures in one place. You can share these collages with your friends, relatives, and dear ones or can also use them for posting on social media sites and other online platforms. Though creating a collage may sound simple, a lot of considerations need to be taken for creating an interesting and eye-catchy collage, and for this, a help of a professional tool can be taken. In the following parts of the topic, you can learn about the best tools for photo collage Windows 10 and other OS.

In the following parts of the topic, you can learn about the best tools for photo collage Windows 10 and other OS.
In this article
01 [Top 10 Pic Collage for Windows Tools](#Part 1)
02 [The Best Tool to Get Stock Images for Creating Collages](#Part 2)
Part 1 Top 10 Pic Collage for Windows Tools
Checkout the best collage for Windows below.
01PhotoPad Photo Editing Software
This is a complete photo editing tool supporting an array of features including the creation of a photo collage. This software from NCH software can let you add the desired images manually and also support using the auto grid to add an unlimited number of pictures. The tool also lets you choose the collage orientation size and set the background as needed.
Pros:
● Create collage Windows manually or automatically.
● Allows adding a background color, image, or from the available background options.
● Spacing and corners between the images can be selected.
● The size of the tool is small.
Cons:
● Stickers and filters to individual images cannot be added.
● Cannot choose a custom collage size.

02PhotoScapeX
Available for download on Windows 10 and higher versions this is another widely used photo editing tool that can also let you create collages manually as well as automatically. Multiple frames are available that can be selected as desired and there are additional features like adding filters, and also edit them in multiple ways.
Pros:
● Allows creating collage manually and automatically.
● Multiple editing tools for customization like filters, crop, zoom, doodle, and more.
● Picture alignment can be done in 3 modes- vertical, horizontal, and tile.
● Option to change and customize image size, spacing, margin, and others.
Cons:
● Limited photos can be added.
● The size of the tool is large in comparison to other tools.

03Phototastic Collage
This is free to use Windows-based tool that can create impressive collages in no time. Multiple designs, frames, and other options are available to create a customized collage as needed.
Pros:
● Multiple customization options are available for creating the desired collage.
● User-friendly and simple interface.
● An array of templates is available.
Cons:
● The free version has limited features.
● Limitation to the number of images that can be added.
● Ads in the app.

04PicCollage
Unleash your creativity by creating an interesting collage using this excellent collage-making app. There are multiple templates and customization options supports.
Pros
● Create collage manually or automatically
● The earlier created collage can be edited.
● Allows creating a collage in 3 options- grid, template, freestyle.
Cons
● Watermark on the created collage.
● The image size cannot be customized.

05Collage Maker-Photo Grid and Montage
Using this free Windows tool, you can create an interesting photo collage or a free-styled montage as needed. A wide range of layouts and templates are available that can be further customized to get the desired collage.
Pros:
● Free Windows software.
● Come with multiple filters, layout, and editing tools.
● The user interface is easy.
● Preview option available.
Cons:
● Performance glitches due to bugs.
● Custom collage size cannot be set.
● Watermark on the collage.

06Fotor
If you are looking for a simple and basic collage-making tool, Fotor is the right choice. Collage in the grid, freestyle, and photo-stitch style can be created and basic customization features are supported.
Pros:
● Simple to use tool that is apt for beginners.
● Border can be changed from a solid color to a background.
Cons:
● Customization options are limited.
● Border and the image size cannot be changed.

07El Collagero
Just like its name, this is an interesting Windows-based tool for creating a collage of your choice. A wide range of options for customization is available that can let you edit the images, choose a template and then also edit the file.
Pros:
● A wide range of templates and designs for collages is available.
● Allows adding text, symbols, and other elements.
● Created collage can be shared on social media sites.
Cons:
● In comparison to other professional tools, the functions are limited.

08Atlantas Photo Collage Studio
This Windows-based tool will let you create collages of all types and for all occasions. You can choose from over 100 templates that best match your collage theme and image content.
Pros:
● More than 100 templates for collage designs are available.
● The size of the layout can be changed.
● Multiple editing and customization options are supported like zoom, opacity selection, and more.
Cons:
● Limitation of adding 45 images.
● For the advanced functions, need to subscribe to the paid version.

09PhotoJoiner
Using this Windows tool, pick up your favorite images and turn them into a beautiful collage with customized design and style.
Pros:
● A simple and basic tool for creating a collage.
● Created collage can be saved or shared to the social media site.
● Change the order of the images, margins, and other aspects.
Cons
● Collage templates are limited.
● Advanced features are missing.

1010. Blend Photo
To create a collage of images with a blending effect, this is the right tool to use. Available for download on the Windows system this tool lets you create collages telling interesting stories.
Pros:
● Simple and easy collage-making tool.
● Add blending effect to your collages.
● Over 50 custom shapes for image cropping are available along with the option for free-hand cropping.
● Multiple filters can be added.
Cons:
● Limited Editing and customization options.

Part 2 The Best Tool to Get Stock Images for Creating Collages
Several times, the captured and stored images may not fit in the collage theme you wish to create and, in such situations, you can use the stock images available online at several sites. One of the best tools where you can check out the images in different categories is Wondershare Filmora. This versatile software from Wondershare Filmora Video Editor is an advanced video editing tool that also has a huge collection of stock media including images.
Additionally, the split-screen feature of the software can be used for creating a video collage. Available for Windows and Mac systems, Wondershare Filmora will look after all your advanced video editing and customized requirements.

Wondershare Filmora - Best Video Editor for Mac/Windows
5,481,435 people have downloaded it.
Build unique custom animations without breaking a sweat.
Focus on creating epic stories and leave the details to Filmora’s auto features.
Start a creative adventure with drag & drop effects and endless possibilities.
Filmora simplifies advanced features to save you time and effort.
Filmora cuts out repetition so you can move on to your next creative breakthrough.
● Key Takeaways from This Episode →
● Collage-making tools help in creating an interesting and eye-catchy collage in a hassle-free manner.
●Several Windows-based tools are available for quick download.
●Wondershare Filmora is a great software to find a collection of stock images in different categories.
Collages are a great way to assemble all your favorite pictures in one place. You can share these collages with your friends, relatives, and dear ones or can also use them for posting on social media sites and other online platforms. Though creating a collage may sound simple, a lot of considerations need to be taken for creating an interesting and eye-catchy collage, and for this, a help of a professional tool can be taken. In the following parts of the topic, you can learn about the best tools for photo collage Windows 10 and other OS.
In the following parts of the topic, you can learn about the best tools for photo collage Windows 10 and other OS.
In this article
01 [Top 10 Pic Collage for Windows Tools](#Part 1)
02 [The Best Tool to Get Stock Images for Creating Collages](#Part 2)
Part 1 Top 10 Pic Collage for Windows Tools
Checkout the best collage for Windows below.
01PhotoPad Photo Editing Software
This is a complete photo editing tool supporting an array of features including the creation of a photo collage. This software from NCH software can let you add the desired images manually and also support using the auto grid to add an unlimited number of pictures. The tool also lets you choose the collage orientation size and set the background as needed.
Pros:
● Create collage Windows manually or automatically.
● Allows adding a background color, image, or from the available background options.
● Spacing and corners between the images can be selected.
● The size of the tool is small.
Cons:
● Stickers and filters to individual images cannot be added.
● Cannot choose a custom collage size.
02PhotoScapeX
Available for download on Windows 10 and higher versions this is another widely used photo editing tool that can also let you create collages manually as well as automatically. Multiple frames are available that can be selected as desired and there are additional features like adding filters, and also edit them in multiple ways.
Pros:
● Allows creating collage manually and automatically.
● Multiple editing tools for customization like filters, crop, zoom, doodle, and more.
● Picture alignment can be done in 3 modes- vertical, horizontal, and tile.
● Option to change and customize image size, spacing, margin, and others.
Cons:
● Limited photos can be added.
● The size of the tool is large in comparison to other tools.
03Phototastic Collage
This is free to use Windows-based tool that can create impressive collages in no time. Multiple designs, frames, and other options are available to create a customized collage as needed.
Pros:
● Multiple customization options are available for creating the desired collage.
● User-friendly and simple interface.
● An array of templates is available.
Cons:
● The free version has limited features.
● Limitation to the number of images that can be added.
● Ads in the app.
04PicCollage
Unleash your creativity by creating an interesting collage using this excellent collage-making app. There are multiple templates and customization options supports.
Pros
● Create collage manually or automatically
● The earlier created collage can be edited.
● Allows creating a collage in 3 options- grid, template, freestyle.
Cons
● Watermark on the created collage.
● The image size cannot be customized.
05Collage Maker-Photo Grid and Montage
Using this free Windows tool, you can create an interesting photo collage or a free-styled montage as needed. A wide range of layouts and templates are available that can be further customized to get the desired collage.
Pros:
● Free Windows software.
● Come with multiple filters, layout, and editing tools.
● The user interface is easy.
● Preview option available.
Cons:
● Performance glitches due to bugs.
● Custom collage size cannot be set.
● Watermark on the collage.
06Fotor
If you are looking for a simple and basic collage-making tool, Fotor is the right choice. Collage in the grid, freestyle, and photo-stitch style can be created and basic customization features are supported.
Pros:
● Simple to use tool that is apt for beginners.
● Border can be changed from a solid color to a background.
Cons:
● Customization options are limited.
● Border and the image size cannot be changed.
07El Collagero
Just like its name, this is an interesting Windows-based tool for creating a collage of your choice. A wide range of options for customization is available that can let you edit the images, choose a template and then also edit the file.
Pros:
● A wide range of templates and designs for collages is available.
● Allows adding text, symbols, and other elements.
● Created collage can be shared on social media sites.
Cons:
● In comparison to other professional tools, the functions are limited.
08Atlantas Photo Collage Studio
This Windows-based tool will let you create collages of all types and for all occasions. You can choose from over 100 templates that best match your collage theme and image content.
Pros:
● More than 100 templates for collage designs are available.
● The size of the layout can be changed.
● Multiple editing and customization options are supported like zoom, opacity selection, and more.
Cons:
● Limitation of adding 45 images.
● For the advanced functions, need to subscribe to the paid version.
09PhotoJoiner
Using this Windows tool, pick up your favorite images and turn them into a beautiful collage with customized design and style.
Pros:
● A simple and basic tool for creating a collage.
● Created collage can be saved or shared to the social media site.
● Change the order of the images, margins, and other aspects.
Cons
● Collage templates are limited.
● Advanced features are missing.
1010. Blend Photo
To create a collage of images with a blending effect, this is the right tool to use. Available for download on the Windows system this tool lets you create collages telling interesting stories.
Pros:
● Simple and easy collage-making tool.
● Add blending effect to your collages.
● Over 50 custom shapes for image cropping are available along with the option for free-hand cropping.
● Multiple filters can be added.
Cons:
● Limited Editing and customization options.
Part 2 The Best Tool to Get Stock Images for Creating Collages
Several times, the captured and stored images may not fit in the collage theme you wish to create and, in such situations, you can use the stock images available online at several sites. One of the best tools where you can check out the images in different categories is Wondershare Filmora. This versatile software from Wondershare Filmora Video Editor is an advanced video editing tool that also has a huge collection of stock media including images.
Additionally, the split-screen feature of the software can be used for creating a video collage. Available for Windows and Mac systems, Wondershare Filmora will look after all your advanced video editing and customized requirements.
Wondershare Filmora - Best Video Editor for Mac/Windows
5,481,435 people have downloaded it.
Build unique custom animations without breaking a sweat.
Focus on creating epic stories and leave the details to Filmora’s auto features.
Start a creative adventure with drag & drop effects and endless possibilities.
Filmora simplifies advanced features to save you time and effort.
Filmora cuts out repetition so you can move on to your next creative breakthrough.
● Key Takeaways from This Episode →
● Collage-making tools help in creating an interesting and eye-catchy collage in a hassle-free manner.
●Several Windows-based tools are available for quick download.
●Wondershare Filmora is a great software to find a collection of stock images in different categories.
How to Animate Image on Scroll and Text on Scroll?
How to Animate Image on Scroll and Text on Scroll?
An easy yet powerful editor
Numerous effects to choose from
Detailed tutorials provided by the official channel
Over the years, web designers have tried different tactics to make their websites visually engaging. From marquee tags to animated navigation bars, designers tried everything they could to enhance the overall visual appearance of their websites.
One such tactic - that even brands like Sony and Apple - followed was image-on-scroll and text-on-scroll animations.
In this article
01 [How to Make Scroll Image Animation Like Apple?](#Part 1)
02 [How to Create a Scrolling Text Animation (Infinite Loop)](#Part 2)
Part 1 How to Make Scroll Image Animation Like Apple?
First, let’s take a look at different ways to make scroll-image animation like Apple. An image-on-scroll animation is an animation playback that appears on images as you continue to scroll down a website. You can use multiple methods to implement scroll image animations on your website.
01Use Filmora
Wondershare Filmora Video Editor is a feature-packed video editing tool that’s designed to help video editors create high-quality videos in a hassle-free manner. The tool offers a timeline-based interface that streamlines the entire video editing process and helps professionals execute complex video editing tasks in no time. In addition to its basic editing features, Filmora also offers advanced editing functions including color grading, motion tracking, and keyframing. It means you can easily turn your RAW footage into high-quality videos without any hassle.
Using Wondershare Filmora to animate images on scroll will be an ideal solution if you want to integrate a visually appealing element to your website. Let’s walk you through the step-by-step procedure of using Wondershare Filmora to create image-on-scroll animations.
Wondershare Filmora - Best Video Editor for Mac/Windows
5,481,435 people have downloaded it.
Build unique custom animations without breaking a sweat.
Focus on creating epic stories and leave the details to Filmora’s auto features.
Start a creative adventure with drag & drop effects and endless possibilities.
Filmora simplifies advanced features to save you time and effort.
Filmora cuts out repetition so you can move on to your next creative breakthrough.
Step 1 - Launch Filmora on your system and import the video/image that you want to edit. Then, load the selected file to Filmora’s timeline to proceed further.
Step 2 - Now, double-tap the video/image. This will launch the editing panel on your screen. Here, switch to the “Animation” panel.

Step 3 - Here you can either select “Presets” or click the “Customize” tab to create a custom animation through keyframing.

Step 4 - If you want to save time, however, it would be better to choose the “Presets” tab. Then, select the preset that you want to use.
Step 5 - Now, drag the selected preset to the timeline. Again, double-tap the preset layer. An editing panel will appear on your screen. Here you can adjust different elements of the preset to customize its playback.

So, that’s everything you need to know about animating image-on-scroll using Wondershare Filmora.
02Use ScrollSequence
Now, if you are not a professional editor or don’t want to overcomplicate things, you can use ScrollSequence to add image-on-scroll animation to your website. For readers who don’t know, ScrollSequence is a built-in WordPress plugin that you can directly install in your WordPress manager. The tool offers hundreds of ready-to-use animation templates that you can integrate and customize without any hassle.
All the templates offer complete customization, which means you can adjust the animation playback, import your own media files, and even customize the text. It’s worth understanding that this method will only work if you are using WordPress as the CMS platform for your website. ScrollSequence is only available as a WordPress plugin and you won’t be able to use it with any other website builder
03Write Your Own JavaScript Code
Finally, you can also write your own JavaScript code to animate image-on-scroll. However, this method will be a bit complicated as you would require technical expertise to write dedicated JavaScript scripts to animate image-on-scroll. If you choose this solution, you’ll have to start with writing HTML and CSS codes. This will help you style your web page in the beginning. And, once the web design is up and ready, you can move towards writing the JavaScript code to animate image-on-scroll in your web page.
Part 2 How to Create a Scrolling Text Animation (Infinite Loop)
Like image-on-scroll, text-on-scroll is another popular way to add visually appealing animations to your web designs. Text-on-scroll animations work the same way as image-on-scroll animations - the only difference is that these types of animations focus on the text playback instead of images. Again, you can use different methods to animate text on scroll and make your website’s content run in an infinite loop.
Some of these methods include:
01Use Filmora
Thanks to Filmora’s advanced editing panel, you can also use it to animate text within the videos. This will be an ideal solution for users who want to add videos with dedicated text banners and titles on their websites. With Filmora, you’ll be able to animate the text and make custom transitions in a hassle-free manner. Let’s walk you through the detailed procedure of using Wondershare Filmora to add text animation to your videos.
Step 1 - Open Filmora on your system and load the video into its timeline.
Step 2 - Double-tap the video file, and switch to the “Titles” tab. You’ll see a list of different title templates on your screen. Browse through these results and drag the desired template to the timelines. Make sure to adjust the title layer right above the video layer.

Step 3 - Again, double-click the title layer and you’ll see a dedicated text editor on your screen. Here enter the text that you want to display within the video. You can also select text size, orientation, and font to personalize its appearance.
Step 4 - Finally, switch to the “Animation” tab at the left sidebar. Choose any of these animation templates and the text within the video will be animated automatically.

So, that’s how you can use Filmora to animate text-on-scroll to improve the overall visual appearance of your website videos.
02Scroll-Text-Animations for Single Words
Another way to implement scroll-text animations is to modify the HTML & CSS code of your website. Again, this method will only be feasible if you have prior coding experience and know how to write well-optimized code.

The easiest way to animate text scrolls is through single-line animations. In this situation, only one line gets displayed at any particular time, which automatically gets switched to the next one as soon as you scroll down the cursor. If you are planning to create simple text-based animations, this method will help you get the job done easily.
Key Takeaways from This Episode
● You can animate image-on-scroll and text-on-scroll to enhance the overall visual appearance of your websites and make them more engaging for the end-users.
● If you are planning to upload dedicated videos on your website, you can use Wondershare Filmora, a fully-functional video editing tool, to animate both images and text through an easy-to-navigate editing panel.
● You should only opt for the coding method if you are an experienced coder and have worked on HTML/CSS/JavaScript projects in the past.
Over the years, web designers have tried different tactics to make their websites visually engaging. From marquee tags to animated navigation bars, designers tried everything they could to enhance the overall visual appearance of their websites.
One such tactic - that even brands like Sony and Apple - followed was image-on-scroll and text-on-scroll animations.
In this article
01 [How to Make Scroll Image Animation Like Apple?](#Part 1)
02 [How to Create a Scrolling Text Animation (Infinite Loop)](#Part 2)
Part 1 How to Make Scroll Image Animation Like Apple?
First, let’s take a look at different ways to make scroll-image animation like Apple. An image-on-scroll animation is an animation playback that appears on images as you continue to scroll down a website. You can use multiple methods to implement scroll image animations on your website.
01Use Filmora
Wondershare Filmora Video Editor is a feature-packed video editing tool that’s designed to help video editors create high-quality videos in a hassle-free manner. The tool offers a timeline-based interface that streamlines the entire video editing process and helps professionals execute complex video editing tasks in no time. In addition to its basic editing features, Filmora also offers advanced editing functions including color grading, motion tracking, and keyframing. It means you can easily turn your RAW footage into high-quality videos without any hassle.
Using Wondershare Filmora to animate images on scroll will be an ideal solution if you want to integrate a visually appealing element to your website. Let’s walk you through the step-by-step procedure of using Wondershare Filmora to create image-on-scroll animations.
Wondershare Filmora - Best Video Editor for Mac/Windows
5,481,435 people have downloaded it.
Build unique custom animations without breaking a sweat.
Focus on creating epic stories and leave the details to Filmora’s auto features.
Start a creative adventure with drag & drop effects and endless possibilities.
Filmora simplifies advanced features to save you time and effort.
Filmora cuts out repetition so you can move on to your next creative breakthrough.
Step 1 - Launch Filmora on your system and import the video/image that you want to edit. Then, load the selected file to Filmora’s timeline to proceed further.
Step 2 - Now, double-tap the video/image. This will launch the editing panel on your screen. Here, switch to the “Animation” panel.
Step 3 - Here you can either select “Presets” or click the “Customize” tab to create a custom animation through keyframing.
Step 4 - If you want to save time, however, it would be better to choose the “Presets” tab. Then, select the preset that you want to use.
Step 5 - Now, drag the selected preset to the timeline. Again, double-tap the preset layer. An editing panel will appear on your screen. Here you can adjust different elements of the preset to customize its playback.
So, that’s everything you need to know about animating image-on-scroll using Wondershare Filmora.
02Use ScrollSequence
Now, if you are not a professional editor or don’t want to overcomplicate things, you can use ScrollSequence to add image-on-scroll animation to your website. For readers who don’t know, ScrollSequence is a built-in WordPress plugin that you can directly install in your WordPress manager. The tool offers hundreds of ready-to-use animation templates that you can integrate and customize without any hassle.
All the templates offer complete customization, which means you can adjust the animation playback, import your own media files, and even customize the text. It’s worth understanding that this method will only work if you are using WordPress as the CMS platform for your website. ScrollSequence is only available as a WordPress plugin and you won’t be able to use it with any other website builder
03Write Your Own JavaScript Code
Finally, you can also write your own JavaScript code to animate image-on-scroll. However, this method will be a bit complicated as you would require technical expertise to write dedicated JavaScript scripts to animate image-on-scroll. If you choose this solution, you’ll have to start with writing HTML and CSS codes. This will help you style your web page in the beginning. And, once the web design is up and ready, you can move towards writing the JavaScript code to animate image-on-scroll in your web page.
Part 2 How to Create a Scrolling Text Animation (Infinite Loop)
Like image-on-scroll, text-on-scroll is another popular way to add visually appealing animations to your web designs. Text-on-scroll animations work the same way as image-on-scroll animations - the only difference is that these types of animations focus on the text playback instead of images. Again, you can use different methods to animate text on scroll and make your website’s content run in an infinite loop.
Some of these methods include:
01Use Filmora
Thanks to Filmora’s advanced editing panel, you can also use it to animate text within the videos. This will be an ideal solution for users who want to add videos with dedicated text banners and titles on their websites. With Filmora, you’ll be able to animate the text and make custom transitions in a hassle-free manner. Let’s walk you through the detailed procedure of using Wondershare Filmora to add text animation to your videos.
Step 1 - Open Filmora on your system and load the video into its timeline.
Step 2 - Double-tap the video file, and switch to the “Titles” tab. You’ll see a list of different title templates on your screen. Browse through these results and drag the desired template to the timelines. Make sure to adjust the title layer right above the video layer.
Step 3 - Again, double-click the title layer and you’ll see a dedicated text editor on your screen. Here enter the text that you want to display within the video. You can also select text size, orientation, and font to personalize its appearance.
Step 4 - Finally, switch to the “Animation” tab at the left sidebar. Choose any of these animation templates and the text within the video will be animated automatically.
So, that’s how you can use Filmora to animate text-on-scroll to improve the overall visual appearance of your website videos.
02Scroll-Text-Animations for Single Words
Another way to implement scroll-text animations is to modify the HTML & CSS code of your website. Again, this method will only be feasible if you have prior coding experience and know how to write well-optimized code.
The easiest way to animate text scrolls is through single-line animations. In this situation, only one line gets displayed at any particular time, which automatically gets switched to the next one as soon as you scroll down the cursor. If you are planning to create simple text-based animations, this method will help you get the job done easily.
Key Takeaways from This Episode
● You can animate image-on-scroll and text-on-scroll to enhance the overall visual appearance of your websites and make them more engaging for the end-users.
● If you are planning to upload dedicated videos on your website, you can use Wondershare Filmora, a fully-functional video editing tool, to animate both images and text through an easy-to-navigate editing panel.
● You should only opt for the coding method if you are an experienced coder and have worked on HTML/CSS/JavaScript projects in the past.
How to Create Picsart Cartoon
How to Create Picsart Cartoon
An easy yet powerful editor
Numerous effects to choose from
Detailed tutorials provided by the official channel
Cartoonized images are a convenient source of fun and media entertainment in present times. Try hands at creating your own caricature masterpieces with Picsart!
In this article
01 [How To Edit Cartoon Picture in Picsart](#Part 1)
02 [How To Make A Cartoon On Your Phone](#Part 2)
03 [How to Cartoon Yourself on Picsart](#Part 3)
Part 1 How to Edit Cartoon Picture in Picsart
Cartoonized pictures as you must be aware of, are comic transformations of real-time images and are widely used on social media to add a funny angle to the diversity of conversation going on, or even just as a source of plentiful amusement.
If you often feel motivated to experiment with the art and are looking for a perfect solution, see through the following section for a detailed and stepwise guide to create and edit a Picsart cartoon with utmost ease and within a quick time span:
User’s Guide to Edit Cartoon Pictures in Picsart
Step 1: Download the Picsart Application
Visit the official Picsart website to download the desktop version of the app in your Windows or MacOs supported PC.
Step 2: Make a Selection
Launch the app in your system to reach the Picsart welcome screen. Navigate to the bottom and tap the ‘+’ symbol. You are now required to choose a desired image to create the cartoon edit. You can either browse through your system gallery or search a specific one from the Picsart photo library in the ‘Search Bar’ at the top of the app screen.

Step 3: Let’s Get Editing!
When you have made your choice, navigate to the toolbar at the bottom of the app screen and click on the ‘Effects’ tab. Make a side scroll to choose a specific effect category, like that of ‘Artistic’ or ‘Magic’ to open a library of effects in the selected category.
As an example, selecting the ‘Cartoonizer’ option in the ‘Artistic’ effects category can add an immediate caricature feel to your selected real-time image. You can further include manual adjustments to get the perfect cartoon look by pressing and holding the ‘Cartoonizer’ option. There are a whole variety of magical effects, such as, Neo Pop, Soul, Badlands, Animation and Paw in the ‘Magic’ effects category, that are just perfect in giving your edit a fantasizing look with a Picsart cartoon background.
If you are looking for a quicker editing process, prefer adding cartoonized elements, like ‘Picsart Stickers’ to your image instead of going for a complete caricature edit. To do this, open the ‘Picsart Photo Editor’, navigates to the ‘Sticker’ symbol and click on it, followed by searching ‘Cartoon Sticker’. You can alternatively search a specific keyword with the ‘Cartoon’ descriptor, if you are clear on what you want to add.
You can further, resize your selected sticker with a ‘Two Finger Pinch’ or use the ‘Eraser’ tool to ward off any unwanted portions from the same. You are free to take as many repetitions of the process as you wish, till you get the perfect result for saving to your device and sharing on your social media handles.

Step 4: Time to Save and Share!
When you are satisfied with your work, navigate to the right hand corner and tap ‘Apply’ to finalize your changes, followed by clicking on the ‘Next’ button at the top right corner of the app screen to save and export your creation.
Part 2 How to Make a Cartoon on Your Phone
After a detailed analysis of the cartoon editing procedure in your desktops, let us see thro ugh the method of creating cartoonized images on your MacOs and Android smartphones on the following section:
Stepwise Procedure for Creating Cartoonized Images on Phone
Step 1: Download the Application
When going to use the Picsart editor application on your smartphone, you will first require a download of the same in your concerned device. You can do this by visiting the ‘Google PlayStore’ for an Android device or the ‘Apple App Store’ for MacOs smartphones.
Step 2: Choose a Real-time Image
After a successful launch of the ‘Picsart Editor’ application in your smartphone, reach to and click on the ‘+’ icon at the bottom of the app’s working interface. This needs to be followed by selecting any specific real-time image, either from your smartphone gallery or the Picsart photo library using the top ‘Search Bar’ of the interface, for creating a cartoonized edit.

Step 3: Editing Begins!
Once you are done with selecting the image, proceed to add effects to your selection by clicking the ‘Effects’ tab in the bottom toolbar, succeeded by picking a desired effect type through a right scroll. Tap on any category, such as, Magic, Artistic, etc, to open the effect library of the same.
For instance, you can click on the ‘Cartoonizer’ option within Artistic’ effects to supplement your uploaded real-time image with an instant cartoonized effect. You are also granted the liberty to make manual changes to set the caricature image effects as per your preferences, which you can do with a ‘Press and Hold’ of the ‘Cartoonizer’ tab. If you have a diversion towards complementing your cartoonized images with magical effects, choose from Animation, Neo Pop, Paw, Badlands, Paw, and other amazing options in the ‘Magic’ category.

Step 4: Save and Export
When you have completed the editing process and the changes satisfy you, go to the ‘Apply’ tab at the right side of the editor screen to see the changes appear in your edit. You can now navigate to the upper right corner of the app screen and click on ‘Next’ to save your work locally to your device, along with exporting the same across different media platforms.
Part 3 How to Cartoon Yourself on Picsart
Having learnt about the interesting ways to edit cartoon pictures and create cartoons on your smartphone, you might like to try hands on creating a cartoon portrait of yourself in the Picsart editor for a variety of reasons, like that of creating cartoon profile pics of yourself. Let us have a look of the procedure for the same using the Picsart Online Image Editor tool in the following section:
User’s Guide to Create a Cartoon Portrait With Picsart Online Photo Editor
Step 1: Launch the Application
In any of your favorite internet browsers, search for and open ‘Picsart Desktop Editor’. In the app’s working interface, tap ‘Upload’ or ‘New Project’ to choose an image from your device or the free to use Picsart image library respectively, for proceeding with the cartoonized transformations.

Step 2: Edit Your Selection
Tap on the ‘Effects’ tab from the editing toolbar at the top of your image and select a desired effect category to access the diversity of cartoonifying filters. It is recommended to select the ‘Magic’ category for the most splendid cartoon effects, such as, Paw, Badland, Animation, Soul and Neo Pop among many others.

You can even make manual adjustments in the brightness, color, saturation, burn and fade, etc., of the image by clicking on the ‘Adjust’ and ‘Blend’ options at the top of the image workspace.

Step 3: Download and Share Your Work
When you are done editing, navigate to and click on the ‘Share’ option at the upper right corner of the editor screen to download your cartoonized image.

****Wondershare Filmora Video Editor Cartoon Image Creator**
For Win 7 or later (64-bit)
For macOS 10.12 or later
Picsart is certainly a dependable solution to create caricature images, but if you are keen on looking for an alternative application to cater to the need, Introduced to the software market by Wondershare, the Filmora Cartoon Image Creator can be a convenient rescue. The app promises you of a high quality cartoonized edit with a plethora of editing effects to suit your most specific editing preferences.
● Ending Thoughts →
● Creating cartoonized edits from real time images is a fun and entertaining activity along with being the latest media trend.
● The Picsart editor application allows making caricature images from actual stills through desktop, smartphone and online compatible image editing program.
● Talking of suitable Picsart alternatives, you can rely on the Filmora Cartoon Image Creator application for high quality cartoonized image creation.
Cartoonized images are a convenient source of fun and media entertainment in present times. Try hands at creating your own caricature masterpieces with Picsart!
In this article
01 [How To Edit Cartoon Picture in Picsart](#Part 1)
02 [How To Make A Cartoon On Your Phone](#Part 2)
03 [How to Cartoon Yourself on Picsart](#Part 3)
Part 1 How to Edit Cartoon Picture in Picsart
Cartoonized pictures as you must be aware of, are comic transformations of real-time images and are widely used on social media to add a funny angle to the diversity of conversation going on, or even just as a source of plentiful amusement.
If you often feel motivated to experiment with the art and are looking for a perfect solution, see through the following section for a detailed and stepwise guide to create and edit a Picsart cartoon with utmost ease and within a quick time span:
User’s Guide to Edit Cartoon Pictures in Picsart
Step 1: Download the Picsart Application
Visit the official Picsart website to download the desktop version of the app in your Windows or MacOs supported PC.
Step 2: Make a Selection
Launch the app in your system to reach the Picsart welcome screen. Navigate to the bottom and tap the ‘+’ symbol. You are now required to choose a desired image to create the cartoon edit. You can either browse through your system gallery or search a specific one from the Picsart photo library in the ‘Search Bar’ at the top of the app screen.
Step 3: Let’s Get Editing!
When you have made your choice, navigate to the toolbar at the bottom of the app screen and click on the ‘Effects’ tab. Make a side scroll to choose a specific effect category, like that of ‘Artistic’ or ‘Magic’ to open a library of effects in the selected category.
As an example, selecting the ‘Cartoonizer’ option in the ‘Artistic’ effects category can add an immediate caricature feel to your selected real-time image. You can further include manual adjustments to get the perfect cartoon look by pressing and holding the ‘Cartoonizer’ option. There are a whole variety of magical effects, such as, Neo Pop, Soul, Badlands, Animation and Paw in the ‘Magic’ effects category, that are just perfect in giving your edit a fantasizing look with a Picsart cartoon background.
If you are looking for a quicker editing process, prefer adding cartoonized elements, like ‘Picsart Stickers’ to your image instead of going for a complete caricature edit. To do this, open the ‘Picsart Photo Editor’, navigates to the ‘Sticker’ symbol and click on it, followed by searching ‘Cartoon Sticker’. You can alternatively search a specific keyword with the ‘Cartoon’ descriptor, if you are clear on what you want to add.
You can further, resize your selected sticker with a ‘Two Finger Pinch’ or use the ‘Eraser’ tool to ward off any unwanted portions from the same. You are free to take as many repetitions of the process as you wish, till you get the perfect result for saving to your device and sharing on your social media handles.
Step 4: Time to Save and Share!
When you are satisfied with your work, navigate to the right hand corner and tap ‘Apply’ to finalize your changes, followed by clicking on the ‘Next’ button at the top right corner of the app screen to save and export your creation.
Part 2 How to Make a Cartoon on Your Phone
After a detailed analysis of the cartoon editing procedure in your desktops, let us see thro ugh the method of creating cartoonized images on your MacOs and Android smartphones on the following section:
Stepwise Procedure for Creating Cartoonized Images on Phone
Step 1: Download the Application
When going to use the Picsart editor application on your smartphone, you will first require a download of the same in your concerned device. You can do this by visiting the ‘Google PlayStore’ for an Android device or the ‘Apple App Store’ for MacOs smartphones.
Step 2: Choose a Real-time Image
After a successful launch of the ‘Picsart Editor’ application in your smartphone, reach to and click on the ‘+’ icon at the bottom of the app’s working interface. This needs to be followed by selecting any specific real-time image, either from your smartphone gallery or the Picsart photo library using the top ‘Search Bar’ of the interface, for creating a cartoonized edit.
Step 3: Editing Begins!
Once you are done with selecting the image, proceed to add effects to your selection by clicking the ‘Effects’ tab in the bottom toolbar, succeeded by picking a desired effect type through a right scroll. Tap on any category, such as, Magic, Artistic, etc, to open the effect library of the same.
For instance, you can click on the ‘Cartoonizer’ option within Artistic’ effects to supplement your uploaded real-time image with an instant cartoonized effect. You are also granted the liberty to make manual changes to set the caricature image effects as per your preferences, which you can do with a ‘Press and Hold’ of the ‘Cartoonizer’ tab. If you have a diversion towards complementing your cartoonized images with magical effects, choose from Animation, Neo Pop, Paw, Badlands, Paw, and other amazing options in the ‘Magic’ category.
Step 4: Save and Export
When you have completed the editing process and the changes satisfy you, go to the ‘Apply’ tab at the right side of the editor screen to see the changes appear in your edit. You can now navigate to the upper right corner of the app screen and click on ‘Next’ to save your work locally to your device, along with exporting the same across different media platforms.
Part 3 How to Cartoon Yourself on Picsart
Having learnt about the interesting ways to edit cartoon pictures and create cartoons on your smartphone, you might like to try hands on creating a cartoon portrait of yourself in the Picsart editor for a variety of reasons, like that of creating cartoon profile pics of yourself. Let us have a look of the procedure for the same using the Picsart Online Image Editor tool in the following section:
User’s Guide to Create a Cartoon Portrait With Picsart Online Photo Editor
Step 1: Launch the Application
In any of your favorite internet browsers, search for and open ‘Picsart Desktop Editor’. In the app’s working interface, tap ‘Upload’ or ‘New Project’ to choose an image from your device or the free to use Picsart image library respectively, for proceeding with the cartoonized transformations.
Step 2: Edit Your Selection
Tap on the ‘Effects’ tab from the editing toolbar at the top of your image and select a desired effect category to access the diversity of cartoonifying filters. It is recommended to select the ‘Magic’ category for the most splendid cartoon effects, such as, Paw, Badland, Animation, Soul and Neo Pop among many others.
You can even make manual adjustments in the brightness, color, saturation, burn and fade, etc., of the image by clicking on the ‘Adjust’ and ‘Blend’ options at the top of the image workspace.
Step 3: Download and Share Your Work
When you are done editing, navigate to and click on the ‘Share’ option at the upper right corner of the editor screen to download your cartoonized image.
****Wondershare Filmora Video Editor Cartoon Image Creator**
For Win 7 or later (64-bit)
For macOS 10.12 or later
Picsart is certainly a dependable solution to create caricature images, but if you are keen on looking for an alternative application to cater to the need, Introduced to the software market by Wondershare, the Filmora Cartoon Image Creator can be a convenient rescue. The app promises you of a high quality cartoonized edit with a plethora of editing effects to suit your most specific editing preferences.
● Ending Thoughts →
● Creating cartoonized edits from real time images is a fun and entertaining activity along with being the latest media trend.
● The Picsart editor application allows making caricature images from actual stills through desktop, smartphone and online compatible image editing program.
● Talking of suitable Picsart alternatives, you can rely on the Filmora Cartoon Image Creator application for high quality cartoonized image creation.
Also read:
- Have You Seen the Facebook Cartoon App Everyones Using Lately for 2024
- How To Create Pinterest Slideshow in Simple Ways for 2024
- Best 10 Animated DP for WhatsApp for 2024
- Best GIF Maker Software for Windows and Mac for 2024
- Updated Adobe Animate Riggings Tutorial for You for 2024
- Updated In 2024, Best 10 Anime Series of All Time | Watch Anime Online
- New In 2024, Little Known Techniques of Motion Graphics in Premiere Pro
- 2024 Approved How to Make GIF Stickers for WhatsApp 100 The Easy Way
- New In-Depth Study of Cartoon Painting Starts From Learning to Draw It for 2024
- Create Animated Video on Canva for 2024
- New In 2024, How to Animate - Adobe Animate Tutorias
- Updated Whiteboard Animation Services Top 15 Animation Companies to Pick for 2024
- 2024 Approved Learn All About 3D Logo Animation and Templates
- New 2024 Approved Amazing Techniques of Motion Graphics in Premiere Pro
- New 2024 Approved Adobe Animate Text Effects Skills That You Need to Know
- Adobe Animate Text Effects Skills You Need to Know
- Tutorials for Animating Picture Online Without Learning From Scratch for 2024
- How to Analyze an Editorial Cartoon
- New In 2024, 10 Trendy & Stylish Free Logo Animation Templates
- New 10 Creative Wallpaper Collage Ideas and Photos
- How to Make Animated Videos for Business – an Ultimate Guide for 2024
- Beginner Tutorial on Making Unity 2D Animation for 2024
- Updated 2024 Approved Beginner Tutorial on Making Unity 2D Animation
- Updated Fuel Your Creativity with 10 Awesome Collection of 2D Animation Examples
- Top 10 Video to GIF Converters Top Picks
- 2024 Approved 10 Stunning Stop Motion Movies That You Should Not Miss
- A Beginners Guide to Tell You What 3D Animation Is for 2024
- 5 Techniques You Never Heard of for Converting MP4 to GIF in Photoshop for 2024
- New Best 15 2D Animation Software Free That Worth to Try
- Animated Collage Maker Tips for 2024
- New 2024 Approved Best GIF Resizers to Reduce GIF Size
- New 12 Animated Slideshow PowerPoint Templates
- Updated Top 3 Ways to Create Gif with Great 3D Gif Maker
- Top 9 Realme Note 50 Monitoring Apps for Parental Controls | Dr.fone
- In 2024, How to Unlock iCloud Activation Lock and iCloud Account On Apple iPhone 6s Plus?
- In 2024, How PGSharp Save You from Ban While Spoofing Pokemon Go On Honor Magic 6? | Dr.fone
- How To Transfer Data From Apple iPhone 11 To Other iPhone 14 Pro Max devices? | Dr.fone
- In 2024, How to Change Location on TikTok to See More Content On your Realme C55 | Dr.fone
- In 2024, A Guide Nokia C12 Pro Wireless and Wired Screen Mirroring | Dr.fone
- How to Hide/Fake Snapchat Location on Your Lava Yuva 2 | Dr.fone
- In 2024, Resolve Your Apple iPhone 6s Plus Keeps Asking for Outlook Password
- In 2024, Full Guide to Catch 100 IV Pokémon Using a Map On Poco X6 | Dr.fone
- In 2024, How Can You Transfer Files From Realme 11 Pro To iPhone 15/14/13? | Dr.fone
- In 2024, How to Mirror Your Realme C67 4G Screen to PC with Chromecast | Dr.fone
- Change Location on Yik Yak For your Apple iPhone 13 Pro to Enjoy More Fun | Dr.fone
- How to Unlock Samsung Galaxy Z Flip 5 PIN Code/Pattern Lock/Password
- Lock Your Realme 11 Pro Phone in Style The Top 5 Gesture Lock Screen Apps
- Getting the Pokemon Go GPS Signal Not Found 11 Error in Poco M6 Pro 5G | Dr.fone
- Best Pokemons for PVP Matches in Pokemon Go For Infinix Hot 40 | Dr.fone
- Breaking Language Barriers Elevate Your Content with the Best Free Video Translator Apps for 2024
- In 2024, Which Pokémon can Evolve with a Moon Stone For Apple iPhone 12 Pro? | Dr.fone
- Title: New Create Animated Video on Canva
- Author: Elon
- Created at : 2024-05-19 03:04:46
- Updated at : 2024-05-20 03:04:46
- Link: https://animation-videos.techidaily.com/new-create-animated-video-on-canva/
- License: This work is licensed under CC BY-NC-SA 4.0.
