
:max_bytes(150000):strip_icc():format(webp)/dts-play-fi-lifestyle-aaa-5a4c211daad52b00366a3575.jpg)
New How to Animate Image on Scroll for 2024
How to Animate Image on Scroll
How to Animate Image on Scroll and Text on Scroll?
An easy yet powerful editor
Numerous effects to choose from
Detailed tutorials provided by the official channel
Over the years, web designers have tried different tactics to make their websites visually engaging. From marquee tags to animated navigation bars, designers tried everything they could to enhance the overall visual appearance of their websites.
One such tactic - that even brands like Sony and Apple - followed was image-on-scroll and text-on-scroll animations.
In this article
01 [How to Make Scroll Image Animation Like Apple?](#Part 1)
02 [How to Create a Scrolling Text Animation (Infinite Loop)](#Part 2)
Part 1 How to Make Scroll Image Animation Like Apple?
First, let’s take a look at different ways to make scroll-image animation like Apple. An image-on-scroll animation is an animation playback that appears on images as you continue to scroll down a website. You can use multiple methods to implement scroll image animations on your website.
01Use Filmora
Wondershare Filmora Video Editor is a feature-packed video editing tool that’s designed to help video editors create high-quality videos in a hassle-free manner. The tool offers a timeline-based interface that streamlines the entire video editing process and helps professionals execute complex video editing tasks in no time. In addition to its basic editing features, Filmora also offers advanced editing functions including color grading, motion tracking, and keyframing. It means you can easily turn your RAW footage into high-quality videos without any hassle.
Using Wondershare Filmora to animate images on scroll will be an ideal solution if you want to integrate a visually appealing element to your website. Let’s walk you through the step-by-step procedure of using Wondershare Filmora to create image-on-scroll animations.

Wondershare Filmora - Best Video Editor for Mac/Windows
5,481,435 people have downloaded it.
Build unique custom animations without breaking a sweat.
Focus on creating epic stories and leave the details to Filmora’s auto features.
Start a creative adventure with drag & drop effects and endless possibilities.
Filmora simplifies advanced features to save you time and effort.
Filmora cuts out repetition so you can move on to your next creative breakthrough.
Step 1 - Launch Filmora on your system and import the video/image that you want to edit. Then, load the selected file to Filmora’s timeline to proceed further.
Step 2 - Now, double-tap the video/image. This will launch the editing panel on your screen. Here, switch to the “Animation” panel.

Step 3 - Here you can either select “Presets” or click the “Customize” tab to create a custom animation through keyframing.

Step 4 - If you want to save time, however, it would be better to choose the “Presets” tab. Then, select the preset that you want to use.
Step 5 - Now, drag the selected preset to the timeline. Again, double-tap the preset layer. An editing panel will appear on your screen. Here you can adjust different elements of the preset to customize its playback.

So, that’s everything you need to know about animating image-on-scroll using Wondershare Filmora.
02Use ScrollSequence
Now, if you are not a professional editor or don’t want to overcomplicate things, you can use ScrollSequence to add image-on-scroll animation to your website. For readers who don’t know, ScrollSequence is a built-in WordPress plugin that you can directly install in your WordPress manager. The tool offers hundreds of ready-to-use animation templates that you can integrate and customize without any hassle.
All the templates offer complete customization, which means you can adjust the animation playback, import your own media files, and even customize the text. It’s worth understanding that this method will only work if you are using WordPress as the CMS platform for your website. ScrollSequence is only available as a WordPress plugin and you won’t be able to use it with any other website builder
03Write Your Own JavaScript Code
Finally, you can also write your own JavaScript code to animate image-on-scroll. However, this method will be a bit complicated as you would require technical expertise to write dedicated JavaScript scripts to animate image-on-scroll. If you choose this solution, you’ll have to start with writing HTML and CSS codes. This will help you style your web page in the beginning. And, once the web design is up and ready, you can move towards writing the JavaScript code to animate image-on-scroll in your web page.
Part 2 How to Create a Scrolling Text Animation (Infinite Loop)
Like image-on-scroll, text-on-scroll is another popular way to add visually appealing animations to your web designs. Text-on-scroll animations work the same way as image-on-scroll animations - the only difference is that these types of animations focus on the text playback instead of images. Again, you can use different methods to animate text on scroll and make your website’s content run in an infinite loop.
Some of these methods include:
01Use Filmora
Thanks to Filmora’s advanced editing panel, you can also use it to animate text within the videos. This will be an ideal solution for users who want to add videos with dedicated text banners and titles on their websites. With Filmora, you’ll be able to animate the text and make custom transitions in a hassle-free manner. Let’s walk you through the detailed procedure of using Wondershare Filmora to add text animation to your videos.
Step 1 - Open Filmora on your system and load the video into its timeline.
Step 2 - Double-tap the video file, and switch to the “Titles” tab. You’ll see a list of different title templates on your screen. Browse through these results and drag the desired template to the timelines. Make sure to adjust the title layer right above the video layer.

Step 3 - Again, double-click the title layer and you’ll see a dedicated text editor on your screen. Here enter the text that you want to display within the video. You can also select text size, orientation, and font to personalize its appearance.
Step 4 - Finally, switch to the “Animation” tab at the left sidebar. Choose any of these animation templates and the text within the video will be animated automatically.

So, that’s how you can use Filmora to animate text-on-scroll to improve the overall visual appearance of your website videos.
02Scroll-Text-Animations for Single Words
Another way to implement scroll-text animations is to modify the HTML & CSS code of your website. Again, this method will only be feasible if you have prior coding experience and know how to write well-optimized code.

The easiest way to animate text scrolls is through single-line animations. In this situation, only one line gets displayed at any particular time, which automatically gets switched to the next one as soon as you scroll down the cursor. If you are planning to create simple text-based animations, this method will help you get the job done easily.
Key Takeaways from This Episode
● You can animate image-on-scroll and text-on-scroll to enhance the overall visual appearance of your websites and make them more engaging for the end-users.
● If you are planning to upload dedicated videos on your website, you can use Wondershare Filmora, a fully-functional video editing tool, to animate both images and text through an easy-to-navigate editing panel.
● You should only opt for the coding method if you are an experienced coder and have worked on HTML/CSS/JavaScript projects in the past.
Over the years, web designers have tried different tactics to make their websites visually engaging. From marquee tags to animated navigation bars, designers tried everything they could to enhance the overall visual appearance of their websites.
One such tactic - that even brands like Sony and Apple - followed was image-on-scroll and text-on-scroll animations.
In this article
01 [How to Make Scroll Image Animation Like Apple?](#Part 1)
02 [How to Create a Scrolling Text Animation (Infinite Loop)](#Part 2)
Part 1 How to Make Scroll Image Animation Like Apple?
First, let’s take a look at different ways to make scroll-image animation like Apple. An image-on-scroll animation is an animation playback that appears on images as you continue to scroll down a website. You can use multiple methods to implement scroll image animations on your website.
01Use Filmora
Wondershare Filmora Video Editor is a feature-packed video editing tool that’s designed to help video editors create high-quality videos in a hassle-free manner. The tool offers a timeline-based interface that streamlines the entire video editing process and helps professionals execute complex video editing tasks in no time. In addition to its basic editing features, Filmora also offers advanced editing functions including color grading, motion tracking, and keyframing. It means you can easily turn your RAW footage into high-quality videos without any hassle.
Using Wondershare Filmora to animate images on scroll will be an ideal solution if you want to integrate a visually appealing element to your website. Let’s walk you through the step-by-step procedure of using Wondershare Filmora to create image-on-scroll animations.
Wondershare Filmora - Best Video Editor for Mac/Windows
5,481,435 people have downloaded it.
Build unique custom animations without breaking a sweat.
Focus on creating epic stories and leave the details to Filmora’s auto features.
Start a creative adventure with drag & drop effects and endless possibilities.
Filmora simplifies advanced features to save you time and effort.
Filmora cuts out repetition so you can move on to your next creative breakthrough.
Step 1 - Launch Filmora on your system and import the video/image that you want to edit. Then, load the selected file to Filmora’s timeline to proceed further.
Step 2 - Now, double-tap the video/image. This will launch the editing panel on your screen. Here, switch to the “Animation” panel.
Step 3 - Here you can either select “Presets” or click the “Customize” tab to create a custom animation through keyframing.
Step 4 - If you want to save time, however, it would be better to choose the “Presets” tab. Then, select the preset that you want to use.
Step 5 - Now, drag the selected preset to the timeline. Again, double-tap the preset layer. An editing panel will appear on your screen. Here you can adjust different elements of the preset to customize its playback.
So, that’s everything you need to know about animating image-on-scroll using Wondershare Filmora.
02Use ScrollSequence
Now, if you are not a professional editor or don’t want to overcomplicate things, you can use ScrollSequence to add image-on-scroll animation to your website. For readers who don’t know, ScrollSequence is a built-in WordPress plugin that you can directly install in your WordPress manager. The tool offers hundreds of ready-to-use animation templates that you can integrate and customize without any hassle.
All the templates offer complete customization, which means you can adjust the animation playback, import your own media files, and even customize the text. It’s worth understanding that this method will only work if you are using WordPress as the CMS platform for your website. ScrollSequence is only available as a WordPress plugin and you won’t be able to use it with any other website builder
03Write Your Own JavaScript Code
Finally, you can also write your own JavaScript code to animate image-on-scroll. However, this method will be a bit complicated as you would require technical expertise to write dedicated JavaScript scripts to animate image-on-scroll. If you choose this solution, you’ll have to start with writing HTML and CSS codes. This will help you style your web page in the beginning. And, once the web design is up and ready, you can move towards writing the JavaScript code to animate image-on-scroll in your web page.
Part 2 How to Create a Scrolling Text Animation (Infinite Loop)
Like image-on-scroll, text-on-scroll is another popular way to add visually appealing animations to your web designs. Text-on-scroll animations work the same way as image-on-scroll animations - the only difference is that these types of animations focus on the text playback instead of images. Again, you can use different methods to animate text on scroll and make your website’s content run in an infinite loop.
Some of these methods include:
01Use Filmora
Thanks to Filmora’s advanced editing panel, you can also use it to animate text within the videos. This will be an ideal solution for users who want to add videos with dedicated text banners and titles on their websites. With Filmora, you’ll be able to animate the text and make custom transitions in a hassle-free manner. Let’s walk you through the detailed procedure of using Wondershare Filmora to add text animation to your videos.
Step 1 - Open Filmora on your system and load the video into its timeline.
Step 2 - Double-tap the video file, and switch to the “Titles” tab. You’ll see a list of different title templates on your screen. Browse through these results and drag the desired template to the timelines. Make sure to adjust the title layer right above the video layer.
Step 3 - Again, double-click the title layer and you’ll see a dedicated text editor on your screen. Here enter the text that you want to display within the video. You can also select text size, orientation, and font to personalize its appearance.
Step 4 - Finally, switch to the “Animation” tab at the left sidebar. Choose any of these animation templates and the text within the video will be animated automatically.
So, that’s how you can use Filmora to animate text-on-scroll to improve the overall visual appearance of your website videos.
02Scroll-Text-Animations for Single Words
Another way to implement scroll-text animations is to modify the HTML & CSS code of your website. Again, this method will only be feasible if you have prior coding experience and know how to write well-optimized code.
The easiest way to animate text scrolls is through single-line animations. In this situation, only one line gets displayed at any particular time, which automatically gets switched to the next one as soon as you scroll down the cursor. If you are planning to create simple text-based animations, this method will help you get the job done easily.
Key Takeaways from This Episode
● You can animate image-on-scroll and text-on-scroll to enhance the overall visual appearance of your websites and make them more engaging for the end-users.
● If you are planning to upload dedicated videos on your website, you can use Wondershare Filmora, a fully-functional video editing tool, to animate both images and text through an easy-to-navigate editing panel.
● You should only opt for the coding method if you are an experienced coder and have worked on HTML/CSS/JavaScript projects in the past.
10 Stunning Stop Motion Movies You Should Not Miss
10 Stunning Stop Motion Movies That You Should Not Miss
An easy yet powerful editor
Numerous effects to choose from
Detailed tutorials provided by the official channel
We do have some recommendations for you. Even more than that, we’ve compiled a comprehensive guide on stop motion movies in hopes of introducing this often-forgotten art to those that may have never thought to appreciate it before.
Complete with an introduction, some examples of great stop motion animation movies and a peek at what the process is usually like for the professionals working on said movies.
In this article
01 [What Movies Use Stop Motion Animation?](#Part 1)
02 [Popular Stop Motion Movies You Might Wonder](#Part 2)
03 [Top 10 Stop Motion Animation Films](#Part 3)
04 [How to Make a Stop Motion Animation Movie](#Part 4)
Part 1 What Movies Use Stop Motion Animation?
First, that overview we promised. This will be a brief introduction to introduce certain key knowledge that you might not already know. Of course, for those who want to head straight to the recommendations, they can do so by skipping to of this article.
01What is a Stop Motion Movie?
The best way to introduce the concept of stop motion animation movies is to first reiterate that it is, literally, the oldest form of animation in film. This was what all the animators did before they figured out how to create the software required to make their characters come alive in a different way.
It involves a lot of crafting, a lot of maneuvering, a lot of careful and precise adjustments. To put it in the simplest way possible, it’s the process of taking a still image of a scene. And then introducing ‘motion’ by changing the elements of said scene, little by little, and taking a picture at every opportunity in between. So that all the still images come together to create the illusion of movement and motion.
02What is the Most Successful Stop Motion Movie?
There are plenty of answers that could be given in this case. Perhaps it should be the first-ever stop motion movie to be made? Which was “The Humpty Dumpty Circus” created by Blackton and Smith with their own daughter’s dolls.
You might also consider success by way of long-term watch ability. If so, then old classics like the “Nightmare Before Christmas” or “Rudolph the Reindeer.” And finally. You have “Chicken Run” which is considered the best performing stop motion movie of all time. Having earned somewhere around $17.5 million in its first, weekend showing.
Part 2 Popular Stop Motion Movies You Might Wonder
Now, how about some of the more popular stop motion practices to come out in the last couple of decades? Different from the stop motion movies of old but still the same at heart. What do we have to say about them?
01Lego Stop Motion Animation Movies
Well… Since our thoughts on the subject are distinctive, we thought to break it up. First starting with Lego Movie stop motion animation. This stop motion movie animation style, also called ‘Brickfilms’, is the practice of using Lego to create stop motion animation movies. It’s been around since the 1970s, but it was only 2003 that the first official film was released by Lego, who partnered up with a production company to create films for them.
It ended up being one of the best choices for them. Especially in terms of marketing their toy products, and the practice had only grown in popularity since, with both kids and adults alike finding joy in the end product.
023D Stop Motion Animation Movies
Alright, so how about 3D stop motion movies? How is it different from 3D animation movies and regular stop motion movies??? Well, it’s actually a bit of a tricky term. The 3D in this case is to differentiate it from regular 2D stop motion animation as you see in a lot of animated films from the East (where each image is hand-drawn to show motion).
In this case, props, objects, character models, and other materials are used in order to sculpt a 3D model of a scene, and pictures are taken to capture motion. The first of the movies of this style is called “Tune with Tomorrow” but you might be more familiar with the title “Coraline.”
Part 3 Top 10 Stop Motion Animation Films
Now for our list of the best stop motion animation movies of our time. This will be somewhat subjective, but also not. Every single one of the stop motion movies on this list is highly rated everywhere and has received rave reviews — making it worth taking the time to watch every single one of them when you have the time.
01Coraline (2009)
We mentioned this stop motion movie previously, but in case you haven’t already watched it, it’s a classic. The storytelling elements of “Coraline” really matched the stop motion style of animation. It was released in 2009 as a 3D movie and it shares the story of a little girl that finds joy and excitement in an alternate reality. Only to realize that it wasn’t all that it was chalked up to be.
02The Nightmare Before Christmas (1993)
“The Nightmare Before Christmas” (1993) is another stop motion animation movie that you might have already heard of before. It features the memorable character, Jack Skellington (the Pumpkin King of Halloweentown.) You can usually catch this film airing somewhere on television during the holiday season, as the story is all about Jack Skellington’s obsession with ruining Christmas.
03Chicken Run (1994)
This next stop motion movie, called “Chicken Run” (1994) was also mentioned before. It is, as was previously discussed, the highest performing stop motion animation movie on the big screen. It features quite a varied cast of chickens in a poultry farm all aiming to make an escape by learning how to fly.
04Fantastic Mr. Fox (2009)
The next film, released in the same year as “Coraline”, is called “Fantastic Mr. Fox.” This was directed by Wes Anderson, who goes on to tell the story of the main character, ‘Mr. Fox’ and how his misadventures involving some of the local farmers in the area got—not only himself—but also his family in danger.
05Rudolph the Red-Nosed Reindeer (1964)
Rudolph the Red-nosed Reindeer is another holiday classic. This one is a lot older than some of the films on this list but is no doubt just as well-known (and perhaps even more so when you consider the older generation.) Much like the nightmare before Christmas, you can usually find this film airing sometime during the holidays on any one channel.
06Kubo and The Two Strings (2016)
From the makers of Coraline is the stop motion animation movie, called “Kubo and The Two Strings” (2016). It tells the story of Kubo, who goes on a search for a suit of magical armor in an effort to destroy an evil plaguing him. It’s quite a beautiful film and is critically acclaimed for the level of effort that went in to making sure that it was produced in a way that honored the timeless art of stop motion.
07Alice (1988)
This next stop motion film is quite unique. It’s called “Alice” and it was released sometime in the late 1980s. The fun part of this story is that it begins with a live actress playing Alice. In fact, even the rabbit that leads her to wonderland, and eventually turns her into a porcelain doll, was a taxidermized hare that escaped from its display case. In this way, the stop motion aspect of the story is integrated in a fun way that matches the mood of the rest of the hypnotic story to come.
088. Mary and Max (2009)
Another stop motion movie that had been released in 2009 (a big year in stop motion animation) is called “Mary and Max.” This one tells the story of a young girl and man. One living in Australia and the other in America. The two characters form a penpal-ship that takes them through both personal growth and development, making it quite heartwarming.
09The Little Prince (2016)
Categorizing this film as ‘stop motion’ one gave us pause because, technically, only half of the film was done in the stop motion style. However, that doesn’t detract from the evident beauty in those scenes — which speaks not only of countless efforts but gives life to the exciting classic story of “The Little Prince.”
10Frankenweenie (2012)
Another classic that you might recognize is “Frankenweenie” which was released in 2012. It starts off quite grim, with a young boy bringing a dead dog back into life — only further adding to the goth aesthetic that the style of the characters is rocking.
Part 4 How to Make a Stop Motion Animation Movie
For the last part of this article, we move on to the promised ‘tutorial’. It won’t be all that comprehensive, but it should give you a better idea of how stop motion movies are created and the kind of effort and hours that are put into it. Perhaps it will inspire you to try your hand at the process yourself.
01Step 1. Get a Camera.
The first and most important part of setting up for a stop motion movie is to prepare your camera. As any little bit of jostling can cause a whole scene to look jarring, you’ll need to make sure that this is taken care of. Otherwise, you might be forced to redo a scene unnecessarily.
In this case, the invention of tripods turned out to be a major boon, as it kept the camera at the correct vantage view.
02Step 2. Prepare Materials for the Set.
Of course, as props and materials are important for bringing characters to life in a stop motion film, you’ll need some pre-prepared in order to start.
This can be Lego action figures (if you’re working on a Lego stop motion movie) or it can be a regular model or doll (if you’re working on a 3D animation stop motion animation movie.)

03Step 3. Prepare the Set.
For stop motion, it’s important that both the scene and the camera are kept in stable positions. After all, the background will be captured too.
And, to allow for that illusion of motion, it’s best if a still object is compared to one in motion. So, pay very careful when setting up your recording studio. It can make or break your project.
04Step 4. Choose Editing Software
For the last step, you’ll need to pick out an editing software that you can use in order to put together your still images and create a video.
For that, we recommend the professional Wondershare Filmora Video Editor . It’s all set up for professionals and beginners alike, allowing you the freedom to create characters that are both simple and complex with ease. In this case, of course, the goal is to put together your story through all the different frames that you captured in the process.
For Win 7 or later (64-bit)
For macOS 10.12 or later
● Key Takeaways from This Episode →
● Stop motion animation is a classic way of telling a story of fantastical characters and settings without having to draw everything frame by frame.
● It offers any film a very distinctive style that a lot of lovers of the classics find themselves constantly seeking out.
● If you go through the list that we organized out of some of the best stop motion movies in film history, you’ll notice that they’re all quite acclaimed for their masterful storytelling and fun graphics (which, before the creation of 3D animation as we know it today, was the height of entertainment.)
● This classic art form can be accomplished by just about anyone with the right equipment and a little bit of effort. It takes some patience, as we hoped to have explained in our tutorial, but the effort is worth the sense of fulfillment that comes when a story told in stills turns into a masterful animation that brings static objects and characters to life.
We do have some recommendations for you. Even more than that, we’ve compiled a comprehensive guide on stop motion movies in hopes of introducing this often-forgotten art to those that may have never thought to appreciate it before.
Complete with an introduction, some examples of great stop motion animation movies and a peek at what the process is usually like for the professionals working on said movies.
In this article
01 [What Movies Use Stop Motion Animation?](#Part 1)
02 [Popular Stop Motion Movies You Might Wonder](#Part 2)
03 [Top 10 Stop Motion Animation Films](#Part 3)
04 [How to Make a Stop Motion Animation Movie](#Part 4)
Part 1 What Movies Use Stop Motion Animation?
First, that overview we promised. This will be a brief introduction to introduce certain key knowledge that you might not already know. Of course, for those who want to head straight to the recommendations, they can do so by skipping to of this article.
01What is a Stop Motion Movie?
The best way to introduce the concept of stop motion animation movies is to first reiterate that it is, literally, the oldest form of animation in film. This was what all the animators did before they figured out how to create the software required to make their characters come alive in a different way.
It involves a lot of crafting, a lot of maneuvering, a lot of careful and precise adjustments. To put it in the simplest way possible, it’s the process of taking a still image of a scene. And then introducing ‘motion’ by changing the elements of said scene, little by little, and taking a picture at every opportunity in between. So that all the still images come together to create the illusion of movement and motion.
02What is the Most Successful Stop Motion Movie?
There are plenty of answers that could be given in this case. Perhaps it should be the first-ever stop motion movie to be made? Which was “The Humpty Dumpty Circus” created by Blackton and Smith with their own daughter’s dolls.
You might also consider success by way of long-term watch ability. If so, then old classics like the “Nightmare Before Christmas” or “Rudolph the Reindeer.” And finally. You have “Chicken Run” which is considered the best performing stop motion movie of all time. Having earned somewhere around $17.5 million in its first, weekend showing.
Part 2 Popular Stop Motion Movies You Might Wonder
Now, how about some of the more popular stop motion practices to come out in the last couple of decades? Different from the stop motion movies of old but still the same at heart. What do we have to say about them?
01Lego Stop Motion Animation Movies
Well… Since our thoughts on the subject are distinctive, we thought to break it up. First starting with Lego Movie stop motion animation. This stop motion movie animation style, also called ‘Brickfilms’, is the practice of using Lego to create stop motion animation movies. It’s been around since the 1970s, but it was only 2003 that the first official film was released by Lego, who partnered up with a production company to create films for them.
It ended up being one of the best choices for them. Especially in terms of marketing their toy products, and the practice had only grown in popularity since, with both kids and adults alike finding joy in the end product.
023D Stop Motion Animation Movies
Alright, so how about 3D stop motion movies? How is it different from 3D animation movies and regular stop motion movies??? Well, it’s actually a bit of a tricky term. The 3D in this case is to differentiate it from regular 2D stop motion animation as you see in a lot of animated films from the East (where each image is hand-drawn to show motion).
In this case, props, objects, character models, and other materials are used in order to sculpt a 3D model of a scene, and pictures are taken to capture motion. The first of the movies of this style is called “Tune with Tomorrow” but you might be more familiar with the title “Coraline.”
Part 3 Top 10 Stop Motion Animation Films
Now for our list of the best stop motion animation movies of our time. This will be somewhat subjective, but also not. Every single one of the stop motion movies on this list is highly rated everywhere and has received rave reviews — making it worth taking the time to watch every single one of them when you have the time.
01Coraline (2009)
We mentioned this stop motion movie previously, but in case you haven’t already watched it, it’s a classic. The storytelling elements of “Coraline” really matched the stop motion style of animation. It was released in 2009 as a 3D movie and it shares the story of a little girl that finds joy and excitement in an alternate reality. Only to realize that it wasn’t all that it was chalked up to be.
02The Nightmare Before Christmas (1993)
“The Nightmare Before Christmas” (1993) is another stop motion animation movie that you might have already heard of before. It features the memorable character, Jack Skellington (the Pumpkin King of Halloweentown.) You can usually catch this film airing somewhere on television during the holiday season, as the story is all about Jack Skellington’s obsession with ruining Christmas.
03Chicken Run (1994)
This next stop motion movie, called “Chicken Run” (1994) was also mentioned before. It is, as was previously discussed, the highest performing stop motion animation movie on the big screen. It features quite a varied cast of chickens in a poultry farm all aiming to make an escape by learning how to fly.
04Fantastic Mr. Fox (2009)
The next film, released in the same year as “Coraline”, is called “Fantastic Mr. Fox.” This was directed by Wes Anderson, who goes on to tell the story of the main character, ‘Mr. Fox’ and how his misadventures involving some of the local farmers in the area got—not only himself—but also his family in danger.
05Rudolph the Red-Nosed Reindeer (1964)
Rudolph the Red-nosed Reindeer is another holiday classic. This one is a lot older than some of the films on this list but is no doubt just as well-known (and perhaps even more so when you consider the older generation.) Much like the nightmare before Christmas, you can usually find this film airing sometime during the holidays on any one channel.
06Kubo and The Two Strings (2016)
From the makers of Coraline is the stop motion animation movie, called “Kubo and The Two Strings” (2016). It tells the story of Kubo, who goes on a search for a suit of magical armor in an effort to destroy an evil plaguing him. It’s quite a beautiful film and is critically acclaimed for the level of effort that went in to making sure that it was produced in a way that honored the timeless art of stop motion.
07Alice (1988)
This next stop motion film is quite unique. It’s called “Alice” and it was released sometime in the late 1980s. The fun part of this story is that it begins with a live actress playing Alice. In fact, even the rabbit that leads her to wonderland, and eventually turns her into a porcelain doll, was a taxidermized hare that escaped from its display case. In this way, the stop motion aspect of the story is integrated in a fun way that matches the mood of the rest of the hypnotic story to come.
088. Mary and Max (2009)
Another stop motion movie that had been released in 2009 (a big year in stop motion animation) is called “Mary and Max.” This one tells the story of a young girl and man. One living in Australia and the other in America. The two characters form a penpal-ship that takes them through both personal growth and development, making it quite heartwarming.
09The Little Prince (2016)
Categorizing this film as ‘stop motion’ one gave us pause because, technically, only half of the film was done in the stop motion style. However, that doesn’t detract from the evident beauty in those scenes — which speaks not only of countless efforts but gives life to the exciting classic story of “The Little Prince.”
10Frankenweenie (2012)
Another classic that you might recognize is “Frankenweenie” which was released in 2012. It starts off quite grim, with a young boy bringing a dead dog back into life — only further adding to the goth aesthetic that the style of the characters is rocking.
Part 4 How to Make a Stop Motion Animation Movie
For the last part of this article, we move on to the promised ‘tutorial’. It won’t be all that comprehensive, but it should give you a better idea of how stop motion movies are created and the kind of effort and hours that are put into it. Perhaps it will inspire you to try your hand at the process yourself.
01Step 1. Get a Camera.
The first and most important part of setting up for a stop motion movie is to prepare your camera. As any little bit of jostling can cause a whole scene to look jarring, you’ll need to make sure that this is taken care of. Otherwise, you might be forced to redo a scene unnecessarily.
In this case, the invention of tripods turned out to be a major boon, as it kept the camera at the correct vantage view.
02Step 2. Prepare Materials for the Set.
Of course, as props and materials are important for bringing characters to life in a stop motion film, you’ll need some pre-prepared in order to start.
This can be Lego action figures (if you’re working on a Lego stop motion movie) or it can be a regular model or doll (if you’re working on a 3D animation stop motion animation movie.)
03Step 3. Prepare the Set.
For stop motion, it’s important that both the scene and the camera are kept in stable positions. After all, the background will be captured too.
And, to allow for that illusion of motion, it’s best if a still object is compared to one in motion. So, pay very careful when setting up your recording studio. It can make or break your project.
04Step 4. Choose Editing Software
For the last step, you’ll need to pick out an editing software that you can use in order to put together your still images and create a video.
For that, we recommend the professional Wondershare Filmora Video Editor . It’s all set up for professionals and beginners alike, allowing you the freedom to create characters that are both simple and complex with ease. In this case, of course, the goal is to put together your story through all the different frames that you captured in the process.
For Win 7 or later (64-bit)
For macOS 10.12 or later
● Key Takeaways from This Episode →
● Stop motion animation is a classic way of telling a story of fantastical characters and settings without having to draw everything frame by frame.
● It offers any film a very distinctive style that a lot of lovers of the classics find themselves constantly seeking out.
● If you go through the list that we organized out of some of the best stop motion movies in film history, you’ll notice that they’re all quite acclaimed for their masterful storytelling and fun graphics (which, before the creation of 3D animation as we know it today, was the height of entertainment.)
● This classic art form can be accomplished by just about anyone with the right equipment and a little bit of effort. It takes some patience, as we hoped to have explained in our tutorial, but the effort is worth the sense of fulfillment that comes when a story told in stills turns into a masterful animation that brings static objects and characters to life.
10 Realistic Cartoon Characters You Will Run Away From if You Met in R
10 Realistic Cartoon Characters You Would Run Away From if You Met in Real Life
An easy yet powerful editor
Numerous effects to choose from
Detailed tutorials provided by the official channel
Remember watching a cartoon reality show on the Cartoon Network? We all grew up watching cartoons. Cartoons are an unforgettable part of our childhood. But have you ever wondered what would your favorite cartoon characters look like in real life? Many cartoon characters like Popeye, Sponge Bob, Mickey Mouse, etc. look funny in their 2D images. Watching them do funny things and their funny expressions have always been fun.
But with the advancement in technology and the passage of time, we have some digital artists like Tatiana and Miguel Vasquez, who have recreated your famous cartoon characters into 3D. They have given them a realistic look that will scare you. These realistic cartoon faces will blow your mind.
In this article
01 [What’s a Realistic Cartoon?](#Part 1)
02 [10 Realistic Cartoon Characters You Would Run Away From If You Met In Real Life](#Part 2)
03 [How Do Cartoon Characters Reimagined As Realistic 3D Animation](#Part 3)
Part 1 What’s Realistic Cartoon?
Before moving towards the list of realistic cartoon characters, you must first know what a realistic cartoon is. As we all know, any animated drawing or illustration is a cartoon, it can either be non-realistic or semi-realistic. Earlier artists used to draw these cartoon characters on paper, but now technology has evolved.
With the introduction of different AI tools, many digital artists have recreated 3D versions of your favorite cartoon characters. These 3D versions of different cartoons are known as realistic cartoons. This can be done easily with help of AI technology and Digital Software.
Part 2 Realistic Cartoon Characters You Would Run Away From If You Met In Real Life
Have you ever thought how would your favorite cartoon character sponge bob looks like in real life? We will show you realistic versions of your favorite cartoon characters. Stay tuned for great fun waiting for you in this article!
01Sponge Bob (Sponge Bob Square Pants)
Sponge Bob Square Pants is an animated series full of fun and comedy. This show currently runs on Nickelodeon. Sponge Bob is a yellow-colored sea sponge and the main protagonist of the show. He is a cook at a restaurant named Krusty Krab. He often goes on adventures with his best friend Patrick Star. He mainly focuses on and aims at getting a boat-driving license from Mr. Puff’s boating school.
Have a look at the 3D recreation of this funny creature.
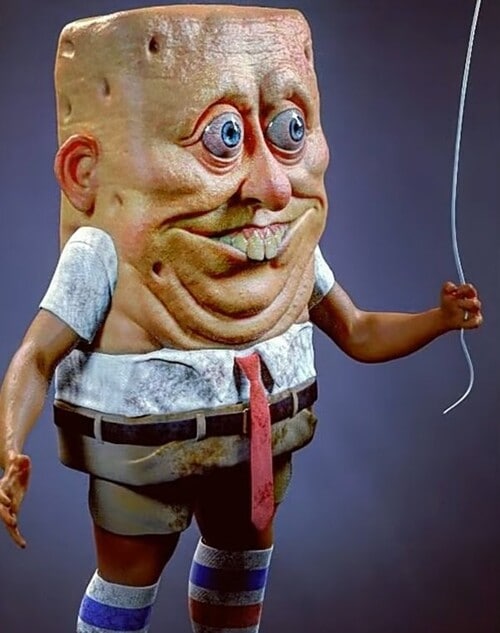
02Sid the Sloth (Ice Age)
Ice Age is one of the most popular animated series that revolves around the lives of a mammoth, tiger, sloth, and a scrat. A scrat is a combination of a squirrel and a rat. This series became so popular among the children that it was even nominated for an Oscar award.
It has a character called Sid. He is an abandoned sloth. His mother left him for some good to happen with him during the migration. His character in the entire series exhibits a friendly and carefree nature. Sometimes, he also acts as dumb and naïve.
Look at the funny recreation of this dumb-witted character. Does this recreation scare you?
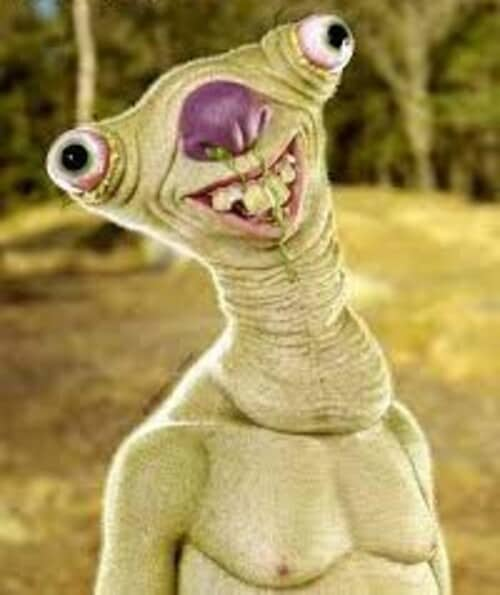
03Mr. Krabs (Sponge Bob Square Pants)
Sponge Bob Square Pants is one of the cartoons that have many different and funny-looking creatures. Mr. Krabs is one of those characters. He is a money-minded and miserly creature. He is the owner of the Krusty Krab fast food restaurant, where Sponge Bob works as a cook. He has a teenage daughter named Pearl and he can do anything to see her happy. He exhibits romantic feelings for Mrs. Puff.
Does this funny creature from the Sponge Bob series look funny in real life too?

04Patrick Star (Sponge Bob Square Pants)
Patrick Star is again a character from the cartoon show Sponge Bob Square Pants. He is the best friend of the main protagonist Sponge Bob, who lives 2 houses away from Sponge Bob’s house. He is a lazy, fat, and stupid pink-colored starfish. His character makes the show funnier and more interesting for kids.
How would you react when you will see this funny creature from Sponge Bob in real life? His 3D recreation seems a bit scary like a monster in real life.
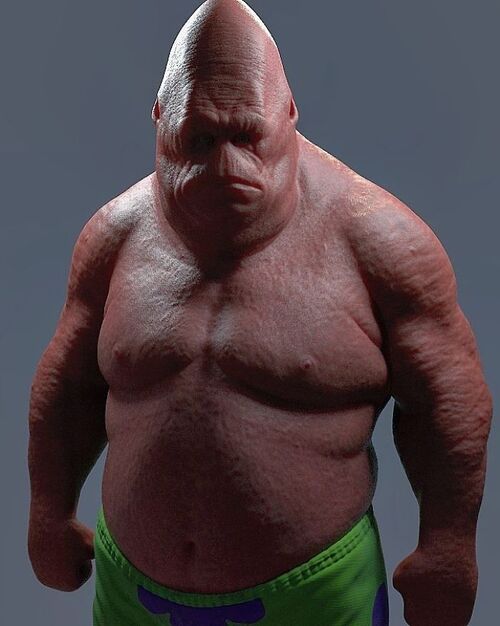
05Plankton (Sponge Bob Square Pants)
Plankton was once the best friend of Mr. Krabs but now they both share a rivalry bond. He is married to Karen and owns a fast food restaurant named Chum Bucket Restaurant in competition with Mr. Krabs’ Restaurant. He plays the antagonist character in the series. His restaurant doesn’t work as successfully as Krusty Krab Restaurant. In rivalry, he often comes up with different plans and tricks to outwit Mr. Krabs and steal the secret recipe of his famous Krabby Patty Burger, but never succeeds.
Have a look at the 3D recreation of this funny character from the series.
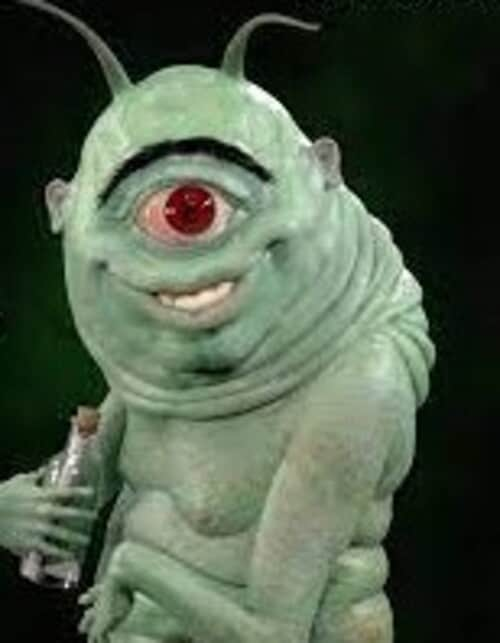
06Homer (The Simpsons)
The Simpsons is an animated series that revolves around the life of an American family. The Simpson family has five members named Homer, Marge, Bart, Lisa, and Maggie. Homer Simpson is the main character of this series. He lives in Springfield and is employed as a Safety Inspector at Springfield Nuclear Power Plant. He is married to Marge and is the father of three children – Bart, Lisa, and Maggie. The series depicts a strong bond of love and care for each other in the family.
Have a look at this realistic 3D recreation of Homer Simpson.
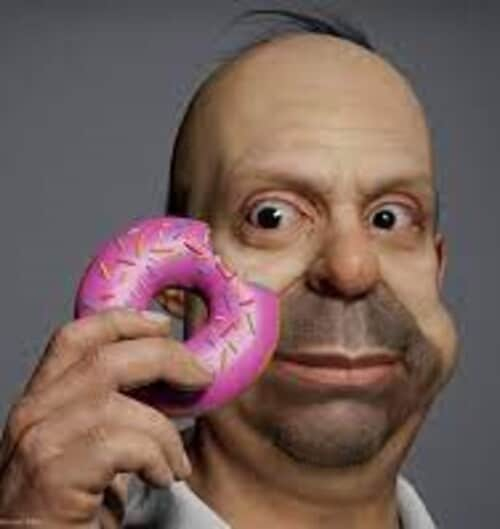
07Bugs Bunny (Looney Tunes)
Looney Tunes is entertaining people of all ages due to its great and funny characters. Bugs Bunny is one of our favorite characters from the animated cartoon show Looney Tunes. He is the main protagonist and the most popular character of the series. Kids love him the most because of his mischievous acts in the show. He looks too funny with a mouth filled with carrots and wearing funny costumes. This unique character has a great fan following all over the world.
The 3D recreation of this famous cartoon character is funny and scary at the same time.
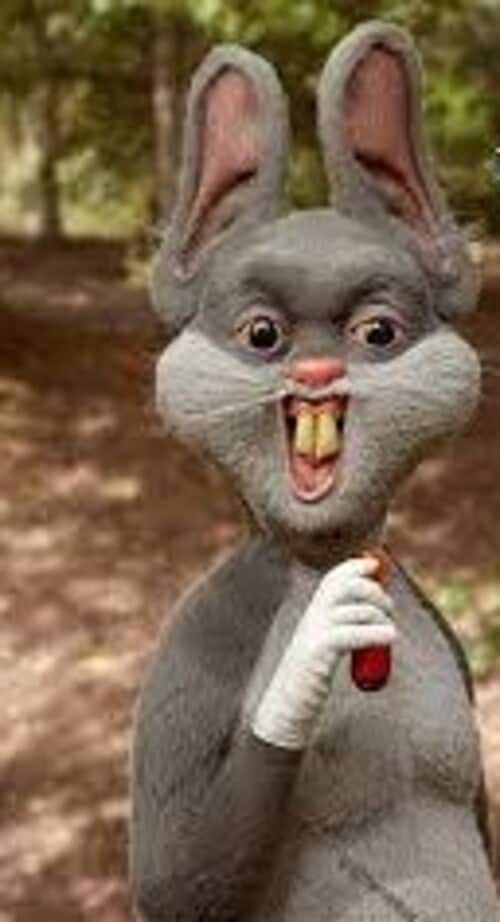
08Sally (The Nightmare Before Christmas)
As the name suggests, The Nightmare Before Christmas is an American dark fantasy animated movie. This animated movie has received great financial success and appreciation for its wonderful characters and music.
Sally is a shy ragdoll created by a scientist Doctor Finkelstein. She secretly loves Jack – the main Protagonist of the movie. She tells him not to mix the preparation of Christmas with the Halloween party.
Look at her realistic 3D recreation by Tatiana, popularly known as TatiMoons.

09Stitch (Lilo and Stitch)
Lilo and Stitch is also an animated American movie. It is a science fiction and comedy movie that attracts the interest of people of all age groups. The story of this animated movie revolves around the two main characters named Lilo and Stitch. Lilo is a 7-year old orphan girl whose parents died in a car accident. She has a pet named Stitch.
The original name of Stitch is Experiment 626. He was illegally created by a scientist Jumba Jokiba through a genetic experiment. Lilo adopts him thinking that he is an innocent creature, she doesn’t know about his birth and origin.
Have a look at this realistic 3D recreation of Stitch’s character. Isn’t it scary?

10 Popeye (Popeye – The Sailor Man)
Popeye – The Sailor Man is another famous cartoon series. Popeye is the main protagonist of this series. He has a girlfriend named Olive Oyl. This series depicts the love triangle between Popeye, Olive, and Bluto. He is an uneducated sailor man who gets energy by eating spinach. He often comes up with non-realistic solutions to different problems and helps the police by investigating different cases. He has a versatile tobacco smoking pipe that sometimes acts as a whistle, and he even intakes the spinach through his pipe.
In the cartoon films, he looks funny, but this 3D recreation of his character is a bit scary.

Part 2 How Do Cartoon Characters Reimagined As Realistic 3D Animation
Nowadays, it has become easier to create and turn your imagination into a cartoon character with different online 3D animators. This makes storytelling easier and funny and it is a great way to engage children. Out of all the 3D animation tools, Filmora will assist you to create the best 3D version of your favorite cartoon character.
Filmora has various smart features that help you to turn any image into realistic 3D animation. You can create great animations using Wondershare Filmora Video Editor within a couple of hours. It offers you many different features that help in convenient customization.
● Ending Thoughts →
● Being a cartoon lover, we hope that you would have liked the 3D recreation of your favorite cartoons. Some of these 3D recreations are so scary that you would just run away from them in real life and some look like real monster cartoons.
● AI combined with digital software like Filmora makes it easier to create these 3D versions of famous cartoon characters.
● With Filmora, you don’t need to spend hours sketching cartoon characters on paper. You can easily create great and realistic animations digitally.
Remember watching a cartoon reality show on the Cartoon Network? We all grew up watching cartoons. Cartoons are an unforgettable part of our childhood. But have you ever wondered what would your favorite cartoon characters look like in real life? Many cartoon characters like Popeye, Sponge Bob, Mickey Mouse, etc. look funny in their 2D images. Watching them do funny things and their funny expressions have always been fun.
But with the advancement in technology and the passage of time, we have some digital artists like Tatiana and Miguel Vasquez, who have recreated your famous cartoon characters into 3D. They have given them a realistic look that will scare you. These realistic cartoon faces will blow your mind.
In this article
01 [What’s a Realistic Cartoon?](#Part 1)
02 [10 Realistic Cartoon Characters You Would Run Away From If You Met In Real Life](#Part 2)
03 [How Do Cartoon Characters Reimagined As Realistic 3D Animation](#Part 3)
Part 1 What’s Realistic Cartoon?
Before moving towards the list of realistic cartoon characters, you must first know what a realistic cartoon is. As we all know, any animated drawing or illustration is a cartoon, it can either be non-realistic or semi-realistic. Earlier artists used to draw these cartoon characters on paper, but now technology has evolved.
With the introduction of different AI tools, many digital artists have recreated 3D versions of your favorite cartoon characters. These 3D versions of different cartoons are known as realistic cartoons. This can be done easily with help of AI technology and Digital Software.
Part 2 Realistic Cartoon Characters You Would Run Away From If You Met In Real Life
Have you ever thought how would your favorite cartoon character sponge bob looks like in real life? We will show you realistic versions of your favorite cartoon characters. Stay tuned for great fun waiting for you in this article!
01Sponge Bob (Sponge Bob Square Pants)
Sponge Bob Square Pants is an animated series full of fun and comedy. This show currently runs on Nickelodeon. Sponge Bob is a yellow-colored sea sponge and the main protagonist of the show. He is a cook at a restaurant named Krusty Krab. He often goes on adventures with his best friend Patrick Star. He mainly focuses on and aims at getting a boat-driving license from Mr. Puff’s boating school.
Have a look at the 3D recreation of this funny creature.
02Sid the Sloth (Ice Age)
Ice Age is one of the most popular animated series that revolves around the lives of a mammoth, tiger, sloth, and a scrat. A scrat is a combination of a squirrel and a rat. This series became so popular among the children that it was even nominated for an Oscar award.
It has a character called Sid. He is an abandoned sloth. His mother left him for some good to happen with him during the migration. His character in the entire series exhibits a friendly and carefree nature. Sometimes, he also acts as dumb and naïve.
Look at the funny recreation of this dumb-witted character. Does this recreation scare you?
03Mr. Krabs (Sponge Bob Square Pants)
Sponge Bob Square Pants is one of the cartoons that have many different and funny-looking creatures. Mr. Krabs is one of those characters. He is a money-minded and miserly creature. He is the owner of the Krusty Krab fast food restaurant, where Sponge Bob works as a cook. He has a teenage daughter named Pearl and he can do anything to see her happy. He exhibits romantic feelings for Mrs. Puff.
Does this funny creature from the Sponge Bob series look funny in real life too?
04Patrick Star (Sponge Bob Square Pants)
Patrick Star is again a character from the cartoon show Sponge Bob Square Pants. He is the best friend of the main protagonist Sponge Bob, who lives 2 houses away from Sponge Bob’s house. He is a lazy, fat, and stupid pink-colored starfish. His character makes the show funnier and more interesting for kids.
How would you react when you will see this funny creature from Sponge Bob in real life? His 3D recreation seems a bit scary like a monster in real life.
05Plankton (Sponge Bob Square Pants)
Plankton was once the best friend of Mr. Krabs but now they both share a rivalry bond. He is married to Karen and owns a fast food restaurant named Chum Bucket Restaurant in competition with Mr. Krabs’ Restaurant. He plays the antagonist character in the series. His restaurant doesn’t work as successfully as Krusty Krab Restaurant. In rivalry, he often comes up with different plans and tricks to outwit Mr. Krabs and steal the secret recipe of his famous Krabby Patty Burger, but never succeeds.
Have a look at the 3D recreation of this funny character from the series.
06Homer (The Simpsons)
The Simpsons is an animated series that revolves around the life of an American family. The Simpson family has five members named Homer, Marge, Bart, Lisa, and Maggie. Homer Simpson is the main character of this series. He lives in Springfield and is employed as a Safety Inspector at Springfield Nuclear Power Plant. He is married to Marge and is the father of three children – Bart, Lisa, and Maggie. The series depicts a strong bond of love and care for each other in the family.
Have a look at this realistic 3D recreation of Homer Simpson.
07Bugs Bunny (Looney Tunes)
Looney Tunes is entertaining people of all ages due to its great and funny characters. Bugs Bunny is one of our favorite characters from the animated cartoon show Looney Tunes. He is the main protagonist and the most popular character of the series. Kids love him the most because of his mischievous acts in the show. He looks too funny with a mouth filled with carrots and wearing funny costumes. This unique character has a great fan following all over the world.
The 3D recreation of this famous cartoon character is funny and scary at the same time.
08Sally (The Nightmare Before Christmas)
As the name suggests, The Nightmare Before Christmas is an American dark fantasy animated movie. This animated movie has received great financial success and appreciation for its wonderful characters and music.
Sally is a shy ragdoll created by a scientist Doctor Finkelstein. She secretly loves Jack – the main Protagonist of the movie. She tells him not to mix the preparation of Christmas with the Halloween party.
Look at her realistic 3D recreation by Tatiana, popularly known as TatiMoons.
09Stitch (Lilo and Stitch)
Lilo and Stitch is also an animated American movie. It is a science fiction and comedy movie that attracts the interest of people of all age groups. The story of this animated movie revolves around the two main characters named Lilo and Stitch. Lilo is a 7-year old orphan girl whose parents died in a car accident. She has a pet named Stitch.
The original name of Stitch is Experiment 626. He was illegally created by a scientist Jumba Jokiba through a genetic experiment. Lilo adopts him thinking that he is an innocent creature, she doesn’t know about his birth and origin.
Have a look at this realistic 3D recreation of Stitch’s character. Isn’t it scary?
10 Popeye (Popeye – The Sailor Man)
Popeye – The Sailor Man is another famous cartoon series. Popeye is the main protagonist of this series. He has a girlfriend named Olive Oyl. This series depicts the love triangle between Popeye, Olive, and Bluto. He is an uneducated sailor man who gets energy by eating spinach. He often comes up with non-realistic solutions to different problems and helps the police by investigating different cases. He has a versatile tobacco smoking pipe that sometimes acts as a whistle, and he even intakes the spinach through his pipe.
In the cartoon films, he looks funny, but this 3D recreation of his character is a bit scary.
Part 2 How Do Cartoon Characters Reimagined As Realistic 3D Animation
Nowadays, it has become easier to create and turn your imagination into a cartoon character with different online 3D animators. This makes storytelling easier and funny and it is a great way to engage children. Out of all the 3D animation tools, Filmora will assist you to create the best 3D version of your favorite cartoon character.
Filmora has various smart features that help you to turn any image into realistic 3D animation. You can create great animations using Wondershare Filmora Video Editor within a couple of hours. It offers you many different features that help in convenient customization.
● Ending Thoughts →
● Being a cartoon lover, we hope that you would have liked the 3D recreation of your favorite cartoons. Some of these 3D recreations are so scary that you would just run away from them in real life and some look like real monster cartoons.
● AI combined with digital software like Filmora makes it easier to create these 3D versions of famous cartoon characters.
● With Filmora, you don’t need to spend hours sketching cartoon characters on paper. You can easily create great and realistic animations digitally.
Best 10 Video to GIF Converters: Top Picks
Best 10 Video to GIF Converters: Top Picks
An easy yet powerful editor
Numerous effects to choose from
Detailed tutorials provided by the official channel
Having trouble converting your videos to GIF? Browse the top 10 converters to sort this out!
In this article
01 [Why GIFs are Widely Used and Popular?](#Part 1)
02 [Top 10 Ways to Turn Video into GIF](#Part 2)
Part 1 Why GIFs are Widely Used and Popular?
If you take a poll on the watch preference of GIF versus videos, most of votes you get would be in favor of watching GIFs. There are obvious reasons to the fact that anyone would prefer watching a GIF over a video, irrespective of its length. Some major ones that make it quite annoying to watch videos include the following:
● To begin with, you need to turn the video on and off, depending on your choice of watching a video or surfing through stories and feeds, failing which you get to hear additional sounds through your feed from the already running video. You further need to stop the music or go for a volume control in case you are not interested to watch the video.
● Most of the videos you run turn up to be irrelevant or uninteresting through the middle, but you don’t have a choice to make bit adjustments. If however possible, the method is not quite convenient. You may need to visit a different site in case you run a video that is not integrated with webpage of your searched content, wait for the portal’s interface to load or watch an advertisement.
● GIFs, on the other hand, do not require pausing or turning off, and run automatically. You also don’t need to mute any sounds. These ensure to-the-point message delivery and don’t divert your attention from the primary content you visit the webpage for.
Owing to the above, most of us are now much interested to convert videos to GIFs for an exact, impactful and to the point content creation and sharing. See through the next sections of this article to learn about the best video to GIF conversion tools and software.
Part 1 Top 10 Ways to Turn Video into GIF
Considering the credibility of GIFs, you may often require to convert your long videos into short and content specific GIFs. Given below are the 10 best methods to cater to the need of video to GIF conversion:
01Filmora
Wondershare Filmora Video Editor is one among the most popular and easy methods to convert videos to GIFs. It is compatible with almost all common video formats and is loaded with a plethora of exciting effects and editing tools. Take the following steps to create GIFs from videos using this application:
Wondershare Filmora
Get started easily with Filmora’s powerful performance, intuitive interface, and countless effects!
Try It Free Try It Free Try It Free Learn More >


Step 1: Import Your Video
Launch Filmora and import your desired video in the app’s welcome window. To do this, click on ‘New Project’ followed by ‘Import’ option from the drop down menu to add your video to the Filmora.

Step 2: Timeline Dragging
Add your video to the app’s timeline using the ‘Drag and Drop’ method. You can also extract video frames by taking screenshots and merge these images into your GIF from the media library.

Step 3: Explore Your Editing Skills
You can now edit the imported video in the timeline using a range of interesting effects. Crop, trim, split or make speed adjustments to give your video a catchy look.

Step 4: Include Messages
Try adding texts and supplementary elements to deliver impactful messages through your creation.

Step 5: It’s Time to Share!
Click ‘Export’ to save your GIF to your device. You are now ready to post your work in your social communities to get the most deserved attention of your peers!

02YouTube to GIF
This one is a simple and user-friendly video to GIF converter. You can convert videos to GIFs from your PC or other online platforms with this converter. The converter allows you to play with a variety of editing effects to make your creation more interesting. All you need to do is the following:
● In the video URL bar, type ‘gif’ after ‘www.’ and you will be redirected to converter’s working window. Set the GIF time interval or apply specific effects using the tools from the panel in the left of the working window.


● To set the video time frame, highlight it in the video timeline. Set the desired interval using the ‘Start Time’ and ‘End Time’ options.

● To add a new visual effect, select it from the menu. Below the video timeline, a row of parameters will get displayed. Set the effect parameters to make desired changes.
● Click ‘Create GIF’. In the ‘Settings’ menu, you can rename and add tags to your creation and even make it private.

● That’s it! You can download your GIF now. You may get a converter purchase offer for enabling advanced features. While most users prefer sticking to the free version, it is up to you whether to decline or accept the purchase offer.
● The ‘Download’ feature is exclusive to registered users. However, if you don’t prefer creating an account, just open the GIF download link in a separate tab’s ‘Direct Link’ row. Alternatively, you can replace ‘gif’ with ‘conv’ in the video URL bar and choose ‘Convert to GIF’. However, this process may take some extra minutes.

03Giphy GIF Maker
This is an editing tool that you can use to convert video to GIF online. This one is a reliable converter tool with a user-cohesive interface. It is a simple video editor that is available to you for free. All you need to do is mentioned below:
Step 1: Load your Video
Go to the official app website and paste your desired video link in the search bar. Your video gets uploaded to the app’s editor screen. Specify the time frame and check out your GIF’s preview.

Step 2: Let’s Go Editing!
Select ‘Continue to Decorate’ to edit your GIF with texts, effects, frames and filters. You can even go for a straight upload if your video doesn’t require customization.

Step 3: Time to Share!
Select ‘Continue to Upload’ and add required tags. Tap ‘Upload to Giphy’ to make a social media post or add it to the app’s website through a specific share code.
04Wondershare TunesGo
This is an effective video to GIF creator tool, loaded with extensive features. You can use this application to convert videos, live photos and multiple snaps into interesting GIFs. TunesGo gives you the freedom to edit your work in your own style with a variety of effects. Here’s what you need to do:

Step 1: Launch TunesGo
Download, install and launch the app into your PC. You may be asked for a device connection setup, but you can skip that in case GIF creation is your only requirement.

Step 2: Upload your Video
In the app’s welcome screen, navigate to ‘Toolbox’ at the top. From the drop down interface, choose ‘GIF Maker’. In the new window that pops-up next, click on ‘Add’ to upload the desired video to the app from your PC.

Step 3: Let’s Create!
Set the required time frame for your GIF in the app’s timeline and tap the ‘Create GIF’ button to start the conversion process. On completion, your work gets automatically saved in the ‘Pictures’ folder in your PC. You can also customize your target location.

05Vimeo
Vimeo is also a quick, 3-stepvideo to GIF converter. However, you need to have a Vimeo account to take up the conversion process. This is an easy and hassle free GIF creator, that adheres to your creation needs within minutes. Here’s what you need to do:
Step 1: Upload Your Video
Log in to your Vimeo account. In the opening window, select ’Upload’ from the toolbar at the top. ‘Drag and Drop’ or click ‘Choose Files’ to upload the desired video from your device.

Step 2: Create Your GIF
After you are done uploading the video, select ‘Create a GIF’ from the sidebar at the left. You will be directed to the GIF Editor window. Select a loop section from the video and set a time frame of maximum 6 seconds in the video timeline. Now click ‘Create GIF’.


Step 3: Export Your Creation
Your GIF is ready to download and share. You can also embed your GIF by generating embed codes for specific platforms.
06 Adobe Photoshop
This one is one f the most popular editing applications you can use to make GIF out of video. It’s simple and user-friendly interface does not require you to possess a Photoshop mastery for the conversion purpose. Here’s what you need to follow:
Step 1: Search Your Video
Find a video of your choice from a desired platform. In case you want a YouTube video, add ‘ss’ prior to the video’s service name in YouTube’s URL bar.
STEP 2: Edit Your Video
Use any preferable video splitters and editors to crop, trim and add interesting effects to your video and set a maximum time frame of 3 seconds.
Step 3: Create GIF
Open your edited video in Adobe Photoshop and tap ‘File Import-Video frames into layers’.

Step 4: Adjust Settings
Make required setting adjustments and click on ‘File-Save for Web’. Try adjusting image resolution and color range if your file size exceeds 10 MB.

Step 5: Save Your Work
In the ’Files’ tab at the top, select ‘Save’ and choose the ‘.gif’ extension in the ‘File Type’ dialog box to save your creation to your PC.
07Convertio
This converter provides a simple, 3-step process to create GIF from video. Either use it as a browser extension or download it from Google Chrome Webstore. Take the following steps to convert videos to GIF online.
● Upload your desired video to the service timeline. You can either choose files directly or ‘Drag and Drop’ them from your device.
● Select ‘Convert’ to make GIF from your uploaded video.
● Tap ‘Download’ to save your creation.

You can use this service to make different format conversions. However, this converter does not allow you to edit or add effects your GIF.
08MakeAGif
You can use this tool as a GIF video maker online to create, exchange and share GIFs on different platforms. Additionally, you also get the flexibility to use already saved images in your device to add them to your GIF. The app’s basic version allows you to create GIFs without watermarks. To add watermarks, you will need an account on the app. To convert videos to GIFs using this tool, you should take the following steps:
Step 1: Upload Your Video
In the app’s welcome screen, click on ‘Video to GIF’ and upload a desired video in the editor timeline. Add effects and make speed and time frame adjustments. When satisfied, tap ‘Continue to Publishing’.

Step 2: Add Names and Tags
In the publishing window, give a suitable name and add required tags to your edited video to make it easily identifiable. When you are done, click on ‘Create a GIF’ from the bottom right.

Step 3: Ready to Share!
You can now share your created GIF across social media platforms.

09Adobe Premiere
Similar to Adobe Photoshop, Adobe Premiere too is quite a preferred application for creating GIFs from videos. This is a simple, quick and free application that converts your videos to GIFs in a span of few minutes. Here’s what you need to do to go about the process:

Step 1: Edit your Video
Add a video of your choice in the Adobe Premiere timeline and play with your editing creativity to add desired effects and filters to it. Make sure to set requisite time frames to your edit.

Step 2: Prepare an Export
Click into the app’s video timeline, and prepare a file export using the following path:
File> Export> Media

Step 3: Settings Adjustments
In the Media Export window, navigate to the ‘Format’ tab. From the drop down menu, choose ‘Animated GIF’. Here, you can add your gif file, select its target destination and adjust the required settings.

Step 4: Export Your Work
Click ‘Export’ to share your creation on social media or click on ‘Queue’ to send your GIF to a specific media encoder.

1010. Movavi Video Converter
This is one of the latest video converter software you can rely on to make GIF from video files. This software allows you to create top quality animated GIFs and is compatible with a variety of video formats. Using this converter, you can create amazing GIFs in 5 quick steps: here’s what you need to follow:
Step 1: Download and Install the Software
To begin, download the converter software from its official site and adhere to the user instructions to install the same in your system.
Step 2: Upload Your Video
In the software’s opening window, click on ‘Add Media’ followed by ‘Add Video’ and select a desired video from your system to upload on the Movavi video timeline.

Step 3: Trim Your Video
Select ‘Edit’ from the right of your video file. In the editing window, specify the initial cut of the video by displacing the marker to the desired point. Click on ‘Scissors’ to add multiple cut points to your video. You can even drag the cut points around the editor timeline. Choose the unvented sections and click ‘Trash Can’. When the result satisfies you, click ‘Done’.

Step 4: Choose a Conversion Format
Navigate to the ‘Images’ tab and select ‘GIF’ and set an adequate size for the GIF. Here, you can adjust quality, frame size and rate and resize method using the ‘Cogwheel’ tool.

Step 5: Let’s Get Converting!
Tap ‘Convert’ and wait for the conversion to finish. You will be automatically directed to the folder where your converted files get saved.

● Key Takeaways from This Episode →
● GIFs are short, to the point and convenient to access, providing exact and impactful message delivery.
● The software market is flooded with a variety of editing tools to convert your dull videos to catchy GIFs.
● Filmora is a quick and smart editing tool that envisages your GIF creating experience with a range of exciting features.
Having trouble converting your videos to GIF? Browse the top 10 converters to sort this out!
In this article
01 [Why GIFs are Widely Used and Popular?](#Part 1)
02 [Top 10 Ways to Turn Video into GIF](#Part 2)
Part 1 Why GIFs are Widely Used and Popular?
If you take a poll on the watch preference of GIF versus videos, most of votes you get would be in favor of watching GIFs. There are obvious reasons to the fact that anyone would prefer watching a GIF over a video, irrespective of its length. Some major ones that make it quite annoying to watch videos include the following:
● To begin with, you need to turn the video on and off, depending on your choice of watching a video or surfing through stories and feeds, failing which you get to hear additional sounds through your feed from the already running video. You further need to stop the music or go for a volume control in case you are not interested to watch the video.
● Most of the videos you run turn up to be irrelevant or uninteresting through the middle, but you don’t have a choice to make bit adjustments. If however possible, the method is not quite convenient. You may need to visit a different site in case you run a video that is not integrated with webpage of your searched content, wait for the portal’s interface to load or watch an advertisement.
● GIFs, on the other hand, do not require pausing or turning off, and run automatically. You also don’t need to mute any sounds. These ensure to-the-point message delivery and don’t divert your attention from the primary content you visit the webpage for.
Owing to the above, most of us are now much interested to convert videos to GIFs for an exact, impactful and to the point content creation and sharing. See through the next sections of this article to learn about the best video to GIF conversion tools and software.
Part 1 Top 10 Ways to Turn Video into GIF
Considering the credibility of GIFs, you may often require to convert your long videos into short and content specific GIFs. Given below are the 10 best methods to cater to the need of video to GIF conversion:
01Filmora
Wondershare Filmora Video Editor is one among the most popular and easy methods to convert videos to GIFs. It is compatible with almost all common video formats and is loaded with a plethora of exciting effects and editing tools. Take the following steps to create GIFs from videos using this application:
Wondershare Filmora
Get started easily with Filmora’s powerful performance, intuitive interface, and countless effects!
Try It Free Try It Free Try It Free Learn More >
Step 1: Import Your Video
Launch Filmora and import your desired video in the app’s welcome window. To do this, click on ‘New Project’ followed by ‘Import’ option from the drop down menu to add your video to the Filmora.
Step 2: Timeline Dragging
Add your video to the app’s timeline using the ‘Drag and Drop’ method. You can also extract video frames by taking screenshots and merge these images into your GIF from the media library.
Step 3: Explore Your Editing Skills
You can now edit the imported video in the timeline using a range of interesting effects. Crop, trim, split or make speed adjustments to give your video a catchy look.
Step 4: Include Messages
Try adding texts and supplementary elements to deliver impactful messages through your creation.
Step 5: It’s Time to Share!
Click ‘Export’ to save your GIF to your device. You are now ready to post your work in your social communities to get the most deserved attention of your peers!
02YouTube to GIF
This one is a simple and user-friendly video to GIF converter. You can convert videos to GIFs from your PC or other online platforms with this converter. The converter allows you to play with a variety of editing effects to make your creation more interesting. All you need to do is the following:
● In the video URL bar, type ‘gif’ after ‘www.’ and you will be redirected to converter’s working window. Set the GIF time interval or apply specific effects using the tools from the panel in the left of the working window.
● To set the video time frame, highlight it in the video timeline. Set the desired interval using the ‘Start Time’ and ‘End Time’ options.
● To add a new visual effect, select it from the menu. Below the video timeline, a row of parameters will get displayed. Set the effect parameters to make desired changes.
● Click ‘Create GIF’. In the ‘Settings’ menu, you can rename and add tags to your creation and even make it private.
● That’s it! You can download your GIF now. You may get a converter purchase offer for enabling advanced features. While most users prefer sticking to the free version, it is up to you whether to decline or accept the purchase offer.
● The ‘Download’ feature is exclusive to registered users. However, if you don’t prefer creating an account, just open the GIF download link in a separate tab’s ‘Direct Link’ row. Alternatively, you can replace ‘gif’ with ‘conv’ in the video URL bar and choose ‘Convert to GIF’. However, this process may take some extra minutes.
03Giphy GIF Maker
This is an editing tool that you can use to convert video to GIF online. This one is a reliable converter tool with a user-cohesive interface. It is a simple video editor that is available to you for free. All you need to do is mentioned below:
Step 1: Load your Video
Go to the official app website and paste your desired video link in the search bar. Your video gets uploaded to the app’s editor screen. Specify the time frame and check out your GIF’s preview.
Step 2: Let’s Go Editing!
Select ‘Continue to Decorate’ to edit your GIF with texts, effects, frames and filters. You can even go for a straight upload if your video doesn’t require customization.
Step 3: Time to Share!
Select ‘Continue to Upload’ and add required tags. Tap ‘Upload to Giphy’ to make a social media post or add it to the app’s website through a specific share code.
04Wondershare TunesGo
This is an effective video to GIF creator tool, loaded with extensive features. You can use this application to convert videos, live photos and multiple snaps into interesting GIFs. TunesGo gives you the freedom to edit your work in your own style with a variety of effects. Here’s what you need to do:
Step 1: Launch TunesGo
Download, install and launch the app into your PC. You may be asked for a device connection setup, but you can skip that in case GIF creation is your only requirement.
Step 2: Upload your Video
In the app’s welcome screen, navigate to ‘Toolbox’ at the top. From the drop down interface, choose ‘GIF Maker’. In the new window that pops-up next, click on ‘Add’ to upload the desired video to the app from your PC.
Step 3: Let’s Create!
Set the required time frame for your GIF in the app’s timeline and tap the ‘Create GIF’ button to start the conversion process. On completion, your work gets automatically saved in the ‘Pictures’ folder in your PC. You can also customize your target location.
05Vimeo
Vimeo is also a quick, 3-stepvideo to GIF converter. However, you need to have a Vimeo account to take up the conversion process. This is an easy and hassle free GIF creator, that adheres to your creation needs within minutes. Here’s what you need to do:
Step 1: Upload Your Video
Log in to your Vimeo account. In the opening window, select ’Upload’ from the toolbar at the top. ‘Drag and Drop’ or click ‘Choose Files’ to upload the desired video from your device.
Step 2: Create Your GIF
After you are done uploading the video, select ‘Create a GIF’ from the sidebar at the left. You will be directed to the GIF Editor window. Select a loop section from the video and set a time frame of maximum 6 seconds in the video timeline. Now click ‘Create GIF’.
Step 3: Export Your Creation
Your GIF is ready to download and share. You can also embed your GIF by generating embed codes for specific platforms.
06 Adobe Photoshop
This one is one f the most popular editing applications you can use to make GIF out of video. It’s simple and user-friendly interface does not require you to possess a Photoshop mastery for the conversion purpose. Here’s what you need to follow:
Step 1: Search Your Video
Find a video of your choice from a desired platform. In case you want a YouTube video, add ‘ss’ prior to the video’s service name in YouTube’s URL bar.
STEP 2: Edit Your Video
Use any preferable video splitters and editors to crop, trim and add interesting effects to your video and set a maximum time frame of 3 seconds.
Step 3: Create GIF
Open your edited video in Adobe Photoshop and tap ‘File Import-Video frames into layers’.
Step 4: Adjust Settings
Make required setting adjustments and click on ‘File-Save for Web’. Try adjusting image resolution and color range if your file size exceeds 10 MB.
Step 5: Save Your Work
In the ’Files’ tab at the top, select ‘Save’ and choose the ‘.gif’ extension in the ‘File Type’ dialog box to save your creation to your PC.
07Convertio
This converter provides a simple, 3-step process to create GIF from video. Either use it as a browser extension or download it from Google Chrome Webstore. Take the following steps to convert videos to GIF online.
● Upload your desired video to the service timeline. You can either choose files directly or ‘Drag and Drop’ them from your device.
● Select ‘Convert’ to make GIF from your uploaded video.
● Tap ‘Download’ to save your creation.
You can use this service to make different format conversions. However, this converter does not allow you to edit or add effects your GIF.
08MakeAGif
You can use this tool as a GIF video maker online to create, exchange and share GIFs on different platforms. Additionally, you also get the flexibility to use already saved images in your device to add them to your GIF. The app’s basic version allows you to create GIFs without watermarks. To add watermarks, you will need an account on the app. To convert videos to GIFs using this tool, you should take the following steps:
Step 1: Upload Your Video
In the app’s welcome screen, click on ‘Video to GIF’ and upload a desired video in the editor timeline. Add effects and make speed and time frame adjustments. When satisfied, tap ‘Continue to Publishing’.
Step 2: Add Names and Tags
In the publishing window, give a suitable name and add required tags to your edited video to make it easily identifiable. When you are done, click on ‘Create a GIF’ from the bottom right.
Step 3: Ready to Share!
You can now share your created GIF across social media platforms.
09Adobe Premiere
Similar to Adobe Photoshop, Adobe Premiere too is quite a preferred application for creating GIFs from videos. This is a simple, quick and free application that converts your videos to GIFs in a span of few minutes. Here’s what you need to do to go about the process:
Step 1: Edit your Video
Add a video of your choice in the Adobe Premiere timeline and play with your editing creativity to add desired effects and filters to it. Make sure to set requisite time frames to your edit.
Step 2: Prepare an Export
Click into the app’s video timeline, and prepare a file export using the following path:
File> Export> Media
Step 3: Settings Adjustments
In the Media Export window, navigate to the ‘Format’ tab. From the drop down menu, choose ‘Animated GIF’. Here, you can add your gif file, select its target destination and adjust the required settings.
Step 4: Export Your Work
Click ‘Export’ to share your creation on social media or click on ‘Queue’ to send your GIF to a specific media encoder.
1010. Movavi Video Converter
This is one of the latest video converter software you can rely on to make GIF from video files. This software allows you to create top quality animated GIFs and is compatible with a variety of video formats. Using this converter, you can create amazing GIFs in 5 quick steps: here’s what you need to follow:
Step 1: Download and Install the Software
To begin, download the converter software from its official site and adhere to the user instructions to install the same in your system.
Step 2: Upload Your Video
In the software’s opening window, click on ‘Add Media’ followed by ‘Add Video’ and select a desired video from your system to upload on the Movavi video timeline.
Step 3: Trim Your Video
Select ‘Edit’ from the right of your video file. In the editing window, specify the initial cut of the video by displacing the marker to the desired point. Click on ‘Scissors’ to add multiple cut points to your video. You can even drag the cut points around the editor timeline. Choose the unvented sections and click ‘Trash Can’. When the result satisfies you, click ‘Done’.
Step 4: Choose a Conversion Format
Navigate to the ‘Images’ tab and select ‘GIF’ and set an adequate size for the GIF. Here, you can adjust quality, frame size and rate and resize method using the ‘Cogwheel’ tool.
Step 5: Let’s Get Converting!
Tap ‘Convert’ and wait for the conversion to finish. You will be automatically directed to the folder where your converted files get saved.
● Key Takeaways from This Episode →
● GIFs are short, to the point and convenient to access, providing exact and impactful message delivery.
● The software market is flooded with a variety of editing tools to convert your dull videos to catchy GIFs.
● Filmora is a quick and smart editing tool that envisages your GIF creating experience with a range of exciting features.
All About Types of Motion Graphics
All about Types of Motion Graphics
An easy yet powerful editor
Numerous effects to choose from
Detailed tutorials provided by the official channel
Motion graphics has bought an ultimate change in the sectors of creative industries. In this guide you will get to know the various types of motion graphics and some examples of the same.
In this article
01 [What are Motion Graphics?](#Part 1)
02 [15 Types of Motion Graphics You Should Know](#Part 2)
03 [8 Stunning Motion Graphic Examples](#Part 3)
Part 1 What are Motion Graphics?
01Definition of Motion Graphics
Motion graphics simples means that graphics which are in motion or movement. In other words, you can say that such graphics create an illusion of movement on the screen and most commonly they are combined with various audios for different purposes of multimedia. Although motion graphics are not like animations as here are some limitations of producing the content.
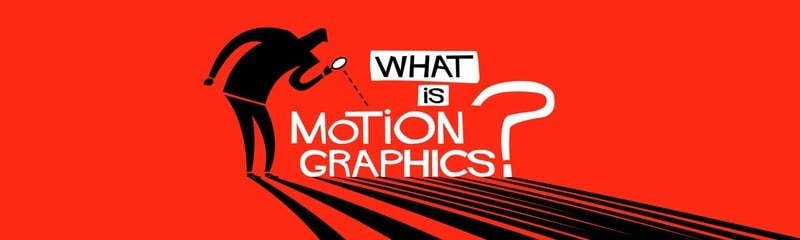
02Motion Graphics vs. Video: is there a Difference?
You can say that every graphic motion is a video. To understand this you will need to know the applications of motion graphics and videos. Here mentioned are some of them:
● If you are creating something in the format of animation then it can done via motion graphics and videos too.
● When you are making a live action video then that could not be created in motion graphics but in the video format.
● Although if you are creating live action videos with animation overlay then you can use motion graphics as well as video formats too.
● Next is the slideshow video format, here the images and videos can be created in slideshow using both motion graphics and videos.
03When to Use Motion Graphics and Video?
Well, the question is how you can get to know that motion graphics is the best choice for creating your visual content. The answer depends on several factors including the users’ experience, the reach that you want to make and a lot more. Here are few factors to consider:
Enhance the users’ experience - using the motion graphics to enhance the users’ experience can be an excellent idea. In motion graphics the user can make benefits of the features like rewind and fast forwarding it. Here they can also get the skip sections which are not their way of interacting with the videos. Thus, you can curate as well as boost your audience experience by suing such content.
Attention at expo booth - At different platforms the users prefer to watch the videos in different sound effects. This means on Facebook the videos are watched on mute mostly. This is the way how people interact on different platforms. So, as a creator if you want to seek attention then you will need to prepare the content as per the audience demands. This is what motion graphics can do for you at the expo booths and various platforms.
Conversions and engagement - Users’ engagement and conversions are the two important needs of any content creator. Video marketing is an excellent idea to boost both of them. All you have to do is invest in high quality motion graphicssound effects videos and you can see that the users will take interest in your landing pages and will ultimately boost your conversion rates.
Part 2 Types of Motion Graphics You Should Know
There are several types of best motion graphicsvideos that can effectively suit your needs. You only need to choose the perfect amongst them and mentioned here are some different types of motion graphics videos:
01Explainer videos
This is the commonest type of motion graphic videos. These videos tell about the working of your product. If you are marketing or selling your product then you will definitely going to need these videos. Needing these videos do not mean that you are having issues in your product, this simply boosts the value of your product and can also be used as marketing of that brand and product.
02Promotional videos
In these videos, your main aim will be grabbing the attentions and conversions of the audience. This is really important as a business and you can easily achieve it through the motion graphics as it will focus on each and every important and crucial aspect of your product and business.
03Emotive videos
If you want your audience to feel something about your brand and product as well as take immediate action then these emotive videos are the perfect ones. This can connect your audience emotionally.

04Logos and icons
There is nothing better than a logo to make your brand keep remembered for a long period of time. This becomes more interesting if the logo will be in motion and this is what the logo motion graphics known for. Icons are equally important for any brand and if you manipulate them into motions then it could be really beneficial for you.
05Infographics
No matter if you are showing interesting stats of Infographics, the audience can skim over it. The reason is it could be boring sometimes. However, using the movements in those Infographics stats can keep the eye of your audience still on it.
06GIFs
If you are active on social media platforms, then you would know how GIFs work on various platforms. These are a pretty popular type of motion graphics that is greatly loved by the audience. Some of the live action videos are turned into GIFs and sometimes they are created especially for that purpose only.
07Animated typography
In simple words this can be said as the moving text. Sometimes it is also termed as the kinetic typography and you can use it to create the explainer videos too. These videos are great in order to add a brand wordmark to your products and brands.
08UI and UX animations
These can also be said as a part of explainer videos only but they offer you with a different feature. This means that you can expect the same interface in which it is explained. Moreover, you will be getting some extra elements too.

09Template editing
The existing templates that you might be using to create the motion graphics can be edited and transformed into more advanced ones. You can even add your customized templates to the purpose or you can also use the tools for making your videos better.
10Animated ads
The animated ads are designed to highlight the key features of your business, product or brand in a short span of time. If this is done in a more engaging manner then this will ultimately boost your conversions as well as the customers’ engagement too. These work as the explainer videos but are little bit different from them.

11Graphic loops
These are short animated videos that tend to loop continuously. You have to use the vector, photo elements, text, etc. These video loops are eye-catching and grabs the attention faster.
12Animated titles
The animated titles can greatly work for expressing the message in a simpler way to the audience. These titles are somewhere in the category of animated typography but the use can be different. You can use them to enhance a particular message, pointing a specific feature or object in that particular video.
13Animated assets
These are also very much similar to the animated titles only but they work pretty similar like the PNG images. These are completely transparent so that they can be placed in your video footage easily. These animated assets can be perfect for the intros, transitions or outros. The animated titles and assets can add a spice to your videos.

14Presentations
You can be an excellent speaker sometimes, but if you are not able to present the ideas on screen in an effective way then it could be a barrier in the success of your presentations. Using the motion graphics in presentations, you can boost the interest of your audience as well as keep them engaged.
15Instructional videos
This video works similar to that of explainer videos. The instructional videos are great to teach and make your audience learn about the implementation of your product and brand. You can go for using the live-action videos for this purpose but motion graphics is best if you want to go with the trend.
Part 3 8 Stunning Motion Graphic Examples
01Haikus in motion
In these videos there is a use of expressive imagery and those imagery effects are perfect to convey the message. Here the motion graphics bring the poetry into life. The poetry sounds to be so true in the videos of Haikus.
02Cinematics
In this beautiful animation series you can see the charm of classic cinema in a completely fresh manner. These videos bring the classic cinema and its stories as well as characters in to life in a fresh and new way. The sound and other effects make the videos nostalgic.
03Subprime
By these videos, you can understand the market crash of the US in an effective way. The motion graphics that are used in these videos can also be used in other videos of same kind with the realistic as well as highly advanced effects.
04Digital Ocean
In order to make the short videos impactful, you can take the examples of videos from Digital Ocean. The videos are short yet very compiling and perfect to deliver the message in short span of time.
05Better light, better life
These videos are created to spread the message that how important light is in people’s life. Perfectly sound in delivering the message you can use these videos to create awareness amongst your audience.
06Reddit
If you want to see how motion graphics work in light hearted style then this is the perfect example of it. These videos also have a pinch of humor in them and are so vibrant too. For promoting any particular website or any mobile application then these videos created through the motion graphics can be an excellent referral.
07Quadro
The videos of Quadro which are created with the help of Wondershare Filmora Video Editor tool are perfect in passing their message. The creation is so dynamic and vibrant that you need not think about the quality. Filmora tool is perfect for adding such vibrancy and dynamics to the motion graphic videos. Many features like text to speech, adding speech and text, conversion of script into videos makes it a good choice to be used for video creations.
Wondershare Filmora
Get started easily with Filmora’s powerful performance, intuitive interface, and countless effects!
Try It Free Try It Free Try It Free Learn More >
08Scribble live
This is an excellent example of motion graphics video in which you can understand the illustrations in a simpler way and that also without any chaos. The narrative of the video is so clear that it gives you a perfect illustration of how the software works. It also suites in his appearance as well as provide you with an effective guide.
● Key Takeaways from This Episode →
● Motion graphics can be said as the subset of graphic designing. Here you can add motion to your ideas when you are making them real. This can be beneficial in so many ways as well as it is loved by the audience too.
● There are different types of motion graphics that are used for different purposes. Moreover, you can choose amongst them which are most suitable for your needs.
● If you are willing to create the motion graphics videos then you can take the help of mentioned examples for understanding the way of creating such graphics. Also it is worth considering that many tools like Wondershare Filmora, are available for creating such motion graphics
Motion graphics has bought an ultimate change in the sectors of creative industries. In this guide you will get to know the various types of motion graphics and some examples of the same.
In this article
01 [What are Motion Graphics?](#Part 1)
02 [15 Types of Motion Graphics You Should Know](#Part 2)
03 [8 Stunning Motion Graphic Examples](#Part 3)
Part 1 What are Motion Graphics?
01Definition of Motion Graphics
Motion graphics simples means that graphics which are in motion or movement. In other words, you can say that such graphics create an illusion of movement on the screen and most commonly they are combined with various audios for different purposes of multimedia. Although motion graphics are not like animations as here are some limitations of producing the content.
02Motion Graphics vs. Video: is there a Difference?
You can say that every graphic motion is a video. To understand this you will need to know the applications of motion graphics and videos. Here mentioned are some of them:
● If you are creating something in the format of animation then it can done via motion graphics and videos too.
● When you are making a live action video then that could not be created in motion graphics but in the video format.
● Although if you are creating live action videos with animation overlay then you can use motion graphics as well as video formats too.
● Next is the slideshow video format, here the images and videos can be created in slideshow using both motion graphics and videos.
03When to Use Motion Graphics and Video?
Well, the question is how you can get to know that motion graphics is the best choice for creating your visual content. The answer depends on several factors including the users’ experience, the reach that you want to make and a lot more. Here are few factors to consider:
Enhance the users’ experience - using the motion graphics to enhance the users’ experience can be an excellent idea. In motion graphics the user can make benefits of the features like rewind and fast forwarding it. Here they can also get the skip sections which are not their way of interacting with the videos. Thus, you can curate as well as boost your audience experience by suing such content.
Attention at expo booth - At different platforms the users prefer to watch the videos in different sound effects. This means on Facebook the videos are watched on mute mostly. This is the way how people interact on different platforms. So, as a creator if you want to seek attention then you will need to prepare the content as per the audience demands. This is what motion graphics can do for you at the expo booths and various platforms.
Conversions and engagement - Users’ engagement and conversions are the two important needs of any content creator. Video marketing is an excellent idea to boost both of them. All you have to do is invest in high quality motion graphicssound effects videos and you can see that the users will take interest in your landing pages and will ultimately boost your conversion rates.
Part 2 Types of Motion Graphics You Should Know
There are several types of best motion graphicsvideos that can effectively suit your needs. You only need to choose the perfect amongst them and mentioned here are some different types of motion graphics videos:
01Explainer videos
This is the commonest type of motion graphic videos. These videos tell about the working of your product. If you are marketing or selling your product then you will definitely going to need these videos. Needing these videos do not mean that you are having issues in your product, this simply boosts the value of your product and can also be used as marketing of that brand and product.
02Promotional videos
In these videos, your main aim will be grabbing the attentions and conversions of the audience. This is really important as a business and you can easily achieve it through the motion graphics as it will focus on each and every important and crucial aspect of your product and business.
03Emotive videos
If you want your audience to feel something about your brand and product as well as take immediate action then these emotive videos are the perfect ones. This can connect your audience emotionally.
04Logos and icons
There is nothing better than a logo to make your brand keep remembered for a long period of time. This becomes more interesting if the logo will be in motion and this is what the logo motion graphics known for. Icons are equally important for any brand and if you manipulate them into motions then it could be really beneficial for you.
05Infographics
No matter if you are showing interesting stats of Infographics, the audience can skim over it. The reason is it could be boring sometimes. However, using the movements in those Infographics stats can keep the eye of your audience still on it.
06GIFs
If you are active on social media platforms, then you would know how GIFs work on various platforms. These are a pretty popular type of motion graphics that is greatly loved by the audience. Some of the live action videos are turned into GIFs and sometimes they are created especially for that purpose only.
07Animated typography
In simple words this can be said as the moving text. Sometimes it is also termed as the kinetic typography and you can use it to create the explainer videos too. These videos are great in order to add a brand wordmark to your products and brands.
08UI and UX animations
These can also be said as a part of explainer videos only but they offer you with a different feature. This means that you can expect the same interface in which it is explained. Moreover, you will be getting some extra elements too.
09Template editing
The existing templates that you might be using to create the motion graphics can be edited and transformed into more advanced ones. You can even add your customized templates to the purpose or you can also use the tools for making your videos better.
10Animated ads
The animated ads are designed to highlight the key features of your business, product or brand in a short span of time. If this is done in a more engaging manner then this will ultimately boost your conversions as well as the customers’ engagement too. These work as the explainer videos but are little bit different from them.
11Graphic loops
These are short animated videos that tend to loop continuously. You have to use the vector, photo elements, text, etc. These video loops are eye-catching and grabs the attention faster.
12Animated titles
The animated titles can greatly work for expressing the message in a simpler way to the audience. These titles are somewhere in the category of animated typography but the use can be different. You can use them to enhance a particular message, pointing a specific feature or object in that particular video.
13Animated assets
These are also very much similar to the animated titles only but they work pretty similar like the PNG images. These are completely transparent so that they can be placed in your video footage easily. These animated assets can be perfect for the intros, transitions or outros. The animated titles and assets can add a spice to your videos.
14Presentations
You can be an excellent speaker sometimes, but if you are not able to present the ideas on screen in an effective way then it could be a barrier in the success of your presentations. Using the motion graphics in presentations, you can boost the interest of your audience as well as keep them engaged.
15Instructional videos
This video works similar to that of explainer videos. The instructional videos are great to teach and make your audience learn about the implementation of your product and brand. You can go for using the live-action videos for this purpose but motion graphics is best if you want to go with the trend.
Part 3 8 Stunning Motion Graphic Examples
01Haikus in motion
In these videos there is a use of expressive imagery and those imagery effects are perfect to convey the message. Here the motion graphics bring the poetry into life. The poetry sounds to be so true in the videos of Haikus.
02Cinematics
In this beautiful animation series you can see the charm of classic cinema in a completely fresh manner. These videos bring the classic cinema and its stories as well as characters in to life in a fresh and new way. The sound and other effects make the videos nostalgic.
03Subprime
By these videos, you can understand the market crash of the US in an effective way. The motion graphics that are used in these videos can also be used in other videos of same kind with the realistic as well as highly advanced effects.
04Digital Ocean
In order to make the short videos impactful, you can take the examples of videos from Digital Ocean. The videos are short yet very compiling and perfect to deliver the message in short span of time.
05Better light, better life
These videos are created to spread the message that how important light is in people’s life. Perfectly sound in delivering the message you can use these videos to create awareness amongst your audience.
06Reddit
If you want to see how motion graphics work in light hearted style then this is the perfect example of it. These videos also have a pinch of humor in them and are so vibrant too. For promoting any particular website or any mobile application then these videos created through the motion graphics can be an excellent referral.
07Quadro
The videos of Quadro which are created with the help of Wondershare Filmora Video Editor tool are perfect in passing their message. The creation is so dynamic and vibrant that you need not think about the quality. Filmora tool is perfect for adding such vibrancy and dynamics to the motion graphic videos. Many features like text to speech, adding speech and text, conversion of script into videos makes it a good choice to be used for video creations.
Wondershare Filmora
Get started easily with Filmora’s powerful performance, intuitive interface, and countless effects!
Try It Free Try It Free Try It Free Learn More >
08Scribble live
This is an excellent example of motion graphics video in which you can understand the illustrations in a simpler way and that also without any chaos. The narrative of the video is so clear that it gives you a perfect illustration of how the software works. It also suites in his appearance as well as provide you with an effective guide.
● Key Takeaways from This Episode →
● Motion graphics can be said as the subset of graphic designing. Here you can add motion to your ideas when you are making them real. This can be beneficial in so many ways as well as it is loved by the audience too.
● There are different types of motion graphics that are used for different purposes. Moreover, you can choose amongst them which are most suitable for your needs.
● If you are willing to create the motion graphics videos then you can take the help of mentioned examples for understanding the way of creating such graphics. Also it is worth considering that many tools like Wondershare Filmora, are available for creating such motion graphics
Are You Ready to Animate Game Character From Scratch?
Are You Ready to Animate Game Character from Scratch?
An easy yet powerful editor
Numerous effects to choose from
Detailed tutorials provided by the official channel
As the popularity of animated video games is reaching new heights, demand for game animators are also going up. But, the Information regarding how to animate games is less or not sufficient enough.
In this article
01 [What is 2D & 3D Animation Game?](#Part 1)
02 [How Do You Animate Games?](#Part 2)
03 [How to Draw 2d & 3d Characters for Video Games?](#Part 3)
Part 1 What is 2D & 3D Animation Game?
Gaming animation is a blend of art and technology. It is one of those fields that require several technical skills. These are brilliant programming skills, understanding the basics of computer science, and practical technology know-how, collectively standing as the basic fundamental of Animation. Both 2D and 3D Animation changed the gaming experience forever and created an array of opportunities. But they differ in working and application.
01Working on 2D Animation
Flipbook can be a good example of the mechanism behind 2D Animation. After drawing a character or an object on the first page of a notebook, continue drawing for the next page and so on. Each removing should be a bit ahead or behind. When flipped swiftly, the series of drawings makes the character or object move.
The working of 2D Animation is not so different. But the detailing of the subject or the object cannot be minimal as a flipbook. 2D Animation demands more characters and more details while at the same time requiring smooth, visually appealing, and accurate detailing, which is a lot of pressure for the makers. Thanks to 2D making software, a week’s work can be taken care of in minutes or two.
02Working on 3D Animation
The working mechanism of 3D Animation is more complicated than 2D. It is a layered process that requires several skills. It also involves “rigged” and animated 3D models. In 3D, the initial sketch of the entire subject and object is the first step towards the animation procedure. The second step is to make a 3D model of the intended animated object. It was third, texturing of the 3D animated object. Rigging is the final step; it gives the 3D model the power and ability to move. Once rigging is done, the character is already for posing. Drop it to the scene and start your Animation.
Part 2 How Do You Animate Games?
01Do You Know How Hot Animated Games Are?
A practical example of how Animation has been handed down over the ages would be the case of ‘Anime’. It has persisted as one of the top cultural exports of Japan and has successfully completed more than 20 years of legacy. The name ‘anime’ practically is a shorter version of the word Animation.
You will find that the reasons for animate games to be so popular are in vast numbers. For example, the anime industry is valued at 19 billion USD, to begin with.
A brief overview of reasons why animate games are so popular:
● There is a Game for Everyone
Game animations are evolving which is why it is able to reach out to a majority of people’s interests.
● Unique Styles of Animation
Gaming animations have come a long way and they have a more individual appeal for all age groups.
● Game History
Gamers have something else to look forward to other than just gaming. There is a story behind every game.
● Customization
Players can customize their characters the way they wish to see themselves.
● Action
Gamers can fight in an action sequence or drive a Lamborghini in a high-speed car chase.
02How Do I Create My Own Game Character?
Designing a character starts with imaging a character in its suitable background or subject. If you are a big fan of fantasy games, your imaginations should not have any boundaries. But, in the case of a sports game, you might have to limit your imagination based on realistic features.
How to streamline wild ideas to get a brilliant character out of it?
● Get an idea
Decide whether the character in mind is the main character or what role, in particular, is it going to play in the game.
● Gender
Gender plays a crucial role in character creation. As it pre-decides certain character traits.
● Build personality
Every character has a specific goal. The personality of each character helps them to achieve their goal.
● Back-story
The personality traits of every character are derived from their back-story.
● Strength& Weakness
Each character should have something unique be it in their personality or in their strength.
● Define Relationship
It is important to imagine and define what relationship the characters have.
● Provide aesthetics
Visual Aesthetics is a realm that has no bounds in the art of gaming.
● Create more characters
Including other characters in relation to the protagonist of the game would make the game or the storyline more interesting.
Part 3 How to Draw 2d & 3d Characters for Video Games
01How to Make a 2d & 3d Game Character - Tutorial
First, we conceive an idea in our mind in an abstract form. But, creating a character from an initial sketch all the way to making it into a full-drawn animation is about developing details keeping the speed of work steady.
Detailed animate game tutorials available online:
● Create composition
Make it more defined and structured. A tip to immediately jump-start your imagination would be to see your character in different lights and shades.
● Refine the Character Sketch
Once you have the clay, it’s time to add form.
● Add References
Start looking for references that suit your character.
● Add Details
Now, it’s time to get into the details, like literally. Start breaking your character into blocks and pieces. Maybe not too literally.
02Learn to Animate Games That Are Underrated Now
With more advancement comes more banishment, which means more and types of games are fading out to obscurity. You can now animate games that are underrated and add a bit of your own flavor to them using software.
You can also apply 3D rendering techniques to apply light and shadow effects to your games.
Stop motion is also a popular 2D gaming animation technique that is used in a number of underrated game models like cutout, Claymation, pixilation.
Motion graphics is amazing tool beginners have fun experimenting with. You can create engaging 2D game animations with motion graphic software like Adobe after effects. Make stunning adobe animation tutorials with the same.
Key Takeaways from This Episode
● Both 2D and 3D Animation offer a separate flavor of the experience. 2D animations run on a definitive FPS and can be compared to a simple flipbook animation, while 3D Animation involves a process called rigging that gives the Animation several movements and abilities.
● Animated games have a global appeal because of their unique style, history, customization, and action features. Animating your own character requires you to pay attention to the details like personality, back story, gender, and aesthetics.
● You can start your animation process with 5 simple steps - concept, composition, sketch, reference, and detailing.
How to Draw Cartoons Step by Step with This Guide
Learn How to Draw Cartoons Step by Step with This Guide
An easy yet powerful editor
Numerous effects to choose from
Detailed tutorials provided by the official channel
Cartoon character drawing is usually a vital aspect of any child’s life who loves to watch cartoon series and can sometimes be someone’s favorite thing in the world.

A cartoon character is a series of single drawings that tell a joke or story. Although cartoons are mostly drawn, they can sometimes be animated. Kids like comics which makes them an essential part of every child’s life. Cartoons are not only used for entertainment purposes but also help kids and young children learn more about the world around them. For example, children learn about love, loss, friendship, and other essential life issues about life by watching cartoons.
However, cartoons are not only limited to children but are also for adults. In addition, cartoons created for an adult audience go deeper into real-life problems and explore darker themes. They aim to create content that matches the maturity and age of the audience. Watching cartoons is fun. But what if you could make them? This article will provide you with a guide on producing cool cartoon drawings that will match different audiences, both older and younger.
In this article
01 [How to Draw Cartoon Characters Step by Step](#Part 1)
02 [Cartoon Easy Drawing with Colour Step by Step](#Part 2)
03 [Cartoon Easy Sketch Drawing Step by Step](#Part 3)
Part 1 How to Draw Cartoon Characters Step by Step
Note that in the world we live in, Professionals were once students, and experts were once beginners. This means that everyone has a starting point, and they all have one thing in common: “learning.” Whether you are aspiring to become an English teacher, an astrophysicist, an artist, or a physician’s assistant, you must first learn the ins and outs of the field.
Those aspiring to become animators and cartoonists must first learn the basics of cartoon character drawing and practice some easy, simple cartoon drawing before cranking out the Mickey-Mouses of the entertainment world. However, we will cover the basic principles of easy cartoon drawing for beginners step by step to get your learning process started. Here is how to draw a Micky-Mouse perfectly:

Step 1:
● Use a pencil to begin your drawing.
● First, create a circle for the head and a curved line on the left side.
● Draw a horizontal line at the center.
Step 2: Next, draw an oval shape for the mouth and a “U” shape added to the bottom, and then you can add another parallel “U” shape and connect it with the oval.
Step 3: Draw the eye using two upside-down “U” shapes, and then you add his large ear on the right and a small one at the top of the head.
Step 4: You can draw a bean shape and another smaller one inside for the body.
Step 5: Add oval shapes for his feet to draw his legs and draw his tail on the right side just above the leg.
Step 6: Draw two elongated shapes for his arms, a small oval for the hand and a basic shape of his fingers.
Step 7: Draw the cheese and add a few small circles inside.
Step 8: Also include the facial features by drawing the inside of the nose, eyebrows, eyes, and whiskers.
Step 9:
● Draw his fingers and hair between his ears.
● Trace your pencil lines with a sharpie.
● Erase the pencil afterward.
Step 10: Finally, you can color your drawing and upload it to your website.
Part 1 Cartoon Easy Drawing with Colour Step by Step
Applying color to a drawing is very important to beautify your drawing and make it look stunning and attractive. Here is how to cartoon easy drawing a flower using a colored pencil:
Step 1: Using a color photocopy of a reference photo, crop and rearrange elements of the poppy composition. With light pressure and HB pencil, draw a composition onto a four-ply, 100% cotton museum board frequently found among framing supplies.
Step 2: With very light pressure, apply the first colored pencil layer and add more emphasis where the values will be deeper. While doing this, note that the pencil application will still appear granular, and the texture of the museum board is still visible.

Step 3: Create the veins in the leaves and the fuzzy texture of the stem and pod, and also, as the individual strands of stamens, put down a sheet of translucent drafting paper. Use heavy tracing paper with a very sharp 7H graphite pencil and apply heavy pressure in drawing the lines for stamens, fuzz, and veins on the drafting paper and impress them into the surface of the museum board. Then, with a contrasting layer of darker color, these features dramatically show up on the stem, leaves, center of the flower, pod, and center of the flower. Then add deeper values of rose in the shadowed areas of the flower petals.

Step 4: To make them appear less granular and intensify the colors, start by blending with a clear, alcohol-based blending marker. The solvent, wax, or vegetable oil then dissolves the binder in the colored pencil layer and fluidly releases the pigment. This will also help to “fill in” the dots of the tooth of the paper and make the color appear denser.

Step 5: Continue to intensify the color by using a non-pigmented blending pencil over a previous layer and repeat a layer or two of color, much like a “color sandwich.” Repeat this “ burnishing “ process for subsequent layerings of color, like a double-decker or triple-decker sandwich.
Also, make sure the rich, dark negative space is carried out the same way, layering colors and burnishing, then repeating the colors for deep, rich saturation.
Render the deep, smeary flecks of pollen by heavily applying “freckles” of burgundy, then slightly smudge them with the tip of a blending marker. Lastly, scratch a few of the tiny wisps of fuzz on the pod and stem carefully into the board via a sharp X-acto knife for a striking contrast of light against the deep background.

Part 2 Cartoon Easy Sketch Drawing Step by Step
This is the initial stage of the drawing process. It requires you to create an outline of the concept you want to draw before adding color. However, it is also referred to as a technique in shading. For example, if you’re going to sketch a cherry fruit, there are a few things to note here.
Try not to look at the cherry as a whole but look at its shapes and name them. This way, you are looking at the parts to the whole and not the entire piece.

Step 1: Draw two overlapping circles and draw two curved lines from each of the circles.
Step 2: Make a small rectangle at the top to join the two stems and draw a second set of curved lines.
Step 3: Draw thick lines inside the rectangle for the bumps and darken the lines and use your finger to smudge them a bit for the shaded effect.
Step 4: Draw a curved line from the stem on the right to the circle’s edge to create the bump.
Step 5: Holding your pencil at an angle, make light strokes going across the front of both cherries. Take note of the places where there is no light. This is where the light source is hitting the cherry the most.
Step 6: To darken, a shade over those places again, keep layering the shading technique until you get the effect you see on the cherries.
Step 7: Use the same technique to shade under the cherries, but use your finger to smudge it to smoother the shadow.
●Bonus:
You can add color, effect, or animate to your cartoon character drawing by using Wondershare Filmora Video Editor , the best editor on the internet. Filmora is a free software program with the same creating abilities and imaging editing similar to Adobe Illustrator. It is open software that runs on various programs, such as Windows, Mac, and Linux. Please get to know more about this exclusive tool from Wondershare on their official website.
For Win 7 or later (64-bit)
For macOS 10.12 or later
● Ending Thoughts →
● A step-by-step guide on drawing easy cartoons for painting and how to sketch your drawing correctly.
● Cartoon character drawings in easy and quick steps.
● Easy cartoon drawing for beginners.
● Lastly, to add color to your drawing, use Filmora software.
● So, use the tips and tricks to make your presentation’s best cartoon characters come alive and be a pro with Filmora.
Cartoon character drawing is usually a vital aspect of any child’s life who loves to watch cartoon series and can sometimes be someone’s favorite thing in the world.
A cartoon character is a series of single drawings that tell a joke or story. Although cartoons are mostly drawn, they can sometimes be animated. Kids like comics which makes them an essential part of every child’s life. Cartoons are not only used for entertainment purposes but also help kids and young children learn more about the world around them. For example, children learn about love, loss, friendship, and other essential life issues about life by watching cartoons.
However, cartoons are not only limited to children but are also for adults. In addition, cartoons created for an adult audience go deeper into real-life problems and explore darker themes. They aim to create content that matches the maturity and age of the audience. Watching cartoons is fun. But what if you could make them? This article will provide you with a guide on producing cool cartoon drawings that will match different audiences, both older and younger.
In this article
01 [How to Draw Cartoon Characters Step by Step](#Part 1)
02 [Cartoon Easy Drawing with Colour Step by Step](#Part 2)
03 [Cartoon Easy Sketch Drawing Step by Step](#Part 3)
Part 1 How to Draw Cartoon Characters Step by Step
Note that in the world we live in, Professionals were once students, and experts were once beginners. This means that everyone has a starting point, and they all have one thing in common: “learning.” Whether you are aspiring to become an English teacher, an astrophysicist, an artist, or a physician’s assistant, you must first learn the ins and outs of the field.
Those aspiring to become animators and cartoonists must first learn the basics of cartoon character drawing and practice some easy, simple cartoon drawing before cranking out the Mickey-Mouses of the entertainment world. However, we will cover the basic principles of easy cartoon drawing for beginners step by step to get your learning process started. Here is how to draw a Micky-Mouse perfectly:
Step 1:
● Use a pencil to begin your drawing.
● First, create a circle for the head and a curved line on the left side.
● Draw a horizontal line at the center.
Step 2: Next, draw an oval shape for the mouth and a “U” shape added to the bottom, and then you can add another parallel “U” shape and connect it with the oval.
Step 3: Draw the eye using two upside-down “U” shapes, and then you add his large ear on the right and a small one at the top of the head.
Step 4: You can draw a bean shape and another smaller one inside for the body.
Step 5: Add oval shapes for his feet to draw his legs and draw his tail on the right side just above the leg.
Step 6: Draw two elongated shapes for his arms, a small oval for the hand and a basic shape of his fingers.
Step 7: Draw the cheese and add a few small circles inside.
Step 8: Also include the facial features by drawing the inside of the nose, eyebrows, eyes, and whiskers.
Step 9:
● Draw his fingers and hair between his ears.
● Trace your pencil lines with a sharpie.
● Erase the pencil afterward.
Step 10: Finally, you can color your drawing and upload it to your website.
Part 1 Cartoon Easy Drawing with Colour Step by Step
Applying color to a drawing is very important to beautify your drawing and make it look stunning and attractive. Here is how to cartoon easy drawing a flower using a colored pencil:
Step 1: Using a color photocopy of a reference photo, crop and rearrange elements of the poppy composition. With light pressure and HB pencil, draw a composition onto a four-ply, 100% cotton museum board frequently found among framing supplies.
Step 2: With very light pressure, apply the first colored pencil layer and add more emphasis where the values will be deeper. While doing this, note that the pencil application will still appear granular, and the texture of the museum board is still visible.
Step 3: Create the veins in the leaves and the fuzzy texture of the stem and pod, and also, as the individual strands of stamens, put down a sheet of translucent drafting paper. Use heavy tracing paper with a very sharp 7H graphite pencil and apply heavy pressure in drawing the lines for stamens, fuzz, and veins on the drafting paper and impress them into the surface of the museum board. Then, with a contrasting layer of darker color, these features dramatically show up on the stem, leaves, center of the flower, pod, and center of the flower. Then add deeper values of rose in the shadowed areas of the flower petals.
Step 4: To make them appear less granular and intensify the colors, start by blending with a clear, alcohol-based blending marker. The solvent, wax, or vegetable oil then dissolves the binder in the colored pencil layer and fluidly releases the pigment. This will also help to “fill in” the dots of the tooth of the paper and make the color appear denser.
Step 5: Continue to intensify the color by using a non-pigmented blending pencil over a previous layer and repeat a layer or two of color, much like a “color sandwich.” Repeat this “ burnishing “ process for subsequent layerings of color, like a double-decker or triple-decker sandwich.
Also, make sure the rich, dark negative space is carried out the same way, layering colors and burnishing, then repeating the colors for deep, rich saturation.
Render the deep, smeary flecks of pollen by heavily applying “freckles” of burgundy, then slightly smudge them with the tip of a blending marker. Lastly, scratch a few of the tiny wisps of fuzz on the pod and stem carefully into the board via a sharp X-acto knife for a striking contrast of light against the deep background.
Part 2 Cartoon Easy Sketch Drawing Step by Step
This is the initial stage of the drawing process. It requires you to create an outline of the concept you want to draw before adding color. However, it is also referred to as a technique in shading. For example, if you’re going to sketch a cherry fruit, there are a few things to note here.
Try not to look at the cherry as a whole but look at its shapes and name them. This way, you are looking at the parts to the whole and not the entire piece.
Step 1: Draw two overlapping circles and draw two curved lines from each of the circles.
Step 2: Make a small rectangle at the top to join the two stems and draw a second set of curved lines.
Step 3: Draw thick lines inside the rectangle for the bumps and darken the lines and use your finger to smudge them a bit for the shaded effect.
Step 4: Draw a curved line from the stem on the right to the circle’s edge to create the bump.
Step 5: Holding your pencil at an angle, make light strokes going across the front of both cherries. Take note of the places where there is no light. This is where the light source is hitting the cherry the most.
Step 6: To darken, a shade over those places again, keep layering the shading technique until you get the effect you see on the cherries.
Step 7: Use the same technique to shade under the cherries, but use your finger to smudge it to smoother the shadow.
●Bonus:
You can add color, effect, or animate to your cartoon character drawing by using Wondershare Filmora Video Editor , the best editor on the internet. Filmora is a free software program with the same creating abilities and imaging editing similar to Adobe Illustrator. It is open software that runs on various programs, such as Windows, Mac, and Linux. Please get to know more about this exclusive tool from Wondershare on their official website.
For Win 7 or later (64-bit)
For macOS 10.12 or later
● Ending Thoughts →
● A step-by-step guide on drawing easy cartoons for painting and how to sketch your drawing correctly.
● Cartoon character drawings in easy and quick steps.
● Easy cartoon drawing for beginners.
● Lastly, to add color to your drawing, use Filmora software.
● So, use the tips and tricks to make your presentation’s best cartoon characters come alive and be a pro with Filmora.
Before You Learn Facebook Slideshow: 5 Things You Should Know
Before You Learn Facebook Slideshow Things You Should Know [How-TOS]
An easy yet powerful editor
Numerous effects to choose from
Detailed tutorials provided by the official channel
If you are looking for interesting solutions to create the most amazing slideshow on Facebook, rest assured, you are at the right place to get every help!
In this article
01 [Where Did the Facebook Slideshow Tool Go?](#Part 1)
02 [How to Create a Slideshow on Facebook?](#Part 2)
03 [Top 5 Facebook Slideshow Alternatives](#Part 3)
Part 1 Where Did the Facebook Slideshow Tool Go?
While almost everyone around you must be fascinated about the stunning and appealing slideshows that the Facebook community used to offer its users with, it is evidently sad to realize that the utility has become a story of the past. The creators of the tool have by now, took multiple rounds on removing, retrieving and again removing the utility from the official Facebook website as well as the smartphone application.
It is however relaxing to know that the Facebook developer team has worked efficiently to produce alternatives to the application’s slideshow tool after the latter’s permanent disappearance from the user account pages and app profiles. You can now work with the Facebook Ads Manager or Facebook Creator Studio to sort out the concern of creating slideshow on Facebook.
Part 2 How to Create a Slideshow on Facebook?
Facebook slideshows are incredibly awesome trends of making a concise, expressive and to the point delivery of diverse content varieties. Piping up your information through and extensive assortment of sound, text and motion, these short snippets are no less than a seamless video streaming of the same information.
If you are about to launch a new product for your business enterprise, consider working with the utility to create an elusive Facebook slideshow ad for a quick demonstration of your brand among different social media communities, turning the fun of slideshow creation into a smart and responsive product promotion strategy, without having to bother your wallet for the same.
If you are concerned about the quality of the final output, it is not a cause of worry, since the Facebook slideshow creator tool promises you of an appreciable slideshow result, that takes a quick loading time, is comparable to a high resolution video and works well with all your favourite devices.
Having talked enough on the usage credibility, let us now proceed to adhere to the concern of creating a slideshow on Facebook with a diversity of media files in the following section:
01Facebook Slideshows from Videos
Step 1: Launch the Tool
Start with opening the Facebook app in your device to launch the ‘Facebook Ads Manager’ utility and tap ‘Create’ in the latter’s welcome interface.

Step 2: Select Your Video
Browse through your device’s gallery to choose a desired video for slideshow creation. When you have made your choice, set a 16:9 aspect ratio for the same to avoid square cropping.

Step 3: Upload Your Video
Proceed with uploading your video to the Facebook tool by clicking on the ‘Add Video’ button and watch it getting split into still images frames, from where you can view a seamless slideshow display of the same.

Step 4: Select Multiple Frames
you can now select a series of image frames and arrange them in the correct sequence of appearance by clicking on each one of them to be included within the creator timeline.
Step 5: Add Captions Your Stills
Tap on the small ‘Pencil’ icon within the images to customize them with suitable captions. You can further add style to these image names by making appropriate selections of font, position color of every frame caption. Once you have finished naming all the frames, click on ‘Save’ to apply your changes.
Step 6: Preview Your Creation
When you are satisfied with your work, consider watching a preview of the same to be assured of the perfect placement of everything. To do this, navigate to the ‘Preview Pane’ at the top right corner of the program interface, and tapping the ‘Preview’ button.
02Facebook Slideshows from Images
Step 1: Launch the Tool
To begin with, open the Facebook app in any of your preferred devices and proceed to launch the ‘Facebook Ads Manager’ tool, followed by clicking on the ‘Create Slideshow’ button at the bottom of the tool’s welcome screen.

Step 2: Upload Your Images
As you complete Step 1, a ‘Video Creation Kit’ will appear, where you will need to click within the ‘Create Slideshow’ checkbox, followed by tapping on the ‘Continue’ button at the bottom right corner of the window.

Step 3: Upload Your Images
Clicking on the ‘Continue’ button will take you to the ‘Settings Box’ where you need to tap on the ‘Add Photos’ option. An image selection box will now pop up, allowing you to select and upload a maximum of 10 images from your Facebook account, stock and page galleries or your device collections. Prefer keeping all the photos within the same aspect ratio to escape the extra task of cropping the images.
When you have finished making your selections, navigate to the bottom right corner of the window and hit the ‘Confirm’ button. This will make your selections shows up all together in the ‘Settings Box’, in the sequential order of their appearance in the slideshow. If you want to introduce some changes, delete and re-upload the images.

Step 4: Customize Your Images with Captions
To add suitable captions to the slideshow images, tap the ‘Pencil’ icon within them. You are also allowed to customize the stills with transitions, effects, etc., and make adjustments to the screen time of each image frame.

Part 3 Top 5 Facebook Slideshow Alternatives
Having heard about the disappointment from the exit of the Facebook slideshow creator tool, it becomes naturally important to seek through the affordable alternatives of the same to set straight the issue of how to do a slideshow on Facebook. Working towards the solutions, let us learn about the top 5 most preferred Facebook slideshow alternatives in the following section:
03PowerDirector
One of the most suitable candidates of Facebook slideshow alternatives, PowerDirector easily lands among the highly preferred tools for creating stunning slideshows. Compatible with the MacOs and Windows operating systems, the software lets you create high end, top quality slideshow presentations with a classic and professional outlook.
Talking of the creator program’s most appealing features, this one is an upgraded slideshow creator suite that is capable enough to address your most diverse design requirements, like those of high resolution video effects, Hollywood inspired movies and personal content sharing. The software package is loaded with tons of elusive video effects, themed templates and transition effects to facilitate a compelling creation.
Working with PowerDirector’s exclusive slideshow program, you get the liberty to escape the notch of storyboard and timeline editing and start the creation process in the launch window of the program itself. The extremely user cohesive interface of the software guides you through each creation step via streamlined plug-ins, making the design process quick and super easy even for newbies.

04SmartSHOW 3D
When thinking of how to make a slideshow on facebook, this one is another top rated Facebook slideshow alternatives, that comes with an extensive toolkit to create amazing presentations from video clips and images, while complementing them with a plethora of effects and transitions. Some of the key features of the program include multiple slide layering, animating selected layers and fine tune the transitions with keyframe adjustments.
You can additionally uplift the slides with image masks, shapes, 3D animated texts and other forms of graphic arts. An additively appealing feature of the slideshow creator program is the ability to mix descriptive images with your favorite music to develop stunning masterpieces of entertaining slideshows, which you can conveniently share and enjoy with family and friends on a diversity of social media platforms.
Using the tool, you can work with applying motion graphic effects to still photos without having to be an over the top tech savvy user. The editor library of the tool is loaded with some of the most awesome transition effects, like, wipes, 3D motions, gradients and fade-ins, along with the facility of adding titles, voice comments and captions to the slides of your presentation. The tool is however, exclusively a Windows compatible utility.

05PhotoStage Slideshow Software
Next in the list of alternatives to the Facebook slideshow maker tool is the aforesaid software program, that allows you to create professional quality slideshows with as many videos and images as you can possibly think of and supplement them with a variety of texts, music, voiceovers and effects. You can further work on customizing the slideshow images with making suitable adjustments in color, brightness and saturation parameters.
The software comes with a Quick Create utility, which you can use to instantly create high resolution slideshows and spark them up with zooms, pans and fades, while getting a preview of the same in real-time. You can even proceed to burn your creation into a disk, make an online upload, or simply save it to your device.
Talking of the cost constraints of this amazing slideshow creator tool, you get to work with the software for a commercial use, free of cost for a definite time period and with a restricted number of features. However, you can always consider on buying the paid version of the program to avail an access to the latter’s entire range of features and utilities. The tool works well with all Windows and Mac supported devices.

06Kizoa
Moving ahead in the list you have the Kizoa slideshow maker for Facebook, which is a dependable alternative to the conventional Facebook slideshow creator. Choosing this tool to design your slideshow presentation, you are entitled to the amazing feature of displaying your presentation on almost any screen, including smartphones, television, computers and tablets with getting to choose from 7 types of aspect ratios. The tool is designed to have a Windows and MacOs compatibility.
The application further lets you add the most specific parts of your images within the presentation slides with its smart cropping tool, while keeping an account of the file formats and screen space requirements of the images with utmost convenience. You are also allowed to choose from a storehouse of preset templates to add your desired photos and video clips in the slideshow and entice them with GIFs, effects and texts.
When you are done with the creation process, just attempt to download and save the slideshow in any preferred file format, such as, AVI, GIF, MP4, MOV, MPEG2, etc., or even burn it to a DVD. You are now free to share your slideshow on various online media sharing platforms. Using the free version of Kizoa, you are permitted to create slideshows with a duration of 60 seconds, which can be upgraded to a limitless length with a paid subscription.

07SlideLab
If you are a newbie to the field of creating slideshows, and wondering about how to create a slideshow on Facebook 2021, this one is affordably the most perfect tool you can rely on. Packed with an extensive range of effects, music, transitions and filters, SlideLab is the smartest software choice to create slideshow presentations for family entertainment and personal use.
The tool consists of an in built sharing utility that allows you to design and share slideshows on social media platforms, like YouTube, Facebook and Instagram with a single click. Working on your slideshow within the program, you can escape the cringe of cropping the images, as they are automatically adjusted to the square fit alignment of the app’s working window. You can quickly rearrange the placement of the images in the slideshow as per your preferences.
As far as the sharing credibility of the presentation is concerned, the software grants you the liberty to export your creation in PPTX and PDF file formats, and view them later in Keynote and PowerPoint.
The app shows a convenient workflow with Windows and MacOs devices and limits the image play duration to 3 seconds, along with a permitting a restricted number of transitions and effects in its free version, which you can access by availing a paid subscription of the program.

08Creating Facebook Slideshows With Wondershare Filmora
When browsing through feasible alternatives on how to make a facebook slideshow, the IT market is indeed flooded with a hoard of creation utilities. If you have just begun trying hands at slideshow creation, consider using the Wondershare Filmora Video Editor slideshow maker application for addressing your slideshow design concerns. The extensive, feature rich library of the app lets you create attractive presentation masterpieces with a wide range of special effects, transitions, texts, titles and music tracks.
For Win 7 or later (64-bit)
For macOS 10.12 or later
Working with the Filmora slideshow creator, you can trim, crop or cut the video clips and images of your presentation to give them the best look. The tool comes with a unique Filmora Template Mode to create business oriented Facebook slideshows, is compatible to any windows and Mac supported device and lets you easily make a slideshow on Facebook.
● Ending Thoughts →
● Creating Facebook slideshows can be useful in addressing a variety of personal and professional data sharing needs.
● Browsing through design alternatives, you will land across a pool of software choices to create stunning slideshows for Facebook.
● When deciding on the best Facebook slideshow creator tool, Wondershare Filmora can be your smartest pick.
If you are looking for interesting solutions to create the most amazing slideshow on Facebook, rest assured, you are at the right place to get every help!
In this article
01 [Where Did the Facebook Slideshow Tool Go?](#Part 1)
02 [How to Create a Slideshow on Facebook?](#Part 2)
03 [Top 5 Facebook Slideshow Alternatives](#Part 3)
Part 1 Where Did the Facebook Slideshow Tool Go?
While almost everyone around you must be fascinated about the stunning and appealing slideshows that the Facebook community used to offer its users with, it is evidently sad to realize that the utility has become a story of the past. The creators of the tool have by now, took multiple rounds on removing, retrieving and again removing the utility from the official Facebook website as well as the smartphone application.
It is however relaxing to know that the Facebook developer team has worked efficiently to produce alternatives to the application’s slideshow tool after the latter’s permanent disappearance from the user account pages and app profiles. You can now work with the Facebook Ads Manager or Facebook Creator Studio to sort out the concern of creating slideshow on Facebook.
Part 2 How to Create a Slideshow on Facebook?
Facebook slideshows are incredibly awesome trends of making a concise, expressive and to the point delivery of diverse content varieties. Piping up your information through and extensive assortment of sound, text and motion, these short snippets are no less than a seamless video streaming of the same information.
If you are about to launch a new product for your business enterprise, consider working with the utility to create an elusive Facebook slideshow ad for a quick demonstration of your brand among different social media communities, turning the fun of slideshow creation into a smart and responsive product promotion strategy, without having to bother your wallet for the same.
If you are concerned about the quality of the final output, it is not a cause of worry, since the Facebook slideshow creator tool promises you of an appreciable slideshow result, that takes a quick loading time, is comparable to a high resolution video and works well with all your favourite devices.
Having talked enough on the usage credibility, let us now proceed to adhere to the concern of creating a slideshow on Facebook with a diversity of media files in the following section:
01Facebook Slideshows from Videos
Step 1: Launch the Tool
Start with opening the Facebook app in your device to launch the ‘Facebook Ads Manager’ utility and tap ‘Create’ in the latter’s welcome interface.
Step 2: Select Your Video
Browse through your device’s gallery to choose a desired video for slideshow creation. When you have made your choice, set a 16:9 aspect ratio for the same to avoid square cropping.
Step 3: Upload Your Video
Proceed with uploading your video to the Facebook tool by clicking on the ‘Add Video’ button and watch it getting split into still images frames, from where you can view a seamless slideshow display of the same.
Step 4: Select Multiple Frames
you can now select a series of image frames and arrange them in the correct sequence of appearance by clicking on each one of them to be included within the creator timeline.
Step 5: Add Captions Your Stills
Tap on the small ‘Pencil’ icon within the images to customize them with suitable captions. You can further add style to these image names by making appropriate selections of font, position color of every frame caption. Once you have finished naming all the frames, click on ‘Save’ to apply your changes.
Step 6: Preview Your Creation
When you are satisfied with your work, consider watching a preview of the same to be assured of the perfect placement of everything. To do this, navigate to the ‘Preview Pane’ at the top right corner of the program interface, and tapping the ‘Preview’ button.
02Facebook Slideshows from Images
Step 1: Launch the Tool
To begin with, open the Facebook app in any of your preferred devices and proceed to launch the ‘Facebook Ads Manager’ tool, followed by clicking on the ‘Create Slideshow’ button at the bottom of the tool’s welcome screen.
Step 2: Upload Your Images
As you complete Step 1, a ‘Video Creation Kit’ will appear, where you will need to click within the ‘Create Slideshow’ checkbox, followed by tapping on the ‘Continue’ button at the bottom right corner of the window.
Step 3: Upload Your Images
Clicking on the ‘Continue’ button will take you to the ‘Settings Box’ where you need to tap on the ‘Add Photos’ option. An image selection box will now pop up, allowing you to select and upload a maximum of 10 images from your Facebook account, stock and page galleries or your device collections. Prefer keeping all the photos within the same aspect ratio to escape the extra task of cropping the images.
When you have finished making your selections, navigate to the bottom right corner of the window and hit the ‘Confirm’ button. This will make your selections shows up all together in the ‘Settings Box’, in the sequential order of their appearance in the slideshow. If you want to introduce some changes, delete and re-upload the images.
Step 4: Customize Your Images with Captions
To add suitable captions to the slideshow images, tap the ‘Pencil’ icon within them. You are also allowed to customize the stills with transitions, effects, etc., and make adjustments to the screen time of each image frame.
Part 3 Top 5 Facebook Slideshow Alternatives
Having heard about the disappointment from the exit of the Facebook slideshow creator tool, it becomes naturally important to seek through the affordable alternatives of the same to set straight the issue of how to do a slideshow on Facebook. Working towards the solutions, let us learn about the top 5 most preferred Facebook slideshow alternatives in the following section:
03PowerDirector
One of the most suitable candidates of Facebook slideshow alternatives, PowerDirector easily lands among the highly preferred tools for creating stunning slideshows. Compatible with the MacOs and Windows operating systems, the software lets you create high end, top quality slideshow presentations with a classic and professional outlook.
Talking of the creator program’s most appealing features, this one is an upgraded slideshow creator suite that is capable enough to address your most diverse design requirements, like those of high resolution video effects, Hollywood inspired movies and personal content sharing. The software package is loaded with tons of elusive video effects, themed templates and transition effects to facilitate a compelling creation.
Working with PowerDirector’s exclusive slideshow program, you get the liberty to escape the notch of storyboard and timeline editing and start the creation process in the launch window of the program itself. The extremely user cohesive interface of the software guides you through each creation step via streamlined plug-ins, making the design process quick and super easy even for newbies.
04SmartSHOW 3D
When thinking of how to make a slideshow on facebook, this one is another top rated Facebook slideshow alternatives, that comes with an extensive toolkit to create amazing presentations from video clips and images, while complementing them with a plethora of effects and transitions. Some of the key features of the program include multiple slide layering, animating selected layers and fine tune the transitions with keyframe adjustments.
You can additionally uplift the slides with image masks, shapes, 3D animated texts and other forms of graphic arts. An additively appealing feature of the slideshow creator program is the ability to mix descriptive images with your favorite music to develop stunning masterpieces of entertaining slideshows, which you can conveniently share and enjoy with family and friends on a diversity of social media platforms.
Using the tool, you can work with applying motion graphic effects to still photos without having to be an over the top tech savvy user. The editor library of the tool is loaded with some of the most awesome transition effects, like, wipes, 3D motions, gradients and fade-ins, along with the facility of adding titles, voice comments and captions to the slides of your presentation. The tool is however, exclusively a Windows compatible utility.
05PhotoStage Slideshow Software
Next in the list of alternatives to the Facebook slideshow maker tool is the aforesaid software program, that allows you to create professional quality slideshows with as many videos and images as you can possibly think of and supplement them with a variety of texts, music, voiceovers and effects. You can further work on customizing the slideshow images with making suitable adjustments in color, brightness and saturation parameters.
The software comes with a Quick Create utility, which you can use to instantly create high resolution slideshows and spark them up with zooms, pans and fades, while getting a preview of the same in real-time. You can even proceed to burn your creation into a disk, make an online upload, or simply save it to your device.
Talking of the cost constraints of this amazing slideshow creator tool, you get to work with the software for a commercial use, free of cost for a definite time period and with a restricted number of features. However, you can always consider on buying the paid version of the program to avail an access to the latter’s entire range of features and utilities. The tool works well with all Windows and Mac supported devices.
06Kizoa
Moving ahead in the list you have the Kizoa slideshow maker for Facebook, which is a dependable alternative to the conventional Facebook slideshow creator. Choosing this tool to design your slideshow presentation, you are entitled to the amazing feature of displaying your presentation on almost any screen, including smartphones, television, computers and tablets with getting to choose from 7 types of aspect ratios. The tool is designed to have a Windows and MacOs compatibility.
The application further lets you add the most specific parts of your images within the presentation slides with its smart cropping tool, while keeping an account of the file formats and screen space requirements of the images with utmost convenience. You are also allowed to choose from a storehouse of preset templates to add your desired photos and video clips in the slideshow and entice them with GIFs, effects and texts.
When you are done with the creation process, just attempt to download and save the slideshow in any preferred file format, such as, AVI, GIF, MP4, MOV, MPEG2, etc., or even burn it to a DVD. You are now free to share your slideshow on various online media sharing platforms. Using the free version of Kizoa, you are permitted to create slideshows with a duration of 60 seconds, which can be upgraded to a limitless length with a paid subscription.
07SlideLab
If you are a newbie to the field of creating slideshows, and wondering about how to create a slideshow on Facebook 2021, this one is affordably the most perfect tool you can rely on. Packed with an extensive range of effects, music, transitions and filters, SlideLab is the smartest software choice to create slideshow presentations for family entertainment and personal use.
The tool consists of an in built sharing utility that allows you to design and share slideshows on social media platforms, like YouTube, Facebook and Instagram with a single click. Working on your slideshow within the program, you can escape the cringe of cropping the images, as they are automatically adjusted to the square fit alignment of the app’s working window. You can quickly rearrange the placement of the images in the slideshow as per your preferences.
As far as the sharing credibility of the presentation is concerned, the software grants you the liberty to export your creation in PPTX and PDF file formats, and view them later in Keynote and PowerPoint.
The app shows a convenient workflow with Windows and MacOs devices and limits the image play duration to 3 seconds, along with a permitting a restricted number of transitions and effects in its free version, which you can access by availing a paid subscription of the program.
08Creating Facebook Slideshows With Wondershare Filmora
When browsing through feasible alternatives on how to make a facebook slideshow, the IT market is indeed flooded with a hoard of creation utilities. If you have just begun trying hands at slideshow creation, consider using the Wondershare Filmora Video Editor slideshow maker application for addressing your slideshow design concerns. The extensive, feature rich library of the app lets you create attractive presentation masterpieces with a wide range of special effects, transitions, texts, titles and music tracks.
For Win 7 or later (64-bit)
For macOS 10.12 or later
Working with the Filmora slideshow creator, you can trim, crop or cut the video clips and images of your presentation to give them the best look. The tool comes with a unique Filmora Template Mode to create business oriented Facebook slideshows, is compatible to any windows and Mac supported device and lets you easily make a slideshow on Facebook.
● Ending Thoughts →
● Creating Facebook slideshows can be useful in addressing a variety of personal and professional data sharing needs.
● Browsing through design alternatives, you will land across a pool of software choices to create stunning slideshows for Facebook.
● When deciding on the best Facebook slideshow creator tool, Wondershare Filmora can be your smartest pick.
How to Convert Video to GIF (Fast & Easy!)
How to Convert Video to GIF (Fast & Easy!)
An easy yet powerful editor
Numerous effects to choose from
Detailed tutorials provided by the official channel
The use of GIFs has increased over time and not only on social media platforms, these interesting animations are used for various purposes like marketing, blogging, WhatsApp chats, and much more.

Though there are several online sites from where you can download the desired GIF, there is also an option to create a customized one using videos of images. So, if you too are keen to create a customized GIF, the article will look after your concerns. Learn how to make video to GIF Photoshop and using other tools. Keep reading!!
In this article
01 [Simple Alternative to Photoshop for creating a GIF from Videos- Wondershare Filmora](#Part 1)
02 [Simple Alternative to Photoshop for creating a GIF from Videos- Wondershare Filmora](#Part 2)
Part 1 Creating GIFs from videos using Photoshop
When it comes to any type of video editing task, the first software that comes to mind is Photoshop. Developed by Adobe, this is an excellent editing tool available for Windows and Mac. The software comes loaded with a wide range of functions that help you create desired graphics including GIFs.
Though the interface and the use of the software are a little complicated, once you get a hang of it, professional-looking files can be created in no time.
Steps to convert video to GIF Photoshop
Step 1. Launch the Photoshop software on your system and select File > Import. Next tap on the “Video Frames to Layers” option. Choose the desired video (compatible format) and tap on Load.
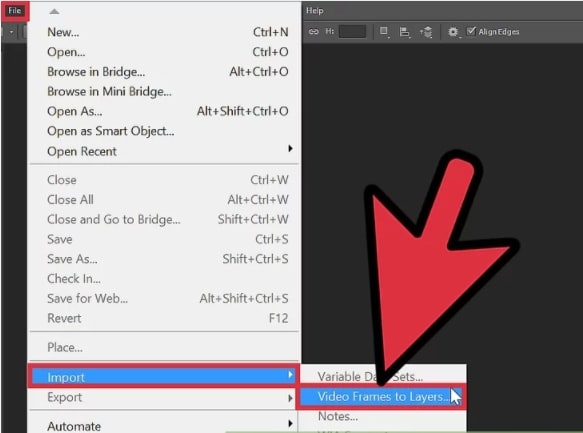
Step 2. Next, you need to select the Range to Import. For a few frames, choose the “Selected Frames Only” option.
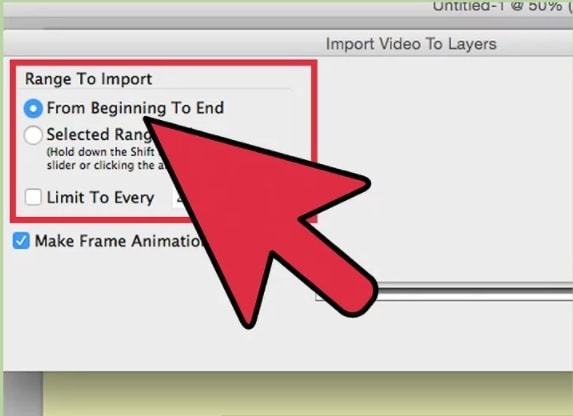
Step 3. You now need to cut the frames that are not needed by going to Window and then selecting the Animation. If needed, new frames can also be added here.
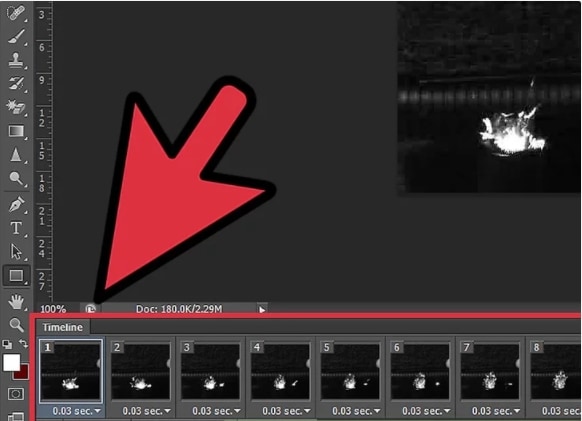
Step 4. To make your animation loop forever, select Forever from the bottom left side of the animation frames.
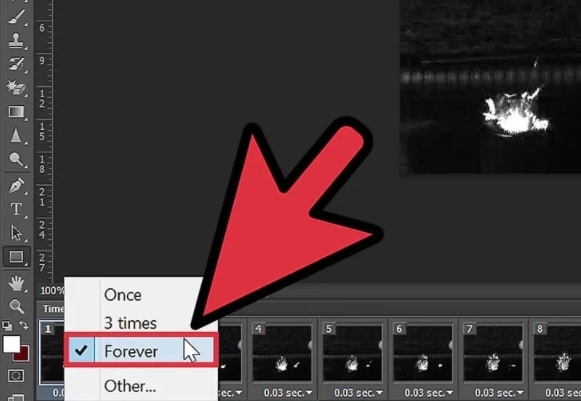
Step 5. Next, at the upper-left corner, go to the Rectangle marquee tool and choose the section you wish to focus on
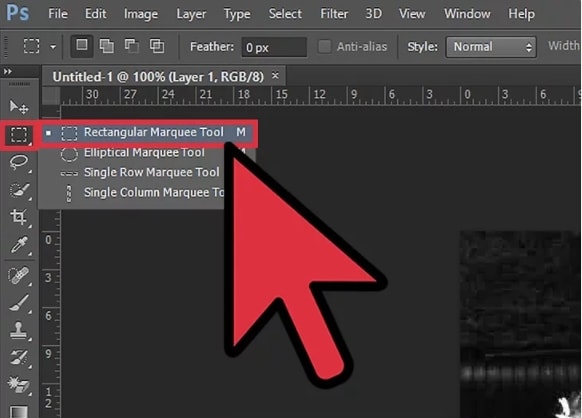
Step 6. Select the image size of the video that will make your GIF look appealing.
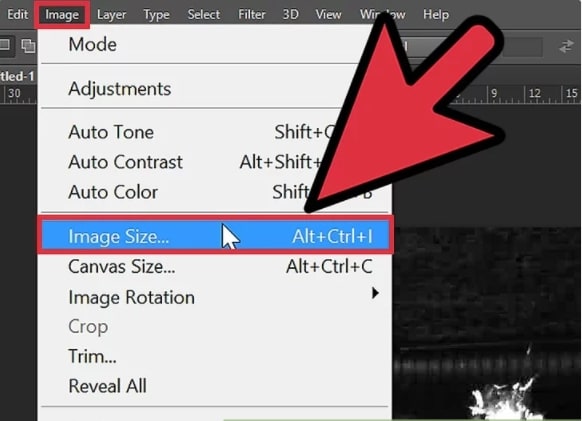
Step 7. Next, go to File > Save for Web & Devices for optimizing the image.
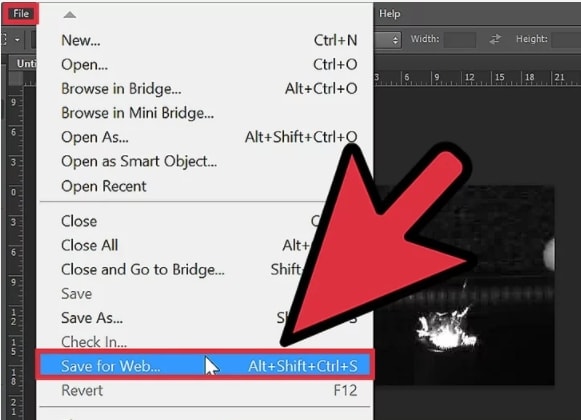
Step 8. Now select GIF at the preset section and check if the animation created is right by clicking on the Preview button.
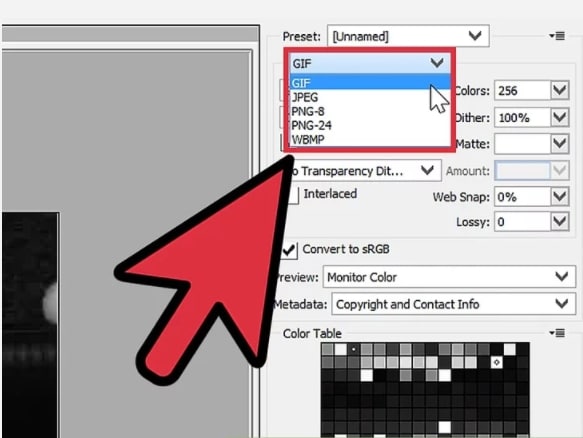
Step 9. Finally, when all is done, click on the Save button and give a desired name to the file.
With the above steps you can make gif from video Photoshop.
Part 2 Simple Alternative to Photoshop for creating a GIF from Videos- Wondershare Filmora
The learning curve of Photoshop is quite steep and to create a GIF from videos using the tool is a complicated process involving multiple steps and especially if you are a beginner and have no prior experience of working with Photoshop software.
So, if you are looking for an alternative that is simple and fast, we suggest Wondershare Filmora Video Editor as the best option.
Wondershare Filmora
Get started easily with Filmora’s powerful performance, intuitive interface, and countless effects!
Try It Free Try It Free Try It Free Learn More >
Using the software videos and images in all key formats can be added to the interface for creating GIF animations. An array of editing options is available like cropping, splitting, rotating, cutting, and more. You can even add text, sound, effects, and other elements for further customization.
In a few simple steps, the software will let you create GIFs of high quality that can be used on several social media and other online platforms.
Steps to create GIF using Wondershare Filmora
Step 1. Download, install, and launch the Wondershare Filmora software on your system and then browse to import the media files from which you want to create a GIF.
Step 2. After the files are added to the interface, move them to the timeline at the bottom by dragging and dropping.
Step 3. Using the editing options you can trim, crop, rotate, and perform other functions.
Step 4. You can even add text, effects, and other elements for further customization.
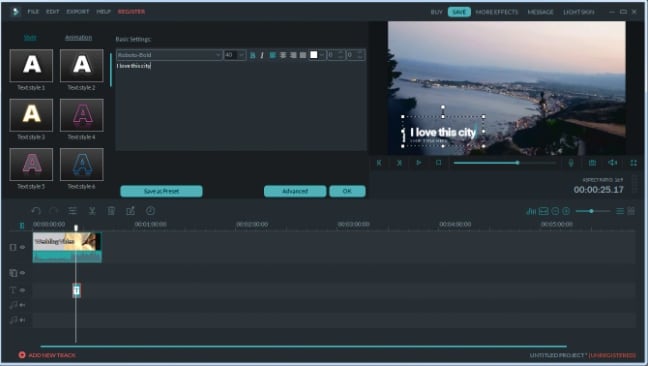
Step 5. Next, choose to save the created file as GIF under the Local tab. Choose the file name and the location, and then finally tap on the EXPORT button to start the processing.
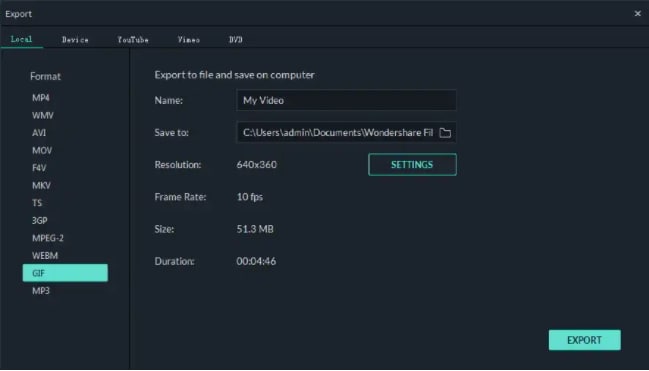
● Key Takeaways from This Episode →
●GIFs are the latest trend that is used all over social media and other online sites.
●Several software and tools can help in creating the desired GIF.
●Adobe Photoshop is one of the widely used software that can create a GIF using videos as well as images, but the process is quite complicated.
●For a simpler and quicker process of creating a GIF, we suggest using Wondershare Filmora.
The use of GIFs has increased over time and not only on social media platforms, these interesting animations are used for various purposes like marketing, blogging, WhatsApp chats, and much more.
Though there are several online sites from where you can download the desired GIF, there is also an option to create a customized one using videos of images. So, if you too are keen to create a customized GIF, the article will look after your concerns. Learn how to make video to GIF Photoshop and using other tools. Keep reading!!
In this article
01 [Simple Alternative to Photoshop for creating a GIF from Videos- Wondershare Filmora](#Part 1)
02 [Simple Alternative to Photoshop for creating a GIF from Videos- Wondershare Filmora](#Part 2)
Part 1 Creating GIFs from videos using Photoshop
When it comes to any type of video editing task, the first software that comes to mind is Photoshop. Developed by Adobe, this is an excellent editing tool available for Windows and Mac. The software comes loaded with a wide range of functions that help you create desired graphics including GIFs.
Though the interface and the use of the software are a little complicated, once you get a hang of it, professional-looking files can be created in no time.
Steps to convert video to GIF Photoshop
Step 1. Launch the Photoshop software on your system and select File > Import. Next tap on the “Video Frames to Layers” option. Choose the desired video (compatible format) and tap on Load.
Step 2. Next, you need to select the Range to Import. For a few frames, choose the “Selected Frames Only” option.
Step 3. You now need to cut the frames that are not needed by going to Window and then selecting the Animation. If needed, new frames can also be added here.
Step 4. To make your animation loop forever, select Forever from the bottom left side of the animation frames.
Step 5. Next, at the upper-left corner, go to the Rectangle marquee tool and choose the section you wish to focus on
Step 6. Select the image size of the video that will make your GIF look appealing.
Step 7. Next, go to File > Save for Web & Devices for optimizing the image.
Step 8. Now select GIF at the preset section and check if the animation created is right by clicking on the Preview button.
Step 9. Finally, when all is done, click on the Save button and give a desired name to the file.
With the above steps you can make gif from video Photoshop.
Part 2 Simple Alternative to Photoshop for creating a GIF from Videos- Wondershare Filmora
The learning curve of Photoshop is quite steep and to create a GIF from videos using the tool is a complicated process involving multiple steps and especially if you are a beginner and have no prior experience of working with Photoshop software.
So, if you are looking for an alternative that is simple and fast, we suggest Wondershare Filmora Video Editor as the best option.
Wondershare Filmora
Get started easily with Filmora’s powerful performance, intuitive interface, and countless effects!
Try It Free Try It Free Try It Free Learn More >
Using the software videos and images in all key formats can be added to the interface for creating GIF animations. An array of editing options is available like cropping, splitting, rotating, cutting, and more. You can even add text, sound, effects, and other elements for further customization.
In a few simple steps, the software will let you create GIFs of high quality that can be used on several social media and other online platforms.
Steps to create GIF using Wondershare Filmora
Step 1. Download, install, and launch the Wondershare Filmora software on your system and then browse to import the media files from which you want to create a GIF.
Step 2. After the files are added to the interface, move them to the timeline at the bottom by dragging and dropping.
Step 3. Using the editing options you can trim, crop, rotate, and perform other functions.
Step 4. You can even add text, effects, and other elements for further customization.
Step 5. Next, choose to save the created file as GIF under the Local tab. Choose the file name and the location, and then finally tap on the EXPORT button to start the processing.
● Key Takeaways from This Episode →
●GIFs are the latest trend that is used all over social media and other online sites.
●Several software and tools can help in creating the desired GIF.
●Adobe Photoshop is one of the widely used software that can create a GIF using videos as well as images, but the process is quite complicated.
●For a simpler and quicker process of creating a GIF, we suggest using Wondershare Filmora.
Adobe Animate CC: Everything You Need to Know
Adobe Animate CC: Everything You Need to Know

Liza Brown
Mar 27, 2024• Proven solutions
In this article, we are going to clue you in on the new features of 2D animation maker Adobe Animate CC. So, if you are confused about flash animation tool and you are up to a project, just go for Animate CC.
You might also like: 10 Best 2D Animation Software in 2020 [Free/Paid]
What is Adobe Animate CC?
The animation lovers when seeking to serve the purpose, must have used and heard about Adobe Flash, but now we would here inform you that Adobe Animate CC has now replaced the old Adobe Flash.
Along with renaming the tool, the evolution from Flash to Adobe Animate CC has added a wide range of advanced functionalities like support to WebGL and HTML5 canvas.
You will not regret your decision after reading this article and will find that using Adobe Animate CC is a wise choice. Hence, let’s begin to get enlightened on the features.
New features of Adobe Animate CC
1. Adobe Animate Camera
Adobe Animate CC introduces virtual camera functionality unlike other animation software . With the help of this feature, you can easily stimulate your camera’s movement giving your animation a more realistic view.
Making it simpler, you can effortlessly execute panning, zooming and rotating to your animations if you wish. Using the virtual camera in Animate CC, you will be enabling to add more dramatic effects while creating an animation.
For instance, if there’s a fighting scene in our animated movie, you can rotate at the moment the scene shows destruction to give it a dramatic effect or you can zoom in or out and change the viewer’s attention from one point to the other.
2. Export format
Adobe Animate CC has adapted the web standards for the exporting your animation which makes it easier for everyone to view it from desktop to mobile device.
This tweak has revolutionized the web based flash animation by simply eliminating the annoying “need to install a flash player plug-in” which was in case of Flash Professional Platform. With Adobe Animate, users can export content for WebGL, HTML5 Canvas, 4k video easily.
Moreover, you can generate the keyframes based sprite-sheet and animate them accordingly using the CSS. Adapting web standards doesn’t mean that Adobe Animate CC has entirely abandoned the SWF format.
Users do have a privilege to export their files to Flash Player format. Furthermore, a new OAM packaging is also introduced by new Adobe Animate CC which enables you to package assets in .zip format.

3. Vector brushes
Another important functionality that Adobe Animate has brought is giving the opportunity to create vector brushes. This is kind of same as that used in Adobe Illustrator. With this update in brushing tools, one can have pressure and tilt functionalities on drawing of lines and strokes with the help of pen or stylus.
This is helpful in creating strokes in touch-sensitive devices. The width can be changed according to how much pressure you apply when creating patterns. So, if you wish to create 2D vector graphics using shapes, patterns, curves etc. Animate CC would be a good choice.
4. Audio Syncing
The timeline feature of the tool will now allow the users to sync audios in their animations and this is a yet another feature that Animate CC has added. This means you can do audio synchronization for your animation series.
Nevertheless, doing this can be a little demanding as well as time-consuming with HTML5 alone. In addition, you also get enabled for audio loop control with the Adobe Animate CC’s timeline feature.
5. Font
Adobe Animate CC comes now with integration of Typekit where you get countless premium web fonts. These web fonts will be present for HTML5 canvas documents in the tool. Users can pick out from thousands of high-quality fonts via a subscription plan.
Putting in different words, first you can try some selected fonts available in the Typekit library via any level of Creative Cloud plan. Then when you subscribe by spending some money, you can then get access to complete Typekit library where there are thousands of premium fonts for HTML5 canvas.

Final Verdict
Animation industry is no doubt a very interesting one and having the best tool can make it more interesting and fun. After making you familiarize with the top functionalities that are coming with Adobe Animate CC, we feel it would be fair to end the discussion here. Hope you will not give a second thought on Animate CC when need to do flash animation.
Before ending, one more thing that we would like to give the other thought by introducing you Filmora.
No, this is a not another feature, but an interesting yet powerful video editing software created by Wondershare, one of the leading brand in multimedia field. You can use this tool and get your animated videos edited using its extraordinary effects.
Liza Brown
Liza Brown is a writer and a lover of all things video.
Follow @Liza Brown
Liza Brown
Mar 27, 2024• Proven solutions
In this article, we are going to clue you in on the new features of 2D animation maker Adobe Animate CC. So, if you are confused about flash animation tool and you are up to a project, just go for Animate CC.
You might also like: 10 Best 2D Animation Software in 2020 [Free/Paid]
What is Adobe Animate CC?
The animation lovers when seeking to serve the purpose, must have used and heard about Adobe Flash, but now we would here inform you that Adobe Animate CC has now replaced the old Adobe Flash.
Along with renaming the tool, the evolution from Flash to Adobe Animate CC has added a wide range of advanced functionalities like support to WebGL and HTML5 canvas.
You will not regret your decision after reading this article and will find that using Adobe Animate CC is a wise choice. Hence, let’s begin to get enlightened on the features.
New features of Adobe Animate CC
1. Adobe Animate Camera
Adobe Animate CC introduces virtual camera functionality unlike other animation software . With the help of this feature, you can easily stimulate your camera’s movement giving your animation a more realistic view.
Making it simpler, you can effortlessly execute panning, zooming and rotating to your animations if you wish. Using the virtual camera in Animate CC, you will be enabling to add more dramatic effects while creating an animation.
For instance, if there’s a fighting scene in our animated movie, you can rotate at the moment the scene shows destruction to give it a dramatic effect or you can zoom in or out and change the viewer’s attention from one point to the other.
2. Export format
Adobe Animate CC has adapted the web standards for the exporting your animation which makes it easier for everyone to view it from desktop to mobile device.
This tweak has revolutionized the web based flash animation by simply eliminating the annoying “need to install a flash player plug-in” which was in case of Flash Professional Platform. With Adobe Animate, users can export content for WebGL, HTML5 Canvas, 4k video easily.
Moreover, you can generate the keyframes based sprite-sheet and animate them accordingly using the CSS. Adapting web standards doesn’t mean that Adobe Animate CC has entirely abandoned the SWF format.
Users do have a privilege to export their files to Flash Player format. Furthermore, a new OAM packaging is also introduced by new Adobe Animate CC which enables you to package assets in .zip format.
3. Vector brushes
Another important functionality that Adobe Animate has brought is giving the opportunity to create vector brushes. This is kind of same as that used in Adobe Illustrator. With this update in brushing tools, one can have pressure and tilt functionalities on drawing of lines and strokes with the help of pen or stylus.
This is helpful in creating strokes in touch-sensitive devices. The width can be changed according to how much pressure you apply when creating patterns. So, if you wish to create 2D vector graphics using shapes, patterns, curves etc. Animate CC would be a good choice.
4. Audio Syncing
The timeline feature of the tool will now allow the users to sync audios in their animations and this is a yet another feature that Animate CC has added. This means you can do audio synchronization for your animation series.
Nevertheless, doing this can be a little demanding as well as time-consuming with HTML5 alone. In addition, you also get enabled for audio loop control with the Adobe Animate CC’s timeline feature.
5. Font
Adobe Animate CC comes now with integration of Typekit where you get countless premium web fonts. These web fonts will be present for HTML5 canvas documents in the tool. Users can pick out from thousands of high-quality fonts via a subscription plan.
Putting in different words, first you can try some selected fonts available in the Typekit library via any level of Creative Cloud plan. Then when you subscribe by spending some money, you can then get access to complete Typekit library where there are thousands of premium fonts for HTML5 canvas.
Final Verdict
Animation industry is no doubt a very interesting one and having the best tool can make it more interesting and fun. After making you familiarize with the top functionalities that are coming with Adobe Animate CC, we feel it would be fair to end the discussion here. Hope you will not give a second thought on Animate CC when need to do flash animation.
Before ending, one more thing that we would like to give the other thought by introducing you Filmora.
No, this is a not another feature, but an interesting yet powerful video editing software created by Wondershare, one of the leading brand in multimedia field. You can use this tool and get your animated videos edited using its extraordinary effects.
Liza Brown
Liza Brown is a writer and a lover of all things video.
Follow @Liza Brown
Looking for Love Animated GIFs? Here Are 5 Free Sources For You
Versatile Video Editor - Wondershare Filmora
An easy yet powerful editor
Numerous effects to choose from
Detailed tutorials provided by the official channel
You might already know how often people share all kinds of images and GIFs on social media and IM apps. For instance, you might want to send some love animated GIFs to others to express your feelings. After all, if a photo is worth a thousand words, then a GIF would value a million instead. That’s why to help you find some of the best anime love GIFs, I have listed the top 5 websites here. Besides that, I will also let you know how to come up with some heart-animated GIFs on your own.

In this article
01 [Tip 5 Places to Explore Love Animated GIFs](#Part 1)
02 [Make your Own Animated Love GIFs with Music](#Part 2)
03 [Make More Funny Love Animated GIFs with Filmora Meme Maker](#Part 3)
Part 1 Tip 5 Places to Explore Love Animated GIFs
If you search on the web, you can find a wide range of heart-animated GIFs on different websites and apps. Out of them, I would recommend exploring the following places to share or download I Love You funny GIFs.
1. Tenor
Tenor features one of the best sources to find heart-animated GIFs of all kinds. You can access its website on any browser of your choice and enter keywords like love, romantic, I love you, and so much more.
Apart from love cartoon GIFs, you can also find stickers and other animated content on Tenor. While there are options to download any I Love You anime GIF from Tenor, you can also generate its unique link and instantly share it with others on IM apps like WhatsApp or Telegram.
2. GyfCat
Explore some of the best I Love You funny GIFs, and that too for free at GyfCat. This online resource can be accessed on almost any platform and has a sleek interface. You can enter any keyword of your choice on GyfCat to find all sorts of anime love GIFs.
Most of the GIFs available on GyfCat are based on popular shows, series, and anime. You can readily download any animated heart GIF from here and later upload it on a preferred platform.
3. Giphy
Giphy is one of the biggest platforms to host GIFs and images of all freely available sorts. Since GIFs have limited inbuilt filters, you can enter keywords or look for anything via hashtags.
One of the best things about Giphy is that you can find tons of love animated GIFs in high quality. You can directly download them to your device or share them with others via their unique links.
4. Imgur
Imgur is known to host millions of images and GIFs in different categories. While most of these anime love GIFs are freely available on Imgur, some have restricted guidelines for commercial use.
You can also upload any GIF to Imgur and get its unique link to share it with others quickly. They can tap on the link to view your heart animated GIF without downloading anything.
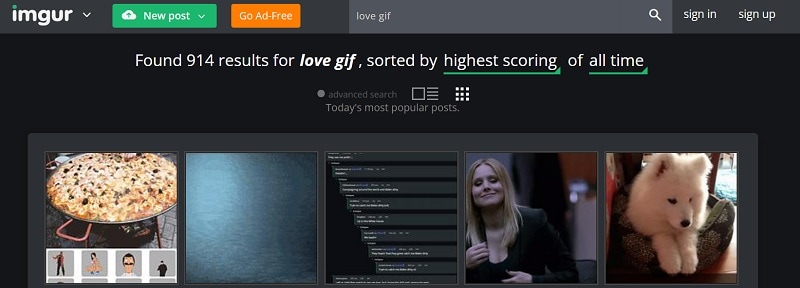
5. Tumblr
Tumblr is a popular microblogging website that hosts millions of blogs in one place. Therefore, you can easily search for interesting blogs that upload the I Love You animated GIF.
Apart from following these blogs, you can also do a global search on Tumblr to find love cartoon GIFs in different categories. You can download them on your device or directly share them with others via Tumblr.
Part 2 Make your Own Animated Love GIFs with Music
Since the above-listed websites for I Love You anime GIFs can be a bit generic, you can consider coming up with some unique media of your own. To do that, I would recommend using Wondershare Filmora, which is a user-friendly and feature-equipped media editing tool.
If you want, you can readily import images, GIFs, videos, music, and other media files on Filmora. Besides that, the application also features a wide range of assets related to sound effects, images, and more that you can readily use. To come up with some interesting, I Love You animated GIFs using Filmora, follow this drill:
Step 1: Load your Media Files from your System
Once Wondershare Filmora is installed, you can launch it on your system and go to its Menu > File > Import to load your photos, videos, and so on. You can also drag and drop them to the interface of Filmora.
For Win 7 or later (64-bit)
For macOS 10.12 or later

Step 2: Use Filmora to Create Amazing Romantic GIFs
After loading these media files, you can drag and drop them to the timeline at the bottom to start editing. To get rid of anything, you can hover the mouse pointer on the sides to get its trimming tool and use it to clip any unwanted part of the clip.

Once you select any media, you can get tons of editing options for it on the side. For instance, you can go to its properties to rotate, flip, reposition, scale, and perform several other edits on your media files.

If you want to add any text or caption effect to your I Love You anime GIF, then you can go to the “Titles” section on Filmora. Here, you can find tons of caption effects that you can add to your projects and customize them further as per your needs.

Besides that, to make your heart-animated GIFs look more interesting, you can add numerous filters, overlays, stickers, and other effects from the available features on Filmora.

One of the best things about Filmora is exploring the inbuilt sound effects and adding background music to your love cartoon GIFs. For instance, you can add soundtracks, effects and even edit the inserted audio in Filmora. There is also an advanced option to record voiceovers using the native feature in Filmora.

Step 3: Save your Love Animated GIFs from Filmora
In the end, you can check a preview of your heart animated GIF on Filmora and can click on the “Export” button at the top. You can now export your media as a GIF file on your system. However, if it has background music, you can consider saving it as an MP4 file instead.

Tip Make More Funny Love Animated GIFs with Filmora Meme Maker
If you want to customize your GIFs, you can also take the assistance of Filmora Meme Maker . Let’s say you have created a love animated GIF or have found it online. Now, you can head to the official website of the Filmora Meme Maker and upload it here. Later, you can add captions to the GIF and customize it using readily available templates. That’s it! You can now download the I Love You funny GIF in a preferred format on your device.
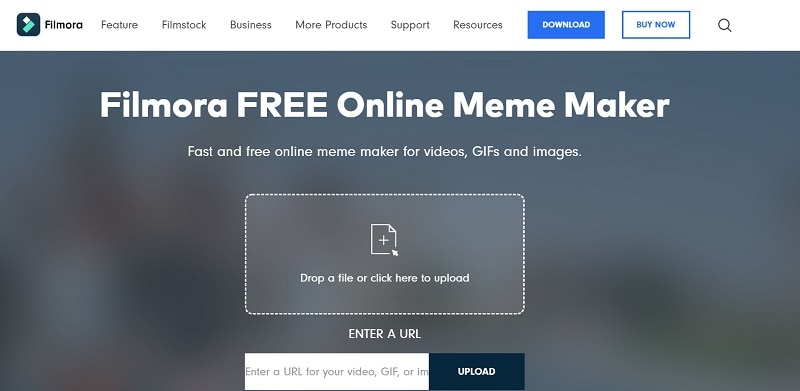
Conclusion
There you go! I’m sure that after reading this post, you can find tons of love animated GIFs. From Tenor to Tumblr and Giphy to GyfCat, there are so many websites from where you can download unlimited anime love GIFs. Though, if you want to come up with some interesting heart-animated GIFs with music, then you can simply try Wondershare Filmora. It is one of the best media editing tools that offer a wide range of assets and other advanced features that would let you create and edit all kinds of GIFs on the go.
Versatile Video Editor - Wondershare Filmora
An easy yet powerful editor
Numerous effects to choose from
Detailed tutorials provided by the official channel
You might already know how often people share all kinds of images and GIFs on social media and IM apps. For instance, you might want to send some love animated GIFs to others to express your feelings. After all, if a photo is worth a thousand words, then a GIF would value a million instead. That’s why to help you find some of the best anime love GIFs, I have listed the top 5 websites here. Besides that, I will also let you know how to come up with some heart-animated GIFs on your own.
In this article
01 [Tip 5 Places to Explore Love Animated GIFs](#Part 1)
02 [Make your Own Animated Love GIFs with Music](#Part 2)
03 [Make More Funny Love Animated GIFs with Filmora Meme Maker](#Part 3)
Part 1 Tip 5 Places to Explore Love Animated GIFs
If you search on the web, you can find a wide range of heart-animated GIFs on different websites and apps. Out of them, I would recommend exploring the following places to share or download I Love You funny GIFs.
1. Tenor
Tenor features one of the best sources to find heart-animated GIFs of all kinds. You can access its website on any browser of your choice and enter keywords like love, romantic, I love you, and so much more.
Apart from love cartoon GIFs, you can also find stickers and other animated content on Tenor. While there are options to download any I Love You anime GIF from Tenor, you can also generate its unique link and instantly share it with others on IM apps like WhatsApp or Telegram.
2. GyfCat
Explore some of the best I Love You funny GIFs, and that too for free at GyfCat. This online resource can be accessed on almost any platform and has a sleek interface. You can enter any keyword of your choice on GyfCat to find all sorts of anime love GIFs.
Most of the GIFs available on GyfCat are based on popular shows, series, and anime. You can readily download any animated heart GIF from here and later upload it on a preferred platform.
3. Giphy
Giphy is one of the biggest platforms to host GIFs and images of all freely available sorts. Since GIFs have limited inbuilt filters, you can enter keywords or look for anything via hashtags.
One of the best things about Giphy is that you can find tons of love animated GIFs in high quality. You can directly download them to your device or share them with others via their unique links.
4. Imgur
Imgur is known to host millions of images and GIFs in different categories. While most of these anime love GIFs are freely available on Imgur, some have restricted guidelines for commercial use.
You can also upload any GIF to Imgur and get its unique link to share it with others quickly. They can tap on the link to view your heart animated GIF without downloading anything.
5. Tumblr
Tumblr is a popular microblogging website that hosts millions of blogs in one place. Therefore, you can easily search for interesting blogs that upload the I Love You animated GIF.
Apart from following these blogs, you can also do a global search on Tumblr to find love cartoon GIFs in different categories. You can download them on your device or directly share them with others via Tumblr.
Part 2 Make your Own Animated Love GIFs with Music
Since the above-listed websites for I Love You anime GIFs can be a bit generic, you can consider coming up with some unique media of your own. To do that, I would recommend using Wondershare Filmora, which is a user-friendly and feature-equipped media editing tool.
If you want, you can readily import images, GIFs, videos, music, and other media files on Filmora. Besides that, the application also features a wide range of assets related to sound effects, images, and more that you can readily use. To come up with some interesting, I Love You animated GIFs using Filmora, follow this drill:
Step 1: Load your Media Files from your System
Once Wondershare Filmora is installed, you can launch it on your system and go to its Menu > File > Import to load your photos, videos, and so on. You can also drag and drop them to the interface of Filmora.
For Win 7 or later (64-bit)
For macOS 10.12 or later
Step 2: Use Filmora to Create Amazing Romantic GIFs
After loading these media files, you can drag and drop them to the timeline at the bottom to start editing. To get rid of anything, you can hover the mouse pointer on the sides to get its trimming tool and use it to clip any unwanted part of the clip.
Once you select any media, you can get tons of editing options for it on the side. For instance, you can go to its properties to rotate, flip, reposition, scale, and perform several other edits on your media files.
If you want to add any text or caption effect to your I Love You anime GIF, then you can go to the “Titles” section on Filmora. Here, you can find tons of caption effects that you can add to your projects and customize them further as per your needs.
Besides that, to make your heart-animated GIFs look more interesting, you can add numerous filters, overlays, stickers, and other effects from the available features on Filmora.
One of the best things about Filmora is exploring the inbuilt sound effects and adding background music to your love cartoon GIFs. For instance, you can add soundtracks, effects and even edit the inserted audio in Filmora. There is also an advanced option to record voiceovers using the native feature in Filmora.
Step 3: Save your Love Animated GIFs from Filmora
In the end, you can check a preview of your heart animated GIF on Filmora and can click on the “Export” button at the top. You can now export your media as a GIF file on your system. However, if it has background music, you can consider saving it as an MP4 file instead.
Tip Make More Funny Love Animated GIFs with Filmora Meme Maker
If you want to customize your GIFs, you can also take the assistance of Filmora Meme Maker . Let’s say you have created a love animated GIF or have found it online. Now, you can head to the official website of the Filmora Meme Maker and upload it here. Later, you can add captions to the GIF and customize it using readily available templates. That’s it! You can now download the I Love You funny GIF in a preferred format on your device.
Conclusion
There you go! I’m sure that after reading this post, you can find tons of love animated GIFs. From Tenor to Tumblr and Giphy to GyfCat, there are so many websites from where you can download unlimited anime love GIFs. Though, if you want to come up with some interesting heart-animated GIFs with music, then you can simply try Wondershare Filmora. It is one of the best media editing tools that offer a wide range of assets and other advanced features that would let you create and edit all kinds of GIFs on the go.
Versatile Video Editor - Wondershare Filmora
An easy yet powerful editor
Numerous effects to choose from
Detailed tutorials provided by the official channel
Also read:
- Convert Animated GIF From Video
- Updated Nurturing Mind, Heart, and Soul on the Top 5 Anime Streaming Sanctuaries
- Step-by-Step Guide to Send Gif WhatsApp on Android
- New Most Effective Tactics to Set WhatsApp Status for 2024
- Updated A Roster of 15 Top Disney Channel Cartoons for 2024
- 2024 Approved 10 Best Convert Video Between GIF Software High Quality
- New Learn Easy Blender Rigging in Only 2 Minutes for 2024
- New 2024 Approved How to Animate Image on Scroll and Text on Scroll?
- New In 2024, Secret Source to Make a Stop Motion Puppet
- Updated How to Get Started in Stop Motion Claymation for 2024
- How to Make GIF Instagram | Quick Tips
- In 2024, Stunning Ideas About Creating Personalised WhatsApp GIF Sticker
- New In 2024, Best 15 Classics Animated Cartoon Movies
- Updated Tips on How to Get Awesome Background for Slideshow in PowerPoint
- 2024 Approved Amazing Ideas About Creating Personalised WhatsApp GIF Sticker
- 2024 Approved 12 Animated Slideshow PowerPoint Templates and Tools to Make Them
- Updated Top Tips for Effortless Unity 3D Animation for 2024
- New A Roster of 15 Best Disney Channel Cartoons for 2024
- Updated The 10 Most Adorable Aesthetic Cartoon Characters of All Time for 2024
- In 2024, The 15 Most Efficient Photo to Cartoon Software for Android
- Updated 15 Best Stop Motion Animation Kits to Fuel Creativity (2024 Guide)
- New Best 10 Apps to Enhance Your Instagram Story Slideshow for 2024
- Updated 12 Animation Video Maker That Can Triple Conversion Rates for 2024
- New In 2024, How to Make a Video a Live Photo
- Can I Do Animated Logo Design Without Design Skills, In 2024
- In 2024, How to Use Pokémon Emerald Master Ball Cheat On Vivo X100 Pro | Dr.fone
- How to Send and Fake Live Location on Facebook Messenger Of your Apple iPhone 13 mini | Dr.fone
- How To Unbrick a Dead Nokia C12 Pro | Dr.fone
- Unlocking iPhone XR Lock Screen 3 Foolproof Methods that Actually Work | Dr.fone
- 5 Ways to Track Honor 90 without App | Dr.fone
- Best Anti Tracker Software For Honor 90 GT | Dr.fone
- How To Create an Apple Developer Account From iPhone 6
- In 2024, How Can You Cast Your Apple iPhone 6 to Windows PC With Ease? | Dr.fone
- In 2024, 5 Ways to Move Contacts From Xiaomi Redmi 12 to iPhone (13/14/15) | Dr.fone
- Proven Ways to Fix There Was A Problem Parsing the Package on Oppo A58 4G | Dr.fone
- 8 Ultimate Fixes for Google Play Your Tecno Pova 6 Pro 5G Isnt Compatible | Dr.fone
- 3 Easy Ways to Factory Reset a Locked iPhone 12 Without iTunes | Dr.fone
- Edit and Send Fake Location on Telegram For your Honor Magic 6 in 3 Ways | Dr.fone
- In 2024, Hide location on Apple iPhone SE (2022) and Android without others knowing | Dr.fone
- In 2024, How To Leave a Life360 Group On Samsung Galaxy S23 Tactical Edition Without Anyone Knowing? | Dr.fone
- Easy Fixes How To Recover Forgotten iCloud Password On your Apple iPhone 12 Pro Max
- Thinking About Changing Your Netflix Region Without a VPN On Infinix Smart 8? | Dr.fone
- Top 4 Android System Repair Software for Xiaomi Redmi A2 Bricked Devices | Dr.fone
- In 2024, Best 3 Tecno Camon 20 Pro 5G Emulator for Mac to Run Your Wanted Android Apps | Dr.fone
- How to identify some outdated drivers with Windows Device Manager in Windows 7
- The Ultimate Guide to Get the Rare Candy on Pokemon Go Fire Red On Honor 90 Lite | Dr.fone
- 3 Ways for Android Pokemon Go Spoofing On Realme C33 2023 | Dr.fone
- Title: New How to Animate Image on Scroll for 2024
- Author: Elon
- Created at : 2024-05-19 03:05:50
- Updated at : 2024-05-20 03:05:50
- Link: https://animation-videos.techidaily.com/new-how-to-animate-image-on-scroll-for-2024/
- License: This work is licensed under CC BY-NC-SA 4.0.
