

New How to Create Free Photo Collage Frame in Minutes for 2024
How to Create Free Photo Collage Frame in Minutes?
How to Create Photo Collage Frame for Free in Minutes?
An easy yet powerful editor
Numerous effects to choose from
Detailed tutorials provided by the official channel
Decoration of pictures and collages can be done by making beautiful and stylish frames. A family picture or collage can be beautified by adding an attractive frame to it. Know about Best App for Photo Frames Online so you can create photo collages easily in minutes.
In this article
01 [How Do You Make a Collage Picture Frame?](#Part 1)
02 [What is the Best App for Photo Frames?](#Part 2)
Part 1 How Do You Make a Collage Picture Frame?
A beautiful collage without a stylish frame will not be attractive. When a family collage is accompanied by an artistic frame, it adds beauty to it and will be an attraction point for the visitors in the home. Wondering where to get it from? You can do it easily through some most popular apps. Yes, you can get your photo collage framed by yourself.

A wall can be decorated with collage picture frames by following just a few simple steps. Let’s begin with!!!
● Selection of the place where the collage frame is required to be hung: The place should be selected based on certain factors such as being easily approachable, proper lighting, and matching with the theme of the home. The place should be sufficient to add on some more picture frames in the future. The wall picture collage frames shall be created based on the room themes like kid’s room, living room, or bedroom. The position of the frames should be marked with tape so that the exact dimension can be known.
● 2. Select the online application to create frames: There are many applications available online that offer pictures collage frames. Choose one application as per the interest and explore it over the phone or desktop. There are various collage picture frame templates available at the application.
● 3. Uploading the pictures: Select the frame that is best for the picture. The frames shall be selected as per the size of the collage. Several pictures can be selected to make a collage and fix the frame. The frame style can be changed that suits best to the picture or collage. A family picture can be uploaded to create a beautiful and perfect size family photo frame collage.
● 4. Customization: The Photo Collage Frame can be even made better with customization over online applications. Text and style can be included in the frames to give it a better look. Grid frame for picture collage is also available which can be created that fits perfectly to the pictures.
● 5. A collage photo frame is ready to hang on the wall & share: The photo collage with frame can be downloaded from the application. A beautiful picture frame collage wall can be hung in the living room or can be shared online with family and friends to print the same. More frames can be added in the future by choosing the same theme and customization.
Part 2 Part2 what is the Best App for Photo Frames?
Selecting the best App for a photo frame enhances the appearance of any ordinary picture. Some of the top Applications used for frame collage wall are as mentioned:

02 PhotoDirector
This app is popular due to its great AI tools, attractive picture effects, and advanced color control. It has a massive collection of frames that fits perfectly for a single picture as well as a collage. The style options of frames available on the app are classic, modern, and whimsical. Animation and glitch effects add an extra feature to this app.
Pros:
1. Wide range of frames is available.
2. It is easy to use as it can work on Android, iOS, macOS, and Windows devices.
3. Free version is available and photo frames can be shared over social media platforms.
Cons:
1. a Large number of editing options makes it confusing.
2. Fewer features are available.
3. Difficulty in finding plug-in features.

03PicsArt-Our Choice
PicsArt-Our Choice app is having a good combination best photo frames and multi-functional photo editing tools. Clip art, text option, frame editing, and making attractive collages make this app a masterpiece. This app can be used over smartphones and the pictures can be easily shared over social media platforms.
Pros:
1. Availability of tools to make clipart and collages.
2. Option to edit frames and objects.
3. Fully packed with a lot of stickers, frames, and filter options.
Cons:
1. The processing of images is slower.
2. Frequent ads disturb the process of editing and frame creation.
3. The application requires more space on downloading over the phone

04 PicFrame
This application has features to combine multiple pictures in one frame and the created frames can be easily shared over social media platforms. A great artwork can be done by using advanced tools such as filters, attractive frames, and drawing tools. The adjustable photo effects, background patterns and fully customized frames allow creating some attractive pictures and collage frame design.
Pros:
1. Option to save pictures in different resolutions.
2. Great tools for reshaping pictures and wide frame patterns
3. Work also on iPhone and iPad.
Cons:
1. With more new and advanced apps, it has become slightly outdated.
2. It closes very frequently, so sometimes work done on the application is lost.
3. Time to create frames is longer.

05Photo Grid
Photo Grid is an App that offers great photo editing features with more than three hundred layouts to give an attractive look to a picture. The users can transform their various pictures into beautiful collages. Filters, stickers, makeup tools, animated emoticons, and customized background features have made this app a bit popular. Extra pages can be added and the Lightbox feature makes it good for presentation.
Pros:
1. Massive collection of photo frames with customized features
2. Easy to use.
3. Various photo editing option
Cons:
1. It comes with various ads that trouble making frames and collages.
2. Lot of flexibility is not there regarding making videos with pictures.
3. Own frames cannot be created.

06ImgLabs
ImgLabs is one of the best applications to decorate photos and add creativity to them. Easy editing, beautify and stickers can be done over pictures and can be easily shared over Instagram and Facebook. More than twenty images can be added along with beautiful frames through this app. Cool photo filters, drawing tools, collage photo frame design tools, and texture effects make it a great photo frame application.
Pros:
1. The Android and iOS versions of the app are easy to use.
2. Attractive blurring and background effects give an attractive look to the images and picture frames.
3. Well-developed photo editing tools are available.
Cons:
1. The frames available are less as compared to other photo & frame editing applications.
2. Difference in functions is noticed in iOS and Android apps.
3. Installation issues in photo edit and stickers

So, these were some of the applications that offer to make some creative photo edits, collages, and frames. Turning to high definition of pictures and frames, most of the applications are coming up with new and advanced features to give the best picture experience to people. One of the applications which any creative person loves to use is Filmora.
****Wondershare Filmora Video Editor ** that creates attractive and professional quality videos for both business and personal purposes. It transforms the video by adding various stylish effects. One can edit the clips, add watermarks, and can adjust the brightness of the videos in simple steps. A wide range of stickers, animated texts, sound effects, filters, and inserting colorful borders over videos make it a great app.
For Win 7 or later (64-bit)
For macOS 10.12 or later
The videos can be made in different file formats such as mp4, wmv, avi, gif, and mp3 and can be easily shared over social media platforms. This app has great importance for business as it offers various facilities such as Multi-channel marketing, social advertising, and social promotion. It is good for user and brand management also.
So, making any video from pictures or movies through Filmora app will be an amazing idea. With advanced texting, color tuning, and 3D effects, one can be so creative. Even Filmora can be used to create video projects.
● Key Takeaways from This Episode →
● Simple pictures or collages can be taken to next level by adding alluring frames to them. With advanced drawing tools, pictures, and light effects, a stylish collage photo frame design can be created online. It allows bringing so many memories of people in one beautiful frame.
● Photo frame collage wall can be created over many applications. There are Android applications that offer many advanced features required to give a fine touch to the pictures, collages, and frames. They can be used and frames for family pictures can be made easily by following simple steps.
● he selection of the application should be made based on the several options available with the app. For example, an app that has easy to use, is good for all devices, has great editing features, eye-catching eye work and mesmerizing effect shall be preferred.
● So, try some amazing and advanced online Apps to create beautiful picture frames for you and your family now!!!
Decoration of pictures and collages can be done by making beautiful and stylish frames. A family picture or collage can be beautified by adding an attractive frame to it. Know about Best App for Photo Frames Online so you can create photo collages easily in minutes.
In this article
01 [How Do You Make a Collage Picture Frame?](#Part 1)
02 [What is the Best App for Photo Frames?](#Part 2)
Part 1 How Do You Make a Collage Picture Frame?
A beautiful collage without a stylish frame will not be attractive. When a family collage is accompanied by an artistic frame, it adds beauty to it and will be an attraction point for the visitors in the home. Wondering where to get it from? You can do it easily through some most popular apps. Yes, you can get your photo collage framed by yourself.
A wall can be decorated with collage picture frames by following just a few simple steps. Let’s begin with!!!
● Selection of the place where the collage frame is required to be hung: The place should be selected based on certain factors such as being easily approachable, proper lighting, and matching with the theme of the home. The place should be sufficient to add on some more picture frames in the future. The wall picture collage frames shall be created based on the room themes like kid’s room, living room, or bedroom. The position of the frames should be marked with tape so that the exact dimension can be known.
● 2. Select the online application to create frames: There are many applications available online that offer pictures collage frames. Choose one application as per the interest and explore it over the phone or desktop. There are various collage picture frame templates available at the application.
● 3. Uploading the pictures: Select the frame that is best for the picture. The frames shall be selected as per the size of the collage. Several pictures can be selected to make a collage and fix the frame. The frame style can be changed that suits best to the picture or collage. A family picture can be uploaded to create a beautiful and perfect size family photo frame collage.
● 4. Customization: The Photo Collage Frame can be even made better with customization over online applications. Text and style can be included in the frames to give it a better look. Grid frame for picture collage is also available which can be created that fits perfectly to the pictures.
● 5. A collage photo frame is ready to hang on the wall & share: The photo collage with frame can be downloaded from the application. A beautiful picture frame collage wall can be hung in the living room or can be shared online with family and friends to print the same. More frames can be added in the future by choosing the same theme and customization.
Part 2 Part2 what is the Best App for Photo Frames?
Selecting the best App for a photo frame enhances the appearance of any ordinary picture. Some of the top Applications used for frame collage wall are as mentioned:
02 PhotoDirector
This app is popular due to its great AI tools, attractive picture effects, and advanced color control. It has a massive collection of frames that fits perfectly for a single picture as well as a collage. The style options of frames available on the app are classic, modern, and whimsical. Animation and glitch effects add an extra feature to this app.
Pros:
1. Wide range of frames is available.
2. It is easy to use as it can work on Android, iOS, macOS, and Windows devices.
3. Free version is available and photo frames can be shared over social media platforms.
Cons:
1. a Large number of editing options makes it confusing.
2. Fewer features are available.
3. Difficulty in finding plug-in features.
03PicsArt-Our Choice
PicsArt-Our Choice app is having a good combination best photo frames and multi-functional photo editing tools. Clip art, text option, frame editing, and making attractive collages make this app a masterpiece. This app can be used over smartphones and the pictures can be easily shared over social media platforms.
Pros:
1. Availability of tools to make clipart and collages.
2. Option to edit frames and objects.
3. Fully packed with a lot of stickers, frames, and filter options.
Cons:
1. The processing of images is slower.
2. Frequent ads disturb the process of editing and frame creation.
3. The application requires more space on downloading over the phone
04 PicFrame
This application has features to combine multiple pictures in one frame and the created frames can be easily shared over social media platforms. A great artwork can be done by using advanced tools such as filters, attractive frames, and drawing tools. The adjustable photo effects, background patterns and fully customized frames allow creating some attractive pictures and collage frame design.
Pros:
1. Option to save pictures in different resolutions.
2. Great tools for reshaping pictures and wide frame patterns
3. Work also on iPhone and iPad.
Cons:
1. With more new and advanced apps, it has become slightly outdated.
2. It closes very frequently, so sometimes work done on the application is lost.
3. Time to create frames is longer.
05Photo Grid
Photo Grid is an App that offers great photo editing features with more than three hundred layouts to give an attractive look to a picture. The users can transform their various pictures into beautiful collages. Filters, stickers, makeup tools, animated emoticons, and customized background features have made this app a bit popular. Extra pages can be added and the Lightbox feature makes it good for presentation.
Pros:
1. Massive collection of photo frames with customized features
2. Easy to use.
3. Various photo editing option
Cons:
1. It comes with various ads that trouble making frames and collages.
2. Lot of flexibility is not there regarding making videos with pictures.
3. Own frames cannot be created.
06ImgLabs
ImgLabs is one of the best applications to decorate photos and add creativity to them. Easy editing, beautify and stickers can be done over pictures and can be easily shared over Instagram and Facebook. More than twenty images can be added along with beautiful frames through this app. Cool photo filters, drawing tools, collage photo frame design tools, and texture effects make it a great photo frame application.
Pros:
1. The Android and iOS versions of the app are easy to use.
2. Attractive blurring and background effects give an attractive look to the images and picture frames.
3. Well-developed photo editing tools are available.
Cons:
1. The frames available are less as compared to other photo & frame editing applications.
2. Difference in functions is noticed in iOS and Android apps.
3. Installation issues in photo edit and stickers
So, these were some of the applications that offer to make some creative photo edits, collages, and frames. Turning to high definition of pictures and frames, most of the applications are coming up with new and advanced features to give the best picture experience to people. One of the applications which any creative person loves to use is Filmora.
****Wondershare Filmora Video Editor ** that creates attractive and professional quality videos for both business and personal purposes. It transforms the video by adding various stylish effects. One can edit the clips, add watermarks, and can adjust the brightness of the videos in simple steps. A wide range of stickers, animated texts, sound effects, filters, and inserting colorful borders over videos make it a great app.
For Win 7 or later (64-bit)
For macOS 10.12 or later
The videos can be made in different file formats such as mp4, wmv, avi, gif, and mp3 and can be easily shared over social media platforms. This app has great importance for business as it offers various facilities such as Multi-channel marketing, social advertising, and social promotion. It is good for user and brand management also.
So, making any video from pictures or movies through Filmora app will be an amazing idea. With advanced texting, color tuning, and 3D effects, one can be so creative. Even Filmora can be used to create video projects.
● Key Takeaways from This Episode →
● Simple pictures or collages can be taken to next level by adding alluring frames to them. With advanced drawing tools, pictures, and light effects, a stylish collage photo frame design can be created online. It allows bringing so many memories of people in one beautiful frame.
● Photo frame collage wall can be created over many applications. There are Android applications that offer many advanced features required to give a fine touch to the pictures, collages, and frames. They can be used and frames for family pictures can be made easily by following simple steps.
● he selection of the application should be made based on the several options available with the app. For example, an app that has easy to use, is good for all devices, has great editing features, eye-catching eye work and mesmerizing effect shall be preferred.
● So, try some amazing and advanced online Apps to create beautiful picture frames for you and your family now!!!
How to Reduce GIF Size and Best GIF Resizers
How to Reduce GIF Size and Best GIF Resizers

Shanoon Cox
Mar 27, 2024• Proven solutions
With the increasing popularity of Smartphones, people these days are experiencing all new things with lots of excitement. And GIFs are always the most interesting content for them. When we talk about limited band width and fast loading time solutions then GIFs are the first options in front of our eyes. These files use to have small size so they can be transferred and downloaded with ease and at faster rate. If you are interested to know about various resizing concepts related to GIFs then the article below can be helpful for you.
How to reduce GIF size?
There are so many things that contribute in managing overall size of GIFs. The list includes the colour count inside, dimensions of images that you have used for development of GIFs and number of frames included inside one GIF folder. In case if it is an animated GIF then size may increase accordingly. Somehow, if you become able to optimize your Gifs then it is much easier to share them over internet.
Photoshop is a great tool to edit your image, including gif images. Here we are going to show you how to make your GIF smaller in Photoshop.
1. Crop away any extra space around the image:
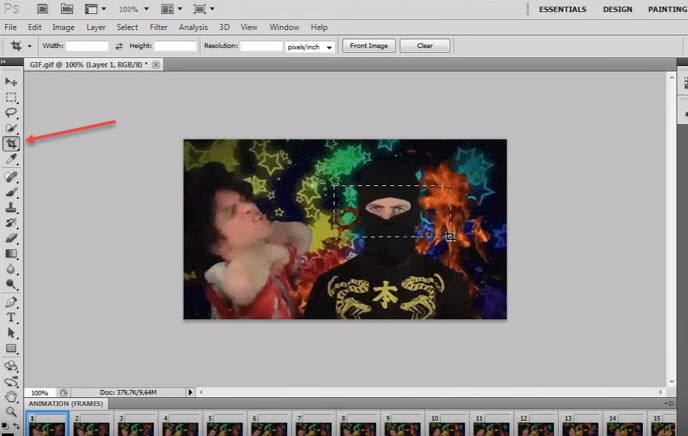
Image source: youtube.com
The very first task for users is to bring your GIF video file onto Photoshop timeline. Sometimes, it is not essential to update whole series of your GIF animation to the library, the GIF can be simply trimmed at timeline panel. One needs to turn on loop option and then be active enough to allocate the right place to trim your video.
2. Reduce dimensions of Output:

Image source: google.com
Those who are working on Photoshop CC 2017 version will be able to develop GIFs by simply executing Explore As option from menu. To do this, they need to move to files and then from drop down menu select Export as. Soon a menu will open where you need to choose your output file format as GIF and adjust weight and height parameter to reduce physical dimensions of your image.
In case if you are using Adobe Photoshop Elements 14 then on its interface, users need to move to File and then hit Save for Web option. It will help to open a Save for Web type dialogue box immediately, on this new window you can apply desired changes to physical dimensions of your content, reduce color information and apply dithering etc.
3. Adjust number of colors in image:
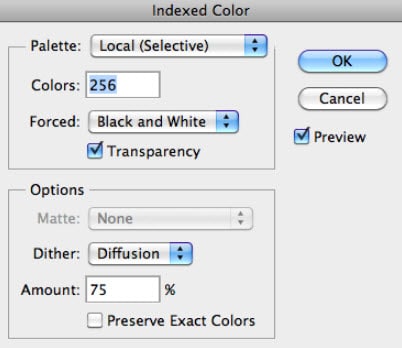
Image source: google.com
One of the most useful tricks for marketers is to optimize size of their GIF images by adjusting total number of colours to it. It can be done using color table tool that assists in easy selection and de-selection. This table use to contain about 256 unique colours and all of them use to contain 8 bit wide information. The best recommendation for good quality and small seize GIFs is to limit colours up to 64 only or keep then less than this. But sometimes your original videos may ask you for increment in color information.
Tips:
During GIF size reduction process, you will have to go through color number selections in the series of 256, 128, 64, 32, 16, 8, 4, 2, 1 etc. Use the smaller side of scale to get best results during optimization process.
- Users can also reduce number of frames in their GIFs.
- Never forget to avoid dithering as it may help to improve appearance of images.
- It is essential work with loss less compression algorithms otherwise huge loss in information will be carried out.
- Interlacing is not good option for your GIFs as it causes significant increase in overall file size.
Best GIF resizers
Those who are searching for some alternatives to Photoshop for creation of GIF images can move towards the list below:
2. FileOptimizer:
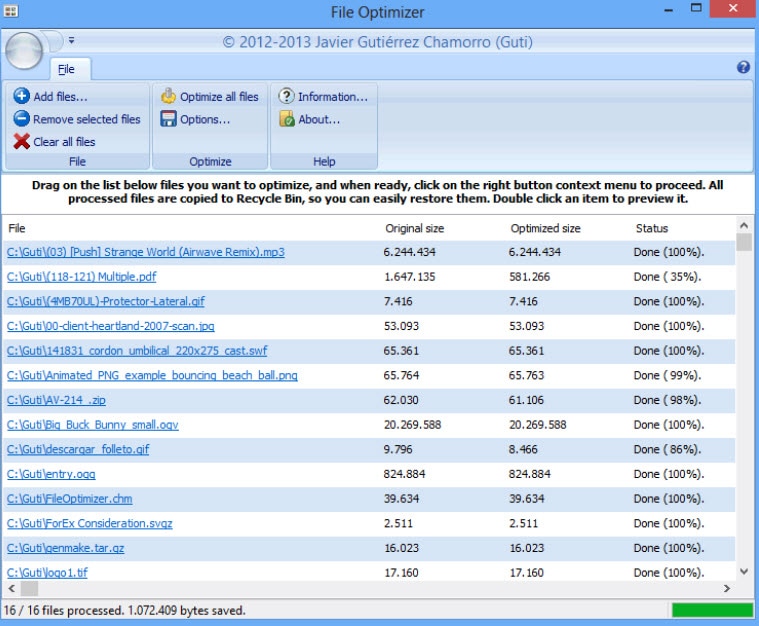
This is an advanced optimization tool for GIF sets as it can shrink output file using its multiple recompressing procedures. It can help to compress audio, video as well as other documents with popular file sizes like JPG, GMP, PNG and TIFF etc.
3. FileMinimizer Pictures:
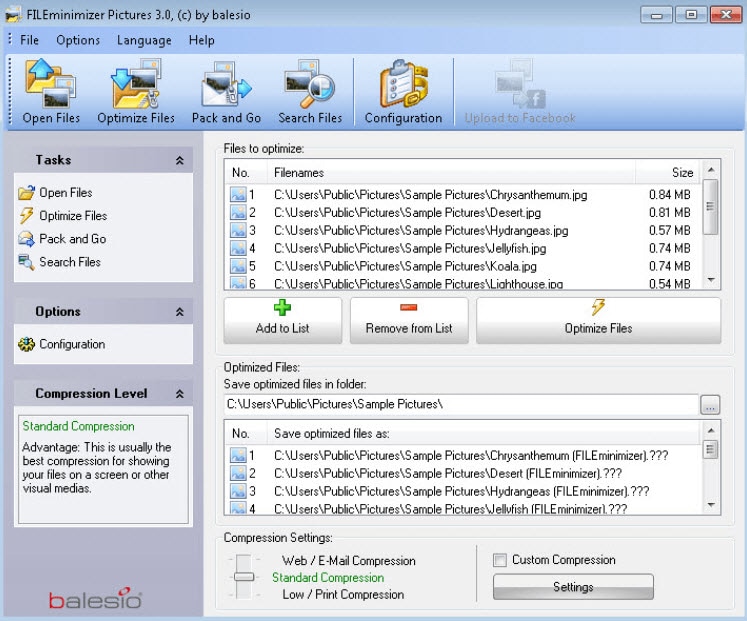
It can compress GIF images up to 98% with its classic optimization techniques. It generally follows 4 compression levels but sometimes may go through several levels to generate smaller GIFs but even without losing quality. It works only on Windows platform.
4. RIOT:
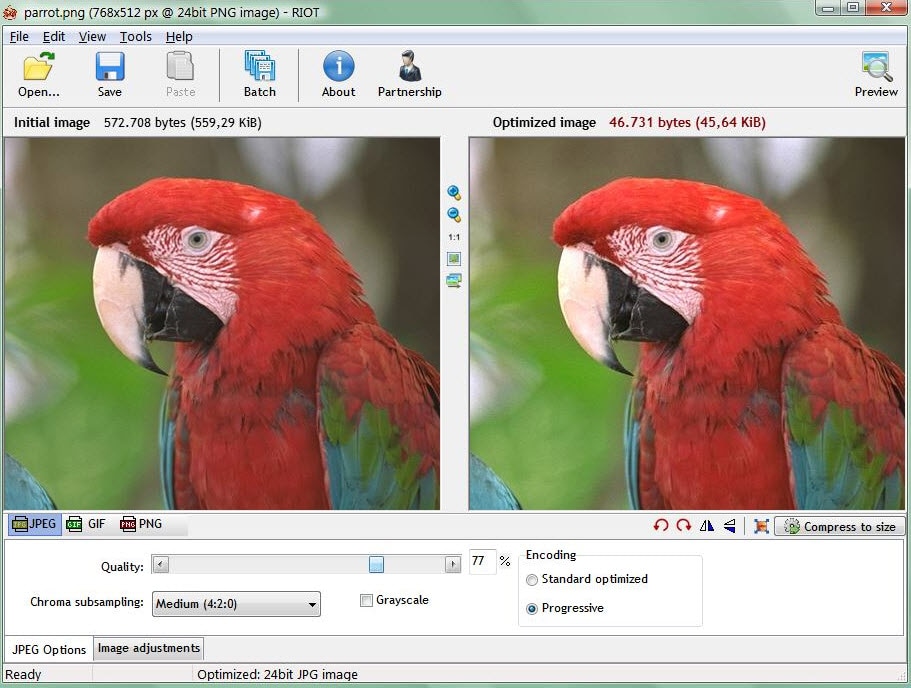
Here RIOT stands for Radical Image Optimization Tool that can adjust so many feature parameters for GIFs along with file size compressions. This optimizer makes use of matadeta settings, color information etc to reduce overall file size.
5. GifftingTool:
BY simply optimizing repetitive colours and pixels from GIF frames, this tool can easily provides loss less optimization solution. It can be used to adjust image cropping, reversing, merging, looping and filtering needs.
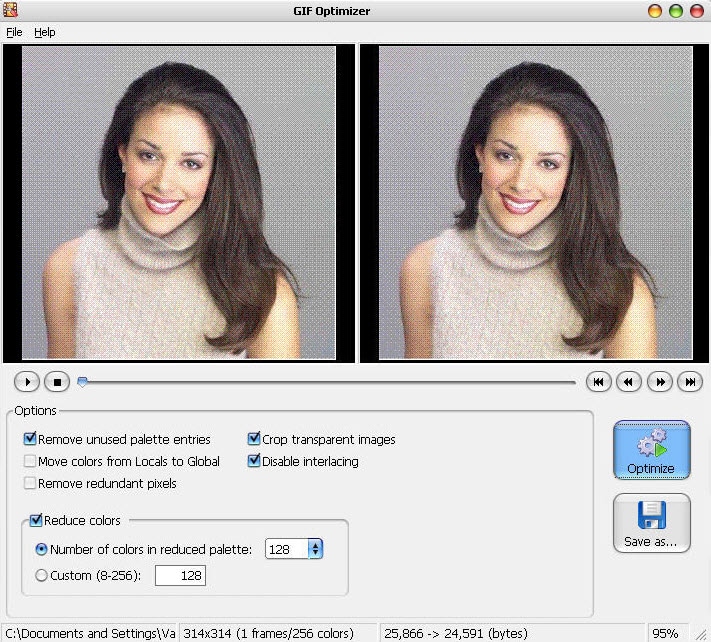
6. GIF Optimizer:
This is specially designed one click type GIF optimizer that can provide compression up to 90%. It also assists to reduce the total load time for GIF with reduction in file size.
7. Ezgif.com – Online:

This online GIF image editor can shrink your image by simply reducing its colour information. Users can easily minimize file size for about 30% using this tool that has features like crop, resize etc.
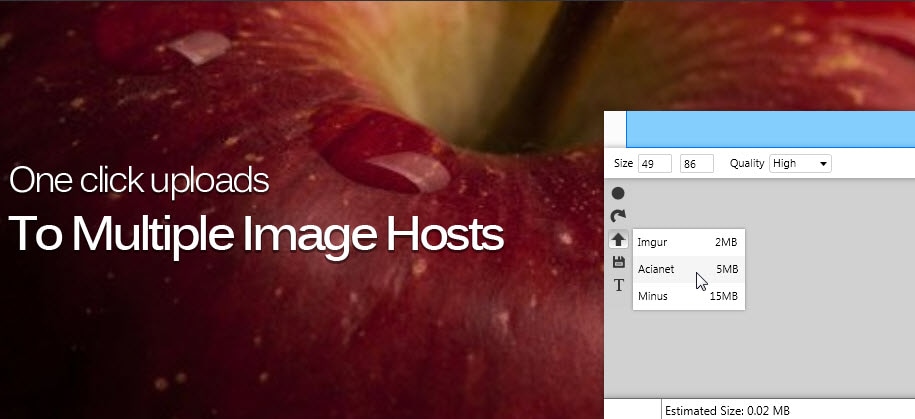
8. Conpressor.io – Online:
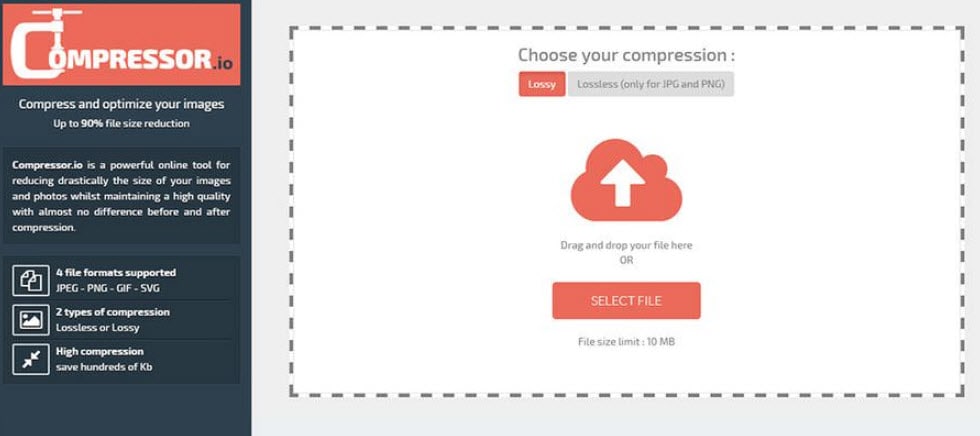
This online web app can assist users to compress their image to smallest size segment even without decaying overall quality. You can easily process SVG, PNG, GIF and JPG file formats over here.
9. Picasion.com – Online:

It helps to reduce overall weight of GIFs so that they can be easily uploaded over internet.
10. GIF Reducer:
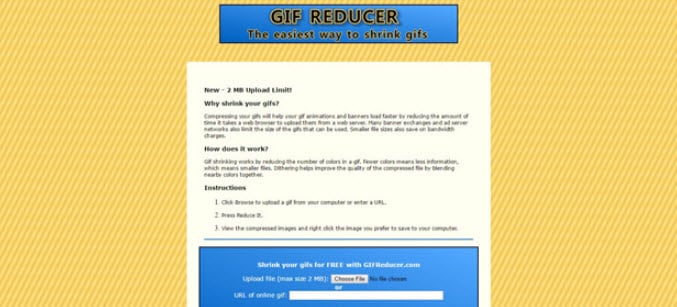
Reducer can easily shrink GIF file so that it web loading times can be increased instantly.
11. Resizeimage.net:
Use this tool to get impressive results for your GIF optimization and it can process almost all file formats to make things easily workable for users.
Conclusion
If you want to make a GIF online, Filmora meme maker is your ultimate solution. It helps you make image, GIF and video memes directly without watermark. It is totally FREE to use and no sign up. You can change text size, color and position to create caption when you are editing. You can also put text inside or outside in GIF. Just with a few clicks, your GIF is done . Try it now!
Shanoon Cox
Shanoon Cox is a writer and a lover of all things video.
Follow @Shanoon Cox
Shanoon Cox
Mar 27, 2024• Proven solutions
With the increasing popularity of Smartphones, people these days are experiencing all new things with lots of excitement. And GIFs are always the most interesting content for them. When we talk about limited band width and fast loading time solutions then GIFs are the first options in front of our eyes. These files use to have small size so they can be transferred and downloaded with ease and at faster rate. If you are interested to know about various resizing concepts related to GIFs then the article below can be helpful for you.
How to reduce GIF size?
There are so many things that contribute in managing overall size of GIFs. The list includes the colour count inside, dimensions of images that you have used for development of GIFs and number of frames included inside one GIF folder. In case if it is an animated GIF then size may increase accordingly. Somehow, if you become able to optimize your Gifs then it is much easier to share them over internet.
Photoshop is a great tool to edit your image, including gif images. Here we are going to show you how to make your GIF smaller in Photoshop.
1. Crop away any extra space around the image:
Image source: youtube.com
The very first task for users is to bring your GIF video file onto Photoshop timeline. Sometimes, it is not essential to update whole series of your GIF animation to the library, the GIF can be simply trimmed at timeline panel. One needs to turn on loop option and then be active enough to allocate the right place to trim your video.
2. Reduce dimensions of Output:
Image source: google.com
Those who are working on Photoshop CC 2017 version will be able to develop GIFs by simply executing Explore As option from menu. To do this, they need to move to files and then from drop down menu select Export as. Soon a menu will open where you need to choose your output file format as GIF and adjust weight and height parameter to reduce physical dimensions of your image.
In case if you are using Adobe Photoshop Elements 14 then on its interface, users need to move to File and then hit Save for Web option. It will help to open a Save for Web type dialogue box immediately, on this new window you can apply desired changes to physical dimensions of your content, reduce color information and apply dithering etc.
3. Adjust number of colors in image:
Image source: google.com
One of the most useful tricks for marketers is to optimize size of their GIF images by adjusting total number of colours to it. It can be done using color table tool that assists in easy selection and de-selection. This table use to contain about 256 unique colours and all of them use to contain 8 bit wide information. The best recommendation for good quality and small seize GIFs is to limit colours up to 64 only or keep then less than this. But sometimes your original videos may ask you for increment in color information.
Tips:
During GIF size reduction process, you will have to go through color number selections in the series of 256, 128, 64, 32, 16, 8, 4, 2, 1 etc. Use the smaller side of scale to get best results during optimization process.
- Users can also reduce number of frames in their GIFs.
- Never forget to avoid dithering as it may help to improve appearance of images.
- It is essential work with loss less compression algorithms otherwise huge loss in information will be carried out.
- Interlacing is not good option for your GIFs as it causes significant increase in overall file size.
Best GIF resizers
Those who are searching for some alternatives to Photoshop for creation of GIF images can move towards the list below:
2. FileOptimizer:
This is an advanced optimization tool for GIF sets as it can shrink output file using its multiple recompressing procedures. It can help to compress audio, video as well as other documents with popular file sizes like JPG, GMP, PNG and TIFF etc.
3. FileMinimizer Pictures:
It can compress GIF images up to 98% with its classic optimization techniques. It generally follows 4 compression levels but sometimes may go through several levels to generate smaller GIFs but even without losing quality. It works only on Windows platform.
4. RIOT:
Here RIOT stands for Radical Image Optimization Tool that can adjust so many feature parameters for GIFs along with file size compressions. This optimizer makes use of matadeta settings, color information etc to reduce overall file size.
5. GifftingTool:
BY simply optimizing repetitive colours and pixels from GIF frames, this tool can easily provides loss less optimization solution. It can be used to adjust image cropping, reversing, merging, looping and filtering needs.
6. GIF Optimizer:
This is specially designed one click type GIF optimizer that can provide compression up to 90%. It also assists to reduce the total load time for GIF with reduction in file size.
7. Ezgif.com – Online:
This online GIF image editor can shrink your image by simply reducing its colour information. Users can easily minimize file size for about 30% using this tool that has features like crop, resize etc.
8. Conpressor.io – Online:
This online web app can assist users to compress their image to smallest size segment even without decaying overall quality. You can easily process SVG, PNG, GIF and JPG file formats over here.
9. Picasion.com – Online:
It helps to reduce overall weight of GIFs so that they can be easily uploaded over internet.
10. GIF Reducer:
Reducer can easily shrink GIF file so that it web loading times can be increased instantly.
11. Resizeimage.net:
Use this tool to get impressive results for your GIF optimization and it can process almost all file formats to make things easily workable for users.
Conclusion
If you want to make a GIF online, Filmora meme maker is your ultimate solution. It helps you make image, GIF and video memes directly without watermark. It is totally FREE to use and no sign up. You can change text size, color and position to create caption when you are editing. You can also put text inside or outside in GIF. Just with a few clicks, your GIF is done . Try it now!
Shanoon Cox
Shanoon Cox is a writer and a lover of all things video.
Follow @Shanoon Cox
Why These 10+ Top Text Motion Templates Are Worth Your Attention
Why These 10+ Top Text Motion Templates Are Worth Your Attention
An easy yet powerful editor
Numerous effects to choose from
Detailed tutorials provided by the official channel
If you’re looking to add some ‘text in motion‘ to your video projects, then you’ve come to the right place! We’ve listed some of our favorite Text Motion After Effects and Text Motion Graphics Premiere Pro templates that you can use to get a head start in the realm of adding motion into text! (As a bonus, we’ve also included an overview on text motion and some of the best text motion graphics tutorials that you can refer to when trying out the templates we’ve recommended.)
In this article
01 [What’s Text Motion?](#Part 1)
02 [10 Best Text Motion After Effects](#Part 2)
03 [Tutorials for Making Great Text Motion](#Part 3)
Part 1 What’s Text Motion?
Alright, first of all, let’s answer the big question! Text Motion, what is it and why should you be adding it to your projects ASAP? Well, in regards to the former, the answer is simple: text motion graphics is literally text animation that you can add to your projects to give it an extra bit of life and make it more show-stealing!
In regards to the latter, the answer is in its description! After all, why wouldn’t you want your projects to be able to capture more attention?

Have a look at the screenshot above that we included of an example project on the video editor, Wondershare Filmora . As you can see, we inserted text in motion at the very start. And despite being a still screenshot of said text motion graphics, the preview is eye-catching even when paused!
This is the kind of project that you can do yourself with the right templates and the right video editor. We’ve got your back on the first in the list coming up. And, as for the second, we recommend that you try out Filmora! It is, as you can see, quite an expansive software. One that will allow you to truly make the most of the text motion graphics you’ll be able to create at the end of this article.
Part 2 10 Best Text Motion After Effects
Alright, now let’s move on to our promised Text Motion Graphics After Effects and Text Motion Graphics Premiere Pro templates. We’ve tried our best to pick a variety out for you so that you can have a good selection to choose from! You should also take the time to explore the different platforms where these templates are offered in case you end up needing a different look!
01 Clean and Elegant Corporate Identity – Text Reveal (Mogrt)
The first on this list is the ‘Clean and Elegant Corporate Identity — Text Reveal’ by Mogrt. The title is quite explanatory in and of itself, but just in case you’re confused, it’s a template that was designed for professionals and brands to establish their corporate identity. The font is very modern in design, and it comes with several flare variations so that the reveal works out in the way that you want it to.
Other aspects, like the shadow blur, opacity, particle size (for the reveal), and text glossiness are also adjustable and can be changed at will based on your standards.
02 Multipurpose Clean 3D Text to Title
The next text motion template is the ‘Multipurpose Clean 3D Text to Title’ also created by Mogrt. This one is text motion graphics that you can use for Premiere Pro and, with proper customization, and be used for just about anything that you want! It’s a very multi-purpose kind of graphic, one that you can maybe sneak in as an advert or for announcing celebrations or anniversaries!
As a final note, if you want to use this graphic as text motion for after effects , it is available for that as well!
03 Simple Motion Text | Premiere Pro
This next template, the ‘Simple Motion Text’ graphic, is one that is available for both Premiere Pro and After Effects (though the link we’ve provided is for the Premiere Pro version!) As the name implies, the animation is quite simple, which may be exactly what you want, in any case. It certainly makes it very versatile (especially as you can change font style and color as you will). Making it the perfect template for a beginner that’s just starting out and doesn’t want anything too complicated.
04 30 Glitch Text Presets For Premiere Pro | Mogrt
This next template, the ‘30 Glitch Text Presets’ by Mogrt is a Premiere Pro exclusive! It’s also quite fun in its particulars. As a template, it’s not as versatile as the one that we introduced previously, since the ‘glitch’ effect gives off quite the unique vibes, but that doesn’t make it any less potent at catching the eyes of your audience!
The best part, in this case, is that it comes with 30 pre-sets, all with fitting glitch sound effects (included in the pack) that you can use. Of course, there are other customization functions as well, including font style, color, transparency, and so on.
05 Comic Bubbles MOGRT
Again, this next templated, called ‘Comic Bubbles’, kind of has its own unique vibe, making it inflexible in some ways but also more fun if that’s the kind of look that you’re looking for. Which, in this case, are literal ‘Comic’ text bubbles, like you would see in your old 90s comic (loud, pop-y, and with lots of bright colors!) The only difference from that to this is that these comic text bubbles move, allowing you to create ‘punchy’ text in between animated projects.
For your reference, there are 80 different comic bubbles included in the pack. All of which are easy to customize and will allow you to adjust colors, text, and transition effects (have a look at the video that we’ve linked if you want to see it in action!)
06 Smoke To Text Reveal (Mogrt)
This next template, ‘Smoke to Text Reveal’ is another one that serves a very particular need. To help with visualization, the text motion graphics are at first obscured by smoke before it bubbles up into a crisp, modern text reveal! It’s perfect for those looking for underwater-themed text motion graphics. Or those who want to serve a hint of mystery with the smoke effect.
This is Text Motion Graphics - Premiere Pro. And the best part about it is that you can customize the text and the background at will — allowing you to truly make the template your own and make the most out of the smoke-to-reveal effect.
07 Text Messages Toolkit
Want to appeal to the Gen Z audience? Then, the ‘text messages toolkit’ might be a fun text motion graphics for you to try. As you can perhaps surmise from the name, it’s a template that you can use in order to create ‘text message’ interactions. It’s customizable too! You can change the text box color, size, transparency, and just have a ball pimping it out of that’s what you want.
08 Large Text Title Block
With the ‘large text title block’ template, you have the flexibility of the naturally more modern and minimalistic design, allowing you to use it for a wide variety of different projects. It works especially well for advertisements, if you’re wondering about potential uses, or as transition graphics between text to video!
09 Blueprint Titles
Want something that’s a little quirkier? Or, perhaps, instructional? Then the ‘Blueprint Titles’ template is one that you can consider. As you can perhaps guess from the name, it allows you to create text motion graphics in a style that is similar to the kind of blueprints you usually see when working with design or architecture.
10 Dynamic Minimalism
Sometimes, simple really is best! And, this next template, the ‘Dynamic Minimalism’ text motion after effects and text motion graphics premiere pro template is one that you might want in your arsenal just for the sake of your simpler projects! The kit comes with 30 different animations, as well as other customization functions that you can play around with to add a little personality to what are otherwise very minimalistic designs.
Part 3 Tutorials for Making Great Text Motion
For the last part of this article, we’ll be introducing some tutorials that you can refer to while trying out the templates that we recommended! We’ve pulled all of this from YouTube so that you can start learning immediately! And, of course, a variety has been chosen so that you can get your info from more than one source.
01Smooth Professional Text Animation in Premiere Pro - TUTORIAL
The first tutorial we have for you was created by Ignace Aleya on YouTube. This tutorial is a ‘Premiere Pro’ tutorial that focuses on helping beginners and intermediate users alike in understanding the ways of text motion graphics. He offers some pretty good pointers and tricks on keeping the quality of your work high. And the way that he shares his knowledge is pretty solid too! Allowing you to both watch and enjoy the video.
02Easy Title Motion Graphics
This next tutorial is about text motion graphics while working in Adobe After Effects. Like the previous tutorial, it will teach you the basics of using templates! It was posted by SonduckFilm, and the video covers five different “Easy Title Motion Graphics” as examples! Altogether, it’s a great choice if what you’re looking for is tips on making the most out of the templates we introduced on our list.
03Basic Logo Animations
Next, we have a tutorial from the YouTube content creator, Broken! This one is on the subject of both simple and complex logo animations that you can create when working on establishing a brand. It’s a great video for beginners and is quite informative on the subject of customization.
● Key Takeaways from This Episode →
● What is text motion and why do you need to start using it for your own projects ASAP? Well, text motion graphics are, basically, text animation! They’re eye-catching and informative at the same time, making them a great vessel for getting a message across to your audience.
● If you want to start creating text motion graphics yourself, we suggest starting with templates first! At least then, you’ll be able to make yourself comfortable while learning about the opportunities available to you.
● There are many different templates out there that you can try. Some are multi-purpose, some not. We’ve chosen a variety to introduce to you in of this article! Complete with a list of some tutorials in that you can refer to no matter what kind of project you’re working on.
If you’re looking to add some ‘text in motion‘ to your video projects, then you’ve come to the right place! We’ve listed some of our favorite Text Motion After Effects and Text Motion Graphics Premiere Pro templates that you can use to get a head start in the realm of adding motion into text! (As a bonus, we’ve also included an overview on text motion and some of the best text motion graphics tutorials that you can refer to when trying out the templates we’ve recommended.)
In this article
01 [What’s Text Motion?](#Part 1)
02 [10 Best Text Motion After Effects](#Part 2)
03 [Tutorials for Making Great Text Motion](#Part 3)
Part 1 What’s Text Motion?
Alright, first of all, let’s answer the big question! Text Motion, what is it and why should you be adding it to your projects ASAP? Well, in regards to the former, the answer is simple: text motion graphics is literally text animation that you can add to your projects to give it an extra bit of life and make it more show-stealing!
In regards to the latter, the answer is in its description! After all, why wouldn’t you want your projects to be able to capture more attention?
Have a look at the screenshot above that we included of an example project on the video editor, Wondershare Filmora . As you can see, we inserted text in motion at the very start. And despite being a still screenshot of said text motion graphics, the preview is eye-catching even when paused!
This is the kind of project that you can do yourself with the right templates and the right video editor. We’ve got your back on the first in the list coming up. And, as for the second, we recommend that you try out Filmora! It is, as you can see, quite an expansive software. One that will allow you to truly make the most of the text motion graphics you’ll be able to create at the end of this article.
Part 2 10 Best Text Motion After Effects
Alright, now let’s move on to our promised Text Motion Graphics After Effects and Text Motion Graphics Premiere Pro templates. We’ve tried our best to pick a variety out for you so that you can have a good selection to choose from! You should also take the time to explore the different platforms where these templates are offered in case you end up needing a different look!
01 Clean and Elegant Corporate Identity – Text Reveal (Mogrt)
The first on this list is the ‘Clean and Elegant Corporate Identity — Text Reveal’ by Mogrt. The title is quite explanatory in and of itself, but just in case you’re confused, it’s a template that was designed for professionals and brands to establish their corporate identity. The font is very modern in design, and it comes with several flare variations so that the reveal works out in the way that you want it to.
Other aspects, like the shadow blur, opacity, particle size (for the reveal), and text glossiness are also adjustable and can be changed at will based on your standards.
02 Multipurpose Clean 3D Text to Title
The next text motion template is the ‘Multipurpose Clean 3D Text to Title’ also created by Mogrt. This one is text motion graphics that you can use for Premiere Pro and, with proper customization, and be used for just about anything that you want! It’s a very multi-purpose kind of graphic, one that you can maybe sneak in as an advert or for announcing celebrations or anniversaries!
As a final note, if you want to use this graphic as text motion for after effects , it is available for that as well!
03 Simple Motion Text | Premiere Pro
This next template, the ‘Simple Motion Text’ graphic, is one that is available for both Premiere Pro and After Effects (though the link we’ve provided is for the Premiere Pro version!) As the name implies, the animation is quite simple, which may be exactly what you want, in any case. It certainly makes it very versatile (especially as you can change font style and color as you will). Making it the perfect template for a beginner that’s just starting out and doesn’t want anything too complicated.
04 30 Glitch Text Presets For Premiere Pro | Mogrt
This next template, the ‘30 Glitch Text Presets’ by Mogrt is a Premiere Pro exclusive! It’s also quite fun in its particulars. As a template, it’s not as versatile as the one that we introduced previously, since the ‘glitch’ effect gives off quite the unique vibes, but that doesn’t make it any less potent at catching the eyes of your audience!
The best part, in this case, is that it comes with 30 pre-sets, all with fitting glitch sound effects (included in the pack) that you can use. Of course, there are other customization functions as well, including font style, color, transparency, and so on.
05 Comic Bubbles MOGRT
Again, this next templated, called ‘Comic Bubbles’, kind of has its own unique vibe, making it inflexible in some ways but also more fun if that’s the kind of look that you’re looking for. Which, in this case, are literal ‘Comic’ text bubbles, like you would see in your old 90s comic (loud, pop-y, and with lots of bright colors!) The only difference from that to this is that these comic text bubbles move, allowing you to create ‘punchy’ text in between animated projects.
For your reference, there are 80 different comic bubbles included in the pack. All of which are easy to customize and will allow you to adjust colors, text, and transition effects (have a look at the video that we’ve linked if you want to see it in action!)
06 Smoke To Text Reveal (Mogrt)
This next template, ‘Smoke to Text Reveal’ is another one that serves a very particular need. To help with visualization, the text motion graphics are at first obscured by smoke before it bubbles up into a crisp, modern text reveal! It’s perfect for those looking for underwater-themed text motion graphics. Or those who want to serve a hint of mystery with the smoke effect.
This is Text Motion Graphics - Premiere Pro. And the best part about it is that you can customize the text and the background at will — allowing you to truly make the template your own and make the most out of the smoke-to-reveal effect.
07 Text Messages Toolkit
Want to appeal to the Gen Z audience? Then, the ‘text messages toolkit’ might be a fun text motion graphics for you to try. As you can perhaps surmise from the name, it’s a template that you can use in order to create ‘text message’ interactions. It’s customizable too! You can change the text box color, size, transparency, and just have a ball pimping it out of that’s what you want.
08 Large Text Title Block
With the ‘large text title block’ template, you have the flexibility of the naturally more modern and minimalistic design, allowing you to use it for a wide variety of different projects. It works especially well for advertisements, if you’re wondering about potential uses, or as transition graphics between text to video!
09 Blueprint Titles
Want something that’s a little quirkier? Or, perhaps, instructional? Then the ‘Blueprint Titles’ template is one that you can consider. As you can perhaps guess from the name, it allows you to create text motion graphics in a style that is similar to the kind of blueprints you usually see when working with design or architecture.
10 Dynamic Minimalism
Sometimes, simple really is best! And, this next template, the ‘Dynamic Minimalism’ text motion after effects and text motion graphics premiere pro template is one that you might want in your arsenal just for the sake of your simpler projects! The kit comes with 30 different animations, as well as other customization functions that you can play around with to add a little personality to what are otherwise very minimalistic designs.
Part 3 Tutorials for Making Great Text Motion
For the last part of this article, we’ll be introducing some tutorials that you can refer to while trying out the templates that we recommended! We’ve pulled all of this from YouTube so that you can start learning immediately! And, of course, a variety has been chosen so that you can get your info from more than one source.
01Smooth Professional Text Animation in Premiere Pro - TUTORIAL
The first tutorial we have for you was created by Ignace Aleya on YouTube. This tutorial is a ‘Premiere Pro’ tutorial that focuses on helping beginners and intermediate users alike in understanding the ways of text motion graphics. He offers some pretty good pointers and tricks on keeping the quality of your work high. And the way that he shares his knowledge is pretty solid too! Allowing you to both watch and enjoy the video.
02Easy Title Motion Graphics
This next tutorial is about text motion graphics while working in Adobe After Effects. Like the previous tutorial, it will teach you the basics of using templates! It was posted by SonduckFilm, and the video covers five different “Easy Title Motion Graphics” as examples! Altogether, it’s a great choice if what you’re looking for is tips on making the most out of the templates we introduced on our list.
03Basic Logo Animations
Next, we have a tutorial from the YouTube content creator, Broken! This one is on the subject of both simple and complex logo animations that you can create when working on establishing a brand. It’s a great video for beginners and is quite informative on the subject of customization.
● Key Takeaways from This Episode →
● What is text motion and why do you need to start using it for your own projects ASAP? Well, text motion graphics are, basically, text animation! They’re eye-catching and informative at the same time, making them a great vessel for getting a message across to your audience.
● If you want to start creating text motion graphics yourself, we suggest starting with templates first! At least then, you’ll be able to make yourself comfortable while learning about the opportunities available to you.
● There are many different templates out there that you can try. Some are multi-purpose, some not. We’ve chosen a variety to introduce to you in of this article! Complete with a list of some tutorials in that you can refer to no matter what kind of project you’re working on.
Interesting Fundamentals and Ultimate Guide to Animated Characters Drawings
Interesting Fundamentals and Ultimate Guide to Animated Characters Drawings
An easy yet powerful editor
Numerous effects to choose from
Detailed tutorials provided by the official channel
Cartoon character have stamped their faces in our hearts from childhood. A cartoon artist represents a cartoon or a natural person’s unique features with simple shapes accurately to recognize the person with the drawing and does not require a lot of patience to do this. The goal of the cartoon is to attract, and the child should get attracted when they see a cartoon image as well as adults. Though the sparkle may appear a little dull, it remains unaltered.
Let us grab a chance to recreate our cartoon characters with easy tutorials about animated characters to draw. In addition to that, you will learn about basic drawing exercises to lead into cool animated characters to draw through this guide in a step-by-step manner.
In this article
01 [What Do I Need to Start Learning Animated Characters Drawings?](#Part 1)
02 [6 Cartoon Characters that Anyone Can Draw (Provided with Free Video Tutorials)](#Part 2)
03 [4 Best Drawing Exercises for Creating Cartoon Characters](#Part 3)
Part 1 What Do I Need to Start Learning Animated Characters Drawings?
There are many software’s available, and anyone can create an animated character drawing, but still, the art of creating a perfect character needs a master. You don’t have to be a Disney-grade animator to make it; start with simple minor characters. Animation is the art of bringing a 3D illustrated cartoon into life. It is created by projecting a sequence of images one after the other immediately. Let us discuss the essential things you need to note before animating characters.
●Timeline is the most important for animation. Depending on the software, you have various options to change the duration and add effects.
●Animation is generally preferable in 24 frames per second, which means the total number of people in the frame for one second.
●There are two types of working they are one’s and two’s. 2D Animation is usually done in two’s, whereas 3D Animation is in one’s.
●In hand-drawn animations, keyframes are more critical to maintain. The keyframe is the position for the cartoon as per animator has decided.
●Breakdowns combine one or two keyframes, which decide the motion in between the keys.
●In-betweens are all the frames that come between to smooth the motion—automatically generated by the computer to move from key to key.
●Composting is creating or joining two or more images to create a single cartoon frame.
Part 2 6 Cartoon Characters that Anyone can Draw (With free Video Tutorials)
We will discuss animated characters to draw in hand. There are many cartoon characters, but we will look into six cartoon character drawings with their tutorial videos.
01 Smurfette
Smurfette stands out as the lone female Smurf in the entire bunch of blue critters around the village area. One of the rare designs with long hair and a dress is hers. Her design is a lot of fun to sketch.
So, in general, it’s best to work through the lesson as is, then turn it into Brainy, Papa, Joker, or even Smurf.
01Angelica Pickles
Angelica Pickles is one of the most challenging characters to depict from The Rugrats. But her design is so intricate that getting it proper will give you a true sense of accomplishment. Her pigtails, like her leggings, might be challenging to master, so keep practicing.
03Yogi Bear
Yogi Bear is a cartoon character on the sweeter side of the comic animal variety. Yogi Bear is a beloved character from Jellystone Park. As long as you get his tie and collar just right, this guy is a breeze to draw.
04Magilla Gorilla
Magilla Gorilla is another bizarre creature from Hanna-catalog. Barbera’s Because he comes with a bow tie, a little cap, and suspenders, this design is a little more complicated. Not to mention his enormous clown shoes. These small details can be a pain to draw, but Magilla is a very charming gorilla.
05Top Cat
Even further back in time, in the 1960s, there was the ever-popular Top Cat. He’s wearing a cap and a button-down vest, and he’s making some reasonably fancy dances. Give Top Cat a shot if you like The Flintstones’ basic Hanna-Barbera art style.
<
06Helga. G. Pataki
Helga is another character with some wacky hair. There’s a lot that’s bizarre about her. And half the fun of drawing her is figuring out how to do it. Just keep an eye on her head since getting it correct, especially with her rectangle hairdo, can be a little odd.
These are some of the cool animated characters to draw.
Part 3 4 Best Drawing Exercise for Creating Cartoon Characters
You’ll learn how to create cartoon characters individually, including their faces, hair, and facial expressions.
01How to Draw Cartoon Characters
We’ll go through the fundamentals of human perception before getting into cartoon face drawing. Humans have a unique ability to synthesize the details that make up a structure or object in highly complicated ways into fundamental and simple ones. We can express everything with a few curves and geometric forms in this way. In cartoon face, we need to identify the character just by looking like looking at the below picture a girl and a boy.
02Here, you will learn How to Draw a Cartoon Face
Let us begin with a sketch of a cartoon face. A circle is a basic cartoon shape. All you need is a circle. As seen in the image below, draw a vertical and horizontal line intersecting at the center.
Let us have a look at how to make cartoon eyeballs. Draw an oval shape with a slight lean to the side at the top for the eyes. Repeat on the other side.
Slightly thicken the characteristic to represent our character eyelashes at the top of the circle, place the brows above the eyelashes to create a shocking appearance, draw both pupils to the center in the same direction.
When creating a nose from the front, it’s typical to leave off many details. Even if you merely sketch its tip, it will likely provide a convincing impact. Drawing only one side of the nose is also quite frequent. Children’s mouths are extremely simple in cartoon style, regardless of gender.
The ears are viewed from the front; therefore, the internal holes are not visible. The circle has already established the shape of our head.
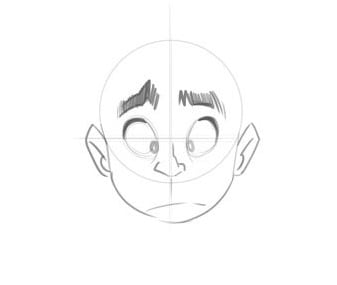
03Let’s learn about How to Draw a Cartoon Hair
Keep in mind that our characters’ hair is essential for identifying their personalities, and it can also indicate their age. So, all we need is an effortless and playful haircut to bring our boy to life. Because there is no particular method for drawing hair, you’ll have to experiment until you find the perfect look. Look for photo references on the internet! Take a look at a magazine shoot or a Google search.
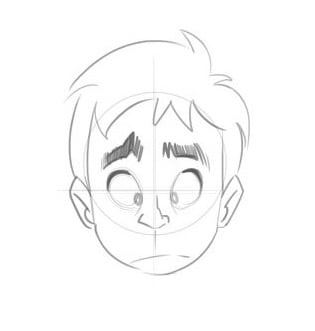
03How to Draw Characters with different Facial Expressions
By simply following the instructions below, you’ll notice that you can completely transform his expression: Lowering one brow and raising the other, eyelashes are used to cut the eyes in half, putting a smile on the face one side is higher.
To stay under the eyelashes, move the eye pupils up. That’s all there is to it! With just a few tweaks, we achieved the desired result. The circular form of the eyes, hair, ears, nose, chin and the circular shape of the ears are all the same! It’s that simple!
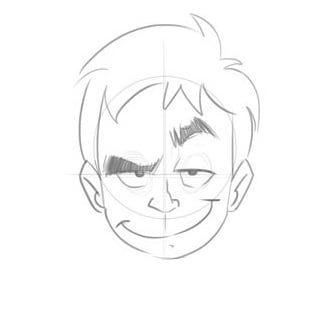
While working in cartooning or video making, Wondershare Wondershare Filmora Video Editor comes out with pros in mind, which can effortlessly convert conventional films into cartoon videos. If you want greater control over your cartoon video, you may also use keyframing to create it. You can fine-tune the parameters in Effects to achieve the best results. You can even change the Animation color after it has been created. It also allows you to use different text themes to showcase your videos.
We propose Wondershare Filmora Video Editor , in this case, to create animation videos by adding keyframes, resulting in a smooth and natural animation. To get started with Animation, all you need is a white plane. Aside from that, color correction and an audio mixer will take your animation video to the next level.
For Win 7 or later (64-bit)
For macOS 10.12 or later
● Key Takeaways from This Episode →
● Learn what are the key elements to make animation videos using software
● Tutorial on how to draw a cartoon character accurately
● In comparison, Wondershare Wondershare Filmora Video Editor is superior in making animation videos.
Cartoon character have stamped their faces in our hearts from childhood. A cartoon artist represents a cartoon or a natural person’s unique features with simple shapes accurately to recognize the person with the drawing and does not require a lot of patience to do this. The goal of the cartoon is to attract, and the child should get attracted when they see a cartoon image as well as adults. Though the sparkle may appear a little dull, it remains unaltered.
Let us grab a chance to recreate our cartoon characters with easy tutorials about animated characters to draw. In addition to that, you will learn about basic drawing exercises to lead into cool animated characters to draw through this guide in a step-by-step manner.
In this article
01 [What Do I Need to Start Learning Animated Characters Drawings?](#Part 1)
02 [6 Cartoon Characters that Anyone Can Draw (Provided with Free Video Tutorials)](#Part 2)
03 [4 Best Drawing Exercises for Creating Cartoon Characters](#Part 3)
Part 1 What Do I Need to Start Learning Animated Characters Drawings?
There are many software’s available, and anyone can create an animated character drawing, but still, the art of creating a perfect character needs a master. You don’t have to be a Disney-grade animator to make it; start with simple minor characters. Animation is the art of bringing a 3D illustrated cartoon into life. It is created by projecting a sequence of images one after the other immediately. Let us discuss the essential things you need to note before animating characters.
●Timeline is the most important for animation. Depending on the software, you have various options to change the duration and add effects.
●Animation is generally preferable in 24 frames per second, which means the total number of people in the frame for one second.
●There are two types of working they are one’s and two’s. 2D Animation is usually done in two’s, whereas 3D Animation is in one’s.
●In hand-drawn animations, keyframes are more critical to maintain. The keyframe is the position for the cartoon as per animator has decided.
●Breakdowns combine one or two keyframes, which decide the motion in between the keys.
●In-betweens are all the frames that come between to smooth the motion—automatically generated by the computer to move from key to key.
●Composting is creating or joining two or more images to create a single cartoon frame.
Part 2 6 Cartoon Characters that Anyone can Draw (With free Video Tutorials)
We will discuss animated characters to draw in hand. There are many cartoon characters, but we will look into six cartoon character drawings with their tutorial videos.
01 Smurfette
Smurfette stands out as the lone female Smurf in the entire bunch of blue critters around the village area. One of the rare designs with long hair and a dress is hers. Her design is a lot of fun to sketch.
So, in general, it’s best to work through the lesson as is, then turn it into Brainy, Papa, Joker, or even Smurf.
01Angelica Pickles
Angelica Pickles is one of the most challenging characters to depict from The Rugrats. But her design is so intricate that getting it proper will give you a true sense of accomplishment. Her pigtails, like her leggings, might be challenging to master, so keep practicing.
03Yogi Bear
Yogi Bear is a cartoon character on the sweeter side of the comic animal variety. Yogi Bear is a beloved character from Jellystone Park. As long as you get his tie and collar just right, this guy is a breeze to draw.
04Magilla Gorilla
Magilla Gorilla is another bizarre creature from Hanna-catalog. Barbera’s Because he comes with a bow tie, a little cap, and suspenders, this design is a little more complicated. Not to mention his enormous clown shoes. These small details can be a pain to draw, but Magilla is a very charming gorilla.
05Top Cat
Even further back in time, in the 1960s, there was the ever-popular Top Cat. He’s wearing a cap and a button-down vest, and he’s making some reasonably fancy dances. Give Top Cat a shot if you like The Flintstones’ basic Hanna-Barbera art style.
<
06Helga. G. Pataki
Helga is another character with some wacky hair. There’s a lot that’s bizarre about her. And half the fun of drawing her is figuring out how to do it. Just keep an eye on her head since getting it correct, especially with her rectangle hairdo, can be a little odd.
These are some of the cool animated characters to draw.
Part 3 4 Best Drawing Exercise for Creating Cartoon Characters
You’ll learn how to create cartoon characters individually, including their faces, hair, and facial expressions.
01How to Draw Cartoon Characters
We’ll go through the fundamentals of human perception before getting into cartoon face drawing. Humans have a unique ability to synthesize the details that make up a structure or object in highly complicated ways into fundamental and simple ones. We can express everything with a few curves and geometric forms in this way. In cartoon face, we need to identify the character just by looking like looking at the below picture a girl and a boy.
02Here, you will learn How to Draw a Cartoon Face
Let us begin with a sketch of a cartoon face. A circle is a basic cartoon shape. All you need is a circle. As seen in the image below, draw a vertical and horizontal line intersecting at the center.
Let us have a look at how to make cartoon eyeballs. Draw an oval shape with a slight lean to the side at the top for the eyes. Repeat on the other side.
Slightly thicken the characteristic to represent our character eyelashes at the top of the circle, place the brows above the eyelashes to create a shocking appearance, draw both pupils to the center in the same direction.
When creating a nose from the front, it’s typical to leave off many details. Even if you merely sketch its tip, it will likely provide a convincing impact. Drawing only one side of the nose is also quite frequent. Children’s mouths are extremely simple in cartoon style, regardless of gender.
The ears are viewed from the front; therefore, the internal holes are not visible. The circle has already established the shape of our head.
03Let’s learn about How to Draw a Cartoon Hair
Keep in mind that our characters’ hair is essential for identifying their personalities, and it can also indicate their age. So, all we need is an effortless and playful haircut to bring our boy to life. Because there is no particular method for drawing hair, you’ll have to experiment until you find the perfect look. Look for photo references on the internet! Take a look at a magazine shoot or a Google search.
03How to Draw Characters with different Facial Expressions
By simply following the instructions below, you’ll notice that you can completely transform his expression: Lowering one brow and raising the other, eyelashes are used to cut the eyes in half, putting a smile on the face one side is higher.
To stay under the eyelashes, move the eye pupils up. That’s all there is to it! With just a few tweaks, we achieved the desired result. The circular form of the eyes, hair, ears, nose, chin and the circular shape of the ears are all the same! It’s that simple!
While working in cartooning or video making, Wondershare Wondershare Filmora Video Editor comes out with pros in mind, which can effortlessly convert conventional films into cartoon videos. If you want greater control over your cartoon video, you may also use keyframing to create it. You can fine-tune the parameters in Effects to achieve the best results. You can even change the Animation color after it has been created. It also allows you to use different text themes to showcase your videos.
We propose Wondershare Filmora Video Editor , in this case, to create animation videos by adding keyframes, resulting in a smooth and natural animation. To get started with Animation, all you need is a white plane. Aside from that, color correction and an audio mixer will take your animation video to the next level.
For Win 7 or later (64-bit)
For macOS 10.12 or later
● Key Takeaways from This Episode →
● Learn what are the key elements to make animation videos using software
● Tutorial on how to draw a cartoon character accurately
● In comparison, Wondershare Wondershare Filmora Video Editor is superior in making animation videos.
Tutorial on Making Unity 2D Animation
Beginner Tutorial on Making Unity 2D Animation
An easy yet powerful editor
Numerous effects to choose from
Detailed tutorials provided by the official channel
Now, ideally, Unity is considered to be a suitable tool for 3D games that have too many animated elements. But, this doesn’t mean that you cannot design 2D animations with Unity.
In this guide, we are going to show you how to get started with 2D animations in Unity and incorporate them into your games to enhance the overall gameplay.
In this article
01 [Can Unity Be Used for 2D Animation?](#Part 1)
02 [How Do You Make a 2D Animation in Unity?](#Part 2)
Part 1 Can Unity Be Used for 2D Animation?
First, things first; can Unity be used for 2D animations. The answer is Yes! Being a full-scale gaming engine, developers/designers can use Unity to create stunning Unity 2D animations for their games. The tool has dedicated 2D animation packages that contain all the elements you’ll need to create high-quality 2D animations for your games.
Keep in mind that for each object, you’ll have to create a separate 2D sprite sheet and use it to configure the 2D animation. However, there are other 2D animation packages that you can install, using sprite sheets is the most common method to get the job done. The latest versions of Unity also offer a dedicated Stripe library where you can add multiple Stripe Sheets and it becomes relatively easier to manage them.
With the Sprite library, 2D animations with Unity becomes a hassle-free job. Designers can even manage dozens of 2D animations without any hassle. The Sprite editor will also let you control the overall movement of different moving objects in your animation and make it look more sleek. In general, if you are planning to create 2D animations for your videos or even a dedicated mobile game, Unity can be a suitable software for the job.
Part 2 How Do You Make a 2D Animation in Unity?
To create a 2D animation with Unity, the first step would be to create a dedicated Sprite sheet. Now, you can use a wide variety of third-party programs to create the desired Sprite sheet. In general, it depends on the project requirements and the personal preferences of the designer himself. However, whichever tool you use to create the Stripe sheets, make sure that the final image is a transparent PNG file as it’ll make your job much easier while animating objects in Unity.
After you have successfully designed the stripe (a transparent image file) in an external application, the next step would be to import it to Unity. When you import the Stripe file, make sure to create a separate Sprite folder so that you can easily manage all these files in one place. Also, a dedicated Stripe folder will allow you to keep a check on each Stripe file in a hassle-free manner.

While importing 2D animations into Unity, you can also configure its settings to ensure that it matches the overall game design. Ideally, we recommend keeping the Pixels Per Unit to the same size as all your visual components. This will allow you to maintain the desired consistency throughout the project and make it visually enticing.
Now, before proceeding any further, make sure to switch to the “Stripe Editor” window. With the “Stripe Editor”, you’ll be able to control the overall settings of each animation individually and control the movement to make it look crisper. In the Stripe window, you can also adjust the slice settings and save your work to avoid any potential data loss.
At this point, you can move towards creating the 2D animation with Unity. To do this, you’ll have to bring both the Animation and the Animator tabs to UnityParts editing panel. You can make them visible by tapping the “Windows” option on your screen.

That’s it; a timeline-based editing panel will appear on your screen. From here onwards, you can get started with animating the object. Each animation will depend on your specific game requirements. So, feel free to unleash your creativity and use different elements of Unity to bring your 2D animations to life.
Part 3 Part 3 Creating 2D Animations for Your Videos - An Effective Solution for Video Editors
Now, when it comes to creating 2D animations for videos, you may not want to use a tool like Unity to get the job done. Why? Because Unity is more suitable for animating objects for games. Not to mention, Unity has a steep learning curve and if you are not an experienced Unity developer, you may fail to create a 2D animation properly.
So, if you only need a 2D animation for videos, we have a better alternative for the job. Instead of Unity, you can use Wondershare Filmora Video Editor for the job. It’s a full-scale video editing software that’s specifically designed to edit high-quality videos. Whether you are a YouTube or simply edit videos for your clients, using Wondershare Filmora will help you showcase your creativity more effectively.

Filmora has a built-in media library that offers a plethora of ready-to-use animation templates as well as video effects. You can import these animations into your video with a single click and enhance the overall quality of the video to drive better engagement. These animations are also customizable, which means you can tweak their appearance to match the overall theme of your video itself. The media player also offers audio effects that’ll make your videos more dramatic.
And, finally, you’ll also find a wide variety of advanced editing options such as keyframing, motion detection, and green screen editing. All these features will allow you to uplift the production quality of your videos and engage potential viewers more effectively.
For Win 7 or later (64-bit)
For macOS 10.12 or later
A few key features of Filmora that make it the most reliable video editing software include:
● Thousands of ready-to-use animation templates and video effects
● Easy-to-use timeline-based editing panel
● Dedicated audio editor to control the sound quality
● Cross-platform compatibility
So, if you are also planning to launch a high-scale video for YouTube or any other platform by adding
Key Takeaways from This Episode
● Creating 2D animations with Unity is possible, however, you must be an expert game developer with extensive experience in Unity game development
● To create Unity 2D animations, you’ll have to use Sprite Sheets and then import them into Unity to turn them into animation.
● Now, if you are a regular video editor and only want to create 2D animations for videos, you can also use full-scale software such as Wondershare Filmora Pro.
Now, ideally, Unity is considered to be a suitable tool for 3D games that have too many animated elements. But, this doesn’t mean that you cannot design 2D animations with Unity.
In this guide, we are going to show you how to get started with 2D animations in Unity and incorporate them into your games to enhance the overall gameplay.
In this article
01 [Can Unity Be Used for 2D Animation?](#Part 1)
02 [How Do You Make a 2D Animation in Unity?](#Part 2)
Part 1 Can Unity Be Used for 2D Animation?
First, things first; can Unity be used for 2D animations. The answer is Yes! Being a full-scale gaming engine, developers/designers can use Unity to create stunning Unity 2D animations for their games. The tool has dedicated 2D animation packages that contain all the elements you’ll need to create high-quality 2D animations for your games.
Keep in mind that for each object, you’ll have to create a separate 2D sprite sheet and use it to configure the 2D animation. However, there are other 2D animation packages that you can install, using sprite sheets is the most common method to get the job done. The latest versions of Unity also offer a dedicated Stripe library where you can add multiple Stripe Sheets and it becomes relatively easier to manage them.
With the Sprite library, 2D animations with Unity becomes a hassle-free job. Designers can even manage dozens of 2D animations without any hassle. The Sprite editor will also let you control the overall movement of different moving objects in your animation and make it look more sleek. In general, if you are planning to create 2D animations for your videos or even a dedicated mobile game, Unity can be a suitable software for the job.
Part 2 How Do You Make a 2D Animation in Unity?
To create a 2D animation with Unity, the first step would be to create a dedicated Sprite sheet. Now, you can use a wide variety of third-party programs to create the desired Sprite sheet. In general, it depends on the project requirements and the personal preferences of the designer himself. However, whichever tool you use to create the Stripe sheets, make sure that the final image is a transparent PNG file as it’ll make your job much easier while animating objects in Unity.
After you have successfully designed the stripe (a transparent image file) in an external application, the next step would be to import it to Unity. When you import the Stripe file, make sure to create a separate Sprite folder so that you can easily manage all these files in one place. Also, a dedicated Stripe folder will allow you to keep a check on each Stripe file in a hassle-free manner.
While importing 2D animations into Unity, you can also configure its settings to ensure that it matches the overall game design. Ideally, we recommend keeping the Pixels Per Unit to the same size as all your visual components. This will allow you to maintain the desired consistency throughout the project and make it visually enticing.
Now, before proceeding any further, make sure to switch to the “Stripe Editor” window. With the “Stripe Editor”, you’ll be able to control the overall settings of each animation individually and control the movement to make it look crisper. In the Stripe window, you can also adjust the slice settings and save your work to avoid any potential data loss.
At this point, you can move towards creating the 2D animation with Unity. To do this, you’ll have to bring both the Animation and the Animator tabs to UnityParts editing panel. You can make them visible by tapping the “Windows” option on your screen.
That’s it; a timeline-based editing panel will appear on your screen. From here onwards, you can get started with animating the object. Each animation will depend on your specific game requirements. So, feel free to unleash your creativity and use different elements of Unity to bring your 2D animations to life.
Part 3 Part 3 Creating 2D Animations for Your Videos - An Effective Solution for Video Editors
Now, when it comes to creating 2D animations for videos, you may not want to use a tool like Unity to get the job done. Why? Because Unity is more suitable for animating objects for games. Not to mention, Unity has a steep learning curve and if you are not an experienced Unity developer, you may fail to create a 2D animation properly.
So, if you only need a 2D animation for videos, we have a better alternative for the job. Instead of Unity, you can use Wondershare Filmora Video Editor for the job. It’s a full-scale video editing software that’s specifically designed to edit high-quality videos. Whether you are a YouTube or simply edit videos for your clients, using Wondershare Filmora will help you showcase your creativity more effectively.
Filmora has a built-in media library that offers a plethora of ready-to-use animation templates as well as video effects. You can import these animations into your video with a single click and enhance the overall quality of the video to drive better engagement. These animations are also customizable, which means you can tweak their appearance to match the overall theme of your video itself. The media player also offers audio effects that’ll make your videos more dramatic.
And, finally, you’ll also find a wide variety of advanced editing options such as keyframing, motion detection, and green screen editing. All these features will allow you to uplift the production quality of your videos and engage potential viewers more effectively.
For Win 7 or later (64-bit)
For macOS 10.12 or later
A few key features of Filmora that make it the most reliable video editing software include:
● Thousands of ready-to-use animation templates and video effects
● Easy-to-use timeline-based editing panel
● Dedicated audio editor to control the sound quality
● Cross-platform compatibility
So, if you are also planning to launch a high-scale video for YouTube or any other platform by adding
Key Takeaways from This Episode
● Creating 2D animations with Unity is possible, however, you must be an expert game developer with extensive experience in Unity game development
● To create Unity 2D animations, you’ll have to use Sprite Sheets and then import them into Unity to turn them into animation.
● Now, if you are a regular video editor and only want to create 2D animations for videos, you can also use full-scale software such as Wondershare Filmora Pro.
How to Make a GIF in Photoshop
How to Make a GIF in Photoshop
Shanoon Cox
Mar 27, 2024• Proven solutions
We all love GIFs and their impressive style of delivering stories. They not only contain set of frames rather they wrap inside lots of emotions and thoughts of creators. You can easily find numbers of eye catching GIF collections over social media sites.
If you love these animated images then probably you might have initiated a search over internet about how to create GIFs. And search engine must have shown you a path to unlimited GIF creator tools . That’s common. But here we are going to talk about one professional recommendation for GIF creation. Yeah, it is Photoshop and it can instantly generate appealing animated Gifs for you.
Below you will be able to learn strategies to create GIF images with latest version of Photoshop:
How to make a GIF in Photoshop
Method 1: Make a GIF from Video in Photoshop
Step 1: Launch your software
Once you have downloaded your Photoshop software tool on your device then simply run it. Note that CS6 versions of Photoshop provide full support to animated files.
Step 2: Get your video clip imported
As your software timeline is available on screen, now you have to import your desired video file to this platform. Simple go to File option from top left corner of toolbar and then from drop down menu select import. Further select, video frames to layers. Choose your video file and soon all its frames will appear on screen. Photoshop also allows users to work on clipped versions of video files; in that case you can use slider to limit the frames at the time of uploading process.
Step 3: Adjust file Import Settings
You will be glad to know that Photoshop offers creative editing features where you can also make color balance adjustments. When you are done with the frame adjustments then go to File and now choose Save for Web from drop down menu.
It will immediately open one new window containing all advanced settings that can assist in better customization of your GIF image. As users need small file size for web uploading needs so you can adjust all these parameters below to get best results:
Colors: Colors are most important descriptive elements for any video so their selection must be done wisely. As more colors can ensure better view but for reducing file size at the same time you can prefer to drop this selection up to 128.
Dither: The dithering process is used to scatter so many colour rich pixels into image so that even a limited colour package can develop intermediate colours over it. If you pick higher number of colours then definitely the image will look finer but at the cost of higher file size.
Lossy: If you want to add some internal drop in the quality of image then this setting is useful. But try to keep it lower because higher range may destroy actual information from image whereas smaller value is good if you want to just reduce the file size.
Size: Users can prefer to change overall dimensions of their GIF that ultimately leads to huge impact on file size.
Step 4: Time to Save your GIF file
When you are done with the editing process and want to save the newly created GIF image then simply move to the File menu available on top left corner of software window and from drop down menu choose “Save for Web” option. It will further ask you to adjust the output file parameters ahead, make changes as per need of your project and finally get it saved to your device.
Check this video to know more:
Method 2: Make a GIF from Still Photos in Photoshop
It is also possible to develop animated GIF images from collection of still images in Photoshop. In this method, users simply need to maintain layers of each frame and then they are sequenced using timeline tool or Photoshop’s animation based editing. Here are few simple to follow steps to get best results:
1. Step 1
First of all, user is advised to bring all desired still images into a single folder in his computer. Then go to the software window, move to Files option and further choose Scripts. It will provide you an option for Load Files into Stack. Now hit browse button and choose your images from desktop folder that you further want to use for development of GIF image. Hit OK. It will immediately open a new composition on screen and all these stills will appear like individual layers of a new single image.
Users can reorder or rearrange these frames as per their desired GIF animation but note that the frame that you want to place at first position in your final GIF must appear at bottom layer and others must follow the same sequence upwards.
All these GIF layers can also be created individually by user using Photoshop tools. To do this, simply run your Photoshop and then use File > New option to start working with a new project. Hit Ok. It is time to unlock the background layer; you can do this by simply double clicking on the lock icon available on screen. Now in order to create a new layer over it, move to Layer option and press New button. You can design all your new layers with this process. As soon as all your images get created then arrange them in bottom to top order same as the previous method.
Note that, this process becomes effective only if you are working on the older version of software and it does not have “Load Files into Stack” feature. You can simply load all your desired stills on Photoshop platform and then drag them to new project window. The free transform tool of Photoshop can help you to resize all the added layers as per need. Use shortcut keys: Ctrl+T to make changes faster.
2. Step 2
Now as your entire GIF image layers have been arranged so next task is to start sequencing. If you are working on CS5 or lower version of Photoshop then you van move to animation window by using Window plus Animation option. On the other side, CS6 or CC users need to click over Window + Timeline option.
As soon as sequencing tool appears on your screen, you will find a small right facing arrow on upper right corner of your screen. Hit this arrow and then choose “Make Frames from Layer” option. The eye icon can be used to hide all unwanted layers. From bottom menu, you can choose looping sequence for your image.
3. Step 3
Finally your animated GIF image is ready and now you can export it to your computer. Hit File option and then Chose Save for Web from drop down menu. But note that for web uploading a file size less then 1MB is acceptable. You can alter it by changing, loss, dither, color and size settings. At last hit Save button and now you can upload your GIF.
Read More to Get : the ultimate guide on How to Convert GIF to Video on your laptop or phone.
Conclusion
If you feel like Photoshop is difficult to learn, Filmora meme maker is your ultimate solution. It helps you make image, GIF and video memes directly without watermark. It is totally FREE to use and no sign up. You can change text size, color and position to create caption when you are editing. You can also put text inside or outside in GIF. Just with a few clicks, your GIF is done . Try it now!
Shanoon Cox
Shanoon Cox is a writer and a lover of all things video.
Follow @Shanoon Cox
Shanoon Cox
Mar 27, 2024• Proven solutions
We all love GIFs and their impressive style of delivering stories. They not only contain set of frames rather they wrap inside lots of emotions and thoughts of creators. You can easily find numbers of eye catching GIF collections over social media sites.
If you love these animated images then probably you might have initiated a search over internet about how to create GIFs. And search engine must have shown you a path to unlimited GIF creator tools . That’s common. But here we are going to talk about one professional recommendation for GIF creation. Yeah, it is Photoshop and it can instantly generate appealing animated Gifs for you.
Below you will be able to learn strategies to create GIF images with latest version of Photoshop:
How to make a GIF in Photoshop
Method 1: Make a GIF from Video in Photoshop
Step 1: Launch your software
Once you have downloaded your Photoshop software tool on your device then simply run it. Note that CS6 versions of Photoshop provide full support to animated files.
Step 2: Get your video clip imported
As your software timeline is available on screen, now you have to import your desired video file to this platform. Simple go to File option from top left corner of toolbar and then from drop down menu select import. Further select, video frames to layers. Choose your video file and soon all its frames will appear on screen. Photoshop also allows users to work on clipped versions of video files; in that case you can use slider to limit the frames at the time of uploading process.
Step 3: Adjust file Import Settings
You will be glad to know that Photoshop offers creative editing features where you can also make color balance adjustments. When you are done with the frame adjustments then go to File and now choose Save for Web from drop down menu.
It will immediately open one new window containing all advanced settings that can assist in better customization of your GIF image. As users need small file size for web uploading needs so you can adjust all these parameters below to get best results:
Colors: Colors are most important descriptive elements for any video so their selection must be done wisely. As more colors can ensure better view but for reducing file size at the same time you can prefer to drop this selection up to 128.
Dither: The dithering process is used to scatter so many colour rich pixels into image so that even a limited colour package can develop intermediate colours over it. If you pick higher number of colours then definitely the image will look finer but at the cost of higher file size.
Lossy: If you want to add some internal drop in the quality of image then this setting is useful. But try to keep it lower because higher range may destroy actual information from image whereas smaller value is good if you want to just reduce the file size.
Size: Users can prefer to change overall dimensions of their GIF that ultimately leads to huge impact on file size.
Step 4: Time to Save your GIF file
When you are done with the editing process and want to save the newly created GIF image then simply move to the File menu available on top left corner of software window and from drop down menu choose “Save for Web” option. It will further ask you to adjust the output file parameters ahead, make changes as per need of your project and finally get it saved to your device.
Check this video to know more:
Method 2: Make a GIF from Still Photos in Photoshop
It is also possible to develop animated GIF images from collection of still images in Photoshop. In this method, users simply need to maintain layers of each frame and then they are sequenced using timeline tool or Photoshop’s animation based editing. Here are few simple to follow steps to get best results:
1. Step 1
First of all, user is advised to bring all desired still images into a single folder in his computer. Then go to the software window, move to Files option and further choose Scripts. It will provide you an option for Load Files into Stack. Now hit browse button and choose your images from desktop folder that you further want to use for development of GIF image. Hit OK. It will immediately open a new composition on screen and all these stills will appear like individual layers of a new single image.
Users can reorder or rearrange these frames as per their desired GIF animation but note that the frame that you want to place at first position in your final GIF must appear at bottom layer and others must follow the same sequence upwards.
All these GIF layers can also be created individually by user using Photoshop tools. To do this, simply run your Photoshop and then use File > New option to start working with a new project. Hit Ok. It is time to unlock the background layer; you can do this by simply double clicking on the lock icon available on screen. Now in order to create a new layer over it, move to Layer option and press New button. You can design all your new layers with this process. As soon as all your images get created then arrange them in bottom to top order same as the previous method.
Note that, this process becomes effective only if you are working on the older version of software and it does not have “Load Files into Stack” feature. You can simply load all your desired stills on Photoshop platform and then drag them to new project window. The free transform tool of Photoshop can help you to resize all the added layers as per need. Use shortcut keys: Ctrl+T to make changes faster.
2. Step 2
Now as your entire GIF image layers have been arranged so next task is to start sequencing. If you are working on CS5 or lower version of Photoshop then you van move to animation window by using Window plus Animation option. On the other side, CS6 or CC users need to click over Window + Timeline option.
As soon as sequencing tool appears on your screen, you will find a small right facing arrow on upper right corner of your screen. Hit this arrow and then choose “Make Frames from Layer” option. The eye icon can be used to hide all unwanted layers. From bottom menu, you can choose looping sequence for your image.
3. Step 3
Finally your animated GIF image is ready and now you can export it to your computer. Hit File option and then Chose Save for Web from drop down menu. But note that for web uploading a file size less then 1MB is acceptable. You can alter it by changing, loss, dither, color and size settings. At last hit Save button and now you can upload your GIF.
Read More to Get : the ultimate guide on How to Convert GIF to Video on your laptop or phone.
Conclusion
If you feel like Photoshop is difficult to learn, Filmora meme maker is your ultimate solution. It helps you make image, GIF and video memes directly without watermark. It is totally FREE to use and no sign up. You can change text size, color and position to create caption when you are editing. You can also put text inside or outside in GIF. Just with a few clicks, your GIF is done . Try it now!
Shanoon Cox
Shanoon Cox is a writer and a lover of all things video.
Follow @Shanoon Cox
Samples of Cartoon Character Face
Samples of Cartoon Character Face to Inspire You
An easy yet powerful editor
Numerous effects to choose from
Detailed tutorials provided by the official channel
Being able to draw facial features is an essential skill for any animator. Whether you are a beginner at drawing faces or an experienced cartoon artist that has been drawing for years, this is a skill that can gradually improve with time. With the implementation and use of simple shapes, creating various facial features and cartoon styles can be done quickly.
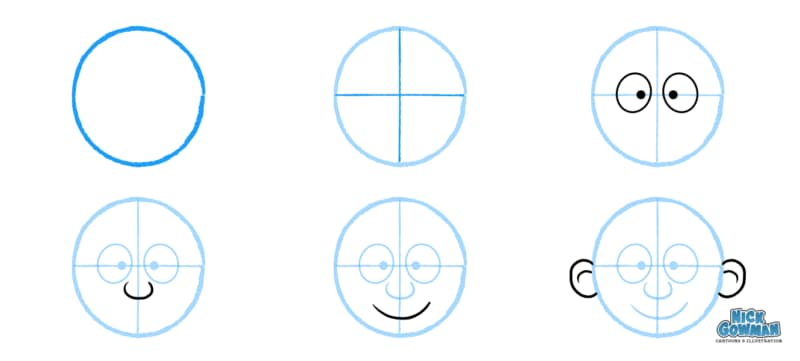
The methods of creating funny face cartoon characters are suitable for everyone, even if they do not have a single day of illustrating experience. These methods presented in this article are easily accessible to provide you with different results depending on your budget and your desired outcome.
The act of drawing cartoon faces can be effortless, and in this article, we will give you some fundamental samples of how you can draw cartoon faces of your own.
In this article
01 [Learn to Understand the Core of Cartoon Style](#Part 1)
02 [Top 12 Cartoon Face Examples](#Part 2)
03 [How to Draw a Cartoon Face - For Beginners](#Part 3)
04 [How to Easily Turn Yourself into a Cartoon](#Part 4)
Part 1 Learn to Understand the Core of Cartoon Style
First, you need to simplify the different parts of the cartoon character face to pick up on very subtle facial expressions and features. For example, the eyes’ shape and size will help determine if the person is feeling sad, excited, happy, excited, or sad. In addition, the amount of lift under a person’s eyebrows can help determine whether a person is mad or not.
These facial expressions are crucial to how a person communicates. It has got to the point that we can read someone’s face without truly understanding which parts of the face convey that emotion. However, these days we get exposed to everyday adaptations of facial expressions, especially with the invention of Instagram, Snapchat, and cartoon face filters.
Consequently, cartoons are a combination of different shapes that are being put together and are not difficult if the focus is on each shape individually and the process breaks down step by step.
Cartoons are a mixture of different shapes put together. It’s not difficult if you focus on each shape individually and break down the process step by step.
Finally, understanding these unconscious and subtle differences in facial expressions is crucial when planning out an animated character. Afterward, when understood, you can simplify the features to be recognizable by your audience.
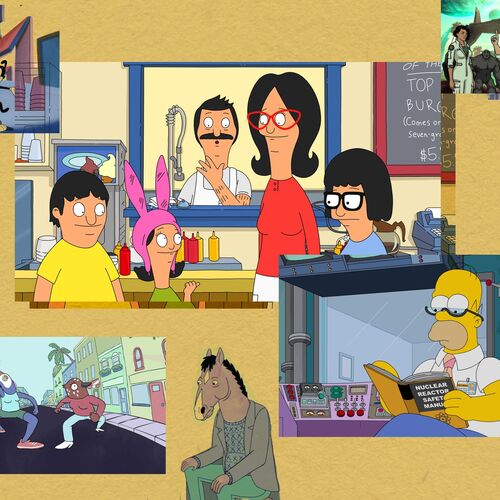
Part 2 Top 12 Cartoon Face Examples
Cartoon character faces are gaining immense importance in design art due to their universality. Cartoon faces can represent people in several situations and add a comic or satirical twist to dull topics by highlighting their importance. However, drawing cartoon faces require a lot of skill and differentiation, and graphic designers, while working on basic and universal templates, always try and introduce unique elements.
Here are the top 10 examples of cartoon character faces you can choose from when you want to make your designs:
01Men and Women
This sketch features different facial expressions made by older men and women.
02Stretch and Squash
This photo shows the difference between squashing and stretching the face and provides references for extreme squash and extreme stretch.

03Dramatic Expressions
The expressions drawn here are super fun and dramatic. However, it is a great way to have fun and practice how to draw facial expressions simultaneously.
04Quick Expressive Sketches
With this, you can practice how to draw different facial expressions by doing quick sketches like this one. Perhaps you do not need to pay attention to perfection.
05This Is Good This Is Better
With this facial expression, you can see a good look and an even better expression. It shows the difference that subtle changes can make to your facial expressions**.**
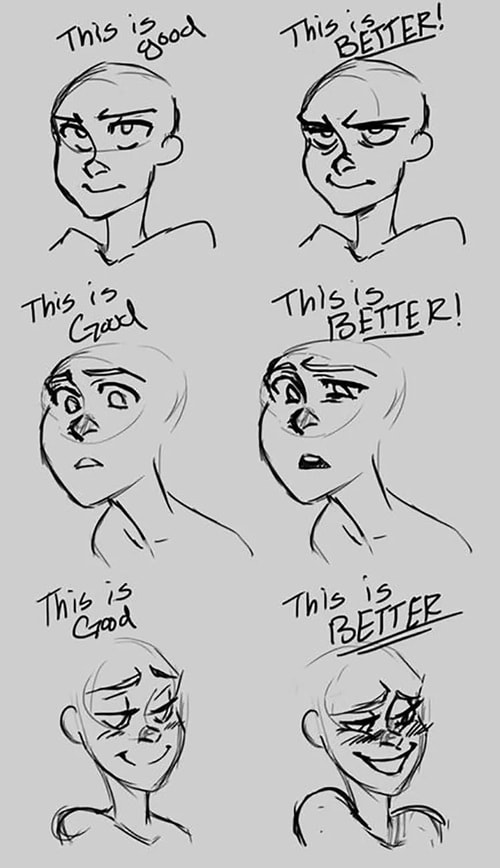
06Male and Female Expressions
This includes both male and female expressions to express the facial reaction of both genders, like some funny cartoon characters face.
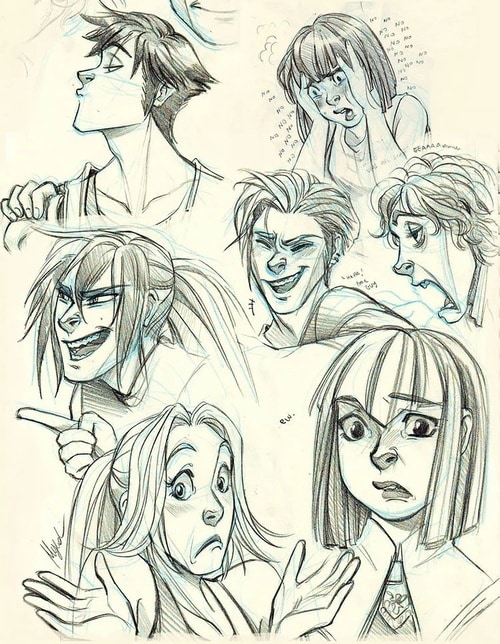
07Quick Sketches
This type of facial expression will help you get better at drawing cartoons, and you can use do some quick sketches every day.

08Jay Leno’s facial expression
Here, it is being exaggerated on a few of his most prominent facial features, including his chin. It is kind of a fat face cartoon character.
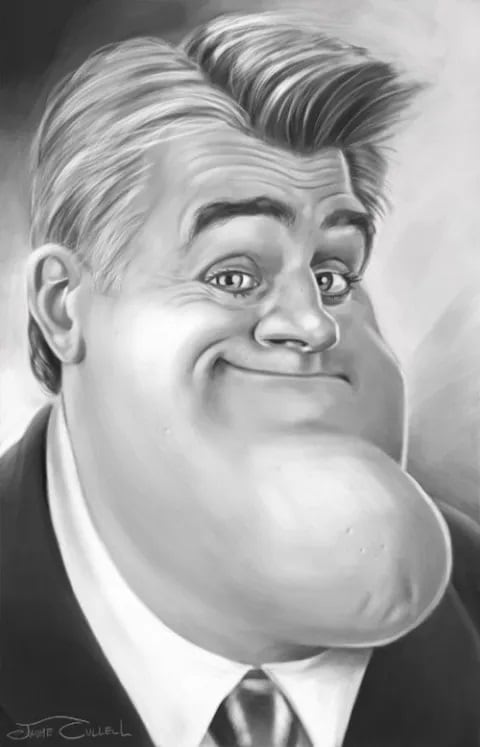
09Robert Pattinson Facials
In this photo, his head shape was distorted to show the thinness of his face, and his big hair also accentuates this prominent feature further.
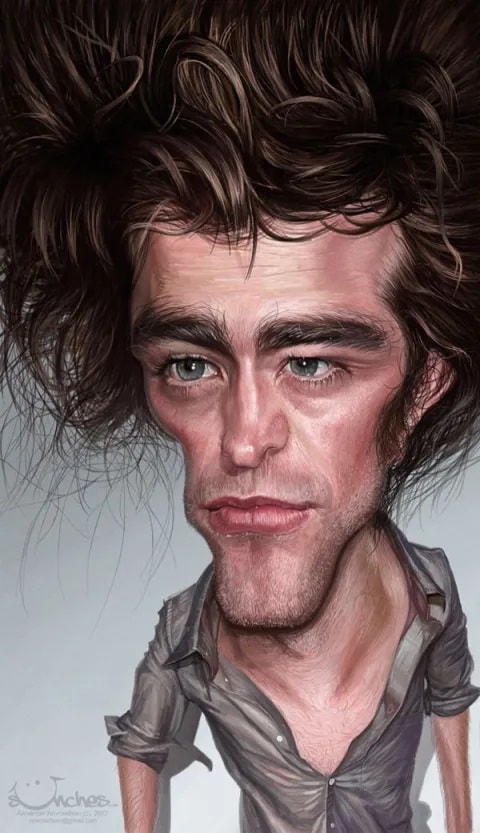
10A,I,U,O,AE,M Facials
With this, you can practice how to draw your facial expression by pronouncing a, i, u, o, ae, m.

Part 3 How to Draw a Cartoon Face - For Beginners
Here, we have written down 7-step to follow on how to draw a cartoon character face as a beginner effectively.
● Step 1: Plan and Prepare
This is the first step is to plan out exactly what this character will convery through its expression while drawing a cartoon character.
● Step 2: Drawing A Cartoon Head
Next is time to start sketching out the shape of the head based on the plan you have made. Whatsoever shape you decide to use for your character, start with a circle to serve as the basic shape for the head.
● Step 3: Drawing Cartoon Eyes
Now, you need to draw the eye of the character, which is a crucial step because the eye is the essential part of their expression. To get the character’s eyes in the right place, you should carefully sketch the horizontal or vertical dimension lines.
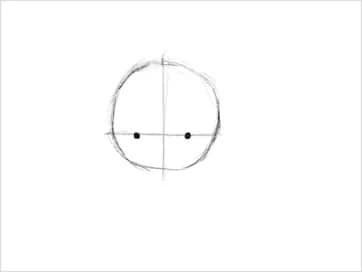
● Step 4: Drawing A Cartoon Nose
The simpler the nose is, the better it looks in a cartoon. Ensure to keep a proper ratio between the mouth, eyes, and nose so that it does not look too crowded together.
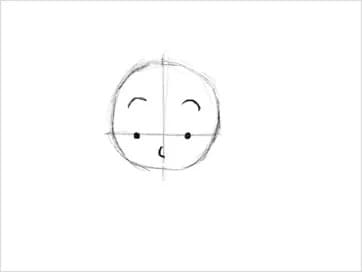
● Step 5: Shaping the Face
In shaping the face, one needs to be mindful of the character, which will help to determine how to shape the jawline and head. For example, for a girl, the face should be narrower and have the chin come to a bit of a point at the end, whereas, for a boy, it requires that the face is a bit bolder and focuses more on the definition of the jawline.
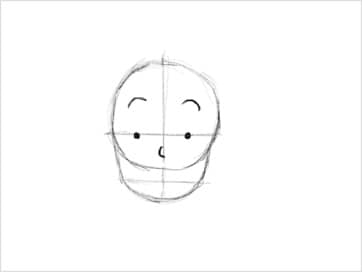
● Step 6: Drawing A Cartoon Mouth
The mouth is another essential part of the cartoon character’s expression and a key indicator of how the character is feeling. It portrays whether you want the character to smile, frown, yell, be nervous, or be neutral.
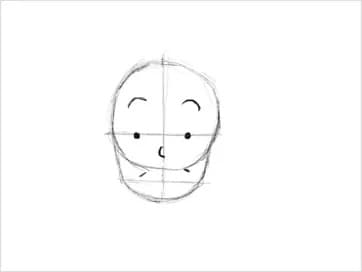
● Step 7: Drawing Cartoon Hair
Next, you need to draw the cartoon hair, and, in some cases, the cartoon hair is a significant part of their appearance as it is a way to convey your character’s personality, appearance, style, or gender.
● Step 8: Coloring
Another part requires you to paint your character to improve the texture and make it beautiful.
Part 4 How to Easily Turn Yourself into a Cartoon
Are you looking to turn yourself into a cartoon? This is very necessary as it provides you with a great way to integrate diverse characters into your brand’s marketing while simultaneously keeping your content personalized.
However, after converting a picture to a cartoon character face, you can decide to animate it, and the best tool is Wondershare Filmora Video Editor . Animation is a great way to advertise your business, especially during times like these. it is a clever way for leaders, CEOs, and managers to connect with their remote workers and boost engagement, company culture, and ultimately work morale. Filmora is also a great tool to create creative and powerful animation with tons of follow-come effect that enables you to carry it out effectively and efficiently. In this section, we will guide you on how to turn yourself into a cartoon easily:
Step 1: Visit Powtoon.com and sign up for a free account, then click on the “build your character” option from the dropdown menu.
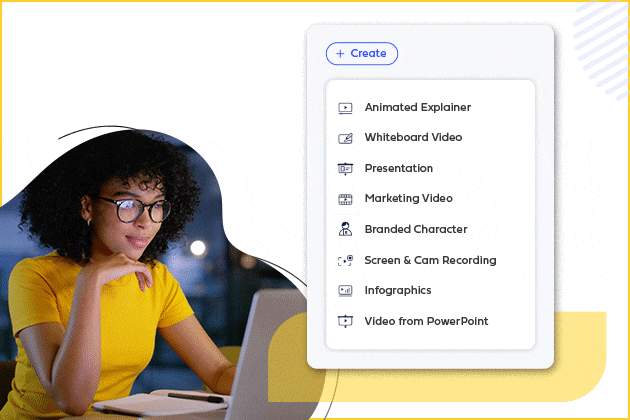
Step 2: Next is to select the cartoon gender you want.
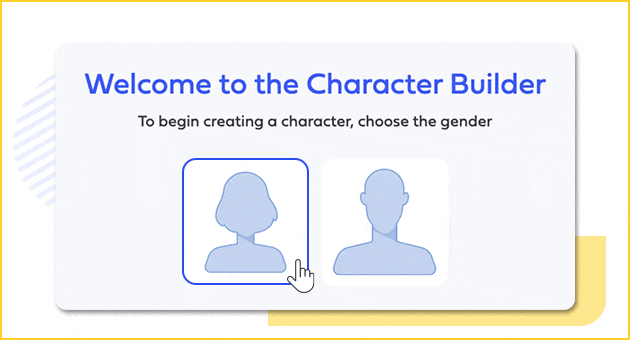
Step 3: Finally, you can customize your character’s facial features such as skin, hair, color, clothes, and animated gestures.
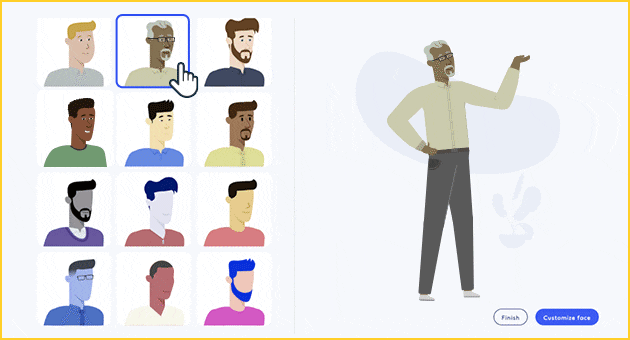
Step 4: Once you are satisfied with the result, you can save it on your device or share it on social media
For Win 7 or later (64-bit)
For macOS 10.12 or later
● Ending Thoughts →
● Thus, we saw how to easily cartoon your character’s face via some samples to help you out. With the method listed above, you can easily use it to create a square-faced cartoon character or draw a fat face cartoon character.
● This article also explained how to cartoon yourself. However, to cartoon your video or create a cartoon animated video, we recommend that you use Filmora, its keyframing feature to help you carry this out effectively.
Being able to draw facial features is an essential skill for any animator. Whether you are a beginner at drawing faces or an experienced cartoon artist that has been drawing for years, this is a skill that can gradually improve with time. With the implementation and use of simple shapes, creating various facial features and cartoon styles can be done quickly.
The methods of creating funny face cartoon characters are suitable for everyone, even if they do not have a single day of illustrating experience. These methods presented in this article are easily accessible to provide you with different results depending on your budget and your desired outcome.
The act of drawing cartoon faces can be effortless, and in this article, we will give you some fundamental samples of how you can draw cartoon faces of your own.
In this article
01 [Learn to Understand the Core of Cartoon Style](#Part 1)
02 [Top 12 Cartoon Face Examples](#Part 2)
03 [How to Draw a Cartoon Face - For Beginners](#Part 3)
04 [How to Easily Turn Yourself into a Cartoon](#Part 4)
Part 1 Learn to Understand the Core of Cartoon Style
First, you need to simplify the different parts of the cartoon character face to pick up on very subtle facial expressions and features. For example, the eyes’ shape and size will help determine if the person is feeling sad, excited, happy, excited, or sad. In addition, the amount of lift under a person’s eyebrows can help determine whether a person is mad or not.
These facial expressions are crucial to how a person communicates. It has got to the point that we can read someone’s face without truly understanding which parts of the face convey that emotion. However, these days we get exposed to everyday adaptations of facial expressions, especially with the invention of Instagram, Snapchat, and cartoon face filters.
Consequently, cartoons are a combination of different shapes that are being put together and are not difficult if the focus is on each shape individually and the process breaks down step by step.
Cartoons are a mixture of different shapes put together. It’s not difficult if you focus on each shape individually and break down the process step by step.
Finally, understanding these unconscious and subtle differences in facial expressions is crucial when planning out an animated character. Afterward, when understood, you can simplify the features to be recognizable by your audience.
Part 2 Top 12 Cartoon Face Examples
Cartoon character faces are gaining immense importance in design art due to their universality. Cartoon faces can represent people in several situations and add a comic or satirical twist to dull topics by highlighting their importance. However, drawing cartoon faces require a lot of skill and differentiation, and graphic designers, while working on basic and universal templates, always try and introduce unique elements.
Here are the top 10 examples of cartoon character faces you can choose from when you want to make your designs:
01Men and Women
This sketch features different facial expressions made by older men and women.
02Stretch and Squash
This photo shows the difference between squashing and stretching the face and provides references for extreme squash and extreme stretch.
03Dramatic Expressions
The expressions drawn here are super fun and dramatic. However, it is a great way to have fun and practice how to draw facial expressions simultaneously.
04Quick Expressive Sketches
With this, you can practice how to draw different facial expressions by doing quick sketches like this one. Perhaps you do not need to pay attention to perfection.
05This Is Good This Is Better
With this facial expression, you can see a good look and an even better expression. It shows the difference that subtle changes can make to your facial expressions**.**
06Male and Female Expressions
This includes both male and female expressions to express the facial reaction of both genders, like some funny cartoon characters face.
07Quick Sketches
This type of facial expression will help you get better at drawing cartoons, and you can use do some quick sketches every day.
08Jay Leno’s facial expression
Here, it is being exaggerated on a few of his most prominent facial features, including his chin. It is kind of a fat face cartoon character.
09Robert Pattinson Facials
In this photo, his head shape was distorted to show the thinness of his face, and his big hair also accentuates this prominent feature further.
10A,I,U,O,AE,M Facials
With this, you can practice how to draw your facial expression by pronouncing a, i, u, o, ae, m.
Part 3 How to Draw a Cartoon Face - For Beginners
Here, we have written down 7-step to follow on how to draw a cartoon character face as a beginner effectively.
● Step 1: Plan and Prepare
This is the first step is to plan out exactly what this character will convery through its expression while drawing a cartoon character.
● Step 2: Drawing A Cartoon Head
Next is time to start sketching out the shape of the head based on the plan you have made. Whatsoever shape you decide to use for your character, start with a circle to serve as the basic shape for the head.
● Step 3: Drawing Cartoon Eyes
Now, you need to draw the eye of the character, which is a crucial step because the eye is the essential part of their expression. To get the character’s eyes in the right place, you should carefully sketch the horizontal or vertical dimension lines.
● Step 4: Drawing A Cartoon Nose
The simpler the nose is, the better it looks in a cartoon. Ensure to keep a proper ratio between the mouth, eyes, and nose so that it does not look too crowded together.
● Step 5: Shaping the Face
In shaping the face, one needs to be mindful of the character, which will help to determine how to shape the jawline and head. For example, for a girl, the face should be narrower and have the chin come to a bit of a point at the end, whereas, for a boy, it requires that the face is a bit bolder and focuses more on the definition of the jawline.
● Step 6: Drawing A Cartoon Mouth
The mouth is another essential part of the cartoon character’s expression and a key indicator of how the character is feeling. It portrays whether you want the character to smile, frown, yell, be nervous, or be neutral.
● Step 7: Drawing Cartoon Hair
Next, you need to draw the cartoon hair, and, in some cases, the cartoon hair is a significant part of their appearance as it is a way to convey your character’s personality, appearance, style, or gender.
● Step 8: Coloring
Another part requires you to paint your character to improve the texture and make it beautiful.
Part 4 How to Easily Turn Yourself into a Cartoon
Are you looking to turn yourself into a cartoon? This is very necessary as it provides you with a great way to integrate diverse characters into your brand’s marketing while simultaneously keeping your content personalized.
However, after converting a picture to a cartoon character face, you can decide to animate it, and the best tool is Wondershare Filmora Video Editor . Animation is a great way to advertise your business, especially during times like these. it is a clever way for leaders, CEOs, and managers to connect with their remote workers and boost engagement, company culture, and ultimately work morale. Filmora is also a great tool to create creative and powerful animation with tons of follow-come effect that enables you to carry it out effectively and efficiently. In this section, we will guide you on how to turn yourself into a cartoon easily:
Step 1: Visit Powtoon.com and sign up for a free account, then click on the “build your character” option from the dropdown menu.
Step 2: Next is to select the cartoon gender you want.
Step 3: Finally, you can customize your character’s facial features such as skin, hair, color, clothes, and animated gestures.
Step 4: Once you are satisfied with the result, you can save it on your device or share it on social media
For Win 7 or later (64-bit)
For macOS 10.12 or later
● Ending Thoughts →
● Thus, we saw how to easily cartoon your character’s face via some samples to help you out. With the method listed above, you can easily use it to create a square-faced cartoon character or draw a fat face cartoon character.
● This article also explained how to cartoon yourself. However, to cartoon your video or create a cartoon animated video, we recommend that you use Filmora, its keyframing feature to help you carry this out effectively.
Also read:
- Updated In 2024, 12 Animated Slideshow PowerPoint Templates and Tools to Make Them
- Updated In 2024, You Can Turn a TikTok Into a GIF Now. Heres How
- Updated Top 15 2D Animation Software Free That Worth to Try for 2024
- Updated In 2024, Before You Learn 3D Animation Things You Should Know
- New 2024 Approved 10 Stunning Stop Motion Movies You Should Not Miss
- Updated Top 10 Animated DP for WhatsApp
- In 2024, 10 Best Romance Anime Movies You Need to Watch
- New In 2024, Top 10 Apps to Enhance Your Instagram Story Slideshow
- New 2024 Approved Learn Pencil2D Animation Tutorial Overview
- How I Animate Discord Profile Pictures for 2024
- New In 2024, Best 15 Instant Classics Animated Cartoon Movies
- Updated Before You Learn 3D Animation Things You Should Know
- Tips to Create Animated Social Media Posts in Canva
- New 2024 Approved The Most Efficient Techniques to Make 3D Animation Character
- Updated 2024 Approved 10 Classical Animated Cartoon Types With Examples
- Updated In 2024, Best Tips for Effortless Unity 3D Animation
- Updated Finding The Best Animated Profile Picture Maker for 2024
- Updated 2024 Approved No. 1 Maker to Animate Your Logo Online Free
- 2024 Approved Top 7 Best Free GIF Apps for Android
- New How to Create YouTube Intro Animation Like a Pro for 2024
- New How to Make Well Done Animated GIF By Yourself, In 2024
- New Learn Easy Blender Rigging in Only 2 Minutes
- New How to Get Started in Stop Motion Claymation for 2024
- New 2024 Approved What Is Motion Graphics
- New Tips for GIF to Animated PNG You Should Know
- Why is iPogo not working On Oppo A2? Fixed | Dr.fone
- In 2024, Here are Some of the Best Pokemon Discord Servers to Join On Xiaomi Redmi Note 12 5G | Dr.fone
- Unlock Apple ID without Phone Number On Apple iPhone 11 Pro Max
- How Do You Get Sun Stone Evolutions in Pokémon For Sony Xperia 1 V? | Dr.fone
- Unlock android phone if you don't have Xiaomi Redmi 13C fingerprint
- In 2024, How To Do Honor V Purse Screen Sharing | Dr.fone
- In 2024, 10 Fake GPS Location Apps on Android Of your Nubia Z50S Pro | Dr.fone
- How to Find iSpoofer Pro Activation Key On Oppo K11 5G? | Dr.fone
- In 2024, How To Unlink Your Apple iPhone SE (2020) From Your Apple ID
- Is your Realme 12 Pro+ 5G working too slow? Heres how you can hard reset it | Dr.fone
- Full Guide on Mirroring Your Honor Magic 6 Lite to Your PC/Mac | Dr.fone
- Ultimate Guide from Infinix Note 30 5G FRP Bypass
- 5 Easy Ways to Change Location on YouTube TV On Vivo Y100 | Dr.fone
- Fixing Persistent Pandora Crashes on Honor Magic5 Ultimate | Dr.fone
- Top 7 Phone Number Locators To Track Oppo Reno 11 5G Location | Dr.fone
- Updated In 2024, The Ultimate Guide to B2B Video Marketing
- The Best 8 VPN Hardware Devices Reviewed On Lava Blaze Curve 5G | Dr.fone
- In 2024, A Comprehensive Guide to Apple iPhone 14 Blacklist Removal Tips and Tools
- In 2024, How to use iSpoofer on Samsung Galaxy F14 5G? | Dr.fone
- What Does Enter PUK Code Mean And Why Did The Sim Get PUK Blocked On Asus Device
- 5 Ways to Track Vivo Y100 5G without App | Dr.fone
- 3 Facts You Need to Know about Screen Mirroring Honor X50i+ | Dr.fone
- In 2024, How to Transfer Contacts from Vivo Y36 to Outlook | Dr.fone
- Complete guide for recovering video files on Honor 90
- In 2024, How Can Motorola G54 5GMirror Share to PC? | Dr.fone
- Title: New How to Create Free Photo Collage Frame in Minutes for 2024
- Author: Elon
- Created at : 2024-06-30 12:28:29
- Updated at : 2024-07-01 12:28:29
- Link: https://animation-videos.techidaily.com/new-how-to-create-free-photo-collage-frame-in-minutes-for-2024/
- License: This work is licensed under CC BY-NC-SA 4.0.
