
:max_bytes(150000):strip_icc():format(webp)/Robothandholdinganapple-fbe6ff482ed641e188dd6650b9ac132e.jpg)
New How to Send and Add Snapchat GIFs 100 in Easy Way
How to Send and Add Snapchat GIFs 100% in Easy Way
How to Send and Add Snapchat GIFs 100% The Easy Way
An easy yet powerful editor
Numerous effects to choose from
Detailed tutorials provided by the official channel
GIFs make texting so much more fun. You can express many emotions and include entertaining animations to give your messages a human touch. Users may share and receive GIFs on most social networking networks, and Snapchat is no exception. We’ll show you how to send GIFs on Snapchat, whether you’re an Android or iOS user, in this article.
This covers instructions on how to get GIFs in Snapchat and how to transmit GIFs in chat rooms and on Snapchat Stories updates. Let’s get started.
In this article
01 [How to Send GIFs on Snapchat](#Part 1)
02 [How to Get GIFs on Snapchat Snaps and Messages?](#Part 2)
Part 1 How to Send GIFs on Snapchat
Here is a simple step guide on how to send Snapchat GIF:
Step 1: Take a photo
Start your Snapchat app as usual and snap a photo or video.

Step 2: Tap the Sticker icon
From the row on the right side of the screen, tap the Sticker icon.
To add a GIF to your photo or video, scroll down and select one. You can also use the search option to locate more particular GIFs by entering a term or phrase.

Step 3: Drag GIF
Drag the GIF you added to the screen’s desired location.
Pinch your screen to change the GIF’s size as needed.
Step 4: Save and Share
You can then share your Snap with other social networking platforms by sending it to your Stories, friends/contacts, or just saving it to your gallery.

Part 2 How to Get GIFs on Snapchat Snaps and Messages?
Getting a GIF on Snapchat can be tasking, but here is a simple guide to achieving that.
Step 1: Make use of a Gboard.
Enter the chat of the friend or person to whom you want to send the GIF and maximize or open the keyboard using the text bar.

Step 2: Select the GIF you want.
Choose a GIF from the collection or catalog that you’d want to utilize and submit it.

You can use the same snap to apply many stickers. Drag and drop it on the trashcan icon to get rid of it.
Here’s how to get Gboard on your Android device if it didn’t come with it:
• Download the Gboard from the Play Store or whichever playstore you want.
• Go to Settings> System> Languages and Input> Virtual Keyboard and select it.
• Double-check that Gboard is selected as your primary keyboard.
After that, grant any permissions it requires so that you can use it right away in Snapchat.
Now that it’s as simple as it gets, let’s send comparable GIFs utilizing iOS devices.
For iPhone/iPad:
For iPhone users, you must first download and install the giphy app on your phone. Once you have successfully set the giphy app as your default keyboard, you can send Snapchat GIFs chat by following the steps below:
Step 1: Press the Globe icon
Continuously press and hold the globe icon to the left of the space bar to reveal the available keyboard, then choose a specific or favorite GIF from the giphy list.

Step 2: Find GIF
Find the GIF you wish to send and tap it to copy it.

Step 3: Paste GIF
Return to the conversation, paste the GIF into the text box, and press the send button.

For those who don’t know how to use the Giphy app on their iPhones or iPads, read the following instructions:
• Go to the Settings menu and pick the General icon.
•To see your keyboard options, go to the keyboard setting and tap it.
• To see the accessible keyboard, tap on the part labelled keyboard.
• Select Add a New Keyboard.
• The Giphy keyboard will undoubtedly be among the third-party keyboards.
• Once you’ve included or added the keyboard, it’ll appear in the “active keyboard” section.
• Select the Allow Full Access option.
Have you heard of Filmora before? I’m afraid not, Wondershare Filmora Video Editor is a video editing program that allows you to edit videos in various ways.
It’s exciting and amusing to make your animated GIF from any video or photo. Due to their large size, video scenes might be challenging to manage, but GIFs are perfect for profile posts and sharing with friends as simple jokes.
However, if you wish to create a GIF online, Filmora’s online meme maker is the ideal choice. You may use it to make a watermark-free photo, GIF, and video memes. It is free to use, and there is no need to register. You can change the text size, color, and position when you’re altering a caption. You can also add text to the inside or outside in a GIF.
Wondershare Filmora
Get started easily with Filmora’s powerful performance, intuitive interface, and countless effects!
Try It Free Try It Free Try It Free Learn More >

GIFs may be created from a collection of static photographs or even moving movies, and the process is effortless enough for anyone to do. We recommend Wondershare Filmora for you to complete this task quickly and easily. The rationale for this suggestion is the software tool’s user-friendly and engaging interface. You can soon mix a lot of stills into GIFs or convert small videos into GIFs with Filmora. What’s more, the Filmora platform enables easy modification of GIFs, with users able to add overlays, components, and text to their GIFs.
● Key Takeaways from This Episode →
● You must have gotten one or two tips on how to send and add Snapchat GIFs, all that is for you is to grab your phone, be it an Android or iOS, and make your chat, conversations, photos, and videos more interesting by making use of GIFs on Snapchat.
● iPhone users must ensure that the Giphy app is installed to achieve this.It is also important to note that you can create your exciting GIFs using Wondershare Filmora, and this can help you easily create an awesome GIF in no time. Get to it!!
GIFs make texting so much more fun. You can express many emotions and include entertaining animations to give your messages a human touch. Users may share and receive GIFs on most social networking networks, and Snapchat is no exception. We’ll show you how to send GIFs on Snapchat, whether you’re an Android or iOS user, in this article.
This covers instructions on how to get GIFs in Snapchat and how to transmit GIFs in chat rooms and on Snapchat Stories updates. Let’s get started.
In this article
01 [How to Send GIFs on Snapchat](#Part 1)
02 [How to Get GIFs on Snapchat Snaps and Messages?](#Part 2)
Part 1 How to Send GIFs on Snapchat
Here is a simple step guide on how to send Snapchat GIF:
Step 1: Take a photo
Start your Snapchat app as usual and snap a photo or video.
Step 2: Tap the Sticker icon
From the row on the right side of the screen, tap the Sticker icon.
To add a GIF to your photo or video, scroll down and select one. You can also use the search option to locate more particular GIFs by entering a term or phrase.
Step 3: Drag GIF
Drag the GIF you added to the screen’s desired location.
Pinch your screen to change the GIF’s size as needed.
Step 4: Save and Share
You can then share your Snap with other social networking platforms by sending it to your Stories, friends/contacts, or just saving it to your gallery.
Part 2 How to Get GIFs on Snapchat Snaps and Messages?
Getting a GIF on Snapchat can be tasking, but here is a simple guide to achieving that.
Step 1: Make use of a Gboard.
Enter the chat of the friend or person to whom you want to send the GIF and maximize or open the keyboard using the text bar.
Step 2: Select the GIF you want.
Choose a GIF from the collection or catalog that you’d want to utilize and submit it.
You can use the same snap to apply many stickers. Drag and drop it on the trashcan icon to get rid of it.
Here’s how to get Gboard on your Android device if it didn’t come with it:
• Download the Gboard from the Play Store or whichever playstore you want.
• Go to Settings> System> Languages and Input> Virtual Keyboard and select it.
• Double-check that Gboard is selected as your primary keyboard.
After that, grant any permissions it requires so that you can use it right away in Snapchat.
Now that it’s as simple as it gets, let’s send comparable GIFs utilizing iOS devices.
For iPhone/iPad:
For iPhone users, you must first download and install the giphy app on your phone. Once you have successfully set the giphy app as your default keyboard, you can send Snapchat GIFs chat by following the steps below:
Step 1: Press the Globe icon
Continuously press and hold the globe icon to the left of the space bar to reveal the available keyboard, then choose a specific or favorite GIF from the giphy list.
Step 2: Find GIF
Find the GIF you wish to send and tap it to copy it.
Step 3: Paste GIF
Return to the conversation, paste the GIF into the text box, and press the send button.
For those who don’t know how to use the Giphy app on their iPhones or iPads, read the following instructions:
• Go to the Settings menu and pick the General icon.
•To see your keyboard options, go to the keyboard setting and tap it.
• To see the accessible keyboard, tap on the part labelled keyboard.
• Select Add a New Keyboard.
• The Giphy keyboard will undoubtedly be among the third-party keyboards.
• Once you’ve included or added the keyboard, it’ll appear in the “active keyboard” section.
• Select the Allow Full Access option.
Have you heard of Filmora before? I’m afraid not, Wondershare Filmora Video Editor is a video editing program that allows you to edit videos in various ways.
It’s exciting and amusing to make your animated GIF from any video or photo. Due to their large size, video scenes might be challenging to manage, but GIFs are perfect for profile posts and sharing with friends as simple jokes.
However, if you wish to create a GIF online, Filmora’s online meme maker is the ideal choice. You may use it to make a watermark-free photo, GIF, and video memes. It is free to use, and there is no need to register. You can change the text size, color, and position when you’re altering a caption. You can also add text to the inside or outside in a GIF.
Wondershare Filmora
Get started easily with Filmora’s powerful performance, intuitive interface, and countless effects!
Try It Free Try It Free Try It Free Learn More >
GIFs may be created from a collection of static photographs or even moving movies, and the process is effortless enough for anyone to do. We recommend Wondershare Filmora for you to complete this task quickly and easily. The rationale for this suggestion is the software tool’s user-friendly and engaging interface. You can soon mix a lot of stills into GIFs or convert small videos into GIFs with Filmora. What’s more, the Filmora platform enables easy modification of GIFs, with users able to add overlays, components, and text to their GIFs.
● Key Takeaways from This Episode →
● You must have gotten one or two tips on how to send and add Snapchat GIFs, all that is for you is to grab your phone, be it an Android or iOS, and make your chat, conversations, photos, and videos more interesting by making use of GIFs on Snapchat.
● iPhone users must ensure that the Giphy app is installed to achieve this.It is also important to note that you can create your exciting GIFs using Wondershare Filmora, and this can help you easily create an awesome GIF in no time. Get to it!!
How to Make Creative Animation Videos
Animation can explain whatever the mind of man can conceive – Walt Disney. Animation video is a craft in which images go through the process of conspiring, layout addition, and photographic chronology to create an illusion of action. In this article, let’s learn the importance of video animations and when and why to use this technique.
What are Video Animation and its importance?
Video as a marketing tool has become more popular but also more important. In this article, you can read more about why media marketing is getting more essential in comparison to text marketing. Therefore, an explainer video with Animation is an amazing way to show your target audience who you are, where you stand for, what you do and how you can solve the customer’s problem.
Video animation is an engaging technique that can help you comprehensively tell your story. Animated meaning can be better comprehended as a simulation of motion created by showing a series of pictures. Animated videos for a business catch the viewers and make for an enjoyable story-telling experience.
Often, animation videos are used to explain a concept or process. It’s straightforward to make these videos appealing and likable as you can primarily create them however you want. It can take longer to get the point across when people explain how to do something. Animations not only trigger emotions but spark conversations as well.
What are most common types of Animation?
The purpose of this article is to take you through the complexity of the different types of animation styles and methods. It also covers the track you should take (and what that path entails) to become an animator for each of the five types.
This guide is not about learning how to animate. But instead, it breaks down the five types of Animation available to you and what you’ll need to start animating: best software, schools, and courses.
Motion Graphics (Key framing): Motion graphics focus on making dynamic and exciting presentations of moving text logos and fundamental illustrations.
- Motion graphics can be 2D and 3D, and you’ll find them everywhere in news, sporting videos, the news, and other TV productions.
- Correct character animation is generally outside the scope of motion graphics, but many core animation principles also apply to motion graphics.
- Creating Motion Graphics depends on the plan used since video editing software often have different user interface or settings, but the idea is the same. Motion Graphics usually involves animating texts, pictures, or video clips using keyframing that is tweened to make a smooth motion between frames.
Traditional Animation: This is the classic type of Animation you’re probably most well known with. In the past, animators drew characters frame by frame, and then those pictures were moved onto transparent sheets for painting. That’s where the term animation comes from.
They started scanning drawings into the computer for digital coloring. The important thing is that hand-drawn animators still create their animation frame by frame using the same method and concept as in those old days of paper and cels.
How to Use Motion Graphics Animation in Filmora
Keyframes specify the start or end of a transition in a shot. A series of keyframes can give the semblance of the movement of an object. Keyframes include parameters such as Position, Scale, Opacity, and Rotation. These values can be changed and customized to make animations using keyframing.
Wondershare Filmora makes it really easy to use. Even learners or novices can use keyframe animation to create extraordinary videos. Plus, the keyframe templates are an added satisfaction. If you have limited time and need a quick fix, using Presets in the Animation tab is your best bet.
For this example, we’ll walk you through using Keyframes on the short video clip to make your Animation using Wondershare Filmora.
Free Download For Win 7 or later(64-bit)
Free Download For macOS 10.14 or later
Step1 Launch Wondershare Filmora from your system and select New Project.

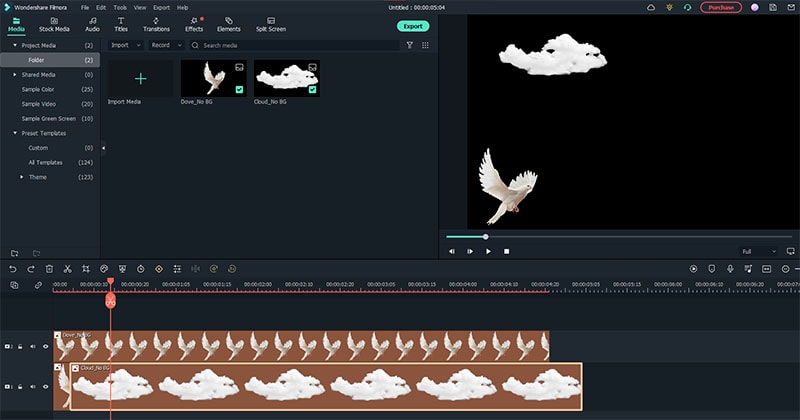
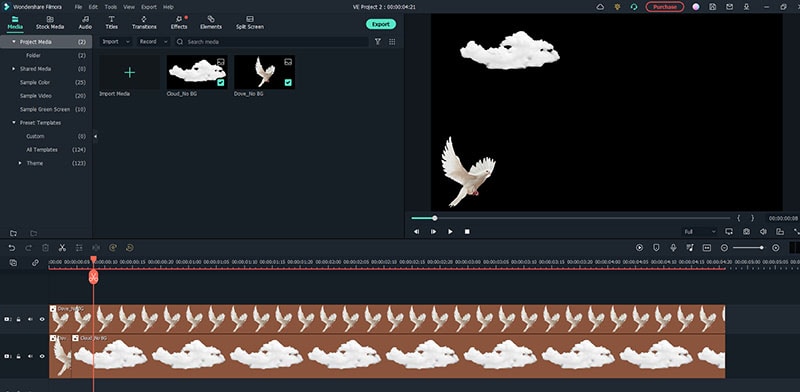
Step2 Import your selected images. In this case I imported no background images to have a clear view on how key framing works.
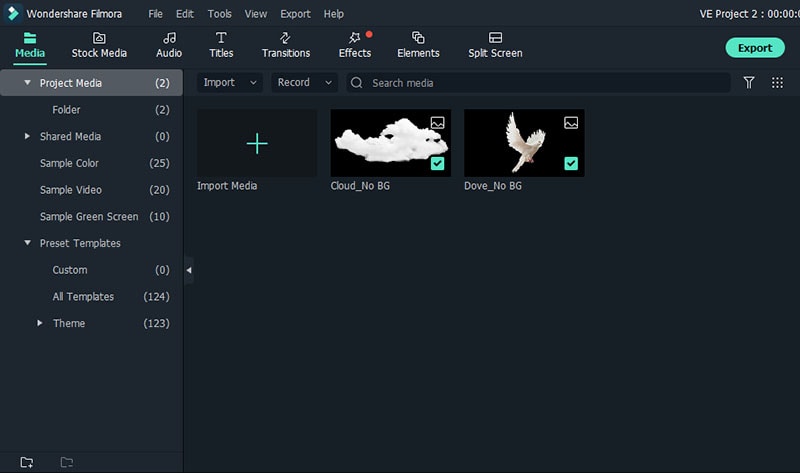
Step3 Drag or add the image on the Timeline Panel.
In this case I use a dove and a cloud to demo the Motion graphics animation
Step4 Double click the image then the Animation tab will display. Here, there are available presets, either the latest or the Legacy Animation, as indicated on the display that you can use.
There is also a tab if you want to customize your animations which requires premium account.
- Fade In
- Fade Out
- Pause
- Slide right
- Slide up
- Vortex In
- Vortex Out
- Zoom In
- Zoom Out
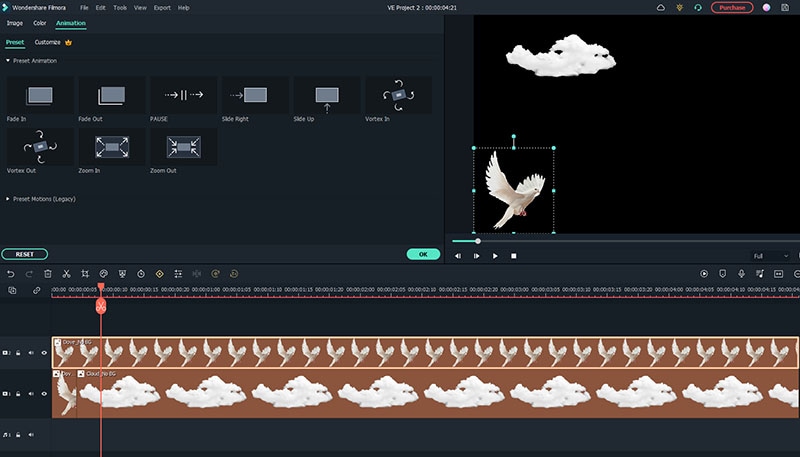
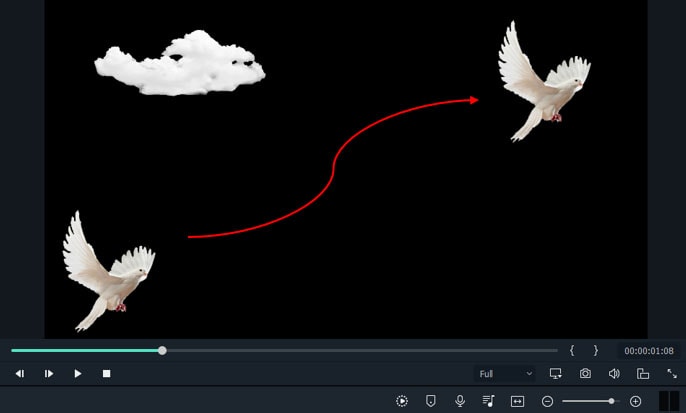
Step5 Select any animation you want by double-clicking the presets. In this case, I selected a slight right preset, and you will notice that the start arrow and end arrow indicator are displayed.
In the Timeline panel, you have an option to customize the start and end of the Preset. Just drag the arrow keys on either side to reach the keyframe you wish to change. Just simple.
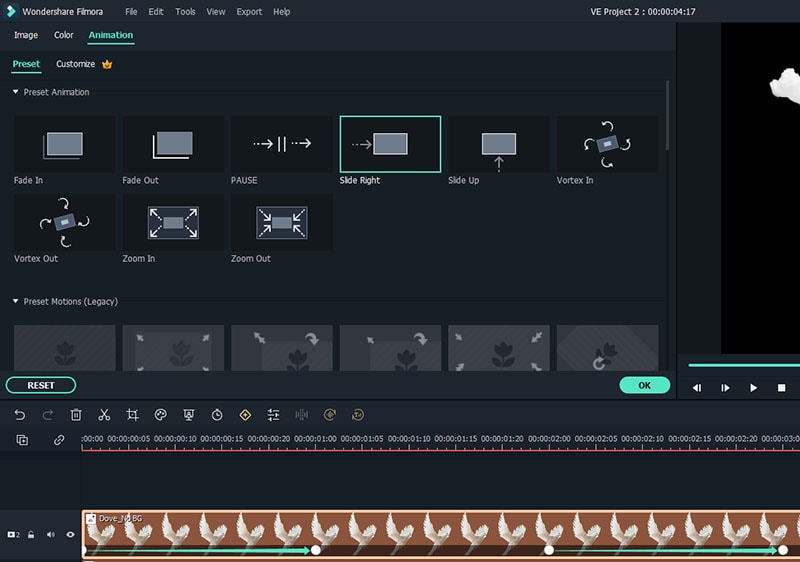
You can also do it on the cloud image that we’ve added.
Takeaway
Keyframing can bring steady images to life by introducing animations. With the super-easy keyframing tool in Filmora, you can now make invigorating videos. From easy to complex key framing. The customization property lets you unbind your creativity and take your editing to a professional level. Make your logo pop by adding keyframe animations. Better yet, you can also animate text.
No matter what industry you’re in, Animation can be relevant. Small start-ups to giant corporations use animation videos, too. Animation videos help to explain tricky processes or concepts, sell a product, or even to gain recognition for a product. Everyone resonates with Animation in some way or another. Almost everyone has watched cartoons or animations in their life, so these tend to grab attention more effectively.
We all love animation. From the animated cartoons we watched as kids to the latest and hottest animated music video, there’s something about seeing visuals come alive that captivates and inspires us. But video animation isn’t just for children, and it isn’t just for the entertainment value only.
Free Download For macOS 10.14 or later
Step1 Launch Wondershare Filmora from your system and select New Project.
Step2 Import your selected images. In this case I imported no background images to have a clear view on how key framing works.
Step3 Drag or add the image on the Timeline Panel.
In this case I use a dove and a cloud to demo the Motion graphics animation
Step4 Double click the image then the Animation tab will display. Here, there are available presets, either the latest or the Legacy Animation, as indicated on the display that you can use.
There is also a tab if you want to customize your animations which requires premium account.
- Fade In
- Fade Out
- Pause
- Slide right
- Slide up
- Vortex In
- Vortex Out
- Zoom In
- Zoom Out
Step5 Select any animation you want by double-clicking the presets. In this case, I selected a slight right preset, and you will notice that the start arrow and end arrow indicator are displayed.
In the Timeline panel, you have an option to customize the start and end of the Preset. Just drag the arrow keys on either side to reach the keyframe you wish to change. Just simple.
You can also do it on the cloud image that we’ve added.
Takeaway
Keyframing can bring steady images to life by introducing animations. With the super-easy keyframing tool in Filmora, you can now make invigorating videos. From easy to complex key framing. The customization property lets you unbind your creativity and take your editing to a professional level. Make your logo pop by adding keyframe animations. Better yet, you can also animate text.
No matter what industry you’re in, Animation can be relevant. Small start-ups to giant corporations use animation videos, too. Animation videos help to explain tricky processes or concepts, sell a product, or even to gain recognition for a product. Everyone resonates with Animation in some way or another. Almost everyone has watched cartoons or animations in their life, so these tend to grab attention more effectively.
We all love animation. From the animated cartoons we watched as kids to the latest and hottest animated music video, there’s something about seeing visuals come alive that captivates and inspires us. But video animation isn’t just for children, and it isn’t just for the entertainment value only.
How to Make a Video a Live Photo
How to Make a Video a Live Photo [2022]
An easy yet powerful editor
Numerous effects to choose from
Detailed tutorials provided by the official channel
Looking forward to turn your videos into live photos? Stay tuned to know how!
In this article
01 [How to Save Live Photos as a Video on iPhone/Ipad/Ipod](#Part 1)
02 [How to Turn a Video Into a Live Photo on iOS/Android](#Part 2)
Part 1 How to Save Live Photos as a Video on iPhone/Ipad/Ipod
Live photos are an amazing utility that allow you to save images as short moving snaps. Creating live photos is among the latest spunk of trendsetter stories, whether shared on social media platforms or created and saved just for fun, these definitely sound and look exciting, but that’s just one among the many things you can experiment on live photos.
Creating live photos takes you to a world of exciting features where you can explore your creativity in a number of ways, one of the easiest being turning live photos to videos. This comes handy when you need to share your live photos on platforms that do not have the compatibility to run live photos. If you are an iPhone user and wish to try your hands on experimenting with live photos, see through the following section of this article to learn how to turn live photo into video:
01Save as Video
Step 1: Launch the Photos App
In your iPhone, launch the ‘Photos’ app and navigate to ‘Albums’. All your live photos are present in the ‘Live Photos’ album.
Step 2: Format Selection
In latest versions (iOS 13v and above), you get a direct ‘Save as Video’ option in the ‘Photos’ application. Just click on that, and your live photo will be instantly saved in your iPhone gallery as a video. Here’s how you can use this feature:
● In the ‘Photos’ application, go to the ‘Live Photos’ album to select and open a desired live photo that you wish to convert to a video.
● Click on the ‘Share’ icon.

● Select ‘Save as Video’ from the drop down menu that displays sharing options.

Your created video will be saved in the ‘Photos’ application, next to the live photo you chose to turn into a video.
02iOS Shortcuts
This is a quicker way to save your live photos as videos in your iPhone. To use this feature, you first need to save the ‘Convert LivePhotos to Video’ shortcut in the ‘Shortcuts App’ gallery of your iPhone. You can do this by opening in your iOS internet browser.
Before using the above link, make sure to enable the ‘Allow Untrusted Shortcuts’ feature in your iPhone settings. You can do this as explained below:
● Reach to the ‘Settings’ application of your iPhone.
● Tap on ‘Shortcuts’ from the app’s welcome screen.
● Enable ‘Allow Untrusted Shortcuts’ with a toggle.

Having done that, here’s what you need to follow:
● Open the ‘Shortcuts’ application in your iOS device and tap the ‘Convert LivePhotos to Video’ shortcut.

● The ‘Live Photos’ album of your device opens up. Make a desired selection.

Your converted video gets automatically saved in the ‘Camera Roll’ folder of the ‘Photos’ application. Open the ‘Recents’ album to view your creation.
Part 2 How to Turn a Video Into a Live Photo on iOS/Android
Converting live photos to videos is fine, but going the other way round is all the more exciting and fun! You can even use these converted live photos as live screen wallpapers for your iOS and Android devices. If you are motivated to take up the excitement, look through the following methods to turn video into live photo:
01iOS Devices
Being an iOS user, you can choose among the following tools to convert video to live photo in your iPad, iPod or iPhone:
● Wondershare Filmora
Wondershare Filmora Video Editor is currently leading the software market among converter utilities that cater to various media conversion needs. This one is a free, smart, quick and convenient conversion tool that assures you of a hassle free video to live photo conversion in just a few clicks. What’s more interesting is, you don’t need to limit yourself with sticking to some particular video format, as Filmora conveniently supports almost all common ones.
Wondershare Filmora
Get started easily with Filmora’s powerful performance, intuitive interface, and countless effects!
Try It Free Try It Free Try It Free Learn More >
● IntoLive
This one is a third party application that allows you to convert videos into live photos, quickly and conveniently. This tool works well with devices having iOS 12.0 and later versions. All you have to do is follow the steps mentioned below:
Step 1:
Download the ‘IntoLive’ application from the Apple App Store.

Step 2:
Launch the same on your iOS device and grant the permission to access its ‘Photos’ Album.

Step 3:
In the ‘Videos’ section, choose the desired video that you wish to turn into a live photo.

Step 4:
An editor window will open up. Here, you can edit (cut, crop, trim, etc.) and add desired effects or filters to your selected video. Click on ‘Make’ at the top right when you finish the editing process.

Step 5:
If you have the paid version of the app, you can take up multiple repeats of your live photo; else you can use the free version with no repeats.

Step 6:
Once you are satisfied with the result, click on ‘Save Live Photo’. This will save your created live photo in your device’s gallery.

02VideoToLive
This is a free converter you can choose to turn video into live photo. This is a quite popular tool among iPhone users worldwide and is suitable for iOS versions 11.2 and later. You also have the liberty to share your created live photos on social media with this converter. Take the following steps to begin the conversion process:

Step 1:
Download the application from the Apple App Store and launch it on your iOS device.
Step 2:
Choose a video from your device gallery to convert it into a live photo.
Step 3:
In the video editor screen, crop the video to the preferred section that has to be converted into live photo. You can add video frames to your edited clip from the upper section of the editor screen.
Step 4:
Click on ‘Convert’ at the top right corner to initiate the conversion process.
03Android Devices
Live photos are undoubtedly known to add spark to your cherished moments, but the notch that puts these off with Android devices is that you can enjoy live photos on these devices only as live wallpapers.
Being an iPhone exclusive utility, Android devices lack the flexibility to capture live images. However, you can see them move on being set as live screen wallpapers. A handy alternative to this is converting a turn video into live photo and use it as live wallpaper. Here’s how you can take up the conversion process:
● TurnLive- Live Wallpaper
This one is a convenient, third party tool that lets you turn video into live photo in just a few quick steps. You can either use this application for free, or upgrade to the paid version to enjoy its premium features. To make amazing live photos from videos using this tool, you need to take up the steps given below:

Step 1: App Installation
To begin, visit the Google Playstore in your Android device and download the TurnLive- Live Wallpaper application. Next, you need install and launch the app in your device and accept its terms of service.
Step 2: Select a Video
Once you are done, click on the ‘Live Photo’ icon in the bottom of the app’s opening screen to reach the video selection page. Here, you need to choose ‘Video to Live Wallpaper’ option and grant the required app permissions to access your device’s camera and gallery. Select a desired video from the ones saved in your device and click ‘Done’ at the top right.
Step 3: Edit Your Video
You will now get directed to the app’s editor window, where you need to trim the selected video within a time frame of 1-5 seconds. To do this, select a cover frame within the clip and click ‘Next’. You can now use the video slider at the bottom to trim the clip. Adding suitable video effects and filters is also possible with this tool.
Step 4: It’s Almost Done!
When you finish editing, click ‘Next’ and choose the number of repeats for the created live photo. Wait for the conversion to finish and click on ‘My Wallpapers’ to view your creation.
Step 5: Download Your Live Photo!
Click ‘Download’ and tap ‘Clear’ in the app’s prompt message to remove your device’s current screen wallpaper. Next, allow the app to access your system settings. Once this finishes, tap ‘Clear’ again to download your creation. You will now get directed to a black screen tagged ‘DayTime LWP’. Click on ‘Set Wallpaper’ in this screen to make your live photo, the current wallpaper of your Android device.
● Video Live Wallpaper
This is another free app that you can use to your videos into amazing live photos in just 4 quick steps. All you need to do is explained in the following steps:
Step 1: download the Application
Download the Video Live Wallpaper application in your Android device from Google Playstore and proceed for its installation and launch.

Step 2: Select Your Video
In the app’s opening screen, click ‘Choose Video’ and grant app permissions to access your device’s media. Browse your video gallery to select a desired video that you wish to convert into a live photo.

Step 3: Edit Your Video
You will now get directed to the app’s editor screen. Here, you can explore your editing creativity to edit the selected video. Once you are happy, click the picture icon at the top right corner.

Step 4: Your Live Wallpaper is Ready!
To set the created live photo as your device screen wallpaper, select ‘Set as Wallpaper’ at the bottom right.

● Key Takeaways from This Episode →
● From cherishing moments to sharing them on social media, live photos can do it all.
● Being an iPhone exclusive utility, you need to create these from videos to enjoy them on other platforms and devices.
● Filmora is the best video to live photo converters, available as an easy, quick and convenient conversion tool.
Looking forward to turn your videos into live photos? Stay tuned to know how!
In this article
01 [How to Save Live Photos as a Video on iPhone/Ipad/Ipod](#Part 1)
02 [How to Turn a Video Into a Live Photo on iOS/Android](#Part 2)
Part 1 How to Save Live Photos as a Video on iPhone/Ipad/Ipod
Live photos are an amazing utility that allow you to save images as short moving snaps. Creating live photos is among the latest spunk of trendsetter stories, whether shared on social media platforms or created and saved just for fun, these definitely sound and look exciting, but that’s just one among the many things you can experiment on live photos.
Creating live photos takes you to a world of exciting features where you can explore your creativity in a number of ways, one of the easiest being turning live photos to videos. This comes handy when you need to share your live photos on platforms that do not have the compatibility to run live photos. If you are an iPhone user and wish to try your hands on experimenting with live photos, see through the following section of this article to learn how to turn live photo into video:
01Save as Video
Step 1: Launch the Photos App
In your iPhone, launch the ‘Photos’ app and navigate to ‘Albums’. All your live photos are present in the ‘Live Photos’ album.
Step 2: Format Selection
In latest versions (iOS 13v and above), you get a direct ‘Save as Video’ option in the ‘Photos’ application. Just click on that, and your live photo will be instantly saved in your iPhone gallery as a video. Here’s how you can use this feature:
● In the ‘Photos’ application, go to the ‘Live Photos’ album to select and open a desired live photo that you wish to convert to a video.
● Click on the ‘Share’ icon.
● Select ‘Save as Video’ from the drop down menu that displays sharing options.
Your created video will be saved in the ‘Photos’ application, next to the live photo you chose to turn into a video.
02iOS Shortcuts
This is a quicker way to save your live photos as videos in your iPhone. To use this feature, you first need to save the ‘Convert LivePhotos to Video’ shortcut in the ‘Shortcuts App’ gallery of your iPhone. You can do this by opening in your iOS internet browser.
Before using the above link, make sure to enable the ‘Allow Untrusted Shortcuts’ feature in your iPhone settings. You can do this as explained below:
● Reach to the ‘Settings’ application of your iPhone.
● Tap on ‘Shortcuts’ from the app’s welcome screen.
● Enable ‘Allow Untrusted Shortcuts’ with a toggle.
Having done that, here’s what you need to follow:
● Open the ‘Shortcuts’ application in your iOS device and tap the ‘Convert LivePhotos to Video’ shortcut.
● The ‘Live Photos’ album of your device opens up. Make a desired selection.
Your converted video gets automatically saved in the ‘Camera Roll’ folder of the ‘Photos’ application. Open the ‘Recents’ album to view your creation.
Part 2 How to Turn a Video Into a Live Photo on iOS/Android
Converting live photos to videos is fine, but going the other way round is all the more exciting and fun! You can even use these converted live photos as live screen wallpapers for your iOS and Android devices. If you are motivated to take up the excitement, look through the following methods to turn video into live photo:
01iOS Devices
Being an iOS user, you can choose among the following tools to convert video to live photo in your iPad, iPod or iPhone:
● Wondershare Filmora
Wondershare Filmora Video Editor is currently leading the software market among converter utilities that cater to various media conversion needs. This one is a free, smart, quick and convenient conversion tool that assures you of a hassle free video to live photo conversion in just a few clicks. What’s more interesting is, you don’t need to limit yourself with sticking to some particular video format, as Filmora conveniently supports almost all common ones.
Wondershare Filmora
Get started easily with Filmora’s powerful performance, intuitive interface, and countless effects!
Try It Free Try It Free Try It Free Learn More >
● IntoLive
This one is a third party application that allows you to convert videos into live photos, quickly and conveniently. This tool works well with devices having iOS 12.0 and later versions. All you have to do is follow the steps mentioned below:
Step 1:
Download the ‘IntoLive’ application from the Apple App Store.
Step 2:
Launch the same on your iOS device and grant the permission to access its ‘Photos’ Album.
Step 3:
In the ‘Videos’ section, choose the desired video that you wish to turn into a live photo.
Step 4:
An editor window will open up. Here, you can edit (cut, crop, trim, etc.) and add desired effects or filters to your selected video. Click on ‘Make’ at the top right when you finish the editing process.
Step 5:
If you have the paid version of the app, you can take up multiple repeats of your live photo; else you can use the free version with no repeats.
Step 6:
Once you are satisfied with the result, click on ‘Save Live Photo’. This will save your created live photo in your device’s gallery.
02VideoToLive
This is a free converter you can choose to turn video into live photo. This is a quite popular tool among iPhone users worldwide and is suitable for iOS versions 11.2 and later. You also have the liberty to share your created live photos on social media with this converter. Take the following steps to begin the conversion process:
Step 1:
Download the application from the Apple App Store and launch it on your iOS device.
Step 2:
Choose a video from your device gallery to convert it into a live photo.
Step 3:
In the video editor screen, crop the video to the preferred section that has to be converted into live photo. You can add video frames to your edited clip from the upper section of the editor screen.
Step 4:
Click on ‘Convert’ at the top right corner to initiate the conversion process.
03Android Devices
Live photos are undoubtedly known to add spark to your cherished moments, but the notch that puts these off with Android devices is that you can enjoy live photos on these devices only as live wallpapers.
Being an iPhone exclusive utility, Android devices lack the flexibility to capture live images. However, you can see them move on being set as live screen wallpapers. A handy alternative to this is converting a turn video into live photo and use it as live wallpaper. Here’s how you can take up the conversion process:
● TurnLive- Live Wallpaper
This one is a convenient, third party tool that lets you turn video into live photo in just a few quick steps. You can either use this application for free, or upgrade to the paid version to enjoy its premium features. To make amazing live photos from videos using this tool, you need to take up the steps given below:
Step 1: App Installation
To begin, visit the Google Playstore in your Android device and download the TurnLive- Live Wallpaper application. Next, you need install and launch the app in your device and accept its terms of service.
Step 2: Select a Video
Once you are done, click on the ‘Live Photo’ icon in the bottom of the app’s opening screen to reach the video selection page. Here, you need to choose ‘Video to Live Wallpaper’ option and grant the required app permissions to access your device’s camera and gallery. Select a desired video from the ones saved in your device and click ‘Done’ at the top right.
Step 3: Edit Your Video
You will now get directed to the app’s editor window, where you need to trim the selected video within a time frame of 1-5 seconds. To do this, select a cover frame within the clip and click ‘Next’. You can now use the video slider at the bottom to trim the clip. Adding suitable video effects and filters is also possible with this tool.
Step 4: It’s Almost Done!
When you finish editing, click ‘Next’ and choose the number of repeats for the created live photo. Wait for the conversion to finish and click on ‘My Wallpapers’ to view your creation.
Step 5: Download Your Live Photo!
Click ‘Download’ and tap ‘Clear’ in the app’s prompt message to remove your device’s current screen wallpaper. Next, allow the app to access your system settings. Once this finishes, tap ‘Clear’ again to download your creation. You will now get directed to a black screen tagged ‘DayTime LWP’. Click on ‘Set Wallpaper’ in this screen to make your live photo, the current wallpaper of your Android device.
● Video Live Wallpaper
This is another free app that you can use to your videos into amazing live photos in just 4 quick steps. All you need to do is explained in the following steps:
Step 1: download the Application
Download the Video Live Wallpaper application in your Android device from Google Playstore and proceed for its installation and launch.
Step 2: Select Your Video
In the app’s opening screen, click ‘Choose Video’ and grant app permissions to access your device’s media. Browse your video gallery to select a desired video that you wish to convert into a live photo.
Step 3: Edit Your Video
You will now get directed to the app’s editor screen. Here, you can explore your editing creativity to edit the selected video. Once you are happy, click the picture icon at the top right corner.
Step 4: Your Live Wallpaper is Ready!
To set the created live photo as your device screen wallpaper, select ‘Set as Wallpaper’ at the bottom right.
● Key Takeaways from This Episode →
● From cherishing moments to sharing them on social media, live photos can do it all.
● Being an iPhone exclusive utility, you need to create these from videos to enjoy them on other platforms and devices.
● Filmora is the best video to live photo converters, available as an easy, quick and convenient conversion tool.
10 Best Tools to Make Pic Collage for Windows
10 Best Tools to Make Pic Collage for Windows
An easy yet powerful editor
Numerous effects to choose from
Detailed tutorials provided by the official channel
Collages are a great way to assemble all your favorite pictures in one place. You can share these collages with your friends, relatives, and dear ones or can also use them for posting on social media sites and other online platforms. Though creating a collage may sound simple, a lot of considerations need to be taken for creating an interesting and eye-catchy collage, and for this, a help of a professional tool can be taken. In the following parts of the topic, you can learn about the best tools for photo collage Windows 10 and other OS.

In the following parts of the topic, you can learn about the best tools for photo collage Windows 10 and other OS.
In this article
01 [Top 10 Pic Collage for Windows Tools](#Part 1)
02 [The Best Tool to Get Stock Images for Creating Collages](#Part 2)
Part 1 Top 10 Pic Collage for Windows Tools
Checkout the best collage for Windows below.
01PhotoPad Photo Editing Software
This is a complete photo editing tool supporting an array of features including the creation of a photo collage. This software from NCH software can let you add the desired images manually and also support using the auto grid to add an unlimited number of pictures. The tool also lets you choose the collage orientation size and set the background as needed.
Pros:
● Create collage Windows manually or automatically.
● Allows adding a background color, image, or from the available background options.
● Spacing and corners between the images can be selected.
● The size of the tool is small.
Cons:
● Stickers and filters to individual images cannot be added.
● Cannot choose a custom collage size.

02PhotoScapeX
Available for download on Windows 10 and higher versions this is another widely used photo editing tool that can also let you create collages manually as well as automatically. Multiple frames are available that can be selected as desired and there are additional features like adding filters, and also edit them in multiple ways.
Pros:
● Allows creating collage manually and automatically.
● Multiple editing tools for customization like filters, crop, zoom, doodle, and more.
● Picture alignment can be done in 3 modes- vertical, horizontal, and tile.
● Option to change and customize image size, spacing, margin, and others.
Cons:
● Limited photos can be added.
● The size of the tool is large in comparison to other tools.

03Phototastic Collage
This is free to use Windows-based tool that can create impressive collages in no time. Multiple designs, frames, and other options are available to create a customized collage as needed.
Pros:
● Multiple customization options are available for creating the desired collage.
● User-friendly and simple interface.
● An array of templates is available.
Cons:
● The free version has limited features.
● Limitation to the number of images that can be added.
● Ads in the app.

04PicCollage
Unleash your creativity by creating an interesting collage using this excellent collage-making app. There are multiple templates and customization options supports.
Pros
● Create collage manually or automatically
● The earlier created collage can be edited.
● Allows creating a collage in 3 options- grid, template, freestyle.
Cons
● Watermark on the created collage.
● The image size cannot be customized.

05Collage Maker-Photo Grid and Montage
Using this free Windows tool, you can create an interesting photo collage or a free-styled montage as needed. A wide range of layouts and templates are available that can be further customized to get the desired collage.
Pros:
● Free Windows software.
● Come with multiple filters, layout, and editing tools.
● The user interface is easy.
● Preview option available.
Cons:
● Performance glitches due to bugs.
● Custom collage size cannot be set.
● Watermark on the collage.

06Fotor
If you are looking for a simple and basic collage-making tool, Fotor is the right choice. Collage in the grid, freestyle, and photo-stitch style can be created and basic customization features are supported.
Pros:
● Simple to use tool that is apt for beginners.
● Border can be changed from a solid color to a background.
Cons:
● Customization options are limited.
● Border and the image size cannot be changed.

07El Collagero
Just like its name, this is an interesting Windows-based tool for creating a collage of your choice. A wide range of options for customization is available that can let you edit the images, choose a template and then also edit the file.
Pros:
● A wide range of templates and designs for collages is available.
● Allows adding text, symbols, and other elements.
● Created collage can be shared on social media sites.
Cons:
● In comparison to other professional tools, the functions are limited.

08Atlantas Photo Collage Studio
This Windows-based tool will let you create collages of all types and for all occasions. You can choose from over 100 templates that best match your collage theme and image content.
Pros:
● More than 100 templates for collage designs are available.
● The size of the layout can be changed.
● Multiple editing and customization options are supported like zoom, opacity selection, and more.
Cons:
● Limitation of adding 45 images.
● For the advanced functions, need to subscribe to the paid version.

09PhotoJoiner
Using this Windows tool, pick up your favorite images and turn them into a beautiful collage with customized design and style.
Pros:
● A simple and basic tool for creating a collage.
● Created collage can be saved or shared to the social media site.
● Change the order of the images, margins, and other aspects.
Cons
● Collage templates are limited.
● Advanced features are missing.

1010. Blend Photo
To create a collage of images with a blending effect, this is the right tool to use. Available for download on the Windows system this tool lets you create collages telling interesting stories.
Pros:
● Simple and easy collage-making tool.
● Add blending effect to your collages.
● Over 50 custom shapes for image cropping are available along with the option for free-hand cropping.
● Multiple filters can be added.
Cons:
● Limited Editing and customization options.

Part 2 The Best Tool to Get Stock Images for Creating Collages
Several times, the captured and stored images may not fit in the collage theme you wish to create and, in such situations, you can use the stock images available online at several sites. One of the best tools where you can check out the images in different categories is Wondershare Filmora. This versatile software from Wondershare Filmora Video Editor is an advanced video editing tool that also has a huge collection of stock media including images.
Additionally, the split-screen feature of the software can be used for creating a video collage. Available for Windows and Mac systems, Wondershare Filmora will look after all your advanced video editing and customized requirements.

Wondershare Filmora - Best Video Editor for Mac/Windows
5,481,435 people have downloaded it.
Build unique custom animations without breaking a sweat.
Focus on creating epic stories and leave the details to Filmora’s auto features.
Start a creative adventure with drag & drop effects and endless possibilities.
Filmora simplifies advanced features to save you time and effort.
Filmora cuts out repetition so you can move on to your next creative breakthrough.
● Key Takeaways from This Episode →
● Collage-making tools help in creating an interesting and eye-catchy collage in a hassle-free manner.
●Several Windows-based tools are available for quick download.
●Wondershare Filmora is a great software to find a collection of stock images in different categories.
Collages are a great way to assemble all your favorite pictures in one place. You can share these collages with your friends, relatives, and dear ones or can also use them for posting on social media sites and other online platforms. Though creating a collage may sound simple, a lot of considerations need to be taken for creating an interesting and eye-catchy collage, and for this, a help of a professional tool can be taken. In the following parts of the topic, you can learn about the best tools for photo collage Windows 10 and other OS.
In the following parts of the topic, you can learn about the best tools for photo collage Windows 10 and other OS.
In this article
01 [Top 10 Pic Collage for Windows Tools](#Part 1)
02 [The Best Tool to Get Stock Images for Creating Collages](#Part 2)
Part 1 Top 10 Pic Collage for Windows Tools
Checkout the best collage for Windows below.
01PhotoPad Photo Editing Software
This is a complete photo editing tool supporting an array of features including the creation of a photo collage. This software from NCH software can let you add the desired images manually and also support using the auto grid to add an unlimited number of pictures. The tool also lets you choose the collage orientation size and set the background as needed.
Pros:
● Create collage Windows manually or automatically.
● Allows adding a background color, image, or from the available background options.
● Spacing and corners between the images can be selected.
● The size of the tool is small.
Cons:
● Stickers and filters to individual images cannot be added.
● Cannot choose a custom collage size.
02PhotoScapeX
Available for download on Windows 10 and higher versions this is another widely used photo editing tool that can also let you create collages manually as well as automatically. Multiple frames are available that can be selected as desired and there are additional features like adding filters, and also edit them in multiple ways.
Pros:
● Allows creating collage manually and automatically.
● Multiple editing tools for customization like filters, crop, zoom, doodle, and more.
● Picture alignment can be done in 3 modes- vertical, horizontal, and tile.
● Option to change and customize image size, spacing, margin, and others.
Cons:
● Limited photos can be added.
● The size of the tool is large in comparison to other tools.
03Phototastic Collage
This is free to use Windows-based tool that can create impressive collages in no time. Multiple designs, frames, and other options are available to create a customized collage as needed.
Pros:
● Multiple customization options are available for creating the desired collage.
● User-friendly and simple interface.
● An array of templates is available.
Cons:
● The free version has limited features.
● Limitation to the number of images that can be added.
● Ads in the app.
04PicCollage
Unleash your creativity by creating an interesting collage using this excellent collage-making app. There are multiple templates and customization options supports.
Pros
● Create collage manually or automatically
● The earlier created collage can be edited.
● Allows creating a collage in 3 options- grid, template, freestyle.
Cons
● Watermark on the created collage.
● The image size cannot be customized.
05Collage Maker-Photo Grid and Montage
Using this free Windows tool, you can create an interesting photo collage or a free-styled montage as needed. A wide range of layouts and templates are available that can be further customized to get the desired collage.
Pros:
● Free Windows software.
● Come with multiple filters, layout, and editing tools.
● The user interface is easy.
● Preview option available.
Cons:
● Performance glitches due to bugs.
● Custom collage size cannot be set.
● Watermark on the collage.
06Fotor
If you are looking for a simple and basic collage-making tool, Fotor is the right choice. Collage in the grid, freestyle, and photo-stitch style can be created and basic customization features are supported.
Pros:
● Simple to use tool that is apt for beginners.
● Border can be changed from a solid color to a background.
Cons:
● Customization options are limited.
● Border and the image size cannot be changed.
07El Collagero
Just like its name, this is an interesting Windows-based tool for creating a collage of your choice. A wide range of options for customization is available that can let you edit the images, choose a template and then also edit the file.
Pros:
● A wide range of templates and designs for collages is available.
● Allows adding text, symbols, and other elements.
● Created collage can be shared on social media sites.
Cons:
● In comparison to other professional tools, the functions are limited.
08Atlantas Photo Collage Studio
This Windows-based tool will let you create collages of all types and for all occasions. You can choose from over 100 templates that best match your collage theme and image content.
Pros:
● More than 100 templates for collage designs are available.
● The size of the layout can be changed.
● Multiple editing and customization options are supported like zoom, opacity selection, and more.
Cons:
● Limitation of adding 45 images.
● For the advanced functions, need to subscribe to the paid version.
09PhotoJoiner
Using this Windows tool, pick up your favorite images and turn them into a beautiful collage with customized design and style.
Pros:
● A simple and basic tool for creating a collage.
● Created collage can be saved or shared to the social media site.
● Change the order of the images, margins, and other aspects.
Cons
● Collage templates are limited.
● Advanced features are missing.
1010. Blend Photo
To create a collage of images with a blending effect, this is the right tool to use. Available for download on the Windows system this tool lets you create collages telling interesting stories.
Pros:
● Simple and easy collage-making tool.
● Add blending effect to your collages.
● Over 50 custom shapes for image cropping are available along with the option for free-hand cropping.
● Multiple filters can be added.
Cons:
● Limited Editing and customization options.
Part 2 The Best Tool to Get Stock Images for Creating Collages
Several times, the captured and stored images may not fit in the collage theme you wish to create and, in such situations, you can use the stock images available online at several sites. One of the best tools where you can check out the images in different categories is Wondershare Filmora. This versatile software from Wondershare Filmora Video Editor is an advanced video editing tool that also has a huge collection of stock media including images.
Additionally, the split-screen feature of the software can be used for creating a video collage. Available for Windows and Mac systems, Wondershare Filmora will look after all your advanced video editing and customized requirements.
Wondershare Filmora - Best Video Editor for Mac/Windows
5,481,435 people have downloaded it.
Build unique custom animations without breaking a sweat.
Focus on creating epic stories and leave the details to Filmora’s auto features.
Start a creative adventure with drag & drop effects and endless possibilities.
Filmora simplifies advanced features to save you time and effort.
Filmora cuts out repetition so you can move on to your next creative breakthrough.
● Key Takeaways from This Episode →
● Collage-making tools help in creating an interesting and eye-catchy collage in a hassle-free manner.
●Several Windows-based tools are available for quick download.
●Wondershare Filmora is a great software to find a collection of stock images in different categories.
How-To Guide: Secret Shortcut to Adobe Animate Character Tutorial
How-to Guide: Secret Shortcut to Adobe Animate Character Tutorial
An easy yet powerful editor
Numerous effects to choose from
Detailed tutorials provided by the official channel
Whether you are a beginner or an experienced graphics designer, you can use Adobe Character Animator to animate 2D characters easily. But, if you are an absolute beginner, it might take a few weeks to get familiar with the software’s features/workflow.

Irrespective of your experience with the tool, this Adobe animate character tutorial will help you get started and edit visually appealing animated shorts.
In this article
01 [How Do I Animate a Character in Adobe Animation?](#Part 1)
02 [Is Adobe Character Animator Easy to Use?](#Part 2)
03 [How to Rig a Simple Character | Adobe Animate Tutorial](#Part 3)
04 [One-Stop Solution to Edit High-Quality Videos in Every Situation](#Part 4)
Part 1 How Do I Animate a Character in Adobe Animation?
1. Start With a Script
If you want to create an animation that engages the customers, you must always start your journey with a script. Like a short movie, even an animated sketch requires a script. It’ll set the tone for the entire animation and help you start sailing in the right direction.

If you have a full production team, the writers will take care of scriptwriting and you’ll just have to suggest a few changes in between. But, if you are working on your own, you’ll have to handle the script writing all-by-yourself. In any case, however, make sure to start by crafting a beautiful script with an amazing storyline.
2. Record the Voiceover
The next step in our Adobe Animate character tutorial is recording the voiceover for the video. Unless you are planning to create a GIF animation, you would need a dedicated voiceover for your animated video to make it more appealing.

Now, before you even begin with animating the character, recording the audio will help you clear out one task from the list. To record the voiceover, you can try different types of audio recording software and equipment.
3. Start Creating the Character
At this point in our Adobe animate character tutorial, we are ready to design the actual character itself. To do this, launch Adobe Character Animator on your system. On its home screen, you’ll see a tab containing different types of characters (along with their dedicated Photoshop and Illustrator versions). Click on any of these characters and it’ll automatically open in the editing panel of Adobe character animator.

Now, you can start with animating the character. In the top-left corner, you’ll see two different options, i.e., “
If you double-tap the “Scene” tab the character will open up in a real-time environment where it’ll react to your movement and speech. Make sure that the webcam stays turned on throughout the process. Then, simply press the “Record” button and start recording the entire scene for your animation.
Part 2 Is Adobe Character Animator Easy to Use?
That’s how you can animate a character in Adobe character animator and create visually stunning animations. However, many beginners want to know if it’s easy to use Adobe character animator. The answer is Yes! With Character Animator, Adobe has developed a relatively easy-to-use interface that anyone can use easily.
Part 3 How to Rig a Simple Character | Adobe Animate Tutorial
Now, if you aspire to become a skilled graphic designer, here are a few tutorials that’ll help you get started with Adobe Character Animator and explore all its features.
1. Getting Started With Adobe Character Animator
This 15 minutes Adobe animate character tutorial by Okay Samurai is the best thing you’ll find on the Internet, especially if you are a complete beginner and want to learn different elements of the software.
2. Creating Illustrator Puppet
Adobe Character Animator lets users create both Illustrator and Photoshop puppets. If you want to become an expert in the former, this hour-long YouTube video is the best tutorial for you.
3. Getting Started With Advanced Rigging
This is another useful Adobe Animate character tutorial that’s exclusively designed to help editors understand the basics of creating a character such as “Surr”. For people who don’t know, it’s a free character in the Illustrator puppet library that you can directly import into your project.
4. Animation Workflow in Adobe Character Animator
If you are looking for an all-in-one tutorial to understand the entire workflow of working with the software, this tutorial by Okay Samurai is the best place to get started.
5. Adding an Illustrator Puppet on Live Footage
In this tutorial, you’ll understand how you can create an Illustrator puppet and add it to real-life footage, even when there’s camera movement.
6. Using the Walk Behavior in Adobe Character Animator
This tutorial will be the perfect knowledge hub. In this tutorial, you’ll learn about the basics of using the walk behavior in Adobe Character Animator and how to apply it to different characters to make it walk across the scene.
7. Creating and Implementing Replays
Replays are one of the most powerful (and one of the latest) features of Adobe Character Animator. With Replays, you can record a gesture/movement and apply a trigger to use it anytime you want throughout the animation. This tutorial will help you understand how to implement the replays in the software and use them to craft the perfect storyline.
8. Cartoon Workflow in Character Animator
Thanks to this amazing 1 hour 40 minutes long Adobe animate character tutorial, you’ll be able to get familiar with the complete workflow of pairing the software with other tools and compiling a cartoon animation at the end using Adobe After Effects.
9. Running an Animated Livestream
If you are a YouTuber or have your own Instagram brand, this will be a pretty exciting way to engage with your audience. Simply use the livestream feature, create a stunning 2D character, and interact with your audience in a more interactive manner.
10. Working With Adobe Fresco and Character Animator
This is also a useful Adobe character animate tutorial by David Werner that’ll help you understand how to use both Adobe Fresco and Character Animator together. After this tutorial, you’ll be able to import your Fresco drawings into Character Animator and customize them to create visually engaging animations.
Key Takeaways from This Episode
● Adobe Character Animator is among the most powerful animation tools you can use in 2021 to create stunning animations
● You should always start designing an animation in Character Animator by writing dedicated scripts.
● You can also pair Adobe Character Animator with other Adobe editing tools such as Illustrator, Photoshop, and Adobe Fresco
Whether you are a beginner or an experienced graphics designer, you can use Adobe Character Animator to animate 2D characters easily. But, if you are an absolute beginner, it might take a few weeks to get familiar with the software’s features/workflow.
Irrespective of your experience with the tool, this Adobe animate character tutorial will help you get started and edit visually appealing animated shorts.
In this article
01 [How Do I Animate a Character in Adobe Animation?](#Part 1)
02 [Is Adobe Character Animator Easy to Use?](#Part 2)
03 [How to Rig a Simple Character | Adobe Animate Tutorial](#Part 3)
04 [One-Stop Solution to Edit High-Quality Videos in Every Situation](#Part 4)
Part 1 How Do I Animate a Character in Adobe Animation?
1. Start With a Script
If you want to create an animation that engages the customers, you must always start your journey with a script. Like a short movie, even an animated sketch requires a script. It’ll set the tone for the entire animation and help you start sailing in the right direction.
If you have a full production team, the writers will take care of scriptwriting and you’ll just have to suggest a few changes in between. But, if you are working on your own, you’ll have to handle the script writing all-by-yourself. In any case, however, make sure to start by crafting a beautiful script with an amazing storyline.
2. Record the Voiceover
The next step in our Adobe Animate character tutorial is recording the voiceover for the video. Unless you are planning to create a GIF animation, you would need a dedicated voiceover for your animated video to make it more appealing.
Now, before you even begin with animating the character, recording the audio will help you clear out one task from the list. To record the voiceover, you can try different types of audio recording software and equipment.
3. Start Creating the Character
At this point in our Adobe animate character tutorial, we are ready to design the actual character itself. To do this, launch Adobe Character Animator on your system. On its home screen, you’ll see a tab containing different types of characters (along with their dedicated Photoshop and Illustrator versions). Click on any of these characters and it’ll automatically open in the editing panel of Adobe character animator.
Now, you can start with animating the character. In the top-left corner, you’ll see two different options, i.e., “
If you double-tap the “Scene” tab the character will open up in a real-time environment where it’ll react to your movement and speech. Make sure that the webcam stays turned on throughout the process. Then, simply press the “Record” button and start recording the entire scene for your animation.
Part 2 Is Adobe Character Animator Easy to Use?
That’s how you can animate a character in Adobe character animator and create visually stunning animations. However, many beginners want to know if it’s easy to use Adobe character animator. The answer is Yes! With Character Animator, Adobe has developed a relatively easy-to-use interface that anyone can use easily.
Part 3 How to Rig a Simple Character | Adobe Animate Tutorial
Now, if you aspire to become a skilled graphic designer, here are a few tutorials that’ll help you get started with Adobe Character Animator and explore all its features.
1. Getting Started With Adobe Character Animator
This 15 minutes Adobe animate character tutorial by Okay Samurai is the best thing you’ll find on the Internet, especially if you are a complete beginner and want to learn different elements of the software.
2. Creating Illustrator Puppet
Adobe Character Animator lets users create both Illustrator and Photoshop puppets. If you want to become an expert in the former, this hour-long YouTube video is the best tutorial for you.
3. Getting Started With Advanced Rigging
This is another useful Adobe Animate character tutorial that’s exclusively designed to help editors understand the basics of creating a character such as “Surr”. For people who don’t know, it’s a free character in the Illustrator puppet library that you can directly import into your project.
4. Animation Workflow in Adobe Character Animator
If you are looking for an all-in-one tutorial to understand the entire workflow of working with the software, this tutorial by Okay Samurai is the best place to get started.
5. Adding an Illustrator Puppet on Live Footage
In this tutorial, you’ll understand how you can create an Illustrator puppet and add it to real-life footage, even when there’s camera movement.
6. Using the Walk Behavior in Adobe Character Animator
This tutorial will be the perfect knowledge hub. In this tutorial, you’ll learn about the basics of using the walk behavior in Adobe Character Animator and how to apply it to different characters to make it walk across the scene.
7. Creating and Implementing Replays
Replays are one of the most powerful (and one of the latest) features of Adobe Character Animator. With Replays, you can record a gesture/movement and apply a trigger to use it anytime you want throughout the animation. This tutorial will help you understand how to implement the replays in the software and use them to craft the perfect storyline.
8. Cartoon Workflow in Character Animator
Thanks to this amazing 1 hour 40 minutes long Adobe animate character tutorial, you’ll be able to get familiar with the complete workflow of pairing the software with other tools and compiling a cartoon animation at the end using Adobe After Effects.
9. Running an Animated Livestream
If you are a YouTuber or have your own Instagram brand, this will be a pretty exciting way to engage with your audience. Simply use the livestream feature, create a stunning 2D character, and interact with your audience in a more interactive manner.
10. Working With Adobe Fresco and Character Animator
This is also a useful Adobe character animate tutorial by David Werner that’ll help you understand how to use both Adobe Fresco and Character Animator together. After this tutorial, you’ll be able to import your Fresco drawings into Character Animator and customize them to create visually engaging animations.
Key Takeaways from This Episode
● Adobe Character Animator is among the most powerful animation tools you can use in 2021 to create stunning animations
● You should always start designing an animation in Character Animator by writing dedicated scripts.
● You can also pair Adobe Character Animator with other Adobe editing tools such as Illustrator, Photoshop, and Adobe Fresco
10 Most Memorable Japanese Cat Cartoons
10 Most Memorable Japanese Cat Cartoons
An easy yet powerful editor
Numerous effects to choose from
Detailed tutorials provided by the official channel
Japanese cartoon series has a huge fan base from all over the world. These shows fascinate the kids of age group 1-10 years. Japanese shows are always remembered because of their unique stories and lovely characters. All these shows have a unique cat character.
Cat is the most loved pet animal that is found in almost every Japanese household. Cats are cute and naughty at the same time, that’s why they are the most loved cartoon characters from all the Japanese cartoon shows.
All Japanese cartoons generally have at least one cat character, but some of them have a separate fan base due to their unique personalities and roles. We have listed the 10 most memorable Japanese cat cartoons below:
01Doraemon
Doraemon is the most loved cartoon character from Japan. Children from all over the world are very fond of this cartoon series. Doraemon is a cute, blue robot cat from the future. He often uses his gadgets from the 22nd century to help Nobita. These gadgets are kept in his magical pocket.
The series shows that Nobita is bullied by his school friends and then Doraemon helps him to solve the problems. Some episodes even show violent acts, but the overall content is good for children. All the episodes of this wonderful Japanese cat cartoon are full of fun and teach moral values at the end.
Rating: 7.4/10
Stars: 3.8
Votes: 10,522
02Chi’s Sweet Home
This is another Japanese cartoon series that kids love very much. Chi is a small and cute cat who lost her family. A young boy named Youhie and his mother adopt her. After the adoption, Chi feels loved and likes her new family. Parents should make their young kids watch the show rather playing video games. This show is overloaded with family values and friendship.
It is a must-watch cartoon show for kids. Both Youhie and Chi share a cute and strong bond of friendship. With each passing episode, they make new friends and wonderful memories.
Rating: 7.7/10
Stars: 4
Votes: 25,419
03The Cat Returns
The Cat Returns is another adventurous and magical animated series from Japan. The character of this series is Haru Yoshioka – a shy, 17-year-old high-school girl. She can talk with the cats. One day, she saves an extraordinary cat from a truck. That extraordinary cat turns out to be the Prince of the Cat Kingdom.
As a token of thanks, the cat offers her to get married to Lune – the Prince of the Cat Kingdom. Here, comes the savior Baron. He is a statue of a cat that comes to life. He saves Haru from being transformed into a cat and getting married to Lune.
Rating: 7.2/10
Stars: 4.7
Votes: 54,838
04Pokémon
Pokémon is one of the most loved adventurous Japanese cartoon series. This series became so popular that there are Pokémon video games, card games, etc. All the characters of Pokémon are loved and have a separate fan base. This series shows a beautiful and strong bond of friendship.
The main character of this series is Ash, who wants to become the world’s best Pokémon trainer. This series shows his journey into the Pokémon battlefield along with his yellow pet – Pikachu and his friends. There are many cat-based Pokémon in this series, but out of those Meowth is the most popular. He walks and talks like a human and he is one of the characters who is known all over the world. He is a member of the Rocket Team, portraying the negative character.
Rating: 7.5/10
Stars: 4
Votes: 41,767
05Natsume’s Book of Friends
This is another adventurous series of Japanese cartoons. In this series, the main character is Takashi Natsume. He has got a special ability to see spirits inherited from his grandmother. He spends a lonely childhood because of his extraordinary ability to see the spirits and feels left out.
When his grandmother is about to die, she hands him her Book of Friends, which contains the names of all the spirits that she has seen and helped in her life. Many good spirits visit Takashi for help and bad spirits visit him for the possession of the Book of Friends.
That’s where the cat-based character Nyanko enters for helping him. Nyanko has got the special abilities to talk, fly, and has an amazing strength to scare away bad spirits. The series also shows the strong bond of friendship between Takashi and Nyanko.
Rating: 8.3/10
Stars: 4
Votes: 167,646
06The Prince of Tennis
This cartoon series revolves around the life of a young Tennis player – Ryoma Echizen. The protagonist joins a famous academy for the most talented tennis players. While his fast grasping skills, Ryoma quickly makes his position as one of the top tennis players.
He aims at winning National Middle School Tennis Championship. In his journey toward his aim, he makes new friends and learns different and complex techniques of Tennis. As the series moves forward, Ryoma realizes his passion and love for the game.
Ryoma also has a cute cat as his pet. The name of the cat is Karupin. It is a brown and white colored small creature with blue eyes. Ryoma shares a beautiful bond with Karupin.
Rating: 7.9/10
Stars: 4
Votes: 77,350
07Yokai Watch
This series is based on the mythical creatures of Japan. It excites the children with its great storytelling concept and supernatural creatures. It revolves around different Yokai haunting the city. The main character of this anime is Keita. He gets a friendship medal every time he befriends a Yokai. This friendship medal helps him to summon his friend Yokai. He can make him do anything like fighting other Yokai, helping people, etc.
Moving further, the cartoon shows the special bond of friendship between Keita and Whisper. Whisper is Keita’s cat Yokai. They both set on an adventurous journey and Whisper helps him to befriend other Yokais, who he later summons using the friendship medal and his Yokai watch to help him throughout his journey.
Rating: 6.5/10
Stars: 3.6
Votes: 11,777
08Kiki’s Delivery Service
It is a lovely Japanese cartoon series based on the fantasy world. The protagonist of this series is a trainee 13-year-old witch, who leaves the house with his black cat – Jiji. After this, she starts her delivery service business. Her first delivery becomes a complete mess when she drops the black toy cat while flying on his broomstick. She sends Jiji, who pretends to be the toy cat to a client’s house and searches for the toy to rescue Jiji.
Kiki shares a cute bond with a boy named Tombo, who largely admires her flying skills. One bad delivery reaction depresses her and she loses all her powers and ability to fly. Later, Ursula visits her and tells her that she will regain all her powers after getting a new purpose in her life.
Rating: 7.8/10
Stars: 4
Votes: 138,823
09Fairy Tail
This is an adventurous anime series from Japan. Natsu Dragneel is a Dragon Slayor wizard who teams up with 17-year-old Lucy while searching for his lost father. Lucy makes a great team with her cat-like pet Happy and other members named Grey Fullbuster, Erza Scarlet, Wendy Marvell, and Carla.
They all start their adventurous journey in the Fairy Tale guild. The character of Happy is memorable as a cute cat with a lot of magical powers. He can talk, fly, and perform different magics. He is Lucy’s best friend and appears a lot in the series.
Rating: 7.6/10
Stars: 4
Votes: 919,985
10 Nichijou – My Ordinary Life
It is a comedy Japanese cartoon series. The main character of this series is Hakase – the Professor. She is an 8-year-old girl, who made Nano. Nano is an android school girl. She finds a black cat named Sakamoto. Initially, Sakamoto was a normal cat, but later she gets the ability to speak. She gets this ability when she wears a pink scarf made by the professor.
Watching the funny gestures of Sakamoto is the real fun that the children would love.
Rating: 8.5/10
Stars: 4
Votes: 318,287
● Ending Thoughts →
● No doubt, Japanese cartoon cats are memorable characters full of life and fun. These cats are not only loved and remembered in Japan but all over the world. Small kids are fond of Japanese cartoon shows.
● Japanese cartoon series is not only fun-filled but they also teach moral and family values to the kids.
● A strong bond of friendship is shown in every cartoon show from Japan. Japanese cartoons are evergreen and they will never fade away in this digital world of video games.
Interesting Fundamentals and Ultimate Guide to Animated Characters Drawings
Interesting Fundamentals and Ultimate Guide to Animated Characters Drawings
An easy yet powerful editor
Numerous effects to choose from
Detailed tutorials provided by the official channel
Cartoon character have stamped their faces in our hearts from childhood. A cartoon artist represents a cartoon or a natural person’s unique features with simple shapes accurately to recognize the person with the drawing and does not require a lot of patience to do this. The goal of the cartoon is to attract, and the child should get attracted when they see a cartoon image as well as adults. Though the sparkle may appear a little dull, it remains unaltered.
Let us grab a chance to recreate our cartoon characters with easy tutorials about animated characters to draw. In addition to that, you will learn about basic drawing exercises to lead into cool animated characters to draw through this guide in a step-by-step manner.
In this article
01 [What Do I Need to Start Learning Animated Characters Drawings? ](#Part 1)
02 [6 Cartoon Characters that Anyone Can Draw (Provided with Free Video Tutorials)](#Part 2)
03 [4 Best Drawing Exercises for Creating Cartoon Characters](#Part 3)
Part 1 What Do I Need to Start Learning Animated Characters Drawings?
There are many software’s available, and anyone can create an animated character drawing, but still, the art of creating a perfect character needs a master. You don’t have to be a Disney-grade animator to make it; start with simple minor characters. Animation is the art of bringing a 3D illustrated cartoon into life. It is created by projecting a sequence of images one after the other immediately. Let us discuss the essential things you need to note before animating characters.
●Timeline is the most important for animation. Depending on the software, you have various options to change the duration and add effects.
●Animation is generally preferable in 24 frames per second, which means the total number of people in the frame for one second.
●There are two types of working they are one’s and two’s. 2D Animation is usually done in two’s, whereas 3D Animation is in one’s.
●In hand-drawn animations, keyframes are more critical to maintain. The keyframe is the position for the cartoon as per animator has decided.
●Breakdowns combine one or two keyframes, which decide the motion in between the keys.
●In-betweens are all the frames that come between to smooth the motion—automatically generated by the computer to move from key to key.
●Composting is creating or joining two or more images to create a single cartoon frame.
Part 2 6 Cartoon Characters that Anyone can Draw (With free Video Tutorials)
We will discuss animated characters to draw in hand. There are many cartoon characters, but we will look into six cartoon character drawings with their tutorial videos.
01 Smurfette
Smurfette stands out as the lone female Smurf in the entire bunch of blue critters around the village area. One of the rare designs with long hair and a dress is hers. Her design is a lot of fun to sketch.
So, in general, it’s best to work through the lesson as is, then turn it into Brainy, Papa, Joker, or even Smurf.
01Angelica Pickles
Angelica Pickles is one of the most challenging characters to depict from The Rugrats. But her design is so intricate that getting it proper will give you a true sense of accomplishment. Her pigtails, like her leggings, might be challenging to master, so keep practicing.
03Yogi Bear
Yogi Bear is a cartoon character on the sweeter side of the comic animal variety. Yogi Bear is a beloved character from Jellystone Park. As long as you get his tie and collar just right, this guy is a breeze to draw.
04Magilla Gorilla
Magilla Gorilla is another bizarre creature from Hanna-catalog. Barbera’s Because he comes with a bow tie, a little cap, and suspenders, this design is a little more complicated. Not to mention his enormous clown shoes. These small details can be a pain to draw, but Magilla is a very charming gorilla.
05Top Cat
Even further back in time, in the 1960s, there was the ever-popular Top Cat. He’s wearing a cap and a button-down vest, and he’s making some reasonably fancy dances. Give Top Cat a shot if you like The Flintstones’ basic Hanna-Barbera art style.
<
06Helga. G. Pataki
Helga is another character with some wacky hair. There’s a lot that’s bizarre about her. And half the fun of drawing her is figuring out how to do it. Just keep an eye on her head since getting it correct, especially with her rectangle hairdo, can be a little odd.
These are some of the cool animated characters to draw.
Part 3 4 Best Drawing Exercise for Creating Cartoon Characters
You’ll learn how to create cartoon characters individually, including their faces, hair, and facial expressions.
01How to Draw Cartoon Characters
We’ll go through the fundamentals of human perception before getting into cartoon face drawing. Humans have a unique ability to synthesize the details that make up a structure or object in highly complicated ways into fundamental and simple ones. We can express everything with a few curves and geometric forms in this way. In cartoon face, we need to identify the character just by looking like looking at the below picture a girl and a boy.
02Here, you will learn How to Draw a Cartoon Face
Let us begin with a sketch of a cartoon face. A circle is a basic cartoon shape. All you need is a circle. As seen in the image below, draw a vertical and horizontal line intersecting at the center.
Let us have a look at how to make cartoon eyeballs. Draw an oval shape with a slight lean to the side at the top for the eyes. Repeat on the other side.
Slightly thicken the characteristic to represent our character eyelashes at the top of the circle, place the brows above the eyelashes to create a shocking appearance, draw both pupils to the center in the same direction.
When creating a nose from the front, it’s typical to leave off many details. Even if you merely sketch its tip, it will likely provide a convincing impact. Drawing only one side of the nose is also quite frequent. Children’s mouths are extremely simple in cartoon style, regardless of gender.
The ears are viewed from the front; therefore, the internal holes are not visible. The circle has already established the shape of our head.
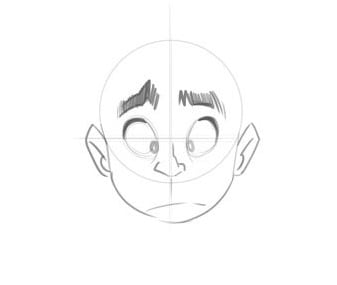
03Let’s learn about How to Draw a Cartoon Hair
Keep in mind that our characters’ hair is essential for identifying their personalities, and it can also indicate their age. So, all we need is an effortless and playful haircut to bring our boy to life. Because there is no particular method for drawing hair, you’ll have to experiment until you find the perfect look. Look for photo references on the internet! Take a look at a magazine shoot or a Google search.
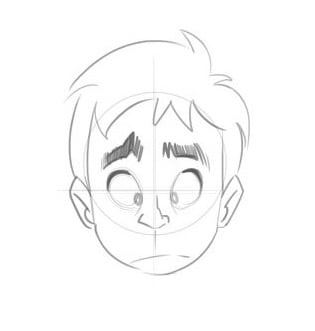
03How to Draw Characters with different Facial Expressions
By simply following the instructions below, you’ll notice that you can completely transform his expression: Lowering one brow and raising the other, eyelashes are used to cut the eyes in half, putting a smile on the face one side is higher.
To stay under the eyelashes, move the eye pupils up. That’s all there is to it! With just a few tweaks, we achieved the desired result. The circular form of the eyes, hair, ears, nose, chin and the circular shape of the ears are all the same! It’s that simple!
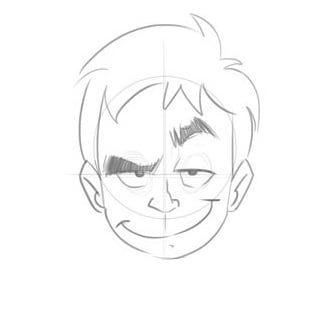
While working in cartooning or video making, Wondershare Wondershare Filmora Video Editor comes out with pros in mind, which can effortlessly convert conventional films into cartoon videos. If you want greater control over your cartoon video, you may also use keyframing to create it. You can fine-tune the parameters in Effects to achieve the best results. You can even change the Animation color after it has been created. It also allows you to use different text themes to showcase your videos.
We propose Wondershare Filmora Video Editor , in this case, to create animation videos by adding keyframes, resulting in a smooth and natural animation. To get started with Animation, all you need is a white plane. Aside from that, color correction and an audio mixer will take your animation video to the next level.
For Win 7 or later (64-bit)
For macOS 10.12 or later
● Key Takeaways from This Episode →
● Learn what are the key elements to make animation videos using software
● Tutorial on how to draw a cartoon character accurately
● In comparison, Wondershare Wondershare Filmora Video Editor is superior in making animation videos.
Cartoon character have stamped their faces in our hearts from childhood. A cartoon artist represents a cartoon or a natural person’s unique features with simple shapes accurately to recognize the person with the drawing and does not require a lot of patience to do this. The goal of the cartoon is to attract, and the child should get attracted when they see a cartoon image as well as adults. Though the sparkle may appear a little dull, it remains unaltered.
Let us grab a chance to recreate our cartoon characters with easy tutorials about animated characters to draw. In addition to that, you will learn about basic drawing exercises to lead into cool animated characters to draw through this guide in a step-by-step manner.
In this article
01 [What Do I Need to Start Learning Animated Characters Drawings? ](#Part 1)
02 [6 Cartoon Characters that Anyone Can Draw (Provided with Free Video Tutorials)](#Part 2)
03 [4 Best Drawing Exercises for Creating Cartoon Characters](#Part 3)
Part 1 What Do I Need to Start Learning Animated Characters Drawings?
There are many software’s available, and anyone can create an animated character drawing, but still, the art of creating a perfect character needs a master. You don’t have to be a Disney-grade animator to make it; start with simple minor characters. Animation is the art of bringing a 3D illustrated cartoon into life. It is created by projecting a sequence of images one after the other immediately. Let us discuss the essential things you need to note before animating characters.
●Timeline is the most important for animation. Depending on the software, you have various options to change the duration and add effects.
●Animation is generally preferable in 24 frames per second, which means the total number of people in the frame for one second.
●There are two types of working they are one’s and two’s. 2D Animation is usually done in two’s, whereas 3D Animation is in one’s.
●In hand-drawn animations, keyframes are more critical to maintain. The keyframe is the position for the cartoon as per animator has decided.
●Breakdowns combine one or two keyframes, which decide the motion in between the keys.
●In-betweens are all the frames that come between to smooth the motion—automatically generated by the computer to move from key to key.
●Composting is creating or joining two or more images to create a single cartoon frame.
Part 2 6 Cartoon Characters that Anyone can Draw (With free Video Tutorials)
We will discuss animated characters to draw in hand. There are many cartoon characters, but we will look into six cartoon character drawings with their tutorial videos.
01 Smurfette
Smurfette stands out as the lone female Smurf in the entire bunch of blue critters around the village area. One of the rare designs with long hair and a dress is hers. Her design is a lot of fun to sketch.
So, in general, it’s best to work through the lesson as is, then turn it into Brainy, Papa, Joker, or even Smurf.
01Angelica Pickles
Angelica Pickles is one of the most challenging characters to depict from The Rugrats. But her design is so intricate that getting it proper will give you a true sense of accomplishment. Her pigtails, like her leggings, might be challenging to master, so keep practicing.
03Yogi Bear
Yogi Bear is a cartoon character on the sweeter side of the comic animal variety. Yogi Bear is a beloved character from Jellystone Park. As long as you get his tie and collar just right, this guy is a breeze to draw.
04Magilla Gorilla
Magilla Gorilla is another bizarre creature from Hanna-catalog. Barbera’s Because he comes with a bow tie, a little cap, and suspenders, this design is a little more complicated. Not to mention his enormous clown shoes. These small details can be a pain to draw, but Magilla is a very charming gorilla.
05Top Cat
Even further back in time, in the 1960s, there was the ever-popular Top Cat. He’s wearing a cap and a button-down vest, and he’s making some reasonably fancy dances. Give Top Cat a shot if you like The Flintstones’ basic Hanna-Barbera art style.
<
06Helga. G. Pataki
Helga is another character with some wacky hair. There’s a lot that’s bizarre about her. And half the fun of drawing her is figuring out how to do it. Just keep an eye on her head since getting it correct, especially with her rectangle hairdo, can be a little odd.
These are some of the cool animated characters to draw.
Part 3 4 Best Drawing Exercise for Creating Cartoon Characters
You’ll learn how to create cartoon characters individually, including their faces, hair, and facial expressions.
01How to Draw Cartoon Characters
We’ll go through the fundamentals of human perception before getting into cartoon face drawing. Humans have a unique ability to synthesize the details that make up a structure or object in highly complicated ways into fundamental and simple ones. We can express everything with a few curves and geometric forms in this way. In cartoon face, we need to identify the character just by looking like looking at the below picture a girl and a boy.
02Here, you will learn How to Draw a Cartoon Face
Let us begin with a sketch of a cartoon face. A circle is a basic cartoon shape. All you need is a circle. As seen in the image below, draw a vertical and horizontal line intersecting at the center.
Let us have a look at how to make cartoon eyeballs. Draw an oval shape with a slight lean to the side at the top for the eyes. Repeat on the other side.
Slightly thicken the characteristic to represent our character eyelashes at the top of the circle, place the brows above the eyelashes to create a shocking appearance, draw both pupils to the center in the same direction.
When creating a nose from the front, it’s typical to leave off many details. Even if you merely sketch its tip, it will likely provide a convincing impact. Drawing only one side of the nose is also quite frequent. Children’s mouths are extremely simple in cartoon style, regardless of gender.
The ears are viewed from the front; therefore, the internal holes are not visible. The circle has already established the shape of our head.
03Let’s learn about How to Draw a Cartoon Hair
Keep in mind that our characters’ hair is essential for identifying their personalities, and it can also indicate their age. So, all we need is an effortless and playful haircut to bring our boy to life. Because there is no particular method for drawing hair, you’ll have to experiment until you find the perfect look. Look for photo references on the internet! Take a look at a magazine shoot or a Google search.
03How to Draw Characters with different Facial Expressions
By simply following the instructions below, you’ll notice that you can completely transform his expression: Lowering one brow and raising the other, eyelashes are used to cut the eyes in half, putting a smile on the face one side is higher.
To stay under the eyelashes, move the eye pupils up. That’s all there is to it! With just a few tweaks, we achieved the desired result. The circular form of the eyes, hair, ears, nose, chin and the circular shape of the ears are all the same! It’s that simple!
While working in cartooning or video making, Wondershare Wondershare Filmora Video Editor comes out with pros in mind, which can effortlessly convert conventional films into cartoon videos. If you want greater control over your cartoon video, you may also use keyframing to create it. You can fine-tune the parameters in Effects to achieve the best results. You can even change the Animation color after it has been created. It also allows you to use different text themes to showcase your videos.
We propose Wondershare Filmora Video Editor , in this case, to create animation videos by adding keyframes, resulting in a smooth and natural animation. To get started with Animation, all you need is a white plane. Aside from that, color correction and an audio mixer will take your animation video to the next level.
For Win 7 or later (64-bit)
For macOS 10.12 or later
● Key Takeaways from This Episode →
● Learn what are the key elements to make animation videos using software
● Tutorial on how to draw a cartoon character accurately
● In comparison, Wondershare Wondershare Filmora Video Editor is superior in making animation videos.
Also read:
- Ways You Can Master to Find 10 Best Free Animated Text Generator
- Guide on How to Create GIF in WhatsApp iPhone
- New What Is Still Motion Animation?
- Updated 2024 Approved How to Make Your Own GIF on WhatsApp in Simple Ways
- 6 Unexpected Ways Gif Animation Maker Can Affect Your Marketing for 2024
- Updated 15 Best Collage Makers to Create Aesthetic Collages
- Updated 2024 Approved 5 Free Animated Gif Sources You Must Check
- New In 2024, Tips to Create Animated Social Media Posts in Canva
- New 15 Best Video to GIF App on iPhone and Android for 2024
- What Is the Best Collage Photo Grid Maker - Experts Choice
- Updated How to Find 3D Animation Studio Meeting All Your Inspiring Needs
- Updated Whats Your No. 1 Maker to Animate Your Logo Online Free for 2024
- 2024 Approved Before You Learn Facebook Slideshow 5 Things You Should Know How-TOS
- Updated In 2024, All About 3D Medical Animation And Its Uses
- In 2024, 10 Stunning Stop Motion Movies You Should Not Miss
- 2024 Approved 10 Cartoon Canvas Painting Ideas for Total Beginners
- Updated 2024 Approved How to Find 3D Animation Studio
- New 2024 Approved Are You Ready to Animate Game Character From Scratch?
- In 2024, 12 Animation Video Maker That Can Triple Your Conversion Rates
- Updated In 2024, How to Make Animation Characters with the Best Character Creators
- New How to Make Photo 3D Cartoon Online for 2024
- In 2024, How to Change/Add Location Filters on Snapchat For your Motorola Moto G84 5G | Dr.fone
- Process of Screen Sharing Infinix Note 30 to PC- Detailed Steps | Dr.fone
- How To Track IMEI Number Of Vivo Y100i Through Google Earth?
- How to Reset Xiaomi Redmi K70E Without the Home Button | Dr.fone
- How to Reset a Locked Itel A05s Phone
- 6 Methods to Mirror Apple iPhone 14 Plus to your Windows PC | Dr.fone
- In 2024, Top 10 AirPlay Apps in Xiaomi Redmi Note 13 Pro+ 5G for Streaming | Dr.fone
- In 2024, Top 7 Phone Number Locators To Track Apple iPhone 14 Plus Location | Dr.fone
- new In 2024, Chrome Video Translators Top 5 Video Translation Chrome Extensions
- In 2024, Best Solutions for Nokia Network Unlock
- Spoofing Life360 How to Do it on Oppo Find X6 Pro? | Dr.fone
- In 2024, How Nokia G42 5G Mirror Screen to PC? | Dr.fone
- Possible solutions to restore deleted call logs from Oppo Find X7 Ultra
- New 2024 Approved Best 8 AI Title Generators for Creating Catchy Titles For All Platform
- How to Restore Deleted Oppo Contacts An Easy Method Explained.
- Process of Screen Sharing OnePlus Ace 3 to PC- Detailed Steps | Dr.fone
- How To Enable USB Debugging on a Locked Infinix Note 30 5G Phone
- Best 10 Mock Location Apps Worth Trying On Xiaomi Redmi K70 Pro | Dr.fone
- In 2024, Catch or Beat Sleeping Snorlax on Pokemon Go For Apple iPhone 7 | Dr.fone
- How to Reset a Vivo X100 Pro Phone that is Locked?
- What Legendaries Are In Pokemon Platinum On Asus ROG Phone 7? | Dr.fone
- Title: New How to Send and Add Snapchat GIFs 100 in Easy Way
- Author: Elon
- Created at : 2024-05-19 03:05:01
- Updated at : 2024-05-20 03:05:01
- Link: https://animation-videos.techidaily.com/new-how-to-send-and-add-snapchat-gifs-100-in-easy-way/
- License: This work is licensed under CC BY-NC-SA 4.0.
