
:max_bytes(150000):strip_icc():format(webp)/GettyImages-1250476440-2ff779100e984029aa752236f9791b11.jpg)
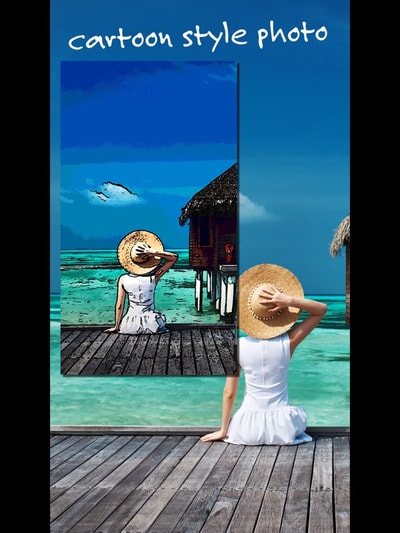
New In 2024, 10 Cartoon Photo Converters
10 Cartoon Photo Converters
D:\【内容】文章录入资料\20220321 Cartoon\35. 10 Cartoon Photo Converters You Couldn’t Do Without
An easy yet powerful editor
Numerous effects to choose from
Detailed tutorials provided by the official channel
We all love to edit our images. Undoubtedly right now, the innovation in technology or day the editing tools available put us at a point where we can do more than editing the photograph. Well, here we are discussing convert picture to cartoon. Yes, you understand it right. This conversion can be done for various projects. We are not saying you to confine this ultimate option to your photos only. If you are a part of social media and create content, these tools will help you to get the best outcome in return.
Well, keep reading till the last as here we explore photo to cartoon online free, and some paid versions that you can try. Let’s get started!
In this article
01 [5 Online Picture to Cartoon Converters](#Part 1)
02 [5 Picture to Cartoon Converters on Your Phone](#Part 2)
03 [How to convert photo to cartoon with the help of FotoSketcher](#Part 3)
Part 1 Online Picture to Cartoon Converters
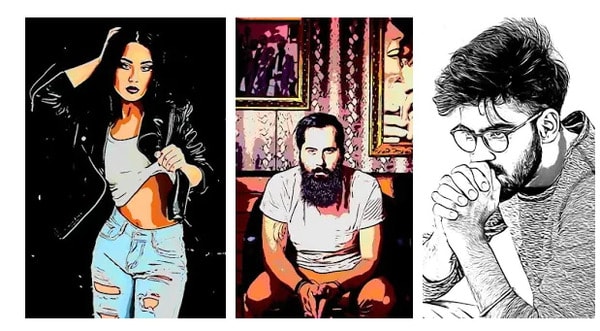
In this section, we are discussing the best online photo to cartoon converter that you can use and complete this tedious task within a few minutes. The best tools that you can consider include: -
01Befunky
Befunky, an online picture converter, offers a unique way of transforming your photographs into cartoon-like images. You can choose from a 50+ range of styles and adjust the size of the image before you start. The website lets you choose the style of cartoon you want, such as traditional or modern. You can also choose the size of your cartoon and even change the background color.

02Cartoonize
Cartoonize is an online tool that converts pictures into cartoon-style images. It is a free online service that allows users to convert any image into a cartoon-style image in seconds. It has been widely used by bloggers, teachers, and artists for the quick and easy creation of cartoons. This online tool can be used for many purposes, including Blogging, Teaching, Social Media Marketing, and other portals.

03PhotoCartoon
PhotoCartoon is an online image-to cartoon converter that converts photos into cartoons. This tool is helpful for people who want to create a cartoon from an image without having to draw it by hand. The website also provides users with the ability to add text, color, and other effects to the images they have converted into comics. It can be used for creating memes or advertisements as well as personal projects like comics and illustrations.

04Free Photo to cartoon
This online Free Photo to Cartoon Converter allows users to convert a photo into an animated cartoon. It is an easy-to-use tool that provides high-quality results in a short amount of time. It has been proven to be more effective than using traditional methods. The site also offers users the option of using different filters and uploading images from Facebook or Instagram for conversion. Within no time, a user will be able to get the outcome of their choice.

05Picsart
Picsart is a website that lets users draw pictures and make them into cartoons. It offers an easy interface to create personalized cartoons, which can be shared on social media. It has a free version for drawing and sharing custom images, as well as paid subscriptions for more features like making animated GIFs, drawing with your webcam, or using the site’s editor.

Part 2 5 Picture to Cartoon Converters on Your Phone
Well, above, we have discussed the tools that can be used through the website or, say, on the computer. But when you don’t have a computer, you can do it with the help of your phone as well. Now cartoon photo converter for phones is also available that one can try. These are as follows: -
01**Wondershare Filmora Video Editor **
Filmora is an app for users to create videos, collages, and other types of images. It is a free app that comes with different features. It has been downloaded over 100 million times and has been used by numerous industries for completing the editing part. This acts as the best video to cartoon converter online free. It is available on iOS, Android, Windows 10, and Mac OS X.
For Win 7 or later (64-bit)
For macOS 10.12 or later
In general, it allows users to take pictures or videos from their phones and then convert them into a cartoon. The app also allows users to edit their images before converting them into cartoons as they want. The effects added in this tool are so awesome that any can love trying this out.
02Cartoon Photo Editor
This is a photo editor that allows users to turn photos into cartoon drawings. Users can choose from a range of styles and colors to create their own unique cartoons. The app offers different drawing styles, and accordingly, a user can choose one and do the editing easily. It also features abstract designs that lack realism but are still recognizable as cartoons. Users feel great using this app because of its interface and the features available.
03Art Camera – Cartoon, Pencil Sketch Art Effect Photo
Art Camera is a new photo app that allows taking photos that look like pencil drawings or sketches. It uses a sophisticated algorithm and the latest machine learning technology to transform your photos into cartoon-like images. This app is perfect for those who are looking for an artistic way of capturing memories, portraits, or even creating art from their own imagination. It is widely is available on iOS, Android, and Windows Phone devices.
04Tooncam – Cartoon, Pencil Sketch Pic
Tooncam is a free app that helps you to create cartoon images. You can use it on your phone or tablet. It is one of the best apps for creating cartoons on your phone with images with just one click. With this app, you can also share your cartoons with friends or family members and make them laugh out loud with funny pictures.
The app uses the camera of your device and its powerful photo editing tools to convert any photo into a cartoon image in just a few steps.
05Photo To Cartoon Yourself Edit
The app is a picture to cartoon converter on your phone that lets you transform a photo into a cartoon in just one tap. You can use this app to create an animated movie, comic strip, or comic book. The app works by converting the image into vector graphics and then adding colors and shading, and finally exporting it as an animated GIF. The app is available for iOS platforms.
Part 3 How to convert photo to cartoon
We are sure you might be thinking about how you can use these tools. Well, firstly, understand that every tool we have discussed above have the somewhere same interface, and you need to follow some steps to convert photo to cartoon. To help you more, here we are discussing the steps you need to follow while using FotoSketcher for the same purpose.
FotoSketcher is one of the best tools available free of cost for you. You can simply convert the photos into a cartoon and use them over different portals as per your need. There will be no need for you to engage in any complicated process to complete the editing task. The steps are also very simple to follow for this tool, and these are as follows: -
Step 1: firstly, get the FotoSketcher tool on your device.
Step 2: Wait until the installation of the tool gets completed. It is compatible with Windows and Mac both.
Step 3: Now, open the tool and upload the photo you wish to convert.
Step 4: Here, it asks you to select the type. You can either select cartoon 1 or Cartoon 2. These are the special effects being part of this software.
Step 5: Now, from the list of features, select the type of editing you wish to apply. There are multiple options available to choose from. You can choose any of them as per your preference.
Step 6: Blend the colors as needed for the edited photo. Along with it, there are some other parameters too need to look out for editing, and accordingly, you can set them.
Step 7: After setting up the changes, click on “Draw” to apply the changes. Wait until it applies the effects.
Step 8: The resulted image will appear, and you can download it in the required format from here.
● Ending Thoughts →
● Do convert photo to cartoon online in just simple steps without being part of any complicated process.
● Filmora is the best cartoon image converter online available, helping in converting the images as required.
● The photo to cartoon software is quite simple to use and does not require any particular technical knowledge.
We all love to edit our images. Undoubtedly right now, the innovation in technology or day the editing tools available put us at a point where we can do more than editing the photograph. Well, here we are discussing convert picture to cartoon. Yes, you understand it right. This conversion can be done for various projects. We are not saying you to confine this ultimate option to your photos only. If you are a part of social media and create content, these tools will help you to get the best outcome in return.
Well, keep reading till the last as here we explore photo to cartoon online free, and some paid versions that you can try. Let’s get started!
In this article
01 [5 Online Picture to Cartoon Converters](#Part 1)
02 [5 Picture to Cartoon Converters on Your Phone](#Part 2)
03 [How to convert photo to cartoon with the help of FotoSketcher](#Part 3)
Part 1 Online Picture to Cartoon Converters
In this section, we are discussing the best online photo to cartoon converter that you can use and complete this tedious task within a few minutes. The best tools that you can consider include: -
01Befunky
Befunky, an online picture converter, offers a unique way of transforming your photographs into cartoon-like images. You can choose from a 50+ range of styles and adjust the size of the image before you start. The website lets you choose the style of cartoon you want, such as traditional or modern. You can also choose the size of your cartoon and even change the background color.
02Cartoonize
Cartoonize is an online tool that converts pictures into cartoon-style images. It is a free online service that allows users to convert any image into a cartoon-style image in seconds. It has been widely used by bloggers, teachers, and artists for the quick and easy creation of cartoons. This online tool can be used for many purposes, including Blogging, Teaching, Social Media Marketing, and other portals.
03PhotoCartoon
PhotoCartoon is an online image-to cartoon converter that converts photos into cartoons. This tool is helpful for people who want to create a cartoon from an image without having to draw it by hand. The website also provides users with the ability to add text, color, and other effects to the images they have converted into comics. It can be used for creating memes or advertisements as well as personal projects like comics and illustrations.
04Free Photo to cartoon
This online Free Photo to Cartoon Converter allows users to convert a photo into an animated cartoon. It is an easy-to-use tool that provides high-quality results in a short amount of time. It has been proven to be more effective than using traditional methods. The site also offers users the option of using different filters and uploading images from Facebook or Instagram for conversion. Within no time, a user will be able to get the outcome of their choice.
05Picsart
Picsart is a website that lets users draw pictures and make them into cartoons. It offers an easy interface to create personalized cartoons, which can be shared on social media. It has a free version for drawing and sharing custom images, as well as paid subscriptions for more features like making animated GIFs, drawing with your webcam, or using the site’s editor.
Part 2 5 Picture to Cartoon Converters on Your Phone
Well, above, we have discussed the tools that can be used through the website or, say, on the computer. But when you don’t have a computer, you can do it with the help of your phone as well. Now cartoon photo converter for phones is also available that one can try. These are as follows: -
01**Wondershare Filmora Video Editor **
Filmora is an app for users to create videos, collages, and other types of images. It is a free app that comes with different features. It has been downloaded over 100 million times and has been used by numerous industries for completing the editing part. This acts as the best video to cartoon converter online free. It is available on iOS, Android, Windows 10, and Mac OS X.
For Win 7 or later (64-bit)
For macOS 10.12 or later
In general, it allows users to take pictures or videos from their phones and then convert them into a cartoon. The app also allows users to edit their images before converting them into cartoons as they want. The effects added in this tool are so awesome that any can love trying this out.
02Cartoon Photo Editor
This is a photo editor that allows users to turn photos into cartoon drawings. Users can choose from a range of styles and colors to create their own unique cartoons. The app offers different drawing styles, and accordingly, a user can choose one and do the editing easily. It also features abstract designs that lack realism but are still recognizable as cartoons. Users feel great using this app because of its interface and the features available.
03Art Camera – Cartoon, Pencil Sketch Art Effect Photo
Art Camera is a new photo app that allows taking photos that look like pencil drawings or sketches. It uses a sophisticated algorithm and the latest machine learning technology to transform your photos into cartoon-like images. This app is perfect for those who are looking for an artistic way of capturing memories, portraits, or even creating art from their own imagination. It is widely is available on iOS, Android, and Windows Phone devices.
04Tooncam – Cartoon, Pencil Sketch Pic
Tooncam is a free app that helps you to create cartoon images. You can use it on your phone or tablet. It is one of the best apps for creating cartoons on your phone with images with just one click. With this app, you can also share your cartoons with friends or family members and make them laugh out loud with funny pictures.
The app uses the camera of your device and its powerful photo editing tools to convert any photo into a cartoon image in just a few steps.
05Photo To Cartoon Yourself Edit
The app is a picture to cartoon converter on your phone that lets you transform a photo into a cartoon in just one tap. You can use this app to create an animated movie, comic strip, or comic book. The app works by converting the image into vector graphics and then adding colors and shading, and finally exporting it as an animated GIF. The app is available for iOS platforms.
Part 3 How to convert photo to cartoon
We are sure you might be thinking about how you can use these tools. Well, firstly, understand that every tool we have discussed above have the somewhere same interface, and you need to follow some steps to convert photo to cartoon. To help you more, here we are discussing the steps you need to follow while using FotoSketcher for the same purpose.
FotoSketcher is one of the best tools available free of cost for you. You can simply convert the photos into a cartoon and use them over different portals as per your need. There will be no need for you to engage in any complicated process to complete the editing task. The steps are also very simple to follow for this tool, and these are as follows: -
Step 1: firstly, get the FotoSketcher tool on your device.
Step 2: Wait until the installation of the tool gets completed. It is compatible with Windows and Mac both.
Step 3: Now, open the tool and upload the photo you wish to convert.
Step 4: Here, it asks you to select the type. You can either select cartoon 1 or Cartoon 2. These are the special effects being part of this software.
Step 5: Now, from the list of features, select the type of editing you wish to apply. There are multiple options available to choose from. You can choose any of them as per your preference.
Step 6: Blend the colors as needed for the edited photo. Along with it, there are some other parameters too need to look out for editing, and accordingly, you can set them.
Step 7: After setting up the changes, click on “Draw” to apply the changes. Wait until it applies the effects.
Step 8: The resulted image will appear, and you can download it in the required format from here.
● Ending Thoughts →
● Do convert photo to cartoon online in just simple steps without being part of any complicated process.
● Filmora is the best cartoon image converter online available, helping in converting the images as required.
● The photo to cartoon software is quite simple to use and does not require any particular technical knowledge.
Adobe Animate Text Effects Skills You Need to Know
Adobe Animate Text Effects Skills That You Need to Know
An easy yet powerful editor
Numerous effects to choose from
Detailed tutorials provided by the official channel
Adobe Animate Text Effects can be created with the use of Adobe Animate. As well as a couple of other models of Adobe.
We’ve outline a thorough explanation on the subject so that you can be prepared as you can be, so continue reading in order to learn more.
In this article
01 [What’s Text Animation?](#Part 1)
02 [What Adobe Program is Best for Text Animation?](#Part 2)
03 [5 Creative Ways to Animate Text in After Effects](#Part 3)
04 [Adobe Alternative to Make Text Animation](#Part 4)
Part 1 What’s Text Animation?
“Text Animation“ refers to moving letters, words, sentences, and even whole paragraphs. The animation, or movement, rather, can be anything. It can move from side to side, jump up and down, create a dizzying circle, recede from view, etc. Usually, said movement is placed on an endless repeat, a pattern that the text is coded to follow decided by the animator who created it!
Part 2 What Adobe Program is Best for Text Animation?
Adobe Animate is Adobe’s very own software developed for animators. Whether they be working on movies, shows, short videos for online posting, games, or text animations. As mentioned at the beginning of this article, this is the software most professionals use in order to bring life to their digital creations. It’s also the one that we’d recommend if you’re looking into advanced adobe animate text animation!
Part 3 5 Creative Ways to Animate Text in After Effects
Now, we should make it very clear, of course. That while Adobe Animate is considered the best for animation (whether it be text or character models), there are other tools that you can use in order to get the same effect. For example, there’s adobe spark animate text, adobe premiere pro animate text, and this next one, also from Adobe, called After Effects, is a VFX and motion graphics software used to create movie titles, intros, transitions, logos, and so much more.
We’ve listed some of the more creative ways you can use After Effects to create what could very well be Adobe Animate text effects below to help you along:
01METHOD 1: After Effects Animation Presets
The first, and easiest, way of animating your text with After Effects is to use presets! After Effects offers multiple animations presets that you can try in order to test out certain settings. (This is also a good way of getting to know the possibilities and limits of text animation and how you can work within those bounds.
02METHOD 2: After Effects Text Animators
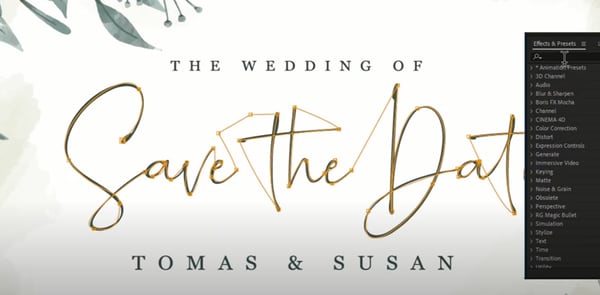
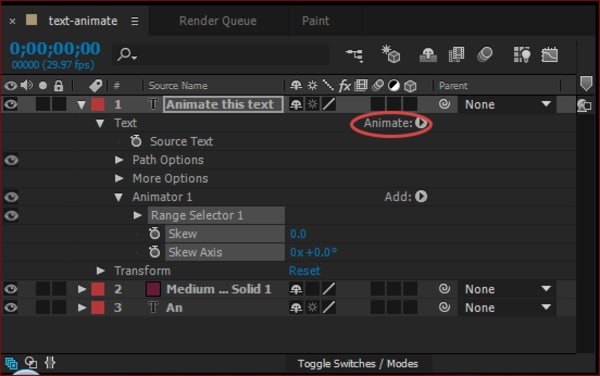
If the presets aren’t working out for you, you can also try out After Effect’s “animators” and “selectors”. To clarify, you add ‘animators’ to your text (it will mark the object(s) to be animated). And then, you use a ‘selector’ in order to specify how you want the properties to be animated. This is a great way of truly getting the exact effect that you want, although it might take some finagling to get it to work completely.
03METHOD 3: Per-Character 3D Text Properties
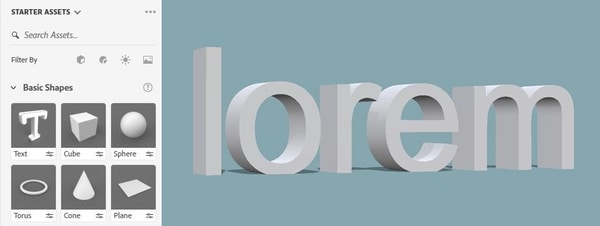
If you want to step up your game even more, you can always make your texts into 3D characters on their own! This is easier to do in Adobe Dimension, which (from the example image below) you can see has a “Text” preset that you can use in order to start creating 3D Text Properties immediately! The beauty of this method, of course, is that your text can be adjusted like any 3D character. Making the possibilities endless!
04METHOD 4: Path Animation
The next method of animating with After Effects is a little more constrained than the others we’ve introduced thus far. However, it has its uses! As you can see from the image below, you can animate your text to follow a mask (which you set over your text layer). This will make it possible for you to animate along a path.

05METHOD 5: After Effects Selectors
This next method is related to the ‘Animators’ methods we introduced second. It also works a lot like the masks we mentioned in Method 4–which, as mentioned, you can use in order to set up a foundation or limits for your animation.

Adobe Animate Text Effects can be created with the use of Adobe Animate. As well as a couple of other models of Adobe.
We’ve outline a thorough explanation on the subject so that you can be prepared as you can be, so continue reading in order to learn more.
In this article
01 [What’s Text Animation?](#Part 1)
02 [What Adobe Program is Best for Text Animation?](#Part 2)
03 [5 Creative Ways to Animate Text in After Effects](#Part 3)
04 [Adobe Alternative to Make Text Animation](#Part 4)
Part 1 What’s Text Animation?
“Text Animation“ refers to moving letters, words, sentences, and even whole paragraphs. The animation, or movement, rather, can be anything. It can move from side to side, jump up and down, create a dizzying circle, recede from view, etc. Usually, said movement is placed on an endless repeat, a pattern that the text is coded to follow decided by the animator who created it!
Part 2 What Adobe Program is Best for Text Animation?
Adobe Animate is Adobe’s very own software developed for animators. Whether they be working on movies, shows, short videos for online posting, games, or text animations. As mentioned at the beginning of this article, this is the software most professionals use in order to bring life to their digital creations. It’s also the one that we’d recommend if you’re looking into advanced adobe animate text animation!
Part 3 5 Creative Ways to Animate Text in After Effects
Now, we should make it very clear, of course. That while Adobe Animate is considered the best for animation (whether it be text or character models), there are other tools that you can use in order to get the same effect. For example, there’s adobe spark animate text, adobe premiere pro animate text, and this next one, also from Adobe, called After Effects, is a VFX and motion graphics software used to create movie titles, intros, transitions, logos, and so much more.
We’ve listed some of the more creative ways you can use After Effects to create what could very well be Adobe Animate text effects below to help you along:
01METHOD 1: After Effects Animation Presets
The first, and easiest, way of animating your text with After Effects is to use presets! After Effects offers multiple animations presets that you can try in order to test out certain settings. (This is also a good way of getting to know the possibilities and limits of text animation and how you can work within those bounds.
02METHOD 2: After Effects Text Animators
If the presets aren’t working out for you, you can also try out After Effect’s “animators” and “selectors”. To clarify, you add ‘animators’ to your text (it will mark the object(s) to be animated). And then, you use a ‘selector’ in order to specify how you want the properties to be animated. This is a great way of truly getting the exact effect that you want, although it might take some finagling to get it to work completely.
03METHOD 3: Per-Character 3D Text Properties
If you want to step up your game even more, you can always make your texts into 3D characters on their own! This is easier to do in Adobe Dimension, which (from the example image below) you can see has a “Text” preset that you can use in order to start creating 3D Text Properties immediately! The beauty of this method, of course, is that your text can be adjusted like any 3D character. Making the possibilities endless!
04METHOD 4: Path Animation
The next method of animating with After Effects is a little more constrained than the others we’ve introduced thus far. However, it has its uses! As you can see from the image below, you can animate your text to follow a mask (which you set over your text layer). This will make it possible for you to animate along a path.
05METHOD 5: After Effects Selectors
This next method is related to the ‘Animators’ methods we introduced second. It also works a lot like the masks we mentioned in Method 4–which, as mentioned, you can use in order to set up a foundation or limits for your animation.
Animate Your Photo Online with These Awesome Tools
Animate Your Photo Online with These Awesome Tools
An easy yet powerful editor
Numerous effects to choose from
Detailed tutorials provided by the official channel
Animating your family photos online will not only make you nostalgic but will also make you relive that moment. Adding on to this, animating your photos can also make your boring ppt interesting.
This article helps you understand how to animate your pictures online for free and the different features you can use.
In this article
01 [How Can I Turn My Photo into a Cartoon Online?](#Part 1)
02 [Some Other Tools/Plugins to Help You Improve Photo Animate](#Part 2)
Part 1 Part 1: How Can I Turn My Photo into a Cartoon Online?
Animation gives life to your lifeless photos, makes them more interesting, and attracts an audience. You can add more fun to your normal photos by turning your photos into a cartoon. One of the simplest ways is by turning your photo into a cartoon by using online tools. In this section of the article, we will explore more on some online tools which will help you to turn your photos into a cartoon online.
01Befunky
An online cartoonizer that processes your photo online at a very good speed and gives you a cartoon version of the photo in seconds.
A single click on your cartoonizer and you’ll go from photo to cartoon in seconds. Go to the photo editor and click on the artsy section. You will have five classic cartoonizer effects and you will be one click away from your beautiful results.
Pros
Can upload several photos simultaneously.
Very simple interface that supports drag and drop feature.
It is possible to download photos from the stream.
Cons
Many functions are not free.
Too much advertising.
Price $4.95/month
Rating 4.1/5
“Great collage maker and photo editing tools.” - Fayak. A
02Painnt- Art & Cartoon Filters
Painnt is one of the best cartoons yourself apps on the market with more than a thousand filters and effects. It is also a creative community which not only helps you animate your photo online but also helps you discover the artwork of your taste or meet like-minded people.
Pros
Regularly updates its software to support more features.
Customize cartoon filter settings with various parameters.
Cons
Bugs might cause trouble to your system even if you have a purchases version.
Price Free/ in-app purchases will not cost more than $9.99
Rating 4.5/ 5
“Great app lots of fun don’t put no money into the custom style.” - SB
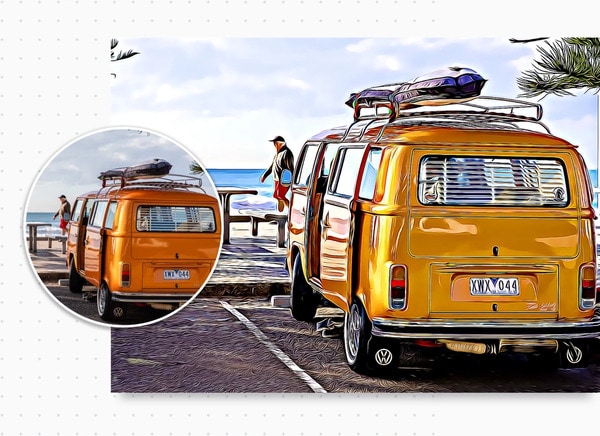
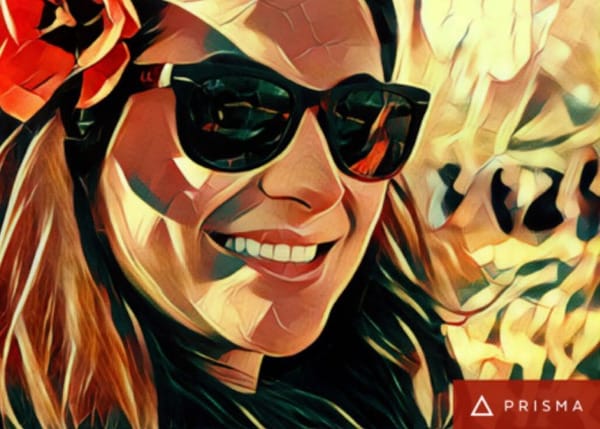
03Prisma Photo Editor
A few years ago, Prisma is one of the most popular applications to animate your photo online. Though its popularity has reduced it still has some cool features.
Pros
Has a good number of filters and you will have a lot of options.
Every image you try will be automatically saved to your camera roll.
Create unique-looking features.
Cons
Create unique-looking features.
Users have no control over how the app reads every image and gives output.
Price Users have no control over how the app reads every image and gives output.
Rating 4.6/5
“I am seriously addicted to this app. I use it to change my 360 pics into mind blowing Virtual Reality 3D photosphere.” -Leighton Scharf
04Cartoon Sketch Camera Pro
Sketch, Cartoon, Halftone, Swirl, Pixellate, Emboss, Crosshatch, or Dots effects can be used to cartoon a photo in this app. but there are only a limited amount of cartoon effects which makes the cartoon sketch camera pro, not one of the best options to animate your photo online free.
Pros
It includes 8 different filters and effects.
You can save a photo to your cartoon library.
Cons
Supported by only Mac products.
Limited filters and effects
Issues wid bugs
Annoying ads
Price Free/In-app purchases.
Rating 3.6/5
“Get ready to watch a lot of application ads”
05Cartoon Photo Editor
The cartoon photo editor app helps you create animated pictures online for free. All effects can be previewed in real-time, which helps you to see your results before capturing a picture or recording a video.
Pros
Supports autofocus when shooting a video, picture.
Can also use cartoon effects on previously captured pictures.
Cons
Ads can be bothersome.
Price Free/ In-app purchases.
Rating 4.4 /5
“Not the most well-developed app.” - Nunya
06Photo Lab
Pros
Has an immense number of filters.
Can easily share pictures on social media.
Easy interface
Cons
It’s an internet-based app, so limited features when using offline.
Price Free/ PRO subscription- $4.99/month
Rating 4.6/5
“I love so many aspects of this app.” - creativeme
07Toon Me
Special AI developed algorithm in Toon me app instantly gives you, your cartoon picture. Just take a picture and upload it and get ready to meet your cartoon self. Toon me is one of the easiest ways to animate your photo online.
Pros
Easy to use.
Cool filters which are unique from normal toon apps.
No adds.
Cons
Good filters are only available after paid subscriptions.
Some add ons are and filters are strange.
The App doesn’t let you cartoon any photo. it has to have a face on it.
Price The App doesn’t let you cartoon any photo. it has to have a face on it.
Rating 4.5/5
“Great app. I’m thinking of actually paying for it to try some of the other cool filters,” - Angel
08MomentCam Cartoons and stickers
This app offers a wide range of filters and stickers. besides this, MomentCam is a community that awards prizes to its most creative members. You can accessorize your cartoon with hairbands, sunglasses, pick hairstyles or beards.
Pros
Great cartoon effects.
Easy to use.
Cons
Bugs to be fixed.
May witness errors while connected to a network.
New updates are causing issues.
Price Free/ Subscription $4.99/month
Rating 4.5 / 5
“Disappointed in the new update. Interface is confusing to use.” - Kristie
Part 2 Some Other Tools/Plugins to Help You Improve Photo Animate
012D Photography Online
An animation is a vital tool for any digital artist. Leaving your images to normal static pictures can sometimes bore your audience. Your 2d photography can be animated easily online. To animate your photos online you have several online tools like -
Open Toonz It is a powerful tool that is also open-source software.
Piskel Piskel is an online tool for creating animated sprites and pixel art. It’s easy to use and requires no sign-up.
Asperite Is another online tool that can animate your 2d photography online. You can purchase the software for $19.99.
023D Photography Online
3D This- 3Dthis is a unique animation platform that supports 3D animation with the help of amazing in-app tools. It can create 3D models of people’s faces to morph animations. You can convert any picture to a 3D image. Being free software it helps you to learn and explore and create 3D animated pictures online for free.
03Animated Photo Frame Online Editor
Animated photo frames and effects will instantly turn any photo into an awesome greeting card. You can now creatively make your greeting cards for any occasion by using these animations which will convert into gif form.
04Animate Face from Photo Online
This particular type of animation has created a huge trend on social media. Animating faces online you can see how a person in the photograph smiles, moves their head around, etc. People often use it to relive their nostalgic moments of their ancestor’s pictures. My heritage blog is one of the websites which makes still faces move. With the help of My heritage blog, you can animate any of the faces in your photos to see them move, blink, and smile. My heritage easily helps you to animate your family photos online.
Now that we have seen various kinds of animation tools and pros and cons, let us look into one such amazing tool that can animate your photo online easily and very professionally.
Key Takeaways from This Episode
● In this article we have seen how animating a picture can make a static picture into an interesting art piece.
● We have also explored various tools that can make a cartoon and animate your photo online. We have also explored each tool’s pros and cons, their pricing, reviews, and ratings. We have also seen various other tools which help you improve your photo animate. We have also seen. With the advancement of technology, we learned that old pictures of our ancestors can be bought into motion.
● In the later part of the article, we also learned about a specific software called Filmora Pro that has awesome features. In addition to this, Filmora Pro gives a very professional result.
Animating your family photos online will not only make you nostalgic but will also make you relive that moment. Adding on to this, animating your photos can also make your boring ppt interesting.
This article helps you understand how to animate your pictures online for free and the different features you can use.
In this article
01 [How Can I Turn My Photo into a Cartoon Online?](#Part 1)
02 [Some Other Tools/Plugins to Help You Improve Photo Animate](#Part 2)
Part 1 Part 1: How Can I Turn My Photo into a Cartoon Online?
Animation gives life to your lifeless photos, makes them more interesting, and attracts an audience. You can add more fun to your normal photos by turning your photos into a cartoon. One of the simplest ways is by turning your photo into a cartoon by using online tools. In this section of the article, we will explore more on some online tools which will help you to turn your photos into a cartoon online.
01Befunky
An online cartoonizer that processes your photo online at a very good speed and gives you a cartoon version of the photo in seconds.
A single click on your cartoonizer and you’ll go from photo to cartoon in seconds. Go to the photo editor and click on the artsy section. You will have five classic cartoonizer effects and you will be one click away from your beautiful results.
Pros
Can upload several photos simultaneously.
Very simple interface that supports drag and drop feature.
It is possible to download photos from the stream.
Cons
Many functions are not free.
Too much advertising.
Price $4.95/month
Rating 4.1/5
“Great collage maker and photo editing tools.” - Fayak. A
02Painnt- Art & Cartoon Filters
Painnt is one of the best cartoons yourself apps on the market with more than a thousand filters and effects. It is also a creative community which not only helps you animate your photo online but also helps you discover the artwork of your taste or meet like-minded people.
Pros
Regularly updates its software to support more features.
Customize cartoon filter settings with various parameters.
Cons
Bugs might cause trouble to your system even if you have a purchases version.
Price Free/ in-app purchases will not cost more than $9.99
Rating 4.5/ 5
“Great app lots of fun don’t put no money into the custom style.” - SB
03Prisma Photo Editor
A few years ago, Prisma is one of the most popular applications to animate your photo online. Though its popularity has reduced it still has some cool features.
Pros
Has a good number of filters and you will have a lot of options.
Every image you try will be automatically saved to your camera roll.
Create unique-looking features.
Cons
Create unique-looking features.
Users have no control over how the app reads every image and gives output.
Price Users have no control over how the app reads every image and gives output.
Rating 4.6/5
“I am seriously addicted to this app. I use it to change my 360 pics into mind blowing Virtual Reality 3D photosphere.” -Leighton Scharf
04Cartoon Sketch Camera Pro
Sketch, Cartoon, Halftone, Swirl, Pixellate, Emboss, Crosshatch, or Dots effects can be used to cartoon a photo in this app. but there are only a limited amount of cartoon effects which makes the cartoon sketch camera pro, not one of the best options to animate your photo online free.
Pros
It includes 8 different filters and effects.
You can save a photo to your cartoon library.
Cons
Supported by only Mac products.
Limited filters and effects
Issues wid bugs
Annoying ads
Price Free/In-app purchases.
Rating 3.6/5
“Get ready to watch a lot of application ads”
05Cartoon Photo Editor
The cartoon photo editor app helps you create animated pictures online for free. All effects can be previewed in real-time, which helps you to see your results before capturing a picture or recording a video.
Pros
Supports autofocus when shooting a video, picture.
Can also use cartoon effects on previously captured pictures.
Cons
Ads can be bothersome.
Price Free/ In-app purchases.
Rating 4.4 /5
“Not the most well-developed app.” - Nunya
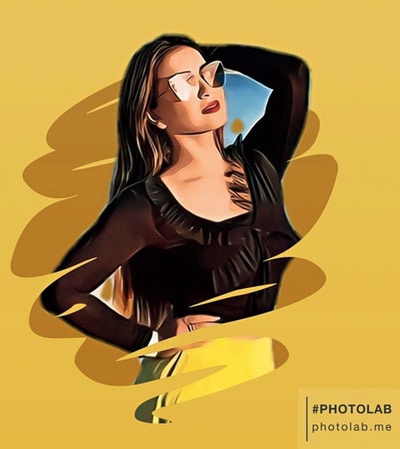
06Photo Lab
Pros
Has an immense number of filters.
Can easily share pictures on social media.
Easy interface
Cons
It’s an internet-based app, so limited features when using offline.
Price Free/ PRO subscription- $4.99/month
Rating 4.6/5
“I love so many aspects of this app.” - creativeme
07Toon Me
Special AI developed algorithm in Toon me app instantly gives you, your cartoon picture. Just take a picture and upload it and get ready to meet your cartoon self. Toon me is one of the easiest ways to animate your photo online.
Pros
Easy to use.
Cool filters which are unique from normal toon apps.
No adds.
Cons
Good filters are only available after paid subscriptions.
Some add ons are and filters are strange.
The App doesn’t let you cartoon any photo. it has to have a face on it.
Price The App doesn’t let you cartoon any photo. it has to have a face on it.
Rating 4.5/5
“Great app. I’m thinking of actually paying for it to try some of the other cool filters,” - Angel
08MomentCam Cartoons and stickers
This app offers a wide range of filters and stickers. besides this, MomentCam is a community that awards prizes to its most creative members. You can accessorize your cartoon with hairbands, sunglasses, pick hairstyles or beards.
Pros
Great cartoon effects.
Easy to use.
Cons
Bugs to be fixed.
May witness errors while connected to a network.
New updates are causing issues.
Price Free/ Subscription $4.99/month
Rating 4.5 / 5
“Disappointed in the new update. Interface is confusing to use.” - Kristie
Part 2 Some Other Tools/Plugins to Help You Improve Photo Animate
012D Photography Online
An animation is a vital tool for any digital artist. Leaving your images to normal static pictures can sometimes bore your audience. Your 2d photography can be animated easily online. To animate your photos online you have several online tools like -
Open Toonz It is a powerful tool that is also open-source software.
Piskel Piskel is an online tool for creating animated sprites and pixel art. It’s easy to use and requires no sign-up.
Asperite Is another online tool that can animate your 2d photography online. You can purchase the software for $19.99.
023D Photography Online
3D This- 3Dthis is a unique animation platform that supports 3D animation with the help of amazing in-app tools. It can create 3D models of people’s faces to morph animations. You can convert any picture to a 3D image. Being free software it helps you to learn and explore and create 3D animated pictures online for free.
03Animated Photo Frame Online Editor
Animated photo frames and effects will instantly turn any photo into an awesome greeting card. You can now creatively make your greeting cards for any occasion by using these animations which will convert into gif form.
04Animate Face from Photo Online
This particular type of animation has created a huge trend on social media. Animating faces online you can see how a person in the photograph smiles, moves their head around, etc. People often use it to relive their nostalgic moments of their ancestor’s pictures. My heritage blog is one of the websites which makes still faces move. With the help of My heritage blog, you can animate any of the faces in your photos to see them move, blink, and smile. My heritage easily helps you to animate your family photos online.
Now that we have seen various kinds of animation tools and pros and cons, let us look into one such amazing tool that can animate your photo online easily and very professionally.
Key Takeaways from This Episode
● In this article we have seen how animating a picture can make a static picture into an interesting art piece.
● We have also explored various tools that can make a cartoon and animate your photo online. We have also explored each tool’s pros and cons, their pricing, reviews, and ratings. We have also seen various other tools which help you improve your photo animate. We have also seen. With the advancement of technology, we learned that old pictures of our ancestors can be bought into motion.
● In the later part of the article, we also learned about a specific software called Filmora Pro that has awesome features. In addition to this, Filmora Pro gives a very professional result.
How to Animate Image on Scroll and Text on Scroll?
How to Animate Image on Scroll and Text on Scroll?
An easy yet powerful editor
Numerous effects to choose from
Detailed tutorials provided by the official channel
Over the years, web designers have tried different tactics to make their websites visually engaging. From marquee tags to animated navigation bars, designers tried everything they could to enhance the overall visual appearance of their websites.
One such tactic - that even brands like Sony and Apple - followed was image-on-scroll and text-on-scroll animations.
In this article
01 [How to Make Scroll Image Animation Like Apple?](#Part 1)
02 [How to Create a Scrolling Text Animation (Infinite Loop)](#Part 2)
Part 1 How to Make Scroll Image Animation Like Apple?
First, let’s take a look at different ways to make scroll-image animation like Apple. An image-on-scroll animation is an animation playback that appears on images as you continue to scroll down a website. You can use multiple methods to implement scroll image animations on your website.
01Use Filmora
Wondershare Filmora Video Editor is a feature-packed video editing tool that’s designed to help video editors create high-quality videos in a hassle-free manner. The tool offers a timeline-based interface that streamlines the entire video editing process and helps professionals execute complex video editing tasks in no time. In addition to its basic editing features, Filmora also offers advanced editing functions including color grading, motion tracking, and keyframing. It means you can easily turn your RAW footage into high-quality videos without any hassle.
Using Wondershare Filmora to animate images on scroll will be an ideal solution if you want to integrate a visually appealing element to your website. Let’s walk you through the step-by-step procedure of using Wondershare Filmora to create image-on-scroll animations.

Wondershare Filmora - Best Video Editor for Mac/Windows
5,481,435 people have downloaded it.
Build unique custom animations without breaking a sweat.
Focus on creating epic stories and leave the details to Filmora’s auto features.
Start a creative adventure with drag & drop effects and endless possibilities.
Filmora simplifies advanced features to save you time and effort.
Filmora cuts out repetition so you can move on to your next creative breakthrough.
Step 1 - Launch Filmora on your system and import the video/image that you want to edit. Then, load the selected file to Filmora’s timeline to proceed further.
Step 2 - Now, double-tap the video/image. This will launch the editing panel on your screen. Here, switch to the “Animation” panel.

Step 3 - Here you can either select “Presets” or click the “Customize” tab to create a custom animation through keyframing.

Step 4 - If you want to save time, however, it would be better to choose the “Presets” tab. Then, select the preset that you want to use.
Step 5 - Now, drag the selected preset to the timeline. Again, double-tap the preset layer. An editing panel will appear on your screen. Here you can adjust different elements of the preset to customize its playback.

So, that’s everything you need to know about animating image-on-scroll using Wondershare Filmora.
02Use ScrollSequence
Now, if you are not a professional editor or don’t want to overcomplicate things, you can use ScrollSequence to add image-on-scroll animation to your website. For readers who don’t know, ScrollSequence is a built-in WordPress plugin that you can directly install in your WordPress manager. The tool offers hundreds of ready-to-use animation templates that you can integrate and customize without any hassle.
All the templates offer complete customization, which means you can adjust the animation playback, import your own media files, and even customize the text. It’s worth understanding that this method will only work if you are using WordPress as the CMS platform for your website. ScrollSequence is only available as a WordPress plugin and you won’t be able to use it with any other website builder
03Write Your Own JavaScript Code
Finally, you can also write your own JavaScript code to animate image-on-scroll. However, this method will be a bit complicated as you would require technical expertise to write dedicated JavaScript scripts to animate image-on-scroll. If you choose this solution, you’ll have to start with writing HTML and CSS codes. This will help you style your web page in the beginning. And, once the web design is up and ready, you can move towards writing the JavaScript code to animate image-on-scroll in your web page.
Part 2 How to Create a Scrolling Text Animation (Infinite Loop)
Like image-on-scroll, text-on-scroll is another popular way to add visually appealing animations to your web designs. Text-on-scroll animations work the same way as image-on-scroll animations - the only difference is that these types of animations focus on the text playback instead of images. Again, you can use different methods to animate text on scroll and make your website’s content run in an infinite loop.
Some of these methods include:
01Use Filmora
Thanks to Filmora’s advanced editing panel, you can also use it to animate text within the videos. This will be an ideal solution for users who want to add videos with dedicated text banners and titles on their websites. With Filmora, you’ll be able to animate the text and make custom transitions in a hassle-free manner. Let’s walk you through the detailed procedure of using Wondershare Filmora to add text animation to your videos.
Step 1 - Open Filmora on your system and load the video into its timeline.
Step 2 - Double-tap the video file, and switch to the “Titles” tab. You’ll see a list of different title templates on your screen. Browse through these results and drag the desired template to the timelines. Make sure to adjust the title layer right above the video layer.

Step 3 - Again, double-click the title layer and you’ll see a dedicated text editor on your screen. Here enter the text that you want to display within the video. You can also select text size, orientation, and font to personalize its appearance.
Step 4 - Finally, switch to the “Animation” tab at the left sidebar. Choose any of these animation templates and the text within the video will be animated automatically.

So, that’s how you can use Filmora to animate text-on-scroll to improve the overall visual appearance of your website videos.
02Scroll-Text-Animations for Single Words
Another way to implement scroll-text animations is to modify the HTML & CSS code of your website. Again, this method will only be feasible if you have prior coding experience and know how to write well-optimized code.

The easiest way to animate text scrolls is through single-line animations. In this situation, only one line gets displayed at any particular time, which automatically gets switched to the next one as soon as you scroll down the cursor. If you are planning to create simple text-based animations, this method will help you get the job done easily.
Key Takeaways from This Episode
● You can animate image-on-scroll and text-on-scroll to enhance the overall visual appearance of your websites and make them more engaging for the end-users.
● If you are planning to upload dedicated videos on your website, you can use Wondershare Filmora, a fully-functional video editing tool, to animate both images and text through an easy-to-navigate editing panel.
● You should only opt for the coding method if you are an experienced coder and have worked on HTML/CSS/JavaScript projects in the past.
Over the years, web designers have tried different tactics to make their websites visually engaging. From marquee tags to animated navigation bars, designers tried everything they could to enhance the overall visual appearance of their websites.
One such tactic - that even brands like Sony and Apple - followed was image-on-scroll and text-on-scroll animations.
In this article
01 [How to Make Scroll Image Animation Like Apple?](#Part 1)
02 [How to Create a Scrolling Text Animation (Infinite Loop)](#Part 2)
Part 1 How to Make Scroll Image Animation Like Apple?
First, let’s take a look at different ways to make scroll-image animation like Apple. An image-on-scroll animation is an animation playback that appears on images as you continue to scroll down a website. You can use multiple methods to implement scroll image animations on your website.
01Use Filmora
Wondershare Filmora Video Editor is a feature-packed video editing tool that’s designed to help video editors create high-quality videos in a hassle-free manner. The tool offers a timeline-based interface that streamlines the entire video editing process and helps professionals execute complex video editing tasks in no time. In addition to its basic editing features, Filmora also offers advanced editing functions including color grading, motion tracking, and keyframing. It means you can easily turn your RAW footage into high-quality videos without any hassle.
Using Wondershare Filmora to animate images on scroll will be an ideal solution if you want to integrate a visually appealing element to your website. Let’s walk you through the step-by-step procedure of using Wondershare Filmora to create image-on-scroll animations.
Wondershare Filmora - Best Video Editor for Mac/Windows
5,481,435 people have downloaded it.
Build unique custom animations without breaking a sweat.
Focus on creating epic stories and leave the details to Filmora’s auto features.
Start a creative adventure with drag & drop effects and endless possibilities.
Filmora simplifies advanced features to save you time and effort.
Filmora cuts out repetition so you can move on to your next creative breakthrough.
Step 1 - Launch Filmora on your system and import the video/image that you want to edit. Then, load the selected file to Filmora’s timeline to proceed further.
Step 2 - Now, double-tap the video/image. This will launch the editing panel on your screen. Here, switch to the “Animation” panel.
Step 3 - Here you can either select “Presets” or click the “Customize” tab to create a custom animation through keyframing.
Step 4 - If you want to save time, however, it would be better to choose the “Presets” tab. Then, select the preset that you want to use.
Step 5 - Now, drag the selected preset to the timeline. Again, double-tap the preset layer. An editing panel will appear on your screen. Here you can adjust different elements of the preset to customize its playback.
So, that’s everything you need to know about animating image-on-scroll using Wondershare Filmora.
02Use ScrollSequence
Now, if you are not a professional editor or don’t want to overcomplicate things, you can use ScrollSequence to add image-on-scroll animation to your website. For readers who don’t know, ScrollSequence is a built-in WordPress plugin that you can directly install in your WordPress manager. The tool offers hundreds of ready-to-use animation templates that you can integrate and customize without any hassle.
All the templates offer complete customization, which means you can adjust the animation playback, import your own media files, and even customize the text. It’s worth understanding that this method will only work if you are using WordPress as the CMS platform for your website. ScrollSequence is only available as a WordPress plugin and you won’t be able to use it with any other website builder
03Write Your Own JavaScript Code
Finally, you can also write your own JavaScript code to animate image-on-scroll. However, this method will be a bit complicated as you would require technical expertise to write dedicated JavaScript scripts to animate image-on-scroll. If you choose this solution, you’ll have to start with writing HTML and CSS codes. This will help you style your web page in the beginning. And, once the web design is up and ready, you can move towards writing the JavaScript code to animate image-on-scroll in your web page.
Part 2 How to Create a Scrolling Text Animation (Infinite Loop)
Like image-on-scroll, text-on-scroll is another popular way to add visually appealing animations to your web designs. Text-on-scroll animations work the same way as image-on-scroll animations - the only difference is that these types of animations focus on the text playback instead of images. Again, you can use different methods to animate text on scroll and make your website’s content run in an infinite loop.
Some of these methods include:
01Use Filmora
Thanks to Filmora’s advanced editing panel, you can also use it to animate text within the videos. This will be an ideal solution for users who want to add videos with dedicated text banners and titles on their websites. With Filmora, you’ll be able to animate the text and make custom transitions in a hassle-free manner. Let’s walk you through the detailed procedure of using Wondershare Filmora to add text animation to your videos.
Step 1 - Open Filmora on your system and load the video into its timeline.
Step 2 - Double-tap the video file, and switch to the “Titles” tab. You’ll see a list of different title templates on your screen. Browse through these results and drag the desired template to the timelines. Make sure to adjust the title layer right above the video layer.
Step 3 - Again, double-click the title layer and you’ll see a dedicated text editor on your screen. Here enter the text that you want to display within the video. You can also select text size, orientation, and font to personalize its appearance.
Step 4 - Finally, switch to the “Animation” tab at the left sidebar. Choose any of these animation templates and the text within the video will be animated automatically.
So, that’s how you can use Filmora to animate text-on-scroll to improve the overall visual appearance of your website videos.
02Scroll-Text-Animations for Single Words
Another way to implement scroll-text animations is to modify the HTML & CSS code of your website. Again, this method will only be feasible if you have prior coding experience and know how to write well-optimized code.
The easiest way to animate text scrolls is through single-line animations. In this situation, only one line gets displayed at any particular time, which automatically gets switched to the next one as soon as you scroll down the cursor. If you are planning to create simple text-based animations, this method will help you get the job done easily.
Key Takeaways from This Episode
● You can animate image-on-scroll and text-on-scroll to enhance the overall visual appearance of your websites and make them more engaging for the end-users.
● If you are planning to upload dedicated videos on your website, you can use Wondershare Filmora, a fully-functional video editing tool, to animate both images and text through an easy-to-navigate editing panel.
● You should only opt for the coding method if you are an experienced coder and have worked on HTML/CSS/JavaScript projects in the past.
How to Make an Animated Travel Map Video?
How to Make an Animated Travel Map Video?

Benjamin Arango
Mar 27, 2024• Proven solutions
Animated travel map videos make it easy for the viewers to follow the routes from the source to destination locations right on the single screen. While the static maps would only allow the audience to see the markers from where the journey would start and is expected to end, the animated ones show the real-time movements and therefore look more interactive when viewed.
That said, here you will learn how to create an attractive and engaging animated travel map video using one of the easiest post-production applications, Wondershare Filmora, which is widely appreciated by amateurs and professionals throughout the globe. In another section, you will also learn about an alternative program that might be of some help in case you are more into online designing.
- Method 1: Make Animated Travel Map Videos with Location Video Maker - [Video Tutorial]
- Method 2: Make Interactive Animated Travel Map with Pictramap
- Method 3: Create Animated Travel Map Using Multidev
Method 1 Make Animated Travel Map Videos with Location Video Maker
The entire process of creating an animated travel map video in Wondershare’s Filmora is categorized into two parts, wherein the first part you will collect all the ingredients that are needed to get started, and in the second part you will actually make an animated map using the tools and features present in Filmora.
Watch a video tutorial to see how to make an animated map for a video:
For Win 7 or later (64-bit)
 Secure Download
For macOS 10.14 or later
Secure Download


Part 1: Prepare the Travel Map Materials
Following are the ingredients and the methods to collect them for animated travel map preparation:
Step 1: Get the Map
The first thing that you would need to prepare an animated map is an image of a realistic map. Thanks to Google and Microsoft, these things are now pretty easy to arrange. The process is given below:
- Launch your preferred web browser
- Type google.com in the address bar or the search box and hit Enter
- Scroll to zoom out so you can see the entire world map on one screen

- Type Snipping Tool in the Cortana search box present on the left side of the Taskbar
- Launch Snipping Tool, and use it to capture the screenshot of the map
Note: Snipping Tool is a built-in app in Windows 10 and is available for free. If you are using any other operating system, or have a different program to capture the screenshots, feel free to use it according to your convenience.
- Save the screenshot you captured as a JPG file on your PC
Step 2: Mark Out the Map Path
The next step in the process of preparing an animated travel map is to mark your route on it. To do so, you can use any of your preferred photo editing tools. However, to keep this illustration simple, Microsoft Paint is used here, and the method is given below:
- Right-click the screenshot you just captured
- Go to Open with on the context menu, and then click Paint from the submenu that appears
- Pick your preferred color from the pallet of the Paint interface. It is advisable to use an eye-catchy shade such as Red
- Use the Sphere shape tool to draw a circle over the source and destination locations on the map
- Use the Line tool to draw a line from the source point to the destination. Try giving the line a few turns to make it look realistic
- Go to File > Save As, and save the marked image with a different name
Note: Once this is done, you should have two image files of the map, i.e., one without the marks and one with it
Step 3: Download Some Travel Icons
Another important ingredient in an effective travel map animation is touring icons such as location marker image, a traveling medium symbol like a helicopter, airplane, car/bike (for short distances), etc. A couple of websites that offer royalty-free stock photos at absolutely no cost are listed below:
Note: Although the websites given above allow you to download and use their stock images and icons for free, you may need to give credits to the designers/creators of the symbols while using their objects. Therefore, you are suggested to check the Terms & Conditions and norms of usage of the elements before downloading and adding them to your projects.
Part 2: Make Animated Travel Map Videos with Filmora
After you have gathered all the necessary ingredients that are required to create a travel map animation, it is now time to get to work. The following instructions would guide you through the step-by-step process of preparing a decent and realistic animated travel map in Wondershare Filmora :
For Win 7 or later (64-bit)
Secure Download
For macOS 10.14 or later
Secure Download
Step 1: Import Ingredients to Filmora and Add Them to the Timeline
Launch the video editor on your computer, click anywhere inside the Media window at the upper-left area, and import all the images and icons that you collected earlier to program. Next, drag both the images of the map, i.e., with and without the marks to the Timeline, and ensure that they are of the same duration and are placed on the same track.

Note: Be sure to put the map without the marks first, and then the one with the marks. Also note that the images have the playback duration of 5 seconds in the Timeline by default, and this tenure can be reduced or increased by dragging the side handle of the media to the left or right respectively.
Step 2: Add Transition for Illusion of Route Appearance
Go to Transition from the standard toolbar at the top, locate the Erase Slide transition effect from the available presets, and place it in between the two image files that you earlier added to the Timeline. Next, click and drag either of the side handles of the transition to the end of the media clip. Notice how the other side of the effect is expanded in equal proportion.

Step 3: Preview and Export
Press the Spacebar on the keyboard to preview the video and see if the route appears as if it is being drawn on the map. Once the animation looks acceptable, click EXPORT from the top-center, go to the Local tab on the Export window, select MP4 from the formats list in the left, and click EXPORT from the bottom-right corner to export the current animation to MP4.
Step 4: Customize the Travel Map Media
Either start a new project and import the video of the map you exported in the previous step to the app and then to the Timeline, or remove the existing media from the Timeline in the same project, and add the exported video to it for convenience.

For Win 7 or later (64-bit)
Secure Download
For macOS 10.14 or later
Secure Download
Next, position the Skimmer (Playhead) a couple of frames before the one the route line appears and starts stretching from, and click the Split icon from the editing toolbar above the Timeline itself. Repeat this process for the other side of the media, i.e., position the Skimmer a couple of frames after the route line reaches the destination location, and click the Split icon again. Then remove the separated segments from both the sides by selecting them and pressing Delete on the keyboard, leaving only the portion where the animation is visible.

Optionally, right-click the media that is left behind in the Timeline, and go to Speed and Duration from the context menu. On the Custom Speed box, drag the Speed slider to the left to decrease the playback speed resulting in the increased duration of the media. Alternatively, you can manually enter a value in the Speed box to get precise tenure. Click OK when you are done.

Step 5: Add Animations to Travel Map
Right-click the media in the Timeline, and go to Add Animation from the context menu. Make sure that the Skimmer is on the first frame, and add several keyframes as explained below:
- Click Add to add the first keyframe

- Move a couple of frames further, and click Add one more time. Now, while you are on this second keyframe, use the Scale slider to zoom in to the map so the source location remains within focus.

- Next, move the Playhead further and add another keyframe a couple of frames before the route line hits the edge of the window.
- After this, move the Playhead again and position it where the route line reaches its destination location. Add another keyframe here as well, and move the map in the Preview window so the focus is now on the destination.
- Move the Playhead a few frames further, add another keyframe, and use the Scale slider to zoom a bit more into the map to make the entire animation look realistic. Click OK to save the changes.
Step 6: Add Icons and Titles, and Export the Project
Drag the image of the traveling medium to the Timeline, and place it on the frame the route line starts from. Make sure to place the image on the track above the map, and stretch it to the end so it remains visible throughout the animation. Next, use the method explained above to add keyframes to move the medium along with the route line from the source to the destination. Optionally, add the image of the location marker at the destination point, go to Transition, and add your preferred transition effect, preferably Dissolve, to the marker track in the Timeline so it looks as if it has appeared as the medium arrived the destination.
For Win 7 or later (64-bit)
Secure Download
For macOS 10.14 or later
Secure Download
Get back to the first frame in the Timeline, go to Titles on the standard toolbar, and add a title preset somewhere near the source location. Resize the text, change the format as needed, and add your preferred caption to it such as the start time, name, etc. Reduce the duration of the track so the title appears for a few frames, preferably before the map animation starts. Click OK when done. Repeat this process for the destination point as well.
Once everything is complete, click the Play button in the Preview window to review your work. If the video looks acceptable, click EXPORT from the top-center of the interface, and use the method explained earlier to export the animated travel map in your preferred format.
![]()
Method 2 How to Make Interactive Animated Travel Map with Pictramap
If you don’t want to install a dedicated animation software on your computer due to limited hardware resources or some other reason, there is an online solution called Pictramap to create a travel map animation using a web browser. The web app offers a lucrative interface that could be easily understood and worked with to produce an animated map for free.
The process to create an animated travel map with Pictramap is given below:
Step 1: Create a Project
Launch your favorite web browser, go to https://www.pictramap.com/ , click Create yours now, it’s free, and sign up to Pictramap using your preferred method. When you are on the Dashboard, enter a name in the field available under the My Projects section, and click Create to create a new project (the animated map).

Step 2: Define the Locations and Method of Commute
On the map, right-click the location you want to start your journey from, enter the name of the location or any other significant title, and click Add. Click the location marker, click the Travel Mode icon, and select your preferred mode of traveling. Repeat this process to mark the destination location as well.

Step 3: Preview the Animation
Click the View Animation button from the upper-right corner of the page to see the animated travel map.

Downsides of Using Pictramap to Create Animated Travel Map Video
Although Pictramap allows you to create a travel map animation with ease and extremely quickly, at the time of this writing, it offers no way of downloading the animation to your PC, and therefore it couldn’t be used in your projects.
If you are using Wondershare Filmora, you can use its built-in screen recording feature to record the animation that Pictramap plays, and then save the captured footage as MP4 or any other format on your computer. This video can then be imported to your projects for further uses.
![]()
A cross-platform for making videos anywhere for all creators

Why your video editing isn’t good enough? How about some creative inspo?
- 100 Million+ Users
- 150+ Countries and Regions
- 4 Million+ Social Media Followers
- 5 Million+ Stock Media for Use
* Secure Download

Method 3 How To Make Animated Travel Map Using Multidev
Multi.dev is still a new web-based application to build awesome animated maps, but it’s good! The application helps you create presentations about all your recent and previous trips. And the interface is also hassle-free.
So, follow this step-by-step guide to making animated maps with Multi.dev.
Step 1: Open Multi.dev
Visit Multi.dev from your internet browser.

Once the tool gets open, you will see a demo video. This example clip will have animated maps of different locations. So it is up to you whether to use the same example and edit the places you have been to or are planning to visit. Or, simply create a new animated map from scratch.
Step 2: Choose Your First Location
Take your mouse cursor on the left side of the application and type the first location in the search bar. As soon as you do it, you will see that the “travel arrow” will automatically begin from there. Likewise, type and select the next location through the search bar.
Once you type the location, you will see 8 travel modes, including airplane, bus, and train. You can select the same mode for all sites or a different mode for another place. Totally up to you!

Step 3: Select Map Themes
All your chosen places will be highlighted in the software’s minimalistic map.

Step 4: Download Map on Your Computer
If you’re happy with the animated map, click the “Create Video” button to save the animated map on your computer in a few minutes.


Contrarily, you can also share the animation by choosing the “Share Animation” option.
Conclusion
An animated travel map plays an important role to add a realistic touring effect to your motion picture projects. While you can use a web app like Pictramap to create such an animation online easily and for free, the limitations it comes along with might keep you from choosing this method.
Instead, you may want to get more inclined toward a dedicated post-production software like Wondershare Filmora that gives you full control over the process, and the freedom to choose your preferred format to export the animation to for independent usage.
For Win 7 or later (64-bit)
Secure Download
For macOS 10.14 or later
Secure Download
Benjamin Arango
Benjamin Arango is a writer and a lover of all things video.
Follow @Benjamin Arango
Benjamin Arango
Mar 27, 2024• Proven solutions
Animated travel map videos make it easy for the viewers to follow the routes from the source to destination locations right on the single screen. While the static maps would only allow the audience to see the markers from where the journey would start and is expected to end, the animated ones show the real-time movements and therefore look more interactive when viewed.
That said, here you will learn how to create an attractive and engaging animated travel map video using one of the easiest post-production applications, Wondershare Filmora, which is widely appreciated by amateurs and professionals throughout the globe. In another section, you will also learn about an alternative program that might be of some help in case you are more into online designing.
- Method 1: Make Animated Travel Map Videos with Location Video Maker - [Video Tutorial]
- Method 2: Make Interactive Animated Travel Map with Pictramap
- Method 3: Create Animated Travel Map Using Multidev
Method 1 Make Animated Travel Map Videos with Location Video Maker
The entire process of creating an animated travel map video in Wondershare’s Filmora is categorized into two parts, wherein the first part you will collect all the ingredients that are needed to get started, and in the second part you will actually make an animated map using the tools and features present in Filmora.
Watch a video tutorial to see how to make an animated map for a video:
For Win 7 or later (64-bit)
Secure Download
For macOS 10.14 or later
Secure Download
Part 1: Prepare the Travel Map Materials
Following are the ingredients and the methods to collect them for animated travel map preparation:
Step 1: Get the Map
The first thing that you would need to prepare an animated map is an image of a realistic map. Thanks to Google and Microsoft, these things are now pretty easy to arrange. The process is given below:
- Launch your preferred web browser
- Type google.com in the address bar or the search box and hit Enter
- Scroll to zoom out so you can see the entire world map on one screen
- Type Snipping Tool in the Cortana search box present on the left side of the Taskbar
- Launch Snipping Tool, and use it to capture the screenshot of the map
Note: Snipping Tool is a built-in app in Windows 10 and is available for free. If you are using any other operating system, or have a different program to capture the screenshots, feel free to use it according to your convenience.
- Save the screenshot you captured as a JPG file on your PC
Step 2: Mark Out the Map Path
The next step in the process of preparing an animated travel map is to mark your route on it. To do so, you can use any of your preferred photo editing tools. However, to keep this illustration simple, Microsoft Paint is used here, and the method is given below:
- Right-click the screenshot you just captured
- Go to Open with on the context menu, and then click Paint from the submenu that appears
- Pick your preferred color from the pallet of the Paint interface. It is advisable to use an eye-catchy shade such as Red
- Use the Sphere shape tool to draw a circle over the source and destination locations on the map
- Use the Line tool to draw a line from the source point to the destination. Try giving the line a few turns to make it look realistic
- Go to File > Save As, and save the marked image with a different name
Note: Once this is done, you should have two image files of the map, i.e., one without the marks and one with it
Step 3: Download Some Travel Icons
Another important ingredient in an effective travel map animation is touring icons such as location marker image, a traveling medium symbol like a helicopter, airplane, car/bike (for short distances), etc. A couple of websites that offer royalty-free stock photos at absolutely no cost are listed below:
Note: Although the websites given above allow you to download and use their stock images and icons for free, you may need to give credits to the designers/creators of the symbols while using their objects. Therefore, you are suggested to check the Terms & Conditions and norms of usage of the elements before downloading and adding them to your projects.
Part 2: Make Animated Travel Map Videos with Filmora
After you have gathered all the necessary ingredients that are required to create a travel map animation, it is now time to get to work. The following instructions would guide you through the step-by-step process of preparing a decent and realistic animated travel map in Wondershare Filmora :
For Win 7 or later (64-bit)
Secure Download
For macOS 10.14 or later
Secure Download
Step 1: Import Ingredients to Filmora and Add Them to the Timeline
Launch the video editor on your computer, click anywhere inside the Media window at the upper-left area, and import all the images and icons that you collected earlier to program. Next, drag both the images of the map, i.e., with and without the marks to the Timeline, and ensure that they are of the same duration and are placed on the same track.
Note: Be sure to put the map without the marks first, and then the one with the marks. Also note that the images have the playback duration of 5 seconds in the Timeline by default, and this tenure can be reduced or increased by dragging the side handle of the media to the left or right respectively.
Step 2: Add Transition for Illusion of Route Appearance
Go to Transition from the standard toolbar at the top, locate the Erase Slide transition effect from the available presets, and place it in between the two image files that you earlier added to the Timeline. Next, click and drag either of the side handles of the transition to the end of the media clip. Notice how the other side of the effect is expanded in equal proportion.
Step 3: Preview and Export
Press the Spacebar on the keyboard to preview the video and see if the route appears as if it is being drawn on the map. Once the animation looks acceptable, click EXPORT from the top-center, go to the Local tab on the Export window, select MP4 from the formats list in the left, and click EXPORT from the bottom-right corner to export the current animation to MP4.
Step 4: Customize the Travel Map Media
Either start a new project and import the video of the map you exported in the previous step to the app and then to the Timeline, or remove the existing media from the Timeline in the same project, and add the exported video to it for convenience.
For Win 7 or later (64-bit)
Secure Download
For macOS 10.14 or later
Secure Download
Next, position the Skimmer (Playhead) a couple of frames before the one the route line appears and starts stretching from, and click the Split icon from the editing toolbar above the Timeline itself. Repeat this process for the other side of the media, i.e., position the Skimmer a couple of frames after the route line reaches the destination location, and click the Split icon again. Then remove the separated segments from both the sides by selecting them and pressing Delete on the keyboard, leaving only the portion where the animation is visible.
Optionally, right-click the media that is left behind in the Timeline, and go to Speed and Duration from the context menu. On the Custom Speed box, drag the Speed slider to the left to decrease the playback speed resulting in the increased duration of the media. Alternatively, you can manually enter a value in the Speed box to get precise tenure. Click OK when you are done.
Step 5: Add Animations to Travel Map
Right-click the media in the Timeline, and go to Add Animation from the context menu. Make sure that the Skimmer is on the first frame, and add several keyframes as explained below:
- Click Add to add the first keyframe
- Move a couple of frames further, and click Add one more time. Now, while you are on this second keyframe, use the Scale slider to zoom in to the map so the source location remains within focus.
- Next, move the Playhead further and add another keyframe a couple of frames before the route line hits the edge of the window.
- After this, move the Playhead again and position it where the route line reaches its destination location. Add another keyframe here as well, and move the map in the Preview window so the focus is now on the destination.
- Move the Playhead a few frames further, add another keyframe, and use the Scale slider to zoom a bit more into the map to make the entire animation look realistic. Click OK to save the changes.
Step 6: Add Icons and Titles, and Export the Project
Drag the image of the traveling medium to the Timeline, and place it on the frame the route line starts from. Make sure to place the image on the track above the map, and stretch it to the end so it remains visible throughout the animation. Next, use the method explained above to add keyframes to move the medium along with the route line from the source to the destination. Optionally, add the image of the location marker at the destination point, go to Transition, and add your preferred transition effect, preferably Dissolve, to the marker track in the Timeline so it looks as if it has appeared as the medium arrived the destination.
For Win 7 or later (64-bit)
Secure Download
For macOS 10.14 or later
Secure Download
Get back to the first frame in the Timeline, go to Titles on the standard toolbar, and add a title preset somewhere near the source location. Resize the text, change the format as needed, and add your preferred caption to it such as the start time, name, etc. Reduce the duration of the track so the title appears for a few frames, preferably before the map animation starts. Click OK when done. Repeat this process for the destination point as well.
Once everything is complete, click the Play button in the Preview window to review your work. If the video looks acceptable, click EXPORT from the top-center of the interface, and use the method explained earlier to export the animated travel map in your preferred format.
![]()
Method 2 How to Make Interactive Animated Travel Map with Pictramap
If you don’t want to install a dedicated animation software on your computer due to limited hardware resources or some other reason, there is an online solution called Pictramap to create a travel map animation using a web browser. The web app offers a lucrative interface that could be easily understood and worked with to produce an animated map for free.
The process to create an animated travel map with Pictramap is given below:
Step 1: Create a Project
Launch your favorite web browser, go to https://www.pictramap.com/ , click Create yours now, it’s free, and sign up to Pictramap using your preferred method. When you are on the Dashboard, enter a name in the field available under the My Projects section, and click Create to create a new project (the animated map).
Step 2: Define the Locations and Method of Commute
On the map, right-click the location you want to start your journey from, enter the name of the location or any other significant title, and click Add. Click the location marker, click the Travel Mode icon, and select your preferred mode of traveling. Repeat this process to mark the destination location as well.
Step 3: Preview the Animation
Click the View Animation button from the upper-right corner of the page to see the animated travel map.
Downsides of Using Pictramap to Create Animated Travel Map Video
Although Pictramap allows you to create a travel map animation with ease and extremely quickly, at the time of this writing, it offers no way of downloading the animation to your PC, and therefore it couldn’t be used in your projects.
If you are using Wondershare Filmora, you can use its built-in screen recording feature to record the animation that Pictramap plays, and then save the captured footage as MP4 or any other format on your computer. This video can then be imported to your projects for further uses.
![]()
A cross-platform for making videos anywhere for all creators
Why your video editing isn’t good enough? How about some creative inspo?
- 100 Million+ Users
- 150+ Countries and Regions
- 4 Million+ Social Media Followers
- 5 Million+ Stock Media for Use
* Secure Download
Method 3 How To Make Animated Travel Map Using Multidev
Multi.dev is still a new web-based application to build awesome animated maps, but it’s good! The application helps you create presentations about all your recent and previous trips. And the interface is also hassle-free.
So, follow this step-by-step guide to making animated maps with Multi.dev.
Step 1: Open Multi.dev
Visit Multi.dev from your internet browser.
Once the tool gets open, you will see a demo video. This example clip will have animated maps of different locations. So it is up to you whether to use the same example and edit the places you have been to or are planning to visit. Or, simply create a new animated map from scratch.
Step 2: Choose Your First Location
Take your mouse cursor on the left side of the application and type the first location in the search bar. As soon as you do it, you will see that the “travel arrow” will automatically begin from there. Likewise, type and select the next location through the search bar.
Once you type the location, you will see 8 travel modes, including airplane, bus, and train. You can select the same mode for all sites or a different mode for another place. Totally up to you!
Step 3: Select Map Themes
All your chosen places will be highlighted in the software’s minimalistic map.
Step 4: Download Map on Your Computer
If you’re happy with the animated map, click the “Create Video” button to save the animated map on your computer in a few minutes.
Contrarily, you can also share the animation by choosing the “Share Animation” option.
Conclusion
An animated travel map plays an important role to add a realistic touring effect to your motion picture projects. While you can use a web app like Pictramap to create such an animation online easily and for free, the limitations it comes along with might keep you from choosing this method.
Instead, you may want to get more inclined toward a dedicated post-production software like Wondershare Filmora that gives you full control over the process, and the freedom to choose your preferred format to export the animation to for independent usage.
For Win 7 or later (64-bit)
Secure Download
For macOS 10.14 or later
Secure Download
Benjamin Arango
Benjamin Arango is a writer and a lover of all things video.
Follow @Benjamin Arango
How to Make Your GIF on WhatsApp in Simple Ways
How to Make Your Own GIF on WhatsApp in Simple Ways
An easy yet powerful editor
Numerous effects to choose from
Detailed tutorials provided by the official channel
The feature of adding a GIF to your conversations on WhatsApp has been rolled out for a long and these animations add liveliness to your chats. On your iPhone as well as Android devices, there is an integrated library of these GIFs in several categories that can be used.
Additionally, you can even make your own GIF using the videos on your WhatsApp in a few simple steps. Learn all about these GIFs and how to make your own GIF on WhatsApp.
In this article
01 [How to send GIF from the integrated library on WhatsApp](#Part 1)
02 [How to create WhatsApp GIF using Videos on Android and iPhone](#Part 2)
03 [How to create an excellent GIF using Wondershare Filmora](#Part 3)
Part 1 How to send GIF from the integrated library on WhatsApp
Your iPhone, as well as Android devices, has a library of GIFs that can be used to search for the desired animations. The steps for sharing these GIFs are as follows.
Step 1. Launch WhatsApp on your smartphone and open the chat to which you wish to send the GIF. On your Android phone, click on the smiley emoji and then select GIF options from the bottom of the screen and the library of the animations will open.
On your iPhone, to open the library of GIF, click on the sticker icon.
Step 2. You can choose from available GIF and even search for the desired one using the keyword at the search icon.
Step 3. Tap on the selected GIF and then click on the Send button that will share the animation to the chat.
Part 2 How to create WhatsApp GIF using Videos on Android and iPhone
In addition to the library, WhatsApp also allows creating GIF animations using the videos on the device. (For iPhone users, even Live Photos can be used). For a video to be used as GIF, it cannot be more than 6 seconds. So, the longer videos need to be trimmed to under 6 seconds.
Steps to create custom GIF WhatsApp using videos
Step 1. Open the WhatsApp chat on your phone where you want to send the GIF. Click on the camera icon and then select the video from your device’s gallery. Alternatively, you can also record a live video to create a GIF.
Step 2. After the video is added, trim it down under 6 seconds using the slider at the top. You can add text to the video using the Caption option.
Step 3. Next, click on the GIF button that will convert the added video into GIF. Finally, click on the Send button at the bottom-right corner.
Part 3 How to create an excellent GIF using Wondershare Filmora
Though iPhone and Android, both allow creating a GIF from videos on your device, the option for customizations is limited. So, if you want to create your own GIF using images and videos, Wondershare Filmora will work as the best software. This versatile tool supports all key media formats like JPG, PNG, MP4, MKV, MOV, and others for creating GIF animations.
The overall process is fast as well as simple where you just need to add the media files, edit them and choose to save them as GIFs. Using Wondershare Filmora Video Editor , multiple customizations can be done, like rotating, trimming, adding texts, adding sounds, speed-up, adding elements, and more.
Wondershare Filmora
Get started easily with Filmora’s powerful performance, intuitive interface, and countless effects!
Try It Free Try It Free Try It Free Learn More >

Steps to create GIF using Wondershare Filmora
StepLaunch the Wondershare software on your system and add the local media files from which you wish to create a GIF.
Step 1. Next, drag and drop the files to the timeline of the software.
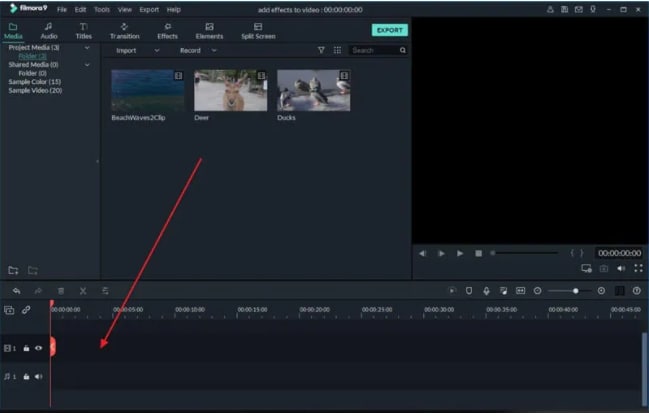
Step 2. Using the editing tools, you can customize the added files.
Step 3. Add texts, and effects as needed using the functions at the software.
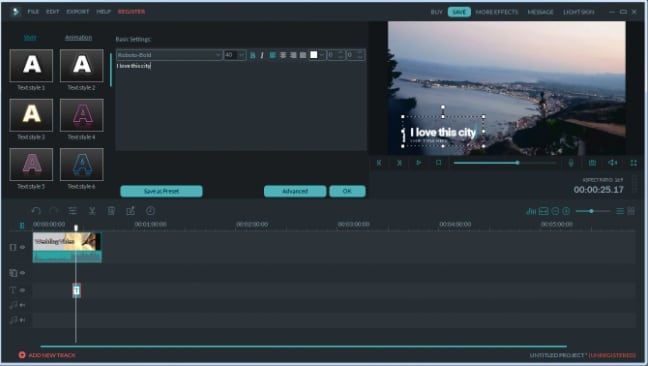
Step 4. Next, at the Local tab choose the GIF option, select the desired file name and the system location to save the file. Finally, click on the EXPORT button to start the file processing.
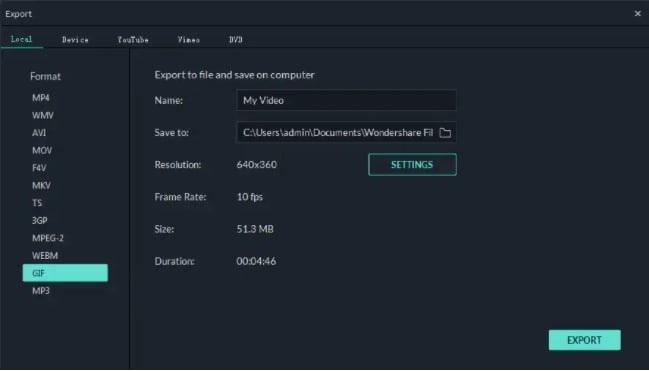
● Key Takeaways from This Episode →
●GIF animations can be added from the integrated library at Android and iPhone devices.
●Using the local videos on the phone, GIF can also be created.
●For creating an excellent and professional-looking GIF, Wondershare Filmora works as one of the best tools that is simple and quick to use.
The feature of adding a GIF to your conversations on WhatsApp has been rolled out for a long and these animations add liveliness to your chats. On your iPhone as well as Android devices, there is an integrated library of these GIFs in several categories that can be used.
Additionally, you can even make your own GIF using the videos on your WhatsApp in a few simple steps. Learn all about these GIFs and how to make your own GIF on WhatsApp.
In this article
01 [How to send GIF from the integrated library on WhatsApp](#Part 1)
02 [How to create WhatsApp GIF using Videos on Android and iPhone](#Part 2)
03 [How to create an excellent GIF using Wondershare Filmora](#Part 3)
Part 1 How to send GIF from the integrated library on WhatsApp
Your iPhone, as well as Android devices, has a library of GIFs that can be used to search for the desired animations. The steps for sharing these GIFs are as follows.
Step 1. Launch WhatsApp on your smartphone and open the chat to which you wish to send the GIF. On your Android phone, click on the smiley emoji and then select GIF options from the bottom of the screen and the library of the animations will open.
On your iPhone, to open the library of GIF, click on the sticker icon.
Step 2. You can choose from available GIF and even search for the desired one using the keyword at the search icon.
Step 3. Tap on the selected GIF and then click on the Send button that will share the animation to the chat.
Part 2 How to create WhatsApp GIF using Videos on Android and iPhone
In addition to the library, WhatsApp also allows creating GIF animations using the videos on the device. (For iPhone users, even Live Photos can be used). For a video to be used as GIF, it cannot be more than 6 seconds. So, the longer videos need to be trimmed to under 6 seconds.
Steps to create custom GIF WhatsApp using videos
Step 1. Open the WhatsApp chat on your phone where you want to send the GIF. Click on the camera icon and then select the video from your device’s gallery. Alternatively, you can also record a live video to create a GIF.
Step 2. After the video is added, trim it down under 6 seconds using the slider at the top. You can add text to the video using the Caption option.
Step 3. Next, click on the GIF button that will convert the added video into GIF. Finally, click on the Send button at the bottom-right corner.
Part 3 How to create an excellent GIF using Wondershare Filmora
Though iPhone and Android, both allow creating a GIF from videos on your device, the option for customizations is limited. So, if you want to create your own GIF using images and videos, Wondershare Filmora will work as the best software. This versatile tool supports all key media formats like JPG, PNG, MP4, MKV, MOV, and others for creating GIF animations.
The overall process is fast as well as simple where you just need to add the media files, edit them and choose to save them as GIFs. Using Wondershare Filmora Video Editor , multiple customizations can be done, like rotating, trimming, adding texts, adding sounds, speed-up, adding elements, and more.
Wondershare Filmora
Get started easily with Filmora’s powerful performance, intuitive interface, and countless effects!
Try It Free Try It Free Try It Free Learn More >
Steps to create GIF using Wondershare Filmora
StepLaunch the Wondershare software on your system and add the local media files from which you wish to create a GIF.
Step 1. Next, drag and drop the files to the timeline of the software.
Step 2. Using the editing tools, you can customize the added files.
Step 3. Add texts, and effects as needed using the functions at the software.
Step 4. Next, at the Local tab choose the GIF option, select the desired file name and the system location to save the file. Finally, click on the EXPORT button to start the file processing.
● Key Takeaways from This Episode →
●GIF animations can be added from the integrated library at Android and iPhone devices.
●Using the local videos on the phone, GIF can also be created.
●For creating an excellent and professional-looking GIF, Wondershare Filmora works as one of the best tools that is simple and quick to use.
5 Must Try Ways to Add and Send GIF in Text Message on Android
5 Must Try Ways to Add and Send GIF in Text Message on Android
An easy yet powerful editor
Numerous effects to choose from
Detailed tutorials provided by the official channel
A much easier and more extraordinary way of expressing yourself is texting with GIFs, and thus, GIFs for texting on Android are so famous now. GIFs, an abbreviation for Graphics Interchange Format, are brief animated images primarily used in a fun way to pass a message during texting and chatting. You do not necessarily have to say a word; a GIF does that for you!

Having GIFs is one thing; it is another to know how to use them effectively during conversations. Almost all operating system keyboards come with their style of sending GIFs to people. Also, you can download GIFs from the internet and go ahead to attach them directly to a text message. There are also third-party applications like GIPHY and GIF Keyboard to get GIFs for texting on Android. GIPHY is undoubtedly the best GIF app for Android texting. With Gboard, the built-in Google keyboard found in most Android devices; you can effortlessly search for GIFs for texting on Android.
In this article
01 [Can You Text a GIF?](#Part 1)
02 [Best 5 Ways to Add and Send GIFs in Text Message on Android](#Part 2)
Part 1 Can You Text a GIF?
The simple answer is yes! It is possible to message a GIF. GIFs for Android text messaging are becoming the new normal, and this is not surprising as they are easy to add to texts and make texting livelier.
To use a GIF for texting on Android, open any messaging app of your choice found on your Android device; it could be WhatsApp or the default message app installed on the Android device. The keyboard would most likely offer you a variety of GIF options. If not, click on the smiley icon at the bottom of the keyboard to reveal other GIFs grouped in categories. Simply clicking on any of your choices would select it, and all you must do is hit the send icon.
Google’s texting app, Google Messages, comes with sending GIFs. To use a GIF in text messages on Android, open the messaging app and start a fresh conversation or open an existing one, then select the square icon with GIF written in the middle. Select your preferred GIF, then click Send. You can also add a brief description or caption before sending the GIF across.
Apart from the built-in apps on Android devices that allow you to send GIFs, there are unique apps like GIPHY (compatible with Android and iOS devices) with an extensive array of GIFs that can fit into different contexts greetings, culture, animals, reactions, etc. You can also employ social media trackers that help you discover popular and trending GIFs. If the available GIFs do not express your intention, you can go ahead to perform a search to find other GIFs. That way, there’s no limitation to the messages you want to pass through GIFs for texting on Android devices.
Part 2 Best 5 Ways to Add and Send GIF in Text Message on Android
There are different ways of using GIFs for Android texting. Apart from using the GIFs available in the built-in keyboard of messaging apps, downloading, and installing an instant messaging app or GIF keyboard is one of the best and easiest ways to access many GIF libraries.
This section would suggest to you the best GIF apps for Android texting and other ways you can explore to send GIFs and make your texting less wordy, more visual, and more expressive:
01Attaching GIF to a text message
This method of using GIFs for Android texting is straightforward. All you need is a messaging app, then follow these steps:
Step 1: On your Android phone’s app list, open Messages, the app represented as a white speech bubble.

Step 2: At the bottom right corner of the app, tap the blue circular button with a white plus sign. This will open a page to select the receiver’s contact.

Step 3: Select the recipient’s number by tapping on it from the contact list or type the number or name of the person directly into the “To” field at the top of the screen.

Step 4: Tap the circular button with the plus sign in the middle on the left side of the message field. Depending on the app, it may be a paper clip icon.

Step 5: Tap the images icon to select an image from your phone media library.

Step 6: Click Gallery to select a previously downloaded GIF.

Step 7: Select the GIF you want to send. This would insert the GIF into a small preview image on the text message. The GIF would play in the preview window.

Step 8: Click the paper icon at the right corner of the text field to send the animated GIF image.

02Gboard
Gboard is a Google keyboard. This is another easy way of adding GIFs for Android text messaging. If you do not have Gboard, download it from Play Store and install it on your Android phone. Follow these to add GIFs to your text messages:
Step 1: Download, install and set up Gboard on your Android phone.

Step 2: Open your text messaging app to write a new text message. If you have previously sent a message to the recipient, click on the ongoing conversation or open a new chat and select the recipient’s contact.
Step 3: Tap the text message field to compose your text message. If your default keyboard is Gboard, then Gboard will be automatically opened.

Step 4: At the bottom of the keyboard, just to the left of the space bar, tap the smiley face icon.

Step 5: Click the GIF button located at the bottom row of the keyboard.

Step 6: Browse through the different categories tab below the GIF to select a GIF or enter a keyword to look for a GIF.

Step 7: Click on the GIF you want to add to the text message you’re typing automatically.

Step 8: Click the Send button, usually represented as a paper airplane icon at the bottom right of the messaging app.

03GIPHY
This is one of the most popular platforms that supports GIFs for texting on Android. It has the largest library of GIFs, making it a perfect search engine for them. GIPHY allows you to personalize your GIFs while finding the latest and trending GIFs. It also allows you to explore visual aspects, including sports highlights, TV shows, movies, etc. Installing this application gives you access to various GIFs that you can directly share with friends on social media or send them to messaging apps like WhatsApp, Facebook Messenger, etc. With GIPHY, you can save and share gifs while also using the animated stickers available on the app.

04SwiftKey Keyboard
This keyboard app comes with many features, including sending GIFs. This keyboard app lends your writing style and adapts to it, making it a highly productive app for typing. Its emoji keyboard allows you to effortlessly search and send fun stickers, emojis, and GIFs while texting. It also has a multilingual feature.

05GIF Keyboard
This keyboard makes it easy for you to directly and conveniently send GIFs from your keyboard. With a library of millions of GIFs, you need to type in a keyword to get the right GIF at any point in time. Send emojis, videos, and animated GIFs with just a single click using GIF Keyboard. You can browse for GIFs by category, save your favorites GIFs, and share them using different messaging apps.

● Key Takeaways from This Episode →
● How to use GIFs for Android texting.
●the Best GIF apps for Android texting.
● Different reliable ways of using GIFs to spice up your texting on Android devices.
●Using GIFs for Android text messaging is the way to go in this modern age. This is because people relate more to visual representations than mere write-ups. Now, you know that it is possible to text GIFs and send them is simple using the extensively discussed methods in this article.
A much easier and more extraordinary way of expressing yourself is texting with GIFs, and thus, GIFs for texting on Android are so famous now. GIFs, an abbreviation for Graphics Interchange Format, are brief animated images primarily used in a fun way to pass a message during texting and chatting. You do not necessarily have to say a word; a GIF does that for you!
Having GIFs is one thing; it is another to know how to use them effectively during conversations. Almost all operating system keyboards come with their style of sending GIFs to people. Also, you can download GIFs from the internet and go ahead to attach them directly to a text message. There are also third-party applications like GIPHY and GIF Keyboard to get GIFs for texting on Android. GIPHY is undoubtedly the best GIF app for Android texting. With Gboard, the built-in Google keyboard found in most Android devices; you can effortlessly search for GIFs for texting on Android.
In this article
01 [Can You Text a GIF?](#Part 1)
02 [Best 5 Ways to Add and Send GIFs in Text Message on Android](#Part 2)
Part 1 Can You Text a GIF?
The simple answer is yes! It is possible to message a GIF. GIFs for Android text messaging are becoming the new normal, and this is not surprising as they are easy to add to texts and make texting livelier.
To use a GIF for texting on Android, open any messaging app of your choice found on your Android device; it could be WhatsApp or the default message app installed on the Android device. The keyboard would most likely offer you a variety of GIF options. If not, click on the smiley icon at the bottom of the keyboard to reveal other GIFs grouped in categories. Simply clicking on any of your choices would select it, and all you must do is hit the send icon.
Google’s texting app, Google Messages, comes with sending GIFs. To use a GIF in text messages on Android, open the messaging app and start a fresh conversation or open an existing one, then select the square icon with GIF written in the middle. Select your preferred GIF, then click Send. You can also add a brief description or caption before sending the GIF across.
Apart from the built-in apps on Android devices that allow you to send GIFs, there are unique apps like GIPHY (compatible with Android and iOS devices) with an extensive array of GIFs that can fit into different contexts greetings, culture, animals, reactions, etc. You can also employ social media trackers that help you discover popular and trending GIFs. If the available GIFs do not express your intention, you can go ahead to perform a search to find other GIFs. That way, there’s no limitation to the messages you want to pass through GIFs for texting on Android devices.
Part 2 Best 5 Ways to Add and Send GIF in Text Message on Android
There are different ways of using GIFs for Android texting. Apart from using the GIFs available in the built-in keyboard of messaging apps, downloading, and installing an instant messaging app or GIF keyboard is one of the best and easiest ways to access many GIF libraries.
This section would suggest to you the best GIF apps for Android texting and other ways you can explore to send GIFs and make your texting less wordy, more visual, and more expressive:
01Attaching GIF to a text message
This method of using GIFs for Android texting is straightforward. All you need is a messaging app, then follow these steps:
Step 1: On your Android phone’s app list, open Messages, the app represented as a white speech bubble.
Step 2: At the bottom right corner of the app, tap the blue circular button with a white plus sign. This will open a page to select the receiver’s contact.
Step 3: Select the recipient’s number by tapping on it from the contact list or type the number or name of the person directly into the “To” field at the top of the screen.
Step 4: Tap the circular button with the plus sign in the middle on the left side of the message field. Depending on the app, it may be a paper clip icon.
Step 5: Tap the images icon to select an image from your phone media library.
Step 6: Click Gallery to select a previously downloaded GIF.
Step 7: Select the GIF you want to send. This would insert the GIF into a small preview image on the text message. The GIF would play in the preview window.
Step 8: Click the paper icon at the right corner of the text field to send the animated GIF image.
02Gboard
Gboard is a Google keyboard. This is another easy way of adding GIFs for Android text messaging. If you do not have Gboard, download it from Play Store and install it on your Android phone. Follow these to add GIFs to your text messages:
Step 1: Download, install and set up Gboard on your Android phone.
Step 2: Open your text messaging app to write a new text message. If you have previously sent a message to the recipient, click on the ongoing conversation or open a new chat and select the recipient’s contact.
Step 3: Tap the text message field to compose your text message. If your default keyboard is Gboard, then Gboard will be automatically opened.
Step 4: At the bottom of the keyboard, just to the left of the space bar, tap the smiley face icon.
Step 5: Click the GIF button located at the bottom row of the keyboard.
Step 6: Browse through the different categories tab below the GIF to select a GIF or enter a keyword to look for a GIF.
Step 7: Click on the GIF you want to add to the text message you’re typing automatically.
Step 8: Click the Send button, usually represented as a paper airplane icon at the bottom right of the messaging app.
03GIPHY
This is one of the most popular platforms that supports GIFs for texting on Android. It has the largest library of GIFs, making it a perfect search engine for them. GIPHY allows you to personalize your GIFs while finding the latest and trending GIFs. It also allows you to explore visual aspects, including sports highlights, TV shows, movies, etc. Installing this application gives you access to various GIFs that you can directly share with friends on social media or send them to messaging apps like WhatsApp, Facebook Messenger, etc. With GIPHY, you can save and share gifs while also using the animated stickers available on the app.
04SwiftKey Keyboard
This keyboard app comes with many features, including sending GIFs. This keyboard app lends your writing style and adapts to it, making it a highly productive app for typing. Its emoji keyboard allows you to effortlessly search and send fun stickers, emojis, and GIFs while texting. It also has a multilingual feature.
05GIF Keyboard
This keyboard makes it easy for you to directly and conveniently send GIFs from your keyboard. With a library of millions of GIFs, you need to type in a keyword to get the right GIF at any point in time. Send emojis, videos, and animated GIFs with just a single click using GIF Keyboard. You can browse for GIFs by category, save your favorites GIFs, and share them using different messaging apps.
● Key Takeaways from This Episode →
● How to use GIFs for Android texting.
●the Best GIF apps for Android texting.
● Different reliable ways of using GIFs to spice up your texting on Android devices.
●Using GIFs for Android text messaging is the way to go in this modern age. This is because people relate more to visual representations than mere write-ups. Now, you know that it is possible to text GIFs and send them is simple using the extensively discussed methods in this article.
Also read:
- Updated Types of Cartoon Styles You May Use for Your Next Marketing Project for 2024
- Updated Best Guide for Beginners on 2D Animation Making
- Updated In 2024, 15 Types of Cartoon Drawing Styles with Examples
- 2024 Approved 10 Trendy & Stylish Free Logo Animation Templates
- 2024 Approved 5 Ways You Never Heard of for Converting MP4 to GIF in Photoshop
- Updated The Best Free 12 GIF Meme Maker at a Glance for 2024
- Updated In 2024, Epic Formula to Animate Photos From These 10 Animate Pictures App
- 15 Top Collage Makers to Create Aesthetic Collages for 2024
- Updated 10 Awesome Moving Animation PowerPoint Techniques for 2024
- Most Effective Tactics to Set WhatsApp Status for 2024
- Tips for Animated Collage Maker
- New Some Techniques for Creating Animated Logo That Few People Know About for 2024
- 2024 Approved How to Make Your Characters Interactive in Unity Animation Rigging
- In 2024, Samples of Cartoon Character Face
- Updated In 2024, Easy Cartoon Characters Drawing Tutorials for You Beginners
- In 2024, Whats Music Video GIF & How to Add Music to Your GIF Files
- Updated The Best 8 Places for High-Quality Royalty Free Gifs (Paid and Free) for 2024
- New Top 15 Male Anime Characters By Voting for 2024
- Updated How to Cartoonize Photo Photoshop in Easy Steps
- New Best Websites to Download Animated GIFs for Free-Free GIF Download
- 2024 Approved Beginners Guide for Learning 3D Animation
- New 2024 Approved 10 Cartoon Canvas Painting Ideas for Total Beginners
- 2024 Approved 15 Top Video to GIF App on iPhone and Android
- Updated 2024 Approved Simple Shortcut to Convert Videos to Gifs on iPhone
- Updated 2024 Approved 10 Amazing Cartoon Music Examples You Need to Bookmark
- New Make Well Done Animated GIF for 2024
- How to Show Wi-Fi Password on Xiaomi Redmi 12
- Fix App Not Available in Your Country Play Store Problem on Realme GT 5 | Dr.fone
- Best Sony Xperia 1 V Pattern Lock Removal Tools Remove Android Pattern Lock Without Losing Data
- 9 Quick Fixes to Unfortunately TouchWiz has stopped Of Samsung Galaxy A25 5G | Dr.fone
- New How To Watch NBA Live Stream Free Anywhere
- In 2024, Edit and Send Fake Location on Telegram For your Realme C51 in 3 Ways | Dr.fone
- In 2024, How To Use Special Features - Virtual Location On Itel P40+? | Dr.fone
- In 2024, Exploring the Magic of AI Selfie Generators
- How to Factory Reset HTC U23 If I Forgot Security Code or Password? | Dr.fone
- How To Change Your SIM PIN Code on Your Honor X50 Phone
- In 2024, Fake the Location to Get Around the MLB Blackouts on Xiaomi Redmi 12 5G | Dr.fone
- In 2024, Top 10 Telegram Spy Tools On Nokia C22 for Parents | Dr.fone
- In 2024, How to Remove the Activation Lock On your iPad and Apple iPhone 15 Pro without Apple Account
- 4 Methods to Turn off Life 360 On Infinix Smart 8 Pro without Anyone Knowing | Dr.fone
- Solved How To Transfer From Apple iPhone 15 to iPhone 15 | Dr.fone
- Step-by-Step Tutorial How To Bypass Tecno Spark Go (2023) FRP
- Ultimate Guide to Catch the Regional-Located Pokemon For Nubia Z50 Ultra | Dr.fone
- Title: New In 2024, 10 Cartoon Photo Converters
- Author: Elon
- Created at : 2024-05-19 03:05:29
- Updated at : 2024-05-20 03:05:29
- Link: https://animation-videos.techidaily.com/new-in-2024-10-cartoon-photo-converters/
- License: This work is licensed under CC BY-NC-SA 4.0.
