

New In 2024, 8 Top Motion Graphics Online Tools for Your Inspiration
8 Top Motion Graphics Online Tools for Your Inspiration
8 Best Motion Graphics Online Tools for Your Inspiration
An easy yet powerful editor
Numerous effects to choose from
Detailed tutorials provided by the official channel
Are you looking for the correct answers about what is motion graphics or how to create motion graphics? If yes, then you are at the right place.
Here we will discuss about few best motion graphics online websites and how to create motion graphics video.
In this article
01 [The Power of Motion Graphics](#Part 1)
02 [Motion Graphics Online Courses You Should Learn](#Part 2)
03 [How to Make Motion Graphics in 5 Steps Easily?](#Part 3)
04 [How to Make a Studio-quality Motion Graphics Video](#Part 4)
Part 1 The Power of Motion Graphics
Motion graphics is actually a term which is generally used to describe the mix up of the animation and the graphic designs. People usage the motion graphics in the emotions videos and market their products as well. Motion graphics with the video on the landing page of your website increases the conversion rate by 8as compared to the other methods. Motion graphic videos of your products can simply display the idea of your business within few seconds to the target audience. The biggest reason of using the motion graphics now a day is that motions graphics can quickly the critical or complex business things in few seconds with the fast, simple and compelling way.
Part 2 Motion Graphics Online Courses You Should Learn
If you are newbie to the motion graphics then there are thousands of courses available over the internet which can help you to learn what motion graphic is and how to create your own motion graphic videos of your product and services. Here we are going to list a few courses.
01Creative Coding: Making Visuals with JavaScript
This is the first course which is mainly designed to learn to make the beautiful visuals using the JavaScript. This course is designed by Bruno Imbrizi. In this course you can also explore the coding fundamentals very easily. You can learn the things you need to setup before the programming concepts such as loops, arrays, variables and functions.

02Psychedelic Animation with Photoshop and After Effects
This motion graphics online course is designed by the Klarens Malluta which helps you to understand the aspect of Photoshop to create the beautiful motion graphic videos. Here, you can easily learn about creating colorful psychedelic animation for your motion graphics. With this course you can easily turn the simple photos in the retro futuristic artwork and connect the emotions of the target audience.

03Introduction to Design and Modeling with Blender
This motion graphics video course is presented by the Luis Arizaga which defines the making of characters and the designs in your videos. This course mainly focuses on the blender software which helps you to create powerful animate videos using the render, light, model and the other objects. This course also tells you that how to use the camera lights and create the materials for your motion graphic videos.

04Express Animation for Social Media with After Effects
This course is provided by the Yimbo Escárrega over the internet. With the help of this course you can learn about making your motion graphic online projects quickly in the record time to save your time. While learning this course you can create the beautiful animations quickly and easily with the graphics as well as the video content.

05#Creation of Animated Short Films in for Social Media
The creation of animated short films in for the social media course is presented by the Buda.tv which mainly helps you to learn creating the animated short films for your projects. This helps you to learn the concept from the starting to the end so you can easily understand the basic concepts as well as up to the execution of your video. This course starts with the meeting with Martin and Dalmiro who are the founders of the Buda.TV. Slowly they will start teaching you short films and finally you will be able to export the project with the specification provided by the Martin and Dalmiro.

Part 3 How to Make Motion Graphics in 5 Steps Easily?
Creating motion graphic videos requires you to have lots of designing skills without using any software. In the software’s generally there are premade templates available for mostly all kinds of categories. You can use them and directly apply with your videos with just few changes. If you are still unsure about how to start then you can follow the below steps in this part.
01Things to Prepare before Starting
● First of all you need to start with a creative story. This will help your animator and writer to understand their job easily. Make sure to include all information in the story.
● Make sure to hire a good promotion team in the starting itself because it will help you to get the view of your videos as much as you want.
Now, if you ready then please follow the below steps.
02Steps of Making Motion Graphics
Step 1 Write your Script with a Story
If you want to create good motion graphics video then the story is the first requirement for your motion graphic video. Make sure to choose a short story which defines and clear the motive of video. Mostly stories will be from the seconds to 3 minutes.
Step 2 Prepare for Storyboard for Visualize the Content
Now, you need to prepare the story with the help of your team members of the production and design team. This is the step where the final product will take place. In this step if you have any confusion then you must discuss it with the team because this is very important part of your motion graphic video.
Step 3 Turn your Creative Storyboard in the Design:
At this stage you can now turn your storyboard idea in the design. Here you have to choose the graphic designs of your video, style and color combination for your video. The best thing is that you can choose simple design because it gives a great impact on the video you are creating for your brand.
Once you are ready with the sketches of the storyboard you can easily translate the storyboard in the design what you want. Make sure to keep the things perfect because at this stage every effort will be for the final design.
Step 4 Create the Final Motion Graphic Video Design:
This stage is where you will start animating your designs to make to actual motion graphic video. Here, you need to take care about lots of things such as the style of animation in video, timing, music and the sound effects.
Part 4 How to Make a Studio-quality Motion Graphics Video
Wondershare Filmora Video Editor
Wondershare Filmora is motion graphics maker software which enables you to create best and perfect motion graphics videos within few seconds with the help of premade templates offered in the software. This program comes with the beautiful interface which is very easy to understand for all users and everyone can videos without any effort even if you are newbie to the animation industry. The program comes with several unique features such as motion tracking, key framing, color matching, audio ducking, green screen, split screen, video effects, audio effects and many more other features.

Wondershare Filmora - Best Video Editor for Mac/Windows
5,481,435 people have downloaded it.
Build unique custom animations without breaking a sweat.
Focus on creating epic stories and leave the details to Filmora’s auto features.
Start a creative adventure with drag & drop effects and endless possibilities.
Filmora simplifies advanced features to save you time and effort.
Filmora cuts out repetition so you can move on to your next creative breakthrough.
● Key Takeaways from This Episode →
● Generally, creating motion graphics videos for your products or services requires lots of efforts when you are going to create them first time. It takes lots of time and research for making the motion graphic videos.
● If you want to save your time and create the award winning motion graphic videos then we would like you to try the Wondershare Filmora because it quickly create best and perfect videos for your product or services promotions.
Are you looking for the correct answers about what is motion graphics or how to create motion graphics? If yes, then you are at the right place.
Here we will discuss about few best motion graphics online websites and how to create motion graphics video.
In this article
01 [The Power of Motion Graphics](#Part 1)
02 [Motion Graphics Online Courses You Should Learn](#Part 2)
03 [How to Make Motion Graphics in 5 Steps Easily?](#Part 3)
04 [How to Make a Studio-quality Motion Graphics Video](#Part 4)
Part 1 The Power of Motion Graphics
Motion graphics is actually a term which is generally used to describe the mix up of the animation and the graphic designs. People usage the motion graphics in the emotions videos and market their products as well. Motion graphics with the video on the landing page of your website increases the conversion rate by 8as compared to the other methods. Motion graphic videos of your products can simply display the idea of your business within few seconds to the target audience. The biggest reason of using the motion graphics now a day is that motions graphics can quickly the critical or complex business things in few seconds with the fast, simple and compelling way.
Part 2 Motion Graphics Online Courses You Should Learn
If you are newbie to the motion graphics then there are thousands of courses available over the internet which can help you to learn what motion graphic is and how to create your own motion graphic videos of your product and services. Here we are going to list a few courses.
01Creative Coding: Making Visuals with JavaScript
This is the first course which is mainly designed to learn to make the beautiful visuals using the JavaScript. This course is designed by Bruno Imbrizi. In this course you can also explore the coding fundamentals very easily. You can learn the things you need to setup before the programming concepts such as loops, arrays, variables and functions.
02Psychedelic Animation with Photoshop and After Effects
This motion graphics online course is designed by the Klarens Malluta which helps you to understand the aspect of Photoshop to create the beautiful motion graphic videos. Here, you can easily learn about creating colorful psychedelic animation for your motion graphics. With this course you can easily turn the simple photos in the retro futuristic artwork and connect the emotions of the target audience.
03Introduction to Design and Modeling with Blender
This motion graphics video course is presented by the Luis Arizaga which defines the making of characters and the designs in your videos. This course mainly focuses on the blender software which helps you to create powerful animate videos using the render, light, model and the other objects. This course also tells you that how to use the camera lights and create the materials for your motion graphic videos.
04Express Animation for Social Media with After Effects
This course is provided by the Yimbo Escárrega over the internet. With the help of this course you can learn about making your motion graphic online projects quickly in the record time to save your time. While learning this course you can create the beautiful animations quickly and easily with the graphics as well as the video content.
05#Creation of Animated Short Films in for Social Media
The creation of animated short films in for the social media course is presented by the Buda.tv which mainly helps you to learn creating the animated short films for your projects. This helps you to learn the concept from the starting to the end so you can easily understand the basic concepts as well as up to the execution of your video. This course starts with the meeting with Martin and Dalmiro who are the founders of the Buda.TV. Slowly they will start teaching you short films and finally you will be able to export the project with the specification provided by the Martin and Dalmiro.
Part 3 How to Make Motion Graphics in 5 Steps Easily?
Creating motion graphic videos requires you to have lots of designing skills without using any software. In the software’s generally there are premade templates available for mostly all kinds of categories. You can use them and directly apply with your videos with just few changes. If you are still unsure about how to start then you can follow the below steps in this part.
01Things to Prepare before Starting
● First of all you need to start with a creative story. This will help your animator and writer to understand their job easily. Make sure to include all information in the story.
● Make sure to hire a good promotion team in the starting itself because it will help you to get the view of your videos as much as you want.
Now, if you ready then please follow the below steps.
02Steps of Making Motion Graphics
Step 1 Write your Script with a Story
If you want to create good motion graphics video then the story is the first requirement for your motion graphic video. Make sure to choose a short story which defines and clear the motive of video. Mostly stories will be from the seconds to 3 minutes.
Step 2 Prepare for Storyboard for Visualize the Content
Now, you need to prepare the story with the help of your team members of the production and design team. This is the step where the final product will take place. In this step if you have any confusion then you must discuss it with the team because this is very important part of your motion graphic video.
Step 3 Turn your Creative Storyboard in the Design:
At this stage you can now turn your storyboard idea in the design. Here you have to choose the graphic designs of your video, style and color combination for your video. The best thing is that you can choose simple design because it gives a great impact on the video you are creating for your brand.
Once you are ready with the sketches of the storyboard you can easily translate the storyboard in the design what you want. Make sure to keep the things perfect because at this stage every effort will be for the final design.
Step 4 Create the Final Motion Graphic Video Design:
This stage is where you will start animating your designs to make to actual motion graphic video. Here, you need to take care about lots of things such as the style of animation in video, timing, music and the sound effects.
Part 4 How to Make a Studio-quality Motion Graphics Video
Wondershare Filmora Video Editor
Wondershare Filmora is motion graphics maker software which enables you to create best and perfect motion graphics videos within few seconds with the help of premade templates offered in the software. This program comes with the beautiful interface which is very easy to understand for all users and everyone can videos without any effort even if you are newbie to the animation industry. The program comes with several unique features such as motion tracking, key framing, color matching, audio ducking, green screen, split screen, video effects, audio effects and many more other features.
Wondershare Filmora - Best Video Editor for Mac/Windows
5,481,435 people have downloaded it.
Build unique custom animations without breaking a sweat.
Focus on creating epic stories and leave the details to Filmora’s auto features.
Start a creative adventure with drag & drop effects and endless possibilities.
Filmora simplifies advanced features to save you time and effort.
Filmora cuts out repetition so you can move on to your next creative breakthrough.
● Key Takeaways from This Episode →
● Generally, creating motion graphics videos for your products or services requires lots of efforts when you are going to create them first time. It takes lots of time and research for making the motion graphic videos.
● If you want to save your time and create the award winning motion graphic videos then we would like you to try the Wondershare Filmora because it quickly create best and perfect videos for your product or services promotions.
10 Creative Wallpaper Collage Ideas and Photos
10 Creative Wallpaper Collage Ideas and Photos for 2024
An easy yet powerful editor
Numerous effects to choose from
Detailed tutorials provided by the official channel
Photos are not only some captured moments, but memories for lifetime. So, why not relive these happy and special moments by creating a wallpaper of these photos in a collage format. You can choose from the huge collection of your photos and create wallpaper collages. Set a theme for different rooms and then create interesting wall picture collage. In this article we will help you to learn about some creative wallpaper collage ideas and photos for 2024.
In this article
01 [Top 10 wall collage ideas](#Part 1)
02 [How can wondershare filmora help you design your desired wall collage](#Part 2)
Part 1 Top 10 wall collage ideas
There is no dearth of ideas, themes, and designs when it comes to wall photo collages and wallpaper. To make your selection task a little easier, we have shortlisted some of the popular and creative wall collage ideas that can be used in 2024.
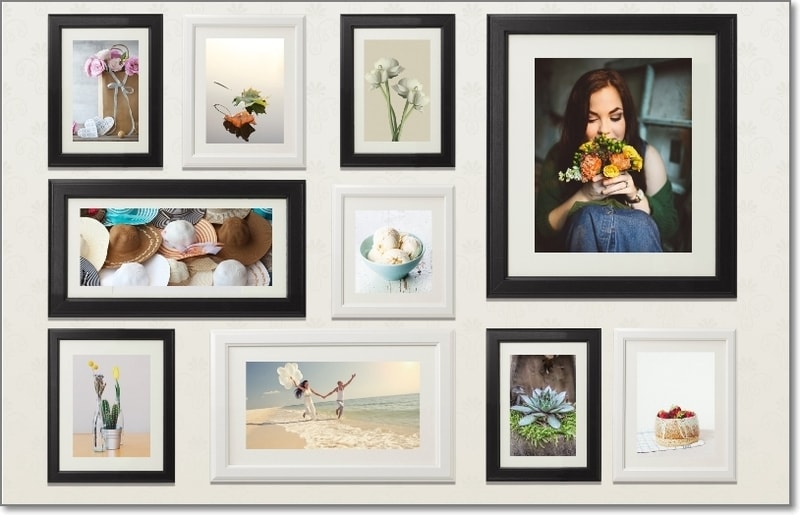
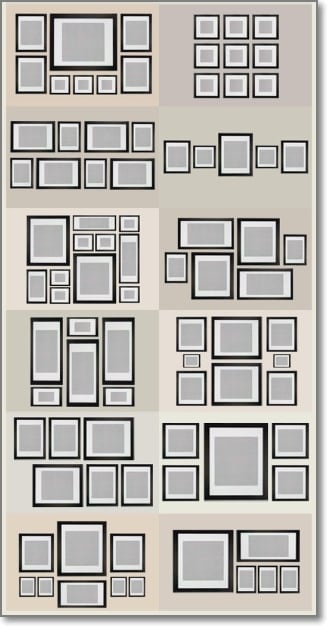
01A simple traditional collage
As it is said simplicity is the best, the same goes with the wall collages. A traditional collage having multiple images set in an order never goes out of fashion. Depending on the size of the wall, you can choose the shape and the number of the pictures to be added to the wallpaper.
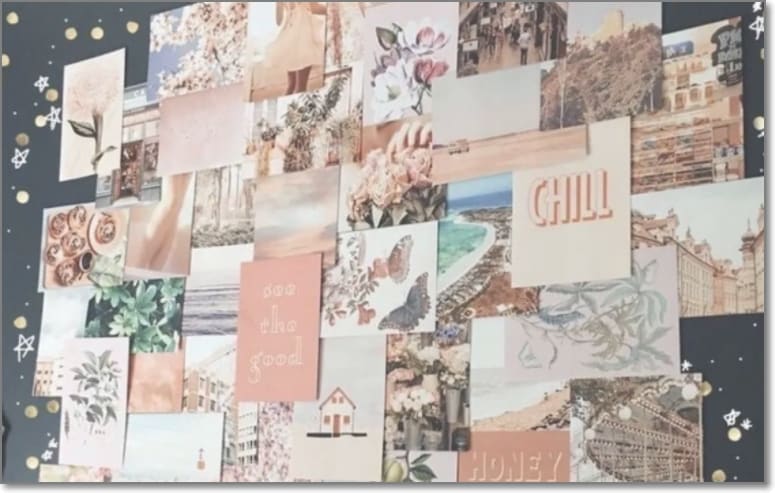
02Full wall collage
This is one of the easiest ways of creating a collage, where you can get all your favourite pics printed and framed and put up randomly on an entire wall. Besides the captured images, you can also choose some of the stock images available at several online sites like Filmora, Canva, and more.
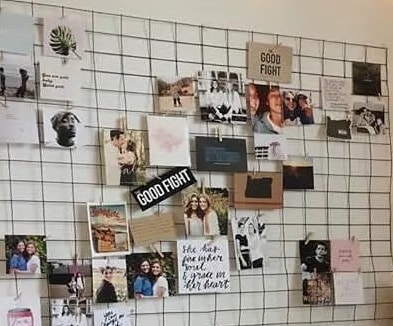
03Creating a photo grid
Besides putting the photos on a wall directly, you can even place them on some rack to create a collage. Creating a wallpaper on a frame or a grid has multiple benefits like it will keep your walls clean, can be moved at any place of your choice and add to overall looks to the room.
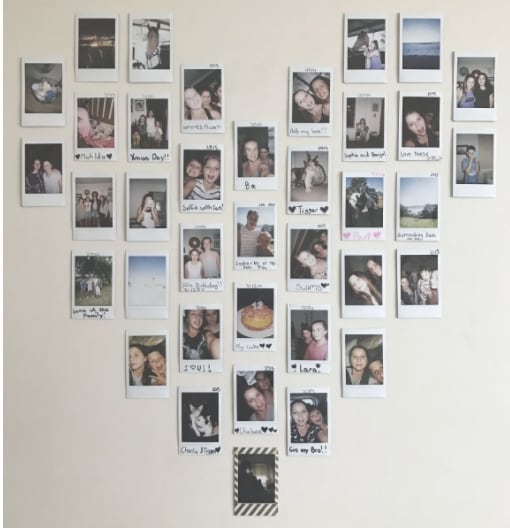
04Creating a collage using polaroid
Instead of getting your images printed and framed, simply take polaroid prints and hang them on a fairy light. This is one of the pocket-friendly collage wall ideas that will also will add warmth and coziness to your room and living space.

05Creating a collage in some shape
Choose a shape of your choice and then set all the desired pictures in that particular shape. This wall collage will look interesting and creative as well. While setting the images in a particular shape ensure that all the pictures are more or less of the same size to make it look symmetrical.
06Adding neon sign to collages
Another interesting way to pep up your wall collage is by adding a neon sign like a heart shape, cloud, or any other amidst your photos on the wall. Neon signs in different shapes, sizes, and colors are available online at pocket friendly prices. As per the theme of your photos, you can add one or more neon signs.

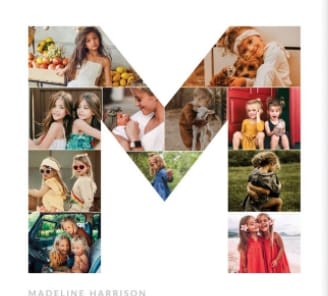
07Wall collage in a letter shape
Create a photo collage in the shape of your name initial or an entire name. You can also create collages for each room in the initials of the name of the person staying in those room. These collages will give a personalised touch to your room.
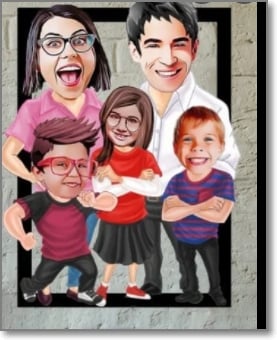
08Caricature wall collage
To add some fun elements to your wall, use caricature of your photos, instead of the simple pictures. There are several online sites that can help you convert your regular images into caricatures that can be used for creating wallpapers.
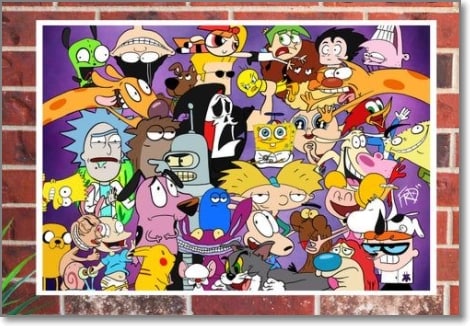
09Cartoon wall collage
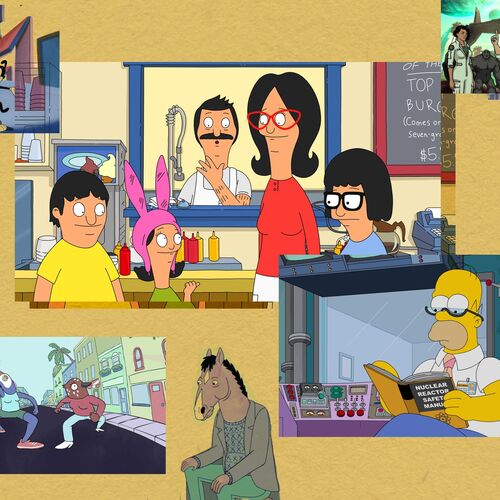
If you want to decorate a kid’s room wall then nothing can be better than using pictures of their favorite cartoon characters for creating a collage. You can even create an interesting wall of your room if you too like cartoon characters. Stock images of these characters in high quality are available on several online sites.
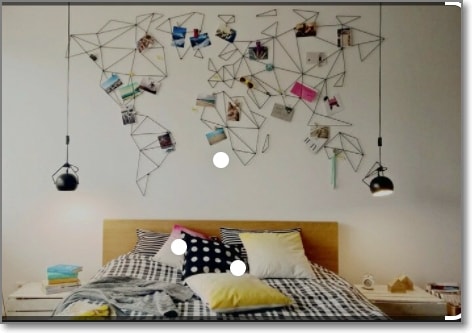
10World Map wall collage
This is one of the best collage ideas if you love to travel. You can create a world map on your wall and then add your own captured images to the places which you have visited.
Part 2 How can Wondershare Filmora help you design your desired wall collage
Using your own captured images for creating a wall collage is a good idea but to further enhance the wallpaper or use the pictures that would match the desired theme you could select the images from the stock library available at several sites.
One such excellent tool is Wondershare Filmora where you can get a huge collection of images in an array of themes and categories. The royalty free images at Wondershare can be used without any worries.
Additionally, the software also has a collection of music and sound effects that can be used for creating online presentations. Wondershare Filmora Video Editor is complete video editing software that can be used for creating professional looking videos. Some of the key features of the tool include adding filters, overlays, transitions, titles, and much more.
Wondershare Filmora - Best Video Editor for Mac/Windows
5,481,435 people have downloaded it.
Build unique custom animations without breaking a sweat.
Focus on creating epic stories and leave the details to Filmora’s auto features.
Start a creative adventure with drag & drop effects and endless possibilities.
Filmora simplifies advanced features to save you time and effort.
Filmora cuts out repetition so you can move on to your next creative breakthrough.
The software is available for download on Windows and Mac systems.
● Key Takeaways from This Episode →
● Wall collages using captured pictures and stock images is an interesting way to decorate your walls.
● There are several creative ideas for wall collage.
● Wondershare Filmora is an excellent tool to find a huge collection of stock images in an array of categories and for all video editing requirements.
Photos are not only some captured moments, but memories for lifetime. So, why not relive these happy and special moments by creating a wallpaper of these photos in a collage format. You can choose from the huge collection of your photos and create wallpaper collages. Set a theme for different rooms and then create interesting wall picture collage. In this article we will help you to learn about some creative wallpaper collage ideas and photos for 2024.
In this article
01 [Top 10 wall collage ideas](#Part 1)
02 [How can wondershare filmora help you design your desired wall collage](#Part 2)
Part 1 Top 10 wall collage ideas
There is no dearth of ideas, themes, and designs when it comes to wall photo collages and wallpaper. To make your selection task a little easier, we have shortlisted some of the popular and creative wall collage ideas that can be used in 2024.
01A simple traditional collage
As it is said simplicity is the best, the same goes with the wall collages. A traditional collage having multiple images set in an order never goes out of fashion. Depending on the size of the wall, you can choose the shape and the number of the pictures to be added to the wallpaper.
02Full wall collage
This is one of the easiest ways of creating a collage, where you can get all your favourite pics printed and framed and put up randomly on an entire wall. Besides the captured images, you can also choose some of the stock images available at several online sites like Filmora, Canva, and more.
03Creating a photo grid
Besides putting the photos on a wall directly, you can even place them on some rack to create a collage. Creating a wallpaper on a frame or a grid has multiple benefits like it will keep your walls clean, can be moved at any place of your choice and add to overall looks to the room.
04Creating a collage using polaroid
Instead of getting your images printed and framed, simply take polaroid prints and hang them on a fairy light. This is one of the pocket-friendly collage wall ideas that will also will add warmth and coziness to your room and living space.
05Creating a collage in some shape
Choose a shape of your choice and then set all the desired pictures in that particular shape. This wall collage will look interesting and creative as well. While setting the images in a particular shape ensure that all the pictures are more or less of the same size to make it look symmetrical.
06Adding neon sign to collages
Another interesting way to pep up your wall collage is by adding a neon sign like a heart shape, cloud, or any other amidst your photos on the wall. Neon signs in different shapes, sizes, and colors are available online at pocket friendly prices. As per the theme of your photos, you can add one or more neon signs.
07Wall collage in a letter shape
Create a photo collage in the shape of your name initial or an entire name. You can also create collages for each room in the initials of the name of the person staying in those room. These collages will give a personalised touch to your room.
08Caricature wall collage
To add some fun elements to your wall, use caricature of your photos, instead of the simple pictures. There are several online sites that can help you convert your regular images into caricatures that can be used for creating wallpapers.
09Cartoon wall collage
If you want to decorate a kid’s room wall then nothing can be better than using pictures of their favorite cartoon characters for creating a collage. You can even create an interesting wall of your room if you too like cartoon characters. Stock images of these characters in high quality are available on several online sites.
10World Map wall collage
This is one of the best collage ideas if you love to travel. You can create a world map on your wall and then add your own captured images to the places which you have visited.
Part 2 How can Wondershare Filmora help you design your desired wall collage
Using your own captured images for creating a wall collage is a good idea but to further enhance the wallpaper or use the pictures that would match the desired theme you could select the images from the stock library available at several sites.
One such excellent tool is Wondershare Filmora where you can get a huge collection of images in an array of themes and categories. The royalty free images at Wondershare can be used without any worries.
Additionally, the software also has a collection of music and sound effects that can be used for creating online presentations. Wondershare Filmora Video Editor is complete video editing software that can be used for creating professional looking videos. Some of the key features of the tool include adding filters, overlays, transitions, titles, and much more.
Wondershare Filmora - Best Video Editor for Mac/Windows
5,481,435 people have downloaded it.
Build unique custom animations without breaking a sweat.
Focus on creating epic stories and leave the details to Filmora’s auto features.
Start a creative adventure with drag & drop effects and endless possibilities.
Filmora simplifies advanced features to save you time and effort.
Filmora cuts out repetition so you can move on to your next creative breakthrough.
The software is available for download on Windows and Mac systems.
● Key Takeaways from This Episode →
● Wall collages using captured pictures and stock images is an interesting way to decorate your walls.
● There are several creative ideas for wall collage.
● Wondershare Filmora is an excellent tool to find a huge collection of stock images in an array of categories and for all video editing requirements.
Samples of Cartoon Character Face
Samples of Cartoon Character Face to Inspire You
An easy yet powerful editor
Numerous effects to choose from
Detailed tutorials provided by the official channel
Being able to draw facial features is an essential skill for any animator. Whether you are a beginner at drawing faces or an experienced cartoon artist that has been drawing for years, this is a skill that can gradually improve with time. With the implementation and use of simple shapes, creating various facial features and cartoon styles can be done quickly.
The methods of creating funny face cartoon characters are suitable for everyone, even if they do not have a single day of illustrating experience. These methods presented in this article are easily accessible to provide you with different results depending on your budget and your desired outcome.
The act of drawing cartoon faces can be effortless, and in this article, we will give you some fundamental samples of how you can draw cartoon faces of your own.
In this article
01 [Learn to Understand the Core of Cartoon Style](#Part 1)
02 [Top 12 Cartoon Face Examples](#Part 2)
03 [How to Draw a Cartoon Face - For Beginners](#Part 3)
04 [How to Easily Turn Yourself into a Cartoon](#Part 4)
Part 1 Learn to Understand the Core of Cartoon Style
First, you need to simplify the different parts of the cartoon character face to pick up on very subtle facial expressions and features. For example, the eyes’ shape and size will help determine if the person is feeling sad, excited, happy, excited, or sad. In addition, the amount of lift under a person’s eyebrows can help determine whether a person is mad or not.
These facial expressions are crucial to how a person communicates. It has got to the point that we can read someone’s face without truly understanding which parts of the face convey that emotion. However, these days we get exposed to everyday adaptations of facial expressions, especially with the invention of Instagram, Snapchat, and cartoon face filters.
Consequently, cartoons are a combination of different shapes that are being put together and are not difficult if the focus is on each shape individually and the process breaks down step by step.
Cartoons are a mixture of different shapes put together. It’s not difficult if you focus on each shape individually and break down the process step by step.
Finally, understanding these unconscious and subtle differences in facial expressions is crucial when planning out an animated character. Afterward, when understood, you can simplify the features to be recognizable by your audience.
Part 2 Top 12 Cartoon Face Examples
Cartoon character faces are gaining immense importance in design art due to their universality. Cartoon faces can represent people in several situations and add a comic or satirical twist to dull topics by highlighting their importance. However, drawing cartoon faces require a lot of skill and differentiation, and graphic designers, while working on basic and universal templates, always try and introduce unique elements.
Here are the top 10 examples of cartoon character faces you can choose from when you want to make your designs:
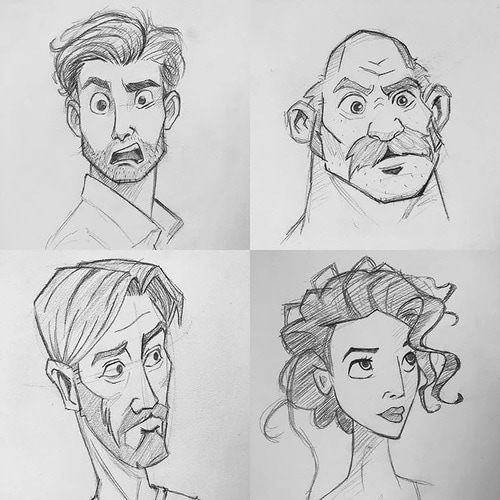
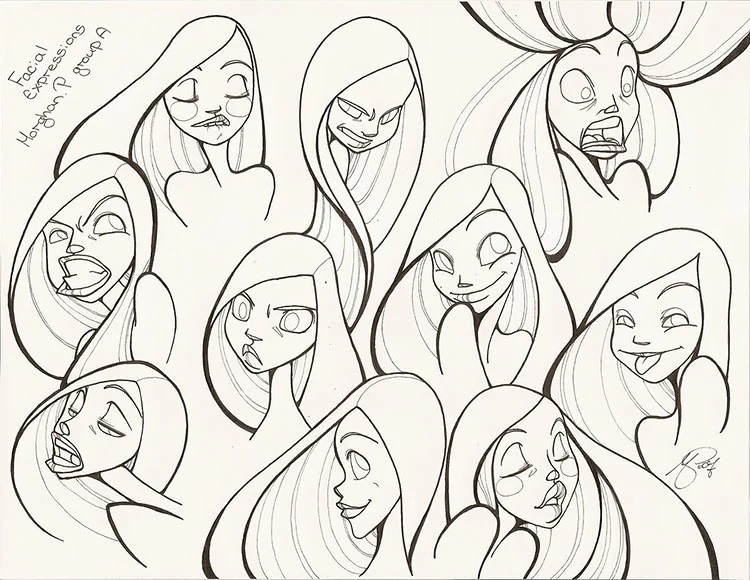
01Men and Women
This sketch features different facial expressions made by older men and women.
02Stretch and Squash
This photo shows the difference between squashing and stretching the face and provides references for extreme squash and extreme stretch.

03Dramatic Expressions
The expressions drawn here are super fun and dramatic. However, it is a great way to have fun and practice how to draw facial expressions simultaneously.
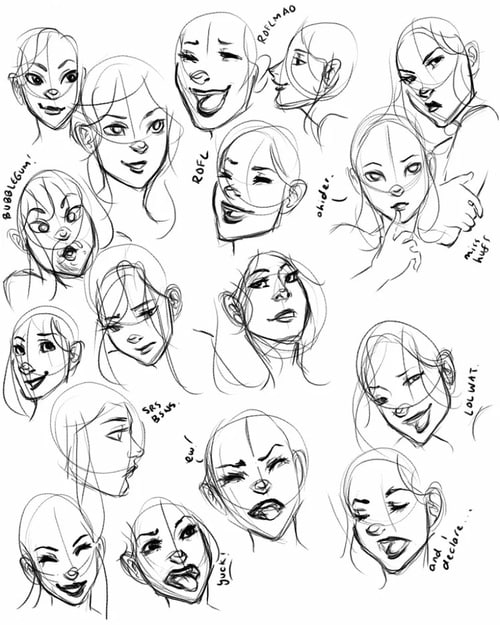
04Quick Expressive Sketches
With this, you can practice how to draw different facial expressions by doing quick sketches like this one. Perhaps you do not need to pay attention to perfection.
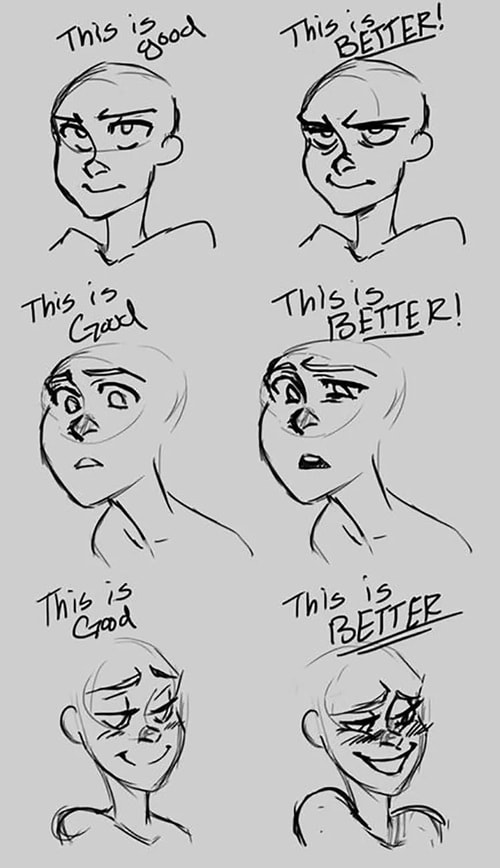
05This Is Good This Is Better
With this facial expression, you can see a good look and an even better expression. It shows the difference that subtle changes can make to your facial expressions**.**
06Male and Female Expressions
This includes both male and female expressions to express the facial reaction of both genders, like some funny cartoon characters face.

07Quick Sketches
This type of facial expression will help you get better at drawing cartoons, and you can use do some quick sketches every day.

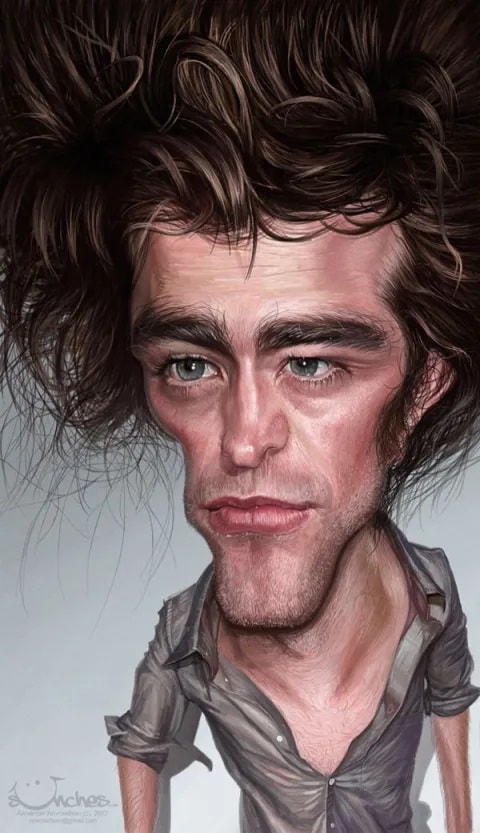
08Jay Leno’s facial expression
Here, it is being exaggerated on a few of his most prominent facial features, including his chin. It is kind of a fat face cartoon character.

09Robert Pattinson Facials
In this photo, his head shape was distorted to show the thinness of his face, and his big hair also accentuates this prominent feature further.
10A,I,U,O,AE,M Facials
With this, you can practice how to draw your facial expression by pronouncing a, i, u, o, ae, m.

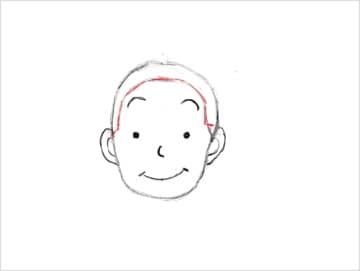
Part 3 How to Draw a Cartoon Face - For Beginners
Here, we have written down 7-step to follow on how to draw a cartoon character face as a beginner effectively.
● Step 1: Plan and Prepare
This is the first step is to plan out exactly what this character will convery through its expression while drawing a cartoon character.
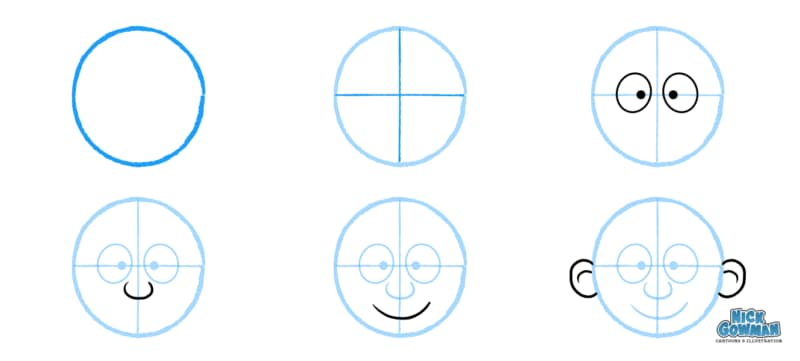
● Step 2: Drawing A Cartoon Head
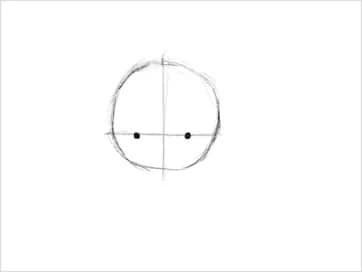
Next is time to start sketching out the shape of the head based on the plan you have made. Whatsoever shape you decide to use for your character, start with a circle to serve as the basic shape for the head.
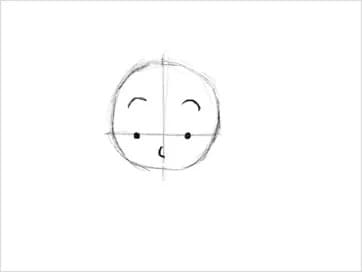
● Step 3: Drawing Cartoon Eyes
Now, you need to draw the eye of the character, which is a crucial step because the eye is the essential part of their expression. To get the character’s eyes in the right place, you should carefully sketch the horizontal or vertical dimension lines.
● Step 4: Drawing A Cartoon Nose
The simpler the nose is, the better it looks in a cartoon. Ensure to keep a proper ratio between the mouth, eyes, and nose so that it does not look too crowded together.
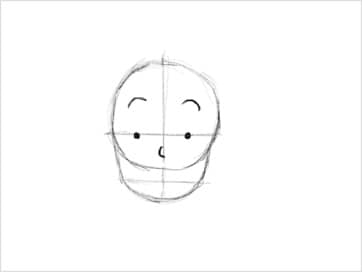
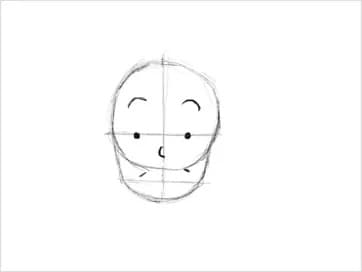
● Step 5: Shaping the Face
In shaping the face, one needs to be mindful of the character, which will help to determine how to shape the jawline and head. For example, for a girl, the face should be narrower and have the chin come to a bit of a point at the end, whereas, for a boy, it requires that the face is a bit bolder and focuses more on the definition of the jawline.
● Step 6: Drawing A Cartoon Mouth
The mouth is another essential part of the cartoon character’s expression and a key indicator of how the character is feeling. It portrays whether you want the character to smile, frown, yell, be nervous, or be neutral.
● Step 7: Drawing Cartoon Hair
Next, you need to draw the cartoon hair, and, in some cases, the cartoon hair is a significant part of their appearance as it is a way to convey your character’s personality, appearance, style, or gender.
● Step 8: Coloring
Another part requires you to paint your character to improve the texture and make it beautiful.
Part 4 How to Easily Turn Yourself into a Cartoon
Are you looking to turn yourself into a cartoon? This is very necessary as it provides you with a great way to integrate diverse characters into your brand’s marketing while simultaneously keeping your content personalized.
However, after converting a picture to a cartoon character face, you can decide to animate it, and the best tool is Wondershare Filmora Video Editor . Animation is a great way to advertise your business, especially during times like these. it is a clever way for leaders, CEOs, and managers to connect with their remote workers and boost engagement, company culture, and ultimately work morale. Filmora is also a great tool to create creative and powerful animation with tons of follow-come effect that enables you to carry it out effectively and efficiently. In this section, we will guide you on how to turn yourself into a cartoon easily:
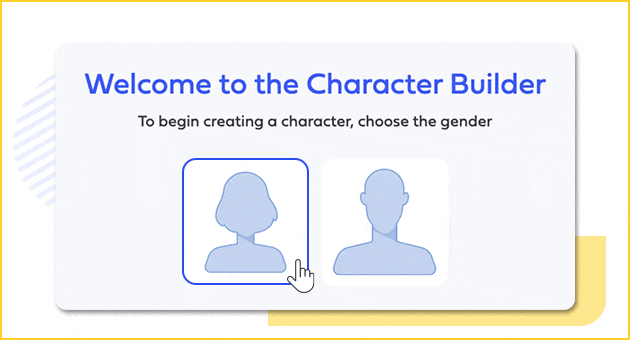
Step 1: Visit Powtoon.com and sign up for a free account, then click on the “build your character” option from the dropdown menu.
Step 2: Next is to select the cartoon gender you want.
Step 3: Finally, you can customize your character’s facial features such as skin, hair, color, clothes, and animated gestures.

Step 4: Once you are satisfied with the result, you can save it on your device or share it on social media
For Win 7 or later (64-bit)
For macOS 10.12 or later
● Ending Thoughts →
● Thus, we saw how to easily cartoon your character’s face via some samples to help you out. With the method listed above, you can easily use it to create a square-faced cartoon character or draw a fat face cartoon character.
● This article also explained how to cartoon yourself. However, to cartoon your video or create a cartoon animated video, we recommend that you use Filmora, its keyframing feature to help you carry this out effectively.
Being able to draw facial features is an essential skill for any animator. Whether you are a beginner at drawing faces or an experienced cartoon artist that has been drawing for years, this is a skill that can gradually improve with time. With the implementation and use of simple shapes, creating various facial features and cartoon styles can be done quickly.
The methods of creating funny face cartoon characters are suitable for everyone, even if they do not have a single day of illustrating experience. These methods presented in this article are easily accessible to provide you with different results depending on your budget and your desired outcome.
The act of drawing cartoon faces can be effortless, and in this article, we will give you some fundamental samples of how you can draw cartoon faces of your own.
In this article
01 [Learn to Understand the Core of Cartoon Style](#Part 1)
02 [Top 12 Cartoon Face Examples](#Part 2)
03 [How to Draw a Cartoon Face - For Beginners](#Part 3)
04 [How to Easily Turn Yourself into a Cartoon](#Part 4)
Part 1 Learn to Understand the Core of Cartoon Style
First, you need to simplify the different parts of the cartoon character face to pick up on very subtle facial expressions and features. For example, the eyes’ shape and size will help determine if the person is feeling sad, excited, happy, excited, or sad. In addition, the amount of lift under a person’s eyebrows can help determine whether a person is mad or not.
These facial expressions are crucial to how a person communicates. It has got to the point that we can read someone’s face without truly understanding which parts of the face convey that emotion. However, these days we get exposed to everyday adaptations of facial expressions, especially with the invention of Instagram, Snapchat, and cartoon face filters.
Consequently, cartoons are a combination of different shapes that are being put together and are not difficult if the focus is on each shape individually and the process breaks down step by step.
Cartoons are a mixture of different shapes put together. It’s not difficult if you focus on each shape individually and break down the process step by step.
Finally, understanding these unconscious and subtle differences in facial expressions is crucial when planning out an animated character. Afterward, when understood, you can simplify the features to be recognizable by your audience.
Part 2 Top 12 Cartoon Face Examples
Cartoon character faces are gaining immense importance in design art due to their universality. Cartoon faces can represent people in several situations and add a comic or satirical twist to dull topics by highlighting their importance. However, drawing cartoon faces require a lot of skill and differentiation, and graphic designers, while working on basic and universal templates, always try and introduce unique elements.
Here are the top 10 examples of cartoon character faces you can choose from when you want to make your designs:
01Men and Women
This sketch features different facial expressions made by older men and women.
02Stretch and Squash
This photo shows the difference between squashing and stretching the face and provides references for extreme squash and extreme stretch.
03Dramatic Expressions
The expressions drawn here are super fun and dramatic. However, it is a great way to have fun and practice how to draw facial expressions simultaneously.
04Quick Expressive Sketches
With this, you can practice how to draw different facial expressions by doing quick sketches like this one. Perhaps you do not need to pay attention to perfection.
05This Is Good This Is Better
With this facial expression, you can see a good look and an even better expression. It shows the difference that subtle changes can make to your facial expressions**.**
06Male and Female Expressions
This includes both male and female expressions to express the facial reaction of both genders, like some funny cartoon characters face.
07Quick Sketches
This type of facial expression will help you get better at drawing cartoons, and you can use do some quick sketches every day.
08Jay Leno’s facial expression
Here, it is being exaggerated on a few of his most prominent facial features, including his chin. It is kind of a fat face cartoon character.
09Robert Pattinson Facials
In this photo, his head shape was distorted to show the thinness of his face, and his big hair also accentuates this prominent feature further.
10A,I,U,O,AE,M Facials
With this, you can practice how to draw your facial expression by pronouncing a, i, u, o, ae, m.
Part 3 How to Draw a Cartoon Face - For Beginners
Here, we have written down 7-step to follow on how to draw a cartoon character face as a beginner effectively.
● Step 1: Plan and Prepare
This is the first step is to plan out exactly what this character will convery through its expression while drawing a cartoon character.
● Step 2: Drawing A Cartoon Head
Next is time to start sketching out the shape of the head based on the plan you have made. Whatsoever shape you decide to use for your character, start with a circle to serve as the basic shape for the head.
● Step 3: Drawing Cartoon Eyes
Now, you need to draw the eye of the character, which is a crucial step because the eye is the essential part of their expression. To get the character’s eyes in the right place, you should carefully sketch the horizontal or vertical dimension lines.
● Step 4: Drawing A Cartoon Nose
The simpler the nose is, the better it looks in a cartoon. Ensure to keep a proper ratio between the mouth, eyes, and nose so that it does not look too crowded together.
● Step 5: Shaping the Face
In shaping the face, one needs to be mindful of the character, which will help to determine how to shape the jawline and head. For example, for a girl, the face should be narrower and have the chin come to a bit of a point at the end, whereas, for a boy, it requires that the face is a bit bolder and focuses more on the definition of the jawline.
● Step 6: Drawing A Cartoon Mouth
The mouth is another essential part of the cartoon character’s expression and a key indicator of how the character is feeling. It portrays whether you want the character to smile, frown, yell, be nervous, or be neutral.
● Step 7: Drawing Cartoon Hair
Next, you need to draw the cartoon hair, and, in some cases, the cartoon hair is a significant part of their appearance as it is a way to convey your character’s personality, appearance, style, or gender.
● Step 8: Coloring
Another part requires you to paint your character to improve the texture and make it beautiful.
Part 4 How to Easily Turn Yourself into a Cartoon
Are you looking to turn yourself into a cartoon? This is very necessary as it provides you with a great way to integrate diverse characters into your brand’s marketing while simultaneously keeping your content personalized.
However, after converting a picture to a cartoon character face, you can decide to animate it, and the best tool is Wondershare Filmora Video Editor . Animation is a great way to advertise your business, especially during times like these. it is a clever way for leaders, CEOs, and managers to connect with their remote workers and boost engagement, company culture, and ultimately work morale. Filmora is also a great tool to create creative and powerful animation with tons of follow-come effect that enables you to carry it out effectively and efficiently. In this section, we will guide you on how to turn yourself into a cartoon easily:
Step 1: Visit Powtoon.com and sign up for a free account, then click on the “build your character” option from the dropdown menu.
Step 2: Next is to select the cartoon gender you want.
Step 3: Finally, you can customize your character’s facial features such as skin, hair, color, clothes, and animated gestures.
Step 4: Once you are satisfied with the result, you can save it on your device or share it on social media
For Win 7 or later (64-bit)
For macOS 10.12 or later
● Ending Thoughts →
● Thus, we saw how to easily cartoon your character’s face via some samples to help you out. With the method listed above, you can easily use it to create a square-faced cartoon character or draw a fat face cartoon character.
● This article also explained how to cartoon yourself. However, to cartoon your video or create a cartoon animated video, we recommend that you use Filmora, its keyframing feature to help you carry this out effectively.
10 Caricature Makers to Turn Your Photo to Caricature Effects
10 Caricature Makers to Turn Your Photo to Caricature Effects
An easy yet powerful editor
Numerous effects to choose from
Detailed tutorials provided by the official channel
We certainly have a couple of recommendations to offer to you. There’s a surprisingly large amount of both caricature photo maker apps and online caricature maker tools.
Today, we’ll be focusing on the apps, to keep things easily accessible. And, in the end, we’ve even included a quick step-by-step guide on how to make a caricature of a photo.
In this article
01 [The 10 Best Makers to Turn Photos to Caricature Effects](#Part 1)
02 [How to Draw a Caricature — Step by Step Guide](#Part 2)
Part 1 The 10 Best Makers to Turn Photos to Caricature Effects
As promised, part one of this article is devoted to a list of the 10 best caricature maker apps that we can find. We’ll be focusing on the Apple App Store, in this case, but it’s important to note that most of these are available on the Google play store as well. (A link to the app has been provided for your convenience as well.)
011. MomentCam Cartoons & Stickers
The first of the caricature maker apps on our list is ‘MomentCam Cartoon & Stickers’ — this app is part of another tool called ‘Avatar Maker Bundle’, but it can be used on its own to create caricature versions of yourself that you can use to express emotions (an avatar, if you will).
This app was made primarily to help the user to create an avatar that matches their look (with accessorization features to complete the set). However, you can interact with other members of the community to create multiple avatars if you wish. Or, you can share your caricature pictures on social media.
URL: https://apps.apple.com/ca/app/momentcam-cartoons-stickers/id687624831

02Color Cartoon Caricature Maker
This next caricature maker app uses a more realistic style akin to what is usually used for a political caricature of famous individuals and politicians. It’s called ‘Color Cartoon Caricature Maker’ and, while not as extensive in its features as the previous app, it can be used to turn an image completely into a caricature (which means that it can be used for photographs with more than one person or focus.)
URL: https://apps.apple.com/ca/app/color-cartoon-caricature-maker/id1448093448

03PicMagic- Cartoon Photo Editor
Up next, we have ‘Pic Magic’ which is better described as a ‘cartoon photo editor’ but still works as a serviceable caricature maker if all you’re looking for is a subtle enhancement of features (unlike what was shown in the political caricature maker we showed previously.)
Much like the second app, while it’s more suitable for enhancing the features of one person, it does work for group pictures as well.
URL: https://apps.apple.com/ca/app/picmagic-cartoon-photo-editor/id1491645007
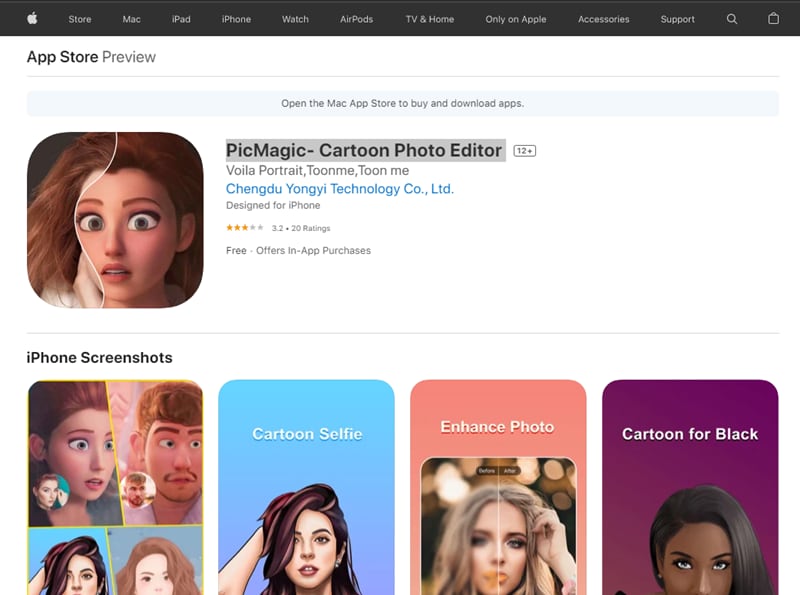
04Photic - Cartoon Yourself AI
This next app, called ‘Photic’ is much like our previously listed app, PicMagic. As you can see from the image provided, it can make a caricature of a photo but in a subtle way that is undeniably more of a ‘cartoony’ style than what you might be looking for. Keep that in mind.
The best part of it is that you can use it along with iMessage — making it very easy to share your finished caricature pictures with friends and family. The downside? It is best used for solo picture caricature-like only.
URL: https://apps.apple.com/ca/app/photic-cartoon-yourself-ai/id1484108330
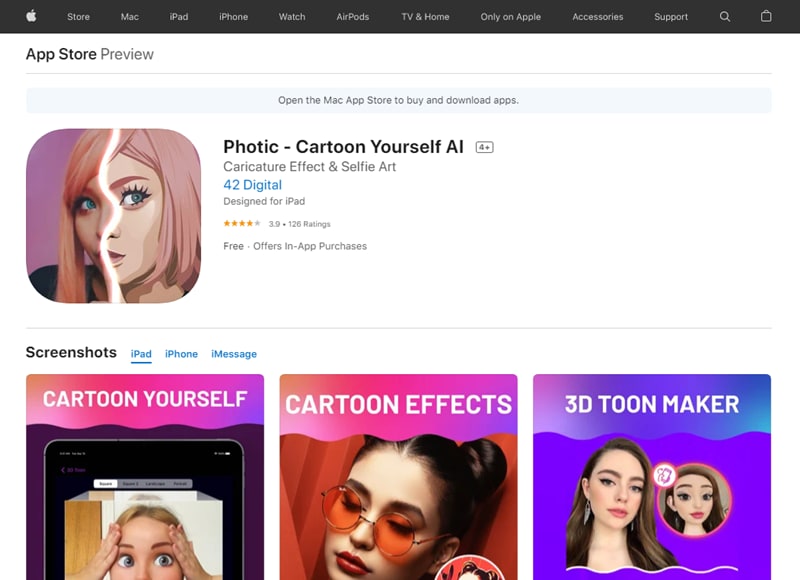
05ToonApp Cartoon Photo Editor
‘ToonApp’ is the next caricature maker on our list. As you can see from the image provided, the style of caricature is a lot more realistic here. Very similar to what you normally see of western comics (which only subtly changes the features of a person to look more rendered.) The best part of this app? Well, unlike some of the other options on this list, it works great for group pictures.
URL: https://apps.apple.com/ca/app/toonapp-cartoon-photo-editor/id1540719743
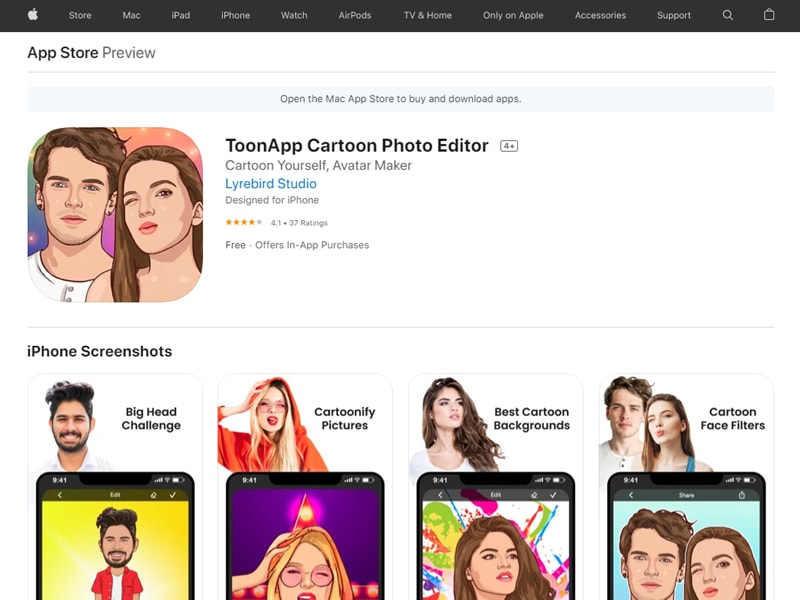
06Voilà AI Artist Cartoon Photo
This next app is very similar to the previous one we introduced. It’s called ‘Voilà AI Artist Cartoon Photo’ and the main difference between it and the ToonApp app that we introduced earlier is that it uses a different caricature style. Not unlike what you see from 3D animations — which is a mix of realism and cartoony.
This tool, much like a lot of other alternatives, is best used for selfies.
URL: https://apps.apple.com/us/app/voil%C3%A0-ai-artist-cartoon-photo/id1558421405
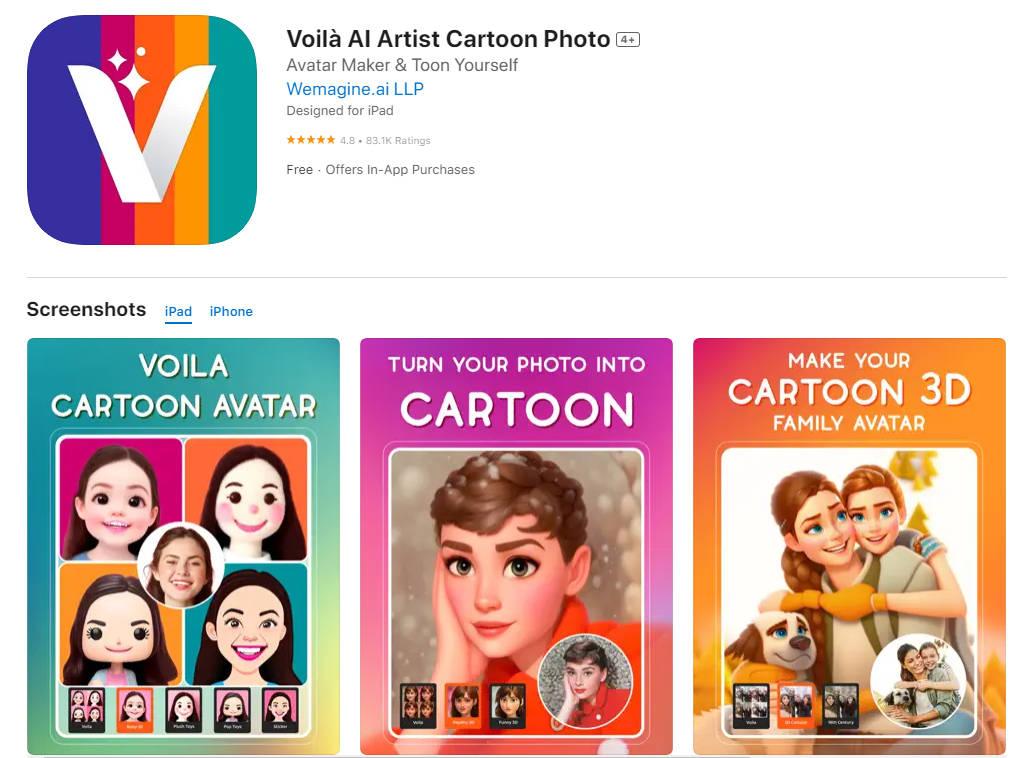
07Caricature Hyper Face Morph
Now we go back to what most people usually consider ‘caricature’ with the ‘Caricature Hyper Face Morph’ app. This app, as you can see from the image below, allows you to morph a photograph into something more exaggerated (turning it into a true-to-form caricature; like what you would see in political caricature segments in newspapers or old animated short films.)
It works for group photographs surprisingly well as well. With the AI recognizing and applying the ‘morph’ effect to everyone.
URL: https://apps.apple.com/ca/app/caricature-hyper-face-morph-from-photos-camera-shots/id587429629
08Face Caricature
The next caricature maker on our list is the app called ‘Face Caricature.’ The best part of this app, undoubtedly, is the fact that it offers several ‘caricature’ styles that you can choose from. So, you aren’t stuck with just one cartoon style. It’s better for selfies, however — it doesn’t work as well as a group picture caricature maker.
URL: https://apps.apple.com/ca/app/face-caricature-cartoon-photo/id1007143753
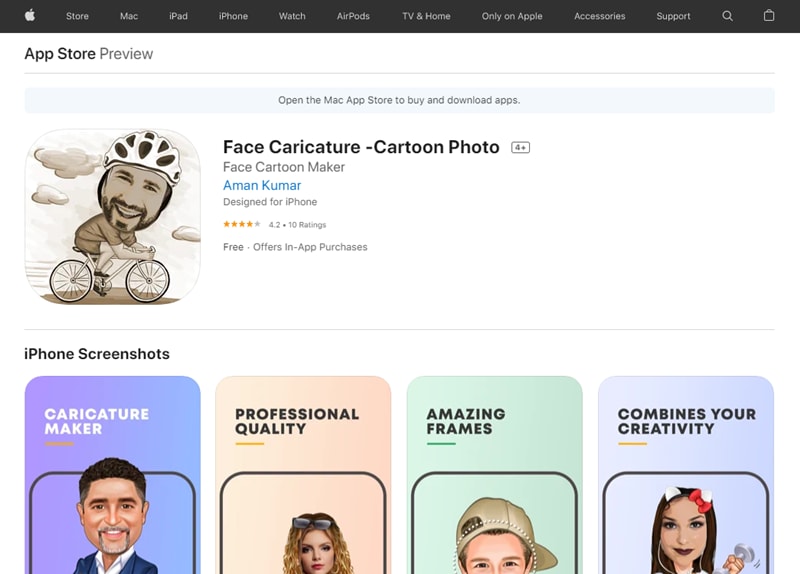
09Cartoon Caricature Face Camera
This is a camera tool that you can use in order to take photographs and turn them into caricatures. There are several caricature art styles for you to choose from, which are always fun. Plus, it offers easy save-and-share features. As a final note, this app works best as a selfie app.
URL: https://apps.apple.com/ca/app/cartoon-caricature-face-camera/id1424277519
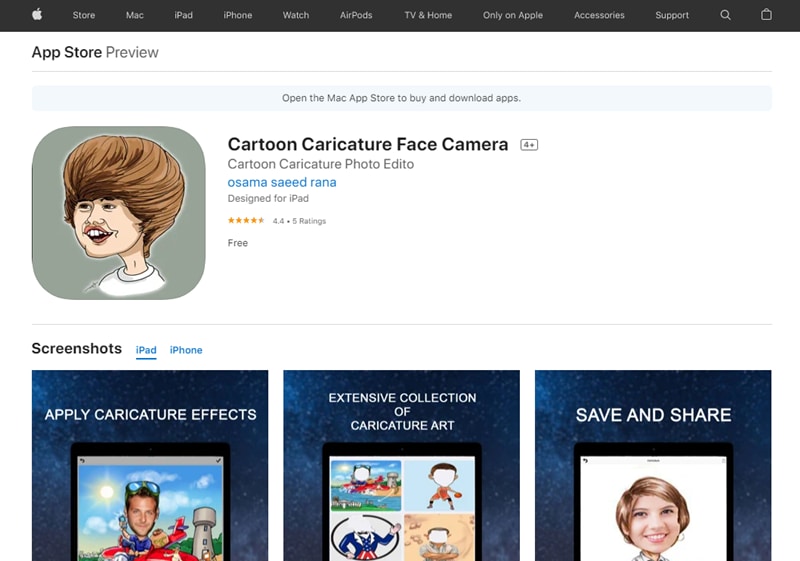
10Face Distortion - Screw Up Your Face
Though this app isn’t exactly a ‘caricature maker‘ it does work like one. It’s just a matter of finding the right distortive effect to mimic the look of an actual caricature sketch. The best part about it is that it’s basically a custom caricature maker — one that allows you to control exactly what features are exaggerated.
URL: https://apps.apple.com/ca/app/face-distortion-screw-up-your-face/id1188623179
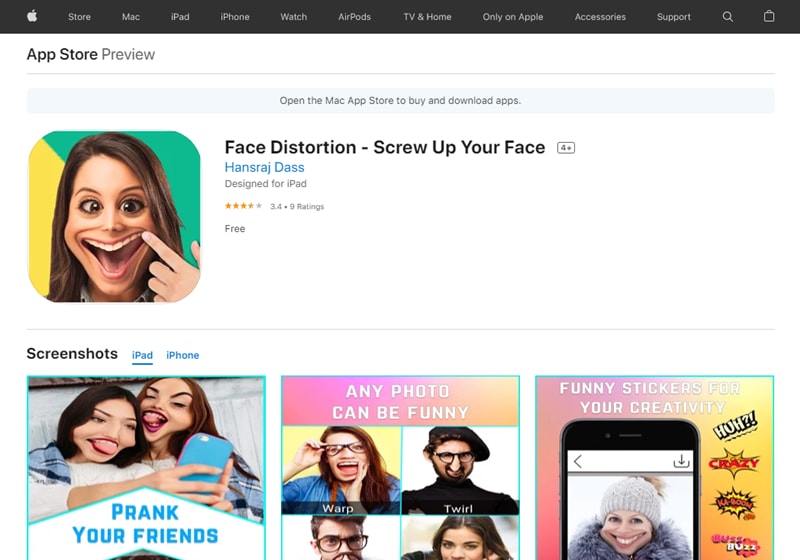
Part 2 How to Draw a Caricature — Step by Step Guide
Now for our promised tutorial. Here, we introduce a quick and easy way to draw caricatures. Take it more as an overview of what exactly caricatures are and how you can create them by following a specific set of steps. Ah, but of course, just to make sure that you are getting something out of it, we’ve also included a recommendation for a tool that you can use in order to step up your caricature creation.
Step 1: Get a Reference Photo.
Any good caricature starts with a good reference photo. If you’re not familiar with the term, a reference photo is basically any photograph that you use in order to draw inspiration from.
When making a caricature, that usually means finding a portrait (like the one below) that you can directly refer to when making your caricature sketch.

Step 2: Exaggerate Features.
What is the point of caricatures? Well, it all comes down to the exaggeration of features. Whether that’s enlarging the person’s head to be half the size of a person or distorting the features of their face to make one more prominent than another. There’s an endless number of ways you can go about doing it.
Just remember, when making a caricature sketch, there are no such things as rules. While you do have a reference photo in front of you, you don’t have to draw it exactly as you see it. Make the eyes farther apart, exaggerate the lift of the eyebrows, give them a teeny tiny nose, etc., etc..
Just let your imagination run wild.
Step 3: Find a Reliable Tool.
And, finally, if you really want to take your caricatures to the next level, consider animating them. That is the main point of caricatures, after all.
And, if you’re going to go about doing such a thing, make sure that you have a reliable tool on your side. For example, having something like Wondershare Filmora Video Editor , a video editor that has an endless amount of presets and effects that you can choose from, may prove to be exactly what you need to get to the next stage of your caricature creation.
For Win 7 or later (64-bit)
For macOS 10.12 or later
● Key Takeaways from This Episode →
● Photo to Caricature is now possible in an instant with the use of a caricature maker app. These tools render an existing photograph with the use of filters and effects to create a caricature sketch worthy of any artist’s skill.
● There’s a lot of these caricature makers for you to choose from as well. Proven by the fact that we were able to easily find at least ten — all of which you can use (some in different ways) to transform your photographs into caricature works.
● Of course, if you want to take the traditional route and draw caricatures yourself, that’s possible too. Just remember the three tips that we outlined above: get a reference, exaggerate, and use good tools.
We certainly have a couple of recommendations to offer to you. There’s a surprisingly large amount of both caricature photo maker apps and online caricature maker tools.
Today, we’ll be focusing on the apps, to keep things easily accessible. And, in the end, we’ve even included a quick step-by-step guide on how to make a caricature of a photo.
In this article
01 [The 10 Best Makers to Turn Photos to Caricature Effects](#Part 1)
02 [How to Draw a Caricature — Step by Step Guide](#Part 2)
Part 1 The 10 Best Makers to Turn Photos to Caricature Effects
As promised, part one of this article is devoted to a list of the 10 best caricature maker apps that we can find. We’ll be focusing on the Apple App Store, in this case, but it’s important to note that most of these are available on the Google play store as well. (A link to the app has been provided for your convenience as well.)
011. MomentCam Cartoons & Stickers
The first of the caricature maker apps on our list is ‘MomentCam Cartoon & Stickers’ — this app is part of another tool called ‘Avatar Maker Bundle’, but it can be used on its own to create caricature versions of yourself that you can use to express emotions (an avatar, if you will).
This app was made primarily to help the user to create an avatar that matches their look (with accessorization features to complete the set). However, you can interact with other members of the community to create multiple avatars if you wish. Or, you can share your caricature pictures on social media.
URL: https://apps.apple.com/ca/app/momentcam-cartoons-stickers/id687624831
02Color Cartoon Caricature Maker
This next caricature maker app uses a more realistic style akin to what is usually used for a political caricature of famous individuals and politicians. It’s called ‘Color Cartoon Caricature Maker’ and, while not as extensive in its features as the previous app, it can be used to turn an image completely into a caricature (which means that it can be used for photographs with more than one person or focus.)
URL: https://apps.apple.com/ca/app/color-cartoon-caricature-maker/id1448093448
03PicMagic- Cartoon Photo Editor
Up next, we have ‘Pic Magic’ which is better described as a ‘cartoon photo editor’ but still works as a serviceable caricature maker if all you’re looking for is a subtle enhancement of features (unlike what was shown in the political caricature maker we showed previously.)
Much like the second app, while it’s more suitable for enhancing the features of one person, it does work for group pictures as well.
URL: https://apps.apple.com/ca/app/picmagic-cartoon-photo-editor/id1491645007
04Photic - Cartoon Yourself AI
This next app, called ‘Photic’ is much like our previously listed app, PicMagic. As you can see from the image provided, it can make a caricature of a photo but in a subtle way that is undeniably more of a ‘cartoony’ style than what you might be looking for. Keep that in mind.
The best part of it is that you can use it along with iMessage — making it very easy to share your finished caricature pictures with friends and family. The downside? It is best used for solo picture caricature-like only.
URL: https://apps.apple.com/ca/app/photic-cartoon-yourself-ai/id1484108330
05ToonApp Cartoon Photo Editor
‘ToonApp’ is the next caricature maker on our list. As you can see from the image provided, the style of caricature is a lot more realistic here. Very similar to what you normally see of western comics (which only subtly changes the features of a person to look more rendered.) The best part of this app? Well, unlike some of the other options on this list, it works great for group pictures.
URL: https://apps.apple.com/ca/app/toonapp-cartoon-photo-editor/id1540719743
06Voilà AI Artist Cartoon Photo
This next app is very similar to the previous one we introduced. It’s called ‘Voilà AI Artist Cartoon Photo’ and the main difference between it and the ToonApp app that we introduced earlier is that it uses a different caricature style. Not unlike what you see from 3D animations — which is a mix of realism and cartoony.
This tool, much like a lot of other alternatives, is best used for selfies.
URL: https://apps.apple.com/us/app/voil%C3%A0-ai-artist-cartoon-photo/id1558421405
07Caricature Hyper Face Morph
Now we go back to what most people usually consider ‘caricature’ with the ‘Caricature Hyper Face Morph’ app. This app, as you can see from the image below, allows you to morph a photograph into something more exaggerated (turning it into a true-to-form caricature; like what you would see in political caricature segments in newspapers or old animated short films.)
It works for group photographs surprisingly well as well. With the AI recognizing and applying the ‘morph’ effect to everyone.
URL: https://apps.apple.com/ca/app/caricature-hyper-face-morph-from-photos-camera-shots/id587429629
08Face Caricature
The next caricature maker on our list is the app called ‘Face Caricature.’ The best part of this app, undoubtedly, is the fact that it offers several ‘caricature’ styles that you can choose from. So, you aren’t stuck with just one cartoon style. It’s better for selfies, however — it doesn’t work as well as a group picture caricature maker.
URL: https://apps.apple.com/ca/app/face-caricature-cartoon-photo/id1007143753
09Cartoon Caricature Face Camera
This is a camera tool that you can use in order to take photographs and turn them into caricatures. There are several caricature art styles for you to choose from, which are always fun. Plus, it offers easy save-and-share features. As a final note, this app works best as a selfie app.
URL: https://apps.apple.com/ca/app/cartoon-caricature-face-camera/id1424277519
10Face Distortion - Screw Up Your Face
Though this app isn’t exactly a ‘caricature maker‘ it does work like one. It’s just a matter of finding the right distortive effect to mimic the look of an actual caricature sketch. The best part about it is that it’s basically a custom caricature maker — one that allows you to control exactly what features are exaggerated.
URL: https://apps.apple.com/ca/app/face-distortion-screw-up-your-face/id1188623179
Part 2 How to Draw a Caricature — Step by Step Guide
Now for our promised tutorial. Here, we introduce a quick and easy way to draw caricatures. Take it more as an overview of what exactly caricatures are and how you can create them by following a specific set of steps. Ah, but of course, just to make sure that you are getting something out of it, we’ve also included a recommendation for a tool that you can use in order to step up your caricature creation.
Step 1: Get a Reference Photo.
Any good caricature starts with a good reference photo. If you’re not familiar with the term, a reference photo is basically any photograph that you use in order to draw inspiration from.
When making a caricature, that usually means finding a portrait (like the one below) that you can directly refer to when making your caricature sketch.
Step 2: Exaggerate Features.
What is the point of caricatures? Well, it all comes down to the exaggeration of features. Whether that’s enlarging the person’s head to be half the size of a person or distorting the features of their face to make one more prominent than another. There’s an endless number of ways you can go about doing it.
Just remember, when making a caricature sketch, there are no such things as rules. While you do have a reference photo in front of you, you don’t have to draw it exactly as you see it. Make the eyes farther apart, exaggerate the lift of the eyebrows, give them a teeny tiny nose, etc., etc..
Just let your imagination run wild.
Step 3: Find a Reliable Tool.
And, finally, if you really want to take your caricatures to the next level, consider animating them. That is the main point of caricatures, after all.
And, if you’re going to go about doing such a thing, make sure that you have a reliable tool on your side. For example, having something like Wondershare Filmora Video Editor , a video editor that has an endless amount of presets and effects that you can choose from, may prove to be exactly what you need to get to the next stage of your caricature creation.
For Win 7 or later (64-bit)
For macOS 10.12 or later
● Key Takeaways from This Episode →
● Photo to Caricature is now possible in an instant with the use of a caricature maker app. These tools render an existing photograph with the use of filters and effects to create a caricature sketch worthy of any artist’s skill.
● There’s a lot of these caricature makers for you to choose from as well. Proven by the fact that we were able to easily find at least ten — all of which you can use (some in different ways) to transform your photographs into caricature works.
● Of course, if you want to take the traditional route and draw caricatures yourself, that’s possible too. Just remember the three tips that we outlined above: get a reference, exaggerate, and use good tools.
How to Make a Video a Live Photo 2023
How to Make a Video a Live Photo [2022]
An easy yet powerful editor
Numerous effects to choose from
Detailed tutorials provided by the official channel
Looking forward to turn your videos into live photos? Stay tuned to know how!
In this article
01 [How to Save Live Photos as a Video on iPhone/Ipad/Ipod](#Part 1)
02 [How to Turn a Video Into a Live Photo on iOS/Android](#Part 2)
Part 1 How to Save Live Photos as a Video on iPhone/Ipad/Ipod
Live photos are an amazing utility that allow you to save images as short moving snaps. Creating live photos is among the latest spunk of trendsetter stories, whether shared on social media platforms or created and saved just for fun, these definitely sound and look exciting, but that’s just one among the many things you can experiment on live photos.
Creating live photos takes you to a world of exciting features where you can explore your creativity in a number of ways, one of the easiest being turning live photos to videos. This comes handy when you need to share your live photos on platforms that do not have the compatibility to run live photos. If you are an iPhone user and wish to try your hands on experimenting with live photos, see through the following section of this article to learn how to turn live photo into video:
01Save as Video
Step 1: Launch the Photos App
In your iPhone, launch the ‘Photos’ app and navigate to ‘Albums’. All your live photos are present in the ‘Live Photos’ album.
Step 2: Format Selection
In latest versions (iOS 13v and above), you get a direct ‘Save as Video’ option in the ‘Photos’ application. Just click on that, and your live photo will be instantly saved in your iPhone gallery as a video. Here’s how you can use this feature:
● In the ‘Photos’ application, go to the ‘Live Photos’ album to select and open a desired live photo that you wish to convert to a video.
● Click on the ‘Share’ icon.

● Select ‘Save as Video’ from the drop down menu that displays sharing options.

Your created video will be saved in the ‘Photos’ application, next to the live photo you chose to turn into a video.
02iOS Shortcuts
This is a quicker way to save your live photos as videos in your iPhone. To use this feature, you first need to save the ‘Convert LivePhotos to Video’ shortcut in the ‘Shortcuts App’ gallery of your iPhone. You can do this by opening in your iOS internet browser.
Before using the above link, make sure to enable the ‘Allow Untrusted Shortcuts’ feature in your iPhone settings. You can do this as explained below:
● Reach to the ‘Settings’ application of your iPhone.
● Tap on ‘Shortcuts’ from the app’s welcome screen.
● Enable ‘Allow Untrusted Shortcuts’ with a toggle.

Having done that, here’s what you need to follow:
● Open the ‘Shortcuts’ application in your iOS device and tap the ‘Convert LivePhotos to Video’ shortcut.

● The ‘Live Photos’ album of your device opens up. Make a desired selection.

Your converted video gets automatically saved in the ‘Camera Roll’ folder of the ‘Photos’ application. Open the ‘Recents’ album to view your creation.
Part 2 How to Turn a Video Into a Live Photo on iOS/Android
Converting live photos to videos is fine, but going the other way round is all the more exciting and fun! You can even use these converted live photos as live screen wallpapers for your iOS and Android devices. If you are motivated to take up the excitement, look through the following methods to turn video into live photo:
01iOS Devices
Being an iOS user, you can choose among the following tools to convert video to live photo in your iPad, iPod or iPhone:
● Wondershare Filmora
Wondershare Filmora Video Editor is currently leading the software market among converter utilities that cater to various media conversion needs. This one is a free, smart, quick and convenient conversion tool that assures you of a hassle free video to live photo conversion in just a few clicks. What’s more interesting is, you don’t need to limit yourself with sticking to some particular video format, as Filmora conveniently supports almost all common ones.
Wondershare Filmora
Get started easily with Filmora’s powerful performance, intuitive interface, and countless effects!
Try It Free Try It Free Try It Free Learn More >

● IntoLive
This one is a third party application that allows you to convert videos into live photos, quickly and conveniently. This tool works well with devices having iOS 12.0 and later versions. All you have to do is follow the steps mentioned below:
Step 1:
Download the ‘IntoLive’ application from the Apple App Store.

Step 2:
Launch the same on your iOS device and grant the permission to access its ‘Photos’ Album.

Step 3:
In the ‘Videos’ section, choose the desired video that you wish to turn into a live photo.

Step 4:
An editor window will open up. Here, you can edit (cut, crop, trim, etc.) and add desired effects or filters to your selected video. Click on ‘Make’ at the top right when you finish the editing process.

Step 5:
If you have the paid version of the app, you can take up multiple repeats of your live photo; else you can use the free version with no repeats.

Step 6:
Once you are satisfied with the result, click on ‘Save Live Photo’. This will save your created live photo in your device’s gallery.

02VideoToLive
This is a free converter you can choose to turn video into live photo. This is a quite popular tool among iPhone users worldwide and is suitable for iOS versions 11.2 and later. You also have the liberty to share your created live photos on social media with this converter. Take the following steps to begin the conversion process:

Step 1:
Download the application from the Apple App Store and launch it on your iOS device.
Step 2:
Choose a video from your device gallery to convert it into a live photo.
Step 3:
In the video editor screen, crop the video to the preferred section that has to be converted into live photo. You can add video frames to your edited clip from the upper section of the editor screen.
Step 4:
Click on ‘Convert’ at the top right corner to initiate the conversion process.
03Android Devices
Live photos are undoubtedly known to add spark to your cherished moments, but the notch that puts these off with Android devices is that you can enjoy live photos on these devices only as live wallpapers.
Being an iPhone exclusive utility, Android devices lack the flexibility to capture live images. However, you can see them move on being set as live screen wallpapers. A handy alternative to this is converting a turn video into live photo and use it as live wallpaper. Here’s how you can take up the conversion process:
● TurnLive- Live Wallpaper
This one is a convenient, third party tool that lets you turn video into live photo in just a few quick steps. You can either use this application for free, or upgrade to the paid version to enjoy its premium features. To make amazing live photos from videos using this tool, you need to take up the steps given below:

Step 1: App Installation
To begin, visit the Google Playstore in your Android device and download the TurnLive- Live Wallpaper application. Next, you need install and launch the app in your device and accept its terms of service.
Step 2: Select a Video
Once you are done, click on the ‘Live Photo’ icon in the bottom of the app’s opening screen to reach the video selection page. Here, you need to choose ‘Video to Live Wallpaper’ option and grant the required app permissions to access your device’s camera and gallery. Select a desired video from the ones saved in your device and click ‘Done’ at the top right.
Step 3: Edit Your Video
You will now get directed to the app’s editor window, where you need to trim the selected video within a time frame of 1-5 seconds. To do this, select a cover frame within the clip and click ‘Next’. You can now use the video slider at the bottom to trim the clip. Adding suitable video effects and filters is also possible with this tool.
Step 4: It’s Almost Done!
When you finish editing, click ‘Next’ and choose the number of repeats for the created live photo. Wait for the conversion to finish and click on ‘My Wallpapers’ to view your creation.
Step 5: Download Your Live Photo!
Click ‘Download’ and tap ‘Clear’ in the app’s prompt message to remove your device’s current screen wallpaper. Next, allow the app to access your system settings. Once this finishes, tap ‘Clear’ again to download your creation. You will now get directed to a black screen tagged ‘DayTime LWP’. Click on ‘Set Wallpaper’ in this screen to make your live photo, the current wallpaper of your Android device.
● Video Live Wallpaper
This is another free app that you can use to your videos into amazing live photos in just 4 quick steps. All you need to do is explained in the following steps:
Step 1: download the Application
Download the Video Live Wallpaper application in your Android device from Google Playstore and proceed for its installation and launch.

Step 2: Select Your Video
In the app’s opening screen, click ‘Choose Video’ and grant app permissions to access your device’s media. Browse your video gallery to select a desired video that you wish to convert into a live photo.

Step 3: Edit Your Video
You will now get directed to the app’s editor screen. Here, you can explore your editing creativity to edit the selected video. Once you are happy, click the picture icon at the top right corner.

Step 4: Your Live Wallpaper is Ready!
To set the created live photo as your device screen wallpaper, select ‘Set as Wallpaper’ at the bottom right.

● Key Takeaways from This Episode →
● From cherishing moments to sharing them on social media, live photos can do it all.
● Being an iPhone exclusive utility, you need to create these from videos to enjoy them on other platforms and devices.
● Filmora is the best video to live photo converters, available as an easy, quick and convenient conversion tool.
Looking forward to turn your videos into live photos? Stay tuned to know how!
In this article
01 [How to Save Live Photos as a Video on iPhone/Ipad/Ipod](#Part 1)
02 [How to Turn a Video Into a Live Photo on iOS/Android](#Part 2)
Part 1 How to Save Live Photos as a Video on iPhone/Ipad/Ipod
Live photos are an amazing utility that allow you to save images as short moving snaps. Creating live photos is among the latest spunk of trendsetter stories, whether shared on social media platforms or created and saved just for fun, these definitely sound and look exciting, but that’s just one among the many things you can experiment on live photos.
Creating live photos takes you to a world of exciting features where you can explore your creativity in a number of ways, one of the easiest being turning live photos to videos. This comes handy when you need to share your live photos on platforms that do not have the compatibility to run live photos. If you are an iPhone user and wish to try your hands on experimenting with live photos, see through the following section of this article to learn how to turn live photo into video:
01Save as Video
Step 1: Launch the Photos App
In your iPhone, launch the ‘Photos’ app and navigate to ‘Albums’. All your live photos are present in the ‘Live Photos’ album.
Step 2: Format Selection
In latest versions (iOS 13v and above), you get a direct ‘Save as Video’ option in the ‘Photos’ application. Just click on that, and your live photo will be instantly saved in your iPhone gallery as a video. Here’s how you can use this feature:
● In the ‘Photos’ application, go to the ‘Live Photos’ album to select and open a desired live photo that you wish to convert to a video.
● Click on the ‘Share’ icon.
● Select ‘Save as Video’ from the drop down menu that displays sharing options.
Your created video will be saved in the ‘Photos’ application, next to the live photo you chose to turn into a video.
02iOS Shortcuts
This is a quicker way to save your live photos as videos in your iPhone. To use this feature, you first need to save the ‘Convert LivePhotos to Video’ shortcut in the ‘Shortcuts App’ gallery of your iPhone. You can do this by opening in your iOS internet browser.
Before using the above link, make sure to enable the ‘Allow Untrusted Shortcuts’ feature in your iPhone settings. You can do this as explained below:
● Reach to the ‘Settings’ application of your iPhone.
● Tap on ‘Shortcuts’ from the app’s welcome screen.
● Enable ‘Allow Untrusted Shortcuts’ with a toggle.
Having done that, here’s what you need to follow:
● Open the ‘Shortcuts’ application in your iOS device and tap the ‘Convert LivePhotos to Video’ shortcut.
● The ‘Live Photos’ album of your device opens up. Make a desired selection.
Your converted video gets automatically saved in the ‘Camera Roll’ folder of the ‘Photos’ application. Open the ‘Recents’ album to view your creation.
Part 2 How to Turn a Video Into a Live Photo on iOS/Android
Converting live photos to videos is fine, but going the other way round is all the more exciting and fun! You can even use these converted live photos as live screen wallpapers for your iOS and Android devices. If you are motivated to take up the excitement, look through the following methods to turn video into live photo:
01iOS Devices
Being an iOS user, you can choose among the following tools to convert video to live photo in your iPad, iPod or iPhone:
● Wondershare Filmora
Wondershare Filmora Video Editor is currently leading the software market among converter utilities that cater to various media conversion needs. This one is a free, smart, quick and convenient conversion tool that assures you of a hassle free video to live photo conversion in just a few clicks. What’s more interesting is, you don’t need to limit yourself with sticking to some particular video format, as Filmora conveniently supports almost all common ones.
Wondershare Filmora
Get started easily with Filmora’s powerful performance, intuitive interface, and countless effects!
Try It Free Try It Free Try It Free Learn More >
● IntoLive
This one is a third party application that allows you to convert videos into live photos, quickly and conveniently. This tool works well with devices having iOS 12.0 and later versions. All you have to do is follow the steps mentioned below:
Step 1:
Download the ‘IntoLive’ application from the Apple App Store.
Step 2:
Launch the same on your iOS device and grant the permission to access its ‘Photos’ Album.
Step 3:
In the ‘Videos’ section, choose the desired video that you wish to turn into a live photo.
Step 4:
An editor window will open up. Here, you can edit (cut, crop, trim, etc.) and add desired effects or filters to your selected video. Click on ‘Make’ at the top right when you finish the editing process.
Step 5:
If you have the paid version of the app, you can take up multiple repeats of your live photo; else you can use the free version with no repeats.
Step 6:
Once you are satisfied with the result, click on ‘Save Live Photo’. This will save your created live photo in your device’s gallery.
02VideoToLive
This is a free converter you can choose to turn video into live photo. This is a quite popular tool among iPhone users worldwide and is suitable for iOS versions 11.2 and later. You also have the liberty to share your created live photos on social media with this converter. Take the following steps to begin the conversion process:
Step 1:
Download the application from the Apple App Store and launch it on your iOS device.
Step 2:
Choose a video from your device gallery to convert it into a live photo.
Step 3:
In the video editor screen, crop the video to the preferred section that has to be converted into live photo. You can add video frames to your edited clip from the upper section of the editor screen.
Step 4:
Click on ‘Convert’ at the top right corner to initiate the conversion process.
03Android Devices
Live photos are undoubtedly known to add spark to your cherished moments, but the notch that puts these off with Android devices is that you can enjoy live photos on these devices only as live wallpapers.
Being an iPhone exclusive utility, Android devices lack the flexibility to capture live images. However, you can see them move on being set as live screen wallpapers. A handy alternative to this is converting a turn video into live photo and use it as live wallpaper. Here’s how you can take up the conversion process:
● TurnLive- Live Wallpaper
This one is a convenient, third party tool that lets you turn video into live photo in just a few quick steps. You can either use this application for free, or upgrade to the paid version to enjoy its premium features. To make amazing live photos from videos using this tool, you need to take up the steps given below:
Step 1: App Installation
To begin, visit the Google Playstore in your Android device and download the TurnLive- Live Wallpaper application. Next, you need install and launch the app in your device and accept its terms of service.
Step 2: Select a Video
Once you are done, click on the ‘Live Photo’ icon in the bottom of the app’s opening screen to reach the video selection page. Here, you need to choose ‘Video to Live Wallpaper’ option and grant the required app permissions to access your device’s camera and gallery. Select a desired video from the ones saved in your device and click ‘Done’ at the top right.
Step 3: Edit Your Video
You will now get directed to the app’s editor window, where you need to trim the selected video within a time frame of 1-5 seconds. To do this, select a cover frame within the clip and click ‘Next’. You can now use the video slider at the bottom to trim the clip. Adding suitable video effects and filters is also possible with this tool.
Step 4: It’s Almost Done!
When you finish editing, click ‘Next’ and choose the number of repeats for the created live photo. Wait for the conversion to finish and click on ‘My Wallpapers’ to view your creation.
Step 5: Download Your Live Photo!
Click ‘Download’ and tap ‘Clear’ in the app’s prompt message to remove your device’s current screen wallpaper. Next, allow the app to access your system settings. Once this finishes, tap ‘Clear’ again to download your creation. You will now get directed to a black screen tagged ‘DayTime LWP’. Click on ‘Set Wallpaper’ in this screen to make your live photo, the current wallpaper of your Android device.
● Video Live Wallpaper
This is another free app that you can use to your videos into amazing live photos in just 4 quick steps. All you need to do is explained in the following steps:
Step 1: download the Application
Download the Video Live Wallpaper application in your Android device from Google Playstore and proceed for its installation and launch.
Step 2: Select Your Video
In the app’s opening screen, click ‘Choose Video’ and grant app permissions to access your device’s media. Browse your video gallery to select a desired video that you wish to convert into a live photo.
Step 3: Edit Your Video
You will now get directed to the app’s editor screen. Here, you can explore your editing creativity to edit the selected video. Once you are happy, click the picture icon at the top right corner.
Step 4: Your Live Wallpaper is Ready!
To set the created live photo as your device screen wallpaper, select ‘Set as Wallpaper’ at the bottom right.
● Key Takeaways from This Episode →
● From cherishing moments to sharing them on social media, live photos can do it all.
● Being an iPhone exclusive utility, you need to create these from videos to enjoy them on other platforms and devices.
● Filmora is the best video to live photo converters, available as an easy, quick and convenient conversion tool.
How to Make Slideshow in LinkedIn
How to Create Slideshow in LinkedIn
An easy yet powerful editor
Numerous effects to choose from
Detailed tutorials provided by the official channel
LinkedIn slideshows are interesting means of professional content presentations in an elusive and catchy style. Stay tuned to learn everything about LinkedIn slideshows!
In this article
01 [Why Should You Care LinkedIn Slideshow?](#Part 1)
02 [What Are the Specs & Dimensions of LinkedIn Slideshow?](#Part 2)
03 [Examples of LinkedIn Slideshow](#Part 3)
04 [How to Create Slideshow in LinkedIn?](#Part 4)
Part 1 Why Should You Care LinkedIn Slideshow?
Today’s IT revolutionized era has a technology infused solution to everything and employment is no exception. Defining the platform, LinkedIn is a professional social networking site that allows you to put forward your qualifications, education, skills, expertise and experience to address your job oriented concerns. The platform is a market leader in hiring professionals to a diversity of work profiles, while increasing the number of potential audiences.
The social media platform essentially works to keep the job realm informed about you with the most detailed aspects. This is why, creating a LinkedIn profile turns out to be a significant step in the professional world. Let us get into understanding some more beneficial aspects of a LinkedIn recognition in the following section:
01Establishing Professional Connections
Making yourself available on the professional front through a LinkedIn profile lets you know about the diversities of recruitment prerequisites, connect with professionals belonging to different domains, backgrounds and industries, while getting numerous opportunities to meet people who share a similar work perspective as yours.
02Being Informed About Job Postings
A LinkedIn profile caters most effectively to your concern of getting regular updates about employment opportunities in a diverse range of industrial and business corporations, companies and recruiting agencies. You can use the platform to create a professional account and follow the respective company pages that match with your qualifications and expertise, to get the latest updates of their job postings and vacancy announcements.
03Recruiter’s Search Visibility
Having a LinkedIn profile affordably means that you are entitled to a recognition in the recruiter’s search results on Google, thus giving a considerable boost to your chances of being viewed and hired. This is additionally beneficial for the recruiting agencies as well, who get the maximum fruit with the least effort.
04Globalization
Creating a comprehensive LinkedIn profile with the correct choice of keywords and exact content opens up employment opportunities beyond the cross country borders, thanks to the platform’s global reach and credibility. This in turn, causes your professional integrity to be presented in front of a large scale audience diversity.
05Personal Branding
Being active on LinkedIn lets you become a brand for yourself through its endorsement and recommendation features. Seeing your LinkedIn profile, your akin, coworkers and professionally senior acquaintances of the past can write a positive testimonial on your expertise, thus increasing your chances of being hired to a new job post.
06A Valuable Asset
You can conveniently regard a LinkedIn profile as your professional diary, where you can update your latest corporate or industrial achievements, awards, project undertakings and voluntary activities. This will facilitate your recruiter with the latest and exact information about your corporate capabilities, which would further aid the latter to consider on hiring you.
07Real and Trustworthy Platform
Creating a LinkedIn profile essentially requires furnishing real and authentic details of education, skills and professional backgrounds for getting relevant opportunities in their respective fields. Uploading false information and fake details will anyway result in beating around the bush, without any significant gain and hence, this practice is essentially avoided by LinkedIn users.
08Active Job Search
Instead of following the conventional passive job seeker pattern of sending resume and waiting for the HR response, LinkedIn allows you to be in regular touch with the recruiter of your chosen company for latest updates on the hiring process. If you are worried of getting the ‘desperate’ tag, rest assured as the platform will rather present you as a proactive professional.
Part 2 What Are the Specs & Dimensions of LinkedIn Slideshow?
Now that you are familiar with the credibility of a LinkedIn carousel post in the professional world, let us get into some more details of the utility with proceeding towards a discussion of the different specifications and dimensions of a LinkedIn slideshow and the professional aspects of the same in the following section:
● Take Care of the File Size
The credibility of LinkedIn carousel posts lies in the engaging presentation of your static and monotonous text to make them stand out of the crowded newsfeed. True that your creative skills are sufficient enough to design a graphic masterpiece, yet you should take care to remain within an affordable limit, lest you would end up with a large file that gets difficult to upload and process. Most reliably, a 100 MB file size would easily fit into the bill.
● Restrict Your Slide Count
When creating a slideshow LinkedIn presentation, it is normal to get a bit over the line while including the most exemplary and comprehensive details about your professional qualifications, skills and background. Relax, that’s nothing wrong! However, all you need to care about is limiting the slide count of your slideshow to a maximum of 300 pages. As a genuine approach, no one would bother going beyond that to read about you anyway!
● Use a Commendable File Format
You would ideally want the documents and media files in your slideshow to have the finest quality. LinkedIn allows you to create and share your graphic presentations in the PDF, DOCX, DOC, PPTX and PPT file formats. If you want the assurance of your slideshows having the highest resolution and appreciable output quality, it is recommended to save them in the PDF file format.
● Make a Careful Upload
When you are ready to upload your presentation, consider taking a close preview of its contents to make sure that you have not missed out on anything. This becomes all the more necessary, owing to the fact that, you are not allowed to edit your post in anyway after it gets uploaded on your LinkedIn profile.
● Bonus Tip
To include the latest and up-to-date information within your presentation, consider visiting the LinkedIn official webpage directly from your platform account.
Part 3 Examples of LinkedIn Slideshow
Creating a LinkedIn slide show can be both, exciting as well as advantageous on the professional front. After having an insight of the significance, dimensions and specifications, let us now move towards browsing through some of the most excellent examples of LinkedIn slideshow presentations in the following section:
● Share Numbers, Infographics and Statistics
The utility of the LinkedIn platform to share documents has been worked upon by Brian Wallace, an infographic agency owner, to present his professional excellence in front of the target audiences through useful statistics and examples. Opening his work profile, you would firstly get to see an infographic PDF export, which are later uploaded as document files on a LinkedIn post that speaks in favor of the statistics.
● Share Action Oriented Business Modules
Travis Lachner, the CEO of a renowned business enterprise, has worked upon the clever idea of designing appealing, call to action presentations to encourage the participation of his potential audiences in the business module through a graphical arrow desisgn, asking them to share their opinions via relatable comments.
● Stepwise Instructions and Design Frameworks
This LinkedIn feature is utilized by Demodesk to present a stepwise demonstration of its newly launched ‘One Feature Framework’ through a slideshow presentation. You can work with the facility to share documents comprising of market oriented case studies, business reports, frameworks, etc., from your company’s official webpage.
● Conference Presentations and Event Contents
LinkedIn slideshows are indeed the most expressive means of sharing conference essentials and event marketing. Such presentations have been perfectly put to use by Jens Hilgers, the eSports creator and entrepreneur, to help viewers and players in navigating through his game landscapes. You can also choose a simple task of creating a buzz of your upcoming event among your audience, like Garter did to inform about the CFO & Executive Conference.
● Content Promotion
You can use a LinkedIn slideshow post to effectively promote your content among a global audience like Matheos Simou, a graphic designer cum recruitment strategist, who utilized LinkedIn presentations to educate his target audience about the significance of graphic desisgn and product branding outsources through his slideshow post titled ‘Flipping Pointless Brand Identity’.
Part 4 How to Create Slideshow in LinkedIn?
Having talked enough about LinkedIn slideshows and their market credibility, let us now make an attempt to try hands at creating professionally useful LinkedIn presentations. The following section describes a detailed, stepwise tutorial to adhere to the aforesaid purpose within a quick time span and utmost ease:
● User’s Guide to Create a LinkedIn Slideshow
Step 1: Open Your LinkedIn Profile
Start with logging in to your LinkedIn profile in any preferred device.
Step 2: Create a Google Slide Deck
Launch Google Slides in your device and proceed to design a slide deck on the same.

Step 3: Add Content to the Inaugural Slide
Populate the first slide of your presentation with the opening content, like the titles and subtitles of slideshow creation objective, company name, profile and expertise, etc.

As far as designing the subsequent slides is concerned, it would be a smart idea to clone the first slide to maintain an overall homogeneity.

Step 4: Save Your Work
When you are done with creating the presentation, choose to save it on your profile in the PDF file format for ensuring a high output quality.

Step 5: Sharing Your Creation
Create a document post on your profile to share the slideshow presentation with fellow LinkedIn users.

Step 6: Describe Your Post
The last step is to supplement your post with a suitable description and a few catchy hashtags. When you are happy with your work, navigate to the bottom right of the profile screen and tap ‘Post’.

● Creating LinkedIn Slideshows with Wondershare Filmora
When looking for a convenient and easy to use slideshow creator to design your LinkedIn presentations, you can rely on the Wondershare Filmora Video Editor Slideshow Creator software program to make high end, professional quality slide shows in a commendable resolution, and supplement them with a diversity of cohesive graphic effects.
For Win 7 or later (64-bit)
For macOS 10.12 or later
● Ending Thoughts →
● LinkedIn slideshows are highly useful in creating a notable impact of your professional skills and capabilities in front of job recruiters.
● There are some essential aspects of LinkedIn slideshows, which you should consider while designing your presentation.
● Wondershare Filmora is certainly one among the best software solutions to create LinkedIn slideshows with high end professional excellence.
LinkedIn slideshows are interesting means of professional content presentations in an elusive and catchy style. Stay tuned to learn everything about LinkedIn slideshows!
In this article
01 [Why Should You Care LinkedIn Slideshow?](#Part 1)
02 [What Are the Specs & Dimensions of LinkedIn Slideshow?](#Part 2)
03 [Examples of LinkedIn Slideshow](#Part 3)
04 [How to Create Slideshow in LinkedIn?](#Part 4)
Part 1 Why Should You Care LinkedIn Slideshow?
Today’s IT revolutionized era has a technology infused solution to everything and employment is no exception. Defining the platform, LinkedIn is a professional social networking site that allows you to put forward your qualifications, education, skills, expertise and experience to address your job oriented concerns. The platform is a market leader in hiring professionals to a diversity of work profiles, while increasing the number of potential audiences.
The social media platform essentially works to keep the job realm informed about you with the most detailed aspects. This is why, creating a LinkedIn profile turns out to be a significant step in the professional world. Let us get into understanding some more beneficial aspects of a LinkedIn recognition in the following section:
01Establishing Professional Connections
Making yourself available on the professional front through a LinkedIn profile lets you know about the diversities of recruitment prerequisites, connect with professionals belonging to different domains, backgrounds and industries, while getting numerous opportunities to meet people who share a similar work perspective as yours.
02Being Informed About Job Postings
A LinkedIn profile caters most effectively to your concern of getting regular updates about employment opportunities in a diverse range of industrial and business corporations, companies and recruiting agencies. You can use the platform to create a professional account and follow the respective company pages that match with your qualifications and expertise, to get the latest updates of their job postings and vacancy announcements.
03Recruiter’s Search Visibility
Having a LinkedIn profile affordably means that you are entitled to a recognition in the recruiter’s search results on Google, thus giving a considerable boost to your chances of being viewed and hired. This is additionally beneficial for the recruiting agencies as well, who get the maximum fruit with the least effort.
04Globalization
Creating a comprehensive LinkedIn profile with the correct choice of keywords and exact content opens up employment opportunities beyond the cross country borders, thanks to the platform’s global reach and credibility. This in turn, causes your professional integrity to be presented in front of a large scale audience diversity.
05Personal Branding
Being active on LinkedIn lets you become a brand for yourself through its endorsement and recommendation features. Seeing your LinkedIn profile, your akin, coworkers and professionally senior acquaintances of the past can write a positive testimonial on your expertise, thus increasing your chances of being hired to a new job post.
06A Valuable Asset
You can conveniently regard a LinkedIn profile as your professional diary, where you can update your latest corporate or industrial achievements, awards, project undertakings and voluntary activities. This will facilitate your recruiter with the latest and exact information about your corporate capabilities, which would further aid the latter to consider on hiring you.
07Real and Trustworthy Platform
Creating a LinkedIn profile essentially requires furnishing real and authentic details of education, skills and professional backgrounds for getting relevant opportunities in their respective fields. Uploading false information and fake details will anyway result in beating around the bush, without any significant gain and hence, this practice is essentially avoided by LinkedIn users.
08Active Job Search
Instead of following the conventional passive job seeker pattern of sending resume and waiting for the HR response, LinkedIn allows you to be in regular touch with the recruiter of your chosen company for latest updates on the hiring process. If you are worried of getting the ‘desperate’ tag, rest assured as the platform will rather present you as a proactive professional.
Part 2 What Are the Specs & Dimensions of LinkedIn Slideshow?
Now that you are familiar with the credibility of a LinkedIn carousel post in the professional world, let us get into some more details of the utility with proceeding towards a discussion of the different specifications and dimensions of a LinkedIn slideshow and the professional aspects of the same in the following section:
● Take Care of the File Size
The credibility of LinkedIn carousel posts lies in the engaging presentation of your static and monotonous text to make them stand out of the crowded newsfeed. True that your creative skills are sufficient enough to design a graphic masterpiece, yet you should take care to remain within an affordable limit, lest you would end up with a large file that gets difficult to upload and process. Most reliably, a 100 MB file size would easily fit into the bill.
● Restrict Your Slide Count
When creating a slideshow LinkedIn presentation, it is normal to get a bit over the line while including the most exemplary and comprehensive details about your professional qualifications, skills and background. Relax, that’s nothing wrong! However, all you need to care about is limiting the slide count of your slideshow to a maximum of 300 pages. As a genuine approach, no one would bother going beyond that to read about you anyway!
● Use a Commendable File Format
You would ideally want the documents and media files in your slideshow to have the finest quality. LinkedIn allows you to create and share your graphic presentations in the PDF, DOCX, DOC, PPTX and PPT file formats. If you want the assurance of your slideshows having the highest resolution and appreciable output quality, it is recommended to save them in the PDF file format.
● Make a Careful Upload
When you are ready to upload your presentation, consider taking a close preview of its contents to make sure that you have not missed out on anything. This becomes all the more necessary, owing to the fact that, you are not allowed to edit your post in anyway after it gets uploaded on your LinkedIn profile.
● Bonus Tip
To include the latest and up-to-date information within your presentation, consider visiting the LinkedIn official webpage directly from your platform account.
Part 3 Examples of LinkedIn Slideshow
Creating a LinkedIn slide show can be both, exciting as well as advantageous on the professional front. After having an insight of the significance, dimensions and specifications, let us now move towards browsing through some of the most excellent examples of LinkedIn slideshow presentations in the following section:
● Share Numbers, Infographics and Statistics
The utility of the LinkedIn platform to share documents has been worked upon by Brian Wallace, an infographic agency owner, to present his professional excellence in front of the target audiences through useful statistics and examples. Opening his work profile, you would firstly get to see an infographic PDF export, which are later uploaded as document files on a LinkedIn post that speaks in favor of the statistics.
● Share Action Oriented Business Modules
Travis Lachner, the CEO of a renowned business enterprise, has worked upon the clever idea of designing appealing, call to action presentations to encourage the participation of his potential audiences in the business module through a graphical arrow desisgn, asking them to share their opinions via relatable comments.
● Stepwise Instructions and Design Frameworks
This LinkedIn feature is utilized by Demodesk to present a stepwise demonstration of its newly launched ‘One Feature Framework’ through a slideshow presentation. You can work with the facility to share documents comprising of market oriented case studies, business reports, frameworks, etc., from your company’s official webpage.
● Conference Presentations and Event Contents
LinkedIn slideshows are indeed the most expressive means of sharing conference essentials and event marketing. Such presentations have been perfectly put to use by Jens Hilgers, the eSports creator and entrepreneur, to help viewers and players in navigating through his game landscapes. You can also choose a simple task of creating a buzz of your upcoming event among your audience, like Garter did to inform about the CFO & Executive Conference.
● Content Promotion
You can use a LinkedIn slideshow post to effectively promote your content among a global audience like Matheos Simou, a graphic designer cum recruitment strategist, who utilized LinkedIn presentations to educate his target audience about the significance of graphic desisgn and product branding outsources through his slideshow post titled ‘Flipping Pointless Brand Identity’.
Part 4 How to Create Slideshow in LinkedIn?
Having talked enough about LinkedIn slideshows and their market credibility, let us now make an attempt to try hands at creating professionally useful LinkedIn presentations. The following section describes a detailed, stepwise tutorial to adhere to the aforesaid purpose within a quick time span and utmost ease:
● User’s Guide to Create a LinkedIn Slideshow
Step 1: Open Your LinkedIn Profile
Start with logging in to your LinkedIn profile in any preferred device.
Step 2: Create a Google Slide Deck
Launch Google Slides in your device and proceed to design a slide deck on the same.
Step 3: Add Content to the Inaugural Slide
Populate the first slide of your presentation with the opening content, like the titles and subtitles of slideshow creation objective, company name, profile and expertise, etc.
As far as designing the subsequent slides is concerned, it would be a smart idea to clone the first slide to maintain an overall homogeneity.
Step 4: Save Your Work
When you are done with creating the presentation, choose to save it on your profile in the PDF file format for ensuring a high output quality.
Step 5: Sharing Your Creation
Create a document post on your profile to share the slideshow presentation with fellow LinkedIn users.
Step 6: Describe Your Post
The last step is to supplement your post with a suitable description and a few catchy hashtags. When you are happy with your work, navigate to the bottom right of the profile screen and tap ‘Post’.
● Creating LinkedIn Slideshows with Wondershare Filmora
When looking for a convenient and easy to use slideshow creator to design your LinkedIn presentations, you can rely on the Wondershare Filmora Video Editor Slideshow Creator software program to make high end, professional quality slide shows in a commendable resolution, and supplement them with a diversity of cohesive graphic effects.
For Win 7 or later (64-bit)
For macOS 10.12 or later
● Ending Thoughts →
● LinkedIn slideshows are highly useful in creating a notable impact of your professional skills and capabilities in front of job recruiters.
● There are some essential aspects of LinkedIn slideshows, which you should consider while designing your presentation.
● Wondershare Filmora is certainly one among the best software solutions to create LinkedIn slideshows with high end professional excellence.
Also read:
- Updated How To Make Pinterest Slideshow in Simple Ways for 2024
- Tips That Show Anybody How to Get Awesome Background for Slideshow in PowerPoint for 2024
- In 2024, Samples of Cartoon Character Face
- Updated 2024 Approved Creative Ways to Create iPhone Text GIF
- New 10 Realistic Cartoon Characters You Would Run Away From if You Met in Real Life for 2024
- In 2024, 12 Animation Video Maker That Can Triple Conversion Rates
- Updated 2024 Approved Learn About Lip-Syncing in Animation
- 2024 Approved Best 10 Anime Websites to Watch Dubbed Anime Free
- New Ideas That Will Help You Out in Learning How to Send WhatsApp Animated Gifs for 2024
- New 2024 Approved 10 Must Watch Netflix Cartoon Series
- New 15 Best Stop Motion Animation Kits to Fuel Creativity
- New Amazing Ways to Find Suitable Animated Graphic Maker for 2024
- 2024 Approved 5 Recommended Websites for Text GIF Maker
- How You Can Turn Yourself Into Anime Character Using Anime Filter for 2024
- New What Is the Best Collage Photo Grid Maker - Experts Choice for 2024
- New How to Create Benime Whiteboard Animation on Android for 2024
- Updated Easy Shortcut to Convert Videos to Gifs on iPhone
- How to Animate Image on Scroll
- New How to Find 3D Animation Studio Meeting All Your Inspiring Needs for 2024
- In 2024, Best 10 Animated Templates in Canva
- Updated How to Make a Video a Live Photo for 2024
- New Amazing Techniques of Motion Graphics in Premiere Pro for 2024
- Updated In 2024, Ways You Can Master to Find 10 Best Free Animated Text Generator
- 10 2D/3D Animation Tips & Tricks to Bring New Ideas to You
- That Will Make Aesthetic Cartoon Drawing More Understandable for 2024
- Top 10 Animated Photo Collage Apps You Should Know for 2024
- How to Make My Photo 3D Cartoon Online for 2024
- In 2024, Handy Tips From Adobe Animate Rigging Tutorial for All Learners
- 2024 Approved 15 Best Video to GIF App on iPhone and Android
- In 2024, How To Stream Anything From Lenovo ThinkPhone to Apple TV | Dr.fone
- In 2024, 6 Ways To Transfer Contacts From Infinix Hot 30i to iPhone | Dr.fone
- In 2024, 5 Ways to Transfer Music from Tecno Pova 6 Pro 5G to Other Android Devices Easily | Dr.fone
- How To Enable USB Debugging on a Locked Vivo V30 Pro Phone
- Easy Tutorial for Activating iCloud from Apple iPhone 15 Plus Safe and Legal
- Hard Reset Oppo A1 5G in 3 Efficient Ways | Dr.fone
- 3 Ways to Change Location on Facebook Marketplace for Motorola Moto G14 | Dr.fone
- Possible solutions to restore deleted pictures from Redmi 13C 5G.
- How Can I Unlock My Apple iPhone 13 mini After Forgetting my PIN Code? | Dr.fone
- In 2024, How to Make the Most of Your Apple iPhone 13 mini Lock Screen with Notifications? | Dr.fone
- How to Add Your Digital Signature to a Word 2003 Document
- Ultimate Guide on Tecno Pova 5 Pro FRP Bypass
- 7 Solutions to Fix Chrome Crashes or Wont Open on Poco C65 | Dr.fone
- Full Guide to Bypass Tecno Pova 5 FRP
- In 2024, How to Transfer Everything from Apple iPhone 11 to iPhone 8/X/11 | Dr.fone
- How To Fix Part of the Touch Screen Not Working on Oppo Find X6 | Dr.fone
- Tips and Tricks for Setting Up your Vivo V29e Phone Pattern Lock
- Forgotten The Voicemail Password Of Vivo Y78t? Try These Fixes
- In 2024, How to Change GPS Location on Realme GT Neo 5 Easily & Safely | Dr.fone
- Best Pokemons for PVP Matches in Pokemon Go For Nokia 130 Music | Dr.fone
- In 2024, 10 Fake GPS Location Apps on Android Of your Asus ROG Phone 8 Pro | Dr.fone
- Life360 Circle Everything You Need to Know On Honor Magic 5 Pro | Dr.fone
- Fix App Not Available in Your Country Play Store Problem on Oppo Find N3 Flip | Dr.fone
- How to Transfer Photos from Samsung Galaxy Z Fold 5 to New Android? | Dr.fone
- Best 3 OnePlus Nord 3 5G Emulator for Mac to Run Your Wanted Android Apps | Dr.fone
- 5 Quick Methods to Bypass Infinix Smart 8 Pro FRP
- How To Transfer WhatsApp From iPhone 13 mini to other iPhone 14 Pro Max devices? | Dr.fone
- Title: New In 2024, 8 Top Motion Graphics Online Tools for Your Inspiration
- Author: Elon
- Created at : 2024-06-08 05:08:08
- Updated at : 2024-06-09 05:08:08
- Link: https://animation-videos.techidaily.com/new-in-2024-8-top-motion-graphics-online-tools-for-your-inspiration/
- License: This work is licensed under CC BY-NC-SA 4.0.
