
:max_bytes(150000):strip_icc():format(webp)/CODA-d4dd2a9b6c3d4a008a05c9718c9bce1e.jpg)
New In 2024, Before You Learn 3D Animation Some Things You Should Know
Before You Learn 3D Animation: Things You Should Know
Before You Learn 3D Animation: Some Things You Should Know
An easy yet powerful editor
Numerous effects to choose from
Detailed tutorials provided by the official channel
Before you delve into the profession of creating 3d cartoon filters, you need to understand or decide if creating animated characters is something you would like to do. It’s not going to be smooth as you will get frustrated at some point, you will get confused, and it will be challenging, but in the end, it is rewarding because it is an expression of your mind coming to life. You are the one to breathe life into your characters who represent your imaginations. You will also have to infuse a great deal of your creativity to create beautiful and exciting characters for others to enjoy. Meanwhile, let’s first understand what 3d animations mean.
Becoming a 3d animator is not a feat you can achieve in a short time. It is not days, weeks, months, or even years. Like any other profession, a professional 3d animator must have put in a great deal of work, mixed with a lot of passion and love for what he is doing. To become successful as a 3d animator, you must love what you are doing or be ready to put in the work.
This article will expose what you should learn to create beautiful 3d animation cartoons, including what to expect as a 3d animator.
In this article
01 [What are 3d animation and the process of 3d animation?](#Part 1)
02 [Differences between 2d animation and 3d animation](#Part 2)
03 [A roaster of 8 best 3d animation software.](#Part 3)
04 [Top 3 3d animation making mistakes to avoid](#Part 4)
Part 1 What Is 3D Animation And The Process of 3D Animation?
animation is a term that describes the art of creating 3-dimensional images and placing them in a digital environment. It is a process that uses motion to bring objects, characters, etc., to life.
It is also known as computer-generated imagery, and it is currently the most common animation type for feature films.
Various software and programs are designed specifically for 3d animations and allow the animators to bring the objects to life.
The process of 3d animation happens in three(3) stages;
● Modeling
● Layout and animation
● Rendering
Modeling in 3d animation involves generating the objects or characters either by using a modeling tool or using a real thing. The real object is scanned directly into the computer, where other processes follow. You have total control over your character and how you want them to appear by modeling. You decide the weight, specifications, feel, etc. However, scanning objects save a lot of time. You must add texture before modeling your character or reviewing it before moving to the following layout and animation.
Layout and animation stage: A layout is determined when the generated objects move to this stage. It involves creating a set/scene where the objects can position. Layout first happens before animation does. After adding the objects and characters, they get animated using animation variables. After this, you use motion capture or keyframing to give life to the models in the scenes.
Rendering: Rendering is using software or programs. It is not something to do using just your computer. These tools can generate the scenes into the finished image according to the client’s requirements or set goals.
Creating cartoon background images or any other form of animations is a process that requires a lot of planning and work, which sums up a lot of time. To learn 3d animation, you must be ready to give in ample time as it is a profession that requires some time to handle.
The process listed above also shows the creativity requirement required to succeed in the 3d animation industry. To think that you must create the scenes, which is the layout stage, means you have to be creative in your imagination. If you then decide to model your character from scratch using modeling tools. That also requires another job of thinking and extracting a lot of your creative juices.
Part 2 What is the difference between 2d animation and 3d animation?
Anyone can decide to learn animation with no plan in mind or understanding of what the profession involves. animation is different from 2d animation, and if you want to learn animation, you need to understand the distinction between these two.
animation can have a lot of creative possibilities, whereas 3d animation has a lot of natural abilities. The visual style of both types of animation is explicitly different.
3d animation is a more intensive technical process than the various stages mentioned earlier. It would most likely involve different specialists to handle them to get a more professional output. However, 2d animation consists of drawing the characters frame by frame.
animated cartoons are in The Simpsons, Pinocchio, the Lion king, etc.

animations are like the ones Dreamworks, Pixar, produce. They include the avengers, the bad guys, etc.


Part 3 A Roaster Of 8 Best 3D Animation Software

Several 3D animation software exists in the market, both free and paid. If you are a animation creator or love animation for fun, you can use the free software to make your videos, cartoon photos, 3d cartoon faces, etc.
With many animation software available in the market, you can only fully trust a few.
Here’s a roaster of 8 best 3D animation software you could use to create the cartoon monsters you’ve always been curious about;
● Filmora
● Blender
● Maya
● Wings 3d
● Adobe Animate
● Cinema 4d
● K-3D
● Milcamo
Filmora Video animation tool: This is a highly recommended 3D animation tool with many features and pros. It has a wide range of keyframes, about six of which make your cartoon background images smooth and natural.
| Software | Features | OS | Pro |
|---|---|---|---|
| Wondershare Filmora Video Editor | It has an auto-color correction It has smooth keyframes | Windows, Mac | You can apply light flare effects You can apply an audio mixer |
| Blender | It has textured brushes and masking for 3d painting. It has add-ons and customised tools with high python scripting. | Windows, Linux, Mac computers | It has Virtual reality rendering, Strong camera restoration. It had both manual and automatic tracking. |
| Maya | Free trial of 30 days. Can create complex technical effects | Windows, Max | Good Control and perfect accuracy. Can collect motion capture data. |
| Wings 3d | Auto UV mapping system It has support for light and material effects. | Windows, Linux, and Mac OS | Advanced 3d and 2d modeling tools. It is free to use |
| Adobe animate | Virtual camera functionality gives a realistic view. Adoptive animation effects, zooming, panning etc. | Windows, Mac | Effective audio syncing technology. Customizable font, styling etc. |
| Cinema 4d | Concepts develop without time modeling Large library of preset scenes. | Windows, Mac | Customised with a huge asset range It is a faster tool than Maya Dissect complete scene and is faster than Maya. |
| K-3D | It has property adjustment capabilities with handy strong features. I5 is made up of basic tools for animation, curves, patches. | Mac OS X, Linux, FreeBSD, windows platforms | It is very flexible for either complex or basic workflows. It has a wide selection of plugins. |
| Mixamo | Streamlined user experience It has a faster search function that is accurate | Windows, Mac | It has fast character and animation browsing. Download multiple animations at a go |
For Win 7 or later (64-bit)
For macOS 10.12 or later
Part 4 Top Three (3) 3d Animation Making Mistakes To Avoid

As we initially mentioned, 3d animation requires an intensive technical process. It is a skill that you need to hone over the years by paying attention to detail, being highly creative, and daring to succeed.
Here are 3 mistakes you must avoid during the animation process;
● Forgetting the ‘why’ factor
● Over-animating a scene
● Not giving your viewers time to take it in
Forgetting the why: In a animation cartoon, every move, walking step, and smile is essential. Every character represented in your cartoon background is there for a specific reason.
You would be making a mistake that will affect the result if you lose focus on this reason. Your viewers won’t find your cartoon believable if the moves and acting don’t add up.
Your characters don’t just move because they want to move. Something must have spurred the motion or reaction. It could be for what happened to them, what they heard, or saw another character did in the scene. Do not neglect the why of the act.
While animating, focus on why and keep revisiting until all your characters and objects are knitted closely together.
Over-animating a scene: This is another mistake animators should avoid. If you animate your characters, everything may be a mess if you animate the background and foreground. Simplicity is how to get this thing, keep it simple and focused.
Do not have much going on in each scene but only where you need the attention of your viewers. Animators that do this end up confusing their viewers with no direction.
You can use camera effects such as depth of field to make your audience focus on the point you are trying to make in the particular scene.
Not giving your viewers time to take it in: This is another 3d animation making a mistake you should be careful of. Not giving your viewers time to process the happenings on the scene before the next.
This can be avoided by timing and measuring cuts such that any animation at the start of a new scene is timed to enable the viewers to take it in. You can ask for third-party criticism on your work to find out how your animation is received and see pointers to mistakes such as this. The third party could be your colleague or friend.
Note: You can easily avoid any error or mistake or modify your 3D animation with the help of the Wondershare Filmora video editor. That will provide a solid base for featuring 3D animation.
● Ending Thoughts →
● 3D animation refers to using motion to breathe life into inanimate objects, and they can create animated videos and animation cartoons.
● 3D animation is highly technical, unlike 2d animation
● You can avoid the above 3d mistakes if you remain objective and open, and ready to accept constructive criticism.
● Becoming an animator is a fun thing to do, and it allows you to be free to express your creativity while entertaining other people entirely.
● Before you start learning 3d animation and create cartoon photos, ensure that you have read through all that we have explained here to have good information about what you are going into.
Before you delve into the profession of creating 3d cartoon filters, you need to understand or decide if creating animated characters is something you would like to do. It’s not going to be smooth as you will get frustrated at some point, you will get confused, and it will be challenging, but in the end, it is rewarding because it is an expression of your mind coming to life. You are the one to breathe life into your characters who represent your imaginations. You will also have to infuse a great deal of your creativity to create beautiful and exciting characters for others to enjoy. Meanwhile, let’s first understand what 3d animations mean.
Becoming a 3d animator is not a feat you can achieve in a short time. It is not days, weeks, months, or even years. Like any other profession, a professional 3d animator must have put in a great deal of work, mixed with a lot of passion and love for what he is doing. To become successful as a 3d animator, you must love what you are doing or be ready to put in the work.
This article will expose what you should learn to create beautiful 3d animation cartoons, including what to expect as a 3d animator.
In this article
01 [What are 3d animation and the process of 3d animation?](#Part 1)
02 [Differences between 2d animation and 3d animation](#Part 2)
03 [A roaster of 8 best 3d animation software.](#Part 3)
04 [Top 3 3d animation making mistakes to avoid](#Part 4)
Part 1 What Is 3D Animation And The Process of 3D Animation?
animation is a term that describes the art of creating 3-dimensional images and placing them in a digital environment. It is a process that uses motion to bring objects, characters, etc., to life.
It is also known as computer-generated imagery, and it is currently the most common animation type for feature films.
Various software and programs are designed specifically for 3d animations and allow the animators to bring the objects to life.
The process of 3d animation happens in three(3) stages;
● Modeling
● Layout and animation
● Rendering
Modeling in 3d animation involves generating the objects or characters either by using a modeling tool or using a real thing. The real object is scanned directly into the computer, where other processes follow. You have total control over your character and how you want them to appear by modeling. You decide the weight, specifications, feel, etc. However, scanning objects save a lot of time. You must add texture before modeling your character or reviewing it before moving to the following layout and animation.
Layout and animation stage: A layout is determined when the generated objects move to this stage. It involves creating a set/scene where the objects can position. Layout first happens before animation does. After adding the objects and characters, they get animated using animation variables. After this, you use motion capture or keyframing to give life to the models in the scenes.
Rendering: Rendering is using software or programs. It is not something to do using just your computer. These tools can generate the scenes into the finished image according to the client’s requirements or set goals.
Creating cartoon background images or any other form of animations is a process that requires a lot of planning and work, which sums up a lot of time. To learn 3d animation, you must be ready to give in ample time as it is a profession that requires some time to handle.
The process listed above also shows the creativity requirement required to succeed in the 3d animation industry. To think that you must create the scenes, which is the layout stage, means you have to be creative in your imagination. If you then decide to model your character from scratch using modeling tools. That also requires another job of thinking and extracting a lot of your creative juices.
Part 2 What is the difference between 2d animation and 3d animation?
Anyone can decide to learn animation with no plan in mind or understanding of what the profession involves. animation is different from 2d animation, and if you want to learn animation, you need to understand the distinction between these two.
animation can have a lot of creative possibilities, whereas 3d animation has a lot of natural abilities. The visual style of both types of animation is explicitly different.
3d animation is a more intensive technical process than the various stages mentioned earlier. It would most likely involve different specialists to handle them to get a more professional output. However, 2d animation consists of drawing the characters frame by frame.
animated cartoons are in The Simpsons, Pinocchio, the Lion king, etc.
animations are like the ones Dreamworks, Pixar, produce. They include the avengers, the bad guys, etc.
Part 3 A Roaster Of 8 Best 3D Animation Software
Several 3D animation software exists in the market, both free and paid. If you are a animation creator or love animation for fun, you can use the free software to make your videos, cartoon photos, 3d cartoon faces, etc.
With many animation software available in the market, you can only fully trust a few.
Here’s a roaster of 8 best 3D animation software you could use to create the cartoon monsters you’ve always been curious about;
● Filmora
● Blender
● Maya
● Wings 3d
● Adobe Animate
● Cinema 4d
● K-3D
● Milcamo
Filmora Video animation tool: This is a highly recommended 3D animation tool with many features and pros. It has a wide range of keyframes, about six of which make your cartoon background images smooth and natural.
| Software | Features | OS | Pro |
|---|---|---|---|
| Wondershare Filmora Video Editor | It has an auto-color correction It has smooth keyframes | Windows, Mac | You can apply light flare effects You can apply an audio mixer |
| Blender | It has textured brushes and masking for 3d painting. It has add-ons and customised tools with high python scripting. | Windows, Linux, Mac computers | It has Virtual reality rendering, Strong camera restoration. It had both manual and automatic tracking. |
| Maya | Free trial of 30 days. Can create complex technical effects | Windows, Max | Good Control and perfect accuracy. Can collect motion capture data. |
| Wings 3d | Auto UV mapping system It has support for light and material effects. | Windows, Linux, and Mac OS | Advanced 3d and 2d modeling tools. It is free to use |
| Adobe animate | Virtual camera functionality gives a realistic view. Adoptive animation effects, zooming, panning etc. | Windows, Mac | Effective audio syncing technology. Customizable font, styling etc. |
| Cinema 4d | Concepts develop without time modeling Large library of preset scenes. | Windows, Mac | Customised with a huge asset range It is a faster tool than Maya Dissect complete scene and is faster than Maya. |
| K-3D | It has property adjustment capabilities with handy strong features. I5 is made up of basic tools for animation, curves, patches. | Mac OS X, Linux, FreeBSD, windows platforms | It is very flexible for either complex or basic workflows. It has a wide selection of plugins. |
| Mixamo | Streamlined user experience It has a faster search function that is accurate | Windows, Mac | It has fast character and animation browsing. Download multiple animations at a go |
For Win 7 or later (64-bit)
For macOS 10.12 or later
Part 4 Top Three (3) 3d Animation Making Mistakes To Avoid
As we initially mentioned, 3d animation requires an intensive technical process. It is a skill that you need to hone over the years by paying attention to detail, being highly creative, and daring to succeed.
Here are 3 mistakes you must avoid during the animation process;
● Forgetting the ‘why’ factor
● Over-animating a scene
● Not giving your viewers time to take it in
Forgetting the why: In a animation cartoon, every move, walking step, and smile is essential. Every character represented in your cartoon background is there for a specific reason.
You would be making a mistake that will affect the result if you lose focus on this reason. Your viewers won’t find your cartoon believable if the moves and acting don’t add up.
Your characters don’t just move because they want to move. Something must have spurred the motion or reaction. It could be for what happened to them, what they heard, or saw another character did in the scene. Do not neglect the why of the act.
While animating, focus on why and keep revisiting until all your characters and objects are knitted closely together.
Over-animating a scene: This is another mistake animators should avoid. If you animate your characters, everything may be a mess if you animate the background and foreground. Simplicity is how to get this thing, keep it simple and focused.
Do not have much going on in each scene but only where you need the attention of your viewers. Animators that do this end up confusing their viewers with no direction.
You can use camera effects such as depth of field to make your audience focus on the point you are trying to make in the particular scene.
Not giving your viewers time to take it in: This is another 3d animation making a mistake you should be careful of. Not giving your viewers time to process the happenings on the scene before the next.
This can be avoided by timing and measuring cuts such that any animation at the start of a new scene is timed to enable the viewers to take it in. You can ask for third-party criticism on your work to find out how your animation is received and see pointers to mistakes such as this. The third party could be your colleague or friend.
Note: You can easily avoid any error or mistake or modify your 3D animation with the help of the Wondershare Filmora video editor. That will provide a solid base for featuring 3D animation.
● Ending Thoughts →
● 3D animation refers to using motion to breathe life into inanimate objects, and they can create animated videos and animation cartoons.
● 3D animation is highly technical, unlike 2d animation
● You can avoid the above 3d mistakes if you remain objective and open, and ready to accept constructive criticism.
● Becoming an animator is a fun thing to do, and it allows you to be free to express your creativity while entertaining other people entirely.
● Before you start learning 3d animation and create cartoon photos, ensure that you have read through all that we have explained here to have good information about what you are going into.
Learn Easy Blender Rigging in Only 2 Minutes
Learn Simple Blender Rigging in Only 2 Minutes
An easy yet powerful editor
Numerous effects to choose from
Detailed tutorials provided by the official channel
Blender is a FREE, open-source 3D Animation program that is very popular for beginner animators. It’s a good way of starting if you’re not yet sure about how far you want to go into animation as it won’t demand any immediate monetary commitment.
Now, as for its features, today, we’ll be focusing on Blender Rigging features.
In this article
01 [Why Use Blender Rigging?](#Part 1)
02 [The Art of Effective Rigging in Blender [TUTORIAL]](#Part 2)
03 [Introduction to Rigging in Blender Course](#Part 3)
Part 1 Why Use Blender Rigging?
Blender Character Rigging is a great way of creating truly beautiful and realistic animations. Despite being an open-source program, it’s capable of doing just as much, if not more, than some of the more premium Animation software out there.
So, if you want to create video projects for your audience’s entertainment or edification with animation, then Blender Rigging is definitely something that you should consider. With this tool, you can create the complex animations that you need and then polish it up in a video editor like Wondershare Filmora Video Editor (which is a premium, video-editing tool that you can use to perfect your finished Blender Rigging animations.)

Part 2 The Art of Effective Rigging in Blender [TUTORIAL]
For this next section, we’re going to be introducing a couple of tutorials that you can look into to teach you more about Blender Character Rigging, Blender Facial Rigging, Blender Muscle Rig, and so on.
These topics are each very long-winded on their own though, so we’ve linked appropriate video tutorials that you can learn more and reserved ourselves to a brief description of each technique so that you can determine whether it’s something that interests you (although, of course, our recommendation is that you check each one out so that you can get the full ‘Blender’ experience.)
01Blender Character Rigging
The main thing people usually look at Blender for is, Blender Character Rigging. And, because it was created to emulate professional animation software, Blender has this function down to pat. To give you an idea of what features you can expect: Blender comes with custom bone shapes for easy Blender character rigging, it also comes with envelope skinny, skeleton skinning, and automatic skinning. With these alone, you can be assured that you will be able to create complex animations without much trouble.
02Blender Facial Rigging
Facial Rigging is usually a more complex subject that is avoided by animators without much experience. But, with Blender, facial rigging is possible. The YouTube video should show you the process of going about Blender Facial Rigging from start to finish (from sculpting the character face itself and then making use of Blender Rigging tools for setting up a skeletal structure for your face’s character to become animated.)
03Blender Muscle Rigging
Creating a Blender Muscle Rig is exactly what it sounds like. It is, of course, much more complicated than normal rigging, but it is a good subject to familiarize yourself with anyway, as it will allow you to go to the ‘next stage’ as you say, with your Animations. The video that we’ve attached is from Pierrick Picaut, who has released a series of videos on the subject of Blender Rigging in general and has extensively explained how to create a Blender Human Rig from the general body, the face, the muscles, and so on.
04Blender Rigging
Although a lot of Animation relies on more ‘traditional’ methods of expressing movement, one can still make use of more modern animation practices, like rigs, to set up their animations for movement. It’s an especially good skill to learn if you’re more interested in content-friendly animations (rather than creating a film of your own.)
05Blender Rigging
This next tutorial is an introduction to basic Blender Rigging. It’s a good one to both start and end on, as it was created for beginners specifically, and uses an example that is perhaps easier to understand most. Make sure to give it a shot just in case.
Part 3 Introduction to Rigging in Blender Course
For this next part, we introduce two other resources that you can take advantage of to learn more about Blender Rigging. Whether it be about Blender character rigging, Blender facial rigging, free blender rigs, creating muscle rigs, and so and so forth. These resources have got your back.
01Where to Learn the Course?
The first major course that we think you might be interested in is Mark Masters’ blender rigging course. You can find this course at PluralSight (which is a website that is focused on helping users of software develop their skills). Mark Masters, the instructor for this course, is a professional animator and works as a Animator for the animation studio, Steelhouse Productions. So, you can be sure that there is much that you can learn from him.

02Other Tools to Learn Rigging
As for other places to learn? We suggest the “Blender Fundamentals” course that Blender themselves have posted on YouTube. They have several of these courses (for all of the more recent versions of Blender). So, you can pick out a course that works for you. One of their more recent series is “Blender Fundamentals 2.which currently has videos all on the subject of Blender rigging (including Blender rigging and Blender rigging videos.)

● Key Takeaways from This Episode →
● If you’re interested in trying out blender rigging yourself, you’ll probably want to study the subject a little before beginning.
● Blender Rigging is quite a complex subject for beginners but having something to start with should help you on your way.
● For that, we recommend checking out the videos that we mentioned in section two of this article, where we recommend some popular tutorials regarding some of the more common Blender Rigging subjects.
● If you’re looking for something more comprehensive or put together though. A course might be more up to your taste. For that, we recommend either Mark Master’s introduction to rigging and animation over at PluralSight or Blender’s own “Blender Fundamental” series on YouTube (which should introduce all the functions you’ll need to know.)
Blender is a FREE, open-source 3D Animation program that is very popular for beginner animators. It’s a good way of starting if you’re not yet sure about how far you want to go into animation as it won’t demand any immediate monetary commitment.
Now, as for its features, today, we’ll be focusing on Blender Rigging features.
In this article
01 [Why Use Blender Rigging?](#Part 1)
02 [The Art of Effective Rigging in Blender [TUTORIAL]](#Part 2)
03 [Introduction to Rigging in Blender Course](#Part 3)
Part 1 Why Use Blender Rigging?
Blender Character Rigging is a great way of creating truly beautiful and realistic animations. Despite being an open-source program, it’s capable of doing just as much, if not more, than some of the more premium Animation software out there.
So, if you want to create video projects for your audience’s entertainment or edification with animation, then Blender Rigging is definitely something that you should consider. With this tool, you can create the complex animations that you need and then polish it up in a video editor like Wondershare Filmora Video Editor (which is a premium, video-editing tool that you can use to perfect your finished Blender Rigging animations.)
Part 2 The Art of Effective Rigging in Blender [TUTORIAL]
For this next section, we’re going to be introducing a couple of tutorials that you can look into to teach you more about Blender Character Rigging, Blender Facial Rigging, Blender Muscle Rig, and so on.
These topics are each very long-winded on their own though, so we’ve linked appropriate video tutorials that you can learn more and reserved ourselves to a brief description of each technique so that you can determine whether it’s something that interests you (although, of course, our recommendation is that you check each one out so that you can get the full ‘Blender’ experience.)
01Blender Character Rigging
The main thing people usually look at Blender for is, Blender Character Rigging. And, because it was created to emulate professional animation software, Blender has this function down to pat. To give you an idea of what features you can expect: Blender comes with custom bone shapes for easy Blender character rigging, it also comes with envelope skinny, skeleton skinning, and automatic skinning. With these alone, you can be assured that you will be able to create complex animations without much trouble.
02Blender Facial Rigging
Facial Rigging is usually a more complex subject that is avoided by animators without much experience. But, with Blender, facial rigging is possible. The YouTube video should show you the process of going about Blender Facial Rigging from start to finish (from sculpting the character face itself and then making use of Blender Rigging tools for setting up a skeletal structure for your face’s character to become animated.)
03Blender Muscle Rigging
Creating a Blender Muscle Rig is exactly what it sounds like. It is, of course, much more complicated than normal rigging, but it is a good subject to familiarize yourself with anyway, as it will allow you to go to the ‘next stage’ as you say, with your Animations. The video that we’ve attached is from Pierrick Picaut, who has released a series of videos on the subject of Blender Rigging in general and has extensively explained how to create a Blender Human Rig from the general body, the face, the muscles, and so on.
04Blender Rigging
Although a lot of Animation relies on more ‘traditional’ methods of expressing movement, one can still make use of more modern animation practices, like rigs, to set up their animations for movement. It’s an especially good skill to learn if you’re more interested in content-friendly animations (rather than creating a film of your own.)
05Blender Rigging
This next tutorial is an introduction to basic Blender Rigging. It’s a good one to both start and end on, as it was created for beginners specifically, and uses an example that is perhaps easier to understand most. Make sure to give it a shot just in case.
Part 3 Introduction to Rigging in Blender Course
For this next part, we introduce two other resources that you can take advantage of to learn more about Blender Rigging. Whether it be about Blender character rigging, Blender facial rigging, free blender rigs, creating muscle rigs, and so and so forth. These resources have got your back.
01Where to Learn the Course?
The first major course that we think you might be interested in is Mark Masters’ blender rigging course. You can find this course at PluralSight (which is a website that is focused on helping users of software develop their skills). Mark Masters, the instructor for this course, is a professional animator and works as a Animator for the animation studio, Steelhouse Productions. So, you can be sure that there is much that you can learn from him.
02Other Tools to Learn Rigging
As for other places to learn? We suggest the “Blender Fundamentals” course that Blender themselves have posted on YouTube. They have several of these courses (for all of the more recent versions of Blender). So, you can pick out a course that works for you. One of their more recent series is “Blender Fundamentals 2.which currently has videos all on the subject of Blender rigging (including Blender rigging and Blender rigging videos.)
● Key Takeaways from This Episode →
● If you’re interested in trying out blender rigging yourself, you’ll probably want to study the subject a little before beginning.
● Blender Rigging is quite a complex subject for beginners but having something to start with should help you on your way.
● For that, we recommend checking out the videos that we mentioned in section two of this article, where we recommend some popular tutorials regarding some of the more common Blender Rigging subjects.
● If you’re looking for something more comprehensive or put together though. A course might be more up to your taste. For that, we recommend either Mark Master’s introduction to rigging and animation over at PluralSight or Blender’s own “Blender Fundamental” series on YouTube (which should introduce all the functions you’ll need to know.)
10 Top Memorable Japanese Cat Cartoons
10 Most Memorable Japanese Cat Cartoons
An easy yet powerful editor
Numerous effects to choose from
Detailed tutorials provided by the official channel
Japanese cartoon series has a huge fan base from all over the world. These shows fascinate the kids of age group 1-10 years. Japanese shows are always remembered because of their unique stories and lovely characters. All these shows have a unique cat character.
Cat is the most loved pet animal that is found in almost every Japanese household. Cats are cute and naughty at the same time, that’s why they are the most loved cartoon characters from all the Japanese cartoon shows.
All Japanese cartoons generally have at least one cat character, but some of them have a separate fan base due to their unique personalities and roles. We have listed the 10 most memorable Japanese cat cartoons below:
01Doraemon
Doraemon is the most loved cartoon character from Japan. Children from all over the world are very fond of this cartoon series. Doraemon is a cute, blue robot cat from the future. He often uses his gadgets from the 22nd century to help Nobita. These gadgets are kept in his magical pocket.
The series shows that Nobita is bullied by his school friends and then Doraemon helps him to solve the problems. Some episodes even show violent acts, but the overall content is good for children. All the episodes of this wonderful Japanese cat cartoon are full of fun and teach moral values at the end.
Rating: 7.4/10
Stars: 3.8
Votes: 10,522
02Chi’s Sweet Home
This is another Japanese cartoon series that kids love very much. Chi is a small and cute cat who lost her family. A young boy named Youhie and his mother adopt her. After the adoption, Chi feels loved and likes her new family. Parents should make their young kids watch the show rather playing video games. This show is overloaded with family values and friendship.
It is a must-watch cartoon show for kids. Both Youhie and Chi share a cute and strong bond of friendship. With each passing episode, they make new friends and wonderful memories.
Rating: 7.7/10
Stars: 4
Votes: 25,419
03The Cat Returns
The Cat Returns is another adventurous and magical animated series from Japan. The character of this series is Haru Yoshioka – a shy, 17-year-old high-school girl. She can talk with the cats. One day, she saves an extraordinary cat from a truck. That extraordinary cat turns out to be the Prince of the Cat Kingdom.
As a token of thanks, the cat offers her to get married to Lune – the Prince of the Cat Kingdom. Here, comes the savior Baron. He is a statue of a cat that comes to life. He saves Haru from being transformed into a cat and getting married to Lune.
Rating: 7.2/10
Stars: 4.7
Votes: 54,838
04Pokémon
Pokémon is one of the most loved adventurous Japanese cartoon series. This series became so popular that there are Pokémon video games, card games, etc. All the characters of Pokémon are loved and have a separate fan base. This series shows a beautiful and strong bond of friendship.
The main character of this series is Ash, who wants to become the world’s best Pokémon trainer. This series shows his journey into the Pokémon battlefield along with his yellow pet – Pikachu and his friends. There are many cat-based Pokémon in this series, but out of those Meowth is the most popular. He walks and talks like a human and he is one of the characters who is known all over the world. He is a member of the Rocket Team, portraying the negative character.
Rating: 7.5/10
Stars: 4
Votes: 41,767
05Natsume’s Book of Friends
This is another adventurous series of Japanese cartoons. In this series, the main character is Takashi Natsume. He has got a special ability to see spirits inherited from his grandmother. He spends a lonely childhood because of his extraordinary ability to see the spirits and feels left out.
When his grandmother is about to die, she hands him her Book of Friends, which contains the names of all the spirits that she has seen and helped in her life. Many good spirits visit Takashi for help and bad spirits visit him for the possession of the Book of Friends.
That’s where the cat-based character Nyanko enters for helping him. Nyanko has got the special abilities to talk, fly, and has an amazing strength to scare away bad spirits. The series also shows the strong bond of friendship between Takashi and Nyanko.
Rating: 8.3/10
Stars: 4
Votes: 167,646
06The Prince of Tennis
This cartoon series revolves around the life of a young Tennis player – Ryoma Echizen. The protagonist joins a famous academy for the most talented tennis players. While his fast grasping skills, Ryoma quickly makes his position as one of the top tennis players.
He aims at winning National Middle School Tennis Championship. In his journey toward his aim, he makes new friends and learns different and complex techniques of Tennis. As the series moves forward, Ryoma realizes his passion and love for the game.
Ryoma also has a cute cat as his pet. The name of the cat is Karupin. It is a brown and white colored small creature with blue eyes. Ryoma shares a beautiful bond with Karupin.
Rating: 7.9/10
Stars: 4
Votes: 77,350
07Yokai Watch
This series is based on the mythical creatures of Japan. It excites the children with its great storytelling concept and supernatural creatures. It revolves around different Yokai haunting the city. The main character of this anime is Keita. He gets a friendship medal every time he befriends a Yokai. This friendship medal helps him to summon his friend Yokai. He can make him do anything like fighting other Yokai, helping people, etc.
Moving further, the cartoon shows the special bond of friendship between Keita and Whisper. Whisper is Keita’s cat Yokai. They both set on an adventurous journey and Whisper helps him to befriend other Yokais, who he later summons using the friendship medal and his Yokai watch to help him throughout his journey.
Rating: 6.5/10
Stars: 3.6
Votes: 11,777
08Kiki’s Delivery Service
It is a lovely Japanese cartoon series based on the fantasy world. The protagonist of this series is a trainee 13-year-old witch, who leaves the house with his black cat – Jiji. After this, she starts her delivery service business. Her first delivery becomes a complete mess when she drops the black toy cat while flying on his broomstick. She sends Jiji, who pretends to be the toy cat to a client’s house and searches for the toy to rescue Jiji.
Kiki shares a cute bond with a boy named Tombo, who largely admires her flying skills. One bad delivery reaction depresses her and she loses all her powers and ability to fly. Later, Ursula visits her and tells her that she will regain all her powers after getting a new purpose in her life.
Rating: 7.8/10
Stars: 4
Votes: 138,823
09Fairy Tail
This is an adventurous anime series from Japan. Natsu Dragneel is a Dragon Slayor wizard who teams up with 17-year-old Lucy while searching for his lost father. Lucy makes a great team with her cat-like pet Happy and other members named Grey Fullbuster, Erza Scarlet, Wendy Marvell, and Carla.
They all start their adventurous journey in the Fairy Tale guild. The character of Happy is memorable as a cute cat with a lot of magical powers. He can talk, fly, and perform different magics. He is Lucy’s best friend and appears a lot in the series.
Rating: 7.6/10
Stars: 4
Votes: 919,985
10 Nichijou – My Ordinary Life
It is a comedy Japanese cartoon series. The main character of this series is Hakase – the Professor. She is an 8-year-old girl, who made Nano. Nano is an android school girl. She finds a black cat named Sakamoto. Initially, Sakamoto was a normal cat, but later she gets the ability to speak. She gets this ability when she wears a pink scarf made by the professor.
Watching the funny gestures of Sakamoto is the real fun that the children would love.
Rating: 8.5/10
Stars: 4
Votes: 318,287
● Ending Thoughts →
● No doubt, Japanese cartoon cats are memorable characters full of life and fun. These cats are not only loved and remembered in Japan but all over the world. Small kids are fond of Japanese cartoon shows.
● Japanese cartoon series is not only fun-filled but they also teach moral and family values to the kids.
● A strong bond of friendship is shown in every cartoon show from Japan. Japanese cartoons are evergreen and they will never fade away in this digital world of video games.
How to Make a Video a Live Photo 2023
How to Make a Video a Live Photo [2022]
An easy yet powerful editor
Numerous effects to choose from
Detailed tutorials provided by the official channel
Looking forward to turn your videos into live photos? Stay tuned to know how!
In this article
01 [How to Save Live Photos as a Video on iPhone/Ipad/Ipod](#Part 1)
02 [How to Turn a Video Into a Live Photo on iOS/Android](#Part 2)
Part 1 How to Save Live Photos as a Video on iPhone/Ipad/Ipod
Live photos are an amazing utility that allow you to save images as short moving snaps. Creating live photos is among the latest spunk of trendsetter stories, whether shared on social media platforms or created and saved just for fun, these definitely sound and look exciting, but that’s just one among the many things you can experiment on live photos.
Creating live photos takes you to a world of exciting features where you can explore your creativity in a number of ways, one of the easiest being turning live photos to videos. This comes handy when you need to share your live photos on platforms that do not have the compatibility to run live photos. If you are an iPhone user and wish to try your hands on experimenting with live photos, see through the following section of this article to learn how to turn live photo into video:
01Save as Video
Step 1: Launch the Photos App
In your iPhone, launch the ‘Photos’ app and navigate to ‘Albums’. All your live photos are present in the ‘Live Photos’ album.
Step 2: Format Selection
In latest versions (iOS 13v and above), you get a direct ‘Save as Video’ option in the ‘Photos’ application. Just click on that, and your live photo will be instantly saved in your iPhone gallery as a video. Here’s how you can use this feature:
● In the ‘Photos’ application, go to the ‘Live Photos’ album to select and open a desired live photo that you wish to convert to a video.
● Click on the ‘Share’ icon.

● Select ‘Save as Video’ from the drop down menu that displays sharing options.

Your created video will be saved in the ‘Photos’ application, next to the live photo you chose to turn into a video.
02iOS Shortcuts
This is a quicker way to save your live photos as videos in your iPhone. To use this feature, you first need to save the ‘Convert LivePhotos to Video’ shortcut in the ‘Shortcuts App’ gallery of your iPhone. You can do this by opening in your iOS internet browser.
Before using the above link, make sure to enable the ‘Allow Untrusted Shortcuts’ feature in your iPhone settings. You can do this as explained below:
● Reach to the ‘Settings’ application of your iPhone.
● Tap on ‘Shortcuts’ from the app’s welcome screen.
● Enable ‘Allow Untrusted Shortcuts’ with a toggle.

Having done that, here’s what you need to follow:
● Open the ‘Shortcuts’ application in your iOS device and tap the ‘Convert LivePhotos to Video’ shortcut.

● The ‘Live Photos’ album of your device opens up. Make a desired selection.

Your converted video gets automatically saved in the ‘Camera Roll’ folder of the ‘Photos’ application. Open the ‘Recents’ album to view your creation.
Part 2 How to Turn a Video Into a Live Photo on iOS/Android
Converting live photos to videos is fine, but going the other way round is all the more exciting and fun! You can even use these converted live photos as live screen wallpapers for your iOS and Android devices. If you are motivated to take up the excitement, look through the following methods to turn video into live photo:
01iOS Devices
Being an iOS user, you can choose among the following tools to convert video to live photo in your iPad, iPod or iPhone:
● Wondershare Filmora
Wondershare Filmora Video Editor is currently leading the software market among converter utilities that cater to various media conversion needs. This one is a free, smart, quick and convenient conversion tool that assures you of a hassle free video to live photo conversion in just a few clicks. What’s more interesting is, you don’t need to limit yourself with sticking to some particular video format, as Filmora conveniently supports almost all common ones.
Wondershare Filmora
Get started easily with Filmora’s powerful performance, intuitive interface, and countless effects!
Try It Free Try It Free Try It Free Learn More >

● IntoLive
This one is a third party application that allows you to convert videos into live photos, quickly and conveniently. This tool works well with devices having iOS 12.0 and later versions. All you have to do is follow the steps mentioned below:
Step 1:
Download the ‘IntoLive’ application from the Apple App Store.

Step 2:
Launch the same on your iOS device and grant the permission to access its ‘Photos’ Album.

Step 3:
In the ‘Videos’ section, choose the desired video that you wish to turn into a live photo.

Step 4:
An editor window will open up. Here, you can edit (cut, crop, trim, etc.) and add desired effects or filters to your selected video. Click on ‘Make’ at the top right when you finish the editing process.

Step 5:
If you have the paid version of the app, you can take up multiple repeats of your live photo; else you can use the free version with no repeats.

Step 6:
Once you are satisfied with the result, click on ‘Save Live Photo’. This will save your created live photo in your device’s gallery.

02VideoToLive
This is a free converter you can choose to turn video into live photo. This is a quite popular tool among iPhone users worldwide and is suitable for iOS versions 11.2 and later. You also have the liberty to share your created live photos on social media with this converter. Take the following steps to begin the conversion process:

Step 1:
Download the application from the Apple App Store and launch it on your iOS device.
Step 2:
Choose a video from your device gallery to convert it into a live photo.
Step 3:
In the video editor screen, crop the video to the preferred section that has to be converted into live photo. You can add video frames to your edited clip from the upper section of the editor screen.
Step 4:
Click on ‘Convert’ at the top right corner to initiate the conversion process.
03Android Devices
Live photos are undoubtedly known to add spark to your cherished moments, but the notch that puts these off with Android devices is that you can enjoy live photos on these devices only as live wallpapers.
Being an iPhone exclusive utility, Android devices lack the flexibility to capture live images. However, you can see them move on being set as live screen wallpapers. A handy alternative to this is converting a turn video into live photo and use it as live wallpaper. Here’s how you can take up the conversion process:
● TurnLive- Live Wallpaper
This one is a convenient, third party tool that lets you turn video into live photo in just a few quick steps. You can either use this application for free, or upgrade to the paid version to enjoy its premium features. To make amazing live photos from videos using this tool, you need to take up the steps given below:

Step 1: App Installation
To begin, visit the Google Playstore in your Android device and download the TurnLive- Live Wallpaper application. Next, you need install and launch the app in your device and accept its terms of service.
Step 2: Select a Video
Once you are done, click on the ‘Live Photo’ icon in the bottom of the app’s opening screen to reach the video selection page. Here, you need to choose ‘Video to Live Wallpaper’ option and grant the required app permissions to access your device’s camera and gallery. Select a desired video from the ones saved in your device and click ‘Done’ at the top right.
Step 3: Edit Your Video
You will now get directed to the app’s editor window, where you need to trim the selected video within a time frame of 1-5 seconds. To do this, select a cover frame within the clip and click ‘Next’. You can now use the video slider at the bottom to trim the clip. Adding suitable video effects and filters is also possible with this tool.
Step 4: It’s Almost Done!
When you finish editing, click ‘Next’ and choose the number of repeats for the created live photo. Wait for the conversion to finish and click on ‘My Wallpapers’ to view your creation.
Step 5: Download Your Live Photo!
Click ‘Download’ and tap ‘Clear’ in the app’s prompt message to remove your device’s current screen wallpaper. Next, allow the app to access your system settings. Once this finishes, tap ‘Clear’ again to download your creation. You will now get directed to a black screen tagged ‘DayTime LWP’. Click on ‘Set Wallpaper’ in this screen to make your live photo, the current wallpaper of your Android device.
● Video Live Wallpaper
This is another free app that you can use to your videos into amazing live photos in just 4 quick steps. All you need to do is explained in the following steps:
Step 1: download the Application
Download the Video Live Wallpaper application in your Android device from Google Playstore and proceed for its installation and launch.

Step 2: Select Your Video
In the app’s opening screen, click ‘Choose Video’ and grant app permissions to access your device’s media. Browse your video gallery to select a desired video that you wish to convert into a live photo.

Step 3: Edit Your Video
You will now get directed to the app’s editor screen. Here, you can explore your editing creativity to edit the selected video. Once you are happy, click the picture icon at the top right corner.

Step 4: Your Live Wallpaper is Ready!
To set the created live photo as your device screen wallpaper, select ‘Set as Wallpaper’ at the bottom right.

● Key Takeaways from This Episode →
● From cherishing moments to sharing them on social media, live photos can do it all.
● Being an iPhone exclusive utility, you need to create these from videos to enjoy them on other platforms and devices.
● Filmora is the best video to live photo converters, available as an easy, quick and convenient conversion tool.
Looking forward to turn your videos into live photos? Stay tuned to know how!
In this article
01 [How to Save Live Photos as a Video on iPhone/Ipad/Ipod](#Part 1)
02 [How to Turn a Video Into a Live Photo on iOS/Android](#Part 2)
Part 1 How to Save Live Photos as a Video on iPhone/Ipad/Ipod
Live photos are an amazing utility that allow you to save images as short moving snaps. Creating live photos is among the latest spunk of trendsetter stories, whether shared on social media platforms or created and saved just for fun, these definitely sound and look exciting, but that’s just one among the many things you can experiment on live photos.
Creating live photos takes you to a world of exciting features where you can explore your creativity in a number of ways, one of the easiest being turning live photos to videos. This comes handy when you need to share your live photos on platforms that do not have the compatibility to run live photos. If you are an iPhone user and wish to try your hands on experimenting with live photos, see through the following section of this article to learn how to turn live photo into video:
01Save as Video
Step 1: Launch the Photos App
In your iPhone, launch the ‘Photos’ app and navigate to ‘Albums’. All your live photos are present in the ‘Live Photos’ album.
Step 2: Format Selection
In latest versions (iOS 13v and above), you get a direct ‘Save as Video’ option in the ‘Photos’ application. Just click on that, and your live photo will be instantly saved in your iPhone gallery as a video. Here’s how you can use this feature:
● In the ‘Photos’ application, go to the ‘Live Photos’ album to select and open a desired live photo that you wish to convert to a video.
● Click on the ‘Share’ icon.
● Select ‘Save as Video’ from the drop down menu that displays sharing options.
Your created video will be saved in the ‘Photos’ application, next to the live photo you chose to turn into a video.
02iOS Shortcuts
This is a quicker way to save your live photos as videos in your iPhone. To use this feature, you first need to save the ‘Convert LivePhotos to Video’ shortcut in the ‘Shortcuts App’ gallery of your iPhone. You can do this by opening in your iOS internet browser.
Before using the above link, make sure to enable the ‘Allow Untrusted Shortcuts’ feature in your iPhone settings. You can do this as explained below:
● Reach to the ‘Settings’ application of your iPhone.
● Tap on ‘Shortcuts’ from the app’s welcome screen.
● Enable ‘Allow Untrusted Shortcuts’ with a toggle.
Having done that, here’s what you need to follow:
● Open the ‘Shortcuts’ application in your iOS device and tap the ‘Convert LivePhotos to Video’ shortcut.
● The ‘Live Photos’ album of your device opens up. Make a desired selection.
Your converted video gets automatically saved in the ‘Camera Roll’ folder of the ‘Photos’ application. Open the ‘Recents’ album to view your creation.
Part 2 How to Turn a Video Into a Live Photo on iOS/Android
Converting live photos to videos is fine, but going the other way round is all the more exciting and fun! You can even use these converted live photos as live screen wallpapers for your iOS and Android devices. If you are motivated to take up the excitement, look through the following methods to turn video into live photo:
01iOS Devices
Being an iOS user, you can choose among the following tools to convert video to live photo in your iPad, iPod or iPhone:
● Wondershare Filmora
Wondershare Filmora Video Editor is currently leading the software market among converter utilities that cater to various media conversion needs. This one is a free, smart, quick and convenient conversion tool that assures you of a hassle free video to live photo conversion in just a few clicks. What’s more interesting is, you don’t need to limit yourself with sticking to some particular video format, as Filmora conveniently supports almost all common ones.
Wondershare Filmora
Get started easily with Filmora’s powerful performance, intuitive interface, and countless effects!
Try It Free Try It Free Try It Free Learn More >
● IntoLive
This one is a third party application that allows you to convert videos into live photos, quickly and conveniently. This tool works well with devices having iOS 12.0 and later versions. All you have to do is follow the steps mentioned below:
Step 1:
Download the ‘IntoLive’ application from the Apple App Store.
Step 2:
Launch the same on your iOS device and grant the permission to access its ‘Photos’ Album.
Step 3:
In the ‘Videos’ section, choose the desired video that you wish to turn into a live photo.
Step 4:
An editor window will open up. Here, you can edit (cut, crop, trim, etc.) and add desired effects or filters to your selected video. Click on ‘Make’ at the top right when you finish the editing process.
Step 5:
If you have the paid version of the app, you can take up multiple repeats of your live photo; else you can use the free version with no repeats.
Step 6:
Once you are satisfied with the result, click on ‘Save Live Photo’. This will save your created live photo in your device’s gallery.
02VideoToLive
This is a free converter you can choose to turn video into live photo. This is a quite popular tool among iPhone users worldwide and is suitable for iOS versions 11.2 and later. You also have the liberty to share your created live photos on social media with this converter. Take the following steps to begin the conversion process:
Step 1:
Download the application from the Apple App Store and launch it on your iOS device.
Step 2:
Choose a video from your device gallery to convert it into a live photo.
Step 3:
In the video editor screen, crop the video to the preferred section that has to be converted into live photo. You can add video frames to your edited clip from the upper section of the editor screen.
Step 4:
Click on ‘Convert’ at the top right corner to initiate the conversion process.
03Android Devices
Live photos are undoubtedly known to add spark to your cherished moments, but the notch that puts these off with Android devices is that you can enjoy live photos on these devices only as live wallpapers.
Being an iPhone exclusive utility, Android devices lack the flexibility to capture live images. However, you can see them move on being set as live screen wallpapers. A handy alternative to this is converting a turn video into live photo and use it as live wallpaper. Here’s how you can take up the conversion process:
● TurnLive- Live Wallpaper
This one is a convenient, third party tool that lets you turn video into live photo in just a few quick steps. You can either use this application for free, or upgrade to the paid version to enjoy its premium features. To make amazing live photos from videos using this tool, you need to take up the steps given below:
Step 1: App Installation
To begin, visit the Google Playstore in your Android device and download the TurnLive- Live Wallpaper application. Next, you need install and launch the app in your device and accept its terms of service.
Step 2: Select a Video
Once you are done, click on the ‘Live Photo’ icon in the bottom of the app’s opening screen to reach the video selection page. Here, you need to choose ‘Video to Live Wallpaper’ option and grant the required app permissions to access your device’s camera and gallery. Select a desired video from the ones saved in your device and click ‘Done’ at the top right.
Step 3: Edit Your Video
You will now get directed to the app’s editor window, where you need to trim the selected video within a time frame of 1-5 seconds. To do this, select a cover frame within the clip and click ‘Next’. You can now use the video slider at the bottom to trim the clip. Adding suitable video effects and filters is also possible with this tool.
Step 4: It’s Almost Done!
When you finish editing, click ‘Next’ and choose the number of repeats for the created live photo. Wait for the conversion to finish and click on ‘My Wallpapers’ to view your creation.
Step 5: Download Your Live Photo!
Click ‘Download’ and tap ‘Clear’ in the app’s prompt message to remove your device’s current screen wallpaper. Next, allow the app to access your system settings. Once this finishes, tap ‘Clear’ again to download your creation. You will now get directed to a black screen tagged ‘DayTime LWP’. Click on ‘Set Wallpaper’ in this screen to make your live photo, the current wallpaper of your Android device.
● Video Live Wallpaper
This is another free app that you can use to your videos into amazing live photos in just 4 quick steps. All you need to do is explained in the following steps:
Step 1: download the Application
Download the Video Live Wallpaper application in your Android device from Google Playstore and proceed for its installation and launch.
Step 2: Select Your Video
In the app’s opening screen, click ‘Choose Video’ and grant app permissions to access your device’s media. Browse your video gallery to select a desired video that you wish to convert into a live photo.
Step 3: Edit Your Video
You will now get directed to the app’s editor screen. Here, you can explore your editing creativity to edit the selected video. Once you are happy, click the picture icon at the top right corner.
Step 4: Your Live Wallpaper is Ready!
To set the created live photo as your device screen wallpaper, select ‘Set as Wallpaper’ at the bottom right.
● Key Takeaways from This Episode →
● From cherishing moments to sharing them on social media, live photos can do it all.
● Being an iPhone exclusive utility, you need to create these from videos to enjoy them on other platforms and devices.
● Filmora is the best video to live photo converters, available as an easy, quick and convenient conversion tool.
Step-by-Step Guide to Send Gif WhatsApp on Android
Step-by-step Guide to Send Gif WhatsApp on Android
An easy yet powerful editor
Numerous effects to choose from
Detailed tutorials provided by the official channel
While chatting with your friends and dear ones on WhatsApp, you can not only send videos and images but also some GIFs. The GIF files will convey your mood and feelings using short animations.
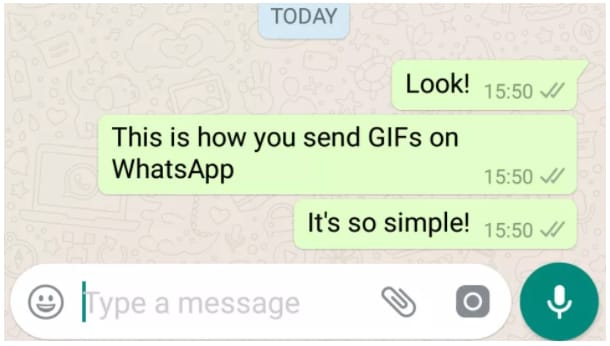
On your Android device, these files can be either selected from the collection available at WhatsApp or can be imported from Giphy. Additionally, you can also create your own customized WhatsApp GIFs Android using images or videos.
In this article
01 [How to send WhatsApp GIF on Android](#Part 1)
02 [How to create a custom GIF on WhatsApp Android](#Part 2)
03 [Create professional-looking GIF using Wondershare Filmora](#Part 3)
Part 1 How to send WhatsApp GIF on Android
To send GIFs to your contacts in WhatsApp it is important to ensure that you have the latest version of the messaging app installed on your phone. There is an integrated library of GIFs on your Android phone from where you can search like tom and jerry gif stickers for WhatsApp, peach and Goma gif for WhatsApp, and more.
Step 1.Launch WhatsApp on your Android device and open any conversation to which you wish to send a GIF.
Step 2.Click on the Emoji icon at the bottom left corner of the chat window.
Step 3.At the bottom middle of the screen, click on the GIF button and the list of options available at the integrated library will appear on the screen. You can even search for the desired GIF by entering the keyword at the search icon.
Step 4.Next, tap on the selected GIF to preview it. You can also add a message using Add a caption… button
Step 5.Finally, click on the green Send button (white paper plane icon) at the bottom-right corner. The GIF will be sent to your conversation.
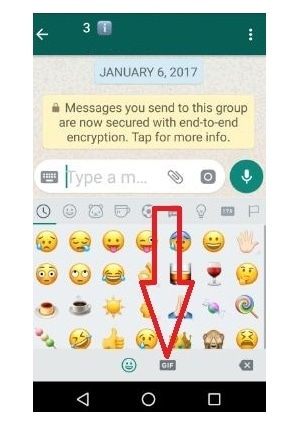
Part 2 How to create a custom GIF on WhatsApp Android
WhatsApp allows you to create a customized GIF using images and videos on your Android phone. The steps for the same are as follows
Step 1.Open the WhatsApp chat to whom you wish to send the customized GIF.
Step 2.At the bottom of the screen, click the camera icon. Either choose to record a desired video or import from the phone gallery to create a GIF.
Step 3.Once the video is added, trim it using the slider at the top. (To create a GIF, the video cannot be more than 5 seconds). You can even add a text message using Add a caption. option at the bottom of the screen.
Step 4.Next, click on the GIF button under the slider and then click on the send button at the bottom-right corner.
GIF created using the video will be sent to your contact.
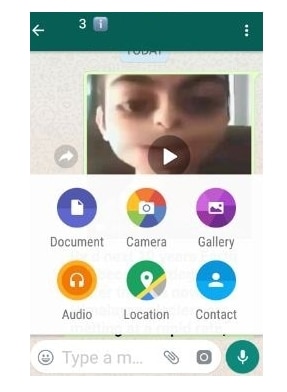
Part 3 Create professional-looking GIF using Wondershare Filmora Video Editor
Though WhatsApp allows creating GIFs using videos and images, the options for customizations are not there. So, to facilitate you creating professional-looking GIFs in no time, we suggest using Wondershare Filmora. Images and videos can be added to this versatile Windows and Mac-based tool for creating artistic animations. There are multiple options for customizing the file like adding elements, sound, text, and more.
Wondershare Filmora
Get started easily with Filmora’s powerful performance, intuitive interface, and countless effects!
Try It Free Try It Free Try It Free Learn More >
You can also speed up, slow down, rotate, crop, and perform other editing tasks. The software allows adding media files in all widely used formats like MO4, MOV, MKV, and more. The software has a user-friendly interface that makes it apt for users even without any prior experience in creating animations.
Steps to create a customized GIF WhstaApp Android using Wondershare Filmora
Step 1.Download, install and open the Wondershare Filmora software on your system. Browse and import the videos and images from your system from which you wish to create a GIF.
Step 2.After the files are added, drag and drop them to the timeline of the software at the bottom.
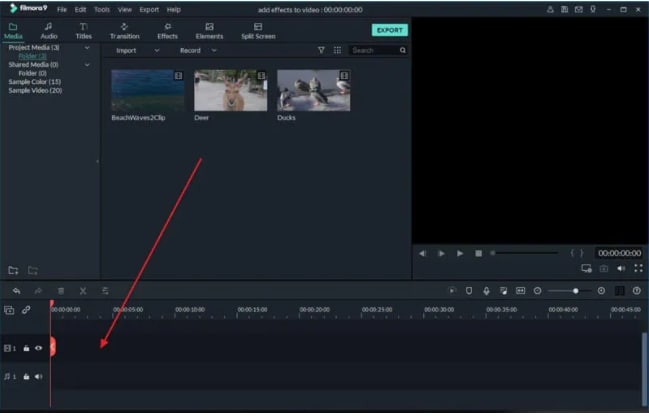
Step 3.Next comes the editing. Using multiple editing functions of the software you can rotate, crop, speed up, slow down, and perform a wide range of tasks as needed.
Step 4.You can even add the text messages to your animations and also choose the font and other parameters of the text.

Step 5.Once all the selections and editing are done, choose GIF at the Local tab to save your created media file as GIF. Finally, click on the EXPORT button to start processing and saving the file as GIF.
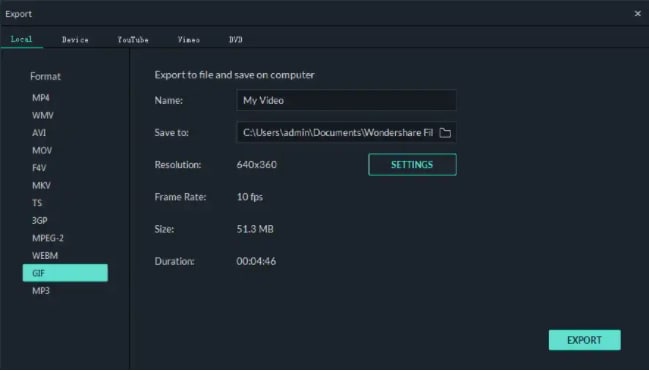
The created GIF can now be used for WhatsApp chat, social media sites, and other online sites.
● Key Takeaways from This Episode →
●GIF animations can be added to WhatsApp chats on your Android phone using an integrated library or GIPHY.
●WhatsApp also allows creating GIFs using videos and images on your device or by recording one.
●To create a professional and appealing GIF, Wondershare Filmora is the best tool. The software can also be used for several other video editing tasks.
While chatting with your friends and dear ones on WhatsApp, you can not only send videos and images but also some GIFs. The GIF files will convey your mood and feelings using short animations.
On your Android device, these files can be either selected from the collection available at WhatsApp or can be imported from Giphy. Additionally, you can also create your own customized WhatsApp GIFs Android using images or videos.
In this article
01 [How to send WhatsApp GIF on Android](#Part 1)
02 [How to create a custom GIF on WhatsApp Android](#Part 2)
03 [Create professional-looking GIF using Wondershare Filmora](#Part 3)
Part 1 How to send WhatsApp GIF on Android
To send GIFs to your contacts in WhatsApp it is important to ensure that you have the latest version of the messaging app installed on your phone. There is an integrated library of GIFs on your Android phone from where you can search like tom and jerry gif stickers for WhatsApp, peach and Goma gif for WhatsApp, and more.
Step 1.Launch WhatsApp on your Android device and open any conversation to which you wish to send a GIF.
Step 2.Click on the Emoji icon at the bottom left corner of the chat window.
Step 3.At the bottom middle of the screen, click on the GIF button and the list of options available at the integrated library will appear on the screen. You can even search for the desired GIF by entering the keyword at the search icon.
Step 4.Next, tap on the selected GIF to preview it. You can also add a message using Add a caption… button
Step 5.Finally, click on the green Send button (white paper plane icon) at the bottom-right corner. The GIF will be sent to your conversation.
Part 2 How to create a custom GIF on WhatsApp Android
WhatsApp allows you to create a customized GIF using images and videos on your Android phone. The steps for the same are as follows
Step 1.Open the WhatsApp chat to whom you wish to send the customized GIF.
Step 2.At the bottom of the screen, click the camera icon. Either choose to record a desired video or import from the phone gallery to create a GIF.
Step 3.Once the video is added, trim it using the slider at the top. (To create a GIF, the video cannot be more than 5 seconds). You can even add a text message using Add a caption. option at the bottom of the screen.
Step 4.Next, click on the GIF button under the slider and then click on the send button at the bottom-right corner.
GIF created using the video will be sent to your contact.
Part 3 Create professional-looking GIF using Wondershare Filmora Video Editor
Though WhatsApp allows creating GIFs using videos and images, the options for customizations are not there. So, to facilitate you creating professional-looking GIFs in no time, we suggest using Wondershare Filmora. Images and videos can be added to this versatile Windows and Mac-based tool for creating artistic animations. There are multiple options for customizing the file like adding elements, sound, text, and more.
Wondershare Filmora
Get started easily with Filmora’s powerful performance, intuitive interface, and countless effects!
Try It Free Try It Free Try It Free Learn More >
You can also speed up, slow down, rotate, crop, and perform other editing tasks. The software allows adding media files in all widely used formats like MO4, MOV, MKV, and more. The software has a user-friendly interface that makes it apt for users even without any prior experience in creating animations.
Steps to create a customized GIF WhstaApp Android using Wondershare Filmora
Step 1.Download, install and open the Wondershare Filmora software on your system. Browse and import the videos and images from your system from which you wish to create a GIF.
Step 2.After the files are added, drag and drop them to the timeline of the software at the bottom.
Step 3.Next comes the editing. Using multiple editing functions of the software you can rotate, crop, speed up, slow down, and perform a wide range of tasks as needed.
Step 4.You can even add the text messages to your animations and also choose the font and other parameters of the text.
Step 5.Once all the selections and editing are done, choose GIF at the Local tab to save your created media file as GIF. Finally, click on the EXPORT button to start processing and saving the file as GIF.
The created GIF can now be used for WhatsApp chat, social media sites, and other online sites.
● Key Takeaways from This Episode →
●GIF animations can be added to WhatsApp chats on your Android phone using an integrated library or GIPHY.
●WhatsApp also allows creating GIFs using videos and images on your device or by recording one.
●To create a professional and appealing GIF, Wondershare Filmora is the best tool. The software can also be used for several other video editing tasks.
How to Stop Animation From Looping in Unity
How to Stop Animation from Looping in Unity
An easy yet powerful editor
Numerous effects to choose from
Detailed tutorials provided by the official channel
Unity is an IDE interface all designed exclusively for game developers. However, you can do much more with Unity than game development. But, our main concern here is something else than this subject. You’re looking for easy tutorials on Unity stop animation!

And luckily, we’ve got you covered as we’ve briefly explained how to perform Unity stop animation from looping and the steps to make a smooth animation.
In this article
01 [What is Unity Used for?](#Part 1)
02 [How to Stop Animation Playing in Loop in Unity?](#Part 2)
03 [How to Smooth an Animation in Unity?](#Part 3)
Part 1 What is Unity Used for?
Unity is a software tool friendly to all the game developers out there. This tool is used by the large community of game developers to power and create their game development projects. And, the software is more of a professional means and not a simple pared-down ‘game builder .’Unity also offers one of the most significant inbuilt features like rendering, physics, and collision detection. Thus, one of the powerful aspects of Unity is that game developers need not go out of the box and create everything from scratch. Instead, they are available with the physics engine required to develop games quickly. Another robust feature of Unity is that it includes an excellent ‘Asset Store’ where developers can upload their creations and showcase them to the whole community. So, that’s Unity and its uses in a broader scope!
Before we take you through the next section, it’s important to mention that Unity is also known as cross-platform IDE, where IDE stands for ‘integrated development environment.’ So, it can be called more of an interface with access to all the tools and resources required to develop games.
Apart from the game development, Unity is known for other excellent usage purposes as:
● Simulations
● Animation
● Architectural Visualization
● Previsualization for Film
● Interactive Experiences
Among these features only, we’ll describe Unity stop animation from looping in detail.
Part 2 How to Stop Animation Playing in Loop in Unity?
As we said, we’ll describe to you the most accessible definition of how to stop Animation in Unity. Thus, there are simple steps that we’d like to define firsthand before explaining the whole procedure with an image-centric step-by-step guide.
So, those simple steps to stop motion animation in After Effects in the loop also go like below:
Step 1 Go to the Project tab and select Animation.
Step 2 Open the Inspector tab.
Step 3 Uncheck the checkbox Loop Time, and you’re good to go!
We’ll describe the same, i.e., Unity stop animation from looping through the step guide below.
In this guide, we’ll explain right from applying the Animation so that you’d understand better. So, let’s begin without any further ado!
01Step 1 Delete animation folder
We have already created an animation folder in the folder named as own Animation, so click that folder, click the animation folder, and then another folder along with as shown below. Hold the Shift key and click another folder. Then, right-click the Delete tab as depicted below.
Similarly, you can also delete the Animation if you wish.

02Step 2 Create an animation for the subject
Now, you may have different subjects. We’re creating Animation on Mobile Joystick for reference, as shown below.

Now, hit the Create tab on the Unity panel below. Then, proceed to save your Animation in the folder you’ve already created for the same.

03Step 3 Give positions to the animation
Firstly, hit the red-icon button used for recording, as shown below.

Give the position on the left side after you click the button. And, then, clicking almost near to 3you can give the position to the right-hand side as shown below.

Now, the animation has been set. You can see the animation from left to right if you click the Play button. So, here, you can see the results of infinite loop animation, which won’t stop.

You can follow two ways to stop this Animation in Unity from looping, and we’ll describe both methods below.
04Step 4 Stop animation Unity Way 1
Go to the animation folder where you’ve created the animation and click the New Animation icon as shown below.

Now, you have to uncheck the Loop Time tab on the top-right corner of the Unity panel.

05Step 5 Stop animation Unity Way 2
Alternatively, you can click the Animator tab on the top of the Unity panel and double-tap the New Animation button. Then, it will also delete or uncheck the loop time, as shown below.

These were all the steps to stop animation Unity.
Part 3 How to Smooth an Animation in Unity?
After done with Unity stop animation, it’s time to smooth your Unity animation. Again, we will describe it simply if you’re used to the Unity platform and then with a step guide with respective screenshots.
So, stay tuned until the end to reveal the easy steps of smoothing an animation in Unity.
Select the Dopesheet at the bottom of the animation window. Then, you need to switch to the ‘Curves’ view once you create your Animation in the Dopesheet. These animation curves help you accelerate and decelerate animations so that the movement and other things can stop and start smoothly.
So, let’s begin with the step guide tutorial on the same as follows:
For reference, take an example of a metronome object imported from Blender to Unity. Here, we’ve grouped all the pendulum objects under one rotation so that when we move the pendulum, it pivots to the correct point, as shown below.

01Add the animator
So, the first step begins with adding the Animator component to the parent object. You can do this by clicking the Add Component tab on the Unity panel’s left side, searching for Animator, and clicking the Animator.
You will also need a controller to control the animations. Go to your animation folder, right-click, and select Create> Animator Controller tab.

Let’s call or give it a name metronome animator as shown below.
Then, you need to drag this into your animator component. Again, you need to go to your animations folder, right-click, select Create> Animations tab.
Now, give this a name pendulum full swing.
02Open the animator tab
Now, open the animator tab, drag this pendulum swing animation to that panel, and double-tap the yellow-colored New Animation button.

03Create an animation
With the game object selected, the animated metronome pendulum, in this case, we’d like to animate the X component of the rotation. So, you need to click Add Property> Transform> Rotation tab and click the + sign on its right, as shown below.
Now, click the plus sign automatically to set two keyframes, one at the beginning and one at the end. Now, click on end select all, and then delete for now.

04Add keyframes to rotate the pendulum
With the first set of keyframes and the pendulum all way to the right, go halfway and change the rotation to the left on the left panel of Unity. Then, add another keyframe.

05Slow down the animation
As you can observe, the Animation of this pendulum is in a straight line and feels unnatural to the eyes. Thus, we’re required to smooth this Animation now! For this purpose, go to the Curves; you can see the pink properties of rotation as going from one side to another.

Now, you need to adjust these pink curves. Start by adding a key to one of its sides, as shown below. After that, it is all on you how slow or fasts you want these values to be.
Here, you’re all done smoothing the animation in Unity after learning the stop-animation Unity tutorial.
You can even stop motion animation on Photoshop with the above tutorial.
06Bonus Tip:
We want to introduce an excellent video editor software called Filmora Video Editor . It is from the house of Wondershare, a well-known software company worldwide.

Wondershare Filmora - Best Video Editor for Mac/Windows
5,481,435 people have downloaded it.
Build unique custom animations without breaking a sweat.
Focus on creating epic stories and leave the details to Filmora’s auto features.
Start a creative adventure with drag & drop effects and endless possibilities.
Filmora simplifies advanced features to save you time and effort.
Filmora cuts out repetition so you can move on to your next creative breakthrough.
With Filmora, you can easily add Animation and edit your videos to make them look world-class. The latest version and new updates are eye-candy and quick fix for beginner video editors.
So, please pay a visit to the Filmora website and check out its Mac and Windows version for free today.
● Key Takeaways from This Episode →
● Learning the concept and usage of Unity
● A tutorial on how to stop animation in Unity from looping
● A tutorial on how to smooth animation in Unity
● Introduction to Filmora, the top-most video editor software for beginners.
Unity is an IDE interface all designed exclusively for game developers. However, you can do much more with Unity than game development. But, our main concern here is something else than this subject. You’re looking for easy tutorials on Unity stop animation!
And luckily, we’ve got you covered as we’ve briefly explained how to perform Unity stop animation from looping and the steps to make a smooth animation.
In this article
01 [What is Unity Used for?](#Part 1)
02 [How to Stop Animation Playing in Loop in Unity?](#Part 2)
03 [How to Smooth an Animation in Unity?](#Part 3)
Part 1 What is Unity Used for?
Unity is a software tool friendly to all the game developers out there. This tool is used by the large community of game developers to power and create their game development projects. And, the software is more of a professional means and not a simple pared-down ‘game builder .’Unity also offers one of the most significant inbuilt features like rendering, physics, and collision detection. Thus, one of the powerful aspects of Unity is that game developers need not go out of the box and create everything from scratch. Instead, they are available with the physics engine required to develop games quickly. Another robust feature of Unity is that it includes an excellent ‘Asset Store’ where developers can upload their creations and showcase them to the whole community. So, that’s Unity and its uses in a broader scope!
Before we take you through the next section, it’s important to mention that Unity is also known as cross-platform IDE, where IDE stands for ‘integrated development environment.’ So, it can be called more of an interface with access to all the tools and resources required to develop games.
Apart from the game development, Unity is known for other excellent usage purposes as:
● Simulations
● Animation
● Architectural Visualization
● Previsualization for Film
● Interactive Experiences
Among these features only, we’ll describe Unity stop animation from looping in detail.
Part 2 How to Stop Animation Playing in Loop in Unity?
As we said, we’ll describe to you the most accessible definition of how to stop Animation in Unity. Thus, there are simple steps that we’d like to define firsthand before explaining the whole procedure with an image-centric step-by-step guide.
So, those simple steps to stop motion animation in After Effects in the loop also go like below:
Step 1 Go to the Project tab and select Animation.
Step 2 Open the Inspector tab.
Step 3 Uncheck the checkbox Loop Time, and you’re good to go!
We’ll describe the same, i.e., Unity stop animation from looping through the step guide below.
In this guide, we’ll explain right from applying the Animation so that you’d understand better. So, let’s begin without any further ado!
01Step 1 Delete animation folder
We have already created an animation folder in the folder named as own Animation, so click that folder, click the animation folder, and then another folder along with as shown below. Hold the Shift key and click another folder. Then, right-click the Delete tab as depicted below.
Similarly, you can also delete the Animation if you wish.
02Step 2 Create an animation for the subject
Now, you may have different subjects. We’re creating Animation on Mobile Joystick for reference, as shown below.
Now, hit the Create tab on the Unity panel below. Then, proceed to save your Animation in the folder you’ve already created for the same.
03Step 3 Give positions to the animation
Firstly, hit the red-icon button used for recording, as shown below.
Give the position on the left side after you click the button. And, then, clicking almost near to 3you can give the position to the right-hand side as shown below.
Now, the animation has been set. You can see the animation from left to right if you click the Play button. So, here, you can see the results of infinite loop animation, which won’t stop.
You can follow two ways to stop this Animation in Unity from looping, and we’ll describe both methods below.
04Step 4 Stop animation Unity Way 1
Go to the animation folder where you’ve created the animation and click the New Animation icon as shown below.
Now, you have to uncheck the Loop Time tab on the top-right corner of the Unity panel.
05Step 5 Stop animation Unity Way 2
Alternatively, you can click the Animator tab on the top of the Unity panel and double-tap the New Animation button. Then, it will also delete or uncheck the loop time, as shown below.
These were all the steps to stop animation Unity.
Part 3 How to Smooth an Animation in Unity?
After done with Unity stop animation, it’s time to smooth your Unity animation. Again, we will describe it simply if you’re used to the Unity platform and then with a step guide with respective screenshots.
So, stay tuned until the end to reveal the easy steps of smoothing an animation in Unity.
Select the Dopesheet at the bottom of the animation window. Then, you need to switch to the ‘Curves’ view once you create your Animation in the Dopesheet. These animation curves help you accelerate and decelerate animations so that the movement and other things can stop and start smoothly.
So, let’s begin with the step guide tutorial on the same as follows:
For reference, take an example of a metronome object imported from Blender to Unity. Here, we’ve grouped all the pendulum objects under one rotation so that when we move the pendulum, it pivots to the correct point, as shown below.
01Add the animator
So, the first step begins with adding the Animator component to the parent object. You can do this by clicking the Add Component tab on the Unity panel’s left side, searching for Animator, and clicking the Animator.
You will also need a controller to control the animations. Go to your animation folder, right-click, and select Create> Animator Controller tab.
Let’s call or give it a name metronome animator as shown below.
Then, you need to drag this into your animator component. Again, you need to go to your animations folder, right-click, select Create> Animations tab.
Now, give this a name pendulum full swing.
02Open the animator tab
Now, open the animator tab, drag this pendulum swing animation to that panel, and double-tap the yellow-colored New Animation button.
03Create an animation
With the game object selected, the animated metronome pendulum, in this case, we’d like to animate the X component of the rotation. So, you need to click Add Property> Transform> Rotation tab and click the + sign on its right, as shown below.
Now, click the plus sign automatically to set two keyframes, one at the beginning and one at the end. Now, click on end select all, and then delete for now.
04Add keyframes to rotate the pendulum
With the first set of keyframes and the pendulum all way to the right, go halfway and change the rotation to the left on the left panel of Unity. Then, add another keyframe.
05Slow down the animation
As you can observe, the Animation of this pendulum is in a straight line and feels unnatural to the eyes. Thus, we’re required to smooth this Animation now! For this purpose, go to the Curves; you can see the pink properties of rotation as going from one side to another.
Now, you need to adjust these pink curves. Start by adding a key to one of its sides, as shown below. After that, it is all on you how slow or fasts you want these values to be.
Here, you’re all done smoothing the animation in Unity after learning the stop-animation Unity tutorial.
You can even stop motion animation on Photoshop with the above tutorial.
06Bonus Tip:
We want to introduce an excellent video editor software called Filmora Video Editor . It is from the house of Wondershare, a well-known software company worldwide.
Wondershare Filmora - Best Video Editor for Mac/Windows
5,481,435 people have downloaded it.
Build unique custom animations without breaking a sweat.
Focus on creating epic stories and leave the details to Filmora’s auto features.
Start a creative adventure with drag & drop effects and endless possibilities.
Filmora simplifies advanced features to save you time and effort.
Filmora cuts out repetition so you can move on to your next creative breakthrough.
With Filmora, you can easily add Animation and edit your videos to make them look world-class. The latest version and new updates are eye-candy and quick fix for beginner video editors.
So, please pay a visit to the Filmora website and check out its Mac and Windows version for free today.
● Key Takeaways from This Episode →
● Learning the concept and usage of Unity
● A tutorial on how to stop animation in Unity from looping
● A tutorial on how to smooth animation in Unity
● Introduction to Filmora, the top-most video editor software for beginners.
No. 1 Maker to Animate Your Logo Online Free
What’s Your No. 1 Maker to Animate Your Logo Online Free
An easy yet powerful editor
Numerous effects to choose from
Detailed tutorials provided by the official channel
A logo can be referred to as the heart of a brand or business. A logo presents the characteristics of a business or a product.
With the help of various applications and tools available online animated graphics can be created. And when we use the same, you can easily animate your logo online.
In this article
01 [Can an Animated Logo Help to Grow Brand?](#Part 1)
02 [What Kind of Animated Logo Maker Can Grab Attention at the Soonest?](#Part 2)
Part 1 Can an Animated Logo Help to Grow Brand?
01Where to Use Animated Logo?
The target of an animated logo is to draw attention to views in all the available digital spaces. The purpose is different for different cases. The following will give an idea of where you can use your animated logo:
● Company website
Websites are considered as a CV for an organization. So it is very important and necessary to see that the website is working effectively. An animated logo will help in improving the brand image website along with it will also boost Search Engine Optimization (SEO). Visitors or consumers are visiting the website or the page will get to see the animated logo whenever they visit the site and thus spend more time on the website. This will also bring an impact on the rank of the websites in regards to the search results.
![]()
● Promo Videos
Promo video acts as marketing tools for companies. Brands and companies make profits and earn revenue through Promo videos. So while promoting a brand’s promo video, you can include an animated logo with it. This combination of promo video and animated logo will certainly accomplish various marketing goals. You can animate your logo online for free if you don’t have one yet.
![]()
● Social Networks
Social networking platforms nowadays are considered to be one of the important platforms for various product promotions. Usually, people spend a lot of time online making communications through social networks such as Twitter, Instagram, Pinterest, and Facebook. We have already learned that video content can be used as a marketing tool. These videos with the animated logo are easy to share as well as access. Also, you can convert your animated logo into a GIF which can be used for a social posting. Thus they get shared all across the social networking platform.
![]()
● Presentations
Companies often hold various presentations from time to time. It can be a presentation at a business meeting or brand promotion or demonstration. While giving these presentations, you can always include your animated logo with the presentation. By doing this, you will also end up adding an element of creativity and originality to your presentation.
![]()
023 Reasons Why Animated Logos Help to Grow Brand
![]()
We all know why a logo is important for branding a product and the business. The logo symbolizes the brand and the product. It also helps the consumers to identify a specific brand. A logo is considered to be the face of the brand or the business. We have also learned the importance of an animated logo.
Tips:
● Animated Logos helps in Increasing Brand Awareness
● Animated Logos tells an engaging story about your brand
● Animated Logos captures the Viewers Attention
Part 2 What Kind of Animated Logo Maker Can Grab Attention at the Soonest?
011.5 Amazing Templates for Jaw-Dropping Logos
● Octopus
![]()
● LUX
![]()
● Giant Owl
![]()
● 500px
![]()
● Zoom
![]()
02These 8 Makers Make Animating Logos Easier Than Ever
When you consider animating your logo online, there are various logo makers in the industry, and you might question yourself that ‘How can I animate my logo online?’ Here is the list of the eight best logo makers who can help you to animate your logo online are:
● Renderforest
5 key features are:
● Amazing logo fonts
● Wide variety of logo styles
● Amazing layout designs
● Logos can be created on the cloud with built-in tools
● Logo can be edited anytime without any hassle
Rating: Renderforest rating is 10 out of 10
Review: I found Renderforest to be very fast and effective in making an animated logo. The amazing logo fonts are available with the vast logo style library. It made the work much easier and smoother. I found Renderforest to be the apt logo maker for my work. If I had assigned some logo artist to do the same, the cost would have been much higher.
![]()
● OFFEO’s Logo
5 key features are:
● Compatible and affordable with all existing programs
● Availability of a huge library
● Animation speed can be customized
● Availability of various color palettes for every single template
● No limitations regarding the length of animation one wish to create
Rating: OFFEO’s Logo rating is 4.7 out of 5
Review: I was looking for a good animation maker for my vlogging site when I came across OFFEO’s Logo. The best part of this maker is that it is very easy to use. And I have made a professional animated logo just with a click of a button. Now I don’t need a pro for any further animated videos.
![]()
● Animaker
5 key features are:
● One can customize the logo
● Availability of awesome sound effects
● Logos can be sketched with the Tetris style and others
● Exclusive library of logo styles
● Largest animation library
Rating: The rating is 4 out of 5
Review: I had a marvelous experience with Animaker. It has been a bag full of positive surprises. Animaker made it possible to create some unique content in a very short time and with very little operational costs.
![]()
● Viddyoze
5 key features are:
● Availability of live-action animation
● Multi rendering processing
● Availability of hundreds of unique templates
● Ready-made logo designs are available
● Logos and characters can be mixed to make one single video
Rating: The rating is 4.2 out of 5
Review: My experience with Viddyoze is amazing. I have made some amazing videos and logos by Viddyoze for my own personal use, as well as helping my friend with his business. I will always use Viddyoze for creating animated logos.
![]()
● Reallusion
5 key features are:
● Creative control features are present
● Modified interface control
● Material generation assistant help available
● Drag and drop for creating 2D motion effect
● Hundreds of ready-made logo designs are available
Rating: The rating is 3.5 out of 5
Review: I was amazed at the character animation and the rendering features available. It is a very user-friendly logo maker with straightforward features available in comparison to other 3D animation software.
![]()
● PixTeller
5 key features are:
● More than 100,000 logo shapes are available
● Unique Text Properties helps to create exclusive text for logos
● Logos created can be downloaded as GIF or MP4 format
● One can create frame by frame tailored logo animations
● Availability of a huge number of logo templates
Rating: The rating is 4.6 out of 5
Review: The best thing about PixTeller are its edit and create images in a simple and placid way. With PixTeller my job has been a smooth one, whereas previously, creating an animated logo with other makers was a headache.
![]()
● Quince MEDIA
5 key features are:
● Availability of Architectural 3D animation
● 2D animators can use this for commercial use
● Presence of 3D illustration and character
● Availability of Promo video motion graphics
● One can create characters with unbeatable graphics
Rating: The rating is 4.4 out of 5
Review: After using Quince MEDIA, I was just left awestruck. I was able to create some exquisite 3D animated logos with the available 3D illustration and characters. Also, I was able to create some unique graphics for my company’s animated logo.
![]()
● Biteable
5 key features are:
● Availability of a large color scheme
● One can share logos directly to Facebook, Instagram, YouTube, and others
● Drag and drop feature available
● Features are built for enterprise uses
● Fast interaction lets animated logos created in a few minutes
Rating: The rating is 4.4 out of 5
Review: After using Biteable, I was able to create videos and animated logos of high quality with a professional outlook. Earlier I used to spend days creating small videos, but now it can be done in an hour or so. Adding my own music is now easier.
![]()
Key Takeaways from This Episode
● At the end of this article, you have understood the importance of having an animated logo instead of a static image logo.
● Also, you got the view as to how an animated logo helps you in the growth of your brand and business.
● And finally, you got an idea that what are the various types of animated logos that grab the viewer’s attention the most.
● So, animate your logo online for your brand and make a mark in your business.
Also read:
- Amazing Ideas About Creating Personalised WhatsApp GIF Sticker for 2024
- Tips for Canva Animated Elements
- New Tips on How to Get Awesome Background for Slideshow in PowerPoint for 2024
- New In 2024, How to Send and Add Snapchat GIFs 100 The Easy Way
- Best 15 Horror Animes That Will Trigger a Heart Attack
- In 2024, 5 Best Adobe Animate Courses & Classes | Beginners Complete Tutorial
- Updated 2024 Approved What Wikipedia Cant Tell You About the 10 Best Batman Cartoons
- 2024 Approved How to Turn Yourself Into WhatsApp Cartoon
- What Is Still Motion Animation and How Does It Work?
- The Top Free 12 GIF Meme Maker at a Glance for 2024
- Best 10 Animoji Apps You Can Use to Edit Animoji for 2024
- New In 2024, 20 Free After Effects Logo Reveal Templates You Will Want to Know
- New How to Draw Skeleton Cartoon – A Step by Step Guide for 2024
- Animated Business Logos and Tools to Create
- 5 Different Animation Styles A Simple but Complete Guide for 2024
- Updated 10 Classical Animated Cartoon Types With Examples
- In 2024, Finding Some Different Ways to Animated Cartoon of Yourself
- New 2024 Approved 10 Great Apps to Turn Funny Animated Images Into Comics
- New How to Create Animated Video on Canva for 2024
- Best 10 Animated Photo Collage Apps
- Updated 2024 Approved Top 10 Animated DP for WhatsApp
- Simple ways to get lost music back from Infinix Hot 40
- In 2024, How to Fix Pokemon Go Route Not Working On Samsung Galaxy S23? | Dr.fone
- In 2024, Troubleshooting Error Connecting to the Apple ID Server From iPhone 7
- In 2024, For People Wanting to Mock GPS on OnePlus Nord N30 SE Devices | Dr.fone
- In 2024, Best Vivo Y200e 5G Pattern Lock Removal Tools Remove Android Pattern Lock Without Losing Data
- Recover lost data from Itel S23
- How to Transfer Data from Vivo Y78t to Any iOS Devices | Dr.fone
- In 2024, Forgot iPhone 6 Backup Password? Heres What to Do
- Unlock Apple ID without Phone Number On iPhone 8
- Simple ways to get lost messages back from Vivo
- In 2024, How to Unlock a Network Locked Itel S23+ Phone?
- How To Unlock Any ZTE Nubia Z60 Ultra Phone Password Using Emergency Call
- In 2024, Hassle-Free Ways to Remove FRP Lock from Google Phones with/without a PC
- In 2024, How To Change Your Apple ID Password On your Apple iPhone 13 | Dr.fone
- In 2024, A Comprehensive Guide to Apple iPhone 13 Blacklist Removal Tips and Tools
- Title: New In 2024, Before You Learn 3D Animation Some Things You Should Know
- Author: Elon
- Created at : 2024-05-19 03:05:24
- Updated at : 2024-05-20 03:05:24
- Link: https://animation-videos.techidaily.com/new-in-2024-before-you-learn-3d-animation-some-things-you-should-know/
- License: This work is licensed under CC BY-NC-SA 4.0.
