
:max_bytes(150000):strip_icc():format(webp)/hexadecimal-code-security-key-krzysztof-zmij-e-plus-getty-images-57c76b825f9b5829f4bd185e.jpg)
New In 2024, Dead Simple Guide to Create New and Exciting Blackboard Animation
Dead Simple Guide to Create New and Exciting Blackboard Animation
Dead Simple Guide to Create New and Exciting Blackboard Animation
An easy yet powerful editor
Numerous effects to choose from
Detailed tutorials provided by the official channel
Yes, it is definitely possible In fact, it couldn’t be easier. A lot of the ‘whiteboard animation’ generators also work as blackboard animation generators.
In this guide, we hope to shed some light on the subject so that everyone can have an easier time approaching the matter of creating a blackboard project on their own.
In this article
01 [Is Blackboard Animation Outdated?](#Part 1)
02 [How to Combine Modern Needs with Blackboard Animation?](#Part 2)
03 [How to Create a Blackboard Animation in ONE DAY?](#Part 3)
Part 1 Is Blackboard Animation Outdated?
Blackboard animation some may say is as outdated as the concept of ‘blackboards’ themselves. After all, nowadays, whiteboards are the standard for presenting information in a school setting — with many preferring the ease of using dry-erase markers over the more unwieldy chalk.
However, unlike the inconveniences of using an actual chalkboard, chalkboard animation is not so different from whiteboard animation In fact, it’s just given a different look. One that may be exactly what you’re looking for — especially if you’re looking to get in touch with the older generation (who would no doubt be more familiar with the concept.)

Part 2 How to Combine Modern Needs with Blackboard Animation?
But alright, so how do you make it so that your blackboard animation is just as suited for the modern generation as it is for the older generation?? Well, that’s easy really. You’ll need images Or, rather, you’ll need visuals outside of just the plain text that is usually associated with chalkboard animation.
With the right kind of visuals to go along with your informational text, you can boost the effectiveness of your chalkboard animation video and make it more palatable. Perfectly in line with the modern needs of the era.

Part 3 How to Create a Blackboard Animation in ONE DAY?
Alright, so onto actually talking about how you can go about creating a chalkboard animation video Take note, this is going to be an ‘overview’ kind of tutorial. We’ve also decided to choose a more ‘custom’ method, rather than using one of the premium blackboard animation generators (which usually require you to pay a steep price in order to gain access to a media library.)
01Step 1. Pick Your Software
The first step in creating chalkboard animation is to pick the software that you want to use This can be something more ‘animation-specific’, like After Effects. Or something more ‘video-editing-specific’ like Filmora.
Again, because this is meant to be more of a ‘general’ tutorial, we won’t be showing you exactly how to use whatever editing software you decide to use in order to create your blackboard animation videos. But, as a general kind of advice, it would be best that you pick a video editor like Wondershare Filmora Video Editor that offers a Timeline feature that will allow you to quickly put together a project

02Step 2. Create a Storyboard
Next, to make the actual blackboard animation creation process go smoother, it’s important that you create a storyboard that will outline the video that you want to create
The more detailed this storyboard is, the better Although, of course, you don’t necessarily have to draw every single frame of your chalkboard animation beforehand. Just sketch out the general idea. It will help make sure that you won’t have to rush about making all sorts of corrections in the future

03Step 3. Draw Characters
For this step, we say ‘characters’ and use the word ‘draw.’ But really, this is a very open kind of step where we encourage you to put together all media that you will need to make your project into a reality This is where the storyboard really helps. After all, with that, you have an idea of exactly what kind of characters, settings, music, audio, etc. you’ll need for each scene (if not each frame)
If you’re not the ‘drawing’ type, by the way, there are both FREE and premium media libraries that you can take advantage of to use for your project It might be difficult to find matching art styles at first. But, if you’re really particular about that, then you can always find a freelance digital artist to design with a specific style in mind

04Step 4. Put Together Project
Last of all, of course, is the process of putting everything together. Do you have your software? Great Launch it and create a new project Do you have your storyboard? That’s also great Now you have an idea where each character and setting will go
In the image below, we’re only showing the start of a potential project. We’ve only added one image to the timeline But, as you can see, with the use of Filmora, even this one image can be turned into a video

● Key Takeaways from This Episode →
● Blackboards are naturally associated with learning This makes blackboard animation videos a great method of sharing information with an audience. Whether you’re doing it to promote your services/goods or just genuinely looking to impart knowledge to another
● Some may think that blackboards are outdated — for the mere fact that blackboards themselves are considered outdated when compared to whiteboards — but that doesn’t make them any less effective at getting a message across so long as you include the right kind of visuals
● In our brief ‘overview’ tutorial, we expand on the subject of blackboard animation some more. Be warned, it’s not the kind of project you should go into if you’re not prepared for the work Longer projects, especially, will require quite a bit of elbow grease to get done.
● Still, there’s something satisfying about a well-done chalkboard animation video that will not only be a joy to create but also, hopefully, catch the attention of your audience as well.
Yes, it is definitely possible In fact, it couldn’t be easier. A lot of the ‘whiteboard animation’ generators also work as blackboard animation generators.
In this guide, we hope to shed some light on the subject so that everyone can have an easier time approaching the matter of creating a blackboard project on their own.
In this article
01 [Is Blackboard Animation Outdated?](#Part 1)
02 [How to Combine Modern Needs with Blackboard Animation?](#Part 2)
03 [How to Create a Blackboard Animation in ONE DAY?](#Part 3)
Part 1 Is Blackboard Animation Outdated?
Blackboard animation some may say is as outdated as the concept of ‘blackboards’ themselves. After all, nowadays, whiteboards are the standard for presenting information in a school setting — with many preferring the ease of using dry-erase markers over the more unwieldy chalk.
However, unlike the inconveniences of using an actual chalkboard, chalkboard animation is not so different from whiteboard animation In fact, it’s just given a different look. One that may be exactly what you’re looking for — especially if you’re looking to get in touch with the older generation (who would no doubt be more familiar with the concept.)
Part 2 How to Combine Modern Needs with Blackboard Animation?
But alright, so how do you make it so that your blackboard animation is just as suited for the modern generation as it is for the older generation?? Well, that’s easy really. You’ll need images Or, rather, you’ll need visuals outside of just the plain text that is usually associated with chalkboard animation.
With the right kind of visuals to go along with your informational text, you can boost the effectiveness of your chalkboard animation video and make it more palatable. Perfectly in line with the modern needs of the era.
Part 3 How to Create a Blackboard Animation in ONE DAY?
Alright, so onto actually talking about how you can go about creating a chalkboard animation video Take note, this is going to be an ‘overview’ kind of tutorial. We’ve also decided to choose a more ‘custom’ method, rather than using one of the premium blackboard animation generators (which usually require you to pay a steep price in order to gain access to a media library.)
01Step 1. Pick Your Software
The first step in creating chalkboard animation is to pick the software that you want to use This can be something more ‘animation-specific’, like After Effects. Or something more ‘video-editing-specific’ like Filmora.
Again, because this is meant to be more of a ‘general’ tutorial, we won’t be showing you exactly how to use whatever editing software you decide to use in order to create your blackboard animation videos. But, as a general kind of advice, it would be best that you pick a video editor like Wondershare Filmora Video Editor that offers a Timeline feature that will allow you to quickly put together a project
02Step 2. Create a Storyboard
Next, to make the actual blackboard animation creation process go smoother, it’s important that you create a storyboard that will outline the video that you want to create
The more detailed this storyboard is, the better Although, of course, you don’t necessarily have to draw every single frame of your chalkboard animation beforehand. Just sketch out the general idea. It will help make sure that you won’t have to rush about making all sorts of corrections in the future
03Step 3. Draw Characters
For this step, we say ‘characters’ and use the word ‘draw.’ But really, this is a very open kind of step where we encourage you to put together all media that you will need to make your project into a reality This is where the storyboard really helps. After all, with that, you have an idea of exactly what kind of characters, settings, music, audio, etc. you’ll need for each scene (if not each frame)
If you’re not the ‘drawing’ type, by the way, there are both FREE and premium media libraries that you can take advantage of to use for your project It might be difficult to find matching art styles at first. But, if you’re really particular about that, then you can always find a freelance digital artist to design with a specific style in mind
04Step 4. Put Together Project
Last of all, of course, is the process of putting everything together. Do you have your software? Great Launch it and create a new project Do you have your storyboard? That’s also great Now you have an idea where each character and setting will go
In the image below, we’re only showing the start of a potential project. We’ve only added one image to the timeline But, as you can see, with the use of Filmora, even this one image can be turned into a video
● Key Takeaways from This Episode →
● Blackboards are naturally associated with learning This makes blackboard animation videos a great method of sharing information with an audience. Whether you’re doing it to promote your services/goods or just genuinely looking to impart knowledge to another
● Some may think that blackboards are outdated — for the mere fact that blackboards themselves are considered outdated when compared to whiteboards — but that doesn’t make them any less effective at getting a message across so long as you include the right kind of visuals
● In our brief ‘overview’ tutorial, we expand on the subject of blackboard animation some more. Be warned, it’s not the kind of project you should go into if you’re not prepared for the work Longer projects, especially, will require quite a bit of elbow grease to get done.
● Still, there’s something satisfying about a well-done chalkboard animation video that will not only be a joy to create but also, hopefully, catch the attention of your audience as well.
How to Make Creative Animation Videos
Animation can explain whatever the mind of man can conceive – Walt Disney. Animation video is a craft in which images go through the process of conspiring, layout addition, and photographic chronology to create an illusion of action. In this article, let’s learn the importance of video animations and when and why to use this technique.
What are Video Animation and its importance?
Video as a marketing tool has become more popular but also more important. In this article, you can read more about why media marketing is getting more essential in comparison to text marketing. Therefore, an explainer video with Animation is an amazing way to show your target audience who you are, where you stand for, what you do and how you can solve the customer’s problem.
Video animation is an engaging technique that can help you comprehensively tell your story. Animated meaning can be better comprehended as a simulation of motion created by showing a series of pictures. Animated videos for a business catch the viewers and make for an enjoyable story-telling experience.
Often, animation videos are used to explain a concept or process. It’s straightforward to make these videos appealing and likable as you can primarily create them however you want. It can take longer to get the point across when people explain how to do something. Animations not only trigger emotions but spark conversations as well.
What are most common types of Animation?
The purpose of this article is to take you through the complexity of the different types of animation styles and methods. It also covers the track you should take (and what that path entails) to become an animator for each of the five types.
This guide is not about learning how to animate. But instead, it breaks down the five types of Animation available to you and what you’ll need to start animating: best software, schools, and courses.
Motion Graphics (Key framing): Motion graphics focus on making dynamic and exciting presentations of moving text logos and fundamental illustrations.
- Motion graphics can be 2D and 3D, and you’ll find them everywhere in news, sporting videos, the news, and other TV productions.
- Correct character animation is generally outside the scope of motion graphics, but many core animation principles also apply to motion graphics.
- Creating Motion Graphics depends on the plan used since video editing software often have different user interface or settings, but the idea is the same. Motion Graphics usually involves animating texts, pictures, or video clips using keyframing that is tweened to make a smooth motion between frames.
Traditional Animation: This is the classic type of Animation you’re probably most well known with. In the past, animators drew characters frame by frame, and then those pictures were moved onto transparent sheets for painting. That’s where the term animation comes from.
They started scanning drawings into the computer for digital coloring. The important thing is that hand-drawn animators still create their animation frame by frame using the same method and concept as in those old days of paper and cels.
How to Use Motion Graphics Animation in Filmora
Keyframes specify the start or end of a transition in a shot. A series of keyframes can give the semblance of the movement of an object. Keyframes include parameters such as Position, Scale, Opacity, and Rotation. These values can be changed and customized to make animations using keyframing.
Wondershare Filmora makes it really easy to use. Even learners or novices can use keyframe animation to create extraordinary videos. Plus, the keyframe templates are an added satisfaction. If you have limited time and need a quick fix, using Presets in the Animation tab is your best bet.
For this example, we’ll walk you through using Keyframes on the short video clip to make your Animation using Wondershare Filmora.
Free Download For Win 7 or later(64-bit)
Free Download For macOS 10.14 or later
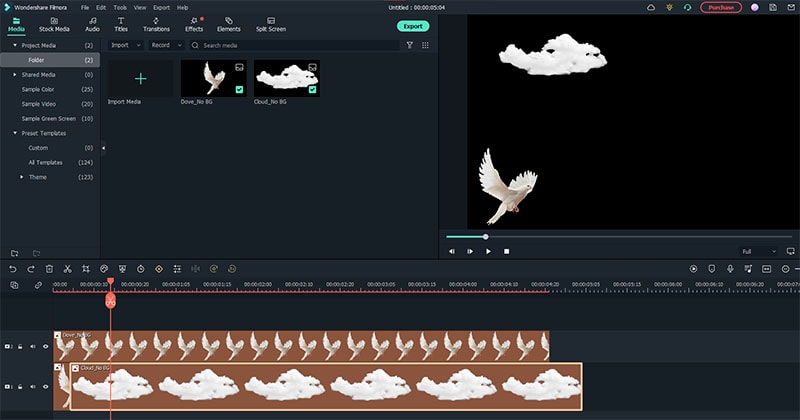
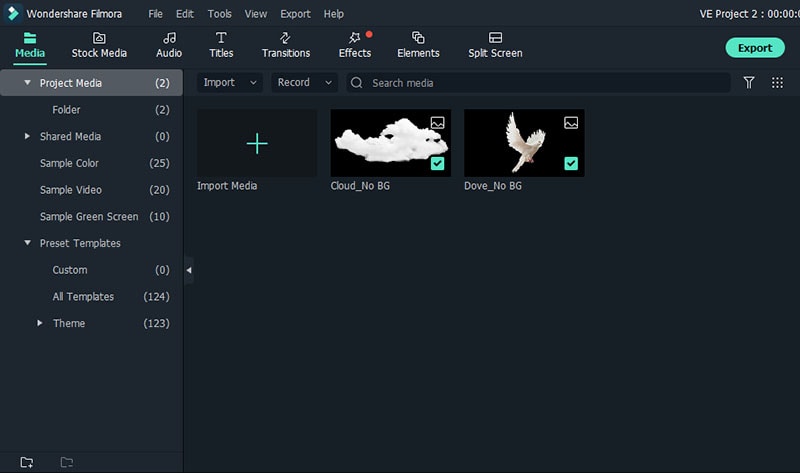
Step1 Launch Wondershare Filmora from your system and select New Project.

Step2 Import your selected images. In this case I imported no background images to have a clear view on how key framing works.
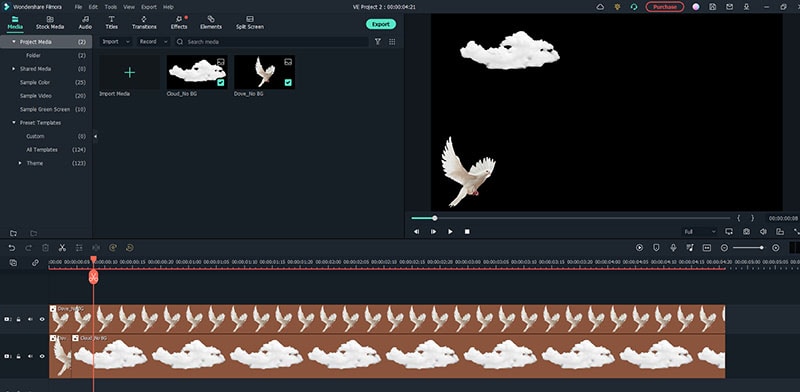
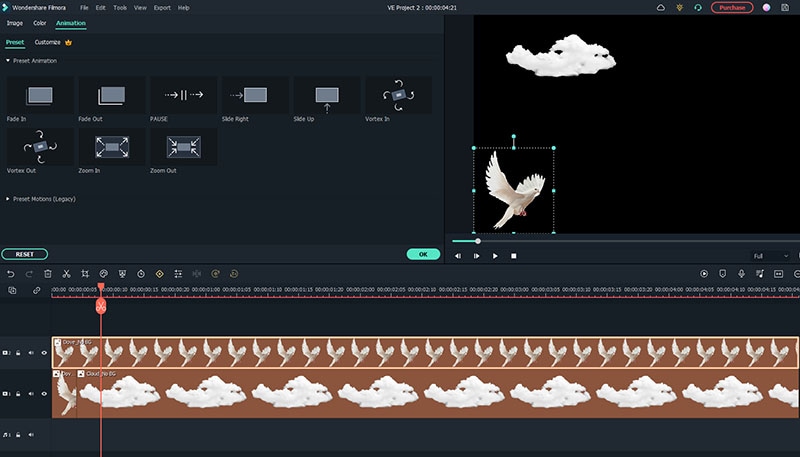
Step3 Drag or add the image on the Timeline Panel.
In this case I use a dove and a cloud to demo the Motion graphics animation
Step4 Double click the image then the Animation tab will display. Here, there are available presets, either the latest or the Legacy Animation, as indicated on the display that you can use.
There is also a tab if you want to customize your animations which requires premium account.
- Fade In
- Fade Out
- Pause
- Slide right
- Slide up
- Vortex In
- Vortex Out
- Zoom In
- Zoom Out
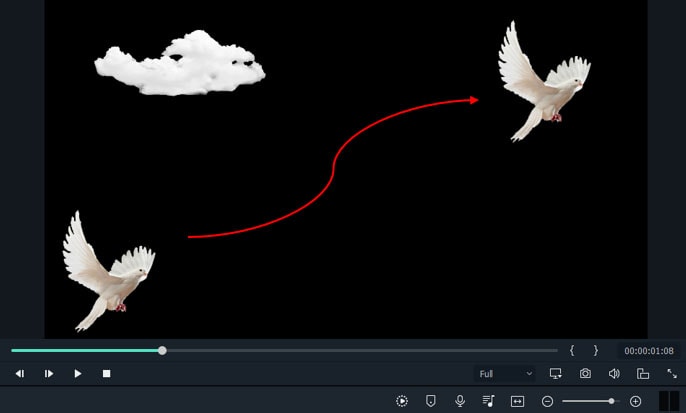
Step5 Select any animation you want by double-clicking the presets. In this case, I selected a slight right preset, and you will notice that the start arrow and end arrow indicator are displayed.
In the Timeline panel, you have an option to customize the start and end of the Preset. Just drag the arrow keys on either side to reach the keyframe you wish to change. Just simple.
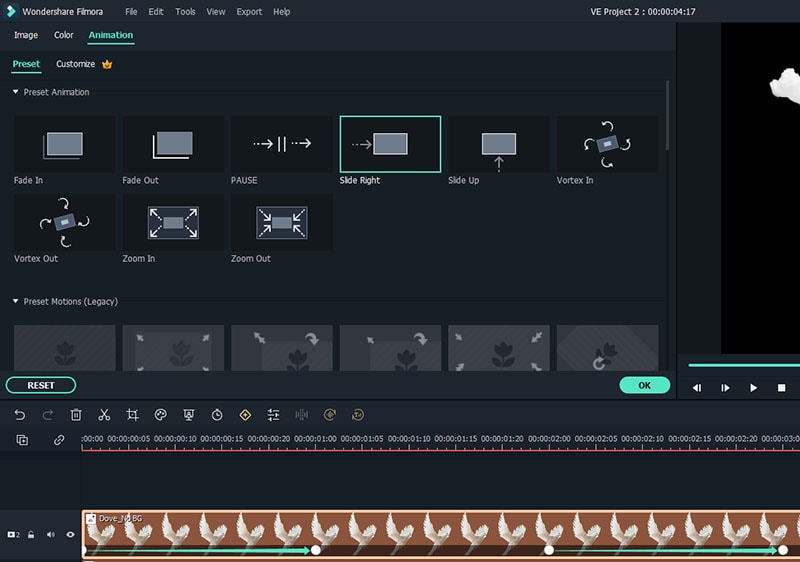
You can also do it on the cloud image that we’ve added.
Takeaway
Keyframing can bring steady images to life by introducing animations. With the super-easy keyframing tool in Filmora, you can now make invigorating videos. From easy to complex key framing. The customization property lets you unbind your creativity and take your editing to a professional level. Make your logo pop by adding keyframe animations. Better yet, you can also animate text.
No matter what industry you’re in, Animation can be relevant. Small start-ups to giant corporations use animation videos, too. Animation videos help to explain tricky processes or concepts, sell a product, or even to gain recognition for a product. Everyone resonates with Animation in some way or another. Almost everyone has watched cartoons or animations in their life, so these tend to grab attention more effectively.
We all love animation. From the animated cartoons we watched as kids to the latest and hottest animated music video, there’s something about seeing visuals come alive that captivates and inspires us. But video animation isn’t just for children, and it isn’t just for the entertainment value only.
Free Download For macOS 10.14 or later
Step1 Launch Wondershare Filmora from your system and select New Project.
Step2 Import your selected images. In this case I imported no background images to have a clear view on how key framing works.
Step3 Drag or add the image on the Timeline Panel.
In this case I use a dove and a cloud to demo the Motion graphics animation
Step4 Double click the image then the Animation tab will display. Here, there are available presets, either the latest or the Legacy Animation, as indicated on the display that you can use.
There is also a tab if you want to customize your animations which requires premium account.
- Fade In
- Fade Out
- Pause
- Slide right
- Slide up
- Vortex In
- Vortex Out
- Zoom In
- Zoom Out
Step5 Select any animation you want by double-clicking the presets. In this case, I selected a slight right preset, and you will notice that the start arrow and end arrow indicator are displayed.
In the Timeline panel, you have an option to customize the start and end of the Preset. Just drag the arrow keys on either side to reach the keyframe you wish to change. Just simple.
You can also do it on the cloud image that we’ve added.
Takeaway
Keyframing can bring steady images to life by introducing animations. With the super-easy keyframing tool in Filmora, you can now make invigorating videos. From easy to complex key framing. The customization property lets you unbind your creativity and take your editing to a professional level. Make your logo pop by adding keyframe animations. Better yet, you can also animate text.
No matter what industry you’re in, Animation can be relevant. Small start-ups to giant corporations use animation videos, too. Animation videos help to explain tricky processes or concepts, sell a product, or even to gain recognition for a product. Everyone resonates with Animation in some way or another. Almost everyone has watched cartoons or animations in their life, so these tend to grab attention more effectively.
We all love animation. From the animated cartoons we watched as kids to the latest and hottest animated music video, there’s something about seeing visuals come alive that captivates and inspires us. But video animation isn’t just for children, and it isn’t just for the entertainment value only.
Best 8 Tools Tell You How to Make Slideshows for Instagram
Top 8 Tools Tell You How to Make Slideshows for Instagram
An easy yet powerful editor
Numerous effects to choose from
Detailed tutorials provided by the official channel
Instagram slideshows land among the latest social media trends of fun and entertainment. Learn how to attract jaw dropping peer attention with creating the same!
In this article
01 [When Should You Use an Instagram Slideshow?](#Part 1)
02 [How to Make an Instagram Slideshow with Music?](#Part 2)
03 [8 Best Instagram Slideshow Apps for Creating Outstanding Slideshow](#Part 3)
Part 1 When Should You Use an Instagram Slideshow?
Revolutions in technology has opened doors to a plenty of new and exciting means of information sharing, entertainment and communication. Playing its part in the game, Instagram slideshow has emerged as an exciting means of quick and impactful content sharing. Diving deeper into the discussion, let us talk about the different areas of working with an Instagram slide show in the following section:
01Explanatory Product Demonstrations and Stepwise Tutorials
Considering the diverse media collaboration entertained by this social media platform, you get the liberty to include 10 media files of videos and images while creating a slideshow on Instagram. This is an affordably sufficient media space to demonstrate your newly launched product in front of the target audience.
The aforesaid characteristic of a slideshow for Instagram can be put to another use of creating detailed, step by step guides and product usage tutorials to create an increased and confident customer reach and brand applicability. A few examples include the presentations of recipes by food blogs and chefs, or a detailed look of the day’s outfit by fashion bloggers.
02Interactive Storytelling or Recreate an Event
Gone are the times when stories and events were restricted to a single image or video with a limited scope of understanding and explanation. You can now work with a combination of multiple images and videos to create more vivid and graphical descriptions of stories, narratives and events.
You can work on creating an engaging slideshow for Instagram to tell an amazing story, voice a narration from the beginning to the end, or share your best moments with your cherished audience, which will surely give them the feel of enjoying the adventure along with you.
03Create a Collection
You can now use a slide show for Instagram to design and present a collection of manifold ideas and products within a single post. You can improvise the collection with displaying a series of related products, showcasing a summary of your different blog posts through the week, or simply present a list of your most reliable inspirations, resources and influencers.
04Exciting Video Teasers
If you have a scheduled video release to entertain your audience, try working with interactive slideshows for Instagram to create some sensational teaser content of the upcoming release to imbibe a natural sense of curiosity within your audience.
You can experiment with releasing a mini photoshoot tour of your filming set, share close up progression details, or include a cliffhanger in the end of your Instagram slideshow to ensure the retrieval of your audience towards watching the release of the actual big content. You can use these short teasers as effective means of creating a campaign buzz, while building a closer connect with your audience.
Part 2 How to Make an Instagram Slideshow with Music?
By now, you must have gathered enough knowledge regarding the credibility of Instagram slideshows in catering to a diversity of commercial, professional and personal content sharing needs. Considering the same, you may conveniently feel motivated to try hands at creating stunning slideshow presentations for Instagram on your own.
Adhering to the concern, let us move ahead with our discussion, while talking about how to make a slideshow for Instagram and supplement the same with adaptable background music to develop amazing content masterpieces and share them with social media peers, while grabbing their obvious attention.
While there are a number of choices in the software market to choose your Instagram slideshow creator tool, the FlexClip tool can be a reliable option. Read though the following section to learn the slideshow creation process in the program with a comprehensive and stepwise tutorial guide:
Step 1: Download the Slideshow Creator Tool
Visit the official website of FlexClip to download and install the slideshow maker software in your preferred device.

Step 2: Start from Scratch
After a successful installation, proceed to launch the tool in your system and wait till the software greets you with its welcome interface. Here, you will have to reach to and tap the ‘Start to Create’ button to begin with the slideshow creation process. You can also select a preset template to work on your slideshow if nothing new clicks in your mind.
Step 3: Select an Aspect Ratio
In the tool’s creator window, navigate to the ‘Options Panel’ at the left and click on ‘More’ to select a suitable aspect ratio. Picking the 9:16 ratio would be a good choice.

Step 4: Upload Your Media
In the same ‘Options Panel’, click on ‘Media’ for dragging and dropping the desired video and image files from your device to the program’s media timeline, followed by applying them to the tool’s storyboard. You can alternatively, choose to directly work with media pages of any preset slideshow template.

Step 5: Customize Your Media
You can now proceed to improvise your media files with amazing texts, filters, stickers, emojis, widgets, etc., by clicking on specific object categories from the ‘Options Panel’.

Step 6: Include Seamless Transitions
Proceed to uplift your creation to the next level with the application of stunning image and video transitions. Navigate to the ‘Options Panel’ and tap ‘Elements’. A variety of transition effects will be displayed to choose from. Select the one you like to add it to your slideshow.

Step 7: Add a Background Music
An in line background audio is the best way to set the mood of your slideshow. Choose to add the same to your creation for making a more engaging impact on the audience. Visit the ‘Options Panel’ again and click on ‘Music’ to open the program’s audio library and select a perfect background music from the huge variety of choices, to include in your slideshow.

Step 8: Preview Your Creation
When you have finished customizing your slideshow, navigate to the top right corner of the editor’s storyboard and hit the ‘Preview’ button to visualize and ensure that your slideshow has everything at the right place. You can continue editing if there is a need to make some changes.
Step 9: Time to Save and Share!
When you are happy with your work, consider saving it either to your device or Google Dropbox, from where you can easily upload the same to your Instagram handle.
Part 3 Best Instagram Slideshow Apps for Creating Outstanding Slideshow
Social media is the talk of the trend in today’s times, which has extended its boundaries to visibly everything around us. Speaking in the light of the fact, slideshow presentations are no exception. Social media platforms today have come up with amazing tools and applications to create and share a stunning slideshow Instagram story with utmost ease and within an affordable time span.
Now that you have developed a comprehensive understanding of the credibility of working with Instagram slideshows and their creation process with the inclusion of complementary background music, let us dive into learning about some of the best and most popular Instagram apps for creating awesome slideshow presentations in the following section:
01Filme Lite
This tool lands among the leading user preferences to work on creating slideshow presentations. The application software is packed with a heap of latest features that form the Instagram trends in current times.
Apart from complementing your slideshow creations with tons of features, this slideshow maker for Instagram grants you the liberty to include your most loved videos and images within your presentation and customize them with a diverse range of effects, along with adjusting their play duration within the slideshow. Additional to image and video customization, you are also allowed to choose the image transition style that perfectly suits your content arrangement within the slides.
Working with the tool, you can be sure of getting an unparalleled slideshow creation experience with a very interactive and user oriented design interface, that is simple enough to be easily understood and worked upon by a newbie to the creative world.
02VivaVideo
If you are working on a detailed presentation and wish to spark up your creation with stunning varieties of jaw dropping special effects, consider creating your PowerPoint slideshows in this application. The tool’s effect library is a storehouse of the most amazing special effects that promise of transforming your slideshow into a visual masterpiece.
You can separately apply these effects to each of the slideshow images or choose to work on a combination of selected effects to include within a single video. Apart from this, you are free to choose an apt background music for your presentation slides from the extensive audio library of the software. The bottom line is; you are assured to a complete fun experience while creating slideshows with this tool.
03Movavi
If you are familiar enough with the fundamental concepts and the trivial anecdotes of working with slideshow presentations and want to take your graphic creativity to the next level, you can try hands at using the Movavi slideshow creator software to design high end PowerPoint presentations of professional quality. The best thing about the tool is, it works online and does not require a software download for usage concerns.
Along with creating online slideshow presentations with ease, the tool permits you to create online videos within minutes and instantly download the same for specific usage. You can further, pop up your presentation slides with wonderful transition and animation effects and also make adjustments in the play duration of each slide. The tool lets you choose and add a perfect background music to your presentation from its conveniently vast audio library.
04Slideshow Lab
If you have just landed into the world of creating slideshow presentations and are looking for easy solutions on how to make a slideshow on Instagram, consider working with this software to polish your design creativity. The simple and user cohesive interface of the tool is best for beginners to understand and get customary with the creation process, that takes the minimum possible time to render an appreciable PowerPoint presentation.
Talking about the slideshow design process, you will need to start with selecting a set of desired images, followed by uploading the same into the tool’s slideshow creator timeline. The next step is to arrange the images in the sequential order of appearance, select an appealing background music and apply smooth image transitions. When you are done with everything, proceed to save the presentation to your device.
05MoShow
While you can choose to create stunning slideshow presentations with almost any class of images, the aforesaid app works best to render Instagram images into a top rated Instagram photo slideshow without compromising with the high resolution image quality of Instagram photos. The application integrates motion pictures and lighting effects to transform the otherwise regular images into lively still captures.
Considering the credibility of the tool in overall user experience, its indeed a thumbs up from graphic creators across the globe, thanks to its smart and interactive interface, in time performance and outstanding creation outputs.
06InVideo Editor
Put an end to your search of effective solutions on how to do a slideshow on Instagram with the InVideo Editor, a smart video and graphic editor that can also be employed to adhere to the requirement of creating amazing slideshow presentations from Instagram media. While the creation process hardly takes a few minutes, you can work with the application to explore your editing creativity to the finest levels. The tool works well with any of your MacOs and Windows compatible devices.
The editor’s effects library is loaded with tons of graphic transitions and filters that are dedicated to enhance the contents of your presentation with utmost ease. You can add creative modifications to the slideshow media, such as, cut, crop and trim videos and images and add the most convincing music, overlays, fonts, etc., and enjoy an additional free access to hundreds of stock videos and slideshow templates.
07LightMV
This one is an online slideshow creator utility that works well with almost any operating system including Windows, iOS, Android and Mac. Essentially a cloud centered editor program, this tool caters to your high quality slideshow creation needs in the most effective way. The design process is quite simple, where you only need to add the images and videos, design your presentation and wait till everything comes to place.
What’s more appealing factor about the tool is that you will never need to download the program in your device or purchase a subscription plan to use the application. All you need to do is land into the tool’s website in your favorite browser and tap on the ‘Slideshow’ option to begin with the creation process. You can select from a heap of preset stunning slideshow templates to create the most enhanced PowerPoint presentation.
08Fliptastic
The Fliptastic slideshow creator app is exclusively developed to adhere to the graphic design concerns of iOS users. This one is a no cost graphic utility with a plethora of versatile features and considerable user backup. The app’s effect library is packed with a unique set of slideshow design templates, transitions, background music choices and filters that work to compliment your presentation with the subtlest look ever.
Paying a bit extra attention to the audio inclusion within the slides, the app offers you a range of free music files to work with, while additionally allowing you to upload and use one from your device or the internet.
09Creating Instagram Slideshows With Filmora
Talking exclusively within the domain of video creation and editing, the credibility of the Wondershare Filmora Video Editor software needs no introduction. Moving ahead with our discussion, let us learn about the process of creating awesome Instagram slideshows with Filmora in the following section:
Step 1: Download and Install the Program
To begin with addressing the concern of how to make a slideshow on Instagram story, navigate to the official Wondershare website and download the Wondershare Filmora Video Editor to your preferred system and proceed to install the same.

Wondershare Filmora - Best Video Editor for Mac/Windows
5,481,435 people have downloaded it.
Build unique custom animations without breaking a sweat.
Focus on creating epic stories and leave the details to Filmora’s auto features.
Start a creative adventure with drag & drop effects and endless possibilities.
Filmora simplifies advanced features to save you time and effort.
Filmora cuts out repetition so you can move on to your next creative breakthrough.
Step 2: Import Your Media
Launch the editor program and wait for the latter’s welcome screen to appear. Here, you need to import the images, videos and other media files to the editor timeline for including them in your slideshow. It is recommended to collect all the image and video files into one single folder before opening a new slideshow design project.
In the editor’s welcome screen, navigate to the ‘Media’ tab at the top left corner and click on the same to open the ‘Import’ menu. From here, you need to choose the ‘Import a Media Folder’ option, followed by navigating to the folder that contains the to be imported media files. When you have reached to the required folder, select it and tap ‘OK’ to import the same into the project timeline. When all the files have been imported, you can see them in the ‘Project Media’ panel.

Step 3: Timeline Positioning of Media Files
Reach to the ‘File’ menu and choose ‘Preferences’ from the latter’s dropdown menu. In the ‘Preferences’ window, hit the ‘Editing’ tab and tap on ‘Photo Preferences’. From the drop down menu that follows, choose the ‘Crop to Fit’ option to adjust the aspect ratio of your imported images in line with the slideshow project. In case your images have the 9:16 vertical aspect ratio, select the ‘Fit’ option to make a proper screen fit.

You can proceed to include the image zoom and camera pan features within your project by clicking on the ‘Pan & Zoom’ option. You can further, modify the preset durations of transitions, effects and photos in the ‘Editing’ tab itself before adding them to the editor timeline. Another way of doing the same is to drag the ends of the media files inward or outward, post the timeline adding process.

When you have finished making the required adjustments, navigate back the ‘Media Panel’ to include the imported media files within the project timeline. You can either click on the files to add them, or choose to ‘Drag and Drop’ the same at a preferred place within the timeline.
When all the images and videos have been added, proceed to arrange them in the desired order of appearance in the slideshow, followed by adjusting their screen time and play durations through any of the methods explained above.
Step 4: Add Transitions to Eliminate Hard Cuts
The smooth play of a slideshow is often distorted by hard cuts, which can be escaped by applying smooth transition effects to the slides. Consider exploring the ‘Transitions’ tab of Filmora to choose from a diversity of easily customizable transition effects and place them at the intersection point of the respective slides in the project timeline.
Instead of applying the same transition to every slide, prefer choosing the one that exclusively suits the content arrangement and flow within particular slides. This would save your slideshow from getting a repetitive look.

Post the timeline adding of a transition, you can double click on the same to reach the ‘Transition Setting Window’, where you are allowed to customize the play duration and select its ‘Transition Mode’. Play durations can alternatively be customised in the project timeline by dragging the slider in a left or right direction.
Step 5: Add Overlays and Filters for an Improvised Colour Scheme
To enhance the thematic appeal of your slideshow, consider desaturating the colours of the included images with the extensive range of visual effects and overlays available in the ‘Effects’ tab of the software’s editing timeline. Opening the tab, you are exposed to a series of ‘Filter and Overlay’ categories, that have further subdivisions of Light Leaks, Sepia Tone and Lomography.
To add a particular effect, place it in the timeline track above the desired clip or image. Observe the changes in the ‘Preview Panel’ and proceed to adjust the effect settings if required, by double clicking on the particular effect.

Step 6: Include Motion Graphic Elements
To supplement your slideshow with elegant motion graphics, navigate to the ‘Elements’ tab in the editor timeline. From here, you can access and choose any suitable motion graphic template from a diversity of available choices, to include within the project timeline. The step is completely optional and you should pay attention to the style of content presentation and the cause of creation of your slideshow when choosing to add these elements to the same.

Step 7: Record Voiceovers and Create Soundtracks
To record a voiceover for your slideshow, navigate to the ‘Media’ tab and tap the ‘Record’ dropdown menu. Click on ‘Record Voiceover’ in the list of options that appears. The ‘Record Audio’ icon pops up and you now need to select a microphone to be used in the recording process. When you are ready, tap the ‘Record’ button to let the recording begin.

You can now see your voice recording appear in the ‘Media’ tab with the previously imported media files, ready to be placed within the audio track of the project timeline. Filmora’s audio library is a storehouse of free access music and audio effects. To add one to your slideshow, navigate and click on the ‘Audio’ tab to select from the extensive Rock, Young & Bright, Electronic, etc., music subcategories till you get the perfect match for your presentation.

Once you have selected all the music tracks, place them one by one on the project timeline and move ahead with adjusting their play durations.
Step 8: Export Your Creation
When you are satisfied with your work, you can export the slideshow directly from Filmora to a number of media sharing platforms. All you need to do is, navigate to and tap the ‘Export’ button in the top right corner of the editor screen and proceed to set the resolution and frame rate, and select the output file format of your created slideshow in the ‘Export Window’ that appears.

When you are ready with everything, click on the ‘Export’ button at the bottom right corner of the screen to share your slideshow across different platforms, including YouTube, Instagram, Vimeo, etc.
The time required by Filmora to render your slideshow on the chosen platform will depend on the output file size. Considering the fact that larger files require a much longer time to be rendered, it would be a smart decision to limit the file size of your slideshow within 500 MB.
● Ending Thoughts →
● Instagram slideshows are exciting means of diving into fun-filled entertainment with your social media peers.
● When looking for solutions on how to create a slideshow on Instagram, there are loads of choices in the software market.
● Talking of best creator alternatives, you can pick the Wondershare Filmora slideshow developer program to make an amazing Insta story slideshow.
Instagram slideshows land among the latest social media trends of fun and entertainment. Learn how to attract jaw dropping peer attention with creating the same!
In this article
01 [When Should You Use an Instagram Slideshow?](#Part 1)
02 [How to Make an Instagram Slideshow with Music?](#Part 2)
03 [8 Best Instagram Slideshow Apps for Creating Outstanding Slideshow](#Part 3)
Part 1 When Should You Use an Instagram Slideshow?
Revolutions in technology has opened doors to a plenty of new and exciting means of information sharing, entertainment and communication. Playing its part in the game, Instagram slideshow has emerged as an exciting means of quick and impactful content sharing. Diving deeper into the discussion, let us talk about the different areas of working with an Instagram slide show in the following section:
01Explanatory Product Demonstrations and Stepwise Tutorials
Considering the diverse media collaboration entertained by this social media platform, you get the liberty to include 10 media files of videos and images while creating a slideshow on Instagram. This is an affordably sufficient media space to demonstrate your newly launched product in front of the target audience.
The aforesaid characteristic of a slideshow for Instagram can be put to another use of creating detailed, step by step guides and product usage tutorials to create an increased and confident customer reach and brand applicability. A few examples include the presentations of recipes by food blogs and chefs, or a detailed look of the day’s outfit by fashion bloggers.
02Interactive Storytelling or Recreate an Event
Gone are the times when stories and events were restricted to a single image or video with a limited scope of understanding and explanation. You can now work with a combination of multiple images and videos to create more vivid and graphical descriptions of stories, narratives and events.
You can work on creating an engaging slideshow for Instagram to tell an amazing story, voice a narration from the beginning to the end, or share your best moments with your cherished audience, which will surely give them the feel of enjoying the adventure along with you.
03Create a Collection
You can now use a slide show for Instagram to design and present a collection of manifold ideas and products within a single post. You can improvise the collection with displaying a series of related products, showcasing a summary of your different blog posts through the week, or simply present a list of your most reliable inspirations, resources and influencers.
04Exciting Video Teasers
If you have a scheduled video release to entertain your audience, try working with interactive slideshows for Instagram to create some sensational teaser content of the upcoming release to imbibe a natural sense of curiosity within your audience.
You can experiment with releasing a mini photoshoot tour of your filming set, share close up progression details, or include a cliffhanger in the end of your Instagram slideshow to ensure the retrieval of your audience towards watching the release of the actual big content. You can use these short teasers as effective means of creating a campaign buzz, while building a closer connect with your audience.
Part 2 How to Make an Instagram Slideshow with Music?
By now, you must have gathered enough knowledge regarding the credibility of Instagram slideshows in catering to a diversity of commercial, professional and personal content sharing needs. Considering the same, you may conveniently feel motivated to try hands at creating stunning slideshow presentations for Instagram on your own.
Adhering to the concern, let us move ahead with our discussion, while talking about how to make a slideshow for Instagram and supplement the same with adaptable background music to develop amazing content masterpieces and share them with social media peers, while grabbing their obvious attention.
While there are a number of choices in the software market to choose your Instagram slideshow creator tool, the FlexClip tool can be a reliable option. Read though the following section to learn the slideshow creation process in the program with a comprehensive and stepwise tutorial guide:
Step 1: Download the Slideshow Creator Tool
Visit the official website of FlexClip to download and install the slideshow maker software in your preferred device.
Step 2: Start from Scratch
After a successful installation, proceed to launch the tool in your system and wait till the software greets you with its welcome interface. Here, you will have to reach to and tap the ‘Start to Create’ button to begin with the slideshow creation process. You can also select a preset template to work on your slideshow if nothing new clicks in your mind.
Step 3: Select an Aspect Ratio
In the tool’s creator window, navigate to the ‘Options Panel’ at the left and click on ‘More’ to select a suitable aspect ratio. Picking the 9:16 ratio would be a good choice.
Step 4: Upload Your Media
In the same ‘Options Panel’, click on ‘Media’ for dragging and dropping the desired video and image files from your device to the program’s media timeline, followed by applying them to the tool’s storyboard. You can alternatively, choose to directly work with media pages of any preset slideshow template.
Step 5: Customize Your Media
You can now proceed to improvise your media files with amazing texts, filters, stickers, emojis, widgets, etc., by clicking on specific object categories from the ‘Options Panel’.
Step 6: Include Seamless Transitions
Proceed to uplift your creation to the next level with the application of stunning image and video transitions. Navigate to the ‘Options Panel’ and tap ‘Elements’. A variety of transition effects will be displayed to choose from. Select the one you like to add it to your slideshow.
Step 7: Add a Background Music
An in line background audio is the best way to set the mood of your slideshow. Choose to add the same to your creation for making a more engaging impact on the audience. Visit the ‘Options Panel’ again and click on ‘Music’ to open the program’s audio library and select a perfect background music from the huge variety of choices, to include in your slideshow.
Step 8: Preview Your Creation
When you have finished customizing your slideshow, navigate to the top right corner of the editor’s storyboard and hit the ‘Preview’ button to visualize and ensure that your slideshow has everything at the right place. You can continue editing if there is a need to make some changes.
Step 9: Time to Save and Share!
When you are happy with your work, consider saving it either to your device or Google Dropbox, from where you can easily upload the same to your Instagram handle.
Part 3 Best Instagram Slideshow Apps for Creating Outstanding Slideshow
Social media is the talk of the trend in today’s times, which has extended its boundaries to visibly everything around us. Speaking in the light of the fact, slideshow presentations are no exception. Social media platforms today have come up with amazing tools and applications to create and share a stunning slideshow Instagram story with utmost ease and within an affordable time span.
Now that you have developed a comprehensive understanding of the credibility of working with Instagram slideshows and their creation process with the inclusion of complementary background music, let us dive into learning about some of the best and most popular Instagram apps for creating awesome slideshow presentations in the following section:
01Filme Lite
This tool lands among the leading user preferences to work on creating slideshow presentations. The application software is packed with a heap of latest features that form the Instagram trends in current times.
Apart from complementing your slideshow creations with tons of features, this slideshow maker for Instagram grants you the liberty to include your most loved videos and images within your presentation and customize them with a diverse range of effects, along with adjusting their play duration within the slideshow. Additional to image and video customization, you are also allowed to choose the image transition style that perfectly suits your content arrangement within the slides.
Working with the tool, you can be sure of getting an unparalleled slideshow creation experience with a very interactive and user oriented design interface, that is simple enough to be easily understood and worked upon by a newbie to the creative world.
02VivaVideo
If you are working on a detailed presentation and wish to spark up your creation with stunning varieties of jaw dropping special effects, consider creating your PowerPoint slideshows in this application. The tool’s effect library is a storehouse of the most amazing special effects that promise of transforming your slideshow into a visual masterpiece.
You can separately apply these effects to each of the slideshow images or choose to work on a combination of selected effects to include within a single video. Apart from this, you are free to choose an apt background music for your presentation slides from the extensive audio library of the software. The bottom line is; you are assured to a complete fun experience while creating slideshows with this tool.
03Movavi
If you are familiar enough with the fundamental concepts and the trivial anecdotes of working with slideshow presentations and want to take your graphic creativity to the next level, you can try hands at using the Movavi slideshow creator software to design high end PowerPoint presentations of professional quality. The best thing about the tool is, it works online and does not require a software download for usage concerns.
Along with creating online slideshow presentations with ease, the tool permits you to create online videos within minutes and instantly download the same for specific usage. You can further, pop up your presentation slides with wonderful transition and animation effects and also make adjustments in the play duration of each slide. The tool lets you choose and add a perfect background music to your presentation from its conveniently vast audio library.
04Slideshow Lab
If you have just landed into the world of creating slideshow presentations and are looking for easy solutions on how to make a slideshow on Instagram, consider working with this software to polish your design creativity. The simple and user cohesive interface of the tool is best for beginners to understand and get customary with the creation process, that takes the minimum possible time to render an appreciable PowerPoint presentation.
Talking about the slideshow design process, you will need to start with selecting a set of desired images, followed by uploading the same into the tool’s slideshow creator timeline. The next step is to arrange the images in the sequential order of appearance, select an appealing background music and apply smooth image transitions. When you are done with everything, proceed to save the presentation to your device.
05MoShow
While you can choose to create stunning slideshow presentations with almost any class of images, the aforesaid app works best to render Instagram images into a top rated Instagram photo slideshow without compromising with the high resolution image quality of Instagram photos. The application integrates motion pictures and lighting effects to transform the otherwise regular images into lively still captures.
Considering the credibility of the tool in overall user experience, its indeed a thumbs up from graphic creators across the globe, thanks to its smart and interactive interface, in time performance and outstanding creation outputs.
06InVideo Editor
Put an end to your search of effective solutions on how to do a slideshow on Instagram with the InVideo Editor, a smart video and graphic editor that can also be employed to adhere to the requirement of creating amazing slideshow presentations from Instagram media. While the creation process hardly takes a few minutes, you can work with the application to explore your editing creativity to the finest levels. The tool works well with any of your MacOs and Windows compatible devices.
The editor’s effects library is loaded with tons of graphic transitions and filters that are dedicated to enhance the contents of your presentation with utmost ease. You can add creative modifications to the slideshow media, such as, cut, crop and trim videos and images and add the most convincing music, overlays, fonts, etc., and enjoy an additional free access to hundreds of stock videos and slideshow templates.
07LightMV
This one is an online slideshow creator utility that works well with almost any operating system including Windows, iOS, Android and Mac. Essentially a cloud centered editor program, this tool caters to your high quality slideshow creation needs in the most effective way. The design process is quite simple, where you only need to add the images and videos, design your presentation and wait till everything comes to place.
What’s more appealing factor about the tool is that you will never need to download the program in your device or purchase a subscription plan to use the application. All you need to do is land into the tool’s website in your favorite browser and tap on the ‘Slideshow’ option to begin with the creation process. You can select from a heap of preset stunning slideshow templates to create the most enhanced PowerPoint presentation.
08Fliptastic
The Fliptastic slideshow creator app is exclusively developed to adhere to the graphic design concerns of iOS users. This one is a no cost graphic utility with a plethora of versatile features and considerable user backup. The app’s effect library is packed with a unique set of slideshow design templates, transitions, background music choices and filters that work to compliment your presentation with the subtlest look ever.
Paying a bit extra attention to the audio inclusion within the slides, the app offers you a range of free music files to work with, while additionally allowing you to upload and use one from your device or the internet.
09Creating Instagram Slideshows With Filmora
Talking exclusively within the domain of video creation and editing, the credibility of the Wondershare Filmora Video Editor software needs no introduction. Moving ahead with our discussion, let us learn about the process of creating awesome Instagram slideshows with Filmora in the following section:
Step 1: Download and Install the Program
To begin with addressing the concern of how to make a slideshow on Instagram story, navigate to the official Wondershare website and download the Wondershare Filmora Video Editor to your preferred system and proceed to install the same.
Wondershare Filmora - Best Video Editor for Mac/Windows
5,481,435 people have downloaded it.
Build unique custom animations without breaking a sweat.
Focus on creating epic stories and leave the details to Filmora’s auto features.
Start a creative adventure with drag & drop effects and endless possibilities.
Filmora simplifies advanced features to save you time and effort.
Filmora cuts out repetition so you can move on to your next creative breakthrough.
Step 2: Import Your Media
Launch the editor program and wait for the latter’s welcome screen to appear. Here, you need to import the images, videos and other media files to the editor timeline for including them in your slideshow. It is recommended to collect all the image and video files into one single folder before opening a new slideshow design project.
In the editor’s welcome screen, navigate to the ‘Media’ tab at the top left corner and click on the same to open the ‘Import’ menu. From here, you need to choose the ‘Import a Media Folder’ option, followed by navigating to the folder that contains the to be imported media files. When you have reached to the required folder, select it and tap ‘OK’ to import the same into the project timeline. When all the files have been imported, you can see them in the ‘Project Media’ panel.
Step 3: Timeline Positioning of Media Files
Reach to the ‘File’ menu and choose ‘Preferences’ from the latter’s dropdown menu. In the ‘Preferences’ window, hit the ‘Editing’ tab and tap on ‘Photo Preferences’. From the drop down menu that follows, choose the ‘Crop to Fit’ option to adjust the aspect ratio of your imported images in line with the slideshow project. In case your images have the 9:16 vertical aspect ratio, select the ‘Fit’ option to make a proper screen fit.
You can proceed to include the image zoom and camera pan features within your project by clicking on the ‘Pan & Zoom’ option. You can further, modify the preset durations of transitions, effects and photos in the ‘Editing’ tab itself before adding them to the editor timeline. Another way of doing the same is to drag the ends of the media files inward or outward, post the timeline adding process.
When you have finished making the required adjustments, navigate back the ‘Media Panel’ to include the imported media files within the project timeline. You can either click on the files to add them, or choose to ‘Drag and Drop’ the same at a preferred place within the timeline.
When all the images and videos have been added, proceed to arrange them in the desired order of appearance in the slideshow, followed by adjusting their screen time and play durations through any of the methods explained above.
Step 4: Add Transitions to Eliminate Hard Cuts
The smooth play of a slideshow is often distorted by hard cuts, which can be escaped by applying smooth transition effects to the slides. Consider exploring the ‘Transitions’ tab of Filmora to choose from a diversity of easily customizable transition effects and place them at the intersection point of the respective slides in the project timeline.
Instead of applying the same transition to every slide, prefer choosing the one that exclusively suits the content arrangement and flow within particular slides. This would save your slideshow from getting a repetitive look.
Post the timeline adding of a transition, you can double click on the same to reach the ‘Transition Setting Window’, where you are allowed to customize the play duration and select its ‘Transition Mode’. Play durations can alternatively be customised in the project timeline by dragging the slider in a left or right direction.
Step 5: Add Overlays and Filters for an Improvised Colour Scheme
To enhance the thematic appeal of your slideshow, consider desaturating the colours of the included images with the extensive range of visual effects and overlays available in the ‘Effects’ tab of the software’s editing timeline. Opening the tab, you are exposed to a series of ‘Filter and Overlay’ categories, that have further subdivisions of Light Leaks, Sepia Tone and Lomography.
To add a particular effect, place it in the timeline track above the desired clip or image. Observe the changes in the ‘Preview Panel’ and proceed to adjust the effect settings if required, by double clicking on the particular effect.
Step 6: Include Motion Graphic Elements
To supplement your slideshow with elegant motion graphics, navigate to the ‘Elements’ tab in the editor timeline. From here, you can access and choose any suitable motion graphic template from a diversity of available choices, to include within the project timeline. The step is completely optional and you should pay attention to the style of content presentation and the cause of creation of your slideshow when choosing to add these elements to the same.
Step 7: Record Voiceovers and Create Soundtracks
To record a voiceover for your slideshow, navigate to the ‘Media’ tab and tap the ‘Record’ dropdown menu. Click on ‘Record Voiceover’ in the list of options that appears. The ‘Record Audio’ icon pops up and you now need to select a microphone to be used in the recording process. When you are ready, tap the ‘Record’ button to let the recording begin.
You can now see your voice recording appear in the ‘Media’ tab with the previously imported media files, ready to be placed within the audio track of the project timeline. Filmora’s audio library is a storehouse of free access music and audio effects. To add one to your slideshow, navigate and click on the ‘Audio’ tab to select from the extensive Rock, Young & Bright, Electronic, etc., music subcategories till you get the perfect match for your presentation.
Once you have selected all the music tracks, place them one by one on the project timeline and move ahead with adjusting their play durations.
Step 8: Export Your Creation
When you are satisfied with your work, you can export the slideshow directly from Filmora to a number of media sharing platforms. All you need to do is, navigate to and tap the ‘Export’ button in the top right corner of the editor screen and proceed to set the resolution and frame rate, and select the output file format of your created slideshow in the ‘Export Window’ that appears.
When you are ready with everything, click on the ‘Export’ button at the bottom right corner of the screen to share your slideshow across different platforms, including YouTube, Instagram, Vimeo, etc.
The time required by Filmora to render your slideshow on the chosen platform will depend on the output file size. Considering the fact that larger files require a much longer time to be rendered, it would be a smart decision to limit the file size of your slideshow within 500 MB.
● Ending Thoughts →
● Instagram slideshows are exciting means of diving into fun-filled entertainment with your social media peers.
● When looking for solutions on how to create a slideshow on Instagram, there are loads of choices in the software market.
● Talking of best creator alternatives, you can pick the Wondershare Filmora slideshow developer program to make an amazing Insta story slideshow.
10 Trendy Free Logo Animation Templates
10 Trendy & Stylish Free Logo Animation Templates in 2024
An easy yet powerful editor
Numerous effects to choose from
Detailed tutorials provided by the official channel
The logo animation of your video or presentation sets the tone for how your audience will perceive your brand. There are many stylish and trendy free logo animation templates that you can use to create an inspiring impression of your brand. The basic is to make sure your logo animation grabs your viewer’s attention and is catchy to make them remember your company’s name. This article will guide you through complete logo animation
![]()
This article will guide you through complete logo animation templates. We have also included various logo animations that you can choose from for your brand. Along with that, you will also see how logo motion graphics and 3D logo effects come out to be a wonder to promote your business to the next level following After Effects logo templates and free logo intro templates. The article also guides you through proper steps to apply logo motion effectively with respective screenshots.
In this article
01 [What an Animated Logo Can Do for Your Business](#Part 1)
02 [10 Top Quality Free Logo Animation Templates](#Part 2)
03 [5 Techniques for Custom Logo Animation in After Effects](#Part 3)
04 [How to Make a Logo Animation for Free in Just 3 Minutes](#Part 4)
Part 1 What an Animated Logo Can Do for Your Business
It is widespread info that logo animation is often an effective promotional tool. Here are some of the fantastic purposes or benefits of an animated logo to your Business is that:
● It helps to increase the memorability of the brand.
● Stop motion logo helps in advertising and creating brand awareness.
● Logo animation on YouTube can improve storytelling, i.e., your animated video can tell a story about your brand.
● logo intro starts an original image for your brand’s growth.
To make animated logo work for your Business perfectly and efficiently, consider the following factors:
● Critically analyze the business goal and think of the brand’s personality.
● The logo animation should orient to the user’s preference. Therefore make sure you carry out user research.
● Create an unpredictable animation logo. Try to make your audience surprised so that the final results are unexpected in the first few seconds.
● After Effects logo animation templates should not be too long; therefore, try not to make your animated logo complex and keep it short. The recommendation is for it to stay under seconds.
![]()
Part 1 Top Quality Free Logo Animation Templates
This article section will provide a top-quality template for free logo animation on YouTube and other platforms for your business growth. From the list, you can select the logo animation templates free download that matches your need:
![]()
01Web Series
Web Series logo animation can be helpful on a web series Project. The pictures include some cool effects with minimal and captivating design to wow your audience.
02VHS 8Logo Intro
VHS 8Logo templates will take you back to the time of kung-fu movies and arcade 8-bit games. It is easy to edit and comes with a video tutorial featuring distortion effects, broken videotape, and lousy TV.
03Comic Logo
Comic Logo can be used in cartoons, comics, and kids theme video projects and comes in very handy. It has a cartoon style animation, is very colorful, and will be appreciated and loved by your audience
04Zero Glitch
Zero GlitchCan be used to give a glitch introduction to your video. It has an industrial and unique draft design that can perfectly fit any project that needs a techno logo opening.
05Quick bling
Quick bling is an elegant and simple logo animation template for upcoming projects. This logo template is easily customized and has a tutorial if you encounter any problems.
06Rise From The Dark
Rise from Dark comes up with some eye-grabbing yet simple After Effect logo animation template free download that can fit any video content. This logo template is perfect whether you need a logo intro for an event opener, TV show, or promo.
07Sports Logo Template
Sports Logo Template includes pre-rendering footage with an easy customization option. It doesn’t require any plugins.
08Holi Festival Logo Templates
Holi Festival Logo Templates are perfect when you want to grab your audience’s attention. A juicy bright explosion of color and features seven sounds of vibrant animation. It is super easy to use in animating your logo.
09Light City Logo Templates
Light City Logo Templates is a stunning logo animation template that features a luminescent cityscape and golden lions against a dark background specially designed for a dramatic and mysterious luxurious feel.
10Drifting Car Logo Templates
Drifting Car Logo Templates is the perfect answer for a movie project. It has seconds of footage with a funky sports car.
Part 3 5 Techniques for Custom Logo Animation in After Effects
A perfect way to capture your viewers’ attention and remind them who made the video is by creating a striking and simple logo animation After Effects template free download for your video project and using the After Effects logo animation template in an absolute sense. In this article, we will throw away tools that you will need to animate your logo from scratch in After Effects:
![]()
01Technique 1: Separate the Layers
Separate the layers in Photoshop or illustrator and check if they are all separated and correctly named
![]()
Steps: Next, import your logo into after-effects as footage correctly. Otherwise, cannot access the individual layers in your logo:
● For illustrator make sure the logo elements are on a separate layer.
● If the element is grouped, that is the same way they will be in After Effect.
● To simplify this process, select the group in AI. Using the layer menu, click on the release to layers>sequence.
● Click on import and select your logo design file.
● Select composition>retain layer sizes
● Click on import, and your logo will appear in your media browser as a comp containing its layer and include the folder of those layers.
02Technique 2: Editing Properly
If you made a mistake and important your file as a footer is better than a composition, here is how to fix it:
● Drag your single a high elements to the timeline from the browser media
● Right click>create>convert to layered comp
● Now your Design file will be accessible in layers
03Technique 3: Transitions
You can opt for different available transitions out of the logo intro template After Effects to modify your logo. Then, you can go with the dual Effect of logo animation with a transition effect.
![]()
04Technique 4: Logo Animation
Animate each layer using the straight-forward property scale, rotation, position, and opacity properties
● Select the layer in the timeline to add a keyframe to your layers
● Create and finish a keyframe by placing your Playhead on the frame you want
● Create where you want the animation to start by moving several frames backward from your first keyframe
● Change the value of the keyframe property until you are satisfied with the look
● Continue with each of the layers in turn until you feel happy with the effects
![]()
05Technique 5: Title Animation
Animate the title using the varieties of animation styles in After Effects if you can edit a text layer.
● Remove any AI text objects that you want to replace with after effects text layer.
● Create a fresh After Effects text layer.
● Copy-paste the text from AI to after-effects. In doing this, it will use the same font, color, and sizes is when you paste it in
● Go to the effects browser, choose your title animation, and drag and drop it to your new title.
● View all keyframes by pressing U and select the layer in the timeline, then adjust as you like.
Part 4 How to Make a Logo Animation for Free in Just 3 Minutes
Filmora is one of the best software editing tools for beginners to design logo animation and logo intro template free download easily and quickly with keyframing. It produces high-quality and smoothly animated logos with motion blur that gives your logo animation more touch-up. The logo intro-free animation in Filmora is simple to replicate if you get some logo inspiration and then conclude how you will execute your animation. All the editing tools like shape, elements, etc., are available in Filmora software.
![]()
01Step 1: Create Logo
First, you need to create the logo or have a png logo image using any photo editing software like Photoshop or Canva.
Wondershare Filmora - Best Video Editor for Mac/Windows
5,481,435 people have downloaded it.
Build unique custom animations without breaking a sweat.
Focus on creating epic stories and leave the details to Filmora’s auto features.
Start a creative adventure with drag & drop effects and endless possibilities.
Filmora simplifies advanced features to save you time and effort.
Filmora cuts out repetition so you can move on to your next creative breakthrough.
02Step 2: Import background
After you have edited your logo on Photoshop, import background video and logo in Filmora and Use the key-framing feature to animate your logo
03Step 3: Add effects
Add other effects to your logo animation to make it perfect by adding colors, text, etc., to wow your logo animations. Add shapes to the image to give it some effect then add the motions to these shapes.
04Step 4: Export
Once you are satisfied with the trendy and stylish free logo, you can export and share them on your social media platform.
● Key Takeaways from This Episode →
● Impact of animated logo for business
● Top-quality free logo animation
● Steps to make logo through Premiere Pro logo animation template for free.
Best 10 Popular Cartoons You Forgot Existed
Top 10 Popular Cartoons You Forgot Existed
An easy yet powerful editor
Numerous effects to choose from
Detailed tutorials provided by the official channel
There has been an advancement in the cartoon since the last publication made by “Paste” (a 5,800-word short story by Henry James). However, traditional cable networks have created exciting and new worlds and characters. Various streaming platforms like YouTube have allowed different creators to draw cartoon videos and publish them as they want. It has long been said that cartoons are specifically made for kids to enjoy on Saturday morning, but this is no longer the case as adults now enjoy watching cartoons in their free time.
Have you ever thought, “I want to draw myself as a cartoon“ and turn it into animation? Then you must get inspired. Cartoons now range from more complex characters. Many employ wittier humor and more profound stories to engage people of any age, giving them the ability to tell powerful, relatable, and hilarious stories within the realm of animation. As a result of the dramatic change in the cartoon world, we will be writing out top popular cartoons you may have forgotten that ever existed. This list will be on influence, relatability, and influence when they lived.
In this article
01 [Do You Remember the Very Popular Simpsons?](#Part 1)
02 [The 10 Best Cartoon Shows Since the Simpsons](#Part 2)
Part 1 Do You Remember the Very Popular Simpsons?
The Simpsons is an American animated cartoonist Matt Groening created for the Fox Broadcasting Company. The Simpsons began in 1987 as a short cartoon shot on The Tracey Ullman Show and received acclamation throughout its early seasons in the 1990s, which are generally considered a “golden age.”
The popular cartoon series is a satirical depiction of American life epitomized by the Simpson family, consisting of Bart, Homer, Lisa, Marge, and Maggie. In addition, the show is set to run on television, and the human condition and the fictional town of Springfield parody American culture and society.
However, the Simpsons is a combined production by 20th Television and Gracie Films. Also, on March 3, 2021, the series got renewed for seasons 33 and 34, with 22 episodes for each. Thus, increasing the number of episodes from 706 to 750. Furthermore, its thirty-third (33rd) season came on September 26, 2021.
Before now, the Simpsons was the longest-running American animated cartoon series, an American sitcom, and American scripted primetime television series awarded in terms of seasons and number of episodes.
Part 2 The 10 Best Cartoon Shows Since the Simpsons
You can decide to learn to draw your cartoons or draw yourself as a cartoon to create an animation for TV just like the Simpsons. However, if you are looking for the best tool to help you animate your cartoon much more manageable, we recommend using Wondershare Filmora Video Editor .
For Win 7 or later (64-bit)
For macOS 10.12 or later
Wondershare Filmora
Get started easily with Filmora’s powerful performance, intuitive interface, and countless effects!
Try It Free Try It Free Try It Free Learn More >

Filmora platform offers you tons of materials for learning to draw cartoons, and also it has a keyframing feature that allows you to animate your cartoon with ease.
However, here are the ten best cartoon shows that have existed since the Simpsons:
01Futurama
This popular cartoon series, first released on March 28, 1999, is a cartoon series about utopian or dystopian. The central concept of this series is that it dares to imagine a future that’s pretty similar to the present using a bunch of crazy technology and space travel. Aside from being pretty, it is also hilarious.
02The Critic
This cartoon series was first created in 1994 by the Simpson’s writers Al Jean and Mike Reiss. This cartoon has ramped up its predecessor’s non sequitur and sight-gag humor featuring Jon Lovitz’s Jay Sherman, an unfortunate portmanteau of Gene Siskel and Roger Ebert.
03Bojack Horseman
Bojack Horseman is a dumb cartoon character series first created on August 22, 2014. However, four (4) days later, the series was renewed for a second season, released on July 17, 2015. It is often a searing portrait of addiction, failure, depression, etc., as humans talk to a horse.
04Family Guy
Family Guy, the snoopy cartoon series, was first created on January 31, 1999, which goes for anything for a laugh style. However, you might not like the Griffin family or the other residents of Quahog, but you have to admit that the show stumbles on a great joke.
05South Park
South Park debuted with “Cartman Gets an Anal Probe, “ first created on August 13, 1997. Although it started with some cheap animations, it has become one of the iconic animated shows.

06Batman: The Animated Series
The Batman animated cartoon series, created on September 5, 1992, is a favorite for many people, although it is more comedy than an animated drama.
07Gravity Falls
This cartoon animated series was first created on June 15, 2012, and is a mystery story about a few kids with a supernatural bend.
08Teenage Mutant Ninja Turtles
This popular cartoon animated series was first created in 1983 by cartoonists Kevin Eastman and Peter Laird. This cartoon series is the definitive version, brightly colored and fun and fluffy.
09Doug
This cartoon animated series was first created on March 26, 1999, by Jim Jinkins and produced by Jumbo Pictures. It was one of the first animated shows on Nickelodeon before moving to Disney pictures. However, this show is creative and down-to-earth at the same time.

10Hey Arnold
This cartoon animated series came in on October 7, 1996. This show was the second after the first wave of the Nickelodeon show. It was the best of the bunch, and I liked the evolved version of “Doug.”
1
● Ending Thoughts →
● Aside from the list of popular cartoons mentioned in this article, you can also pick the snoopy cartoonswhen talking about comics that once existed.
● Addionally, you can also learn drawing cartoon videos and turn them into animation to publish in TV series.
● Finally, this article also emphasizes Fimora as the best editing tool you can choose from when you want to transform your cartoon drawing for class 6 into an animation.
There has been an advancement in the cartoon since the last publication made by “Paste” (a 5,800-word short story by Henry James). However, traditional cable networks have created exciting and new worlds and characters. Various streaming platforms like YouTube have allowed different creators to draw cartoon videos and publish them as they want. It has long been said that cartoons are specifically made for kids to enjoy on Saturday morning, but this is no longer the case as adults now enjoy watching cartoons in their free time.
Have you ever thought, “I want to draw myself as a cartoon“ and turn it into animation? Then you must get inspired. Cartoons now range from more complex characters. Many employ wittier humor and more profound stories to engage people of any age, giving them the ability to tell powerful, relatable, and hilarious stories within the realm of animation. As a result of the dramatic change in the cartoon world, we will be writing out top popular cartoons you may have forgotten that ever existed. This list will be on influence, relatability, and influence when they lived.
In this article
01 [Do You Remember the Very Popular Simpsons?](#Part 1)
02 [The 10 Best Cartoon Shows Since the Simpsons](#Part 2)
Part 1 Do You Remember the Very Popular Simpsons?
The Simpsons is an American animated cartoonist Matt Groening created for the Fox Broadcasting Company. The Simpsons began in 1987 as a short cartoon shot on The Tracey Ullman Show and received acclamation throughout its early seasons in the 1990s, which are generally considered a “golden age.”
The popular cartoon series is a satirical depiction of American life epitomized by the Simpson family, consisting of Bart, Homer, Lisa, Marge, and Maggie. In addition, the show is set to run on television, and the human condition and the fictional town of Springfield parody American culture and society.
However, the Simpsons is a combined production by 20th Television and Gracie Films. Also, on March 3, 2021, the series got renewed for seasons 33 and 34, with 22 episodes for each. Thus, increasing the number of episodes from 706 to 750. Furthermore, its thirty-third (33rd) season came on September 26, 2021.
Before now, the Simpsons was the longest-running American animated cartoon series, an American sitcom, and American scripted primetime television series awarded in terms of seasons and number of episodes.
Part 2 The 10 Best Cartoon Shows Since the Simpsons
You can decide to learn to draw your cartoons or draw yourself as a cartoon to create an animation for TV just like the Simpsons. However, if you are looking for the best tool to help you animate your cartoon much more manageable, we recommend using Wondershare Filmora Video Editor .
For Win 7 or later (64-bit)
For macOS 10.12 or later
Wondershare Filmora
Get started easily with Filmora’s powerful performance, intuitive interface, and countless effects!
Try It Free Try It Free Try It Free Learn More >
Filmora platform offers you tons of materials for learning to draw cartoons, and also it has a keyframing feature that allows you to animate your cartoon with ease.
However, here are the ten best cartoon shows that have existed since the Simpsons:
01Futurama
This popular cartoon series, first released on March 28, 1999, is a cartoon series about utopian or dystopian. The central concept of this series is that it dares to imagine a future that’s pretty similar to the present using a bunch of crazy technology and space travel. Aside from being pretty, it is also hilarious.
02The Critic
This cartoon series was first created in 1994 by the Simpson’s writers Al Jean and Mike Reiss. This cartoon has ramped up its predecessor’s non sequitur and sight-gag humor featuring Jon Lovitz’s Jay Sherman, an unfortunate portmanteau of Gene Siskel and Roger Ebert.
03Bojack Horseman
Bojack Horseman is a dumb cartoon character series first created on August 22, 2014. However, four (4) days later, the series was renewed for a second season, released on July 17, 2015. It is often a searing portrait of addiction, failure, depression, etc., as humans talk to a horse.
04Family Guy
Family Guy, the snoopy cartoon series, was first created on January 31, 1999, which goes for anything for a laugh style. However, you might not like the Griffin family or the other residents of Quahog, but you have to admit that the show stumbles on a great joke.
05South Park
South Park debuted with “Cartman Gets an Anal Probe, “ first created on August 13, 1997. Although it started with some cheap animations, it has become one of the iconic animated shows.
06Batman: The Animated Series
The Batman animated cartoon series, created on September 5, 1992, is a favorite for many people, although it is more comedy than an animated drama.
07Gravity Falls
This cartoon animated series was first created on June 15, 2012, and is a mystery story about a few kids with a supernatural bend.
08Teenage Mutant Ninja Turtles
This popular cartoon animated series was first created in 1983 by cartoonists Kevin Eastman and Peter Laird. This cartoon series is the definitive version, brightly colored and fun and fluffy.
09Doug
This cartoon animated series was first created on March 26, 1999, by Jim Jinkins and produced by Jumbo Pictures. It was one of the first animated shows on Nickelodeon before moving to Disney pictures. However, this show is creative and down-to-earth at the same time.
10Hey Arnold
This cartoon animated series came in on October 7, 1996. This show was the second after the first wave of the Nickelodeon show. It was the best of the bunch, and I liked the evolved version of “Doug.”
1
● Ending Thoughts →
● Aside from the list of popular cartoons mentioned in this article, you can also pick the snoopy cartoonswhen talking about comics that once existed.
● Addionally, you can also learn drawing cartoon videos and turn them into animation to publish in TV series.
● Finally, this article also emphasizes Fimora as the best editing tool you can choose from when you want to transform your cartoon drawing for class 6 into an animation.
How-To Guide: Secret Shortcut to Adobe Animate Character Tutorial
How-to Guide: Secret Shortcut to Adobe Animate Character Tutorial
An easy yet powerful editor
Numerous effects to choose from
Detailed tutorials provided by the official channel
Whether you are a beginner or an experienced graphics designer, you can use Adobe Character Animator to animate 2D characters easily. But, if you are an absolute beginner, it might take a few weeks to get familiar with the software’s features/workflow.

Irrespective of your experience with the tool, this Adobe animate character tutorial will help you get started and edit visually appealing animated shorts.
In this article
01 [How Do I Animate a Character in Adobe Animation?](#Part 1)
02 [Is Adobe Character Animator Easy to Use?](#Part 2)
03 [How to Rig a Simple Character | Adobe Animate Tutorial](#Part 3)
04 [One-Stop Solution to Edit High-Quality Videos in Every Situation](#Part 4)
Part 1 How Do I Animate a Character in Adobe Animation?
1. Start With a Script
If you want to create an animation that engages the customers, you must always start your journey with a script. Like a short movie, even an animated sketch requires a script. It’ll set the tone for the entire animation and help you start sailing in the right direction.

If you have a full production team, the writers will take care of scriptwriting and you’ll just have to suggest a few changes in between. But, if you are working on your own, you’ll have to handle the script writing all-by-yourself. In any case, however, make sure to start by crafting a beautiful script with an amazing storyline.
2. Record the Voiceover
The next step in our Adobe Animate character tutorial is recording the voiceover for the video. Unless you are planning to create a GIF animation, you would need a dedicated voiceover for your animated video to make it more appealing.

Now, before you even begin with animating the character, recording the audio will help you clear out one task from the list. To record the voiceover, you can try different types of audio recording software and equipment.
3. Start Creating the Character
At this point in our Adobe animate character tutorial, we are ready to design the actual character itself. To do this, launch Adobe Character Animator on your system. On its home screen, you’ll see a tab containing different types of characters (along with their dedicated Photoshop and Illustrator versions). Click on any of these characters and it’ll automatically open in the editing panel of Adobe character animator.

Now, you can start with animating the character. In the top-left corner, you’ll see two different options, i.e., “
If you double-tap the “Scene” tab the character will open up in a real-time environment where it’ll react to your movement and speech. Make sure that the webcam stays turned on throughout the process. Then, simply press the “Record” button and start recording the entire scene for your animation.
Part 2 Is Adobe Character Animator Easy to Use?
That’s how you can animate a character in Adobe character animator and create visually stunning animations. However, many beginners want to know if it’s easy to use Adobe character animator. The answer is Yes! With Character Animator, Adobe has developed a relatively easy-to-use interface that anyone can use easily.
Part 3 How to Rig a Simple Character | Adobe Animate Tutorial
Now, if you aspire to become a skilled graphic designer, here are a few tutorials that’ll help you get started with Adobe Character Animator and explore all its features.
1. Getting Started With Adobe Character Animator
This 15 minutes Adobe animate character tutorial by Okay Samurai is the best thing you’ll find on the Internet, especially if you are a complete beginner and want to learn different elements of the software.
2. Creating Illustrator Puppet
Adobe Character Animator lets users create both Illustrator and Photoshop puppets. If you want to become an expert in the former, this hour-long YouTube video is the best tutorial for you.
3. Getting Started With Advanced Rigging
This is another useful Adobe Animate character tutorial that’s exclusively designed to help editors understand the basics of creating a character such as “Surr”. For people who don’t know, it’s a free character in the Illustrator puppet library that you can directly import into your project.
4. Animation Workflow in Adobe Character Animator
If you are looking for an all-in-one tutorial to understand the entire workflow of working with the software, this tutorial by Okay Samurai is the best place to get started.
5. Adding an Illustrator Puppet on Live Footage
In this tutorial, you’ll understand how you can create an Illustrator puppet and add it to real-life footage, even when there’s camera movement.
6. Using the Walk Behavior in Adobe Character Animator
This tutorial will be the perfect knowledge hub. In this tutorial, you’ll learn about the basics of using the walk behavior in Adobe Character Animator and how to apply it to different characters to make it walk across the scene.
7. Creating and Implementing Replays
Replays are one of the most powerful (and one of the latest) features of Adobe Character Animator. With Replays, you can record a gesture/movement and apply a trigger to use it anytime you want throughout the animation. This tutorial will help you understand how to implement the replays in the software and use them to craft the perfect storyline.
8. Cartoon Workflow in Character Animator
Thanks to this amazing 1 hour 40 minutes long Adobe animate character tutorial, you’ll be able to get familiar with the complete workflow of pairing the software with other tools and compiling a cartoon animation at the end using Adobe After Effects.
9. Running an Animated Livestream
If you are a YouTuber or have your own Instagram brand, this will be a pretty exciting way to engage with your audience. Simply use the livestream feature, create a stunning 2D character, and interact with your audience in a more interactive manner.
10. Working With Adobe Fresco and Character Animator
This is also a useful Adobe character animate tutorial by David Werner that’ll help you understand how to use both Adobe Fresco and Character Animator together. After this tutorial, you’ll be able to import your Fresco drawings into Character Animator and customize them to create visually engaging animations.
Key Takeaways from This Episode
● Adobe Character Animator is among the most powerful animation tools you can use in 2021 to create stunning animations
● You should always start designing an animation in Character Animator by writing dedicated scripts.
● You can also pair Adobe Character Animator with other Adobe editing tools such as Illustrator, Photoshop, and Adobe Fresco
Whether you are a beginner or an experienced graphics designer, you can use Adobe Character Animator to animate 2D characters easily. But, if you are an absolute beginner, it might take a few weeks to get familiar with the software’s features/workflow.
Irrespective of your experience with the tool, this Adobe animate character tutorial will help you get started and edit visually appealing animated shorts.
In this article
01 [How Do I Animate a Character in Adobe Animation?](#Part 1)
02 [Is Adobe Character Animator Easy to Use?](#Part 2)
03 [How to Rig a Simple Character | Adobe Animate Tutorial](#Part 3)
04 [One-Stop Solution to Edit High-Quality Videos in Every Situation](#Part 4)
Part 1 How Do I Animate a Character in Adobe Animation?
1. Start With a Script
If you want to create an animation that engages the customers, you must always start your journey with a script. Like a short movie, even an animated sketch requires a script. It’ll set the tone for the entire animation and help you start sailing in the right direction.
If you have a full production team, the writers will take care of scriptwriting and you’ll just have to suggest a few changes in between. But, if you are working on your own, you’ll have to handle the script writing all-by-yourself. In any case, however, make sure to start by crafting a beautiful script with an amazing storyline.
2. Record the Voiceover
The next step in our Adobe Animate character tutorial is recording the voiceover for the video. Unless you are planning to create a GIF animation, you would need a dedicated voiceover for your animated video to make it more appealing.
Now, before you even begin with animating the character, recording the audio will help you clear out one task from the list. To record the voiceover, you can try different types of audio recording software and equipment.
3. Start Creating the Character
At this point in our Adobe animate character tutorial, we are ready to design the actual character itself. To do this, launch Adobe Character Animator on your system. On its home screen, you’ll see a tab containing different types of characters (along with their dedicated Photoshop and Illustrator versions). Click on any of these characters and it’ll automatically open in the editing panel of Adobe character animator.
Now, you can start with animating the character. In the top-left corner, you’ll see two different options, i.e., “
If you double-tap the “Scene” tab the character will open up in a real-time environment where it’ll react to your movement and speech. Make sure that the webcam stays turned on throughout the process. Then, simply press the “Record” button and start recording the entire scene for your animation.
Part 2 Is Adobe Character Animator Easy to Use?
That’s how you can animate a character in Adobe character animator and create visually stunning animations. However, many beginners want to know if it’s easy to use Adobe character animator. The answer is Yes! With Character Animator, Adobe has developed a relatively easy-to-use interface that anyone can use easily.
Part 3 How to Rig a Simple Character | Adobe Animate Tutorial
Now, if you aspire to become a skilled graphic designer, here are a few tutorials that’ll help you get started with Adobe Character Animator and explore all its features.
1. Getting Started With Adobe Character Animator
This 15 minutes Adobe animate character tutorial by Okay Samurai is the best thing you’ll find on the Internet, especially if you are a complete beginner and want to learn different elements of the software.
2. Creating Illustrator Puppet
Adobe Character Animator lets users create both Illustrator and Photoshop puppets. If you want to become an expert in the former, this hour-long YouTube video is the best tutorial for you.
3. Getting Started With Advanced Rigging
This is another useful Adobe Animate character tutorial that’s exclusively designed to help editors understand the basics of creating a character such as “Surr”. For people who don’t know, it’s a free character in the Illustrator puppet library that you can directly import into your project.
4. Animation Workflow in Adobe Character Animator
If you are looking for an all-in-one tutorial to understand the entire workflow of working with the software, this tutorial by Okay Samurai is the best place to get started.
5. Adding an Illustrator Puppet on Live Footage
In this tutorial, you’ll understand how you can create an Illustrator puppet and add it to real-life footage, even when there’s camera movement.
6. Using the Walk Behavior in Adobe Character Animator
This tutorial will be the perfect knowledge hub. In this tutorial, you’ll learn about the basics of using the walk behavior in Adobe Character Animator and how to apply it to different characters to make it walk across the scene.
7. Creating and Implementing Replays
Replays are one of the most powerful (and one of the latest) features of Adobe Character Animator. With Replays, you can record a gesture/movement and apply a trigger to use it anytime you want throughout the animation. This tutorial will help you understand how to implement the replays in the software and use them to craft the perfect storyline.
8. Cartoon Workflow in Character Animator
Thanks to this amazing 1 hour 40 minutes long Adobe animate character tutorial, you’ll be able to get familiar with the complete workflow of pairing the software with other tools and compiling a cartoon animation at the end using Adobe After Effects.
9. Running an Animated Livestream
If you are a YouTuber or have your own Instagram brand, this will be a pretty exciting way to engage with your audience. Simply use the livestream feature, create a stunning 2D character, and interact with your audience in a more interactive manner.
10. Working With Adobe Fresco and Character Animator
This is also a useful Adobe character animate tutorial by David Werner that’ll help you understand how to use both Adobe Fresco and Character Animator together. After this tutorial, you’ll be able to import your Fresco drawings into Character Animator and customize them to create visually engaging animations.
Key Takeaways from This Episode
● Adobe Character Animator is among the most powerful animation tools you can use in 2021 to create stunning animations
● You should always start designing an animation in Character Animator by writing dedicated scripts.
● You can also pair Adobe Character Animator with other Adobe editing tools such as Illustrator, Photoshop, and Adobe Fresco
10 Caricature Makers to Turn Photo to Caricature Effects
10 Caricature Makers to Turn Your Photo to Caricature Effects
An easy yet powerful editor
Numerous effects to choose from
Detailed tutorials provided by the official channel
We certainly have a couple of recommendations to offer to you. There’s a surprisingly large amount of both caricature photo maker apps and online caricature maker tools.
Today, we’ll be focusing on the apps, to keep things easily accessible. And, in the end, we’ve even included a quick step-by-step guide on how to make a caricature of a photo.
In this article
01 [The 10 Best Makers to Turn Photos to Caricature Effects](#Part 1)
02 [How to Draw a Caricature — Step by Step Guide](#Part 2)
Part 1 The 10 Best Makers to Turn Photos to Caricature Effects
As promised, part one of this article is devoted to a list of the 10 best caricature maker apps that we can find. We’ll be focusing on the Apple App Store, in this case, but it’s important to note that most of these are available on the Google play store as well. (A link to the app has been provided for your convenience as well.)
011. MomentCam Cartoons & Stickers
The first of the caricature maker apps on our list is ‘MomentCam Cartoon & Stickers’ — this app is part of another tool called ‘Avatar Maker Bundle’, but it can be used on its own to create caricature versions of yourself that you can use to express emotions (an avatar, if you will).
This app was made primarily to help the user to create an avatar that matches their look (with accessorization features to complete the set). However, you can interact with other members of the community to create multiple avatars if you wish. Or, you can share your caricature pictures on social media.
URL: https://apps.apple.com/ca/app/momentcam-cartoons-stickers/id687624831

02Color Cartoon Caricature Maker
This next caricature maker app uses a more realistic style akin to what is usually used for a political caricature of famous individuals and politicians. It’s called ‘Color Cartoon Caricature Maker’ and, while not as extensive in its features as the previous app, it can be used to turn an image completely into a caricature (which means that it can be used for photographs with more than one person or focus.)
URL: https://apps.apple.com/ca/app/color-cartoon-caricature-maker/id1448093448

03PicMagic- Cartoon Photo Editor
Up next, we have ‘Pic Magic’ which is better described as a ‘cartoon photo editor’ but still works as a serviceable caricature maker if all you’re looking for is a subtle enhancement of features (unlike what was shown in the political caricature maker we showed previously.)
Much like the second app, while it’s more suitable for enhancing the features of one person, it does work for group pictures as well.
URL: https://apps.apple.com/ca/app/picmagic-cartoon-photo-editor/id1491645007
04Photic - Cartoon Yourself AI
This next app, called ‘Photic’ is much like our previously listed app, PicMagic. As you can see from the image provided, it can make a caricature of a photo but in a subtle way that is undeniably more of a ‘cartoony’ style than what you might be looking for. Keep that in mind.
The best part of it is that you can use it along with iMessage — making it very easy to share your finished caricature pictures with friends and family. The downside? It is best used for solo picture caricature-like only.
URL: https://apps.apple.com/ca/app/photic-cartoon-yourself-ai/id1484108330
05ToonApp Cartoon Photo Editor
‘ToonApp’ is the next caricature maker on our list. As you can see from the image provided, the style of caricature is a lot more realistic here. Very similar to what you normally see of western comics (which only subtly changes the features of a person to look more rendered.) The best part of this app? Well, unlike some of the other options on this list, it works great for group pictures.
URL: https://apps.apple.com/ca/app/toonapp-cartoon-photo-editor/id1540719743
06Voilà AI Artist Cartoon Photo
This next app is very similar to the previous one we introduced. It’s called ‘Voilà AI Artist Cartoon Photo’ and the main difference between it and the ToonApp app that we introduced earlier is that it uses a different caricature style. Not unlike what you see from 3D animations — which is a mix of realism and cartoony.
This tool, much like a lot of other alternatives, is best used for selfies.
URL: https://apps.apple.com/us/app/voil%C3%A0-ai-artist-cartoon-photo/id1558421405
07Caricature Hyper Face Morph
Now we go back to what most people usually consider ‘caricature’ with the ‘Caricature Hyper Face Morph’ app. This app, as you can see from the image below, allows you to morph a photograph into something more exaggerated (turning it into a true-to-form caricature; like what you would see in political caricature segments in newspapers or old animated short films.)
It works for group photographs surprisingly well as well. With the AI recognizing and applying the ‘morph’ effect to everyone.
URL: https://apps.apple.com/ca/app/caricature-hyper-face-morph-from-photos-camera-shots/id587429629
08Face Caricature
The next caricature maker on our list is the app called ‘Face Caricature.’ The best part of this app, undoubtedly, is the fact that it offers several ‘caricature’ styles that you can choose from. So, you aren’t stuck with just one cartoon style. It’s better for selfies, however — it doesn’t work as well as a group picture caricature maker.
URL: https://apps.apple.com/ca/app/face-caricature-cartoon-photo/id1007143753
09Cartoon Caricature Face Camera
This is a camera tool that you can use in order to take photographs and turn them into caricatures. There are several caricature art styles for you to choose from, which are always fun. Plus, it offers easy save-and-share features. As a final note, this app works best as a selfie app.
URL: https://apps.apple.com/ca/app/cartoon-caricature-face-camera/id1424277519
10Face Distortion - Screw Up Your Face
Though this app isn’t exactly a ‘caricature maker‘ it does work like one. It’s just a matter of finding the right distortive effect to mimic the look of an actual caricature sketch. The best part about it is that it’s basically a custom caricature maker — one that allows you to control exactly what features are exaggerated.
URL: https://apps.apple.com/ca/app/face-distortion-screw-up-your-face/id1188623179
Part 2 How to Draw a Caricature — Step by Step Guide
Now for our promised tutorial. Here, we introduce a quick and easy way to draw caricatures. Take it more as an overview of what exactly caricatures are and how you can create them by following a specific set of steps. Ah, but of course, just to make sure that you are getting something out of it, we’ve also included a recommendation for a tool that you can use in order to step up your caricature creation.
Step 1: Get a Reference Photo.
Any good caricature starts with a good reference photo. If you’re not familiar with the term, a reference photo is basically any photograph that you use in order to draw inspiration from.
When making a caricature, that usually means finding a portrait (like the one below) that you can directly refer to when making your caricature sketch.

Step 2: Exaggerate Features.
What is the point of caricatures? Well, it all comes down to the exaggeration of features. Whether that’s enlarging the person’s head to be half the size of a person or distorting the features of their face to make one more prominent than another. There’s an endless number of ways you can go about doing it.
Just remember, when making a caricature sketch, there are no such things as rules. While you do have a reference photo in front of you, you don’t have to draw it exactly as you see it. Make the eyes farther apart, exaggerate the lift of the eyebrows, give them a teeny tiny nose, etc., etc..
Just let your imagination run wild.
Step 3: Find a Reliable Tool.
And, finally, if you really want to take your caricatures to the next level, consider animating them. That is the main point of caricatures, after all.
And, if you’re going to go about doing such a thing, make sure that you have a reliable tool on your side. For example, having something like Wondershare Filmora Video Editor , a video editor that has an endless amount of presets and effects that you can choose from, may prove to be exactly what you need to get to the next stage of your caricature creation.
For Win 7 or later (64-bit)
For macOS 10.12 or later
● Key Takeaways from This Episode →
● Photo to Caricature is now possible in an instant with the use of a caricature maker app. These tools render an existing photograph with the use of filters and effects to create a caricature sketch worthy of any artist’s skill.
● There’s a lot of these caricature makers for you to choose from as well. Proven by the fact that we were able to easily find at least ten — all of which you can use (some in different ways) to transform your photographs into caricature works.
● Of course, if you want to take the traditional route and draw caricatures yourself, that’s possible too. Just remember the three tips that we outlined above: get a reference, exaggerate, and use good tools.
We certainly have a couple of recommendations to offer to you. There’s a surprisingly large amount of both caricature photo maker apps and online caricature maker tools.
Today, we’ll be focusing on the apps, to keep things easily accessible. And, in the end, we’ve even included a quick step-by-step guide on how to make a caricature of a photo.
In this article
01 [The 10 Best Makers to Turn Photos to Caricature Effects](#Part 1)
02 [How to Draw a Caricature — Step by Step Guide](#Part 2)
Part 1 The 10 Best Makers to Turn Photos to Caricature Effects
As promised, part one of this article is devoted to a list of the 10 best caricature maker apps that we can find. We’ll be focusing on the Apple App Store, in this case, but it’s important to note that most of these are available on the Google play store as well. (A link to the app has been provided for your convenience as well.)
011. MomentCam Cartoons & Stickers
The first of the caricature maker apps on our list is ‘MomentCam Cartoon & Stickers’ — this app is part of another tool called ‘Avatar Maker Bundle’, but it can be used on its own to create caricature versions of yourself that you can use to express emotions (an avatar, if you will).
This app was made primarily to help the user to create an avatar that matches their look (with accessorization features to complete the set). However, you can interact with other members of the community to create multiple avatars if you wish. Or, you can share your caricature pictures on social media.
URL: https://apps.apple.com/ca/app/momentcam-cartoons-stickers/id687624831
02Color Cartoon Caricature Maker
This next caricature maker app uses a more realistic style akin to what is usually used for a political caricature of famous individuals and politicians. It’s called ‘Color Cartoon Caricature Maker’ and, while not as extensive in its features as the previous app, it can be used to turn an image completely into a caricature (which means that it can be used for photographs with more than one person or focus.)
URL: https://apps.apple.com/ca/app/color-cartoon-caricature-maker/id1448093448
03PicMagic- Cartoon Photo Editor
Up next, we have ‘Pic Magic’ which is better described as a ‘cartoon photo editor’ but still works as a serviceable caricature maker if all you’re looking for is a subtle enhancement of features (unlike what was shown in the political caricature maker we showed previously.)
Much like the second app, while it’s more suitable for enhancing the features of one person, it does work for group pictures as well.
URL: https://apps.apple.com/ca/app/picmagic-cartoon-photo-editor/id1491645007
04Photic - Cartoon Yourself AI
This next app, called ‘Photic’ is much like our previously listed app, PicMagic. As you can see from the image provided, it can make a caricature of a photo but in a subtle way that is undeniably more of a ‘cartoony’ style than what you might be looking for. Keep that in mind.
The best part of it is that you can use it along with iMessage — making it very easy to share your finished caricature pictures with friends and family. The downside? It is best used for solo picture caricature-like only.
URL: https://apps.apple.com/ca/app/photic-cartoon-yourself-ai/id1484108330
05ToonApp Cartoon Photo Editor
‘ToonApp’ is the next caricature maker on our list. As you can see from the image provided, the style of caricature is a lot more realistic here. Very similar to what you normally see of western comics (which only subtly changes the features of a person to look more rendered.) The best part of this app? Well, unlike some of the other options on this list, it works great for group pictures.
URL: https://apps.apple.com/ca/app/toonapp-cartoon-photo-editor/id1540719743
06Voilà AI Artist Cartoon Photo
This next app is very similar to the previous one we introduced. It’s called ‘Voilà AI Artist Cartoon Photo’ and the main difference between it and the ToonApp app that we introduced earlier is that it uses a different caricature style. Not unlike what you see from 3D animations — which is a mix of realism and cartoony.
This tool, much like a lot of other alternatives, is best used for selfies.
URL: https://apps.apple.com/us/app/voil%C3%A0-ai-artist-cartoon-photo/id1558421405
07Caricature Hyper Face Morph
Now we go back to what most people usually consider ‘caricature’ with the ‘Caricature Hyper Face Morph’ app. This app, as you can see from the image below, allows you to morph a photograph into something more exaggerated (turning it into a true-to-form caricature; like what you would see in political caricature segments in newspapers or old animated short films.)
It works for group photographs surprisingly well as well. With the AI recognizing and applying the ‘morph’ effect to everyone.
URL: https://apps.apple.com/ca/app/caricature-hyper-face-morph-from-photos-camera-shots/id587429629
08Face Caricature
The next caricature maker on our list is the app called ‘Face Caricature.’ The best part of this app, undoubtedly, is the fact that it offers several ‘caricature’ styles that you can choose from. So, you aren’t stuck with just one cartoon style. It’s better for selfies, however — it doesn’t work as well as a group picture caricature maker.
URL: https://apps.apple.com/ca/app/face-caricature-cartoon-photo/id1007143753
09Cartoon Caricature Face Camera
This is a camera tool that you can use in order to take photographs and turn them into caricatures. There are several caricature art styles for you to choose from, which are always fun. Plus, it offers easy save-and-share features. As a final note, this app works best as a selfie app.
URL: https://apps.apple.com/ca/app/cartoon-caricature-face-camera/id1424277519
10Face Distortion - Screw Up Your Face
Though this app isn’t exactly a ‘caricature maker‘ it does work like one. It’s just a matter of finding the right distortive effect to mimic the look of an actual caricature sketch. The best part about it is that it’s basically a custom caricature maker — one that allows you to control exactly what features are exaggerated.
URL: https://apps.apple.com/ca/app/face-distortion-screw-up-your-face/id1188623179
Part 2 How to Draw a Caricature — Step by Step Guide
Now for our promised tutorial. Here, we introduce a quick and easy way to draw caricatures. Take it more as an overview of what exactly caricatures are and how you can create them by following a specific set of steps. Ah, but of course, just to make sure that you are getting something out of it, we’ve also included a recommendation for a tool that you can use in order to step up your caricature creation.
Step 1: Get a Reference Photo.
Any good caricature starts with a good reference photo. If you’re not familiar with the term, a reference photo is basically any photograph that you use in order to draw inspiration from.
When making a caricature, that usually means finding a portrait (like the one below) that you can directly refer to when making your caricature sketch.
Step 2: Exaggerate Features.
What is the point of caricatures? Well, it all comes down to the exaggeration of features. Whether that’s enlarging the person’s head to be half the size of a person or distorting the features of their face to make one more prominent than another. There’s an endless number of ways you can go about doing it.
Just remember, when making a caricature sketch, there are no such things as rules. While you do have a reference photo in front of you, you don’t have to draw it exactly as you see it. Make the eyes farther apart, exaggerate the lift of the eyebrows, give them a teeny tiny nose, etc., etc..
Just let your imagination run wild.
Step 3: Find a Reliable Tool.
And, finally, if you really want to take your caricatures to the next level, consider animating them. That is the main point of caricatures, after all.
And, if you’re going to go about doing such a thing, make sure that you have a reliable tool on your side. For example, having something like Wondershare Filmora Video Editor , a video editor that has an endless amount of presets and effects that you can choose from, may prove to be exactly what you need to get to the next stage of your caricature creation.
For Win 7 or later (64-bit)
For macOS 10.12 or later
● Key Takeaways from This Episode →
● Photo to Caricature is now possible in an instant with the use of a caricature maker app. These tools render an existing photograph with the use of filters and effects to create a caricature sketch worthy of any artist’s skill.
● There’s a lot of these caricature makers for you to choose from as well. Proven by the fact that we were able to easily find at least ten — all of which you can use (some in different ways) to transform your photographs into caricature works.
● Of course, if you want to take the traditional route and draw caricatures yourself, that’s possible too. Just remember the three tips that we outlined above: get a reference, exaggerate, and use good tools.
Also read:
- New 2024 Approved 10 Must Watch Netflix Cartoon Series For You
- Updated 2024 Approved Techniques for Creating Animated Logo That Few People Know About
- Updated Best Guide for Beginners on 2D Animation Making
- Top 8 Anime Name Generators Online-Get Cool Anime Names for 2024
- New 2024 Approved 10 Realistic Cartoon Characters You Would Run Away From if You Met in Real Life
- In 2024, Most Popular Tips on Learning Animate Rigging
- New 2024 Approved 5 Websites with Animated Logos That Can Catch Your Eyes
- 2024 Approved Have You Seen the Facebook Cartoon App Everyones Using Lately
- New How to Create Free Photo Collage Frame in Minutes for 2024
- New Top 10 Free Online Animated Logo Makers Everyone Should Know
- In 2024, Best GIF Croppers How to Crop an Animated GIF
- 2024 Approved Best 15 Female Anime Characters-Who Is Your Favorite?
- New All About Types of Motion Graphics for 2024
- 10 Top Tools to Make Pic Collage for Windows for 2024
- In 2024, Animate Pictures in Canva
- 15 Top Video to GIF App on iPhone and Android
- Updated How to Make a GIF in Photoshop
- Top 10 3D Text Animation Templates for 2024
- In 2024, 10 Stunning Stop Motion Movies You Should Not Miss
- 2024 Approved Best 15 Anime Fonts-Find Your Favorite One
- In 2024, How to Convert Video to GIF Fast & Easy
- Updated 2024 Approved Top 10 Sketch Animation Video Makers
- Updated 2024 Approved That Will Make Aesthetic Cartoon Drawing More Understandable
- 8 Best Apps for Screen Mirroring Infinix Zero 30 5G PC | Dr.fone
- How to Unlock Infinix Phone Password Without Factory Reset?
- In 2024, How to Bypass iPhone 14 Plus Passcode Easily Video Inside
- In 2024, How to Reset a Locked Poco M6 5G Phone
- Full Guide to Hard Reset Your Samsung Galaxy S24 | Dr.fone
- For People Wanting to Mock GPS on Poco C50 Devices | Dr.fone
- MKV playback issues on Motorola Moto G34 5G
- How to Transfer Data from Samsung Galaxy Z Flip 5 to Samsung Phone | Dr.fone
- Life360 Learn How Everything Works On Honor X50 GT | Dr.fone
- Undelete lost contacts from Honor 90.
- Best 3 HTC U23 Emulator for Mac to Run Your Wanted Android Apps | Dr.fone
- In 2024, 4 Most-Known Ways to Find Someone on Tinder For Oppo A2 by Name | Dr.fone
- How to Mirror Vivo Y36i to Mac? | Dr.fone
- In 2024, How to fix iCloud lock from your Apple iPhone 7 and iPad
- New What Is an AI Video Generator? | Wondershare Virbo Glossary
- What To Do if Your Tecno Pova 6 Pro 5G Auto Does Not Work | Dr.fone
- Best 10 Mock Location Apps Worth Trying On Vivo Y100A | Dr.fone
- What are Location Permissions Life360 On Vivo G2? | Dr.fone
- Title: New In 2024, Dead Simple Guide to Create New and Exciting Blackboard Animation
- Author: Elon
- Created at : 2024-05-19 03:05:31
- Updated at : 2024-05-20 03:05:31
- Link: https://animation-videos.techidaily.com/new-in-2024-dead-simple-guide-to-create-new-and-exciting-blackboard-animation/
- License: This work is licensed under CC BY-NC-SA 4.0.
