
:max_bytes(150000):strip_icc():format(webp)/GettyImages-104288650-cd3f369f8ead449f94d1a1ce6f55c9de.jpg)
New In 2024, How to Make Photo 3D Cartoon Online
How to Make Photo 3D Cartoon Online
How to Make My Photo 3D Cartoon Online
An easy yet powerful editor
Numerous effects to choose from
Detailed tutorials provided by the official channel
Animated pictures are picking up the pace on the list of the top trends since they are able to convey so much in a fraction of a second which normal pictures or videos are incapable of.
From creating vlogs to making your photos into a 3D cartoon online, everything is possible with the right software or app.
In this article
01 [3 Secrets to Creating an (amazing) Animated Video](#Part 1)
02 [Best 10 3D Photo Maker and Photo Animator Apps](#Part 2)
03 [How to Make Your Own Photo into Cartoon?](#Part 3)
Part 1 3 Secrets to Creating an (amazing) Animated Video
Animation is the perfect tool to boost any campaign. It is a medium of brand communication that has the potential to reach out to a wide variety of audiences. Most recently, photo animations like GIFs, cartooned pictures and motion graphic posters are becoming widely popular.

Marketers and content creators can take full advantage of online apps to develop amazing animated videos that would instantly grasp the viewer’s attention. Here are three secrets you should know about creating an amazing animated video:
Storytelling:
● It is easier to tell a story with moving pictures.
● They add a different level of visual charisma to the storytelling process.
● With the help of a few interesting and easy-to-use apps, you can create stunning cinematic images and establish your own unique style of storytelling.

Persuasive Call to Action:
● A call-to-action is a standard way of telling people what you want them to do such as making a purchase, downloading an e-book or registering for a subscription.
● It helps your audience if you guide them step-by-step with the help of images.
● Try out a combination of both written and animated graphics to boost your content’s persuasion.
● It is easier to convince people when they have the information laid out in front of their eyes.

Simplify the Complex:
● It helps if you imagine your audience like children who need a picture book to learn their lessons.
● It is easier to retain information when they are visually stimulating.
● Designing animated graphics is pretty easy when you understand the purpose behind it.
● Scrutinize your work to check if it is causing any hindrance in keeping up with the information.

Animating images can be a fun and engaging process. It only involves understanding the mindset of your target audience. This process need not be complicated. You can start out by converting your photos into 3D animations using a 3D animated photo maker.
Part 2 Best 10 3D Photo Maker and Photo Animator Apps 800
No. 1 LucidPix

Lucidpix permits you to explore your creative side in fun ways. An app that captures depth-enhanced pictures! Anyone with a smart device (mobile or tablet) can start creating 3D photos using lucidpix.
YouTube Product Demo Video ↓ ↓ ↓
| Name of maker | Size | Rating | Operating System |
|---|---|---|---|
| Lucid Inc. | 39 to 154 MB | 3.6/5 on playstore. | Android and iOS. |
Pros
Free download
User-friendly UI
Easily converts a regular photo into 3D
Cons
Contains Ads
Always offers & insists users to buy app
App is still under development
No. 2 Wigglegram

Wigglegram creates a single 3D image after combining multiple photographs. It turns all the captured photos into one single animated photo to make it look like a 3D image.
YouTube Product Demo Video ↓ ↓ ↓
| Name of maker | Size | Rating | Operating System |
|---|---|---|---|
| n4no | 8.7MB | 3.0/5 on Playstore | Android & iOS |
Pros
Direct social media share option.
Helps create reaction Gifs.
Super easy and fast 3D photo-making experience.
Cons
It doesn’t have good ratings.
App contains Ads.
App size is below 10MB.
No. 3 MotionLeap

Earlier branded as Pixaloop, Motionleap is a great option to animate still images. It also has cool features like animated rains, snow, butterfly & diamond.
YouTube Product Demo Video ↓ ↓ ↓
| Name of maker | Size | Rating | Operating System |
|---|---|---|---|
| Lightricks Ltd | 84 to 197 MB | 4.2/5 Playstore | iOS and Android |
Pros
Easy to use & accurate.
Elements opacity can be controlled.
Neat & clean effects, elements and overlays.
Cons
Better source photos are required.
Animation takes more time in comparison to other apps.
No. 4 Movepic

This super cool app offers effects that let you add glitches, flowing water and even a live sky to your images by just selecting the area you wish to apply the effects and is not that heavy to download.
YouTube Product Demo Video ↓ ↓ ↓
| Name of maker | Size | Rating | Operating System |
|---|---|---|---|
| ryzenrise | 48.16 MB | 4.3/5 on Playstore | Android and iOS (alternative) |
Pros
Is it a secure app to use?
Great for applying photo motion.
Regularly updated for bug fixes.
Cons
Regularly updated for bug fixes.
Lacks certain editing features
No. 5 Adobe Spark

Adobe Spark is a free-to-use photo animation software and has Adobe trust with it. It offers hundreds of fonts and templates for any type of photo though you would bear a watermark for the free version.
YouTube Product Demo Video ↓ ↓ ↓
| Name of maker | Size | Rating | Operating System |
|---|---|---|---|
| Adobe | 2.5 MB | 4.5/5 on Playstore | Android and iOS |
Pros
Hundreds of exclusive templates.
Intuitive interface best suited for beginners.
Easy to view dashboard.
Cons
Limited features in the free version.
Glitches in design.
No. 6 PopPic 6

PopPic 6 is a 3D camera with which you can directly click and apply a 3D filter effect to your flat images in order to make them pop.
YouTube Product Demo Video ↓ ↓ ↓
| Name of maker | Size | Rating | Operating System |
|---|---|---|---|
| PopPic 3D LLC | 36.9 MB | 4.7/5 on Applestore | iOS |
Pros
Ready to click 3D camera.
Dozens of filters.
Stylish and simple app design.
Cons
Limited functionality.
Low performance.
No. 7 ImgPlay

ImgPlay is kind of a cross between the features of Werble and Motionleap. There are hundreds of ready-to-use animations for your photos.
YouTube Product Demo Video ↓ ↓ ↓
| Name of maker | Size | Rating | Operating System |
|---|---|---|---|
| ImgBase Inc | 139 MB | 3.9/5 on Applestore | Android and iOS |
Pros
The convenient app to create easy GIFs.
Click, save and share feature.
Live photo features.
Cons
Limited editing options.
Not for professional graphics.
No. 8 GIPHY

Giphy is like a search engine for GIFs but also has an app version that lets you create amazing GIF animations that are ready for upload.
YouTube Product Demo Video ↓ ↓ ↓
| Name of maker | Size | Rating | Operating System |
|---|---|---|---|
| GIPHY | 100 MB | 4.8/5 on Playstore. | Android and iOS. |
Pros
Great for simple animations.
Create GIFs for promotions.
A vast range of options.
Cons
Limited color options.
Only suitable for GIF animations.
No. 9 Photo Bender

Photo Bender is more specifically designed for Android users. It is an app that enables you to warp your images against an animated effect. There are slight editing features also available in the app like bending and stretching an image.
YouTube Product Demo Video ↓ ↓ ↓
| Name of maker | Size | Rating | Operating System |
|---|---|---|---|
| Smart Photo Editor | 3.5 MB | 3.5/5 on Playstore | Android |
Pros
Export GIF, JPEG and PNG files.
Use simple editing features like coloring, stretching, and brushing.
Completely free to use.
Cons
Limited only to Android.
No. 10 Vimage 3D

An award-winning app for creating awe-inspiring animated images. Programmed to automatically detect what edits your images need. Does involve paying a premium.
YouTube Product Demo Video ↓ ↓ ↓
| Name of maker | Size | Rating | Operating System |
|---|---|---|---|
| Vimage | 21MB | 5.0/5 on Playstore | Android and iOS |
Pros
A large variety of filters, sounds and animated effects.
Max 2560p resolution.
Intuitive app interface.
Cons
Best features are limited to the premium version.
The free version comes with a non-removable watermark.
Part 3 How to Make Your Own Photo into Cartoon?
Prior to the digital age, creating a cartoon would require an entire team of professional animators such as in the house of Disney. A Cartoon animation meant sketching each frame by hand while maintaining continuity.
Now with the help of smart video effects, you can literally turn any image into a cartoon. These cartoonish animations can be both engaging and entertaining with some help from Wondershare Filmora .
Though we have enlisted 10 exceptional apps for ‘cartooning’ your images, Filmora gives you the flexibility which other apps don’t. You can create awesome animated videos online using Filmora while saving a ton of time.
You can use Filmora on both Mac and PC. Turn selfies, stock pictures, and snapshots into inspiring cartoon visuals using dozens of amazing filters and features on Filmora Pro.
Some of the exclusive features of Filmora Pro;
Audio Features →
● Noise Reduction.
● Audio Sync.
● Transition Audio.
● Compressor.
Animation Features →
● Motion Tracking.
● Ease In/Ease Out.
● Pan & Zoom
Movie Editing →
● Add Titles and Texts.
● Cinematic Lighting.
● Masking.
● Distortion and Wrapping.
Colouring Features →
● Colour Wheels
● Colour Correction
● Scopes.
By now you should know that Filmora Pro has a ton of customizable features that you can experiment with but this can be a bit confusing for beginners.
Key Takeaways from This Episode
● You can now turn your images into amazing animated cartoons using a wide range of 3d animated image-makers available online.
● Creating an exceptional animated video is a matter of storytelling, visual engagement and simplifying complex information.
● Use Filmora Pro to get your hands on professional editing software which is jam-packed with a bunch of exclusive features.
Animated pictures are picking up the pace on the list of the top trends since they are able to convey so much in a fraction of a second which normal pictures or videos are incapable of.
From creating vlogs to making your photos into a 3D cartoon online, everything is possible with the right software or app.
In this article
01 [3 Secrets to Creating an (amazing) Animated Video](#Part 1)
02 [Best 10 3D Photo Maker and Photo Animator Apps](#Part 2)
03 [How to Make Your Own Photo into Cartoon?](#Part 3)
Part 1 3 Secrets to Creating an (amazing) Animated Video
Animation is the perfect tool to boost any campaign. It is a medium of brand communication that has the potential to reach out to a wide variety of audiences. Most recently, photo animations like GIFs, cartooned pictures and motion graphic posters are becoming widely popular.
Marketers and content creators can take full advantage of online apps to develop amazing animated videos that would instantly grasp the viewer’s attention. Here are three secrets you should know about creating an amazing animated video:
Storytelling:
● It is easier to tell a story with moving pictures.
● They add a different level of visual charisma to the storytelling process.
● With the help of a few interesting and easy-to-use apps, you can create stunning cinematic images and establish your own unique style of storytelling.
Persuasive Call to Action:
● A call-to-action is a standard way of telling people what you want them to do such as making a purchase, downloading an e-book or registering for a subscription.
● It helps your audience if you guide them step-by-step with the help of images.
● Try out a combination of both written and animated graphics to boost your content’s persuasion.
● It is easier to convince people when they have the information laid out in front of their eyes.
Simplify the Complex:
● It helps if you imagine your audience like children who need a picture book to learn their lessons.
● It is easier to retain information when they are visually stimulating.
● Designing animated graphics is pretty easy when you understand the purpose behind it.
● Scrutinize your work to check if it is causing any hindrance in keeping up with the information.
Animating images can be a fun and engaging process. It only involves understanding the mindset of your target audience. This process need not be complicated. You can start out by converting your photos into 3D animations using a 3D animated photo maker.
Part 2 Best 10 3D Photo Maker and Photo Animator Apps 800
No. 1 LucidPix
Lucidpix permits you to explore your creative side in fun ways. An app that captures depth-enhanced pictures! Anyone with a smart device (mobile or tablet) can start creating 3D photos using lucidpix.
YouTube Product Demo Video ↓ ↓ ↓
| Name of maker | Size | Rating | Operating System |
|---|---|---|---|
| Lucid Inc. | 39 to 154 MB | 3.6/5 on playstore. | Android and iOS. |
Pros
Free download
User-friendly UI
Easily converts a regular photo into 3D
Cons
Contains Ads
Always offers & insists users to buy app
App is still under development
No. 2 Wigglegram
Wigglegram creates a single 3D image after combining multiple photographs. It turns all the captured photos into one single animated photo to make it look like a 3D image.
YouTube Product Demo Video ↓ ↓ ↓
| Name of maker | Size | Rating | Operating System |
|---|---|---|---|
| n4no | 8.7MB | 3.0/5 on Playstore | Android & iOS |
Pros
Direct social media share option.
Helps create reaction Gifs.
Super easy and fast 3D photo-making experience.
Cons
It doesn’t have good ratings.
App contains Ads.
App size is below 10MB.
No. 3 MotionLeap
Earlier branded as Pixaloop, Motionleap is a great option to animate still images. It also has cool features like animated rains, snow, butterfly & diamond.
YouTube Product Demo Video ↓ ↓ ↓
| Name of maker | Size | Rating | Operating System |
|---|---|---|---|
| Lightricks Ltd | 84 to 197 MB | 4.2/5 Playstore | iOS and Android |
Pros
Easy to use & accurate.
Elements opacity can be controlled.
Neat & clean effects, elements and overlays.
Cons
Better source photos are required.
Animation takes more time in comparison to other apps.
No. 4 Movepic
This super cool app offers effects that let you add glitches, flowing water and even a live sky to your images by just selecting the area you wish to apply the effects and is not that heavy to download.
YouTube Product Demo Video ↓ ↓ ↓
| Name of maker | Size | Rating | Operating System |
|---|---|---|---|
| ryzenrise | 48.16 MB | 4.3/5 on Playstore | Android and iOS (alternative) |
Pros
Is it a secure app to use?
Great for applying photo motion.
Regularly updated for bug fixes.
Cons
Regularly updated for bug fixes.
Lacks certain editing features
No. 5 Adobe Spark
Adobe Spark is a free-to-use photo animation software and has Adobe trust with it. It offers hundreds of fonts and templates for any type of photo though you would bear a watermark for the free version.
YouTube Product Demo Video ↓ ↓ ↓
| Name of maker | Size | Rating | Operating System |
|---|---|---|---|
| Adobe | 2.5 MB | 4.5/5 on Playstore | Android and iOS |
Pros
Hundreds of exclusive templates.
Intuitive interface best suited for beginners.
Easy to view dashboard.
Cons
Limited features in the free version.
Glitches in design.
No. 6 PopPic 6
PopPic 6 is a 3D camera with which you can directly click and apply a 3D filter effect to your flat images in order to make them pop.
YouTube Product Demo Video ↓ ↓ ↓
| Name of maker | Size | Rating | Operating System |
|---|---|---|---|
| PopPic 3D LLC | 36.9 MB | 4.7/5 on Applestore | iOS |
Pros
Ready to click 3D camera.
Dozens of filters.
Stylish and simple app design.
Cons
Limited functionality.
Low performance.
No. 7 ImgPlay
ImgPlay is kind of a cross between the features of Werble and Motionleap. There are hundreds of ready-to-use animations for your photos.
YouTube Product Demo Video ↓ ↓ ↓
| Name of maker | Size | Rating | Operating System |
|---|---|---|---|
| ImgBase Inc | 139 MB | 3.9/5 on Applestore | Android and iOS |
Pros
The convenient app to create easy GIFs.
Click, save and share feature.
Live photo features.
Cons
Limited editing options.
Not for professional graphics.
No. 8 GIPHY
Giphy is like a search engine for GIFs but also has an app version that lets you create amazing GIF animations that are ready for upload.
YouTube Product Demo Video ↓ ↓ ↓
| Name of maker | Size | Rating | Operating System |
|---|---|---|---|
| GIPHY | 100 MB | 4.8/5 on Playstore. | Android and iOS. |
Pros
Great for simple animations.
Create GIFs for promotions.
A vast range of options.
Cons
Limited color options.
Only suitable for GIF animations.
No. 9 Photo Bender
Photo Bender is more specifically designed for Android users. It is an app that enables you to warp your images against an animated effect. There are slight editing features also available in the app like bending and stretching an image.
YouTube Product Demo Video ↓ ↓ ↓
| Name of maker | Size | Rating | Operating System |
|---|---|---|---|
| Smart Photo Editor | 3.5 MB | 3.5/5 on Playstore | Android |
Pros
Export GIF, JPEG and PNG files.
Use simple editing features like coloring, stretching, and brushing.
Completely free to use.
Cons
Limited only to Android.
No. 10 Vimage 3D
An award-winning app for creating awe-inspiring animated images. Programmed to automatically detect what edits your images need. Does involve paying a premium.
YouTube Product Demo Video ↓ ↓ ↓
| Name of maker | Size | Rating | Operating System |
|---|---|---|---|
| Vimage | 21MB | 5.0/5 on Playstore | Android and iOS |
Pros
A large variety of filters, sounds and animated effects.
Max 2560p resolution.
Intuitive app interface.
Cons
Best features are limited to the premium version.
The free version comes with a non-removable watermark.
Part 3 How to Make Your Own Photo into Cartoon?
Prior to the digital age, creating a cartoon would require an entire team of professional animators such as in the house of Disney. A Cartoon animation meant sketching each frame by hand while maintaining continuity.
Now with the help of smart video effects, you can literally turn any image into a cartoon. These cartoonish animations can be both engaging and entertaining with some help from Wondershare Filmora .
Though we have enlisted 10 exceptional apps for ‘cartooning’ your images, Filmora gives you the flexibility which other apps don’t. You can create awesome animated videos online using Filmora while saving a ton of time.
You can use Filmora on both Mac and PC. Turn selfies, stock pictures, and snapshots into inspiring cartoon visuals using dozens of amazing filters and features on Filmora Pro.
Some of the exclusive features of Filmora Pro;
Audio Features →
● Noise Reduction.
● Audio Sync.
● Transition Audio.
● Compressor.
Animation Features →
● Motion Tracking.
● Ease In/Ease Out.
● Pan & Zoom
Movie Editing →
● Add Titles and Texts.
● Cinematic Lighting.
● Masking.
● Distortion and Wrapping.
Colouring Features →
● Colour Wheels
● Colour Correction
● Scopes.
By now you should know that Filmora Pro has a ton of customizable features that you can experiment with but this can be a bit confusing for beginners.
Key Takeaways from This Episode
● You can now turn your images into amazing animated cartoons using a wide range of 3d animated image-makers available online.
● Creating an exceptional animated video is a matter of storytelling, visual engagement and simplifying complex information.
● Use Filmora Pro to get your hands on professional editing software which is jam-packed with a bunch of exclusive features.
5 Foolproof Amazing Anime Text to Speech Tips for Makers
5 Foolproof Amazing Anime Text to Speech Tips for Makers
An easy yet powerful editor
Numerous effects to choose from
Detailed tutorials provided by the official channel
Our topic for today’s article is on that exact same subject. Or, rather, more specifically, anime text-to-speech.
For those who want more than the usual robotic text-to-speech AI that you see in more professional software. Learn more about all this below, we’ve prepared an entire guide for you!
In this article
01 [What is the Most Realistic Sounding Text to Speech & How to Do It?](#Part 1)
02 [How to Make Your Own Text to Speech Videos for Youtube](#Part 2)
03 [How to Get More Voices for Text to Speech?](#Part 3)
04 [Top 5 Tips on Anime Text to Speech](#Part 4)
Part 1 What is the Most Realistic Sounding Text to Speech & How to Do It?
To start off, we’ve included this little second on need-to-know information regarding text-to-speech. Starting with:
01How did text to speech get popular?
Perhaps unsurprisingly, the text-to-speech function was developed to increase accessibility for those who have trouble reading on screen-text. Either as a result of visual impairment, are blindness. However, with its emergence came popular programs like Audible, which introduced even those without accessibility problems to its convenience for multi-tasking purposes.
02How to get the most realistic sounding text to speech?
There are several ways you can increase the natural sound of your text-to-speech:
● You can choose a tone that suits your taste.
● You can choose a voice gender that you are more comfortable with.
● And you can increase the speed of the text to reduce the awkward, and unnatural pauses that occur after each word.
In the end, though, the best way to get realistic speech is to find a tool that offers high-quality audio options. Which is what we’ll be introducing in the latter sections:
Part 2 How to Make Your Own Text to Speech Videos for YouTube
If you want to create your own anime text-to-speech for your YouTube videos (which is popular with a lot of YouTubers these days), the process is about the same no matter what text-to-speech option you end up choosing in the end. For our examples below, we will be using Natural Readers though, which is a FREE tool, making it a good choice for those who are just looking to try it out.
Step 1: Compose Your Text
The first step is to compose your text! You might prefer to do this on Google Docs or Word, but a lot of text-to-speech tools do offer you a way of composing your text along with them (like the online tool Natural Readers):

Step 2: Choose Voice / Reader
Next, it’s time to choose the reader that you want your text to be read by!
Usually, there are options for different types of accents and languages offered. So, if you want your text to speech to match that of your desired anime characters, you should play around with these options to get the right one.

Step 3: Choose Reading Speed!
Next, it’s time to choose your desired reading speed!
Most readers start off at 1X speed on average, but we personally recommend going for at least 1.25X - 1.5X for an instantly more natural-sounding text-to-speech anime characters.

Step 4: Choose Output Format
And finally, to finish us off, it’s time to choose what output format you want your text-to-speech audio to be! To keep this simple for uploading to YouTube, we recommend sticking with MP3, which most editors accept.

Part 3 How to Get More Voices for Text to Speech?
If you think that the available cartoon characters text-to-speech voices you have are not quite doing it for your project, then you can always explore alternative, third-party options! There are many of these available. Although, you’ll have to check with your text-to-speech reader or maker to make sure that it allows for such a feat:
01Method 1: Windows Text-to-Speech Voices
If you’re looking to change your computer’s text-to-speech voice, then the place to look for this is on ‘Control Panel > Speech’. There, not only can you choose from a variety of different voice options, but you can also change voice speed and voice pitch (how high or low the pitch is), which is a great way of getting a very specific kind of tone for your anime text-to-speech creations.

02Method 2: Third-Party Voices (Screaming Bee)
Next is the third-party resource, Screaming Bee , which offers a good variety of text-to-speech voices that you can try out as well! Using this method will, of course, require downloading and applying these voices for your chosen text-to-speech reader. For example, if you want to use the Windows reader, go to the Control Panel > Speech page for the option to apply it there.

03Method 3: Third-Party Voices (Cepstral Voices)
Another resource that you can check out is Cepstral Voices . Just like Screaming Bee, it offers a range of text-to-speech voices that you can try out to see which one suits your taste most. This includes text-to-speech cartoon characters and text-to-speech anime characters voices!

Part 4 Top 5 Tips on Anime Text to Speech
Now, onto some more anime text-to-speech options that you can try in order to make your text-to-speech script sound exactly like your favorite cartoon or anime characters! For this list, we’ve not only included a description of each reader but also why you might want to try it out:
01Flixier
Flixier is the first anime text-to-speech maker on this list! It is not a free solution. You can try it out for FREE, but if you want to use it for its full capacity, then you’ll need to pay for one of their subscription packages, which start at $10 per month (for access to longer audios, unlimited projects, and more advanced export options.)
● Flixier comes with many different voice options.
● It is an online tool, so no download or installation is required.
● It comes with advanced team functionalities.

02Woord
Woord is our next pick because it works very efficiently at turning text into speech. All you need to do is plug in your text and it will convert it immediately! Much like Flixier, however, it is a freemium tool. So, while you can try it out for free, if you truly want to use it for creating professional projects, you’ll need to unlock one of its subscription packages (which start at $25 per month!)
● Instant text-to-speech maker.
● An online tool, no need for download or installation.
● Lots of natural-sounding voices to choose from.

03Speechelo
Speechelo is a bit different from the two text-to-speech makers on this list. However, that may just mean that it is a more preferable option for some. More specifically, it’s really more of a ‘voice-over-maker’. It does still use AI in order to create human-like voiceovers, with several different options to voice and language. The difference then lies in the fact that it is a one-time payment software that normally costs around $100. In this way, you can avoid long-term ongoing subscription plans. But it is a heavier commitment from the get-go.
● High-quality AI voices for creating realistic voice-overs.
● One-time payment only! No Subscription fees are needed.
● Works in several different languages.

04Cartoon Animator 4
Cartoon Animator 4 is a good option if you’re really looking for that anime or character style for your audio. It works just like your average text-to-speech maker, generally, although it does also offer a couple of more advanced features for those who are looking into animation.
● Free-to-use text-to-speech anime character
● Adjustable volume, pitch, and speed voice parameters.
● A wide variety of voice options to choose from.

05TTS Reader
TTSReader, much like Cartoon Animator 4, is a FREE online tool that you can use in order to create quick and easy text-to-speech audio for your cartoon/anime characters. It doesn’t have as many advanced features as some of the other tools out there, but it can get the job done if all you’re looking for is something easy to use.
● Available to use online for FREE.
● Variety of different voice options.
● Adjustable speed for voice.

Key Takeaways from This Episode
● If you’re looking to increase conversions with better-sounding voiceovers for your video content, then it’s important that you’re aware of all the different options out there!
● Most of these text-to-speech tools work in the same way, but you’ll notice that some of them offer more advanced tools than others.
● In the end, you’ll have to find one that works with your budget and learn how to play around with its settings to make sure that you are getting the most out of your text-to-speech maker.
Our topic for today’s article is on that exact same subject. Or, rather, more specifically, anime text-to-speech.
For those who want more than the usual robotic text-to-speech AI that you see in more professional software. Learn more about all this below, we’ve prepared an entire guide for you!
In this article
01 [What is the Most Realistic Sounding Text to Speech & How to Do It?](#Part 1)
02 [How to Make Your Own Text to Speech Videos for Youtube](#Part 2)
03 [How to Get More Voices for Text to Speech?](#Part 3)
04 [Top 5 Tips on Anime Text to Speech](#Part 4)
Part 1 What is the Most Realistic Sounding Text to Speech & How to Do It?
To start off, we’ve included this little second on need-to-know information regarding text-to-speech. Starting with:
01How did text to speech get popular?
Perhaps unsurprisingly, the text-to-speech function was developed to increase accessibility for those who have trouble reading on screen-text. Either as a result of visual impairment, are blindness. However, with its emergence came popular programs like Audible, which introduced even those without accessibility problems to its convenience for multi-tasking purposes.
02How to get the most realistic sounding text to speech?
There are several ways you can increase the natural sound of your text-to-speech:
● You can choose a tone that suits your taste.
● You can choose a voice gender that you are more comfortable with.
● And you can increase the speed of the text to reduce the awkward, and unnatural pauses that occur after each word.
In the end, though, the best way to get realistic speech is to find a tool that offers high-quality audio options. Which is what we’ll be introducing in the latter sections:
Part 2 How to Make Your Own Text to Speech Videos for YouTube
If you want to create your own anime text-to-speech for your YouTube videos (which is popular with a lot of YouTubers these days), the process is about the same no matter what text-to-speech option you end up choosing in the end. For our examples below, we will be using Natural Readers though, which is a FREE tool, making it a good choice for those who are just looking to try it out.
Step 1: Compose Your Text
The first step is to compose your text! You might prefer to do this on Google Docs or Word, but a lot of text-to-speech tools do offer you a way of composing your text along with them (like the online tool Natural Readers):
Step 2: Choose Voice / Reader
Next, it’s time to choose the reader that you want your text to be read by!
Usually, there are options for different types of accents and languages offered. So, if you want your text to speech to match that of your desired anime characters, you should play around with these options to get the right one.
Step 3: Choose Reading Speed!
Next, it’s time to choose your desired reading speed!
Most readers start off at 1X speed on average, but we personally recommend going for at least 1.25X - 1.5X for an instantly more natural-sounding text-to-speech anime characters.
Step 4: Choose Output Format
And finally, to finish us off, it’s time to choose what output format you want your text-to-speech audio to be! To keep this simple for uploading to YouTube, we recommend sticking with MP3, which most editors accept.
Part 3 How to Get More Voices for Text to Speech?
If you think that the available cartoon characters text-to-speech voices you have are not quite doing it for your project, then you can always explore alternative, third-party options! There are many of these available. Although, you’ll have to check with your text-to-speech reader or maker to make sure that it allows for such a feat:
01Method 1: Windows Text-to-Speech Voices
If you’re looking to change your computer’s text-to-speech voice, then the place to look for this is on ‘Control Panel > Speech’. There, not only can you choose from a variety of different voice options, but you can also change voice speed and voice pitch (how high or low the pitch is), which is a great way of getting a very specific kind of tone for your anime text-to-speech creations.
02Method 2: Third-Party Voices (Screaming Bee)
Next is the third-party resource, Screaming Bee , which offers a good variety of text-to-speech voices that you can try out as well! Using this method will, of course, require downloading and applying these voices for your chosen text-to-speech reader. For example, if you want to use the Windows reader, go to the Control Panel > Speech page for the option to apply it there.
03Method 3: Third-Party Voices (Cepstral Voices)
Another resource that you can check out is Cepstral Voices . Just like Screaming Bee, it offers a range of text-to-speech voices that you can try out to see which one suits your taste most. This includes text-to-speech cartoon characters and text-to-speech anime characters voices!
Part 4 Top 5 Tips on Anime Text to Speech
Now, onto some more anime text-to-speech options that you can try in order to make your text-to-speech script sound exactly like your favorite cartoon or anime characters! For this list, we’ve not only included a description of each reader but also why you might want to try it out:
01Flixier
Flixier is the first anime text-to-speech maker on this list! It is not a free solution. You can try it out for FREE, but if you want to use it for its full capacity, then you’ll need to pay for one of their subscription packages, which start at $10 per month (for access to longer audios, unlimited projects, and more advanced export options.)
● Flixier comes with many different voice options.
● It is an online tool, so no download or installation is required.
● It comes with advanced team functionalities.
02Woord
Woord is our next pick because it works very efficiently at turning text into speech. All you need to do is plug in your text and it will convert it immediately! Much like Flixier, however, it is a freemium tool. So, while you can try it out for free, if you truly want to use it for creating professional projects, you’ll need to unlock one of its subscription packages (which start at $25 per month!)
● Instant text-to-speech maker.
● An online tool, no need for download or installation.
● Lots of natural-sounding voices to choose from.
03Speechelo
Speechelo is a bit different from the two text-to-speech makers on this list. However, that may just mean that it is a more preferable option for some. More specifically, it’s really more of a ‘voice-over-maker’. It does still use AI in order to create human-like voiceovers, with several different options to voice and language. The difference then lies in the fact that it is a one-time payment software that normally costs around $100. In this way, you can avoid long-term ongoing subscription plans. But it is a heavier commitment from the get-go.
● High-quality AI voices for creating realistic voice-overs.
● One-time payment only! No Subscription fees are needed.
● Works in several different languages.
04Cartoon Animator 4
Cartoon Animator 4 is a good option if you’re really looking for that anime or character style for your audio. It works just like your average text-to-speech maker, generally, although it does also offer a couple of more advanced features for those who are looking into animation.
● Free-to-use text-to-speech anime character
● Adjustable volume, pitch, and speed voice parameters.
● A wide variety of voice options to choose from.
05TTS Reader
TTSReader, much like Cartoon Animator 4, is a FREE online tool that you can use in order to create quick and easy text-to-speech audio for your cartoon/anime characters. It doesn’t have as many advanced features as some of the other tools out there, but it can get the job done if all you’re looking for is something easy to use.
● Available to use online for FREE.
● Variety of different voice options.
● Adjustable speed for voice.
Key Takeaways from This Episode
● If you’re looking to increase conversions with better-sounding voiceovers for your video content, then it’s important that you’re aware of all the different options out there!
● Most of these text-to-speech tools work in the same way, but you’ll notice that some of them offer more advanced tools than others.
● In the end, you’ll have to find one that works with your budget and learn how to play around with its settings to make sure that you are getting the most out of your text-to-speech maker.
10 Stunning Stop Motion Movies That You Should Not Miss
10 Stunning Stop Motion Movies That You Should Not Miss
An easy yet powerful editor
Numerous effects to choose from
Detailed tutorials provided by the official channel
We do have some recommendations for you. Even more than that, we’ve compiled a comprehensive guide on stop motion movies in hopes of introducing this often-forgotten art to those that may have never thought to appreciate it before.
Complete with an introduction, some examples of great stop motion animation movies and a peek at what the process is usually like for the professionals working on said movies.
In this article
01 [What Movies Use Stop Motion Animation?](#Part 1)
02 [Popular Stop Motion Movies You Might Wonder](#Part 2)
03 [Top 10 Stop Motion Animation Films](#Part 3)
04 [How to Make a Stop Motion Animation Movie](#Part 4)
Part 1 What Movies Use Stop Motion Animation?
First, that overview we promised. This will be a brief introduction to introduce certain key knowledge that you might not already know. Of course, for those who want to head straight to the recommendations, they can do so by skipping to of this article.
01What is a Stop Motion Movie?
The best way to introduce the concept of stop motion animation movies is to first reiterate that it is, literally, the oldest form of animation in film. This was what all the animators did before they figured out how to create the software required to make their characters come alive in a different way.
It involves a lot of crafting, a lot of maneuvering, a lot of careful and precise adjustments. To put it in the simplest way possible, it’s the process of taking a still image of a scene. And then introducing ‘motion’ by changing the elements of said scene, little by little, and taking a picture at every opportunity in between. So that all the still images come together to create the illusion of movement and motion.
02What is the Most Successful Stop Motion Movie?
There are plenty of answers that could be given in this case. Perhaps it should be the first-ever stop motion movie to be made? Which was “The Humpty Dumpty Circus” created by Blackton and Smith with their own daughter’s dolls.
You might also consider success by way of long-term watch ability. If so, then old classics like the “Nightmare Before Christmas” or “Rudolph the Reindeer.” And finally. You have “Chicken Run” which is considered the best performing stop motion movie of all time. Having earned somewhere around $17.5 million in its first, weekend showing.
Part 2 Popular Stop Motion Movies You Might Wonder
Now, how about some of the more popular stop motion practices to come out in the last couple of decades? Different from the stop motion movies of old but still the same at heart. What do we have to say about them?
01Lego Stop Motion Animation Movies
Well… Since our thoughts on the subject are distinctive, we thought to break it up. First starting with Lego Movie stop motion animation. This stop motion movie animation style, also called ‘Brickfilms’, is the practice of using Lego to create stop motion animation movies. It’s been around since the 1970s, but it was only 2003 that the first official film was released by Lego, who partnered up with a production company to create films for them.
It ended up being one of the best choices for them. Especially in terms of marketing their toy products, and the practice had only grown in popularity since, with both kids and adults alike finding joy in the end product.
023D Stop Motion Animation Movies
Alright, so how about 3D stop motion movies? How is it different from 3D animation movies and regular stop motion movies??? Well, it’s actually a bit of a tricky term. The 3D in this case is to differentiate it from regular 2D stop motion animation as you see in a lot of animated films from the East (where each image is hand-drawn to show motion).
In this case, props, objects, character models, and other materials are used in order to sculpt a 3D model of a scene, and pictures are taken to capture motion. The first of the movies of this style is called “Tune with Tomorrow” but you might be more familiar with the title “Coraline.”
Part 3 Top 10 Stop Motion Animation Films
Now for our list of the best stop motion animation movies of our time. This will be somewhat subjective, but also not. Every single one of the stop motion movies on this list is highly rated everywhere and has received rave reviews — making it worth taking the time to watch every single one of them when you have the time.
01Coraline (2009)
We mentioned this stop motion movie previously, but in case you haven’t already watched it, it’s a classic. The storytelling elements of “Coraline” really matched the stop motion style of animation. It was released in 2009 as a 3D movie and it shares the story of a little girl that finds joy and excitement in an alternate reality. Only to realize that it wasn’t all that it was chalked up to be.
02The Nightmare Before Christmas (1993)
“The Nightmare Before Christmas” (1993) is another stop motion animation movie that you might have already heard of before. It features the memorable character, Jack Skellington (the Pumpkin King of Halloweentown.) You can usually catch this film airing somewhere on television during the holiday season, as the story is all about Jack Skellington’s obsession with ruining Christmas.
03Chicken Run (1994)
This next stop motion movie, called “Chicken Run” (1994) was also mentioned before. It is, as was previously discussed, the highest performing stop motion animation movie on the big screen. It features quite a varied cast of chickens in a poultry farm all aiming to make an escape by learning how to fly.
04Fantastic Mr. Fox (2009)
The next film, released in the same year as “Coraline”, is called “Fantastic Mr. Fox.” This was directed by Wes Anderson, who goes on to tell the story of the main character, ‘Mr. Fox’ and how his misadventures involving some of the local farmers in the area got—not only himself—but also his family in danger.
05Rudolph the Red-Nosed Reindeer (1964)
Rudolph the Red-nosed Reindeer is another holiday classic. This one is a lot older than some of the films on this list but is no doubt just as well-known (and perhaps even more so when you consider the older generation.) Much like the nightmare before Christmas, you can usually find this film airing sometime during the holidays on any one channel.
06Kubo and The Two Strings (2016)
From the makers of Coraline is the stop motion animation movie, called “Kubo and The Two Strings” (2016). It tells the story of Kubo, who goes on a search for a suit of magical armor in an effort to destroy an evil plaguing him. It’s quite a beautiful film and is critically acclaimed for the level of effort that went in to making sure that it was produced in a way that honored the timeless art of stop motion.
07Alice (1988)
This next stop motion film is quite unique. It’s called “Alice” and it was released sometime in the late 1980s. The fun part of this story is that it begins with a live actress playing Alice. In fact, even the rabbit that leads her to wonderland, and eventually turns her into a porcelain doll, was a taxidermized hare that escaped from its display case. In this way, the stop motion aspect of the story is integrated in a fun way that matches the mood of the rest of the hypnotic story to come.
088. Mary and Max (2009)
Another stop motion movie that had been released in 2009 (a big year in stop motion animation) is called “Mary and Max.” This one tells the story of a young girl and man. One living in Australia and the other in America. The two characters form a penpal-ship that takes them through both personal growth and development, making it quite heartwarming.
09The Little Prince (2016)
Categorizing this film as ‘stop motion’ one gave us pause because, technically, only half of the film was done in the stop motion style. However, that doesn’t detract from the evident beauty in those scenes — which speaks not only of countless efforts but gives life to the exciting classic story of “The Little Prince.”
10Frankenweenie (2012)
Another classic that you might recognize is “Frankenweenie” which was released in 2012. It starts off quite grim, with a young boy bringing a dead dog back into life — only further adding to the goth aesthetic that the style of the characters is rocking.
Part 4 How to Make a Stop Motion Animation Movie
For the last part of this article, we move on to the promised ‘tutorial’. It won’t be all that comprehensive, but it should give you a better idea of how stop motion movies are created and the kind of effort and hours that are put into it. Perhaps it will inspire you to try your hand at the process yourself.
01Step 1. Get a Camera.
The first and most important part of setting up for a stop motion movie is to prepare your camera. As any little bit of jostling can cause a whole scene to look jarring, you’ll need to make sure that this is taken care of. Otherwise, you might be forced to redo a scene unnecessarily.
In this case, the invention of tripods turned out to be a major boon, as it kept the camera at the correct vantage view.
02Step 2. Prepare Materials for the Set.
Of course, as props and materials are important for bringing characters to life in a stop motion film, you’ll need some pre-prepared in order to start.
This can be Lego action figures (if you’re working on a Lego stop motion movie) or it can be a regular model or doll (if you’re working on a 3D animation stop motion animation movie.)

03Step 3. Prepare the Set.
For stop motion, it’s important that both the scene and the camera are kept in stable positions. After all, the background will be captured too.
And, to allow for that illusion of motion, it’s best if a still object is compared to one in motion. So, pay very careful when setting up your recording studio. It can make or break your project.
04Step 4. Choose Editing Software
For the last step, you’ll need to pick out an editing software that you can use in order to put together your still images and create a video.
For that, we recommend the professional Wondershare Filmora Video Editor . It’s all set up for professionals and beginners alike, allowing you the freedom to create characters that are both simple and complex with ease. In this case, of course, the goal is to put together your story through all the different frames that you captured in the process.
For Win 7 or later (64-bit)
For macOS 10.12 or later
● Key Takeaways from This Episode →
● Stop motion animation is a classic way of telling a story of fantastical characters and settings without having to draw everything frame by frame.
● It offers any film a very distinctive style that a lot of lovers of the classics find themselves constantly seeking out.
● If you go through the list that we organized out of some of the best stop motion movies in film history, you’ll notice that they’re all quite acclaimed for their masterful storytelling and fun graphics (which, before the creation of 3D animation as we know it today, was the height of entertainment.)
● This classic art form can be accomplished by just about anyone with the right equipment and a little bit of effort. It takes some patience, as we hoped to have explained in our tutorial, but the effort is worth the sense of fulfillment that comes when a story told in stills turns into a masterful animation that brings static objects and characters to life.
We do have some recommendations for you. Even more than that, we’ve compiled a comprehensive guide on stop motion movies in hopes of introducing this often-forgotten art to those that may have never thought to appreciate it before.
Complete with an introduction, some examples of great stop motion animation movies and a peek at what the process is usually like for the professionals working on said movies.
In this article
01 [What Movies Use Stop Motion Animation?](#Part 1)
02 [Popular Stop Motion Movies You Might Wonder](#Part 2)
03 [Top 10 Stop Motion Animation Films](#Part 3)
04 [How to Make a Stop Motion Animation Movie](#Part 4)
Part 1 What Movies Use Stop Motion Animation?
First, that overview we promised. This will be a brief introduction to introduce certain key knowledge that you might not already know. Of course, for those who want to head straight to the recommendations, they can do so by skipping to of this article.
01What is a Stop Motion Movie?
The best way to introduce the concept of stop motion animation movies is to first reiterate that it is, literally, the oldest form of animation in film. This was what all the animators did before they figured out how to create the software required to make their characters come alive in a different way.
It involves a lot of crafting, a lot of maneuvering, a lot of careful and precise adjustments. To put it in the simplest way possible, it’s the process of taking a still image of a scene. And then introducing ‘motion’ by changing the elements of said scene, little by little, and taking a picture at every opportunity in between. So that all the still images come together to create the illusion of movement and motion.
02What is the Most Successful Stop Motion Movie?
There are plenty of answers that could be given in this case. Perhaps it should be the first-ever stop motion movie to be made? Which was “The Humpty Dumpty Circus” created by Blackton and Smith with their own daughter’s dolls.
You might also consider success by way of long-term watch ability. If so, then old classics like the “Nightmare Before Christmas” or “Rudolph the Reindeer.” And finally. You have “Chicken Run” which is considered the best performing stop motion movie of all time. Having earned somewhere around $17.5 million in its first, weekend showing.
Part 2 Popular Stop Motion Movies You Might Wonder
Now, how about some of the more popular stop motion practices to come out in the last couple of decades? Different from the stop motion movies of old but still the same at heart. What do we have to say about them?
01Lego Stop Motion Animation Movies
Well… Since our thoughts on the subject are distinctive, we thought to break it up. First starting with Lego Movie stop motion animation. This stop motion movie animation style, also called ‘Brickfilms’, is the practice of using Lego to create stop motion animation movies. It’s been around since the 1970s, but it was only 2003 that the first official film was released by Lego, who partnered up with a production company to create films for them.
It ended up being one of the best choices for them. Especially in terms of marketing their toy products, and the practice had only grown in popularity since, with both kids and adults alike finding joy in the end product.
023D Stop Motion Animation Movies
Alright, so how about 3D stop motion movies? How is it different from 3D animation movies and regular stop motion movies??? Well, it’s actually a bit of a tricky term. The 3D in this case is to differentiate it from regular 2D stop motion animation as you see in a lot of animated films from the East (where each image is hand-drawn to show motion).
In this case, props, objects, character models, and other materials are used in order to sculpt a 3D model of a scene, and pictures are taken to capture motion. The first of the movies of this style is called “Tune with Tomorrow” but you might be more familiar with the title “Coraline.”
Part 3 Top 10 Stop Motion Animation Films
Now for our list of the best stop motion animation movies of our time. This will be somewhat subjective, but also not. Every single one of the stop motion movies on this list is highly rated everywhere and has received rave reviews — making it worth taking the time to watch every single one of them when you have the time.
01Coraline (2009)
We mentioned this stop motion movie previously, but in case you haven’t already watched it, it’s a classic. The storytelling elements of “Coraline” really matched the stop motion style of animation. It was released in 2009 as a 3D movie and it shares the story of a little girl that finds joy and excitement in an alternate reality. Only to realize that it wasn’t all that it was chalked up to be.
02The Nightmare Before Christmas (1993)
“The Nightmare Before Christmas” (1993) is another stop motion animation movie that you might have already heard of before. It features the memorable character, Jack Skellington (the Pumpkin King of Halloweentown.) You can usually catch this film airing somewhere on television during the holiday season, as the story is all about Jack Skellington’s obsession with ruining Christmas.
03Chicken Run (1994)
This next stop motion movie, called “Chicken Run” (1994) was also mentioned before. It is, as was previously discussed, the highest performing stop motion animation movie on the big screen. It features quite a varied cast of chickens in a poultry farm all aiming to make an escape by learning how to fly.
04Fantastic Mr. Fox (2009)
The next film, released in the same year as “Coraline”, is called “Fantastic Mr. Fox.” This was directed by Wes Anderson, who goes on to tell the story of the main character, ‘Mr. Fox’ and how his misadventures involving some of the local farmers in the area got—not only himself—but also his family in danger.
05Rudolph the Red-Nosed Reindeer (1964)
Rudolph the Red-nosed Reindeer is another holiday classic. This one is a lot older than some of the films on this list but is no doubt just as well-known (and perhaps even more so when you consider the older generation.) Much like the nightmare before Christmas, you can usually find this film airing sometime during the holidays on any one channel.
06Kubo and The Two Strings (2016)
From the makers of Coraline is the stop motion animation movie, called “Kubo and The Two Strings” (2016). It tells the story of Kubo, who goes on a search for a suit of magical armor in an effort to destroy an evil plaguing him. It’s quite a beautiful film and is critically acclaimed for the level of effort that went in to making sure that it was produced in a way that honored the timeless art of stop motion.
07Alice (1988)
This next stop motion film is quite unique. It’s called “Alice” and it was released sometime in the late 1980s. The fun part of this story is that it begins with a live actress playing Alice. In fact, even the rabbit that leads her to wonderland, and eventually turns her into a porcelain doll, was a taxidermized hare that escaped from its display case. In this way, the stop motion aspect of the story is integrated in a fun way that matches the mood of the rest of the hypnotic story to come.
088. Mary and Max (2009)
Another stop motion movie that had been released in 2009 (a big year in stop motion animation) is called “Mary and Max.” This one tells the story of a young girl and man. One living in Australia and the other in America. The two characters form a penpal-ship that takes them through both personal growth and development, making it quite heartwarming.
09The Little Prince (2016)
Categorizing this film as ‘stop motion’ one gave us pause because, technically, only half of the film was done in the stop motion style. However, that doesn’t detract from the evident beauty in those scenes — which speaks not only of countless efforts but gives life to the exciting classic story of “The Little Prince.”
10Frankenweenie (2012)
Another classic that you might recognize is “Frankenweenie” which was released in 2012. It starts off quite grim, with a young boy bringing a dead dog back into life — only further adding to the goth aesthetic that the style of the characters is rocking.
Part 4 How to Make a Stop Motion Animation Movie
For the last part of this article, we move on to the promised ‘tutorial’. It won’t be all that comprehensive, but it should give you a better idea of how stop motion movies are created and the kind of effort and hours that are put into it. Perhaps it will inspire you to try your hand at the process yourself.
01Step 1. Get a Camera.
The first and most important part of setting up for a stop motion movie is to prepare your camera. As any little bit of jostling can cause a whole scene to look jarring, you’ll need to make sure that this is taken care of. Otherwise, you might be forced to redo a scene unnecessarily.
In this case, the invention of tripods turned out to be a major boon, as it kept the camera at the correct vantage view.
02Step 2. Prepare Materials for the Set.
Of course, as props and materials are important for bringing characters to life in a stop motion film, you’ll need some pre-prepared in order to start.
This can be Lego action figures (if you’re working on a Lego stop motion movie) or it can be a regular model or doll (if you’re working on a 3D animation stop motion animation movie.)
03Step 3. Prepare the Set.
For stop motion, it’s important that both the scene and the camera are kept in stable positions. After all, the background will be captured too.
And, to allow for that illusion of motion, it’s best if a still object is compared to one in motion. So, pay very careful when setting up your recording studio. It can make or break your project.
04Step 4. Choose Editing Software
For the last step, you’ll need to pick out an editing software that you can use in order to put together your still images and create a video.
For that, we recommend the professional Wondershare Filmora Video Editor . It’s all set up for professionals and beginners alike, allowing you the freedom to create characters that are both simple and complex with ease. In this case, of course, the goal is to put together your story through all the different frames that you captured in the process.
For Win 7 or later (64-bit)
For macOS 10.12 or later
● Key Takeaways from This Episode →
● Stop motion animation is a classic way of telling a story of fantastical characters and settings without having to draw everything frame by frame.
● It offers any film a very distinctive style that a lot of lovers of the classics find themselves constantly seeking out.
● If you go through the list that we organized out of some of the best stop motion movies in film history, you’ll notice that they’re all quite acclaimed for their masterful storytelling and fun graphics (which, before the creation of 3D animation as we know it today, was the height of entertainment.)
● This classic art form can be accomplished by just about anyone with the right equipment and a little bit of effort. It takes some patience, as we hoped to have explained in our tutorial, but the effort is worth the sense of fulfillment that comes when a story told in stills turns into a masterful animation that brings static objects and characters to life.
Learn All About Lip-Syncing in Animation
Learn all about Lip-Syncing in Animation
An easy yet powerful editor
Numerous effects to choose from
Detailed tutorials provided by the official channel
Lip syncing is one of the important parts of animations that need to be done perfectly. As children we have all enjoyed the special way in which Donald Duck or Mickey Mouse used to talk in cartoons, this is all because of the perfect lip-syncing.

Lip-sync animation tutorial are available that can assist you with the task.
In this article
01 [What is lip-syncing and its importance in animations?](#Part 1)
02 [Key factors to consider while lip-syncing in animations.](#Part 2)
03 [Best software for lip-syncing animations.](#Part 3)
04 [Best all-in-one video editing software for creating impressive animations.](#Part 4)
Part 1 What is Lip-syncing and Its Importance in Animations
In the simplest terms, lip-syncing can be termed as the process and way in which the sound is synchronized to the characters in animation. It is lip-syncing which brings life to the characters and makes them look talking. The process of lip-syncing in animations includes the dialogues and the mouth charts. The dialogues are broken into the phonetic syllables and the frames required for these syllables are then accessed.
Animations are moving and talking images and liveliness come from the dialogues that they speak. So, to make these talks appear real, flawless lip-syncing is very important.
Part 2 Key Factors to Consider While Lip-syncing in Animations
To make the lip-syncing in your animation look perfect several factors need to be taken care of. Some of these important ones are enlisted below.
01 Perfect Match of the Keyframes
The keyframes for the shapes of the words phrase by phrase needs to be perfect to make it look right. The right lip sync will have the correct timings from the mouth open to the mouth close.
02 Adding Body Language
To make the characters in your animations look real and lively, adding gestures and body language will play a huge role. Moreover, lip-syncing along with facial expressions will add to the overall richness of the animations.
03 Watch Yourself or Record Sample Videos
To get the correct lip-syncing for your animations, you can first try and practice by using a mirror or recording some trial videos. In these videos, you can speak and observe the jaw motion.
04 Use Blending
The technique of blending can also be used where the focus is on the most important shape of the mouth rather than each syllable. These shapes can then be blended and used in different ways and combinations.
05 Emphasize Eyes
Eyes need special focus as they can be used for expressing several emotions. Especially during the close-up shots in animations, a person looks at the eyes before the rest of the face.
06 Use the Apt Voice
No matter how perfectly the lip-syncing is done, it will not look good if the voice does not match the characters in your animations. So, make sure to select the voice that matches the looks and the personality of your characters.
Part 3 Best Software for Lip-syncing Animations
Lip sync in animations has become an easier and hassle-free task thanks to the advanced technology and several software and programs available. These 2D and 3D animation-supported tools allow syncing the mouth of the animated character with the dialogues and audio tracks. A few widely used tools for the task are enlisted below.
01 Anime Studio
This is a Windows and Mac-based professional software that supports multiple advanced functions like bone-rigging, automatic image tracing, integrated lip-synching, motion tracking, 3D shape design, character wizard, and many more. Using the vector-based tools of the software, you can add drawings and images for creating customized characters. There is a built-in character wizard that can be used for quick drawing and rigging the characters from the starting. Anime Studio allows recording the sound clip and then these can be synced to the animated characters. Several pre-set props, scenes, videos, stock audio, and characters are also available to choose from.

02 DAZ Studio
This is free-to-use software that can create impressive animations using multiple advanced features. The simple interface and functioning of the software make it apt even for users who have no prior experience in animations. The lip-sync feature of the software can be used to add audio to the created animations. Additional functions include morphing, adjusting different camera angles, plug-ins with advanced capabilities, and more.

03 Crazy Talk
To create impressive animations and add lip-syncing this is one of the popularly used tools. Quick to download, the software allows adding images and pictures to the tool, and then the head, mouth, and eye movement can be added along with lip-synced audio for creating impressive animations. The built-in timeline of the software offers you complete control over the animations, audio, and other parameters. Detailed customization options are supported including the teeth in the mouth of the character. The software is available for Windows and Mac systems.

04 Toon Boom Studio
To help you create rich animations for movies, games, learning, social media sites and any other purpose this is an apt tool to use. The software has a basic version for beginners while an advanced version for professionals. You can import media files in an array of formats like AI, JPEG, TGA, GIF, and others to create animations of your choice. Audio files in WAV, AIFF, and MP3 formats can be added to the created animations and the lip-sync analyzer tool can be used for that perfect syncing. Additional features include zoom-in, zoom-out, skeleton effect, support to the 3D background, multiple formats for exporting files, and more.

05 Crazy Talk Animator
This 2D animation tool can be used for creating rich animations by adding motion and different effects to your images. You can also create landscapes and scenes to further enhance the overall clip. Lip-sync to the animations is supported by the tool and you can even create marks for facial expression and use them to morph. Several tutorials and web resources are available for a better understanding of the tool and its functioning.

Adobe is also a good tool for all types of animation requirements and you can also check the adobe animate lip sync tutorial for your lip-syncing task.
Key Takeaways from This Episode
● Lip-syncing is an important and inevitable part of animations. Lip-syncing brings richness and liveliness to the clips.
● An array of tools and software are available that can help you effortlessly lip-sync animations.
● or all types of video editing needs and for creating animations, Wondershare Filmora works as an excellent all-in-one software.
Lip syncing is one of the important parts of animations that need to be done perfectly. As children we have all enjoyed the special way in which Donald Duck or Mickey Mouse used to talk in cartoons, this is all because of the perfect lip-syncing.
Lip-sync animation tutorial are available that can assist you with the task.
In this article
01 [What is lip-syncing and its importance in animations?](#Part 1)
02 [Key factors to consider while lip-syncing in animations.](#Part 2)
03 [Best software for lip-syncing animations.](#Part 3)
04 [Best all-in-one video editing software for creating impressive animations.](#Part 4)
Part 1 What is Lip-syncing and Its Importance in Animations
In the simplest terms, lip-syncing can be termed as the process and way in which the sound is synchronized to the characters in animation. It is lip-syncing which brings life to the characters and makes them look talking. The process of lip-syncing in animations includes the dialogues and the mouth charts. The dialogues are broken into the phonetic syllables and the frames required for these syllables are then accessed.
Animations are moving and talking images and liveliness come from the dialogues that they speak. So, to make these talks appear real, flawless lip-syncing is very important.
Part 2 Key Factors to Consider While Lip-syncing in Animations
To make the lip-syncing in your animation look perfect several factors need to be taken care of. Some of these important ones are enlisted below.
01 Perfect Match of the Keyframes
The keyframes for the shapes of the words phrase by phrase needs to be perfect to make it look right. The right lip sync will have the correct timings from the mouth open to the mouth close.
02 Adding Body Language
To make the characters in your animations look real and lively, adding gestures and body language will play a huge role. Moreover, lip-syncing along with facial expressions will add to the overall richness of the animations.
03 Watch Yourself or Record Sample Videos
To get the correct lip-syncing for your animations, you can first try and practice by using a mirror or recording some trial videos. In these videos, you can speak and observe the jaw motion.
04 Use Blending
The technique of blending can also be used where the focus is on the most important shape of the mouth rather than each syllable. These shapes can then be blended and used in different ways and combinations.
05 Emphasize Eyes
Eyes need special focus as they can be used for expressing several emotions. Especially during the close-up shots in animations, a person looks at the eyes before the rest of the face.
06 Use the Apt Voice
No matter how perfectly the lip-syncing is done, it will not look good if the voice does not match the characters in your animations. So, make sure to select the voice that matches the looks and the personality of your characters.
Part 3 Best Software for Lip-syncing Animations
Lip sync in animations has become an easier and hassle-free task thanks to the advanced technology and several software and programs available. These 2D and 3D animation-supported tools allow syncing the mouth of the animated character with the dialogues and audio tracks. A few widely used tools for the task are enlisted below.
01 Anime Studio
This is a Windows and Mac-based professional software that supports multiple advanced functions like bone-rigging, automatic image tracing, integrated lip-synching, motion tracking, 3D shape design, character wizard, and many more. Using the vector-based tools of the software, you can add drawings and images for creating customized characters. There is a built-in character wizard that can be used for quick drawing and rigging the characters from the starting. Anime Studio allows recording the sound clip and then these can be synced to the animated characters. Several pre-set props, scenes, videos, stock audio, and characters are also available to choose from.
02 DAZ Studio
This is free-to-use software that can create impressive animations using multiple advanced features. The simple interface and functioning of the software make it apt even for users who have no prior experience in animations. The lip-sync feature of the software can be used to add audio to the created animations. Additional functions include morphing, adjusting different camera angles, plug-ins with advanced capabilities, and more.
03 Crazy Talk
To create impressive animations and add lip-syncing this is one of the popularly used tools. Quick to download, the software allows adding images and pictures to the tool, and then the head, mouth, and eye movement can be added along with lip-synced audio for creating impressive animations. The built-in timeline of the software offers you complete control over the animations, audio, and other parameters. Detailed customization options are supported including the teeth in the mouth of the character. The software is available for Windows and Mac systems.
04 Toon Boom Studio
To help you create rich animations for movies, games, learning, social media sites and any other purpose this is an apt tool to use. The software has a basic version for beginners while an advanced version for professionals. You can import media files in an array of formats like AI, JPEG, TGA, GIF, and others to create animations of your choice. Audio files in WAV, AIFF, and MP3 formats can be added to the created animations and the lip-sync analyzer tool can be used for that perfect syncing. Additional features include zoom-in, zoom-out, skeleton effect, support to the 3D background, multiple formats for exporting files, and more.
05 Crazy Talk Animator
This 2D animation tool can be used for creating rich animations by adding motion and different effects to your images. You can also create landscapes and scenes to further enhance the overall clip. Lip-sync to the animations is supported by the tool and you can even create marks for facial expression and use them to morph. Several tutorials and web resources are available for a better understanding of the tool and its functioning.
Adobe is also a good tool for all types of animation requirements and you can also check the adobe animate lip sync tutorial for your lip-syncing task.
Key Takeaways from This Episode
● Lip-syncing is an important and inevitable part of animations. Lip-syncing brings richness and liveliness to the clips.
● An array of tools and software are available that can help you effortlessly lip-sync animations.
● or all types of video editing needs and for creating animations, Wondershare Filmora works as an excellent all-in-one software.
Why These 10 Top Text Motion Templates Are Worth Your Attention
Why These 10+ Top Text Motion Templates Are Worth Your Attention
An easy yet powerful editor
Numerous effects to choose from
Detailed tutorials provided by the official channel
If you’re looking to add some ‘text in motion‘ to your video projects, then you’ve come to the right place! We’ve listed some of our favorite Text Motion After Effects and Text Motion Graphics Premiere Pro templates that you can use to get a head start in the realm of adding motion into text! (As a bonus, we’ve also included an overview on text motion and some of the best text motion graphics tutorials that you can refer to when trying out the templates we’ve recommended.)
In this article
01 [What’s Text Motion?](#Part 1)
02 [10 Best Text Motion After Effects](#Part 2)
03 [Tutorials for Making Great Text Motion](#Part 3)
Part 1 What’s Text Motion?
Alright, first of all, let’s answer the big question! Text Motion, what is it and why should you be adding it to your projects ASAP? Well, in regards to the former, the answer is simple: text motion graphics is literally text animation that you can add to your projects to give it an extra bit of life and make it more show-stealing!
In regards to the latter, the answer is in its description! After all, why wouldn’t you want your projects to be able to capture more attention?

Have a look at the screenshot above that we included of an example project on the video editor, Wondershare Filmora . As you can see, we inserted text in motion at the very start. And despite being a still screenshot of said text motion graphics, the preview is eye-catching even when paused!
This is the kind of project that you can do yourself with the right templates and the right video editor. We’ve got your back on the first in the list coming up. And, as for the second, we recommend that you try out Filmora! It is, as you can see, quite an expansive software. One that will allow you to truly make the most of the text motion graphics you’ll be able to create at the end of this article.
Part 2 10 Best Text Motion After Effects
Alright, now let’s move on to our promised Text Motion Graphics After Effects and Text Motion Graphics Premiere Pro templates. We’ve tried our best to pick a variety out for you so that you can have a good selection to choose from! You should also take the time to explore the different platforms where these templates are offered in case you end up needing a different look!
01Clean and Elegant Corporate Identity – Text Reveal (Mogrt)
The first on this list is the ‘Clean and Elegant Corporate Identity — Text Reveal’ by Mogrt. The title is quite explanatory in and of itself, but just in case you’re confused, it’s a template that was designed for professionals and brands to establish their corporate identity. The font is very modern in design, and it comes with several flare variations so that the reveal works out in the way that you want it to.
Other aspects, like the shadow blur, opacity, particle size (for the reveal), and text glossiness are also adjustable and can be changed at will based on your standards.
02Multipurpose Clean 3D Text to Title
The next text motion template is the ‘Multipurpose Clean 3D Text to Title’ also created by Mogrt. This one is text motion graphics that you can use for Premiere Pro and, with proper customization, and be used for just about anything that you want! It’s a very multi-purpose kind of graphic, one that you can maybe sneak in as an advert or for announcing celebrations or anniversaries!
As a final note, if you want to use this graphic as text motion for after effects , it is available for that as well!
03Simple Motion Text | Premiere Pro
This next template, the ‘Simple Motion Text’ graphic, is one that is available for both Premiere Pro and After Effects (though the link we’ve provided is for the Premiere Pro version!) As the name implies, the animation is quite simple, which may be exactly what you want, in any case. It certainly makes it very versatile (especially as you can change font style and color as you will). Making it the perfect template for a beginner that’s just starting out and doesn’t want anything too complicated.
0430 Glitch Text Presets For Premiere Pro | Mogrt
This next template, the ‘30 Glitch Text Presets’ by Mogrt is a Premiere Pro exclusive! It’s also quite fun in its particulars. As a template, it’s not as versatile as the one that we introduced previously, since the ‘glitch’ effect gives off quite the unique vibes, but that doesn’t make it any less potent at catching the eyes of your audience!
The best part, in this case, is that it comes with 30 pre-sets, all with fitting glitch sound effects (included in the pack) that you can use. Of course, there are other customization functions as well, including font style, color, transparency, and so on.
05Comic Bubbles MOGRT
Again, this next templated, called ‘Comic Bubbles’, kind of has its own unique vibe, making it inflexible in some ways but also more fun if that’s the kind of look that you’re looking for. Which, in this case, are literal ‘Comic’ text bubbles, like you would see in your old 90s comic (loud, pop-y, and with lots of bright colors!) The only difference from that to this is that these comic text bubbles move, allowing you to create ‘punchy’ text in between animated projects.
For your reference, there are 80 different comic bubbles included in the pack. All of which are easy to customize and will allow you to adjust colors, text, and transition effects (have a look at the video that we’ve linked if you want to see it in action!)
06Smoke To Text Reveal (Mogrt)
This next template, ‘Smoke to Text Reveal’ is another one that serves a very particular need. To help with visualization, the text motion graphics are at first obscured by smoke before it bubbles up into a crisp, modern text reveal! It’s perfect for those looking for underwater-themed text motion graphics. Or those who want to serve a hint of mystery with the smoke effect.
This is Text Motion Graphics - Premiere Pro. And the best part about it is that you can customize the text and the background at will — allowing you to truly make the template your own and make the most out of the smoke-to-reveal effect.
07Text Messages Toolkit
Want to appeal to the Gen Z audience? Then, the ‘text messages toolkit’ might be a fun text motion graphics for you to try. As you can perhaps surmise from the name, it’s a template that you can use in order to create ‘text message’ interactions. It’s customizable too! You can change the text box color, size, transparency, and just have a ball pimping it out of that’s what you want.
08Large Text Title Block
With the ‘large text title block’ template, you have the flexibility of the naturally more modern and minimalistic design, allowing you to use it for a wide variety of different projects. It works especially well for advertisements, if you’re wondering about potential uses, or as transition graphics between text to video!
09Blueprint Titles
Want something that’s a little quirkier? Or, perhaps, instructional? Then the ‘Blueprint Titles’ template is one that you can consider. As you can perhaps guess from the name, it allows you to create text motion graphics in a style that is similar to the kind of blueprints you usually see when working with design or architecture.
10Dynamic Minimalism
Sometimes, simple really is best! And, this next template, the ‘Dynamic Minimalism’ text motion after effects and text motion graphics premiere pro template is one that you might want in your arsenal just for the sake of your simpler projects! The kit comes with 30 different animations, as well as other customization functions that you can play around with to add a little personality to what are otherwise very minimalistic designs.
Part 3 Tutorials for Making Great Text Motion
For the last part of this article, we’ll be introducing some tutorials that you can refer to while trying out the templates that we recommended! We’ve pulled all of this from YouTube so that you can start learning immediately! And, of course, a variety has been chosen so that you can get your info from more than one source.
01Smooth Professional Text Animation in Premiere Pro - TUTORIAL
The first tutorial we have for you was created by Ignace Aleya on YouTube. This tutorial is a ‘Premiere Pro’ tutorial that focuses on helping beginners and intermediate users alike in understanding the ways of text motion graphics. He offers some pretty good pointers and tricks on keeping the quality of your work high. And the way that he shares his knowledge is pretty solid too! Allowing you to both watch and enjoy the video.
02Easy Title Motion Graphics
This next tutorial is about text motion graphics while working in Adobe After Effects. Like the previous tutorial, it will teach you the basics of using templates! It was posted by SonduckFilm, and the video covers five different “Easy Title Motion Graphics” as examples! Altogether, it’s a great choice if what you’re looking for is tips on making the most out of the templates we introduced on our list.
03Basic Logo Animations
Next, we have a tutorial from the YouTube content creator, Broken! This one is on the subject of both simple and complex logo animations that you can create when working on establishing a brand. It’s a great video for beginners and is quite informative on the subject of customization.
● Key Takeaways from This Episode →
● What is text motion and why do you need to start using it for your own projects ASAP? Well, text motion graphics are, basically, text animation! They’re eye-catching and informative at the same time, making them a great vessel for getting a message across to your audience.
● If you want to start creating text motion graphics yourself, we suggest starting with templates first! At least then, you’ll be able to make yourself comfortable while learning about the opportunities available to you.
● There are many different templates out there that you can try. Some are multi-purpose, some not. We’ve chosen a variety to introduce to you in of this article! Complete with a list of some tutorials in that you can refer to no matter what kind of project you’re working on.
If you’re looking to add some ‘text in motion‘ to your video projects, then you’ve come to the right place! We’ve listed some of our favorite Text Motion After Effects and Text Motion Graphics Premiere Pro templates that you can use to get a head start in the realm of adding motion into text! (As a bonus, we’ve also included an overview on text motion and some of the best text motion graphics tutorials that you can refer to when trying out the templates we’ve recommended.)
In this article
01 [What’s Text Motion?](#Part 1)
02 [10 Best Text Motion After Effects](#Part 2)
03 [Tutorials for Making Great Text Motion](#Part 3)
Part 1 What’s Text Motion?
Alright, first of all, let’s answer the big question! Text Motion, what is it and why should you be adding it to your projects ASAP? Well, in regards to the former, the answer is simple: text motion graphics is literally text animation that you can add to your projects to give it an extra bit of life and make it more show-stealing!
In regards to the latter, the answer is in its description! After all, why wouldn’t you want your projects to be able to capture more attention?
Have a look at the screenshot above that we included of an example project on the video editor, Wondershare Filmora . As you can see, we inserted text in motion at the very start. And despite being a still screenshot of said text motion graphics, the preview is eye-catching even when paused!
This is the kind of project that you can do yourself with the right templates and the right video editor. We’ve got your back on the first in the list coming up. And, as for the second, we recommend that you try out Filmora! It is, as you can see, quite an expansive software. One that will allow you to truly make the most of the text motion graphics you’ll be able to create at the end of this article.
Part 2 10 Best Text Motion After Effects
Alright, now let’s move on to our promised Text Motion Graphics After Effects and Text Motion Graphics Premiere Pro templates. We’ve tried our best to pick a variety out for you so that you can have a good selection to choose from! You should also take the time to explore the different platforms where these templates are offered in case you end up needing a different look!
01Clean and Elegant Corporate Identity – Text Reveal (Mogrt)
The first on this list is the ‘Clean and Elegant Corporate Identity — Text Reveal’ by Mogrt. The title is quite explanatory in and of itself, but just in case you’re confused, it’s a template that was designed for professionals and brands to establish their corporate identity. The font is very modern in design, and it comes with several flare variations so that the reveal works out in the way that you want it to.
Other aspects, like the shadow blur, opacity, particle size (for the reveal), and text glossiness are also adjustable and can be changed at will based on your standards.
02Multipurpose Clean 3D Text to Title
The next text motion template is the ‘Multipurpose Clean 3D Text to Title’ also created by Mogrt. This one is text motion graphics that you can use for Premiere Pro and, with proper customization, and be used for just about anything that you want! It’s a very multi-purpose kind of graphic, one that you can maybe sneak in as an advert or for announcing celebrations or anniversaries!
As a final note, if you want to use this graphic as text motion for after effects , it is available for that as well!
03Simple Motion Text | Premiere Pro
This next template, the ‘Simple Motion Text’ graphic, is one that is available for both Premiere Pro and After Effects (though the link we’ve provided is for the Premiere Pro version!) As the name implies, the animation is quite simple, which may be exactly what you want, in any case. It certainly makes it very versatile (especially as you can change font style and color as you will). Making it the perfect template for a beginner that’s just starting out and doesn’t want anything too complicated.
0430 Glitch Text Presets For Premiere Pro | Mogrt
This next template, the ‘30 Glitch Text Presets’ by Mogrt is a Premiere Pro exclusive! It’s also quite fun in its particulars. As a template, it’s not as versatile as the one that we introduced previously, since the ‘glitch’ effect gives off quite the unique vibes, but that doesn’t make it any less potent at catching the eyes of your audience!
The best part, in this case, is that it comes with 30 pre-sets, all with fitting glitch sound effects (included in the pack) that you can use. Of course, there are other customization functions as well, including font style, color, transparency, and so on.
05Comic Bubbles MOGRT
Again, this next templated, called ‘Comic Bubbles’, kind of has its own unique vibe, making it inflexible in some ways but also more fun if that’s the kind of look that you’re looking for. Which, in this case, are literal ‘Comic’ text bubbles, like you would see in your old 90s comic (loud, pop-y, and with lots of bright colors!) The only difference from that to this is that these comic text bubbles move, allowing you to create ‘punchy’ text in between animated projects.
For your reference, there are 80 different comic bubbles included in the pack. All of which are easy to customize and will allow you to adjust colors, text, and transition effects (have a look at the video that we’ve linked if you want to see it in action!)
06Smoke To Text Reveal (Mogrt)
This next template, ‘Smoke to Text Reveal’ is another one that serves a very particular need. To help with visualization, the text motion graphics are at first obscured by smoke before it bubbles up into a crisp, modern text reveal! It’s perfect for those looking for underwater-themed text motion graphics. Or those who want to serve a hint of mystery with the smoke effect.
This is Text Motion Graphics - Premiere Pro. And the best part about it is that you can customize the text and the background at will — allowing you to truly make the template your own and make the most out of the smoke-to-reveal effect.
07Text Messages Toolkit
Want to appeal to the Gen Z audience? Then, the ‘text messages toolkit’ might be a fun text motion graphics for you to try. As you can perhaps surmise from the name, it’s a template that you can use in order to create ‘text message’ interactions. It’s customizable too! You can change the text box color, size, transparency, and just have a ball pimping it out of that’s what you want.
08Large Text Title Block
With the ‘large text title block’ template, you have the flexibility of the naturally more modern and minimalistic design, allowing you to use it for a wide variety of different projects. It works especially well for advertisements, if you’re wondering about potential uses, or as transition graphics between text to video!
09Blueprint Titles
Want something that’s a little quirkier? Or, perhaps, instructional? Then the ‘Blueprint Titles’ template is one that you can consider. As you can perhaps guess from the name, it allows you to create text motion graphics in a style that is similar to the kind of blueprints you usually see when working with design or architecture.
10Dynamic Minimalism
Sometimes, simple really is best! And, this next template, the ‘Dynamic Minimalism’ text motion after effects and text motion graphics premiere pro template is one that you might want in your arsenal just for the sake of your simpler projects! The kit comes with 30 different animations, as well as other customization functions that you can play around with to add a little personality to what are otherwise very minimalistic designs.
Part 3 Tutorials for Making Great Text Motion
For the last part of this article, we’ll be introducing some tutorials that you can refer to while trying out the templates that we recommended! We’ve pulled all of this from YouTube so that you can start learning immediately! And, of course, a variety has been chosen so that you can get your info from more than one source.
01Smooth Professional Text Animation in Premiere Pro - TUTORIAL
The first tutorial we have for you was created by Ignace Aleya on YouTube. This tutorial is a ‘Premiere Pro’ tutorial that focuses on helping beginners and intermediate users alike in understanding the ways of text motion graphics. He offers some pretty good pointers and tricks on keeping the quality of your work high. And the way that he shares his knowledge is pretty solid too! Allowing you to both watch and enjoy the video.
02Easy Title Motion Graphics
This next tutorial is about text motion graphics while working in Adobe After Effects. Like the previous tutorial, it will teach you the basics of using templates! It was posted by SonduckFilm, and the video covers five different “Easy Title Motion Graphics” as examples! Altogether, it’s a great choice if what you’re looking for is tips on making the most out of the templates we introduced on our list.
03Basic Logo Animations
Next, we have a tutorial from the YouTube content creator, Broken! This one is on the subject of both simple and complex logo animations that you can create when working on establishing a brand. It’s a great video for beginners and is quite informative on the subject of customization.
● Key Takeaways from This Episode →
● What is text motion and why do you need to start using it for your own projects ASAP? Well, text motion graphics are, basically, text animation! They’re eye-catching and informative at the same time, making them a great vessel for getting a message across to your audience.
● If you want to start creating text motion graphics yourself, we suggest starting with templates first! At least then, you’ll be able to make yourself comfortable while learning about the opportunities available to you.
● There are many different templates out there that you can try. Some are multi-purpose, some not. We’ve chosen a variety to introduce to you in of this article! Complete with a list of some tutorials in that you can refer to no matter what kind of project you’re working on.
Great Guide for Beginners on 2D Animation Making
Best Guide for Beginners on 2D Animation Making
An easy yet powerful editor
Numerous effects to choose from
Detailed tutorials provided by the official channel
Often called traditional animation, 2D animation making mostly syncs with vector graphics via computer software. The aim is to create animated images useful in websites, advertisements, films, or computer games.
Furthermore, the 2D animation-making process includes creating storyboards, characters, and backgrounds in 2D space. Objects in 2D animation move up, down, right, and left, but not towards or away from the camera, such as in the 3D animation.
In this article
01 [Is 2D Animation Easy & How Do You Learn It?](#Part 1)
02 [The 5 Principles of Animation](#Part 2)
03 [3 Reasons to Create Animated Videos](#Part 3)
04 [5 Essential Tips for Your 2D Animation Making](#Part 4)
Part 1 Is 2D Animation Easy & How Do You Learn It?
In 2020, the video became the #1 form of media for content strategy, overtaking infographics and blogs. Undoubtedly, the power of video marketing and animated videos offer a creative, unique, and sometimes more effective way to explain a concept or tell a story.
We asked Yakkety Yak Video Producer and animator extraordinaire Sean Froelich to give us his top 2D animation tips for beginners or tell us how they can be made accessible. So, with his comments, here we’ve described all the content you need for this section and how you can learn the 2D animation making the easy way!
First, let’s look at the difference between different kinds of animation and answer the question: “What is 2D animation?”
You’re probably much more familiar with this animation style than you think. This work involves drawing 2D objects and characters within a flat space. Everything you draw only has a height and width but no depth (which would make it 3D).
So how do you get flat characters and objects to move? Here, the artist would move from the page or screen to specialist 2D animation software to sequence the individual images.
Classic Disney movies are good examples of creating 2D animation for the big screen, but it’s not only in cinema that you can find this sort of project. You might hear people asking, “is 2D animation dead?” but it’s still widely used for commercials, corporate marketing, advertising, video games, and more.
The best way to learn 2D animation making is through courses and tutorials and taking inspiration from real-time scenarios.
If you have already started learning but aren’t getting the progress you want, they are an excellent guide to get you back on the right track.
Fact Check:
A good animation includes various elements: Acting, Image Composition, Physics, film-making, body language, character design, world-building, and much more.
Even professionals use step-by-step workflows, so they don’t have to think about everything.
If even they can’t do it, why should you, as a beginner, overwhelm yourself? The best you can do is to tackle one challenge after the other.
● Deliberately practice single aspects of animation.
● Get feedback from mentors and other artists.
● Increase the difficulty step by step.
Part 2 The 5 Principles of Animation
Animators follow a list of strict principles to create the most inspiring projects. And, these five basic principles stand above the rest as the most significant ones. Your animation will look wooden and fall flat if you ignore these fundamental principles of making 2D animation video memorable.
01Squash and stretch
Squash and stretch give weight and authenticity to an object. For example, imagine a rubber ball bouncing on the ground. It squashes as it hits the ground and comes back up after it stretches. On the other hand, a metal ball would barely stretch or squash.
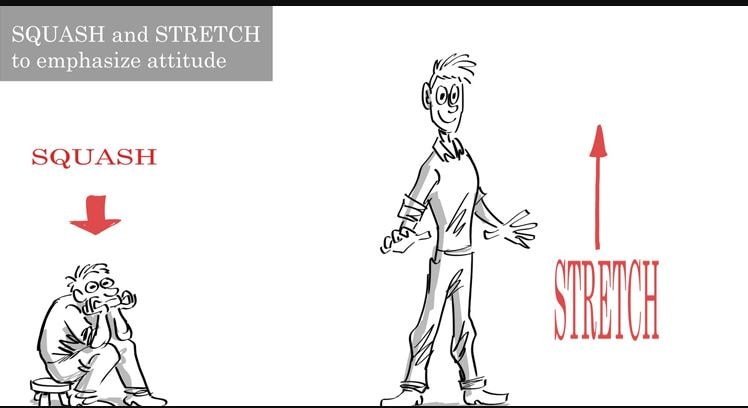
02Anticipation
Anticipation is one of the essential 2D animation-making principles to give animations a sense of grounding. For example, you must position your body to help you move before heading up from the chair. It would be unrealistic to get up without using your arms to help push your body up. This is why anticipation is crucial to consider.
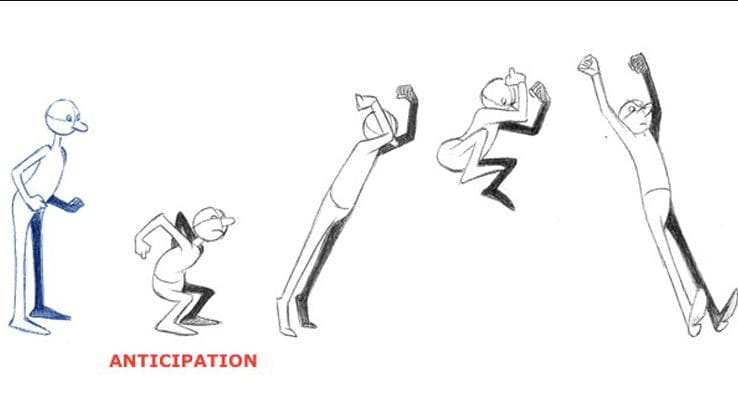
03Ease in ease out
Imagine the swinging pendulum of a clock. It slows down on each side before increasing the speed. This swinging from side to side would be the quickest in the middle and naturally slow down on each side. This is the essential aspect of easing in and out. It further moves to feel more natural.
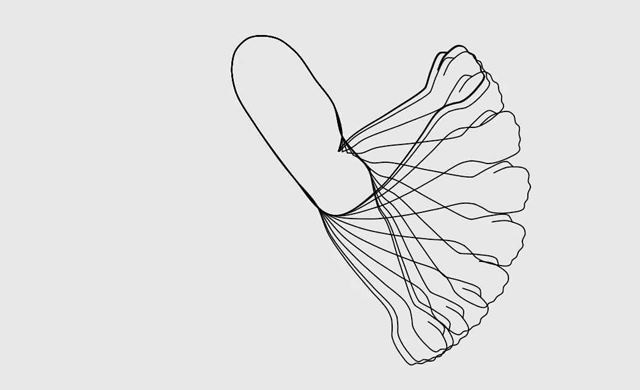
04Timing
The quantity of drawings for a given action will vary based on the movements. Fast movements get less drawing while complex and slow movements need more. Timing will give believability to your characters’ movements and objects.
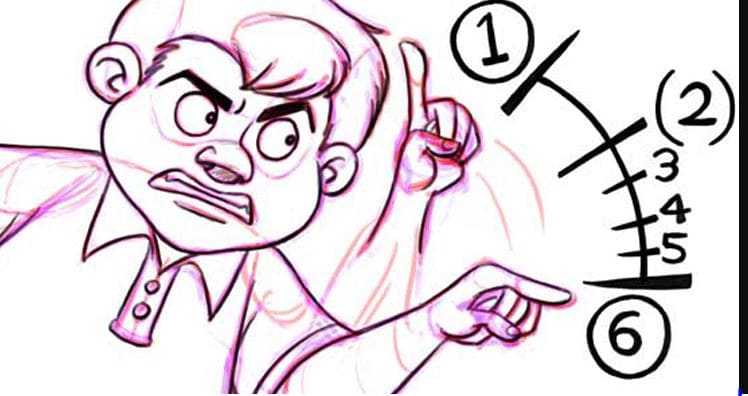
05Solid Drawing
Without any practice of solid drawing, an animator cannot use it effectively animate. On the other hand, with the concept of solid drawing, the animator understands the object’s dimensions in 3D space. Therefore, depth, volume, and weight can convey to the necessary movement.
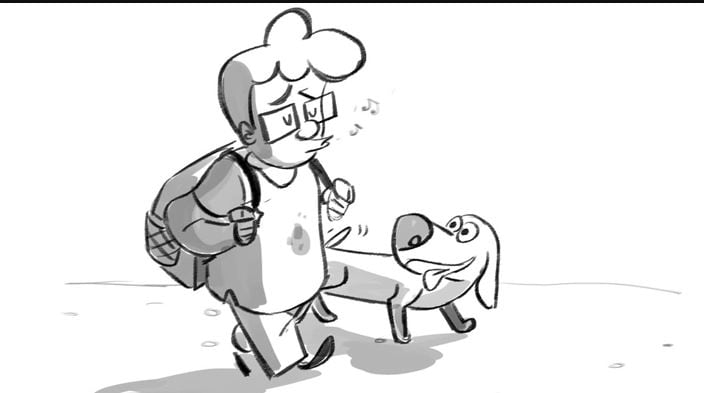
Part 2 3 Reasons to Create Animated Videos
We can describe a list of 5 reasons to use animation for business.
01It is fun
Your animation doesn’t need to be accurate or realistic. The main objective of using it in business or even cartoons is to instill entertainment and fun. It’s an ideal way to catch customers’ attention instead of strictly for marketing.
02Lasting impression
The animated videos for business leave a lasting impression on the current and new customers. Yet, you must be clear about using animation to convey your business creatively. A story too dragged from the business purpose may not be ideal for making a lasting impression.
So, convey the values you inject into a particular product so that the potential customers get attracted by the information they get from it.
03Boosts conversion rate
Due to the beautiful aspect of business animation videos, the customer is likely to finish the action expected by the brand. Therefore, more than half the visited customers will likely stay on the website with animated content instead of getting high bounce-off rates.
So, you should explain the merits of your product or service to the user in the business’s animated videos. Please add CTA at the end of the video.
Part 4 5 Essential Tips for Your 2D Animation Making
The decision to excel in 2D animation making could be a tricky task even if you are aware of its significance, as mentioned above, of animation. However, knowing the importance won’t get you on the right path without any implementation efforts.
You must implement the right strategies and know the essential factors before making animated videos for business. So, let’s discuss those points!
01Budget
The budget is the best factor because you can’t do anything without having money. So, you need to invest a fair amount or invest in decent 2D animation software for beginners. Yet, animation for business doesn’t demand a budget like creating a Pixar movie in millions. For instance, Wondershare Filmora will cost you around $156 per year, less than spending millions in outsourcing video animation work. Yet, it also depends on the style and job of business values you want to incorporate in the animation. You have to outsource if it is expert-level work!
02Brand Positioning
Consider your brand positioning! While 2D animation making, viewers tend to remember more about the brand values. They must know your identity as a brand and the whole industry.
It will allow for incorporating some brand positioning before deciding to make animation videos for business. You can check the brand’s overview from the customer’s point of view. Then, you can instill the presentation according to your business type, whether B2B or B2C, afterward.
03Target Audience
The 2D animation making also holds about the target audience, but it doesn’t mean making videos only for them necessarily. The first question is why you are creating such a video. There could be various reasons, such as attaining new customers, educating the current customers, or raising the awareness of a latest brand or a product.
04Market
You must be aware of the ideas to market your videos before even beginning the 2D animation making. The market can be Instagram, YouTube, or any other social media handle to get a high presence of a potential audience. Moreover, the video should not be too pushy.
05Do Your Research in Advance
Research is a natural starter of all the video production processes, regardless of the objective of a video. You are required to know everything there is to know about a service or a product your animated video is about to execute and plan the video’s production from beginning to end.
You should decide if the 2D animated video is a good option for the product you’re promoting since a live-action video.
Powerful Video Editor Allows You Make Wonderful Animated Videos
Animation maker Wondershare Filmora Video Editor is ideal for you looking to make stunning animated videos. It is also the best alternative to Adobe Premiere Pro or Adobe After Effects.
Key Features of Filmora
● It includes every primary and advanced editing option, including unlimited tracks, automatic stabilization, preset transitions, advanced editing, and an inbuilt screen recorder.
● Customized animations can help insert video clips and make them fascinating with a unique signature style.
● The Filmora comes with a pack of audio editing options, including an audio compressor, automatic audio sync, audio transitions, noise reduction, etc.
● Each video can be color corrected and set to high-quality video presets with control settings, auto-correction, color wheels, and scopes.
● You have a great option to use different effects such as lights & flares, texts & tiles, masking, warp & distort, etc.
For Win 7 or later (64-bit)
For macOS 10.12 or later
● Key Takeaways from This Episode →
● A guide to 2D animation making
● Five principles of 2D animation making
● Three reasons to create 2D animated videos
● Five top tips for 2D animation making
Often called traditional animation, 2D animation making mostly syncs with vector graphics via computer software. The aim is to create animated images useful in websites, advertisements, films, or computer games.
Furthermore, the 2D animation-making process includes creating storyboards, characters, and backgrounds in 2D space. Objects in 2D animation move up, down, right, and left, but not towards or away from the camera, such as in the 3D animation.
In this article
01 [Is 2D Animation Easy & How Do You Learn It?](#Part 1)
02 [The 5 Principles of Animation](#Part 2)
03 [3 Reasons to Create Animated Videos](#Part 3)
04 [5 Essential Tips for Your 2D Animation Making](#Part 4)
Part 1 Is 2D Animation Easy & How Do You Learn It?
In 2020, the video became the #1 form of media for content strategy, overtaking infographics and blogs. Undoubtedly, the power of video marketing and animated videos offer a creative, unique, and sometimes more effective way to explain a concept or tell a story.
We asked Yakkety Yak Video Producer and animator extraordinaire Sean Froelich to give us his top 2D animation tips for beginners or tell us how they can be made accessible. So, with his comments, here we’ve described all the content you need for this section and how you can learn the 2D animation making the easy way!
First, let’s look at the difference between different kinds of animation and answer the question: “What is 2D animation?”
You’re probably much more familiar with this animation style than you think. This work involves drawing 2D objects and characters within a flat space. Everything you draw only has a height and width but no depth (which would make it 3D).
So how do you get flat characters and objects to move? Here, the artist would move from the page or screen to specialist 2D animation software to sequence the individual images.
Classic Disney movies are good examples of creating 2D animation for the big screen, but it’s not only in cinema that you can find this sort of project. You might hear people asking, “is 2D animation dead?” but it’s still widely used for commercials, corporate marketing, advertising, video games, and more.
The best way to learn 2D animation making is through courses and tutorials and taking inspiration from real-time scenarios.
If you have already started learning but aren’t getting the progress you want, they are an excellent guide to get you back on the right track.
Fact Check:
A good animation includes various elements: Acting, Image Composition, Physics, film-making, body language, character design, world-building, and much more.
Even professionals use step-by-step workflows, so they don’t have to think about everything.
If even they can’t do it, why should you, as a beginner, overwhelm yourself? The best you can do is to tackle one challenge after the other.
● Deliberately practice single aspects of animation.
● Get feedback from mentors and other artists.
● Increase the difficulty step by step.
Part 2 The 5 Principles of Animation
Animators follow a list of strict principles to create the most inspiring projects. And, these five basic principles stand above the rest as the most significant ones. Your animation will look wooden and fall flat if you ignore these fundamental principles of making 2D animation video memorable.
01Squash and stretch
Squash and stretch give weight and authenticity to an object. For example, imagine a rubber ball bouncing on the ground. It squashes as it hits the ground and comes back up after it stretches. On the other hand, a metal ball would barely stretch or squash.
02Anticipation
Anticipation is one of the essential 2D animation-making principles to give animations a sense of grounding. For example, you must position your body to help you move before heading up from the chair. It would be unrealistic to get up without using your arms to help push your body up. This is why anticipation is crucial to consider.
03Ease in ease out
Imagine the swinging pendulum of a clock. It slows down on each side before increasing the speed. This swinging from side to side would be the quickest in the middle and naturally slow down on each side. This is the essential aspect of easing in and out. It further moves to feel more natural.
04Timing
The quantity of drawings for a given action will vary based on the movements. Fast movements get less drawing while complex and slow movements need more. Timing will give believability to your characters’ movements and objects.
05Solid Drawing
Without any practice of solid drawing, an animator cannot use it effectively animate. On the other hand, with the concept of solid drawing, the animator understands the object’s dimensions in 3D space. Therefore, depth, volume, and weight can convey to the necessary movement.
Part 2 3 Reasons to Create Animated Videos
We can describe a list of 5 reasons to use animation for business.
01It is fun
Your animation doesn’t need to be accurate or realistic. The main objective of using it in business or even cartoons is to instill entertainment and fun. It’s an ideal way to catch customers’ attention instead of strictly for marketing.
02Lasting impression
The animated videos for business leave a lasting impression on the current and new customers. Yet, you must be clear about using animation to convey your business creatively. A story too dragged from the business purpose may not be ideal for making a lasting impression.
So, convey the values you inject into a particular product so that the potential customers get attracted by the information they get from it.
03Boosts conversion rate
Due to the beautiful aspect of business animation videos, the customer is likely to finish the action expected by the brand. Therefore, more than half the visited customers will likely stay on the website with animated content instead of getting high bounce-off rates.
So, you should explain the merits of your product or service to the user in the business’s animated videos. Please add CTA at the end of the video.
Part 4 5 Essential Tips for Your 2D Animation Making
The decision to excel in 2D animation making could be a tricky task even if you are aware of its significance, as mentioned above, of animation. However, knowing the importance won’t get you on the right path without any implementation efforts.
You must implement the right strategies and know the essential factors before making animated videos for business. So, let’s discuss those points!
01Budget
The budget is the best factor because you can’t do anything without having money. So, you need to invest a fair amount or invest in decent 2D animation software for beginners. Yet, animation for business doesn’t demand a budget like creating a Pixar movie in millions. For instance, Wondershare Filmora will cost you around $156 per year, less than spending millions in outsourcing video animation work. Yet, it also depends on the style and job of business values you want to incorporate in the animation. You have to outsource if it is expert-level work!
02Brand Positioning
Consider your brand positioning! While 2D animation making, viewers tend to remember more about the brand values. They must know your identity as a brand and the whole industry.
It will allow for incorporating some brand positioning before deciding to make animation videos for business. You can check the brand’s overview from the customer’s point of view. Then, you can instill the presentation according to your business type, whether B2B or B2C, afterward.
03Target Audience
The 2D animation making also holds about the target audience, but it doesn’t mean making videos only for them necessarily. The first question is why you are creating such a video. There could be various reasons, such as attaining new customers, educating the current customers, or raising the awareness of a latest brand or a product.
04Market
You must be aware of the ideas to market your videos before even beginning the 2D animation making. The market can be Instagram, YouTube, or any other social media handle to get a high presence of a potential audience. Moreover, the video should not be too pushy.
05Do Your Research in Advance
Research is a natural starter of all the video production processes, regardless of the objective of a video. You are required to know everything there is to know about a service or a product your animated video is about to execute and plan the video’s production from beginning to end.
You should decide if the 2D animated video is a good option for the product you’re promoting since a live-action video.
Powerful Video Editor Allows You Make Wonderful Animated Videos
Animation maker Wondershare Filmora Video Editor is ideal for you looking to make stunning animated videos. It is also the best alternative to Adobe Premiere Pro or Adobe After Effects.
Key Features of Filmora
● It includes every primary and advanced editing option, including unlimited tracks, automatic stabilization, preset transitions, advanced editing, and an inbuilt screen recorder.
● Customized animations can help insert video clips and make them fascinating with a unique signature style.
● The Filmora comes with a pack of audio editing options, including an audio compressor, automatic audio sync, audio transitions, noise reduction, etc.
● Each video can be color corrected and set to high-quality video presets with control settings, auto-correction, color wheels, and scopes.
● You have a great option to use different effects such as lights & flares, texts & tiles, masking, warp & distort, etc.
For Win 7 or later (64-bit)
For macOS 10.12 or later
● Key Takeaways from This Episode →
● A guide to 2D animation making
● Five principles of 2D animation making
● Three reasons to create 2D animated videos
● Five top tips for 2D animation making
Top 10 Best and Fast Ways to Turn Image Into Gif
[Top 10] Best and Fast Ways to Turn Image into Gif
An easy yet powerful editor
Numerous effects to choose from
Detailed tutorials provided by the official channel
There are in fact ways to turn an image into GIF easily We’ll be showing off a couple of some of the easier ways below, including in-depth tutorials of some of the best methods so that you will no longer have to be troubled.
These tutorials, of course, will focus on teaching you how to create GIF from photos If that’s something you’re interested in, continue reading
In this article
01 [Why GIF?](#Part 1)
02 [How to Add an Image to a GIF?](#Part 2)
Part 1 Why GIF?
Before we move on to the tutorials, let’s do a brief account on GIF files We’ve also answered some of the more common questions regarding using a GIF image maker below for your edification
But, first: Why GIF? Well, it all comes down to what you’re looking for A lot of people use GIF files to create animated icons that they can use for their accounts. Some just genuinely want to create a GIF file that they can share with their friends and families (either for a laugh or something else) GIF files are a convenient vessel for doing this because they have a lot of flexibility and are accepted by most platforms
01Why Gif from My Images Are Blurry?
One of the biggest issues people tend to have when turning an image into GIF is that they come out of the process with a blurry end-product. No one wants that But, how are you supposed to avoid it? Well, it all depends on the tool that you’re using and your initial picture For the former, it’s best to review the upload requirements of your chosen GIF maker to get a better end result. For the latter, it’s best to pick a good, high-quality GIF creator for a better outcome
02There Are Jaggy Strokes Around Gif?
Another issue that you might suffer from while trying to create GIFs from photos is jaggy or raggedy strokes around the GIF when converted. These occur often with GIF makers that support transparency If you find these happening to you, adjust the transparency settings to get rid of the white pixel outline around your converted GIF.
Part 2 How to Add an Image to a GIF?
Now it’s finally time for the tutorials that we promised at the beginning of this article These tutorials will range from online to software solutions — so that you can get a clear idea of what you can expect from all these different GIF makers. To be more specific, we’ll be demonstrating with an online images to GIF converter, how to create animated GIF photoshop, and how to easily turn any image into GIF with the photo GIF creator, Wondershare Filmora Video Editor.
01Image to GIF: How to Turn Photos into Animated GIFs
For our first tutorial, we’re going to be demonstrating how to create GIF from photos with an online photo GIF creator More specifically, we’ll be demonstrating with Loading.IO, which is an online tool that you can use to create animated icons for your profiles or on your video content It comes with several animation options and other settings that you can use to quickly create GIFs from photos
**Step 1: Go to Loading.IO
Of course, we start off this tutorial by opening the GIF maker. In this case, since the tool is hosted online, that’s as easy as opening the link that we’ve provided below It will take you directly to the online GIF creator.
URL: https://loading.io/animation/icon/

**Step 2: Upload Photo
Once on-site, it’s time to upload the photo that you want to turn into a GIF As this is an icon creator, you should pick a photo with the proper parameters
To upload your icon for animating, select the ‘Upload’ button and browse your computer or your Google Drive for the image in question.

**Step 3: Choose animation Style
Next, choose how you want the uploaded photo to be animated Loading.IO offers a couple of animations that you can choose from Including the ‘beat’ animation, which is what we choose for our example

**Step 4: Adjust Settings
This step is technically optional, as there are default settings already prepared if you have no other specifications for your image-turned GIF. But, if you want, you can adjust certain settings for a better outcome
For example, you can speed up the animation with the ‘Speed’ slider. Or, you can increase the number of times the GIF loops by adjusting the ‘Repeat’ slider. Test out a couple of settings to get the best result

**Step 5: Download as GIF
To wrap things up, it’s time to download your finished animation Loading.IO gives several options for this. But, of course, in our case, we choose to ‘Download As: GIF’

02How to Make an Animated GIF in Photoshop [Tutorial]
For the next tutorial, we’ll be showing you how to use Photoshop to create and edit an animated GIF This process is fairly lengthy and is not recommended for beginners. But, it is a very professional method of creating an animated GIF — one that will allow you to control every step of the process (which may be exactly what you want)
**Step 1: Import Images into an Image Stack
First, starting on a new product, upload the images that you want to turn into a GIF into a photoshop ‘Image Stack’. This can be done by clicking the ‘File’ tab and selecting the ‘Scripts > Load Files into Stack…’ option
Afterward, a pop-up window will appear where you will be prompted to browse your computer for the aforementioned images Click ‘OK’ when done

**Step 2: Organize Layers
Check the ‘Layers’ panel for the images that you uploaded and organize them based on how you want them to appear for your animated GIF

**Step 3: (Optional) Import Video
If you want to work on a video to turn into a GIF instead, you can do such by selecting the ‘File’ tab and clicking on the ‘Import > Video Frames to Layers…’ option. This will get you to the same place shown in Step 2
Note: Just be careful that you do not transfer an image that is too long Photoshop may not be able to properly break it down, if so.

**Step 4: Open Timeline Then Create Frame Animation
Next, in order to start working on your animation, open the Timeline Window This can be done by clicking the ‘Window’ tab and selecting ‘Timeline’
With the ‘Timeline’ Window now open, select the ‘Create Frame Animation’ option to begin working

**Step 5: Make Frame from Layers
In order to transfer your uploaded images from the ‘Layers’ panel to your timeline, select the ‘Menu’ option on the top-right hand corner of the ‘Timeline’ window and select the ‘Make Frames From Layers’ option

**Step 6: Preview Animation and Adjust as Needed
To preview your animation, click the ‘Play’ button This is the best time to check that your frames have been organized correctly If they are not, you can adjust them by dragging and dropping them on the timeline.
OR, you can use the ‘Reverse Frames’ option if your animation has been completely flipped around

**Step 7: Create an Animation Loop
In order to be a proper looped GIF, the animation should repeat endlessly You can make sure of this by changing the ‘Repeat’ option to ‘Forever’ (as is shown in the image below).

**Step 8: Export Finished Animation to Gif
In order to finish turning your image into GIF, you’ll need to export it in the proper format This is possible by selecting the ‘File’ tab and then clicking the ‘Export > Save for Web (Legacy)…’ option
A pop-up window should appear where you can control export settings Do so in order to ensure that you have the best outcome

03How To Make an Animated GIF in Wondershare Filmora Video Editor (Fast & Easy)
For Win 7 or later (64-bit)
For macOS 10.12 or later
For our last tutorial, we’ll be showing you how to make an animated GIF with the use of Wondershare Wondershare Filmora Video Editor . Filmora is a video editor, one that is used by professionals all over to produce high-quality content And, of course, as a video editor, it works just as well as a GIF maker. One that you can use to create images into a GIF easily
**Step 1: Launch Filmora
First, download and install Filmora If you want to follow along with this demonstration, you can Wondershare offers a FREE trial where you can test out all of the software’s functions before making a commitment

Step 2: Upload Video to Turn into GIF
For this next step, we do something akin to what we did earlier with Photoshop. And that is to upload images or a video to fit into a timeline
This process is started by first uploading images, which you can do by clicking the ‘File’ tab and selecting the ‘Import Media > Import Media Files’ option

**Step 3: Drag Media to Timeline
With Filmora, the ‘Timeline’ window is already open Also, you won’t have to do anything complicated to get your media onto the said timeline. Just drag and drop it from the Media library (as is shown in the image below).

**Step 4: Edit or Adjust GIF
Before moving forward, you should take this chance to make adjustments to the media that you uploaded into your timeline There are many things that you can do at this stage so feel free to experiment
For our example, we cut down the video that we uploaded by using the ‘Trim’ option (which you can find by right-clicking on video media).

**Step 5: Export into GIF
Finally, to finish us off, we export our finished GIF This can be done by selecting the ‘Export’ tab and then clicking the ‘Create Video’ option A pop-up window will appear where you can adjust export settings

● Key Takeaways from This Episode →
● GIFs are fun and easy-to-share content It’s accepted by most platforms and can even be used to create professional, animated icons to be added to video content
● The process of turning an image into a GIF can be a bit tricky. But, don’t worry, so long as you start with high-quality media and use a reliable Photo-GIF Creator, then you should be fine
● If you’re struggling with turning your images into GIFs, check out one of the tutorials that we’ve offered We specifically chose the three GIF creators that we demonstrated to offer multiple methods that you can choose from
There are in fact ways to turn an image into GIF easily We’ll be showing off a couple of some of the easier ways below, including in-depth tutorials of some of the best methods so that you will no longer have to be troubled.
These tutorials, of course, will focus on teaching you how to create GIF from photos If that’s something you’re interested in, continue reading
In this article
01 [Why GIF?](#Part 1)
02 [How to Add an Image to a GIF?](#Part 2)
Part 1 Why GIF?
Before we move on to the tutorials, let’s do a brief account on GIF files We’ve also answered some of the more common questions regarding using a GIF image maker below for your edification
But, first: Why GIF? Well, it all comes down to what you’re looking for A lot of people use GIF files to create animated icons that they can use for their accounts. Some just genuinely want to create a GIF file that they can share with their friends and families (either for a laugh or something else) GIF files are a convenient vessel for doing this because they have a lot of flexibility and are accepted by most platforms
01Why Gif from My Images Are Blurry?
One of the biggest issues people tend to have when turning an image into GIF is that they come out of the process with a blurry end-product. No one wants that But, how are you supposed to avoid it? Well, it all depends on the tool that you’re using and your initial picture For the former, it’s best to review the upload requirements of your chosen GIF maker to get a better end result. For the latter, it’s best to pick a good, high-quality GIF creator for a better outcome
02There Are Jaggy Strokes Around Gif?
Another issue that you might suffer from while trying to create GIFs from photos is jaggy or raggedy strokes around the GIF when converted. These occur often with GIF makers that support transparency If you find these happening to you, adjust the transparency settings to get rid of the white pixel outline around your converted GIF.
Part 2 How to Add an Image to a GIF?
Now it’s finally time for the tutorials that we promised at the beginning of this article These tutorials will range from online to software solutions — so that you can get a clear idea of what you can expect from all these different GIF makers. To be more specific, we’ll be demonstrating with an online images to GIF converter, how to create animated GIF photoshop, and how to easily turn any image into GIF with the photo GIF creator, Wondershare Filmora Video Editor.
01Image to GIF: How to Turn Photos into Animated GIFs
For our first tutorial, we’re going to be demonstrating how to create GIF from photos with an online photo GIF creator More specifically, we’ll be demonstrating with Loading.IO, which is an online tool that you can use to create animated icons for your profiles or on your video content It comes with several animation options and other settings that you can use to quickly create GIFs from photos
**Step 1: Go to Loading.IO
Of course, we start off this tutorial by opening the GIF maker. In this case, since the tool is hosted online, that’s as easy as opening the link that we’ve provided below It will take you directly to the online GIF creator.
URL: https://loading.io/animation/icon/
**Step 2: Upload Photo
Once on-site, it’s time to upload the photo that you want to turn into a GIF As this is an icon creator, you should pick a photo with the proper parameters
To upload your icon for animating, select the ‘Upload’ button and browse your computer or your Google Drive for the image in question.
**Step 3: Choose animation Style
Next, choose how you want the uploaded photo to be animated Loading.IO offers a couple of animations that you can choose from Including the ‘beat’ animation, which is what we choose for our example
**Step 4: Adjust Settings
This step is technically optional, as there are default settings already prepared if you have no other specifications for your image-turned GIF. But, if you want, you can adjust certain settings for a better outcome
For example, you can speed up the animation with the ‘Speed’ slider. Or, you can increase the number of times the GIF loops by adjusting the ‘Repeat’ slider. Test out a couple of settings to get the best result
**Step 5: Download as GIF
To wrap things up, it’s time to download your finished animation Loading.IO gives several options for this. But, of course, in our case, we choose to ‘Download As: GIF’
02How to Make an Animated GIF in Photoshop [Tutorial]
For the next tutorial, we’ll be showing you how to use Photoshop to create and edit an animated GIF This process is fairly lengthy and is not recommended for beginners. But, it is a very professional method of creating an animated GIF — one that will allow you to control every step of the process (which may be exactly what you want)
**Step 1: Import Images into an Image Stack
First, starting on a new product, upload the images that you want to turn into a GIF into a photoshop ‘Image Stack’. This can be done by clicking the ‘File’ tab and selecting the ‘Scripts > Load Files into Stack…’ option
Afterward, a pop-up window will appear where you will be prompted to browse your computer for the aforementioned images Click ‘OK’ when done
**Step 2: Organize Layers
Check the ‘Layers’ panel for the images that you uploaded and organize them based on how you want them to appear for your animated GIF
**Step 3: (Optional) Import Video
If you want to work on a video to turn into a GIF instead, you can do such by selecting the ‘File’ tab and clicking on the ‘Import > Video Frames to Layers…’ option. This will get you to the same place shown in Step 2
Note: Just be careful that you do not transfer an image that is too long Photoshop may not be able to properly break it down, if so.
**Step 4: Open Timeline Then Create Frame Animation
Next, in order to start working on your animation, open the Timeline Window This can be done by clicking the ‘Window’ tab and selecting ‘Timeline’
With the ‘Timeline’ Window now open, select the ‘Create Frame Animation’ option to begin working
**Step 5: Make Frame from Layers
In order to transfer your uploaded images from the ‘Layers’ panel to your timeline, select the ‘Menu’ option on the top-right hand corner of the ‘Timeline’ window and select the ‘Make Frames From Layers’ option
**Step 6: Preview Animation and Adjust as Needed
To preview your animation, click the ‘Play’ button This is the best time to check that your frames have been organized correctly If they are not, you can adjust them by dragging and dropping them on the timeline.
OR, you can use the ‘Reverse Frames’ option if your animation has been completely flipped around
**Step 7: Create an Animation Loop
In order to be a proper looped GIF, the animation should repeat endlessly You can make sure of this by changing the ‘Repeat’ option to ‘Forever’ (as is shown in the image below).
**Step 8: Export Finished Animation to Gif
In order to finish turning your image into GIF, you’ll need to export it in the proper format This is possible by selecting the ‘File’ tab and then clicking the ‘Export > Save for Web (Legacy)…’ option
A pop-up window should appear where you can control export settings Do so in order to ensure that you have the best outcome
03How To Make an Animated GIF in Wondershare Filmora Video Editor (Fast & Easy)
For Win 7 or later (64-bit)
For macOS 10.12 or later
For our last tutorial, we’ll be showing you how to make an animated GIF with the use of Wondershare Wondershare Filmora Video Editor . Filmora is a video editor, one that is used by professionals all over to produce high-quality content And, of course, as a video editor, it works just as well as a GIF maker. One that you can use to create images into a GIF easily
**Step 1: Launch Filmora
First, download and install Filmora If you want to follow along with this demonstration, you can Wondershare offers a FREE trial where you can test out all of the software’s functions before making a commitment
Step 2: Upload Video to Turn into GIF
For this next step, we do something akin to what we did earlier with Photoshop. And that is to upload images or a video to fit into a timeline
This process is started by first uploading images, which you can do by clicking the ‘File’ tab and selecting the ‘Import Media > Import Media Files’ option
**Step 3: Drag Media to Timeline
With Filmora, the ‘Timeline’ window is already open Also, you won’t have to do anything complicated to get your media onto the said timeline. Just drag and drop it from the Media library (as is shown in the image below).
**Step 4: Edit or Adjust GIF
Before moving forward, you should take this chance to make adjustments to the media that you uploaded into your timeline There are many things that you can do at this stage so feel free to experiment
For our example, we cut down the video that we uploaded by using the ‘Trim’ option (which you can find by right-clicking on video media).
**Step 5: Export into GIF
Finally, to finish us off, we export our finished GIF This can be done by selecting the ‘Export’ tab and then clicking the ‘Create Video’ option A pop-up window will appear where you can adjust export settings
● Key Takeaways from This Episode →
● GIFs are fun and easy-to-share content It’s accepted by most platforms and can even be used to create professional, animated icons to be added to video content
● The process of turning an image into a GIF can be a bit tricky. But, don’t worry, so long as you start with high-quality media and use a reliable Photo-GIF Creator, then you should be fine
● If you’re struggling with turning your images into GIFs, check out one of the tutorials that we’ve offered We specifically chose the three GIF creators that we demonstrated to offer multiple methods that you can choose from
Also read:
- New 10 Stunning Stop Motion Movies That You Should Not Miss for 2024
- Updated In 2024, Amazing Ways to Find Suitable Animated Graphic Maker
- Top 4 Websites to Get Anime Footage for Free
- 2024 Approved Adobe Animate Text Effects Skills You Need to Know
- Best 15 2D Animation Software Free That Worth to Try
- In 2024, 10 Amazing Cartoon Music Examples You Need to Bookmark
- In 2024, How to Create a YouTube Intro Animation Like a Pro
- New In 2024, Animated Collage Maker Tips
- New In 2024, 6 Unexpected Ways Gif Animation Maker Can Affect Your Marketing
- Updated 2024 Approved How to Make a Video a Live Photo 2023
- New 15 Iconic Cartoon Characters of All Time for 2024
- New 10 Options for Your Need on Animation Makers
- New 2024 Approved How To Make Pinterest Slideshow in Simple Ways
- Updated How to Create Picsart Cartoon for 2024
- New In 2024, What Wikipedia Cant Tell You About the 10 Best Batman Cartoons
- Updated 2024 Approved Have You Seen the Facebook Cartoon App Everyones Using Lately
- Updated Secret Source to Make a Great Stop Motion Puppet
- Adobe Animate Riggings PROPER Tutorial for You for 2024
- Updated How to Create Benime Whiteboard Animation in Android for 2024
- New Best Websites to Download Animated GIFs for Free-Free GIF Download
- Updated Ways to Make Sure You Get the Most up to Date Cartoon Character Design Tips for 2024
- Updated Top 15 Greatest Claymation Movies of All Time
- 5 Photoshop Alternatives to Animate Your Logo
- In 2024, Animate Pictures in Canva
- Tutorials for Animating Picture Online Without Learning From Scratch for 2024
- Ways to Create Animated Clipart in PowerPoint for 2024
- Updated 2024 Approved Animate Your Photo Online with These Awesome Tools
- What Is Still Motion Animation and How Does It Work, In 2024
- Updated How to Analyze an Editorial Cartoon
- New Beginner Tutorial on Making Unity 2D Animation for 2024
- Updated Best 15 Female Anime Characters-Who Is Your Favorite, In 2024
- Updated What Make Aesthetic Cartoon Drawing More Understandable for 2024
- How To Learn Cartoon Sketch Drawing— Pencil Sketch for Beginners
- 2024 Approved Learn Disney Cartoon Drawing to See Disney Magic Moments
- New Learn How to Create Adobe 3D Animation for 2024
- 2024 Approved 10 Amazing Wallpaper Collage Ideas and Photos
- New Top 12 2D Animation Studios All Should Check Out for 2024
- Updated How to Make Your Characters Interactive in Unity Animation Rigging for 2024
- In 2024, The Best 10 Sketch Animation Video Makers
- New In 2024, How to Analyze an Editorial Cartoon
- Updated How to Get Started in Stop Motion Claymation for 2024
- Apps to Animate Still Pictures for 2024
- DP Animation Maker Tutorial for Finding The Best Animated Profile Picture Maker
- Updated 10 Cartoon Canvas Painting Ideas for Total Beginners for 2024
- 10 Cartoon Character Makers to Create Animated Characters
- Updated Ways to Create an Adobe Collage for 2024
- New In 2024, How to Make a 3D Cartoon of Yourself
- How To Transfer WhatsApp From Apple iPhone 13 to other iPhone 13 Pro Max devices? | Dr.fone
- How to Fix It Nokia C12 Wont Turn On | Dr.fone
- In 2024, How Can We Unlock Our Vivo Phone Screen?
- 9 Best Phone Monitoring Apps for Oppo Reno 8T 5G | Dr.fone
- The Best Android Unlock Software For Samsung Galaxy A05s Device Top 5 Picks to Remove Android Locks
- In 2024, How PGSharp Save You from Ban While Spoofing Pokemon Go On Vivo Y200e 5G? | Dr.fone
- Unlock Your Device iCloud DNS Bypass Explained and Tested, Plus Easy Alternatives From Apple iPhone 13 Pro
- How to Retrieve deleted photos on Poco
- How To Bypass Infinix Hot 40 Pro FRP In 3 Different Ways
- 4 Ways to Fix Android Blue Screen of Death On Lava Agni 2 5G | Dr.fone
- Where Is the Best Place to Catch Dratini On Samsung Galaxy S24 | Dr.fone
- In 2024, 3 Effective Ways to Bypass Activation Lock on Apple iPhone 6 Plus
- In 2024, How to Delete iCloud Account with or without Password from your iPhone XS Max/Windows/Mac
- How to Transfer Photos from Nokia C22 to Laptop Without USB | Dr.fone
- The Top 10 Apple iPhone 15 Plus Emualtors for Windows, Mac and Android | Dr.fone
- Apply These Techniques to Improve How to Detect Fake GPS Location On Xiaomi Redmi A2+ | Dr.fone
- How to Track a Lost Vivo T2 5G for Free? | Dr.fone
- Top 4 Ways to Trace Vivo Y78 5G Location | Dr.fone
- Does MP4 play on Galaxy A24?
- Title: New In 2024, How to Make Photo 3D Cartoon Online
- Author: Elon
- Created at : 2024-04-21 09:30:44
- Updated at : 2024-04-22 09:30:44
- Link: https://animation-videos.techidaily.com/new-in-2024-how-to-make-photo-3d-cartoon-online/
- License: This work is licensed under CC BY-NC-SA 4.0.
