
:max_bytes(150000):strip_icc():format(webp)/GettyImages-527847020-5b9edc17c9e77c0050ff9045.jpg)
New In 2024, Obtain and Create Animated GIF Icons
Obtain and Create Animated GIF Icons
Versatile Video Editor - Wondershare Filmora
An easy yet powerful editor
Numerous effects to choose from
Detailed tutorials provided by the official channel
Are you looking for some interesting and animated GIF icons? Then simply read this guide to discover funny GIF icons and learn how to create them on your own.
GIF, which stands for Graphics Interchange Format, has now become extremely popular among social media. From sending our reactions to something to wishing others on special occasions, GIFs can be used in so many ways. Though, there are times when we would like to use animated GIF icons in your designs to make them more appealing. Therefore, in this post, I will let you know how to create some funny GIF icons and would also share a few resources to find readily available GIF icons.
![]()
In this article
01 [Smart Ways to Create Your Own Animated GIF Icons](#Part 1)
02 [Top 3 Resources to Get Free Animated GIF Icons](#Part 2)
Part 1 Smart Ways to Create Your Own Animated GIF Icons
While there are so many ways to come up with animated GIF icons, I would recommend exploring the following options:
Method 1: Use Adobe Photoshop to Create GIF Icons
If you are looking for a professional solution to create a live GIF icon, then I would recommend using Adobe Photoshop. While the application is not that easy to use, it will be an ideal long-term solution. In nutshell, you can create animated GIF icons by loading assets, duplicating layers, and then merging them in the following way:
Step 1 Load Assets on Photoshop
At first, you can simply launch Adobe Photoshop on your system and go to its File > Scripts to load media assets into your stack.
![]()
This will let you browse and load the media assets to your projects. In case you don’t have a layer created, then you can just go to its File > Layer and create a new layer.
![]()
You can now rename your layers and can go to its File > Window > Timeline to get a timeline view of the added assets.
![]()
Step 2 Work on the Video Timeline to Create a GIF
Great! Once you have got the timeline view on the application, you can click on its dropdown menu and choose to create a frame animation.
![]()
Afterward, you can select the added media and go to its Properties menu on the sidebar. From here, you can choose to create a new layer for each frame and then make frames from each layer.
![]()
This will create multiple frames on the timeline at the bottom. You can edit each frame on the timeline and can also set up its preferred duration.
![]()
You can also right-click the frames and select how many times your loading icon GIF would be repeated.
![]()
Step 3 Preview and Export your GIF from Photoshop
Lastly, you can get a preview of your animated GIF icons and can go to its File > Export and choose to save it for the web in a compatible (GIF) format.
![]()
Method 2: Make Stunning Animated GIF Icons with Wondershare Filmora
Since Adobe Photoshop can be quite complicated to use, you can consider using Wondershare Filmora to create all kinds of animated GIF icons. It is a user-friendly media editing application that has a wide range of readily available assets and would also let you import files from your system.
Besides that, there are tons of stickers, visual elements, captions, animations, transitions, and so on that would let you create and customize funny GIF icons. Therefore, if you want to create animated GIF icons using Filmora, then you can simply follow these steps:
Step 1 Load Media Files (Images and Videos) on Filmora
To get things started, you can just launch Wondershare Filmora on your system and go to its File > Import menu to load media files to it. You can also drag and drop your media files directly to the interface of Filmora.

Step 2 Create or Edit GIFs on Wondershare Filmora
After loading your images or video clips, you can drag and drop them to the timeline at the bottom. In case you can want to get rid of any video clip, you can just hover the mouse around and use its trimming tool to meet your requirements.

Once you have edited your videos or images, you can just go to their properties from the sidebar. From here, you can scale, reposition, rotate, flip, and perform other edits on your media files.

If you want to add texts to your GIFs, then just visit the “Titles” section of Filmora from the top. This will let you explore and include any caption effect that you can later edit on Filmora.

You can also go to the “Effects” section from the sidebar to explore a wide range of transitions, filters, stickers, and more that you can add to your GIFs.

Step 3 Export your Animated GIFs from Filmora
That’s it! Once you have worked on your funny GIF icons, you can get their preview, and click on the “Export” icon from the top. Here, you can select “GIF” as a target format and simply save them to a preferred location on your system.

Method 3: Take the Assistance of Canva to Create Animated GIFs
You might already know that Canva is already a popular online application that can be used to create social media posts, marketing video ads, brochures, GIFs, and more. Since Canva offers a wide range of assets (images, GIFs, and more), you can use it to create animated GIF icons on the go.
Step 1 Select a Template of your Choice on Canvas
Whenever you want to create a loading icon GIF, you can just go to your Canva account and look for any existing template. Apart from its existing template, you can also load a blank canvas.
![]()
Step 2 Use the Existing Designing Features of Canva
Great! Once you have opened your canvas, you can explore tons of assets on the side. For instance, you can add texts, borders, objects, and so on from the sidebar to your canvas. You can also select a relevant animation style and add it to your project.
![]()
Step 3 Export the Media as a GIF from Canva
After working on the live GIF icon on Canva, you can just go to the Export option from the top and save it as a GIF on your system.
![]()
Part 2 Top 3 Resources to Get Free Animated GIF Icons
If you are running short on time and would like to get some premade animated GIF icons, then you can explore the following options.
1. Icons8
Icons8 is one of the most popular resources for free animated GIF icons. You can explore a wide range of more than 3000 animated icons (free and paid) on the website and can download them on your system in a preferred format. For your convenience, these animated icons are listed in different categories on Icons8.
![]()
2. Giphy
Giphy is one of the most popular websites that is entirely dedicated to GIFs. Therefore, if you are looking for an animated Discord server icon, a professional icon, or a personal animation – you can find it all on Giphy. While it has an extensive range of icons, they aren’t listed in different categories, and finding the right GIF can be time-consuming.
![]()
3. Cliply
Lastly, you can also go to the official website of Cliply to explore tons of animated GIF icons. There are all kinds of GIF Discord server icons, 3D icons, professional sets, and more that you can download from Cliply.
![]()
Wondershare Filmora
Get started easily with Filmora’s powerful performance, intuitive interface, and countless effects!
Try It Free Try It Free Try It Free Learn More >

AI Portrait – The best feature of Wondershare Filmora for gameplay editing
The AI Portrait is a new add-on in Wondershare Filmora. It can easily remove video backgrounds without using a green screen or chroma key, allowing you to add borders, glitch effects, pixelated, noise, or segmentation video effects.

Conclusion
There you go! I’m sure that after going through this post, you can easily find all kinds of animated GIF icons. Though, if you have specific requirements and would like to come up with some customized loading or funny GIF icons, then you can consider using tools like Canva, Photoshop, or Filmora. Out of them, Wondershare Filmora has to be the best solution to create live GIF icons as it features tons of resources and will let you come up with any video or GIF on the go.
Are you looking for some interesting and animated GIF icons? Then simply read this guide to discover funny GIF icons and learn how to create them on your own.
GIF, which stands for Graphics Interchange Format, has now become extremely popular among social media. From sending our reactions to something to wishing others on special occasions, GIFs can be used in so many ways. Though, there are times when we would like to use animated GIF icons in your designs to make them more appealing. Therefore, in this post, I will let you know how to create some funny GIF icons and would also share a few resources to find readily available GIF icons.
![]()
In this article
01 [Smart Ways to Create Your Own Animated GIF Icons](#Part 1)
02 [Top 3 Resources to Get Free Animated GIF Icons](#Part 2)
Part 1 Smart Ways to Create Your Own Animated GIF Icons
While there are so many ways to come up with animated GIF icons, I would recommend exploring the following options:
Method 1: Use Adobe Photoshop to Create GIF Icons
If you are looking for a professional solution to create a live GIF icon, then I would recommend using Adobe Photoshop. While the application is not that easy to use, it will be an ideal long-term solution. In nutshell, you can create animated GIF icons by loading assets, duplicating layers, and then merging them in the following way:
Step 1 Load Assets on Photoshop
At first, you can simply launch Adobe Photoshop on your system and go to its File > Scripts to load media assets into your stack.
![]()
This will let you browse and load the media assets to your projects. In case you don’t have a layer created, then you can just go to its File > Layer and create a new layer.
![]()
You can now rename your layers and can go to its File > Window > Timeline to get a timeline view of the added assets.
![]()
Step 2 Work on the Video Timeline to Create a GIF
Great! Once you have got the timeline view on the application, you can click on its dropdown menu and choose to create a frame animation.
![]()
Afterward, you can select the added media and go to its Properties menu on the sidebar. From here, you can choose to create a new layer for each frame and then make frames from each layer.
![]()
This will create multiple frames on the timeline at the bottom. You can edit each frame on the timeline and can also set up its preferred duration.
![]()
You can also right-click the frames and select how many times your loading icon GIF would be repeated.
![]()
Step 3 Preview and Export your GIF from Photoshop
Lastly, you can get a preview of your animated GIF icons and can go to its File > Export and choose to save it for the web in a compatible (GIF) format.
![]()
Method 2: Make Stunning Animated GIF Icons with Wondershare Filmora
Since Adobe Photoshop can be quite complicated to use, you can consider using Wondershare Filmora to create all kinds of animated GIF icons. It is a user-friendly media editing application that has a wide range of readily available assets and would also let you import files from your system.
Besides that, there are tons of stickers, visual elements, captions, animations, transitions, and so on that would let you create and customize funny GIF icons. Therefore, if you want to create animated GIF icons using Filmora, then you can simply follow these steps:
Step 1 Load Media Files (Images and Videos) on Filmora
To get things started, you can just launch Wondershare Filmora on your system and go to its File > Import menu to load media files to it. You can also drag and drop your media files directly to the interface of Filmora.
Step 2 Create or Edit GIFs on Wondershare Filmora
After loading your images or video clips, you can drag and drop them to the timeline at the bottom. In case you can want to get rid of any video clip, you can just hover the mouse around and use its trimming tool to meet your requirements.
Once you have edited your videos or images, you can just go to their properties from the sidebar. From here, you can scale, reposition, rotate, flip, and perform other edits on your media files.
If you want to add texts to your GIFs, then just visit the “Titles” section of Filmora from the top. This will let you explore and include any caption effect that you can later edit on Filmora.
You can also go to the “Effects” section from the sidebar to explore a wide range of transitions, filters, stickers, and more that you can add to your GIFs.
Step 3 Export your Animated GIFs from Filmora
That’s it! Once you have worked on your funny GIF icons, you can get their preview, and click on the “Export” icon from the top. Here, you can select “GIF” as a target format and simply save them to a preferred location on your system.
Method 3: Take the Assistance of Canva to Create Animated GIFs
You might already know that Canva is already a popular online application that can be used to create social media posts, marketing video ads, brochures, GIFs, and more. Since Canva offers a wide range of assets (images, GIFs, and more), you can use it to create animated GIF icons on the go.
Step 1 Select a Template of your Choice on Canvas
Whenever you want to create a loading icon GIF, you can just go to your Canva account and look for any existing template. Apart from its existing template, you can also load a blank canvas.
![]()
Step 2 Use the Existing Designing Features of Canva
Great! Once you have opened your canvas, you can explore tons of assets on the side. For instance, you can add texts, borders, objects, and so on from the sidebar to your canvas. You can also select a relevant animation style and add it to your project.
![]()
Step 3 Export the Media as a GIF from Canva
After working on the live GIF icon on Canva, you can just go to the Export option from the top and save it as a GIF on your system.
![]()
Part 2 Top 3 Resources to Get Free Animated GIF Icons
If you are running short on time and would like to get some premade animated GIF icons, then you can explore the following options.
1. Icons8
Icons8 is one of the most popular resources for free animated GIF icons. You can explore a wide range of more than 3000 animated icons (free and paid) on the website and can download them on your system in a preferred format. For your convenience, these animated icons are listed in different categories on Icons8.
![]()
2. Giphy
Giphy is one of the most popular websites that is entirely dedicated to GIFs. Therefore, if you are looking for an animated Discord server icon, a professional icon, or a personal animation – you can find it all on Giphy. While it has an extensive range of icons, they aren’t listed in different categories, and finding the right GIF can be time-consuming.
![]()
3. Cliply
Lastly, you can also go to the official website of Cliply to explore tons of animated GIF icons. There are all kinds of GIF Discord server icons, 3D icons, professional sets, and more that you can download from Cliply.
![]()
Wondershare Filmora
Get started easily with Filmora’s powerful performance, intuitive interface, and countless effects!
Try It Free Try It Free Try It Free Learn More >
AI Portrait – The best feature of Wondershare Filmora for gameplay editing
The AI Portrait is a new add-on in Wondershare Filmora. It can easily remove video backgrounds without using a green screen or chroma key, allowing you to add borders, glitch effects, pixelated, noise, or segmentation video effects.
Conclusion
There you go! I’m sure that after going through this post, you can easily find all kinds of animated GIF icons. Though, if you have specific requirements and would like to come up with some customized loading or funny GIF icons, then you can consider using tools like Canva, Photoshop, or Filmora. Out of them, Wondershare Filmora has to be the best solution to create live GIF icons as it features tons of resources and will let you come up with any video or GIF on the go.
Learn Disney Cartoon Drawing to See Disney Magic Moments
Learn Disney Cartoon Drawing to See More Disney Magic Moments
An easy yet powerful editor
Numerous effects to choose from
Detailed tutorials provided by the official channel
How to Draw a Disney Caricature

Disney-Inspired Ipad Drawing Class for Beginners
In this article
01 [How to Draw a Disney Caricature](#Part 1)
02 [Disney-Inspired Ipad Drawing Class for Beginners](#Part 2)
Part 1 How to Draw a Disney Caricature
Below is the step-by-step guide to making a Disney cartoon drawing with colors from the comfort of your home:
01How to Draw Mickey

Unarguably, Mickey Mouse is one of the most famous anime characters globally. This character was created in 1928 and is a famous Disney cartoon drawing by animators. Here are straightforward steps to help you draw a Mickey Mouse:
Step 1: Sketch the general but carefully observed features of Mickey Mouse, including the position of ears, body shape (reverse C shape), body proportions including eyes, limbs, and arms, length of arms, button on his pants, and angle on the hands.
Step 2: Take your pencil and paper, and using gentle and weak strokes, make a simple sketch of the head, neck, belly, and limbs.

Step 3: Draw contours of the mouth, ears, and nose.

Step 4: Specify the face features like a smiling opened mouth, tip of the nose, and eyes.

Step 5: Draw the hands carefully, observing the length of both arms and their proportion to the size of the character’s head.

Step 6: Sketch the outline contours of the shoes, the legs, and the pants.

Step 7: Sketch the final outline contour of the body, then erase excess lines where necessary. Add the two buttons on Mickey mouse pants.

Step 8: Draw his nose’s tail, tongue, and ellipse.

Step 9: First, use a 2B or 4B or any soft black color pencil to color the black parts.

Step 10: Depending on your preference, you can color with water, acrylic paints, or pastels.

02How to Draw Captain America
Follow these simple steps to make a Disney cartoon drawing of Captain America:
Step 1: Draw the head and chest
Draw the outlines of his masked face using smooth lines. Draw a curved line across his face to divide his face from his mask. Draw a large letter A and add tiny wings beside it on his forehead. Draw his mouth, eyes, and nose. Use curved lines to indicate his shoulder and chest, then draw a star on his chest.

Step 2: Draw his arm and waist
Draw a curved line on the shoulder to represent the bicep, then draw his gloved arm curled to form a fist. Draw curved lines beneath the chest to represent his muscular weight, then draw the pouches on his belt and use more curved lines to draw his waist.

Step 3: Draw his legs
Here, we shall portray Captain America in action. Use curved lines to show his extended right leg with boots. The left leg should appear more petite.

Step 4: Draw his shield
Against his right arm, carefully draw a flattened circular shape. You can achieve this by drawing concentric circles with a large star in the middle. Draw his arm poking out from behind his shield.

Step 5: Include the final details
Add some vertical lines across his waist and some details on his boots.

Step 6: Colour Captain America
Using colors of the American flag, color your drawing with red, white, and blue colors.

03How to Draw Stitch
Stitch is a bulletproof and fireproof alien from the Lilo and Stitch animations. Here’s how you can draw Stitch:
Step 1: Draw a circle that would form Stitch’s head

Step 2: Using a long curved line, draw an irregular peanut shape beneath the head to represent its body.

Step 3: To form its light underbelly, enclose a small shape parallel to the outline of Stitch’s body using a long curved line. On the chest region, draw a series of small “V” shapes to indicate the presence of fur.

Step 4: Draw Stitch’s arm using curved lines for the upper arm and another pair for the lower arm. Draw his bent hands and fingers using short lines. At the tip of its fingers, draw small pointed triangles to represent its claws.

Step 5: Erase the guidelines from Stitch’s arm

Step 6: Draw Stitch’s outstretched arm using a pair of curved lines and small “C” shaped lines to represent the fingers. Use short lines to connect the fingers. Draw small “V” shapes at the tip of the fingers for the triangular claws.

Step 7: Use a pair of curved lines to sketch each leg, then enclose the toes using C-shaped lines

Step 8: Sketch the ears using long curved lines to indicate the base and folds. Sketch the fur on top of Stitch’s head using a series of curved lines.

Step 9: Draw a big circle for the nose and use curved lines to indicate the nostrils. For the eyes, draw irregular rounded shapes, one within the other. Sketch too long curved lines to show the mouth and small blonde triangles for the teeth. Above the eyes and nose, draw curved lines.

Step 10: Use different shades of blue to colour Stitch.

Part 2 Disney-Inspired Ipad Drawing Class for Beginner
Here is a list of classes for beginners interested in drawing Disney characters.
01Dive into the world of Animation with a Disney-Inspired Ipad Drawing Course

This Disney-inspired lesson focuses on real-life scenarios that are beautiful and adorable. Create your everyday settings by sketching backgrounds and outfitting figures.
It will assist you in developing a straightforward approach to drawing cartoon characters through experimentation and time. Follow along and sketch characters, then make your new character.
02Drawing Faces: A Beginner‘s Guide

Ira Marcks, a graphic novelist, will teach you everything you need to know about drawing faces. Are you completely new when it comes to drawing? No worries; follow along with Ira’s bite-sized lectures, and you’ll be ready to delve into a class project by the end of the course.
Do you prefer to set your speed and work at it? If yes, then extend your learning beyond the classroom, download Ira’s Drawing Faces Book.
03Disney Inspired Drawings: Faces and Expressions

Learners will look at sketching a cartoon image of themselves or people they know while exploring the specific traits of Disney-style characters in this one-time live drawing lesson.
Learners will collaborate with the teacher while working on their art projects. This is a technique class, so the focus will be on the process and working towards a finished goal. Nevertheless, a piece may get completed outside of class.
This program is for students who have a basic understanding of drawing and proportion, are open to artistic growth, and are comfortable appearing on camera and sharing their work in a small group setting. All to help each other, and the classroom environment will support all students.
04Free Art Lessons By The Parks’ Imagineers
This lesson will teach how to create your theme park, design virtual landscapes, and even sketch unique costumes!
You’ll also learn how to draw characters from Frozen 2 like Anna and Elsa and classics like Mickey Mouse, Daisy Duck, Pluto, and others.
Your class experience can be enjoyable when using an easy-to-use tool like Wondershare Filmora.
Wondershare Filmora Video Editor is a robust and easy-to-use video editor for users of all skill levels, from beginner to advanced. Its advanced tools, adjustable keyframing, smoothing effects, and motion blur will considerably assist you in creating a high-quality animation video. Furthermore, the auto color correction and audio mixing will elevate your 2D animation film to new heights. Filmora is the best solution if you want more productivity, control, and customization options for your Disney cartoon drawings and animation.
For Win 7 or later (64-bit)
For macOS 10.12 or later
● Ending Thoughts →
● How to make a Disney cartoon drawing
● A step-by-step guide to drawing your favorite Disney cartoon drawing with colors
● How to use Filmora to create animations
● Different Disney-inspired beginner classes for iPad users.
How to Draw a Disney Caricature
Disney-Inspired Ipad Drawing Class for Beginners
In this article
01 [How to Draw a Disney Caricature](#Part 1)
02 [Disney-Inspired Ipad Drawing Class for Beginners](#Part 2)
Part 1 How to Draw a Disney Caricature
Below is the step-by-step guide to making a Disney cartoon drawing with colors from the comfort of your home:
01How to Draw Mickey
Unarguably, Mickey Mouse is one of the most famous anime characters globally. This character was created in 1928 and is a famous Disney cartoon drawing by animators. Here are straightforward steps to help you draw a Mickey Mouse:
Step 1: Sketch the general but carefully observed features of Mickey Mouse, including the position of ears, body shape (reverse C shape), body proportions including eyes, limbs, and arms, length of arms, button on his pants, and angle on the hands.
Step 2: Take your pencil and paper, and using gentle and weak strokes, make a simple sketch of the head, neck, belly, and limbs.
Step 3: Draw contours of the mouth, ears, and nose.
Step 4: Specify the face features like a smiling opened mouth, tip of the nose, and eyes.
Step 5: Draw the hands carefully, observing the length of both arms and their proportion to the size of the character’s head.
Step 6: Sketch the outline contours of the shoes, the legs, and the pants.
Step 7: Sketch the final outline contour of the body, then erase excess lines where necessary. Add the two buttons on Mickey mouse pants.
Step 8: Draw his nose’s tail, tongue, and ellipse.
Step 9: First, use a 2B or 4B or any soft black color pencil to color the black parts.
Step 10: Depending on your preference, you can color with water, acrylic paints, or pastels.
02How to Draw Captain America
Follow these simple steps to make a Disney cartoon drawing of Captain America:
Step 1: Draw the head and chest
Draw the outlines of his masked face using smooth lines. Draw a curved line across his face to divide his face from his mask. Draw a large letter A and add tiny wings beside it on his forehead. Draw his mouth, eyes, and nose. Use curved lines to indicate his shoulder and chest, then draw a star on his chest.
Step 2: Draw his arm and waist
Draw a curved line on the shoulder to represent the bicep, then draw his gloved arm curled to form a fist. Draw curved lines beneath the chest to represent his muscular weight, then draw the pouches on his belt and use more curved lines to draw his waist.
Step 3: Draw his legs
Here, we shall portray Captain America in action. Use curved lines to show his extended right leg with boots. The left leg should appear more petite.
Step 4: Draw his shield
Against his right arm, carefully draw a flattened circular shape. You can achieve this by drawing concentric circles with a large star in the middle. Draw his arm poking out from behind his shield.
Step 5: Include the final details
Add some vertical lines across his waist and some details on his boots.
Step 6: Colour Captain America
Using colors of the American flag, color your drawing with red, white, and blue colors.
03How to Draw Stitch
Stitch is a bulletproof and fireproof alien from the Lilo and Stitch animations. Here’s how you can draw Stitch:
Step 1: Draw a circle that would form Stitch’s head
Step 2: Using a long curved line, draw an irregular peanut shape beneath the head to represent its body.
Step 3: To form its light underbelly, enclose a small shape parallel to the outline of Stitch’s body using a long curved line. On the chest region, draw a series of small “V” shapes to indicate the presence of fur.
Step 4: Draw Stitch’s arm using curved lines for the upper arm and another pair for the lower arm. Draw his bent hands and fingers using short lines. At the tip of its fingers, draw small pointed triangles to represent its claws.
Step 5: Erase the guidelines from Stitch’s arm
Step 6: Draw Stitch’s outstretched arm using a pair of curved lines and small “C” shaped lines to represent the fingers. Use short lines to connect the fingers. Draw small “V” shapes at the tip of the fingers for the triangular claws.
Step 7: Use a pair of curved lines to sketch each leg, then enclose the toes using C-shaped lines
Step 8: Sketch the ears using long curved lines to indicate the base and folds. Sketch the fur on top of Stitch’s head using a series of curved lines.
Step 9: Draw a big circle for the nose and use curved lines to indicate the nostrils. For the eyes, draw irregular rounded shapes, one within the other. Sketch too long curved lines to show the mouth and small blonde triangles for the teeth. Above the eyes and nose, draw curved lines.
Step 10: Use different shades of blue to colour Stitch.
Part 2 Disney-Inspired Ipad Drawing Class for Beginner
Here is a list of classes for beginners interested in drawing Disney characters.
01Dive into the world of Animation with a Disney-Inspired Ipad Drawing Course
This Disney-inspired lesson focuses on real-life scenarios that are beautiful and adorable. Create your everyday settings by sketching backgrounds and outfitting figures.
It will assist you in developing a straightforward approach to drawing cartoon characters through experimentation and time. Follow along and sketch characters, then make your new character.
02Drawing Faces: A Beginner‘s Guide
Ira Marcks, a graphic novelist, will teach you everything you need to know about drawing faces. Are you completely new when it comes to drawing? No worries; follow along with Ira’s bite-sized lectures, and you’ll be ready to delve into a class project by the end of the course.
Do you prefer to set your speed and work at it? If yes, then extend your learning beyond the classroom, download Ira’s Drawing Faces Book.
03Disney Inspired Drawings: Faces and Expressions
Learners will look at sketching a cartoon image of themselves or people they know while exploring the specific traits of Disney-style characters in this one-time live drawing lesson.
Learners will collaborate with the teacher while working on their art projects. This is a technique class, so the focus will be on the process and working towards a finished goal. Nevertheless, a piece may get completed outside of class.
This program is for students who have a basic understanding of drawing and proportion, are open to artistic growth, and are comfortable appearing on camera and sharing their work in a small group setting. All to help each other, and the classroom environment will support all students.
04Free Art Lessons By The Parks’ Imagineers
This lesson will teach how to create your theme park, design virtual landscapes, and even sketch unique costumes!
You’ll also learn how to draw characters from Frozen 2 like Anna and Elsa and classics like Mickey Mouse, Daisy Duck, Pluto, and others.
Your class experience can be enjoyable when using an easy-to-use tool like Wondershare Filmora.
Wondershare Filmora Video Editor is a robust and easy-to-use video editor for users of all skill levels, from beginner to advanced. Its advanced tools, adjustable keyframing, smoothing effects, and motion blur will considerably assist you in creating a high-quality animation video. Furthermore, the auto color correction and audio mixing will elevate your 2D animation film to new heights. Filmora is the best solution if you want more productivity, control, and customization options for your Disney cartoon drawings and animation.
For Win 7 or later (64-bit)
For macOS 10.12 or later
● Ending Thoughts →
● How to make a Disney cartoon drawing
● A step-by-step guide to drawing your favorite Disney cartoon drawing with colors
● How to use Filmora to create animations
● Different Disney-inspired beginner classes for iPad users.
Why These 10+ Top Text Motion Templates Are Worth Your Attention
Why These 10+ Top Text Motion Templates Are Worth Your Attention
An easy yet powerful editor
Numerous effects to choose from
Detailed tutorials provided by the official channel
If you’re looking to add some ‘text in motion‘ to your video projects, then you’ve come to the right place! We’ve listed some of our favorite Text Motion After Effects and Text Motion Graphics Premiere Pro templates that you can use to get a head start in the realm of adding motion into text! (As a bonus, we’ve also included an overview on text motion and some of the best text motion graphics tutorials that you can refer to when trying out the templates we’ve recommended.)
In this article
01 [What’s Text Motion?](#Part 1)
02 [10 Best Text Motion After Effects](#Part 2)
03 [Tutorials for Making Great Text Motion](#Part 3)
Part 1 What’s Text Motion?
Alright, first of all, let’s answer the big question! Text Motion, what is it and why should you be adding it to your projects ASAP? Well, in regards to the former, the answer is simple: text motion graphics is literally text animation that you can add to your projects to give it an extra bit of life and make it more show-stealing!
In regards to the latter, the answer is in its description! After all, why wouldn’t you want your projects to be able to capture more attention?

Have a look at the screenshot above that we included of an example project on the video editor, Wondershare Filmora . As you can see, we inserted text in motion at the very start. And despite being a still screenshot of said text motion graphics, the preview is eye-catching even when paused!
This is the kind of project that you can do yourself with the right templates and the right video editor. We’ve got your back on the first in the list coming up. And, as for the second, we recommend that you try out Filmora! It is, as you can see, quite an expansive software. One that will allow you to truly make the most of the text motion graphics you’ll be able to create at the end of this article.
Part 2 10 Best Text Motion After Effects
Alright, now let’s move on to our promised Text Motion Graphics After Effects and Text Motion Graphics Premiere Pro templates. We’ve tried our best to pick a variety out for you so that you can have a good selection to choose from! You should also take the time to explore the different platforms where these templates are offered in case you end up needing a different look!
01Clean and Elegant Corporate Identity – Text Reveal (Mogrt)
The first on this list is the ‘Clean and Elegant Corporate Identity — Text Reveal’ by Mogrt. The title is quite explanatory in and of itself, but just in case you’re confused, it’s a template that was designed for professionals and brands to establish their corporate identity. The font is very modern in design, and it comes with several flare variations so that the reveal works out in the way that you want it to.
Other aspects, like the shadow blur, opacity, particle size (for the reveal), and text glossiness are also adjustable and can be changed at will based on your standards.
02Multipurpose Clean 3D Text to Title
The next text motion template is the ‘Multipurpose Clean 3D Text to Title’ also created by Mogrt. This one is text motion graphics that you can use for Premiere Pro and, with proper customization, and be used for just about anything that you want! It’s a very multi-purpose kind of graphic, one that you can maybe sneak in as an advert or for announcing celebrations or anniversaries!
As a final note, if you want to use this graphic as text motion for after effects , it is available for that as well!
03Simple Motion Text | Premiere Pro
This next template, the ‘Simple Motion Text’ graphic, is one that is available for both Premiere Pro and After Effects (though the link we’ve provided is for the Premiere Pro version!) As the name implies, the animation is quite simple, which may be exactly what you want, in any case. It certainly makes it very versatile (especially as you can change font style and color as you will). Making it the perfect template for a beginner that’s just starting out and doesn’t want anything too complicated.
0430 Glitch Text Presets For Premiere Pro | Mogrt
This next template, the ‘30 Glitch Text Presets’ by Mogrt is a Premiere Pro exclusive! It’s also quite fun in its particulars. As a template, it’s not as versatile as the one that we introduced previously, since the ‘glitch’ effect gives off quite the unique vibes, but that doesn’t make it any less potent at catching the eyes of your audience!
The best part, in this case, is that it comes with 30 pre-sets, all with fitting glitch sound effects (included in the pack) that you can use. Of course, there are other customization functions as well, including font style, color, transparency, and so on.
05Comic Bubbles MOGRT
Again, this next templated, called ‘Comic Bubbles’, kind of has its own unique vibe, making it inflexible in some ways but also more fun if that’s the kind of look that you’re looking for. Which, in this case, are literal ‘Comic’ text bubbles, like you would see in your old 90s comic (loud, pop-y, and with lots of bright colors!) The only difference from that to this is that these comic text bubbles move, allowing you to create ‘punchy’ text in between animated projects.
For your reference, there are 80 different comic bubbles included in the pack. All of which are easy to customize and will allow you to adjust colors, text, and transition effects (have a look at the video that we’ve linked if you want to see it in action!)
06Smoke To Text Reveal (Mogrt)
This next template, ‘Smoke to Text Reveal’ is another one that serves a very particular need. To help with visualization, the text motion graphics are at first obscured by smoke before it bubbles up into a crisp, modern text reveal! It’s perfect for those looking for underwater-themed text motion graphics. Or those who want to serve a hint of mystery with the smoke effect.
This is Text Motion Graphics - Premiere Pro. And the best part about it is that you can customize the text and the background at will — allowing you to truly make the template your own and make the most out of the smoke-to-reveal effect.
07Text Messages Toolkit
Want to appeal to the Gen Z audience? Then, the ‘text messages toolkit’ might be a fun text motion graphics for you to try. As you can perhaps surmise from the name, it’s a template that you can use in order to create ‘text message’ interactions. It’s customizable too! You can change the text box color, size, transparency, and just have a ball pimping it out of that’s what you want.
08Large Text Title Block
With the ‘large text title block’ template, you have the flexibility of the naturally more modern and minimalistic design, allowing you to use it for a wide variety of different projects. It works especially well for advertisements, if you’re wondering about potential uses, or as transition graphics between text to video!
09Blueprint Titles
Want something that’s a little quirkier? Or, perhaps, instructional? Then the ‘Blueprint Titles’ template is one that you can consider. As you can perhaps guess from the name, it allows you to create text motion graphics in a style that is similar to the kind of blueprints you usually see when working with design or architecture.
10Dynamic Minimalism
Sometimes, simple really is best! And, this next template, the ‘Dynamic Minimalism’ text motion after effects and text motion graphics premiere pro template is one that you might want in your arsenal just for the sake of your simpler projects! The kit comes with 30 different animations, as well as other customization functions that you can play around with to add a little personality to what are otherwise very minimalistic designs.
Part 3 Tutorials for Making Great Text Motion
For the last part of this article, we’ll be introducing some tutorials that you can refer to while trying out the templates that we recommended! We’ve pulled all of this from YouTube so that you can start learning immediately! And, of course, a variety has been chosen so that you can get your info from more than one source.
01Smooth Professional Text Animation in Premiere Pro - TUTORIAL
The first tutorial we have for you was created by Ignace Aleya on YouTube. This tutorial is a ‘Premiere Pro’ tutorial that focuses on helping beginners and intermediate users alike in understanding the ways of text motion graphics. He offers some pretty good pointers and tricks on keeping the quality of your work high. And the way that he shares his knowledge is pretty solid too! Allowing you to both watch and enjoy the video.
02Easy Title Motion Graphics
This next tutorial is about text motion graphics while working in Adobe After Effects. Like the previous tutorial, it will teach you the basics of using templates! It was posted by SonduckFilm, and the video covers five different “Easy Title Motion Graphics” as examples! Altogether, it’s a great choice if what you’re looking for is tips on making the most out of the templates we introduced on our list.
03Basic Logo Animations
Next, we have a tutorial from the YouTube content creator, Broken! This one is on the subject of both simple and complex logo animations that you can create when working on establishing a brand. It’s a great video for beginners and is quite informative on the subject of customization.
● Key Takeaways from This Episode →
● What is text motion and why do you need to start using it for your own projects ASAP? Well, text motion graphics are, basically, text animation! They’re eye-catching and informative at the same time, making them a great vessel for getting a message across to your audience.
● If you want to start creating text motion graphics yourself, we suggest starting with templates first! At least then, you’ll be able to make yourself comfortable while learning about the opportunities available to you.
● There are many different templates out there that you can try. Some are multi-purpose, some not. We’ve chosen a variety to introduce to you in of this article! Complete with a list of some tutorials in that you can refer to no matter what kind of project you’re working on.
If you’re looking to add some ‘text in motion‘ to your video projects, then you’ve come to the right place! We’ve listed some of our favorite Text Motion After Effects and Text Motion Graphics Premiere Pro templates that you can use to get a head start in the realm of adding motion into text! (As a bonus, we’ve also included an overview on text motion and some of the best text motion graphics tutorials that you can refer to when trying out the templates we’ve recommended.)
In this article
01 [What’s Text Motion?](#Part 1)
02 [10 Best Text Motion After Effects](#Part 2)
03 [Tutorials for Making Great Text Motion](#Part 3)
Part 1 What’s Text Motion?
Alright, first of all, let’s answer the big question! Text Motion, what is it and why should you be adding it to your projects ASAP? Well, in regards to the former, the answer is simple: text motion graphics is literally text animation that you can add to your projects to give it an extra bit of life and make it more show-stealing!
In regards to the latter, the answer is in its description! After all, why wouldn’t you want your projects to be able to capture more attention?
Have a look at the screenshot above that we included of an example project on the video editor, Wondershare Filmora . As you can see, we inserted text in motion at the very start. And despite being a still screenshot of said text motion graphics, the preview is eye-catching even when paused!
This is the kind of project that you can do yourself with the right templates and the right video editor. We’ve got your back on the first in the list coming up. And, as for the second, we recommend that you try out Filmora! It is, as you can see, quite an expansive software. One that will allow you to truly make the most of the text motion graphics you’ll be able to create at the end of this article.
Part 2 10 Best Text Motion After Effects
Alright, now let’s move on to our promised Text Motion Graphics After Effects and Text Motion Graphics Premiere Pro templates. We’ve tried our best to pick a variety out for you so that you can have a good selection to choose from! You should also take the time to explore the different platforms where these templates are offered in case you end up needing a different look!
01Clean and Elegant Corporate Identity – Text Reveal (Mogrt)
The first on this list is the ‘Clean and Elegant Corporate Identity — Text Reveal’ by Mogrt. The title is quite explanatory in and of itself, but just in case you’re confused, it’s a template that was designed for professionals and brands to establish their corporate identity. The font is very modern in design, and it comes with several flare variations so that the reveal works out in the way that you want it to.
Other aspects, like the shadow blur, opacity, particle size (for the reveal), and text glossiness are also adjustable and can be changed at will based on your standards.
02Multipurpose Clean 3D Text to Title
The next text motion template is the ‘Multipurpose Clean 3D Text to Title’ also created by Mogrt. This one is text motion graphics that you can use for Premiere Pro and, with proper customization, and be used for just about anything that you want! It’s a very multi-purpose kind of graphic, one that you can maybe sneak in as an advert or for announcing celebrations or anniversaries!
As a final note, if you want to use this graphic as text motion for after effects , it is available for that as well!
03Simple Motion Text | Premiere Pro
This next template, the ‘Simple Motion Text’ graphic, is one that is available for both Premiere Pro and After Effects (though the link we’ve provided is for the Premiere Pro version!) As the name implies, the animation is quite simple, which may be exactly what you want, in any case. It certainly makes it very versatile (especially as you can change font style and color as you will). Making it the perfect template for a beginner that’s just starting out and doesn’t want anything too complicated.
0430 Glitch Text Presets For Premiere Pro | Mogrt
This next template, the ‘30 Glitch Text Presets’ by Mogrt is a Premiere Pro exclusive! It’s also quite fun in its particulars. As a template, it’s not as versatile as the one that we introduced previously, since the ‘glitch’ effect gives off quite the unique vibes, but that doesn’t make it any less potent at catching the eyes of your audience!
The best part, in this case, is that it comes with 30 pre-sets, all with fitting glitch sound effects (included in the pack) that you can use. Of course, there are other customization functions as well, including font style, color, transparency, and so on.
05Comic Bubbles MOGRT
Again, this next templated, called ‘Comic Bubbles’, kind of has its own unique vibe, making it inflexible in some ways but also more fun if that’s the kind of look that you’re looking for. Which, in this case, are literal ‘Comic’ text bubbles, like you would see in your old 90s comic (loud, pop-y, and with lots of bright colors!) The only difference from that to this is that these comic text bubbles move, allowing you to create ‘punchy’ text in between animated projects.
For your reference, there are 80 different comic bubbles included in the pack. All of which are easy to customize and will allow you to adjust colors, text, and transition effects (have a look at the video that we’ve linked if you want to see it in action!)
06Smoke To Text Reveal (Mogrt)
This next template, ‘Smoke to Text Reveal’ is another one that serves a very particular need. To help with visualization, the text motion graphics are at first obscured by smoke before it bubbles up into a crisp, modern text reveal! It’s perfect for those looking for underwater-themed text motion graphics. Or those who want to serve a hint of mystery with the smoke effect.
This is Text Motion Graphics - Premiere Pro. And the best part about it is that you can customize the text and the background at will — allowing you to truly make the template your own and make the most out of the smoke-to-reveal effect.
07Text Messages Toolkit
Want to appeal to the Gen Z audience? Then, the ‘text messages toolkit’ might be a fun text motion graphics for you to try. As you can perhaps surmise from the name, it’s a template that you can use in order to create ‘text message’ interactions. It’s customizable too! You can change the text box color, size, transparency, and just have a ball pimping it out of that’s what you want.
08Large Text Title Block
With the ‘large text title block’ template, you have the flexibility of the naturally more modern and minimalistic design, allowing you to use it for a wide variety of different projects. It works especially well for advertisements, if you’re wondering about potential uses, or as transition graphics between text to video!
09Blueprint Titles
Want something that’s a little quirkier? Or, perhaps, instructional? Then the ‘Blueprint Titles’ template is one that you can consider. As you can perhaps guess from the name, it allows you to create text motion graphics in a style that is similar to the kind of blueprints you usually see when working with design or architecture.
10Dynamic Minimalism
Sometimes, simple really is best! And, this next template, the ‘Dynamic Minimalism’ text motion after effects and text motion graphics premiere pro template is one that you might want in your arsenal just for the sake of your simpler projects! The kit comes with 30 different animations, as well as other customization functions that you can play around with to add a little personality to what are otherwise very minimalistic designs.
Part 3 Tutorials for Making Great Text Motion
For the last part of this article, we’ll be introducing some tutorials that you can refer to while trying out the templates that we recommended! We’ve pulled all of this from YouTube so that you can start learning immediately! And, of course, a variety has been chosen so that you can get your info from more than one source.
01Smooth Professional Text Animation in Premiere Pro - TUTORIAL
The first tutorial we have for you was created by Ignace Aleya on YouTube. This tutorial is a ‘Premiere Pro’ tutorial that focuses on helping beginners and intermediate users alike in understanding the ways of text motion graphics. He offers some pretty good pointers and tricks on keeping the quality of your work high. And the way that he shares his knowledge is pretty solid too! Allowing you to both watch and enjoy the video.
02Easy Title Motion Graphics
This next tutorial is about text motion graphics while working in Adobe After Effects. Like the previous tutorial, it will teach you the basics of using templates! It was posted by SonduckFilm, and the video covers five different “Easy Title Motion Graphics” as examples! Altogether, it’s a great choice if what you’re looking for is tips on making the most out of the templates we introduced on our list.
03Basic Logo Animations
Next, we have a tutorial from the YouTube content creator, Broken! This one is on the subject of both simple and complex logo animations that you can create when working on establishing a brand. It’s a great video for beginners and is quite informative on the subject of customization.
● Key Takeaways from This Episode →
● What is text motion and why do you need to start using it for your own projects ASAP? Well, text motion graphics are, basically, text animation! They’re eye-catching and informative at the same time, making them a great vessel for getting a message across to your audience.
● If you want to start creating text motion graphics yourself, we suggest starting with templates first! At least then, you’ll be able to make yourself comfortable while learning about the opportunities available to you.
● There are many different templates out there that you can try. Some are multi-purpose, some not. We’ve chosen a variety to introduce to you in of this article! Complete with a list of some tutorials in that you can refer to no matter what kind of project you’re working on.
Best Practices on Online 3D Avatar Creator
Best Practices on Online 3D Avatar Creator
An easy yet powerful editor
Numerous effects to choose from
Detailed tutorials provided by the official channel
Avatar will match your personality to your social media profiles, YouTube videos, Snapchat, and many others. With 3D Avatar makers online, designing an Avatar is about customizing the color, layout, typography, and other designs and instantly sharing your Avatar to the social media digital platform as easy as choosing a template, customizing, and sharing.
The new software involved in AR and VR technologies uses these realistically customized Avatars. The accurate representation of virtual reality will give a feeling of being in an absolute sense. Users will love to create an avatar representing themselves in the virtual spaces. Making an avatar does not mean you lock your personality; you can change it anytime. This Avatar is created by capturing a webcam, ensuring it is perfect. We will discuss many free 3D Avatar creators online.
In this article
01 [What is a 3D Avatar?](#Part 1)
02 [Best 10 Practices on How to Create an Avatar for Spatial](#Part 2)
03 [How to Create a Gallery in Spatial for Your Art (NFT and Non-NFT)](#Part 3)
04 [How to Build Your Own 3D Avatar Accurately?](#Part 4)
Part 1 What is a 3D Avatar?
In Computer graphics, Avatar is the virtual representation of the user. This can be in the 2D illustration used as a profile picture and 3D representation used in games, VR, and AR technologies. Lately, termed as “Picons,” which means personal icons, but not used now. The use of these avatars was first coined by Neal Stephenson in 1992, which is a stepping stone for the vast Metaverse Universe. A graphic representation by which users wish to represent themselves. It is a caricature of a person, not precisely a photography of that person, is a simple fancy cartoon and bizarre structure; however, the images of natural objects identify the shape and design.
They are widely in online games and websites. They are an integral part of online chat, messaging systems, blogs, and artificial intelligence, especially VR. There are many Online 3D Avatar Creators available, and we shall you get the right match.
01What is Avatar Social Media?
These days’ social media play an integral part in our lives personally and professionally. We can connect with friends and customers easily sitting at the desk. An Avatar can be a profile picture on social media such as Bitmoji. Most users use their photos, sometimes supplemented by digital frames. There are various definitions to represent Avatar-like on social media it is a tiny cartoon picture representing us or our business in social media. Even if it is small, it can significantly impact the people who visit our profile to contact us, so we need to make sure it accurately represents who we are by utilizing an avatar. Keeping a profile picture is very important in social media, which creates a great impression to the followers than visiting a default profile picture set by the applications. There are many free 3D Avatar creators online from which you can create a free 3D avatar and directly share it on your social media.
02Why Do You Need a 3d Avatar?
These 3D avatars show a sense of seriousness and trust. Customers and people who communicate with them directly using avatars feel as if they are physically present in front of them, which makes them joyful, confident, and satisfied. Intelligent technologies like IoT and Machine learning have converted their way of working with 3D avatars having the central part. This is the beginning of the Metaverse universe, where we will have 3D Avatars in malls as salespersons and waiters in restaurants, and many more.
Part 2 Best 10 Practices On How To Create An Avatar For Spatial
Avatars being the most exciting topic for us today, let us get into creating the best Avatar and 3D avatar creator online for free. Besides, we shall see the software and unique features available in it.
01What Are the Best Avatar Creator?
Creating an Avatar can be seen to be complicated, but it is not. You need not even use complex software to create avatars. Let us discuss some Best Avatar Creators in the market to date.
❶ Face Your Manga
Face Your Manga is a 3D Avatar creator Online. We have truly outstanding and most generally utilized Avatar creators getting going our list. Face Your Manga allows you to make a graphical cartoon version of yourself, and it offers a ton of customization features like skin tone, structure, and shape.
There are some default formats, yet you can change them if you feel more innovative. The site is simple to use and free, so you have nothing to lose to create a free 3D Avatar.
![]()
❷ Bitmoji
Bitmoji is the most popular and well-known option on this list, and it’s also the best option for having Animoji on Android! It’s the most popular application in the Play Store, with around 100 million downloads.
With Bitmoji, you can undoubtedly make a ton of stickers and emojis with your face, which means you’ll have the option to effectively and completely put yourself out there. It incorporates a face-like, laughing, crying face, and that’s just the beginning. This is a free 3D avatar creator online that you can get from the Play Store.
![]()
❸ BeFuncky
BeFuncky is a 3D Avatar creator online to edit your photo creatively. This is extraordinary for the people who need to make an Avatar taking motivation from an image without the expectation of making it too cartoony.
You can blow up colors, including a few genuinely fascinating impacts, or essentially change the contrast. Regardless, the site creates a free 3D Avatar loaded with choices!
![]()
❹ PickaFace
A genuinely excellent site we can suggest you use is PickaFace, as it is a 3D avatar creator online. It has a creative drawing style, extraordinary for the people after something more careful than most applications and sites offer.
Considering all the things it offers, including a ton of customization choices, we can say, PickaFace creates a free 3D avatar like no other subscription software.
![]()
❺ Doppelme
We have Doppelme among the best 3D Avatar maker online to finalize the list. The site is similar to other choices we’ve discussed, with numerous customization choices.
The figures and cartoons you create can be changed in any way you choose, whether for your symbol or your friends.
![]()
02Top 8 Practices On How To Create An Avatar For Spatial
To begin creating avatars in spatial, you only need to submit a single photo of yourself. Spatial believes that avatars will have a significant impact on the internet.
●Start by creating a Spatial Account for you using Google, Microsoft, or Slack accounts. The best practice in Spatial is to add good light and color to the Avatar.
●After this, you have to create an avatar with the first step with your webcam, make sure the photo is clear and has perfect light on it.
●Later in your profile, you will have an edit menu to edit your Avatar anytime.
Light is an essential feature in avatar creation. That will create a better light than artificial lightning.
●Spatial will begin to generate a 3D avatar of you once it has a good photo of you.
●You may modify the shirt, skin tone, and color. After you’ve used all of your ingenuity, click “Looks Good,” and you’re done.
●Next, you can customize your Avatar. There is the customization of body, shape for men, woman. Users love to make the Avatar look like themselves. You can make a hand body effect while using VR headsets if you are a hand talker. If joined from the web, you will have different movements with keyboards like dancing.
●Make changes to spatial VR avatar anytime and update. You can change the skin tone, color of the shirt, and your name. The realistic effects create a real presence in VR meetings.
❶ Spatial – Collaborate From Anywhere In Ar.
This is the launch film of Spatial, “A short real-time in Spatial,” a better way to build and work together, a way that brought us to sit next to each other face to face.
●Spatial is a collaborative computing environment that combines all the creativity and visualizes it in the room.
●All of your digital devices are seamlessly tied together into an infinite workspace.
●With a click, you can expand the world’s information with all the power.
●Using AR, infinite canvas pixels become tactile, letting you manipulate them like clay.
●You can sketch a drawing on paper and have them in front of you as a visual.
❷ Spatial Passthrough Prototype
●With this passthrough, you will feel a completely immersive experience.
●To avoid this, Facebook has partnered with spatial and Logitech for the K830 keyboard, which will help users prevent mixed sensations and provide a complete VR experience.
●Facebook says this will provide an infinite office experience.
●There are multiple customizable screens and multiple monitor setups.
●Companies have already collaborated with spatial to bring up infinite offices.
❸ Microsoft Build Keynote collaboration with Spatial
Microsoft and Teams have worked with Spatial.
●A Spatial option on the team’s channel allows you to enter a 2D meeting with avatars.
●To turn something into 3D, scan the QR code and put on the VR or AR Hololens glasses.
●Through Hololens, they can access data with Microsoft productivity apps.
●They can also adjust the position of the robot.
●The eye-tracking is good, which enables the avatars to convey user emoticon.
❹ Qualcomm Snapdragon Summit Keynote
The stage where the digital world is changing, where virtually everyone and everything is connected. We are moving into the world of VR, which is the next noble platform.
●We are all going to wear glasses for effective and interactive communication.
●Spatial tools are already used in companies like Purina to bring the teams together.
●Spatial allows all people on Oculus, Hololens, and even AR-capable smartphones to engage in one virtual environment.
●These are used in games like Pokémon.
●There will be a vast development in technology with these features.
❺ Hololens 2 Launch Keynote
●Hololens is very comfortable and fits like a hat.
●And it signs in as we put on the device.
●After recognizing your Hololens, recognize your hands and then the world.
●You can touch the holo, move it and even resize it.
●Hololens collaborated with Spatial with many more features involved in connecting people, playing games, etc.
❻ Spatial In the Wall Street Journal
●With Virtual reality headsets like Hololens and Oculus Quest with virtual reality platforms like Spatial, you can meet up and collaborate with colleagues and friends.
●You can switch to any world you choose using VR Headsets within a second.
●Before this pandemic, VR used in the market was forecasted at about 829 million in 2018.
●If you wear a holographic headset, you can feel like someone is there with you in the room, and it feels natural.
●Connecting through Spatial is very simple. You need to need to sign in through a Spatial account.
❼ Spatial on TED
This is a video of the Co-founder talking about the improvement of technologies and the transformative nature of Holographic Telepresence.
●The technology improvement from wired telephones to phones and now zoom meetings to VR and AR meetings.
●The troubles in ordinary meetings end through these VR technologies.
●TED has collaborated with Spatial to increase its market.
●TED is an online broadcast that focuses on the target audience with scripted logic.
●The seized extend how to use most of the Spatial features.
❼ AR Insider – A Publication about Spatial Computing
●AR insider profiles as the most significant innovation in VR technologies.
●This is the most crucial feature in Spatial Computing producing the best VR experiences.
●This is like a launchpad to update daily insights of Spatial computing.
●They collect data from top sources.
●It is also seen as a business angle because it has fun games in AR and VR and technical.
Part 3 How To Create A Gallery In Spatial For Your Art (Nft And Non-Nft)
Many artists and creators have been working in Spatial to show their talents on social platforms.
Provide the 3D models the stage they deserve.
You can directly drag/drop your files into Spatial directly.
NFT artists and collectors can import directly from the collections via the Metamask integration.
You can use the gorgeous environment in the library or use your 3D model of yours to set a unique customer environment.
The technologies will be helpful to create an Avatar and Digital Twins to humanize the remote work as companies move to the hybrid work methods.
The future of the world will look like a science fiction movie.
The AR and VR promise to revolutionize the workplace.
The digital twins will be the following way to show ourselves to the digital environment in a decade.
VR headsets are getting cost-efficient, and people are starting to use them. It has to be still improved to be more efficient and lighter.
Part 4 How to Build Your Own 3D Avatar Accurately?
Turning into an Avatar or Disney character is now accessible using AI software like Wondershare Wondershare Filmora Video Editor . Among the various trends in social media, creating an Avatar is getting trendy nowadays. Let us discuss the steps to create a 3D Avatar creator online.
For Win 7 or later (64-bit)
For macOS 10.12 or later
Step 1: To start learning to create a 3D avatar, you need to know how to make layers and stack them on each other.
Step 2: Later, you can “Liquify” the layers to form a mold for your Avatar.
Step 3: Before turning it into a cartoon, apply the skin smoothening effects to create a more realistic image.
Step 4: Now, you can apply details like eyes, nose, hairs, dress, and facial lines to your Avatars.
Step 5: You can change the color of any particular feature.
Compared to all other 3D Avatar creators online free, Wondershare Filmora Video Editor is the most user-friendly and efficient software.
● Key Takeaways from This Episode →
● Learned about multiple applications available for creating 3D Avatars
● Looked into the future world through Spatial
● Discussed the steps involved in making a 3D Avatar maker online using Wondershare Filmora Video Editor
Can I Still Do Animated Logo Design Without Design Skills?
Can I Still Do Animated Logo Design Without Design Skills?
An easy yet powerful editor
Numerous effects to choose from
Detailed tutorials provided by the official channel
In the fast-moving world, you cannot afford to keep your brand design still as it doesn’t influence the audience toward your business. It is pretty essential to create an impressive and animated logo for the brand.
This article will discuss how you can create an animated logo design even if you do not have design skills.
In this article
01 [This is What a Conventional Professional Animation Designer Should Be](#Part 1)
02 [Your Number 1 Tip to Do Animated Logo Design Without Design Skills](#Part 2)
03 [This is the Smartest Tip Ever About Filmora](#Part 3)
Part 1 This is What a Conventional Professional Animation Designer Should Be
01How to Make an Animated Logo for an Animation Designer?
There are various online logo maker tools available to create an animated logo design for your brand easily. There are several online logo makers available from which you can easily create an effective animated logo for your business. We will discuss Canva online logo maker for a better understanding of making the online animated logo design for the brand. All you have to do is to follow the simple steps listed below.
Method to make the Animated Logo Design for your Business
Step 1: Initiate with Canva
Initially, you need to launch Canva and choose “Animated Logos” for the library of effectively and professionally designed templates through which you can create inspiration and further customize it accordingly.
Step 2: Choose the appropriate design as per nature of business
Now, you have to select any one of the designed templates that seem closest to the look you are looking to give to your brand. All the templates available are professionally designed and fully customizable. You can even initiate the process with the blank design template from scratch. It would help if you made sure that you were looking to create a simple or complex design for the logo.
![]()
Step 3: Customization of the animated logo
Now is the time to customize your logo. You can use a lot of creativity and skills. Think about your business and how the logo should and take help of the font styles, design colors, font size, video background, and text to bring out the best in your animated logo design. Look for what effect you want for the logo design. Apart from this, it is better to animate the text and elements separately or set the complete design into motion. After successfully editing the design of the logo, you need to proceed to the next step listed below.
![]()
Step 4: Download the file in required format
When you are satisfied with the logo animation design, you need to save it. Also, you can download it into high-resolution either in MP4 videos or GIF files as per your choice. With MP4 file, you will need to include the audio files; however, if you choose GIF files, it will provide you with brief and compressed clips with no audio.
![]()
Step 5: Include the file to your various visual branding media
Lastly, you need to recall and recognize the brand by employing an innovative animated logo in different visual media like social media accounts, websites, and various advertising and promo videos. After making a creative animated logo design, you can use it on your website or different social accounts to attract your business audience.
02How Much Does a Professional Animated Logo Cost?
The cost for the professional animated logo is not fixed, as it depends on the work you have done while making a logo for your brand. In general words, it can be said that the price for animated logo design is anywhere from $0 to $1000. However, if you have a small firm or startup looking to get a quality design, it will cost you between $300-$1300. Suppose you have a large-scale business and are looking to replace the traditional logo design with a customized animated logo. In that case, you will be required to hire a professional logo designer who will look after the design and make it creative.
Part 2 Your Number 1 Tip to Do Animated Logo Design Without Design Skills
011. 5 Tools You Need to Make an Animated Logo
When looking to create an animated logo design free for your social media account or website, you need to understand that you will require some tools to create it impressive and professional. The 5 tools or the websites used for making the animated logo design are listed below:
● Canva
● Filmora
● Designhill
● Squarespace
● Hatchful
025 Tips to Animate a Logo
● Make sure to use images that include transparent background
You need to make sure that when you upload any images or illustrations, it must include a transparent background so that you will be able to make a seamless animation logo without having pesky color and look attractive to the audience.
![]()
● Select the suitable template for the business
You will discover several template options available while using the animated logo designer; however, you need to make sure that chosen template must align with the business nature. For example, if you sell organic products, you need to choose the environment design template.
![]()
● Make use of masks appropriately
A mask is defined as the container for the photos. The logo design maker service provides interesting masks in different shapes to make a stunning and appealing animated logo after effects. You are required to use masks with photos, solid color, and shaded background.
● Keep it simple and short
Always try to make logo design short and straightforward! If you are using too many effects and colors in the logo design, it turns complex for the audience.
![]()
● Create an impact on the audience
To impact the audience, you need to make sure that the animation doesn’t last longer than 3-4 seconds. The templates collections of the different logo design makers are perfectly timed; therefore, there is no need to worry about making long animation.
Part 3 This is the Smartest Tip Ever About Filmora
01What’s Filmora?
![]()
Wondershare Filmora is video editing software available on Wondershare that facilitates you to explore creativity and make the cinematic magic regarding the professionally designed videos. This tool comprises a wide range of visual effects, video editing features, and motion graphics, making it the most preferred and ideal tool for video editing purposes. If you are looking to use the tool, all you have to do is download the Filmora software on your Windows or Mac system. After downloading the software, please install the program, run it and start using it.
Wondershare Filmora
Power Up Your Story with Filmora. Professional video editing is made easy.
Requirement
Windows- Win 8 or later (64 bit OS) and MAC- macOS X 10.13 or later.
The state-of-art feature of the tool makes it one of the most preferred tools for video editing, especially for the filmmaker and video editors.
02Is It Possible to Add a Video to the Animated Logo?
Yes, you will include video to the animated logo by selecting the “Video” tab. Along with such, add it to a text or make use of them as the background. You also need to understand that such videos are accessible to Filmora Pro members.
03Is the Music Available on the Asset Library Royalty-free?
No, if you are using royalty- free assets you are required to pay for getting the access…
04How to Make an Animated Video in a Snap?
If you are looking to create an animated video in a snap, you need to follow the below steps:
Step 1: Choose the incredible tool for making animated videos: You need to download the tool and register your account.
Step 2: Select a well-made animation template: Select the template from the library of the tool and launch your trip of creation.
Step 3: Drag and drop: Drag and drop the content to the canvas and customize every aspect of the video with complete flexibility.
Step 4: Download and share: Download your creation to the device and also remember to share it on your social media account for better reach.
Key Takeaways from This Episode
● Filmora makes the video editing experience more engaging and hassle-free. It can be easily downloaded on your Window or Mac System by visiting the Wondershare official website. It includes several editing options which help you to create an engaging animated video.
● You can make animated logo designs even if you don’t have design skills by choosing the online logo design maker over the Internet. The template will be initially provided to you; all you have to do is select the correct template following the nature of your business.
● You can easily add multimedia files like audio and video to your animated logo design by selecting the “Video” tab. Along with, such add it to a text or make use of them as the background. Therefore, it can be concluded that you can easily create an animated logo design without design skills and give your brand professional and valued recognition.
● If you have any recommendations or doubts regarding the discussion, please let us know by commenting on the box below.
4 Things You Need to Know About Pinterest GIF
4 Things You Should Know About Pinterest GIF
An easy yet powerful editor
Numerous effects to choose from
Detailed tutorials provided by the official channel
Emojis formerly reigned supreme, but GIFs and memes have since supplanted them. When you add a GIF to a conversation, it becomes more exciting. GIFs are considerably better at communicating our feelings, and they deserve credit for that. Pinterest, like other social networking sites and chat apps, enables GIFs. Pinterest is a photo-sharing website where you can find home decor ideas, recipes, fashion inspiration, DIY projects, and more.
Compared to a static image, adding a GIF to Pinterest conveys more information. You can make GIFs for your DIY projects or use them to display all sides of a cushion, which would typically require many images. But what if you like a GIF you found on Pinterest? What’s the best way to get it? That is what we will demonstrate here. This article will show how to download Pinterest GIFs to your computer and mobile device.
In this article
01 [Are There Gifs on Pinterest?](#Part 1)
02 [How to Get Pinterest GIF Downloader](#Part 2)
03 [How to Get an Animated GIF on Pinterest](#Part 3)
Part 1 Are There Gifs on Pinterest?
You can submit GIF and animated GIF images from your computer or the Internet to Pinterest. Because the pictures on your board aren’t animated, you might conclude that animated GIFs don’t work on Pinterest. When you click on the photos and open them on their respective Web pages, they become animated. Because images posted from websites do not save on Pinterest’s servers, they are not animated. You can’t do anything if Pinterest doesn’t animate a GIF.
Part 2 How to Get Pinterest GIF Downloader
Compared to a static image, adding a GIF to Pinterest conveys more information. You can make GIFs for your DIY projects or use them to display all sides of a cushion, which would typically require many images.
But what if you’re a Pinterest fan of a GIF? What’s the best way to get it? That is what we will demonstrate here. We’ll show you how to complete a Pinterest GIF video download to your computer and mobile device in this session.
Let’s get started.
01How to Download Pinterest Videos Using Mobile?
Here are simple steps to follow to achieve this:
Make use of the native download button
Step 1: Select GIF to download
Go to the selected GIF and click it.
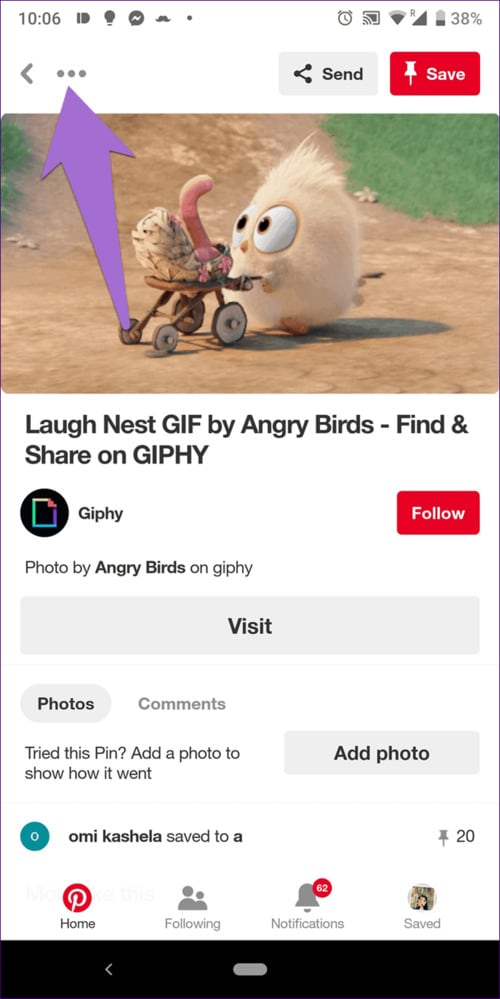
Step 2: Download Image
Click the three-dot icon at the top from the menu and select Download image.

Step 3: Notification
After the image gets saved, you will receive a notification at the bottom. The freshly downloaded GIF will appear in your gallery or camera roll when you open it.
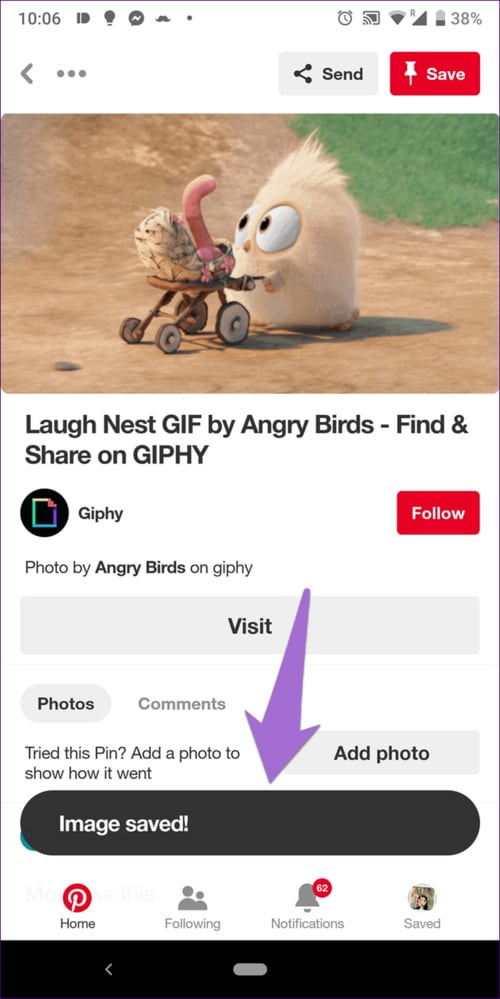
02How to Download Pinterest Videos by Computer?
Follow these simple step guides to achieve this:
Step 1: Open selected GIF
On your computer, open the GIF you want to use.
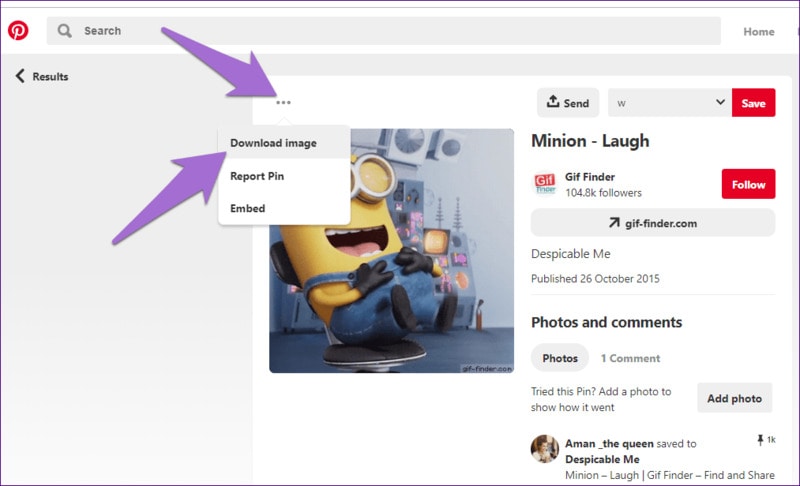
Step 2: Select Download
Select Download image from the menu by clicking on the three-dot icon above the GIF.
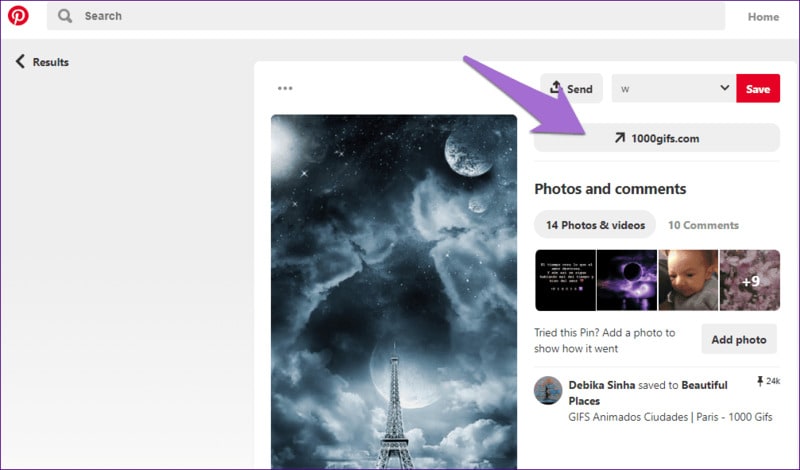
Step 3: Alternative
If the download option isn’t available for any reason, you’ll have to rely on the company’s
website. To do so, click on the GIF’s link.
You’ll reach the GIF’s host site. Right-click on the GIF and choose to Save image as… from the menu that appears. Ensure that the extension is . GIF. In some circumstances, you will have the opportunity to download the video.
Part 3 How to Get an Animated GIF on Pinterest
Save a picture from the Web to your hard drive before pinning it; GIFs pinned from Web pages are not animated. Open the Web page with the image you want to pin, then right-click the image and opt “Save as” to save it to a folder on your computer. You can save pictures off the Web in all major Web browsers, including Google Chrome, Mozilla Firefox, and Internet Explorer. Log in to Pinterest select “Upload a Pin” from the “+” menu. Select the animated GIF from your hard drive by clicking the “Choose Image” button. Click “Pin It” after selecting the board you wish to pin the image.
How to Upload a GIF to Pinterest
Now that you know how to download Pinterest GIFs, you may want to consider posting GIFs to Pinterest as well. Unfortunately, you cannot upload GIFs from mobile apps. To upload a GIF to your Pinterest account, you’ll need to utilize a computer.
If you have a GIF file on your computer, follow these instructions to add it.
Step 1: Log in to your Pinterest account
Log in to your Pinterest account, then go to the bottom of the page to the add icon. From the menu, choose to Create a Pin.
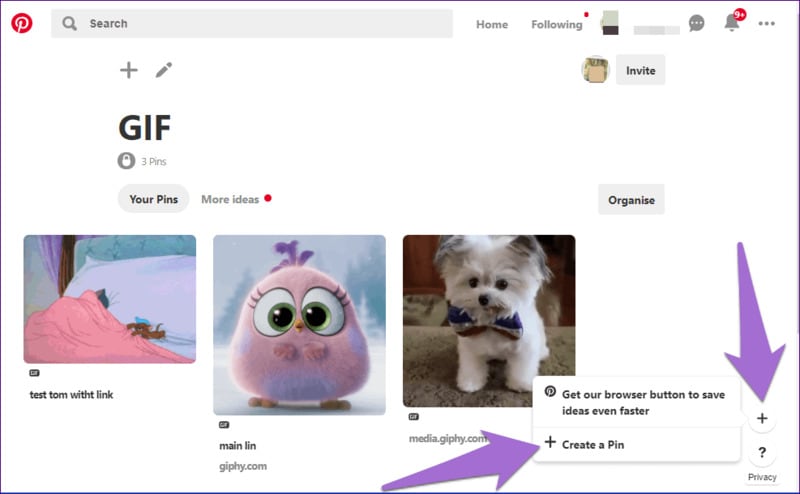
Step 2: Upload GIF
Drag and drop the GIF or upload it onto the pin creation screen from your computer.
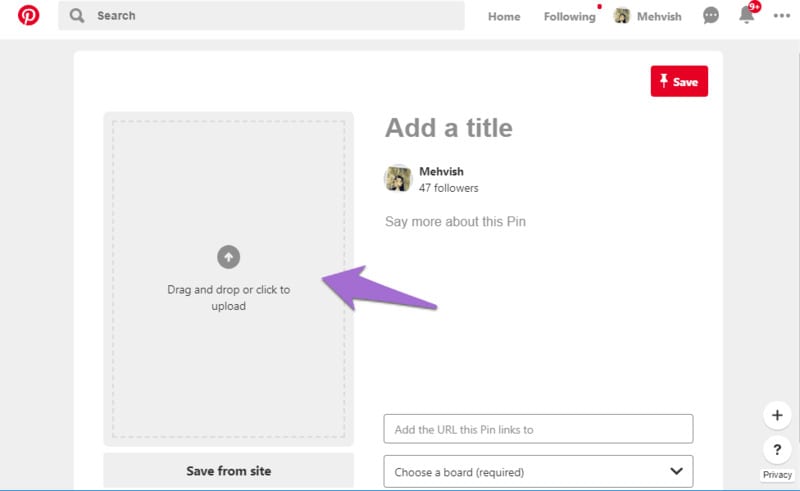
Step 3: Save GIF
When the GIF appears on the next screen, describe it and select a board for the pin. Finally, press the Save button.
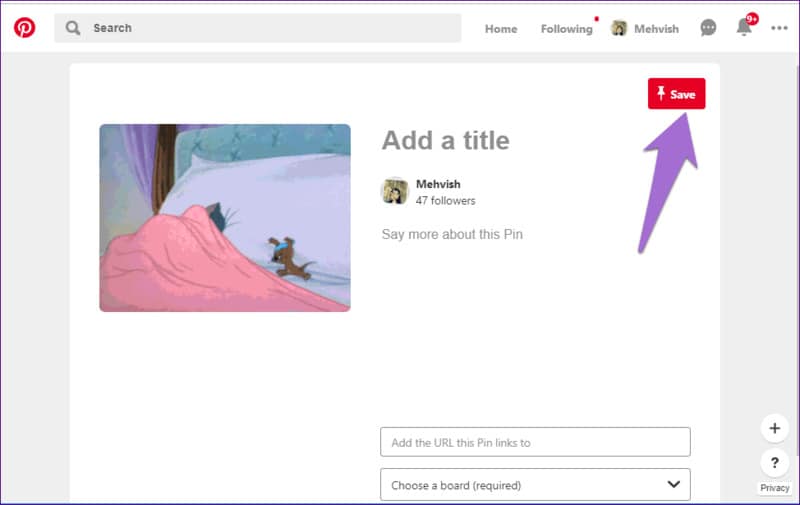
To save a file with the.GIF extension, you’ll need to use a GIF Pinterest downloader software or an application usable both online and offline. Wondershare Filmora is the most popular programs for this work because of the following benefits: it is elementary to use, and anyone can handle who isn’t technically inclined.
Wondershare Filmora Video Editor can convert Pinterest video to GIF from various video formats, including.wmv,.mp4,.mkv,.evo,.dat,.wav,.mpeg, and.avi, so you don’t have to worry about compatibility.
Wondershare Filmora
Get started easily with Filmora’s powerful performance, intuitive interface, and countless effects!
Try It Free Try It Free Try It Free Learn More >
The most important thing to know about Filmora video editing software is that it allows users to edit GIF files is one of the preferable programs for this task due to its advantages. It is elementary to use and is operational by any nontechnical person.
● Key Takeaways from This Episode →
● Now have learned how to easily download GIFs from Pinterest using Pinterest GIF downloader. By sincerely following the simple tips listed above, you can easily download video on GIF from Pinterest using any device on your mobile phone or your PC.
● However, Wondershare Filmora is one app that can meet all your needs to create a unique Pinterest GIF. And to top is all it is easy to use for none professionals
Emojis formerly reigned supreme, but GIFs and memes have since supplanted them. When you add a GIF to a conversation, it becomes more exciting. GIFs are considerably better at communicating our feelings, and they deserve credit for that. Pinterest, like other social networking sites and chat apps, enables GIFs. Pinterest is a photo-sharing website where you can find home decor ideas, recipes, fashion inspiration, DIY projects, and more.
Compared to a static image, adding a GIF to Pinterest conveys more information. You can make GIFs for your DIY projects or use them to display all sides of a cushion, which would typically require many images. But what if you like a GIF you found on Pinterest? What’s the best way to get it? That is what we will demonstrate here. This article will show how to download Pinterest GIFs to your computer and mobile device.
In this article
01 [Are There Gifs on Pinterest?](#Part 1)
02 [How to Get Pinterest GIF Downloader](#Part 2)
03 [How to Get an Animated GIF on Pinterest](#Part 3)
Part 1 Are There Gifs on Pinterest?
You can submit GIF and animated GIF images from your computer or the Internet to Pinterest. Because the pictures on your board aren’t animated, you might conclude that animated GIFs don’t work on Pinterest. When you click on the photos and open them on their respective Web pages, they become animated. Because images posted from websites do not save on Pinterest’s servers, they are not animated. You can’t do anything if Pinterest doesn’t animate a GIF.
Part 2 How to Get Pinterest GIF Downloader
Compared to a static image, adding a GIF to Pinterest conveys more information. You can make GIFs for your DIY projects or use them to display all sides of a cushion, which would typically require many images.
But what if you’re a Pinterest fan of a GIF? What’s the best way to get it? That is what we will demonstrate here. We’ll show you how to complete a Pinterest GIF video download to your computer and mobile device in this session.
Let’s get started.
01How to Download Pinterest Videos Using Mobile?
Here are simple steps to follow to achieve this:
Make use of the native download button
Step 1: Select GIF to download
Go to the selected GIF and click it.
Step 2: Download Image
Click the three-dot icon at the top from the menu and select Download image.
Step 3: Notification
After the image gets saved, you will receive a notification at the bottom. The freshly downloaded GIF will appear in your gallery or camera roll when you open it.
02How to Download Pinterest Videos by Computer?
Follow these simple step guides to achieve this:
Step 1: Open selected GIF
On your computer, open the GIF you want to use.
Step 2: Select Download
Select Download image from the menu by clicking on the three-dot icon above the GIF.
Step 3: Alternative
If the download option isn’t available for any reason, you’ll have to rely on the company’s
website. To do so, click on the GIF’s link.
You’ll reach the GIF’s host site. Right-click on the GIF and choose to Save image as… from the menu that appears. Ensure that the extension is . GIF. In some circumstances, you will have the opportunity to download the video.
Part 3 How to Get an Animated GIF on Pinterest
Save a picture from the Web to your hard drive before pinning it; GIFs pinned from Web pages are not animated. Open the Web page with the image you want to pin, then right-click the image and opt “Save as” to save it to a folder on your computer. You can save pictures off the Web in all major Web browsers, including Google Chrome, Mozilla Firefox, and Internet Explorer. Log in to Pinterest select “Upload a Pin” from the “+” menu. Select the animated GIF from your hard drive by clicking the “Choose Image” button. Click “Pin It” after selecting the board you wish to pin the image.
How to Upload a GIF to Pinterest
Now that you know how to download Pinterest GIFs, you may want to consider posting GIFs to Pinterest as well. Unfortunately, you cannot upload GIFs from mobile apps. To upload a GIF to your Pinterest account, you’ll need to utilize a computer.
If you have a GIF file on your computer, follow these instructions to add it.
Step 1: Log in to your Pinterest account
Log in to your Pinterest account, then go to the bottom of the page to the add icon. From the menu, choose to Create a Pin.
Step 2: Upload GIF
Drag and drop the GIF or upload it onto the pin creation screen from your computer.
Step 3: Save GIF
When the GIF appears on the next screen, describe it and select a board for the pin. Finally, press the Save button.
To save a file with the.GIF extension, you’ll need to use a GIF Pinterest downloader software or an application usable both online and offline. Wondershare Filmora is the most popular programs for this work because of the following benefits: it is elementary to use, and anyone can handle who isn’t technically inclined.
Wondershare Filmora Video Editor can convert Pinterest video to GIF from various video formats, including.wmv,.mp4,.mkv,.evo,.dat,.wav,.mpeg, and.avi, so you don’t have to worry about compatibility.
Wondershare Filmora
Get started easily with Filmora’s powerful performance, intuitive interface, and countless effects!
Try It Free Try It Free Try It Free Learn More >
The most important thing to know about Filmora video editing software is that it allows users to edit GIF files is one of the preferable programs for this task due to its advantages. It is elementary to use and is operational by any nontechnical person.
● Key Takeaways from This Episode →
● Now have learned how to easily download GIFs from Pinterest using Pinterest GIF downloader. By sincerely following the simple tips listed above, you can easily download video on GIF from Pinterest using any device on your mobile phone or your PC.
● However, Wondershare Filmora is one app that can meet all your needs to create a unique Pinterest GIF. And to top is all it is easy to use for none professionals
Amazing Ideas About Creating Personalised WhatsApp GIF Sticker
Stunning Ideas About Creating Personalised WhatsApp GIF Sticker
An easy yet powerful editor
Numerous effects to choose from
Detailed tutorials provided by the official channel
WhatsApp has become the most popularly and widely used medium for text conversation and with the reach of the platform increasing every day, new features are added from time to time to keep the users hooked. In the same line, WhatsApp now allows creating customized animated GIF stickers to be used in the chats.
Animated stickers will let you express your feeling and thoughts through animations which will surely make the conversation more interesting. These stickers can be created on your Android as well as iPhone. The article below will help you to know the detailed process to create GIF sticker WhatsApp and also how these stickers can be used in your videos to make the videos more entertaining.
In this article
01 [How to Create Custom Animated WhatsApp Stickers on Android and iPhone](#Part 1)
02 [How to Use Custom Stickers in Filmora?](#Part 2)
Part 1 How to Create Custom Animated WhatsApp Stickers on Android and iPhone
Animated third-party stickers cannot be added directly to WhatsApp and thus you can create a customized one. To create these GIF stickers for WhatsApp, you would need the help of third-party apps.
For Android devices, one such popular app is the Sticker Maker app. For iPhone, we suggest using Sticker Maker Studio app.
Once these apps are installed on your device, GIF stickers can be made in no time.
Steps to make sticker GIF WhatsApp on Android phone
Step 1. Download, install and open the Sticker maker app on your Android device.
Step 2. Tap on the “Create a new sticker pack” option on your app.
Step 3. Give the desired name to your sticker pack and click on the Create button.
Step 4. To add the animated stickers, click on the created sticker pack.
Step 5. Next, click on the first box, and then from the menu choose the Select file option.

Step 6. Next, choose the video from your phone from which you wish to create a sticker. You can even add a GIF file. After the media file is added, the app will compress it and will turn it into an animated sticker automatically.
Step 7. Now, you need to add 3 animated stickers to the other boxes of the sticker app (as mentioned in step 5).
Note: Multiple stickers can be added using the same process.
Step 8. Click on the “Add to WhatsApp” button after a minimum of 3 stickers are added to the pack.
Step 9. Now, your stickers are ready. Open the WhatsApp chat and launch the sticker panel where you can see your created GIF stickers. Choose the sticker you want, add it to your chat, and send it.

Steps to make WhatsApp Sticker GIF on iPhone
Step 1. On your iPhone, download, install and launch the Sticker Maker Studio app from the app store.
Step 2. Choose the sticker pack and also the name of the author at the respective boxes and then click on the Create button.
Step 3. Next, click on the new sticker pack that is created.

Step 4. Multiple boxes will now appear from which you need to choose the first one and then
select the Files option.
Step 5. Choose the desired Video from your device from which sticker has to be created. You can also create GIF to WhatsApp sticker. Other stickers to the pack can be added similarly. The app will automatically convert the added file to a sticker.
Step 6. After the stickers are added (at least 3), click on the Add to WhatsApp button at the generated Tray icon.

Note: If you see your tray icon to be blank, click on it else there will be issues adding the stickers to the WhatsApp chat later. A tray icon can be selected from the images.
Step 7. Next, you will be asked if you wish to open WhatsApp, click on Okay.
Step 8. Now, to add the animated GIF stickers to WhatsApp, you need to click on the Save button and your stickers are ready to be used in the chat.

Part 2 How to Use Custom Stickers in Wondershare Filmora Video Editor ?
For Win 7 or later (64-bit)
For macOS 10.12 or later
Why use your customized GIF stickers only in WhatsApp chats when they can be used in Videos as well? Yes, using Wondershare Filmora software you can use your customized animated stickers in your videos as well to make them more eye-catchy and interesting. Additionally, you can also add the effects to your videos using the software.
Wondershare Filmora is a feature-packed that allows creating stunning and professional-looking videos using its wide range of functions like motion tracking, adding effects, color matching, noise enhancement, keyframe animations, adding captions, and much more.
The user-friendly interface makes the tool apt even for beginners.
Steps to add GIF animations to videos using Wondershare Filmora
Step 1. On your Windows or Mac system, launch the software and choose Media > Import> Import Media Files on the main interface.

Step 2. Next, choose and add the created animated sticker to the software interface. Alternatively, you can also select the sticker from Elements. Drag and drop the added sticker to the video.

Step 3. To adjust the parameters like the size and the rotation of the sticker, you need to double-click on the sticker at the timeline. Additionally, color adjustments can also be made and if needed, you can also add 3D motion.

Step 4. To change the size and the location of the sticker, you need to drag it accordingly in
the viewer panel.
Step 5. Next, at the Local tab, choose the video format, resolution, and desktop folder. Finally, click on the Export button to start processing.
Note: The created video can also be saved to DVD or can be uploaded to YouTube and Vimeo directly using the software.

● Key Takeaways from This Episode →
●The latest GIF sticker feature of WhatsApp allows adding interesting animations to your chats.
●To create customized GIF stickers on Android and iPhone, third-party apps have to be used.
●The customized stickers can also be added to your videos using Wondershare Filmora.
WhatsApp has become the most popularly and widely used medium for text conversation and with the reach of the platform increasing every day, new features are added from time to time to keep the users hooked. In the same line, WhatsApp now allows creating customized animated GIF stickers to be used in the chats.
Animated stickers will let you express your feeling and thoughts through animations which will surely make the conversation more interesting. These stickers can be created on your Android as well as iPhone. The article below will help you to know the detailed process to create GIF sticker WhatsApp and also how these stickers can be used in your videos to make the videos more entertaining.
In this article
01 [How to Create Custom Animated WhatsApp Stickers on Android and iPhone](#Part 1)
02 [How to Use Custom Stickers in Filmora?](#Part 2)
Part 1 How to Create Custom Animated WhatsApp Stickers on Android and iPhone
Animated third-party stickers cannot be added directly to WhatsApp and thus you can create a customized one. To create these GIF stickers for WhatsApp, you would need the help of third-party apps.
For Android devices, one such popular app is the Sticker Maker app. For iPhone, we suggest using Sticker Maker Studio app.
Once these apps are installed on your device, GIF stickers can be made in no time.
Steps to make sticker GIF WhatsApp on Android phone
Step 1. Download, install and open the Sticker maker app on your Android device.
Step 2. Tap on the “Create a new sticker pack” option on your app.
Step 3. Give the desired name to your sticker pack and click on the Create button.
Step 4. To add the animated stickers, click on the created sticker pack.
Step 5. Next, click on the first box, and then from the menu choose the Select file option.
Step 6. Next, choose the video from your phone from which you wish to create a sticker. You can even add a GIF file. After the media file is added, the app will compress it and will turn it into an animated sticker automatically.
Step 7. Now, you need to add 3 animated stickers to the other boxes of the sticker app (as mentioned in step 5).
Note: Multiple stickers can be added using the same process.
Step 8. Click on the “Add to WhatsApp” button after a minimum of 3 stickers are added to the pack.
Step 9. Now, your stickers are ready. Open the WhatsApp chat and launch the sticker panel where you can see your created GIF stickers. Choose the sticker you want, add it to your chat, and send it.
Steps to make WhatsApp Sticker GIF on iPhone
Step 1. On your iPhone, download, install and launch the Sticker Maker Studio app from the app store.
Step 2. Choose the sticker pack and also the name of the author at the respective boxes and then click on the Create button.
Step 3. Next, click on the new sticker pack that is created.
Step 4. Multiple boxes will now appear from which you need to choose the first one and then
select the Files option.
Step 5. Choose the desired Video from your device from which sticker has to be created. You can also create GIF to WhatsApp sticker. Other stickers to the pack can be added similarly. The app will automatically convert the added file to a sticker.
Step 6. After the stickers are added (at least 3), click on the Add to WhatsApp button at the generated Tray icon.
Note: If you see your tray icon to be blank, click on it else there will be issues adding the stickers to the WhatsApp chat later. A tray icon can be selected from the images.
Step 7. Next, you will be asked if you wish to open WhatsApp, click on Okay.
Step 8. Now, to add the animated GIF stickers to WhatsApp, you need to click on the Save button and your stickers are ready to be used in the chat.
Part 2 How to Use Custom Stickers in Wondershare Filmora Video Editor ?
For Win 7 or later (64-bit)
For macOS 10.12 or later
Why use your customized GIF stickers only in WhatsApp chats when they can be used in Videos as well? Yes, using Wondershare Filmora software you can use your customized animated stickers in your videos as well to make them more eye-catchy and interesting. Additionally, you can also add the effects to your videos using the software.
Wondershare Filmora is a feature-packed that allows creating stunning and professional-looking videos using its wide range of functions like motion tracking, adding effects, color matching, noise enhancement, keyframe animations, adding captions, and much more.
The user-friendly interface makes the tool apt even for beginners.
Steps to add GIF animations to videos using Wondershare Filmora
Step 1. On your Windows or Mac system, launch the software and choose Media > Import> Import Media Files on the main interface.
Step 2. Next, choose and add the created animated sticker to the software interface. Alternatively, you can also select the sticker from Elements. Drag and drop the added sticker to the video.
Step 3. To adjust the parameters like the size and the rotation of the sticker, you need to double-click on the sticker at the timeline. Additionally, color adjustments can also be made and if needed, you can also add 3D motion.
Step 4. To change the size and the location of the sticker, you need to drag it accordingly in
the viewer panel.
Step 5. Next, at the Local tab, choose the video format, resolution, and desktop folder. Finally, click on the Export button to start processing.
Note: The created video can also be saved to DVD or can be uploaded to YouTube and Vimeo directly using the software.
● Key Takeaways from This Episode →
●The latest GIF sticker feature of WhatsApp allows adding interesting animations to your chats.
●To create customized GIF stickers on Android and iPhone, third-party apps have to be used.
●The customized stickers can also be added to your videos using Wondershare Filmora.
Also read:
- New In 2024, 10 Great Apps for Turning Funny Animated Images Into Comics
- New In 2024, Great Guide for Beginners on 2D Animation Making
- New 2024 Approved Learn Disney Cartoon Drawing to See More Disney Magic Moments
- 2024 Approved Adobe Animate Riggings PROPER Tutorial for You
- 2024 Approved That Will Make Aesthetic Cartoon Drawing More Understandable
- The Best 10 Sketch Animation Video Makers
- New 2024 Approved Top 10 Popular Cartoons You Forgot Existed
- New 2024 Approved 8 Blender 3D Animation Tutorials for Beginners
- Nurturing Mind, Heart, and Soul on the Top 5 Anime Streaming Sanctuaries
- Updated How to Insert a GIF Into Powerpoint for 2024
- New How To Turn Yourself Into Anime Character for 2024
- New 2024 Approved Uncensored Top 10 + Free Streaming Sites
- Updated 2024 Approved Learn Easy Blender Rigging in Only 2 Minutes
- New How-To Guide Make Animation Characters with the Best Animated Character Creators
- New 2024 Approved Tutorials for Animating Picture Online Without Learning From Scratch
- 10 Caricature Makers to Turn Photo to Caricature Effects
- Updated In 2024, Best 10 Apps to Enhance Your Instagram Story Slideshow
- New How to Make Your GIF on WhatsApp in Simple Ways for 2024
- New 2024 Approved Best 12 2D Animation Studios All Should Check Out
- Adobe Animate Riggings PROPER Tutorial for You for 2024
- Updated Methods to Make Photo Motion Effect Online?
- Updated 10 Stunning Stop Motion Movies You Should Not Miss for 2024
- Updated Top Tips for Effortless Unity 3D Animation for 2024
- A Roster of 15 Best Disney Channel Cartoons
- Overview of the Best Oppo Reno 10 5G Screen Mirroring App | Dr.fone
- How To Change Vivo Y100A Lock Screen Clock in Seconds
- The way to get back lost music from Google Pixel 7a
- How and Where to Find a Shiny Stone Pokémon For Honor Magic 6 Lite? | Dr.fone
- How to Stop Life360 from Tracking You On Lenovo ThinkPhone? | Dr.fone
- In 2024, How to Change Apple iPhone 11 Pro Max Location on Skout | Dr.fone
- How to Change your Oppo Reno 10 5G Location on Twitter | Dr.fone
- Fake the Location to Get Around the MLB Blackouts on Nubia Red Magic 8S Pro | Dr.fone
- How To Restore Missing Photos Files from Oppo Find X6 Pro.
- In 2024, How to Reset your Poco X5 Lock Screen Password
- In 2024, How to Unlock Verizon iPhone 12
- How to Quickly Fix Bluetooth Not Working on Motorola Moto G24 | Dr.fone
- How to Repair Broken video files of Samsung Galaxy S21 FE 5G (2023)?
- In 2024, How to Mirror Your Vivo Y27s Screen to PC with Chromecast | Dr.fone
- 2 Ways to Transfer Text Messages from Honor X50 GT to iPhone 15/14/13/12/11/X/8/ | Dr.fone
- 2 Ways to Transfer Text Messages from Lava Blaze 2 5G to iPhone 15/14/13/12/11/X/8/ | Dr.fone
- Title: New In 2024, Obtain and Create Animated GIF Icons
- Author: Elon
- Created at : 2024-05-19 03:05:21
- Updated at : 2024-05-20 03:05:21
- Link: https://animation-videos.techidaily.com/new-in-2024-obtain-and-create-animated-gif-icons/
- License: This work is licensed under CC BY-NC-SA 4.0.
