

New In 2024, Top 7 Best Animated Lyric Video Software for FREE
Top 7 Best Animated Lyric Video Software for FREE
Top 7 Best Animated Lyric Video Software for FREE

Shanoon Cox
Mar 27, 2024• Proven solutions
The animated lyric videos have created a strong foothold in the music industry and have always been a vital part of it.
With television becoming a household necessity, lyric video creation has been the best entertainment content to share.
Creating an animated lyric video is one of the best ways to make a music video on a low budget.
In this article, you will learn what has animated lyric videos are and the best lyric video software to make it for PC and phone.
- Part1: What Is Animated Lyric Video
- Part2: Best Lyric Video Software for PC
- Part3: Best Animated Lyric Video Maker App
You may also like: 8 Best Lyric Video Templates for After Effects
Recommended Animated Lyric Video Maker - Filmora
If you want to make an animated lyric video, here we recommend using Filmora .
You can use it to make an animated lyric video by adding keyframes , so the animation will be smooth and natural. You just need to build a white plane to easily start making animation.
Besides, the audio mixer will raise your animated lyric video to a new level. Free download it to have a try! Or learn more from Wondershare Video Community .
For Win 7 or later (64-bit)
 Secure Download
For macOS 10.14 or later
Secure Download
Click here to get Filmora for PC by email
or Try Filmora App for mobile >>>
download filmora app for ios ](https://app.adjust.com/b0k9hf2%5F4bsu85t ) download filmora app for android ](https://app.adjust.com/b0k9hf2%5F4bsu85t )
Part 1: What Is Animated Lyric Video?
The term animated lyric video says it all to understand what it means. When the lyrics of a song appear on the screen in an animated version all through the song’s duration, it is usually said to be an animated lyric video.
Such videos are different from any normal music videos. Adding some flash and loops to the texts of the songs can enhance a plain lyric video.
For instance, there are times when you are unable to understand the lyrics of a song or maybe you wish to sing in a different language and are unable to understand the lyrics or the words, at such times the animated lyric video makes it easy for your understanding.
Part 2: Best Lyric Video Software for PC Free Download
1. Animaker
Pros:
- Kinetic typography effects
- A free version is good enough for any beginner to start animating
One of the most useful free-to-use animation tools , Animaker offers a range of video templates for customizing your video as per your choice.
For beginners, Animaker is the best lyric tool that is easy to understand and used without any help from anyone. Just choose the right template and play the video to start customizing your animated lyric video with the right effects as you like. The features of Animaker are-
Features:
- More than 40 fonts library
- Upload custom fonts to suit your requirement
- More than 60 transition styles

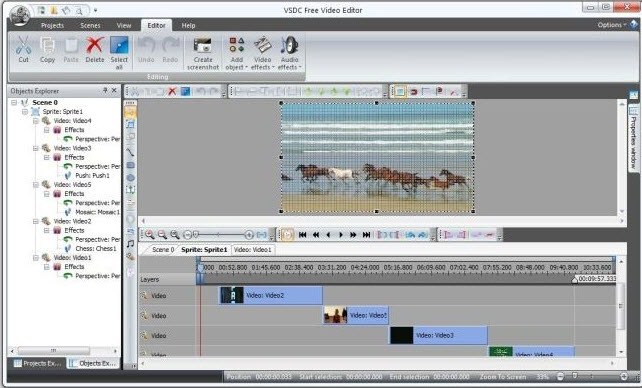
2. VSDC Free Video Editor
Pros:
- Multi-color Chroma Key
- Adjustable parameters settings
Whether your home or your business, VSDC free video editor has versatile features which make it apt to make lyric videos. One can edit every kind of video and file.
VSDC free video editor supports all the popular audio and video formats and codecs, which includes HD, DVD, and also GoPro videos. The features are-
Features:
- Text overlay for lyrics
- An array of charts and diagrams
- No sequence require to be followed, non-linear editing system
- Hardware acceleration
3. iMovie
Pros:
- Color correction, green-screen effects, and animated maps
- Start animation on iPhone and continue the same on iPad
For Mac and iOS users, the iMovie lyric video software comes with loads of features. With a range of studio-quality animation styles, iMovie helps you to create an animated lyric video with several additions in animated credits and tiles.
You just need to select the clip and add effects, titles, or music. The features include-
Features:
- 10 creative video filters for lyrics
- Picture-in-picture and split-screen effects
- Built-in music, sound effects, and voice over recording

4. Superstring
Pros:
- Easily customize the texts, backgrounds, and effects
- Intuitive and simple with the right tools in place
Superstring is the easiest way to create your animated lyric video on both Windows and Mac. You just need to select a song that you want to animate lyrics, drag it to this animation tool, align the lyrics by entering it, make other customization, and export. The features of Superstring are-
Features:
- Innovative interface
- Easy dragging and dropping when creating lyric

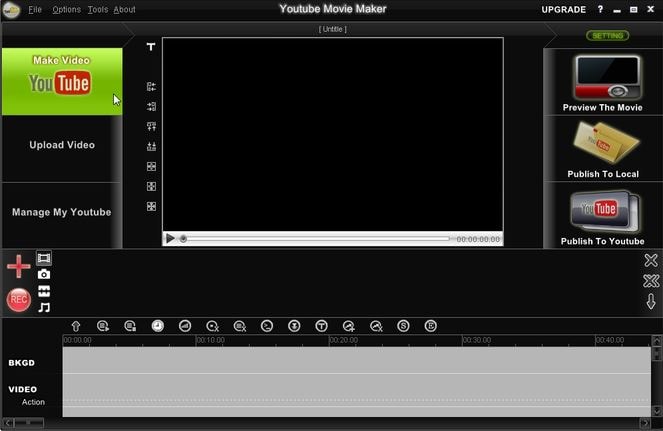
5. Youtube Movie Maker
Pros:
- Modify the layout and position
- Make 3D lyric of karaoke video with YouTube Movie Maker v10 or above version
It has the best built-in animated lyric video creating feature that makes YouTube movie makers a great choice when it comes to creating one. You can make lyrics video with different animation styles.
Its official site has also offered various great animated lyric video examples for your reference. The features are-
Features:
- Customize fonts, size, colors, styles
- Add motion effects, mask or shadow effects, background or music
Part 3: Best Animated Lyric Video Maker App
6. Music Video Maker
Pros:
- Several fonts and colors to choose from
- Add zoom-in and zoom-out effects
Do you want your lyric video to dance with the rhythm of the song? The Music video maker app is one of the best to create an animated lyric video and make the lyrics or the photos dance to your tune. The features include-
Features:
- Add songs from the in-built library or your music library
- Amazing filters to make your lyrical music video seem like a movie
- Add text and sub-titles to the images and photos
7. Vidal
Pros:
- Full control of the animation, positioning, opacity, and size of your text
- Fun overlays, shapes, and masks
A multi-clip video editor, VidLab lets you create an amazing lyric video very easily. You just need to customize it by adding texts, music, artworks, sound effects, etc. The features are-
Features:
- Several collections of fonts or add your fonts
- An ever-growing collection of video effects

Bonus tip: Create an Animation Video with Anireel
Anireel is an animation video production software with intelligent editing function, rich scene templates, and characters/animation/audio/text materials, which is easy to use and has high-cost performance. It is aimed at all users who explain or demonstrate through animation videos, such as general knowledge content creators, marketing personnel, and people who need enterprise propaganda or demonstration and supports one-click script into pieces.

Conclusion
All the above animated lyric video makers are great resources for beginners. These animation tools feature a very instinctive UI and offer various tutorials to let you get a hang of lyric animation faster. There are free trial periods that you can decide the best lyric video maker as per your choice. If you want to make video easily, try to use Filmora. It is one of the best animated lyric video makers. Download it now to have a try!
For Win 7 or later (64-bit)
Secure Download
For macOS 10.14 or later
Secure Download
Click here to get Filmora for PC by email
or Try Filmora App for mobile >>>
download filmora app for ios ](https://app.adjust.com/b0k9hf2%5F4bsu85t ) download filmora app for android ](https://app.adjust.com/b0k9hf2%5F4bsu85t )
Shanoon Cox
Shanoon Cox is a writer and a lover of all things video.
Follow @Shanoon Cox
Shanoon Cox
Mar 27, 2024• Proven solutions
The animated lyric videos have created a strong foothold in the music industry and have always been a vital part of it.
With television becoming a household necessity, lyric video creation has been the best entertainment content to share.
Creating an animated lyric video is one of the best ways to make a music video on a low budget.
In this article, you will learn what has animated lyric videos are and the best lyric video software to make it for PC and phone.
- Part1: What Is Animated Lyric Video
- Part2: Best Lyric Video Software for PC
- Part3: Best Animated Lyric Video Maker App
You may also like: 8 Best Lyric Video Templates for After Effects
Recommended Animated Lyric Video Maker - Filmora
If you want to make an animated lyric video, here we recommend using Filmora .
You can use it to make an animated lyric video by adding keyframes , so the animation will be smooth and natural. You just need to build a white plane to easily start making animation.
Besides, the audio mixer will raise your animated lyric video to a new level. Free download it to have a try! Or learn more from Wondershare Video Community .
For Win 7 or later (64-bit)
Secure Download
For macOS 10.14 or later
Secure Download
Click here to get Filmora for PC by email
or Try Filmora App for mobile >>>
download filmora app for ios ](https://app.adjust.com/b0k9hf2%5F4bsu85t ) download filmora app for android ](https://app.adjust.com/b0k9hf2%5F4bsu85t )
Part 1: What Is Animated Lyric Video?
The term animated lyric video says it all to understand what it means. When the lyrics of a song appear on the screen in an animated version all through the song’s duration, it is usually said to be an animated lyric video.
Such videos are different from any normal music videos. Adding some flash and loops to the texts of the songs can enhance a plain lyric video.
For instance, there are times when you are unable to understand the lyrics of a song or maybe you wish to sing in a different language and are unable to understand the lyrics or the words, at such times the animated lyric video makes it easy for your understanding.
Part 2: Best Lyric Video Software for PC Free Download
1. Animaker
Pros:
- Kinetic typography effects
- A free version is good enough for any beginner to start animating
One of the most useful free-to-use animation tools , Animaker offers a range of video templates for customizing your video as per your choice.
For beginners, Animaker is the best lyric tool that is easy to understand and used without any help from anyone. Just choose the right template and play the video to start customizing your animated lyric video with the right effects as you like. The features of Animaker are-
Features:
- More than 40 fonts library
- Upload custom fonts to suit your requirement
- More than 60 transition styles
2. VSDC Free Video Editor
Pros:
- Multi-color Chroma Key
- Adjustable parameters settings
Whether your home or your business, VSDC free video editor has versatile features which make it apt to make lyric videos. One can edit every kind of video and file.
VSDC free video editor supports all the popular audio and video formats and codecs, which includes HD, DVD, and also GoPro videos. The features are-
Features:
- Text overlay for lyrics
- An array of charts and diagrams
- No sequence require to be followed, non-linear editing system
- Hardware acceleration
3. iMovie
Pros:
- Color correction, green-screen effects, and animated maps
- Start animation on iPhone and continue the same on iPad
For Mac and iOS users, the iMovie lyric video software comes with loads of features. With a range of studio-quality animation styles, iMovie helps you to create an animated lyric video with several additions in animated credits and tiles.
You just need to select the clip and add effects, titles, or music. The features include-
Features:
- 10 creative video filters for lyrics
- Picture-in-picture and split-screen effects
- Built-in music, sound effects, and voice over recording
4. Superstring
Pros:
- Easily customize the texts, backgrounds, and effects
- Intuitive and simple with the right tools in place
Superstring is the easiest way to create your animated lyric video on both Windows and Mac. You just need to select a song that you want to animate lyrics, drag it to this animation tool, align the lyrics by entering it, make other customization, and export. The features of Superstring are-
Features:
- Innovative interface
- Easy dragging and dropping when creating lyric
5. Youtube Movie Maker
Pros:
- Modify the layout and position
- Make 3D lyric of karaoke video with YouTube Movie Maker v10 or above version
It has the best built-in animated lyric video creating feature that makes YouTube movie makers a great choice when it comes to creating one. You can make lyrics video with different animation styles.
Its official site has also offered various great animated lyric video examples for your reference. The features are-
Features:
- Customize fonts, size, colors, styles
- Add motion effects, mask or shadow effects, background or music
Part 3: Best Animated Lyric Video Maker App
6. Music Video Maker
Pros:
- Several fonts and colors to choose from
- Add zoom-in and zoom-out effects
Do you want your lyric video to dance with the rhythm of the song? The Music video maker app is one of the best to create an animated lyric video and make the lyrics or the photos dance to your tune. The features include-
Features:
- Add songs from the in-built library or your music library
- Amazing filters to make your lyrical music video seem like a movie
- Add text and sub-titles to the images and photos
7. Vidal
Pros:
- Full control of the animation, positioning, opacity, and size of your text
- Fun overlays, shapes, and masks
A multi-clip video editor, VidLab lets you create an amazing lyric video very easily. You just need to customize it by adding texts, music, artworks, sound effects, etc. The features are-
Features:
- Several collections of fonts or add your fonts
- An ever-growing collection of video effects
Bonus tip: Create an Animation Video with Anireel
Anireel is an animation video production software with intelligent editing function, rich scene templates, and characters/animation/audio/text materials, which is easy to use and has high-cost performance. It is aimed at all users who explain or demonstrate through animation videos, such as general knowledge content creators, marketing personnel, and people who need enterprise propaganda or demonstration and supports one-click script into pieces.
Conclusion
All the above animated lyric video makers are great resources for beginners. These animation tools feature a very instinctive UI and offer various tutorials to let you get a hang of lyric animation faster. There are free trial periods that you can decide the best lyric video maker as per your choice. If you want to make video easily, try to use Filmora. It is one of the best animated lyric video makers. Download it now to have a try!
For Win 7 or later (64-bit)
Secure Download
For macOS 10.14 or later
Secure Download
Click here to get Filmora for PC by email
or Try Filmora App for mobile >>>
download filmora app for ios ](https://app.adjust.com/b0k9hf2%5F4bsu85t ) download filmora app for android ](https://app.adjust.com/b0k9hf2%5F4bsu85t )
Shanoon Cox
Shanoon Cox is a writer and a lover of all things video.
Follow @Shanoon Cox
Learn Easy Blender Rigging in Only 2 Minutes
Learn Simple Blender Rigging in Only 2 Minutes
An easy yet powerful editor
Numerous effects to choose from
Detailed tutorials provided by the official channel
Blender is a FREE, open-source 3D Animation program that is very popular for beginner animators. It’s a good way of starting if you’re not yet sure about how far you want to go into animation as it won’t demand any immediate monetary commitment.
Now, as for its features, today, we’ll be focusing on Blender Rigging features.
In this article
01 [Why Use Blender Rigging?](#Part 1)
02 [The Art of Effective Rigging in Blender [TUTORIAL]](#Part 2)
03 [Introduction to Rigging in Blender Course](#Part 3)
Part 1 Why Use Blender Rigging?
Blender Character Rigging is a great way of creating truly beautiful and realistic animations. Despite being an open-source program, it’s capable of doing just as much, if not more, than some of the more premium Animation software out there.
So, if you want to create video projects for your audience’s entertainment or edification with animation, then Blender Rigging is definitely something that you should consider. With this tool, you can create the complex animations that you need and then polish it up in a video editor like Wondershare Filmora Video Editor (which is a premium, video-editing tool that you can use to perfect your finished Blender Rigging animations.)

Part 2 The Art of Effective Rigging in Blender [TUTORIAL]
For this next section, we’re going to be introducing a couple of tutorials that you can look into to teach you more about Blender Character Rigging, Blender Facial Rigging, Blender Muscle Rig, and so on.
These topics are each very long-winded on their own though, so we’ve linked appropriate video tutorials that you can learn more and reserved ourselves to a brief description of each technique so that you can determine whether it’s something that interests you (although, of course, our recommendation is that you check each one out so that you can get the full ‘Blender’ experience.)
01Blender Character Rigging
The main thing people usually look at Blender for is, Blender Character Rigging. And, because it was created to emulate professional animation software, Blender has this function down to pat. To give you an idea of what features you can expect: Blender comes with custom bone shapes for easy Blender character rigging, it also comes with envelope skinny, skeleton skinning, and automatic skinning. With these alone, you can be assured that you will be able to create complex animations without much trouble.
02Blender Facial Rigging
Facial Rigging is usually a more complex subject that is avoided by animators without much experience. But, with Blender, facial rigging is possible. The YouTube video should show you the process of going about Blender Facial Rigging from start to finish (from sculpting the character face itself and then making use of Blender Rigging tools for setting up a skeletal structure for your face’s character to become animated.)
03Blender Muscle Rigging
Creating a Blender Muscle Rig is exactly what it sounds like. It is, of course, much more complicated than normal rigging, but it is a good subject to familiarize yourself with anyway, as it will allow you to go to the ‘next stage’ as you say, with your Animations. The video that we’ve attached is from Pierrick Picaut, who has released a series of videos on the subject of Blender Rigging in general and has extensively explained how to create a Blender Human Rig from the general body, the face, the muscles, and so on.
04Blender Rigging
Although a lot of Animation relies on more ‘traditional’ methods of expressing movement, one can still make use of more modern animation practices, like rigs, to set up their animations for movement. It’s an especially good skill to learn if you’re more interested in content-friendly animations (rather than creating a film of your own.)
05Blender Rigging
This next tutorial is an introduction to basic Blender Rigging. It’s a good one to both start and end on, as it was created for beginners specifically, and uses an example that is perhaps easier to understand most. Make sure to give it a shot just in case.
Part 3 Introduction to Rigging in Blender Course
For this next part, we introduce two other resources that you can take advantage of to learn more about Blender Rigging. Whether it be about Blender character rigging, Blender facial rigging, free blender rigs, creating muscle rigs, and so and so forth. These resources have got your back.
01Where to Learn the Course?
The first major course that we think you might be interested in is Mark Masters’ blender rigging course. You can find this course at PluralSight (which is a website that is focused on helping users of software develop their skills). Mark Masters, the instructor for this course, is a professional animator and works as a Animator for the animation studio, Steelhouse Productions. So, you can be sure that there is much that you can learn from him.

02Other Tools to Learn Rigging
As for other places to learn? We suggest the “Blender Fundamentals” course that Blender themselves have posted on YouTube. They have several of these courses (for all of the more recent versions of Blender). So, you can pick out a course that works for you. One of their more recent series is “Blender Fundamentals 2.which currently has videos all on the subject of Blender rigging (including Blender rigging and Blender rigging videos.)

● Key Takeaways from This Episode →
● If you’re interested in trying out blender rigging yourself, you’ll probably want to study the subject a little before beginning.
● Blender Rigging is quite a complex subject for beginners but having something to start with should help you on your way.
● For that, we recommend checking out the videos that we mentioned in section two of this article, where we recommend some popular tutorials regarding some of the more common Blender Rigging subjects.
● If you’re looking for something more comprehensive or put together though. A course might be more up to your taste. For that, we recommend either Mark Master’s introduction to rigging and animation over at PluralSight or Blender’s own “Blender Fundamental” series on YouTube (which should introduce all the functions you’ll need to know.)
Blender is a FREE, open-source 3D Animation program that is very popular for beginner animators. It’s a good way of starting if you’re not yet sure about how far you want to go into animation as it won’t demand any immediate monetary commitment.
Now, as for its features, today, we’ll be focusing on Blender Rigging features.
In this article
01 [Why Use Blender Rigging?](#Part 1)
02 [The Art of Effective Rigging in Blender [TUTORIAL]](#Part 2)
03 [Introduction to Rigging in Blender Course](#Part 3)
Part 1 Why Use Blender Rigging?
Blender Character Rigging is a great way of creating truly beautiful and realistic animations. Despite being an open-source program, it’s capable of doing just as much, if not more, than some of the more premium Animation software out there.
So, if you want to create video projects for your audience’s entertainment or edification with animation, then Blender Rigging is definitely something that you should consider. With this tool, you can create the complex animations that you need and then polish it up in a video editor like Wondershare Filmora Video Editor (which is a premium, video-editing tool that you can use to perfect your finished Blender Rigging animations.)
Part 2 The Art of Effective Rigging in Blender [TUTORIAL]
For this next section, we’re going to be introducing a couple of tutorials that you can look into to teach you more about Blender Character Rigging, Blender Facial Rigging, Blender Muscle Rig, and so on.
These topics are each very long-winded on their own though, so we’ve linked appropriate video tutorials that you can learn more and reserved ourselves to a brief description of each technique so that you can determine whether it’s something that interests you (although, of course, our recommendation is that you check each one out so that you can get the full ‘Blender’ experience.)
01Blender Character Rigging
The main thing people usually look at Blender for is, Blender Character Rigging. And, because it was created to emulate professional animation software, Blender has this function down to pat. To give you an idea of what features you can expect: Blender comes with custom bone shapes for easy Blender character rigging, it also comes with envelope skinny, skeleton skinning, and automatic skinning. With these alone, you can be assured that you will be able to create complex animations without much trouble.
02Blender Facial Rigging
Facial Rigging is usually a more complex subject that is avoided by animators without much experience. But, with Blender, facial rigging is possible. The YouTube video should show you the process of going about Blender Facial Rigging from start to finish (from sculpting the character face itself and then making use of Blender Rigging tools for setting up a skeletal structure for your face’s character to become animated.)
03Blender Muscle Rigging
Creating a Blender Muscle Rig is exactly what it sounds like. It is, of course, much more complicated than normal rigging, but it is a good subject to familiarize yourself with anyway, as it will allow you to go to the ‘next stage’ as you say, with your Animations. The video that we’ve attached is from Pierrick Picaut, who has released a series of videos on the subject of Blender Rigging in general and has extensively explained how to create a Blender Human Rig from the general body, the face, the muscles, and so on.
04Blender Rigging
Although a lot of Animation relies on more ‘traditional’ methods of expressing movement, one can still make use of more modern animation practices, like rigs, to set up their animations for movement. It’s an especially good skill to learn if you’re more interested in content-friendly animations (rather than creating a film of your own.)
05Blender Rigging
This next tutorial is an introduction to basic Blender Rigging. It’s a good one to both start and end on, as it was created for beginners specifically, and uses an example that is perhaps easier to understand most. Make sure to give it a shot just in case.
Part 3 Introduction to Rigging in Blender Course
For this next part, we introduce two other resources that you can take advantage of to learn more about Blender Rigging. Whether it be about Blender character rigging, Blender facial rigging, free blender rigs, creating muscle rigs, and so and so forth. These resources have got your back.
01Where to Learn the Course?
The first major course that we think you might be interested in is Mark Masters’ blender rigging course. You can find this course at PluralSight (which is a website that is focused on helping users of software develop their skills). Mark Masters, the instructor for this course, is a professional animator and works as a Animator for the animation studio, Steelhouse Productions. So, you can be sure that there is much that you can learn from him.
02Other Tools to Learn Rigging
As for other places to learn? We suggest the “Blender Fundamentals” course that Blender themselves have posted on YouTube. They have several of these courses (for all of the more recent versions of Blender). So, you can pick out a course that works for you. One of their more recent series is “Blender Fundamentals 2.which currently has videos all on the subject of Blender rigging (including Blender rigging and Blender rigging videos.)
● Key Takeaways from This Episode →
● If you’re interested in trying out blender rigging yourself, you’ll probably want to study the subject a little before beginning.
● Blender Rigging is quite a complex subject for beginners but having something to start with should help you on your way.
● For that, we recommend checking out the videos that we mentioned in section two of this article, where we recommend some popular tutorials regarding some of the more common Blender Rigging subjects.
● If you’re looking for something more comprehensive or put together though. A course might be more up to your taste. For that, we recommend either Mark Master’s introduction to rigging and animation over at PluralSight or Blender’s own “Blender Fundamental” series on YouTube (which should introduce all the functions you’ll need to know.)
Simple Shortcut to Convert Videos to Gifs on iPhone
Simple Shortcut to Convert Videos to Gifs on iPhone
An easy yet powerful editor
Numerous effects to choose from
Detailed tutorials provided by the official channel
To create iPhone video to GIF there are several third-party apps available. You can even choose the online sites for the task, but the editing and other options will be limited. The GIFs on your iPhone can be created using videos as well as Live photos.

One of the best ways to create a GIF is using the Shortcuts app that comes pre-installed on devices running on iOS 13 and later versions of the OS. The app has shortcuts to accomplish several tasks on your iPhone including GIF creation. Learn about using Shortcuts and other tools for creating a GIF on iPhone.
In this article
01 [How to make GIF from Video on iPhone using Shortcut App](#Part 1)
02 [How to save Live Photos as GIF on iPhone](#Part 2)
03 [How to save Live Photos as GIF on iPhone](#Part 3)
04 [How to save videos as live photos on your iPhone?](#Part 4)
05 [Best tool for creating GIFs and video editing on your Windows and Mac- Wondershare Filmora](#Part 5)
Part 1 How to make GIF from Video on iPhone using Shortcut App
One of the easiest ways to convert video GIF iPhone is by using the Shortcuts app. If you have deleted the app, you can reinstall it from the app store. Once the app is installed, you would next need to allow the untrusted shortcuts and for this go to Settings > Shortcuts> toggle Add Untrusted Shortcuts to add the shortcuts created by the user. The further steps for converting video to GIF iPhone are as follows.
Step 1. On your iPhone, download the Video to GIF shortcut. You can download it using iCloud or RoutineHub. Find the shortcut and click on Get Shortcut will let you check the action of the shortcut.
Move down and click on the red Add Untrusted Shortcut button that will add the shortcut for the library.

Step 2. Go to the My Shortcuts tab and click on the Video to GIF section. If you are using it for the first time, you need to grant permission to use the videos and photos. Click on the OK button and continue.

Step 3. Next, browse and add the video from which you wish to create the GIF. Since GIF animations are short, it is always recommended to use short videos.
Step 4. Video processing will start and during this, the Video to GIF shortcut will be greyed out.

Step 5. Once done, the preview of the GIF will appear on the screen. Finally, you can save the GIF to your Photos app on iPhone or can also share it through email, AirDrop, iMessage, and other third-party services as needed.

Part 2 How to save Live Photos as GIF on iPhone
Live Photo is an interesting feature of the iPhone where an image is captured in an animated form for a couple of seconds. These Live Photos can be easily converted to GIFs using the steps below.
Step 1. On your iPhone Photo app, open the Live Photo that you want to save as GIF.
Step 2. Darg the selected photo upwards and will see multiple effects options along with other image details.
Step 3 To save the selected image as GIF, choose Loop or Bounce animation. Once done, share the image on mail and other services listed or save it to the device.

Part 3 How to save Live Photo as video on iPhone
You can also convert your live photos to videos and then use them for making GIFs and for other uses. The steps for iPhone live photo to video are as follows.
Step 1. On your iPhone, open the Photos app and choose the Live Photo that you want to convert.
Step 2. Next, click on the share button at the bottom of the screen and multiple options will be seen.
Step 3. Scroll down and choose Save as Video option and with this, the live photo will be saved as a Video.
Additionally, you can also convert the LivePhotos to videos using the shortcut app.

Part 4 How to save videos as live photos on your iPhone?
If you need to convert your videos to live photos on iPhone, there are several third-party tools available and one of the widely used is IntoLive. Using this app, videos, as well as GIFs, can be converted into live photos.
Steps on how to turn a video into a live photo iPhone
Step 1. Download, install and launch the IntoLive app from the app store.
Step 2. Next, browse and add the desired video.
Step 3. If needed, the added video can be customized using several supported features.
Step 4. Next, click on the Make option at the top-right corner and then choose the repeats you want for a Live Photo.
Step 5. Finally, click on the Live Photo and your Live Photo will be saved to the device.

Part 5 Best tool for creating GIFs and video editing on your Windows and Mac- Wondershare Filmora
Above we have listed several ways to create GIFs on your iPhone and also to convert videos to LivePhotos and vice-versa. Installing different tools for different tasks is a hassle and also a time-consuming task. So, if you are looking for an all-in-one tool that allows you to create GIFs, and professionally edit your media files, Wondershare Filmora Video Editor is the best tool to consider. Available for quick download on your Windows and Mac system, this feature-packed software has an intuitive and user-friendly interface.
Wondershare Filmora
Get started easily with Filmora’s powerful performance, intuitive interface, and countless effects!
Try It Free Try It Free Try It Free Learn More >

Media files in all key formats are supported by the tool and there are multiple options for editing and video creation like splitting, rotating, cutting, adding effects, sounds, text, and other elements. In a few simple steps, your customized GIF and other professional-looking media files will be ready.
Steps to create GIF using Wondershare Filmora
Step 1. Launch the installed software on your system and add the video or images from the system.
Step 2. The added media files next need to be dragged and dropped to the timeline at the bottom of the interface.

Step 3. After the files are moved, you can customize them using several editing tools like rotate, crop, cut, and more.
Step 4. Next, add text, effects, sound, and other elements as needed.

Step 5. Finally choose to export the file and then from the Local tab, select the GIF option. Choose a file name and location and then finally click on the EXPORT button.

● Key Takeaways from This Episode →
●There are several ways to turn video into GIF iPhone.
●Using shortcuts is one of the most straightforward methods for creating GIFs using videos.
●You can also convert videos to LivePhoto and vice versa on your iPhone using third-party apps.
●Wondershare Filmora is an excellent software to make GIFs and professionally edit media files.
To create iPhone video to GIF there are several third-party apps available. You can even choose the online sites for the task, but the editing and other options will be limited. The GIFs on your iPhone can be created using videos as well as Live photos.
One of the best ways to create a GIF is using the Shortcuts app that comes pre-installed on devices running on iOS 13 and later versions of the OS. The app has shortcuts to accomplish several tasks on your iPhone including GIF creation. Learn about using Shortcuts and other tools for creating a GIF on iPhone.
In this article
01 [How to make GIF from Video on iPhone using Shortcut App](#Part 1)
02 [How to save Live Photos as GIF on iPhone](#Part 2)
03 [How to save Live Photos as GIF on iPhone](#Part 3)
04 [How to save videos as live photos on your iPhone?](#Part 4)
05 [Best tool for creating GIFs and video editing on your Windows and Mac- Wondershare Filmora](#Part 5)
Part 1 How to make GIF from Video on iPhone using Shortcut App
One of the easiest ways to convert video GIF iPhone is by using the Shortcuts app. If you have deleted the app, you can reinstall it from the app store. Once the app is installed, you would next need to allow the untrusted shortcuts and for this go to Settings > Shortcuts> toggle Add Untrusted Shortcuts to add the shortcuts created by the user. The further steps for converting video to GIF iPhone are as follows.
Step 1. On your iPhone, download the Video to GIF shortcut. You can download it using iCloud or RoutineHub. Find the shortcut and click on Get Shortcut will let you check the action of the shortcut.
Move down and click on the red Add Untrusted Shortcut button that will add the shortcut for the library.
Step 2. Go to the My Shortcuts tab and click on the Video to GIF section. If you are using it for the first time, you need to grant permission to use the videos and photos. Click on the OK button and continue.
Step 3. Next, browse and add the video from which you wish to create the GIF. Since GIF animations are short, it is always recommended to use short videos.
Step 4. Video processing will start and during this, the Video to GIF shortcut will be greyed out.
Step 5. Once done, the preview of the GIF will appear on the screen. Finally, you can save the GIF to your Photos app on iPhone or can also share it through email, AirDrop, iMessage, and other third-party services as needed.
Part 2 How to save Live Photos as GIF on iPhone
Live Photo is an interesting feature of the iPhone where an image is captured in an animated form for a couple of seconds. These Live Photos can be easily converted to GIFs using the steps below.
Step 1. On your iPhone Photo app, open the Live Photo that you want to save as GIF.
Step 2. Darg the selected photo upwards and will see multiple effects options along with other image details.
Step 3 To save the selected image as GIF, choose Loop or Bounce animation. Once done, share the image on mail and other services listed or save it to the device.
Part 3 How to save Live Photo as video on iPhone
You can also convert your live photos to videos and then use them for making GIFs and for other uses. The steps for iPhone live photo to video are as follows.
Step 1. On your iPhone, open the Photos app and choose the Live Photo that you want to convert.
Step 2. Next, click on the share button at the bottom of the screen and multiple options will be seen.
Step 3. Scroll down and choose Save as Video option and with this, the live photo will be saved as a Video.
Additionally, you can also convert the LivePhotos to videos using the shortcut app.
Part 4 How to save videos as live photos on your iPhone?
If you need to convert your videos to live photos on iPhone, there are several third-party tools available and one of the widely used is IntoLive. Using this app, videos, as well as GIFs, can be converted into live photos.
Steps on how to turn a video into a live photo iPhone
Step 1. Download, install and launch the IntoLive app from the app store.
Step 2. Next, browse and add the desired video.
Step 3. If needed, the added video can be customized using several supported features.
Step 4. Next, click on the Make option at the top-right corner and then choose the repeats you want for a Live Photo.
Step 5. Finally, click on the Live Photo and your Live Photo will be saved to the device.
Part 5 Best tool for creating GIFs and video editing on your Windows and Mac- Wondershare Filmora
Above we have listed several ways to create GIFs on your iPhone and also to convert videos to LivePhotos and vice-versa. Installing different tools for different tasks is a hassle and also a time-consuming task. So, if you are looking for an all-in-one tool that allows you to create GIFs, and professionally edit your media files, Wondershare Filmora Video Editor is the best tool to consider. Available for quick download on your Windows and Mac system, this feature-packed software has an intuitive and user-friendly interface.
Wondershare Filmora
Get started easily with Filmora’s powerful performance, intuitive interface, and countless effects!
Try It Free Try It Free Try It Free Learn More >
Media files in all key formats are supported by the tool and there are multiple options for editing and video creation like splitting, rotating, cutting, adding effects, sounds, text, and other elements. In a few simple steps, your customized GIF and other professional-looking media files will be ready.
Steps to create GIF using Wondershare Filmora
Step 1. Launch the installed software on your system and add the video or images from the system.
Step 2. The added media files next need to be dragged and dropped to the timeline at the bottom of the interface.
Step 3. After the files are moved, you can customize them using several editing tools like rotate, crop, cut, and more.
Step 4. Next, add text, effects, sound, and other elements as needed.
Step 5. Finally choose to export the file and then from the Local tab, select the GIF option. Choose a file name and location and then finally click on the EXPORT button.
● Key Takeaways from This Episode →
●There are several ways to turn video into GIF iPhone.
●Using shortcuts is one of the most straightforward methods for creating GIFs using videos.
●You can also convert videos to LivePhoto and vice versa on your iPhone using third-party apps.
●Wondershare Filmora is an excellent software to make GIFs and professionally edit media files.
How to Make Your GIF on WhatsApp in Simple Ways
How to Make Your Own GIF on WhatsApp in Simple Ways
An easy yet powerful editor
Numerous effects to choose from
Detailed tutorials provided by the official channel
The feature of adding a GIF to your conversations on WhatsApp has been rolled out for a long and these animations add liveliness to your chats. On your iPhone as well as Android devices, there is an integrated library of these GIFs in several categories that can be used.
Additionally, you can even make your own GIF using the videos on your WhatsApp in a few simple steps. Learn all about these GIFs and how to make your own GIF on WhatsApp.
In this article
01 [How to send GIF from the integrated library on WhatsApp](#Part 1)
02 [How to create WhatsApp GIF using Videos on Android and iPhone](#Part 2)
03 [How to create an excellent GIF using Wondershare Filmora](#Part 3)
Part 1 How to send GIF from the integrated library on WhatsApp
Your iPhone, as well as Android devices, has a library of GIFs that can be used to search for the desired animations. The steps for sharing these GIFs are as follows.
Step 1. Launch WhatsApp on your smartphone and open the chat to which you wish to send the GIF. On your Android phone, click on the smiley emoji and then select GIF options from the bottom of the screen and the library of the animations will open.
On your iPhone, to open the library of GIF, click on the sticker icon.
Step 2. You can choose from available GIF and even search for the desired one using the keyword at the search icon.
Step 3. Tap on the selected GIF and then click on the Send button that will share the animation to the chat.
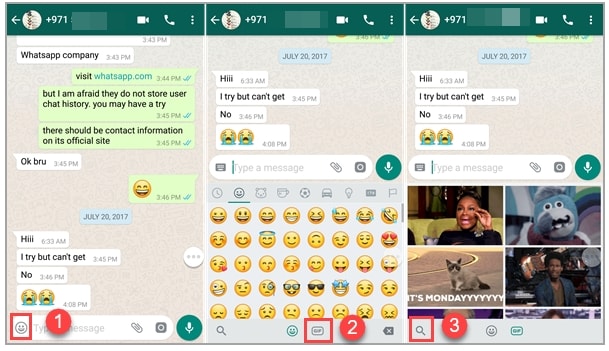
Part 2 How to create WhatsApp GIF using Videos on Android and iPhone
In addition to the library, WhatsApp also allows creating GIF animations using the videos on the device. (For iPhone users, even Live Photos can be used). For a video to be used as GIF, it cannot be more than 6 seconds. So, the longer videos need to be trimmed to under 6 seconds.
Steps to create custom GIF WhatsApp using videos
Step 1. Open the WhatsApp chat on your phone where you want to send the GIF. Click on the camera icon and then select the video from your device’s gallery. Alternatively, you can also record a live video to create a GIF.
Step 2. After the video is added, trim it down under 6 seconds using the slider at the top. You can add text to the video using the Caption option.
Step 3. Next, click on the GIF button that will convert the added video into GIF. Finally, click on the Send button at the bottom-right corner.
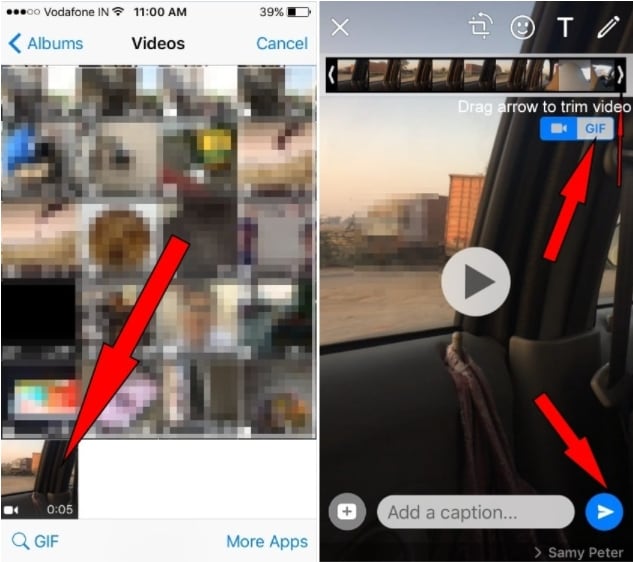
Part 3 How to create an excellent GIF using Wondershare Filmora
Though iPhone and Android, both allow creating a GIF from videos on your device, the option for customizations is limited. So, if you want to create your own GIF using images and videos, Wondershare Filmora will work as the best software. This versatile tool supports all key media formats like JPG, PNG, MP4, MKV, MOV, and others for creating GIF animations.
The overall process is fast as well as simple where you just need to add the media files, edit them and choose to save them as GIFs. Using Wondershare Filmora Video Editor , multiple customizations can be done, like rotating, trimming, adding texts, adding sounds, speed-up, adding elements, and more.
Wondershare Filmora
Get started easily with Filmora’s powerful performance, intuitive interface, and countless effects!
Try It Free Try It Free Try It Free Learn More >
Steps to create GIF using Wondershare Filmora
StepLaunch the Wondershare software on your system and add the local media files from which you wish to create a GIF.
Step 1. Next, drag and drop the files to the timeline of the software.
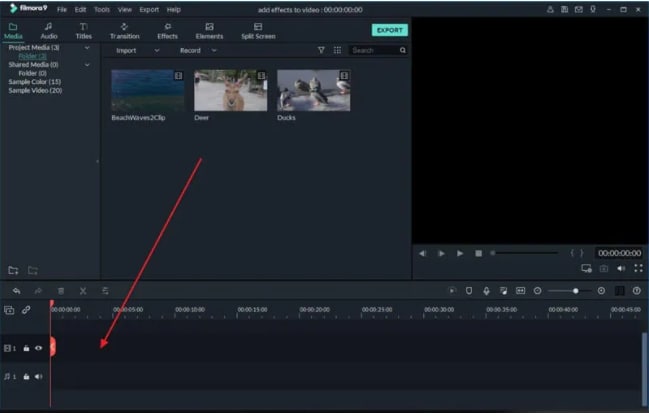
Step 2. Using the editing tools, you can customize the added files.
Step 3. Add texts, and effects as needed using the functions at the software.

Step 4. Next, at the Local tab choose the GIF option, select the desired file name and the system location to save the file. Finally, click on the EXPORT button to start the file processing.

● Key Takeaways from This Episode →
●GIF animations can be added from the integrated library at Android and iPhone devices.
●Using the local videos on the phone, GIF can also be created.
●For creating an excellent and professional-looking GIF, Wondershare Filmora works as one of the best tools that is simple and quick to use.
The feature of adding a GIF to your conversations on WhatsApp has been rolled out for a long and these animations add liveliness to your chats. On your iPhone as well as Android devices, there is an integrated library of these GIFs in several categories that can be used.
Additionally, you can even make your own GIF using the videos on your WhatsApp in a few simple steps. Learn all about these GIFs and how to make your own GIF on WhatsApp.
In this article
01 [How to send GIF from the integrated library on WhatsApp](#Part 1)
02 [How to create WhatsApp GIF using Videos on Android and iPhone](#Part 2)
03 [How to create an excellent GIF using Wondershare Filmora](#Part 3)
Part 1 How to send GIF from the integrated library on WhatsApp
Your iPhone, as well as Android devices, has a library of GIFs that can be used to search for the desired animations. The steps for sharing these GIFs are as follows.
Step 1. Launch WhatsApp on your smartphone and open the chat to which you wish to send the GIF. On your Android phone, click on the smiley emoji and then select GIF options from the bottom of the screen and the library of the animations will open.
On your iPhone, to open the library of GIF, click on the sticker icon.
Step 2. You can choose from available GIF and even search for the desired one using the keyword at the search icon.
Step 3. Tap on the selected GIF and then click on the Send button that will share the animation to the chat.
Part 2 How to create WhatsApp GIF using Videos on Android and iPhone
In addition to the library, WhatsApp also allows creating GIF animations using the videos on the device. (For iPhone users, even Live Photos can be used). For a video to be used as GIF, it cannot be more than 6 seconds. So, the longer videos need to be trimmed to under 6 seconds.
Steps to create custom GIF WhatsApp using videos
Step 1. Open the WhatsApp chat on your phone where you want to send the GIF. Click on the camera icon and then select the video from your device’s gallery. Alternatively, you can also record a live video to create a GIF.
Step 2. After the video is added, trim it down under 6 seconds using the slider at the top. You can add text to the video using the Caption option.
Step 3. Next, click on the GIF button that will convert the added video into GIF. Finally, click on the Send button at the bottom-right corner.
Part 3 How to create an excellent GIF using Wondershare Filmora
Though iPhone and Android, both allow creating a GIF from videos on your device, the option for customizations is limited. So, if you want to create your own GIF using images and videos, Wondershare Filmora will work as the best software. This versatile tool supports all key media formats like JPG, PNG, MP4, MKV, MOV, and others for creating GIF animations.
The overall process is fast as well as simple where you just need to add the media files, edit them and choose to save them as GIFs. Using Wondershare Filmora Video Editor , multiple customizations can be done, like rotating, trimming, adding texts, adding sounds, speed-up, adding elements, and more.
Wondershare Filmora
Get started easily with Filmora’s powerful performance, intuitive interface, and countless effects!
Try It Free Try It Free Try It Free Learn More >
Steps to create GIF using Wondershare Filmora
StepLaunch the Wondershare software on your system and add the local media files from which you wish to create a GIF.
Step 1. Next, drag and drop the files to the timeline of the software.
Step 2. Using the editing tools, you can customize the added files.
Step 3. Add texts, and effects as needed using the functions at the software.
Step 4. Next, at the Local tab choose the GIF option, select the desired file name and the system location to save the file. Finally, click on the EXPORT button to start the file processing.
● Key Takeaways from This Episode →
●GIF animations can be added from the integrated library at Android and iPhone devices.
●Using the local videos on the phone, GIF can also be created.
●For creating an excellent and professional-looking GIF, Wondershare Filmora works as one of the best tools that is simple and quick to use.
Create Animated Video on Canva
Canva is a simple way—without any graphic design experience—to make professional graphics for social media, newsletters, presentations, business cards, gift certificates, brochures, and more. Flexible design templates offer the ideal layout for your target destination, letting you aim over the design, not the file formatting or the size.
So, can you make an animated video on Canva?
Yes, because Canva lives on the cloud, you can access your graphics from anywhere you can get online while using Canva on the cloud. Learn how you can play, get up, and run with Canva in this short, fun tutorial guide. We’ll discuss adding and editing images, using inbuilt design templates, and working with typography to build your next project with Canva.
In the subsequent sections, we shall learn more about Canva animated videos and how to create one easily on your PC.
In this article
01 [Create an animated video with a Canva template](#Part 1)
02 [Create Canva animated video with your video](#Part 2)
Part 1 Create an animated video with a Canva template
In this section, we’ll explore how to make animated video on Canva, which applies to both the free and pro account of Canva. However, the steps given below got created from Canva’s free account. We suppose that you’ve already created an account on Canva and logged into the platform. So, further steps will proceed as follows:
Go to the Video tab given in the top front panel of Canva and choose any template of your desire. Let’s say we’ve selected the very first template, 1920 × 1080 pixels. There are lots of options provided by Canva from where you can choose your favorites. You can also create a template with a custom size.

After you enter the editing panel, you have the choice of different templates on the left-hand panel. You can search for a template of your choice among them and can create other pages, as shown below. To preview the templates, you can click the Play button with mentioned time duration on the top right corner of the editing screen.

Now, it’s time to add creativity and explore more editing elements within the Canva. You can modify the entire template given and add something of your own.

Now, you can explore various editing Elements given on the left-hand panel, as shown below. There are multiple options available here as well.

You can add some text within the Canva template, and you can search from the left-hand panel. Given above are various options by which you can bold, italicize, and underline the text.

Now, let’s add some music to the video. So, go to the Audio tab and select any one of the options among them. There are different choices for you to explore here as well.

After you’re done, you can hit the Preview Play button on the top and see your project, as shown below.
It’s all done, and you can proceed with the next section.
Part 2 Create Canva animated video with your video
We’ll discuss how to create an animated video by uploading our video in Canva without using any template in this section. After logging in to the Canva account credentials, select the Video tab and choose the different templates offered.
We’ve selected a blank template for the purpose as follows.

Now, you need to head directly towards the Uploads tab and upload your video created over here.

By now, you have most probably got over with uploading your media. Click the uploaded video, and it will automatically enter within the editing panel of Canva, as shown below.

You’re all done now, and it’s all finished! Even though template usage is quite simple, it’s pretty straightforward when you don’t use any ready-made template. However, you can still beautify this simple video with different elements like text, music, etc.
Animation style videos influence people of all ages to whatever generation, or the kind you belong to will be one of them for sure.
Animated ones provoke diverse impacts instead of ordinary videos on the audience utilizing illustration, kinesthetic, etc. But the fact is, due to technological advancements and overexposure to social media sites, we have forgotten its significance.
Want to know some other most accessible software tools that can bring out the artist in you? Here is an alternative that is all you need.
Are you surprised to find that you can go with various animation styles to boost your business or bring out your talents? But are you confused about how to revamp your story and effectively film it? Why should you worry when the best animation maker and Canva’s alternative Wondershare Filmora is here exclusively for you to create fantastic animation videos that could stand out of the box?
Conclusion
Do you aspire to paint with bright colors to videos or want to become an animator? Then, choose animation styles that you most enjoy, find attractive today, start working on them, or create Canva animated videos as the tutorial indicates above. Lastly, don’t forget to give Filmora a chance to upscale your creation and give your animation style a life!
02 [Create Canva animated video with your video](#Part 2)
Part 1 Create an animated video with a Canva template
In this section, we’ll explore how to make animated video on Canva, which applies to both the free and pro account of Canva. However, the steps given below got created from Canva’s free account. We suppose that you’ve already created an account on Canva and logged into the platform. So, further steps will proceed as follows:
Go to the Video tab given in the top front panel of Canva and choose any template of your desire. Let’s say we’ve selected the very first template, 1920 × 1080 pixels. There are lots of options provided by Canva from where you can choose your favorites. You can also create a template with a custom size.
After you enter the editing panel, you have the choice of different templates on the left-hand panel. You can search for a template of your choice among them and can create other pages, as shown below. To preview the templates, you can click the Play button with mentioned time duration on the top right corner of the editing screen.
Now, it’s time to add creativity and explore more editing elements within the Canva. You can modify the entire template given and add something of your own.
Now, you can explore various editing Elements given on the left-hand panel, as shown below. There are multiple options available here as well.
You can add some text within the Canva template, and you can search from the left-hand panel. Given above are various options by which you can bold, italicize, and underline the text.
Now, let’s add some music to the video. So, go to the Audio tab and select any one of the options among them. There are different choices for you to explore here as well.
After you’re done, you can hit the Preview Play button on the top and see your project, as shown below.
It’s all done, and you can proceed with the next section.
Part 2 Create Canva animated video with your video
We’ll discuss how to create an animated video by uploading our video in Canva without using any template in this section. After logging in to the Canva account credentials, select the Video tab and choose the different templates offered.
We’ve selected a blank template for the purpose as follows.
Now, you need to head directly towards the Uploads tab and upload your video created over here.
By now, you have most probably got over with uploading your media. Click the uploaded video, and it will automatically enter within the editing panel of Canva, as shown below.
You’re all done now, and it’s all finished! Even though template usage is quite simple, it’s pretty straightforward when you don’t use any ready-made template. However, you can still beautify this simple video with different elements like text, music, etc.
Animation style videos influence people of all ages to whatever generation, or the kind you belong to will be one of them for sure.
Animated ones provoke diverse impacts instead of ordinary videos on the audience utilizing illustration, kinesthetic, etc. But the fact is, due to technological advancements and overexposure to social media sites, we have forgotten its significance.
Want to know some other most accessible software tools that can bring out the artist in you? Here is an alternative that is all you need.
Are you surprised to find that you can go with various animation styles to boost your business or bring out your talents? But are you confused about how to revamp your story and effectively film it? Why should you worry when the best animation maker and Canva’s alternative Wondershare Filmora is here exclusively for you to create fantastic animation videos that could stand out of the box?
Conclusion
Do you aspire to paint with bright colors to videos or want to become an animator? Then, choose animation styles that you most enjoy, find attractive today, start working on them, or create Canva animated videos as the tutorial indicates above. Lastly, don’t forget to give Filmora a chance to upscale your creation and give your animation style a life!
How to Create Picsart Cartoon
How to Create Picsart Cartoon
An easy yet powerful editor
Numerous effects to choose from
Detailed tutorials provided by the official channel
Cartoonized images are a convenient source of fun and media entertainment in present times. Try hands at creating your own caricature masterpieces with Picsart!
In this article
01 [How To Edit Cartoon Picture in Picsart](#Part 1)
02 [How To Make A Cartoon On Your Phone](#Part 2)
03 [How to Cartoon Yourself on Picsart](#Part 3)
Part 1 How to Edit Cartoon Picture in Picsart
Cartoonized pictures as you must be aware of, are comic transformations of real-time images and are widely used on social media to add a funny angle to the diversity of conversation going on, or even just as a source of plentiful amusement.
If you often feel motivated to experiment with the art and are looking for a perfect solution, see through the following section for a detailed and stepwise guide to create and edit a Picsart cartoon with utmost ease and within a quick time span:
User’s Guide to Edit Cartoon Pictures in Picsart
Step 1: Download the Picsart Application
Visit the official Picsart website to download the desktop version of the app in your Windows or MacOs supported PC.
Step 2: Make a Selection
Launch the app in your system to reach the Picsart welcome screen. Navigate to the bottom and tap the ‘+’ symbol. You are now required to choose a desired image to create the cartoon edit. You can either browse through your system gallery or search a specific one from the Picsart photo library in the ‘Search Bar’ at the top of the app screen.

Step 3: Let’s Get Editing!
When you have made your choice, navigate to the toolbar at the bottom of the app screen and click on the ‘Effects’ tab. Make a side scroll to choose a specific effect category, like that of ‘Artistic’ or ‘Magic’ to open a library of effects in the selected category.
As an example, selecting the ‘Cartoonizer’ option in the ‘Artistic’ effects category can add an immediate caricature feel to your selected real-time image. You can further include manual adjustments to get the perfect cartoon look by pressing and holding the ‘Cartoonizer’ option. There are a whole variety of magical effects, such as, Neo Pop, Soul, Badlands, Animation and Paw in the ‘Magic’ effects category, that are just perfect in giving your edit a fantasizing look with a Picsart cartoon background.
If you are looking for a quicker editing process, prefer adding cartoonized elements, like ‘Picsart Stickers’ to your image instead of going for a complete caricature edit. To do this, open the ‘Picsart Photo Editor’, navigates to the ‘Sticker’ symbol and click on it, followed by searching ‘Cartoon Sticker’. You can alternatively search a specific keyword with the ‘Cartoon’ descriptor, if you are clear on what you want to add.
You can further, resize your selected sticker with a ‘Two Finger Pinch’ or use the ‘Eraser’ tool to ward off any unwanted portions from the same. You are free to take as many repetitions of the process as you wish, till you get the perfect result for saving to your device and sharing on your social media handles.

Step 4: Time to Save and Share!
When you are satisfied with your work, navigate to the right hand corner and tap ‘Apply’ to finalize your changes, followed by clicking on the ‘Next’ button at the top right corner of the app screen to save and export your creation.
Part 2 How to Make a Cartoon on Your Phone
After a detailed analysis of the cartoon editing procedure in your desktops, let us see thro ugh the method of creating cartoonized images on your MacOs and Android smartphones on the following section:
Stepwise Procedure for Creating Cartoonized Images on Phone
Step 1: Download the Application
When going to use the Picsart editor application on your smartphone, you will first require a download of the same in your concerned device. You can do this by visiting the ‘Google PlayStore’ for an Android device or the ‘Apple App Store’ for MacOs smartphones.
Step 2: Choose a Real-time Image
After a successful launch of the ‘Picsart Editor’ application in your smartphone, reach to and click on the ‘+’ icon at the bottom of the app’s working interface. This needs to be followed by selecting any specific real-time image, either from your smartphone gallery or the Picsart photo library using the top ‘Search Bar’ of the interface, for creating a cartoonized edit.

Step 3: Editing Begins!
Once you are done with selecting the image, proceed to add effects to your selection by clicking the ‘Effects’ tab in the bottom toolbar, succeeded by picking a desired effect type through a right scroll. Tap on any category, such as, Magic, Artistic, etc, to open the effect library of the same.
For instance, you can click on the ‘Cartoonizer’ option within Artistic’ effects to supplement your uploaded real-time image with an instant cartoonized effect. You are also granted the liberty to make manual changes to set the caricature image effects as per your preferences, which you can do with a ‘Press and Hold’ of the ‘Cartoonizer’ tab. If you have a diversion towards complementing your cartoonized images with magical effects, choose from Animation, Neo Pop, Paw, Badlands, Paw, and other amazing options in the ‘Magic’ category.

Step 4: Save and Export
When you have completed the editing process and the changes satisfy you, go to the ‘Apply’ tab at the right side of the editor screen to see the changes appear in your edit. You can now navigate to the upper right corner of the app screen and click on ‘Next’ to save your work locally to your device, along with exporting the same across different media platforms.
Part 3 How to Cartoon Yourself on Picsart
Having learnt about the interesting ways to edit cartoon pictures and create cartoons on your smartphone, you might like to try hands on creating a cartoon portrait of yourself in the Picsart editor for a variety of reasons, like that of creating cartoon profile pics of yourself. Let us have a look of the procedure for the same using the Picsart Online Image Editor tool in the following section:
User’s Guide to Create a Cartoon Portrait With Picsart Online Photo Editor
Step 1: Launch the Application
In any of your favorite internet browsers, search for and open ‘Picsart Desktop Editor’. In the app’s working interface, tap ‘Upload’ or ‘New Project’ to choose an image from your device or the free to use Picsart image library respectively, for proceeding with the cartoonized transformations.

Step 2: Edit Your Selection
Tap on the ‘Effects’ tab from the editing toolbar at the top of your image and select a desired effect category to access the diversity of cartoonifying filters. It is recommended to select the ‘Magic’ category for the most splendid cartoon effects, such as, Paw, Badland, Animation, Soul and Neo Pop among many others.

You can even make manual adjustments in the brightness, color, saturation, burn and fade, etc., of the image by clicking on the ‘Adjust’ and ‘Blend’ options at the top of the image workspace.

Step 3: Download and Share Your Work
When you are done editing, navigate to and click on the ‘Share’ option at the upper right corner of the editor screen to download your cartoonized image.

****Wondershare Filmora Video Editor Cartoon Image Creator**
For Win 7 or later (64-bit)
For macOS 10.12 or later
Picsart is certainly a dependable solution to create caricature images, but if you are keen on looking for an alternative application to cater to the need, Introduced to the software market by Wondershare, the Filmora Cartoon Image Creator can be a convenient rescue. The app promises you of a high quality cartoonized edit with a plethora of editing effects to suit your most specific editing preferences.
● Ending Thoughts →
● Creating cartoonized edits from real time images is a fun and entertaining activity along with being the latest media trend.
● The Picsart editor application allows making caricature images from actual stills through desktop, smartphone and online compatible image editing program.
● Talking of suitable Picsart alternatives, you can rely on the Filmora Cartoon Image Creator application for high quality cartoonized image creation.
Cartoonized images are a convenient source of fun and media entertainment in present times. Try hands at creating your own caricature masterpieces with Picsart!
In this article
01 [How To Edit Cartoon Picture in Picsart](#Part 1)
02 [How To Make A Cartoon On Your Phone](#Part 2)
03 [How to Cartoon Yourself on Picsart](#Part 3)
Part 1 How to Edit Cartoon Picture in Picsart
Cartoonized pictures as you must be aware of, are comic transformations of real-time images and are widely used on social media to add a funny angle to the diversity of conversation going on, or even just as a source of plentiful amusement.
If you often feel motivated to experiment with the art and are looking for a perfect solution, see through the following section for a detailed and stepwise guide to create and edit a Picsart cartoon with utmost ease and within a quick time span:
User’s Guide to Edit Cartoon Pictures in Picsart
Step 1: Download the Picsart Application
Visit the official Picsart website to download the desktop version of the app in your Windows or MacOs supported PC.
Step 2: Make a Selection
Launch the app in your system to reach the Picsart welcome screen. Navigate to the bottom and tap the ‘+’ symbol. You are now required to choose a desired image to create the cartoon edit. You can either browse through your system gallery or search a specific one from the Picsart photo library in the ‘Search Bar’ at the top of the app screen.
Step 3: Let’s Get Editing!
When you have made your choice, navigate to the toolbar at the bottom of the app screen and click on the ‘Effects’ tab. Make a side scroll to choose a specific effect category, like that of ‘Artistic’ or ‘Magic’ to open a library of effects in the selected category.
As an example, selecting the ‘Cartoonizer’ option in the ‘Artistic’ effects category can add an immediate caricature feel to your selected real-time image. You can further include manual adjustments to get the perfect cartoon look by pressing and holding the ‘Cartoonizer’ option. There are a whole variety of magical effects, such as, Neo Pop, Soul, Badlands, Animation and Paw in the ‘Magic’ effects category, that are just perfect in giving your edit a fantasizing look with a Picsart cartoon background.
If you are looking for a quicker editing process, prefer adding cartoonized elements, like ‘Picsart Stickers’ to your image instead of going for a complete caricature edit. To do this, open the ‘Picsart Photo Editor’, navigates to the ‘Sticker’ symbol and click on it, followed by searching ‘Cartoon Sticker’. You can alternatively search a specific keyword with the ‘Cartoon’ descriptor, if you are clear on what you want to add.
You can further, resize your selected sticker with a ‘Two Finger Pinch’ or use the ‘Eraser’ tool to ward off any unwanted portions from the same. You are free to take as many repetitions of the process as you wish, till you get the perfect result for saving to your device and sharing on your social media handles.
Step 4: Time to Save and Share!
When you are satisfied with your work, navigate to the right hand corner and tap ‘Apply’ to finalize your changes, followed by clicking on the ‘Next’ button at the top right corner of the app screen to save and export your creation.
Part 2 How to Make a Cartoon on Your Phone
After a detailed analysis of the cartoon editing procedure in your desktops, let us see thro ugh the method of creating cartoonized images on your MacOs and Android smartphones on the following section:
Stepwise Procedure for Creating Cartoonized Images on Phone
Step 1: Download the Application
When going to use the Picsart editor application on your smartphone, you will first require a download of the same in your concerned device. You can do this by visiting the ‘Google PlayStore’ for an Android device or the ‘Apple App Store’ for MacOs smartphones.
Step 2: Choose a Real-time Image
After a successful launch of the ‘Picsart Editor’ application in your smartphone, reach to and click on the ‘+’ icon at the bottom of the app’s working interface. This needs to be followed by selecting any specific real-time image, either from your smartphone gallery or the Picsart photo library using the top ‘Search Bar’ of the interface, for creating a cartoonized edit.
Step 3: Editing Begins!
Once you are done with selecting the image, proceed to add effects to your selection by clicking the ‘Effects’ tab in the bottom toolbar, succeeded by picking a desired effect type through a right scroll. Tap on any category, such as, Magic, Artistic, etc, to open the effect library of the same.
For instance, you can click on the ‘Cartoonizer’ option within Artistic’ effects to supplement your uploaded real-time image with an instant cartoonized effect. You are also granted the liberty to make manual changes to set the caricature image effects as per your preferences, which you can do with a ‘Press and Hold’ of the ‘Cartoonizer’ tab. If you have a diversion towards complementing your cartoonized images with magical effects, choose from Animation, Neo Pop, Paw, Badlands, Paw, and other amazing options in the ‘Magic’ category.
Step 4: Save and Export
When you have completed the editing process and the changes satisfy you, go to the ‘Apply’ tab at the right side of the editor screen to see the changes appear in your edit. You can now navigate to the upper right corner of the app screen and click on ‘Next’ to save your work locally to your device, along with exporting the same across different media platforms.
Part 3 How to Cartoon Yourself on Picsart
Having learnt about the interesting ways to edit cartoon pictures and create cartoons on your smartphone, you might like to try hands on creating a cartoon portrait of yourself in the Picsart editor for a variety of reasons, like that of creating cartoon profile pics of yourself. Let us have a look of the procedure for the same using the Picsart Online Image Editor tool in the following section:
User’s Guide to Create a Cartoon Portrait With Picsart Online Photo Editor
Step 1: Launch the Application
In any of your favorite internet browsers, search for and open ‘Picsart Desktop Editor’. In the app’s working interface, tap ‘Upload’ or ‘New Project’ to choose an image from your device or the free to use Picsart image library respectively, for proceeding with the cartoonized transformations.
Step 2: Edit Your Selection
Tap on the ‘Effects’ tab from the editing toolbar at the top of your image and select a desired effect category to access the diversity of cartoonifying filters. It is recommended to select the ‘Magic’ category for the most splendid cartoon effects, such as, Paw, Badland, Animation, Soul and Neo Pop among many others.
You can even make manual adjustments in the brightness, color, saturation, burn and fade, etc., of the image by clicking on the ‘Adjust’ and ‘Blend’ options at the top of the image workspace.
Step 3: Download and Share Your Work
When you are done editing, navigate to and click on the ‘Share’ option at the upper right corner of the editor screen to download your cartoonized image.
****Wondershare Filmora Video Editor Cartoon Image Creator**
For Win 7 or later (64-bit)
For macOS 10.12 or later
Picsart is certainly a dependable solution to create caricature images, but if you are keen on looking for an alternative application to cater to the need, Introduced to the software market by Wondershare, the Filmora Cartoon Image Creator can be a convenient rescue. The app promises you of a high quality cartoonized edit with a plethora of editing effects to suit your most specific editing preferences.
● Ending Thoughts →
● Creating cartoonized edits from real time images is a fun and entertaining activity along with being the latest media trend.
● The Picsart editor application allows making caricature images from actual stills through desktop, smartphone and online compatible image editing program.
● Talking of suitable Picsart alternatives, you can rely on the Filmora Cartoon Image Creator application for high quality cartoonized image creation.
Are You Head Over Heels With 3D Animation Design
Are You Head Over Heels With 3D Animation Design?
An easy yet powerful editor
Numerous effects to choose from
Detailed tutorials provided by the official channel
3D animation design is an acronym for three-dimensional animation, meaning that the backgrounds and characters in this project are in a three-dimensional space. 3D animation artist makes use of computer graphics to make the object looks like they’re moving in a three-dimensional space.
Today, 3D animation design and animation are trendy, helpful, and in high demand to both the designer and the animator. Animation tools are beneficial to create a background, storyboards, models, and after-effects and can also be used to animate characters from movies, commercials, and televisions.
In this article
01 [What is a Bachelor of 3D Design and Animation?](#Part 1)
02 [Best 3D Animation and Design Software for Beginners and Professionals](#Part 2)
Part 1 What is a Bachelor of 3D Design and Animation?
It is a fact that anything that has to do with computer-generated graphics like 3D animation is a growing field and required in high demand due to the advancement of ICT around the world, and it is an advanced form of design. If you’re aspiring to be a professional interior designer, you should consider adding the value of 3D animation interior designing skills to your resume.
The bachelor of 3D designs and animation provides you with skills, knowledge, and experience in rigging, animation, lighting, texturing, compositing, and modeling. The course will help you get your practical skill in 3D designs, animation, and interactivity in the game industry, and the study of professional practice in 3D animation and character design workplaces. There are also several reasons why learning 3D makes sense which include:
● Graphic design with 3D animation saves time. It gives you more detail quality and brings imagination to reality.
● It opens you up to more professional opportunities.
● It keeps you in line with the modern world.
● 3D animation character design allows you to challenge yourself by expanding your skill and growing your portfolio to stay abreast and improve yourself.
● The 3D animation design allows you to create a more detailed and realistic concept for better design evaluation.
● It allows you to make a new creative workflow.
● The production of a wide range of 3D software makes it easier to create 3D designs.
● There are plenty online resources to learn 3D designs.
● 3D animation interior design opens new career opportunities and increases the marketability of your skill as a designer.
Part 2 Best 3D Animation and Design Software for Beginners and Professionals
3D modeling has improved the way we design. It is vital to use decent software to produce the best output because it improves your Design accuracy and efficiency and helps the designer and end-user visualize space requirements. There is excellent graphic design possibility with 3D animation software for creating a perfect design used by beginners and professionals, and this software includes:
01Best 3D Animation and Design Software for Beginners
● Adobe’s Creative Cloud
Adobe’s Creative Cloud is a straightforward 3D animation house design tool for beginners. It is a subscription-based service that provides over 20 desktop and mobile designing apps for UX, web, video, photography, etc. If you need a medium to showcase your work, you are at the right place as it does not just display your work but also gives ideas on characters design, colors, photographs, videos, icons, etc.
● ****Wondershare Filmora Video Editor **
For Win 7 or later (64-bit)
For macOS 10.12 or later
Filmora is one of the most accessible 3D animation design software for beginners. This software allows you to create various shapes of your choice, add a keyframe in for the movement, fine-tuning to make it smooth, and also allows you to add visual text, color, and effects before exporting it.
● Seamless3d
Seamless3d Is 100-percent free, open-source 3D software that you can download and helps you create specialized 3D design and animation videos images or 3D characters. It also supports FFmpeg video formats such as AVI, MP4, etc.
● Stykz
Stykz is an easy-to-use and straightforward animation program for beginners. It is entirely free and easy to customize without a watermark.
● Maya
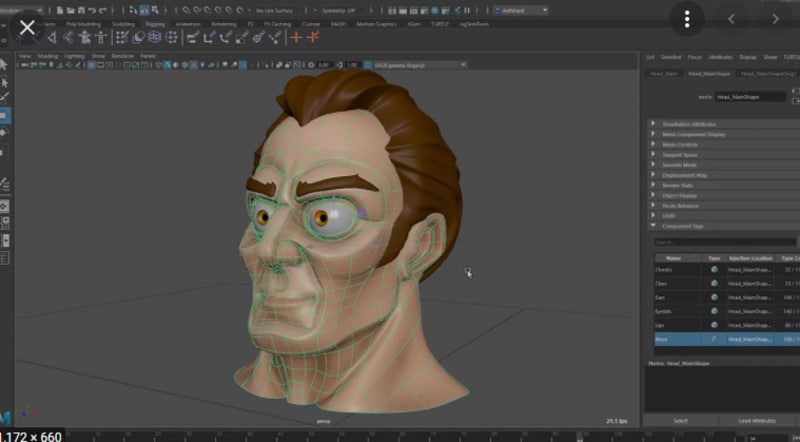
Maya is a user-friendly beginner software for 3D animation character design, wearable technology, and motion graphics. This software has various 3D rendering and shading features that impact GPU, which helps speed up the workflow.
02Best 3D Animation and Design Software for Professionals
● SketchUp Pro
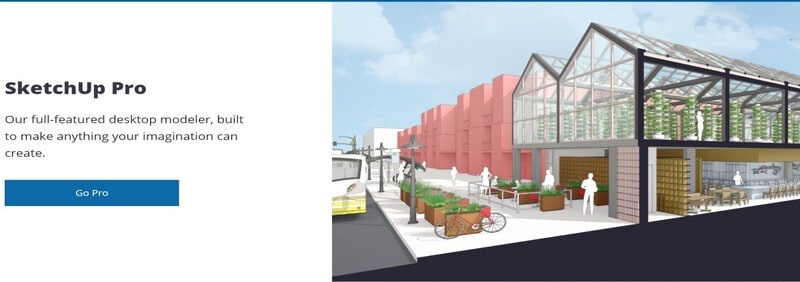
SketchUp Pro is the best 3D animation design software most companies and designers use to automatically transform 3D models into 2D design. It gives your 3D animation home design a personalized touch with the help of its customized features.
● iclone 7
iclone 7 is one of the fastest 3D animation design tools professionals use to create animation movies, content creation, video games education, and art. It is a paid to that is packed with many features to help your design.
● Arnold
Arnold is a paid 3D software that allows you to render 3D images in high quality quickly. It also interactively produces immediate results and leaves more iteration time with an intuitive and straightforward UI control.
● Akeytsu
Akeytsu is a 3D design software for animation well known for its creativity and crafts. It makes designing 3D animation house design much more accessible with its cycle of animation tools.
● Blender
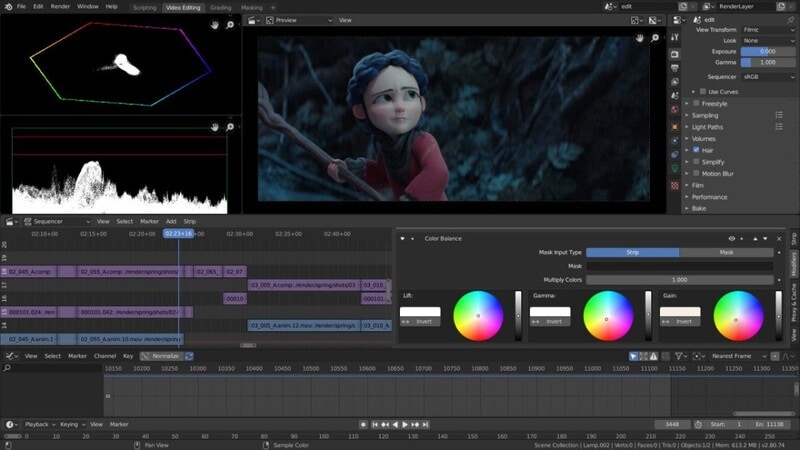
Blender is a good alternative for 3D design and animation open-source software professionals. It is a multi-functional platform that works on Windows MacBook and Linux computers and ensures that you have a smooth experience in 3D designs.
● Key Takeaways from This Episode →
● Understanding what is a Bachelor of 3D design and animation?
● Best 3D animation and character design Software for Beginners and Professionals
● Finding out why 3D animation makes sense.
3D animation design is an acronym for three-dimensional animation, meaning that the backgrounds and characters in this project are in a three-dimensional space. 3D animation artist makes use of computer graphics to make the object looks like they’re moving in a three-dimensional space.
Today, 3D animation design and animation are trendy, helpful, and in high demand to both the designer and the animator. Animation tools are beneficial to create a background, storyboards, models, and after-effects and can also be used to animate characters from movies, commercials, and televisions.
In this article
01 [What is a Bachelor of 3D Design and Animation?](#Part 1)
02 [Best 3D Animation and Design Software for Beginners and Professionals](#Part 2)
Part 1 What is a Bachelor of 3D Design and Animation?
It is a fact that anything that has to do with computer-generated graphics like 3D animation is a growing field and required in high demand due to the advancement of ICT around the world, and it is an advanced form of design. If you’re aspiring to be a professional interior designer, you should consider adding the value of 3D animation interior designing skills to your resume.
The bachelor of 3D designs and animation provides you with skills, knowledge, and experience in rigging, animation, lighting, texturing, compositing, and modeling. The course will help you get your practical skill in 3D designs, animation, and interactivity in the game industry, and the study of professional practice in 3D animation and character design workplaces. There are also several reasons why learning 3D makes sense which include:
● Graphic design with 3D animation saves time. It gives you more detail quality and brings imagination to reality.
● It opens you up to more professional opportunities.
● It keeps you in line with the modern world.
● 3D animation character design allows you to challenge yourself by expanding your skill and growing your portfolio to stay abreast and improve yourself.
● The 3D animation design allows you to create a more detailed and realistic concept for better design evaluation.
● It allows you to make a new creative workflow.
● The production of a wide range of 3D software makes it easier to create 3D designs.
● There are plenty online resources to learn 3D designs.
● 3D animation interior design opens new career opportunities and increases the marketability of your skill as a designer.
Part 2 Best 3D Animation and Design Software for Beginners and Professionals
3D modeling has improved the way we design. It is vital to use decent software to produce the best output because it improves your Design accuracy and efficiency and helps the designer and end-user visualize space requirements. There is excellent graphic design possibility with 3D animation software for creating a perfect design used by beginners and professionals, and this software includes:
01Best 3D Animation and Design Software for Beginners
● Adobe’s Creative Cloud
Adobe’s Creative Cloud is a straightforward 3D animation house design tool for beginners. It is a subscription-based service that provides over 20 desktop and mobile designing apps for UX, web, video, photography, etc. If you need a medium to showcase your work, you are at the right place as it does not just display your work but also gives ideas on characters design, colors, photographs, videos, icons, etc.
● ****Wondershare Filmora Video Editor **
For Win 7 or later (64-bit)
For macOS 10.12 or later
Filmora is one of the most accessible 3D animation design software for beginners. This software allows you to create various shapes of your choice, add a keyframe in for the movement, fine-tuning to make it smooth, and also allows you to add visual text, color, and effects before exporting it.
● Seamless3d
Seamless3d Is 100-percent free, open-source 3D software that you can download and helps you create specialized 3D design and animation videos images or 3D characters. It also supports FFmpeg video formats such as AVI, MP4, etc.
● Stykz
Stykz is an easy-to-use and straightforward animation program for beginners. It is entirely free and easy to customize without a watermark.
● Maya
Maya is a user-friendly beginner software for 3D animation character design, wearable technology, and motion graphics. This software has various 3D rendering and shading features that impact GPU, which helps speed up the workflow.
02Best 3D Animation and Design Software for Professionals
● SketchUp Pro
SketchUp Pro is the best 3D animation design software most companies and designers use to automatically transform 3D models into 2D design. It gives your 3D animation home design a personalized touch with the help of its customized features.
● iclone 7
iclone 7 is one of the fastest 3D animation design tools professionals use to create animation movies, content creation, video games education, and art. It is a paid to that is packed with many features to help your design.
● Arnold
Arnold is a paid 3D software that allows you to render 3D images in high quality quickly. It also interactively produces immediate results and leaves more iteration time with an intuitive and straightforward UI control.
● Akeytsu
Akeytsu is a 3D design software for animation well known for its creativity and crafts. It makes designing 3D animation house design much more accessible with its cycle of animation tools.
● Blender
Blender is a good alternative for 3D design and animation open-source software professionals. It is a multi-functional platform that works on Windows MacBook and Linux computers and ensures that you have a smooth experience in 3D designs.
● Key Takeaways from This Episode →
● Understanding what is a Bachelor of 3D design and animation?
● Best 3D animation and character design Software for Beginners and Professionals
● Finding out why 3D animation makes sense.
Also read:
- New Best 12 Evil Cartoon Characters of All Time
- Updated In 2024, Tutorials to Make Animated Images – Even if Youre Just Starting Out
- Updated 10 of the Best Disney Animated Shows
- Ways to Make Sure You Get the Most up to Date Cartoon Character Design Tips
- New In 2024, How to Make Well Done Animated GIF By Yourself?
- Updated How to Create A GIF with Sound?
- New How to Get Started in Stop Motion Claymation for 2024
- 2024 Approved 5 Best Adobe Animate Courses & Classes | Beginners Complete Tutorial
- Updated Ways You Can Master to Find 10 Best Free Animated Text Generator for 2024
- Updated What Is A GIF for 2024
- Updated In 2024, How to Analyze an Editorial Cartoon Easily
- Updated 12+ Stunning Instagram GIF Stickers and How to Make & Find for 2024
- Updated In 2024, 15 Top Collage Makers to Create Aesthetic Collages
- In 2024, Top 10 Sketch Animation Video Makers
- Apps to Animate Still Pictures Which Could Make Your Pictures Become Internet Sensation
- Ways to Create an Adobe Collage
- 10 Cartoon Canvas Painting Ideas for Total Beginners
- Updated In 2024, Stunning Ideas About Creating Personalised WhatsApp GIF Sticker
- New Samples of Cartoon Character Face to Inspire You
- Updated How to Analyze an Editorial Cartoon
- Updated Finding The Best Animated Profile Picture Maker
- In 2024, Have You Seen the Facebook Cartoon App Everyones Using Recently
- New 10 Amazing Cartoon Music Examples You Need to Bookmark for 2024
- Updated 2024 Approved Amazing Techniques of Motion Graphics in Premiere Pro
- 8 Top Motion Graphics Online Tools for Your Inspiration
- 2024 Approved 5 Foolproof Amazing Anime Text to Speech Tips
- New 10 Scary Anime Girls That Will Make You Creepy
- New In 2024, Learn What Are Differences Between 2D And 3D Animation
- In 2024, Interesting Fundamentals and Ultimate Guide to Animated Characters Drawings
- New 2024 Approved How to Create an Animated Sticky Navbar
- In 2024, Popular Female & Male Disney Cartoon Characters
- New 5 Recommended Websites for Text GIF Maker for 2024
- New How to Create a Whiteboard Video Step by Step 2023 Updated
- New 2024 Approved How to Draw Cartoons Step by Step with This Guide
- Updated In 2024, 12 Aesthetic GIF Instagram for Marketers and Creatives
- Tutorials to Make Animated Images – Even if Youre Just Starting Out for 2024
- 15 Best Collage Makers to Create Aesthetic Collages
- New Whats the Best 10 Photo Animator Templates That Bring Your Images to Life, In 2024
- Updated 2024 Approved Tips for Animated Collage Maker
- Updated Types of Cartoon Styles You May Use for The Next Marketing Project
- 2024 Approved Simple Guide to Create New and Exciting Blackboard Animation
- New 2024 Approved How to Send and Add Snapchat GIFs 100 The Easy Way
- 4 Smart Solutions to Create or Find Good Morning/Night GIFs for 2024
- In 2024, Top 12 Video to GIF Converters High Quality to Check Out
- Best Claymation Shows That Make Your Memories Unforgettable
- Updated 2024 Approved Best 12 Video to GIF Converters High Quality to Check Out
- New How to Make Photo Motion Effect Online for 2024
- How to Create Free Photo Collage Frame in Minutes for 2024
- Updated How to Cartoonize Photo Photoshop in Easy Steps for 2024
- New 4 Things You Should Know About Pinterest GIF
- In 2024, 10 Free Location Spoofers to Fake GPS Location on your Nokia C110 | Dr.fone
- How To Erase Private Data From iPhone 14 Pro | Dr.fone
- How To Remove Flashlight From Apple iPhone XS Lock Screen | Dr.fone
- How To Fix Auto Lock Greyed Out on iPhone 11 Pro | Dr.fone
- A Comprehensive Guide to Mastering iPogo for Pokémon GO On Apple iPhone 13 mini | Dr.fone
- 3 Effective Ways to Unlock iCloud Account Without Password From iPhone XS Max
- In 2024, How Can You Cast Your Apple iPhone 13 to Windows PC With Ease? | Dr.fone
- How to Stop Life360 from Tracking You On Samsung Galaxy A14 5G? | Dr.fone
- In 2024, How To Remove Screen Lock PIN On Vivo Y36 Like A Pro 5 Easy Ways
- Complete guide for recovering messages files on 11 5G
- Does MP4 play on Samsung Galaxy S24 Ultra?
- How To Teleport Your GPS Location On Vivo Y02T? | Dr.fone
- What To Do if Your Honor X8b Auto Does Not Work | Dr.fone
- In 2024, 3 Ways to Track Samsung Galaxy A34 5G without Them Knowing | Dr.fone
- In 2024, A Comprehensive Guide to iCloud Unlock On Apple iPhone 13 Pro Online
- Issues playing MKV video on Samsung Galaxy M54 5G
- In 2024, How Do I Stop Someone From Tracking My Oppo K11 5G? | Dr.fone
- 3 Things You Must Know about Fake Snapchat Location On Motorola Edge+ (2023) | Dr.fone
- What Pokémon Evolve with A Dawn Stone For Apple iPhone 11? | Dr.fone
- How to Fix Unfortunately, Contacts Has Stopped Error on Oppo A1x 5G | Dr.fone
- How To Repair iOS of iPhone 12 Pro? | Dr.fone
- Why Your Nokia G22 Screen Might be Unresponsive and How to Fix It | Dr.fone
- In 2024, 5 Techniques to Transfer Data from Oppo Find X6 to iPhone 15/14/13/12 | Dr.fone
- In 2024, Apple ID Locked for Security Reasons On Apple iPhone 8 Plus? Find the Best Solution Here
- In 2024, How to Fix Pokemon Go Route Not Working On Samsung Galaxy A24? | Dr.fone
- Everything You Need to Know about Lock Screen Settings on your Itel
- In 2024, How to Screen Mirroring Xiaomi Redmi K70E? | Dr.fone
- Everything You Need To Know About Unlocked Apple iPhone 13 Pro
- Dose Life360 Notify Me When Someone Checks My Location On Oppo F23 5G? | Dr.fone
- How To Stream Anything From Itel S23 to Apple TV | Dr.fone
- Edit and Send Fake Location on Telegram For your OnePlus Nord 3 5G in 3 Ways | Dr.fone
- In 2024, 9 Best Free Android Monitoring Apps to Monitor Phone Remotely For your Tecno Spark 20 | Dr.fone
- How to Change Netflix Location to Get More Country Version On Oppo Find N3 | Dr.fone
- In 2024, How to Hide/Fake Snapchat Location on Your Realme Narzo N53 | Dr.fone
- What You Need To Know To Improve Your Honor X9b Hard Reset | Dr.fone
- How to Fix Samsung Galaxy M54 5G Find My Friends No Location Found? | Dr.fone
- In 2024, How to get the dragon scale and evolution-enabled pokemon On Nokia C22? | Dr.fone
- 3 Ways to Track Vivo Y17s without Them Knowing | Dr.fone
- Top 10 Fingerprint Lock Apps to Lock Your Samsung Galaxy S23 Phone
- Why Is My OnePlus Ace 3 Offline? Troubleshooting Guide | Dr.fone
- How to Fake GPS on Android without Mock Location For your Nokia C110 | Dr.fone
- Title: New In 2024, Top 7 Best Animated Lyric Video Software for FREE
- Author: Elon
- Created at : 2024-06-15 11:22:36
- Updated at : 2024-06-16 11:22:36
- Link: https://animation-videos.techidaily.com/new-in-2024-top-7-best-animated-lyric-video-software-for-free/
- License: This work is licensed under CC BY-NC-SA 4.0.
