
:max_bytes(150000):strip_icc():format(webp)/the-10-best-password-managers-of-2022-6543213-7650bf3ab2eb41a08dbee8713ce811e3.jpg)
New In 2024, Useful Tips for Canva Animated Elements
Useful Tips for Canva Animated Elements
Versatile Video Editor - Wondershare Filmora
An easy yet powerful editor
Numerous effects to choose from
Detailed tutorials provided by the official channel
Thanks to the progress of graphic design, users are no longer simply satisfied with everyday designs, no matter how complex the design itself. They want innovation, they want a fresh and mesmerizing new idea. This becomes increasingly harder to achieve and helps push the boundaries of what designers want.
This is where motion can come into play. Movement in graphic design has emerged as a recent design trend. This is where users benefit from valuable tips for Canva animated elements.
Without further ado, let’s dive into everything you need to know to design animated elements in Canva.
In this article
01 [What is Canva?](#Part 1)
02 [Animate An Element In Canva ](#Part 2)
03 [Make Elements Move In Canva](#Part 3)
04 [How About Making Animated Elements On Video](#Part 4)
Part 1 What is Canva?
Canva has become a buzzword in the designing and animation world. It’s a graphic design platform that allows users to create graphic designs for social media, for presentations, documents, cards for any memorable occasion. It was founded by Melanie Perkins, an Australian technology entrepreneur.
Canva has become a buzzword in the designing and animation world. It’s a graphic design platform that allows users to create graphic designs for social media, for presentations, documents, cards for any memorable occasion. It was founded by Melanie Perkins, an Australian technology entrepreneur.
It allows users to work individually or across teams. With real-time live changes made available, Canva is pushing the boundary of what is possible and making it more accessible. With the introduction of animated elements in Canva, the possibilities for design horizons have expanded significantly.
Part 2 Animate An Element In Canva
There are one of two ways to go about creating an animation. You can work off an existing template or create a custom template. If you’re wondering how to animate individual elements in Canva then this guide is for you.
The first step to animation is building your custom static design. For that you need to go to Canva and select “Create a Design” option. Once you do, select the type of content you’re attempting to create- from Instagram posts to a presentation or an A4 document.
Think of the text font you’re going to use.

Then you should look into adding elements that suit your text on the design.

You can upload photographs into your creation with the upload button. This also extends to uploading audio that you want to use on video clips.

Once you’re done with these steps, you should have a customized static design that you can use. Let’s now look at how to animate individual elements in Canva. These elements are the text, the image, audio, and video.
2.1 Image
To add an image to Canva, you need to upload it in the ‘Upload’ tab on Canva. Once you do, the image can then be selected for display on your presentation.
For images, you can also choose to frame them within the “elements” tab. There are two kinds of elements. One which allows photographs to be embedded in them and ones which don’t. You can choose any element as a frame for your embedded image.
The next thing is to choose the “Animate” button. This will open up different options for animation features. The animate button allows a preview of what each animation does in real-time.

The ones with the crown are premium features exclusive to Canva Pro, the paid subscription.
2.2 Text
Add in the text you want to see to the image. The text can be in any style that you choose. Canva offers a variety of fonts that you can use to customize the color, size, and duration of the display.

2.3 Video
If you’re ready to take your content creation skills to the next level, this section is for you. You have the option of adding videos to Canva as well. Just load the video you have on hand to the Canva “Uploads” section. Introduce the video clip to the design.
Another way to embed the video is by using an element and embedding your video within it.
With video, you also have options like cropping, adjusting the playback. With playback, you can choose “Autoplay Video” and “Loop Video.” These are basic options for how the video can be played. The crop function allows you to trim the video to any point in time.
On top of this, you can use the animate button, which can create options for how the video is introduced to the backdrop.

If you want to remove the animation, you need to go to the “Animate” button and select the ‘None’ option to delete the animation from the design.
You can opt to animate either just the elements or you can animate the slide on the whole with “Page Animations.”
Part 3 Make Elements Move In Canva
How To Arrange The Order Of An Animation?
The brilliant thing about Canva is that you can decide the order you want to create your animation. The component elements of a Canva backdrop are the text, audio, images, video. These form the basis for the animated elements in Canva.
You can work on whichever component feels more accessible to you. Canva also allows users to make videos for title sequences and end-cards for video sharing platforms.
How to Change The Duration Of Animated Graphic In Canva
Once you’ve added a video element to your presentation, you’ll notice that the timer disappears from the production. This is because the presentation only lasts the duration of the video.
If you go to the next slide of the presentation, you can often notice a timer available. It has a default duration of five seconds. If you click on the clock symbol, a menu with “Timing” will appear with a slider. You can adjust the timing from 0.1 seconds up to a maximum of 30 seconds.
Part 4 How About Making Animated Elements On Video
If you’ve decided Canva is not the tool for you, you can choose any video editing software to make your animation.
Wondershare Filmora is the tool that can help you level up your content creation. It allows users to increase precision and provides professional video editing options.
AI Portrait – The best feature of Wondershare Filmora for gameplay editing
The AI Portrait is a new add-on in Wondershare Filmora. It can easily remove video backgrounds without using a green screen or chroma key, allowing you to add borders, glitch effects, pixelated, noise, or segmentation video effects.

Conclusion
Now that you understand how to build an animation and the software required, you should differentiate between average and extraordinary editing tools.
Filmora and Canva are the best editing tools in this case. Like you can animate individual elements Canva, you can do the same in the other tool also. It may be used to produce animation videos by introducing keyframes, resulting in a seamless and realistic animation. Aside from that, using color correction and an audio processor can help take your animations to the next tier.
Download it today to make your videos better.
Thanks to the progress of graphic design, users are no longer simply satisfied with everyday designs, no matter how complex the design itself. They want innovation, they want a fresh and mesmerizing new idea. This becomes increasingly harder to achieve and helps push the boundaries of what designers want.
This is where motion can come into play. Movement in graphic design has emerged as a recent design trend. This is where users benefit from valuable tips for Canva animated elements.
Without further ado, let’s dive into everything you need to know to design animated elements in Canva.
In this article
01 [What is Canva?](#Part 1)
02 [Animate An Element In Canva ](#Part 2)
03 [Make Elements Move In Canva](#Part 3)
04 [How About Making Animated Elements On Video](#Part 4)
Part 1 What is Canva?
Canva has become a buzzword in the designing and animation world. It’s a graphic design platform that allows users to create graphic designs for social media, for presentations, documents, cards for any memorable occasion. It was founded by Melanie Perkins, an Australian technology entrepreneur.
Canva has become a buzzword in the designing and animation world. It’s a graphic design platform that allows users to create graphic designs for social media, for presentations, documents, cards for any memorable occasion. It was founded by Melanie Perkins, an Australian technology entrepreneur.
It allows users to work individually or across teams. With real-time live changes made available, Canva is pushing the boundary of what is possible and making it more accessible. With the introduction of animated elements in Canva, the possibilities for design horizons have expanded significantly.
Part 2 Animate An Element In Canva
There are one of two ways to go about creating an animation. You can work off an existing template or create a custom template. If you’re wondering how to animate individual elements in Canva then this guide is for you.
The first step to animation is building your custom static design. For that you need to go to Canva and select “Create a Design” option. Once you do, select the type of content you’re attempting to create- from Instagram posts to a presentation or an A4 document.
Think of the text font you’re going to use.
Then you should look into adding elements that suit your text on the design.
You can upload photographs into your creation with the upload button. This also extends to uploading audio that you want to use on video clips.
Once you’re done with these steps, you should have a customized static design that you can use. Let’s now look at how to animate individual elements in Canva. These elements are the text, the image, audio, and video.
2.1 Image
To add an image to Canva, you need to upload it in the ‘Upload’ tab on Canva. Once you do, the image can then be selected for display on your presentation.
For images, you can also choose to frame them within the “elements” tab. There are two kinds of elements. One which allows photographs to be embedded in them and ones which don’t. You can choose any element as a frame for your embedded image.
The next thing is to choose the “Animate” button. This will open up different options for animation features. The animate button allows a preview of what each animation does in real-time.
The ones with the crown are premium features exclusive to Canva Pro, the paid subscription.
2.2 Text
Add in the text you want to see to the image. The text can be in any style that you choose. Canva offers a variety of fonts that you can use to customize the color, size, and duration of the display.
2.3 Video
If you’re ready to take your content creation skills to the next level, this section is for you. You have the option of adding videos to Canva as well. Just load the video you have on hand to the Canva “Uploads” section. Introduce the video clip to the design.
Another way to embed the video is by using an element and embedding your video within it.
With video, you also have options like cropping, adjusting the playback. With playback, you can choose “Autoplay Video” and “Loop Video.” These are basic options for how the video can be played. The crop function allows you to trim the video to any point in time.
On top of this, you can use the animate button, which can create options for how the video is introduced to the backdrop.
If you want to remove the animation, you need to go to the “Animate” button and select the ‘None’ option to delete the animation from the design.
You can opt to animate either just the elements or you can animate the slide on the whole with “Page Animations.”
Part 3 Make Elements Move In Canva
How To Arrange The Order Of An Animation?
The brilliant thing about Canva is that you can decide the order you want to create your animation. The component elements of a Canva backdrop are the text, audio, images, video. These form the basis for the animated elements in Canva.
You can work on whichever component feels more accessible to you. Canva also allows users to make videos for title sequences and end-cards for video sharing platforms.
How to Change The Duration Of Animated Graphic In Canva
Once you’ve added a video element to your presentation, you’ll notice that the timer disappears from the production. This is because the presentation only lasts the duration of the video.
If you go to the next slide of the presentation, you can often notice a timer available. It has a default duration of five seconds. If you click on the clock symbol, a menu with “Timing” will appear with a slider. You can adjust the timing from 0.1 seconds up to a maximum of 30 seconds.
Part 4 How About Making Animated Elements On Video
If you’ve decided Canva is not the tool for you, you can choose any video editing software to make your animation.
Wondershare Filmora is the tool that can help you level up your content creation. It allows users to increase precision and provides professional video editing options.
AI Portrait – The best feature of Wondershare Filmora for gameplay editing
The AI Portrait is a new add-on in Wondershare Filmora. It can easily remove video backgrounds without using a green screen or chroma key, allowing you to add borders, glitch effects, pixelated, noise, or segmentation video effects.
Conclusion
Now that you understand how to build an animation and the software required, you should differentiate between average and extraordinary editing tools.
Filmora and Canva are the best editing tools in this case. Like you can animate individual elements Canva, you can do the same in the other tool also. It may be used to produce animation videos by introducing keyframes, resulting in a seamless and realistic animation. Aside from that, using color correction and an audio processor can help take your animations to the next tier.
Download it today to make your videos better.
How to Stop Animation From Looping in Unity
How to Stop Animation from Looping in Unity
An easy yet powerful editor
Numerous effects to choose from
Detailed tutorials provided by the official channel
Unity is an IDE interface all designed exclusively for game developers. However, you can do much more with Unity than game development. But, our main concern here is something else than this subject. You’re looking for easy tutorials on Unity stop animation!

And luckily, we’ve got you covered as we’ve briefly explained how to perform Unity stop animation from looping and the steps to make a smooth animation.
In this article
01 [What is Unity Used for?](#Part 1)
02 [How to Stop Animation Playing in Loop in Unity?](#Part 2)
03 [How to Smooth an Animation in Unity?](#Part 3)
Part 1 What is Unity Used for?
Unity is a software tool friendly to all the game developers out there. This tool is used by the large community of game developers to power and create their game development projects. And, the software is more of a professional means and not a simple pared-down ‘game builder .’Unity also offers one of the most significant inbuilt features like rendering, physics, and collision detection. Thus, one of the powerful aspects of Unity is that game developers need not go out of the box and create everything from scratch. Instead, they are available with the physics engine required to develop games quickly. Another robust feature of Unity is that it includes an excellent ‘Asset Store’ where developers can upload their creations and showcase them to the whole community. So, that’s Unity and its uses in a broader scope!
Before we take you through the next section, it’s important to mention that Unity is also known as cross-platform IDE, where IDE stands for ‘integrated development environment.’ So, it can be called more of an interface with access to all the tools and resources required to develop games.
Apart from the game development, Unity is known for other excellent usage purposes as:
● Simulations
● Animation
● Architectural Visualization
● Previsualization for Film
● Interactive Experiences
Among these features only, we’ll describe Unity stop animation from looping in detail.
Part 2 How to Stop Animation Playing in Loop in Unity?
As we said, we’ll describe to you the most accessible definition of how to stop Animation in Unity. Thus, there are simple steps that we’d like to define firsthand before explaining the whole procedure with an image-centric step-by-step guide.
So, those simple steps to stop motion animation in After Effects in the loop also go like below:
Step 1 Go to the Project tab and select Animation.
Step 2 Open the Inspector tab.
Step 3 Uncheck the checkbox Loop Time, and you’re good to go!
We’ll describe the same, i.e., Unity stop animation from looping through the step guide below.
In this guide, we’ll explain right from applying the Animation so that you’d understand better. So, let’s begin without any further ado!
01Step 1 Delete animation folder
We have already created an animation folder in the folder named as own Animation, so click that folder, click the animation folder, and then another folder along with as shown below. Hold the Shift key and click another folder. Then, right-click the Delete tab as depicted below.
Similarly, you can also delete the Animation if you wish.

02Step 2 Create an animation for the subject
Now, you may have different subjects. We’re creating Animation on Mobile Joystick for reference, as shown below.

Now, hit the Create tab on the Unity panel below. Then, proceed to save your Animation in the folder you’ve already created for the same.

03Step 3 Give positions to the animation
Firstly, hit the red-icon button used for recording, as shown below.

Give the position on the left side after you click the button. And, then, clicking almost near to 3you can give the position to the right-hand side as shown below.

Now, the animation has been set. You can see the animation from left to right if you click the Play button. So, here, you can see the results of infinite loop animation, which won’t stop.

You can follow two ways to stop this Animation in Unity from looping, and we’ll describe both methods below.
04Step 4 Stop animation Unity Way 1
Go to the animation folder where you’ve created the animation and click the New Animation icon as shown below.

Now, you have to uncheck the Loop Time tab on the top-right corner of the Unity panel.

05Step 5 Stop animation Unity Way 2
Alternatively, you can click the Animator tab on the top of the Unity panel and double-tap the New Animation button. Then, it will also delete or uncheck the loop time, as shown below.

These were all the steps to stop animation Unity.
Part 3 How to Smooth an Animation in Unity?
After done with Unity stop animation, it’s time to smooth your Unity animation. Again, we will describe it simply if you’re used to the Unity platform and then with a step guide with respective screenshots.
So, stay tuned until the end to reveal the easy steps of smoothing an animation in Unity.
Select the Dopesheet at the bottom of the animation window. Then, you need to switch to the ‘Curves’ view once you create your Animation in the Dopesheet. These animation curves help you accelerate and decelerate animations so that the movement and other things can stop and start smoothly.
So, let’s begin with the step guide tutorial on the same as follows:
For reference, take an example of a metronome object imported from Blender to Unity. Here, we’ve grouped all the pendulum objects under one rotation so that when we move the pendulum, it pivots to the correct point, as shown below.

01Add the animator
So, the first step begins with adding the Animator component to the parent object. You can do this by clicking the Add Component tab on the Unity panel’s left side, searching for Animator, and clicking the Animator.
You will also need a controller to control the animations. Go to your animation folder, right-click, and select Create> Animator Controller tab.

Let’s call or give it a name metronome animator as shown below.
Then, you need to drag this into your animator component. Again, you need to go to your animations folder, right-click, select Create> Animations tab.
Now, give this a name pendulum full swing.
02Open the animator tab
Now, open the animator tab, drag this pendulum swing animation to that panel, and double-tap the yellow-colored New Animation button.

03Create an animation
With the game object selected, the animated metronome pendulum, in this case, we’d like to animate the X component of the rotation. So, you need to click Add Property> Transform> Rotation tab and click the + sign on its right, as shown below.
Now, click the plus sign automatically to set two keyframes, one at the beginning and one at the end. Now, click on end select all, and then delete for now.

04Add keyframes to rotate the pendulum
With the first set of keyframes and the pendulum all way to the right, go halfway and change the rotation to the left on the left panel of Unity. Then, add another keyframe.

05Slow down the animation
As you can observe, the Animation of this pendulum is in a straight line and feels unnatural to the eyes. Thus, we’re required to smooth this Animation now! For this purpose, go to the Curves; you can see the pink properties of rotation as going from one side to another.

Now, you need to adjust these pink curves. Start by adding a key to one of its sides, as shown below. After that, it is all on you how slow or fasts you want these values to be.
Here, you’re all done smoothing the animation in Unity after learning the stop-animation Unity tutorial.
You can even stop motion animation on Photoshop with the above tutorial.
06Bonus Tip:
We want to introduce an excellent video editor software called Filmora Video Editor . It is from the house of Wondershare, a well-known software company worldwide.

Wondershare Filmora - Best Video Editor for Mac/Windows
5,481,435 people have downloaded it.
Build unique custom animations without breaking a sweat.
Focus on creating epic stories and leave the details to Filmora’s auto features.
Start a creative adventure with drag & drop effects and endless possibilities.
Filmora simplifies advanced features to save you time and effort.
Filmora cuts out repetition so you can move on to your next creative breakthrough.
With Filmora, you can easily add Animation and edit your videos to make them look world-class. The latest version and new updates are eye-candy and quick fix for beginner video editors.
So, please pay a visit to the Filmora website and check out its Mac and Windows version for free today.
● Key Takeaways from This Episode →
● Learning the concept and usage of Unity
● A tutorial on how to stop animation in Unity from looping
● A tutorial on how to smooth animation in Unity
● Introduction to Filmora, the top-most video editor software for beginners.
Unity is an IDE interface all designed exclusively for game developers. However, you can do much more with Unity than game development. But, our main concern here is something else than this subject. You’re looking for easy tutorials on Unity stop animation!
And luckily, we’ve got you covered as we’ve briefly explained how to perform Unity stop animation from looping and the steps to make a smooth animation.
In this article
01 [What is Unity Used for?](#Part 1)
02 [How to Stop Animation Playing in Loop in Unity?](#Part 2)
03 [How to Smooth an Animation in Unity?](#Part 3)
Part 1 What is Unity Used for?
Unity is a software tool friendly to all the game developers out there. This tool is used by the large community of game developers to power and create their game development projects. And, the software is more of a professional means and not a simple pared-down ‘game builder .’Unity also offers one of the most significant inbuilt features like rendering, physics, and collision detection. Thus, one of the powerful aspects of Unity is that game developers need not go out of the box and create everything from scratch. Instead, they are available with the physics engine required to develop games quickly. Another robust feature of Unity is that it includes an excellent ‘Asset Store’ where developers can upload their creations and showcase them to the whole community. So, that’s Unity and its uses in a broader scope!
Before we take you through the next section, it’s important to mention that Unity is also known as cross-platform IDE, where IDE stands for ‘integrated development environment.’ So, it can be called more of an interface with access to all the tools and resources required to develop games.
Apart from the game development, Unity is known for other excellent usage purposes as:
● Simulations
● Animation
● Architectural Visualization
● Previsualization for Film
● Interactive Experiences
Among these features only, we’ll describe Unity stop animation from looping in detail.
Part 2 How to Stop Animation Playing in Loop in Unity?
As we said, we’ll describe to you the most accessible definition of how to stop Animation in Unity. Thus, there are simple steps that we’d like to define firsthand before explaining the whole procedure with an image-centric step-by-step guide.
So, those simple steps to stop motion animation in After Effects in the loop also go like below:
Step 1 Go to the Project tab and select Animation.
Step 2 Open the Inspector tab.
Step 3 Uncheck the checkbox Loop Time, and you’re good to go!
We’ll describe the same, i.e., Unity stop animation from looping through the step guide below.
In this guide, we’ll explain right from applying the Animation so that you’d understand better. So, let’s begin without any further ado!
01Step 1 Delete animation folder
We have already created an animation folder in the folder named as own Animation, so click that folder, click the animation folder, and then another folder along with as shown below. Hold the Shift key and click another folder. Then, right-click the Delete tab as depicted below.
Similarly, you can also delete the Animation if you wish.
02Step 2 Create an animation for the subject
Now, you may have different subjects. We’re creating Animation on Mobile Joystick for reference, as shown below.
Now, hit the Create tab on the Unity panel below. Then, proceed to save your Animation in the folder you’ve already created for the same.
03Step 3 Give positions to the animation
Firstly, hit the red-icon button used for recording, as shown below.
Give the position on the left side after you click the button. And, then, clicking almost near to 3you can give the position to the right-hand side as shown below.
Now, the animation has been set. You can see the animation from left to right if you click the Play button. So, here, you can see the results of infinite loop animation, which won’t stop.
You can follow two ways to stop this Animation in Unity from looping, and we’ll describe both methods below.
04Step 4 Stop animation Unity Way 1
Go to the animation folder where you’ve created the animation and click the New Animation icon as shown below.
Now, you have to uncheck the Loop Time tab on the top-right corner of the Unity panel.
05Step 5 Stop animation Unity Way 2
Alternatively, you can click the Animator tab on the top of the Unity panel and double-tap the New Animation button. Then, it will also delete or uncheck the loop time, as shown below.
These were all the steps to stop animation Unity.
Part 3 How to Smooth an Animation in Unity?
After done with Unity stop animation, it’s time to smooth your Unity animation. Again, we will describe it simply if you’re used to the Unity platform and then with a step guide with respective screenshots.
So, stay tuned until the end to reveal the easy steps of smoothing an animation in Unity.
Select the Dopesheet at the bottom of the animation window. Then, you need to switch to the ‘Curves’ view once you create your Animation in the Dopesheet. These animation curves help you accelerate and decelerate animations so that the movement and other things can stop and start smoothly.
So, let’s begin with the step guide tutorial on the same as follows:
For reference, take an example of a metronome object imported from Blender to Unity. Here, we’ve grouped all the pendulum objects under one rotation so that when we move the pendulum, it pivots to the correct point, as shown below.
01Add the animator
So, the first step begins with adding the Animator component to the parent object. You can do this by clicking the Add Component tab on the Unity panel’s left side, searching for Animator, and clicking the Animator.
You will also need a controller to control the animations. Go to your animation folder, right-click, and select Create> Animator Controller tab.
Let’s call or give it a name metronome animator as shown below.
Then, you need to drag this into your animator component. Again, you need to go to your animations folder, right-click, select Create> Animations tab.
Now, give this a name pendulum full swing.
02Open the animator tab
Now, open the animator tab, drag this pendulum swing animation to that panel, and double-tap the yellow-colored New Animation button.
03Create an animation
With the game object selected, the animated metronome pendulum, in this case, we’d like to animate the X component of the rotation. So, you need to click Add Property> Transform> Rotation tab and click the + sign on its right, as shown below.
Now, click the plus sign automatically to set two keyframes, one at the beginning and one at the end. Now, click on end select all, and then delete for now.
04Add keyframes to rotate the pendulum
With the first set of keyframes and the pendulum all way to the right, go halfway and change the rotation to the left on the left panel of Unity. Then, add another keyframe.
05Slow down the animation
As you can observe, the Animation of this pendulum is in a straight line and feels unnatural to the eyes. Thus, we’re required to smooth this Animation now! For this purpose, go to the Curves; you can see the pink properties of rotation as going from one side to another.
Now, you need to adjust these pink curves. Start by adding a key to one of its sides, as shown below. After that, it is all on you how slow or fasts you want these values to be.
Here, you’re all done smoothing the animation in Unity after learning the stop-animation Unity tutorial.
You can even stop motion animation on Photoshop with the above tutorial.
06Bonus Tip:
We want to introduce an excellent video editor software called Filmora Video Editor . It is from the house of Wondershare, a well-known software company worldwide.
Wondershare Filmora - Best Video Editor for Mac/Windows
5,481,435 people have downloaded it.
Build unique custom animations without breaking a sweat.
Focus on creating epic stories and leave the details to Filmora’s auto features.
Start a creative adventure with drag & drop effects and endless possibilities.
Filmora simplifies advanced features to save you time and effort.
Filmora cuts out repetition so you can move on to your next creative breakthrough.
With Filmora, you can easily add Animation and edit your videos to make them look world-class. The latest version and new updates are eye-candy and quick fix for beginner video editors.
So, please pay a visit to the Filmora website and check out its Mac and Windows version for free today.
● Key Takeaways from This Episode →
● Learning the concept and usage of Unity
● A tutorial on how to stop animation in Unity from looping
● A tutorial on how to smooth animation in Unity
● Introduction to Filmora, the top-most video editor software for beginners.
[Top 10] Best Photo to Animation Converters
[Top 10] Best Photo to Animation Converters That Give You an Advantage
An easy yet powerful editor
Numerous effects to choose from
Detailed tutorials provided by the official channel
We do have a couple of recommendations to give. There’s a wide variety of tools out there that will allow you to make animated pictures. With some actually allowing you to add animation (or motion) to your photographs while others bring a pop-up of life to your pictures with artistic filters and effects.
Have a look at our list of the top ten best photos to animation converter tools below to see if one of them catches your eye.
Alright, let’s get straight to our list of the best photo to animation converter tools available. As mentioned, we’ve picked quite the variety — including both software and online photo animator tools so that you can find one that best suits the kind of projects that you’re working on.
For your convenience, we’ve included the pros and cons of each converter as well as the most common scenarios each application can be used.
01Filmora
Rating and Reviews: [Techradar: 4.5/5]
Wondershare Filmora Video Editor , while, first and foremost, is an advanced video editor, is the first photo animation maker on this list of ours. This software is highly-rated online and it comes with a bunch of presets, filters, and effects, that you can use in order to animate your photographs. Its more advanced video editing functions would no doubt prove to be useful in the future as well, allowing you to increase the complexity of your projects and achieve more and more things.
● With Filmora, you have access to a built-in library of Effects and Elements that you can use in order to make animated pictures.
● The advanced video editing functions can also be used to create more complex motion animations that you are unlikely to see in other alternatives.
URL: https://filmora.wondershare.com/
| PROS | CONS |
|---|---|
| ● Access to built-in effects and elements library.● Advanced editing functions.● A FREE trial is available to try out its many features. | ● As a downloadable software, Filmora will require downloading and installing.● Some of its features and functions are locked in the FREE version as well.● Payment is either subscription-based or one-time for a perpetual license. |
For Win 7 or later (64-bit)
For macOS 10.12 or later
02PicMonkey
Rating and Reviews: [G2: 4.4/5]
When it comes to online photo animator tools, PicMonkey is definitely one of the first that people recommend. It’s premium software, so you’ll have to pay to use all of its functions — with the cheapest plan worth $72 annually or $7.99 monthly. The best part about it is, undoubtedly, the fact that it was developed by Shutterstock, which is highly regarded in the photography industry. So, you can surely rely on stable support.
● Photo Animation maker with lots of built-in animation effects and templates that allow users to easily make animated pictures.
URL: https://www.picmonkey.com/design/photo-animation-maker
| PROS | CONS |
|---|---|
| ● A FREE trial is available to test out its functions.● Developed by a reliable company.● Packed with lots of built-in animated effects and presets. | ● Packed with lots of built-in animated effects and presets.● No software version for use without the internet.● Does not come equipped with advanced custom animation tools. |

03Adobe Creative Cloud Express
Rating and Reviews: [Creative Bloq: 4/5]
The Adobe Creative Cloud Express is both an online photo animator and an application that you can download and install on your phone. As is expected from any Adobe product, it’s quite premium in make and is better suited for more serious photo animations — especially as you’ll need to pay in order to be able to use it to its fullest extent.
● Comes with a veritable library of templates, effects, and filters for advanced photo editing and photo animation.
URL: https://www.adobe.com/express/create/social-media-graphic
| PROS | CONS |
|---|---|
| ● Advanced photo editing tool.● Available both online and as an app.● Reliable and trustworthy adobe product. | ● The FREE trial is limited.● The FREE trial is limited.● Advanced photo editing is not suitable for beginners. |

04ColorCinch
Rating and Reviews: [Crozdesk: 4/5]
ColorCinch, or Cartoonize, as it is also called, is another popular online photo animator that you might have heard about already. This one features quite a few presets that you can use to quickly change the look of your photographs.
● Photo editing functions for breathing new life into existing photographs.
● Presets, templates, filters, and effects are available for easy and efficient photo editing.
URL: https://www.cartoonize.net/
| PROS | CONS |
|---|---|
| ● Beginner-friendly UI.● Comes with lots of filters and effects built-in.● Cartoonizer effect for simple photo animation onlinep. | ● Paid tool Limited FREE trial.● Subscription-based packages.● Limited customer animation functions. |

05Photo Cartoon
Rating and Reviews: N/A
Photo Cartoon is an online photo animator that specifically alters your photos and ‘cartoon-izes’ it (with several effects to choose from as to the specific style that you want). This single-use, while definitely not the most advanced on this list of ours, offers the user an easy way to change the look of their photographs.
● Transform photos into cartoons, paintings, drawings, and caricatures.
URL: https://photocartoon.net/
| PROS | CONS |
|---|---|
| ● Quick and easy to use● Online software, good for all devices● The finished photo animation can be downloaded and shared. | ● Very basic functions.● Limited effects/filters to choose from. ● Not highly rated online. |
06BeFunky
Rating and Reviews: [G2: 4.2/5]
With BeFunky, we go back to somewhat more advanced online photo animator tools. This one works quite simply as well though. Similar to the previous tool we introduced, BeFunky is meant primarily for quickly and easily adding filters and effects to photographs to change its style to look more like a cartoon or animation.
● Create a cartoon version of your images easily and quickly.
URL: https://www.befunky.com/features/photo-to-cartoon/
| PROS | CONS |
|---|---|
| ● Easy-to-use and beginner-friendly● Easy-to-use and beginner-friendly.● Available online and thus compatible with most devices. | ● Limited photo editing scope.● Sign-up is required for long-term use.● No advanced custom animation functions. |

077. ASPOSE
Rating and Reviews: N/A
Although not very well-known, ASPOSE is an easy way of animating pictures online. All you really have to do is upload your file (in the way that is suggested) and you’re good to go. You’ll be given a choice in what kind of animations you want to put on your photograph thereafter. And, when the conversion is complete, it’ll be FREE to download and share.
● Easily make animated pictures online by uploading photographs to be animated.
URL: https://products.aspose.app/imaging/animation-maker
| PROS | CONS |
|---|---|
| ● FREE photo to animation converter● Easy-to-use and efficient.● Motion animations available. | ● Internet is required for use.● Not the most advanced filters/effects/animations are available.● No custom animation function. |

08TheCartoonist.me
Rating and Reviews: N/A
We’re approaching more and more obscure territory the further we go along this list, with many of the tools, including this next one, called ‘The Cartoonist.me’, not having been rated by the usual tech websites. But, that doesn’t mean that the tool itself is any less useful. This one, in particular, is akin to the other cartoon-izers that we introduced earlier — in that it changes the look of photographs into one similar to what is used in animations.
● Picture animator online that allows you to turn your pictures into cartoon versions of their former self.
URL: https://thecartoonist.me/
| PROS | CONS |
|---|---|
| ● FREE photo animation maker.● Basic cartoon effects available.● Upload and Download | ● No advanced photo editing.● No advanced photo editing.● Not highly rated. |

09Snapstouch
Rating and Reviews: N/A
Snapstouch is another obscure, but no less useful, photo editing tool that adds a touch animation to your photographs. This online tool offers sketch, painting, pencil sketch, outline, cartoon, and many other filters that you can apply to your photographs to directly change their look.
● Change the look of your photographs with an easily applied filter.
URL: http://www.snapstouch.com/
| PROS | CONS |
|---|---|
| ● Easy-to-use (upload then download)● FREE to use online tool.● Several effects to choose from. | ● A limited selection of filter effects.● Old and dated UI.● Not highly rated. |

10AnyMaking
Rating and Reviews: N/A
AnyMaking is a basic online photo editor that comes with a variety of photo effects that you can apply to your photographs to change their looks. Much like the previous tools, AnyMaking offers ‘animation’ style filters that can turn your photographs into something that looks like they came from one of your favorite animated films.
● Turn your photographs completely anew with fun photo effects.
| PROS | CONS |
|---|---|
| ● FREE-to-use photo effects tool.● Cartoonizer effect for animating photographs.● Easy-to-use (upload then download) | ● Limited photo effects.● No custom photo animation functions.● Not highly rated. |

● Key Takeaways from This Episode →
● Photo to Animation is quite a broad subject and, fittingly, that means that the tools that allow for it are varied indeed.
● Some photo to animation converters will allow you to completely change the look of your photograph with a single application of a filter. While others are more involved (and thus, more flexible) and require more careful customization.
● We’ve included both types (and all the types between) in our list of photo to animation converters. Hopefully, you’ll find one that can help you make the animated pictures that you want to make.
We do have a couple of recommendations to give. There’s a wide variety of tools out there that will allow you to make animated pictures. With some actually allowing you to add animation (or motion) to your photographs while others bring a pop-up of life to your pictures with artistic filters and effects.
Have a look at our list of the top ten best photos to animation converter tools below to see if one of them catches your eye.
Alright, let’s get straight to our list of the best photo to animation converter tools available. As mentioned, we’ve picked quite the variety — including both software and online photo animator tools so that you can find one that best suits the kind of projects that you’re working on.
For your convenience, we’ve included the pros and cons of each converter as well as the most common scenarios each application can be used.
01Filmora
Rating and Reviews: [Techradar: 4.5/5]
Wondershare Filmora Video Editor , while, first and foremost, is an advanced video editor, is the first photo animation maker on this list of ours. This software is highly-rated online and it comes with a bunch of presets, filters, and effects, that you can use in order to animate your photographs. Its more advanced video editing functions would no doubt prove to be useful in the future as well, allowing you to increase the complexity of your projects and achieve more and more things.
● With Filmora, you have access to a built-in library of Effects and Elements that you can use in order to make animated pictures.
● The advanced video editing functions can also be used to create more complex motion animations that you are unlikely to see in other alternatives.
URL: https://filmora.wondershare.com/
| PROS | CONS |
|---|---|
| ● Access to built-in effects and elements library.● Advanced editing functions.● A FREE trial is available to try out its many features. | ● As a downloadable software, Filmora will require downloading and installing.● Some of its features and functions are locked in the FREE version as well.● Payment is either subscription-based or one-time for a perpetual license. |
For Win 7 or later (64-bit)
For macOS 10.12 or later
02PicMonkey
Rating and Reviews: [G2: 4.4/5]
When it comes to online photo animator tools, PicMonkey is definitely one of the first that people recommend. It’s premium software, so you’ll have to pay to use all of its functions — with the cheapest plan worth $72 annually or $7.99 monthly. The best part about it is, undoubtedly, the fact that it was developed by Shutterstock, which is highly regarded in the photography industry. So, you can surely rely on stable support.
● Photo Animation maker with lots of built-in animation effects and templates that allow users to easily make animated pictures.
URL: https://www.picmonkey.com/design/photo-animation-maker
| PROS | CONS |
|---|---|
| ● A FREE trial is available to test out its functions.● Developed by a reliable company.● Packed with lots of built-in animated effects and presets. | ● Packed with lots of built-in animated effects and presets.● No software version for use without the internet.● Does not come equipped with advanced custom animation tools. |
03Adobe Creative Cloud Express
Rating and Reviews: [Creative Bloq: 4/5]
The Adobe Creative Cloud Express is both an online photo animator and an application that you can download and install on your phone. As is expected from any Adobe product, it’s quite premium in make and is better suited for more serious photo animations — especially as you’ll need to pay in order to be able to use it to its fullest extent.
● Comes with a veritable library of templates, effects, and filters for advanced photo editing and photo animation.
URL: https://www.adobe.com/express/create/social-media-graphic
| PROS | CONS |
|---|---|
| ● Advanced photo editing tool.● Available both online and as an app.● Reliable and trustworthy adobe product. | ● The FREE trial is limited.● The FREE trial is limited.● Advanced photo editing is not suitable for beginners. |
04ColorCinch
Rating and Reviews: [Crozdesk: 4/5]
ColorCinch, or Cartoonize, as it is also called, is another popular online photo animator that you might have heard about already. This one features quite a few presets that you can use to quickly change the look of your photographs.
● Photo editing functions for breathing new life into existing photographs.
● Presets, templates, filters, and effects are available for easy and efficient photo editing.
URL: https://www.cartoonize.net/
| PROS | CONS |
|---|---|
| ● Beginner-friendly UI.● Comes with lots of filters and effects built-in.● Cartoonizer effect for simple photo animation onlinep. | ● Paid tool Limited FREE trial.● Subscription-based packages.● Limited customer animation functions. |
05Photo Cartoon
Rating and Reviews: N/A
Photo Cartoon is an online photo animator that specifically alters your photos and ‘cartoon-izes’ it (with several effects to choose from as to the specific style that you want). This single-use, while definitely not the most advanced on this list of ours, offers the user an easy way to change the look of their photographs.
● Transform photos into cartoons, paintings, drawings, and caricatures.
URL: https://photocartoon.net/
| PROS | CONS |
|---|---|
| ● Quick and easy to use● Online software, good for all devices● The finished photo animation can be downloaded and shared. | ● Very basic functions.● Limited effects/filters to choose from. ● Not highly rated online. |
06BeFunky
Rating and Reviews: [G2: 4.2/5]
With BeFunky, we go back to somewhat more advanced online photo animator tools. This one works quite simply as well though. Similar to the previous tool we introduced, BeFunky is meant primarily for quickly and easily adding filters and effects to photographs to change its style to look more like a cartoon or animation.
● Create a cartoon version of your images easily and quickly.
URL: https://www.befunky.com/features/photo-to-cartoon/
| PROS | CONS |
|---|---|
| ● Easy-to-use and beginner-friendly● Easy-to-use and beginner-friendly.● Available online and thus compatible with most devices. | ● Limited photo editing scope.● Sign-up is required for long-term use.● No advanced custom animation functions. |
077. ASPOSE
Rating and Reviews: N/A
Although not very well-known, ASPOSE is an easy way of animating pictures online. All you really have to do is upload your file (in the way that is suggested) and you’re good to go. You’ll be given a choice in what kind of animations you want to put on your photograph thereafter. And, when the conversion is complete, it’ll be FREE to download and share.
● Easily make animated pictures online by uploading photographs to be animated.
URL: https://products.aspose.app/imaging/animation-maker
| PROS | CONS |
|---|---|
| ● FREE photo to animation converter● Easy-to-use and efficient.● Motion animations available. | ● Internet is required for use.● Not the most advanced filters/effects/animations are available.● No custom animation function. |
08TheCartoonist.me
Rating and Reviews: N/A
We’re approaching more and more obscure territory the further we go along this list, with many of the tools, including this next one, called ‘The Cartoonist.me’, not having been rated by the usual tech websites. But, that doesn’t mean that the tool itself is any less useful. This one, in particular, is akin to the other cartoon-izers that we introduced earlier — in that it changes the look of photographs into one similar to what is used in animations.
● Picture animator online that allows you to turn your pictures into cartoon versions of their former self.
URL: https://thecartoonist.me/
| PROS | CONS |
|---|---|
| ● FREE photo animation maker.● Basic cartoon effects available.● Upload and Download | ● No advanced photo editing.● No advanced photo editing.● Not highly rated. |
09Snapstouch
Rating and Reviews: N/A
Snapstouch is another obscure, but no less useful, photo editing tool that adds a touch animation to your photographs. This online tool offers sketch, painting, pencil sketch, outline, cartoon, and many other filters that you can apply to your photographs to directly change their look.
● Change the look of your photographs with an easily applied filter.
URL: http://www.snapstouch.com/
| PROS | CONS |
|---|---|
| ● Easy-to-use (upload then download)● FREE to use online tool.● Several effects to choose from. | ● A limited selection of filter effects.● Old and dated UI.● Not highly rated. |
10AnyMaking
Rating and Reviews: N/A
AnyMaking is a basic online photo editor that comes with a variety of photo effects that you can apply to your photographs to change their looks. Much like the previous tools, AnyMaking offers ‘animation’ style filters that can turn your photographs into something that looks like they came from one of your favorite animated films.
● Turn your photographs completely anew with fun photo effects.
| PROS | CONS |
|---|---|
| ● FREE-to-use photo effects tool.● Cartoonizer effect for animating photographs.● Easy-to-use (upload then download) | ● Limited photo effects.● No custom photo animation functions.● Not highly rated. |
● Key Takeaways from This Episode →
● Photo to Animation is quite a broad subject and, fittingly, that means that the tools that allow for it are varied indeed.
● Some photo to animation converters will allow you to completely change the look of your photograph with a single application of a filter. While others are more involved (and thus, more flexible) and require more careful customization.
● We’ve included both types (and all the types between) in our list of photo to animation converters. Hopefully, you’ll find one that can help you make the animated pictures that you want to make.
Top 8 Anime Name Generators Online-Get Cool Anime Names
Top 8 Anime Name Generators Online-Get Cool Anime Names

Shanoon Cox
Mar 27, 2024• Proven solutions
An anime name generator is a cool and fun tool that is used by anime lovers all over the world. This tool helps to create attractive anime names for you depending on your interests in anime or your character traits.
Anime names are used for a variety of purposes by anime lovers. Most of them want a cool anime-related name for their YouTube channel, game profile, twitch profile, etc. and with a large number of users on these platforms, it is difficult to get a unique name.
Also, a name becomes a symbol that represents quality, appearance, shortcomings, personality, etc.
The anime name generators will generate unique anime-related names for the users to choose from. A cool anime name always will attract more audiences to whatever content they are displaying.
Top 8 Anime Name Generators Online
A cool anime name will always attract the attention of people no matter what platform you are on. But not all people are creative enough to create such a name of their own. That is where an anime name generator comes for help.
Let’s have a look at the top 8 anime name generators available online that can be used to create unique anime names.
1. Fantasy Name Generator
The Fantasy Name Generator is a free application that can provide up to 10 anime and manga character names. The names on this site are divided into 3 categories, namely real names, fake names, and nicknames or unique names. All the names provided are Japanese.
A list of 10 names will be listed on the website when you open it. You can easily choose between male and female character anime names. If you are not satisfied with the displayed list, simply click on the Male names of Females names tab and 10 new random names will be displayed.
2. Cool Generator
The Cool Generator is another simple anime name generator that can be used to create anime names, clan names, team names, etc. All the anime names generated by this tool are unique and represent different characteristics.
A list of 24 anime names will be displayed when you open the cool generator. You can choose any one of the names from it. If you are not satisfied with the names displayed, you can go for another set of 24 names by tapping on the Generate New tab displayed above.
3. Thestoryshack.com
Thestoryshack.com is an awesome anime name generator that can provide you with countless anime names for your story, gaming adventure, or any other project. 6 unique names will be displayed on the page and you can go for more by clicking on the refresh tab.
This anime name-generating tool helps to choose between female and male character names very easily. They have also sorted the names into different categories elf names like elf names, dragon names, demon names, dwarf names, medieval names, Viking names, etc. for the convenience of the users.
4. Masterpiece Generator
Masterpiece Generator is another free online tool that helps you to create epic anime names. This tool allows you to create names with a maximum of 5 components, and hence you can choose between short and sweet or long and swanky names.
This application takes into account a variety of factors like gender, character title, flavor, character type, birth year, nationality, etc. to create a list of names. Once you have givens your suggestion, a list of names will be displayed on the page after clicking on the Write me some character names tab towards the bottom.
5. Reedsy
Reedsy is another tool that can generate cool Japanese anime character names for you. All the names are computer-generated and have something to do with their traditions.
A list of five Japanese names will be displayed once you open the page. The meanings of these names will also be mentioned for those who wish to choose names with specific meanings. You can choose the names between random, male, and female options. Clicking on the Generate names tab will always display a new set of names with the meanings.
6. Rumandmonkey.com
Rumandmonkey.com is a fun anime title generator that you can use to create appealing anime names. A small drawback is the number of ads that keep covering your display when you open the tool.
This anime name generator has classified the character names based on a different generation. You can choose between the greatest generation, baby boomer, generation x, millennials, and generation alpha categories. A variety of other questions will be asked on your likes and dislikes and an anime name will be displayed depending on the answers you have given. This tool only displays 1 name at a time and might require a little patience.
7. Quizony
Quizony is a great anime name generator for anime fans out there. The anime names generated by this tool represent the personality and character of the individual.
A series of questions will be asked by this tool to have an idea of likes and dislikes. A small drawback is that about 29 questions must be answered before they provide you with anime names. Once all the questions are answered the tool will choose a unique name for you. This tool has a brilliant way of choosing names but is not a suitable option if you want more than one anime name.
8. Fun Generator
As the name indicates Fun Generator is a very good application for all the fun-seeking anime lovers out there. This tool allows you to choose between a variety of Japanese anime names for your character.
A list of 5 different anime character names will be displayed when you open the site. You can either choose any one of them or go for another set by clicking on the tabs below. They also have options to choose from random, male or female character names.
Conclusion
Anime names are used by many anime lovers all over the world as their user name, profile name, etc. most people tend to keep this name for a lifetime. But not everyone can create an anime name that defines them and which is already not taken.
This problem is solved by anime name generators that are freely available online nowadays. These anime name generators help to create unique anime names that are appealing and tailored to the character traits of the individual.
We have listed the best online anime title generators available above. Choose an attractive anime name for yourself and have fun.
Shanoon Cox
Shanoon Cox is a writer and a lover of all things video.
Follow @Shanoon Cox
Shanoon Cox
Mar 27, 2024• Proven solutions
An anime name generator is a cool and fun tool that is used by anime lovers all over the world. This tool helps to create attractive anime names for you depending on your interests in anime or your character traits.
Anime names are used for a variety of purposes by anime lovers. Most of them want a cool anime-related name for their YouTube channel, game profile, twitch profile, etc. and with a large number of users on these platforms, it is difficult to get a unique name.
Also, a name becomes a symbol that represents quality, appearance, shortcomings, personality, etc.
The anime name generators will generate unique anime-related names for the users to choose from. A cool anime name always will attract more audiences to whatever content they are displaying.
Top 8 Anime Name Generators Online
A cool anime name will always attract the attention of people no matter what platform you are on. But not all people are creative enough to create such a name of their own. That is where an anime name generator comes for help.
Let’s have a look at the top 8 anime name generators available online that can be used to create unique anime names.
1. Fantasy Name Generator
The Fantasy Name Generator is a free application that can provide up to 10 anime and manga character names. The names on this site are divided into 3 categories, namely real names, fake names, and nicknames or unique names. All the names provided are Japanese.
A list of 10 names will be listed on the website when you open it. You can easily choose between male and female character anime names. If you are not satisfied with the displayed list, simply click on the Male names of Females names tab and 10 new random names will be displayed.
2. Cool Generator
The Cool Generator is another simple anime name generator that can be used to create anime names, clan names, team names, etc. All the anime names generated by this tool are unique and represent different characteristics.
A list of 24 anime names will be displayed when you open the cool generator. You can choose any one of the names from it. If you are not satisfied with the names displayed, you can go for another set of 24 names by tapping on the Generate New tab displayed above.
3. Thestoryshack.com
Thestoryshack.com is an awesome anime name generator that can provide you with countless anime names for your story, gaming adventure, or any other project. 6 unique names will be displayed on the page and you can go for more by clicking on the refresh tab.
This anime name-generating tool helps to choose between female and male character names very easily. They have also sorted the names into different categories elf names like elf names, dragon names, demon names, dwarf names, medieval names, Viking names, etc. for the convenience of the users.
4. Masterpiece Generator
Masterpiece Generator is another free online tool that helps you to create epic anime names. This tool allows you to create names with a maximum of 5 components, and hence you can choose between short and sweet or long and swanky names.
This application takes into account a variety of factors like gender, character title, flavor, character type, birth year, nationality, etc. to create a list of names. Once you have givens your suggestion, a list of names will be displayed on the page after clicking on the Write me some character names tab towards the bottom.
5. Reedsy
Reedsy is another tool that can generate cool Japanese anime character names for you. All the names are computer-generated and have something to do with their traditions.
A list of five Japanese names will be displayed once you open the page. The meanings of these names will also be mentioned for those who wish to choose names with specific meanings. You can choose the names between random, male, and female options. Clicking on the Generate names tab will always display a new set of names with the meanings.
6. Rumandmonkey.com
Rumandmonkey.com is a fun anime title generator that you can use to create appealing anime names. A small drawback is the number of ads that keep covering your display when you open the tool.
This anime name generator has classified the character names based on a different generation. You can choose between the greatest generation, baby boomer, generation x, millennials, and generation alpha categories. A variety of other questions will be asked on your likes and dislikes and an anime name will be displayed depending on the answers you have given. This tool only displays 1 name at a time and might require a little patience.
7. Quizony
Quizony is a great anime name generator for anime fans out there. The anime names generated by this tool represent the personality and character of the individual.
A series of questions will be asked by this tool to have an idea of likes and dislikes. A small drawback is that about 29 questions must be answered before they provide you with anime names. Once all the questions are answered the tool will choose a unique name for you. This tool has a brilliant way of choosing names but is not a suitable option if you want more than one anime name.
8. Fun Generator
As the name indicates Fun Generator is a very good application for all the fun-seeking anime lovers out there. This tool allows you to choose between a variety of Japanese anime names for your character.
A list of 5 different anime character names will be displayed when you open the site. You can either choose any one of them or go for another set by clicking on the tabs below. They also have options to choose from random, male or female character names.
Conclusion
Anime names are used by many anime lovers all over the world as their user name, profile name, etc. most people tend to keep this name for a lifetime. But not everyone can create an anime name that defines them and which is already not taken.
This problem is solved by anime name generators that are freely available online nowadays. These anime name generators help to create unique anime names that are appealing and tailored to the character traits of the individual.
We have listed the best online anime title generators available above. Choose an attractive anime name for yourself and have fun.
Shanoon Cox
Shanoon Cox is a writer and a lover of all things video.
Follow @Shanoon Cox
Secret Source to Make a Stop Motion Puppet
Secret Source to Make a Stop Motion Puppetd
An easy yet powerful editor
Numerous effects to choose from
Detailed tutorials provided by the official channel
The significant difference between a stop-motion puppet and other types is that they have an armature inside. An armature is the puppet’s skeleton, a must to hold its position without sleeping for each captured frame. The stop motion puppet makeover should be precise to prevent it from breaking down or falling quickly. In addition, buying a stop-motion puppet armature might be pretty expensive, so making them by yourself is much more fun and cheaper.

To prevent any mishap during your stop-motion puppet making, your pupils should be as durable and lightweight as possible, and they must be designed based on what you will be doing and what kind of movement will be required of them. In essence, your story’s overall purpose for creating the animation will be the ultimate factor in how your character is built and designed.
In this article
01 [8 Popular Stop Motion Puppet Examples](#Part 1)
02 [How to Make a Stop Motion Puppet](#Part 2)
Part 1 8 Popular Stop Motion Puppet Examples
While wandering all through the web world, you will encounter many famous stop motion puppets. Some of them are very popular stop-motion puppets for sale, and this section of the article is about to explore eight (of them and what they stand for:
01Rudolph the Red-Nosed Reindeer

Rudolph, the Red-Nosed Reindeer, is a pleasant Christmas stop motion animated TV special in 19produced by video craft international limited. These figures starred in the perennially beloved stop motion animation Christmas special.
02Nestor the Long-Eared Christmas Donkey

The Long-Eared Christmas Donkey, Nestor is a Christmas stop motion animated TV special in 19produced by Rankin-Bass productions. The story is back in the Roman Empire days when miniature donkeys were born with very long years and kept getting into trouble. When the owner decides to throw him out of the stable, his mother sacrifices her life to save him from a blizzard.
03Santa Claus is Comin’ to Town

This is a stop-motion animation TV special in 19made by Rankin-bass productions. The story tells all about Santa Claus when he was a baby and growing up with the Kringles. The story is told and sang by a special delivery Kluger voiced by Fred Astaire.
04Negative Space
This one is one of the world’s wide appreciated and Oscar-nominated stop motion puppet animations that reflect the son and father relationship in an interactive way. It is a must to watch animation effects.

05Fantastic Mr. Fox

Fantastic Mr. Fox is a 20puppet animation movie that talks about an urban fox that cannot resist returning to his farm and must help his community survive the farmer’s retaliation.
06Coraline

Coraline is a 20Pope x animation TV series that talks about an adventurous 11-year-old girl that finds another strange world that is an idealized version of her frustrating home.
07The Nightmare before Christmas

The nightmare before Christmas is a puppet animation TV series that talks about Jack Skellington, the king of Halloween Town, and discovers Christmas town but his attempts to bring Christmas to his home result in confusion.
07Corpse bride

Corpse Bride is a puppet animated family TV series in 20talks about a shy groom practicing his wedding vow in the inadvertent presence of a deceased young woman as she rises from the grave, assuming that he has married her.
Part 2 How to Make a Stop Motion Puppet
Do you have a story, and you need some puppets to take the place of your actors, and you want to double in stop motion animation. The fact is there are different ways to create your Stop Motion Puppet, and as per your storyboard requirement, you can go with other methods. Such as, you can either use tools to build your puppet armature, otherwise can make some puppets from clothes and threads to give it a structure, else can use clay to assign a static puppet structure. It’s all your choice, so all in all what you need is:
● A Storyboard
● Puppet armature tools
● Camera setup
● Editing Software (in our case, we are going to use Wondershare Filmora Video Editor )
In this tutorial, we will be teaching you how to make stop-motion puppets in a way that is relatively cost-effective to produce durable means whose construction requires little or no time or extra equipment:
Wondershare Filmora - Best Video Editor for Mac/Windows
5,481,435 people have downloaded it.
Build unique custom animations without breaking a sweat.
Focus on creating epic stories and leave the details to Filmora’s auto features.
Start a creative adventure with drag & drop effects and endless possibilities.
Filmora simplifies advanced features to save you time and effort.
Filmora cuts out repetition so you can move on to your next creative breakthrough.
Materials:
● Ball head screws (M2.5)
● Small screws (M3)
● Ball head screws (2xand brass pipes whose diameter is less than ball head screws
● Brass plate (strips 2mm thick)
Tools:
● M3 thread tap
● M2.5 thread tap
● Screwdriver
● Pliers
● Drill press
● Drills of 2.5 mm, 2 mm, 3 mm
● Power sander
● Loctite
● File
● Bandsaw
Step
● Use the brass to mark the length of the bone
● Cut the tube according to the length
● Sandpaper or file it Square
● On both sides of the tube, use the tap to cause the tread
● Use the screws in the brass tube to screw the ball head

Step 2:
● On each sides of the brass strip, drill 2.5 mm holes
● Then, between holes of the holes you drill, drill 2.5 mm holes
● Between the other 2.5 mm holes, drill 3mm holes

Step 3:
● On the 2.5 mm holes on the sides, use the 3mm drill to create some cup
● With the 3 mm tap, cut the thread in the 2 mm holes in the middle

Step 4:
● Without damaging the holes, file the end of the strip with all the holes as close to the first 3
● From the strip, cut the parts with the first three holes
● Also, as close to the most used flyer to file the other side.
Note: Make sure you are careful while filing as this will get very hot

**Step 5:**Join all the parts together and make sure that the cup on the outer holes of the two plates is two words each other and tighten the bolts to hold the bones

Step 6: Join to strip of bras together and form a torso. Then cut the torso and form the feet

Step 7: When your puppet is the way you want it, lock teeth styles by fixing the ball head screw in place

Animation Editing:
Also, you can make a stop motion video on Filmora by considering the following factors:
● Camera Steadiness is a must for every shot you plan for Stop Motion Video. Shaking a camera is not good. Else, your video won’t be smooth.
● Ensure capture the shot under consistent light and prevent light exposure from changing on the object; otherwise, there will be inconsistency in the video.
● To make it easier, play the film in advance, as the more friends your video, the smoother the video will be.
Here are steps to make a stop motion video on Filmora:
Step 1 Place the camera steady and bring your object in the frame. Lightly move your things and capture the movement frame by frame.

Step 2 Download and start, or if you have already installed, run the Filmora program and choose a suitable frame rate in the project settings. After selecting the resolution, click on the file and go to the project setting.

Step 3 Now import the media file using the import option from the file menu and import the captured images.

Step 4 Adjust the menu’s preference or press the shortcut key Ctrl+Shift+, and a window will appear on your screen. Select the editing panel and change the photo duration between 0.2 to 0.5 seconds.

Step 5 Once done with all the settings and satisfied with the results, click on export and select your desired video format. Your video will be exported and saved in your library so you can share it with friends.

● Key Takeaways from This Episode →
● Get to know about what is stop motion puppets.
● Different examples of how dinosaur stop motion puppet or other puppet animation form works.
● The process to create your stop motion puppet and how Filmora will assist you in it.
The significant difference between a stop-motion puppet and other types is that they have an armature inside. An armature is the puppet’s skeleton, a must to hold its position without sleeping for each captured frame. The stop motion puppet makeover should be precise to prevent it from breaking down or falling quickly. In addition, buying a stop-motion puppet armature might be pretty expensive, so making them by yourself is much more fun and cheaper.
To prevent any mishap during your stop-motion puppet making, your pupils should be as durable and lightweight as possible, and they must be designed based on what you will be doing and what kind of movement will be required of them. In essence, your story’s overall purpose for creating the animation will be the ultimate factor in how your character is built and designed.
In this article
01 [8 Popular Stop Motion Puppet Examples](#Part 1)
02 [How to Make a Stop Motion Puppet](#Part 2)
Part 1 8 Popular Stop Motion Puppet Examples
While wandering all through the web world, you will encounter many famous stop motion puppets. Some of them are very popular stop-motion puppets for sale, and this section of the article is about to explore eight (of them and what they stand for:
01Rudolph the Red-Nosed Reindeer
Rudolph, the Red-Nosed Reindeer, is a pleasant Christmas stop motion animated TV special in 19produced by video craft international limited. These figures starred in the perennially beloved stop motion animation Christmas special.
02Nestor the Long-Eared Christmas Donkey
The Long-Eared Christmas Donkey, Nestor is a Christmas stop motion animated TV special in 19produced by Rankin-Bass productions. The story is back in the Roman Empire days when miniature donkeys were born with very long years and kept getting into trouble. When the owner decides to throw him out of the stable, his mother sacrifices her life to save him from a blizzard.
03Santa Claus is Comin’ to Town
This is a stop-motion animation TV special in 19made by Rankin-bass productions. The story tells all about Santa Claus when he was a baby and growing up with the Kringles. The story is told and sang by a special delivery Kluger voiced by Fred Astaire.
04Negative Space
This one is one of the world’s wide appreciated and Oscar-nominated stop motion puppet animations that reflect the son and father relationship in an interactive way. It is a must to watch animation effects.
05Fantastic Mr. Fox
Fantastic Mr. Fox is a 20puppet animation movie that talks about an urban fox that cannot resist returning to his farm and must help his community survive the farmer’s retaliation.
06Coraline
Coraline is a 20Pope x animation TV series that talks about an adventurous 11-year-old girl that finds another strange world that is an idealized version of her frustrating home.
07The Nightmare before Christmas
The nightmare before Christmas is a puppet animation TV series that talks about Jack Skellington, the king of Halloween Town, and discovers Christmas town but his attempts to bring Christmas to his home result in confusion.
07Corpse bride
Corpse Bride is a puppet animated family TV series in 20talks about a shy groom practicing his wedding vow in the inadvertent presence of a deceased young woman as she rises from the grave, assuming that he has married her.
Part 2 How to Make a Stop Motion Puppet
Do you have a story, and you need some puppets to take the place of your actors, and you want to double in stop motion animation. The fact is there are different ways to create your Stop Motion Puppet, and as per your storyboard requirement, you can go with other methods. Such as, you can either use tools to build your puppet armature, otherwise can make some puppets from clothes and threads to give it a structure, else can use clay to assign a static puppet structure. It’s all your choice, so all in all what you need is:
● A Storyboard
● Puppet armature tools
● Camera setup
● Editing Software (in our case, we are going to use Wondershare Filmora Video Editor )
In this tutorial, we will be teaching you how to make stop-motion puppets in a way that is relatively cost-effective to produce durable means whose construction requires little or no time or extra equipment:
Wondershare Filmora - Best Video Editor for Mac/Windows
5,481,435 people have downloaded it.
Build unique custom animations without breaking a sweat.
Focus on creating epic stories and leave the details to Filmora’s auto features.
Start a creative adventure with drag & drop effects and endless possibilities.
Filmora simplifies advanced features to save you time and effort.
Filmora cuts out repetition so you can move on to your next creative breakthrough.
Materials:
● Ball head screws (M2.5)
● Small screws (M3)
● Ball head screws (2xand brass pipes whose diameter is less than ball head screws
● Brass plate (strips 2mm thick)
Tools:
● M3 thread tap
● M2.5 thread tap
● Screwdriver
● Pliers
● Drill press
● Drills of 2.5 mm, 2 mm, 3 mm
● Power sander
● Loctite
● File
● Bandsaw
Step
● Use the brass to mark the length of the bone
● Cut the tube according to the length
● Sandpaper or file it Square
● On both sides of the tube, use the tap to cause the tread
● Use the screws in the brass tube to screw the ball head
Step 2:
● On each sides of the brass strip, drill 2.5 mm holes
● Then, between holes of the holes you drill, drill 2.5 mm holes
● Between the other 2.5 mm holes, drill 3mm holes
Step 3:
● On the 2.5 mm holes on the sides, use the 3mm drill to create some cup
● With the 3 mm tap, cut the thread in the 2 mm holes in the middle
Step 4:
● Without damaging the holes, file the end of the strip with all the holes as close to the first 3
● From the strip, cut the parts with the first three holes
● Also, as close to the most used flyer to file the other side.
Note: Make sure you are careful while filing as this will get very hot
**Step 5:**Join all the parts together and make sure that the cup on the outer holes of the two plates is two words each other and tighten the bolts to hold the bones
Step 6: Join to strip of bras together and form a torso. Then cut the torso and form the feet
Step 7: When your puppet is the way you want it, lock teeth styles by fixing the ball head screw in place
Animation Editing:
Also, you can make a stop motion video on Filmora by considering the following factors:
● Camera Steadiness is a must for every shot you plan for Stop Motion Video. Shaking a camera is not good. Else, your video won’t be smooth.
● Ensure capture the shot under consistent light and prevent light exposure from changing on the object; otherwise, there will be inconsistency in the video.
● To make it easier, play the film in advance, as the more friends your video, the smoother the video will be.
Here are steps to make a stop motion video on Filmora:
Step 1 Place the camera steady and bring your object in the frame. Lightly move your things and capture the movement frame by frame.
Step 2 Download and start, or if you have already installed, run the Filmora program and choose a suitable frame rate in the project settings. After selecting the resolution, click on the file and go to the project setting.
Step 3 Now import the media file using the import option from the file menu and import the captured images.
Step 4 Adjust the menu’s preference or press the shortcut key Ctrl+Shift+, and a window will appear on your screen. Select the editing panel and change the photo duration between 0.2 to 0.5 seconds.
Step 5 Once done with all the settings and satisfied with the results, click on export and select your desired video format. Your video will be exported and saved in your library so you can share it with friends.
● Key Takeaways from This Episode →
● Get to know about what is stop motion puppets.
● Different examples of how dinosaur stop motion puppet or other puppet animation form works.
● The process to create your stop motion puppet and how Filmora will assist you in it.
How to Learn Cartoon Characters Sketch Quickly
Cartoon Fundamentals: How to Learn Cartoon Characters Sketch Quickly
An easy yet powerful editor
Numerous effects to choose from
Detailed tutorials provided by the official channel
Whether your favourite Cartoon character Bugs-bunny comes from space or beyond your imagination, whether nostalgic Tom and Jerry are young, eternal or old, knowing the process to draw cute, funny, adorable cartoon-characters is a kind of special feeling always & looks essential incase you desire to become quality professional artist. Cartoon Characters are more challenging to draw while taking care of their weird postures, body-parts like legs, hands.Cartoons characters are the easiest ones to draw as it involved simplistic shapes and doesn’t needed a hard core practice.
In this article, you will be able to get access to drawing amazing characters with a wide range of characters featuring ordinary people, fictional-characters, creatures, monsters, or your favourite cute little ones in easy way.
In this article
01 [Basics of Cartoon Characters Sketch](#Part 1)
02 [Cartoon Characters Sketch Anyone Can Draw (With Free Video Tutorials)](#Part 2)
Part 1 Basics of Cartoon Characters Sketch
Before going ahead with the process of learning step by step how to draw cartoon characters, you need to understand the methodology behind sketching. It is easy to draw multiple cartoon characters but at the same time, you need to figure out sketching techniques involved in making that happen. If you want to extract few details of your central character, you need to represent cartoon characters sketch with the help of shapes. The main goal here is to recognize drawing & let it be attractive as children are the main audience and cartoon characters like Disney, Chuck Jones, Walter-Lantz and others have truly enchanted this world with eternal character & their magical appearance.
01Concentrating on circle
One of the most basic and interesting shape for any cartoon sketch is circle. All you need is to clearly define basic proportion of your character and that can be happened with desired character’s head. Later on you can trace its charm with face axis.
02Draw Cartoon Eyes
In order to make eyes, one needs to take care of oval shape sketch with slight tilt to side at top position. You have to note that, it is always important to leave good gap between each one of them of approximately similar size as the eye.
03Drawing Cartoon Hair
There is nothing to fear when it comes to draw cartoon hair. You don’t need stylist or a fashion designer in order to make them look perfect. With ideal haircut and matching personality of the desired character, you can do this thing pretty awesome. Hair can represent age, conservatism, rebellion etc. and comes in incredible features.
One of the most accurate & a faster way to do that is by taking references from a fashion magazine, Google Search or cartoon magazine. Once you are done with your findings of ideal styling, you can later on simplify your hair version.
04Sketching for Older Character
Sometimes older characters can be pretty easy to draw as it all begins with their eyes, facial expressions, addition of wrinkles, eyebrows, eye pupils etc. You just need to expand eyebrow a little bit. The older characters have thicker-eyebrows, large forehead space etc.
05Drawing a female character
It’s simple, just focus around delicacy in facial structures, like:-
● Thin eyebrows
● Larger & expressive eyelashes
● Thinner-chin
● Small-nose under fewer-details
● Long hair or depends on your choice
That’s it. Also, you need to give comfort feeling to your character, the more you draw the more realistic it will look.
● Filmora for learning new drawing skills
For Win 7 or later (64-bit)
For macOS 10.12 or later
If you want to showcase your talent to this world without any extravagant apps or software then FIlmora is the best choice that you can consider for drawing some amazing cartoon at your own. This app has its own fun loving designing features and you can add varieties of stickers, images and text to your drawings.
What exactly Filmora can do your drawings:
● For your Pencil sketch of cartoon characters, this app has a lot of text, images and fun loving stickers to showcase more highlighting features of your cartoon character.
● You can share your cartoon with your friends and other community over the web through Twitter, Facebook, and WhatsApp etc.
● This will let you access video editing and image editing features also, to give your cartoon a life.
Part 2 Cartoon Characters Sketch Anyone Can Draw (With Free Video Tutorials)
Now, it’s time to move on with thinking about which cartoon characters to put in your papers with emotions, facial expressions and other features. We are now moving towards the process to include more and more emotions to the same.
Let’s begin drawing 8 amazing characters that are not only famous but also living in heart of children.
01Bugs Bunny
Who doesn’t live Bugs Bunny? Well, it is among the list of most iconic characters that you can imagine and it is certainly the most funnies and interesting character to draw. Right from drawing its big feet to attractive teeth just made for cutting carrots, a lot of things are included in Bugs bunny.
Let’s Draw it:-
● Draw a circle & a “noodle” shaped object as per the imagination. The circle will be its head & pear shape will be its body. You need to make bottom pear fatter as compared to upper portion and also upper-part has to overlap head circle only a little.
● Include perspective guidelines at around the head as this thing can correctly position eyes as well as nose of your bunny.
● You need to draw the eyes at Horizontal guideline and nose where guidelines crosses.
● Draw cheeks and include ears, arms. At the time of drawing arms, you have to give natural curve to arms.
● The arm curves together with the legs-curves might look little difficult, therefore you have to make use of your pencil tenderly without pushing it harder.
● Draw inner lines in ear & iris ellipse at inner portion of eyes.
● Add nose & draw mouth, teeth.
● Your Bunny starts taking its shape and here you can add colors as per your choice
Your cartoon Bugs-Bunny is now ready.
02Popeye
One of the most famous cartoon character of Disney Popeye also appeared on the cinema screens and this belongs to the list of famous classic cartoon-characters.
Let’s draw this amazing character:-
● First Sketch few basic shapes like head, chest, belly.
● It’s a comic character so give it a grotesque-look
● Slightly include other body-parts with shapes like ellipses, noodles in the form of contours.
● Draw one centre-line across the head with well-balanced facial features.
● Draw nose, mouth, ears for the face to form.
● Sketch contours of Popeye’s fists, and arms.
● You can begin giving colors to this shape with flat layers of colorings
03Barney Rubble
As a next door friend and neighbor of Flintstone-house, Barney is kind of a quirky character. This contains features like ears & big feet in the form of angles.
Here is an amazing video tutorial for your Barnet Rubble Cartoon Character:-
04Scrooge McDuck
This cartoon character has wealthy features with fun-loving designs to draw in the form of top-hat, a-cane, as well as few small reading glasses. When it comes to drawing this cartoon characters sketch you need to come up with funny and slightly challenging features.
05Drawing a Ninja For Amazing Action
● Step 1
Work on the head first with nice & precise circle in order to illustrate head portion. Inside this, you can add two more tiny circles for eyes. Once you are done with the eyes, you need to add large & thin rectangle that represents headband. At one portion of headband draw tiny circle with small triangles in numbers 2.
● Step 2
Left arm of our ninja can be sketched through a long & thin rectangle. In order to showcase right arm, draw two rectangles and later on both hands has to be represented in terms of circles.
● Step 3
Two Legs are also need to draw in terms of unusual position. So total of 5 rectangles has to be drawn for both legs & feet.
● Step 4
Add accessories like sabre with basic shapes like circle or rectangle for the same.
● Step 5
Now refine it with an outline and work upon head to make sure both eyes will be clear & visible and also keep the head round & tight.
● Step 6
For upper portion, use nice curved lines and illustrate chest & arms. For showing a discipline make use of good contour likes that highlights posture & gesture.
● Step 7
Repeat the process for the lower portion of your Action ninja.
● Step 8
Now throw some colors’ either black, brown & red to finish the masterpiece!
06Morty Smith
Morty is a lot easy and occupies t-shirt & jeans in its overall appearance and it is much smaller & way more natural than you usually think.
07Helga G. Pataki
If you want to add some crazy cartoon characters in your list then Helga is a good choice. While drawing its cartoon, you need to pay close attention to head as this thing can be little strange with her rectangle hairdo.
08Kim Possible
The design of Kim Possible looks easy at first appearance but when you actually begin with the process of draw its shape, you may get confused. You need to add varieties of features in her face with crazy parachute pants right from the 1980s.
09Shaggy Rogers
The companion of Scooby Shaggy also love its treats & also like to run-away from the monsters at first sight. He can solve mysteries and fun to watch.
● Ending Thoughts →
● Well, drawing cartoons is always a fun loving thing to do. You can pick any one cartoon for drawing some favorite designs.
● You can make use of professional apps to give proper background to your poster or sketch making.
● For Fictional creatures, you can illustrate their styling features, fun facts and lot more to make it much more interesting.
Most Popular Tips on Learning Animate Rigging
Most Popular Tips on Learning Animate Rigging
An easy yet powerful editor
Numerous effects to choose from
Detailed tutorials provided by the official channel
This was a question one of my friends asked me recently on the subject of animate rigging
To help them out (as well as other animation rigging beginners) I decided to compile some of the most popular tips on the subject in this article!
In this article
01 [The Only Guide You’ll Ever Need to Know About Rigging in Animation](#Part 1)
02 [How Do You Animate Rigging?](#Part 2)
Part 1 The Only Guide You’ll Ever Need to Know About Rigging in Animation
Before anything else, we’ve prepared a bit of an OVERVIEW on rigging in animation. This will cover most of the basic, need-to-know stuff to nudge you in the right direction and help the tips we’ve prepared to settle in more easily.
01What is Rigging in Animation
Rigging in animation is a technique used by animators to—quite literally—‘rig’ up a statistic digital character to act or move.
Even more simply, it’s a way of bringing literal life to your character models by introducing them to motion. The ‘rig’ in this case, is usually made as a sort of one-size-fits-all kind of tool, which you can use in order to create pre-made skeletal animations that replicate motions like walking, running, jumping, etc., and apply onto static characters. You can use animation software, like Maya in order to get this done!

02An Introduction to 2D Animation Rigging
2D animation is a more back-breaking kind of process. It’s what you see in a lot of older animations — where every frame needs to be drawn in order to allow for the illusion of motion in characters. This is how classics, like Mickey Mouse, are usually produced!
03An Introduction to 3D Animation Rigging
3D animation, as you can probably guess, is a more modern animation style. You see it in a lot of big blockbuster animated movies these days! Even Disney has since moved onto this style, whereas they were staunch supporters of 2D animation in previous decades. Now, a lot of their major productions, including titles such as “Tangled”, “Frozen”, and “Moana” are 3D animated.
In any case, this is more like what we described earlier — where skeletal ‘rigs’ are applied to static 3D character models to make them move.
04Key 3D Rigging Terms to Get You Moving
Finally, to make sure that you’re headed in the right direction, here’s a list of some of the more important 3D rigging terms that you’ll need to know:
Joints|Bones: This is pretty straightforward, but the Joints or the Bones, in this case, refers to the pieces of the skeletal rig that is used to create movement.
Driven Keys: Driven keys are there to help rigging artists make the movement appear more natural faster. It consists of two parts, the driver (which controls the animation) and the driven (the parts controlled by the driver).
Blend Shapes: This is an animation tool that riggers used mainly for facial animation (like lip-syncing). Basically, it allows them to blend or morph an existing shape to give it motion.
Inverse Kinematics: This is a method of animation that separates a part from the whole. Like how an animator can create motion in the wrist, for example, as a separate entity from the arm.
Forward Kinematics: Opposite of the previous style, this one is a method that follows a hierarchical progression.
Control Curves: This is a way of manipulating multiple joins in a rig in order to create one flowing movement.
Constraint: A way of limiting the positioning of a model or a joint.
Deformers: A way of enhancing rigs to produce a more organic model.
Skinning: This is the process of adding the 3D mesh to the joints.
Weight Planning: This is the process of planning how the weight of an object will affect its 3D mesh and the movement of its joints.
Facial Rigging: This is the process of setting up facial animation, similar to how you set up skeletal animation, but far more complex.
Part 2 How Do You Animate Rigging?
Now, onto actually talking about how you can start animate rigging. This section will guide you through the process in a way that should hopefully help you while in the process of learning about animation in general.
01How to Rig a Simple Character
This has been broken down into four distinct stages to make things as simple as possible! It won’t be discussing the tools you use, as there are plenty of tools you can use for animation, just the general process:
Step 1: Design Your Character

Before you even think about animation, you should start with designing your character (or characters.) This will give you a good basis on what kind of animation rigging you’ll need to work on for that character.
For example, for a humanoid character, a general skeletal rigging might be okay. However, for a creature or monster, their joints might be in different areas or they might even have additional joints regular human rigs don’t have!
So, start with a foundation that you can work from to make things easier on yourself.
Step 2: Start With Rigging Points!

When you have your character design ready, it’s time to start rigging joints! It’s best to start with the joints and leave the more finicky parts later. Basically, it’s always easier to start with the parts that can create big movements first!
Working on things layer by layer should help make things easier for you as well.
Step 3: Connect The Layers!
It’s time to put everything together to create smooth movement! Depending on what tool you’re using, this is usually just as easy as dragging things into place.
Step 4: Timing Your Animation

With the rig in place, the next thing you have to worry about is frame timing. Timing is important for ensuring that there is no break in character motions
02Beginners Tutorial on Shape Rigging
This one is a little more complicated, and should be improved more by trial and error, but here are a couple of tips that you can follow along with while exploring blend shapes in animation:
Master your sculpting tools first and foremost! The more familiar you are with the shapes that your tools can create, the better!
Symmetrical modeling is one way of making the process go a lot faster! Take advantage of this option to highlight components that you need to be affected in the same way and at the same time.
If symmetrical modeling is not working for you, independent modeling is a great way of making things appear more organic.

03How Auto Rig Mapping Works
Auto-rigging is the use of pre-made rigs in order to simplify the process. The tool automatically maps the areas where the characters and the rig are given the same symbol names and snaps them together to create joints for a motion to be applied.
04How Visual Rig Mapping Works
Visual mapping is a lot more complicated the auto-rig mapping, so it’s not something you want to jump into immediately. However, it is a must for animation riggers that work with unique character models. The process usually goes as follows:
Manually make connections starting with the joints.
Applying the skeleton to the rig to complete bones and connections.
Motion can then be added to the timeline.

05Finalizing Your Animated Rig
To finish us off, let’s talk about how you go about publishing your finished product! Of course, even after you have your complex rig completed, there are still other matters to think about in terms of making sure that the video is of quality!
Key Takeaways from This Episode
● Start off on the right footing by learning the basics of animation! These days, there are more options than ever, with the modern 3D animation rigging style now just as popular as the more classic 2D animation style.
● The best way to learn animation rigging is to practice! Structured guides can help you get to the point of almost mastery, but it’s not until you start playing with the tools of your craft that you can truly learn how to create beautiful animations!
● Some of the more complex functions of rigging require a lot of patience, so make sure that you always go into your projects with a level-head. And, just to be sure, invest in tools that will help rather than hinder your progress! There are many advanced software out there that can help you improve more easily.
This was a question one of my friends asked me recently on the subject of animate rigging
To help them out (as well as other animation rigging beginners) I decided to compile some of the most popular tips on the subject in this article!
In this article
01 [The Only Guide You’ll Ever Need to Know About Rigging in Animation](#Part 1)
02 [How Do You Animate Rigging?](#Part 2)
Part 1 The Only Guide You’ll Ever Need to Know About Rigging in Animation
Before anything else, we’ve prepared a bit of an OVERVIEW on rigging in animation. This will cover most of the basic, need-to-know stuff to nudge you in the right direction and help the tips we’ve prepared to settle in more easily.
01What is Rigging in Animation
Rigging in animation is a technique used by animators to—quite literally—‘rig’ up a statistic digital character to act or move.
Even more simply, it’s a way of bringing literal life to your character models by introducing them to motion. The ‘rig’ in this case, is usually made as a sort of one-size-fits-all kind of tool, which you can use in order to create pre-made skeletal animations that replicate motions like walking, running, jumping, etc., and apply onto static characters. You can use animation software, like Maya in order to get this done!
02An Introduction to 2D Animation Rigging
2D animation is a more back-breaking kind of process. It’s what you see in a lot of older animations — where every frame needs to be drawn in order to allow for the illusion of motion in characters. This is how classics, like Mickey Mouse, are usually produced!
03An Introduction to 3D Animation Rigging
3D animation, as you can probably guess, is a more modern animation style. You see it in a lot of big blockbuster animated movies these days! Even Disney has since moved onto this style, whereas they were staunch supporters of 2D animation in previous decades. Now, a lot of their major productions, including titles such as “Tangled”, “Frozen”, and “Moana” are 3D animated.
In any case, this is more like what we described earlier — where skeletal ‘rigs’ are applied to static 3D character models to make them move.
04Key 3D Rigging Terms to Get You Moving
Finally, to make sure that you’re headed in the right direction, here’s a list of some of the more important 3D rigging terms that you’ll need to know:
Joints|Bones: This is pretty straightforward, but the Joints or the Bones, in this case, refers to the pieces of the skeletal rig that is used to create movement.
Driven Keys: Driven keys are there to help rigging artists make the movement appear more natural faster. It consists of two parts, the driver (which controls the animation) and the driven (the parts controlled by the driver).
Blend Shapes: This is an animation tool that riggers used mainly for facial animation (like lip-syncing). Basically, it allows them to blend or morph an existing shape to give it motion.
Inverse Kinematics: This is a method of animation that separates a part from the whole. Like how an animator can create motion in the wrist, for example, as a separate entity from the arm.
Forward Kinematics: Opposite of the previous style, this one is a method that follows a hierarchical progression.
Control Curves: This is a way of manipulating multiple joins in a rig in order to create one flowing movement.
Constraint: A way of limiting the positioning of a model or a joint.
Deformers: A way of enhancing rigs to produce a more organic model.
Skinning: This is the process of adding the 3D mesh to the joints.
Weight Planning: This is the process of planning how the weight of an object will affect its 3D mesh and the movement of its joints.
Facial Rigging: This is the process of setting up facial animation, similar to how you set up skeletal animation, but far more complex.
Part 2 How Do You Animate Rigging?
Now, onto actually talking about how you can start animate rigging. This section will guide you through the process in a way that should hopefully help you while in the process of learning about animation in general.
01How to Rig a Simple Character
This has been broken down into four distinct stages to make things as simple as possible! It won’t be discussing the tools you use, as there are plenty of tools you can use for animation, just the general process:
Step 1: Design Your Character
Before you even think about animation, you should start with designing your character (or characters.) This will give you a good basis on what kind of animation rigging you’ll need to work on for that character.
For example, for a humanoid character, a general skeletal rigging might be okay. However, for a creature or monster, their joints might be in different areas or they might even have additional joints regular human rigs don’t have!
So, start with a foundation that you can work from to make things easier on yourself.
Step 2: Start With Rigging Points!
When you have your character design ready, it’s time to start rigging joints! It’s best to start with the joints and leave the more finicky parts later. Basically, it’s always easier to start with the parts that can create big movements first!
Working on things layer by layer should help make things easier for you as well.
Step 3: Connect The Layers!
It’s time to put everything together to create smooth movement! Depending on what tool you’re using, this is usually just as easy as dragging things into place.
Step 4: Timing Your Animation
With the rig in place, the next thing you have to worry about is frame timing. Timing is important for ensuring that there is no break in character motions
02Beginners Tutorial on Shape Rigging
This one is a little more complicated, and should be improved more by trial and error, but here are a couple of tips that you can follow along with while exploring blend shapes in animation:
Master your sculpting tools first and foremost! The more familiar you are with the shapes that your tools can create, the better!
Symmetrical modeling is one way of making the process go a lot faster! Take advantage of this option to highlight components that you need to be affected in the same way and at the same time.
If symmetrical modeling is not working for you, independent modeling is a great way of making things appear more organic.
03How Auto Rig Mapping Works
Auto-rigging is the use of pre-made rigs in order to simplify the process. The tool automatically maps the areas where the characters and the rig are given the same symbol names and snaps them together to create joints for a motion to be applied.
04How Visual Rig Mapping Works
Visual mapping is a lot more complicated the auto-rig mapping, so it’s not something you want to jump into immediately. However, it is a must for animation riggers that work with unique character models. The process usually goes as follows:
Manually make connections starting with the joints.
Applying the skeleton to the rig to complete bones and connections.
Motion can then be added to the timeline.
05Finalizing Your Animated Rig
To finish us off, let’s talk about how you go about publishing your finished product! Of course, even after you have your complex rig completed, there are still other matters to think about in terms of making sure that the video is of quality!
Key Takeaways from This Episode
● Start off on the right footing by learning the basics of animation! These days, there are more options than ever, with the modern 3D animation rigging style now just as popular as the more classic 2D animation style.
● The best way to learn animation rigging is to practice! Structured guides can help you get to the point of almost mastery, but it’s not until you start playing with the tools of your craft that you can truly learn how to create beautiful animations!
● Some of the more complex functions of rigging require a lot of patience, so make sure that you always go into your projects with a level-head. And, just to be sure, invest in tools that will help rather than hinder your progress! There are many advanced software out there that can help you improve more easily.
12 Aesthetic GIF Instagram for Marketers and Creatives
12 Aesthetic GIF Instagram for Marketers and Creatives
An easy yet powerful editor
Numerous effects to choose from
Detailed tutorials provided by the official channel
Cute-Instagram story-stickers or in simple words GIFs are becoming one of the most handy ways to decorate your Instagram-stories with beautiful & distinctive ways – even in the case of not being an artist or having artistic mind. However, there are various Instagram GIFs present on the app which is quite difficult to weed by using the wacky & tacky ones to find-out, but don’t worry we will make the structure of your Instagram truly aesthetic.
Who doesn’t want to be attractive with their Instagram-Stories? Let’s find out the means of having aesthetic gif Instagram.
In this article
01 [What Are Aesthetic GIF Instagram?](#Part 1)
02 [How to Search to Find and Use Cute Gifs on Instagram](#Part 2)
03 [10 Stunning Instagram Story Gifs for Bloggers + Creatives](#Part 3)
Part 1 What Are Aesthetic GIF Instagram?
Making use of GIFs on the Instagram app is just a magnificent way to clutch your viewer’s interest as well as spotlight sure factors in the dedicated stories. Aesthetic GIF can let you discover new ways to put GIFs to the Instagram Stories of yours that’s for sure your followers are going to love.
In case you have been searching for some methods to apply the content material that is greater attention-grabbing, engaging, and creative, then making use of Instagram-Stories GIF’s would possibly be one of the most brilliant answers.
Initially, this year, the Instagram teamed-up with the GIPHY to construct a beautiful library of fantastic GIF’s on the Instagram Stories. It is now the time for you be fun loving, expressive and attractive through the use of GIF stickers for any of your pictures or videos in desired story.GIFs are additionally the exquisite device for an organizations to create flawlessly branded Instagram-Stories with assured satisfaction for all of your followers.
Are you ready to begin? Next you will learn about how to look after the cutest GIF’s on the Instagram for your stories.
Part 2 How to Search to Find and Use Cute Gifs on Instagram
You understand what’s truly hard? Well, being in the 2nd when actually you are spending the first-rate time with the cherished ones. You comprehend, what makes it even-harder? At the time of doing something adorable with your loved ones, &you’re making an attempt to just publish an equally adorable Instagram-story whilst nonetheless staying in attractive moment. So what typically happens?
You both probably:
● Save the content-material and strive to bear in mind to submit later or
● You throw some lovely GIFs, with a tag & then name it with a day, that is exactly we all think about.
However, it definitely can be so tough to discover an accurate GIF. Don’t trust us? Just search “fitness” the subsequent time, by doing so, you’re just making an attempt to put-up your ‘workout-of-day’ story. Tons of exceptional selections there are possibly, thankfully, we did one of the most challenging task for you. Tirelessly scoured & determined the fantastic GIFs is Instagram has for you to offer. Let’s begin what and how to search in order to perfectly locate lovable GIFs at the Instagram.
If you are not a regular user of Instagram, then here is one of the most brilliant way to speed up the process of applying stepwise solutions for finding or adding some creative gif Instagram aestheticfor your stories.
● First step is to head towards the Instagram profile & after that click on the profile picture to begin growing a latest style of story.
● Next thing for you to do is just click on the + (plus) sign available at the top-left corner. (In case you have already posted something in your story)
● On the third step, upload your recently selected picture or a video for that particular story.
● Hit the ‘square smiley-face’ icon.
● At last click on the “GIF”.
Voila, you are ready to discover the true essence of GIF aesthetic.
Now, is the time for you to find out an answer to your question of “How to search Cute Instagram-story GIFs’? As there are tons of GIFs are available at the Instagram app to use.
Part 3 Stunning Instagram Story Gifs for Bloggers + Creatives
If you are a blogger or a creative person who just want to get number of followers to your blog for finding right kind of product or service that you are delivering through your posts, then it is a better idea for you to consider adding stunning designed Instagram Story GIFs in your posts.GIF-section can be quite overwhelming & similarly a hard thing to sift as there are numerous options available for you to use and finding the aesthetic GIF Instagram story-stickers is a hard nut to crack.
Here is the compiled list of 10 stunning and the most lovable Instagram Story GIFsfor the artists or bloggers to search while considering aesthetic Instagram stickers.
01The Uncommon Place
Name any instantaneous place where you can easily publish your desired Instagram story & that too with “good times” by the use of relevant GIF? Yes, right from the dedicated polaroid of constellations to some adorable little leaves, ‘The Uncommon Place’ is where you can easily get higher acceptance of attractiveness through GIFs to make it looks better for all your upcoming posts, stories etc. it is very close to the heart and has many cheerful GIFs in the heat colors.
02Vipapier

We may also no-longer all be in a position to completely agree whether or not it is pronounced as “GIF” or “Jiff,” however one thing we all can genuinely agree that this pack of GIFs is absolutely adorable! Right from the scripts to colors, we could not assist any single one, however just “enjoy!” The Vipapier Instagram story-stickers are bit muted & comes with antique feels.
03Lidiaontheroad
With some truly inspirational as well as motivational pack of stickers the Lidiaontheroad has something warm, minimal and neutral in its tones.
04Ohlalalita
It is a cute pack of Instagram story-GIFs by which you can easily and in a pretty much confident manner for any kind of picture or video as per your preferences at the time of uploading.
05Queenbemonyei
Image Name: 12-aesthetic-gif-instagram-for-marketers-and-creatives7
As the name suggests, it makes use of attractive-rich jewel-tones in your Instagram stickers/GIFs with the true blend of beautiful stickers available for the African- American persons.
06Ilustralle
For you to clearly enjoy the true essence of romantic-novel or smoothening dream of frolicking inside the field of flowers, Ilustralle is the one you need today. The stickers here are whimsical & fashionable to give us major hat-inspiration!
07Inspiredbythis
You understand you be aware of we are absolutely going to start this off through a non-public plug. Attending one of the wonderful-occasions or even simply having the stimulation of way of something, the ‘Inspiredbythis’ is magnificent GIF set.
08Gladdest
For you to add cuteness and bubbly appearance in your picture/Posts, this GIF set is for you. Whether it is about a “Good Morning” GIF for your loved one with a cup of tea! Or a mix of balloons for your upcoming birthday-dinner, the Gladdest have it all. This is meant for giving absolutely anything as well as everything. It also brings cheerful-vibes with the warm-toned Instagram-stickers.
09Malenaflores
Whether you are a baking master, a thinker, a reader, or a blogger who is finding cute collection of GIFs on the Instagram, then with a fast searching of “Malenaflores” you can achieve this. Malenaflores absolutely brings softness and feminism to your stories with great varieties of stickers.
10 Chicayeye
In case you like the GIF pictures with warm-color options, then it has all the things to provide really amazing performance.
Filmora App to Apply Varieties in your Instagram Posts
If you desire to obtain greater varieties of services in your Instagram story then by being a little expert about the posts, the added software that can be helpful for applying amazing aspects of powerful features and at the same time being an identical among the followers in a friendlier way, the Filmora app is the brilliant solution you need today.It is one of the most brilliant video-editor and picture editor for all you to create interesting, fun loving and attractiveness in your posts for Instagram in an extraordinary manner. It is a handy way to make the most of it in an interesting way with fun loving features.
Features that you can enjoy the most with Wondershare Filmora Video Editor :
● Capability to beautifully construct the custom-animations
● Different varieties of Effects-pack to make the most out of it for your Instagram stories
● Attractive filters as well as GIFs pack to allow you focused around cute Stickers with right kind of suggestions.
● Additionally flawless features to crop, cut, trim, cut-up & mix the operations in a few-clicks.
● For the visualization, different effects, stickers, GIFs and smileys to be an outstanding creator
● You can also save your creations to your device
● Animations for your videos
● Options to share the same to many websites like Facebook, YouTube, and Instagram story quickly.
Instead of just making use of common, unrealistic and unattractive celebration tags, stickers that can depart a messy-watermark as soon as after the process of developing your story and then spreading it among your friends, you can easily utilise different characteristic of Instagram stickers or GIFs to apply visual appearance to your posts through many different types of Nama GIF Instagram yang aesthetic as per your preference and the types of moments to capture in your photo. Doing this can excellently put the option of being attractive among your followers through your posts. You can use this feature through your android or iPhone device with higher quality.
It is the time for you to try out the latest GIF-ideas for your Instagram-stories, and never forget to apply all of these in your stories for the desired posts and feel trending among your followers.
● Key Takeaways from This Episode →
● Instagram GIFcan be an interesting way to grab the attention of millions without any worries.
● Aesthetic story Instagram is the trend that has been following among the users for their posts to look fantastic.
● Through an Instagram, there are varieties of ways to club together many things in a single picture. Just use the same for adding better solutions to your stories.
Cute-Instagram story-stickers or in simple words GIFs are becoming one of the most handy ways to decorate your Instagram-stories with beautiful & distinctive ways – even in the case of not being an artist or having artistic mind. However, there are various Instagram GIFs present on the app which is quite difficult to weed by using the wacky & tacky ones to find-out, but don’t worry we will make the structure of your Instagram truly aesthetic.
Who doesn’t want to be attractive with their Instagram-Stories? Let’s find out the means of having aesthetic gif Instagram.
In this article
01 [What Are Aesthetic GIF Instagram?](#Part 1)
02 [How to Search to Find and Use Cute Gifs on Instagram](#Part 2)
03 [10 Stunning Instagram Story Gifs for Bloggers + Creatives](#Part 3)
Part 1 What Are Aesthetic GIF Instagram?
Making use of GIFs on the Instagram app is just a magnificent way to clutch your viewer’s interest as well as spotlight sure factors in the dedicated stories. Aesthetic GIF can let you discover new ways to put GIFs to the Instagram Stories of yours that’s for sure your followers are going to love.
In case you have been searching for some methods to apply the content material that is greater attention-grabbing, engaging, and creative, then making use of Instagram-Stories GIF’s would possibly be one of the most brilliant answers.
Initially, this year, the Instagram teamed-up with the GIPHY to construct a beautiful library of fantastic GIF’s on the Instagram Stories. It is now the time for you be fun loving, expressive and attractive through the use of GIF stickers for any of your pictures or videos in desired story.GIFs are additionally the exquisite device for an organizations to create flawlessly branded Instagram-Stories with assured satisfaction for all of your followers.
Are you ready to begin? Next you will learn about how to look after the cutest GIF’s on the Instagram for your stories.
Part 2 How to Search to Find and Use Cute Gifs on Instagram
You understand what’s truly hard? Well, being in the 2nd when actually you are spending the first-rate time with the cherished ones. You comprehend, what makes it even-harder? At the time of doing something adorable with your loved ones, &you’re making an attempt to just publish an equally adorable Instagram-story whilst nonetheless staying in attractive moment. So what typically happens?
You both probably:
● Save the content-material and strive to bear in mind to submit later or
● You throw some lovely GIFs, with a tag & then name it with a day, that is exactly we all think about.
However, it definitely can be so tough to discover an accurate GIF. Don’t trust us? Just search “fitness” the subsequent time, by doing so, you’re just making an attempt to put-up your ‘workout-of-day’ story. Tons of exceptional selections there are possibly, thankfully, we did one of the most challenging task for you. Tirelessly scoured & determined the fantastic GIFs is Instagram has for you to offer. Let’s begin what and how to search in order to perfectly locate lovable GIFs at the Instagram.
If you are not a regular user of Instagram, then here is one of the most brilliant way to speed up the process of applying stepwise solutions for finding or adding some creative gif Instagram aestheticfor your stories.
● First step is to head towards the Instagram profile & after that click on the profile picture to begin growing a latest style of story.
● Next thing for you to do is just click on the + (plus) sign available at the top-left corner. (In case you have already posted something in your story)
● On the third step, upload your recently selected picture or a video for that particular story.
● Hit the ‘square smiley-face’ icon.
● At last click on the “GIF”.
Voila, you are ready to discover the true essence of GIF aesthetic.
Now, is the time for you to find out an answer to your question of “How to search Cute Instagram-story GIFs’? As there are tons of GIFs are available at the Instagram app to use.
Part 3 Stunning Instagram Story Gifs for Bloggers + Creatives
If you are a blogger or a creative person who just want to get number of followers to your blog for finding right kind of product or service that you are delivering through your posts, then it is a better idea for you to consider adding stunning designed Instagram Story GIFs in your posts.GIF-section can be quite overwhelming & similarly a hard thing to sift as there are numerous options available for you to use and finding the aesthetic GIF Instagram story-stickers is a hard nut to crack.
Here is the compiled list of 10 stunning and the most lovable Instagram Story GIFsfor the artists or bloggers to search while considering aesthetic Instagram stickers.
01The Uncommon Place
Name any instantaneous place where you can easily publish your desired Instagram story & that too with “good times” by the use of relevant GIF? Yes, right from the dedicated polaroid of constellations to some adorable little leaves, ‘The Uncommon Place’ is where you can easily get higher acceptance of attractiveness through GIFs to make it looks better for all your upcoming posts, stories etc. it is very close to the heart and has many cheerful GIFs in the heat colors.
02Vipapier
We may also no-longer all be in a position to completely agree whether or not it is pronounced as “GIF” or “Jiff,” however one thing we all can genuinely agree that this pack of GIFs is absolutely adorable! Right from the scripts to colors, we could not assist any single one, however just “enjoy!” The Vipapier Instagram story-stickers are bit muted & comes with antique feels.
03Lidiaontheroad
With some truly inspirational as well as motivational pack of stickers the Lidiaontheroad has something warm, minimal and neutral in its tones.
04Ohlalalita
It is a cute pack of Instagram story-GIFs by which you can easily and in a pretty much confident manner for any kind of picture or video as per your preferences at the time of uploading.
05Queenbemonyei
Image Name: 12-aesthetic-gif-instagram-for-marketers-and-creatives7
As the name suggests, it makes use of attractive-rich jewel-tones in your Instagram stickers/GIFs with the true blend of beautiful stickers available for the African- American persons.
06Ilustralle
For you to clearly enjoy the true essence of romantic-novel or smoothening dream of frolicking inside the field of flowers, Ilustralle is the one you need today. The stickers here are whimsical & fashionable to give us major hat-inspiration!
07Inspiredbythis
You understand you be aware of we are absolutely going to start this off through a non-public plug. Attending one of the wonderful-occasions or even simply having the stimulation of way of something, the ‘Inspiredbythis’ is magnificent GIF set.
08Gladdest
For you to add cuteness and bubbly appearance in your picture/Posts, this GIF set is for you. Whether it is about a “Good Morning” GIF for your loved one with a cup of tea! Or a mix of balloons for your upcoming birthday-dinner, the Gladdest have it all. This is meant for giving absolutely anything as well as everything. It also brings cheerful-vibes with the warm-toned Instagram-stickers.
09Malenaflores
Whether you are a baking master, a thinker, a reader, or a blogger who is finding cute collection of GIFs on the Instagram, then with a fast searching of “Malenaflores” you can achieve this. Malenaflores absolutely brings softness and feminism to your stories with great varieties of stickers.
10 Chicayeye
In case you like the GIF pictures with warm-color options, then it has all the things to provide really amazing performance.
Filmora App to Apply Varieties in your Instagram Posts
If you desire to obtain greater varieties of services in your Instagram story then by being a little expert about the posts, the added software that can be helpful for applying amazing aspects of powerful features and at the same time being an identical among the followers in a friendlier way, the Filmora app is the brilliant solution you need today.It is one of the most brilliant video-editor and picture editor for all you to create interesting, fun loving and attractiveness in your posts for Instagram in an extraordinary manner. It is a handy way to make the most of it in an interesting way with fun loving features.
Features that you can enjoy the most with Wondershare Filmora Video Editor :
● Capability to beautifully construct the custom-animations
● Different varieties of Effects-pack to make the most out of it for your Instagram stories
● Attractive filters as well as GIFs pack to allow you focused around cute Stickers with right kind of suggestions.
● Additionally flawless features to crop, cut, trim, cut-up & mix the operations in a few-clicks.
● For the visualization, different effects, stickers, GIFs and smileys to be an outstanding creator
● You can also save your creations to your device
● Animations for your videos
● Options to share the same to many websites like Facebook, YouTube, and Instagram story quickly.
Instead of just making use of common, unrealistic and unattractive celebration tags, stickers that can depart a messy-watermark as soon as after the process of developing your story and then spreading it among your friends, you can easily utilise different characteristic of Instagram stickers or GIFs to apply visual appearance to your posts through many different types of Nama GIF Instagram yang aesthetic as per your preference and the types of moments to capture in your photo. Doing this can excellently put the option of being attractive among your followers through your posts. You can use this feature through your android or iPhone device with higher quality.
It is the time for you to try out the latest GIF-ideas for your Instagram-stories, and never forget to apply all of these in your stories for the desired posts and feel trending among your followers.
● Key Takeaways from This Episode →
● Instagram GIFcan be an interesting way to grab the attention of millions without any worries.
● Aesthetic story Instagram is the trend that has been following among the users for their posts to look fantastic.
● Through an Instagram, there are varieties of ways to club together many things in a single picture. Just use the same for adding better solutions to your stories.
4 Things You Need to Know About Pinterest GIF
4 Things You Should Know About Pinterest GIF
An easy yet powerful editor
Numerous effects to choose from
Detailed tutorials provided by the official channel
Emojis formerly reigned supreme, but GIFs and memes have since supplanted them. When you add a GIF to a conversation, it becomes more exciting. GIFs are considerably better at communicating our feelings, and they deserve credit for that. Pinterest, like other social networking sites and chat apps, enables GIFs. Pinterest is a photo-sharing website where you can find home decor ideas, recipes, fashion inspiration, DIY projects, and more.
Compared to a static image, adding a GIF to Pinterest conveys more information. You can make GIFs for your DIY projects or use them to display all sides of a cushion, which would typically require many images. But what if you like a GIF you found on Pinterest? What’s the best way to get it? That is what we will demonstrate here. This article will show how to download Pinterest GIFs to your computer and mobile device.
In this article
01 [Are There Gifs on Pinterest?](#Part 1)
02 [How to Get Pinterest GIF Downloader](#Part 2)
03 [How to Get an Animated GIF on Pinterest](#Part 3)
Part 1 Are There Gifs on Pinterest?
You can submit GIF and animated GIF images from your computer or the Internet to Pinterest. Because the pictures on your board aren’t animated, you might conclude that animated GIFs don’t work on Pinterest. When you click on the photos and open them on their respective Web pages, they become animated. Because images posted from websites do not save on Pinterest’s servers, they are not animated. You can’t do anything if Pinterest doesn’t animate a GIF.
Part 2 How to Get Pinterest GIF Downloader
Compared to a static image, adding a GIF to Pinterest conveys more information. You can make GIFs for your DIY projects or use them to display all sides of a cushion, which would typically require many images.
But what if you’re a Pinterest fan of a GIF? What’s the best way to get it? That is what we will demonstrate here. We’ll show you how to complete a Pinterest GIF video download to your computer and mobile device in this session.
Let’s get started.
01How to Download Pinterest Videos Using Mobile?
Here are simple steps to follow to achieve this:
Make use of the native download button
Step 1: Select GIF to download
Go to the selected GIF and click it.
Step 2: Download Image
Click the three-dot icon at the top from the menu and select Download image.

Step 3: Notification
After the image gets saved, you will receive a notification at the bottom. The freshly downloaded GIF will appear in your gallery or camera roll when you open it.
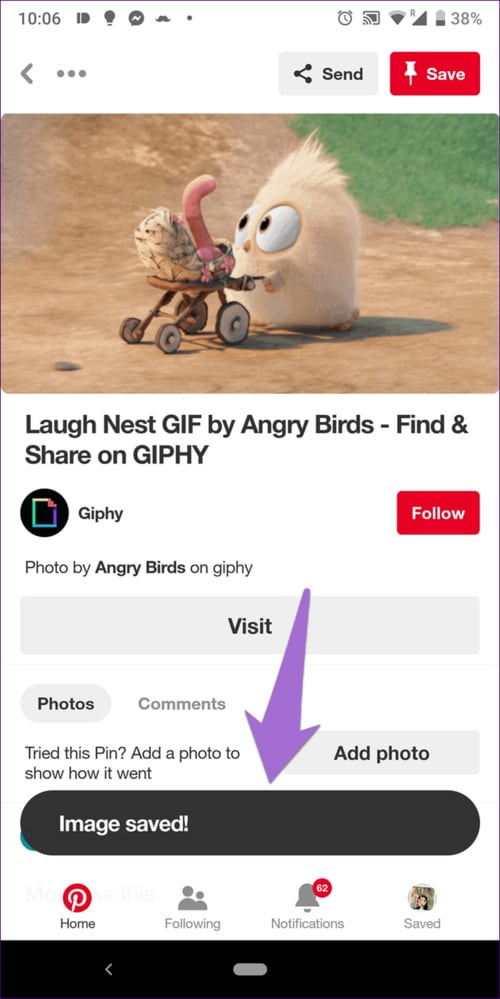
02How to Download Pinterest Videos by Computer?
Follow these simple step guides to achieve this:
Step 1: Open selected GIF
On your computer, open the GIF you want to use.
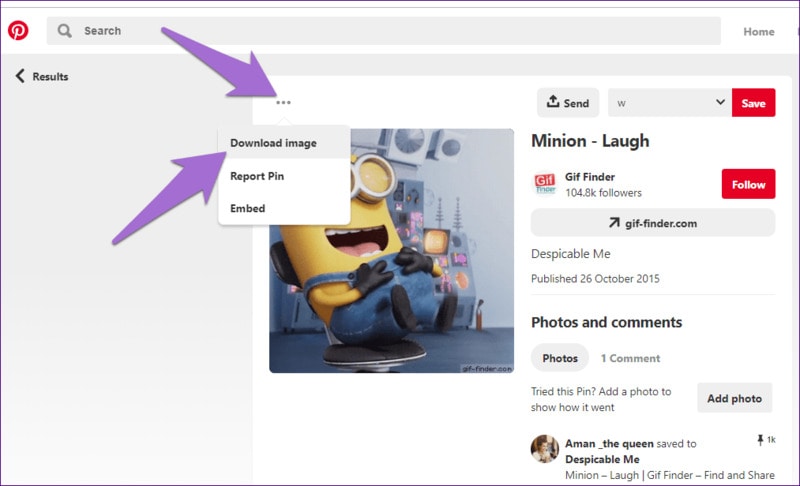
Step 2: Select Download
Select Download image from the menu by clicking on the three-dot icon above the GIF.
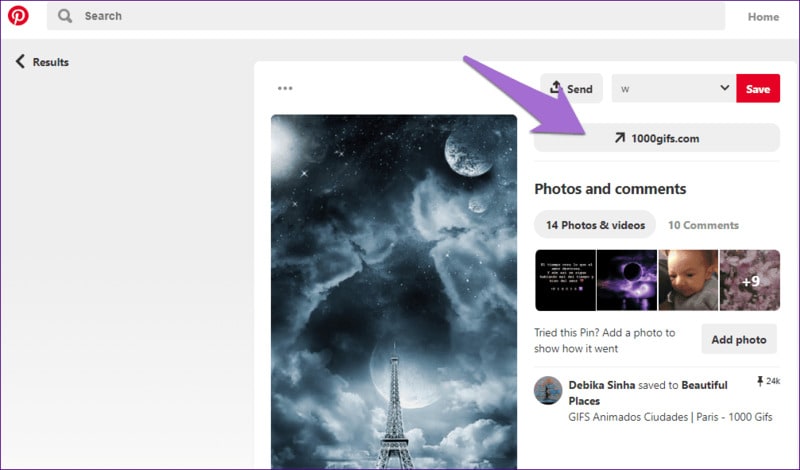
Step 3: Alternative
If the download option isn’t available for any reason, you’ll have to rely on the company’s
website. To do so, click on the GIF’s link.
You’ll reach the GIF’s host site. Right-click on the GIF and choose to Save image as… from the menu that appears. Ensure that the extension is . GIF. In some circumstances, you will have the opportunity to download the video.
Part 3 How to Get an Animated GIF on Pinterest
Save a picture from the Web to your hard drive before pinning it; GIFs pinned from Web pages are not animated. Open the Web page with the image you want to pin, then right-click the image and opt “Save as” to save it to a folder on your computer. You can save pictures off the Web in all major Web browsers, including Google Chrome, Mozilla Firefox, and Internet Explorer. Log in to Pinterest select “Upload a Pin” from the “+” menu. Select the animated GIF from your hard drive by clicking the “Choose Image” button. Click “Pin It” after selecting the board you wish to pin the image.
How to Upload a GIF to Pinterest
Now that you know how to download Pinterest GIFs, you may want to consider posting GIFs to Pinterest as well. Unfortunately, you cannot upload GIFs from mobile apps. To upload a GIF to your Pinterest account, you’ll need to utilize a computer.
If you have a GIF file on your computer, follow these instructions to add it.
Step 1: Log in to your Pinterest account
Log in to your Pinterest account, then go to the bottom of the page to the add icon. From the menu, choose to Create a Pin.
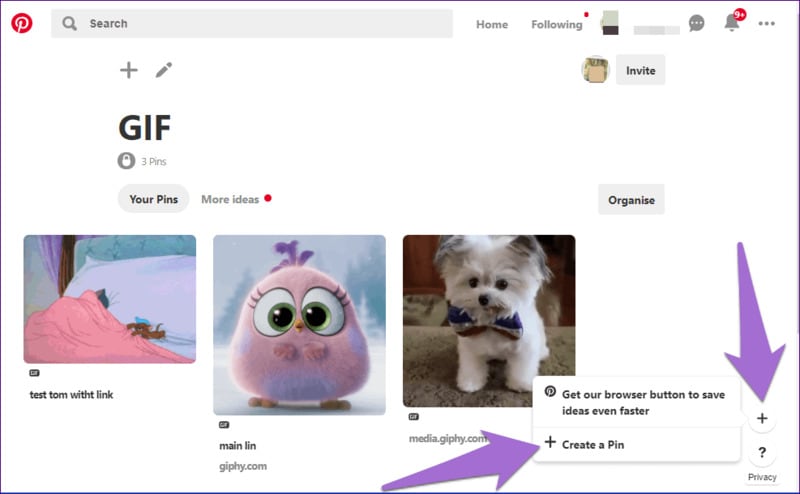
Step 2: Upload GIF
Drag and drop the GIF or upload it onto the pin creation screen from your computer.
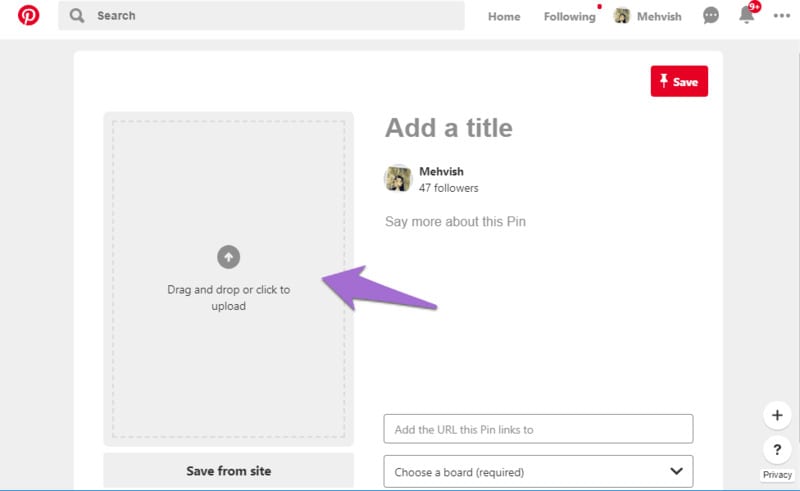
Step 3: Save GIF
When the GIF appears on the next screen, describe it and select a board for the pin. Finally, press the Save button.
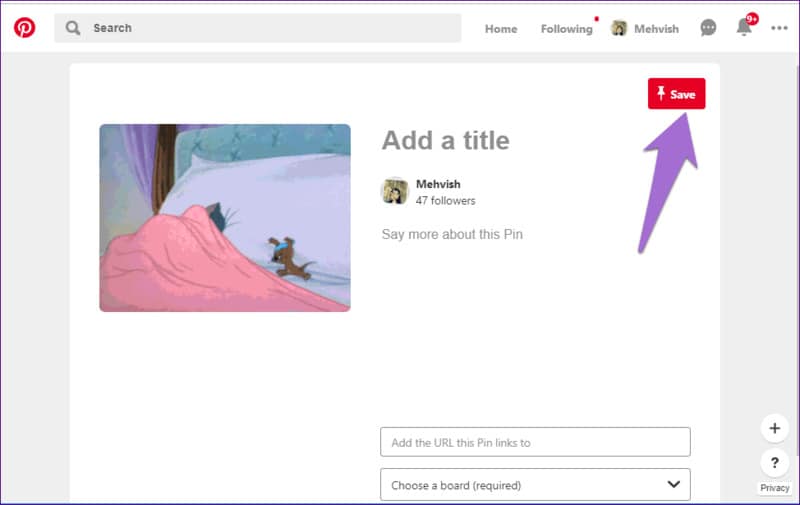
To save a file with the.GIF extension, you’ll need to use a GIF Pinterest downloader software or an application usable both online and offline. Wondershare Filmora is the most popular programs for this work because of the following benefits: it is elementary to use, and anyone can handle who isn’t technically inclined.
Wondershare Filmora Video Editor can convert Pinterest video to GIF from various video formats, including.wmv,.mp4,.mkv,.evo,.dat,.wav,.mpeg, and.avi, so you don’t have to worry about compatibility.
Wondershare Filmora
Get started easily with Filmora’s powerful performance, intuitive interface, and countless effects!
Try It Free Try It Free Try It Free Learn More >

The most important thing to know about Filmora video editing software is that it allows users to edit GIF files is one of the preferable programs for this task due to its advantages. It is elementary to use and is operational by any nontechnical person.
● Key Takeaways from This Episode →
● Now have learned how to easily download GIFs from Pinterest using Pinterest GIF downloader. By sincerely following the simple tips listed above, you can easily download video on GIF from Pinterest using any device on your mobile phone or your PC.
● However, Wondershare Filmora is one app that can meet all your needs to create a unique Pinterest GIF. And to top is all it is easy to use for none professionals
Emojis formerly reigned supreme, but GIFs and memes have since supplanted them. When you add a GIF to a conversation, it becomes more exciting. GIFs are considerably better at communicating our feelings, and they deserve credit for that. Pinterest, like other social networking sites and chat apps, enables GIFs. Pinterest is a photo-sharing website where you can find home decor ideas, recipes, fashion inspiration, DIY projects, and more.
Compared to a static image, adding a GIF to Pinterest conveys more information. You can make GIFs for your DIY projects or use them to display all sides of a cushion, which would typically require many images. But what if you like a GIF you found on Pinterest? What’s the best way to get it? That is what we will demonstrate here. This article will show how to download Pinterest GIFs to your computer and mobile device.
In this article
01 [Are There Gifs on Pinterest?](#Part 1)
02 [How to Get Pinterest GIF Downloader](#Part 2)
03 [How to Get an Animated GIF on Pinterest](#Part 3)
Part 1 Are There Gifs on Pinterest?
You can submit GIF and animated GIF images from your computer or the Internet to Pinterest. Because the pictures on your board aren’t animated, you might conclude that animated GIFs don’t work on Pinterest. When you click on the photos and open them on their respective Web pages, they become animated. Because images posted from websites do not save on Pinterest’s servers, they are not animated. You can’t do anything if Pinterest doesn’t animate a GIF.
Part 2 How to Get Pinterest GIF Downloader
Compared to a static image, adding a GIF to Pinterest conveys more information. You can make GIFs for your DIY projects or use them to display all sides of a cushion, which would typically require many images.
But what if you’re a Pinterest fan of a GIF? What’s the best way to get it? That is what we will demonstrate here. We’ll show you how to complete a Pinterest GIF video download to your computer and mobile device in this session.
Let’s get started.
01How to Download Pinterest Videos Using Mobile?
Here are simple steps to follow to achieve this:
Make use of the native download button
Step 1: Select GIF to download
Go to the selected GIF and click it.
Step 2: Download Image
Click the three-dot icon at the top from the menu and select Download image.
Step 3: Notification
After the image gets saved, you will receive a notification at the bottom. The freshly downloaded GIF will appear in your gallery or camera roll when you open it.
02How to Download Pinterest Videos by Computer?
Follow these simple step guides to achieve this:
Step 1: Open selected GIF
On your computer, open the GIF you want to use.
Step 2: Select Download
Select Download image from the menu by clicking on the three-dot icon above the GIF.
Step 3: Alternative
If the download option isn’t available for any reason, you’ll have to rely on the company’s
website. To do so, click on the GIF’s link.
You’ll reach the GIF’s host site. Right-click on the GIF and choose to Save image as… from the menu that appears. Ensure that the extension is . GIF. In some circumstances, you will have the opportunity to download the video.
Part 3 How to Get an Animated GIF on Pinterest
Save a picture from the Web to your hard drive before pinning it; GIFs pinned from Web pages are not animated. Open the Web page with the image you want to pin, then right-click the image and opt “Save as” to save it to a folder on your computer. You can save pictures off the Web in all major Web browsers, including Google Chrome, Mozilla Firefox, and Internet Explorer. Log in to Pinterest select “Upload a Pin” from the “+” menu. Select the animated GIF from your hard drive by clicking the “Choose Image” button. Click “Pin It” after selecting the board you wish to pin the image.
How to Upload a GIF to Pinterest
Now that you know how to download Pinterest GIFs, you may want to consider posting GIFs to Pinterest as well. Unfortunately, you cannot upload GIFs from mobile apps. To upload a GIF to your Pinterest account, you’ll need to utilize a computer.
If you have a GIF file on your computer, follow these instructions to add it.
Step 1: Log in to your Pinterest account
Log in to your Pinterest account, then go to the bottom of the page to the add icon. From the menu, choose to Create a Pin.
Step 2: Upload GIF
Drag and drop the GIF or upload it onto the pin creation screen from your computer.
Step 3: Save GIF
When the GIF appears on the next screen, describe it and select a board for the pin. Finally, press the Save button.
To save a file with the.GIF extension, you’ll need to use a GIF Pinterest downloader software or an application usable both online and offline. Wondershare Filmora is the most popular programs for this work because of the following benefits: it is elementary to use, and anyone can handle who isn’t technically inclined.
Wondershare Filmora Video Editor can convert Pinterest video to GIF from various video formats, including.wmv,.mp4,.mkv,.evo,.dat,.wav,.mpeg, and.avi, so you don’t have to worry about compatibility.
Wondershare Filmora
Get started easily with Filmora’s powerful performance, intuitive interface, and countless effects!
Try It Free Try It Free Try It Free Learn More >
The most important thing to know about Filmora video editing software is that it allows users to edit GIF files is one of the preferable programs for this task due to its advantages. It is elementary to use and is operational by any nontechnical person.
● Key Takeaways from This Episode →
● Now have learned how to easily download GIFs from Pinterest using Pinterest GIF downloader. By sincerely following the simple tips listed above, you can easily download video on GIF from Pinterest using any device on your mobile phone or your PC.
● However, Wondershare Filmora is one app that can meet all your needs to create a unique Pinterest GIF. And to top is all it is easy to use for none professionals
Also read:
- New How to Get Started in Stop Motion Claymation
- Updated Ways to Stop Animation From Looping in Unity
- Updated 2024 Approved The Best 20 Motion Graphics Companies & Studios
- In 2024, How to Make Well Done Animated GIF By Yourself?
- Updated Top 10 3D Text Animation Templates for 2024
- 2024 Approved How to Make Photo Motion Effect Online?
- Updated 2024 Approved 10 Cartoon Photo Converters You Couldnt Do Without
- New How to Get Started in Stop Motion Claymation for 2024
- Updated In 2024, Little Known Techniques of Motion Graphics in Premiere Pro
- New How to Cartoonize Photo Photoshop in Simple Steps for 2024
- New What Is Anime? Anime VS Manga VS Cartoon
- New 2024 Approved Top 10 Best Photo to Animation Converters
- New Tips on How to Learn Graphics Animation for 2024
- New 15 Best Collage Makers to Create Aesthetic Collages
- 2024 Approved Create Animated Social Media Posts in Canva
- New Most Effective Ways to Set WhatsApp Status
- Little Known Techniques of Motion Graphics in Premiere Pro for 2024
- In 2024, 12 Captivating Websites with Triggered Animate on Scroll Examples
- Top Tips for Effortless Unity 3D Animation
- Updated In 2024, 10 Cartoon Characters That Should Top Your List
- Updated 26 Cool Anime Girl Names and Their Meanings for 2024
- Top 15 Apps To Hack WiFi Password On Realme Narzo N55
- In 2024, 5 Ways to Move Contacts From OnePlus Ace 2 Pro to iPhone (13/14/15) | Dr.fone
- How to Stop Life360 from Tracking You On Nokia G310? | Dr.fone
- Unlock Apple ID without Phone Number From iPhone 13 mini
- How To Reset iPhone 13 Pro? | Dr.fone
- The Best Android SIM Unlock Code Generators Unlock Your Motorola Edge+ (2023) Phone Hassle-Free
- In 2024, New Guide How To Check iCloud Activation Lock Status On Your iPhone 11 Pro Max
- In 2024, Which Pokémon can Evolve with a Moon Stone For Oppo Find N3? | Dr.fone
- How to Unlock Your Apple iPhone 11 Pro Passcode 4 Easy Methods (With or Without iTunes) | Dr.fone
- Turn Off Screen Lock - Magic 6 Lite
- How does the stardust trade cost In pokemon go On Tecno Spark 20C? | Dr.fone
- How to fix iCloud lock on your iPhone 11 Pro Max and iPad
- In 2024, Easiest Guide How to Clone Nokia XR21 Phone? | Dr.fone
- How to Screen Mirroring Realme GT 5 Pro? | Dr.fone
- In 2024, Recommended Best Applications for Mirroring Your Samsung Galaxy F34 5G Screen | Dr.fone
- 7 Fixes for Unfortunately, Phone Has Stopped on Nokia XR21 | Dr.fone
- In 2024, Your Account Has Been Disabled in the App Store and iTunes From Apple iPhone 13?
- Full Guide How To Fix Connection Is Not Private on Infinix Note 30 VIP Racing Edition | Dr.fone
- Updated Master Amazon Live Features, Pro Tips and Future Trends for 2024
- Title: New In 2024, Useful Tips for Canva Animated Elements
- Author: Elon
- Created at : 2024-05-19 03:05:55
- Updated at : 2024-05-20 03:05:55
- Link: https://animation-videos.techidaily.com/new-in-2024-useful-tips-for-canva-animated-elements/
- License: This work is licensed under CC BY-NC-SA 4.0.
