

New Samples of Cartoon Character Face
Samples of Cartoon Character Face
Samples of Cartoon Character Face to Inspire You
An easy yet powerful editor
Numerous effects to choose from
Detailed tutorials provided by the official channel
Being able to draw facial features is an essential skill for any animator. Whether you are a beginner at drawing faces or an experienced cartoon artist that has been drawing for years, this is a skill that can gradually improve with time. With the implementation and use of simple shapes, creating various facial features and cartoon styles can be done quickly.
The methods of creating funny face cartoon characters are suitable for everyone, even if they do not have a single day of illustrating experience. These methods presented in this article are easily accessible to provide you with different results depending on your budget and your desired outcome.
The act of drawing cartoon faces can be effortless, and in this article, we will give you some fundamental samples of how you can draw cartoon faces of your own.
In this article
01 [Learn to Understand the Core of Cartoon Style](#Part 1)
02 [Top 12 Cartoon Face Examples](#Part 2)
03 [How to Draw a Cartoon Face - For Beginners](#Part 3)
04 [How to Easily Turn Yourself into a Cartoon](#Part 4)
Part 1 Learn to Understand the Core of Cartoon Style
First, you need to simplify the different parts of the cartoon character face to pick up on very subtle facial expressions and features. For example, the eyes’ shape and size will help determine if the person is feeling sad, excited, happy, excited, or sad. In addition, the amount of lift under a person’s eyebrows can help determine whether a person is mad or not.
These facial expressions are crucial to how a person communicates. It has got to the point that we can read someone’s face without truly understanding which parts of the face convey that emotion. However, these days we get exposed to everyday adaptations of facial expressions, especially with the invention of Instagram, Snapchat, and cartoon face filters.
Consequently, cartoons are a combination of different shapes that are being put together and are not difficult if the focus is on each shape individually and the process breaks down step by step.
Cartoons are a mixture of different shapes put together. It’s not difficult if you focus on each shape individually and break down the process step by step.
Finally, understanding these unconscious and subtle differences in facial expressions is crucial when planning out an animated character. Afterward, when understood, you can simplify the features to be recognizable by your audience.
Part 2 Top 12 Cartoon Face Examples
Cartoon character faces are gaining immense importance in design art due to their universality. Cartoon faces can represent people in several situations and add a comic or satirical twist to dull topics by highlighting their importance. However, drawing cartoon faces require a lot of skill and differentiation, and graphic designers, while working on basic and universal templates, always try and introduce unique elements.
Here are the top 10 examples of cartoon character faces you can choose from when you want to make your designs:
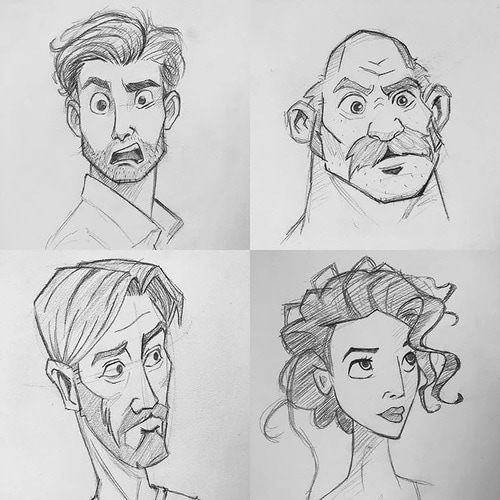
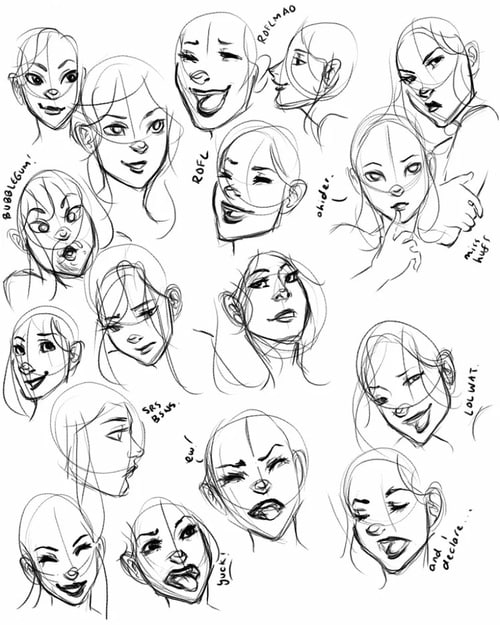
01Men and Women
This sketch features different facial expressions made by older men and women.
02Stretch and Squash
This photo shows the difference between squashing and stretching the face and provides references for extreme squash and extreme stretch.

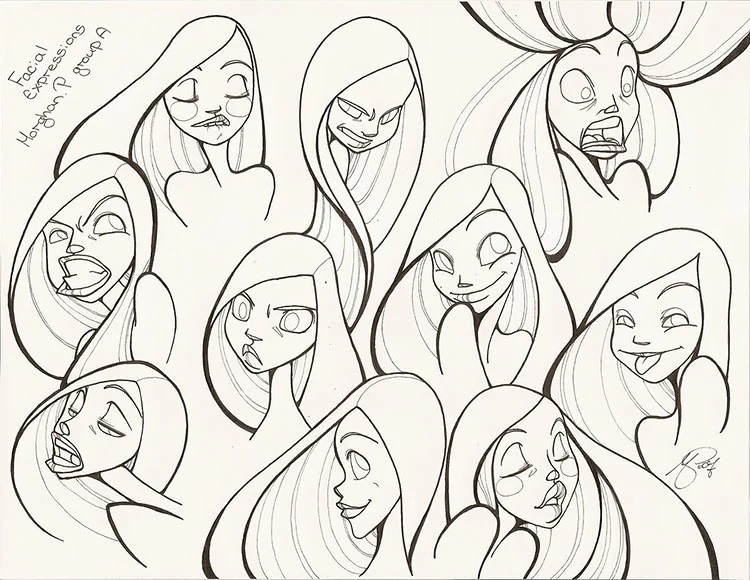
03Dramatic Expressions
The expressions drawn here are super fun and dramatic. However, it is a great way to have fun and practice how to draw facial expressions simultaneously.
04Quick Expressive Sketches
With this, you can practice how to draw different facial expressions by doing quick sketches like this one. Perhaps you do not need to pay attention to perfection.
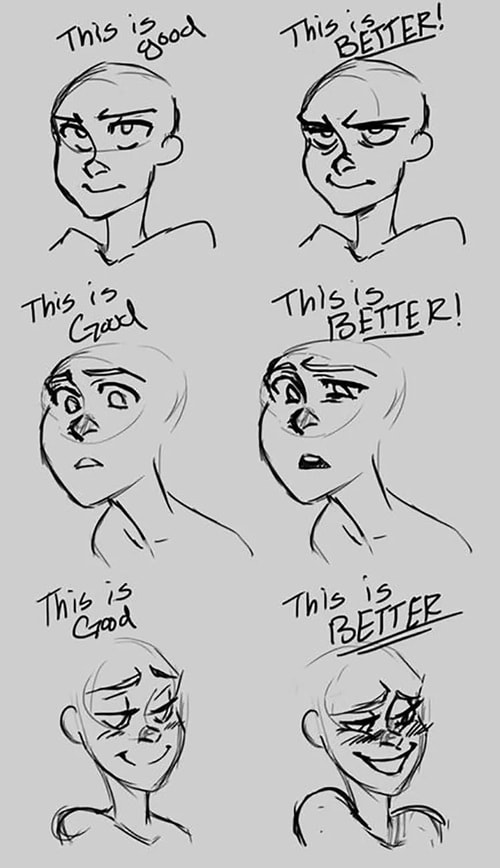
05This Is Good This Is Better
With this facial expression, you can see a good look and an even better expression. It shows the difference that subtle changes can make to your facial expressions**.**
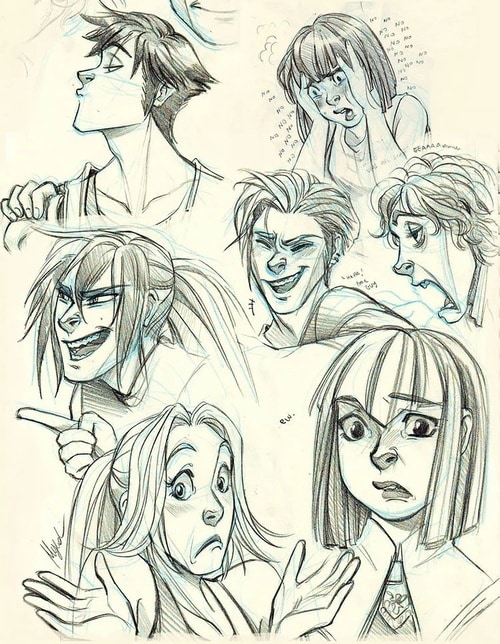
06Male and Female Expressions
This includes both male and female expressions to express the facial reaction of both genders, like some funny cartoon characters face.
07Quick Sketches
This type of facial expression will help you get better at drawing cartoons, and you can use do some quick sketches every day.

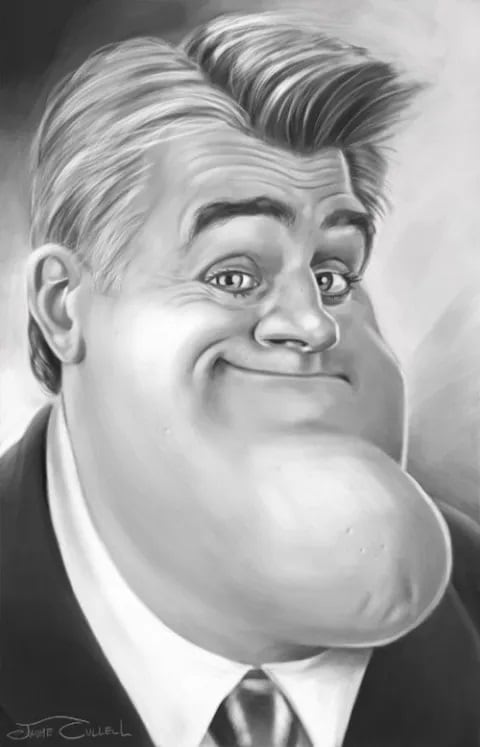
08Jay Leno’s facial expression
Here, it is being exaggerated on a few of his most prominent facial features, including his chin. It is kind of a fat face cartoon character.
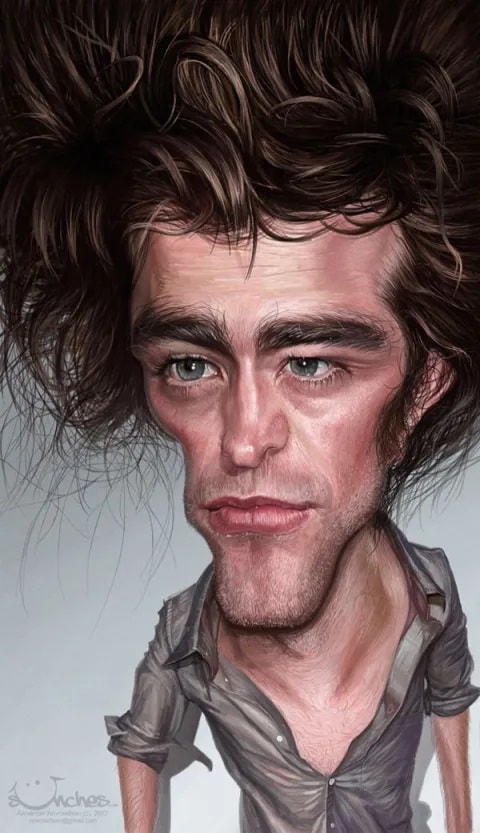
09Robert Pattinson Facials
In this photo, his head shape was distorted to show the thinness of his face, and his big hair also accentuates this prominent feature further.
10A,I,U,O,AE,M Facials
With this, you can practice how to draw your facial expression by pronouncing a, i, u, o, ae, m.

Part 3 How to Draw a Cartoon Face - For Beginners
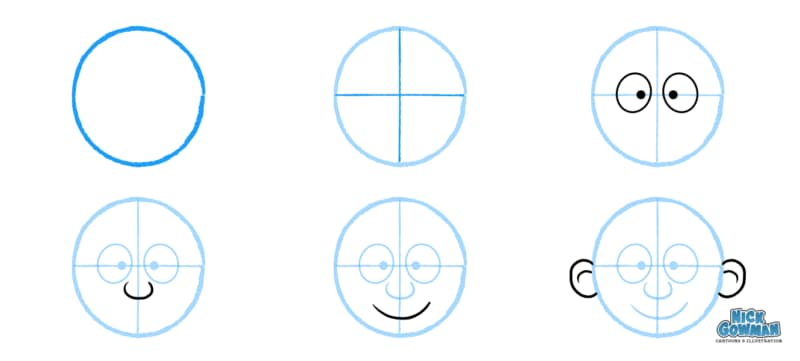
Here, we have written down 7-step to follow on how to draw a cartoon character face as a beginner effectively.
● Step 1: Plan and Prepare
This is the first step is to plan out exactly what this character will convery through its expression while drawing a cartoon character.
● Step 2: Drawing A Cartoon Head
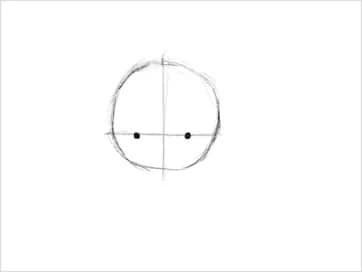
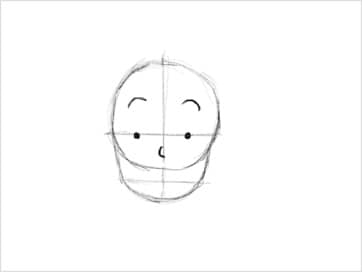
Next is time to start sketching out the shape of the head based on the plan you have made. Whatsoever shape you decide to use for your character, start with a circle to serve as the basic shape for the head.
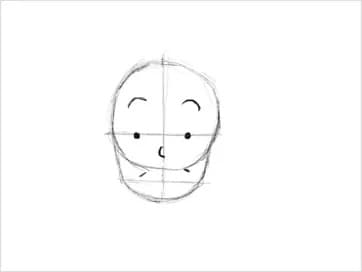
● Step 3: Drawing Cartoon Eyes
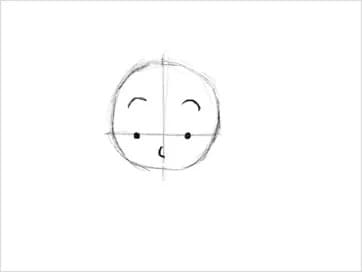
Now, you need to draw the eye of the character, which is a crucial step because the eye is the essential part of their expression. To get the character’s eyes in the right place, you should carefully sketch the horizontal or vertical dimension lines.
● Step 4: Drawing A Cartoon Nose
The simpler the nose is, the better it looks in a cartoon. Ensure to keep a proper ratio between the mouth, eyes, and nose so that it does not look too crowded together.
● Step 5: Shaping the Face
In shaping the face, one needs to be mindful of the character, which will help to determine how to shape the jawline and head. For example, for a girl, the face should be narrower and have the chin come to a bit of a point at the end, whereas, for a boy, it requires that the face is a bit bolder and focuses more on the definition of the jawline.
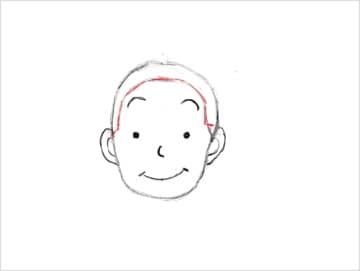
● Step 6: Drawing A Cartoon Mouth
The mouth is another essential part of the cartoon character’s expression and a key indicator of how the character is feeling. It portrays whether you want the character to smile, frown, yell, be nervous, or be neutral.
● Step 7: Drawing Cartoon Hair
Next, you need to draw the cartoon hair, and, in some cases, the cartoon hair is a significant part of their appearance as it is a way to convey your character’s personality, appearance, style, or gender.
● Step 8: Coloring
Another part requires you to paint your character to improve the texture and make it beautiful.
Part 4 How to Easily Turn Yourself into a Cartoon
Are you looking to turn yourself into a cartoon? This is very necessary as it provides you with a great way to integrate diverse characters into your brand’s marketing while simultaneously keeping your content personalized.
However, after converting a picture to a cartoon character face, you can decide to animate it, and the best tool is Wondershare Filmora Video Editor . Animation is a great way to advertise your business, especially during times like these. it is a clever way for leaders, CEOs, and managers to connect with their remote workers and boost engagement, company culture, and ultimately work morale. Filmora is also a great tool to create creative and powerful animation with tons of follow-come effect that enables you to carry it out effectively and efficiently. In this section, we will guide you on how to turn yourself into a cartoon easily:
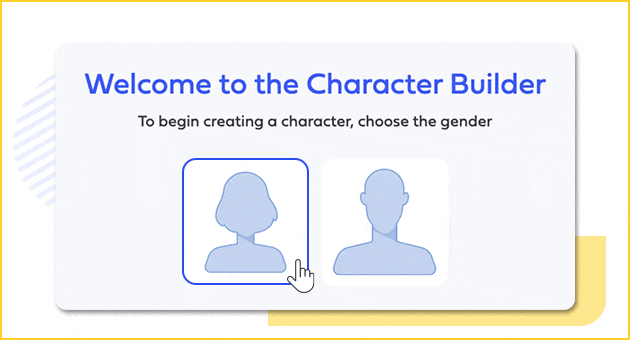
Step 1: Visit Powtoon.com and sign up for a free account, then click on the “build your character” option from the dropdown menu.
Step 2: Next is to select the cartoon gender you want.
Step 3: Finally, you can customize your character’s facial features such as skin, hair, color, clothes, and animated gestures.
Step 4: Once you are satisfied with the result, you can save it on your device or share it on social media
For Win 7 or later (64-bit)
For macOS 10.12 or later
● Ending Thoughts →
● Thus, we saw how to easily cartoon your character’s face via some samples to help you out. With the method listed above, you can easily use it to create a square-faced cartoon character or draw a fat face cartoon character.
● This article also explained how to cartoon yourself. However, to cartoon your video or create a cartoon animated video, we recommend that you use Filmora, its keyframing feature to help you carry this out effectively.
Being able to draw facial features is an essential skill for any animator. Whether you are a beginner at drawing faces or an experienced cartoon artist that has been drawing for years, this is a skill that can gradually improve with time. With the implementation and use of simple shapes, creating various facial features and cartoon styles can be done quickly.
The methods of creating funny face cartoon characters are suitable for everyone, even if they do not have a single day of illustrating experience. These methods presented in this article are easily accessible to provide you with different results depending on your budget and your desired outcome.
The act of drawing cartoon faces can be effortless, and in this article, we will give you some fundamental samples of how you can draw cartoon faces of your own.
In this article
01 [Learn to Understand the Core of Cartoon Style](#Part 1)
02 [Top 12 Cartoon Face Examples](#Part 2)
03 [How to Draw a Cartoon Face - For Beginners](#Part 3)
04 [How to Easily Turn Yourself into a Cartoon](#Part 4)
Part 1 Learn to Understand the Core of Cartoon Style
First, you need to simplify the different parts of the cartoon character face to pick up on very subtle facial expressions and features. For example, the eyes’ shape and size will help determine if the person is feeling sad, excited, happy, excited, or sad. In addition, the amount of lift under a person’s eyebrows can help determine whether a person is mad or not.
These facial expressions are crucial to how a person communicates. It has got to the point that we can read someone’s face without truly understanding which parts of the face convey that emotion. However, these days we get exposed to everyday adaptations of facial expressions, especially with the invention of Instagram, Snapchat, and cartoon face filters.
Consequently, cartoons are a combination of different shapes that are being put together and are not difficult if the focus is on each shape individually and the process breaks down step by step.
Cartoons are a mixture of different shapes put together. It’s not difficult if you focus on each shape individually and break down the process step by step.
Finally, understanding these unconscious and subtle differences in facial expressions is crucial when planning out an animated character. Afterward, when understood, you can simplify the features to be recognizable by your audience.
Part 2 Top 12 Cartoon Face Examples
Cartoon character faces are gaining immense importance in design art due to their universality. Cartoon faces can represent people in several situations and add a comic or satirical twist to dull topics by highlighting their importance. However, drawing cartoon faces require a lot of skill and differentiation, and graphic designers, while working on basic and universal templates, always try and introduce unique elements.
Here are the top 10 examples of cartoon character faces you can choose from when you want to make your designs:
01Men and Women
This sketch features different facial expressions made by older men and women.
02Stretch and Squash
This photo shows the difference between squashing and stretching the face and provides references for extreme squash and extreme stretch.
03Dramatic Expressions
The expressions drawn here are super fun and dramatic. However, it is a great way to have fun and practice how to draw facial expressions simultaneously.
04Quick Expressive Sketches
With this, you can practice how to draw different facial expressions by doing quick sketches like this one. Perhaps you do not need to pay attention to perfection.
05This Is Good This Is Better
With this facial expression, you can see a good look and an even better expression. It shows the difference that subtle changes can make to your facial expressions**.**
06Male and Female Expressions
This includes both male and female expressions to express the facial reaction of both genders, like some funny cartoon characters face.
07Quick Sketches
This type of facial expression will help you get better at drawing cartoons, and you can use do some quick sketches every day.
08Jay Leno’s facial expression
Here, it is being exaggerated on a few of his most prominent facial features, including his chin. It is kind of a fat face cartoon character.
09Robert Pattinson Facials
In this photo, his head shape was distorted to show the thinness of his face, and his big hair also accentuates this prominent feature further.
10A,I,U,O,AE,M Facials
With this, you can practice how to draw your facial expression by pronouncing a, i, u, o, ae, m.
Part 3 How to Draw a Cartoon Face - For Beginners
Here, we have written down 7-step to follow on how to draw a cartoon character face as a beginner effectively.
● Step 1: Plan and Prepare
This is the first step is to plan out exactly what this character will convery through its expression while drawing a cartoon character.
● Step 2: Drawing A Cartoon Head
Next is time to start sketching out the shape of the head based on the plan you have made. Whatsoever shape you decide to use for your character, start with a circle to serve as the basic shape for the head.
● Step 3: Drawing Cartoon Eyes
Now, you need to draw the eye of the character, which is a crucial step because the eye is the essential part of their expression. To get the character’s eyes in the right place, you should carefully sketch the horizontal or vertical dimension lines.
● Step 4: Drawing A Cartoon Nose
The simpler the nose is, the better it looks in a cartoon. Ensure to keep a proper ratio between the mouth, eyes, and nose so that it does not look too crowded together.
● Step 5: Shaping the Face
In shaping the face, one needs to be mindful of the character, which will help to determine how to shape the jawline and head. For example, for a girl, the face should be narrower and have the chin come to a bit of a point at the end, whereas, for a boy, it requires that the face is a bit bolder and focuses more on the definition of the jawline.
● Step 6: Drawing A Cartoon Mouth
The mouth is another essential part of the cartoon character’s expression and a key indicator of how the character is feeling. It portrays whether you want the character to smile, frown, yell, be nervous, or be neutral.
● Step 7: Drawing Cartoon Hair
Next, you need to draw the cartoon hair, and, in some cases, the cartoon hair is a significant part of their appearance as it is a way to convey your character’s personality, appearance, style, or gender.
● Step 8: Coloring
Another part requires you to paint your character to improve the texture and make it beautiful.
Part 4 How to Easily Turn Yourself into a Cartoon
Are you looking to turn yourself into a cartoon? This is very necessary as it provides you with a great way to integrate diverse characters into your brand’s marketing while simultaneously keeping your content personalized.
However, after converting a picture to a cartoon character face, you can decide to animate it, and the best tool is Wondershare Filmora Video Editor . Animation is a great way to advertise your business, especially during times like these. it is a clever way for leaders, CEOs, and managers to connect with their remote workers and boost engagement, company culture, and ultimately work morale. Filmora is also a great tool to create creative and powerful animation with tons of follow-come effect that enables you to carry it out effectively and efficiently. In this section, we will guide you on how to turn yourself into a cartoon easily:
Step 1: Visit Powtoon.com and sign up for a free account, then click on the “build your character” option from the dropdown menu.
Step 2: Next is to select the cartoon gender you want.
Step 3: Finally, you can customize your character’s facial features such as skin, hair, color, clothes, and animated gestures.
Step 4: Once you are satisfied with the result, you can save it on your device or share it on social media
For Win 7 or later (64-bit)
For macOS 10.12 or later
● Ending Thoughts →
● Thus, we saw how to easily cartoon your character’s face via some samples to help you out. With the method listed above, you can easily use it to create a square-faced cartoon character or draw a fat face cartoon character.
● This article also explained how to cartoon yourself. However, to cartoon your video or create a cartoon animated video, we recommend that you use Filmora, its keyframing feature to help you carry this out effectively.
Types of Cartoon Styles You May Use for Your Next Marketing Project
Types of Cartoon Styles You May Use for Your Next Marketing Project
An easy yet powerful editor
Numerous effects to choose from
Detailed tutorials provided by the official channel
The whole concept of animation originated mainly from Japan. The cartoons that are shown on TV have different cartoon art styles. These cartoon art styles have their history of origin. These numerous cartoon styles play a significant role in the whole animation industry. If you find which cartoon illustration styles to use for your next project, this is the perfect place for your answer.
You can use any cartoon art style in your upcoming marketing project and make it a success. This article focuses on different cartoon art styles and how you can develop your anime cartoon style. You can use these methods to draw cartoon styles of yourself.
In this article
01 [10 Types of Cartoon Styles With Examples](#Part 1)
02 [Drawing Myself in 5 Different Cartoon Styles](#Part 2)
03 [How You Can Develop a Cartoon Style for Animation](#Part 3)
Part 1 Types of Cartoon Styles With Examples
There are numerous kinds of cartoon styles. Different animators use different cartoon styles. You can even develop your anime cartoon style. The different types of Animation are:
012D Animation
animations are trendy cartoon styles. This style of animation needs no introduction. This type of anime cartoon style was produced by Walt Disney. The most exciting features of the images were that they had only two dimensions: height and width.
Even though several people suggested that 2D art styles cartoon were invented during the early twentieth century. Back then, it was not much popular; Walt Disney made these cartoon styles famous. Example:

02Traditional Animation
As the name suggests, traditional Animation is an old cartoon art style. These cartoon styles were first seen in the year 1877. Emil Reynaud discovered a new tool for demonstrating objects that are moving. In this type of Animation, all the images are drawn manually on paper with a pencil. This method of making cartoon styles is time-consuming. However, later computer applications and programs were developed, making this task much easier and more efficient. Example:

03Animation
animation cartoon styles came into existence with graphics and visual software development. The first 3D dimensional image was created in the year 1972. However, an attempt to make 3D Animation was made in 1961. Nowadays, 3D Animation is a widely used animation style. It is used in the entertainment industry and medical imaging to adequately explain the body and organisms. Example:

04Flipbook Animation
In flipbook animation, each frame is drawn on each notebook page. After drawing all the frames is complete, turn the pages quickly. When the pages are turned quickly, it seems to be a moving video because of the different frames drawn on each page. Example:

05Clay Animation
This animation method turns out to be very funny after it is completed. This method of Animation is quite tricky. In this animation method, the characters are made out of clay at first, and then the movements are recorded in a camera. These movements are then made smooth and compiled like a video with different scenes using the software. The main audience for this kind of Animation is children. Example:

06Typography Animation
Typography animation is also called kinetic typography. This style of Animation is text animation. This method was originated in the year 1899. Back then, this Animation was not much popular. This style of typography animation gained popularity after 60 years it first originated. Typography animation is considered a good method for e-learning while training employees. Example:

07Stop-Motion Animation
Stop-Motion animation is an age-old animation technique. The attempt to use this type of Animation was made 150 years ago. The specialty of this type of Animation is that the animator takes pictures of different frames by moving the objects in different positions and clicking the picture of each frame. These pictures are compiled to create a continuous video. This method of Animation is straightforward to go. Example:

08Sand Animation
Sand Animation was invented in the year 1969. This type of Animation involves sand and a luminous surface on which the Animation is done. This method is used in cartoon anime styles or different shows. In this type of Animation, the sand is used to create 2D images. This type of Animation is used for storytelling in reality shows. Example:

09Motion Graphics
Motion design was invented in the year 1960. It is one of the most popular cartoon art styles used nowadays. This type of Animation creates promotional videos, game screensavers, commercial advertising videos, etc. It is one of the universal animation techniques used globally for various purposes. Example:

10Mechanical Animation
Mechanical Animation is mainly used in producing technical equipment. The most fantastic thing about this animation method is that you can make changes to a product that has not yet been developed. This kind of Animation is used with 3D Animation to show the working of machines in and out. It is done together with 3D Animation to clearly visualize the machine.

Part 2 Drawing Myself in 5 Different Cartoon Styles
You can draw yourself using these 5 different cartoon styles:
01You can use 3D filters on Snapchat to draw a Pixar-like picture of yourself
The steps are:
Step 1: Install and run the “Snapchat” app on your phone.
Step2: Open the app and turn on the camera.
Step 3: There is a smiling face symbol on the right side of the camera button, tap on that.
Step 4: Click on the explore menu and select the “Cartoon 3D Style” option.
Step 5: Capture your video
Step 6: Then your cartoon character-like video is ready.
02You can also use Instagram to create a Disney-like character of yourself
The steps are:
Step 1: Open your Instagram account.
Step 2: Click on the ‘+’ icon. Select the “Story” option.
Step 3: Different effects appear on the screen.
Step 4: Scroll the effects and find an icon of a magnifying glass.
Step 5: Click on that icon and type cartoon on the search bar.
Step 6: After your search is finished, different cartoon filters will appear on your screen.
Step 7: Tap on any one of the effects. The effect opens.
Step 8: Tap on the bookmark icon to save the cartoon effect.
Step 9: Now you can go back to the effects options to use the cartoon effect.
Your Disney-like cartoon picture is ready!
03You can use Google meet
Step 1: When you open the Google meet app, there are filters to use while on a call.
Step 2: Choose one of the filters that have a cartoon effect.
Step 3: When you join any meeting, you will appear like a cartoon character from TV.
04You can use B612
Step 1: Install and open the app on your phone.
Step 2: After you open the app, a circle button appears at the bottom of your screen in the middle.
Step 3: Tap on the circle.
Step 4: Numerous filters will appear.
Step 5: Choose one cartoon-like filter from the options of effect in the menu.
Step 6: After selecting one effect, make a video of yourself using an effect.
Step 7: Your cartoon video is ready on your screen.
05You can use Wondershare Filmora Video Editor
For Win 7 or later (64-bit)
For macOS 10.12 or later
Step 1: Capture a video of yourself using your phone’s camera.
Step 2: Install and open the Filmora app on your phone.
Step 3: After you open the app, you will be given the option to choose a video.
Step 4: Choose the video of yourself.
Step 5: After choosing your video, there is an option “click edit” tap on that.
Step 6: A menu appears; select the “effects” option from the menu.
Step 7: Different effects will appear on your screen.
Step 8: Select the cartoon effect you want to use in your video.
Step 9: After you have selected the effect, it will take some time to process.
Step 10: Your cartoon-like video is ready.
How You Can Develop a Cartoon Style for Animation
Anyone can develop new cartoon styles by following these simple procedures or habits. The procedures are:
● You can take references from real-life objects.
Most of the Animation we see here has been taken from real-life references, be it a cat, car, house, etc. So, to develop the cartoon styles, you can take references from real-life objects. You can also search for a particular characteristic in things you won’t use as your reference. If you want to draw a cat, you can use a living cat as your reference.
● You can copy and try to make Animation like your favorite animator.
If you use this method, this will help you improve your skill. No animation is 100% real, no matter what kind of Animation it is or who is creating it. However, you cannot keep on making animations like your favorite animator because you will not be able to find your anime art styles and skills.
● You can create an animated character of your own.
After taking your reference from real-life objects and knowing about the animation styles and the basic principles of Animation, you can create your animated character. If you create your character, keeping all the skills and techniques in mind, you can develop outstanding animation styles.
● To develop your cartoon style, you need to practice drawing regularly.
To get s grasp this whole process of Animation, you need to draw and practice different cartoon art styles. You can draw anything you like, or you don’t like on paper or on a drawing tablet. You can also color sketchbooks to improve your skills in Animation.
You can use Filmora to make cartoon videos and, at the same time, make cartoon videos of normally captured videos. These cartoon videos can be compiled into one video. You can use this video to edit different types of videos. Filmora has a user-friendly interface that can help you create your cartoon video effortlessly.
● Ending Thoughts →
● I hope you have understood the different types of anime cartoon styles by now.
● These methods can help you make the best for your next marketing project.
● These methods are easy, efficient, and efficient. All the aforementioned methods were discovered in the late nineteenth and early twentieth century.
● With the advancement of technology, the process has become more accessible. However, you can use any cartoon-style art.
The whole concept of animation originated mainly from Japan. The cartoons that are shown on TV have different cartoon art styles. These cartoon art styles have their history of origin. These numerous cartoon styles play a significant role in the whole animation industry. If you find which cartoon illustration styles to use for your next project, this is the perfect place for your answer.
You can use any cartoon art style in your upcoming marketing project and make it a success. This article focuses on different cartoon art styles and how you can develop your anime cartoon style. You can use these methods to draw cartoon styles of yourself.
In this article
01 [10 Types of Cartoon Styles With Examples](#Part 1)
02 [Drawing Myself in 5 Different Cartoon Styles](#Part 2)
03 [How You Can Develop a Cartoon Style for Animation](#Part 3)
Part 1 Types of Cartoon Styles With Examples
There are numerous kinds of cartoon styles. Different animators use different cartoon styles. You can even develop your anime cartoon style. The different types of Animation are:
012D Animation
animations are trendy cartoon styles. This style of animation needs no introduction. This type of anime cartoon style was produced by Walt Disney. The most exciting features of the images were that they had only two dimensions: height and width.
Even though several people suggested that 2D art styles cartoon were invented during the early twentieth century. Back then, it was not much popular; Walt Disney made these cartoon styles famous. Example:
02Traditional Animation
As the name suggests, traditional Animation is an old cartoon art style. These cartoon styles were first seen in the year 1877. Emil Reynaud discovered a new tool for demonstrating objects that are moving. In this type of Animation, all the images are drawn manually on paper with a pencil. This method of making cartoon styles is time-consuming. However, later computer applications and programs were developed, making this task much easier and more efficient. Example:
03Animation
animation cartoon styles came into existence with graphics and visual software development. The first 3D dimensional image was created in the year 1972. However, an attempt to make 3D Animation was made in 1961. Nowadays, 3D Animation is a widely used animation style. It is used in the entertainment industry and medical imaging to adequately explain the body and organisms. Example:
04Flipbook Animation
In flipbook animation, each frame is drawn on each notebook page. After drawing all the frames is complete, turn the pages quickly. When the pages are turned quickly, it seems to be a moving video because of the different frames drawn on each page. Example:
05Clay Animation
This animation method turns out to be very funny after it is completed. This method of Animation is quite tricky. In this animation method, the characters are made out of clay at first, and then the movements are recorded in a camera. These movements are then made smooth and compiled like a video with different scenes using the software. The main audience for this kind of Animation is children. Example:
06Typography Animation
Typography animation is also called kinetic typography. This style of Animation is text animation. This method was originated in the year 1899. Back then, this Animation was not much popular. This style of typography animation gained popularity after 60 years it first originated. Typography animation is considered a good method for e-learning while training employees. Example:
07Stop-Motion Animation
Stop-Motion animation is an age-old animation technique. The attempt to use this type of Animation was made 150 years ago. The specialty of this type of Animation is that the animator takes pictures of different frames by moving the objects in different positions and clicking the picture of each frame. These pictures are compiled to create a continuous video. This method of Animation is straightforward to go. Example:
08Sand Animation
Sand Animation was invented in the year 1969. This type of Animation involves sand and a luminous surface on which the Animation is done. This method is used in cartoon anime styles or different shows. In this type of Animation, the sand is used to create 2D images. This type of Animation is used for storytelling in reality shows. Example:
09Motion Graphics
Motion design was invented in the year 1960. It is one of the most popular cartoon art styles used nowadays. This type of Animation creates promotional videos, game screensavers, commercial advertising videos, etc. It is one of the universal animation techniques used globally for various purposes. Example:
10Mechanical Animation
Mechanical Animation is mainly used in producing technical equipment. The most fantastic thing about this animation method is that you can make changes to a product that has not yet been developed. This kind of Animation is used with 3D Animation to show the working of machines in and out. It is done together with 3D Animation to clearly visualize the machine.
Part 2 Drawing Myself in 5 Different Cartoon Styles
You can draw yourself using these 5 different cartoon styles:
01You can use 3D filters on Snapchat to draw a Pixar-like picture of yourself
The steps are:
Step 1: Install and run the “Snapchat” app on your phone.
Step2: Open the app and turn on the camera.
Step 3: There is a smiling face symbol on the right side of the camera button, tap on that.
Step 4: Click on the explore menu and select the “Cartoon 3D Style” option.
Step 5: Capture your video
Step 6: Then your cartoon character-like video is ready.
02You can also use Instagram to create a Disney-like character of yourself
The steps are:
Step 1: Open your Instagram account.
Step 2: Click on the ‘+’ icon. Select the “Story” option.
Step 3: Different effects appear on the screen.
Step 4: Scroll the effects and find an icon of a magnifying glass.
Step 5: Click on that icon and type cartoon on the search bar.
Step 6: After your search is finished, different cartoon filters will appear on your screen.
Step 7: Tap on any one of the effects. The effect opens.
Step 8: Tap on the bookmark icon to save the cartoon effect.
Step 9: Now you can go back to the effects options to use the cartoon effect.
Your Disney-like cartoon picture is ready!
03You can use Google meet
Step 1: When you open the Google meet app, there are filters to use while on a call.
Step 2: Choose one of the filters that have a cartoon effect.
Step 3: When you join any meeting, you will appear like a cartoon character from TV.
04You can use B612
Step 1: Install and open the app on your phone.
Step 2: After you open the app, a circle button appears at the bottom of your screen in the middle.
Step 3: Tap on the circle.
Step 4: Numerous filters will appear.
Step 5: Choose one cartoon-like filter from the options of effect in the menu.
Step 6: After selecting one effect, make a video of yourself using an effect.
Step 7: Your cartoon video is ready on your screen.
05You can use Wondershare Filmora Video Editor
For Win 7 or later (64-bit)
For macOS 10.12 or later
Step 1: Capture a video of yourself using your phone’s camera.
Step 2: Install and open the Filmora app on your phone.
Step 3: After you open the app, you will be given the option to choose a video.
Step 4: Choose the video of yourself.
Step 5: After choosing your video, there is an option “click edit” tap on that.
Step 6: A menu appears; select the “effects” option from the menu.
Step 7: Different effects will appear on your screen.
Step 8: Select the cartoon effect you want to use in your video.
Step 9: After you have selected the effect, it will take some time to process.
Step 10: Your cartoon-like video is ready.
How You Can Develop a Cartoon Style for Animation
Anyone can develop new cartoon styles by following these simple procedures or habits. The procedures are:
● You can take references from real-life objects.
Most of the Animation we see here has been taken from real-life references, be it a cat, car, house, etc. So, to develop the cartoon styles, you can take references from real-life objects. You can also search for a particular characteristic in things you won’t use as your reference. If you want to draw a cat, you can use a living cat as your reference.
● You can copy and try to make Animation like your favorite animator.
If you use this method, this will help you improve your skill. No animation is 100% real, no matter what kind of Animation it is or who is creating it. However, you cannot keep on making animations like your favorite animator because you will not be able to find your anime art styles and skills.
● You can create an animated character of your own.
After taking your reference from real-life objects and knowing about the animation styles and the basic principles of Animation, you can create your animated character. If you create your character, keeping all the skills and techniques in mind, you can develop outstanding animation styles.
● To develop your cartoon style, you need to practice drawing regularly.
To get s grasp this whole process of Animation, you need to draw and practice different cartoon art styles. You can draw anything you like, or you don’t like on paper or on a drawing tablet. You can also color sketchbooks to improve your skills in Animation.
You can use Filmora to make cartoon videos and, at the same time, make cartoon videos of normally captured videos. These cartoon videos can be compiled into one video. You can use this video to edit different types of videos. Filmora has a user-friendly interface that can help you create your cartoon video effortlessly.
● Ending Thoughts →
● I hope you have understood the different types of anime cartoon styles by now.
● These methods can help you make the best for your next marketing project.
● These methods are easy, efficient, and efficient. All the aforementioned methods were discovered in the late nineteenth and early twentieth century.
● With the advancement of technology, the process has become more accessible. However, you can use any cartoon-style art.
How to Make a Video a Live Photo
How to Make a Video a Live Photo [2022]
An easy yet powerful editor
Numerous effects to choose from
Detailed tutorials provided by the official channel
Looking forward to turn your videos into live photos? Stay tuned to know how!
In this article
01 [How to Save Live Photos as a Video on iPhone/Ipad/Ipod](#Part 1)
02 [How to Turn a Video Into a Live Photo on iOS/Android](#Part 2)
Part 1 How to Save Live Photos as a Video on iPhone/Ipad/Ipod
Live photos are an amazing utility that allow you to save images as short moving snaps. Creating live photos is among the latest spunk of trendsetter stories, whether shared on social media platforms or created and saved just for fun, these definitely sound and look exciting, but that’s just one among the many things you can experiment on live photos.
Creating live photos takes you to a world of exciting features where you can explore your creativity in a number of ways, one of the easiest being turning live photos to videos. This comes handy when you need to share your live photos on platforms that do not have the compatibility to run live photos. If you are an iPhone user and wish to try your hands on experimenting with live photos, see through the following section of this article to learn how to turn live photo into video:
01Save as Video
Step 1: Launch the Photos App
In your iPhone, launch the ‘Photos’ app and navigate to ‘Albums’. All your live photos are present in the ‘Live Photos’ album.
Step 2: Format Selection
In latest versions (iOS 13v and above), you get a direct ‘Save as Video’ option in the ‘Photos’ application. Just click on that, and your live photo will be instantly saved in your iPhone gallery as a video. Here’s how you can use this feature:
● In the ‘Photos’ application, go to the ‘Live Photos’ album to select and open a desired live photo that you wish to convert to a video.
● Click on the ‘Share’ icon.

● Select ‘Save as Video’ from the drop down menu that displays sharing options.

Your created video will be saved in the ‘Photos’ application, next to the live photo you chose to turn into a video.
02iOS Shortcuts
This is a quicker way to save your live photos as videos in your iPhone. To use this feature, you first need to save the ‘Convert LivePhotos to Video’ shortcut in the ‘Shortcuts App’ gallery of your iPhone. You can do this by opening in your iOS internet browser.
Before using the above link, make sure to enable the ‘Allow Untrusted Shortcuts’ feature in your iPhone settings. You can do this as explained below:
● Reach to the ‘Settings’ application of your iPhone.
● Tap on ‘Shortcuts’ from the app’s welcome screen.
● Enable ‘Allow Untrusted Shortcuts’ with a toggle.

Having done that, here’s what you need to follow:
● Open the ‘Shortcuts’ application in your iOS device and tap the ‘Convert LivePhotos to Video’ shortcut.

● The ‘Live Photos’ album of your device opens up. Make a desired selection.

Your converted video gets automatically saved in the ‘Camera Roll’ folder of the ‘Photos’ application. Open the ‘Recents’ album to view your creation.
Part 2 How to Turn a Video Into a Live Photo on iOS/Android
Converting live photos to videos is fine, but going the other way round is all the more exciting and fun! You can even use these converted live photos as live screen wallpapers for your iOS and Android devices. If you are motivated to take up the excitement, look through the following methods to turn video into live photo:
01iOS Devices
Being an iOS user, you can choose among the following tools to convert video to live photo in your iPad, iPod or iPhone:
● Wondershare Filmora
Wondershare Filmora Video Editor is currently leading the software market among converter utilities that cater to various media conversion needs. This one is a free, smart, quick and convenient conversion tool that assures you of a hassle free video to live photo conversion in just a few clicks. What’s more interesting is, you don’t need to limit yourself with sticking to some particular video format, as Filmora conveniently supports almost all common ones.
Wondershare Filmora
Get started easily with Filmora’s powerful performance, intuitive interface, and countless effects!
Try It Free Try It Free Try It Free Learn More >

● IntoLive
This one is a third party application that allows you to convert videos into live photos, quickly and conveniently. This tool works well with devices having iOS 12.0 and later versions. All you have to do is follow the steps mentioned below:
Step 1:
Download the ‘IntoLive’ application from the Apple App Store.

Step 2:
Launch the same on your iOS device and grant the permission to access its ‘Photos’ Album.

Step 3:
In the ‘Videos’ section, choose the desired video that you wish to turn into a live photo.

Step 4:
An editor window will open up. Here, you can edit (cut, crop, trim, etc.) and add desired effects or filters to your selected video. Click on ‘Make’ at the top right when you finish the editing process.

Step 5:
If you have the paid version of the app, you can take up multiple repeats of your live photo; else you can use the free version with no repeats.

Step 6:
Once you are satisfied with the result, click on ‘Save Live Photo’. This will save your created live photo in your device’s gallery.

02VideoToLive
This is a free converter you can choose to turn video into live photo. This is a quite popular tool among iPhone users worldwide and is suitable for iOS versions 11.2 and later. You also have the liberty to share your created live photos on social media with this converter. Take the following steps to begin the conversion process:

Step 1:
Download the application from the Apple App Store and launch it on your iOS device.
Step 2:
Choose a video from your device gallery to convert it into a live photo.
Step 3:
In the video editor screen, crop the video to the preferred section that has to be converted into live photo. You can add video frames to your edited clip from the upper section of the editor screen.
Step 4:
Click on ‘Convert’ at the top right corner to initiate the conversion process.
03Android Devices
Live photos are undoubtedly known to add spark to your cherished moments, but the notch that puts these off with Android devices is that you can enjoy live photos on these devices only as live wallpapers.
Being an iPhone exclusive utility, Android devices lack the flexibility to capture live images. However, you can see them move on being set as live screen wallpapers. A handy alternative to this is converting a turn video into live photo and use it as live wallpaper. Here’s how you can take up the conversion process:
● TurnLive- Live Wallpaper
This one is a convenient, third party tool that lets you turn video into live photo in just a few quick steps. You can either use this application for free, or upgrade to the paid version to enjoy its premium features. To make amazing live photos from videos using this tool, you need to take up the steps given below:

Step 1: App Installation
To begin, visit the Google Playstore in your Android device and download the TurnLive- Live Wallpaper application. Next, you need install and launch the app in your device and accept its terms of service.
Step 2: Select a Video
Once you are done, click on the ‘Live Photo’ icon in the bottom of the app’s opening screen to reach the video selection page. Here, you need to choose ‘Video to Live Wallpaper’ option and grant the required app permissions to access your device’s camera and gallery. Select a desired video from the ones saved in your device and click ‘Done’ at the top right.
Step 3: Edit Your Video
You will now get directed to the app’s editor window, where you need to trim the selected video within a time frame of 1-5 seconds. To do this, select a cover frame within the clip and click ‘Next’. You can now use the video slider at the bottom to trim the clip. Adding suitable video effects and filters is also possible with this tool.
Step 4: It’s Almost Done!
When you finish editing, click ‘Next’ and choose the number of repeats for the created live photo. Wait for the conversion to finish and click on ‘My Wallpapers’ to view your creation.
Step 5: Download Your Live Photo!
Click ‘Download’ and tap ‘Clear’ in the app’s prompt message to remove your device’s current screen wallpaper. Next, allow the app to access your system settings. Once this finishes, tap ‘Clear’ again to download your creation. You will now get directed to a black screen tagged ‘DayTime LWP’. Click on ‘Set Wallpaper’ in this screen to make your live photo, the current wallpaper of your Android device.
● Video Live Wallpaper
This is another free app that you can use to your videos into amazing live photos in just 4 quick steps. All you need to do is explained in the following steps:
Step 1: download the Application
Download the Video Live Wallpaper application in your Android device from Google Playstore and proceed for its installation and launch.

Step 2: Select Your Video
In the app’s opening screen, click ‘Choose Video’ and grant app permissions to access your device’s media. Browse your video gallery to select a desired video that you wish to convert into a live photo.

Step 3: Edit Your Video
You will now get directed to the app’s editor screen. Here, you can explore your editing creativity to edit the selected video. Once you are happy, click the picture icon at the top right corner.

Step 4: Your Live Wallpaper is Ready!
To set the created live photo as your device screen wallpaper, select ‘Set as Wallpaper’ at the bottom right.

● Key Takeaways from This Episode →
● From cherishing moments to sharing them on social media, live photos can do it all.
● Being an iPhone exclusive utility, you need to create these from videos to enjoy them on other platforms and devices.
● Filmora is the best video to live photo converters, available as an easy, quick and convenient conversion tool.
Looking forward to turn your videos into live photos? Stay tuned to know how!
In this article
01 [How to Save Live Photos as a Video on iPhone/Ipad/Ipod](#Part 1)
02 [How to Turn a Video Into a Live Photo on iOS/Android](#Part 2)
Part 1 How to Save Live Photos as a Video on iPhone/Ipad/Ipod
Live photos are an amazing utility that allow you to save images as short moving snaps. Creating live photos is among the latest spunk of trendsetter stories, whether shared on social media platforms or created and saved just for fun, these definitely sound and look exciting, but that’s just one among the many things you can experiment on live photos.
Creating live photos takes you to a world of exciting features where you can explore your creativity in a number of ways, one of the easiest being turning live photos to videos. This comes handy when you need to share your live photos on platforms that do not have the compatibility to run live photos. If you are an iPhone user and wish to try your hands on experimenting with live photos, see through the following section of this article to learn how to turn live photo into video:
01Save as Video
Step 1: Launch the Photos App
In your iPhone, launch the ‘Photos’ app and navigate to ‘Albums’. All your live photos are present in the ‘Live Photos’ album.
Step 2: Format Selection
In latest versions (iOS 13v and above), you get a direct ‘Save as Video’ option in the ‘Photos’ application. Just click on that, and your live photo will be instantly saved in your iPhone gallery as a video. Here’s how you can use this feature:
● In the ‘Photos’ application, go to the ‘Live Photos’ album to select and open a desired live photo that you wish to convert to a video.
● Click on the ‘Share’ icon.
● Select ‘Save as Video’ from the drop down menu that displays sharing options.
Your created video will be saved in the ‘Photos’ application, next to the live photo you chose to turn into a video.
02iOS Shortcuts
This is a quicker way to save your live photos as videos in your iPhone. To use this feature, you first need to save the ‘Convert LivePhotos to Video’ shortcut in the ‘Shortcuts App’ gallery of your iPhone. You can do this by opening in your iOS internet browser.
Before using the above link, make sure to enable the ‘Allow Untrusted Shortcuts’ feature in your iPhone settings. You can do this as explained below:
● Reach to the ‘Settings’ application of your iPhone.
● Tap on ‘Shortcuts’ from the app’s welcome screen.
● Enable ‘Allow Untrusted Shortcuts’ with a toggle.
Having done that, here’s what you need to follow:
● Open the ‘Shortcuts’ application in your iOS device and tap the ‘Convert LivePhotos to Video’ shortcut.
● The ‘Live Photos’ album of your device opens up. Make a desired selection.
Your converted video gets automatically saved in the ‘Camera Roll’ folder of the ‘Photos’ application. Open the ‘Recents’ album to view your creation.
Part 2 How to Turn a Video Into a Live Photo on iOS/Android
Converting live photos to videos is fine, but going the other way round is all the more exciting and fun! You can even use these converted live photos as live screen wallpapers for your iOS and Android devices. If you are motivated to take up the excitement, look through the following methods to turn video into live photo:
01iOS Devices
Being an iOS user, you can choose among the following tools to convert video to live photo in your iPad, iPod or iPhone:
● Wondershare Filmora
Wondershare Filmora Video Editor is currently leading the software market among converter utilities that cater to various media conversion needs. This one is a free, smart, quick and convenient conversion tool that assures you of a hassle free video to live photo conversion in just a few clicks. What’s more interesting is, you don’t need to limit yourself with sticking to some particular video format, as Filmora conveniently supports almost all common ones.
Wondershare Filmora
Get started easily with Filmora’s powerful performance, intuitive interface, and countless effects!
Try It Free Try It Free Try It Free Learn More >
● IntoLive
This one is a third party application that allows you to convert videos into live photos, quickly and conveniently. This tool works well with devices having iOS 12.0 and later versions. All you have to do is follow the steps mentioned below:
Step 1:
Download the ‘IntoLive’ application from the Apple App Store.
Step 2:
Launch the same on your iOS device and grant the permission to access its ‘Photos’ Album.
Step 3:
In the ‘Videos’ section, choose the desired video that you wish to turn into a live photo.
Step 4:
An editor window will open up. Here, you can edit (cut, crop, trim, etc.) and add desired effects or filters to your selected video. Click on ‘Make’ at the top right when you finish the editing process.
Step 5:
If you have the paid version of the app, you can take up multiple repeats of your live photo; else you can use the free version with no repeats.
Step 6:
Once you are satisfied with the result, click on ‘Save Live Photo’. This will save your created live photo in your device’s gallery.
02VideoToLive
This is a free converter you can choose to turn video into live photo. This is a quite popular tool among iPhone users worldwide and is suitable for iOS versions 11.2 and later. You also have the liberty to share your created live photos on social media with this converter. Take the following steps to begin the conversion process:
Step 1:
Download the application from the Apple App Store and launch it on your iOS device.
Step 2:
Choose a video from your device gallery to convert it into a live photo.
Step 3:
In the video editor screen, crop the video to the preferred section that has to be converted into live photo. You can add video frames to your edited clip from the upper section of the editor screen.
Step 4:
Click on ‘Convert’ at the top right corner to initiate the conversion process.
03Android Devices
Live photos are undoubtedly known to add spark to your cherished moments, but the notch that puts these off with Android devices is that you can enjoy live photos on these devices only as live wallpapers.
Being an iPhone exclusive utility, Android devices lack the flexibility to capture live images. However, you can see them move on being set as live screen wallpapers. A handy alternative to this is converting a turn video into live photo and use it as live wallpaper. Here’s how you can take up the conversion process:
● TurnLive- Live Wallpaper
This one is a convenient, third party tool that lets you turn video into live photo in just a few quick steps. You can either use this application for free, or upgrade to the paid version to enjoy its premium features. To make amazing live photos from videos using this tool, you need to take up the steps given below:
Step 1: App Installation
To begin, visit the Google Playstore in your Android device and download the TurnLive- Live Wallpaper application. Next, you need install and launch the app in your device and accept its terms of service.
Step 2: Select a Video
Once you are done, click on the ‘Live Photo’ icon in the bottom of the app’s opening screen to reach the video selection page. Here, you need to choose ‘Video to Live Wallpaper’ option and grant the required app permissions to access your device’s camera and gallery. Select a desired video from the ones saved in your device and click ‘Done’ at the top right.
Step 3: Edit Your Video
You will now get directed to the app’s editor window, where you need to trim the selected video within a time frame of 1-5 seconds. To do this, select a cover frame within the clip and click ‘Next’. You can now use the video slider at the bottom to trim the clip. Adding suitable video effects and filters is also possible with this tool.
Step 4: It’s Almost Done!
When you finish editing, click ‘Next’ and choose the number of repeats for the created live photo. Wait for the conversion to finish and click on ‘My Wallpapers’ to view your creation.
Step 5: Download Your Live Photo!
Click ‘Download’ and tap ‘Clear’ in the app’s prompt message to remove your device’s current screen wallpaper. Next, allow the app to access your system settings. Once this finishes, tap ‘Clear’ again to download your creation. You will now get directed to a black screen tagged ‘DayTime LWP’. Click on ‘Set Wallpaper’ in this screen to make your live photo, the current wallpaper of your Android device.
● Video Live Wallpaper
This is another free app that you can use to your videos into amazing live photos in just 4 quick steps. All you need to do is explained in the following steps:
Step 1: download the Application
Download the Video Live Wallpaper application in your Android device from Google Playstore and proceed for its installation and launch.
Step 2: Select Your Video
In the app’s opening screen, click ‘Choose Video’ and grant app permissions to access your device’s media. Browse your video gallery to select a desired video that you wish to convert into a live photo.
Step 3: Edit Your Video
You will now get directed to the app’s editor screen. Here, you can explore your editing creativity to edit the selected video. Once you are happy, click the picture icon at the top right corner.
Step 4: Your Live Wallpaper is Ready!
To set the created live photo as your device screen wallpaper, select ‘Set as Wallpaper’ at the bottom right.
● Key Takeaways from This Episode →
● From cherishing moments to sharing them on social media, live photos can do it all.
● Being an iPhone exclusive utility, you need to create these from videos to enjoy them on other platforms and devices.
● Filmora is the best video to live photo converters, available as an easy, quick and convenient conversion tool.
Learn Disney Cartoon Drawing to See More Disney Magic Moments
Learn Disney Cartoon Drawing to See More Disney Magic Moments
An easy yet powerful editor
Numerous effects to choose from
Detailed tutorials provided by the official channel
How to Draw a Disney Caricature

Disney-Inspired Ipad Drawing Class for Beginners
In this article
01 [How to Draw a Disney Caricature](#Part 1)
02 [Disney-Inspired Ipad Drawing Class for Beginners](#Part 2)
Part 1 How to Draw a Disney Caricature
Below is the step-by-step guide to making a Disney cartoon drawing with colors from the comfort of your home:
01How to Draw Mickey

Unarguably, Mickey Mouse is one of the most famous anime characters globally. This character was created in 1928 and is a famous Disney cartoon drawing by animators. Here are straightforward steps to help you draw a Mickey Mouse:
Step 1: Sketch the general but carefully observed features of Mickey Mouse, including the position of ears, body shape (reverse C shape), body proportions including eyes, limbs, and arms, length of arms, button on his pants, and angle on the hands.
Step 2: Take your pencil and paper, and using gentle and weak strokes, make a simple sketch of the head, neck, belly, and limbs.

Step 3: Draw contours of the mouth, ears, and nose.

Step 4: Specify the face features like a smiling opened mouth, tip of the nose, and eyes.

Step 5: Draw the hands carefully, observing the length of both arms and their proportion to the size of the character’s head.

Step 6: Sketch the outline contours of the shoes, the legs, and the pants.

Step 7: Sketch the final outline contour of the body, then erase excess lines where necessary. Add the two buttons on Mickey mouse pants.

Step 8: Draw his nose’s tail, tongue, and ellipse.

Step 9: First, use a 2B or 4B or any soft black color pencil to color the black parts.

Step 10: Depending on your preference, you can color with water, acrylic paints, or pastels.

02How to Draw Captain America
Follow these simple steps to make a Disney cartoon drawing of Captain America:
Step 1: Draw the head and chest
Draw the outlines of his masked face using smooth lines. Draw a curved line across his face to divide his face from his mask. Draw a large letter A and add tiny wings beside it on his forehead. Draw his mouth, eyes, and nose. Use curved lines to indicate his shoulder and chest, then draw a star on his chest.

Step 2: Draw his arm and waist
Draw a curved line on the shoulder to represent the bicep, then draw his gloved arm curled to form a fist. Draw curved lines beneath the chest to represent his muscular weight, then draw the pouches on his belt and use more curved lines to draw his waist.

Step 3: Draw his legs
Here, we shall portray Captain America in action. Use curved lines to show his extended right leg with boots. The left leg should appear more petite.

Step 4: Draw his shield
Against his right arm, carefully draw a flattened circular shape. You can achieve this by drawing concentric circles with a large star in the middle. Draw his arm poking out from behind his shield.

Step 5: Include the final details
Add some vertical lines across his waist and some details on his boots.

Step 6: Colour Captain America
Using colors of the American flag, color your drawing with red, white, and blue colors.

03How to Draw Stitch
Stitch is a bulletproof and fireproof alien from the Lilo and Stitch animations. Here’s how you can draw Stitch:
Step 1: Draw a circle that would form Stitch’s head

Step 2: Using a long curved line, draw an irregular peanut shape beneath the head to represent its body.

Step 3: To form its light underbelly, enclose a small shape parallel to the outline of Stitch’s body using a long curved line. On the chest region, draw a series of small “V” shapes to indicate the presence of fur.

Step 4: Draw Stitch’s arm using curved lines for the upper arm and another pair for the lower arm. Draw his bent hands and fingers using short lines. At the tip of its fingers, draw small pointed triangles to represent its claws.

Step 5: Erase the guidelines from Stitch’s arm

Step 6: Draw Stitch’s outstretched arm using a pair of curved lines and small “C” shaped lines to represent the fingers. Use short lines to connect the fingers. Draw small “V” shapes at the tip of the fingers for the triangular claws.

Step 7: Use a pair of curved lines to sketch each leg, then enclose the toes using C-shaped lines

Step 8: Sketch the ears using long curved lines to indicate the base and folds. Sketch the fur on top of Stitch’s head using a series of curved lines.

Step 9: Draw a big circle for the nose and use curved lines to indicate the nostrils. For the eyes, draw irregular rounded shapes, one within the other. Sketch too long curved lines to show the mouth and small blonde triangles for the teeth. Above the eyes and nose, draw curved lines.

Step 10: Use different shades of blue to colour Stitch.

Part 2 Disney-Inspired Ipad Drawing Class for Beginner
Here is a list of classes for beginners interested in drawing Disney characters.
01Dive into the world of Animation with a Disney-Inspired Ipad Drawing Course

This Disney-inspired lesson focuses on real-life scenarios that are beautiful and adorable. Create your everyday settings by sketching backgrounds and outfitting figures.
It will assist you in developing a straightforward approach to drawing cartoon characters through experimentation and time. Follow along and sketch characters, then make your new character.
02Drawing Faces: A Beginner‘s Guide

Ira Marcks, a graphic novelist, will teach you everything you need to know about drawing faces. Are you completely new when it comes to drawing? No worries; follow along with Ira’s bite-sized lectures, and you’ll be ready to delve into a class project by the end of the course.
Do you prefer to set your speed and work at it? If yes, then extend your learning beyond the classroom, download Ira’s Drawing Faces Book.
03Disney Inspired Drawings: Faces and Expressions

Learners will look at sketching a cartoon image of themselves or people they know while exploring the specific traits of Disney-style characters in this one-time live drawing lesson.
Learners will collaborate with the teacher while working on their art projects. This is a technique class, so the focus will be on the process and working towards a finished goal. Nevertheless, a piece may get completed outside of class.
This program is for students who have a basic understanding of drawing and proportion, are open to artistic growth, and are comfortable appearing on camera and sharing their work in a small group setting. All to help each other, and the classroom environment will support all students.
04Free Art Lessons By The Parks’ Imagineers
This lesson will teach how to create your theme park, design virtual landscapes, and even sketch unique costumes!
You’ll also learn how to draw characters from Frozen 2 like Anna and Elsa and classics like Mickey Mouse, Daisy Duck, Pluto, and others.
Your class experience can be enjoyable when using an easy-to-use tool like Wondershare Filmora.
Wondershare Filmora Video Editor is a robust and easy-to-use video editor for users of all skill levels, from beginner to advanced. Its advanced tools, adjustable keyframing, smoothing effects, and motion blur will considerably assist you in creating a high-quality animation video. Furthermore, the auto color correction and audio mixing will elevate your 2D animation film to new heights. Filmora is the best solution if you want more productivity, control, and customization options for your Disney cartoon drawings and animation.
For Win 7 or later (64-bit)
For macOS 10.12 or later
● Ending Thoughts →
● How to make a Disney cartoon drawing
● A step-by-step guide to drawing your favorite Disney cartoon drawing with colors
● How to use Filmora to create animations
● Different Disney-inspired beginner classes for iPad users.
How to Draw a Disney Caricature
Disney-Inspired Ipad Drawing Class for Beginners
In this article
01 [How to Draw a Disney Caricature](#Part 1)
02 [Disney-Inspired Ipad Drawing Class for Beginners](#Part 2)
Part 1 How to Draw a Disney Caricature
Below is the step-by-step guide to making a Disney cartoon drawing with colors from the comfort of your home:
01How to Draw Mickey
Unarguably, Mickey Mouse is one of the most famous anime characters globally. This character was created in 1928 and is a famous Disney cartoon drawing by animators. Here are straightforward steps to help you draw a Mickey Mouse:
Step 1: Sketch the general but carefully observed features of Mickey Mouse, including the position of ears, body shape (reverse C shape), body proportions including eyes, limbs, and arms, length of arms, button on his pants, and angle on the hands.
Step 2: Take your pencil and paper, and using gentle and weak strokes, make a simple sketch of the head, neck, belly, and limbs.
Step 3: Draw contours of the mouth, ears, and nose.
Step 4: Specify the face features like a smiling opened mouth, tip of the nose, and eyes.
Step 5: Draw the hands carefully, observing the length of both arms and their proportion to the size of the character’s head.
Step 6: Sketch the outline contours of the shoes, the legs, and the pants.
Step 7: Sketch the final outline contour of the body, then erase excess lines where necessary. Add the two buttons on Mickey mouse pants.
Step 8: Draw his nose’s tail, tongue, and ellipse.
Step 9: First, use a 2B or 4B or any soft black color pencil to color the black parts.
Step 10: Depending on your preference, you can color with water, acrylic paints, or pastels.
02How to Draw Captain America
Follow these simple steps to make a Disney cartoon drawing of Captain America:
Step 1: Draw the head and chest
Draw the outlines of his masked face using smooth lines. Draw a curved line across his face to divide his face from his mask. Draw a large letter A and add tiny wings beside it on his forehead. Draw his mouth, eyes, and nose. Use curved lines to indicate his shoulder and chest, then draw a star on his chest.
Step 2: Draw his arm and waist
Draw a curved line on the shoulder to represent the bicep, then draw his gloved arm curled to form a fist. Draw curved lines beneath the chest to represent his muscular weight, then draw the pouches on his belt and use more curved lines to draw his waist.
Step 3: Draw his legs
Here, we shall portray Captain America in action. Use curved lines to show his extended right leg with boots. The left leg should appear more petite.
Step 4: Draw his shield
Against his right arm, carefully draw a flattened circular shape. You can achieve this by drawing concentric circles with a large star in the middle. Draw his arm poking out from behind his shield.
Step 5: Include the final details
Add some vertical lines across his waist and some details on his boots.
Step 6: Colour Captain America
Using colors of the American flag, color your drawing with red, white, and blue colors.
03How to Draw Stitch
Stitch is a bulletproof and fireproof alien from the Lilo and Stitch animations. Here’s how you can draw Stitch:
Step 1: Draw a circle that would form Stitch’s head
Step 2: Using a long curved line, draw an irregular peanut shape beneath the head to represent its body.
Step 3: To form its light underbelly, enclose a small shape parallel to the outline of Stitch’s body using a long curved line. On the chest region, draw a series of small “V” shapes to indicate the presence of fur.
Step 4: Draw Stitch’s arm using curved lines for the upper arm and another pair for the lower arm. Draw his bent hands and fingers using short lines. At the tip of its fingers, draw small pointed triangles to represent its claws.
Step 5: Erase the guidelines from Stitch’s arm
Step 6: Draw Stitch’s outstretched arm using a pair of curved lines and small “C” shaped lines to represent the fingers. Use short lines to connect the fingers. Draw small “V” shapes at the tip of the fingers for the triangular claws.
Step 7: Use a pair of curved lines to sketch each leg, then enclose the toes using C-shaped lines
Step 8: Sketch the ears using long curved lines to indicate the base and folds. Sketch the fur on top of Stitch’s head using a series of curved lines.
Step 9: Draw a big circle for the nose and use curved lines to indicate the nostrils. For the eyes, draw irregular rounded shapes, one within the other. Sketch too long curved lines to show the mouth and small blonde triangles for the teeth. Above the eyes and nose, draw curved lines.
Step 10: Use different shades of blue to colour Stitch.
Part 2 Disney-Inspired Ipad Drawing Class for Beginner
Here is a list of classes for beginners interested in drawing Disney characters.
01Dive into the world of Animation with a Disney-Inspired Ipad Drawing Course
This Disney-inspired lesson focuses on real-life scenarios that are beautiful and adorable. Create your everyday settings by sketching backgrounds and outfitting figures.
It will assist you in developing a straightforward approach to drawing cartoon characters through experimentation and time. Follow along and sketch characters, then make your new character.
02Drawing Faces: A Beginner‘s Guide
Ira Marcks, a graphic novelist, will teach you everything you need to know about drawing faces. Are you completely new when it comes to drawing? No worries; follow along with Ira’s bite-sized lectures, and you’ll be ready to delve into a class project by the end of the course.
Do you prefer to set your speed and work at it? If yes, then extend your learning beyond the classroom, download Ira’s Drawing Faces Book.
03Disney Inspired Drawings: Faces and Expressions
Learners will look at sketching a cartoon image of themselves or people they know while exploring the specific traits of Disney-style characters in this one-time live drawing lesson.
Learners will collaborate with the teacher while working on their art projects. This is a technique class, so the focus will be on the process and working towards a finished goal. Nevertheless, a piece may get completed outside of class.
This program is for students who have a basic understanding of drawing and proportion, are open to artistic growth, and are comfortable appearing on camera and sharing their work in a small group setting. All to help each other, and the classroom environment will support all students.
04Free Art Lessons By The Parks’ Imagineers
This lesson will teach how to create your theme park, design virtual landscapes, and even sketch unique costumes!
You’ll also learn how to draw characters from Frozen 2 like Anna and Elsa and classics like Mickey Mouse, Daisy Duck, Pluto, and others.
Your class experience can be enjoyable when using an easy-to-use tool like Wondershare Filmora.
Wondershare Filmora Video Editor is a robust and easy-to-use video editor for users of all skill levels, from beginner to advanced. Its advanced tools, adjustable keyframing, smoothing effects, and motion blur will considerably assist you in creating a high-quality animation video. Furthermore, the auto color correction and audio mixing will elevate your 2D animation film to new heights. Filmora is the best solution if you want more productivity, control, and customization options for your Disney cartoon drawings and animation.
For Win 7 or later (64-bit)
For macOS 10.12 or later
● Ending Thoughts →
● How to make a Disney cartoon drawing
● A step-by-step guide to drawing your favorite Disney cartoon drawing with colors
● How to use Filmora to create animations
● Different Disney-inspired beginner classes for iPad users.
Best 10 Animated Photo Collage Apps
Versatile Video Editor - Wondershare Filmora
An easy yet powerful editor
Numerous effects to choose from
Detailed tutorials provided by the official channel
What if you wish to animate images, adding movement to stationary objects in time? Well, there are apps for these purposes!
Videos and GIFs are a mainstay of social media. These days it’s rare to see a still photo online. The simplicity with which you can add filter and movement effects to your images has identified a proliferation of these online animated photos.
So what if you wish to apply animation to a still image? There are many apps for such purposes. Given below is a selection of the best apps you can use to animate images on both Android and iPhone devices with the help of animated photo collage apps.
In this article
01 [Top 10 Animated Photo Collage Apps ](#Part 1)
02 [Wondershare Filmora: The Advanced Editing App of 2022!](#Part 2)
Part 1 Top 10 Animated Photo Collage Apps
We’ve compiled an index of the top 10 animated collage apps compatible with photo enthusiasts and photographers at every level of expertise. Most of these amazing apps are available for both iOS and Android, so there are numerous options no matter what device you’re using.
Before showcasing your collage-making skills, gather the perfect images from your last photography project.
1. GIPHY
The GIPHY is the mega search engine for all things related to GIFs.
Here, you can easily upload and find reaction memes for anything under the sun; GIPHY is also available with a mobile app. It also helps you to frame your GIFs and animate photos. Then, you can upload them by using the inbuilt animation tools on the platform.
It consists of a sticker maker (available for iPhone X and later), and you can also add captions to your animated images or shoot your short videos.
2. Motionleap
Motionleap is also an ideal animated photo collage app, and for a good reason. This app is highly reviewed, with 250,000 plus ratings of five stars in the Play Store.
Motionleap is a free animated photo collage app, although there’s a subscription and Pro version, too. Also, it doesn’t put a watermark over your image when you download it to your phone.
The app’s primary goal is animating still images and converting them into short, concise, and looping videos. Programming directional cues can easily do it into your image by dragging your thumb across the screen.
You can also freeze certain image sections and apply filters on top of your picture to frame an atmosphere within your image.
Unluckily, Motionleap saves your animated still photos in video format unless you’ve paid for a Pro account.
3. Movepic

Movepic is almost similar to Motionleap in that it animates images, but you can make a massive chunk of this animation with its inbuilt filters and overlays.
The only limitation is that you wouldn’t be able to remove the watermark without updating it to a VIP account. Movepic also saves your pictures automatically as a movie file than within a GIFformat.
4. ImgPlay
ImgPlay is another ideal animated collage maker app you can use to animate images. It creates ready-to-use animated images for the web and consists of easy-to-understand yet advanced controls. Unfortunately, it also adds a watermark on your image—one that you can’t remove unless you update to a complete account.
The process of making animated images online and GIFs can be in a couple of different ways within ImgPlay itself. You can use still photographs side-by-side, use burst images, or even videos.
5. Zoetropic
If you wish to animate your photo within a few minutes only, Zoetropic is for you. Though its functions aren’t as extensive as other apps we’ve mentioned, it does the job pretty well.
To get started, you choose your images and then select motion points. Next, you mask or stabilize the areas you want to keep still. Finally, you choose your overlays and animations. You can also change colors and add tags.
On the downside, it has limited the number of effects you can access on a free account. However, you might find what you’re considering if you are looking for a prompt manner to animate a photo online.
6. StoryZ
Despite its unattractive user interface, StoryZ is one of the useful apps on this list. It works excellent with still photographs to animate them effectively via various programmed paths of movements, overlays, and color filters—a lot of which are free and unique. It also automatically saves your files as GIFs.
One of the most incredible things about StoryZ is cutting the watermark from your image if you preview a quick ad before saving the file.
7. Lumyer
Lumyer is one of the useful animated photo collage apps on our list, which lets you add hundreds and thousands of effects to your pictures to animate them. So whether you wish to include sparkle or subtle weather effects, seasonal animations for Christmas and Halloween, or all-out scene transformations like appearing on a rollercoaster, Lumyer can do it.
If you’re okay with the watermark, Lumyer is a good choice, but otherwise, you may prefer one of our other recommended photo animation college apps.
8. VIMAGE 3D
VIMAGE got recognized with Google Play award in 2018. It can make some pretty good-looking animated photos in just a few clicks. There’s a wide variety of animations, filters, and sounds to select among a bundle of options.
You don’t even need to select the object because VIMAGE detects and replaces it for you quite automatically.
Similar to these apps, you do need to pay to remove the watermark, get access to the full effects library, and you can export your photos online in up to 2560p resolution.
9. Photo Bender
Photo Bender is an Android-specific animated photo collage app that helps you warp to animate photos digitally by coloring your image by stretching it, bending it, and using brushes. You can then export your transformed images as GIFs, JPEGs, MP4s, and PNGs.
While this app doesn’t contain ratings like others on this list, it is highly rated, so it’s still worth a look.
10. Werble
The primary purpose of Werble is to animate your images, and while the basic account is free, in-app purchases are also available. Most of Werble’s animations come through different filter effects that you can add on top of your images.
A downside to Werble is that it saves these images entirely automatically as GIFs, so they’re ready to use online. The limitation? However, you need to pay to cut the watermark that they place on your image. That watermark is huge enough to be disturbing.
Part 2 Wondershare Filmora: The Advanced Editing App of 2022
If you are tired of considering various animated photo collage apps, here is a section to introduce you to the best alternative with a reliable yet powerful video editor.
Filmora : This platform comes entirely loaded with advanced social integration options and editing functions. You can enjoy premium preloaded video editing services on your mobile devices with this tool. For video customization requirements, you can imply multiple caption options, title editing facilities, and advanced animation effects.
Filmora Features
- Filmora is available for both Android as well as iOS devices without any login.
- Filmora assists users in importing camera roll, Instagram, Google Plus, and Facebook collections with simplicity.
- This software tool contains different advanced features and highlights the missing components of the above-listed animated collage maker apps.
- You can add watermarks to all created videos.
- Above all, now share videos directly shared via Instagram, Facebook, WhatsApp, Email, Vimeo, YouTube, etc.
This advanced editing tool, Wondershare Filmora, can efficiently serve all your requirements. The good part is that it syncs well with iOS and Android devices so that you can access it anywhere with simplicity.
Also, Filmora provides is compatible with 4K videos, which is the most outstanding merit for developing informative video sessions and tutorials. Its ability to work offline with principal functions will simplify your editing tasks even when the internet connection is still an issue.
Wondershare Filmora
Get started easily with Filmora’s powerful performance, intuitive interface, and countless effects!
Try It Free Try It Free Try It Free Learn More >
AI Portrait – The best feature of Wondershare Filmora for gameplay editing
The AI Portrait is a new add-on in Wondershare Filmora. It can easily remove video backgrounds without using a green screen or chroma key, allowing you to add borders, glitch effects, pixelated, noise, or segmentation video effects.

Conclusion
Now that we’ve run through some great animated photo collage apps that can enliven your images, you can choose the ones you’re wandering to try out. They all follow roughly a similar concept, so you should select the ones you think will work best for such needs.
Gone are the days when you had to necessarily use a robust desktop computer to edit your videos and images. You can go forward to efficiently perform the same operation all from your smartphone with significant effects by using the Wondershare Filmora.
What if you wish to animate images, adding movement to stationary objects in time? Well, there are apps for these purposes!
Videos and GIFs are a mainstay of social media. These days it’s rare to see a still photo online. The simplicity with which you can add filter and movement effects to your images has identified a proliferation of these online animated photos.
So what if you wish to apply animation to a still image? There are many apps for such purposes. Given below is a selection of the best apps you can use to animate images on both Android and iPhone devices with the help of animated photo collage apps.
In this article
01 [Top 10 Animated Photo Collage Apps ](#Part 1)
02 [Wondershare Filmora: The Advanced Editing App of 2022!](#Part 2)
Part 1 Top 10 Animated Photo Collage Apps
We’ve compiled an index of the top 10 animated collage apps compatible with photo enthusiasts and photographers at every level of expertise. Most of these amazing apps are available for both iOS and Android, so there are numerous options no matter what device you’re using.
Before showcasing your collage-making skills, gather the perfect images from your last photography project.
1. GIPHY
The GIPHY is the mega search engine for all things related to GIFs.
Here, you can easily upload and find reaction memes for anything under the sun; GIPHY is also available with a mobile app. It also helps you to frame your GIFs and animate photos. Then, you can upload them by using the inbuilt animation tools on the platform.
It consists of a sticker maker (available for iPhone X and later), and you can also add captions to your animated images or shoot your short videos.
2. Motionleap
Motionleap is also an ideal animated photo collage app, and for a good reason. This app is highly reviewed, with 250,000 plus ratings of five stars in the Play Store.
Motionleap is a free animated photo collage app, although there’s a subscription and Pro version, too. Also, it doesn’t put a watermark over your image when you download it to your phone.
The app’s primary goal is animating still images and converting them into short, concise, and looping videos. Programming directional cues can easily do it into your image by dragging your thumb across the screen.
You can also freeze certain image sections and apply filters on top of your picture to frame an atmosphere within your image.
Unluckily, Motionleap saves your animated still photos in video format unless you’ve paid for a Pro account.
3. Movepic
Movepic is almost similar to Motionleap in that it animates images, but you can make a massive chunk of this animation with its inbuilt filters and overlays.
The only limitation is that you wouldn’t be able to remove the watermark without updating it to a VIP account. Movepic also saves your pictures automatically as a movie file than within a GIFformat.
4. ImgPlay
ImgPlay is another ideal animated collage maker app you can use to animate images. It creates ready-to-use animated images for the web and consists of easy-to-understand yet advanced controls. Unfortunately, it also adds a watermark on your image—one that you can’t remove unless you update to a complete account.
The process of making animated images online and GIFs can be in a couple of different ways within ImgPlay itself. You can use still photographs side-by-side, use burst images, or even videos.
5. Zoetropic
If you wish to animate your photo within a few minutes only, Zoetropic is for you. Though its functions aren’t as extensive as other apps we’ve mentioned, it does the job pretty well.
To get started, you choose your images and then select motion points. Next, you mask or stabilize the areas you want to keep still. Finally, you choose your overlays and animations. You can also change colors and add tags.
On the downside, it has limited the number of effects you can access on a free account. However, you might find what you’re considering if you are looking for a prompt manner to animate a photo online.
6. StoryZ
Despite its unattractive user interface, StoryZ is one of the useful apps on this list. It works excellent with still photographs to animate them effectively via various programmed paths of movements, overlays, and color filters—a lot of which are free and unique. It also automatically saves your files as GIFs.
One of the most incredible things about StoryZ is cutting the watermark from your image if you preview a quick ad before saving the file.
7. Lumyer
Lumyer is one of the useful animated photo collage apps on our list, which lets you add hundreds and thousands of effects to your pictures to animate them. So whether you wish to include sparkle or subtle weather effects, seasonal animations for Christmas and Halloween, or all-out scene transformations like appearing on a rollercoaster, Lumyer can do it.
If you’re okay with the watermark, Lumyer is a good choice, but otherwise, you may prefer one of our other recommended photo animation college apps.
8. VIMAGE 3D
VIMAGE got recognized with Google Play award in 2018. It can make some pretty good-looking animated photos in just a few clicks. There’s a wide variety of animations, filters, and sounds to select among a bundle of options.
You don’t even need to select the object because VIMAGE detects and replaces it for you quite automatically.
Similar to these apps, you do need to pay to remove the watermark, get access to the full effects library, and you can export your photos online in up to 2560p resolution.
9. Photo Bender
Photo Bender is an Android-specific animated photo collage app that helps you warp to animate photos digitally by coloring your image by stretching it, bending it, and using brushes. You can then export your transformed images as GIFs, JPEGs, MP4s, and PNGs.
While this app doesn’t contain ratings like others on this list, it is highly rated, so it’s still worth a look.
10. Werble
The primary purpose of Werble is to animate your images, and while the basic account is free, in-app purchases are also available. Most of Werble’s animations come through different filter effects that you can add on top of your images.
A downside to Werble is that it saves these images entirely automatically as GIFs, so they’re ready to use online. The limitation? However, you need to pay to cut the watermark that they place on your image. That watermark is huge enough to be disturbing.
Part 2 Wondershare Filmora: The Advanced Editing App of 2022
If you are tired of considering various animated photo collage apps, here is a section to introduce you to the best alternative with a reliable yet powerful video editor.
Filmora : This platform comes entirely loaded with advanced social integration options and editing functions. You can enjoy premium preloaded video editing services on your mobile devices with this tool. For video customization requirements, you can imply multiple caption options, title editing facilities, and advanced animation effects.
Filmora Features
- Filmora is available for both Android as well as iOS devices without any login.
- Filmora assists users in importing camera roll, Instagram, Google Plus, and Facebook collections with simplicity.
- This software tool contains different advanced features and highlights the missing components of the above-listed animated collage maker apps.
- You can add watermarks to all created videos.
- Above all, now share videos directly shared via Instagram, Facebook, WhatsApp, Email, Vimeo, YouTube, etc.
This advanced editing tool, Wondershare Filmora, can efficiently serve all your requirements. The good part is that it syncs well with iOS and Android devices so that you can access it anywhere with simplicity.
Also, Filmora provides is compatible with 4K videos, which is the most outstanding merit for developing informative video sessions and tutorials. Its ability to work offline with principal functions will simplify your editing tasks even when the internet connection is still an issue.
Wondershare Filmora
Get started easily with Filmora’s powerful performance, intuitive interface, and countless effects!
Try It Free Try It Free Try It Free Learn More >
AI Portrait – The best feature of Wondershare Filmora for gameplay editing
The AI Portrait is a new add-on in Wondershare Filmora. It can easily remove video backgrounds without using a green screen or chroma key, allowing you to add borders, glitch effects, pixelated, noise, or segmentation video effects.
Conclusion
Now that we’ve run through some great animated photo collage apps that can enliven your images, you can choose the ones you’re wandering to try out. They all follow roughly a similar concept, so you should select the ones you think will work best for such needs.
Gone are the days when you had to necessarily use a robust desktop computer to edit your videos and images. You can go forward to efficiently perform the same operation all from your smartphone with significant effects by using the Wondershare Filmora.
Best 12 2D Animation Studios All Should Check Out
Top 12 2D Animation Studios All Should Check Out
An easy yet powerful editor
Numerous effects to choose from
Detailed tutorials provided by the official channel
Now, when it comes to video marketing, the majority of businesses prefer choosing 2D animations. The reason being 2D animations have a lower production cost and they still offer complete liberty over creativity. However, it’s worth noting that editing a visually engaging 2D animation requires expertise.
That’s why it’s always an ideal solution to hire a dedicated 2D animation company. Such organizations have experienced video editors who specialize in 2D video editing and can craft the perfect 2D animation for your brand. In this article, we are going to walk you through a list of the top 12 2D animation studios you can hire to launch an enticing marketing video for your business.
In this article
01 [What is a 2D Animation Video and How Much Does a 2D Animation Video Cost?](#Part 1)
02 [How Much Time Does It Take to Create a 2D Animation Video?](#Part 2)
03 [What Are the Best Company for Creating 2D Animation Video?](#Part 3)
Part 1 What is a 2D Animation Video and How Much Does a 2D Animation Video Cost?
First things first; what is a 2D animation and why is it necessary to hire a 2D animation company? In layman’s terms, a 2D animation is a video where the movements are represented in two-dimensional space. The subjects in the video can either move forward or backward, but they can’t be allowed to move in a third dimension (depth).
Now, even though there are tools you can use to edit a 2D animation on your own, the process is time-consuming and requires certain expertise. And, since the primary objective of creating a 2D animation video is to engage potential customers, it’s always necessary to be super creative with the editing approach. This is the reason why the majority of brands hire professional 2D animation studios for the job.
The cost to create a 2D animation video can range anywhere between $1,000 to $10,000. It all depends on the length of the video, the production company you hire, and the quality you are looking for. But, it’s also worth noting that high pricing does not always mean superior quality as well. You’ll have to be extra cautious while picking through the best 2D animation studios.
Part 2 How Much Time Does It Take to Create a 2D Animation Video?
Due to their immense popularity in the marketing world, many business owners and marketers want to know how much time it takes to create a 2D animation video. Well, the answer is - it depends. If you have hired a team of professional editors or a dedicated 2D animation company, you’ll get your animated video within a week. However, if you try to follow the DIY approach and don’t know where to get started, it can even take up to 3-4 weeks for the video to complete.
Part 3 What Are the Best Company for Creating 2D Animation Video?
Now that you know the cost and time it takes to create a 2D animation video, let’s dive into the list of the most popular 2D animation studios you can hire for the next project. We have listed these companies on the basis of their customer reviews and pricing so that you can make the right decision easily.
01Explain Ninja
Minimum Project Size: $5,000
Team Size: 100-300
Location: Poland
Ratings: 4.5/5
Explain Ninja is a popular Poland-based 2D animation company that offers a wide variety of video production services to global clients. The company has already worked with big brands like Google, Bolt, and MyTaxi and is more than ready to create a 2D animation video for you as well.
The team can create different types of marketing videos including whitepaper animations, explainer videos, conventional 2D animations, etc. Basically, if you have the desired budget and are looking for a professional video production company, Explain Ninja is the right answer.
02**Wondershare Filmora Video Editor **
Minimum Project Size: $100 (Depends on the type of video you want to edit)
Team Size: The tool is an ideal choice for DIY editing
Ratings: 5/5
Technically not a 2D animation studio, Wondershare Filmora is a full-scale video editing tool designed to help editors create stunning videos. The tool offers a plethora of features that make it the best choice for people who want to create 2D animations on their own.
Filmroa has a built-in media library where you can find an array of 2D animation templates, video graphics, and transitions that could be integrated into a video within a few seconds. Not to mention, its timeline-based interface will make it a hassle-free job to create high-quality 2D animations that engage the viewers and help you promote your product more effectively.
For Win 7 or later (64-bit)
For macOS 10.12 or later
03Sparkhouse
Minimum Project Size: $10,000
Team Size: 10-50
Location: California
Ratings: 4/5
SparkHouse is another popular 2D animation studio that primarily specializes in corporate and commercial projects. The company is based in California, USA, and has worked with top brands like YouTube and Forever 2Sparkhouse offers a wide variety of video production services including 2D animations, explainer videos, and regular white paper animations.
Unique storytelling and custom transitions are two of the major USPs of Sparkhouse. The only downside of Sparkhouse is its expensive price tag. Due to its extensive popularity, Sparkhouse charges a hefty amount for its projects, which means it’s only ideal for large enterprises with a solid marketing budget.
04Studio Pigeon
Minimum Project Size: $5,000
Team Size: 50-500
Location: Poland
Ratings: 5/5
Studio Pigeon is also a popular Poland-based 2D animation company that provides full-scale video production services to a global clientele. Studio Pigeon’s portfolio includes some of the industry leaders including Microsoft, Ikea, and FOX Networks.
While Studio Pigeon specializes in all types of video production services, 2D explainer videos are their strong point. So, if you are looking to create a stunning explainer video for a newly launched product or service, you can get in touch with Studio Pigeon and let expert designers create a stunning video for you.
05BluBlu Studios
Minimum Project Size: $5,000
Team Size: 50-250
Location: Poland and USA
Ratings: 4.5/5
BluBlu Studios is one of the best 2D animation studios having two different branches in Poland and Chicago, USA. The company is well-renowned for its remarkable work across the industry. Since its inception in 2013, BluBlu Studios has worked with both small-scale businesses and fortune 500s. During this period, the company has also worked with many big brands including The New York Times, IKEA, and Twitter.
Basically, if you want to get a high-quality 2D animation for your product/services, BluBlu Studios is worth the consideration. Even if you own a startup or a small business, BluBlue Studios will allow you to get a stunning 2D animated video without burning a hole in your wallet.
06Epipheo
Minimum Project Size: $12,000
Team Size: 10-100
Location: Los Angeles
Ratings: 5/5
With Google considering it as their official marketing partner, Epipheo is undoubtedly one of the most reliable 2D animation studios you can hire to create a high-quality 2D animation for your marketing campaigns.
In addition to end-to-end video production services, Epipheo also offers other digital services including UI/UX design and marketing assistance. In short, Epiheo can handle the entire online marketing campaign for your brand. However, since the company has Google on its portfolio, the production charges are going to be comparatively higher than other available options.
07Snowy Peak
Minimum Project Size: $3,000
Team Size: 10 Employees
Location: Colorado, USA
Ratings: 3.5/5
Snowy Peak is a Colorado-based video production company that offers full-scale production services to help brands elevate their online presence and attract more customers.
As compared to other available options, Snowy Peak’s services are relatively affordable - so even if you have a limited marketing budget, you can hire them to get your 2D animation video. In addition to end-to-end video production services, Snowy Peak also specializes in direction assistance so that you can launch the most stunning marketing video for your brand.
08Animation Explainers
Minimum Project Size: $2,000
Team Size: 10 Employees
Location: Dublin, Ireland
Ratings: 4.5/5
Animation Explainers is a small-scale video production company that primarily works with startups and small-scale businesses. Based out of Dublin, Ireland, Animation Explainers is working with a vision to help businesses gain better online exposure through high-quality video production. Animation Explainers is an ideal video production studio for brands who want to launch a 2D animation video at a lower production cost.
09Darvideo Animation Studio
Minimum Project Size: $1,000+
Team Size: 50 Employees
Location: UKRAINE
Ratings: 4/5
Darvideo Animation Studio is one of the most affordable video production studios that offer an array of video production services such as explainer videos, 2D animations, 3D animated videos, and explainer videos.
The services start at as low as $1,000, which means you can launch a high-quality animation video without going over budget. Apart from 2D animation videos, Darvideo Animation Studio can also help you launch short-form videos to engage potential buyers across different platforms. Ideally, the company is a suitable choice for small-scale businesses and startups that have a limited marketing budget for 2D animated videos.
10The DVI Group
Minimum Project Size: $10,000+
Team Size: 50 Employees
Location: Atlanta
Ratings: 4.5/5
The DVI Group is a widely popular 2D animation company that has worked with different brands and helped them gain massive exposure in the digital landscape. The DVI team specializes in both 2D as well as 3D animation, which means brands can target different types of customers through dedicated videos. You can also hire the company to get short-form videos to engage customers across different social media platforms.
111Kasra Design
Minimum Project Size: $5,000+
Team Size: 50 Employees
Location: Malaysia
Ratings: 4.5/5
If you are looking for an experienced 2D animation studio, Kasra Design is the right answer. This Malaysia-based 2D animation company has delivered more than 600 2D and 3D animations to different organizations. Their services are relatively affordable, which means you can hire them even with a limited marketing budget.
121Demo Duck
Minimum Project Size: $2,000
Team Size: 100 Employees
Location: Chicago, United States
Rating: 4/5
Last, but certainly not least, Demo Duck is an ideal 2D animation company for businesses who want to step up their marketing game through creativity. The team has highly talented video editors who have years of experience working with a variety of brands from different parts of the world. Even though the company specializes in 2D animation videos, you can also hire them to get explainer videos, 3D animations, and conventional marketing videos.
Key Takeaways from This Episode
● 2D animations are one of the great ways to engage potential customers and drive better brand exposure
● The cost to create a 2D animation varies for each brand and mainly depends on the 2D animation company you hire
● There are dozens of 2D animation studios you can hire to launch a custom 2D animation or use a professional tool like Wondershare Pro to create a dedicated 2D animated video by yourself.
How to Make GIF Stickers for WhatsApp 100% The Easy Way
How to Make GIF Stickers for WhatsApp 100% The Easy Way
An easy yet powerful editor
Numerous effects to choose from
Detailed tutorials provided by the official channel
Wish your dear friends and loved ones on their special days using some interesting WhatsApp stickers. There is an integrated library of these stickers in different categories on your Android as well as iPhone.

Still, if you want a more personalized one, you can create a customized sticker using videos on your phone or using third-party apps and tools. Learn about how to use the integrated stickers and create customized in the following parts of the topic.
In this article
01 [Using stickers from integrated library](#Part 1)
02 [Best tools to create animated GIF sticker – Wondershare Filmora](#Part 2)
03 [Using iPhone and Android videos to make GIF stickers](#Part 3)
Part 1 Using stickers from integrated library
WhatsApp on your Android and iPhone has a decent collection of stickers that can send to your contacts. You simply need to look for the sticker in the desired category and send it and the steps for adding GIFs to WhatsApp are listed below.
Step 1. Open the WhatsApp contact to which you wish to send the sticker. To open the animation library on your Android device, tap on the emoji icon and choose the GIF option. On an iPhone, the library opens by clicking on the sticker icon.
Step 2. Search and select the desired sticker from the available options.
Step 3. To finally share the selected one, click on the sticker and then on the Send button.

Part 2 Best tools to create animated GIF sticker – Wondershare Filmora
If you are in search of a tool that lets you create a professional-looking animated GIF easily Wondershare Filmora Video Editor is the best WhatsApp GIF maker tool. This software once downloaded on your Windows or Mac system, is all set to look after multiple video editing tasks including GIF creation.
Wondershare Filmora
Get started easily with Filmora’s powerful performance, intuitive interface, and countless effects!
Try It Free Try It Free Try It Free Learn More >
Your videos in MP4, MKV, MOV, and several other key formats can be converted to a GIF file using the program and multiple options for editing are available as well like crop, trim, add effects, add texts, and more.
The intuitive interface of the software makes it easy to use even by non-techy people.
Steps on how to make WhatsApp GIF sticker using Wondershare Filmora
**Step 1.**On your Windows or Mac, download, install, and launch the Wondershare software and then import the video files from which GIF has to be created.
Step 2. The added files have to be now dragged and dropped to the timeline.

Step 3. Editing tools for customization can be used.
**Step 4.**For further personalization by adding text, effects, and more the related functions can be used.

Step 5. Next, choose the GIF option as the target file format from the Local tab. Select the file name and the location. Clicking on the EXPORT button will start the processing.

Part 3 Using iPhone and Android videos to make GIF stickers
If you do not wish to use any third-party tools, basic stickers can also be created using the videos on your Android and iPhone. A video cannot be more than 6 seconds in length to be used as a GIF and thus longer videos need to be trimmed.
Steps on how to make a GIF stickers for WhatsApp
Step 1. Launch the WhatsApp contact to which you wish to send the GIF. Add the video from the device gallery by clicking on the camera button. A video using the camera can also be recorded.
Note: Ensure that video length is not more than 6 seconds. If it is more, use the slider at the top to trim the video.
Step 2. Next, you can add the text using the Caption option.
Step 3. Now to convert this video into a GIF click on the GIF button under the video and then tap on the Send button to share this animation with the contact.

● Key Takeaways from This Episode →
●WhatsApp has an integrated library of GIF stickers in a wide range of categories.
●For creating customized stickers, Wondershare Filmora works as the best software as it is simple, quick, and has multiple editing options.
●Using the videos from the gallery, GIF stickers can also be created on your Android and iPhone.
Wish your dear friends and loved ones on their special days using some interesting WhatsApp stickers. There is an integrated library of these stickers in different categories on your Android as well as iPhone.
Still, if you want a more personalized one, you can create a customized sticker using videos on your phone or using third-party apps and tools. Learn about how to use the integrated stickers and create customized in the following parts of the topic.
In this article
01 [Using stickers from integrated library](#Part 1)
02 [Best tools to create animated GIF sticker – Wondershare Filmora](#Part 2)
03 [Using iPhone and Android videos to make GIF stickers](#Part 3)
Part 1 Using stickers from integrated library
WhatsApp on your Android and iPhone has a decent collection of stickers that can send to your contacts. You simply need to look for the sticker in the desired category and send it and the steps for adding GIFs to WhatsApp are listed below.
Step 1. Open the WhatsApp contact to which you wish to send the sticker. To open the animation library on your Android device, tap on the emoji icon and choose the GIF option. On an iPhone, the library opens by clicking on the sticker icon.
Step 2. Search and select the desired sticker from the available options.
Step 3. To finally share the selected one, click on the sticker and then on the Send button.
Part 2 Best tools to create animated GIF sticker – Wondershare Filmora
If you are in search of a tool that lets you create a professional-looking animated GIF easily Wondershare Filmora Video Editor is the best WhatsApp GIF maker tool. This software once downloaded on your Windows or Mac system, is all set to look after multiple video editing tasks including GIF creation.
Wondershare Filmora
Get started easily with Filmora’s powerful performance, intuitive interface, and countless effects!
Try It Free Try It Free Try It Free Learn More >
Your videos in MP4, MKV, MOV, and several other key formats can be converted to a GIF file using the program and multiple options for editing are available as well like crop, trim, add effects, add texts, and more.
The intuitive interface of the software makes it easy to use even by non-techy people.
Steps on how to make WhatsApp GIF sticker using Wondershare Filmora
**Step 1.**On your Windows or Mac, download, install, and launch the Wondershare software and then import the video files from which GIF has to be created.
Step 2. The added files have to be now dragged and dropped to the timeline.
Step 3. Editing tools for customization can be used.
**Step 4.**For further personalization by adding text, effects, and more the related functions can be used.
Step 5. Next, choose the GIF option as the target file format from the Local tab. Select the file name and the location. Clicking on the EXPORT button will start the processing.
Part 3 Using iPhone and Android videos to make GIF stickers
If you do not wish to use any third-party tools, basic stickers can also be created using the videos on your Android and iPhone. A video cannot be more than 6 seconds in length to be used as a GIF and thus longer videos need to be trimmed.
Steps on how to make a GIF stickers for WhatsApp
Step 1. Launch the WhatsApp contact to which you wish to send the GIF. Add the video from the device gallery by clicking on the camera button. A video using the camera can also be recorded.
Note: Ensure that video length is not more than 6 seconds. If it is more, use the slider at the top to trim the video.
Step 2. Next, you can add the text using the Caption option.
Step 3. Now to convert this video into a GIF click on the GIF button under the video and then tap on the Send button to share this animation with the contact.
● Key Takeaways from This Episode →
●WhatsApp has an integrated library of GIF stickers in a wide range of categories.
●For creating customized stickers, Wondershare Filmora works as the best software as it is simple, quick, and has multiple editing options.
●Using the videos from the gallery, GIF stickers can also be created on your Android and iPhone.
Also read:
- 2024 Approved Best 12 Illusion Gifs Top Picks
- Updated 2024 Approved Top 10 Best and Fast Ways to Turn Image Into Gif
- 2024 Approved 10 Realistic Cartoon Characters You Will Run Away From if You Met in R
- New In 2024, How to Find & Make Animated Christmas GIFs?
- New 2024 Approved Best 15 Classics Animated Cartoon Movies
- 2024 Approved 10 Photoshop Cartoon Effects For Creatives
- Updated In 2024, Easy Cartoon Characters Drawing Tutorials for You Beginners
- Updated In 2024, 10 2D/3D Animation Tips & Tricks to Bring New Ideas to You
- New Ways to Master to Find 10 Best Free Animated Text Generator
- Updated 2024 Approved Cartoon Fundamentals How to Learn Cartoon Characters Sketch Quickly
- Updated In 2024, Want to Make a Meme GIF? Heres How to Do
- Updated In 2024, Top 15 Male Anime Characters By Voting
- Updated 10 Great Apps for Turning Funny Animated Images Into Comics
- New Step-by-Step Guide to Send Gif WhatsApp on Android for 2024
- New What Make Aesthetic Cartoon Drawing More Understandable
- In 2024, Creative Ways to Create iPhone Text GIF
- In 2024, Top 4 Websites to Get Anime Footage for Free
- New In 2024, The Art of Comics - Learn How to Do Funny Cartoon Drawings
- New In 2024, How to Create A GIF with Sound?
- New The Complete Guide to Whiteboard Animation for 2024
- 2024 Approved Finding The Best Animated Profile Picture Maker
- The Most Efficient Techniques to Make 3D Animation Character
- Updated 2024 Approved 5 Best Adobe Animate Courses & Classes
- New In 2024, Easy Cartoon Characters Drawing Tutorials for You Who Are Learning to Draw
- Updated 2024 Approved 8 Top Motion Graphics Online Tools for Your Inspiration
- Updated In 2024, Best 15 Horror Animes That Will Trigger a Heart Attack
- Updated Tutorial on Making Unity 2D Animation for 2024
- Nurturing the Spirit Through the Top 10 Intellectual Anime Websites
- Updated 2024 Approved Learn About Lip-Syncing in Animation
- How to Find 3D Animation Studio
- New How to Cartoonize Photo Photoshop in Easy Steps
- Adobe Animate Riggings PROPER Tutorial for You
- Updated 2024 Approved How to Turn Yourself Into WhatsApp Cartoon
- New 2024 Approved Top 10 Best Photo to Animation Converters
- 12 Animated Slideshow PowerPoint Templates and Tools to Make Them for 2024
- New You Can Turn a TikTok Into a GIF Now. Heres How for 2024
- In 2024, 10 Amazing Wallpaper Collage Ideas and Photos
- New How to Create Animated Video on Canva for 2024
- In 2024, 5 Best Adobe Animate Courses & Classes
- Updated 10 Great MP4 to GIF Converters to Get Perfect-Made GIF
- Top 10 Animated DP for WhatsApp for 2024
- Updated Tips for Canva Animated Elements for 2024
- How to Fix when Apple Account Locked From iPhone X?
- In 2024, Is Your iPhone XR in Security Lockout? Proper Ways To Unlock
- Fix Realme 11 Pro+ Android System Webview Crash 2024 Issue | Dr.fone
- Easy Guide to Honor Magic5 Ultimate FRP Bypass With Best Methods
- 2024 Approved What Is an AI Editor?
- How To Transfer WhatsApp From iPhone 6s Plus to other iPhone 13 Pro Max devices? | Dr.fone
- In 2024, Things You Should Know When Unlocking Total Wireless Of iPhone SE (2022)
- 8 Quick Fixes Unfortunately, Snapchat has Stopped on OnePlus 12R | Dr.fone
- How to Change Spotify Location After Moving to Another Country On Vivo Y36i | Dr.fone
- New In 2024, Top 6 Mickey Mouse Voice Generators Providing Efficient Results
- Fixing Foneazy MockGo Not Working On Honor 90 GT | Dr.fone
- In 2024, How to Access Your iPhone 15 Pro Max When You Forget the Passcode? | Dr.fone
- In 2024, 3 Facts You Need to Know about Screen Mirroring Oppo Reno 10 Pro 5G | Dr.fone
- In 2024, How to Unlock Apple iPhone 14 Pro Max Online? Here are 6 Easy Ways
- Fix Excel 2007 formula not showing result | Stellar
- Learn The Best 6 Alternative Streaming Platforms for 2024
- In 2024, Top 6 Apps/Services to Trace Any Oppo A1x 5G Location By Mobile Number | Dr.fone
- Process of Screen Sharing OnePlus Nord N30 SE to PC- Detailed Steps | Dr.fone
- In 2024, The 10 Best Tools to Bypass iCloud Activation Lock On Apple iPhone 12 Pro You Should Try Out
- In 2024, How To Bypass iCloud By Checkra1n Even From iPhone 14 If Youve Tried Everything
- Best Video Language Changers to Make Your Videos Accessible for 2024
- Does Life360 Notify When You Log Out On ZTE Axon 40 Lite? | Dr.fone
- How to Fix My Infinix Smart 8 Location Is Wrong | Dr.fone
- For People Wanting to Mock GPS on Tecno Spark 10 4G Devices | Dr.fone
- Want to Uninstall Google Play Service from Samsung Galaxy S23 FE? Here is How | Dr.fone
- The way to recover deleted photos on 12 5G without backup.
- In 2024, CatchEmAll Celebrate National Pokémon Day with Virtual Location On OnePlus Nord CE 3 5G | Dr.fone
- How to Fix Pokemon Go Route Not Working On Motorola Moto G34 5G? | Dr.fone
- In 2024, How can I get more stardust in pokemon go On Realme C33 2023? | Dr.fone
- Title: New Samples of Cartoon Character Face
- Author: Elon
- Created at : 2024-06-15 11:22:16
- Updated at : 2024-06-16 11:22:16
- Link: https://animation-videos.techidaily.com/new-samples-of-cartoon-character-face/
- License: This work is licensed under CC BY-NC-SA 4.0.
