
:max_bytes(150000):strip_icc():format(webp)/001_how-to-transfer-data-from-ps4-to-ps5-3392eb400af3482fabad65cabb2a1a91.jpg)
New Techniques for Creating Animated Logo That Few People Know About for 2024
Techniques for Creating Animated Logo That Few People Know About
Some Techniques for Creating Animated Logo That Few People Know About
An easy yet powerful editor
Numerous effects to choose from
Detailed tutorials provided by the official channel
How you present your brand on the digital landscape has a huge impact on your company’s overall conversions.
![]()
This guide will walk you through different procedures for creating an animated logo using different solutions.
In this article
01 [Are There Wow Factors in Your Branding with Animation Effects?](#Part 1)
02 [How to Make an Animated Logo: a Step-by-step Guide](#Part 2)
03 [5 Steps to Animate Your Logo](#Part 3)
04 [What is the Best Software to Animate a Logo?](#Part 4)
05 [Want to Explore More Advanced Animation Skills?](#Part 5)
Part 1 Are There Wow Factors in Your Branding with Animation Effects?
As we mentioned in the earlier paragraph, an animated logo can do wonders for your digital presence. How? When you publish an animated logo on your website or any other social media profile, it’ll automatically help you garner the attention from website visitors. Creating an animated logo will also make it easier for the customers to remember your business days after they visited your website.
However, when you are creating an animated logo, it’ll be crucial to follow a few tips to achieve the best results. Here are a few factors that’ll help you create the best animated logo.
● Always start with a simple research to analyze the customer behavior
● Instead of starting with the final design, take your time and work on a few sketches at the beginning
● Understand where you are going to publish the logo and then, choose the right color-scheme accordingly
● When it comes to animated logos, overdoing the animations can also damage the overall visual appearance of your logo
Part 2 How to Make an Animated Logo: a Step-by-step Guide
So, now that we’ve explained the importance of animated logos, let’s start with the step-by-step process of creating an animated logo using different solutions. First, we’ll take a look at some of the premade logo templates that you can integrate and customize to speed up the entire process.
01Vortex Logo Reveal
If you want to use your animated logo in a dedicated video, Vortex logo reveal can be an ideal choice for the job. The template contains a 3-5 seconds animation that’ll reveal your actual logo in a suspenseful manner.
023D Logo Animation
This is a pre-made animated logo template in After Effects that you can integrate with a single tap. The template simply shatters the logo into pieces after the initial reveal to create a dramatic effect for the viewers.
03Gold Luxury Logo Reveal
If you’re worried that using 3D-effects might overdo the animations, you can use this simple gold luxury logo reveal template. As compared to the previous two templates, this one has a simple animation and will help you convey your message more effectively.
04Waving 3D Logo Reveal
This logo is a widely popular AE animated logo template that many users buy to make their logos more appealing. The template utilizes motion graphics and a clean animation to reveal the actual brand logo while keeping the viewers engaged throughout the process.
05Infinite Zoom Logo Reveal
Want to reveal your animated logo in a unique manner? This template has got you covered. The After Effects logo template will allow you to use different pictures to reveal the logo with the traditional zoom-out transition. You can use all the pictures that represent your brand to add the required business values to your logo.
06Space Animation
Space animation is another After Effects template that’s ideal for brands who want to reveal their brand logo in a visually appealing manner. Different stars in the cosmos will combine together to represent your logo and leave a great first impression on the viewers.
Part 3 5 Steps to Animate Your Logo
Now, let’s move towards the next phase of creating an animated logo, i.e., animating the logo itself. It doesn’t matter which software you use to get the job done, you can adhere to the following steps to achieve the best results and create a visually stunning animated logo.
01Prepare the Simple Logo
In every situation, you’ll first have to prepare the simple one-dimension logo that you’ve been using so far. To create this logo, you can use a wide variety of tools such as Adobe Photoshop or even a simple logo maker such as Canva. Keep in mind that you should implement all the customization on the design during this stage only.
02Import the Logo File
The next step towards creating the animated logo is to simply import your logo file into the tool that you want to use to do the job. For instance, if you are planning to use Adobe After Effects, simply click “File > Open” and select the logo file to load it into AE’s editing panel. Once the file is successfully imported, you can move towards the next step.
03Choose the Right Animation Template
Now, you can proceed towards choosing the right animation template for your animated logo. It doesn’t matter which software you’re using for creating an animated logo, you’ll find dozens of built-in templates that can be integrated into the design with one click. Choose any of these templates and move towards the next step.
04Apply the Keyframes
After you’ve successfully imported the file and chosen a dedicated animation template, the next step would be to apply the keyframes. In tools like After Effects, you’ll find a built-in slider that’ll allow you to adjust the keyframes to customize the animation.
05Make the Final Adjustments
Finally, make the final adjustments to the animation. For instance, you can customize the color scheme or color-grade the logo for better visual appearance. You can also add other objects on top of the design to enhance the overall quality of the logo.
Part 4 What is the Best Software to Animate a Logo?
Here are the top three software you can use to get started with your animated logo and complete the process.
01Pixteller
![]()
Pixteller is an online logo maker designed to allow users to animate their logos in an easy-to-use interface. Even if you are not an experienced designer, you’ll find it pretty easy to animate the logo using Pixteller. The tool has a plethora of built-in templates that’ll allow you to edit your logo without any hassle.
02Crello
![]()
Crello is another easy-to-use online tool you can use to animate your logos without any technical skills. Being a web-based software, you can use Crello anywhere you want. In every situation, it’ll allow you to design a visually appealing logo with high-quality animation.
03Adobe After Effects
![]()
Now, if you are an experienced designer and are familiar with the Adobe ecosystem, After Effects is the most reliable tool to get the job done. Even though AE has a pretty complicated user interface, it’ll allow you to design a stunning logo animation, especially if you are familiar with all its editing tools.
Key Takeaways from This Episode
● Creating an animated logo is one of the most reliable ways to boost your brand visibility and attract new customers
● While creating an animated logo, it’s crucial to follow a dedicated process to attain the best results
● To use animated logos in your promotional videos, you can use Filmora Pro and its built-in features to get the job done.
Amazing Ideas About Creating Personalised WhatsApp GIF Sticker
Stunning Ideas About Creating Personalised WhatsApp GIF Sticker
An easy yet powerful editor
Numerous effects to choose from
Detailed tutorials provided by the official channel
WhatsApp has become the most popularly and widely used medium for text conversation and with the reach of the platform increasing every day, new features are added from time to time to keep the users hooked. In the same line, WhatsApp now allows creating customized animated GIF stickers to be used in the chats.
Animated stickers will let you express your feeling and thoughts through animations which will surely make the conversation more interesting. These stickers can be created on your Android as well as iPhone. The article below will help you to know the detailed process to create GIF sticker WhatsApp and also how these stickers can be used in your videos to make the videos more entertaining.
In this article
01 [How to Create Custom Animated WhatsApp Stickers on Android and iPhone](#Part 1)
02 [How to Use Custom Stickers in Filmora?](#Part 2)
Part 1 How to Create Custom Animated WhatsApp Stickers on Android and iPhone
Animated third-party stickers cannot be added directly to WhatsApp and thus you can create a customized one. To create these GIF stickers for WhatsApp, you would need the help of third-party apps.
For Android devices, one such popular app is the Sticker Maker app. For iPhone, we suggest using Sticker Maker Studio app.
Once these apps are installed on your device, GIF stickers can be made in no time.
Steps to make sticker GIF WhatsApp on Android phone
Step 1. Download, install and open the Sticker maker app on your Android device.
Step 2. Tap on the “Create a new sticker pack” option on your app.
Step 3. Give the desired name to your sticker pack and click on the Create button.
Step 4. To add the animated stickers, click on the created sticker pack.
Step 5. Next, click on the first box, and then from the menu choose the Select file option.

Step 6. Next, choose the video from your phone from which you wish to create a sticker. You can even add a GIF file. After the media file is added, the app will compress it and will turn it into an animated sticker automatically.
Step 7. Now, you need to add 3 animated stickers to the other boxes of the sticker app (as mentioned in step 5).
Note: Multiple stickers can be added using the same process.
Step 8. Click on the “Add to WhatsApp” button after a minimum of 3 stickers are added to the pack.
Step 9. Now, your stickers are ready. Open the WhatsApp chat and launch the sticker panel where you can see your created GIF stickers. Choose the sticker you want, add it to your chat, and send it.

Steps to make WhatsApp Sticker GIF on iPhone
Step 1. On your iPhone, download, install and launch the Sticker Maker Studio app from the app store.
Step 2. Choose the sticker pack and also the name of the author at the respective boxes and then click on the Create button.
Step 3. Next, click on the new sticker pack that is created.

Step 4. Multiple boxes will now appear from which you need to choose the first one and then
select the Files option.
Step 5. Choose the desired Video from your device from which sticker has to be created. You can also create GIF to WhatsApp sticker. Other stickers to the pack can be added similarly. The app will automatically convert the added file to a sticker.
Step 6. After the stickers are added (at least 3), click on the Add to WhatsApp button at the generated Tray icon.

Note: If you see your tray icon to be blank, click on it else there will be issues adding the stickers to the WhatsApp chat later. A tray icon can be selected from the images.
Step 7. Next, you will be asked if you wish to open WhatsApp, click on Okay.
Step 8. Now, to add the animated GIF stickers to WhatsApp, you need to click on the Save button and your stickers are ready to be used in the chat.

Part 2 How to Use Custom Stickers in Wondershare Filmora Video Editor ?
For Win 7 or later (64-bit)
For macOS 10.12 or later
Why use your customized GIF stickers only in WhatsApp chats when they can be used in Videos as well? Yes, using Wondershare Filmora software you can use your customized animated stickers in your videos as well to make them more eye-catchy and interesting. Additionally, you can also add the effects to your videos using the software.
Wondershare Filmora is a feature-packed that allows creating stunning and professional-looking videos using its wide range of functions like motion tracking, adding effects, color matching, noise enhancement, keyframe animations, adding captions, and much more.
The user-friendly interface makes the tool apt even for beginners.
Steps to add GIF animations to videos using Wondershare Filmora
Step 1. On your Windows or Mac system, launch the software and choose Media > Import> Import Media Files on the main interface.

Step 2. Next, choose and add the created animated sticker to the software interface. Alternatively, you can also select the sticker from Elements. Drag and drop the added sticker to the video.

Step 3. To adjust the parameters like the size and the rotation of the sticker, you need to double-click on the sticker at the timeline. Additionally, color adjustments can also be made and if needed, you can also add 3D motion.

Step 4. To change the size and the location of the sticker, you need to drag it accordingly in
the viewer panel.
Step 5. Next, at the Local tab, choose the video format, resolution, and desktop folder. Finally, click on the Export button to start processing.
Note: The created video can also be saved to DVD or can be uploaded to YouTube and Vimeo directly using the software.

● Key Takeaways from This Episode →
●The latest GIF sticker feature of WhatsApp allows adding interesting animations to your chats.
●To create customized GIF stickers on Android and iPhone, third-party apps have to be used.
●The customized stickers can also be added to your videos using Wondershare Filmora.
WhatsApp has become the most popularly and widely used medium for text conversation and with the reach of the platform increasing every day, new features are added from time to time to keep the users hooked. In the same line, WhatsApp now allows creating customized animated GIF stickers to be used in the chats.
Animated stickers will let you express your feeling and thoughts through animations which will surely make the conversation more interesting. These stickers can be created on your Android as well as iPhone. The article below will help you to know the detailed process to create GIF sticker WhatsApp and also how these stickers can be used in your videos to make the videos more entertaining.
In this article
01 [How to Create Custom Animated WhatsApp Stickers on Android and iPhone](#Part 1)
02 [How to Use Custom Stickers in Filmora?](#Part 2)
Part 1 How to Create Custom Animated WhatsApp Stickers on Android and iPhone
Animated third-party stickers cannot be added directly to WhatsApp and thus you can create a customized one. To create these GIF stickers for WhatsApp, you would need the help of third-party apps.
For Android devices, one such popular app is the Sticker Maker app. For iPhone, we suggest using Sticker Maker Studio app.
Once these apps are installed on your device, GIF stickers can be made in no time.
Steps to make sticker GIF WhatsApp on Android phone
Step 1. Download, install and open the Sticker maker app on your Android device.
Step 2. Tap on the “Create a new sticker pack” option on your app.
Step 3. Give the desired name to your sticker pack and click on the Create button.
Step 4. To add the animated stickers, click on the created sticker pack.
Step 5. Next, click on the first box, and then from the menu choose the Select file option.
Step 6. Next, choose the video from your phone from which you wish to create a sticker. You can even add a GIF file. After the media file is added, the app will compress it and will turn it into an animated sticker automatically.
Step 7. Now, you need to add 3 animated stickers to the other boxes of the sticker app (as mentioned in step 5).
Note: Multiple stickers can be added using the same process.
Step 8. Click on the “Add to WhatsApp” button after a minimum of 3 stickers are added to the pack.
Step 9. Now, your stickers are ready. Open the WhatsApp chat and launch the sticker panel where you can see your created GIF stickers. Choose the sticker you want, add it to your chat, and send it.
Steps to make WhatsApp Sticker GIF on iPhone
Step 1. On your iPhone, download, install and launch the Sticker Maker Studio app from the app store.
Step 2. Choose the sticker pack and also the name of the author at the respective boxes and then click on the Create button.
Step 3. Next, click on the new sticker pack that is created.
Step 4. Multiple boxes will now appear from which you need to choose the first one and then
select the Files option.
Step 5. Choose the desired Video from your device from which sticker has to be created. You can also create GIF to WhatsApp sticker. Other stickers to the pack can be added similarly. The app will automatically convert the added file to a sticker.
Step 6. After the stickers are added (at least 3), click on the Add to WhatsApp button at the generated Tray icon.
Note: If you see your tray icon to be blank, click on it else there will be issues adding the stickers to the WhatsApp chat later. A tray icon can be selected from the images.
Step 7. Next, you will be asked if you wish to open WhatsApp, click on Okay.
Step 8. Now, to add the animated GIF stickers to WhatsApp, you need to click on the Save button and your stickers are ready to be used in the chat.
Part 2 How to Use Custom Stickers in Wondershare Filmora Video Editor ?
For Win 7 or later (64-bit)
For macOS 10.12 or later
Why use your customized GIF stickers only in WhatsApp chats when they can be used in Videos as well? Yes, using Wondershare Filmora software you can use your customized animated stickers in your videos as well to make them more eye-catchy and interesting. Additionally, you can also add the effects to your videos using the software.
Wondershare Filmora is a feature-packed that allows creating stunning and professional-looking videos using its wide range of functions like motion tracking, adding effects, color matching, noise enhancement, keyframe animations, adding captions, and much more.
The user-friendly interface makes the tool apt even for beginners.
Steps to add GIF animations to videos using Wondershare Filmora
Step 1. On your Windows or Mac system, launch the software and choose Media > Import> Import Media Files on the main interface.
Step 2. Next, choose and add the created animated sticker to the software interface. Alternatively, you can also select the sticker from Elements. Drag and drop the added sticker to the video.
Step 3. To adjust the parameters like the size and the rotation of the sticker, you need to double-click on the sticker at the timeline. Additionally, color adjustments can also be made and if needed, you can also add 3D motion.
Step 4. To change the size and the location of the sticker, you need to drag it accordingly in
the viewer panel.
Step 5. Next, at the Local tab, choose the video format, resolution, and desktop folder. Finally, click on the Export button to start processing.
Note: The created video can also be saved to DVD or can be uploaded to YouTube and Vimeo directly using the software.
● Key Takeaways from This Episode →
●The latest GIF sticker feature of WhatsApp allows adding interesting animations to your chats.
●To create customized GIF stickers on Android and iPhone, third-party apps have to be used.
●The customized stickers can also be added to your videos using Wondershare Filmora.
Adobe Animate Text Effects Skills That You Need to Know
Adobe Animate Text Effects Skills That You Need to Know
An easy yet powerful editor
Numerous effects to choose from
Detailed tutorials provided by the official channel
Adobe Animate Text Effects can be created with the use of Adobe Animate. As well as a couple of other models of Adobe.
We’ve outline a thorough explanation on the subject so that you can be prepared as you can be, so continue reading in order to learn more.
In this article
01 [What’s Text Animation?](#Part 1)
02 [What Adobe Program is Best for Text Animation?](#Part 2)
03 [5 Creative Ways to Animate Text in After Effects](#Part 3)
04 [Adobe Alternative to Make Text Animation](#Part 4)
Part 1 What’s Text Animation?
“Text Animation“ refers to moving letters, words, sentences, and even whole paragraphs. The animation, or movement, rather, can be anything. It can move from side to side, jump up and down, create a dizzying circle, recede from view, etc. Usually, said movement is placed on an endless repeat, a pattern that the text is coded to follow decided by the animator who created it!
Part 2 What Adobe Program is Best for Text Animation?
Adobe Animate is Adobe’s very own software developed for animators. Whether they be working on movies, shows, short videos for online posting, games, or text animations. As mentioned at the beginning of this article, this is the software most professionals use in order to bring life to their digital creations. It’s also the one that we’d recommend if you’re looking into advanced adobe animate text animation!
Part 3 5 Creative Ways to Animate Text in After Effects
Now, we should make it very clear, of course. That while Adobe Animate is considered the best for animation (whether it be text or character models), there are other tools that you can use in order to get the same effect. For example, there’s adobe spark animate text, adobe premiere pro animate text, and this next one, also from Adobe, called After Effects, is a VFX and motion graphics software used to create movie titles, intros, transitions, logos, and so much more.
We’ve listed some of the more creative ways you can use After Effects to create what could very well be Adobe Animate text effects below to help you along:
01METHOD 1: After Effects Animation Presets
The first, and easiest, way of animating your text with After Effects is to use presets! After Effects offers multiple animations presets that you can try in order to test out certain settings. (This is also a good way of getting to know the possibilities and limits of text animation and how you can work within those bounds.
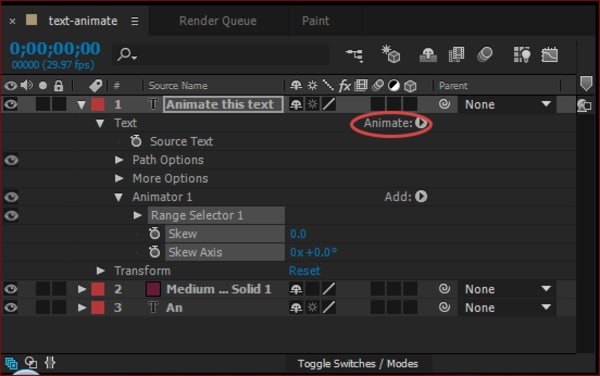
02METHOD 2: After Effects Text Animators
If the presets aren’t working out for you, you can also try out After Effect’s “animators” and “selectors”. To clarify, you add ‘animators’ to your text (it will mark the object(s) to be animated). And then, you use a ‘selector’ in order to specify how you want the properties to be animated. This is a great way of truly getting the exact effect that you want, although it might take some finagling to get it to work completely.
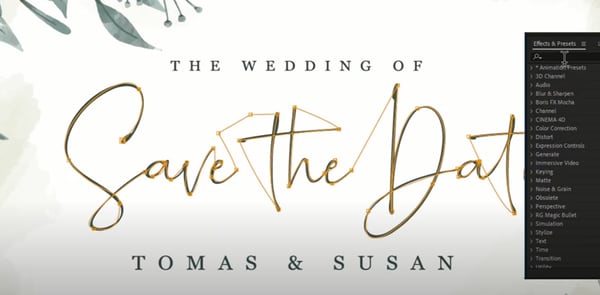
03METHOD 3: Per-Character 3D Text Properties
If you want to step up your game even more, you can always make your texts into 3D characters on their own! This is easier to do in Adobe Dimension, which (from the example image below) you can see has a “Text” preset that you can use in order to start creating 3D Text Properties immediately! The beauty of this method, of course, is that your text can be adjusted like any 3D character. Making the possibilities endless!
04METHOD 4: Path Animation
The next method of animating with After Effects is a little more constrained than the others we’ve introduced thus far. However, it has its uses! As you can see from the image below, you can animate your text to follow a mask (which you set over your text layer). This will make it possible for you to animate along a path.

05METHOD 5: After Effects Selectors
This next method is related to the ‘Animators’ methods we introduced second. It also works a lot like the masks we mentioned in Method 4–which, as mentioned, you can use in order to set up a foundation or limits for your animation.

Adobe Animate Text Effects can be created with the use of Adobe Animate. As well as a couple of other models of Adobe.
We’ve outline a thorough explanation on the subject so that you can be prepared as you can be, so continue reading in order to learn more.
In this article
01 [What’s Text Animation?](#Part 1)
02 [What Adobe Program is Best for Text Animation?](#Part 2)
03 [5 Creative Ways to Animate Text in After Effects](#Part 3)
04 [Adobe Alternative to Make Text Animation](#Part 4)
Part 1 What’s Text Animation?
“Text Animation“ refers to moving letters, words, sentences, and even whole paragraphs. The animation, or movement, rather, can be anything. It can move from side to side, jump up and down, create a dizzying circle, recede from view, etc. Usually, said movement is placed on an endless repeat, a pattern that the text is coded to follow decided by the animator who created it!
Part 2 What Adobe Program is Best for Text Animation?
Adobe Animate is Adobe’s very own software developed for animators. Whether they be working on movies, shows, short videos for online posting, games, or text animations. As mentioned at the beginning of this article, this is the software most professionals use in order to bring life to their digital creations. It’s also the one that we’d recommend if you’re looking into advanced adobe animate text animation!
Part 3 5 Creative Ways to Animate Text in After Effects
Now, we should make it very clear, of course. That while Adobe Animate is considered the best for animation (whether it be text or character models), there are other tools that you can use in order to get the same effect. For example, there’s adobe spark animate text, adobe premiere pro animate text, and this next one, also from Adobe, called After Effects, is a VFX and motion graphics software used to create movie titles, intros, transitions, logos, and so much more.
We’ve listed some of the more creative ways you can use After Effects to create what could very well be Adobe Animate text effects below to help you along:
01METHOD 1: After Effects Animation Presets
The first, and easiest, way of animating your text with After Effects is to use presets! After Effects offers multiple animations presets that you can try in order to test out certain settings. (This is also a good way of getting to know the possibilities and limits of text animation and how you can work within those bounds.
02METHOD 2: After Effects Text Animators
If the presets aren’t working out for you, you can also try out After Effect’s “animators” and “selectors”. To clarify, you add ‘animators’ to your text (it will mark the object(s) to be animated). And then, you use a ‘selector’ in order to specify how you want the properties to be animated. This is a great way of truly getting the exact effect that you want, although it might take some finagling to get it to work completely.
03METHOD 3: Per-Character 3D Text Properties
If you want to step up your game even more, you can always make your texts into 3D characters on their own! This is easier to do in Adobe Dimension, which (from the example image below) you can see has a “Text” preset that you can use in order to start creating 3D Text Properties immediately! The beauty of this method, of course, is that your text can be adjusted like any 3D character. Making the possibilities endless!
04METHOD 4: Path Animation
The next method of animating with After Effects is a little more constrained than the others we’ve introduced thus far. However, it has its uses! As you can see from the image below, you can animate your text to follow a mask (which you set over your text layer). This will make it possible for you to animate along a path.
05METHOD 5: After Effects Selectors
This next method is related to the ‘Animators’ methods we introduced second. It also works a lot like the masks we mentioned in Method 4–which, as mentioned, you can use in order to set up a foundation or limits for your animation.
Best Websites to Download Animated GIFs for Free
Best Websites to Download Animated GIFs for Free

Shanoon Cox
Mar 27, 2024• Proven solutions
The GIF stands for ‘Graphic Interchange Format’. It reduces the file size without affecting the quality factor of the image. You can create GIFs as still images and animated files according to your requirements. You can download free GIFs as effortlessly from the online platform. Most social media users use GIFs to convey their emotions to their friends and family members in an impressive way. The animated GIF gives realistic feelings of the message what you want to convey. Many social media apps like Facebook, Twitter, WhatsApp, etc users employ this gif for effective communication with their dear ones. In this article, you are going to learn:
- Part 1: 5 Types of Popular GIF Downloads
- Part 2: Best 10 Websites to Download Animated GIFs
- Part 3: Make Your GIF with Wondershare Filmora
You may also like:
Part 1: 5 Types of Popular GIF Downloads
Many people often use animated gifs when they chat on social media platforms. In this part, I summarized 5 kinds of GIFs that people like to use most. Let’s see them first!
1. Good Morning/Afternoon/Night gifs
It is the startup message for any kind of relationship. This type of GIF helps to make friends with strangers you meet in the online platform. You can greet one another with blossoming Good mornings GIFs. Similarly, you can end the day with sparkling Good night GIFs. These GIFs help you to build a good relationship in the online platform and you can find ample free GIFs download with greeting texts.
2. Happy Birthday gifs
This type of GIF is commonly used by people worldwide to wish their loved ones on their special day. Some GIFs reveal a good wish and fewer animated GIFs portray a comic type wish to bring a smile on the special occasion of their best ones.
3. Thank You gifs
There is an immense collection of free GIFs download of Thanking texts. People go for these GIFs to show their gratitude. You can find formal Thanking GIFs used for your office colleagues and informal Thanking GIFs to make fun with your closed ones on the social media.
![]()
A cross-platform for making videos anywhere for all creators

Why your video editing isn’t good enough? How about some creative inspo?
- 100 Million+ Users
- 150+ Countries and Regions
- 4 Million+ Social Media Followers
- 5 Million+ Stock Media for Use
* Secure Download

4. Happy New Year gifs
You can explore and download free GIFs wishing the new beginning of the year. This GIF contains texts and positive messages for a good start of a year. Many people download these GIFs from the cyberspace on December 31st to greet their loved ones worldwide.
5. Love& Kiss gifs
As you all know that people hesitate to convey their love in reality and hence the current generation young minds use love and kiss GIFs to convey their love to dear ones. It brings a better impression than mere words.
Part 2: Best 10 Websites to Download Animated GIFs
You would be excited if you design your favorite GIFs to share with your friends and family. Instead of a GIFs download, you can use best-animated GIFs tools to create a unique image and animated texts to convey your message with your lovable souls worldwide through cyberspace.
- 1. Giphy
- 2. Gifer
- 3. AnimatedImages.org
- 4. Reaction GIFs
- 5. Imgflip
- 6. GIFbin
- 7. Reddit
- 8. Gfycat
- 9. Tumblr
- 10. MotionElements
1. Giphy
It is an online tool to create and upload GIFs. There are built-in templates for a free download without any difficulty. You can create theme-based GIFs to suit the appropriate situation as per your needs.
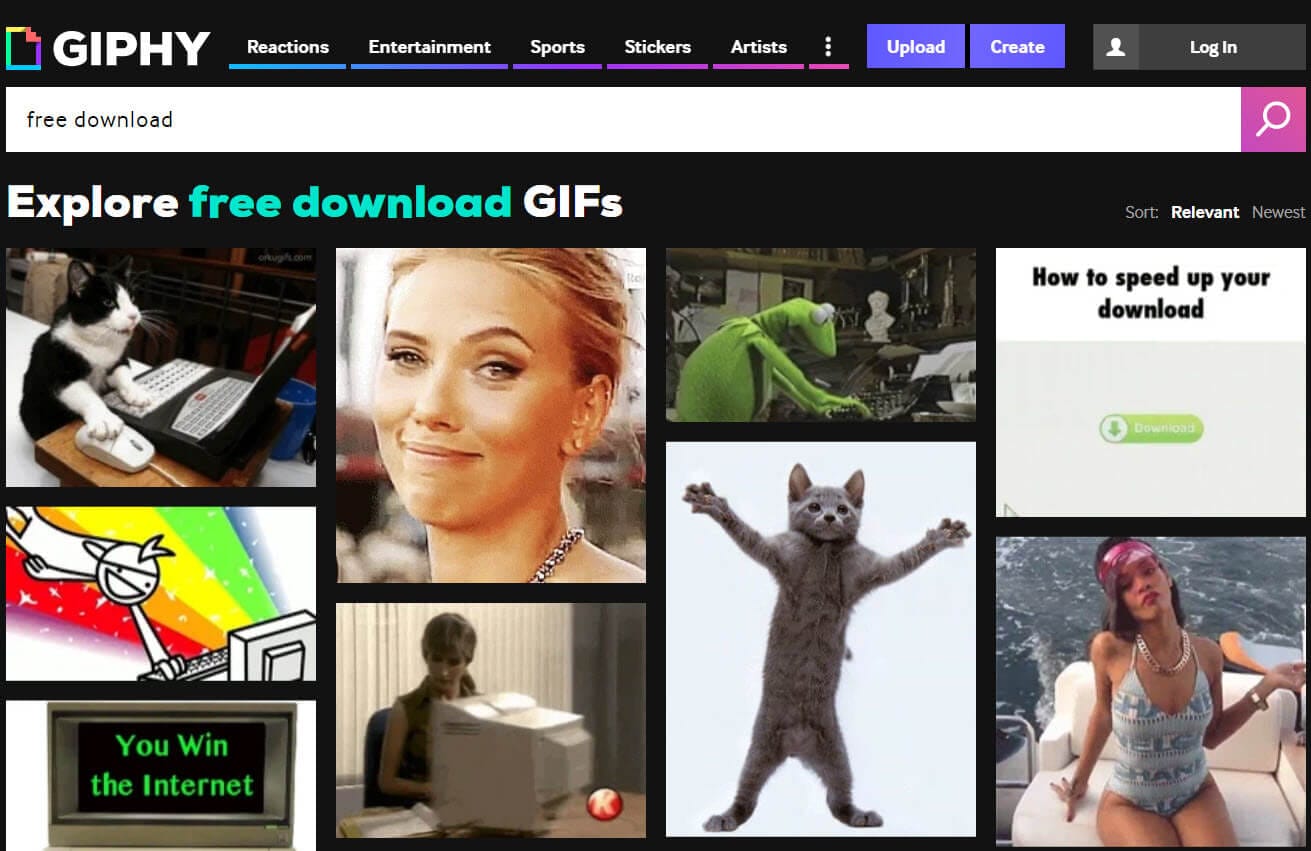
**Do I have to sign up?**--Yes, you need a sign up to make use of this tool using your Email address and password. You can also use your Facebook login and Apple account login for signup.
Is it free to download? --It is free to use but strictly prohibited for commercial purposes.
How many kinds of GIFs types available? --There are five kinds of GIFs types available. They are Reactions, Entertainment, Sports, Stickers and Artists, etc.
Highlights:
- User-friendly space to create GIFs
- You can upload your favorite clicks into the timeline to animate
- It allows you to download the images and videos from the online platform using the URLs. It permits links from YouTube and Vimeo.
2. Gifer
In this platform, you can create funny and interactive GIFs as per your needs effortlessly. Make use of this online environment to bring creativity to the words you wish to convey to your dear ones.
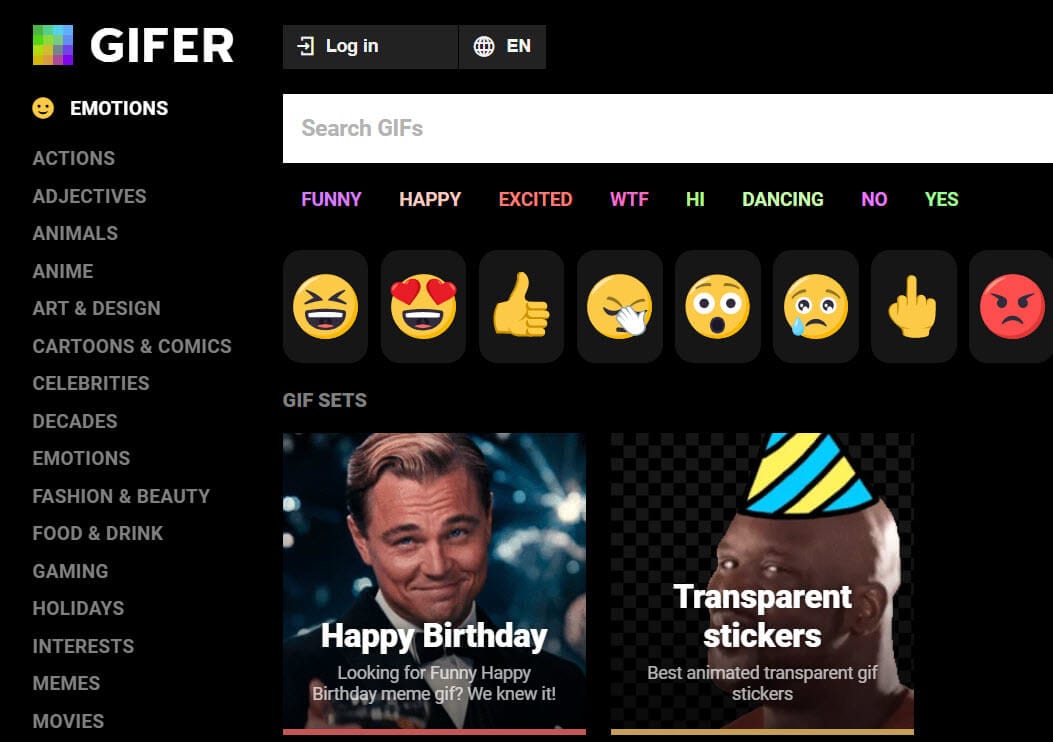
**Do I have to sign up?**--Yes, you have to sign up using Email Username and password or Facebook account to access the extended features of this application
**Is it free to download?**-- It is an online program to create your favorite GIFs
**How many kinds of GIFs types available?**-- More than 20 types of GIFs available at this platform
Highlights:
- You can easily download your desired GIFs template according to the GIFs type listed at the left side of the screen
- Easy to upload the GIFs from your local drive to animate
- The image files loads into the timeline quickly despite the file size
3. AnimatedImages.org
In this platform, you can find an ocean of animated GIFs flooded with stunning collections to suit your requirements without any compromises.

**Do I have to sign up?**--No need to sign up
**Is it free to download?**-- Free to download without any associated charges
**How many kinds of GIFs types available?**--More than 2000 categories of GIFs available at this platform
Highlights:
- Select the GIF category you wish to download the funny GIFs animated file
- The GIFs are listed out in an organized way for easy access to the users
- You can make free GIFs download effortlessly at this environment
4. Reaction GIFs
This online environment comprises of all types of reaction GIFs to use during appropriate situations. It is an exclusive platform portraying only the Reaction emotions.
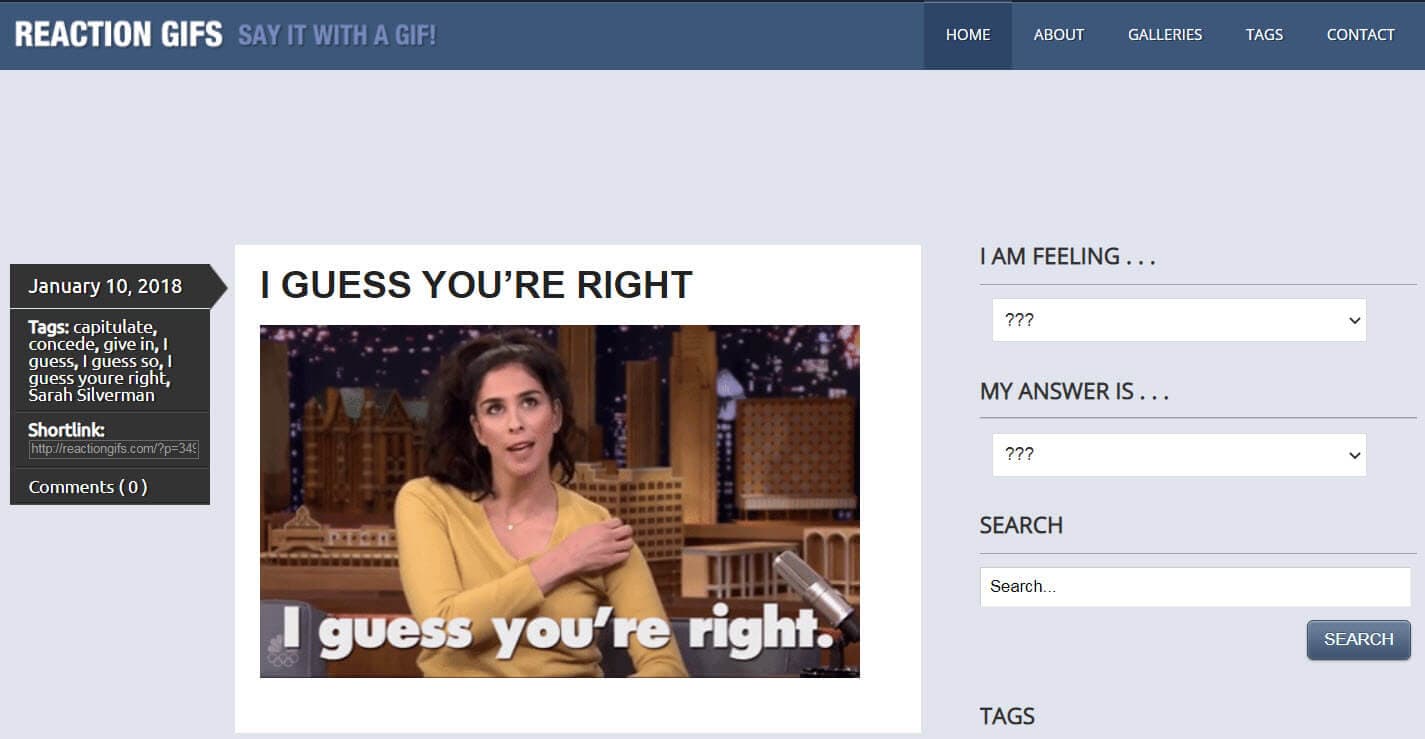
**Do I have to sign up?**-- No, you do not have to sign up
**Is it free to download?**-- Yes, it is a free download
**How many kinds of GIFs types available?**-- There are 8 kinds of GIFs types available at this environment
Highlights
- Easy to access the right type of reaction GIFs at this platform
- You can find all types of reaction GIFs like Yes, No, Love, etc
- It has amazing collections of reaction GIFs in an organized manner
5. Imgflip
It is an online tool to create attractive GIFs for your needs. It is enough if you upload the images, arrange it, adjust the options, and generate the desired GIFs in no time.

**Do I have to sign up?**--Yes, you must sign up by creating a new account with the username and password else to make use of your Gmail account.
**Is it free to download?**--You can download the GIFs for free
**How many kinds of GIFs types available?**--You can create you won GIFs using the images, videos, website links, YouTube videos, etc
Highlights
- Easy to create GIFs using this online environment with explicit controls
- Quickly share the created GIF link to the social media network just by a single link
- Effortlessly upload the desired file to create stunning GIFs as per your needs.
6. GIFbin
In this online environment, you can download the built-in GIF templates of your choice in no time. The GIFs are available as a random collection and you can choose the right fit quickly according to your needs.
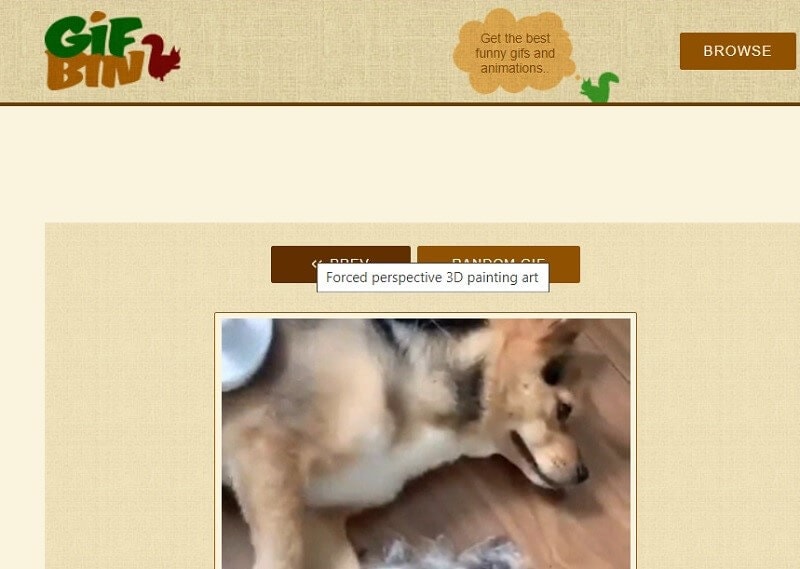
**Do I have to sign up?**--No, there is no signup process
**Is it free to download?**--Yes, you can download the GIFs free
**How many kinds of GIFs types available?**--The GIFs are organized in three tabs newest, top-rated, and viewed. There are no specific kind GIFs available. The GIFs are organized randomly.
Highlights:
- Excellent collections of built-in GIFs for free access
- Choose the desired tab named as newest, top-rated and viewed to access the desired GIFs
7. Reddit
A good collection of GIFs funnily portraying trendy stuff. Many GIFs are available on this platform to target hot happenings around the globe.
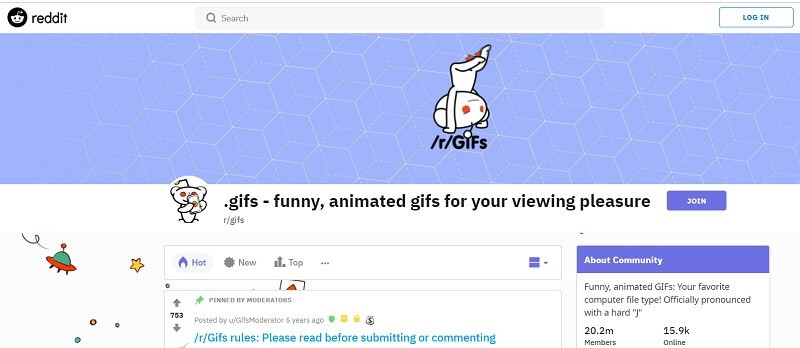
**Do I have to sign up?**--Yes, you must sign up with your Google account or Apple account else using your Email account.
**Is it free to download?**--Yes, free to download
**How many kinds of GIFs types available?**--There is no specific kinds but organized as Hot, New, and Top.
Highlights:
- You can find the latest and trendy GIFs with a funny message to convey
- Mostly used by social media users
- Easy to share your favorite GIFs in no time
8. Gfycat
In this online environment, you can create and download attractive GIFs according to your needs. This platform provides audio effects to the created GIFs to make the animation livelier.
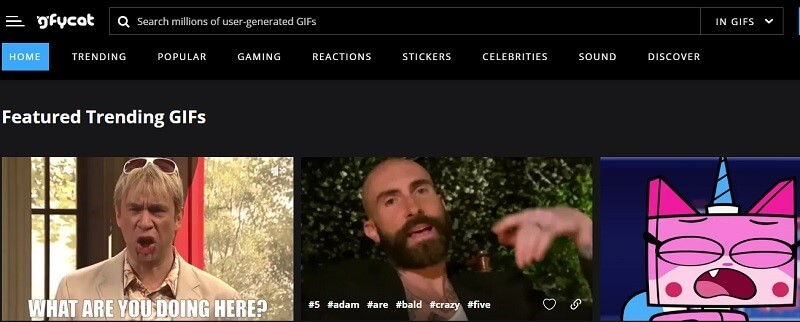
**Do I have to sign up?**--Yes, you must sign up by creating a new Username and Password to access the desired features on this website.
**Is it free to download?**--You can download it easily without any cost
**How many kinds of GIFs types available?**--There are 8 types of GIFs such as Popular, Gaming, Reactions, Stickers, Celebrities, Sound, and Discover.
Highlights:
- You can create your GIFs in this online platform effortlessly
- Download the built-in GIFs easily from this website depending on your requirement
- you can upload the image from your local drive or you can paste the link from YouTube, Facebook, Twitch, Vimeo, Instagram, etc.
9. Tumblr
It is an excellent environment comprising trendy animated GIFs which suits your needs optimally. Download the animated link in your drive for free and use it on various social media on the chat platform effortlessly.
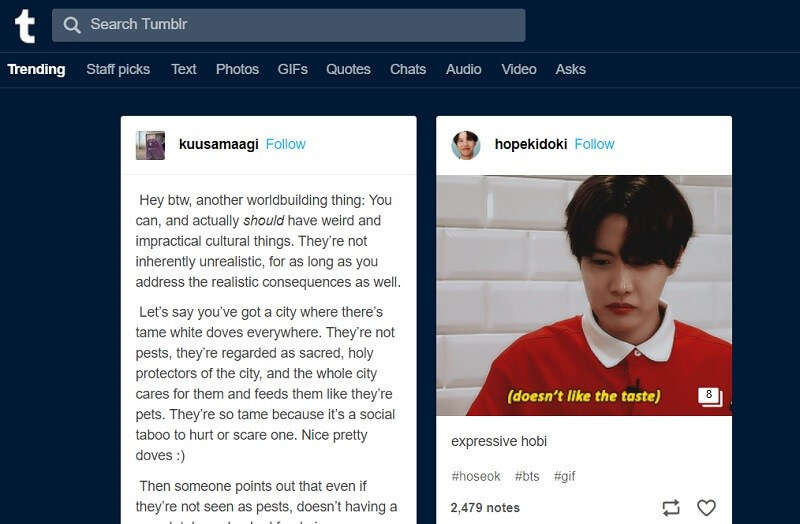
**Do I have to sign up?**--Yes, you need to sign up with Email, Password, and Username
**Is it free to download?**--You can download the animated GIFs into your local drive for free
**How many kinds of GIFs types available?**--The GIFs are organized with relevant searches like ‘Animals, Disney, Movie Stars, Marvel, Filmedit’ etc.
Highlights:
- A unique trending animated GIFs collection are available for free download
- You can also find audio related animated GIFs as templates in this online platform
- Easily reach out for the desired animated GIFs with a reliable search option.
10. MotionElements
It is a commercial platform with built-in animated GIFs collection displayed in an organized way. You can make a quick and uninterrupted download without any issues.
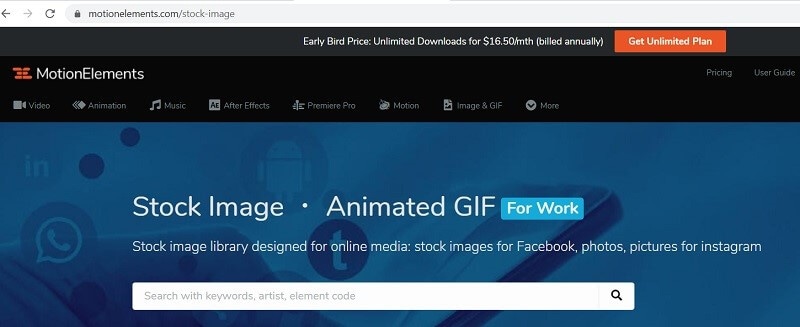
**Do I have to sign up?**--You must create an account with ‘First Name, Last Name, Email, and Password’.
**Is it free to download?**--You must purchase to access the best features in this online platform. The monthly subscription is $16.50 and $198 is billed annually. There is a credit package available depending on the number of downloads you make. The minimum credit package is 50 credits for $50.
**How many kinds of GIFs types available?**--There are 6 kinds of GIFs types are Popular, Aerial mode, Flowers, Sports, Architecture and Startup, etc.
Highlights:
- Customize the built-in GIFs templates available in this online platform
- Easily reach out for your desired GIFs using the search option
- Finest and quality animated GIFs serves the customer’s requirement aptly
Part 3: Make Your GIF with Wondershare Filmora
Wondershare Filmora is a sophisticated video editing software to bring creative changes to your image files in no time and make animated GIFs effortlessly. It is an extraordinary program customize and personalize your favorite pictures into animated GIFs to result in livelier emotions. It has a user-friendly interface and interacts with the users optimally displaying the explicit controls. It is enough if you follow the below steps to create stunning GIFs from your favorite clicks.


- First of all, you need to import the desired file into the timeline for creative changes.
- You can find a wide range of editing tools to make innovative changes in your file. The editing toolbox includes custom speed, crop, trim, split, combine, etc
- There are options to add texts and titles to your GIFs for more interactive results.
- Finally, export the edited GIFs by adjusting its resolution type into your local drive for future use.
It is compatible with all the audio and video formats like MP4, DAT, EVO, MKV, MPEG, AVI, etc and you can easily import the file into its timeline quickly. It is a free tool and you do not have to sign up to access the features in this program. This tool is available for Windows and Mac versions. Go to its official website and explore more the exciting facts of Wondershare Filmora’s GIF creator.
Conclusion
Thus, you had a nice informative journey on GIFs creators and how to download animated gifs for free at the cyberspace. There are ample platform allows you to download free GIFs quickly without any interruptions. Make use of the available sophisticated GIFs sources on the online environment and interact with your friends and family with funny GIFs on chat apps. And also, the Wondershare Filmora is a reliable platform to create animated GIFs with stunning editing tools and effects. Try out this program and feed your creativity with the right solution to obtain the desired outcomes. Always remember to use personal images to create GIFs on this tool and it is illegal to use copyrighted pictures or links for editing. Leave your comments and suggestions about this article and tune with us to explore exciting facts on the GIFs and animated interactive GIFs collections.
Shanoon Cox
Shanoon Cox is a writer and a lover of all things video.
Follow @Shanoon Cox
Shanoon Cox
Mar 27, 2024• Proven solutions
The GIF stands for ‘Graphic Interchange Format’. It reduces the file size without affecting the quality factor of the image. You can create GIFs as still images and animated files according to your requirements. You can download free GIFs as effortlessly from the online platform. Most social media users use GIFs to convey their emotions to their friends and family members in an impressive way. The animated GIF gives realistic feelings of the message what you want to convey. Many social media apps like Facebook, Twitter, WhatsApp, etc users employ this gif for effective communication with their dear ones. In this article, you are going to learn:
- Part 1: 5 Types of Popular GIF Downloads
- Part 2: Best 10 Websites to Download Animated GIFs
- Part 3: Make Your GIF with Wondershare Filmora
You may also like:
Part 1: 5 Types of Popular GIF Downloads
Many people often use animated gifs when they chat on social media platforms. In this part, I summarized 5 kinds of GIFs that people like to use most. Let’s see them first!
1. Good Morning/Afternoon/Night gifs
It is the startup message for any kind of relationship. This type of GIF helps to make friends with strangers you meet in the online platform. You can greet one another with blossoming Good mornings GIFs. Similarly, you can end the day with sparkling Good night GIFs. These GIFs help you to build a good relationship in the online platform and you can find ample free GIFs download with greeting texts.
2. Happy Birthday gifs
This type of GIF is commonly used by people worldwide to wish their loved ones on their special day. Some GIFs reveal a good wish and fewer animated GIFs portray a comic type wish to bring a smile on the special occasion of their best ones.
3. Thank You gifs
There is an immense collection of free GIFs download of Thanking texts. People go for these GIFs to show their gratitude. You can find formal Thanking GIFs used for your office colleagues and informal Thanking GIFs to make fun with your closed ones on the social media.
![]()
A cross-platform for making videos anywhere for all creators
Why your video editing isn’t good enough? How about some creative inspo?
- 100 Million+ Users
- 150+ Countries and Regions
- 4 Million+ Social Media Followers
- 5 Million+ Stock Media for Use
* Secure Download
4. Happy New Year gifs
You can explore and download free GIFs wishing the new beginning of the year. This GIF contains texts and positive messages for a good start of a year. Many people download these GIFs from the cyberspace on December 31st to greet their loved ones worldwide.
5. Love& Kiss gifs
As you all know that people hesitate to convey their love in reality and hence the current generation young minds use love and kiss GIFs to convey their love to dear ones. It brings a better impression than mere words.
Part 2: Best 10 Websites to Download Animated GIFs
You would be excited if you design your favorite GIFs to share with your friends and family. Instead of a GIFs download, you can use best-animated GIFs tools to create a unique image and animated texts to convey your message with your lovable souls worldwide through cyberspace.
- 1. Giphy
- 2. Gifer
- 3. AnimatedImages.org
- 4. Reaction GIFs
- 5. Imgflip
- 6. GIFbin
- 7. Reddit
- 8. Gfycat
- 9. Tumblr
- 10. MotionElements
1. Giphy
It is an online tool to create and upload GIFs. There are built-in templates for a free download without any difficulty. You can create theme-based GIFs to suit the appropriate situation as per your needs.
**Do I have to sign up?**--Yes, you need a sign up to make use of this tool using your Email address and password. You can also use your Facebook login and Apple account login for signup.
Is it free to download? --It is free to use but strictly prohibited for commercial purposes.
How many kinds of GIFs types available? --There are five kinds of GIFs types available. They are Reactions, Entertainment, Sports, Stickers and Artists, etc.
Highlights:
- User-friendly space to create GIFs
- You can upload your favorite clicks into the timeline to animate
- It allows you to download the images and videos from the online platform using the URLs. It permits links from YouTube and Vimeo.
2. Gifer
In this platform, you can create funny and interactive GIFs as per your needs effortlessly. Make use of this online environment to bring creativity to the words you wish to convey to your dear ones.
**Do I have to sign up?**--Yes, you have to sign up using Email Username and password or Facebook account to access the extended features of this application
**Is it free to download?**-- It is an online program to create your favorite GIFs
**How many kinds of GIFs types available?**-- More than 20 types of GIFs available at this platform
Highlights:
- You can easily download your desired GIFs template according to the GIFs type listed at the left side of the screen
- Easy to upload the GIFs from your local drive to animate
- The image files loads into the timeline quickly despite the file size
3. AnimatedImages.org
In this platform, you can find an ocean of animated GIFs flooded with stunning collections to suit your requirements without any compromises.
**Do I have to sign up?**--No need to sign up
**Is it free to download?**-- Free to download without any associated charges
**How many kinds of GIFs types available?**--More than 2000 categories of GIFs available at this platform
Highlights:
- Select the GIF category you wish to download the funny GIFs animated file
- The GIFs are listed out in an organized way for easy access to the users
- You can make free GIFs download effortlessly at this environment
4. Reaction GIFs
This online environment comprises of all types of reaction GIFs to use during appropriate situations. It is an exclusive platform portraying only the Reaction emotions.
**Do I have to sign up?**-- No, you do not have to sign up
**Is it free to download?**-- Yes, it is a free download
**How many kinds of GIFs types available?**-- There are 8 kinds of GIFs types available at this environment
Highlights
- Easy to access the right type of reaction GIFs at this platform
- You can find all types of reaction GIFs like Yes, No, Love, etc
- It has amazing collections of reaction GIFs in an organized manner
5. Imgflip
It is an online tool to create attractive GIFs for your needs. It is enough if you upload the images, arrange it, adjust the options, and generate the desired GIFs in no time.
**Do I have to sign up?**--Yes, you must sign up by creating a new account with the username and password else to make use of your Gmail account.
**Is it free to download?**--You can download the GIFs for free
**How many kinds of GIFs types available?**--You can create you won GIFs using the images, videos, website links, YouTube videos, etc
Highlights
- Easy to create GIFs using this online environment with explicit controls
- Quickly share the created GIF link to the social media network just by a single link
- Effortlessly upload the desired file to create stunning GIFs as per your needs.
6. GIFbin
In this online environment, you can download the built-in GIF templates of your choice in no time. The GIFs are available as a random collection and you can choose the right fit quickly according to your needs.
**Do I have to sign up?**--No, there is no signup process
**Is it free to download?**--Yes, you can download the GIFs free
**How many kinds of GIFs types available?**--The GIFs are organized in three tabs newest, top-rated, and viewed. There are no specific kind GIFs available. The GIFs are organized randomly.
Highlights:
- Excellent collections of built-in GIFs for free access
- Choose the desired tab named as newest, top-rated and viewed to access the desired GIFs
7. Reddit
A good collection of GIFs funnily portraying trendy stuff. Many GIFs are available on this platform to target hot happenings around the globe.
**Do I have to sign up?**--Yes, you must sign up with your Google account or Apple account else using your Email account.
**Is it free to download?**--Yes, free to download
**How many kinds of GIFs types available?**--There is no specific kinds but organized as Hot, New, and Top.
Highlights:
- You can find the latest and trendy GIFs with a funny message to convey
- Mostly used by social media users
- Easy to share your favorite GIFs in no time
8. Gfycat
In this online environment, you can create and download attractive GIFs according to your needs. This platform provides audio effects to the created GIFs to make the animation livelier.
**Do I have to sign up?**--Yes, you must sign up by creating a new Username and Password to access the desired features on this website.
**Is it free to download?**--You can download it easily without any cost
**How many kinds of GIFs types available?**--There are 8 types of GIFs such as Popular, Gaming, Reactions, Stickers, Celebrities, Sound, and Discover.
Highlights:
- You can create your GIFs in this online platform effortlessly
- Download the built-in GIFs easily from this website depending on your requirement
- you can upload the image from your local drive or you can paste the link from YouTube, Facebook, Twitch, Vimeo, Instagram, etc.
9. Tumblr
It is an excellent environment comprising trendy animated GIFs which suits your needs optimally. Download the animated link in your drive for free and use it on various social media on the chat platform effortlessly.
**Do I have to sign up?**--Yes, you need to sign up with Email, Password, and Username
**Is it free to download?**--You can download the animated GIFs into your local drive for free
**How many kinds of GIFs types available?**--The GIFs are organized with relevant searches like ‘Animals, Disney, Movie Stars, Marvel, Filmedit’ etc.
Highlights:
- A unique trending animated GIFs collection are available for free download
- You can also find audio related animated GIFs as templates in this online platform
- Easily reach out for the desired animated GIFs with a reliable search option.
10. MotionElements
It is a commercial platform with built-in animated GIFs collection displayed in an organized way. You can make a quick and uninterrupted download without any issues.
**Do I have to sign up?**--You must create an account with ‘First Name, Last Name, Email, and Password’.
**Is it free to download?**--You must purchase to access the best features in this online platform. The monthly subscription is $16.50 and $198 is billed annually. There is a credit package available depending on the number of downloads you make. The minimum credit package is 50 credits for $50.
**How many kinds of GIFs types available?**--There are 6 kinds of GIFs types are Popular, Aerial mode, Flowers, Sports, Architecture and Startup, etc.
Highlights:
- Customize the built-in GIFs templates available in this online platform
- Easily reach out for your desired GIFs using the search option
- Finest and quality animated GIFs serves the customer’s requirement aptly
Part 3: Make Your GIF with Wondershare Filmora
Wondershare Filmora is a sophisticated video editing software to bring creative changes to your image files in no time and make animated GIFs effortlessly. It is an extraordinary program customize and personalize your favorite pictures into animated GIFs to result in livelier emotions. It has a user-friendly interface and interacts with the users optimally displaying the explicit controls. It is enough if you follow the below steps to create stunning GIFs from your favorite clicks.
- First of all, you need to import the desired file into the timeline for creative changes.
- You can find a wide range of editing tools to make innovative changes in your file. The editing toolbox includes custom speed, crop, trim, split, combine, etc
- There are options to add texts and titles to your GIFs for more interactive results.
- Finally, export the edited GIFs by adjusting its resolution type into your local drive for future use.
It is compatible with all the audio and video formats like MP4, DAT, EVO, MKV, MPEG, AVI, etc and you can easily import the file into its timeline quickly. It is a free tool and you do not have to sign up to access the features in this program. This tool is available for Windows and Mac versions. Go to its official website and explore more the exciting facts of Wondershare Filmora’s GIF creator.
Conclusion
Thus, you had a nice informative journey on GIFs creators and how to download animated gifs for free at the cyberspace. There are ample platform allows you to download free GIFs quickly without any interruptions. Make use of the available sophisticated GIFs sources on the online environment and interact with your friends and family with funny GIFs on chat apps. And also, the Wondershare Filmora is a reliable platform to create animated GIFs with stunning editing tools and effects. Try out this program and feed your creativity with the right solution to obtain the desired outcomes. Always remember to use personal images to create GIFs on this tool and it is illegal to use copyrighted pictures or links for editing. Leave your comments and suggestions about this article and tune with us to explore exciting facts on the GIFs and animated interactive GIFs collections.
Shanoon Cox
Shanoon Cox is a writer and a lover of all things video.
Follow @Shanoon Cox
Top 10 Sketch Animation Video Makers
The Best 10 Sketch Animation Video Makers
An easy yet powerful editor
Numerous effects to choose from
Detailed tutorials provided by the official channel
Sketch animation has been in style for a very long time, and there is no doubt that it is a time-consuming process. But the sketch animation maker available these days helps us a lot. Are you aware of all these? Do you know how these are helping us currently?
Don’t worry if you are unaware because here we are discussing the same in detail and will help you to get the best tool for the same too. Let’s get started!
In this article
01 [What is a Sketch Animation?](#Part 1)
02 [How to Create Sketch Animation Videos with 10 Best Software](#Part 2)
03 [How to Make Sketch Animations](#Part 3)
Part 1 What is a Sketch Animation?
A sketch animation is a series of sketches that bring an idea to life. The drawings are usually rough and not perfect, but they are enough to tell a story. Sketch animations are used for many purposes, from advertising to product design. They can be used as a way to show a process or a product design in an easy-to-understand way.
Sketch animations can also be used for marketing purposes, such as explaining the features of a new product or promoting it with humour or through storytelling.
But to be someone who knows how to create the best sketches or videos, one needs to try their hands on the best sketch animation video maker too. One cannot achieve the desired results unless and until they are aware of a tool.
Part 2 How to Create Sketch Animation Videos with Best Software
In this section, we are discussing the best software to help you with Sketchup animation easily. All this software will cater to your needs for creating the best animations seamlessly. These are as follows:
01Animaker
Animaker is the most famous name in the list of software when you are looking for a whiteboard sketch animation maker. It features a drag and drop animation option, helping you to create the content easily. It is a suitable tool for professionals and beginners alike. It also offers thousands of templates that can be customised as per the needs of the user. You can simply utilise the stock videos and photos for better results.

Pros:
● Easy to use.
● The results are delivered quickly.
● It is suitable for professionals and beginners alike.
Cons:
● Some users complain about its interface.
● Sometimes video creation takes a lot of time.
02Renderforest video maker
Renderforest video maker is the best platform for all those who are looking to create sketch animation and other videos. It provides a free plan, and the same is available limitlessly for users. It features thousands of stock clips and a library of music tracks for creating the content seamlessly.

Pros:
● Easy to use.
● Different features are integrated.
● Impressive interface.
Cons:
● complaint about the content’s quality
03Powtoon
Powtoon is among the best visual communication platforms available, helping in creating short videos with animation. It features professionally designed templates along with some additional tools, including clips, audio, characters, and so on, which a user can utilize while creating the animation video. It comes up with paid and free options, and users can utilize any of them.

Pros:
● Easy to use.
● Templates are innovative.
● It makes engaging content.
Cons:
● Some find it difficult to use.
04Vyond
Vyond is among the best sketch animation makers and offers a free trial to all users. This is especially true for professionals with all the skills. Some pre-built templates are also there to help users create the content seamlessly. It features royalty-free music along with some stock characters that can be utilised in the content.

Pros:
● Good video creation tool.
● Many functions are integrated.
● One can upload content directly and get the animation.
Cons:
● Not for beginners,
05Keyshot
Keyshot is the best sketch animation software available these days. It features file formats along with some photorealistic rendering. The outcome created with it appears to be a real animation, and users can also add on some interactive visual studio. It also comes with a free trial, so users can use it and analyse whether they want to go for the paid version or not.

Pros:
● Innovative interface
● Support for two different extensions of models.
● A library of materials and textures is available.
Cons:
● Utilizing all the features seems to be difficult.
063ds Max Design
3ds Max design is the best sketch animation software for users when they are looking to create sketch animations. The best part is that it offers realistic animation behaviour along with all the sophisticated particle effects. There are certain third-party extensions that are available that a user can integrate for better results.

Pros:
● Third-party extensions are available.
● Realistic animation behaviour
● Procedural tools are available.
Cons:
● Beginners find it difficult to use.
07Moovly
Moovly is a cloud-based software with a drag and drop interface. Whenever you are looking to create sketch animations, this tool will help you out with it. It also has millions of free stock images and other content available, helping in creating the content as a user requires.

Pros:
● Simple to use
● Innovative interface
● Limitless features
Cons:
● The interface appears to be buggy sometimes.
08Harmony
Harmony is also among the best reproduction animation software available, which is helpful in creating the content with special lighting, shading, and special effects. There are certain options and features available to help in creating the content with the texture and sound management options. It comes in free and paid versions, and the free trial version will help users analyse whether they want to go for it or not.

Pros:
● Easy to use.
● Clean interface.
● Bugs free.
Cons:
● Beginners find it difficult to use.
09Modo
Modo is the best modeling, rendering, texturing, and sketch animation software available. Whenever you are looking for a sketch animation maker, this tool will definitely hit the top. The navigation through the software is really very easy, and users can get the outcome immediately as they want.

Pros:
● Navigation throughout is easy.
● The interface is innovative.
● by 7 community is available to help in case of issues
Cons:
● Outcome delivered bit lately.
10Cinema 4D
Cinema is among the software available for sketch animation that has an innovative interface along with some additional features. It comes with object tracking and some cartoon styling features that help users get the outcome they want. A free trial option is also integrated for convenience.

Pros:
● Easy to use.
● Additional layouts are integrated.
● Mouse shortcuts are easy to use.
Cons:
● Beginners find it difficult to use.
Part 3 How to Make Sketch Animations
Well, when it comes to making sketch animations, users are confused about the steps that they need to follow for the same. Well, do know that the steps are very simple to follow and one can easily complete the task with a few steps. The steps needed to be followed are:
01Step 1 Write and record the script
Writing and recording the script is the primary step a user needs to follow. It is helpful in analyzing where to start and how they want the animation sketch to come out. Get the organizational structures available and then integrate them according to the recorded script.
02Step 2 Create a storyboard
Get the storyboard or, say, the sketch animation maker like Filmora, available and start keeping the recorded stuff over the same in the best manner possible. After implementing the changes, test the same.
03Step 3 Draw it out
After managing all the things, it is integral to sketch the same. The tools are integrated into the software like Filmora, helping you to put things accordingly. You can also do the customizations required if required.
04Step 4 Scanning and editing
Now you need to scan the complete content and do any editing required. This part is among the most crucial ones because, after finalizing the outcome, you will not be able to do the editing. However, if you want to do the editing, you need to repeat the entire process. Check things out mindfully.
05Step 5 Play Filmora once more
When you are done editing the images and creating the sketch animation, put them on Filmora for the final results.
Wondershare Filmora Video Editor is one of the efficient tools available for users to create sketch animated videos easily. This tool has all the advanced features integrated, making the task easy to achieve. Also, it features a customization option, helping users to add on or extract things or effects easily and rapidly.
Wondershare Filmora
Get started easily with Filmora’s powerful performance, intuitive interface, and countless effects!
Try It Free Try It Free Try It Free Learn More >

● Key Takeaways from This Episode →
● Sketch animation is a new art form used for many purposes.
● Filmora is one of the best sketch animation video makers.
● Sketch animsation tools are best for us for creating the desired outcome.
Sketch animation has been in style for a very long time, and there is no doubt that it is a time-consuming process. But the sketch animation maker available these days helps us a lot. Are you aware of all these? Do you know how these are helping us currently?
Don’t worry if you are unaware because here we are discussing the same in detail and will help you to get the best tool for the same too. Let’s get started!
In this article
01 [What is a Sketch Animation?](#Part 1)
02 [How to Create Sketch Animation Videos with 10 Best Software](#Part 2)
03 [How to Make Sketch Animations](#Part 3)
Part 1 What is a Sketch Animation?
A sketch animation is a series of sketches that bring an idea to life. The drawings are usually rough and not perfect, but they are enough to tell a story. Sketch animations are used for many purposes, from advertising to product design. They can be used as a way to show a process or a product design in an easy-to-understand way.
Sketch animations can also be used for marketing purposes, such as explaining the features of a new product or promoting it with humour or through storytelling.
But to be someone who knows how to create the best sketches or videos, one needs to try their hands on the best sketch animation video maker too. One cannot achieve the desired results unless and until they are aware of a tool.
Part 2 How to Create Sketch Animation Videos with Best Software
In this section, we are discussing the best software to help you with Sketchup animation easily. All this software will cater to your needs for creating the best animations seamlessly. These are as follows:
01Animaker
Animaker is the most famous name in the list of software when you are looking for a whiteboard sketch animation maker. It features a drag and drop animation option, helping you to create the content easily. It is a suitable tool for professionals and beginners alike. It also offers thousands of templates that can be customised as per the needs of the user. You can simply utilise the stock videos and photos for better results.
Pros:
● Easy to use.
● The results are delivered quickly.
● It is suitable for professionals and beginners alike.
Cons:
● Some users complain about its interface.
● Sometimes video creation takes a lot of time.
02Renderforest video maker
Renderforest video maker is the best platform for all those who are looking to create sketch animation and other videos. It provides a free plan, and the same is available limitlessly for users. It features thousands of stock clips and a library of music tracks for creating the content seamlessly.
Pros:
● Easy to use.
● Different features are integrated.
● Impressive interface.
Cons:
● complaint about the content’s quality
03Powtoon
Powtoon is among the best visual communication platforms available, helping in creating short videos with animation. It features professionally designed templates along with some additional tools, including clips, audio, characters, and so on, which a user can utilize while creating the animation video. It comes up with paid and free options, and users can utilize any of them.
Pros:
● Easy to use.
● Templates are innovative.
● It makes engaging content.
Cons:
● Some find it difficult to use.
04Vyond
Vyond is among the best sketch animation makers and offers a free trial to all users. This is especially true for professionals with all the skills. Some pre-built templates are also there to help users create the content seamlessly. It features royalty-free music along with some stock characters that can be utilised in the content.
Pros:
● Good video creation tool.
● Many functions are integrated.
● One can upload content directly and get the animation.
Cons:
● Not for beginners,
05Keyshot
Keyshot is the best sketch animation software available these days. It features file formats along with some photorealistic rendering. The outcome created with it appears to be a real animation, and users can also add on some interactive visual studio. It also comes with a free trial, so users can use it and analyse whether they want to go for the paid version or not.
Pros:
● Innovative interface
● Support for two different extensions of models.
● A library of materials and textures is available.
Cons:
● Utilizing all the features seems to be difficult.
063ds Max Design
3ds Max design is the best sketch animation software for users when they are looking to create sketch animations. The best part is that it offers realistic animation behaviour along with all the sophisticated particle effects. There are certain third-party extensions that are available that a user can integrate for better results.
Pros:
● Third-party extensions are available.
● Realistic animation behaviour
● Procedural tools are available.
Cons:
● Beginners find it difficult to use.
07Moovly
Moovly is a cloud-based software with a drag and drop interface. Whenever you are looking to create sketch animations, this tool will help you out with it. It also has millions of free stock images and other content available, helping in creating the content as a user requires.
Pros:
● Simple to use
● Innovative interface
● Limitless features
Cons:
● The interface appears to be buggy sometimes.
08Harmony
Harmony is also among the best reproduction animation software available, which is helpful in creating the content with special lighting, shading, and special effects. There are certain options and features available to help in creating the content with the texture and sound management options. It comes in free and paid versions, and the free trial version will help users analyse whether they want to go for it or not.
Pros:
● Easy to use.
● Clean interface.
● Bugs free.
Cons:
● Beginners find it difficult to use.
09Modo
Modo is the best modeling, rendering, texturing, and sketch animation software available. Whenever you are looking for a sketch animation maker, this tool will definitely hit the top. The navigation through the software is really very easy, and users can get the outcome immediately as they want.
Pros:
● Navigation throughout is easy.
● The interface is innovative.
● by 7 community is available to help in case of issues
Cons:
● Outcome delivered bit lately.
10Cinema 4D
Cinema is among the software available for sketch animation that has an innovative interface along with some additional features. It comes with object tracking and some cartoon styling features that help users get the outcome they want. A free trial option is also integrated for convenience.
Pros:
● Easy to use.
● Additional layouts are integrated.
● Mouse shortcuts are easy to use.
Cons:
● Beginners find it difficult to use.
Part 3 How to Make Sketch Animations
Well, when it comes to making sketch animations, users are confused about the steps that they need to follow for the same. Well, do know that the steps are very simple to follow and one can easily complete the task with a few steps. The steps needed to be followed are:
01Step 1 Write and record the script
Writing and recording the script is the primary step a user needs to follow. It is helpful in analyzing where to start and how they want the animation sketch to come out. Get the organizational structures available and then integrate them according to the recorded script.
02Step 2 Create a storyboard
Get the storyboard or, say, the sketch animation maker like Filmora, available and start keeping the recorded stuff over the same in the best manner possible. After implementing the changes, test the same.
03Step 3 Draw it out
After managing all the things, it is integral to sketch the same. The tools are integrated into the software like Filmora, helping you to put things accordingly. You can also do the customizations required if required.
04Step 4 Scanning and editing
Now you need to scan the complete content and do any editing required. This part is among the most crucial ones because, after finalizing the outcome, you will not be able to do the editing. However, if you want to do the editing, you need to repeat the entire process. Check things out mindfully.
05Step 5 Play Filmora once more
When you are done editing the images and creating the sketch animation, put them on Filmora for the final results.
Wondershare Filmora Video Editor is one of the efficient tools available for users to create sketch animated videos easily. This tool has all the advanced features integrated, making the task easy to achieve. Also, it features a customization option, helping users to add on or extract things or effects easily and rapidly.
Wondershare Filmora
Get started easily with Filmora’s powerful performance, intuitive interface, and countless effects!
Try It Free Try It Free Try It Free Learn More >
● Key Takeaways from This Episode →
● Sketch animation is a new art form used for many purposes.
● Filmora is one of the best sketch animation video makers.
● Sketch animsation tools are best for us for creating the desired outcome.
Techniques on Making After Effects 2D Animation
Adobe After Effects is probably the most versatile software you can add to your arsenal of skills on your journey to learn After Effects 2D animation. Both beginners and professionals can brush up their animation skills on After Effects with some help from tutorials and videos. When it comes to experimenting with visual effects, motion graphics, and 3D composting, Adobe After Effects is recommended as an industry-standard software. So it should come as no surprise that there is a surplus of After Effects tutorials and information on the internet. To help simplify things, here’s a compiled list of Adobe After Effects courses along with a few tips to get started.
In this article
01 [Practical Online 2D Animation Courses](#Part 1)
02 [How to Create 2D Motion Graphics with After Effects](#Part 2)
03 [5 Best Animation After Effects that you must know](#Part 3)
04 [5 Character Animation Tools for After Effects](#Part 4)
Part 1 Practical Online 2D Animation Courses
Learning After Effects need not be complicated. You can use this tool to help you create amazing designs from your sheer imagination. Here is a list of the best courses which are self-paced so you don’t need to worry about fitting them into your schedule. Some of these courses are primarily for beginners who are seeking to orient themselves to the basics. While other courses have recent insights into the latest techniques curated by the industry experts. The courses in this list are diverse and are from different platforms like Domestika, Coursera, Adobe, and YouTube.
1. Getting Started - Adobe
The official Adobe learning site has its own course for introducing After Effects. After all, the software is a product of Adobe itself. This tutorial is purely for complete beginners and is designed to briefly introduce the interface and basic functioning of Adobe After Effects. It takes you through the manual control and menu options which you will need to familiarize yourself with.
2. The Basics – YouTube
This free-to-watch After Effects tutorial is presented by a very passionate photographer and YouTuber Peter Meckinnon. He walks you through the various elements the Adobe interface puts at your disposal. These elements are quite artistically introduced by Peter as he animates a basic title project on Adobe.
3. How to Animate a line - YouTube
When you are introduced to a vast world of possibilities, it can be a bit overwhelming. Which is why starting from the very basics is always a good idea. This next YouTube tutorial shows you step by step how to animate a line on Adobe After Effects from one point to another.
4. Introduction and Advanced After Effects – Domestika
Domestika is an online learning platform that is great for freelancers and independent artists who can purchase self-paced lessons on topics like graphic design and animation. The Introduction and Advanced After Effects tutorials by Carlos Zensuke Albarran are a comprehensive bundle of lessons that quench your thirst for 2D effects animation a bit further.
5. Typography Animation – Domestika
The mark of a professional is his specialization. As you gain more experience in practicing Adobe After Effects, you can begin trying out more bold and stylistic animations with simple typographic techniques. It would not only make you more confident as a motion graphics designer but also equip you with fluid skills as a freelancer. Typographic motion graphics is a cash cow for many After Effect animators.
6. Vectorial Animation – Domestika
Cartoonist animated videos and motion designs are quite interesting to animate. Vectorial 2D animation is quite popular among YouTube tutorials and explainer videos. They make for excellent corporate animations. You can find an amazing Domestika tutorial on Vectorial that walks you through in simple steps on Frame by Frame style animations.
7. Getting Started with Motion Graphics - Coursera
Coursera is another amazing online learning platform for gaining access to Beginner to Advanced courses on Adobe After Effects. This one tutorial introduces you to Beginner level motion graphics where you can learn from short self-paced videos.
8. Getting Started with Motion Graphics - SkillShare
SkillShare is another amazing online learning platform for gaining access to Beginner to Advanced courses on Adobe After Effects. This one tutorial introduces you to Beginner level motion graphics where you can learn from short self-paced videos. It is guided by a leading professional in motion graphics and visual effects who covers all the bases alongside hands-projects.
9. Make Simple Logo Intro in After Effects – YouTube
Creating Intros for your videos is probably the most cost-effective marketing gizmos employed today. This free tutorial on YouTube from Tech Infusion is a simple-to-follow video that sheds some light on how to create eye-catching intros that instantly catches your audience’s attention.
10. Work with Composition - Adobe
Working with After Effects is all about creating gorgeous compositions that pop. This Adobe tutorial equips you with the basics of creating animation on Adobe After Effects with multiple layers and keyframes.
Part 2 How to Create 2D Motion Graphics with After Effects
The astonishing world of intriguing after-effects is vast. Whether you do it as a profession or simply as a hobby, learning how to add after-effects to your 2d motion graphics is always an amazing idea. Worried how you’d understand the tools to add after-effects to your animation? Well, we’ve got you covered! Today we’ll be looking at how you can add after-effects to your 2d animation.

●To make a new 2D graphics in after effects, you need to make a new composition. To do so, head to the composition menu in the menu bar. Upon clicking on the composition menu, a new drop-down menu would open up. From the drop-down menu, click on “new composition”.

●A new setting box would pop up, in this settings box you can alter the settings of the composition. If you do not wish to change any setting, simply click on “ok” and proceed ahead.

●Next, you need to find the tool panel in the main menu bar. Upon clicking on it, a new drop-down menu will appear, click on “star tool”. We’re simply taking the star shape, for instance, alternatively, you can select and another shape too…

●Once you’ve selected the shape you want, draw by clicking your mouse and dragging

●Click on the shape and the layers will appear on the left of your screen. From the popped up screen, click on “properties”. Here you can find multiple animation options and you can even edit frame by frame. Add frames at regular intervals and move according to your wish

Part 3 5 Best Animation After Effects that you must know
1. Stacking animation – YouTube
Stacking animation is an excellent and simple trick that can make any animation look cool and complex. The stacking animation is nothing but the use of the stacking template multiple times. To do so, you just need to duplicate a few of the base layers. Next, you need to offset the duplicated frames by a few frames and finally add some effects. The Adding of stacking animation will result in a slight extension of your animation layers. You can further customize your frames by adding effects or color to enhance the animation.

2. Light sweeps
An advantage of using the after effects software is that it offers several drag and drop features which you can simply drag and drop to your animation to enhance its looks. A light sweep animation is one such animation that can add great value to your animation. You can add this effect by following the steps given below
●Head to “effects” from your main interface
●Here you need to find “generate”
●Now from the list of drag and drop animations, drag and drop “light sweeps” onto your workspace
You can then change and customize almost any aspect of the animation simply by clicking on it and changing the settings

3. Quick shape animation
This is a very cool trick that you can use on your 2d objects! This includes the creation of your own layer(you can use any 2d shape). Further, you need to duplicate your shape and the stagger the animation. This gives the entire animation an interesting and engaging effect. The trick is very resourceful while dealing with 2d objects.

4. Animate your background
When your entire animation looks slightly basic and you wish to give your animation a zest, this trick is highly useful! If you’re working with colored backgrounds, this animation trick can help make it more attractive. This animation is simply just adding motion to your background making it look like it’s moving in or out.

5. Graphics reflection
Although this method is slightly complicated, it could enhance the animation by leaps and bounds. To do so, you need to write a fancy text of your choice, then you need to duplicate this text, and further, you need to flip it vertically. To make it look more realistic, you can add the blur effect. This will make it look like the duplicated text is a reflection of the original text

Part 4 5 Character Animation Tools for After Effects
1. Rubber hose 2
Rubber hose is one of the primitive tools for adding animations. This is mainly because it was found in the early 2000s and back then, animations had wobbly legs and an absurd body structure. This tool has several cool inbuilt functions that make the animation so much simpler. The robust tool. makes animation pretty simple and hassle-free. Rubber hose 2 is an advanced version of rubber hose, it has several advanced features. The plug-in is however not free, you’d need to purchase it at $45 in order to gain a lifetime access.
2. Duik
Duik is one of the most advanced and comprehensive character animation tools in the market. It was initially launched in 2008, but since then there’s been a vast improvement in the tool’s features and today it’s one of the picks to perform animation using rigging and other animation techniques. Duik has several tools that make the animation so convenient. The tool has features such as auto rig, which helps save time while animating. Other tools include effects such as bones, rigging, various filters, and effects.
3. Joystick ‘n sliders
Joystick’n sliders is another highly utilitarian tool for animators. Along with key animation features such as rigging and boning, the tool has other cool and highly useful features to make your animation interesting! The user interface of this tool is a big plus, the simplicity of the user interface makes the tool perfect for beginners and advanced level animators. The tool is simple to use and has a plethora of cool features which could help you make your animation highly engaging.
4. Puppet tool 3
Puppet tool 3 is an after effects plugin that could help you create character animations. The plug-in is different from the in-built puppet tool in after effects. The puppet tool inbuilt into after effects are the Rigging tool for animation, however using the inbuilt tool is slightly sophisticated. Puppet tool 3 is not an individual tool but works in coordination with the inbuilt the puppet tool. Since using the inbuilt tool was complex, puppet tool 3 made it simple. Apart from rigging, the plugin also allows you to work with a few additional features. You can buy the plug-in for only $39.95!
5. Adobe animate character
Adobe character animation is the in-house plugin of Adobe to animate characters. However, the tool is probably still in development. Adobe has been working on releasing this tool for a while now, and in the latest version of after effects, Adobe added the beta version of the character animator. Character animator is probably the most efficient and advanced animation tool. It uses facial recognition for animations and allows you to perform almost all basic animations. The software is perfect when you’re trying to create a complex animated character.
Key Takeaways from This Episode
● Today we’ve dwelled a lot into animation and the tools available for animation.
● We’ve seen how animation could be enhanced using the inbuilt tools available in Adobe after effects.
● We’ve also gone a step further and seen the external plugin tools that you can use to make character animations and highly advanced 2d effects ok animations.
● We’ve also taken an overview on how to create a simple basic 2d motion animation, all in all, we’ve gone from understanding the beginner level animation to understanding advanced animation
02 [How to Create 2D Motion Graphics with After Effects](#Part 2)
03 [5 Best Animation After Effects that you must know](#Part 3)
04 [5 Character Animation Tools for After Effects](#Part 4)
Part 1 Practical Online 2D Animation Courses
Learning After Effects need not be complicated. You can use this tool to help you create amazing designs from your sheer imagination. Here is a list of the best courses which are self-paced so you don’t need to worry about fitting them into your schedule. Some of these courses are primarily for beginners who are seeking to orient themselves to the basics. While other courses have recent insights into the latest techniques curated by the industry experts. The courses in this list are diverse and are from different platforms like Domestika, Coursera, Adobe, and YouTube.
1. Getting Started - Adobe
The official Adobe learning site has its own course for introducing After Effects. After all, the software is a product of Adobe itself. This tutorial is purely for complete beginners and is designed to briefly introduce the interface and basic functioning of Adobe After Effects. It takes you through the manual control and menu options which you will need to familiarize yourself with.
2. The Basics – YouTube
This free-to-watch After Effects tutorial is presented by a very passionate photographer and YouTuber Peter Meckinnon. He walks you through the various elements the Adobe interface puts at your disposal. These elements are quite artistically introduced by Peter as he animates a basic title project on Adobe.
3. How to Animate a line - YouTube
When you are introduced to a vast world of possibilities, it can be a bit overwhelming. Which is why starting from the very basics is always a good idea. This next YouTube tutorial shows you step by step how to animate a line on Adobe After Effects from one point to another.
4. Introduction and Advanced After Effects – Domestika
Domestika is an online learning platform that is great for freelancers and independent artists who can purchase self-paced lessons on topics like graphic design and animation. The Introduction and Advanced After Effects tutorials by Carlos Zensuke Albarran are a comprehensive bundle of lessons that quench your thirst for 2D effects animation a bit further.
5. Typography Animation – Domestika
The mark of a professional is his specialization. As you gain more experience in practicing Adobe After Effects, you can begin trying out more bold and stylistic animations with simple typographic techniques. It would not only make you more confident as a motion graphics designer but also equip you with fluid skills as a freelancer. Typographic motion graphics is a cash cow for many After Effect animators.
6. Vectorial Animation – Domestika
Cartoonist animated videos and motion designs are quite interesting to animate. Vectorial 2D animation is quite popular among YouTube tutorials and explainer videos. They make for excellent corporate animations. You can find an amazing Domestika tutorial on Vectorial that walks you through in simple steps on Frame by Frame style animations.
7. Getting Started with Motion Graphics - Coursera
Coursera is another amazing online learning platform for gaining access to Beginner to Advanced courses on Adobe After Effects. This one tutorial introduces you to Beginner level motion graphics where you can learn from short self-paced videos.
8. Getting Started with Motion Graphics - SkillShare
SkillShare is another amazing online learning platform for gaining access to Beginner to Advanced courses on Adobe After Effects. This one tutorial introduces you to Beginner level motion graphics where you can learn from short self-paced videos. It is guided by a leading professional in motion graphics and visual effects who covers all the bases alongside hands-projects.
9. Make Simple Logo Intro in After Effects – YouTube
Creating Intros for your videos is probably the most cost-effective marketing gizmos employed today. This free tutorial on YouTube from Tech Infusion is a simple-to-follow video that sheds some light on how to create eye-catching intros that instantly catches your audience’s attention.
10. Work with Composition - Adobe
Working with After Effects is all about creating gorgeous compositions that pop. This Adobe tutorial equips you with the basics of creating animation on Adobe After Effects with multiple layers and keyframes.
Part 2 How to Create 2D Motion Graphics with After Effects
The astonishing world of intriguing after-effects is vast. Whether you do it as a profession or simply as a hobby, learning how to add after-effects to your 2d motion graphics is always an amazing idea. Worried how you’d understand the tools to add after-effects to your animation? Well, we’ve got you covered! Today we’ll be looking at how you can add after-effects to your 2d animation.
●To make a new 2D graphics in after effects, you need to make a new composition. To do so, head to the composition menu in the menu bar. Upon clicking on the composition menu, a new drop-down menu would open up. From the drop-down menu, click on “new composition”.
●A new setting box would pop up, in this settings box you can alter the settings of the composition. If you do not wish to change any setting, simply click on “ok” and proceed ahead.
●Next, you need to find the tool panel in the main menu bar. Upon clicking on it, a new drop-down menu will appear, click on “star tool”. We’re simply taking the star shape, for instance, alternatively, you can select and another shape too…
●Once you’ve selected the shape you want, draw by clicking your mouse and dragging
●Click on the shape and the layers will appear on the left of your screen. From the popped up screen, click on “properties”. Here you can find multiple animation options and you can even edit frame by frame. Add frames at regular intervals and move according to your wish
Part 3 5 Best Animation After Effects that you must know
1. Stacking animation – YouTube
Stacking animation is an excellent and simple trick that can make any animation look cool and complex. The stacking animation is nothing but the use of the stacking template multiple times. To do so, you just need to duplicate a few of the base layers. Next, you need to offset the duplicated frames by a few frames and finally add some effects. The Adding of stacking animation will result in a slight extension of your animation layers. You can further customize your frames by adding effects or color to enhance the animation.
2. Light sweeps
An advantage of using the after effects software is that it offers several drag and drop features which you can simply drag and drop to your animation to enhance its looks. A light sweep animation is one such animation that can add great value to your animation. You can add this effect by following the steps given below
●Head to “effects” from your main interface
●Here you need to find “generate”
●Now from the list of drag and drop animations, drag and drop “light sweeps” onto your workspace
You can then change and customize almost any aspect of the animation simply by clicking on it and changing the settings
3. Quick shape animation
This is a very cool trick that you can use on your 2d objects! This includes the creation of your own layer(you can use any 2d shape). Further, you need to duplicate your shape and the stagger the animation. This gives the entire animation an interesting and engaging effect. The trick is very resourceful while dealing with 2d objects.
4. Animate your background
When your entire animation looks slightly basic and you wish to give your animation a zest, this trick is highly useful! If you’re working with colored backgrounds, this animation trick can help make it more attractive. This animation is simply just adding motion to your background making it look like it’s moving in or out.
5. Graphics reflection
Although this method is slightly complicated, it could enhance the animation by leaps and bounds. To do so, you need to write a fancy text of your choice, then you need to duplicate this text, and further, you need to flip it vertically. To make it look more realistic, you can add the blur effect. This will make it look like the duplicated text is a reflection of the original text
Part 4 5 Character Animation Tools for After Effects
1. Rubber hose 2
Rubber hose is one of the primitive tools for adding animations. This is mainly because it was found in the early 2000s and back then, animations had wobbly legs and an absurd body structure. This tool has several cool inbuilt functions that make the animation so much simpler. The robust tool. makes animation pretty simple and hassle-free. Rubber hose 2 is an advanced version of rubber hose, it has several advanced features. The plug-in is however not free, you’d need to purchase it at $45 in order to gain a lifetime access.
2. Duik
Duik is one of the most advanced and comprehensive character animation tools in the market. It was initially launched in 2008, but since then there’s been a vast improvement in the tool’s features and today it’s one of the picks to perform animation using rigging and other animation techniques. Duik has several tools that make the animation so convenient. The tool has features such as auto rig, which helps save time while animating. Other tools include effects such as bones, rigging, various filters, and effects.
3. Joystick ‘n sliders
Joystick’n sliders is another highly utilitarian tool for animators. Along with key animation features such as rigging and boning, the tool has other cool and highly useful features to make your animation interesting! The user interface of this tool is a big plus, the simplicity of the user interface makes the tool perfect for beginners and advanced level animators. The tool is simple to use and has a plethora of cool features which could help you make your animation highly engaging.
4. Puppet tool 3
Puppet tool 3 is an after effects plugin that could help you create character animations. The plug-in is different from the in-built puppet tool in after effects. The puppet tool inbuilt into after effects are the Rigging tool for animation, however using the inbuilt tool is slightly sophisticated. Puppet tool 3 is not an individual tool but works in coordination with the inbuilt the puppet tool. Since using the inbuilt tool was complex, puppet tool 3 made it simple. Apart from rigging, the plugin also allows you to work with a few additional features. You can buy the plug-in for only $39.95!
5. Adobe animate character
Adobe character animation is the in-house plugin of Adobe to animate characters. However, the tool is probably still in development. Adobe has been working on releasing this tool for a while now, and in the latest version of after effects, Adobe added the beta version of the character animator. Character animator is probably the most efficient and advanced animation tool. It uses facial recognition for animations and allows you to perform almost all basic animations. The software is perfect when you’re trying to create a complex animated character.
Key Takeaways from This Episode
● Today we’ve dwelled a lot into animation and the tools available for animation.
● We’ve seen how animation could be enhanced using the inbuilt tools available in Adobe after effects.
● We’ve also gone a step further and seen the external plugin tools that you can use to make character animations and highly advanced 2d effects ok animations.
● We’ve also taken an overview on how to create a simple basic 2d motion animation, all in all, we’ve gone from understanding the beginner level animation to understanding advanced animation
https://images.wondershare.com/filmora/article-images/filmora9-website
2D Character Animation: Everything You Should Know About It
An easy yet powerful editor
Numerous effects to choose from
Detailed tutorials provided by the official channel
2D character animation is one of the significant kinds of animation popularly used for creating animated movies, marketing videos, cartoons, advertisements, educational content, corporate presentations, video games, etc.
With the popularity of video content, more and more businesses tend to use animation for promotion, as they magnify conversion rates by 20%. Some companies hire 2D character animation services; others try to make them online with software help.
In this article
01 [What is 2D Character Animation and What Does 2D Animation Do?](#Part 1)
02 [2D Character Animation Tips and Tricks](#Part 2)
03 [An Ultimate Guide to Create 2D Character Animation Online](#Part 3)
04 [5 Great 2D Character Animation Templates](#Part 4)
Part 1 What is 2D Character Animation and What Does 2D Animation Do?
2D animation is identified by having its characters and objects created in a 2D space. It means that they only have height and width to specify.
However, 2D animation is considered a traditional style, known from the 1800s. Initially, it was designed by merging the frames in which one drawing was followed by another and making them different; every second consists of 24 frames.
We all remember the classic Disney animations. Snow White and the Seven Dwarfs, The Little Mermaid, Bambi, etc. They are some of the highly famous 2D animation styles.
With the advancement of computer technologies, this process also got digitized through various 2D character animation software.
In this guide, we’ll talk about everything relatable to 2D character animation, and let’s proceed with the expert tips and tricks to create inspirational style within animation character 2D.
Part 2 2D Character Animation Tips and Tricks
01Look for a real-time reference
Using a real-world reference for 2D character animation can help you effectively animate faces. For example, when studios collaborate with voice-over artists, they often record their facial movements. It further helps 2D animators to ensure their expressions get captured convincingly.
If it seems impossible, you can consider using your face, so you have something to refer back to. You could also use a mirror and utter the words your character will speak. It will display the correct animated expressions.
02Observe real life
You need to use observation a lot more. One of the primary aspects of 2D character animation is bringing life to animate objections. Therefore, you must carefully consider how emotion can get portrayed and select each movement accordingly.
Take time watching how people in real-life environments talk and interact with each other, how they express emotions, how they move, etc. Please don’t spend much time doing this, as it is valuable to research.
03Simplicity is the key
2D character animation is never complex compared with 3D. Think carefully before creating a scene too complicated. You must not include too much information, which is hard to digest, and you may even find yourself compromising the scene’s realism. Try not to heavy the stage with too many pose changes or other elements, and keep it genuine.
04Draw animation again and again
Drawing animation consumes a lot of time. You can’t complete it within one day, so you better know deep down that one task only can be done after you have revamped it various times. For 2D character animation, you may need to draw objects on paper several times.
You can’t master the skill of animation character 2D quickly. Luckily, all pains will be relieved someday.
05Feedback is important
Feedback is an essential element of artistic development. It’s wise to actively seek out feedback from familiar figures who can help you enhance. Naturally, we may see work we have invested a great deal of time and effort indifferently to someone not so involved in the creative process. Feedback can equate to a valuable learning opportunity that will assist you produce the results hit the spot much more appropriately.
Part 3 An Ultimate Guide to Create 2D Character Animation Online
Let’s now look at making an illustrated 2D character animation move on a screen.
While there are nearly numerous options for 2D character animation tools and software, this tutorial will animate a character in Adobe After Effects.
Steps to create 2D character animation After Effects
01Step 1: Download and Install Duik
You need to install the Duik animation plugin for Adobe After Effects to simplify the whole process. You can animate and rig characters’ entire limbs with Duik using just the placement of their feet and hands.
While this isn’t an essential step, it can be valuable for beginners, as you’ll see in this tutorial. Luckily, Duik is available for free from Rainbox Laboratory.
02Step 2: Design Your Character
You need a moving character before you’re able to start animating. You can create this character in Adobe Illustrator and import it into After Effects.
Try creating a straightforward character with an aim on the character’s limbs.
In the example mentioned below, you can see that the body is a very rudimentary shape—a circle—with long legs that make it simple to consider the animation process.

Check the character’s joints. Making a round joint between the lower and upper parts of the legs, for instance, will help the character move more smoothly.

03Step 3: Make and Import Your Character Artwork
Now, you’ll need to make a few final adjustments before moving your character artwork. Break your character out into layers firstly. Every section of the character that will move independently needs a separate layer.
So, layers include his circular body, face, and the leg’s segments (i.e., lower leg, upper leg, and foot).

To import your character artwork, go to File, click the Import tab, and choose your character file. Ensure that you need to import it as a composition to ensure it includes the layers you just created.
04Step 4: Establish Initial Character Rigging
Now, the 2D character animation is almost over by the initial rigging.
Firstly, lower the opacity of all your layers to above 50% to see the critical joints within the character.
Next, you must ensure that the joints hinge in the ideal direction. It’s simple to do with the anchor point tool. For each character’s layer, place the anchor point at the center of gravity for each layer of the 2D character animation.
The anchor point would probably go between the eyes for the layer of the face (i.e., the nose, eyes, and mouth). For each legs’ section, hold the anchor point where the leg will hinge (e.g., the anchor point would be at the highest point for the leg’s upper portion, where it meets the body).

Then, use the parent tool to join the limbs’ sections. For instance, the parent of the foot would be the lower leg, and the upper portion is the parent of the lower leg.
It makes sure that the leg moves together as one unit with multiple hinge points.
Finally, use the Duik toolbar to create character controllers. Controllers control the rotation and position of critical elements within your character. For the ankles of the 2D character animation, you would select the controller that encompasses both the rotation and position.
05Step 5: Create Your Rig
Use the Duik toolbar to create a rig. Select each layer from the extremities inward from each limb, lasting with your controllers.
You would select the ankle for a leg, followed by the upper portion, the lower leg, and conclusively, the controller at the ankle. Then, select auto-rig within the Rigging area of the Duik toolbar.
The entire leg will move when you move that ankle controller. If your character contains them, repeat the process for the other leg, along with other limbs.
Before proceeding, test the limbs to make sure they hinge and move correctly. You need to adjust the opacity of the character back to 100% once you are satisfied with the movements.

06Step 6: Start Animating Your Character
You can begin animating after completing a rig. First, create keyframes—the ending and beginning points of the character’s movement. The character’s legs are at their most magnified are thus the endpoints for a walk cycle. Make sure that the beginning and ending of keyframes are identical to get an ideal loop.
Start adding in-between frames from there, like when one leg crosses over the other in the middle of a walking stride.
Moreover, you can add ‘easing” to the animation via 2D character animation After Effects’ Easy Ease tab, located under the Animation button, and Keyframe Assistant.
It will smoothen the transition between the keyframes. You will have a primary walking sequence at this instance.

Now, you can make further refinements to add detail and secondary movement, like a bobbing motion of the head. You can also modify elements like the keyframe velocity, further smoothing out the animation.
As you practice, you’ll get a better feel for your animation preferences and develop more advanced realistic 2D animation character design capabilities.
Part 4 5 Great 2D Character Animation Templates
1 – FrameStory Character Animation Toolkit
2 – Explainer Video Character Animation ToolKit
3 – 2D Character Animation After Effects Template
4 – Character Animation ToolKit
5 – Rigged Character Animation Mockup Template
Given above is a list of the best 2D character animation templates worth considering. Yet, if you are tired of using After Effects Templates, why not select Wondershare Filmora Template Mode?
It is a brand-new mode recently launched by Filmora to ramp up your story. It is a simplistic way to use compared with After Effects.
****Wondershare Filmora Video Editor Template Mode**
For Win 7 or later (64-bit)
For macOS 10.12 or later
Filmora Template Mode is a bold breakthrough that helps you create incredible videos in a minute. Forget about dragging n dropping the video clips into a timeline; Filmora template Mode provides you a new way of generating videos automatically by using various stylish video templates.
Steps to create a stunning animated video in 3 levels
01Step 1: Choose a template
Pick up a video template that best suits your needs.

02Step 2: Import Media
Import at least three video clips or images and let AI assist you in ramping the production process without hassle.

03Step 3: Export Project
Export media among multiple social media platforms.

● Key Takeaways from This Episode →
● Understanding 2D character animation tips and tricks
● A step by step guide to creating 2D character animation online
● Five best 2D character animation templates
● The best alternative of using the Template mode directly within the Wondershare Filmora
2D character animation is one of the significant kinds of animation popularly used for creating animated movies, marketing videos, cartoons, advertisements, educational content, corporate presentations, video games, etc.
With the popularity of video content, more and more businesses tend to use animation for promotion, as they magnify conversion rates by 20%. Some companies hire 2D character animation services; others try to make them online with software help.
In this article
01 [What is 2D Character Animation and What Does 2D Animation Do?](#Part 1)
02 [2D Character Animation Tips and Tricks](#Part 2)
03 [An Ultimate Guide to Create 2D Character Animation Online](#Part 3)
04 [5 Great 2D Character Animation Templates](#Part 4)
Part 1 What is 2D Character Animation and What Does 2D Animation Do?
2D animation is identified by having its characters and objects created in a 2D space. It means that they only have height and width to specify.
However, 2D animation is considered a traditional style, known from the 1800s. Initially, it was designed by merging the frames in which one drawing was followed by another and making them different; every second consists of 24 frames.
We all remember the classic Disney animations. Snow White and the Seven Dwarfs, The Little Mermaid, Bambi, etc. They are some of the highly famous 2D animation styles.
With the advancement of computer technologies, this process also got digitized through various 2D character animation software.
In this guide, we’ll talk about everything relatable to 2D character animation, and let’s proceed with the expert tips and tricks to create inspirational style within animation character 2D.
Part 2 2D Character Animation Tips and Tricks
01Look for a real-time reference
Using a real-world reference for 2D character animation can help you effectively animate faces. For example, when studios collaborate with voice-over artists, they often record their facial movements. It further helps 2D animators to ensure their expressions get captured convincingly.
If it seems impossible, you can consider using your face, so you have something to refer back to. You could also use a mirror and utter the words your character will speak. It will display the correct animated expressions.
02Observe real life
You need to use observation a lot more. One of the primary aspects of 2D character animation is bringing life to animate objections. Therefore, you must carefully consider how emotion can get portrayed and select each movement accordingly.
Take time watching how people in real-life environments talk and interact with each other, how they express emotions, how they move, etc. Please don’t spend much time doing this, as it is valuable to research.
03Simplicity is the key
2D character animation is never complex compared with 3D. Think carefully before creating a scene too complicated. You must not include too much information, which is hard to digest, and you may even find yourself compromising the scene’s realism. Try not to heavy the stage with too many pose changes or other elements, and keep it genuine.
04Draw animation again and again
Drawing animation consumes a lot of time. You can’t complete it within one day, so you better know deep down that one task only can be done after you have revamped it various times. For 2D character animation, you may need to draw objects on paper several times.
You can’t master the skill of animation character 2D quickly. Luckily, all pains will be relieved someday.
05Feedback is important
Feedback is an essential element of artistic development. It’s wise to actively seek out feedback from familiar figures who can help you enhance. Naturally, we may see work we have invested a great deal of time and effort indifferently to someone not so involved in the creative process. Feedback can equate to a valuable learning opportunity that will assist you produce the results hit the spot much more appropriately.
Part 3 An Ultimate Guide to Create 2D Character Animation Online
Let’s now look at making an illustrated 2D character animation move on a screen.
While there are nearly numerous options for 2D character animation tools and software, this tutorial will animate a character in Adobe After Effects.
Steps to create 2D character animation After Effects
01Step 1: Download and Install Duik
You need to install the Duik animation plugin for Adobe After Effects to simplify the whole process. You can animate and rig characters’ entire limbs with Duik using just the placement of their feet and hands.
While this isn’t an essential step, it can be valuable for beginners, as you’ll see in this tutorial. Luckily, Duik is available for free from Rainbox Laboratory.
02Step 2: Design Your Character
You need a moving character before you’re able to start animating. You can create this character in Adobe Illustrator and import it into After Effects.
Try creating a straightforward character with an aim on the character’s limbs.
In the example mentioned below, you can see that the body is a very rudimentary shape—a circle—with long legs that make it simple to consider the animation process.
Check the character’s joints. Making a round joint between the lower and upper parts of the legs, for instance, will help the character move more smoothly.
03Step 3: Make and Import Your Character Artwork
Now, you’ll need to make a few final adjustments before moving your character artwork. Break your character out into layers firstly. Every section of the character that will move independently needs a separate layer.
So, layers include his circular body, face, and the leg’s segments (i.e., lower leg, upper leg, and foot).
To import your character artwork, go to File, click the Import tab, and choose your character file. Ensure that you need to import it as a composition to ensure it includes the layers you just created.
04Step 4: Establish Initial Character Rigging
Now, the 2D character animation is almost over by the initial rigging.
Firstly, lower the opacity of all your layers to above 50% to see the critical joints within the character.
Next, you must ensure that the joints hinge in the ideal direction. It’s simple to do with the anchor point tool. For each character’s layer, place the anchor point at the center of gravity for each layer of the 2D character animation.
The anchor point would probably go between the eyes for the layer of the face (i.e., the nose, eyes, and mouth). For each legs’ section, hold the anchor point where the leg will hinge (e.g., the anchor point would be at the highest point for the leg’s upper portion, where it meets the body).
Then, use the parent tool to join the limbs’ sections. For instance, the parent of the foot would be the lower leg, and the upper portion is the parent of the lower leg.
It makes sure that the leg moves together as one unit with multiple hinge points.
Finally, use the Duik toolbar to create character controllers. Controllers control the rotation and position of critical elements within your character. For the ankles of the 2D character animation, you would select the controller that encompasses both the rotation and position.
05Step 5: Create Your Rig
Use the Duik toolbar to create a rig. Select each layer from the extremities inward from each limb, lasting with your controllers.
You would select the ankle for a leg, followed by the upper portion, the lower leg, and conclusively, the controller at the ankle. Then, select auto-rig within the Rigging area of the Duik toolbar.
The entire leg will move when you move that ankle controller. If your character contains them, repeat the process for the other leg, along with other limbs.
Before proceeding, test the limbs to make sure they hinge and move correctly. You need to adjust the opacity of the character back to 100% once you are satisfied with the movements.
06Step 6: Start Animating Your Character
You can begin animating after completing a rig. First, create keyframes—the ending and beginning points of the character’s movement. The character’s legs are at their most magnified are thus the endpoints for a walk cycle. Make sure that the beginning and ending of keyframes are identical to get an ideal loop.
Start adding in-between frames from there, like when one leg crosses over the other in the middle of a walking stride.
Moreover, you can add ‘easing” to the animation via 2D character animation After Effects’ Easy Ease tab, located under the Animation button, and Keyframe Assistant.
It will smoothen the transition between the keyframes. You will have a primary walking sequence at this instance.
Now, you can make further refinements to add detail and secondary movement, like a bobbing motion of the head. You can also modify elements like the keyframe velocity, further smoothing out the animation.
As you practice, you’ll get a better feel for your animation preferences and develop more advanced realistic 2D animation character design capabilities.
Part 4 5 Great 2D Character Animation Templates
1 – FrameStory Character Animation Toolkit
2 – Explainer Video Character Animation ToolKit
3 – 2D Character Animation After Effects Template
4 – Character Animation ToolKit
5 – Rigged Character Animation Mockup Template
Given above is a list of the best 2D character animation templates worth considering. Yet, if you are tired of using After Effects Templates, why not select Wondershare Filmora Template Mode?
It is a brand-new mode recently launched by Filmora to ramp up your story. It is a simplistic way to use compared with After Effects.
****Wondershare Filmora Video Editor Template Mode**
For Win 7 or later (64-bit)
For macOS 10.12 or later
Filmora Template Mode is a bold breakthrough that helps you create incredible videos in a minute. Forget about dragging n dropping the video clips into a timeline; Filmora template Mode provides you a new way of generating videos automatically by using various stylish video templates.
Steps to create a stunning animated video in 3 levels
01Step 1: Choose a template
Pick up a video template that best suits your needs.
02Step 2: Import Media
Import at least three video clips or images and let AI assist you in ramping the production process without hassle.
03Step 3: Export Project
Export media among multiple social media platforms.
● Key Takeaways from This Episode →
● Understanding 2D character animation tips and tricks
● A step by step guide to creating 2D character animation online
● Five best 2D character animation templates
● The best alternative of using the Template mode directly within the Wondershare Filmora
Also read:
- New Best 10 Apps to Enhance Your Instagram Story Slideshow
- Updated 2024 Approved Why These 10+ Top Text Motion Templates Are Worth Your Attention
- Updated In 2024, Amazing Ideas About Creating Personalised WhatsApp GIF Sticker
- 2024 Approved Before You Learn Facebook Slideshow 5 Things You Should Know How-TOS
- Updated In 2024, Before You Learn 3D Animation Some Things You Should Know
- Updated 2024 Approved FREE Top 21 Best Anime Websites to Watch Anime Online
- New 15 Types of Cartoon Drawing Styles Examples for 2024
- New What This Post Can Teach You About Clay Animation for 2024
- Updated 2024 Approved Everything You Need to Know About Becoming a Motion Graphic Designer
- Apps to Animate Still Pictures Which Could Make Your Pictures Become Internet Sensation
- Amazing Ideas About Creating Personalised WhatsApp GIF Sticker for 2024
- In 2024, How to Stop Animation From Looping in Unity
- New 10 Best Photoshop Cartoon Effects For Creatives
- New How to Make Your Characters Interactive in Unity Animation Rigging
- New 10 Caricature Makers to Turn Your Photo to Caricature Effects for 2024
- Updated What Is Still Motion Animation, In 2024
- Updated The Secret Sauce for Making GIF Instagram Story More Aesthetic for 2024
- Updated In 2024, Tips for Canva Animated Elements
- 10 Cartoon Characters That Should Top Your List for 2024
- New In 2024, Tutorial on Making Unity 2D Animation
- Updated 2024 Approved How to Animate Picture Online Without Learning From Scratch
- New Top 3 Ways to Create Gif with Great 3D Gif Maker
- New 2024 Approved How to Make a Photoshop Collage in EASY Steps
- How to Make a Photoshop Collage in EASY Steps
- In 2024,
- Updated 10 Cartoon Characters That Should Top Your List for 2024
- New 2024 Approved Top 10 Popular Cartoons You Forgot Existed
- New How to Make Photo 3D Cartoon Online
- 10 Great Apps to Turn Funny Animated Images Into Comics for 2024
- New In 2024, Best GIF Croppers How to Crop an Animated GIF
- In 2024, Techniques on How to Make After Effects 2D Animation
- New 2024 Approved Top 12 Evil Cartoon Characters of All Time
- New Nurturing the Spirit Through the Top 10 Intellectual Anime Websites
- New The Art of Comics - Learn How to Do Funny Cartoon Drawings for 2024
- 10 2D/3D Animation Tips & Tricks to Bring New Ideas to You
- New 2024 Approved Best Canva 10 Animated Templates
- 5 Must Try Ways to Add GIF in Text Message on Android for 2024
- New Handy Tips From Adobe Animate Rigging Tutorial for All Learners
- Updated 2024 Approved How to Make GIF Stickers for WhatsApp 100 The Easy Way
- New In 2024, Tutorials to Make Animated Images – Even if Youre Just Starting Out
- New In 2024, 10 Cartoon Characters That Should Top Your List
- Top 10 Free Online Animated Logo Makers Everyone Should Know
- New 2024 Approved 15 Iconic Cartoon Characters of All Time
- New Best GIF Maker Software for Windows and Mac
- In 2024, How to Make a Video a Live Photo
- New 2024 Approved 5 Must Try Ways to Add and Send GIF in Text Message on Android
- iPhone SE (2022) Backup Password Never Set But Still Asking? Heres the Fix
- What is Geo-Blocking and How to Bypass it On Oppo K11 5G? | Dr.fone
- In 2024, What Is AI Marketing?
- Methods to Change GPS Location On Lava Agni 2 5G | Dr.fone
- In 2024, How to Change Lock Screen Wallpaper on Realme GT 5
- In 2024, A Guide Vivo Y27 5G Wireless and Wired Screen Mirroring | Dr.fone
- In 2024, How to Reset a Locked Samsung Phone
- In 2024, 6 Methods for Switching from Apple iPhone 13 to Samsung | Dr.fone
- iSpoofer is not working On Meizu 21? Fixed | Dr.fone
- Unlock Your Boost Mobile Apple iPhone XS Max Before the Plan Expires
- Why Apple Account Disabled From your iPhone 7? How to Fix
- Why Does My Infinix Note 30 VIP Racing Edition Keep Turning Off By Itself? 6 Fixes Are Here | Dr.fone
- Unova Stone Pokémon Go Evolution List and How Catch Them For Honor Magic Vs 2 | Dr.fone
- How can I get more stardust in pokemon go On Samsung Galaxy A14 5G? | Dr.fone
- Your Complete Guide To Reset Nubia Z50S Pro | Dr.fone
- New Boost Sales with Live Shopping Learn Winning Strategies From Top Brands for 2024
- In 2024, How to Successfully Bypass iCloud Activation Lock from iPhone 14 Pro
- Unova Stone Pokémon Go Evolution List and How Catch Them For Motorola G24 Power | Dr.fone
- In 2024, Find My App Troubleshooting No Location Found vs. Location Not Available & How to Fix Them On Apple iPhone 11 Pro | Dr.fone
- In 2024, How To Activate and Use Life360 Ghost Mode On Lava Storm 5G | Dr.fone
- In 2024, Remove the Lock Screen Fingerprint Of Your Xiaomi Redmi Note 12 5G
- In 2024, Is pgsharp legal when you are playing pokemon On Motorola Moto G13? | Dr.fone
- Top 6 Apps/Services to Trace Any Vivo T2 5G Location By Mobile Number | Dr.fone
- In 2024, How Can We Unlock Our Nubia Red Magic 9 Pro+ Phone Screen?
- In 2024, How to Delete iCloud Account with or without Password from your iPhone 12 mini/Windows/Mac
- The Ultimate Guide to Get the Rare Candy on Pokemon Go Fire Red On Honor 100 Pro | Dr.fone
- How To Transfer WhatsApp From Apple iPhone XS Max to Android? | Dr.fone
- Lock Your Vivo T2x 5G Phone in Style The Top 5 Gesture Lock Screen Apps
- Can Life360 Track You When Your Samsung Galaxy F14 5G is off? | Dr.fone
- A Guide OnePlus Ace 2 Pro Wireless and Wired Screen Mirroring | Dr.fone
- Is pgsharp legal when you are playing pokemon On Realme V30T? | Dr.fone
- In 2024, Best Ways to Bypass iCloud Activation Lock from iPhone 8 Plus/iPad/iPod
- Additional Tips About Sinnoh Stone For Tecno Camon 20 Premier 5G | Dr.fone
- New How to Translate TikTok Videos? All You Want to Know for 2024
- In 2024, Unlock Apple iPhone 15 With Forgotten Passcode Different Methods You Can Try
- 5 Most Effective Methods to Unlock Apple iPhone SE (2022) in Lost Mode | Dr.fone
- How to Fake Snapchat Location on Infinix Note 30 VIP | Dr.fone
- In 2024, How to Transfer Contacts from Samsung Galaxy F15 5G to iPhone XS/11 | Dr.fone
- In 2024, How To Change Your Apple ID on Apple iPhone 15 Pro Max With or Without Password | Dr.fone
- How to Downgrade iPhone 11 without iTunes? | Dr.fone
- In 2024, A Quick Guide to Vivo Y02T FRP Bypass Instantly
- Title: New Techniques for Creating Animated Logo That Few People Know About for 2024
- Author: Elon
- Created at : 2024-05-19 03:05:30
- Updated at : 2024-05-20 03:05:30
- Link: https://animation-videos.techidaily.com/new-techniques-for-creating-animated-logo-that-few-people-know-about-for-2024/
- License: This work is licensed under CC BY-NC-SA 4.0.
