
:max_bytes(150000):strip_icc():format(webp)/how-to-fix-it-when-reddit-apps-arent-working-f4c8fe50a9ff4c90a28e6a056b427208.jpg)
New Whats Music Video GIF & How to Add Music to Your GIF Files for 2024
What’s Music Video GIF & How to Add Music to Your GIF Files
What’s Music Video GIF & How to Add Music to Your GIF Files
An easy yet powerful editor
Numerous effects to choose from
Detailed tutorials provided by the official channel
Want to make your GIFs more catchy and interesting? Try adding music videos to multiply the fun!
In this article
01 [What’s Music Video GIF](#Part 1)
02 [How to Easily Add Music to Your GIF](#Part 2)
03 [How To Make a GIF With Music to Post on Instagram?](#Part 3)
Part 1 What’s Music Video GIF?
GIFs are essentially animated image files that already form an effective and interesting means of communication and media sharing. Your messages get additional spunk and appeal when you add relatable audios to your GIFs. A music video GIF is one that you create by adding sound to the originally mute GIF files. Additionally, creating music enabled GIFs is a fun activity on its own. You get to explore your editing creativity on different levels as you play with the exciting features that come with the latest editing tools available in the software market.
Whether create them casually or use them as a marketing tool, sound effects tend to considerably upgrade the utility of an animated or unmoving snap. If you are a social media freak and want to get your Instagram and Facebook stories be the talk among your friends on the internet, do consider trying these editing tricks to add that extra notch to your otherwise simple and soundless GIFs. After all, your creativity should never go unnoticed and get the attention it deserves!
If this gets you motivated and you have decided to level up your editing skills, do spare your valuable time to see through further sections of this article for quick and easy tools and methods to introduce audio and sound effects to those mute GIFs and never let your social media posts and stories miss a catch!

Part 2 How to Easily Add Music to Your GIF?
Musical GIF videos are quite interesting, no doubt on that, but what is noticeable here is that GIFs do not have inbuilt audio features. You need to add sound additionally to these files to create musical GIF videos. When trying to make your own music GIF video, you can take help of the following tools:
01Kapwing Editor
This one is a free online tool that helps you add audio to your GIFs. This application is free from issues of spam and watermark requirements. It assures you of a quality editing experience without supporting unnecessary and annoying advertisements.
Using this tool, you can create musical GIF videos in two different ways. Take the following steps to create musical GIF videos with this application:
● Using The Kapwing Studio:
Open the Studio and select the GIF and music files you want to merge. Upload the selected files in the tool.
Customize your audio in the Studio timeline to trim the sound file to the specific segment you wish to add to your GIF. You can also introduce volume adjustments and waveform effects to enhance your music video for GIF for an extra catch.
You can further add text and make size adjustments to your GIF using the sidebar controls.
Once you have finalized everything, click ‘Export’ to download the GIF music video in MP4 format. Note that if you download the GIF format, your video will lose the sound effect.
● Copy-Paste Method
You can also merge GIFs and music videos using the direct copy-paste method in the Kapwing Editor. To create one for yourself, here’s what you need to follow:
Step 1: GIF Upload
Select a GIF from your smartphone or PC gallery and upload it to the Kapwing Editor. You can even copy a GIF link from other apps like, YouTube, GIFHY, etc, and paste it in the editor timeline.
Step 2: Audio Upload
Next, you need to upload the audio file you want to get stitched with your GIF. Choose a file either from your system or copy-paste the YouTube URL of the selected video in the Kapwing timeline.
Step 3: Export Your Creation
That it! You are done with your creation. Click ‘Export’ to share your musical GIF video on different social platforms.

02VEED’S GIF Maker
Like the Kapwing Editor, this one is also a free online tool that you can use to add sound to your originally mute GIF files. What’s more interesting is, apart from adding music, you have the flexibility to draw over, add text and images to your GIFs before you proceed with adding sound to your selected GIF.
Follow the steps given below to start creating GIF music videos with this application:
Step 1: Upload GIF File
To begin, upload your selected GIF file to the application’s pop-up window using ‘Drag and Drop’ method. Alternatively, you can click on ‘Choose GIF File’ tab on the app’s welcome window. Select a file from your system’s gallery and click ‘Open’ to upload it.

Step 2: Add Music
To add audio files, select ‘Upload’ or tap the (+) sign at the bottom right to choose the desired music files. Drag them to VEED’s timeline to set them in the order of your preference.

Step 3: Download Your Creation
Your video gets created in MP4 format. Tap ‘Export’ to directly share it with your peers on Twitter, Facebook or other social platforms.
Part 3 How to Make a GIF With Music to Post on Instagram?
Exploring your creative skills is one thing, while attracting attention to your work is the other. You would definitely want your social media communities to notice and compliment your work. Instagram is one among the best media sharing apps you can use to share your creations.
To adhere to the concern of creating audio enabled GIFs compatible for sharing to your Instagram stories and feeds, you can any of the following editing tools:
01Filmora
Wondershare Filmora Video Editor is one of the best and most preferred editing software you can use to add sound to your GIFs and videos. You can play with your editing creativity to make exciting musical GIF videos with this software in just a few minutes.

Using this tool for your editing work promises you the following advantages:
Wondershare Filmora
Get started easily with Filmora’s powerful performance, intuitive interface, and countless effects!
Try It Free Try It Free Try It Free Learn More >

● Huge Audio Library
Filmora audio library exposes you with a diverse range of audio and music files and a variety of exciting and relatable sound effects to choose from. You can browse through this storehouse for that perfect music for your GIF absolutely free of cost. The library has an additional Filmstock Effect Store that further increases your audio choice bandwidth.
● Optimal Sync
Filmora allows you to establish the perfect sync between your GIF and audio. Its beat detection feature identifies audio hits to produce markers that you can use to obtain the ideal audio-GIF synchronization in your creations.
● Voiceover Applicable
Filmora gives you the flexibility to record and add you own voiceover using your microphone to make your creations more impactful.
Steps to Create Audio Enabled GIFs Using Filmora
Take the following steps to enhance your GIFs with music and sound effects:
● Select and import your GIF file to the Filmora timeline
● In the software’s audio library, select your desired music and sound effects to add them to the imported GIF file. You can even choose to add your own voiceover to the GIF.
● That’s it! You are now ready to share your work on your Instagram handle and other media sharing platforms. Just click ‘Export’ and your creation gets uploaded on social media in MP4 format. Make sure to adjust the resolution and bit settings for best results.

02Artwork
Like Filmora, Artwork is another application you can use to add sound to GIF files. This one is a browser tool that allows you to create sound enabled videos with static and animated images. Take up the following process to make your own musical GIF with Artwork:
● To begin, signup to Artwork’s free trial feature. Choose your desired sound file in MP3 format and trim it to a play duration of 1 minute. This is essential because Instagram doesn’t allow you to post longer GIFs.
● Add your selected GIF and trimmed MP3 files in Artwork’s pop-up window. Click ‘Save’ and wait till the process to finish.
● Your creation is ready. Download and share it on Instagram.
● Key Takeaways from This Episode →
● Adding music and sound to your GIF is both a fun and exciting activity and also has the potential to enhance the quality and reach of the message you desire to deliver through your GIF. Besides this, it enhances your editing creativity and skill, which is a complement in itself.
● A number of software and online tools available on the internet are ready to help you get through the task. You can rely on these tools to add audio to your GIFs within minutes absolutely free of cost and share them directly on social media.
● Filmora is one among the best GIF editing tools for sharing your creations on Instagram. You can access its huge audio library for selected sound effects, set a perfect sync between your GIF and its audio and even add your own voiceover to boost your creativity using this software.
Want to make your GIFs more catchy and interesting? Try adding music videos to multiply the fun!
In this article
01 [What’s Music Video GIF](#Part 1)
02 [How to Easily Add Music to Your GIF](#Part 2)
03 [How To Make a GIF With Music to Post on Instagram?](#Part 3)
Part 1 What’s Music Video GIF?
GIFs are essentially animated image files that already form an effective and interesting means of communication and media sharing. Your messages get additional spunk and appeal when you add relatable audios to your GIFs. A music video GIF is one that you create by adding sound to the originally mute GIF files. Additionally, creating music enabled GIFs is a fun activity on its own. You get to explore your editing creativity on different levels as you play with the exciting features that come with the latest editing tools available in the software market.
Whether create them casually or use them as a marketing tool, sound effects tend to considerably upgrade the utility of an animated or unmoving snap. If you are a social media freak and want to get your Instagram and Facebook stories be the talk among your friends on the internet, do consider trying these editing tricks to add that extra notch to your otherwise simple and soundless GIFs. After all, your creativity should never go unnoticed and get the attention it deserves!
If this gets you motivated and you have decided to level up your editing skills, do spare your valuable time to see through further sections of this article for quick and easy tools and methods to introduce audio and sound effects to those mute GIFs and never let your social media posts and stories miss a catch!
Part 2 How to Easily Add Music to Your GIF?
Musical GIF videos are quite interesting, no doubt on that, but what is noticeable here is that GIFs do not have inbuilt audio features. You need to add sound additionally to these files to create musical GIF videos. When trying to make your own music GIF video, you can take help of the following tools:
01Kapwing Editor
This one is a free online tool that helps you add audio to your GIFs. This application is free from issues of spam and watermark requirements. It assures you of a quality editing experience without supporting unnecessary and annoying advertisements.
Using this tool, you can create musical GIF videos in two different ways. Take the following steps to create musical GIF videos with this application:
● Using The Kapwing Studio:
Open the Studio and select the GIF and music files you want to merge. Upload the selected files in the tool.
Customize your audio in the Studio timeline to trim the sound file to the specific segment you wish to add to your GIF. You can also introduce volume adjustments and waveform effects to enhance your music video for GIF for an extra catch.
You can further add text and make size adjustments to your GIF using the sidebar controls.
Once you have finalized everything, click ‘Export’ to download the GIF music video in MP4 format. Note that if you download the GIF format, your video will lose the sound effect.
● Copy-Paste Method
You can also merge GIFs and music videos using the direct copy-paste method in the Kapwing Editor. To create one for yourself, here’s what you need to follow:
Step 1: GIF Upload
Select a GIF from your smartphone or PC gallery and upload it to the Kapwing Editor. You can even copy a GIF link from other apps like, YouTube, GIFHY, etc, and paste it in the editor timeline.
Step 2: Audio Upload
Next, you need to upload the audio file you want to get stitched with your GIF. Choose a file either from your system or copy-paste the YouTube URL of the selected video in the Kapwing timeline.
Step 3: Export Your Creation
That it! You are done with your creation. Click ‘Export’ to share your musical GIF video on different social platforms.
02VEED’S GIF Maker
Like the Kapwing Editor, this one is also a free online tool that you can use to add sound to your originally mute GIF files. What’s more interesting is, apart from adding music, you have the flexibility to draw over, add text and images to your GIFs before you proceed with adding sound to your selected GIF.
Follow the steps given below to start creating GIF music videos with this application:
Step 1: Upload GIF File
To begin, upload your selected GIF file to the application’s pop-up window using ‘Drag and Drop’ method. Alternatively, you can click on ‘Choose GIF File’ tab on the app’s welcome window. Select a file from your system’s gallery and click ‘Open’ to upload it.
Step 2: Add Music
To add audio files, select ‘Upload’ or tap the (+) sign at the bottom right to choose the desired music files. Drag them to VEED’s timeline to set them in the order of your preference.
Step 3: Download Your Creation
Your video gets created in MP4 format. Tap ‘Export’ to directly share it with your peers on Twitter, Facebook or other social platforms.
Part 3 How to Make a GIF With Music to Post on Instagram?
Exploring your creative skills is one thing, while attracting attention to your work is the other. You would definitely want your social media communities to notice and compliment your work. Instagram is one among the best media sharing apps you can use to share your creations.
To adhere to the concern of creating audio enabled GIFs compatible for sharing to your Instagram stories and feeds, you can any of the following editing tools:
01Filmora
Wondershare Filmora Video Editor is one of the best and most preferred editing software you can use to add sound to your GIFs and videos. You can play with your editing creativity to make exciting musical GIF videos with this software in just a few minutes.
Using this tool for your editing work promises you the following advantages:
Wondershare Filmora
Get started easily with Filmora’s powerful performance, intuitive interface, and countless effects!
Try It Free Try It Free Try It Free Learn More >
● Huge Audio Library
Filmora audio library exposes you with a diverse range of audio and music files and a variety of exciting and relatable sound effects to choose from. You can browse through this storehouse for that perfect music for your GIF absolutely free of cost. The library has an additional Filmstock Effect Store that further increases your audio choice bandwidth.
● Optimal Sync
Filmora allows you to establish the perfect sync between your GIF and audio. Its beat detection feature identifies audio hits to produce markers that you can use to obtain the ideal audio-GIF synchronization in your creations.
● Voiceover Applicable
Filmora gives you the flexibility to record and add you own voiceover using your microphone to make your creations more impactful.
Steps to Create Audio Enabled GIFs Using Filmora
Take the following steps to enhance your GIFs with music and sound effects:
● Select and import your GIF file to the Filmora timeline
● In the software’s audio library, select your desired music and sound effects to add them to the imported GIF file. You can even choose to add your own voiceover to the GIF.
● That’s it! You are now ready to share your work on your Instagram handle and other media sharing platforms. Just click ‘Export’ and your creation gets uploaded on social media in MP4 format. Make sure to adjust the resolution and bit settings for best results.
02Artwork
Like Filmora, Artwork is another application you can use to add sound to GIF files. This one is a browser tool that allows you to create sound enabled videos with static and animated images. Take up the following process to make your own musical GIF with Artwork:
● To begin, signup to Artwork’s free trial feature. Choose your desired sound file in MP3 format and trim it to a play duration of 1 minute. This is essential because Instagram doesn’t allow you to post longer GIFs.
● Add your selected GIF and trimmed MP3 files in Artwork’s pop-up window. Click ‘Save’ and wait till the process to finish.
● Your creation is ready. Download and share it on Instagram.
● Key Takeaways from This Episode →
● Adding music and sound to your GIF is both a fun and exciting activity and also has the potential to enhance the quality and reach of the message you desire to deliver through your GIF. Besides this, it enhances your editing creativity and skill, which is a complement in itself.
● A number of software and online tools available on the internet are ready to help you get through the task. You can rely on these tools to add audio to your GIFs within minutes absolutely free of cost and share them directly on social media.
● Filmora is one among the best GIF editing tools for sharing your creations on Instagram. You can access its huge audio library for selected sound effects, set a perfect sync between your GIF and its audio and even add your own voiceover to boost your creativity using this software.
10 Must-Use MP4 to GIF Converters to Get Perfect-Made GIF
10 Must-Use MP4 to GIF Converters to Get Perfect-Made GIF
An easy yet powerful editor
Numerous effects to choose from
Detailed tutorials provided by the official channel
GIFs are becoming more common day by day. They are used for a wide range of purposes, from chatting and expressing emotions on social media to promoting products and services. GIFs are image formats that are relatively easy to download and upload and easy to convey messages and thoughts to a wide range of people. On the other hand, MP4 are video files that contain audio. These files are large and require special requirements to run and work properly.
There are a lot of advantages of using GIF files, like they are easy to make and store, help create animations quickly, and convey messages and emotions more conveniently. With the increasing usage of GIF files, it has become important to know and understand the tools used to convert the MP4 files into GIF formats.
In this article
01 [5 Offline MP4 to GIF Converters](#Part 1)
02 [5 Online MP4 to GIF Converters](#Part 2)
Part 1 5 Offline MP4 to GIF Converters
Offline MP4 to GIF converter is the best option as it helps to create GIF files quickly and easily, without any quality loss. The following offline converters can be used effectively to turn MP4 into GIF formats very easily and quickly:
01Any GIF Animator
Any GIF Animator is one of the great offline tools used for converting videos to GIF files very quickly. It can easily convert the videos into attractive GIFs in seconds.
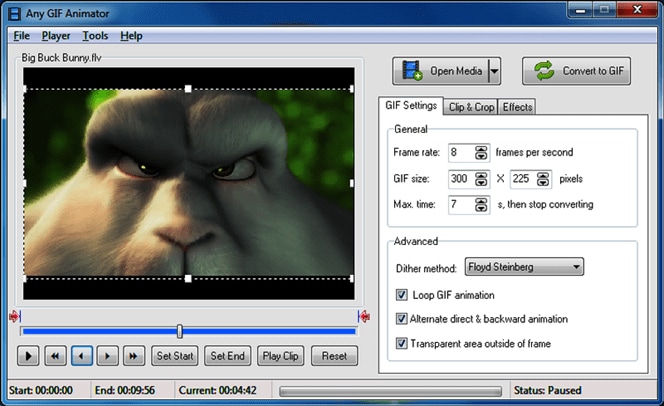
Key Features:
● It has a very easy-to-use interface for user convenience.
● It sustains a considerable number of video formats.
● It allows the users to edit converted GIFs like adding frames, forward and backward looping, etc.
● It will enable you to edit the files imported from DVDs and WebCam recorded files.
● It has an in-built animation wizard.
Pros:
● It works for both Mac as well as Windows
● Any GIF Animator can be downloaded freely.
● It can convert both videos as well as images.
Cons:
● It crashes at times while processing the videos.
● Uploading the files takes a longer time than usual.
02DVDFab
DVDFab is another offline tool that converts the files from MP4 to GIF in very little time without compromising the quality of the outcome.

Key Features:
● It supports a large number of video formats.
● It has a user-friendly interface.
● It can be used for both Mac & Windows.
● It is a great multimedia solution software.
● It comes with affordable pricing.
Pros:
● It is quick & easy to use.
● It delivers high-quality outputs.
● It allows the users to completely control the looping, frequency, and size of the files.
Cons:
● Being a multimedia software, it requires learning.
● Complete beginners can get confused.
03Wondershare TunesGo
TunesGo was developed by one of the most trusted software companies – Wondershare. It is a great tool used to make GIFs from MP4 files.
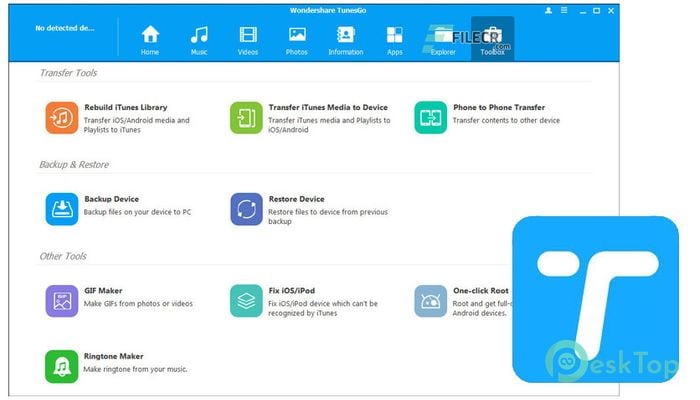
Key Features:
● Developed by one of the most trusted software development companies.
● Compatible for all iOS devices.
● A user-friendly interface is suitable for complete beginners.
● A trial version is available.
● Works faster and delivers high-resolution output.
Pros:
● Supports; almost all types of video formats.
● It permits you to edit the videos before converting.
● It can also convert images and live videos to GIFs.
Cons:
● It is costly.
● It doesn’t allow you to edit Smart playlists.
04KickMyGraphics
It is another powerful offline tool to convert MP4 to high-quality GIF files. It allows users to convert different formats of videos and images into GIFs.
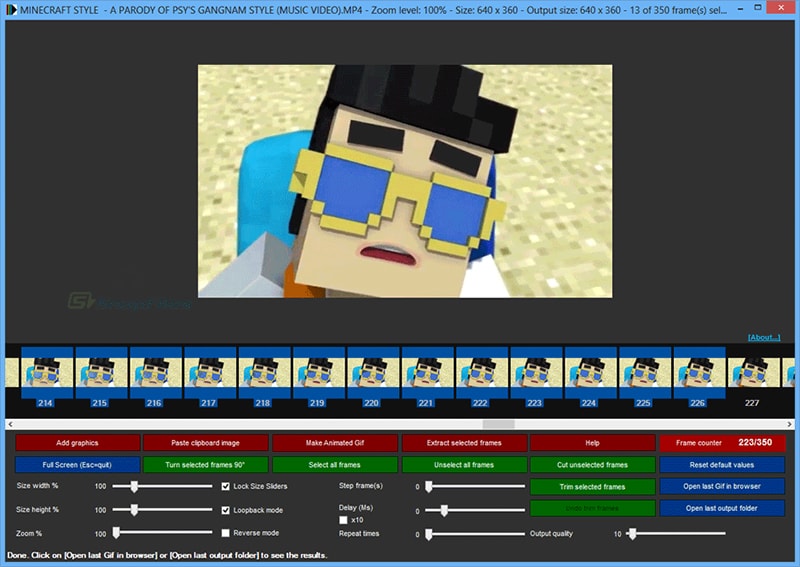
Key Features:
● Compatibility lies with Mac and Windows both.
● Users can instantly upload various video formats like MPG, MP4, AVI, etc.
● Users can directly upload considerable image formats like JPG, PNG, BMP, etc.
● It has a user-friendly interface.
● It is a freeware offline GIF converter.
Pros:
● It has an in-built editing tool for easy customization.
● It supports direct recording of the animated GIFs.
● It also allows you to use different editing features like the loop, pan, reverse, etc.
Cons:
● Its usage is somehow complicated for beginners.
● It doesn’t support all types of video formats.
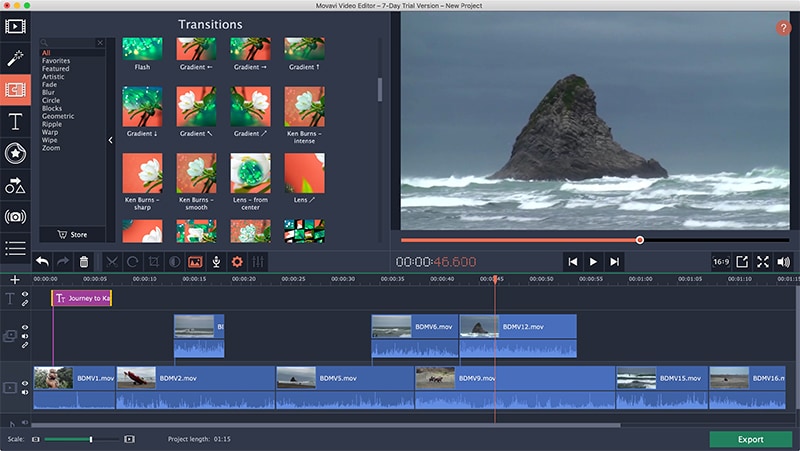
05Movavi
It is tremendous offline software that can be downloaded for Mac & PC. It helps in converting the MP4 to GIFs very quickly and easily.
Key Features:
● Mac and Windows are completely supported.
● It allows the users to edit their creations.
● It is also available for all android devices.
● It converts the files very quickly without compromising the quality of the content.
● It is an excellent tool for converting and editing GIFs.
Pros:
● Easy and beneficial for beginners
● Compatible with video formats like MOV, MP4, MPG, AVI, etc.
● It has an in-built AI feature to upscale the output quality.
Cons:
● It has fundamental video editing features.
● It doesn’t allow to copy-paste the video effect while editing.
Part 2 5 Online MP4 to GIF Converters
Online tools for converting files from MP4 to GIF are effortless and convenient because they can be used on any operating system. The following given are some of the great online tools to convert MP4 to GIF with ease and convenience:
01GIF Maker by Giphy
Giphy is known as the king of the online GIF maker tools. It is a GIF converter great tool with around 300 million users daily using it. It allows the users to convert the GIFs by pasting the video links from third-party websites like YouTube.
Key Features:
● Being an online tool, it is compatible with all types of devices.
● It is elementary to use for all types of users.
● It allows the users to add stickers and captions to their GIFs.
● No fee for this so you can use it free of cost.
● It is a website, so it doesn’t require to be downloaded.
Pros:
● Straightforward and quick to use.
● It delivers a high-resolution output with many customization features.
● It can also convert the GIFs using the links of videos from third-party hosting like YouTube.
Cons:
● Speed of the internet connection matters.
● It comes with a limited edition of colors.
02**Wondershare Filmora Video Editor **
Filmora is one of the best online video editing tools created by Wondershare. Filmora can be used to convert files from MP4 to GIF very effectively and efficiently.
For Win 7 or later (64-bit)
For macOS 10.12 or later
Wondershare Filmora
Get started easily with Filmora’s powerful performance, intuitive interface, and countless effects!
Try It Free Try It Free Try It Free Learn More >
Key Features:
● Fully compatible with any operating system.
● It is a great video editing software with many features like adding music, subtitles, etc.
● It can be also be downloaded on Mac and Windows OS.
● It comes with an annual premium subscription for $51.99.
● It can also be purchased with a one-time fee of $79.99.
Pros:
● It has great video editing features.
● It can convert a large number of video formats to high-resolution GIF files.
● You can customize your GIFs as per your requirements using this tool.
Cons:
● Being an all-in-one video editing tool, this can be much more if you just need GIF creations.
● You cannot remove the watermark and use many editing features if you use a trial version.
03CloudConvert
CloudConvert is another easy-to-use MP4 to GIF converter online. It converts all types of video files into GIFs in a concise time.
Key Features:
● It is easy to use.
● It converts MP4 to GIF very quickly.
● It is free of cost.
● It doesn’t require third-party installation.
● It uses compression algorithms.
Pros:
● It is an open-source converter.
● It allows you to add texts.
● It helps in creating GIFs for web publishing.
Cons:
● Complicated for large files.
● Requires; steady internet connection.
04Convertio
Convertio is another online GIF converter that anyone can use. You just need to upload the MP4 file using Dropbox and hit the ‘Convert’ button.
Key Features:
● Effortless and anyone can easily use it.
● One can easily upload files from Dropbox and Google Drive.
● It also has a drag and drops component for uploading the files.
● It is entirely free to use.
● It is online and doesn’t require any installation.
Pros:
● It converts MP4 to GIF very quickly.
● It delivers high-quality output.
● User-friendly interface.
Cons:
● It doesn’t allow the users to edit their GIFs.
● It doesn’t have the customizing feature and is not user-specific.
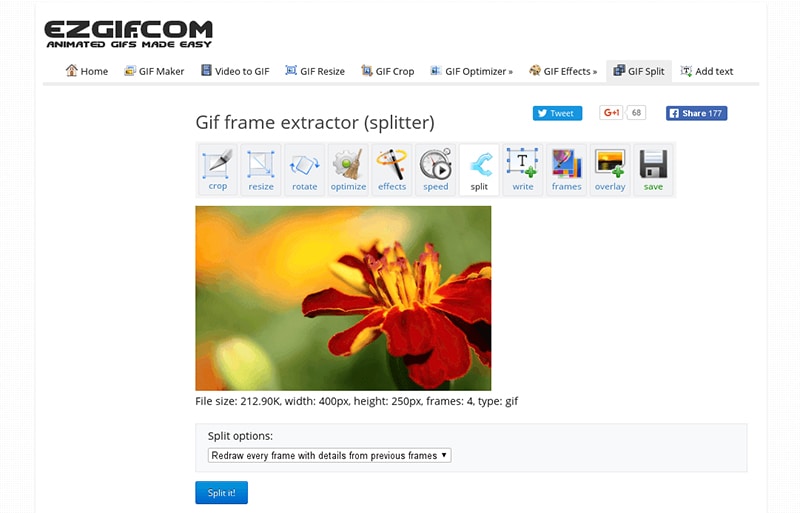
05Ezgif
Ezgif is free of cost and an easy-to-use online tool that helps you create GIFs in two easy steps, i.e., upload and convert.
Key Features:
● It is an online tool compatible with both Mac and Windows.
● No download and installation required.
● It is a freeware program.
● It maintains the quality of the outcome.
● It converts GIFs very quickly.
Pros:
● User-friendly and can be used by all.
● It has amazing features that assist you while you convert MP4 to GIF.
● It is not complicated for beginners.
Cons:
● It has limited editing features.
● Only 3 minutes video can be done at maximum.
● Key Takeaways from This Episode →
●The demand for GIF files increases with each passing day due to its many advantages. As a result, many people are looking for easy MP4 to GIF converters that are easy and convenient to use.
●Above mentioned online and offline converters can quickly help you turn MP4 into GIF files without compromising the quality of the graphics.
●These converters are readily available and can easily be used on both Mac and Windows with many conveniences.
●They can help you convert the MP4 files into GIF format very quickly, no matter how large the video size is. GIFs being smaller in size and easily transferrable provide many advantages to the users.
GIFs are becoming more common day by day. They are used for a wide range of purposes, from chatting and expressing emotions on social media to promoting products and services. GIFs are image formats that are relatively easy to download and upload and easy to convey messages and thoughts to a wide range of people. On the other hand, MP4 are video files that contain audio. These files are large and require special requirements to run and work properly.
There are a lot of advantages of using GIF files, like they are easy to make and store, help create animations quickly, and convey messages and emotions more conveniently. With the increasing usage of GIF files, it has become important to know and understand the tools used to convert the MP4 files into GIF formats.
In this article
01 [5 Offline MP4 to GIF Converters](#Part 1)
02 [5 Online MP4 to GIF Converters](#Part 2)
Part 1 5 Offline MP4 to GIF Converters
Offline MP4 to GIF converter is the best option as it helps to create GIF files quickly and easily, without any quality loss. The following offline converters can be used effectively to turn MP4 into GIF formats very easily and quickly:
01Any GIF Animator
Any GIF Animator is one of the great offline tools used for converting videos to GIF files very quickly. It can easily convert the videos into attractive GIFs in seconds.
Key Features:
● It has a very easy-to-use interface for user convenience.
● It sustains a considerable number of video formats.
● It allows the users to edit converted GIFs like adding frames, forward and backward looping, etc.
● It will enable you to edit the files imported from DVDs and WebCam recorded files.
● It has an in-built animation wizard.
Pros:
● It works for both Mac as well as Windows
● Any GIF Animator can be downloaded freely.
● It can convert both videos as well as images.
Cons:
● It crashes at times while processing the videos.
● Uploading the files takes a longer time than usual.
02DVDFab
DVDFab is another offline tool that converts the files from MP4 to GIF in very little time without compromising the quality of the outcome.
Key Features:
● It supports a large number of video formats.
● It has a user-friendly interface.
● It can be used for both Mac & Windows.
● It is a great multimedia solution software.
● It comes with affordable pricing.
Pros:
● It is quick & easy to use.
● It delivers high-quality outputs.
● It allows the users to completely control the looping, frequency, and size of the files.
Cons:
● Being a multimedia software, it requires learning.
● Complete beginners can get confused.
03Wondershare TunesGo
TunesGo was developed by one of the most trusted software companies – Wondershare. It is a great tool used to make GIFs from MP4 files.
Key Features:
● Developed by one of the most trusted software development companies.
● Compatible for all iOS devices.
● A user-friendly interface is suitable for complete beginners.
● A trial version is available.
● Works faster and delivers high-resolution output.
Pros:
● Supports; almost all types of video formats.
● It permits you to edit the videos before converting.
● It can also convert images and live videos to GIFs.
Cons:
● It is costly.
● It doesn’t allow you to edit Smart playlists.
04KickMyGraphics
It is another powerful offline tool to convert MP4 to high-quality GIF files. It allows users to convert different formats of videos and images into GIFs.
Key Features:
● Compatibility lies with Mac and Windows both.
● Users can instantly upload various video formats like MPG, MP4, AVI, etc.
● Users can directly upload considerable image formats like JPG, PNG, BMP, etc.
● It has a user-friendly interface.
● It is a freeware offline GIF converter.
Pros:
● It has an in-built editing tool for easy customization.
● It supports direct recording of the animated GIFs.
● It also allows you to use different editing features like the loop, pan, reverse, etc.
Cons:
● Its usage is somehow complicated for beginners.
● It doesn’t support all types of video formats.
05Movavi
It is tremendous offline software that can be downloaded for Mac & PC. It helps in converting the MP4 to GIFs very quickly and easily.
Key Features:
● Mac and Windows are completely supported.
● It allows the users to edit their creations.
● It is also available for all android devices.
● It converts the files very quickly without compromising the quality of the content.
● It is an excellent tool for converting and editing GIFs.
Pros:
● Easy and beneficial for beginners
● Compatible with video formats like MOV, MP4, MPG, AVI, etc.
● It has an in-built AI feature to upscale the output quality.
Cons:
● It has fundamental video editing features.
● It doesn’t allow to copy-paste the video effect while editing.
Part 2 5 Online MP4 to GIF Converters
Online tools for converting files from MP4 to GIF are effortless and convenient because they can be used on any operating system. The following given are some of the great online tools to convert MP4 to GIF with ease and convenience:
01GIF Maker by Giphy
Giphy is known as the king of the online GIF maker tools. It is a GIF converter great tool with around 300 million users daily using it. It allows the users to convert the GIFs by pasting the video links from third-party websites like YouTube.
Key Features:
● Being an online tool, it is compatible with all types of devices.
● It is elementary to use for all types of users.
● It allows the users to add stickers and captions to their GIFs.
● No fee for this so you can use it free of cost.
● It is a website, so it doesn’t require to be downloaded.
Pros:
● Straightforward and quick to use.
● It delivers a high-resolution output with many customization features.
● It can also convert the GIFs using the links of videos from third-party hosting like YouTube.
Cons:
● Speed of the internet connection matters.
● It comes with a limited edition of colors.
02**Wondershare Filmora Video Editor **
Filmora is one of the best online video editing tools created by Wondershare. Filmora can be used to convert files from MP4 to GIF very effectively and efficiently.
For Win 7 or later (64-bit)
For macOS 10.12 or later
Wondershare Filmora
Get started easily with Filmora’s powerful performance, intuitive interface, and countless effects!
Try It Free Try It Free Try It Free Learn More >
Key Features:
● Fully compatible with any operating system.
● It is a great video editing software with many features like adding music, subtitles, etc.
● It can be also be downloaded on Mac and Windows OS.
● It comes with an annual premium subscription for $51.99.
● It can also be purchased with a one-time fee of $79.99.
Pros:
● It has great video editing features.
● It can convert a large number of video formats to high-resolution GIF files.
● You can customize your GIFs as per your requirements using this tool.
Cons:
● Being an all-in-one video editing tool, this can be much more if you just need GIF creations.
● You cannot remove the watermark and use many editing features if you use a trial version.
03CloudConvert
CloudConvert is another easy-to-use MP4 to GIF converter online. It converts all types of video files into GIFs in a concise time.
Key Features:
● It is easy to use.
● It converts MP4 to GIF very quickly.
● It is free of cost.
● It doesn’t require third-party installation.
● It uses compression algorithms.
Pros:
● It is an open-source converter.
● It allows you to add texts.
● It helps in creating GIFs for web publishing.
Cons:
● Complicated for large files.
● Requires; steady internet connection.
04Convertio
Convertio is another online GIF converter that anyone can use. You just need to upload the MP4 file using Dropbox and hit the ‘Convert’ button.
Key Features:
● Effortless and anyone can easily use it.
● One can easily upload files from Dropbox and Google Drive.
● It also has a drag and drops component for uploading the files.
● It is entirely free to use.
● It is online and doesn’t require any installation.
Pros:
● It converts MP4 to GIF very quickly.
● It delivers high-quality output.
● User-friendly interface.
Cons:
● It doesn’t allow the users to edit their GIFs.
● It doesn’t have the customizing feature and is not user-specific.
05Ezgif
Ezgif is free of cost and an easy-to-use online tool that helps you create GIFs in two easy steps, i.e., upload and convert.
Key Features:
● It is an online tool compatible with both Mac and Windows.
● No download and installation required.
● It is a freeware program.
● It maintains the quality of the outcome.
● It converts GIFs very quickly.
Pros:
● User-friendly and can be used by all.
● It has amazing features that assist you while you convert MP4 to GIF.
● It is not complicated for beginners.
Cons:
● It has limited editing features.
● Only 3 minutes video can be done at maximum.
● Key Takeaways from This Episode →
●The demand for GIF files increases with each passing day due to its many advantages. As a result, many people are looking for easy MP4 to GIF converters that are easy and convenient to use.
●Above mentioned online and offline converters can quickly help you turn MP4 into GIF files without compromising the quality of the graphics.
●These converters are readily available and can easily be used on both Mac and Windows with many conveniences.
●They can help you convert the MP4 files into GIF format very quickly, no matter how large the video size is. GIFs being smaller in size and easily transferrable provide many advantages to the users.
Most Popular Tips on Learning Animate Rigging
Most Popular Tips on Learning Animate Rigging
An easy yet powerful editor
Numerous effects to choose from
Detailed tutorials provided by the official channel
This was a question one of my friends asked me recently on the subject of animate rigging
To help them out (as well as other animation rigging beginners) I decided to compile some of the most popular tips on the subject in this article!
In this article
01 [The Only Guide You’ll Ever Need to Know About Rigging in Animation](#Part 1)
02 [How Do You Animate Rigging?](#Part 2)
Part 1 The Only Guide You’ll Ever Need to Know About Rigging in Animation
Before anything else, we’ve prepared a bit of an OVERVIEW on rigging in animation. This will cover most of the basic, need-to-know stuff to nudge you in the right direction and help the tips we’ve prepared to settle in more easily.
01What is Rigging in Animation
Rigging in animation is a technique used by animators to—quite literally—‘rig’ up a statistic digital character to act or move.
Even more simply, it’s a way of bringing literal life to your character models by introducing them to motion. The ‘rig’ in this case, is usually made as a sort of one-size-fits-all kind of tool, which you can use in order to create pre-made skeletal animations that replicate motions like walking, running, jumping, etc., and apply onto static characters. You can use animation software, like Maya in order to get this done!

02An Introduction to 2D Animation Rigging
2D animation is a more back-breaking kind of process. It’s what you see in a lot of older animations — where every frame needs to be drawn in order to allow for the illusion of motion in characters. This is how classics, like Mickey Mouse, are usually produced!
03An Introduction to 3D Animation Rigging
3D animation, as you can probably guess, is a more modern animation style. You see it in a lot of big blockbuster animated movies these days! Even Disney has since moved onto this style, whereas they were staunch supporters of 2D animation in previous decades. Now, a lot of their major productions, including titles such as “Tangled”, “Frozen”, and “Moana” are 3D animated.
In any case, this is more like what we described earlier — where skeletal ‘rigs’ are applied to static 3D character models to make them move.
04Key 3D Rigging Terms to Get You Moving
Finally, to make sure that you’re headed in the right direction, here’s a list of some of the more important 3D rigging terms that you’ll need to know:
Joints|Bones: This is pretty straightforward, but the Joints or the Bones, in this case, refers to the pieces of the skeletal rig that is used to create movement.
Driven Keys: Driven keys are there to help rigging artists make the movement appear more natural faster. It consists of two parts, the driver (which controls the animation) and the driven (the parts controlled by the driver).
Blend Shapes: This is an animation tool that riggers used mainly for facial animation (like lip-syncing). Basically, it allows them to blend or morph an existing shape to give it motion.
Inverse Kinematics: This is a method of animation that separates a part from the whole. Like how an animator can create motion in the wrist, for example, as a separate entity from the arm.
Forward Kinematics: Opposite of the previous style, this one is a method that follows a hierarchical progression.
Control Curves: This is a way of manipulating multiple joins in a rig in order to create one flowing movement.
Constraint: A way of limiting the positioning of a model or a joint.
Deformers: A way of enhancing rigs to produce a more organic model.
Skinning: This is the process of adding the 3D mesh to the joints.
Weight Planning: This is the process of planning how the weight of an object will affect its 3D mesh and the movement of its joints.
Facial Rigging: This is the process of setting up facial animation, similar to how you set up skeletal animation, but far more complex.
Part 2 How Do You Animate Rigging?
Now, onto actually talking about how you can start animate rigging. This section will guide you through the process in a way that should hopefully help you while in the process of learning about animation in general.
01How to Rig a Simple Character
This has been broken down into four distinct stages to make things as simple as possible! It won’t be discussing the tools you use, as there are plenty of tools you can use for animation, just the general process:
Step 1: Design Your Character

Before you even think about animation, you should start with designing your character (or characters.) This will give you a good basis on what kind of animation rigging you’ll need to work on for that character.
For example, for a humanoid character, a general skeletal rigging might be okay. However, for a creature or monster, their joints might be in different areas or they might even have additional joints regular human rigs don’t have!
So, start with a foundation that you can work from to make things easier on yourself.
Step 2: Start With Rigging Points!

When you have your character design ready, it’s time to start rigging joints! It’s best to start with the joints and leave the more finicky parts later. Basically, it’s always easier to start with the parts that can create big movements first!
Working on things layer by layer should help make things easier for you as well.
Step 3: Connect The Layers!
It’s time to put everything together to create smooth movement! Depending on what tool you’re using, this is usually just as easy as dragging things into place.
Step 4: Timing Your Animation

With the rig in place, the next thing you have to worry about is frame timing. Timing is important for ensuring that there is no break in character motions
02Beginners Tutorial on Shape Rigging
This one is a little more complicated, and should be improved more by trial and error, but here are a couple of tips that you can follow along with while exploring blend shapes in animation:
Master your sculpting tools first and foremost! The more familiar you are with the shapes that your tools can create, the better!
Symmetrical modeling is one way of making the process go a lot faster! Take advantage of this option to highlight components that you need to be affected in the same way and at the same time.
If symmetrical modeling is not working for you, independent modeling is a great way of making things appear more organic.

03How Auto Rig Mapping Works
Auto-rigging is the use of pre-made rigs in order to simplify the process. The tool automatically maps the areas where the characters and the rig are given the same symbol names and snaps them together to create joints for a motion to be applied.
04How Visual Rig Mapping Works
Visual mapping is a lot more complicated the auto-rig mapping, so it’s not something you want to jump into immediately. However, it is a must for animation riggers that work with unique character models. The process usually goes as follows:
Manually make connections starting with the joints.
Applying the skeleton to the rig to complete bones and connections.
Motion can then be added to the timeline.

05Finalizing Your Animated Rig
To finish us off, let’s talk about how you go about publishing your finished product! Of course, even after you have your complex rig completed, there are still other matters to think about in terms of making sure that the video is of quality!
Key Takeaways from This Episode
● Start off on the right footing by learning the basics of animation! These days, there are more options than ever, with the modern 3D animation rigging style now just as popular as the more classic 2D animation style.
● The best way to learn animation rigging is to practice! Structured guides can help you get to the point of almost mastery, but it’s not until you start playing with the tools of your craft that you can truly learn how to create beautiful animations!
● Some of the more complex functions of rigging require a lot of patience, so make sure that you always go into your projects with a level-head. And, just to be sure, invest in tools that will help rather than hinder your progress! There are many advanced software out there that can help you improve more easily.
This was a question one of my friends asked me recently on the subject of animate rigging
To help them out (as well as other animation rigging beginners) I decided to compile some of the most popular tips on the subject in this article!
In this article
01 [The Only Guide You’ll Ever Need to Know About Rigging in Animation](#Part 1)
02 [How Do You Animate Rigging?](#Part 2)
Part 1 The Only Guide You’ll Ever Need to Know About Rigging in Animation
Before anything else, we’ve prepared a bit of an OVERVIEW on rigging in animation. This will cover most of the basic, need-to-know stuff to nudge you in the right direction and help the tips we’ve prepared to settle in more easily.
01What is Rigging in Animation
Rigging in animation is a technique used by animators to—quite literally—‘rig’ up a statistic digital character to act or move.
Even more simply, it’s a way of bringing literal life to your character models by introducing them to motion. The ‘rig’ in this case, is usually made as a sort of one-size-fits-all kind of tool, which you can use in order to create pre-made skeletal animations that replicate motions like walking, running, jumping, etc., and apply onto static characters. You can use animation software, like Maya in order to get this done!
02An Introduction to 2D Animation Rigging
2D animation is a more back-breaking kind of process. It’s what you see in a lot of older animations — where every frame needs to be drawn in order to allow for the illusion of motion in characters. This is how classics, like Mickey Mouse, are usually produced!
03An Introduction to 3D Animation Rigging
3D animation, as you can probably guess, is a more modern animation style. You see it in a lot of big blockbuster animated movies these days! Even Disney has since moved onto this style, whereas they were staunch supporters of 2D animation in previous decades. Now, a lot of their major productions, including titles such as “Tangled”, “Frozen”, and “Moana” are 3D animated.
In any case, this is more like what we described earlier — where skeletal ‘rigs’ are applied to static 3D character models to make them move.
04Key 3D Rigging Terms to Get You Moving
Finally, to make sure that you’re headed in the right direction, here’s a list of some of the more important 3D rigging terms that you’ll need to know:
Joints|Bones: This is pretty straightforward, but the Joints or the Bones, in this case, refers to the pieces of the skeletal rig that is used to create movement.
Driven Keys: Driven keys are there to help rigging artists make the movement appear more natural faster. It consists of two parts, the driver (which controls the animation) and the driven (the parts controlled by the driver).
Blend Shapes: This is an animation tool that riggers used mainly for facial animation (like lip-syncing). Basically, it allows them to blend or morph an existing shape to give it motion.
Inverse Kinematics: This is a method of animation that separates a part from the whole. Like how an animator can create motion in the wrist, for example, as a separate entity from the arm.
Forward Kinematics: Opposite of the previous style, this one is a method that follows a hierarchical progression.
Control Curves: This is a way of manipulating multiple joins in a rig in order to create one flowing movement.
Constraint: A way of limiting the positioning of a model or a joint.
Deformers: A way of enhancing rigs to produce a more organic model.
Skinning: This is the process of adding the 3D mesh to the joints.
Weight Planning: This is the process of planning how the weight of an object will affect its 3D mesh and the movement of its joints.
Facial Rigging: This is the process of setting up facial animation, similar to how you set up skeletal animation, but far more complex.
Part 2 How Do You Animate Rigging?
Now, onto actually talking about how you can start animate rigging. This section will guide you through the process in a way that should hopefully help you while in the process of learning about animation in general.
01How to Rig a Simple Character
This has been broken down into four distinct stages to make things as simple as possible! It won’t be discussing the tools you use, as there are plenty of tools you can use for animation, just the general process:
Step 1: Design Your Character
Before you even think about animation, you should start with designing your character (or characters.) This will give you a good basis on what kind of animation rigging you’ll need to work on for that character.
For example, for a humanoid character, a general skeletal rigging might be okay. However, for a creature or monster, their joints might be in different areas or they might even have additional joints regular human rigs don’t have!
So, start with a foundation that you can work from to make things easier on yourself.
Step 2: Start With Rigging Points!
When you have your character design ready, it’s time to start rigging joints! It’s best to start with the joints and leave the more finicky parts later. Basically, it’s always easier to start with the parts that can create big movements first!
Working on things layer by layer should help make things easier for you as well.
Step 3: Connect The Layers!
It’s time to put everything together to create smooth movement! Depending on what tool you’re using, this is usually just as easy as dragging things into place.
Step 4: Timing Your Animation
With the rig in place, the next thing you have to worry about is frame timing. Timing is important for ensuring that there is no break in character motions
02Beginners Tutorial on Shape Rigging
This one is a little more complicated, and should be improved more by trial and error, but here are a couple of tips that you can follow along with while exploring blend shapes in animation:
Master your sculpting tools first and foremost! The more familiar you are with the shapes that your tools can create, the better!
Symmetrical modeling is one way of making the process go a lot faster! Take advantage of this option to highlight components that you need to be affected in the same way and at the same time.
If symmetrical modeling is not working for you, independent modeling is a great way of making things appear more organic.
03How Auto Rig Mapping Works
Auto-rigging is the use of pre-made rigs in order to simplify the process. The tool automatically maps the areas where the characters and the rig are given the same symbol names and snaps them together to create joints for a motion to be applied.
04How Visual Rig Mapping Works
Visual mapping is a lot more complicated the auto-rig mapping, so it’s not something you want to jump into immediately. However, it is a must for animation riggers that work with unique character models. The process usually goes as follows:
Manually make connections starting with the joints.
Applying the skeleton to the rig to complete bones and connections.
Motion can then be added to the timeline.
05Finalizing Your Animated Rig
To finish us off, let’s talk about how you go about publishing your finished product! Of course, even after you have your complex rig completed, there are still other matters to think about in terms of making sure that the video is of quality!
Key Takeaways from This Episode
● Start off on the right footing by learning the basics of animation! These days, there are more options than ever, with the modern 3D animation rigging style now just as popular as the more classic 2D animation style.
● The best way to learn animation rigging is to practice! Structured guides can help you get to the point of almost mastery, but it’s not until you start playing with the tools of your craft that you can truly learn how to create beautiful animations!
● Some of the more complex functions of rigging require a lot of patience, so make sure that you always go into your projects with a level-head. And, just to be sure, invest in tools that will help rather than hinder your progress! There are many advanced software out there that can help you improve more easily.
Secrets to Make 2D Game Animation
Secrets to Make 2D Game Animation
An easy yet powerful editor
Numerous effects to choose from
Detailed tutorials provided by the official channel
In this dominated era by 2D game animation, when even the latest versions of Super Mario Bros and Street Fighter. are created of polygonized characters, quality sprite-based 2D games are rare.
In this article
01 [2D Game Animation Courses and Tutorials](#Part 1)
02 [5 Best Game Animation Services to Buy Online](#Part 2)
03 [Best 5 Game Animation Tools for Development As of 2022](#Part 3)
04 [3 Tips for Making Great Animations for 2D Games](#Part 4)
05 [How to Make 2D Animation for Games](#Part 5)
Part 1 2D Game Animation Courses and Tutorials
01Animating a 2D Character within Live-Action Video in Photoshop and Premiere
This tutorial greatly defines the process of creating traditional 2D animation in Photoshop implacable over live-action video. We’ll discuss the live-action planning shots with animation in mind, continuity of video editing, and making references for video animation. You will also know how to create the critical poses via rough animation to finish the entire movement and make final line images.
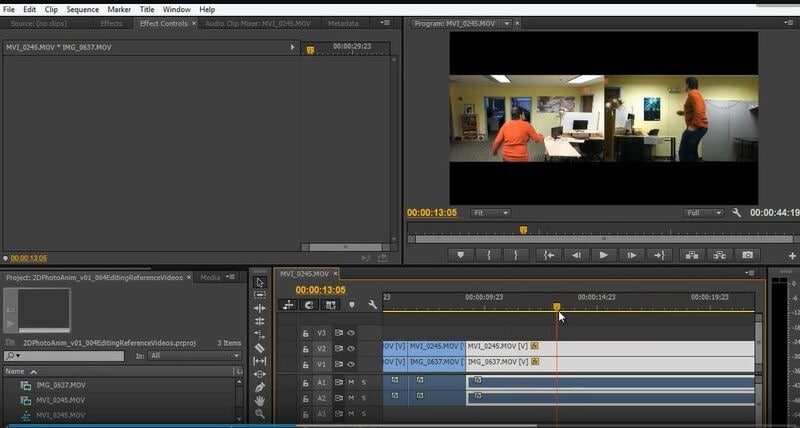
02Beginning 2D Animation: The Absolute Beginner’s Entry with Jeff Mumm
This course lays a solid foundation for absolute beginners entering the exciting world of 2D game animation. Here, we describe the detailed steps to create unique and great-looking animations.
You will also learn ‘easing,’ one of the twelve animation principles, and ultimately plan an animated sequence.
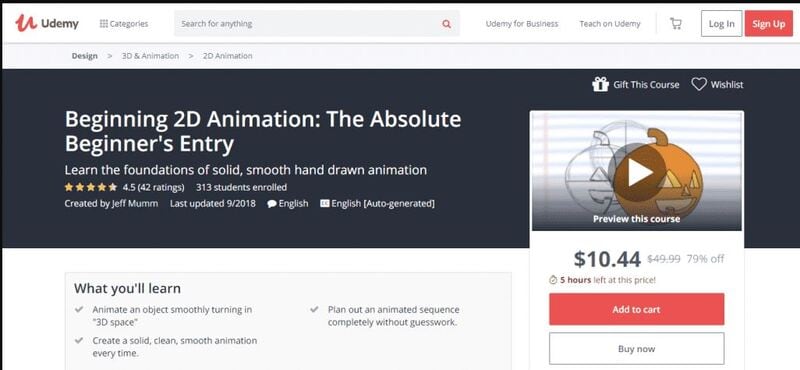
032D Animation in Moho from Basic to Advanced
This course focuses on applying the principles of animation to create an organic walk cycle for the character. This tutorial or course will also teach you how to rig and prepare your animated characters and do 2D game animation.
You will also learn how to trace characters in Moho and use different drawing tools.
Also, you will learn how to create an organic walk cycle by applying advanced animation principles.

042D Animation 101 Courses
This is one of the free online and the ultimate 2D game character design and animation courses that offer free online certificates. Autumn Leave Films has ten years of experience in the film industry and a great collection of short films – nearly 30 2D Animation 101 Courses.
2D Animation 101 provides eight courses, plus free and proprietary 2D game character animation software. In addition, their “Free Step-by-Step Plan” is specifically compelling to beginners in the 2D Animation arena.
It includes daily 10-minute lessons, online 2D game character animation tutorials, suggestions, and tips on using the required software.
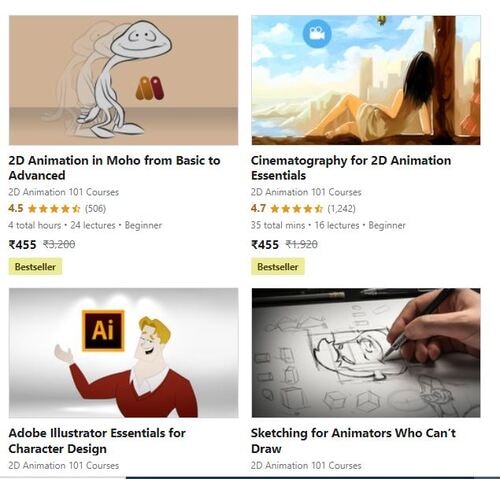
05Skillshare -2D Animation for Beginners with Adobe Animate
This is one of the free online 2D animation courses that offer free online animation courses with certificates. You can learn 2D animation online by following Walt’s course. This course is designed for beginners and demonstrates how to create animated characters by providing students with an understanding of the fundamental principles and vivid examples. This tutorial covers various topics, including vector art basics in Animate, nested animations, adding audio to animations, and more.
This short course or tutorial is ideal for animation for personal rather than professional reasons.

Part 2 5 Best Game Animation Services to Buy Online
Rather than using and learning the best 2D animation software for game development, we’d like to describe a list of the top 5 freelancing platforms to rely upon for the best game animation services.
01Upwork
02Freelancer
03Fiverr
04Guru
05PeoplePerHour
Part 3 Best 5 Game Animation Tools for Development As of 2022
01Adobe Animate
It is a program from Adobe’s Creative Cloud. It offers the ability to make many varieties of animated features, games, or other Flash multimedia. The program was called Adobe Flash Professional for more than ten years; that name was retired in 2015.
The main features of Animate are as follows:
● Integration with your Adobe cloud library of assets
● Easy cross-platform use with other Adobe products
● Creates animated movies, cartoons, or clips
● Creates Flash games or interactive Flash utilities
02Moho
It’s a comprehensive and best 2D game animation software where your animations are basically on the level of some of your favorite creations. It’s projected toward animators looking to hone their craft.
You could create some fantastic stuff if you’re up to the task (and the price). Moreover, they’re constantly adding updates.
03Plastic Animation Paper
Plastic Animation Paper is another best 2D game character animation software that deals heavily with the concept of pencil drawing.
The program is designed for the most straightforward use and involves clear resolution. You can do whatever you wish with your drawings and elevate yourself to the next level.
04Stop Motion Studio
‘Want to create movies like Wallace and those groovy Lego shorts on YouTube? Stop Motion Studio allows you to create terrific stop action movies with a bucket of specialized features.’
05Animaker
Learning how to make 2D animation for games with Animaker is also good to set up a storyboard and animate the characters or props in that scene. It’s used by companies like Verizon, Google, Pepsi, etc.
It’s appropriate for ad placement on websites and simplistic for beginners. They make it easy and super-fast to get lost for hours animating.
Part 4 3 Tips for Making Great Animations for 2D Games
Now that you have some initial idea of 2D game animation let’s jump to the top 3 tips that will help you create the best and unique 2D game character animation designs with ease.
It will be beneficial while knowing how to make 2D animation for games.
01Focus on the story and start with simple movements
You need to focus on the storyline so that outcome will come accordingly. Focus on every detail while sketching, and don’t miss out on simple movements. Take paper and pencil and start drawing simple exercises like the movement of a bouncing ball etc.
02Use keyframes properly
You need to carefully use keyframes’ start and endpoints to have robust storytelling and movements. To adequately describe the first and last, you need to consider effectively using the keyframes.
03Enliven your characters
You need to give life to your characters so that audience can best relate to the story. Also, pay good attention to facial expressions, sound, tickling movements, etc.
Although these may look like the most straightforward tips ever, these are the most practical 2D game animation strategies that can do wonders if used effectively.
Part 5 How to Make 2D Animation for Games
Making 2D game character animation isn’t a straightforward process and thus needs detailed knowledge that we will describe below.
Let’s use Unity as the best 2D animation software for games without further ado!
Essential awareness of the Unity Editor (how to navigate and open tabs) is required to work with the Unity Animation window.
01Step 1: Start the Animation tab
Choose the Adventurer character and launch the Animation tab.
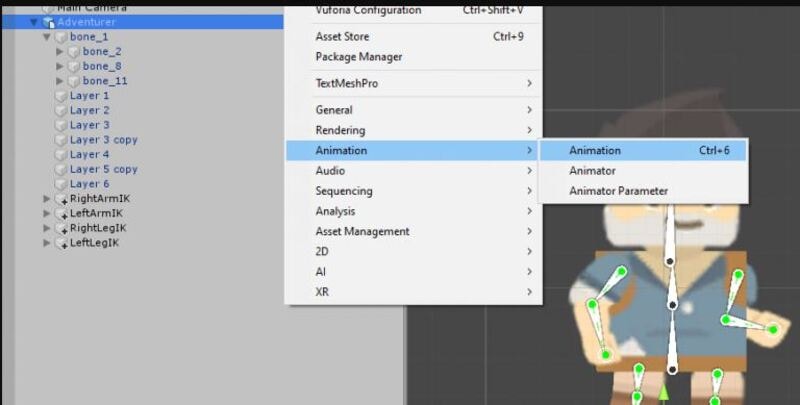
Dock this next to your project tab and console tab. Head towards the project tab and name with the Adventurer folder. Make a new folder known as “Animation.”
With the Animation tab, create a new animation known as “Idle” placed in our Animation folder.
It also creates an Animator Controller in that same folder.
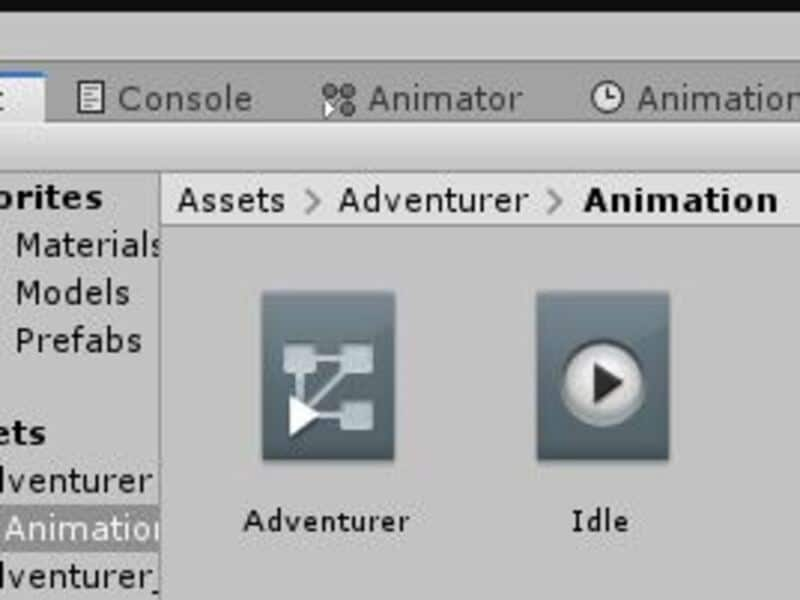
Now, let’s start animating this character!
02Step 2: Proceed with the Idle Animation
IKs contribute a lot to the efficiency and speed of animating when it comes to idle animation. We must animate a subtle movement very similar to a breathing motion. Tap the red record button and move the character to this position:
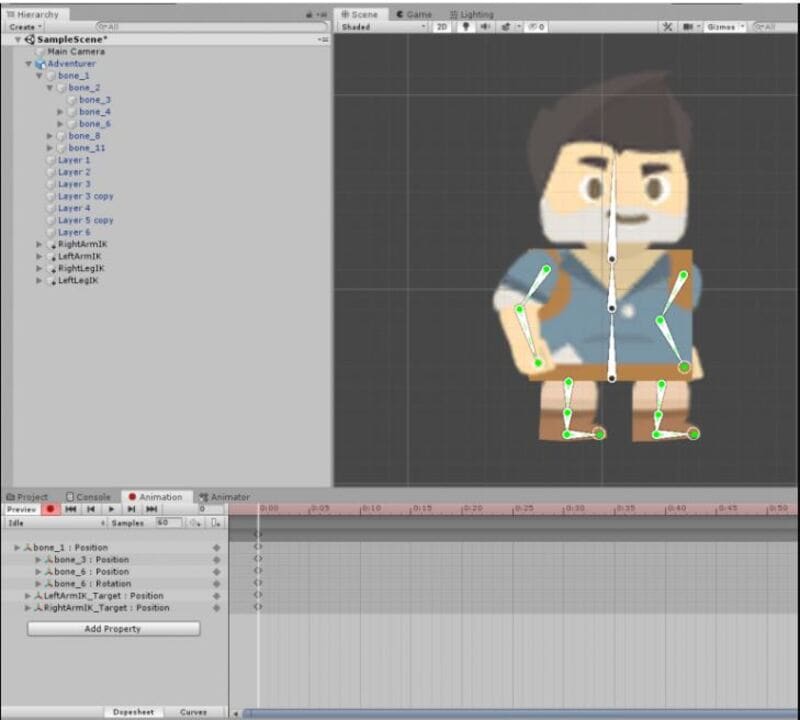
Now go about fifty frames ahead and barely move the top torso bone straight down.
Drag the arm IKs to the side to contain less bend in them and display a sort of “swinging” motion. Here is the pose that I chose:
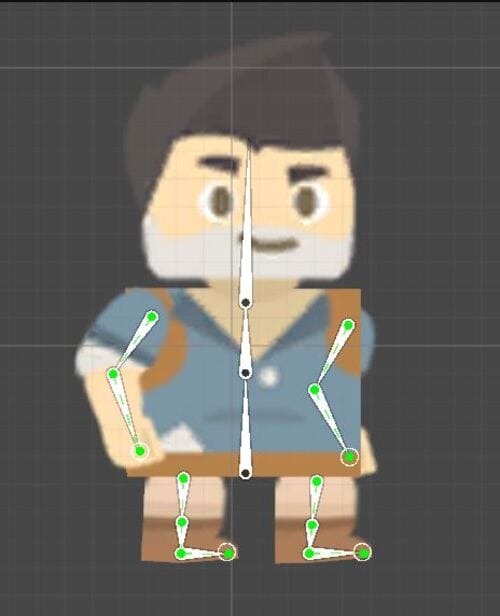
A subtle tweak is there. It makes the idle animation look strange if we create large movements. Then, choose the first group of keyframes and tap the Ctrl-C (Command-C on a Mac).
Then, paste these frame-centric keyframes on number 1:50.
So, the nice looping animation is over now! It looks genuine, but we need to add some head motion to improve the illusion.
Just rotate the head back ever so slightly. But, as you can see, it makes a huge difference. Alright! Congratulations! We now have an idle animation!
03Step 3: Start walk animation
Create a new animation clip called ‘Walk.”
This animation is a bit more technical. Here, we need to know a few essential things about walk locomotion. The walk animation’s primary function is that the character is always touching the ground. Therefore, we should never have a pose where our character is airborne. Also, I use the word “pose” intentionally. When we animate in 2D, an action comprises certain key poses. In the scenario of the walk animation, we have one posture like this:
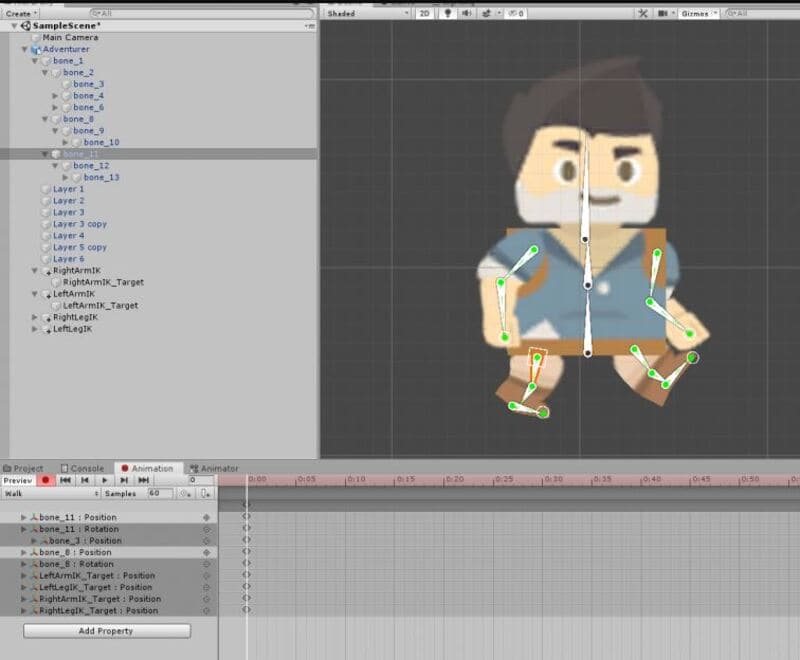
Here we have the right foot (relative to the character) touching the ground as you wander.
Then, about six frames ahead, we have a “passing pose.”
It contains a slight movement downwards. It further adds a realistic bobbing motion.
We must animate the character moving forward by moving the entire character game object. Don’t move the surface by any other means except by dragging the character as the whole object.
Then, the “dynamic pose” with the left foot touching the ground this time.
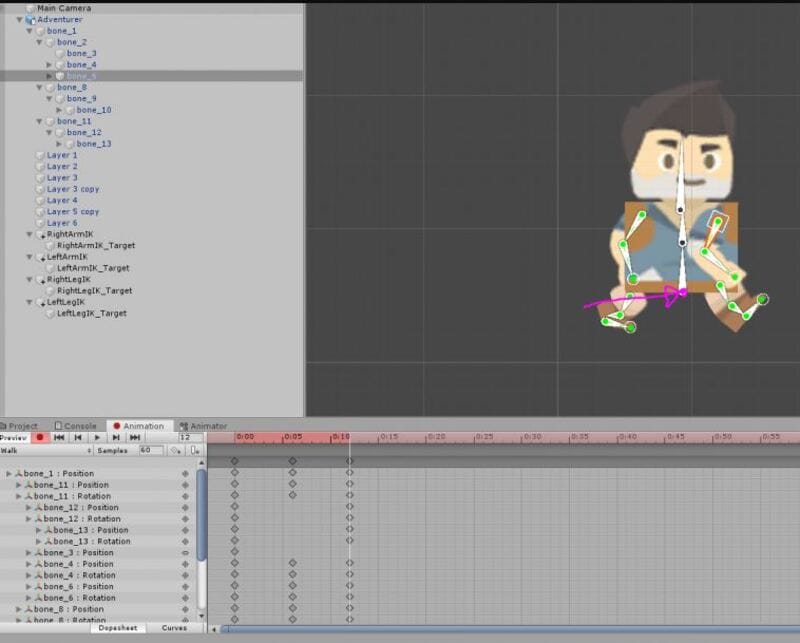
This happens at frame twelve, and we are still forwarding the character.
Now, we just require a final passing pose.
And then we recreate the same pose!
Now, copy the first keyframe and paste it. Reposition the character on the X-axis to match the forward motion. Now, go back to your animation and tweak any limbs bending in the wrong direction.
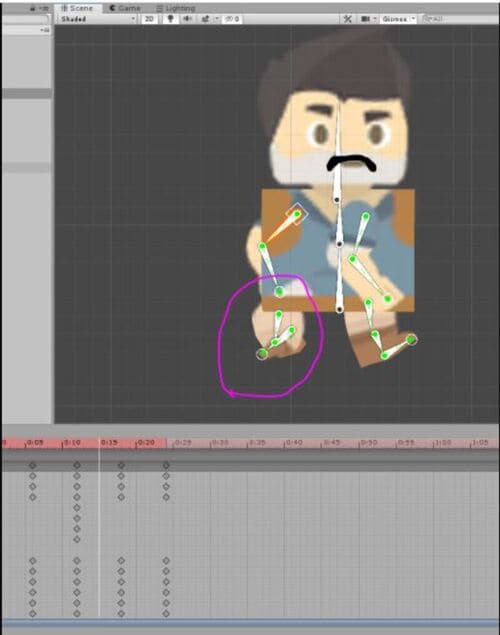
We are done!
04Step 4: Run animation
For the Run animation, create one pose with the airborne character. The distance covered is also more significant than the walk animation. Besides, the run animation has a similar general structure, but we add one extra pose to improve the illusion ultimately.
Create a new animation folder or clip called “Run.”
Tap the record tab and move the limbs to this pose:
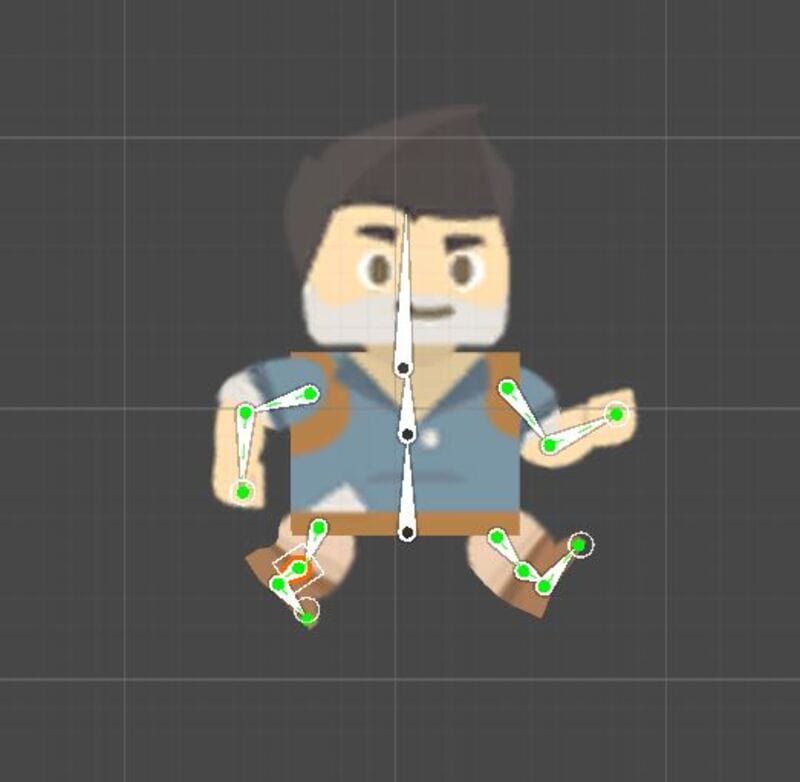
The armature, we found, was very fiddly, so be patient while trying to create this pose. This first dynamic pose means that we need to have the whole character move slightly up on the y-axis. Then, after forwarding the six frames, we drag the character in different positions and down while limbs reposition to make the first passing pose.
Go through these two keyframes to check if you have an experimental animation. Reposition the feet to avoid foot sliding.
Then, the second dynamic pose happens six frames forward:
Now, we have another passing posture at frame number 18:
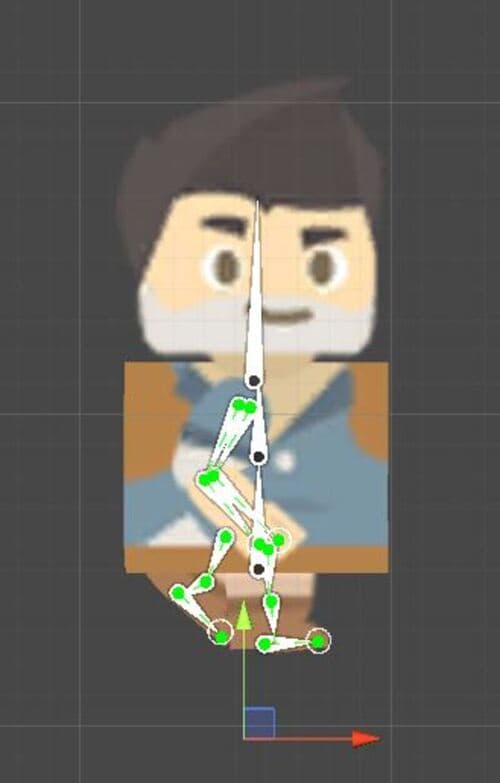
And conclusively, we have our final dynamic pose and make it look like the first pose. An excellent place to begin is to copy the first frame and paste it at the end. Drag the character forward on the X-axis into the ideal place. Now move the limbs into roughly the exact position as the beginning pose.
05Step 5: Go back to animation and check
Now, you can go back through the animation and consider checking two things. Firstly, correct any unnaturally bent limbs.
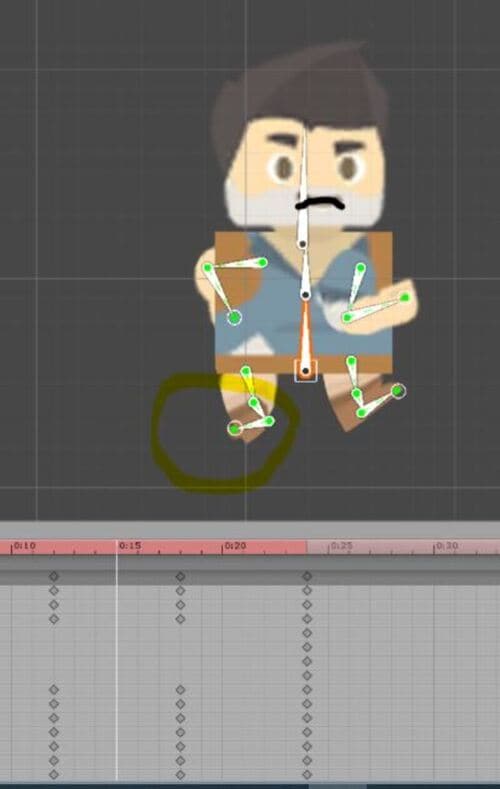
06Step 6: Create a contact pose
Secondly, we are required to add a unique pose to this run cycle called a “Contact Pose,” where we can visibly see the character make contact with the ground. This pose occurs a few frames after the dynamic pose and a few before the passing pose. It is simply the forward leg making early contact with the ground.

We need one of these before every passing pose. Also, while we’re here, let’s add a little more toe movement after passing each passing pose to make it look like the character got pushed off the ground.
So, this is the procedure to use the best 2D animation software for game development via Unity, and you can similarly continue to make jump animations, root motion, and more.
This tutorial mainly focused on animating a 2D character and dove deeper into the actual structure of an animation. Knowing these things will allow you to animate 2D characters and 3D characters as the principles are the same for each medium.
Easiest Solution for 2D Game Character Animation
Animating 2D games with Filmora Pro is a perfect choice. You get to try out its excellent 2D and 3D animation functions that are highly affordable and simple to use for both Android and iOS devices. You can consider using keyframe animations and letting them look realistic.
You can also get your fingers on a vast range of video editing tools with Wondershare Filmora Video Editor , such as color correction and grading, motion tracking, keying, simulations, and more. It allows you to make incredible animated videos and cinematic reels.
How to animate games with Wondershare Filmora
More advancement means more and kinds of games are fading out to obscurity. You can now animate 2D games underrated and add a bit of your touch to them via software like Filmora Pro and others like it.
For example, Filmora Pro features a dozen different transition effects like Centre Wipe, Evaporate, or Linear Wipe.
For Win 7 or later (64-bit)
For macOS 10.12 or later
You can also apply 3D rendering techniques to your games’ light and shadow effects.
● Key Takeaways from This Episode →
● A guide to the ultimate 2d game character design & animation course
● A guide to 5 best game animation services
● Learning five best 2D game character animation tools
● Tips for making excellent 2D game animations
● A step by ultimate step guide to making 2D game animation character in Unity
● Exploring the easiest solution for 2D game animation
In this dominated era by 2D game animation, when even the latest versions of Super Mario Bros and Street Fighter. are created of polygonized characters, quality sprite-based 2D games are rare.
In this article
01 [2D Game Animation Courses and Tutorials](#Part 1)
02 [5 Best Game Animation Services to Buy Online](#Part 2)
03 [Best 5 Game Animation Tools for Development As of 2022](#Part 3)
04 [3 Tips for Making Great Animations for 2D Games](#Part 4)
05 [How to Make 2D Animation for Games](#Part 5)
Part 1 2D Game Animation Courses and Tutorials
01Animating a 2D Character within Live-Action Video in Photoshop and Premiere
This tutorial greatly defines the process of creating traditional 2D animation in Photoshop implacable over live-action video. We’ll discuss the live-action planning shots with animation in mind, continuity of video editing, and making references for video animation. You will also know how to create the critical poses via rough animation to finish the entire movement and make final line images.
02Beginning 2D Animation: The Absolute Beginner’s Entry with Jeff Mumm
This course lays a solid foundation for absolute beginners entering the exciting world of 2D game animation. Here, we describe the detailed steps to create unique and great-looking animations.
You will also learn ‘easing,’ one of the twelve animation principles, and ultimately plan an animated sequence.
032D Animation in Moho from Basic to Advanced
This course focuses on applying the principles of animation to create an organic walk cycle for the character. This tutorial or course will also teach you how to rig and prepare your animated characters and do 2D game animation.
You will also learn how to trace characters in Moho and use different drawing tools.
Also, you will learn how to create an organic walk cycle by applying advanced animation principles.
042D Animation 101 Courses
This is one of the free online and the ultimate 2D game character design and animation courses that offer free online certificates. Autumn Leave Films has ten years of experience in the film industry and a great collection of short films – nearly 30 2D Animation 101 Courses.
2D Animation 101 provides eight courses, plus free and proprietary 2D game character animation software. In addition, their “Free Step-by-Step Plan” is specifically compelling to beginners in the 2D Animation arena.
It includes daily 10-minute lessons, online 2D game character animation tutorials, suggestions, and tips on using the required software.
05Skillshare -2D Animation for Beginners with Adobe Animate
This is one of the free online 2D animation courses that offer free online animation courses with certificates. You can learn 2D animation online by following Walt’s course. This course is designed for beginners and demonstrates how to create animated characters by providing students with an understanding of the fundamental principles and vivid examples. This tutorial covers various topics, including vector art basics in Animate, nested animations, adding audio to animations, and more.
This short course or tutorial is ideal for animation for personal rather than professional reasons.
Part 2 5 Best Game Animation Services to Buy Online
Rather than using and learning the best 2D animation software for game development, we’d like to describe a list of the top 5 freelancing platforms to rely upon for the best game animation services.
01Upwork
02Freelancer
03Fiverr
04Guru
05PeoplePerHour
Part 3 Best 5 Game Animation Tools for Development As of 2022
01Adobe Animate
It is a program from Adobe’s Creative Cloud. It offers the ability to make many varieties of animated features, games, or other Flash multimedia. The program was called Adobe Flash Professional for more than ten years; that name was retired in 2015.
The main features of Animate are as follows:
● Integration with your Adobe cloud library of assets
● Easy cross-platform use with other Adobe products
● Creates animated movies, cartoons, or clips
● Creates Flash games or interactive Flash utilities
02Moho
It’s a comprehensive and best 2D game animation software where your animations are basically on the level of some of your favorite creations. It’s projected toward animators looking to hone their craft.
You could create some fantastic stuff if you’re up to the task (and the price). Moreover, they’re constantly adding updates.
03Plastic Animation Paper
Plastic Animation Paper is another best 2D game character animation software that deals heavily with the concept of pencil drawing.
The program is designed for the most straightforward use and involves clear resolution. You can do whatever you wish with your drawings and elevate yourself to the next level.
04Stop Motion Studio
‘Want to create movies like Wallace and those groovy Lego shorts on YouTube? Stop Motion Studio allows you to create terrific stop action movies with a bucket of specialized features.’
05Animaker
Learning how to make 2D animation for games with Animaker is also good to set up a storyboard and animate the characters or props in that scene. It’s used by companies like Verizon, Google, Pepsi, etc.
It’s appropriate for ad placement on websites and simplistic for beginners. They make it easy and super-fast to get lost for hours animating.
Part 4 3 Tips for Making Great Animations for 2D Games
Now that you have some initial idea of 2D game animation let’s jump to the top 3 tips that will help you create the best and unique 2D game character animation designs with ease.
It will be beneficial while knowing how to make 2D animation for games.
01Focus on the story and start with simple movements
You need to focus on the storyline so that outcome will come accordingly. Focus on every detail while sketching, and don’t miss out on simple movements. Take paper and pencil and start drawing simple exercises like the movement of a bouncing ball etc.
02Use keyframes properly
You need to carefully use keyframes’ start and endpoints to have robust storytelling and movements. To adequately describe the first and last, you need to consider effectively using the keyframes.
03Enliven your characters
You need to give life to your characters so that audience can best relate to the story. Also, pay good attention to facial expressions, sound, tickling movements, etc.
Although these may look like the most straightforward tips ever, these are the most practical 2D game animation strategies that can do wonders if used effectively.
Part 5 How to Make 2D Animation for Games
Making 2D game character animation isn’t a straightforward process and thus needs detailed knowledge that we will describe below.
Let’s use Unity as the best 2D animation software for games without further ado!
Essential awareness of the Unity Editor (how to navigate and open tabs) is required to work with the Unity Animation window.
01Step 1: Start the Animation tab
Choose the Adventurer character and launch the Animation tab.
Dock this next to your project tab and console tab. Head towards the project tab and name with the Adventurer folder. Make a new folder known as “Animation.”
With the Animation tab, create a new animation known as “Idle” placed in our Animation folder.
It also creates an Animator Controller in that same folder.
Now, let’s start animating this character!
02Step 2: Proceed with the Idle Animation
IKs contribute a lot to the efficiency and speed of animating when it comes to idle animation. We must animate a subtle movement very similar to a breathing motion. Tap the red record button and move the character to this position:
Now go about fifty frames ahead and barely move the top torso bone straight down.
Drag the arm IKs to the side to contain less bend in them and display a sort of “swinging” motion. Here is the pose that I chose:
A subtle tweak is there. It makes the idle animation look strange if we create large movements. Then, choose the first group of keyframes and tap the Ctrl-C (Command-C on a Mac).
Then, paste these frame-centric keyframes on number 1:50.
So, the nice looping animation is over now! It looks genuine, but we need to add some head motion to improve the illusion.
Just rotate the head back ever so slightly. But, as you can see, it makes a huge difference. Alright! Congratulations! We now have an idle animation!
03Step 3: Start walk animation
Create a new animation clip called ‘Walk.”
This animation is a bit more technical. Here, we need to know a few essential things about walk locomotion. The walk animation’s primary function is that the character is always touching the ground. Therefore, we should never have a pose where our character is airborne. Also, I use the word “pose” intentionally. When we animate in 2D, an action comprises certain key poses. In the scenario of the walk animation, we have one posture like this:
Here we have the right foot (relative to the character) touching the ground as you wander.
Then, about six frames ahead, we have a “passing pose.”
It contains a slight movement downwards. It further adds a realistic bobbing motion.
We must animate the character moving forward by moving the entire character game object. Don’t move the surface by any other means except by dragging the character as the whole object.
Then, the “dynamic pose” with the left foot touching the ground this time.
This happens at frame twelve, and we are still forwarding the character.
Now, we just require a final passing pose.
And then we recreate the same pose!
Now, copy the first keyframe and paste it. Reposition the character on the X-axis to match the forward motion. Now, go back to your animation and tweak any limbs bending in the wrong direction.
We are done!
04Step 4: Run animation
For the Run animation, create one pose with the airborne character. The distance covered is also more significant than the walk animation. Besides, the run animation has a similar general structure, but we add one extra pose to improve the illusion ultimately.
Create a new animation folder or clip called “Run.”
Tap the record tab and move the limbs to this pose:
The armature, we found, was very fiddly, so be patient while trying to create this pose. This first dynamic pose means that we need to have the whole character move slightly up on the y-axis. Then, after forwarding the six frames, we drag the character in different positions and down while limbs reposition to make the first passing pose.
Go through these two keyframes to check if you have an experimental animation. Reposition the feet to avoid foot sliding.
Then, the second dynamic pose happens six frames forward:
Now, we have another passing posture at frame number 18:
And conclusively, we have our final dynamic pose and make it look like the first pose. An excellent place to begin is to copy the first frame and paste it at the end. Drag the character forward on the X-axis into the ideal place. Now move the limbs into roughly the exact position as the beginning pose.
05Step 5: Go back to animation and check
Now, you can go back through the animation and consider checking two things. Firstly, correct any unnaturally bent limbs.
06Step 6: Create a contact pose
Secondly, we are required to add a unique pose to this run cycle called a “Contact Pose,” where we can visibly see the character make contact with the ground. This pose occurs a few frames after the dynamic pose and a few before the passing pose. It is simply the forward leg making early contact with the ground.
We need one of these before every passing pose. Also, while we’re here, let’s add a little more toe movement after passing each passing pose to make it look like the character got pushed off the ground.
So, this is the procedure to use the best 2D animation software for game development via Unity, and you can similarly continue to make jump animations, root motion, and more.
This tutorial mainly focused on animating a 2D character and dove deeper into the actual structure of an animation. Knowing these things will allow you to animate 2D characters and 3D characters as the principles are the same for each medium.
Easiest Solution for 2D Game Character Animation
Animating 2D games with Filmora Pro is a perfect choice. You get to try out its excellent 2D and 3D animation functions that are highly affordable and simple to use for both Android and iOS devices. You can consider using keyframe animations and letting them look realistic.
You can also get your fingers on a vast range of video editing tools with Wondershare Filmora Video Editor , such as color correction and grading, motion tracking, keying, simulations, and more. It allows you to make incredible animated videos and cinematic reels.
How to animate games with Wondershare Filmora
More advancement means more and kinds of games are fading out to obscurity. You can now animate 2D games underrated and add a bit of your touch to them via software like Filmora Pro and others like it.
For example, Filmora Pro features a dozen different transition effects like Centre Wipe, Evaporate, or Linear Wipe.
For Win 7 or later (64-bit)
For macOS 10.12 or later
You can also apply 3D rendering techniques to your games’ light and shadow effects.
● Key Takeaways from This Episode →
● A guide to the ultimate 2d game character design & animation course
● A guide to 5 best game animation services
● Learning five best 2D game character animation tools
● Tips for making excellent 2D game animations
● A step by ultimate step guide to making 2D game animation character in Unity
● Exploring the easiest solution for 2D game animation
How To Make Pinterest Slideshow in Simple Ways
How to Make Pinterest Slideshow in Simple Ways
An easy yet powerful editor
Numerous effects to choose from
Detailed tutorials provided by the official channel
Slideshows are a collection of images arranged together that an audience can quickly swipe through to view the content. Pinterest is known for its one-pin to one post feature. You cannot post more than one image or video in a pin.
Thus, business people could start sharing all of the images or products, services, or articles mostly because it can be stressful to do that. But with the Pinterest slideshow, you can now upload all the images you want to at once in one pin. Moreso, even have people view the pins simultaneously just by swiping through.
In this article
01 [How to display Pinterest’s latest pins in a slideshow? ](#Part 1)
02 [How to upload multiple photos to Pinterest?](#Part 2)
03 [How to display Pinterest’s latest pins in a slideshow? ](#Part 3)
Part 1 How to Display Pinterest Latest Pins in A Slideshow
Using Pinterest’s latest pins in a slideshow is another way to display the latest pins from any Pinterest user or blogger’s blog. Each image is linked to its pin page on Pinterest instead of the board or profile page if you use the Pinterest profile or board widget.
To install this widget, you need the user or board’s RSS feed URL, then use it as the input for a blogger slide show gadget.
Here are the tricky steps to follow for the Pinterest slide show;
Step 1: Constructing Pinterest RSS feed URL
The Pinterest RSS feed URL of a user is different from aboard.
● It would be the user’s profile URL + feed/RSS for a user. To get your Profile URL, click on your username in the top right corner of your screen, and you will see a URL in your web browser’s URL. That is your profile URL.
● For the board URL, you will get that after clicking on the board from the homepage. The URL would appear on your browser’s URL bar.

Step 2: Reformatting the feed for the slideshow gadget:
The RSS feed from step one is not very compatible with the blogger slideshow gadget. It accepts RSS feed in Media RSS format, but you can convert with Yahoo pipe. Simply plug in your feed URL in the Yahoo pipe URL.
You have to replace the value of the feed URL with the feed URL you got in step one and the pin count with the number of pins displayed on the slide show.
With this, you have successfully converted your feed URL to the media version of the Pinterest feed.
Step 3: Add the slideshow widget
Take the following step to add the slideshow widget.
Go to Dashboard > Layout and click on ‘Add A Gadget.’
Now Add, A Gadget window, scroll down and select Slideshow.

Under Source, select Other.

Put in the converted Pinterest RSS feed URL from step 2 into the Feed URL text box.
Click Save and view your blog.
Part 2 How to Upload Multiple Photos to Pinterest
If you want to display multiple photos of your product or share your brand story with pictures, then this is a feature you will grab. Pinterest allows you to display various products at a time. But first, you must also have a business account to do this.
When you upload multiple photos on Pinterest, they are known as carousel pins. This feature is a great advertising tool and will help you during the Pinterest slideshow.
This is because people would see your carousel on their home feed just like any other pin you have posted. They may also tap on the carousel and swipe through the different photos on the carousel. When the pinner saves it, they have kept the entire image.
Here is a step-by-step method to upload multiple photos to Pinterest.
Step 1: Log into your Pinterest
First, log into your Pinterest business account to access the feature. If you do not have a business account, it is elementary to do so. There is no need for you to enter any billing information if you are wondering about that. It is a straightforward process. Just open your account, click on the drop-down menu near your profile picture, see ‘convert to business,’ then upgrade your account, and you are good to go.
You should also ensure that the photos you want to upload are on your computer. If you have originally planned to use it to explain an article visually, then make sure the particular image that represents that article is correctly saved on your computer. The images should be 1:1 or 2:3 in ratio, and the format either ‘png’ or ‘jpeg.’
Add your pictures and upload. If you want to reorder your pin, you can replace or remove images within the carousel.

Step 2: Add Title
Add a title, description, and website of the carousel pin. Your title will be a snippet of what the blog post or article will be about or the recipe’s title. Your description should be the same as your Pinterest text, and you can also choose to let it appear only on your first image on your carousel pin.
Step 3: Select a Board
The last step is to select a board relevant to your carousel pin. Thus, you have your carousel pin and images. However, you cannot view this immediately as in a standard pin or video pin. But you can go back to your board to view your pin when it is ready.
Part 3 How to Make Pinterest Slideshow In 5 Simple Ways
Slideshows are a beautiful way to enhance your Pinterest account and generate more leads on your Profile. If you’ve been wondering if and how you can make slideshows on Pinterest, here’s a guaranteed step you can follow. But then Pinterest slideshows are instead referred to as a showcase.
However, to access this feature, you must first own a business account on Pinterest.
Here are five (5) simple ways you can make Slideshow on Pinterest:
Step 1: Go to your Pinterest Profile
Click settings next to your profile photo in the top right corner.

Step 2: Select Profile
When the Settings window appears, select Profile.

Step 3: Click Edit
Next to Featured Boards, click Edit.

Step 4: Select Boards
After clicking Edit for your Featured Boards, you’ll reach a screen where you may edit the boards you want to highlight. Select which boards you’d like to feature by clicking on each drop-down menu.
Opening a new Pinterest page is a good idea. Scroll down to Boards with the most Pin impressions under Analytics>Profile. These are the boards that I highlighted.

Step 5: Save
When you’ve decided which boards to include in your Featured, click Save.
● Bonus – Wondershare Filmora
With this feature, you can also tweak your Pinterest slides and make them look professional and befitting to your audience using Wondershare Filmora Video Editor .
For Win 7 or later (64-bit)
For macOS 10.12 or later
Wondershare Filmora is an online video editing software with several unique features, including split-screen, freeze-frame, loop images, and videos to help you create top-notch visual content for your brand. With features like the Chroma key, you can easily create special effects in your Pinterest slideshow background.
You can also use color match and video effects to enhance the quality of the slide.
● Ending Thoughts →
● Making a Pinterest slideshow can be confusing if you do not have the correct information. But if you do, it’ll be a great way to spice up your social media content and create more leads for your business.
● Pinterest is a social media platform that keeps growing and adding more features by the day. It is also increasing the number of users per day. Try out the simple steps stated on how to make a slideshow on Pinterest. Finally, by incorporating Filmora in your levelling up plans, you will be able to bring your brand in front of your target customer and present it nicely.
Slideshows are a collection of images arranged together that an audience can quickly swipe through to view the content. Pinterest is known for its one-pin to one post feature. You cannot post more than one image or video in a pin.
Thus, business people could start sharing all of the images or products, services, or articles mostly because it can be stressful to do that. But with the Pinterest slideshow, you can now upload all the images you want to at once in one pin. Moreso, even have people view the pins simultaneously just by swiping through.
In this article
01 [How to display Pinterest’s latest pins in a slideshow? ](#Part 1)
02 [How to upload multiple photos to Pinterest?](#Part 2)
03 [How to display Pinterest’s latest pins in a slideshow? ](#Part 3)
Part 1 How to Display Pinterest Latest Pins in A Slideshow
Using Pinterest’s latest pins in a slideshow is another way to display the latest pins from any Pinterest user or blogger’s blog. Each image is linked to its pin page on Pinterest instead of the board or profile page if you use the Pinterest profile or board widget.
To install this widget, you need the user or board’s RSS feed URL, then use it as the input for a blogger slide show gadget.
Here are the tricky steps to follow for the Pinterest slide show;
Step 1: Constructing Pinterest RSS feed URL
The Pinterest RSS feed URL of a user is different from aboard.
● It would be the user’s profile URL + feed/RSS for a user. To get your Profile URL, click on your username in the top right corner of your screen, and you will see a URL in your web browser’s URL. That is your profile URL.
● For the board URL, you will get that after clicking on the board from the homepage. The URL would appear on your browser’s URL bar.
Step 2: Reformatting the feed for the slideshow gadget:
The RSS feed from step one is not very compatible with the blogger slideshow gadget. It accepts RSS feed in Media RSS format, but you can convert with Yahoo pipe. Simply plug in your feed URL in the Yahoo pipe URL.
You have to replace the value of the feed URL with the feed URL you got in step one and the pin count with the number of pins displayed on the slide show.
With this, you have successfully converted your feed URL to the media version of the Pinterest feed.
Step 3: Add the slideshow widget
Take the following step to add the slideshow widget.
Go to Dashboard > Layout and click on ‘Add A Gadget.’
Now Add, A Gadget window, scroll down and select Slideshow.
Under Source, select Other.
Put in the converted Pinterest RSS feed URL from step 2 into the Feed URL text box.
Click Save and view your blog.
Part 2 How to Upload Multiple Photos to Pinterest
If you want to display multiple photos of your product or share your brand story with pictures, then this is a feature you will grab. Pinterest allows you to display various products at a time. But first, you must also have a business account to do this.
When you upload multiple photos on Pinterest, they are known as carousel pins. This feature is a great advertising tool and will help you during the Pinterest slideshow.
This is because people would see your carousel on their home feed just like any other pin you have posted. They may also tap on the carousel and swipe through the different photos on the carousel. When the pinner saves it, they have kept the entire image.
Here is a step-by-step method to upload multiple photos to Pinterest.
Step 1: Log into your Pinterest
First, log into your Pinterest business account to access the feature. If you do not have a business account, it is elementary to do so. There is no need for you to enter any billing information if you are wondering about that. It is a straightforward process. Just open your account, click on the drop-down menu near your profile picture, see ‘convert to business,’ then upgrade your account, and you are good to go.
You should also ensure that the photos you want to upload are on your computer. If you have originally planned to use it to explain an article visually, then make sure the particular image that represents that article is correctly saved on your computer. The images should be 1:1 or 2:3 in ratio, and the format either ‘png’ or ‘jpeg.’
Add your pictures and upload. If you want to reorder your pin, you can replace or remove images within the carousel.
Step 2: Add Title
Add a title, description, and website of the carousel pin. Your title will be a snippet of what the blog post or article will be about or the recipe’s title. Your description should be the same as your Pinterest text, and you can also choose to let it appear only on your first image on your carousel pin.
Step 3: Select a Board
The last step is to select a board relevant to your carousel pin. Thus, you have your carousel pin and images. However, you cannot view this immediately as in a standard pin or video pin. But you can go back to your board to view your pin when it is ready.
Part 3 How to Make Pinterest Slideshow In 5 Simple Ways
Slideshows are a beautiful way to enhance your Pinterest account and generate more leads on your Profile. If you’ve been wondering if and how you can make slideshows on Pinterest, here’s a guaranteed step you can follow. But then Pinterest slideshows are instead referred to as a showcase.
However, to access this feature, you must first own a business account on Pinterest.
Here are five (5) simple ways you can make Slideshow on Pinterest:
Step 1: Go to your Pinterest Profile
Click settings next to your profile photo in the top right corner.
Step 2: Select Profile
When the Settings window appears, select Profile.
Step 3: Click Edit
Next to Featured Boards, click Edit.
Step 4: Select Boards
After clicking Edit for your Featured Boards, you’ll reach a screen where you may edit the boards you want to highlight. Select which boards you’d like to feature by clicking on each drop-down menu.
Opening a new Pinterest page is a good idea. Scroll down to Boards with the most Pin impressions under Analytics>Profile. These are the boards that I highlighted.
Step 5: Save
When you’ve decided which boards to include in your Featured, click Save.
● Bonus – Wondershare Filmora
With this feature, you can also tweak your Pinterest slides and make them look professional and befitting to your audience using Wondershare Filmora Video Editor .
For Win 7 or later (64-bit)
For macOS 10.12 or later
Wondershare Filmora is an online video editing software with several unique features, including split-screen, freeze-frame, loop images, and videos to help you create top-notch visual content for your brand. With features like the Chroma key, you can easily create special effects in your Pinterest slideshow background.
You can also use color match and video effects to enhance the quality of the slide.
● Ending Thoughts →
● Making a Pinterest slideshow can be confusing if you do not have the correct information. But if you do, it’ll be a great way to spice up your social media content and create more leads for your business.
● Pinterest is a social media platform that keeps growing and adding more features by the day. It is also increasing the number of users per day. Try out the simple steps stated on how to make a slideshow on Pinterest. Finally, by incorporating Filmora in your levelling up plans, you will be able to bring your brand in front of your target customer and present it nicely.
Top 10 Banned Anime Around the World and Why
Top 10 Banned Anime Around the World and Why

Shanoon Cox
Mar 27, 2024• Proven solutions
There is hardly a genre that anime hasn’t conquered. While anime is super entertaining and fun to watch, it can get quite crazy and questionable. Yes, anime is animated but the content is mature. From violence to incest and other controversial issues, anime can be offensive sometimes. Due to this, some countries have banned anime shows for its viewers – especially for younger audiences.
Want to find out what anime shows they are and why they are banned? Well, you are in the right spot. Today, we will talk about the top 10 banned anime shows and why they are banned. So, let’s find out!
![]()
A cross-platform for making videos anywhere for all creators

Why your video editing isn’t good enough? How about some creative inspo?
- 100 Million+ Users
- 150+ Countries and Regions
- 4 Million+ Social Media Followers
- 5 Million+ Stock Media for Use
* Secure Download

Part 1: Top 10 Banned Anime List
Here is a list of the 10 banned animes you should know about and why they are banned:
1. Shoujo Tsubaki (Banned Everywhere)
It has a very dark, depressing, and intense storyline and it is considered one of the most controversial anime movies ever. This is a 1992 anime film about a young girl whose mother dies. The girl meets a man who tells her he will help her if she ever needs anything. So, after her mother’s death, she goes to find the man and ends up at a circus where she gets abused and raped. Thus, Shoujo Tsubaki is about child sexual abuse with unbearable gore scenes. The horrific and disturbing visuals of this anime have left many viewers traumatized – so much so that the tapes of this film were also destroyed. Therefore, Shoujo Tsubaki is banned almost everywhere, including Japan itself.
2. Osomatsu-San (Banned in Japan)
Osomatsu-San is banned in Japan due to copyright issues. The series’ first episode had parodies of famous anime shows including Attack on Titan, Naruto, Sailor Moon, Dragon Ball Z, and more. Thus, due to copyright, the show’s first episode was removed from airing. It is still not available on mainstream anime websites. You can find the DVD version of the show, but even those do not have the first episode.

3. Excel Saga (Banned in Japan)
Excel Saga is based on a popular manga of the same name. It is about a secret ideological organization whose purpose is world domination. The entire Excel Saga is available to watch except for its last episode, called “Going Too Far” – very fitting indeed. It is even banned in its home country, Japan. The reason why this episode got banned is that it’s too long, violent, pornographic, and offensive. Fun fact: The Director of the show, Shinichi Watanabe, purposely got the last episode banned to make it daring and unforgettable. The last episode of Excel Saga is only available on DVD.

4. Death Note (Banned in China)
Death note is one of the most famous anime shows ever and while it’s gruesome, bloody and horrific, it is easily available on mainstream platforms, including Netflix. However, there is still a country that did not appreciate the dark premise of this show. Death Note is banned in China due to its theme. The show is about death, justice, murder and violence so it is considered as a corrupting influence on kids.
5. Attack on Titan (Banned in China)
Another cult-favorite anime on the lists is Attack on Titan. Due to its bloody, disgusting and disturbing visuals, it has been banned in China. While millions of viewers love this anime, China thinks this show portrays a lot of excessive violence which is very unhealthy for the younger audience. With that being said, if you are 18 and above, do not miss out on Attack on Titan. It is truly one of the best anime out there!
6. High School DxD (Banned in New Zealand)
With very high viewer ratings, it’s a bit of shock to see this show on the list. High School DxD follows the story of Issei Hyodo, a perverted high school kid who is killed on his very first date. But he gets reincarnated by Rias Gremory as a demon. Now, how come a show about angles and demons gets banned? Well, the premise of the show focuses on corrupt high school kids with a perverted mindset. This show is very sexual and shows a lot of nudity in certain scenes. This is why New Zealand has banned High School DxD for its sexual, harem themes based around high school kids.
7. Puni Puny Poemy (Banned in New Zealand)
Puni Puny Poemy sounds super cute and childish but don’t let the name fool you. Puni Puny Poemy is a spin-off inspired by Excel Saga – no wonder is it banned. This anime has a lot of sexual content surrounding very young characters. The nudity, explicit sexual scenes and harem inspired content is what makes this show so questionable. Thus, it is banned in New Zealand for being overly vulgar and sexual for young viewers. The show does not have a high viewership such as popular titles like Death Note or Attack on Titan, so many countries ignored it.
8. Hetalia: Axis Powers (Banned in South Korea)
Every character in this show represents a country and the role they played in World War II. Even though it is a comedy anime, it offended a few countries. South Korea actually banned the show on the grounds of “offensive stereotypes” and was called a “national crime” by the country. Hetalia: Axis Powers continued to air, the character and all the references to South Korea were completely removed due to backlash. The censored version of this anime is still available in some parts of the country.
9. Pokémon (Banned in Saudi Arabia)
Pokemon banned? Pokemon is perhaps THE most famous and innocent anime ever. It’s kid friendly and super clean. So, why is a show about Satoshi and his pocket monster banned? The religious authorities of Saudi Arabia declared that Pokemon promotes gambling and Jewish sentiments. Since then, there have been many conspiracy theories revolving around the show claiming it to be a Zionist conspiracy. Thus, it is banned in Saudi Arabia. Crazy right?
10. Kite (Banned in Norway)
Kite follows the story of a girl who uses bullets to kill people and make them explode. Now, you must be thinking that the violent nature of the show got it banned in Norway. Nope! not the case. Kite is banned in Norway due to a very graphic sexual assault scene on a minor. Norway has very strict laws against child pornography, thus the entire anime got banned. Similarly, the United States also censored and removed certain parts of the movie but it is not banned there.
Part 2: Where to Watch Anime Online for Free
If you live in any of the countries mentioned in the list above and want to watch the anime banned by your country, we have got you covered. Here are top 5 websites where you can watch anime online for free:
1. Crunchyroll
Crunchyroll has a wide range of anime shows and movies. This streaming service is available in different countries including the USA, UK, Canada, Australia and some Asian countries. From old anime shows to all the latest ones, you will find everything here. It allows you to watch and share anime on social media. It is also available in different languages with subtitles and dubbing. Crunchyroll also offers a premium version for an ad-free experience. The premium version also has a popular manga.
2. 9anime
9anime is a dedicated website for anime. It allows you to watch different types of animated content. From action, drama, and thriller to comedy, you can watch any anime show here. This website gives you access to all the popular anime shows, movies, and OVA (Original Video Animation). It is available across multiple countries including Canada, United States, United Kingdom, Australia, Netherlands, and some Asian countries. If it is not available in your country of origin, you can also access this website on a VPN.
3. 123anime
This is a great alternative to 9anime. This website is a free platform to watch anime online for free in HD quality. It is also mobile-friendly and loads video without buffering. You can watch all the famous anime shows and movies on 123anime such as Pokemon, One Piece, Death Note, Dragon Ball Z, Naruto, and more. It also allows you to download anime for free.
4. VIZ
VIZ is one of the most popular choices for manga and anime. From publishing, to animation and to entertainment licensing, VIZ handles it all. It offers all popular manga as well as all the latest anime series. From classic cult favorites to latest hits, VIZ has the best collection of anime shows and movies. You can save your favorite show on the website and create your own library to binge watch anime shows. All the shows also come with English subtitles.
5. Animelab
AnimeLab is a website that offers a huge collection of all the popular anime. Plus, all the videos here are dubbed and subtitled. It also allows you to watch all the latest shows and releases as soon as they are aired. From action, thriller, adventure and horror to drama and comedy, you can watch all types of anime here. It is also compatible with all android and iPhone devices. AnimeLab is available in only two countries currently i.e., New Zealand and Australia. You can use VPN to watch in any other country.
While anime has entertained fans over the years, there are some anime shows that are very disturbing and offensive. They can toy with the psychology of the viewer and are often too inappropriate to handle. Such anime can be violent, sexual or gruesome. This is why some anime are banned in certain countries due to local laws, censorship, and copyright issues. In this article, we listed down top 10 banned anime shows and why they are banned. If you want to watch anime, especially banned anime, do check out the websites mentioned above. You will find all the anime shows you are looking for!
Shanoon Cox
Shanoon Cox is a writer and a lover of all things video.
Follow @Shanoon Cox
Shanoon Cox
Mar 27, 2024• Proven solutions
There is hardly a genre that anime hasn’t conquered. While anime is super entertaining and fun to watch, it can get quite crazy and questionable. Yes, anime is animated but the content is mature. From violence to incest and other controversial issues, anime can be offensive sometimes. Due to this, some countries have banned anime shows for its viewers – especially for younger audiences.
Want to find out what anime shows they are and why they are banned? Well, you are in the right spot. Today, we will talk about the top 10 banned anime shows and why they are banned. So, let’s find out!
![]()
A cross-platform for making videos anywhere for all creators
Why your video editing isn’t good enough? How about some creative inspo?
- 100 Million+ Users
- 150+ Countries and Regions
- 4 Million+ Social Media Followers
- 5 Million+ Stock Media for Use
* Secure Download
Part 1: Top 10 Banned Anime List
Here is a list of the 10 banned animes you should know about and why they are banned:
1. Shoujo Tsubaki (Banned Everywhere)
It has a very dark, depressing, and intense storyline and it is considered one of the most controversial anime movies ever. This is a 1992 anime film about a young girl whose mother dies. The girl meets a man who tells her he will help her if she ever needs anything. So, after her mother’s death, she goes to find the man and ends up at a circus where she gets abused and raped. Thus, Shoujo Tsubaki is about child sexual abuse with unbearable gore scenes. The horrific and disturbing visuals of this anime have left many viewers traumatized – so much so that the tapes of this film were also destroyed. Therefore, Shoujo Tsubaki is banned almost everywhere, including Japan itself.
2. Osomatsu-San (Banned in Japan)
Osomatsu-San is banned in Japan due to copyright issues. The series’ first episode had parodies of famous anime shows including Attack on Titan, Naruto, Sailor Moon, Dragon Ball Z, and more. Thus, due to copyright, the show’s first episode was removed from airing. It is still not available on mainstream anime websites. You can find the DVD version of the show, but even those do not have the first episode.
3. Excel Saga (Banned in Japan)
Excel Saga is based on a popular manga of the same name. It is about a secret ideological organization whose purpose is world domination. The entire Excel Saga is available to watch except for its last episode, called “Going Too Far” – very fitting indeed. It is even banned in its home country, Japan. The reason why this episode got banned is that it’s too long, violent, pornographic, and offensive. Fun fact: The Director of the show, Shinichi Watanabe, purposely got the last episode banned to make it daring and unforgettable. The last episode of Excel Saga is only available on DVD.
4. Death Note (Banned in China)
Death note is one of the most famous anime shows ever and while it’s gruesome, bloody and horrific, it is easily available on mainstream platforms, including Netflix. However, there is still a country that did not appreciate the dark premise of this show. Death Note is banned in China due to its theme. The show is about death, justice, murder and violence so it is considered as a corrupting influence on kids.
5. Attack on Titan (Banned in China)
Another cult-favorite anime on the lists is Attack on Titan. Due to its bloody, disgusting and disturbing visuals, it has been banned in China. While millions of viewers love this anime, China thinks this show portrays a lot of excessive violence which is very unhealthy for the younger audience. With that being said, if you are 18 and above, do not miss out on Attack on Titan. It is truly one of the best anime out there!
6. High School DxD (Banned in New Zealand)
With very high viewer ratings, it’s a bit of shock to see this show on the list. High School DxD follows the story of Issei Hyodo, a perverted high school kid who is killed on his very first date. But he gets reincarnated by Rias Gremory as a demon. Now, how come a show about angles and demons gets banned? Well, the premise of the show focuses on corrupt high school kids with a perverted mindset. This show is very sexual and shows a lot of nudity in certain scenes. This is why New Zealand has banned High School DxD for its sexual, harem themes based around high school kids.
7. Puni Puny Poemy (Banned in New Zealand)
Puni Puny Poemy sounds super cute and childish but don’t let the name fool you. Puni Puny Poemy is a spin-off inspired by Excel Saga – no wonder is it banned. This anime has a lot of sexual content surrounding very young characters. The nudity, explicit sexual scenes and harem inspired content is what makes this show so questionable. Thus, it is banned in New Zealand for being overly vulgar and sexual for young viewers. The show does not have a high viewership such as popular titles like Death Note or Attack on Titan, so many countries ignored it.
8. Hetalia: Axis Powers (Banned in South Korea)
Every character in this show represents a country and the role they played in World War II. Even though it is a comedy anime, it offended a few countries. South Korea actually banned the show on the grounds of “offensive stereotypes” and was called a “national crime” by the country. Hetalia: Axis Powers continued to air, the character and all the references to South Korea were completely removed due to backlash. The censored version of this anime is still available in some parts of the country.
9. Pokémon (Banned in Saudi Arabia)
Pokemon banned? Pokemon is perhaps THE most famous and innocent anime ever. It’s kid friendly and super clean. So, why is a show about Satoshi and his pocket monster banned? The religious authorities of Saudi Arabia declared that Pokemon promotes gambling and Jewish sentiments. Since then, there have been many conspiracy theories revolving around the show claiming it to be a Zionist conspiracy. Thus, it is banned in Saudi Arabia. Crazy right?
10. Kite (Banned in Norway)
Kite follows the story of a girl who uses bullets to kill people and make them explode. Now, you must be thinking that the violent nature of the show got it banned in Norway. Nope! not the case. Kite is banned in Norway due to a very graphic sexual assault scene on a minor. Norway has very strict laws against child pornography, thus the entire anime got banned. Similarly, the United States also censored and removed certain parts of the movie but it is not banned there.
Part 2: Where to Watch Anime Online for Free
If you live in any of the countries mentioned in the list above and want to watch the anime banned by your country, we have got you covered. Here are top 5 websites where you can watch anime online for free:
1. Crunchyroll
Crunchyroll has a wide range of anime shows and movies. This streaming service is available in different countries including the USA, UK, Canada, Australia and some Asian countries. From old anime shows to all the latest ones, you will find everything here. It allows you to watch and share anime on social media. It is also available in different languages with subtitles and dubbing. Crunchyroll also offers a premium version for an ad-free experience. The premium version also has a popular manga.
2. 9anime
9anime is a dedicated website for anime. It allows you to watch different types of animated content. From action, drama, and thriller to comedy, you can watch any anime show here. This website gives you access to all the popular anime shows, movies, and OVA (Original Video Animation). It is available across multiple countries including Canada, United States, United Kingdom, Australia, Netherlands, and some Asian countries. If it is not available in your country of origin, you can also access this website on a VPN.
3. 123anime
This is a great alternative to 9anime. This website is a free platform to watch anime online for free in HD quality. It is also mobile-friendly and loads video without buffering. You can watch all the famous anime shows and movies on 123anime such as Pokemon, One Piece, Death Note, Dragon Ball Z, Naruto, and more. It also allows you to download anime for free.
4. VIZ
VIZ is one of the most popular choices for manga and anime. From publishing, to animation and to entertainment licensing, VIZ handles it all. It offers all popular manga as well as all the latest anime series. From classic cult favorites to latest hits, VIZ has the best collection of anime shows and movies. You can save your favorite show on the website and create your own library to binge watch anime shows. All the shows also come with English subtitles.
5. Animelab
AnimeLab is a website that offers a huge collection of all the popular anime. Plus, all the videos here are dubbed and subtitled. It also allows you to watch all the latest shows and releases as soon as they are aired. From action, thriller, adventure and horror to drama and comedy, you can watch all types of anime here. It is also compatible with all android and iPhone devices. AnimeLab is available in only two countries currently i.e., New Zealand and Australia. You can use VPN to watch in any other country.
While anime has entertained fans over the years, there are some anime shows that are very disturbing and offensive. They can toy with the psychology of the viewer and are often too inappropriate to handle. Such anime can be violent, sexual or gruesome. This is why some anime are banned in certain countries due to local laws, censorship, and copyright issues. In this article, we listed down top 10 banned anime shows and why they are banned. If you want to watch anime, especially banned anime, do check out the websites mentioned above. You will find all the anime shows you are looking for!
Shanoon Cox
Shanoon Cox is a writer and a lover of all things video.
Follow @Shanoon Cox
Top 10 Cartoon Canvas Painting Ideas for Total Beginners
10 Cartoon Canvas Painting Ideas for Total Beginners
An easy yet powerful editor
Numerous effects to choose from
Detailed tutorials provided by the official channel
Beginning your streak into cartoon canvas painting? Stay tuned to learn about the 10 most amazing ideas to design your best cartoon canvas art in no time!
In this article
01 [10 Cartoon Canvas Painting Ideas](#Part 1)
02 [How To Paint A Cartoon On Canvas](#Part 2)
Part 1 Cartoon Canvas Painting Ideas
Cartoon are an evergreen favourite for almost everyone around. After all, who would mind sparing a laugh on the adorable musings of the cutest cat and mouse duo in Tom and Jerry, or long for a dive into the fantasy of icy adventures with the Frozen fairy tale! While the huge caricature repository has the best of fun to offer, watching them peep at you from the canvas painting on your art wall is no less of a delight.
When starting to create your own cartoon canvas art, end your search of the most striking painting idea with the amazingly stunning choices in the following section:
01Tom and Jerry
These two are undoubtedly the pioneers of the entire cartoon story that has affordably existed till date. The naughty duo promises to lighten up your day with a mere gaze through the art wall in your room, in the same way as their show sets the mood in. Painting them on your room’s wall canvas will certainly add life to the place.
02Super Mario
Who can forget this adorable red plumber, who conveniently takes the credit for giving us the fondest childhood memories? Whether or not a regular console gamer, this adventure hero is an undisputed favorite of everyone around. So why not make him a member of your art collection through a cartoon canvas painting!
03Characters from the Frozen Land
The adorable cartoon characters from the icy landscapes of this winter fairy saga are possibly the best way to begin your exciting journey of cartoon canvas painting. While the magical storyline of the pixie quest has a diversity of the coolest and the most adorable characters to choose from, you are always free to pick your favorite one and start your design spree.
04Kung fu Panda
If you are a parallel admirer of martial arts and caricature heroes, this cartoon character would be an apt choice to satisfy your love for canvas painting. The adorably cute bear eyeing at you from the painting in his best warlike posture would certainly motivate you to work on keeping a check of your fitness levels!
05Sponge Bob
Living up to his name, this spongy creature has created a separate and strong fan base among viewers of all age groups beyond time. Choosing this character for your cartoon canvas art is surely going to spark up your day with the vibrancy of a real rainbow, even in between the sulkiest of moments, as they say, it’s time to brighten up your life with Bob!
06Homer Simpson
If you are convincingly fascinated by the lures of life overseas, this American toon character is all set to give you the perfect feel of the day to day American lifestyle. Try hands at painting a scene from the eventful life of the Simpson family that is ready to add a fun angle to the most boring chores, while giving you a parodical glimpse of the American society and culture.
07Characters from the Avenger Series
Avengers must be your absolute favorite if you have a love for battle and combat games. Bring your adventure feel back to life with creating a canvas painting art of your most admired avenger, or consider including all of them on a king size canvas if you are having a tough time picking the best from the best!
08Angry Birds
These furious creatures have been a global sensation since their entry into the world of gaming. While these star birds take you on a stunning adventure realism with an amazing graphic excellence, a caricature canvas art of these in your painting collection will certainly add the missing spunk to your graphic creativity.
09Members and Trainers of the Pokémon Species
From TV series to gaming adventures, the love for Pokémon has stood the tests of time in every dimension. When it comes to adding these characters to your canvas painting, you have a storehouse of choices from the cute Pikachu and the meticulous Ash to the nasty team Rocket and other amazing members of the Pokémon species.
10Donald Duck
If you are keen on adding a touch of nostalgia to your creative drawing, consider designing a masterpiece of cartoon canvas artwork portraying this bubbly ad quaky creature that has given you the best of childhood entertainment in the form of possibly the most reliable financial advisor and the cutest good luck charm of toon land.
Now that the graphic design technology has reached its par, you can explore your creativity to design these characters for various uses, such as, illustrative, animated, gag, editorial and political cartoons, or caricatures on comic panels and strips.
Part 2 How To Paint A Cartoon On Canvas
Now that you have come cross the exciting ideas of creating cartoon canvas art, this must be a sufficient motivation to experiment with creating a top class caricature canvas painting for yourself. Read through the following section to get an insight into the knowhow of painting a cartoon on canvas in the easiest possible way!
User’s Guide to Create a Cartoon Canvas Painting on Wondershare Filmora Video Editor
Before entering into the actual design task, you will require a download, installation and launch of the Wondershare Filmora application to any of your Windows or Mac supported devices. Visit the following link for a free download of the software program:

Wondershare Filmora - Best Video Editor for Mac/Windows
5,481,435 people have downloaded it.
Build unique custom animations without breaking a sweat.
Focus on creating epic stories and leave the details to Filmora’s auto features.
Start a creative adventure with drag & drop effects and endless possibilities.
Filmora simplifies advanced features to save you time and effort.
Filmora cuts out repetition so you can move on to your next creative breakthrough.
Painting a Young Character
Take the following steps to draw the caricature form of a young or middle aged character in Wondershare Filmora:
Step 1:
Launch Wondershare Filmora on your system and then start new project. Now import the video from your computer in the software interface.

Step 2:
Once you have added the video then simply drag and drop it in the timeline.

Step 3
Once you have added video to the timeline double click on the added video in timeline to open the video editing menu of Wondershare Filmora.

Step 4:
Now, click the “Animation” tab in the editing options at the left side of interface then you can select anyone from the available preset options.

Step 5:
Select any preset from the available list and then drag and drop it in the timeline to apply the preset on the video. After applying you can use the play button to preview the file. This is the way to create beautiful animation with the Wondershare Filmora. Just like this you can quickly create the best Cartoon canvas as well.

Step 5
After doing all necessary editing you just need to click the “Export” button and save it on your computer.

● Ending Thoughts →
● Cartoon canvas art has gained immense popularity in recent times having a reliable economic and creation advantage with the growth of animation design.
● There are a variety of cartoon painting ideas that you can choose to explore your graphic design creativity.
● When looking for the best solutions to work on creating caricature canvas art, Wondershare Filmora is your worthiest choice.
Beginning your streak into cartoon canvas painting? Stay tuned to learn about the 10 most amazing ideas to design your best cartoon canvas art in no time!
In this article
01 [10 Cartoon Canvas Painting Ideas](#Part 1)
02 [How To Paint A Cartoon On Canvas](#Part 2)
Part 1 Cartoon Canvas Painting Ideas
Cartoon are an evergreen favourite for almost everyone around. After all, who would mind sparing a laugh on the adorable musings of the cutest cat and mouse duo in Tom and Jerry, or long for a dive into the fantasy of icy adventures with the Frozen fairy tale! While the huge caricature repository has the best of fun to offer, watching them peep at you from the canvas painting on your art wall is no less of a delight.
When starting to create your own cartoon canvas art, end your search of the most striking painting idea with the amazingly stunning choices in the following section:
01Tom and Jerry
These two are undoubtedly the pioneers of the entire cartoon story that has affordably existed till date. The naughty duo promises to lighten up your day with a mere gaze through the art wall in your room, in the same way as their show sets the mood in. Painting them on your room’s wall canvas will certainly add life to the place.
02Super Mario
Who can forget this adorable red plumber, who conveniently takes the credit for giving us the fondest childhood memories? Whether or not a regular console gamer, this adventure hero is an undisputed favorite of everyone around. So why not make him a member of your art collection through a cartoon canvas painting!
03Characters from the Frozen Land
The adorable cartoon characters from the icy landscapes of this winter fairy saga are possibly the best way to begin your exciting journey of cartoon canvas painting. While the magical storyline of the pixie quest has a diversity of the coolest and the most adorable characters to choose from, you are always free to pick your favorite one and start your design spree.
04Kung fu Panda
If you are a parallel admirer of martial arts and caricature heroes, this cartoon character would be an apt choice to satisfy your love for canvas painting. The adorably cute bear eyeing at you from the painting in his best warlike posture would certainly motivate you to work on keeping a check of your fitness levels!
05Sponge Bob
Living up to his name, this spongy creature has created a separate and strong fan base among viewers of all age groups beyond time. Choosing this character for your cartoon canvas art is surely going to spark up your day with the vibrancy of a real rainbow, even in between the sulkiest of moments, as they say, it’s time to brighten up your life with Bob!
06Homer Simpson
If you are convincingly fascinated by the lures of life overseas, this American toon character is all set to give you the perfect feel of the day to day American lifestyle. Try hands at painting a scene from the eventful life of the Simpson family that is ready to add a fun angle to the most boring chores, while giving you a parodical glimpse of the American society and culture.
07Characters from the Avenger Series
Avengers must be your absolute favorite if you have a love for battle and combat games. Bring your adventure feel back to life with creating a canvas painting art of your most admired avenger, or consider including all of them on a king size canvas if you are having a tough time picking the best from the best!
08Angry Birds
These furious creatures have been a global sensation since their entry into the world of gaming. While these star birds take you on a stunning adventure realism with an amazing graphic excellence, a caricature canvas art of these in your painting collection will certainly add the missing spunk to your graphic creativity.
09Members and Trainers of the Pokémon Species
From TV series to gaming adventures, the love for Pokémon has stood the tests of time in every dimension. When it comes to adding these characters to your canvas painting, you have a storehouse of choices from the cute Pikachu and the meticulous Ash to the nasty team Rocket and other amazing members of the Pokémon species.
10Donald Duck
If you are keen on adding a touch of nostalgia to your creative drawing, consider designing a masterpiece of cartoon canvas artwork portraying this bubbly ad quaky creature that has given you the best of childhood entertainment in the form of possibly the most reliable financial advisor and the cutest good luck charm of toon land.
Now that the graphic design technology has reached its par, you can explore your creativity to design these characters for various uses, such as, illustrative, animated, gag, editorial and political cartoons, or caricatures on comic panels and strips.
Part 2 How To Paint A Cartoon On Canvas
Now that you have come cross the exciting ideas of creating cartoon canvas art, this must be a sufficient motivation to experiment with creating a top class caricature canvas painting for yourself. Read through the following section to get an insight into the knowhow of painting a cartoon on canvas in the easiest possible way!
User’s Guide to Create a Cartoon Canvas Painting on Wondershare Filmora Video Editor
Before entering into the actual design task, you will require a download, installation and launch of the Wondershare Filmora application to any of your Windows or Mac supported devices. Visit the following link for a free download of the software program:
Wondershare Filmora - Best Video Editor for Mac/Windows
5,481,435 people have downloaded it.
Build unique custom animations without breaking a sweat.
Focus on creating epic stories and leave the details to Filmora’s auto features.
Start a creative adventure with drag & drop effects and endless possibilities.
Filmora simplifies advanced features to save you time and effort.
Filmora cuts out repetition so you can move on to your next creative breakthrough.
Painting a Young Character
Take the following steps to draw the caricature form of a young or middle aged character in Wondershare Filmora:
Step 1:
Launch Wondershare Filmora on your system and then start new project. Now import the video from your computer in the software interface.
Step 2:
Once you have added the video then simply drag and drop it in the timeline.
Step 3
Once you have added video to the timeline double click on the added video in timeline to open the video editing menu of Wondershare Filmora.
Step 4:
Now, click the “Animation” tab in the editing options at the left side of interface then you can select anyone from the available preset options.
Step 5:
Select any preset from the available list and then drag and drop it in the timeline to apply the preset on the video. After applying you can use the play button to preview the file. This is the way to create beautiful animation with the Wondershare Filmora. Just like this you can quickly create the best Cartoon canvas as well.
Step 5
After doing all necessary editing you just need to click the “Export” button and save it on your computer.
● Ending Thoughts →
● Cartoon canvas art has gained immense popularity in recent times having a reliable economic and creation advantage with the growth of animation design.
● There are a variety of cartoon painting ideas that you can choose to explore your graphic design creativity.
● When looking for the best solutions to work on creating caricature canvas art, Wondershare Filmora is your worthiest choice.
Also read:
- 5 Ways You Never Heard of for Converting MP4 to GIF in Photoshop for 2024
- Updated 2024 Approved Learn Simple Blender Rigging in Only 2 Minutes
- New In 2024, 15 Horror Animes That Will Trigger a Heart Attack
- New 15 Top Collage Makers to Create Aesthetic Collages for 2024
- New 2024 Approved Best Websites to Download Animated GIFs for Free
- Updated Popular Tips on Learning Animate Rigging for 2024
- New Why These 10 Top Text Motion Templates Are Worth Your Attention for 2024
- 2024 Approved FREE Top 21 Best Anime Websites to Watch Anime Online
- The Most Efficient Techniques to Make 3D Animation Character
- New 2024 Approved 10 Must Watch Netflix Cartoon Series For You
- 2024 Approved 12 Websites with Triggered Animate on Scroll Examples
- New 2024 Approved 15 Best Pics Collage Apps Top Picks
- New 15 Top Collage Makers to Create Aesthetic Collages
- Adobe Animate Riggings Tutorial for You
- 2024 Approved Whats Music Video GIF & How to Add Music to GIF Files
- Updated Learn How to Do Funny Cartoon Drawings for 2024
- New Techniques for Making After Effects 2D Animation
- Updated In 2024, How to Animate - Adobe Animate Tutorias
- Tutorial on Making Unity 2D Animation for 2024
- Make Well Done Animated GIF
- New How to Insert a GIF Into Powerpoint
- Updated Learn About Lip-Syncing in Animation for 2024
- Updated 20 Best Anime Movies You Cannot Miss 2024 List
- In 2024, Top 10 Sketch Animation Video Makers
- 2024 Approved 8 Blender 3D Animation Tutorials
- 2024 Approved How to Convert Animated GIF From Video
- New 12 Captivating Websites with Triggered Animate on Scroll Examples
- Updated 2024 Approved Something About Types of Motion Graphics
- How to Obtain and Create Animated GIF Icons Like a Pro, In 2024
- New 2024 Approved How to Become a Motion Graphic Designer
- In 2024, How does the stardust trade cost In pokemon go On Realme 11 5G? | Dr.fone
- Is GSM Flasher ADB Legit? Full Review To Bypass Your Lava Blaze Curve 5GFRP Lock
- In 2024, How to Unlock Xiaomi Redmi 12 Phone without PIN
- In 2024, How to Remove and Reset Face ID on Apple iPhone 6s Plus
- How to Cast Samsung Galaxy A34 5G to Computer for iPhone and Android? | Dr.fone
- How To Repair iPhone 11 iOS System? | Dr.fone
- In 2024, Additional Tips About Sinnoh Stone For Apple iPhone 15 Pro | Dr.fone
- How to Change Location on TikTok to See More Content On your Infinix GT 10 Pro | Dr.fone
- Top 10 Fixes for Phone Keep Disconnecting from Wi-Fi On Nubia Red Magic 9 Pro+ | Dr.fone
- Is pgsharp legal when you are playing pokemon On Realme GT Neo 5 SE? | Dr.fone
- How to recover deleted photos from Android Gallery after format on Y27 5G
- Android Safe Mode - How to Turn off Safe Mode on Motorola Razr 40? | Dr.fone
- Title: New Whats Music Video GIF & How to Add Music to Your GIF Files for 2024
- Author: Elon
- Created at : 2024-04-21 09:30:48
- Updated at : 2024-04-22 09:30:48
- Link: https://animation-videos.techidaily.com/new-whats-music-video-gif-and-how-to-add-music-to-your-gif-files-for-2024/
- License: This work is licensed under CC BY-NC-SA 4.0.
