

New Whats Rigging Animation and Why It Matters for 2024
What’s Rigging Animation and Why It Matters
What’s Rigging Animation and Why It Matters
An easy yet powerful editor
Numerous effects to choose from
Detailed tutorials provided by the official channel
Today there is a lot pre-made skeletons you can use and reuse as many times as you want, making only a few minor adjustments to the base design. If your creativity is sparking like firecrackers, then a rig can make it look more defined and/or realistic.
Not convinced? Let’s talk more about Rigging Animation.
In this article
01 [What is Rigging Animation](#Part 1)
02 [The Ultimate Collection for Free Maya Rigs [2022]](#Part 2)
Part 1 What is Rigging Animation
01Why Your Animators Need to Know How to Rig
Walk into any professional animation studio toady, you would notice unfamiliar skeleton figures in at least one of the screens.
This is called skeleton animation and is a major technique used in creating animated models that give us that 36vibe of the character in movies. It helps animators in controlling its movement just like a puppet. Hidden call back to the Matrix.
What you see in most movies or games, are characters and models who supported by a network of digital mechanical skeletons all rigged to move in a certain way.
02How Does Rigging Work?
The process of rigging is usually the second step in a long line of other methods applied after creating a model.
There is a series of interdependent bones that need to be constructed which is representation of the skeletal structure which is the basic goal in rigging animation.
With the right digital animation software you can reposition, repurpose and scale these bones in more ways than one.
The next step would involve recording the different movements of these bones on a timeline. This part of the process is called keyframing in animation.
These simple steps are actually more intricate than they actually are. Each movement acts as trigger to another set of movements like how the shoulder bone is connected to the forearm of our body.
This movement of the model becomes even more realistic once its weight scale has been determined. Painting weight can be considered to be the most unnerving challenge in the entire process.
Which is where Inverse Kinematics can help in making things 5easier by just reversing forward kinematic movements.
All of these aspects of rigging makes it possible to help animation mimic real life movements.
03How is Rigging Used?
Rigging is a technique which has only started gaining more prominence in recent times due to how crucial it is to the gaming and animation movie industry.
Not only is it used on characters but all mechanical objects in animations can also be rigged. With the help of a computerized program physicality is added to the bone structure and is recorded through a series of frames. These recording are then played back.
There are other applications to the and modelling process which goes beyond the entertainment industry such as giving virtual medical demonstrations or modeling a product.
This entire process can get much more repetitive and complex when it comes to rigging something as dynamic as the human face.
04Intro to Rigging Software
You might already be aware by now that there are some major animation software on the market that can provide you with just about every tool you need to make jaw dropping rigger animations.
Software like Blender, Cinema 4D, Maya and Houdini employs fantastic Skeletal Animation and digital motion capturing techniques. They open the doors to more realistic animations that can be used to create far more interactive and personalized digital worlds.
Maya and 3Ds Max is used to do real time animation rigging and is considered by most to be the industry standard by most animators.
Blender on the other hand is a free to use software. Though not quite as strong as Maya, it is an open source software which is equipped with everything you need to rig and animate models.
You can import completed animated files onto game engines and all types of other applications. The most common format for importing animated files is .fbx.
Part 2 The Ultimate Collection for Free Maya Rigs [2022]
01How’s Maya Rigs?
To tell the truth, every year you have spent on learning animation would come into great use in making your imagination come to life. Maya is probably the one software which gives you credit for just knowing it.
Maya has several levels of features you need to practice before you can call yourself a Maya master.
The best way to get your hands practiced on animating on Maya is by becoming well versed with all the stats and proportions while working with rigs. You would surely need to get your hands on high quality rig packages that makes the learning experience even more worth it.
With time, you would get better at understanding of the specifics of building a structure you would be showing in the final result. However getting stuck with the wrong type of rig can end up making your animating experience counterintuitive.
Here is a list of Maya Rigs you can start on right away;
02Best Free Maya Rigs of 2022
● Basic Rigs

Understanding the Basic Functionality of inanimate objects is a clear place to start in animation rigging. It helps you get a strong grasp over animation principals like bouncing a ball, before moving on to more challenging rigging packages.
● Ultimate Rigs
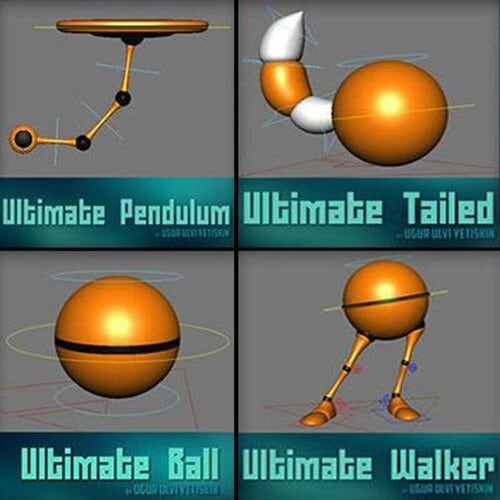
As you keep trying out different basic rigging functionalities, you eventually would need an ultimate rigging pack which is a complete set of all basic rigs. It is a great option to download and have this as a backup.
● Flour Sack
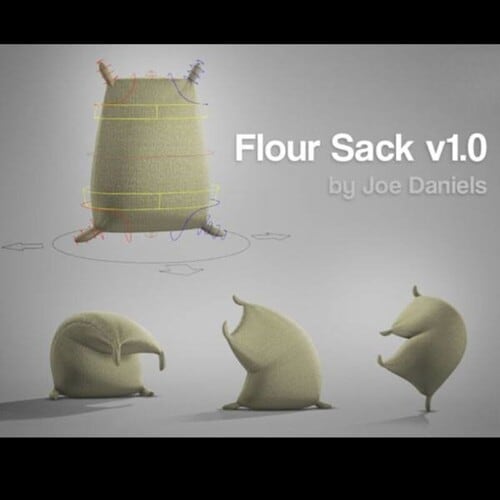
The Flour Sack free Rig is old school trainer pack. It simplifies your understanding character emotions by applying posing and adding weight to an object with a whimsical undefined structure.
● Wall E

If you are easily familiar with this character then you should remember how beautifully Wall-E was able express himself. It certainly is a step up on your journey to improving motion capture techniques. Try making your own Dreamworks style animation with Filmora from Wondershare where you can pair your animations with a few amazing film editing tools.
● JuiceBox
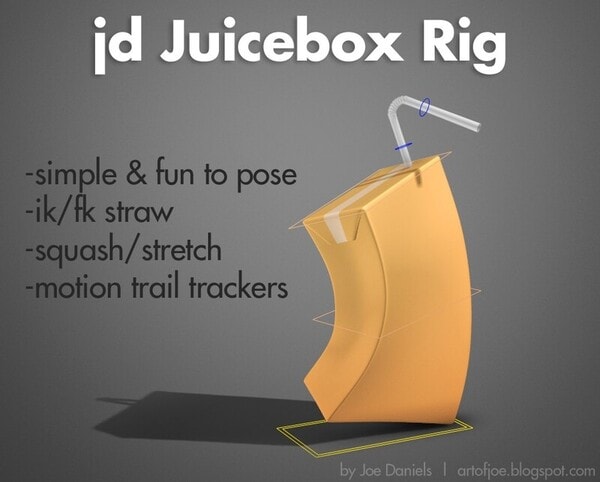
Another favored animation teaching prop is the Juice Box. It follows similar principals like the Flour Sack but the straw adds a different dimension to it. This is where an animator can try out more ways to get creative without a simple straw getting in their way.
● The Walking Egg
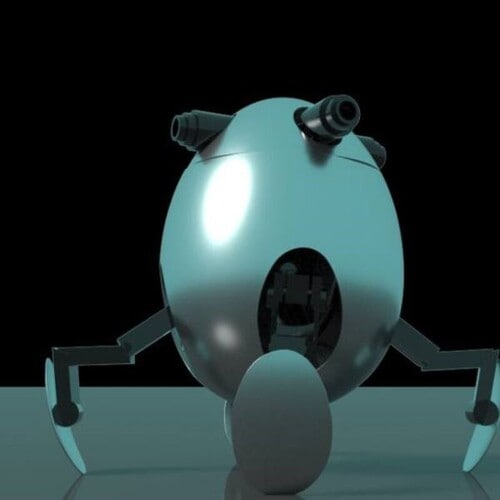
An egg shaped mechanical quadruped robot who has the ability to contract its legs into its body. Its legs are probably its best feature since it is lockable at then joints. A fun part of this robot is that its screen eyes can turn into guns.
● Cartoon Chameleon
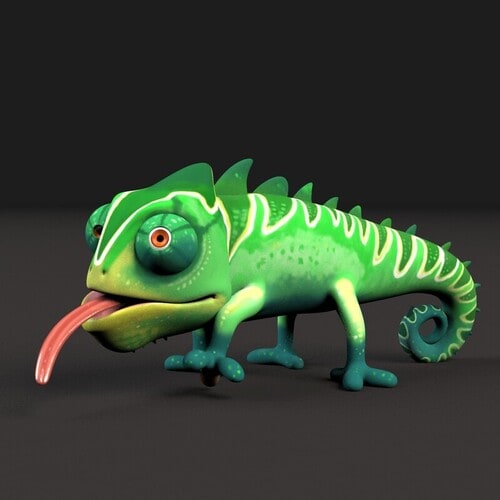
This chameleon has all basic body and facial functions needed by a quadruped. It is a funny whimsical character similar to ‘Pasacal’ from the movie “Tangled” which you can play with. Its tongue is a special feature although you may need to work on its control.
● Judy Hopps
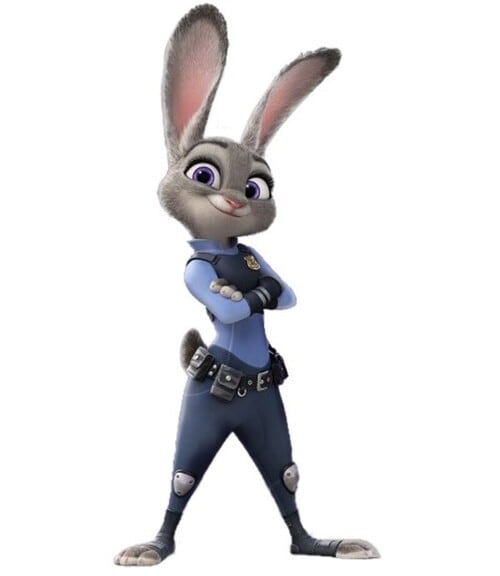
Time to master the art of animating emotions and Judy with her amazing big round eyes can easily be adjusted with the help of floating controllers. The dynamic features of this rig has micro facial controls which you practice with.
● Roboter 2.0.1
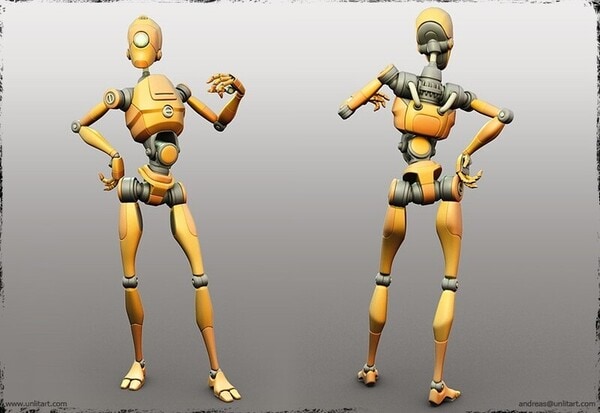
Interested in Robots? Try playing with this humanoid figure but be warned that it might not feel as easy to replicate natural human body motion. It might take some practice but you can try taking on the initial steps by practicing on a robot rig. At least you can excuse any minor imperfections.
● Bony and Beefy
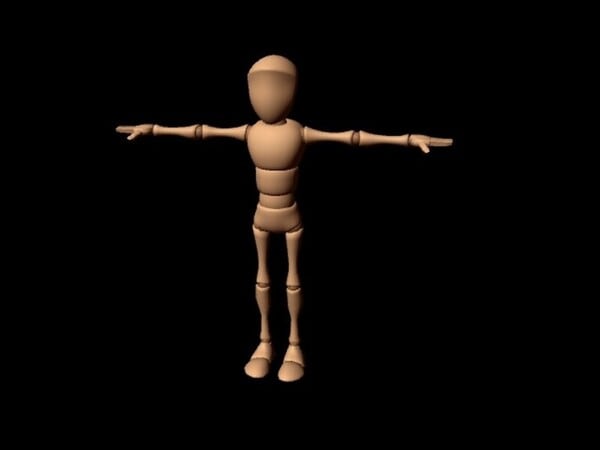
The next challenge would be to master this incredibly advanced rig. There are various different body specifications which you will need to be familiar with. This rig gives you a fair advantage by already toggling all visibility controls.
● Key Takeaways from This Episode →
● Rigging is a fantastic way to learn the foundations of animations and how it all ties into the final result. It involves creating skeletal animations of bones that share parental relationship with each other; one bone moves an entire set. You can record these movements and then play them over timeline.
● You can practice rigging with both simple and advanced animations. Complex rigging structures like facial features may require separate project of its own. There are various rigging software like Blender and Maya which provides you with everything you need to carry out a successful rigging process.
● Get started with rigging animation by practicing on free Maya Rigs. Find out which rig suits you best according to your skills level.
Today there is a lot pre-made skeletons you can use and reuse as many times as you want, making only a few minor adjustments to the base design. If your creativity is sparking like firecrackers, then a rig can make it look more defined and/or realistic.
Not convinced? Let’s talk more about Rigging Animation.
In this article
01 [What is Rigging Animation](#Part 1)
02 [The Ultimate Collection for Free Maya Rigs [2022]](#Part 2)
Part 1 What is Rigging Animation
01Why Your Animators Need to Know How to Rig
Walk into any professional animation studio toady, you would notice unfamiliar skeleton figures in at least one of the screens.
This is called skeleton animation and is a major technique used in creating animated models that give us that 36vibe of the character in movies. It helps animators in controlling its movement just like a puppet. Hidden call back to the Matrix.
What you see in most movies or games, are characters and models who supported by a network of digital mechanical skeletons all rigged to move in a certain way.
02How Does Rigging Work?
The process of rigging is usually the second step in a long line of other methods applied after creating a model.
There is a series of interdependent bones that need to be constructed which is representation of the skeletal structure which is the basic goal in rigging animation.
With the right digital animation software you can reposition, repurpose and scale these bones in more ways than one.
The next step would involve recording the different movements of these bones on a timeline. This part of the process is called keyframing in animation.
These simple steps are actually more intricate than they actually are. Each movement acts as trigger to another set of movements like how the shoulder bone is connected to the forearm of our body.
This movement of the model becomes even more realistic once its weight scale has been determined. Painting weight can be considered to be the most unnerving challenge in the entire process.
Which is where Inverse Kinematics can help in making things 5easier by just reversing forward kinematic movements.
All of these aspects of rigging makes it possible to help animation mimic real life movements.
03How is Rigging Used?
Rigging is a technique which has only started gaining more prominence in recent times due to how crucial it is to the gaming and animation movie industry.
Not only is it used on characters but all mechanical objects in animations can also be rigged. With the help of a computerized program physicality is added to the bone structure and is recorded through a series of frames. These recording are then played back.
There are other applications to the and modelling process which goes beyond the entertainment industry such as giving virtual medical demonstrations or modeling a product.
This entire process can get much more repetitive and complex when it comes to rigging something as dynamic as the human face.
04Intro to Rigging Software
You might already be aware by now that there are some major animation software on the market that can provide you with just about every tool you need to make jaw dropping rigger animations.
Software like Blender, Cinema 4D, Maya and Houdini employs fantastic Skeletal Animation and digital motion capturing techniques. They open the doors to more realistic animations that can be used to create far more interactive and personalized digital worlds.
Maya and 3Ds Max is used to do real time animation rigging and is considered by most to be the industry standard by most animators.
Blender on the other hand is a free to use software. Though not quite as strong as Maya, it is an open source software which is equipped with everything you need to rig and animate models.
You can import completed animated files onto game engines and all types of other applications. The most common format for importing animated files is .fbx.
Part 2 The Ultimate Collection for Free Maya Rigs [2022]
01How’s Maya Rigs?
To tell the truth, every year you have spent on learning animation would come into great use in making your imagination come to life. Maya is probably the one software which gives you credit for just knowing it.
Maya has several levels of features you need to practice before you can call yourself a Maya master.
The best way to get your hands practiced on animating on Maya is by becoming well versed with all the stats and proportions while working with rigs. You would surely need to get your hands on high quality rig packages that makes the learning experience even more worth it.
With time, you would get better at understanding of the specifics of building a structure you would be showing in the final result. However getting stuck with the wrong type of rig can end up making your animating experience counterintuitive.
Here is a list of Maya Rigs you can start on right away;
02Best Free Maya Rigs of 2022
● Basic Rigs
Understanding the Basic Functionality of inanimate objects is a clear place to start in animation rigging. It helps you get a strong grasp over animation principals like bouncing a ball, before moving on to more challenging rigging packages.
● Ultimate Rigs
As you keep trying out different basic rigging functionalities, you eventually would need an ultimate rigging pack which is a complete set of all basic rigs. It is a great option to download and have this as a backup.
● Flour Sack
The Flour Sack free Rig is old school trainer pack. It simplifies your understanding character emotions by applying posing and adding weight to an object with a whimsical undefined structure.
● Wall E
If you are easily familiar with this character then you should remember how beautifully Wall-E was able express himself. It certainly is a step up on your journey to improving motion capture techniques. Try making your own Dreamworks style animation with Filmora from Wondershare where you can pair your animations with a few amazing film editing tools.
● JuiceBox
Another favored animation teaching prop is the Juice Box. It follows similar principals like the Flour Sack but the straw adds a different dimension to it. This is where an animator can try out more ways to get creative without a simple straw getting in their way.
● The Walking Egg
An egg shaped mechanical quadruped robot who has the ability to contract its legs into its body. Its legs are probably its best feature since it is lockable at then joints. A fun part of this robot is that its screen eyes can turn into guns.
● Cartoon Chameleon
This chameleon has all basic body and facial functions needed by a quadruped. It is a funny whimsical character similar to ‘Pasacal’ from the movie “Tangled” which you can play with. Its tongue is a special feature although you may need to work on its control.
● Judy Hopps
Time to master the art of animating emotions and Judy with her amazing big round eyes can easily be adjusted with the help of floating controllers. The dynamic features of this rig has micro facial controls which you practice with.
● Roboter 2.0.1
Interested in Robots? Try playing with this humanoid figure but be warned that it might not feel as easy to replicate natural human body motion. It might take some practice but you can try taking on the initial steps by practicing on a robot rig. At least you can excuse any minor imperfections.
● Bony and Beefy
The next challenge would be to master this incredibly advanced rig. There are various different body specifications which you will need to be familiar with. This rig gives you a fair advantage by already toggling all visibility controls.
● Key Takeaways from This Episode →
● Rigging is a fantastic way to learn the foundations of animations and how it all ties into the final result. It involves creating skeletal animations of bones that share parental relationship with each other; one bone moves an entire set. You can record these movements and then play them over timeline.
● You can practice rigging with both simple and advanced animations. Complex rigging structures like facial features may require separate project of its own. There are various rigging software like Blender and Maya which provides you with everything you need to carry out a successful rigging process.
● Get started with rigging animation by practicing on free Maya Rigs. Find out which rig suits you best according to your skills level.
How to Draw Cartoons Step by Step with This Guide
Learn How to Draw Cartoons Step by Step with This Guide
An easy yet powerful editor
Numerous effects to choose from
Detailed tutorials provided by the official channel
Cartoon character drawing is usually a vital aspect of any child’s life who loves to watch cartoon series and can sometimes be someone’s favorite thing in the world.

A cartoon character is a series of single drawings that tell a joke or story. Although cartoons are mostly drawn, they can sometimes be animated. Kids like comics which makes them an essential part of every child’s life. Cartoons are not only used for entertainment purposes but also help kids and young children learn more about the world around them. For example, children learn about love, loss, friendship, and other essential life issues about life by watching cartoons.
However, cartoons are not only limited to children but are also for adults. In addition, cartoons created for an adult audience go deeper into real-life problems and explore darker themes. They aim to create content that matches the maturity and age of the audience. Watching cartoons is fun. But what if you could make them? This article will provide you with a guide on producing cool cartoon drawings that will match different audiences, both older and younger.
In this article
01 [How to Draw Cartoon Characters Step by Step](#Part 1)
02 [Cartoon Easy Drawing with Colour Step by Step](#Part 2)
03 [Cartoon Easy Sketch Drawing Step by Step](#Part 3)
Part 1 How to Draw Cartoon Characters Step by Step
Note that in the world we live in, Professionals were once students, and experts were once beginners. This means that everyone has a starting point, and they all have one thing in common: “learning.” Whether you are aspiring to become an English teacher, an astrophysicist, an artist, or a physician’s assistant, you must first learn the ins and outs of the field.
Those aspiring to become animators and cartoonists must first learn the basics of cartoon character drawing and practice some easy, simple cartoon drawing before cranking out the Mickey-Mouses of the entertainment world. However, we will cover the basic principles of easy cartoon drawing for beginners step by step to get your learning process started. Here is how to draw a Micky-Mouse perfectly:

Step 1:
● Use a pencil to begin your drawing.
● First, create a circle for the head and a curved line on the left side.
● Draw a horizontal line at the center.
Step 2: Next, draw an oval shape for the mouth and a “U” shape added to the bottom, and then you can add another parallel “U” shape and connect it with the oval.
Step 3: Draw the eye using two upside-down “U” shapes, and then you add his large ear on the right and a small one at the top of the head.
Step 4: You can draw a bean shape and another smaller one inside for the body.
Step 5: Add oval shapes for his feet to draw his legs and draw his tail on the right side just above the leg.
Step 6: Draw two elongated shapes for his arms, a small oval for the hand and a basic shape of his fingers.
Step 7: Draw the cheese and add a few small circles inside.
Step 8: Also include the facial features by drawing the inside of the nose, eyebrows, eyes, and whiskers.
Step 9:
● Draw his fingers and hair between his ears.
● Trace your pencil lines with a sharpie.
● Erase the pencil afterward.
Step 10: Finally, you can color your drawing and upload it to your website.
Part 1 Cartoon Easy Drawing with Colour Step by Step
Applying color to a drawing is very important to beautify your drawing and make it look stunning and attractive. Here is how to cartoon easy drawing a flower using a colored pencil:
Step 1: Using a color photocopy of a reference photo, crop and rearrange elements of the poppy composition. With light pressure and HB pencil, draw a composition onto a four-ply, 100% cotton museum board frequently found among framing supplies.
Step 2: With very light pressure, apply the first colored pencil layer and add more emphasis where the values will be deeper. While doing this, note that the pencil application will still appear granular, and the texture of the museum board is still visible.

Step 3: Create the veins in the leaves and the fuzzy texture of the stem and pod, and also, as the individual strands of stamens, put down a sheet of translucent drafting paper. Use heavy tracing paper with a very sharp 7H graphite pencil and apply heavy pressure in drawing the lines for stamens, fuzz, and veins on the drafting paper and impress them into the surface of the museum board. Then, with a contrasting layer of darker color, these features dramatically show up on the stem, leaves, center of the flower, pod, and center of the flower. Then add deeper values of rose in the shadowed areas of the flower petals.

Step 4: To make them appear less granular and intensify the colors, start by blending with a clear, alcohol-based blending marker. The solvent, wax, or vegetable oil then dissolves the binder in the colored pencil layer and fluidly releases the pigment. This will also help to “fill in” the dots of the tooth of the paper and make the color appear denser.

Step 5: Continue to intensify the color by using a non-pigmented blending pencil over a previous layer and repeat a layer or two of color, much like a “color sandwich.” Repeat this “ burnishing “ process for subsequent layerings of color, like a double-decker or triple-decker sandwich.
Also, make sure the rich, dark negative space is carried out the same way, layering colors and burnishing, then repeating the colors for deep, rich saturation.
Render the deep, smeary flecks of pollen by heavily applying “freckles” of burgundy, then slightly smudge them with the tip of a blending marker. Lastly, scratch a few of the tiny wisps of fuzz on the pod and stem carefully into the board via a sharp X-acto knife for a striking contrast of light against the deep background.

Part 2 Cartoon Easy Sketch Drawing Step by Step
This is the initial stage of the drawing process. It requires you to create an outline of the concept you want to draw before adding color. However, it is also referred to as a technique in shading. For example, if you’re going to sketch a cherry fruit, there are a few things to note here.
Try not to look at the cherry as a whole but look at its shapes and name them. This way, you are looking at the parts to the whole and not the entire piece.

Step 1: Draw two overlapping circles and draw two curved lines from each of the circles.
Step 2: Make a small rectangle at the top to join the two stems and draw a second set of curved lines.
Step 3: Draw thick lines inside the rectangle for the bumps and darken the lines and use your finger to smudge them a bit for the shaded effect.
Step 4: Draw a curved line from the stem on the right to the circle’s edge to create the bump.
Step 5: Holding your pencil at an angle, make light strokes going across the front of both cherries. Take note of the places where there is no light. This is where the light source is hitting the cherry the most.
Step 6: To darken, a shade over those places again, keep layering the shading technique until you get the effect you see on the cherries.
Step 7: Use the same technique to shade under the cherries, but use your finger to smudge it to smoother the shadow.
●Bonus:
You can add color, effect, or animate to your cartoon character drawing by using Wondershare Filmora Video Editor , the best editor on the internet. Filmora is a free software program with the same creating abilities and imaging editing similar to Adobe Illustrator. It is open software that runs on various programs, such as Windows, Mac, and Linux. Please get to know more about this exclusive tool from Wondershare on their official website.
For Win 7 or later (64-bit)
For macOS 10.12 or later
● Ending Thoughts →
● A step-by-step guide on drawing easy cartoons for painting and how to sketch your drawing correctly.
● Cartoon character drawings in easy and quick steps.
● Easy cartoon drawing for beginners.
● Lastly, to add color to your drawing, use Filmora software.
● So, use the tips and tricks to make your presentation’s best cartoon characters come alive and be a pro with Filmora.
Cartoon character drawing is usually a vital aspect of any child’s life who loves to watch cartoon series and can sometimes be someone’s favorite thing in the world.
A cartoon character is a series of single drawings that tell a joke or story. Although cartoons are mostly drawn, they can sometimes be animated. Kids like comics which makes them an essential part of every child’s life. Cartoons are not only used for entertainment purposes but also help kids and young children learn more about the world around them. For example, children learn about love, loss, friendship, and other essential life issues about life by watching cartoons.
However, cartoons are not only limited to children but are also for adults. In addition, cartoons created for an adult audience go deeper into real-life problems and explore darker themes. They aim to create content that matches the maturity and age of the audience. Watching cartoons is fun. But what if you could make them? This article will provide you with a guide on producing cool cartoon drawings that will match different audiences, both older and younger.
In this article
01 [How to Draw Cartoon Characters Step by Step](#Part 1)
02 [Cartoon Easy Drawing with Colour Step by Step](#Part 2)
03 [Cartoon Easy Sketch Drawing Step by Step](#Part 3)
Part 1 How to Draw Cartoon Characters Step by Step
Note that in the world we live in, Professionals were once students, and experts were once beginners. This means that everyone has a starting point, and they all have one thing in common: “learning.” Whether you are aspiring to become an English teacher, an astrophysicist, an artist, or a physician’s assistant, you must first learn the ins and outs of the field.
Those aspiring to become animators and cartoonists must first learn the basics of cartoon character drawing and practice some easy, simple cartoon drawing before cranking out the Mickey-Mouses of the entertainment world. However, we will cover the basic principles of easy cartoon drawing for beginners step by step to get your learning process started. Here is how to draw a Micky-Mouse perfectly:
Step 1:
● Use a pencil to begin your drawing.
● First, create a circle for the head and a curved line on the left side.
● Draw a horizontal line at the center.
Step 2: Next, draw an oval shape for the mouth and a “U” shape added to the bottom, and then you can add another parallel “U” shape and connect it with the oval.
Step 3: Draw the eye using two upside-down “U” shapes, and then you add his large ear on the right and a small one at the top of the head.
Step 4: You can draw a bean shape and another smaller one inside for the body.
Step 5: Add oval shapes for his feet to draw his legs and draw his tail on the right side just above the leg.
Step 6: Draw two elongated shapes for his arms, a small oval for the hand and a basic shape of his fingers.
Step 7: Draw the cheese and add a few small circles inside.
Step 8: Also include the facial features by drawing the inside of the nose, eyebrows, eyes, and whiskers.
Step 9:
● Draw his fingers and hair between his ears.
● Trace your pencil lines with a sharpie.
● Erase the pencil afterward.
Step 10: Finally, you can color your drawing and upload it to your website.
Part 1 Cartoon Easy Drawing with Colour Step by Step
Applying color to a drawing is very important to beautify your drawing and make it look stunning and attractive. Here is how to cartoon easy drawing a flower using a colored pencil:
Step 1: Using a color photocopy of a reference photo, crop and rearrange elements of the poppy composition. With light pressure and HB pencil, draw a composition onto a four-ply, 100% cotton museum board frequently found among framing supplies.
Step 2: With very light pressure, apply the first colored pencil layer and add more emphasis where the values will be deeper. While doing this, note that the pencil application will still appear granular, and the texture of the museum board is still visible.
Step 3: Create the veins in the leaves and the fuzzy texture of the stem and pod, and also, as the individual strands of stamens, put down a sheet of translucent drafting paper. Use heavy tracing paper with a very sharp 7H graphite pencil and apply heavy pressure in drawing the lines for stamens, fuzz, and veins on the drafting paper and impress them into the surface of the museum board. Then, with a contrasting layer of darker color, these features dramatically show up on the stem, leaves, center of the flower, pod, and center of the flower. Then add deeper values of rose in the shadowed areas of the flower petals.
Step 4: To make them appear less granular and intensify the colors, start by blending with a clear, alcohol-based blending marker. The solvent, wax, or vegetable oil then dissolves the binder in the colored pencil layer and fluidly releases the pigment. This will also help to “fill in” the dots of the tooth of the paper and make the color appear denser.
Step 5: Continue to intensify the color by using a non-pigmented blending pencil over a previous layer and repeat a layer or two of color, much like a “color sandwich.” Repeat this “ burnishing “ process for subsequent layerings of color, like a double-decker or triple-decker sandwich.
Also, make sure the rich, dark negative space is carried out the same way, layering colors and burnishing, then repeating the colors for deep, rich saturation.
Render the deep, smeary flecks of pollen by heavily applying “freckles” of burgundy, then slightly smudge them with the tip of a blending marker. Lastly, scratch a few of the tiny wisps of fuzz on the pod and stem carefully into the board via a sharp X-acto knife for a striking contrast of light against the deep background.
Part 2 Cartoon Easy Sketch Drawing Step by Step
This is the initial stage of the drawing process. It requires you to create an outline of the concept you want to draw before adding color. However, it is also referred to as a technique in shading. For example, if you’re going to sketch a cherry fruit, there are a few things to note here.
Try not to look at the cherry as a whole but look at its shapes and name them. This way, you are looking at the parts to the whole and not the entire piece.
Step 1: Draw two overlapping circles and draw two curved lines from each of the circles.
Step 2: Make a small rectangle at the top to join the two stems and draw a second set of curved lines.
Step 3: Draw thick lines inside the rectangle for the bumps and darken the lines and use your finger to smudge them a bit for the shaded effect.
Step 4: Draw a curved line from the stem on the right to the circle’s edge to create the bump.
Step 5: Holding your pencil at an angle, make light strokes going across the front of both cherries. Take note of the places where there is no light. This is where the light source is hitting the cherry the most.
Step 6: To darken, a shade over those places again, keep layering the shading technique until you get the effect you see on the cherries.
Step 7: Use the same technique to shade under the cherries, but use your finger to smudge it to smoother the shadow.
●Bonus:
You can add color, effect, or animate to your cartoon character drawing by using Wondershare Filmora Video Editor , the best editor on the internet. Filmora is a free software program with the same creating abilities and imaging editing similar to Adobe Illustrator. It is open software that runs on various programs, such as Windows, Mac, and Linux. Please get to know more about this exclusive tool from Wondershare on their official website.
For Win 7 or later (64-bit)
For macOS 10.12 or later
● Ending Thoughts →
● A step-by-step guide on drawing easy cartoons for painting and how to sketch your drawing correctly.
● Cartoon character drawings in easy and quick steps.
● Easy cartoon drawing for beginners.
● Lastly, to add color to your drawing, use Filmora software.
● So, use the tips and tricks to make your presentation’s best cartoon characters come alive and be a pro with Filmora.
Top 7 Best Free GIF Apps for Android
Top 7 Best Free GIF Apps for Android

Shanoon Cox
Mar 27, 2024• Proven solutions
GIFs can present a collection of memorable moments with animation style media files. These images can be created by arranging the order of a sequence of stills or by simply editing video files. The most important thing to know is that developing GIF images is an inexpensive option and these files can be designed with lightweight file size.
It is much easier to transfer GIF images between two users. As so many tools have been already developed for designing GIF images, here we are going to cover a few top rated android based applications.
You can easily find so many interesting tools online that can develop GIF images instantly but when quality is the major constraint then we need a reliable source. Wondershare Filmora is one of the best recommendations for all those who want to develop classic professional style GIFs. Here are a few incredible features of Wondershare Filmora:
- This tool is able to process almost all popular media files as it extends support to 150 plus formats. You can easily upload content in forms of PNG, JPG, AVI, MKV and MP4 files.
- This tool can convert videos or a series of photos to GIFs instantly.
- Wondershare Filmora is a trustworthy desktop application that is compatible with Windows as well as Mac platforms.
- Users can easily update changes to GIF collections with the ability to modify frame rate, frame size, filters, time-lapse, captions, and resolution levels.
However, if you want to make a GIF online , Filmora meme maker is your ultimate solution. It helps you make images, GIFs and video memes directly without watermark. It is totally FREE to use and no signup. You can change text size, color and position to create caption when you are editing. You can also put text inside or outside in GIF. Just with a few clicks, your GIF is done . Try it now!
Check this video tutorial to know more details:
 Download Mac Version ](https://tools.techidaily.com/wondershare/filmora/download/ )
Best GIF Apps for Android Smartphone
1. GIF Camera:
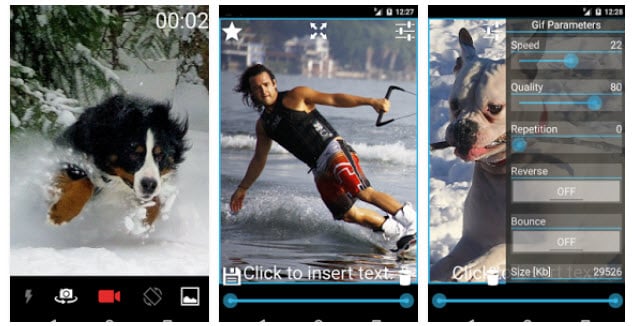
Using this interactive tool, you can easily record videos from your Android camera and then get them saved in the form of GIF extension. One of the most interesting things to know about this app is its Gravity Lock that helps to maintain picture orientation when the phone is following certain kinds of rotation.
Pricing: free
Key Features:
- It can easily develop GIFs by processing your camera results.
- This tool allows autofocus, flashlight adjustments and can manage its own GIF gallery on the browser.
- There is a wide range of live filters and many other customization tools. You will definitely love to use its bounce effect.
- It allows performance maximization with easy adjustments over frame rates and file sizes.
2. GIF Me Camera:
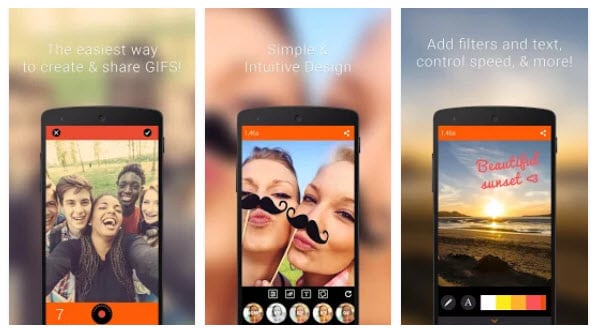
Gif Me Camera allows users to develop files with incredible quality content for all animated GIFs. It can easily process all image files from your computer to generate Gifs or short videos can be easily converted into interactive GIFs. This tool is well known as GIF editor, GIF Maker, and Video to GIF creator.
Pricing: free
Key Features:
- It offers a wide range of real-time color filters.
- Developed GIFs can be easily shared by email or one can also upload them directly over social media websites like WhatsApp, Instagram, Tumblr, Facebook, and Twitter, etc.
- Users can also make adjustments to stop video or motion mode.
- The professional version of GIF Me Camera allows users to remove watermarks from images with ease.
3. GIF Creator:
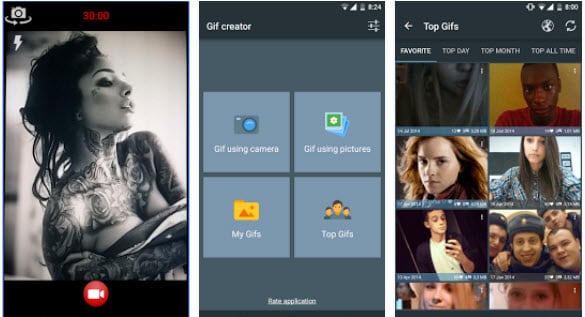
This tool is widely used for the creation of GIFs and to share those creative animations on other platforms instantly. It is possible to process animations for images captured directly from the camera or videos that are downloaded from the internet. Users can also have a preview of all animations side by side so that content quality can be adjusted accordingly.
Pricing: Free
Key Features:
- It allows users to add comments and ratings for animations.
- The maximum duration of animations can go up to 30 seconds.
- There are 10 user-friendly but quite interesting filters.
- Processed animations can be easily saved to memory cards for future needs.
- With GIF Creator, users can easily label or revert their animations.
4. GIF Maker:
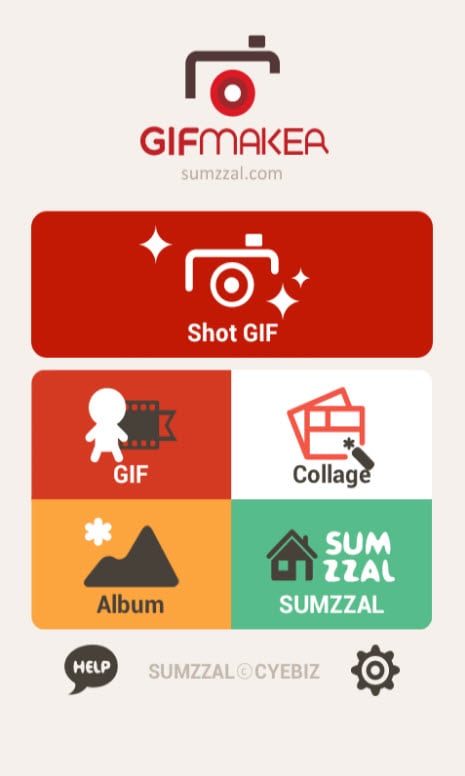
With GIF Maker, your photos can find the right platform for generating emotions in the form of animations. This application is available for free and it provides services to record funny moments from the life and merges them on a single GIF file with eye-catching animations. The best part is that it allows continuous shooting while adding unique animation effects to all files.
Pricing: Free
Key Features:
- It can process a maximum of 50 photos for the creation of a single GIF image.
- Users can customize the timing for each added photo.
- It maintains its own high-quality album that keeps perfect track of all shared, edited, and deleted files.
- This tool is currently available in more than 25 languages so anyone can start working over it with its easy to the user interface.
5. GIF Pro:
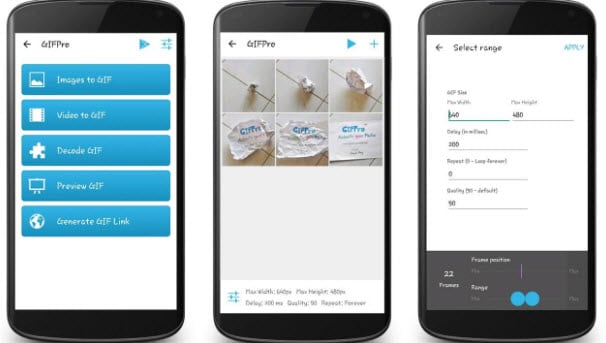
This powerful GIF animator is commonly used by professionals due to its breathtaking results. GIF Pro is an extremely easy and feature-rich tool with so many cool features. The best part is that it allows users to enjoy all features for free and never even generates a watermark for developed GIFs. All processed files can be easily shared with the audience over Facebook.
Pricing: Free
Key Features:
- It can easily convert all photos and videos into animated GIFs.
- GIF Pro is capable enough to merge numbers of video frames and images on a single platform so that a high quality animated GIF can be created.
- It allows users to develop GIFs directly from URL.
- Some of the added features include the ability to adjust the quality of GIF output, animated delays, and sequences of loops as well as the size of output files.
6. GIF Studio:
GIF Studio possesses all the incredible features that you may need for designing professional quality GIFs. It is developed with 21 unique animation effects and the best feature is its ability to develop GIF collage. Here users can generate instant GIFs for stills captured from camera share them on other platforms within a fraction of seconds.
Pricing: Free
Key Features:
- It allows users to add animations, stickers, filters, or overlays over GIF files.
- Some additional editing options include crop, edit, create, and changing backgrounds of images.
- Timing for GIF animations can be adjusted manually.
- It can manage best loops for GIF files.
Frequently Asked Questions About GIF Apps on Android
1. Is It Possible To Create Gifs From An Android Device?
Recording a GIF with a camera on an Android phone is not possible unless you install a third-party app. There a lot of GIF apps for Android to choose from that enable you to create GIFs directly from your phone.
GIF Camera, GIF Maker or GIF Creator are just a few among countless apps that allow Android users to make GIFs, although some of them place limits on the maximum duration of a GIF. In addition, most of these apps are equipped with filters and effects that can be easily applied to a GIF.
2. How To Add Text To A GIF From An Android Phone?
In case the app you are using to record a GIF with an Android phone doesn’t offer text tools you will have to use a video editing app to add text to a GIF you created. However, most GIF apps are equipped with at least basic text editing tools that enable you to apply text layers over the animated GIFs you create with them.
After you launch a GIF app and record a new GIF, you can use the text tool to insert the text you want to include in a GIF and to adjust its position, size, or color.
3. Why Can’t I Preview Gifs On My Android Phone?
Android OS has had compatibility issues with GIF files for years, as nearly all versions of the OS don’t offer native support for GIFs. In case you are having trouble previewing a GIF file from an Android device, you should try restarting it in order to make sure that some unrelated issue isn’t causing the lagging.
If the issue persists, you should update the OS to Android 7.1 or later, because previous versions of the OS may experience difficulties displaying GIF files.
Shanoon Cox
Shanoon Cox is a writer and a lover of all things video.
Follow @Shanoon Cox
Shanoon Cox
Mar 27, 2024• Proven solutions
GIFs can present a collection of memorable moments with animation style media files. These images can be created by arranging the order of a sequence of stills or by simply editing video files. The most important thing to know is that developing GIF images is an inexpensive option and these files can be designed with lightweight file size.
It is much easier to transfer GIF images between two users. As so many tools have been already developed for designing GIF images, here we are going to cover a few top rated android based applications.
You can easily find so many interesting tools online that can develop GIF images instantly but when quality is the major constraint then we need a reliable source. Wondershare Filmora is one of the best recommendations for all those who want to develop classic professional style GIFs. Here are a few incredible features of Wondershare Filmora:
- This tool is able to process almost all popular media files as it extends support to 150 plus formats. You can easily upload content in forms of PNG, JPG, AVI, MKV and MP4 files.
- This tool can convert videos or a series of photos to GIFs instantly.
- Wondershare Filmora is a trustworthy desktop application that is compatible with Windows as well as Mac platforms.
- Users can easily update changes to GIF collections with the ability to modify frame rate, frame size, filters, time-lapse, captions, and resolution levels.
However, if you want to make a GIF online , Filmora meme maker is your ultimate solution. It helps you make images, GIFs and video memes directly without watermark. It is totally FREE to use and no signup. You can change text size, color and position to create caption when you are editing. You can also put text inside or outside in GIF. Just with a few clicks, your GIF is done . Try it now!
Check this video tutorial to know more details:
Download Mac Version ](https://tools.techidaily.com/wondershare/filmora/download/ )
Best GIF Apps for Android Smartphone
1. GIF Camera:
Using this interactive tool, you can easily record videos from your Android camera and then get them saved in the form of GIF extension. One of the most interesting things to know about this app is its Gravity Lock that helps to maintain picture orientation when the phone is following certain kinds of rotation.
Pricing: free
Key Features:
- It can easily develop GIFs by processing your camera results.
- This tool allows autofocus, flashlight adjustments and can manage its own GIF gallery on the browser.
- There is a wide range of live filters and many other customization tools. You will definitely love to use its bounce effect.
- It allows performance maximization with easy adjustments over frame rates and file sizes.
2. GIF Me Camera:
Gif Me Camera allows users to develop files with incredible quality content for all animated GIFs. It can easily process all image files from your computer to generate Gifs or short videos can be easily converted into interactive GIFs. This tool is well known as GIF editor, GIF Maker, and Video to GIF creator.
Pricing: free
Key Features:
- It offers a wide range of real-time color filters.
- Developed GIFs can be easily shared by email or one can also upload them directly over social media websites like WhatsApp, Instagram, Tumblr, Facebook, and Twitter, etc.
- Users can also make adjustments to stop video or motion mode.
- The professional version of GIF Me Camera allows users to remove watermarks from images with ease.
3. GIF Creator:
This tool is widely used for the creation of GIFs and to share those creative animations on other platforms instantly. It is possible to process animations for images captured directly from the camera or videos that are downloaded from the internet. Users can also have a preview of all animations side by side so that content quality can be adjusted accordingly.
Pricing: Free
Key Features:
- It allows users to add comments and ratings for animations.
- The maximum duration of animations can go up to 30 seconds.
- There are 10 user-friendly but quite interesting filters.
- Processed animations can be easily saved to memory cards for future needs.
- With GIF Creator, users can easily label or revert their animations.
4. GIF Maker:
With GIF Maker, your photos can find the right platform for generating emotions in the form of animations. This application is available for free and it provides services to record funny moments from the life and merges them on a single GIF file with eye-catching animations. The best part is that it allows continuous shooting while adding unique animation effects to all files.
Pricing: Free
Key Features:
- It can process a maximum of 50 photos for the creation of a single GIF image.
- Users can customize the timing for each added photo.
- It maintains its own high-quality album that keeps perfect track of all shared, edited, and deleted files.
- This tool is currently available in more than 25 languages so anyone can start working over it with its easy to the user interface.
5. GIF Pro:
This powerful GIF animator is commonly used by professionals due to its breathtaking results. GIF Pro is an extremely easy and feature-rich tool with so many cool features. The best part is that it allows users to enjoy all features for free and never even generates a watermark for developed GIFs. All processed files can be easily shared with the audience over Facebook.
Pricing: Free
Key Features:
- It can easily convert all photos and videos into animated GIFs.
- GIF Pro is capable enough to merge numbers of video frames and images on a single platform so that a high quality animated GIF can be created.
- It allows users to develop GIFs directly from URL.
- Some of the added features include the ability to adjust the quality of GIF output, animated delays, and sequences of loops as well as the size of output files.
6. GIF Studio:
GIF Studio possesses all the incredible features that you may need for designing professional quality GIFs. It is developed with 21 unique animation effects and the best feature is its ability to develop GIF collage. Here users can generate instant GIFs for stills captured from camera share them on other platforms within a fraction of seconds.
Pricing: Free
Key Features:
- It allows users to add animations, stickers, filters, or overlays over GIF files.
- Some additional editing options include crop, edit, create, and changing backgrounds of images.
- Timing for GIF animations can be adjusted manually.
- It can manage best loops for GIF files.
Frequently Asked Questions About GIF Apps on Android
1. Is It Possible To Create Gifs From An Android Device?
Recording a GIF with a camera on an Android phone is not possible unless you install a third-party app. There a lot of GIF apps for Android to choose from that enable you to create GIFs directly from your phone.
GIF Camera, GIF Maker or GIF Creator are just a few among countless apps that allow Android users to make GIFs, although some of them place limits on the maximum duration of a GIF. In addition, most of these apps are equipped with filters and effects that can be easily applied to a GIF.
2. How To Add Text To A GIF From An Android Phone?
In case the app you are using to record a GIF with an Android phone doesn’t offer text tools you will have to use a video editing app to add text to a GIF you created. However, most GIF apps are equipped with at least basic text editing tools that enable you to apply text layers over the animated GIFs you create with them.
After you launch a GIF app and record a new GIF, you can use the text tool to insert the text you want to include in a GIF and to adjust its position, size, or color.
3. Why Can’t I Preview Gifs On My Android Phone?
Android OS has had compatibility issues with GIF files for years, as nearly all versions of the OS don’t offer native support for GIFs. In case you are having trouble previewing a GIF file from an Android device, you should try restarting it in order to make sure that some unrelated issue isn’t causing the lagging.
If the issue persists, you should update the OS to Android 7.1 or later, because previous versions of the OS may experience difficulties displaying GIF files.
Shanoon Cox
Shanoon Cox is a writer and a lover of all things video.
Follow @Shanoon Cox
Top Claymation Shows That Make Your Memories Unforgettable
Best Claymation Shows That Make Your Memories Unforgettable
An easy yet powerful editor
Numerous effects to choose from
Detailed tutorials provided by the official channel
There are plenty of things that the 90s have given us. And when we revisit them now, it gives us an inimitable feeling of nostalgia which we would like to store forever with us. And one of the things that can bring back tons of cherished memories from the 90s is the claymation tv shows.
The claymation shows were called the clay animation shows. The reason for such a name was because the characters in the shows were made from malleable or deformable materials, especially out of clay. They have been one of the most revolutionary and entertaining components of that time.
These shows were one of the forms among the numerous forms of stop-motion animations. We will cover what these shows were about, their cast, and where you can watch them today. And in the following discussion, we will be discussing the ten best 90s claymation shows to bring back wonderful nostalgic memories.

Here is the list of the top claymation tv shows and all the information, including the sites and apps you can watch even today!
01Plasmo
Plasmo was an Australian science fiction TV series about a two and a half-year-old space orphan. The show first premiered in 199starring Abbe Holmes, Phillip Houghton and Pia Morley. You can watch this show on YouTube.

02Plonsters
The Plonsters was a show that premiered in 19which showed the characters Plif, Plops and Plummy, babble and morph, and their wonderful adventures. The show starred Ralph Thiekötter, and you can watch this show on Netflix and Tubi.
04Rex the Runt
Rex the Runt was a comedy show that premiered in 199The show was about the adventures of intrepid Rex and his plasticine companions. It starred about nine celebrities. Steve Box, Elisabeth Hadley, Andrew Jeffers, and Kevin Wrench were among them. You can watch this show even today on Amazon Prime.

05Mio Mao
Mia Mao first premiered in 197starring Derek Griffiths as cast. The show was about two plasticine kittens, Mia and Mao, exploring and finding different objects and animals who hide in their garden. You can watch this show on Amazon Prime.
06Celebrity Death
The Celebrity Deathmatch featured numerous celebrities who were shown as clay-animated characters. Their characters would have quite an intense fight in a boxing ring, and the match would be pretty different from the ordinary boxing matches.
Most of the boxing matches ended with the death of the celebrities, which was the reason for the show to get its name “Celebrity Deathmatch”. It was one of the most favourite and popular 9claymation shows on MTV, an absolute treat and entertainment to watch.
The show premiered on January 2199and it continued to air till the year 2007., with its final episode on March 3200Its cast included a series of celebrities, including Maurice Schlafer, Lean Maxwell, Mills Lane, David Wills, Steve Austin, Masasa Moyo and several other celebrities.
You can readily watch this show today on Amazon Instant Video, iTunes, Paramount+ or Amazon Prime Video.
07The Gumby Show
The Gumby Show was yet another popular tv show of the 9that premiered first on March 1195It featured a green-titular character, a humanoid that was a creation and the model of Art Clokey.
This character has been the reason behind two tv series, another feature-length movie and several other media. The ones to star in this tv show are Dal McKennon and Dick Beals. The show is about Gumby experiencing different adventures through various times and environments in history. The show also features his constant companion, a titular, red coloured talking pony named Pokey.
You can watch the show on Netflix and Amazon Prime.
08Pat & Mat
Pat & Mat was an entertaining and fun-to-watch television show of the 90s. The show first premiered in 19and starred David Nykl and Peter Alton, who played the role of Pat and Mat, respectively.
The show was about two neighbours, Pat and Mat, who faced self-created problems. And then, they solved these problems through any possible and impossible remedy.
You can watch this show now on Zee5 and Mx Player for free.
09Pingu
Pingu was a television show about a clumsy yet sweet penguin who lived with his family in the polar ice cap of Antarctica. Pingu, along with his seal friend Robby and sister, Punga, go on different adventures.
This show first premiered on May 2198with Carlo Bonomi, David Sant and Marcello Magni starring in it. You can watch the episodes of this unforgettable and entertaining tv show on ITV Hub and Amazon Prime.
10The Red and the Blue
The Red and the Blue was an Italian television series for children that first premiered in 197The show was about two antagonist clay shape-shifting characters who detected against an undifferentiated background, white.
The cast of this tv show included Carlo Bonomi, and you can see this show today on YouTube.
11The PJs
The PJs was a popular and loved tv show that premiered on 10th January 199About twenty celebrities were starring in this show, and naming a few among them were Eddie Murphy, Ja’Net DuBois, Loretta Devine, Shawn Michael Howard, Snoop Dog and many more.
The show was about Thurgood Stubbs, the superintendent of Lawrence Hilton-Jacobs housing project and lived with his wife, Muriel. This comedy show satirically featured the difficulties one faces in a big-city housing project, which the protagonist Thurgood Stubbs and his friends faced.
You can watch this show on Peacock Tv.
● Bonus:
Now, without video editing, these fantastic shows of the 9could not have been created. But To your surprise, you too can create such incredible videos effortlessly. And that can be possible through an efficient and effective video editing tool.
You can find innumerable video editing tools available in this present world, but you must choose the best. So, let us introduce you to the best video editing tool, with which you can showcase all your editing skills and creativity-Wondershare Filmora Video Editor !
We call this tool the best video editing tool because its numerous features make it the most proficient video editing tool. Let us now look into its numerous effective features below.
● Professional editing tools
Filmora is the video editing tool that incorporates all the professional editing features to make your videos of the best and the professional quality. The elements envelop every aspect of the finest quality video editing works, which brings out the best of skills and creativity in you.
● Easy to use
Although Filmora has every professional editing tool, you will face no difficulty figuring out how the tools work. Even if you are a beginner, you can effortlessly use this editing tool to not only initiate your video editing journey but also enrich your skills.
● Free trial
You need not buy the proceed features on your first try. You can readily avail of the free trial of Filmora and its paid features. And as you try and find the features pleasing, you can proceed to purchase the aid features.
● Personalize and edit your videos
You can avail of the various features such as rotating, cropping, trimming and splitting the videos to edit. Also, there are other features where you can change the speed of the videos. Therefore, the features you get in these tools are of the most proficient quality.
● Over 8effects
The Filmora editing tool offers you more than 8editing effects that will never make you feel lacking any features and effects you need. And this helps you in making the best videos most effortlessly.
● Get the tool on any devices
Filmora believes that editing skills should be made discoverable anywhere and everywhere. Thus, you can download or use this tool on any device that you use. So, you need not have any specific device to avail of this incredible video editing tool, and you can make and edit videos on any device you want.
● Key Takeaways from This Episode →
● These are the best ten claymation tv shows and series that you can watch even today to bring back all the memories and revisit your early days of the 90s. So, to wrap up our discussion, we would conclude by retracing the aspects and factors that we covered in our discussion. We had enveloped the following topics effectively.
● We discussed the claymation picture through a little interdiction.
● Then, we discussed the ten best claymation TV shows popular in the 90s. We discussed their stories, their casts, their premieres and also the sites and apps where you can watch them even today.
● Lastly, we introduced you to the best editing tool, Filmora, that will help you edit any video of your choice and explore your video editing skills with the finest professional features and infinite effects.
There are plenty of things that the 90s have given us. And when we revisit them now, it gives us an inimitable feeling of nostalgia which we would like to store forever with us. And one of the things that can bring back tons of cherished memories from the 90s is the claymation tv shows.
The claymation shows were called the clay animation shows. The reason for such a name was because the characters in the shows were made from malleable or deformable materials, especially out of clay. They have been one of the most revolutionary and entertaining components of that time.
These shows were one of the forms among the numerous forms of stop-motion animations. We will cover what these shows were about, their cast, and where you can watch them today. And in the following discussion, we will be discussing the ten best 90s claymation shows to bring back wonderful nostalgic memories.
Here is the list of the top claymation tv shows and all the information, including the sites and apps you can watch even today!
01Plasmo
Plasmo was an Australian science fiction TV series about a two and a half-year-old space orphan. The show first premiered in 199starring Abbe Holmes, Phillip Houghton and Pia Morley. You can watch this show on YouTube.
02Plonsters
The Plonsters was a show that premiered in 19which showed the characters Plif, Plops and Plummy, babble and morph, and their wonderful adventures. The show starred Ralph Thiekötter, and you can watch this show on Netflix and Tubi.
04Rex the Runt
Rex the Runt was a comedy show that premiered in 199The show was about the adventures of intrepid Rex and his plasticine companions. It starred about nine celebrities. Steve Box, Elisabeth Hadley, Andrew Jeffers, and Kevin Wrench were among them. You can watch this show even today on Amazon Prime.
05Mio Mao
Mia Mao first premiered in 197starring Derek Griffiths as cast. The show was about two plasticine kittens, Mia and Mao, exploring and finding different objects and animals who hide in their garden. You can watch this show on Amazon Prime.
06Celebrity Death
The Celebrity Deathmatch featured numerous celebrities who were shown as clay-animated characters. Their characters would have quite an intense fight in a boxing ring, and the match would be pretty different from the ordinary boxing matches.
Most of the boxing matches ended with the death of the celebrities, which was the reason for the show to get its name “Celebrity Deathmatch”. It was one of the most favourite and popular 9claymation shows on MTV, an absolute treat and entertainment to watch.
The show premiered on January 2199and it continued to air till the year 2007., with its final episode on March 3200Its cast included a series of celebrities, including Maurice Schlafer, Lean Maxwell, Mills Lane, David Wills, Steve Austin, Masasa Moyo and several other celebrities.
You can readily watch this show today on Amazon Instant Video, iTunes, Paramount+ or Amazon Prime Video.
07The Gumby Show
The Gumby Show was yet another popular tv show of the 9that premiered first on March 1195It featured a green-titular character, a humanoid that was a creation and the model of Art Clokey.
This character has been the reason behind two tv series, another feature-length movie and several other media. The ones to star in this tv show are Dal McKennon and Dick Beals. The show is about Gumby experiencing different adventures through various times and environments in history. The show also features his constant companion, a titular, red coloured talking pony named Pokey.
You can watch the show on Netflix and Amazon Prime.
08Pat & Mat
Pat & Mat was an entertaining and fun-to-watch television show of the 90s. The show first premiered in 19and starred David Nykl and Peter Alton, who played the role of Pat and Mat, respectively.
The show was about two neighbours, Pat and Mat, who faced self-created problems. And then, they solved these problems through any possible and impossible remedy.
You can watch this show now on Zee5 and Mx Player for free.
09Pingu
Pingu was a television show about a clumsy yet sweet penguin who lived with his family in the polar ice cap of Antarctica. Pingu, along with his seal friend Robby and sister, Punga, go on different adventures.
This show first premiered on May 2198with Carlo Bonomi, David Sant and Marcello Magni starring in it. You can watch the episodes of this unforgettable and entertaining tv show on ITV Hub and Amazon Prime.
10The Red and the Blue
The Red and the Blue was an Italian television series for children that first premiered in 197The show was about two antagonist clay shape-shifting characters who detected against an undifferentiated background, white.
The cast of this tv show included Carlo Bonomi, and you can see this show today on YouTube.
11The PJs
The PJs was a popular and loved tv show that premiered on 10th January 199About twenty celebrities were starring in this show, and naming a few among them were Eddie Murphy, Ja’Net DuBois, Loretta Devine, Shawn Michael Howard, Snoop Dog and many more.
The show was about Thurgood Stubbs, the superintendent of Lawrence Hilton-Jacobs housing project and lived with his wife, Muriel. This comedy show satirically featured the difficulties one faces in a big-city housing project, which the protagonist Thurgood Stubbs and his friends faced.
You can watch this show on Peacock Tv.
● Bonus:
Now, without video editing, these fantastic shows of the 9could not have been created. But To your surprise, you too can create such incredible videos effortlessly. And that can be possible through an efficient and effective video editing tool.
You can find innumerable video editing tools available in this present world, but you must choose the best. So, let us introduce you to the best video editing tool, with which you can showcase all your editing skills and creativity-Wondershare Filmora Video Editor !
We call this tool the best video editing tool because its numerous features make it the most proficient video editing tool. Let us now look into its numerous effective features below.
● Professional editing tools
Filmora is the video editing tool that incorporates all the professional editing features to make your videos of the best and the professional quality. The elements envelop every aspect of the finest quality video editing works, which brings out the best of skills and creativity in you.
● Easy to use
Although Filmora has every professional editing tool, you will face no difficulty figuring out how the tools work. Even if you are a beginner, you can effortlessly use this editing tool to not only initiate your video editing journey but also enrich your skills.
● Free trial
You need not buy the proceed features on your first try. You can readily avail of the free trial of Filmora and its paid features. And as you try and find the features pleasing, you can proceed to purchase the aid features.
● Personalize and edit your videos
You can avail of the various features such as rotating, cropping, trimming and splitting the videos to edit. Also, there are other features where you can change the speed of the videos. Therefore, the features you get in these tools are of the most proficient quality.
● Over 8effects
The Filmora editing tool offers you more than 8editing effects that will never make you feel lacking any features and effects you need. And this helps you in making the best videos most effortlessly.
● Get the tool on any devices
Filmora believes that editing skills should be made discoverable anywhere and everywhere. Thus, you can download or use this tool on any device that you use. So, you need not have any specific device to avail of this incredible video editing tool, and you can make and edit videos on any device you want.
● Key Takeaways from This Episode →
● These are the best ten claymation tv shows and series that you can watch even today to bring back all the memories and revisit your early days of the 90s. So, to wrap up our discussion, we would conclude by retracing the aspects and factors that we covered in our discussion. We had enveloped the following topics effectively.
● We discussed the claymation picture through a little interdiction.
● Then, we discussed the ten best claymation TV shows popular in the 90s. We discussed their stories, their casts, their premieres and also the sites and apps where you can watch them even today.
● Lastly, we introduced you to the best editing tool, Filmora, that will help you edit any video of your choice and explore your video editing skills with the finest professional features and infinite effects.
Create Animated Video on Canva
Canva is a simple way—without any graphic design experience—to make professional graphics for social media, newsletters, presentations, business cards, gift certificates, brochures, and more. Flexible design templates offer the ideal layout for your target destination, letting you aim over the design, not the file formatting or the size.
So, can you make an animated video on Canva?
Yes, because Canva lives on the cloud, you can access your graphics from anywhere you can get online while using Canva on the cloud. Learn how you can play, get up, and run with Canva in this short, fun tutorial guide. We’ll discuss adding and editing images, using inbuilt design templates, and working with typography to build your next project with Canva.
In the subsequent sections, we shall learn more about Canva animated videos and how to create one easily on your PC.
In this article
01 [Create an animated video with a Canva template](#Part 1)
02 [Create Canva animated video with your video](#Part 2)
Part 1 Create an animated video with a Canva template
In this section, we’ll explore how to make animated video on Canva, which applies to both the free and pro account of Canva. However, the steps given below got created from Canva’s free account. We suppose that you’ve already created an account on Canva and logged into the platform. So, further steps will proceed as follows:
Go to the Video tab given in the top front panel of Canva and choose any template of your desire. Let’s say we’ve selected the very first template, 1920 × 1080 pixels. There are lots of options provided by Canva from where you can choose your favorites. You can also create a template with a custom size.

After you enter the editing panel, you have the choice of different templates on the left-hand panel. You can search for a template of your choice among them and can create other pages, as shown below. To preview the templates, you can click the Play button with mentioned time duration on the top right corner of the editing screen.

Now, it’s time to add creativity and explore more editing elements within the Canva. You can modify the entire template given and add something of your own.

Now, you can explore various editing Elements given on the left-hand panel, as shown below. There are multiple options available here as well.

You can add some text within the Canva template, and you can search from the left-hand panel. Given above are various options by which you can bold, italicize, and underline the text.

Now, let’s add some music to the video. So, go to the Audio tab and select any one of the options among them. There are different choices for you to explore here as well.

After you’re done, you can hit the Preview Play button on the top and see your project, as shown below.
It’s all done, and you can proceed with the next section.
Part 2 Create Canva animated video with your video
We’ll discuss how to create an animated video by uploading our video in Canva without using any template in this section. After logging in to the Canva account credentials, select the Video tab and choose the different templates offered.
We’ve selected a blank template for the purpose as follows.

Now, you need to head directly towards the Uploads tab and upload your video created over here.

By now, you have most probably got over with uploading your media. Click the uploaded video, and it will automatically enter within the editing panel of Canva, as shown below.

You’re all done now, and it’s all finished! Even though template usage is quite simple, it’s pretty straightforward when you don’t use any ready-made template. However, you can still beautify this simple video with different elements like text, music, etc.
Animation style videos influence people of all ages to whatever generation, or the kind you belong to will be one of them for sure.
Animated ones provoke diverse impacts instead of ordinary videos on the audience utilizing illustration, kinesthetic, etc. But the fact is, due to technological advancements and overexposure to social media sites, we have forgotten its significance.
Want to know some other most accessible software tools that can bring out the artist in you? Here is an alternative that is all you need.
Are you surprised to find that you can go with various animation styles to boost your business or bring out your talents? But are you confused about how to revamp your story and effectively film it? Why should you worry when the best animation maker and Canva’s alternative Wondershare Filmora is here exclusively for you to create fantastic animation videos that could stand out of the box?
Conclusion
Do you aspire to paint with bright colors to videos or want to become an animator? Then, choose animation styles that you most enjoy, find attractive today, start working on them, or create Canva animated videos as the tutorial indicates above. Lastly, don’t forget to give Filmora a chance to upscale your creation and give your animation style a life!
02 [Create Canva animated video with your video](#Part 2)
Part 1 Create an animated video with a Canva template
In this section, we’ll explore how to make animated video on Canva, which applies to both the free and pro account of Canva. However, the steps given below got created from Canva’s free account. We suppose that you’ve already created an account on Canva and logged into the platform. So, further steps will proceed as follows:
Go to the Video tab given in the top front panel of Canva and choose any template of your desire. Let’s say we’ve selected the very first template, 1920 × 1080 pixels. There are lots of options provided by Canva from where you can choose your favorites. You can also create a template with a custom size.
After you enter the editing panel, you have the choice of different templates on the left-hand panel. You can search for a template of your choice among them and can create other pages, as shown below. To preview the templates, you can click the Play button with mentioned time duration on the top right corner of the editing screen.
Now, it’s time to add creativity and explore more editing elements within the Canva. You can modify the entire template given and add something of your own.
Now, you can explore various editing Elements given on the left-hand panel, as shown below. There are multiple options available here as well.
You can add some text within the Canva template, and you can search from the left-hand panel. Given above are various options by which you can bold, italicize, and underline the text.
Now, let’s add some music to the video. So, go to the Audio tab and select any one of the options among them. There are different choices for you to explore here as well.
After you’re done, you can hit the Preview Play button on the top and see your project, as shown below.
It’s all done, and you can proceed with the next section.
Part 2 Create Canva animated video with your video
We’ll discuss how to create an animated video by uploading our video in Canva without using any template in this section. After logging in to the Canva account credentials, select the Video tab and choose the different templates offered.
We’ve selected a blank template for the purpose as follows.
Now, you need to head directly towards the Uploads tab and upload your video created over here.
By now, you have most probably got over with uploading your media. Click the uploaded video, and it will automatically enter within the editing panel of Canva, as shown below.
You’re all done now, and it’s all finished! Even though template usage is quite simple, it’s pretty straightforward when you don’t use any ready-made template. However, you can still beautify this simple video with different elements like text, music, etc.
Animation style videos influence people of all ages to whatever generation, or the kind you belong to will be one of them for sure.
Animated ones provoke diverse impacts instead of ordinary videos on the audience utilizing illustration, kinesthetic, etc. But the fact is, due to technological advancements and overexposure to social media sites, we have forgotten its significance.
Want to know some other most accessible software tools that can bring out the artist in you? Here is an alternative that is all you need.
Are you surprised to find that you can go with various animation styles to boost your business or bring out your talents? But are you confused about how to revamp your story and effectively film it? Why should you worry when the best animation maker and Canva’s alternative Wondershare Filmora is here exclusively for you to create fantastic animation videos that could stand out of the box?
Conclusion
Do you aspire to paint with bright colors to videos or want to become an animator? Then, choose animation styles that you most enjoy, find attractive today, start working on them, or create Canva animated videos as the tutorial indicates above. Lastly, don’t forget to give Filmora a chance to upscale your creation and give your animation style a life!
How to Turn Yourself Into WhatsApp Cartoon
How to Turn Yourself Into a WhatsApp Cartoon
An easy yet powerful editor
Numerous effects to choose from
Detailed tutorials provided by the official channel
Let me ask you a question - how much fun would it be if you could create your own animated stickers and send them to your friends and family members on Whatsapp? I mean, it would make the entire conversation more fun and also add a personal element to the entire chat. Right? Well, to tell you the truth, it is possible to create Whatsapp cartoons and stickers, and the best part is you don’t need any technical expertise to get the job done.
Of course, for a long time, Whatsapp didn’t allow its users to use third-party animated stickers within the messenger. But, recently the messaging platform introduced a custom “stickers pack” feature that now allows people to upload their own stickers and create a dedicated sticker app.
You can also rely on several third-party sticker designer applications to get the job done. So, if you have been looking for a way to use your own face as an animated sticker in Whatsapp, continue reading. In this guide, we’ll walk you through different ways to create and upload a custom cartoon sticker in Whatsapp and make your Whatsapp chats more fun.
In this article
01 [How to Create Your Own Custom Animated Whatsapp Stickers](#Part 1)
02 [How to Create Custom Animated Whatsapp Stickers on Android and iPhone](#Part 2)
Part 1 How to Create Your Own Custom Animated Whatsapp Stickers
Now, before we go any further, I would like to point out that Whatsapp doesn’t allow users to directly create a custom cartoon sticker. There’s no AR feature that’ll turn your face into a cartoon character. So, to use a cartoon Whatsapp profile picture, you’ll have to rely on a third-party tool to get the job done. Based on which platform you use to access Whatsapp, you can choose a wide variety of Whatsapp animated sticker creators and use them to design custom cartoon stickers to make traditional Whatsapp conversations more fun.
One of the easiest ways to create custom stickers for Whatsapp is to use Wondershare Wondershare Filmora Video Editor . Filmora is a full-scale video editing software that’s specifically designed to help editors unleash their creativity and create stunning movies for different platforms.
For Win 7 or later (64-bit)
For macOS 10.12 or later
Filmora is among the most popular video editing tools that many creators use to edit high-quality YouTube vlogs and other types of videos for other platforms. However, Wondershare Filmora is not just a video editing tool. You can also use it to create custom cartoon animations and export them in the desired format within a few seconds. Filmora has a timeline-based interface that makes it relatively easier for editors to streamline the entire editing process while ensuring that none of the shots go missing.

Filmora also has a built-in media store - known as FilmStocks - where you can find hundreds of video effects, animations, animated characters, etc. FilmStocks also offers access to copyright-free music, allowing creators to use high-quality music in their videos without worrying about unexpected copyright strikes.
So, if you are looking for an all-in-one tool to create Whatsapp cartoon stickers, install Wondershare Filmora on your computer and start turning your face into an animated sticker.
Part 1 How to Create Custom Animated Whatsapp Stickers on Android and iPhone
One of the tools that can help you do the job is “Toon Me”. As the name implies, Toon Me is an online platform that’s designed to help users turn their faces into respective cartoon stickers. It’s designed by the developers at Photo Labs - an online platform that makes photo editing a hassle-free task. Since the tool is designed by expert developers, you can expect to get the best results in the end. And, the best part is creating custom cartoon characters using Toon Me is a relatively easy process.

All you have to do is download Toon Me on your phone and use the camera to create a Whatsapp cartoon sticker for yourself. The app is available on both Google Play Store and Apple’s App Store. It means regardless of the smartphone you’re using, Toon Me will allow you to design a Whatsapp cartoon sticker without any hassle.
Like Toon Me, there are dozens of other applications you can install on your smartphone to create personalized animated stickers. One such example is Sticker Maker. Sticker Maker is an Android application that’ll allow you to capture your face and turn it into an animated sticker. It’s compatible across different Android versions and runs smoothly on all Android models. So, if you own an Android device, here’s the step-by-step process to use Sticker Maker to turn your face into an animated sticker.
Step 1 - Start by installing Sticker Maker on your smartphone and launch the application to get started.
Step 2 - On its home screen, click the “Create a New Sticker Pack” option.
Step 3 - Give the sticker pack a name and then, press enter to proceed further.
Step 4 - At this point, you can either select one of the existing pictures from your Gallery or open the camera to click a fresh selfie. Either way, upload the picture and let the app convert it into a corresponding sticker.
Step 5 - You can upload 8-10 pictures at once and create the entire sticker pack instantly. And, once you have successfully created the sticker pack, simply click the “Add to Whatsapp” button.

That’s it; the selected sticker pack will get added to your Whatsapp’s sticker collection and you’ll be able to use them right away. That’s how quick and easy it is to create custom Whatsapp cartoons using different tools on your smartphone.
● Ending Thoughts →
● Using personalized Whatsapp cartoon stickers is a great way to make Whatsapp conversations fun.
● Wondershare Filmora is a feature-packed video editing software that’s designed to help creators create stunning videos and Whatsapp stickers. Its timeline-based interface and built-in media store will allow you to create stunning Whatsapp stickers without any hassle
● You can also download dedicated sticker maker applications on your iPhone or Android devices and use them directly to create visually appealing animated stickers for Whatsapp.
Let me ask you a question - how much fun would it be if you could create your own animated stickers and send them to your friends and family members on Whatsapp? I mean, it would make the entire conversation more fun and also add a personal element to the entire chat. Right? Well, to tell you the truth, it is possible to create Whatsapp cartoons and stickers, and the best part is you don’t need any technical expertise to get the job done.
Of course, for a long time, Whatsapp didn’t allow its users to use third-party animated stickers within the messenger. But, recently the messaging platform introduced a custom “stickers pack” feature that now allows people to upload their own stickers and create a dedicated sticker app.
You can also rely on several third-party sticker designer applications to get the job done. So, if you have been looking for a way to use your own face as an animated sticker in Whatsapp, continue reading. In this guide, we’ll walk you through different ways to create and upload a custom cartoon sticker in Whatsapp and make your Whatsapp chats more fun.
In this article
01 [How to Create Your Own Custom Animated Whatsapp Stickers](#Part 1)
02 [How to Create Custom Animated Whatsapp Stickers on Android and iPhone](#Part 2)
Part 1 How to Create Your Own Custom Animated Whatsapp Stickers
Now, before we go any further, I would like to point out that Whatsapp doesn’t allow users to directly create a custom cartoon sticker. There’s no AR feature that’ll turn your face into a cartoon character. So, to use a cartoon Whatsapp profile picture, you’ll have to rely on a third-party tool to get the job done. Based on which platform you use to access Whatsapp, you can choose a wide variety of Whatsapp animated sticker creators and use them to design custom cartoon stickers to make traditional Whatsapp conversations more fun.
One of the easiest ways to create custom stickers for Whatsapp is to use Wondershare Wondershare Filmora Video Editor . Filmora is a full-scale video editing software that’s specifically designed to help editors unleash their creativity and create stunning movies for different platforms.
For Win 7 or later (64-bit)
For macOS 10.12 or later
Filmora is among the most popular video editing tools that many creators use to edit high-quality YouTube vlogs and other types of videos for other platforms. However, Wondershare Filmora is not just a video editing tool. You can also use it to create custom cartoon animations and export them in the desired format within a few seconds. Filmora has a timeline-based interface that makes it relatively easier for editors to streamline the entire editing process while ensuring that none of the shots go missing.
Filmora also has a built-in media store - known as FilmStocks - where you can find hundreds of video effects, animations, animated characters, etc. FilmStocks also offers access to copyright-free music, allowing creators to use high-quality music in their videos without worrying about unexpected copyright strikes.
So, if you are looking for an all-in-one tool to create Whatsapp cartoon stickers, install Wondershare Filmora on your computer and start turning your face into an animated sticker.
Part 1 How to Create Custom Animated Whatsapp Stickers on Android and iPhone
One of the tools that can help you do the job is “Toon Me”. As the name implies, Toon Me is an online platform that’s designed to help users turn their faces into respective cartoon stickers. It’s designed by the developers at Photo Labs - an online platform that makes photo editing a hassle-free task. Since the tool is designed by expert developers, you can expect to get the best results in the end. And, the best part is creating custom cartoon characters using Toon Me is a relatively easy process.
All you have to do is download Toon Me on your phone and use the camera to create a Whatsapp cartoon sticker for yourself. The app is available on both Google Play Store and Apple’s App Store. It means regardless of the smartphone you’re using, Toon Me will allow you to design a Whatsapp cartoon sticker without any hassle.
Like Toon Me, there are dozens of other applications you can install on your smartphone to create personalized animated stickers. One such example is Sticker Maker. Sticker Maker is an Android application that’ll allow you to capture your face and turn it into an animated sticker. It’s compatible across different Android versions and runs smoothly on all Android models. So, if you own an Android device, here’s the step-by-step process to use Sticker Maker to turn your face into an animated sticker.
Step 1 - Start by installing Sticker Maker on your smartphone and launch the application to get started.
Step 2 - On its home screen, click the “Create a New Sticker Pack” option.
Step 3 - Give the sticker pack a name and then, press enter to proceed further.
Step 4 - At this point, you can either select one of the existing pictures from your Gallery or open the camera to click a fresh selfie. Either way, upload the picture and let the app convert it into a corresponding sticker.
Step 5 - You can upload 8-10 pictures at once and create the entire sticker pack instantly. And, once you have successfully created the sticker pack, simply click the “Add to Whatsapp” button.
That’s it; the selected sticker pack will get added to your Whatsapp’s sticker collection and you’ll be able to use them right away. That’s how quick and easy it is to create custom Whatsapp cartoons using different tools on your smartphone.
● Ending Thoughts →
● Using personalized Whatsapp cartoon stickers is a great way to make Whatsapp conversations fun.
● Wondershare Filmora is a feature-packed video editing software that’s designed to help creators create stunning videos and Whatsapp stickers. Its timeline-based interface and built-in media store will allow you to create stunning Whatsapp stickers without any hassle
● You can also download dedicated sticker maker applications on your iPhone or Android devices and use them directly to create visually appealing animated stickers for Whatsapp.
How to Create YouTube Intro Animation Like a Pro
How to Create a YouTube Intro Animation like a Pro
An easy yet powerful editor
Numerous effects to choose from
Detailed tutorials provided by the official channel
YouTube video intro animation is the short introductory clips and plays at the beginning of a YouTube video. YouTube intro videos as in almost everywhere, most times probably without giving them a second chance or understanding what their purpose is. There is no difference in YouTube videos, as without a proper setup, even if the content is excellent, your audience is not likely to hang around.
There is some free animation intro for YouTube that you can choose from to create your own YouTube intro. In this article, we will show a comprehensive guide on how to get an intro animation template free download and create your own free YouTube animation intro like a professional. So, let’s move on to explore how is the YouTube intro animation download process works using YouTube Intro Animation Makers through this article.
In this article
01 [What is YouTube Intro Animation?](#Part 1)
02 [How does YouTube Intro Animation Maker works?](#Part 2)
03 [5 of YouTube Intro Animation examples (2022)](#Part 3)
04 [How to Create a YouTube Intro Animation FAST](#Part 4)
Part 1 What is YouTube Intro Animation?
An animation video for YouTube intro is a short animated clip usually 5 to seconds in length and plays before the main YouTube video content. The intro YouTube animation is the primary step to creating your online persona and branding your content on YouTube. You can get YouTube intro animation for free online and include them in your YouTube content. A YouTube intro easily and quickly provides viewers insight into what they should expect from the channel. It is used to familiarize the viewer with the channel’s theme, feel, and look, which gives them context before reaching the main content.
Intro animation YouTube is sometimes called video bumpers, as they catch viewers’ attention and help reinforce your brand. In the general video, intros boost the video quality. You can also get a good video intro from intro animation free download websites for your YouTube content.
Part 2 How do YouTube Intro Animation Maker works?
You can create compelling, engaging, and best intro animation on YouTube by using free animation intro for YouTube or creating a YouTube intro animation by yourself. You don’t need be a pro in video editing or a creator to make animated video intros for your YouTube channel if you have the best intro animation software to create intro videos like a professional. Here are some benefits of YouTube intro animation maker and how it works:
● A YouTube intro animation maker has a built-in editor in your browser
● A YouTube intro animation maker is affordable, fast, and easy to use
● A YouTube intro animation maker can broadcast-quality logo animation and intros
● A YouTube intro animation maker has a wide variety of templates to make your YouTube animation intro
Using a YouTube intro animation maker, you are ready to create unskippable YouTube intros using the most versatile tool to turn your viewers into lifelong channel subscribers.
Part 3 5 of YouTube Intro Animation examples (2022)
To be successful on YouTube, capture and retain your viewers’ attention and increase your conversions. The best method to achieve this is by using an excellent YouTube animated intro to create a lasting impression to make your video worth watching. You can also get Professional YouTube animated intro from intro animation download websites. This action will look at 5 make YouTube intro animation examples and ideas from where you can draw your inspiration in 2022.
01Ted Talk
Ted Talk, free fire intro animation, is a perfect example of a beautiful and captured sequence that helps to tell the audience what the brand is all about and their ideas and worth spreading. The good news about this intro is that you don’t need to be a professional, hire an animator, or invest in any flashy or expensive animation to show your brand on YouTube.
To achieve this intro, all you require is some intro animation in After Effects template free that can work for your brand so that you’ll be able to retain your audience and make them wanting to come back for more.
02Jazza
Jazza is a perfect example of free intro animation templates that you can use all over again to showcase your brand. The main idea for making a gaming intro animation video free download is to bring about an attractive, eye-capturing video intro through it.
This intro communicates a passion for teaching people to paint, animate, and draw. This same template can also create a vlog animation intro for the Jazza language lesson website, as it is a tremendous sequential presentation that represents Jazza mission.
03Salma Jafra
Salma Jafra Video intro tells a short story about the video’s main takeaways and includes an 8 seconds vlog intro animation sequence. Everything, including a brand color, is purple, which helps the audience recognize our videos on YouTube.
In addition to the free animation for YouTube intro, she plugged in her content to the end of the video or outro to generate enough traffic and adhere to SEO guidelines to ensure that the targeted audience finds the videos.
04SciShow
SciShow enables viewers to understand the brand and the kind of free YouTube intro animation video. The main trick of the video is to instantly grab viewers’ attention and convince them that the video is for them.
This intro animation video free download is a perfect example of how you can introduce your theme, tone, and brand name into your YouTube animation intro video download. This type of intro allows viewers to know what to expect quickly, and superb animation and design show off the value of production. Examples of a brand that can benefit from this type of YouTube animation intro download template is sleep studies.
05”Pump Red” Cinema Template

“Pump Red” Cinema Template is perfect for capturing reviewers’ imagination with an eye-catching, captivating, and intelligent video intro. By following the examples in this Minecraft animation intro template, you are more likely to retain your visitors or viewers from the moment they hit the play button on your YouTube video by using a catching soundtrack, on-brand messaging, and exciting visuals.
Part 4 How to Create a YouTube Intro Animation FAST
Whether you are using any streaming channel, YouTube, or selling videos on any e-commerce website, making animation for YouTube intro plays a vital role in promoting your brand. With it, creating an introduction may not seem as complicated as it sounds.
The section explains in detail how to make a YouTube intro animation free with the Wondershare Filmora Video Editor video editor from animated intro download templates or create a custom intro from scratch even if there is no existing footage or image to begin with. The following method will guide you through the process, and then you can keep your video saved for reuse in all creations to maintain consistency and give your brand a unique identity:
Wondershare Filmora
Get started easily with Filmora’s powerful performance, intuitive interface, and countless effects!
Try It Free Try It Free Try It Free Learn More >

01Step Launch Intro Animation Software
Launch Wondershare Filmora Video Editor editor, add intro background to Filmora by going to the media tab at the top and selecting any sample colors category from the left pane. All the solid and gradient colors in the media library are available at the right, then over the mouse to the color title you want to use as a background and click on the + icon in the middle to add it to the timeline.
02Step Add Different effects
Add sound effects or audio to YouTube animated intro to make it more recognizable. In Wondershare Filmora Video Editor , visit the built-in audio library by double-clicking the audio thumbnail from the library and listening to the soundtrack. Repeat the process to find the perfect sound effects or background music for your video intro. D-and-drop the audio to the video.

03Step Adding Branding Element
In the animated video intro, add the company name, branding element, and channel name to create brand awareness by clicking on the title tab and hovering the mouse to the text you want to use. Then drag and drop it to track above the video.
Go to the Effects tab and select category from the top left pane. Click and drag your preferred effects from the library effects to the timeline.
04Step Export
Once you finish creating your animated video intro with all the required ingredients, go to Export at the top center area of the interface to export the animated video intro, and once done, share it on social media.
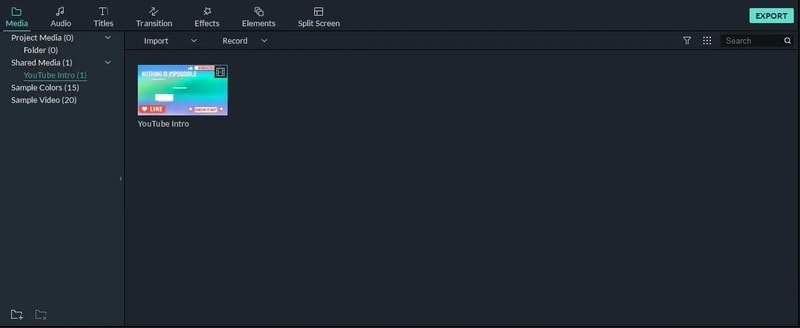
To make YouTube intro animation templates free download with Filmora templates, follow the steps listed below:
Step Select Effects
Log onto the Filmora effects page on filmstock with the same wsid used on Filmora and select the effect you want
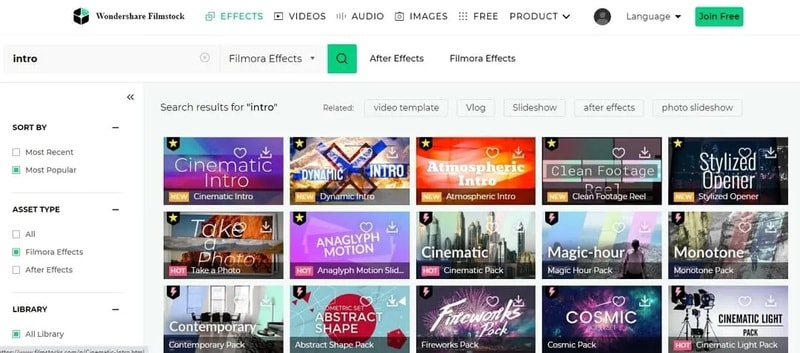
Step Select template
Select the preferred intro templates by clicking on the download now and following the instructions on the screen to attend a download template. After downloading, see in red cycle under the transition, titles, and filter based on the element included in the effect part. Add this downloaded title or transition to the animated intro video.
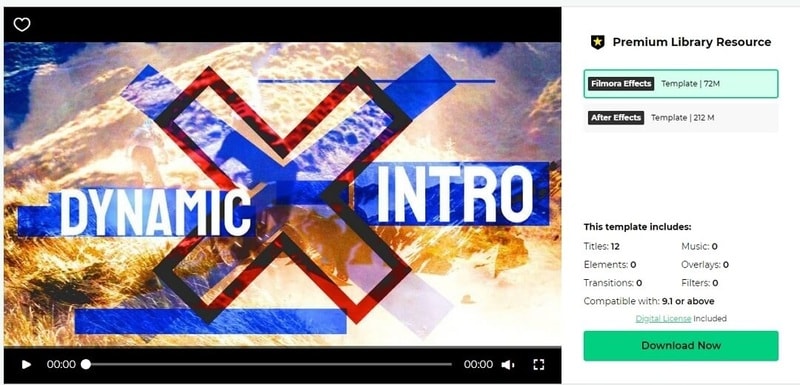
Step Finalization
Delete your animated video intro from the templates that you selected.
● Key Takeaways from This Episode →
● Introduction about what is YouTube Intro?
● How Intro Animation Maker works with examples.
● The process to develop your own YouTube intro animation for free with Wondershare Filmora Video Editor .
YouTube video intro animation is the short introductory clips and plays at the beginning of a YouTube video. YouTube intro videos as in almost everywhere, most times probably without giving them a second chance or understanding what their purpose is. There is no difference in YouTube videos, as without a proper setup, even if the content is excellent, your audience is not likely to hang around.
There is some free animation intro for YouTube that you can choose from to create your own YouTube intro. In this article, we will show a comprehensive guide on how to get an intro animation template free download and create your own free YouTube animation intro like a professional. So, let’s move on to explore how is the YouTube intro animation download process works using YouTube Intro Animation Makers through this article.
In this article
01 [What is YouTube Intro Animation?](#Part 1)
02 [How does YouTube Intro Animation Maker works?](#Part 2)
03 [5 of YouTube Intro Animation examples (2022)](#Part 3)
04 [How to Create a YouTube Intro Animation FAST](#Part 4)
Part 1 What is YouTube Intro Animation?
An animation video for YouTube intro is a short animated clip usually 5 to seconds in length and plays before the main YouTube video content. The intro YouTube animation is the primary step to creating your online persona and branding your content on YouTube. You can get YouTube intro animation for free online and include them in your YouTube content. A YouTube intro easily and quickly provides viewers insight into what they should expect from the channel. It is used to familiarize the viewer with the channel’s theme, feel, and look, which gives them context before reaching the main content.
Intro animation YouTube is sometimes called video bumpers, as they catch viewers’ attention and help reinforce your brand. In the general video, intros boost the video quality. You can also get a good video intro from intro animation free download websites for your YouTube content.
Part 2 How do YouTube Intro Animation Maker works?
You can create compelling, engaging, and best intro animation on YouTube by using free animation intro for YouTube or creating a YouTube intro animation by yourself. You don’t need be a pro in video editing or a creator to make animated video intros for your YouTube channel if you have the best intro animation software to create intro videos like a professional. Here are some benefits of YouTube intro animation maker and how it works:
● A YouTube intro animation maker has a built-in editor in your browser
● A YouTube intro animation maker is affordable, fast, and easy to use
● A YouTube intro animation maker can broadcast-quality logo animation and intros
● A YouTube intro animation maker has a wide variety of templates to make your YouTube animation intro
Using a YouTube intro animation maker, you are ready to create unskippable YouTube intros using the most versatile tool to turn your viewers into lifelong channel subscribers.
Part 3 5 of YouTube Intro Animation examples (2022)
To be successful on YouTube, capture and retain your viewers’ attention and increase your conversions. The best method to achieve this is by using an excellent YouTube animated intro to create a lasting impression to make your video worth watching. You can also get Professional YouTube animated intro from intro animation download websites. This action will look at 5 make YouTube intro animation examples and ideas from where you can draw your inspiration in 2022.
01Ted Talk
Ted Talk, free fire intro animation, is a perfect example of a beautiful and captured sequence that helps to tell the audience what the brand is all about and their ideas and worth spreading. The good news about this intro is that you don’t need to be a professional, hire an animator, or invest in any flashy or expensive animation to show your brand on YouTube.
To achieve this intro, all you require is some intro animation in After Effects template free that can work for your brand so that you’ll be able to retain your audience and make them wanting to come back for more.
02Jazza
Jazza is a perfect example of free intro animation templates that you can use all over again to showcase your brand. The main idea for making a gaming intro animation video free download is to bring about an attractive, eye-capturing video intro through it.
This intro communicates a passion for teaching people to paint, animate, and draw. This same template can also create a vlog animation intro for the Jazza language lesson website, as it is a tremendous sequential presentation that represents Jazza mission.
03Salma Jafra
Salma Jafra Video intro tells a short story about the video’s main takeaways and includes an 8 seconds vlog intro animation sequence. Everything, including a brand color, is purple, which helps the audience recognize our videos on YouTube.
In addition to the free animation for YouTube intro, she plugged in her content to the end of the video or outro to generate enough traffic and adhere to SEO guidelines to ensure that the targeted audience finds the videos.
04SciShow
SciShow enables viewers to understand the brand and the kind of free YouTube intro animation video. The main trick of the video is to instantly grab viewers’ attention and convince them that the video is for them.
This intro animation video free download is a perfect example of how you can introduce your theme, tone, and brand name into your YouTube animation intro video download. This type of intro allows viewers to know what to expect quickly, and superb animation and design show off the value of production. Examples of a brand that can benefit from this type of YouTube animation intro download template is sleep studies.
05”Pump Red” Cinema Template
“Pump Red” Cinema Template is perfect for capturing reviewers’ imagination with an eye-catching, captivating, and intelligent video intro. By following the examples in this Minecraft animation intro template, you are more likely to retain your visitors or viewers from the moment they hit the play button on your YouTube video by using a catching soundtrack, on-brand messaging, and exciting visuals.
Part 4 How to Create a YouTube Intro Animation FAST
Whether you are using any streaming channel, YouTube, or selling videos on any e-commerce website, making animation for YouTube intro plays a vital role in promoting your brand. With it, creating an introduction may not seem as complicated as it sounds.
The section explains in detail how to make a YouTube intro animation free with the Wondershare Filmora Video Editor video editor from animated intro download templates or create a custom intro from scratch even if there is no existing footage or image to begin with. The following method will guide you through the process, and then you can keep your video saved for reuse in all creations to maintain consistency and give your brand a unique identity:
Wondershare Filmora
Get started easily with Filmora’s powerful performance, intuitive interface, and countless effects!
Try It Free Try It Free Try It Free Learn More >
01Step Launch Intro Animation Software
Launch Wondershare Filmora Video Editor editor, add intro background to Filmora by going to the media tab at the top and selecting any sample colors category from the left pane. All the solid and gradient colors in the media library are available at the right, then over the mouse to the color title you want to use as a background and click on the + icon in the middle to add it to the timeline.
02Step Add Different effects
Add sound effects or audio to YouTube animated intro to make it more recognizable. In Wondershare Filmora Video Editor , visit the built-in audio library by double-clicking the audio thumbnail from the library and listening to the soundtrack. Repeat the process to find the perfect sound effects or background music for your video intro. D-and-drop the audio to the video.
03Step Adding Branding Element
In the animated video intro, add the company name, branding element, and channel name to create brand awareness by clicking on the title tab and hovering the mouse to the text you want to use. Then drag and drop it to track above the video.
Go to the Effects tab and select category from the top left pane. Click and drag your preferred effects from the library effects to the timeline.
04Step Export
Once you finish creating your animated video intro with all the required ingredients, go to Export at the top center area of the interface to export the animated video intro, and once done, share it on social media.
To make YouTube intro animation templates free download with Filmora templates, follow the steps listed below:
Step Select Effects
Log onto the Filmora effects page on filmstock with the same wsid used on Filmora and select the effect you want
Step Select template
Select the preferred intro templates by clicking on the download now and following the instructions on the screen to attend a download template. After downloading, see in red cycle under the transition, titles, and filter based on the element included in the effect part. Add this downloaded title or transition to the animated intro video.
Step Finalization
Delete your animated video intro from the templates that you selected.
● Key Takeaways from This Episode →
● Introduction about what is YouTube Intro?
● How Intro Animation Maker works with examples.
● The process to develop your own YouTube intro animation for free with Wondershare Filmora Video Editor .
Also read:
- In 2024, How to Make Slideshow in LinkedIn
- 4 Things You Need to Know About Pinterest GIF
- Nurturing the Spirit Through the Top 10 Intellectual Anime Websites for 2024
- Updated All About 3D Medical Animation for 2024
- New How to Get Started in Stop Motion Claymation
- New How to Animate - Adobe Animate Tutorial for All
- 2024 Approved How to Create a YouTube Intro Animation Like a Pro
- How to Make GIF Stickers for WhatsApp 100 The Simple Way for 2024
- New In 2024, Learn How to Create Adobe 3D Animation
- New How to Create YouTube Intro Animation Like a Pro for 2024
- In 2024, How to Reduce GIF Size and Best GIF Resizers
- Updated 15 Best Video to GIF App on iPhone and Android for 2024
- Best Canva 10 Animated Templates for 2024
- New 2024 Approved Techniques for Making After Effects 2D Animation
- The Best 8 Places for High-Quality Royalty Free Gifs
- Updated 2024 Approved How to Make an Animation With 7 Steps
- Updated How to Make GIF Instagram | Quick Tips for 2024
- Best 12 Evil Cartoon Characters of All Time for 2024
- New In 2024, 6 Types of Animation You May Like
- New Best 10 Photo Animator Templates for 2024
- New What Is the Meaning of Motion Graphics for 2024
- New In 2024, A Beginners Guide to Tell You What 3D Animation Is
- The Coolest Anime Characters Ever| List of Top Favorites for 2024
- Secret Source to Make a Great Stop Motion Puppet for 2024
- Updated How to Turn Yourself Into a WhatsApp Cartoon for 2024
- New 2024 Approved Top 12 Illusion Gifs Top Picks
- Updated In 2024, 5 Best Adobe Animate Courses & Classes | Beginners Complete Tutorial
- 8 Blender 3D Animation Tutorials for Beginners for 2024
- Updated In 2024, The Best 20 Motion Graphics Companies & Studios
- Top 10 Websites to Download Anime Subtitles for Free
- Updated 2024 Approved Top 10 Websites to Download Anime Subtitles for Free
- Updated 2024 Approved All About 3D Medical Animation And Its Uses
- Updated Best 10 Video to GIF Converters Top Picks
- New In 2024, Techniques on Making After Effects 2D Animation
- 2024 Approved 10 Must Watch Netflix Cartoon Series For You
- In 2024, Tips for GIF to Animated PNG You Should Know
- Updated Top 10 Cartoon Canvas Painting Ideas for Total Beginners
- Updated Have You Seen the Facebook Cartoon App Everyones Using Recently for 2024
- Updated How to Find 3D Animation Studio Meeting All Your Inspiring Needs
- OBS Animated Lower Thirds Alternatives
- New How to Convert Video to GIF Fast & Easy
- New Formula to Animate Photos From 10 Animate Pictures App
- Updated 2024 Approved Learn What Are Differences Between 2D And 3D Animation
- Updated In 2024, Techniques for Making After Effects 2D Animation
- New 2024 Approved The Most Efficient Techniques for You to Make 3D Animation Character
- New Handy Tips From Adobe Animate Rigging Tutorial for All Learners
- In 2024, 2 Ways to Transfer Text Messages from Honor Magic 6 Lite to iPhone 15/14/13/12/11/X/8/ | Dr.fone
- Some MP4 won't play on my Samsung Galaxy A34 5G
- In 2024, Your Account Has Been Disabled in the App Store and iTunes From iPhone 6s?
- In 2024, How to Send and Fake Live Location on Facebook Messenger Of your Realme Narzo 60 Pro 5G | Dr.fone
- Ultimate Guide to Catch the Regional-Located Pokemon For Apple iPhone 13 Pro | Dr.fone
- How To Bypass iCloud Activation Lock on Mac For iPhone 11 Pro Max?
- Does find my friends work on Apple iPhone SE (2020) | Dr.fone
- What is Fake GPS Location Pro and Is It Good On Motorola G54 5G? | Dr.fone
- In 2024, How to Reset Gmail Password on Realme Narzo 60 Pro 5G Devices
- How to Simulate GPS Movement in AR games On Google Pixel Fold? | Dr.fone
- Complete Tutorial to Use GPS Joystick to Fake GPS Location On Honor X50 | Dr.fone
- How to Unlock iPhone 15 Pro Max without Passcode or Face ID
- In 2024, Can Life360 Track You When Your Vivo G2 is off? | Dr.fone
- In 2024, How to Unlock Apple iPhone SE (2022) Without Passcode?
- How to Fix Vivo S18 Pro Find My Friends No Location Found? | Dr.fone
- Recommended Best Applications for Mirroring Your Vivo Y200e 5G Screen | Dr.fone
- In 2024, Lock Your Poco X5 Phone in Style The Top 5 Gesture Lock Screen Apps
- Filter Not Working Error in Excel 2000 Fix 2024 | Stellar
- In 2024, How To Unlock SIM Cards Of Nokia 150 (2023) Without PUK Codes
- Things You Dont Know About Motorola Edge 40 Pro Reset Code | Dr.fone
- In 2024, PassFab Apple iPhone 8 Backup Unlocker Top 4 Alternatives | Dr.fone
- How to Soft Reset OnePlus Nord CE 3 5G phone? | Dr.fone
- In 2024, The Ultimate Guide How to Bypass Swipe Screen to Unlock on Poco M6 Pro 4G Device
- In 2024, How to Change Your Apple iPhone 13 Location on life360 Without Anyone Knowing? | Dr.fone
- How to Remove an AirTag from Your Apple ID Account From Apple iPhone 11 Pro?
- Title: New Whats Rigging Animation and Why It Matters for 2024
- Author: Elon
- Created at : 2024-06-08 05:08:12
- Updated at : 2024-06-09 05:08:12
- Link: https://animation-videos.techidaily.com/new-whats-rigging-animation-and-why-it-matters-for-2024/
- License: This work is licensed under CC BY-NC-SA 4.0.
