
:max_bytes(150000):strip_icc():format(webp)/connect-tv-to-stereo-system-3135127-83ec0f315fa54c1290555169d689ad88.jpg)
Updated 20 Free After Effects Logo Reveal Templates You Will Want to Know for 2024
20 Free After Effects Logo Reveal Templates You Will Want to Know
20 Free After Effects Logo Reveal Templates You Will Want to Know
An easy yet powerful editor
Numerous effects to choose from
Detailed tutorials provided by the official channel
The free After Effects logo reveals templates is a creative and clean animation that is very easy to use and customizable in just a few clicks. This template allows you to change the color, edit the text, add your logo, and click on render and contains two different logo animations for you to choose from. It does not require any plugin, and you can use it for your following modern and professional logo animation.
![]()
By incorporating a logo animation into your video, you can make your brand memorable and choose a suitable template for your brand personality. So, get ready for all the free logo reveal templates in this article.
In this article
01 [20 Best Logo Reveal Templates for After Effects 2022](#Part 1)
02 [Learn How to Use After Effects Logo Reveal Templates](#Part 2)
Part 1 Best Logo Reveal Templates for After Effects 2022
You can use an animated logo reveal if you need to add spice to your marketing campaigns and branded videos. An animated logo reveal is explained as a Great way to capture your audience’s attention as they screw through their newsfeed and stand you out from the competition. This section of the article will give you After Effects logo reveal templates for free that you can choose from this 2022:
![]()
01[Fast Flip Logo Reveal Template](https://dsqqu7oxq6o1v.cloudfront.net/preview-215084-pWlBMUhYg4-high.mp4 target=)
Fast Flip logo reveal template free to download is perfect for those on a budget and uses stock photography which can be replaced with photos of a company or team to review and an elegant logo at the end. All that is required is to customize the color, replace the images, and add your logo.
02Logo Web Search
Logo Web Search is an easy-to-use, stylish and simple animation for a company website. It allows you to change colors quickly and free sound effects, and all you need to do is change the logo text and click on render.
03Search Logo Reveal
Search Logo Reveal After Effect template for free allows you to customize the text and easily drag and drop in your logo. It provides a unique way to review your logo by using an animated search bar with a sample question and bringing up your logo as the answer. It can be a great add on to websites with search options.
04Colors Logo Reveal
Colors Logo Reveal is a super clean and straightforward After Effects logo reveal template that is very easy to use for designers and creators. It contains two different logos animations that you can choose from and requires no plugin. Add your logo, change the color, edit the text, and click on render.
05Logo Reveal
Logo Reveal is perfect for small business companies and startups with an easy-to-use template that comes with detailed instruction on how to customize and render your logo reveal Project.
06Unlock Phone Logo Reveal
Unlock Phone Logo Reveal is one of the dynamic logo reveal After Effects templates for free with a modern design, smooth transition effects, and simple text animation that is super easy to use. All that is required is to edit the text, drag and drop in your media, and click on render. It comprises a cool intro or opener to presentations, slideshows, promotions, and event videos to impress your audience.
07Orbital Free HUD Logo Reveal
Orbital Free HUD Logo Reveal is perfect for any tech company, and it’s done up in futuristic style and includes the complete. AEP project file with background texture and elements.
08Corporate logo reveal
Corporate Logo Reveal template is a stylish and contemporary template that features a simple shape that is elegantly animated and combined with reviewing your logo. It has one logo placeholder, editable text layers, and an easy-to-use color controller. An excellent logo reveals the Premiere Pro template free to download for companies like stockbrokers.
09White Scroll Logo Reveals
White Scroll Logo Reveals perfect for a more classic logo opener and comes with three background versions and three different logo placement options.
10Shape Logo Reveal
Shape Logo Reveal is a stylish logo reveal template with colorful shape layers and lines that beautifully form a clean-looking logo reveal. It is a short intro for a business slideshow, promotions, events, TV shows, videos, commercials, corporate presentations, etc.
11Free Animated Logo Reveals
Free Animated Logo Reveals is packed with three different logos reveal, which a suitable for corporates and an excellent option for one who wants a modern and professional logo show.
12Clean Titles And Logo Reveal
Clean Titles and Logo Reveal offers stylish templates which an eye-catching design and contains two text placeholders and one logo placeholder. It is effortless to use and a short introduction to TV shows, commercials, slideshows, promotions, Facebook and YouTube videos, etc.
13Hi-Tech Logo Reveal 02
Hi-Tech Logo Reveal is a premium animated logo reveal that features a dark blue background joint with light blue HUD elements and a perfect logo reveal template for a company that wants to stand out online.
14Testimonials Logo Reveal
Testimonials logo Reveal is a stylish and clean project that is perfect for displaying the company’s testimonials and reviews. This After Effects logo reveal template for free features six title placeholders, one logo holder, and six photo placeholders, requiring no plugin.
15Elegant Logo Reveal
Elegant logo Reveals perfect for a feminine background. It features chrome logo pens with a silky dark background, enabling you to easily add your text, insert your logo, and change the colors.
16Logo Web Search II
Logo Web Search II is a stylish and straightforward animation mainly for company websites. It is elementary to use.
17Battle Logo Reveal
Blue Action Logo Reveal is for those looking for a minimalist logo opener and features a dynamic animation style, including an editable text layer and a logo placeholder. It also allows you to adjust the colors easily.
18Blue Action Logo Reveal
Blue Action Logo Reveal is majorly for those looking for a minimalist logo opener and features a dynamic animation style including an editable text layer and a logo placeholder. It also allows you to easily adjust the colors.
19Logo Introduction Template
Logo Introduction Template is a free logo reveal from Premiere Pro. It is perfect for the ones looking for a Tudor style logo reveal and allows you to easily customize the colors and insert your logo with a detailed help file.
20Minimal Logo Klick
Minimal Logo Klick comes in a sleek and modern design with playful animation. It encompasses a logo placeholder, an editable text layer, and an intelligent color controller. If you are searching for an unfussy and free logo reveal online, this one is for you.
Part 2 Learn How to Use After Effects Logo Reveal Templates
This section provides you with a basic tutorial on using the logo reveal After Effects template for free. However, this is a professional video editing software, but if video editing is new to you, you can try out Filmora, which is powerful, easy to use for new users. In Filmora, you will use the logo reveal template as a professional even if you are a beginner.
Below is how to use the After Effects logo reveals template:
01Open After Effects and Begin
Open your After Effect software and set up your Project ready. To begin face, create a composition using composition>New. You can also search the web resolution to 3x 2for this Project.
![]()
02Start Creating Logo
Next is to create a solid layer for your logo by using layers>new>solid, and select an appropriate color to match your composition.
![]()
Next is the creator logo by adding the pre-prepared logo artwork. Go to layer>new>text to create a text layer and adjust the text size and color to see.
![]()
03Add Animation to Logo
Manipulate your logo to create an animation and ensure that everything is right where you want it.
![]()
04Add Effects and Keyframe
Add Effect by going to Effect>Simulation>CC Particle World or click on Effects and Presets panel on the right to drag the CC Particle World effect onto your solid layer.
![]()
Set off your animation by adding a keyframe and controlling the animation of the particles effect through the birth rate setting, which is found by expanding the settings in the timeline panel for the solid layer.
![]()
05Import Vector Graphics and Finish
Finally, import your vector graphics into the After Effects by dragging and dropping the file into the Project panel, which brings up an import dialogue.
For Win 7 or later (64-bit)
For macOS 10.12 or later
That’s it! You successfully made use of the logo reveal maker.
● Key Takeaways from This Episode →
● The top 20 logo reveal Premiere Pro templates free to download.
● THow to make logo with After Effects – the logo reveal maker.
● TLastly, the logo reveal, free online tool, Filmora.
● TI hope I’ve gave you a few ideas on the After Effects logo reveal template for your Project and provided a breakdown of other software you can use for free logo reveal, such as Filmora. The article also lists the best logo reveal templates for after-effects that you can choose from this 202You can also use other software for your free logo reveal, but we all need to start somewhere.
How to Combine Two/More GIFs Into One [GIF Mergers Offered]
How to Combine Multiple GIFs into One with GIF Combiner

Shanoon Cox
Mar 27, 2024• Proven solutions
Are you looking for a software tool to create animated GIFs? Go online, you will easily find so many with impressive editing abilities. There are so many interesting things that you can do with a collection of GIFs. Many professionals these days are trying new tricks to make classic small duration animated movies with interactive GIF creator tools .
The article below will provide you step by step guidance about how to merge or combine animated GIFs together.
We are going to discuss two methods where one GIF combiner can assist you to play GIFs side by side, whereas the other will tell you about playing another GIF in continuation after first. In the end, we will also let you know the three best GIF combiners you can use.
Keep reading.
If you are not able to use Photoshop due to its complicated interface and Ezgif is not a suitable tool for your device, then the best recommendation for your animated GIF creation needs is Wondershare Filmora .
This tool is designed with a user-friendly interface and it can easily assist you in the development of high-quality gifs. There are so many customization options associated with each design like color correction, speed adjustments, and overlays, etc.
Filmora offers compatibility over Windows as well as Mac devices so you can easily access it anywhere. Further, it can process more than 150 file formats so you need not worry about your selection. Simply download Wondershare Filmora for your desktop and get started with impressive GIF editing.
Download it now to have a try!
See how to make a cool GIF from a video with Wondershare Filmora.
 Download Mac Version ](https://tools.techidaily.com/wondershare/filmora/download/ )
Part 1: How to Combine/Merge Animated GIFs Into One
Method 1: Merge GIFs into one with Photoshop
Adobe Photoshop is one of the top-rated photo editing software tools and nowadays it is popularly being used for GIF combining. Using Photoshop, you can easily play multiple GIF images side by side on the screen. Here are a few simple to follow steps to accomplish this task:
Step 1: Import GIFs to combine
First of all, users need to launch Adobe Photoshop on their device and then import both GIF images to individual tabs. This task can be easily done using Drag and Drop tools. Resize both tabs so that you can view both images at a time on screen.
Step 2: Save GIF with name
Go to the Window menu and ensure that the Timeline option is marked in the drop-down menu.

Now open one empty file with height same as that of already imported GIF files. Save this file with any suitable name, for example Z.

Note: If you need a transparent view of your imported GIF images then go to Layer and select New and finally hit Layer option. You can now hide its bottom layer.
Step 3: Copy frames

Now move to the tab of the first GIF file and then to the timeline toolbar. On the top right corner of your screen, you will find the menu icon. Here you need to select and copy all frames.
Step 4: Paste your copy
It is time to move to GIF Z file, move to its timeline toolbar, and then select the menu icon from the top right corner of your screen. Paste your recently copied selection over here. Never forget to choose Paste Over selection option from Pop up Dialogue Box.
Step 5: Copy and paste
Simply repeat the process explained in Step 3 and 4 for the 2nd GIF image. After execution of these steps, your GIF Z file will be containing all layers of your imported GIF files but as you have pasted them one over another so it is important to separate their elements now.
Step 6: To make separation
To do this separation, go to GIF Z tab and then select layers of second GIF file and simply move them below the first GIF layer files. Users can now have a preview of both GIFs in the timeline window.

Step 7: Change image settings
After finalizing the best preview for your edited files, you can hit the file menu option and then save your project for device or web option. It will immediately open a dialogue box where users can easily specify their image quality and loop count details. Never forget to have one more preview before saving the final results.

Step 8: Save your project
As now you are done with all the editing tasks so it is time to hit the “Save” option and then provide your destination address to the modified file. Your animated GIF file is now ready to get uploaded on the internet.
Check this video to learn more on how to combine gifs with Photoshop
Method 2: Combine GIFs and Play one After Another
Many youngsters love to create impressive stories by just combining a few GIF images one after another in sequence. If you are also one of them then you should follow these steps discussed in the second method.
We are recommending Ezgif.com to complete this task with the easy to follow steps as discussed below:
You may also like: Top 26 Best Free GIF Makers Online >>
Step 1: Upload GIFs files
First of all, you need to upload your desired GIF files to the Ezgif.com platform. For fast selection of multiple files simply follow Ctrl key-based selection.
This tool also allows users to create a mixture of animated GIF files with simple still images even if they are of different file formats. The conversion process will be carried out automatically by this tool.
Step 2: Adjust frame
As soon as these files will get uploaded, you will find all frames on the editor window. Here you can easily adjust frame delays as well as their order. Note that, GIFs are often ordered in alphabetic order so while reorganizing your files, never forget to rename them accurately. Now hit the “Animate It” button and it will immediately prepare a small preview window on the screen.

Step 3: Optimize your GIFs
Ezgif.com provides a wide range of optimization options to users after this preview. You can easily adjust features as per your requirement by setting desired values for text, speed, effects, rotate, resize and crop, etc. If you do not want to make such changes then you can directly hit the save button. This software tool will take a few seconds to process your project and then a new GIF image with all defined frames will be generated. It will be containing all source images with your preferred ordered sequence. You can easily find it at your destination folder and use it further for entertainment.
Part 2: 3 Best GIF Combiners You Can Make GIFs
1. Filmora Meme Maker - Online GIF Combiner
If you want to combine GIFs online, the Filmora meme maker is your ultimate solution.
It helps you make images, GIFs and video memes directly without watermark. It is totally FREE to use and no signup. You can change text size, color and position to create caption when you are editing. You can also put text inside or outside in GIF.
Just with a few clicks, your GIF is done . Try Now!

2. GIPHY
GIPHY is a GIF combiner where you can find various GIF files to combine. All of the GIFs are funny and interesting to use for people who love to combine GIFs. There are some examples in this site, so you can have the inspiration to combine GIFs if you don’t know where to start. You also can find different styles: reaction, sports, artists and more.

3. PIXEL
If you don’t want to use Photoshop to combine GIFs, here we recommend using PIXEL. You can use it to make GIFs easily online. You can add more than one GIF at one time. Besides, this GIF combiner can also change the GIF size to fit your needs. After the editing is made, you need to click create animation to export GIFs. You should know that GIF size is 32×32 for PIXEL, and 64×64 for SUPER PIXEL.
![]()
Frequently Asked Questions About Combing GIFs
1. Can I Combine A Few Gifs?
Yes, you can. Any photo or video editing software that supports GIF file format allows you to combine one or more GIFs. For instance, Adobe Photoshop users can combine several GIF files and play them simultaneously next to each other, but this task can be overwhelming if you are not familiar with this photo editing software.
An online GIF combiner like Ezgif enables you to combine multiple GIFs from your web browser for free, which makes it a great option for anyone who doesn’t have access to a professional photo or video editing software.
2. How To Merge Several Animated GIFs?
Playing two or more GIFs one after another in a single file is easy, as you just have to arrange them in a way you want them to appear in the final version of the GIF on the editor’s timeline and then export your project as a GIF file.
What’s more, you will be able to remove the frames of the GIFs you don’t want to include in the output file or apply different filters and effects. However, the options you are going to have at your disposal depending on the GIF maker or video editing software you are using to merge several animated GIFs into a single file.
Shanoon Cox
Shanoon Cox is a writer and a lover of all things video.
Follow @Shanoon Cox
Shanoon Cox
Mar 27, 2024• Proven solutions
Are you looking for a software tool to create animated GIFs? Go online, you will easily find so many with impressive editing abilities. There are so many interesting things that you can do with a collection of GIFs. Many professionals these days are trying new tricks to make classic small duration animated movies with interactive GIF creator tools .
The article below will provide you step by step guidance about how to merge or combine animated GIFs together.
We are going to discuss two methods where one GIF combiner can assist you to play GIFs side by side, whereas the other will tell you about playing another GIF in continuation after first. In the end, we will also let you know the three best GIF combiners you can use.
Keep reading.
If you are not able to use Photoshop due to its complicated interface and Ezgif is not a suitable tool for your device, then the best recommendation for your animated GIF creation needs is Wondershare Filmora .
This tool is designed with a user-friendly interface and it can easily assist you in the development of high-quality gifs. There are so many customization options associated with each design like color correction, speed adjustments, and overlays, etc.
Filmora offers compatibility over Windows as well as Mac devices so you can easily access it anywhere. Further, it can process more than 150 file formats so you need not worry about your selection. Simply download Wondershare Filmora for your desktop and get started with impressive GIF editing.
Download it now to have a try!
See how to make a cool GIF from a video with Wondershare Filmora.
Download Mac Version ](https://tools.techidaily.com/wondershare/filmora/download/ )
Part 1: How to Combine/Merge Animated GIFs Into One
Method 1: Merge GIFs into one with Photoshop
Adobe Photoshop is one of the top-rated photo editing software tools and nowadays it is popularly being used for GIF combining. Using Photoshop, you can easily play multiple GIF images side by side on the screen. Here are a few simple to follow steps to accomplish this task:
Step 1: Import GIFs to combine
First of all, users need to launch Adobe Photoshop on their device and then import both GIF images to individual tabs. This task can be easily done using Drag and Drop tools. Resize both tabs so that you can view both images at a time on screen.
Step 2: Save GIF with name
Go to the Window menu and ensure that the Timeline option is marked in the drop-down menu.
Now open one empty file with height same as that of already imported GIF files. Save this file with any suitable name, for example Z.
Note: If you need a transparent view of your imported GIF images then go to Layer and select New and finally hit Layer option. You can now hide its bottom layer.
Step 3: Copy frames
Now move to the tab of the first GIF file and then to the timeline toolbar. On the top right corner of your screen, you will find the menu icon. Here you need to select and copy all frames.
Step 4: Paste your copy
It is time to move to GIF Z file, move to its timeline toolbar, and then select the menu icon from the top right corner of your screen. Paste your recently copied selection over here. Never forget to choose Paste Over selection option from Pop up Dialogue Box.
Step 5: Copy and paste
Simply repeat the process explained in Step 3 and 4 for the 2nd GIF image. After execution of these steps, your GIF Z file will be containing all layers of your imported GIF files but as you have pasted them one over another so it is important to separate their elements now.
Step 6: To make separation
To do this separation, go to GIF Z tab and then select layers of second GIF file and simply move them below the first GIF layer files. Users can now have a preview of both GIFs in the timeline window.
Step 7: Change image settings
After finalizing the best preview for your edited files, you can hit the file menu option and then save your project for device or web option. It will immediately open a dialogue box where users can easily specify their image quality and loop count details. Never forget to have one more preview before saving the final results.
Step 8: Save your project
As now you are done with all the editing tasks so it is time to hit the “Save” option and then provide your destination address to the modified file. Your animated GIF file is now ready to get uploaded on the internet.
Check this video to learn more on how to combine gifs with Photoshop
Method 2: Combine GIFs and Play one After Another
Many youngsters love to create impressive stories by just combining a few GIF images one after another in sequence. If you are also one of them then you should follow these steps discussed in the second method.
We are recommending Ezgif.com to complete this task with the easy to follow steps as discussed below:
You may also like: Top 26 Best Free GIF Makers Online >>
Step 1: Upload GIFs files
First of all, you need to upload your desired GIF files to the Ezgif.com platform. For fast selection of multiple files simply follow Ctrl key-based selection.
This tool also allows users to create a mixture of animated GIF files with simple still images even if they are of different file formats. The conversion process will be carried out automatically by this tool.
Step 2: Adjust frame
As soon as these files will get uploaded, you will find all frames on the editor window. Here you can easily adjust frame delays as well as their order. Note that, GIFs are often ordered in alphabetic order so while reorganizing your files, never forget to rename them accurately. Now hit the “Animate It” button and it will immediately prepare a small preview window on the screen.
Step 3: Optimize your GIFs
Ezgif.com provides a wide range of optimization options to users after this preview. You can easily adjust features as per your requirement by setting desired values for text, speed, effects, rotate, resize and crop, etc. If you do not want to make such changes then you can directly hit the save button. This software tool will take a few seconds to process your project and then a new GIF image with all defined frames will be generated. It will be containing all source images with your preferred ordered sequence. You can easily find it at your destination folder and use it further for entertainment.
Part 2: 3 Best GIF Combiners You Can Make GIFs
1. Filmora Meme Maker - Online GIF Combiner
If you want to combine GIFs online, the Filmora meme maker is your ultimate solution.
It helps you make images, GIFs and video memes directly without watermark. It is totally FREE to use and no signup. You can change text size, color and position to create caption when you are editing. You can also put text inside or outside in GIF.
Just with a few clicks, your GIF is done . Try Now!
2. GIPHY
GIPHY is a GIF combiner where you can find various GIF files to combine. All of the GIFs are funny and interesting to use for people who love to combine GIFs. There are some examples in this site, so you can have the inspiration to combine GIFs if you don’t know where to start. You also can find different styles: reaction, sports, artists and more.
3. PIXEL
If you don’t want to use Photoshop to combine GIFs, here we recommend using PIXEL. You can use it to make GIFs easily online. You can add more than one GIF at one time. Besides, this GIF combiner can also change the GIF size to fit your needs. After the editing is made, you need to click create animation to export GIFs. You should know that GIF size is 32×32 for PIXEL, and 64×64 for SUPER PIXEL.
![]()
Frequently Asked Questions About Combing GIFs
1. Can I Combine A Few Gifs?
Yes, you can. Any photo or video editing software that supports GIF file format allows you to combine one or more GIFs. For instance, Adobe Photoshop users can combine several GIF files and play them simultaneously next to each other, but this task can be overwhelming if you are not familiar with this photo editing software.
An online GIF combiner like Ezgif enables you to combine multiple GIFs from your web browser for free, which makes it a great option for anyone who doesn’t have access to a professional photo or video editing software.
2. How To Merge Several Animated GIFs?
Playing two or more GIFs one after another in a single file is easy, as you just have to arrange them in a way you want them to appear in the final version of the GIF on the editor’s timeline and then export your project as a GIF file.
What’s more, you will be able to remove the frames of the GIFs you don’t want to include in the output file or apply different filters and effects. However, the options you are going to have at your disposal depending on the GIF maker or video editing software you are using to merge several animated GIFs into a single file.
Shanoon Cox
Shanoon Cox is a writer and a lover of all things video.
Follow @Shanoon Cox
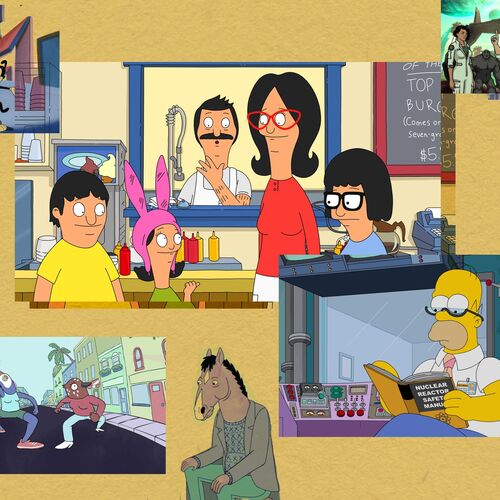
Samples of Cartoon Character Face to Inspire You
Samples of Cartoon Character Face to Inspire You
An easy yet powerful editor
Numerous effects to choose from
Detailed tutorials provided by the official channel
Being able to draw facial features is an essential skill for any animator. Whether you are a beginner at drawing faces or an experienced cartoon artist that has been drawing for years, this is a skill that can gradually improve with time. With the implementation and use of simple shapes, creating various facial features and cartoon styles can be done quickly.
The methods of creating funny face cartoon characters are suitable for everyone, even if they do not have a single day of illustrating experience. These methods presented in this article are easily accessible to provide you with different results depending on your budget and your desired outcome.
The act of drawing cartoon faces can be effortless, and in this article, we will give you some fundamental samples of how you can draw cartoon faces of your own.
In this article
01 [Learn to Understand the Core of Cartoon Style](#Part 1)
02 [Top 12 Cartoon Face Examples](#Part 2)
03 [How to Draw a Cartoon Face - For Beginners](#Part 3)
04 [How to Easily Turn Yourself into a Cartoon](#Part 4)
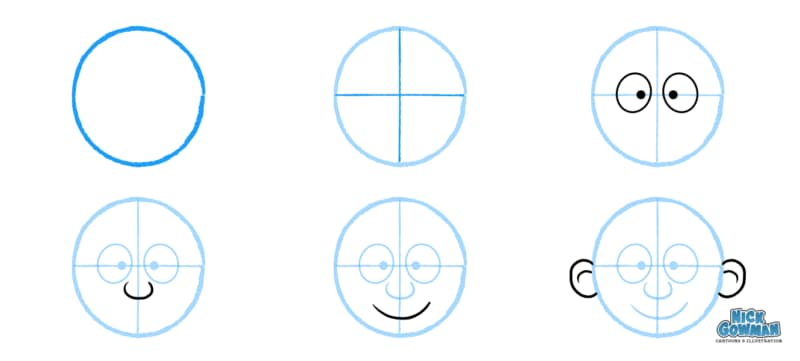
Part 1 Learn to Understand the Core of Cartoon Style
First, you need to simplify the different parts of the cartoon character face to pick up on very subtle facial expressions and features. For example, the eyes’ shape and size will help determine if the person is feeling sad, excited, happy, excited, or sad. In addition, the amount of lift under a person’s eyebrows can help determine whether a person is mad or not.
These facial expressions are crucial to how a person communicates. It has got to the point that we can read someone’s face without truly understanding which parts of the face convey that emotion. However, these days we get exposed to everyday adaptations of facial expressions, especially with the invention of Instagram, Snapchat, and cartoon face filters.
Consequently, cartoons are a combination of different shapes that are being put together and are not difficult if the focus is on each shape individually and the process breaks down step by step.
Cartoons are a mixture of different shapes put together. It’s not difficult if you focus on each shape individually and break down the process step by step.
Finally, understanding these unconscious and subtle differences in facial expressions is crucial when planning out an animated character. Afterward, when understood, you can simplify the features to be recognizable by your audience.
Part 2 Top 12 Cartoon Face Examples
Cartoon character faces are gaining immense importance in design art due to their universality. Cartoon faces can represent people in several situations and add a comic or satirical twist to dull topics by highlighting their importance. However, drawing cartoon faces require a lot of skill and differentiation, and graphic designers, while working on basic and universal templates, always try and introduce unique elements.
Here are the top 10 examples of cartoon character faces you can choose from when you want to make your designs:
01Men and Women
This sketch features different facial expressions made by older men and women.
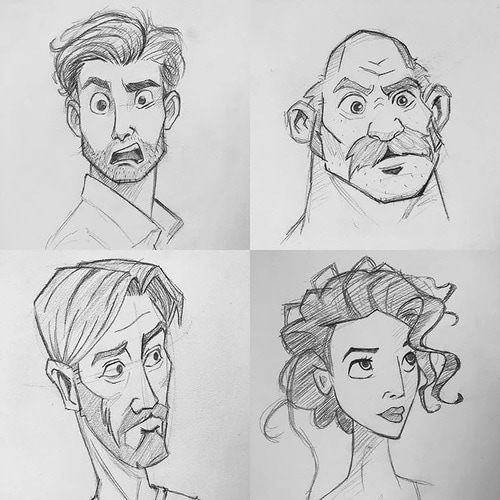
02Stretch and Squash
This photo shows the difference between squashing and stretching the face and provides references for extreme squash and extreme stretch.

03Dramatic Expressions
The expressions drawn here are super fun and dramatic. However, it is a great way to have fun and practice how to draw facial expressions simultaneously.
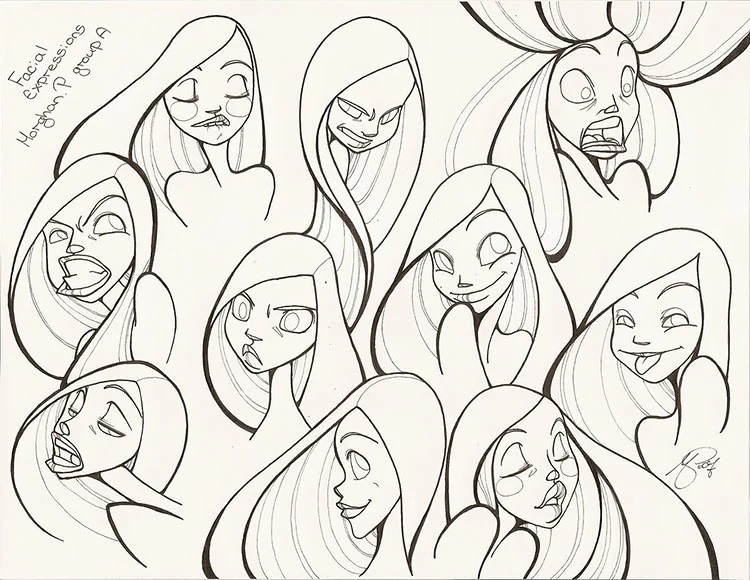
04Quick Expressive Sketches
With this, you can practice how to draw different facial expressions by doing quick sketches like this one. Perhaps you do not need to pay attention to perfection.
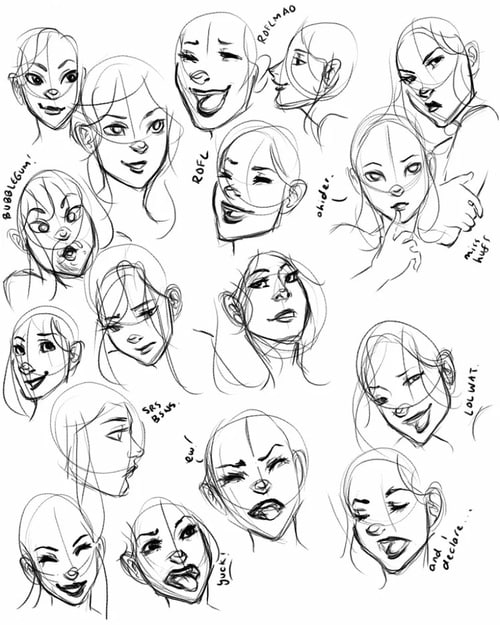
05This Is Good This Is Better
With this facial expression, you can see a good look and an even better expression. It shows the difference that subtle changes can make to your facial expressions**.**
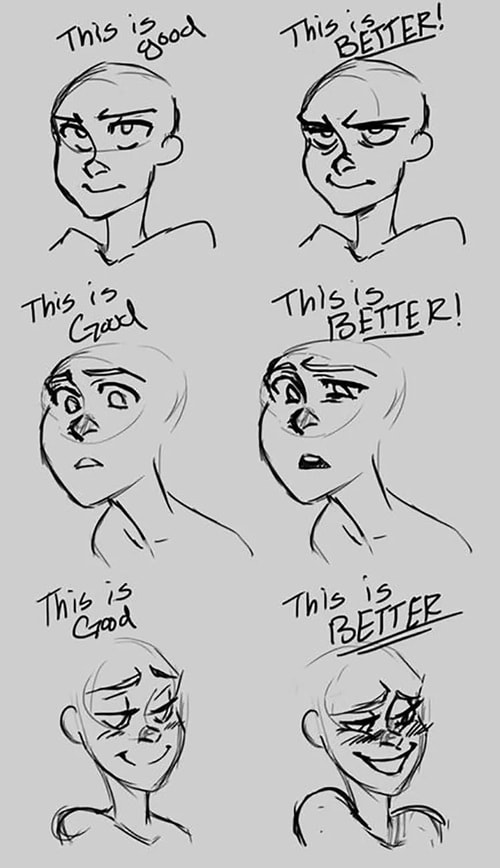
06Male and Female Expressions
This includes both male and female expressions to express the facial reaction of both genders, like some funny cartoon characters face.
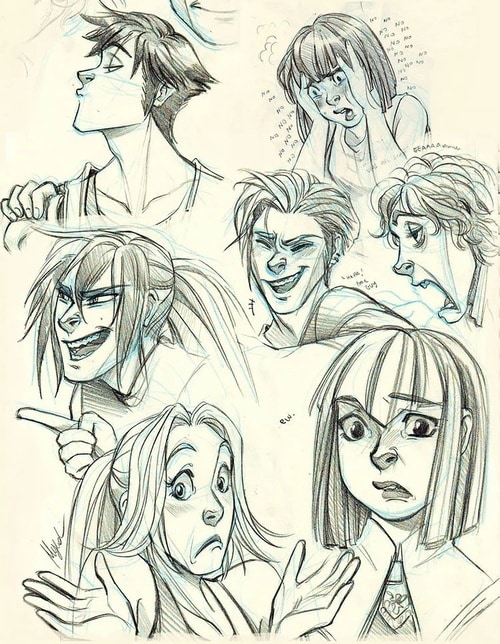
07Quick Sketches
This type of facial expression will help you get better at drawing cartoons, and you can use do some quick sketches every day.

08Jay Leno’s facial expression
Here, it is being exaggerated on a few of his most prominent facial features, including his chin. It is kind of a fat face cartoon character.
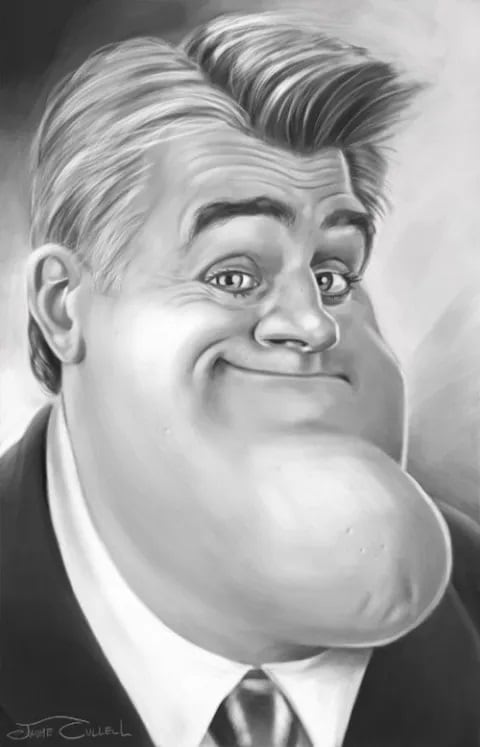
09Robert Pattinson Facials
In this photo, his head shape was distorted to show the thinness of his face, and his big hair also accentuates this prominent feature further.
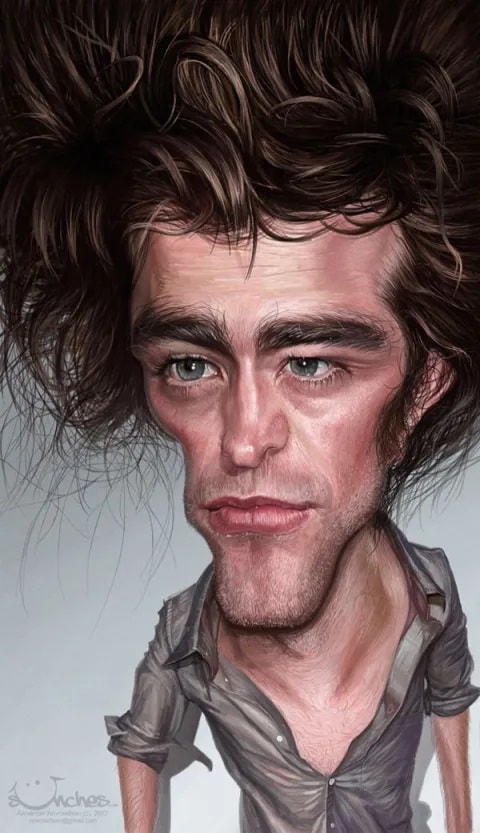
10A,I,U,O,AE,M Facials
With this, you can practice how to draw your facial expression by pronouncing a, i, u, o, ae, m.

Part 3 How to Draw a Cartoon Face - For Beginners
Here, we have written down 7-step to follow on how to draw a cartoon character face as a beginner effectively.
● Step 1: Plan and Prepare
This is the first step is to plan out exactly what this character will convery through its expression while drawing a cartoon character.
● Step 2: Drawing A Cartoon Head
Next is time to start sketching out the shape of the head based on the plan you have made. Whatsoever shape you decide to use for your character, start with a circle to serve as the basic shape for the head.
● Step 3: Drawing Cartoon Eyes
Now, you need to draw the eye of the character, which is a crucial step because the eye is the essential part of their expression. To get the character’s eyes in the right place, you should carefully sketch the horizontal or vertical dimension lines.
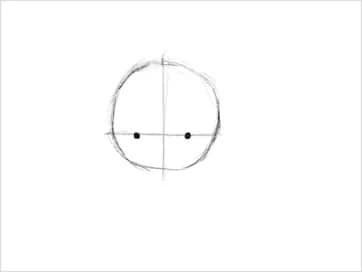
● Step 4: Drawing A Cartoon Nose
The simpler the nose is, the better it looks in a cartoon. Ensure to keep a proper ratio between the mouth, eyes, and nose so that it does not look too crowded together.
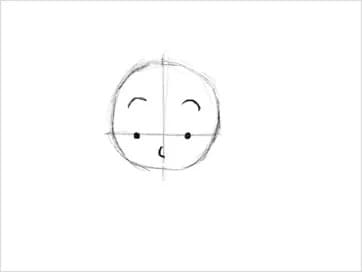
● Step 5: Shaping the Face
In shaping the face, one needs to be mindful of the character, which will help to determine how to shape the jawline and head. For example, for a girl, the face should be narrower and have the chin come to a bit of a point at the end, whereas, for a boy, it requires that the face is a bit bolder and focuses more on the definition of the jawline.
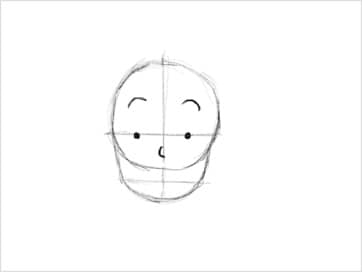
● Step 6: Drawing A Cartoon Mouth
The mouth is another essential part of the cartoon character’s expression and a key indicator of how the character is feeling. It portrays whether you want the character to smile, frown, yell, be nervous, or be neutral.
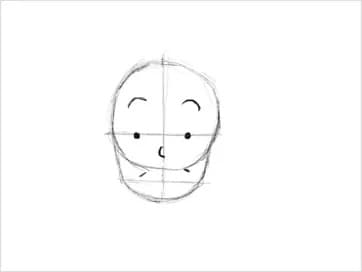
● Step 7: Drawing Cartoon Hair
Next, you need to draw the cartoon hair, and, in some cases, the cartoon hair is a significant part of their appearance as it is a way to convey your character’s personality, appearance, style, or gender.
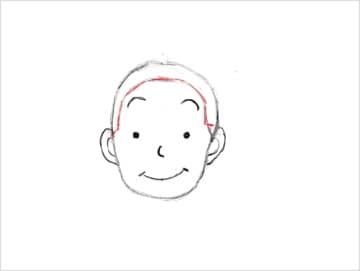
● Step 8: Coloring
Another part requires you to paint your character to improve the texture and make it beautiful.
Part 4 How to Easily Turn Yourself into a Cartoon
Are you looking to turn yourself into a cartoon? This is very necessary as it provides you with a great way to integrate diverse characters into your brand’s marketing while simultaneously keeping your content personalized.
However, after converting a picture to a cartoon character face, you can decide to animate it, and the best tool is Wondershare Filmora Video Editor . Animation is a great way to advertise your business, especially during times like these. it is a clever way for leaders, CEOs, and managers to connect with their remote workers and boost engagement, company culture, and ultimately work morale. Filmora is also a great tool to create creative and powerful animation with tons of follow-come effect that enables you to carry it out effectively and efficiently. In this section, we will guide you on how to turn yourself into a cartoon easily:
Step 1: Visit Powtoon.com and sign up for a free account, then click on the “build your character” option from the dropdown menu.
Step 2: Next is to select the cartoon gender you want.
Step 3: Finally, you can customize your character’s facial features such as skin, hair, color, clothes, and animated gestures.
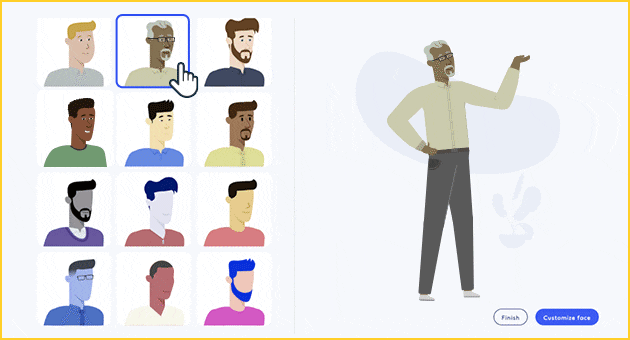
Step 4: Once you are satisfied with the result, you can save it on your device or share it on social media
For Win 7 or later (64-bit)
For macOS 10.12 or later
● Ending Thoughts →
● Thus, we saw how to easily cartoon your character’s face via some samples to help you out. With the method listed above, you can easily use it to create a square-faced cartoon character or draw a fat face cartoon character.
● This article also explained how to cartoon yourself. However, to cartoon your video or create a cartoon animated video, we recommend that you use Filmora, its keyframing feature to help you carry this out effectively.
Being able to draw facial features is an essential skill for any animator. Whether you are a beginner at drawing faces or an experienced cartoon artist that has been drawing for years, this is a skill that can gradually improve with time. With the implementation and use of simple shapes, creating various facial features and cartoon styles can be done quickly.
The methods of creating funny face cartoon characters are suitable for everyone, even if they do not have a single day of illustrating experience. These methods presented in this article are easily accessible to provide you with different results depending on your budget and your desired outcome.
The act of drawing cartoon faces can be effortless, and in this article, we will give you some fundamental samples of how you can draw cartoon faces of your own.
In this article
01 [Learn to Understand the Core of Cartoon Style](#Part 1)
02 [Top 12 Cartoon Face Examples](#Part 2)
03 [How to Draw a Cartoon Face - For Beginners](#Part 3)
04 [How to Easily Turn Yourself into a Cartoon](#Part 4)
Part 1 Learn to Understand the Core of Cartoon Style
First, you need to simplify the different parts of the cartoon character face to pick up on very subtle facial expressions and features. For example, the eyes’ shape and size will help determine if the person is feeling sad, excited, happy, excited, or sad. In addition, the amount of lift under a person’s eyebrows can help determine whether a person is mad or not.
These facial expressions are crucial to how a person communicates. It has got to the point that we can read someone’s face without truly understanding which parts of the face convey that emotion. However, these days we get exposed to everyday adaptations of facial expressions, especially with the invention of Instagram, Snapchat, and cartoon face filters.
Consequently, cartoons are a combination of different shapes that are being put together and are not difficult if the focus is on each shape individually and the process breaks down step by step.
Cartoons are a mixture of different shapes put together. It’s not difficult if you focus on each shape individually and break down the process step by step.
Finally, understanding these unconscious and subtle differences in facial expressions is crucial when planning out an animated character. Afterward, when understood, you can simplify the features to be recognizable by your audience.
Part 2 Top 12 Cartoon Face Examples
Cartoon character faces are gaining immense importance in design art due to their universality. Cartoon faces can represent people in several situations and add a comic or satirical twist to dull topics by highlighting their importance. However, drawing cartoon faces require a lot of skill and differentiation, and graphic designers, while working on basic and universal templates, always try and introduce unique elements.
Here are the top 10 examples of cartoon character faces you can choose from when you want to make your designs:
01Men and Women
This sketch features different facial expressions made by older men and women.
02Stretch and Squash
This photo shows the difference between squashing and stretching the face and provides references for extreme squash and extreme stretch.
03Dramatic Expressions
The expressions drawn here are super fun and dramatic. However, it is a great way to have fun and practice how to draw facial expressions simultaneously.
04Quick Expressive Sketches
With this, you can practice how to draw different facial expressions by doing quick sketches like this one. Perhaps you do not need to pay attention to perfection.
05This Is Good This Is Better
With this facial expression, you can see a good look and an even better expression. It shows the difference that subtle changes can make to your facial expressions**.**
06Male and Female Expressions
This includes both male and female expressions to express the facial reaction of both genders, like some funny cartoon characters face.
07Quick Sketches
This type of facial expression will help you get better at drawing cartoons, and you can use do some quick sketches every day.
08Jay Leno’s facial expression
Here, it is being exaggerated on a few of his most prominent facial features, including his chin. It is kind of a fat face cartoon character.
09Robert Pattinson Facials
In this photo, his head shape was distorted to show the thinness of his face, and his big hair also accentuates this prominent feature further.
10A,I,U,O,AE,M Facials
With this, you can practice how to draw your facial expression by pronouncing a, i, u, o, ae, m.
Part 3 How to Draw a Cartoon Face - For Beginners
Here, we have written down 7-step to follow on how to draw a cartoon character face as a beginner effectively.
● Step 1: Plan and Prepare
This is the first step is to plan out exactly what this character will convery through its expression while drawing a cartoon character.
● Step 2: Drawing A Cartoon Head
Next is time to start sketching out the shape of the head based on the plan you have made. Whatsoever shape you decide to use for your character, start with a circle to serve as the basic shape for the head.
● Step 3: Drawing Cartoon Eyes
Now, you need to draw the eye of the character, which is a crucial step because the eye is the essential part of their expression. To get the character’s eyes in the right place, you should carefully sketch the horizontal or vertical dimension lines.
● Step 4: Drawing A Cartoon Nose
The simpler the nose is, the better it looks in a cartoon. Ensure to keep a proper ratio between the mouth, eyes, and nose so that it does not look too crowded together.
● Step 5: Shaping the Face
In shaping the face, one needs to be mindful of the character, which will help to determine how to shape the jawline and head. For example, for a girl, the face should be narrower and have the chin come to a bit of a point at the end, whereas, for a boy, it requires that the face is a bit bolder and focuses more on the definition of the jawline.
● Step 6: Drawing A Cartoon Mouth
The mouth is another essential part of the cartoon character’s expression and a key indicator of how the character is feeling. It portrays whether you want the character to smile, frown, yell, be nervous, or be neutral.
● Step 7: Drawing Cartoon Hair
Next, you need to draw the cartoon hair, and, in some cases, the cartoon hair is a significant part of their appearance as it is a way to convey your character’s personality, appearance, style, or gender.
● Step 8: Coloring
Another part requires you to paint your character to improve the texture and make it beautiful.
Part 4 How to Easily Turn Yourself into a Cartoon
Are you looking to turn yourself into a cartoon? This is very necessary as it provides you with a great way to integrate diverse characters into your brand’s marketing while simultaneously keeping your content personalized.
However, after converting a picture to a cartoon character face, you can decide to animate it, and the best tool is Wondershare Filmora Video Editor . Animation is a great way to advertise your business, especially during times like these. it is a clever way for leaders, CEOs, and managers to connect with their remote workers and boost engagement, company culture, and ultimately work morale. Filmora is also a great tool to create creative and powerful animation with tons of follow-come effect that enables you to carry it out effectively and efficiently. In this section, we will guide you on how to turn yourself into a cartoon easily:
Step 1: Visit Powtoon.com and sign up for a free account, then click on the “build your character” option from the dropdown menu.
Step 2: Next is to select the cartoon gender you want.
Step 3: Finally, you can customize your character’s facial features such as skin, hair, color, clothes, and animated gestures.
Step 4: Once you are satisfied with the result, you can save it on your device or share it on social media
For Win 7 or later (64-bit)
For macOS 10.12 or later
● Ending Thoughts →
● Thus, we saw how to easily cartoon your character’s face via some samples to help you out. With the method listed above, you can easily use it to create a square-faced cartoon character or draw a fat face cartoon character.
● This article also explained how to cartoon yourself. However, to cartoon your video or create a cartoon animated video, we recommend that you use Filmora, its keyframing feature to help you carry this out effectively.
What Wikipedia Won’t Tell You About Character Rigging
What Wikipedia Won’t Tell You Specifically About Character Rigging
An easy yet powerful editor
Numerous effects to choose from
Detailed tutorials provided by the official channel
The function of character rigging can easily be compared to that of bones, muscles and joints. They act as skeletons to virtual animations. You can also imagine them as strings used on dolls. These digitalized bones function inter-connectedly in a 3D animation.
In this article
01 [Intro to Character Rigging](#Part 1)
02 [8 Tips for Character Rigging](#Part 2)
03 [10 Best Character Rigging Services to Buy Online](#Part 3)
04 [How to Make 3d Character Rig? Are There Any Plugins or Easy](#Part 4)
Part 1 Intro to Character Rigging
As you already know by now that the process of rigging a character can be quite a tedious task. It involves a lot of creative thinking, precision and a keen eye to notice all the small details.
Once you have a model character to work on, riggers set off to creating a skeleton to match the character. These skele-animations can be used to move the entire model as if tugging on strings (not literally).
The movement of the chain of skeletons or rigs is interdependent. Which means if you pull on any one bone, it moves all the other bones in the same sequence. Similar to how bones move within the human body.
Riggers use programs and tools to create a series of bone like structures that can deformed and animated freely according to the preference of the animators.
Movements like positioning, curving and rotation can be recorded and then played back in the animation.
This requires the rigger to constantly coordinate between modelers, animators till the end of the project. This entire process can take weeks or even months.
Amazingly enough, its 20and there are online tools and tutorials you can use to easily learn complex animations like they make in large scale movies and games.
Part 2 8 Tips for Character Rigging
01The Right Rig for the Job
Rigging is a skill all animators gets good at overtime. The more you practice the more familiar you are with the tools you are using. It will also help you understand that not all rigs are meant for the same set of movements.
You need to be able to discern what rig is it that you need and discard what you don’t. If the rig is being used in a game, then the focus will be more on the experience while for movies its attention.
02Deformers for Facial Rigging
Constructing a realistic facial rig can be quite a task but is indeed satisfying once finished. Human facial features require a great degree of flexibility which is why using a variety of deformers for different parts of the face. They are better suited for creating joints over the face and can be done more quickly.
03IK and FK
Though you can use one without the other, it is best to use both of them in an animation. You can’t work without both arms can you? Applying both Inverse and Forward Kinematics in your rig design can help it make more stylistic.
04Learn Python and Maya API: Learn Python and Maya API
If you wish to take your rigging skills to the next level then learning Maya API and Python are great millstones. This way, you can create high quality and sophisticated rigs with high intense flexibility on Maya. Also, Python allows you to write new scripts for PlugIns.
05Delegate to an Animator
After rigging for several hours it is easy to feel like you are only seeing from one perspective. Get in touch with an animator earlier on in the project can help you get feedback to stay consistent in the rigging process.
06Learn Web Technologies: Learn Web Technologies
To be a good animator or rigging specialist involves a lot of learning. Animation technology is constantly changing therefore it is highly recommended to stay up to date with the latest web technologies. Learning HTML, Java Script and CSS is becoming vital to being a part of the gaming world.
07Use Scalable Tools
Not all the characters or objects you rig are going to be of the same size. Selecting the right rigging software is crucial for you to be able to scale your animations. You won’t need to use everything, just the tools that serve your purpose.
08Use a Clean Interface
If you have ever heard of the phrase ‘clean workplace – cleaner work’ then you should know how an untidy interface can affect your workflow. This won’t necessarily change the results but can surely better your experience.
Part 3 Best Character Rigging Services to Buy Online
Don’t feel confused about where to begin. The first step to get into rigging is to master a software, any software, here are of the best ones you can choose from;
01Maya
Offers the best animation features on the market.

02Blender
Vast variety of tools for sculpting, rigging or VFX.

03Modo
Has a more simplified approach towards modelling and rigging.

043ds Max
Leverages high flexibility and ease of use to riggers.
05Sculptris
Excellentfor beginners who need a gateway software to start art.

06ZBrush
Lets you work on your sculpting skills with digital clay.

07Cheetah 3D
Developed by Macintosh to be an easy to learn modelling software.

08Rhinoceros 3D
Harbours a mathematical approach to modelling and modular design.

09Fusion 360
Offers a wide range of simulation tools.

10Cinema 4D
Recognized by professionals for well-equipped arsenal of digital rendering.

Part 4 How to Make Character Rig? Are There Any Plugins or Easy
How to Make Character Rig? Are There Any Plugins or Easy
When we imagine animation, most of the time we are baffled by the end product? But what really goes on behind the mesmerizing colors and whimsical characters.
The basic is of course building rigs to support the entire movement of the character and confine it to actual physical laws that makes it almost a mimic of reality. The entire process of rigging rather simplifies the path to achieve that goal.
In Cinema, character rigging has multiple layers that goes into creating the entire skeleton animation. Setting up a character rig can take anywhere between a few hours or a few days. It probably takes mainstream movies ten times that time.
Let us break down the process of making a rig so that it is simpler to understand.
The process;
Weight Painting: An integral part of the entire rigging process. Although, weight painting can be rendered automatically by the software that you are using, but that can end up making the animation look less realistic. You can instead fine tune the weight of each bone in the rig. You can also copy similar looking bones and apply them to different mesh and repurpose them to function differently.
Placing Bones: After designing a bone structure of character, you can copy the same and use it for similar characters. This is why in games and animation, you notice characters with similar features and traits.
Inverse Kinematics: Not all bones are meant to move in a forward direction. This is why inverses Kinematics are applied to certain bones like the legs, shoulders or even a dragon’s tail. Setting up the IK of your rig would keep specific bones pointed in the right direction so as to make the animation look more natural.
Applying Constraints: The physical realm is built with restrictions. There are things you can do or can’t do according to the natural order of things so as to make your character movement more naturalistic.
Simulation Skeletons: Now comes the part where the magic happens. After fully completing a skeletal animation you can now simulate the motion over the mesh and record the result of the simulation through a series of frames.
Create an animated movie: You can play back the simulation in an animation software such as Blender and then create your own animated movie with Filmora with its easy drag and drop interface. Movies are a collage of frames, so you need to animate according to the fps you want for your video.
Facial Rigs: Facial expressions are more complex than whole body movements. It requires the attention dedicated to a project of its own. Here is where you can play with deforming shapes together to replicate facial muscle movement.
● Key Takeaways from This Episode →
● Rigging has become science in its own right but that does not mean you can’t be artistic with it.
● What you should remember that creating skeletal animation is all about movement and applying physical restrictions to it.
● Start simple and practice until you master the most complex features of any of the top rigging software services raging in the market.
The function of character rigging can easily be compared to that of bones, muscles and joints. They act as skeletons to virtual animations. You can also imagine them as strings used on dolls. These digitalized bones function inter-connectedly in a 3D animation.
In this article
01 [Intro to Character Rigging](#Part 1)
02 [8 Tips for Character Rigging](#Part 2)
03 [10 Best Character Rigging Services to Buy Online](#Part 3)
04 [How to Make 3d Character Rig? Are There Any Plugins or Easy](#Part 4)
Part 1 Intro to Character Rigging
As you already know by now that the process of rigging a character can be quite a tedious task. It involves a lot of creative thinking, precision and a keen eye to notice all the small details.
Once you have a model character to work on, riggers set off to creating a skeleton to match the character. These skele-animations can be used to move the entire model as if tugging on strings (not literally).
The movement of the chain of skeletons or rigs is interdependent. Which means if you pull on any one bone, it moves all the other bones in the same sequence. Similar to how bones move within the human body.
Riggers use programs and tools to create a series of bone like structures that can deformed and animated freely according to the preference of the animators.
Movements like positioning, curving and rotation can be recorded and then played back in the animation.
This requires the rigger to constantly coordinate between modelers, animators till the end of the project. This entire process can take weeks or even months.
Amazingly enough, its 20and there are online tools and tutorials you can use to easily learn complex animations like they make in large scale movies and games.
Part 2 8 Tips for Character Rigging
01The Right Rig for the Job
Rigging is a skill all animators gets good at overtime. The more you practice the more familiar you are with the tools you are using. It will also help you understand that not all rigs are meant for the same set of movements.
You need to be able to discern what rig is it that you need and discard what you don’t. If the rig is being used in a game, then the focus will be more on the experience while for movies its attention.
02Deformers for Facial Rigging
Constructing a realistic facial rig can be quite a task but is indeed satisfying once finished. Human facial features require a great degree of flexibility which is why using a variety of deformers for different parts of the face. They are better suited for creating joints over the face and can be done more quickly.
03IK and FK
Though you can use one without the other, it is best to use both of them in an animation. You can’t work without both arms can you? Applying both Inverse and Forward Kinematics in your rig design can help it make more stylistic.
04Learn Python and Maya API: Learn Python and Maya API
If you wish to take your rigging skills to the next level then learning Maya API and Python are great millstones. This way, you can create high quality and sophisticated rigs with high intense flexibility on Maya. Also, Python allows you to write new scripts for PlugIns.
05Delegate to an Animator
After rigging for several hours it is easy to feel like you are only seeing from one perspective. Get in touch with an animator earlier on in the project can help you get feedback to stay consistent in the rigging process.
06Learn Web Technologies: Learn Web Technologies
To be a good animator or rigging specialist involves a lot of learning. Animation technology is constantly changing therefore it is highly recommended to stay up to date with the latest web technologies. Learning HTML, Java Script and CSS is becoming vital to being a part of the gaming world.
07Use Scalable Tools
Not all the characters or objects you rig are going to be of the same size. Selecting the right rigging software is crucial for you to be able to scale your animations. You won’t need to use everything, just the tools that serve your purpose.
08Use a Clean Interface
If you have ever heard of the phrase ‘clean workplace – cleaner work’ then you should know how an untidy interface can affect your workflow. This won’t necessarily change the results but can surely better your experience.
Part 3 Best Character Rigging Services to Buy Online
Don’t feel confused about where to begin. The first step to get into rigging is to master a software, any software, here are of the best ones you can choose from;
01Maya
Offers the best animation features on the market.
02Blender
Vast variety of tools for sculpting, rigging or VFX.
03Modo
Has a more simplified approach towards modelling and rigging.
043ds Max
Leverages high flexibility and ease of use to riggers.
05Sculptris
Excellentfor beginners who need a gateway software to start art.
06ZBrush
Lets you work on your sculpting skills with digital clay.
07Cheetah 3D
Developed by Macintosh to be an easy to learn modelling software.
08Rhinoceros 3D
Harbours a mathematical approach to modelling and modular design.
09Fusion 360
Offers a wide range of simulation tools.
10Cinema 4D
Recognized by professionals for well-equipped arsenal of digital rendering.
Part 4 How to Make Character Rig? Are There Any Plugins or Easy
How to Make Character Rig? Are There Any Plugins or Easy
When we imagine animation, most of the time we are baffled by the end product? But what really goes on behind the mesmerizing colors and whimsical characters.
The basic is of course building rigs to support the entire movement of the character and confine it to actual physical laws that makes it almost a mimic of reality. The entire process of rigging rather simplifies the path to achieve that goal.
In Cinema, character rigging has multiple layers that goes into creating the entire skeleton animation. Setting up a character rig can take anywhere between a few hours or a few days. It probably takes mainstream movies ten times that time.
Let us break down the process of making a rig so that it is simpler to understand.
The process;
Weight Painting: An integral part of the entire rigging process. Although, weight painting can be rendered automatically by the software that you are using, but that can end up making the animation look less realistic. You can instead fine tune the weight of each bone in the rig. You can also copy similar looking bones and apply them to different mesh and repurpose them to function differently.
Placing Bones: After designing a bone structure of character, you can copy the same and use it for similar characters. This is why in games and animation, you notice characters with similar features and traits.
Inverse Kinematics: Not all bones are meant to move in a forward direction. This is why inverses Kinematics are applied to certain bones like the legs, shoulders or even a dragon’s tail. Setting up the IK of your rig would keep specific bones pointed in the right direction so as to make the animation look more natural.
Applying Constraints: The physical realm is built with restrictions. There are things you can do or can’t do according to the natural order of things so as to make your character movement more naturalistic.
Simulation Skeletons: Now comes the part where the magic happens. After fully completing a skeletal animation you can now simulate the motion over the mesh and record the result of the simulation through a series of frames.
Create an animated movie: You can play back the simulation in an animation software such as Blender and then create your own animated movie with Filmora with its easy drag and drop interface. Movies are a collage of frames, so you need to animate according to the fps you want for your video.
Facial Rigs: Facial expressions are more complex than whole body movements. It requires the attention dedicated to a project of its own. Here is where you can play with deforming shapes together to replicate facial muscle movement.
● Key Takeaways from This Episode →
● Rigging has become science in its own right but that does not mean you can’t be artistic with it.
● What you should remember that creating skeletal animation is all about movement and applying physical restrictions to it.
● Start simple and practice until you master the most complex features of any of the top rigging software services raging in the market.
12 Animation Video Maker That Can Triple Your Conversion Rates
12 Animation Video Maker That Can Triple Conversion Rates
An easy yet powerful editor
Numerous effects to choose from
Detailed tutorials provided by the official channel
Gone are the days when creating animation requires expert skills, time, and a lot of money. Thanks to technological advancement several software and tools are available for creating animated videos in a hassle-free manner.

The following parts of the topic will help you to learn in detail about animation videos, their importance, the best software, and animation online website tools.
In this article
01 [What is an Animated Video and Its Importance?](#Part 1)
02 [Top 11 Online Animation Video Maker](#Part 2)
03 [Best Alternative To Online Tools For Creating Professional Animated Videos ](#Part 3)
Part 1 What is an Animated Video and Its Importance?
Animated Video
In simplest terms, animation refers to a method where figures appear as moving images to make them look lively and interesting. Using the drawings, effects, designs, and illustrations, an animated video is created to catch your attention. Animations can be of several types like cartoon animations, 3D animations, motion graphics, CGI, 2D animations, and more.
Benefits of using Animated videos
Animated videos have dominated the entire digital space and there are several reasons for the same. Some of the major ones are enlisted below.
● Add life to your concepts
● Bring in the content to your interesting ideas
● Ability to represent abstract ideas visually
● Video production can be managed in a hassle-free manner
● Animated videos are more visually and psychologically appealing
● Helps in boosting the conversion rates
● Makes you stand out from the competition
● Helps in expanding the reach and getting the attention and engagement
● Improves SEO
Part 2 Top 11 online animation video maker
If you are in search of a simple yet effective solution to create animations, 3D animation maker online tools work as a great choice. The majority of these programs are free and simple to use and support all basic animation requirements. Below listed are the top 11 online 3D animation makers that can be used for creating impressive animations.
01PowToon
This is a widely used online tool that supports creating videos in multiple formats including animated ones. The tool majorly supports features related to cartoon animation and depending on your requirements you can choose from different licenses and plans. Some of the key features of the tool include presentation mode, animation mode, readymade templates, integration with different tools, and others.

02Moovly
This is one of the top online animation maker 3D tool for creating interesting and eye-catchy animations. The tool is completely cloud-based and thus there is no need for any software download or installation. Different types of animations like doodles, cartoons, and others can be created easily using the program. Huge stock of videos, sound, music, motion graphics, photos, and others are available at the program to create a customized animation as required.
03Explee
This is a simple to use online tool that can help you create animated videos in a few simple steps. The program focuses on using a whiteboard which along with Explee’s Bringlife technology can create impressive animations. More than 6000 images are available at the tool for illustrating your concept and ideas. Some of the animation features supported by the tool include draw, pop, pin, fade, and others.
04Wideo
This is a simple yet versatile 3D online animation maker tool for animated video creation. Several pre-designed templates are available using which animated videos can be created quickly and easily. The free version of the tool allows creating animations for up to 30 seconds and for longer animations you would need to upgrade to a paid subscription. The tool also has a stock of free video library and the processed files can be exported as MP4 videos.
05Animaker
Creating cartoons and other animations can be done quickly and easily using this online tool that comes along with several pre-designed templates. The tool is simple to use and requires no specialized skill sets or technical know-how. Some of the interesting features for animation creation include character building, lip-syncing, facial expressions, smart moves, and more. You can customize the templates at the program and create the desired animation using the wide collection of images, videos, GIFs, and music files.
06Vyond
Professional-looking animated videos can be created using this cloud-based tool. You can either create an animation from scratch or use one of the templates at the site and then customize it as needed. The lip-sync feature of the tool allows you to import or an audio file or even add a voice recording. Animations for marketing, training, communications, HR and other purposes can be created using the tool. The tool comes with a 14-days free trial version after which you need to upgrade to a paid plan.
07Renderforest
This online tool comes with more than 500 templates in different categories that can be used along with multiple customization tools of the program to create the desired 2D as well as 3D animation. Simple interface and easy steps make the tool apt even for the ones who do not possess technical know-how. Several toolkits like the 3D video toolkit, whiteboard animation toolkit, and others are available at the site for you to learn the process. Customization options include adding music, adjusting scene order, adjusting VoiceOver, and more. The created video can be directly uploaded to YouTube or can be saved to the local system or project library.
08Animatron
Using this browser-based tool you can easily create animated videos for multiple purposes like presentation, explainer videos, banners, whiteboard animations, and more. You can choose from more than 200 animated templates available at the site and then customize them as required multiple functions. In addition to your videos and other media files, you can also add them from the free library available at Animatron. You can preview the created animation and then export it to your system or directly to popular social media platforms. Tutorials o guide you through the process of animated video creation are also present on the site.
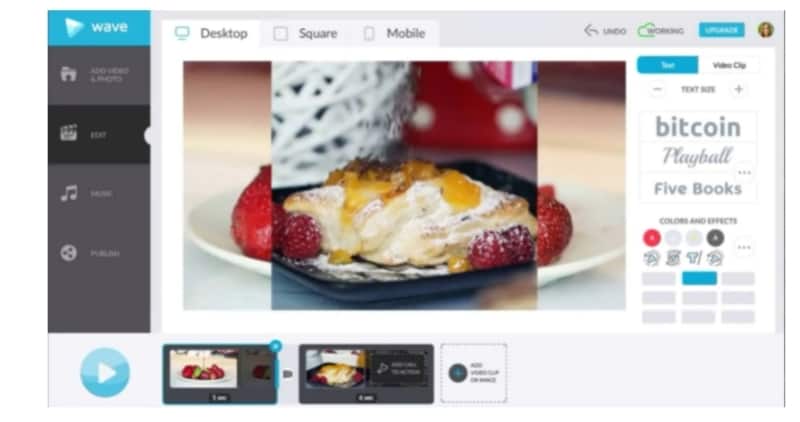
09MotionDen
This is another widely used name when it comes to online video creation tools. This simple yet functional program will let you create animated videos of your choice using multiple templates available at the site. There is a collection of desktop as well as mobile-friendly templates. These template’s video, music, photos, text, and other elements can be customized using the program editor and then the processed video can be quickly downloaded to your local system.
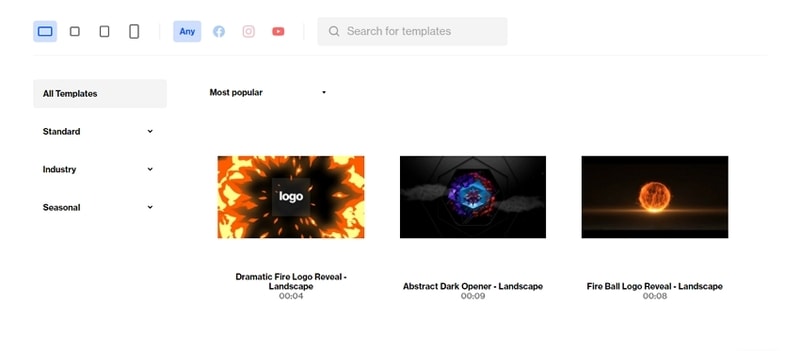
10Toonator
Creating cartoons is simple and quick using this online tool that requires no software download or installation. Using the program, you can create an interesting cartoon as needed as well as edit the graphics. The tool can also work with your tablets that making it easy to edit the files using a pen or fingers. You can even check the designs of cartoons that have been created by other users.
11Biteable
To create animations for your social media sites, marketing, and other requirements, this is a versatile tool to use. You can use the readymade templates available at the site or can also create animation from a scratch. Customize the templates by selecting the scenes, adding images, music, and text as needed. The animated videos can be saved locally or can also be uploaded to popular social media sites.
Part 3 Part Best Alternative to online tools for creating professional animated videos
****Wondershare Filmora Video Editor **
Online tools are simple programs for basic animated video creation. Moreover, these programs are internet-dependent and support limited file size processing. So, if you are looking for an alternative program for creating professional-looking animated videos with support to advanced features, Wondershare Fimora works as an excellent alternative. This Windows and Mac-based tool comes with an array of features that can let you create the desired 2D, 3D, and other animated videos in just a few simple steps.
For Win 7 or later (64-bit)
For macOS 10.12 or later
Key features of the software
● Create professional-looking 2D, 3D, and other animated videos using keyframes.
● Customize the animations using features like motion tracking, pan & zoom, ease-in, ease-out, and more.
● Add customized text & titles, lights & flares, masking, warp, distorting, and more.
● High-quality pre-set available for auto-correction, color wheels, scopes, and more.
● Customize audio using features like automatic audio sync, audio compression, noise reduction, audio transitions, and more.
● Windows and Mac support.
● Key Takeaways from This Episode →
● Animated videos are important to improve the conversion rates, increase the reach of the videos, engage the viewers, and more.
● Several 3D online animation maker is available that can help create decent animated videos.
● With restrictions and limitations of 3D animation websites, professional software like Wondershare Fimora works as the best alternative.
Gone are the days when creating animation requires expert skills, time, and a lot of money. Thanks to technological advancement several software and tools are available for creating animated videos in a hassle-free manner.
The following parts of the topic will help you to learn in detail about animation videos, their importance, the best software, and animation online website tools.
In this article
01 [What is an Animated Video and Its Importance?](#Part 1)
02 [Top 11 Online Animation Video Maker](#Part 2)
03 [Best Alternative To Online Tools For Creating Professional Animated Videos ](#Part 3)
Part 1 What is an Animated Video and Its Importance?
Animated Video
In simplest terms, animation refers to a method where figures appear as moving images to make them look lively and interesting. Using the drawings, effects, designs, and illustrations, an animated video is created to catch your attention. Animations can be of several types like cartoon animations, 3D animations, motion graphics, CGI, 2D animations, and more.
Benefits of using Animated videos
Animated videos have dominated the entire digital space and there are several reasons for the same. Some of the major ones are enlisted below.
● Add life to your concepts
● Bring in the content to your interesting ideas
● Ability to represent abstract ideas visually
● Video production can be managed in a hassle-free manner
● Animated videos are more visually and psychologically appealing
● Helps in boosting the conversion rates
● Makes you stand out from the competition
● Helps in expanding the reach and getting the attention and engagement
● Improves SEO
Part 2 Top 11 online animation video maker
If you are in search of a simple yet effective solution to create animations, 3D animation maker online tools work as a great choice. The majority of these programs are free and simple to use and support all basic animation requirements. Below listed are the top 11 online 3D animation makers that can be used for creating impressive animations.
01PowToon
This is a widely used online tool that supports creating videos in multiple formats including animated ones. The tool majorly supports features related to cartoon animation and depending on your requirements you can choose from different licenses and plans. Some of the key features of the tool include presentation mode, animation mode, readymade templates, integration with different tools, and others.
02Moovly
This is one of the top online animation maker 3D tool for creating interesting and eye-catchy animations. The tool is completely cloud-based and thus there is no need for any software download or installation. Different types of animations like doodles, cartoons, and others can be created easily using the program. Huge stock of videos, sound, music, motion graphics, photos, and others are available at the program to create a customized animation as required.
03Explee
This is a simple to use online tool that can help you create animated videos in a few simple steps. The program focuses on using a whiteboard which along with Explee’s Bringlife technology can create impressive animations. More than 6000 images are available at the tool for illustrating your concept and ideas. Some of the animation features supported by the tool include draw, pop, pin, fade, and others.
04Wideo
This is a simple yet versatile 3D online animation maker tool for animated video creation. Several pre-designed templates are available using which animated videos can be created quickly and easily. The free version of the tool allows creating animations for up to 30 seconds and for longer animations you would need to upgrade to a paid subscription. The tool also has a stock of free video library and the processed files can be exported as MP4 videos.
05Animaker
Creating cartoons and other animations can be done quickly and easily using this online tool that comes along with several pre-designed templates. The tool is simple to use and requires no specialized skill sets or technical know-how. Some of the interesting features for animation creation include character building, lip-syncing, facial expressions, smart moves, and more. You can customize the templates at the program and create the desired animation using the wide collection of images, videos, GIFs, and music files.
06Vyond
Professional-looking animated videos can be created using this cloud-based tool. You can either create an animation from scratch or use one of the templates at the site and then customize it as needed. The lip-sync feature of the tool allows you to import or an audio file or even add a voice recording. Animations for marketing, training, communications, HR and other purposes can be created using the tool. The tool comes with a 14-days free trial version after which you need to upgrade to a paid plan.
07Renderforest
This online tool comes with more than 500 templates in different categories that can be used along with multiple customization tools of the program to create the desired 2D as well as 3D animation. Simple interface and easy steps make the tool apt even for the ones who do not possess technical know-how. Several toolkits like the 3D video toolkit, whiteboard animation toolkit, and others are available at the site for you to learn the process. Customization options include adding music, adjusting scene order, adjusting VoiceOver, and more. The created video can be directly uploaded to YouTube or can be saved to the local system or project library.
08Animatron
Using this browser-based tool you can easily create animated videos for multiple purposes like presentation, explainer videos, banners, whiteboard animations, and more. You can choose from more than 200 animated templates available at the site and then customize them as required multiple functions. In addition to your videos and other media files, you can also add them from the free library available at Animatron. You can preview the created animation and then export it to your system or directly to popular social media platforms. Tutorials o guide you through the process of animated video creation are also present on the site.
09MotionDen
This is another widely used name when it comes to online video creation tools. This simple yet functional program will let you create animated videos of your choice using multiple templates available at the site. There is a collection of desktop as well as mobile-friendly templates. These template’s video, music, photos, text, and other elements can be customized using the program editor and then the processed video can be quickly downloaded to your local system.
10Toonator
Creating cartoons is simple and quick using this online tool that requires no software download or installation. Using the program, you can create an interesting cartoon as needed as well as edit the graphics. The tool can also work with your tablets that making it easy to edit the files using a pen or fingers. You can even check the designs of cartoons that have been created by other users.
11Biteable
To create animations for your social media sites, marketing, and other requirements, this is a versatile tool to use. You can use the readymade templates available at the site or can also create animation from a scratch. Customize the templates by selecting the scenes, adding images, music, and text as needed. The animated videos can be saved locally or can also be uploaded to popular social media sites.
Part 3 Part Best Alternative to online tools for creating professional animated videos
****Wondershare Filmora Video Editor **
Online tools are simple programs for basic animated video creation. Moreover, these programs are internet-dependent and support limited file size processing. So, if you are looking for an alternative program for creating professional-looking animated videos with support to advanced features, Wondershare Fimora works as an excellent alternative. This Windows and Mac-based tool comes with an array of features that can let you create the desired 2D, 3D, and other animated videos in just a few simple steps.
For Win 7 or later (64-bit)
For macOS 10.12 or later
Key features of the software
● Create professional-looking 2D, 3D, and other animated videos using keyframes.
● Customize the animations using features like motion tracking, pan & zoom, ease-in, ease-out, and more.
● Add customized text & titles, lights & flares, masking, warp, distorting, and more.
● High-quality pre-set available for auto-correction, color wheels, scopes, and more.
● Customize audio using features like automatic audio sync, audio compression, noise reduction, audio transitions, and more.
● Windows and Mac support.
● Key Takeaways from This Episode →
● Animated videos are important to improve the conversion rates, increase the reach of the videos, engage the viewers, and more.
● Several 3D online animation maker is available that can help create decent animated videos.
● With restrictions and limitations of 3D animation websites, professional software like Wondershare Fimora works as the best alternative.
8 Blender 3D Animation Tutorials
8 Blender 3D Animation Tutorials for Beginners
An easy yet powerful editor
Numerous effects to choose from
Detailed tutorials provided by the official channel
Blender animation software is one of the open-source software chosen to create animations. It is easy to create animations, videos or graphics, etc. If you want to be an animation 3D artist, make creative universes, and meet each of the different characters moving around in your heart.
You will learn the step-by-step procedure to create animations and add other edits to the animation. And also a few tips to develop better Blender 3D animation effects.
In this article
01 [Is Blender best for animation?](#Part 1)
02 [How to Create 3D Animated Characters with Blender in 15 Minutes.](#Part 2)
03 [Become a Pro from Beginners in 8 Tutorials](#Part 3)
Part 1 Is Blender best for animation?
The answer to if the Blender is suitable for animation is yes. Blender animation is the best for making animations and bringing any living to animator. This software is mostly for professional works whose limitations will be learning the process, not any technical defects. Let’s talk about why Blender 3D animation software is the best and more helpful.
Character animation is an essential tool for animation, and Blender has developed this tool with no way less to other software.
There are many animation effects other than animating characters. Blender 3D for free has all the necessary tools to do all types of rigs and animations without any difficulty.
Blender is one software that has 2D animation inbuilt in it, like drawing and creating 2D animation.
Blender’s animation tools are making motion graphics possible by advancing the features than it was four years ago.
Nowadays, many people are using Blender to do professional works, including freelancers, small studios, and even game developers.
Part 2 How to Create 3D Animated Characters with Blender in 15 Minutes.
This is a series for people who want to learn how to create 3D blender animation characters from keeping a reference image. Blender’s ringing tools will be more helpful for this process.
01Step 1: Importing
Initially, import a Blender 3D animation character into the Blender to animate. Many free and paid characters are available in Vincent, and Rain v2.0 is present in Blender Cloud; above all, these characters are for free.
Steps to import the character either from Vincent or Rain v2.0
Download the character file from the cloud to any destination folder on the computer. Open the Blender and place the cursor on the origin point on the screen. Later select import present in the File menu and choose the file format. And now, allow the Python script to run for the selected character folder.

02Step 2: Add Keyframes
There will be a diamond-shaped icon below to choose the keyframe you want to add to the timeline, which you may also delete.
Adding a keyframe is simple. Open the timeline window in the animation editor. Press the alphabet ‘G’ on the keyboard, move the bone and place it. Then hit Shift+I and choose the channel LocRot and insert the keyframe. Likewise, you can adjust the keyframe by dragging, making it fast or slow to the requirements.
Moving the keyframe to 20 makes it faster, and moving to 40, slower.
03Step 3: Get Reference Materials
It will be challenging to add movements to the characters, so plenty of videos can get the moves right. There are various reference images and videos available on the Internet. You can either add the selected reference materials to the second screen or add them to the 3D space. Let’s discuss how to add it.
Hit Shift + A to add the reference material. Later select “Image” and then choose the “Background.” Scale the reference image onto the 3D space after it loads.
Afterward, you can leave it to the animation of the reference article, or you can further edit or amplify the movements.
04Step 4: Fine–Tuning and Sound
This step will add smooth movements by combining two keyframes for a more professional look. We have to use the Dope sheet to do complete this process. Let’s see how to add it.
Initially, split the window horizontally. Later switch over the dope sheet below the animation tab, where you can see keyframes of all axis. Now you can drag and edit to slow or amplify the speed.
There is a Graphic editor, which is more advanced to make the movements more accurately and directly to edit the curves.
Sound effects make any video or animation better. You can add and import the sound files. You can also create your sound and insert it into the Blender. Let’s discuss adding sound and making it sync to the character.
Download the audio file, hit shift + A to open Add menu, and choose the “Sound.” Now select the sound that you wish to add.
Drag the sound to keep it to the specific sections alone. Also, you can switch between “No Sync” to “AV Sync” in the playback to give the best synchronization to the characters. The volume and pitch can be adjusted using the sidebar.
05Step 5: Rendering
Before rendering, make sure you keep the FPS is same as that chosen during the keyframes to avoid unnecessary renders. After setting the frame correctly, causing the animation is easy.
Initially, click on “scene” and choose the file extension, file formats, and file colors (BW, RGB, or RGBA). Select the encoding container as “WebM” and video Codec as “WEBM/VP9. After adding the sound, set the audio codec to “Vorbis.” Choose output quality and speed.
After all the rendering, select Render from the top bar and select “Render Animation” in Blender Animation.
Awesome! We have successfully blended a character using Blender 3D animation software. With more practice and knowledge about more tools, one can easily use the Blender 3D mouse.
Part 3 Become a Pro from Beginners in 8 Tutorials.
01Fix 1: Complete Beginners Guide to Blender 2.8
This YouTube tutorial focuses on Blender version 2.8. The tutorial features the redesigned user interface and tools like 3D viewpoint and UV editor, which has new interactive tools. And about different 3D shapes and simple edits like adding colors and “G drag,” etc.
02Fix 2: Blender 2.9 for Absolute Beginners
This YouTube tutorial on Blender 3D animation software version 2.9 has the new advancement about denoiser interactivity in the 3D viewpoint. The YouTuber explains EEVEE, cycles, workbench, movements, rotate, and scale objects.
03Fix 3: Blender Day -1 Absolute Basics - Introduction Series for Beginners
This YouTube tutorial says about the introduction to the Blender 3D for free for beginners. He explains simple movements like rotating and scaling, shapes, and colors to the objects. He also says about the pivot plot and how to create a basic primitive using blender.
04Fix 4: Zoync TV’s Blender Beginners Series
The Blender Beginners video by ZoyncTV is on Blender 2.6. Indeed, even as hotkeys and terms change, the hidden ideas will forever be pertinent. Every video in this 11-section is somewhere between 10 and 20 minutes, split into five separate subjects: displaying, modifiers, materials, surfaces, and animations. It’s a beginner-level course.
05Fix 5: The Blender Survival Guide
The Blender Survival Guide series by Creative COW is outdated but the best video for somebody who has never utilized Blender. Each video in this 13-section series is somewhere in the range of 15 and 45 minutes in length, which means you’ll get 350 intense minutes of preparing. It is a survival reference that shows just the outright necessities.
06Fix 6: KatBit’s Blender Tutorial
The KatsBits site is home to lots of tutorials, video games. Its Blender animation tutorials are fantastic when you want a beginning stage for various 3D models. There are 45 Blender tutorials. Tutorials take you through the most common way of making a 3D level for Quake and tell you the best way to make a basic model.
07Fix 7: Daniel Krafft’s 100 Blender 2.8 Tips
While this is another Blender 2.8 tutorial, Daniel’s tips are overall for any Blender work process. He teaches simple stuff like vertex and edges and some technical parts in the Blender 3D animation software.
08Fix 8: Blender 3D: Noob to Pro
This last tutorial is a “wiki book” called Blender 3D: Noob to Pro that consists of important Blender animation tips and experiences. Start with an outline of 3D ideas and a top-to-bottom introduction to Blender.
Regarding Blender 3D mouse software, we would like to recommend one more tool to you the most. Yes, it is none other than Wondershare Filmora, a perfect alternative to Blender 3D animation software wherein you can get excellent 3D animation effects, 3D texts and animate it. There are some simple steps and various options to work in Filmora for creating 3D animated effects.
● Composition
● Creating our 3D text
● Creating the 3D look
● Basics of 3D animation
● Animating the text in 3D
There are countless YouTube tutorial videos for working with Wondershare Filmora Video Editor ‘s latest version.
Key Takeaways from This Episode
● We learned about Blender 3D animation software.
● How can you create characters using Blender animation?
● 8 Tutorials to move you from a beginner to a Pro.
Blender animation software is one of the open-source software chosen to create animations. It is easy to create animations, videos or graphics, etc. If you want to be an animation 3D artist, make creative universes, and meet each of the different characters moving around in your heart.
You will learn the step-by-step procedure to create animations and add other edits to the animation. And also a few tips to develop better Blender 3D animation effects.
In this article
01 [Is Blender best for animation?](#Part 1)
02 [How to Create 3D Animated Characters with Blender in 15 Minutes.](#Part 2)
03 [Become a Pro from Beginners in 8 Tutorials](#Part 3)
Part 1 Is Blender best for animation?
The answer to if the Blender is suitable for animation is yes. Blender animation is the best for making animations and bringing any living to animator. This software is mostly for professional works whose limitations will be learning the process, not any technical defects. Let’s talk about why Blender 3D animation software is the best and more helpful.
Character animation is an essential tool for animation, and Blender has developed this tool with no way less to other software.
There are many animation effects other than animating characters. Blender 3D for free has all the necessary tools to do all types of rigs and animations without any difficulty.
Blender is one software that has 2D animation inbuilt in it, like drawing and creating 2D animation.
Blender’s animation tools are making motion graphics possible by advancing the features than it was four years ago.
Nowadays, many people are using Blender to do professional works, including freelancers, small studios, and even game developers.
Part 2 How to Create 3D Animated Characters with Blender in 15 Minutes.
This is a series for people who want to learn how to create 3D blender animation characters from keeping a reference image. Blender’s ringing tools will be more helpful for this process.
01Step 1: Importing
Initially, import a Blender 3D animation character into the Blender to animate. Many free and paid characters are available in Vincent, and Rain v2.0 is present in Blender Cloud; above all, these characters are for free.
Steps to import the character either from Vincent or Rain v2.0
Download the character file from the cloud to any destination folder on the computer. Open the Blender and place the cursor on the origin point on the screen. Later select import present in the File menu and choose the file format. And now, allow the Python script to run for the selected character folder.
02Step 2: Add Keyframes
There will be a diamond-shaped icon below to choose the keyframe you want to add to the timeline, which you may also delete.
Adding a keyframe is simple. Open the timeline window in the animation editor. Press the alphabet ‘G’ on the keyboard, move the bone and place it. Then hit Shift+I and choose the channel LocRot and insert the keyframe. Likewise, you can adjust the keyframe by dragging, making it fast or slow to the requirements.
Moving the keyframe to 20 makes it faster, and moving to 40, slower.
03Step 3: Get Reference Materials
It will be challenging to add movements to the characters, so plenty of videos can get the moves right. There are various reference images and videos available on the Internet. You can either add the selected reference materials to the second screen or add them to the 3D space. Let’s discuss how to add it.
Hit Shift + A to add the reference material. Later select “Image” and then choose the “Background.” Scale the reference image onto the 3D space after it loads.
Afterward, you can leave it to the animation of the reference article, or you can further edit or amplify the movements.
04Step 4: Fine–Tuning and Sound
This step will add smooth movements by combining two keyframes for a more professional look. We have to use the Dope sheet to do complete this process. Let’s see how to add it.
Initially, split the window horizontally. Later switch over the dope sheet below the animation tab, where you can see keyframes of all axis. Now you can drag and edit to slow or amplify the speed.
There is a Graphic editor, which is more advanced to make the movements more accurately and directly to edit the curves.
Sound effects make any video or animation better. You can add and import the sound files. You can also create your sound and insert it into the Blender. Let’s discuss adding sound and making it sync to the character.
Download the audio file, hit shift + A to open Add menu, and choose the “Sound.” Now select the sound that you wish to add.
Drag the sound to keep it to the specific sections alone. Also, you can switch between “No Sync” to “AV Sync” in the playback to give the best synchronization to the characters. The volume and pitch can be adjusted using the sidebar.
05Step 5: Rendering
Before rendering, make sure you keep the FPS is same as that chosen during the keyframes to avoid unnecessary renders. After setting the frame correctly, causing the animation is easy.
Initially, click on “scene” and choose the file extension, file formats, and file colors (BW, RGB, or RGBA). Select the encoding container as “WebM” and video Codec as “WEBM/VP9. After adding the sound, set the audio codec to “Vorbis.” Choose output quality and speed.
After all the rendering, select Render from the top bar and select “Render Animation” in Blender Animation.
Awesome! We have successfully blended a character using Blender 3D animation software. With more practice and knowledge about more tools, one can easily use the Blender 3D mouse.
Part 3 Become a Pro from Beginners in 8 Tutorials.
01Fix 1: Complete Beginners Guide to Blender 2.8
This YouTube tutorial focuses on Blender version 2.8. The tutorial features the redesigned user interface and tools like 3D viewpoint and UV editor, which has new interactive tools. And about different 3D shapes and simple edits like adding colors and “G drag,” etc.
02Fix 2: Blender 2.9 for Absolute Beginners
This YouTube tutorial on Blender 3D animation software version 2.9 has the new advancement about denoiser interactivity in the 3D viewpoint. The YouTuber explains EEVEE, cycles, workbench, movements, rotate, and scale objects.
03Fix 3: Blender Day -1 Absolute Basics - Introduction Series for Beginners
This YouTube tutorial says about the introduction to the Blender 3D for free for beginners. He explains simple movements like rotating and scaling, shapes, and colors to the objects. He also says about the pivot plot and how to create a basic primitive using blender.
04Fix 4: Zoync TV’s Blender Beginners Series
The Blender Beginners video by ZoyncTV is on Blender 2.6. Indeed, even as hotkeys and terms change, the hidden ideas will forever be pertinent. Every video in this 11-section is somewhere between 10 and 20 minutes, split into five separate subjects: displaying, modifiers, materials, surfaces, and animations. It’s a beginner-level course.
05Fix 5: The Blender Survival Guide
The Blender Survival Guide series by Creative COW is outdated but the best video for somebody who has never utilized Blender. Each video in this 13-section series is somewhere in the range of 15 and 45 minutes in length, which means you’ll get 350 intense minutes of preparing. It is a survival reference that shows just the outright necessities.
06Fix 6: KatBit’s Blender Tutorial
The KatsBits site is home to lots of tutorials, video games. Its Blender animation tutorials are fantastic when you want a beginning stage for various 3D models. There are 45 Blender tutorials. Tutorials take you through the most common way of making a 3D level for Quake and tell you the best way to make a basic model.
07Fix 7: Daniel Krafft’s 100 Blender 2.8 Tips
While this is another Blender 2.8 tutorial, Daniel’s tips are overall for any Blender work process. He teaches simple stuff like vertex and edges and some technical parts in the Blender 3D animation software.
08Fix 8: Blender 3D: Noob to Pro
This last tutorial is a “wiki book” called Blender 3D: Noob to Pro that consists of important Blender animation tips and experiences. Start with an outline of 3D ideas and a top-to-bottom introduction to Blender.
Regarding Blender 3D mouse software, we would like to recommend one more tool to you the most. Yes, it is none other than Wondershare Filmora, a perfect alternative to Blender 3D animation software wherein you can get excellent 3D animation effects, 3D texts and animate it. There are some simple steps and various options to work in Filmora for creating 3D animated effects.
● Composition
● Creating our 3D text
● Creating the 3D look
● Basics of 3D animation
● Animating the text in 3D
There are countless YouTube tutorial videos for working with Wondershare Filmora Video Editor ‘s latest version.
Key Takeaways from This Episode
● We learned about Blender 3D animation software.
● How can you create characters using Blender animation?
● 8 Tutorials to move you from a beginner to a Pro.
10 Great Apps for Turning Funny Animated Images Into Comics
10 Great Apps for Turning Funny Animated Images into Comics
An easy yet powerful editor
Numerous effects to choose from
Detailed tutorials provided by the official channel
There are several apps available that can let you create interesting funny animated images, cartoons, and comics by adding speech bubbles, animations, and other effects.
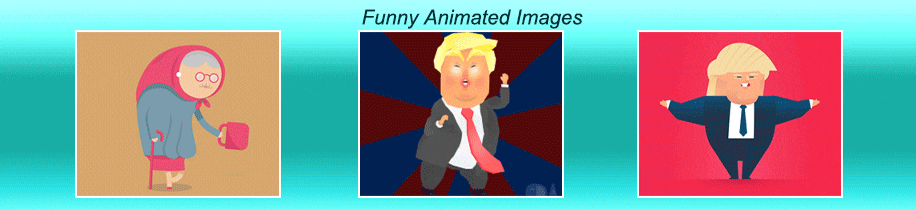
In this article
01 [Top apps to turn pictures into cartoons](#Part 1)
02 [Best Alternative to Cartoon Apps- Wondershare Filmorapro](#Part 2)
03 [Key Takeaways](#Part 3)
Part 1 Top apps to turn pictures into cartoons
To add some fun elements to your regular images and make them even more interesting you can convert them into cartoons and comics. The task of conversion can seem to be difficult and tricky but with the availability of several apps and programs, you can achieve the desired results in just a few clicks.
With multiple options available, you are bound to get confused while selecting an app. Helping you with the same, we have shortlisted the top 10 apps in the category as below.
01 Prisma Photo Editor
Available for download on Android and iOS devices this is an excellent photo editing app that comes with over 300 art filters and animations. You can quickly convert your images into funny and interesting cartoons using the app in no time. Additionally, several image parameters like sharpness, exposure, brightness, and others can also be adjusted as needed.
02 Photo Lab Picture Editor
This is free to use app on the Google Play Store with the IAP option. With a 4.6 high rating, the app is simple to use and offers more than 900 funny and stylish effects that can be added to your images. You can choose from photo montages, animations, filters, and other effects that match your requirements. You can even add photo frames to make your image look impressive. Create professional-looking cartoons in no time using this wonderful app.
03 MomentCam Cartoons & Stickers
This free app on Google Play Store with a 4 rating is just perfect for creating interesting cartoons and emoticons using images. The process is simple and quick where you just need to add the image and create its personalized avatar. Interesting background can also be added to further enhance the cartoon. The app also gives you the option to share the created cartoon on social media sites.

04 ToonMe
Create cartoons using your selfies and other images on your phone in just a few clicks using this high-rated app on Google Play Store. The AI of the app allows the creation of interesting full-body cartoons as well as vector portrait templates. Multiple layouts and designs are also available to choose from. The interface is simple and the app is also available for download Apple Play Store.

05 Pixlr- Free Photo Editor
This is a widely used image editing app that is simple and free to use. A wide range of image editing features and filters are available with the app including cartoon filters that will let you unleash your creativity and design impressive cartoons and other images. Also available for iOS devices the app also facilitates sharing the created images over social media and emails. Additional features include auto-fix, double exposure, adjusting image tone, and others.
06 Painnt- Pro Art Filters
This feature-packed app on Google Store lets you create professional-looking art pieces from the images using filters and animations. With more than 1000 filters in several categories including cartoons, classical, abstract, and others you can have a creation of your choice. App uses AI and also has an option for preview and fine-tuning. You can even share your creations with the app community and over social networking sites.
07 Clip2Comic & Caricature Maker
This is among the best app for iPhone users that allows creating funny and interesting cartoons, caricatures, and other artwork using images. Several other editing tools and filters are also available that support customizing high-quality and high-resolution images. Additionally, the app also supports editing the videos and converting them into animated clippings. The deformation filter further makes your creation look funny and interesting.
08 Deep Art Effects
This free app for Android and iOS devices comes with more than 100 effects and filters of different types including cartoon-based. Using the AI of the app, you can create impressive artwork in HD resolution. The app supports fast image processing and also supports sharing the artwork with the community. A paid premium version of the app is also available that has no ads, watermark, allows creating own filters, and has additional features.
09 Cartoon Photo Editor
This free app for iOS devices will let you turn your images into cartoons like a pro. The app comes with more than 15 cartoon filters to choose from and you can even choose the art style as a retro cartoon, Minecraft, and others. The images from the device can be added to the app or you can even capture one using the camera. The created cartoons can also be shared over social media sites using the app. The pro-paid version offers additional features and functions.
10 Comica- Comics and cartoon maker
As the name suggests, this is a comics and cartoon creating an app on Google Play Store. This lightweight app is free to use and comes with legit-looking effects and allows adding speech balloons. You can even create your memes using the app and take your creativity to a new level.

Key Takeaways from This Episode
● Check out the images on your smartphone or system that can be used for creating interesting cartoons.
● Analyze multiple apps and programs that can let you add cartoon and comic effects to your selected images.
● Finalize the tool that offers the best features, is simple to use, and can quickly convert your images to funny animated images and cartoons with added functionalities.
There are several apps available that can let you create interesting funny animated images, cartoons, and comics by adding speech bubbles, animations, and other effects.
In this article
01 [Top apps to turn pictures into cartoons](#Part 1)
02 [Best Alternative to Cartoon Apps- Wondershare Filmorapro](#Part 2)
03 [Key Takeaways](#Part 3)
Part 1 Top apps to turn pictures into cartoons
To add some fun elements to your regular images and make them even more interesting you can convert them into cartoons and comics. The task of conversion can seem to be difficult and tricky but with the availability of several apps and programs, you can achieve the desired results in just a few clicks.
With multiple options available, you are bound to get confused while selecting an app. Helping you with the same, we have shortlisted the top 10 apps in the category as below.
01 Prisma Photo Editor
Available for download on Android and iOS devices this is an excellent photo editing app that comes with over 300 art filters and animations. You can quickly convert your images into funny and interesting cartoons using the app in no time. Additionally, several image parameters like sharpness, exposure, brightness, and others can also be adjusted as needed.
02 Photo Lab Picture Editor
This is free to use app on the Google Play Store with the IAP option. With a 4.6 high rating, the app is simple to use and offers more than 900 funny and stylish effects that can be added to your images. You can choose from photo montages, animations, filters, and other effects that match your requirements. You can even add photo frames to make your image look impressive. Create professional-looking cartoons in no time using this wonderful app.
03 MomentCam Cartoons & Stickers
This free app on Google Play Store with a 4 rating is just perfect for creating interesting cartoons and emoticons using images. The process is simple and quick where you just need to add the image and create its personalized avatar. Interesting background can also be added to further enhance the cartoon. The app also gives you the option to share the created cartoon on social media sites.
04 ToonMe
Create cartoons using your selfies and other images on your phone in just a few clicks using this high-rated app on Google Play Store. The AI of the app allows the creation of interesting full-body cartoons as well as vector portrait templates. Multiple layouts and designs are also available to choose from. The interface is simple and the app is also available for download Apple Play Store.
05 Pixlr- Free Photo Editor
This is a widely used image editing app that is simple and free to use. A wide range of image editing features and filters are available with the app including cartoon filters that will let you unleash your creativity and design impressive cartoons and other images. Also available for iOS devices the app also facilitates sharing the created images over social media and emails. Additional features include auto-fix, double exposure, adjusting image tone, and others.
06 Painnt- Pro Art Filters
This feature-packed app on Google Store lets you create professional-looking art pieces from the images using filters and animations. With more than 1000 filters in several categories including cartoons, classical, abstract, and others you can have a creation of your choice. App uses AI and also has an option for preview and fine-tuning. You can even share your creations with the app community and over social networking sites.
07 Clip2Comic & Caricature Maker
This is among the best app for iPhone users that allows creating funny and interesting cartoons, caricatures, and other artwork using images. Several other editing tools and filters are also available that support customizing high-quality and high-resolution images. Additionally, the app also supports editing the videos and converting them into animated clippings. The deformation filter further makes your creation look funny and interesting.
08 Deep Art Effects
This free app for Android and iOS devices comes with more than 100 effects and filters of different types including cartoon-based. Using the AI of the app, you can create impressive artwork in HD resolution. The app supports fast image processing and also supports sharing the artwork with the community. A paid premium version of the app is also available that has no ads, watermark, allows creating own filters, and has additional features.
09 Cartoon Photo Editor
This free app for iOS devices will let you turn your images into cartoons like a pro. The app comes with more than 15 cartoon filters to choose from and you can even choose the art style as a retro cartoon, Minecraft, and others. The images from the device can be added to the app or you can even capture one using the camera. The created cartoons can also be shared over social media sites using the app. The pro-paid version offers additional features and functions.
10 Comica- Comics and cartoon maker
As the name suggests, this is a comics and cartoon creating an app on Google Play Store. This lightweight app is free to use and comes with legit-looking effects and allows adding speech balloons. You can even create your memes using the app and take your creativity to a new level.
Key Takeaways from This Episode
● Check out the images on your smartphone or system that can be used for creating interesting cartoons.
● Analyze multiple apps and programs that can let you add cartoon and comic effects to your selected images.
● Finalize the tool that offers the best features, is simple to use, and can quickly convert your images to funny animated images and cartoons with added functionalities.
Also read:
- 2024 Approved How I Animate Discord Profile Pictures
- In 2024, Best 12 Evil Cartoon Characters of All Time
- New 10 of the Best Disney Animated Shows (Sorted by Popularity Ascending)
- New The Best 10 Sketch Animation Video Makers
- Best 15 Greatest Claymation Movies of All Time for 2024
- New 2024 Approved The Secret Sauce for Making GIF Instagram Story More Aesthetic
- New In 2024, Tips That Show Anybody How to Get Awesome Background for Slideshow in PowerPoint
- Updated Top 4 Websites to Get Anime Footage for Free for 2024
- New How to Make a Video a Live Photo for 2024
- New In 2024, Little Known Techniques of Motion Graphics in Premiere Pro
- New How to Liven Up Your Animate Website on Scroll
- Updated 2024 Approved How to Make Creative Animation Videos
- In 2024, How to Send and Add Snapchat GIFs 100 in Easy Way
- Updated In 2024, Have You Seen the Facebook Cartoon App Everyones Using Recently
- New Learn How to Create Adobe 3D Animation
- New In 2024, 15 Horror Animes That Will Trigger a Heart Attack
- In 2024, The Only Guide to Make 2D Rigging Clear to You
- New Top 12 Evil Cartoon Characters of All Time
- Updated Animate Pictures in Canva
- New Top 10 Video to GIF Converters Top Picks
- New In 2024, Ways to Make Sure You Get the Most up to Date Cartoon Character Design Tips
- New In 2024, 18 Best Tools and Services to Create Animated Videos for Business 2023
- Updated Best 15 Anime Shows That Are Great to Binge Watch for 2024
- In 2024, Have You Seen the Facebook Cartoon App Everyones Using Lately
- New Top 10 Best Photo to Animation Converters That Give You an Advantage for 2024
- New Can I Do Animated Logo Design Without Design Skills, In 2024
- New 10 Classical Animated Cartoon Types With Examples for 2024
- Updated How to Make 3D Cartoon of Yourself for 2024
- Updated Top 3 Ways to Create Gif with Great 3D Gif Maker for 2024
- New Learn How to Draw Cartoons Step by Step with This Guide
- Updated In 2024, Top 10 Best and Fast Ways to Turn Image Into Gif
- In 2024, Why These 10 Top Text Motion Templates Are Worth Your Attention
- New 2024 Approved How to Insert a GIF Into Powerpoint
- New 2024 Approved How to Create Slideshow in LinkedIn
- Updated Convert Animated GIF From Video
- Finding Some Different Ways to Animated Cartoon of Yourself for 2024
- Animate Graphics in Canva
- Updated 2024 Approved Top 4 Websites to Get Anime Footage for Free
- New 2024 Approved 12 Animated Slideshow PowerPoint Templates
- New OBS Animated Lower Thirds Alternatives
- New Methods to Make Photo Motion Effect Online, In 2024
- New 2024 Approved What Are Differences Between 2D And 3D Animation
- New The Best 20 Motion Graphics Companies & Studios for 2024
- Hassle-Free Ways to Remove FRP Lock on Honor Magic 5 Prowith/without a PC
- In 2024, How to Change your Poco F5 5G Location on Twitter | Dr.fone
- In 2024, The Complete Guide to Vivo Y200 FRP Bypass Everything You Need to Know
- In 2024, Best Nubia Red Magic 8S Pro+ Pattern Lock Removal Tools Remove Android Pattern Lock Without Losing Data
- How to recover old music from your Nubia Red Magic 9 Pro+
- Apple iPhone 8 Backup Password Never Set But Still Asking? Heres the Fix
- What To Do if Your Vivo V30 Auto Does Not Work | Dr.fone
- 7 Solutions to Fix Chrome Crashes or Wont Open on Realme GT 5 Pro | Dr.fone
- Unlock iPhone 15 Plus With Forgotten Passcode Different Methods You Can Try
- How to Transfer Videos from Samsung Galaxy A15 4G to iPad | Dr.fone
- How to Change Location On Facebook Dating for your OnePlus 12R | Dr.fone
- In 2024, Complete Tutorial to Use VPNa to Fake GPS Location On Honor X50 | Dr.fone
- In 2024, Mastering Android Device Manager The Ultimate Guide to Unlocking Your Vivo S18 Device
- Bypass/Reset Honor Phone Screen Passcode/Pattern/Pin
- In 2024, Top 15 Augmented Reality Games Like Pokémon GO To Play On Vivo S17e | Dr.fone
- How to Transfer Videos from Oppo Find N3 to iPad | Dr.fone
- How to Transfer Photos from Samsung Galaxy S23 Tactical Edition to New Android? | Dr.fone
- iSpoofer is not working On Apple iPhone 7 Plus? Fixed | Dr.fone
- Fixes for Apps Keep Crashing on Lava Yuva 2 | Dr.fone
- In 2024, How Can Vivo V29eMirror Share to PC? | Dr.fone
- In 2024, The Ultimate Guide to Samsung Galaxy M14 4G Pattern Lock Screen Everything You Need to Know
- How to Rescue Lost Pictures from Blaze 2 Pro?
- Title: Updated 20 Free After Effects Logo Reveal Templates You Will Want to Know for 2024
- Author: Elon
- Created at : 2024-05-19 03:05:12
- Updated at : 2024-05-20 03:05:12
- Link: https://animation-videos.techidaily.com/updated-20-free-after-effects-logo-reveal-templates-you-will-want-to-know-for-2024/
- License: This work is licensed under CC BY-NC-SA 4.0.
