
Updated 2024 Approved 10 Realistic Cartoon Characters You Would Run Away From if You Met in Real Life
10 Realistic Cartoon Characters You Will Run Away From if You Met in R
10 Realistic Cartoon Characters You Would Run Away From if You Met in Real Life
An easy yet powerful editor
Numerous effects to choose from
Detailed tutorials provided by the official channel
Remember watching a cartoon reality show on the Cartoon Network? We all grew up watching cartoons. Cartoons are an unforgettable part of our childhood. But have you ever wondered what would your favorite cartoon characters look like in real life? Many cartoon characters like Popeye, Sponge Bob, Mickey Mouse, etc. look funny in their 2D images. Watching them do funny things and their funny expressions have always been fun.
But with the advancement in technology and the passage of time, we have some digital artists like Tatiana and Miguel Vasquez, who have recreated your famous cartoon characters into 3D. They have given them a realistic look that will scare you. These realistic cartoon faces will blow your mind.
In this article
01 [What’s a Realistic Cartoon?](#Part 1)
02 [10 Realistic Cartoon Characters You Would Run Away From If You Met In Real Life](#Part 2)
03 [How Do Cartoon Characters Reimagined As Realistic 3D Animation](#Part 3)
Part 1 What’s Realistic Cartoon?
Before moving towards the list of realistic cartoon characters, you must first know what a realistic cartoon is. As we all know, any animated drawing or illustration is a cartoon, it can either be non-realistic or semi-realistic. Earlier artists used to draw these cartoon characters on paper, but now technology has evolved.
With the introduction of different AI tools, many digital artists have recreated 3D versions of your favorite cartoon characters. These 3D versions of different cartoons are known as realistic cartoons. This can be done easily with help of AI technology and Digital Software.
Part 2 Realistic Cartoon Characters You Would Run Away From If You Met In Real Life
Have you ever thought how would your favorite cartoon character sponge bob looks like in real life? We will show you realistic versions of your favorite cartoon characters. Stay tuned for great fun waiting for you in this article!
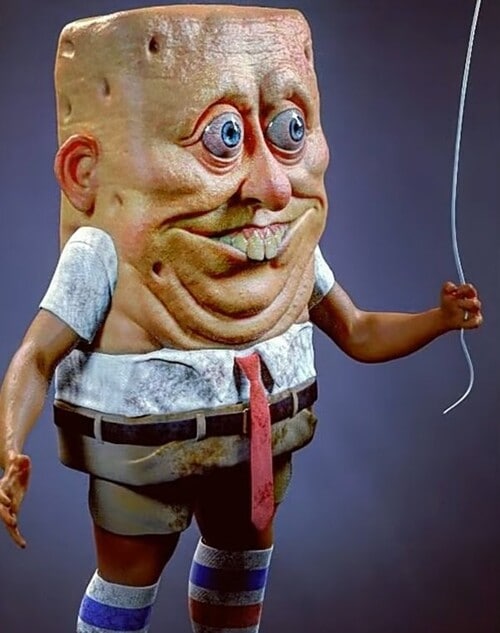
01Sponge Bob (Sponge Bob Square Pants)
Sponge Bob Square Pants is an animated series full of fun and comedy. This show currently runs on Nickelodeon. Sponge Bob is a yellow-colored sea sponge and the main protagonist of the show. He is a cook at a restaurant named Krusty Krab. He often goes on adventures with his best friend Patrick Star. He mainly focuses on and aims at getting a boat-driving license from Mr. Puff’s boating school.
Have a look at the 3D recreation of this funny creature.
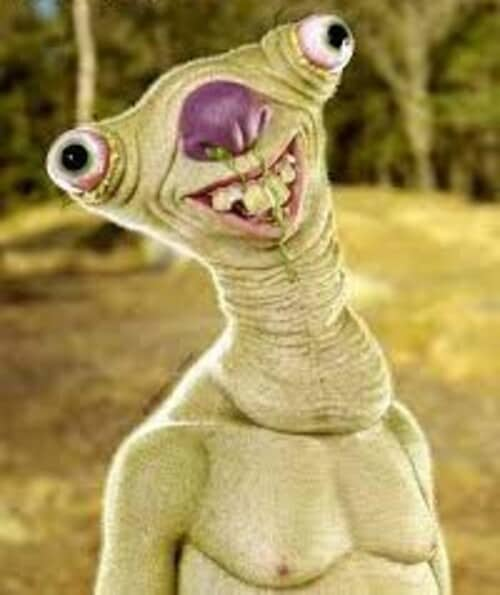
02Sid the Sloth (Ice Age)
Ice Age is one of the most popular animated series that revolves around the lives of a mammoth, tiger, sloth, and a scrat. A scrat is a combination of a squirrel and a rat. This series became so popular among the children that it was even nominated for an Oscar award.
It has a character called Sid. He is an abandoned sloth. His mother left him for some good to happen with him during the migration. His character in the entire series exhibits a friendly and carefree nature. Sometimes, he also acts as dumb and naïve.
Look at the funny recreation of this dumb-witted character. Does this recreation scare you?
03Mr. Krabs (Sponge Bob Square Pants)
Sponge Bob Square Pants is one of the cartoons that have many different and funny-looking creatures. Mr. Krabs is one of those characters. He is a money-minded and miserly creature. He is the owner of the Krusty Krab fast food restaurant, where Sponge Bob works as a cook. He has a teenage daughter named Pearl and he can do anything to see her happy. He exhibits romantic feelings for Mrs. Puff.
Does this funny creature from the Sponge Bob series look funny in real life too?

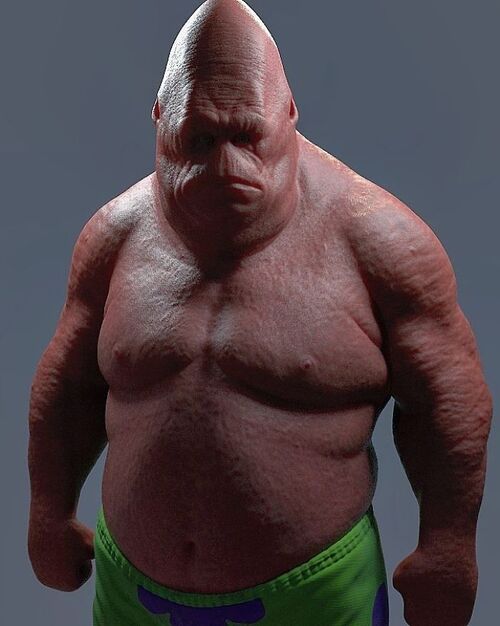
04Patrick Star (Sponge Bob Square Pants)
Patrick Star is again a character from the cartoon show Sponge Bob Square Pants. He is the best friend of the main protagonist Sponge Bob, who lives 2 houses away from Sponge Bob’s house. He is a lazy, fat, and stupid pink-colored starfish. His character makes the show funnier and more interesting for kids.
How would you react when you will see this funny creature from Sponge Bob in real life? His 3D recreation seems a bit scary like a monster in real life.
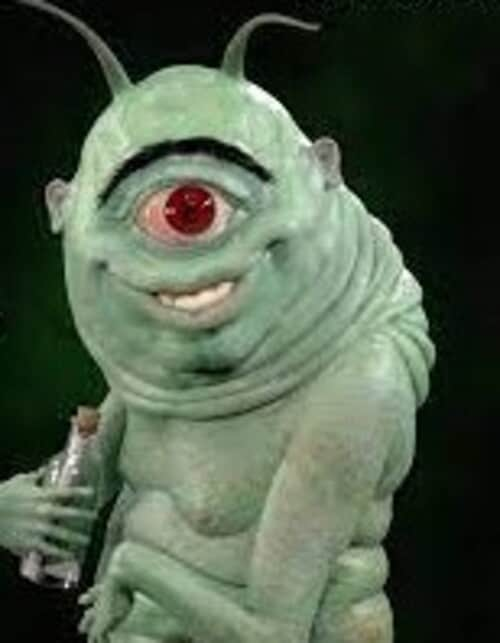
05Plankton (Sponge Bob Square Pants)
Plankton was once the best friend of Mr. Krabs but now they both share a rivalry bond. He is married to Karen and owns a fast food restaurant named Chum Bucket Restaurant in competition with Mr. Krabs’ Restaurant. He plays the antagonist character in the series. His restaurant doesn’t work as successfully as Krusty Krab Restaurant. In rivalry, he often comes up with different plans and tricks to outwit Mr. Krabs and steal the secret recipe of his famous Krabby Patty Burger, but never succeeds.
Have a look at the 3D recreation of this funny character from the series.
06Homer (The Simpsons)
The Simpsons is an animated series that revolves around the life of an American family. The Simpson family has five members named Homer, Marge, Bart, Lisa, and Maggie. Homer Simpson is the main character of this series. He lives in Springfield and is employed as a Safety Inspector at Springfield Nuclear Power Plant. He is married to Marge and is the father of three children – Bart, Lisa, and Maggie. The series depicts a strong bond of love and care for each other in the family.
Have a look at this realistic 3D recreation of Homer Simpson.
07Bugs Bunny (Looney Tunes)
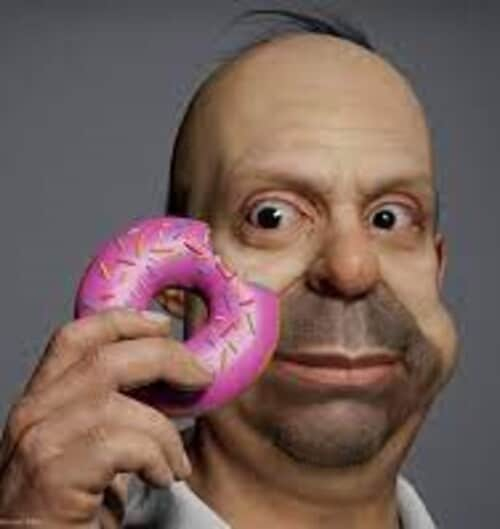
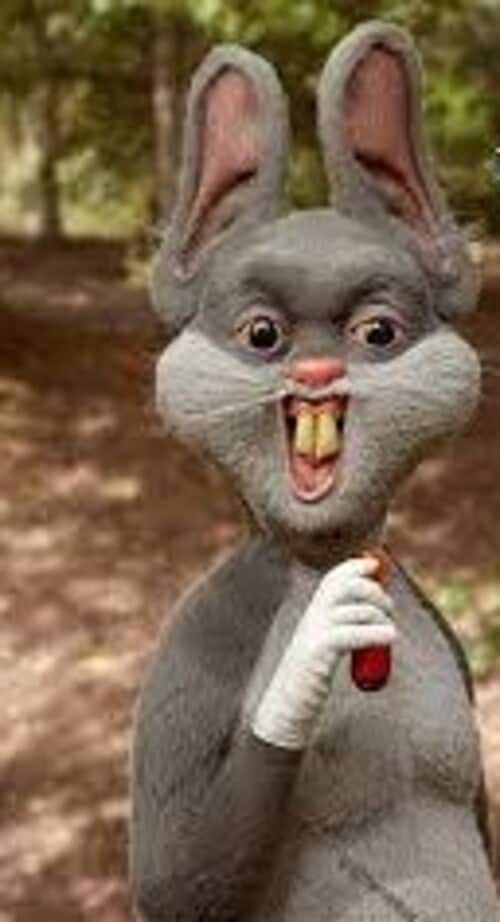
Looney Tunes is entertaining people of all ages due to its great and funny characters. Bugs Bunny is one of our favorite characters from the animated cartoon show Looney Tunes. He is the main protagonist and the most popular character of the series. Kids love him the most because of his mischievous acts in the show. He looks too funny with a mouth filled with carrots and wearing funny costumes. This unique character has a great fan following all over the world.
The 3D recreation of this famous cartoon character is funny and scary at the same time.
08Sally (The Nightmare Before Christmas)
As the name suggests, The Nightmare Before Christmas is an American dark fantasy animated movie. This animated movie has received great financial success and appreciation for its wonderful characters and music.
Sally is a shy ragdoll created by a scientist Doctor Finkelstein. She secretly loves Jack – the main Protagonist of the movie. She tells him not to mix the preparation of Christmas with the Halloween party.
Look at her realistic 3D recreation by Tatiana, popularly known as TatiMoons.

09Stitch (Lilo and Stitch)
Lilo and Stitch is also an animated American movie. It is a science fiction and comedy movie that attracts the interest of people of all age groups. The story of this animated movie revolves around the two main characters named Lilo and Stitch. Lilo is a 7-year old orphan girl whose parents died in a car accident. She has a pet named Stitch.
The original name of Stitch is Experiment 626. He was illegally created by a scientist Jumba Jokiba through a genetic experiment. Lilo adopts him thinking that he is an innocent creature, she doesn’t know about his birth and origin.
Have a look at this realistic 3D recreation of Stitch’s character. Isn’t it scary?

10 Popeye (Popeye – The Sailor Man)
Popeye – The Sailor Man is another famous cartoon series. Popeye is the main protagonist of this series. He has a girlfriend named Olive Oyl. This series depicts the love triangle between Popeye, Olive, and Bluto. He is an uneducated sailor man who gets energy by eating spinach. He often comes up with non-realistic solutions to different problems and helps the police by investigating different cases. He has a versatile tobacco smoking pipe that sometimes acts as a whistle, and he even intakes the spinach through his pipe.
In the cartoon films, he looks funny, but this 3D recreation of his character is a bit scary.

Part 2 How Do Cartoon Characters Reimagined As Realistic 3D Animation
Nowadays, it has become easier to create and turn your imagination into a cartoon character with different online 3D animators. This makes storytelling easier and funny and it is a great way to engage children. Out of all the 3D animation tools, Filmora will assist you to create the best 3D version of your favorite cartoon character.
Filmora has various smart features that help you to turn any image into realistic 3D animation. You can create great animations using Wondershare Filmora Video Editor within a couple of hours. It offers you many different features that help in convenient customization.
● Ending Thoughts →
● Being a cartoon lover, we hope that you would have liked the 3D recreation of your favorite cartoons. Some of these 3D recreations are so scary that you would just run away from them in real life and some look like real monster cartoons.
● AI combined with digital software like Filmora makes it easier to create these 3D versions of famous cartoon characters.
● With Filmora, you don’t need to spend hours sketching cartoon characters on paper. You can easily create great and realistic animations digitally.
Remember watching a cartoon reality show on the Cartoon Network? We all grew up watching cartoons. Cartoons are an unforgettable part of our childhood. But have you ever wondered what would your favorite cartoon characters look like in real life? Many cartoon characters like Popeye, Sponge Bob, Mickey Mouse, etc. look funny in their 2D images. Watching them do funny things and their funny expressions have always been fun.
But with the advancement in technology and the passage of time, we have some digital artists like Tatiana and Miguel Vasquez, who have recreated your famous cartoon characters into 3D. They have given them a realistic look that will scare you. These realistic cartoon faces will blow your mind.
In this article
01 [What’s a Realistic Cartoon?](#Part 1)
02 [10 Realistic Cartoon Characters You Would Run Away From If You Met In Real Life](#Part 2)
03 [How Do Cartoon Characters Reimagined As Realistic 3D Animation](#Part 3)
Part 1 What’s Realistic Cartoon?
Before moving towards the list of realistic cartoon characters, you must first know what a realistic cartoon is. As we all know, any animated drawing or illustration is a cartoon, it can either be non-realistic or semi-realistic. Earlier artists used to draw these cartoon characters on paper, but now technology has evolved.
With the introduction of different AI tools, many digital artists have recreated 3D versions of your favorite cartoon characters. These 3D versions of different cartoons are known as realistic cartoons. This can be done easily with help of AI technology and Digital Software.
Part 2 Realistic Cartoon Characters You Would Run Away From If You Met In Real Life
Have you ever thought how would your favorite cartoon character sponge bob looks like in real life? We will show you realistic versions of your favorite cartoon characters. Stay tuned for great fun waiting for you in this article!
01Sponge Bob (Sponge Bob Square Pants)
Sponge Bob Square Pants is an animated series full of fun and comedy. This show currently runs on Nickelodeon. Sponge Bob is a yellow-colored sea sponge and the main protagonist of the show. He is a cook at a restaurant named Krusty Krab. He often goes on adventures with his best friend Patrick Star. He mainly focuses on and aims at getting a boat-driving license from Mr. Puff’s boating school.
Have a look at the 3D recreation of this funny creature.
02Sid the Sloth (Ice Age)
Ice Age is one of the most popular animated series that revolves around the lives of a mammoth, tiger, sloth, and a scrat. A scrat is a combination of a squirrel and a rat. This series became so popular among the children that it was even nominated for an Oscar award.
It has a character called Sid. He is an abandoned sloth. His mother left him for some good to happen with him during the migration. His character in the entire series exhibits a friendly and carefree nature. Sometimes, he also acts as dumb and naïve.
Look at the funny recreation of this dumb-witted character. Does this recreation scare you?
03Mr. Krabs (Sponge Bob Square Pants)
Sponge Bob Square Pants is one of the cartoons that have many different and funny-looking creatures. Mr. Krabs is one of those characters. He is a money-minded and miserly creature. He is the owner of the Krusty Krab fast food restaurant, where Sponge Bob works as a cook. He has a teenage daughter named Pearl and he can do anything to see her happy. He exhibits romantic feelings for Mrs. Puff.
Does this funny creature from the Sponge Bob series look funny in real life too?
04Patrick Star (Sponge Bob Square Pants)
Patrick Star is again a character from the cartoon show Sponge Bob Square Pants. He is the best friend of the main protagonist Sponge Bob, who lives 2 houses away from Sponge Bob’s house. He is a lazy, fat, and stupid pink-colored starfish. His character makes the show funnier and more interesting for kids.
How would you react when you will see this funny creature from Sponge Bob in real life? His 3D recreation seems a bit scary like a monster in real life.
05Plankton (Sponge Bob Square Pants)
Plankton was once the best friend of Mr. Krabs but now they both share a rivalry bond. He is married to Karen and owns a fast food restaurant named Chum Bucket Restaurant in competition with Mr. Krabs’ Restaurant. He plays the antagonist character in the series. His restaurant doesn’t work as successfully as Krusty Krab Restaurant. In rivalry, he often comes up with different plans and tricks to outwit Mr. Krabs and steal the secret recipe of his famous Krabby Patty Burger, but never succeeds.
Have a look at the 3D recreation of this funny character from the series.
06Homer (The Simpsons)
The Simpsons is an animated series that revolves around the life of an American family. The Simpson family has five members named Homer, Marge, Bart, Lisa, and Maggie. Homer Simpson is the main character of this series. He lives in Springfield and is employed as a Safety Inspector at Springfield Nuclear Power Plant. He is married to Marge and is the father of three children – Bart, Lisa, and Maggie. The series depicts a strong bond of love and care for each other in the family.
Have a look at this realistic 3D recreation of Homer Simpson.
07Bugs Bunny (Looney Tunes)
Looney Tunes is entertaining people of all ages due to its great and funny characters. Bugs Bunny is one of our favorite characters from the animated cartoon show Looney Tunes. He is the main protagonist and the most popular character of the series. Kids love him the most because of his mischievous acts in the show. He looks too funny with a mouth filled with carrots and wearing funny costumes. This unique character has a great fan following all over the world.
The 3D recreation of this famous cartoon character is funny and scary at the same time.
08Sally (The Nightmare Before Christmas)
As the name suggests, The Nightmare Before Christmas is an American dark fantasy animated movie. This animated movie has received great financial success and appreciation for its wonderful characters and music.
Sally is a shy ragdoll created by a scientist Doctor Finkelstein. She secretly loves Jack – the main Protagonist of the movie. She tells him not to mix the preparation of Christmas with the Halloween party.
Look at her realistic 3D recreation by Tatiana, popularly known as TatiMoons.
09Stitch (Lilo and Stitch)
Lilo and Stitch is also an animated American movie. It is a science fiction and comedy movie that attracts the interest of people of all age groups. The story of this animated movie revolves around the two main characters named Lilo and Stitch. Lilo is a 7-year old orphan girl whose parents died in a car accident. She has a pet named Stitch.
The original name of Stitch is Experiment 626. He was illegally created by a scientist Jumba Jokiba through a genetic experiment. Lilo adopts him thinking that he is an innocent creature, she doesn’t know about his birth and origin.
Have a look at this realistic 3D recreation of Stitch’s character. Isn’t it scary?
10 Popeye (Popeye – The Sailor Man)
Popeye – The Sailor Man is another famous cartoon series. Popeye is the main protagonist of this series. He has a girlfriend named Olive Oyl. This series depicts the love triangle between Popeye, Olive, and Bluto. He is an uneducated sailor man who gets energy by eating spinach. He often comes up with non-realistic solutions to different problems and helps the police by investigating different cases. He has a versatile tobacco smoking pipe that sometimes acts as a whistle, and he even intakes the spinach through his pipe.
In the cartoon films, he looks funny, but this 3D recreation of his character is a bit scary.
Part 2 How Do Cartoon Characters Reimagined As Realistic 3D Animation
Nowadays, it has become easier to create and turn your imagination into a cartoon character with different online 3D animators. This makes storytelling easier and funny and it is a great way to engage children. Out of all the 3D animation tools, Filmora will assist you to create the best 3D version of your favorite cartoon character.
Filmora has various smart features that help you to turn any image into realistic 3D animation. You can create great animations using Wondershare Filmora Video Editor within a couple of hours. It offers you many different features that help in convenient customization.
● Ending Thoughts →
● Being a cartoon lover, we hope that you would have liked the 3D recreation of your favorite cartoons. Some of these 3D recreations are so scary that you would just run away from them in real life and some look like real monster cartoons.
● AI combined with digital software like Filmora makes it easier to create these 3D versions of famous cartoon characters.
● With Filmora, you don’t need to spend hours sketching cartoon characters on paper. You can easily create great and realistic animations digitally.
Complete Guide to Send Gif WhatsApp on Android
Step-by-step Guide to Send Gif WhatsApp on Android
An easy yet powerful editor
Numerous effects to choose from
Detailed tutorials provided by the official channel
While chatting with your friends and dear ones on WhatsApp, you can not only send videos and images but also some GIFs. The GIF files will convey your mood and feelings using short animations.
On your Android device, these files can be either selected from the collection available at WhatsApp or can be imported from Giphy. Additionally, you can also create your own customized WhatsApp GIFs Android using images or videos.
In this article
01 [How to send WhatsApp GIF on Android](#Part 1)
02 [How to create a custom GIF on WhatsApp Android](#Part 2)
03 [Create professional-looking GIF using Wondershare Filmora](#Part 3)
Part 1 How to send WhatsApp GIF on Android
To send GIFs to your contacts in WhatsApp it is important to ensure that you have the latest version of the messaging app installed on your phone. There is an integrated library of GIFs on your Android phone from where you can search like tom and jerry gif stickers for WhatsApp, peach and Goma gif for WhatsApp, and more.
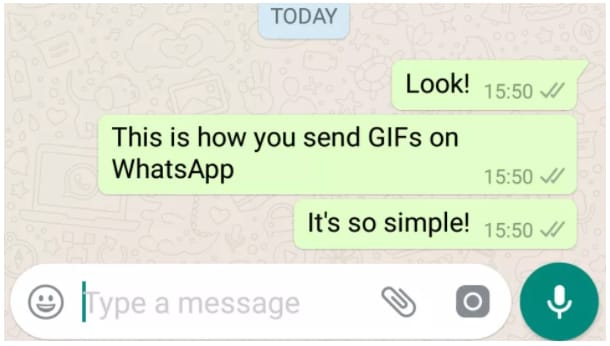
Step 1.Launch WhatsApp on your Android device and open any conversation to which you wish to send a GIF.
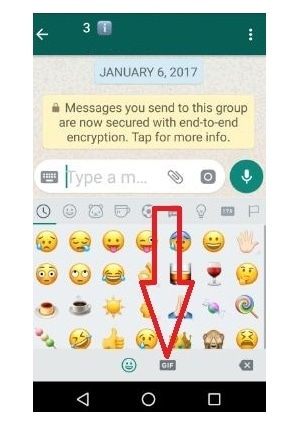
Step 2.Click on the Emoji icon at the bottom left corner of the chat window.
Step 3.At the bottom middle of the screen, click on the GIF button and the list of options available at the integrated library will appear on the screen. You can even search for the desired GIF by entering the keyword at the search icon.
Step 4.Next, tap on the selected GIF to preview it. You can also add a message using Add a caption… button
Step 5.Finally, click on the green Send button (white paper plane icon) at the bottom-right corner. The GIF will be sent to your conversation.
Part 2 How to create a custom GIF on WhatsApp Android
WhatsApp allows you to create a customized GIF using images and videos on your Android phone. The steps for the same are as follows
Step 1.Open the WhatsApp chat to whom you wish to send the customized GIF.
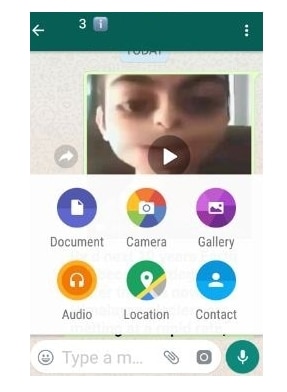
Step 2.At the bottom of the screen, click the camera icon. Either choose to record a desired video or import from the phone gallery to create a GIF.
Step 3.Once the video is added, trim it using the slider at the top. (To create a GIF, the video cannot be more than 5 seconds). You can even add a text message using Add a caption. option at the bottom of the screen.
Step 4.Next, click on the GIF button under the slider and then click on the send button at the bottom-right corner.
GIF created using the video will be sent to your contact.
Part 3 Create professional-looking GIF using Wondershare Filmora Video Editor
Though WhatsApp allows creating GIFs using videos and images, the options for customizations are not there. So, to facilitate you creating professional-looking GIFs in no time, we suggest using Wondershare Filmora. Images and videos can be added to this versatile Windows and Mac-based tool for creating artistic animations. There are multiple options for customizing the file like adding elements, sound, text, and more.
Wondershare Filmora
Get started easily with Filmora’s powerful performance, intuitive interface, and countless effects!
Try It Free Try It Free Try It Free Learn More >

You can also speed up, slow down, rotate, crop, and perform other editing tasks. The software allows adding media files in all widely used formats like MO4, MOV, MKV, and more. The software has a user-friendly interface that makes it apt for users even without any prior experience in creating animations.
Steps to create a customized GIF WhstaApp Android using Wondershare Filmora
Step 1.Download, install and open the Wondershare Filmora software on your system. Browse and import the videos and images from your system from which you wish to create a GIF.
Step 2.After the files are added, drag and drop them to the timeline of the software at the bottom.
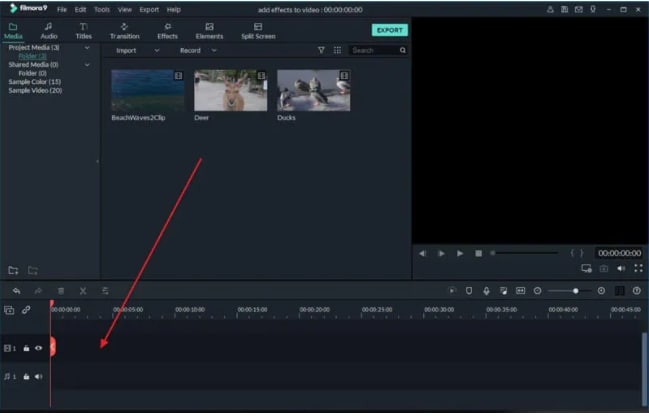
Step 3.Next comes the editing. Using multiple editing functions of the software you can rotate, crop, speed up, slow down, and perform a wide range of tasks as needed.
Step 4.You can even add the text messages to your animations and also choose the font and other parameters of the text.

Step 5.Once all the selections and editing are done, choose GIF at the Local tab to save your created media file as GIF. Finally, click on the EXPORT button to start processing and saving the file as GIF.
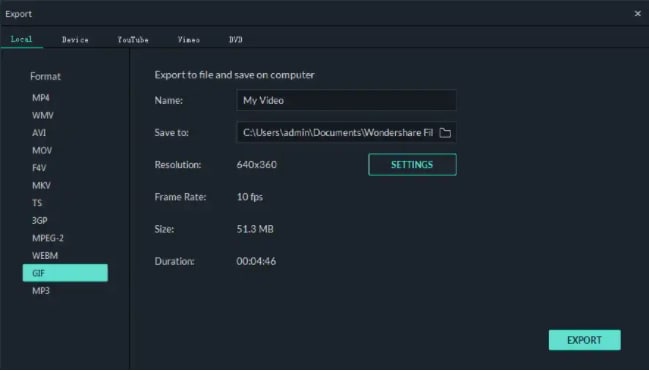
The created GIF can now be used for WhatsApp chat, social media sites, and other online sites.
● Key Takeaways from This Episode →
●GIF animations can be added to WhatsApp chats on your Android phone using an integrated library or GIPHY.
●WhatsApp also allows creating GIFs using videos and images on your device or by recording one.
●To create a professional and appealing GIF, Wondershare Filmora is the best tool. The software can also be used for several other video editing tasks.
While chatting with your friends and dear ones on WhatsApp, you can not only send videos and images but also some GIFs. The GIF files will convey your mood and feelings using short animations.
On your Android device, these files can be either selected from the collection available at WhatsApp or can be imported from Giphy. Additionally, you can also create your own customized WhatsApp GIFs Android using images or videos.
In this article
01 [How to send WhatsApp GIF on Android](#Part 1)
02 [How to create a custom GIF on WhatsApp Android](#Part 2)
03 [Create professional-looking GIF using Wondershare Filmora](#Part 3)
Part 1 How to send WhatsApp GIF on Android
To send GIFs to your contacts in WhatsApp it is important to ensure that you have the latest version of the messaging app installed on your phone. There is an integrated library of GIFs on your Android phone from where you can search like tom and jerry gif stickers for WhatsApp, peach and Goma gif for WhatsApp, and more.
Step 1.Launch WhatsApp on your Android device and open any conversation to which you wish to send a GIF.
Step 2.Click on the Emoji icon at the bottom left corner of the chat window.
Step 3.At the bottom middle of the screen, click on the GIF button and the list of options available at the integrated library will appear on the screen. You can even search for the desired GIF by entering the keyword at the search icon.
Step 4.Next, tap on the selected GIF to preview it. You can also add a message using Add a caption… button
Step 5.Finally, click on the green Send button (white paper plane icon) at the bottom-right corner. The GIF will be sent to your conversation.
Part 2 How to create a custom GIF on WhatsApp Android
WhatsApp allows you to create a customized GIF using images and videos on your Android phone. The steps for the same are as follows
Step 1.Open the WhatsApp chat to whom you wish to send the customized GIF.
Step 2.At the bottom of the screen, click the camera icon. Either choose to record a desired video or import from the phone gallery to create a GIF.
Step 3.Once the video is added, trim it using the slider at the top. (To create a GIF, the video cannot be more than 5 seconds). You can even add a text message using Add a caption. option at the bottom of the screen.
Step 4.Next, click on the GIF button under the slider and then click on the send button at the bottom-right corner.
GIF created using the video will be sent to your contact.
Part 3 Create professional-looking GIF using Wondershare Filmora Video Editor
Though WhatsApp allows creating GIFs using videos and images, the options for customizations are not there. So, to facilitate you creating professional-looking GIFs in no time, we suggest using Wondershare Filmora. Images and videos can be added to this versatile Windows and Mac-based tool for creating artistic animations. There are multiple options for customizing the file like adding elements, sound, text, and more.
Wondershare Filmora
Get started easily with Filmora’s powerful performance, intuitive interface, and countless effects!
Try It Free Try It Free Try It Free Learn More >
You can also speed up, slow down, rotate, crop, and perform other editing tasks. The software allows adding media files in all widely used formats like MO4, MOV, MKV, and more. The software has a user-friendly interface that makes it apt for users even without any prior experience in creating animations.
Steps to create a customized GIF WhstaApp Android using Wondershare Filmora
Step 1.Download, install and open the Wondershare Filmora software on your system. Browse and import the videos and images from your system from which you wish to create a GIF.
Step 2.After the files are added, drag and drop them to the timeline of the software at the bottom.
Step 3.Next comes the editing. Using multiple editing functions of the software you can rotate, crop, speed up, slow down, and perform a wide range of tasks as needed.
Step 4.You can even add the text messages to your animations and also choose the font and other parameters of the text.
Step 5.Once all the selections and editing are done, choose GIF at the Local tab to save your created media file as GIF. Finally, click on the EXPORT button to start processing and saving the file as GIF.
The created GIF can now be used for WhatsApp chat, social media sites, and other online sites.
● Key Takeaways from This Episode →
●GIF animations can be added to WhatsApp chats on your Android phone using an integrated library or GIPHY.
●WhatsApp also allows creating GIFs using videos and images on your device or by recording one.
●To create a professional and appealing GIF, Wondershare Filmora is the best tool. The software can also be used for several other video editing tasks.
20 Free After Effects Logo Reveal Templates You Will Want to Know
20 Free After Effects Logo Reveal Templates You Will Want to Know
An easy yet powerful editor
Numerous effects to choose from
Detailed tutorials provided by the official channel
The free After Effects logo reveals templates is a creative and clean animation that is very easy to use and customizable in just a few clicks. This template allows you to change the color, edit the text, add your logo, and click on render and contains two different logo animations for you to choose from. It does not require any plugin, and you can use it for your following modern and professional logo animation.
![]()
By incorporating a logo animation into your video, you can make your brand memorable and choose a suitable template for your brand personality. So, get ready for all the free logo reveal templates in this article.
In this article
01 [20 Best Logo Reveal Templates for After Effects 2022](#Part 1)
02 [Learn How to Use After Effects Logo Reveal Templates](#Part 2)
Part 1 Best Logo Reveal Templates for After Effects 2022
You can use an animated logo reveal if you need to add spice to your marketing campaigns and branded videos. An animated logo reveal is explained as a Great way to capture your audience’s attention as they screw through their newsfeed and stand you out from the competition. This section of the article will give you After Effects logo reveal templates for free that you can choose from this 2022:
![]()
01[Fast Flip Logo Reveal Template](https://dsqqu7oxq6o1v.cloudfront.net/preview-215084-pWlBMUhYg4-high.mp4 target=)
Fast Flip logo reveal template free to download is perfect for those on a budget and uses stock photography which can be replaced with photos of a company or team to review and an elegant logo at the end. All that is required is to customize the color, replace the images, and add your logo.
02Logo Web Search
Logo Web Search is an easy-to-use, stylish and simple animation for a company website. It allows you to change colors quickly and free sound effects, and all you need to do is change the logo text and click on render.
03Search Logo Reveal
Search Logo Reveal After Effect template for free allows you to customize the text and easily drag and drop in your logo. It provides a unique way to review your logo by using an animated search bar with a sample question and bringing up your logo as the answer. It can be a great add on to websites with search options.
04Colors Logo Reveal
Colors Logo Reveal is a super clean and straightforward After Effects logo reveal template that is very easy to use for designers and creators. It contains two different logos animations that you can choose from and requires no plugin. Add your logo, change the color, edit the text, and click on render.
05Logo Reveal
Logo Reveal is perfect for small business companies and startups with an easy-to-use template that comes with detailed instruction on how to customize and render your logo reveal Project.
06Unlock Phone Logo Reveal
Unlock Phone Logo Reveal is one of the dynamic logo reveal After Effects templates for free with a modern design, smooth transition effects, and simple text animation that is super easy to use. All that is required is to edit the text, drag and drop in your media, and click on render. It comprises a cool intro or opener to presentations, slideshows, promotions, and event videos to impress your audience.
07Orbital Free HUD Logo Reveal
Orbital Free HUD Logo Reveal is perfect for any tech company, and it’s done up in futuristic style and includes the complete. AEP project file with background texture and elements.
08Corporate logo reveal
Corporate Logo Reveal template is a stylish and contemporary template that features a simple shape that is elegantly animated and combined with reviewing your logo. It has one logo placeholder, editable text layers, and an easy-to-use color controller. An excellent logo reveals the Premiere Pro template free to download for companies like stockbrokers.
09White Scroll Logo Reveals
White Scroll Logo Reveals perfect for a more classic logo opener and comes with three background versions and three different logo placement options.
10Shape Logo Reveal
Shape Logo Reveal is a stylish logo reveal template with colorful shape layers and lines that beautifully form a clean-looking logo reveal. It is a short intro for a business slideshow, promotions, events, TV shows, videos, commercials, corporate presentations, etc.
11Free Animated Logo Reveals
Free Animated Logo Reveals is packed with three different logos reveal, which a suitable for corporates and an excellent option for one who wants a modern and professional logo show.
12Clean Titles And Logo Reveal
Clean Titles and Logo Reveal offers stylish templates which an eye-catching design and contains two text placeholders and one logo placeholder. It is effortless to use and a short introduction to TV shows, commercials, slideshows, promotions, Facebook and YouTube videos, etc.
13Hi-Tech Logo Reveal 02
Hi-Tech Logo Reveal is a premium animated logo reveal that features a dark blue background joint with light blue HUD elements and a perfect logo reveal template for a company that wants to stand out online.
14Testimonials Logo Reveal
Testimonials logo Reveal is a stylish and clean project that is perfect for displaying the company’s testimonials and reviews. This After Effects logo reveal template for free features six title placeholders, one logo holder, and six photo placeholders, requiring no plugin.
15Elegant Logo Reveal
Elegant logo Reveals perfect for a feminine background. It features chrome logo pens with a silky dark background, enabling you to easily add your text, insert your logo, and change the colors.
16Logo Web Search II
Logo Web Search II is a stylish and straightforward animation mainly for company websites. It is elementary to use.
17Battle Logo Reveal
Blue Action Logo Reveal is for those looking for a minimalist logo opener and features a dynamic animation style, including an editable text layer and a logo placeholder. It also allows you to adjust the colors easily.
18Blue Action Logo Reveal
Blue Action Logo Reveal is majorly for those looking for a minimalist logo opener and features a dynamic animation style including an editable text layer and a logo placeholder. It also allows you to easily adjust the colors.
19Logo Introduction Template
Logo Introduction Template is a free logo reveal from Premiere Pro. It is perfect for the ones looking for a Tudor style logo reveal and allows you to easily customize the colors and insert your logo with a detailed help file.
20Minimal Logo Klick
Minimal Logo Klick comes in a sleek and modern design with playful animation. It encompasses a logo placeholder, an editable text layer, and an intelligent color controller. If you are searching for an unfussy and free logo reveal online, this one is for you.
Part 2 Learn How to Use After Effects Logo Reveal Templates
This section provides you with a basic tutorial on using the logo reveal After Effects template for free. However, this is a professional video editing software, but if video editing is new to you, you can try out Filmora, which is powerful, easy to use for new users. In Filmora, you will use the logo reveal template as a professional even if you are a beginner.
Below is how to use the After Effects logo reveals template:
01Open After Effects and Begin
Open your After Effect software and set up your Project ready. To begin face, create a composition using composition>New. You can also search the web resolution to 3x 2for this Project.
![]()
02Start Creating Logo
Next is to create a solid layer for your logo by using layers>new>solid, and select an appropriate color to match your composition.
![]()
Next is the creator logo by adding the pre-prepared logo artwork. Go to layer>new>text to create a text layer and adjust the text size and color to see.
![]()
03Add Animation to Logo
Manipulate your logo to create an animation and ensure that everything is right where you want it.
![]()
04Add Effects and Keyframe
Add Effect by going to Effect>Simulation>CC Particle World or click on Effects and Presets panel on the right to drag the CC Particle World effect onto your solid layer.
![]()
Set off your animation by adding a keyframe and controlling the animation of the particles effect through the birth rate setting, which is found by expanding the settings in the timeline panel for the solid layer.
![]()
05Import Vector Graphics and Finish
Finally, import your vector graphics into the After Effects by dragging and dropping the file into the Project panel, which brings up an import dialogue.
For Win 7 or later (64-bit)
For macOS 10.12 or later
That’s it! You successfully made use of the logo reveal maker.
● Key Takeaways from This Episode →
● The top 20 logo reveal Premiere Pro templates free to download.
● THow to make logo with After Effects – the logo reveal maker.
● TLastly, the logo reveal, free online tool, Filmora.
● TI hope I’ve gave you a few ideas on the After Effects logo reveal template for your Project and provided a breakdown of other software you can use for free logo reveal, such as Filmora. The article also lists the best logo reveal templates for after-effects that you can choose from this 202You can also use other software for your free logo reveal, but we all need to start somewhere.
10 2D/3D Animation Tips & Tricks for You
10 2D/3D Animation Tips & Tricks to Bring New Ideas to You

Shanoon Cox
Mar 27, 2024• Proven solutions
Animation is a skill that you need years to practice. However, the learning process can be boosted if you master some animation tips. If you’re looking for great 2D/3D animation tips and tricks, this is what we will offer here.
There are some overlaps between 2D and 3D animation tips like practicing and object pose, but in essence, animation tips can be learned commonly.
These animation tips will help you make your 2D and 3D animations as bold and creative as possible, while reduce your workload and enable you to get your work out into the world quicker with excellent animation software . Let’s take a look at the top 10 2D/3D animation tips and tricks right now.
- Part 1: 2D Animation Tips for Beginners
- Part 2: 3D Animation Tips for Beginners
- Part 3: Frequently Asked Questions about Animation Tips
You may also like: Top 10 Anime Websites to Watch Anime Free
Part 1: 2D Animation Tips for Beginners
1. Find a reference in the real world
This first 2D animation tip is to find a reference. Using a real-world reference can help you animate faces effectively. When studios work with voice-over artists , they often record their facial movements so 2D animators can work with them and ensure their expressions are captured convincingly.
If this isn’t possible, consider using your face, so you have something to refer back to. You could use a mirror and speak the words your character will be saying into it. This can help you get the animated expressions just right.

2. Observe real life
The second animation tip is about observation. One of the key aspects of 2D animation is bringing life to animate objections. You need to think hard about how emotion can be portrayed and choose each movement carefully.
Spend time watching how people in real-life environments talk and interact with each one another, how they move, and how they express emotion. People-watching can be worth its weight in gold when it comes to preparing animations for 2D. Don’t be afraid to spend a great deal of time doing this, as it can be counted as valuable research.

3. Simplicity is the key
2D animation is never complicated compared with 3D. Think carefully before making a scene too complex. If there is too much information to digest, the overall effect can be one of confusion, and you may even find yourself compromising the realism of the scene. Try not to litter the scene with too many pose changes or other elements, and keep it authentic.

4. Draw animation again and again
Drawing animation takes a lot of time. It can’t be finished within one day, so you better know deep down that one piece of work only can be done after you have revised it many times. For 2D animation, it means you need to draw objects on paper many times.
In other words, the animation is a skill that needs practice and time. You can’t master it quickly. Luckily, all pains will be rewarded someday.

5. Feedback is crucial
Feedback is an essential part of artistic development . It’s wise to actively seek out commentary from knowledgeable figures who can help you improve. Naturally, we may see work we have invested a great deal of time and effort indifferently to someone not so involved in the creative process. Feedback can equate to a valuable learning opportunity that will help you make the result hit the spot much more convincingly.

Part 2: 3D Animation Tips for Beginners
Speaking of 3D animation, we think it is not easy to start at first. In this case, you need more tips and tricks.
6. Carefully use keyframing
3D Animation is all about poses. Remember, this animation tip is crucial. Individual frames come together to create movement and tell a story. The keyframes in 3D animation videos are the first and last movements in any sequence. You need to create strong first and last poses for your movements before deciding what happens between them. You must make these poses as memorable and powerful as you can.

7. Evaluate constructive criticism
It’s vital to pay attention to constructive criticism rather than simply choosing to ignore it. Most examples of constructive criticism aren’t about offending you, and friendly advice can play a pivotal role in helping you get the results that you are looking for.
This 3D animation tip can take years to reach the level you want to when it comes to the animation industry. Even if you don’t receive a great deal of or even any positive feedback, the people offering their comments may simply be trying to help you so you can improve. You may find that the criticism is being made purely because of personal preference on the part of the commentator.

8. Take the rhythm in animation
For 3D stop motion animation video, rhythm is an element to do storytelling. The best 3D animations have a strong sense of rhythm and a natural movement flow. Many inexperienced animators have found themselves animating too fast or slow. Don’t worry if you have this problem in the early days, as chances are you’ll start to get it right with time. Timing and spacing between your frames create movement in your animation. With time, you will get a better idea of how many frames you need to move the object from point A to B.

9. Basic model
You may see your system working too hard when you use a high-res model , and this can dramatically slow down the animation process. When you playback the animation in real-time, you may not see every frame. If you are working on the motion of a character, use a simple proxy 3D model to prevent this problem. You can then work more effectively with movement and return the more complex model to the process later.

10. Use ‘shark fin’
This is a advanced 3D animation tip for you. A curve known as the ‘shark fin’ is often used for facial animation processes. This can help you represent rapid facial movements, including those involving the lips and eyebrows. Faces can move very quickly, so it’s wise to make expressions occur within just one or two frames, or three if the spacing demands it.

Part 3: Frequently Asked Questions about Animation Tips
Below are four FAQs about 2D and 3D animation tips that people have asked many times. Hope they are helpful.
1. Are there any animation tricks to use?
We must say muting dialogue is one trick you should know. If your audio is on, you need to listen to it again and again. Thus, audio can disturb your creating process. After you finished the animation, you can turn audio on to revise the animation.
Besides, when you do animation, another trick is you can pause the post before the character goes into the next pose. It is a commonly used trick used by professionals, so you might think it is useful.
2. Is animation hard to learn?
Many beginners are wondering is it difficult to learn animation. The answer is NO if you are about to learn 2D animation. Many tutorials and lessons are easy to find in the market. However, if you start on 3D animation, it will be much harder than you thought. In this case, we recommend you learning 2D animation first.
3. Can I learn animation on my own?
You can learn animation on your own, but that’s not the best way. We recommend you learning animation by attending a training class , especially if you are a starter. You can build a solid animation knowledge base fast compared with learning on your own.
4. How can I get better at animation?
The best answer to get better is to imitate and practice. This tip is the most useful, practical, but difficult to complete one. If you can practice like half a year, you will get much better at animation.
Conclusion
By taking the above animation tips, you can create engaging, inspiring, and unforgettable animations that will captivate your audience. Why not get started following these animation tips right now?
Shanoon Cox
Shanoon Cox is a writer and a lover of all things video.
Follow @Shanoon Cox
Shanoon Cox
Mar 27, 2024• Proven solutions
Animation is a skill that you need years to practice. However, the learning process can be boosted if you master some animation tips. If you’re looking for great 2D/3D animation tips and tricks, this is what we will offer here.
There are some overlaps between 2D and 3D animation tips like practicing and object pose, but in essence, animation tips can be learned commonly.
These animation tips will help you make your 2D and 3D animations as bold and creative as possible, while reduce your workload and enable you to get your work out into the world quicker with excellent animation software . Let’s take a look at the top 10 2D/3D animation tips and tricks right now.
- Part 1: 2D Animation Tips for Beginners
- Part 2: 3D Animation Tips for Beginners
- Part 3: Frequently Asked Questions about Animation Tips
You may also like: Top 10 Anime Websites to Watch Anime Free
Part 1: 2D Animation Tips for Beginners
1. Find a reference in the real world
This first 2D animation tip is to find a reference. Using a real-world reference can help you animate faces effectively. When studios work with voice-over artists , they often record their facial movements so 2D animators can work with them and ensure their expressions are captured convincingly.
If this isn’t possible, consider using your face, so you have something to refer back to. You could use a mirror and speak the words your character will be saying into it. This can help you get the animated expressions just right.
2. Observe real life
The second animation tip is about observation. One of the key aspects of 2D animation is bringing life to animate objections. You need to think hard about how emotion can be portrayed and choose each movement carefully.
Spend time watching how people in real-life environments talk and interact with each one another, how they move, and how they express emotion. People-watching can be worth its weight in gold when it comes to preparing animations for 2D. Don’t be afraid to spend a great deal of time doing this, as it can be counted as valuable research.
3. Simplicity is the key
2D animation is never complicated compared with 3D. Think carefully before making a scene too complex. If there is too much information to digest, the overall effect can be one of confusion, and you may even find yourself compromising the realism of the scene. Try not to litter the scene with too many pose changes or other elements, and keep it authentic.
4. Draw animation again and again
Drawing animation takes a lot of time. It can’t be finished within one day, so you better know deep down that one piece of work only can be done after you have revised it many times. For 2D animation, it means you need to draw objects on paper many times.
In other words, the animation is a skill that needs practice and time. You can’t master it quickly. Luckily, all pains will be rewarded someday.
5. Feedback is crucial
Feedback is an essential part of artistic development . It’s wise to actively seek out commentary from knowledgeable figures who can help you improve. Naturally, we may see work we have invested a great deal of time and effort indifferently to someone not so involved in the creative process. Feedback can equate to a valuable learning opportunity that will help you make the result hit the spot much more convincingly.
Part 2: 3D Animation Tips for Beginners
Speaking of 3D animation, we think it is not easy to start at first. In this case, you need more tips and tricks.
6. Carefully use keyframing
3D Animation is all about poses. Remember, this animation tip is crucial. Individual frames come together to create movement and tell a story. The keyframes in 3D animation videos are the first and last movements in any sequence. You need to create strong first and last poses for your movements before deciding what happens between them. You must make these poses as memorable and powerful as you can.
7. Evaluate constructive criticism
It’s vital to pay attention to constructive criticism rather than simply choosing to ignore it. Most examples of constructive criticism aren’t about offending you, and friendly advice can play a pivotal role in helping you get the results that you are looking for.
This 3D animation tip can take years to reach the level you want to when it comes to the animation industry. Even if you don’t receive a great deal of or even any positive feedback, the people offering their comments may simply be trying to help you so you can improve. You may find that the criticism is being made purely because of personal preference on the part of the commentator.
8. Take the rhythm in animation
For 3D stop motion animation video, rhythm is an element to do storytelling. The best 3D animations have a strong sense of rhythm and a natural movement flow. Many inexperienced animators have found themselves animating too fast or slow. Don’t worry if you have this problem in the early days, as chances are you’ll start to get it right with time. Timing and spacing between your frames create movement in your animation. With time, you will get a better idea of how many frames you need to move the object from point A to B.
9. Basic model
You may see your system working too hard when you use a high-res model , and this can dramatically slow down the animation process. When you playback the animation in real-time, you may not see every frame. If you are working on the motion of a character, use a simple proxy 3D model to prevent this problem. You can then work more effectively with movement and return the more complex model to the process later.
10. Use ‘shark fin’
This is a advanced 3D animation tip for you. A curve known as the ‘shark fin’ is often used for facial animation processes. This can help you represent rapid facial movements, including those involving the lips and eyebrows. Faces can move very quickly, so it’s wise to make expressions occur within just one or two frames, or three if the spacing demands it.
Part 3: Frequently Asked Questions about Animation Tips
Below are four FAQs about 2D and 3D animation tips that people have asked many times. Hope they are helpful.
1. Are there any animation tricks to use?
We must say muting dialogue is one trick you should know. If your audio is on, you need to listen to it again and again. Thus, audio can disturb your creating process. After you finished the animation, you can turn audio on to revise the animation.
Besides, when you do animation, another trick is you can pause the post before the character goes into the next pose. It is a commonly used trick used by professionals, so you might think it is useful.
2. Is animation hard to learn?
Many beginners are wondering is it difficult to learn animation. The answer is NO if you are about to learn 2D animation. Many tutorials and lessons are easy to find in the market. However, if you start on 3D animation, it will be much harder than you thought. In this case, we recommend you learning 2D animation first.
3. Can I learn animation on my own?
You can learn animation on your own, but that’s not the best way. We recommend you learning animation by attending a training class , especially if you are a starter. You can build a solid animation knowledge base fast compared with learning on your own.
4. How can I get better at animation?
The best answer to get better is to imitate and practice. This tip is the most useful, practical, but difficult to complete one. If you can practice like half a year, you will get much better at animation.
Conclusion
By taking the above animation tips, you can create engaging, inspiring, and unforgettable animations that will captivate your audience. Why not get started following these animation tips right now?
Shanoon Cox
Shanoon Cox is a writer and a lover of all things video.
Follow @Shanoon Cox
How to Make GIF Stickers for WhatsApp 100% The Easy Way
How to Make GIF Stickers for WhatsApp 100% The Easy Way
An easy yet powerful editor
Numerous effects to choose from
Detailed tutorials provided by the official channel
Wish your dear friends and loved ones on their special days using some interesting WhatsApp stickers. There is an integrated library of these stickers in different categories on your Android as well as iPhone.

Still, if you want a more personalized one, you can create a customized sticker using videos on your phone or using third-party apps and tools. Learn about how to use the integrated stickers and create customized in the following parts of the topic.
In this article
01 [Using stickers from integrated library](#Part 1)
02 [Best tools to create animated GIF sticker – Wondershare Filmora](#Part 2)
03 [Using iPhone and Android videos to make GIF stickers](#Part 3)
Part 1 Using stickers from integrated library
WhatsApp on your Android and iPhone has a decent collection of stickers that can send to your contacts. You simply need to look for the sticker in the desired category and send it and the steps for adding GIFs to WhatsApp are listed below.
Step 1. Open the WhatsApp contact to which you wish to send the sticker. To open the animation library on your Android device, tap on the emoji icon and choose the GIF option. On an iPhone, the library opens by clicking on the sticker icon.
Step 2. Search and select the desired sticker from the available options.
Step 3. To finally share the selected one, click on the sticker and then on the Send button.

Part 2 Best tools to create animated GIF sticker – Wondershare Filmora
If you are in search of a tool that lets you create a professional-looking animated GIF easily Wondershare Filmora Video Editor is the best WhatsApp GIF maker tool. This software once downloaded on your Windows or Mac system, is all set to look after multiple video editing tasks including GIF creation.
Wondershare Filmora
Get started easily with Filmora’s powerful performance, intuitive interface, and countless effects!
Try It Free Try It Free Try It Free Learn More >
Your videos in MP4, MKV, MOV, and several other key formats can be converted to a GIF file using the program and multiple options for editing are available as well like crop, trim, add effects, add texts, and more.
The intuitive interface of the software makes it easy to use even by non-techy people.
Steps on how to make WhatsApp GIF sticker using Wondershare Filmora
**Step 1.**On your Windows or Mac, download, install, and launch the Wondershare software and then import the video files from which GIF has to be created.
Step 2. The added files have to be now dragged and dropped to the timeline.

Step 3. Editing tools for customization can be used.
**Step 4.**For further personalization by adding text, effects, and more the related functions can be used.

Step 5. Next, choose the GIF option as the target file format from the Local tab. Select the file name and the location. Clicking on the EXPORT button will start the processing.

Part 3 Using iPhone and Android videos to make GIF stickers
If you do not wish to use any third-party tools, basic stickers can also be created using the videos on your Android and iPhone. A video cannot be more than 6 seconds in length to be used as a GIF and thus longer videos need to be trimmed.
Steps on how to make a GIF stickers for WhatsApp
Step 1. Launch the WhatsApp contact to which you wish to send the GIF. Add the video from the device gallery by clicking on the camera button. A video using the camera can also be recorded.
Note: Ensure that video length is not more than 6 seconds. If it is more, use the slider at the top to trim the video.
Step 2. Next, you can add the text using the Caption option.
Step 3. Now to convert this video into a GIF click on the GIF button under the video and then tap on the Send button to share this animation with the contact.

● Key Takeaways from This Episode →
●WhatsApp has an integrated library of GIF stickers in a wide range of categories.
●For creating customized stickers, Wondershare Filmora works as the best software as it is simple, quick, and has multiple editing options.
●Using the videos from the gallery, GIF stickers can also be created on your Android and iPhone.
Wish your dear friends and loved ones on their special days using some interesting WhatsApp stickers. There is an integrated library of these stickers in different categories on your Android as well as iPhone.
Still, if you want a more personalized one, you can create a customized sticker using videos on your phone or using third-party apps and tools. Learn about how to use the integrated stickers and create customized in the following parts of the topic.
In this article
01 [Using stickers from integrated library](#Part 1)
02 [Best tools to create animated GIF sticker – Wondershare Filmora](#Part 2)
03 [Using iPhone and Android videos to make GIF stickers](#Part 3)
Part 1 Using stickers from integrated library
WhatsApp on your Android and iPhone has a decent collection of stickers that can send to your contacts. You simply need to look for the sticker in the desired category and send it and the steps for adding GIFs to WhatsApp are listed below.
Step 1. Open the WhatsApp contact to which you wish to send the sticker. To open the animation library on your Android device, tap on the emoji icon and choose the GIF option. On an iPhone, the library opens by clicking on the sticker icon.
Step 2. Search and select the desired sticker from the available options.
Step 3. To finally share the selected one, click on the sticker and then on the Send button.
Part 2 Best tools to create animated GIF sticker – Wondershare Filmora
If you are in search of a tool that lets you create a professional-looking animated GIF easily Wondershare Filmora Video Editor is the best WhatsApp GIF maker tool. This software once downloaded on your Windows or Mac system, is all set to look after multiple video editing tasks including GIF creation.
Wondershare Filmora
Get started easily with Filmora’s powerful performance, intuitive interface, and countless effects!
Try It Free Try It Free Try It Free Learn More >
Your videos in MP4, MKV, MOV, and several other key formats can be converted to a GIF file using the program and multiple options for editing are available as well like crop, trim, add effects, add texts, and more.
The intuitive interface of the software makes it easy to use even by non-techy people.
Steps on how to make WhatsApp GIF sticker using Wondershare Filmora
**Step 1.**On your Windows or Mac, download, install, and launch the Wondershare software and then import the video files from which GIF has to be created.
Step 2. The added files have to be now dragged and dropped to the timeline.
Step 3. Editing tools for customization can be used.
**Step 4.**For further personalization by adding text, effects, and more the related functions can be used.
Step 5. Next, choose the GIF option as the target file format from the Local tab. Select the file name and the location. Clicking on the EXPORT button will start the processing.
Part 3 Using iPhone and Android videos to make GIF stickers
If you do not wish to use any third-party tools, basic stickers can also be created using the videos on your Android and iPhone. A video cannot be more than 6 seconds in length to be used as a GIF and thus longer videos need to be trimmed.
Steps on how to make a GIF stickers for WhatsApp
Step 1. Launch the WhatsApp contact to which you wish to send the GIF. Add the video from the device gallery by clicking on the camera button. A video using the camera can also be recorded.
Note: Ensure that video length is not more than 6 seconds. If it is more, use the slider at the top to trim the video.
Step 2. Next, you can add the text using the Caption option.
Step 3. Now to convert this video into a GIF click on the GIF button under the video and then tap on the Send button to share this animation with the contact.
● Key Takeaways from This Episode →
●WhatsApp has an integrated library of GIF stickers in a wide range of categories.
●For creating customized stickers, Wondershare Filmora works as the best software as it is simple, quick, and has multiple editing options.
●Using the videos from the gallery, GIF stickers can also be created on your Android and iPhone.
Best 15 Greatest Claymation Movies of All Time
Top 15 Greatest Claymation Movies of All Time
An easy yet powerful editor
Numerous effects to choose from
Detailed tutorials provided by the official channel
Presently, thanks to technology, we have a lot of things available that make us feel happy all the time, and similarly, the Claymation movies. These movies are among the best with their use of flexible, plasticine figures in the creation of stop-motion animation. These are created in such a manner that the characters appear to belong only to real life, and the animations give us a good feel too.
Well, if you are a fan of claymation, you must watch the best claymation movies we are discussing below. Yes, you got it right. Here we are sharing a list of the best claymation movies that you can watch.
Well, as the best claymation movies that you can watch are discussed below, Here we are also sharing the rating and reviews that the movie received so that you can make up your mind to have it on your screens. Let’s get started.
01Rudolph the Red-Nosed Reindeer (1964)
Rudolph: The Red-Nosed Reindeer is a classic film that is appropriate for children over the age of four. They will get the message that it is important to maintain things accordingly. The content appears to be cheesy to adults, but for kids, it is one of the best claymation movies to watch. Also, for middle-aged children, this movie appears to be a very interesting one.
02The Clash of the Titans (1981)
The Clash of the Titans movie is a movie that comes up with a spectacular story to tell. You will see that the movie is full of some cheesy moments and is also entertaining. Basically, this movie focuses on the son of a Greek who grew up on a deserted island, and he is destined to marry Princess Andromeda. This movie revolves around both of them. After that, the Princess will rule out the city of Joppa. But somehow, she gets entrapped by a monster and others move ahead to rescue her.
03A Grand Day Out (1989)
A grand day out is a movie, especially one focusing on children. In this movie, there is a coin-activated robot that lives on the moon. Wallace and Gromit reach for the moon to activate him with the help of 1coins. The plot is very interesting and keeps the audience interested. It is also right to conclude that there is a good use of science in creating this Claymation movie.
04The Wrong Trousers (1993)
The Wrong Trousers is a comedy fantasy animation and crime fiction movie that users love to watch. The content appears to be so pleasing to the kids and to adults as well. This story starts when Wallace rents out the spare bedroom to a penguin. After that, he takes an interest in the techno pants that were created by the landlord, Wallace. Also, this story revolves around the things that we can encounter in real life too.
05The Nightmare Before Christmas (1993)
The Nightmare Before Christmas is a movie following the misadventures of Jack Skellington. He gets bored of the regular routine and wants something interesting to happen. By keeping the same into consideration, he tries to kidnap Santa Claus and wants to take up the role. Somehow he planned things in such a manner that destiny starts to favour him, but in the end, skeleton men go serious, and somehow his plan comes to an end. Some twists and turns are making the plot more interesting to watch.
06A Close Shave (1995)
A Close Shave is a movie that revolves around a situation that needs to be avoided. In this case, there is a need to escape the situation and focus on more important things. You will see the combination of love, jealousy, and sympathy in this movie, which makes it one of the best claymation movies of all time.
07Chicken Run (2000)
Chicken Run is an award-winning animation movie that tells a story about chickens. Their life is confined to laying eggs, but things change when an American rooster arrives. All the hens think of getting freedom after his arrival. There is a different story which has been shown in this claymation movie, and the users feel they have interacted with it. You will also notice a turbulent romance between two farmyard chickens, Rocky and Ginger. They are planning to leave for freedom.
08Wallace & Gromit: The Curse of the Were-Rabbit (2005)
The Curse of the Were-Rabbit is an animated movie which is entirely a comedy film produced by DreamWorks. This movie is among the longest-running stop-motion movies of that time. Also, the storey is great, with a creative twist. You will see the monster being a rabbit, eating all the vegetables, while the wolf is eating people. Also, there is a strong correlation that has been shown between both of them, which is very funny to note.
09Coraline (2009)
The Coraline movie revolves around the plot of a girl named Coraline exploring her new home. Here she discovers a secret door with an opening to the alternate world. She will also notice that there is something to discover and be overjoyed after taking a look at it. The other world is parallel to the present world and also has things that are not in contrast with her family as well. This movie is among those claymation movies where the use of animation has been done at its best and also lets people feel hooked on it.
10Consuming Spirits (2012)
Consuming Spirit tells the storey of three people who live in a small rust-belt town. All three have interconnected lives, and somewhere each of them is affected by the things happening. Moreover, the things that happen in their surroundings not only affect one of them but all three experience sudden changes. The storey is also interesting to you because a comedy is also a part of this movie along with some other content.
11A Town Called Panic (2009)
A Town Called Panic is an animated film where a cowboy plans to construct a barbecue pit for his friend’s birthday. But the problem arises when they receive million bricks. They had placed an order for something else but accidentally received it. This destroys their house, and somewhere, they start to rebuild, but unfortunately, their walls are continually stolen. You will see that he is so dedicated to the task that he never sits silently until the task is completed.
12Early Man (2018)
Early Man is a storey of black cavemen whose name is “Dug”. The entire tribe is facing difficulties because of their simple existence and also because there are other people who are threatening them. They are not ready to go down without a fight, and then somehow it happens. This storey is interesting to see because it is a family film and the kids can enjoy it easily, as can adults too.
13The Pirates. Band of Misfits (2012)
The Pirates. The Band of Misfits is a storey of an enthusiastic pirate captain. He is sailing through the high seas and dreaming of the best for his bitter rivals. The captain is also ready to take all the hurdles to be the best one. During the battle, they have encountered different people, and some of them have joined their teams as well. This is among those movies where he appears in a manner that appears to be so real to us.
14Paranorman (2012)
Paranorman is among those movies where you will see the effect of paranormal things and also the young man trying to speak with the dead. There is a strange behaviour portrayed by them, which gets fans hooked on it. Some people consider it a suspenseful movie because, initially, they are not able to conclude what is happening. But in the end, somewhere, the young man has courage and compassion, which helps him to master his paranormal abilities. Also, it is quite interesting to watch how he is able to develop his skills throughout.
15The Missing Link (2019)
“Missing Link” is a movie based on the life of a person who is tired of living a solitary life in the Pacific Northwest. He is 8 feet tall and covered with fur. He is so experienced, but somehow his destiny is not favouring him. However, it is the hypothetical Instinct creature and is considered to be the evolutionary line between modern human beings and anthropoid progenitors. It is right to conclude that this plot revolves around a lot of human existence and early man, helping people to understand things in a bit more detail.
● Key Takeaways from This Episode →
● Claymation movies hold a good place in the entertainment content list.
● Claymation movies give us many hours of entertainment.
● Claymation content from the past is far different from the content we have presently.
How to Make a Photoshop Collage in EASY Steps
How to Make a Photoshop Collage in EASY Steps
An easy yet powerful editor
Numerous effects to choose from
Detailed tutorials provided by the official channel
Photographs are a way of capturing and stopping the time in a small frame. They hold millions of memories that we want to cherish forever in our lives. And sometimes, we want to make a cluster of all the happy memories by making a collage of the photos.

Also, what can be a better gift to someone than presenting them a collection of all the cherishable memories you have with them in photographs? And that can be made possible through various photoshop collage ideas.
In this article
01 [Does Photoshop Have Collage Templates?](#Part 1)
02 [How to Make Your Own Collage with Photoshop Templates](#Part 2)
03 [How to Custom a Photoshop Collage in 9 Simple Steps](#Part 3)
Part 1 Does Photoshop Have Collage Templates?
There is numerous photo collage template in photoshop, and you even access and use some of them for free. Additionally, you can also create your template in Photoshop and use them in making your collage. If you want to make your template in Photoshop, here is how.
Step 1: Make a new layer and fill it up with your choice of colour.
Step 2: Resize and duplicate the layer to create the pattern you want for your collage.
Step 3: Integrate a “Clipping Mask.”
Step 4: For every image, create new clipping masks.
Step 5: Your collage template is ready so, export it to use!
Part 2 How to Make Your Own Collage with Photoshop Templates
Now that we know that you can access numerous incredible photoshop templates for free, you might want to create a collage for yourself in Photoshop. So, this is how you can use the photoshop collage template to make your collage with Photoshop Templates.
First, you need to select the images you want to create a collage with. Then you will have to import them. You can either “select and import” them one at a time or even batch import all of them together. Then, you can readily choose the template you want to use, or you can also create one for yourself.
Then you can resize or edit the images in the way you want and place them in the desired order. After you are done arranging and creating the collage perfectly, save the file in JPEG format and then export it to access it whenever you want!
Part 3 How to Custom a Photoshop Collage in 9 Simple Steps
If you do not know the answer to the question: how to make a collage in photoshop, there is absolutely nothing to worry about. Because the answer to this question is simple and includes not more than nine steps.
So now, we will be discussing the nine simple steps that will help you make a custom photo collage in photoshop. Here is the list of steps that will help you in doing so.
● Step 1: Selecting your favorite photos
The first step to making a collage in photoshop is to select all the photos you would like your collage to have. Now, it will be best for you to choose your photos wisely. We understand that each photograph is equally sweet and cherishable. But, when you select the images for your collage in a thoughtful manner, the collage turns out much better than expected.
You can use different collage ideas for photoshop, such as following a particular storyline, where you collage the photos so that it recreates the memory or the moments in sequence. Another way to select your photos is by sticking to a particular theme, and it can be vintage or on one specific color or the like. It will help your collage turn out in the best and the most thoughtful way.
● Step 2: Opening the photos you have selected, in collage maker photoshop
Now that you have selected which images you would want your collage to have, the next step will require you to open those images in the collage maker Photoshop. For this, you will have to select the option “File”. There, you will find the option “Open”. Then you will open the images you have chosen in Photoshop.
Also, you can simply press the “ctrl” and the “O” keys on your keyboard and it will automatically help you open the images you have selected for the photo collage on photoshop.

Another way to open the pages you have selected for your collage is through the “Drag and Drop” function. It is more effortless to choose the images and open them in Photoshop. After you have opened the photos in Photoshop, it will open in a different tab and look like in the following picture.

● Step 3: Make a new file for your collage on photoshop
The third step requires you to make a new file for your photo collage in photoshop. For this, you need to select or click on the “File” option on Photoshop. Then, click on the “New” option. It will help you make a new file for your collage. You can also select the “ctrl” and “N” together.
As you click on the “New” option, you will be given options to choose from. Choose the one that matches your preference.
When you are working on photoshop to make a collage, the images will need a collage background because it is on this background that the photos will assemble. If you have made a collage before on photoshop, you can use the old collage photoshop template. Otherwise, you need to create a new document for the collage.

● Step 4: Add the selected images one-by-one
Adding the images can be done in many ways. One way to do so is by opening the photo and clicking on it. Another way of doing so is to use the “Marquee Tool” of Photoshop.

Another way of doing so is by pressing the “ctrl” and “A” keys on your keyboard together. You will find the matching ants border around the image when you do this.

Then, go to the “Edit” option and choose “Copy” there. Or, you can also select the “ctrl” and “C” keys on your keywords together. Then go to your new document and select the option of “Paste” from the “Edit” option, or you can also press the “ctrl” and “V” keys together to do so.
The photo will be added in its own layer on the new document.

● Step 5: Arrange the images
Now, arrange the images in the way you want. If you have chosen to tell a story through your collage creator in photoshop, then arrange the photos accordingly. You can do so with the help of the “Move” tool or simply tap V. You can also use the “Free Transform” tool to edit and transform the images in the way you want. You can resize, rotate and edit the photos in many other ways through the “Free Transform” tool.
Step 6: Integrate image space
To create a collage in photoshop in a better and more spaced-out manner, you need to add some spacing between the images you have in your collage. There are two ways to add spacing between the pictures; one way is by creating a thin, white border around each image.
And the second method is by accessing and using the “Layers” feature in Photoshop.

● Step 7: Merge all the Layers
This step is necessary when you have used the “Layer” feature to create the spacing among the images present in your collage. You will be able to do so from the “Layer” option. So, go to the “Layer” option and select the “Merge Invisible” option present there.

● Step 8: cropping the final picture
Before the final step, it is important that you crop the final picture. And to do so, you can opt for the “Crop tool”. You will be able to access it easily, or you can also simply tap C to use the “Crop tool.”

● Step 9: Save the final collage and export
After you have done all the necessary changes and are satisfied with the final collage, then, save the file. To do so, go to the “File” option and select the “Save as” option.

Then choose the file type to be “JPEG”. Type the name you would want the collage to be saved as. This completes the process of saving the file. Then choose the image quality you would want the collage to be exported in.

● Key Takeaways from This Episode →
● In this discussion, we have covered the following topics.
● We discussed whether Photoshop has collage templates.
● Then we proceeded with discussing how we can create a collage in photoshop using the templates in it.
● Lastly, we wrapped up our discussion with the nine-step tutorial about customizing a collage in Photoshop.
Photographs are a way of capturing and stopping the time in a small frame. They hold millions of memories that we want to cherish forever in our lives. And sometimes, we want to make a cluster of all the happy memories by making a collage of the photos.
Also, what can be a better gift to someone than presenting them a collection of all the cherishable memories you have with them in photographs? And that can be made possible through various photoshop collage ideas.
In this article
01 [Does Photoshop Have Collage Templates?](#Part 1)
02 [How to Make Your Own Collage with Photoshop Templates](#Part 2)
03 [How to Custom a Photoshop Collage in 9 Simple Steps](#Part 3)
Part 1 Does Photoshop Have Collage Templates?
There is numerous photo collage template in photoshop, and you even access and use some of them for free. Additionally, you can also create your template in Photoshop and use them in making your collage. If you want to make your template in Photoshop, here is how.
Step 1: Make a new layer and fill it up with your choice of colour.
Step 2: Resize and duplicate the layer to create the pattern you want for your collage.
Step 3: Integrate a “Clipping Mask.”
Step 4: For every image, create new clipping masks.
Step 5: Your collage template is ready so, export it to use!
Part 2 How to Make Your Own Collage with Photoshop Templates
Now that we know that you can access numerous incredible photoshop templates for free, you might want to create a collage for yourself in Photoshop. So, this is how you can use the photoshop collage template to make your collage with Photoshop Templates.
First, you need to select the images you want to create a collage with. Then you will have to import them. You can either “select and import” them one at a time or even batch import all of them together. Then, you can readily choose the template you want to use, or you can also create one for yourself.
Then you can resize or edit the images in the way you want and place them in the desired order. After you are done arranging and creating the collage perfectly, save the file in JPEG format and then export it to access it whenever you want!
Part 3 How to Custom a Photoshop Collage in 9 Simple Steps
If you do not know the answer to the question: how to make a collage in photoshop, there is absolutely nothing to worry about. Because the answer to this question is simple and includes not more than nine steps.
So now, we will be discussing the nine simple steps that will help you make a custom photo collage in photoshop. Here is the list of steps that will help you in doing so.
● Step 1: Selecting your favorite photos
The first step to making a collage in photoshop is to select all the photos you would like your collage to have. Now, it will be best for you to choose your photos wisely. We understand that each photograph is equally sweet and cherishable. But, when you select the images for your collage in a thoughtful manner, the collage turns out much better than expected.
You can use different collage ideas for photoshop, such as following a particular storyline, where you collage the photos so that it recreates the memory or the moments in sequence. Another way to select your photos is by sticking to a particular theme, and it can be vintage or on one specific color or the like. It will help your collage turn out in the best and the most thoughtful way.
● Step 2: Opening the photos you have selected, in collage maker photoshop
Now that you have selected which images you would want your collage to have, the next step will require you to open those images in the collage maker Photoshop. For this, you will have to select the option “File”. There, you will find the option “Open”. Then you will open the images you have chosen in Photoshop.
Also, you can simply press the “ctrl” and the “O” keys on your keyboard and it will automatically help you open the images you have selected for the photo collage on photoshop.
Another way to open the pages you have selected for your collage is through the “Drag and Drop” function. It is more effortless to choose the images and open them in Photoshop. After you have opened the photos in Photoshop, it will open in a different tab and look like in the following picture.
● Step 3: Make a new file for your collage on photoshop
The third step requires you to make a new file for your photo collage in photoshop. For this, you need to select or click on the “File” option on Photoshop. Then, click on the “New” option. It will help you make a new file for your collage. You can also select the “ctrl” and “N” together.
As you click on the “New” option, you will be given options to choose from. Choose the one that matches your preference.
When you are working on photoshop to make a collage, the images will need a collage background because it is on this background that the photos will assemble. If you have made a collage before on photoshop, you can use the old collage photoshop template. Otherwise, you need to create a new document for the collage.
● Step 4: Add the selected images one-by-one
Adding the images can be done in many ways. One way to do so is by opening the photo and clicking on it. Another way of doing so is to use the “Marquee Tool” of Photoshop.
Another way of doing so is by pressing the “ctrl” and “A” keys on your keyboard together. You will find the matching ants border around the image when you do this.
Then, go to the “Edit” option and choose “Copy” there. Or, you can also select the “ctrl” and “C” keys on your keywords together. Then go to your new document and select the option of “Paste” from the “Edit” option, or you can also press the “ctrl” and “V” keys together to do so.
The photo will be added in its own layer on the new document.
● Step 5: Arrange the images
Now, arrange the images in the way you want. If you have chosen to tell a story through your collage creator in photoshop, then arrange the photos accordingly. You can do so with the help of the “Move” tool or simply tap V. You can also use the “Free Transform” tool to edit and transform the images in the way you want. You can resize, rotate and edit the photos in many other ways through the “Free Transform” tool.
Step 6: Integrate image space
To create a collage in photoshop in a better and more spaced-out manner, you need to add some spacing between the images you have in your collage. There are two ways to add spacing between the pictures; one way is by creating a thin, white border around each image.
And the second method is by accessing and using the “Layers” feature in Photoshop.
● Step 7: Merge all the Layers
This step is necessary when you have used the “Layer” feature to create the spacing among the images present in your collage. You will be able to do so from the “Layer” option. So, go to the “Layer” option and select the “Merge Invisible” option present there.
● Step 8: cropping the final picture
Before the final step, it is important that you crop the final picture. And to do so, you can opt for the “Crop tool”. You will be able to access it easily, or you can also simply tap C to use the “Crop tool.”
● Step 9: Save the final collage and export
After you have done all the necessary changes and are satisfied with the final collage, then, save the file. To do so, go to the “File” option and select the “Save as” option.
Then choose the file type to be “JPEG”. Type the name you would want the collage to be saved as. This completes the process of saving the file. Then choose the image quality you would want the collage to be exported in.
● Key Takeaways from This Episode →
● In this discussion, we have covered the following topics.
● We discussed whether Photoshop has collage templates.
● Then we proceeded with discussing how we can create a collage in photoshop using the templates in it.
● Lastly, we wrapped up our discussion with the nine-step tutorial about customizing a collage in Photoshop.
Also read:
- New 10 Photoshop Cartoon Effects For Creatives for 2024
- Updated Want to Make a Meme GIF? Heres How to Do for 2024
- New The Secret Sauce for Making GIF Instagram Story More Stunning for 2024
- How to Make Animation Characters with the Best Character Creators for 2024
- New In 2024, Obtain and Create Animated GIF Icons
- Tutorial Guide to Animate Pictures in Canva for 2024
- 2024 Approved Fuel Your Creativity with 10 Awesome Collection of 2D Animation Examples
- New 2024 Approved Ideas That Will Help You Out in Learning How to Send WhatsApp Animated Gifs
- New How to Create Animated Video on Canva for 2024
- New 2024 Approved How-To Guide Secret Shortcut to Adobe Animate Character Tutorial
- New Best 12 Video to GIF Converters High Quality to Check Out
- Updated Best 10 Video to GIF Converters Top Picks
- Updated 10 Realistic Cartoon Characters You Would Run Away From if You Met in Real Life
- Updated 2024 Approved Learn Easy Blender Rigging in Only 2 Minutes
- Top 8 Anime Name & Title Generators Online-Get Cool Anime Names for 2024
- Updated OBS Animated Alternatives
- New 4 Smart Solutions to Create or Find Good Morning/Night GIFs for 2024
- 2024 Approved Why These 10 Top Text Motion Templates Are Worth Your Attention
- Updated 2024 Approved Cartoon Fundamentals How to Learn Cartoon Characters Sketch Quickly
- Updated Animate Your Photo Online with These Awesome Tools
- Updated Best 12 Evil Cartoon Characters of All Time
- Updated 2024 Approved Ways to Create an Adobe Collage
- 2024 Approved Most Effective Ways to Set WhatsApp Status
- Updated 2024 Approved 10 Stunning Stop Motion Movies You Should Not Miss
- How to Combine Multiple GIFs Into One with GIF Combiner for 2024
- New How to Make Your GIF on WhatsApp in Simple Ways for 2024
- New In 2024, Techniques on Making After Effects 2D Animation
- New In 2024, Something About Types of Motion Graphics
- Updated What Make Aesthetic Cartoon Drawing More Understandable
- New In 2024, 6 Unexpected Ways Gif Animation Maker That Affect Your Marketing
- 10 Great Apps to Turn Funny Animated Images Into Comics for 2024
- Updated How to Create Photo Collage Frame for Free in Minutes, In 2024
- Updated 2024 Approved How to Reduce GIF Size and Best GIF Resizers
- Secret Source to Make a Great Stop Motion Puppet for 2024
- 10 Cartoon Characters That Should Top Your List
- New In 2024, Ways You Can Master to Make Claymation Videos
- In 2024, 15 Types of Cartoon Drawing Styles with Examples
- Learn How to Create Adobe 3D Animation for 2024
- New 2024 Approved The Only Guide Youll Ever Need to Learn About GIF Video Downloader
- New All About 3D Medical Animation for 2024
- Updated In 2024, What Is A GIF
- New The Best 10 Sketch Animation Video Makers
- New How to Create YouTube Intro Animation Like a Pro for 2024
- Updated In 2024, 15 Best Apps to Turn Photos Into Cartoons and Sketches
- Amazing Techniques of Motion Graphics in Premiere Pro
- Updated How-To Guide Secret Shortcut to Adobe Animate Character Tutorial
- Updated 10 Best Tools to Make Pic Collage for Windows for 2024
- In 2024, Forgot iPhone Passcode Again? Unlock Apple iPhone 12 Without Passcode Now
- In 2024, Top 5 Samsung Galaxy M14 5G Bypass FRP Tools for PC That Actually Work
- How to Reset your Xiaomi Redmi Note 12 5G Lock Screen Password
- Will MOV files play on Samsung Galaxy A15 4G ?
- Top IMEI Unlokers for Apple iPhone 15 and Android Phones
- How to Check Distance and Radius on Google Maps For your Apple iPhone 13 Pro Max | Dr.fone
- The best electronic signature way to sign .docx file documents online
- 3 Ways to Change Location on Facebook Marketplace for Samsung Galaxy S24+ | Dr.fone
- What to Do if Google Play Services Keeps Stopping on Vivo Y56 5G | Dr.fone
- How to Change Your Lava Yuva 2 Location on life360 Without Anyone Knowing? | Dr.fone
- Cellular Network Not Available for Voice Calls On Honor X50 GT | Dr.fone
- Tutorial to Change Asus ROG Phone 8 Pro IMEI without Root A Comprehensive Guide
- In 2024, How Many Attempts To Unlock iPhone 14 Pro
- 3 Things You Must Know about Fake Snapchat Location On Itel P40 | Dr.fone
- How to Fake GPS on Android without Mock Location For your Motorola Moto G Stylus (2023) | Dr.fone
- How To Remove Flashlight From iPhone 8 Plus Lock Screen
- Tecno Spark Go (2023) ADB Format Tool for PC vs. Other Unlocking Tools Which One is the Best?
- 5 Easy Ways to Change Location on YouTube TV On Apple iPhone 13 mini | Dr.fone
- How to Fix Android App Not Installed Error on Vivo V27 Pro Quickly? | Dr.fone
- In 2024, Must-Have Apps for Real-Time Video Translation
- Hard Resetting an Realme 12 Pro+ 5G Device Made Easy | Dr.fone
- How to Remove and Reset Face ID on Apple iPhone 6s Plus | Dr.fone
- In 2024, Is pgsharp legal when you are playing pokemon On Nokia C110? | Dr.fone
- List of Pokémon Go Joysticks On OnePlus Ace 2 | Dr.fone
- How to Change Netflix Location to Get More Country Version On Tecno Pop 8 | Dr.fone
- Title: Updated 2024 Approved 10 Realistic Cartoon Characters You Would Run Away From if You Met in Real Life
- Author: Elon
- Created at : 2024-05-19 03:05:11
- Updated at : 2024-05-20 03:05:11
- Link: https://animation-videos.techidaily.com/updated-2024-approved-10-realistic-cartoon-characters-you-would-run-away-from-if-you-met-in-real-life/
- License: This work is licensed under CC BY-NC-SA 4.0.
