
:max_bytes(150000):strip_icc():format(webp)/samsungtvhomepage-58f0d708245a4140bb4bbad8ea0cfc26.jpg)
Updated 2024 Approved 20 Free After Effects Logo Reveal Templates
20 Free After Effects Logo Reveal Templates
20 Free After Effects Logo Reveal Templates You Will Want to Know
An easy yet powerful editor
Numerous effects to choose from
Detailed tutorials provided by the official channel
The free After Effects logo reveals templates is a creative and clean animation that is very easy to use and customizable in just a few clicks. This template allows you to change the color, edit the text, add your logo, and click on render and contains two different logo animations for you to choose from. It does not require any plugin, and you can use it for your following modern and professional logo animation.
![]()
By incorporating a logo animation into your video, you can make your brand memorable and choose a suitable template for your brand personality. So, get ready for all the free logo reveal templates in this article.
In this article
01 [20 Best Logo Reveal Templates for After Effects 2022](#Part 1)
02 [Learn How to Use After Effects Logo Reveal Templates](#Part 2)
Part 1 Best Logo Reveal Templates for After Effects 2022
You can use an animated logo reveal if you need to add spice to your marketing campaigns and branded videos. An animated logo reveal is explained as a Great way to capture your audience’s attention as they screw through their newsfeed and stand you out from the competition. This section of the article will give you After Effects logo reveal templates for free that you can choose from this 2022:
![]()
01[Fast Flip Logo Reveal Template](https://dsqqu7oxq6o1v.cloudfront.net/preview-215084-pWlBMUhYg4-high.mp4 target=)
Fast Flip logo reveal template free to download is perfect for those on a budget and uses stock photography which can be replaced with photos of a company or team to review and an elegant logo at the end. All that is required is to customize the color, replace the images, and add your logo.
02Logo Web Search
Logo Web Search is an easy-to-use, stylish and simple animation for a company website. It allows you to change colors quickly and free sound effects, and all you need to do is change the logo text and click on render.
03Search Logo Reveal
Search Logo Reveal After Effect template for free allows you to customize the text and easily drag and drop in your logo. It provides a unique way to review your logo by using an animated search bar with a sample question and bringing up your logo as the answer. It can be a great add on to websites with search options.
04Colors Logo Reveal
Colors Logo Reveal is a super clean and straightforward After Effects logo reveal template that is very easy to use for designers and creators. It contains two different logos animations that you can choose from and requires no plugin. Add your logo, change the color, edit the text, and click on render.
05Logo Reveal
Logo Reveal is perfect for small business companies and startups with an easy-to-use template that comes with detailed instruction on how to customize and render your logo reveal Project.
06Unlock Phone Logo Reveal
Unlock Phone Logo Reveal is one of the dynamic logo reveal After Effects templates for free with a modern design, smooth transition effects, and simple text animation that is super easy to use. All that is required is to edit the text, drag and drop in your media, and click on render. It comprises a cool intro or opener to presentations, slideshows, promotions, and event videos to impress your audience.
07Orbital Free HUD Logo Reveal
Orbital Free HUD Logo Reveal is perfect for any tech company, and it’s done up in futuristic style and includes the complete. AEP project file with background texture and elements.
08Corporate logo reveal
Corporate Logo Reveal template is a stylish and contemporary template that features a simple shape that is elegantly animated and combined with reviewing your logo. It has one logo placeholder, editable text layers, and an easy-to-use color controller. An excellent logo reveals the Premiere Pro template free to download for companies like stockbrokers.
09White Scroll Logo Reveals
White Scroll Logo Reveals perfect for a more classic logo opener and comes with three background versions and three different logo placement options.
10Shape Logo Reveal
Shape Logo Reveal is a stylish logo reveal template with colorful shape layers and lines that beautifully form a clean-looking logo reveal. It is a short intro for a business slideshow, promotions, events, TV shows, videos, commercials, corporate presentations, etc.
11Free Animated Logo Reveals
Free Animated Logo Reveals is packed with three different logos reveal, which a suitable for corporates and an excellent option for one who wants a modern and professional logo show.
12Clean Titles And Logo Reveal
Clean Titles and Logo Reveal offers stylish templates which an eye-catching design and contains two text placeholders and one logo placeholder. It is effortless to use and a short introduction to TV shows, commercials, slideshows, promotions, Facebook and YouTube videos, etc.
13Hi-Tech Logo Reveal 02
Hi-Tech Logo Reveal is a premium animated logo reveal that features a dark blue background joint with light blue HUD elements and a perfect logo reveal template for a company that wants to stand out online.
14Testimonials Logo Reveal
Testimonials logo Reveal is a stylish and clean project that is perfect for displaying the company’s testimonials and reviews. This After Effects logo reveal template for free features six title placeholders, one logo holder, and six photo placeholders, requiring no plugin.
15Elegant Logo Reveal
Elegant logo Reveals perfect for a feminine background. It features chrome logo pens with a silky dark background, enabling you to easily add your text, insert your logo, and change the colors.
16Logo Web Search II
Logo Web Search II is a stylish and straightforward animation mainly for company websites. It is elementary to use.
17Battle Logo Reveal
Blue Action Logo Reveal is for those looking for a minimalist logo opener and features a dynamic animation style, including an editable text layer and a logo placeholder. It also allows you to adjust the colors easily.
18Blue Action Logo Reveal
Blue Action Logo Reveal is majorly for those looking for a minimalist logo opener and features a dynamic animation style including an editable text layer and a logo placeholder. It also allows you to easily adjust the colors.
19Logo Introduction Template
Logo Introduction Template is a free logo reveal from Premiere Pro. It is perfect for the ones looking for a Tudor style logo reveal and allows you to easily customize the colors and insert your logo with a detailed help file.
20Minimal Logo Klick
Minimal Logo Klick comes in a sleek and modern design with playful animation. It encompasses a logo placeholder, an editable text layer, and an intelligent color controller. If you are searching for an unfussy and free logo reveal online, this one is for you.
Part 2 Learn How to Use After Effects Logo Reveal Templates
This section provides you with a basic tutorial on using the logo reveal After Effects template for free. However, this is a professional video editing software, but if video editing is new to you, you can try out Filmora, which is powerful, easy to use for new users. In Filmora, you will use the logo reveal template as a professional even if you are a beginner.
Below is how to use the After Effects logo reveals template:
01Open After Effects and Begin
Open your After Effect software and set up your Project ready. To begin face, create a composition using composition>New. You can also search the web resolution to 3x 2for this Project.
![]()
02Start Creating Logo
Next is to create a solid layer for your logo by using layers>new>solid, and select an appropriate color to match your composition.
![]()
Next is the creator logo by adding the pre-prepared logo artwork. Go to layer>new>text to create a text layer and adjust the text size and color to see.
![]()
03Add Animation to Logo
Manipulate your logo to create an animation and ensure that everything is right where you want it.
![]()
04Add Effects and Keyframe
Add Effect by going to Effect>Simulation>CC Particle World or click on Effects and Presets panel on the right to drag the CC Particle World effect onto your solid layer.
![]()
Set off your animation by adding a keyframe and controlling the animation of the particles effect through the birth rate setting, which is found by expanding the settings in the timeline panel for the solid layer.
![]()
05Import Vector Graphics and Finish
Finally, import your vector graphics into the After Effects by dragging and dropping the file into the Project panel, which brings up an import dialogue.
For Win 7 or later (64-bit)
For macOS 10.12 or later
That’s it! You successfully made use of the logo reveal maker.
● Key Takeaways from This Episode →
● The top 20 logo reveal Premiere Pro templates free to download.
● THow to make logo with After Effects – the logo reveal maker.
● TLastly, the logo reveal, free online tool, Filmora.
● TI hope I’ve gave you a few ideas on the After Effects logo reveal template for your Project and provided a breakdown of other software you can use for free logo reveal, such as Filmora. The article also lists the best logo reveal templates for after-effects that you can choose from this 202You can also use other software for your free logo reveal, but we all need to start somewhere.
Top 10 Cartoon Canvas Painting Ideas for Total Beginners
10 Cartoon Canvas Painting Ideas for Total Beginners
An easy yet powerful editor
Numerous effects to choose from
Detailed tutorials provided by the official channel
Beginning your streak into cartoon canvas painting? Stay tuned to learn about the 10 most amazing ideas to design your best cartoon canvas art in no time!
In this article
01 [10 Cartoon Canvas Painting Ideas](#Part 1)
02 [How To Paint A Cartoon On Canvas](#Part 2)
Part 1 Cartoon Canvas Painting Ideas
Cartoon are an evergreen favourite for almost everyone around. After all, who would mind sparing a laugh on the adorable musings of the cutest cat and mouse duo in Tom and Jerry, or long for a dive into the fantasy of icy adventures with the Frozen fairy tale! While the huge caricature repository has the best of fun to offer, watching them peep at you from the canvas painting on your art wall is no less of a delight.
When starting to create your own cartoon canvas art, end your search of the most striking painting idea with the amazingly stunning choices in the following section:
01Tom and Jerry
These two are undoubtedly the pioneers of the entire cartoon story that has affordably existed till date. The naughty duo promises to lighten up your day with a mere gaze through the art wall in your room, in the same way as their show sets the mood in. Painting them on your room’s wall canvas will certainly add life to the place.
02Super Mario
Who can forget this adorable red plumber, who conveniently takes the credit for giving us the fondest childhood memories? Whether or not a regular console gamer, this adventure hero is an undisputed favorite of everyone around. So why not make him a member of your art collection through a cartoon canvas painting!
03Characters from the Frozen Land
The adorable cartoon characters from the icy landscapes of this winter fairy saga are possibly the best way to begin your exciting journey of cartoon canvas painting. While the magical storyline of the pixie quest has a diversity of the coolest and the most adorable characters to choose from, you are always free to pick your favorite one and start your design spree.
04Kung fu Panda
If you are a parallel admirer of martial arts and caricature heroes, this cartoon character would be an apt choice to satisfy your love for canvas painting. The adorably cute bear eyeing at you from the painting in his best warlike posture would certainly motivate you to work on keeping a check of your fitness levels!
05Sponge Bob
Living up to his name, this spongy creature has created a separate and strong fan base among viewers of all age groups beyond time. Choosing this character for your cartoon canvas art is surely going to spark up your day with the vibrancy of a real rainbow, even in between the sulkiest of moments, as they say, it’s time to brighten up your life with Bob!
06Homer Simpson
If you are convincingly fascinated by the lures of life overseas, this American toon character is all set to give you the perfect feel of the day to day American lifestyle. Try hands at painting a scene from the eventful life of the Simpson family that is ready to add a fun angle to the most boring chores, while giving you a parodical glimpse of the American society and culture.
07Characters from the Avenger Series
Avengers must be your absolute favorite if you have a love for battle and combat games. Bring your adventure feel back to life with creating a canvas painting art of your most admired avenger, or consider including all of them on a king size canvas if you are having a tough time picking the best from the best!
08Angry Birds
These furious creatures have been a global sensation since their entry into the world of gaming. While these star birds take you on a stunning adventure realism with an amazing graphic excellence, a caricature canvas art of these in your painting collection will certainly add the missing spunk to your graphic creativity.
09Members and Trainers of the Pokémon Species
From TV series to gaming adventures, the love for Pokémon has stood the tests of time in every dimension. When it comes to adding these characters to your canvas painting, you have a storehouse of choices from the cute Pikachu and the meticulous Ash to the nasty team Rocket and other amazing members of the Pokémon species.
10Donald Duck
If you are keen on adding a touch of nostalgia to your creative drawing, consider designing a masterpiece of cartoon canvas artwork portraying this bubbly ad quaky creature that has given you the best of childhood entertainment in the form of possibly the most reliable financial advisor and the cutest good luck charm of toon land.
Now that the graphic design technology has reached its par, you can explore your creativity to design these characters for various uses, such as, illustrative, animated, gag, editorial and political cartoons, or caricatures on comic panels and strips.
Part 2 How To Paint A Cartoon On Canvas
Now that you have come cross the exciting ideas of creating cartoon canvas art, this must be a sufficient motivation to experiment with creating a top class caricature canvas painting for yourself. Read through the following section to get an insight into the knowhow of painting a cartoon on canvas in the easiest possible way!
User’s Guide to Create a Cartoon Canvas Painting on Wondershare Filmora Video Editor
Before entering into the actual design task, you will require a download, installation and launch of the Wondershare Filmora application to any of your Windows or Mac supported devices. Visit the following link for a free download of the software program:

Wondershare Filmora - Best Video Editor for Mac/Windows
5,481,435 people have downloaded it.
Build unique custom animations without breaking a sweat.
Focus on creating epic stories and leave the details to Filmora’s auto features.
Start a creative adventure with drag & drop effects and endless possibilities.
Filmora simplifies advanced features to save you time and effort.
Filmora cuts out repetition so you can move on to your next creative breakthrough.
Painting a Young Character
Take the following steps to draw the caricature form of a young or middle aged character in Wondershare Filmora:
Step 1:
Launch Wondershare Filmora on your system and then start new project. Now import the video from your computer in the software interface.

Step 2:
Once you have added the video then simply drag and drop it in the timeline.

Step 3
Once you have added video to the timeline double click on the added video in timeline to open the video editing menu of Wondershare Filmora.

Step 4:
Now, click the “Animation” tab in the editing options at the left side of interface then you can select anyone from the available preset options.

Step 5:
Select any preset from the available list and then drag and drop it in the timeline to apply the preset on the video. After applying you can use the play button to preview the file. This is the way to create beautiful animation with the Wondershare Filmora. Just like this you can quickly create the best Cartoon canvas as well.

Step 5
After doing all necessary editing you just need to click the “Export” button and save it on your computer.

● Ending Thoughts →
● Cartoon canvas art has gained immense popularity in recent times having a reliable economic and creation advantage with the growth of animation design.
● There are a variety of cartoon painting ideas that you can choose to explore your graphic design creativity.
● When looking for the best solutions to work on creating caricature canvas art, Wondershare Filmora is your worthiest choice.
Beginning your streak into cartoon canvas painting? Stay tuned to learn about the 10 most amazing ideas to design your best cartoon canvas art in no time!
In this article
01 [10 Cartoon Canvas Painting Ideas](#Part 1)
02 [How To Paint A Cartoon On Canvas](#Part 2)
Part 1 Cartoon Canvas Painting Ideas
Cartoon are an evergreen favourite for almost everyone around. After all, who would mind sparing a laugh on the adorable musings of the cutest cat and mouse duo in Tom and Jerry, or long for a dive into the fantasy of icy adventures with the Frozen fairy tale! While the huge caricature repository has the best of fun to offer, watching them peep at you from the canvas painting on your art wall is no less of a delight.
When starting to create your own cartoon canvas art, end your search of the most striking painting idea with the amazingly stunning choices in the following section:
01Tom and Jerry
These two are undoubtedly the pioneers of the entire cartoon story that has affordably existed till date. The naughty duo promises to lighten up your day with a mere gaze through the art wall in your room, in the same way as their show sets the mood in. Painting them on your room’s wall canvas will certainly add life to the place.
02Super Mario
Who can forget this adorable red plumber, who conveniently takes the credit for giving us the fondest childhood memories? Whether or not a regular console gamer, this adventure hero is an undisputed favorite of everyone around. So why not make him a member of your art collection through a cartoon canvas painting!
03Characters from the Frozen Land
The adorable cartoon characters from the icy landscapes of this winter fairy saga are possibly the best way to begin your exciting journey of cartoon canvas painting. While the magical storyline of the pixie quest has a diversity of the coolest and the most adorable characters to choose from, you are always free to pick your favorite one and start your design spree.
04Kung fu Panda
If you are a parallel admirer of martial arts and caricature heroes, this cartoon character would be an apt choice to satisfy your love for canvas painting. The adorably cute bear eyeing at you from the painting in his best warlike posture would certainly motivate you to work on keeping a check of your fitness levels!
05Sponge Bob
Living up to his name, this spongy creature has created a separate and strong fan base among viewers of all age groups beyond time. Choosing this character for your cartoon canvas art is surely going to spark up your day with the vibrancy of a real rainbow, even in between the sulkiest of moments, as they say, it’s time to brighten up your life with Bob!
06Homer Simpson
If you are convincingly fascinated by the lures of life overseas, this American toon character is all set to give you the perfect feel of the day to day American lifestyle. Try hands at painting a scene from the eventful life of the Simpson family that is ready to add a fun angle to the most boring chores, while giving you a parodical glimpse of the American society and culture.
07Characters from the Avenger Series
Avengers must be your absolute favorite if you have a love for battle and combat games. Bring your adventure feel back to life with creating a canvas painting art of your most admired avenger, or consider including all of them on a king size canvas if you are having a tough time picking the best from the best!
08Angry Birds
These furious creatures have been a global sensation since their entry into the world of gaming. While these star birds take you on a stunning adventure realism with an amazing graphic excellence, a caricature canvas art of these in your painting collection will certainly add the missing spunk to your graphic creativity.
09Members and Trainers of the Pokémon Species
From TV series to gaming adventures, the love for Pokémon has stood the tests of time in every dimension. When it comes to adding these characters to your canvas painting, you have a storehouse of choices from the cute Pikachu and the meticulous Ash to the nasty team Rocket and other amazing members of the Pokémon species.
10Donald Duck
If you are keen on adding a touch of nostalgia to your creative drawing, consider designing a masterpiece of cartoon canvas artwork portraying this bubbly ad quaky creature that has given you the best of childhood entertainment in the form of possibly the most reliable financial advisor and the cutest good luck charm of toon land.
Now that the graphic design technology has reached its par, you can explore your creativity to design these characters for various uses, such as, illustrative, animated, gag, editorial and political cartoons, or caricatures on comic panels and strips.
Part 2 How To Paint A Cartoon On Canvas
Now that you have come cross the exciting ideas of creating cartoon canvas art, this must be a sufficient motivation to experiment with creating a top class caricature canvas painting for yourself. Read through the following section to get an insight into the knowhow of painting a cartoon on canvas in the easiest possible way!
User’s Guide to Create a Cartoon Canvas Painting on Wondershare Filmora Video Editor
Before entering into the actual design task, you will require a download, installation and launch of the Wondershare Filmora application to any of your Windows or Mac supported devices. Visit the following link for a free download of the software program:
Wondershare Filmora - Best Video Editor for Mac/Windows
5,481,435 people have downloaded it.
Build unique custom animations without breaking a sweat.
Focus on creating epic stories and leave the details to Filmora’s auto features.
Start a creative adventure with drag & drop effects and endless possibilities.
Filmora simplifies advanced features to save you time and effort.
Filmora cuts out repetition so you can move on to your next creative breakthrough.
Painting a Young Character
Take the following steps to draw the caricature form of a young or middle aged character in Wondershare Filmora:
Step 1:
Launch Wondershare Filmora on your system and then start new project. Now import the video from your computer in the software interface.
Step 2:
Once you have added the video then simply drag and drop it in the timeline.
Step 3
Once you have added video to the timeline double click on the added video in timeline to open the video editing menu of Wondershare Filmora.
Step 4:
Now, click the “Animation” tab in the editing options at the left side of interface then you can select anyone from the available preset options.
Step 5:
Select any preset from the available list and then drag and drop it in the timeline to apply the preset on the video. After applying you can use the play button to preview the file. This is the way to create beautiful animation with the Wondershare Filmora. Just like this you can quickly create the best Cartoon canvas as well.
Step 5
After doing all necessary editing you just need to click the “Export” button and save it on your computer.
● Ending Thoughts →
● Cartoon canvas art has gained immense popularity in recent times having a reliable economic and creation advantage with the growth of animation design.
● There are a variety of cartoon painting ideas that you can choose to explore your graphic design creativity.
● When looking for the best solutions to work on creating caricature canvas art, Wondershare Filmora is your worthiest choice.
Before You Learn 3D Animation: Some Things You Should Know
Before You Learn 3D Animation: Some Things You Should Know
An easy yet powerful editor
Numerous effects to choose from
Detailed tutorials provided by the official channel
Before you delve into the profession of creating 3d cartoon filters, you need to understand or decide if creating animated characters is something you would like to do. It’s not going to be smooth as you will get frustrated at some point, you will get confused, and it will be challenging, but in the end, it is rewarding because it is an expression of your mind coming to life. You are the one to breathe life into your characters who represent your imaginations. You will also have to infuse a great deal of your creativity to create beautiful and exciting characters for others to enjoy. Meanwhile, let’s first understand what 3d animations mean.
Becoming a 3d animator is not a feat you can achieve in a short time. It is not days, weeks, months, or even years. Like any other profession, a professional 3d animator must have put in a great deal of work, mixed with a lot of passion and love for what he is doing. To become successful as a 3d animator, you must love what you are doing or be ready to put in the work.
This article will expose what you should learn to create beautiful 3d animation cartoons, including what to expect as a 3d animator.
In this article
01 [What are 3d animation and the process of 3d animation?](#Part 1)
02 [Differences between 2d animation and 3d animation](#Part 2)
03 [A roaster of 8 best 3d animation software.](#Part 3)
04 [Top 3 3d animation making mistakes to avoid](#Part 4)
Part 1 What Is 3D Animation And The Process of 3D Animation?
animation is a term that describes the art of creating 3-dimensional images and placing them in a digital environment. It is a process that uses motion to bring objects, characters, etc., to life.
It is also known as computer-generated imagery, and it is currently the most common animation type for feature films.
Various software and programs are designed specifically for 3d animations and allow the animators to bring the objects to life.
The process of 3d animation happens in three(3) stages;
● Modeling
● Layout and animation
● Rendering
Modeling in 3d animation involves generating the objects or characters either by using a modeling tool or using a real thing. The real object is scanned directly into the computer, where other processes follow. You have total control over your character and how you want them to appear by modeling. You decide the weight, specifications, feel, etc. However, scanning objects save a lot of time. You must add texture before modeling your character or reviewing it before moving to the following layout and animation.
Layout and animation stage: A layout is determined when the generated objects move to this stage. It involves creating a set/scene where the objects can position. Layout first happens before animation does. After adding the objects and characters, they get animated using animation variables. After this, you use motion capture or keyframing to give life to the models in the scenes.
Rendering: Rendering is using software or programs. It is not something to do using just your computer. These tools can generate the scenes into the finished image according to the client’s requirements or set goals.
Creating cartoon background images or any other form of animations is a process that requires a lot of planning and work, which sums up a lot of time. To learn 3d animation, you must be ready to give in ample time as it is a profession that requires some time to handle.
The process listed above also shows the creativity requirement required to succeed in the 3d animation industry. To think that you must create the scenes, which is the layout stage, means you have to be creative in your imagination. If you then decide to model your character from scratch using modeling tools. That also requires another job of thinking and extracting a lot of your creative juices.
Part 2 What is the difference between 2d animation and 3d animation?
Anyone can decide to learn animation with no plan in mind or understanding of what the profession involves. animation is different from 2d animation, and if you want to learn animation, you need to understand the distinction between these two.
animation can have a lot of creative possibilities, whereas 3d animation has a lot of natural abilities. The visual style of both types of animation is explicitly different.
3d animation is a more intensive technical process than the various stages mentioned earlier. It would most likely involve different specialists to handle them to get a more professional output. However, 2d animation consists of drawing the characters frame by frame.
animated cartoons are in The Simpsons, Pinocchio, the Lion king, etc.

animations are like the ones Dreamworks, Pixar, produce. They include the avengers, the bad guys, etc.


Part 3 A Roaster Of 8 Best 3D Animation Software

Several 3D animation software exists in the market, both free and paid. If you are a animation creator or love animation for fun, you can use the free software to make your videos, cartoon photos, 3d cartoon faces, etc.
With many animation software available in the market, you can only fully trust a few.
Here’s a roaster of 8 best 3D animation software you could use to create the cartoon monsters you’ve always been curious about;
● Filmora
● Blender
● Maya
● Wings 3d
● Adobe Animate
● Cinema 4d
● K-3D
● Milcamo
Filmora Video animation tool: This is a highly recommended 3D animation tool with many features and pros. It has a wide range of keyframes, about six of which make your cartoon background images smooth and natural.
| Software | Features | OS | Pro |
|---|---|---|---|
| Wondershare Filmora Video Editor | It has an auto-color correction It has smooth keyframes | Windows, Mac | You can apply light flare effects You can apply an audio mixer |
| Blender | It has textured brushes and masking for 3d painting. It has add-ons and customised tools with high python scripting. | Windows, Linux, Mac computers | It has Virtual reality rendering, Strong camera restoration. It had both manual and automatic tracking. |
| Maya | Free trial of 30 days. Can create complex technical effects | Windows, Max | Good Control and perfect accuracy. Can collect motion capture data. |
| Wings 3d | Auto UV mapping system It has support for light and material effects. | Windows, Linux, and Mac OS | Advanced 3d and 2d modeling tools. It is free to use |
| Adobe animate | Virtual camera functionality gives a realistic view. Adoptive animation effects, zooming, panning etc. | Windows, Mac | Effective audio syncing technology. Customizable font, styling etc. |
| Cinema 4d | Concepts develop without time modeling Large library of preset scenes. | Windows, Mac | Customised with a huge asset range It is a faster tool than Maya Dissect complete scene and is faster than Maya. |
| K-3D | It has property adjustment capabilities with handy strong features. I5 is made up of basic tools for animation, curves, patches. | Mac OS X, Linux, FreeBSD, windows platforms | It is very flexible for either complex or basic workflows. It has a wide selection of plugins. |
| Mixamo | Streamlined user experience It has a faster search function that is accurate | Windows, Mac | It has fast character and animation browsing. Download multiple animations at a go |
For Win 7 or later (64-bit)
For macOS 10.12 or later
Part 4 Top Three (3) 3d Animation Making Mistakes To Avoid

As we initially mentioned, 3d animation requires an intensive technical process. It is a skill that you need to hone over the years by paying attention to detail, being highly creative, and daring to succeed.
Here are 3 mistakes you must avoid during the animation process;
● Forgetting the ‘why’ factor
● Over-animating a scene
● Not giving your viewers time to take it in
Forgetting the why: In a animation cartoon, every move, walking step, and smile is essential. Every character represented in your cartoon background is there for a specific reason.
You would be making a mistake that will affect the result if you lose focus on this reason. Your viewers won’t find your cartoon believable if the moves and acting don’t add up.
Your characters don’t just move because they want to move. Something must have spurred the motion or reaction. It could be for what happened to them, what they heard, or saw another character did in the scene. Do not neglect the why of the act.
While animating, focus on why and keep revisiting until all your characters and objects are knitted closely together.
Over-animating a scene: This is another mistake animators should avoid. If you animate your characters, everything may be a mess if you animate the background and foreground. Simplicity is how to get this thing, keep it simple and focused.
Do not have much going on in each scene but only where you need the attention of your viewers. Animators that do this end up confusing their viewers with no direction.
You can use camera effects such as depth of field to make your audience focus on the point you are trying to make in the particular scene.
Not giving your viewers time to take it in: This is another 3d animation making a mistake you should be careful of. Not giving your viewers time to process the happenings on the scene before the next.
This can be avoided by timing and measuring cuts such that any animation at the start of a new scene is timed to enable the viewers to take it in. You can ask for third-party criticism on your work to find out how your animation is received and see pointers to mistakes such as this. The third party could be your colleague or friend.
Note: You can easily avoid any error or mistake or modify your 3D animation with the help of the Wondershare Filmora video editor. That will provide a solid base for featuring 3D animation.
● Ending Thoughts →
● 3D animation refers to using motion to breathe life into inanimate objects, and they can create animated videos and animation cartoons.
● 3D animation is highly technical, unlike 2d animation
● You can avoid the above 3d mistakes if you remain objective and open, and ready to accept constructive criticism.
● Becoming an animator is a fun thing to do, and it allows you to be free to express your creativity while entertaining other people entirely.
● Before you start learning 3d animation and create cartoon photos, ensure that you have read through all that we have explained here to have good information about what you are going into.
Before you delve into the profession of creating 3d cartoon filters, you need to understand or decide if creating animated characters is something you would like to do. It’s not going to be smooth as you will get frustrated at some point, you will get confused, and it will be challenging, but in the end, it is rewarding because it is an expression of your mind coming to life. You are the one to breathe life into your characters who represent your imaginations. You will also have to infuse a great deal of your creativity to create beautiful and exciting characters for others to enjoy. Meanwhile, let’s first understand what 3d animations mean.
Becoming a 3d animator is not a feat you can achieve in a short time. It is not days, weeks, months, or even years. Like any other profession, a professional 3d animator must have put in a great deal of work, mixed with a lot of passion and love for what he is doing. To become successful as a 3d animator, you must love what you are doing or be ready to put in the work.
This article will expose what you should learn to create beautiful 3d animation cartoons, including what to expect as a 3d animator.
In this article
01 [What are 3d animation and the process of 3d animation?](#Part 1)
02 [Differences between 2d animation and 3d animation](#Part 2)
03 [A roaster of 8 best 3d animation software.](#Part 3)
04 [Top 3 3d animation making mistakes to avoid](#Part 4)
Part 1 What Is 3D Animation And The Process of 3D Animation?
animation is a term that describes the art of creating 3-dimensional images and placing them in a digital environment. It is a process that uses motion to bring objects, characters, etc., to life.
It is also known as computer-generated imagery, and it is currently the most common animation type for feature films.
Various software and programs are designed specifically for 3d animations and allow the animators to bring the objects to life.
The process of 3d animation happens in three(3) stages;
● Modeling
● Layout and animation
● Rendering
Modeling in 3d animation involves generating the objects or characters either by using a modeling tool or using a real thing. The real object is scanned directly into the computer, where other processes follow. You have total control over your character and how you want them to appear by modeling. You decide the weight, specifications, feel, etc. However, scanning objects save a lot of time. You must add texture before modeling your character or reviewing it before moving to the following layout and animation.
Layout and animation stage: A layout is determined when the generated objects move to this stage. It involves creating a set/scene where the objects can position. Layout first happens before animation does. After adding the objects and characters, they get animated using animation variables. After this, you use motion capture or keyframing to give life to the models in the scenes.
Rendering: Rendering is using software or programs. It is not something to do using just your computer. These tools can generate the scenes into the finished image according to the client’s requirements or set goals.
Creating cartoon background images or any other form of animations is a process that requires a lot of planning and work, which sums up a lot of time. To learn 3d animation, you must be ready to give in ample time as it is a profession that requires some time to handle.
The process listed above also shows the creativity requirement required to succeed in the 3d animation industry. To think that you must create the scenes, which is the layout stage, means you have to be creative in your imagination. If you then decide to model your character from scratch using modeling tools. That also requires another job of thinking and extracting a lot of your creative juices.
Part 2 What is the difference between 2d animation and 3d animation?
Anyone can decide to learn animation with no plan in mind or understanding of what the profession involves. animation is different from 2d animation, and if you want to learn animation, you need to understand the distinction between these two.
animation can have a lot of creative possibilities, whereas 3d animation has a lot of natural abilities. The visual style of both types of animation is explicitly different.
3d animation is a more intensive technical process than the various stages mentioned earlier. It would most likely involve different specialists to handle them to get a more professional output. However, 2d animation consists of drawing the characters frame by frame.
animated cartoons are in The Simpsons, Pinocchio, the Lion king, etc.
animations are like the ones Dreamworks, Pixar, produce. They include the avengers, the bad guys, etc.
Part 3 A Roaster Of 8 Best 3D Animation Software
Several 3D animation software exists in the market, both free and paid. If you are a animation creator or love animation for fun, you can use the free software to make your videos, cartoon photos, 3d cartoon faces, etc.
With many animation software available in the market, you can only fully trust a few.
Here’s a roaster of 8 best 3D animation software you could use to create the cartoon monsters you’ve always been curious about;
● Filmora
● Blender
● Maya
● Wings 3d
● Adobe Animate
● Cinema 4d
● K-3D
● Milcamo
Filmora Video animation tool: This is a highly recommended 3D animation tool with many features and pros. It has a wide range of keyframes, about six of which make your cartoon background images smooth and natural.
| Software | Features | OS | Pro |
|---|---|---|---|
| Wondershare Filmora Video Editor | It has an auto-color correction It has smooth keyframes | Windows, Mac | You can apply light flare effects You can apply an audio mixer |
| Blender | It has textured brushes and masking for 3d painting. It has add-ons and customised tools with high python scripting. | Windows, Linux, Mac computers | It has Virtual reality rendering, Strong camera restoration. It had both manual and automatic tracking. |
| Maya | Free trial of 30 days. Can create complex technical effects | Windows, Max | Good Control and perfect accuracy. Can collect motion capture data. |
| Wings 3d | Auto UV mapping system It has support for light and material effects. | Windows, Linux, and Mac OS | Advanced 3d and 2d modeling tools. It is free to use |
| Adobe animate | Virtual camera functionality gives a realistic view. Adoptive animation effects, zooming, panning etc. | Windows, Mac | Effective audio syncing technology. Customizable font, styling etc. |
| Cinema 4d | Concepts develop without time modeling Large library of preset scenes. | Windows, Mac | Customised with a huge asset range It is a faster tool than Maya Dissect complete scene and is faster than Maya. |
| K-3D | It has property adjustment capabilities with handy strong features. I5 is made up of basic tools for animation, curves, patches. | Mac OS X, Linux, FreeBSD, windows platforms | It is very flexible for either complex or basic workflows. It has a wide selection of plugins. |
| Mixamo | Streamlined user experience It has a faster search function that is accurate | Windows, Mac | It has fast character and animation browsing. Download multiple animations at a go |
For Win 7 or later (64-bit)
For macOS 10.12 or later
Part 4 Top Three (3) 3d Animation Making Mistakes To Avoid
As we initially mentioned, 3d animation requires an intensive technical process. It is a skill that you need to hone over the years by paying attention to detail, being highly creative, and daring to succeed.
Here are 3 mistakes you must avoid during the animation process;
● Forgetting the ‘why’ factor
● Over-animating a scene
● Not giving your viewers time to take it in
Forgetting the why: In a animation cartoon, every move, walking step, and smile is essential. Every character represented in your cartoon background is there for a specific reason.
You would be making a mistake that will affect the result if you lose focus on this reason. Your viewers won’t find your cartoon believable if the moves and acting don’t add up.
Your characters don’t just move because they want to move. Something must have spurred the motion or reaction. It could be for what happened to them, what they heard, or saw another character did in the scene. Do not neglect the why of the act.
While animating, focus on why and keep revisiting until all your characters and objects are knitted closely together.
Over-animating a scene: This is another mistake animators should avoid. If you animate your characters, everything may be a mess if you animate the background and foreground. Simplicity is how to get this thing, keep it simple and focused.
Do not have much going on in each scene but only where you need the attention of your viewers. Animators that do this end up confusing their viewers with no direction.
You can use camera effects such as depth of field to make your audience focus on the point you are trying to make in the particular scene.
Not giving your viewers time to take it in: This is another 3d animation making a mistake you should be careful of. Not giving your viewers time to process the happenings on the scene before the next.
This can be avoided by timing and measuring cuts such that any animation at the start of a new scene is timed to enable the viewers to take it in. You can ask for third-party criticism on your work to find out how your animation is received and see pointers to mistakes such as this. The third party could be your colleague or friend.
Note: You can easily avoid any error or mistake or modify your 3D animation with the help of the Wondershare Filmora video editor. That will provide a solid base for featuring 3D animation.
● Ending Thoughts →
● 3D animation refers to using motion to breathe life into inanimate objects, and they can create animated videos and animation cartoons.
● 3D animation is highly technical, unlike 2d animation
● You can avoid the above 3d mistakes if you remain objective and open, and ready to accept constructive criticism.
● Becoming an animator is a fun thing to do, and it allows you to be free to express your creativity while entertaining other people entirely.
● Before you start learning 3d animation and create cartoon photos, ensure that you have read through all that we have explained here to have good information about what you are going into.
Top 12 Illusion Gifs: Top Picks
Best 12 Illusion Gifs: Top Picks
An easy yet powerful editor
Numerous effects to choose from
Detailed tutorials provided by the official channel
Do you know that these are reaching heights and people are very happy in sharing them? If you are unaware of it, don’t worry and keep reading. Thorugh today’s post, we will discuss illusion GIF in detail yo make it easy for you to make up your mind and try your hands on it.
In this article
01 [What Is GIF Illustration?](#Part 1)
02 [Best 12 Illusion Gifs](#Part 2)
Part 1 What Is GIF Illustration?
GIFs are a form of digital media that is used to show animations and other types of visuals. It is a type of file format that can be created with different editing software. These are usually used for short videos or images on the internet and social media.
Furthermore, GIFs are an excellent way to create visual content for social media posts or as an animated overlay on a video.
These are now used as everything from advertisements to commentary from all walks of life. The users of GIFs seem to be endless! They can be used in many different ways, such as to add visual interest, provide context or even humor, and so on. It is totally on the user how they are considering it to make the things more relevant to the context for which they have created or shared the GIF.
Part 2 Best 12 Illusion Gifs
This curated list will help you to know the best Illusion GIF that is still ruling out the market. This includes:-
01Van Gogh Stare GIF
The Van Gogh Stare, also known as the “dazzle camouflage,” is an optical illusion created by artist Vincent van Gogh. It was likely intended to represent the eye’s instability and movement. The image has been used in a variety of ways, including on social media sites like Tumblr. In general, this GIF illusion is a demonstration of the Van Gogh Stare.
02This brain-busting rotation
We are all used to seeing the world around us in two dimensions. But what if we could see it in three dimensions? Well, now you can! This GIF shows a rotating 3D object that appears to be made of cubes. The illusion is created by the fact that the camera rotates around the object, but you can’t see it from every angle.
03This loop tea GIF
This GIF illusion is a perfect example of how our brain works. When we see something that doesn’t make sense, we try to make sense of it by filling in the gaps with what we believe it should look like. The GIF illusion consists of two frames. The first frame shows a woman drinking tea from a cup, and the second frame shows her drinking from an empty cup. When our brain tries to fill in the gaps, it assumes that the woman drank all of the tea and sees her as drinking from an empty cup even though she is actually drinking from a full one.
04No smkoing! Well, you should never
The GIF illusion consists of two images: one of a cloud and another of cauliflower. The animation starts with the cloud and then switches to the cauliflower. But if you take a closer look, you’ll notice that there’s actually no smoke in the first image, just the cauliflower. And it’s not really a head either - it’s just an ordinary cauliflower from behind.
The reason why this illusion works is that our brains are wired to see patterns and shapes in things that aren’t always there - for example, when we see faces in random objects or shapes in clouds. This GIF takes advantage of that by showing two images where these are
05The never-ending corridor
The GIF illusion is a rather simple illusion that takes advantage of the way our brains perceive motion. Our brains are programmed to see a moving object as a single object in order to make sense of the world around us. This means that when we see an object moving, we perceive it as one solid thing instead of many separate objects.
This GIF illusion is a perfect example of how the human brain works. The brain can’t process that the two images are different, and instead, it sees them as a single image.
06Now, this, the eye-pleaser
The illusion works on the principle of depth perception and how our eyes are not able to accurately process all of the information that they receive from our surroundings. The black lines on the white background make it seem like there are two rows of lines, but there’s only one row that appears to be moving back and forth.
07Commercial At design GIF
The GIF illusion is a simple design that tricks the brain into thinking that it is 3D. The design consists of two circles, one inside the other, with three arrows pointing inwards. The outside circle has a white background and the inside circle has a black background. When you look at this design from different angles, you will see that the arrows point outwards and not inwards as they should be doing.
08Wait what? Is this truly a reflection?
This illusion works because our brain recognizes that the mirror image is not what’s really happening and flips the image in our head to make it right-side up.
It’s also possible that we are tricked by the fact that we know mirrors flip images, so when we see an upside-down image in front of us, we automatically assume it’s just inverted.
09This haunting tableau (Not exactly a GIF but worth sharing)
The GIF illusion is a type of optical illusion that can be explained by the Gestalt Principles. The Gestalt Principles are guidelines for how we perceive and organize visual information. This optical illusion is created by overlapping two similar images on top of each other in the same place but with different colors. Our brain perceives this as a single image, and our eyes try to make sense of it by looking for visual cues in the image. When we focus on one image, it looks like a triangle with a red line going through it. But when we focus on the other image, it looks like an arrow pointing up that has been cut in half with a red line through it.
10This safety hazard
This GIF illusion is a safety hazard because it tricks the brain into thinking that the person in front of them is standing still. When you stare at this GIF for too long, the person will appear to be moving backward. This illusion can cause accidents if you believe that a person is still when they are actually approaching you.
11Welcome to the 3d World
It’s an illusion created by the use of perspective. The camera is positioned in such a way that it appears that the three-dimensional cube is only two-dimensional.
The camera is positioned in such a way that it appears that the three-dimensional cube is only two-dimensional.
12I will keep this table forever
The GIF illusion is an optical illusion that makes the table in the background appear to be bigger than it actually is. The table in front of the window appears to be smaller and closer to the viewer. There are two factors that make this illusion happen. One of them is perspective, which makes objects appear larger as they get closer and smaller as they get farther away. The other factor is size constancy, which makes objects look about the same size regardless of how far away they are from you.
Part 3 How Do You Make a GIF Illustration?
If you are someone who is curious to make a GIF illustration but have no clue how to make it, then the online portals are catering to all your needs. Right now, there are multiple tools available that will help you to create the illustration seamlessly. Among all of them, we suggest you try your hands on Filmora.
Wondershare Filmora Video Editor is one of the best tools available to make the gift illustration as you want. You just need to upload the content, and then you are all set to edit it at your convenience. The best part is the interface of the tool is very simple to understand, which simply means there will be no need for you to belong to any technical background to use this tool.
Wondershare Filmora - Best Video Editor for Mac/Windows
5,481,435 people have downloaded it.
Build unique custom animations without breaking a sweat.
Focus on creating epic stories and leave the details to Filmora’s auto features.
Start a creative adventure with drag & drop effects and endless possibilities.
Filmora simplifies advanced features to save you time and effort.
Filmora cuts out repetition so you can move on to your next creative breakthrough.
Along with creating the GIF files, it also help you to do the editing as you wanted. For example, if you are looking forward to reading on any text to the GIF file, you can also do it seamlessly. The interface will help you to understand how you can do it so that there will be no problem in creating the content as you want.
● Key Takeaways from This Episode →
● Filmora is the best tool to create illusion GIF.
●Illusion GIF are in use for advertisement.
●Creating illusion GIF is just a matter of few steps.
8 Blender 3D Animation Tutorials
8 Blender 3D Animation Tutorials for Beginners
An easy yet powerful editor
Numerous effects to choose from
Detailed tutorials provided by the official channel
Blender animation software is one of the open-source software chosen to create animations. It is easy to create animations, videos or graphics, etc. If you want to be an animation 3D artist, make creative universes, and meet each of the different characters moving around in your heart.
You will learn the step-by-step procedure to create animations and add other edits to the animation. And also a few tips to develop better Blender 3D animation effects.
In this article
01 [Is Blender best for animation?](#Part 1)
02 [How to Create 3D Animated Characters with Blender in 15 Minutes.](#Part 2)
03 [Become a Pro from Beginners in 8 Tutorials](#Part 3)
Part 1 Is Blender best for animation?
The answer to if the Blender is suitable for animation is yes. Blender animation is the best for making animations and bringing any living to animator. This software is mostly for professional works whose limitations will be learning the process, not any technical defects. Let’s talk about why Blender 3D animation software is the best and more helpful.
Character animation is an essential tool for animation, and Blender has developed this tool with no way less to other software.
There are many animation effects other than animating characters. Blender 3D for free has all the necessary tools to do all types of rigs and animations without any difficulty.
Blender is one software that has 2D animation inbuilt in it, like drawing and creating 2D animation.
Blender’s animation tools are making motion graphics possible by advancing the features than it was four years ago.
Nowadays, many people are using Blender to do professional works, including freelancers, small studios, and even game developers.
Part 2 How to Create 3D Animated Characters with Blender in 15 Minutes.
This is a series for people who want to learn how to create 3D blender animation characters from keeping a reference image. Blender’s ringing tools will be more helpful for this process.
01Step 1: Importing
Initially, import a Blender 3D animation character into the Blender to animate. Many free and paid characters are available in Vincent, and Rain v2.0 is present in Blender Cloud; above all, these characters are for free.
Steps to import the character either from Vincent or Rain v2.0
Download the character file from the cloud to any destination folder on the computer. Open the Blender and place the cursor on the origin point on the screen. Later select import present in the File menu and choose the file format. And now, allow the Python script to run for the selected character folder.

02Step 2: Add Keyframes
There will be a diamond-shaped icon below to choose the keyframe you want to add to the timeline, which you may also delete.
Adding a keyframe is simple. Open the timeline window in the animation editor. Press the alphabet ‘G’ on the keyboard, move the bone and place it. Then hit Shift+I and choose the channel LocRot and insert the keyframe. Likewise, you can adjust the keyframe by dragging, making it fast or slow to the requirements.
Moving the keyframe to 20 makes it faster, and moving to 40, slower.
03Step 3: Get Reference Materials
It will be challenging to add movements to the characters, so plenty of videos can get the moves right. There are various reference images and videos available on the Internet. You can either add the selected reference materials to the second screen or add them to the 3D space. Let’s discuss how to add it.
Hit Shift + A to add the reference material. Later select “Image” and then choose the “Background.” Scale the reference image onto the 3D space after it loads.
Afterward, you can leave it to the animation of the reference article, or you can further edit or amplify the movements.
04Step 4: Fine–Tuning and Sound
This step will add smooth movements by combining two keyframes for a more professional look. We have to use the Dope sheet to do complete this process. Let’s see how to add it.
Initially, split the window horizontally. Later switch over the dope sheet below the animation tab, where you can see keyframes of all axis. Now you can drag and edit to slow or amplify the speed.
There is a Graphic editor, which is more advanced to make the movements more accurately and directly to edit the curves.
Sound effects make any video or animation better. You can add and import the sound files. You can also create your sound and insert it into the Blender. Let’s discuss adding sound and making it sync to the character.
Download the audio file, hit shift + A to open Add menu, and choose the “Sound.” Now select the sound that you wish to add.
Drag the sound to keep it to the specific sections alone. Also, you can switch between “No Sync” to “AV Sync” in the playback to give the best synchronization to the characters. The volume and pitch can be adjusted using the sidebar.
05Step 5: Rendering
Before rendering, make sure you keep the FPS is same as that chosen during the keyframes to avoid unnecessary renders. After setting the frame correctly, causing the animation is easy.
Initially, click on “scene” and choose the file extension, file formats, and file colors (BW, RGB, or RGBA). Select the encoding container as “WebM” and video Codec as “WEBM/VP9. After adding the sound, set the audio codec to “Vorbis.” Choose output quality and speed.
After all the rendering, select Render from the top bar and select “Render Animation” in Blender Animation.
Awesome! We have successfully blended a character using Blender 3D animation software. With more practice and knowledge about more tools, one can easily use the Blender 3D mouse.
Part 3 Become a Pro from Beginners in 8 Tutorials.
01Fix 1: Complete Beginners Guide to Blender 2.8
This YouTube tutorial focuses on Blender version 2.8. The tutorial features the redesigned user interface and tools like 3D viewpoint and UV editor, which has new interactive tools. And about different 3D shapes and simple edits like adding colors and “G drag,” etc.
02Fix 2: Blender 2.9 for Absolute Beginners
This YouTube tutorial on Blender 3D animation software version 2.9 has the new advancement about denoiser interactivity in the 3D viewpoint. The YouTuber explains EEVEE, cycles, workbench, movements, rotate, and scale objects.
03Fix 3: Blender Day -1 Absolute Basics - Introduction Series for Beginners
This YouTube tutorial says about the introduction to the Blender 3D for free for beginners. He explains simple movements like rotating and scaling, shapes, and colors to the objects. He also says about the pivot plot and how to create a basic primitive using blender.
04Fix 4: Zoync TV’s Blender Beginners Series
The Blender Beginners video by ZoyncTV is on Blender 2.6. Indeed, even as hotkeys and terms change, the hidden ideas will forever be pertinent. Every video in this 11-section is somewhere between 10 and 20 minutes, split into five separate subjects: displaying, modifiers, materials, surfaces, and animations. It’s a beginner-level course.
05Fix 5: The Blender Survival Guide
The Blender Survival Guide series by Creative COW is outdated but the best video for somebody who has never utilized Blender. Each video in this 13-section series is somewhere in the range of 15 and 45 minutes in length, which means you’ll get 350 intense minutes of preparing. It is a survival reference that shows just the outright necessities.
06Fix 6: KatBit’s Blender Tutorial
The KatsBits site is home to lots of tutorials, video games. Its Blender animation tutorials are fantastic when you want a beginning stage for various 3D models. There are 45 Blender tutorials. Tutorials take you through the most common way of making a 3D level for Quake and tell you the best way to make a basic model.
07Fix 7: Daniel Krafft’s 100 Blender 2.8 Tips
While this is another Blender 2.8 tutorial, Daniel’s tips are overall for any Blender work process. He teaches simple stuff like vertex and edges and some technical parts in the Blender 3D animation software.
08Fix 8: Blender 3D: Noob to Pro
This last tutorial is a “wiki book” called Blender 3D: Noob to Pro that consists of important Blender animation tips and experiences. Start with an outline of 3D ideas and a top-to-bottom introduction to Blender.
Regarding Blender 3D mouse software, we would like to recommend one more tool to you the most. Yes, it is none other than Wondershare Filmora, a perfect alternative to Blender 3D animation software wherein you can get excellent 3D animation effects, 3D texts and animate it. There are some simple steps and various options to work in Filmora for creating 3D animated effects.
● Composition
● Creating our 3D text
● Creating the 3D look
● Basics of 3D animation
● Animating the text in 3D
There are countless YouTube tutorial videos for working with Wondershare Filmora Video Editor ‘s latest version.
Key Takeaways from This Episode
● We learned about Blender 3D animation software.
● How can you create characters using Blender animation?
● 8 Tutorials to move you from a beginner to a Pro.
Blender animation software is one of the open-source software chosen to create animations. It is easy to create animations, videos or graphics, etc. If you want to be an animation 3D artist, make creative universes, and meet each of the different characters moving around in your heart.
You will learn the step-by-step procedure to create animations and add other edits to the animation. And also a few tips to develop better Blender 3D animation effects.
In this article
01 [Is Blender best for animation?](#Part 1)
02 [How to Create 3D Animated Characters with Blender in 15 Minutes.](#Part 2)
03 [Become a Pro from Beginners in 8 Tutorials](#Part 3)
Part 1 Is Blender best for animation?
The answer to if the Blender is suitable for animation is yes. Blender animation is the best for making animations and bringing any living to animator. This software is mostly for professional works whose limitations will be learning the process, not any technical defects. Let’s talk about why Blender 3D animation software is the best and more helpful.
Character animation is an essential tool for animation, and Blender has developed this tool with no way less to other software.
There are many animation effects other than animating characters. Blender 3D for free has all the necessary tools to do all types of rigs and animations without any difficulty.
Blender is one software that has 2D animation inbuilt in it, like drawing and creating 2D animation.
Blender’s animation tools are making motion graphics possible by advancing the features than it was four years ago.
Nowadays, many people are using Blender to do professional works, including freelancers, small studios, and even game developers.
Part 2 How to Create 3D Animated Characters with Blender in 15 Minutes.
This is a series for people who want to learn how to create 3D blender animation characters from keeping a reference image. Blender’s ringing tools will be more helpful for this process.
01Step 1: Importing
Initially, import a Blender 3D animation character into the Blender to animate. Many free and paid characters are available in Vincent, and Rain v2.0 is present in Blender Cloud; above all, these characters are for free.
Steps to import the character either from Vincent or Rain v2.0
Download the character file from the cloud to any destination folder on the computer. Open the Blender and place the cursor on the origin point on the screen. Later select import present in the File menu and choose the file format. And now, allow the Python script to run for the selected character folder.
02Step 2: Add Keyframes
There will be a diamond-shaped icon below to choose the keyframe you want to add to the timeline, which you may also delete.
Adding a keyframe is simple. Open the timeline window in the animation editor. Press the alphabet ‘G’ on the keyboard, move the bone and place it. Then hit Shift+I and choose the channel LocRot and insert the keyframe. Likewise, you can adjust the keyframe by dragging, making it fast or slow to the requirements.
Moving the keyframe to 20 makes it faster, and moving to 40, slower.
03Step 3: Get Reference Materials
It will be challenging to add movements to the characters, so plenty of videos can get the moves right. There are various reference images and videos available on the Internet. You can either add the selected reference materials to the second screen or add them to the 3D space. Let’s discuss how to add it.
Hit Shift + A to add the reference material. Later select “Image” and then choose the “Background.” Scale the reference image onto the 3D space after it loads.
Afterward, you can leave it to the animation of the reference article, or you can further edit or amplify the movements.
04Step 4: Fine–Tuning and Sound
This step will add smooth movements by combining two keyframes for a more professional look. We have to use the Dope sheet to do complete this process. Let’s see how to add it.
Initially, split the window horizontally. Later switch over the dope sheet below the animation tab, where you can see keyframes of all axis. Now you can drag and edit to slow or amplify the speed.
There is a Graphic editor, which is more advanced to make the movements more accurately and directly to edit the curves.
Sound effects make any video or animation better. You can add and import the sound files. You can also create your sound and insert it into the Blender. Let’s discuss adding sound and making it sync to the character.
Download the audio file, hit shift + A to open Add menu, and choose the “Sound.” Now select the sound that you wish to add.
Drag the sound to keep it to the specific sections alone. Also, you can switch between “No Sync” to “AV Sync” in the playback to give the best synchronization to the characters. The volume and pitch can be adjusted using the sidebar.
05Step 5: Rendering
Before rendering, make sure you keep the FPS is same as that chosen during the keyframes to avoid unnecessary renders. After setting the frame correctly, causing the animation is easy.
Initially, click on “scene” and choose the file extension, file formats, and file colors (BW, RGB, or RGBA). Select the encoding container as “WebM” and video Codec as “WEBM/VP9. After adding the sound, set the audio codec to “Vorbis.” Choose output quality and speed.
After all the rendering, select Render from the top bar and select “Render Animation” in Blender Animation.
Awesome! We have successfully blended a character using Blender 3D animation software. With more practice and knowledge about more tools, one can easily use the Blender 3D mouse.
Part 3 Become a Pro from Beginners in 8 Tutorials.
01Fix 1: Complete Beginners Guide to Blender 2.8
This YouTube tutorial focuses on Blender version 2.8. The tutorial features the redesigned user interface and tools like 3D viewpoint and UV editor, which has new interactive tools. And about different 3D shapes and simple edits like adding colors and “G drag,” etc.
02Fix 2: Blender 2.9 for Absolute Beginners
This YouTube tutorial on Blender 3D animation software version 2.9 has the new advancement about denoiser interactivity in the 3D viewpoint. The YouTuber explains EEVEE, cycles, workbench, movements, rotate, and scale objects.
03Fix 3: Blender Day -1 Absolute Basics - Introduction Series for Beginners
This YouTube tutorial says about the introduction to the Blender 3D for free for beginners. He explains simple movements like rotating and scaling, shapes, and colors to the objects. He also says about the pivot plot and how to create a basic primitive using blender.
04Fix 4: Zoync TV’s Blender Beginners Series
The Blender Beginners video by ZoyncTV is on Blender 2.6. Indeed, even as hotkeys and terms change, the hidden ideas will forever be pertinent. Every video in this 11-section is somewhere between 10 and 20 minutes, split into five separate subjects: displaying, modifiers, materials, surfaces, and animations. It’s a beginner-level course.
05Fix 5: The Blender Survival Guide
The Blender Survival Guide series by Creative COW is outdated but the best video for somebody who has never utilized Blender. Each video in this 13-section series is somewhere in the range of 15 and 45 minutes in length, which means you’ll get 350 intense minutes of preparing. It is a survival reference that shows just the outright necessities.
06Fix 6: KatBit’s Blender Tutorial
The KatsBits site is home to lots of tutorials, video games. Its Blender animation tutorials are fantastic when you want a beginning stage for various 3D models. There are 45 Blender tutorials. Tutorials take you through the most common way of making a 3D level for Quake and tell you the best way to make a basic model.
07Fix 7: Daniel Krafft’s 100 Blender 2.8 Tips
While this is another Blender 2.8 tutorial, Daniel’s tips are overall for any Blender work process. He teaches simple stuff like vertex and edges and some technical parts in the Blender 3D animation software.
08Fix 8: Blender 3D: Noob to Pro
This last tutorial is a “wiki book” called Blender 3D: Noob to Pro that consists of important Blender animation tips and experiences. Start with an outline of 3D ideas and a top-to-bottom introduction to Blender.
Regarding Blender 3D mouse software, we would like to recommend one more tool to you the most. Yes, it is none other than Wondershare Filmora, a perfect alternative to Blender 3D animation software wherein you can get excellent 3D animation effects, 3D texts and animate it. There are some simple steps and various options to work in Filmora for creating 3D animated effects.
● Composition
● Creating our 3D text
● Creating the 3D look
● Basics of 3D animation
● Animating the text in 3D
There are countless YouTube tutorial videos for working with Wondershare Filmora Video Editor ‘s latest version.
Key Takeaways from This Episode
● We learned about Blender 3D animation software.
● How can you create characters using Blender animation?
● 8 Tutorials to move you from a beginner to a Pro.
Top 8 Tools Tell You How to Make Slideshows for Instagram
Top 8 Tools Tell You How to Make Slideshows for Instagram
An easy yet powerful editor
Numerous effects to choose from
Detailed tutorials provided by the official channel
Instagram slideshows land among the latest social media trends of fun and entertainment. Learn how to attract jaw dropping peer attention with creating the same!
In this article
01 [When Should You Use an Instagram Slideshow?](#Part 1)
02 [How to Make an Instagram Slideshow with Music?](#Part 2)
03 [8 Best Instagram Slideshow Apps for Creating Outstanding Slideshow](#Part 3)
Part 1 When Should You Use an Instagram Slideshow?
Revolutions in technology has opened doors to a plenty of new and exciting means of information sharing, entertainment and communication. Playing its part in the game, Instagram slideshow has emerged as an exciting means of quick and impactful content sharing. Diving deeper into the discussion, let us talk about the different areas of working with an Instagram slide show in the following section:
01Explanatory Product Demonstrations and Stepwise Tutorials
Considering the diverse media collaboration entertained by this social media platform, you get the liberty to include 10 media files of videos and images while creating a slideshow on Instagram. This is an affordably sufficient media space to demonstrate your newly launched product in front of the target audience.
The aforesaid characteristic of a slideshow for Instagram can be put to another use of creating detailed, step by step guides and product usage tutorials to create an increased and confident customer reach and brand applicability. A few examples include the presentations of recipes by food blogs and chefs, or a detailed look of the day’s outfit by fashion bloggers.
02Interactive Storytelling or Recreate an Event
Gone are the times when stories and events were restricted to a single image or video with a limited scope of understanding and explanation. You can now work with a combination of multiple images and videos to create more vivid and graphical descriptions of stories, narratives and events.
You can work on creating an engaging slideshow for Instagram to tell an amazing story, voice a narration from the beginning to the end, or share your best moments with your cherished audience, which will surely give them the feel of enjoying the adventure along with you.
03Create a Collection
You can now use a slide show for Instagram to design and present a collection of manifold ideas and products within a single post. You can improvise the collection with displaying a series of related products, showcasing a summary of your different blog posts through the week, or simply present a list of your most reliable inspirations, resources and influencers.
04Exciting Video Teasers
If you have a scheduled video release to entertain your audience, try working with interactive slideshows for Instagram to create some sensational teaser content of the upcoming release to imbibe a natural sense of curiosity within your audience.
You can experiment with releasing a mini photoshoot tour of your filming set, share close up progression details, or include a cliffhanger in the end of your Instagram slideshow to ensure the retrieval of your audience towards watching the release of the actual big content. You can use these short teasers as effective means of creating a campaign buzz, while building a closer connect with your audience.
Part 2 How to Make an Instagram Slideshow with Music?
By now, you must have gathered enough knowledge regarding the credibility of Instagram slideshows in catering to a diversity of commercial, professional and personal content sharing needs. Considering the same, you may conveniently feel motivated to try hands at creating stunning slideshow presentations for Instagram on your own.
Adhering to the concern, let us move ahead with our discussion, while talking about how to make a slideshow for Instagram and supplement the same with adaptable background music to develop amazing content masterpieces and share them with social media peers, while grabbing their obvious attention.
While there are a number of choices in the software market to choose your Instagram slideshow creator tool, the FlexClip tool can be a reliable option. Read though the following section to learn the slideshow creation process in the program with a comprehensive and stepwise tutorial guide:
Step 1: Download the Slideshow Creator Tool
Visit the official website of FlexClip to download and install the slideshow maker software in your preferred device.

Step 2: Start from Scratch
After a successful installation, proceed to launch the tool in your system and wait till the software greets you with its welcome interface. Here, you will have to reach to and tap the ‘Start to Create’ button to begin with the slideshow creation process. You can also select a preset template to work on your slideshow if nothing new clicks in your mind.
Step 3: Select an Aspect Ratio
In the tool’s creator window, navigate to the ‘Options Panel’ at the left and click on ‘More’ to select a suitable aspect ratio. Picking the 9:16 ratio would be a good choice.

Step 4: Upload Your Media
In the same ‘Options Panel’, click on ‘Media’ for dragging and dropping the desired video and image files from your device to the program’s media timeline, followed by applying them to the tool’s storyboard. You can alternatively, choose to directly work with media pages of any preset slideshow template.

Step 5: Customize Your Media
You can now proceed to improvise your media files with amazing texts, filters, stickers, emojis, widgets, etc., by clicking on specific object categories from the ‘Options Panel’.

Step 6: Include Seamless Transitions
Proceed to uplift your creation to the next level with the application of stunning image and video transitions. Navigate to the ‘Options Panel’ and tap ‘Elements’. A variety of transition effects will be displayed to choose from. Select the one you like to add it to your slideshow.

Step 7: Add a Background Music
An in line background audio is the best way to set the mood of your slideshow. Choose to add the same to your creation for making a more engaging impact on the audience. Visit the ‘Options Panel’ again and click on ‘Music’ to open the program’s audio library and select a perfect background music from the huge variety of choices, to include in your slideshow.

Step 8: Preview Your Creation
When you have finished customizing your slideshow, navigate to the top right corner of the editor’s storyboard and hit the ‘Preview’ button to visualize and ensure that your slideshow has everything at the right place. You can continue editing if there is a need to make some changes.
Step 9: Time to Save and Share!
When you are happy with your work, consider saving it either to your device or Google Dropbox, from where you can easily upload the same to your Instagram handle.
Part 3 Best Instagram Slideshow Apps for Creating Outstanding Slideshow
Social media is the talk of the trend in today’s times, which has extended its boundaries to visibly everything around us. Speaking in the light of the fact, slideshow presentations are no exception. Social media platforms today have come up with amazing tools and applications to create and share a stunning slideshow Instagram story with utmost ease and within an affordable time span.
Now that you have developed a comprehensive understanding of the credibility of working with Instagram slideshows and their creation process with the inclusion of complementary background music, let us dive into learning about some of the best and most popular Instagram apps for creating awesome slideshow presentations in the following section:
01Filme Lite
This tool lands among the leading user preferences to work on creating slideshow presentations. The application software is packed with a heap of latest features that form the Instagram trends in current times.
Apart from complementing your slideshow creations with tons of features, this slideshow maker for Instagram grants you the liberty to include your most loved videos and images within your presentation and customize them with a diverse range of effects, along with adjusting their play duration within the slideshow. Additional to image and video customization, you are also allowed to choose the image transition style that perfectly suits your content arrangement within the slides.
Working with the tool, you can be sure of getting an unparalleled slideshow creation experience with a very interactive and user oriented design interface, that is simple enough to be easily understood and worked upon by a newbie to the creative world.
02VivaVideo
If you are working on a detailed presentation and wish to spark up your creation with stunning varieties of jaw dropping special effects, consider creating your PowerPoint slideshows in this application. The tool’s effect library is a storehouse of the most amazing special effects that promise of transforming your slideshow into a visual masterpiece.
You can separately apply these effects to each of the slideshow images or choose to work on a combination of selected effects to include within a single video. Apart from this, you are free to choose an apt background music for your presentation slides from the extensive audio library of the software. The bottom line is; you are assured to a complete fun experience while creating slideshows with this tool.
03Movavi
If you are familiar enough with the fundamental concepts and the trivial anecdotes of working with slideshow presentations and want to take your graphic creativity to the next level, you can try hands at using the Movavi slideshow creator software to design high end PowerPoint presentations of professional quality. The best thing about the tool is, it works online and does not require a software download for usage concerns.
Along with creating online slideshow presentations with ease, the tool permits you to create online videos within minutes and instantly download the same for specific usage. You can further, pop up your presentation slides with wonderful transition and animation effects and also make adjustments in the play duration of each slide. The tool lets you choose and add a perfect background music to your presentation from its conveniently vast audio library.
04Slideshow Lab
If you have just landed into the world of creating slideshow presentations and are looking for easy solutions on how to make a slideshow on Instagram, consider working with this software to polish your design creativity. The simple and user cohesive interface of the tool is best for beginners to understand and get customary with the creation process, that takes the minimum possible time to render an appreciable PowerPoint presentation.
Talking about the slideshow design process, you will need to start with selecting a set of desired images, followed by uploading the same into the tool’s slideshow creator timeline. The next step is to arrange the images in the sequential order of appearance, select an appealing background music and apply smooth image transitions. When you are done with everything, proceed to save the presentation to your device.
05MoShow
While you can choose to create stunning slideshow presentations with almost any class of images, the aforesaid app works best to render Instagram images into a top rated Instagram photo slideshow without compromising with the high resolution image quality of Instagram photos. The application integrates motion pictures and lighting effects to transform the otherwise regular images into lively still captures.
Considering the credibility of the tool in overall user experience, its indeed a thumbs up from graphic creators across the globe, thanks to its smart and interactive interface, in time performance and outstanding creation outputs.
06InVideo Editor
Put an end to your search of effective solutions on how to do a slideshow on Instagram with the InVideo Editor, a smart video and graphic editor that can also be employed to adhere to the requirement of creating amazing slideshow presentations from Instagram media. While the creation process hardly takes a few minutes, you can work with the application to explore your editing creativity to the finest levels. The tool works well with any of your MacOs and Windows compatible devices.
The editor’s effects library is loaded with tons of graphic transitions and filters that are dedicated to enhance the contents of your presentation with utmost ease. You can add creative modifications to the slideshow media, such as, cut, crop and trim videos and images and add the most convincing music, overlays, fonts, etc., and enjoy an additional free access to hundreds of stock videos and slideshow templates.
07LightMV
This one is an online slideshow creator utility that works well with almost any operating system including Windows, iOS, Android and Mac. Essentially a cloud centered editor program, this tool caters to your high quality slideshow creation needs in the most effective way. The design process is quite simple, where you only need to add the images and videos, design your presentation and wait till everything comes to place.
What’s more appealing factor about the tool is that you will never need to download the program in your device or purchase a subscription plan to use the application. All you need to do is land into the tool’s website in your favorite browser and tap on the ‘Slideshow’ option to begin with the creation process. You can select from a heap of preset stunning slideshow templates to create the most enhanced PowerPoint presentation.
08Fliptastic
The Fliptastic slideshow creator app is exclusively developed to adhere to the graphic design concerns of iOS users. This one is a no cost graphic utility with a plethora of versatile features and considerable user backup. The app’s effect library is packed with a unique set of slideshow design templates, transitions, background music choices and filters that work to compliment your presentation with the subtlest look ever.
Paying a bit extra attention to the audio inclusion within the slides, the app offers you a range of free music files to work with, while additionally allowing you to upload and use one from your device or the internet.
09Creating Instagram Slideshows With Filmora
Talking exclusively within the domain of video creation and editing, the credibility of the Wondershare Filmora Video Editor software needs no introduction. Moving ahead with our discussion, let us learn about the process of creating awesome Instagram slideshows with Filmora in the following section:
Step 1: Download and Install the Program
To begin with addressing the concern of how to make a slideshow on Instagram story, navigate to the official Wondershare website and download the Wondershare Filmora Video Editor to your preferred system and proceed to install the same.
Wondershare Filmora - Best Video Editor for Mac/Windows
5,481,435 people have downloaded it.
Build unique custom animations without breaking a sweat.
Focus on creating epic stories and leave the details to Filmora’s auto features.
Start a creative adventure with drag & drop effects and endless possibilities.
Filmora simplifies advanced features to save you time and effort.
Filmora cuts out repetition so you can move on to your next creative breakthrough.
Step 2: Import Your Media
Launch the editor program and wait for the latter’s welcome screen to appear. Here, you need to import the images, videos and other media files to the editor timeline for including them in your slideshow. It is recommended to collect all the image and video files into one single folder before opening a new slideshow design project.
In the editor’s welcome screen, navigate to the ‘Media’ tab at the top left corner and click on the same to open the ‘Import’ menu. From here, you need to choose the ‘Import a Media Folder’ option, followed by navigating to the folder that contains the to be imported media files. When you have reached to the required folder, select it and tap ‘OK’ to import the same into the project timeline. When all the files have been imported, you can see them in the ‘Project Media’ panel.

Step 3: Timeline Positioning of Media Files
Reach to the ‘File’ menu and choose ‘Preferences’ from the latter’s dropdown menu. In the ‘Preferences’ window, hit the ‘Editing’ tab and tap on ‘Photo Preferences’. From the drop down menu that follows, choose the ‘Crop to Fit’ option to adjust the aspect ratio of your imported images in line with the slideshow project. In case your images have the 9:16 vertical aspect ratio, select the ‘Fit’ option to make a proper screen fit.

You can proceed to include the image zoom and camera pan features within your project by clicking on the ‘Pan & Zoom’ option. You can further, modify the preset durations of transitions, effects and photos in the ‘Editing’ tab itself before adding them to the editor timeline. Another way of doing the same is to drag the ends of the media files inward or outward, post the timeline adding process.

When you have finished making the required adjustments, navigate back the ‘Media Panel’ to include the imported media files within the project timeline. You can either click on the files to add them, or choose to ‘Drag and Drop’ the same at a preferred place within the timeline.
When all the images and videos have been added, proceed to arrange them in the desired order of appearance in the slideshow, followed by adjusting their screen time and play durations through any of the methods explained above.
Step 4: Add Transitions to Eliminate Hard Cuts
The smooth play of a slideshow is often distorted by hard cuts, which can be escaped by applying smooth transition effects to the slides. Consider exploring the ‘Transitions’ tab of Filmora to choose from a diversity of easily customizable transition effects and place them at the intersection point of the respective slides in the project timeline.
Instead of applying the same transition to every slide, prefer choosing the one that exclusively suits the content arrangement and flow within particular slides. This would save your slideshow from getting a repetitive look.

Post the timeline adding of a transition, you can double click on the same to reach the ‘Transition Setting Window’, where you are allowed to customize the play duration and select its ‘Transition Mode’. Play durations can alternatively be customised in the project timeline by dragging the slider in a left or right direction.
Step 5: Add Overlays and Filters for an Improvised Colour Scheme
To enhance the thematic appeal of your slideshow, consider desaturating the colours of the included images with the extensive range of visual effects and overlays available in the ‘Effects’ tab of the software’s editing timeline. Opening the tab, you are exposed to a series of ‘Filter and Overlay’ categories, that have further subdivisions of Light Leaks, Sepia Tone and Lomography.
To add a particular effect, place it in the timeline track above the desired clip or image. Observe the changes in the ‘Preview Panel’ and proceed to adjust the effect settings if required, by double clicking on the particular effect.

Step 6: Include Motion Graphic Elements
To supplement your slideshow with elegant motion graphics, navigate to the ‘Elements’ tab in the editor timeline. From here, you can access and choose any suitable motion graphic template from a diversity of available choices, to include within the project timeline. The step is completely optional and you should pay attention to the style of content presentation and the cause of creation of your slideshow when choosing to add these elements to the same.

Step 7: Record Voiceovers and Create Soundtracks
To record a voiceover for your slideshow, navigate to the ‘Media’ tab and tap the ‘Record’ dropdown menu. Click on ‘Record Voiceover’ in the list of options that appears. The ‘Record Audio’ icon pops up and you now need to select a microphone to be used in the recording process. When you are ready, tap the ‘Record’ button to let the recording begin.

You can now see your voice recording appear in the ‘Media’ tab with the previously imported media files, ready to be placed within the audio track of the project timeline. Filmora’s audio library is a storehouse of free access music and audio effects. To add one to your slideshow, navigate and click on the ‘Audio’ tab to select from the extensive Rock, Young & Bright, Electronic, etc., music subcategories till you get the perfect match for your presentation.

Once you have selected all the music tracks, place them one by one on the project timeline and move ahead with adjusting their play durations.
Step 8: Export Your Creation
When you are satisfied with your work, you can export the slideshow directly from Filmora to a number of media sharing platforms. All you need to do is, navigate to and tap the ‘Export’ button in the top right corner of the editor screen and proceed to set the resolution and frame rate, and select the output file format of your created slideshow in the ‘Export Window’ that appears.

When you are ready with everything, click on the ‘Export’ button at the bottom right corner of the screen to share your slideshow across different platforms, including YouTube, Instagram, Vimeo, etc.
The time required by Filmora to render your slideshow on the chosen platform will depend on the output file size. Considering the fact that larger files require a much longer time to be rendered, it would be a smart decision to limit the file size of your slideshow within 500 MB.
● Ending Thoughts →
● Instagram slideshows are exciting means of diving into fun-filled entertainment with your social media peers.
● When looking for solutions on how to create a slideshow on Instagram, there are loads of choices in the software market.
● Talking of best creator alternatives, you can pick the Wondershare Filmora slideshow developer program to make an amazing Insta story slideshow.
Instagram slideshows land among the latest social media trends of fun and entertainment. Learn how to attract jaw dropping peer attention with creating the same!
In this article
01 [When Should You Use an Instagram Slideshow?](#Part 1)
02 [How to Make an Instagram Slideshow with Music?](#Part 2)
03 [8 Best Instagram Slideshow Apps for Creating Outstanding Slideshow](#Part 3)
Part 1 When Should You Use an Instagram Slideshow?
Revolutions in technology has opened doors to a plenty of new and exciting means of information sharing, entertainment and communication. Playing its part in the game, Instagram slideshow has emerged as an exciting means of quick and impactful content sharing. Diving deeper into the discussion, let us talk about the different areas of working with an Instagram slide show in the following section:
01Explanatory Product Demonstrations and Stepwise Tutorials
Considering the diverse media collaboration entertained by this social media platform, you get the liberty to include 10 media files of videos and images while creating a slideshow on Instagram. This is an affordably sufficient media space to demonstrate your newly launched product in front of the target audience.
The aforesaid characteristic of a slideshow for Instagram can be put to another use of creating detailed, step by step guides and product usage tutorials to create an increased and confident customer reach and brand applicability. A few examples include the presentations of recipes by food blogs and chefs, or a detailed look of the day’s outfit by fashion bloggers.
02Interactive Storytelling or Recreate an Event
Gone are the times when stories and events were restricted to a single image or video with a limited scope of understanding and explanation. You can now work with a combination of multiple images and videos to create more vivid and graphical descriptions of stories, narratives and events.
You can work on creating an engaging slideshow for Instagram to tell an amazing story, voice a narration from the beginning to the end, or share your best moments with your cherished audience, which will surely give them the feel of enjoying the adventure along with you.
03Create a Collection
You can now use a slide show for Instagram to design and present a collection of manifold ideas and products within a single post. You can improvise the collection with displaying a series of related products, showcasing a summary of your different blog posts through the week, or simply present a list of your most reliable inspirations, resources and influencers.
04Exciting Video Teasers
If you have a scheduled video release to entertain your audience, try working with interactive slideshows for Instagram to create some sensational teaser content of the upcoming release to imbibe a natural sense of curiosity within your audience.
You can experiment with releasing a mini photoshoot tour of your filming set, share close up progression details, or include a cliffhanger in the end of your Instagram slideshow to ensure the retrieval of your audience towards watching the release of the actual big content. You can use these short teasers as effective means of creating a campaign buzz, while building a closer connect with your audience.
Part 2 How to Make an Instagram Slideshow with Music?
By now, you must have gathered enough knowledge regarding the credibility of Instagram slideshows in catering to a diversity of commercial, professional and personal content sharing needs. Considering the same, you may conveniently feel motivated to try hands at creating stunning slideshow presentations for Instagram on your own.
Adhering to the concern, let us move ahead with our discussion, while talking about how to make a slideshow for Instagram and supplement the same with adaptable background music to develop amazing content masterpieces and share them with social media peers, while grabbing their obvious attention.
While there are a number of choices in the software market to choose your Instagram slideshow creator tool, the FlexClip tool can be a reliable option. Read though the following section to learn the slideshow creation process in the program with a comprehensive and stepwise tutorial guide:
Step 1: Download the Slideshow Creator Tool
Visit the official website of FlexClip to download and install the slideshow maker software in your preferred device.
Step 2: Start from Scratch
After a successful installation, proceed to launch the tool in your system and wait till the software greets you with its welcome interface. Here, you will have to reach to and tap the ‘Start to Create’ button to begin with the slideshow creation process. You can also select a preset template to work on your slideshow if nothing new clicks in your mind.
Step 3: Select an Aspect Ratio
In the tool’s creator window, navigate to the ‘Options Panel’ at the left and click on ‘More’ to select a suitable aspect ratio. Picking the 9:16 ratio would be a good choice.
Step 4: Upload Your Media
In the same ‘Options Panel’, click on ‘Media’ for dragging and dropping the desired video and image files from your device to the program’s media timeline, followed by applying them to the tool’s storyboard. You can alternatively, choose to directly work with media pages of any preset slideshow template.
Step 5: Customize Your Media
You can now proceed to improvise your media files with amazing texts, filters, stickers, emojis, widgets, etc., by clicking on specific object categories from the ‘Options Panel’.
Step 6: Include Seamless Transitions
Proceed to uplift your creation to the next level with the application of stunning image and video transitions. Navigate to the ‘Options Panel’ and tap ‘Elements’. A variety of transition effects will be displayed to choose from. Select the one you like to add it to your slideshow.
Step 7: Add a Background Music
An in line background audio is the best way to set the mood of your slideshow. Choose to add the same to your creation for making a more engaging impact on the audience. Visit the ‘Options Panel’ again and click on ‘Music’ to open the program’s audio library and select a perfect background music from the huge variety of choices, to include in your slideshow.
Step 8: Preview Your Creation
When you have finished customizing your slideshow, navigate to the top right corner of the editor’s storyboard and hit the ‘Preview’ button to visualize and ensure that your slideshow has everything at the right place. You can continue editing if there is a need to make some changes.
Step 9: Time to Save and Share!
When you are happy with your work, consider saving it either to your device or Google Dropbox, from where you can easily upload the same to your Instagram handle.
Part 3 Best Instagram Slideshow Apps for Creating Outstanding Slideshow
Social media is the talk of the trend in today’s times, which has extended its boundaries to visibly everything around us. Speaking in the light of the fact, slideshow presentations are no exception. Social media platforms today have come up with amazing tools and applications to create and share a stunning slideshow Instagram story with utmost ease and within an affordable time span.
Now that you have developed a comprehensive understanding of the credibility of working with Instagram slideshows and their creation process with the inclusion of complementary background music, let us dive into learning about some of the best and most popular Instagram apps for creating awesome slideshow presentations in the following section:
01Filme Lite
This tool lands among the leading user preferences to work on creating slideshow presentations. The application software is packed with a heap of latest features that form the Instagram trends in current times.
Apart from complementing your slideshow creations with tons of features, this slideshow maker for Instagram grants you the liberty to include your most loved videos and images within your presentation and customize them with a diverse range of effects, along with adjusting their play duration within the slideshow. Additional to image and video customization, you are also allowed to choose the image transition style that perfectly suits your content arrangement within the slides.
Working with the tool, you can be sure of getting an unparalleled slideshow creation experience with a very interactive and user oriented design interface, that is simple enough to be easily understood and worked upon by a newbie to the creative world.
02VivaVideo
If you are working on a detailed presentation and wish to spark up your creation with stunning varieties of jaw dropping special effects, consider creating your PowerPoint slideshows in this application. The tool’s effect library is a storehouse of the most amazing special effects that promise of transforming your slideshow into a visual masterpiece.
You can separately apply these effects to each of the slideshow images or choose to work on a combination of selected effects to include within a single video. Apart from this, you are free to choose an apt background music for your presentation slides from the extensive audio library of the software. The bottom line is; you are assured to a complete fun experience while creating slideshows with this tool.
03Movavi
If you are familiar enough with the fundamental concepts and the trivial anecdotes of working with slideshow presentations and want to take your graphic creativity to the next level, you can try hands at using the Movavi slideshow creator software to design high end PowerPoint presentations of professional quality. The best thing about the tool is, it works online and does not require a software download for usage concerns.
Along with creating online slideshow presentations with ease, the tool permits you to create online videos within minutes and instantly download the same for specific usage. You can further, pop up your presentation slides with wonderful transition and animation effects and also make adjustments in the play duration of each slide. The tool lets you choose and add a perfect background music to your presentation from its conveniently vast audio library.
04Slideshow Lab
If you have just landed into the world of creating slideshow presentations and are looking for easy solutions on how to make a slideshow on Instagram, consider working with this software to polish your design creativity. The simple and user cohesive interface of the tool is best for beginners to understand and get customary with the creation process, that takes the minimum possible time to render an appreciable PowerPoint presentation.
Talking about the slideshow design process, you will need to start with selecting a set of desired images, followed by uploading the same into the tool’s slideshow creator timeline. The next step is to arrange the images in the sequential order of appearance, select an appealing background music and apply smooth image transitions. When you are done with everything, proceed to save the presentation to your device.
05MoShow
While you can choose to create stunning slideshow presentations with almost any class of images, the aforesaid app works best to render Instagram images into a top rated Instagram photo slideshow without compromising with the high resolution image quality of Instagram photos. The application integrates motion pictures and lighting effects to transform the otherwise regular images into lively still captures.
Considering the credibility of the tool in overall user experience, its indeed a thumbs up from graphic creators across the globe, thanks to its smart and interactive interface, in time performance and outstanding creation outputs.
06InVideo Editor
Put an end to your search of effective solutions on how to do a slideshow on Instagram with the InVideo Editor, a smart video and graphic editor that can also be employed to adhere to the requirement of creating amazing slideshow presentations from Instagram media. While the creation process hardly takes a few minutes, you can work with the application to explore your editing creativity to the finest levels. The tool works well with any of your MacOs and Windows compatible devices.
The editor’s effects library is loaded with tons of graphic transitions and filters that are dedicated to enhance the contents of your presentation with utmost ease. You can add creative modifications to the slideshow media, such as, cut, crop and trim videos and images and add the most convincing music, overlays, fonts, etc., and enjoy an additional free access to hundreds of stock videos and slideshow templates.
07LightMV
This one is an online slideshow creator utility that works well with almost any operating system including Windows, iOS, Android and Mac. Essentially a cloud centered editor program, this tool caters to your high quality slideshow creation needs in the most effective way. The design process is quite simple, where you only need to add the images and videos, design your presentation and wait till everything comes to place.
What’s more appealing factor about the tool is that you will never need to download the program in your device or purchase a subscription plan to use the application. All you need to do is land into the tool’s website in your favorite browser and tap on the ‘Slideshow’ option to begin with the creation process. You can select from a heap of preset stunning slideshow templates to create the most enhanced PowerPoint presentation.
08Fliptastic
The Fliptastic slideshow creator app is exclusively developed to adhere to the graphic design concerns of iOS users. This one is a no cost graphic utility with a plethora of versatile features and considerable user backup. The app’s effect library is packed with a unique set of slideshow design templates, transitions, background music choices and filters that work to compliment your presentation with the subtlest look ever.
Paying a bit extra attention to the audio inclusion within the slides, the app offers you a range of free music files to work with, while additionally allowing you to upload and use one from your device or the internet.
09Creating Instagram Slideshows With Filmora
Talking exclusively within the domain of video creation and editing, the credibility of the Wondershare Filmora Video Editor software needs no introduction. Moving ahead with our discussion, let us learn about the process of creating awesome Instagram slideshows with Filmora in the following section:
Step 1: Download and Install the Program
To begin with addressing the concern of how to make a slideshow on Instagram story, navigate to the official Wondershare website and download the Wondershare Filmora Video Editor to your preferred system and proceed to install the same.
Wondershare Filmora - Best Video Editor for Mac/Windows
5,481,435 people have downloaded it.
Build unique custom animations without breaking a sweat.
Focus on creating epic stories and leave the details to Filmora’s auto features.
Start a creative adventure with drag & drop effects and endless possibilities.
Filmora simplifies advanced features to save you time and effort.
Filmora cuts out repetition so you can move on to your next creative breakthrough.
Step 2: Import Your Media
Launch the editor program and wait for the latter’s welcome screen to appear. Here, you need to import the images, videos and other media files to the editor timeline for including them in your slideshow. It is recommended to collect all the image and video files into one single folder before opening a new slideshow design project.
In the editor’s welcome screen, navigate to the ‘Media’ tab at the top left corner and click on the same to open the ‘Import’ menu. From here, you need to choose the ‘Import a Media Folder’ option, followed by navigating to the folder that contains the to be imported media files. When you have reached to the required folder, select it and tap ‘OK’ to import the same into the project timeline. When all the files have been imported, you can see them in the ‘Project Media’ panel.
Step 3: Timeline Positioning of Media Files
Reach to the ‘File’ menu and choose ‘Preferences’ from the latter’s dropdown menu. In the ‘Preferences’ window, hit the ‘Editing’ tab and tap on ‘Photo Preferences’. From the drop down menu that follows, choose the ‘Crop to Fit’ option to adjust the aspect ratio of your imported images in line with the slideshow project. In case your images have the 9:16 vertical aspect ratio, select the ‘Fit’ option to make a proper screen fit.
You can proceed to include the image zoom and camera pan features within your project by clicking on the ‘Pan & Zoom’ option. You can further, modify the preset durations of transitions, effects and photos in the ‘Editing’ tab itself before adding them to the editor timeline. Another way of doing the same is to drag the ends of the media files inward or outward, post the timeline adding process.
When you have finished making the required adjustments, navigate back the ‘Media Panel’ to include the imported media files within the project timeline. You can either click on the files to add them, or choose to ‘Drag and Drop’ the same at a preferred place within the timeline.
When all the images and videos have been added, proceed to arrange them in the desired order of appearance in the slideshow, followed by adjusting their screen time and play durations through any of the methods explained above.
Step 4: Add Transitions to Eliminate Hard Cuts
The smooth play of a slideshow is often distorted by hard cuts, which can be escaped by applying smooth transition effects to the slides. Consider exploring the ‘Transitions’ tab of Filmora to choose from a diversity of easily customizable transition effects and place them at the intersection point of the respective slides in the project timeline.
Instead of applying the same transition to every slide, prefer choosing the one that exclusively suits the content arrangement and flow within particular slides. This would save your slideshow from getting a repetitive look.
Post the timeline adding of a transition, you can double click on the same to reach the ‘Transition Setting Window’, where you are allowed to customize the play duration and select its ‘Transition Mode’. Play durations can alternatively be customised in the project timeline by dragging the slider in a left or right direction.
Step 5: Add Overlays and Filters for an Improvised Colour Scheme
To enhance the thematic appeal of your slideshow, consider desaturating the colours of the included images with the extensive range of visual effects and overlays available in the ‘Effects’ tab of the software’s editing timeline. Opening the tab, you are exposed to a series of ‘Filter and Overlay’ categories, that have further subdivisions of Light Leaks, Sepia Tone and Lomography.
To add a particular effect, place it in the timeline track above the desired clip or image. Observe the changes in the ‘Preview Panel’ and proceed to adjust the effect settings if required, by double clicking on the particular effect.
Step 6: Include Motion Graphic Elements
To supplement your slideshow with elegant motion graphics, navigate to the ‘Elements’ tab in the editor timeline. From here, you can access and choose any suitable motion graphic template from a diversity of available choices, to include within the project timeline. The step is completely optional and you should pay attention to the style of content presentation and the cause of creation of your slideshow when choosing to add these elements to the same.
Step 7: Record Voiceovers and Create Soundtracks
To record a voiceover for your slideshow, navigate to the ‘Media’ tab and tap the ‘Record’ dropdown menu. Click on ‘Record Voiceover’ in the list of options that appears. The ‘Record Audio’ icon pops up and you now need to select a microphone to be used in the recording process. When you are ready, tap the ‘Record’ button to let the recording begin.
You can now see your voice recording appear in the ‘Media’ tab with the previously imported media files, ready to be placed within the audio track of the project timeline. Filmora’s audio library is a storehouse of free access music and audio effects. To add one to your slideshow, navigate and click on the ‘Audio’ tab to select from the extensive Rock, Young & Bright, Electronic, etc., music subcategories till you get the perfect match for your presentation.
Once you have selected all the music tracks, place them one by one on the project timeline and move ahead with adjusting their play durations.
Step 8: Export Your Creation
When you are satisfied with your work, you can export the slideshow directly from Filmora to a number of media sharing platforms. All you need to do is, navigate to and tap the ‘Export’ button in the top right corner of the editor screen and proceed to set the resolution and frame rate, and select the output file format of your created slideshow in the ‘Export Window’ that appears.
When you are ready with everything, click on the ‘Export’ button at the bottom right corner of the screen to share your slideshow across different platforms, including YouTube, Instagram, Vimeo, etc.
The time required by Filmora to render your slideshow on the chosen platform will depend on the output file size. Considering the fact that larger files require a much longer time to be rendered, it would be a smart decision to limit the file size of your slideshow within 500 MB.
● Ending Thoughts →
● Instagram slideshows are exciting means of diving into fun-filled entertainment with your social media peers.
● When looking for solutions on how to create a slideshow on Instagram, there are loads of choices in the software market.
● Talking of best creator alternatives, you can pick the Wondershare Filmora slideshow developer program to make an amazing Insta story slideshow.
Best 15 Anime Fonts-Find Your Favorite One
Best 15 Anime Fonts-Find Your Favorite One

Shanoon Cox
Mar 27, 2024• Proven solutions
Anime is basically a fancy name for Japanese cartoons and is a trending genre for a long time. The popularity of these anime series has led fans to create characteristic font styles based on the logo or title of these series. A font such as this is commonly regarded as an anime font.
Since the anime font has a very distinct typeface and usually represents a theme, it is now widely used in video making, titles, posters, and also in games. The anime font can depict fun or thrill depending on which one you choose.
In this article, we have listed the best anime fonts of all time.
- Best 15 Anime Fonts You Can Choose
- Bonus Tip-Add Subtitle to an Anime Movie with Wondershare Filmora
Best 15 Anime Fonts You Can Choose
As anime is a trendy genre and you are likely to find a huge variety of anime font online. However, some of these fonts, based on the best-selling anime series, are sought after more than others. Therefore, we have rounded the ultimate anime font list for your ease.
1. Naruto Font
As we all know the popular Japanese Manga series Naruto, this anime font is based on the logo of that series. It is a very simple brush stroke anime font but is designed very artistically. This free anime font is perfect for adding elegant yet animated fonts to various kinds of videos or content.
2. Anime Ace Font
Anime Ace is a free anime font that is part of Blambot’s Dialogue Collection by Nate Piekos. It is a cartoonish font that is perfect for use in comic books. This is designed to be used as the font for the character’s speech bubbles. Using this anime font can give a very comic-esque vibe to your creations, making them very attractive.
3. Death Note Font
The famous thrilling action series Death Note has a very characteristic font used. This has come to be known as the Death Note Font. As its origin is from a thriller series, this anime font is best for complementing horror and scary themes. An anime font like this one has a hair-rising and dramatic appeal to it.
4. Evangelion Font
Another famed television series released back in the 90s, Neon Genesis Evangelion, has been trending, and so is the anime font used in its titles. This bold and tightly packed anime font is very conventional and artistic. It can be used to complement some serious themes with a stylish anime font like this one. This anime font also gives a dramatic outlook and hence can be used for engaging titles.
5. Sailor Moon Font
Sailor Moon is a best-selling Manga series, and its distinctive fonts are also quite loved. There are total 3 fonts used in this series. The unique feature of these fonts is that they are all very stylish with a visually attractive appeal. This particular anime font is thus best suited for brand titles, posters, shopping bags, etc. As a free anime font, you can use it for various purposes, including utilizing it for making beautiful invitation cards.
6. Haikyuu Font
This anime font from the sports-based Manga series resembles Japanese calligraphy. It has a dramatic vibe that is well-suited for short titles for serious shows and content. You can also use this free anime font to give your content a striking introduction. Plus, this anime font is available as Regular as well Shadowed. So, you can choose the style that best fits the theme of your content.
7. Danganronpa font
A captivating anime font is featured in the Japanese video game, Danganronpa. This anime font has gained popularity as it is stylishly distinct with a thriller vibe linked to it. Since it is a free anime font and is easily available, it can help you craft very engaging and stunning content. It will serve to give your content a unique touch as this anime font has a very characteristic style.
8. My Hero Academia Font
My Hero Academia is a highly acclaimed superhero Manga series, and its font has also been used extensively. It presents a very attractive anime font that can be utilized in banners and posters since it has a very clean and simple typeface. This anime font is also well-suited for use in logos.
9. Pet Fonts
As the name suggests, this anime font is based on different animals. Cats, dogs, bunnies, and many other animals are used creatively as fonts. Using this cute and creative anime font gives a very crafty and artful effect to the content it is utilized in. So, Pets font is great to create a light-hearted and cartoonish outlook.
10. Otaku Rant Anime Font Family
The Otaku Rant Anime Font Family consists of 3 types i.e., Regular, Italic, and Bold. All these comic fonts are very simple yet elegant. This anime font family can be perfectly used for designing posters and covers, owing to its stylish appeal. Thus, it is a great anime font for making interesting content that wows the viewers.

11. Squealer Anime Font
The Squealer Anime Font is very artistic. It has a gothic calligraphic appeal to it. This unique and riveting anime font can be employed in designing posters to impress the audience. As this free anime font is very stylish, it can also be used commercially in crafting cards or posters.

12. Porky’s Font Comic Font
As the name suggests, this anime font is based on the 1980’s Classic movie ‘Porky.’ It presents a very fancy and artistic style. Therefore, it is widely used for blogs or fashion magazines, giving an attractive outlook. It is a fusion of ancient and conventional typography. This free anime font can help you give a beautiful look to your content.

13. Anime Inept
Anime Inept gives the look of a handwritten font, which makes the text more personalized. Since this anime font gives a distinct look, it makes any text stand out of the ordinary. Given the simplicity of this font, it is an excellent choice for comic texts or titles.
14. Pokemon Anime Font
We all know the world-famous Pokemon that has been a popular game and animated series. Its even catchier anime font has also been extensively used for various purposes. Since the Pokemon anime font has a clear and fun typeface, it is perfect for creating attractive stickers, advertisements, and similar titles.
15. Saiyan Sans Anime Font
Dragon Ball Z or Saiyan Sans is a fan-favorite anime series. This anime font is based on the fancy logo used in the Dragon Ball Z title. It is a very catchy and curvy anime font that adds a stylish appeal to the text. Owing to its fancy style, it is also suitable for use as overlay text on an image.
Bonus Tip-Add Subtitle to an Anime Movie with Wondershare Filmora
Wondershare Filmora is a very intuitive and easy-to-use video editor. It has powerful one-click tools to enable users to craft professional-grade videos effortlessly. In Filmora, you will find a wide array of catchy text templates that can be customized and animated to add further effects.


Here is a guide to add anime font to your videos using Filmora.
1. Download and install Filmora on your PC. To import your anime video, go to File and select Import Media Files or drag and drop it to Filmora.
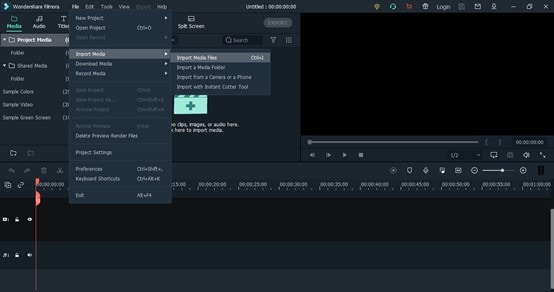
2. After importing, drag and drop the video to the timeline.
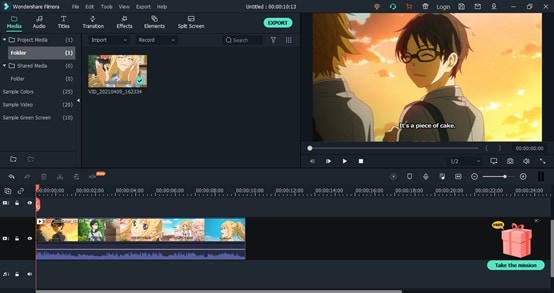
3. In the Titles tab, you can find a variety of text templates from different categories like Openers, Subtitles, Titles, etc. Double-click a title to it to the timeline. Drag and adjust the duration of the text. Double-click on the title in the timeline to customize it.
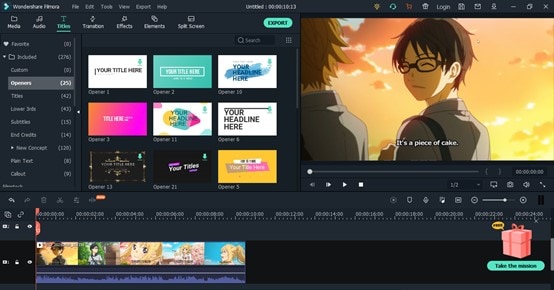
4. Here you can adjust the size, position, font, and other aspects of the text. Use the scale to change the size of the text.
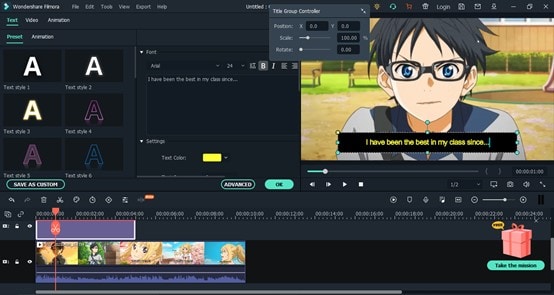
5. In the Animation tab, you can also add a special effect to the text, making it catchy and dynamic. Just double-click the animation to add it.
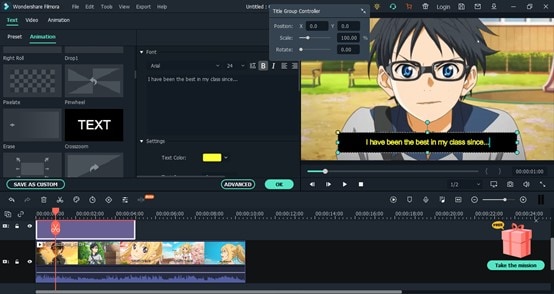
6. Click on Export. Select the resolution and export it to your device or share it to social media.

Conclusion
Now, you have the best 15 anime font list to help you craft exciting videos. Whether you wish to create a stylish fashion video with an elegant anime font, or a short horror clip with anime font from Death Note, you will find a free anime font for every theme here.
Since fonts play a significant role in any content, they must be chosen with care. So, give our list a read and find out which anime font complements your video the best. Don’t forget to try and add anime font subtitles to your video using the Filmora video editor.
Good luck!
Shanoon Cox
Shanoon Cox is a writer and a lover of all things video.
Follow @Shanoon Cox
Shanoon Cox
Mar 27, 2024• Proven solutions
Anime is basically a fancy name for Japanese cartoons and is a trending genre for a long time. The popularity of these anime series has led fans to create characteristic font styles based on the logo or title of these series. A font such as this is commonly regarded as an anime font.
Since the anime font has a very distinct typeface and usually represents a theme, it is now widely used in video making, titles, posters, and also in games. The anime font can depict fun or thrill depending on which one you choose.
In this article, we have listed the best anime fonts of all time.
- Best 15 Anime Fonts You Can Choose
- Bonus Tip-Add Subtitle to an Anime Movie with Wondershare Filmora
Best 15 Anime Fonts You Can Choose
As anime is a trendy genre and you are likely to find a huge variety of anime font online. However, some of these fonts, based on the best-selling anime series, are sought after more than others. Therefore, we have rounded the ultimate anime font list for your ease.
1. Naruto Font
As we all know the popular Japanese Manga series Naruto, this anime font is based on the logo of that series. It is a very simple brush stroke anime font but is designed very artistically. This free anime font is perfect for adding elegant yet animated fonts to various kinds of videos or content.
2. Anime Ace Font
Anime Ace is a free anime font that is part of Blambot’s Dialogue Collection by Nate Piekos. It is a cartoonish font that is perfect for use in comic books. This is designed to be used as the font for the character’s speech bubbles. Using this anime font can give a very comic-esque vibe to your creations, making them very attractive.
3. Death Note Font
The famous thrilling action series Death Note has a very characteristic font used. This has come to be known as the Death Note Font. As its origin is from a thriller series, this anime font is best for complementing horror and scary themes. An anime font like this one has a hair-rising and dramatic appeal to it.
4. Evangelion Font
Another famed television series released back in the 90s, Neon Genesis Evangelion, has been trending, and so is the anime font used in its titles. This bold and tightly packed anime font is very conventional and artistic. It can be used to complement some serious themes with a stylish anime font like this one. This anime font also gives a dramatic outlook and hence can be used for engaging titles.
5. Sailor Moon Font
Sailor Moon is a best-selling Manga series, and its distinctive fonts are also quite loved. There are total 3 fonts used in this series. The unique feature of these fonts is that they are all very stylish with a visually attractive appeal. This particular anime font is thus best suited for brand titles, posters, shopping bags, etc. As a free anime font, you can use it for various purposes, including utilizing it for making beautiful invitation cards.
6. Haikyuu Font
This anime font from the sports-based Manga series resembles Japanese calligraphy. It has a dramatic vibe that is well-suited for short titles for serious shows and content. You can also use this free anime font to give your content a striking introduction. Plus, this anime font is available as Regular as well Shadowed. So, you can choose the style that best fits the theme of your content.
7. Danganronpa font
A captivating anime font is featured in the Japanese video game, Danganronpa. This anime font has gained popularity as it is stylishly distinct with a thriller vibe linked to it. Since it is a free anime font and is easily available, it can help you craft very engaging and stunning content. It will serve to give your content a unique touch as this anime font has a very characteristic style.
8. My Hero Academia Font
My Hero Academia is a highly acclaimed superhero Manga series, and its font has also been used extensively. It presents a very attractive anime font that can be utilized in banners and posters since it has a very clean and simple typeface. This anime font is also well-suited for use in logos.
9. Pet Fonts
As the name suggests, this anime font is based on different animals. Cats, dogs, bunnies, and many other animals are used creatively as fonts. Using this cute and creative anime font gives a very crafty and artful effect to the content it is utilized in. So, Pets font is great to create a light-hearted and cartoonish outlook.
10. Otaku Rant Anime Font Family
The Otaku Rant Anime Font Family consists of 3 types i.e., Regular, Italic, and Bold. All these comic fonts are very simple yet elegant. This anime font family can be perfectly used for designing posters and covers, owing to its stylish appeal. Thus, it is a great anime font for making interesting content that wows the viewers.
11. Squealer Anime Font
The Squealer Anime Font is very artistic. It has a gothic calligraphic appeal to it. This unique and riveting anime font can be employed in designing posters to impress the audience. As this free anime font is very stylish, it can also be used commercially in crafting cards or posters.
12. Porky’s Font Comic Font
As the name suggests, this anime font is based on the 1980’s Classic movie ‘Porky.’ It presents a very fancy and artistic style. Therefore, it is widely used for blogs or fashion magazines, giving an attractive outlook. It is a fusion of ancient and conventional typography. This free anime font can help you give a beautiful look to your content.
13. Anime Inept
Anime Inept gives the look of a handwritten font, which makes the text more personalized. Since this anime font gives a distinct look, it makes any text stand out of the ordinary. Given the simplicity of this font, it is an excellent choice for comic texts or titles.
14. Pokemon Anime Font
We all know the world-famous Pokemon that has been a popular game and animated series. Its even catchier anime font has also been extensively used for various purposes. Since the Pokemon anime font has a clear and fun typeface, it is perfect for creating attractive stickers, advertisements, and similar titles.
15. Saiyan Sans Anime Font
Dragon Ball Z or Saiyan Sans is a fan-favorite anime series. This anime font is based on the fancy logo used in the Dragon Ball Z title. It is a very catchy and curvy anime font that adds a stylish appeal to the text. Owing to its fancy style, it is also suitable for use as overlay text on an image.
Bonus Tip-Add Subtitle to an Anime Movie with Wondershare Filmora
Wondershare Filmora is a very intuitive and easy-to-use video editor. It has powerful one-click tools to enable users to craft professional-grade videos effortlessly. In Filmora, you will find a wide array of catchy text templates that can be customized and animated to add further effects.
Here is a guide to add anime font to your videos using Filmora.
1. Download and install Filmora on your PC. To import your anime video, go to File and select Import Media Files or drag and drop it to Filmora.
2. After importing, drag and drop the video to the timeline.
3. In the Titles tab, you can find a variety of text templates from different categories like Openers, Subtitles, Titles, etc. Double-click a title to it to the timeline. Drag and adjust the duration of the text. Double-click on the title in the timeline to customize it.
4. Here you can adjust the size, position, font, and other aspects of the text. Use the scale to change the size of the text.
5. In the Animation tab, you can also add a special effect to the text, making it catchy and dynamic. Just double-click the animation to add it.
6. Click on Export. Select the resolution and export it to your device or share it to social media.
Conclusion
Now, you have the best 15 anime font list to help you craft exciting videos. Whether you wish to create a stylish fashion video with an elegant anime font, or a short horror clip with anime font from Death Note, you will find a free anime font for every theme here.
Since fonts play a significant role in any content, they must be chosen with care. So, give our list a read and find out which anime font complements your video the best. Don’t forget to try and add anime font subtitles to your video using the Filmora video editor.
Good luck!
Shanoon Cox
Shanoon Cox is a writer and a lover of all things video.
Follow @Shanoon Cox
Also read:
- Updated 2024 Approved Animate Your Photo Online with These Awesome Tools
- Updated Ways to Create Animated Clipart in PowerPoint
- 2024 Approved 12 Best Stop Motion Studios Worth Recommending
- New Obtain and Create Animated GIF Icons
- New The Coolest Anime Characters Ever| List of Top Favorites
- In 2024, What Is the Best Collage Photo Grid Maker - Experts Choice
- Updated How to Reduce GIF Size and Best GIF Resizers for 2024
- 2024 Approved How to Convert Animated GIF From Video
- Updated A Beginners Guide to Explain What 3D Animation Is
- Interesting Fundamentals and Ultimate Guide to Animated Characters Drawings
- Updated The 10 Most Adorable Aesthetic Cartoon Characters
- Updated In 2024, Tutorials to Make Animated Images
- New 10 Must-Use MP4 to GIF Converters to Get Perfect-Made GIF for 2024
- New 2024 Approved 10 Cartoon Canvas Painting Ideas for Total Beginners
- New Great Ways to Make Claymation Videos
- In 2024, How to Make My Photo 3D Cartoon Online
- 2024 Approved The Ultimate Cheatsheet to 15 Adobe Animate Alternatives
- Great Guide for Beginners on 2D Animation Making for 2024
- 10 Realistic Cartoon Characters You Would Run Away From if You Met in Real Life
- Updated Amazing Ways to Find Suitable Animated Graphic Maker for 2024
- New 15 Best Pics Collage Apps Top Picks for 2024
- New In 2024, What Make Aesthetic Cartoon Drawing More Understandable
- New What Wikipedia Cant Tell You About the 10 Batman Cartoons for 2024
- Updated In 2024, 12+ Stunning Instagram GIF Stickers and How to Make & Find
- Updated Finding The Best Animated Profile Picture Maker for 2024
- 2024 Approved 8 Free GIF Animators to Make Your Own GIF
- Updated 2024 Approved Some Must-Know Useful Lego Animation Ideas for You
- New All About Types of Motion Graphics for 2024
- New Popular Tips on Learning Animate Rigging for 2024
- 2024 Approved Adobe Animate Text Effects Skills You Need to Know
- Updated In 2024, How to Make GIF Stickers for WhatsApp 100 The Easy Way
- Updated 2024 Approved Everything You Need to Know About Becoming a Motion Graphic Designer
- Secrets to Make 2D Game Animation
- 15 Best Stop Motion Animation Kits to Fuel Creativity for 2024
- New How to Create Animated Video on Canva, In 2024
- How to Make Animation Characters with the Best Character Creators
- 2024 Approved How to Make a Video a Live Photo
- 2024 Approved How to Create A GIF with Sound?
- Updated 2024 Approved How to Turn Yourself Into WhatsApp Cartoon
- New In 2024, Create or Find Good Morning/Night GIFs
- In 2024, A Roster of 15 Top Disney Channel Cartoons
- Are You Head Over Heels With 3D Animation Design, In 2024
- New Top 10 Banned Anime Around the World and Why
- New How to Animate Image on Scroll for 2024
- Fixes for Apps Keep Crashing on Oppo A2 | Dr.fone
- In 2024, How to Copy Contacts from Apple iPhone 11 to SIM? | Dr.fone
- 3uTools Virtual Location Not Working On Honor Magic 5? Fix Now | Dr.fone
- In 2024, New Multiple Ways How To Remove iCloud Activation Lock On your iPhone SE (2020)
- 5 Ways to Send Ringtones from Apple iPhone 11 to iPhone Including iPhone 15 | Dr.fone
- 4 Ways to Transfer Music from Nokia C210 to iPhone | Dr.fone
- In 2024, How to Track Samsung Galaxy F04 Location by Number | Dr.fone
- How Can I Create My Pokemon Overworld Maps On Apple iPhone 14 Pro Max? | Dr.fone
- How to Factory Reset Lava Agni 2 5G in 5 Easy Ways | Dr.fone
- Why Your WhatsApp Live Location is Not Updating and How to Fix on your Oppo Reno 11 5G | Dr.fone
- In 2024, Dose Life360 Notify Me When Someone Checks My Location On Oppo A58 4G? | Dr.fone
- Full Guide to Bypass Tecno Spark 10 Pro FRP
- How to Bypass Android Lock Screen Using Emergency Call On ZTE Nubia Flip 5G?
- 6 Ways to Change Spotify Location On Your Honor Magic 6 | Dr.fone
- Fix Tecno Pova 6 Pro 5G Android System Webview Crash 2024 Issue | Dr.fone
- In 2024, How to Share/Fake Location on WhatsApp for Vivo X90S | Dr.fone
- How to identify missing or malfunctioning your hardware drivers with Windows Device Manager in Windows 10
- The Ultimate Guide to Unlocking Your Apple iPhone 14 on MetroPCS
- How To Bypass Google FRP on Lava Yuva 2
- How to Screen Mirroring Vivo V30 Pro? | Dr.fone
- A Detailed Guide on Faking Your Location in Mozilla Firefox On Realme Narzo N55 | Dr.fone
- In 2024, Full Guide to Unlock Your Realme Narzo 60 Pro 5G
- What Is a SIM Network Unlock PIN? Get Your Nokia G22 Phone Network-Ready
- In 2024, 15 Best Strongest Pokémon To Use in Pokémon GO PvP Leagues For Vivo T2x 5G | Dr.fone
- How to Reset a Infinix Smart 7 Phone that is Locked?
- In 2024, The Best Android SIM Unlock Code Generators Unlock Your Lava Phone Hassle-Free
- In 2024, How to Unlock Vivo S18e Pattern Lock if Forgotten? 6 Ways
- Fake Android Location without Rooting For Your Xiaomi Redmi Note 12 4G | Dr.fone
- In 2024, How Can Nokia G310Mirror Share to PC? | Dr.fone
- How to Remove Forgotten PIN Of Your Vivo Y100t
- In 2024, How To Remove the Two Factor Authentication From Apple iPhone 15
- Did Your iPhone XS Passcode Change Itself? Unlock It Now
- 10 Free Location Spoofers to Fake GPS Location on your Vivo Y100t | Dr.fone
- Locked Out of Apple iPhone SE (2020)? 5 Ways to get into a Locked Apple iPhone SE (2020)
- In 2024, Forgotten The Voicemail Password Of Infinix Note 30 VIP Racing Edition? Try These Fixes
- How to retrieve erased videos from Moto G Stylus (2023)
- 9 Best Phone Monitoring Apps for Vivo Y100t | Dr.fone
- Unlock Your Disabled iPhone XR Without iTunes in 5 Ways | Dr.fone
- In 2024, How to Track WhatsApp Messages on Poco X6 Pro Without Them Knowing? | Dr.fone
- How To Transfer WhatsApp From iPhone 13 Pro Max to other iPhone 14 devices? | Dr.fone
- Solved Warning Camera Failed on Vivo Y78t | Dr.fone
- How to Change Spotify Location After Moving to Another Country On Honor 90 Lite | Dr.fone
- Title: Updated 2024 Approved 20 Free After Effects Logo Reveal Templates
- Author: Elon
- Created at : 2024-05-19 03:05:32
- Updated at : 2024-05-20 03:05:32
- Link: https://animation-videos.techidaily.com/updated-2024-approved-20-free-after-effects-logo-reveal-templates/
- License: This work is licensed under CC BY-NC-SA 4.0.
