
:max_bytes(150000):strip_icc():format(webp)/reddit-app-for-andoird-652f6fcd646245e9807afbac25a072ee.jpg)
Updated 2024 Approved How to Analyze an Editorial Cartoon Easily
How to Analyze an Editorial Cartoon Easily
How to Analyze an Editorial Cartoon
An easy yet powerful editor
Numerous effects to choose from
Detailed tutorials provided by the official channel
We all remember opening our daily newspaper and seeing a graphical representation of some new scoop or story that gives you a gist of what is happening, usually involving humor or sarcasm. That is what one would call and editorial cartoon and they are quite popular amongst newspapers, internet blogs and most recently, Social Media.
Some would even say that ‘Memes’ are an evolved form of editorial cartoons. They are funny, entertaining and can even portray some type of story. Editorial cartoons, in layman terms are a graphical approach to reflect the creator’s ideas. These are usually drawn on a tight deadline; hence feature simple caricatures and whimsical characters.
Cartoonists and hobbyists around the world can save on time using online tools to bring their ideas to life. Today, with some help from the right technology, anybody can try their hands in drawing amazing characters, combining both visual and verbal languages.
If you are someone who feels they have an amazing idea for a cartoon but lacks the skills to draw one can choose from a plethora of tools like Powtown, Photoshop or AI Artist to create amazing sketches and drawing, in half the time.
In this article
01 [Always Be Timely — Editorial Cartoons in a Snap](#Part 1)
02 [The 8 Best Apps to Turn Photos Into Cartoons and Sketches](#Part 2)
03 [How to Make 3D Cartoon From a Photo](#Part 3)
Part 1 Always Be Timely — Editorial Cartoons in a Snap
When a new idea pops into your head, we are usually overwhelmed or excited by its prospects of it that we forget to analyze its features before proceeding to turn it into a cartoon. Here are some tips to help you look into the details of your cartoon.
● Make a note of all the characters in your cartoon strip, what actions are they involved in and the dialogues that are being uttered.
● From which angle or whose angle the story is being told.
● Divide the cartoon design into four quadrants; Top Right & Left, Bottom Right & Left.
● Pay attention to key elements such as use of furniture, tools, technology or signs.
● Define traits like time of day, time of the year or time in history where the context is set.
● Keep in mind the audience you are reaching out to. You can ensure reliability the subtle use of intellect and humour.
Now that you have a clearer picture of what you are trying to depict it is best not to delay the idea and start cracking your creative eggs.
Beginners can use an easy tool like Powtoon, and its simple drag and drop interface to start making cartoons in just three simple steps. You can save up on a lot of time and get your cartoon ready for uploading to your new blog post.
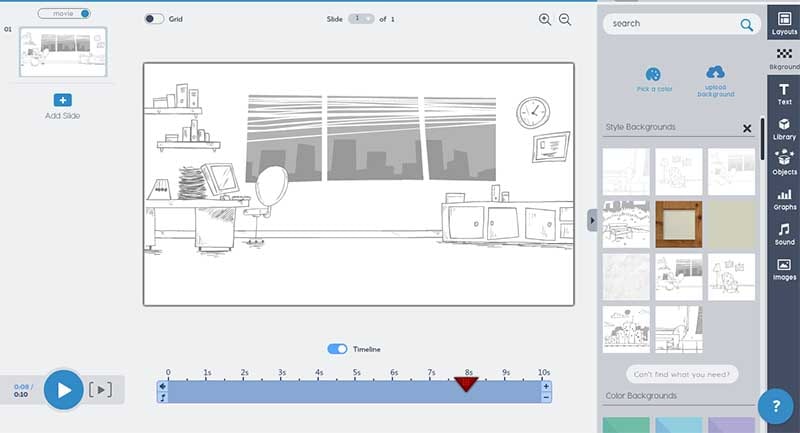
Step 1: Set a Background for your Cartoon
Open the Powtoon Studio on your system and click on ‘Backgrounds’ located on the panel to your right. It will open up a vast library filled with ready to use backgrounds.
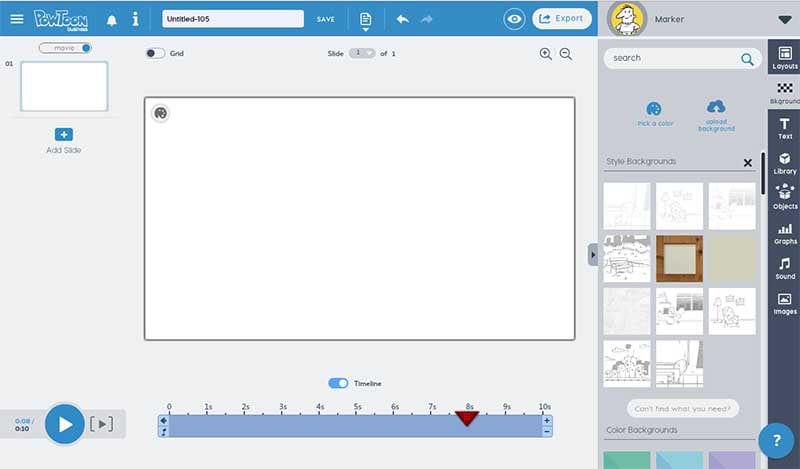
Select any you like to get started. It will intently appear on the board.
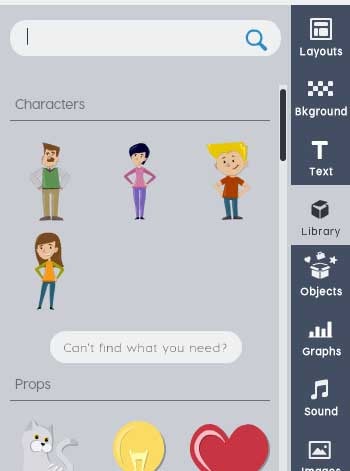
Step 2: Select the Characters for your Cartoon
Well, you have a setting and now it is time to place your characters in it. Click on the ‘Animated Character’ from the panel. Choose any template for your characters.
Step 3: Add the Text
There are various ways you can add dialogues, messages or texts to your cartoon. You can click on ‘Text’ and add a Quote Box or Dialogue Box. You can edit your text by simply clicking on the box.
Part 2 The 8 Best Apps to Turn Photos Into Cartoons and Sketches
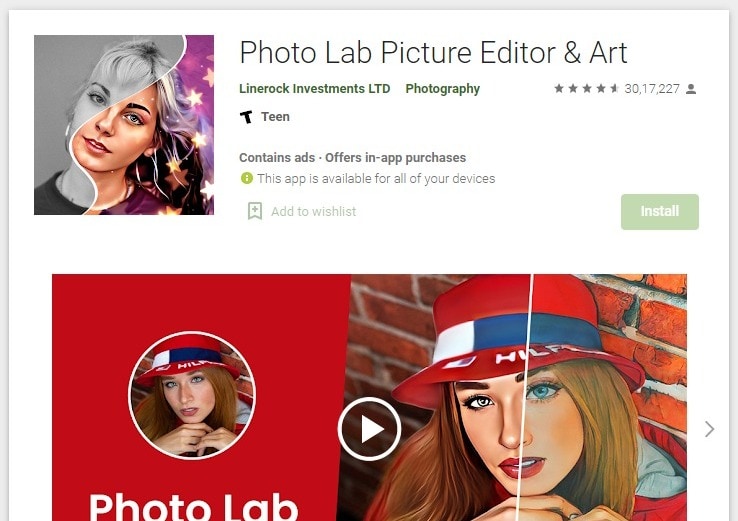
01Photo Lab Picture Editor
Photolab is a great choice for turning your photos into a painting, sketch or a watercolor image. Along with filters you will get montages, borders and frames to make your art work more realistic. You will find all presets in the effects category. It also features filters like digital rain and jigsaw puzzle. Photolab can also be used as a photo editor as it is capable to perform color adjustment, rotate and crop.
Key Features:
● 800+ effects.
● E-card templates for special occasions.
● You can choose a photo from gallery or click one using the camera app.
02Prisma Photo Editor
Prisma has the magical ability to turn your photo or sketch into a Van Gogh or Picasso style painting. Wondering how? It has filters that are inspired by the eminent artist around the world. Choose a photo from your gallery and choose from exciting filters. Prisma also have cool editing tools that help you adjust the intensity of the filters applied if you want to.
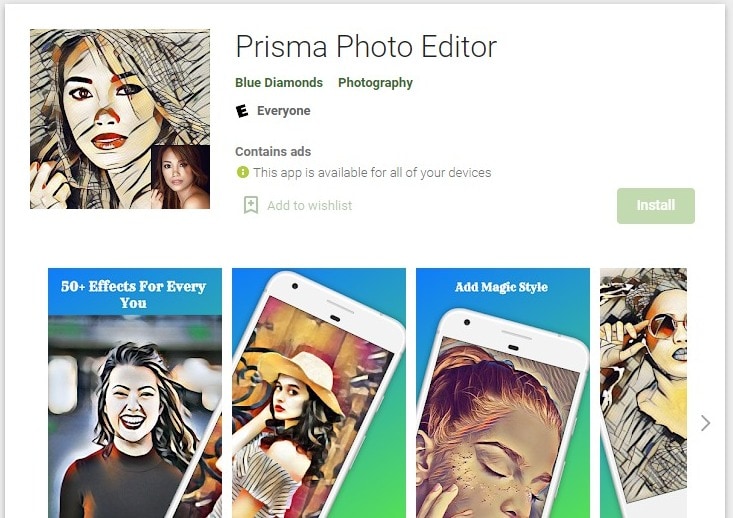
Key Features
● Online App community.
● Similar to Instagram
● artistic filters.
03Paint Lab – Photo Cartoon
Paintlab features an easy to use interface and wide range of filters. With it you can turn any photos into a cartoon or a drawing just in few seconds. Once you are done editing you can share your final work on any social media platform directly from paintlab. It is compatible only with androids.
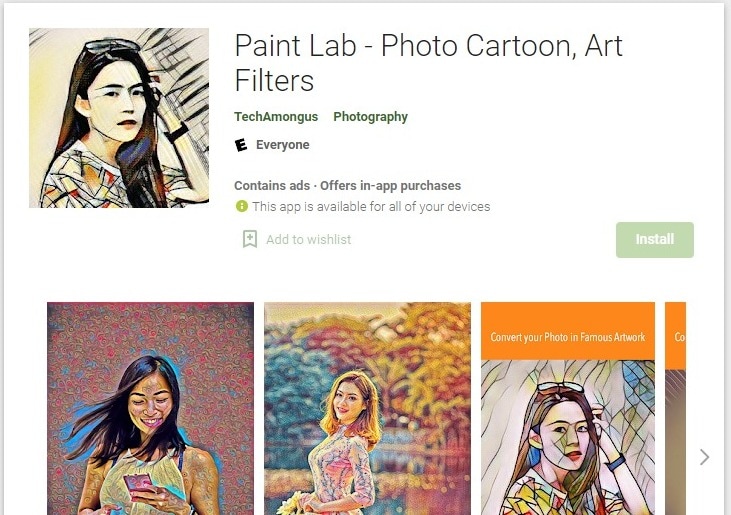
Key Fetaures
● Fast editing
● Perfect or beginners.
● Includes beautification and imperfection correction tools and effects.
04Cartoon Photo PRO
Using Cartoon Photo Pro alongside your photos you can also turn your videos into cartoon. Effects are artistic and customizable. Only downside it doesn’t come for free. It also has great ratings in Playstore.

Key Features
● User friendly interface
● Animates videos.
05Brushstroke
Brushstroke is ideal for editing and printing high resolution photos. The app comes with a paint directly option. It is not android compatible. The best feature is apart from filters and painting styles you can also pick the color palette and canvas surface.
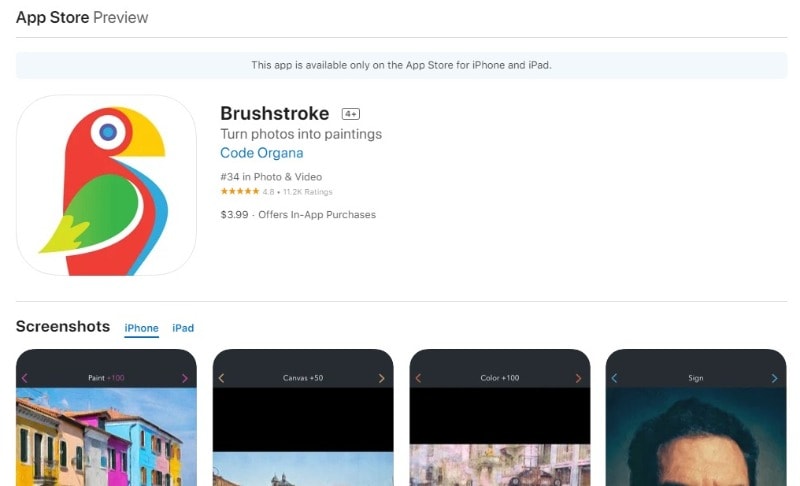
Key Features
● You can sign your photos before printing
● Wide range of styles and sub-styles.
06Clip2Comic
If you like having fun and playing around we bet you would love an photo editing app that turn your close ones’ photo into caricatures. One tap can give you comic-book style drawing and sketches. This is one of best sketch and animation apps suggested for iPhone users. User friendly interface is an added bonus.
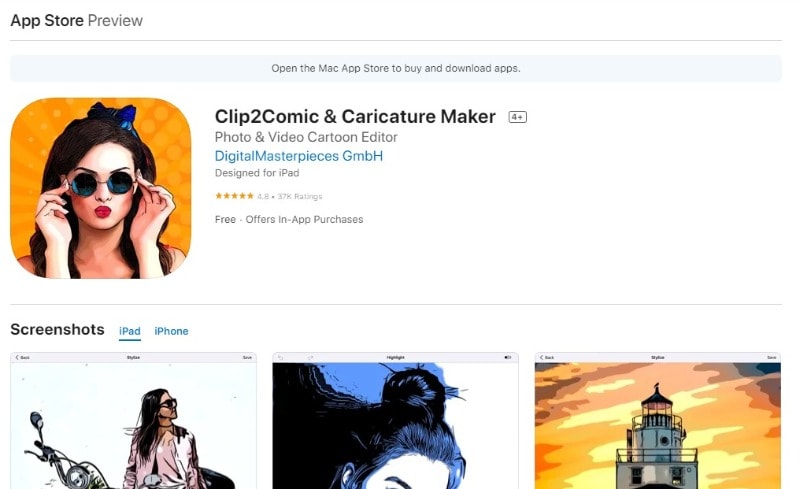
Key Features
● Live preview animation camera option.
● Carton-style photo effects.
07PhotoMania
PhotoMania is fun to use, if you want to try out different effects then you are at the right app. It has 400 presets in total including vintage looks and effects for sketches. PhotoMania has a collection of cool and exciting frames that you can add to your photos to make them more interesting. If you are someone who likes to send e-cards here you will get dozens of options. You can also utilize PhotoMania as a photo editor as it features the best exposure settings. And we know how important masking tool is, it helps you create neat photos, the app also has this amazing feature.
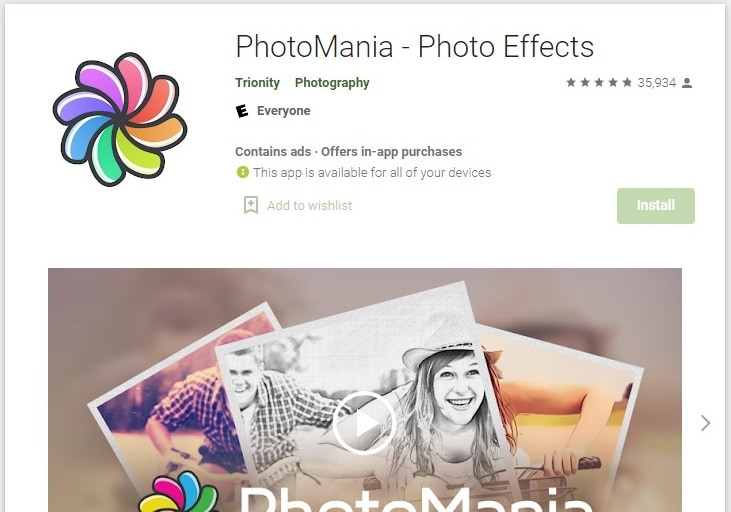
Key Features:
● Advanced photo editing tools and presets, for instance HDR and LOMO.
● It can also make your photo a painting.
● Adds textures and offers holiday templates.
08Toonme
Toonme has similar photo editing features like Clip2Comic. Only it is better. It has AI assistance that helps you create realistic effects. You can choose from the variety of styles and even tweak them to get a personalized style. Toonme is free to download but if you want use pro features you can subscribe to their monthly affordable package. Also, it is compatible with both iOS and Android devices.
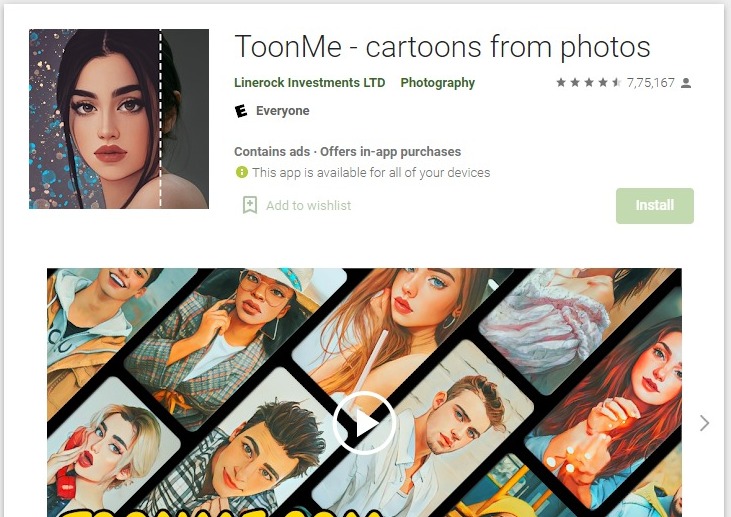
Key Features:
● Offers hand-drawn effects.
● Offers numerous layouts that goes well with profile pictures even instagram stories.
● You can share your work with other Toonme Users.
Part 3 How to Make 3D Cartoon From a Photo
Do you know that animators used to hand sketch every frame and every detail that too with continuation? Thanks to our modern day technology we can take a snap of any object or person and turn that into a cartoon within few seconds. With the right amount of help and creativity you can create characters that are entertaining and engaging at the same time. Wondershare Filmora Video Editor can be used to create animated videos. Amazing features and filters save editing time while making the entire process flexible. Though we have already mentioned eight apps for sketching, animating and caricaturing your photos, Filmora is a complete package. Motion tracking, easy zoom in and out, masking, panning and color correction are some of the best features offered by this editing software. It can run on both PC and Mac. User friendly interface suits both professionals as well as beginner.
For Win 7 or later (64-bit)
For macOS 10.12 or later
● Ending Thoughts →
● Creating an animated video that stands as an exception is now simple and hassle-free.
● Never be afraid to experiment and explore amazing ways of story-telling.
● Things discussed so far will help you analyze and understand cartoons and animation.
We all remember opening our daily newspaper and seeing a graphical representation of some new scoop or story that gives you a gist of what is happening, usually involving humor or sarcasm. That is what one would call and editorial cartoon and they are quite popular amongst newspapers, internet blogs and most recently, Social Media.
Some would even say that ‘Memes’ are an evolved form of editorial cartoons. They are funny, entertaining and can even portray some type of story. Editorial cartoons, in layman terms are a graphical approach to reflect the creator’s ideas. These are usually drawn on a tight deadline; hence feature simple caricatures and whimsical characters.
Cartoonists and hobbyists around the world can save on time using online tools to bring their ideas to life. Today, with some help from the right technology, anybody can try their hands in drawing amazing characters, combining both visual and verbal languages.
If you are someone who feels they have an amazing idea for a cartoon but lacks the skills to draw one can choose from a plethora of tools like Powtown, Photoshop or AI Artist to create amazing sketches and drawing, in half the time.
In this article
01 [Always Be Timely — Editorial Cartoons in a Snap](#Part 1)
02 [The 8 Best Apps to Turn Photos Into Cartoons and Sketches](#Part 2)
03 [How to Make 3D Cartoon From a Photo](#Part 3)
Part 1 Always Be Timely — Editorial Cartoons in a Snap
When a new idea pops into your head, we are usually overwhelmed or excited by its prospects of it that we forget to analyze its features before proceeding to turn it into a cartoon. Here are some tips to help you look into the details of your cartoon.
● Make a note of all the characters in your cartoon strip, what actions are they involved in and the dialogues that are being uttered.
● From which angle or whose angle the story is being told.
● Divide the cartoon design into four quadrants; Top Right & Left, Bottom Right & Left.
● Pay attention to key elements such as use of furniture, tools, technology or signs.
● Define traits like time of day, time of the year or time in history where the context is set.
● Keep in mind the audience you are reaching out to. You can ensure reliability the subtle use of intellect and humour.
Now that you have a clearer picture of what you are trying to depict it is best not to delay the idea and start cracking your creative eggs.
Beginners can use an easy tool like Powtoon, and its simple drag and drop interface to start making cartoons in just three simple steps. You can save up on a lot of time and get your cartoon ready for uploading to your new blog post.
Step 1: Set a Background for your Cartoon
Open the Powtoon Studio on your system and click on ‘Backgrounds’ located on the panel to your right. It will open up a vast library filled with ready to use backgrounds.
Select any you like to get started. It will intently appear on the board.
Step 2: Select the Characters for your Cartoon
Well, you have a setting and now it is time to place your characters in it. Click on the ‘Animated Character’ from the panel. Choose any template for your characters.
Step 3: Add the Text
There are various ways you can add dialogues, messages or texts to your cartoon. You can click on ‘Text’ and add a Quote Box or Dialogue Box. You can edit your text by simply clicking on the box.
Part 2 The 8 Best Apps to Turn Photos Into Cartoons and Sketches
01Photo Lab Picture Editor
Photolab is a great choice for turning your photos into a painting, sketch or a watercolor image. Along with filters you will get montages, borders and frames to make your art work more realistic. You will find all presets in the effects category. It also features filters like digital rain and jigsaw puzzle. Photolab can also be used as a photo editor as it is capable to perform color adjustment, rotate and crop.
Key Features:
● 800+ effects.
● E-card templates for special occasions.
● You can choose a photo from gallery or click one using the camera app.
02Prisma Photo Editor
Prisma has the magical ability to turn your photo or sketch into a Van Gogh or Picasso style painting. Wondering how? It has filters that are inspired by the eminent artist around the world. Choose a photo from your gallery and choose from exciting filters. Prisma also have cool editing tools that help you adjust the intensity of the filters applied if you want to.
Key Features
● Online App community.
● Similar to Instagram
● artistic filters.
03Paint Lab – Photo Cartoon
Paintlab features an easy to use interface and wide range of filters. With it you can turn any photos into a cartoon or a drawing just in few seconds. Once you are done editing you can share your final work on any social media platform directly from paintlab. It is compatible only with androids.
Key Fetaures
● Fast editing
● Perfect or beginners.
● Includes beautification and imperfection correction tools and effects.
04Cartoon Photo PRO
Using Cartoon Photo Pro alongside your photos you can also turn your videos into cartoon. Effects are artistic and customizable. Only downside it doesn’t come for free. It also has great ratings in Playstore.
Key Features
● User friendly interface
● Animates videos.
05Brushstroke
Brushstroke is ideal for editing and printing high resolution photos. The app comes with a paint directly option. It is not android compatible. The best feature is apart from filters and painting styles you can also pick the color palette and canvas surface.
Key Features
● You can sign your photos before printing
● Wide range of styles and sub-styles.
06Clip2Comic
If you like having fun and playing around we bet you would love an photo editing app that turn your close ones’ photo into caricatures. One tap can give you comic-book style drawing and sketches. This is one of best sketch and animation apps suggested for iPhone users. User friendly interface is an added bonus.
Key Features
● Live preview animation camera option.
● Carton-style photo effects.
07PhotoMania
PhotoMania is fun to use, if you want to try out different effects then you are at the right app. It has 400 presets in total including vintage looks and effects for sketches. PhotoMania has a collection of cool and exciting frames that you can add to your photos to make them more interesting. If you are someone who likes to send e-cards here you will get dozens of options. You can also utilize PhotoMania as a photo editor as it features the best exposure settings. And we know how important masking tool is, it helps you create neat photos, the app also has this amazing feature.
Key Features:
● Advanced photo editing tools and presets, for instance HDR and LOMO.
● It can also make your photo a painting.
● Adds textures and offers holiday templates.
08Toonme
Toonme has similar photo editing features like Clip2Comic. Only it is better. It has AI assistance that helps you create realistic effects. You can choose from the variety of styles and even tweak them to get a personalized style. Toonme is free to download but if you want use pro features you can subscribe to their monthly affordable package. Also, it is compatible with both iOS and Android devices.
Key Features:
● Offers hand-drawn effects.
● Offers numerous layouts that goes well with profile pictures even instagram stories.
● You can share your work with other Toonme Users.
Part 3 How to Make 3D Cartoon From a Photo
Do you know that animators used to hand sketch every frame and every detail that too with continuation? Thanks to our modern day technology we can take a snap of any object or person and turn that into a cartoon within few seconds. With the right amount of help and creativity you can create characters that are entertaining and engaging at the same time. Wondershare Filmora Video Editor can be used to create animated videos. Amazing features and filters save editing time while making the entire process flexible. Though we have already mentioned eight apps for sketching, animating and caricaturing your photos, Filmora is a complete package. Motion tracking, easy zoom in and out, masking, panning and color correction are some of the best features offered by this editing software. It can run on both PC and Mac. User friendly interface suits both professionals as well as beginner.
For Win 7 or later (64-bit)
For macOS 10.12 or later
● Ending Thoughts →
● Creating an animated video that stands as an exception is now simple and hassle-free.
● Never be afraid to experiment and explore amazing ways of story-telling.
● Things discussed so far will help you analyze and understand cartoons and animation.
10 Best Photoshop Cartoon Effects For Creatives
10 Photoshop Cartoon Effects For Creatives
An easy yet powerful editor
Numerous effects to choose from
Detailed tutorials provided by the official channel
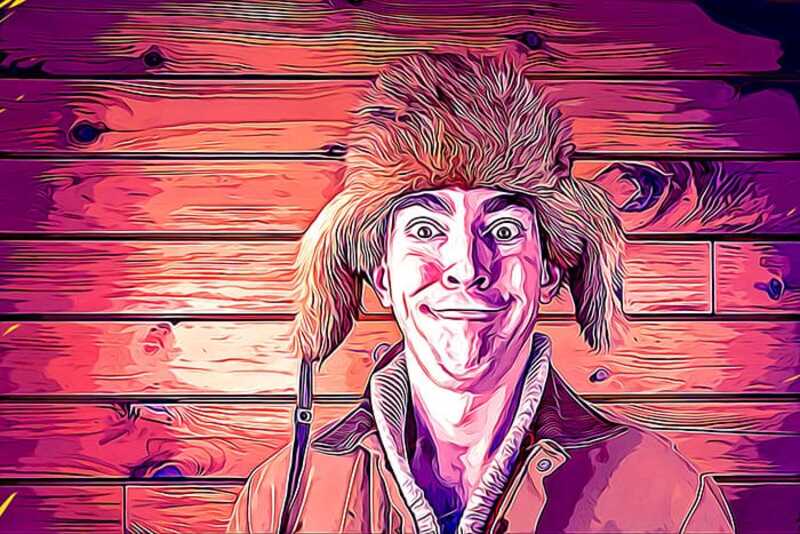
Whether cartoon lover or not, photo cartoon effects is admired by everyone nowadays. People want to use Photoshop cartoon effects.
Using Photoshop applications lets, you know that editing and applying effects are often time-consuming. Adjusting the color, resizing the image, applying effects is lengthy, requires focus, and sometimes may be boring. Thus, we have some Photoshop cartoon effects that will save your time and provide you with desired results.
In this article
01 [11 Best Photoshop Cartoon Effects](#Part 1)
02 [How To Create A Photo To Cartoon Effect In A Photoshop](#Part 2)
Part 1 Best Photoshop Cartoon Effects
If you prefer to download the cartoon effect app or want to edit the photo online without editing, here’s is a list of some of the best Photoshop or Premiere Pro cartoon effects:
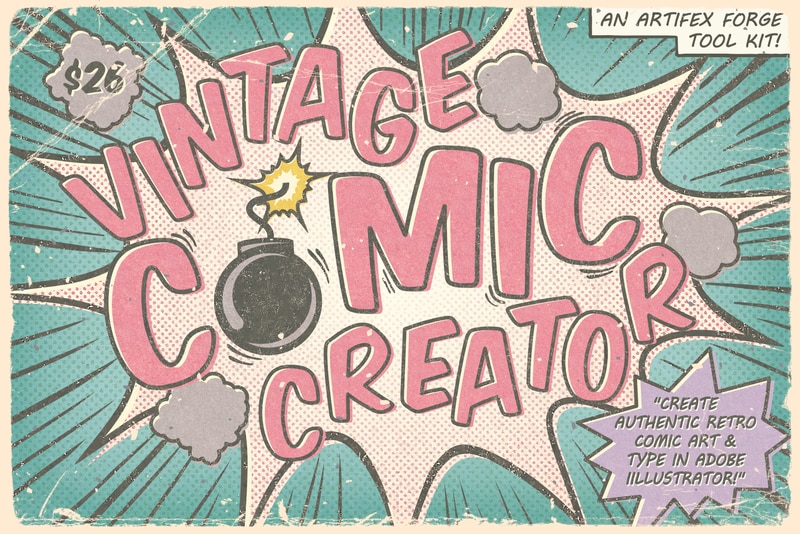
01Vintage Comic Creator
Vintage Comic Creator allows users to add After Effects in cartoon effects in photographs and texts. This can be the best choice if you want to add some shape effects, color, and change texture.
Along with cartoon edit text, an individual can also download overlays, pattern styles, and layer styles to make it comic book text. All the downloaded versions of templates are popular and editable as per the user’s requirement.
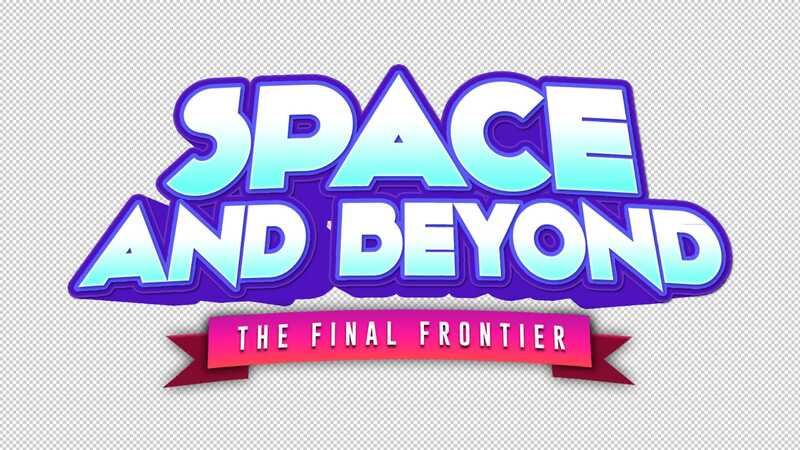
02Ultra Realistic 3D Space effect
Are you a space lover and looking for space inspires cartoon edits? Here’s a Solution. Ultra Realistic 3D Space cartoon effect allows the users to create editable fun cartoon text and Space themes.
Since it provides a variety of themes and ideas doesn’t limit the user when it comes to editing.
It provides you with a file with an example to make it easy to apply the cartoon effect online according to your wish.
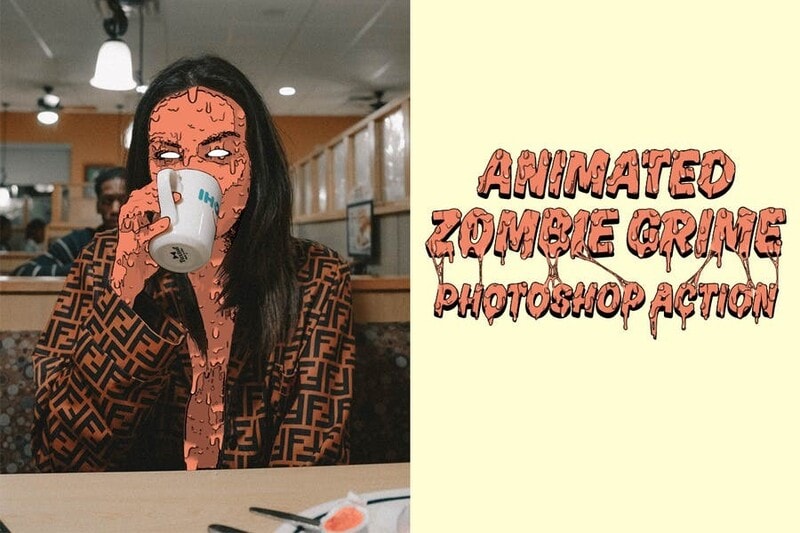
03Animated Zombie Grime Art Photoshop action
To the fans of all the zombie movies, here’s something you should try out!
Animated Zombie Grime Art provides features in which users can edit their photographs with zombie cartoon effects and experience how they will look like a zombie with zero effort. It also provides the option to create and save GIFs or videos. One can easily use them on their social media accounts.
04Cartoon art Photoshop action
A quick and easy online cartoon effect helps individuals edit their photographs into paintings or cartoon characters. With only a few simple actions, users can easily edit their pictures. It provides editing in paintings, cartoons, oil pastels, oil paintings, etc.
05Soft Photoshop cartoon effects
Soft Photoshop cartoon effects help the users edit the photos into cartoon effects and allow them to add smooth effects to them. With just one click, you can add different colors to your image can adjust the brightness, contrast, highlight, texture, etc. It includes layers and smart filters, thus providing various editing options.
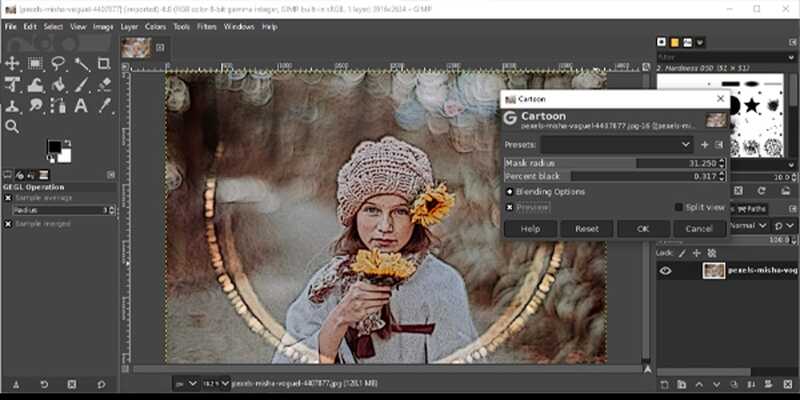
06Gimp cartoon effect
It is one of the fastest methods to edit your photographs into cartoon effects. Within a single click, you can cartoonify your pictures. With the help of the Gimp cartoon effect, the user can readjust brightness, contrast, light, etc. You can try soft burn, burn and overlay and can invert colors. It provides different filters with special effects that users can use free of cost.
07Pop art Photoshop action
Pop art Photoshop action easily converts any photograph into a retro cartoon photo effect. It transforms the picture into a cartoon customized painting within one click. Users can enjoy the features of adjusting colors and can change the background according to their wishes.

08Cell shader Photoshop action
If you want to convert photos into cartoon effects and at the same time want to apply cell shading, then here’s a magic photo cartoon effect. Cartooning your picture along with cell shading can be time-consuming sometimes. Cell shader Photoshop allows the user to shade the image with a single click. You can try it on any picture.
093D cartoon text effect
This cartoon effect app helped change the text or the style of the text by adding specific animations or filters. It includes different forms and types in which users can edit the text and make it look fantastic. This 3D animation you can use in your document in animation or simple editing.
10Filmora cartoon effects
With Wondershare Filmora Video Editor , users can take a new picture or add a photo from their phone’s gallery. Once the image is ready for editing, you should tap on the Apply Cartoon Effect button. It contains 12 different cartoon photo effect styles; thus, users can choose any style they want to insert in their picture. You can also add motion to images, videos, and unlimited editing features with the latest updates.
For Win 7 or later (64-bit)
For macOS 10.12 or later
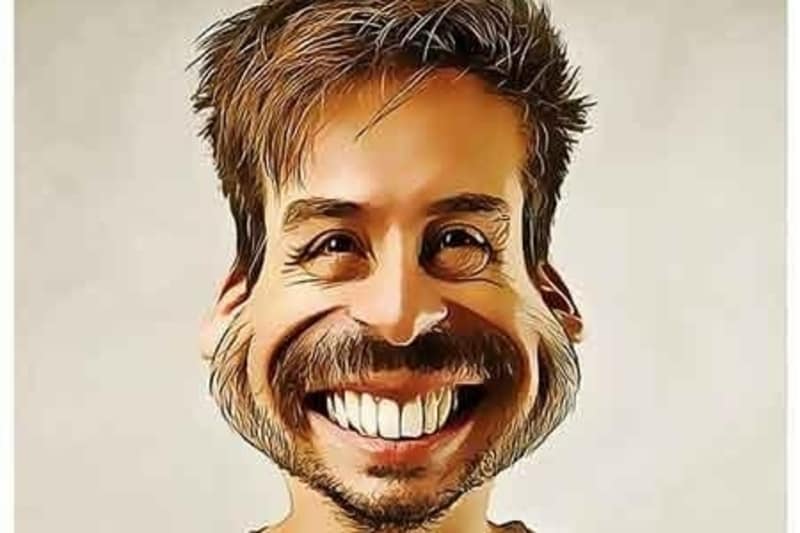
11 Caricature maker Photoshop action
You can turn your photographs into caricatures and make them look awesome. With the help of this After Effects, cartoon animation converts a simple picture into a fun carriage with just one click. You can adjust colors, size, and shape and add more features.
Part 2 How To Create A Photo To Cartoon Effect In A Photoshop
Below is a guide that will help you know more about Photoshop’s cartoon effect.
● Step 1: Select Image
Now, choose an image you want to cartoonize.
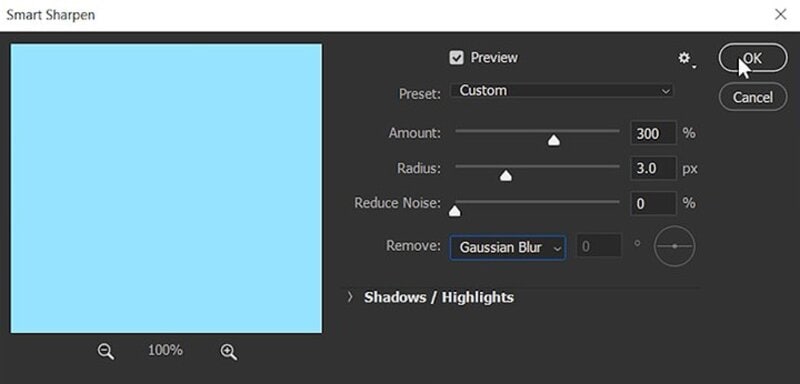
● Step 2: Apply Filter-Sharpen
Go to Filter to sharpen the image. Select the Gaussian Blur from the Remove drop-down list
Press OK.
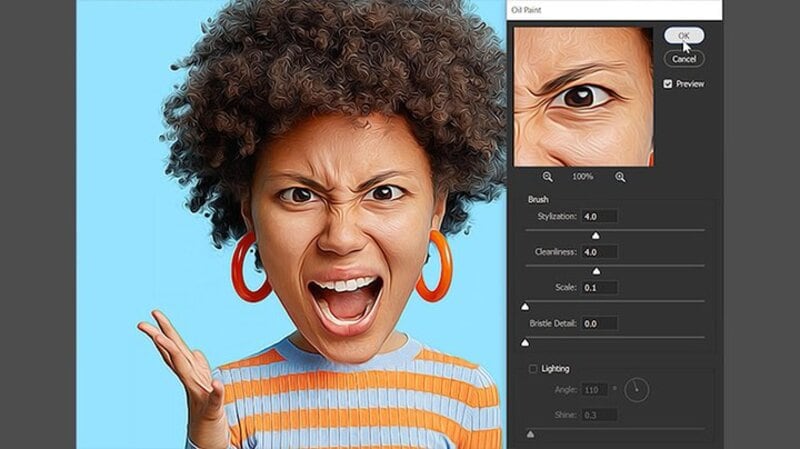
● Step 3: Apply Filter-Stylize
Go to Filter, then apply stylization and Oil paint.
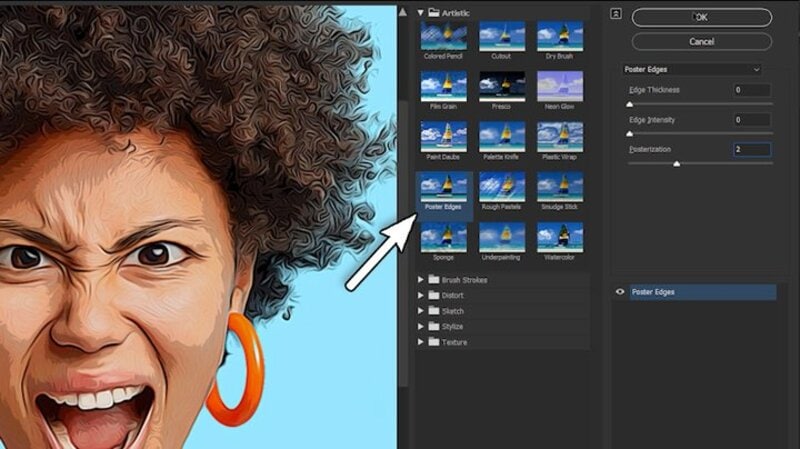
● Step 4: Choose Poster Edges
Choose from the list of effects on the filter gallery, click on Poster Edges and click OK.
● Step 5: Blur
It will start to resemble a cartoon, but there’s still more to do, so use the Filter > Blur Menu to add a Surface Blur. Set the Threshold to 15 pixels and the Radius to 12 pixels. This effect gives the skin a considerably smoother and cleaner appearance. Select OK.
● Step 6: Unsharp Mask
You can add some sharpness and increase particular highlights by going to Filter > Sharpen > Unsharp Mask.
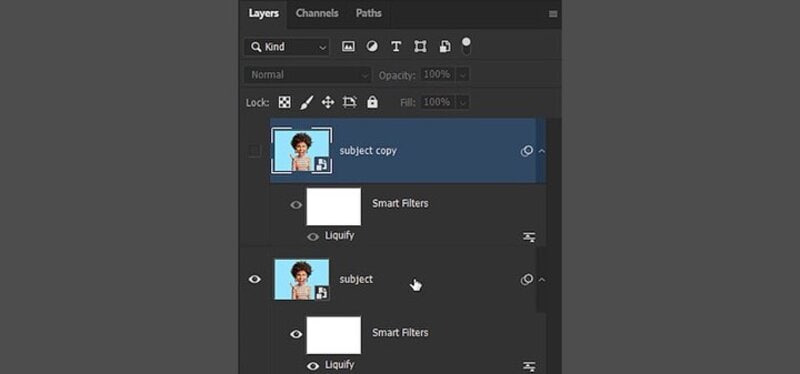
Unhide the second Smart Object layer and change its blending mode to Overlay. Then, reduce the layer’s Opacity to 55 percent.
Now, it will start to resemble a cartoon, but there’s still more to do, so use the Filter > Blur Menu to add a Surface Blur. Set the Threshold to 12 pixels and the Radius to 12 pixels.
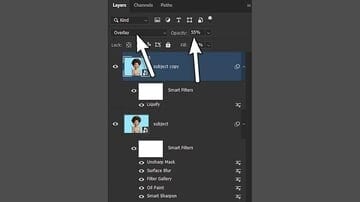
● Step 7: Apply the Oil paint filter again
Return to Filter > Filter Gallery and select Poster Edges once more. These will draw attention to certain aspects of the portrait.
Choose the Oil Paint Filter from Filter > Stylize. Select OK.
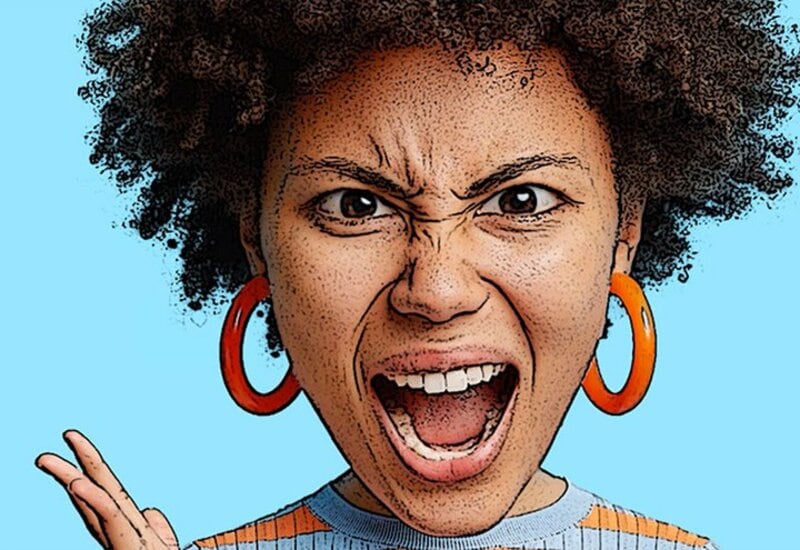
● Step 8: Double-click on Filter Gallery
Click OK after double-clicking the Filter Gallery Smart Filter already on this layer.
Carry on with the same steps for the Oil Paint Filter.
Select OK.
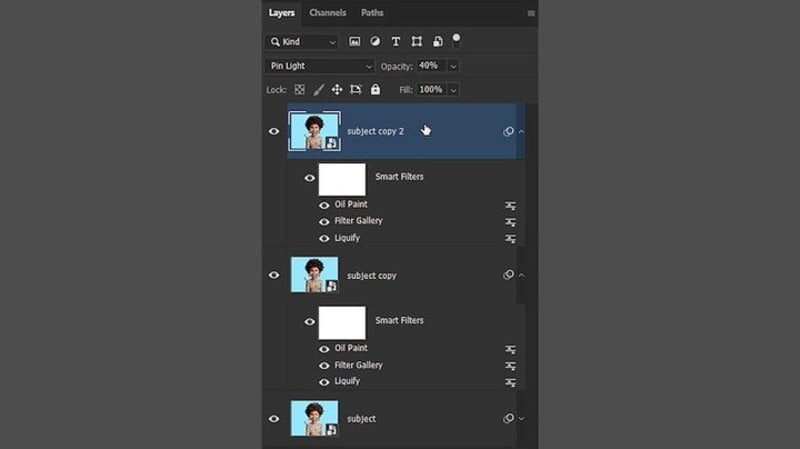
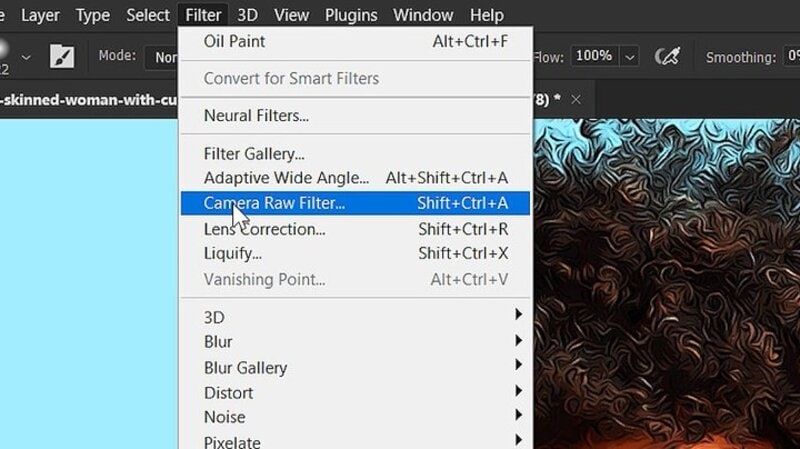
● Step 9: Choose the Raw filter option
Let’s take this photo cartoon effect to the next level with a simple method! To make a Stamp Visible Layer, choose the very top layer and press Control-Shift-Alt-E. When you wish to merge all the layers in a document onto a new layer, this shortcut comes in handy.
Lastly, convert the new layer to a Smart Object by right-clicking on it.
Select the Camera Raw Filter option from the Filter menu.
● Ending Thoughts →
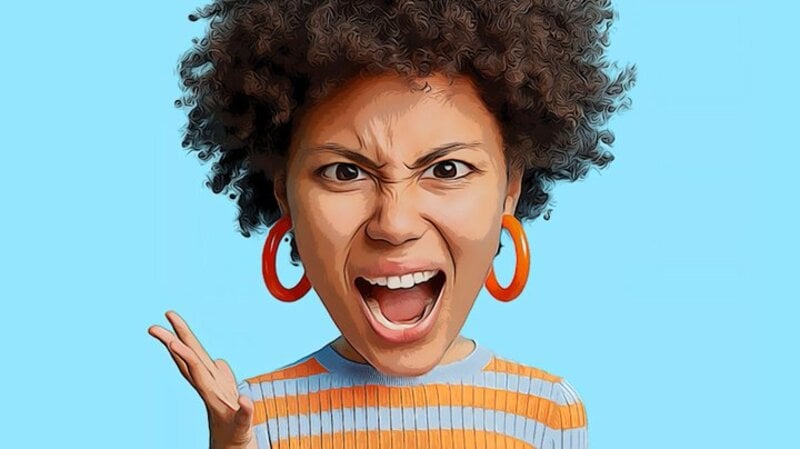
● After visiting this article, I’m sure you have plenty of options for cartoon effects according to your choice. In this technological world, it’s hard to find the Photoshop cartoon effect of your desire, which helps save time.
● The above is one of the best After Effects cartoon animations you can use as a cartoon lover. Besides, you can also try out our recommended Filmora – the editor in vogue for its world-class editing features to help enhance your data.
Whether cartoon lover or not, photo cartoon effects is admired by everyone nowadays. People want to use Photoshop cartoon effects.
Using Photoshop applications lets, you know that editing and applying effects are often time-consuming. Adjusting the color, resizing the image, applying effects is lengthy, requires focus, and sometimes may be boring. Thus, we have some Photoshop cartoon effects that will save your time and provide you with desired results.
In this article
01 [11 Best Photoshop Cartoon Effects](#Part 1)
02 [How To Create A Photo To Cartoon Effect In A Photoshop](#Part 2)
Part 1 Best Photoshop Cartoon Effects
If you prefer to download the cartoon effect app or want to edit the photo online without editing, here’s is a list of some of the best Photoshop or Premiere Pro cartoon effects:
01Vintage Comic Creator
Vintage Comic Creator allows users to add After Effects in cartoon effects in photographs and texts. This can be the best choice if you want to add some shape effects, color, and change texture.
Along with cartoon edit text, an individual can also download overlays, pattern styles, and layer styles to make it comic book text. All the downloaded versions of templates are popular and editable as per the user’s requirement.
02Ultra Realistic 3D Space effect
Are you a space lover and looking for space inspires cartoon edits? Here’s a Solution. Ultra Realistic 3D Space cartoon effect allows the users to create editable fun cartoon text and Space themes.
Since it provides a variety of themes and ideas doesn’t limit the user when it comes to editing.
It provides you with a file with an example to make it easy to apply the cartoon effect online according to your wish.
03Animated Zombie Grime Art Photoshop action
To the fans of all the zombie movies, here’s something you should try out!
Animated Zombie Grime Art provides features in which users can edit their photographs with zombie cartoon effects and experience how they will look like a zombie with zero effort. It also provides the option to create and save GIFs or videos. One can easily use them on their social media accounts.
04Cartoon art Photoshop action
A quick and easy online cartoon effect helps individuals edit their photographs into paintings or cartoon characters. With only a few simple actions, users can easily edit their pictures. It provides editing in paintings, cartoons, oil pastels, oil paintings, etc.
05Soft Photoshop cartoon effects
Soft Photoshop cartoon effects help the users edit the photos into cartoon effects and allow them to add smooth effects to them. With just one click, you can add different colors to your image can adjust the brightness, contrast, highlight, texture, etc. It includes layers and smart filters, thus providing various editing options.
06Gimp cartoon effect
It is one of the fastest methods to edit your photographs into cartoon effects. Within a single click, you can cartoonify your pictures. With the help of the Gimp cartoon effect, the user can readjust brightness, contrast, light, etc. You can try soft burn, burn and overlay and can invert colors. It provides different filters with special effects that users can use free of cost.
07Pop art Photoshop action
Pop art Photoshop action easily converts any photograph into a retro cartoon photo effect. It transforms the picture into a cartoon customized painting within one click. Users can enjoy the features of adjusting colors and can change the background according to their wishes.
08Cell shader Photoshop action
If you want to convert photos into cartoon effects and at the same time want to apply cell shading, then here’s a magic photo cartoon effect. Cartooning your picture along with cell shading can be time-consuming sometimes. Cell shader Photoshop allows the user to shade the image with a single click. You can try it on any picture.
093D cartoon text effect
This cartoon effect app helped change the text or the style of the text by adding specific animations or filters. It includes different forms and types in which users can edit the text and make it look fantastic. This 3D animation you can use in your document in animation or simple editing.
10Filmora cartoon effects
With Wondershare Filmora Video Editor , users can take a new picture or add a photo from their phone’s gallery. Once the image is ready for editing, you should tap on the Apply Cartoon Effect button. It contains 12 different cartoon photo effect styles; thus, users can choose any style they want to insert in their picture. You can also add motion to images, videos, and unlimited editing features with the latest updates.
For Win 7 or later (64-bit)
For macOS 10.12 or later
11 Caricature maker Photoshop action
You can turn your photographs into caricatures and make them look awesome. With the help of this After Effects, cartoon animation converts a simple picture into a fun carriage with just one click. You can adjust colors, size, and shape and add more features.
Part 2 How To Create A Photo To Cartoon Effect In A Photoshop
Below is a guide that will help you know more about Photoshop’s cartoon effect.
● Step 1: Select Image
Now, choose an image you want to cartoonize.
● Step 2: Apply Filter-Sharpen
Go to Filter to sharpen the image. Select the Gaussian Blur from the Remove drop-down list
Press OK.
● Step 3: Apply Filter-Stylize
Go to Filter, then apply stylization and Oil paint.
● Step 4: Choose Poster Edges
Choose from the list of effects on the filter gallery, click on Poster Edges and click OK.
● Step 5: Blur
It will start to resemble a cartoon, but there’s still more to do, so use the Filter > Blur Menu to add a Surface Blur. Set the Threshold to 15 pixels and the Radius to 12 pixels. This effect gives the skin a considerably smoother and cleaner appearance. Select OK.
● Step 6: Unsharp Mask
You can add some sharpness and increase particular highlights by going to Filter > Sharpen > Unsharp Mask.
Unhide the second Smart Object layer and change its blending mode to Overlay. Then, reduce the layer’s Opacity to 55 percent.
Now, it will start to resemble a cartoon, but there’s still more to do, so use the Filter > Blur Menu to add a Surface Blur. Set the Threshold to 12 pixels and the Radius to 12 pixels.
● Step 7: Apply the Oil paint filter again
Return to Filter > Filter Gallery and select Poster Edges once more. These will draw attention to certain aspects of the portrait.
Choose the Oil Paint Filter from Filter > Stylize. Select OK.
● Step 8: Double-click on Filter Gallery
Click OK after double-clicking the Filter Gallery Smart Filter already on this layer.
Carry on with the same steps for the Oil Paint Filter.
Select OK.
● Step 9: Choose the Raw filter option
Let’s take this photo cartoon effect to the next level with a simple method! To make a Stamp Visible Layer, choose the very top layer and press Control-Shift-Alt-E. When you wish to merge all the layers in a document onto a new layer, this shortcut comes in handy.
Lastly, convert the new layer to a Smart Object by right-clicking on it.
Select the Camera Raw Filter option from the Filter menu.
● Ending Thoughts →
● After visiting this article, I’m sure you have plenty of options for cartoon effects according to your choice. In this technological world, it’s hard to find the Photoshop cartoon effect of your desire, which helps save time.
● The above is one of the best After Effects cartoon animations you can use as a cartoon lover. Besides, you can also try out our recommended Filmora – the editor in vogue for its world-class editing features to help enhance your data.
Are You Head Over Heels With 3D Animation Design
Are You Head Over Heels With 3D Animation Design?
An easy yet powerful editor
Numerous effects to choose from
Detailed tutorials provided by the official channel
3D animation design is an acronym for three-dimensional animation, meaning that the backgrounds and characters in this project are in a three-dimensional space. 3D animation artist makes use of computer graphics to make the object looks like they’re moving in a three-dimensional space.
Today, 3D animation design and animation are trendy, helpful, and in high demand to both the designer and the animator. Animation tools are beneficial to create a background, storyboards, models, and after-effects and can also be used to animate characters from movies, commercials, and televisions.
In this article
01 [What is a Bachelor of 3D Design and Animation?](#Part 1)
02 [Best 3D Animation and Design Software for Beginners and Professionals](#Part 2)
Part 1 What is a Bachelor of 3D Design and Animation?
It is a fact that anything that has to do with computer-generated graphics like 3D animation is a growing field and required in high demand due to the advancement of ICT around the world, and it is an advanced form of design. If you’re aspiring to be a professional interior designer, you should consider adding the value of 3D animation interior designing skills to your resume.
The bachelor of 3D designs and animation provides you with skills, knowledge, and experience in rigging, animation, lighting, texturing, compositing, and modeling. The course will help you get your practical skill in 3D designs, animation, and interactivity in the game industry, and the study of professional practice in 3D animation and character design workplaces. There are also several reasons why learning 3D makes sense which include:
● Graphic design with 3D animation saves time. It gives you more detail quality and brings imagination to reality.
● It opens you up to more professional opportunities.
● It keeps you in line with the modern world.
● 3D animation character design allows you to challenge yourself by expanding your skill and growing your portfolio to stay abreast and improve yourself.
● The 3D animation design allows you to create a more detailed and realistic concept for better design evaluation.
● It allows you to make a new creative workflow.
● The production of a wide range of 3D software makes it easier to create 3D designs.
● There are plenty online resources to learn 3D designs.
● 3D animation interior design opens new career opportunities and increases the marketability of your skill as a designer.
Part 2 Best 3D Animation and Design Software for Beginners and Professionals
3D modeling has improved the way we design. It is vital to use decent software to produce the best output because it improves your Design accuracy and efficiency and helps the designer and end-user visualize space requirements. There is excellent graphic design possibility with 3D animation software for creating a perfect design used by beginners and professionals, and this software includes:
01Best 3D Animation and Design Software for Beginners
● Adobe’s Creative Cloud
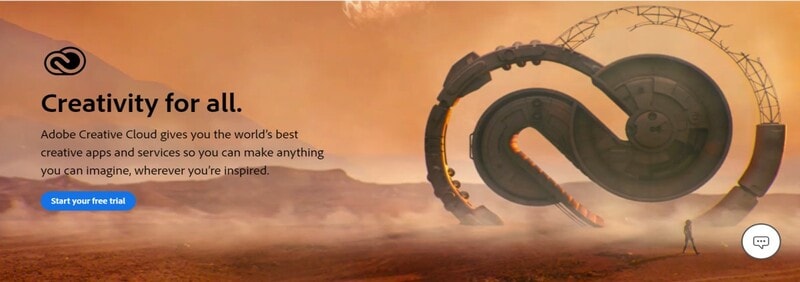
Adobe’s Creative Cloud is a straightforward 3D animation house design tool for beginners. It is a subscription-based service that provides over 20 desktop and mobile designing apps for UX, web, video, photography, etc. If you need a medium to showcase your work, you are at the right place as it does not just display your work but also gives ideas on characters design, colors, photographs, videos, icons, etc.
● ****Wondershare Filmora Video Editor **
For Win 7 or later (64-bit)
For macOS 10.12 or later
Filmora is one of the most accessible 3D animation design software for beginners. This software allows you to create various shapes of your choice, add a keyframe in for the movement, fine-tuning to make it smooth, and also allows you to add visual text, color, and effects before exporting it.
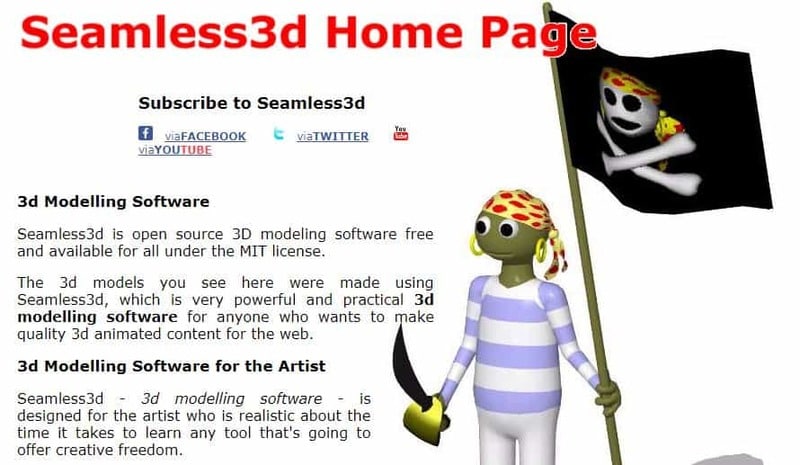
● Seamless3d
Seamless3d Is 100-percent free, open-source 3D software that you can download and helps you create specialized 3D design and animation videos images or 3D characters. It also supports FFmpeg video formats such as AVI, MP4, etc.
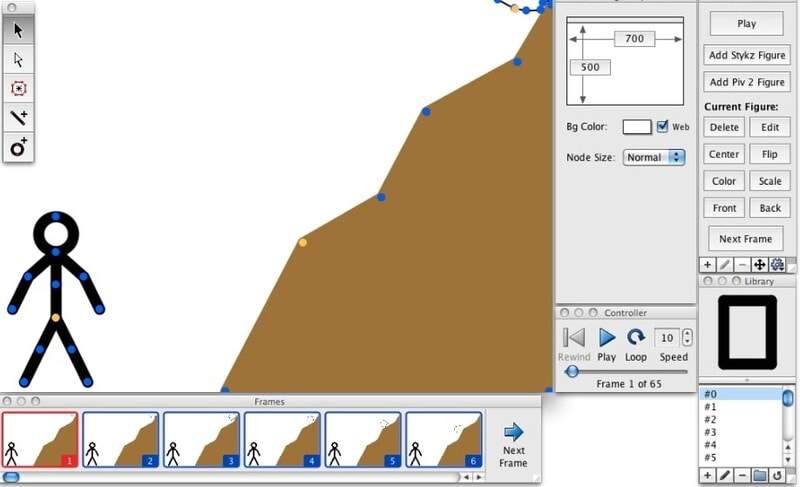
● Stykz
Stykz is an easy-to-use and straightforward animation program for beginners. It is entirely free and easy to customize without a watermark.
● Maya
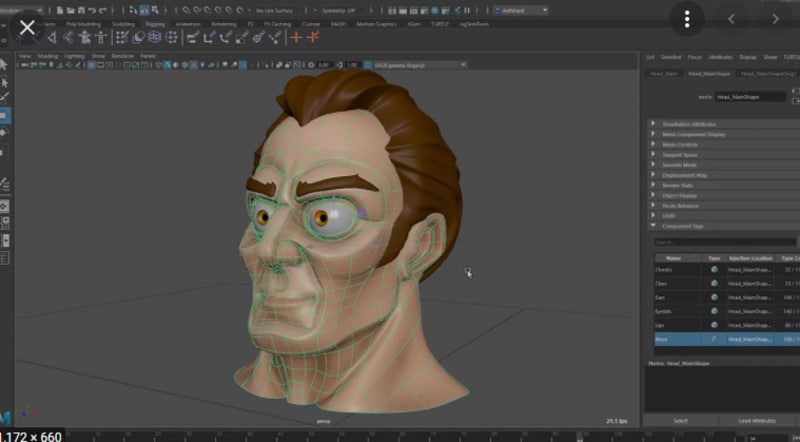
Maya is a user-friendly beginner software for 3D animation character design, wearable technology, and motion graphics. This software has various 3D rendering and shading features that impact GPU, which helps speed up the workflow.
02Best 3D Animation and Design Software for Professionals
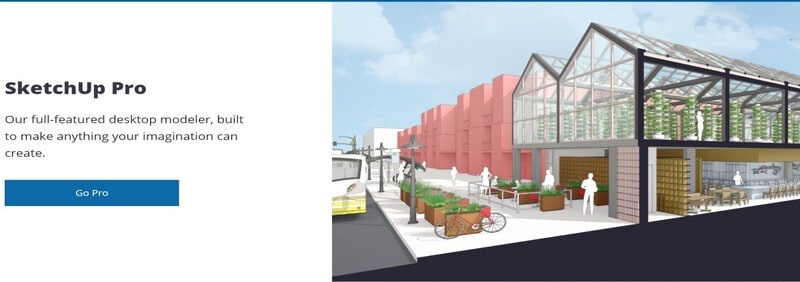
● SketchUp Pro
SketchUp Pro is the best 3D animation design software most companies and designers use to automatically transform 3D models into 2D design. It gives your 3D animation home design a personalized touch with the help of its customized features.
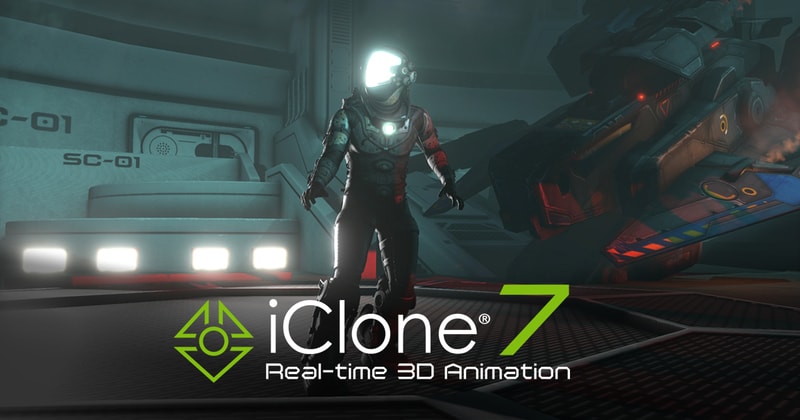
● iclone 7
iclone 7 is one of the fastest 3D animation design tools professionals use to create animation movies, content creation, video games education, and art. It is a paid to that is packed with many features to help your design.
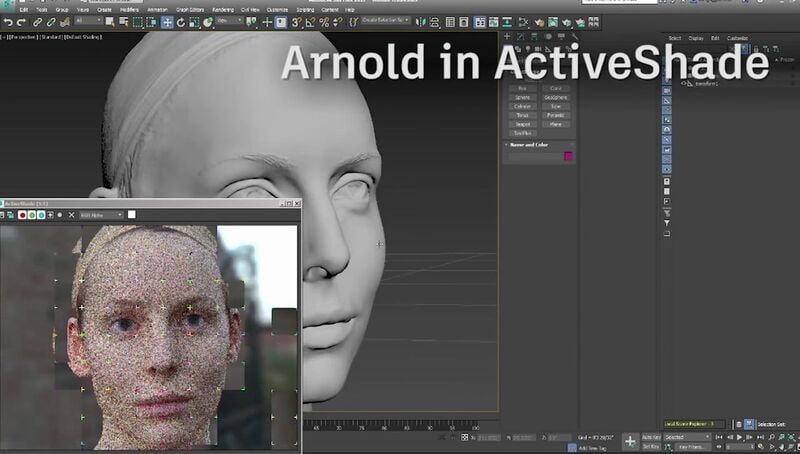
● Arnold
Arnold is a paid 3D software that allows you to render 3D images in high quality quickly. It also interactively produces immediate results and leaves more iteration time with an intuitive and straightforward UI control.
● Akeytsu
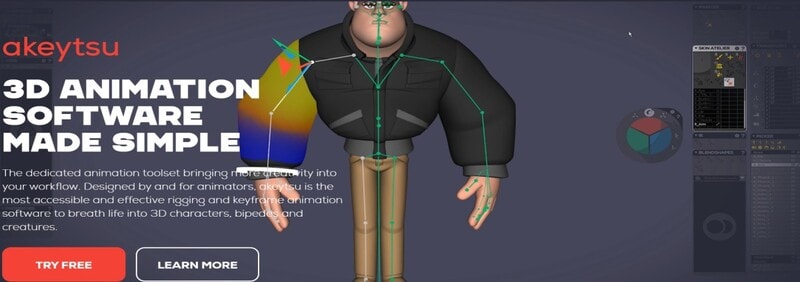
Akeytsu is a 3D design software for animation well known for its creativity and crafts. It makes designing 3D animation house design much more accessible with its cycle of animation tools.
● Blender
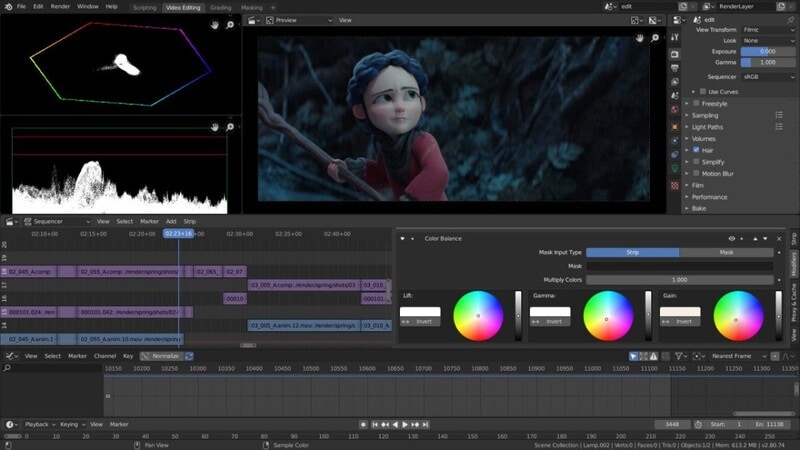
Blender is a good alternative for 3D design and animation open-source software professionals. It is a multi-functional platform that works on Windows MacBook and Linux computers and ensures that you have a smooth experience in 3D designs.
● Key Takeaways from This Episode →
● Understanding what is a Bachelor of 3D design and animation?
● Best 3D animation and character design Software for Beginners and Professionals
● Finding out why 3D animation makes sense.
3D animation design is an acronym for three-dimensional animation, meaning that the backgrounds and characters in this project are in a three-dimensional space. 3D animation artist makes use of computer graphics to make the object looks like they’re moving in a three-dimensional space.
Today, 3D animation design and animation are trendy, helpful, and in high demand to both the designer and the animator. Animation tools are beneficial to create a background, storyboards, models, and after-effects and can also be used to animate characters from movies, commercials, and televisions.
In this article
01 [What is a Bachelor of 3D Design and Animation?](#Part 1)
02 [Best 3D Animation and Design Software for Beginners and Professionals](#Part 2)
Part 1 What is a Bachelor of 3D Design and Animation?
It is a fact that anything that has to do with computer-generated graphics like 3D animation is a growing field and required in high demand due to the advancement of ICT around the world, and it is an advanced form of design. If you’re aspiring to be a professional interior designer, you should consider adding the value of 3D animation interior designing skills to your resume.
The bachelor of 3D designs and animation provides you with skills, knowledge, and experience in rigging, animation, lighting, texturing, compositing, and modeling. The course will help you get your practical skill in 3D designs, animation, and interactivity in the game industry, and the study of professional practice in 3D animation and character design workplaces. There are also several reasons why learning 3D makes sense which include:
● Graphic design with 3D animation saves time. It gives you more detail quality and brings imagination to reality.
● It opens you up to more professional opportunities.
● It keeps you in line with the modern world.
● 3D animation character design allows you to challenge yourself by expanding your skill and growing your portfolio to stay abreast and improve yourself.
● The 3D animation design allows you to create a more detailed and realistic concept for better design evaluation.
● It allows you to make a new creative workflow.
● The production of a wide range of 3D software makes it easier to create 3D designs.
● There are plenty online resources to learn 3D designs.
● 3D animation interior design opens new career opportunities and increases the marketability of your skill as a designer.
Part 2 Best 3D Animation and Design Software for Beginners and Professionals
3D modeling has improved the way we design. It is vital to use decent software to produce the best output because it improves your Design accuracy and efficiency and helps the designer and end-user visualize space requirements. There is excellent graphic design possibility with 3D animation software for creating a perfect design used by beginners and professionals, and this software includes:
01Best 3D Animation and Design Software for Beginners
● Adobe’s Creative Cloud
Adobe’s Creative Cloud is a straightforward 3D animation house design tool for beginners. It is a subscription-based service that provides over 20 desktop and mobile designing apps for UX, web, video, photography, etc. If you need a medium to showcase your work, you are at the right place as it does not just display your work but also gives ideas on characters design, colors, photographs, videos, icons, etc.
● ****Wondershare Filmora Video Editor **
For Win 7 or later (64-bit)
For macOS 10.12 or later
Filmora is one of the most accessible 3D animation design software for beginners. This software allows you to create various shapes of your choice, add a keyframe in for the movement, fine-tuning to make it smooth, and also allows you to add visual text, color, and effects before exporting it.
● Seamless3d
Seamless3d Is 100-percent free, open-source 3D software that you can download and helps you create specialized 3D design and animation videos images or 3D characters. It also supports FFmpeg video formats such as AVI, MP4, etc.
● Stykz
Stykz is an easy-to-use and straightforward animation program for beginners. It is entirely free and easy to customize without a watermark.
● Maya
Maya is a user-friendly beginner software for 3D animation character design, wearable technology, and motion graphics. This software has various 3D rendering and shading features that impact GPU, which helps speed up the workflow.
02Best 3D Animation and Design Software for Professionals
● SketchUp Pro
SketchUp Pro is the best 3D animation design software most companies and designers use to automatically transform 3D models into 2D design. It gives your 3D animation home design a personalized touch with the help of its customized features.
● iclone 7
iclone 7 is one of the fastest 3D animation design tools professionals use to create animation movies, content creation, video games education, and art. It is a paid to that is packed with many features to help your design.
● Arnold
Arnold is a paid 3D software that allows you to render 3D images in high quality quickly. It also interactively produces immediate results and leaves more iteration time with an intuitive and straightforward UI control.
● Akeytsu
Akeytsu is a 3D design software for animation well known for its creativity and crafts. It makes designing 3D animation house design much more accessible with its cycle of animation tools.
● Blender
Blender is a good alternative for 3D design and animation open-source software professionals. It is a multi-functional platform that works on Windows MacBook and Linux computers and ensures that you have a smooth experience in 3D designs.
● Key Takeaways from This Episode →
● Understanding what is a Bachelor of 3D design and animation?
● Best 3D animation and character design Software for Beginners and Professionals
● Finding out why 3D animation makes sense.
Top 8 Tools Tell You How to Make Slideshows for Instagram
Top 8 Tools Tell You How to Make Slideshows for Instagram
An easy yet powerful editor
Numerous effects to choose from
Detailed tutorials provided by the official channel
Instagram slideshows land among the latest social media trends of fun and entertainment. Learn how to attract jaw dropping peer attention with creating the same!
In this article
01 [When Should You Use an Instagram Slideshow?](#Part 1)
02 [How to Make an Instagram Slideshow with Music?](#Part 2)
03 [8 Best Instagram Slideshow Apps for Creating Outstanding Slideshow](#Part 3)
Part 1 When Should You Use an Instagram Slideshow?
Revolutions in technology has opened doors to a plenty of new and exciting means of information sharing, entertainment and communication. Playing its part in the game, Instagram slideshow has emerged as an exciting means of quick and impactful content sharing. Diving deeper into the discussion, let us talk about the different areas of working with an Instagram slide show in the following section:
01Explanatory Product Demonstrations and Stepwise Tutorials
Considering the diverse media collaboration entertained by this social media platform, you get the liberty to include 10 media files of videos and images while creating a slideshow on Instagram. This is an affordably sufficient media space to demonstrate your newly launched product in front of the target audience.
The aforesaid characteristic of a slideshow for Instagram can be put to another use of creating detailed, step by step guides and product usage tutorials to create an increased and confident customer reach and brand applicability. A few examples include the presentations of recipes by food blogs and chefs, or a detailed look of the day’s outfit by fashion bloggers.
02Interactive Storytelling or Recreate an Event
Gone are the times when stories and events were restricted to a single image or video with a limited scope of understanding and explanation. You can now work with a combination of multiple images and videos to create more vivid and graphical descriptions of stories, narratives and events.
You can work on creating an engaging slideshow for Instagram to tell an amazing story, voice a narration from the beginning to the end, or share your best moments with your cherished audience, which will surely give them the feel of enjoying the adventure along with you.
03Create a Collection
You can now use a slide show for Instagram to design and present a collection of manifold ideas and products within a single post. You can improvise the collection with displaying a series of related products, showcasing a summary of your different blog posts through the week, or simply present a list of your most reliable inspirations, resources and influencers.
04Exciting Video Teasers
If you have a scheduled video release to entertain your audience, try working with interactive slideshows for Instagram to create some sensational teaser content of the upcoming release to imbibe a natural sense of curiosity within your audience.
You can experiment with releasing a mini photoshoot tour of your filming set, share close up progression details, or include a cliffhanger in the end of your Instagram slideshow to ensure the retrieval of your audience towards watching the release of the actual big content. You can use these short teasers as effective means of creating a campaign buzz, while building a closer connect with your audience.
Part 2 How to Make an Instagram Slideshow with Music?
By now, you must have gathered enough knowledge regarding the credibility of Instagram slideshows in catering to a diversity of commercial, professional and personal content sharing needs. Considering the same, you may conveniently feel motivated to try hands at creating stunning slideshow presentations for Instagram on your own.
Adhering to the concern, let us move ahead with our discussion, while talking about how to make a slideshow for Instagram and supplement the same with adaptable background music to develop amazing content masterpieces and share them with social media peers, while grabbing their obvious attention.
While there are a number of choices in the software market to choose your Instagram slideshow creator tool, the FlexClip tool can be a reliable option. Read though the following section to learn the slideshow creation process in the program with a comprehensive and stepwise tutorial guide:
Step 1: Download the Slideshow Creator Tool
Visit the official website of FlexClip to download and install the slideshow maker software in your preferred device.

Step 2: Start from Scratch
After a successful installation, proceed to launch the tool in your system and wait till the software greets you with its welcome interface. Here, you will have to reach to and tap the ‘Start to Create’ button to begin with the slideshow creation process. You can also select a preset template to work on your slideshow if nothing new clicks in your mind.
Step 3: Select an Aspect Ratio
In the tool’s creator window, navigate to the ‘Options Panel’ at the left and click on ‘More’ to select a suitable aspect ratio. Picking the 9:16 ratio would be a good choice.

Step 4: Upload Your Media
In the same ‘Options Panel’, click on ‘Media’ for dragging and dropping the desired video and image files from your device to the program’s media timeline, followed by applying them to the tool’s storyboard. You can alternatively, choose to directly work with media pages of any preset slideshow template.

Step 5: Customize Your Media
You can now proceed to improvise your media files with amazing texts, filters, stickers, emojis, widgets, etc., by clicking on specific object categories from the ‘Options Panel’.

Step 6: Include Seamless Transitions
Proceed to uplift your creation to the next level with the application of stunning image and video transitions. Navigate to the ‘Options Panel’ and tap ‘Elements’. A variety of transition effects will be displayed to choose from. Select the one you like to add it to your slideshow.

Step 7: Add a Background Music
An in line background audio is the best way to set the mood of your slideshow. Choose to add the same to your creation for making a more engaging impact on the audience. Visit the ‘Options Panel’ again and click on ‘Music’ to open the program’s audio library and select a perfect background music from the huge variety of choices, to include in your slideshow.

Step 8: Preview Your Creation
When you have finished customizing your slideshow, navigate to the top right corner of the editor’s storyboard and hit the ‘Preview’ button to visualize and ensure that your slideshow has everything at the right place. You can continue editing if there is a need to make some changes.
Step 9: Time to Save and Share!
When you are happy with your work, consider saving it either to your device or Google Dropbox, from where you can easily upload the same to your Instagram handle.
Part 3 Best Instagram Slideshow Apps for Creating Outstanding Slideshow
Social media is the talk of the trend in today’s times, which has extended its boundaries to visibly everything around us. Speaking in the light of the fact, slideshow presentations are no exception. Social media platforms today have come up with amazing tools and applications to create and share a stunning slideshow Instagram story with utmost ease and within an affordable time span.
Now that you have developed a comprehensive understanding of the credibility of working with Instagram slideshows and their creation process with the inclusion of complementary background music, let us dive into learning about some of the best and most popular Instagram apps for creating awesome slideshow presentations in the following section:
01Filme Lite
This tool lands among the leading user preferences to work on creating slideshow presentations. The application software is packed with a heap of latest features that form the Instagram trends in current times.
Apart from complementing your slideshow creations with tons of features, this slideshow maker for Instagram grants you the liberty to include your most loved videos and images within your presentation and customize them with a diverse range of effects, along with adjusting their play duration within the slideshow. Additional to image and video customization, you are also allowed to choose the image transition style that perfectly suits your content arrangement within the slides.
Working with the tool, you can be sure of getting an unparalleled slideshow creation experience with a very interactive and user oriented design interface, that is simple enough to be easily understood and worked upon by a newbie to the creative world.
02VivaVideo
If you are working on a detailed presentation and wish to spark up your creation with stunning varieties of jaw dropping special effects, consider creating your PowerPoint slideshows in this application. The tool’s effect library is a storehouse of the most amazing special effects that promise of transforming your slideshow into a visual masterpiece.
You can separately apply these effects to each of the slideshow images or choose to work on a combination of selected effects to include within a single video. Apart from this, you are free to choose an apt background music for your presentation slides from the extensive audio library of the software. The bottom line is; you are assured to a complete fun experience while creating slideshows with this tool.
03Movavi
If you are familiar enough with the fundamental concepts and the trivial anecdotes of working with slideshow presentations and want to take your graphic creativity to the next level, you can try hands at using the Movavi slideshow creator software to design high end PowerPoint presentations of professional quality. The best thing about the tool is, it works online and does not require a software download for usage concerns.
Along with creating online slideshow presentations with ease, the tool permits you to create online videos within minutes and instantly download the same for specific usage. You can further, pop up your presentation slides with wonderful transition and animation effects and also make adjustments in the play duration of each slide. The tool lets you choose and add a perfect background music to your presentation from its conveniently vast audio library.
04Slideshow Lab
If you have just landed into the world of creating slideshow presentations and are looking for easy solutions on how to make a slideshow on Instagram, consider working with this software to polish your design creativity. The simple and user cohesive interface of the tool is best for beginners to understand and get customary with the creation process, that takes the minimum possible time to render an appreciable PowerPoint presentation.
Talking about the slideshow design process, you will need to start with selecting a set of desired images, followed by uploading the same into the tool’s slideshow creator timeline. The next step is to arrange the images in the sequential order of appearance, select an appealing background music and apply smooth image transitions. When you are done with everything, proceed to save the presentation to your device.
05MoShow
While you can choose to create stunning slideshow presentations with almost any class of images, the aforesaid app works best to render Instagram images into a top rated Instagram photo slideshow without compromising with the high resolution image quality of Instagram photos. The application integrates motion pictures and lighting effects to transform the otherwise regular images into lively still captures.
Considering the credibility of the tool in overall user experience, its indeed a thumbs up from graphic creators across the globe, thanks to its smart and interactive interface, in time performance and outstanding creation outputs.
06InVideo Editor
Put an end to your search of effective solutions on how to do a slideshow on Instagram with the InVideo Editor, a smart video and graphic editor that can also be employed to adhere to the requirement of creating amazing slideshow presentations from Instagram media. While the creation process hardly takes a few minutes, you can work with the application to explore your editing creativity to the finest levels. The tool works well with any of your MacOs and Windows compatible devices.
The editor’s effects library is loaded with tons of graphic transitions and filters that are dedicated to enhance the contents of your presentation with utmost ease. You can add creative modifications to the slideshow media, such as, cut, crop and trim videos and images and add the most convincing music, overlays, fonts, etc., and enjoy an additional free access to hundreds of stock videos and slideshow templates.
07LightMV
This one is an online slideshow creator utility that works well with almost any operating system including Windows, iOS, Android and Mac. Essentially a cloud centered editor program, this tool caters to your high quality slideshow creation needs in the most effective way. The design process is quite simple, where you only need to add the images and videos, design your presentation and wait till everything comes to place.
What’s more appealing factor about the tool is that you will never need to download the program in your device or purchase a subscription plan to use the application. All you need to do is land into the tool’s website in your favorite browser and tap on the ‘Slideshow’ option to begin with the creation process. You can select from a heap of preset stunning slideshow templates to create the most enhanced PowerPoint presentation.
08Fliptastic
The Fliptastic slideshow creator app is exclusively developed to adhere to the graphic design concerns of iOS users. This one is a no cost graphic utility with a plethora of versatile features and considerable user backup. The app’s effect library is packed with a unique set of slideshow design templates, transitions, background music choices and filters that work to compliment your presentation with the subtlest look ever.
Paying a bit extra attention to the audio inclusion within the slides, the app offers you a range of free music files to work with, while additionally allowing you to upload and use one from your device or the internet.
09Creating Instagram Slideshows With Filmora
Talking exclusively within the domain of video creation and editing, the credibility of the Wondershare Filmora Video Editor software needs no introduction. Moving ahead with our discussion, let us learn about the process of creating awesome Instagram slideshows with Filmora in the following section:
Step 1: Download and Install the Program
To begin with addressing the concern of how to make a slideshow on Instagram story, navigate to the official Wondershare website and download the Wondershare Filmora Video Editor to your preferred system and proceed to install the same.

Wondershare Filmora - Best Video Editor for Mac/Windows
5,481,435 people have downloaded it.
Build unique custom animations without breaking a sweat.
Focus on creating epic stories and leave the details to Filmora’s auto features.
Start a creative adventure with drag & drop effects and endless possibilities.
Filmora simplifies advanced features to save you time and effort.
Filmora cuts out repetition so you can move on to your next creative breakthrough.
Step 2: Import Your Media
Launch the editor program and wait for the latter’s welcome screen to appear. Here, you need to import the images, videos and other media files to the editor timeline for including them in your slideshow. It is recommended to collect all the image and video files into one single folder before opening a new slideshow design project.
In the editor’s welcome screen, navigate to the ‘Media’ tab at the top left corner and click on the same to open the ‘Import’ menu. From here, you need to choose the ‘Import a Media Folder’ option, followed by navigating to the folder that contains the to be imported media files. When you have reached to the required folder, select it and tap ‘OK’ to import the same into the project timeline. When all the files have been imported, you can see them in the ‘Project Media’ panel.

Step 3: Timeline Positioning of Media Files
Reach to the ‘File’ menu and choose ‘Preferences’ from the latter’s dropdown menu. In the ‘Preferences’ window, hit the ‘Editing’ tab and tap on ‘Photo Preferences’. From the drop down menu that follows, choose the ‘Crop to Fit’ option to adjust the aspect ratio of your imported images in line with the slideshow project. In case your images have the 9:16 vertical aspect ratio, select the ‘Fit’ option to make a proper screen fit.

You can proceed to include the image zoom and camera pan features within your project by clicking on the ‘Pan & Zoom’ option. You can further, modify the preset durations of transitions, effects and photos in the ‘Editing’ tab itself before adding them to the editor timeline. Another way of doing the same is to drag the ends of the media files inward or outward, post the timeline adding process.

When you have finished making the required adjustments, navigate back the ‘Media Panel’ to include the imported media files within the project timeline. You can either click on the files to add them, or choose to ‘Drag and Drop’ the same at a preferred place within the timeline.
When all the images and videos have been added, proceed to arrange them in the desired order of appearance in the slideshow, followed by adjusting their screen time and play durations through any of the methods explained above.
Step 4: Add Transitions to Eliminate Hard Cuts
The smooth play of a slideshow is often distorted by hard cuts, which can be escaped by applying smooth transition effects to the slides. Consider exploring the ‘Transitions’ tab of Filmora to choose from a diversity of easily customizable transition effects and place them at the intersection point of the respective slides in the project timeline.
Instead of applying the same transition to every slide, prefer choosing the one that exclusively suits the content arrangement and flow within particular slides. This would save your slideshow from getting a repetitive look.

Post the timeline adding of a transition, you can double click on the same to reach the ‘Transition Setting Window’, where you are allowed to customize the play duration and select its ‘Transition Mode’. Play durations can alternatively be customised in the project timeline by dragging the slider in a left or right direction.
Step 5: Add Overlays and Filters for an Improvised Colour Scheme
To enhance the thematic appeal of your slideshow, consider desaturating the colours of the included images with the extensive range of visual effects and overlays available in the ‘Effects’ tab of the software’s editing timeline. Opening the tab, you are exposed to a series of ‘Filter and Overlay’ categories, that have further subdivisions of Light Leaks, Sepia Tone and Lomography.
To add a particular effect, place it in the timeline track above the desired clip or image. Observe the changes in the ‘Preview Panel’ and proceed to adjust the effect settings if required, by double clicking on the particular effect.

Step 6: Include Motion Graphic Elements
To supplement your slideshow with elegant motion graphics, navigate to the ‘Elements’ tab in the editor timeline. From here, you can access and choose any suitable motion graphic template from a diversity of available choices, to include within the project timeline. The step is completely optional and you should pay attention to the style of content presentation and the cause of creation of your slideshow when choosing to add these elements to the same.

Step 7: Record Voiceovers and Create Soundtracks
To record a voiceover for your slideshow, navigate to the ‘Media’ tab and tap the ‘Record’ dropdown menu. Click on ‘Record Voiceover’ in the list of options that appears. The ‘Record Audio’ icon pops up and you now need to select a microphone to be used in the recording process. When you are ready, tap the ‘Record’ button to let the recording begin.

You can now see your voice recording appear in the ‘Media’ tab with the previously imported media files, ready to be placed within the audio track of the project timeline. Filmora’s audio library is a storehouse of free access music and audio effects. To add one to your slideshow, navigate and click on the ‘Audio’ tab to select from the extensive Rock, Young & Bright, Electronic, etc., music subcategories till you get the perfect match for your presentation.

Once you have selected all the music tracks, place them one by one on the project timeline and move ahead with adjusting their play durations.
Step 8: Export Your Creation
When you are satisfied with your work, you can export the slideshow directly from Filmora to a number of media sharing platforms. All you need to do is, navigate to and tap the ‘Export’ button in the top right corner of the editor screen and proceed to set the resolution and frame rate, and select the output file format of your created slideshow in the ‘Export Window’ that appears.

When you are ready with everything, click on the ‘Export’ button at the bottom right corner of the screen to share your slideshow across different platforms, including YouTube, Instagram, Vimeo, etc.
The time required by Filmora to render your slideshow on the chosen platform will depend on the output file size. Considering the fact that larger files require a much longer time to be rendered, it would be a smart decision to limit the file size of your slideshow within 500 MB.
● Ending Thoughts →
● Instagram slideshows are exciting means of diving into fun-filled entertainment with your social media peers.
● When looking for solutions on how to create a slideshow on Instagram, there are loads of choices in the software market.
● Talking of best creator alternatives, you can pick the Wondershare Filmora slideshow developer program to make an amazing Insta story slideshow.
Instagram slideshows land among the latest social media trends of fun and entertainment. Learn how to attract jaw dropping peer attention with creating the same!
In this article
01 [When Should You Use an Instagram Slideshow?](#Part 1)
02 [How to Make an Instagram Slideshow with Music?](#Part 2)
03 [8 Best Instagram Slideshow Apps for Creating Outstanding Slideshow](#Part 3)
Part 1 When Should You Use an Instagram Slideshow?
Revolutions in technology has opened doors to a plenty of new and exciting means of information sharing, entertainment and communication. Playing its part in the game, Instagram slideshow has emerged as an exciting means of quick and impactful content sharing. Diving deeper into the discussion, let us talk about the different areas of working with an Instagram slide show in the following section:
01Explanatory Product Demonstrations and Stepwise Tutorials
Considering the diverse media collaboration entertained by this social media platform, you get the liberty to include 10 media files of videos and images while creating a slideshow on Instagram. This is an affordably sufficient media space to demonstrate your newly launched product in front of the target audience.
The aforesaid characteristic of a slideshow for Instagram can be put to another use of creating detailed, step by step guides and product usage tutorials to create an increased and confident customer reach and brand applicability. A few examples include the presentations of recipes by food blogs and chefs, or a detailed look of the day’s outfit by fashion bloggers.
02Interactive Storytelling or Recreate an Event
Gone are the times when stories and events were restricted to a single image or video with a limited scope of understanding and explanation. You can now work with a combination of multiple images and videos to create more vivid and graphical descriptions of stories, narratives and events.
You can work on creating an engaging slideshow for Instagram to tell an amazing story, voice a narration from the beginning to the end, or share your best moments with your cherished audience, which will surely give them the feel of enjoying the adventure along with you.
03Create a Collection
You can now use a slide show for Instagram to design and present a collection of manifold ideas and products within a single post. You can improvise the collection with displaying a series of related products, showcasing a summary of your different blog posts through the week, or simply present a list of your most reliable inspirations, resources and influencers.
04Exciting Video Teasers
If you have a scheduled video release to entertain your audience, try working with interactive slideshows for Instagram to create some sensational teaser content of the upcoming release to imbibe a natural sense of curiosity within your audience.
You can experiment with releasing a mini photoshoot tour of your filming set, share close up progression details, or include a cliffhanger in the end of your Instagram slideshow to ensure the retrieval of your audience towards watching the release of the actual big content. You can use these short teasers as effective means of creating a campaign buzz, while building a closer connect with your audience.
Part 2 How to Make an Instagram Slideshow with Music?
By now, you must have gathered enough knowledge regarding the credibility of Instagram slideshows in catering to a diversity of commercial, professional and personal content sharing needs. Considering the same, you may conveniently feel motivated to try hands at creating stunning slideshow presentations for Instagram on your own.
Adhering to the concern, let us move ahead with our discussion, while talking about how to make a slideshow for Instagram and supplement the same with adaptable background music to develop amazing content masterpieces and share them with social media peers, while grabbing their obvious attention.
While there are a number of choices in the software market to choose your Instagram slideshow creator tool, the FlexClip tool can be a reliable option. Read though the following section to learn the slideshow creation process in the program with a comprehensive and stepwise tutorial guide:
Step 1: Download the Slideshow Creator Tool
Visit the official website of FlexClip to download and install the slideshow maker software in your preferred device.
Step 2: Start from Scratch
After a successful installation, proceed to launch the tool in your system and wait till the software greets you with its welcome interface. Here, you will have to reach to and tap the ‘Start to Create’ button to begin with the slideshow creation process. You can also select a preset template to work on your slideshow if nothing new clicks in your mind.
Step 3: Select an Aspect Ratio
In the tool’s creator window, navigate to the ‘Options Panel’ at the left and click on ‘More’ to select a suitable aspect ratio. Picking the 9:16 ratio would be a good choice.
Step 4: Upload Your Media
In the same ‘Options Panel’, click on ‘Media’ for dragging and dropping the desired video and image files from your device to the program’s media timeline, followed by applying them to the tool’s storyboard. You can alternatively, choose to directly work with media pages of any preset slideshow template.
Step 5: Customize Your Media
You can now proceed to improvise your media files with amazing texts, filters, stickers, emojis, widgets, etc., by clicking on specific object categories from the ‘Options Panel’.
Step 6: Include Seamless Transitions
Proceed to uplift your creation to the next level with the application of stunning image and video transitions. Navigate to the ‘Options Panel’ and tap ‘Elements’. A variety of transition effects will be displayed to choose from. Select the one you like to add it to your slideshow.
Step 7: Add a Background Music
An in line background audio is the best way to set the mood of your slideshow. Choose to add the same to your creation for making a more engaging impact on the audience. Visit the ‘Options Panel’ again and click on ‘Music’ to open the program’s audio library and select a perfect background music from the huge variety of choices, to include in your slideshow.
Step 8: Preview Your Creation
When you have finished customizing your slideshow, navigate to the top right corner of the editor’s storyboard and hit the ‘Preview’ button to visualize and ensure that your slideshow has everything at the right place. You can continue editing if there is a need to make some changes.
Step 9: Time to Save and Share!
When you are happy with your work, consider saving it either to your device or Google Dropbox, from where you can easily upload the same to your Instagram handle.
Part 3 Best Instagram Slideshow Apps for Creating Outstanding Slideshow
Social media is the talk of the trend in today’s times, which has extended its boundaries to visibly everything around us. Speaking in the light of the fact, slideshow presentations are no exception. Social media platforms today have come up with amazing tools and applications to create and share a stunning slideshow Instagram story with utmost ease and within an affordable time span.
Now that you have developed a comprehensive understanding of the credibility of working with Instagram slideshows and their creation process with the inclusion of complementary background music, let us dive into learning about some of the best and most popular Instagram apps for creating awesome slideshow presentations in the following section:
01Filme Lite
This tool lands among the leading user preferences to work on creating slideshow presentations. The application software is packed with a heap of latest features that form the Instagram trends in current times.
Apart from complementing your slideshow creations with tons of features, this slideshow maker for Instagram grants you the liberty to include your most loved videos and images within your presentation and customize them with a diverse range of effects, along with adjusting their play duration within the slideshow. Additional to image and video customization, you are also allowed to choose the image transition style that perfectly suits your content arrangement within the slides.
Working with the tool, you can be sure of getting an unparalleled slideshow creation experience with a very interactive and user oriented design interface, that is simple enough to be easily understood and worked upon by a newbie to the creative world.
02VivaVideo
If you are working on a detailed presentation and wish to spark up your creation with stunning varieties of jaw dropping special effects, consider creating your PowerPoint slideshows in this application. The tool’s effect library is a storehouse of the most amazing special effects that promise of transforming your slideshow into a visual masterpiece.
You can separately apply these effects to each of the slideshow images or choose to work on a combination of selected effects to include within a single video. Apart from this, you are free to choose an apt background music for your presentation slides from the extensive audio library of the software. The bottom line is; you are assured to a complete fun experience while creating slideshows with this tool.
03Movavi
If you are familiar enough with the fundamental concepts and the trivial anecdotes of working with slideshow presentations and want to take your graphic creativity to the next level, you can try hands at using the Movavi slideshow creator software to design high end PowerPoint presentations of professional quality. The best thing about the tool is, it works online and does not require a software download for usage concerns.
Along with creating online slideshow presentations with ease, the tool permits you to create online videos within minutes and instantly download the same for specific usage. You can further, pop up your presentation slides with wonderful transition and animation effects and also make adjustments in the play duration of each slide. The tool lets you choose and add a perfect background music to your presentation from its conveniently vast audio library.
04Slideshow Lab
If you have just landed into the world of creating slideshow presentations and are looking for easy solutions on how to make a slideshow on Instagram, consider working with this software to polish your design creativity. The simple and user cohesive interface of the tool is best for beginners to understand and get customary with the creation process, that takes the minimum possible time to render an appreciable PowerPoint presentation.
Talking about the slideshow design process, you will need to start with selecting a set of desired images, followed by uploading the same into the tool’s slideshow creator timeline. The next step is to arrange the images in the sequential order of appearance, select an appealing background music and apply smooth image transitions. When you are done with everything, proceed to save the presentation to your device.
05MoShow
While you can choose to create stunning slideshow presentations with almost any class of images, the aforesaid app works best to render Instagram images into a top rated Instagram photo slideshow without compromising with the high resolution image quality of Instagram photos. The application integrates motion pictures and lighting effects to transform the otherwise regular images into lively still captures.
Considering the credibility of the tool in overall user experience, its indeed a thumbs up from graphic creators across the globe, thanks to its smart and interactive interface, in time performance and outstanding creation outputs.
06InVideo Editor
Put an end to your search of effective solutions on how to do a slideshow on Instagram with the InVideo Editor, a smart video and graphic editor that can also be employed to adhere to the requirement of creating amazing slideshow presentations from Instagram media. While the creation process hardly takes a few minutes, you can work with the application to explore your editing creativity to the finest levels. The tool works well with any of your MacOs and Windows compatible devices.
The editor’s effects library is loaded with tons of graphic transitions and filters that are dedicated to enhance the contents of your presentation with utmost ease. You can add creative modifications to the slideshow media, such as, cut, crop and trim videos and images and add the most convincing music, overlays, fonts, etc., and enjoy an additional free access to hundreds of stock videos and slideshow templates.
07LightMV
This one is an online slideshow creator utility that works well with almost any operating system including Windows, iOS, Android and Mac. Essentially a cloud centered editor program, this tool caters to your high quality slideshow creation needs in the most effective way. The design process is quite simple, where you only need to add the images and videos, design your presentation and wait till everything comes to place.
What’s more appealing factor about the tool is that you will never need to download the program in your device or purchase a subscription plan to use the application. All you need to do is land into the tool’s website in your favorite browser and tap on the ‘Slideshow’ option to begin with the creation process. You can select from a heap of preset stunning slideshow templates to create the most enhanced PowerPoint presentation.
08Fliptastic
The Fliptastic slideshow creator app is exclusively developed to adhere to the graphic design concerns of iOS users. This one is a no cost graphic utility with a plethora of versatile features and considerable user backup. The app’s effect library is packed with a unique set of slideshow design templates, transitions, background music choices and filters that work to compliment your presentation with the subtlest look ever.
Paying a bit extra attention to the audio inclusion within the slides, the app offers you a range of free music files to work with, while additionally allowing you to upload and use one from your device or the internet.
09Creating Instagram Slideshows With Filmora
Talking exclusively within the domain of video creation and editing, the credibility of the Wondershare Filmora Video Editor software needs no introduction. Moving ahead with our discussion, let us learn about the process of creating awesome Instagram slideshows with Filmora in the following section:
Step 1: Download and Install the Program
To begin with addressing the concern of how to make a slideshow on Instagram story, navigate to the official Wondershare website and download the Wondershare Filmora Video Editor to your preferred system and proceed to install the same.
Wondershare Filmora - Best Video Editor for Mac/Windows
5,481,435 people have downloaded it.
Build unique custom animations without breaking a sweat.
Focus on creating epic stories and leave the details to Filmora’s auto features.
Start a creative adventure with drag & drop effects and endless possibilities.
Filmora simplifies advanced features to save you time and effort.
Filmora cuts out repetition so you can move on to your next creative breakthrough.
Step 2: Import Your Media
Launch the editor program and wait for the latter’s welcome screen to appear. Here, you need to import the images, videos and other media files to the editor timeline for including them in your slideshow. It is recommended to collect all the image and video files into one single folder before opening a new slideshow design project.
In the editor’s welcome screen, navigate to the ‘Media’ tab at the top left corner and click on the same to open the ‘Import’ menu. From here, you need to choose the ‘Import a Media Folder’ option, followed by navigating to the folder that contains the to be imported media files. When you have reached to the required folder, select it and tap ‘OK’ to import the same into the project timeline. When all the files have been imported, you can see them in the ‘Project Media’ panel.
Step 3: Timeline Positioning of Media Files
Reach to the ‘File’ menu and choose ‘Preferences’ from the latter’s dropdown menu. In the ‘Preferences’ window, hit the ‘Editing’ tab and tap on ‘Photo Preferences’. From the drop down menu that follows, choose the ‘Crop to Fit’ option to adjust the aspect ratio of your imported images in line with the slideshow project. In case your images have the 9:16 vertical aspect ratio, select the ‘Fit’ option to make a proper screen fit.
You can proceed to include the image zoom and camera pan features within your project by clicking on the ‘Pan & Zoom’ option. You can further, modify the preset durations of transitions, effects and photos in the ‘Editing’ tab itself before adding them to the editor timeline. Another way of doing the same is to drag the ends of the media files inward or outward, post the timeline adding process.
When you have finished making the required adjustments, navigate back the ‘Media Panel’ to include the imported media files within the project timeline. You can either click on the files to add them, or choose to ‘Drag and Drop’ the same at a preferred place within the timeline.
When all the images and videos have been added, proceed to arrange them in the desired order of appearance in the slideshow, followed by adjusting their screen time and play durations through any of the methods explained above.
Step 4: Add Transitions to Eliminate Hard Cuts
The smooth play of a slideshow is often distorted by hard cuts, which can be escaped by applying smooth transition effects to the slides. Consider exploring the ‘Transitions’ tab of Filmora to choose from a diversity of easily customizable transition effects and place them at the intersection point of the respective slides in the project timeline.
Instead of applying the same transition to every slide, prefer choosing the one that exclusively suits the content arrangement and flow within particular slides. This would save your slideshow from getting a repetitive look.
Post the timeline adding of a transition, you can double click on the same to reach the ‘Transition Setting Window’, where you are allowed to customize the play duration and select its ‘Transition Mode’. Play durations can alternatively be customised in the project timeline by dragging the slider in a left or right direction.
Step 5: Add Overlays and Filters for an Improvised Colour Scheme
To enhance the thematic appeal of your slideshow, consider desaturating the colours of the included images with the extensive range of visual effects and overlays available in the ‘Effects’ tab of the software’s editing timeline. Opening the tab, you are exposed to a series of ‘Filter and Overlay’ categories, that have further subdivisions of Light Leaks, Sepia Tone and Lomography.
To add a particular effect, place it in the timeline track above the desired clip or image. Observe the changes in the ‘Preview Panel’ and proceed to adjust the effect settings if required, by double clicking on the particular effect.
Step 6: Include Motion Graphic Elements
To supplement your slideshow with elegant motion graphics, navigate to the ‘Elements’ tab in the editor timeline. From here, you can access and choose any suitable motion graphic template from a diversity of available choices, to include within the project timeline. The step is completely optional and you should pay attention to the style of content presentation and the cause of creation of your slideshow when choosing to add these elements to the same.
Step 7: Record Voiceovers and Create Soundtracks
To record a voiceover for your slideshow, navigate to the ‘Media’ tab and tap the ‘Record’ dropdown menu. Click on ‘Record Voiceover’ in the list of options that appears. The ‘Record Audio’ icon pops up and you now need to select a microphone to be used in the recording process. When you are ready, tap the ‘Record’ button to let the recording begin.
You can now see your voice recording appear in the ‘Media’ tab with the previously imported media files, ready to be placed within the audio track of the project timeline. Filmora’s audio library is a storehouse of free access music and audio effects. To add one to your slideshow, navigate and click on the ‘Audio’ tab to select from the extensive Rock, Young & Bright, Electronic, etc., music subcategories till you get the perfect match for your presentation.
Once you have selected all the music tracks, place them one by one on the project timeline and move ahead with adjusting their play durations.
Step 8: Export Your Creation
When you are satisfied with your work, you can export the slideshow directly from Filmora to a number of media sharing platforms. All you need to do is, navigate to and tap the ‘Export’ button in the top right corner of the editor screen and proceed to set the resolution and frame rate, and select the output file format of your created slideshow in the ‘Export Window’ that appears.
When you are ready with everything, click on the ‘Export’ button at the bottom right corner of the screen to share your slideshow across different platforms, including YouTube, Instagram, Vimeo, etc.
The time required by Filmora to render your slideshow on the chosen platform will depend on the output file size. Considering the fact that larger files require a much longer time to be rendered, it would be a smart decision to limit the file size of your slideshow within 500 MB.
● Ending Thoughts →
● Instagram slideshows are exciting means of diving into fun-filled entertainment with your social media peers.
● When looking for solutions on how to create a slideshow on Instagram, there are loads of choices in the software market.
● Talking of best creator alternatives, you can pick the Wondershare Filmora slideshow developer program to make an amazing Insta story slideshow.
5 Websites with Animated Logos That Can Catch Your Eyes
5 Websites with Animated Logos That Can Catch Your Eyes
An easy yet powerful editor
Numerous effects to choose from
Detailed tutorials provided by the official channel
Animated logos could be difficult to make for someone who has no experience with animation. That is why we are here to tell you how you can make an attractive animated logo.
Learn more about websites with animated logos through this article.
In this article
01 [Why You Should Use Logo Animation](#Part 1)
02 [5 Awesome Ways to Use Logo Animation](#Part 2)
03 [6 of the Best Animated Logos](#Part 3)
04 [8 Websites with Premium Animated Logo Templates](#Part 4)
Part 1 Why You Should Use Logo Animation
Those who make it big are known to brave the storm. The ones who follow the crowd just turn out to be ordinary. However, those who innovate, rise to a higher level. Here is why you should go for a website with animated logo!
01They grab viewers attraction
The human mind chooses to believe in the supremacy of what appeals to them visually. It is highly important to grab the user’s attention in order to make a mark. Animated logos help your website to visually appeal to the viewer and grab his/her attention. Potential customers will tend to remember the logo of your website and this would directly impact the conversion rates of your website.

02Increase in brand awareness
Brand awareness is key to a website’s success. As we saw earlier, people often tend to remember brands by their logo and not name. An attractive animated logo will help you create a strong brand awareness among potential customers and help your brand gain popularity.
03Animated logos can convey more
A brand logo is supposed to be the identity of a brand. The logo should be capable enough of explaining your website’s understanding about the field. For instance, if your company is in the cyber security domain, the logo should be good enough to justify your company’s expertise. Animated logos help you establish trust by conveying more through the medium of a logo.
Part 2 4 Awesome Ways to Use Logo Animation
01They can serve as introductions to marketing videos
Video marketing is one of the most commonly used marketing techniques. Research suggested that about 99 percent of brands use video marketing in order to enhance their brand image. Starting of your video with an animated logo will not just look catchy but also make the video all the more professional.
02They can make great outros
Just like animated videos can serve as amazing introductory bits of the video, they can also be the perfect outros to videos. If you haven’t added your animated logo in the introduction of the video then they can be added at the end. This will lead to your viewers remembering your brand for a longer time.
03Look very attractive at trade shows
Trade shows are opportunities where websites and company owners can interact with investors and potential customers face to face. It’s an excellent opportunity to make your mark on the big stage. Logos of companies may be projected on the big screen in such events. At such events when you have just a few seconds to make a mark, you need your logo to grab the viewer’s attention. Hence, animated logos could be very useful.
04They could be a great addition to your company’s email signature
Emails are regarded as the 3rd largest information sources in the B2B industry. It is one of the largest means of communication and marketing. Email signatures have been around for years; however the traditional email signatures have now gone out of fashion. Contemporary email signatures include animated logos to leave a bigger impact on the receiver. Using animated logos, you can add grace to your email signatures and escape the ordinary.
Part 3 6 of the Best Animated Logos
01Mastercard
Mastercard is one of the first companies to use animated logos. The logo is simply fantastic due to the meaning it conveys without any complex animation. The animated logo involves the traditional venn diagram logo of mastercard morphing into several objects. These objects include everything from food to groceries to luxurious products. It basically includes the various kinds of commodities people buy using mastercards.
02Burger king
Another popular brand that uses animated logos is the american fast food giant, burger king. The logo is not highly flashy like we see in mastercard. However, the animated logo does obviously look more attention seeking than the conventional static logo. The logo shows the stacking of the different elements of the logo one by one over each other. This resembles the process of making a burger.
03Fedex
Another logo that would classify as a flashy animated logo is the fedex logo. Initially, fedex had experimented with several logos before sticking to the arrow logo which continues even today. The animated logo involves an arrow making the letter “Fedex” with its trajectory and then finally settling in between letters X and E. The logistics giant delivers couriers from one corner of the world to another, and the arrow symbolizes exactly that!
04Flickr
Flickr is a popular stock image and video hosting platform. Anyone can use the stock images and videos in their content. The logo starts with a blue and pink dot initially. These dots later expand in a whirlpool like motion. The logo starts off with the static logo before it expands. The idea is to show that the online stock image portal goes beyond limits and has every picture and video you’d need
05Bundle
Bundle is a popular app that offers its users rewards upon shopping from selected stores. These stores have an alliance with bundle and upon shopping from them, users seek reward points on the bundle app. The animated logo starts of with a pink screen which later converges to become a large “B” wrapped with a gifting ribbon. Although, the logo is pretty simple it does an amazing job at explaining the brand’s MSP and attracts customers.
06Google
The logo of google has evolved over the years. Google is almost synonymous to attractive logos and it comes up with attractive new logos every now and then. One of the newest logos, an animated one, is by far one of the most attractive animated logos. It aims to depict the numerous things users can search using “Google voice search”.
Part 4 5 Websites with Premium Animated Logo Templates
01RenderForest
There are several applications you can use for animating your next logo for your website. RenderForest is one such software that lets you explore multiple animated logo templates. The tool has an array of templates you can choose from. Each of the templates is unique in its own way and has its own charm. Additionally, the software also has a functionality using which you can animate your static logo using templates.
Developed and managed by Adobe, the editing application is a popular one. The software allows you to use several pre-made templates while animating. The animations that you can find on adobe spark are
02Adobe Spark
Adobe spark seamless and designed perfectly. Using adobe spark, you can give your animated logo a touch of class and perfection. Although the software is paid, it is worth every penny due to the numerous animation templates and video editing tools available.
03Design free logo
Another amazing tool for animation, design free logo is a complete animation tool that offers several animation templates. Additionally, the free software also lets users animate in 3 dimensions. The software is best suited for novice animators who have limited experience with animation. The software is very simple to use unlike its sophisticated counterparts.
04Logo maker plus
If you are looking for an android application that helps you create seamless animated logos, well logo maker plus is just the perfect application for you. The app has more than a 100 templates for animating your logo, hence making it the perfect app for those who want to perform basic animation. Additionally, the app also has multiple visual effects which would enable you to make catchy logos
05Animaker
The final software on this list of amazing softwares is animaker. The software works well to animate logos, presentations, and marketing videos. The software has more than 50 effects. Moreover, using this software you can add filters, effects and sound effects. The software also lets users upload the videos to facebook and youtube directly!
Final Thoughts
● Today, we took a look at a few of the best animated logos which you could idealize.
● Nowadays, even big brands are adopting animated logos.
● They help establish a brand image and take your brand to a higher level.
● We also saw a few softwares that could help you make an animated logo. Wish to make an animated logo? Head to any one of the websites and make your website with animated logos!
Animated logos could be difficult to make for someone who has no experience with animation. That is why we are here to tell you how you can make an attractive animated logo.
Learn more about websites with animated logos through this article.
In this article
01 [Why You Should Use Logo Animation](#Part 1)
02 [5 Awesome Ways to Use Logo Animation](#Part 2)
03 [6 of the Best Animated Logos](#Part 3)
04 [8 Websites with Premium Animated Logo Templates](#Part 4)
Part 1 Why You Should Use Logo Animation
Those who make it big are known to brave the storm. The ones who follow the crowd just turn out to be ordinary. However, those who innovate, rise to a higher level. Here is why you should go for a website with animated logo!
01They grab viewers attraction
The human mind chooses to believe in the supremacy of what appeals to them visually. It is highly important to grab the user’s attention in order to make a mark. Animated logos help your website to visually appeal to the viewer and grab his/her attention. Potential customers will tend to remember the logo of your website and this would directly impact the conversion rates of your website.
02Increase in brand awareness
Brand awareness is key to a website’s success. As we saw earlier, people often tend to remember brands by their logo and not name. An attractive animated logo will help you create a strong brand awareness among potential customers and help your brand gain popularity.
03Animated logos can convey more
A brand logo is supposed to be the identity of a brand. The logo should be capable enough of explaining your website’s understanding about the field. For instance, if your company is in the cyber security domain, the logo should be good enough to justify your company’s expertise. Animated logos help you establish trust by conveying more through the medium of a logo.
Part 2 4 Awesome Ways to Use Logo Animation
01They can serve as introductions to marketing videos
Video marketing is one of the most commonly used marketing techniques. Research suggested that about 99 percent of brands use video marketing in order to enhance their brand image. Starting of your video with an animated logo will not just look catchy but also make the video all the more professional.
02They can make great outros
Just like animated videos can serve as amazing introductory bits of the video, they can also be the perfect outros to videos. If you haven’t added your animated logo in the introduction of the video then they can be added at the end. This will lead to your viewers remembering your brand for a longer time.
03Look very attractive at trade shows
Trade shows are opportunities where websites and company owners can interact with investors and potential customers face to face. It’s an excellent opportunity to make your mark on the big stage. Logos of companies may be projected on the big screen in such events. At such events when you have just a few seconds to make a mark, you need your logo to grab the viewer’s attention. Hence, animated logos could be very useful.
04They could be a great addition to your company’s email signature
Emails are regarded as the 3rd largest information sources in the B2B industry. It is one of the largest means of communication and marketing. Email signatures have been around for years; however the traditional email signatures have now gone out of fashion. Contemporary email signatures include animated logos to leave a bigger impact on the receiver. Using animated logos, you can add grace to your email signatures and escape the ordinary.
Part 3 6 of the Best Animated Logos
01Mastercard
Mastercard is one of the first companies to use animated logos. The logo is simply fantastic due to the meaning it conveys without any complex animation. The animated logo involves the traditional venn diagram logo of mastercard morphing into several objects. These objects include everything from food to groceries to luxurious products. It basically includes the various kinds of commodities people buy using mastercards.
02Burger king
Another popular brand that uses animated logos is the american fast food giant, burger king. The logo is not highly flashy like we see in mastercard. However, the animated logo does obviously look more attention seeking than the conventional static logo. The logo shows the stacking of the different elements of the logo one by one over each other. This resembles the process of making a burger.
03Fedex
Another logo that would classify as a flashy animated logo is the fedex logo. Initially, fedex had experimented with several logos before sticking to the arrow logo which continues even today. The animated logo involves an arrow making the letter “Fedex” with its trajectory and then finally settling in between letters X and E. The logistics giant delivers couriers from one corner of the world to another, and the arrow symbolizes exactly that!
04Flickr
Flickr is a popular stock image and video hosting platform. Anyone can use the stock images and videos in their content. The logo starts with a blue and pink dot initially. These dots later expand in a whirlpool like motion. The logo starts off with the static logo before it expands. The idea is to show that the online stock image portal goes beyond limits and has every picture and video you’d need
05Bundle
Bundle is a popular app that offers its users rewards upon shopping from selected stores. These stores have an alliance with bundle and upon shopping from them, users seek reward points on the bundle app. The animated logo starts of with a pink screen which later converges to become a large “B” wrapped with a gifting ribbon. Although, the logo is pretty simple it does an amazing job at explaining the brand’s MSP and attracts customers.
06Google
The logo of google has evolved over the years. Google is almost synonymous to attractive logos and it comes up with attractive new logos every now and then. One of the newest logos, an animated one, is by far one of the most attractive animated logos. It aims to depict the numerous things users can search using “Google voice search”.
Part 4 5 Websites with Premium Animated Logo Templates
01RenderForest
There are several applications you can use for animating your next logo for your website. RenderForest is one such software that lets you explore multiple animated logo templates. The tool has an array of templates you can choose from. Each of the templates is unique in its own way and has its own charm. Additionally, the software also has a functionality using which you can animate your static logo using templates.
Developed and managed by Adobe, the editing application is a popular one. The software allows you to use several pre-made templates while animating. The animations that you can find on adobe spark are
02Adobe Spark
Adobe spark seamless and designed perfectly. Using adobe spark, you can give your animated logo a touch of class and perfection. Although the software is paid, it is worth every penny due to the numerous animation templates and video editing tools available.
03Design free logo
Another amazing tool for animation, design free logo is a complete animation tool that offers several animation templates. Additionally, the free software also lets users animate in 3 dimensions. The software is best suited for novice animators who have limited experience with animation. The software is very simple to use unlike its sophisticated counterparts.
04Logo maker plus
If you are looking for an android application that helps you create seamless animated logos, well logo maker plus is just the perfect application for you. The app has more than a 100 templates for animating your logo, hence making it the perfect app for those who want to perform basic animation. Additionally, the app also has multiple visual effects which would enable you to make catchy logos
05Animaker
The final software on this list of amazing softwares is animaker. The software works well to animate logos, presentations, and marketing videos. The software has more than 50 effects. Moreover, using this software you can add filters, effects and sound effects. The software also lets users upload the videos to facebook and youtube directly!
Final Thoughts
● Today, we took a look at a few of the best animated logos which you could idealize.
● Nowadays, even big brands are adopting animated logos.
● They help establish a brand image and take your brand to a higher level.
● We also saw a few softwares that could help you make an animated logo. Wish to make an animated logo? Head to any one of the websites and make your website with animated logos!
How You Can Turn Yourself Into Anime Character Using Anime Filter
How You Can Turn Yourself into Anime Character Using Anime Filter
An easy yet powerful editor
Numerous effects to choose from
Detailed tutorials provided by the official channel
Everyone is looking for the Anime Filter that allows you to turn yourself into an animated character. All in an effort to join in on the TikTok trend that’s been awakening the inner anime enthusiast in everyone.

In this post, we’ll be sharing with you all that we know about this elusive anime filter (along with some bonuses along the way)
In this article
01 [Let’s Figure out What’s Anime Filter First](#Part 1)
02 [More Tutorials on Anime Filter That You Should Not Miss](#Part 2)
Part 1 Let’s Figure out What’s Anime Filter First
01What is the Anime Filter on TikTok?
Okay, first off What even is this anime filter everyone is talking about and how can you use it to turn yourself into an animated character? We’ve attached a helpful YouTube Video below from @Kapwing who has a more comprehensive explanation for you.
But, as for the basics? It works just like most filters in that it can be used in both video and picture mode (allowing you to also make your own animated profile picture if you’d like). All you have to do is turn it on, and it’ll turn you into the most fitting anime character of your style immediately
02How to Get the TikTok Anime Filter?
Now to finally get down to business How exactly can you get the anime filter for your TikTok? Well, here’s the trick Despite having earned its popularity on TikTok, the Anime Style filter actually comes from Snapchat So, if you do want to animate yourself like you’ve seen all the other popular TikTok-ers do, you’ll need to record the video (or take the picture) on the Snapchat App first and then upload it to TikTok.
03A step-by-step breakdown of this process has been provided below (pictures included)
Step 1Download the Snapchat App
Alright, to start off with, you’ll need to download the Snapchat app on your smartphone (it’s available for both Android and iOS devices)

Step 2Open Snapchat App on your mobile device
Once you have the Snapchat app downloaded and installed on your device, open it

Step 3Search for the Anime Style Filter on Snapchat
Once you have the Snapchat app open, click on the search bar at the top of the interface, type ‘anime style’, and search
You might find that there are multiple versions of the filter (like as is shown in the image below), but the one that you need to select is the one titled Anime Style and created by Snapchat (it should appear first, as it does in the example)

Step 4Turn Yourself into an Animated Character
Finally You should be moved to the video recorder or the profile picture taker, where you can see yourself animated once and for all

Step 5Upload your anime filter-ed video to TikTok
Now, in order to get your Anime-fied self on TikTok, all you need to do is upload your video creation (either on your mobile device or your computer) We’ve provided a URL for you below that will take you directly to the TikTok upload page.

Part 2 More Tutorials on Anime Filter That You Should Not Miss
The Anime Style filter that we introduced in the previous section isn’t the only ‘animated’ filter available, of course It’s the one that caught the attention of a lot of people, thanks, in large part, to the participation of a couple of some of the bigger TikTok-ers on the platform. However, you can always expand your selection a bit by checking out some of the other interesting anime filters in the market:
0112 Anime Filters to Turn Yourself into an Anime Character
Anime Filter #1: Anime Style Realistic

In order to fix some of the more glaring issues with the regular Anime Style filter, Snapchat created a second filter, called Anime Style Realistic This one has a distinctively less anime style when it comes to looks. But it does allow for more skin colors, better hair integration, and accessories
Pros
FREE Snapchat lens that you can use at any time.
Works with most skin tones.
Better hair/accessory integration.
Cons
The style is more realistic than anime.
It is not available anywhere else; you’ll need to be on Snapchat to use it.
Not great at capturing motion.
This is a fun filter to use for those looking to spice up their timeline with something a little different (OR for those having a bad day and would like the almost-anonymity the filter can provide).
Anime Filter #2: Cartoon Style

Next, we have another Snapchat original lens called Cartoon Style This filter is more reminiscent of the older animated cartoon styles (think Pocahontas, Lilo & Stitch, etc.), but it doesn’t make it any less fun
Pros
FREE Snapchat lens.
Works with all skin tones.
Works with accessories.
Cons
More of a cartoon animated style than anime.
Not available anywhere else, you can only use it with Snapchat.
Not great at capturing motion.
Again, just like the Anime Filter, this is good for slapping on just to have fun or to sneakily erase a couple of blemishes
Anime Filter #3: Anime Filter

Now, although we mentioned that TikTok doesn’t have any anime-style filters, the Chinese version of it (surprisingly) does You can see it being used in the image above, rendering the user into an animated (albeit not classically Japanese animated) character.
Pros
Free Chinese TikTok filter.
Great at capturing motion.
Chinese animated drawing style.
Cons
Only available for the foreign version of the TikTok app.
Not the best with skin tones.
It doesn’t use the classic Japanese-animation style.
This has seen a popularity boost recently, with many TikTok users using it to show a ‘before’ and ‘after’ (like the image shown above), of their dance being animated.
Filter URL: https://www.douyin.com/
Anime Filter #4: Anime Eyes

This next filter is the first unofficial anime filter on this list. It was created by one of the users of Snapchat and can be found there if you want to use it This one doesn’t animate the whole face of the user, but it does apply a sticker of various ‘anime eyes’ that you can use as a semi-animated profile picture maker (free)
Pros
FREE Snapchat filter
Anime-eyes sticker to cover the eyes
Useful as an animated profile picture maker
Cons
Only available on the Snapchat app
Does not capture motion
Does not animate the entire face
This really is best used for profile pictures only You’ve probably seen it around as such, although some users also find it useful for hiding tired eyes
Anime Filter #5: Wondershare Filmora

If you’re looking to step up your game ‘editing-wise’ and give your pictures and videos an even more anime feel, then you can also consider the anime filters that the video editing tool, Wondershare Filmora Video Editor , offers. (You can also skip the pre-made filters altogether and create your own animated video with stickers and other effects.)
Pros
Variety of anime filters for videos
Comes with advanced video editing tools
Creates high-quality videos
Cons
Premium Software
No face animation
This particular option is for those looking for something a step above what everyone else is doing. All while allowing a more flexible experience
For Win 7 or later (64-bit)
For macOS 10.12 or later
Anime Filter #6: MHA Anime Filter (Instagram)

Continuing on from our trend of ‘out-there’ options, there’s also the MHA filter from Instagram This one has been especially popular with the anime fanbase as it offers plenty of opportunities for hilarious, pointed responses
Pros
FREE with Instagram
Anime-themed sticker
Trending on TikTok
Cons
Not a face animator filter
Not a profile picture animator
Limited anime options
It’s definitely not what you might have initially been looking for. But its popularity on TikTok is undeniable
Anime Filter #7: Anime Filter

Our second recommended anime-themed filter is the basic Anime Filter on Instagram This one flicks through dozens of some of the most popular animes to find out which one suits you best And, just like the previous, is currently trending on Tiktok
Pros
FREE with Instagram
Anime-themed sticker filter
Trending on TikTok
Cons
Sticker, not face animator
Available only on Instagram
Limited options
Anime Filter #8: Cartoon

This next animation filter pick of ours brings us back to Snapchat It’s called the Cartoon lens. And, just like our initial picks, it will change your pictures to that of a cartoon This one is closer to the cartoon-style popular around the 2000s (think Frozen & Tangled)
Pros
Available on Snapchat
Animated profile picture maker (free)
Works for various skin types
Cons
Not the best at motion capturing
Only available on Snapchat
Doesn’t use classic Japanese style
It’s not quite the anime filter that you’re probably looking for, but it does still work if all you want is a way of cartoon-ifying yourself to spice up your timeline It’ll clear up any blemishes too
Anime Filter #9: Comics Style

Again, we’re moving towards a different kind of animation style with this next filter from Snapchat, but the Comics Style filter does have its own promises of fun as well Especially for those who are long-time fans of American comics (or, even, your average modern-day Avengers fan)
Pros
FREE on Snapchat
Video face animator
Works with a variety of skin tones
Cons
Awkward with some face shapes
Does not work with all face accessories
Available only on Snapchat
Anime Filter #10: Cartoon 3D Style

Now, this might get confusing, but for our last picks, we actually have a set of filters all called Cartoon 3D Style But trust us They’re all different This first version is one you would probably relate more to the DreamWorks motion picture, Ratatouille
Pros
FREE profile picture animator on Snapchat
Compatible with a variety of face shapes
Compatible with a variety of skin tones
Cons
Set features (i.e., pointed nose)
Non-anime drawing style
Not compatible with some facial accessories
Anime Filter #11: Cartoon 3D Style

For our next Cartoon 3D Style lens from Snapchat, we have a face animator that can help you turn into something very close to another dreamwork’s motion picture (think the Despicable me or the Minions)
Pros
Cartoon style animator that is FREE to use
Great for motion capturing
Compatible with a variety of skin colors
Cons
Available only on Snapchat
Not compatible with certain face accessories
Limited face warping effect
Anime Filter #12: Cartoon 3D Style

And finally, for the last of our recommended anime filters, we have the Cartoon 3D Style lens from Snapchat that makes you look like your favorite Disney character (In this case, the obvious inspiration comes from Disney’s Frozen or Tangled)
Pros
Disney face animator that is FREE on Snapchat
Compatible with all skin tones
Trending on TikTok
Cons
It can only be used on Snapchat
Not great at capturing motion
02Steps to Download the Anime Filter App and Turn Yourself into an Anime Character
Now, if those filters weren’t enough for you, we’ve also included this next tutorial on how you can find apps on your mobile device that will allow you to get the same effect without having to use Snapchat, TikTok, or Instagram
Step 1Go to the App Store
The first step, of course, is to go to the app store on your mobile device.

Step 2Search for Anime Filter App
Next, search ‘Anime Filter’ on your phone’s app store.

Step 3Select Anime Filter App
There are multiple types of anime filter apps available in the market. Pick the one that you think will work best for you.

Step 4Install Anime Filter App
Finally, once you’ve found the anime filter app for you, install it.

Step 5Open Anime Filter App
The app that we used for our example, Anime Camera, offers several different animation styles However, this app does come with a subscription fee, so keep that in mind.

03Anime Filter Has a Sadly Unsurprising Problem
You might have noticed this while we were introducing all the different types of anime-style filters available, but the popular Anime Filter has its shortcomings. Which includes:
PROBLEM 1: Dark Skin Tones
The anime filter’s inability to capture darker skin tones accurately is one of the biggest issues users have with the filter.
PROBLEM 2: Hair Style
Hairstyle options are also very limited. And, as for black hairstyles? Well, the options are pretty much non-existent.
PROBLEM 3: Face Accessories
Do you wear glasses? How about piercings? Well, this won’t translate for you either, unfortunately
Key Takeaways from This Episode
● The Anime Filter is a hot, trending topic in platforms like Tiktok, Instagram, and Snapchat It’s also a fun way of engaging with the anime community
● There are other, similar face-animation filters available (The Cartoon 3D Styles, especially, were quite popular for a time)
● Unsurprisingly, the anime filter does have its problems… And it left a big chunk of the TikTok community pretty flabbergasted — and disappointed. But that didn’t stop them from joining in the fun to provide some empowering commentary
Everyone is looking for the Anime Filter that allows you to turn yourself into an animated character. All in an effort to join in on the TikTok trend that’s been awakening the inner anime enthusiast in everyone.
In this post, we’ll be sharing with you all that we know about this elusive anime filter (along with some bonuses along the way)
In this article
01 [Let’s Figure out What’s Anime Filter First](#Part 1)
02 [More Tutorials on Anime Filter That You Should Not Miss](#Part 2)
Part 1 Let’s Figure out What’s Anime Filter First
01What is the Anime Filter on TikTok?
Okay, first off What even is this anime filter everyone is talking about and how can you use it to turn yourself into an animated character? We’ve attached a helpful YouTube Video below from @Kapwing who has a more comprehensive explanation for you.
But, as for the basics? It works just like most filters in that it can be used in both video and picture mode (allowing you to also make your own animated profile picture if you’d like). All you have to do is turn it on, and it’ll turn you into the most fitting anime character of your style immediately
02How to Get the TikTok Anime Filter?
Now to finally get down to business How exactly can you get the anime filter for your TikTok? Well, here’s the trick Despite having earned its popularity on TikTok, the Anime Style filter actually comes from Snapchat So, if you do want to animate yourself like you’ve seen all the other popular TikTok-ers do, you’ll need to record the video (or take the picture) on the Snapchat App first and then upload it to TikTok.
03A step-by-step breakdown of this process has been provided below (pictures included)
Step 1Download the Snapchat App
Alright, to start off with, you’ll need to download the Snapchat app on your smartphone (it’s available for both Android and iOS devices)
Step 2Open Snapchat App on your mobile device
Once you have the Snapchat app downloaded and installed on your device, open it
Step 3Search for the Anime Style Filter on Snapchat
Once you have the Snapchat app open, click on the search bar at the top of the interface, type ‘anime style’, and search
You might find that there are multiple versions of the filter (like as is shown in the image below), but the one that you need to select is the one titled Anime Style and created by Snapchat (it should appear first, as it does in the example)
Step 4Turn Yourself into an Animated Character
Finally You should be moved to the video recorder or the profile picture taker, where you can see yourself animated once and for all
Step 5Upload your anime filter-ed video to TikTok
Now, in order to get your Anime-fied self on TikTok, all you need to do is upload your video creation (either on your mobile device or your computer) We’ve provided a URL for you below that will take you directly to the TikTok upload page.
Part 2 More Tutorials on Anime Filter That You Should Not Miss
The Anime Style filter that we introduced in the previous section isn’t the only ‘animated’ filter available, of course It’s the one that caught the attention of a lot of people, thanks, in large part, to the participation of a couple of some of the bigger TikTok-ers on the platform. However, you can always expand your selection a bit by checking out some of the other interesting anime filters in the market:
0112 Anime Filters to Turn Yourself into an Anime Character
Anime Filter #1: Anime Style Realistic
In order to fix some of the more glaring issues with the regular Anime Style filter, Snapchat created a second filter, called Anime Style Realistic This one has a distinctively less anime style when it comes to looks. But it does allow for more skin colors, better hair integration, and accessories
Pros
FREE Snapchat lens that you can use at any time.
Works with most skin tones.
Better hair/accessory integration.
Cons
The style is more realistic than anime.
It is not available anywhere else; you’ll need to be on Snapchat to use it.
Not great at capturing motion.
This is a fun filter to use for those looking to spice up their timeline with something a little different (OR for those having a bad day and would like the almost-anonymity the filter can provide).
Anime Filter #2: Cartoon Style
Next, we have another Snapchat original lens called Cartoon Style This filter is more reminiscent of the older animated cartoon styles (think Pocahontas, Lilo & Stitch, etc.), but it doesn’t make it any less fun
Pros
FREE Snapchat lens.
Works with all skin tones.
Works with accessories.
Cons
More of a cartoon animated style than anime.
Not available anywhere else, you can only use it with Snapchat.
Not great at capturing motion.
Again, just like the Anime Filter, this is good for slapping on just to have fun or to sneakily erase a couple of blemishes
Anime Filter #3: Anime Filter
Now, although we mentioned that TikTok doesn’t have any anime-style filters, the Chinese version of it (surprisingly) does You can see it being used in the image above, rendering the user into an animated (albeit not classically Japanese animated) character.
Pros
Free Chinese TikTok filter.
Great at capturing motion.
Chinese animated drawing style.
Cons
Only available for the foreign version of the TikTok app.
Not the best with skin tones.
It doesn’t use the classic Japanese-animation style.
This has seen a popularity boost recently, with many TikTok users using it to show a ‘before’ and ‘after’ (like the image shown above), of their dance being animated.
Filter URL: https://www.douyin.com/
Anime Filter #4: Anime Eyes
This next filter is the first unofficial anime filter on this list. It was created by one of the users of Snapchat and can be found there if you want to use it This one doesn’t animate the whole face of the user, but it does apply a sticker of various ‘anime eyes’ that you can use as a semi-animated profile picture maker (free)
Pros
FREE Snapchat filter
Anime-eyes sticker to cover the eyes
Useful as an animated profile picture maker
Cons
Only available on the Snapchat app
Does not capture motion
Does not animate the entire face
This really is best used for profile pictures only You’ve probably seen it around as such, although some users also find it useful for hiding tired eyes
Anime Filter #5: Wondershare Filmora
If you’re looking to step up your game ‘editing-wise’ and give your pictures and videos an even more anime feel, then you can also consider the anime filters that the video editing tool, Wondershare Filmora Video Editor , offers. (You can also skip the pre-made filters altogether and create your own animated video with stickers and other effects.)
Pros
Variety of anime filters for videos
Comes with advanced video editing tools
Creates high-quality videos
Cons
Premium Software
No face animation
This particular option is for those looking for something a step above what everyone else is doing. All while allowing a more flexible experience
For Win 7 or later (64-bit)
For macOS 10.12 or later
Anime Filter #6: MHA Anime Filter (Instagram)
Continuing on from our trend of ‘out-there’ options, there’s also the MHA filter from Instagram This one has been especially popular with the anime fanbase as it offers plenty of opportunities for hilarious, pointed responses
Pros
FREE with Instagram
Anime-themed sticker
Trending on TikTok
Cons
Not a face animator filter
Not a profile picture animator
Limited anime options
It’s definitely not what you might have initially been looking for. But its popularity on TikTok is undeniable
Anime Filter #7: Anime Filter
Our second recommended anime-themed filter is the basic Anime Filter on Instagram This one flicks through dozens of some of the most popular animes to find out which one suits you best And, just like the previous, is currently trending on Tiktok
Pros
FREE with Instagram
Anime-themed sticker filter
Trending on TikTok
Cons
Sticker, not face animator
Available only on Instagram
Limited options
Anime Filter #8: Cartoon
This next animation filter pick of ours brings us back to Snapchat It’s called the Cartoon lens. And, just like our initial picks, it will change your pictures to that of a cartoon This one is closer to the cartoon-style popular around the 2000s (think Frozen & Tangled)
Pros
Available on Snapchat
Animated profile picture maker (free)
Works for various skin types
Cons
Not the best at motion capturing
Only available on Snapchat
Doesn’t use classic Japanese style
It’s not quite the anime filter that you’re probably looking for, but it does still work if all you want is a way of cartoon-ifying yourself to spice up your timeline It’ll clear up any blemishes too
Anime Filter #9: Comics Style
Again, we’re moving towards a different kind of animation style with this next filter from Snapchat, but the Comics Style filter does have its own promises of fun as well Especially for those who are long-time fans of American comics (or, even, your average modern-day Avengers fan)
Pros
FREE on Snapchat
Video face animator
Works with a variety of skin tones
Cons
Awkward with some face shapes
Does not work with all face accessories
Available only on Snapchat
Anime Filter #10: Cartoon 3D Style
Now, this might get confusing, but for our last picks, we actually have a set of filters all called Cartoon 3D Style But trust us They’re all different This first version is one you would probably relate more to the DreamWorks motion picture, Ratatouille
Pros
FREE profile picture animator on Snapchat
Compatible with a variety of face shapes
Compatible with a variety of skin tones
Cons
Set features (i.e., pointed nose)
Non-anime drawing style
Not compatible with some facial accessories
Anime Filter #11: Cartoon 3D Style
For our next Cartoon 3D Style lens from Snapchat, we have a face animator that can help you turn into something very close to another dreamwork’s motion picture (think the Despicable me or the Minions)
Pros
Cartoon style animator that is FREE to use
Great for motion capturing
Compatible with a variety of skin colors
Cons
Available only on Snapchat
Not compatible with certain face accessories
Limited face warping effect
Anime Filter #12: Cartoon 3D Style
And finally, for the last of our recommended anime filters, we have the Cartoon 3D Style lens from Snapchat that makes you look like your favorite Disney character (In this case, the obvious inspiration comes from Disney’s Frozen or Tangled)
Pros
Disney face animator that is FREE on Snapchat
Compatible with all skin tones
Trending on TikTok
Cons
It can only be used on Snapchat
Not great at capturing motion
02Steps to Download the Anime Filter App and Turn Yourself into an Anime Character
Now, if those filters weren’t enough for you, we’ve also included this next tutorial on how you can find apps on your mobile device that will allow you to get the same effect without having to use Snapchat, TikTok, or Instagram
Step 1Go to the App Store
The first step, of course, is to go to the app store on your mobile device.
Step 2Search for Anime Filter App
Next, search ‘Anime Filter’ on your phone’s app store.
Step 3Select Anime Filter App
There are multiple types of anime filter apps available in the market. Pick the one that you think will work best for you.
Step 4Install Anime Filter App
Finally, once you’ve found the anime filter app for you, install it.
Step 5Open Anime Filter App
The app that we used for our example, Anime Camera, offers several different animation styles However, this app does come with a subscription fee, so keep that in mind.
03Anime Filter Has a Sadly Unsurprising Problem
You might have noticed this while we were introducing all the different types of anime-style filters available, but the popular Anime Filter has its shortcomings. Which includes:
PROBLEM 1: Dark Skin Tones
The anime filter’s inability to capture darker skin tones accurately is one of the biggest issues users have with the filter.
PROBLEM 2: Hair Style
Hairstyle options are also very limited. And, as for black hairstyles? Well, the options are pretty much non-existent.
PROBLEM 3: Face Accessories
Do you wear glasses? How about piercings? Well, this won’t translate for you either, unfortunately
Key Takeaways from This Episode
● The Anime Filter is a hot, trending topic in platforms like Tiktok, Instagram, and Snapchat It’s also a fun way of engaging with the anime community
● There are other, similar face-animation filters available (The Cartoon 3D Styles, especially, were quite popular for a time)
● Unsurprisingly, the anime filter does have its problems… And it left a big chunk of the TikTok community pretty flabbergasted — and disappointed. But that didn’t stop them from joining in the fun to provide some empowering commentary
Tips for GIF to Animated PNG
Versatile Video Editor - Wondershare Filmora
An easy yet powerful editor
Numerous effects to choose from
Detailed tutorials provided by the official channel
The advent of many instant chats had led to the demand for GIFs and animated PNGs. Users access these files to express their emotions amidst the chat environment. There are unique ways to convert GIFs to animated PNGs precisely. In the digital space, there are surplus applications are available to perform this conversion process without compromising with the quality factors.
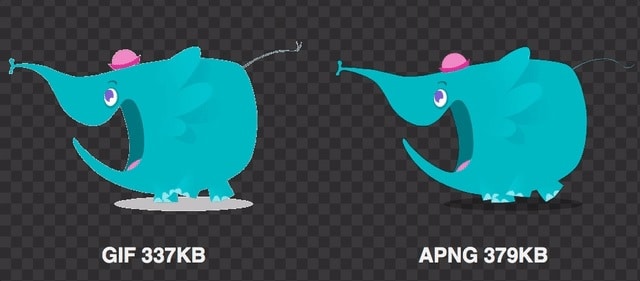
In this article, a detailed discussion on the GIFs and the animated PNGs are available for better understanding. It is the process of working with images and implementing some actions with the pictures that makes it appear interesting. Most GIFs and animated PNGs are used for fun and it helps to excite your friends amidst serious chats. It serves as the source of conveying thoughts with fun-filled visuals. Before choosing between the GIFs and APNGs, analyze which file format offers you surplus advantages for optimal handling. Here, in the below discussion you will study the features of this file format and the precise methods to switch between these two files efficiently.
In this article
01 [What is GIF & What is animated PNG](#Part 1)
02 [GIF vs animated PNG, which is better?](#Part 2)
03 [Can PNG be animated like GIF?](#Part 3)
04 [How to Convert GIF to animated PNG?](#Part 4)
Part 1 What is GIF & What is animated PNG
The GIFs are animated images and the picture moves in a sequence in a cycle. The movement repeats without stopping. This type of picture is popular on the webpages and the built-in templates are available in the digital space for quick downloads. The single-frame GIFs take more time to download and displays exciting moves that trigger laughter with audiences. GIF takes the abbreviation of Graphics Interchange Format. It came into existence in the year 1980s and is widely used globally. GIFs are animated images in a basic format. It adopts the safe LZW algorithm that tracks the colors optimally.
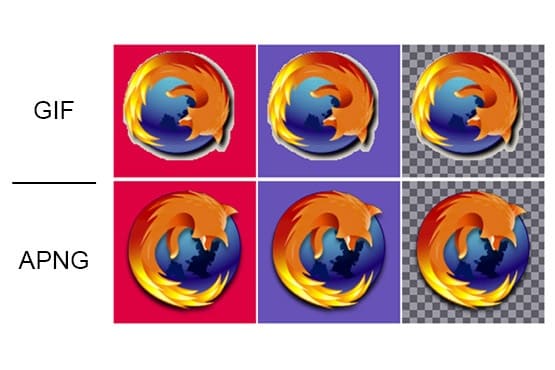
The superior form of the motion picture is animated PNGs. It stands for Portable Network Graphics. This format supports indexed color, grayscale, and true color images. Additionally, the animated PNGs has advantages like alpha channels, cross-platform gamma corrections and two-dimensional interlacing. APNG came into existence in the year 1995 and is compatible with a few web browsers.
Part 2 GIF vs animated PNG, which is better?
When compared to GIFs and APNG, APNG seems to be technically strong with a wide range of supporting features. The quality of the file of APNG is good as it displays 24-bit images and 8- bit transparency. The APNG images can be compressed to the smallest value thereby encouraging the ease of transfer between devices. APNG has access to many color combinations whereas GIFs can use up to 256 colors. The new web browser versions are compatible with APNGs and the older browsers play the GIFs precisely. To view the APNG files in the older browsers you require external plugins or extensions. The higher quality APNGs are mostly used by professionals when compared to GIFs. The portability in moving the animated images is simple with APNGs. The GIF files have a poor compression rate and it is difficult to transfer at the digital space.
Part 3 Can PNG be animated like GIF?
You can animate the PNG files like GIF using reliable tools in the online space. There are unique programs to establish this process. It works on every detail on the PNG files and adds transition effects to the images to implement the movements. If you take closer looks at the digital space, you will acquire sophisticated programs to add transitions to the static pictures. While animating the PNG files, you must include frames, durations, and transition effects to the PNG images to include the animations. Based on the settings, the animated PNG file functions. Every move of the images is assigned by the attributes set by the users with the help of powerful applications in the digital space. You can also find online tools to assist in this operation. The static PNG files get desired moves by animating like GIF files. The APNG has superior quality when compared to GIF files. As discussed above many professionals opt for APNG files than GIFs.

Part 4 How to Convert GIF to animated PNG?
In this section, you will learn how to convert GIF to animated PNG using online tools. Use the recommended online platform to carry out the quality conversions to acquire desired outcomes.
1. EZGIF
It is an exclusive online space that brings quality animations to GIF files acquiring the properties of APNG. By converting the GIFs to APNG, you can enhance various features like easy storage, best compression, quality elements in the file. When you step into this website, you can perform a wide range of conversion processes between animated and static image files. Choose the right tabs on the menu to trigger the desired changes to the uploaded files.
Choose GIF to APNG tab at the top menu to begin this conversion process. The GIF files will receive all the good functionalities of APNG after this conversion process. You can download the animated PNGs to any platform after a successful conversion.
Follow the below steps to proceed with GIF to animated PNGs using the EZGIF online tool.
Step 1
Go to the website and upload the GIF file by tapping the ‘Choose File’ button. The maximum file size is 50MB that ensures a flawless upload process. Here, you can either choose a file from a local drive or paste the URL from an online source into this webpage flawlessly. Then, click the Upload button to trigger this GIF to the APNG conversion process.
Step 2
Format the output and click the convert button to download the animated PNG files.
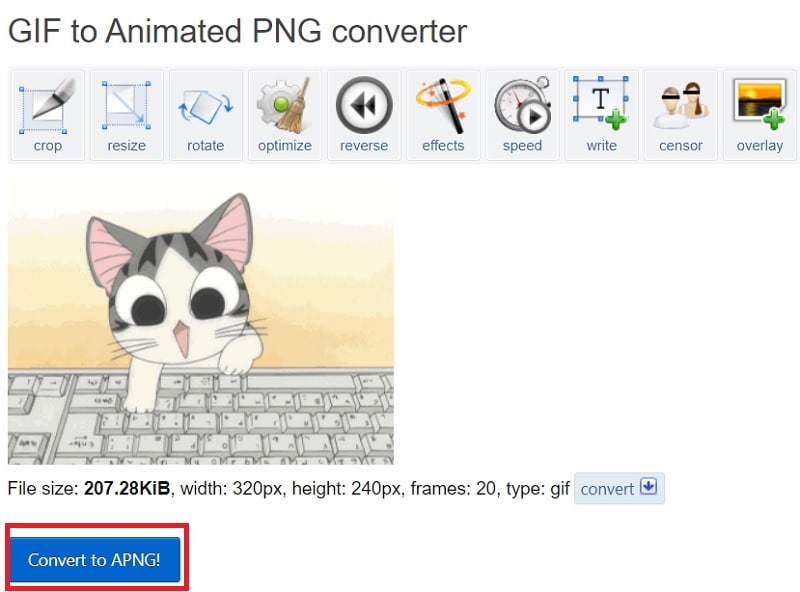
It is a simple and yet effective one that helps to convert the GIFs to animated PNGs in no time. You can also use the edit tools to make changes to the GIF files before the conversion process. The converted files are available for downloads at your local system drive. Access them when required and upload them to the desired platform to make fun with your friends and family members.
2. Free convert
In this section, you will be learning how to use the Free convert webpage to carry out the GIF to the animated PNG conversion process. It is a user-friendly interface where the controls are explicit to make the perfect click appropriately. This website provides a secure platform to carry out the conversion process optimally. The uploaded files are deleted automatically after 2 hours. You can expect a quality conversion process to take place on this website.
The stepwise process to convert GIF to animated PNG using the Freeconvert website.
Step 1
Upload the Gif files by tapping the ‘Choose GIF files’ button. This platform supports GIF file sizes up to 1GB.

Step 2
Hit the Convert to APNG button to trigger the conversion process and download the APNG file to desired storage space precisely.

Surf the above steps to carry out a precise conversion process between GIF and animated PNG. After this format conversion process, you can enjoy all the benefits of APNG overcoming the constraints with the GIF files.
These are the two efficient ways of converting the GIF files to APNG format using online web pages. You can choose any one of the websites to carry out the desired APNG conversion process optimally.
Wondershare Filmora
Get started easily with Filmora’s powerful performance, intuitive interface, and countless effects!
Try It Free Try It Free Try It Free Learn More >

AI Portrait – The best feature of Wondershare Filmora for gameplay editing
The AI Portrait is a new add-on in Wondershare Filmora. It can easily remove video backgrounds without using a green screen or chroma key, allowing you to add borders, glitch effects, pixelated, noise, or segmentation video effects.

Conclusion
Thus, this article had given valuable insights on the conversion of GIF to animated PNG files. The enlightening discussion about the GIFs and APNGs assists you to choose the best one from these two options. You must be clear about the differences between these formats and select the ones that meet your needs appropriately. Connect with the above-discussed web pages to carry out the conversion effortlessly with a few clicks. Stay connected with this article to discover the new horizons of animated clippings that excite you during online communications.
The advent of many instant chats had led to the demand for GIFs and animated PNGs. Users access these files to express their emotions amidst the chat environment. There are unique ways to convert GIFs to animated PNGs precisely. In the digital space, there are surplus applications are available to perform this conversion process without compromising with the quality factors.
In this article, a detailed discussion on the GIFs and the animated PNGs are available for better understanding. It is the process of working with images and implementing some actions with the pictures that makes it appear interesting. Most GIFs and animated PNGs are used for fun and it helps to excite your friends amidst serious chats. It serves as the source of conveying thoughts with fun-filled visuals. Before choosing between the GIFs and APNGs, analyze which file format offers you surplus advantages for optimal handling. Here, in the below discussion you will study the features of this file format and the precise methods to switch between these two files efficiently.
In this article
01 [What is GIF & What is animated PNG](#Part 1)
02 [GIF vs animated PNG, which is better?](#Part 2)
03 [Can PNG be animated like GIF?](#Part 3)
04 [How to Convert GIF to animated PNG?](#Part 4)
Part 1 What is GIF & What is animated PNG
The GIFs are animated images and the picture moves in a sequence in a cycle. The movement repeats without stopping. This type of picture is popular on the webpages and the built-in templates are available in the digital space for quick downloads. The single-frame GIFs take more time to download and displays exciting moves that trigger laughter with audiences. GIF takes the abbreviation of Graphics Interchange Format. It came into existence in the year 1980s and is widely used globally. GIFs are animated images in a basic format. It adopts the safe LZW algorithm that tracks the colors optimally.
The superior form of the motion picture is animated PNGs. It stands for Portable Network Graphics. This format supports indexed color, grayscale, and true color images. Additionally, the animated PNGs has advantages like alpha channels, cross-platform gamma corrections and two-dimensional interlacing. APNG came into existence in the year 1995 and is compatible with a few web browsers.
Part 2 GIF vs animated PNG, which is better?
When compared to GIFs and APNG, APNG seems to be technically strong with a wide range of supporting features. The quality of the file of APNG is good as it displays 24-bit images and 8- bit transparency. The APNG images can be compressed to the smallest value thereby encouraging the ease of transfer between devices. APNG has access to many color combinations whereas GIFs can use up to 256 colors. The new web browser versions are compatible with APNGs and the older browsers play the GIFs precisely. To view the APNG files in the older browsers you require external plugins or extensions. The higher quality APNGs are mostly used by professionals when compared to GIFs. The portability in moving the animated images is simple with APNGs. The GIF files have a poor compression rate and it is difficult to transfer at the digital space.
Part 3 Can PNG be animated like GIF?
You can animate the PNG files like GIF using reliable tools in the online space. There are unique programs to establish this process. It works on every detail on the PNG files and adds transition effects to the images to implement the movements. If you take closer looks at the digital space, you will acquire sophisticated programs to add transitions to the static pictures. While animating the PNG files, you must include frames, durations, and transition effects to the PNG images to include the animations. Based on the settings, the animated PNG file functions. Every move of the images is assigned by the attributes set by the users with the help of powerful applications in the digital space. You can also find online tools to assist in this operation. The static PNG files get desired moves by animating like GIF files. The APNG has superior quality when compared to GIF files. As discussed above many professionals opt for APNG files than GIFs.
Part 4 How to Convert GIF to animated PNG?
In this section, you will learn how to convert GIF to animated PNG using online tools. Use the recommended online platform to carry out the quality conversions to acquire desired outcomes.
1. EZGIF
It is an exclusive online space that brings quality animations to GIF files acquiring the properties of APNG. By converting the GIFs to APNG, you can enhance various features like easy storage, best compression, quality elements in the file. When you step into this website, you can perform a wide range of conversion processes between animated and static image files. Choose the right tabs on the menu to trigger the desired changes to the uploaded files.
Choose GIF to APNG tab at the top menu to begin this conversion process. The GIF files will receive all the good functionalities of APNG after this conversion process. You can download the animated PNGs to any platform after a successful conversion.
Follow the below steps to proceed with GIF to animated PNGs using the EZGIF online tool.
Step 1
Go to the website and upload the GIF file by tapping the ‘Choose File’ button. The maximum file size is 50MB that ensures a flawless upload process. Here, you can either choose a file from a local drive or paste the URL from an online source into this webpage flawlessly. Then, click the Upload button to trigger this GIF to the APNG conversion process.
Step 2
Format the output and click the convert button to download the animated PNG files.
It is a simple and yet effective one that helps to convert the GIFs to animated PNGs in no time. You can also use the edit tools to make changes to the GIF files before the conversion process. The converted files are available for downloads at your local system drive. Access them when required and upload them to the desired platform to make fun with your friends and family members.
2. Free convert
In this section, you will be learning how to use the Free convert webpage to carry out the GIF to the animated PNG conversion process. It is a user-friendly interface where the controls are explicit to make the perfect click appropriately. This website provides a secure platform to carry out the conversion process optimally. The uploaded files are deleted automatically after 2 hours. You can expect a quality conversion process to take place on this website.
The stepwise process to convert GIF to animated PNG using the Freeconvert website.
Step 1
Upload the Gif files by tapping the ‘Choose GIF files’ button. This platform supports GIF file sizes up to 1GB.
Step 2
Hit the Convert to APNG button to trigger the conversion process and download the APNG file to desired storage space precisely.
Surf the above steps to carry out a precise conversion process between GIF and animated PNG. After this format conversion process, you can enjoy all the benefits of APNG overcoming the constraints with the GIF files.
These are the two efficient ways of converting the GIF files to APNG format using online web pages. You can choose any one of the websites to carry out the desired APNG conversion process optimally.
Wondershare Filmora
Get started easily with Filmora’s powerful performance, intuitive interface, and countless effects!
Try It Free Try It Free Try It Free Learn More >
AI Portrait – The best feature of Wondershare Filmora for gameplay editing
The AI Portrait is a new add-on in Wondershare Filmora. It can easily remove video backgrounds without using a green screen or chroma key, allowing you to add borders, glitch effects, pixelated, noise, or segmentation video effects.
Conclusion
Thus, this article had given valuable insights on the conversion of GIF to animated PNG files. The enlightening discussion about the GIFs and APNGs assists you to choose the best one from these two options. You must be clear about the differences between these formats and select the ones that meet your needs appropriately. Connect with the above-discussed web pages to carry out the conversion effortlessly with a few clicks. Stay connected with this article to discover the new horizons of animated clippings that excite you during online communications.
Also read:
- 2024 Approved 10 Scary Anime Girls That Will Make You Creepy
- 2024 Approved How to Liven Up Your Animate Website on Scroll
- Updated 2024 Approved Can I Do Animated Logo Design Without Design Skills?
- Updated In 2024, How to Make 3D Cartoon of Yourself
- What Is Anime? Anime VS Manga VS Cartoon for 2024
- New How to Convert Animated GIF From Video
- 21 Top Free Anime Websites to Watch Anime Online-Anime
- New In 2024, Before You Learn Facebook Slideshow 5 Things You Should Know
- New In 2024, Guide on Creating GIF in WhatsApp iPhone
- In 2024, Popular Female & Male Disney Cartoon Characters To Empower You
- In 2024, Best 15 Horror Animes That Will Trigger a Heart Attack
- New 2024 Approved Types of Cartoon Styles You May Use for Your Next Marketing Project
- New Amazing Ideas About Creating Personalised WhatsApp GIF Sticker for 2024
- New How to Create A GIF with Sound for 2024
- 2024 Approved Samples of Cartoon Character Face
- New In 2024, 10 Cartoon Character Makers to Create Animated Characters
- Updated In 2024, How to Send and Add Snapchat GIFs 100 The Easy Way
- New 2024 Approved Samples of Cartoon Character Face
- 20 Free After Effects Logo Reveal Templates for 2024
- Updated Best Tips for Effortless Unity 3D Animation
- Updated DP Animation Maker Tutorial for Finding The Best Animated Profile Picture Maker
- In 2024, Is Blender 2D Animation As Awesome As 3D?
- New 2024 Approved The Only Guide Youll Ever Need to Learn About GIF Video Downloader
- How To Change Your Apple ID on Apple iPhone X With or Without Password | Dr.fone
- In 2024, Unlock Nubia Red Magic 9 Pro Phone Password Without Factory Reset Full Guide Here
- In 2024, How to get the dragon scale and evolution-enabled pokemon On Lava Agni 2 5G? | Dr.fone
- How to Change Credit Card on Your Apple iPhone X Apple ID and Apple Pay
- Best Anti Tracker Software For Samsung Galaxy M14 5G | Dr.fone
- In 2024, How and Where to Find a Shiny Stone Pokémon For Motorola Moto G14? | Dr.fone
- Unlock Your Boost Mobile iPhone 7 Plus Before the Plan Expires
- Super Easy Ways To Deal with HTC U23 Unresponsive Screen | Dr.fone
- Rootjunky APK To Bypass Google FRP Lock For Vivo Y36
- How to Change/Add Location Filters on Snapchat For your ZTE Nubia Flip 5G | Dr.fone
- In 2024, How to Change Netflix Location to Get More Country Version On Gionee F3 Pro | Dr.fone
- Possible solutions to restore deleted messages from Oppo A18
- Title: Updated 2024 Approved How to Analyze an Editorial Cartoon Easily
- Author: Elon
- Created at : 2024-05-19 03:05:31
- Updated at : 2024-05-20 03:05:31
- Link: https://animation-videos.techidaily.com/updated-2024-approved-how-to-analyze-an-editorial-cartoon-easily/
- License: This work is licensed under CC BY-NC-SA 4.0.
