
:max_bytes(150000):strip_icc():format(webp)/Google-Cloud-Next-59a9cb4a03e644389e2ffa9939c420f8.jpg)
Updated 2024 Approved Some Techniques for Creating Animated Logo That Few People Know About
Some Techniques for Creating Animated Logo That Few People Know About
Some Techniques for Creating Animated Logo That Few People Know About
An easy yet powerful editor
Numerous effects to choose from
Detailed tutorials provided by the official channel
How you present your brand on the digital landscape has a huge impact on your company’s overall conversions.
![]()
This guide will walk you through different procedures for creating an animated logo using different solutions.
In this article
01 [Are There Wow Factors in Your Branding with Animation Effects?](#Part 1)
02 [How to Make an Animated Logo: a Step-by-step Guide](#Part 2)
03 [5 Steps to Animate Your Logo](#Part 3)
04 [What is the Best Software to Animate a Logo?](#Part 4)
05 [Want to Explore More Advanced Animation Skills?](#Part 5)
Part 1 Are There Wow Factors in Your Branding with Animation Effects?
As we mentioned in the earlier paragraph, an animated logo can do wonders for your digital presence. How? When you publish an animated logo on your website or any other social media profile, it’ll automatically help you garner the attention from website visitors. Creating an animated logo will also make it easier for the customers to remember your business days after they visited your website.
However, when you are creating an animated logo, it’ll be crucial to follow a few tips to achieve the best results. Here are a few factors that’ll help you create the best animated logo.
● Always start with a simple research to analyze the customer behavior
● Instead of starting with the final design, take your time and work on a few sketches at the beginning
● Understand where you are going to publish the logo and then, choose the right color-scheme accordingly
● When it comes to animated logos, overdoing the animations can also damage the overall visual appearance of your logo
Part 2 How to Make an Animated Logo: a Step-by-step Guide
So, now that we’ve explained the importance of animated logos, let’s start with the step-by-step process of creating an animated logo using different solutions. First, we’ll take a look at some of the premade logo templates that you can integrate and customize to speed up the entire process.
01Vortex Logo Reveal
If you want to use your animated logo in a dedicated video, Vortex logo reveal can be an ideal choice for the job. The template contains a 3-5 seconds animation that’ll reveal your actual logo in a suspenseful manner.
023D Logo Animation
This is a pre-made animated logo template in After Effects that you can integrate with a single tap. The template simply shatters the logo into pieces after the initial reveal to create a dramatic effect for the viewers.
03Gold Luxury Logo Reveal
If you’re worried that using 3D-effects might overdo the animations, you can use this simple gold luxury logo reveal template. As compared to the previous two templates, this one has a simple animation and will help you convey your message more effectively.
04Waving 3D Logo Reveal
This logo is a widely popular AE animated logo template that many users buy to make their logos more appealing. The template utilizes motion graphics and a clean animation to reveal the actual brand logo while keeping the viewers engaged throughout the process.
05Infinite Zoom Logo Reveal
Want to reveal your animated logo in a unique manner? This template has got you covered. The After Effects logo template will allow you to use different pictures to reveal the logo with the traditional zoom-out transition. You can use all the pictures that represent your brand to add the required business values to your logo.
06Space Animation
Space animation is another After Effects template that’s ideal for brands who want to reveal their brand logo in a visually appealing manner. Different stars in the cosmos will combine together to represent your logo and leave a great first impression on the viewers.
Part 3 5 Steps to Animate Your Logo
Now, let’s move towards the next phase of creating an animated logo, i.e., animating the logo itself. It doesn’t matter which software you use to get the job done, you can adhere to the following steps to achieve the best results and create a visually stunning animated logo.
01Prepare the Simple Logo
In every situation, you’ll first have to prepare the simple one-dimension logo that you’ve been using so far. To create this logo, you can use a wide variety of tools such as Adobe Photoshop or even a simple logo maker such as Canva. Keep in mind that you should implement all the customization on the design during this stage only.
02Import the Logo File
The next step towards creating the animated logo is to simply import your logo file into the tool that you want to use to do the job. For instance, if you are planning to use Adobe After Effects, simply click “File > Open” and select the logo file to load it into AE’s editing panel. Once the file is successfully imported, you can move towards the next step.
03Choose the Right Animation Template
Now, you can proceed towards choosing the right animation template for your animated logo. It doesn’t matter which software you’re using for creating an animated logo, you’ll find dozens of built-in templates that can be integrated into the design with one click. Choose any of these templates and move towards the next step.
04Apply the Keyframes
After you’ve successfully imported the file and chosen a dedicated animation template, the next step would be to apply the keyframes. In tools like After Effects, you’ll find a built-in slider that’ll allow you to adjust the keyframes to customize the animation.
05Make the Final Adjustments
Finally, make the final adjustments to the animation. For instance, you can customize the color scheme or color-grade the logo for better visual appearance. You can also add other objects on top of the design to enhance the overall quality of the logo.
Part 4 What is the Best Software to Animate a Logo?
Here are the top three software you can use to get started with your animated logo and complete the process.
01Pixteller
![]()
Pixteller is an online logo maker designed to allow users to animate their logos in an easy-to-use interface. Even if you are not an experienced designer, you’ll find it pretty easy to animate the logo using Pixteller. The tool has a plethora of built-in templates that’ll allow you to edit your logo without any hassle.
02Crello
![]()
Crello is another easy-to-use online tool you can use to animate your logos without any technical skills. Being a web-based software, you can use Crello anywhere you want. In every situation, it’ll allow you to design a visually appealing logo with high-quality animation.
03Adobe After Effects
![]()
Now, if you are an experienced designer and are familiar with the Adobe ecosystem, After Effects is the most reliable tool to get the job done. Even though AE has a pretty complicated user interface, it’ll allow you to design a stunning logo animation, especially if you are familiar with all its editing tools.
Key Takeaways from This Episode
● Creating an animated logo is one of the most reliable ways to boost your brand visibility and attract new customers
● While creating an animated logo, it’s crucial to follow a dedicated process to attain the best results
● To use animated logos in your promotional videos, you can use Filmora Pro and its built-in features to get the job done.
Cartoon Fundamentals: How to Learn Cartoon Characters Sketch Quickly
Cartoon Fundamentals: How to Learn Cartoon Characters Sketch Quickly
An easy yet powerful editor
Numerous effects to choose from
Detailed tutorials provided by the official channel
Whether your favourite Cartoon character Bugs-bunny comes from space or beyond your imagination, whether nostalgic Tom and Jerry are young, eternal or old, knowing the process to draw cute, funny, adorable cartoon-characters is a kind of special feeling always & looks essential incase you desire to become quality professional artist. Cartoon Characters are more challenging to draw while taking care of their weird postures, body-parts like legs, hands.Cartoons characters are the easiest ones to draw as it involved simplistic shapes and doesn’t needed a hard core practice.
In this article, you will be able to get access to drawing amazing characters with a wide range of characters featuring ordinary people, fictional-characters, creatures, monsters, or your favourite cute little ones in easy way.
In this article
01 [Basics of Cartoon Characters Sketch](#Part 1)
02 [Cartoon Characters Sketch Anyone Can Draw (With Free Video Tutorials)](#Part 2)
Part 1 Basics of Cartoon Characters Sketch
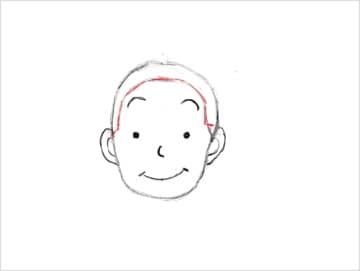
Before going ahead with the process of learning step by step how to draw cartoon characters, you need to understand the methodology behind sketching. It is easy to draw multiple cartoon characters but at the same time, you need to figure out sketching techniques involved in making that happen. If you want to extract few details of your central character, you need to represent cartoon characters sketch with the help of shapes. The main goal here is to recognize drawing & let it be attractive as children are the main audience and cartoon characters like Disney, Chuck Jones, Walter-Lantz and others have truly enchanted this world with eternal character & their magical appearance.
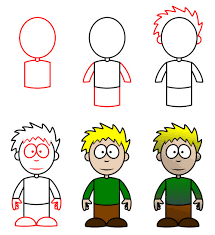
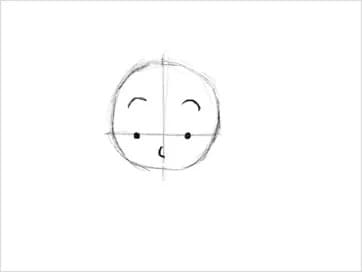
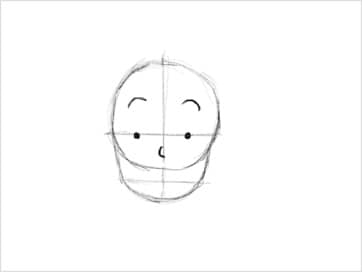
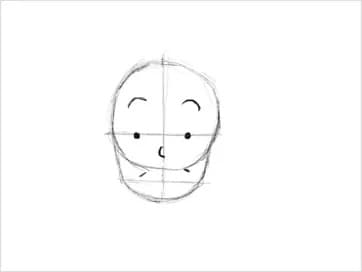
01Concentrating on circle
One of the most basic and interesting shape for any cartoon sketch is circle. All you need is to clearly define basic proportion of your character and that can be happened with desired character’s head. Later on you can trace its charm with face axis.
02Draw Cartoon Eyes
In order to make eyes, one needs to take care of oval shape sketch with slight tilt to side at top position. You have to note that, it is always important to leave good gap between each one of them of approximately similar size as the eye.
03Drawing Cartoon Hair
There is nothing to fear when it comes to draw cartoon hair. You don’t need stylist or a fashion designer in order to make them look perfect. With ideal haircut and matching personality of the desired character, you can do this thing pretty awesome. Hair can represent age, conservatism, rebellion etc. and comes in incredible features.
One of the most accurate & a faster way to do that is by taking references from a fashion magazine, Google Search or cartoon magazine. Once you are done with your findings of ideal styling, you can later on simplify your hair version.
04Sketching for Older Character
Sometimes older characters can be pretty easy to draw as it all begins with their eyes, facial expressions, addition of wrinkles, eyebrows, eye pupils etc. You just need to expand eyebrow a little bit. The older characters have thicker-eyebrows, large forehead space etc.
05Drawing a female character
It’s simple, just focus around delicacy in facial structures, like:-
● Thin eyebrows
● Larger & expressive eyelashes
● Thinner-chin
● Small-nose under fewer-details
● Long hair or depends on your choice
That’s it. Also, you need to give comfort feeling to your character, the more you draw the more realistic it will look.
● Filmora for learning new drawing skills
For Win 7 or later (64-bit)
For macOS 10.12 or later
If you want to showcase your talent to this world without any extravagant apps or software then FIlmora is the best choice that you can consider for drawing some amazing cartoon at your own. This app has its own fun loving designing features and you can add varieties of stickers, images and text to your drawings.
What exactly Filmora can do your drawings:
● For your Pencil sketch of cartoon characters, this app has a lot of text, images and fun loving stickers to showcase more highlighting features of your cartoon character.
● You can share your cartoon with your friends and other community over the web through Twitter, Facebook, and WhatsApp etc.
● This will let you access video editing and image editing features also, to give your cartoon a life.
Part 2 Cartoon Characters Sketch Anyone Can Draw (With Free Video Tutorials)
Now, it’s time to move on with thinking about which cartoon characters to put in your papers with emotions, facial expressions and other features. We are now moving towards the process to include more and more emotions to the same.
Let’s begin drawing 8 amazing characters that are not only famous but also living in heart of children.
01Bugs Bunny
Who doesn’t live Bugs Bunny? Well, it is among the list of most iconic characters that you can imagine and it is certainly the most funnies and interesting character to draw. Right from drawing its big feet to attractive teeth just made for cutting carrots, a lot of things are included in Bugs bunny.
Let’s Draw it:-
● Draw a circle & a “noodle” shaped object as per the imagination. The circle will be its head & pear shape will be its body. You need to make bottom pear fatter as compared to upper portion and also upper-part has to overlap head circle only a little.
● Include perspective guidelines at around the head as this thing can correctly position eyes as well as nose of your bunny.
● You need to draw the eyes at Horizontal guideline and nose where guidelines crosses.
● Draw cheeks and include ears, arms. At the time of drawing arms, you have to give natural curve to arms.
● The arm curves together with the legs-curves might look little difficult, therefore you have to make use of your pencil tenderly without pushing it harder.
● Draw inner lines in ear & iris ellipse at inner portion of eyes.
● Add nose & draw mouth, teeth.
● Your Bunny starts taking its shape and here you can add colors as per your choice
Your cartoon Bugs-Bunny is now ready.
02Popeye
One of the most famous cartoon character of Disney Popeye also appeared on the cinema screens and this belongs to the list of famous classic cartoon-characters.
Let’s draw this amazing character:-
● First Sketch few basic shapes like head, chest, belly.
● It’s a comic character so give it a grotesque-look
● Slightly include other body-parts with shapes like ellipses, noodles in the form of contours.
● Draw one centre-line across the head with well-balanced facial features.
● Draw nose, mouth, ears for the face to form.
● Sketch contours of Popeye’s fists, and arms.
● You can begin giving colors to this shape with flat layers of colorings
03Barney Rubble
As a next door friend and neighbor of Flintstone-house, Barney is kind of a quirky character. This contains features like ears & big feet in the form of angles.
Here is an amazing video tutorial for your Barnet Rubble Cartoon Character:-
04Scrooge McDuck
This cartoon character has wealthy features with fun-loving designs to draw in the form of top-hat, a-cane, as well as few small reading glasses. When it comes to drawing this cartoon characters sketch you need to come up with funny and slightly challenging features.
05Drawing a Ninja For Amazing Action
● Step 1
Work on the head first with nice & precise circle in order to illustrate head portion. Inside this, you can add two more tiny circles for eyes. Once you are done with the eyes, you need to add large & thin rectangle that represents headband. At one portion of headband draw tiny circle with small triangles in numbers 2.
● Step 2
Left arm of our ninja can be sketched through a long & thin rectangle. In order to showcase right arm, draw two rectangles and later on both hands has to be represented in terms of circles.
● Step 3
Two Legs are also need to draw in terms of unusual position. So total of 5 rectangles has to be drawn for both legs & feet.
● Step 4
Add accessories like sabre with basic shapes like circle or rectangle for the same.
● Step 5
Now refine it with an outline and work upon head to make sure both eyes will be clear & visible and also keep the head round & tight.
● Step 6
For upper portion, use nice curved lines and illustrate chest & arms. For showing a discipline make use of good contour likes that highlights posture & gesture.
● Step 7
Repeat the process for the lower portion of your Action ninja.
● Step 8
Now throw some colors’ either black, brown & red to finish the masterpiece!
06Morty Smith
Morty is a lot easy and occupies t-shirt & jeans in its overall appearance and it is much smaller & way more natural than you usually think.
07Helga G. Pataki
If you want to add some crazy cartoon characters in your list then Helga is a good choice. While drawing its cartoon, you need to pay close attention to head as this thing can be little strange with her rectangle hairdo.
08Kim Possible
The design of Kim Possible looks easy at first appearance but when you actually begin with the process of draw its shape, you may get confused. You need to add varieties of features in her face with crazy parachute pants right from the 1980s.
09Shaggy Rogers
The companion of Scooby Shaggy also love its treats & also like to run-away from the monsters at first sight. He can solve mysteries and fun to watch.
● Ending Thoughts →
● Well, drawing cartoons is always a fun loving thing to do. You can pick any one cartoon for drawing some favorite designs.
● You can make use of professional apps to give proper background to your poster or sketch making.
● For Fictional creatures, you can illustrate their styling features, fun facts and lot more to make it much more interesting.
Whether your favourite Cartoon character Bugs-bunny comes from space or beyond your imagination, whether nostalgic Tom and Jerry are young, eternal or old, knowing the process to draw cute, funny, adorable cartoon-characters is a kind of special feeling always & looks essential incase you desire to become quality professional artist. Cartoon Characters are more challenging to draw while taking care of their weird postures, body-parts like legs, hands.Cartoons characters are the easiest ones to draw as it involved simplistic shapes and doesn’t needed a hard core practice.
In this article, you will be able to get access to drawing amazing characters with a wide range of characters featuring ordinary people, fictional-characters, creatures, monsters, or your favourite cute little ones in easy way.
In this article
01 [Basics of Cartoon Characters Sketch](#Part 1)
02 [Cartoon Characters Sketch Anyone Can Draw (With Free Video Tutorials)](#Part 2)
Part 1 Basics of Cartoon Characters Sketch
Before going ahead with the process of learning step by step how to draw cartoon characters, you need to understand the methodology behind sketching. It is easy to draw multiple cartoon characters but at the same time, you need to figure out sketching techniques involved in making that happen. If you want to extract few details of your central character, you need to represent cartoon characters sketch with the help of shapes. The main goal here is to recognize drawing & let it be attractive as children are the main audience and cartoon characters like Disney, Chuck Jones, Walter-Lantz and others have truly enchanted this world with eternal character & their magical appearance.
01Concentrating on circle
One of the most basic and interesting shape for any cartoon sketch is circle. All you need is to clearly define basic proportion of your character and that can be happened with desired character’s head. Later on you can trace its charm with face axis.
02Draw Cartoon Eyes
In order to make eyes, one needs to take care of oval shape sketch with slight tilt to side at top position. You have to note that, it is always important to leave good gap between each one of them of approximately similar size as the eye.
03Drawing Cartoon Hair
There is nothing to fear when it comes to draw cartoon hair. You don’t need stylist or a fashion designer in order to make them look perfect. With ideal haircut and matching personality of the desired character, you can do this thing pretty awesome. Hair can represent age, conservatism, rebellion etc. and comes in incredible features.
One of the most accurate & a faster way to do that is by taking references from a fashion magazine, Google Search or cartoon magazine. Once you are done with your findings of ideal styling, you can later on simplify your hair version.
04Sketching for Older Character
Sometimes older characters can be pretty easy to draw as it all begins with their eyes, facial expressions, addition of wrinkles, eyebrows, eye pupils etc. You just need to expand eyebrow a little bit. The older characters have thicker-eyebrows, large forehead space etc.
05Drawing a female character
It’s simple, just focus around delicacy in facial structures, like:-
● Thin eyebrows
● Larger & expressive eyelashes
● Thinner-chin
● Small-nose under fewer-details
● Long hair or depends on your choice
That’s it. Also, you need to give comfort feeling to your character, the more you draw the more realistic it will look.
● Filmora for learning new drawing skills
For Win 7 or later (64-bit)
For macOS 10.12 or later
If you want to showcase your talent to this world without any extravagant apps or software then FIlmora is the best choice that you can consider for drawing some amazing cartoon at your own. This app has its own fun loving designing features and you can add varieties of stickers, images and text to your drawings.
What exactly Filmora can do your drawings:
● For your Pencil sketch of cartoon characters, this app has a lot of text, images and fun loving stickers to showcase more highlighting features of your cartoon character.
● You can share your cartoon with your friends and other community over the web through Twitter, Facebook, and WhatsApp etc.
● This will let you access video editing and image editing features also, to give your cartoon a life.
Part 2 Cartoon Characters Sketch Anyone Can Draw (With Free Video Tutorials)
Now, it’s time to move on with thinking about which cartoon characters to put in your papers with emotions, facial expressions and other features. We are now moving towards the process to include more and more emotions to the same.
Let’s begin drawing 8 amazing characters that are not only famous but also living in heart of children.
01Bugs Bunny
Who doesn’t live Bugs Bunny? Well, it is among the list of most iconic characters that you can imagine and it is certainly the most funnies and interesting character to draw. Right from drawing its big feet to attractive teeth just made for cutting carrots, a lot of things are included in Bugs bunny.
Let’s Draw it:-
● Draw a circle & a “noodle” shaped object as per the imagination. The circle will be its head & pear shape will be its body. You need to make bottom pear fatter as compared to upper portion and also upper-part has to overlap head circle only a little.
● Include perspective guidelines at around the head as this thing can correctly position eyes as well as nose of your bunny.
● You need to draw the eyes at Horizontal guideline and nose where guidelines crosses.
● Draw cheeks and include ears, arms. At the time of drawing arms, you have to give natural curve to arms.
● The arm curves together with the legs-curves might look little difficult, therefore you have to make use of your pencil tenderly without pushing it harder.
● Draw inner lines in ear & iris ellipse at inner portion of eyes.
● Add nose & draw mouth, teeth.
● Your Bunny starts taking its shape and here you can add colors as per your choice
Your cartoon Bugs-Bunny is now ready.
02Popeye
One of the most famous cartoon character of Disney Popeye also appeared on the cinema screens and this belongs to the list of famous classic cartoon-characters.
Let’s draw this amazing character:-
● First Sketch few basic shapes like head, chest, belly.
● It’s a comic character so give it a grotesque-look
● Slightly include other body-parts with shapes like ellipses, noodles in the form of contours.
● Draw one centre-line across the head with well-balanced facial features.
● Draw nose, mouth, ears for the face to form.
● Sketch contours of Popeye’s fists, and arms.
● You can begin giving colors to this shape with flat layers of colorings
03Barney Rubble
As a next door friend and neighbor of Flintstone-house, Barney is kind of a quirky character. This contains features like ears & big feet in the form of angles.
Here is an amazing video tutorial for your Barnet Rubble Cartoon Character:-
04Scrooge McDuck
This cartoon character has wealthy features with fun-loving designs to draw in the form of top-hat, a-cane, as well as few small reading glasses. When it comes to drawing this cartoon characters sketch you need to come up with funny and slightly challenging features.
05Drawing a Ninja For Amazing Action
● Step 1
Work on the head first with nice & precise circle in order to illustrate head portion. Inside this, you can add two more tiny circles for eyes. Once you are done with the eyes, you need to add large & thin rectangle that represents headband. At one portion of headband draw tiny circle with small triangles in numbers 2.
● Step 2
Left arm of our ninja can be sketched through a long & thin rectangle. In order to showcase right arm, draw two rectangles and later on both hands has to be represented in terms of circles.
● Step 3
Two Legs are also need to draw in terms of unusual position. So total of 5 rectangles has to be drawn for both legs & feet.
● Step 4
Add accessories like sabre with basic shapes like circle or rectangle for the same.
● Step 5
Now refine it with an outline and work upon head to make sure both eyes will be clear & visible and also keep the head round & tight.
● Step 6
For upper portion, use nice curved lines and illustrate chest & arms. For showing a discipline make use of good contour likes that highlights posture & gesture.
● Step 7
Repeat the process for the lower portion of your Action ninja.
● Step 8
Now throw some colors’ either black, brown & red to finish the masterpiece!
06Morty Smith
Morty is a lot easy and occupies t-shirt & jeans in its overall appearance and it is much smaller & way more natural than you usually think.
07Helga G. Pataki
If you want to add some crazy cartoon characters in your list then Helga is a good choice. While drawing its cartoon, you need to pay close attention to head as this thing can be little strange with her rectangle hairdo.
08Kim Possible
The design of Kim Possible looks easy at first appearance but when you actually begin with the process of draw its shape, you may get confused. You need to add varieties of features in her face with crazy parachute pants right from the 1980s.
09Shaggy Rogers
The companion of Scooby Shaggy also love its treats & also like to run-away from the monsters at first sight. He can solve mysteries and fun to watch.
● Ending Thoughts →
● Well, drawing cartoons is always a fun loving thing to do. You can pick any one cartoon for drawing some favorite designs.
● You can make use of professional apps to give proper background to your poster or sketch making.
● For Fictional creatures, you can illustrate their styling features, fun facts and lot more to make it much more interesting.
Samples of Cartoon Character Face to Inspire You
Samples of Cartoon Character Face to Inspire You
An easy yet powerful editor
Numerous effects to choose from
Detailed tutorials provided by the official channel
Being able to draw facial features is an essential skill for any animator. Whether you are a beginner at drawing faces or an experienced cartoon artist that has been drawing for years, this is a skill that can gradually improve with time. With the implementation and use of simple shapes, creating various facial features and cartoon styles can be done quickly.
The methods of creating funny face cartoon characters are suitable for everyone, even if they do not have a single day of illustrating experience. These methods presented in this article are easily accessible to provide you with different results depending on your budget and your desired outcome.
The act of drawing cartoon faces can be effortless, and in this article, we will give you some fundamental samples of how you can draw cartoon faces of your own.
In this article
01 [Learn to Understand the Core of Cartoon Style](#Part 1)
02 [Top 12 Cartoon Face Examples](#Part 2)
03 [How to Draw a Cartoon Face - For Beginners](#Part 3)
04 [How to Easily Turn Yourself into a Cartoon](#Part 4)
Part 1 Learn to Understand the Core of Cartoon Style
First, you need to simplify the different parts of the cartoon character face to pick up on very subtle facial expressions and features. For example, the eyes’ shape and size will help determine if the person is feeling sad, excited, happy, excited, or sad. In addition, the amount of lift under a person’s eyebrows can help determine whether a person is mad or not.
These facial expressions are crucial to how a person communicates. It has got to the point that we can read someone’s face without truly understanding which parts of the face convey that emotion. However, these days we get exposed to everyday adaptations of facial expressions, especially with the invention of Instagram, Snapchat, and cartoon face filters.
Consequently, cartoons are a combination of different shapes that are being put together and are not difficult if the focus is on each shape individually and the process breaks down step by step.
Cartoons are a mixture of different shapes put together. It’s not difficult if you focus on each shape individually and break down the process step by step.
Finally, understanding these unconscious and subtle differences in facial expressions is crucial when planning out an animated character. Afterward, when understood, you can simplify the features to be recognizable by your audience.
Part 2 Top 12 Cartoon Face Examples
Cartoon character faces are gaining immense importance in design art due to their universality. Cartoon faces can represent people in several situations and add a comic or satirical twist to dull topics by highlighting their importance. However, drawing cartoon faces require a lot of skill and differentiation, and graphic designers, while working on basic and universal templates, always try and introduce unique elements.
Here are the top 10 examples of cartoon character faces you can choose from when you want to make your designs:
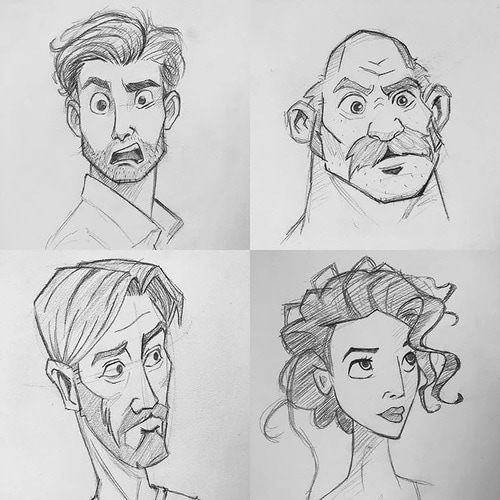
01Men and Women
This sketch features different facial expressions made by older men and women.
02Stretch and Squash
This photo shows the difference between squashing and stretching the face and provides references for extreme squash and extreme stretch.

03Dramatic Expressions
The expressions drawn here are super fun and dramatic. However, it is a great way to have fun and practice how to draw facial expressions simultaneously.
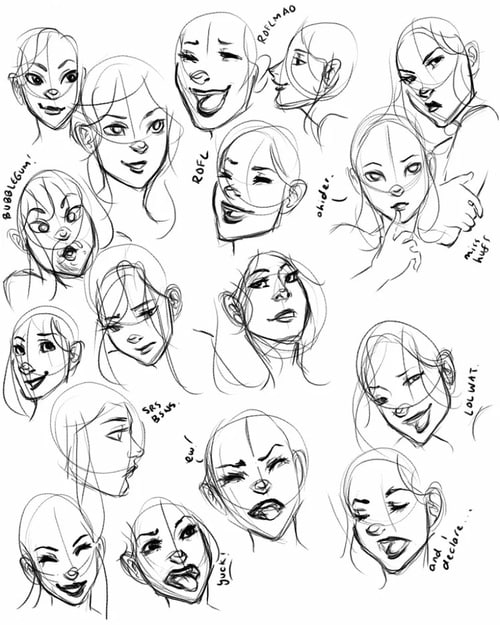
04Quick Expressive Sketches
With this, you can practice how to draw different facial expressions by doing quick sketches like this one. Perhaps you do not need to pay attention to perfection.
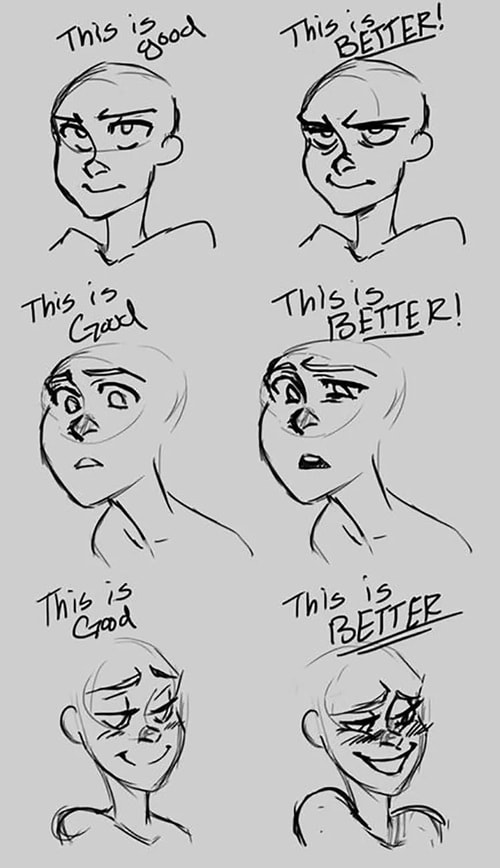
05This Is Good This Is Better
With this facial expression, you can see a good look and an even better expression. It shows the difference that subtle changes can make to your facial expressions**.**
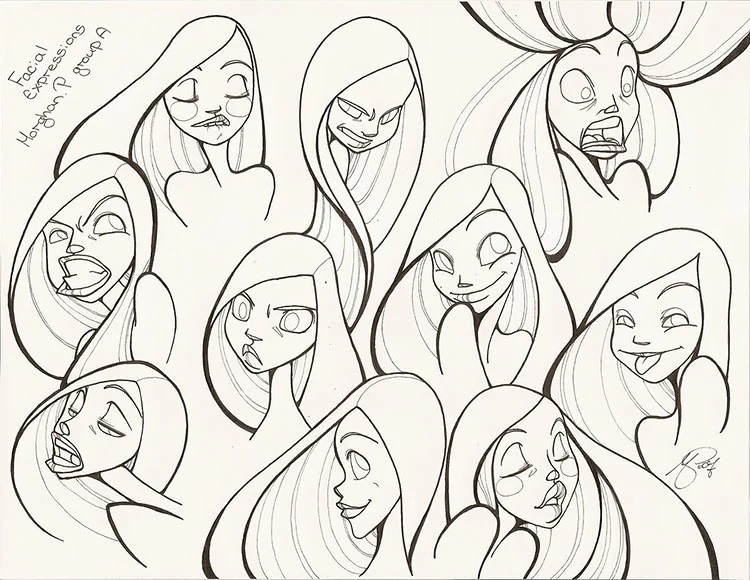
06Male and Female Expressions
This includes both male and female expressions to express the facial reaction of both genders, like some funny cartoon characters face.
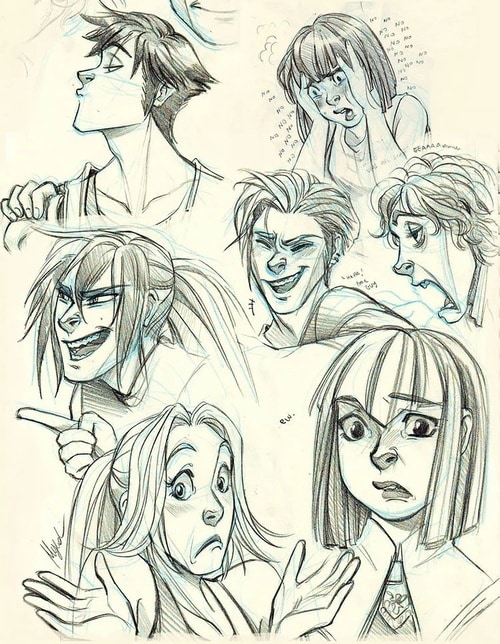
07Quick Sketches
This type of facial expression will help you get better at drawing cartoons, and you can use do some quick sketches every day.

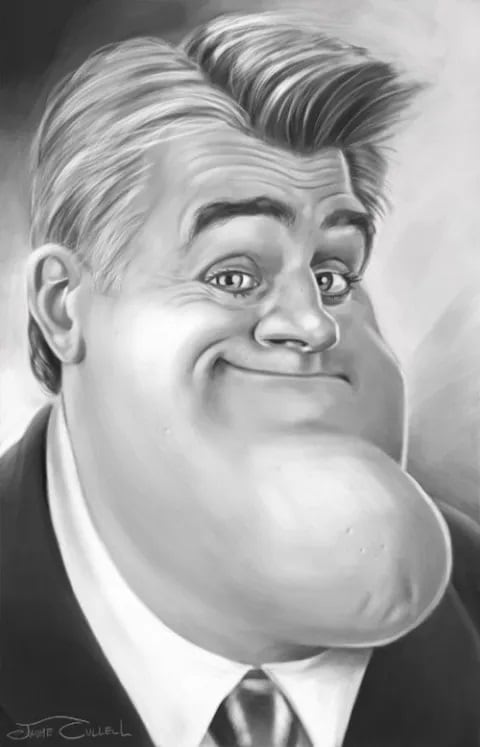
08Jay Leno’s facial expression
Here, it is being exaggerated on a few of his most prominent facial features, including his chin. It is kind of a fat face cartoon character.
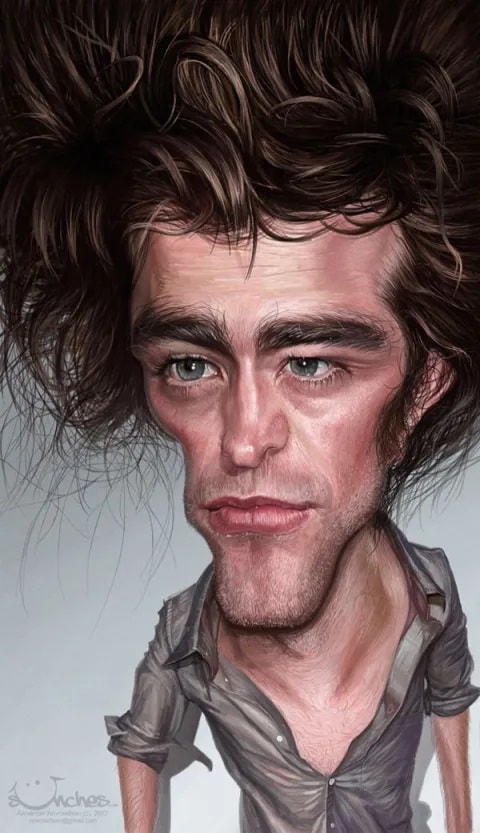
09Robert Pattinson Facials
In this photo, his head shape was distorted to show the thinness of his face, and his big hair also accentuates this prominent feature further.
10A,I,U,O,AE,M Facials
With this, you can practice how to draw your facial expression by pronouncing a, i, u, o, ae, m.

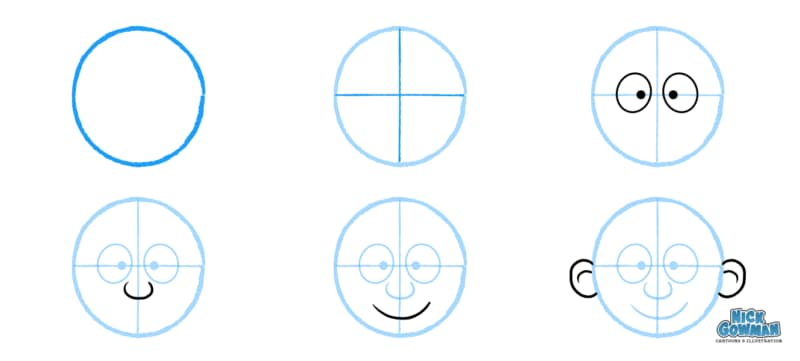
Part 3 How to Draw a Cartoon Face - For Beginners
Here, we have written down 7-step to follow on how to draw a cartoon character face as a beginner effectively.
● Step 1: Plan and Prepare
This is the first step is to plan out exactly what this character will convery through its expression while drawing a cartoon character.
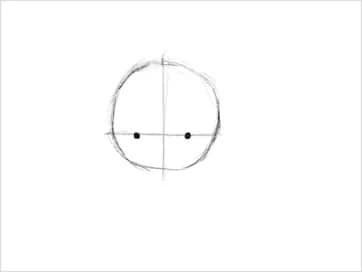
● Step 2: Drawing A Cartoon Head
Next is time to start sketching out the shape of the head based on the plan you have made. Whatsoever shape you decide to use for your character, start with a circle to serve as the basic shape for the head.
● Step 3: Drawing Cartoon Eyes
Now, you need to draw the eye of the character, which is a crucial step because the eye is the essential part of their expression. To get the character’s eyes in the right place, you should carefully sketch the horizontal or vertical dimension lines.
● Step 4: Drawing A Cartoon Nose
The simpler the nose is, the better it looks in a cartoon. Ensure to keep a proper ratio between the mouth, eyes, and nose so that it does not look too crowded together.
● Step 5: Shaping the Face
In shaping the face, one needs to be mindful of the character, which will help to determine how to shape the jawline and head. For example, for a girl, the face should be narrower and have the chin come to a bit of a point at the end, whereas, for a boy, it requires that the face is a bit bolder and focuses more on the definition of the jawline.
● Step 6: Drawing A Cartoon Mouth
The mouth is another essential part of the cartoon character’s expression and a key indicator of how the character is feeling. It portrays whether you want the character to smile, frown, yell, be nervous, or be neutral.
● Step 7: Drawing Cartoon Hair
Next, you need to draw the cartoon hair, and, in some cases, the cartoon hair is a significant part of their appearance as it is a way to convey your character’s personality, appearance, style, or gender.
● Step 8: Coloring
Another part requires you to paint your character to improve the texture and make it beautiful.
Part 4 How to Easily Turn Yourself into a Cartoon
Are you looking to turn yourself into a cartoon? This is very necessary as it provides you with a great way to integrate diverse characters into your brand’s marketing while simultaneously keeping your content personalized.
However, after converting a picture to a cartoon character face, you can decide to animate it, and the best tool is Wondershare Filmora Video Editor . Animation is a great way to advertise your business, especially during times like these. it is a clever way for leaders, CEOs, and managers to connect with their remote workers and boost engagement, company culture, and ultimately work morale. Filmora is also a great tool to create creative and powerful animation with tons of follow-come effect that enables you to carry it out effectively and efficiently. In this section, we will guide you on how to turn yourself into a cartoon easily:
Step 1: Visit Powtoon.com and sign up for a free account, then click on the “build your character” option from the dropdown menu.
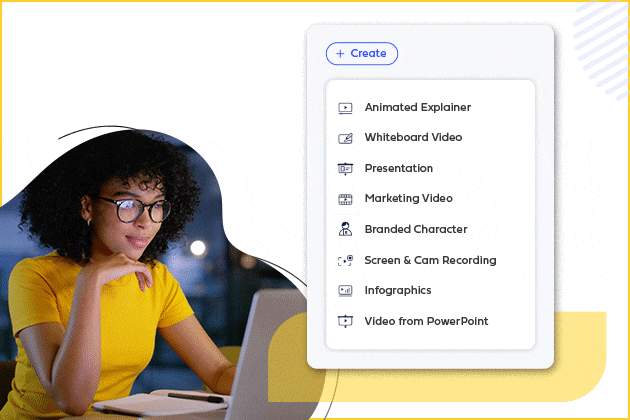
Step 2: Next is to select the cartoon gender you want.
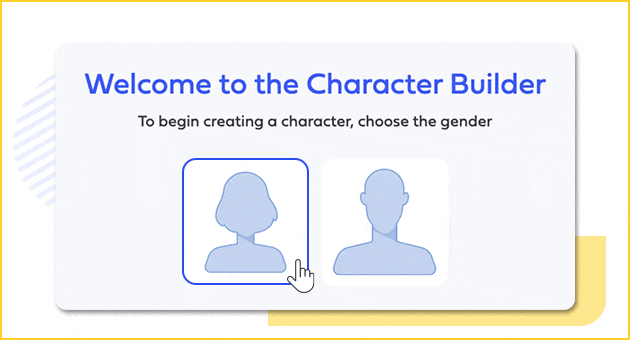
Step 3: Finally, you can customize your character’s facial features such as skin, hair, color, clothes, and animated gestures.

Step 4: Once you are satisfied with the result, you can save it on your device or share it on social media
For Win 7 or later (64-bit)
For macOS 10.12 or later
● Ending Thoughts →
● Thus, we saw how to easily cartoon your character’s face via some samples to help you out. With the method listed above, you can easily use it to create a square-faced cartoon character or draw a fat face cartoon character.
● This article also explained how to cartoon yourself. However, to cartoon your video or create a cartoon animated video, we recommend that you use Filmora, its keyframing feature to help you carry this out effectively.
Being able to draw facial features is an essential skill for any animator. Whether you are a beginner at drawing faces or an experienced cartoon artist that has been drawing for years, this is a skill that can gradually improve with time. With the implementation and use of simple shapes, creating various facial features and cartoon styles can be done quickly.
The methods of creating funny face cartoon characters are suitable for everyone, even if they do not have a single day of illustrating experience. These methods presented in this article are easily accessible to provide you with different results depending on your budget and your desired outcome.
The act of drawing cartoon faces can be effortless, and in this article, we will give you some fundamental samples of how you can draw cartoon faces of your own.
In this article
01 [Learn to Understand the Core of Cartoon Style](#Part 1)
02 [Top 12 Cartoon Face Examples](#Part 2)
03 [How to Draw a Cartoon Face - For Beginners](#Part 3)
04 [How to Easily Turn Yourself into a Cartoon](#Part 4)
Part 1 Learn to Understand the Core of Cartoon Style
First, you need to simplify the different parts of the cartoon character face to pick up on very subtle facial expressions and features. For example, the eyes’ shape and size will help determine if the person is feeling sad, excited, happy, excited, or sad. In addition, the amount of lift under a person’s eyebrows can help determine whether a person is mad or not.
These facial expressions are crucial to how a person communicates. It has got to the point that we can read someone’s face without truly understanding which parts of the face convey that emotion. However, these days we get exposed to everyday adaptations of facial expressions, especially with the invention of Instagram, Snapchat, and cartoon face filters.
Consequently, cartoons are a combination of different shapes that are being put together and are not difficult if the focus is on each shape individually and the process breaks down step by step.
Cartoons are a mixture of different shapes put together. It’s not difficult if you focus on each shape individually and break down the process step by step.
Finally, understanding these unconscious and subtle differences in facial expressions is crucial when planning out an animated character. Afterward, when understood, you can simplify the features to be recognizable by your audience.
Part 2 Top 12 Cartoon Face Examples
Cartoon character faces are gaining immense importance in design art due to their universality. Cartoon faces can represent people in several situations and add a comic or satirical twist to dull topics by highlighting their importance. However, drawing cartoon faces require a lot of skill and differentiation, and graphic designers, while working on basic and universal templates, always try and introduce unique elements.
Here are the top 10 examples of cartoon character faces you can choose from when you want to make your designs:
01Men and Women
This sketch features different facial expressions made by older men and women.
02Stretch and Squash
This photo shows the difference between squashing and stretching the face and provides references for extreme squash and extreme stretch.
03Dramatic Expressions
The expressions drawn here are super fun and dramatic. However, it is a great way to have fun and practice how to draw facial expressions simultaneously.
04Quick Expressive Sketches
With this, you can practice how to draw different facial expressions by doing quick sketches like this one. Perhaps you do not need to pay attention to perfection.
05This Is Good This Is Better
With this facial expression, you can see a good look and an even better expression. It shows the difference that subtle changes can make to your facial expressions**.**
06Male and Female Expressions
This includes both male and female expressions to express the facial reaction of both genders, like some funny cartoon characters face.
07Quick Sketches
This type of facial expression will help you get better at drawing cartoons, and you can use do some quick sketches every day.
08Jay Leno’s facial expression
Here, it is being exaggerated on a few of his most prominent facial features, including his chin. It is kind of a fat face cartoon character.
09Robert Pattinson Facials
In this photo, his head shape was distorted to show the thinness of his face, and his big hair also accentuates this prominent feature further.
10A,I,U,O,AE,M Facials
With this, you can practice how to draw your facial expression by pronouncing a, i, u, o, ae, m.
Part 3 How to Draw a Cartoon Face - For Beginners
Here, we have written down 7-step to follow on how to draw a cartoon character face as a beginner effectively.
● Step 1: Plan and Prepare
This is the first step is to plan out exactly what this character will convery through its expression while drawing a cartoon character.
● Step 2: Drawing A Cartoon Head
Next is time to start sketching out the shape of the head based on the plan you have made. Whatsoever shape you decide to use for your character, start with a circle to serve as the basic shape for the head.
● Step 3: Drawing Cartoon Eyes
Now, you need to draw the eye of the character, which is a crucial step because the eye is the essential part of their expression. To get the character’s eyes in the right place, you should carefully sketch the horizontal or vertical dimension lines.
● Step 4: Drawing A Cartoon Nose
The simpler the nose is, the better it looks in a cartoon. Ensure to keep a proper ratio between the mouth, eyes, and nose so that it does not look too crowded together.
● Step 5: Shaping the Face
In shaping the face, one needs to be mindful of the character, which will help to determine how to shape the jawline and head. For example, for a girl, the face should be narrower and have the chin come to a bit of a point at the end, whereas, for a boy, it requires that the face is a bit bolder and focuses more on the definition of the jawline.
● Step 6: Drawing A Cartoon Mouth
The mouth is another essential part of the cartoon character’s expression and a key indicator of how the character is feeling. It portrays whether you want the character to smile, frown, yell, be nervous, or be neutral.
● Step 7: Drawing Cartoon Hair
Next, you need to draw the cartoon hair, and, in some cases, the cartoon hair is a significant part of their appearance as it is a way to convey your character’s personality, appearance, style, or gender.
● Step 8: Coloring
Another part requires you to paint your character to improve the texture and make it beautiful.
Part 4 How to Easily Turn Yourself into a Cartoon
Are you looking to turn yourself into a cartoon? This is very necessary as it provides you with a great way to integrate diverse characters into your brand’s marketing while simultaneously keeping your content personalized.
However, after converting a picture to a cartoon character face, you can decide to animate it, and the best tool is Wondershare Filmora Video Editor . Animation is a great way to advertise your business, especially during times like these. it is a clever way for leaders, CEOs, and managers to connect with their remote workers and boost engagement, company culture, and ultimately work morale. Filmora is also a great tool to create creative and powerful animation with tons of follow-come effect that enables you to carry it out effectively and efficiently. In this section, we will guide you on how to turn yourself into a cartoon easily:
Step 1: Visit Powtoon.com and sign up for a free account, then click on the “build your character” option from the dropdown menu.
Step 2: Next is to select the cartoon gender you want.
Step 3: Finally, you can customize your character’s facial features such as skin, hair, color, clothes, and animated gestures.
Step 4: Once you are satisfied with the result, you can save it on your device or share it on social media
For Win 7 or later (64-bit)
For macOS 10.12 or later
● Ending Thoughts →
● Thus, we saw how to easily cartoon your character’s face via some samples to help you out. With the method listed above, you can easily use it to create a square-faced cartoon character or draw a fat face cartoon character.
● This article also explained how to cartoon yourself. However, to cartoon your video or create a cartoon animated video, we recommend that you use Filmora, its keyframing feature to help you carry this out effectively.
Learn Pencil2D Animation Tutorial Overview
Animation is one of the trendiest technologies. The basics of animation were formulated in the 2000s from the moving page trick. The first few animators learned that animation is nothing but continuous switching of frames from one to another. One animated still is switched to another and then another in a quick sequence such that it makes a sequential moving frame. Today, animation has come a long way from where it started and today it is used for several commercials, tutorials, and even educational lecture videos. Pencil2D animation is an amazing animation tool that can be used by even neophytes. Want to learn more about 2d pencil animation and its super cool features? Well, you’re at the perfect place. Today we’ll be telling you more about pencil 2d animation and giving you a small overview of its usage.
In this article
01 [What is Pencil2D and How to Install?](#Part 1)
02 [Overview of the Application Interface](#Part 2)
03 [How to Create Animations with Pencil2D?](#Part 3)
Part 1 What is Pencil2D and How to Install?
2d pencil animation is popular open-source animation software. The software is pretty cool for those who are newly starting off with animation. The open-source software is available on all major operating systems including Windows, Mac OS, and Unix. Using this amazing software, we can make amazing cartoon characters using traditional cartoon-making techniques such as tracing drawing, skinning. Using this software, you can save animations in the native animation formats or extract the animation to PNG, JPG, or other formats. Wish to explore more about pencil 2d animation software? Follow the steps listed below in order to download the pencil2d animation software.
● Firstly, you need to ensure that your device has ample space on it.
● Next, you need to head to the official website of pencil2d.
● Further, you need to select your operating system. You can find different versions of the software, namely windows 7/8/10, windows XP/ Vista, Mac OS, and Linux
● Once downloaded, you need to start the installation setup. Note that this may take a while to download.
● Once downloaded, you can start familiarizing yourself with the software.
Part 2 Overview of the Application Interface
1. The brush tool
The brush tool must have reminded you of paint software in windows. The brush tool is a popular and highly utilitarian basic tool in Pencil2D animation software. You can either access it via the user interface or quickly access it by using the B key on your keyboard. As the name suggests, the brush tool is literally just a brush that allows you to draw and paint any sort of drawings of different shades, colors, and thickness. If you wish to change the color, you can find a color palette on the left side of the interface.

2. The eraser tool
You’ve a brush tool; it’s almost common sense that there’d be an eraser. The eraser tool has an eraser as its icon. If you wish to use the eraser, click on the eraser tool or simply click the E button on your keyboard. Once you’ve selected the tool, you need to simply hover over the parts you wish to erase.

3. Bucket tool
The bucket tool is another useful tool that you can find in the left tool pane of pencil 2d animation. The tool icon looks like a bucket and it is used to fill an entire area with a particular color. You can choose the color you’d like to fill from the color pallet available on the left side. Alternatively, you can also access the bucket tool by pressing the “K” key on your keyboard.

4. Custom colors
A cool feature that you can find on pencil 2d animation software is the custom color one. You can merge and mix colors according to your choice and create your own color. To do so, you need to click on the small color box that you’ll find at the top right of your screen. By doing so, a huge color wheel will appear on your screen. Now you can either enter values of the R, G, and B if you wish to merge different colors and make a new one or select a particular color from the huge color wheel that appears in front of you. These colors vary in gradient, shade, and a lot of different factors.

5. The Undo button
The Undo button is a highly useful functionality for the lazy ones who do not wish to erase the mistake they made. By undoing, the previous step gets reverted and you can start over again. The traditional undo shortcut, Ctrl+Z does work in the pencil 2d animation. Alternatively, you can also use the undo feature via the user interface. You can do so by heading over to the edit option in the topmost bar. The first option in the drop-down menu would be undo.

Part 3 How to Create Animations with Pencil2D?
Creating animations in pencil 2d is slightly sophisticated and certainly needs minimal practice. Follow the steps listed below in order to learn how to animate through pencil 2d to make your first animation.
1. Ensure that you’ve turned on your bitmap on the first frame
Animation works through quick switching of frame which makes it appear as though the object is in motion. By turning on the bitmap, pencil 2d animation ensures that you’ve no blank frames at the start of your animation.

2. Draw your animated character
Since you’re trying to animate, you need to have an animated character or object. Hence, the first step to making your first animation is by drawing the object or character that you wish to animate. Try to make the character as realistic as possible. To start with, maybe you can try animating just a stick figure; this is because animating a complex character is rather difficult for beginners.

3.The three circular buttons
Once you’re satisfied with the character you draw, you need to spot the 3 circular buttons which are arranged in the “+”,”-“,”+” order. By pressing the first “+” button, you can add an empty slide. If you click on the “-“ button, it will delete the most recent slide and if you click on the next “+” button, it will duplicate the current slide.

4.Repeat until you get an animation
Now that you know how to deal with multiple frames, you can continue creating frames and making the animated characters move by tweaking with the drawing in every frame. For instance, if you wish to show that the animated character is running, in one of the frames the left leg should be forward and in the next one, the right leg should be forward. Keep repeating this process of tweaking with frames until you’ve your desired animated video.

Now that we’ve seen the process of animation via Pencil2D, you must have realized that it’s pretty orthodox and complicated. Moreover, you cannot carry out rigging and other newer animation techniques. Hence, we introduce you to Wondershare Filmora Video Editor , your all in one animation making platform. Here you can animate without any hassle. Wondershare Filmora makes your job easier with multiple animation features, you needn’t even draw your animated character. You can simply import a custom-made character and rig the character. Further, you need not deal with multiple frames and personally pay attention to each frame. All in all, Filmora makes your job simple and your animations much more seamless.
For Win 7 or later (64-bit)
For macOS 10.12 or later
Key Takeaways from This Episode
● Animation is actively being used for multiple purposes.
● Today we took a look at one of the orthodox yet popular animation tools, Pencil2D.
● The Pencil2D animation tool offers you multiple functionalities and allows you to make animations.
● Next, we also took a look at Wondershare Filmora Pro, your one-stop shop for all animation needs. You can find multiple animation features here and it’s all so simple.
● What are you waiting for? Your next animation is just one click away.
02 [Overview of the Application Interface](#Part 2)
03 [How to Create Animations with Pencil2D?](#Part 3)
Part 1 What is Pencil2D and How to Install?
2d pencil animation is popular open-source animation software. The software is pretty cool for those who are newly starting off with animation. The open-source software is available on all major operating systems including Windows, Mac OS, and Unix. Using this amazing software, we can make amazing cartoon characters using traditional cartoon-making techniques such as tracing drawing, skinning. Using this software, you can save animations in the native animation formats or extract the animation to PNG, JPG, or other formats. Wish to explore more about pencil 2d animation software? Follow the steps listed below in order to download the pencil2d animation software.
● Firstly, you need to ensure that your device has ample space on it.
● Next, you need to head to the official website of pencil2d.
● Further, you need to select your operating system. You can find different versions of the software, namely windows 7/8/10, windows XP/ Vista, Mac OS, and Linux
● Once downloaded, you need to start the installation setup. Note that this may take a while to download.
● Once downloaded, you can start familiarizing yourself with the software.
Part 2 Overview of the Application Interface
1. The brush tool
The brush tool must have reminded you of paint software in windows. The brush tool is a popular and highly utilitarian basic tool in Pencil2D animation software. You can either access it via the user interface or quickly access it by using the B key on your keyboard. As the name suggests, the brush tool is literally just a brush that allows you to draw and paint any sort of drawings of different shades, colors, and thickness. If you wish to change the color, you can find a color palette on the left side of the interface.
2. The eraser tool
You’ve a brush tool; it’s almost common sense that there’d be an eraser. The eraser tool has an eraser as its icon. If you wish to use the eraser, click on the eraser tool or simply click the E button on your keyboard. Once you’ve selected the tool, you need to simply hover over the parts you wish to erase.
3. Bucket tool
The bucket tool is another useful tool that you can find in the left tool pane of pencil 2d animation. The tool icon looks like a bucket and it is used to fill an entire area with a particular color. You can choose the color you’d like to fill from the color pallet available on the left side. Alternatively, you can also access the bucket tool by pressing the “K” key on your keyboard.
4. Custom colors
A cool feature that you can find on pencil 2d animation software is the custom color one. You can merge and mix colors according to your choice and create your own color. To do so, you need to click on the small color box that you’ll find at the top right of your screen. By doing so, a huge color wheel will appear on your screen. Now you can either enter values of the R, G, and B if you wish to merge different colors and make a new one or select a particular color from the huge color wheel that appears in front of you. These colors vary in gradient, shade, and a lot of different factors.
5. The Undo button
The Undo button is a highly useful functionality for the lazy ones who do not wish to erase the mistake they made. By undoing, the previous step gets reverted and you can start over again. The traditional undo shortcut, Ctrl+Z does work in the pencil 2d animation. Alternatively, you can also use the undo feature via the user interface. You can do so by heading over to the edit option in the topmost bar. The first option in the drop-down menu would be undo.
Part 3 How to Create Animations with Pencil2D?
Creating animations in pencil 2d is slightly sophisticated and certainly needs minimal practice. Follow the steps listed below in order to learn how to animate through pencil 2d to make your first animation.
1. Ensure that you’ve turned on your bitmap on the first frame
Animation works through quick switching of frame which makes it appear as though the object is in motion. By turning on the bitmap, pencil 2d animation ensures that you’ve no blank frames at the start of your animation.
2. Draw your animated character
Since you’re trying to animate, you need to have an animated character or object. Hence, the first step to making your first animation is by drawing the object or character that you wish to animate. Try to make the character as realistic as possible. To start with, maybe you can try animating just a stick figure; this is because animating a complex character is rather difficult for beginners.
3.The three circular buttons
Once you’re satisfied with the character you draw, you need to spot the 3 circular buttons which are arranged in the “+”,”-“,”+” order. By pressing the first “+” button, you can add an empty slide. If you click on the “-“ button, it will delete the most recent slide and if you click on the next “+” button, it will duplicate the current slide.
4.Repeat until you get an animation
Now that you know how to deal with multiple frames, you can continue creating frames and making the animated characters move by tweaking with the drawing in every frame. For instance, if you wish to show that the animated character is running, in one of the frames the left leg should be forward and in the next one, the right leg should be forward. Keep repeating this process of tweaking with frames until you’ve your desired animated video.
Now that we’ve seen the process of animation via Pencil2D, you must have realized that it’s pretty orthodox and complicated. Moreover, you cannot carry out rigging and other newer animation techniques. Hence, we introduce you to Wondershare Filmora Video Editor , your all in one animation making platform. Here you can animate without any hassle. Wondershare Filmora makes your job easier with multiple animation features, you needn’t even draw your animated character. You can simply import a custom-made character and rig the character. Further, you need not deal with multiple frames and personally pay attention to each frame. All in all, Filmora makes your job simple and your animations much more seamless.
For Win 7 or later (64-bit)
For macOS 10.12 or later
Key Takeaways from This Episode
● Animation is actively being used for multiple purposes.
● Today we took a look at one of the orthodox yet popular animation tools, Pencil2D.
● The Pencil2D animation tool offers you multiple functionalities and allows you to make animations.
● Next, we also took a look at Wondershare Filmora Pro, your one-stop shop for all animation needs. You can find multiple animation features here and it’s all so simple.
● What are you waiting for? Your next animation is just one click away.
Learn 3D Logo Animation and Templates
Learn All About 3D Logo Animation and Templates
An easy yet powerful editor
Numerous effects to choose from
Detailed tutorials provided by the official channel
If you too are keen to have an animated logo for your brand, product, or business several readymade templates can be used.
![]()
There are types of 3D logo animation tools available that can be used for customizing these templates or creating a logo from scratch as per your requirements.
In this article
01 [Benefits of Using 3d Logo Animation?](#Part 1)
02 [Where to Use Animated Logos?](#Part 2)
03 [Tips to make animated logos effective](#Part 3)
04 [Top 3D-logo Animation Template Sites](#Part 4)
05 [Top Software for Creating 3D Animated Logos](#Part 5)
Part 1 Benefits of using 3D logo animation?
Animated logos offers multiple benefits to a business or a brand. Some of the major ones are gathered for you as below.
01Increase brand awareness
Animations add life to your logos and thus can help in raising brand awareness and creating an instant connection with the clients and audience. The chances of remembering an animated logo are high and this in turn will get the attention and engagement of the audience.
02Better storytelling
The combination of images, sound, and motion in a 3D logo helps in creating an emotional connection with the audience. An animated logo supports the brand story more efficiently than a static logo and can further help to create a detailed explanation of the story.
03Adds a modern and professional look
An animated logo will add a professional and modern look to your business, product, brand, company, site, and others. An animated logo will make the audience feel that you are innovative and go with the latest trends that in turn add to the professionalism.
04Look unique and stand out from the crowd
With similar-looking designs and logos, animation can make your brand and business look apart from the others and thus get the attention of prospective clients and customers.
05Creates a pleasant first impression
It is the first impression that can make or break the image of a brand or a product. So, to ensure that the first impression of your brand or business is excellent, animated logos works to a great extent.
![]()
Part 2 Where to use Animated Logos?
Though animated logos can be used for an array of business types and platforms, there are a few certain ones where they are most effective. Check these as below.
● Social Media
● Paid Ads
● Branded Videos
● Email signatures
● Websites
● Brands and business
● Products and e-commerce
Part 3 Tips to make animated logos effective
Animated logos are created to get the attention of the audience and thus create brand awareness and for this, several factors can be considered.
● Firstly, analyze the goals of the company before creating an animated logo. It is important to know what will be the brand personality that you wish to portray through the logo.
● The logos should be created based on the preferences of the users and thus making research of the same before finalizing the animation is important.
● Animated logos should be short and interesting. Long ones are boring and will also result in the loss of interest.
● It is interesting to include a surprise element in your logo by creating them in a manner so that they are unpredictable.
● Use professional software to create impressive software that will not only make the task easier but will also save time.
![]()
Part 4 Top 3D-logo animation template sites
There are several sites where you can check readymade animated logo templates that will make your animation creating task quick and easy. These templates have a readymade design for the animated logo and these designs can be further customized to create a logo of your choice. Most of the sites with templates also have a built-in editor that can be used for editing the templates. If not, you can download the template and can then edit them using professional editing software like Wondershare Filmora Video Editor .
Some of the sites where you can check 3D logo animation free download and paid download of the templates in different categories.
● Storyblocks
● FlexClip
● MotionArray
● AfterEffects and more.
You can check out the various templates available at one of these sites and choose the one that best matches your company or product’s personality and fit your requirements.
Part 5 Top software for creating 3D Animated Logos
If you want a customized logo to be created as per your needs or want to edit the templates, there are several animations creating software available. Below we have shortlisted some of the major ones.
01**Wondershare Filmora Video Editor **
This Windows and Mac-based software is an excellent tool for all types of video editing and creating requirements. Using the tool, you can create a 3D animated logo or can even edit the templates to meet your requirements. A simple interface makes the software apt for all users and the process is also fast.
Key features:
● Create the desired animation using keyframing.
● Use motion-blur to enhance the animation.
● Edit the animation and other videos using multiple editing effects.
● Allows adding interesting effects like transitions, filters, and more.
● Enhanced audio using features like background noise removal, audio equalizer, keyframe audio editing, and more.
● Support fast rendering and fast import and export of the files.
● Windows and Mac support.
For Win 7 or later (64-bit)
For macOS 10.12 or later
02Viddyoze
This is another popular and user-friendly software that can be used for creating 3D animated logos and other animations. The tool comes packed with multiple features and templates that allow creating the desired animation in no time.
Key features
● A user-friendly tool with an intuitive interface.
● Comes with multiple templates to choose from.
● The template can be customized by changing several parameters like text, colors, and more.
● Comes with multiple editing tools and has multi-font support.
● The custom-created audio track for live templates.
● Support multi-ratio templates to make them compatible with different platforms and sites.
![]()
03Renderforest
This is an online 3D animated logo maker that comes with multiple templates and tools. Simple to use, the tool needs no software download or installation.
Key features
● This 3D logo animation online free tool is simple to use and does not require any software download.
● Comes with multiple templates and animation designs like fire logo, shattering logo, splash logo, and more.
● 3D effects of the tool can be used for creating 3D animated logos.
![]()
04Adobe After Effects
Adobe is a reputed software for all types of video editing requirements and its long list of functions also includes 3D animated logo making. Though the learning curve of the software is steep, once you get the hang of it, you can easily create professional animations and edit files.
Key features
● Create high-quality animations including 3D logos.
● Allows adding keyframes for animations and add exciting effects.
● Support features like the 3D ground plane, 3D draught preview, extended viewport, 3D transform gizmos, and more.
● Comes with a wide range of readymade templates for creating logos.
● 3D logo animation after effects tool allows media replacement in motion graphic templates.
![]()
05Animaker
This is another widely used online tool that allows creating of decent 3D animated logos. The interface is simple and there is no requirement for any software download.
Key features
● Simple and user-friendly interface with support to drop and drag.
● Comes with over 20 readymade templates for creating animated logos.
● Audio files and music to the animations can also be added.
● Support to more than 50 languages which makes it accessible across the world.
● Created animations can also be uploaded to YouTube and Facebook.
![]()
● Key Takeaways from This Episode →
● 3D animated logos work magic for your business and brand by creating awareness, catching the attention of the audience, and also keeping them engaged.
● Animated logos are used by different types of businesses and industries and for different platforms.
● There are several sites where readymade templates for creating 3D animated logos are available. These templates can be customized as needed.
● An array of 3D animated logo-making software is available and one of the best on the list is Wondershare Filmora Video Editor that is effective and also user-friendly.
Learn Simple Blender Rigging in Only 2 Minutes
Learn Simple Blender Rigging in Only 2 Minutes
An easy yet powerful editor
Numerous effects to choose from
Detailed tutorials provided by the official channel
Blender is a FREE, open-source 3D Animation program that is very popular for beginner animators. It’s a good way of starting if you’re not yet sure about how far you want to go into animation as it won’t demand any immediate monetary commitment.
Now, as for its features, today, we’ll be focusing on Blender Rigging features.
In this article
01 [Why Use Blender Rigging?](#Part 1)
02 [The Art of Effective Rigging in Blender [TUTORIAL]](#Part 2)
03 [Introduction to Rigging in Blender Course](#Part 3)
Part 1 Why Use Blender Rigging?
Blender Character Rigging is a great way of creating truly beautiful and realistic animations. Despite being an open-source program, it’s capable of doing just as much, if not more, than some of the more premium Animation software out there.
So, if you want to create video projects for your audience’s entertainment or edification with animation, then Blender Rigging is definitely something that you should consider. With this tool, you can create the complex animations that you need and then polish it up in a video editor like Wondershare Filmora Video Editor (which is a premium, video-editing tool that you can use to perfect your finished Blender Rigging animations.)

Part 2 The Art of Effective Rigging in Blender [TUTORIAL]
For this next section, we’re going to be introducing a couple of tutorials that you can look into to teach you more about Blender Character Rigging, Blender Facial Rigging, Blender Muscle Rig, and so on.
These topics are each very long-winded on their own though, so we’ve linked appropriate video tutorials that you can learn more and reserved ourselves to a brief description of each technique so that you can determine whether it’s something that interests you (although, of course, our recommendation is that you check each one out so that you can get the full ‘Blender’ experience.)
01Blender Character Rigging
The main thing people usually look at Blender for is, Blender Character Rigging. And, because it was created to emulate professional animation software, Blender has this function down to pat. To give you an idea of what features you can expect: Blender comes with custom bone shapes for easy Blender character rigging, it also comes with envelope skinny, skeleton skinning, and automatic skinning. With these alone, you can be assured that you will be able to create complex animations without much trouble.
02Blender Facial Rigging
Facial Rigging is usually a more complex subject that is avoided by animators without much experience. But, with Blender, facial rigging is possible. The YouTube video should show you the process of going about Blender Facial Rigging from start to finish (from sculpting the character face itself and then making use of Blender Rigging tools for setting up a skeletal structure for your face’s character to become animated.)
03Blender Muscle Rigging
Creating a Blender Muscle Rig is exactly what it sounds like. It is, of course, much more complicated than normal rigging, but it is a good subject to familiarize yourself with anyway, as it will allow you to go to the ‘next stage’ as you say, with your Animations. The video that we’ve attached is from Pierrick Picaut, who has released a series of videos on the subject of Blender Rigging in general and has extensively explained how to create a Blender Human Rig from the general body, the face, the muscles, and so on.
04Blender Rigging
Although a lot of Animation relies on more ‘traditional’ methods of expressing movement, one can still make use of more modern animation practices, like rigs, to set up their animations for movement. It’s an especially good skill to learn if you’re more interested in content-friendly animations (rather than creating a film of your own.)
05Blender Rigging
This next tutorial is an introduction to basic Blender Rigging. It’s a good one to both start and end on, as it was created for beginners specifically, and uses an example that is perhaps easier to understand most. Make sure to give it a shot just in case.
Part 3 Introduction to Rigging in Blender Course
For this next part, we introduce two other resources that you can take advantage of to learn more about Blender Rigging. Whether it be about Blender character rigging, Blender facial rigging, free blender rigs, creating muscle rigs, and so and so forth. These resources have got your back.
01Where to Learn the Course?
The first major course that we think you might be interested in is Mark Masters’ blender rigging course. You can find this course at PluralSight (which is a website that is focused on helping users of software develop their skills). Mark Masters, the instructor for this course, is a professional animator and works as a Animator for the animation studio, Steelhouse Productions. So, you can be sure that there is much that you can learn from him.

02Other Tools to Learn Rigging
As for other places to learn? We suggest the “Blender Fundamentals” course that Blender themselves have posted on YouTube. They have several of these courses (for all of the more recent versions of Blender). So, you can pick out a course that works for you. One of their more recent series is “Blender Fundamentals 2.which currently has videos all on the subject of Blender rigging (including Blender rigging and Blender rigging videos.)

● Key Takeaways from This Episode →
● If you’re interested in trying out blender rigging yourself, you’ll probably want to study the subject a little before beginning.
● Blender Rigging is quite a complex subject for beginners but having something to start with should help you on your way.
● For that, we recommend checking out the videos that we mentioned in section two of this article, where we recommend some popular tutorials regarding some of the more common Blender Rigging subjects.
● If you’re looking for something more comprehensive or put together though. A course might be more up to your taste. For that, we recommend either Mark Master’s introduction to rigging and animation over at PluralSight or Blender’s own “Blender Fundamental” series on YouTube (which should introduce all the functions you’ll need to know.)
Blender is a FREE, open-source 3D Animation program that is very popular for beginner animators. It’s a good way of starting if you’re not yet sure about how far you want to go into animation as it won’t demand any immediate monetary commitment.
Now, as for its features, today, we’ll be focusing on Blender Rigging features.
In this article
01 [Why Use Blender Rigging?](#Part 1)
02 [The Art of Effective Rigging in Blender [TUTORIAL]](#Part 2)
03 [Introduction to Rigging in Blender Course](#Part 3)
Part 1 Why Use Blender Rigging?
Blender Character Rigging is a great way of creating truly beautiful and realistic animations. Despite being an open-source program, it’s capable of doing just as much, if not more, than some of the more premium Animation software out there.
So, if you want to create video projects for your audience’s entertainment or edification with animation, then Blender Rigging is definitely something that you should consider. With this tool, you can create the complex animations that you need and then polish it up in a video editor like Wondershare Filmora Video Editor (which is a premium, video-editing tool that you can use to perfect your finished Blender Rigging animations.)
Part 2 The Art of Effective Rigging in Blender [TUTORIAL]
For this next section, we’re going to be introducing a couple of tutorials that you can look into to teach you more about Blender Character Rigging, Blender Facial Rigging, Blender Muscle Rig, and so on.
These topics are each very long-winded on their own though, so we’ve linked appropriate video tutorials that you can learn more and reserved ourselves to a brief description of each technique so that you can determine whether it’s something that interests you (although, of course, our recommendation is that you check each one out so that you can get the full ‘Blender’ experience.)
01Blender Character Rigging
The main thing people usually look at Blender for is, Blender Character Rigging. And, because it was created to emulate professional animation software, Blender has this function down to pat. To give you an idea of what features you can expect: Blender comes with custom bone shapes for easy Blender character rigging, it also comes with envelope skinny, skeleton skinning, and automatic skinning. With these alone, you can be assured that you will be able to create complex animations without much trouble.
02Blender Facial Rigging
Facial Rigging is usually a more complex subject that is avoided by animators without much experience. But, with Blender, facial rigging is possible. The YouTube video should show you the process of going about Blender Facial Rigging from start to finish (from sculpting the character face itself and then making use of Blender Rigging tools for setting up a skeletal structure for your face’s character to become animated.)
03Blender Muscle Rigging
Creating a Blender Muscle Rig is exactly what it sounds like. It is, of course, much more complicated than normal rigging, but it is a good subject to familiarize yourself with anyway, as it will allow you to go to the ‘next stage’ as you say, with your Animations. The video that we’ve attached is from Pierrick Picaut, who has released a series of videos on the subject of Blender Rigging in general and has extensively explained how to create a Blender Human Rig from the general body, the face, the muscles, and so on.
04Blender Rigging
Although a lot of Animation relies on more ‘traditional’ methods of expressing movement, one can still make use of more modern animation practices, like rigs, to set up their animations for movement. It’s an especially good skill to learn if you’re more interested in content-friendly animations (rather than creating a film of your own.)
05Blender Rigging
This next tutorial is an introduction to basic Blender Rigging. It’s a good one to both start and end on, as it was created for beginners specifically, and uses an example that is perhaps easier to understand most. Make sure to give it a shot just in case.
Part 3 Introduction to Rigging in Blender Course
For this next part, we introduce two other resources that you can take advantage of to learn more about Blender Rigging. Whether it be about Blender character rigging, Blender facial rigging, free blender rigs, creating muscle rigs, and so and so forth. These resources have got your back.
01Where to Learn the Course?
The first major course that we think you might be interested in is Mark Masters’ blender rigging course. You can find this course at PluralSight (which is a website that is focused on helping users of software develop their skills). Mark Masters, the instructor for this course, is a professional animator and works as a Animator for the animation studio, Steelhouse Productions. So, you can be sure that there is much that you can learn from him.
02Other Tools to Learn Rigging
As for other places to learn? We suggest the “Blender Fundamentals” course that Blender themselves have posted on YouTube. They have several of these courses (for all of the more recent versions of Blender). So, you can pick out a course that works for you. One of their more recent series is “Blender Fundamentals 2.which currently has videos all on the subject of Blender rigging (including Blender rigging and Blender rigging videos.)
● Key Takeaways from This Episode →
● If you’re interested in trying out blender rigging yourself, you’ll probably want to study the subject a little before beginning.
● Blender Rigging is quite a complex subject for beginners but having something to start with should help you on your way.
● For that, we recommend checking out the videos that we mentioned in section two of this article, where we recommend some popular tutorials regarding some of the more common Blender Rigging subjects.
● If you’re looking for something more comprehensive or put together though. A course might be more up to your taste. For that, we recommend either Mark Master’s introduction to rigging and animation over at PluralSight or Blender’s own “Blender Fundamental” series on YouTube (which should introduce all the functions you’ll need to know.)
Also read:
- New 2024 Approved How To Remove The Endless Loop From Animated GIF
- Best 12 Illusion Gifs Top Picks
- Updated In 2024, How To Create Pinterest Slideshow in Simple Ways
- 2024 Approved How To Make Pinterest Slideshow in Simple Ways
- Updated 8 Blender 3D Animation Tutorials for Beginners
- Updated Animated Collage Maker Tips for 2024
- How to Make a Photoshop Collage in EASY Steps for 2024
- Updated How to Make Your Own GIF on WhatsApp in Simple Ways for 2024
- Updated Best 10 Anime Websites to Watch Dubbed Anime Free for 2024
- New How to Insert a GIF Into Powerpoint
- New 2024 Approved Pencil2D Animation Tutorial Overview
- New In 2024, How You Can Turn Yourself Into Anime Character Using Anime Filter
- How to Make Architecture Animation
- Updated In 2024, Top 3 Ways to Create Gif Images with Great 3D Gif Maker
- Finding Some Different Ways to Animated Cartoon of Yourself for 2024
- 6 Proven Ways to Dub Anime for Anime Voice Actor for 2024
- New 2024 Approved Learn Simple Blender Rigging in Only 2 Minutes
- In 2024, Top 8 Anime Name & Title Generators Online-Get Cool Anime Names
- How to Analyze an Editorial Cartoon for 2024
- Updated 5 Foolproof Amazing Anime Text to Speech Tips
- Updated In 2024, Adobe Animate Text Effects Skills You Need to Know
- 2024 Approved 12 Animated Slideshow PowerPoint Templates
- 5 Best Adobe Animate Courses & Classes
- New In 2024, FREE Best Anime Streaming Sites to Download Anime
- New Easy Shortcut to Convert Videos to Gifs on iPhone
- New 2024 Approved Top 4 Websites to Get Anime Footage for Free
- Updated In 2024, 15 Horror Animes That Will Trigger a Heart Attack
- Updated 18 Best Tools and Services to Create Animated Videos for Your Business for 2024
- New How to Make GIF Stickers for WhatsApp 100 The Simple Way
- 2024 Approved In-Depth Study of Cartoon Painting Starts From Learning to Draw It
- Updated 2024 Approved Pencil2D Animation Tutorial Overview
- Updated In 2024, Most Effective Ways to Set WhatsApp Status
- Guide to Completely Erase Data on iPhone 15 Plus to Avoid Privacy Leak | Stellar
- How and Where to Find a Shiny Stone Pokémon For HTC U23? | Dr.fone
- How To Unbrick a Dead Realme 12 Pro+ 5G | Dr.fone
- In 2024, How To Change Oppo A2 Lock Screen Password?
- Your Complete Guide To Reset Google Pixel 8 Pro | Dr.fone
- In 2024, How To Change Xiaomi Lock Screen Password?
- In 2024, What You Want To Know About Two-Factor Authentication for iCloud On your Apple iPhone 14 Pro Max
- How to Upgrade iPhone 14 Plus to the Latest iOS/iPadOS Version? | Dr.fone
- The 6 Best SIM Unlock Services That Actually Work On Your Nokia 105 Classic Device
- Remove FRP Lock on Google Pixel 7a
- Top 10 Password Cracking Tools For Vivo Y77t
- Title: Updated 2024 Approved Some Techniques for Creating Animated Logo That Few People Know About
- Author: Elon
- Created at : 2024-05-19 03:05:48
- Updated at : 2024-05-20 03:05:48
- Link: https://animation-videos.techidaily.com/updated-2024-approved-some-techniques-for-creating-animated-logo-that-few-people-know-about/
- License: This work is licensed under CC BY-NC-SA 4.0.
