

Updated 2024 Approved The Definitive Guide to Whiteboard Animation
The Definitive Guide to Whiteboard Animation
The Definitive Guide to Whiteboard Animation
An easy yet powerful editor
Numerous effects to choose from
Detailed tutorials provided by the official channel
We think about moving videos with actors and actresses when we talk about motion. But, when we speak about doodle videos or drawn videos, we feel about whiteboard animation.
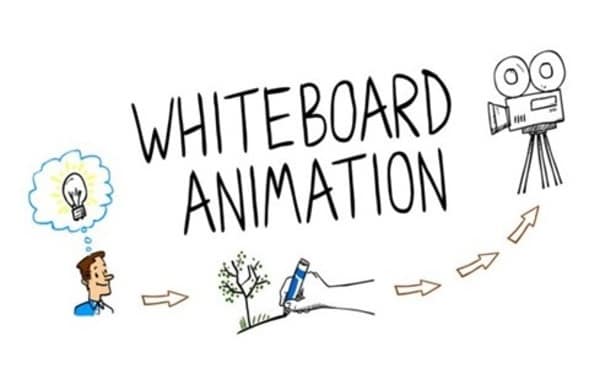
This article covers all the necessary information about whiteboard animation, Filmora whiteboard animation, whiteboard animation cost, etc. Under whiteboard animation, sketches adjust in a manner that results in continual animation reflection.
In this article
01 [What is Whiteboard Animation?](#Part 1)
02 [How Can Whiteboard Animation Be Used?](#Part 2)
03 [What is Whiteboard Animation Cost?](#Part 3)
04 [Some Whiteboard Animation Tools That Worth Using](#Part 4)
Part 1 What is Whiteboard Animation?

Whiteboard animation is a style that shows static watcher images getting drawn on the white screen. The graphics are at the core of a narration that walks the audience through the story by the draws. These animations are modest to understand, but they make us involved all of an impulsive.
Whiteboard animation could be a video in the middle of narration that walks the viewer through a story by viewing the illustrator’s hand drawing it onto a white background. Established in 2007, whiteboard animation may be a new and exciting way of communicating to the viewer in a very personal way.
It applies effects like time-lapse and stop-motion to bring stories to life. Its uses include internal and external television and internet advertisements, software and product demonstrations, whiteboard animation lectures and educational videos for all ages, and various artistic possibilities like untrue storytelling.
Whiteboard animation videos are traditionally made by simply recording the artist live as they draw the content for the video while at the same time reciting the story. An efficient technique in these visually-oriented times, but a tricky balancing act for even the most effective illustrators and speakers.
Part 2 How Can Whiteboard Animation Be Used?
While working with whiteboard animation for pc or going with whiteboard animation hand drawing in digital mode, it is important to understand how can whiteboard animation be used for? Let’s try to figure out that in the following points:
01Represent complex ideas in a simple way
A whiteboard video can offer assistance if the item or framework you need to portray is complex or exceedingly specialized. Individuals frequently get bored amid clarifications, and the more point by point those clarifications are, the harder it is to focus.
Whether you’re pushing an item on a press page or sharing a new trade prepare with your team, employing a high-quality whiteboard movement video to induce your point-over will keep up tall intrigued for as long as the video is playing. This can be because whiteboard liveliness is fast-moving, outwardly point by point, and frequently colorful, making them simple and fun to watch—for as long as it takes to clarify the thought.
02You can cover a part of your thoughts all at once
For reasons comparative to those displayed over, a whiteboard video is perfect on the off chance that you would like to cover an expansive sum of data within the introduction. With ideas unfolding visually as the storyteller portrays what’s going on, you’ll be able to get absent with counting a part of diverse thoughts within the same video without losing the watcher intrigued.
03You need to get other business attention
Did you know that whiteboard activity recordings are fair as compelling for Bshowcasing? The industrial-yet-casual look-and-feel of whiteboard activity loans itself astoundingly generously to a corporate environment.
Whiteboard movement administrations can donate you a noteworthy edge over competing companies once you approach other businesses along with your offer.
04You should maintain a strategic distance from awful performing artists at all costs
With whiteboard liveliness, you don’t ought to enlist on-screen characters to play in your video. This cruel noteworthy took a toll on reserve funds. Still, it can moreover spare you genuine embarrassment—good, persuading performing artists can be troublesome to find, and awful ones will have your group of onlookers wincing through the complete introduction. Movement ousts this issue inside and out.
05You plan to use social media marketing
If you need to utilize YouTube or social media advertisements for your promotion, whiteboard liveliness recordings alone will do the job. Individuals like them, so you’ve got a great chance of getting sees and clicks—and sales.
(Fun truth: Did you know there are 3billion looks conducted on YouTube alone each month? If you need your share of that activity, utilizing whiteboard activity recordings may be your best wager.)
06You want to create a story
On the off-chance that you need your video to tell a portion of your brand’s story, no one will do that way better than whiteboard movement administrations. Disney demonstrated that liveliness was an incredibly viable way to tell stories nearly a hundred years ago. Why not take after that convention?
07You want to use humor
When you need to consolidate humor into your video introduction, whiteboard activity is one of the most excellent ways to induce giggles. Novice performing artists can be unbalanced and irritating when they attempt to be clever on camera, but in whiteboard animation’s laid-back visual fashion, it can communicate humor immaculately.
08You need to reuse ancient sound substance
If you want to repurpose other sorts of the substance you’ve got lying around—say, a podcast scene or a discourse you gave—you can combine preexisting audio with whiteboard liveliness. This will assist you to capitalize on the substance you’ve as of now made, and it’ll undoubtedly breathe new life into it.
Part 3 What is Whiteboard Animation Cost?
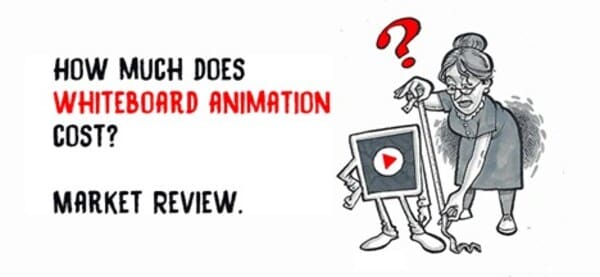
Should you contract an artisan or fair do-it-yourself for whiteboard activity? Let’s have a conversation around sweat equity.
You can set up a video camera yourself and utilize video altering computer program to make a Whiteboard Liveliness. However, it’ll likely require a couple of weeks of your time, and your comes about will be far from a professional studio’s quality. Expect ineffectively drawn pictures and composed words that are unreadable.
Whiteboard activity program can be fetched as small as $50plus saves a couple of weeks of your time. These cheap programs utilize an inactive picture of a hand and clip craftsmanship. But the ultimate item isn’t unique, and its esteem is an excellent Control Point introduction.
Another choice is Adobe Eventual outcomes, an industry-standard activity program. It’s what they utilize to create National Commercials. It costs $16in any case, and learning the computer program requires a bachelor’s degree.
Part 4 Some Whiteboard Animation Tools That Worth Using
Whiteboard animation software or whiteboard animation app permits you to form whiteboard animation videos. Animation software offers a visual, drag-and-drop interface to simplify the designing process for creators.
Wondering what whiteboard animations are? They’re explainer videos where a hand sketches on a whiteboard. Before, this was manual, where a lecturer writes on a whiteboard. But because of whiteboard animation software, you don’t have to have a whiteboard or compose aboard again.
Whiteboard animation tool has built-in hand styles and virtual whiteboards that automatically process animation formation.
Wondershare Filmora Video Editor and Camtasia are some of the best videos altering computer programs with cool features compared to other competing video varying Software.
Wondershare Filmora
Get started easily with Filmora’s powerful performance, intuitive interface, and countless effects Try It Free Try It Free Learn More >

Here are a few steps to follow for making whiteboard animation videos in Filmora and Camtasia:
01Write a Script
Much like a standard video or a brief skit, there must be a script if a whiteboard animation video succeeds. It is excellent to have compelling images and information, but without a logical story, they’re nothing.
It is not a blog, storyboard, or a collection of bullet points. You hope for a proper script, which says everything about the video. Why? Because then you’ll know precisely what images should be added further in specific segments, what the narrator must show, and what transitions are necessary.
02Start with the Storyboard
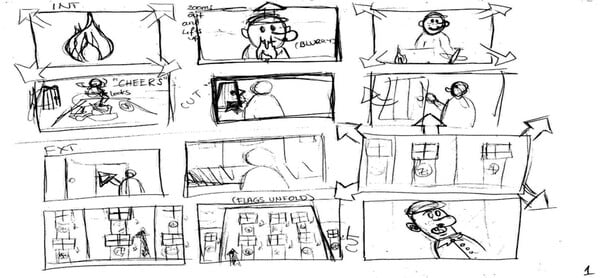
Now you have got a script, and you’ve got a clear idea of how you want your video to return across. It’s time to start out building the storyboard. With a storyboard, you may be able to sort out your thoughts far better. You’ll see how each frame comes onto the screen, and a unit of ammunition ties into the opposite.
When you create your storyboard, you may have a simple idea about how your final product will look. If there is some alteration you’re not proud of, this can be the instant where you’ll make changes.
03Create Images
You may find this part very easy if you’re a precise person. It’s all about crafting fun and unique images that will help deliver the data you want to bring across. Attempt to create striking photos which will excite your audience. The simpler, more distinctive, and attractive you’ll be able to make those images, the higher your end product.
04Animate Those Images
With your images drawn and in situ on the storyboard, it’s time to animate them. When animating your whiteboard animation video, confine in mind that every frame will likely show for no. quite seconds. This forces you to form every single movement count – with only some seconds per frame available, and quick movements are often preferable to extended scenes of stillness.
05Record and Sync the Audio
The audio is arguably one of the main essential parts of a whiteboard animation video. So, before recording the audio for any part of your project, practice reading through your script several times until you recognize it by memory and cannot struggle when speaking into the microphone during the particular recording process.
The final step involves getting your audio. Every animated video must have narration because it helps to elucidate what’s happening within the images that folks are seeing. Record your audio, and ensure it’s perfectly in sync with your content.
So, whether you are going with hand whiteboard animation and then modifying and animated with Filmora or the Camtasia whiteboard animation, both result in good whiteboard animation. Whereas, if looking for comprehensive video editing tools, the obvious choice will be Filmora.
● Key Takeaways from This Episode →
● In short, the article gives you the basic understanding of:
● What is meant by Whiteboard Animation?
● Different examples of whiteboard animation videos to explain the techniques
● Steps to apply whiteboard animation with Filmora
● Further, the article has explained Whiteboard Animation with different examples to clarify how it looks, and some websites may help you lead more about Whiteboard Animation videos. The most important question answered above is how to make videos ideally at Filmora. I hope your queries are explicit after reading this post.
We think about moving videos with actors and actresses when we talk about motion. But, when we speak about doodle videos or drawn videos, we feel about whiteboard animation.
This article covers all the necessary information about whiteboard animation, Filmora whiteboard animation, whiteboard animation cost, etc. Under whiteboard animation, sketches adjust in a manner that results in continual animation reflection.
In this article
01 [What is Whiteboard Animation?](#Part 1)
02 [How Can Whiteboard Animation Be Used?](#Part 2)
03 [What is Whiteboard Animation Cost?](#Part 3)
04 [Some Whiteboard Animation Tools That Worth Using](#Part 4)
Part 1 What is Whiteboard Animation?
Whiteboard animation is a style that shows static watcher images getting drawn on the white screen. The graphics are at the core of a narration that walks the audience through the story by the draws. These animations are modest to understand, but they make us involved all of an impulsive.
Whiteboard animation could be a video in the middle of narration that walks the viewer through a story by viewing the illustrator’s hand drawing it onto a white background. Established in 2007, whiteboard animation may be a new and exciting way of communicating to the viewer in a very personal way.
It applies effects like time-lapse and stop-motion to bring stories to life. Its uses include internal and external television and internet advertisements, software and product demonstrations, whiteboard animation lectures and educational videos for all ages, and various artistic possibilities like untrue storytelling.
Whiteboard animation videos are traditionally made by simply recording the artist live as they draw the content for the video while at the same time reciting the story. An efficient technique in these visually-oriented times, but a tricky balancing act for even the most effective illustrators and speakers.
Part 2 How Can Whiteboard Animation Be Used?
While working with whiteboard animation for pc or going with whiteboard animation hand drawing in digital mode, it is important to understand how can whiteboard animation be used for? Let’s try to figure out that in the following points:
01Represent complex ideas in a simple way
A whiteboard video can offer assistance if the item or framework you need to portray is complex or exceedingly specialized. Individuals frequently get bored amid clarifications, and the more point by point those clarifications are, the harder it is to focus.
Whether you’re pushing an item on a press page or sharing a new trade prepare with your team, employing a high-quality whiteboard movement video to induce your point-over will keep up tall intrigued for as long as the video is playing. This can be because whiteboard liveliness is fast-moving, outwardly point by point, and frequently colorful, making them simple and fun to watch—for as long as it takes to clarify the thought.
02You can cover a part of your thoughts all at once
For reasons comparative to those displayed over, a whiteboard video is perfect on the off chance that you would like to cover an expansive sum of data within the introduction. With ideas unfolding visually as the storyteller portrays what’s going on, you’ll be able to get absent with counting a part of diverse thoughts within the same video without losing the watcher intrigued.
03You need to get other business attention
Did you know that whiteboard activity recordings are fair as compelling for Bshowcasing? The industrial-yet-casual look-and-feel of whiteboard activity loans itself astoundingly generously to a corporate environment.
Whiteboard movement administrations can donate you a noteworthy edge over competing companies once you approach other businesses along with your offer.
04You should maintain a strategic distance from awful performing artists at all costs
With whiteboard liveliness, you don’t ought to enlist on-screen characters to play in your video. This cruel noteworthy took a toll on reserve funds. Still, it can moreover spare you genuine embarrassment—good, persuading performing artists can be troublesome to find, and awful ones will have your group of onlookers wincing through the complete introduction. Movement ousts this issue inside and out.
05You plan to use social media marketing
If you need to utilize YouTube or social media advertisements for your promotion, whiteboard liveliness recordings alone will do the job. Individuals like them, so you’ve got a great chance of getting sees and clicks—and sales.
(Fun truth: Did you know there are 3billion looks conducted on YouTube alone each month? If you need your share of that activity, utilizing whiteboard activity recordings may be your best wager.)
06You want to create a story
On the off-chance that you need your video to tell a portion of your brand’s story, no one will do that way better than whiteboard movement administrations. Disney demonstrated that liveliness was an incredibly viable way to tell stories nearly a hundred years ago. Why not take after that convention?
07You want to use humor
When you need to consolidate humor into your video introduction, whiteboard activity is one of the most excellent ways to induce giggles. Novice performing artists can be unbalanced and irritating when they attempt to be clever on camera, but in whiteboard animation’s laid-back visual fashion, it can communicate humor immaculately.
08You need to reuse ancient sound substance
If you want to repurpose other sorts of the substance you’ve got lying around—say, a podcast scene or a discourse you gave—you can combine preexisting audio with whiteboard liveliness. This will assist you to capitalize on the substance you’ve as of now made, and it’ll undoubtedly breathe new life into it.
Part 3 What is Whiteboard Animation Cost?
Should you contract an artisan or fair do-it-yourself for whiteboard activity? Let’s have a conversation around sweat equity.
You can set up a video camera yourself and utilize video altering computer program to make a Whiteboard Liveliness. However, it’ll likely require a couple of weeks of your time, and your comes about will be far from a professional studio’s quality. Expect ineffectively drawn pictures and composed words that are unreadable.
Whiteboard activity program can be fetched as small as $50plus saves a couple of weeks of your time. These cheap programs utilize an inactive picture of a hand and clip craftsmanship. But the ultimate item isn’t unique, and its esteem is an excellent Control Point introduction.
Another choice is Adobe Eventual outcomes, an industry-standard activity program. It’s what they utilize to create National Commercials. It costs $16in any case, and learning the computer program requires a bachelor’s degree.
Part 4 Some Whiteboard Animation Tools That Worth Using
Whiteboard animation software or whiteboard animation app permits you to form whiteboard animation videos. Animation software offers a visual, drag-and-drop interface to simplify the designing process for creators.
Wondering what whiteboard animations are? They’re explainer videos where a hand sketches on a whiteboard. Before, this was manual, where a lecturer writes on a whiteboard. But because of whiteboard animation software, you don’t have to have a whiteboard or compose aboard again.
Whiteboard animation tool has built-in hand styles and virtual whiteboards that automatically process animation formation.
Wondershare Filmora Video Editor and Camtasia are some of the best videos altering computer programs with cool features compared to other competing video varying Software.
Wondershare Filmora
Get started easily with Filmora’s powerful performance, intuitive interface, and countless effects Try It Free Try It Free Learn More >
Here are a few steps to follow for making whiteboard animation videos in Filmora and Camtasia:
01Write a Script
Much like a standard video or a brief skit, there must be a script if a whiteboard animation video succeeds. It is excellent to have compelling images and information, but without a logical story, they’re nothing.
It is not a blog, storyboard, or a collection of bullet points. You hope for a proper script, which says everything about the video. Why? Because then you’ll know precisely what images should be added further in specific segments, what the narrator must show, and what transitions are necessary.
02Start with the Storyboard
Now you have got a script, and you’ve got a clear idea of how you want your video to return across. It’s time to start out building the storyboard. With a storyboard, you may be able to sort out your thoughts far better. You’ll see how each frame comes onto the screen, and a unit of ammunition ties into the opposite.
When you create your storyboard, you may have a simple idea about how your final product will look. If there is some alteration you’re not proud of, this can be the instant where you’ll make changes.
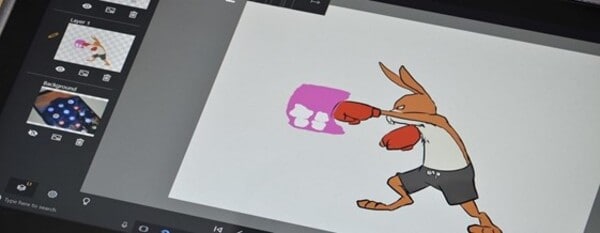
03Create Images
You may find this part very easy if you’re a precise person. It’s all about crafting fun and unique images that will help deliver the data you want to bring across. Attempt to create striking photos which will excite your audience. The simpler, more distinctive, and attractive you’ll be able to make those images, the higher your end product.
04Animate Those Images
With your images drawn and in situ on the storyboard, it’s time to animate them. When animating your whiteboard animation video, confine in mind that every frame will likely show for no. quite seconds. This forces you to form every single movement count – with only some seconds per frame available, and quick movements are often preferable to extended scenes of stillness.
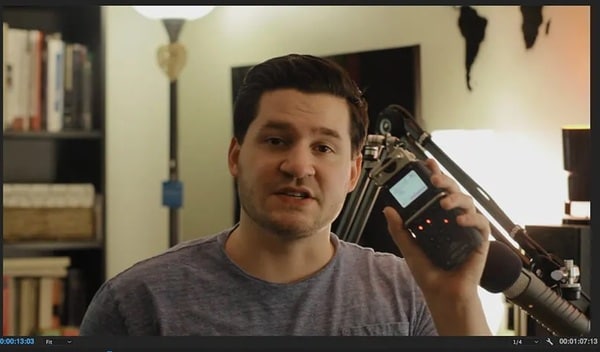
05Record and Sync the Audio
The audio is arguably one of the main essential parts of a whiteboard animation video. So, before recording the audio for any part of your project, practice reading through your script several times until you recognize it by memory and cannot struggle when speaking into the microphone during the particular recording process.
The final step involves getting your audio. Every animated video must have narration because it helps to elucidate what’s happening within the images that folks are seeing. Record your audio, and ensure it’s perfectly in sync with your content.
So, whether you are going with hand whiteboard animation and then modifying and animated with Filmora or the Camtasia whiteboard animation, both result in good whiteboard animation. Whereas, if looking for comprehensive video editing tools, the obvious choice will be Filmora.
● Key Takeaways from This Episode →
● In short, the article gives you the basic understanding of:
● What is meant by Whiteboard Animation?
● Different examples of whiteboard animation videos to explain the techniques
● Steps to apply whiteboard animation with Filmora
● Further, the article has explained Whiteboard Animation with different examples to clarify how it looks, and some websites may help you lead more about Whiteboard Animation videos. The most important question answered above is how to make videos ideally at Filmora. I hope your queries are explicit after reading this post.
We think about moving videos with actors and actresses when we talk about motion. But, when we speak about doodle videos or drawn videos, we feel about whiteboard animation.
This article covers all the necessary information about whiteboard animation, Filmora whiteboard animation, whiteboard animation cost, etc. Under whiteboard animation, sketches adjust in a manner that results in continual animation reflection.
In this article
01 [What is Whiteboard Animation?](#Part 1)
02 [How Can Whiteboard Animation Be Used?](#Part 2)
03 [What is Whiteboard Animation Cost?](#Part 3)
04 [Some Whiteboard Animation Tools That Worth Using](#Part 4)
Part 1 What is Whiteboard Animation?
Whiteboard animation is a style that shows static watcher images getting drawn on the white screen. The graphics are at the core of a narration that walks the audience through the story by the draws. These animations are modest to understand, but they make us involved all of an impulsive.
Whiteboard animation could be a video in the middle of narration that walks the viewer through a story by viewing the illustrator’s hand drawing it onto a white background. Established in 2007, whiteboard animation may be a new and exciting way of communicating to the viewer in a very personal way.
It applies effects like time-lapse and stop-motion to bring stories to life. Its uses include internal and external television and internet advertisements, software and product demonstrations, whiteboard animation lectures and educational videos for all ages, and various artistic possibilities like untrue storytelling.
Whiteboard animation videos are traditionally made by simply recording the artist live as they draw the content for the video while at the same time reciting the story. An efficient technique in these visually-oriented times, but a tricky balancing act for even the most effective illustrators and speakers.
Part 2 How Can Whiteboard Animation Be Used?
While working with whiteboard animation for pc or going with whiteboard animation hand drawing in digital mode, it is important to understand how can whiteboard animation be used for? Let’s try to figure out that in the following points:
01Represent complex ideas in a simple way
A whiteboard video can offer assistance if the item or framework you need to portray is complex or exceedingly specialized. Individuals frequently get bored amid clarifications, and the more point by point those clarifications are, the harder it is to focus.
Whether you’re pushing an item on a press page or sharing a new trade prepare with your team, employing a high-quality whiteboard movement video to induce your point-over will keep up tall intrigued for as long as the video is playing. This can be because whiteboard liveliness is fast-moving, outwardly point by point, and frequently colorful, making them simple and fun to watch—for as long as it takes to clarify the thought.
02You can cover a part of your thoughts all at once
For reasons comparative to those displayed over, a whiteboard video is perfect on the off chance that you would like to cover an expansive sum of data within the introduction. With ideas unfolding visually as the storyteller portrays what’s going on, you’ll be able to get absent with counting a part of diverse thoughts within the same video without losing the watcher intrigued.
03You need to get other business attention
Did you know that whiteboard activity recordings are fair as compelling for Bshowcasing? The industrial-yet-casual look-and-feel of whiteboard activity loans itself astoundingly generously to a corporate environment.
Whiteboard movement administrations can donate you a noteworthy edge over competing companies once you approach other businesses along with your offer.
04You should maintain a strategic distance from awful performing artists at all costs
With whiteboard liveliness, you don’t ought to enlist on-screen characters to play in your video. This cruel noteworthy took a toll on reserve funds. Still, it can moreover spare you genuine embarrassment—good, persuading performing artists can be troublesome to find, and awful ones will have your group of onlookers wincing through the complete introduction. Movement ousts this issue inside and out.
05You plan to use social media marketing
If you need to utilize YouTube or social media advertisements for your promotion, whiteboard liveliness recordings alone will do the job. Individuals like them, so you’ve got a great chance of getting sees and clicks—and sales.
(Fun truth: Did you know there are 3billion looks conducted on YouTube alone each month? If you need your share of that activity, utilizing whiteboard activity recordings may be your best wager.)
06You want to create a story
On the off-chance that you need your video to tell a portion of your brand’s story, no one will do that way better than whiteboard movement administrations. Disney demonstrated that liveliness was an incredibly viable way to tell stories nearly a hundred years ago. Why not take after that convention?
07You want to use humor
When you need to consolidate humor into your video introduction, whiteboard activity is one of the most excellent ways to induce giggles. Novice performing artists can be unbalanced and irritating when they attempt to be clever on camera, but in whiteboard animation’s laid-back visual fashion, it can communicate humor immaculately.
08You need to reuse ancient sound substance
If you want to repurpose other sorts of the substance you’ve got lying around—say, a podcast scene or a discourse you gave—you can combine preexisting audio with whiteboard liveliness. This will assist you to capitalize on the substance you’ve as of now made, and it’ll undoubtedly breathe new life into it.
Part 3 What is Whiteboard Animation Cost?
Should you contract an artisan or fair do-it-yourself for whiteboard activity? Let’s have a conversation around sweat equity.
You can set up a video camera yourself and utilize video altering computer program to make a Whiteboard Liveliness. However, it’ll likely require a couple of weeks of your time, and your comes about will be far from a professional studio’s quality. Expect ineffectively drawn pictures and composed words that are unreadable.
Whiteboard activity program can be fetched as small as $50plus saves a couple of weeks of your time. These cheap programs utilize an inactive picture of a hand and clip craftsmanship. But the ultimate item isn’t unique, and its esteem is an excellent Control Point introduction.
Another choice is Adobe Eventual outcomes, an industry-standard activity program. It’s what they utilize to create National Commercials. It costs $16in any case, and learning the computer program requires a bachelor’s degree.
Part 4 Some Whiteboard Animation Tools That Worth Using
Whiteboard animation software or whiteboard animation app permits you to form whiteboard animation videos. Animation software offers a visual, drag-and-drop interface to simplify the designing process for creators.
Wondering what whiteboard animations are? They’re explainer videos where a hand sketches on a whiteboard. Before, this was manual, where a lecturer writes on a whiteboard. But because of whiteboard animation software, you don’t have to have a whiteboard or compose aboard again.
Whiteboard animation tool has built-in hand styles and virtual whiteboards that automatically process animation formation.
Wondershare Filmora Video Editor and Camtasia are some of the best videos altering computer programs with cool features compared to other competing video varying Software.
Wondershare Filmora
Get started easily with Filmora’s powerful performance, intuitive interface, and countless effects Try It Free Try It Free Learn More >
Here are a few steps to follow for making whiteboard animation videos in Filmora and Camtasia:
01Write a Script
Much like a standard video or a brief skit, there must be a script if a whiteboard animation video succeeds. It is excellent to have compelling images and information, but without a logical story, they’re nothing.
It is not a blog, storyboard, or a collection of bullet points. You hope for a proper script, which says everything about the video. Why? Because then you’ll know precisely what images should be added further in specific segments, what the narrator must show, and what transitions are necessary.
02Start with the Storyboard
Now you have got a script, and you’ve got a clear idea of how you want your video to return across. It’s time to start out building the storyboard. With a storyboard, you may be able to sort out your thoughts far better. You’ll see how each frame comes onto the screen, and a unit of ammunition ties into the opposite.
When you create your storyboard, you may have a simple idea about how your final product will look. If there is some alteration you’re not proud of, this can be the instant where you’ll make changes.
03Create Images
You may find this part very easy if you’re a precise person. It’s all about crafting fun and unique images that will help deliver the data you want to bring across. Attempt to create striking photos which will excite your audience. The simpler, more distinctive, and attractive you’ll be able to make those images, the higher your end product.
04Animate Those Images
With your images drawn and in situ on the storyboard, it’s time to animate them. When animating your whiteboard animation video, confine in mind that every frame will likely show for no. quite seconds. This forces you to form every single movement count – with only some seconds per frame available, and quick movements are often preferable to extended scenes of stillness.
05Record and Sync the Audio
The audio is arguably one of the main essential parts of a whiteboard animation video. So, before recording the audio for any part of your project, practice reading through your script several times until you recognize it by memory and cannot struggle when speaking into the microphone during the particular recording process.
The final step involves getting your audio. Every animated video must have narration because it helps to elucidate what’s happening within the images that folks are seeing. Record your audio, and ensure it’s perfectly in sync with your content.
So, whether you are going with hand whiteboard animation and then modifying and animated with Filmora or the Camtasia whiteboard animation, both result in good whiteboard animation. Whereas, if looking for comprehensive video editing tools, the obvious choice will be Filmora.
● Key Takeaways from This Episode →
● In short, the article gives you the basic understanding of:
● What is meant by Whiteboard Animation?
● Different examples of whiteboard animation videos to explain the techniques
● Steps to apply whiteboard animation with Filmora
● Further, the article has explained Whiteboard Animation with different examples to clarify how it looks, and some websites may help you lead more about Whiteboard Animation videos. The most important question answered above is how to make videos ideally at Filmora. I hope your queries are explicit after reading this post.
Cartoon Fundamentals: How to Learn Cartoon Characters Sketch Quickly
Cartoon Fundamentals: How to Learn Cartoon Characters Sketch Quickly
An easy yet powerful editor
Numerous effects to choose from
Detailed tutorials provided by the official channel
Whether your favourite Cartoon character Bugs-bunny comes from space or beyond your imagination, whether nostalgic Tom and Jerry are young, eternal or old, knowing the process to draw cute, funny, adorable cartoon-characters is a kind of special feeling always & looks essential incase you desire to become quality professional artist. Cartoon Characters are more challenging to draw while taking care of their weird postures, body-parts like legs, hands.Cartoons characters are the easiest ones to draw as it involved simplistic shapes and doesn’t needed a hard core practice.
In this article, you will be able to get access to drawing amazing characters with a wide range of characters featuring ordinary people, fictional-characters, creatures, monsters, or your favourite cute little ones in easy way.
In this article
01 [Basics of Cartoon Characters Sketch](#Part 1)
02 [Cartoon Characters Sketch Anyone Can Draw (With Free Video Tutorials)](#Part 2)
Part 1 Basics of Cartoon Characters Sketch
Before going ahead with the process of learning step by step how to draw cartoon characters, you need to understand the methodology behind sketching. It is easy to draw multiple cartoon characters but at the same time, you need to figure out sketching techniques involved in making that happen. If you want to extract few details of your central character, you need to represent cartoon characters sketch with the help of shapes. The main goal here is to recognize drawing & let it be attractive as children are the main audience and cartoon characters like Disney, Chuck Jones, Walter-Lantz and others have truly enchanted this world with eternal character & their magical appearance.
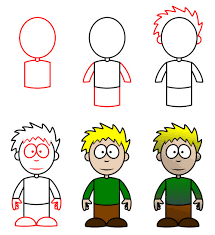
01Concentrating on circle
One of the most basic and interesting shape for any cartoon sketch is circle. All you need is to clearly define basic proportion of your character and that can be happened with desired character’s head. Later on you can trace its charm with face axis.
02Draw Cartoon Eyes
In order to make eyes, one needs to take care of oval shape sketch with slight tilt to side at top position. You have to note that, it is always important to leave good gap between each one of them of approximately similar size as the eye.
03Drawing Cartoon Hair
There is nothing to fear when it comes to draw cartoon hair. You don’t need stylist or a fashion designer in order to make them look perfect. With ideal haircut and matching personality of the desired character, you can do this thing pretty awesome. Hair can represent age, conservatism, rebellion etc. and comes in incredible features.
One of the most accurate & a faster way to do that is by taking references from a fashion magazine, Google Search or cartoon magazine. Once you are done with your findings of ideal styling, you can later on simplify your hair version.
04Sketching for Older Character
Sometimes older characters can be pretty easy to draw as it all begins with their eyes, facial expressions, addition of wrinkles, eyebrows, eye pupils etc. You just need to expand eyebrow a little bit. The older characters have thicker-eyebrows, large forehead space etc.
05Drawing a female character
It’s simple, just focus around delicacy in facial structures, like:-
● Thin eyebrows
● Larger & expressive eyelashes
● Thinner-chin
● Small-nose under fewer-details
● Long hair or depends on your choice
That’s it. Also, you need to give comfort feeling to your character, the more you draw the more realistic it will look.
● Filmora for learning new drawing skills
For Win 7 or later (64-bit)
For macOS 10.12 or later
If you want to showcase your talent to this world without any extravagant apps or software then FIlmora is the best choice that you can consider for drawing some amazing cartoon at your own. This app has its own fun loving designing features and you can add varieties of stickers, images and text to your drawings.
What exactly Filmora can do your drawings:
● For your Pencil sketch of cartoon characters, this app has a lot of text, images and fun loving stickers to showcase more highlighting features of your cartoon character.
● You can share your cartoon with your friends and other community over the web through Twitter, Facebook, and WhatsApp etc.
● This will let you access video editing and image editing features also, to give your cartoon a life.
Part 2 Cartoon Characters Sketch Anyone Can Draw (With Free Video Tutorials)
Now, it’s time to move on with thinking about which cartoon characters to put in your papers with emotions, facial expressions and other features. We are now moving towards the process to include more and more emotions to the same.
Let’s begin drawing 8 amazing characters that are not only famous but also living in heart of children.
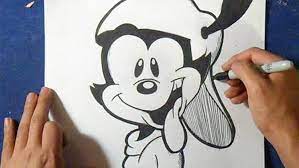
01Bugs Bunny
Who doesn’t live Bugs Bunny? Well, it is among the list of most iconic characters that you can imagine and it is certainly the most funnies and interesting character to draw. Right from drawing its big feet to attractive teeth just made for cutting carrots, a lot of things are included in Bugs bunny.
Let’s Draw it:-
● Draw a circle & a “noodle” shaped object as per the imagination. The circle will be its head & pear shape will be its body. You need to make bottom pear fatter as compared to upper portion and also upper-part has to overlap head circle only a little.
● Include perspective guidelines at around the head as this thing can correctly position eyes as well as nose of your bunny.
● You need to draw the eyes at Horizontal guideline and nose where guidelines crosses.
● Draw cheeks and include ears, arms. At the time of drawing arms, you have to give natural curve to arms.
● The arm curves together with the legs-curves might look little difficult, therefore you have to make use of your pencil tenderly without pushing it harder.
● Draw inner lines in ear & iris ellipse at inner portion of eyes.
● Add nose & draw mouth, teeth.
● Your Bunny starts taking its shape and here you can add colors as per your choice
Your cartoon Bugs-Bunny is now ready.
02Popeye
One of the most famous cartoon character of Disney Popeye also appeared on the cinema screens and this belongs to the list of famous classic cartoon-characters.
Let’s draw this amazing character:-
● First Sketch few basic shapes like head, chest, belly.
● It’s a comic character so give it a grotesque-look
● Slightly include other body-parts with shapes like ellipses, noodles in the form of contours.
● Draw one centre-line across the head with well-balanced facial features.
● Draw nose, mouth, ears for the face to form.
● Sketch contours of Popeye’s fists, and arms.
● You can begin giving colors to this shape with flat layers of colorings
03Barney Rubble
As a next door friend and neighbor of Flintstone-house, Barney is kind of a quirky character. This contains features like ears & big feet in the form of angles.
Here is an amazing video tutorial for your Barnet Rubble Cartoon Character:-
04Scrooge McDuck
This cartoon character has wealthy features with fun-loving designs to draw in the form of top-hat, a-cane, as well as few small reading glasses. When it comes to drawing this cartoon characters sketch you need to come up with funny and slightly challenging features.
05Drawing a Ninja For Amazing Action
● Step 1
Work on the head first with nice & precise circle in order to illustrate head portion. Inside this, you can add two more tiny circles for eyes. Once you are done with the eyes, you need to add large & thin rectangle that represents headband. At one portion of headband draw tiny circle with small triangles in numbers 2.
● Step 2
Left arm of our ninja can be sketched through a long & thin rectangle. In order to showcase right arm, draw two rectangles and later on both hands has to be represented in terms of circles.
● Step 3
Two Legs are also need to draw in terms of unusual position. So total of 5 rectangles has to be drawn for both legs & feet.
● Step 4
Add accessories like sabre with basic shapes like circle or rectangle for the same.
● Step 5
Now refine it with an outline and work upon head to make sure both eyes will be clear & visible and also keep the head round & tight.
● Step 6
For upper portion, use nice curved lines and illustrate chest & arms. For showing a discipline make use of good contour likes that highlights posture & gesture.
● Step 7
Repeat the process for the lower portion of your Action ninja.
● Step 8
Now throw some colors’ either black, brown & red to finish the masterpiece!
06Morty Smith
Morty is a lot easy and occupies t-shirt & jeans in its overall appearance and it is much smaller & way more natural than you usually think.
07Helga G. Pataki
If you want to add some crazy cartoon characters in your list then Helga is a good choice. While drawing its cartoon, you need to pay close attention to head as this thing can be little strange with her rectangle hairdo.
08Kim Possible
The design of Kim Possible looks easy at first appearance but when you actually begin with the process of draw its shape, you may get confused. You need to add varieties of features in her face with crazy parachute pants right from the 1980s.
09Shaggy Rogers
The companion of Scooby Shaggy also love its treats & also like to run-away from the monsters at first sight. He can solve mysteries and fun to watch.
● Ending Thoughts →
● Well, drawing cartoons is always a fun loving thing to do. You can pick any one cartoon for drawing some favorite designs.
● You can make use of professional apps to give proper background to your poster or sketch making.
● For Fictional creatures, you can illustrate their styling features, fun facts and lot more to make it much more interesting.
Whether your favourite Cartoon character Bugs-bunny comes from space or beyond your imagination, whether nostalgic Tom and Jerry are young, eternal or old, knowing the process to draw cute, funny, adorable cartoon-characters is a kind of special feeling always & looks essential incase you desire to become quality professional artist. Cartoon Characters are more challenging to draw while taking care of their weird postures, body-parts like legs, hands.Cartoons characters are the easiest ones to draw as it involved simplistic shapes and doesn’t needed a hard core practice.
In this article, you will be able to get access to drawing amazing characters with a wide range of characters featuring ordinary people, fictional-characters, creatures, monsters, or your favourite cute little ones in easy way.
In this article
01 [Basics of Cartoon Characters Sketch](#Part 1)
02 [Cartoon Characters Sketch Anyone Can Draw (With Free Video Tutorials)](#Part 2)
Part 1 Basics of Cartoon Characters Sketch
Before going ahead with the process of learning step by step how to draw cartoon characters, you need to understand the methodology behind sketching. It is easy to draw multiple cartoon characters but at the same time, you need to figure out sketching techniques involved in making that happen. If you want to extract few details of your central character, you need to represent cartoon characters sketch with the help of shapes. The main goal here is to recognize drawing & let it be attractive as children are the main audience and cartoon characters like Disney, Chuck Jones, Walter-Lantz and others have truly enchanted this world with eternal character & their magical appearance.
01Concentrating on circle
One of the most basic and interesting shape for any cartoon sketch is circle. All you need is to clearly define basic proportion of your character and that can be happened with desired character’s head. Later on you can trace its charm with face axis.
02Draw Cartoon Eyes
In order to make eyes, one needs to take care of oval shape sketch with slight tilt to side at top position. You have to note that, it is always important to leave good gap between each one of them of approximately similar size as the eye.
03Drawing Cartoon Hair
There is nothing to fear when it comes to draw cartoon hair. You don’t need stylist or a fashion designer in order to make them look perfect. With ideal haircut and matching personality of the desired character, you can do this thing pretty awesome. Hair can represent age, conservatism, rebellion etc. and comes in incredible features.
One of the most accurate & a faster way to do that is by taking references from a fashion magazine, Google Search or cartoon magazine. Once you are done with your findings of ideal styling, you can later on simplify your hair version.
04Sketching for Older Character
Sometimes older characters can be pretty easy to draw as it all begins with their eyes, facial expressions, addition of wrinkles, eyebrows, eye pupils etc. You just need to expand eyebrow a little bit. The older characters have thicker-eyebrows, large forehead space etc.
05Drawing a female character
It’s simple, just focus around delicacy in facial structures, like:-
● Thin eyebrows
● Larger & expressive eyelashes
● Thinner-chin
● Small-nose under fewer-details
● Long hair or depends on your choice
That’s it. Also, you need to give comfort feeling to your character, the more you draw the more realistic it will look.
● Filmora for learning new drawing skills
For Win 7 or later (64-bit)
For macOS 10.12 or later
If you want to showcase your talent to this world without any extravagant apps or software then FIlmora is the best choice that you can consider for drawing some amazing cartoon at your own. This app has its own fun loving designing features and you can add varieties of stickers, images and text to your drawings.
What exactly Filmora can do your drawings:
● For your Pencil sketch of cartoon characters, this app has a lot of text, images and fun loving stickers to showcase more highlighting features of your cartoon character.
● You can share your cartoon with your friends and other community over the web through Twitter, Facebook, and WhatsApp etc.
● This will let you access video editing and image editing features also, to give your cartoon a life.
Part 2 Cartoon Characters Sketch Anyone Can Draw (With Free Video Tutorials)
Now, it’s time to move on with thinking about which cartoon characters to put in your papers with emotions, facial expressions and other features. We are now moving towards the process to include more and more emotions to the same.
Let’s begin drawing 8 amazing characters that are not only famous but also living in heart of children.
01Bugs Bunny
Who doesn’t live Bugs Bunny? Well, it is among the list of most iconic characters that you can imagine and it is certainly the most funnies and interesting character to draw. Right from drawing its big feet to attractive teeth just made for cutting carrots, a lot of things are included in Bugs bunny.
Let’s Draw it:-
● Draw a circle & a “noodle” shaped object as per the imagination. The circle will be its head & pear shape will be its body. You need to make bottom pear fatter as compared to upper portion and also upper-part has to overlap head circle only a little.
● Include perspective guidelines at around the head as this thing can correctly position eyes as well as nose of your bunny.
● You need to draw the eyes at Horizontal guideline and nose where guidelines crosses.
● Draw cheeks and include ears, arms. At the time of drawing arms, you have to give natural curve to arms.
● The arm curves together with the legs-curves might look little difficult, therefore you have to make use of your pencil tenderly without pushing it harder.
● Draw inner lines in ear & iris ellipse at inner portion of eyes.
● Add nose & draw mouth, teeth.
● Your Bunny starts taking its shape and here you can add colors as per your choice
Your cartoon Bugs-Bunny is now ready.
02Popeye
One of the most famous cartoon character of Disney Popeye also appeared on the cinema screens and this belongs to the list of famous classic cartoon-characters.
Let’s draw this amazing character:-
● First Sketch few basic shapes like head, chest, belly.
● It’s a comic character so give it a grotesque-look
● Slightly include other body-parts with shapes like ellipses, noodles in the form of contours.
● Draw one centre-line across the head with well-balanced facial features.
● Draw nose, mouth, ears for the face to form.
● Sketch contours of Popeye’s fists, and arms.
● You can begin giving colors to this shape with flat layers of colorings
03Barney Rubble
As a next door friend and neighbor of Flintstone-house, Barney is kind of a quirky character. This contains features like ears & big feet in the form of angles.
Here is an amazing video tutorial for your Barnet Rubble Cartoon Character:-
04Scrooge McDuck
This cartoon character has wealthy features with fun-loving designs to draw in the form of top-hat, a-cane, as well as few small reading glasses. When it comes to drawing this cartoon characters sketch you need to come up with funny and slightly challenging features.
05Drawing a Ninja For Amazing Action
● Step 1
Work on the head first with nice & precise circle in order to illustrate head portion. Inside this, you can add two more tiny circles for eyes. Once you are done with the eyes, you need to add large & thin rectangle that represents headband. At one portion of headband draw tiny circle with small triangles in numbers 2.
● Step 2
Left arm of our ninja can be sketched through a long & thin rectangle. In order to showcase right arm, draw two rectangles and later on both hands has to be represented in terms of circles.
● Step 3
Two Legs are also need to draw in terms of unusual position. So total of 5 rectangles has to be drawn for both legs & feet.
● Step 4
Add accessories like sabre with basic shapes like circle or rectangle for the same.
● Step 5
Now refine it with an outline and work upon head to make sure both eyes will be clear & visible and also keep the head round & tight.
● Step 6
For upper portion, use nice curved lines and illustrate chest & arms. For showing a discipline make use of good contour likes that highlights posture & gesture.
● Step 7
Repeat the process for the lower portion of your Action ninja.
● Step 8
Now throw some colors’ either black, brown & red to finish the masterpiece!
06Morty Smith
Morty is a lot easy and occupies t-shirt & jeans in its overall appearance and it is much smaller & way more natural than you usually think.
07Helga G. Pataki
If you want to add some crazy cartoon characters in your list then Helga is a good choice. While drawing its cartoon, you need to pay close attention to head as this thing can be little strange with her rectangle hairdo.
08Kim Possible
The design of Kim Possible looks easy at first appearance but when you actually begin with the process of draw its shape, you may get confused. You need to add varieties of features in her face with crazy parachute pants right from the 1980s.
09Shaggy Rogers
The companion of Scooby Shaggy also love its treats & also like to run-away from the monsters at first sight. He can solve mysteries and fun to watch.
● Ending Thoughts →
● Well, drawing cartoons is always a fun loving thing to do. You can pick any one cartoon for drawing some favorite designs.
● You can make use of professional apps to give proper background to your poster or sketch making.
● For Fictional creatures, you can illustrate their styling features, fun facts and lot more to make it much more interesting.
How to Make Your Characters Interactive in Unity Animation Rigging
Learn How to Make Your Characters Interactive in Unity Animation Rigging
An easy yet powerful editor
Numerous effects to choose from
Detailed tutorials provided by the official channel
Animation is one such aspect that is formed from the integration of several varied factors and processes. One of the most vital ones is the process of rigging. Thus, we will be discussing Unity character rigging as Unity is one of the most efficient platforms for animation.
Additionally, we will introduce you to one of the best tools you can use to edit videos and nurture the creative skills you carry in yourself. So, without any further delay, let us start our discussion.
In this article
01 [What is Unity Rigging?](#Part 1)
02 [Is It Better to Rig in Unity or Blender?](#Part 2)
03 [How To Use Animation Rigging In Unity](#Part 3)
Part 1 What is Unity Rigging?
To understand what Unity rigging is, we must start our discussion first by discussing rigging in animation. In animation, rigging is the process in which your animation characters are separated into two parts. One is the mesh-like structure of the characters. And the other is the skeletal structure given to the characters.
You integrate bones and joints and join them accordingly in the characters present in your animation. It is similar to the presence of the human skeletal system. Moreover, just like the skeletal system in humans helps in the movements of the different parts of the body, the bone and joint structure through rigging also enables the characters in animation to move.
Therefore, we can say that rigging is the process by which you can enable your characters’ in animation to move and show different facial expressions, etc. So, it is obvious that without the process of rigging, the animation is impossible, which makes rigging one of the most crucial aspects of animation.
Now that we know what rigging in animation is, we will be discussing what is animation rigging in Unity. Unity technologies have developed a cross-platform gaming engine called ‘Unity’. And this platform also offers the ones interested in animation to learn animation rigging.
The Unity platform offers robust and effective tools for animation rigging. And these tools assist the animators to create real-time rigs in Unity. Most commonly, the set of tools in Unity for rigging is used on the characters. But, if one likes, they can also use the tools on ani Game Object that includes animations and skeletons.
Therefore, when you utilise the platform of Unity or the toolsets of Unity to perform rigging in animation, it can be referred to as unity rigging. It is one of the most powerful and renowned platforms for animation, creating the finest and most professional animation creations.

Part 2 Is It Better to Rig in Unity or Blender?
Another platform that can ideally assist you in animation is Blender. A common question arises as to whether one should choose blender rigging over Unity or vice versa. We have laid down the following table to compare the different features of Blender with that of Unity.
| | Unity | Blender | |
| ——————- | ————————————————————————————————————————- | ————————————————————————————————————————————— |
| About | It is a game engine that enables you in creating human-machine interfaces, AR simulations, customize splash screens, etc. | It is a computer graphics software that is open source and is mainly used for creating 3D models. |
| Types Supported | Supports 3D | |
| Best Purpose | Ideal for film, architecture, automotive, transportation, and other industries | Ideal for animation and design that assists in VFX, simulation, organizations of all sizes with rendering, modeling, and video editing. |
There are many features that Blender lacks, but Unity includes. The features included in Unity but are absent in Blender are as follows.
● Drawing
● Games
● In-Game Analytics
● Multi-player Gaming Network
● Player Management
● Virtual Reality
● IT Asset Management
● Prototype Creation
Therefore, it is preferred to opt for Unity rigging than Blender rigging, as Blender lacks a considerable number of features.
Part 3 How To Use Animation Rigging In Unity
Now, we will be introducing you to the different steps that will help you in unity rig animation. The following list includes the steps in the sequence that, when you deploy, will help you rig in the platform of Unity.
Step 1Installation
The first step is to install the “animation rigging package” of Unity. You will get the animation rigging package in the “Package Manager”. You will be able to avail of this animation package in Unity 2019.1 and above.
This package offers you a library that consists of rig constraints. And this library of rig constraints enables you to create procedural motion during the runtime. And the general term used for this is called “runtime rigging”.
The “Asset’s Animator Root” consist of the “Rig Builder Component”, which is the source where the rigs are accumulated. The rigs here are the constraints put together in groups. With these steps you will be able to create Unity humanoid rig that will make your animation creations look the finest, most realistic and most professional.

Step 2Rig Builder set-up
After installing the unity animation rigging package, the next step is to set up the rig builder. You will have to use the “Animator component” in this step. Using the “Animator component”, integrate the “Rig Builder component” with the “GameObject”. Generally, in the hierarchy of rig, it is the topmost “Transform”.
Then, you will have to make a new child GameObject. To which, you will have to integrate the “Rig component”. After this step, you need to access the “Animator root”, where you will find the “Rig Builder component”. In the “Rig Builder component”, you need to assign the “Rig to the Rig Layers” list.
It will complete the task of creating the most basic rig. The further steps will help you install the required behaviours in the character or characters.

Step 3Bone Rendering
Whether it is unity rigging or 3D, bone rendering is the most crucial step to enable your animation characters to gain movement. The “Unity Editor” will help you interact and work with the character’s skeleton in the “Scene view.”
You can add “Transform” lists and then display them in various visual styles with the help of the “Bone Renderer: component. It enables you to integrate numerous “Bone Renderer” components, each of them having its unique style of display. As a result, gameplay debugging, rig setup, keyframing, and other artist workflows are facilitated.

Step 4Adding Rig Effectors
This step enables one to add Gizmos to Transforms, facilitating selection and visualisation. The “Effector” are invisible during “Game View”, and this step enhances the quality of the character animation.

Step 5Managing the Rig Constraints
Your characters gain “runtime animation” through the rig constraints, and thus, these are the building blocks facilitating assembling the rigs. The rigs are combined in multiple and varied ways to obtain the desired motions and movements in the characters.

Step 6Working with the Two Bone IK Constraint
The first step here is to rest your character to the “Bind Pose.” you can do so by opting for the “Menu Bar” and selecting the “Animation Rigging” option. You will find the “Bind Pose” option there, and you will have to click on it.

Then add a child GameObject below “Character Rig”. Then add a new child GameObject below “Right Arm IK”. Integrate two new child GameObjects beneath the “Right Arm Ik” by naming the first and the second one “RH IK Target” and “RH IK Hint”, respectively.

Integrate the “Rig Builder Component” with the “Animator root GameObject”. Then proceed with selecting the “CharecterRig GameObject” and integrating a “Rig Component”. Select “Two Bone IK Contrainst” to the “Right Arm IK.”

Then, incorporate a “Box Effector” to the RH IK Target. Integrate a “Ball Effector” to the “RH IK Hint”.

Then select the “RH IK Hint” and “Right Elbow”. Select “Animation Rigging>align Transform”. Move away from the “Ball Effector”. Select the “Right Arm IK GameObject” and integrate the required bones. Integrate the Character Rig GameObkect with Rig Layer list by selecting the option of “Ninja”. Then press “Play” and see your creation come to life.

Now, you might as well want to showcase your creativity in editing and video making. For that, we have the best tool for you- FILMORA. This is the finest video editing tool with the most proficient features included in the following list.
● Over 8effects for editing videos
● Keyboard shortcut, audio ducking colour, colour match
● You can also change the speed of the videos
● Every professional-level video editing tool that you need is included in Wondershare Filmora Video Editor
The features are innumerable and so can not be possibly listed differently. So, you can readily try out this tool yourself, and if you do not want to purchase in the first instance, you can easily avail of its free trial. Although, we can guarantee that after using its free trial, you would definitely want to use every avail feature of the tool!

For Win 7 or later (64-bit)
For macOS 10.12 or later
● Key Takeaways from This Episode →
● A short introduction to the process of rigging, with which we proceeded on describing and understanding what unity rigging is. We also stated how important it is in the sphere of animation.
● Next, we compared rigging in Blender and Unity. After comparing the different factors, we decided that it is optimum to choose Unity for character rigging because of the lack of features in Blender.
● Lastly, we introduced you to the best video editing tool that will equally assist you in nurturing your creativity, video editing, and animation skills.
Animation is one such aspect that is formed from the integration of several varied factors and processes. One of the most vital ones is the process of rigging. Thus, we will be discussing Unity character rigging as Unity is one of the most efficient platforms for animation.
Additionally, we will introduce you to one of the best tools you can use to edit videos and nurture the creative skills you carry in yourself. So, without any further delay, let us start our discussion.
In this article
01 [What is Unity Rigging?](#Part 1)
02 [Is It Better to Rig in Unity or Blender?](#Part 2)
03 [How To Use Animation Rigging In Unity](#Part 3)
Part 1 What is Unity Rigging?
To understand what Unity rigging is, we must start our discussion first by discussing rigging in animation. In animation, rigging is the process in which your animation characters are separated into two parts. One is the mesh-like structure of the characters. And the other is the skeletal structure given to the characters.
You integrate bones and joints and join them accordingly in the characters present in your animation. It is similar to the presence of the human skeletal system. Moreover, just like the skeletal system in humans helps in the movements of the different parts of the body, the bone and joint structure through rigging also enables the characters in animation to move.
Therefore, we can say that rigging is the process by which you can enable your characters’ in animation to move and show different facial expressions, etc. So, it is obvious that without the process of rigging, the animation is impossible, which makes rigging one of the most crucial aspects of animation.
Now that we know what rigging in animation is, we will be discussing what is animation rigging in Unity. Unity technologies have developed a cross-platform gaming engine called ‘Unity’. And this platform also offers the ones interested in animation to learn animation rigging.
The Unity platform offers robust and effective tools for animation rigging. And these tools assist the animators to create real-time rigs in Unity. Most commonly, the set of tools in Unity for rigging is used on the characters. But, if one likes, they can also use the tools on ani Game Object that includes animations and skeletons.
Therefore, when you utilise the platform of Unity or the toolsets of Unity to perform rigging in animation, it can be referred to as unity rigging. It is one of the most powerful and renowned platforms for animation, creating the finest and most professional animation creations.
Part 2 Is It Better to Rig in Unity or Blender?
Another platform that can ideally assist you in animation is Blender. A common question arises as to whether one should choose blender rigging over Unity or vice versa. We have laid down the following table to compare the different features of Blender with that of Unity.
| | Unity | Blender | |
| ——————- | ————————————————————————————————————————- | ————————————————————————————————————————————— |
| About | It is a game engine that enables you in creating human-machine interfaces, AR simulations, customize splash screens, etc. | It is a computer graphics software that is open source and is mainly used for creating 3D models. |
| Types Supported | Supports 3D | |
| Best Purpose | Ideal for film, architecture, automotive, transportation, and other industries | Ideal for animation and design that assists in VFX, simulation, organizations of all sizes with rendering, modeling, and video editing. |
There are many features that Blender lacks, but Unity includes. The features included in Unity but are absent in Blender are as follows.
● Drawing
● Games
● In-Game Analytics
● Multi-player Gaming Network
● Player Management
● Virtual Reality
● IT Asset Management
● Prototype Creation
Therefore, it is preferred to opt for Unity rigging than Blender rigging, as Blender lacks a considerable number of features.
Part 3 How To Use Animation Rigging In Unity
Now, we will be introducing you to the different steps that will help you in unity rig animation. The following list includes the steps in the sequence that, when you deploy, will help you rig in the platform of Unity.
Step 1Installation
The first step is to install the “animation rigging package” of Unity. You will get the animation rigging package in the “Package Manager”. You will be able to avail of this animation package in Unity 2019.1 and above.
This package offers you a library that consists of rig constraints. And this library of rig constraints enables you to create procedural motion during the runtime. And the general term used for this is called “runtime rigging”.
The “Asset’s Animator Root” consist of the “Rig Builder Component”, which is the source where the rigs are accumulated. The rigs here are the constraints put together in groups. With these steps you will be able to create Unity humanoid rig that will make your animation creations look the finest, most realistic and most professional.
Step 2Rig Builder set-up
After installing the unity animation rigging package, the next step is to set up the rig builder. You will have to use the “Animator component” in this step. Using the “Animator component”, integrate the “Rig Builder component” with the “GameObject”. Generally, in the hierarchy of rig, it is the topmost “Transform”.
Then, you will have to make a new child GameObject. To which, you will have to integrate the “Rig component”. After this step, you need to access the “Animator root”, where you will find the “Rig Builder component”. In the “Rig Builder component”, you need to assign the “Rig to the Rig Layers” list.
It will complete the task of creating the most basic rig. The further steps will help you install the required behaviours in the character or characters.
Step 3Bone Rendering
Whether it is unity rigging or 3D, bone rendering is the most crucial step to enable your animation characters to gain movement. The “Unity Editor” will help you interact and work with the character’s skeleton in the “Scene view.”
You can add “Transform” lists and then display them in various visual styles with the help of the “Bone Renderer: component. It enables you to integrate numerous “Bone Renderer” components, each of them having its unique style of display. As a result, gameplay debugging, rig setup, keyframing, and other artist workflows are facilitated.
Step 4Adding Rig Effectors
This step enables one to add Gizmos to Transforms, facilitating selection and visualisation. The “Effector” are invisible during “Game View”, and this step enhances the quality of the character animation.
Step 5Managing the Rig Constraints
Your characters gain “runtime animation” through the rig constraints, and thus, these are the building blocks facilitating assembling the rigs. The rigs are combined in multiple and varied ways to obtain the desired motions and movements in the characters.
Step 6Working with the Two Bone IK Constraint
The first step here is to rest your character to the “Bind Pose.” you can do so by opting for the “Menu Bar” and selecting the “Animation Rigging” option. You will find the “Bind Pose” option there, and you will have to click on it.
Then add a child GameObject below “Character Rig”. Then add a new child GameObject below “Right Arm IK”. Integrate two new child GameObjects beneath the “Right Arm Ik” by naming the first and the second one “RH IK Target” and “RH IK Hint”, respectively.
Integrate the “Rig Builder Component” with the “Animator root GameObject”. Then proceed with selecting the “CharecterRig GameObject” and integrating a “Rig Component”. Select “Two Bone IK Contrainst” to the “Right Arm IK.”
Then, incorporate a “Box Effector” to the RH IK Target. Integrate a “Ball Effector” to the “RH IK Hint”.
Then select the “RH IK Hint” and “Right Elbow”. Select “Animation Rigging>align Transform”. Move away from the “Ball Effector”. Select the “Right Arm IK GameObject” and integrate the required bones. Integrate the Character Rig GameObkect with Rig Layer list by selecting the option of “Ninja”. Then press “Play” and see your creation come to life.
Now, you might as well want to showcase your creativity in editing and video making. For that, we have the best tool for you- FILMORA. This is the finest video editing tool with the most proficient features included in the following list.
● Over 8effects for editing videos
● Keyboard shortcut, audio ducking colour, colour match
● You can also change the speed of the videos
● Every professional-level video editing tool that you need is included in Wondershare Filmora Video Editor
The features are innumerable and so can not be possibly listed differently. So, you can readily try out this tool yourself, and if you do not want to purchase in the first instance, you can easily avail of its free trial. Although, we can guarantee that after using its free trial, you would definitely want to use every avail feature of the tool!
For Win 7 or later (64-bit)
For macOS 10.12 or later
● Key Takeaways from This Episode →
● A short introduction to the process of rigging, with which we proceeded on describing and understanding what unity rigging is. We also stated how important it is in the sphere of animation.
● Next, we compared rigging in Blender and Unity. After comparing the different factors, we decided that it is optimum to choose Unity for character rigging because of the lack of features in Blender.
● Lastly, we introduced you to the best video editing tool that will equally assist you in nurturing your creativity, video editing, and animation skills.
How to Animate Image on Scroll
How to Animate Image on Scroll and Text on Scroll?
An easy yet powerful editor
Numerous effects to choose from
Detailed tutorials provided by the official channel
Over the years, web designers have tried different tactics to make their websites visually engaging. From marquee tags to animated navigation bars, designers tried everything they could to enhance the overall visual appearance of their websites.
One such tactic - that even brands like Sony and Apple - followed was image-on-scroll and text-on-scroll animations.
In this article
01 [How to Make Scroll Image Animation Like Apple?](#Part 1)
02 [How to Create a Scrolling Text Animation (Infinite Loop)](#Part 2)
Part 1 How to Make Scroll Image Animation Like Apple?
First, let’s take a look at different ways to make scroll-image animation like Apple. An image-on-scroll animation is an animation playback that appears on images as you continue to scroll down a website. You can use multiple methods to implement scroll image animations on your website.
01Use Filmora
Wondershare Filmora Video Editor is a feature-packed video editing tool that’s designed to help video editors create high-quality videos in a hassle-free manner. The tool offers a timeline-based interface that streamlines the entire video editing process and helps professionals execute complex video editing tasks in no time. In addition to its basic editing features, Filmora also offers advanced editing functions including color grading, motion tracking, and keyframing. It means you can easily turn your RAW footage into high-quality videos without any hassle.
Using Wondershare Filmora to animate images on scroll will be an ideal solution if you want to integrate a visually appealing element to your website. Let’s walk you through the step-by-step procedure of using Wondershare Filmora to create image-on-scroll animations.

Wondershare Filmora - Best Video Editor for Mac/Windows
5,481,435 people have downloaded it.
Build unique custom animations without breaking a sweat.
Focus on creating epic stories and leave the details to Filmora’s auto features.
Start a creative adventure with drag & drop effects and endless possibilities.
Filmora simplifies advanced features to save you time and effort.
Filmora cuts out repetition so you can move on to your next creative breakthrough.
Step 1 - Launch Filmora on your system and import the video/image that you want to edit. Then, load the selected file to Filmora’s timeline to proceed further.
Step 2 - Now, double-tap the video/image. This will launch the editing panel on your screen. Here, switch to the “Animation” panel.

Step 3 - Here you can either select “Presets” or click the “Customize” tab to create a custom animation through keyframing.

Step 4 - If you want to save time, however, it would be better to choose the “Presets” tab. Then, select the preset that you want to use.
Step 5 - Now, drag the selected preset to the timeline. Again, double-tap the preset layer. An editing panel will appear on your screen. Here you can adjust different elements of the preset to customize its playback.

So, that’s everything you need to know about animating image-on-scroll using Wondershare Filmora.
02Use ScrollSequence
Now, if you are not a professional editor or don’t want to overcomplicate things, you can use ScrollSequence to add image-on-scroll animation to your website. For readers who don’t know, ScrollSequence is a built-in WordPress plugin that you can directly install in your WordPress manager. The tool offers hundreds of ready-to-use animation templates that you can integrate and customize without any hassle.
All the templates offer complete customization, which means you can adjust the animation playback, import your own media files, and even customize the text. It’s worth understanding that this method will only work if you are using WordPress as the CMS platform for your website. ScrollSequence is only available as a WordPress plugin and you won’t be able to use it with any other website builder
03Write Your Own JavaScript Code
Finally, you can also write your own JavaScript code to animate image-on-scroll. However, this method will be a bit complicated as you would require technical expertise to write dedicated JavaScript scripts to animate image-on-scroll. If you choose this solution, you’ll have to start with writing HTML and CSS codes. This will help you style your web page in the beginning. And, once the web design is up and ready, you can move towards writing the JavaScript code to animate image-on-scroll in your web page.
Part 2 How to Create a Scrolling Text Animation (Infinite Loop)
Like image-on-scroll, text-on-scroll is another popular way to add visually appealing animations to your web designs. Text-on-scroll animations work the same way as image-on-scroll animations - the only difference is that these types of animations focus on the text playback instead of images. Again, you can use different methods to animate text on scroll and make your website’s content run in an infinite loop.
Some of these methods include:
01Use Filmora
Thanks to Filmora’s advanced editing panel, you can also use it to animate text within the videos. This will be an ideal solution for users who want to add videos with dedicated text banners and titles on their websites. With Filmora, you’ll be able to animate the text and make custom transitions in a hassle-free manner. Let’s walk you through the detailed procedure of using Wondershare Filmora to add text animation to your videos.
Step 1 - Open Filmora on your system and load the video into its timeline.
Step 2 - Double-tap the video file, and switch to the “Titles” tab. You’ll see a list of different title templates on your screen. Browse through these results and drag the desired template to the timelines. Make sure to adjust the title layer right above the video layer.

Step 3 - Again, double-click the title layer and you’ll see a dedicated text editor on your screen. Here enter the text that you want to display within the video. You can also select text size, orientation, and font to personalize its appearance.
Step 4 - Finally, switch to the “Animation” tab at the left sidebar. Choose any of these animation templates and the text within the video will be animated automatically.

So, that’s how you can use Filmora to animate text-on-scroll to improve the overall visual appearance of your website videos.
02Scroll-Text-Animations for Single Words
Another way to implement scroll-text animations is to modify the HTML & CSS code of your website. Again, this method will only be feasible if you have prior coding experience and know how to write well-optimized code.

The easiest way to animate text scrolls is through single-line animations. In this situation, only one line gets displayed at any particular time, which automatically gets switched to the next one as soon as you scroll down the cursor. If you are planning to create simple text-based animations, this method will help you get the job done easily.
Key Takeaways from This Episode
● You can animate image-on-scroll and text-on-scroll to enhance the overall visual appearance of your websites and make them more engaging for the end-users.
● If you are planning to upload dedicated videos on your website, you can use Wondershare Filmora, a fully-functional video editing tool, to animate both images and text through an easy-to-navigate editing panel.
● You should only opt for the coding method if you are an experienced coder and have worked on HTML/CSS/JavaScript projects in the past.
Over the years, web designers have tried different tactics to make their websites visually engaging. From marquee tags to animated navigation bars, designers tried everything they could to enhance the overall visual appearance of their websites.
One such tactic - that even brands like Sony and Apple - followed was image-on-scroll and text-on-scroll animations.
In this article
01 [How to Make Scroll Image Animation Like Apple?](#Part 1)
02 [How to Create a Scrolling Text Animation (Infinite Loop)](#Part 2)
Part 1 How to Make Scroll Image Animation Like Apple?
First, let’s take a look at different ways to make scroll-image animation like Apple. An image-on-scroll animation is an animation playback that appears on images as you continue to scroll down a website. You can use multiple methods to implement scroll image animations on your website.
01Use Filmora
Wondershare Filmora Video Editor is a feature-packed video editing tool that’s designed to help video editors create high-quality videos in a hassle-free manner. The tool offers a timeline-based interface that streamlines the entire video editing process and helps professionals execute complex video editing tasks in no time. In addition to its basic editing features, Filmora also offers advanced editing functions including color grading, motion tracking, and keyframing. It means you can easily turn your RAW footage into high-quality videos without any hassle.
Using Wondershare Filmora to animate images on scroll will be an ideal solution if you want to integrate a visually appealing element to your website. Let’s walk you through the step-by-step procedure of using Wondershare Filmora to create image-on-scroll animations.
Wondershare Filmora - Best Video Editor for Mac/Windows
5,481,435 people have downloaded it.
Build unique custom animations without breaking a sweat.
Focus on creating epic stories and leave the details to Filmora’s auto features.
Start a creative adventure with drag & drop effects and endless possibilities.
Filmora simplifies advanced features to save you time and effort.
Filmora cuts out repetition so you can move on to your next creative breakthrough.
Step 1 - Launch Filmora on your system and import the video/image that you want to edit. Then, load the selected file to Filmora’s timeline to proceed further.
Step 2 - Now, double-tap the video/image. This will launch the editing panel on your screen. Here, switch to the “Animation” panel.
Step 3 - Here you can either select “Presets” or click the “Customize” tab to create a custom animation through keyframing.
Step 4 - If you want to save time, however, it would be better to choose the “Presets” tab. Then, select the preset that you want to use.
Step 5 - Now, drag the selected preset to the timeline. Again, double-tap the preset layer. An editing panel will appear on your screen. Here you can adjust different elements of the preset to customize its playback.
So, that’s everything you need to know about animating image-on-scroll using Wondershare Filmora.
02Use ScrollSequence
Now, if you are not a professional editor or don’t want to overcomplicate things, you can use ScrollSequence to add image-on-scroll animation to your website. For readers who don’t know, ScrollSequence is a built-in WordPress plugin that you can directly install in your WordPress manager. The tool offers hundreds of ready-to-use animation templates that you can integrate and customize without any hassle.
All the templates offer complete customization, which means you can adjust the animation playback, import your own media files, and even customize the text. It’s worth understanding that this method will only work if you are using WordPress as the CMS platform for your website. ScrollSequence is only available as a WordPress plugin and you won’t be able to use it with any other website builder
03Write Your Own JavaScript Code
Finally, you can also write your own JavaScript code to animate image-on-scroll. However, this method will be a bit complicated as you would require technical expertise to write dedicated JavaScript scripts to animate image-on-scroll. If you choose this solution, you’ll have to start with writing HTML and CSS codes. This will help you style your web page in the beginning. And, once the web design is up and ready, you can move towards writing the JavaScript code to animate image-on-scroll in your web page.
Part 2 How to Create a Scrolling Text Animation (Infinite Loop)
Like image-on-scroll, text-on-scroll is another popular way to add visually appealing animations to your web designs. Text-on-scroll animations work the same way as image-on-scroll animations - the only difference is that these types of animations focus on the text playback instead of images. Again, you can use different methods to animate text on scroll and make your website’s content run in an infinite loop.
Some of these methods include:
01Use Filmora
Thanks to Filmora’s advanced editing panel, you can also use it to animate text within the videos. This will be an ideal solution for users who want to add videos with dedicated text banners and titles on their websites. With Filmora, you’ll be able to animate the text and make custom transitions in a hassle-free manner. Let’s walk you through the detailed procedure of using Wondershare Filmora to add text animation to your videos.
Step 1 - Open Filmora on your system and load the video into its timeline.
Step 2 - Double-tap the video file, and switch to the “Titles” tab. You’ll see a list of different title templates on your screen. Browse through these results and drag the desired template to the timelines. Make sure to adjust the title layer right above the video layer.
Step 3 - Again, double-click the title layer and you’ll see a dedicated text editor on your screen. Here enter the text that you want to display within the video. You can also select text size, orientation, and font to personalize its appearance.
Step 4 - Finally, switch to the “Animation” tab at the left sidebar. Choose any of these animation templates and the text within the video will be animated automatically.
So, that’s how you can use Filmora to animate text-on-scroll to improve the overall visual appearance of your website videos.
02Scroll-Text-Animations for Single Words
Another way to implement scroll-text animations is to modify the HTML & CSS code of your website. Again, this method will only be feasible if you have prior coding experience and know how to write well-optimized code.
The easiest way to animate text scrolls is through single-line animations. In this situation, only one line gets displayed at any particular time, which automatically gets switched to the next one as soon as you scroll down the cursor. If you are planning to create simple text-based animations, this method will help you get the job done easily.
Key Takeaways from This Episode
● You can animate image-on-scroll and text-on-scroll to enhance the overall visual appearance of your websites and make them more engaging for the end-users.
● If you are planning to upload dedicated videos on your website, you can use Wondershare Filmora, a fully-functional video editing tool, to animate both images and text through an easy-to-navigate editing panel.
● You should only opt for the coding method if you are an experienced coder and have worked on HTML/CSS/JavaScript projects in the past.
Best 15 Instant Classics Animated Cartoon Movies
Best 15 Instant Classics Animated Cartoon Movies
An easy yet powerful editor
Numerous effects to choose from
Detailed tutorials provided by the official channel
The animated characters let an individual experience a world that has certain things that hardly exist in reality.
Here we will share all the relatable details about the particular movie that will be helpful in deciding whether you wish to watch it or not.
In this article
01 [Which is the Best Animated Movie Ever?](#Part 1)
02 [We know how to animate. Do you?](#Part 2)
Part 1 Which is the Best Animated Movie Ever?
Let’s have a look at the best 15 classical animated cartoon movies that you should watch if you are an animation movie lover.
01 Toy Story 4
Toy Story 4 was released on June 21, 2019 in the United States and will be available for streaming on October 1, 2019.The IMDb rating for Toy Story 4 was 7.7 out of 10, and the Rotten Tomatoes rating was 97%. This movie ranks first among all the animated movies available till date. This is a movie from Walt Disney, and its gross revenue was $434 million.

02 Spider-Man: into the spider verse
Spider-Man: Into the Spider Verse was released in theatres on December 14, 2018 and started streaming on March 19, 2019. The IMDB rating for this movie is 8.4 out of 10 and the Rotten Tomatoes rating is 97%. This movie is from Sony Pictures Entertainment and Columbia Pictures. The gross revenue was $190.2 million.

03 Inside Out
Inside Out was released worldwide in theatres on June 19, 2015 and started streaming on November 3, 2015. This movie received an 8.1 IMDB rating out of 10, and the Rotten Tomatoes rating was 98%. It is from Walt Disney and has a gross revenue of $2 million.

04 COCO
Coco was released in theatres on November 22, 2017 and started streaming on February 13, 2018. The IMDB rating for this movie is 8.4 out of 10 and the Rotten Tomatoes rating is 97%. This movie is from Walt Disney. The gross revenue was $210.5 million.

05 Snow White and the Seven Dwarfs
Snow White and the Seven Dwarfs (1937) was released in theatres in 1937 and started streaming on Nov. 16, 2004. The IMDB rating for this movie is 7.6 out of 10 and the Rotten Tomatoes rating is 98%. This movie is from Walt Disney.

06 Incredibles 2
Incredibles 2 (2018) was released in theatres on June 15, 2018 and became available for streaming on November 6, 2018.The IMDB rating for this movie is 7.6 out of 10 and the Rotten Tomatoes rating is 97%. This movie is from Walt Disney. The gross revenue was $608.6 million.

07 Zootopia (2016)
Zootopia (2016) was released in theatres on March 4, 2016 and started streaming on June 7, 2016. The IMDB rating for this movie is 8.0 out of 10 and the Rotten Tomatoes rating is 98%. This movie is from Walt Disney. The gross revenue was $200 million.

08 Paddington 2 (2018)
Paddington 2 (2018) was released in theatres on Jan. 1, 2018 and started streaming on Apr. 24, 2018. The IMDB rating for this movie is 7.8 out of 10 and the Rotten Tomatoes rating is 99%. This movie is from Warner Bros. Pictures. The gross revenue was $38.4 million.

09 Up
Up was released in theatres on May 29, 2009 and started streaming on Nov. 10, 2009. The IMDB rating for this movie is 8.2 out of 10 and the Rotten Tomatoes rating is 98%. This movie is from Walt Disney and Pixar Animation Studios. The gross revenue was $78.2 million.

10 Toy Story 2 (1999)
Toy Story 2 (1999) was released in theatres on December 24, 1999 and started streaming on March 23, 2010. The IMDB rating for this movie is 7.9 out of 10 and the Rotten Tomatoes rating is 100%. This movie is from Walt Disney Pictures. The gross revenue was $245.9 million.

11 Toy Story 3 (2010)
Toy Story 3 (2010) was released in theatres on June 18, 2010 and started streaming on Nov. 2, 2010. The IMDB rating for this movie is 8.2 out of 10 and the Rotten Tomatoes rating is 98%. This movie is from Walt Disney. The gross revenue was $415.0 million.

12 Finding Dory (2016)
Finding Dory (2016) was released in theatres on June 17, 2016 and started streaming on Nov. 15, 2016. The IMDB rating for this movie is 7.3 out of 10 and the Rotten Tomatoes rating is 94%. This movie is from Sony Pictures Entertainment and Columbia Pictures. The gross revenue was $486.2 million.

13 Finding Nemo (2003)
Finding Nemo (2003) was released in theatres on May 30, 2003 and started streaming on Nov. 4, 2003. The IMDB rating for this movie is 8.1 out of 10 and the Rotten Tomatoes rating is 99%. This movie is from Walt Disney Pictures. The gross revenue was $110.2 million.

13 Pinocchio (1940)
Pinocchio (1940) was released in theatres on February 9, 1940 and started streaming on December 3, 2002. The IMDB rating for this movie is 8.4 out of 10 and the Rotten Tomatoes rating is 100%. This movie is from Walt Disney Pictures. The gross revenue was $18.7 million.

13 The LEGO Movie (2014)
The LEGO Movie (2014) was released in theatres on February 7, 2014 and started streaming on June 17, 2014. The IMDB rating for this movie is 7.7 out of 10 and the Rotten Tomatoes rating is 96%. This movie is from Warner Bros. Pictures. The gross revenue was $257.8 million.
The animated characters let an individual experience a world that has certain things that hardly exist in reality.
Here we will share all the relatable details about the particular movie that will be helpful in deciding whether you wish to watch it or not.
In this article
01 [Which is the Best Animated Movie Ever?](#Part 1)
02 [We know how to animate. Do you?](#Part 2)
Part 1 Which is the Best Animated Movie Ever?
Let’s have a look at the best 15 classical animated cartoon movies that you should watch if you are an animation movie lover.
01 Toy Story 4
Toy Story 4 was released on June 21, 2019 in the United States and will be available for streaming on October 1, 2019.The IMDb rating for Toy Story 4 was 7.7 out of 10, and the Rotten Tomatoes rating was 97%. This movie ranks first among all the animated movies available till date. This is a movie from Walt Disney, and its gross revenue was $434 million.
02 Spider-Man: into the spider verse
Spider-Man: Into the Spider Verse was released in theatres on December 14, 2018 and started streaming on March 19, 2019. The IMDB rating for this movie is 8.4 out of 10 and the Rotten Tomatoes rating is 97%. This movie is from Sony Pictures Entertainment and Columbia Pictures. The gross revenue was $190.2 million.
03 Inside Out
Inside Out was released worldwide in theatres on June 19, 2015 and started streaming on November 3, 2015. This movie received an 8.1 IMDB rating out of 10, and the Rotten Tomatoes rating was 98%. It is from Walt Disney and has a gross revenue of $2 million.
04 COCO
Coco was released in theatres on November 22, 2017 and started streaming on February 13, 2018. The IMDB rating for this movie is 8.4 out of 10 and the Rotten Tomatoes rating is 97%. This movie is from Walt Disney. The gross revenue was $210.5 million.
05 Snow White and the Seven Dwarfs
Snow White and the Seven Dwarfs (1937) was released in theatres in 1937 and started streaming on Nov. 16, 2004. The IMDB rating for this movie is 7.6 out of 10 and the Rotten Tomatoes rating is 98%. This movie is from Walt Disney.
06 Incredibles 2
Incredibles 2 (2018) was released in theatres on June 15, 2018 and became available for streaming on November 6, 2018.The IMDB rating for this movie is 7.6 out of 10 and the Rotten Tomatoes rating is 97%. This movie is from Walt Disney. The gross revenue was $608.6 million.
07 Zootopia (2016)
Zootopia (2016) was released in theatres on March 4, 2016 and started streaming on June 7, 2016. The IMDB rating for this movie is 8.0 out of 10 and the Rotten Tomatoes rating is 98%. This movie is from Walt Disney. The gross revenue was $200 million.
08 Paddington 2 (2018)
Paddington 2 (2018) was released in theatres on Jan. 1, 2018 and started streaming on Apr. 24, 2018. The IMDB rating for this movie is 7.8 out of 10 and the Rotten Tomatoes rating is 99%. This movie is from Warner Bros. Pictures. The gross revenue was $38.4 million.
09 Up
Up was released in theatres on May 29, 2009 and started streaming on Nov. 10, 2009. The IMDB rating for this movie is 8.2 out of 10 and the Rotten Tomatoes rating is 98%. This movie is from Walt Disney and Pixar Animation Studios. The gross revenue was $78.2 million.
10 Toy Story 2 (1999)
Toy Story 2 (1999) was released in theatres on December 24, 1999 and started streaming on March 23, 2010. The IMDB rating for this movie is 7.9 out of 10 and the Rotten Tomatoes rating is 100%. This movie is from Walt Disney Pictures. The gross revenue was $245.9 million.
11 Toy Story 3 (2010)
Toy Story 3 (2010) was released in theatres on June 18, 2010 and started streaming on Nov. 2, 2010. The IMDB rating for this movie is 8.2 out of 10 and the Rotten Tomatoes rating is 98%. This movie is from Walt Disney. The gross revenue was $415.0 million.
12 Finding Dory (2016)
Finding Dory (2016) was released in theatres on June 17, 2016 and started streaming on Nov. 15, 2016. The IMDB rating for this movie is 7.3 out of 10 and the Rotten Tomatoes rating is 94%. This movie is from Sony Pictures Entertainment and Columbia Pictures. The gross revenue was $486.2 million.
13 Finding Nemo (2003)
Finding Nemo (2003) was released in theatres on May 30, 2003 and started streaming on Nov. 4, 2003. The IMDB rating for this movie is 8.1 out of 10 and the Rotten Tomatoes rating is 99%. This movie is from Walt Disney Pictures. The gross revenue was $110.2 million.
13 Pinocchio (1940)
Pinocchio (1940) was released in theatres on February 9, 1940 and started streaming on December 3, 2002. The IMDB rating for this movie is 8.4 out of 10 and the Rotten Tomatoes rating is 100%. This movie is from Walt Disney Pictures. The gross revenue was $18.7 million.
13 The LEGO Movie (2014)
The LEGO Movie (2014) was released in theatres on February 7, 2014 and started streaming on June 17, 2014. The IMDB rating for this movie is 7.7 out of 10 and the Rotten Tomatoes rating is 96%. This movie is from Warner Bros. Pictures. The gross revenue was $257.8 million.
Before You Learn 3D Animation: Things You Should Know
Before You Learn 3D Animation: Some Things You Should Know
An easy yet powerful editor
Numerous effects to choose from
Detailed tutorials provided by the official channel
Before you delve into the profession of creating 3d cartoon filters, you need to understand or decide if creating animated characters is something you would like to do. It’s not going to be smooth as you will get frustrated at some point, you will get confused, and it will be challenging, but in the end, it is rewarding because it is an expression of your mind coming to life. You are the one to breathe life into your characters who represent your imaginations. You will also have to infuse a great deal of your creativity to create beautiful and exciting characters for others to enjoy. Meanwhile, let’s first understand what 3d animations mean.
Becoming a 3d animator is not a feat you can achieve in a short time. It is not days, weeks, months, or even years. Like any other profession, a professional 3d animator must have put in a great deal of work, mixed with a lot of passion and love for what he is doing. To become successful as a 3d animator, you must love what you are doing or be ready to put in the work.
This article will expose what you should learn to create beautiful 3d animation cartoons, including what to expect as a 3d animator.
In this article
01 [What are 3d animation and the process of 3d animation?](#Part 1)
02 [Differences between 2d animation and 3d animation](#Part 2)
03 [A roaster of 8 best 3d animation software.](#Part 3)
04 [Top 3 3d animation making mistakes to avoid](#Part 4)
Part 1 What Is 3D Animation And The Process of 3D Animation?
animation is a term that describes the art of creating 3-dimensional images and placing them in a digital environment. It is a process that uses motion to bring objects, characters, etc., to life.
It is also known as computer-generated imagery, and it is currently the most common animation type for feature films.
Various software and programs are designed specifically for 3d animations and allow the animators to bring the objects to life.
The process of 3d animation happens in three(3) stages;
● Modeling
● Layout and animation
● Rendering
Modeling in 3d animation involves generating the objects or characters either by using a modeling tool or using a real thing. The real object is scanned directly into the computer, where other processes follow. You have total control over your character and how you want them to appear by modeling. You decide the weight, specifications, feel, etc. However, scanning objects save a lot of time. You must add texture before modeling your character or reviewing it before moving to the following layout and animation.
Layout and animation stage: A layout is determined when the generated objects move to this stage. It involves creating a set/scene where the objects can position. Layout first happens before animation does. After adding the objects and characters, they get animated using animation variables. After this, you use motion capture or keyframing to give life to the models in the scenes.
Rendering: Rendering is using software or programs. It is not something to do using just your computer. These tools can generate the scenes into the finished image according to the client’s requirements or set goals.
Creating cartoon background images or any other form of animations is a process that requires a lot of planning and work, which sums up a lot of time. To learn 3d animation, you must be ready to give in ample time as it is a profession that requires some time to handle.
The process listed above also shows the creativity requirement required to succeed in the 3d animation industry. To think that you must create the scenes, which is the layout stage, means you have to be creative in your imagination. If you then decide to model your character from scratch using modeling tools. That also requires another job of thinking and extracting a lot of your creative juices.
Part 2 What is the difference between 2d animation and 3d animation?
Anyone can decide to learn animation with no plan in mind or understanding of what the profession involves. animation is different from 2d animation, and if you want to learn animation, you need to understand the distinction between these two.
animation can have a lot of creative possibilities, whereas 3d animation has a lot of natural abilities. The visual style of both types of animation is explicitly different.
3d animation is a more intensive technical process than the various stages mentioned earlier. It would most likely involve different specialists to handle them to get a more professional output. However, 2d animation consists of drawing the characters frame by frame.
animated cartoons are in The Simpsons, Pinocchio, the Lion king, etc.

animations are like the ones Dreamworks, Pixar, produce. They include the avengers, the bad guys, etc.


Part 3 A Roaster Of 8 Best 3D Animation Software

Several 3D animation software exists in the market, both free and paid. If you are a animation creator or love animation for fun, you can use the free software to make your videos, cartoon photos, 3d cartoon faces, etc.
With many animation software available in the market, you can only fully trust a few.
Here’s a roaster of 8 best 3D animation software you could use to create the cartoon monsters you’ve always been curious about;
● Filmora
● Blender
● Maya
● Wings 3d
● Adobe Animate
● Cinema 4d
● K-3D
● Milcamo
Filmora Video animation tool: This is a highly recommended 3D animation tool with many features and pros. It has a wide range of keyframes, about six of which make your cartoon background images smooth and natural.
| Software | Features | OS | Pro |
|---|---|---|---|
| Wondershare Filmora Video Editor | It has an auto-color correction It has smooth keyframes | Windows, Mac | You can apply light flare effects You can apply an audio mixer |
| Blender | It has textured brushes and masking for 3d painting. It has add-ons and customised tools with high python scripting. | Windows, Linux, Mac computers | It has Virtual reality rendering, Strong camera restoration. It had both manual and automatic tracking. |
| Maya | Free trial of 30 days. Can create complex technical effects | Windows, Max | Good Control and perfect accuracy. Can collect motion capture data. |
| Wings 3d | Auto UV mapping system It has support for light and material effects. | Windows, Linux, and Mac OS | Advanced 3d and 2d modeling tools. It is free to use |
| Adobe animate | Virtual camera functionality gives a realistic view. Adoptive animation effects, zooming, panning etc. | Windows, Mac | Effective audio syncing technology. Customizable font, styling etc. |
| Cinema 4d | Concepts develop without time modeling Large library of preset scenes. | Windows, Mac | Customised with a huge asset range It is a faster tool than Maya Dissect complete scene and is faster than Maya. |
| K-3D | It has property adjustment capabilities with handy strong features. I5 is made up of basic tools for animation, curves, patches. | Mac OS X, Linux, FreeBSD, windows platforms | It is very flexible for either complex or basic workflows. It has a wide selection of plugins. |
| Mixamo | Streamlined user experience It has a faster search function that is accurate | Windows, Mac | It has fast character and animation browsing. Download multiple animations at a go |
For Win 7 or later (64-bit)
For macOS 10.12 or later
Part 4 Top Three (3) 3d Animation Making Mistakes To Avoid

As we initially mentioned, 3d animation requires an intensive technical process. It is a skill that you need to hone over the years by paying attention to detail, being highly creative, and daring to succeed.
Here are 3 mistakes you must avoid during the animation process;
● Forgetting the ‘why’ factor
● Over-animating a scene
● Not giving your viewers time to take it in
Forgetting the why: In a animation cartoon, every move, walking step, and smile is essential. Every character represented in your cartoon background is there for a specific reason.
You would be making a mistake that will affect the result if you lose focus on this reason. Your viewers won’t find your cartoon believable if the moves and acting don’t add up.
Your characters don’t just move because they want to move. Something must have spurred the motion or reaction. It could be for what happened to them, what they heard, or saw another character did in the scene. Do not neglect the why of the act.
While animating, focus on why and keep revisiting until all your characters and objects are knitted closely together.
Over-animating a scene: This is another mistake animators should avoid. If you animate your characters, everything may be a mess if you animate the background and foreground. Simplicity is how to get this thing, keep it simple and focused.
Do not have much going on in each scene but only where you need the attention of your viewers. Animators that do this end up confusing their viewers with no direction.
You can use camera effects such as depth of field to make your audience focus on the point you are trying to make in the particular scene.
Not giving your viewers time to take it in: This is another 3d animation making a mistake you should be careful of. Not giving your viewers time to process the happenings on the scene before the next.
This can be avoided by timing and measuring cuts such that any animation at the start of a new scene is timed to enable the viewers to take it in. You can ask for third-party criticism on your work to find out how your animation is received and see pointers to mistakes such as this. The third party could be your colleague or friend.
Note: You can easily avoid any error or mistake or modify your 3D animation with the help of the Wondershare Filmora video editor. That will provide a solid base for featuring 3D animation.
● Ending Thoughts →
● 3D animation refers to using motion to breathe life into inanimate objects, and they can create animated videos and animation cartoons.
● 3D animation is highly technical, unlike 2d animation
● You can avoid the above 3d mistakes if you remain objective and open, and ready to accept constructive criticism.
● Becoming an animator is a fun thing to do, and it allows you to be free to express your creativity while entertaining other people entirely.
● Before you start learning 3d animation and create cartoon photos, ensure that you have read through all that we have explained here to have good information about what you are going into.
Before you delve into the profession of creating 3d cartoon filters, you need to understand or decide if creating animated characters is something you would like to do. It’s not going to be smooth as you will get frustrated at some point, you will get confused, and it will be challenging, but in the end, it is rewarding because it is an expression of your mind coming to life. You are the one to breathe life into your characters who represent your imaginations. You will also have to infuse a great deal of your creativity to create beautiful and exciting characters for others to enjoy. Meanwhile, let’s first understand what 3d animations mean.
Becoming a 3d animator is not a feat you can achieve in a short time. It is not days, weeks, months, or even years. Like any other profession, a professional 3d animator must have put in a great deal of work, mixed with a lot of passion and love for what he is doing. To become successful as a 3d animator, you must love what you are doing or be ready to put in the work.
This article will expose what you should learn to create beautiful 3d animation cartoons, including what to expect as a 3d animator.
In this article
01 [What are 3d animation and the process of 3d animation?](#Part 1)
02 [Differences between 2d animation and 3d animation](#Part 2)
03 [A roaster of 8 best 3d animation software.](#Part 3)
04 [Top 3 3d animation making mistakes to avoid](#Part 4)
Part 1 What Is 3D Animation And The Process of 3D Animation?
animation is a term that describes the art of creating 3-dimensional images and placing them in a digital environment. It is a process that uses motion to bring objects, characters, etc., to life.
It is also known as computer-generated imagery, and it is currently the most common animation type for feature films.
Various software and programs are designed specifically for 3d animations and allow the animators to bring the objects to life.
The process of 3d animation happens in three(3) stages;
● Modeling
● Layout and animation
● Rendering
Modeling in 3d animation involves generating the objects or characters either by using a modeling tool or using a real thing. The real object is scanned directly into the computer, where other processes follow. You have total control over your character and how you want them to appear by modeling. You decide the weight, specifications, feel, etc. However, scanning objects save a lot of time. You must add texture before modeling your character or reviewing it before moving to the following layout and animation.
Layout and animation stage: A layout is determined when the generated objects move to this stage. It involves creating a set/scene where the objects can position. Layout first happens before animation does. After adding the objects and characters, they get animated using animation variables. After this, you use motion capture or keyframing to give life to the models in the scenes.
Rendering: Rendering is using software or programs. It is not something to do using just your computer. These tools can generate the scenes into the finished image according to the client’s requirements or set goals.
Creating cartoon background images or any other form of animations is a process that requires a lot of planning and work, which sums up a lot of time. To learn 3d animation, you must be ready to give in ample time as it is a profession that requires some time to handle.
The process listed above also shows the creativity requirement required to succeed in the 3d animation industry. To think that you must create the scenes, which is the layout stage, means you have to be creative in your imagination. If you then decide to model your character from scratch using modeling tools. That also requires another job of thinking and extracting a lot of your creative juices.
Part 2 What is the difference between 2d animation and 3d animation?
Anyone can decide to learn animation with no plan in mind or understanding of what the profession involves. animation is different from 2d animation, and if you want to learn animation, you need to understand the distinction between these two.
animation can have a lot of creative possibilities, whereas 3d animation has a lot of natural abilities. The visual style of both types of animation is explicitly different.
3d animation is a more intensive technical process than the various stages mentioned earlier. It would most likely involve different specialists to handle them to get a more professional output. However, 2d animation consists of drawing the characters frame by frame.
animated cartoons are in The Simpsons, Pinocchio, the Lion king, etc.
animations are like the ones Dreamworks, Pixar, produce. They include the avengers, the bad guys, etc.
Part 3 A Roaster Of 8 Best 3D Animation Software
Several 3D animation software exists in the market, both free and paid. If you are a animation creator or love animation for fun, you can use the free software to make your videos, cartoon photos, 3d cartoon faces, etc.
With many animation software available in the market, you can only fully trust a few.
Here’s a roaster of 8 best 3D animation software you could use to create the cartoon monsters you’ve always been curious about;
● Filmora
● Blender
● Maya
● Wings 3d
● Adobe Animate
● Cinema 4d
● K-3D
● Milcamo
Filmora Video animation tool: This is a highly recommended 3D animation tool with many features and pros. It has a wide range of keyframes, about six of which make your cartoon background images smooth and natural.
| Software | Features | OS | Pro |
|---|---|---|---|
| Wondershare Filmora Video Editor | It has an auto-color correction It has smooth keyframes | Windows, Mac | You can apply light flare effects You can apply an audio mixer |
| Blender | It has textured brushes and masking for 3d painting. It has add-ons and customised tools with high python scripting. | Windows, Linux, Mac computers | It has Virtual reality rendering, Strong camera restoration. It had both manual and automatic tracking. |
| Maya | Free trial of 30 days. Can create complex technical effects | Windows, Max | Good Control and perfect accuracy. Can collect motion capture data. |
| Wings 3d | Auto UV mapping system It has support for light and material effects. | Windows, Linux, and Mac OS | Advanced 3d and 2d modeling tools. It is free to use |
| Adobe animate | Virtual camera functionality gives a realistic view. Adoptive animation effects, zooming, panning etc. | Windows, Mac | Effective audio syncing technology. Customizable font, styling etc. |
| Cinema 4d | Concepts develop without time modeling Large library of preset scenes. | Windows, Mac | Customised with a huge asset range It is a faster tool than Maya Dissect complete scene and is faster than Maya. |
| K-3D | It has property adjustment capabilities with handy strong features. I5 is made up of basic tools for animation, curves, patches. | Mac OS X, Linux, FreeBSD, windows platforms | It is very flexible for either complex or basic workflows. It has a wide selection of plugins. |
| Mixamo | Streamlined user experience It has a faster search function that is accurate | Windows, Mac | It has fast character and animation browsing. Download multiple animations at a go |
For Win 7 or later (64-bit)
For macOS 10.12 or later
Part 4 Top Three (3) 3d Animation Making Mistakes To Avoid
As we initially mentioned, 3d animation requires an intensive technical process. It is a skill that you need to hone over the years by paying attention to detail, being highly creative, and daring to succeed.
Here are 3 mistakes you must avoid during the animation process;
● Forgetting the ‘why’ factor
● Over-animating a scene
● Not giving your viewers time to take it in
Forgetting the why: In a animation cartoon, every move, walking step, and smile is essential. Every character represented in your cartoon background is there for a specific reason.
You would be making a mistake that will affect the result if you lose focus on this reason. Your viewers won’t find your cartoon believable if the moves and acting don’t add up.
Your characters don’t just move because they want to move. Something must have spurred the motion or reaction. It could be for what happened to them, what they heard, or saw another character did in the scene. Do not neglect the why of the act.
While animating, focus on why and keep revisiting until all your characters and objects are knitted closely together.
Over-animating a scene: This is another mistake animators should avoid. If you animate your characters, everything may be a mess if you animate the background and foreground. Simplicity is how to get this thing, keep it simple and focused.
Do not have much going on in each scene but only where you need the attention of your viewers. Animators that do this end up confusing their viewers with no direction.
You can use camera effects such as depth of field to make your audience focus on the point you are trying to make in the particular scene.
Not giving your viewers time to take it in: This is another 3d animation making a mistake you should be careful of. Not giving your viewers time to process the happenings on the scene before the next.
This can be avoided by timing and measuring cuts such that any animation at the start of a new scene is timed to enable the viewers to take it in. You can ask for third-party criticism on your work to find out how your animation is received and see pointers to mistakes such as this. The third party could be your colleague or friend.
Note: You can easily avoid any error or mistake or modify your 3D animation with the help of the Wondershare Filmora video editor. That will provide a solid base for featuring 3D animation.
● Ending Thoughts →
● 3D animation refers to using motion to breathe life into inanimate objects, and they can create animated videos and animation cartoons.
● 3D animation is highly technical, unlike 2d animation
● You can avoid the above 3d mistakes if you remain objective and open, and ready to accept constructive criticism.
● Becoming an animator is a fun thing to do, and it allows you to be free to express your creativity while entertaining other people entirely.
● Before you start learning 3d animation and create cartoon photos, ensure that you have read through all that we have explained here to have good information about what you are going into.
How to Animate Picture Online Without Learning From Scratch
How to Animate Picture Online Without Learning from Scratch
An easy yet powerful editor
Numerous effects to choose from
Detailed tutorials provided by the official channel
The Internet is flooded with thousands of tools that aim to provide the best-animated video. But trusting all of them every time is not a go-to thing for everyone.

If you also fall into the same category of people who are looking to add animation to designs but are not able to find the best tools, you are on the right page.
In this article
01 [Ready to Add Animation to Your Designs?](#Part 1)
02 [The Secret of Animating Pictures Online](#Part 2)
Part 1 Ready to Add Animation to Your Designs?
Here we are discussing the top three Animated picture maker that is used for creating different videos with differnt types of online picture tools. These are as follows:
1. Powtoon
Powtoon is an interactive yet simple tool available to add animation to designs. It has all the basic functions available for motion graphics that are useful for presentation. It has a variety of characters and animations available, along with simple textual animation. A user can easily prepare the video with full animation.
(This video indicates how to use the Powtoon tool for creating the best-animated videos, along with an example.)
1. Animaker
Animaker is one of the wonderful animation programs to add animation to designs in an interactive yet simple manner. It has all the best features integrated into it, which let a user create the video of their choice. It is safe to use and, being a web-based program, offers all the options.
(This video indicates how to use the Animaker tool for creating the best-animated videos, along with an example.)
3. Moovly
Moovly is also one of the best animation tools available to add animation to the content. On the main page, the “add content” option is available from where a user can simply update the video and add animation to it.
(This video indicates how to use the Moovly tool for creating the best-animated videos, along with an example.)
Note: These tools are among those that even a layman can use. But some users are still not happy with the interface of these animate picture online tools and feel like they are lacking features. For all those out there, we have some other options too.
Part 2 The Secret of Animating Pictures Online
The secret behind animating pictures online is to save time and effort. With the help of online tools, one can get the outcome with the help of inbuilt templates. There will be no need to install any application or plugin when they wish to add any particular animation to the content. Some tools you can consider using to add animation to designs are as follows:
1. Pixtellar
Pixtellar is a great tool that helps in creating animated videos and images too. Along with creating animated videos and images, one can easily create posters, logos, photo collages, and so on.
However, before using it, be sure to do the registration, as without it, using it is impossible. After registering, the steps you need to follow to use it are as follows:
Step 1Create from Scratch
Choose the template of your choice or click on “Create from Scratch”. Here we are choosing the templates.

Step 2Choose social media
It will be redirected to the next page where you will find out templates according to the selected category. (Here we choose social media).

Step 3Click on “Animate”
Choose any of them based on your preferences. You will head to the next page where you can do the editing as per your needs by clicking on “Animate”.

Step 4Save the image
After making the changes and adding the animations, you are all set to save the image. The “Save” button is right at the top of the page!

2. Adobe Spark
Adobe Spark is a tool that has pre-built templates available for adding animations to the designs. From adding animations to editing the image and video, all the options are featured in this. It also gives users an idea of how they can simply create the video and images with the help of animations and other effects.
However, when you are using it, registration is a must. After performing the registration, you are all set to use it. The steps you need to follow to use this tool are as follows:
Step 1Start editing
After completing the registration, you will reach the main page where you can choose the option of your choice and start editing. Here we have chosen the template option.

Step 2Create From This Template
It asks you to be sure and click on “Create From This Template.”

Step 3Do the editing
It takes a few seconds to present the same in front of you. On this page, you are all set to do the editing as per your needs.

Step 4Save the image
After doing all the editing, you are all set to save the image. The “Save” button is right there at the top. Click on it and save the image!

3. Crello or VistaCreate
Crello, which turns out to be VistaCreate, is one of the most famous tools for adding motion to images. It has almost 8,000+ animated designs and motion graphics available, which are helpful in creating eye-catching videos.
When you are using this feature, registration or sign-up is important. On the main page, the signup option is available, helping users do it. After that, the steps are as follows:
Step 1Click on the “Template”
On the home page, you can either create your own or click on the “Template” option available. (We chose the template option here).

Step 2Select the template
Now select the template of your choice. Here we have selected the Happy New Year one.

Step 3Do the editing as required
Now you are all set to do the editing as required. Here all the options are available, which help in adding all the basic to advanced details to the image. You can use it.

Step 4Download the image
After doing the editing, you are all set to download the image. The downloading button is right there at the top.

Key Takeaways from This Episode
● Animated videos are eye-catching, and tools are helpful in making them more enhanced.
● Animation tools are very easy to use and precisely make the video.
● Editing options are available in the tools, which are helpful in adding extra effects to the image.
● The tools are free to use with all the in-built templates and other features.
The Internet is flooded with thousands of tools that aim to provide the best-animated video. But trusting all of them every time is not a go-to thing for everyone.
If you also fall into the same category of people who are looking to add animation to designs but are not able to find the best tools, you are on the right page.
In this article
01 [Ready to Add Animation to Your Designs?](#Part 1)
02 [The Secret of Animating Pictures Online](#Part 2)
Part 1 Ready to Add Animation to Your Designs?
Here we are discussing the top three Animated picture maker that is used for creating different videos with differnt types of online picture tools. These are as follows:
1. Powtoon
Powtoon is an interactive yet simple tool available to add animation to designs. It has all the basic functions available for motion graphics that are useful for presentation. It has a variety of characters and animations available, along with simple textual animation. A user can easily prepare the video with full animation.
(This video indicates how to use the Powtoon tool for creating the best-animated videos, along with an example.)
1. Animaker
Animaker is one of the wonderful animation programs to add animation to designs in an interactive yet simple manner. It has all the best features integrated into it, which let a user create the video of their choice. It is safe to use and, being a web-based program, offers all the options.
(This video indicates how to use the Animaker tool for creating the best-animated videos, along with an example.)
3. Moovly
Moovly is also one of the best animation tools available to add animation to the content. On the main page, the “add content” option is available from where a user can simply update the video and add animation to it.
(This video indicates how to use the Moovly tool for creating the best-animated videos, along with an example.)
Note: These tools are among those that even a layman can use. But some users are still not happy with the interface of these animate picture online tools and feel like they are lacking features. For all those out there, we have some other options too.
Part 2 The Secret of Animating Pictures Online
The secret behind animating pictures online is to save time and effort. With the help of online tools, one can get the outcome with the help of inbuilt templates. There will be no need to install any application or plugin when they wish to add any particular animation to the content. Some tools you can consider using to add animation to designs are as follows:
1. Pixtellar
Pixtellar is a great tool that helps in creating animated videos and images too. Along with creating animated videos and images, one can easily create posters, logos, photo collages, and so on.
However, before using it, be sure to do the registration, as without it, using it is impossible. After registering, the steps you need to follow to use it are as follows:
Step 1Create from Scratch
Choose the template of your choice or click on “Create from Scratch”. Here we are choosing the templates.
Step 2Choose social media
It will be redirected to the next page where you will find out templates according to the selected category. (Here we choose social media).
Step 3Click on “Animate”
Choose any of them based on your preferences. You will head to the next page where you can do the editing as per your needs by clicking on “Animate”.
Step 4Save the image
After making the changes and adding the animations, you are all set to save the image. The “Save” button is right at the top of the page!
2. Adobe Spark
Adobe Spark is a tool that has pre-built templates available for adding animations to the designs. From adding animations to editing the image and video, all the options are featured in this. It also gives users an idea of how they can simply create the video and images with the help of animations and other effects.
However, when you are using it, registration is a must. After performing the registration, you are all set to use it. The steps you need to follow to use this tool are as follows:
Step 1Start editing
After completing the registration, you will reach the main page where you can choose the option of your choice and start editing. Here we have chosen the template option.
Step 2Create From This Template
It asks you to be sure and click on “Create From This Template.”
Step 3Do the editing
It takes a few seconds to present the same in front of you. On this page, you are all set to do the editing as per your needs.
Step 4Save the image
After doing all the editing, you are all set to save the image. The “Save” button is right there at the top. Click on it and save the image!
3. Crello or VistaCreate
Crello, which turns out to be VistaCreate, is one of the most famous tools for adding motion to images. It has almost 8,000+ animated designs and motion graphics available, which are helpful in creating eye-catching videos.
When you are using this feature, registration or sign-up is important. On the main page, the signup option is available, helping users do it. After that, the steps are as follows:
Step 1Click on the “Template”
On the home page, you can either create your own or click on the “Template” option available. (We chose the template option here).
Step 2Select the template
Now select the template of your choice. Here we have selected the Happy New Year one.
Step 3Do the editing as required
Now you are all set to do the editing as required. Here all the options are available, which help in adding all the basic to advanced details to the image. You can use it.
Step 4Download the image
After doing the editing, you are all set to download the image. The downloading button is right there at the top.
Key Takeaways from This Episode
● Animated videos are eye-catching, and tools are helpful in making them more enhanced.
● Animation tools are very easy to use and precisely make the video.
● Editing options are available in the tools, which are helpful in adding extra effects to the image.
● The tools are free to use with all the in-built templates and other features.
Also read:
- 2024 Approved Tutorials to Make Animated Images – Even if Youre Just Starting Out
- 21 Top Free Anime Websites to Watch Anime Online-Anime for 2024
- In 2024, 10 2D/3D Animation Tips & Tricks for You
- New In 2024, FREE Top 21 Best Anime Websites to Watch Anime Online
- 12 Dubbed Anime Websites to Watch for Free
- New 2024 Approved The Coolest Anime Characters Ever| List of Top Favorites
- New In 2024, How to Animate Image on Scroll
- Updated In 2024, How to Create a Whiteboard Video Step by Step 2023 Updated
- Updated Create Animated Social Media Posts in Canva
- Updated In 2024, How to Become a Motion Graphic Designer
- New 10 Awesome Moving Animation PowerPoint Techniques
- Updated 15 Best Pics Collage Apps Top Picks for 2024
- Updated How to Stop Animation From Looping in Unity for 2024
- Updated Know All About Animated Business Logos and the Best Tools to Create One for 2024
- Updated In 2024, Create Animated Video on Canva
- Updated 10 Great MP4 to GIF Converters to Get Perfect-Made GIF
- In 2024, Top 10 Best and Fast Ways to Turn Image Into Gif
- In 2024, Make Creative Animation Videos
- In 2024, 15 Best Stop Motion Animation Kits to Fuel Creativity
- In 2024, How to Insert a GIF Into Powerpoint
- 2024 Approved Learn Pencil2D Animation Tutorial Overview
- Updated 2024 Approved 5 Recommended Websites for Text GIF Maker
- New In 2024, Ideas of Learning How to Send WhatsApp Animated Gifs
- New 2024 Approved Adobe Animate CC Everything You Need to Know
- In 2024, How You Can Turn Yourself Into Anime Character Using Anime Filter
- Updated 2024 Approved Easy Cartoon Characters Drawing Tutorials for You Beginners
- How to Analyze an Editorial Cartoon Easily
- 2024 Approved Best 12 Video to GIF Converters High Quality to Check Out
- Updated 12 Websites with Triggered Animate on Scroll Examples
- Updated In 2024, How to Create Photo Collage Frame for Free in Minutes?
- Updated Top 10 Free Online Animated Logo Makers Everyone Should Know
- New In 2024, Adobe Animate Text Effects Skills You Need to Know
- Updated In 2024, Complete Guide to Send Gif WhatsApp on Android
- New In 2024, 15 Top Video to GIF App on iPhone and Android
- Updated What Is the Meaning of Motion Graphics for 2024
- Updated In 2024, A Roster of 15 Best Disney Channel Cartoons
- New 2024 Approved Best 10 Popular Cartoons You Forgot Existed
- New In 2024, Whats Rigging Animation
- New Apps to Animate Still Pictures for 2024
- In 2024, Types of Cartoon Styles You May Use for The Next Marketing Project
- Updated How to Convert Animated GIF From Video
- Updated How to Make a GIF in Photoshop
- What Is the Meaning of Motion Graphics
- In 2024, How to Transfer from Apple iPhone X to iPhone 8/X/11 | Dr.fone
- How To Do Google Pixel 8 Pro Screen Sharing | Dr.fone
- Ultimate Guide, How to Transfer Music From Apple iPhone 7 Plus to iPhone | Dr.fone
- New 9 Best French Video Translators Online and Download Options for 2024
- Will iSpoofer update On Itel P55 5G | Dr.fone
- How can I get more stardust in pokemon go On Lava Yuva 2 Pro? | Dr.fone
- In 2024, Best Vivo G2 Pattern Lock Removal Tools Remove Android Pattern Lock Without Losing Data
- How to Unlock Apple ID From your iPhone SE (2020) without Security Questions?
- How to Fake GPS on Android without Mock Location For your Itel P55 5G | Dr.fone
- In 2024, Is Fake GPS Location Spoofer a Good Choice On Samsung Galaxy S23? | Dr.fone
- How To Simulate GPS Movement With Location Spoofer On Itel P55? | Dr.fone
- Stellar Data Recovery for iPhone X failed to recognize my iPhone. How to fix it? | Stellar
- In 2024, Unlock Your Nubia Z50S Pro Phone with Ease The 3 Best Lock Screen Removal Tools
- In 2024, How To Unlock Apple iPhone 6 Plus 3 Ways To Unlock
- How To Unlock Cricket iPhone 13 Pro for Free
- How Do I Stop Someone From Tracking My Samsung Galaxy XCover 6 Pro Tactical Edition? | Dr.fone
- How to Update Apple iPhone 13 Pro Max without Losing Anything? | Dr.fone
- Updated 2024 Approved Ultimate Guide to Translating YouTube Videos Without CC
- 3 Best Tools to Hard Reset Nokia G310 | Dr.fone
- A Perfect Guide To Remove or Disable Google Smart Lock On Xiaomi Redmi Note 12 Pro 4G
- A Guide Honor X8b Wireless and Wired Screen Mirroring | Dr.fone
- Calls on Realme 11 Pro Go Straight to Voicemail? 12 Fixes | Dr.fone
- Catch or Beat Sleeping Snorlax on Pokemon Go For Honor Magic 5 | Dr.fone
- In 2024, Top 6 Apps/Services to Trace Any Apple iPhone 15 Pro Location By Mobile Number | Dr.fone
- In 2024, Everything You Need To Know About Unlocked iPhone 6s Plus
- Bricked Your Honor V Purse? Heres A Full Solution | Dr.fone
- How to Screen Mirror your Apple iPhone X Display? | Dr.fone
- In 2024, How to Get and Use Pokemon Go Promo Codes On Vivo V29 Pro | Dr.fone
- In 2024, OnePlus Nord 3 5G ADB Format Tool for PC vs. Other Unlocking Tools Which One is the Best?
- How to Rescue Lost Photos from Tecno Phantom V Flip?
- Guide to Mirror Your Realme 11 5G to Other Android devices | Dr.fone
- In 2024, How to Unlock iPhone X Passcode Screen?
- 4 Easy Ways for Your Vivo V29 Pro Hard Reset | Dr.fone
- Top 10 Password Cracking Tools For Realme C53
- The way to recover deleted pictures on Honor Magic 6 Pro without backup.
- In 2024, Ways to trade pokemon go from far away On Samsung Galaxy S24+? | Dr.fone
- Here Are Some Reliable Ways to Get Pokemon Go Friend Codes For Google Pixel 7a | Dr.fone
- How to Mirror Xiaomi 14 Pro to Mac? | Dr.fone
- How to Change Your Location on Apple iPhone 15 Pro | Dr.fone
- Title: Updated 2024 Approved The Definitive Guide to Whiteboard Animation
- Author: Elon
- Created at : 2024-06-23 02:10:17
- Updated at : 2024-06-24 02:10:17
- Link: https://animation-videos.techidaily.com/updated-2024-approved-the-definitive-guide-to-whiteboard-animation/
- License: This work is licensed under CC BY-NC-SA 4.0.
