
:max_bytes(150000):strip_icc():format(webp)/6-things-to-consider-before-buying-a-gaming-pc-5221042-8a79710a1e4549edbc357125123fb04e.jpg)
Updated 2024 Approved Top 7 Best Free GIF Apps for Android
Top 7 Best Free GIF Apps for Android
Top 7 Best Free GIF Apps for Android

Shanoon Cox
Mar 27, 2024• Proven solutions
GIFs can present a collection of memorable moments with animation style media files. These images can be created by arranging the order of a sequence of stills or by simply editing video files. The most important thing to know is that developing GIF images is an inexpensive option and these files can be designed with lightweight file size.
It is much easier to transfer GIF images between two users. As so many tools have been already developed for designing GIF images, here we are going to cover a few top rated android based applications.
You can easily find so many interesting tools online that can develop GIF images instantly but when quality is the major constraint then we need a reliable source. Wondershare Filmora is one of the best recommendations for all those who want to develop classic professional style GIFs. Here are a few incredible features of Wondershare Filmora:
- This tool is able to process almost all popular media files as it extends support to 150 plus formats. You can easily upload content in forms of PNG, JPG, AVI, MKV and MP4 files.
- This tool can convert videos or a series of photos to GIFs instantly.
- Wondershare Filmora is a trustworthy desktop application that is compatible with Windows as well as Mac platforms.
- Users can easily update changes to GIF collections with the ability to modify frame rate, frame size, filters, time-lapse, captions, and resolution levels.
However, if you want to make a GIF online , Filmora meme maker is your ultimate solution. It helps you make images, GIFs and video memes directly without watermark. It is totally FREE to use and no signup. You can change text size, color and position to create caption when you are editing. You can also put text inside or outside in GIF. Just with a few clicks, your GIF is done . Try it now!
Check this video tutorial to know more details:
 Download Mac Version ](https://tools.techidaily.com/wondershare/filmora/download/ )
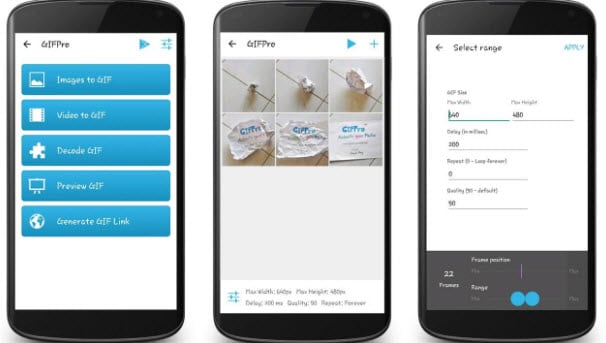
Best GIF Apps for Android Smartphone
1. GIF Camera:
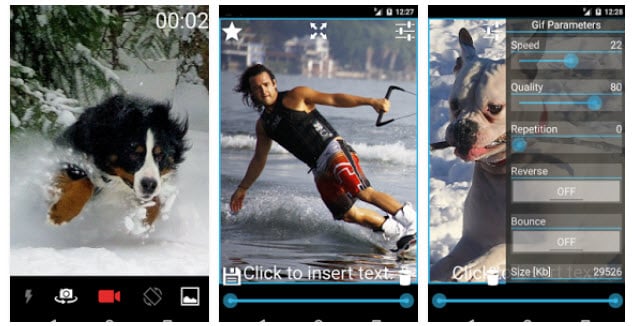
Using this interactive tool, you can easily record videos from your Android camera and then get them saved in the form of GIF extension. One of the most interesting things to know about this app is its Gravity Lock that helps to maintain picture orientation when the phone is following certain kinds of rotation.
Pricing: free
Key Features:
- It can easily develop GIFs by processing your camera results.
- This tool allows autofocus, flashlight adjustments and can manage its own GIF gallery on the browser.
- There is a wide range of live filters and many other customization tools. You will definitely love to use its bounce effect.
- It allows performance maximization with easy adjustments over frame rates and file sizes.
2. GIF Me Camera:
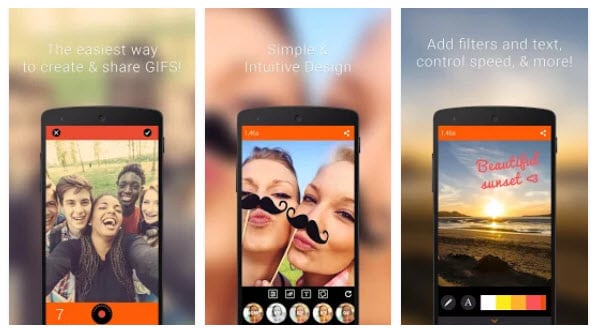
Gif Me Camera allows users to develop files with incredible quality content for all animated GIFs. It can easily process all image files from your computer to generate Gifs or short videos can be easily converted into interactive GIFs. This tool is well known as GIF editor, GIF Maker, and Video to GIF creator.
Pricing: free
Key Features:
- It offers a wide range of real-time color filters.
- Developed GIFs can be easily shared by email or one can also upload them directly over social media websites like WhatsApp, Instagram, Tumblr, Facebook, and Twitter, etc.
- Users can also make adjustments to stop video or motion mode.
- The professional version of GIF Me Camera allows users to remove watermarks from images with ease.
3. GIF Creator:
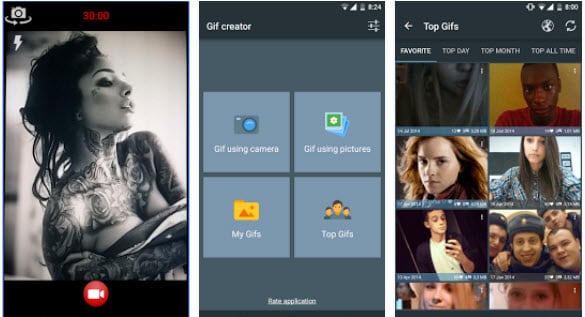
This tool is widely used for the creation of GIFs and to share those creative animations on other platforms instantly. It is possible to process animations for images captured directly from the camera or videos that are downloaded from the internet. Users can also have a preview of all animations side by side so that content quality can be adjusted accordingly.
Pricing: Free
Key Features:
- It allows users to add comments and ratings for animations.
- The maximum duration of animations can go up to 30 seconds.
- There are 10 user-friendly but quite interesting filters.
- Processed animations can be easily saved to memory cards for future needs.
- With GIF Creator, users can easily label or revert their animations.
4. GIF Maker:
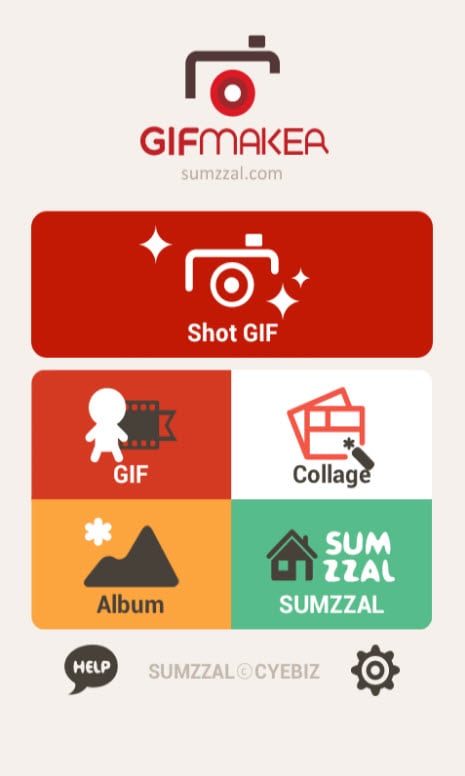
With GIF Maker, your photos can find the right platform for generating emotions in the form of animations. This application is available for free and it provides services to record funny moments from the life and merges them on a single GIF file with eye-catching animations. The best part is that it allows continuous shooting while adding unique animation effects to all files.
Pricing: Free
Key Features:
- It can process a maximum of 50 photos for the creation of a single GIF image.
- Users can customize the timing for each added photo.
- It maintains its own high-quality album that keeps perfect track of all shared, edited, and deleted files.
- This tool is currently available in more than 25 languages so anyone can start working over it with its easy to the user interface.
5. GIF Pro:
This powerful GIF animator is commonly used by professionals due to its breathtaking results. GIF Pro is an extremely easy and feature-rich tool with so many cool features. The best part is that it allows users to enjoy all features for free and never even generates a watermark for developed GIFs. All processed files can be easily shared with the audience over Facebook.
Pricing: Free
Key Features:
- It can easily convert all photos and videos into animated GIFs.
- GIF Pro is capable enough to merge numbers of video frames and images on a single platform so that a high quality animated GIF can be created.
- It allows users to develop GIFs directly from URL.
- Some of the added features include the ability to adjust the quality of GIF output, animated delays, and sequences of loops as well as the size of output files.
6. GIF Studio:
GIF Studio possesses all the incredible features that you may need for designing professional quality GIFs. It is developed with 21 unique animation effects and the best feature is its ability to develop GIF collage. Here users can generate instant GIFs for stills captured from camera share them on other platforms within a fraction of seconds.
Pricing: Free
Key Features:
- It allows users to add animations, stickers, filters, or overlays over GIF files.
- Some additional editing options include crop, edit, create, and changing backgrounds of images.
- Timing for GIF animations can be adjusted manually.
- It can manage best loops for GIF files.
Frequently Asked Questions About GIF Apps on Android
1. Is It Possible To Create Gifs From An Android Device?
Recording a GIF with a camera on an Android phone is not possible unless you install a third-party app. There a lot of GIF apps for Android to choose from that enable you to create GIFs directly from your phone.
GIF Camera, GIF Maker or GIF Creator are just a few among countless apps that allow Android users to make GIFs, although some of them place limits on the maximum duration of a GIF. In addition, most of these apps are equipped with filters and effects that can be easily applied to a GIF.
2. How To Add Text To A GIF From An Android Phone?
In case the app you are using to record a GIF with an Android phone doesn’t offer text tools you will have to use a video editing app to add text to a GIF you created. However, most GIF apps are equipped with at least basic text editing tools that enable you to apply text layers over the animated GIFs you create with them.
After you launch a GIF app and record a new GIF, you can use the text tool to insert the text you want to include in a GIF and to adjust its position, size, or color.
3. Why Can’t I Preview Gifs On My Android Phone?
Android OS has had compatibility issues with GIF files for years, as nearly all versions of the OS don’t offer native support for GIFs. In case you are having trouble previewing a GIF file from an Android device, you should try restarting it in order to make sure that some unrelated issue isn’t causing the lagging.
If the issue persists, you should update the OS to Android 7.1 or later, because previous versions of the OS may experience difficulties displaying GIF files.
Shanoon Cox
Shanoon Cox is a writer and a lover of all things video.
Follow @Shanoon Cox
Shanoon Cox
Mar 27, 2024• Proven solutions
GIFs can present a collection of memorable moments with animation style media files. These images can be created by arranging the order of a sequence of stills or by simply editing video files. The most important thing to know is that developing GIF images is an inexpensive option and these files can be designed with lightweight file size.
It is much easier to transfer GIF images between two users. As so many tools have been already developed for designing GIF images, here we are going to cover a few top rated android based applications.
You can easily find so many interesting tools online that can develop GIF images instantly but when quality is the major constraint then we need a reliable source. Wondershare Filmora is one of the best recommendations for all those who want to develop classic professional style GIFs. Here are a few incredible features of Wondershare Filmora:
- This tool is able to process almost all popular media files as it extends support to 150 plus formats. You can easily upload content in forms of PNG, JPG, AVI, MKV and MP4 files.
- This tool can convert videos or a series of photos to GIFs instantly.
- Wondershare Filmora is a trustworthy desktop application that is compatible with Windows as well as Mac platforms.
- Users can easily update changes to GIF collections with the ability to modify frame rate, frame size, filters, time-lapse, captions, and resolution levels.
However, if you want to make a GIF online , Filmora meme maker is your ultimate solution. It helps you make images, GIFs and video memes directly without watermark. It is totally FREE to use and no signup. You can change text size, color and position to create caption when you are editing. You can also put text inside or outside in GIF. Just with a few clicks, your GIF is done . Try it now!
Check this video tutorial to know more details:
Download Mac Version ](https://tools.techidaily.com/wondershare/filmora/download/ )
Best GIF Apps for Android Smartphone
1. GIF Camera:
Using this interactive tool, you can easily record videos from your Android camera and then get them saved in the form of GIF extension. One of the most interesting things to know about this app is its Gravity Lock that helps to maintain picture orientation when the phone is following certain kinds of rotation.
Pricing: free
Key Features:
- It can easily develop GIFs by processing your camera results.
- This tool allows autofocus, flashlight adjustments and can manage its own GIF gallery on the browser.
- There is a wide range of live filters and many other customization tools. You will definitely love to use its bounce effect.
- It allows performance maximization with easy adjustments over frame rates and file sizes.
2. GIF Me Camera:
Gif Me Camera allows users to develop files with incredible quality content for all animated GIFs. It can easily process all image files from your computer to generate Gifs or short videos can be easily converted into interactive GIFs. This tool is well known as GIF editor, GIF Maker, and Video to GIF creator.
Pricing: free
Key Features:
- It offers a wide range of real-time color filters.
- Developed GIFs can be easily shared by email or one can also upload them directly over social media websites like WhatsApp, Instagram, Tumblr, Facebook, and Twitter, etc.
- Users can also make adjustments to stop video or motion mode.
- The professional version of GIF Me Camera allows users to remove watermarks from images with ease.
3. GIF Creator:
This tool is widely used for the creation of GIFs and to share those creative animations on other platforms instantly. It is possible to process animations for images captured directly from the camera or videos that are downloaded from the internet. Users can also have a preview of all animations side by side so that content quality can be adjusted accordingly.
Pricing: Free
Key Features:
- It allows users to add comments and ratings for animations.
- The maximum duration of animations can go up to 30 seconds.
- There are 10 user-friendly but quite interesting filters.
- Processed animations can be easily saved to memory cards for future needs.
- With GIF Creator, users can easily label or revert their animations.
4. GIF Maker:
With GIF Maker, your photos can find the right platform for generating emotions in the form of animations. This application is available for free and it provides services to record funny moments from the life and merges them on a single GIF file with eye-catching animations. The best part is that it allows continuous shooting while adding unique animation effects to all files.
Pricing: Free
Key Features:
- It can process a maximum of 50 photos for the creation of a single GIF image.
- Users can customize the timing for each added photo.
- It maintains its own high-quality album that keeps perfect track of all shared, edited, and deleted files.
- This tool is currently available in more than 25 languages so anyone can start working over it with its easy to the user interface.
5. GIF Pro:
This powerful GIF animator is commonly used by professionals due to its breathtaking results. GIF Pro is an extremely easy and feature-rich tool with so many cool features. The best part is that it allows users to enjoy all features for free and never even generates a watermark for developed GIFs. All processed files can be easily shared with the audience over Facebook.
Pricing: Free
Key Features:
- It can easily convert all photos and videos into animated GIFs.
- GIF Pro is capable enough to merge numbers of video frames and images on a single platform so that a high quality animated GIF can be created.
- It allows users to develop GIFs directly from URL.
- Some of the added features include the ability to adjust the quality of GIF output, animated delays, and sequences of loops as well as the size of output files.
6. GIF Studio:
GIF Studio possesses all the incredible features that you may need for designing professional quality GIFs. It is developed with 21 unique animation effects and the best feature is its ability to develop GIF collage. Here users can generate instant GIFs for stills captured from camera share them on other platforms within a fraction of seconds.
Pricing: Free
Key Features:
- It allows users to add animations, stickers, filters, or overlays over GIF files.
- Some additional editing options include crop, edit, create, and changing backgrounds of images.
- Timing for GIF animations can be adjusted manually.
- It can manage best loops for GIF files.
Frequently Asked Questions About GIF Apps on Android
1. Is It Possible To Create Gifs From An Android Device?
Recording a GIF with a camera on an Android phone is not possible unless you install a third-party app. There a lot of GIF apps for Android to choose from that enable you to create GIFs directly from your phone.
GIF Camera, GIF Maker or GIF Creator are just a few among countless apps that allow Android users to make GIFs, although some of them place limits on the maximum duration of a GIF. In addition, most of these apps are equipped with filters and effects that can be easily applied to a GIF.
2. How To Add Text To A GIF From An Android Phone?
In case the app you are using to record a GIF with an Android phone doesn’t offer text tools you will have to use a video editing app to add text to a GIF you created. However, most GIF apps are equipped with at least basic text editing tools that enable you to apply text layers over the animated GIFs you create with them.
After you launch a GIF app and record a new GIF, you can use the text tool to insert the text you want to include in a GIF and to adjust its position, size, or color.
3. Why Can’t I Preview Gifs On My Android Phone?
Android OS has had compatibility issues with GIF files for years, as nearly all versions of the OS don’t offer native support for GIFs. In case you are having trouble previewing a GIF file from an Android device, you should try restarting it in order to make sure that some unrelated issue isn’t causing the lagging.
If the issue persists, you should update the OS to Android 7.1 or later, because previous versions of the OS may experience difficulties displaying GIF files.
Shanoon Cox
Shanoon Cox is a writer and a lover of all things video.
Follow @Shanoon Cox
How to Combine Multiple GIFs Into One with GIF Combiner
How to Combine Multiple GIFs into One with GIF Combiner
Shanoon Cox
Mar 27, 2024• Proven solutions
Are you looking for a software tool to create animated GIFs? Go online, you will easily find so many with impressive editing abilities. There are so many interesting things that you can do with a collection of GIFs. Many professionals these days are trying new tricks to make classic small duration animated movies with interactive GIF creator tools .
The article below will provide you step by step guidance about how to merge or combine animated GIFs together.
We are going to discuss two methods where one GIF combiner can assist you to play GIFs side by side, whereas the other will tell you about playing another GIF in continuation after first. In the end, we will also let you know the three best GIF combiners you can use.
Keep reading.
If you are not able to use Photoshop due to its complicated interface and Ezgif is not a suitable tool for your device, then the best recommendation for your animated GIF creation needs is Wondershare Filmora .
This tool is designed with a user-friendly interface and it can easily assist you in the development of high-quality gifs. There are so many customization options associated with each design like color correction, speed adjustments, and overlays, etc.
Filmora offers compatibility over Windows as well as Mac devices so you can easily access it anywhere. Further, it can process more than 150 file formats so you need not worry about your selection. Simply download Wondershare Filmora for your desktop and get started with impressive GIF editing.
Download it now to have a try!
See how to make a cool GIF from a video with Wondershare Filmora.
Download Mac Version ](https://tools.techidaily.com/wondershare/filmora/download/ )
Part 1: How to Combine/Merge Animated GIFs Into One
Method 1: Merge GIFs into one with Photoshop
Adobe Photoshop is one of the top-rated photo editing software tools and nowadays it is popularly being used for GIF combining. Using Photoshop, you can easily play multiple GIF images side by side on the screen. Here are a few simple to follow steps to accomplish this task:
Step 1: Import GIFs to combine
First of all, users need to launch Adobe Photoshop on their device and then import both GIF images to individual tabs. This task can be easily done using Drag and Drop tools. Resize both tabs so that you can view both images at a time on screen.
Step 2: Save GIF with name
Go to the Window menu and ensure that the Timeline option is marked in the drop-down menu.

Now open one empty file with height same as that of already imported GIF files. Save this file with any suitable name, for example Z.

Note: If you need a transparent view of your imported GIF images then go to Layer and select New and finally hit Layer option. You can now hide its bottom layer.
Step 3: Copy frames

Now move to the tab of the first GIF file and then to the timeline toolbar. On the top right corner of your screen, you will find the menu icon. Here you need to select and copy all frames.
Step 4: Paste your copy
It is time to move to GIF Z file, move to its timeline toolbar, and then select the menu icon from the top right corner of your screen. Paste your recently copied selection over here. Never forget to choose Paste Over selection option from Pop up Dialogue Box.
Step 5: Copy and paste
Simply repeat the process explained in Step 3 and 4 for the 2nd GIF image. After execution of these steps, your GIF Z file will be containing all layers of your imported GIF files but as you have pasted them one over another so it is important to separate their elements now.
Step 6: To make separation
To do this separation, go to GIF Z tab and then select layers of second GIF file and simply move them below the first GIF layer files. Users can now have a preview of both GIFs in the timeline window.

Step 7: Change image settings
After finalizing the best preview for your edited files, you can hit the file menu option and then save your project for device or web option. It will immediately open a dialogue box where users can easily specify their image quality and loop count details. Never forget to have one more preview before saving the final results.

Step 8: Save your project
As now you are done with all the editing tasks so it is time to hit the “Save” option and then provide your destination address to the modified file. Your animated GIF file is now ready to get uploaded on the internet.
Check this video to learn more on how to combine gifs with Photoshop
Method 2: Combine GIFs and Play one After Another
Many youngsters love to create impressive stories by just combining a few GIF images one after another in sequence. If you are also one of them then you should follow these steps discussed in the second method.
We are recommending Ezgif.com to complete this task with the easy to follow steps as discussed below:
You may also like: Top 26 Best Free GIF Makers Online >>
Step 1: Upload GIFs files
First of all, you need to upload your desired GIF files to the Ezgif.com platform. For fast selection of multiple files simply follow Ctrl key-based selection.
This tool also allows users to create a mixture of animated GIF files with simple still images even if they are of different file formats. The conversion process will be carried out automatically by this tool.
Step 2: Adjust frame
As soon as these files will get uploaded, you will find all frames on the editor window. Here you can easily adjust frame delays as well as their order. Note that, GIFs are often ordered in alphabetic order so while reorganizing your files, never forget to rename them accurately. Now hit the “Animate It” button and it will immediately prepare a small preview window on the screen.

Step 3: Optimize your GIFs
Ezgif.com provides a wide range of optimization options to users after this preview. You can easily adjust features as per your requirement by setting desired values for text, speed, effects, rotate, resize and crop, etc. If you do not want to make such changes then you can directly hit the save button. This software tool will take a few seconds to process your project and then a new GIF image with all defined frames will be generated. It will be containing all source images with your preferred ordered sequence. You can easily find it at your destination folder and use it further for entertainment.
Part 2: 3 Best GIF Combiners You Can Make GIFs
1. Filmora Meme Maker - Online GIF Combiner
If you want to combine GIFs online, the Filmora meme maker is your ultimate solution.
It helps you make images, GIFs and video memes directly without watermark. It is totally FREE to use and no signup. You can change text size, color and position to create caption when you are editing. You can also put text inside or outside in GIF.
Just with a few clicks, your GIF is done . Try Now!

2. GIPHY
GIPHY is a GIF combiner where you can find various GIF files to combine. All of the GIFs are funny and interesting to use for people who love to combine GIFs. There are some examples in this site, so you can have the inspiration to combine GIFs if you don’t know where to start. You also can find different styles: reaction, sports, artists and more.

3. PIXEL
If you don’t want to use Photoshop to combine GIFs, here we recommend using PIXEL. You can use it to make GIFs easily online. You can add more than one GIF at one time. Besides, this GIF combiner can also change the GIF size to fit your needs. After the editing is made, you need to click create animation to export GIFs. You should know that GIF size is 32×32 for PIXEL, and 64×64 for SUPER PIXEL.
![]()
Frequently Asked Questions About Combing GIFs
1. Can I Combine A Few Gifs?
Yes, you can. Any photo or video editing software that supports GIF file format allows you to combine one or more GIFs. For instance, Adobe Photoshop users can combine several GIF files and play them simultaneously next to each other, but this task can be overwhelming if you are not familiar with this photo editing software.
An online GIF combiner like Ezgif enables you to combine multiple GIFs from your web browser for free, which makes it a great option for anyone who doesn’t have access to a professional photo or video editing software.
2. How To Merge Several Animated GIFs?
Playing two or more GIFs one after another in a single file is easy, as you just have to arrange them in a way you want them to appear in the final version of the GIF on the editor’s timeline and then export your project as a GIF file.
What’s more, you will be able to remove the frames of the GIFs you don’t want to include in the output file or apply different filters and effects. However, the options you are going to have at your disposal depending on the GIF maker or video editing software you are using to merge several animated GIFs into a single file.
Shanoon Cox
Shanoon Cox is a writer and a lover of all things video.
Follow @Shanoon Cox
Shanoon Cox
Mar 27, 2024• Proven solutions
Are you looking for a software tool to create animated GIFs? Go online, you will easily find so many with impressive editing abilities. There are so many interesting things that you can do with a collection of GIFs. Many professionals these days are trying new tricks to make classic small duration animated movies with interactive GIF creator tools .
The article below will provide you step by step guidance about how to merge or combine animated GIFs together.
We are going to discuss two methods where one GIF combiner can assist you to play GIFs side by side, whereas the other will tell you about playing another GIF in continuation after first. In the end, we will also let you know the three best GIF combiners you can use.
Keep reading.
If you are not able to use Photoshop due to its complicated interface and Ezgif is not a suitable tool for your device, then the best recommendation for your animated GIF creation needs is Wondershare Filmora .
This tool is designed with a user-friendly interface and it can easily assist you in the development of high-quality gifs. There are so many customization options associated with each design like color correction, speed adjustments, and overlays, etc.
Filmora offers compatibility over Windows as well as Mac devices so you can easily access it anywhere. Further, it can process more than 150 file formats so you need not worry about your selection. Simply download Wondershare Filmora for your desktop and get started with impressive GIF editing.
Download it now to have a try!
See how to make a cool GIF from a video with Wondershare Filmora.
Download Mac Version ](https://tools.techidaily.com/wondershare/filmora/download/ )
Part 1: How to Combine/Merge Animated GIFs Into One
Method 1: Merge GIFs into one with Photoshop
Adobe Photoshop is one of the top-rated photo editing software tools and nowadays it is popularly being used for GIF combining. Using Photoshop, you can easily play multiple GIF images side by side on the screen. Here are a few simple to follow steps to accomplish this task:
Step 1: Import GIFs to combine
First of all, users need to launch Adobe Photoshop on their device and then import both GIF images to individual tabs. This task can be easily done using Drag and Drop tools. Resize both tabs so that you can view both images at a time on screen.
Step 2: Save GIF with name
Go to the Window menu and ensure that the Timeline option is marked in the drop-down menu.
Now open one empty file with height same as that of already imported GIF files. Save this file with any suitable name, for example Z.
Note: If you need a transparent view of your imported GIF images then go to Layer and select New and finally hit Layer option. You can now hide its bottom layer.
Step 3: Copy frames
Now move to the tab of the first GIF file and then to the timeline toolbar. On the top right corner of your screen, you will find the menu icon. Here you need to select and copy all frames.
Step 4: Paste your copy
It is time to move to GIF Z file, move to its timeline toolbar, and then select the menu icon from the top right corner of your screen. Paste your recently copied selection over here. Never forget to choose Paste Over selection option from Pop up Dialogue Box.
Step 5: Copy and paste
Simply repeat the process explained in Step 3 and 4 for the 2nd GIF image. After execution of these steps, your GIF Z file will be containing all layers of your imported GIF files but as you have pasted them one over another so it is important to separate their elements now.
Step 6: To make separation
To do this separation, go to GIF Z tab and then select layers of second GIF file and simply move them below the first GIF layer files. Users can now have a preview of both GIFs in the timeline window.
Step 7: Change image settings
After finalizing the best preview for your edited files, you can hit the file menu option and then save your project for device or web option. It will immediately open a dialogue box where users can easily specify their image quality and loop count details. Never forget to have one more preview before saving the final results.
Step 8: Save your project
As now you are done with all the editing tasks so it is time to hit the “Save” option and then provide your destination address to the modified file. Your animated GIF file is now ready to get uploaded on the internet.
Check this video to learn more on how to combine gifs with Photoshop
Method 2: Combine GIFs and Play one After Another
Many youngsters love to create impressive stories by just combining a few GIF images one after another in sequence. If you are also one of them then you should follow these steps discussed in the second method.
We are recommending Ezgif.com to complete this task with the easy to follow steps as discussed below:
You may also like: Top 26 Best Free GIF Makers Online >>
Step 1: Upload GIFs files
First of all, you need to upload your desired GIF files to the Ezgif.com platform. For fast selection of multiple files simply follow Ctrl key-based selection.
This tool also allows users to create a mixture of animated GIF files with simple still images even if they are of different file formats. The conversion process will be carried out automatically by this tool.
Step 2: Adjust frame
As soon as these files will get uploaded, you will find all frames on the editor window. Here you can easily adjust frame delays as well as their order. Note that, GIFs are often ordered in alphabetic order so while reorganizing your files, never forget to rename them accurately. Now hit the “Animate It” button and it will immediately prepare a small preview window on the screen.
Step 3: Optimize your GIFs
Ezgif.com provides a wide range of optimization options to users after this preview. You can easily adjust features as per your requirement by setting desired values for text, speed, effects, rotate, resize and crop, etc. If you do not want to make such changes then you can directly hit the save button. This software tool will take a few seconds to process your project and then a new GIF image with all defined frames will be generated. It will be containing all source images with your preferred ordered sequence. You can easily find it at your destination folder and use it further for entertainment.
Part 2: 3 Best GIF Combiners You Can Make GIFs
1. Filmora Meme Maker - Online GIF Combiner
If you want to combine GIFs online, the Filmora meme maker is your ultimate solution.
It helps you make images, GIFs and video memes directly without watermark. It is totally FREE to use and no signup. You can change text size, color and position to create caption when you are editing. You can also put text inside or outside in GIF.
Just with a few clicks, your GIF is done . Try Now!
2. GIPHY
GIPHY is a GIF combiner where you can find various GIF files to combine. All of the GIFs are funny and interesting to use for people who love to combine GIFs. There are some examples in this site, so you can have the inspiration to combine GIFs if you don’t know where to start. You also can find different styles: reaction, sports, artists and more.
3. PIXEL
If you don’t want to use Photoshop to combine GIFs, here we recommend using PIXEL. You can use it to make GIFs easily online. You can add more than one GIF at one time. Besides, this GIF combiner can also change the GIF size to fit your needs. After the editing is made, you need to click create animation to export GIFs. You should know that GIF size is 32×32 for PIXEL, and 64×64 for SUPER PIXEL.
![]()
Frequently Asked Questions About Combing GIFs
1. Can I Combine A Few Gifs?
Yes, you can. Any photo or video editing software that supports GIF file format allows you to combine one or more GIFs. For instance, Adobe Photoshop users can combine several GIF files and play them simultaneously next to each other, but this task can be overwhelming if you are not familiar with this photo editing software.
An online GIF combiner like Ezgif enables you to combine multiple GIFs from your web browser for free, which makes it a great option for anyone who doesn’t have access to a professional photo or video editing software.
2. How To Merge Several Animated GIFs?
Playing two or more GIFs one after another in a single file is easy, as you just have to arrange them in a way you want them to appear in the final version of the GIF on the editor’s timeline and then export your project as a GIF file.
What’s more, you will be able to remove the frames of the GIFs you don’t want to include in the output file or apply different filters and effects. However, the options you are going to have at your disposal depending on the GIF maker or video editing software you are using to merge several animated GIFs into a single file.
Shanoon Cox
Shanoon Cox is a writer and a lover of all things video.
Follow @Shanoon Cox
10 Realistic Cartoon Characters You Will Run Away From if You Met in R
10 Realistic Cartoon Characters You Would Run Away From if You Met in Real Life
An easy yet powerful editor
Numerous effects to choose from
Detailed tutorials provided by the official channel
Remember watching a cartoon reality show on the Cartoon Network? We all grew up watching cartoons. Cartoons are an unforgettable part of our childhood. But have you ever wondered what would your favorite cartoon characters look like in real life? Many cartoon characters like Popeye, Sponge Bob, Mickey Mouse, etc. look funny in their 2D images. Watching them do funny things and their funny expressions have always been fun.
But with the advancement in technology and the passage of time, we have some digital artists like Tatiana and Miguel Vasquez, who have recreated your famous cartoon characters into 3D. They have given them a realistic look that will scare you. These realistic cartoon faces will blow your mind.
In this article
01 [What’s a Realistic Cartoon?](#Part 1)
02 [10 Realistic Cartoon Characters You Would Run Away From If You Met In Real Life](#Part 2)
03 [How Do Cartoon Characters Reimagined As Realistic 3D Animation](#Part 3)
Part 1 What’s Realistic Cartoon?
Before moving towards the list of realistic cartoon characters, you must first know what a realistic cartoon is. As we all know, any animated drawing or illustration is a cartoon, it can either be non-realistic or semi-realistic. Earlier artists used to draw these cartoon characters on paper, but now technology has evolved.
With the introduction of different AI tools, many digital artists have recreated 3D versions of your favorite cartoon characters. These 3D versions of different cartoons are known as realistic cartoons. This can be done easily with help of AI technology and Digital Software.
Part 2 Realistic Cartoon Characters You Would Run Away From If You Met In Real Life
Have you ever thought how would your favorite cartoon character sponge bob looks like in real life? We will show you realistic versions of your favorite cartoon characters. Stay tuned for great fun waiting for you in this article!
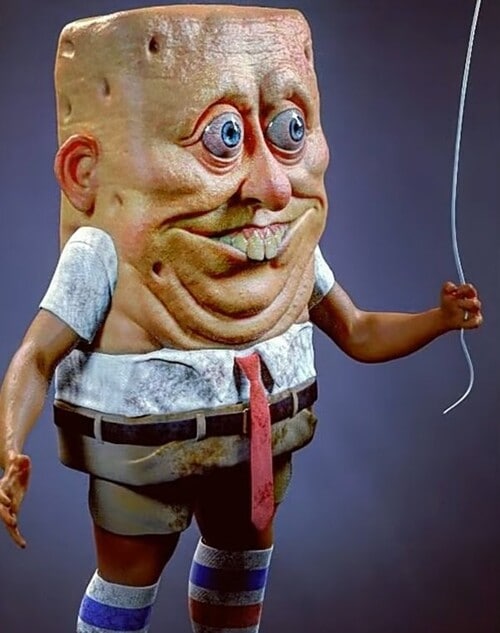
01Sponge Bob (Sponge Bob Square Pants)
Sponge Bob Square Pants is an animated series full of fun and comedy. This show currently runs on Nickelodeon. Sponge Bob is a yellow-colored sea sponge and the main protagonist of the show. He is a cook at a restaurant named Krusty Krab. He often goes on adventures with his best friend Patrick Star. He mainly focuses on and aims at getting a boat-driving license from Mr. Puff’s boating school.
Have a look at the 3D recreation of this funny creature.
02Sid the Sloth (Ice Age)
Ice Age is one of the most popular animated series that revolves around the lives of a mammoth, tiger, sloth, and a scrat. A scrat is a combination of a squirrel and a rat. This series became so popular among the children that it was even nominated for an Oscar award.
It has a character called Sid. He is an abandoned sloth. His mother left him for some good to happen with him during the migration. His character in the entire series exhibits a friendly and carefree nature. Sometimes, he also acts as dumb and naïve.
Look at the funny recreation of this dumb-witted character. Does this recreation scare you?
03Mr. Krabs (Sponge Bob Square Pants)
Sponge Bob Square Pants is one of the cartoons that have many different and funny-looking creatures. Mr. Krabs is one of those characters. He is a money-minded and miserly creature. He is the owner of the Krusty Krab fast food restaurant, where Sponge Bob works as a cook. He has a teenage daughter named Pearl and he can do anything to see her happy. He exhibits romantic feelings for Mrs. Puff.
Does this funny creature from the Sponge Bob series look funny in real life too?

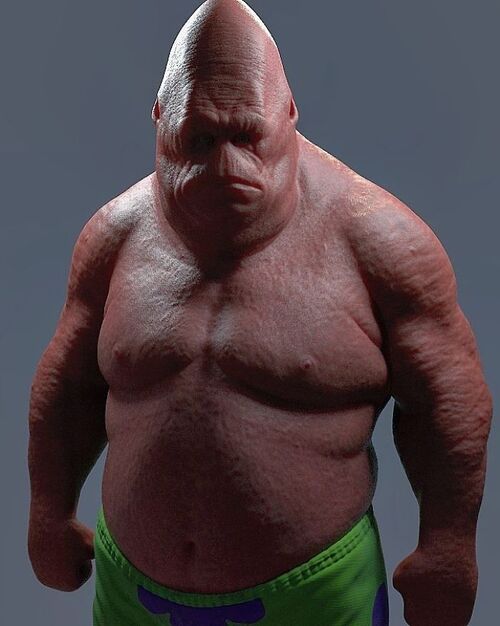
04Patrick Star (Sponge Bob Square Pants)
Patrick Star is again a character from the cartoon show Sponge Bob Square Pants. He is the best friend of the main protagonist Sponge Bob, who lives 2 houses away from Sponge Bob’s house. He is a lazy, fat, and stupid pink-colored starfish. His character makes the show funnier and more interesting for kids.
How would you react when you will see this funny creature from Sponge Bob in real life? His 3D recreation seems a bit scary like a monster in real life.
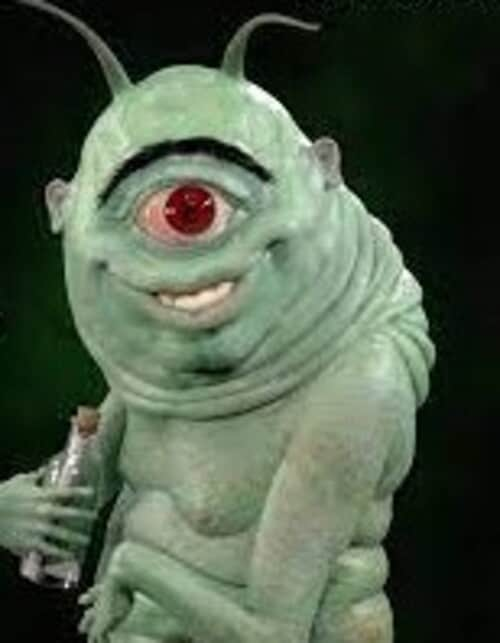
05Plankton (Sponge Bob Square Pants)
Plankton was once the best friend of Mr. Krabs but now they both share a rivalry bond. He is married to Karen and owns a fast food restaurant named Chum Bucket Restaurant in competition with Mr. Krabs’ Restaurant. He plays the antagonist character in the series. His restaurant doesn’t work as successfully as Krusty Krab Restaurant. In rivalry, he often comes up with different plans and tricks to outwit Mr. Krabs and steal the secret recipe of his famous Krabby Patty Burger, but never succeeds.
Have a look at the 3D recreation of this funny character from the series.
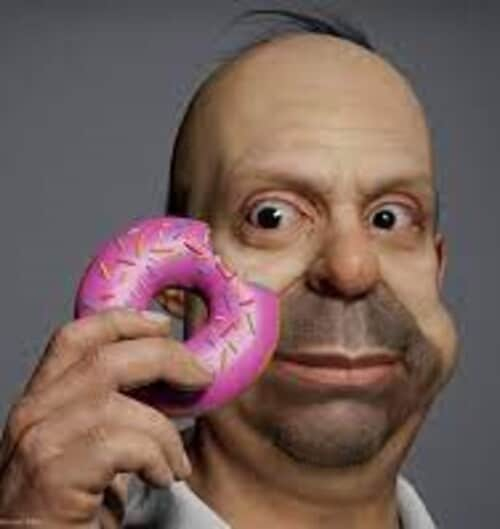
06Homer (The Simpsons)
The Simpsons is an animated series that revolves around the life of an American family. The Simpson family has five members named Homer, Marge, Bart, Lisa, and Maggie. Homer Simpson is the main character of this series. He lives in Springfield and is employed as a Safety Inspector at Springfield Nuclear Power Plant. He is married to Marge and is the father of three children – Bart, Lisa, and Maggie. The series depicts a strong bond of love and care for each other in the family.
Have a look at this realistic 3D recreation of Homer Simpson.
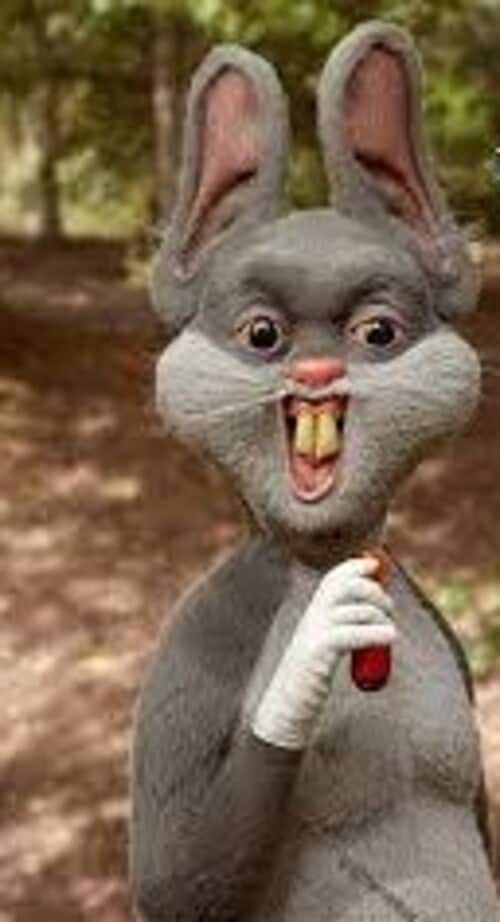
07Bugs Bunny (Looney Tunes)
Looney Tunes is entertaining people of all ages due to its great and funny characters. Bugs Bunny is one of our favorite characters from the animated cartoon show Looney Tunes. He is the main protagonist and the most popular character of the series. Kids love him the most because of his mischievous acts in the show. He looks too funny with a mouth filled with carrots and wearing funny costumes. This unique character has a great fan following all over the world.
The 3D recreation of this famous cartoon character is funny and scary at the same time.
08Sally (The Nightmare Before Christmas)
As the name suggests, The Nightmare Before Christmas is an American dark fantasy animated movie. This animated movie has received great financial success and appreciation for its wonderful characters and music.
Sally is a shy ragdoll created by a scientist Doctor Finkelstein. She secretly loves Jack – the main Protagonist of the movie. She tells him not to mix the preparation of Christmas with the Halloween party.
Look at her realistic 3D recreation by Tatiana, popularly known as TatiMoons.

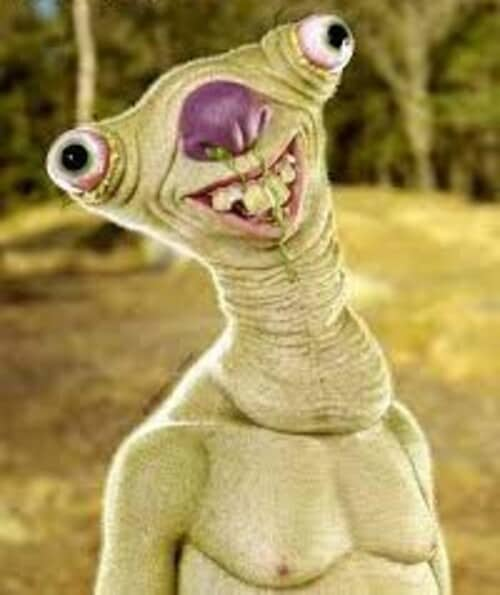
09Stitch (Lilo and Stitch)
Lilo and Stitch is also an animated American movie. It is a science fiction and comedy movie that attracts the interest of people of all age groups. The story of this animated movie revolves around the two main characters named Lilo and Stitch. Lilo is a 7-year old orphan girl whose parents died in a car accident. She has a pet named Stitch.
The original name of Stitch is Experiment 626. He was illegally created by a scientist Jumba Jokiba through a genetic experiment. Lilo adopts him thinking that he is an innocent creature, she doesn’t know about his birth and origin.
Have a look at this realistic 3D recreation of Stitch’s character. Isn’t it scary?

10 Popeye (Popeye – The Sailor Man)
Popeye – The Sailor Man is another famous cartoon series. Popeye is the main protagonist of this series. He has a girlfriend named Olive Oyl. This series depicts the love triangle between Popeye, Olive, and Bluto. He is an uneducated sailor man who gets energy by eating spinach. He often comes up with non-realistic solutions to different problems and helps the police by investigating different cases. He has a versatile tobacco smoking pipe that sometimes acts as a whistle, and he even intakes the spinach through his pipe.
In the cartoon films, he looks funny, but this 3D recreation of his character is a bit scary.

Part 2 How Do Cartoon Characters Reimagined As Realistic 3D Animation
Nowadays, it has become easier to create and turn your imagination into a cartoon character with different online 3D animators. This makes storytelling easier and funny and it is a great way to engage children. Out of all the 3D animation tools, Filmora will assist you to create the best 3D version of your favorite cartoon character.
Filmora has various smart features that help you to turn any image into realistic 3D animation. You can create great animations using Wondershare Filmora Video Editor within a couple of hours. It offers you many different features that help in convenient customization.
● Ending Thoughts →
● Being a cartoon lover, we hope that you would have liked the 3D recreation of your favorite cartoons. Some of these 3D recreations are so scary that you would just run away from them in real life and some look like real monster cartoons.
● AI combined with digital software like Filmora makes it easier to create these 3D versions of famous cartoon characters.
● With Filmora, you don’t need to spend hours sketching cartoon characters on paper. You can easily create great and realistic animations digitally.
Remember watching a cartoon reality show on the Cartoon Network? We all grew up watching cartoons. Cartoons are an unforgettable part of our childhood. But have you ever wondered what would your favorite cartoon characters look like in real life? Many cartoon characters like Popeye, Sponge Bob, Mickey Mouse, etc. look funny in their 2D images. Watching them do funny things and their funny expressions have always been fun.
But with the advancement in technology and the passage of time, we have some digital artists like Tatiana and Miguel Vasquez, who have recreated your famous cartoon characters into 3D. They have given them a realistic look that will scare you. These realistic cartoon faces will blow your mind.
In this article
01 [What’s a Realistic Cartoon?](#Part 1)
02 [10 Realistic Cartoon Characters You Would Run Away From If You Met In Real Life](#Part 2)
03 [How Do Cartoon Characters Reimagined As Realistic 3D Animation](#Part 3)
Part 1 What’s Realistic Cartoon?
Before moving towards the list of realistic cartoon characters, you must first know what a realistic cartoon is. As we all know, any animated drawing or illustration is a cartoon, it can either be non-realistic or semi-realistic. Earlier artists used to draw these cartoon characters on paper, but now technology has evolved.
With the introduction of different AI tools, many digital artists have recreated 3D versions of your favorite cartoon characters. These 3D versions of different cartoons are known as realistic cartoons. This can be done easily with help of AI technology and Digital Software.
Part 2 Realistic Cartoon Characters You Would Run Away From If You Met In Real Life
Have you ever thought how would your favorite cartoon character sponge bob looks like in real life? We will show you realistic versions of your favorite cartoon characters. Stay tuned for great fun waiting for you in this article!
01Sponge Bob (Sponge Bob Square Pants)
Sponge Bob Square Pants is an animated series full of fun and comedy. This show currently runs on Nickelodeon. Sponge Bob is a yellow-colored sea sponge and the main protagonist of the show. He is a cook at a restaurant named Krusty Krab. He often goes on adventures with his best friend Patrick Star. He mainly focuses on and aims at getting a boat-driving license from Mr. Puff’s boating school.
Have a look at the 3D recreation of this funny creature.
02Sid the Sloth (Ice Age)
Ice Age is one of the most popular animated series that revolves around the lives of a mammoth, tiger, sloth, and a scrat. A scrat is a combination of a squirrel and a rat. This series became so popular among the children that it was even nominated for an Oscar award.
It has a character called Sid. He is an abandoned sloth. His mother left him for some good to happen with him during the migration. His character in the entire series exhibits a friendly and carefree nature. Sometimes, he also acts as dumb and naïve.
Look at the funny recreation of this dumb-witted character. Does this recreation scare you?
03Mr. Krabs (Sponge Bob Square Pants)
Sponge Bob Square Pants is one of the cartoons that have many different and funny-looking creatures. Mr. Krabs is one of those characters. He is a money-minded and miserly creature. He is the owner of the Krusty Krab fast food restaurant, where Sponge Bob works as a cook. He has a teenage daughter named Pearl and he can do anything to see her happy. He exhibits romantic feelings for Mrs. Puff.
Does this funny creature from the Sponge Bob series look funny in real life too?
04Patrick Star (Sponge Bob Square Pants)
Patrick Star is again a character from the cartoon show Sponge Bob Square Pants. He is the best friend of the main protagonist Sponge Bob, who lives 2 houses away from Sponge Bob’s house. He is a lazy, fat, and stupid pink-colored starfish. His character makes the show funnier and more interesting for kids.
How would you react when you will see this funny creature from Sponge Bob in real life? His 3D recreation seems a bit scary like a monster in real life.
05Plankton (Sponge Bob Square Pants)
Plankton was once the best friend of Mr. Krabs but now they both share a rivalry bond. He is married to Karen and owns a fast food restaurant named Chum Bucket Restaurant in competition with Mr. Krabs’ Restaurant. He plays the antagonist character in the series. His restaurant doesn’t work as successfully as Krusty Krab Restaurant. In rivalry, he often comes up with different plans and tricks to outwit Mr. Krabs and steal the secret recipe of his famous Krabby Patty Burger, but never succeeds.
Have a look at the 3D recreation of this funny character from the series.
06Homer (The Simpsons)
The Simpsons is an animated series that revolves around the life of an American family. The Simpson family has five members named Homer, Marge, Bart, Lisa, and Maggie. Homer Simpson is the main character of this series. He lives in Springfield and is employed as a Safety Inspector at Springfield Nuclear Power Plant. He is married to Marge and is the father of three children – Bart, Lisa, and Maggie. The series depicts a strong bond of love and care for each other in the family.
Have a look at this realistic 3D recreation of Homer Simpson.
07Bugs Bunny (Looney Tunes)
Looney Tunes is entertaining people of all ages due to its great and funny characters. Bugs Bunny is one of our favorite characters from the animated cartoon show Looney Tunes. He is the main protagonist and the most popular character of the series. Kids love him the most because of his mischievous acts in the show. He looks too funny with a mouth filled with carrots and wearing funny costumes. This unique character has a great fan following all over the world.
The 3D recreation of this famous cartoon character is funny and scary at the same time.
08Sally (The Nightmare Before Christmas)
As the name suggests, The Nightmare Before Christmas is an American dark fantasy animated movie. This animated movie has received great financial success and appreciation for its wonderful characters and music.
Sally is a shy ragdoll created by a scientist Doctor Finkelstein. She secretly loves Jack – the main Protagonist of the movie. She tells him not to mix the preparation of Christmas with the Halloween party.
Look at her realistic 3D recreation by Tatiana, popularly known as TatiMoons.
09Stitch (Lilo and Stitch)
Lilo and Stitch is also an animated American movie. It is a science fiction and comedy movie that attracts the interest of people of all age groups. The story of this animated movie revolves around the two main characters named Lilo and Stitch. Lilo is a 7-year old orphan girl whose parents died in a car accident. She has a pet named Stitch.
The original name of Stitch is Experiment 626. He was illegally created by a scientist Jumba Jokiba through a genetic experiment. Lilo adopts him thinking that he is an innocent creature, she doesn’t know about his birth and origin.
Have a look at this realistic 3D recreation of Stitch’s character. Isn’t it scary?
10 Popeye (Popeye – The Sailor Man)
Popeye – The Sailor Man is another famous cartoon series. Popeye is the main protagonist of this series. He has a girlfriend named Olive Oyl. This series depicts the love triangle between Popeye, Olive, and Bluto. He is an uneducated sailor man who gets energy by eating spinach. He often comes up with non-realistic solutions to different problems and helps the police by investigating different cases. He has a versatile tobacco smoking pipe that sometimes acts as a whistle, and he even intakes the spinach through his pipe.
In the cartoon films, he looks funny, but this 3D recreation of his character is a bit scary.
Part 2 How Do Cartoon Characters Reimagined As Realistic 3D Animation
Nowadays, it has become easier to create and turn your imagination into a cartoon character with different online 3D animators. This makes storytelling easier and funny and it is a great way to engage children. Out of all the 3D animation tools, Filmora will assist you to create the best 3D version of your favorite cartoon character.
Filmora has various smart features that help you to turn any image into realistic 3D animation. You can create great animations using Wondershare Filmora Video Editor within a couple of hours. It offers you many different features that help in convenient customization.
● Ending Thoughts →
● Being a cartoon lover, we hope that you would have liked the 3D recreation of your favorite cartoons. Some of these 3D recreations are so scary that you would just run away from them in real life and some look like real monster cartoons.
● AI combined with digital software like Filmora makes it easier to create these 3D versions of famous cartoon characters.
● With Filmora, you don’t need to spend hours sketching cartoon characters on paper. You can easily create great and realistic animations digitally.
How to Send and Add Snapchat GIFs 100% The Easy Way
How to Send and Add Snapchat GIFs 100% The Easy Way
An easy yet powerful editor
Numerous effects to choose from
Detailed tutorials provided by the official channel
GIFs make texting so much more fun. You can express many emotions and include entertaining animations to give your messages a human touch. Users may share and receive GIFs on most social networking networks, and Snapchat is no exception. We’ll show you how to send GIFs on Snapchat, whether you’re an Android or iOS user, in this article.
This covers instructions on how to get GIFs in Snapchat and how to transmit GIFs in chat rooms and on Snapchat Stories updates. Let’s get started.
In this article
01 [How to Send GIFs on Snapchat](#Part 1)
02 [How to Get GIFs on Snapchat Snaps and Messages?](#Part 2)
Part 1 How to Send GIFs on Snapchat
Here is a simple step guide on how to send Snapchat GIF:
Step 1: Take a photo
Start your Snapchat app as usual and snap a photo or video.

Step 2: Tap the Sticker icon
From the row on the right side of the screen, tap the Sticker icon.
To add a GIF to your photo or video, scroll down and select one. You can also use the search option to locate more particular GIFs by entering a term or phrase.

Step 3: Drag GIF
Drag the GIF you added to the screen’s desired location.
Pinch your screen to change the GIF’s size as needed.
Step 4: Save and Share
You can then share your Snap with other social networking platforms by sending it to your Stories, friends/contacts, or just saving it to your gallery.

Part 2 How to Get GIFs on Snapchat Snaps and Messages?
Getting a GIF on Snapchat can be tasking, but here is a simple guide to achieving that.
Step 1: Make use of a Gboard.
Enter the chat of the friend or person to whom you want to send the GIF and maximize or open the keyboard using the text bar.

Step 2: Select the GIF you want.
Choose a GIF from the collection or catalog that you’d want to utilize and submit it.

You can use the same snap to apply many stickers. Drag and drop it on the trashcan icon to get rid of it.
Here’s how to get Gboard on your Android device if it didn’t come with it:
• Download the Gboard from the Play Store or whichever playstore you want.
• Go to Settings> System> Languages and Input> Virtual Keyboard and select it.
• Double-check that Gboard is selected as your primary keyboard.
After that, grant any permissions it requires so that you can use it right away in Snapchat.
Now that it’s as simple as it gets, let’s send comparable GIFs utilizing iOS devices.
For iPhone/iPad:
For iPhone users, you must first download and install the giphy app on your phone. Once you have successfully set the giphy app as your default keyboard, you can send Snapchat GIFs chat by following the steps below:
Step 1: Press the Globe icon
Continuously press and hold the globe icon to the left of the space bar to reveal the available keyboard, then choose a specific or favorite GIF from the giphy list.

Step 2: Find GIF
Find the GIF you wish to send and tap it to copy it.

Step 3: Paste GIF
Return to the conversation, paste the GIF into the text box, and press the send button.

For those who don’t know how to use the Giphy app on their iPhones or iPads, read the following instructions:
• Go to the Settings menu and pick the General icon.
•To see your keyboard options, go to the keyboard setting and tap it.
• To see the accessible keyboard, tap on the part labelled keyboard.
• Select Add a New Keyboard.
• The Giphy keyboard will undoubtedly be among the third-party keyboards.
• Once you’ve included or added the keyboard, it’ll appear in the “active keyboard” section.
• Select the Allow Full Access option.
Have you heard of Filmora before? I’m afraid not, Wondershare Filmora Video Editor is a video editing program that allows you to edit videos in various ways.
It’s exciting and amusing to make your animated GIF from any video or photo. Due to their large size, video scenes might be challenging to manage, but GIFs are perfect for profile posts and sharing with friends as simple jokes.
However, if you wish to create a GIF online, Filmora’s online meme maker is the ideal choice. You may use it to make a watermark-free photo, GIF, and video memes. It is free to use, and there is no need to register. You can change the text size, color, and position when you’re altering a caption. You can also add text to the inside or outside in a GIF.
Wondershare Filmora
Get started easily with Filmora’s powerful performance, intuitive interface, and countless effects!
Try It Free Try It Free Try It Free Learn More >

GIFs may be created from a collection of static photographs or even moving movies, and the process is effortless enough for anyone to do. We recommend Wondershare Filmora for you to complete this task quickly and easily. The rationale for this suggestion is the software tool’s user-friendly and engaging interface. You can soon mix a lot of stills into GIFs or convert small videos into GIFs with Filmora. What’s more, the Filmora platform enables easy modification of GIFs, with users able to add overlays, components, and text to their GIFs.
● Key Takeaways from This Episode →
● You must have gotten one or two tips on how to send and add Snapchat GIFs, all that is for you is to grab your phone, be it an Android or iOS, and make your chat, conversations, photos, and videos more interesting by making use of GIFs on Snapchat.
● iPhone users must ensure that the Giphy app is installed to achieve this.It is also important to note that you can create your exciting GIFs using Wondershare Filmora, and this can help you easily create an awesome GIF in no time. Get to it!!
GIFs make texting so much more fun. You can express many emotions and include entertaining animations to give your messages a human touch. Users may share and receive GIFs on most social networking networks, and Snapchat is no exception. We’ll show you how to send GIFs on Snapchat, whether you’re an Android or iOS user, in this article.
This covers instructions on how to get GIFs in Snapchat and how to transmit GIFs in chat rooms and on Snapchat Stories updates. Let’s get started.
In this article
01 [How to Send GIFs on Snapchat](#Part 1)
02 [How to Get GIFs on Snapchat Snaps and Messages?](#Part 2)
Part 1 How to Send GIFs on Snapchat
Here is a simple step guide on how to send Snapchat GIF:
Step 1: Take a photo
Start your Snapchat app as usual and snap a photo or video.
Step 2: Tap the Sticker icon
From the row on the right side of the screen, tap the Sticker icon.
To add a GIF to your photo or video, scroll down and select one. You can also use the search option to locate more particular GIFs by entering a term or phrase.
Step 3: Drag GIF
Drag the GIF you added to the screen’s desired location.
Pinch your screen to change the GIF’s size as needed.
Step 4: Save and Share
You can then share your Snap with other social networking platforms by sending it to your Stories, friends/contacts, or just saving it to your gallery.
Part 2 How to Get GIFs on Snapchat Snaps and Messages?
Getting a GIF on Snapchat can be tasking, but here is a simple guide to achieving that.
Step 1: Make use of a Gboard.
Enter the chat of the friend or person to whom you want to send the GIF and maximize or open the keyboard using the text bar.
Step 2: Select the GIF you want.
Choose a GIF from the collection or catalog that you’d want to utilize and submit it.
You can use the same snap to apply many stickers. Drag and drop it on the trashcan icon to get rid of it.
Here’s how to get Gboard on your Android device if it didn’t come with it:
• Download the Gboard from the Play Store or whichever playstore you want.
• Go to Settings> System> Languages and Input> Virtual Keyboard and select it.
• Double-check that Gboard is selected as your primary keyboard.
After that, grant any permissions it requires so that you can use it right away in Snapchat.
Now that it’s as simple as it gets, let’s send comparable GIFs utilizing iOS devices.
For iPhone/iPad:
For iPhone users, you must first download and install the giphy app on your phone. Once you have successfully set the giphy app as your default keyboard, you can send Snapchat GIFs chat by following the steps below:
Step 1: Press the Globe icon
Continuously press and hold the globe icon to the left of the space bar to reveal the available keyboard, then choose a specific or favorite GIF from the giphy list.
Step 2: Find GIF
Find the GIF you wish to send and tap it to copy it.
Step 3: Paste GIF
Return to the conversation, paste the GIF into the text box, and press the send button.
For those who don’t know how to use the Giphy app on their iPhones or iPads, read the following instructions:
• Go to the Settings menu and pick the General icon.
•To see your keyboard options, go to the keyboard setting and tap it.
• To see the accessible keyboard, tap on the part labelled keyboard.
• Select Add a New Keyboard.
• The Giphy keyboard will undoubtedly be among the third-party keyboards.
• Once you’ve included or added the keyboard, it’ll appear in the “active keyboard” section.
• Select the Allow Full Access option.
Have you heard of Filmora before? I’m afraid not, Wondershare Filmora Video Editor is a video editing program that allows you to edit videos in various ways.
It’s exciting and amusing to make your animated GIF from any video or photo. Due to their large size, video scenes might be challenging to manage, but GIFs are perfect for profile posts and sharing with friends as simple jokes.
However, if you wish to create a GIF online, Filmora’s online meme maker is the ideal choice. You may use it to make a watermark-free photo, GIF, and video memes. It is free to use, and there is no need to register. You can change the text size, color, and position when you’re altering a caption. You can also add text to the inside or outside in a GIF.
Wondershare Filmora
Get started easily with Filmora’s powerful performance, intuitive interface, and countless effects!
Try It Free Try It Free Try It Free Learn More >
GIFs may be created from a collection of static photographs or even moving movies, and the process is effortless enough for anyone to do. We recommend Wondershare Filmora for you to complete this task quickly and easily. The rationale for this suggestion is the software tool’s user-friendly and engaging interface. You can soon mix a lot of stills into GIFs or convert small videos into GIFs with Filmora. What’s more, the Filmora platform enables easy modification of GIFs, with users able to add overlays, components, and text to their GIFs.
● Key Takeaways from This Episode →
● You must have gotten one or two tips on how to send and add Snapchat GIFs, all that is for you is to grab your phone, be it an Android or iOS, and make your chat, conversations, photos, and videos more interesting by making use of GIFs on Snapchat.
● iPhone users must ensure that the Giphy app is installed to achieve this.It is also important to note that you can create your exciting GIFs using Wondershare Filmora, and this can help you easily create an awesome GIF in no time. Get to it!!
How to Get Started in Stop Motion Claymation
How to Get Started in Stop Motion Claymation
An easy yet powerful editor
Numerous effects to choose from
Detailed tutorials provided by the official channel
Stop Motion Claymation is not a new concept. It has been floating around the media industry since the 1950 and many creators have utilized it to tell their stories to the world. If you haven’t heard about claymations so far, you are not alone. Unfortunately, a wide range of the global population is unfamiliar with the concept of stop motion claymation.

But, if you are someone who wants to get into animation, but don’t have an expensive budget, claymations can be a great tool to share your story with the world and attract a global audience. In this guide, we are going to talk about claymations, some of the most popular claymation websites, and the best ways to get started with stop motion claymation. So, if you also want to explore your creative side and be unique with the approach, continue reading. By the end of this guide, you’ll be running out to buy clay and make some high-quality clay stop-motion animations.
In this article
01 [Ways to Make Stop Motion Videos with Clay Using Your Phone](#Part 1)
02 [How to Edit a Stop Motion Claymation Animation ](#Part 2)
03 [Best 5 Clay for Stop Motion and Ways to Get Started](#Part 3)
Part 1 Ways to Make Stop Motion Videos with Clay Using Your Phone
So, now that you are familiar with the basic concept of clay stop animation, let’s understand how you can get started with claymation animations. Ideally, if you are an absolute beginner, you would want to start by understanding the dynamics of creating clay models first. Whether you are going to create a animation or a simple stop motion clip, the models will play a major role in the story and it would be important that these models look appealing.
When it comes to capturing the motion, you don’t need any expensive cameras. You can easily shoot the entire motion on your phone as well. Today, even the basic smartphones come with recording features and they are enough to capture the movement of your clay models. However, if you want to keep the production quality as high as possible, make sure to invest in a decent tripod. A tripod will ensure that your stop motion claymation doesn’t feel jerky at all.
After you have crafted the clay models and purchased the tripod, the next step would be to write down a script for the animation. Whether you are creating a short video or a 3-hour long movie, a script will ensure that you don’t miss out on any important scenes while recording the animation. There are multiple script writing software you can find online that’ll speed up the entire process. However, as a beginner, you can also pen down your script in a regular MS Word document. Lack of resources should never come between your creativity.
Once the script is final, the next phase would be to record the stop motion animation claymation. This is the stage where you have to be extra careful because you’ll practically be recording the storyline of your animation. Simply fire up the smartphone’s camera and start shooting each frame one-by-one. Keep in mind that shooting a stop motion animation is pretty time-consuming and it can even take up to 5-7 hours to get the job done. So, make sure to grab your cup of coffee and stay patient throughout the process.
Part 2 How to Edit a Stop Motion Claymation Animation
At this point, you would have several hundred photographs and a script in mind to make your stop motion claymation. So, the next part would be to turn these raw images into an animation. To do this, you can use different types of video editing applications. However, we recommend using Wondershare Wondershare Filmora Video Editor for the job.
It’s a full-scale cross-platform video editing tool that’s designed to help creators showcase their creativity by turning RAW images/clips into visually engaging videos. Filmora is targeted towards a wide variety of creators such as YouTubers, social media influencers, production artists, and even animators. For an animator, Filmora is nothing short of an oasis.
The tool comes with a built-in media library where you’ll find hundreds of ready-to-use animation templates. These templates could be integrated into your video with a single click. The best part is all these templates are fully customizable, which means you can modify them to meet the overall theme of your claymation.
Filmora boasts a timeline-based interface that makes the editing process a hassle-free task, especially when you have hundreds of images to edit. You can simply bring all the images to the timeline and merge them together to make a stunning animation within a few minutes. The tool also comes with a dedicated audio editing panel where you can add the voiceover or background tracks to bring life to your stop animation claymation. If you have edited any videos in the past, you may already know that the audio is the backbone for any video, even if you are editing a stop motion animation using clay.
Here’s a quick recap of all the features that make Wondershare Filmora an ideal video editing software for stop motion claymation animation.
● Timeline based user interface for more convenient editing
● Built-in media library to find graphic, animation, and audio templates
● Export videos directly to YouTube and other social media platforms
● Available for both Windows and macOS
So, if you are also ready with your clay models and smartphone’s camera, get started with the shooting process and use Filmora to turn the RAW images to a visually enticing stop motion claymation.
Part 3 Best 5 Clay for Stop Motion and Ways to Get Started
In case you are getting serious about stop motion claymations, you would also want to understand which clays are best for such animations. To be honest, you can find dozens of clays in the market. But, not every clay is worth using in a claymation. Here are 5 of the best clays for stop motion animations you can use in your projects.
01Puppet Putty
Puppet Putty is one of the most popular clay brands that’s specifically marketed towards claymation fanatics. As compared to other available options, the Puppet Putty is comparatively softer, which means you can easily mold it into different shapes using your hands only. While the Puppet Putty works great by itself, you can also combine it with other types of clay to make your clay models more appealing.
02Van Aken
Van Aken is another popular clay brand that’s ideal for claymation animations. It’s one of the inexpensive clays and that’s the reason why many claymation fanatics use it to create clay models for their projects. One of the best features of the Van Aken clay is that it’s available in different colors, which means you can get creative with your models by mixing different color combinations. Some animators also mix Van Aken with Pupper Putty to make the characters look more stunning under the perfect lighting conditions.
03Sargent Art
Sargent Art is a brand that primarily designs clays for sculpting. However, you can also use it to create clay models for your claymations. Sargent Art’s clay has the perfect blend of Wax and Oil, which makes it quite easier for the animator to sculpt different models.
04Sculpey
Sculpey is a clay brand that designs polymer-based clays that are relatively better than the traditional ceramic mud clays. This type of clay is made up of plastic and it’s comparatively more pliable than any regular clay. And, once you have your sculpture ready, you can simply place the cay model in an oven and make it rock solid within a few minutes.
05Plastilina
Finally, Plastilina is also a great option for stop motion claymation models. You can use Plastilina to design parts of the model that need to look as natural as possible. For example, you can use Plastilina to create parts such as teeth, eyes, and tongue so that your animation characters don’t contain any distortions.
● Key Takeaways from This Episode →
● Stop motion claymation animations are a great way to create stunning animations and share your creative stories with the world.
● To get started with claymations, you’ll need the right type of clay, an editing software like Wondershare Filmora Video Editor , and a storyline.
● There are different types of clays you can use to create clay models for your animations. To make your animations look more natural, you can also mix different types of clays together. This will also allow you to create personalized color combinations for your animation projects.
Stop Motion Claymation is not a new concept. It has been floating around the media industry since the 1950 and many creators have utilized it to tell their stories to the world. If you haven’t heard about claymations so far, you are not alone. Unfortunately, a wide range of the global population is unfamiliar with the concept of stop motion claymation.
But, if you are someone who wants to get into animation, but don’t have an expensive budget, claymations can be a great tool to share your story with the world and attract a global audience. In this guide, we are going to talk about claymations, some of the most popular claymation websites, and the best ways to get started with stop motion claymation. So, if you also want to explore your creative side and be unique with the approach, continue reading. By the end of this guide, you’ll be running out to buy clay and make some high-quality clay stop-motion animations.
In this article
01 [Ways to Make Stop Motion Videos with Clay Using Your Phone](#Part 1)
02 [How to Edit a Stop Motion Claymation Animation ](#Part 2)
03 [Best 5 Clay for Stop Motion and Ways to Get Started](#Part 3)
Part 1 Ways to Make Stop Motion Videos with Clay Using Your Phone
So, now that you are familiar with the basic concept of clay stop animation, let’s understand how you can get started with claymation animations. Ideally, if you are an absolute beginner, you would want to start by understanding the dynamics of creating clay models first. Whether you are going to create a animation or a simple stop motion clip, the models will play a major role in the story and it would be important that these models look appealing.
When it comes to capturing the motion, you don’t need any expensive cameras. You can easily shoot the entire motion on your phone as well. Today, even the basic smartphones come with recording features and they are enough to capture the movement of your clay models. However, if you want to keep the production quality as high as possible, make sure to invest in a decent tripod. A tripod will ensure that your stop motion claymation doesn’t feel jerky at all.
After you have crafted the clay models and purchased the tripod, the next step would be to write down a script for the animation. Whether you are creating a short video or a 3-hour long movie, a script will ensure that you don’t miss out on any important scenes while recording the animation. There are multiple script writing software you can find online that’ll speed up the entire process. However, as a beginner, you can also pen down your script in a regular MS Word document. Lack of resources should never come between your creativity.
Once the script is final, the next phase would be to record the stop motion animation claymation. This is the stage where you have to be extra careful because you’ll practically be recording the storyline of your animation. Simply fire up the smartphone’s camera and start shooting each frame one-by-one. Keep in mind that shooting a stop motion animation is pretty time-consuming and it can even take up to 5-7 hours to get the job done. So, make sure to grab your cup of coffee and stay patient throughout the process.
Part 2 How to Edit a Stop Motion Claymation Animation
At this point, you would have several hundred photographs and a script in mind to make your stop motion claymation. So, the next part would be to turn these raw images into an animation. To do this, you can use different types of video editing applications. However, we recommend using Wondershare Wondershare Filmora Video Editor for the job.
It’s a full-scale cross-platform video editing tool that’s designed to help creators showcase their creativity by turning RAW images/clips into visually engaging videos. Filmora is targeted towards a wide variety of creators such as YouTubers, social media influencers, production artists, and even animators. For an animator, Filmora is nothing short of an oasis.
The tool comes with a built-in media library where you’ll find hundreds of ready-to-use animation templates. These templates could be integrated into your video with a single click. The best part is all these templates are fully customizable, which means you can modify them to meet the overall theme of your claymation.
Filmora boasts a timeline-based interface that makes the editing process a hassle-free task, especially when you have hundreds of images to edit. You can simply bring all the images to the timeline and merge them together to make a stunning animation within a few minutes. The tool also comes with a dedicated audio editing panel where you can add the voiceover or background tracks to bring life to your stop animation claymation. If you have edited any videos in the past, you may already know that the audio is the backbone for any video, even if you are editing a stop motion animation using clay.
Here’s a quick recap of all the features that make Wondershare Filmora an ideal video editing software for stop motion claymation animation.
● Timeline based user interface for more convenient editing
● Built-in media library to find graphic, animation, and audio templates
● Export videos directly to YouTube and other social media platforms
● Available for both Windows and macOS
So, if you are also ready with your clay models and smartphone’s camera, get started with the shooting process and use Filmora to turn the RAW images to a visually enticing stop motion claymation.
Part 3 Best 5 Clay for Stop Motion and Ways to Get Started
In case you are getting serious about stop motion claymations, you would also want to understand which clays are best for such animations. To be honest, you can find dozens of clays in the market. But, not every clay is worth using in a claymation. Here are 5 of the best clays for stop motion animations you can use in your projects.
01Puppet Putty
Puppet Putty is one of the most popular clay brands that’s specifically marketed towards claymation fanatics. As compared to other available options, the Puppet Putty is comparatively softer, which means you can easily mold it into different shapes using your hands only. While the Puppet Putty works great by itself, you can also combine it with other types of clay to make your clay models more appealing.
02Van Aken
Van Aken is another popular clay brand that’s ideal for claymation animations. It’s one of the inexpensive clays and that’s the reason why many claymation fanatics use it to create clay models for their projects. One of the best features of the Van Aken clay is that it’s available in different colors, which means you can get creative with your models by mixing different color combinations. Some animators also mix Van Aken with Pupper Putty to make the characters look more stunning under the perfect lighting conditions.
03Sargent Art
Sargent Art is a brand that primarily designs clays for sculpting. However, you can also use it to create clay models for your claymations. Sargent Art’s clay has the perfect blend of Wax and Oil, which makes it quite easier for the animator to sculpt different models.
04Sculpey
Sculpey is a clay brand that designs polymer-based clays that are relatively better than the traditional ceramic mud clays. This type of clay is made up of plastic and it’s comparatively more pliable than any regular clay. And, once you have your sculpture ready, you can simply place the cay model in an oven and make it rock solid within a few minutes.
05Plastilina
Finally, Plastilina is also a great option for stop motion claymation models. You can use Plastilina to design parts of the model that need to look as natural as possible. For example, you can use Plastilina to create parts such as teeth, eyes, and tongue so that your animation characters don’t contain any distortions.
● Key Takeaways from This Episode →
● Stop motion claymation animations are a great way to create stunning animations and share your creative stories with the world.
● To get started with claymations, you’ll need the right type of clay, an editing software like Wondershare Filmora Video Editor , and a storyline.
● There are different types of clays you can use to create clay models for your animations. To make your animations look more natural, you can also mix different types of clays together. This will also allow you to create personalized color combinations for your animation projects.
Top 10 Best and Fast Ways to Turn Image Into Gif
[Top 10] Best and Fast Ways to Turn Image into Gif
An easy yet powerful editor
Numerous effects to choose from
Detailed tutorials provided by the official channel
There are in fact ways to turn an image into GIF easily We’ll be showing off a couple of some of the easier ways below, including in-depth tutorials of some of the best methods so that you will no longer have to be troubled.
These tutorials, of course, will focus on teaching you how to create GIF from photos If that’s something you’re interested in, continue reading
In this article
01 [Why GIF?](#Part 1)
02 [How to Add an Image to a GIF?](#Part 2)
Part 1 Why GIF?
Before we move on to the tutorials, let’s do a brief account on GIF files We’ve also answered some of the more common questions regarding using a GIF image maker below for your edification
But, first: Why GIF? Well, it all comes down to what you’re looking for A lot of people use GIF files to create animated icons that they can use for their accounts. Some just genuinely want to create a GIF file that they can share with their friends and families (either for a laugh or something else) GIF files are a convenient vessel for doing this because they have a lot of flexibility and are accepted by most platforms
01Why Gif from My Images Are Blurry?
One of the biggest issues people tend to have when turning an image into GIF is that they come out of the process with a blurry end-product. No one wants that But, how are you supposed to avoid it? Well, it all depends on the tool that you’re using and your initial picture For the former, it’s best to review the upload requirements of your chosen GIF maker to get a better end result. For the latter, it’s best to pick a good, high-quality GIF creator for a better outcome
02There Are Jaggy Strokes Around Gif?
Another issue that you might suffer from while trying to create GIFs from photos is jaggy or raggedy strokes around the GIF when converted. These occur often with GIF makers that support transparency If you find these happening to you, adjust the transparency settings to get rid of the white pixel outline around your converted GIF.
Part 2 How to Add an Image to a GIF?
Now it’s finally time for the tutorials that we promised at the beginning of this article These tutorials will range from online to software solutions — so that you can get a clear idea of what you can expect from all these different GIF makers. To be more specific, we’ll be demonstrating with an online images to GIF converter, how to create animated GIF photoshop, and how to easily turn any image into GIF with the photo GIF creator, Wondershare Filmora Video Editor.
01Image to GIF: How to Turn Photos into Animated GIFs
For our first tutorial, we’re going to be demonstrating how to create GIF from photos with an online photo GIF creator More specifically, we’ll be demonstrating with Loading.IO, which is an online tool that you can use to create animated icons for your profiles or on your video content It comes with several animation options and other settings that you can use to quickly create GIFs from photos
**Step 1: Go to Loading.IO
Of course, we start off this tutorial by opening the GIF maker. In this case, since the tool is hosted online, that’s as easy as opening the link that we’ve provided below It will take you directly to the online GIF creator.
URL: https://loading.io/animation/icon/

**Step 2: Upload Photo
Once on-site, it’s time to upload the photo that you want to turn into a GIF As this is an icon creator, you should pick a photo with the proper parameters
To upload your icon for animating, select the ‘Upload’ button and browse your computer or your Google Drive for the image in question.

**Step 3: Choose animation Style
Next, choose how you want the uploaded photo to be animated Loading.IO offers a couple of animations that you can choose from Including the ‘beat’ animation, which is what we choose for our example

**Step 4: Adjust Settings
This step is technically optional, as there are default settings already prepared if you have no other specifications for your image-turned GIF. But, if you want, you can adjust certain settings for a better outcome
For example, you can speed up the animation with the ‘Speed’ slider. Or, you can increase the number of times the GIF loops by adjusting the ‘Repeat’ slider. Test out a couple of settings to get the best result

**Step 5: Download as GIF
To wrap things up, it’s time to download your finished animation Loading.IO gives several options for this. But, of course, in our case, we choose to ‘Download As: GIF’

02How to Make an Animated GIF in Photoshop [Tutorial]
For the next tutorial, we’ll be showing you how to use Photoshop to create and edit an animated GIF This process is fairly lengthy and is not recommended for beginners. But, it is a very professional method of creating an animated GIF — one that will allow you to control every step of the process (which may be exactly what you want)
**Step 1: Import Images into an Image Stack
First, starting on a new product, upload the images that you want to turn into a GIF into a photoshop ‘Image Stack’. This can be done by clicking the ‘File’ tab and selecting the ‘Scripts > Load Files into Stack…’ option
Afterward, a pop-up window will appear where you will be prompted to browse your computer for the aforementioned images Click ‘OK’ when done

**Step 2: Organize Layers
Check the ‘Layers’ panel for the images that you uploaded and organize them based on how you want them to appear for your animated GIF

**Step 3: (Optional) Import Video
If you want to work on a video to turn into a GIF instead, you can do such by selecting the ‘File’ tab and clicking on the ‘Import > Video Frames to Layers…’ option. This will get you to the same place shown in Step 2
Note: Just be careful that you do not transfer an image that is too long Photoshop may not be able to properly break it down, if so.

**Step 4: Open Timeline Then Create Frame Animation
Next, in order to start working on your animation, open the Timeline Window This can be done by clicking the ‘Window’ tab and selecting ‘Timeline’
With the ‘Timeline’ Window now open, select the ‘Create Frame Animation’ option to begin working

**Step 5: Make Frame from Layers
In order to transfer your uploaded images from the ‘Layers’ panel to your timeline, select the ‘Menu’ option on the top-right hand corner of the ‘Timeline’ window and select the ‘Make Frames From Layers’ option

**Step 6: Preview Animation and Adjust as Needed
To preview your animation, click the ‘Play’ button This is the best time to check that your frames have been organized correctly If they are not, you can adjust them by dragging and dropping them on the timeline.
OR, you can use the ‘Reverse Frames’ option if your animation has been completely flipped around

**Step 7: Create an Animation Loop
In order to be a proper looped GIF, the animation should repeat endlessly You can make sure of this by changing the ‘Repeat’ option to ‘Forever’ (as is shown in the image below).

**Step 8: Export Finished Animation to Gif
In order to finish turning your image into GIF, you’ll need to export it in the proper format This is possible by selecting the ‘File’ tab and then clicking the ‘Export > Save for Web (Legacy)…’ option
A pop-up window should appear where you can control export settings Do so in order to ensure that you have the best outcome

03How To Make an Animated GIF in Wondershare Filmora Video Editor (Fast & Easy)
For Win 7 or later (64-bit)
For macOS 10.12 or later
For our last tutorial, we’ll be showing you how to make an animated GIF with the use of Wondershare Wondershare Filmora Video Editor . Filmora is a video editor, one that is used by professionals all over to produce high-quality content And, of course, as a video editor, it works just as well as a GIF maker. One that you can use to create images into a GIF easily
**Step 1: Launch Filmora
First, download and install Filmora If you want to follow along with this demonstration, you can Wondershare offers a FREE trial where you can test out all of the software’s functions before making a commitment

Step 2: Upload Video to Turn into GIF
For this next step, we do something akin to what we did earlier with Photoshop. And that is to upload images or a video to fit into a timeline
This process is started by first uploading images, which you can do by clicking the ‘File’ tab and selecting the ‘Import Media > Import Media Files’ option

**Step 3: Drag Media to Timeline
With Filmora, the ‘Timeline’ window is already open Also, you won’t have to do anything complicated to get your media onto the said timeline. Just drag and drop it from the Media library (as is shown in the image below).

**Step 4: Edit or Adjust GIF
Before moving forward, you should take this chance to make adjustments to the media that you uploaded into your timeline There are many things that you can do at this stage so feel free to experiment
For our example, we cut down the video that we uploaded by using the ‘Trim’ option (which you can find by right-clicking on video media).

**Step 5: Export into GIF
Finally, to finish us off, we export our finished GIF This can be done by selecting the ‘Export’ tab and then clicking the ‘Create Video’ option A pop-up window will appear where you can adjust export settings

● Key Takeaways from This Episode →
● GIFs are fun and easy-to-share content It’s accepted by most platforms and can even be used to create professional, animated icons to be added to video content
● The process of turning an image into a GIF can be a bit tricky. But, don’t worry, so long as you start with high-quality media and use a reliable Photo-GIF Creator, then you should be fine
● If you’re struggling with turning your images into GIFs, check out one of the tutorials that we’ve offered We specifically chose the three GIF creators that we demonstrated to offer multiple methods that you can choose from
There are in fact ways to turn an image into GIF easily We’ll be showing off a couple of some of the easier ways below, including in-depth tutorials of some of the best methods so that you will no longer have to be troubled.
These tutorials, of course, will focus on teaching you how to create GIF from photos If that’s something you’re interested in, continue reading
In this article
01 [Why GIF?](#Part 1)
02 [How to Add an Image to a GIF?](#Part 2)
Part 1 Why GIF?
Before we move on to the tutorials, let’s do a brief account on GIF files We’ve also answered some of the more common questions regarding using a GIF image maker below for your edification
But, first: Why GIF? Well, it all comes down to what you’re looking for A lot of people use GIF files to create animated icons that they can use for their accounts. Some just genuinely want to create a GIF file that they can share with their friends and families (either for a laugh or something else) GIF files are a convenient vessel for doing this because they have a lot of flexibility and are accepted by most platforms
01Why Gif from My Images Are Blurry?
One of the biggest issues people tend to have when turning an image into GIF is that they come out of the process with a blurry end-product. No one wants that But, how are you supposed to avoid it? Well, it all depends on the tool that you’re using and your initial picture For the former, it’s best to review the upload requirements of your chosen GIF maker to get a better end result. For the latter, it’s best to pick a good, high-quality GIF creator for a better outcome
02There Are Jaggy Strokes Around Gif?
Another issue that you might suffer from while trying to create GIFs from photos is jaggy or raggedy strokes around the GIF when converted. These occur often with GIF makers that support transparency If you find these happening to you, adjust the transparency settings to get rid of the white pixel outline around your converted GIF.
Part 2 How to Add an Image to a GIF?
Now it’s finally time for the tutorials that we promised at the beginning of this article These tutorials will range from online to software solutions — so that you can get a clear idea of what you can expect from all these different GIF makers. To be more specific, we’ll be demonstrating with an online images to GIF converter, how to create animated GIF photoshop, and how to easily turn any image into GIF with the photo GIF creator, Wondershare Filmora Video Editor.
01Image to GIF: How to Turn Photos into Animated GIFs
For our first tutorial, we’re going to be demonstrating how to create GIF from photos with an online photo GIF creator More specifically, we’ll be demonstrating with Loading.IO, which is an online tool that you can use to create animated icons for your profiles or on your video content It comes with several animation options and other settings that you can use to quickly create GIFs from photos
**Step 1: Go to Loading.IO
Of course, we start off this tutorial by opening the GIF maker. In this case, since the tool is hosted online, that’s as easy as opening the link that we’ve provided below It will take you directly to the online GIF creator.
URL: https://loading.io/animation/icon/
**Step 2: Upload Photo
Once on-site, it’s time to upload the photo that you want to turn into a GIF As this is an icon creator, you should pick a photo with the proper parameters
To upload your icon for animating, select the ‘Upload’ button and browse your computer or your Google Drive for the image in question.
**Step 3: Choose animation Style
Next, choose how you want the uploaded photo to be animated Loading.IO offers a couple of animations that you can choose from Including the ‘beat’ animation, which is what we choose for our example
**Step 4: Adjust Settings
This step is technically optional, as there are default settings already prepared if you have no other specifications for your image-turned GIF. But, if you want, you can adjust certain settings for a better outcome
For example, you can speed up the animation with the ‘Speed’ slider. Or, you can increase the number of times the GIF loops by adjusting the ‘Repeat’ slider. Test out a couple of settings to get the best result
**Step 5: Download as GIF
To wrap things up, it’s time to download your finished animation Loading.IO gives several options for this. But, of course, in our case, we choose to ‘Download As: GIF’
02How to Make an Animated GIF in Photoshop [Tutorial]
For the next tutorial, we’ll be showing you how to use Photoshop to create and edit an animated GIF This process is fairly lengthy and is not recommended for beginners. But, it is a very professional method of creating an animated GIF — one that will allow you to control every step of the process (which may be exactly what you want)
**Step 1: Import Images into an Image Stack
First, starting on a new product, upload the images that you want to turn into a GIF into a photoshop ‘Image Stack’. This can be done by clicking the ‘File’ tab and selecting the ‘Scripts > Load Files into Stack…’ option
Afterward, a pop-up window will appear where you will be prompted to browse your computer for the aforementioned images Click ‘OK’ when done
**Step 2: Organize Layers
Check the ‘Layers’ panel for the images that you uploaded and organize them based on how you want them to appear for your animated GIF
**Step 3: (Optional) Import Video
If you want to work on a video to turn into a GIF instead, you can do such by selecting the ‘File’ tab and clicking on the ‘Import > Video Frames to Layers…’ option. This will get you to the same place shown in Step 2
Note: Just be careful that you do not transfer an image that is too long Photoshop may not be able to properly break it down, if so.
**Step 4: Open Timeline Then Create Frame Animation
Next, in order to start working on your animation, open the Timeline Window This can be done by clicking the ‘Window’ tab and selecting ‘Timeline’
With the ‘Timeline’ Window now open, select the ‘Create Frame Animation’ option to begin working
**Step 5: Make Frame from Layers
In order to transfer your uploaded images from the ‘Layers’ panel to your timeline, select the ‘Menu’ option on the top-right hand corner of the ‘Timeline’ window and select the ‘Make Frames From Layers’ option
**Step 6: Preview Animation and Adjust as Needed
To preview your animation, click the ‘Play’ button This is the best time to check that your frames have been organized correctly If they are not, you can adjust them by dragging and dropping them on the timeline.
OR, you can use the ‘Reverse Frames’ option if your animation has been completely flipped around
**Step 7: Create an Animation Loop
In order to be a proper looped GIF, the animation should repeat endlessly You can make sure of this by changing the ‘Repeat’ option to ‘Forever’ (as is shown in the image below).
**Step 8: Export Finished Animation to Gif
In order to finish turning your image into GIF, you’ll need to export it in the proper format This is possible by selecting the ‘File’ tab and then clicking the ‘Export > Save for Web (Legacy)…’ option
A pop-up window should appear where you can control export settings Do so in order to ensure that you have the best outcome
03How To Make an Animated GIF in Wondershare Filmora Video Editor (Fast & Easy)
For Win 7 or later (64-bit)
For macOS 10.12 or later
For our last tutorial, we’ll be showing you how to make an animated GIF with the use of Wondershare Wondershare Filmora Video Editor . Filmora is a video editor, one that is used by professionals all over to produce high-quality content And, of course, as a video editor, it works just as well as a GIF maker. One that you can use to create images into a GIF easily
**Step 1: Launch Filmora
First, download and install Filmora If you want to follow along with this demonstration, you can Wondershare offers a FREE trial where you can test out all of the software’s functions before making a commitment
Step 2: Upload Video to Turn into GIF
For this next step, we do something akin to what we did earlier with Photoshop. And that is to upload images or a video to fit into a timeline
This process is started by first uploading images, which you can do by clicking the ‘File’ tab and selecting the ‘Import Media > Import Media Files’ option
**Step 3: Drag Media to Timeline
With Filmora, the ‘Timeline’ window is already open Also, you won’t have to do anything complicated to get your media onto the said timeline. Just drag and drop it from the Media library (as is shown in the image below).
**Step 4: Edit or Adjust GIF
Before moving forward, you should take this chance to make adjustments to the media that you uploaded into your timeline There are many things that you can do at this stage so feel free to experiment
For our example, we cut down the video that we uploaded by using the ‘Trim’ option (which you can find by right-clicking on video media).
**Step 5: Export into GIF
Finally, to finish us off, we export our finished GIF This can be done by selecting the ‘Export’ tab and then clicking the ‘Create Video’ option A pop-up window will appear where you can adjust export settings
● Key Takeaways from This Episode →
● GIFs are fun and easy-to-share content It’s accepted by most platforms and can even be used to create professional, animated icons to be added to video content
● The process of turning an image into a GIF can be a bit tricky. But, don’t worry, so long as you start with high-quality media and use a reliable Photo-GIF Creator, then you should be fine
● If you’re struggling with turning your images into GIFs, check out one of the tutorials that we’ve offered We specifically chose the three GIF creators that we demonstrated to offer multiple methods that you can choose from
Best 10 Animoji Apps You Can Use to Edit Animoji
Best 10 Animoji Apps You Can Use to Edit Animoji
Shanoon Cox
Mar 27, 2024• Proven solutions
Animojis are animated emojis first developed by Apple for iOS users. Animojis are 3D avatars that can mimic and duplicate your facial expressions through the face ID camera system. They can make any conversation entertaining, convey your feelings more clearly and can be used across different social media networks. iPhones and some high-end Android phones have built-in animoji apps but this feature is not available on every device. Don’t worry if you do not have an expensive phone because there are many animoji apps for both Android and iOS.
Today, we will talk about the 10 best animoji apps to edit animoji on android and IOS. So, let’s begin!
Best 10 And Emoji Apps to Edit Animoji
Most of the smartphones today come with the facial recognition feature (also known as face ID). This means that any phone that features face ID can also be used to create and edit animoji. Thus, even if your phone does not come with a featured animoji app, you can download any one of the 10 best animoji apps down below!
Note: Some of these apps are available for Android only, while others are compatible with both Android and IOS.
- 1. Anymoji (Android)
- 2. Bitmoji (Android and iPhone)
- 3. Disney Emoji Blitz (Android and iPhone)
- 4. SuperMoji (Android and iOS)
- 5. Zepeto (Android and iOS)
- 6. Emoji Face Recorder (Android and iOS)
- 7. Mirror (Android and iPhone)
- 8. Mojipop (Android and iPhone)
- 9. Emoji Maker (Android)
- 10. Big Emoji (Android)
1.Anymoji (Android)
Anymoji is a 3D emoji, avatar, and cartoon creation and editing app. It offers an extensive library of face emoji avatars that can duplicate your facial expressions and mimic your voice. This animoji maker for Android allows you to create cool stories and posts for social media. The best part about this app is that it is free to download. Moreover, it does not require any registration or sign up. With over one million downloads on Google Play Store, anymoji has become the go-to app for 3D Avatar creation!
2.Bitmoji (Android and iPhone)
The bitmoji app is designed by Bitstrips that is acquired by Snapchat. It is one of the most popular emoji utility apps and web extensions. It allows you to create personalized emojis with a custom Avatar of yourself. You can use bitmoji to create and edit your own animated cartoons combined with a library of emotions, expressions, and stickers – all featuring YOU! The bitmoji app allows you to copy and paste your bitmojis virtually anywhere, including social media apps like Facebook, Instagram, or Snapchat.
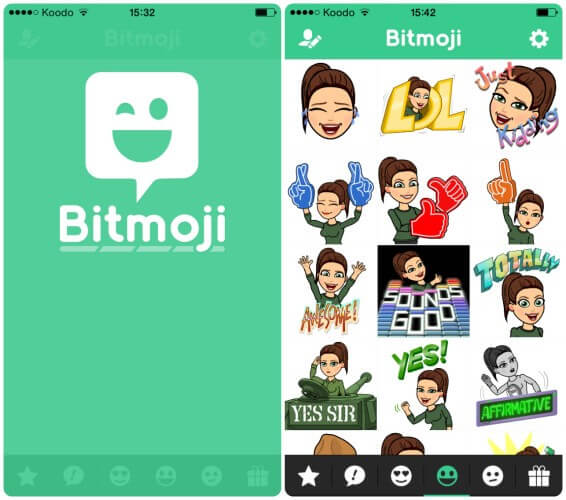
3.Disney Emoji Blitz (Android and iPhone)
Disney emoji black is an app that features hundreds of Disney Star Wars and Pixar emojis. It is not just an animoji maker but it also serves as a gaming app. You can virtually play with all your Disney characters here. From frozen Elsa to Aladdin’s genie, you can play with over 400 different Disney and Pixar characters. So, collect and chat with your favorite Disney characters through this fun emoji app!
4.SuperMoji (Android and iOS)
Supermoji is yet another popular and emoji app that allows you to create and edit funny emoticons and animojis. It supports both sound and videos and is compatible with both Android and IOS. Supermoji offers high quality animated emojis that you can control and animate with your gestures and facial expressions. 8 uses many popular animojis, including cat, alien, poop, chicken, and dog. One of the best things about this app is that it is also compatible with older devices, so even if you do not have the latest iOS or Android phone, you can still create animoji using this app.
5.Zepeto (Android and iOS)
Zepeto is created by SNOW corporation for both iOS and Android. It is a custom Avatar creation app that allows you to personalize your avatar with millions of options. From hairstyle to clothing and makeup, you can create a full custom version of yourself through this app. Zepeto reads and copies your facial expressions and creates a custom sticker for you. This app will save your animated stickers that can later be used during conversations on social media platforms. Moreover, you can also add special effects on the stickers and edit animoji whenever you want.
6.Emoji Face Recorder (Android and iOS)
Emoji face recorder is another popular and emoji app that allows you to create live avatars and selfies on your smartphone. This app includes different 3D stickers like zebra, Santa Claus, deer, octopus, panda, leopard, squirrel, etc. So, record your face and your expressions to different 3D models without any hassle now. You can share your stickers and gifs on social media apps and amuse your friends all day!
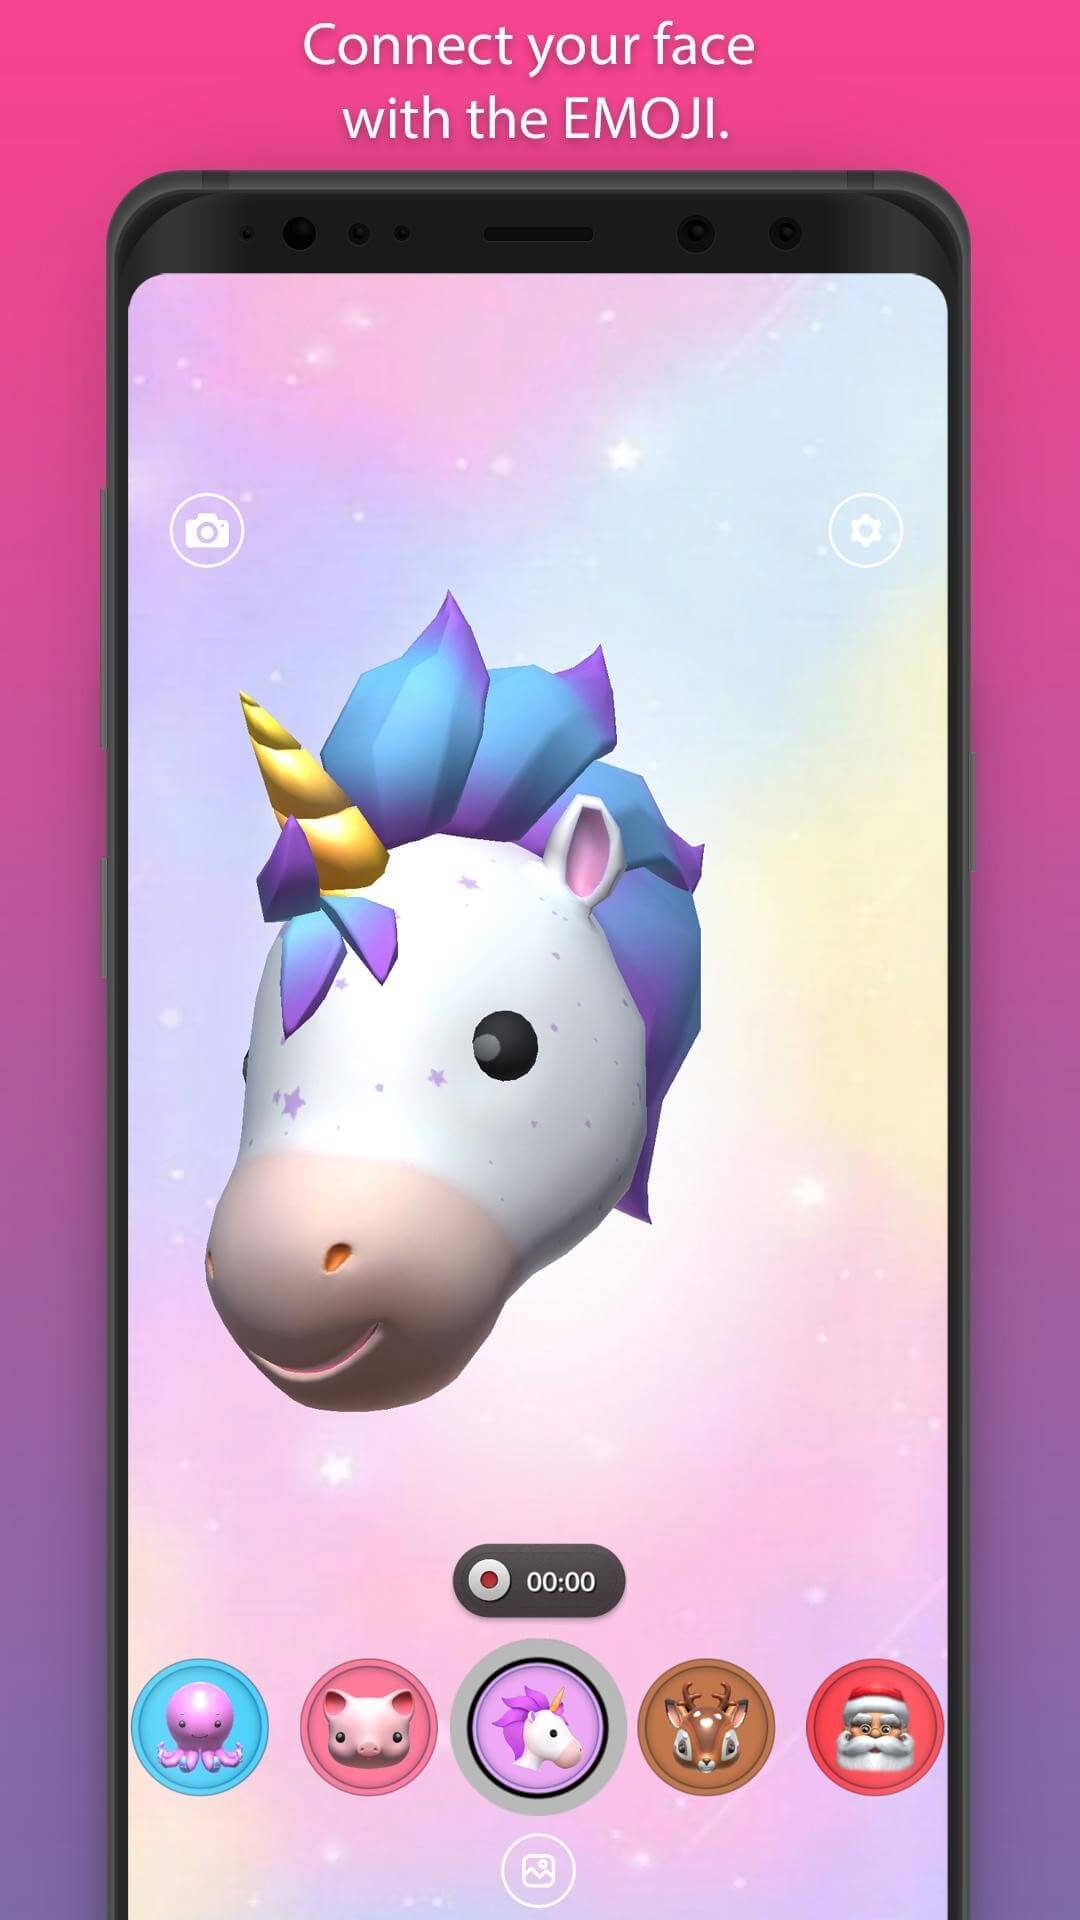
7.Mirror (Android and iPhone)
Mirror is a fun emoji maker that allows you to create funny animoji on your iPhone and iOS device. This app has more than 1500+ stickers that you can customize. Along with this, you can also use this app to create full 3D avatars of yourself with the real-time face swap option. You can share and send your personal emojis to friends and family on Messenger, WhatsApp, and Snapchat.

8.Mojipop (Android and iPhone)
Mojipop is an app that you can use to take a selfie and create your own avatars and stickers. This app has an advanced facial recognition feature, so it is very easy to create and edit animojis with Mojipop. You can share them on social media and use them in day-to-day conversations to make them more fun. It also allows you to create a personalized GIF sticker on this device.
9.Emoji Maker (Android)
Emoji maker app can create free personal and animated phone emojis. It has many popular characters like a pig, fox, cat, panda, and other animated emojis. Moreover, you can also create your avatar by customizing your face, hair, body, and more. You can choose from a wide range of moods, expressions, and animated text as well. Emoji Maker app also allows you to send and receive animated emojis on your phone. This is a very simple 3D animated Avatar and sticker making app that anyone can easily use and express themselves!
10.Big Emoji (Android)
big emoji is a 3D Avatar creator app for Android that can create your 3D avatars and animojis. This app has over 5000+ emojis and emoticons. It allows you to edit and customize emojis by changing the background, color, and other features. It is easy to use, and it is compatible with older devices as well. Like other emoji apps, Big Emoji also allows you to send and share custom emojis on social media apps like Messenger, Facebook, WhatsApp, and Snapchat.
Bonus Tip-Add Animoji to Your Video with Wondershare Filmora
Filmora from Wondershare is one of the most popular video editing tools that comes with various cool features. It is user-friendly with an intuitive interface that makes the app suitable for beginners as well.
Filmora is the number one tool for all types of video editing , whether you create YouTube vlogs, Professional Videos, or TikToks. So, no matter what the purpose, Wondershare Filmora is the best tool to test your creativity.
How to Add Animoji in Video with Wondershare Filmora?
One of the best features of Wondershare Filmora is motion tracking. You can use this feature to add and edit emojis and animojis in any video. Motion tracking allows you to track the movement of something in a video to add images, text, stickers, or emojis.
Follow these steps to add animoji/emoji in your videos using the motion tracking feature in Wondershare Filmora:
Step 1: Download and Install Filmora
First of all, download and install Wondershare Filmora on your Mac or PC from the official website.

Step 2: Launch the Wondershare Filmora
Once you install the app, launch it on the desktop, and open the app.
Step 3: Import Video
Now, click on the “Import Media Files Here” option on the welcome screen and import the video and emoji/animoji to the media library. Once the files are uploaded, they will appear on the left side of the screen in Media Tab.

Step 4: Add Emoji or Animoji to Video
Drag the video from the Media Tab and drop it onto a video track on the timeline. Now, to apply motion tracking, place the play-head at the beginning of the clip. The video tracking will start wherever the play-head.
Now, click on the icon in the timeline bar to enable the motion tracking tool. Once the tracking box appears, move it to select the object that you want to track. Now you can place the emoji or Animoji that you want to add. Go to the Media Tab and select the Animoji. Place it wherever you want to.
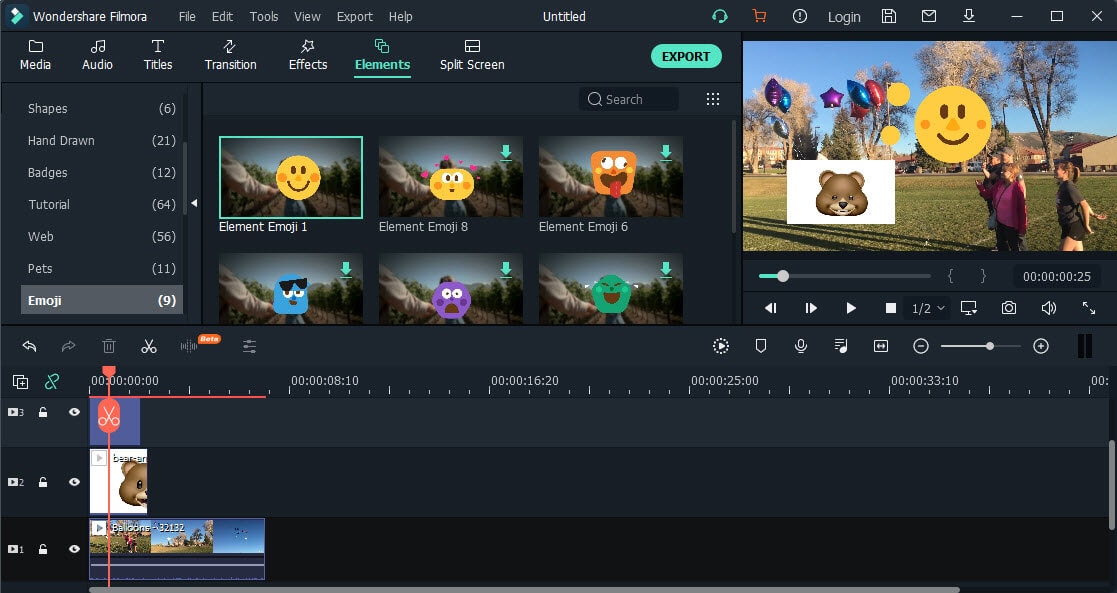
Step 5: Export Video
Click on the Export button and export your video to your computer or directly to a YouTube or Vimeo channel.
Conclusion
Modern communication is all about emojis and expressions. Nowadays, emojis and animojis have become an essential part of all our digital interactions and communications. From popular social media apps to smartphone keywords, emojis are present everywhere! If you don’t know how to create and edit animoji, use one of the 10 best animoji apps mentioned above!
Shanoon Cox
Shanoon Cox is a writer and a lover of all things video.
Follow @Shanoon Cox
Shanoon Cox
Mar 27, 2024• Proven solutions
Animojis are animated emojis first developed by Apple for iOS users. Animojis are 3D avatars that can mimic and duplicate your facial expressions through the face ID camera system. They can make any conversation entertaining, convey your feelings more clearly and can be used across different social media networks. iPhones and some high-end Android phones have built-in animoji apps but this feature is not available on every device. Don’t worry if you do not have an expensive phone because there are many animoji apps for both Android and iOS.
Today, we will talk about the 10 best animoji apps to edit animoji on android and IOS. So, let’s begin!
Best 10 And Emoji Apps to Edit Animoji
Most of the smartphones today come with the facial recognition feature (also known as face ID). This means that any phone that features face ID can also be used to create and edit animoji. Thus, even if your phone does not come with a featured animoji app, you can download any one of the 10 best animoji apps down below!
Note: Some of these apps are available for Android only, while others are compatible with both Android and IOS.
- 1. Anymoji (Android)
- 2. Bitmoji (Android and iPhone)
- 3. Disney Emoji Blitz (Android and iPhone)
- 4. SuperMoji (Android and iOS)
- 5. Zepeto (Android and iOS)
- 6. Emoji Face Recorder (Android and iOS)
- 7. Mirror (Android and iPhone)
- 8. Mojipop (Android and iPhone)
- 9. Emoji Maker (Android)
- 10. Big Emoji (Android)
1.Anymoji (Android)
Anymoji is a 3D emoji, avatar, and cartoon creation and editing app. It offers an extensive library of face emoji avatars that can duplicate your facial expressions and mimic your voice. This animoji maker for Android allows you to create cool stories and posts for social media. The best part about this app is that it is free to download. Moreover, it does not require any registration or sign up. With over one million downloads on Google Play Store, anymoji has become the go-to app for 3D Avatar creation!
2.Bitmoji (Android and iPhone)
The bitmoji app is designed by Bitstrips that is acquired by Snapchat. It is one of the most popular emoji utility apps and web extensions. It allows you to create personalized emojis with a custom Avatar of yourself. You can use bitmoji to create and edit your own animated cartoons combined with a library of emotions, expressions, and stickers – all featuring YOU! The bitmoji app allows you to copy and paste your bitmojis virtually anywhere, including social media apps like Facebook, Instagram, or Snapchat.
3.Disney Emoji Blitz (Android and iPhone)
Disney emoji black is an app that features hundreds of Disney Star Wars and Pixar emojis. It is not just an animoji maker but it also serves as a gaming app. You can virtually play with all your Disney characters here. From frozen Elsa to Aladdin’s genie, you can play with over 400 different Disney and Pixar characters. So, collect and chat with your favorite Disney characters through this fun emoji app!
4.SuperMoji (Android and iOS)
Supermoji is yet another popular and emoji app that allows you to create and edit funny emoticons and animojis. It supports both sound and videos and is compatible with both Android and IOS. Supermoji offers high quality animated emojis that you can control and animate with your gestures and facial expressions. 8 uses many popular animojis, including cat, alien, poop, chicken, and dog. One of the best things about this app is that it is also compatible with older devices, so even if you do not have the latest iOS or Android phone, you can still create animoji using this app.
5.Zepeto (Android and iOS)
Zepeto is created by SNOW corporation for both iOS and Android. It is a custom Avatar creation app that allows you to personalize your avatar with millions of options. From hairstyle to clothing and makeup, you can create a full custom version of yourself through this app. Zepeto reads and copies your facial expressions and creates a custom sticker for you. This app will save your animated stickers that can later be used during conversations on social media platforms. Moreover, you can also add special effects on the stickers and edit animoji whenever you want.
6.Emoji Face Recorder (Android and iOS)
Emoji face recorder is another popular and emoji app that allows you to create live avatars and selfies on your smartphone. This app includes different 3D stickers like zebra, Santa Claus, deer, octopus, panda, leopard, squirrel, etc. So, record your face and your expressions to different 3D models without any hassle now. You can share your stickers and gifs on social media apps and amuse your friends all day!
7.Mirror (Android and iPhone)
Mirror is a fun emoji maker that allows you to create funny animoji on your iPhone and iOS device. This app has more than 1500+ stickers that you can customize. Along with this, you can also use this app to create full 3D avatars of yourself with the real-time face swap option. You can share and send your personal emojis to friends and family on Messenger, WhatsApp, and Snapchat.
8.Mojipop (Android and iPhone)
Mojipop is an app that you can use to take a selfie and create your own avatars and stickers. This app has an advanced facial recognition feature, so it is very easy to create and edit animojis with Mojipop. You can share them on social media and use them in day-to-day conversations to make them more fun. It also allows you to create a personalized GIF sticker on this device.
9.Emoji Maker (Android)
Emoji maker app can create free personal and animated phone emojis. It has many popular characters like a pig, fox, cat, panda, and other animated emojis. Moreover, you can also create your avatar by customizing your face, hair, body, and more. You can choose from a wide range of moods, expressions, and animated text as well. Emoji Maker app also allows you to send and receive animated emojis on your phone. This is a very simple 3D animated Avatar and sticker making app that anyone can easily use and express themselves!
10.Big Emoji (Android)
big emoji is a 3D Avatar creator app for Android that can create your 3D avatars and animojis. This app has over 5000+ emojis and emoticons. It allows you to edit and customize emojis by changing the background, color, and other features. It is easy to use, and it is compatible with older devices as well. Like other emoji apps, Big Emoji also allows you to send and share custom emojis on social media apps like Messenger, Facebook, WhatsApp, and Snapchat.
Bonus Tip-Add Animoji to Your Video with Wondershare Filmora
Filmora from Wondershare is one of the most popular video editing tools that comes with various cool features. It is user-friendly with an intuitive interface that makes the app suitable for beginners as well.
Filmora is the number one tool for all types of video editing , whether you create YouTube vlogs, Professional Videos, or TikToks. So, no matter what the purpose, Wondershare Filmora is the best tool to test your creativity.
How to Add Animoji in Video with Wondershare Filmora?
One of the best features of Wondershare Filmora is motion tracking. You can use this feature to add and edit emojis and animojis in any video. Motion tracking allows you to track the movement of something in a video to add images, text, stickers, or emojis.
Follow these steps to add animoji/emoji in your videos using the motion tracking feature in Wondershare Filmora:
Step 1: Download and Install Filmora
First of all, download and install Wondershare Filmora on your Mac or PC from the official website.
Step 2: Launch the Wondershare Filmora
Once you install the app, launch it on the desktop, and open the app.
Step 3: Import Video
Now, click on the “Import Media Files Here” option on the welcome screen and import the video and emoji/animoji to the media library. Once the files are uploaded, they will appear on the left side of the screen in Media Tab.
Step 4: Add Emoji or Animoji to Video
Drag the video from the Media Tab and drop it onto a video track on the timeline. Now, to apply motion tracking, place the play-head at the beginning of the clip. The video tracking will start wherever the play-head.
Now, click on the icon in the timeline bar to enable the motion tracking tool. Once the tracking box appears, move it to select the object that you want to track. Now you can place the emoji or Animoji that you want to add. Go to the Media Tab and select the Animoji. Place it wherever you want to.
Step 5: Export Video
Click on the Export button and export your video to your computer or directly to a YouTube or Vimeo channel.
Conclusion
Modern communication is all about emojis and expressions. Nowadays, emojis and animojis have become an essential part of all our digital interactions and communications. From popular social media apps to smartphone keywords, emojis are present everywhere! If you don’t know how to create and edit animoji, use one of the 10 best animoji apps mentioned above!
Shanoon Cox
Shanoon Cox is a writer and a lover of all things video.
Follow @Shanoon Cox
Also read:
- In 2024, Top 10 Popular Cartoons You Forgot Existed
- Updated 2024 Approved 15 Best Collage Makers to Create Aesthetic Collages
- New 5 Best Adobe Animate Courses & Classes for 2024
- In 2024, The Top Free 12 GIF Meme Maker at a Glance
- Updated 2024 Approved Top 15 Greatest Claymation Movies of All Time
- Updated How to Draw A Skeleton Cartoon – A Step by Step Guide for 2024
- New In 2024, Step-by-Step Guide to Send Gif WhatsApp on Android
- Updated Uncensored Top 10 + Free Streaming Sites
- In 2024, Make Creative Animation Videos
- Updated 2024 Approved In-Depth Study of Cartoon Painting Starts From Learning to Draw It
- New Ways to Stop Animation From Looping in Unity
- How to Analyze an Editorial Cartoon Easily
- Updated How You Can Turn Yourself Into Anime Character Using Anime Filter
- 10 Popular Cartoon Characters That You Wont Want to Miss for 2024
- New 12 Aesthetic GIF Instagram for Marketers
- Before You Learn Facebook Slideshow 5 Things You Should Know
- 2024 Approved The Best 8 Places for High-Quality Royalty Free Gifs
- Updated In 2024, Best GIF Resizers to Reduce GIF Size
- New 2024 Approved Top 7 Best Animated Lyric Video Software for FREE
- Updated Tutorials for Animating Picture Online Without Learning From Scratch
- New 2024 Approved Techniques for Creating Animated Logo That Few People Know About
- New Most Effective Tactics to Set WhatsApp Status for 2024
- Updated 2024 Approved Top 10 Apps to Enhance Your Instagram Story Slideshow
- Updated In 2024, Top 10 3D Text Animation Templates
- Updated The Only Guide Youll Need to Learn About GIF Video Downloader for 2024
- New In 2024, Want to Make a Meme GIF?
- 2024 Approved How to Create Slideshow in LinkedIn
- New In 2024, A Beginners Guide to Tell You What 3D Animation Is
- New In 2024, How to Make a Photoshop Collage in Simple Steps
- Updated In 2024, How to Create Slideshow in LinkedIn
- New 2024 Approved The 15 Most Efficient Photo to Cartoon Software for Android
- Tutorial on Making Unity 2D Animation
- Updated In 2024, Christmas Is Coming! How to Find & Make Animated Christmas GIFs?
- 2024 Approved 15 Forgotten Cartoon Characters of All Time
- In 2024, The Updated Method to Bypass Vivo V30 FRP
- How to Transfer Data from Realme Narzo 60 Pro 5G to Any iOS Devices | Dr.fone
- In 2024, How to Spy on Text Messages from Computer & Realme C67 5G | Dr.fone
- How to Fix Corrupt video files of Nokia C12 Plus using Video Repair Utility?
- How to Stop Google Chrome from Tracking Your Location On Honor Magic 5 Pro? | Dr.fone
- How to Screen Mirroring Realme Note 50? | Dr.fone
- Your Account Has Been Disabled in the App Store and iTunes On iPhone 12 mini?
- In 2024, Why is iPogo not working On Gionee F3 Pro? Fixed | Dr.fone
- In 2024, How To Use Special Features - Virtual Location On Honor X50i+? | Dr.fone
- In 2024, Detailed Review of doctorSIM Unlock Service For Apple iPhone 11 Pro Max | Dr.fone
- In 2024, iPogo will be the new iSpoofer On Nokia 150 (2023)? | Dr.fone
- How to Use Phone Clone to Migrate Your Samsung Galaxy M54 5G Data? | Dr.fone
- Latest Guide How To Bypass OnePlus FRP Without Computer
- Different Methods To Unlock Your Apple iPhone 12 mini | Dr.fone
- In 2024, How to Cast Realme 10T 5G to Computer for iPhone and Android? | Dr.fone
- In 2024, How to Use Pokémon Emerald Master Ball Cheat On HTC U23 | Dr.fone
- In 2024, How to Unlock Your Apple iPhone 7 Passcode 4 Easy Methods (With or Without iTunes) | Dr.fone
- How PGSharp Save You from Ban While Spoofing Pokemon Go On Motorola Moto G34 5G? | Dr.fone
- In 2024, Why does the pokemon go battle league not available On Itel P55 | Dr.fone
- How To Pause Life360 Location Sharing For Nokia 150 (2023) | Dr.fone
- How To Pause Life360 Location Sharing For Samsung Galaxy A15 4G | Dr.fone
- 10 Free Location Spoofers to Fake GPS Location on your Nokia XR21 | Dr.fone
- Does Life360 Notify When You Log Out On Apple iPhone SE? | Dr.fone
- Title: Updated 2024 Approved Top 7 Best Free GIF Apps for Android
- Author: Elon
- Created at : 2024-05-19 03:05:33
- Updated at : 2024-05-20 03:05:33
- Link: https://animation-videos.techidaily.com/updated-2024-approved-top-7-best-free-gif-apps-for-android/
- License: This work is licensed under CC BY-NC-SA 4.0.
