

Updated 2024 Approved You Can Turn a TikTok Into a GIF Now
You Can Turn a TikTok Into a GIF Now
You Can Turn a TikTok Into a GIF Now. Here’s How
An easy yet powerful editor
Numerous effects to choose from
Detailed tutorials provided by the official channel
Want to add sharing flexibility to TikTok videos? Convert them into GIFs!
In this article
01 [What is GIF TikTok?](#Part 1)
02 [How to Make a GIF From a TikTok Video](#Part 2)
Part 1 What Is TikTok GIF?
In today’s IT enhanced lifestyle, having a profound reach on social media is the new name of popularity. Everyone out there is profusely keen on creating and sharing a plethora of content varieties; memes, videos, animations and what not, across social communities. However, TikTok videos lag behind in this race; often lack the ‘Share’ flexibility.
To match up, there are solutions to convert TikTok video into GIFs. A TikTok GIF is a short, impactful and to the point clip that’s here to share fun and exciting content in the most interesting ways. If you have a bunch of TikTok videos to share with your peers, but missing out on an effective sharing solution, you can conveniently look forward to convert those videos into catchy and interesting GIFs that will definitely hold the attention of your viewers.
Feel motivated? See through the rest of this article to know some quick and easy TikTok to GIF conversion tools and software!
Part 2 How to Make a GIF From a TikTok Video
When looking through solutions to create GIF TikTok videos, you will find a pool of methods and tools available on the internet. All you need to do is select the best one for yourself and get started with converting TikTok Videos into GIFs. Given below are some of the best solutions adhering to the aforesaid concern:
01Filmora
Wondershare Filmora Video Editor is one of the best application software to create a TikTok GIF. This is a simple and smart converter application that caters to your concern in just a few minutes. What’s best is that this app is absolutely free to use and is compatible with your PC, smartphone and a variety of other devices. Here’s how you can use Filmora to convert your TikTok videos into GIFs:

Step 1: Import Your Video
Start with importing a desired TikTok video file to the Filmora timeline. You can also ‘Drag and Drop’ the video file to the editor timeline. Using this application, you have the flexibility to import your clip in almost any video format.

Step 2: Edit Your Clip
Suited to your content preferences, you can edit and enhance your clips with a variety of effects, like, cut, trim, rotate, split, etc., and make appropriate speed adjustments. You can even include text messages to make your GIF more impactful.

Wondershare Filmora
Get started easily with Filmora’s powerful performance, intuitive interface, and countless effects!
Try It Free Try It Free Try It Free Learn More >

Step 3: Let’s Save and Share!
When you are happy, save your work using the .gif file extension. That’s it! You are ready to share your creation with your social media peers.

02TikTok’s Inbuilt GIF Converter
TikTok allows you to directly convert its videos into GIFs. You can use the TikTok application in your smartphone to take up the conversion process. All you need to do is follow the steps given below:
Step 1: Select Your TikTok Video
To get started, open the TikTok application in your smartphone and select the video you want to convert into GIF.
Step 2: Share the Video
Click the ‘Share’ icon at the right of the video screen.

Step 3: Format Selection
Scroll down to the bottom of the screen and choose the ‘Share as GIF’ option. This will automatically convert your TikTok video into GIF in a few seconds.

Step 4: Save and Export
Click on the ‘Save Image’ option to save the GIF in your phone’s gallery. You can also export your creation to different social media platforms.
03Wondershare UniConverter
This one is a handy toolbox loaded with a variety of features that allow you to play with your video creativity. Using this tool, you can quickly create GIF for TikTok and also fix the size and duration of the same. This software supports almost all video formats and comes with an inbuilt editor that you can use to add effects and make your GIFs all the more interesting. This is compatible with your Windows or MacOS PC.
Take the following steps to create GIFs from TikTok videos using this software:

Step 1: Download and Launch the Application
Download the Wondershare UniConverter application to your PC from the software’s official website.
Step 2: Open GIF Maker
In the app’s welcome screen, navigate to the ‘Toolbox’ tab and select ‘GIF Maker’ from the panel that gets displayed.
Step 3: Upload Your TikTok Video
In the next pop-up window, select ‘Video to GIF’ and click on the (+) icon in the centre. You can also click on ‘Add Files’ in the top left and choose a saved TikTok video from your PC to upload.

Step 4: Trim Your Video
Trim the uploaded video to the desired portion from where you wish to create the GIF and set adequate time frames for the same. You can even drag the video thumbnail slider to trim the video.

Step 5: Let’s Get Creating!
Set the final size and frame rate from the ‘Output Size’ and ‘Frame Rate’ tabs respectively. To save your creation, browse and choose the desired system folder by clicking on the ‘Save to:’ tab. Lastly, select ‘Create GIF’ to start the conversion process.

04Kapwing GIF Maker
There may be instances where you cannot save or share TikTok videos. To cut the rush in such cases, you can use Kapwing’s GIF Maker to convert videos from TikTok to GIF online. This one is a free video editing tool that works with almost all internet enabled smartphones and supports almost all common video formats. Here’s what you need to do for making GIFs from TikTok videos using this tool:
Step 1: Copy a Video Link
Search your desired TikTok video and click on the ‘Share’ icon. In the drop down menu, select ‘Copy Link’ to save the video link in your device memory. Once this happens, you will get a confirmation message that says, ‘Copied’.

Step 2: Open GIF Maker
Open the GIF Maker tool in your browser and paste the saved TikTok video link in the editor’s URL bar. This will automatically redirect you to the Kapwing Studio, where you have the liberty to trim, crop or split your video clip to the desired time frame. It is better to set a play span of 3-5 seconds.
You can trim the clip by dragging its ends or introduce cuts at specific points using the split button above the editor timeline. To make volume adjustments, select the video layer and click on ‘Edit Video’ and move the adjuster circle to the left or right to decrease, increase and mute the video volume.


Step 3: Download and Share Your Creation
To save your work, tap ‘Export Video’ at the top and select ‘Export as GIF’ from the drop down menu. Wait for the conversion process to finish and click ‘Download’. This will save the GIF to your device.
You will find a watermark at the corner of your clip. Click ‘Sign In to Remove the Watermark’ to remove it. A workspace for the present and later projects will be created, where you can save you work for a couple of days with Kapwing’s free version. To export your work to social media, click ‘Share’. You can even host your creation on websites. Just copy the video link and select ‘Embed’.

05TT Downloader
This one is another online tool you can use to create GIFs from TikTok videos. This is a quick converter tool that transforms TikTok videos to GIFs in 5 easy steps within minutes. It is a browser tool and does not require a software download. All you need to do is explained in the following steps:

Step 1:
Visit the official site of the tool.
Step 2:
Select ‘TikTok to GIF’ to get redirected to the TikTok to GIF Converter home page.
Step 3:
Copy and paste the desired TikTok video link in the converter’s URL bar. To proceed further, click on ‘Get Video’.

Step 4:
Trim your clip within a time frame of 1-10 seconds.
Step 5:
Click ‘Done’ to initiate the conversion process. Once it finishes, you can download the converted GIF to your device.
06MiniTool MovieMaker
You can prefer this tool to convert TikTok videos in your PC into GIFs. This tool gives you the liberty to trim, cut, reverse and rotate GIFs and even add text and filters to them. Here’s how you can use this tool to transform TikTok videos into interesting GIFs:
Step 1:
Download and install this GIF maker tool in your PC. Launch the same when you are done with the installation process.
Step 2:
In the converter window, import and add your desired TikTok clip into the converter timeline.

Step 3:
You are now free to edit and add text to your video.
Step 4:
Once you finish, tap ‘Export’ and choose your output format as GIF.
Step 5:
Hit ‘Export’ to let the conversion process begin.
● Key Takeaways from This Episode →
● TikTok videos often lack the save and share features, which is an obvious necessity of today’s social outlook.
● Varieties of online tools and software are available for converting TikTok videos to GIFs to increase the sharing flexibility.
● Filmora is a quick and intelligent choice to take up the conversion process within a catch of few clicks.
Want to add sharing flexibility to TikTok videos? Convert them into GIFs!
In this article
01 [What is GIF TikTok?](#Part 1)
02 [How to Make a GIF From a TikTok Video](#Part 2)
Part 1 What Is TikTok GIF?
In today’s IT enhanced lifestyle, having a profound reach on social media is the new name of popularity. Everyone out there is profusely keen on creating and sharing a plethora of content varieties; memes, videos, animations and what not, across social communities. However, TikTok videos lag behind in this race; often lack the ‘Share’ flexibility.
To match up, there are solutions to convert TikTok video into GIFs. A TikTok GIF is a short, impactful and to the point clip that’s here to share fun and exciting content in the most interesting ways. If you have a bunch of TikTok videos to share with your peers, but missing out on an effective sharing solution, you can conveniently look forward to convert those videos into catchy and interesting GIFs that will definitely hold the attention of your viewers.
Feel motivated? See through the rest of this article to know some quick and easy TikTok to GIF conversion tools and software!
Part 2 How to Make a GIF From a TikTok Video
When looking through solutions to create GIF TikTok videos, you will find a pool of methods and tools available on the internet. All you need to do is select the best one for yourself and get started with converting TikTok Videos into GIFs. Given below are some of the best solutions adhering to the aforesaid concern:
01Filmora
Wondershare Filmora Video Editor is one of the best application software to create a TikTok GIF. This is a simple and smart converter application that caters to your concern in just a few minutes. What’s best is that this app is absolutely free to use and is compatible with your PC, smartphone and a variety of other devices. Here’s how you can use Filmora to convert your TikTok videos into GIFs:
Step 1: Import Your Video
Start with importing a desired TikTok video file to the Filmora timeline. You can also ‘Drag and Drop’ the video file to the editor timeline. Using this application, you have the flexibility to import your clip in almost any video format.
Step 2: Edit Your Clip
Suited to your content preferences, you can edit and enhance your clips with a variety of effects, like, cut, trim, rotate, split, etc., and make appropriate speed adjustments. You can even include text messages to make your GIF more impactful.
Wondershare Filmora
Get started easily with Filmora’s powerful performance, intuitive interface, and countless effects!
Try It Free Try It Free Try It Free Learn More >
Step 3: Let’s Save and Share!
When you are happy, save your work using the .gif file extension. That’s it! You are ready to share your creation with your social media peers.
02TikTok’s Inbuilt GIF Converter
TikTok allows you to directly convert its videos into GIFs. You can use the TikTok application in your smartphone to take up the conversion process. All you need to do is follow the steps given below:
Step 1: Select Your TikTok Video
To get started, open the TikTok application in your smartphone and select the video you want to convert into GIF.
Step 2: Share the Video
Click the ‘Share’ icon at the right of the video screen.
Step 3: Format Selection
Scroll down to the bottom of the screen and choose the ‘Share as GIF’ option. This will automatically convert your TikTok video into GIF in a few seconds.
Step 4: Save and Export
Click on the ‘Save Image’ option to save the GIF in your phone’s gallery. You can also export your creation to different social media platforms.
03Wondershare UniConverter
This one is a handy toolbox loaded with a variety of features that allow you to play with your video creativity. Using this tool, you can quickly create GIF for TikTok and also fix the size and duration of the same. This software supports almost all video formats and comes with an inbuilt editor that you can use to add effects and make your GIFs all the more interesting. This is compatible with your Windows or MacOS PC.
Take the following steps to create GIFs from TikTok videos using this software:
Step 1: Download and Launch the Application
Download the Wondershare UniConverter application to your PC from the software’s official website.
Step 2: Open GIF Maker
In the app’s welcome screen, navigate to the ‘Toolbox’ tab and select ‘GIF Maker’ from the panel that gets displayed.
Step 3: Upload Your TikTok Video
In the next pop-up window, select ‘Video to GIF’ and click on the (+) icon in the centre. You can also click on ‘Add Files’ in the top left and choose a saved TikTok video from your PC to upload.
Step 4: Trim Your Video
Trim the uploaded video to the desired portion from where you wish to create the GIF and set adequate time frames for the same. You can even drag the video thumbnail slider to trim the video.
Step 5: Let’s Get Creating!
Set the final size and frame rate from the ‘Output Size’ and ‘Frame Rate’ tabs respectively. To save your creation, browse and choose the desired system folder by clicking on the ‘Save to:’ tab. Lastly, select ‘Create GIF’ to start the conversion process.
04Kapwing GIF Maker
There may be instances where you cannot save or share TikTok videos. To cut the rush in such cases, you can use Kapwing’s GIF Maker to convert videos from TikTok to GIF online. This one is a free video editing tool that works with almost all internet enabled smartphones and supports almost all common video formats. Here’s what you need to do for making GIFs from TikTok videos using this tool:
Step 1: Copy a Video Link
Search your desired TikTok video and click on the ‘Share’ icon. In the drop down menu, select ‘Copy Link’ to save the video link in your device memory. Once this happens, you will get a confirmation message that says, ‘Copied’.
Step 2: Open GIF Maker
Open the GIF Maker tool in your browser and paste the saved TikTok video link in the editor’s URL bar. This will automatically redirect you to the Kapwing Studio, where you have the liberty to trim, crop or split your video clip to the desired time frame. It is better to set a play span of 3-5 seconds.
You can trim the clip by dragging its ends or introduce cuts at specific points using the split button above the editor timeline. To make volume adjustments, select the video layer and click on ‘Edit Video’ and move the adjuster circle to the left or right to decrease, increase and mute the video volume.
Step 3: Download and Share Your Creation
To save your work, tap ‘Export Video’ at the top and select ‘Export as GIF’ from the drop down menu. Wait for the conversion process to finish and click ‘Download’. This will save the GIF to your device.
You will find a watermark at the corner of your clip. Click ‘Sign In to Remove the Watermark’ to remove it. A workspace for the present and later projects will be created, where you can save you work for a couple of days with Kapwing’s free version. To export your work to social media, click ‘Share’. You can even host your creation on websites. Just copy the video link and select ‘Embed’.
05TT Downloader
This one is another online tool you can use to create GIFs from TikTok videos. This is a quick converter tool that transforms TikTok videos to GIFs in 5 easy steps within minutes. It is a browser tool and does not require a software download. All you need to do is explained in the following steps:
Step 1:
Visit the official site of the tool.
Step 2:
Select ‘TikTok to GIF’ to get redirected to the TikTok to GIF Converter home page.
Step 3:
Copy and paste the desired TikTok video link in the converter’s URL bar. To proceed further, click on ‘Get Video’.
Step 4:
Trim your clip within a time frame of 1-10 seconds.
Step 5:
Click ‘Done’ to initiate the conversion process. Once it finishes, you can download the converted GIF to your device.
06MiniTool MovieMaker
You can prefer this tool to convert TikTok videos in your PC into GIFs. This tool gives you the liberty to trim, cut, reverse and rotate GIFs and even add text and filters to them. Here’s how you can use this tool to transform TikTok videos into interesting GIFs:
Step 1:
Download and install this GIF maker tool in your PC. Launch the same when you are done with the installation process.
Step 2:
In the converter window, import and add your desired TikTok clip into the converter timeline.
Step 3:
You are now free to edit and add text to your video.
Step 4:
Once you finish, tap ‘Export’ and choose your output format as GIF.
Step 5:
Hit ‘Export’ to let the conversion process begin.
● Key Takeaways from This Episode →
● TikTok videos often lack the save and share features, which is an obvious necessity of today’s social outlook.
● Varieties of online tools and software are available for converting TikTok videos to GIFs to increase the sharing flexibility.
● Filmora is a quick and intelligent choice to take up the conversion process within a catch of few clicks.
How to Make a Video a Live Photo 2023
How to Make a Video a Live Photo [2022]
An easy yet powerful editor
Numerous effects to choose from
Detailed tutorials provided by the official channel
Looking forward to turn your videos into live photos? Stay tuned to know how!
In this article
01 [How to Save Live Photos as a Video on iPhone/Ipad/Ipod](#Part 1)
02 [How to Turn a Video Into a Live Photo on iOS/Android](#Part 2)
Part 1 How to Save Live Photos as a Video on iPhone/Ipad/Ipod
Live photos are an amazing utility that allow you to save images as short moving snaps. Creating live photos is among the latest spunk of trendsetter stories, whether shared on social media platforms or created and saved just for fun, these definitely sound and look exciting, but that’s just one among the many things you can experiment on live photos.
Creating live photos takes you to a world of exciting features where you can explore your creativity in a number of ways, one of the easiest being turning live photos to videos. This comes handy when you need to share your live photos on platforms that do not have the compatibility to run live photos. If you are an iPhone user and wish to try your hands on experimenting with live photos, see through the following section of this article to learn how to turn live photo into video:
01Save as Video
Step 1: Launch the Photos App
In your iPhone, launch the ‘Photos’ app and navigate to ‘Albums’. All your live photos are present in the ‘Live Photos’ album.
Step 2: Format Selection
In latest versions (iOS 13v and above), you get a direct ‘Save as Video’ option in the ‘Photos’ application. Just click on that, and your live photo will be instantly saved in your iPhone gallery as a video. Here’s how you can use this feature:
● In the ‘Photos’ application, go to the ‘Live Photos’ album to select and open a desired live photo that you wish to convert to a video.
● Click on the ‘Share’ icon.

● Select ‘Save as Video’ from the drop down menu that displays sharing options.

Your created video will be saved in the ‘Photos’ application, next to the live photo you chose to turn into a video.
02iOS Shortcuts
This is a quicker way to save your live photos as videos in your iPhone. To use this feature, you first need to save the ‘Convert LivePhotos to Video’ shortcut in the ‘Shortcuts App’ gallery of your iPhone. You can do this by opening in your iOS internet browser.
Before using the above link, make sure to enable the ‘Allow Untrusted Shortcuts’ feature in your iPhone settings. You can do this as explained below:
● Reach to the ‘Settings’ application of your iPhone.
● Tap on ‘Shortcuts’ from the app’s welcome screen.
● Enable ‘Allow Untrusted Shortcuts’ with a toggle.

Having done that, here’s what you need to follow:
● Open the ‘Shortcuts’ application in your iOS device and tap the ‘Convert LivePhotos to Video’ shortcut.

● The ‘Live Photos’ album of your device opens up. Make a desired selection.

Your converted video gets automatically saved in the ‘Camera Roll’ folder of the ‘Photos’ application. Open the ‘Recents’ album to view your creation.
Part 2 How to Turn a Video Into a Live Photo on iOS/Android
Converting live photos to videos is fine, but going the other way round is all the more exciting and fun! You can even use these converted live photos as live screen wallpapers for your iOS and Android devices. If you are motivated to take up the excitement, look through the following methods to turn video into live photo:
01iOS Devices
Being an iOS user, you can choose among the following tools to convert video to live photo in your iPad, iPod or iPhone:
● Wondershare Filmora
Wondershare Filmora Video Editor is currently leading the software market among converter utilities that cater to various media conversion needs. This one is a free, smart, quick and convenient conversion tool that assures you of a hassle free video to live photo conversion in just a few clicks. What’s more interesting is, you don’t need to limit yourself with sticking to some particular video format, as Filmora conveniently supports almost all common ones.
Wondershare Filmora
Get started easily with Filmora’s powerful performance, intuitive interface, and countless effects!
Try It Free Try It Free Try It Free Learn More >
● IntoLive
This one is a third party application that allows you to convert videos into live photos, quickly and conveniently. This tool works well with devices having iOS 12.0 and later versions. All you have to do is follow the steps mentioned below:
Step 1:
Download the ‘IntoLive’ application from the Apple App Store.

Step 2:
Launch the same on your iOS device and grant the permission to access its ‘Photos’ Album.

Step 3:
In the ‘Videos’ section, choose the desired video that you wish to turn into a live photo.

Step 4:
An editor window will open up. Here, you can edit (cut, crop, trim, etc.) and add desired effects or filters to your selected video. Click on ‘Make’ at the top right when you finish the editing process.

Step 5:
If you have the paid version of the app, you can take up multiple repeats of your live photo; else you can use the free version with no repeats.

Step 6:
Once you are satisfied with the result, click on ‘Save Live Photo’. This will save your created live photo in your device’s gallery.

02VideoToLive
This is a free converter you can choose to turn video into live photo. This is a quite popular tool among iPhone users worldwide and is suitable for iOS versions 11.2 and later. You also have the liberty to share your created live photos on social media with this converter. Take the following steps to begin the conversion process:

Step 1:
Download the application from the Apple App Store and launch it on your iOS device.
Step 2:
Choose a video from your device gallery to convert it into a live photo.
Step 3:
In the video editor screen, crop the video to the preferred section that has to be converted into live photo. You can add video frames to your edited clip from the upper section of the editor screen.
Step 4:
Click on ‘Convert’ at the top right corner to initiate the conversion process.
03Android Devices
Live photos are undoubtedly known to add spark to your cherished moments, but the notch that puts these off with Android devices is that you can enjoy live photos on these devices only as live wallpapers.
Being an iPhone exclusive utility, Android devices lack the flexibility to capture live images. However, you can see them move on being set as live screen wallpapers. A handy alternative to this is converting a turn video into live photo and use it as live wallpaper. Here’s how you can take up the conversion process:
● TurnLive- Live Wallpaper
This one is a convenient, third party tool that lets you turn video into live photo in just a few quick steps. You can either use this application for free, or upgrade to the paid version to enjoy its premium features. To make amazing live photos from videos using this tool, you need to take up the steps given below:

Step 1: App Installation
To begin, visit the Google Playstore in your Android device and download the TurnLive- Live Wallpaper application. Next, you need install and launch the app in your device and accept its terms of service.
Step 2: Select a Video
Once you are done, click on the ‘Live Photo’ icon in the bottom of the app’s opening screen to reach the video selection page. Here, you need to choose ‘Video to Live Wallpaper’ option and grant the required app permissions to access your device’s camera and gallery. Select a desired video from the ones saved in your device and click ‘Done’ at the top right.
Step 3: Edit Your Video
You will now get directed to the app’s editor window, where you need to trim the selected video within a time frame of 1-5 seconds. To do this, select a cover frame within the clip and click ‘Next’. You can now use the video slider at the bottom to trim the clip. Adding suitable video effects and filters is also possible with this tool.
Step 4: It’s Almost Done!
When you finish editing, click ‘Next’ and choose the number of repeats for the created live photo. Wait for the conversion to finish and click on ‘My Wallpapers’ to view your creation.
Step 5: Download Your Live Photo!
Click ‘Download’ and tap ‘Clear’ in the app’s prompt message to remove your device’s current screen wallpaper. Next, allow the app to access your system settings. Once this finishes, tap ‘Clear’ again to download your creation. You will now get directed to a black screen tagged ‘DayTime LWP’. Click on ‘Set Wallpaper’ in this screen to make your live photo, the current wallpaper of your Android device.
● Video Live Wallpaper
This is another free app that you can use to your videos into amazing live photos in just 4 quick steps. All you need to do is explained in the following steps:
Step 1: download the Application
Download the Video Live Wallpaper application in your Android device from Google Playstore and proceed for its installation and launch.

Step 2: Select Your Video
In the app’s opening screen, click ‘Choose Video’ and grant app permissions to access your device’s media. Browse your video gallery to select a desired video that you wish to convert into a live photo.

Step 3: Edit Your Video
You will now get directed to the app’s editor screen. Here, you can explore your editing creativity to edit the selected video. Once you are happy, click the picture icon at the top right corner.

Step 4: Your Live Wallpaper is Ready!
To set the created live photo as your device screen wallpaper, select ‘Set as Wallpaper’ at the bottom right.

● Key Takeaways from This Episode →
● From cherishing moments to sharing them on social media, live photos can do it all.
● Being an iPhone exclusive utility, you need to create these from videos to enjoy them on other platforms and devices.
● Filmora is the best video to live photo converters, available as an easy, quick and convenient conversion tool.
Looking forward to turn your videos into live photos? Stay tuned to know how!
In this article
01 [How to Save Live Photos as a Video on iPhone/Ipad/Ipod](#Part 1)
02 [How to Turn a Video Into a Live Photo on iOS/Android](#Part 2)
Part 1 How to Save Live Photos as a Video on iPhone/Ipad/Ipod
Live photos are an amazing utility that allow you to save images as short moving snaps. Creating live photos is among the latest spunk of trendsetter stories, whether shared on social media platforms or created and saved just for fun, these definitely sound and look exciting, but that’s just one among the many things you can experiment on live photos.
Creating live photos takes you to a world of exciting features where you can explore your creativity in a number of ways, one of the easiest being turning live photos to videos. This comes handy when you need to share your live photos on platforms that do not have the compatibility to run live photos. If you are an iPhone user and wish to try your hands on experimenting with live photos, see through the following section of this article to learn how to turn live photo into video:
01Save as Video
Step 1: Launch the Photos App
In your iPhone, launch the ‘Photos’ app and navigate to ‘Albums’. All your live photos are present in the ‘Live Photos’ album.
Step 2: Format Selection
In latest versions (iOS 13v and above), you get a direct ‘Save as Video’ option in the ‘Photos’ application. Just click on that, and your live photo will be instantly saved in your iPhone gallery as a video. Here’s how you can use this feature:
● In the ‘Photos’ application, go to the ‘Live Photos’ album to select and open a desired live photo that you wish to convert to a video.
● Click on the ‘Share’ icon.
● Select ‘Save as Video’ from the drop down menu that displays sharing options.
Your created video will be saved in the ‘Photos’ application, next to the live photo you chose to turn into a video.
02iOS Shortcuts
This is a quicker way to save your live photos as videos in your iPhone. To use this feature, you first need to save the ‘Convert LivePhotos to Video’ shortcut in the ‘Shortcuts App’ gallery of your iPhone. You can do this by opening in your iOS internet browser.
Before using the above link, make sure to enable the ‘Allow Untrusted Shortcuts’ feature in your iPhone settings. You can do this as explained below:
● Reach to the ‘Settings’ application of your iPhone.
● Tap on ‘Shortcuts’ from the app’s welcome screen.
● Enable ‘Allow Untrusted Shortcuts’ with a toggle.
Having done that, here’s what you need to follow:
● Open the ‘Shortcuts’ application in your iOS device and tap the ‘Convert LivePhotos to Video’ shortcut.
● The ‘Live Photos’ album of your device opens up. Make a desired selection.
Your converted video gets automatically saved in the ‘Camera Roll’ folder of the ‘Photos’ application. Open the ‘Recents’ album to view your creation.
Part 2 How to Turn a Video Into a Live Photo on iOS/Android
Converting live photos to videos is fine, but going the other way round is all the more exciting and fun! You can even use these converted live photos as live screen wallpapers for your iOS and Android devices. If you are motivated to take up the excitement, look through the following methods to turn video into live photo:
01iOS Devices
Being an iOS user, you can choose among the following tools to convert video to live photo in your iPad, iPod or iPhone:
● Wondershare Filmora
Wondershare Filmora Video Editor is currently leading the software market among converter utilities that cater to various media conversion needs. This one is a free, smart, quick and convenient conversion tool that assures you of a hassle free video to live photo conversion in just a few clicks. What’s more interesting is, you don’t need to limit yourself with sticking to some particular video format, as Filmora conveniently supports almost all common ones.
Wondershare Filmora
Get started easily with Filmora’s powerful performance, intuitive interface, and countless effects!
Try It Free Try It Free Try It Free Learn More >
● IntoLive
This one is a third party application that allows you to convert videos into live photos, quickly and conveniently. This tool works well with devices having iOS 12.0 and later versions. All you have to do is follow the steps mentioned below:
Step 1:
Download the ‘IntoLive’ application from the Apple App Store.
Step 2:
Launch the same on your iOS device and grant the permission to access its ‘Photos’ Album.
Step 3:
In the ‘Videos’ section, choose the desired video that you wish to turn into a live photo.
Step 4:
An editor window will open up. Here, you can edit (cut, crop, trim, etc.) and add desired effects or filters to your selected video. Click on ‘Make’ at the top right when you finish the editing process.
Step 5:
If you have the paid version of the app, you can take up multiple repeats of your live photo; else you can use the free version with no repeats.
Step 6:
Once you are satisfied with the result, click on ‘Save Live Photo’. This will save your created live photo in your device’s gallery.
02VideoToLive
This is a free converter you can choose to turn video into live photo. This is a quite popular tool among iPhone users worldwide and is suitable for iOS versions 11.2 and later. You also have the liberty to share your created live photos on social media with this converter. Take the following steps to begin the conversion process:
Step 1:
Download the application from the Apple App Store and launch it on your iOS device.
Step 2:
Choose a video from your device gallery to convert it into a live photo.
Step 3:
In the video editor screen, crop the video to the preferred section that has to be converted into live photo. You can add video frames to your edited clip from the upper section of the editor screen.
Step 4:
Click on ‘Convert’ at the top right corner to initiate the conversion process.
03Android Devices
Live photos are undoubtedly known to add spark to your cherished moments, but the notch that puts these off with Android devices is that you can enjoy live photos on these devices only as live wallpapers.
Being an iPhone exclusive utility, Android devices lack the flexibility to capture live images. However, you can see them move on being set as live screen wallpapers. A handy alternative to this is converting a turn video into live photo and use it as live wallpaper. Here’s how you can take up the conversion process:
● TurnLive- Live Wallpaper
This one is a convenient, third party tool that lets you turn video into live photo in just a few quick steps. You can either use this application for free, or upgrade to the paid version to enjoy its premium features. To make amazing live photos from videos using this tool, you need to take up the steps given below:
Step 1: App Installation
To begin, visit the Google Playstore in your Android device and download the TurnLive- Live Wallpaper application. Next, you need install and launch the app in your device and accept its terms of service.
Step 2: Select a Video
Once you are done, click on the ‘Live Photo’ icon in the bottom of the app’s opening screen to reach the video selection page. Here, you need to choose ‘Video to Live Wallpaper’ option and grant the required app permissions to access your device’s camera and gallery. Select a desired video from the ones saved in your device and click ‘Done’ at the top right.
Step 3: Edit Your Video
You will now get directed to the app’s editor window, where you need to trim the selected video within a time frame of 1-5 seconds. To do this, select a cover frame within the clip and click ‘Next’. You can now use the video slider at the bottom to trim the clip. Adding suitable video effects and filters is also possible with this tool.
Step 4: It’s Almost Done!
When you finish editing, click ‘Next’ and choose the number of repeats for the created live photo. Wait for the conversion to finish and click on ‘My Wallpapers’ to view your creation.
Step 5: Download Your Live Photo!
Click ‘Download’ and tap ‘Clear’ in the app’s prompt message to remove your device’s current screen wallpaper. Next, allow the app to access your system settings. Once this finishes, tap ‘Clear’ again to download your creation. You will now get directed to a black screen tagged ‘DayTime LWP’. Click on ‘Set Wallpaper’ in this screen to make your live photo, the current wallpaper of your Android device.
● Video Live Wallpaper
This is another free app that you can use to your videos into amazing live photos in just 4 quick steps. All you need to do is explained in the following steps:
Step 1: download the Application
Download the Video Live Wallpaper application in your Android device from Google Playstore and proceed for its installation and launch.
Step 2: Select Your Video
In the app’s opening screen, click ‘Choose Video’ and grant app permissions to access your device’s media. Browse your video gallery to select a desired video that you wish to convert into a live photo.
Step 3: Edit Your Video
You will now get directed to the app’s editor screen. Here, you can explore your editing creativity to edit the selected video. Once you are happy, click the picture icon at the top right corner.
Step 4: Your Live Wallpaper is Ready!
To set the created live photo as your device screen wallpaper, select ‘Set as Wallpaper’ at the bottom right.
● Key Takeaways from This Episode →
● From cherishing moments to sharing them on social media, live photos can do it all.
● Being an iPhone exclusive utility, you need to create these from videos to enjoy them on other platforms and devices.
● Filmora is the best video to live photo converters, available as an easy, quick and convenient conversion tool.
Dead Simple Guide to Create New and Exciting Blackboard Animation
Dead Simple Guide to Create New and Exciting Blackboard Animation
An easy yet powerful editor
Numerous effects to choose from
Detailed tutorials provided by the official channel
Yes, it is definitely possible In fact, it couldn’t be easier. A lot of the ‘whiteboard animation’ generators also work as blackboard animation generators.
In this guide, we hope to shed some light on the subject so that everyone can have an easier time approaching the matter of creating a blackboard project on their own.
In this article
01 [Is Blackboard Animation Outdated?](#Part 1)
02 [How to Combine Modern Needs with Blackboard Animation?](#Part 2)
03 [How to Create a Blackboard Animation in ONE DAY?](#Part 3)
Part 1 Is Blackboard Animation Outdated?
Blackboard animation some may say is as outdated as the concept of ‘blackboards’ themselves. After all, nowadays, whiteboards are the standard for presenting information in a school setting — with many preferring the ease of using dry-erase markers over the more unwieldy chalk.
However, unlike the inconveniences of using an actual chalkboard, chalkboard animation is not so different from whiteboard animation In fact, it’s just given a different look. One that may be exactly what you’re looking for — especially if you’re looking to get in touch with the older generation (who would no doubt be more familiar with the concept.)

Part 2 How to Combine Modern Needs with Blackboard Animation?
But alright, so how do you make it so that your blackboard animation is just as suited for the modern generation as it is for the older generation?? Well, that’s easy really. You’ll need images Or, rather, you’ll need visuals outside of just the plain text that is usually associated with chalkboard animation.
With the right kind of visuals to go along with your informational text, you can boost the effectiveness of your chalkboard animation video and make it more palatable. Perfectly in line with the modern needs of the era.

Part 3 How to Create a Blackboard Animation in ONE DAY?
Alright, so onto actually talking about how you can go about creating a chalkboard animation video Take note, this is going to be an ‘overview’ kind of tutorial. We’ve also decided to choose a more ‘custom’ method, rather than using one of the premium blackboard animation generators (which usually require you to pay a steep price in order to gain access to a media library.)
01Step 1. Pick Your Software
The first step in creating chalkboard animation is to pick the software that you want to use This can be something more ‘animation-specific’, like After Effects. Or something more ‘video-editing-specific’ like Filmora.
Again, because this is meant to be more of a ‘general’ tutorial, we won’t be showing you exactly how to use whatever editing software you decide to use in order to create your blackboard animation videos. But, as a general kind of advice, it would be best that you pick a video editor like Wondershare Filmora Video Editor that offers a Timeline feature that will allow you to quickly put together a project

02Step 2. Create a Storyboard
Next, to make the actual blackboard animation creation process go smoother, it’s important that you create a storyboard that will outline the video that you want to create
The more detailed this storyboard is, the better Although, of course, you don’t necessarily have to draw every single frame of your chalkboard animation beforehand. Just sketch out the general idea. It will help make sure that you won’t have to rush about making all sorts of corrections in the future

03Step 3. Draw Characters
For this step, we say ‘characters’ and use the word ‘draw.’ But really, this is a very open kind of step where we encourage you to put together all media that you will need to make your project into a reality This is where the storyboard really helps. After all, with that, you have an idea of exactly what kind of characters, settings, music, audio, etc. you’ll need for each scene (if not each frame)
If you’re not the ‘drawing’ type, by the way, there are both FREE and premium media libraries that you can take advantage of to use for your project It might be difficult to find matching art styles at first. But, if you’re really particular about that, then you can always find a freelance digital artist to design with a specific style in mind

04Step 4. Put Together Project
Last of all, of course, is the process of putting everything together. Do you have your software? Great Launch it and create a new project Do you have your storyboard? That’s also great Now you have an idea where each character and setting will go
In the image below, we’re only showing the start of a potential project. We’ve only added one image to the timeline But, as you can see, with the use of Filmora, even this one image can be turned into a video

● Key Takeaways from This Episode →
● Blackboards are naturally associated with learning This makes blackboard animation videos a great method of sharing information with an audience. Whether you’re doing it to promote your services/goods or just genuinely looking to impart knowledge to another
● Some may think that blackboards are outdated — for the mere fact that blackboards themselves are considered outdated when compared to whiteboards — but that doesn’t make them any less effective at getting a message across so long as you include the right kind of visuals
● In our brief ‘overview’ tutorial, we expand on the subject of blackboard animation some more. Be warned, it’s not the kind of project you should go into if you’re not prepared for the work Longer projects, especially, will require quite a bit of elbow grease to get done.
● Still, there’s something satisfying about a well-done chalkboard animation video that will not only be a joy to create but also, hopefully, catch the attention of your audience as well.
Yes, it is definitely possible In fact, it couldn’t be easier. A lot of the ‘whiteboard animation’ generators also work as blackboard animation generators.
In this guide, we hope to shed some light on the subject so that everyone can have an easier time approaching the matter of creating a blackboard project on their own.
In this article
01 [Is Blackboard Animation Outdated?](#Part 1)
02 [How to Combine Modern Needs with Blackboard Animation?](#Part 2)
03 [How to Create a Blackboard Animation in ONE DAY?](#Part 3)
Part 1 Is Blackboard Animation Outdated?
Blackboard animation some may say is as outdated as the concept of ‘blackboards’ themselves. After all, nowadays, whiteboards are the standard for presenting information in a school setting — with many preferring the ease of using dry-erase markers over the more unwieldy chalk.
However, unlike the inconveniences of using an actual chalkboard, chalkboard animation is not so different from whiteboard animation In fact, it’s just given a different look. One that may be exactly what you’re looking for — especially if you’re looking to get in touch with the older generation (who would no doubt be more familiar with the concept.)
Part 2 How to Combine Modern Needs with Blackboard Animation?
But alright, so how do you make it so that your blackboard animation is just as suited for the modern generation as it is for the older generation?? Well, that’s easy really. You’ll need images Or, rather, you’ll need visuals outside of just the plain text that is usually associated with chalkboard animation.
With the right kind of visuals to go along with your informational text, you can boost the effectiveness of your chalkboard animation video and make it more palatable. Perfectly in line with the modern needs of the era.
Part 3 How to Create a Blackboard Animation in ONE DAY?
Alright, so onto actually talking about how you can go about creating a chalkboard animation video Take note, this is going to be an ‘overview’ kind of tutorial. We’ve also decided to choose a more ‘custom’ method, rather than using one of the premium blackboard animation generators (which usually require you to pay a steep price in order to gain access to a media library.)
01Step 1. Pick Your Software
The first step in creating chalkboard animation is to pick the software that you want to use This can be something more ‘animation-specific’, like After Effects. Or something more ‘video-editing-specific’ like Filmora.
Again, because this is meant to be more of a ‘general’ tutorial, we won’t be showing you exactly how to use whatever editing software you decide to use in order to create your blackboard animation videos. But, as a general kind of advice, it would be best that you pick a video editor like Wondershare Filmora Video Editor that offers a Timeline feature that will allow you to quickly put together a project
02Step 2. Create a Storyboard
Next, to make the actual blackboard animation creation process go smoother, it’s important that you create a storyboard that will outline the video that you want to create
The more detailed this storyboard is, the better Although, of course, you don’t necessarily have to draw every single frame of your chalkboard animation beforehand. Just sketch out the general idea. It will help make sure that you won’t have to rush about making all sorts of corrections in the future
03Step 3. Draw Characters
For this step, we say ‘characters’ and use the word ‘draw.’ But really, this is a very open kind of step where we encourage you to put together all media that you will need to make your project into a reality This is where the storyboard really helps. After all, with that, you have an idea of exactly what kind of characters, settings, music, audio, etc. you’ll need for each scene (if not each frame)
If you’re not the ‘drawing’ type, by the way, there are both FREE and premium media libraries that you can take advantage of to use for your project It might be difficult to find matching art styles at first. But, if you’re really particular about that, then you can always find a freelance digital artist to design with a specific style in mind
04Step 4. Put Together Project
Last of all, of course, is the process of putting everything together. Do you have your software? Great Launch it and create a new project Do you have your storyboard? That’s also great Now you have an idea where each character and setting will go
In the image below, we’re only showing the start of a potential project. We’ve only added one image to the timeline But, as you can see, with the use of Filmora, even this one image can be turned into a video
● Key Takeaways from This Episode →
● Blackboards are naturally associated with learning This makes blackboard animation videos a great method of sharing information with an audience. Whether you’re doing it to promote your services/goods or just genuinely looking to impart knowledge to another
● Some may think that blackboards are outdated — for the mere fact that blackboards themselves are considered outdated when compared to whiteboards — but that doesn’t make them any less effective at getting a message across so long as you include the right kind of visuals
● In our brief ‘overview’ tutorial, we expand on the subject of blackboard animation some more. Be warned, it’s not the kind of project you should go into if you’re not prepared for the work Longer projects, especially, will require quite a bit of elbow grease to get done.
● Still, there’s something satisfying about a well-done chalkboard animation video that will not only be a joy to create but also, hopefully, catch the attention of your audience as well.
Step-by-Step Guide to Send Gif WhatsApp on Android
Step-by-step Guide to Send Gif WhatsApp on Android
An easy yet powerful editor
Numerous effects to choose from
Detailed tutorials provided by the official channel
While chatting with your friends and dear ones on WhatsApp, you can not only send videos and images but also some GIFs. The GIF files will convey your mood and feelings using short animations.
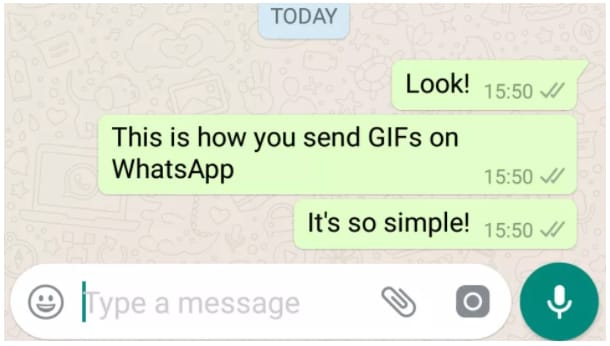
On your Android device, these files can be either selected from the collection available at WhatsApp or can be imported from Giphy. Additionally, you can also create your own customized WhatsApp GIFs Android using images or videos.
In this article
01 [How to send WhatsApp GIF on Android](#Part 1)
02 [How to create a custom GIF on WhatsApp Android](#Part 2)
03 [Create professional-looking GIF using Wondershare Filmora](#Part 3)
Part 1 How to send WhatsApp GIF on Android
To send GIFs to your contacts in WhatsApp it is important to ensure that you have the latest version of the messaging app installed on your phone. There is an integrated library of GIFs on your Android phone from where you can search like tom and jerry gif stickers for WhatsApp, peach and Goma gif for WhatsApp, and more.
Step 1.Launch WhatsApp on your Android device and open any conversation to which you wish to send a GIF.
Step 2.Click on the Emoji icon at the bottom left corner of the chat window.
Step 3.At the bottom middle of the screen, click on the GIF button and the list of options available at the integrated library will appear on the screen. You can even search for the desired GIF by entering the keyword at the search icon.
Step 4.Next, tap on the selected GIF to preview it. You can also add a message using Add a caption… button
Step 5.Finally, click on the green Send button (white paper plane icon) at the bottom-right corner. The GIF will be sent to your conversation.
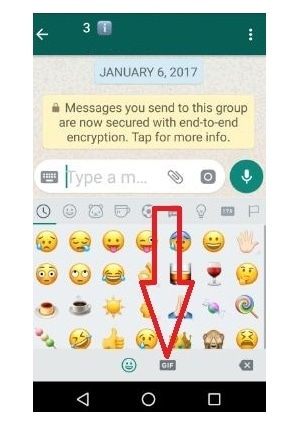
Part 2 How to create a custom GIF on WhatsApp Android
WhatsApp allows you to create a customized GIF using images and videos on your Android phone. The steps for the same are as follows
Step 1.Open the WhatsApp chat to whom you wish to send the customized GIF.
Step 2.At the bottom of the screen, click the camera icon. Either choose to record a desired video or import from the phone gallery to create a GIF.
Step 3.Once the video is added, trim it using the slider at the top. (To create a GIF, the video cannot be more than 5 seconds). You can even add a text message using Add a caption. option at the bottom of the screen.
Step 4.Next, click on the GIF button under the slider and then click on the send button at the bottom-right corner.
GIF created using the video will be sent to your contact.
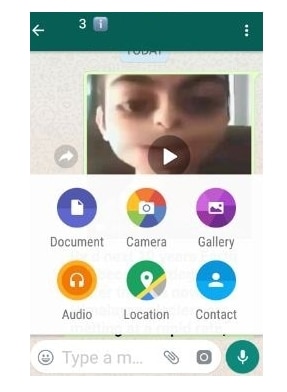
Part 3 Create professional-looking GIF using Wondershare Filmora Video Editor
Though WhatsApp allows creating GIFs using videos and images, the options for customizations are not there. So, to facilitate you creating professional-looking GIFs in no time, we suggest using Wondershare Filmora. Images and videos can be added to this versatile Windows and Mac-based tool for creating artistic animations. There are multiple options for customizing the file like adding elements, sound, text, and more.
Wondershare Filmora
Get started easily with Filmora’s powerful performance, intuitive interface, and countless effects!
Try It Free Try It Free Try It Free Learn More >
You can also speed up, slow down, rotate, crop, and perform other editing tasks. The software allows adding media files in all widely used formats like MO4, MOV, MKV, and more. The software has a user-friendly interface that makes it apt for users even without any prior experience in creating animations.
Steps to create a customized GIF WhstaApp Android using Wondershare Filmora
Step 1.Download, install and open the Wondershare Filmora software on your system. Browse and import the videos and images from your system from which you wish to create a GIF.
Step 2.After the files are added, drag and drop them to the timeline of the software at the bottom.
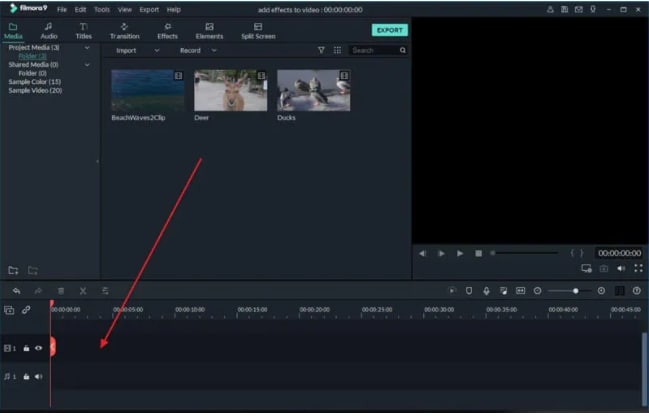
Step 3.Next comes the editing. Using multiple editing functions of the software you can rotate, crop, speed up, slow down, and perform a wide range of tasks as needed.
Step 4.You can even add the text messages to your animations and also choose the font and other parameters of the text.

Step 5.Once all the selections and editing are done, choose GIF at the Local tab to save your created media file as GIF. Finally, click on the EXPORT button to start processing and saving the file as GIF.
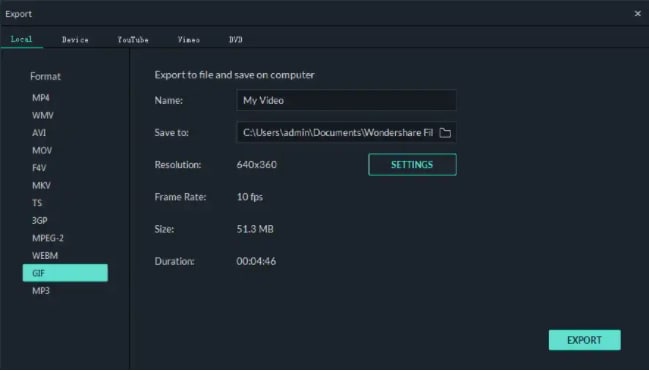
The created GIF can now be used for WhatsApp chat, social media sites, and other online sites.
● Key Takeaways from This Episode →
●GIF animations can be added to WhatsApp chats on your Android phone using an integrated library or GIPHY.
●WhatsApp also allows creating GIFs using videos and images on your device or by recording one.
●To create a professional and appealing GIF, Wondershare Filmora is the best tool. The software can also be used for several other video editing tasks.
While chatting with your friends and dear ones on WhatsApp, you can not only send videos and images but also some GIFs. The GIF files will convey your mood and feelings using short animations.
On your Android device, these files can be either selected from the collection available at WhatsApp or can be imported from Giphy. Additionally, you can also create your own customized WhatsApp GIFs Android using images or videos.
In this article
01 [How to send WhatsApp GIF on Android](#Part 1)
02 [How to create a custom GIF on WhatsApp Android](#Part 2)
03 [Create professional-looking GIF using Wondershare Filmora](#Part 3)
Part 1 How to send WhatsApp GIF on Android
To send GIFs to your contacts in WhatsApp it is important to ensure that you have the latest version of the messaging app installed on your phone. There is an integrated library of GIFs on your Android phone from where you can search like tom and jerry gif stickers for WhatsApp, peach and Goma gif for WhatsApp, and more.
Step 1.Launch WhatsApp on your Android device and open any conversation to which you wish to send a GIF.
Step 2.Click on the Emoji icon at the bottom left corner of the chat window.
Step 3.At the bottom middle of the screen, click on the GIF button and the list of options available at the integrated library will appear on the screen. You can even search for the desired GIF by entering the keyword at the search icon.
Step 4.Next, tap on the selected GIF to preview it. You can also add a message using Add a caption… button
Step 5.Finally, click on the green Send button (white paper plane icon) at the bottom-right corner. The GIF will be sent to your conversation.
Part 2 How to create a custom GIF on WhatsApp Android
WhatsApp allows you to create a customized GIF using images and videos on your Android phone. The steps for the same are as follows
Step 1.Open the WhatsApp chat to whom you wish to send the customized GIF.
Step 2.At the bottom of the screen, click the camera icon. Either choose to record a desired video or import from the phone gallery to create a GIF.
Step 3.Once the video is added, trim it using the slider at the top. (To create a GIF, the video cannot be more than 5 seconds). You can even add a text message using Add a caption. option at the bottom of the screen.
Step 4.Next, click on the GIF button under the slider and then click on the send button at the bottom-right corner.
GIF created using the video will be sent to your contact.
Part 3 Create professional-looking GIF using Wondershare Filmora Video Editor
Though WhatsApp allows creating GIFs using videos and images, the options for customizations are not there. So, to facilitate you creating professional-looking GIFs in no time, we suggest using Wondershare Filmora. Images and videos can be added to this versatile Windows and Mac-based tool for creating artistic animations. There are multiple options for customizing the file like adding elements, sound, text, and more.
Wondershare Filmora
Get started easily with Filmora’s powerful performance, intuitive interface, and countless effects!
Try It Free Try It Free Try It Free Learn More >
You can also speed up, slow down, rotate, crop, and perform other editing tasks. The software allows adding media files in all widely used formats like MO4, MOV, MKV, and more. The software has a user-friendly interface that makes it apt for users even without any prior experience in creating animations.
Steps to create a customized GIF WhstaApp Android using Wondershare Filmora
Step 1.Download, install and open the Wondershare Filmora software on your system. Browse and import the videos and images from your system from which you wish to create a GIF.
Step 2.After the files are added, drag and drop them to the timeline of the software at the bottom.
Step 3.Next comes the editing. Using multiple editing functions of the software you can rotate, crop, speed up, slow down, and perform a wide range of tasks as needed.
Step 4.You can even add the text messages to your animations and also choose the font and other parameters of the text.
Step 5.Once all the selections and editing are done, choose GIF at the Local tab to save your created media file as GIF. Finally, click on the EXPORT button to start processing and saving the file as GIF.
The created GIF can now be used for WhatsApp chat, social media sites, and other online sites.
● Key Takeaways from This Episode →
●GIF animations can be added to WhatsApp chats on your Android phone using an integrated library or GIPHY.
●WhatsApp also allows creating GIFs using videos and images on your device or by recording one.
●To create a professional and appealing GIF, Wondershare Filmora is the best tool. The software can also be used for several other video editing tasks.
6 Types of Animation You May Like
6 Types of Animation You May Like

Shanoon Cox
Mar 27, 2024• Proven solutions
Playing around with different types of animation can be a great deal of fun and can help you decide which style is most suited to your skills and preferences. There are many computer animation software to help you experiment with, with new forms emerging all the time.
Read on to learn more about some of the most popular types of animated videos around and the steps you need to take to produce them. We will also tell you which software you need to create videos in all sorts of different styles. Let’s begin and look at six different types of animation you might like right now.
You may also like: 10 Classical Animated Cartoon Types With Examples
The list of 6 types of animation
1. Traditional animation
As you would expect, this type of animation is the kind of old classic animation drawn on paper. The characters, backgrounds and layout were normally committed to paper by hand, with each drawing being slightly different from its predecessor. The papers were placed on sheets called cels before paint was added to them. Advancements in technology mean animation can be hand-drawn before color is added via software.
Synfig Studio is a popular product for those wishing to produce videos that are traditional in look and feel. It supports a variety of layers and offers a bone system as well as sound support.
2. 2D animation
With 2D animation, movement is created in a two-dimensional environment. Characters and figures can move up, down, left or right but won’t move nearer or further away from the viewer. Many 2D animated video software can be used to make this kind of video. Pencil 2D is a leading solution noted for its simplicity and ease of use.
This type of animation is ideal for animating on the move and runs on various operating platforms. What’s also great about Pencil 2D is that it allows you to switch between raster and vector workflows quickly and is completely free to use, even if you need it for commercial purposes.
3. 3D animation
With 3D animation, you can represent real-world 3D images in a digital space. The main three processes of 3D are modeling, layout and animation plus rendering. There are many reliable solutions for 3D animation on the market, with Autodesk 3DS Max being a market leader.
This product offers simple, robust modeling, allowing you to create a wide range of environments with richly-detailed characters and enjoy high-end rendering. It is used for producing games, product design, architecture and more.
4. Clay animation
Clay animation is also called claymation and has been around for many years. In clay animation, clay pieces are used to create characters and background animation. The pieces are moved or deformed between frames so continuous motion can occur.
One leading solution for clay animation is Adobe Animate CC. With this product, you can create vector animations for apps, games, videos and more. You can publish the results quickly and can animate pretty much anything, allowing your characters to walk, talk, blink and more with ease.
It’s also possible to create illusions of depths via the enhanced camera tool, and new features are being added all the time.
5. HTML animation
HMTL5 allows you to do all sorts of things including elements of video and animation creation. You can create excellent animated content via a fusion of HTML5, JavaScript and CSS3. HTML5 is essentially the language of today’s most exciting websites and is used to add vast beauty and efficiency to them.
HTML5 Maker is a free solution ideal for beginners and pros that supports various leading text filters and offers a diverse library of images. You can use this tool to produce elegant animations with stunning transitions and create gorgeous Instagram-esque effects.
6. Kinetic Typography Animation
Typography animation as another type of animation enables you to do all sorts of exciting and thought-provoking things with letters and fonts. Kinetic typography is based on the concept of moving text and is often used for advertising purposes and to deliver important information including statistics and more.
Videos involving kinetic typography animation can help you demand the attention of your audience. One very popular tool for creating kinetic typography animation is Renderforest.
This solution is ideal even for those without vast technical expertise and helps you create animations, music visualizations, slideshows and much more in mere moments. Trailers, YouTube openings, logo animations are frequently created with the tool, as are explainer animations and whiteboard videos, to give you just a few more examples.
Conclusion
Once you have found the types of animated videos and tools that appeal to you the most and have created your content, you can put magical finishing touches to your videos by using Filmora.
You may be amazed to see how quickly you can get to grips with these different styles and tools even if your experience is relatively limited, so why wait any longer to start experimenting? More and more people are surpassing their expectations all the time by playing around with different resources for online animation.
Shanoon Cox
Shanoon Cox is a writer and a lover of all things video.
Follow @Shanoon Cox
Shanoon Cox
Mar 27, 2024• Proven solutions
Playing around with different types of animation can be a great deal of fun and can help you decide which style is most suited to your skills and preferences. There are many computer animation software to help you experiment with, with new forms emerging all the time.
Read on to learn more about some of the most popular types of animated videos around and the steps you need to take to produce them. We will also tell you which software you need to create videos in all sorts of different styles. Let’s begin and look at six different types of animation you might like right now.
You may also like: 10 Classical Animated Cartoon Types With Examples
The list of 6 types of animation
1. Traditional animation
As you would expect, this type of animation is the kind of old classic animation drawn on paper. The characters, backgrounds and layout were normally committed to paper by hand, with each drawing being slightly different from its predecessor. The papers were placed on sheets called cels before paint was added to them. Advancements in technology mean animation can be hand-drawn before color is added via software.
Synfig Studio is a popular product for those wishing to produce videos that are traditional in look and feel. It supports a variety of layers and offers a bone system as well as sound support.
2. 2D animation
With 2D animation, movement is created in a two-dimensional environment. Characters and figures can move up, down, left or right but won’t move nearer or further away from the viewer. Many 2D animated video software can be used to make this kind of video. Pencil 2D is a leading solution noted for its simplicity and ease of use.
This type of animation is ideal for animating on the move and runs on various operating platforms. What’s also great about Pencil 2D is that it allows you to switch between raster and vector workflows quickly and is completely free to use, even if you need it for commercial purposes.
3. 3D animation
With 3D animation, you can represent real-world 3D images in a digital space. The main three processes of 3D are modeling, layout and animation plus rendering. There are many reliable solutions for 3D animation on the market, with Autodesk 3DS Max being a market leader.
This product offers simple, robust modeling, allowing you to create a wide range of environments with richly-detailed characters and enjoy high-end rendering. It is used for producing games, product design, architecture and more.
4. Clay animation
Clay animation is also called claymation and has been around for many years. In clay animation, clay pieces are used to create characters and background animation. The pieces are moved or deformed between frames so continuous motion can occur.
One leading solution for clay animation is Adobe Animate CC. With this product, you can create vector animations for apps, games, videos and more. You can publish the results quickly and can animate pretty much anything, allowing your characters to walk, talk, blink and more with ease.
It’s also possible to create illusions of depths via the enhanced camera tool, and new features are being added all the time.
5. HTML animation
HMTL5 allows you to do all sorts of things including elements of video and animation creation. You can create excellent animated content via a fusion of HTML5, JavaScript and CSS3. HTML5 is essentially the language of today’s most exciting websites and is used to add vast beauty and efficiency to them.
HTML5 Maker is a free solution ideal for beginners and pros that supports various leading text filters and offers a diverse library of images. You can use this tool to produce elegant animations with stunning transitions and create gorgeous Instagram-esque effects.
6. Kinetic Typography Animation
Typography animation as another type of animation enables you to do all sorts of exciting and thought-provoking things with letters and fonts. Kinetic typography is based on the concept of moving text and is often used for advertising purposes and to deliver important information including statistics and more.
Videos involving kinetic typography animation can help you demand the attention of your audience. One very popular tool for creating kinetic typography animation is Renderforest.
This solution is ideal even for those without vast technical expertise and helps you create animations, music visualizations, slideshows and much more in mere moments. Trailers, YouTube openings, logo animations are frequently created with the tool, as are explainer animations and whiteboard videos, to give you just a few more examples.
Conclusion
Once you have found the types of animated videos and tools that appeal to you the most and have created your content, you can put magical finishing touches to your videos by using Filmora.
You may be amazed to see how quickly you can get to grips with these different styles and tools even if your experience is relatively limited, so why wait any longer to start experimenting? More and more people are surpassing their expectations all the time by playing around with different resources for online animation.
Shanoon Cox
Shanoon Cox is a writer and a lover of all things video.
Follow @Shanoon Cox
20 Best Anime Movies You Cannot Miss [2024 List]
20 Best Anime Movies You Cannot Miss [2024 Update]
Shanoon Cox
Mar 27, 2024• Proven solutions
Most anime movies are originally produced in Japan, but their popularity spans worldwide. Anime movie has made it to the most-liked genre list and is widely viewed by people of all ages, gender, and nationalities. An anime movie is mostly based on science fiction, fantasy, or supernatural creatures. These movies feature extraordinary graphics and highly engaging plots that attract viewers.
Choosing the best anime movie can be hard as there are countless such movies. But, if you are looking for a must-watch anime movie, read ahead for our ultimate list of top anime movies.
- 20 Best Anime Movies You Can Watch Online
- Bonus Tip-Record Anime Movie with Wondershare Filmora for an Anime Explanation
20 Best Anime Movies You Can Watch Online
Below we have listed the anime movie we consider to be the best amongst the hundreds and thousands of others.
| Top Anime Movies | Genre | Director | Release Time |
|---|---|---|---|
| Spirited Away | Drama, Fantasy | Hayao Miyazaki | 2001 |
| Princess Mononoke | Fantasy | Hayao Miyazaki | 1997 |
| Howl’s Moving Castle | Fantasy | Hayao Miyazaki | 2004 |
| Ghost in the Shell | Science Fiction, Crime | Mamoru Oshii | 1995 |
| Psycho-Pass | Action, Sci-fi | Naoyoshi Shiotani | 2012 |
| Your Name | Sci-fi, Drama | Makoto Shinkai | 2016 |
| A Silent Voice | Drama | Naoko Yamada | 2016 |
| Akira | Cyberpunk, Sci-fi, Action | Katsuhiro Ôtomo | 1988 |
| Weathering with You | Fantasy, Drama | Makoto Shinkao | 2019 |
| Grave of the Fireflies | War, Drama | Isao Takahat | 1988 |
| Perfect Blue | Thriller, Drama | Satoshi Kon | 1977 |
| The Girl Who Leapt Through Time | Fantasy, Romance | Mamuro Hosoda | 2006 |
| My Hero Academia: Heroes Rising | Sci-fi | Kenji Nagasaki | 2019 |
| Wolf Children | Fantasy, Drama | Mamoru Hosoda | 2012 |
| Your Lie in April | Musical, Romance | Takehiko Shinjo | 2015 |
| I Want to Eat Your Pancreas | Romance, Drama | Shin’ichirō Ushijima | 2018 |
| Whisper of the Heart | Romance | Yoshifumi Kondo | 1995 |
| One Piece: Stampede | Action, Adventure | Takashi Otsuka | 2019 |
| Death Note | Crime, Action, Thriller | Tetsuro Araki | 2006 |
| Dragon Ball Super: Broly | Adventure, Fantasy | Tatsuya Nagamine | 2018 |
1. Spirited Away
Release Time: 2001
Genre: Drama, Fantasy
Director: Hayao Miyazaki
The masterpiece created in the anime movie industry is certainly ‘Spirited Away.’ It is a very gripping story of a 10-year old girl who accidentally wanders into a mysterious land with her parents who are transformed into pigs as a witch curse. The girl, Chihiro, starts working for the witch Yubaba, who takes away her original name, changing it to Sen. The main character Haku saves Chihiro from trouble, and they become acquainted. You can watch a free anime movie like this one and be taken to the world of Sen as she tries to keep her real name alive and portrays an extraordinary character of a happy spirit.
2. Princess Mononoke
Release Time: 1997
Genre: Fantasy
Director: Hayao Miyazaki
Princess Mononoke is classified as the best anime movie of all time. This anime movie was aired years ago and is based on a much ancient Muromachi period. The fantasy movie revolves around the life of the main characters. One is a clan’s prince, Ashitaka, And the other is a young girl, San, who lives in the woods and was raised by the wolves. As the fantasy unfolds, Ashitaka can be seen struggling to strike an understanding between humans and nature so that he and San may live together. It is widely viewed and loved globally owing to the hyper-realistically attractive plot of the anime movie.
3. Howl’s Moving Castle
Release Time: 2004
Genre: Fantasy
Director: Hayao Miyazaki
Another impressive anime movie by the master filmmaker Hayao Miyazaki is Howl’s Moving Castle. You can watch this free anime movie that is originally based on the British novel. As a young and beautiful girl is reviled by a witch and turned into a 90-year old woman, she discovers a magic castle and a handsome wizard. The powerful wizard might be the chance to her freedom and youth again. The highly gripping plot of this anime movie that takes viewers on a journey through fantasyland is the basis for its worldwide popularity.
4. Ghost in the Shell
Release Time: 1995
Genre: Science Fiction, Crime
Director: Mamoru Oshii
Ghost in the Shell is a pioneer anime movie based on the Manga by Masamune Shiro. It was released decades ago, but it shows life in 2030. As the anime movie features a world where technology is highly advanced, a cyborg policewoman is seen fighting crime using her extraordinary powers. The main characters, such as Major Motoko Kusanagi and the members of Public Security Section 9, are also seen preventing crime in this evolved era. This action-packed anime movie is well-loved by fans as it displays striking graphics and thrilling action scenes.
5. Psycho-Pass
Release Time: 2012
Genre: Action, Sci-fi
Director: Naoyoshi Shiotani
Psycho-Pass is a free anime movie streaming worldwide and building fans owing to its storyline. As the name suggests, this anime movie introduces an innovative judgment system known as Sibyl System. People are analyzed and given a psycho pass after assessing their criminal intent. But, the climax is introduced as a new police recruit Akane Tsunemori starts questioning the authorities. As she discovers what is actually right and wrong, the anime builds suspense in this dystopian-themed anime movie.
6. Your Name
Release Time: 2016
Genre: Sci-fi, drama
Director: Makoto Shinkai
The best anime movie released recently is ‘Your Name.’ It features a strange phenomenon that leads to the swapping of the lives of two individuals. The boy residing in Metropolitan Tokyo, Taki Tachibana, and a rural Japanese girl Mitusha Miyamizu are on a path to find whose body they are inhabiting. This anime movie simultaneously features two different lives as they try to discover each other. It unfolds quite spectacularly while being emotional and humorous at the same time.
7. A Silent Voice
Release Time: 2016
Genre: Drama
Director: Naoko Yamada
An emotionally exceptional anime movie, A Silent Voice, is also based on the Manga series. It brings to light the social issues mostly faced by teenagers and school-going teens. The story unfurls as a deaf girl, Shoka, is continuously harassed and bullied by Shoya, her classmate. But, the anime movie is highly appraised as it takes a positive turn when the harasser realizes his mistake and sets out to make amends. You can watch this free anime movie which is incredibly moving and raises sensitive issues like suicide, bullying, parental divorce, etc.
8. Akira
Release Time: 1988
Genre: Cyberpunk, Sci-fi, Action
Director: Katsuhiro Ôtomo
Yet another amazing anime movie based on a best-selling manga series is Manga. It is based in Neo-Tokyo, which is collapsing due to World War 3. The twist comes when the Biker gang Bosozoku member Tetsuo Shima is involved in an accident, and the military experiments on him, resulting in a murderous being with supernatural powers. This story also features the gang leader Shotaro Kaneda, who, alongside Tetsuo, gets involved in a conspiracy involving a guy named Akira. This free anime movie is renowned due to the high-end animations and remarkable visuals. This adds to the reasons why you should definitely watch anime movie like this one.
9. Weathering with You
Release Time: 2019
Genre: Fantasy, drama
Director: Makoto Shinkao
Makoto Shinkao again takes the lead by directing an outstanding anime movie that has become one of the most viewed anime movies recently. An islander boy Hodaka leaves his home for the bustling life of the Metropolitan city of Tokyo. There, he runs into a young girl, Hina, who lives all by herself. Soon, he discovers that Hina holds power to bend the weather to her will. And she uses that power to bring sunshine into people’s lives on their significant days such as weddings, etc. Both Hina and Hodaka become close and explore her powers in secret together until evil pops up and the movie plunges into a moving climax. The suspense of this anime movie has been keeping the viewers glued to the screens.
10. Grave of the Fireflies
Release Time: 1988
Genre: War, drama
Director: Isao Takahat
A phenomenal anime movie by Isao Takahat features the struggling life of two siblings trying to make do in the country torn apart by war. It is an extremely emotional anime movie that displays the after-effects and repercussions of war. The 14-year old boy, Seita, tries to rebuild his life with a 4-year old sister. As the movie progresses, the young kids can be seen surviving on scraps and looking for happiness in the ruins of what is left. The stunning and shocking reality of the wars is accurately depicted in this moving movie, making it one of the best anime movie ever.
11. Perfect Blue
Release Time: 1977
Genre: Thriller, drama
Director: Satoshi Kon
Perfect Blue is the best anime movie that features the fusion of various genres, ultimately presenting a masterpiece. This anime movie follows the life of a pop-star turned actress whose life is stalked and threatened by her past, an obsessed stalker, and the ghosts following her all the time. She suffers humiliation, privacy breaches, and psychological issues. This gripping thriller shows the life of a star behind the limelight. Its emotionally gripping plot has built a huge fanbase.
12. The Girl Who Leapt Through Time
Release Time: 2006
Genre: Fantasy, romance
Director: Mamuro Hosoda
This particular anime movie revolves around three high schoolers, namely, Makoto, Kosuke, and Chiaki. Among these, Makoto discovers that she can time travel. By using this power, she travels into the past. But, soon, she realizes that her actions are going to cost her in one way or the other, and she learns that time waits for no one. It also explores other common interests possessed by teenagers, such as love, studies, and career. This anime movie certainly features an excellent fantasy plot that attracts fans.
13. My Hero Academia: Heroes Rising
Release Time: 2019
Genre: Sci-fi
Director: Kenji Nagasaki
Another anime movie based on the Manga series, My Hero Academia is superhero fiction. It features a world where the majority of the population consists of people with superpowers, commonly known as Quirks. However, a young boy Izuku, born without any powers, longs to become a superhero like the rest of them. The movie follows the journey of Izuku as he saves a bully from evil and is granted the chance to attend the training school otherwise reserved for superheroes. The plot is suspenseful and keeps viewers guessing as to what will happen in the next scene.
14. Wolf Children
Release Time: 2012
Genre: Fantasy, drama
Director: Mamoru Hosoda
Under the direction of Mamoru Hosoda, this masterpiece was produced by Studio Chizu and can easily be classified as the best anime movie so far. This unique plot features the life of a young woman, Hana, who falls in love with a guy she meets at her college in Tokyo. Little does she know that he is not an ordinary boy but, in fact, a werewolf. Nevertheless, they get married, and 2 kids, Yuki and Ama, are born. The story becomes very interesting when the father dies, and Hana is left alone to care for her children. As Yuki and Ama are not ordinary like their mother, Hana faces numerous issues along her journey.
15. Your Lie in April
Release Time: 2015
Genre: Musical, romance
Director: Takehiko Shinjo
Your Lie in April is a free anime movie also streamed on Netlfix owing to its extraordinary storyline loved by people all over the world. This story features a piano prodigy, Kosei Arima, who breaks down during a performance after his mother passes away. Despite a fine hearing, he is unable to hear his own piano. But, all that magically changes when Kaori Miyazono, an enthusiastic violinist, enters his life and takes him back to his music. This anime movie beautifully unfolds as she herself deteriorates but gives Kosei a new life before she falls fatally sick.
16. I Want to Eat Your Pancreas
Release Time: 2018
Genre: Romance, drama
Director: Shin’ichirō Ushijima
This anime movie is extremely emotional yet humorous. As Haruki stumbles upon a secret diary in a hospital waiting room, he discovers that his classmate, Sakura, is dying from a fatal disease. And soon, they go from classmates to lovers, living life to the fullest by following Sakura’s bucket list. A heart-wrenching twist is introduced when fate takes Sakura away from Haruki a little too soon and very suddenly. This exceptional and heart-breaking love story is a must-watch anime movie.
17. Whisper of the Heart
Release Time: 1995
Genre: Romance
Director: Yoshifumi Kondo
Whisper of the Heart follows the life of a young girl and boy as they meet and befriend each other in rather accidental circumstances. Shizuku, a 14-year old bibliophile, discovers that all her favorite books are already being checked out by someone named Seiji. Curious, she is determined to find the boy who shares the same interests as her. But, when she follows a cat riding the train into a shop, she finds him, and they instantly become friends. This anime movie is a story about dreams and passion and the journey they take to fulfill them. It is a very light-hearted comedy and romance anime movie attracting huge fans.
18. One Piece: Stampede
Release Time: 2019
Genre: Action, adventure
Director: Takashi Otsuka
One Piece: Stampede takes viewers to a bustling Pirate Festival. This festival is for pirates and by pirates. From around the world, pirates gather to partake in the treasure hunt organized in this festival. The treasure is from the collection of Golder Roger, the former Pirate king, and all those involved give their all to win it. This anime movie is one of the best action movies and features numerous famed anime movie characters in all their glory, along with the best, most powerful character, Bullet.
19. Death Note
Release Time: 2006
Genre: Crime, action, thriller
Director: Tetsuro Araki
As a thriller anime movie, Death Note features a young high school boy, Light Yagami, who tries to purge the world by using a supernatural diary. Light stumbles upon a diary containing supernatural powers that have the ability to kill anyone whose name is written in it, given that the user knows the person and has seen his face. As Light goes around killing people he deems too immoral to live, he calls for trouble as the police force is after him. This suspenseful anime movie grips the viewers as they try to gauge who is right or wrong.
20. Dragon Ball Super: Broly
Release Time: 2018
Genre: Adventure, fantasy
Director: Tatsuya Nagamine
Dragon Ball Super: Broly is the tale of three Saiyans fighting each other for power and revenge. As Broly returns, Goku and Vegeta encounter powers are unseen before. As the anime movie unfolds, it shows how jealousy and the politics of acquiring the throne lead people to behave. The three warriors are seen fighting, and the whole plot revolves around the legendary Super Saiyan.
Bonus Tip-Record Anime Movie with Wondershare Filmora for an Anime Explanation
Wondershare Filmora is an all-in-one video editor loaded with professional-grade tools to create spectacular videos. The intuitive interface further makes it easy to use the one-click tools for crafting cinematics videos. It has numerous editing features such as the motion-tracking tool, color match, and audio ducking. With it, you can easily record and explain an anime movie by editing it as you like.
Here are the steps to record an anime movie with Filmora.
1. Download, install and launch Wondershare Filmora. In the Media tab, open the Record drop-down menu and tap on the Record PC Screen.
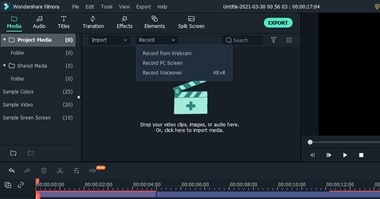


2. A settings dialogue box will pop open. Customize the parameters such as the custom screen or tab, quality, record time, etc. Press the red icon to start recording the anime movie.
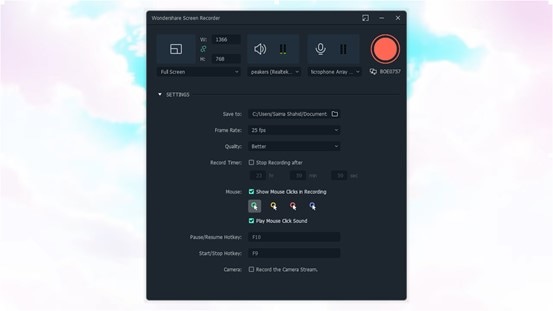
3.After 3 seconds, it will start recording. To stop the recording, you can press the F9 button.
4.The recorded video will be saved to your device and will also be added to your preview in Filmora.
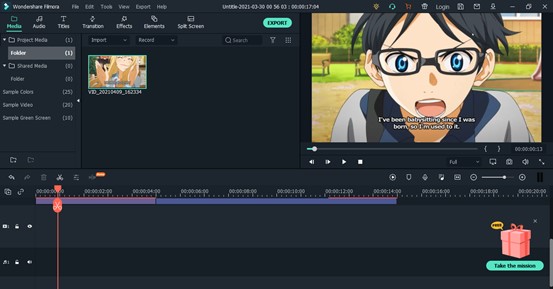
5.Now, you can drag it to the timeline to make more edits to the anime movie. From the Titles tab, you can add the title for the anime movie by choosing an attractive template and customizing it.
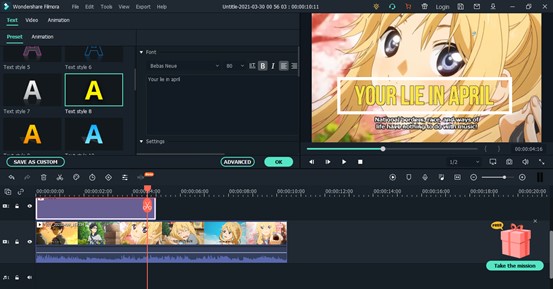
6.You can also add exciting Elements and emoticons.
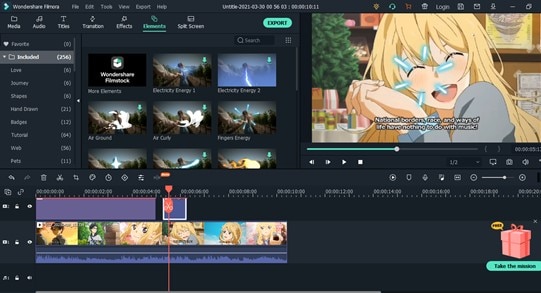
7.Once you have finished editing the anime movie, click on Export and save the video to your device or share it directly on social media.

Summing up
If you are a true anime movie fan, it is possible that you might have watched all the top movies we have mentioned above. But, if you still haven’t come across these truly impressive anime movies, you are in for a treat. Even if you are not a fan of anime, you must watch anime movie listed above to be truly amazed. All these are ever-green and the best anime movie of their time.
Add these stunning anime movies and serials to your bucket list and prepare for endless entertainment provided by exciting anime characters. So, go on and watch free anime movie of your choice and enjoy.
Shanoon Cox
Shanoon Cox is a writer and a lover of all things video.
Follow @Shanoon Cox
Shanoon Cox
Mar 27, 2024• Proven solutions
Most anime movies are originally produced in Japan, but their popularity spans worldwide. Anime movie has made it to the most-liked genre list and is widely viewed by people of all ages, gender, and nationalities. An anime movie is mostly based on science fiction, fantasy, or supernatural creatures. These movies feature extraordinary graphics and highly engaging plots that attract viewers.
Choosing the best anime movie can be hard as there are countless such movies. But, if you are looking for a must-watch anime movie, read ahead for our ultimate list of top anime movies.
- 20 Best Anime Movies You Can Watch Online
- Bonus Tip-Record Anime Movie with Wondershare Filmora for an Anime Explanation
20 Best Anime Movies You Can Watch Online
Below we have listed the anime movie we consider to be the best amongst the hundreds and thousands of others.
| Top Anime Movies | Genre | Director | Release Time |
|---|---|---|---|
| Spirited Away | Drama, Fantasy | Hayao Miyazaki | 2001 |
| Princess Mononoke | Fantasy | Hayao Miyazaki | 1997 |
| Howl’s Moving Castle | Fantasy | Hayao Miyazaki | 2004 |
| Ghost in the Shell | Science Fiction, Crime | Mamoru Oshii | 1995 |
| Psycho-Pass | Action, Sci-fi | Naoyoshi Shiotani | 2012 |
| Your Name | Sci-fi, Drama | Makoto Shinkai | 2016 |
| A Silent Voice | Drama | Naoko Yamada | 2016 |
| Akira | Cyberpunk, Sci-fi, Action | Katsuhiro Ôtomo | 1988 |
| Weathering with You | Fantasy, Drama | Makoto Shinkao | 2019 |
| Grave of the Fireflies | War, Drama | Isao Takahat | 1988 |
| Perfect Blue | Thriller, Drama | Satoshi Kon | 1977 |
| The Girl Who Leapt Through Time | Fantasy, Romance | Mamuro Hosoda | 2006 |
| My Hero Academia: Heroes Rising | Sci-fi | Kenji Nagasaki | 2019 |
| Wolf Children | Fantasy, Drama | Mamoru Hosoda | 2012 |
| Your Lie in April | Musical, Romance | Takehiko Shinjo | 2015 |
| I Want to Eat Your Pancreas | Romance, Drama | Shin’ichirō Ushijima | 2018 |
| Whisper of the Heart | Romance | Yoshifumi Kondo | 1995 |
| One Piece: Stampede | Action, Adventure | Takashi Otsuka | 2019 |
| Death Note | Crime, Action, Thriller | Tetsuro Araki | 2006 |
| Dragon Ball Super: Broly | Adventure, Fantasy | Tatsuya Nagamine | 2018 |
1. Spirited Away
Release Time: 2001
Genre: Drama, Fantasy
Director: Hayao Miyazaki
The masterpiece created in the anime movie industry is certainly ‘Spirited Away.’ It is a very gripping story of a 10-year old girl who accidentally wanders into a mysterious land with her parents who are transformed into pigs as a witch curse. The girl, Chihiro, starts working for the witch Yubaba, who takes away her original name, changing it to Sen. The main character Haku saves Chihiro from trouble, and they become acquainted. You can watch a free anime movie like this one and be taken to the world of Sen as she tries to keep her real name alive and portrays an extraordinary character of a happy spirit.
2. Princess Mononoke
Release Time: 1997
Genre: Fantasy
Director: Hayao Miyazaki
Princess Mononoke is classified as the best anime movie of all time. This anime movie was aired years ago and is based on a much ancient Muromachi period. The fantasy movie revolves around the life of the main characters. One is a clan’s prince, Ashitaka, And the other is a young girl, San, who lives in the woods and was raised by the wolves. As the fantasy unfolds, Ashitaka can be seen struggling to strike an understanding between humans and nature so that he and San may live together. It is widely viewed and loved globally owing to the hyper-realistically attractive plot of the anime movie.
3. Howl’s Moving Castle
Release Time: 2004
Genre: Fantasy
Director: Hayao Miyazaki
Another impressive anime movie by the master filmmaker Hayao Miyazaki is Howl’s Moving Castle. You can watch this free anime movie that is originally based on the British novel. As a young and beautiful girl is reviled by a witch and turned into a 90-year old woman, she discovers a magic castle and a handsome wizard. The powerful wizard might be the chance to her freedom and youth again. The highly gripping plot of this anime movie that takes viewers on a journey through fantasyland is the basis for its worldwide popularity.
4. Ghost in the Shell
Release Time: 1995
Genre: Science Fiction, Crime
Director: Mamoru Oshii
Ghost in the Shell is a pioneer anime movie based on the Manga by Masamune Shiro. It was released decades ago, but it shows life in 2030. As the anime movie features a world where technology is highly advanced, a cyborg policewoman is seen fighting crime using her extraordinary powers. The main characters, such as Major Motoko Kusanagi and the members of Public Security Section 9, are also seen preventing crime in this evolved era. This action-packed anime movie is well-loved by fans as it displays striking graphics and thrilling action scenes.
5. Psycho-Pass
Release Time: 2012
Genre: Action, Sci-fi
Director: Naoyoshi Shiotani
Psycho-Pass is a free anime movie streaming worldwide and building fans owing to its storyline. As the name suggests, this anime movie introduces an innovative judgment system known as Sibyl System. People are analyzed and given a psycho pass after assessing their criminal intent. But, the climax is introduced as a new police recruit Akane Tsunemori starts questioning the authorities. As she discovers what is actually right and wrong, the anime builds suspense in this dystopian-themed anime movie.
6. Your Name
Release Time: 2016
Genre: Sci-fi, drama
Director: Makoto Shinkai
The best anime movie released recently is ‘Your Name.’ It features a strange phenomenon that leads to the swapping of the lives of two individuals. The boy residing in Metropolitan Tokyo, Taki Tachibana, and a rural Japanese girl Mitusha Miyamizu are on a path to find whose body they are inhabiting. This anime movie simultaneously features two different lives as they try to discover each other. It unfolds quite spectacularly while being emotional and humorous at the same time.
7. A Silent Voice
Release Time: 2016
Genre: Drama
Director: Naoko Yamada
An emotionally exceptional anime movie, A Silent Voice, is also based on the Manga series. It brings to light the social issues mostly faced by teenagers and school-going teens. The story unfurls as a deaf girl, Shoka, is continuously harassed and bullied by Shoya, her classmate. But, the anime movie is highly appraised as it takes a positive turn when the harasser realizes his mistake and sets out to make amends. You can watch this free anime movie which is incredibly moving and raises sensitive issues like suicide, bullying, parental divorce, etc.
8. Akira
Release Time: 1988
Genre: Cyberpunk, Sci-fi, Action
Director: Katsuhiro Ôtomo
Yet another amazing anime movie based on a best-selling manga series is Manga. It is based in Neo-Tokyo, which is collapsing due to World War 3. The twist comes when the Biker gang Bosozoku member Tetsuo Shima is involved in an accident, and the military experiments on him, resulting in a murderous being with supernatural powers. This story also features the gang leader Shotaro Kaneda, who, alongside Tetsuo, gets involved in a conspiracy involving a guy named Akira. This free anime movie is renowned due to the high-end animations and remarkable visuals. This adds to the reasons why you should definitely watch anime movie like this one.
9. Weathering with You
Release Time: 2019
Genre: Fantasy, drama
Director: Makoto Shinkao
Makoto Shinkao again takes the lead by directing an outstanding anime movie that has become one of the most viewed anime movies recently. An islander boy Hodaka leaves his home for the bustling life of the Metropolitan city of Tokyo. There, he runs into a young girl, Hina, who lives all by herself. Soon, he discovers that Hina holds power to bend the weather to her will. And she uses that power to bring sunshine into people’s lives on their significant days such as weddings, etc. Both Hina and Hodaka become close and explore her powers in secret together until evil pops up and the movie plunges into a moving climax. The suspense of this anime movie has been keeping the viewers glued to the screens.
10. Grave of the Fireflies
Release Time: 1988
Genre: War, drama
Director: Isao Takahat
A phenomenal anime movie by Isao Takahat features the struggling life of two siblings trying to make do in the country torn apart by war. It is an extremely emotional anime movie that displays the after-effects and repercussions of war. The 14-year old boy, Seita, tries to rebuild his life with a 4-year old sister. As the movie progresses, the young kids can be seen surviving on scraps and looking for happiness in the ruins of what is left. The stunning and shocking reality of the wars is accurately depicted in this moving movie, making it one of the best anime movie ever.
11. Perfect Blue
Release Time: 1977
Genre: Thriller, drama
Director: Satoshi Kon
Perfect Blue is the best anime movie that features the fusion of various genres, ultimately presenting a masterpiece. This anime movie follows the life of a pop-star turned actress whose life is stalked and threatened by her past, an obsessed stalker, and the ghosts following her all the time. She suffers humiliation, privacy breaches, and psychological issues. This gripping thriller shows the life of a star behind the limelight. Its emotionally gripping plot has built a huge fanbase.
12. The Girl Who Leapt Through Time
Release Time: 2006
Genre: Fantasy, romance
Director: Mamuro Hosoda
This particular anime movie revolves around three high schoolers, namely, Makoto, Kosuke, and Chiaki. Among these, Makoto discovers that she can time travel. By using this power, she travels into the past. But, soon, she realizes that her actions are going to cost her in one way or the other, and she learns that time waits for no one. It also explores other common interests possessed by teenagers, such as love, studies, and career. This anime movie certainly features an excellent fantasy plot that attracts fans.
13. My Hero Academia: Heroes Rising
Release Time: 2019
Genre: Sci-fi
Director: Kenji Nagasaki
Another anime movie based on the Manga series, My Hero Academia is superhero fiction. It features a world where the majority of the population consists of people with superpowers, commonly known as Quirks. However, a young boy Izuku, born without any powers, longs to become a superhero like the rest of them. The movie follows the journey of Izuku as he saves a bully from evil and is granted the chance to attend the training school otherwise reserved for superheroes. The plot is suspenseful and keeps viewers guessing as to what will happen in the next scene.
14. Wolf Children
Release Time: 2012
Genre: Fantasy, drama
Director: Mamoru Hosoda
Under the direction of Mamoru Hosoda, this masterpiece was produced by Studio Chizu and can easily be classified as the best anime movie so far. This unique plot features the life of a young woman, Hana, who falls in love with a guy she meets at her college in Tokyo. Little does she know that he is not an ordinary boy but, in fact, a werewolf. Nevertheless, they get married, and 2 kids, Yuki and Ama, are born. The story becomes very interesting when the father dies, and Hana is left alone to care for her children. As Yuki and Ama are not ordinary like their mother, Hana faces numerous issues along her journey.
15. Your Lie in April
Release Time: 2015
Genre: Musical, romance
Director: Takehiko Shinjo
Your Lie in April is a free anime movie also streamed on Netlfix owing to its extraordinary storyline loved by people all over the world. This story features a piano prodigy, Kosei Arima, who breaks down during a performance after his mother passes away. Despite a fine hearing, he is unable to hear his own piano. But, all that magically changes when Kaori Miyazono, an enthusiastic violinist, enters his life and takes him back to his music. This anime movie beautifully unfolds as she herself deteriorates but gives Kosei a new life before she falls fatally sick.
16. I Want to Eat Your Pancreas
Release Time: 2018
Genre: Romance, drama
Director: Shin’ichirō Ushijima
This anime movie is extremely emotional yet humorous. As Haruki stumbles upon a secret diary in a hospital waiting room, he discovers that his classmate, Sakura, is dying from a fatal disease. And soon, they go from classmates to lovers, living life to the fullest by following Sakura’s bucket list. A heart-wrenching twist is introduced when fate takes Sakura away from Haruki a little too soon and very suddenly. This exceptional and heart-breaking love story is a must-watch anime movie.
17. Whisper of the Heart
Release Time: 1995
Genre: Romance
Director: Yoshifumi Kondo
Whisper of the Heart follows the life of a young girl and boy as they meet and befriend each other in rather accidental circumstances. Shizuku, a 14-year old bibliophile, discovers that all her favorite books are already being checked out by someone named Seiji. Curious, she is determined to find the boy who shares the same interests as her. But, when she follows a cat riding the train into a shop, she finds him, and they instantly become friends. This anime movie is a story about dreams and passion and the journey they take to fulfill them. It is a very light-hearted comedy and romance anime movie attracting huge fans.
18. One Piece: Stampede
Release Time: 2019
Genre: Action, adventure
Director: Takashi Otsuka
One Piece: Stampede takes viewers to a bustling Pirate Festival. This festival is for pirates and by pirates. From around the world, pirates gather to partake in the treasure hunt organized in this festival. The treasure is from the collection of Golder Roger, the former Pirate king, and all those involved give their all to win it. This anime movie is one of the best action movies and features numerous famed anime movie characters in all their glory, along with the best, most powerful character, Bullet.
19. Death Note
Release Time: 2006
Genre: Crime, action, thriller
Director: Tetsuro Araki
As a thriller anime movie, Death Note features a young high school boy, Light Yagami, who tries to purge the world by using a supernatural diary. Light stumbles upon a diary containing supernatural powers that have the ability to kill anyone whose name is written in it, given that the user knows the person and has seen his face. As Light goes around killing people he deems too immoral to live, he calls for trouble as the police force is after him. This suspenseful anime movie grips the viewers as they try to gauge who is right or wrong.
20. Dragon Ball Super: Broly
Release Time: 2018
Genre: Adventure, fantasy
Director: Tatsuya Nagamine
Dragon Ball Super: Broly is the tale of three Saiyans fighting each other for power and revenge. As Broly returns, Goku and Vegeta encounter powers are unseen before. As the anime movie unfolds, it shows how jealousy and the politics of acquiring the throne lead people to behave. The three warriors are seen fighting, and the whole plot revolves around the legendary Super Saiyan.
Bonus Tip-Record Anime Movie with Wondershare Filmora for an Anime Explanation
Wondershare Filmora is an all-in-one video editor loaded with professional-grade tools to create spectacular videos. The intuitive interface further makes it easy to use the one-click tools for crafting cinematics videos. It has numerous editing features such as the motion-tracking tool, color match, and audio ducking. With it, you can easily record and explain an anime movie by editing it as you like.
Here are the steps to record an anime movie with Filmora.
1. Download, install and launch Wondershare Filmora. In the Media tab, open the Record drop-down menu and tap on the Record PC Screen.
2. A settings dialogue box will pop open. Customize the parameters such as the custom screen or tab, quality, record time, etc. Press the red icon to start recording the anime movie.
3.After 3 seconds, it will start recording. To stop the recording, you can press the F9 button.
4.The recorded video will be saved to your device and will also be added to your preview in Filmora.
5.Now, you can drag it to the timeline to make more edits to the anime movie. From the Titles tab, you can add the title for the anime movie by choosing an attractive template and customizing it.
6.You can also add exciting Elements and emoticons.
7.Once you have finished editing the anime movie, click on Export and save the video to your device or share it directly on social media.
Summing up
If you are a true anime movie fan, it is possible that you might have watched all the top movies we have mentioned above. But, if you still haven’t come across these truly impressive anime movies, you are in for a treat. Even if you are not a fan of anime, you must watch anime movie listed above to be truly amazed. All these are ever-green and the best anime movie of their time.
Add these stunning anime movies and serials to your bucket list and prepare for endless entertainment provided by exciting anime characters. So, go on and watch free anime movie of your choice and enjoy.
Shanoon Cox
Shanoon Cox is a writer and a lover of all things video.
Follow @Shanoon Cox
How to Cartoonize Photo Photoshop in Simple Steps
How to Cartoonize Photo Photoshop in Easy Steps
An easy yet powerful editor
Numerous effects to choose from
Detailed tutorials provided by the official channel
Cartoons, an already catchy entertainment source, can upgrade other media utilities on integration. Look through the easiest ways of creating cartoonize photo Photoshop stills!
In this article
01 [Types of Cartoon Effects in Photoshop](#Part 1)
02 [Easiest Ways to Cartoonize Photo in Photoshop](#Part 2)
03 [How to Use a Variety of Photoshop Special Effects to Create the Final Caricature Look](#Part 3)
Part 1 Types of Cartoon Effects in Photoshop
It is an absolute fun activity to explore your editing creativity in the realm of cartoonizing the otherwise ordinary still captures. Talking of the most convenient cartoon creator and editor applications, you can safely rely on the Photoshop Image Editor application to choose from a pool of cartoon editing effects for adding that spunky and funny element to your image files.
Presented in the following section, is a discussion of some of the most stunning and visibly amazing cartoon effects in the application’s Editor Library to cartoonize Photoshop images:
01Pop Art Photoshop Action
The effect is a predominantly preferred as a cartoon action Photoshop utility to caricaturize a normal image, along with customizing the same to change the colors and background of the original still capture for creating a brand new appearance with utmost ease. Apart from this, the aforesaid effect allows you to exclusively customize the globally acclaimed graphic masterpieces of Roy Lichtenstein. Working with the effect, you can edit a self-portrait or the favorite image of your pet to give the latter, a funny retro feel.

02Vintage Comic Creator
If the idea of sticking to just the creation of cartoon images is not enough to satisfy you, the Vintage Comic Creator effect allows you to expand your creativity level to work on cartoon based shape and text edits. You can use the effect to enhance an image logo or plain text with a comic book oriented text. A download of this cartoon effect template facilitates you with diversities of customizable layer styles, overlays and patterns.

03GTA Photoshop Action
This is a complete pleasure for the creative fan of Grand Theft Auto, the wicked chasing game series. Additional to creating a stark variety of edited cartoon stills, you are free to reinvent the aforesaid game’s most popular caricature edits, while using the GTA Photoshop Action editing filter. Launched by Indworks, the effect package consisting of 15 vibrant themes and 5 collage templates; promises a quick mimicry of your most cherished video and console games.

04Vector Paint Photoshop Action
The one is an amazing Photoshop effect for creating cartoon edits, which works through a merger of two different ingenious art themes or styles for transforming basic images into cartoonized stills.
The effect grants you the liberty to use varieties of art styles, such as, comic, photo retouching and energetic oil to obtain editing results comparable to that of any original photograph. The template is conveniently simple to use and assures you of quick results. All this, just at a nominal price of $6! Interesting, right?

05Ultra Realistic 3D Space Effect
Considering the fact of you being a space admirer, this one is the perfect image editor for you to add the vibrancy of stunning space elements and backgrounds within your cartoonized edits. The effect lets you play with the diverse range of customizable text and exciting caricature backgrounds. When downloading the template, you get a main setup file, a few editing examples and a web link to the free fonts present in the effect.

06Animated Zombie Grime Art Photoshop Action
Are you in love with the latest zombie grimes? If yes, then this action set is exclusive editor package for you. Working with the aforesaid image template, you can effortlessly add the perfect zombie theme to your cartoon edits, along with simultaneously creating a stunning animation, which you can use to enhance your video or GIF uploads on social media. Not forgetting the best part, you get a free access to this amazing utility.

Part 2 Easiest Ways to Cartoonize Photo in Photoshop
Having known about the amazing varieties of cartoonized editor templates in Photoshop, it is a natural instinct to feel motivated to create your own caricature images from normal capture stills. Addressing the concern of image transformation methods to turn a photo into a cartoon Photoshop, let us dive into some of the most affordable methods of creating cartoonized photos in the aforesaid editing application.
Talking of the most basic Photoshop tools for creating caricature images, you can start your editing spree with using the Graphic Tablet, Brush Tool, Layer Masks and a graphic pen to create amateur cartoonized edits from your still photographs, getting a full control on image tracing.
01Brush Tool
A few usage examples include working with a combination of the graphic tablet pen and the editor brushes to trace your image, using the brush in a masked or a fresh layer to avoid altering the actual image, and much more.
02Graphic Tablet
It is best to use the Photoshop Graphic Tablet for adhering to the concern of tracing cartoonized images. You can alternatively cater to the job with a trackpad, mouse, or even your hand. It is however, difficult to assure steady hand postures for image tracing, lest you are using a stylus pen.
03Pen Tool
Using the Pen Tool for cartoonizing your portrait, allows you to draw outlines along the desired figure within the image, along with its important elements, so that you can easily use these outlined paths to introduce different color blocks.
Similar to the Brush Tool, the Photoshop Pen utility grants you the freedom to vary the degree of detailing in your cartoon edit, from being highly expressive to only remaining around the shore. Working with the Pen Tool can, however be a bit tiring and time taking, with respect to the extent of detailing you wish to add to the caricature edits.
Additional to the aforementioned tools, you can also consider using the default image filters of the Photoshop application to get comparable results. This is an exclusively better option to choose, compared to the Pen Tool, when you are working without a Graphic Tablet. To get over the top realistic caricature renderings, you will need to supplement the use of Photoshop filters with the application’s editing channels and other adjustments.
Part 3 How to Use a Variety of Photoshop Special Effects to Create the Final Caricature Look
Considering the extensive discussion on the credibility of the Photoshop Image Editor application in the realm of creating stunning caricature images in high end resolution, let us proceed to learn about using the diversity of Photoshop’s special effects to get the last stage cartoonized appearance of ordinary still images.
User’s Guide to Create High End Cartoonized Look
The following tutorial is a stepwise explanation of the process to convert photo into cartoon Photoshop in the easiest possible way. Stick to the method for getting affordable results in a quick span.
Step 1: Download and Launch the Program
Visit the official website of Photoshop Image Editor for a free download of the software program in your system, followed by installing and launching the same in your device.
Step 2: Upload Your Image
On a successful launch of the editor program, you will be directed to the ‘Photoshop Editor’ window, where you are required to upload any desired still image from your device for creating a cartoonized edit. To do this, either simply add your image to the editor workspace using the ‘Drag and Drop’ method, or navigate to the ‘File’ tab in the top toolbar and click on ‘Open’ in the dropdown menu.
Step 3: Edge Enhancement
Once your image appears in the editor timeline, proceed to sharpen the edges of the face and body of the portrait. Start with navigating to and clicking on the ‘Filter’ option, followed by tapping on ‘Filter Gallery’ and selecting the ‘Artistic’ folder, where you need to choose the ‘Poster Edges’ option. Observe the effect of these setting on the portrait and make necessary changes.

Step 4: Background Setting
Ensure that the background and foreground of your image are set to white and black colors respectively. If not, proceed to adjust the same as required.

Step 5: Distorting the Edges
You now need to introduce some distortion in the edges of your portrait. Navigate to the ‘Filter’ option again, open the ‘Filter Gallery’ and choose ‘Torn Edges’ from the menu that drops down. Select the desired parameter values in accordance with your creative suitability.


Step 6: Using the Channels Panel
The next step is to select and copy your portrait using the ‘Ctrl + A’ and Ctrl + C commands respectively. Navigate to the ‘Channels’ panel at the right of the Photoshop workspace. At the panel’s bottom right, proceed with creating a new channel. It will be assigned the name ‘Alpha 1’ by Photoshop, which you are most welcome to change.


Step 7: Color Inversion
When you finish creating the channel, use the ‘Ctrl + V’ command to paste your portrait in the same. Proceed with inverting the image colors by navigating to the ‘Image’ option, followed by choosing the ‘Adjustment’ and ‘Invert’ options from the consecutive drop downs. Now, make a selection of the ‘White’ regions of your portrait by pressing the ‘Ctrl’ key and clicking on the ‘Alpha 1 Channel thumbnail.

Step 8: Layer Creation
Navigate to the ‘Layers’ panel at the right of the Photoshop workspace, and click on the ‘New Layer’ icon for creating a fresh layer. Fill the just created layer with black color, either by pressing ‘g’ from your system’s keyboard, or using the ‘Paint Bucket’ tool. Don’t forget to assign a suitable name to the layer.

Repeat the above process to create a separate layer and e fill the same with white color. The layer creation process is essential to separate the white and black colors of the actual image.

Step 10: Layer Dragging
In the ‘Layers’ panel, drag the ‘Black’ layer above the ‘White’ one.

Step 11: Creating Additional Layers
You are now required to create three more layers, with the same process as for the above two, for adding effects to the Skin, Clothes and Teeth/Eyes of the portrait. When you finish creation, assign suitable names to the layers, followed by dragging them below the ‘Black’ one within the ‘Layers’ panel.

Step 12: Color Selection and Application
Choose the respective colors for the clothes, skin and teeth/eyes of the cartoonized edit. To proceed with color application, navigate to the toolbar at the left of the Photoshop workspace and choose the ‘Brush Tool’. Finally, choose a particular layer and apply careful brush strokes to add color to the specific area of the portrait that you wish to edit. Follow the same process to add colors to the remaining layers to get the desired result in all areas of your cartoonized edit.

Step 13: Using the Gradient Tool
Navigate to the ‘Layers’ panel again and create a new ‘Gradient’ layer to further enhance your creation. You now need to select the ‘Gradient Tool’ from the toolbar at the left of the Photoshop workspace. The ‘Gradient Editor’ pops up with the continuously running ‘Gradient Bar’, as soon as you make the selection. Double click on the gradient boxes at both ends to select them, followed by making your color choices. Tap on ‘OK’ when you are satisfied with your work.

Step 14: Filling the Gradients
To proceed with gradient filling, press and hold the mouse button on the image at the bottom left and continue to drag the cursor to its top right corner. Leave the mouse and navigate to the ‘Layers’ panel for dragging and dropping the ‘Gradient’ layer above the ‘White’ layer.

You are now done with the process of creating a caricature edit from a normal still portrait. Your final image output will appear something like the following:

Cartoons, an already catchy entertainment source, can upgrade other media utilities on integration. Look through the easiest ways of creating cartoonize photo Photoshop stills!
In this article
01 [Types of Cartoon Effects in Photoshop](#Part 1)
02 [Easiest Ways to Cartoonize Photo in Photoshop](#Part 2)
03 [How to Use a Variety of Photoshop Special Effects to Create the Final Caricature Look](#Part 3)
Part 1 Types of Cartoon Effects in Photoshop
It is an absolute fun activity to explore your editing creativity in the realm of cartoonizing the otherwise ordinary still captures. Talking of the most convenient cartoon creator and editor applications, you can safely rely on the Photoshop Image Editor application to choose from a pool of cartoon editing effects for adding that spunky and funny element to your image files.
Presented in the following section, is a discussion of some of the most stunning and visibly amazing cartoon effects in the application’s Editor Library to cartoonize Photoshop images:
01Pop Art Photoshop Action
The effect is a predominantly preferred as a cartoon action Photoshop utility to caricaturize a normal image, along with customizing the same to change the colors and background of the original still capture for creating a brand new appearance with utmost ease. Apart from this, the aforesaid effect allows you to exclusively customize the globally acclaimed graphic masterpieces of Roy Lichtenstein. Working with the effect, you can edit a self-portrait or the favorite image of your pet to give the latter, a funny retro feel.
02Vintage Comic Creator
If the idea of sticking to just the creation of cartoon images is not enough to satisfy you, the Vintage Comic Creator effect allows you to expand your creativity level to work on cartoon based shape and text edits. You can use the effect to enhance an image logo or plain text with a comic book oriented text. A download of this cartoon effect template facilitates you with diversities of customizable layer styles, overlays and patterns.
03GTA Photoshop Action
This is a complete pleasure for the creative fan of Grand Theft Auto, the wicked chasing game series. Additional to creating a stark variety of edited cartoon stills, you are free to reinvent the aforesaid game’s most popular caricature edits, while using the GTA Photoshop Action editing filter. Launched by Indworks, the effect package consisting of 15 vibrant themes and 5 collage templates; promises a quick mimicry of your most cherished video and console games.
04Vector Paint Photoshop Action
The one is an amazing Photoshop effect for creating cartoon edits, which works through a merger of two different ingenious art themes or styles for transforming basic images into cartoonized stills.
The effect grants you the liberty to use varieties of art styles, such as, comic, photo retouching and energetic oil to obtain editing results comparable to that of any original photograph. The template is conveniently simple to use and assures you of quick results. All this, just at a nominal price of $6! Interesting, right?
05Ultra Realistic 3D Space Effect
Considering the fact of you being a space admirer, this one is the perfect image editor for you to add the vibrancy of stunning space elements and backgrounds within your cartoonized edits. The effect lets you play with the diverse range of customizable text and exciting caricature backgrounds. When downloading the template, you get a main setup file, a few editing examples and a web link to the free fonts present in the effect.
06Animated Zombie Grime Art Photoshop Action
Are you in love with the latest zombie grimes? If yes, then this action set is exclusive editor package for you. Working with the aforesaid image template, you can effortlessly add the perfect zombie theme to your cartoon edits, along with simultaneously creating a stunning animation, which you can use to enhance your video or GIF uploads on social media. Not forgetting the best part, you get a free access to this amazing utility.
Part 2 Easiest Ways to Cartoonize Photo in Photoshop
Having known about the amazing varieties of cartoonized editor templates in Photoshop, it is a natural instinct to feel motivated to create your own caricature images from normal capture stills. Addressing the concern of image transformation methods to turn a photo into a cartoon Photoshop, let us dive into some of the most affordable methods of creating cartoonized photos in the aforesaid editing application.
Talking of the most basic Photoshop tools for creating caricature images, you can start your editing spree with using the Graphic Tablet, Brush Tool, Layer Masks and a graphic pen to create amateur cartoonized edits from your still photographs, getting a full control on image tracing.
01Brush Tool
A few usage examples include working with a combination of the graphic tablet pen and the editor brushes to trace your image, using the brush in a masked or a fresh layer to avoid altering the actual image, and much more.
02Graphic Tablet
It is best to use the Photoshop Graphic Tablet for adhering to the concern of tracing cartoonized images. You can alternatively cater to the job with a trackpad, mouse, or even your hand. It is however, difficult to assure steady hand postures for image tracing, lest you are using a stylus pen.
03Pen Tool
Using the Pen Tool for cartoonizing your portrait, allows you to draw outlines along the desired figure within the image, along with its important elements, so that you can easily use these outlined paths to introduce different color blocks.
Similar to the Brush Tool, the Photoshop Pen utility grants you the freedom to vary the degree of detailing in your cartoon edit, from being highly expressive to only remaining around the shore. Working with the Pen Tool can, however be a bit tiring and time taking, with respect to the extent of detailing you wish to add to the caricature edits.
Additional to the aforementioned tools, you can also consider using the default image filters of the Photoshop application to get comparable results. This is an exclusively better option to choose, compared to the Pen Tool, when you are working without a Graphic Tablet. To get over the top realistic caricature renderings, you will need to supplement the use of Photoshop filters with the application’s editing channels and other adjustments.
Part 3 How to Use a Variety of Photoshop Special Effects to Create the Final Caricature Look
Considering the extensive discussion on the credibility of the Photoshop Image Editor application in the realm of creating stunning caricature images in high end resolution, let us proceed to learn about using the diversity of Photoshop’s special effects to get the last stage cartoonized appearance of ordinary still images.
User’s Guide to Create High End Cartoonized Look
The following tutorial is a stepwise explanation of the process to convert photo into cartoon Photoshop in the easiest possible way. Stick to the method for getting affordable results in a quick span.
Step 1: Download and Launch the Program
Visit the official website of Photoshop Image Editor for a free download of the software program in your system, followed by installing and launching the same in your device.
Step 2: Upload Your Image
On a successful launch of the editor program, you will be directed to the ‘Photoshop Editor’ window, where you are required to upload any desired still image from your device for creating a cartoonized edit. To do this, either simply add your image to the editor workspace using the ‘Drag and Drop’ method, or navigate to the ‘File’ tab in the top toolbar and click on ‘Open’ in the dropdown menu.
Step 3: Edge Enhancement
Once your image appears in the editor timeline, proceed to sharpen the edges of the face and body of the portrait. Start with navigating to and clicking on the ‘Filter’ option, followed by tapping on ‘Filter Gallery’ and selecting the ‘Artistic’ folder, where you need to choose the ‘Poster Edges’ option. Observe the effect of these setting on the portrait and make necessary changes.
Step 4: Background Setting
Ensure that the background and foreground of your image are set to white and black colors respectively. If not, proceed to adjust the same as required.
Step 5: Distorting the Edges
You now need to introduce some distortion in the edges of your portrait. Navigate to the ‘Filter’ option again, open the ‘Filter Gallery’ and choose ‘Torn Edges’ from the menu that drops down. Select the desired parameter values in accordance with your creative suitability.
Step 6: Using the Channels Panel
The next step is to select and copy your portrait using the ‘Ctrl + A’ and Ctrl + C commands respectively. Navigate to the ‘Channels’ panel at the right of the Photoshop workspace. At the panel’s bottom right, proceed with creating a new channel. It will be assigned the name ‘Alpha 1’ by Photoshop, which you are most welcome to change.
Step 7: Color Inversion
When you finish creating the channel, use the ‘Ctrl + V’ command to paste your portrait in the same. Proceed with inverting the image colors by navigating to the ‘Image’ option, followed by choosing the ‘Adjustment’ and ‘Invert’ options from the consecutive drop downs. Now, make a selection of the ‘White’ regions of your portrait by pressing the ‘Ctrl’ key and clicking on the ‘Alpha 1 Channel thumbnail.
Step 8: Layer Creation
Navigate to the ‘Layers’ panel at the right of the Photoshop workspace, and click on the ‘New Layer’ icon for creating a fresh layer. Fill the just created layer with black color, either by pressing ‘g’ from your system’s keyboard, or using the ‘Paint Bucket’ tool. Don’t forget to assign a suitable name to the layer.
Repeat the above process to create a separate layer and e fill the same with white color. The layer creation process is essential to separate the white and black colors of the actual image.
Step 10: Layer Dragging
In the ‘Layers’ panel, drag the ‘Black’ layer above the ‘White’ one.
Step 11: Creating Additional Layers
You are now required to create three more layers, with the same process as for the above two, for adding effects to the Skin, Clothes and Teeth/Eyes of the portrait. When you finish creation, assign suitable names to the layers, followed by dragging them below the ‘Black’ one within the ‘Layers’ panel.
Step 12: Color Selection and Application
Choose the respective colors for the clothes, skin and teeth/eyes of the cartoonized edit. To proceed with color application, navigate to the toolbar at the left of the Photoshop workspace and choose the ‘Brush Tool’. Finally, choose a particular layer and apply careful brush strokes to add color to the specific area of the portrait that you wish to edit. Follow the same process to add colors to the remaining layers to get the desired result in all areas of your cartoonized edit.
Step 13: Using the Gradient Tool
Navigate to the ‘Layers’ panel again and create a new ‘Gradient’ layer to further enhance your creation. You now need to select the ‘Gradient Tool’ from the toolbar at the left of the Photoshop workspace. The ‘Gradient Editor’ pops up with the continuously running ‘Gradient Bar’, as soon as you make the selection. Double click on the gradient boxes at both ends to select them, followed by making your color choices. Tap on ‘OK’ when you are satisfied with your work.
Step 14: Filling the Gradients
To proceed with gradient filling, press and hold the mouse button on the image at the bottom left and continue to drag the cursor to its top right corner. Leave the mouse and navigate to the ‘Layers’ panel for dragging and dropping the ‘Gradient’ layer above the ‘White’ layer.
You are now done with the process of creating a caricature edit from a normal still portrait. Your final image output will appear something like the following:
Also read:
- Updated 2024 Approved How to Make Photo Motion Effect Online?
- Learn Simple Blender Rigging in Only 2 Minutes
- Updated In 2024, How to Find & Make Animated Christmas GIFs?
- A Beginners Guide to Explain What 3D Animation Is
- Updated How to Create Your Avatar Free for 2024
- Interesting Fundamentals and Ultimate Guide to Animated Characters Drawings for 2024
- New In 2024, 15 Best Stop Motion Animation Kits to Fuel Creativity
- New Great Guide for Beginners on 2D Animation Making
- Best 10 3D Text Animation Templates for 2024
- Updated The Best 8 Places for High-Quality Royalty Free Gifs (Paid and Free) for 2024
- New The Top Free 12 GIF Meme Maker at a Glance for 2024
- Updated Ways to Stop Animation From Looping in Unity for 2024
- New A Roster of 15 Top Disney Channel Cartoons
- Beginner Tutorial on Making Unity 2D Animation for 2024
- Simple Shortcut to Convert Videos to Gifs on iPhone for 2024
- New What This Post Can Teach You About Clay Animation
- In 2024, How to Make GIF Stickers for WhatsApp 100 The Easy Way
- New Secret Source to Make a Stop Motion Puppet
- In 2024, 5 Best Adobe Animate Courses & Classes | Beginners Complete Tutorial
- Updated 5 Foolproof Amazing Anime Text to Speech Tips for 2024
- New Before You Learn 3D Animation Some Things You Should Know for 2024
- Updated How to Make a 3D Cartoon of Yourself for 2024
- New What Is A GIF
- 10 Best Free GIF Apps for iPhone and iPad
- Updated In 2024, Best 10 Anime Series of All Time | Watch Anime Online
- Updated Incredible Ways to Find Suitable Animated Graphic Maker
- Updated Is It That Easy to Make My Animated Character
- Updated You Can Turn a TikTok Into a GIF Now. Heres How for 2024
- How to Mirror PC to Apple iPhone 15 Pro? | Dr.fone
- Top IMEI Unlokers for Your Motorola G54 5G Phone
- In 2024, How to Fix Pokemon Go Route Not Working On Oppo A59 5G? | Dr.fone
- Android Safe Mode - How to Turn off Safe Mode on Itel S23? | Dr.fone
- How to Reset Asus ROG Phone 8 without Losing Data | Dr.fone
- How do I play MKV movies on 14?
- In 2024, Complete Guide For Apple iPhone 13 Pro Max Lock Screen | Dr.fone
- In 2024, How to Fake GPS on Android without Mock Location For your Oppo Reno 10 5G | Dr.fone
- 9 Quick Fixes to Unfortunately TouchWiz has stopped Of Honor X7b | Dr.fone
- All You Need To Know About Mega Greninja For Nubia Red Magic 8S Pro | Dr.fone
- How to restore wiped call history on Xperia 5 V?
- In 2024, 4 Ways to Transfer Music from Tecno Spark 10C to iPhone | Dr.fone
- In 2024, What Legendaries Are In Pokemon Platinum On Sony Xperia 1 V? | Dr.fone
- How to Unlock Apple iPhone XS Max With an Apple Watch & What to Do if It Doesnt Work | Dr.fone
- Remove Google FRP Lock on Realme V30T
- Title: Updated 2024 Approved You Can Turn a TikTok Into a GIF Now
- Author: Elon
- Created at : 2024-06-15 11:22:43
- Updated at : 2024-06-16 11:22:43
- Link: https://animation-videos.techidaily.com/updated-2024-approved-you-can-turn-a-tiktok-into-a-gif-now/
- License: This work is licensed under CC BY-NC-SA 4.0.
