
:max_bytes(150000):strip_icc():format(webp)/sb10069770n-003-56a104403df78cafdaa7dd48-ba41d70c51114343aaa38409d9cdfc3f.jpg)
Updated Can I Still Do Animated Logo Design Without Design Skills?
Can I Still Do Animated Logo Design Without Design Skills?
Can I Still Do Animated Logo Design Without Design Skills?
An easy yet powerful editor
Numerous effects to choose from
Detailed tutorials provided by the official channel
In the fast-moving world, you cannot afford to keep your brand design still as it doesn’t influence the audience toward your business. It is pretty essential to create an impressive and animated logo for the brand.
This article will discuss how you can create an animated logo design even if you do not have design skills.
In this article
01 [This is What a Conventional Professional Animation Designer Should Be](#Part 1)
02 [Your Number 1 Tip to Do Animated Logo Design Without Design Skills](#Part 2)
03 [This is the Smartest Tip Ever About Filmora](#Part 3)
Part 1 This is What a Conventional Professional Animation Designer Should Be
01How to Make an Animated Logo for an Animation Designer?
There are various online logo maker tools available to create an animated logo design for your brand easily. There are several online logo makers available from which you can easily create an effective animated logo for your business. We will discuss Canva online logo maker for a better understanding of making the online animated logo design for the brand. All you have to do is to follow the simple steps listed below.
Method to make the Animated Logo Design for your Business
Step 1: Initiate with Canva
Initially, you need to launch Canva and choose “Animated Logos” for the library of effectively and professionally designed templates through which you can create inspiration and further customize it accordingly.
Step 2: Choose the appropriate design as per nature of business
Now, you have to select any one of the designed templates that seem closest to the look you are looking to give to your brand. All the templates available are professionally designed and fully customizable. You can even initiate the process with the blank design template from scratch. It would help if you made sure that you were looking to create a simple or complex design for the logo.
![]()
Step 3: Customization of the animated logo
Now is the time to customize your logo. You can use a lot of creativity and skills. Think about your business and how the logo should and take help of the font styles, design colors, font size, video background, and text to bring out the best in your animated logo design. Look for what effect you want for the logo design. Apart from this, it is better to animate the text and elements separately or set the complete design into motion. After successfully editing the design of the logo, you need to proceed to the next step listed below.
![]()
Step 4: Download the file in required format
When you are satisfied with the logo animation design, you need to save it. Also, you can download it into high-resolution either in MP4 videos or GIF files as per your choice. With MP4 file, you will need to include the audio files; however, if you choose GIF files, it will provide you with brief and compressed clips with no audio.
![]()
Step 5: Include the file to your various visual branding media
Lastly, you need to recall and recognize the brand by employing an innovative animated logo in different visual media like social media accounts, websites, and various advertising and promo videos. After making a creative animated logo design, you can use it on your website or different social accounts to attract your business audience.
02How Much Does a Professional Animated Logo Cost?
The cost for the professional animated logo is not fixed, as it depends on the work you have done while making a logo for your brand. In general words, it can be said that the price for animated logo design is anywhere from $0 to $1000. However, if you have a small firm or startup looking to get a quality design, it will cost you between $300-$1300. Suppose you have a large-scale business and are looking to replace the traditional logo design with a customized animated logo. In that case, you will be required to hire a professional logo designer who will look after the design and make it creative.
Part 2 Your Number 1 Tip to Do Animated Logo Design Without Design Skills
011. 5 Tools You Need to Make an Animated Logo
When looking to create an animated logo design free for your social media account or website, you need to understand that you will require some tools to create it impressive and professional. The 5 tools or the websites used for making the animated logo design are listed below:
● Canva
● Filmora
● Designhill
● Squarespace
● Hatchful
025 Tips to Animate a Logo
● Make sure to use images that include transparent background
You need to make sure that when you upload any images or illustrations, it must include a transparent background so that you will be able to make a seamless animation logo without having pesky color and look attractive to the audience.
![]()
● Select the suitable template for the business
You will discover several template options available while using the animated logo designer; however, you need to make sure that chosen template must align with the business nature. For example, if you sell organic products, you need to choose the environment design template.
![]()
● Make use of masks appropriately
A mask is defined as the container for the photos. The logo design maker service provides interesting masks in different shapes to make a stunning and appealing animated logo after effects. You are required to use masks with photos, solid color, and shaded background.
● Keep it simple and short
Always try to make logo design short and straightforward! If you are using too many effects and colors in the logo design, it turns complex for the audience.
![]()
● Create an impact on the audience
To impact the audience, you need to make sure that the animation doesn’t last longer than 3-4 seconds. The templates collections of the different logo design makers are perfectly timed; therefore, there is no need to worry about making long animation.
Part 3 This is the Smartest Tip Ever About Filmora
01What’s Filmora?
![]()
Wondershare Filmora is video editing software available on Wondershare that facilitates you to explore creativity and make the cinematic magic regarding the professionally designed videos. This tool comprises a wide range of visual effects, video editing features, and motion graphics, making it the most preferred and ideal tool for video editing purposes. If you are looking to use the tool, all you have to do is download the Filmora software on your Windows or Mac system. After downloading the software, please install the program, run it and start using it.
Wondershare Filmora
Power Up Your Story with Filmora. Professional video editing is made easy.
Requirement
Windows- Win 8 or later (64 bit OS) and MAC- macOS X 10.13 or later.
The state-of-art feature of the tool makes it one of the most preferred tools for video editing, especially for the filmmaker and video editors.
02Is It Possible to Add a Video to the Animated Logo?
Yes, you will include video to the animated logo by selecting the “Video” tab. Along with such, add it to a text or make use of them as the background. You also need to understand that such videos are accessible to Filmora Pro members.
03Is the Music Available on the Asset Library Royalty-free?
No, if you are using royalty- free assets you are required to pay for getting the access…
04How to Make an Animated Video in a Snap?
If you are looking to create an animated video in a snap, you need to follow the below steps:
Step 1: Choose the incredible tool for making animated videos: You need to download the tool and register your account.
Step 2: Select a well-made animation template: Select the template from the library of the tool and launch your trip of creation.
Step 3: Drag and drop: Drag and drop the content to the canvas and customize every aspect of the video with complete flexibility.
Step 4: Download and share: Download your creation to the device and also remember to share it on your social media account for better reach.
Key Takeaways from This Episode
● Filmora makes the video editing experience more engaging and hassle-free. It can be easily downloaded on your Window or Mac System by visiting the Wondershare official website. It includes several editing options which help you to create an engaging animated video.
● You can make animated logo designs even if you don’t have design skills by choosing the online logo design maker over the Internet. The template will be initially provided to you; all you have to do is select the correct template following the nature of your business.
● You can easily add multimedia files like audio and video to your animated logo design by selecting the “Video” tab. Along with, such add it to a text or make use of them as the background. Therefore, it can be concluded that you can easily create an animated logo design without design skills and give your brand professional and valued recognition.
● If you have any recommendations or doubts regarding the discussion, please let us know by commenting on the box below.
Top 12 Video to GIF Converters [High Quality] to Check Out
Top 12 Video to GIF Converters [High Quality] to Check Out
An easy yet powerful editor
Numerous effects to choose from
Detailed tutorials provided by the official channel
GIFs are images with looping animations for a few seconds and are used a lot over social media sites and other online platforms. There are several sites from where you can download readymade GIFs.
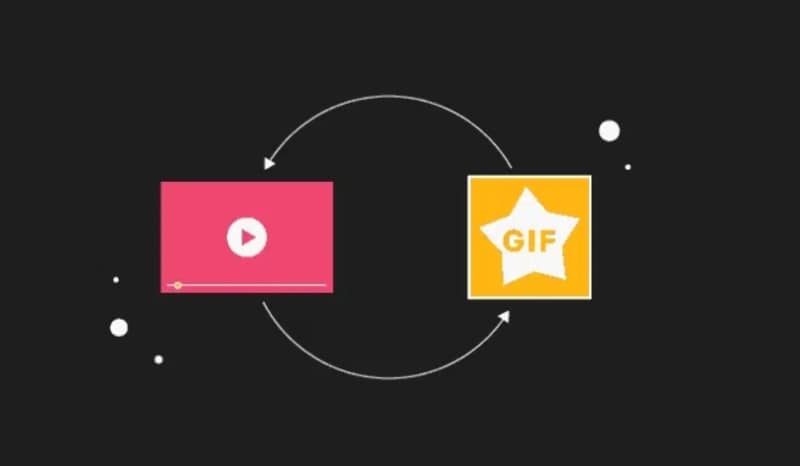
Alternatively, there are countless tools using which customized GIFs can be created from videos. So, if you too are looking for video to GIF converter high quality keep reading.
In this article
01 [The Difference Between A Video And A Gif](#Part 1)
02 [Top 12 Video to GIF Converters](#Part 2)
Part 1 The Difference Between A Video And A Gif
A GIF is a lot in use these days over social media platforms, and other online sites. Standing for Graphics Interchange Format, a GIF is basically a looping animation or a video that has a sequence of frames or images.
Though a lot of people can consider a GIF as a short video, there are a few key differences between the two. The first one lies in the name extension. A GIF file is saved as .gif while a video can be saved into several formats like .mp4, .mov, and more.
A video contains visual information having good quality frames as well as sound while a GIF is a short animation that uses some specific information created from a sequence of frames. Moreover, a GIF does not have a sound and the size is also very small.
Part 2 Top 12 Video to GIF Converters
An array of online and desktop tools is available to convert video to GIF high quality. We have shortlisted the top ones as below.
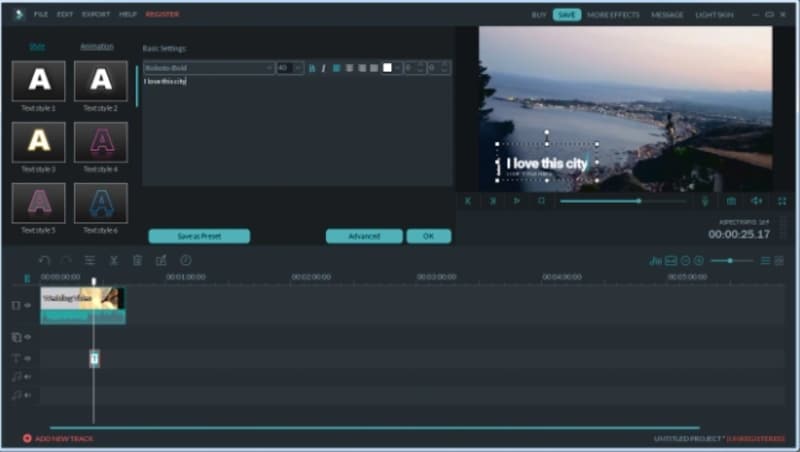
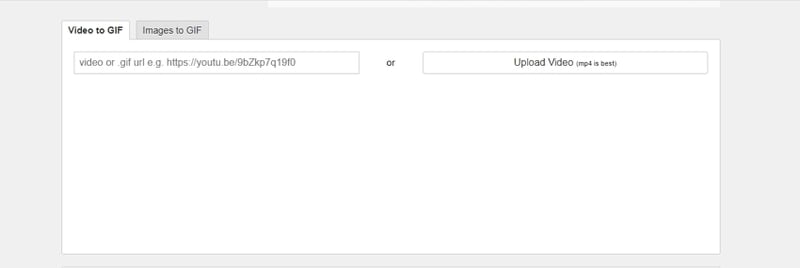
01**Wondershare Filmora Video Editor **
If you are looking for software that lets you create an excellent GIF in a hassle-free manner, Wondershare Filmora is the best choice. This professional software comes with multiple editing and customization capabilities for creating a desired animated file. You can not only create GIFs, but perform a host of additional functions using the tool like video editing, music editing, and more. Once downloaded on your Windows or Mac systems, the software is all set to work as desired without any limitations.
Wondershare Filmora
Get started easily with Filmora’s powerful performance, intuitive interface, and countless effects!
Try It Free Try It Free Try It Free Learn More >

Pros:
● Support to almost all media formats for high quality video to GIF conversion.
● A wide range of editing and customization options are supported.
● Works as a complete video editing tool.
Cons:
● Paid software
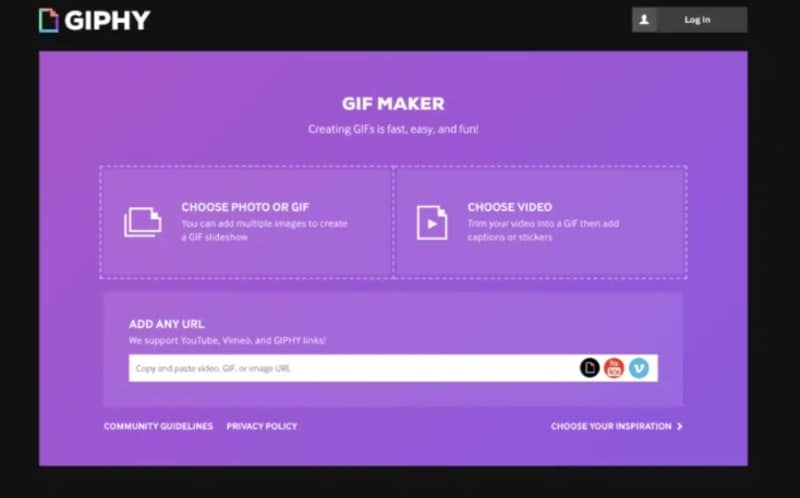
02Giphy
When it comes to GIFs, GIPHY is one of the most widely used tools. The tool allows you to create GIFs not only from the locally saved videos but also from YouTube, Vimeo, and other third-party platforms. There are multiple features for creating GIFs using this tool like selecting the length of the GIF, adding captions, text, frame of the GIF, and more. Not only videos, but the software also allows creating GIFs using multiple static photos.
Pros:
● Create GIFs from local as well as online videos
● User-friendly interface
● Support to multiple platforms and OS
Cons:
● The searching function is not very effective.
● Need to sign-up to use the tool.
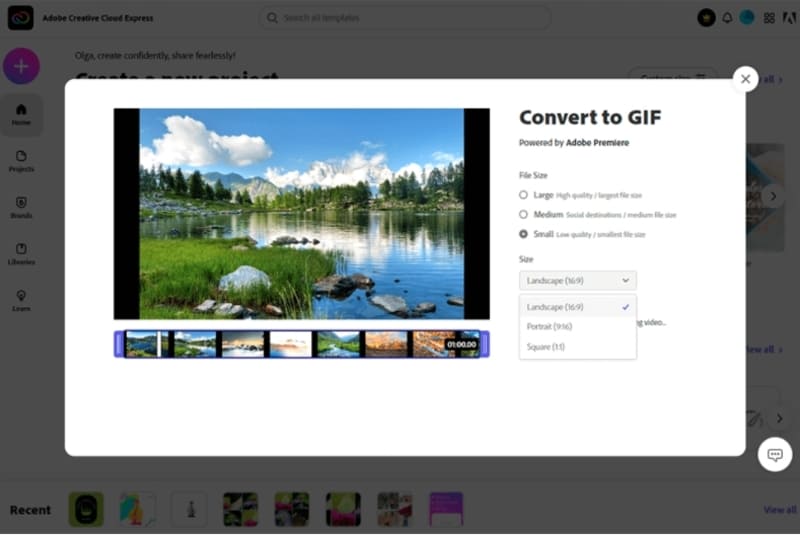
03Adobe Creative Cloud Express
This is a free video conversion tool that allows creating a GIF from videos in an array of formats. The tool gives you the freedom to choose your GIF size option that includes square, portrait, and landscape. Additionally, you can also select the quality of the GIF. Tools for adjusting and editing several parameters of the GIF are also supported by the software.
Pros:
● Allows creating GIFs in 3 size and multiple quality
● Created GIFs can be shared directly to social networking sites.
● Several editing options are available.
Cons:
● Issues of lags and bugs occasionally
● There are no guides
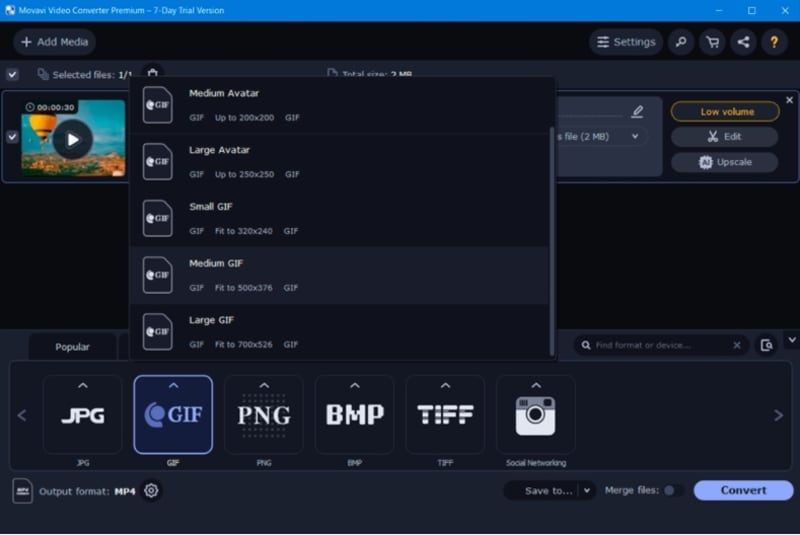
04Movavi
This is a reliable and widely used video editing tool that supports multiple functions including video to GIF conversion. Several useful functions are supported by the software like batch file processing, easy and quick GIF creation, editing options, and more. The tool is available for multiple platforms as well as for different OS.
Pros:
● Support to a wide range of formats
● Multiple editing options
● Available for different platforms and OS
Cons:
● Need to purchase the software after the limited trial period expires.
● The rendering is slow.
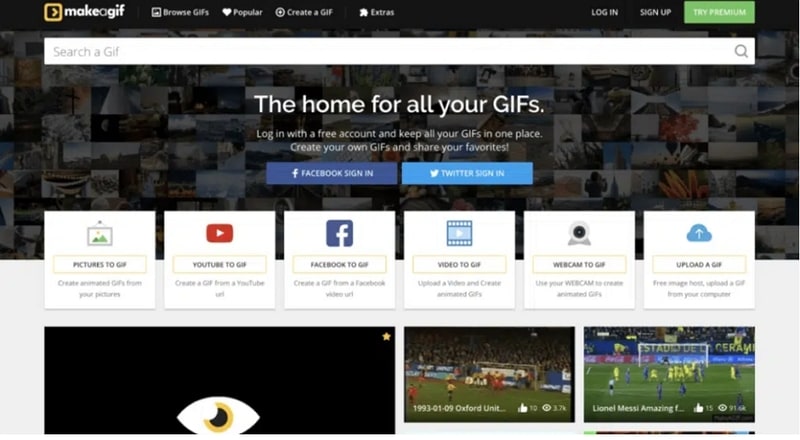
05MakeAGIF
As the name suggests this software is a GIF-making tool that not only converts your videos into a GIF but virtually anything like a collection of pictures, YouTube clips, Facebook clips, and much more. Using the tool you can add captions, stickers, and a lot of other filters to the created GIF. You can even adjust the speed of the GIF and also select the start and the stop time.
Pros:
● Allows creating a GIF from videos, images, URLs, clips, and others.
● Multiple options for GIF customization are available.
● Offers a huge library of GIFs as well.
Cons:
● The free version processes files with a watermark.
● The site has annoying ads.
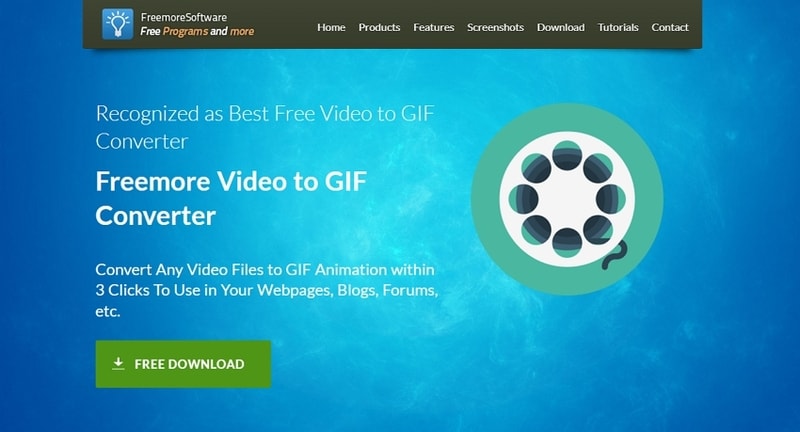
06Freemore Video to GIF Converter
Using this software, videos can be converted into GIFs in a few simple steps. You can also select the frames and also adjust the height and the width of the frames as needed. All key video formats like MP4, MOV, MPEG, and others are supported by the tool. The interface of the tool is simple and the process of creating a GIF is fast.
Pros:
● Free to use software
● Support to multiple video formats
● Allows selecting the exact frames and the width and height of the GIF.
Cons:
● No support for Mac systems.
● Limited customization options as compared to other sites.
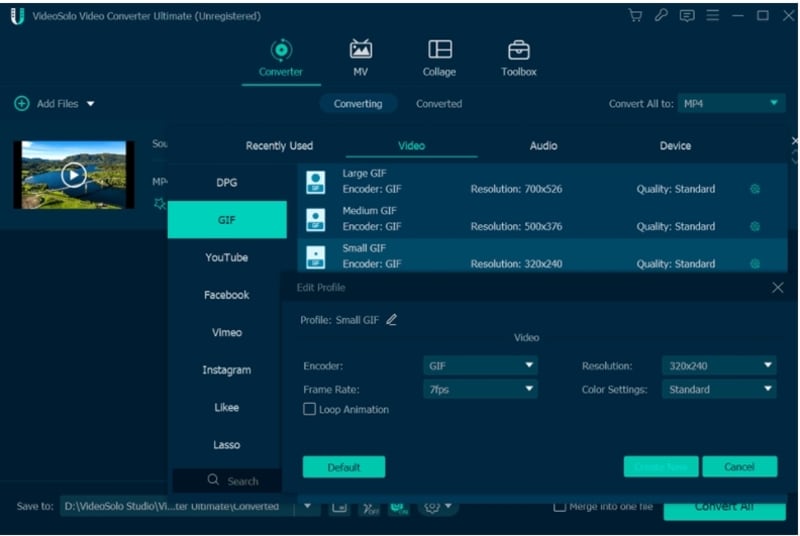
07VideoSolo Video Converter Ultimate
Multiple options for creating a GIF are supported by this software that also lets you convert your videos as well as edit them. Using the editing options, you can choose a specific part of the clip, trim a longer video, or can also join multiple clips for creating a GIF. Using the software you can adjust the color grading, saturation, contrast, and other parameters. Also, you can add a picture or text to the GIF to make it look interesting.
Pros:
● Support to a wide range of formats
● Multiple editing options.
● Fast processing speed.
Cons:
● Locating features can be a complicated task.
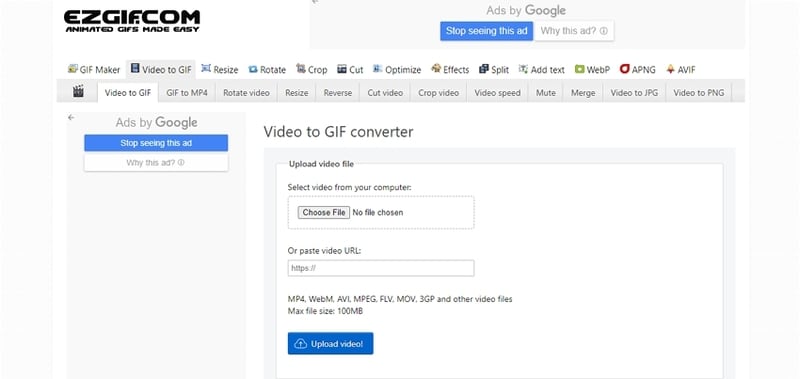
08Ezgif
This is a free online tool for creating GIFs and needs no software download or installation. Simple to use, the program allows adding videos in key formats like MP4, MOV, 3GP, and others for creating a GIF. Local video as well as its URL can be added. The tool allows to trim the unnecessary parts of the video and if not specified the GIF is created using the first 5 seconds of the file.
Pros:
● Free to use online tool.
● Add local videos or online URLs for creating a GIF.
● Allows to trim and crop the added files.
Cons:
● Internet dependency
● The maximum supported file size is 100MB.
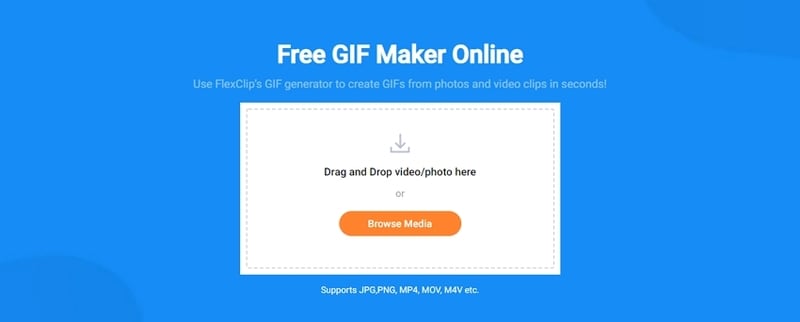
09FlexClip GIF Maker
Using this browser-based tool, videos and images can be quickly converted to GIFs. All the popular media formats are supported by the tool for processing and the interface is user-friendly. Transitions and captions can also be added to GIFs to make them eye-catchy. Other customization options include adjusting the frame, speed, and other parameters.
● No software download or installation is needed.
● Support a wide range of formats.
● Multiple customization options are supported.
Cons:
● Limitation to the video size that can be added.
● Dependency on internet connectivity.
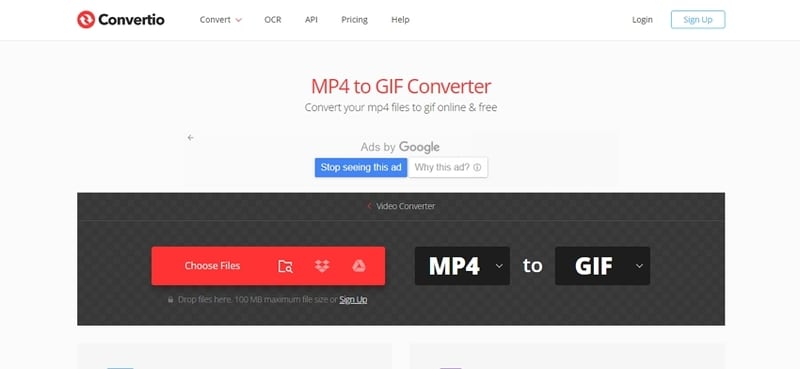
10Convertio
This is a popular online tool that supports video conversion to an array of formats including GIF. Not only local, videos from Google Drive as well as Dropbox can also be added to the interface for processing. If you want a simple tool to create a GIF without much customization and editing, Convertio is the best. The processed files can be saved to the local device or cloud storage.
Pros:
● Add videos from the local device, Google Drive, as well as Dropbox.
● Simple user-interface.
● Processed files can be downloaded and saved to the system as well as the cloud.
Cons:
● The file size limitation of 100MB.
● No option to edit or choose any file specification.
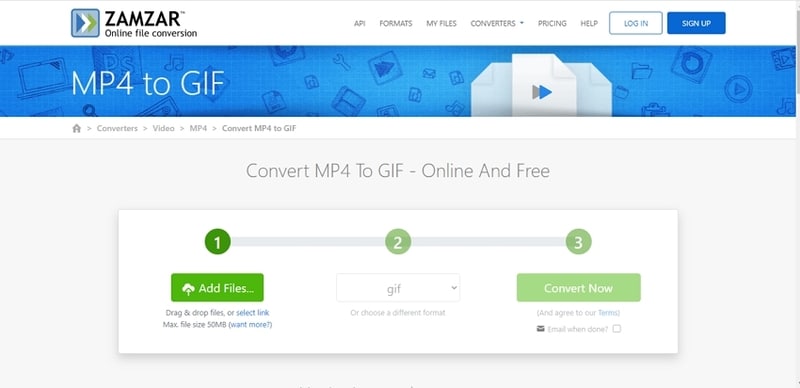
11Zamzar
For a free and quick conversion of videos to GIF, this is an excellent online tool to consider. The process is user-friendly where you just have to add the video or its link and choose GIF as the target format. The tool will automatically convert the added video to a GIF that can be downloaded to the system or can also be sent through an email.
Pros:
● Free and simple to use the tool.
● Support to multiple video formats.
● Processed GIFs can be saved locally or the link can be sent through an email.
Cons:
● Maximum file size support is 50MB.
● No option for selecting any file parameters.
12ImgFlip
Using this online tool, videos and images can be converted to a GIF file quickly. You can either add the media files from your system or also use their link. The tool supports multiple editing and customization options like selecting the size, trimming the video, selecting FPS, adding titles, rotating, and more. You can also save the template of the created file for future use.
Pros:
● GIFs can be created from videos and images.
● Multiple file customization and editing options are supported.
● Multiple options to save, download, and share the created GIF.
Cons:
● The file size limitation of 100MB.
● Internet dependency.
● Key Takeaways from This Episode →
●GIFs are a lot in use these days to express emotion, feelings, or a situation.
●There are several online as well as desktop tools available to convert video to GIF without losing quality.
●Wondershare Filmora is one of the best tools in the category that is simple yet functional and results in high-quality GIF files.
GIFs are images with looping animations for a few seconds and are used a lot over social media sites and other online platforms. There are several sites from where you can download readymade GIFs.
Alternatively, there are countless tools using which customized GIFs can be created from videos. So, if you too are looking for video to GIF converter high quality keep reading.
In this article
01 [The Difference Between A Video And A Gif](#Part 1)
02 [Top 12 Video to GIF Converters](#Part 2)
Part 1 The Difference Between A Video And A Gif
A GIF is a lot in use these days over social media platforms, and other online sites. Standing for Graphics Interchange Format, a GIF is basically a looping animation or a video that has a sequence of frames or images.
Though a lot of people can consider a GIF as a short video, there are a few key differences between the two. The first one lies in the name extension. A GIF file is saved as .gif while a video can be saved into several formats like .mp4, .mov, and more.
A video contains visual information having good quality frames as well as sound while a GIF is a short animation that uses some specific information created from a sequence of frames. Moreover, a GIF does not have a sound and the size is also very small.
Part 2 Top 12 Video to GIF Converters
An array of online and desktop tools is available to convert video to GIF high quality. We have shortlisted the top ones as below.
01**Wondershare Filmora Video Editor **
If you are looking for software that lets you create an excellent GIF in a hassle-free manner, Wondershare Filmora is the best choice. This professional software comes with multiple editing and customization capabilities for creating a desired animated file. You can not only create GIFs, but perform a host of additional functions using the tool like video editing, music editing, and more. Once downloaded on your Windows or Mac systems, the software is all set to work as desired without any limitations.
Wondershare Filmora
Get started easily with Filmora’s powerful performance, intuitive interface, and countless effects!
Try It Free Try It Free Try It Free Learn More >
Pros:
● Support to almost all media formats for high quality video to GIF conversion.
● A wide range of editing and customization options are supported.
● Works as a complete video editing tool.
Cons:
● Paid software
02Giphy
When it comes to GIFs, GIPHY is one of the most widely used tools. The tool allows you to create GIFs not only from the locally saved videos but also from YouTube, Vimeo, and other third-party platforms. There are multiple features for creating GIFs using this tool like selecting the length of the GIF, adding captions, text, frame of the GIF, and more. Not only videos, but the software also allows creating GIFs using multiple static photos.
Pros:
● Create GIFs from local as well as online videos
● User-friendly interface
● Support to multiple platforms and OS
Cons:
● The searching function is not very effective.
● Need to sign-up to use the tool.
03Adobe Creative Cloud Express
This is a free video conversion tool that allows creating a GIF from videos in an array of formats. The tool gives you the freedom to choose your GIF size option that includes square, portrait, and landscape. Additionally, you can also select the quality of the GIF. Tools for adjusting and editing several parameters of the GIF are also supported by the software.
Pros:
● Allows creating GIFs in 3 size and multiple quality
● Created GIFs can be shared directly to social networking sites.
● Several editing options are available.
Cons:
● Issues of lags and bugs occasionally
● There are no guides
04Movavi
This is a reliable and widely used video editing tool that supports multiple functions including video to GIF conversion. Several useful functions are supported by the software like batch file processing, easy and quick GIF creation, editing options, and more. The tool is available for multiple platforms as well as for different OS.
Pros:
● Support to a wide range of formats
● Multiple editing options
● Available for different platforms and OS
Cons:
● Need to purchase the software after the limited trial period expires.
● The rendering is slow.
05MakeAGIF
As the name suggests this software is a GIF-making tool that not only converts your videos into a GIF but virtually anything like a collection of pictures, YouTube clips, Facebook clips, and much more. Using the tool you can add captions, stickers, and a lot of other filters to the created GIF. You can even adjust the speed of the GIF and also select the start and the stop time.
Pros:
● Allows creating a GIF from videos, images, URLs, clips, and others.
● Multiple options for GIF customization are available.
● Offers a huge library of GIFs as well.
Cons:
● The free version processes files with a watermark.
● The site has annoying ads.
06Freemore Video to GIF Converter
Using this software, videos can be converted into GIFs in a few simple steps. You can also select the frames and also adjust the height and the width of the frames as needed. All key video formats like MP4, MOV, MPEG, and others are supported by the tool. The interface of the tool is simple and the process of creating a GIF is fast.
Pros:
● Free to use software
● Support to multiple video formats
● Allows selecting the exact frames and the width and height of the GIF.
Cons:
● No support for Mac systems.
● Limited customization options as compared to other sites.
07VideoSolo Video Converter Ultimate
Multiple options for creating a GIF are supported by this software that also lets you convert your videos as well as edit them. Using the editing options, you can choose a specific part of the clip, trim a longer video, or can also join multiple clips for creating a GIF. Using the software you can adjust the color grading, saturation, contrast, and other parameters. Also, you can add a picture or text to the GIF to make it look interesting.
Pros:
● Support to a wide range of formats
● Multiple editing options.
● Fast processing speed.
Cons:
● Locating features can be a complicated task.
08Ezgif
This is a free online tool for creating GIFs and needs no software download or installation. Simple to use, the program allows adding videos in key formats like MP4, MOV, 3GP, and others for creating a GIF. Local video as well as its URL can be added. The tool allows to trim the unnecessary parts of the video and if not specified the GIF is created using the first 5 seconds of the file.
Pros:
● Free to use online tool.
● Add local videos or online URLs for creating a GIF.
● Allows to trim and crop the added files.
Cons:
● Internet dependency
● The maximum supported file size is 100MB.
09FlexClip GIF Maker
Using this browser-based tool, videos and images can be quickly converted to GIFs. All the popular media formats are supported by the tool for processing and the interface is user-friendly. Transitions and captions can also be added to GIFs to make them eye-catchy. Other customization options include adjusting the frame, speed, and other parameters.
● No software download or installation is needed.
● Support a wide range of formats.
● Multiple customization options are supported.
Cons:
● Limitation to the video size that can be added.
● Dependency on internet connectivity.
10Convertio
This is a popular online tool that supports video conversion to an array of formats including GIF. Not only local, videos from Google Drive as well as Dropbox can also be added to the interface for processing. If you want a simple tool to create a GIF without much customization and editing, Convertio is the best. The processed files can be saved to the local device or cloud storage.
Pros:
● Add videos from the local device, Google Drive, as well as Dropbox.
● Simple user-interface.
● Processed files can be downloaded and saved to the system as well as the cloud.
Cons:
● The file size limitation of 100MB.
● No option to edit or choose any file specification.
11Zamzar
For a free and quick conversion of videos to GIF, this is an excellent online tool to consider. The process is user-friendly where you just have to add the video or its link and choose GIF as the target format. The tool will automatically convert the added video to a GIF that can be downloaded to the system or can also be sent through an email.
Pros:
● Free and simple to use the tool.
● Support to multiple video formats.
● Processed GIFs can be saved locally or the link can be sent through an email.
Cons:
● Maximum file size support is 50MB.
● No option for selecting any file parameters.
12ImgFlip
Using this online tool, videos and images can be converted to a GIF file quickly. You can either add the media files from your system or also use their link. The tool supports multiple editing and customization options like selecting the size, trimming the video, selecting FPS, adding titles, rotating, and more. You can also save the template of the created file for future use.
Pros:
● GIFs can be created from videos and images.
● Multiple file customization and editing options are supported.
● Multiple options to save, download, and share the created GIF.
Cons:
● The file size limitation of 100MB.
● Internet dependency.
● Key Takeaways from This Episode →
●GIFs are a lot in use these days to express emotion, feelings, or a situation.
●There are several online as well as desktop tools available to convert video to GIF without losing quality.
●Wondershare Filmora is one of the best tools in the category that is simple yet functional and results in high-quality GIF files.
How to Create an Animated Sticky Navbar
How to Create an Animated Sticky Navbar
An easy yet powerful editor
Numerous effects to choose from
Detailed tutorials provided by the official channel
While there are different ways to enhance the overall user experience of a website, using an animated sticky navbar is the most ideal solution to get the job done.
In this article, we’ll walk you through some of the top benefits of animated sticky navbars and why you should incorporate them in your website’s design. So, without any further ado, let’s get started.
In this article
01 [What is an Animated Sticky Navbar?](#Part 1)
02 [What Are the Benefits of An Animated Sticky Navbar?](#Part 2)
03 [8 Fixed Sticky Navbars That’ll Grab Your Attention](#Part 3)
04 [Want To Create More Professional and Amazing Animations?](#Part 4)
Part 1 What is an Animated Sticky Navbar?
To put it in simple words, an animated sticky navbar is a dedicated header that stays fixed on the website, irrespective of the web page you’re accessing. Ideally, designers use a sticky navbar to allow website visitors to visit any web page within 2-3 clicks.
The animated navbar also incorporates a few animations that uplift the overall visual appearance of the website. It doesn’t matter if you are planning to design an e-commerce store or a simple service-based website, the animated navbar will allow you to make your website more user-friendly for the end-users.
Part 2 What Are the Benefits of An Animated Sticky Navbar?
Now, there are endless benefits of using an animated sticky navbar on your website. However, these are a few factors that make animated sticky navbars the most useful on-page element of a website.
01Quick Navigation
As we mentioned earlier, easy navigation is one of the key features of a sticky navbar. You can place links to all the other web pages within the navbar in the form of drop-down menus and ensure that users can visit any webpage within a single click. This will enhance the overall user experience and you’ll be able to encourage one-time visitors to spend more time on your website. Using the navbar will also improve your search engine rankings because the search engine crawler will be able to crawl all the web pages easily.
02Aesthetically Pleasing
The way your website looks has a huge impact on whether you’re going to retain the website visitors or not. An animated sticky navbar will make your website look aesthetically pleasing and captivate the visitors more effectively. You can add different animations and visual elements to the navbar and make them match your website’s overall color scheme.
03Better User Experience
Another reason why you would want to place an animated sticky navbar on your website is that it’ll uplift the overall user experience for the website visitors. From finding easy navigation to all the web pages to ensuring that all the web pages offer the same browsing experience, a navbar will make your website engaging and it’ll become easier to captivate the users.
Part 3 8 Fixed Sticky Navbars That’ll Grab Your Attention
So, now that you are familiar with the benefits of animated sticky navbars, here are the top examples that explain the best ways to use navigation bars on a website.
01Search Engine Journal
Search Engine Journal is an online knowledge hub where users can find every bit of information about digital marketing. The website publishes regular guides on SEO, PPC, Social Media Marketing, etc to help people get detailed insight into the benefits of digital marketing.
Since there are thousands of articles on the website, it could easily get chaotic for users to find the guide they are looking for. But, with an easy-to-navigate animated sticky navbar, Search Engine Journal has divided all the articles into their respective categories using simple drop-down menus
02AirBnB

Airbnb is one of the most popular platforms to find vacation homes in a different city/country to enjoy your holiday in complete comfort. One of the major reasons behind AirBnB’s immense success is its high-quality and easy-to-use website.
As you continue to scroll down the website, the sticky navbar stays fixed at the top with a dedicated search bar and a “Become a Host” Call-to-Action button. This way it doesn’t matter if a user is looking for a place to rent or simply wants to become a host, they’ll be able to get the job done within a few clicks.
03Graz Secrets
Graz Secrets is the perfect example of how you can use a sticky bar in the simplest manner and still grab users’ attention easily. The website uses a black-colored simple navigation bar with a “Download Now” button at the center. The button continues to illuminate due to the background animation even if you scroll to the end of the web page. The overall black design of the navbar adds more visual factors to the website and engages the visitors more effectively.
04Adobe
Adobe’s navigation bar is also a great example of how to use sticky navbars to uplift the overall user experience for website visitors. Even though the website doesn’t stay at its place when you scroll down, it immediately comes back as soon as you scroll up once.
Moreover, the navbar has links to all the Adobe products, which means users can visit any product page they want right away. It’s also worth understanding that Adobe has added a dedicated “Sign-in” button in the navigation bar to allow visitors to sign in to the Adobe cloud account straightaway.
05Daniel Filler
Daniel Filler’s website uses the navigation bar in the simplest way possible - yet manages to draw the viewers’ attention without any hassle. The designers have placed a pretty small navigation bar with links to all the important web pages.
The smaller size of the navigation bar doesn’t make the website look cluttered and still manages to do its job easily. In addition to this, the designers have also placed a dedicated logo and the “Up” button to allow users to directly go to the top of the web page with one click.
06Mind Inventory
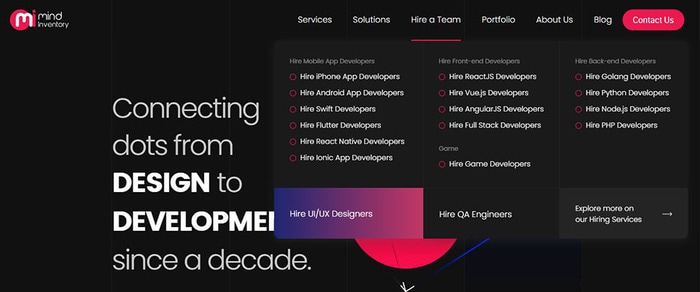
Mind Inventory is an Indian software development company working towards designing high-quality websites and mobile applications. Their website is a perfect example of how one should use navigation bars in a website to improve the overall design scheme. In addition to placing links to all the important web pages, Mind Inventory has also introduced dedicated animations to make the drop-down menu appearance more pleasing.
07FHOKE
FHOKE’s navigation bar is one of the most aesthetically pleasing animated navbars that you can replicate on your website to maximize its performance. A white-colored navbar automatically turns gray as soon as you scroll down to maintain the contrast of the entire web page.
There are dedicated links to other web pages as well. However, you won’t find any drop-down menus. In case your website also has limited web pages, you can also replicate this animated sticky navbar to make it more appealing.
08H&M
Last but certainly not least, H&M is a clothing brand that’s popular across the globe. At first, H&M’s official website may look pretty basic, but its navigation bar is backed by a great marketing strategy. The bar contains all the product page categories that’ll direct you to any product page within a single click.
Key Takeaways from This Episode
● Animated sticky navbars are one of the most useful on-page elements that could help you grab user’s attention easily
● There are different ways to use animated navbars and it mainly depends on your website requirements.
● Like your website, you can also uplift the quality of your videos by adding animations and high-quality transitions
While there are different ways to enhance the overall user experience of a website, using an animated sticky navbar is the most ideal solution to get the job done.
In this article, we’ll walk you through some of the top benefits of animated sticky navbars and why you should incorporate them in your website’s design. So, without any further ado, let’s get started.
In this article
01 [What is an Animated Sticky Navbar?](#Part 1)
02 [What Are the Benefits of An Animated Sticky Navbar?](#Part 2)
03 [8 Fixed Sticky Navbars That’ll Grab Your Attention](#Part 3)
04 [Want To Create More Professional and Amazing Animations?](#Part 4)
Part 1 What is an Animated Sticky Navbar?
To put it in simple words, an animated sticky navbar is a dedicated header that stays fixed on the website, irrespective of the web page you’re accessing. Ideally, designers use a sticky navbar to allow website visitors to visit any web page within 2-3 clicks.
The animated navbar also incorporates a few animations that uplift the overall visual appearance of the website. It doesn’t matter if you are planning to design an e-commerce store or a simple service-based website, the animated navbar will allow you to make your website more user-friendly for the end-users.
Part 2 What Are the Benefits of An Animated Sticky Navbar?
Now, there are endless benefits of using an animated sticky navbar on your website. However, these are a few factors that make animated sticky navbars the most useful on-page element of a website.
01Quick Navigation
As we mentioned earlier, easy navigation is one of the key features of a sticky navbar. You can place links to all the other web pages within the navbar in the form of drop-down menus and ensure that users can visit any webpage within a single click. This will enhance the overall user experience and you’ll be able to encourage one-time visitors to spend more time on your website. Using the navbar will also improve your search engine rankings because the search engine crawler will be able to crawl all the web pages easily.
02Aesthetically Pleasing
The way your website looks has a huge impact on whether you’re going to retain the website visitors or not. An animated sticky navbar will make your website look aesthetically pleasing and captivate the visitors more effectively. You can add different animations and visual elements to the navbar and make them match your website’s overall color scheme.
03Better User Experience
Another reason why you would want to place an animated sticky navbar on your website is that it’ll uplift the overall user experience for the website visitors. From finding easy navigation to all the web pages to ensuring that all the web pages offer the same browsing experience, a navbar will make your website engaging and it’ll become easier to captivate the users.
Part 3 8 Fixed Sticky Navbars That’ll Grab Your Attention
So, now that you are familiar with the benefits of animated sticky navbars, here are the top examples that explain the best ways to use navigation bars on a website.
01Search Engine Journal
Search Engine Journal is an online knowledge hub where users can find every bit of information about digital marketing. The website publishes regular guides on SEO, PPC, Social Media Marketing, etc to help people get detailed insight into the benefits of digital marketing.
Since there are thousands of articles on the website, it could easily get chaotic for users to find the guide they are looking for. But, with an easy-to-navigate animated sticky navbar, Search Engine Journal has divided all the articles into their respective categories using simple drop-down menus
02AirBnB
Airbnb is one of the most popular platforms to find vacation homes in a different city/country to enjoy your holiday in complete comfort. One of the major reasons behind AirBnB’s immense success is its high-quality and easy-to-use website.
As you continue to scroll down the website, the sticky navbar stays fixed at the top with a dedicated search bar and a “Become a Host” Call-to-Action button. This way it doesn’t matter if a user is looking for a place to rent or simply wants to become a host, they’ll be able to get the job done within a few clicks.
03Graz Secrets
Graz Secrets is the perfect example of how you can use a sticky bar in the simplest manner and still grab users’ attention easily. The website uses a black-colored simple navigation bar with a “Download Now” button at the center. The button continues to illuminate due to the background animation even if you scroll to the end of the web page. The overall black design of the navbar adds more visual factors to the website and engages the visitors more effectively.
04Adobe
Adobe’s navigation bar is also a great example of how to use sticky navbars to uplift the overall user experience for website visitors. Even though the website doesn’t stay at its place when you scroll down, it immediately comes back as soon as you scroll up once.
Moreover, the navbar has links to all the Adobe products, which means users can visit any product page they want right away. It’s also worth understanding that Adobe has added a dedicated “Sign-in” button in the navigation bar to allow visitors to sign in to the Adobe cloud account straightaway.
05Daniel Filler
Daniel Filler’s website uses the navigation bar in the simplest way possible - yet manages to draw the viewers’ attention without any hassle. The designers have placed a pretty small navigation bar with links to all the important web pages.
The smaller size of the navigation bar doesn’t make the website look cluttered and still manages to do its job easily. In addition to this, the designers have also placed a dedicated logo and the “Up” button to allow users to directly go to the top of the web page with one click.
06Mind Inventory
Mind Inventory is an Indian software development company working towards designing high-quality websites and mobile applications. Their website is a perfect example of how one should use navigation bars in a website to improve the overall design scheme. In addition to placing links to all the important web pages, Mind Inventory has also introduced dedicated animations to make the drop-down menu appearance more pleasing.
07FHOKE
FHOKE’s navigation bar is one of the most aesthetically pleasing animated navbars that you can replicate on your website to maximize its performance. A white-colored navbar automatically turns gray as soon as you scroll down to maintain the contrast of the entire web page.
There are dedicated links to other web pages as well. However, you won’t find any drop-down menus. In case your website also has limited web pages, you can also replicate this animated sticky navbar to make it more appealing.
08H&M
Last but certainly not least, H&M is a clothing brand that’s popular across the globe. At first, H&M’s official website may look pretty basic, but its navigation bar is backed by a great marketing strategy. The bar contains all the product page categories that’ll direct you to any product page within a single click.
Key Takeaways from This Episode
● Animated sticky navbars are one of the most useful on-page elements that could help you grab user’s attention easily
● There are different ways to use animated navbars and it mainly depends on your website requirements.
● Like your website, you can also uplift the quality of your videos by adding animations and high-quality transitions
How to Make a Video a Live Photo
How to Make a Video a Live Photo [2022]
An easy yet powerful editor
Numerous effects to choose from
Detailed tutorials provided by the official channel
Looking forward to turn your videos into live photos? Stay tuned to know how!
In this article
01 [How to Save Live Photos as a Video on iPhone/Ipad/Ipod](#Part 1)
02 [How to Turn a Video Into a Live Photo on iOS/Android](#Part 2)
Part 1 How to Save Live Photos as a Video on iPhone/Ipad/Ipod
Live photos are an amazing utility that allow you to save images as short moving snaps. Creating live photos is among the latest spunk of trendsetter stories, whether shared on social media platforms or created and saved just for fun, these definitely sound and look exciting, but that’s just one among the many things you can experiment on live photos.
Creating live photos takes you to a world of exciting features where you can explore your creativity in a number of ways, one of the easiest being turning live photos to videos. This comes handy when you need to share your live photos on platforms that do not have the compatibility to run live photos. If you are an iPhone user and wish to try your hands on experimenting with live photos, see through the following section of this article to learn how to turn live photo into video:
01Save as Video
Step 1: Launch the Photos App
In your iPhone, launch the ‘Photos’ app and navigate to ‘Albums’. All your live photos are present in the ‘Live Photos’ album.
Step 2: Format Selection
In latest versions (iOS 13v and above), you get a direct ‘Save as Video’ option in the ‘Photos’ application. Just click on that, and your live photo will be instantly saved in your iPhone gallery as a video. Here’s how you can use this feature:
● In the ‘Photos’ application, go to the ‘Live Photos’ album to select and open a desired live photo that you wish to convert to a video.
● Click on the ‘Share’ icon.

● Select ‘Save as Video’ from the drop down menu that displays sharing options.

Your created video will be saved in the ‘Photos’ application, next to the live photo you chose to turn into a video.
02iOS Shortcuts
This is a quicker way to save your live photos as videos in your iPhone. To use this feature, you first need to save the ‘Convert LivePhotos to Video’ shortcut in the ‘Shortcuts App’ gallery of your iPhone. You can do this by opening in your iOS internet browser.
Before using the above link, make sure to enable the ‘Allow Untrusted Shortcuts’ feature in your iPhone settings. You can do this as explained below:
● Reach to the ‘Settings’ application of your iPhone.
● Tap on ‘Shortcuts’ from the app’s welcome screen.
● Enable ‘Allow Untrusted Shortcuts’ with a toggle.

Having done that, here’s what you need to follow:
● Open the ‘Shortcuts’ application in your iOS device and tap the ‘Convert LivePhotos to Video’ shortcut.

● The ‘Live Photos’ album of your device opens up. Make a desired selection.

Your converted video gets automatically saved in the ‘Camera Roll’ folder of the ‘Photos’ application. Open the ‘Recents’ album to view your creation.
Part 2 How to Turn a Video Into a Live Photo on iOS/Android
Converting live photos to videos is fine, but going the other way round is all the more exciting and fun! You can even use these converted live photos as live screen wallpapers for your iOS and Android devices. If you are motivated to take up the excitement, look through the following methods to turn video into live photo:
01iOS Devices
Being an iOS user, you can choose among the following tools to convert video to live photo in your iPad, iPod or iPhone:
● Wondershare Filmora
Wondershare Filmora Video Editor is currently leading the software market among converter utilities that cater to various media conversion needs. This one is a free, smart, quick and convenient conversion tool that assures you of a hassle free video to live photo conversion in just a few clicks. What’s more interesting is, you don’t need to limit yourself with sticking to some particular video format, as Filmora conveniently supports almost all common ones.
Wondershare Filmora
Get started easily with Filmora’s powerful performance, intuitive interface, and countless effects!
Try It Free Try It Free Try It Free Learn More >
● IntoLive
This one is a third party application that allows you to convert videos into live photos, quickly and conveniently. This tool works well with devices having iOS 12.0 and later versions. All you have to do is follow the steps mentioned below:
Step 1:
Download the ‘IntoLive’ application from the Apple App Store.

Step 2:
Launch the same on your iOS device and grant the permission to access its ‘Photos’ Album.

Step 3:
In the ‘Videos’ section, choose the desired video that you wish to turn into a live photo.

Step 4:
An editor window will open up. Here, you can edit (cut, crop, trim, etc.) and add desired effects or filters to your selected video. Click on ‘Make’ at the top right when you finish the editing process.

Step 5:
If you have the paid version of the app, you can take up multiple repeats of your live photo; else you can use the free version with no repeats.

Step 6:
Once you are satisfied with the result, click on ‘Save Live Photo’. This will save your created live photo in your device’s gallery.

02VideoToLive
This is a free converter you can choose to turn video into live photo. This is a quite popular tool among iPhone users worldwide and is suitable for iOS versions 11.2 and later. You also have the liberty to share your created live photos on social media with this converter. Take the following steps to begin the conversion process:

Step 1:
Download the application from the Apple App Store and launch it on your iOS device.
Step 2:
Choose a video from your device gallery to convert it into a live photo.
Step 3:
In the video editor screen, crop the video to the preferred section that has to be converted into live photo. You can add video frames to your edited clip from the upper section of the editor screen.
Step 4:
Click on ‘Convert’ at the top right corner to initiate the conversion process.
03Android Devices
Live photos are undoubtedly known to add spark to your cherished moments, but the notch that puts these off with Android devices is that you can enjoy live photos on these devices only as live wallpapers.
Being an iPhone exclusive utility, Android devices lack the flexibility to capture live images. However, you can see them move on being set as live screen wallpapers. A handy alternative to this is converting a turn video into live photo and use it as live wallpaper. Here’s how you can take up the conversion process:
● TurnLive- Live Wallpaper
This one is a convenient, third party tool that lets you turn video into live photo in just a few quick steps. You can either use this application for free, or upgrade to the paid version to enjoy its premium features. To make amazing live photos from videos using this tool, you need to take up the steps given below:

Step 1: App Installation
To begin, visit the Google Playstore in your Android device and download the TurnLive- Live Wallpaper application. Next, you need install and launch the app in your device and accept its terms of service.
Step 2: Select a Video
Once you are done, click on the ‘Live Photo’ icon in the bottom of the app’s opening screen to reach the video selection page. Here, you need to choose ‘Video to Live Wallpaper’ option and grant the required app permissions to access your device’s camera and gallery. Select a desired video from the ones saved in your device and click ‘Done’ at the top right.
Step 3: Edit Your Video
You will now get directed to the app’s editor window, where you need to trim the selected video within a time frame of 1-5 seconds. To do this, select a cover frame within the clip and click ‘Next’. You can now use the video slider at the bottom to trim the clip. Adding suitable video effects and filters is also possible with this tool.
Step 4: It’s Almost Done!
When you finish editing, click ‘Next’ and choose the number of repeats for the created live photo. Wait for the conversion to finish and click on ‘My Wallpapers’ to view your creation.
Step 5: Download Your Live Photo!
Click ‘Download’ and tap ‘Clear’ in the app’s prompt message to remove your device’s current screen wallpaper. Next, allow the app to access your system settings. Once this finishes, tap ‘Clear’ again to download your creation. You will now get directed to a black screen tagged ‘DayTime LWP’. Click on ‘Set Wallpaper’ in this screen to make your live photo, the current wallpaper of your Android device.
● Video Live Wallpaper
This is another free app that you can use to your videos into amazing live photos in just 4 quick steps. All you need to do is explained in the following steps:
Step 1: download the Application
Download the Video Live Wallpaper application in your Android device from Google Playstore and proceed for its installation and launch.

Step 2: Select Your Video
In the app’s opening screen, click ‘Choose Video’ and grant app permissions to access your device’s media. Browse your video gallery to select a desired video that you wish to convert into a live photo.

Step 3: Edit Your Video
You will now get directed to the app’s editor screen. Here, you can explore your editing creativity to edit the selected video. Once you are happy, click the picture icon at the top right corner.

Step 4: Your Live Wallpaper is Ready!
To set the created live photo as your device screen wallpaper, select ‘Set as Wallpaper’ at the bottom right.

● Key Takeaways from This Episode →
● From cherishing moments to sharing them on social media, live photos can do it all.
● Being an iPhone exclusive utility, you need to create these from videos to enjoy them on other platforms and devices.
● Filmora is the best video to live photo converters, available as an easy, quick and convenient conversion tool.
Looking forward to turn your videos into live photos? Stay tuned to know how!
In this article
01 [How to Save Live Photos as a Video on iPhone/Ipad/Ipod](#Part 1)
02 [How to Turn a Video Into a Live Photo on iOS/Android](#Part 2)
Part 1 How to Save Live Photos as a Video on iPhone/Ipad/Ipod
Live photos are an amazing utility that allow you to save images as short moving snaps. Creating live photos is among the latest spunk of trendsetter stories, whether shared on social media platforms or created and saved just for fun, these definitely sound and look exciting, but that’s just one among the many things you can experiment on live photos.
Creating live photos takes you to a world of exciting features where you can explore your creativity in a number of ways, one of the easiest being turning live photos to videos. This comes handy when you need to share your live photos on platforms that do not have the compatibility to run live photos. If you are an iPhone user and wish to try your hands on experimenting with live photos, see through the following section of this article to learn how to turn live photo into video:
01Save as Video
Step 1: Launch the Photos App
In your iPhone, launch the ‘Photos’ app and navigate to ‘Albums’. All your live photos are present in the ‘Live Photos’ album.
Step 2: Format Selection
In latest versions (iOS 13v and above), you get a direct ‘Save as Video’ option in the ‘Photos’ application. Just click on that, and your live photo will be instantly saved in your iPhone gallery as a video. Here’s how you can use this feature:
● In the ‘Photos’ application, go to the ‘Live Photos’ album to select and open a desired live photo that you wish to convert to a video.
● Click on the ‘Share’ icon.
● Select ‘Save as Video’ from the drop down menu that displays sharing options.
Your created video will be saved in the ‘Photos’ application, next to the live photo you chose to turn into a video.
02iOS Shortcuts
This is a quicker way to save your live photos as videos in your iPhone. To use this feature, you first need to save the ‘Convert LivePhotos to Video’ shortcut in the ‘Shortcuts App’ gallery of your iPhone. You can do this by opening in your iOS internet browser.
Before using the above link, make sure to enable the ‘Allow Untrusted Shortcuts’ feature in your iPhone settings. You can do this as explained below:
● Reach to the ‘Settings’ application of your iPhone.
● Tap on ‘Shortcuts’ from the app’s welcome screen.
● Enable ‘Allow Untrusted Shortcuts’ with a toggle.
Having done that, here’s what you need to follow:
● Open the ‘Shortcuts’ application in your iOS device and tap the ‘Convert LivePhotos to Video’ shortcut.
● The ‘Live Photos’ album of your device opens up. Make a desired selection.
Your converted video gets automatically saved in the ‘Camera Roll’ folder of the ‘Photos’ application. Open the ‘Recents’ album to view your creation.
Part 2 How to Turn a Video Into a Live Photo on iOS/Android
Converting live photos to videos is fine, but going the other way round is all the more exciting and fun! You can even use these converted live photos as live screen wallpapers for your iOS and Android devices. If you are motivated to take up the excitement, look through the following methods to turn video into live photo:
01iOS Devices
Being an iOS user, you can choose among the following tools to convert video to live photo in your iPad, iPod or iPhone:
● Wondershare Filmora
Wondershare Filmora Video Editor is currently leading the software market among converter utilities that cater to various media conversion needs. This one is a free, smart, quick and convenient conversion tool that assures you of a hassle free video to live photo conversion in just a few clicks. What’s more interesting is, you don’t need to limit yourself with sticking to some particular video format, as Filmora conveniently supports almost all common ones.
Wondershare Filmora
Get started easily with Filmora’s powerful performance, intuitive interface, and countless effects!
Try It Free Try It Free Try It Free Learn More >
● IntoLive
This one is a third party application that allows you to convert videos into live photos, quickly and conveniently. This tool works well with devices having iOS 12.0 and later versions. All you have to do is follow the steps mentioned below:
Step 1:
Download the ‘IntoLive’ application from the Apple App Store.
Step 2:
Launch the same on your iOS device and grant the permission to access its ‘Photos’ Album.
Step 3:
In the ‘Videos’ section, choose the desired video that you wish to turn into a live photo.
Step 4:
An editor window will open up. Here, you can edit (cut, crop, trim, etc.) and add desired effects or filters to your selected video. Click on ‘Make’ at the top right when you finish the editing process.
Step 5:
If you have the paid version of the app, you can take up multiple repeats of your live photo; else you can use the free version with no repeats.
Step 6:
Once you are satisfied with the result, click on ‘Save Live Photo’. This will save your created live photo in your device’s gallery.
02VideoToLive
This is a free converter you can choose to turn video into live photo. This is a quite popular tool among iPhone users worldwide and is suitable for iOS versions 11.2 and later. You also have the liberty to share your created live photos on social media with this converter. Take the following steps to begin the conversion process:
Step 1:
Download the application from the Apple App Store and launch it on your iOS device.
Step 2:
Choose a video from your device gallery to convert it into a live photo.
Step 3:
In the video editor screen, crop the video to the preferred section that has to be converted into live photo. You can add video frames to your edited clip from the upper section of the editor screen.
Step 4:
Click on ‘Convert’ at the top right corner to initiate the conversion process.
03Android Devices
Live photos are undoubtedly known to add spark to your cherished moments, but the notch that puts these off with Android devices is that you can enjoy live photos on these devices only as live wallpapers.
Being an iPhone exclusive utility, Android devices lack the flexibility to capture live images. However, you can see them move on being set as live screen wallpapers. A handy alternative to this is converting a turn video into live photo and use it as live wallpaper. Here’s how you can take up the conversion process:
● TurnLive- Live Wallpaper
This one is a convenient, third party tool that lets you turn video into live photo in just a few quick steps. You can either use this application for free, or upgrade to the paid version to enjoy its premium features. To make amazing live photos from videos using this tool, you need to take up the steps given below:
Step 1: App Installation
To begin, visit the Google Playstore in your Android device and download the TurnLive- Live Wallpaper application. Next, you need install and launch the app in your device and accept its terms of service.
Step 2: Select a Video
Once you are done, click on the ‘Live Photo’ icon in the bottom of the app’s opening screen to reach the video selection page. Here, you need to choose ‘Video to Live Wallpaper’ option and grant the required app permissions to access your device’s camera and gallery. Select a desired video from the ones saved in your device and click ‘Done’ at the top right.
Step 3: Edit Your Video
You will now get directed to the app’s editor window, where you need to trim the selected video within a time frame of 1-5 seconds. To do this, select a cover frame within the clip and click ‘Next’. You can now use the video slider at the bottom to trim the clip. Adding suitable video effects and filters is also possible with this tool.
Step 4: It’s Almost Done!
When you finish editing, click ‘Next’ and choose the number of repeats for the created live photo. Wait for the conversion to finish and click on ‘My Wallpapers’ to view your creation.
Step 5: Download Your Live Photo!
Click ‘Download’ and tap ‘Clear’ in the app’s prompt message to remove your device’s current screen wallpaper. Next, allow the app to access your system settings. Once this finishes, tap ‘Clear’ again to download your creation. You will now get directed to a black screen tagged ‘DayTime LWP’. Click on ‘Set Wallpaper’ in this screen to make your live photo, the current wallpaper of your Android device.
● Video Live Wallpaper
This is another free app that you can use to your videos into amazing live photos in just 4 quick steps. All you need to do is explained in the following steps:
Step 1: download the Application
Download the Video Live Wallpaper application in your Android device from Google Playstore and proceed for its installation and launch.
Step 2: Select Your Video
In the app’s opening screen, click ‘Choose Video’ and grant app permissions to access your device’s media. Browse your video gallery to select a desired video that you wish to convert into a live photo.
Step 3: Edit Your Video
You will now get directed to the app’s editor screen. Here, you can explore your editing creativity to edit the selected video. Once you are happy, click the picture icon at the top right corner.
Step 4: Your Live Wallpaper is Ready!
To set the created live photo as your device screen wallpaper, select ‘Set as Wallpaper’ at the bottom right.
● Key Takeaways from This Episode →
● From cherishing moments to sharing them on social media, live photos can do it all.
● Being an iPhone exclusive utility, you need to create these from videos to enjoy them on other platforms and devices.
● Filmora is the best video to live photo converters, available as an easy, quick and convenient conversion tool.
Tips for GIF to Animated PNG
Versatile Video Editor - Wondershare Filmora
An easy yet powerful editor
Numerous effects to choose from
Detailed tutorials provided by the official channel
The advent of many instant chats had led to the demand for GIFs and animated PNGs. Users access these files to express their emotions amidst the chat environment. There are unique ways to convert GIFs to animated PNGs precisely. In the digital space, there are surplus applications are available to perform this conversion process without compromising with the quality factors.
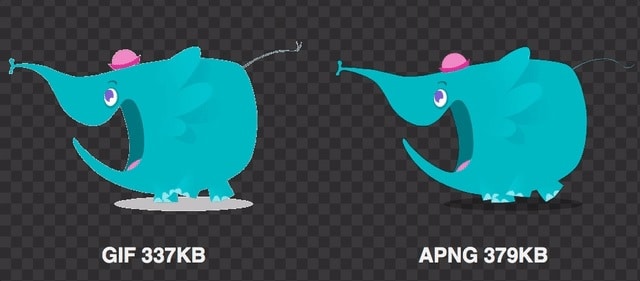
In this article, a detailed discussion on the GIFs and the animated PNGs are available for better understanding. It is the process of working with images and implementing some actions with the pictures that makes it appear interesting. Most GIFs and animated PNGs are used for fun and it helps to excite your friends amidst serious chats. It serves as the source of conveying thoughts with fun-filled visuals. Before choosing between the GIFs and APNGs, analyze which file format offers you surplus advantages for optimal handling. Here, in the below discussion you will study the features of this file format and the precise methods to switch between these two files efficiently.
In this article
01 [What is GIF & What is animated PNG](#Part 1)
02 [GIF vs animated PNG, which is better?](#Part 2)
03 [Can PNG be animated like GIF?](#Part 3)
04 [How to Convert GIF to animated PNG?](#Part 4)
Part 1 What is GIF & What is animated PNG
The GIFs are animated images and the picture moves in a sequence in a cycle. The movement repeats without stopping. This type of picture is popular on the webpages and the built-in templates are available in the digital space for quick downloads. The single-frame GIFs take more time to download and displays exciting moves that trigger laughter with audiences. GIF takes the abbreviation of Graphics Interchange Format. It came into existence in the year 1980s and is widely used globally. GIFs are animated images in a basic format. It adopts the safe LZW algorithm that tracks the colors optimally.
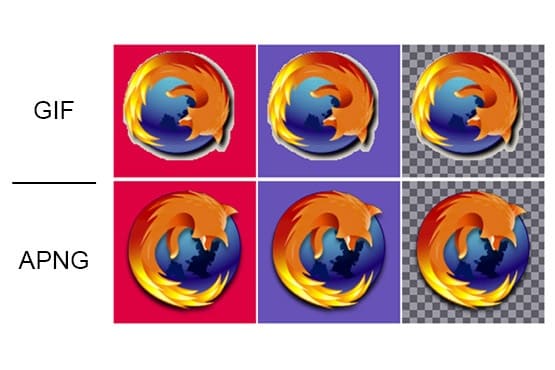
The superior form of the motion picture is animated PNGs. It stands for Portable Network Graphics. This format supports indexed color, grayscale, and true color images. Additionally, the animated PNGs has advantages like alpha channels, cross-platform gamma corrections and two-dimensional interlacing. APNG came into existence in the year 1995 and is compatible with a few web browsers.
Part 2 GIF vs animated PNG, which is better?
When compared to GIFs and APNG, APNG seems to be technically strong with a wide range of supporting features. The quality of the file of APNG is good as it displays 24-bit images and 8- bit transparency. The APNG images can be compressed to the smallest value thereby encouraging the ease of transfer between devices. APNG has access to many color combinations whereas GIFs can use up to 256 colors. The new web browser versions are compatible with APNGs and the older browsers play the GIFs precisely. To view the APNG files in the older browsers you require external plugins or extensions. The higher quality APNGs are mostly used by professionals when compared to GIFs. The portability in moving the animated images is simple with APNGs. The GIF files have a poor compression rate and it is difficult to transfer at the digital space.
Part 3 Can PNG be animated like GIF?
You can animate the PNG files like GIF using reliable tools in the online space. There are unique programs to establish this process. It works on every detail on the PNG files and adds transition effects to the images to implement the movements. If you take closer looks at the digital space, you will acquire sophisticated programs to add transitions to the static pictures. While animating the PNG files, you must include frames, durations, and transition effects to the PNG images to include the animations. Based on the settings, the animated PNG file functions. Every move of the images is assigned by the attributes set by the users with the help of powerful applications in the digital space. You can also find online tools to assist in this operation. The static PNG files get desired moves by animating like GIF files. The APNG has superior quality when compared to GIF files. As discussed above many professionals opt for APNG files than GIFs.

Part 4 How to Convert GIF to animated PNG?
In this section, you will learn how to convert GIF to animated PNG using online tools. Use the recommended online platform to carry out the quality conversions to acquire desired outcomes.
1. EZGIF
It is an exclusive online space that brings quality animations to GIF files acquiring the properties of APNG. By converting the GIFs to APNG, you can enhance various features like easy storage, best compression, quality elements in the file. When you step into this website, you can perform a wide range of conversion processes between animated and static image files. Choose the right tabs on the menu to trigger the desired changes to the uploaded files.
Choose GIF to APNG tab at the top menu to begin this conversion process. The GIF files will receive all the good functionalities of APNG after this conversion process. You can download the animated PNGs to any platform after a successful conversion.
Follow the below steps to proceed with GIF to animated PNGs using the EZGIF online tool.
Step 1
Go to the website and upload the GIF file by tapping the ‘Choose File’ button. The maximum file size is 50MB that ensures a flawless upload process. Here, you can either choose a file from a local drive or paste the URL from an online source into this webpage flawlessly. Then, click the Upload button to trigger this GIF to the APNG conversion process.
Step 2
Format the output and click the convert button to download the animated PNG files.
It is a simple and yet effective one that helps to convert the GIFs to animated PNGs in no time. You can also use the edit tools to make changes to the GIF files before the conversion process. The converted files are available for downloads at your local system drive. Access them when required and upload them to the desired platform to make fun with your friends and family members.
2. Free convert
In this section, you will be learning how to use the Free convert webpage to carry out the GIF to the animated PNG conversion process. It is a user-friendly interface where the controls are explicit to make the perfect click appropriately. This website provides a secure platform to carry out the conversion process optimally. The uploaded files are deleted automatically after 2 hours. You can expect a quality conversion process to take place on this website.
The stepwise process to convert GIF to animated PNG using the Freeconvert website.
Step 1
Upload the Gif files by tapping the ‘Choose GIF files’ button. This platform supports GIF file sizes up to 1GB.

Step 2
Hit the Convert to APNG button to trigger the conversion process and download the APNG file to desired storage space precisely.

Surf the above steps to carry out a precise conversion process between GIF and animated PNG. After this format conversion process, you can enjoy all the benefits of APNG overcoming the constraints with the GIF files.
These are the two efficient ways of converting the GIF files to APNG format using online web pages. You can choose any one of the websites to carry out the desired APNG conversion process optimally.
Wondershare Filmora
Get started easily with Filmora’s powerful performance, intuitive interface, and countless effects!
Try It Free Try It Free Try It Free Learn More >
AI Portrait – The best feature of Wondershare Filmora for gameplay editing
The AI Portrait is a new add-on in Wondershare Filmora. It can easily remove video backgrounds without using a green screen or chroma key, allowing you to add borders, glitch effects, pixelated, noise, or segmentation video effects.

Conclusion
Thus, this article had given valuable insights on the conversion of GIF to animated PNG files. The enlightening discussion about the GIFs and APNGs assists you to choose the best one from these two options. You must be clear about the differences between these formats and select the ones that meet your needs appropriately. Connect with the above-discussed web pages to carry out the conversion effortlessly with a few clicks. Stay connected with this article to discover the new horizons of animated clippings that excite you during online communications.
The advent of many instant chats had led to the demand for GIFs and animated PNGs. Users access these files to express their emotions amidst the chat environment. There are unique ways to convert GIFs to animated PNGs precisely. In the digital space, there are surplus applications are available to perform this conversion process without compromising with the quality factors.
In this article, a detailed discussion on the GIFs and the animated PNGs are available for better understanding. It is the process of working with images and implementing some actions with the pictures that makes it appear interesting. Most GIFs and animated PNGs are used for fun and it helps to excite your friends amidst serious chats. It serves as the source of conveying thoughts with fun-filled visuals. Before choosing between the GIFs and APNGs, analyze which file format offers you surplus advantages for optimal handling. Here, in the below discussion you will study the features of this file format and the precise methods to switch between these two files efficiently.
In this article
01 [What is GIF & What is animated PNG](#Part 1)
02 [GIF vs animated PNG, which is better?](#Part 2)
03 [Can PNG be animated like GIF?](#Part 3)
04 [How to Convert GIF to animated PNG?](#Part 4)
Part 1 What is GIF & What is animated PNG
The GIFs are animated images and the picture moves in a sequence in a cycle. The movement repeats without stopping. This type of picture is popular on the webpages and the built-in templates are available in the digital space for quick downloads. The single-frame GIFs take more time to download and displays exciting moves that trigger laughter with audiences. GIF takes the abbreviation of Graphics Interchange Format. It came into existence in the year 1980s and is widely used globally. GIFs are animated images in a basic format. It adopts the safe LZW algorithm that tracks the colors optimally.
The superior form of the motion picture is animated PNGs. It stands for Portable Network Graphics. This format supports indexed color, grayscale, and true color images. Additionally, the animated PNGs has advantages like alpha channels, cross-platform gamma corrections and two-dimensional interlacing. APNG came into existence in the year 1995 and is compatible with a few web browsers.
Part 2 GIF vs animated PNG, which is better?
When compared to GIFs and APNG, APNG seems to be technically strong with a wide range of supporting features. The quality of the file of APNG is good as it displays 24-bit images and 8- bit transparency. The APNG images can be compressed to the smallest value thereby encouraging the ease of transfer between devices. APNG has access to many color combinations whereas GIFs can use up to 256 colors. The new web browser versions are compatible with APNGs and the older browsers play the GIFs precisely. To view the APNG files in the older browsers you require external plugins or extensions. The higher quality APNGs are mostly used by professionals when compared to GIFs. The portability in moving the animated images is simple with APNGs. The GIF files have a poor compression rate and it is difficult to transfer at the digital space.
Part 3 Can PNG be animated like GIF?
You can animate the PNG files like GIF using reliable tools in the online space. There are unique programs to establish this process. It works on every detail on the PNG files and adds transition effects to the images to implement the movements. If you take closer looks at the digital space, you will acquire sophisticated programs to add transitions to the static pictures. While animating the PNG files, you must include frames, durations, and transition effects to the PNG images to include the animations. Based on the settings, the animated PNG file functions. Every move of the images is assigned by the attributes set by the users with the help of powerful applications in the digital space. You can also find online tools to assist in this operation. The static PNG files get desired moves by animating like GIF files. The APNG has superior quality when compared to GIF files. As discussed above many professionals opt for APNG files than GIFs.
Part 4 How to Convert GIF to animated PNG?
In this section, you will learn how to convert GIF to animated PNG using online tools. Use the recommended online platform to carry out the quality conversions to acquire desired outcomes.
1. EZGIF
It is an exclusive online space that brings quality animations to GIF files acquiring the properties of APNG. By converting the GIFs to APNG, you can enhance various features like easy storage, best compression, quality elements in the file. When you step into this website, you can perform a wide range of conversion processes between animated and static image files. Choose the right tabs on the menu to trigger the desired changes to the uploaded files.
Choose GIF to APNG tab at the top menu to begin this conversion process. The GIF files will receive all the good functionalities of APNG after this conversion process. You can download the animated PNGs to any platform after a successful conversion.
Follow the below steps to proceed with GIF to animated PNGs using the EZGIF online tool.
Step 1
Go to the website and upload the GIF file by tapping the ‘Choose File’ button. The maximum file size is 50MB that ensures a flawless upload process. Here, you can either choose a file from a local drive or paste the URL from an online source into this webpage flawlessly. Then, click the Upload button to trigger this GIF to the APNG conversion process.
Step 2
Format the output and click the convert button to download the animated PNG files.
It is a simple and yet effective one that helps to convert the GIFs to animated PNGs in no time. You can also use the edit tools to make changes to the GIF files before the conversion process. The converted files are available for downloads at your local system drive. Access them when required and upload them to the desired platform to make fun with your friends and family members.
2. Free convert
In this section, you will be learning how to use the Free convert webpage to carry out the GIF to the animated PNG conversion process. It is a user-friendly interface where the controls are explicit to make the perfect click appropriately. This website provides a secure platform to carry out the conversion process optimally. The uploaded files are deleted automatically after 2 hours. You can expect a quality conversion process to take place on this website.
The stepwise process to convert GIF to animated PNG using the Freeconvert website.
Step 1
Upload the Gif files by tapping the ‘Choose GIF files’ button. This platform supports GIF file sizes up to 1GB.
Step 2
Hit the Convert to APNG button to trigger the conversion process and download the APNG file to desired storage space precisely.
Surf the above steps to carry out a precise conversion process between GIF and animated PNG. After this format conversion process, you can enjoy all the benefits of APNG overcoming the constraints with the GIF files.
These are the two efficient ways of converting the GIF files to APNG format using online web pages. You can choose any one of the websites to carry out the desired APNG conversion process optimally.
Wondershare Filmora
Get started easily with Filmora’s powerful performance, intuitive interface, and countless effects!
Try It Free Try It Free Try It Free Learn More >
AI Portrait – The best feature of Wondershare Filmora for gameplay editing
The AI Portrait is a new add-on in Wondershare Filmora. It can easily remove video backgrounds without using a green screen or chroma key, allowing you to add borders, glitch effects, pixelated, noise, or segmentation video effects.
Conclusion
Thus, this article had given valuable insights on the conversion of GIF to animated PNG files. The enlightening discussion about the GIFs and APNGs assists you to choose the best one from these two options. You must be clear about the differences between these formats and select the ones that meet your needs appropriately. Connect with the above-discussed web pages to carry out the conversion effortlessly with a few clicks. Stay connected with this article to discover the new horizons of animated clippings that excite you during online communications.
Ultimate Guide to Animated Characters Drawings
Interesting Fundamentals and Ultimate Guide to Animated Characters Drawings
An easy yet powerful editor
Numerous effects to choose from
Detailed tutorials provided by the official channel
Cartoon character have stamped their faces in our hearts from childhood. A cartoon artist represents a cartoon or a natural person’s unique features with simple shapes accurately to recognize the person with the drawing and does not require a lot of patience to do this. The goal of the cartoon is to attract, and the child should get attracted when they see a cartoon image as well as adults. Though the sparkle may appear a little dull, it remains unaltered.
Let us grab a chance to recreate our cartoon characters with easy tutorials about animated characters to draw. In addition to that, you will learn about basic drawing exercises to lead into cool animated characters to draw through this guide in a step-by-step manner.
In this article
01 [What Do I Need to Start Learning Animated Characters Drawings? ](#Part 1)
02 [6 Cartoon Characters that Anyone Can Draw (Provided with Free Video Tutorials)](#Part 2)
03 [4 Best Drawing Exercises for Creating Cartoon Characters](#Part 3)
Part 1 What Do I Need to Start Learning Animated Characters Drawings?
There are many software’s available, and anyone can create an animated character drawing, but still, the art of creating a perfect character needs a master. You don’t have to be a Disney-grade animator to make it; start with simple minor characters. Animation is the art of bringing a 3D illustrated cartoon into life. It is created by projecting a sequence of images one after the other immediately. Let us discuss the essential things you need to note before animating characters.
●Timeline is the most important for animation. Depending on the software, you have various options to change the duration and add effects.
●Animation is generally preferable in 24 frames per second, which means the total number of people in the frame for one second.
●There are two types of working they are one’s and two’s. 2D Animation is usually done in two’s, whereas 3D Animation is in one’s.
●In hand-drawn animations, keyframes are more critical to maintain. The keyframe is the position for the cartoon as per animator has decided.
●Breakdowns combine one or two keyframes, which decide the motion in between the keys.
●In-betweens are all the frames that come between to smooth the motion—automatically generated by the computer to move from key to key.
●Composting is creating or joining two or more images to create a single cartoon frame.
Part 2 6 Cartoon Characters that Anyone can Draw (With free Video Tutorials)
We will discuss animated characters to draw in hand. There are many cartoon characters, but we will look into six cartoon character drawings with their tutorial videos.
01 Smurfette
Smurfette stands out as the lone female Smurf in the entire bunch of blue critters around the village area. One of the rare designs with long hair and a dress is hers. Her design is a lot of fun to sketch.
So, in general, it’s best to work through the lesson as is, then turn it into Brainy, Papa, Joker, or even Smurf.
01Angelica Pickles
Angelica Pickles is one of the most challenging characters to depict from The Rugrats. But her design is so intricate that getting it proper will give you a true sense of accomplishment. Her pigtails, like her leggings, might be challenging to master, so keep practicing.
03Yogi Bear
Yogi Bear is a cartoon character on the sweeter side of the comic animal variety. Yogi Bear is a beloved character from Jellystone Park. As long as you get his tie and collar just right, this guy is a breeze to draw.
04Magilla Gorilla
Magilla Gorilla is another bizarre creature from Hanna-catalog. Barbera’s Because he comes with a bow tie, a little cap, and suspenders, this design is a little more complicated. Not to mention his enormous clown shoes. These small details can be a pain to draw, but Magilla is a very charming gorilla.
05Top Cat
Even further back in time, in the 1960s, there was the ever-popular Top Cat. He’s wearing a cap and a button-down vest, and he’s making some reasonably fancy dances. Give Top Cat a shot if you like The Flintstones’ basic Hanna-Barbera art style.
<
06Helga. G. Pataki
Helga is another character with some wacky hair. There’s a lot that’s bizarre about her. And half the fun of drawing her is figuring out how to do it. Just keep an eye on her head since getting it correct, especially with her rectangle hairdo, can be a little odd.
These are some of the cool animated characters to draw.
Part 3 4 Best Drawing Exercise for Creating Cartoon Characters
You’ll learn how to create cartoon characters individually, including their faces, hair, and facial expressions.
01How to Draw Cartoon Characters
We’ll go through the fundamentals of human perception before getting into cartoon face drawing. Humans have a unique ability to synthesize the details that make up a structure or object in highly complicated ways into fundamental and simple ones. We can express everything with a few curves and geometric forms in this way. In cartoon face, we need to identify the character just by looking like looking at the below picture a girl and a boy.
02Here, you will learn How to Draw a Cartoon Face
Let us begin with a sketch of a cartoon face. A circle is a basic cartoon shape. All you need is a circle. As seen in the image below, draw a vertical and horizontal line intersecting at the center.
Let us have a look at how to make cartoon eyeballs. Draw an oval shape with a slight lean to the side at the top for the eyes. Repeat on the other side.
Slightly thicken the characteristic to represent our character eyelashes at the top of the circle, place the brows above the eyelashes to create a shocking appearance, draw both pupils to the center in the same direction.
When creating a nose from the front, it’s typical to leave off many details. Even if you merely sketch its tip, it will likely provide a convincing impact. Drawing only one side of the nose is also quite frequent. Children’s mouths are extremely simple in cartoon style, regardless of gender.
The ears are viewed from the front; therefore, the internal holes are not visible. The circle has already established the shape of our head.
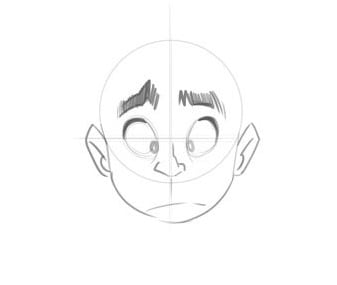
03Let’s learn about How to Draw a Cartoon Hair
Keep in mind that our characters’ hair is essential for identifying their personalities, and it can also indicate their age. So, all we need is an effortless and playful haircut to bring our boy to life. Because there is no particular method for drawing hair, you’ll have to experiment until you find the perfect look. Look for photo references on the internet! Take a look at a magazine shoot or a Google search.
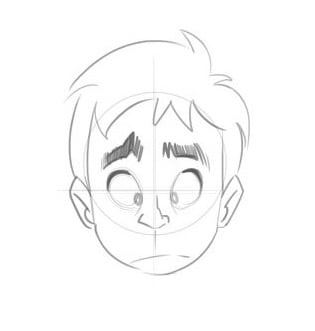
03How to Draw Characters with different Facial Expressions
By simply following the instructions below, you’ll notice that you can completely transform his expression: Lowering one brow and raising the other, eyelashes are used to cut the eyes in half, putting a smile on the face one side is higher.
To stay under the eyelashes, move the eye pupils up. That’s all there is to it! With just a few tweaks, we achieved the desired result. The circular form of the eyes, hair, ears, nose, chin and the circular shape of the ears are all the same! It’s that simple!
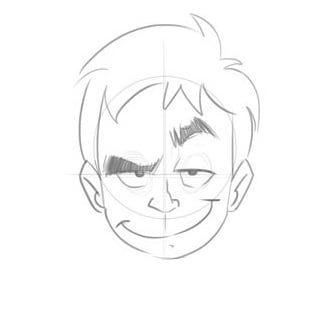
While working in cartooning or video making, Wondershare Wondershare Filmora Video Editor comes out with pros in mind, which can effortlessly convert conventional films into cartoon videos. If you want greater control over your cartoon video, you may also use keyframing to create it. You can fine-tune the parameters in Effects to achieve the best results. You can even change the Animation color after it has been created. It also allows you to use different text themes to showcase your videos.
We propose Wondershare Filmora Video Editor , in this case, to create animation videos by adding keyframes, resulting in a smooth and natural animation. To get started with Animation, all you need is a white plane. Aside from that, color correction and an audio mixer will take your animation video to the next level.
For Win 7 or later (64-bit)
For macOS 10.12 or later
● Key Takeaways from This Episode →
● Learn what are the key elements to make animation videos using software
● Tutorial on how to draw a cartoon character accurately
● In comparison, Wondershare Wondershare Filmora Video Editor is superior in making animation videos.
Cartoon character have stamped their faces in our hearts from childhood. A cartoon artist represents a cartoon or a natural person’s unique features with simple shapes accurately to recognize the person with the drawing and does not require a lot of patience to do this. The goal of the cartoon is to attract, and the child should get attracted when they see a cartoon image as well as adults. Though the sparkle may appear a little dull, it remains unaltered.
Let us grab a chance to recreate our cartoon characters with easy tutorials about animated characters to draw. In addition to that, you will learn about basic drawing exercises to lead into cool animated characters to draw through this guide in a step-by-step manner.
In this article
01 [What Do I Need to Start Learning Animated Characters Drawings? ](#Part 1)
02 [6 Cartoon Characters that Anyone Can Draw (Provided with Free Video Tutorials)](#Part 2)
03 [4 Best Drawing Exercises for Creating Cartoon Characters](#Part 3)
Part 1 What Do I Need to Start Learning Animated Characters Drawings?
There are many software’s available, and anyone can create an animated character drawing, but still, the art of creating a perfect character needs a master. You don’t have to be a Disney-grade animator to make it; start with simple minor characters. Animation is the art of bringing a 3D illustrated cartoon into life. It is created by projecting a sequence of images one after the other immediately. Let us discuss the essential things you need to note before animating characters.
●Timeline is the most important for animation. Depending on the software, you have various options to change the duration and add effects.
●Animation is generally preferable in 24 frames per second, which means the total number of people in the frame for one second.
●There are two types of working they are one’s and two’s. 2D Animation is usually done in two’s, whereas 3D Animation is in one’s.
●In hand-drawn animations, keyframes are more critical to maintain. The keyframe is the position for the cartoon as per animator has decided.
●Breakdowns combine one or two keyframes, which decide the motion in between the keys.
●In-betweens are all the frames that come between to smooth the motion—automatically generated by the computer to move from key to key.
●Composting is creating or joining two or more images to create a single cartoon frame.
Part 2 6 Cartoon Characters that Anyone can Draw (With free Video Tutorials)
We will discuss animated characters to draw in hand. There are many cartoon characters, but we will look into six cartoon character drawings with their tutorial videos.
01 Smurfette
Smurfette stands out as the lone female Smurf in the entire bunch of blue critters around the village area. One of the rare designs with long hair and a dress is hers. Her design is a lot of fun to sketch.
So, in general, it’s best to work through the lesson as is, then turn it into Brainy, Papa, Joker, or even Smurf.
01Angelica Pickles
Angelica Pickles is one of the most challenging characters to depict from The Rugrats. But her design is so intricate that getting it proper will give you a true sense of accomplishment. Her pigtails, like her leggings, might be challenging to master, so keep practicing.
03Yogi Bear
Yogi Bear is a cartoon character on the sweeter side of the comic animal variety. Yogi Bear is a beloved character from Jellystone Park. As long as you get his tie and collar just right, this guy is a breeze to draw.
04Magilla Gorilla
Magilla Gorilla is another bizarre creature from Hanna-catalog. Barbera’s Because he comes with a bow tie, a little cap, and suspenders, this design is a little more complicated. Not to mention his enormous clown shoes. These small details can be a pain to draw, but Magilla is a very charming gorilla.
05Top Cat
Even further back in time, in the 1960s, there was the ever-popular Top Cat. He’s wearing a cap and a button-down vest, and he’s making some reasonably fancy dances. Give Top Cat a shot if you like The Flintstones’ basic Hanna-Barbera art style.
<
06Helga. G. Pataki
Helga is another character with some wacky hair. There’s a lot that’s bizarre about her. And half the fun of drawing her is figuring out how to do it. Just keep an eye on her head since getting it correct, especially with her rectangle hairdo, can be a little odd.
These are some of the cool animated characters to draw.
Part 3 4 Best Drawing Exercise for Creating Cartoon Characters
You’ll learn how to create cartoon characters individually, including their faces, hair, and facial expressions.
01How to Draw Cartoon Characters
We’ll go through the fundamentals of human perception before getting into cartoon face drawing. Humans have a unique ability to synthesize the details that make up a structure or object in highly complicated ways into fundamental and simple ones. We can express everything with a few curves and geometric forms in this way. In cartoon face, we need to identify the character just by looking like looking at the below picture a girl and a boy.
02Here, you will learn How to Draw a Cartoon Face
Let us begin with a sketch of a cartoon face. A circle is a basic cartoon shape. All you need is a circle. As seen in the image below, draw a vertical and horizontal line intersecting at the center.
Let us have a look at how to make cartoon eyeballs. Draw an oval shape with a slight lean to the side at the top for the eyes. Repeat on the other side.
Slightly thicken the characteristic to represent our character eyelashes at the top of the circle, place the brows above the eyelashes to create a shocking appearance, draw both pupils to the center in the same direction.
When creating a nose from the front, it’s typical to leave off many details. Even if you merely sketch its tip, it will likely provide a convincing impact. Drawing only one side of the nose is also quite frequent. Children’s mouths are extremely simple in cartoon style, regardless of gender.
The ears are viewed from the front; therefore, the internal holes are not visible. The circle has already established the shape of our head.
03Let’s learn about How to Draw a Cartoon Hair
Keep in mind that our characters’ hair is essential for identifying their personalities, and it can also indicate their age. So, all we need is an effortless and playful haircut to bring our boy to life. Because there is no particular method for drawing hair, you’ll have to experiment until you find the perfect look. Look for photo references on the internet! Take a look at a magazine shoot or a Google search.
03How to Draw Characters with different Facial Expressions
By simply following the instructions below, you’ll notice that you can completely transform his expression: Lowering one brow and raising the other, eyelashes are used to cut the eyes in half, putting a smile on the face one side is higher.
To stay under the eyelashes, move the eye pupils up. That’s all there is to it! With just a few tweaks, we achieved the desired result. The circular form of the eyes, hair, ears, nose, chin and the circular shape of the ears are all the same! It’s that simple!
While working in cartooning or video making, Wondershare Wondershare Filmora Video Editor comes out with pros in mind, which can effortlessly convert conventional films into cartoon videos. If you want greater control over your cartoon video, you may also use keyframing to create it. You can fine-tune the parameters in Effects to achieve the best results. You can even change the Animation color after it has been created. It also allows you to use different text themes to showcase your videos.
We propose Wondershare Filmora Video Editor , in this case, to create animation videos by adding keyframes, resulting in a smooth and natural animation. To get started with Animation, all you need is a white plane. Aside from that, color correction and an audio mixer will take your animation video to the next level.
For Win 7 or later (64-bit)
For macOS 10.12 or later
● Key Takeaways from This Episode →
● Learn what are the key elements to make animation videos using software
● Tutorial on how to draw a cartoon character accurately
● In comparison, Wondershare Wondershare Filmora Video Editor is superior in making animation videos.
12 Animation Video Maker That Can Triple Your Conversion Rates
12 Animation Video Maker That Can Triple Conversion Rates
An easy yet powerful editor
Numerous effects to choose from
Detailed tutorials provided by the official channel
Gone are the days when creating animation requires expert skills, time, and a lot of money. Thanks to technological advancement several software and tools are available for creating animated videos in a hassle-free manner.
The following parts of the topic will help you to learn in detail about animation videos, their importance, the best software, and animation online website tools.
In this article
01 [What is an Animated Video and Its Importance?](#Part 1)
02 [Top 11 Online Animation Video Maker](#Part 2)
03 [Best Alternative To Online Tools For Creating Professional Animated Videos ](#Part 3)
Part 1 What is an Animated Video and Its Importance?
Animated Video
In simplest terms, animation refers to a method where figures appear as moving images to make them look lively and interesting. Using the drawings, effects, designs, and illustrations, an animated video is created to catch your attention. Animations can be of several types like cartoon animations, 3D animations, motion graphics, CGI, 2D animations, and more.
Benefits of using Animated videos
Animated videos have dominated the entire digital space and there are several reasons for the same. Some of the major ones are enlisted below.
● Add life to your concepts
● Bring in the content to your interesting ideas
● Ability to represent abstract ideas visually
● Video production can be managed in a hassle-free manner
● Animated videos are more visually and psychologically appealing
● Helps in boosting the conversion rates
● Makes you stand out from the competition
● Helps in expanding the reach and getting the attention and engagement
● Improves SEO
Part 2 Top 11 online animation video maker
If you are in search of a simple yet effective solution to create animations, 3D animation maker online tools work as a great choice. The majority of these programs are free and simple to use and support all basic animation requirements. Below listed are the top 11 online 3D animation makers that can be used for creating impressive animations.
01PowToon
This is a widely used online tool that supports creating videos in multiple formats including animated ones. The tool majorly supports features related to cartoon animation and depending on your requirements you can choose from different licenses and plans. Some of the key features of the tool include presentation mode, animation mode, readymade templates, integration with different tools, and others.

02Moovly
This is one of the top online animation maker 3D tool for creating interesting and eye-catchy animations. The tool is completely cloud-based and thus there is no need for any software download or installation. Different types of animations like doodles, cartoons, and others can be created easily using the program. Huge stock of videos, sound, music, motion graphics, photos, and others are available at the program to create a customized animation as required.
03Explee
This is a simple to use online tool that can help you create animated videos in a few simple steps. The program focuses on using a whiteboard which along with Explee’s Bringlife technology can create impressive animations. More than 6000 images are available at the tool for illustrating your concept and ideas. Some of the animation features supported by the tool include draw, pop, pin, fade, and others.
04Wideo
This is a simple yet versatile 3D online animation maker tool for animated video creation. Several pre-designed templates are available using which animated videos can be created quickly and easily. The free version of the tool allows creating animations for up to 30 seconds and for longer animations you would need to upgrade to a paid subscription. The tool also has a stock of free video library and the processed files can be exported as MP4 videos.
05Animaker
Creating cartoons and other animations can be done quickly and easily using this online tool that comes along with several pre-designed templates. The tool is simple to use and requires no specialized skill sets or technical know-how. Some of the interesting features for animation creation include character building, lip-syncing, facial expressions, smart moves, and more. You can customize the templates at the program and create the desired animation using the wide collection of images, videos, GIFs, and music files.
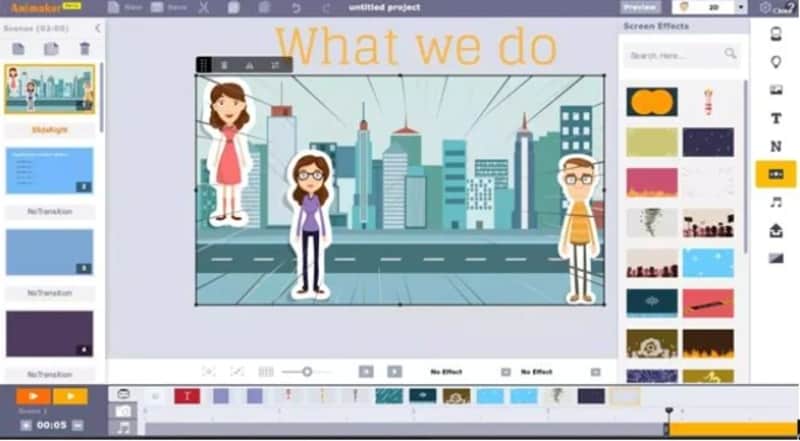
06Vyond
Professional-looking animated videos can be created using this cloud-based tool. You can either create an animation from scratch or use one of the templates at the site and then customize it as needed. The lip-sync feature of the tool allows you to import or an audio file or even add a voice recording. Animations for marketing, training, communications, HR and other purposes can be created using the tool. The tool comes with a 14-days free trial version after which you need to upgrade to a paid plan.
07Renderforest
This online tool comes with more than 500 templates in different categories that can be used along with multiple customization tools of the program to create the desired 2D as well as 3D animation. Simple interface and easy steps make the tool apt even for the ones who do not possess technical know-how. Several toolkits like the 3D video toolkit, whiteboard animation toolkit, and others are available at the site for you to learn the process. Customization options include adding music, adjusting scene order, adjusting VoiceOver, and more. The created video can be directly uploaded to YouTube or can be saved to the local system or project library.
08Animatron
Using this browser-based tool you can easily create animated videos for multiple purposes like presentation, explainer videos, banners, whiteboard animations, and more. You can choose from more than 200 animated templates available at the site and then customize them as required multiple functions. In addition to your videos and other media files, you can also add them from the free library available at Animatron. You can preview the created animation and then export it to your system or directly to popular social media platforms. Tutorials o guide you through the process of animated video creation are also present on the site.
09MotionDen
This is another widely used name when it comes to online video creation tools. This simple yet functional program will let you create animated videos of your choice using multiple templates available at the site. There is a collection of desktop as well as mobile-friendly templates. These template’s video, music, photos, text, and other elements can be customized using the program editor and then the processed video can be quickly downloaded to your local system.
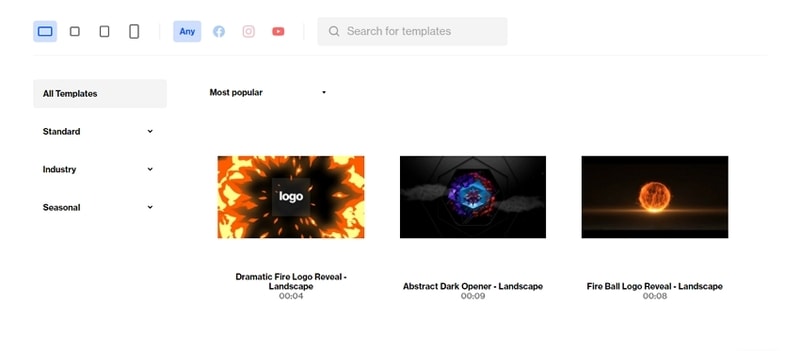
10Toonator
Creating cartoons is simple and quick using this online tool that requires no software download or installation. Using the program, you can create an interesting cartoon as needed as well as edit the graphics. The tool can also work with your tablets that making it easy to edit the files using a pen or fingers. You can even check the designs of cartoons that have been created by other users.
11Biteable
To create animations for your social media sites, marketing, and other requirements, this is a versatile tool to use. You can use the readymade templates available at the site or can also create animation from a scratch. Customize the templates by selecting the scenes, adding images, music, and text as needed. The animated videos can be saved locally or can also be uploaded to popular social media sites.
Part 3 Part Best Alternative to online tools for creating professional animated videos
****Wondershare Filmora Video Editor **
Online tools are simple programs for basic animated video creation. Moreover, these programs are internet-dependent and support limited file size processing. So, if you are looking for an alternative program for creating professional-looking animated videos with support to advanced features, Wondershare Fimora works as an excellent alternative. This Windows and Mac-based tool comes with an array of features that can let you create the desired 2D, 3D, and other animated videos in just a few simple steps.
For Win 7 or later (64-bit)
For macOS 10.12 or later
Key features of the software
● Create professional-looking 2D, 3D, and other animated videos using keyframes.
● Customize the animations using features like motion tracking, pan & zoom, ease-in, ease-out, and more.
● Add customized text & titles, lights & flares, masking, warp, distorting, and more.
● High-quality pre-set available for auto-correction, color wheels, scopes, and more.
● Customize audio using features like automatic audio sync, audio compression, noise reduction, audio transitions, and more.
● Windows and Mac support.
● Key Takeaways from This Episode →
● Animated videos are important to improve the conversion rates, increase the reach of the videos, engage the viewers, and more.
● Several 3D online animation maker is available that can help create decent animated videos.
● With restrictions and limitations of 3D animation websites, professional software like Wondershare Fimora works as the best alternative.
Gone are the days when creating animation requires expert skills, time, and a lot of money. Thanks to technological advancement several software and tools are available for creating animated videos in a hassle-free manner.
The following parts of the topic will help you to learn in detail about animation videos, their importance, the best software, and animation online website tools.
In this article
01 [What is an Animated Video and Its Importance?](#Part 1)
02 [Top 11 Online Animation Video Maker](#Part 2)
03 [Best Alternative To Online Tools For Creating Professional Animated Videos ](#Part 3)
Part 1 What is an Animated Video and Its Importance?
Animated Video
In simplest terms, animation refers to a method where figures appear as moving images to make them look lively and interesting. Using the drawings, effects, designs, and illustrations, an animated video is created to catch your attention. Animations can be of several types like cartoon animations, 3D animations, motion graphics, CGI, 2D animations, and more.
Benefits of using Animated videos
Animated videos have dominated the entire digital space and there are several reasons for the same. Some of the major ones are enlisted below.
● Add life to your concepts
● Bring in the content to your interesting ideas
● Ability to represent abstract ideas visually
● Video production can be managed in a hassle-free manner
● Animated videos are more visually and psychologically appealing
● Helps in boosting the conversion rates
● Makes you stand out from the competition
● Helps in expanding the reach and getting the attention and engagement
● Improves SEO
Part 2 Top 11 online animation video maker
If you are in search of a simple yet effective solution to create animations, 3D animation maker online tools work as a great choice. The majority of these programs are free and simple to use and support all basic animation requirements. Below listed are the top 11 online 3D animation makers that can be used for creating impressive animations.
01PowToon
This is a widely used online tool that supports creating videos in multiple formats including animated ones. The tool majorly supports features related to cartoon animation and depending on your requirements you can choose from different licenses and plans. Some of the key features of the tool include presentation mode, animation mode, readymade templates, integration with different tools, and others.
02Moovly
This is one of the top online animation maker 3D tool for creating interesting and eye-catchy animations. The tool is completely cloud-based and thus there is no need for any software download or installation. Different types of animations like doodles, cartoons, and others can be created easily using the program. Huge stock of videos, sound, music, motion graphics, photos, and others are available at the program to create a customized animation as required.
03Explee
This is a simple to use online tool that can help you create animated videos in a few simple steps. The program focuses on using a whiteboard which along with Explee’s Bringlife technology can create impressive animations. More than 6000 images are available at the tool for illustrating your concept and ideas. Some of the animation features supported by the tool include draw, pop, pin, fade, and others.
04Wideo
This is a simple yet versatile 3D online animation maker tool for animated video creation. Several pre-designed templates are available using which animated videos can be created quickly and easily. The free version of the tool allows creating animations for up to 30 seconds and for longer animations you would need to upgrade to a paid subscription. The tool also has a stock of free video library and the processed files can be exported as MP4 videos.
05Animaker
Creating cartoons and other animations can be done quickly and easily using this online tool that comes along with several pre-designed templates. The tool is simple to use and requires no specialized skill sets or technical know-how. Some of the interesting features for animation creation include character building, lip-syncing, facial expressions, smart moves, and more. You can customize the templates at the program and create the desired animation using the wide collection of images, videos, GIFs, and music files.
06Vyond
Professional-looking animated videos can be created using this cloud-based tool. You can either create an animation from scratch or use one of the templates at the site and then customize it as needed. The lip-sync feature of the tool allows you to import or an audio file or even add a voice recording. Animations for marketing, training, communications, HR and other purposes can be created using the tool. The tool comes with a 14-days free trial version after which you need to upgrade to a paid plan.
07Renderforest
This online tool comes with more than 500 templates in different categories that can be used along with multiple customization tools of the program to create the desired 2D as well as 3D animation. Simple interface and easy steps make the tool apt even for the ones who do not possess technical know-how. Several toolkits like the 3D video toolkit, whiteboard animation toolkit, and others are available at the site for you to learn the process. Customization options include adding music, adjusting scene order, adjusting VoiceOver, and more. The created video can be directly uploaded to YouTube or can be saved to the local system or project library.
08Animatron
Using this browser-based tool you can easily create animated videos for multiple purposes like presentation, explainer videos, banners, whiteboard animations, and more. You can choose from more than 200 animated templates available at the site and then customize them as required multiple functions. In addition to your videos and other media files, you can also add them from the free library available at Animatron. You can preview the created animation and then export it to your system or directly to popular social media platforms. Tutorials o guide you through the process of animated video creation are also present on the site.
09MotionDen
This is another widely used name when it comes to online video creation tools. This simple yet functional program will let you create animated videos of your choice using multiple templates available at the site. There is a collection of desktop as well as mobile-friendly templates. These template’s video, music, photos, text, and other elements can be customized using the program editor and then the processed video can be quickly downloaded to your local system.
10Toonator
Creating cartoons is simple and quick using this online tool that requires no software download or installation. Using the program, you can create an interesting cartoon as needed as well as edit the graphics. The tool can also work with your tablets that making it easy to edit the files using a pen or fingers. You can even check the designs of cartoons that have been created by other users.
11Biteable
To create animations for your social media sites, marketing, and other requirements, this is a versatile tool to use. You can use the readymade templates available at the site or can also create animation from a scratch. Customize the templates by selecting the scenes, adding images, music, and text as needed. The animated videos can be saved locally or can also be uploaded to popular social media sites.
Part 3 Part Best Alternative to online tools for creating professional animated videos
****Wondershare Filmora Video Editor **
Online tools are simple programs for basic animated video creation. Moreover, these programs are internet-dependent and support limited file size processing. So, if you are looking for an alternative program for creating professional-looking animated videos with support to advanced features, Wondershare Fimora works as an excellent alternative. This Windows and Mac-based tool comes with an array of features that can let you create the desired 2D, 3D, and other animated videos in just a few simple steps.
For Win 7 or later (64-bit)
For macOS 10.12 or later
Key features of the software
● Create professional-looking 2D, 3D, and other animated videos using keyframes.
● Customize the animations using features like motion tracking, pan & zoom, ease-in, ease-out, and more.
● Add customized text & titles, lights & flares, masking, warp, distorting, and more.
● High-quality pre-set available for auto-correction, color wheels, scopes, and more.
● Customize audio using features like automatic audio sync, audio compression, noise reduction, audio transitions, and more.
● Windows and Mac support.
● Key Takeaways from This Episode →
● Animated videos are important to improve the conversion rates, increase the reach of the videos, engage the viewers, and more.
● Several 3D online animation maker is available that can help create decent animated videos.
● With restrictions and limitations of 3D animation websites, professional software like Wondershare Fimora works as the best alternative.
Also read:
- New You Can Turn a TikTok Into a GIF Now for 2024
- Most Effective Tactics to Set WhatsApp Status for 2024
- Learn About Lip-Syncing in Animation for 2024
- 2024 Approved How to Obtain and Create Animated GIF Icons Like a Pro?
- In 2024, Best 15 Female Anime Characters-Who Is Your Favorite?
- New The Coolest Anime Characters Ever| List of Top Favorites
- 2024 Approved The Secret Sauce for Making GIF Instagram Story More Stunning
- Updated Whats Rigging Animation and Why It Matters for 2024
- New Popular Tips on Learning Animate Rigging
- Updated In 2024, Best 15 Classics Animated Cartoon Movies
- New 12 Top Stop Motion Studios Worth Recommending
- Updated Top 10 Best Photo to Animation Converters That Give You an Advantage
- Updated 2024 Approved 10 Awesome Moving Animation PowerPoint Techniques
- New 10 Best Animation Makers for Kids to Have Fun for 2024
- Animate Photo Online with These Awesome Tools
- New In 2024, Best 10 Anime Websites to Watch Dubbed Anime Free
- New Great Guide for Beginners on 2D Animation Making for 2024
- Updated 2D Character Animation Everything You Should Know About It
- New 2024 Approved How to Make an Animation With 7 Steps
- Updated In 2024, How To Learn Cartoon Sketch Drawing— Pencil Sketch for Beginners
- New 5 Free Animated Gif Sources You Must Check for 2024
- Updated 2024 Approved Ways to Get the Most up to Date Cartoon Character Design Tips
- In 2024, How to Send and Add Snapchat GIFs 100 in Easy Way
- Updated Before You Learn 3D Animation Some Things You Should Know for 2024
- Updated In 2024, How to Make Your Own GIF on WhatsApp in Simple Ways
- In 2024, 5 Ways to Track Vivo X100 Pro without App | Dr.fone
- Complete Tutorial to Use VPNa to Fake GPS Location On Tecno Spark 20 | Dr.fone
- How to convert AVCHD MTS to MP4 for Xiaomi 14 Pro?
- In 2024, 4 Ways to Transfer Music from ZTE Nubia Z60 Ultra to iPhone | Dr.fone
- What is Geo-Blocking and How to Bypass it On Apple iPhone 12 mini? | Dr.fone
- In 2024, Proven Ways in How To Hide Location on Life360 For Nubia Red Magic 8S Pro+ | Dr.fone
- In 2024, How To Change Your Apple ID on Apple iPhone 14 With or Without Password
- 4 Solutions to Fix Unfortunately Your App Has Stopped Error on Oppo Reno 11F 5G | Dr.fone
- How to Use Google Assistant on Your Lock Screen Of Samsung Galaxy S23 Phone
- In 2024, Full Guide on Mirroring Your Vivo S18 to Your PC/Mac | Dr.fone
- How To Upgrade or Downgrade Apple iPhone SE? | Dr.fone
- In 2024, 7 Top Ways To Resolve Apple ID Not Active Issue For iPhone 12 | Dr.fone
- How to Transfer Data After Switching From Itel A05s to Latest Samsung | Dr.fone
- Recommended Best Applications for Mirroring Your Motorola Moto G04 Screen | Dr.fone
- Reasons for Poco M6 5G Stuck on Startup Screen and Ways To Fix Them | Dr.fone
- How to Stop Google Chrome from Tracking Your Location On Apple iPhone 13 Pro? | Dr.fone
- In 2024, 2 Ways to Transfer Text Messages from Infinix Note 30 VIP Racing Edition to iPhone 15/14/13/12/11/X/8/ | Dr.fone
- Unlocking the Power of Smart Lock A Beginners Guide for Samsung Galaxy M34 5G Users
- In 2024, Hassle-Free Ways to Remove FRP Lock on Xiaomi Redmi Note 12 Pro+ 5Gwith/without a PC
- How to Get and Use Pokemon Go Promo Codes On Apple iPhone 8 Plus | Dr.fone
- In 2024, Simple and Effective Ways to Change Your Country on YouTube App Of your Realme GT 5 | Dr.fone
- Failed to play HEVC files on Motorola Moto G24
- Title: Updated Can I Still Do Animated Logo Design Without Design Skills?
- Author: Elon
- Created at : 2024-05-19 03:04:43
- Updated at : 2024-05-20 03:04:43
- Link: https://animation-videos.techidaily.com/updated-can-i-still-do-animated-logo-design-without-design-skills/
- License: This work is licensed under CC BY-NC-SA 4.0.
