
:max_bytes(150000):strip_icc():format(webp)/GettyImages-667603173-fac0b8f4b1d9453c866d332dc73821f8.jpg)
Updated How to Create Free Photo Collage Frame in Minutes, In 2024
How to Create Free Photo Collage Frame in Minutes?
How to Create Photo Collage Frame for Free in Minutes?
An easy yet powerful editor
Numerous effects to choose from
Detailed tutorials provided by the official channel
Decoration of pictures and collages can be done by making beautiful and stylish frames. A family picture or collage can be beautified by adding an attractive frame to it. Know about Best App for Photo Frames Online so you can create photo collages easily in minutes.
In this article
01 [How Do You Make a Collage Picture Frame?](#Part 1)
02 [What is the Best App for Photo Frames?](#Part 2)
Part 1 How Do You Make a Collage Picture Frame?
A beautiful collage without a stylish frame will not be attractive. When a family collage is accompanied by an artistic frame, it adds beauty to it and will be an attraction point for the visitors in the home. Wondering where to get it from? You can do it easily through some most popular apps. Yes, you can get your photo collage framed by yourself.

A wall can be decorated with collage picture frames by following just a few simple steps. Let’s begin with!!!
● Selection of the place where the collage frame is required to be hung: The place should be selected based on certain factors such as being easily approachable, proper lighting, and matching with the theme of the home. The place should be sufficient to add on some more picture frames in the future. The wall picture collage frames shall be created based on the room themes like kid’s room, living room, or bedroom. The position of the frames should be marked with tape so that the exact dimension can be known.
● 2. Select the online application to create frames: There are many applications available online that offer pictures collage frames. Choose one application as per the interest and explore it over the phone or desktop. There are various collage picture frame templates available at the application.
● 3. Uploading the pictures: Select the frame that is best for the picture. The frames shall be selected as per the size of the collage. Several pictures can be selected to make a collage and fix the frame. The frame style can be changed that suits best to the picture or collage. A family picture can be uploaded to create a beautiful and perfect size family photo frame collage.
● 4. Customization: The Photo Collage Frame can be even made better with customization over online applications. Text and style can be included in the frames to give it a better look. Grid frame for picture collage is also available which can be created that fits perfectly to the pictures.
● 5. A collage photo frame is ready to hang on the wall & share: The photo collage with frame can be downloaded from the application. A beautiful picture frame collage wall can be hung in the living room or can be shared online with family and friends to print the same. More frames can be added in the future by choosing the same theme and customization.
Part 2 Part2 what is the Best App for Photo Frames?
Selecting the best App for a photo frame enhances the appearance of any ordinary picture. Some of the top Applications used for frame collage wall are as mentioned:

02 PhotoDirector
This app is popular due to its great AI tools, attractive picture effects, and advanced color control. It has a massive collection of frames that fits perfectly for a single picture as well as a collage. The style options of frames available on the app are classic, modern, and whimsical. Animation and glitch effects add an extra feature to this app.
Pros:
1. Wide range of frames is available.
2. It is easy to use as it can work on Android, iOS, macOS, and Windows devices.
3. Free version is available and photo frames can be shared over social media platforms.
Cons:
1. a Large number of editing options makes it confusing.
2. Fewer features are available.
3. Difficulty in finding plug-in features.

03PicsArt-Our Choice
PicsArt-Our Choice app is having a good combination best photo frames and multi-functional photo editing tools. Clip art, text option, frame editing, and making attractive collages make this app a masterpiece. This app can be used over smartphones and the pictures can be easily shared over social media platforms.
Pros:
1. Availability of tools to make clipart and collages.
2. Option to edit frames and objects.
3. Fully packed with a lot of stickers, frames, and filter options.
Cons:
1. The processing of images is slower.
2. Frequent ads disturb the process of editing and frame creation.
3. The application requires more space on downloading over the phone

04 PicFrame
This application has features to combine multiple pictures in one frame and the created frames can be easily shared over social media platforms. A great artwork can be done by using advanced tools such as filters, attractive frames, and drawing tools. The adjustable photo effects, background patterns and fully customized frames allow creating some attractive pictures and collage frame design.
Pros:
1. Option to save pictures in different resolutions.
2. Great tools for reshaping pictures and wide frame patterns
3. Work also on iPhone and iPad.
Cons:
1. With more new and advanced apps, it has become slightly outdated.
2. It closes very frequently, so sometimes work done on the application is lost.
3. Time to create frames is longer.

05Photo Grid
Photo Grid is an App that offers great photo editing features with more than three hundred layouts to give an attractive look to a picture. The users can transform their various pictures into beautiful collages. Filters, stickers, makeup tools, animated emoticons, and customized background features have made this app a bit popular. Extra pages can be added and the Lightbox feature makes it good for presentation.
Pros:
1. Massive collection of photo frames with customized features
2. Easy to use.
3. Various photo editing option
Cons:
1. It comes with various ads that trouble making frames and collages.
2. Lot of flexibility is not there regarding making videos with pictures.
3. Own frames cannot be created.

06ImgLabs
ImgLabs is one of the best applications to decorate photos and add creativity to them. Easy editing, beautify and stickers can be done over pictures and can be easily shared over Instagram and Facebook. More than twenty images can be added along with beautiful frames through this app. Cool photo filters, drawing tools, collage photo frame design tools, and texture effects make it a great photo frame application.
Pros:
1. The Android and iOS versions of the app are easy to use.
2. Attractive blurring and background effects give an attractive look to the images and picture frames.
3. Well-developed photo editing tools are available.
Cons:
1. The frames available are less as compared to other photo & frame editing applications.
2. Difference in functions is noticed in iOS and Android apps.
3. Installation issues in photo edit and stickers

So, these were some of the applications that offer to make some creative photo edits, collages, and frames. Turning to high definition of pictures and frames, most of the applications are coming up with new and advanced features to give the best picture experience to people. One of the applications which any creative person loves to use is Filmora.
****Wondershare Filmora Video Editor ** that creates attractive and professional quality videos for both business and personal purposes. It transforms the video by adding various stylish effects. One can edit the clips, add watermarks, and can adjust the brightness of the videos in simple steps. A wide range of stickers, animated texts, sound effects, filters, and inserting colorful borders over videos make it a great app.
For Win 7 or later (64-bit)
For macOS 10.12 or later
The videos can be made in different file formats such as mp4, wmv, avi, gif, and mp3 and can be easily shared over social media platforms. This app has great importance for business as it offers various facilities such as Multi-channel marketing, social advertising, and social promotion. It is good for user and brand management also.
So, making any video from pictures or movies through Filmora app will be an amazing idea. With advanced texting, color tuning, and 3D effects, one can be so creative. Even Filmora can be used to create video projects.
● Key Takeaways from This Episode →
● Simple pictures or collages can be taken to next level by adding alluring frames to them. With advanced drawing tools, pictures, and light effects, a stylish collage photo frame design can be created online. It allows bringing so many memories of people in one beautiful frame.
● Photo frame collage wall can be created over many applications. There are Android applications that offer many advanced features required to give a fine touch to the pictures, collages, and frames. They can be used and frames for family pictures can be made easily by following simple steps.
● he selection of the application should be made based on the several options available with the app. For example, an app that has easy to use, is good for all devices, has great editing features, eye-catching eye work and mesmerizing effect shall be preferred.
● So, try some amazing and advanced online Apps to create beautiful picture frames for you and your family now!!!
Decoration of pictures and collages can be done by making beautiful and stylish frames. A family picture or collage can be beautified by adding an attractive frame to it. Know about Best App for Photo Frames Online so you can create photo collages easily in minutes.
In this article
01 [How Do You Make a Collage Picture Frame?](#Part 1)
02 [What is the Best App for Photo Frames?](#Part 2)
Part 1 How Do You Make a Collage Picture Frame?
A beautiful collage without a stylish frame will not be attractive. When a family collage is accompanied by an artistic frame, it adds beauty to it and will be an attraction point for the visitors in the home. Wondering where to get it from? You can do it easily through some most popular apps. Yes, you can get your photo collage framed by yourself.
A wall can be decorated with collage picture frames by following just a few simple steps. Let’s begin with!!!
● Selection of the place where the collage frame is required to be hung: The place should be selected based on certain factors such as being easily approachable, proper lighting, and matching with the theme of the home. The place should be sufficient to add on some more picture frames in the future. The wall picture collage frames shall be created based on the room themes like kid’s room, living room, or bedroom. The position of the frames should be marked with tape so that the exact dimension can be known.
● 2. Select the online application to create frames: There are many applications available online that offer pictures collage frames. Choose one application as per the interest and explore it over the phone or desktop. There are various collage picture frame templates available at the application.
● 3. Uploading the pictures: Select the frame that is best for the picture. The frames shall be selected as per the size of the collage. Several pictures can be selected to make a collage and fix the frame. The frame style can be changed that suits best to the picture or collage. A family picture can be uploaded to create a beautiful and perfect size family photo frame collage.
● 4. Customization: The Photo Collage Frame can be even made better with customization over online applications. Text and style can be included in the frames to give it a better look. Grid frame for picture collage is also available which can be created that fits perfectly to the pictures.
● 5. A collage photo frame is ready to hang on the wall & share: The photo collage with frame can be downloaded from the application. A beautiful picture frame collage wall can be hung in the living room or can be shared online with family and friends to print the same. More frames can be added in the future by choosing the same theme and customization.
Part 2 Part2 what is the Best App for Photo Frames?
Selecting the best App for a photo frame enhances the appearance of any ordinary picture. Some of the top Applications used for frame collage wall are as mentioned:
02 PhotoDirector
This app is popular due to its great AI tools, attractive picture effects, and advanced color control. It has a massive collection of frames that fits perfectly for a single picture as well as a collage. The style options of frames available on the app are classic, modern, and whimsical. Animation and glitch effects add an extra feature to this app.
Pros:
1. Wide range of frames is available.
2. It is easy to use as it can work on Android, iOS, macOS, and Windows devices.
3. Free version is available and photo frames can be shared over social media platforms.
Cons:
1. a Large number of editing options makes it confusing.
2. Fewer features are available.
3. Difficulty in finding plug-in features.
03PicsArt-Our Choice
PicsArt-Our Choice app is having a good combination best photo frames and multi-functional photo editing tools. Clip art, text option, frame editing, and making attractive collages make this app a masterpiece. This app can be used over smartphones and the pictures can be easily shared over social media platforms.
Pros:
1. Availability of tools to make clipart and collages.
2. Option to edit frames and objects.
3. Fully packed with a lot of stickers, frames, and filter options.
Cons:
1. The processing of images is slower.
2. Frequent ads disturb the process of editing and frame creation.
3. The application requires more space on downloading over the phone
04 PicFrame
This application has features to combine multiple pictures in one frame and the created frames can be easily shared over social media platforms. A great artwork can be done by using advanced tools such as filters, attractive frames, and drawing tools. The adjustable photo effects, background patterns and fully customized frames allow creating some attractive pictures and collage frame design.
Pros:
1. Option to save pictures in different resolutions.
2. Great tools for reshaping pictures and wide frame patterns
3. Work also on iPhone and iPad.
Cons:
1. With more new and advanced apps, it has become slightly outdated.
2. It closes very frequently, so sometimes work done on the application is lost.
3. Time to create frames is longer.
05Photo Grid
Photo Grid is an App that offers great photo editing features with more than three hundred layouts to give an attractive look to a picture. The users can transform their various pictures into beautiful collages. Filters, stickers, makeup tools, animated emoticons, and customized background features have made this app a bit popular. Extra pages can be added and the Lightbox feature makes it good for presentation.
Pros:
1. Massive collection of photo frames with customized features
2. Easy to use.
3. Various photo editing option
Cons:
1. It comes with various ads that trouble making frames and collages.
2. Lot of flexibility is not there regarding making videos with pictures.
3. Own frames cannot be created.
06ImgLabs
ImgLabs is one of the best applications to decorate photos and add creativity to them. Easy editing, beautify and stickers can be done over pictures and can be easily shared over Instagram and Facebook. More than twenty images can be added along with beautiful frames through this app. Cool photo filters, drawing tools, collage photo frame design tools, and texture effects make it a great photo frame application.
Pros:
1. The Android and iOS versions of the app are easy to use.
2. Attractive blurring and background effects give an attractive look to the images and picture frames.
3. Well-developed photo editing tools are available.
Cons:
1. The frames available are less as compared to other photo & frame editing applications.
2. Difference in functions is noticed in iOS and Android apps.
3. Installation issues in photo edit and stickers
So, these were some of the applications that offer to make some creative photo edits, collages, and frames. Turning to high definition of pictures and frames, most of the applications are coming up with new and advanced features to give the best picture experience to people. One of the applications which any creative person loves to use is Filmora.
****Wondershare Filmora Video Editor ** that creates attractive and professional quality videos for both business and personal purposes. It transforms the video by adding various stylish effects. One can edit the clips, add watermarks, and can adjust the brightness of the videos in simple steps. A wide range of stickers, animated texts, sound effects, filters, and inserting colorful borders over videos make it a great app.
For Win 7 or later (64-bit)
For macOS 10.12 or later
The videos can be made in different file formats such as mp4, wmv, avi, gif, and mp3 and can be easily shared over social media platforms. This app has great importance for business as it offers various facilities such as Multi-channel marketing, social advertising, and social promotion. It is good for user and brand management also.
So, making any video from pictures or movies through Filmora app will be an amazing idea. With advanced texting, color tuning, and 3D effects, one can be so creative. Even Filmora can be used to create video projects.
● Key Takeaways from This Episode →
● Simple pictures or collages can be taken to next level by adding alluring frames to them. With advanced drawing tools, pictures, and light effects, a stylish collage photo frame design can be created online. It allows bringing so many memories of people in one beautiful frame.
● Photo frame collage wall can be created over many applications. There are Android applications that offer many advanced features required to give a fine touch to the pictures, collages, and frames. They can be used and frames for family pictures can be made easily by following simple steps.
● he selection of the application should be made based on the several options available with the app. For example, an app that has easy to use, is good for all devices, has great editing features, eye-catching eye work and mesmerizing effect shall be preferred.
● So, try some amazing and advanced online Apps to create beautiful picture frames for you and your family now!!!
Learn Simple Blender Rigging in Only 2 Minutes
Learn Simple Blender Rigging in Only 2 Minutes
An easy yet powerful editor
Numerous effects to choose from
Detailed tutorials provided by the official channel
Blender is a FREE, open-source 3D Animation program that is very popular for beginner animators. It’s a good way of starting if you’re not yet sure about how far you want to go into animation as it won’t demand any immediate monetary commitment.
Now, as for its features, today, we’ll be focusing on Blender Rigging features.
In this article
01 [Why Use Blender Rigging?](#Part 1)
02 [The Art of Effective Rigging in Blender [TUTORIAL]](#Part 2)
03 [Introduction to Rigging in Blender Course](#Part 3)
Part 1 Why Use Blender Rigging?
Blender Character Rigging is a great way of creating truly beautiful and realistic animations. Despite being an open-source program, it’s capable of doing just as much, if not more, than some of the more premium Animation software out there.
So, if you want to create video projects for your audience’s entertainment or edification with animation, then Blender Rigging is definitely something that you should consider. With this tool, you can create the complex animations that you need and then polish it up in a video editor like Wondershare Filmora Video Editor (which is a premium, video-editing tool that you can use to perfect your finished Blender Rigging animations.)

Part 2 The Art of Effective Rigging in Blender [TUTORIAL]
For this next section, we’re going to be introducing a couple of tutorials that you can look into to teach you more about Blender Character Rigging, Blender Facial Rigging, Blender Muscle Rig, and so on.
These topics are each very long-winded on their own though, so we’ve linked appropriate video tutorials that you can learn more and reserved ourselves to a brief description of each technique so that you can determine whether it’s something that interests you (although, of course, our recommendation is that you check each one out so that you can get the full ‘Blender’ experience.)
01Blender Character Rigging
The main thing people usually look at Blender for is, Blender Character Rigging. And, because it was created to emulate professional animation software, Blender has this function down to pat. To give you an idea of what features you can expect: Blender comes with custom bone shapes for easy Blender character rigging, it also comes with envelope skinny, skeleton skinning, and automatic skinning. With these alone, you can be assured that you will be able to create complex animations without much trouble.
02Blender Facial Rigging
Facial Rigging is usually a more complex subject that is avoided by animators without much experience. But, with Blender, facial rigging is possible. The YouTube video should show you the process of going about Blender Facial Rigging from start to finish (from sculpting the character face itself and then making use of Blender Rigging tools for setting up a skeletal structure for your face’s character to become animated.)
03Blender Muscle Rigging
Creating a Blender Muscle Rig is exactly what it sounds like. It is, of course, much more complicated than normal rigging, but it is a good subject to familiarize yourself with anyway, as it will allow you to go to the ‘next stage’ as you say, with your Animations. The video that we’ve attached is from Pierrick Picaut, who has released a series of videos on the subject of Blender Rigging in general and has extensively explained how to create a Blender Human Rig from the general body, the face, the muscles, and so on.
04Blender Rigging
Although a lot of Animation relies on more ‘traditional’ methods of expressing movement, one can still make use of more modern animation practices, like rigs, to set up their animations for movement. It’s an especially good skill to learn if you’re more interested in content-friendly animations (rather than creating a film of your own.)
05Blender Rigging
This next tutorial is an introduction to basic Blender Rigging. It’s a good one to both start and end on, as it was created for beginners specifically, and uses an example that is perhaps easier to understand most. Make sure to give it a shot just in case.
Part 3 Introduction to Rigging in Blender Course
For this next part, we introduce two other resources that you can take advantage of to learn more about Blender Rigging. Whether it be about Blender character rigging, Blender facial rigging, free blender rigs, creating muscle rigs, and so and so forth. These resources have got your back.
01Where to Learn the Course?
The first major course that we think you might be interested in is Mark Masters’ blender rigging course. You can find this course at PluralSight (which is a website that is focused on helping users of software develop their skills). Mark Masters, the instructor for this course, is a professional animator and works as a Animator for the animation studio, Steelhouse Productions. So, you can be sure that there is much that you can learn from him.

02Other Tools to Learn Rigging
As for other places to learn? We suggest the “Blender Fundamentals” course that Blender themselves have posted on YouTube. They have several of these courses (for all of the more recent versions of Blender). So, you can pick out a course that works for you. One of their more recent series is “Blender Fundamentals 2.which currently has videos all on the subject of Blender rigging (including Blender rigging and Blender rigging videos.)

● Key Takeaways from This Episode →
● If you’re interested in trying out blender rigging yourself, you’ll probably want to study the subject a little before beginning.
● Blender Rigging is quite a complex subject for beginners but having something to start with should help you on your way.
● For that, we recommend checking out the videos that we mentioned in section two of this article, where we recommend some popular tutorials regarding some of the more common Blender Rigging subjects.
● If you’re looking for something more comprehensive or put together though. A course might be more up to your taste. For that, we recommend either Mark Master’s introduction to rigging and animation over at PluralSight or Blender’s own “Blender Fundamental” series on YouTube (which should introduce all the functions you’ll need to know.)
Blender is a FREE, open-source 3D Animation program that is very popular for beginner animators. It’s a good way of starting if you’re not yet sure about how far you want to go into animation as it won’t demand any immediate monetary commitment.
Now, as for its features, today, we’ll be focusing on Blender Rigging features.
In this article
01 [Why Use Blender Rigging?](#Part 1)
02 [The Art of Effective Rigging in Blender [TUTORIAL]](#Part 2)
03 [Introduction to Rigging in Blender Course](#Part 3)
Part 1 Why Use Blender Rigging?
Blender Character Rigging is a great way of creating truly beautiful and realistic animations. Despite being an open-source program, it’s capable of doing just as much, if not more, than some of the more premium Animation software out there.
So, if you want to create video projects for your audience’s entertainment or edification with animation, then Blender Rigging is definitely something that you should consider. With this tool, you can create the complex animations that you need and then polish it up in a video editor like Wondershare Filmora Video Editor (which is a premium, video-editing tool that you can use to perfect your finished Blender Rigging animations.)
Part 2 The Art of Effective Rigging in Blender [TUTORIAL]
For this next section, we’re going to be introducing a couple of tutorials that you can look into to teach you more about Blender Character Rigging, Blender Facial Rigging, Blender Muscle Rig, and so on.
These topics are each very long-winded on their own though, so we’ve linked appropriate video tutorials that you can learn more and reserved ourselves to a brief description of each technique so that you can determine whether it’s something that interests you (although, of course, our recommendation is that you check each one out so that you can get the full ‘Blender’ experience.)
01Blender Character Rigging
The main thing people usually look at Blender for is, Blender Character Rigging. And, because it was created to emulate professional animation software, Blender has this function down to pat. To give you an idea of what features you can expect: Blender comes with custom bone shapes for easy Blender character rigging, it also comes with envelope skinny, skeleton skinning, and automatic skinning. With these alone, you can be assured that you will be able to create complex animations without much trouble.
02Blender Facial Rigging
Facial Rigging is usually a more complex subject that is avoided by animators without much experience. But, with Blender, facial rigging is possible. The YouTube video should show you the process of going about Blender Facial Rigging from start to finish (from sculpting the character face itself and then making use of Blender Rigging tools for setting up a skeletal structure for your face’s character to become animated.)
03Blender Muscle Rigging
Creating a Blender Muscle Rig is exactly what it sounds like. It is, of course, much more complicated than normal rigging, but it is a good subject to familiarize yourself with anyway, as it will allow you to go to the ‘next stage’ as you say, with your Animations. The video that we’ve attached is from Pierrick Picaut, who has released a series of videos on the subject of Blender Rigging in general and has extensively explained how to create a Blender Human Rig from the general body, the face, the muscles, and so on.
04Blender Rigging
Although a lot of Animation relies on more ‘traditional’ methods of expressing movement, one can still make use of more modern animation practices, like rigs, to set up their animations for movement. It’s an especially good skill to learn if you’re more interested in content-friendly animations (rather than creating a film of your own.)
05Blender Rigging
This next tutorial is an introduction to basic Blender Rigging. It’s a good one to both start and end on, as it was created for beginners specifically, and uses an example that is perhaps easier to understand most. Make sure to give it a shot just in case.
Part 3 Introduction to Rigging in Blender Course
For this next part, we introduce two other resources that you can take advantage of to learn more about Blender Rigging. Whether it be about Blender character rigging, Blender facial rigging, free blender rigs, creating muscle rigs, and so and so forth. These resources have got your back.
01Where to Learn the Course?
The first major course that we think you might be interested in is Mark Masters’ blender rigging course. You can find this course at PluralSight (which is a website that is focused on helping users of software develop their skills). Mark Masters, the instructor for this course, is a professional animator and works as a Animator for the animation studio, Steelhouse Productions. So, you can be sure that there is much that you can learn from him.
02Other Tools to Learn Rigging
As for other places to learn? We suggest the “Blender Fundamentals” course that Blender themselves have posted on YouTube. They have several of these courses (for all of the more recent versions of Blender). So, you can pick out a course that works for you. One of their more recent series is “Blender Fundamentals 2.which currently has videos all on the subject of Blender rigging (including Blender rigging and Blender rigging videos.)
● Key Takeaways from This Episode →
● If you’re interested in trying out blender rigging yourself, you’ll probably want to study the subject a little before beginning.
● Blender Rigging is quite a complex subject for beginners but having something to start with should help you on your way.
● For that, we recommend checking out the videos that we mentioned in section two of this article, where we recommend some popular tutorials regarding some of the more common Blender Rigging subjects.
● If you’re looking for something more comprehensive or put together though. A course might be more up to your taste. For that, we recommend either Mark Master’s introduction to rigging and animation over at PluralSight or Blender’s own “Blender Fundamental” series on YouTube (which should introduce all the functions you’ll need to know.)
How To Learn Cartoon Sketch Drawing
How To Learn Cartoon Sketch Drawing— Pencil Sketch for Beginners
An easy yet powerful editor
Numerous effects to choose from
Detailed tutorials provided by the official channel
If you are learning how to draw, particularly cartoon sketches drawing, you must start at a beginner’s level. No skill is difficult if you just put your mind to it. You can learn the basics of the beginning, what you must do, and a learning curve, but if you have passion for it or love what you are doing, you will give it time to practice.
It all boils down to practicing it. Knowing how to draw beautiful sketch cartoons drawing is not a complex thing to do if you start at the beginner’s level.
So, for all who are reading this article, we will show sketch drawings of cartoons, i.e., how to draw step by step in an understandable manner.
In this article
01 [Collection of 8 Hottest Cartoon Drawings](#Part 1)
02 [How to Draw Cartoon Step by Step Easy Pencil Drawing](#Part 2)
Part 1 Collection of 8 Hottest Cartoon Drawings
Here’s a collection of 8 hottest cartoon love drawing pencil sketches for you.
01Motlu Patlu
This is a sketch of the Motu Patlu cartoon drawing. The artist used some simple forms such as a pear shape while developing the body in making this sketch. The pear shape helps in developing the bodies of cartoon characters.

02Basketball Sketch Drawing
The cartoon basketball drawing is one of our top picks wherein the artist took his time to get every detail in the scene. The image alone tells the story.

03Tom and Jerry Sketch drawing
If you were a lover of the famous cartoon Tom and Jerry, you should know this. Here’s a sketch cartoon drawing of Tom and Jerry.

04Cat Sketch
Isn’t this beautiful sketch cartoon drawing of a cat just it? The way the artist details it and gets the perfect fit made it part of our collection.

05Cute Cartoon love sketch
We couldn’t have finished this list without adding this beautiful sketch cartoon drawing.

06Homer
This cartoon sketch drawing of Homer in the Simpsons is just it. Looking at the body build, you can easily trace the outline of the pear-shaped form.

07Cute Cartoon Drawing
This drawing cartoon sketch caught our attention, and we are sure you would love it. With the round head and pear-shaped belly, you will agree that you can start your learning journey with the steps listed in this article.

08Cartoon love drawing
This sketch cartoon drawing portrays the love between a girl and a boy. It is one attractive sketch that shows details of expressions on the faces.

Part 2 How to Draw Cartoon Step by Step Easy Pencil Drawing
An essential factor you must bear in mind is that you must not let go of your creativity when learning how to draw.
You have to be free with yourself and try to create cartoon sketch drawings of characters that you love.
The more it’s about something you love, the better you get at it.
Here’s a step-by-step process of an easy pencil drawing or sketch cartoon drawing.
● Step 1: Draw a circle
Draw a circle and a “noodle” shape, as shown in the illustration. The head is a circle, and the body is a pear form.
The lower half of the pear is fatter than the top. Take note of how the upper half slightly overlaps the head circle.

● Step 2: Draw a pair of eyes.
As shown in the image, add the perspective guidelines around the head. These recommendations will assist you in correctly positioning your rabbit’s eyes and nose.
Above the horizontal guideline, draw the eyes. Where the parameters cross is where the nose is put.

● Step 3: Draw the cheek and Wings
Make the cheekbones. As shown in the illustration, add the ears and arms. It’s OK if the ear shapes differ somewhat from those displayed.
Notice how the arm contour curve organically emerges from behind the shoulders when you sketch the arms. Make it this way if you can.

● Step 4: Draw the legs
Draw the legs and tail of the animal. The arm and leg curves may appear to be challenging. As a result, be gentle with your pencil. Don’t yank on the pencil too hard!
Your cartoon rabbit’s shape is now plainly evident.

● Step 5: Draw the mouth
Let’s focus on the face for a moment. Draw an iris ellipse and an inner line in the ear inside the eyes. Include the nose. Draw the mouth and the teeth.

● Step 6: Outline the contours
Because rabbits eat carrots, this one eats them in excess. Outline the carrot’s outlines. On the legs, draw the brows and the fingers.
As you may have observed, I messed up the teeth in the previous image. Therefore I deleted the thick black pencil lines that were superfluous.
Erase and Shade (Step 8)

● Step 7: Outline the Character
Now, outline the contours of the entire character with a softer pencil. You can pick up B4 or B6 (if you don’t have either, try HB). Please leave a little bright dot on the nose while darkening it.

● Step 8: Erase and Shade
Remove everything that isn’t required. See? That is how your bunny should seem.
I also advocate using a pencil-type eraser in addition to regular or kneaded erasers. Shade the entire rabbit’s body if you’re using a graphite pencil. The inside of the ear, the belly, the paws, and the tail can all be white or brighter.

●Bonus Software for Beautiful Sketch Cartoon Drawing:
Wondershare Filmora Video Editor is a superb video editing software developed by Wondershare. It is a simple entry-level version with preset video templates and effects. With the numerous powerful features in Filmora, we can add amazing effects to our cartoon sketches to make them look better.
For Win 7 or later (64-bit)
For macOS 10.12 or later
Here’s how to use Filmora for cartoon sketch drawing enhancements.
Chroma key (Green screen): This feature can change the background of your sketched cartoon drawing photo by adding special effects to make it look nice.
Color Match: Color match is a feature in Filmora used to apply color correction settings in a video. You can use this feature to enhance your sketches.
Mask and blend: Filmora mask and blend feature has resourceful modes and is easy to use. You can use them for your pencil sketched cartoon drawing.
● Ending Thoughts →
● Making beautiful sketch cartoon drawings is not rocket science. It is a result of consistent practice.
● In this article, we have given you key points and strategies you can use to start practicing cartoon sketch drawing. However, do begin from our idea, i.e., a circle for the head and a pear for developing the body.
● Thus, your journey to learning how to draw cartoons step by step quickly with a pencil is already a walkover.
If you are learning how to draw, particularly cartoon sketches drawing, you must start at a beginner’s level. No skill is difficult if you just put your mind to it. You can learn the basics of the beginning, what you must do, and a learning curve, but if you have passion for it or love what you are doing, you will give it time to practice.
It all boils down to practicing it. Knowing how to draw beautiful sketch cartoons drawing is not a complex thing to do if you start at the beginner’s level.
So, for all who are reading this article, we will show sketch drawings of cartoons, i.e., how to draw step by step in an understandable manner.
In this article
01 [Collection of 8 Hottest Cartoon Drawings](#Part 1)
02 [How to Draw Cartoon Step by Step Easy Pencil Drawing](#Part 2)
Part 1 Collection of 8 Hottest Cartoon Drawings
Here’s a collection of 8 hottest cartoon love drawing pencil sketches for you.
01Motlu Patlu
This is a sketch of the Motu Patlu cartoon drawing. The artist used some simple forms such as a pear shape while developing the body in making this sketch. The pear shape helps in developing the bodies of cartoon characters.
02Basketball Sketch Drawing
The cartoon basketball drawing is one of our top picks wherein the artist took his time to get every detail in the scene. The image alone tells the story.
03Tom and Jerry Sketch drawing
If you were a lover of the famous cartoon Tom and Jerry, you should know this. Here’s a sketch cartoon drawing of Tom and Jerry.
04Cat Sketch
Isn’t this beautiful sketch cartoon drawing of a cat just it? The way the artist details it and gets the perfect fit made it part of our collection.
05Cute Cartoon love sketch
We couldn’t have finished this list without adding this beautiful sketch cartoon drawing.
06Homer
This cartoon sketch drawing of Homer in the Simpsons is just it. Looking at the body build, you can easily trace the outline of the pear-shaped form.
07Cute Cartoon Drawing
This drawing cartoon sketch caught our attention, and we are sure you would love it. With the round head and pear-shaped belly, you will agree that you can start your learning journey with the steps listed in this article.
08Cartoon love drawing
This sketch cartoon drawing portrays the love between a girl and a boy. It is one attractive sketch that shows details of expressions on the faces.
Part 2 How to Draw Cartoon Step by Step Easy Pencil Drawing
An essential factor you must bear in mind is that you must not let go of your creativity when learning how to draw.
You have to be free with yourself and try to create cartoon sketch drawings of characters that you love.
The more it’s about something you love, the better you get at it.
Here’s a step-by-step process of an easy pencil drawing or sketch cartoon drawing.
● Step 1: Draw a circle
Draw a circle and a “noodle” shape, as shown in the illustration. The head is a circle, and the body is a pear form.
The lower half of the pear is fatter than the top. Take note of how the upper half slightly overlaps the head circle.
● Step 2: Draw a pair of eyes.
As shown in the image, add the perspective guidelines around the head. These recommendations will assist you in correctly positioning your rabbit’s eyes and nose.
Above the horizontal guideline, draw the eyes. Where the parameters cross is where the nose is put.
● Step 3: Draw the cheek and Wings
Make the cheekbones. As shown in the illustration, add the ears and arms. It’s OK if the ear shapes differ somewhat from those displayed.
Notice how the arm contour curve organically emerges from behind the shoulders when you sketch the arms. Make it this way if you can.
● Step 4: Draw the legs
Draw the legs and tail of the animal. The arm and leg curves may appear to be challenging. As a result, be gentle with your pencil. Don’t yank on the pencil too hard!
Your cartoon rabbit’s shape is now plainly evident.
● Step 5: Draw the mouth
Let’s focus on the face for a moment. Draw an iris ellipse and an inner line in the ear inside the eyes. Include the nose. Draw the mouth and the teeth.
● Step 6: Outline the contours
Because rabbits eat carrots, this one eats them in excess. Outline the carrot’s outlines. On the legs, draw the brows and the fingers.
As you may have observed, I messed up the teeth in the previous image. Therefore I deleted the thick black pencil lines that were superfluous.
Erase and Shade (Step 8)
● Step 7: Outline the Character
Now, outline the contours of the entire character with a softer pencil. You can pick up B4 or B6 (if you don’t have either, try HB). Please leave a little bright dot on the nose while darkening it.
● Step 8: Erase and Shade
Remove everything that isn’t required. See? That is how your bunny should seem.
I also advocate using a pencil-type eraser in addition to regular or kneaded erasers. Shade the entire rabbit’s body if you’re using a graphite pencil. The inside of the ear, the belly, the paws, and the tail can all be white or brighter.
●Bonus Software for Beautiful Sketch Cartoon Drawing:
Wondershare Filmora Video Editor is a superb video editing software developed by Wondershare. It is a simple entry-level version with preset video templates and effects. With the numerous powerful features in Filmora, we can add amazing effects to our cartoon sketches to make them look better.
For Win 7 or later (64-bit)
For macOS 10.12 or later
Here’s how to use Filmora for cartoon sketch drawing enhancements.
Chroma key (Green screen): This feature can change the background of your sketched cartoon drawing photo by adding special effects to make it look nice.
Color Match: Color match is a feature in Filmora used to apply color correction settings in a video. You can use this feature to enhance your sketches.
Mask and blend: Filmora mask and blend feature has resourceful modes and is easy to use. You can use them for your pencil sketched cartoon drawing.
● Ending Thoughts →
● Making beautiful sketch cartoon drawings is not rocket science. It is a result of consistent practice.
● In this article, we have given you key points and strategies you can use to start practicing cartoon sketch drawing. However, do begin from our idea, i.e., a circle for the head and a pear for developing the body.
● Thus, your journey to learning how to draw cartoons step by step quickly with a pencil is already a walkover.
Is Blender 2D Animation As Awesome As 3D?
Blender is a widely popular animation tool that designers primarily use to create 3D animations. It offers a full-scale editing panel and a plethora of features that allow designers to create visually enticing 3D animations for videos, games, and marketing purposes. But, can you use Blender to create 2D animations? Even though the tool is marketed as a 3D animation creator, it’s worth noting that one can use it for 2D animations as well. Now, the process may not be as straightforward as using a dedicated 2D animation creator, you can still get the job done using Blender. This will be pretty helpful if you are already a Blender user and want to create 2D animations for a project.
To help you along the way, we have put together a detailed guide on how to create Blender 2D animations and use them in your videos to make them look more stunning. So, without any further ado, let’s get started.
In this article
01 [Is Blender 2D Animation As Awesome AS 3D?](#Part 1)
02 [How to Mix 2D & 3D Animation in Blender?](#Part 2)
03 [5 Amazing Blender 2D Animation Examples](#Part 3)
Part 1 Is Blender 2D Animation As Awesome AS 3D?
There’s no arguing the fact that Blender is a remarkable tool for 3D animations. Its worldwide popularity is clear proof of what one can achieve while creating a 3D animation with Blender. But, the real question is - are Blender 2D animations as good as their 3D alternatives. Well, the answer is Yes! Blender has a built-in feature known as Grease Pencil that’s specifically designed to create 2D animations. With Grease Pencil, you can create different 2D layouts from scratch and turn them into visually appealing animations to engage the potential viewers.
Part 2 How to Mix 2D & 3D Animation in Blender?
So, how can you create 2D animations in Blender? Well, it depends! The process to create a 2D animation in Blender mainly depends on what you want to design. You can find different Blender 2D animation tutorials on YouTube and use them to get started with 2D animations in Blender. But, we would like to point out that there’s a generic process that’ll remain consistent in every situation. If you are also getting started with creating 2D animations in Blender, here’s the step-by-step process that’ll help you start sailing in the right direction and make the 2D animation designing a hassle-free task.
Step 1
First and foremost, launch Blender on your system and set it up to get started. On the home screen, click on “File>New” and then, select “2D Animation”.

Step 2
Now, click on the Grease Pencil tool and use it to draw any shape on the canvas. If you want to add multiple objects to the animation, you can also draw multiple shapes.

Step 3
The next step would be to apply the array modifier to these shapes, considering you want to add a specific movement to them. So, add an array modifier first and then apply it over the desired shapes.
Step 4
After you have applied the array modifier, go ahead and start adding colors to the animation. Keep in mind the more colors you use, the better the Blender 2D animation will appear at the end.

Step 5
Now, through the editing panel, right-click on the shape you’ve drawn on the screen and then, select “Rotation and Scale”. A separate editing window will pop up on your screen. Here you can customize the movement of the object by changing its scaling options through keyframing.
That’s it; your 2D animation is now ready and you can save it on your computer.
Part 3 5 Amazing Blender 2D Animation Tutorials
So, now that you know how to create Blender 2D animations, let’s take a look at a few of the 2D animation tutorials that’ll help you get started with your first animation. All these tutorials are available on YouTube and share a detailed insight into different elements of using Blender to create 2D animation.
1. Blender Guru’s Donut Tutorial
If you search Blender on YouTube, this will be the first video you’ll see in the search results. With 11 million views on YouTube, this Blender 2D animation tutorial is one of the most sought-after tutorials on the platforms.
This 14-minute long video will walk you through the step-by-step process of creating a dedicated 2D animation for a donut using different elements of Blender. What’s more interesting is that there’s a second part to this video that’ll help you move a step forward and dive into advanced editing. Basically, if you want to get familiar with Blender’s 2D animation architecture, this video will help you embark on the right track.
2. Blender Lighting Tutorial
Gleb Alexandrov is undoubtedly one of the most talented animation experts who has created hundreds of stunning animations during his career. In this video, he has shared his years of knowledge and expertise and explained different ways to use lighting in your Blender 2D animation.
If you have ever worked on animation or even a regular YouTube video in the past, you may already be familiar with the importance of lighting. If the lighting is right, the subjects look more stunning and the overall frame becomes visually engaging. If you also want to know how to use lighting in a 2D animation, this 19-minutes long video is your answer.
3. Blender Fundamentals
If you are an absolute beginner, it would be better to first familiarize yourself with different elements of the software. Without knowing what a particular tool can do, you’ll most likely struggle to pour your creativity into the Blender 2D animation. So, before working on your first 2D animation, make sure to take your time to go through these Blender 2D animation tutorials uploaded by the tech giant itself.
Keep in mind that it’s not a single video, but a series of episodes that’ll walk you through the basics of Blender and how to start with your first 2D/3D animation. If you are serious about working with Blender, this series is your one-stop solution to get familiar with the application.
4. Character Creation and Rigging
Every 2D animation requires at least one character that would act as the main subject of the animation. And, in case you are planning to create a 3D animation with extensive movement, you’ll also have to incorporate Rigging to ensure that any movement looks realistic.
This video is for anyone who has a basic understanding of 2D animation in Blender and wants to step up their game. Here you’ll learn how to design a specific character on the canvas and how to use rigging to configure its movement. Again, this is not a single video, but a series of episodes, which means it would be better if you sit with your coffee in your hand.
5. CG Geek’s 2D Animation Tutorial in Blender
Now, if you are specifically looking for a video that only talks about Blender 2D animations and nothing else, this tutorial by CG Geek is the most suitable option. In this video, CG Geek goes on explaining how to use the Grease Pencil feature in Blender for 2D animation. He has also explained how to keyframe your 2D animation on Blender’s timeline so that any movement looks as realistic as possible.
6. Wondershare Filmora - A Reliable Alternative to Blender for Video Editors
Now, if you are a video editor and only want to create an animation for one of your videos, it would not be a wise decision to use Blender. Why? Because the tool has a steep learning curve and it’s not worth investing your time if you only want to create a 10-seconds animation. So, what’s the next best solution?
The answer is Wondershare Filmora Video Editor . It’s a full-scale video editing tool that’s designed to help editors enhance their productivity through ready-to-use templates. It has a built-in media library where you’ll find dozens of animation templates. You can simply drag these templates to your timeline and customize them to match the overall theme of your video itself.
With its timeline-based editing panel, you’ll be able to speed up the overall editing process and create visually stunning videos in no time. The tool also has a stack of ready-to-use transitions, special effects, and sounds that you can apply to the video and improve the overall production quality. In short, if your only goal is to add a 2D animation to your video, it won’t be a wise decision to rely on Blender. Instead, download and install Wondershare Filmora Pro on your system and use it to edit the video.
For Win 7 or later (64-bit)
For macOS 10.12 or later
Key Takeaways from This Episode
● Even though Blender is a3D animation software, one can use it to create stunning 2D animations as well..
● Blender has a dedicated feature known as “Grease Pencil” that’ll allow you to create your 2D animations and customize them to make them look stunning.
● Despite its advanced features, Blender is difficult to use. So, if you are looking for an alternative to Blender (only if you want to create 2D animations for your videos), Wondershare Filmora Pro is the right solution.
02 [How to Mix 2D & 3D Animation in Blender?](#Part 2)
03 [5 Amazing Blender 2D Animation Examples](#Part 3)
Part 1 Is Blender 2D Animation As Awesome AS 3D?
There’s no arguing the fact that Blender is a remarkable tool for 3D animations. Its worldwide popularity is clear proof of what one can achieve while creating a 3D animation with Blender. But, the real question is - are Blender 2D animations as good as their 3D alternatives. Well, the answer is Yes! Blender has a built-in feature known as Grease Pencil that’s specifically designed to create 2D animations. With Grease Pencil, you can create different 2D layouts from scratch and turn them into visually appealing animations to engage the potential viewers.
Part 2 How to Mix 2D & 3D Animation in Blender?
So, how can you create 2D animations in Blender? Well, it depends! The process to create a 2D animation in Blender mainly depends on what you want to design. You can find different Blender 2D animation tutorials on YouTube and use them to get started with 2D animations in Blender. But, we would like to point out that there’s a generic process that’ll remain consistent in every situation. If you are also getting started with creating 2D animations in Blender, here’s the step-by-step process that’ll help you start sailing in the right direction and make the 2D animation designing a hassle-free task.
Step 1
First and foremost, launch Blender on your system and set it up to get started. On the home screen, click on “File>New” and then, select “2D Animation”.
Step 2
Now, click on the Grease Pencil tool and use it to draw any shape on the canvas. If you want to add multiple objects to the animation, you can also draw multiple shapes.
Step 3
The next step would be to apply the array modifier to these shapes, considering you want to add a specific movement to them. So, add an array modifier first and then apply it over the desired shapes.
Step 4
After you have applied the array modifier, go ahead and start adding colors to the animation. Keep in mind the more colors you use, the better the Blender 2D animation will appear at the end.
Step 5
Now, through the editing panel, right-click on the shape you’ve drawn on the screen and then, select “Rotation and Scale”. A separate editing window will pop up on your screen. Here you can customize the movement of the object by changing its scaling options through keyframing.
That’s it; your 2D animation is now ready and you can save it on your computer.
Part 3 5 Amazing Blender 2D Animation Tutorials
So, now that you know how to create Blender 2D animations, let’s take a look at a few of the 2D animation tutorials that’ll help you get started with your first animation. All these tutorials are available on YouTube and share a detailed insight into different elements of using Blender to create 2D animation.
1. Blender Guru’s Donut Tutorial
If you search Blender on YouTube, this will be the first video you’ll see in the search results. With 11 million views on YouTube, this Blender 2D animation tutorial is one of the most sought-after tutorials on the platforms.
This 14-minute long video will walk you through the step-by-step process of creating a dedicated 2D animation for a donut using different elements of Blender. What’s more interesting is that there’s a second part to this video that’ll help you move a step forward and dive into advanced editing. Basically, if you want to get familiar with Blender’s 2D animation architecture, this video will help you embark on the right track.
2. Blender Lighting Tutorial
Gleb Alexandrov is undoubtedly one of the most talented animation experts who has created hundreds of stunning animations during his career. In this video, he has shared his years of knowledge and expertise and explained different ways to use lighting in your Blender 2D animation.
If you have ever worked on animation or even a regular YouTube video in the past, you may already be familiar with the importance of lighting. If the lighting is right, the subjects look more stunning and the overall frame becomes visually engaging. If you also want to know how to use lighting in a 2D animation, this 19-minutes long video is your answer.
3. Blender Fundamentals
If you are an absolute beginner, it would be better to first familiarize yourself with different elements of the software. Without knowing what a particular tool can do, you’ll most likely struggle to pour your creativity into the Blender 2D animation. So, before working on your first 2D animation, make sure to take your time to go through these Blender 2D animation tutorials uploaded by the tech giant itself.
Keep in mind that it’s not a single video, but a series of episodes that’ll walk you through the basics of Blender and how to start with your first 2D/3D animation. If you are serious about working with Blender, this series is your one-stop solution to get familiar with the application.
4. Character Creation and Rigging
Every 2D animation requires at least one character that would act as the main subject of the animation. And, in case you are planning to create a 3D animation with extensive movement, you’ll also have to incorporate Rigging to ensure that any movement looks realistic.
This video is for anyone who has a basic understanding of 2D animation in Blender and wants to step up their game. Here you’ll learn how to design a specific character on the canvas and how to use rigging to configure its movement. Again, this is not a single video, but a series of episodes, which means it would be better if you sit with your coffee in your hand.
5. CG Geek’s 2D Animation Tutorial in Blender
Now, if you are specifically looking for a video that only talks about Blender 2D animations and nothing else, this tutorial by CG Geek is the most suitable option. In this video, CG Geek goes on explaining how to use the Grease Pencil feature in Blender for 2D animation. He has also explained how to keyframe your 2D animation on Blender’s timeline so that any movement looks as realistic as possible.
6. Wondershare Filmora - A Reliable Alternative to Blender for Video Editors
Now, if you are a video editor and only want to create an animation for one of your videos, it would not be a wise decision to use Blender. Why? Because the tool has a steep learning curve and it’s not worth investing your time if you only want to create a 10-seconds animation. So, what’s the next best solution?
The answer is Wondershare Filmora Video Editor . It’s a full-scale video editing tool that’s designed to help editors enhance their productivity through ready-to-use templates. It has a built-in media library where you’ll find dozens of animation templates. You can simply drag these templates to your timeline and customize them to match the overall theme of your video itself.
With its timeline-based editing panel, you’ll be able to speed up the overall editing process and create visually stunning videos in no time. The tool also has a stack of ready-to-use transitions, special effects, and sounds that you can apply to the video and improve the overall production quality. In short, if your only goal is to add a 2D animation to your video, it won’t be a wise decision to rely on Blender. Instead, download and install Wondershare Filmora Pro on your system and use it to edit the video.
For Win 7 or later (64-bit)
For macOS 10.12 or later
Key Takeaways from This Episode
● Even though Blender is a3D animation software, one can use it to create stunning 2D animations as well..
● Blender has a dedicated feature known as “Grease Pencil” that’ll allow you to create your 2D animations and customize them to make them look stunning.
● Despite its advanced features, Blender is difficult to use. So, if you are looking for an alternative to Blender (only if you want to create 2D animations for your videos), Wondershare Filmora Pro is the right solution.
What Is the Best Collage Photo Grid Maker - Experts Choice
What is the Best Collage Photo Grid Maker - Experts Choice
An easy yet powerful editor
Numerous effects to choose from
Detailed tutorials provided by the official channel
Whether it is an Instagram collage grid, other social media sites, an online platform, a greeting card, or even a wall of your room, collages are everywhere. It is a great way to assemble multiple pictures into a single frame. Depending on your purpose, theme, and other factors, there are several different styles of collages that can be created like photo grid, shaped collage, polaroid collage, and more. One of the most classic and traditional styles is a photo grid collage. Taking the help of a dedicated collage-making app or a tool can help you create an amazing and eye-catchy collage in no time. Keep reading to learn more about collage photo grid and the best tools to create them.

In this article
01 [What is a photo grid?](#Part 1)
02 [Need for using special tools and apps to create a photo grid collage](#Part 2)
03 [Top 5 tools to create photo grid](#Part 3)
04 [Use stock images to enhance your photo grid](#Part 4)
Part 1 What is a photo grid?
When a special grid frame having a specific number of rows and columns is used for arranging photos, the created collage is known as a photo grid collage. These multiple added images will make them look like a single picture in a frame. A photo grid is one of the most classic styles of creating a collage that is also the most widely used one. You can never go wrong with a collage while arranging the pictures in a photo grid.
Part 2 Need for using special tools and apps to create a photo grid collage
Though creating a photo grid may look like a simple process which it is also, there are a lot of elements that go into creating an impressive and attractive collage. Adding the images of the correct size and orientation, adjusting the borders, customizing the frames, adding filters, adding text, are some of the many factors that help in creating a wonderful collage, and for this good collage-making tool or an app is required.
These special photo grid collage maker tools have built-in templates, designs, and support other features that help you create an interesting photo grid of your choice. Moreover, some of these programs also come with high-quality stock images that can be used in the grid to further enhance their overall looks.
Part 3 Top 5 tools to create photo grid
We have selected the top 5 grid collage maker tools that can be used to create a customized photo grid.
01Fotor
This is one of the best tools available for creating a photo grid using one of the several templates available. It is the Classic Collage style of this app that will let you create a customized grid where you can add the desired number of images and then edit the background, borders, and other elements. You can even add text, stickers, effects, and other interesting filters. Fotor is a free online tool that can be used from your browser and you just need to free sign-up using your Google, Facebook, or Apple account.

02FotoJet
This is another free-to-use browser-based tool that can be used for creating a photo grid. The interface of the tool is simple and there are multiple grid options to choose from depending on the number of images to be added. The spacing between the grids as well as the roundness of the margins can also be adjusted as desired. The tool also gives you the option to choose the added image file resolution. Text, clipart, and background to the collage can also be added and there is also a library of images that can be used. The created collage can be saved or can also be shared directly to Twitter, Pinterest, and Tumblr.

03Adobe Spark
This is one of the top collages making tools that can be used to design the desired collage in different styles including photo grid. Unlike other Adobe tools, the collage-making program is simple and quick to use and does not require advanced technical know-how. You simply need to create a free account for Adobe Creative Cloud and the collage-making features can be easily used. There are pre-set designs and templates available to match your theme and requirements. You can further make customization to other collage elements as needed.

04Photo Collage
This free-to-use online tool requires no software download or installation and allows creating a grid quickly and easily. The interface of the tool is user-friendly where you just need to browse and add the images or can simply drag and drop them as well. You can choose from multiple template options available and can also add text, effects, and stickers to the collage. Multiple image editing options are also supported like zoom, flip, transparency, and more.

05Canva
Free and simple to use, this is one of the most widely used collage-making tools that is available as a browser-based program as well as Android and iOS app. Several photo-grid templates in different styles are available at the site that lets you create the desired collage in no time. You can customize the selected templates by adding filters, texts, effects, and more elements available. A paid version of the tool with advanced features is also available.

Part 4 Use stock images to enhance your photo grid
Adding high-quality and interesting images to your photo grid will level up its overall look and make it eye-catchy. If you are running short of such interesting and bright images, no need to worry as several sites have a good collection of images that can be used. One such program that we recommend here to check the stock images is Wondershare Filmora. Though Filmora is an advanced Windows and Mac-based video editing software, there are multiple additional features supported one of them is a collection of images in an array of categories.
Depending on the theme of your photo grid, you can select the desired images and other media from Wondershare Filmora Video Editor . Additionally, the split-screen feature of the software will let you add and play multiple videos in a single frame that makes it look like a video collage.

Wondershare Filmora - Best Video Editor for Mac/Windows
5,481,435 people have downloaded it.
Build unique custom animations without breaking a sweat.
Focus on creating epic stories and leave the details to Filmora’s auto features.
Start a creative adventure with drag & drop effects and endless possibilities.
Filmora simplifies advanced features to save you time and effort.
Filmora cuts out repetition so you can move on to your next creative breakthrough.
● Key Takeaways from This Episode →
● A photo grid is a classic and traditional style of creating a collage.
● There are several online tools, software, and mobile apps available for creating interesting photo grids.
● Wondershare Filmora is a great site to get stock of images in different categories and for all types of video editing requirements.
Whether it is an Instagram collage grid, other social media sites, an online platform, a greeting card, or even a wall of your room, collages are everywhere. It is a great way to assemble multiple pictures into a single frame. Depending on your purpose, theme, and other factors, there are several different styles of collages that can be created like photo grid, shaped collage, polaroid collage, and more. One of the most classic and traditional styles is a photo grid collage. Taking the help of a dedicated collage-making app or a tool can help you create an amazing and eye-catchy collage in no time. Keep reading to learn more about collage photo grid and the best tools to create them.
In this article
01 [What is a photo grid?](#Part 1)
02 [Need for using special tools and apps to create a photo grid collage](#Part 2)
03 [Top 5 tools to create photo grid](#Part 3)
04 [Use stock images to enhance your photo grid](#Part 4)
Part 1 What is a photo grid?
When a special grid frame having a specific number of rows and columns is used for arranging photos, the created collage is known as a photo grid collage. These multiple added images will make them look like a single picture in a frame. A photo grid is one of the most classic styles of creating a collage that is also the most widely used one. You can never go wrong with a collage while arranging the pictures in a photo grid.
Part 2 Need for using special tools and apps to create a photo grid collage
Though creating a photo grid may look like a simple process which it is also, there are a lot of elements that go into creating an impressive and attractive collage. Adding the images of the correct size and orientation, adjusting the borders, customizing the frames, adding filters, adding text, are some of the many factors that help in creating a wonderful collage, and for this good collage-making tool or an app is required.
These special photo grid collage maker tools have built-in templates, designs, and support other features that help you create an interesting photo grid of your choice. Moreover, some of these programs also come with high-quality stock images that can be used in the grid to further enhance their overall looks.
Part 3 Top 5 tools to create photo grid
We have selected the top 5 grid collage maker tools that can be used to create a customized photo grid.
01Fotor
This is one of the best tools available for creating a photo grid using one of the several templates available. It is the Classic Collage style of this app that will let you create a customized grid where you can add the desired number of images and then edit the background, borders, and other elements. You can even add text, stickers, effects, and other interesting filters. Fotor is a free online tool that can be used from your browser and you just need to free sign-up using your Google, Facebook, or Apple account.
02FotoJet
This is another free-to-use browser-based tool that can be used for creating a photo grid. The interface of the tool is simple and there are multiple grid options to choose from depending on the number of images to be added. The spacing between the grids as well as the roundness of the margins can also be adjusted as desired. The tool also gives you the option to choose the added image file resolution. Text, clipart, and background to the collage can also be added and there is also a library of images that can be used. The created collage can be saved or can also be shared directly to Twitter, Pinterest, and Tumblr.
03Adobe Spark
This is one of the top collages making tools that can be used to design the desired collage in different styles including photo grid. Unlike other Adobe tools, the collage-making program is simple and quick to use and does not require advanced technical know-how. You simply need to create a free account for Adobe Creative Cloud and the collage-making features can be easily used. There are pre-set designs and templates available to match your theme and requirements. You can further make customization to other collage elements as needed.
04Photo Collage
This free-to-use online tool requires no software download or installation and allows creating a grid quickly and easily. The interface of the tool is user-friendly where you just need to browse and add the images or can simply drag and drop them as well. You can choose from multiple template options available and can also add text, effects, and stickers to the collage. Multiple image editing options are also supported like zoom, flip, transparency, and more.
05Canva
Free and simple to use, this is one of the most widely used collage-making tools that is available as a browser-based program as well as Android and iOS app. Several photo-grid templates in different styles are available at the site that lets you create the desired collage in no time. You can customize the selected templates by adding filters, texts, effects, and more elements available. A paid version of the tool with advanced features is also available.
Part 4 Use stock images to enhance your photo grid
Adding high-quality and interesting images to your photo grid will level up its overall look and make it eye-catchy. If you are running short of such interesting and bright images, no need to worry as several sites have a good collection of images that can be used. One such program that we recommend here to check the stock images is Wondershare Filmora. Though Filmora is an advanced Windows and Mac-based video editing software, there are multiple additional features supported one of them is a collection of images in an array of categories.
Depending on the theme of your photo grid, you can select the desired images and other media from Wondershare Filmora Video Editor . Additionally, the split-screen feature of the software will let you add and play multiple videos in a single frame that makes it look like a video collage.
Wondershare Filmora - Best Video Editor for Mac/Windows
5,481,435 people have downloaded it.
Build unique custom animations without breaking a sweat.
Focus on creating epic stories and leave the details to Filmora’s auto features.
Start a creative adventure with drag & drop effects and endless possibilities.
Filmora simplifies advanced features to save you time and effort.
Filmora cuts out repetition so you can move on to your next creative breakthrough.
● Key Takeaways from This Episode →
● A photo grid is a classic and traditional style of creating a collage.
● There are several online tools, software, and mobile apps available for creating interesting photo grids.
● Wondershare Filmora is a great site to get stock of images in different categories and for all types of video editing requirements.
How to Animate Picture Online Without Learning From Scratch
How to Animate Picture Online Without Learning from Scratch
An easy yet powerful editor
Numerous effects to choose from
Detailed tutorials provided by the official channel
The Internet is flooded with thousands of tools that aim to provide the best-animated video. But trusting all of them every time is not a go-to thing for everyone.

If you also fall into the same category of people who are looking to add animation to designs but are not able to find the best tools, you are on the right page.
In this article
01 [Ready to Add Animation to Your Designs?](#Part 1)
02 [The Secret of Animating Pictures Online](#Part 2)
Part 1 Ready to Add Animation to Your Designs?
Here we are discussing the top three Animated picture maker that is used for creating different videos with differnt types of online picture tools. These are as follows:
1. Powtoon
Powtoon is an interactive yet simple tool available to add animation to designs. It has all the basic functions available for motion graphics that are useful for presentation. It has a variety of characters and animations available, along with simple textual animation. A user can easily prepare the video with full animation.
(This video indicates how to use the Powtoon tool for creating the best-animated videos, along with an example.)
1. Animaker
Animaker is one of the wonderful animation programs to add animation to designs in an interactive yet simple manner. It has all the best features integrated into it, which let a user create the video of their choice. It is safe to use and, being a web-based program, offers all the options.
(This video indicates how to use the Animaker tool for creating the best-animated videos, along with an example.)
3. Moovly
Moovly is also one of the best animation tools available to add animation to the content. On the main page, the “add content” option is available from where a user can simply update the video and add animation to it.
(This video indicates how to use the Moovly tool for creating the best-animated videos, along with an example.)
Note: These tools are among those that even a layman can use. But some users are still not happy with the interface of these animate picture online tools and feel like they are lacking features. For all those out there, we have some other options too.
Part 2 The Secret of Animating Pictures Online
The secret behind animating pictures online is to save time and effort. With the help of online tools, one can get the outcome with the help of inbuilt templates. There will be no need to install any application or plugin when they wish to add any particular animation to the content. Some tools you can consider using to add animation to designs are as follows:
1. Pixtellar
Pixtellar is a great tool that helps in creating animated videos and images too. Along with creating animated videos and images, one can easily create posters, logos, photo collages, and so on.
However, before using it, be sure to do the registration, as without it, using it is impossible. After registering, the steps you need to follow to use it are as follows:
Step 1Create from Scratch
Choose the template of your choice or click on “Create from Scratch”. Here we are choosing the templates.

Step 2Choose social media
It will be redirected to the next page where you will find out templates according to the selected category. (Here we choose social media).

Step 3Click on “Animate”
Choose any of them based on your preferences. You will head to the next page where you can do the editing as per your needs by clicking on “Animate”.

Step 4Save the image
After making the changes and adding the animations, you are all set to save the image. The “Save” button is right at the top of the page!

2. Adobe Spark
Adobe Spark is a tool that has pre-built templates available for adding animations to the designs. From adding animations to editing the image and video, all the options are featured in this. It also gives users an idea of how they can simply create the video and images with the help of animations and other effects.
However, when you are using it, registration is a must. After performing the registration, you are all set to use it. The steps you need to follow to use this tool are as follows:
Step 1Start editing
After completing the registration, you will reach the main page where you can choose the option of your choice and start editing. Here we have chosen the template option.

Step 2Create From This Template
It asks you to be sure and click on “Create From This Template.”

Step 3Do the editing
It takes a few seconds to present the same in front of you. On this page, you are all set to do the editing as per your needs.

Step 4Save the image
After doing all the editing, you are all set to save the image. The “Save” button is right there at the top. Click on it and save the image!

3. Crello or VistaCreate
Crello, which turns out to be VistaCreate, is one of the most famous tools for adding motion to images. It has almost 8,000+ animated designs and motion graphics available, which are helpful in creating eye-catching videos.
When you are using this feature, registration or sign-up is important. On the main page, the signup option is available, helping users do it. After that, the steps are as follows:
Step 1Click on the “Template”
On the home page, you can either create your own or click on the “Template” option available. (We chose the template option here).

Step 2Select the template
Now select the template of your choice. Here we have selected the Happy New Year one.

Step 3Do the editing as required
Now you are all set to do the editing as required. Here all the options are available, which help in adding all the basic to advanced details to the image. You can use it.

Step 4Download the image
After doing the editing, you are all set to download the image. The downloading button is right there at the top.

Key Takeaways from This Episode
● Animated videos are eye-catching, and tools are helpful in making them more enhanced.
● Animation tools are very easy to use and precisely make the video.
● Editing options are available in the tools, which are helpful in adding extra effects to the image.
● The tools are free to use with all the in-built templates and other features.
The Internet is flooded with thousands of tools that aim to provide the best-animated video. But trusting all of them every time is not a go-to thing for everyone.
If you also fall into the same category of people who are looking to add animation to designs but are not able to find the best tools, you are on the right page.
In this article
01 [Ready to Add Animation to Your Designs?](#Part 1)
02 [The Secret of Animating Pictures Online](#Part 2)
Part 1 Ready to Add Animation to Your Designs?
Here we are discussing the top three Animated picture maker that is used for creating different videos with differnt types of online picture tools. These are as follows:
1. Powtoon
Powtoon is an interactive yet simple tool available to add animation to designs. It has all the basic functions available for motion graphics that are useful for presentation. It has a variety of characters and animations available, along with simple textual animation. A user can easily prepare the video with full animation.
(This video indicates how to use the Powtoon tool for creating the best-animated videos, along with an example.)
1. Animaker
Animaker is one of the wonderful animation programs to add animation to designs in an interactive yet simple manner. It has all the best features integrated into it, which let a user create the video of their choice. It is safe to use and, being a web-based program, offers all the options.
(This video indicates how to use the Animaker tool for creating the best-animated videos, along with an example.)
3. Moovly
Moovly is also one of the best animation tools available to add animation to the content. On the main page, the “add content” option is available from where a user can simply update the video and add animation to it.
(This video indicates how to use the Moovly tool for creating the best-animated videos, along with an example.)
Note: These tools are among those that even a layman can use. But some users are still not happy with the interface of these animate picture online tools and feel like they are lacking features. For all those out there, we have some other options too.
Part 2 The Secret of Animating Pictures Online
The secret behind animating pictures online is to save time and effort. With the help of online tools, one can get the outcome with the help of inbuilt templates. There will be no need to install any application or plugin when they wish to add any particular animation to the content. Some tools you can consider using to add animation to designs are as follows:
1. Pixtellar
Pixtellar is a great tool that helps in creating animated videos and images too. Along with creating animated videos and images, one can easily create posters, logos, photo collages, and so on.
However, before using it, be sure to do the registration, as without it, using it is impossible. After registering, the steps you need to follow to use it are as follows:
Step 1Create from Scratch
Choose the template of your choice or click on “Create from Scratch”. Here we are choosing the templates.
Step 2Choose social media
It will be redirected to the next page where you will find out templates according to the selected category. (Here we choose social media).
Step 3Click on “Animate”
Choose any of them based on your preferences. You will head to the next page where you can do the editing as per your needs by clicking on “Animate”.
Step 4Save the image
After making the changes and adding the animations, you are all set to save the image. The “Save” button is right at the top of the page!
2. Adobe Spark
Adobe Spark is a tool that has pre-built templates available for adding animations to the designs. From adding animations to editing the image and video, all the options are featured in this. It also gives users an idea of how they can simply create the video and images with the help of animations and other effects.
However, when you are using it, registration is a must. After performing the registration, you are all set to use it. The steps you need to follow to use this tool are as follows:
Step 1Start editing
After completing the registration, you will reach the main page where you can choose the option of your choice and start editing. Here we have chosen the template option.
Step 2Create From This Template
It asks you to be sure and click on “Create From This Template.”
Step 3Do the editing
It takes a few seconds to present the same in front of you. On this page, you are all set to do the editing as per your needs.
Step 4Save the image
After doing all the editing, you are all set to save the image. The “Save” button is right there at the top. Click on it and save the image!
3. Crello or VistaCreate
Crello, which turns out to be VistaCreate, is one of the most famous tools for adding motion to images. It has almost 8,000+ animated designs and motion graphics available, which are helpful in creating eye-catching videos.
When you are using this feature, registration or sign-up is important. On the main page, the signup option is available, helping users do it. After that, the steps are as follows:
Step 1Click on the “Template”
On the home page, you can either create your own or click on the “Template” option available. (We chose the template option here).
Step 2Select the template
Now select the template of your choice. Here we have selected the Happy New Year one.
Step 3Do the editing as required
Now you are all set to do the editing as required. Here all the options are available, which help in adding all the basic to advanced details to the image. You can use it.
Step 4Download the image
After doing the editing, you are all set to download the image. The downloading button is right there at the top.
Key Takeaways from This Episode
● Animated videos are eye-catching, and tools are helpful in making them more enhanced.
● Animation tools are very easy to use and precisely make the video.
● Editing options are available in the tools, which are helpful in adding extra effects to the image.
● The tools are free to use with all the in-built templates and other features.
Animated Business Logos and Tools to Create
Know All About Animated Business Logos and the Best Tools to Create One
An easy yet powerful editor
Numerous effects to choose from
Detailed tutorials provided by the official channel
Just like people, brands and businesses also have their own identities.
If you too want to reap the benefits of an animated business logo, creating an impressive one is important and to get the task done, there are several software and other tools available.
In this article
01 [About animated business logos and how they can help in the growth of the business?](#Part 1)
02 [Tips for making an effective animated business logo](#Part 2)
03 [Types of animated business logo makers](#Part 3)
04 [The best tool to create an animated business logo effortlessly- Wondershare Filmora](#Part 4)
Part 1 About Animated Business Logos and How They Can Help in the Growth of the Business?
An animated logo is a logo that has rich motion graphics. These logos are catchy and get the instant attention of the viewers. A well-created animated business logo not only gives a professional look but also helps in creating awareness about the brand, supports the story of the brand, and enhances visual appearance.
There are several ways in which an animated business logo can be used for the growth of the business. Summarized below are some of the major ones.
01Use animated logos at the start or the end of the videos
An animated logo creates a lasting impression and thus including then in the marketing videos at the starting or the end helps in the business growth. These logos can be added to the videos that are created for internal communication as well as for the public.
02Using animated logos for e-commerce
If your business is related to products, then adding animated logos to the product movies will make them look interesting.
03Use animated logos for YouTube videos
If you are using YouTube videos for your business promotion, ensure to add the animated logos for branding as it makes the videos look different from the other regular ones and thus creates an interest among the viewers.
04Using animated logos for YouTube ads
Using these motion graphic logos as short YouTube ads will work as an effective way for promoting the business and for their growth as well.
05Use animated logos for the films on your website
If you are making videos for your business websites as introduction videos or explainer videos, using animated logos adds a professional and dynamic touch.
06Using animated logos for social media sites
The number of users on social media sites is increasing every day and thus promoting your business on these sites helps you reach a wider audience. So, if you too are planning a video campaign on Facebook, Twitter, Instagram, and other sites use animated logos in the newsfeed.

Part 2 Tips for making an effective an animated business logo
The below-listed tips can help you create an impressive and interesting animated logo for your business.
● Create short animated logos: Animated logos should be short and convey the meaning and purpose of your business and brand. A long video can be boring and the target audience can lose interest and thus they have to be short, immersive, and impactful.
● Create an impression: Create an animated logo that can create a positive impression. Your animated logo needs to match the style of your business and get the interest of the viewers.
● Use the correct animation style: Several animation styles can be used for creating your business logo like 2D, 3D, traditional, and more. Different designs leave a different impact among the viewers and create a different understanding of the brand. Thus, while using the animation style, choose the one that matches your business style.
Part 3 Types of animated business logo makers
If you are looking for created animated logos, there is no dearth of tools. The majority of the editing and animated software can help you get the task done. There is several online and desktop software available using which you can either add your own logo and make an animated version of it or can design an animation from the scratch.
The choice of the tool selection depends on your budget and the features required. Some of the popularly used tools that can be considered are as below.
Popularly Used Tools →
● Renderforest
● Adobe Spark
● Logo Maker Plus
● Animaker
● Viddyoze
Popularly Used Tools →
● Offeo
● Canva
● Design Free Logo
● Tube Arsenal
● MotionDen
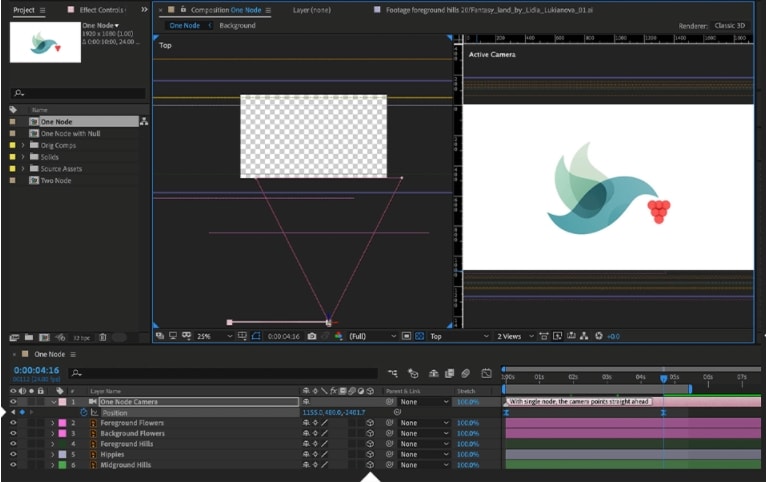
Part 4 The best tool to create an animated business logo effortlessly- Wondershare Filmora
To create animated logos effortlessly and use the best features Wondershare Filmora is an excellent choice. This desktop software can be quickly downloaded and installed on your Windows and Mac after which it can be used for multitasking like editing, creating animations, logos, and much more. The interface is simple and user-friendly which makes the program popular among all user types.
Wondershare Filmora
Power Up Your Story with Filmora. Professional video editing is made easy.
Key features of the software:
● Allows creating different types of animations including animated business logos.
● Allows creating 2D and 3D animated logos.
● Allows creating logos using keyframing for better customization.
● Multiple effects can be added like titles, tiles, warp, masking, distort, lights, flares, and more.
● To further enhance the overall looks of your animation the software offers better control over the colors and other parameters through tools like color wheels, auto-correction, scopes, and more.
● Audio controls are also offered through features like audio compression, audio noise correction, audio sync, transitions, and more.
● Compatible with all the latest Windows and Mac.
Key Takeaways from This Episode
● Animated business logos are an important aspect of any business promotion and marketing strategy.
● An impressive animated logo can help a business grow in several ways and several factors should be considered while creating an animated logo.
● Different types of desktop and online tools for animated business logos are present.
● Wondershare Filmora works as the best animation logo that can create impressive animated logos in no time.


Just like people, brands and businesses also have their own identities.
If you too want to reap the benefits of an animated business logo, creating an impressive one is important and to get the task done, there are several software and other tools available.
In this article
01 [About animated business logos and how they can help in the growth of the business?](#Part 1)
02 [Tips for making an effective animated business logo](#Part 2)
03 [Types of animated business logo makers](#Part 3)
04 [The best tool to create an animated business logo effortlessly- Wondershare Filmora](#Part 4)
Part 1 About Animated Business Logos and How They Can Help in the Growth of the Business?
An animated logo is a logo that has rich motion graphics. These logos are catchy and get the instant attention of the viewers. A well-created animated business logo not only gives a professional look but also helps in creating awareness about the brand, supports the story of the brand, and enhances visual appearance.
There are several ways in which an animated business logo can be used for the growth of the business. Summarized below are some of the major ones.
01Use animated logos at the start or the end of the videos
An animated logo creates a lasting impression and thus including then in the marketing videos at the starting or the end helps in the business growth. These logos can be added to the videos that are created for internal communication as well as for the public.
02Using animated logos for e-commerce
If your business is related to products, then adding animated logos to the product movies will make them look interesting.
03Use animated logos for YouTube videos
If you are using YouTube videos for your business promotion, ensure to add the animated logos for branding as it makes the videos look different from the other regular ones and thus creates an interest among the viewers.
04Using animated logos for YouTube ads
Using these motion graphic logos as short YouTube ads will work as an effective way for promoting the business and for their growth as well.
05Use animated logos for the films on your website
If you are making videos for your business websites as introduction videos or explainer videos, using animated logos adds a professional and dynamic touch.
06Using animated logos for social media sites
The number of users on social media sites is increasing every day and thus promoting your business on these sites helps you reach a wider audience. So, if you too are planning a video campaign on Facebook, Twitter, Instagram, and other sites use animated logos in the newsfeed.
Part 2 Tips for making an effective an animated business logo
The below-listed tips can help you create an impressive and interesting animated logo for your business.
● Create short animated logos: Animated logos should be short and convey the meaning and purpose of your business and brand. A long video can be boring and the target audience can lose interest and thus they have to be short, immersive, and impactful.
● Create an impression: Create an animated logo that can create a positive impression. Your animated logo needs to match the style of your business and get the interest of the viewers.
● Use the correct animation style: Several animation styles can be used for creating your business logo like 2D, 3D, traditional, and more. Different designs leave a different impact among the viewers and create a different understanding of the brand. Thus, while using the animation style, choose the one that matches your business style.
Part 3 Types of animated business logo makers
If you are looking for created animated logos, there is no dearth of tools. The majority of the editing and animated software can help you get the task done. There is several online and desktop software available using which you can either add your own logo and make an animated version of it or can design an animation from the scratch.
The choice of the tool selection depends on your budget and the features required. Some of the popularly used tools that can be considered are as below.
Popularly Used Tools →
● Renderforest
● Adobe Spark
● Logo Maker Plus
● Animaker
● Viddyoze
Popularly Used Tools →
● Offeo
● Canva
● Design Free Logo
● Tube Arsenal
● MotionDen
Part 4 The best tool to create an animated business logo effortlessly- Wondershare Filmora
To create animated logos effortlessly and use the best features Wondershare Filmora is an excellent choice. This desktop software can be quickly downloaded and installed on your Windows and Mac after which it can be used for multitasking like editing, creating animations, logos, and much more. The interface is simple and user-friendly which makes the program popular among all user types.
Wondershare Filmora
Power Up Your Story with Filmora. Professional video editing is made easy.
Key features of the software:
● Allows creating different types of animations including animated business logos.
● Allows creating 2D and 3D animated logos.
● Allows creating logos using keyframing for better customization.
● Multiple effects can be added like titles, tiles, warp, masking, distort, lights, flares, and more.
● To further enhance the overall looks of your animation the software offers better control over the colors and other parameters through tools like color wheels, auto-correction, scopes, and more.
● Audio controls are also offered through features like audio compression, audio noise correction, audio sync, transitions, and more.
● Compatible with all the latest Windows and Mac.
Key Takeaways from This Episode
● Animated business logos are an important aspect of any business promotion and marketing strategy.
● An impressive animated logo can help a business grow in several ways and several factors should be considered while creating an animated logo.
● Different types of desktop and online tools for animated business logos are present.
● Wondershare Filmora works as the best animation logo that can create impressive animated logos in no time.
Also read:
- New In 2024, Easy Cartoon Characters Drawing Tutorials for You Beginners
- Updated 15 Best Collage Makers to Create Aesthetic Collages for 2024
- Updated Learn Pencil2D Animation Tutorial Overview for 2024
- Updated 2024 Approved Top 3 Ways to Create Gif Images with Great 3D Gif Maker
- New Top 15 Greatest Claymation Movies of All Time for 2024
- New Top 12 Video to GIF Converters High Quality to Check Out
- Create or Find Good Morning/Night GIFs for 2024
- Updated 2024 Approved Some Techniques for Creating Animated Logo That Few People Know About
- New That Will Make Aesthetic Cartoon Drawing More Understandable
- 2024 Approved Top 12 Video to GIF Converters High Quality to Check Out
- How to Make Your Own GIF on WhatsApp in Simple Ways for 2024
- 2024 Approved Popular Female & Male Disney Cartoon Characters
- Whats Music Video GIF & How to Add Music to GIF Files for 2024
- 2024 Approved Nurturing Mind, Heart, and Soul on the Top 5 Anime Streaming Sanctuaries
- Updated 2024 Approved Best Guide for Beginners on 2D Animation Making
- Handy Tips From Adobe Animate Rigging Tutorial for All Learners
- New Tips for GIF to Animated PNG
- Updated Animate Photo Online with These Awesome Tools for 2024
- New Top Tips for Effortless Unity 3D Animation for 2024
- 2024 Approved 10 Great Apps for Turning Funny Animated Images Into Comics
- New All About 3D Medical Animation And Its Uses for 2024
- How to Make a 3D Cartoon of Yourself for 2024
- New Best 10 Popular Cartoons You Forgot Existed
- Updated 2024 Approved 18 Best Tools and Services to Create Animated Videos for Business 2023
- In 2024, How to Make Well Done Animated GIF By Yourself?
- New Tips for GIF to Animated PNG for 2024
- In 2024, 15 Horror Animes That Will Trigger a Heart Attack
- Best 15 Horror Animes That Will Trigger a Heart Attack
- Updated Why These 10 Top Text Motion Templates Are Worth Your Attention
- New How I Animate Discord Profile Pictures (& You Can Too) for 2024
- In 2024, Convert Animated GIF From Video
- Updated No. 1 Maker to Animate Your Logo Online Free
- 10 Best Tools to Make Pic Collage for Windows for 2024
- Updated 6 Types of Animation You May Like
- Updated 20 Best Anime Movies You Cannot Miss 2024 Update
- Best 12 Evil Cartoon Characters of All Time for 2024
- New 2024 Approved Most Popular Tips on Learning Animate Rigging
- Updated In 2024, Guide on Creating GIF in WhatsApp iPhone
- New 10 2D/3D Animation Tips & Tricks to Bring New Ideas to You for 2024
- All About 3D Medical Animation And Its Uses for 2024
- New Make Well Done Animated GIF for 2024
- 10 Stunning Stop Motion Movies You Should Not Miss for 2024
- In 2024, What Is Still Motion Animation?
- New In 2024, Most Effective Ways to Set WhatsApp Status
- New In 2024, 15 Best Video to GIF App on iPhone and Android
- New Amazing Ways to Find Suitable Animated Graphic Maker for 2024
- New In 2024, Have You Seen the Facebook Cartoon App Everyones Using Recently
- Best Websites to Download Animated GIFs for Free
- How to Soft Reset Tecno Pop 8 phone? | Dr.fone
- In 2024, Remove the Lock Screen Fingerprint Of Your Vivo X90S
- In 2024, Simple and Effective Ways to Change Your Country on YouTube App Of your Apple iPhone 12 Pro | Dr.fone
- In 2024, How To Change Realme 11X 5G Lock Screen Password?
- Guide How To Unbrick a Bricked Samsung Galaxy Z Flip 5 Phone | Dr.fone
- How to Check Distance and Radius on Google Maps For your Xiaomi Redmi Note 12 Pro 5G | Dr.fone
- Pokemon Go Error 12 Failed to Detect Location On Samsung Galaxy S23 FE? | Dr.fone
- 11 Best Location Changers for Tecno Camon 20 Premier 5G | Dr.fone
- In 2024, Ultimate Guide on Oppo Reno 8T 5G FRP Bypass
- In 2024, How to Change Location on TikTok to See More Content On your Realme C67 5G | Dr.fone
- In 2024, Pokemon Go No GPS Signal? Heres Every Possible Solution On Asus ROG Phone 7 | Dr.fone
- In 2024, Top 15 Augmented Reality Games Like Pokémon GO To Play On Apple iPhone 13 mini | Dr.fone
- In 2024, Trouble with iPhone X Swipe-Up? Try These 11 Solutions
- Quickly Remove Google FRP Lock on OnePlus Nord 3 5G
- How to Reset Oppo Reno 10 5G without Losing Data | Dr.fone
- Title: Updated How to Create Free Photo Collage Frame in Minutes, In 2024
- Author: Elon
- Created at : 2024-05-19 03:05:46
- Updated at : 2024-05-20 03:05:46
- Link: https://animation-videos.techidaily.com/updated-how-to-create-free-photo-collage-frame-in-minutes-in-2024/
- License: This work is licensed under CC BY-NC-SA 4.0.
